Leaderboard


Popular Content
Showing content with the highest reputation on 04/23/15 in all areas
-
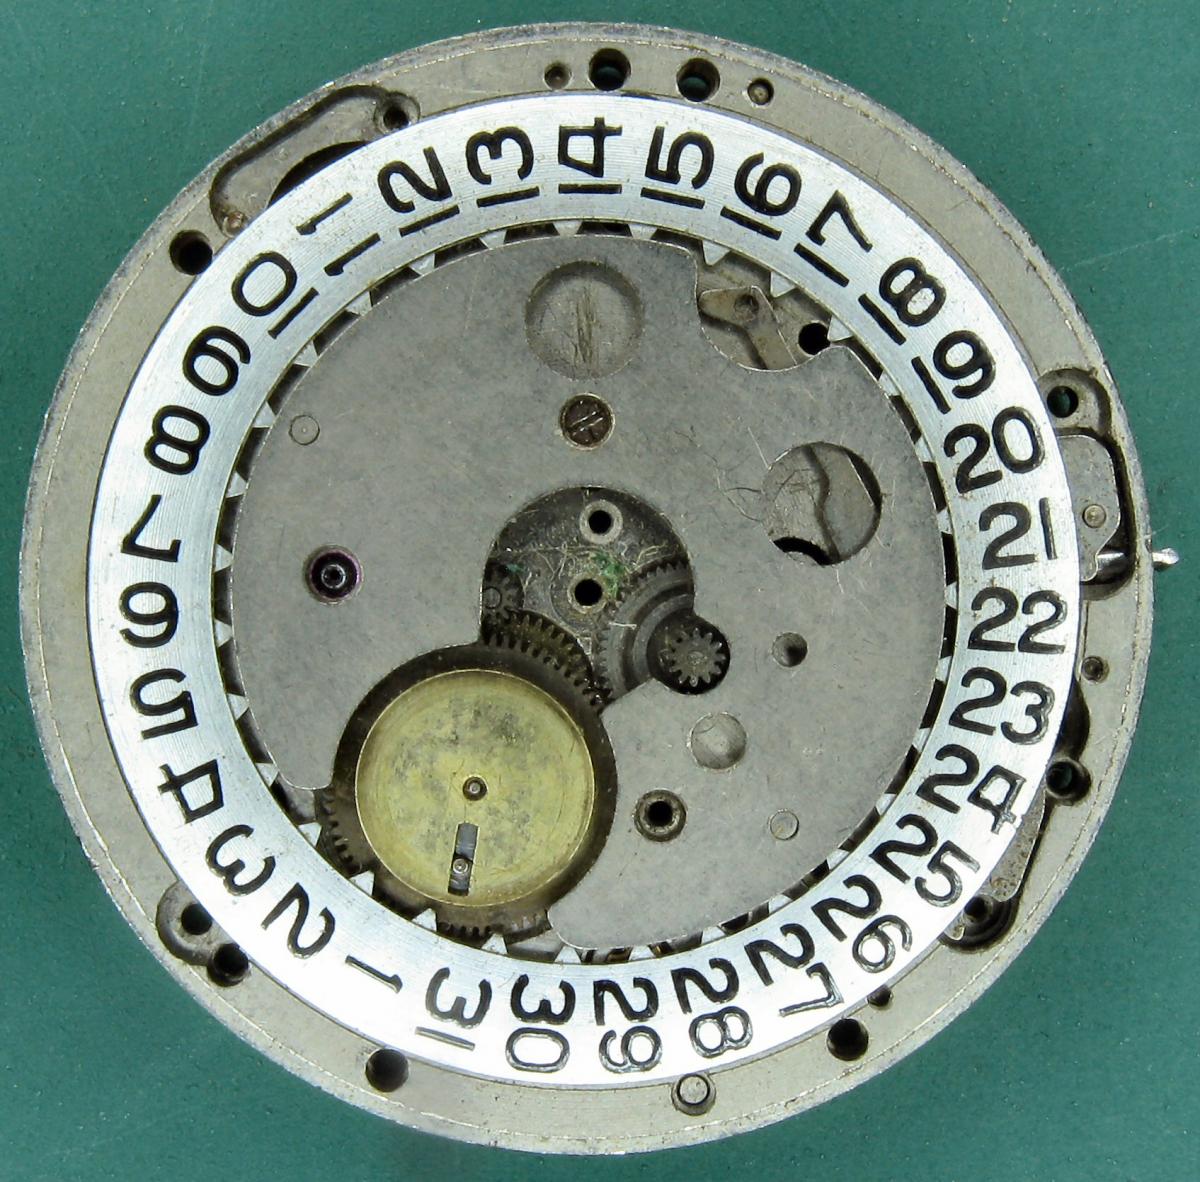
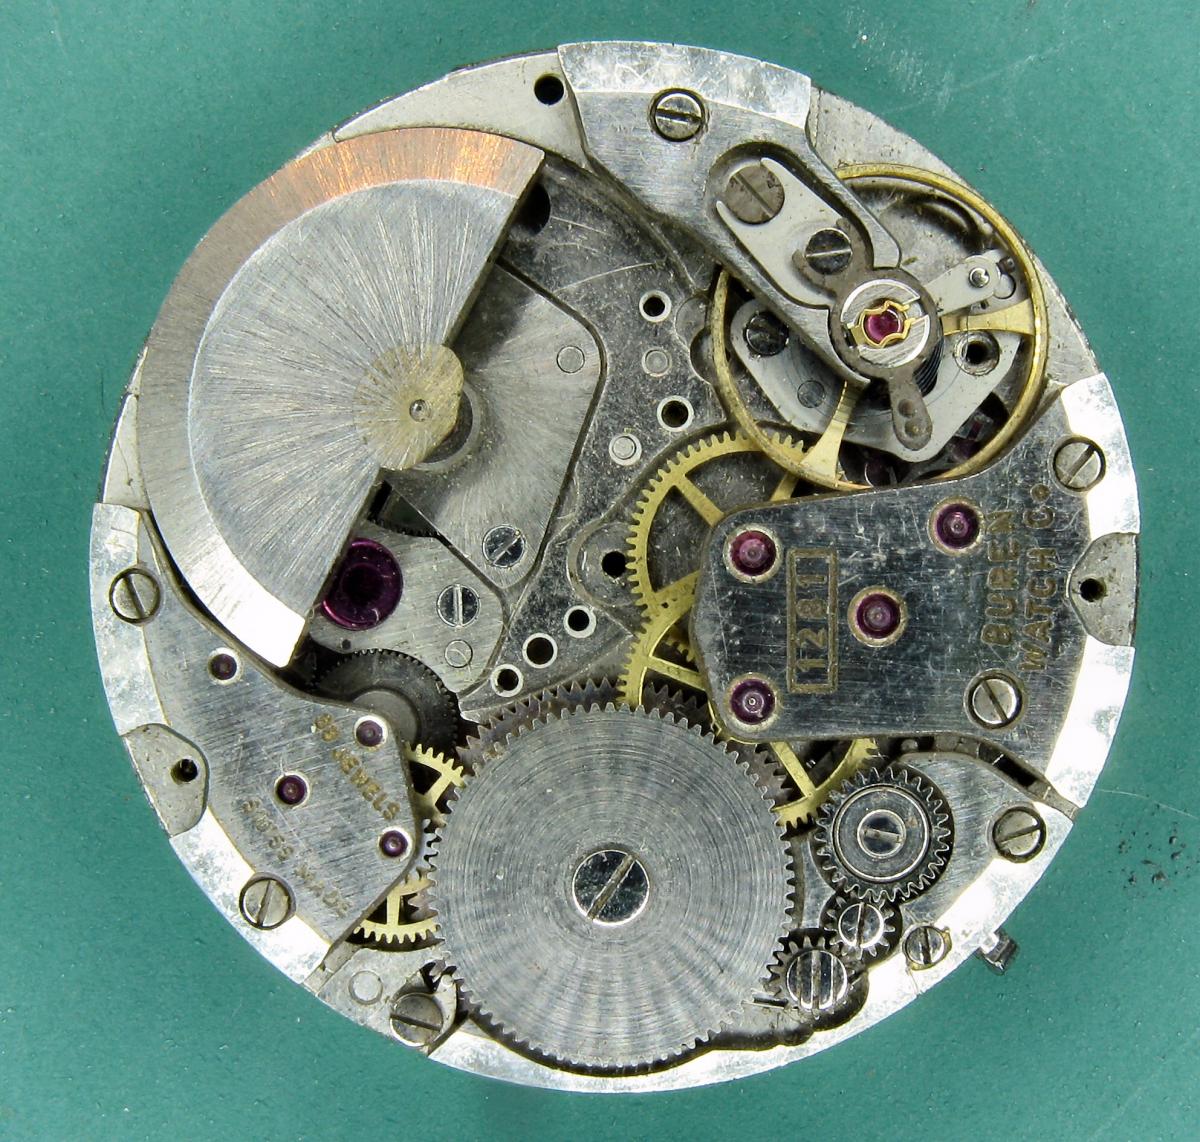
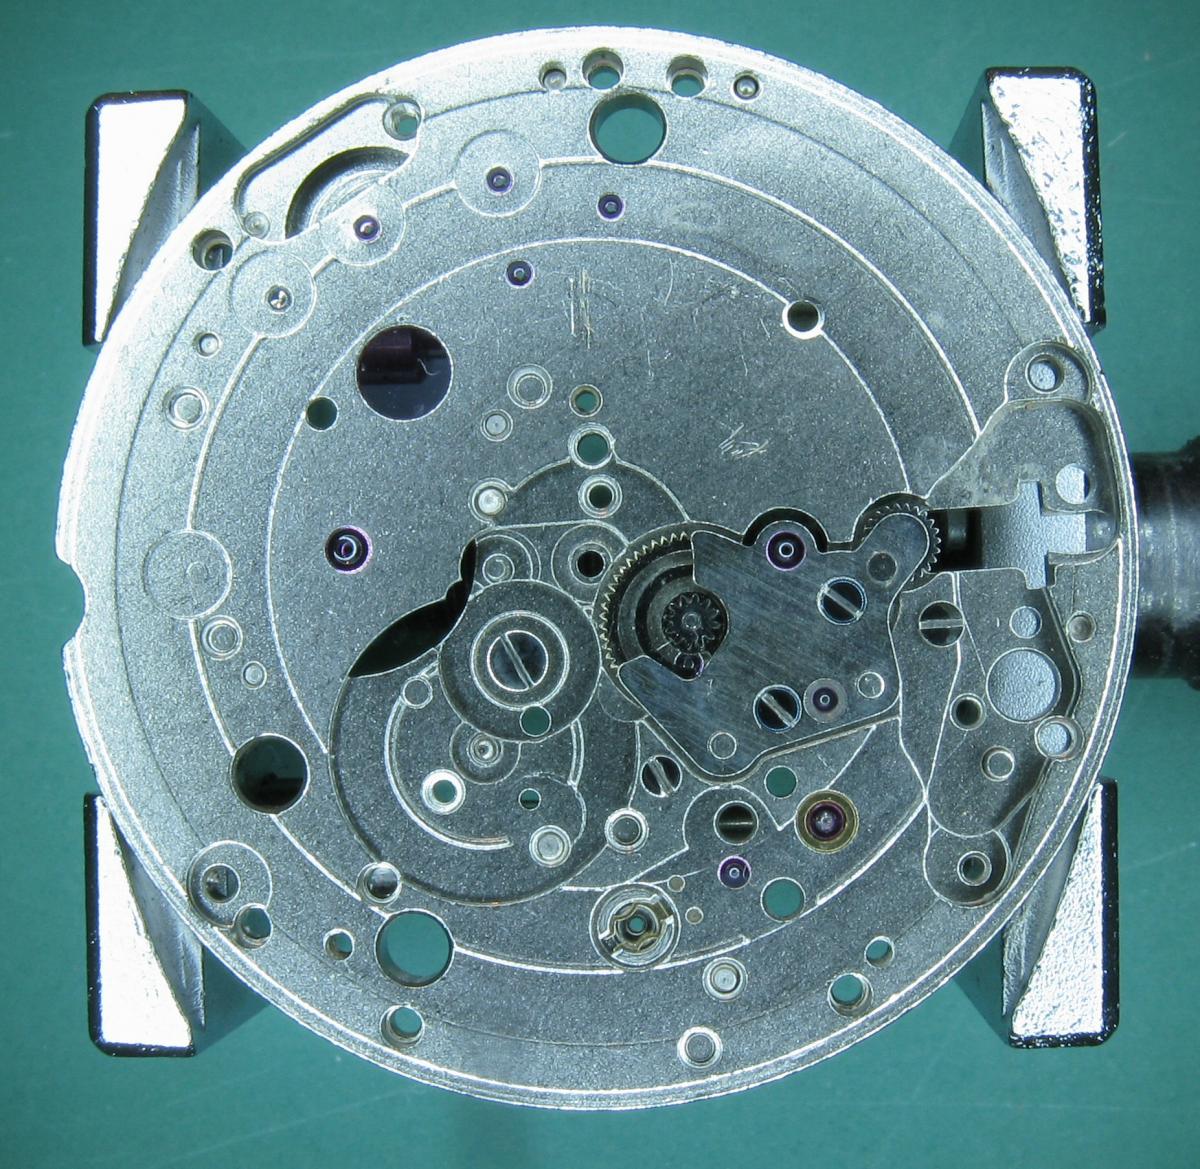
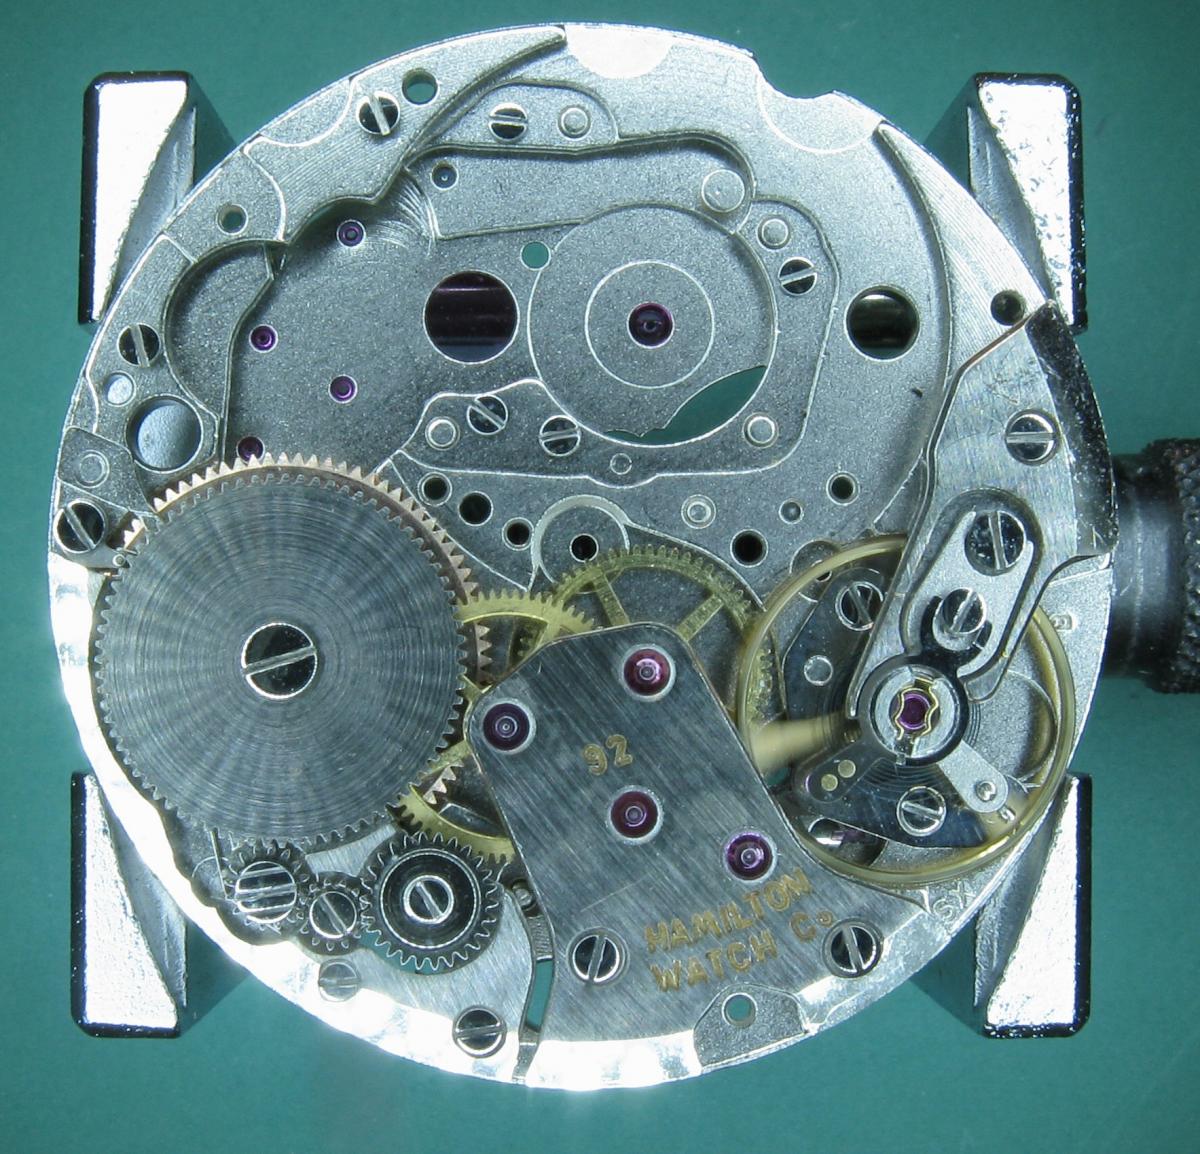
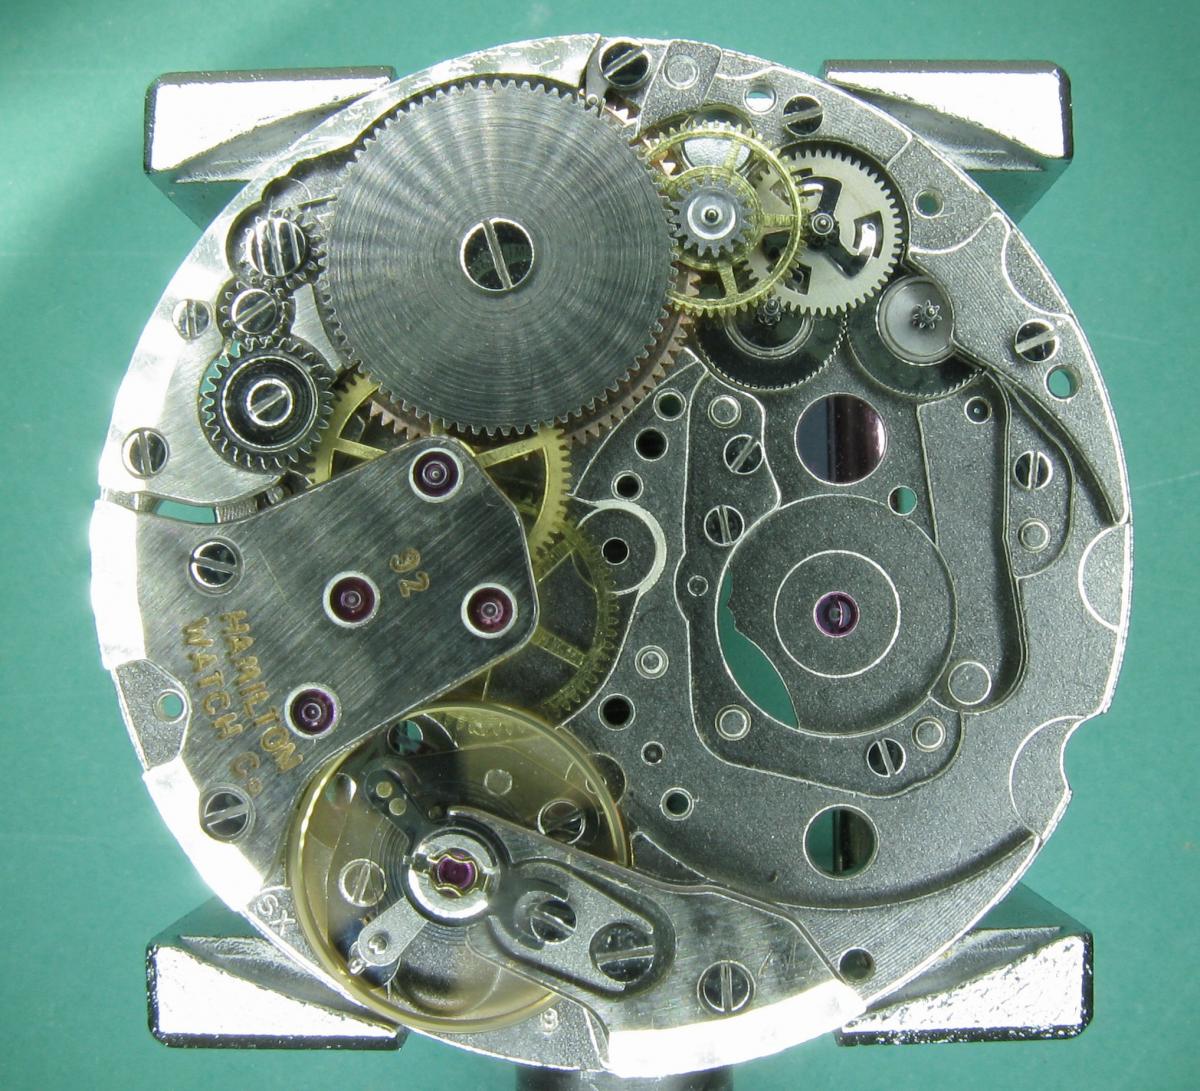
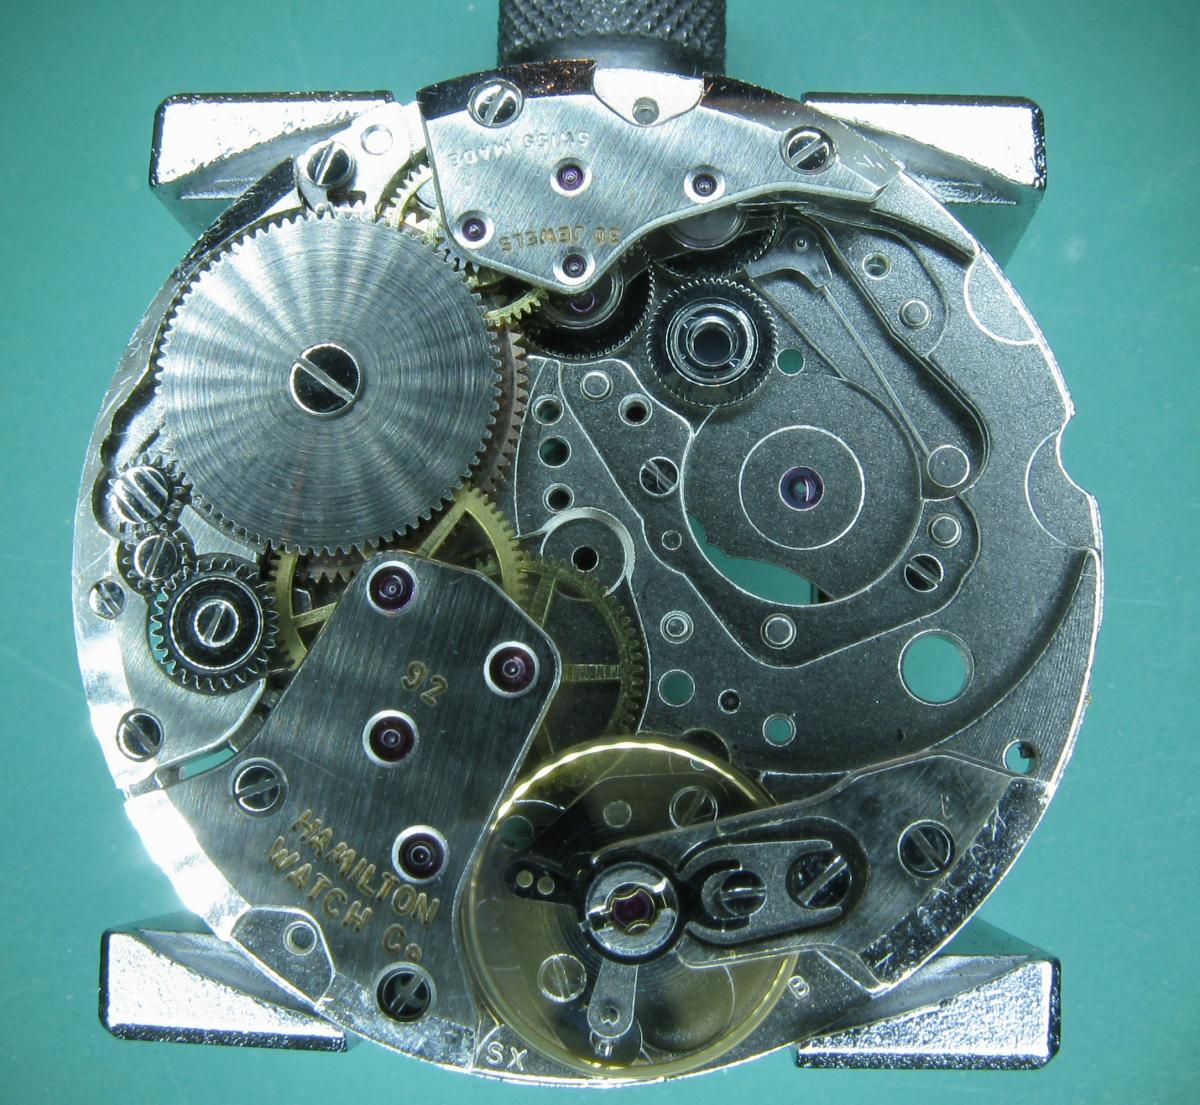
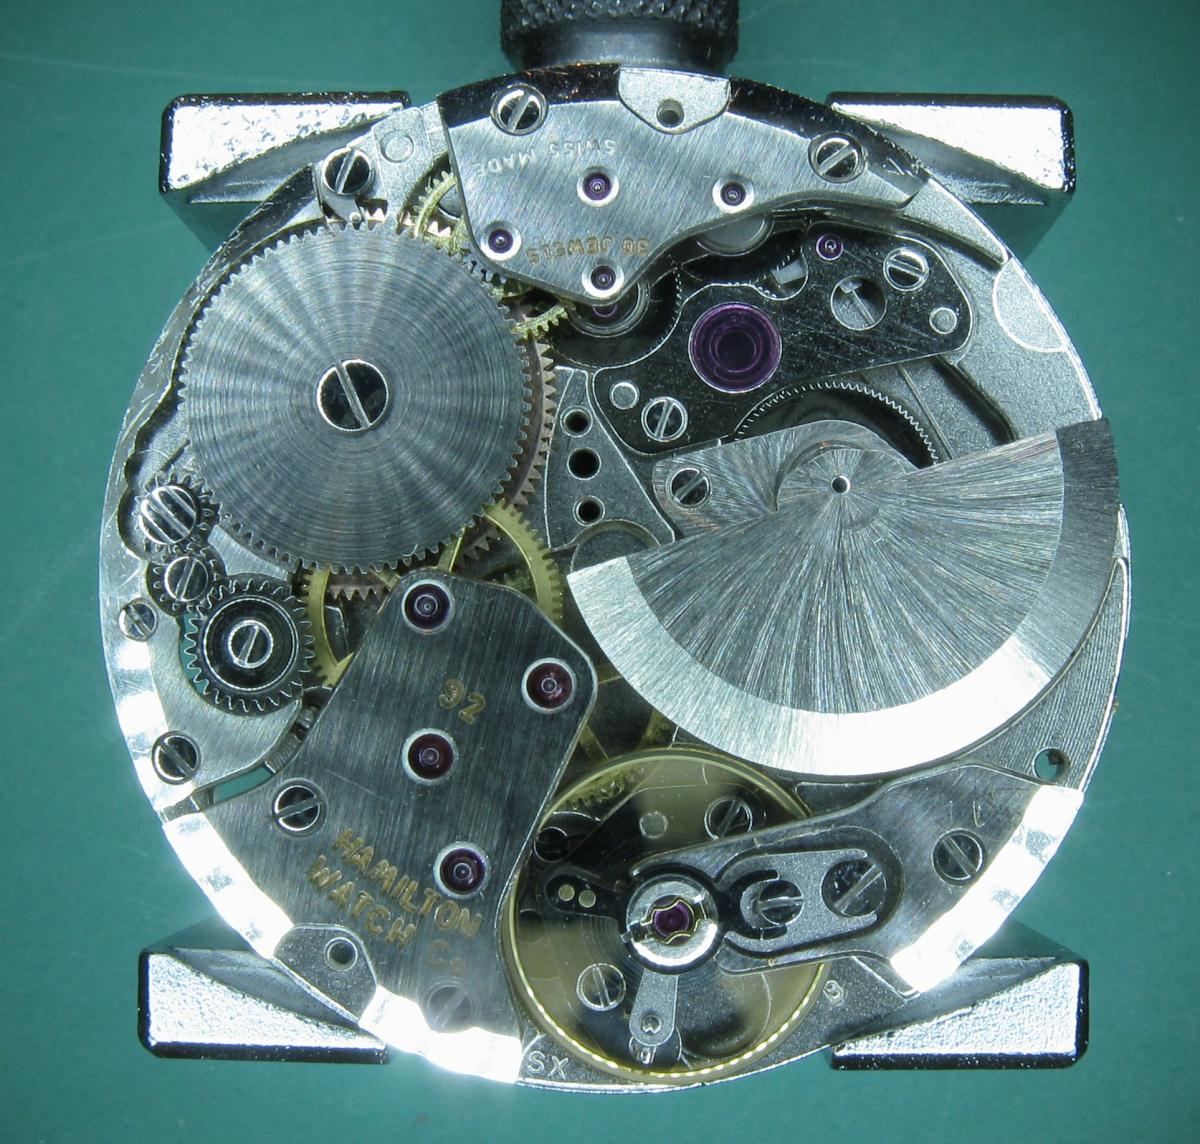
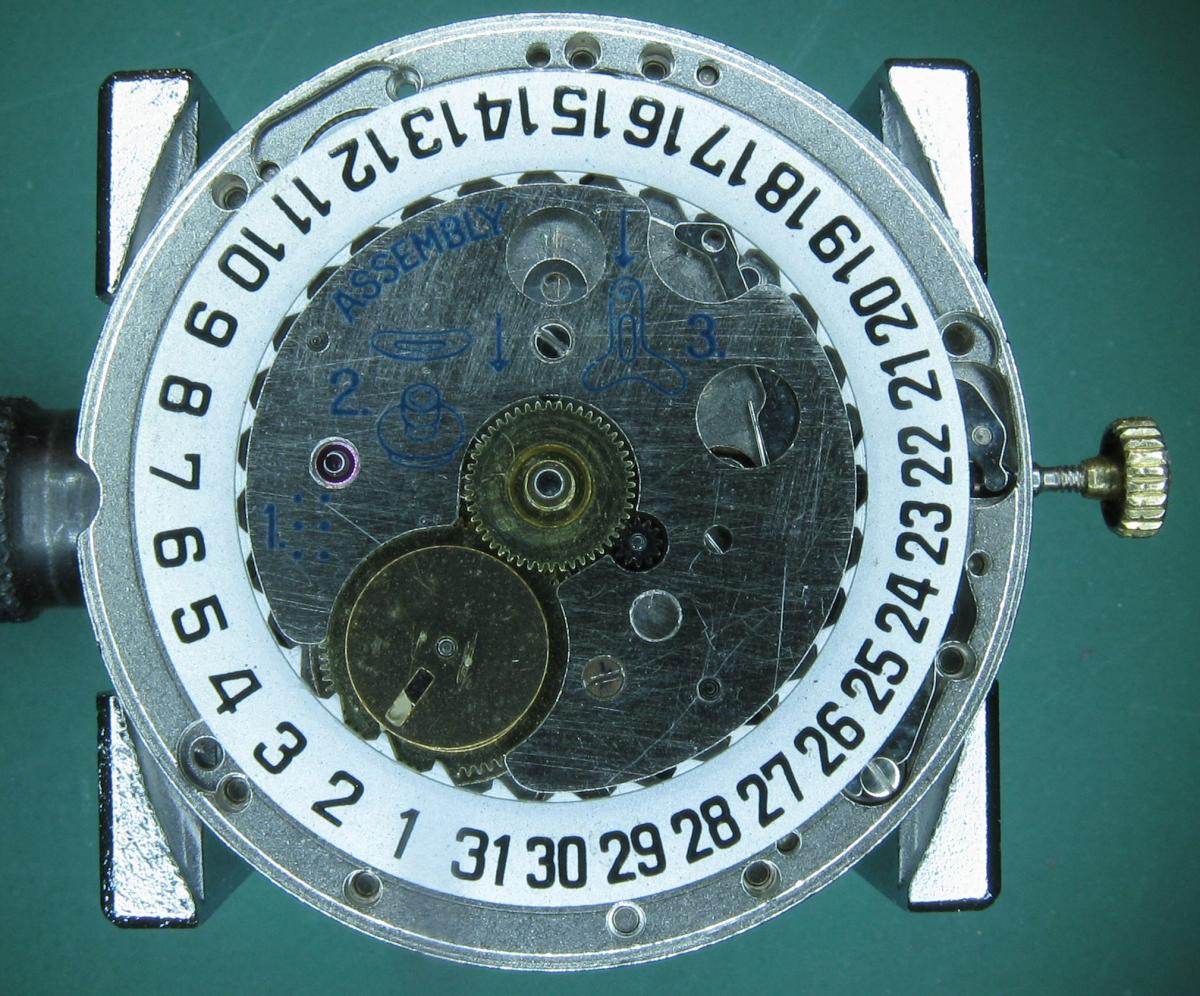
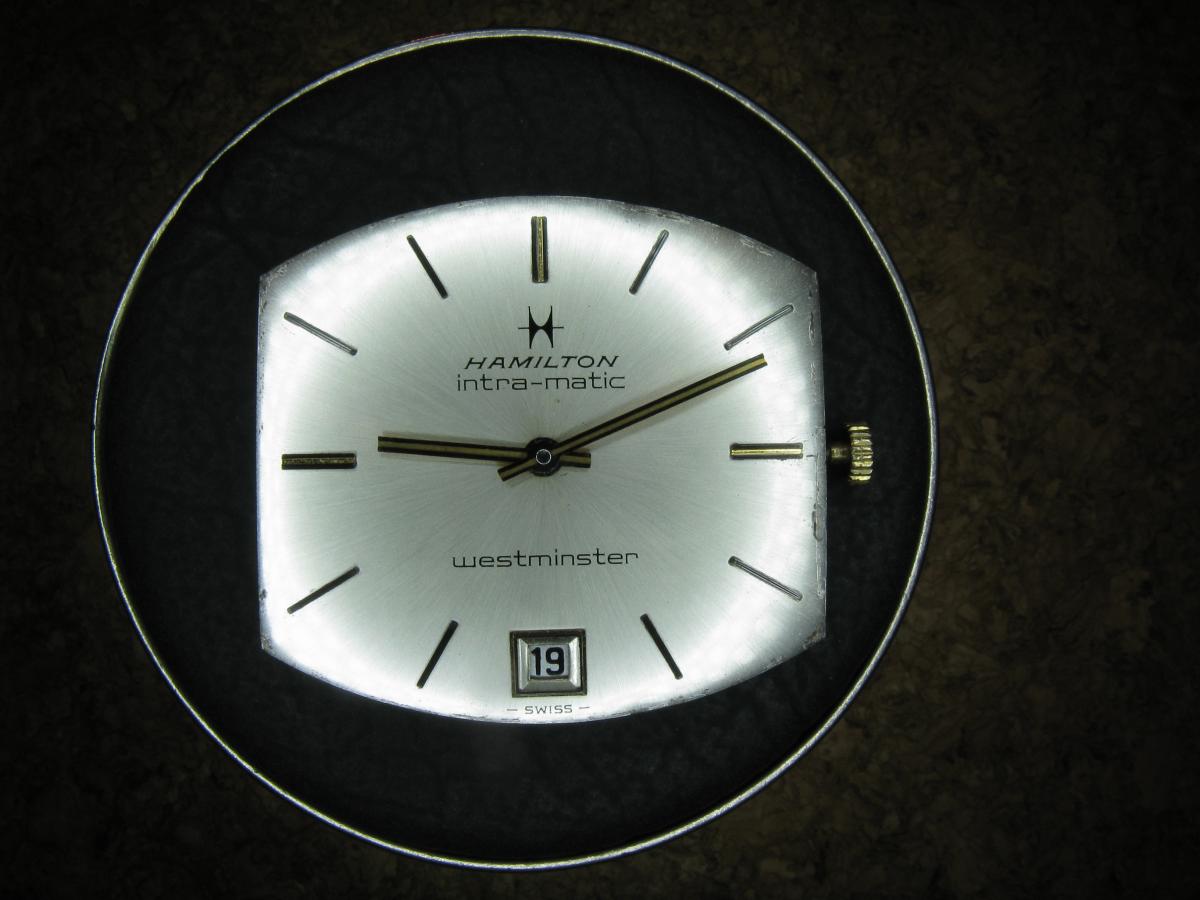
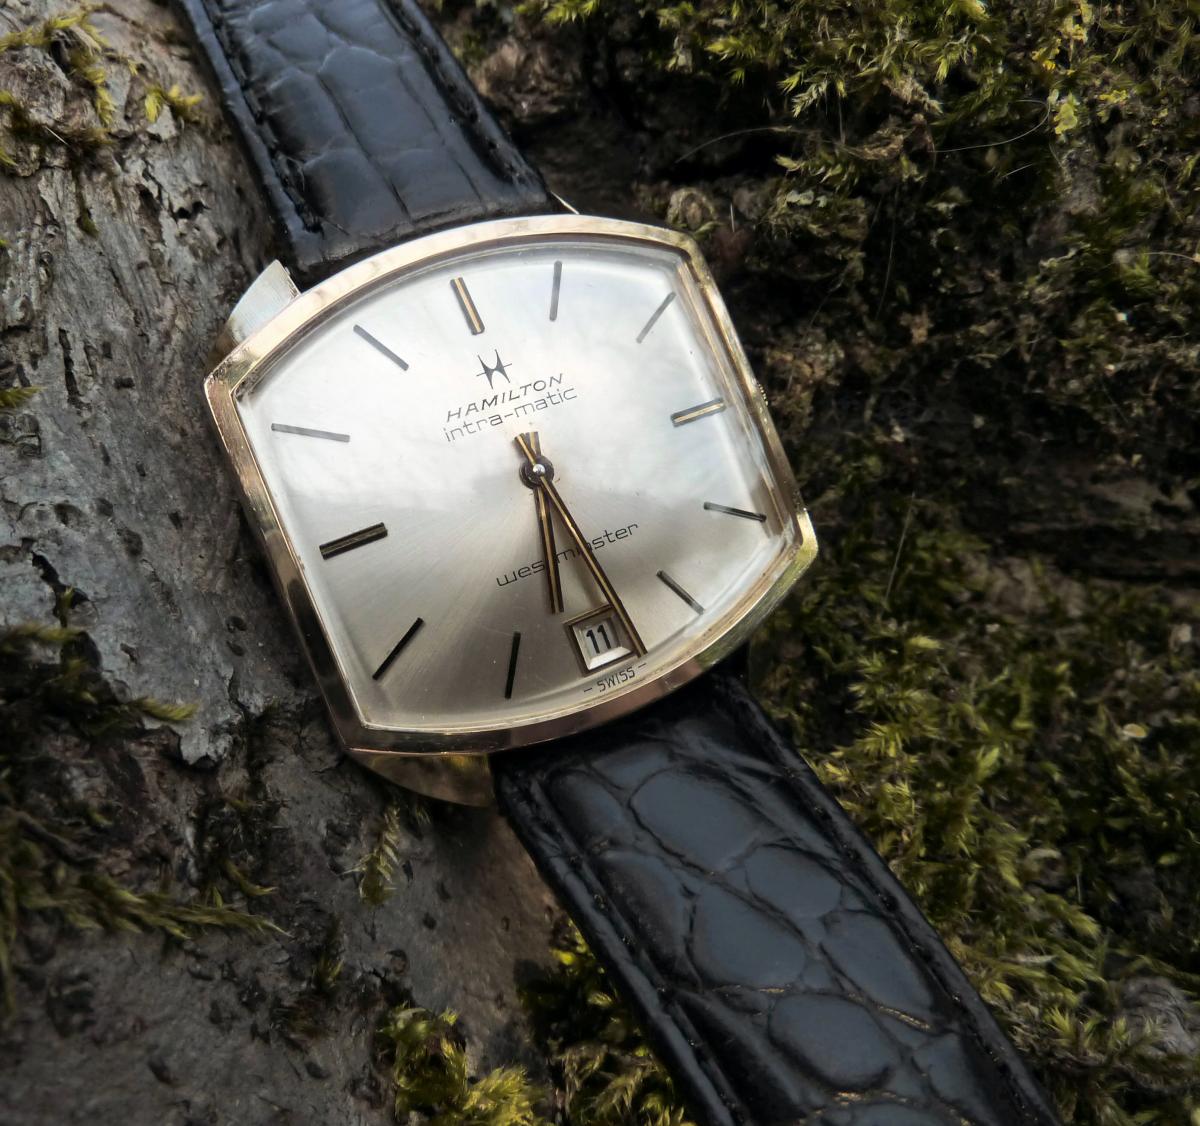
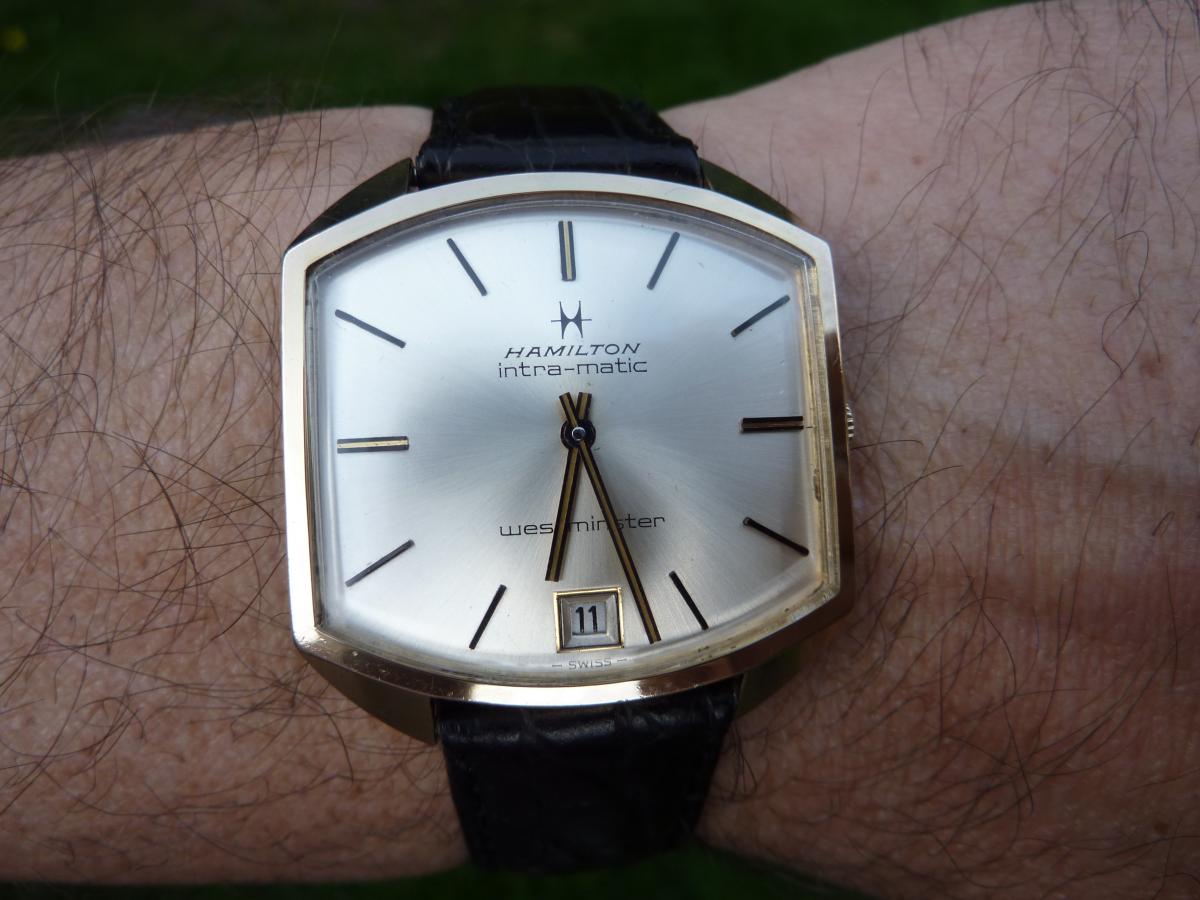
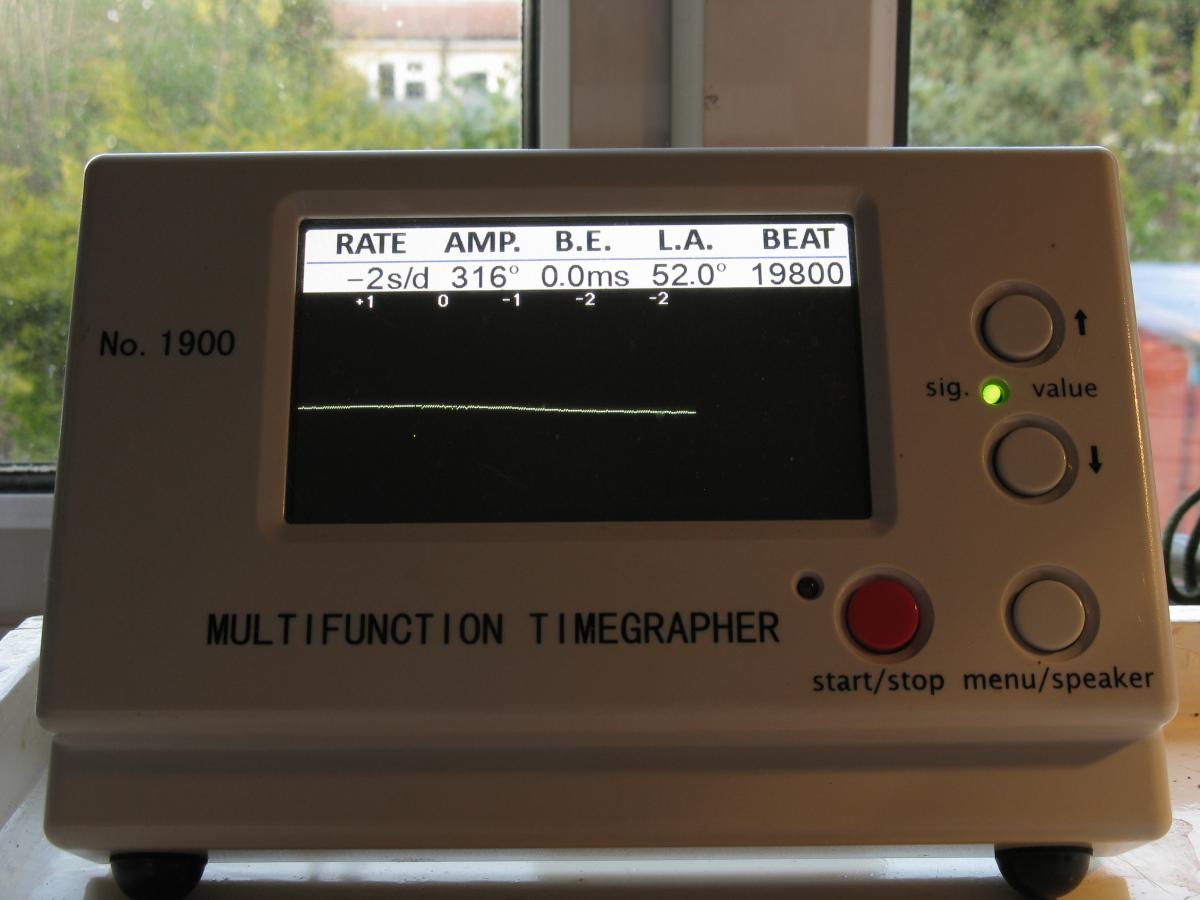
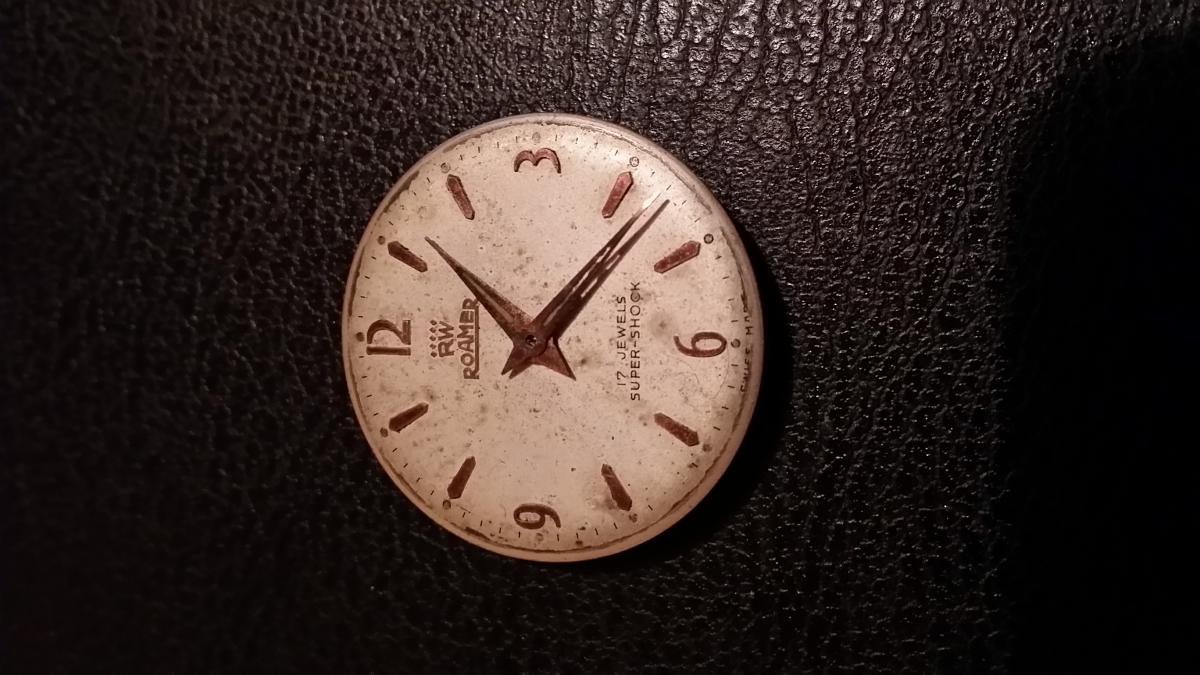
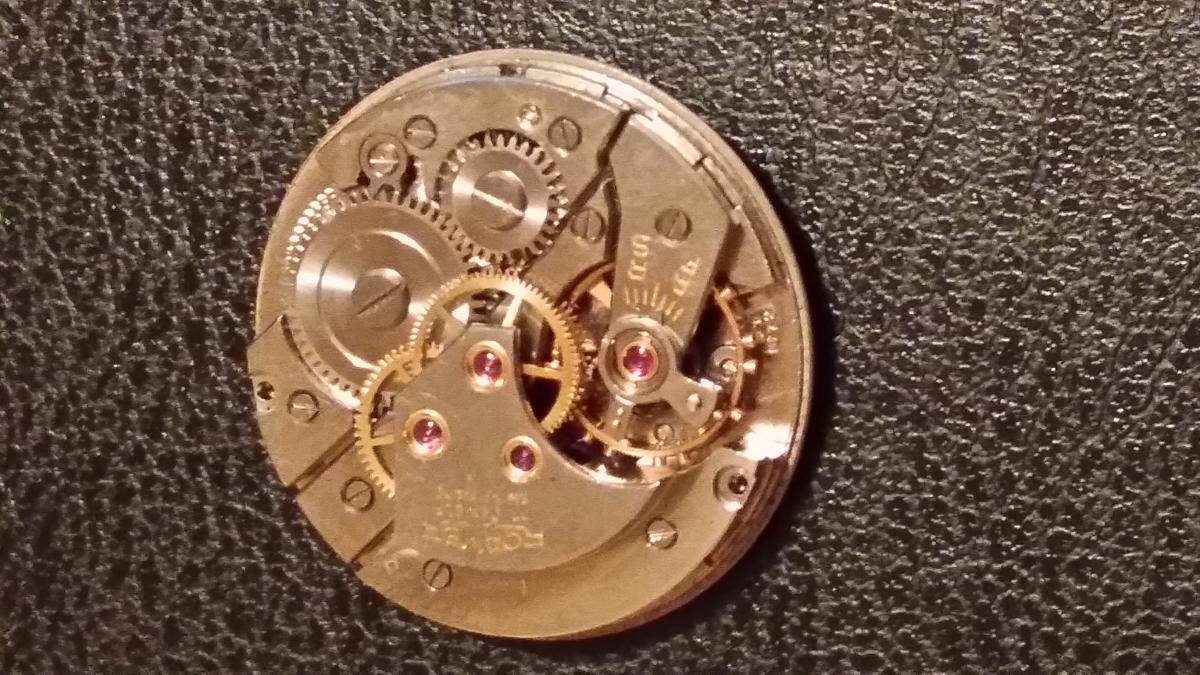
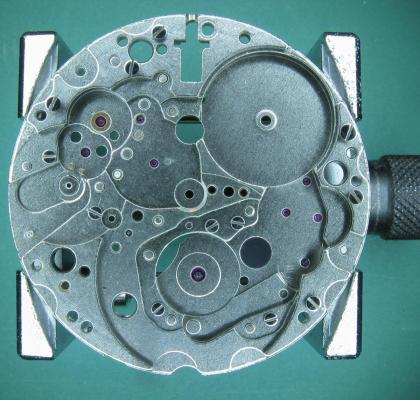
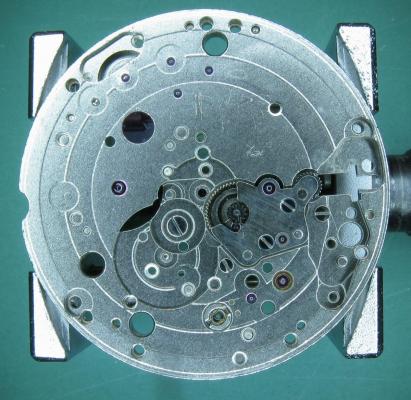
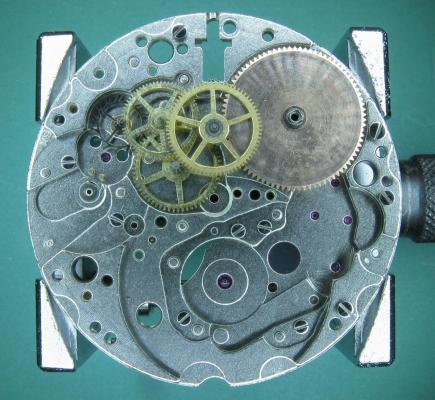
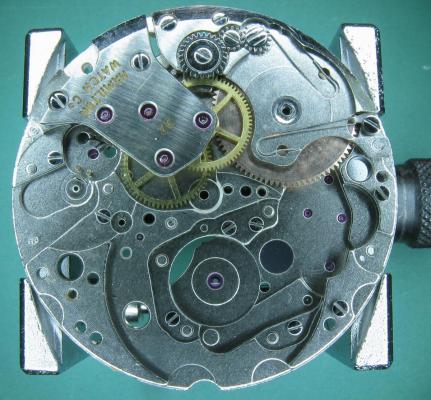
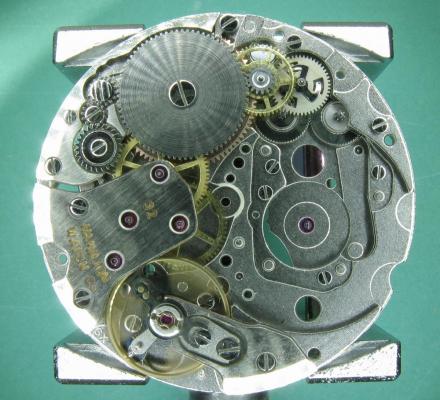
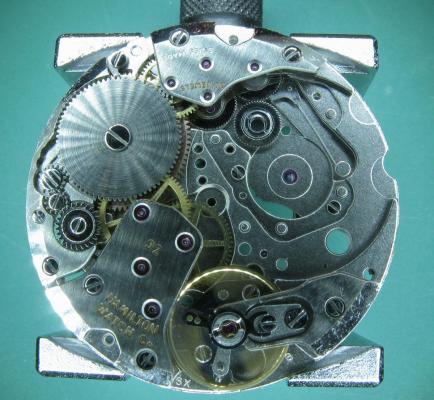
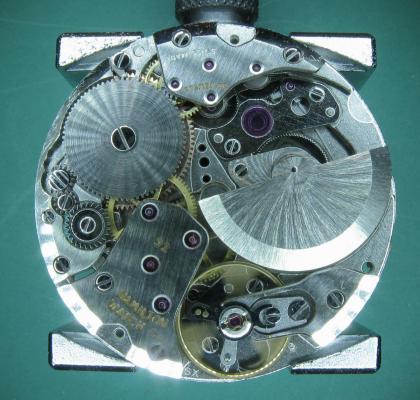
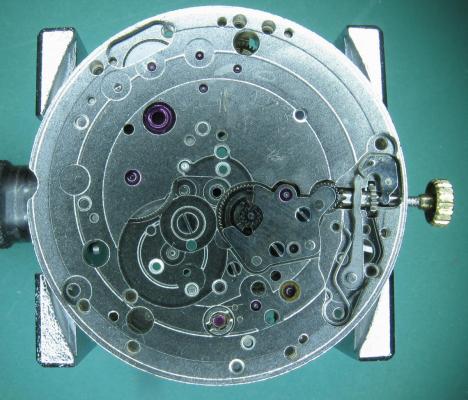
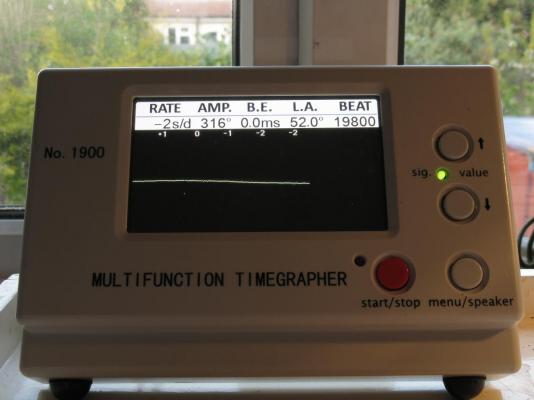
This is what I got up to over the Easter break. It was a project that I bought as a box of bits for a few quid about 4 years ago because although I had no idea what it was (the listing didn't say), it looked interesting and I fancied the challenge. It turned out to be a Hamilton Intra-Matic Westminster which the previous owner had tried to "fix", got as far as dismantling, and given up on. Cosmetically it was in good order but mechanically was not good. The rotor pinion had lost its bottom pivot, as had the second wheel (centre wheel in a more conventional wheel train). And because it had spent some time rattling around loose in the box of bits the hair spring was in a poor state, and what had me really stumped when it came to working out how it all went back together was a large and rather complicated looking wheel and pinion assembly for which I simply couldn't find a home. Any way, it was put to one side until I could track down a donor for the parts and to hopefully show me where the "spare wheel" went. The movement is a 30 jewel Hamilton 92 micro-rotor, which is a re-badged Buren 1281. Unfortunately (for me) this has been used in a number of higher end autos and also as the base movement in some big name modular chronographs because of its thinness, which means that they tend to hold 3 figure values even as spare parts donors so it took a while for me to track down a suitable candidate at the right price. However, I did manage in the end to nab one for just over £30 and it arrived at the beginning of April, so the fun could begin. No strip down on this one as the Hammy came to me fully dismantled, here is the donor as I got it. It's a Buren 1281, a bit grubby with some missing screws, and the minute hand pinion has seized onto the centre post. I later discover that the canon pinion (which is actually on the second wheel pinion) is loose and I reckon that someone had diagnosed the loose canon pinion, had tried to correct it by tightening what they thought was the canon pinion, which was in fact the minute hand pinion, onto the centre post, over did it, and caused the whole thing to seize, hence spare parts movement on eBay!!! I stripped out the second wheel (complete with canon pinion which I tightened), rotor pinion, balance and hair spring, and the main spring (which was in better shape than the Hammy one), and then put the parts through the cleaner; the Hamilton 92 parts had already been cleaned. And here we go with the good bit. The Hamilton 92 main plate; cleaned and ready for reassembly. I usually start with the wheel train when I build a movement back up but that's not possible here because the motion works bridge also carries the lower pivot jewel for the second wheel, so the motion works have to go in first. With the bridge in place you can see the pivot jewel in between the minute wheel and the intermediate wheel. The movement is flipped and the wheel train and barrel (cleaned and greased main spring, and braking grease on the barrel walls) are positioned. Train bridge and barrel bridge installed complete with crown wheel and intermediate winding wheels. At this point the end shake on all of the wheels was checked and the general free running of the whole train tested, then the pivots oiled. The ratchet wheel in place, the pallet fork installed and the escape wheel teeth / pallet jewels lubricated. The balance dropped in and off it goes. Then the auto winding reversers and reduction wheels go in. The three armed spring on the first reduction wheel is a ratchet which prevents the rotor from helicoptering during manual winding. Unfortunately it also gives the crown a very gritty feeling when you hand wind which takes a bit of getting used too but it is normal. Bi-directional flip-flop (for want of a better term) gear and auto wind ratchet in place. Cover plate on and the micro-rotor assembly installed. Turning things over again the keyless works go in. Then the calendar works, date wheel, and cover plate. Before the dial and hands go back on. Confirmation on the Timegrapher that all is well. The obligatory wrist shot. And something more formal for the album :-) This is now an absolute favourite of mine and has a permanent home in my collection. It took a lot of waiting to get the donor but it was well worth it. The watch has been running continuously since 11 April kept wound from wearing it when I get home from work in the evenings and at the weekend, and has remained within a few seconds of reference time. And the "spare wheel"..... was precisely that, it didn't belong with the box of parts that this project started out as. I do hope the seller didn't miss it :-)


 2 points
 -
I would send you my mother-in-law for free, postage paid and no vat! :)2 points
-
So it's been a few months since I posted here...but I've been regularly checking in. Hi Mark and Geo! So as a few of you know, I have a hobby of building watches. The one thing I hated was relying on some of the very few companies that actually print dials. Here is the USA there are only a handful that do this type of work! I was lucky enough to find an antique dial printing machine on eBay. It was just a vessel to move the dial from printing plate to paint application. I found a willing company to "Fill in the Blanks!" I won't name them here because I don't want to seem like I'm Selling this company! Anyway, they were a very big help when it came to me having questions. The sales, engineering and billing staff were first rate! They helped me pick the proper printing pads, helping me design and then produce my printing plates and then help me choose the proper ink and also recommended how to prepare the inks, pads and thinners to get the best results! So, here I am....First try at printing a dial.... I designed the dial myself using a free online software. The dial is printed in 3 stages. The first step was printing the hour chapter. Then, the second step was to print the sub seconds chapter. Lastly, I printed the name of the manufacturer that I will be using for this build. This was more of a proof of concept to me...Now, I can't wait to try new designs and styles! And, Now I have more control of what I build! That's very important to me...Cheers!
 1 point
 -
Just uploaded a new video. this one concentrating on correcting beat error.
 1 point
 -
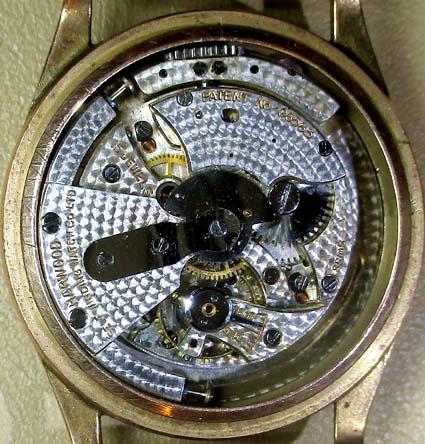
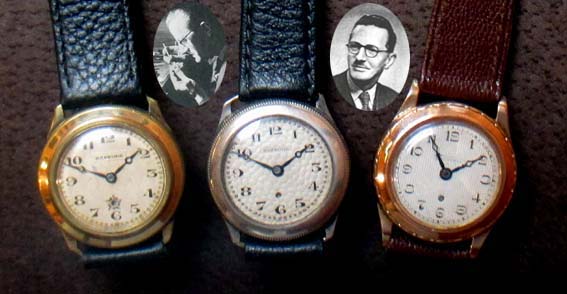
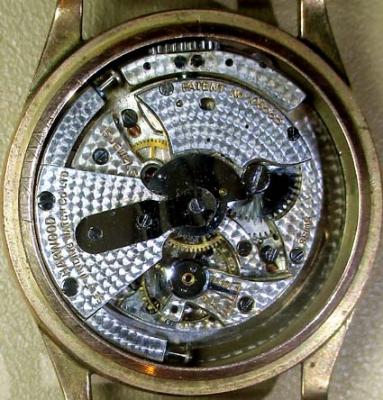
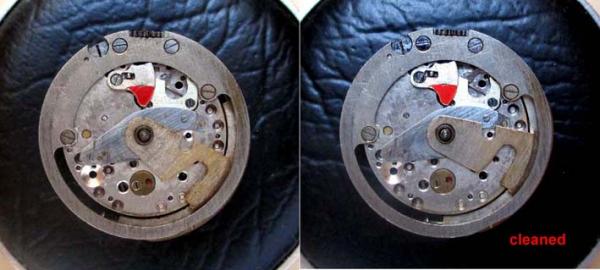
I have a particular, somewhat private, association with Douglas Isle of Man (hence my second initial, D). And being born and bred a Lancastrian the story of John Harwood of Bolton, Lancs, and his watches has always facinated me. For those who do not follow me read: http://www.harwood-watches.com/en/history/index.html I have collected three fine Harwoods, from left to right rolled-gold, silver and a 9 Ct gold cased versions with a selection of dial designs. The gold model has this very fine pearled movement. I had also a spare non-working movement, But after a bath in Bergeon One Dip within a small glass jar, immersed in my ultra sonic tank, it came to life and now keeps good time. See below. The keen-eyed observer will note that in the cleaned movement the balance wheel is oscillating. If there is any interest I could do a complete clean and oil with all stages in pictures.

 1 point
 -
Hi, I'm a watch noob, my passion started some time ago but I'm a watch noob. I'm buying PoorManWatch for now but I would like to buy an Omega Planet Ocean as soon as they will release that watch with the new antimagnetic caliber. For now, this is my little collection. A Seiko Monster SRP307 (2nd gen) with Seiko 4R36 caliber I love it with bracelet and with the many NATO straps I have. I like it because it glows like a torch and it looks cool. and the Seiko SARB033 with Seiko 6R15C caliber.1 point
-
It's here!1 point
-
Yes, the hands are re-lumed from the back of the hands and it is capillary action that draws the lume into the aperture in the hands. When it comes to the dial, you actually have to apply it very accurately with a very fine paint brush.1 point
-
Like you say Joe, funny how these pin-levers are popping up! Interesting to see one in such a modern-looking watch.1 point
-
Thanks Bob, its the second thing i have bought off this guy and the quality and feel is superb. This is a tool which will continue to be cared for and used and preserved for the future.1 point
-
Geo, I'm no clypin' on ye, it's Sint George's dee!1 point
-
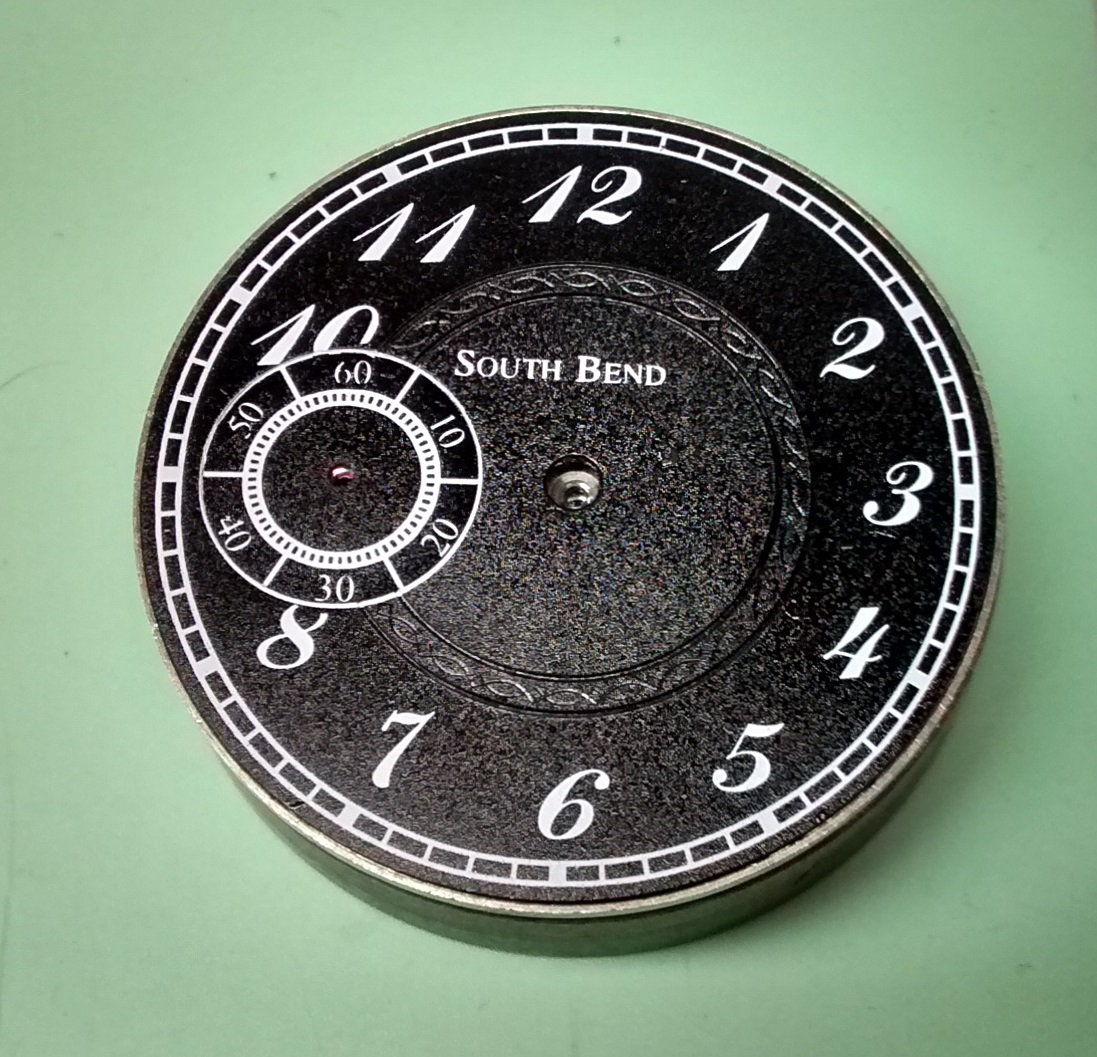
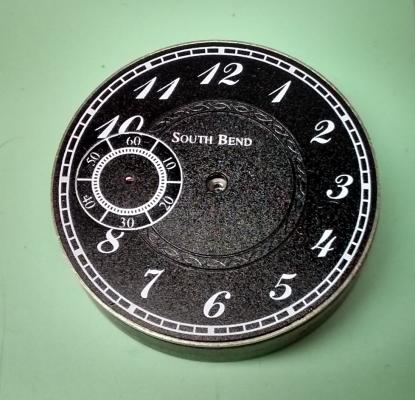
Don, I thought I was being funny, knowing that Studebaker Automobiles were made in South Bend. Little did I know that the same family had a watchmaking company and called it the South Bend Watch Co. I love Studebakers and was fortunate enough to visit the museum in South Bend on a recent visit to the US. Now I think I want a Studebaker watch!1 point
-
Rogart that's a beauty of a watch. The movement looks like a Baumgartner (BFG) 866--as solid a little pin lever as I know. They have a 17 jewels version too, but its basically the same thing. When you have the drive gears in place, put the top plate back on and follow Geo's suggestion. Make SURE those gears are spinning freely (escape wheel is the trickiest) before you screw top plate down tightly--also don't put the pin-pallet lever in place until after that top plate is on...Easier that way. J1 point
-
Absolutely. Mmm.. thinks... she could have been called April, of course....1 point
-
Hello Nigel and a warm welcome, I see you are from the same part of the country as me. My offer to Geo still stands as since I have been a member I have enjoyed his posts and shared experiences and as a more junior member am duty bound to bestow him with gifts to feed his watchitis. However you may be interested in this. http://www.ebay.co.uk/itm/MST-10-cal-371-372-shock-resistant-balance-staff-watch-movement-part-/271831156451?pt=LH_DefaultDomain_0&hash=item3f4a6646e3 :thumbsu:1 point
-
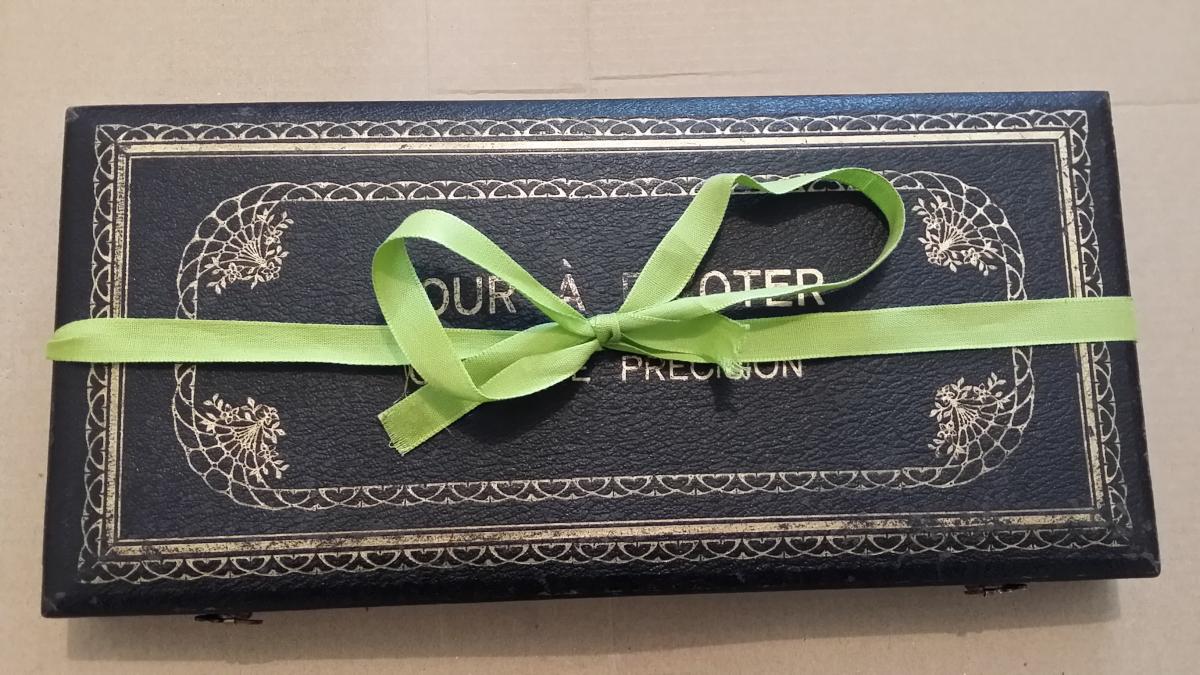
My jacot tool just arrived and it did come with a bow!! :woohoo-jumping-smiley-emoticon:
 1 point
 -
Nice watches, I'm almost tempted to buy a MONSTER for myself.1 point
-
Another fine and very welcomed suggestion, thank you. (This forum is better than brilliant!) I have a Brunel Long arm Stereoscope with various eye pieces and can confirm that the pivots are, by far, much straighter than any politicians promises will ever be. I am on the lookout for a Jacot tool, but the one's on Ebay etc either have something missing, or are damaged. Len.1 point
-
I just got in after a long days work and thought I'd check out what you guys have been up to and clicked on this thread! Well the other night I was rooting through one of my boxes of bits and remembered seeing this. So I just dug it out. Balance seems fine its wound up but not running no stem but pretty sure it just needs a good clean and oiling. If you want it Geo pm me your address and i'll post it on to you as i have no use for it.
 1 point
 -
John that is a great idea about the pin levers! Perhaps Mark will post a fantastic video in his inimitable style on a pin-lever overhaul! Mark are you reading this?!? Joe1 point
-
In no way I intend to steal the job of our Mark, from whom I only can get inspiration (both in making the videos and in servicing the watches), but I started some time ago documenting (silently) my services in a series of videos. all watches are mine to either keep or resell on the popular online platforms, funding in this way the purchase of more expensice, better mechanical watches. But that is another story... With this post I would like to introduce a series of parts of a video I made servicing a Seiko 7T32 quartz movement last week, and for the first time talking about it live (btw, I hate my voice...) The video was prompted from some friends on another forum which were wondering if it was worthwile servicing this particular movement, since it is all in plastic (well, almost all). The thing is that I like tinketing with this movement, even if it is deemd by experts as a waste of time, since it is usually swapped for a new one when it brakes down. I am though of the opinion that this particular series of quartz chronographs deserves a proper service, also considering that it is not in production anymore, and you cannot find them easily anymore at decent prices. Enough said, here the series of videos (6 parts in total) Part 1: Part 2: Part 3: Part 4: Part 5: Part 6: There will be a part 7, in which I deal with the dial side of the movement, but it is still in the works. Hope you enjoy the videos, and any comment / criticism is very well welcome. George1 point
-
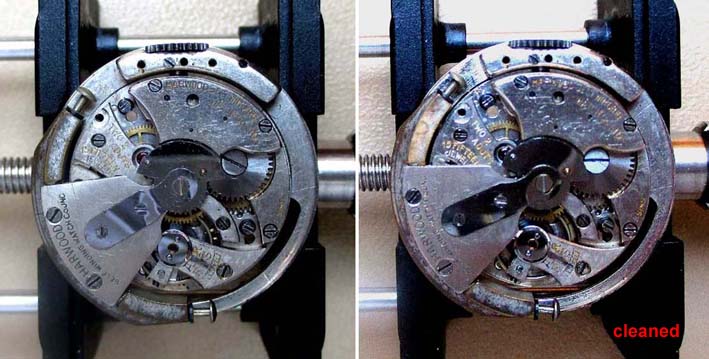
Well i managed to find some time to give her a better color finish, which i think is a definite improvement on the cyan color. I gave it two good coats ( so 2 x primer 2 x colour ), and am fairly pleased with the result. The front plate was a little worse for wear but i plan on making a new one in the near future hopefully. I did however i give the front plate four coats of plastic type paint ( which makes for wipe away cleaning ) which is a little better than before. I do plan on overhauling the electrics in the future ( new rheostat, led, switches, wiring , etc ), but since i have a ton of omegas waiting for a clean it will just have to wait for now :) I also need to order a new jar for the final rinse since i broke the old one a few months back....oooppps ! Anyways feel free to share what you guys think :) Back next to one of my other cleaners :) ( i think they missed each other :P )1 point
-
Hi Joe, I'm happy with using machine in the watch contest, my Rolex is a machine (device that performs work), i.e. helps pick up women easily! As for the measurements, I do it myself! :) Cheers, Bob1 point
-
It always cheers the heart of a Master when an acolyte follows in his footsteps... well done, Grasshopper! Will :D1 point
-
Easy solution, tick them off and give them a good tocking to! ;)1 point