Leaderboard


Popular Content
Showing content with the highest reputation on 09/27/23 in all areas
-
..a quick check suggests the pallet forks are different for the two movements. Try the other one? Generally you can get in much trouble mixing parts from different movements- and sometimes identical movements…2 points
-
I'm not sure if this is the correct way to resize these type of bracelets, but it sure looks painful.2 points
-
I have to agree with all of the comments above, as soon as you open up the watch all those loose flakes of paint will start to peel off and if you go near it to remove the hands etc you will cause more to become dislodged and you will end up with less dial detail than you do now. From my understanding dial restoration is extremely expensive and many times the cost of anything other than a very premium brand of watch. If you can find one then a replacement dial is the way to go as other have mentioned. My advice would be to look on ebay for a similar watch, looking for just a dial can be an expensive and time consuming way to do it, often a movement including a dial or more often complete watch with a good dial can be purchased for less than the cost of a solo dial (strange but true) and you will also have spare parts available in case something you haven't discovered yet on the inside needs replacing. As and example, I have an Enicar with a damaged dial, and a (new after market) replacement dial is over $50, but I just ordered a complete movement (including original dial and hands) for $30. Non-round dials are more tricky to find, and just as a 'heads-up' you may want to think about the crystal also, as finding a replacement non-round crystal for it may prove as challenging as finding the new dial. Sorry it's not good news, but hopefully you have enough information now to move in the right direction - best of luck and let us know how it turns out2 points
-
Yeah, I saw that on a video a couple days ago, thanks.2 points
-
Adjustments to hairspring , terminal curve and regulator slot might be needed at every service time. Make a habbit of making these adjustments as soon as you get to bare mainplate, instal the balance cock assembly on mainplate. See photo, notice how accessable are most parts of the oscilator thus easy to work on.
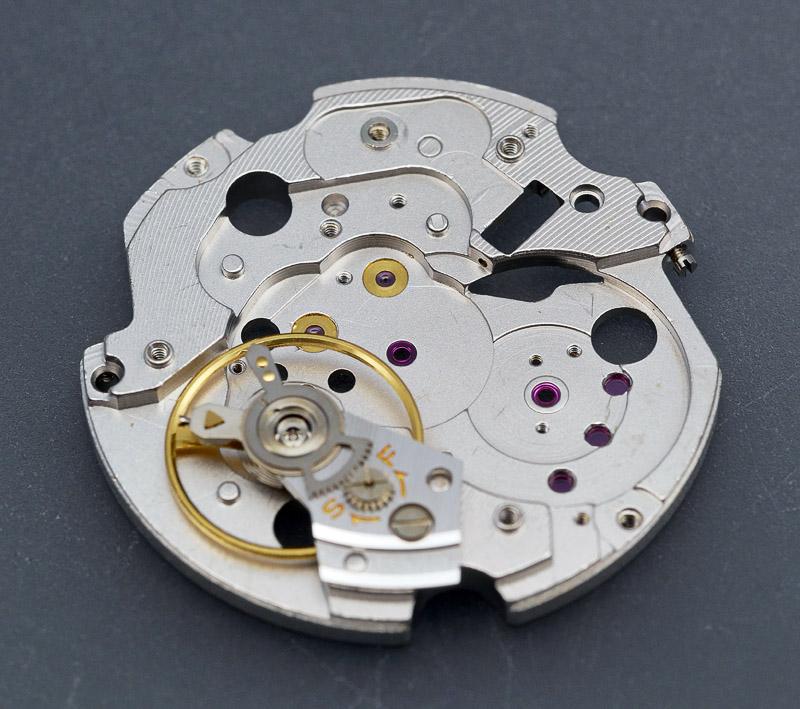 2 points
 -
I would like to share a check list made up by a master watchmaker. I take no credit for it, only think it would be helpful for us hobbyists. Here it is! CHECK LIST I decided to write up what is called a 16 point check that is meant to be a guide to steps required to service a watch this is slightly bias towards a wrist watch but very relevant to pocket watches also: This is a guide and not the definitive answer after going through it a few times add you own additional tests and observations. This is of course for a basic time only non-automatic or any with additional features, I also leave out things like demagnetizing, actual cleaning procedures, a good chunk of common sense needs to be applied also as I say its meant as a good starting point to a correct disciplined procedure, This is version 1 may add or edit/delete later. Check number 1 a Check the winding to see if the mainspring is broken. b Check to see if the setting bridge or sleeve is broken by pulling the stem out and testing the proper snap of stem. A broken setting bridge/sleeve is easily detected c. The balance wheel should be oscillated to see that it is true and the balance pivots should be checked by looking through the upper jewel to see that there is not a flash on the pivot. d. The hairspring should be checked to see that it is not damaged. e Check setting of hands f. The watch should be looked over in every respect, paying particular attention to any rust spots that may appear on any part of the movement. When rust is evident around the stem or setting mechanism, it is most important to remove the dial and hands in order to check this mechanism to see if the rust is very extensive. Check Number 2 a. Examine each part as it is being removed from the movement. b. Check for rust on every part. c. Check every pivot to see that it is not damaged or bent. d. Check the jewels in the watch, to see that there are no cracked jewels. e. Check pallet stones to see that they are not chipped or damaged. f. When removing barrel cap, make sure that it snaps off only after sufficient pressure has been applied to it. g. In the examination of each part, a close check is not made at this time as many of the parts will not be clean enough for that purpose. a much closer check will be made on the parts as each part is handled in the assembly of the watch Check Number 3 a. Upon completion of cleaning and parts removed from the basket into the assembly tray, each part should be checked over with the use of a watchmaker’s loupe special attention should be paid to the jewels, because if there is gum oil still remaining on the jewels, the cleaning job was not done satisfactory . It is also worthwhile at this time to examine the pivots. If the jewels are clean, and the pinion leaves are clean, it is almost certain that the cleaning operation was performed effectively. Check Number 4 a. Examine the condition of the mainspring. b. Check the width, strength and length of the mainspring. c.. If correct, replace mainspring using correct mainspring winding tool, not by hand d. Check the lubrication of the mainspring if required e. Check the fit of the mainspring around barrel arbor. f. check the mainspring end for proper shape to catch in barrel. g. Check the snap of the cap on barrel and replace in correct position h. Check the end shake and side shake of barrel arbor is it also sometime recommended to do this without mainspring fitted to test for free run and end shake i. Check the cleanliness of the barrel and barrel teeth. j. Check the oiling of the barrel arbor after the cap is on. k. Check the condition of the barrel teeth to see if they are bent or worn. Check Number 5 a. Jewel holes must be cleaned with peg wood if necessary. b. Jewels must be checked for chips or cracks. c. Check the train wheel pivots for rust, polish, cuts and straightness. d. Check the pinions for rust’, pits and polish. e. Check the pivots for pitting check that clean pith wood is being used. f. Check plates for tarnish, fingerprints, and polish jewel settings. g. Assemble time train and check end shake and side shake. h. Check wheels for trueness arid upright. i. Lift each wheel with tweezers to check for end shake and to see if each wheel is free enough to fall back to its original position. j. Spin train to see that is spins freely, in dial up, dial down and a vertical position. Check Number 6 a. Replace barrel and barrel bridge and check the oiling of the barrel arbor upper and lower bearing. b. Check oiling of crown wheel. c. Replace ratchet wheel. d. Note: do not oil remainder of movement until after kick-back is checked or cap jewels are present oil those now e. Wind watch slightly to check kick-back and recoil. This check should be made in dial up and dial down positions. If the watch does not have kick¬back, this indicates that the train is not as free as it should be. First, however, before checking into the train itself to determine if there is some frictional error, it would be worthwhile to examine the mainspring around the barrel arbor. Many times the loose fit of the mainspring around the arbor will prevent kick-back from occurring within the train. In such instances, the arbor is simply slipped in the mainspring instead of the train receiving the reversal torque, that normally occurs. If the barrel is found to be satisfactory, then the train. should be checked to see if the trouble can be located. first, the train should be examined carefully to see if each wheel is free, and if no trouble can be found, then it is advisable to remove the train wheels from the watch and replace each wheel in the watch individually and to check the spin of each wheel. If each wheel spins freely, this indicates that the pivots and the jewels are in good condition and that one need not look further for defects or faults in those areas. Next, place two wheels at a time in the watch and check the spin of the wheels. Thus, any error of improper depthing or a badly formed tooth on a wheel or pinion will be detected. It is simply a process of elimination in order to locate the particular trouble, and of course, proper corrective measures must be taken to correct an error when one is found. Check Number 7 a. Oil all the train jewels in the watch, and at this point it is advisable to oil also the balance jewels. b. Check to see that there is a ring of oil around each train pivot and that the jewels are not over-oiled or under-oiled. c. Check the jewels that have caps to see that the globule of oil has been formed properly between the flat cap and curved hole jewel and no keyhole shape if so remove re clean jewels and check seating the re oil and repeat check for perfect ring. Check Number 8 a. Oil stem properly. b. Oil friction parts of setting. c. Oil wolf teeth of clutch wheel and winding pinion. d. Oil clutch wheel groove. e. Oil points on setting lever that contact the setting bridge or the clutch lever. f. Never oil dial train. Note: ‘dial train means all wheels following center wheel staff. g. Seek expert advice on some types of intermediate wheels connecting clutch at setting positions that require oil. Check Number 9 a. Check condition of pallet arbor pivots. b. Check for chipped or loose stones, shellac or gummed oil on pallet stones. c. Check guard pin for straightness and proper shape. d. Check polish of pallet arbor, pivots and fork slot. e. Check end shake of pallet fork. f. Check height of pallet stones in conjunction with escape wheel teeth. g. Check matching stones. h Check drop lock i. Inside and outside drop. j. Draw. k. Hang-up of stones on escape wheel teeth. Check Number 10 a. Check tightness of roller jewel in roller table - uprightness of roller jewel. b. Check the height of the balance wheel in conjunction with the fork bridge and the center wheel. c. Check the clearances. d. Check the height of the guard pin in relation to safety roller. e. Check the proper length of roller jewel and fit of roller jewel to fork slot. f. Check the guard clearance. g. Check the corner clearance. h. Check the jewel pin shake. i. Check the guard test, j. Check the corner test. Check Number 11. a. Check the hairspring in-the-flat. b. Check the hairspring in-the-round. c. Check the quadrant of the hairspring to see that it is formed properly between the regulator pins and stud d. Check for beat of the watch by equalizing the force to receiving and discharge pallets. e. Check for the collet wobble. f. Check for trueness of the balance wheel, and for the flash of the balance pivots g. Check for trueness of roller table. Check Number 12 a. Place the watch on the timing machine and take a rate in the dial down position, then turn the movement over to dial up position and take a rate. There are three things that should be observed from the rate that was taken: 1. Dial up should indicate the same time as dial down. 2. Observe the closeness of the lines to determine if the watch is in perfect beat. 3. Observe how the watch is running in reference to the time error over a 24-hour period. b. Adjust the mean time rate of the watch so that the dial up and dial down positions will record on time. Do not move the regulator more than one degree in adjusting the mean time rate. Any other alteration must be made by adjusting mean time screws or by adding or removing weight from the balance wheel in such a manner as not to affect poise, static or dynamic,. c. If the rates in dial up arid dial down are found to be different from one another, then this indicates a mechanical error in the watch which must be traced out before proceeding. d. If the watch is found to be out-of-beat, then of course, it should be put r in proper beat at this time. We might emphasize that if the watch was put in proper beat in accordance with the proper procedure at the bench, then an out-of-beat condition or minimal amount would not be indicated on the timing machine. e. When the above conditions have been satisfied, the next step would be to take a rate in positions and errors corrected. If everything has proved to be satisfactory, the watch should be tested for isochronal test be made on the timing machine, which consists of re-testing at different winding levels and rate in the dial up position. Check Number 13 a. Check for proper lubrication of cannon pinion on center post. b. When replacing the cannon pinion, be sure that the leaves of the cannon pinion do not come down on top of the minute wheel teeth so as to bend the teeth of the minute wheel. c. Check tightness of. cannon pinion d. Check to see that cannon pinion does not ride up when watch is being set. and smooth consistent operation. Check Number 14 a Make sure that the hands are fitted securely to the parts to which they are attached b. Make sure that the hands are adjusted so that there is equal space between the hands and the hands are set as close to the dial as possible. c. Check to be sure that the hands are shaped to the contour of the dial. d. Check to see that\ the hands are positioned so that they are synchronized with one another. Check Number 15 a. If there is no case for the movement, simply disregard this check and proceed with the next check, number 16. b. Check for proper snap/screw back of the case. c. Check for the clearance of the hands under the crystal. d. Check the crystal to see that it is securely fitted into the case. e. Check to see that the crown is next to the stem and reasonably close to the case. f. Check for tightness of movement in case. g. Check the spring bars to see that proper spring bars are used for the particular type of case so that the band is held securely to the case. h. Check the lug holes to see that they have not been worn badly by the spring bars to a point where the hole may break through and allow the spring bar to come out of place. Check Number 16 a. Set the watch on time with a master clock. b. Let the watch run for a period of 24 hours and check the error in the time repeat in several positions. c. Allow the watch to run until it completely runs down and check the length of run. The watch should run a minimum of 30 hours, preferably 40 hours, if it is in “A. I have no answers to any of the steps since I didn't make this up. Maybe Mark might.1 point
-
Wobble sticks anybody?1 point
-
I believe that's one of the selling points of the membership. Then at one time they even gave the members all the data on disk but if I remember right they cleverly encoded it so you still needed something to access it. It wasn't like it was a huge data disk of data. Then at one time I was a member the membership used to be insanely cheap like $40 a year then had the bright idea of raising at the 90 and they lost half their membership. Plus a whole bunch of other amusing things they were doing with their money in just interesting things that they shouldn't be doing. But before they raise their rates a lifetime membership used to be $400 which seemed expensive at the time. So even though I didn't like their politics thinking about it at $400 would open wisely spent over the next. I don't even want to think about if they had a lifetime membership what they would charge now. Another place you can look for data is you look on eBay often times people have CDs DVDs whatever of lots of data a lot of it's available for free and some of it doesn't seem to be available for free so you get stuck purchasing on eBay. of course there's all those interesting locations if you know where they are like this one I think you'll find quite a few tech sheets here. but of course they do suffer from the problem of not entirely entire information. Now that the ability of digitized papers a lot easier some basic go back and slowly start scanning all of the paper documents. https://watchguy.co.uk/cgi-bin/files1 point
-
I'm guessing but most watch dials are stamped out. Omega may of bought the blanks and the impression is the manufacturer's trade mark.1 point
-
My DIY device uses a 12 v car battery charger as the power source. The dials are usually brass and the feet. Copper wire. I have used solder paste and solder chips cut off flattened solder wire with fluxite paste, never had one not work. A solid joint and no dislike damage. A damp sponge as Hector mentioned will cause problems with water transfer chapter rings. W hai I use is a bit of asbestos dampened just enough , not wet Do a search on the box door dial foot soldering machine and scroll down the results. Jan 4 th is my post and the machine I built1 point
-
Just a bit of scrap metal they had laying around, Omega eh cheapskates1 point
-
I have a dial feet soldering machine that runs off a 12V lead acid battery. But I don't use it much. I still prefer flame soldering from a microtorch. From my experience, the wire used has to be copper. For some reason, brass wire doesn't work. Low fusing solder paste works best for me. And LESS is MORE. Hot air soldering doesn't work. The heat is not localized enough and spreads till it scorches the dial. For successful soldering, it must be hot and it must be quick. Cooling with a damp sponge on the dial face is not a good idea. There are some dials which are so sensitive to water, that contact with a damp sponge would mar the surface. There are some expensive setups that have an air cooling jet directed below the spot to be soldered to reduce the risk of scorching the dial.1 point
-
Hi, dials are made from brass. Copper may be a too good heat sink (depending on thickness, too). But I also wonder if it really works as well as proud Youtubers like to claim. The heated wire is still a tiny area compared to the dial plate, and both must have the same temperature for the solder ro flow. The tiny wire is to heat the big area of the dial?? Frank1 point
-
send pics…1 point
-
@tomh207 Thanks! I am going to have a whack at this.1 point
-
You may want to check out the end-shake on the pallet fork, switching parts, even from compatible movements can result in bridges pinching wheels and in this case (perhaps) the pallet fork. Another option is that the jewel in the pallet bridge is damaged (cracked) or maybe the pinion of the fork itself is damaged (bent, sheared, corrosion etc...) such damage may also prevent the free movement of the pallet fork. To check the end shake, use an oiler to carefully see if the pallet fork can move up and down (not side to side) between the two jewels, there should be a little bit of free movement up and down which is known as end shake. If there is movement then you can scratch this off your list of possible culprits, if there is no or very little movement then the bridge may be restricting (pinching) the pallet fork and you may need to move a jewel to allow sufficient end shake. I just noticed on your photo that I do not see the pinion of the pallet fork poking through the jewel, usually you can just see it poking through the hole in the jewel - maybe this is a trick of the light in your photo or some other camera trickery? However, this would lead me to think that there may be a problem with the pallet fork pinions, perhaps one or both is sheared off or otherwise damaged? @RichardHarris123 snap!1 point
-
You will find with the cheaper bracelets there is no way of removing links.1 point
-
just encase you need the service information I've attached a PDF. as pointed out up above this is a common movement used for training purposes. Fortunately yours is the Swiss version not the Chinese version is so getting parts will be much easier. then in watch repair before we can fix a problem we have to figure out exactly what the problem is. this means as others have recommended up above disassembly is required. Movement comes out of the case hands and dial come off and then we can evaluate the keyless parts. ct_6498-1_fde_482382_10.pdf1 point
-
Clickspring released a video clip on making what looks ideal for this application. Tom1 point
-
@JohnR725 thanks for your help and advice, apologies again for the lack of pictures, I'll add them tonight when I get back home1 point
-
no pictures of the front and back of the dial. This means I get to guess based on your descriptions hopefully you got those correct in order to enamel a dial or anything for that matter you have to have a counter enamel on the back side. Otherwise when the basically glass goes solid it's thermal expansion is different from the copper and it will break off. So you put basically a enamel on the backside usually not very pretty good as the same thermal properties which means the dial hopefully won't crack. It's basically a really interesting procedure if you do enameling that you have to put enamel on both sides. it also means that typically enamel dial's will be much thicker than pay for dials because enamel which is class is basically going to be thicker. sapphire is easy as it has a cold feel. Is a very different thermal properties than the others. Glass if you gently try to scratch it without a lot of enthusiasm is relatively hard as compared to plastic which if you just touch you'll scratch. so basically enamel dial should be like glass I suppose if you made sure it was not in a visible location or maybe on the back side take a screwdriver and gently maybe try it was some window or drinking glass first. In other words if you're a scraper painted dial it would be like the acrylic crystal it would just scrape instantly but something to its glass hard will take a little more force but if you're enthusiastic you could definitely scratch it with steel tools normally with the American pocket watch enamel dial's I will actually run them briefly through the same ultrasonic cleaner as what they're using to clean their watch bands in cases in the front room. I don't leave it in there all day can they don't want to push my luck but promptly made enamel dial can be washed and can be an ultrasonic at least for a while. But I've heard stories of people who found out that the white is enamel but the numbers are not. The summary was talking about the numbering floating away which I haven't seen yet okay haven't read the fine print we will get the pictures of eventually okay it would help to see the backside. Then I've heard of people using the dentures stuff as I said I is wash it with the same stuff the use for cleaning the watch bands you can even take a brush to it because it's almost like washing a eating plate.1 point
-
one of the most important lessons to learn in watch repair is when not to work on a watch.1 point
-
Those look like riveted pins (see below) I think there are two ways to go about this, the first it to remove the riveted pin either by filing off the head (tricky work) and then later replacing the rivet or maybe you can prize it off or get enough of a grip on it to pull it apart. The other option is to open up the links on the underside, looks like there will be 7 you will need to open up on each side (also tricky work). I think either option is high risk and you stand a good chance of damaging the bracelet. Unless someone else has another suggestion I think you have to take the risk or replace the bracelet with something else? This is how the rivets look before they are installed, so you would need to overcome the friction holding the two parts together or cut/file off the head: Here is the other option:
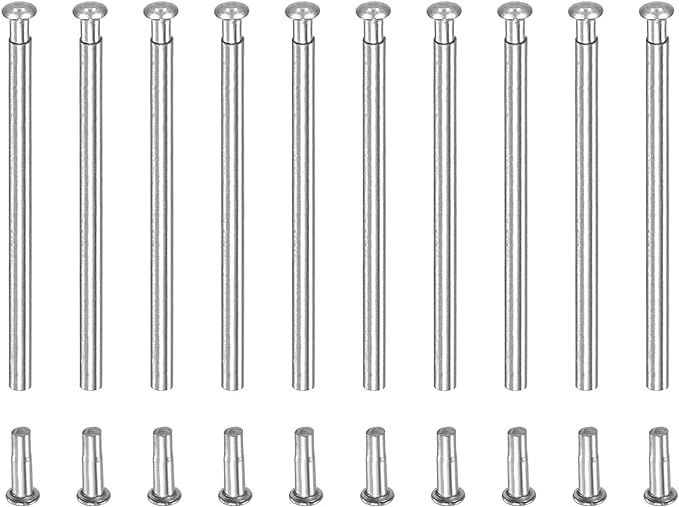
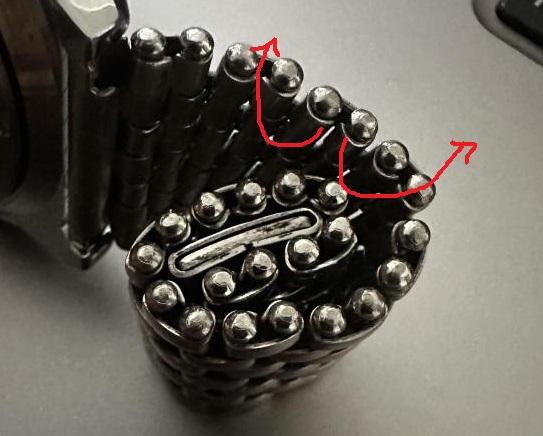 1 point
 -
Ahh i'm sorry, lot's of problems because I simply don't understand all the terms of watchmaking industry. (English is not my native language)1 point
-
I always put a dab of molykote grease on the post before installing. Not sure anybody ever told me to do that, so maybe I am wrong.1 point
-
From the looks of it should be adjustable. Press on the washer thats underside of the bearing ( fig 2 ) to move it until you feel it ( the washer) doesn't want to move any deeper. It can be done in situ Press carefully: DO NOT PUNCH Good luck1 point
-
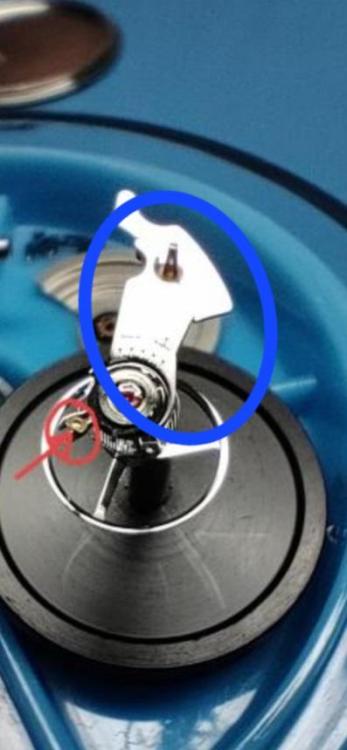
The blue highlighted bit is the balance cock. The part that holds the balance and screws to the plate.
 1 point
 -
The reason the dial foot soldering machines work the way they do is it creates heat right at the joint, and for just a brief moment. Other methods of heating the parts to flow the solder will inevitably create too much residual heat, almost guaranteeing damage to the front of the dial.1 point
-
I've been to a lecture where it was explained why Rolex watches cost so much to service. In the service center where they have an endless supply of parts we don't have they do replace stuff. This would mean more than likely they must have supplemental information telling the center what they're supposed to be replacing and why. But we don't get that information ever. Oh and then what about old Rolex service information what is that go? So I asked a friend who used to run the service center and he said when Rolex would send out at least the days of the physical now it's all online where it can't be copied supposedly. But in the days of the physical when you received the new documentation you are required to send all of the old documentation back to Rolex. If you're seeking a technical guide the best place to look is eBay. There's a seller in Italy that seems to have a continuous supply of Rolex manuals. I've seen some other one stroll up on eBay in one particular case the seller was getting negative reviews because apparently the seller was photocopying some of the manual. Otherwise anything out there is only going to be bits and pieces or vintage stuff like the PDF I'm attaching. oh and a suspicion of why he don't see anything modern PDF if somebody had the modern manual why would they PDF it anyway. then I have a suspicion Rolex would be unhappy if you are distributing PDFs of their manuals. yes the old days where I service to watch for somebody and it came back with the reverser is not suitable. I'm sure if all the procedure my instructor told us in school but that didn't apparently work. Fortunately in those old days Omega parts were still available for material house I just purchased a brand-new one the problem was solved. Today you would look in the technical guide like the one I attached from Omega there is a procedure for the reverser wheels you don't even have to take them apart which you can't do anyway because you wouldn't have the tools and there's no reason to when you have a procedure that's better. the problem with reverser wheels each of the companies have differing procedures. Rolex has a procedure where lubrication has to be in specific places but definitely not in other places they have to use epilam and follow some procedure that they have in their manual. the phrase turn it away implies moneymaking job? The problem with a Rolex watch is if you make a mistake a can become a very expensive mistake. Plus the bonus of Rolex doesn't like any of us which means purchasing new components well go look on eBay and see what things cost. There are some aftermarket components for Rolex although Rolex frowns on that. The big thing the think about is if you taking jobs in for money you're doing it for the fun of that and you have an accident just how expensive is at accident going to be. Then you find out why typically the service people I think for Rolex watches don't know about this one was at the lecture was at least $600. And that's from a service center that would have all the parts Omega 8645_WI_40_rules for lubrication cousins UK.pdf 2130-2135-tech rolex technical notes update March 1987.pdf1 point