Leaderboard


Popular Content
Showing content with the highest reputation on 10/29/23 in all areas
-
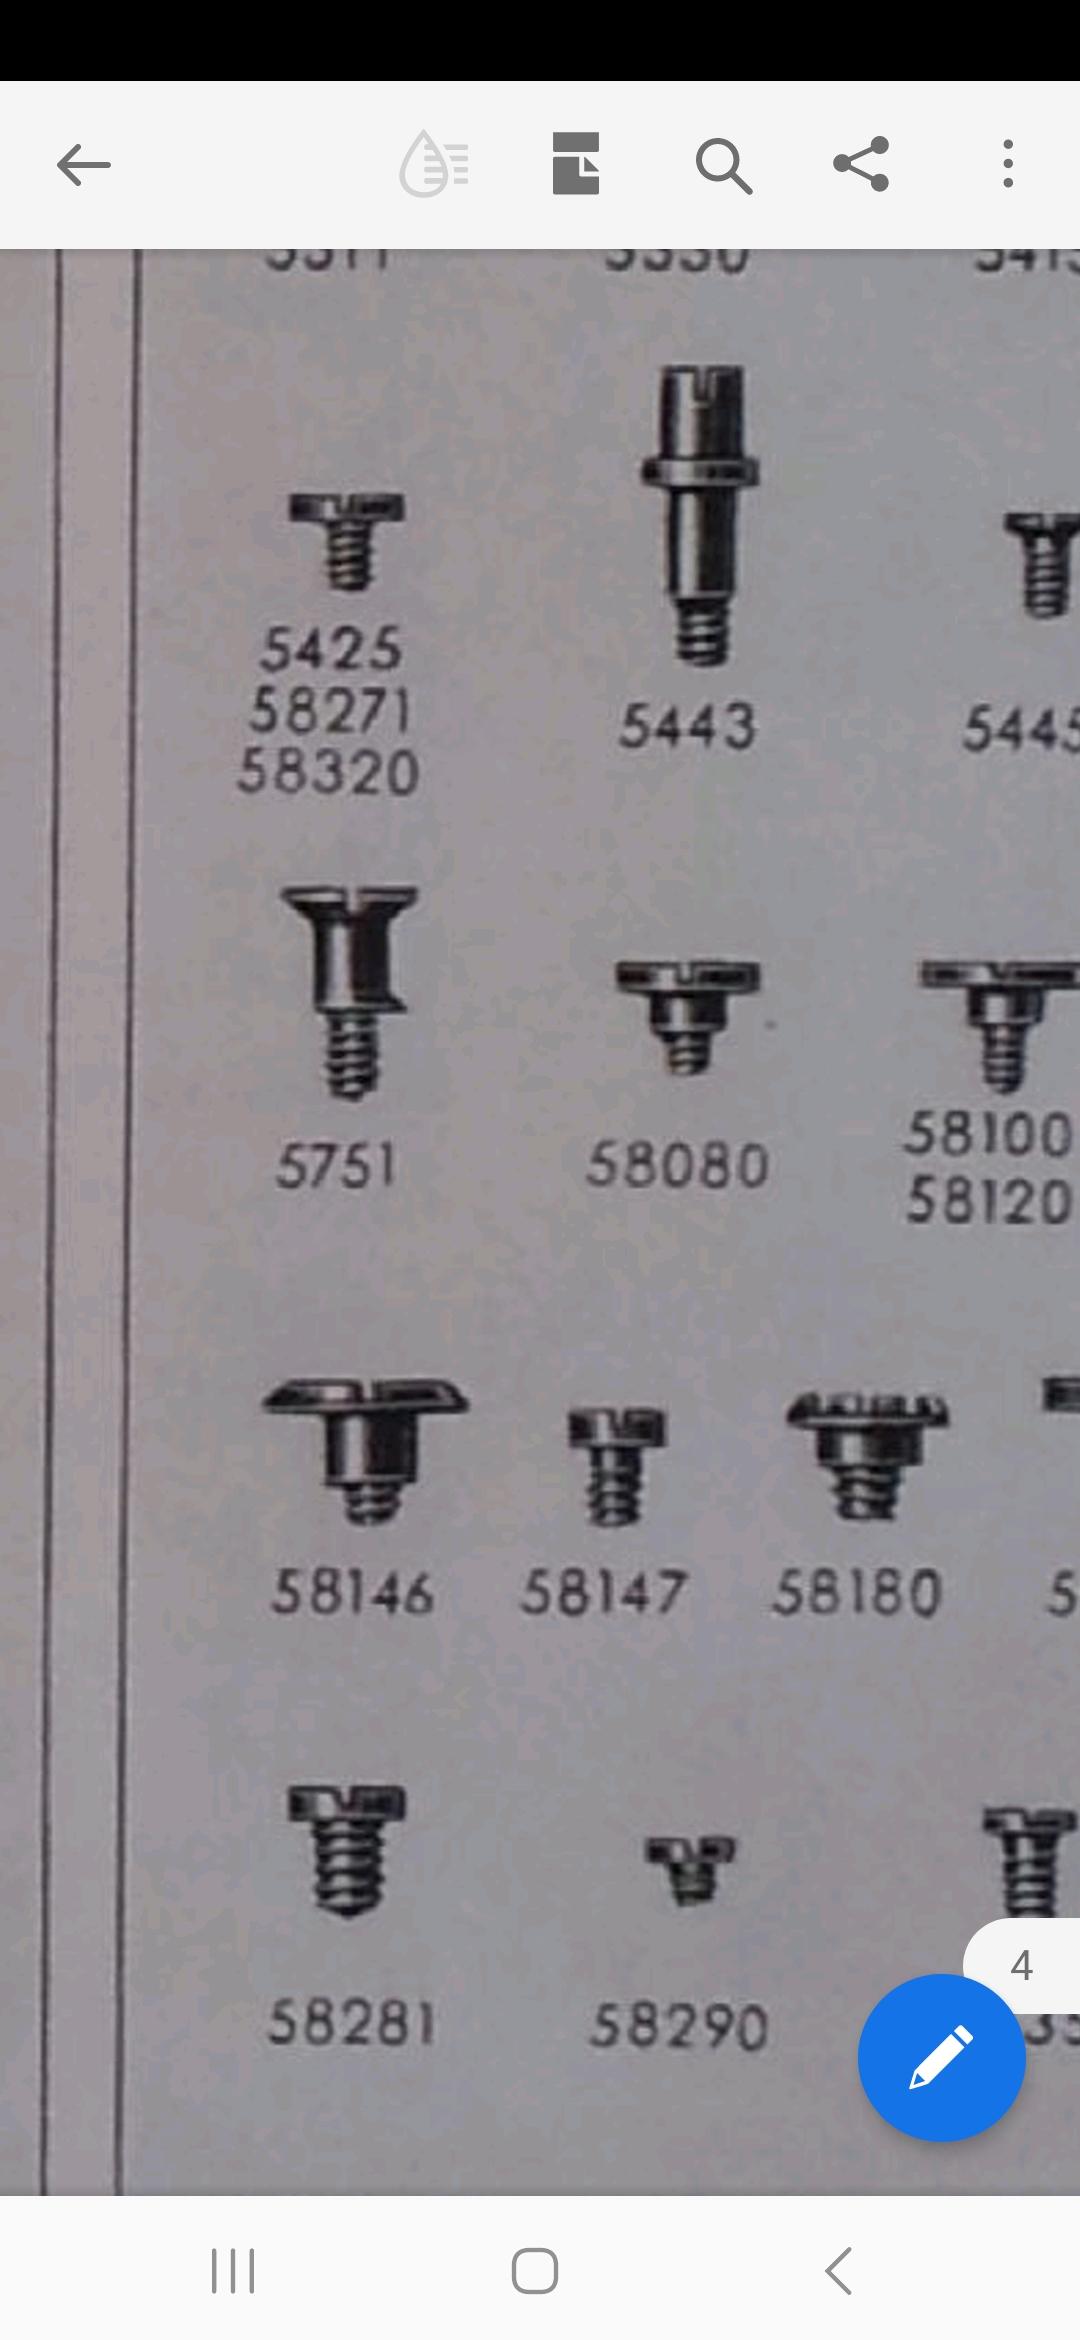
Has anyone ever tried epoxy metal in watches? - Something like QuickSteel or Quick Metal Putty I have done this on larger things (vintage bicycles) There you fill the hole with the putty and then stick a bit of grease on your screw and then push it into the putty while turning slightly as if actually turning the screw in. Once the epoxy has cured you should be able to remove and replace the screw. This trick works well for screw holes where there isn't space to drill and tap to the next size.2 points
-
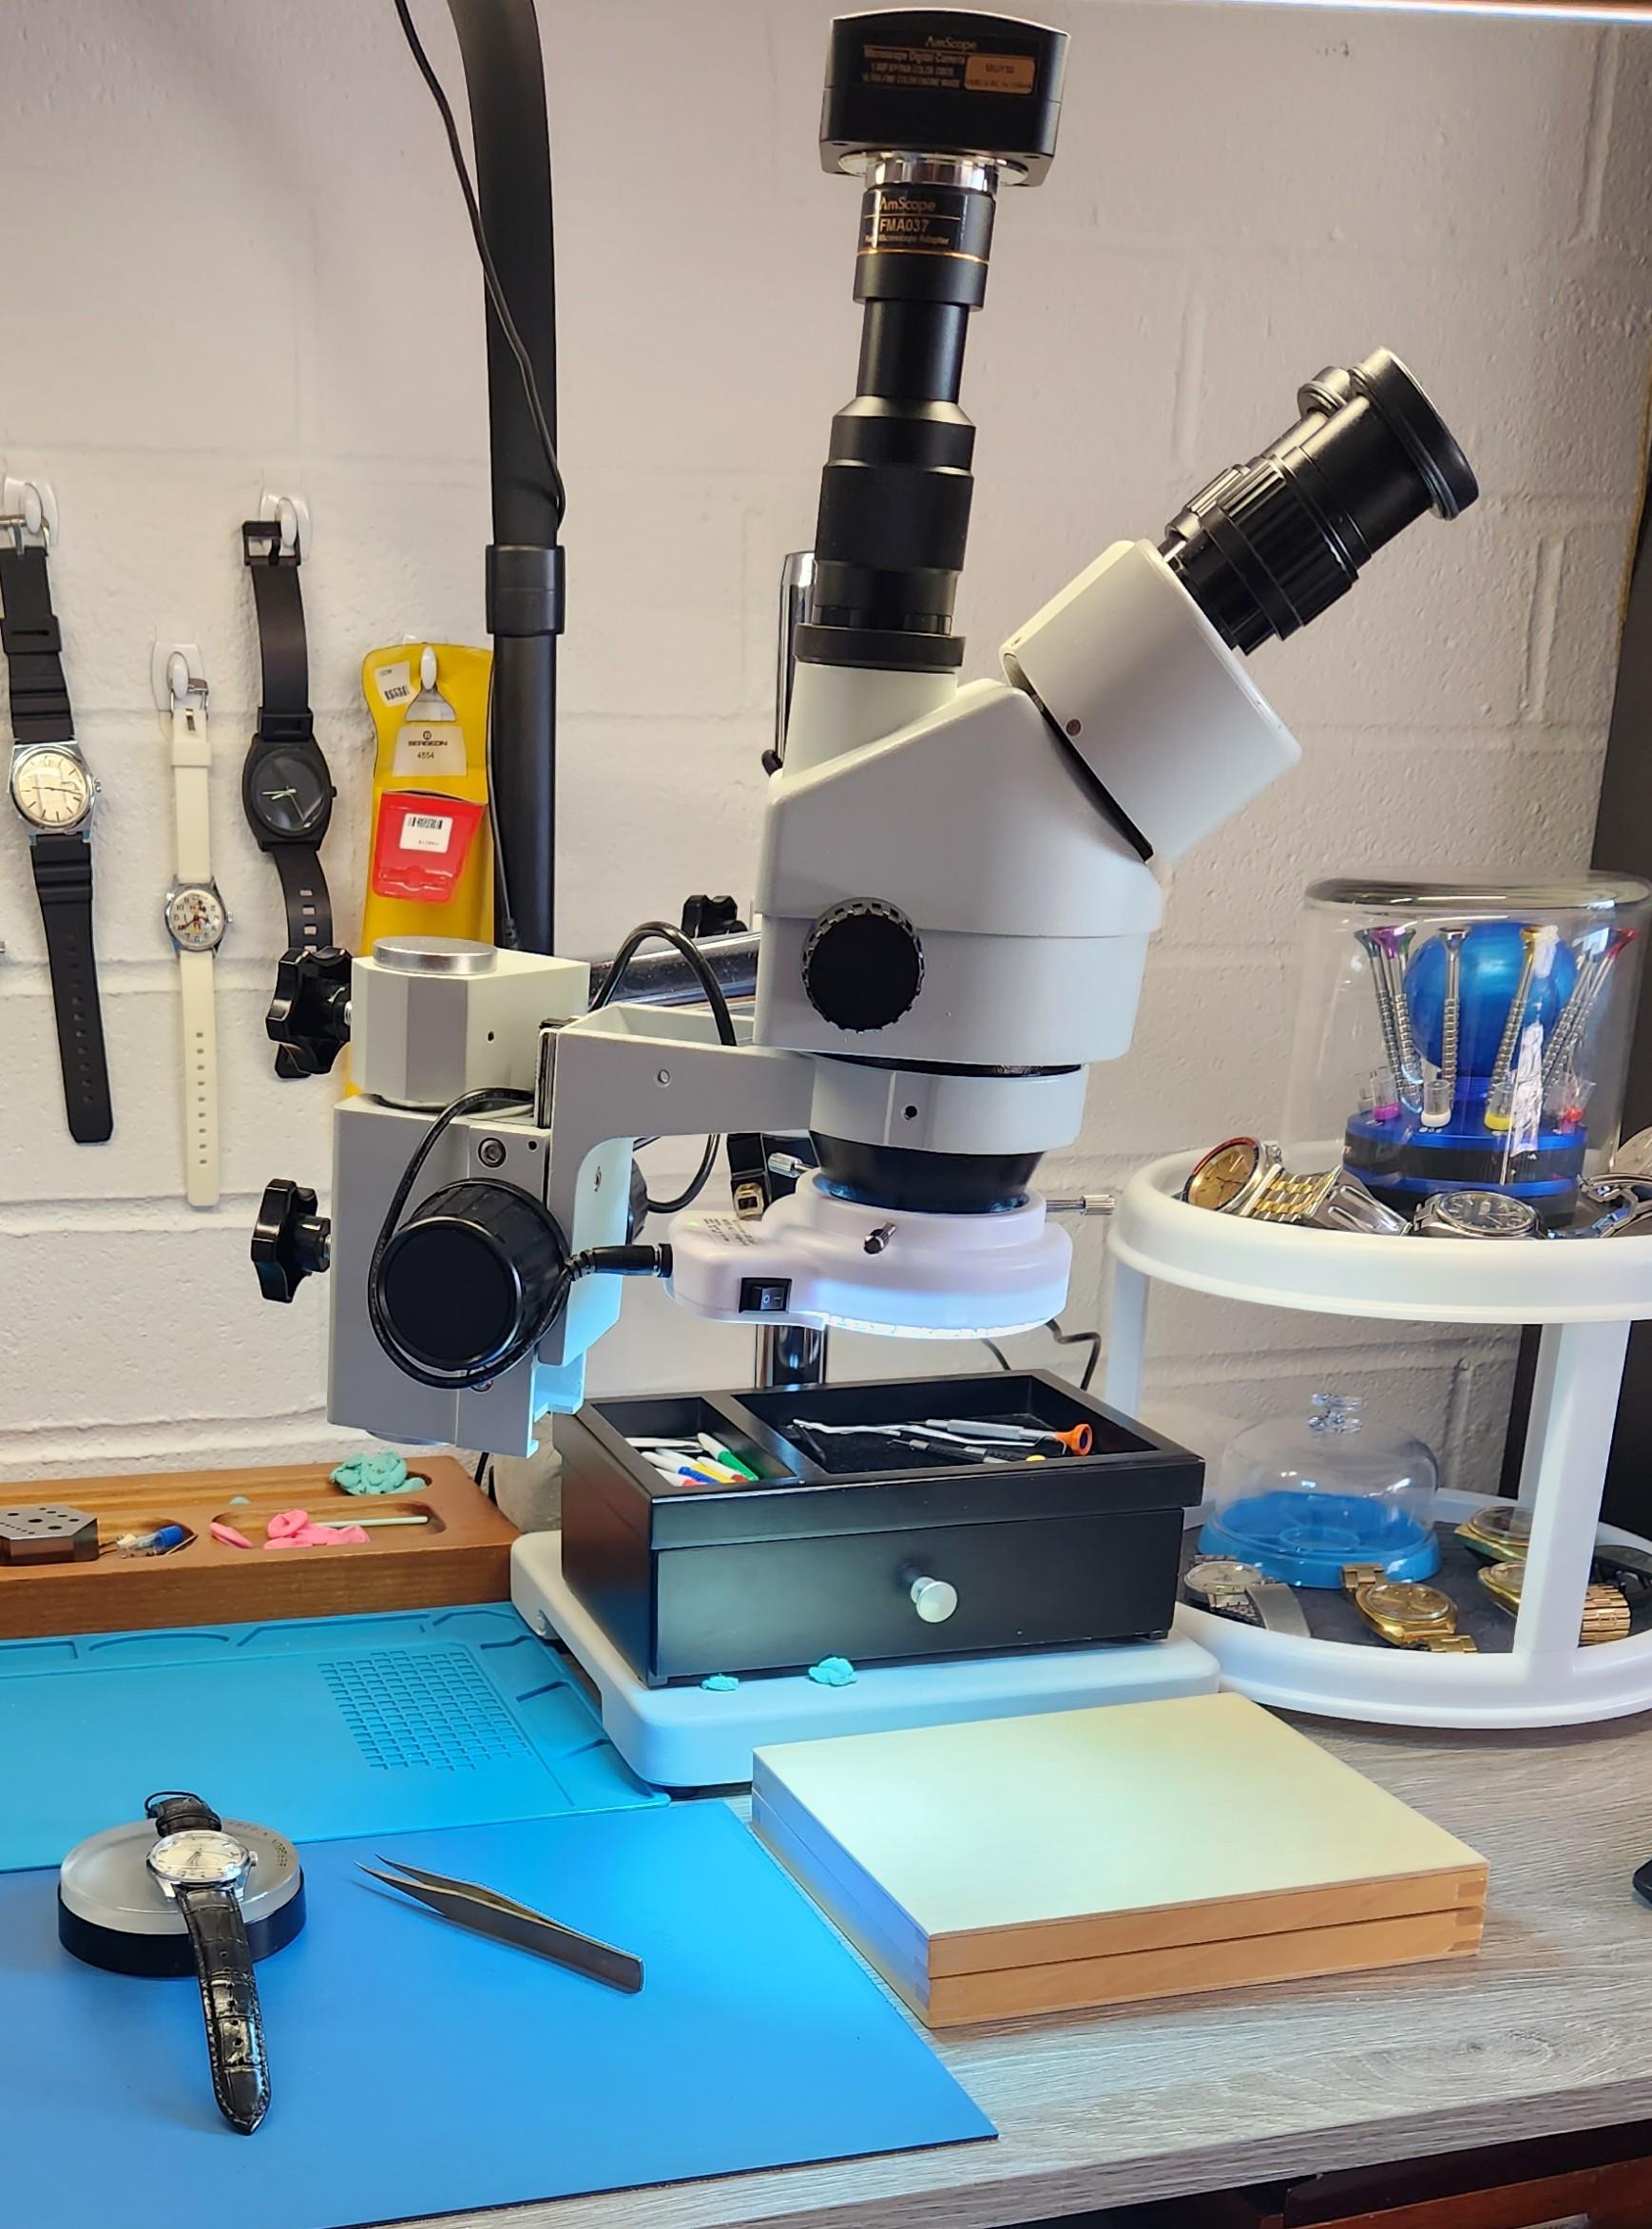
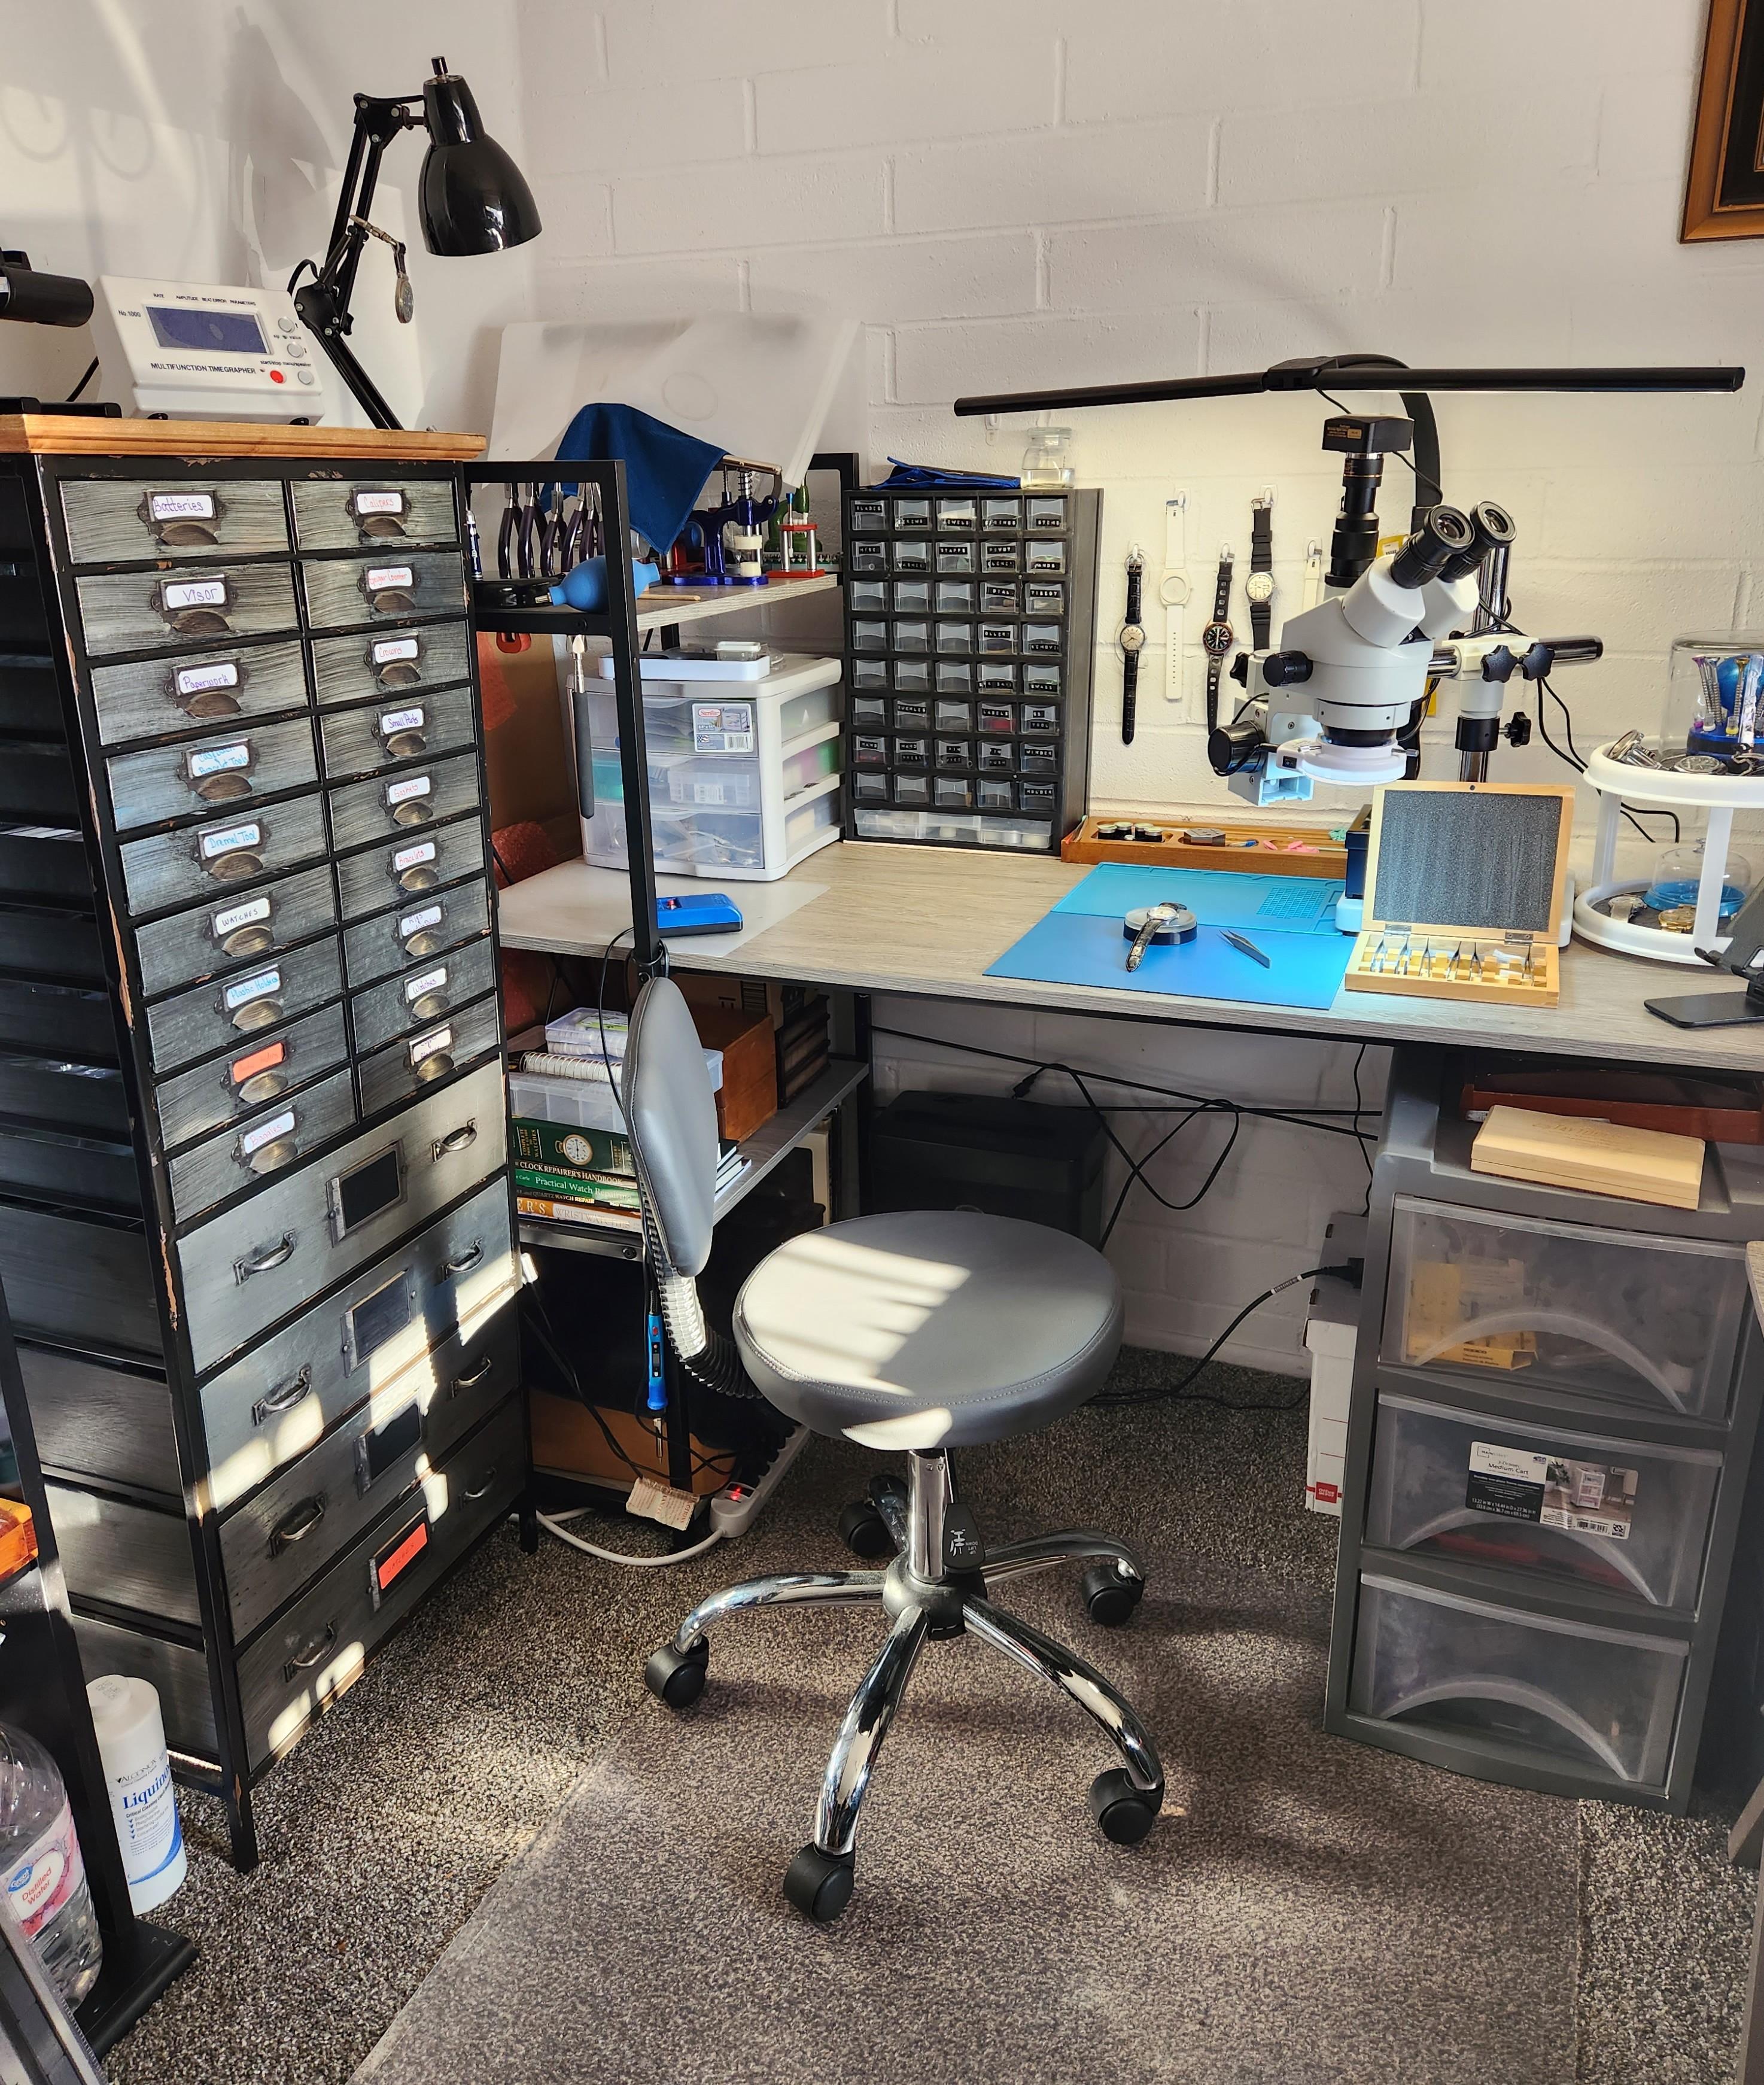
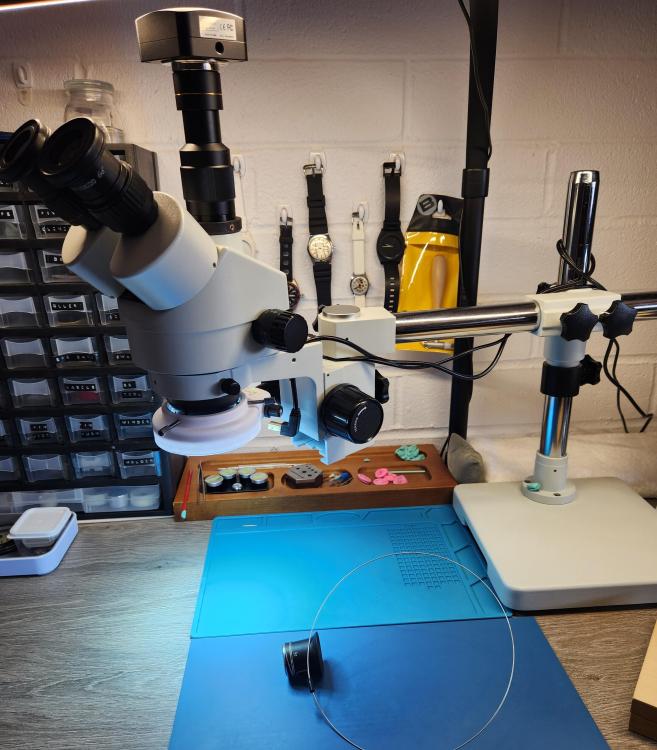
I know this has been covered but wanted to share my experience. I have read all the threads in this subforum and know this is all been discussed in length and it boils down to personnel preference. I think that a stereo microscope is an essential tool and most watchmakers should have one for their low bench. for the other 10% of work on a high bench a 2.5 (inches of focal length) Bergeron loupe is what I use. I got the trinocular and back earlier this year it cost $498.00, all in (without the camera) with the Barlow lens, shipping, tax everything. As Alex Hamilton on his youtube channel and Klaas on Chronoglide says, it is a game changer and WILL make you a better watchmaker. You can't work on what you can't see. You can tilt the head so that your hands are not in the way (this is set at about 6% - i know because on my photo cropping tool I can rotate the image and it gives me ! degree increments that I can use to line up the horizontal lines on the scope). I have a range of working area under the lens of 15 to 20 cm, depending on the zoom. It also has another 12 cm of "play" to adjust the range to fit anyone's bench and chair heights, and seat to eye level height. The eyepieces can be adjusted to individual eyes both focus for differences in eye strength and width to get the center of your eyes in the center of the lens. The cups can be rolled back on the eye pieces for glasses the same as birding binoculars and adjusting the eyepieces is exactly the same as on field binoculars in that you use your dominant eye to fine tune the focus in that eyepiece (with both eyes open), then leaving your dominant eye open block it (you can close it but technically you should have both your eyes open when doing this adjustment) and adjust the focus on the other eyepiece. Klaas does a similar adjustment discussion on his youtube channel as well as a couple of other useful tip on setting up the scope. Hope this helps someone interested in obtaining and setting up this tool. Here is my set up. Yes, I know I have carpet, but I do have a chair mat and a nice padded professional stool. Thinking bout adding a second mat and sliding the other one over that will get me to a hard surface under the entire work area.

 2 points
 -
This is why I like this forum and members. Criticism is constructive, not divisive. Base plate is now stripped and the donor plate is ready. Train of wheels installed. Time for a coffee.2 points
-
Ross, take lots and lots of pics as you disassemble - before you remove a part, then each time you remove something. Here's just one of about 30 I took when I first did a 4006A, to show spring positions, and one with notes added. If you take enough pics, and make notes on the pics if necessary, you can't go wrong.
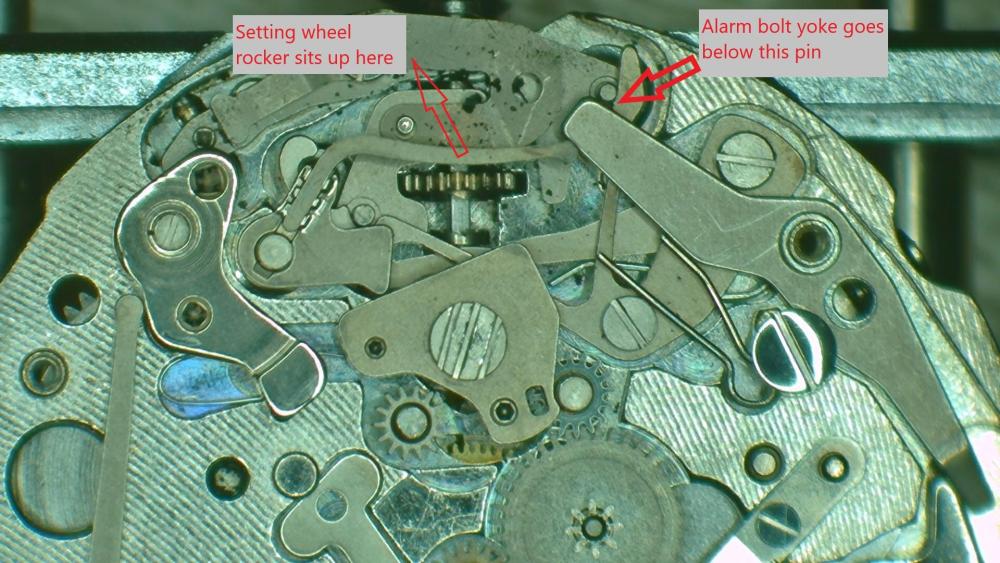 2 points
 -
Back in my days I'm referring to the 70's & 80's only two things would I ever use a glue, the first would be the proper cement for the crystal and that would be the recommended stuff, the other was on the tip of the stem to secure the button to the stem, but I never did that to all watches, if the button was a snug fit to the stem glue would not be used. I don't recommend gluing in screws that is bad practice.2 points
-
Ooops. scope. Update. Decided to do a complete re-service. Doesn't feel right when I have all the correct parts.2 points
-
probably left-handed as they almost always are. Unfortunately almost always. usually with something like this I use a little screw loosening fluid found at the link below. then because the hole for the screw usually goes all the way through the plate you can place the fluid on the backside in addition to the front side. Usually this stuff works relatively fast but occasionally I left it overnight. Worst-case is you just clean it without there and providing it can turn use some HP 1300 credit will flow down and hopefully lubricates. More than likely the reason that super tightest is somebody didn't know which way to turn it but that makes you then wonder if it's a right-handed screw? Oh you might billet tell by looking at the threads on the backside as to which direction if you can see them. http://www.julesborel.com/products/tools-lubricating-greases/Screw-Loosening-Flluid https://westernoptical.com/products/screw-loosening-fluid2 points
-
I'll second @JohnR725's recommendation of the Western Optical screw loosening fluid. It has saved my bacon many times.1 point
-
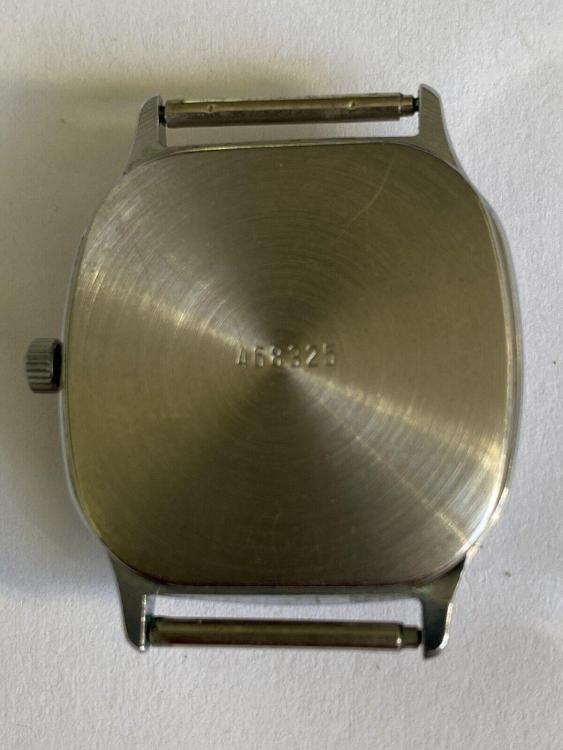
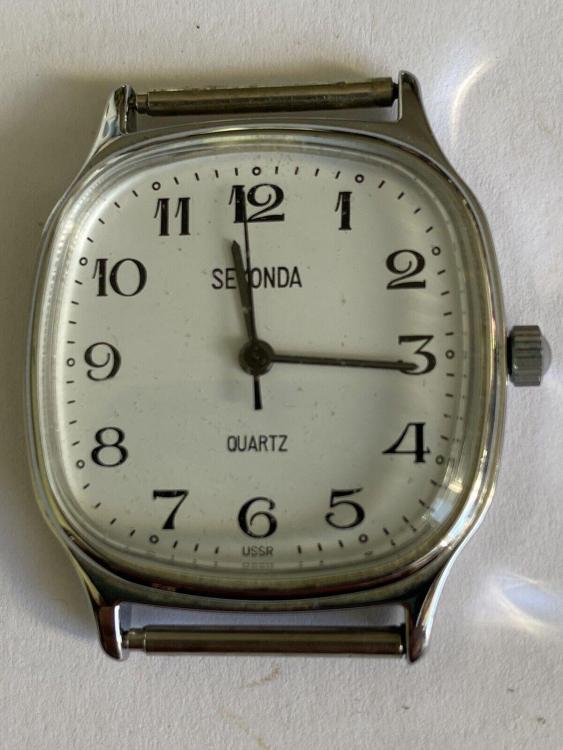
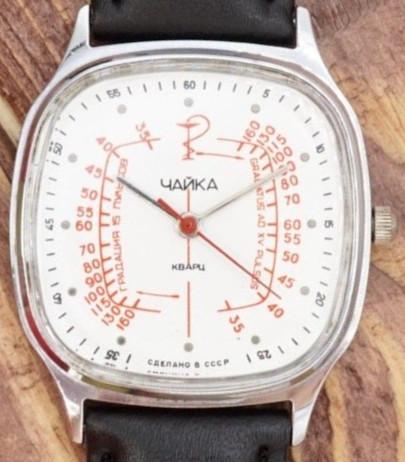
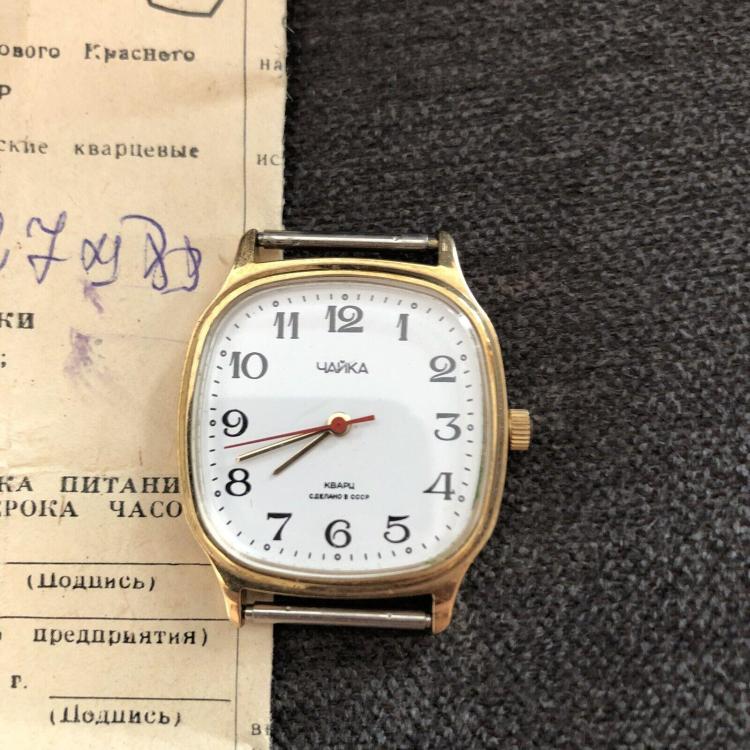
Another USSR era 404 club piece. This time a 0.99 pence Chaika R2356 7 jewel quartz. There are a number of versions of this particular model... ...including a very interesting "Medical" pulse meter dial version, shown below.
 1 point
 -
Hello and welcome from Leeds, England.1 point
-
Hello Friends. I am a watch enthusiast, collector, and fixer. I appreciate all types, manual, automatic, and electronic. My particular interests, and representative examples from my collection, are; 24-hour movements (Longines Heritage Navigator, Glycine Airman, Zodiac Jet, Lum-Tec, Gruen Airflight), alarm watches (Vulcain Cricket, Mido MaticAlarm, Tissot Sonorous), men's watches from the 1940's (Oris, Bulova, Wyler, Invar, Universal Geneve, Elgin), watches with unusual displays (slow watch, Svallbard, NoWatch, led-binary display), high-accuracy quartz (The Citizen Chronometer, Bulova Precisionist, Longines VHP). My first watch, a high-school graduation present from my Father (1971, Bainbridge Island High School in Washington State) was a Wyler Incaflex 660 Lifeguard. My first luxury watch was an Omega Seamaster, and my latest purchase is the Longines Spirit Zulu GMT. I service most of my watches, being self-taught through books and videos. The feeling of observing the inner workings of a watch through the loupe while working on it is fantastic, having all your attention focussed on the little world in front of you. I experienced a stroke in 2016, so my watchmaking is primarily done one-handed from my wheelchair. I am a retired printer, and my wife is a retired librarian. We live in with our dogs in Port Townsend, Washington. Best regards to you all, Drew Elicker1 point
-
Should not be attempted unless you have the tools and skill to do so. You can cause a lot of damage.1 point
-
Gonna take this path. It turns freely now.1 point
-
Try Joe's cokecola trick, soak overnight.1 point
-
seems simple enough except? in addition to checking for a bent banking pins you also have to pay attention to the movable banking pins standard on almost all American pocket watches. So is not enough to visually look at them they look right you actually have to check that aspect. notice how all the books on escapement's all the writings slightly different terms slightly different well just lots of variations. basically more or less like the quoted above check the horn clearance. Then the guard pin and then I leave my banking pins alone. Then I can look at the pallet stones fortunately unlike the banking pins which are to easy to adjust usually nobody plays with the stones. Just like usually they never play with the guard pin but anything that's a screw that's adjustable like the banking pins the mean time screws those get played with. Sometimes the point where there were physically loose because they been adjusted so many times. one of the problems with reference material on the lever escapement is the assumption that every single lever escapement was manufactured the exact same specifications. The problem is the lever escapement has evolved over time with the modern lever escapement obviously be more efficient than a vintage lever escapement. So you going to find the variation and the rules are not necessarily written in stone.1 point
-
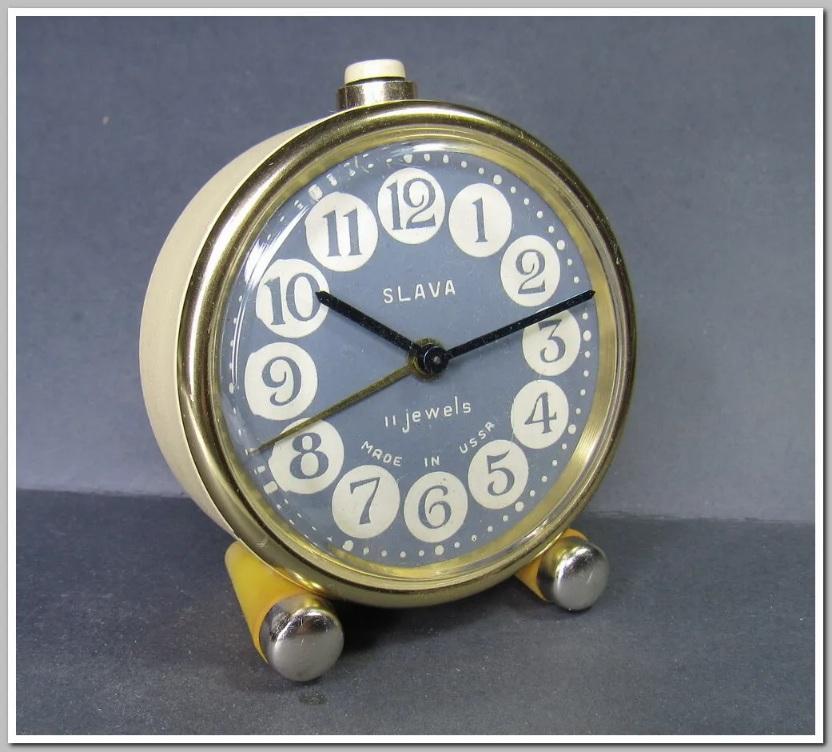
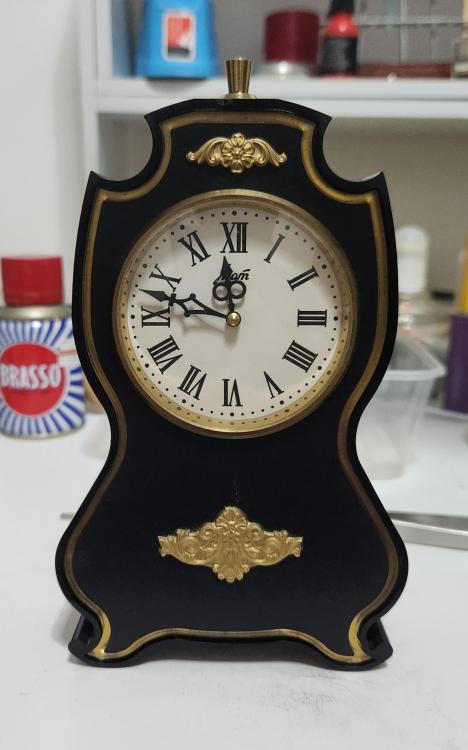
Hi Hector, The one in the first photo is the one. No mater of the model outside, they have the same movenetnt (11 jewels) with sometime different names on the dial as МИР, ДРУЖБА. The second one, АГАТ is different, it is based on the old Hampden 42mm pocket watch movement that russians bought the factory back in 1933 and started production of КИРОВСКИЕ 1МЧЗ. I used Slava movement in the article as there is (stil) many of them here (Eastern Europe) and You can get one on a carboot sales for less than 50 cents, and of course, the size and design of the movement are perfrct for educational purpose1 point
-
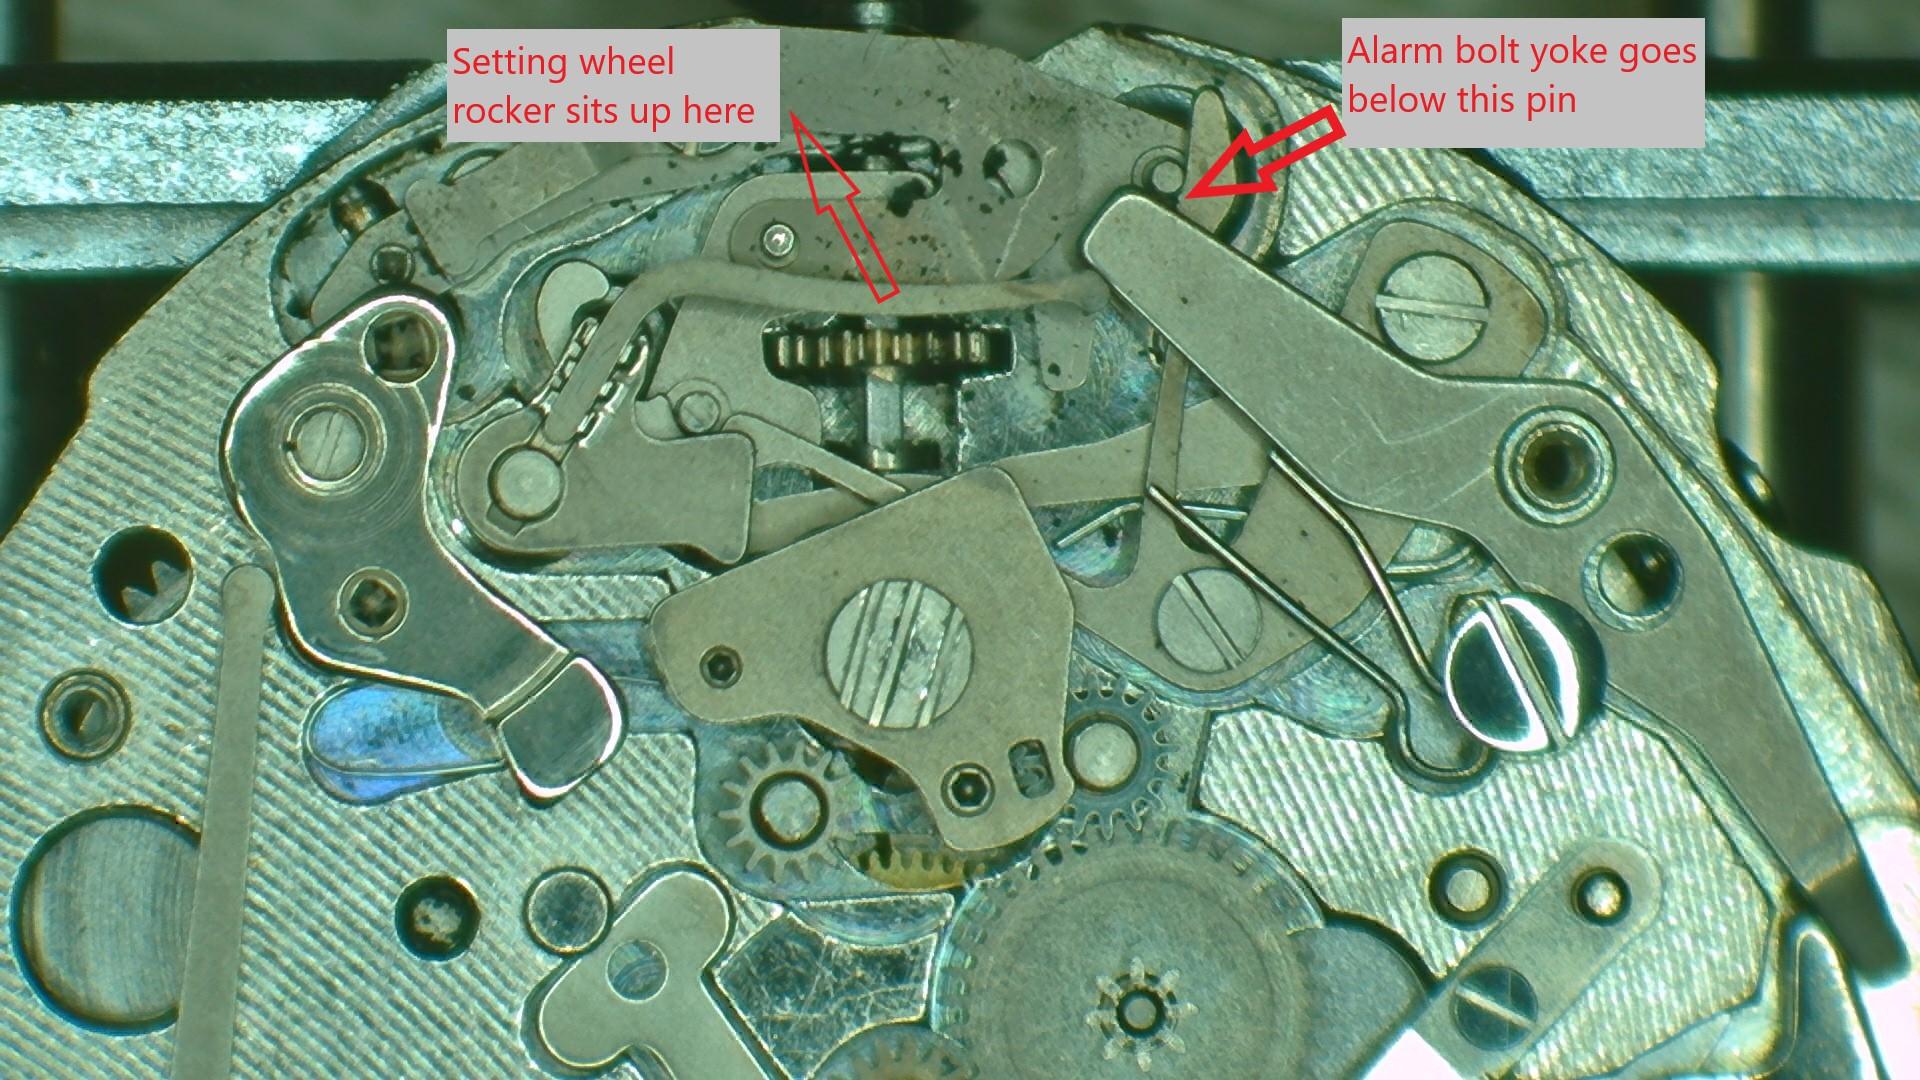
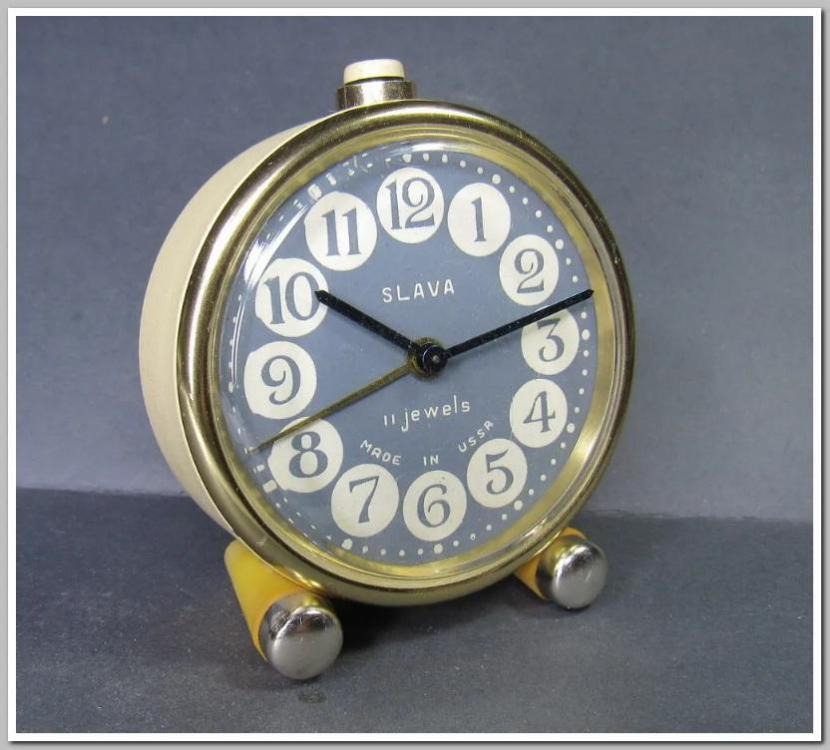
Hi @nevenbekriev, in your article on setting pallet depth in The watch Forum, you mentioned Slava alarm clock as a good example to study the escapement due to its size. May I know what model is recommended? Would the model in the picture below be suitable? By the way, I love Soviet clocks. Like my Agat table clock and my submarine clock.
 1 point
 -
Unfortunately your advice comes a little too late to help with this restoration Pent. There is another thread from murks pertaining to the outcome1 point
-
Indeed, photographic evidence of my hubris was the real mistake!1 point
-
I understand, but way back in the day I finger handled some parts thinking they'll get cleaned straight away and just a few days later there was "tarnish". At least don't show pics holding parts in fingers to avoid this discussion haha (I still touch parts with skin sometimes but only if I'm really sure it's getting cleaned straight away).1 point
-
Further to Neven's post, setting drop lock "blind" doesn't take too much into account the position of the actual fork. Like he says, assuming one jewel is correct. The pallet fork is also referred to as the anchor; the anchor shape is where the pallet stones are, the fork itself is what works with the roller jewel. In the event of a bent fork, or balance center off center (was the case in the last fork I made), things get wonky. And if you thought adjusting pallet stones/bankings was a source of skullsweat already, these situations make things really fun. If everything is original, one stone is missing for example, you can proceed assuming the remaining stone is at least close to where it should be. Also, in good grade watches, the gap at the back of the fork slot is generally more or less the same for both jewels. This is a ballpark view. You get your extensive Seitz set out and whoa, the only jewel that fits is either way too long or so short you have a massive gap at the back of the slot. You either live with a big gap, or reduce the length o f the new jewel. It gets quite complex. But, imagine the entry jewel is too far out, but you checked with a depthing tool and got the exit positioned well, BUT the "neutral" point of the fork now favors one or the other sides of the bankings. Using the checks in this thread you can get things back where they need to be. Or find a Hardinge escapement matching tool for 3 or 4 hundred bucks and use it once every 5 years, haha.1 point
-
1000% agree, also don't touch the movement with bare fingers.1 point
-
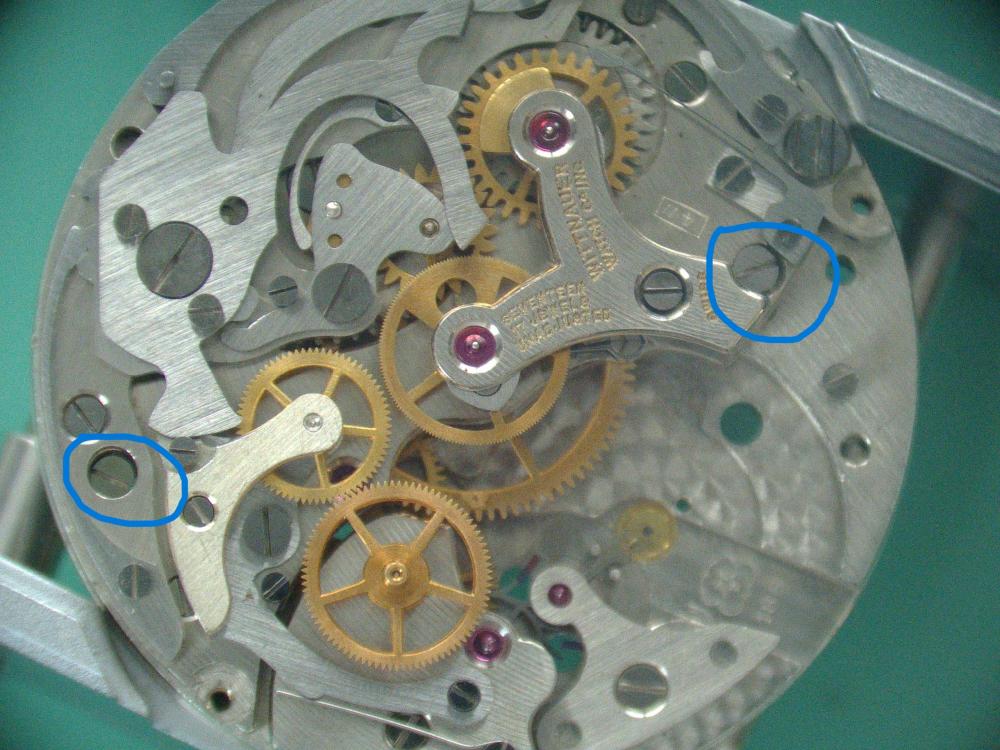
Here is a picture of the two dial screws for the archives. Thanks again for the help. Darren
 1 point
 -
There are dial screw but you can't see the eccentric part of the screw. One I believe is highlighted in the second picture.
 1 point
 -
ADVICE: DO NOT TOUCH THE DIAL WITH BARE FINGERS!!! Now, picture of the movement from the back side needed. The screws that hold the dial will show there1 point
-
We will need a picture of the movement. Quite a lot of movements (especially older ones) have dial feet that are held in place by screws that are accessed on the back of the movement, not on the side. If this is one of those and you try levering it of as though it is a friction fit you will not be happy with the result.1 point
-
Hi Hector, Actually, the depthing tool is not a tool for escapements adjustment. It is an useful tool that You are going to use when someone brings to You a box full of all the wheels and parts from a watch or clock but without plates and asks You to build a watch or clock out of this parts. It will help You to position the wheels between the new plates at the right distance from each other in such manner that they will be geared(?) correctly. Here I offered it’s use as in such movements as OP’s it is not possible to observe and operate the escapement from above, but only from aside, and this makes work with the escapement much inconvenient. I didn’t say impossible without it, and using of the tool is not unavoidable. It just would make life easier. In modern style movements, where lever has separate bridge and everything is seen from above, such toll is not needed for escapement adjustment. Further more, the method I offered is apliable only if one of the pallets in it's correct place, as the metthod uses the position of this pallet as reference for the other pallet positioning. If initial position of the first pallet is wrong, the method will be still apliable, but then corrections of the both pallets will be needed in a manner that one of them will go in antd the other out in order to make the lever's tail decline symetrically as much to one side as to the other. I would advice to open the banking pins when adjusting pallets positions and when adjustment is done, to correct the pins position as to ensure the needed minimal clearences and that movements 'run to the banking' are greater than zero.1 point
-
If I'm checking a watch escapement, I would normally check the horn clearance and make sure there is safe lock. Then guard pin clearance which should be smaller. Then drop lock, which should lock, then total lock (banked). If there is excessive total lock, but the run to the banking is large, then drop lock is (generally) small, but run to the banking large, so I close the bankings. If there is excessive total lock, and drop lock is large, run to the banking minimal, I would move the stone(s) as long as there is enough safety with the horn clearance. At a certain point you may find that you still have excessive drop lock but can't move the stones in any further as horn clearance is too large. This is either a design or manufacturing defect, or someone filed the horns at some point. Bottom line is drop lock is independent of the banking pins, and can be observed using a depthing tool- which while useful when making a fork is also useful when working on full plate watches. Once you have decent drop lock, horn and guard pin clearance can be (painfully) checked in the watch, and eccentric bankings can be closed so that they can be opened to "bank to drop" (this is found in older texts, opening the banking until drop lock occurs), then open a tiny bit more to permit slide and total lock. Even with the lovely Hardinge tool which effectively converts a mainplate into a 3-way depthing tool, setting drop lock is a pain on full plate watches with the fork and balance on the full upper bridge. And drop lock really is the base.1 point
-
Kalle has an excellent set of videos on closing watch holes. I was successful on my first try thanks to his descriptions. @Neverenoughwatches is correct though, you actually close the hole more than you need to, then broach it open to the right size. The stake has to be just big enough to pinch some of the metal closest to the hole, so the domed stake should only be slightly larger than the hole, and when you have it set up, you should be able to rotate it freely. (Vid will show this)1 point
-
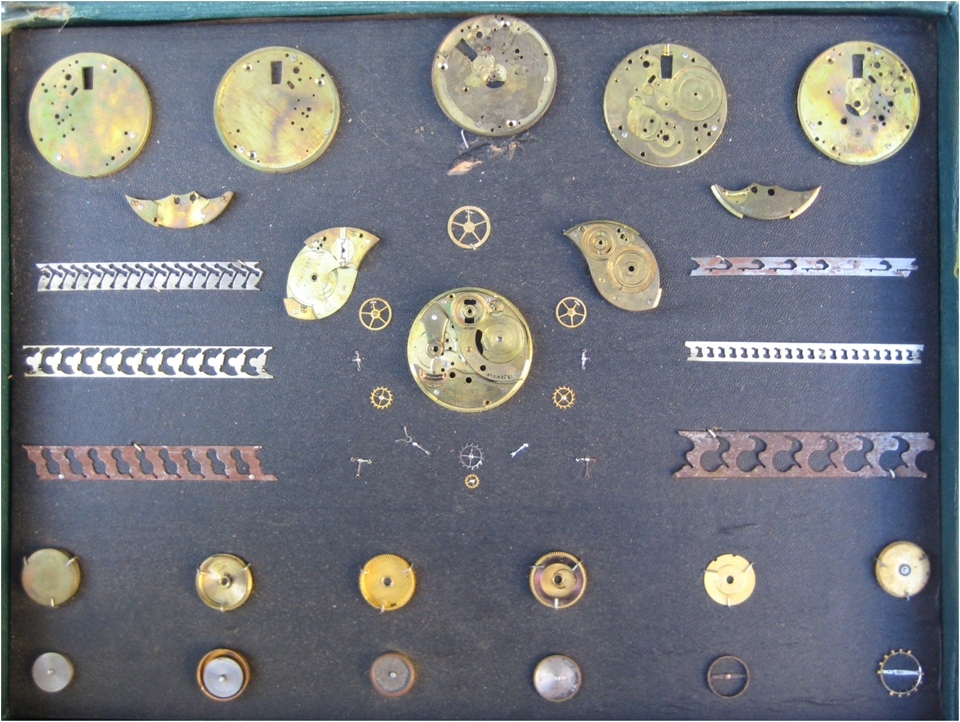
which interesting is yours are nicely framed and it appears to be one specific watch. Somewhere I've seen this before I think somebody on this group may have posted a picture previously. than the Elgin watch company had something sort of similar. Not nicely framed but in cardboard boxes which have the problem of basically the effect of time and water. Then not so much one watch but more of components used to make a watch more like showing how the watch parts are made where they come from etc. the steps of making the watch. Then if you read the text indicates is for an 18 size watch but the reality is both of these are 12 size watches. found on the inside lid is this label the interesting aspect is they're not exactly the same.
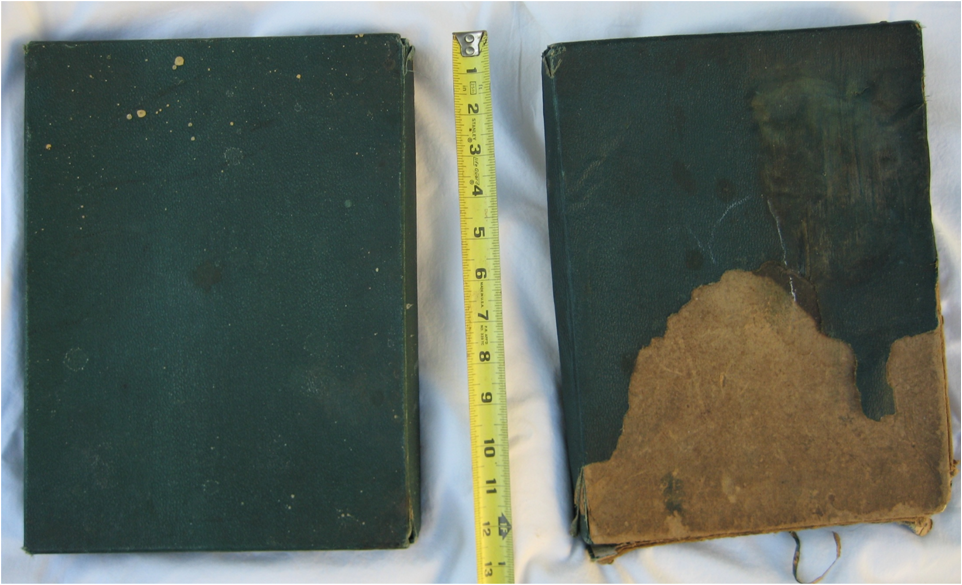
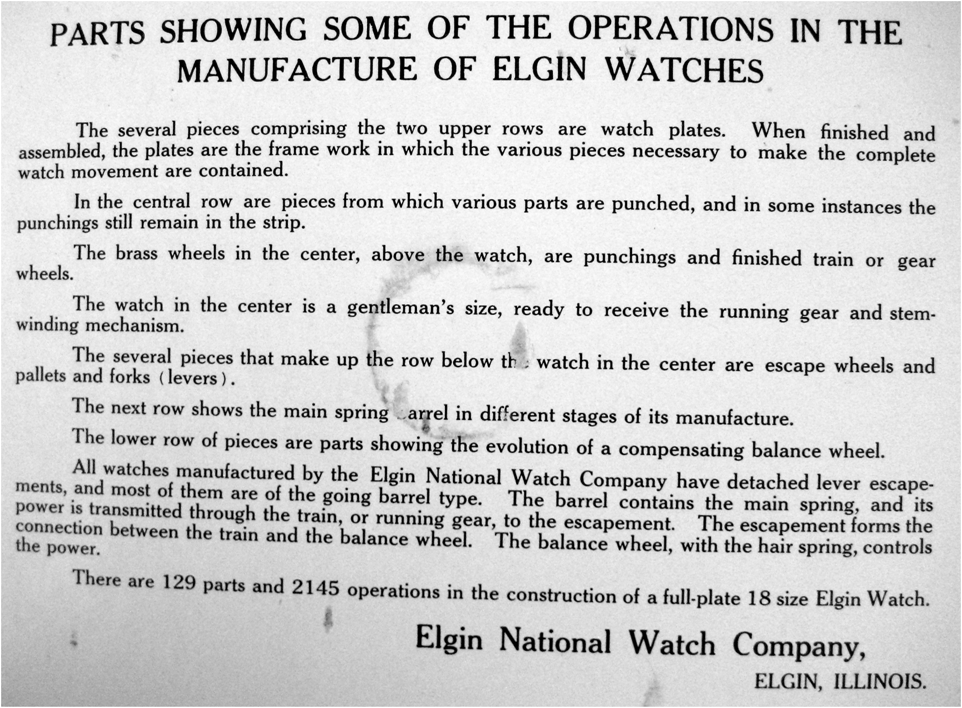
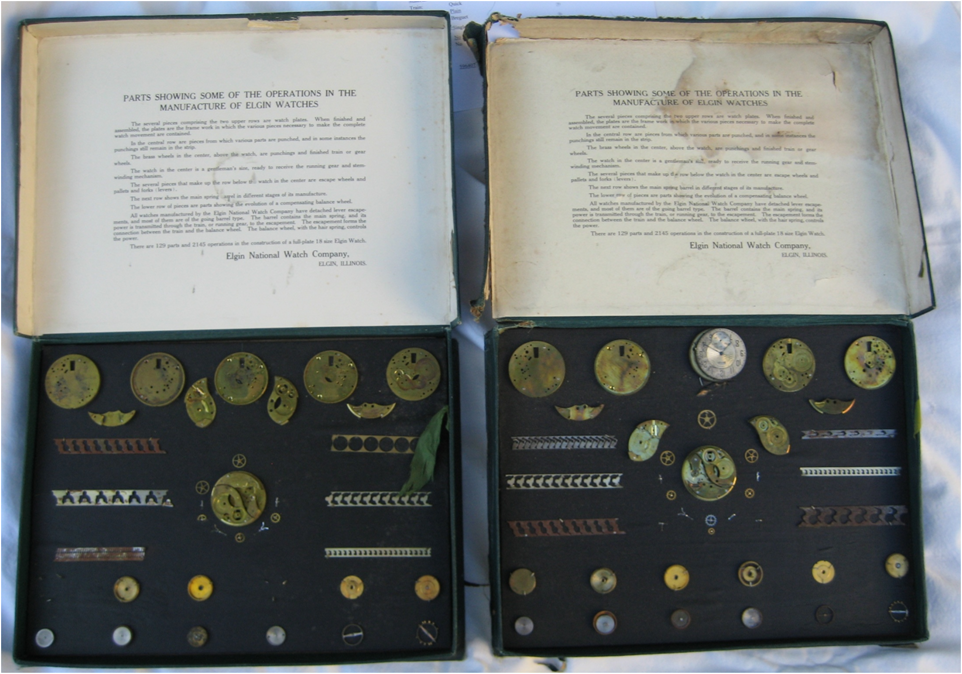
 1 point
 -
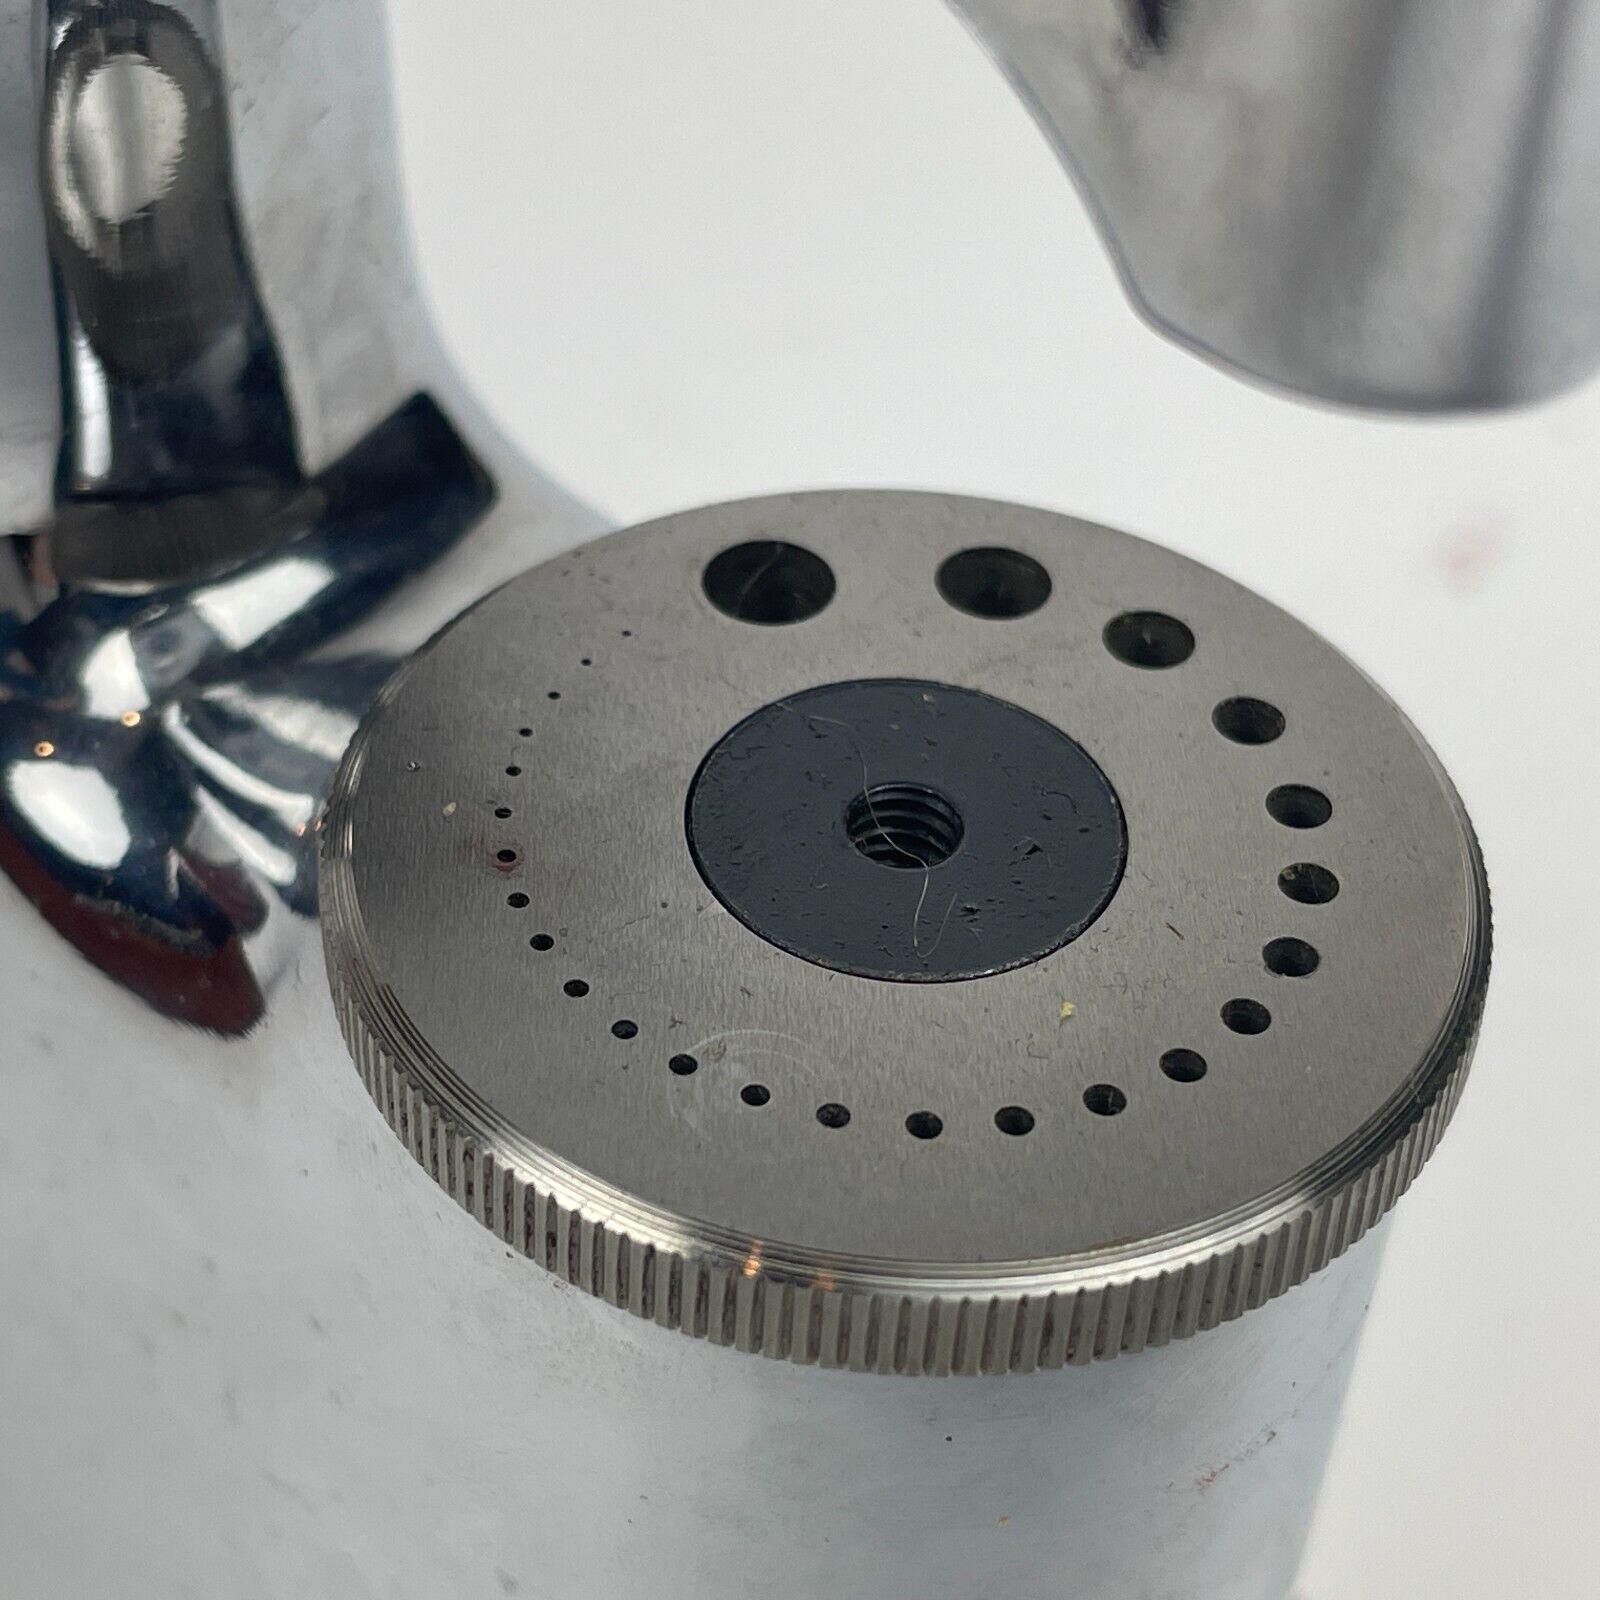
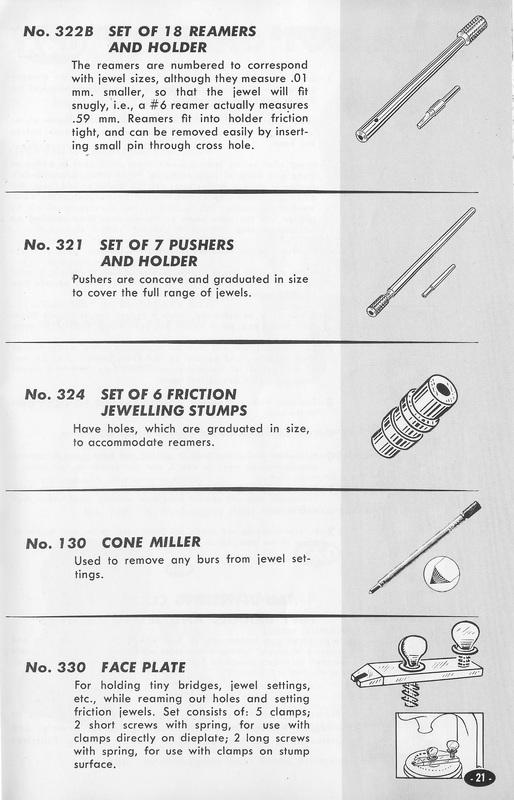
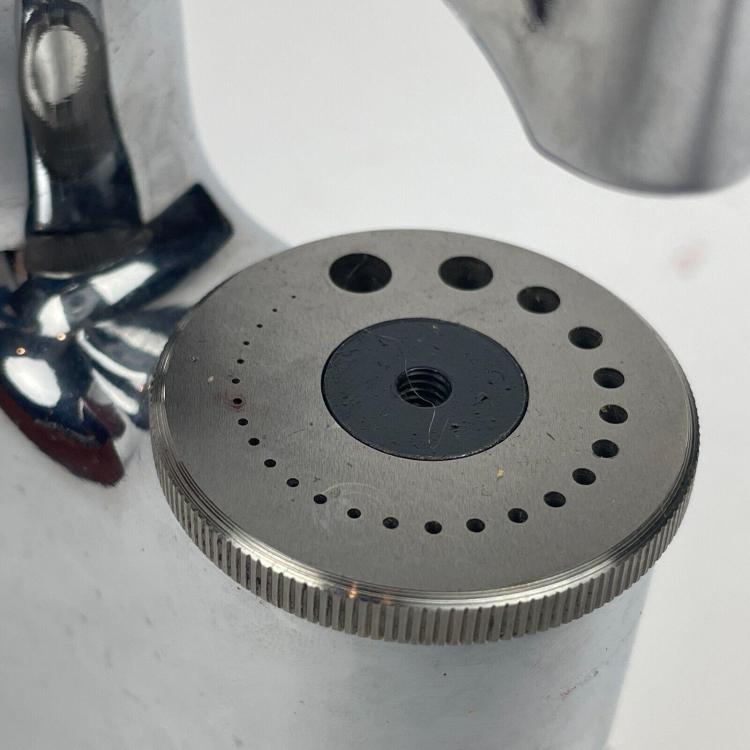
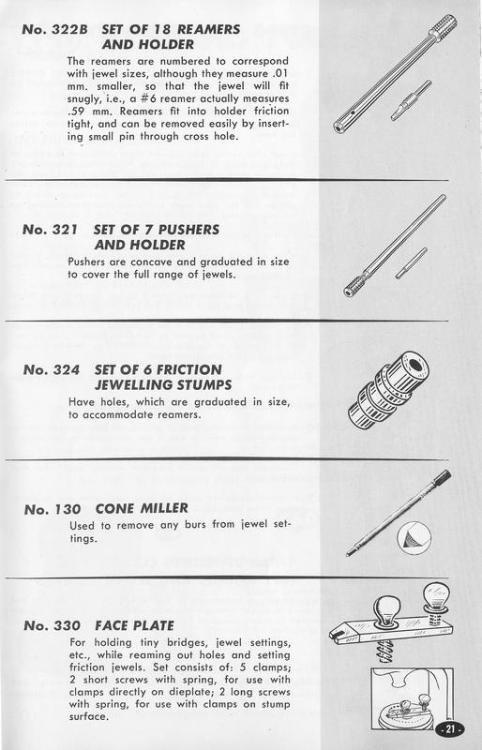
I finally figured out what the central threaded hole was for. It is for use with the No. 330 accessory to clamp things down to the anvil.
 1 point
 -
Thats Safe Zone not War Zone people1 point
-
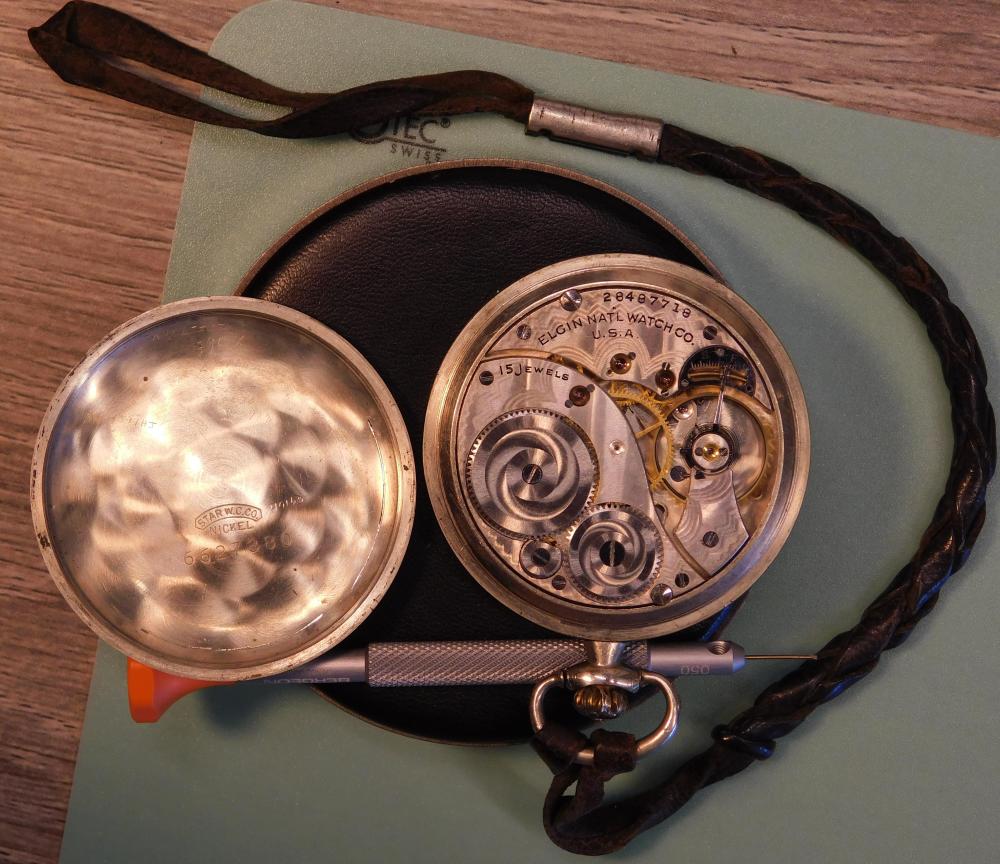
I picked up this Elgin pocket watch today for $12 US at an antiques fair. It wasn't running and the sub seconds hand was floating around under the crystal. I think I scored. Everything is there except for 2 small screws, one on the rate adjustment bracket and 1 on the bridge holding a jewel on the 3rd wheel (I think). Anyway, spent about 20 minutes taking apart and pegging some old grease off. Finally got it to where I could put a wind in it and got it going. I count 9 watchmakers marks and the serial numbers dates to 1925. Not sure why I picked Anthony7s thread to post this one but saw the title and thought it was a more general thread and seemed appropriate at the time, so to speak.

 1 point
 -
That's considered very good. You could probably loosen the screws of the posts and try getting it better. Have a look at mine in its original state.
 1 point
 -
11 USD AliExpress copy of the original 60 GBP Bergeon hairspring holder tool Glass and Aluminum And a balance holding tool similar to the plastic Bergeon one but in brass with a lower platform for the cock for ease of handling. That would be great. I have one of these and the top and bottom are not parallel
 1 point
 -
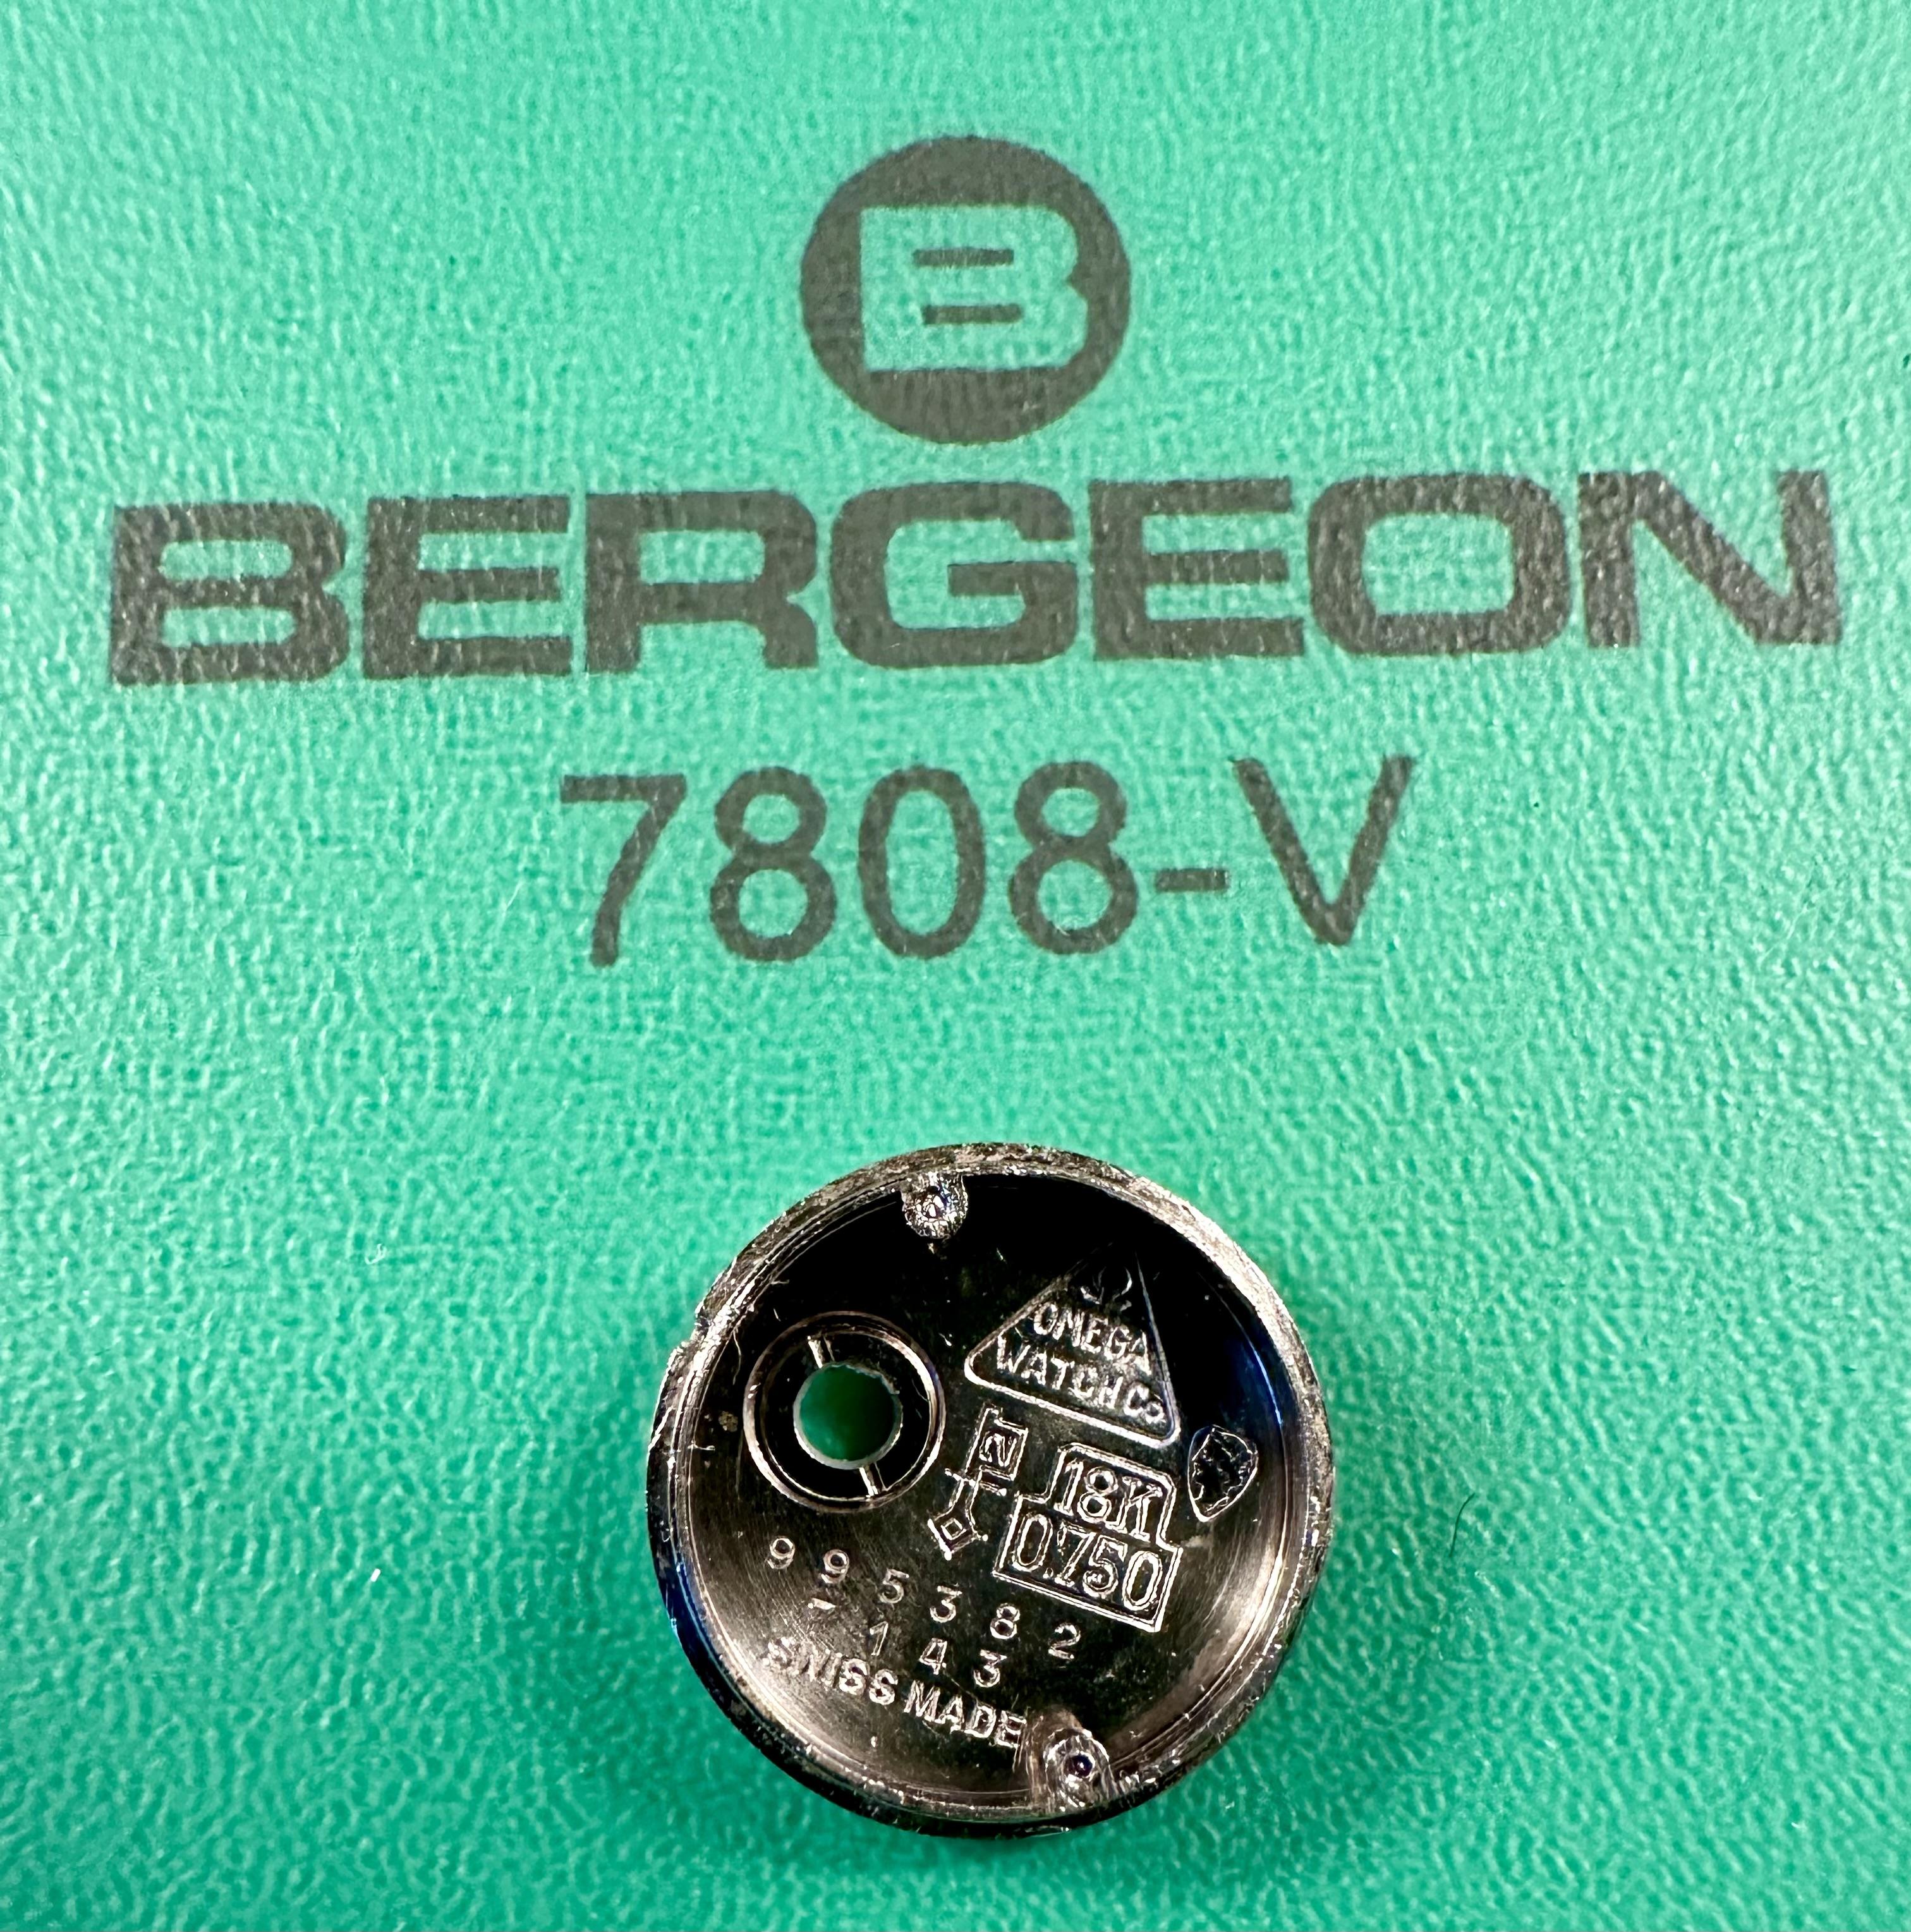
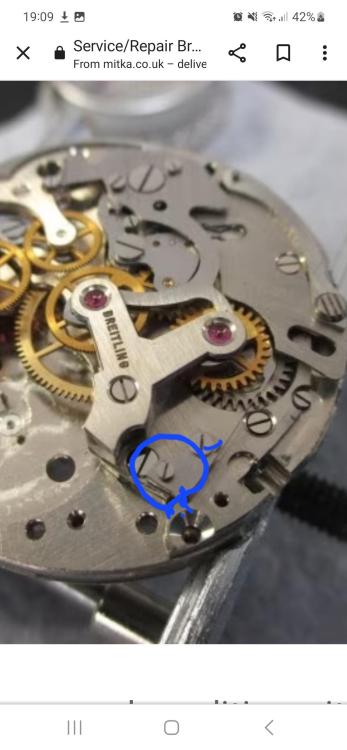
Yes, short of some kind of outer space vacuum cold welding these case screws were bonded in. The next service the screw heads were sheared off…the next service it’s up to me
 0 points