Leaderboard


Popular Content
Showing content with the highest reputation on 01/13/24 in all areas
-
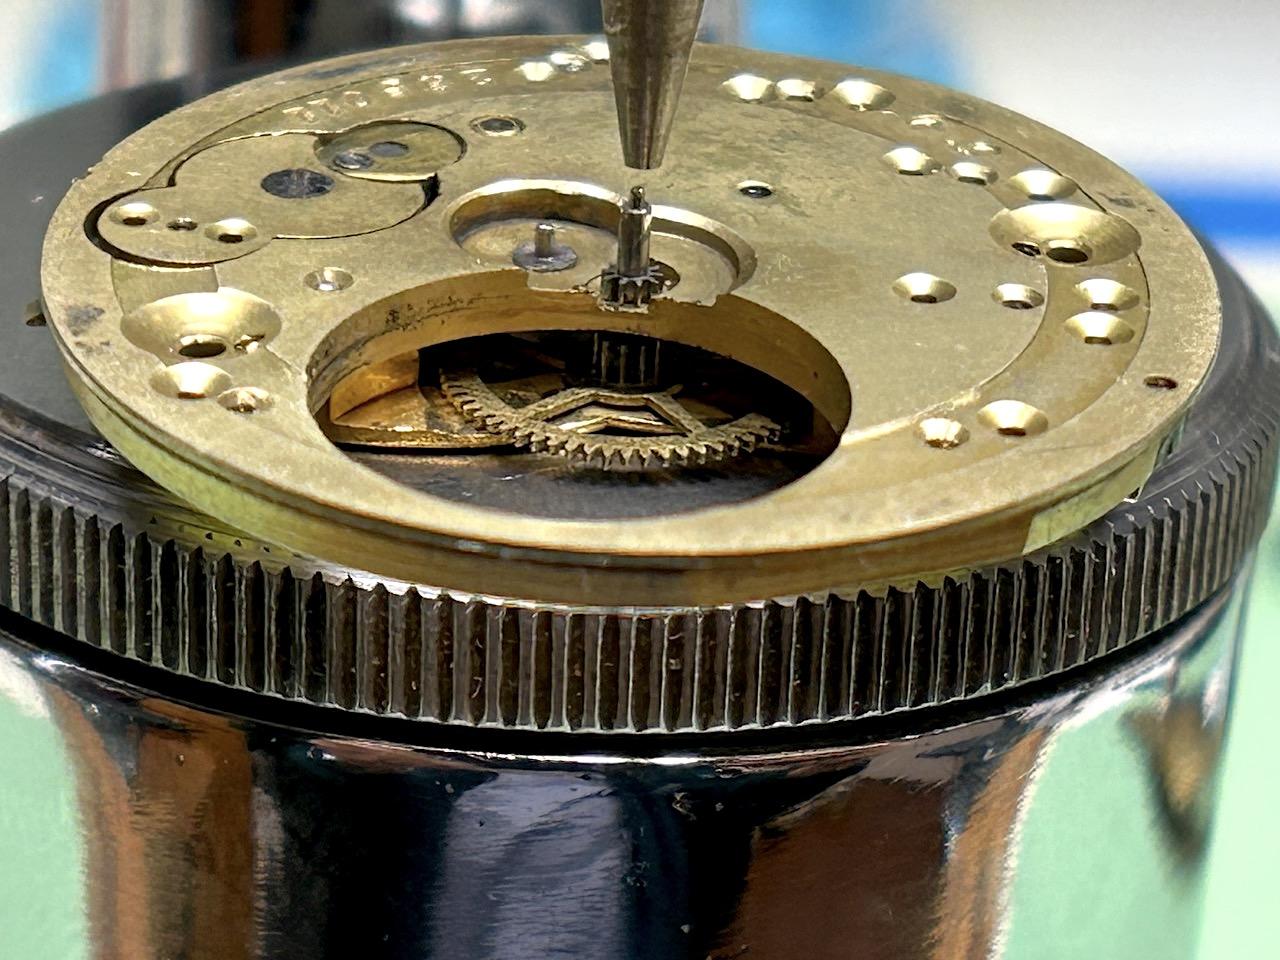
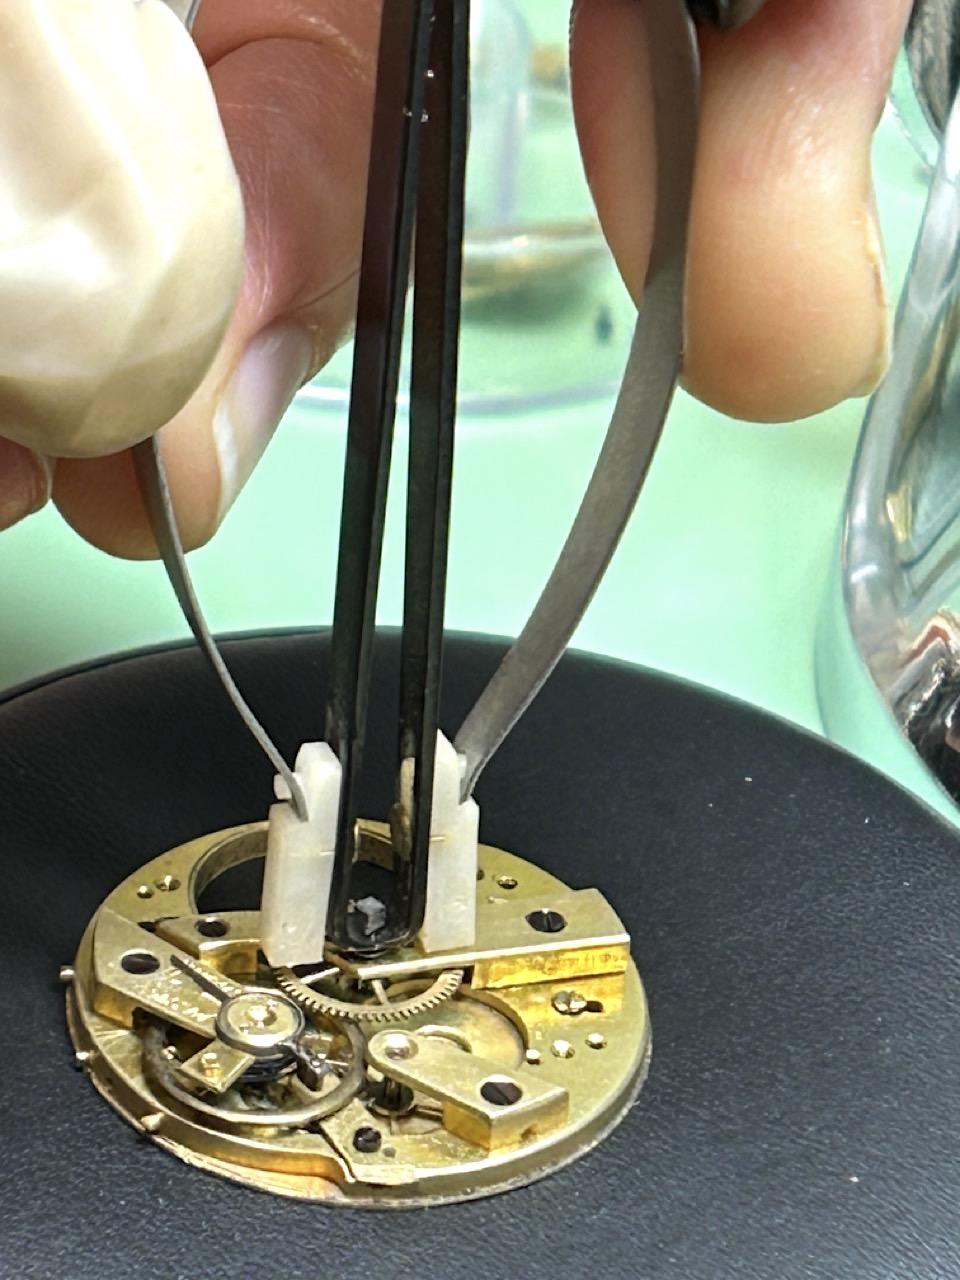
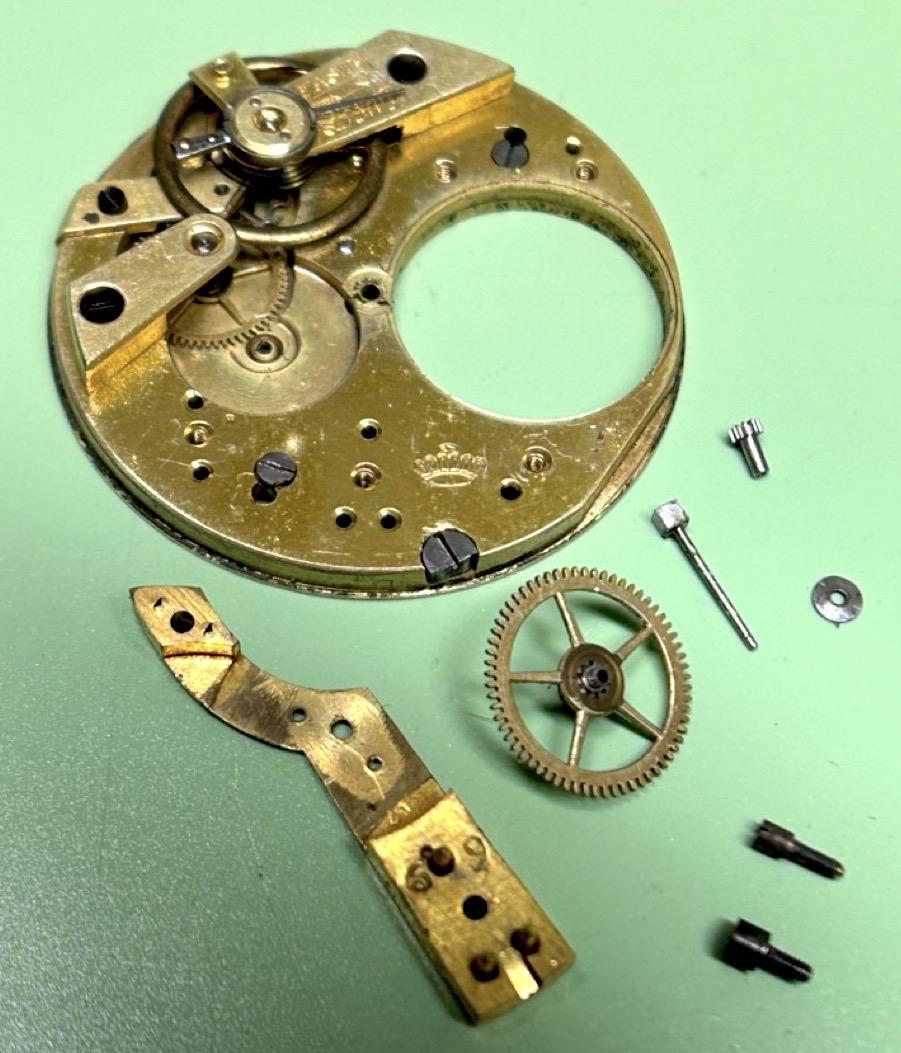
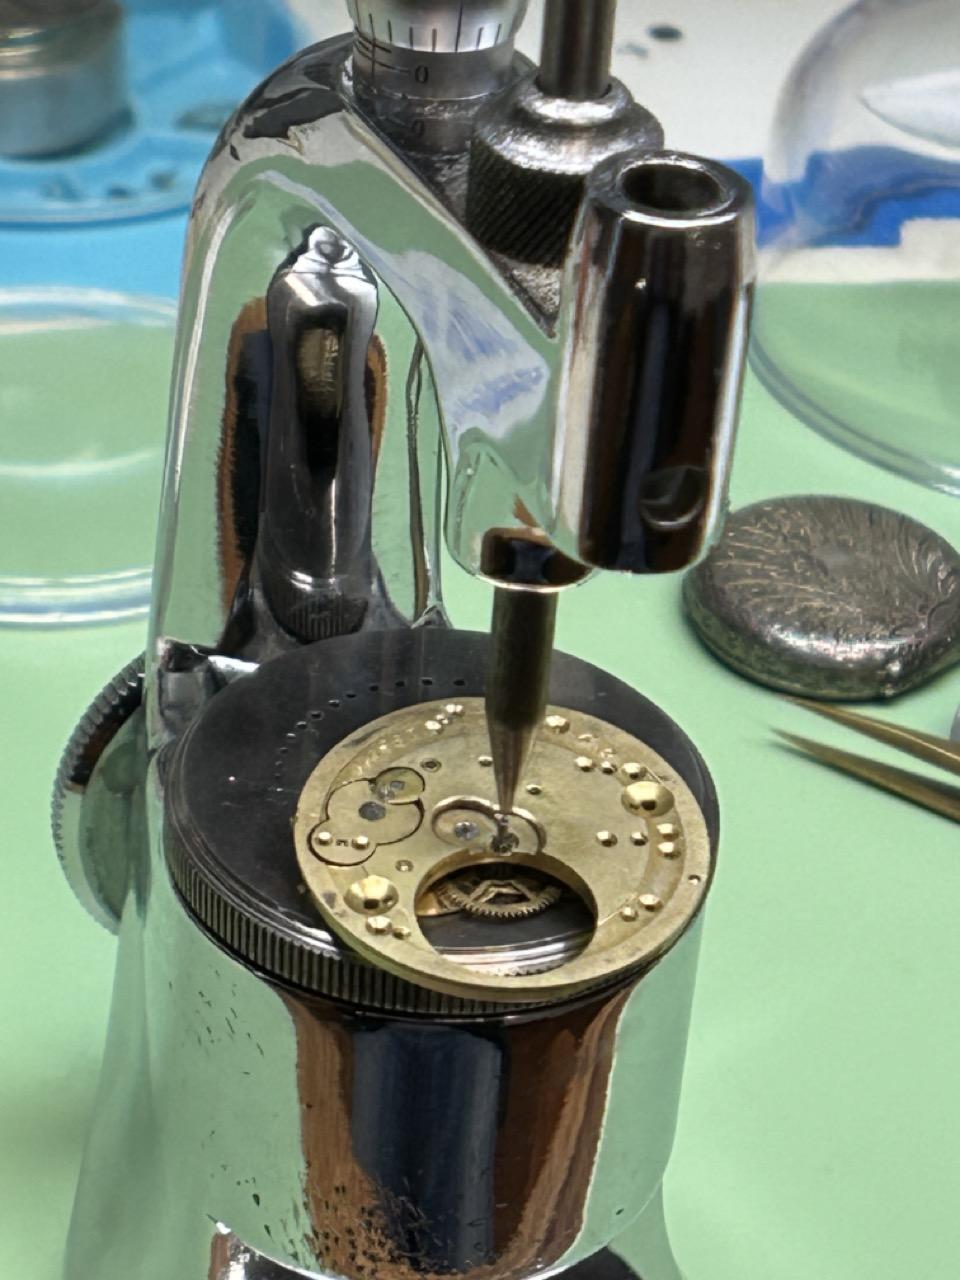
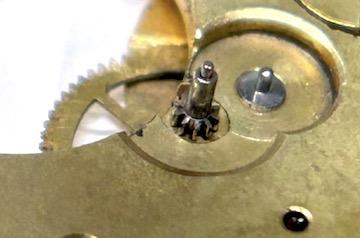
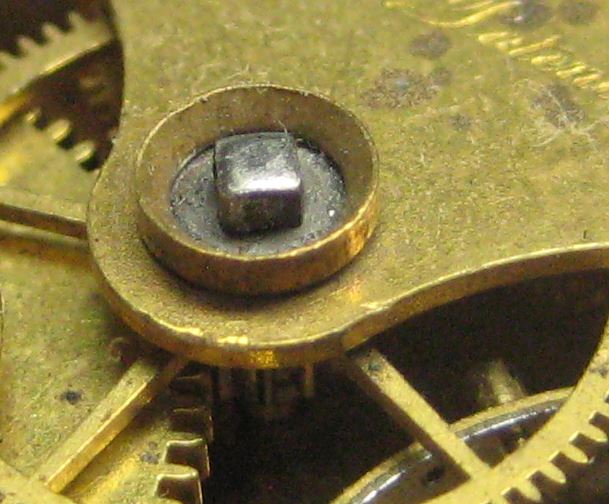
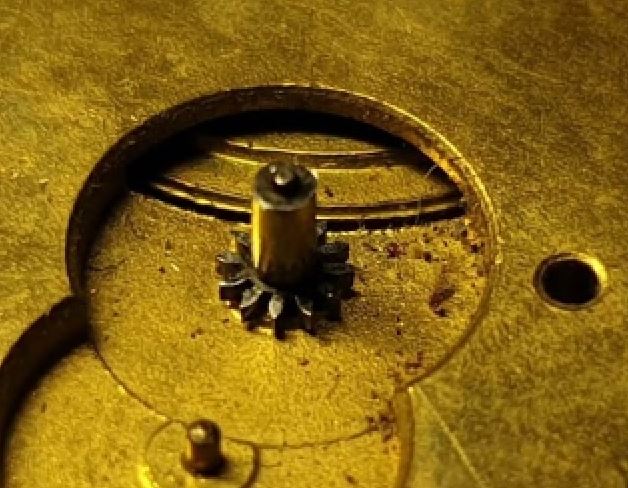
Thanks for the advice provided on this topic! I was faced with a similar question and was able to resolve it quickly once I understood the canon pinion is attached to a pin that goes through the movent to the top of the center wheel bridge. I used a staking tool to tap the end that pokes out of the canon pinion, then flipped the movement over and was able to grap the pin head using a canon pinion remover to finish the job on it now that it was pushed out a bit. Not enough gap to get a lever under this (it is a thin washer under the arbor head) Smooth canon pinion top, can't grab with a canon pinion remover. A couple gentle taps on the end of the arbor, pushes it away from the center bridge on the other side. The arbor end was protruding enough now that I could get the canon pinion remover under it to finish removing it.


 5 points
 -
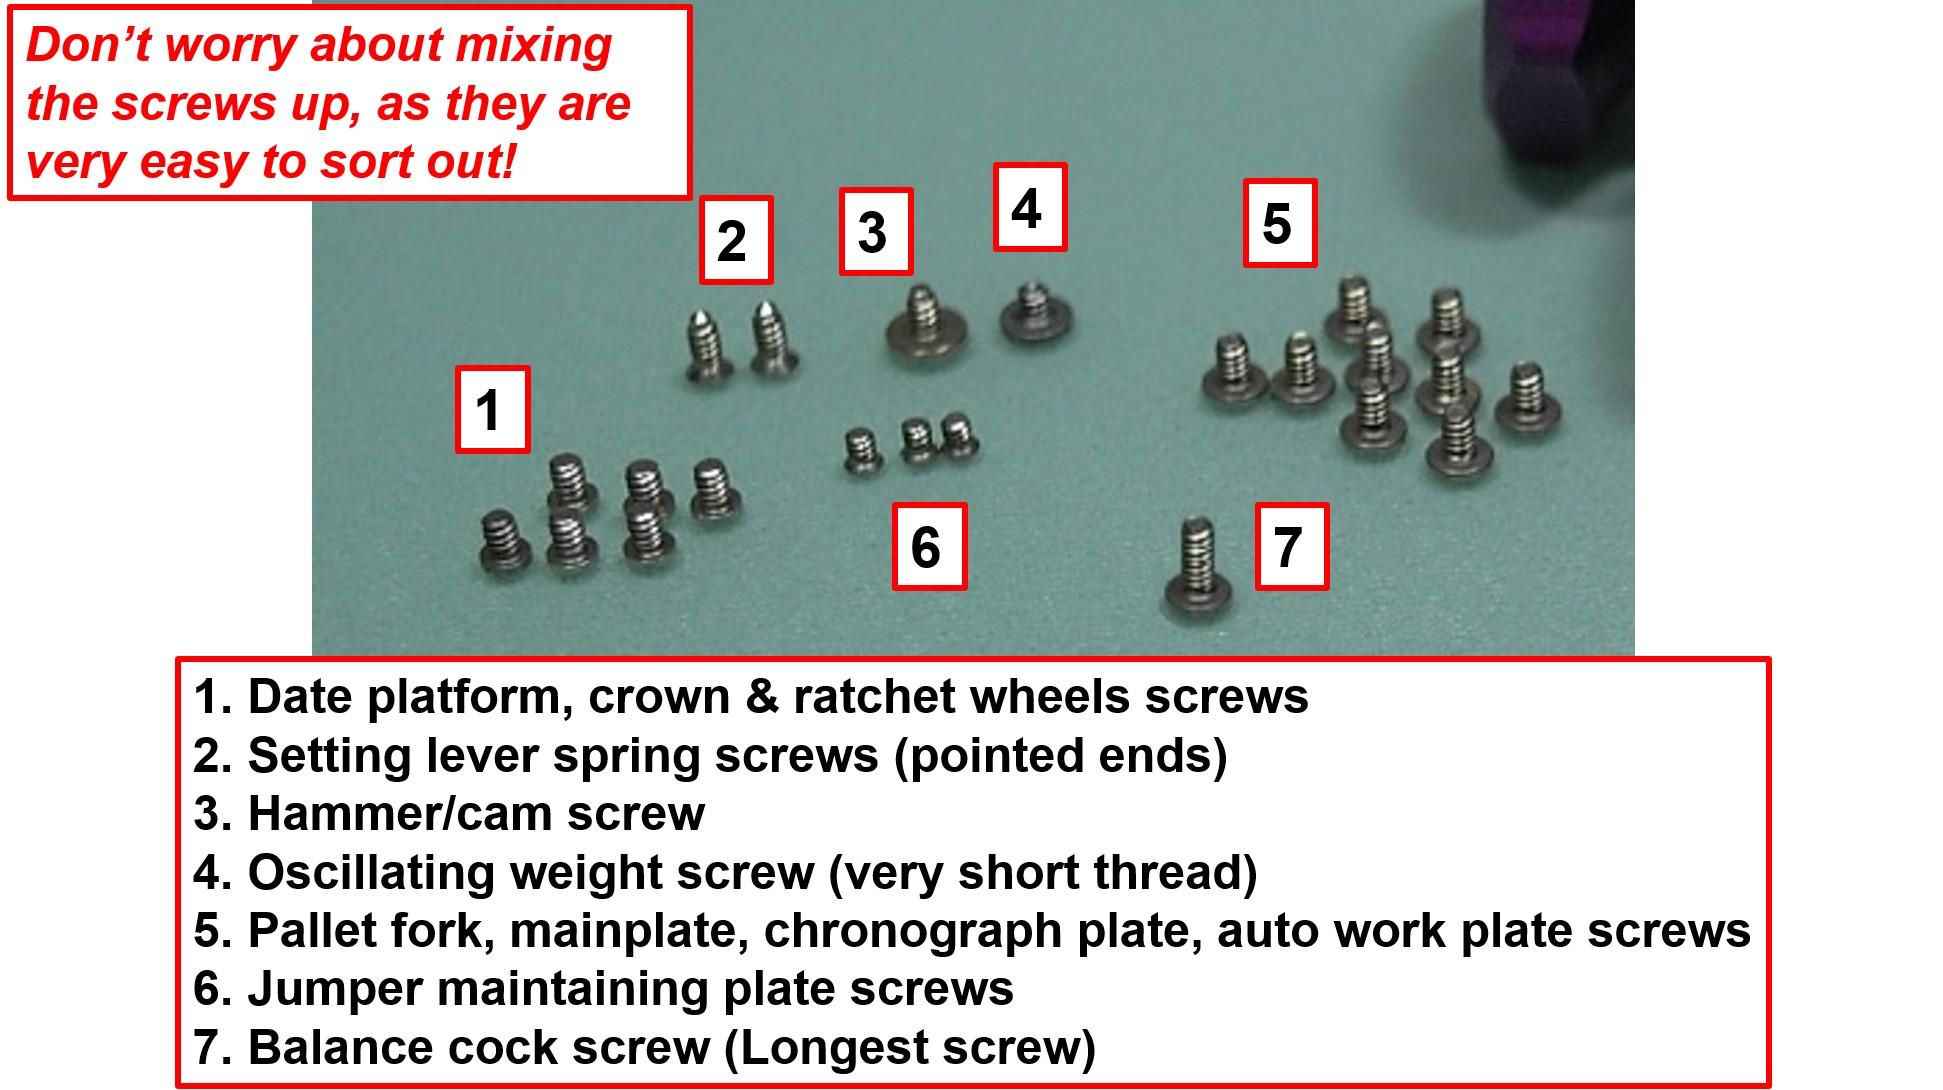
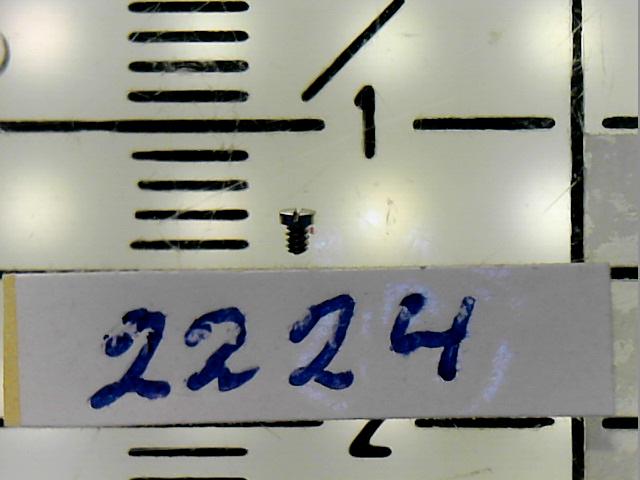
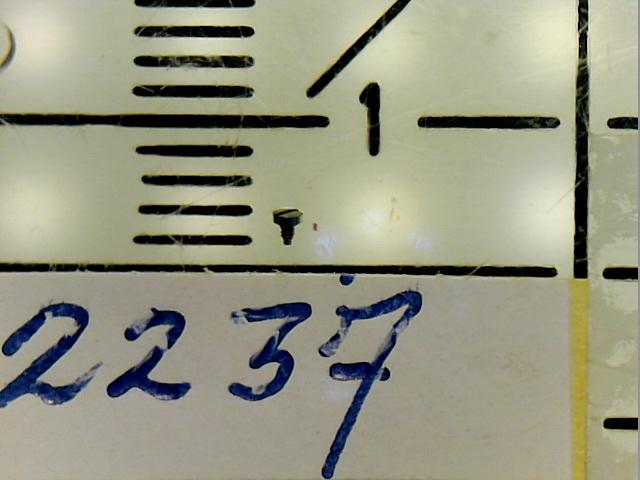
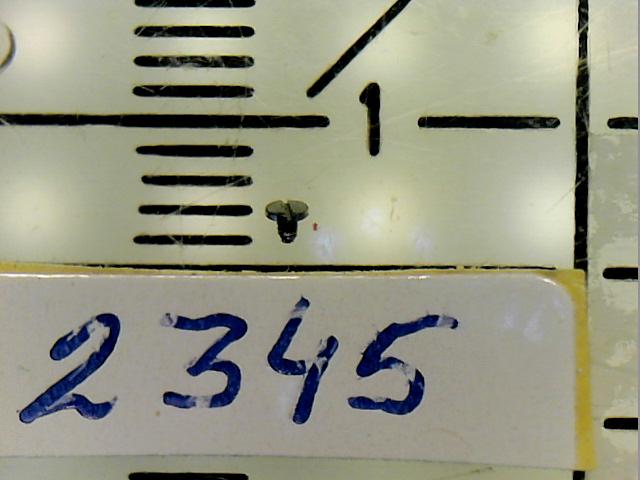
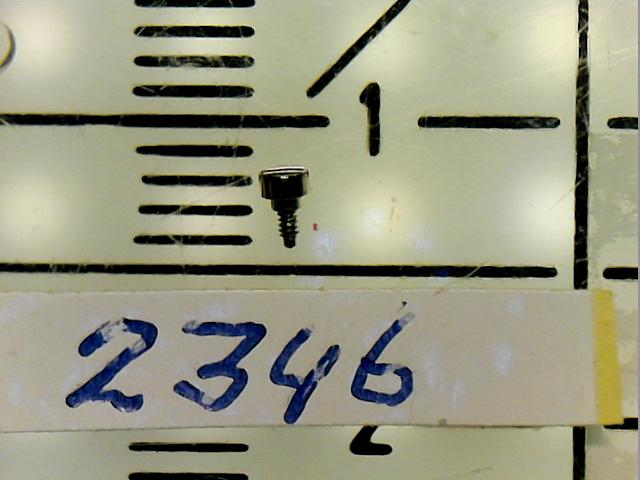
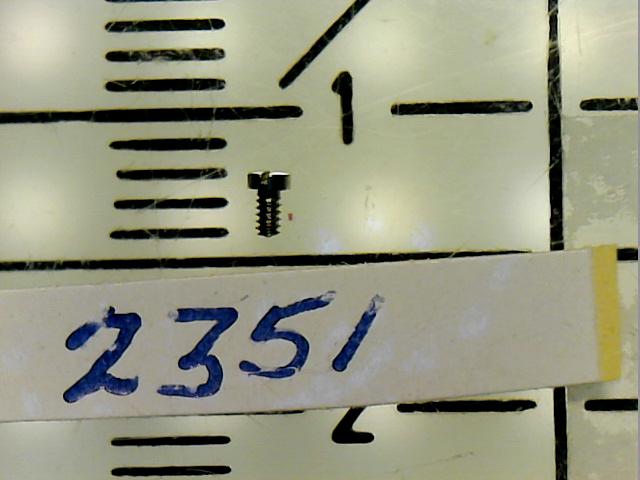
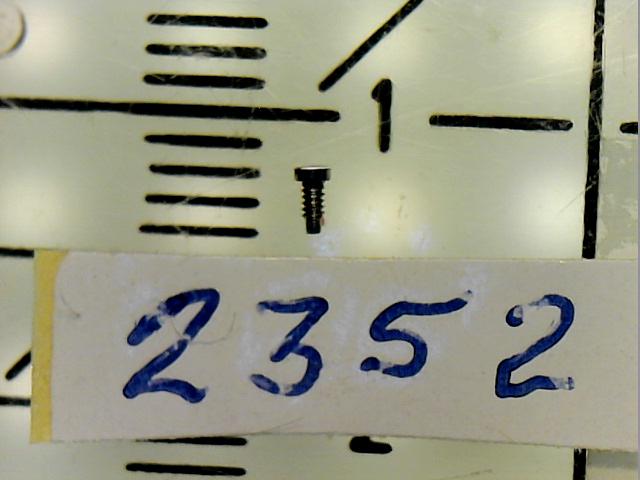
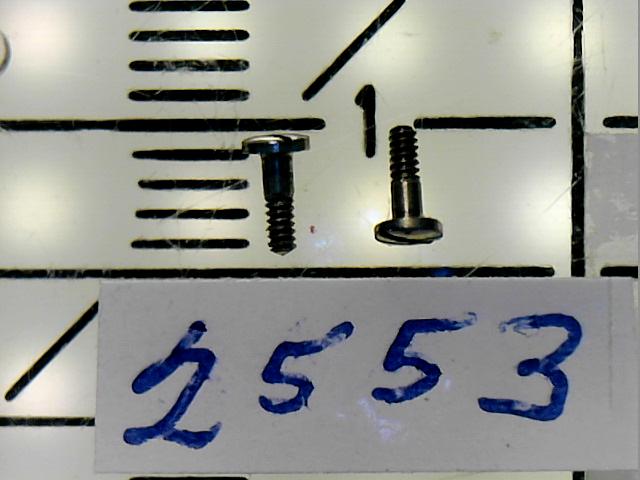
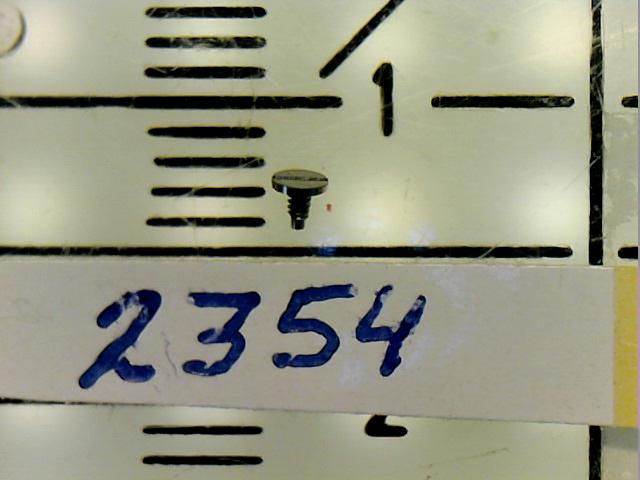
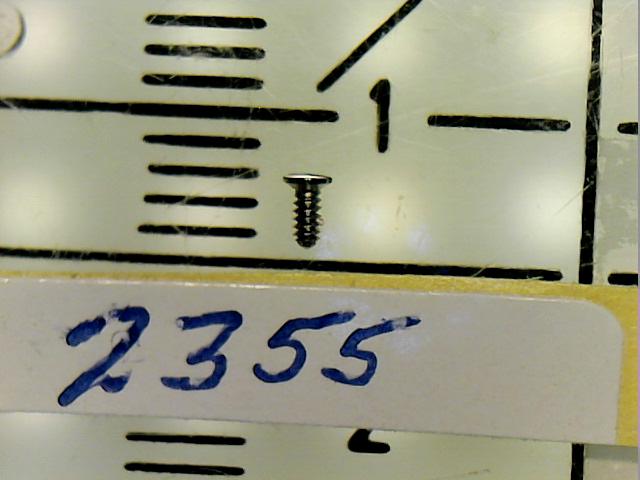
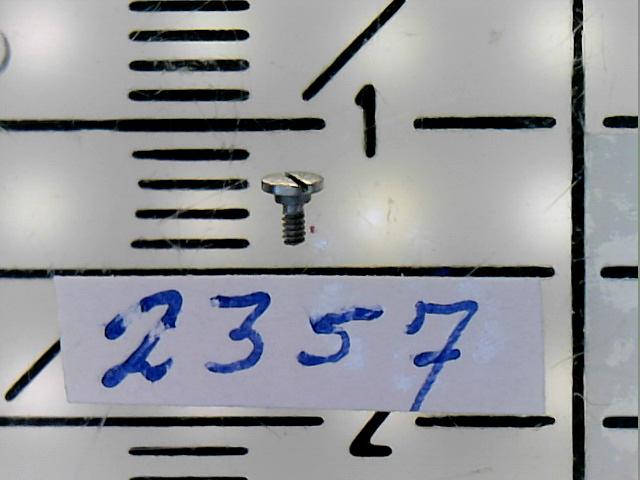
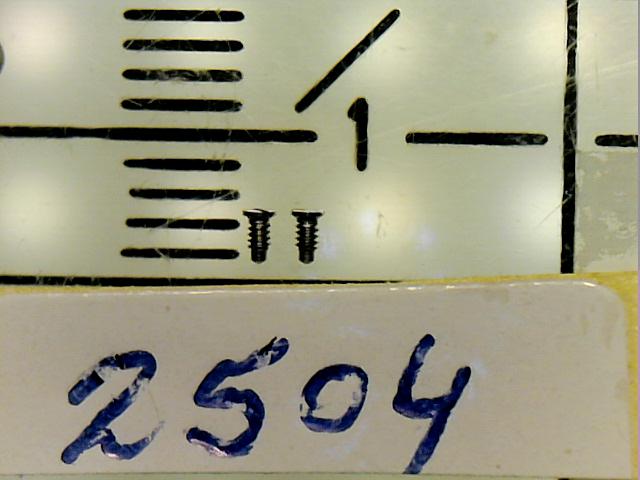
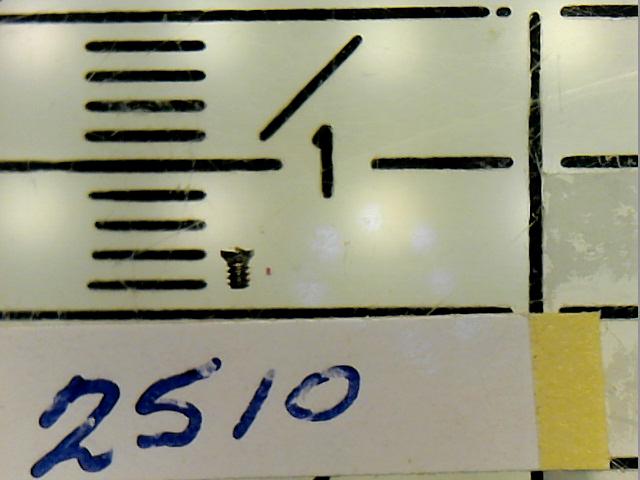
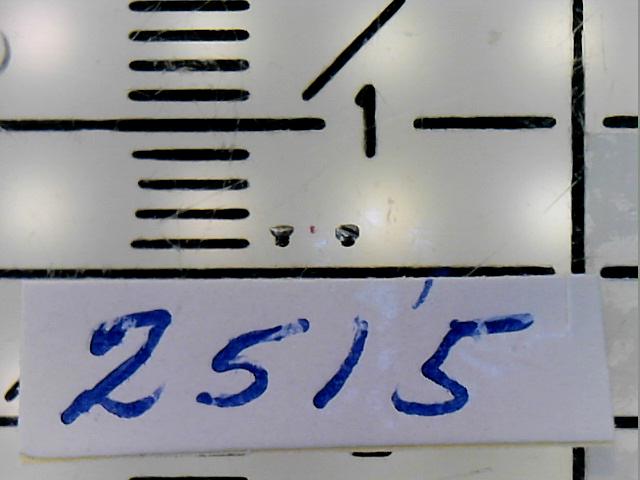
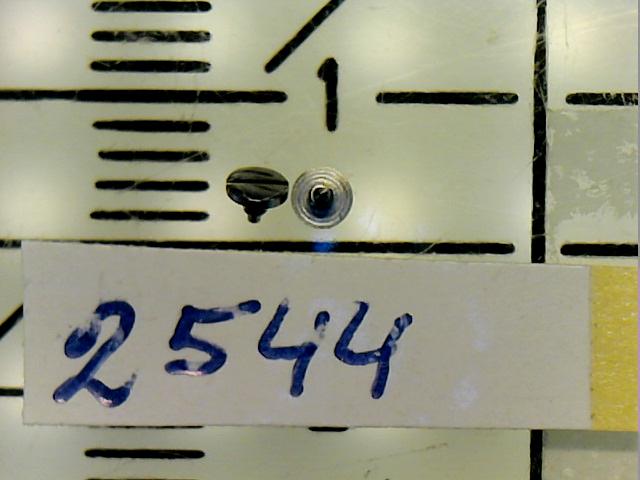
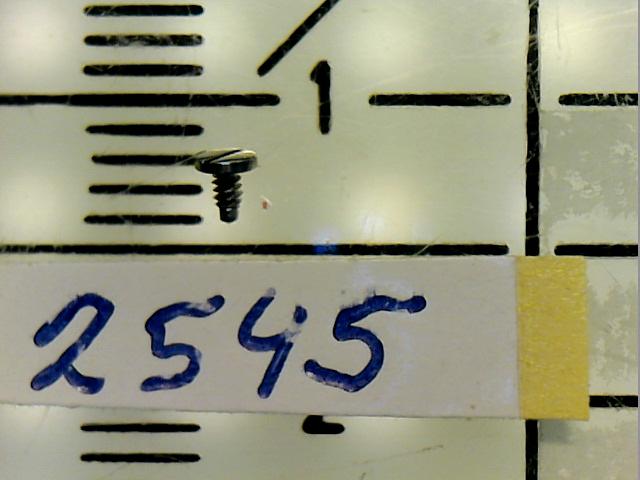
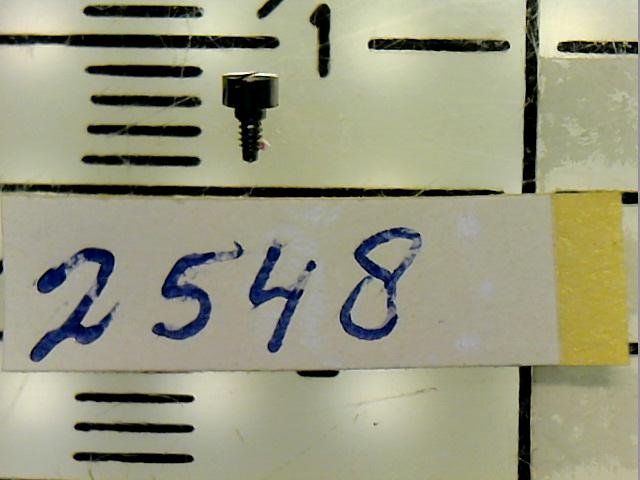
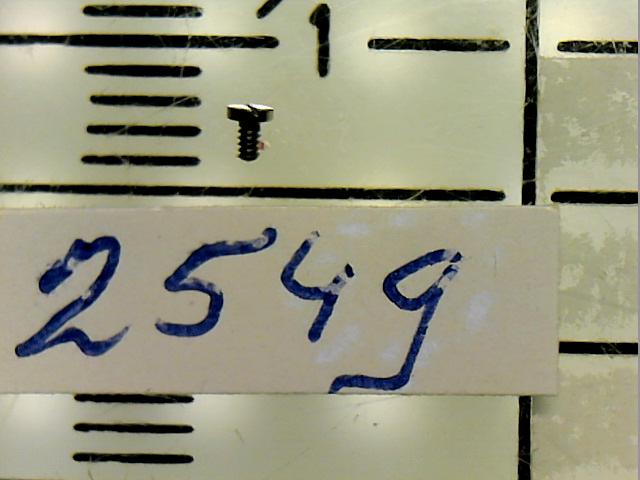
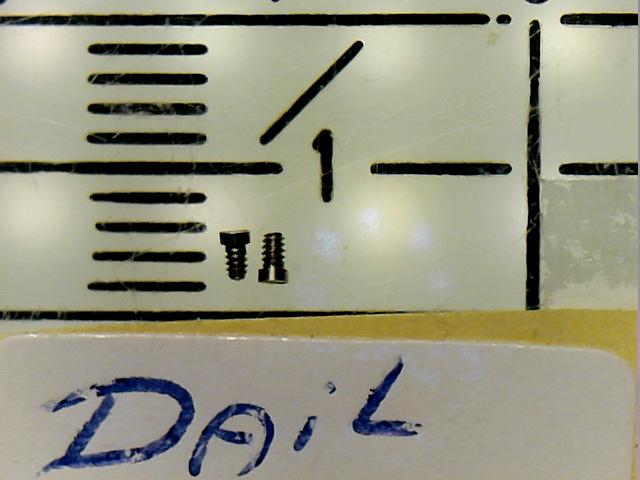
This in addition to my earlier 2017 walk-through of the same 861; The Omega 861 movement has no less than 18x different types of screws, some easy to recognize, some less so. Working on the same movement again, I've done an attempt to catalogue the different types of screws. It may not be perfect, but I do hope it's a help. The screw part numbers are as per the Omega 861 service manual (given already in the walk-through) 2033, 6x 2224, 1x 2237, 1x 2345, 1x 2346, 1x 2351, 4x 2352, 1x 2353, 2x 2354, 1x 2355, 1x 2357, 1x 2504, 2x 2510, 1x 2515, 2x 2544, 6x 2545, 1x 2548, 1x 2549, 1x Dial screws, 2x

 4 points
 -
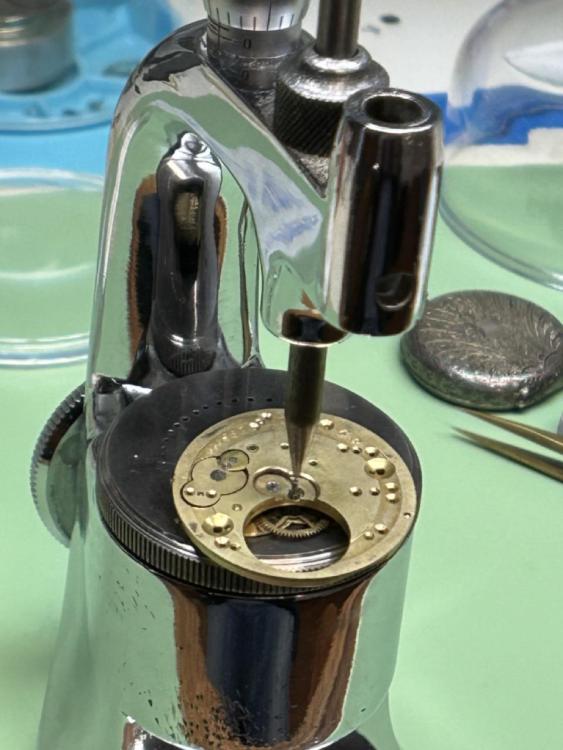
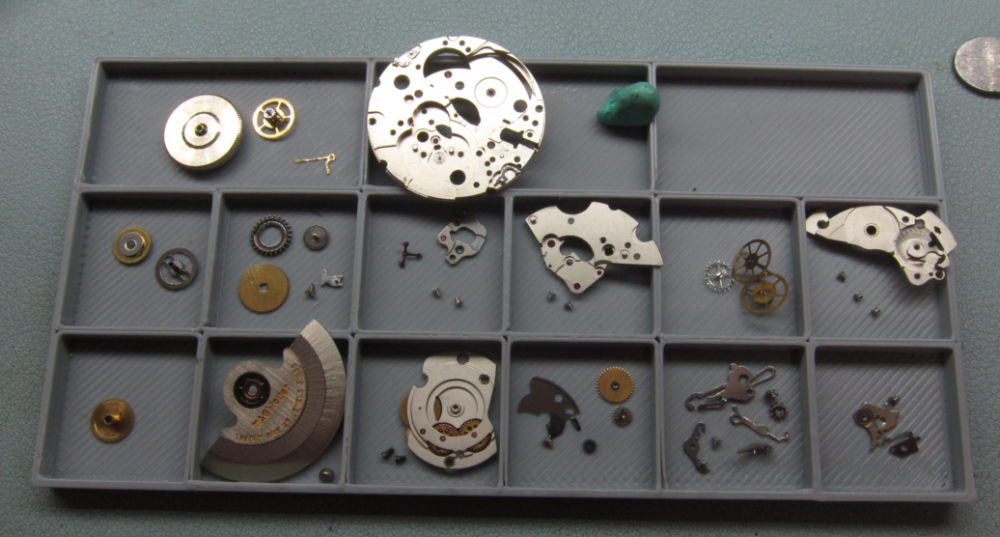
If I'm unfamiliar with a particular movement I will do as others have suggested and take photos of those screws with their respective parts. I always clean screws through the cleaning machine, as this gives the screws and the holes in the bridges and main-plate a really good clean as well. It also makes sure any brass fillings and crud are removed in the process. You can save some time sorting the screws out by putting all the keyless work smaller parts in a mini basket together with the screws. All the bridge screws go together in another mini basket and maybe the pallet bridge screws in with them, as they will be very different to bridge screws. barrel bridge furniture and screws are all kept together (crown, ratchet and click screws) They are all different lengths. The crown screw will always be shorter than the ratchet screw, as well as being a left-hand thread, and generally, but not always the click will be the smallest. I use four or five mini baskets and keep the screws in one of the baskets with the respective parts where the screws are from, so it isn't a crap shoot when removing them. Even working on a Rolex automatic this method works very well. Working on a 7750 is even easier, as the screws are so different and most are the same type as I have shown in this slide from one of my lessons. With the 7750 all the screws can go in just one basket. Once this discipline has been done several times, it becomes quite natural to know what goes where. You may get the odd one out of place, but not often. Cleaning the screws and the bridges and main-plate and bridges is important for the reason I have already stated, although some may not think so. Watchmaking teaching discipline, rather than the easier softer option, but that only comes with practice, knowledge, and then wisdom from the previous two.
 4 points
 -
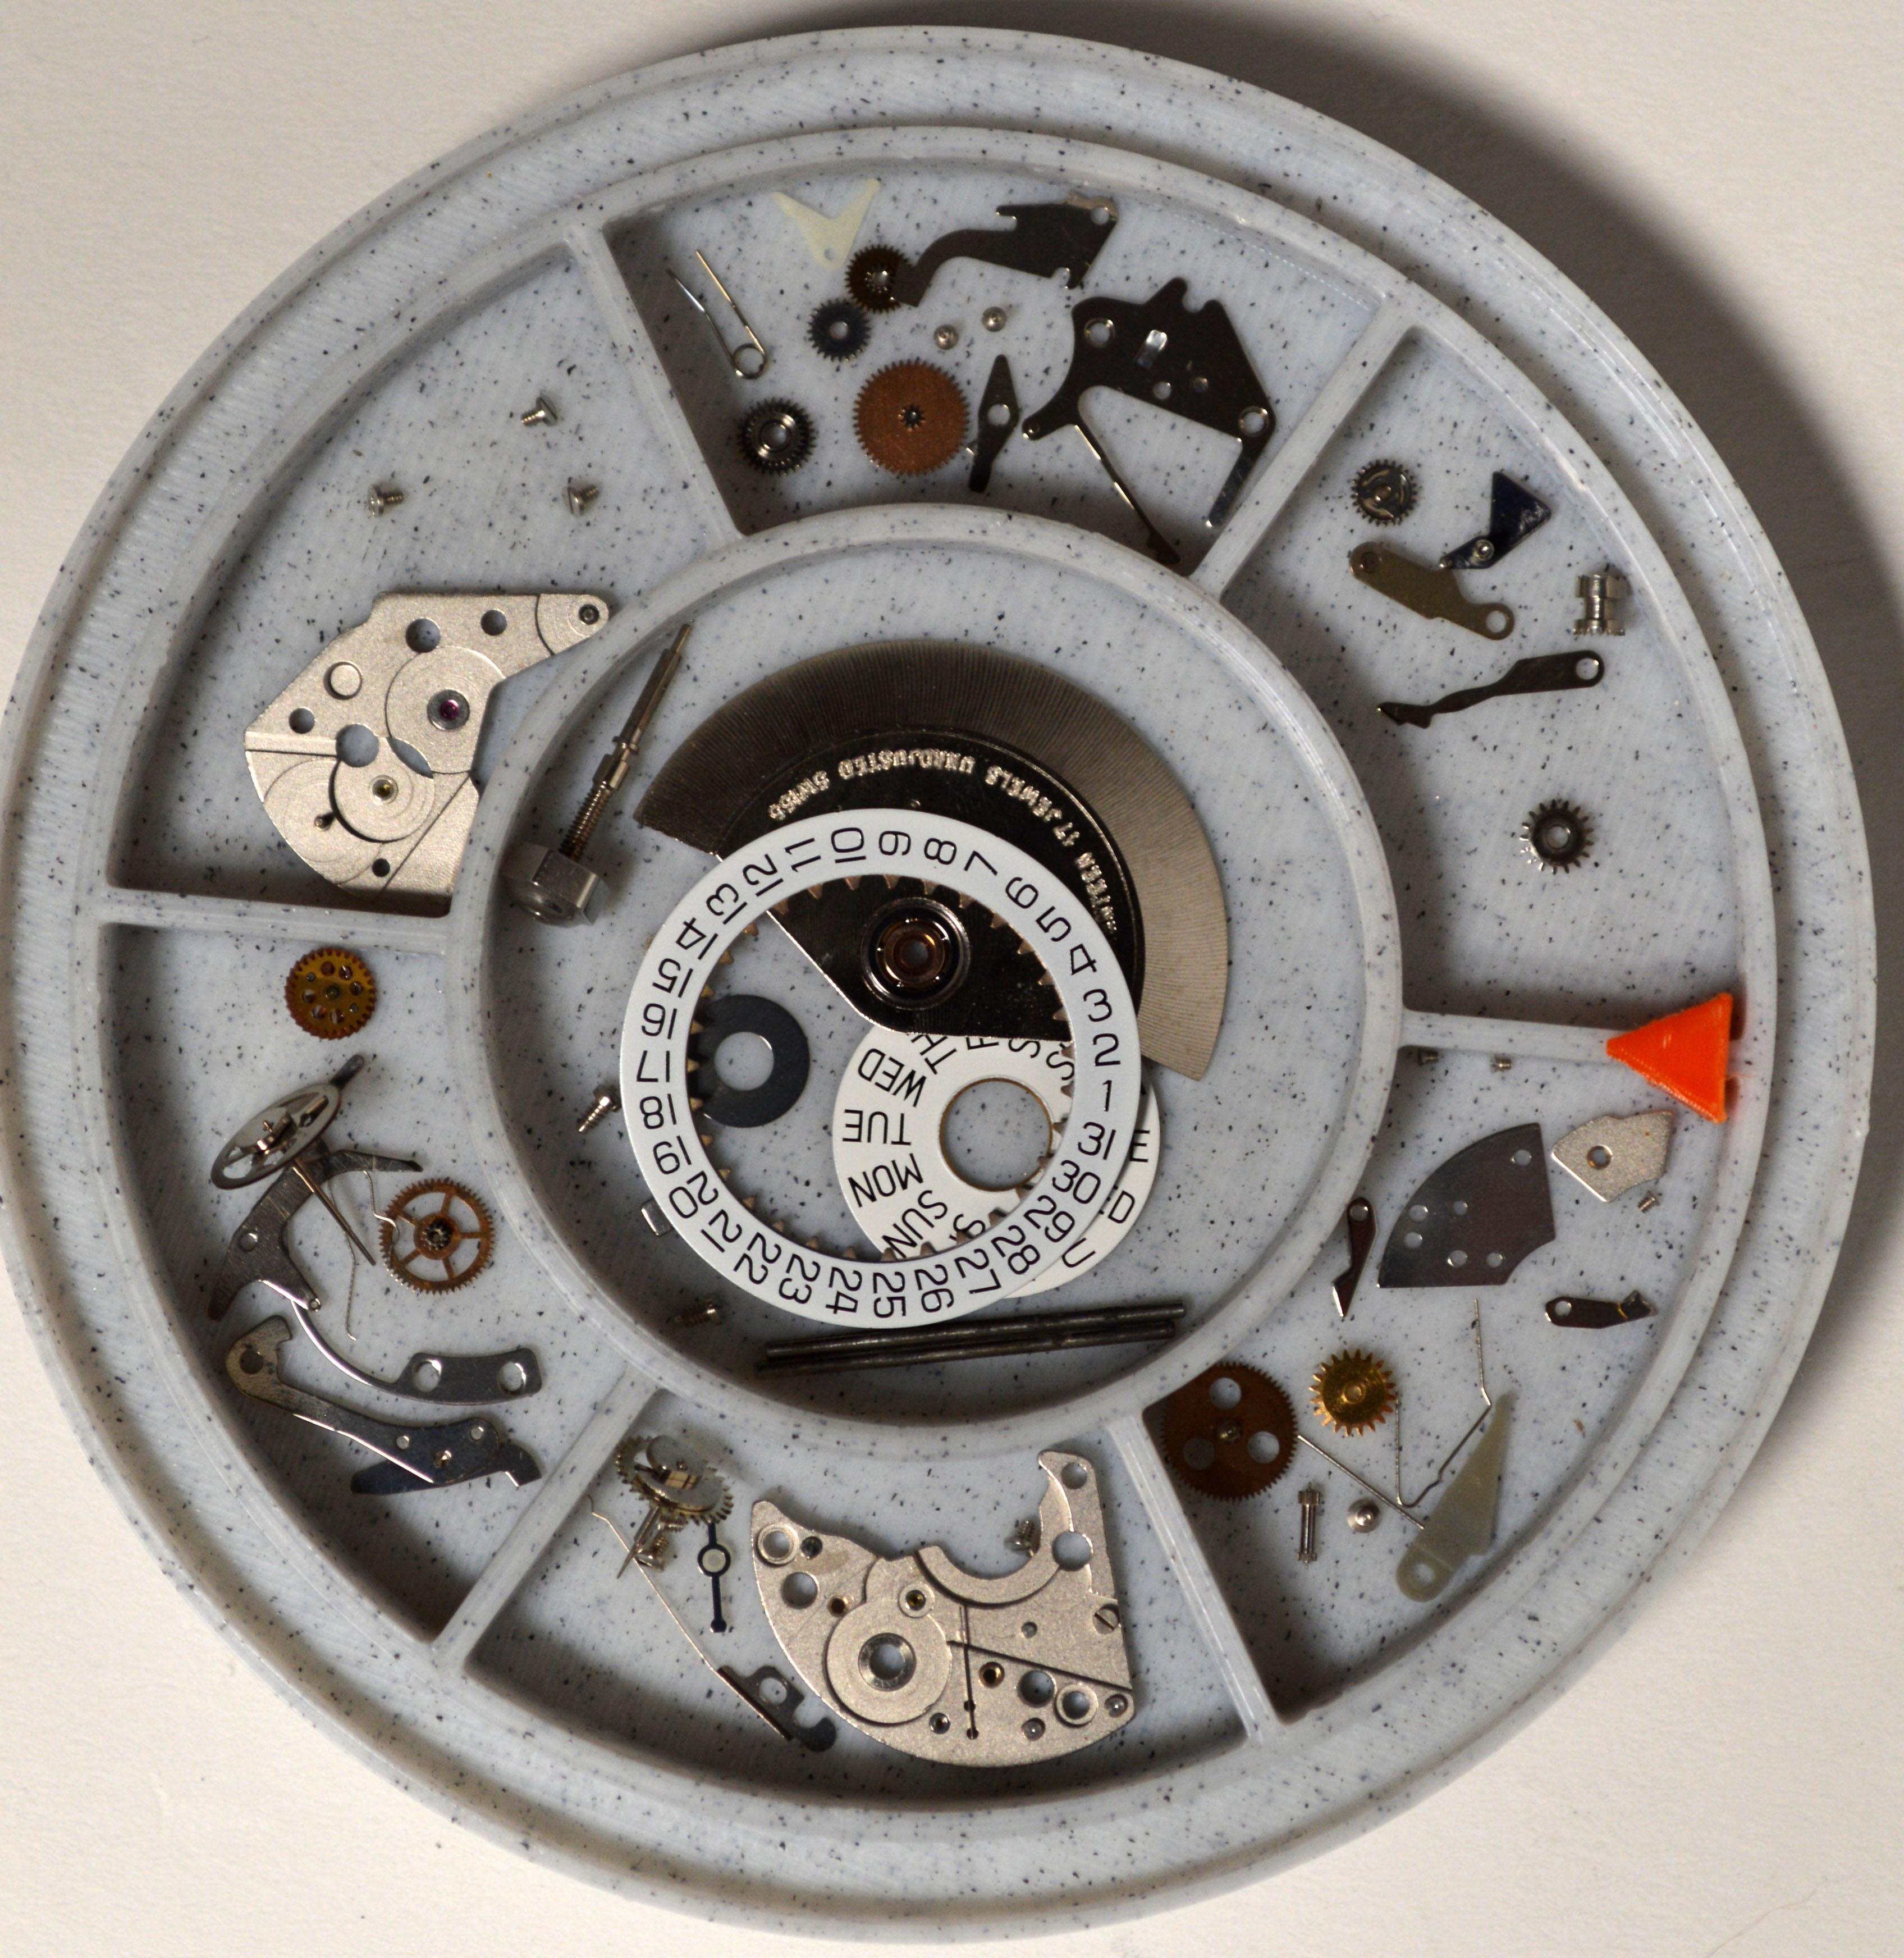
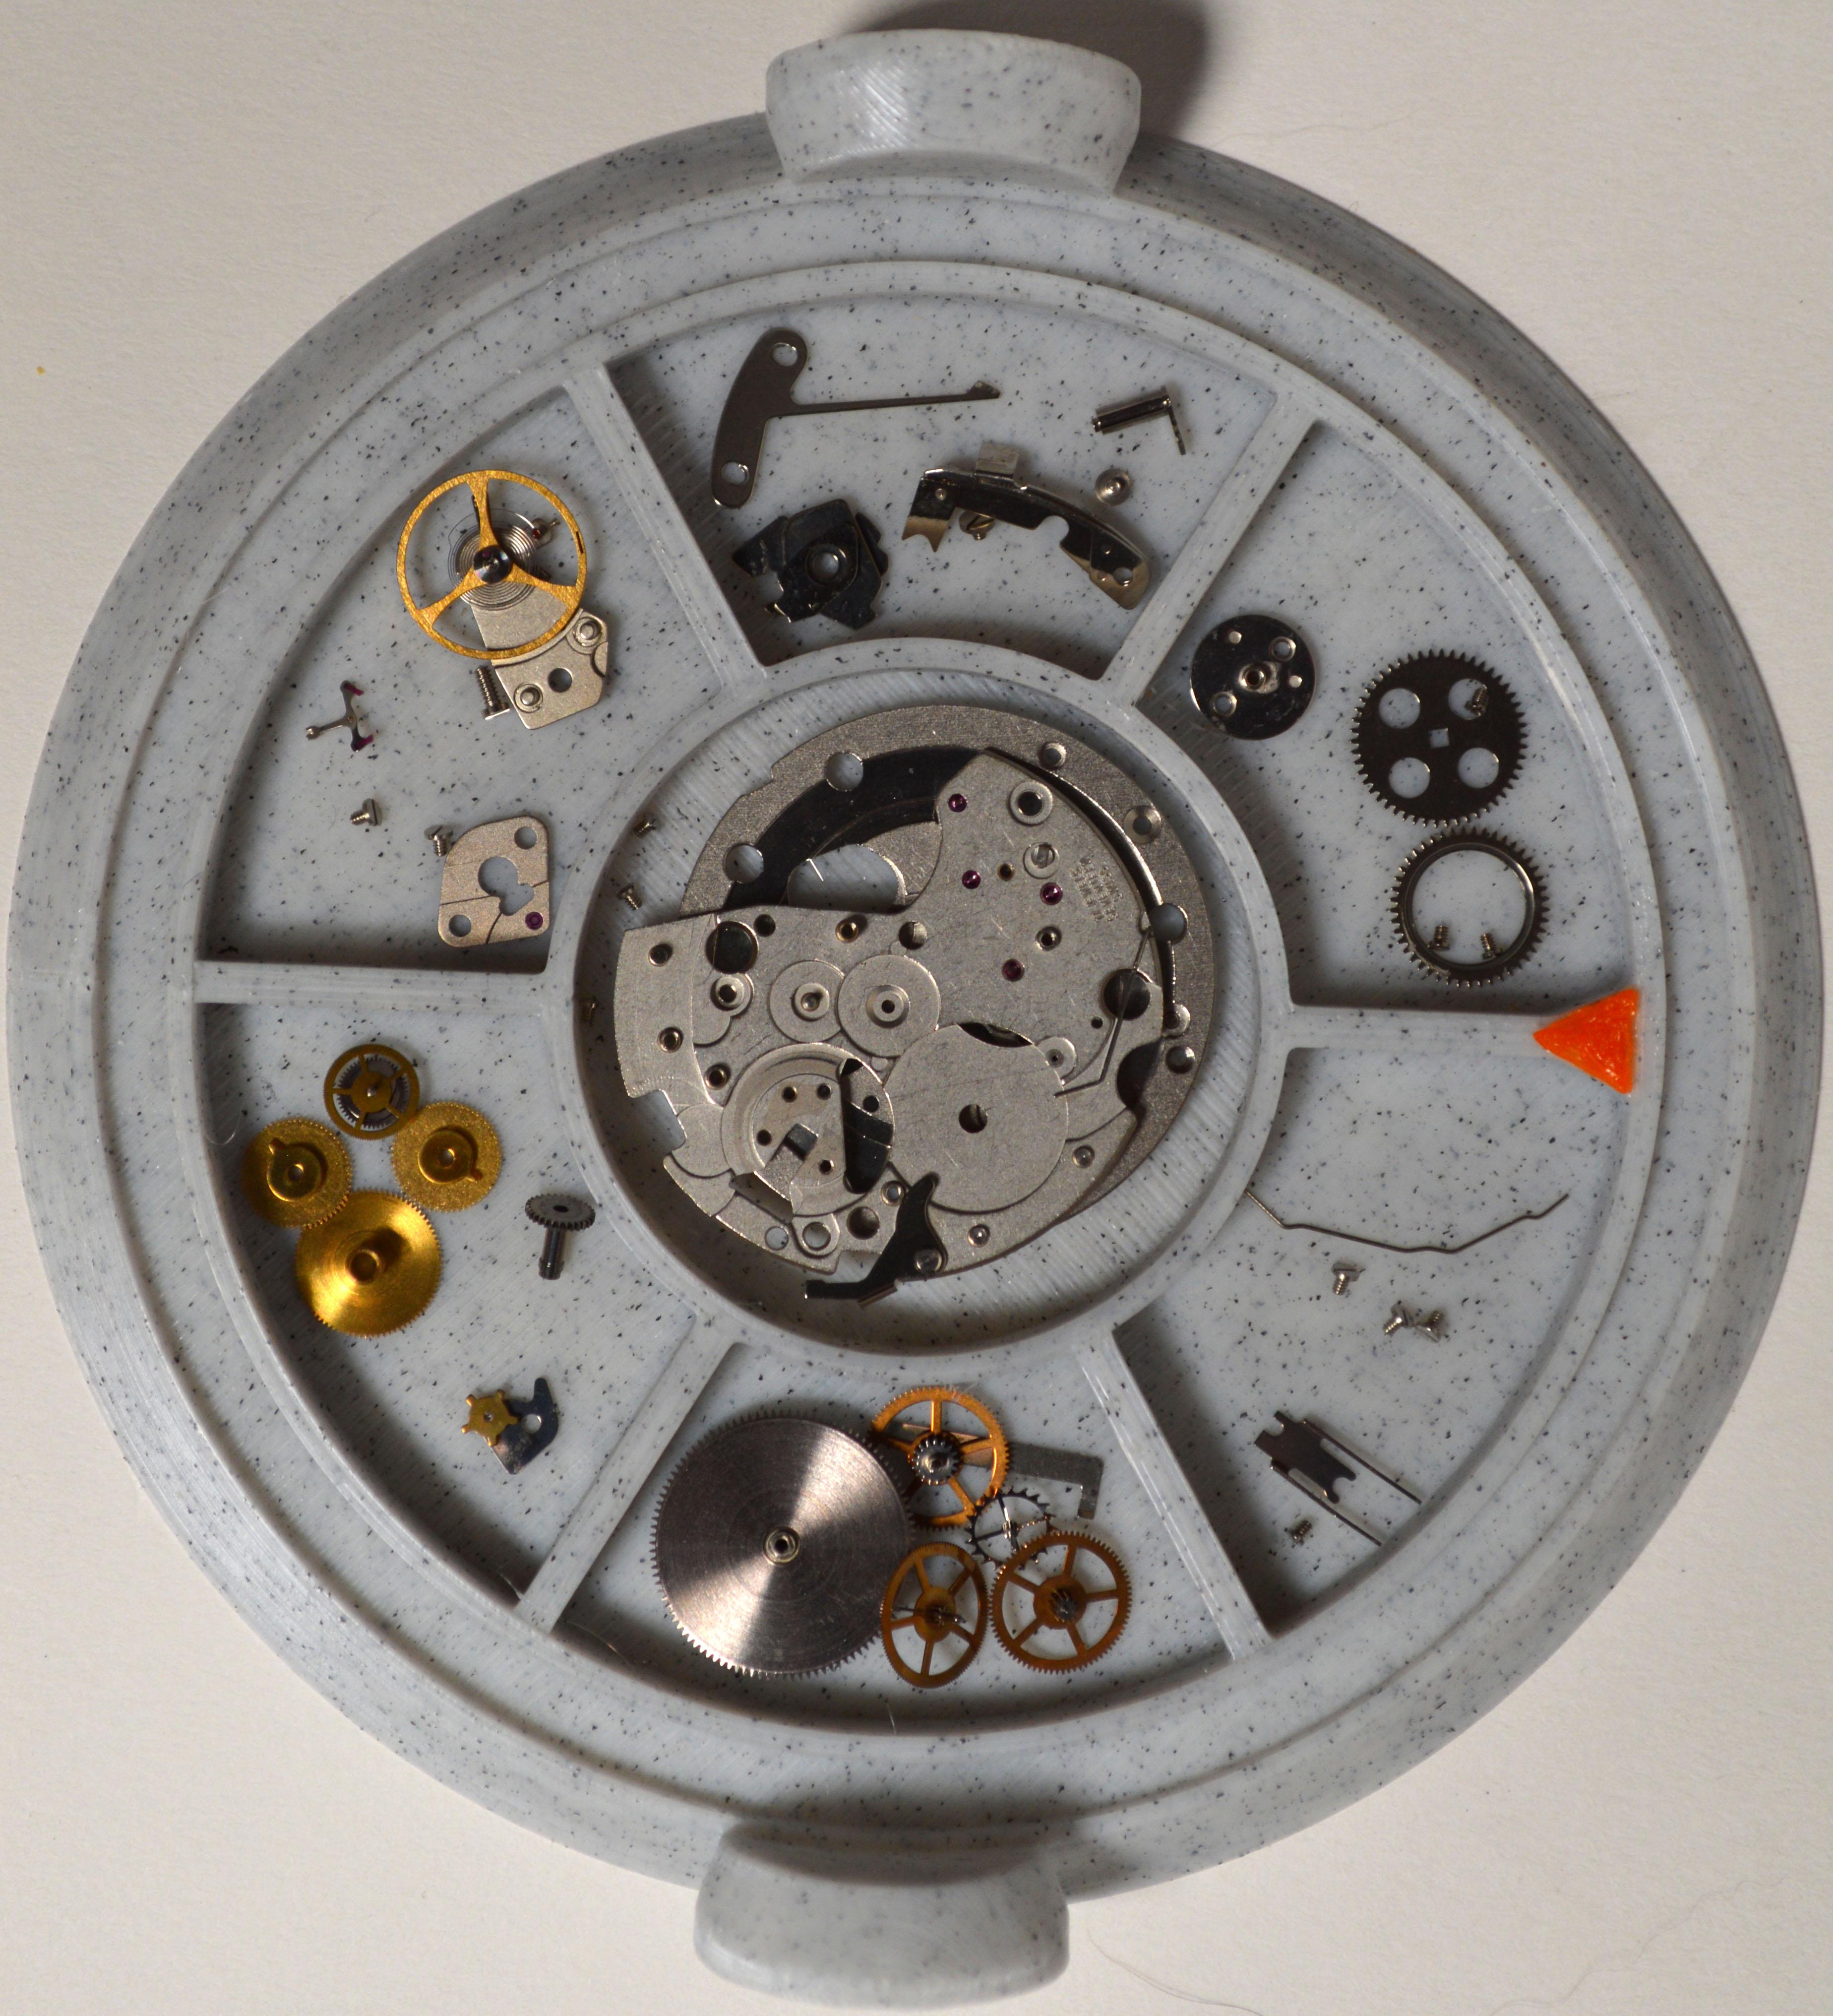
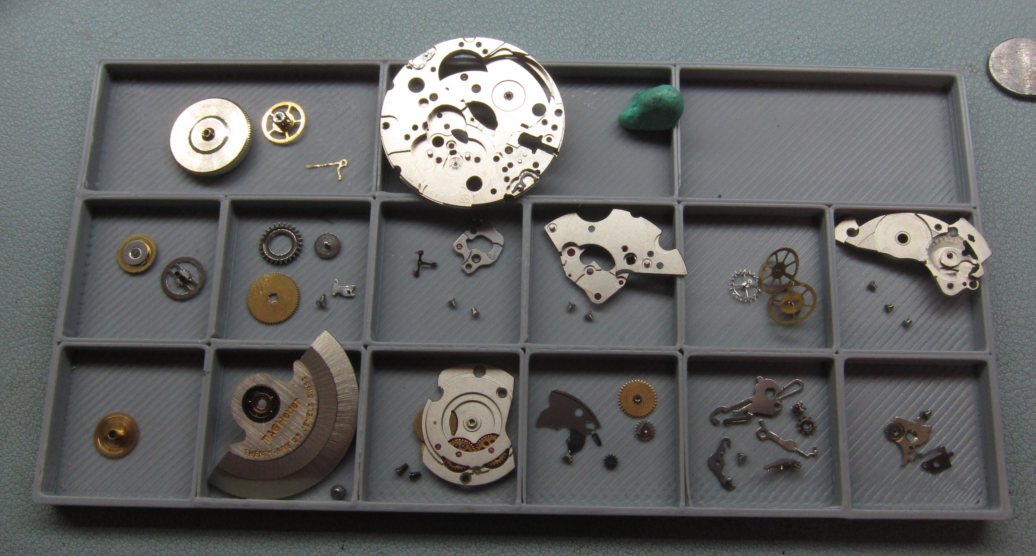
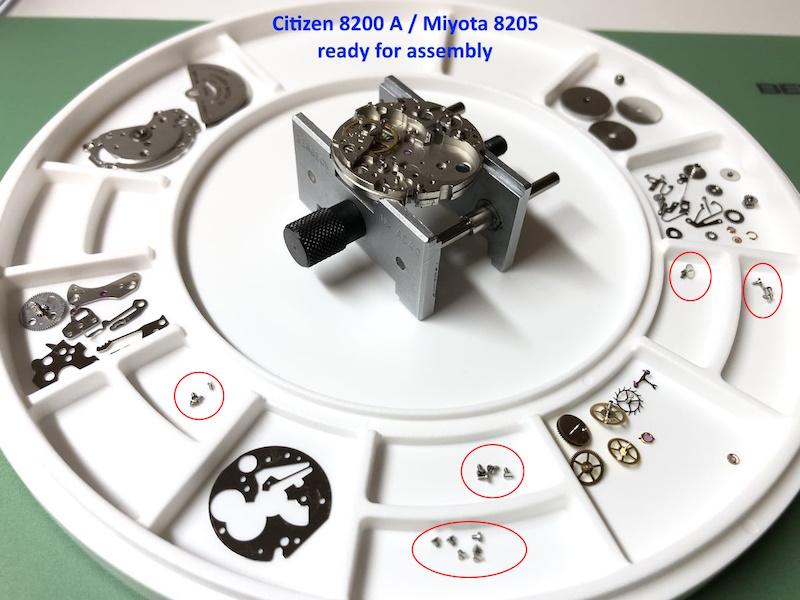
For a calibre I haven't worked on before I take macro images of the screws together with the parts they are holding. Once out of the cleaning machine, I sort them by appearance into the parts tray as illustrated in the image. For a normal automatic or manually wound movement with only a date complication, there are only about 4 or 5 different types of screws, so no big deal, but perhaps not very practical for a chronograph!? Not cleaning and inspecting the screws I would personally consider to be a service error.
 4 points
 -
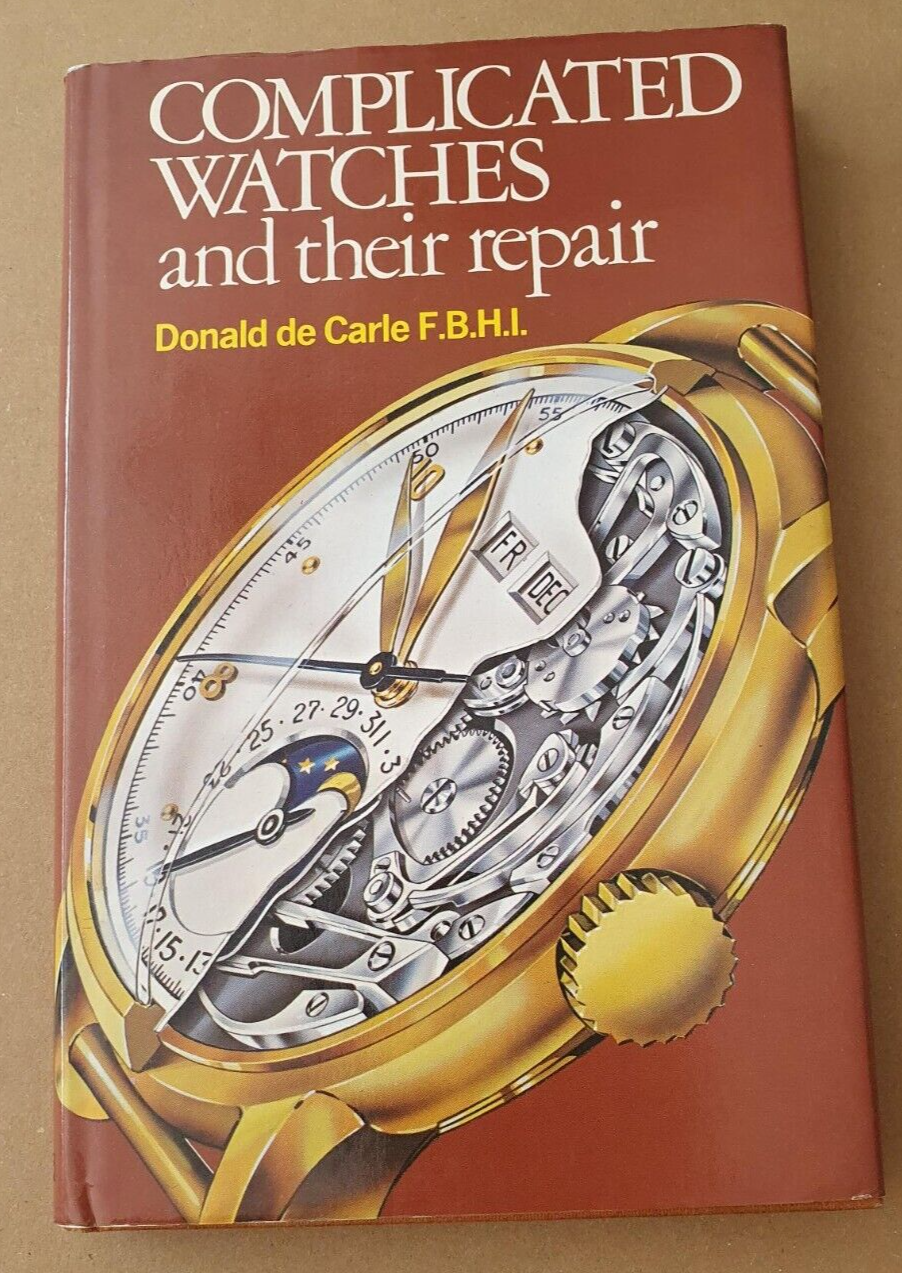
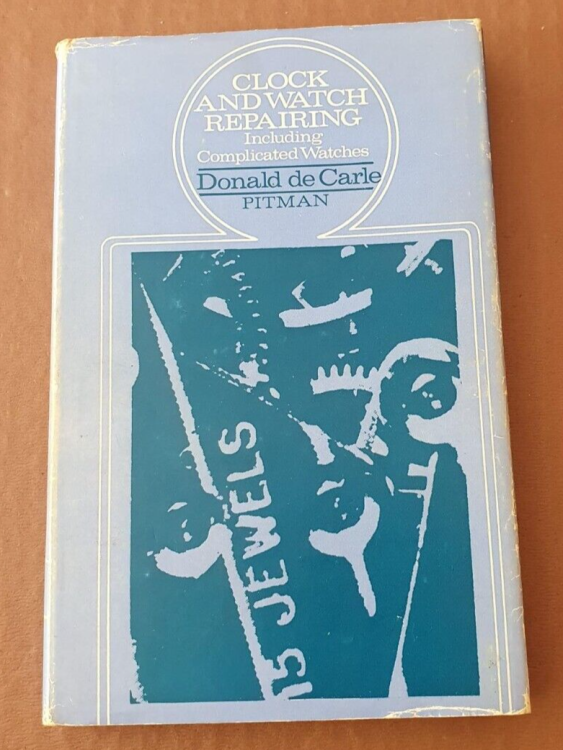
I now have 3 books 1. Clock and watch repairing - De Carle. Half the content of the book seals with clocks. Uses Photographs and illustrations 2. Complicated watches- De Carle. 10 chronometer watches. Line drawings. 3. Watch repairer's manual - Fried. An excellent book. Large print. Good visual line drawings. Reading a chapter most nights. Well, re-reading the basics most nights. Very interesting. Recommended by members. I agree with their comments. If I did not have knowledge from 2 years practice and internet courses, I would be totally lost if it were just down to the books for study. I did buy one book when I started. Watch repair for beginners - Kelly. Could not make head nor tail of it. Too advanced for me. Resold within a week.

 3 points
 -
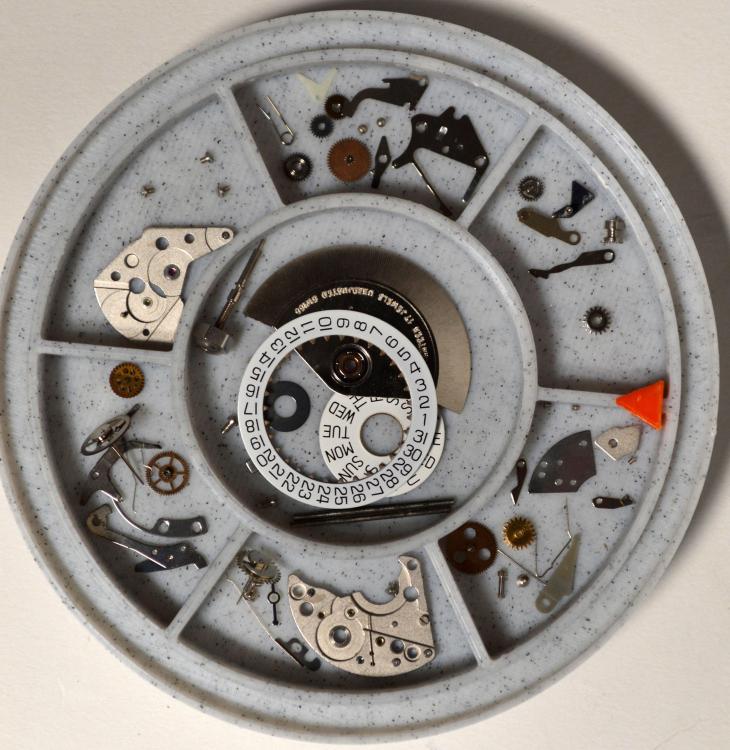
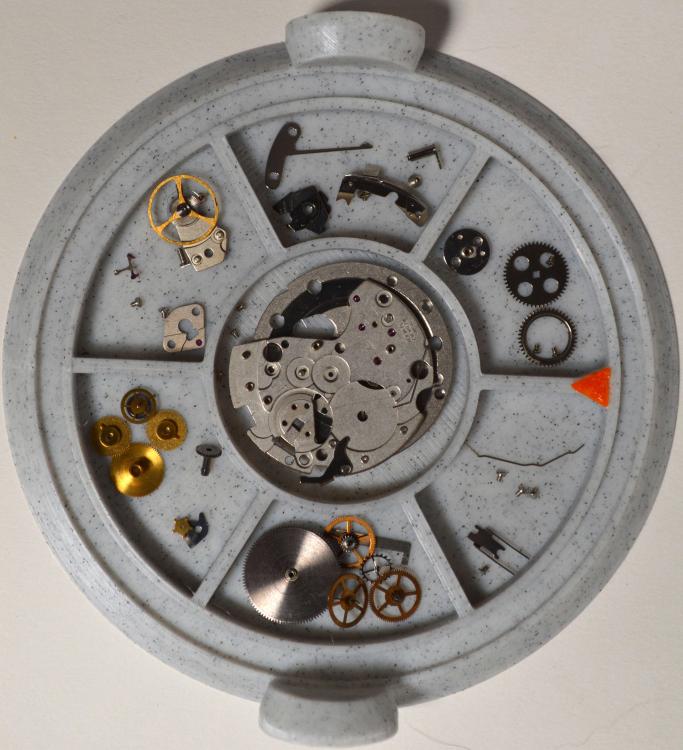
What I do is keep screws with the parts they were attached to in the trays. When disassembly is completed I take a picture of the trays before cleaning. Something like this 7750 I'm working on now. I'll put the parts but not the screws through the cleaner and then put the clean parts back in the same slot in the tray, with their original screws. Those little orange triangles help me keep everything indexed. Finally, as I am reassembling, I'll clean the screws manually if needed. The shouldered screws or reverse threaded screws are obvious, and plate screws are usually all the same size/thread, but you have to be careful with levers and springs which might have similar heads and/or threads, but be different lengths. Those I make sure are in separate trays.
 3 points
 -
I have a new rule when working on Accutrons: no turning screws without a pair of tweezers guiding the blade of the screwdriver. Because I also have a bad habit of bending pawl fingers... But that said, this could not be a more beautiful sight: I followed Rob Berkavicius's procedures here and it runs smoothly from 1.05 to 1.90v, which is more than enough range for a silver oxide cell. Now to clean up the case and assemble the calendar works!2 points
-
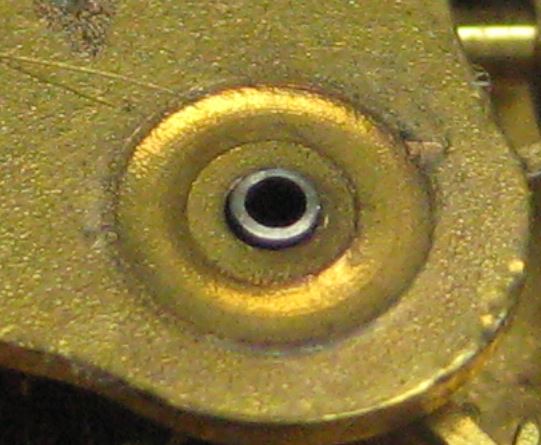
The above post is exactly how to manage these. Note, if the center wheel is jeweled, the head of the pin will invariably be small enough to pass through the jewel. Take off the center wheel bridge, and support the center wheel with its pivot passing through a hole, so the force is on the pinion, then tap. Otherwise there's a very high (almost 100%) chance of destroying the jewel.2 points
-
Probably a good idea Richard, cross contamination ? With heavily soiled parts. Good policy to peg and pre-clean anything particular dirty in denatured alcohol barring anything that has adhesive on it. i like that macro photos, thats an extra step up from standard picures, creating an identity parade of screws. There will come a time when you want to rely on your own recognition of the correct screws though whenever that may be.2 points
-
Thanks for your suggestions so far Obviously I like to clean the screws in the ultra-sonic too and since they are now sorted & identified, I may take pictures of them next to some kind of known reference. It becomes easier when one has worked on a particular movement more often, like the 7750, but this 861 is not my daily exercise. Some screw look quite similar, but one type has a slightly doomed head, others have the same size heads but are flat. This is even not recognizable on the small silhouettes given in the service manual. I haven't worked on a Landeron for some time, but I do remember that they have a nice selection of screws too. As said, so far it hasn't been a problem, but now with the ultra-sonic machine I like to do it different. Maybe it may not be such a problem, if I lay them out (before mixing ) and closely compare/ examen the different types. Perhaps, just like Jon says, a pattern starts to emerge or maybe I may be able to identify each and every type of screw.....2 points
-
Hi I seem to remember reading on this forum some one had the same problem. It was advocated to dismantle the watch leaving only the center wheel and canon pinion on the front plate, Then supporting the front plate tap the top of the center wheel and it pops out. leaving the canon pinion loose. Grateful if some one could confirm my assumptions.2 points
-
Unless the highly reputable "watchmaker" in the 1980's (the one who left a broken 2544 screw behind) mixed up some screws, I'm the only one who has been working on this movement after him. Currently all the screws are still sorted in the paper-bags and I may clean them, one-by-one, separately. With movements like these, there is clearly not an easy answer to my initial question.1 point
-
I never clean the screws unless there is an obvious reason to do so. I make my own multi-section parts tray and the screws go in the compartment with their associated part. Once fully disassembled, I take a picture. After cleaning, I put the parts in their compartment where their happy little screws reside. Done
 1 point
 -
Probably not in this case. That'll be a world full of pain! I suppose if you do that particular movement several times, you will get used to what goes where. What I always say to my students is, 'Don't always assume what you find is meant to be there', so sometimes you'll find a screw has been replaced with a thread that fits, but a profile unlike anything else because it is a replacement for what was lost, which makes identifying the screw from a profile pic nigh on impossible!1 point
-
Three good books Ross, another popular fried book is his bench practices, de-carle also has a dictionary of parts and terms.1 point
-
I believe were in the safe zone that means you don't have to hide in the corner. This is the friendly where everything is acceptable. If that watch was cheap enough it would be fine it would have some minor challenges though but anything of vintage is going to have challenges. the particular bridge style I would prefer something in the 16 size range would be fine. I'm just not a fan of Waltham watches for the most part definitely not a fan of their mainspring barrels. So as you're in the safe zone you can't go hide in the corner well you can but not in the safe zone all answers are welcome here. Okay to be technically correct all polite answers are welcome here which is what your answer is so you're fine.1 point
-
Hopefully it is ok. One way to protect from damage is to temporarily cover the coils with a small clean leather buff stick before you approach the watch with something sharp near the coils. Like removing or installing screws. Ounce of prevention is worth it. ( Of course I still have to remember to do that myself. )1 point
-
I leave them in the parts tray, clean them, put them in a clean parts tray, and then wipe it out, I now have a clean parts tray. Rinse and repeat.1 point
-
I would claim to find them in the strangest of places. Once in the tub while having a bath, god knows where it was hiding about my person.1 point
-
You get better at not pinging parts over time. Microscope helps tons. I clean cap jewels by placing them on a piece of watchpaper, folding it over, and rubbing it around with my finger. Then flip it and do it twice. It usually stays with your finger, and you want to get both sides. This is quick, easy, requires no weird tools, and the paper keeps the jewel from getting away. Just gotta be careful not to crinkle the paper itself, as that can be a flinging mechanism. I once spent the better part of an evening searching for a click spring or some such. As I was throwing in the towel, I took off my glasses to rub my eyes or something, and there it was on the INSIDE of one of the lenses! I was looking right at it the entire time! Right in front of my face. Not right UNDER my nose, per se, but right nose adjacent.1 point
-
Hey all, myself Gaurav. I am a watch enthusiast since my fifth bday when my mom gifted me a Fastrack vintage watch. I am everyday in search to collect watches for investment, my hobbies and for my wrist. To keep passion continue, I started running a blog, Celebs Watch Spotter. On this domain, currently, i am writing blogs on Celebrities Watches. You guys are avid watch collectors. I will request you guys to share your opinions on what else I can do to share the knowledge of my watch collection journey.1 point
-
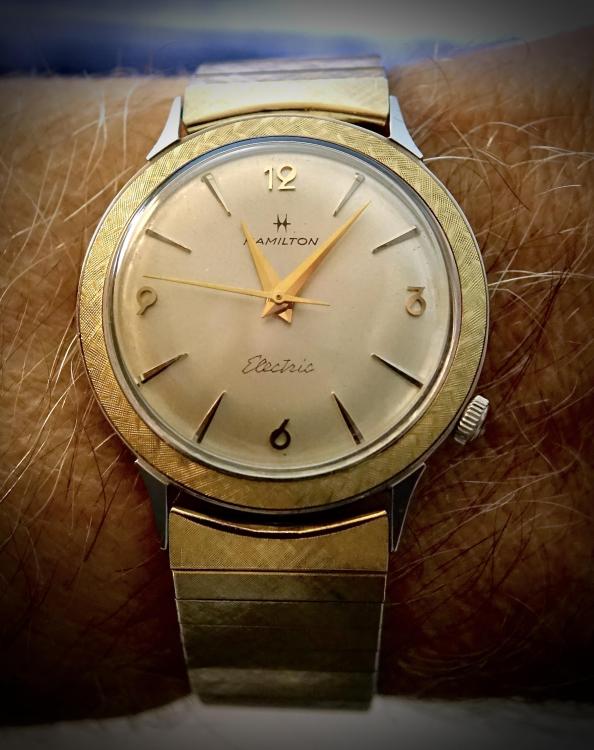
1st Watch of the first 2024 rotation...Hamilton Nautilus 450, 1963
 1 point
 -
It's unusual that you had no luck with this method as it's a well established technique for dealing with the removal of otherwise inaccessible steel casualties from non-ferrous parent material. There are a couple of possible explanations for this though, the first of which is that the stem was made of stainless steel (alum doesn't dissolve stainless steel), which would be unusual but not impossible; the second is that it was the wrong kind of alum. Technically "alum" refers to a range of compounds (see here). It may well be that some alums are better than others for dissolving steel. I believe that the one to use is potassium alum KAl(SO4)2·12 H2O. This has always worked well for me. I think I'd be more worried about the potential for damage from a slipping or breaking drill bit, or the drill bit actually impinging on the threads in the parent material. I'm pretty certain that the alum won't stain or otherwise damage the gold, however, a simple experiment with an otherwise redundant gold plated item would answer that question.1 point
-
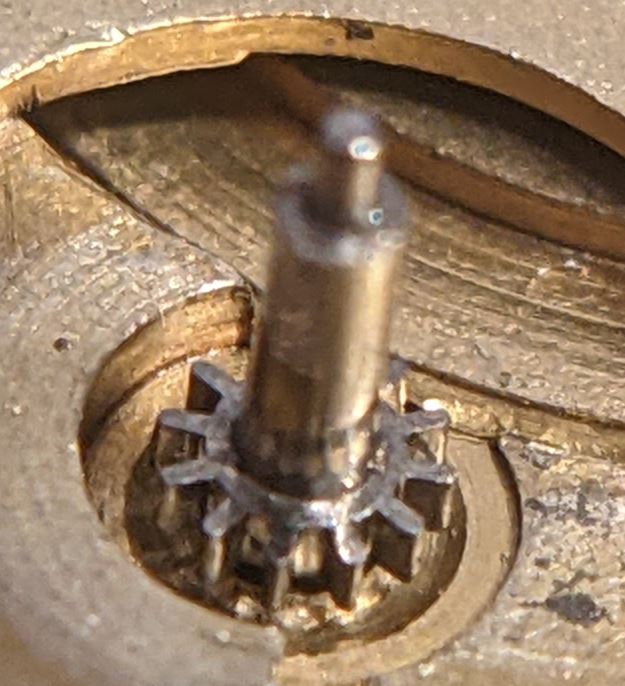
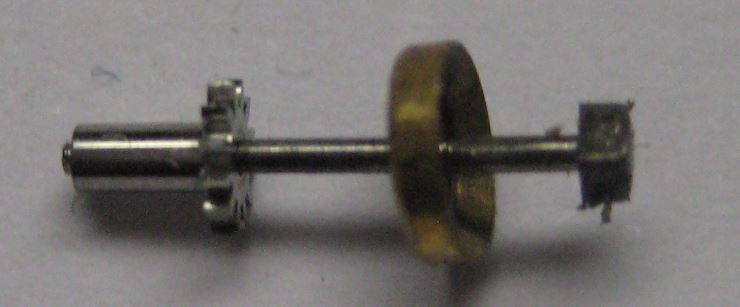
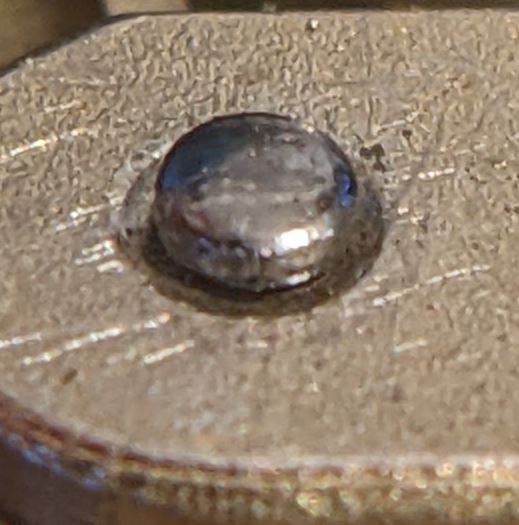
It's not stuck is doing exactly what it's supposed to do. Did you notice it doesn't look like the normal canon pinion? It doesn't even function the same for one thing it doesn't rotate its fixed on something. The something that's what rotates. We've actually covered this before somewhere in the message board. Typically on the vintage you'll find this if the canon pinion is As you notice very heavy and very smooth and usually sticks up but occasionally it doesn't typically it has a center pin that goes into a center wheel tube. What you need to do is support the backside staking set works really well for this so that the pin can come out. Then you can tap on the other side straight down as you don't want to break its hammering at some weird angle and the pins should come out. They're much easier to spot when the really vintage and they have the square on the back for setting. Yours is much harder to tell sometimes the other side will be a little bit bigger you can see it looks like the head of a ground nail for instance but yours is really hard. I snipped out some images from your images suit and see yours up close. You look really carefully at the backside of what looks like the end of the center wheel does it look like kind of a weird head of a nail? In other words is it a pin? Then images out of a prior watch C can see what you're looking at because the only way these come out as they have to be driven out and you absolutely have to support the backside otherwise distort the plate and doing it without the bridge in place is usually a bad idea because it has a habit of not being stable and you can break things They really would be nice if we had a tech sheet for every single watch in existence but this one's too old and more than likely to generic
 1 point
 -
I think this is what you are after, I'll provide the 7750. ETA 7750 Manufacturing Information.pdf1 point
-
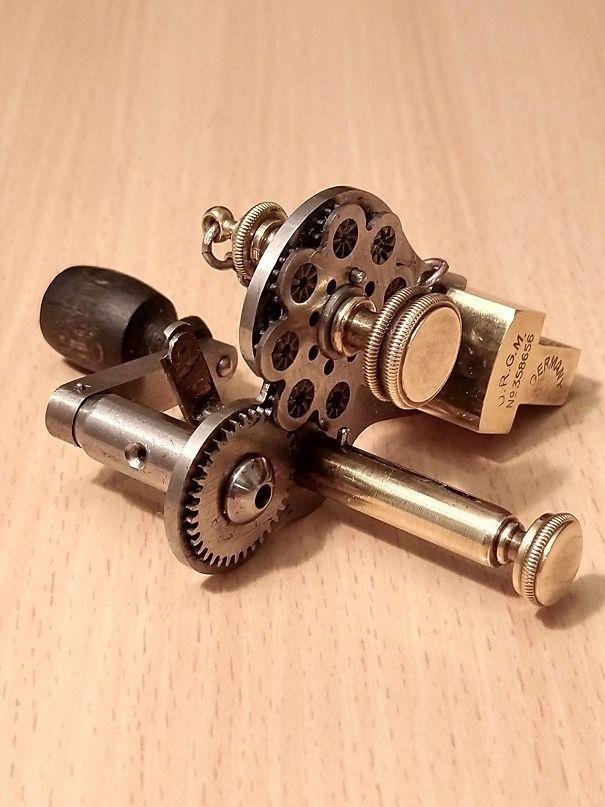
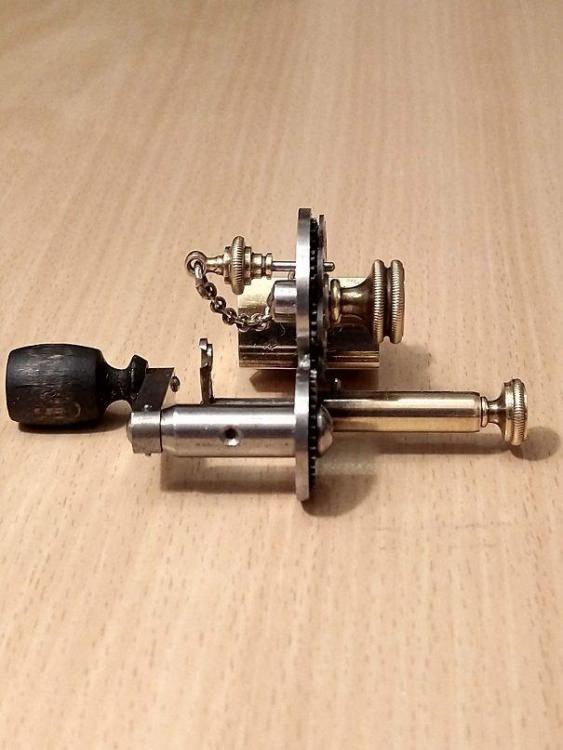
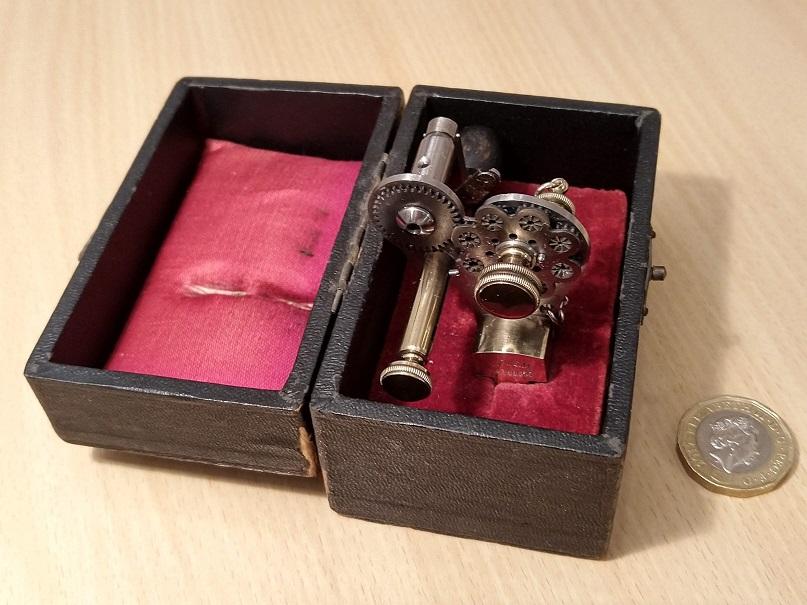
New toy, a bow milling machine. Now how and when to use it? I must figure it out, cleaned a little bit up and greased/oiled it.


 1 point
 -
...and then there is this a travesty IMHO0 points