Leaderboard


Popular Content
Showing content with the highest reputation on 02/19/24 in Posts
-
The concoctions members use on here in order to clean their watch movements. I’m sorry if this sounds harsh, you only have yourself to blame. Use the proper cleaners and rinse that is what they are manufactured for. Read about them see what the pros say. Watch parts are very fragile, you can’t just plonk them in any solution.4 points
-
Hi there are a lot of books out there written over 40 years ago, even Henry B Fried, they are lagging behind in technology but and it’s a big but there is still a lot of useful material to be gleaned from them, they are best followed as a guide to techniques and processes not followed verbatim. I have books from the past, Chicago watch school, and the like full of useful information. Just because mr X said this is the best , it might have been in his day, but times move on. If you are not sure put a post up, you will likely be inundated with information which you can sift through or get corroboration on and hopefully solve your problem.3 points
-
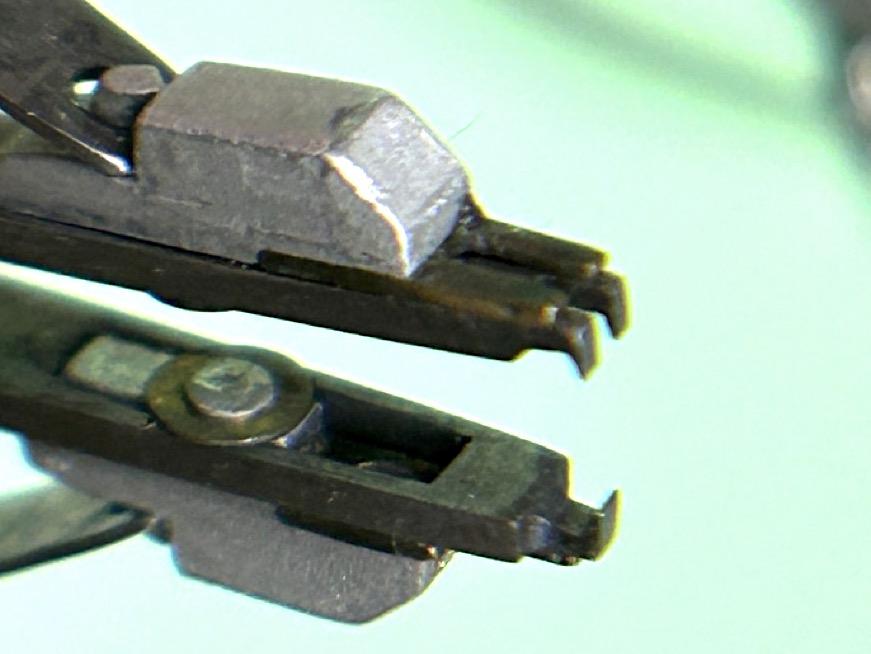
Further to that information provided. The tips on the #3 presto tool are a bit different than the hand lifting version since they are have a slit in the one side allowing you to get the tool tips positioned safely straddling close to the spokes near the hub. The design makes it consistently safer than using hand levers to avoid accidentally bending the long arbor of the driving wheel. But with either approach you still need to be careful with all the bendable bits around the area. Attached a close up of the claws on the chrono driver wheel puller, and a comparison in size and shape to the standard presto hand puller (which also has a center plunger). The hand puller (and canon pinion puller have wide plunger feet on either side, which is not the case with the chrono drive puller that is trying to have as small a footprint as possible on the area. Last time I checked they were still hard to find if you want to purchase one.
 3 points
 -
I have just reread the post, you didn't answer whether or not the wheel train was free before installing the pallet. Is the wheel train free running? If not then the pallet cannot snap back and forth because it's not receiving power.2 points
-
Just to end this thread - I put in a new balance staff and shock jewels. After having 12 hours to run in, on a full wind, the numbers are : DD 290° 0s DU 284° +7s CD 235° +2s CU 227° +2s CL 228° -5s After fitting a new staff, I thought I might need to tweak the balance, but I'm more than happy with the numbers. I think one reason for the good performance is, all the pivots in the gear train are beautifully polished, AND the shoulders of the pivots are polished. Not something I've noticed on other makes. The original poor performance was due to lack of end shake between the barrel arbor and bridge.2 points
-
Quality comes first Col and is earned through time and effort, your working speed takes care of itself naturally.2 points
-
Not sure i've earned the title as watchmaker yet but I think on the movements i'm comfortable with i would put my services toe to toe with any watchmaker. And i'm very straight up. I would love this to become a little sidegig which could greatly motivate my speed as that's currently my biggest problem servicing watches. I take too damn long at it haha. Thanks for the vote of confidence. HOping he likes having the most accurate 7s26 he's ever seen (If it's anything like my other two where i got the delta that low this thing should keep within about 2 seconds variation a day on the wrist.) and tells his friends or posts about it on watchuseek. Gonna put in my sig on there that I am willing to service and repair 7006, 7009, 7s26 and nh movements.2 points
-
The more of them you do, the more you'll get a handle on how far they can go. I suppose there will be a few that under perform and a few that will over perform no matter how well you've serviced them . There's always going to be other little things going on due to wear and tear or just production line Friday watches that are out of your control. But every one that you've done up to now has come out great.2 points
-
Hi. They look very good . 1. It’s up and running. 2 it’s keeping good time . That’s all your client wants, no confusion over technicalities. Good job. Any heavier lubrication will have an effect on amplitude but it’s the time keeping that matters. Nice one2 points
-
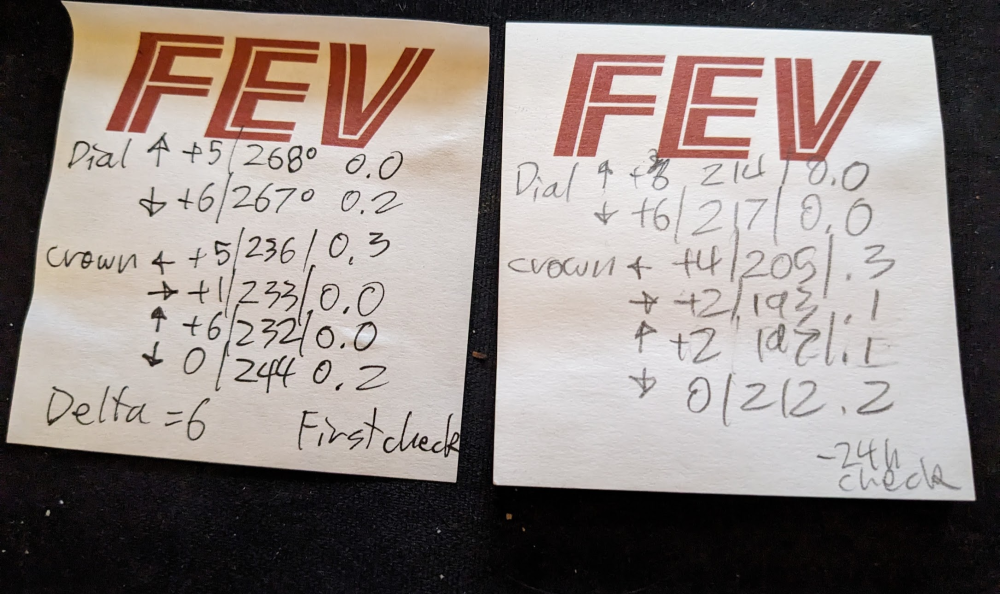
Ok i just finished my first paid gig and here's the results. This is after running for 2 days. First check is one hour from full wind and second is 24 hours running, isochronism achieved. The only thing i find odd is i couldn't quite get the amplitude to over 270, not that it has to be. This watch has run for 15 years without a service and got knocked so hard it stopped working hence why he paid me to repair it. This may have some wear keeping amplitude a bit lower than i normally get. ALso this is the first time using my new oiling method i properly oiled the 3rd wheel with hp1300, I'll be doing investigations on this to see if that thicker oil there lowers the amplitude a bit as this is not what seiko recommends in their service sheets. I think these are pretty damn good results regardless right? Movement is 7s26c from a seiko skx007
 2 points
 -
I came across this video recently. I think it's one of the best filmed videos explaining and demonstrating how it's done.2 points
-
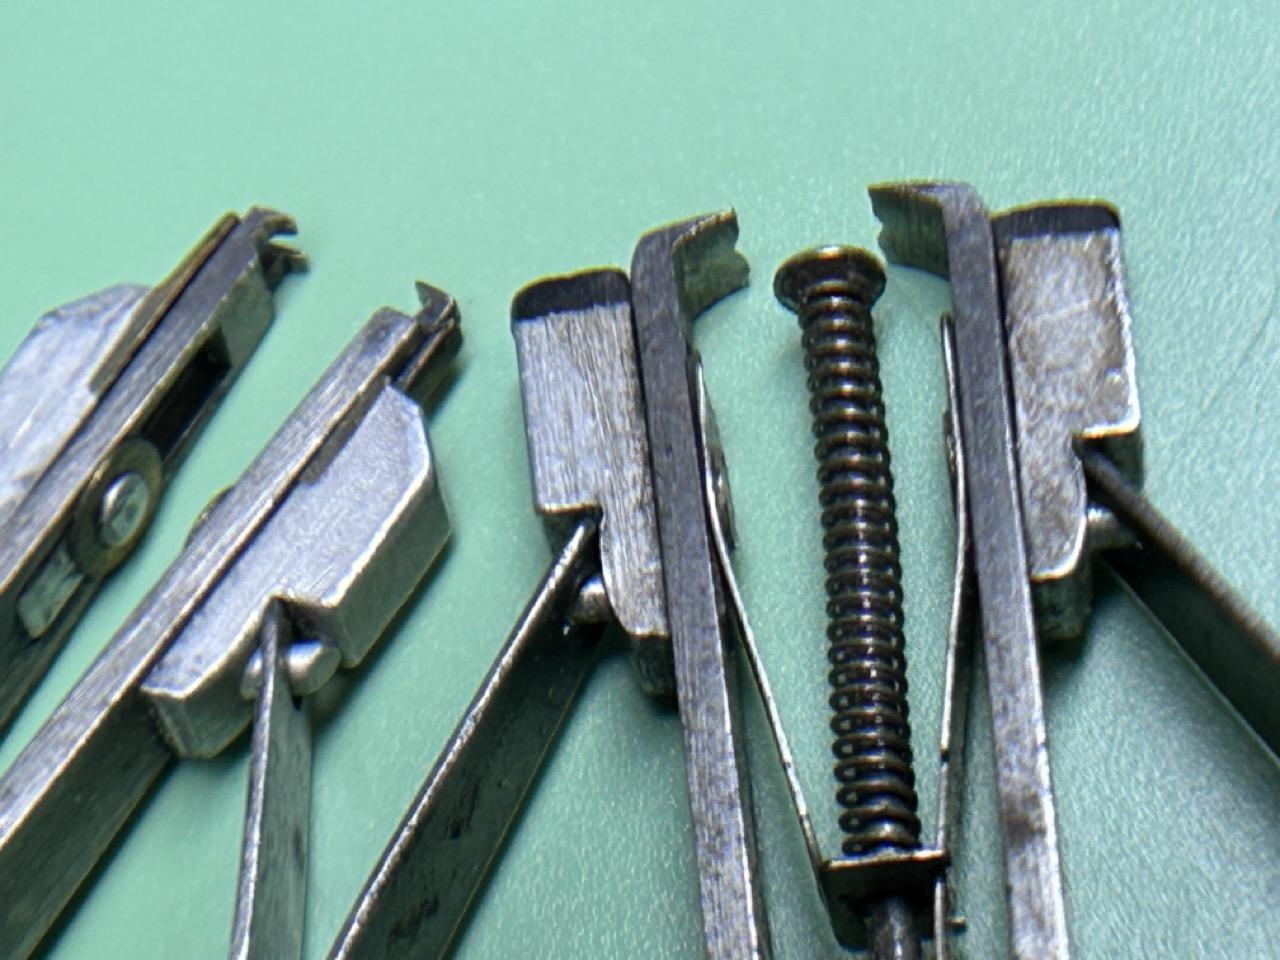
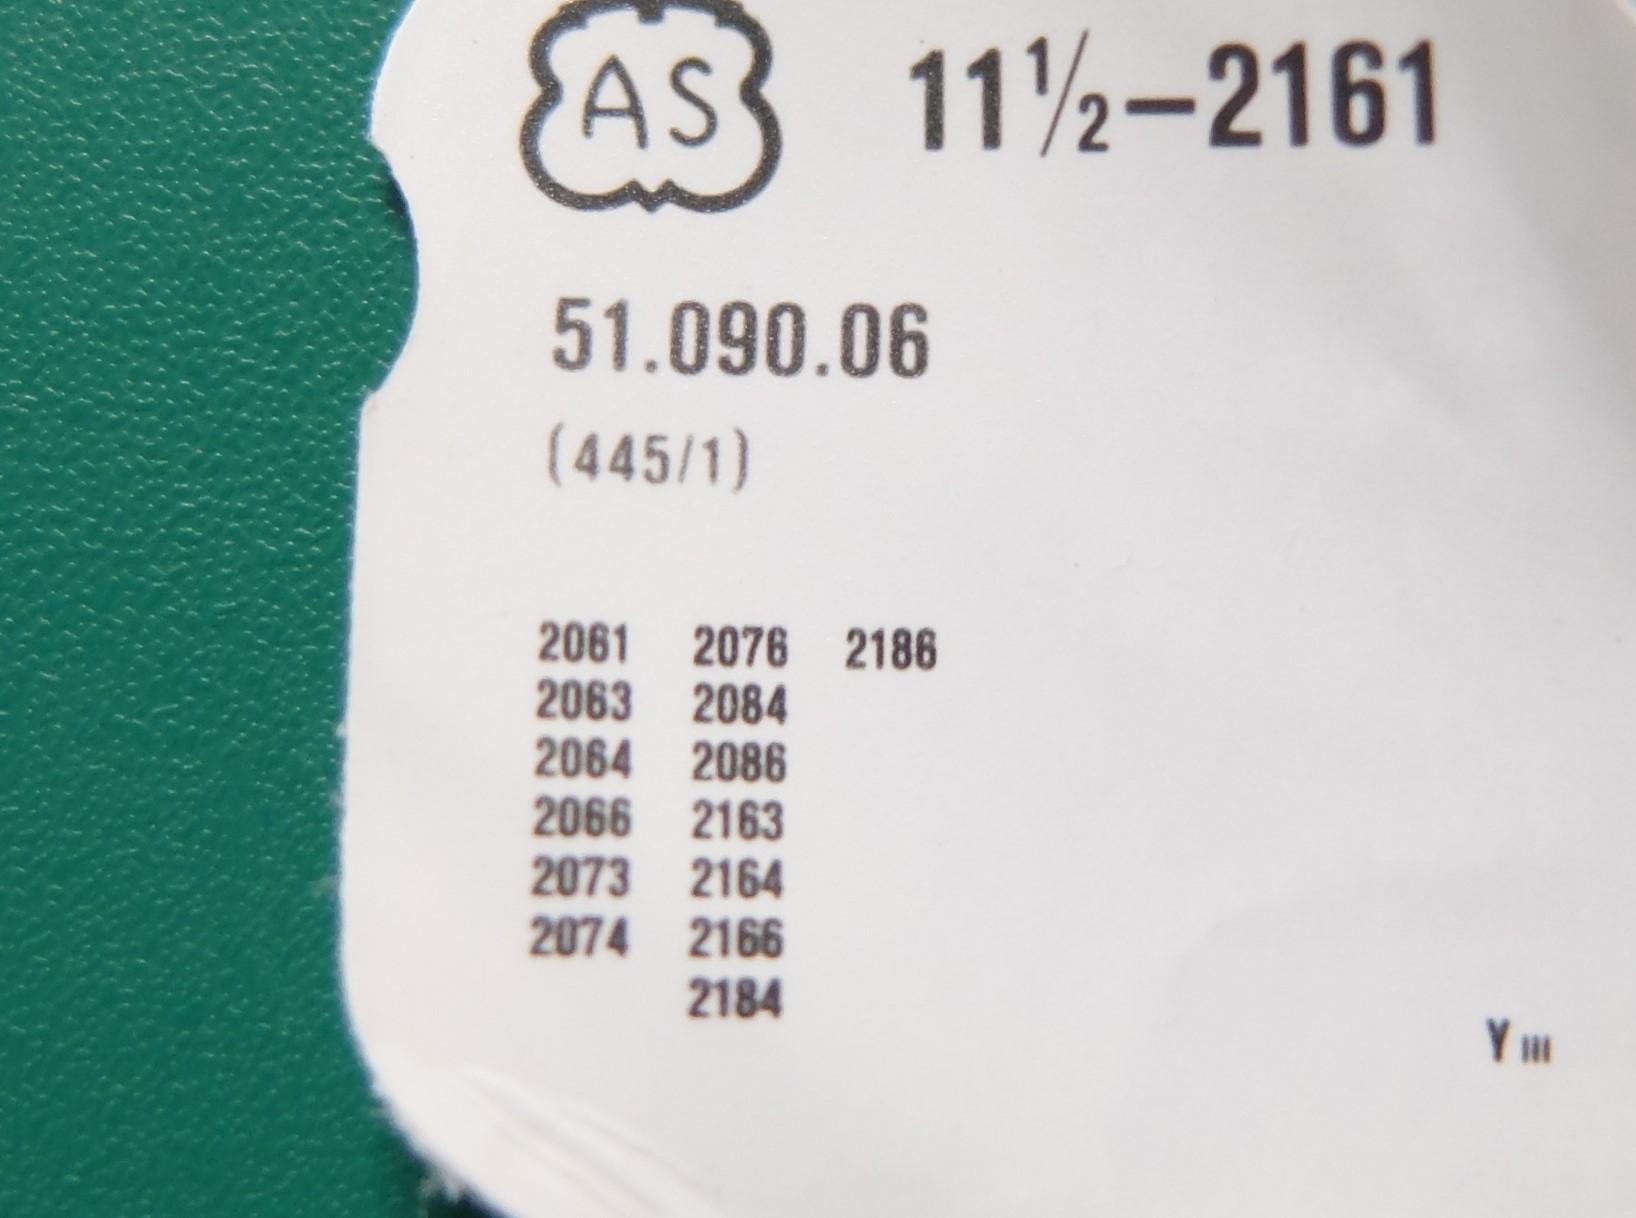
After a run of two ulcer watch resurrections a straightforward service on an unmolested AS 2063 was looking good until we found the classic broken set lever spring part No 51.090.06. They are very complicated on this movement since they incorporate a pivoted three gear system which controls the date and time settings. A search soon showed that all parts for this series are reasonably available except for this damn thing - they clearly like to self destruct. However, some kind sellers had listed a few similar AS series movements also using the part and after extending the search we found one in the UK. Photo list here of the factory packaging so you can see the range of movements this part fits and thus extend your search options . So the two position spring gave a nice basic wind and second position, a well engineered and simple Non-plastic fast date change. Could not see how the hand setting was achieved - I failed to find any help on line and went to bed defeated. So after a hard examination it appears that the there is a third setting position - but no clear cutaway on the spring end part. The force required is too damn much since the sharp rise in the actual spring is too severe. This also causes excessive strain on the slender arm. In the photo below the broken lever has been laid next to the new one already in place and you can see that the shape has been factory modified. The blue arrow points to what is a well disguised third setting position. . The stiff action was relieved by stoning down the sharp area highlighted by the red arrow. Hope that helps. Coffee time..

 1 point
 -
If this has been discussed elsewhere feel free to delete. So for things like the train bridge shock settings in 7XXX series seiko movements it's impossible to set them wet and have a good oil bubble. You gotta set them dry and oil from the other side. When i started out i was told you basically have to have an auto oiler for this. I got one, i hate it, it works, sometimes, but it does a terrible job at metering the oil flow and there's about a 20% chance it will overfill it instantly causing me to have to reclean the jewel and try again. On top of that, for things like the 3rd wheel in the 7s26 it according to most SHOULD be oiled with hp1300 even though the tech sheets for the various versions of the 7s26 are all over the place on this. Some iirc recommend 9010 in the shock setting and 1300 in the lower jewel. One says 9010 on both. One wants you to use grease on the bottom jewel, it's strange.. So unless you want to get two auto oilers for the two shock settings and fill one with hp1300, what do you do? Well just save yourself 100 bucks on a pretty crappy tool imo there's a much simpler way to do it. Just take your dip oiler, put a bead of oil on the back of the setting once the shock setting has been set already, then take your wheel and poke the pivot through the jewel hole and capillary action will draw in the oil and do it slowly and precise enough you get that perfect bubble every time. I don't know if this insanely easy technique is used a lot here but nobody suggested it to me when i was starting out and i blew about 120 bucks on a tool i now realize i just don't need. Just a little psa for people that aren't aware of this insanely simple technique that requires no tools.1 point
-
That's the most sense I've heard in a long time. In 35 years of business not once did i let a customer knock me down on my quotations. I'd rather risk losing a job than lose my self respect .1 point
-
@BirbdadBuy yourself an automatic watch winding machine from AliExpress for pennies https://www.aliexpress.com/item/4000004784736.html?spm=a2g0o.order_list.order_list_main.159.594618024QfCOB It will pay dividends and make timing your watches so much easier. For any watch, aim to always gain time, and never lose time. Take a reading after 24 hours as the movement may be gaining time when fully wound, but lose a slight amount when sitting on the bedside table for 8 hours. With a Seiko, it should gain about 20 seconds per day. The specs say more. With this type of movement don't try and aim for zero seconds of gain or loss as it's futile. I've just serviced a Citizen 8260A manual watch for a client and it went out the door gaining 25 seconds per day when fully wound. After 24 hours of running it gains about 8 seconds per day, so at the end of the week it should gain about a minute or two. This is more than acceptable for the quality of this type of movement. In London, I charge £190 for an automatic and £140 for a manual watch with no date plus £20 for a new mainspring which should be fitted as standard. I always expect to see at least 270 to 280 degrees amplitude, maybe more. I think this is a reasonable amount to charge. Some charge more, some less. Always charge what you think you are worth. Never charge less than your value. If a client doesn't want to pay your fees, then they were never meant to be your client. That's just how it goes, so don't bring yourself down to meet the client's expectations of price. Don't ever question your worth if you know you are good at what you do, only others will question that, and again, they are never going to be your clients or pay what you are worth. On a side note. The main positions to look at are dial-up, crown left and crown down (as you look at the dial), as these are the main positions your watch will be in. These are unadjusted positions.1 point
-
That would be the devil in you Rich, i wonder if it matches the devil in me1 point
-
I would probably self combust, if that's still a thing.1 point
-
I started off using ultrasonic cleaning and water based degreasers. I also experienced rust on screws and steel pinions. The strange thing is it doesn't happen to every watch. Some go through the cleaning process and come out absolutely fine. It might be due the composition of the steel used. I also ranted about water based cleaners on this forum and promptly got chided by several professional watchmakers. They said that they have been using water based cleaners for years and have never had any problems. So I moved on to using water free solutions but these are frightfully expensive here in Singapore. A bottle of L&R #111 and Rinse #3 comes to a whopping $300. You'll have to do a lot of explaining to justify spending that kind of money. But I never stopped thinking about why I was getting rust sometimes and why other watchmakers don't. Some of the points I've identified are:- 1) They are using professional water based watch cleaners. I think these professional cleaners contain rust inhibitors that are not listed in the MSDS. 2) They use rotary type cleaning machines. At the end of the cleaning cycle, the basket is spun at high speed to throw off any water trapped in narrow gaps such as screw slots and leaves of the pinions. 3) They use hot air to dry their parts. I think air circulation removes water droplets faster than waiting for parts to heat up via radiation and conduction in an oven and letting evaporation dry up any trapped droplets. AND heat speeds up chemical processes, which includes rusting.1 point
-
Occam's Razor strikes again. It appears that the problem was purely mechanical. The hack lever in some instances can ride up the fulcrum pin. When it does, it can hit the fork ever so slightly. The train bridge will hold it down somewhat, but I don't believe it is always snug. Also, I have observed different washers. Sometimes two gold, sometimes gold and silver. I always to put it back the way it came. In this instance, I think the wrong washer was in place...the interior one. So all this worked together to stop oscillation.1 point
-
I will say again and for the last time: the rust, when it is surface and fresh, must be removed not in chemical way, but in mechanical. Use some polishing compaund/paste and wooden stick. When the rust gets deep, then You can throw hte parts in the dust bin.1 point
-
I the grand scheme of things, it really is massive. Like the actress said to the vicar. Hehe.1 point
-
eyup me old mucker1 point
-
Many thanks to all of you ... I have a nice working vintage watch !.... I could not have done without all the help I got here.... Thanks 1000x1 point
-
Stereomicroscope is the answer, as it turns out. The high powered reader idea was a bust. I tried a bunch of things trying to avoid the cost of the microscope. The cost on that solution is down to something like $400 on Ali-X if memory serves. Worth it.1 point
-
But that cannot have impact on performance. The arbor moves when winding only.1 point
-
How about thinning whiskers on lathe ? I hope bergeon doesn't read this , hate to see whiskerless dog community.1 point
-
Hi @Birbdad don’t sell yourself short you are a capable watch repairman no doubt. I would have no hesitation in using your services or recomending them based on what you post. I think your quality will speak for its self. Just be straight up with your clients and tell them as it is no flannel.1 point
-
the banking pins are typically used for the fork horn clearance. The guard pin is what you want to look at but people playing with the banking pins will screw up the guard pin clearance also. so basically have to make sure that the banking pins our where there supposed to be usually people don't play with the guard pin but usually is not 100% and is bound to be somebody who decides to play with it. I would check your banking pins first you might be lucky. Then there is the other little problem vintage hopefully nobody has been mixing and matching balance components. I assume this is a single roller? single roller tends to be well can have more issues which is why they abandoned it but not soon enough.1 point
-
Using water based cleaner isn't necessarily a death sentence. I've mentioned the Greiner cleaning machine that I used for years; it used water based cleaner, and then isopropyl alcohol for rinse- but it has a built-in distiller, so there was an endless supply of clean alcohol, and the distillation column had a fan below blowing the warm air (filtered) up to dry the parts. That machine never caused rust. Greiner hasn't made the specific cleaning solution in years, but they do make a water based cleaner for watch parts, their GS cleaner. I get what I understand is the same concoction, a concentrate, from Hegel. The old Greiner machine has been replaced with a modern Greiner ACS900, using petroleum based cleaners, but in the workshop many parts get cleaned regularly with the Hegel cleaner, rinsed in water then alcohol, and no rust issues. The clock cleaning solution I use is also water based, from a formula out of the Finnish watchmaking school; again, no rust- but parts come out and get rinsed in hot water, then immediately alcohol, and then immediately on forced air dryer. The above solutions are "pro"; I haven't tried dish soap or anything similar. The Hegel cleaner is about 50 bucks a liter, but makes 20 liters, so really not expensive.1 point
-
Looks good Col, you should be pleased with it.1 point
-
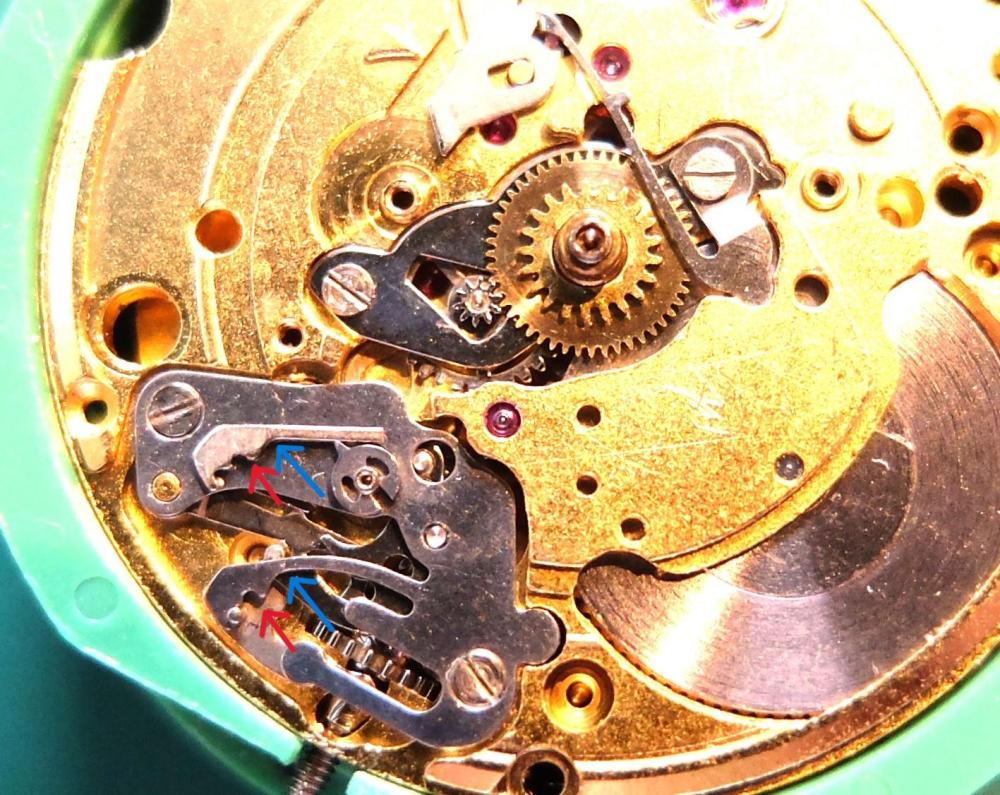
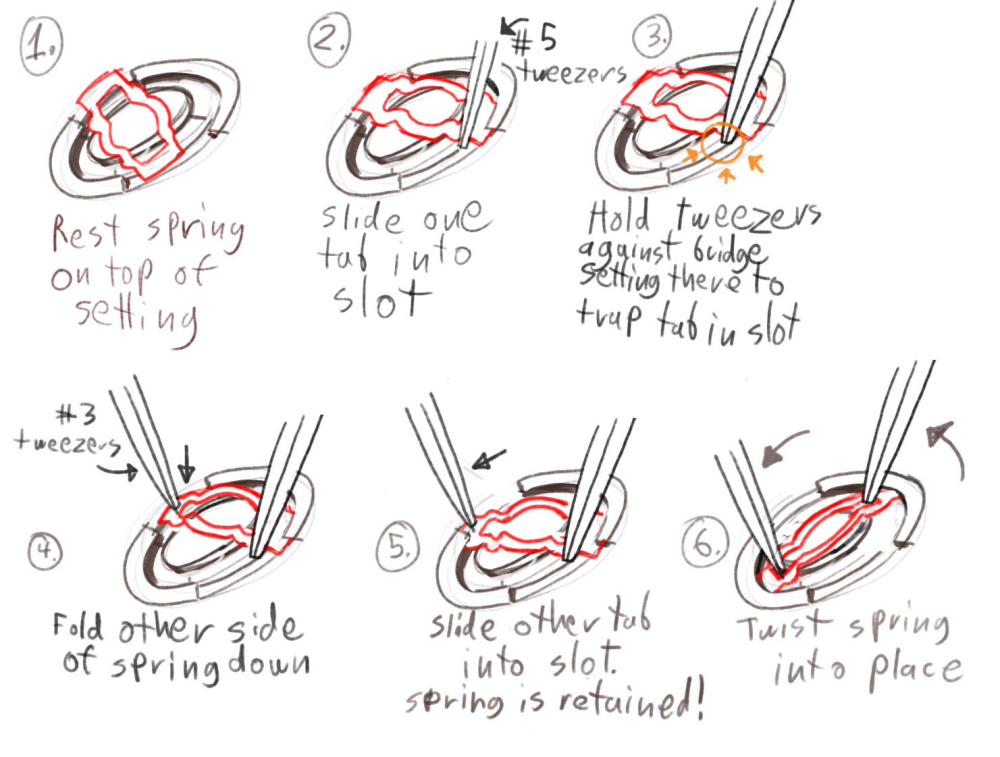
I am indeed talking about those godforsaken diafix springs and here's the step by step of how i do it now. It makes it basically impossible for them to ping off because they're trapped by two points before you even really try to move them much at all.
 1 point
 -
To all, I'm a career mechanical design engineer, recently retired. I own a seat of SolidWorks 3D CAD software. I've been a SolidWorks user since '95. If anyone needs a solid model created, I'd be more than happy to give it a wail. I'm a budding watch repairman and would like to give back to this community that has helped me immeasurably thus far. cheers1 point
-
Well, You are inventing You own cleaning technique. That is good, but don't ask the others what is wrong with it, as You are the inventor. Now You have only surface rust developed to the parts. It can stil be removed from the pinions teeth by sharp wooden stick and polishing compaund (use oil solvable one and clean by brushing with pure petrol after). All professional cleaning solutions are water based. The parts doesn't develop rust in the solution, but in water used for rinsing. No one rinses for 5 min, this is silly. Then imedatelly in pure alkohol to rinse the water, then blow with air and dry with hair dryer. Using oven for drying is silly too.1 point
-
Hi Waggy, I am sorry I did not see your question until now. You mentioned you had figured it out, but here is the info for anyone else with the question. You do them in sequence, but don't have to complete level 3 DLC before starting on the level 4 learning. I have already received the Combined Intermediate and Final Grade course material and am still working on the prepping for my exams this May. The combined courses go into calendars, automatic and chrongraph movements, and technical drawings along with more information on the different types of escapments. You need to pick the direction you are planning whether it is the watch or clock path so they send you material more pertinent to that path.1 point
-
Here is the Bergeon sheet that describes all 8 variations. The #3 (for chronograph driving wheels) is hard to find lately. 7051 7052.pdf1 point
-
Same here, and I do that whenever possible. The problem is when it's not, like on pressed-in Accutron train jewels, or a handful of settings I've come across that are not meant to be disassembled.1 point
-
complicated than that typically you lubricate the exit pallet and you have to do it three times over the revolution of the escape wheel and occasionally you might have to put a little bit of oil/grease on the entry stone if the oil didn't transfer all the way around. As far as ever seeing this technical document that is never going to happen. The watch companies make a silly assumption that people working on watches are all experts. Then as far as techniques go those are usually in separate documents like the Omega working instruction number 40 that's a lubrication document. Omega has another document for epilam. then from Megan Epilam the earliest document I have on cleaning of lubrication in 1957 basically the Epilam whole watch except pallet fork and maybe one other thing. But you'll never see the word Epilam mentioned in any of the service guides. It's only a relatively recent times that some of the technical documentation will mention Epilam. remember he wasn't pleasing one of those newfangled timing machines for amplitude. Traditionally those oils would've been organic and typically again he wasn't servicing a watch like a Rolex for five years.1 point
-
I hope this works!
 1 point
 -
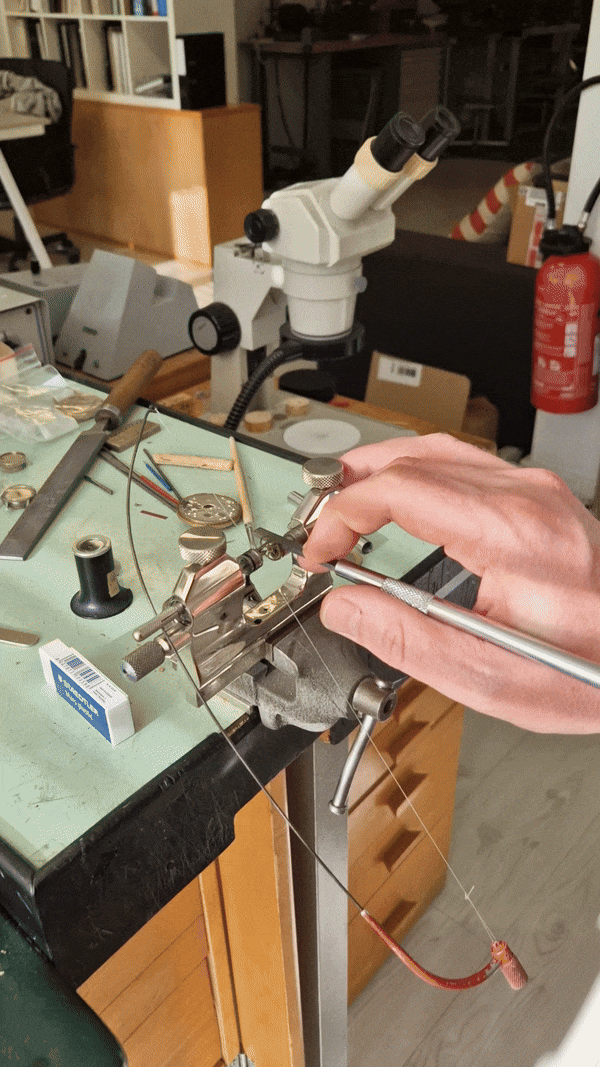
Great advice. I found an old scrap balance to practice on, and re-dressed my cheapo burnisher, I too was making the mistake of trying to work looking through the microscope. Following your advice - once set up, sit back and feel and listen to what's going on. You can feel and hear what's happening. I found shaping the end quite easy - as the pivot is sat in a hole in the disc, there's no chance of the balance escaping and getting damaged. I was so pleased with the pivot end shape and finish I'm not going to bother getting the Bergeon tool.1 point
-
The story I heard on the thicker top cap jewel (cock jewel) was after lots of practical study, they found that that jewel saw the most impact, so it made sense for it to be thicker. But in reality, I have never ever found a cracked cap jewel on a shock setting, so it seems to have been overkill. But you can't replace it with a thinner one, the spring won't hold correctly- or vice-versa, the spring won't go over the jewel without damaging it. On Jacot too use- This is a tool I use frequently enough I keep one set up in a vice all the time. I also see young watchmakers who supposedly learned to use it in school come to the shop and are useless on it. Aside from typically using far too short of strokes on both burnisher and bow, they always want to have their face right in the tool with a loupe while using it (possibly why the super short strokes). As I was taught, and continue to do, I get the pivot in place and runner adjusted, checking with a 10x loupe. Then, I get my burnisher in place, and from there it's almost like John said "eyes closed in the dark", that is, I'm not peering at what's going on, just focusing on keeping the burnisher in contact with the pivot (i.e. level and to the left), and listening to and feeling what's going on. I'm sitting in a normal position, looking at the tool, but not up close. Usually pinky and ring finger are resting on the right of the tool, burnisher held the same as one would hold a pen. Pressure is between 250g-1kg, depending on the pivot. It does take some practice to develop a bit of feel, but I have shown folks in 10 minutes how to use it and they are successful.1 point
-
I took on Marks course and applied level 1 and 2 to my early learning. Level 3 seemed a bit to far ahead for me when I looked. Needed more practice. Even though I practiced, Still I needed more depth of knowledge. This has come form a YouTube weekly programme. Chronoglide. I'm sure you have heard of it . But in case you haven't. Chronoglide is like the breakdown of why Mark's course is needed? I began to watch about 12 month ago. As result of what they do, dealing mostly with disassembly and looking at problems that have arisen with use, and the reason why such has occurred, together with verbal and visual observations. I am now spending more time on Mark's level 3 as I understand what needs to be applied by his methods.1 point
-
Well I lost mine !! I did another 1 quick & took pics so you'll get the idea.


 1 point
 -
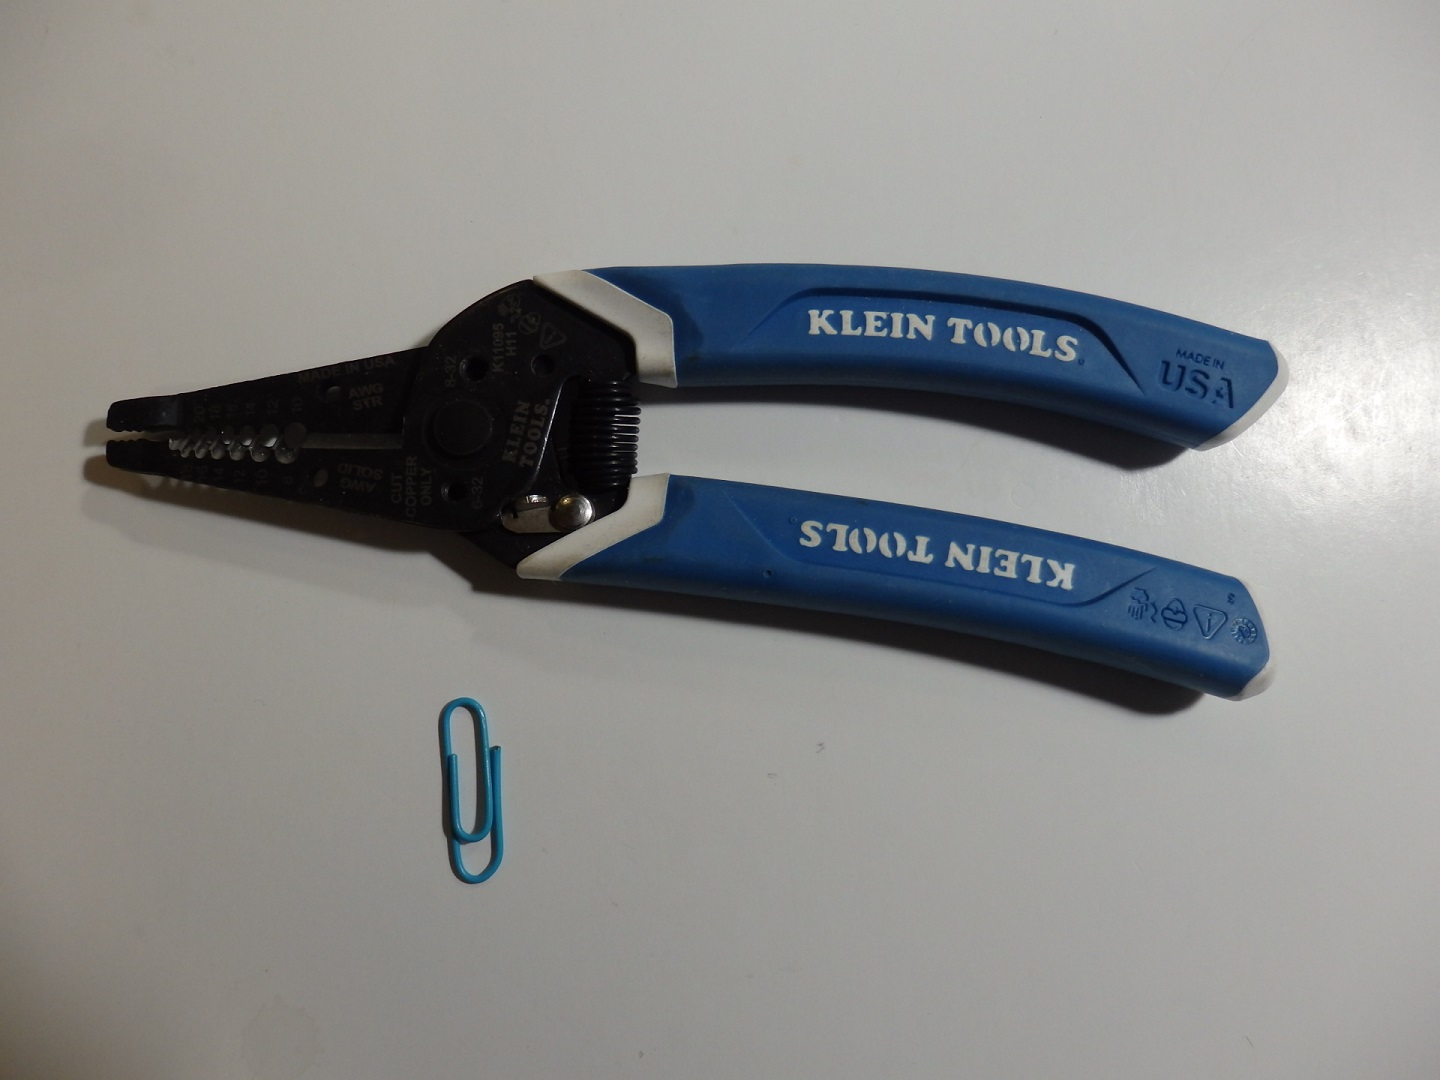
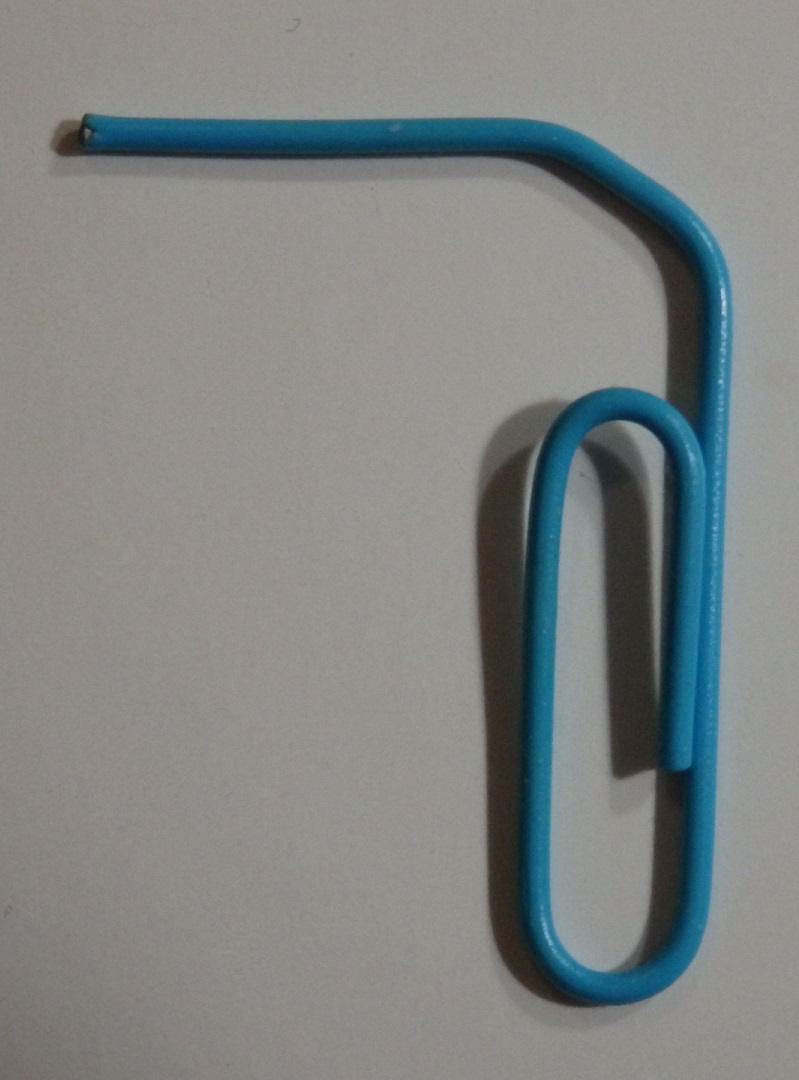
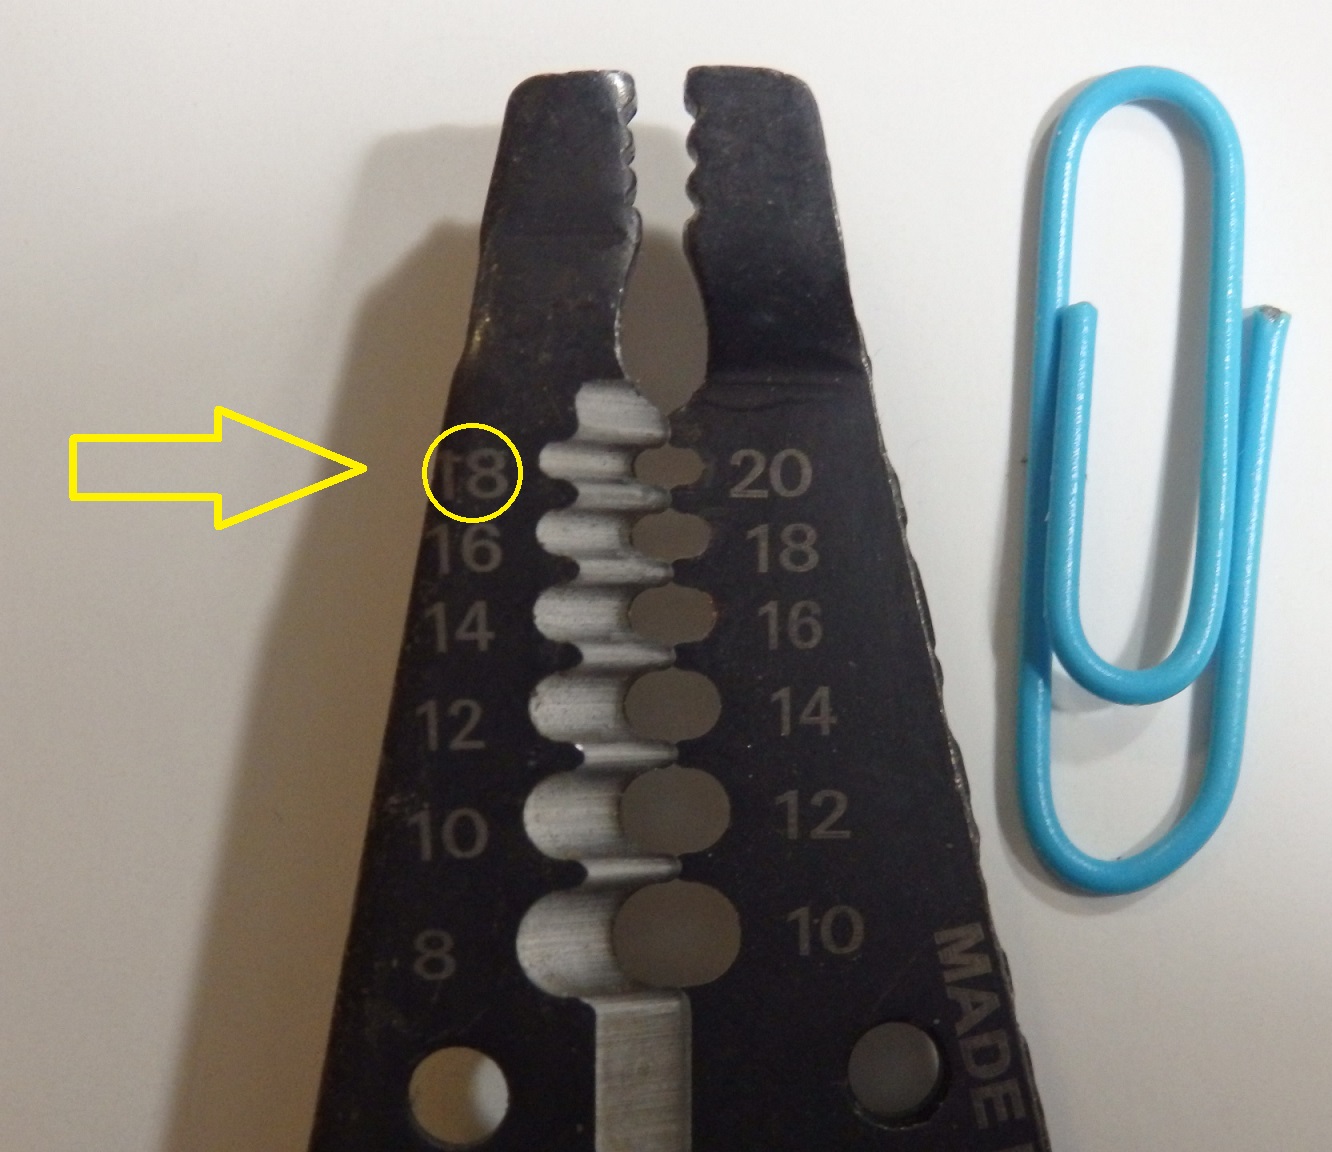
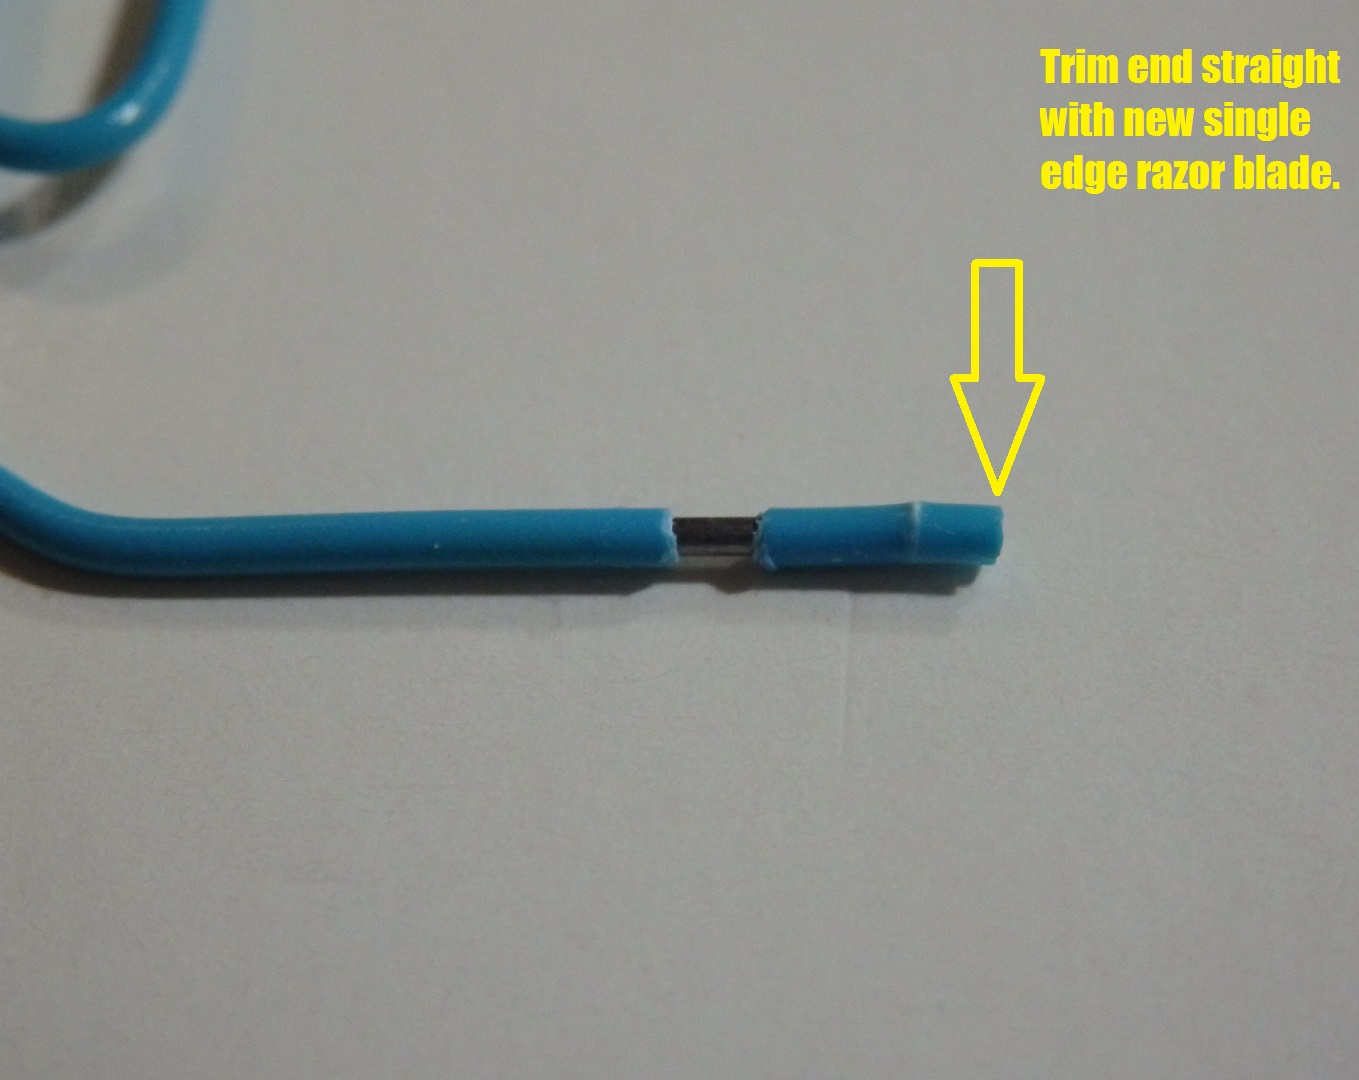
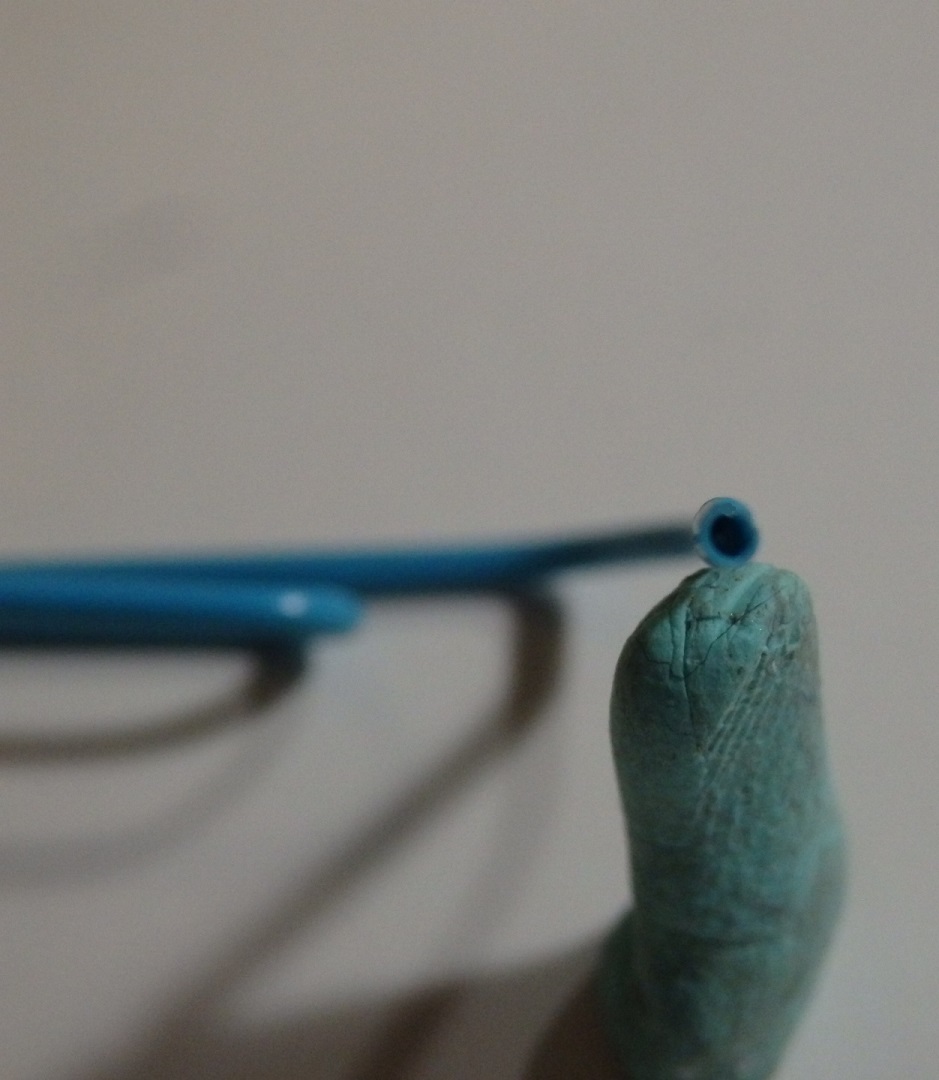
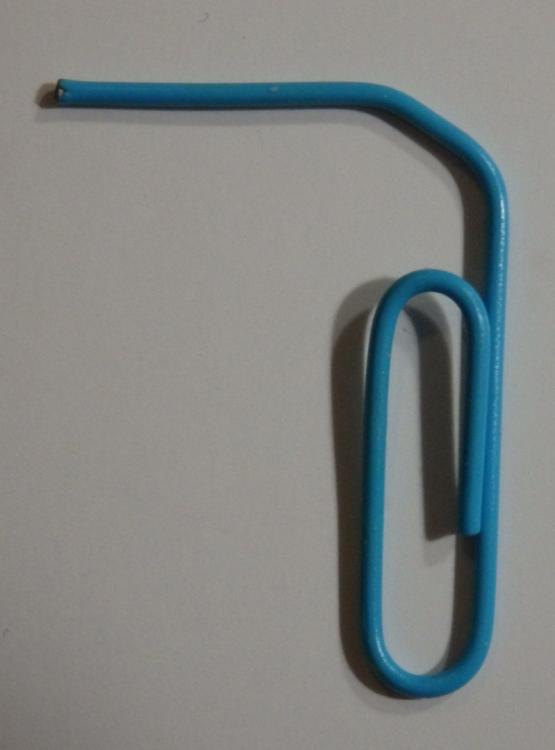
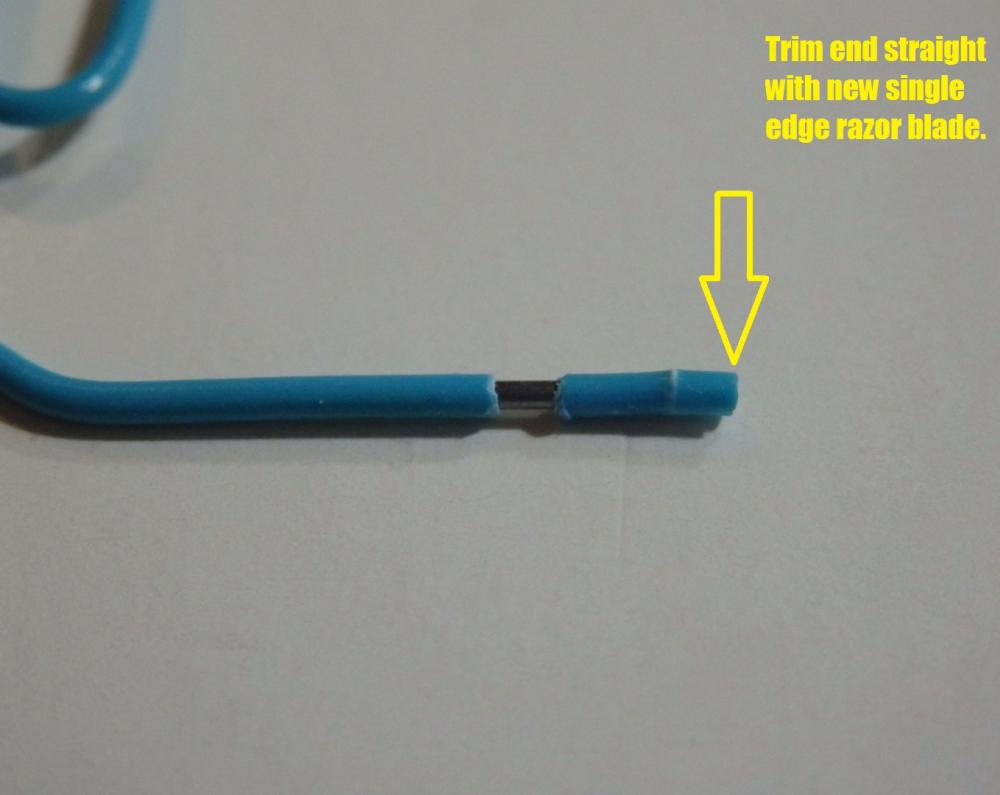
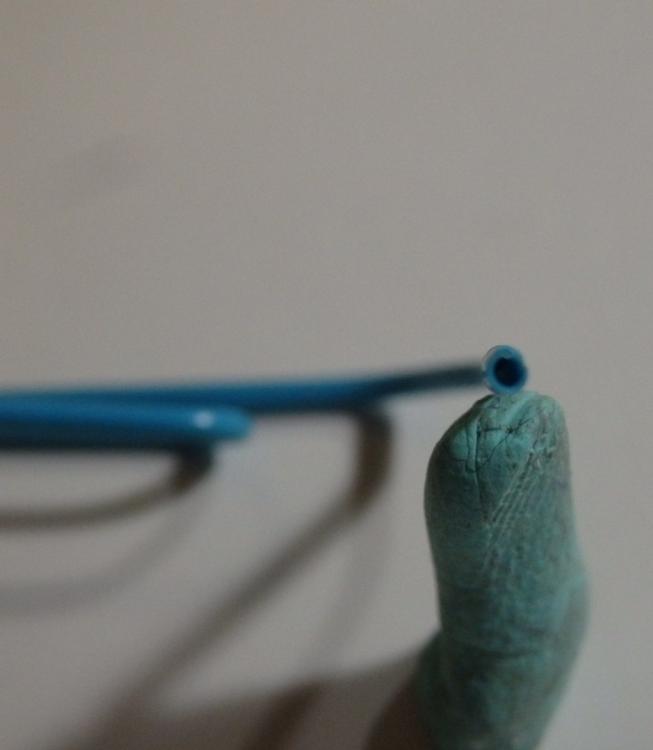
Coated Paper Clip Method For Diashock Springs Straighten out 1 end of a color coated paper clip. Using wire strippers on the straightened end like you're going to strip off some insulation, about 1/4" up from the end, squeeze the strippers & pull the color coating about 1/16" to 1/8" past the metal end of the clip. The paper clip now serves as a tool to twist the spring in or out of place.1 point
-
It's a common mistake many pros make as well, but it's rebanking. Overbanked is when the safety mechanisms of the escapement are faulty and the fork can cross to the opposing banking at the wrong time, stopping the watch. If it's rebanking after fully winding it could be too strong of a braking grease. 8217 is considered a soft braking grease, I didn't quite get if you've serviced it and used that, or will service it and use that? If the former, maybe try some Kluber P125? If the latter it could be the grease is hard and useless a and a service will do it. It's highly unlikely the watch became more efficient through wear, haha.1 point
-
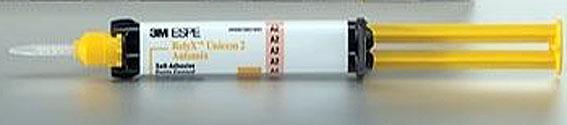
There has been some discussion in the past regarding the possibility of glueing dial feet. No really good glue was reported. However, my dentist suggested the use of 3M dental cement. She uses it for pemanent gluing of crowns etc. The strongest for metal cementing is 3M ESPE RELYX UNICEM 2. It is expensive but available on eBay with some limitations according to country. Here is an example of a test on a scrap dial. 6 mintes working time and after setting at room temperature for one hour I was able to lift, with the dial foot held by pliers, a 500g weight placed on the dial. Good enough as an alternative emergency repair when soldering could harm the dial finish.
 1 point