Leaderboard


.thumb.jpg.cb17a66989f1e796fd4217db2e9ca9df.jpg)
Popular Content
Showing content with the highest reputation on 03/02/24 in all areas
-
I have wanted a Robur watch crystal press and dies for a long time, but when considering the cost of about £510 (CousinsUK, excluding shipping and VAT) I just couldn't defend it. However, as the Robur-like press, shown in my video, now and then shows up in various YouTube videos I got curious and ordered it from AliExpress. I don't think it's on par with the Robur press, but for the price, it seems like a decent option. In the video, I happened to mention that I was going to link to my WRT service walkthroughs, so below is the list in case anyone would be looking for it. Hope you'll find my video useful! My Service Walkthroughs: Citizen 8200A ETA 2892-A2 2804-2 2836-2 955.112 2772 2472 2824-2 Vostok 2431 2409 Enicar 161 Miyota 8205 9015 Tissot 781 Omega 268 Orient 46E40 Unitas 6380 63256 points
-
Hi guys, I wrote this lesson for my second students to understand the theoretical aspects of the Swiss lever escapement in conjunction with the practical application of end-shake and setting jewels using a jewelling tool. Both Seitz and Horia-type jewelling tools were used. Although I talk about measurements using the settings on the side of the jewelling tools, it is more about what 'feels' right, especailly when gauging the end-shake of a particular component, such as the balance, pallet and escape wheel. Ideally, you wouldn't start by adjusting the end shake of the balance to suit your needs, but if the IncaBloc setting has been replaced or the Inca setting has been moved to replace the shockproof spring, then it is important to set the end-shake correctly. This presentation also looks at how to set the correct end-shake of the pallet in relation to the balance safety roller as well as other critical measurements, including the height of the escape wheel teeth hitting the impulse face of the pallet fork in both dial-up and dial down positions. The escape wheel and pallet have to have the exact same end-shake as each other for this reason. Unfortunately, the slides that contain videos can't be played as I converted the PowerPoint into PDF. I have used some diagrams from a WOSTEP handout on this subject, to show the vital measurement of the escapement in relation to the balance safety roller, so all credit goes to the author of that hand-out, which has been posted several times on this forum. All the students that set all the jewels after removing them and the balance end-shake to its optimum got a watch movement working with much improved amplitude than when they started. All ten jewels in the wheel train were removed as well as both IncaBloc settings. Another lesson was created just about the balance setting and disassembly and assembly of the EtaChron balance system which included removing a replacing that Inca setting. I haven't included that lesson. Not every aspect of this work is within the presentation, as it would be very long otherwise. I talk a lot and explain more as the lesson proceeds. This lesson was held over six to seven hours. If anyone is interested in learning more on this subject, please message me. Lesson 16. Balance endshake & Incabloc adjustment.pdf Lesson 16. Balance endshake & Incabloc adjustment.pdf3 points
-
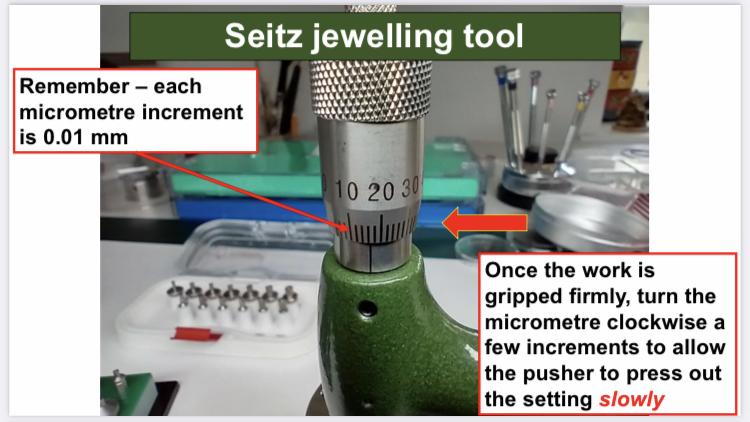
You're right, Well spotted! I used the wrong tool in the slide, so I've now corrected the slide to reflect each increment is 0.02 mm on that particular Horia style tool. Many thanks for that. To err is human.3 points
-
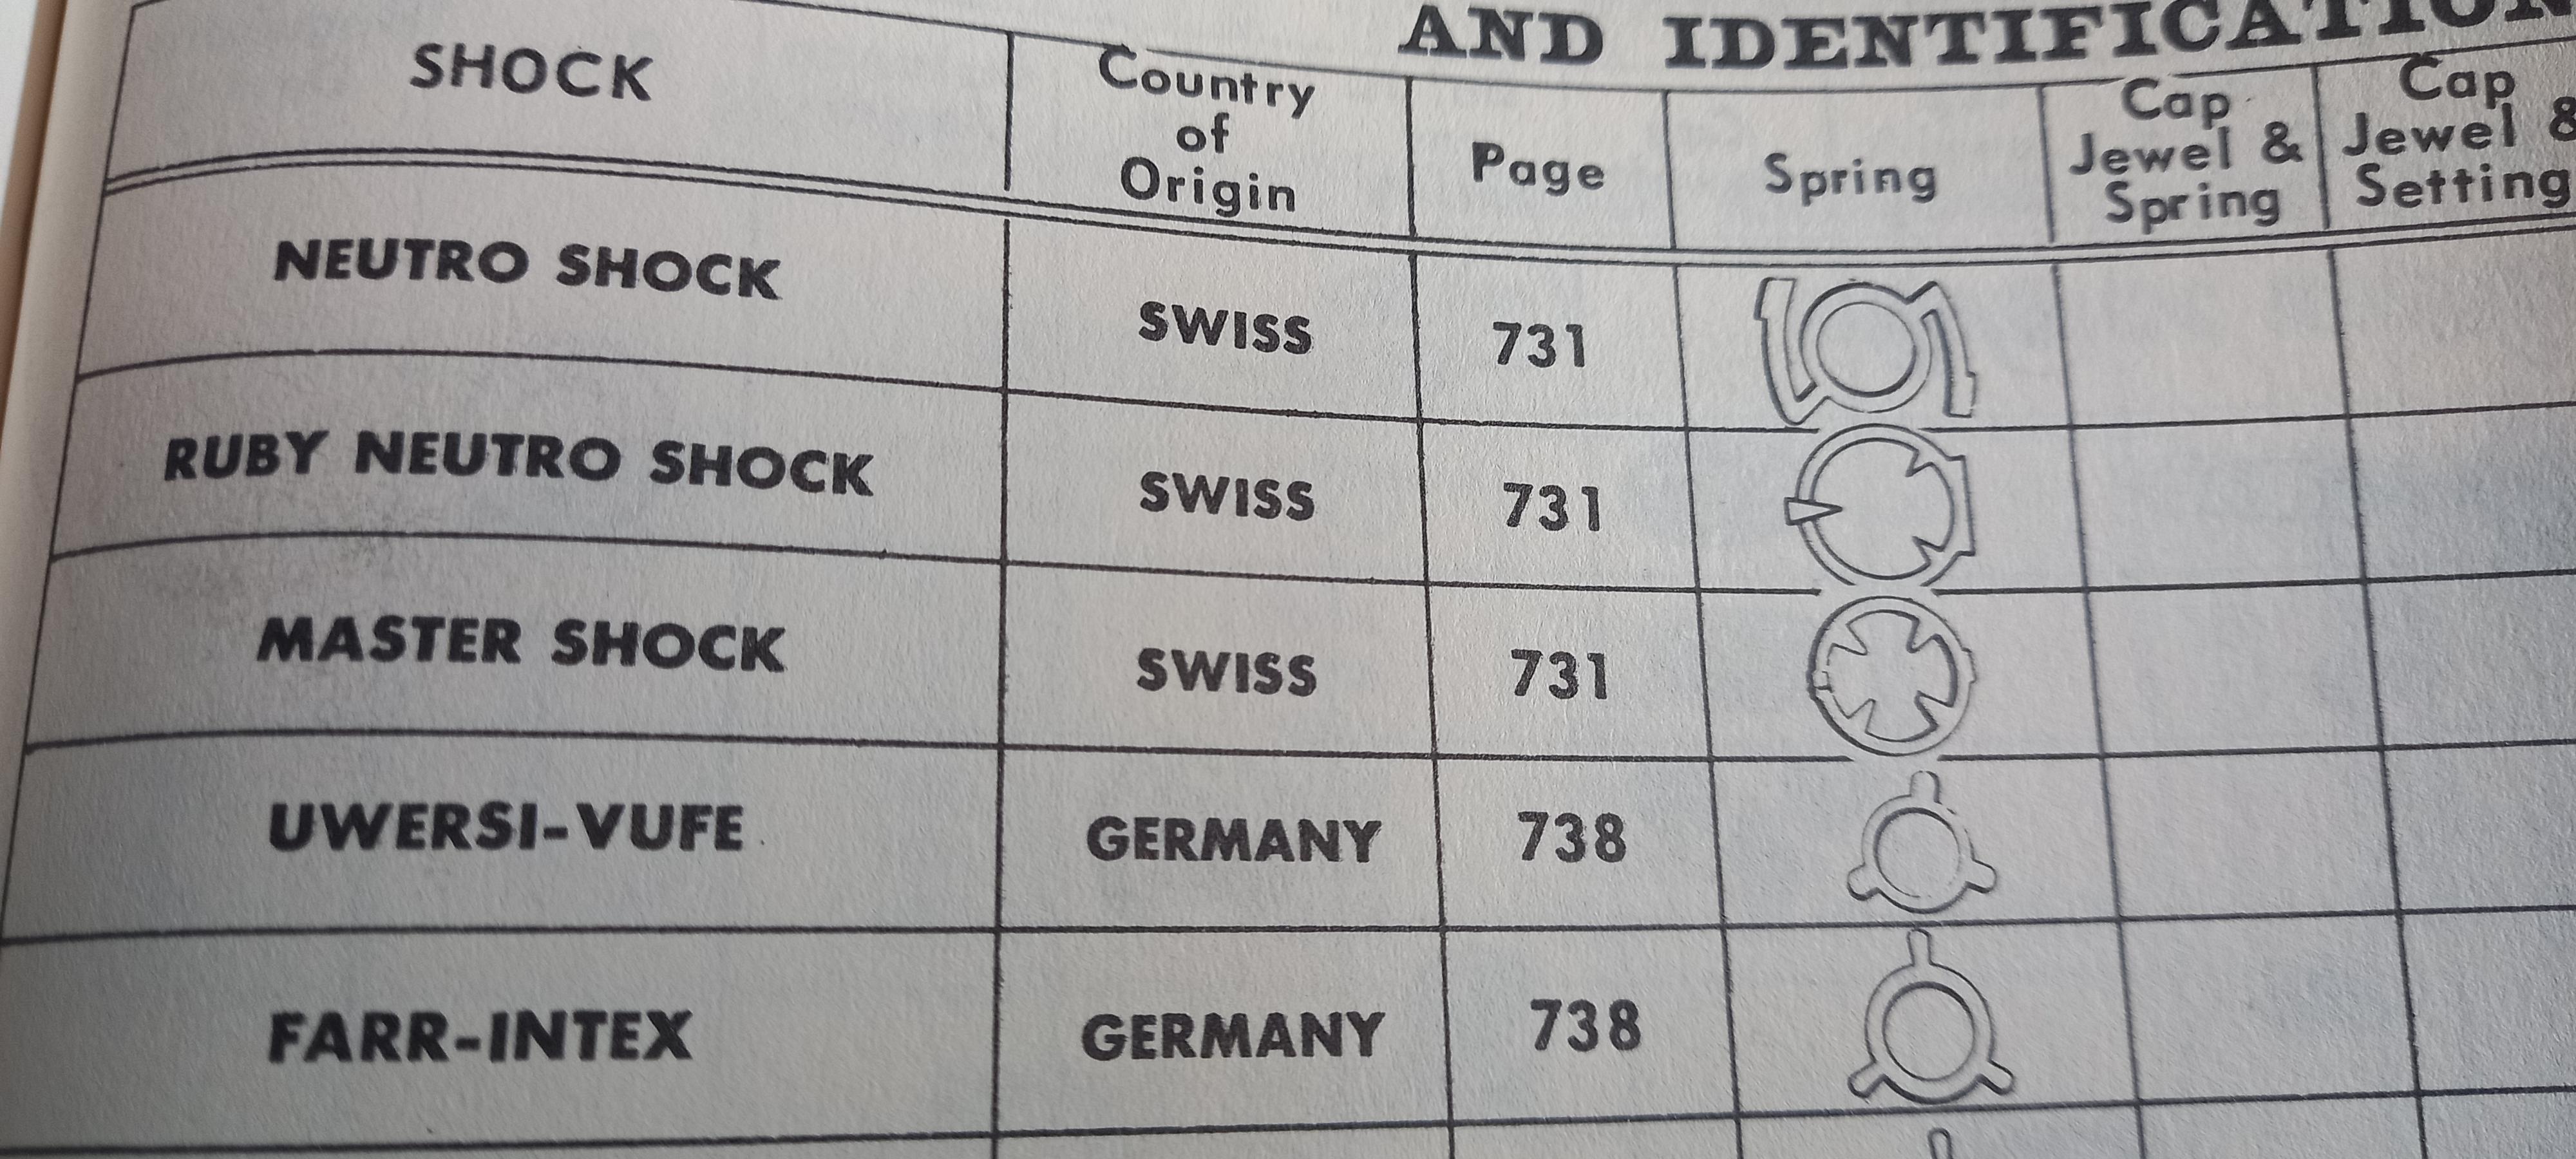
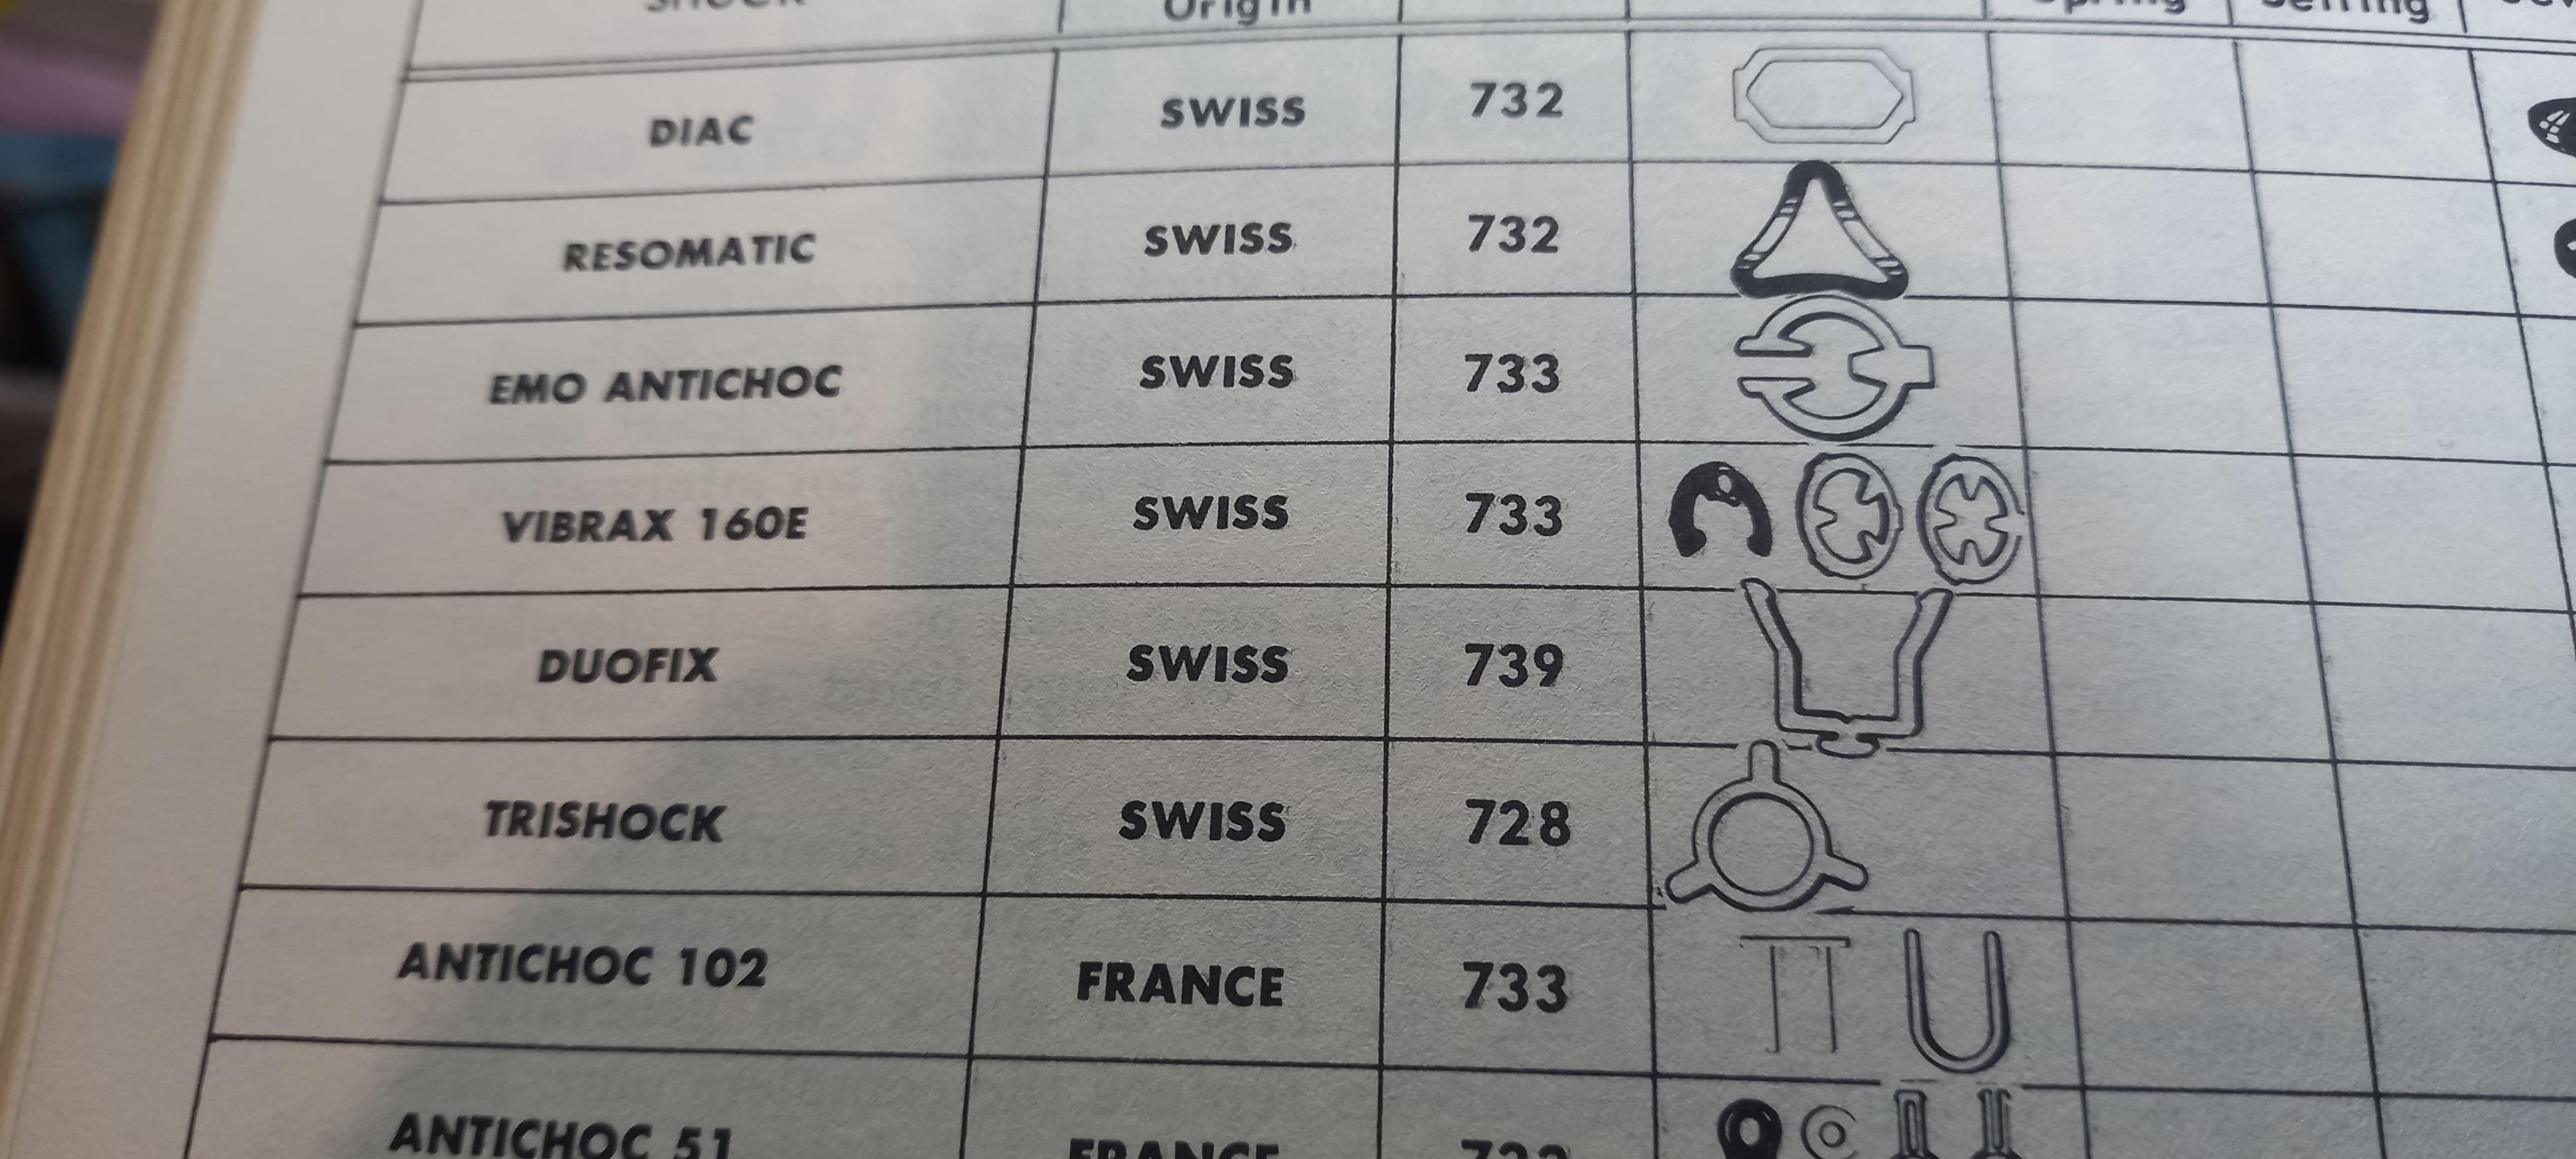
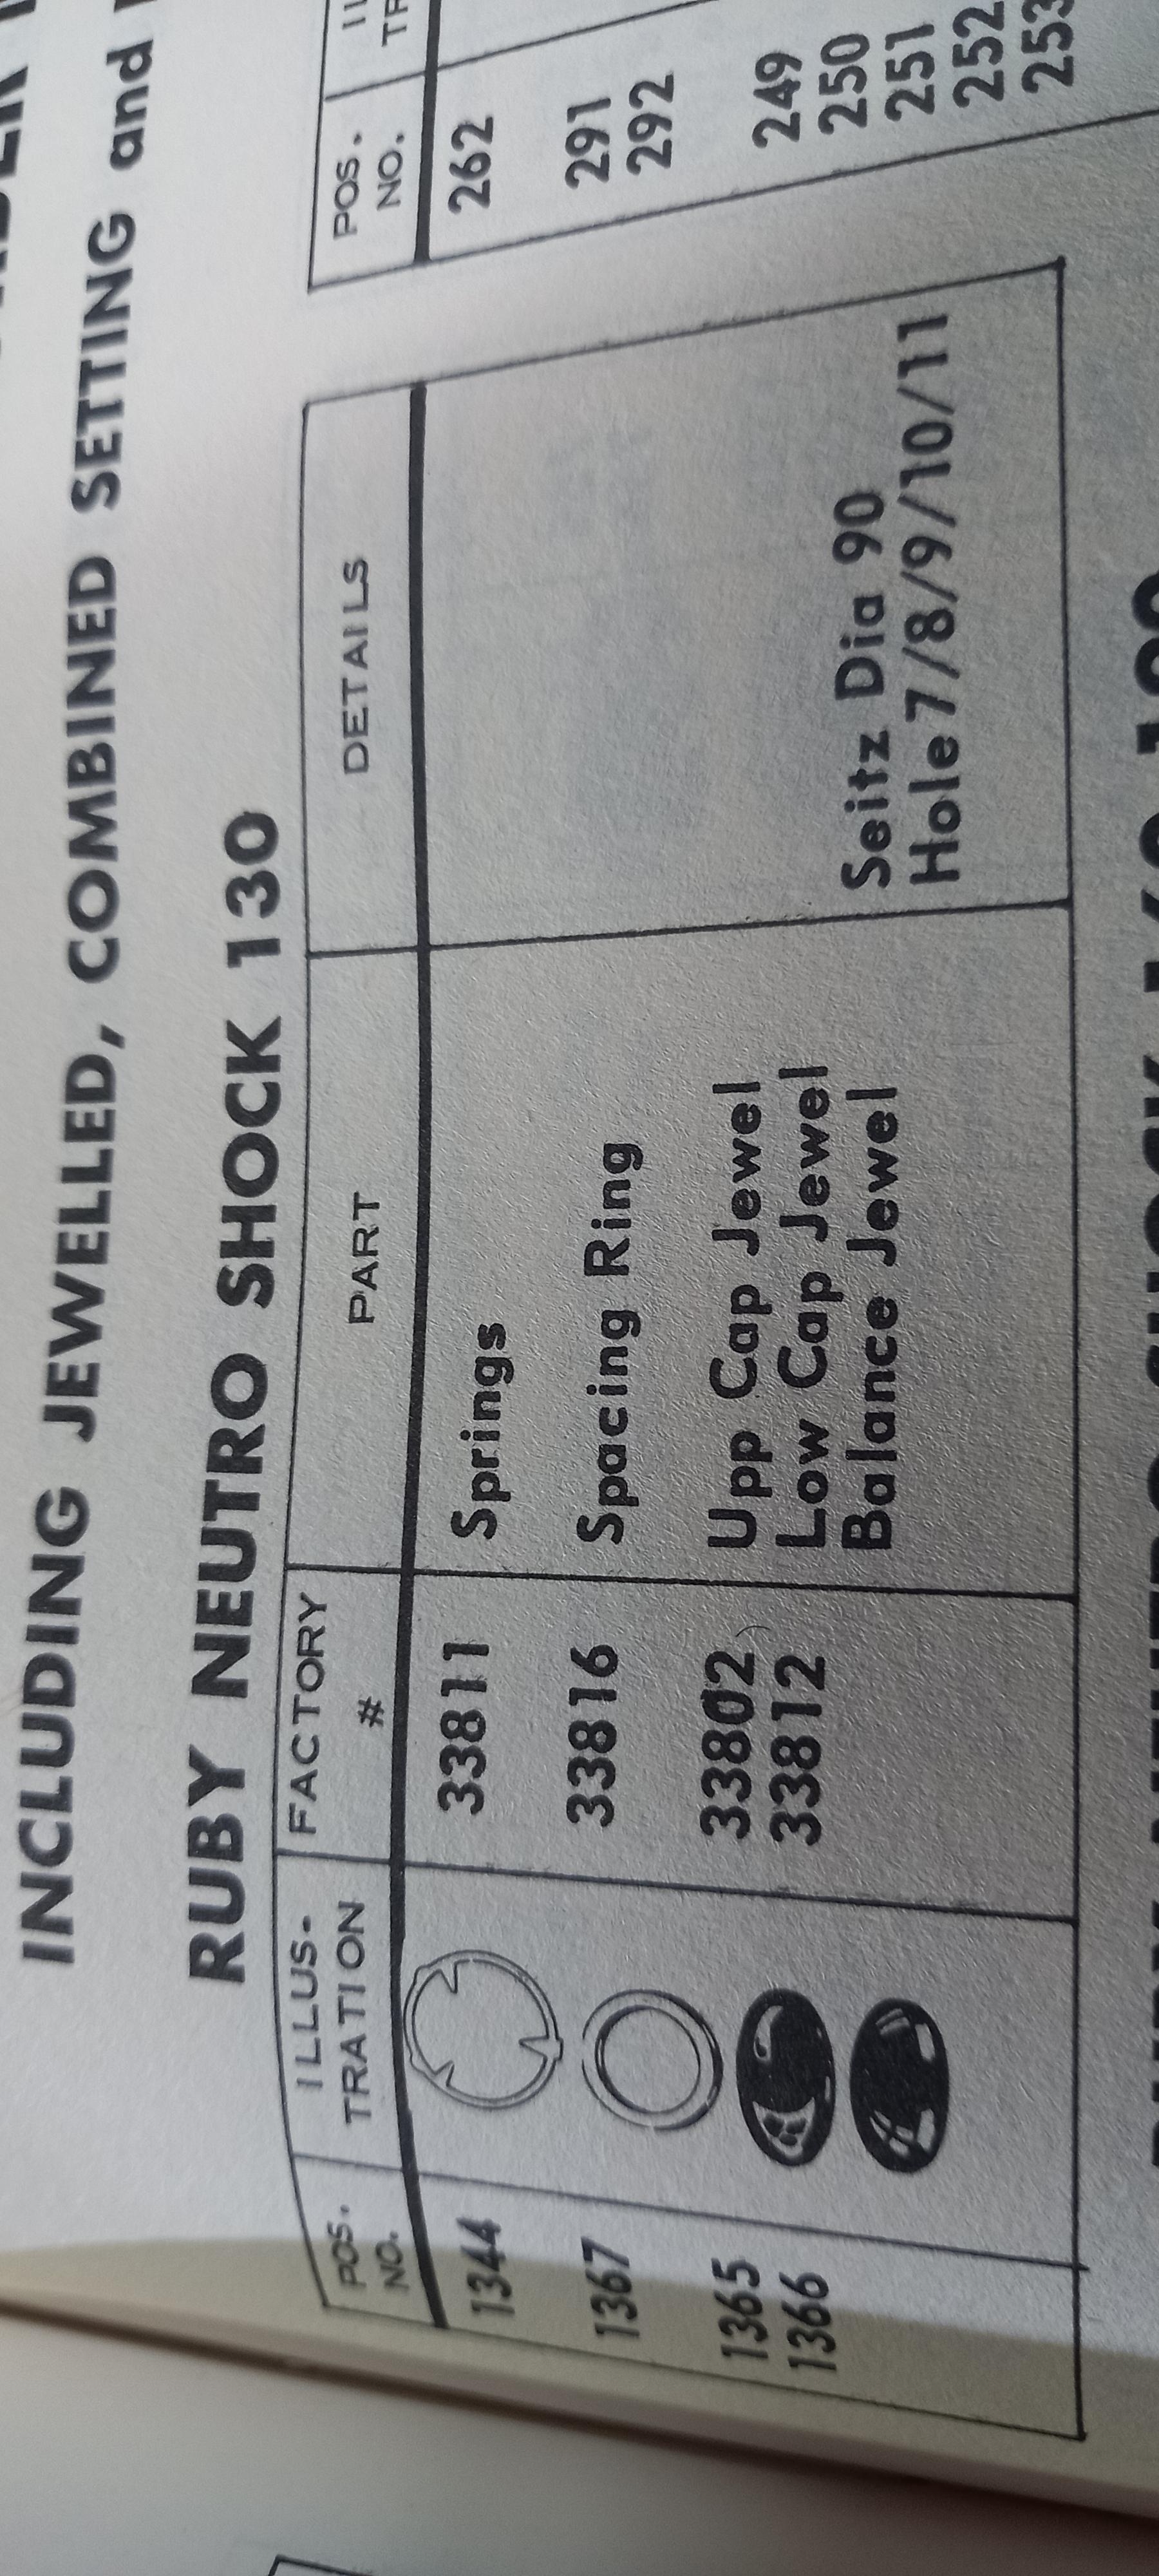
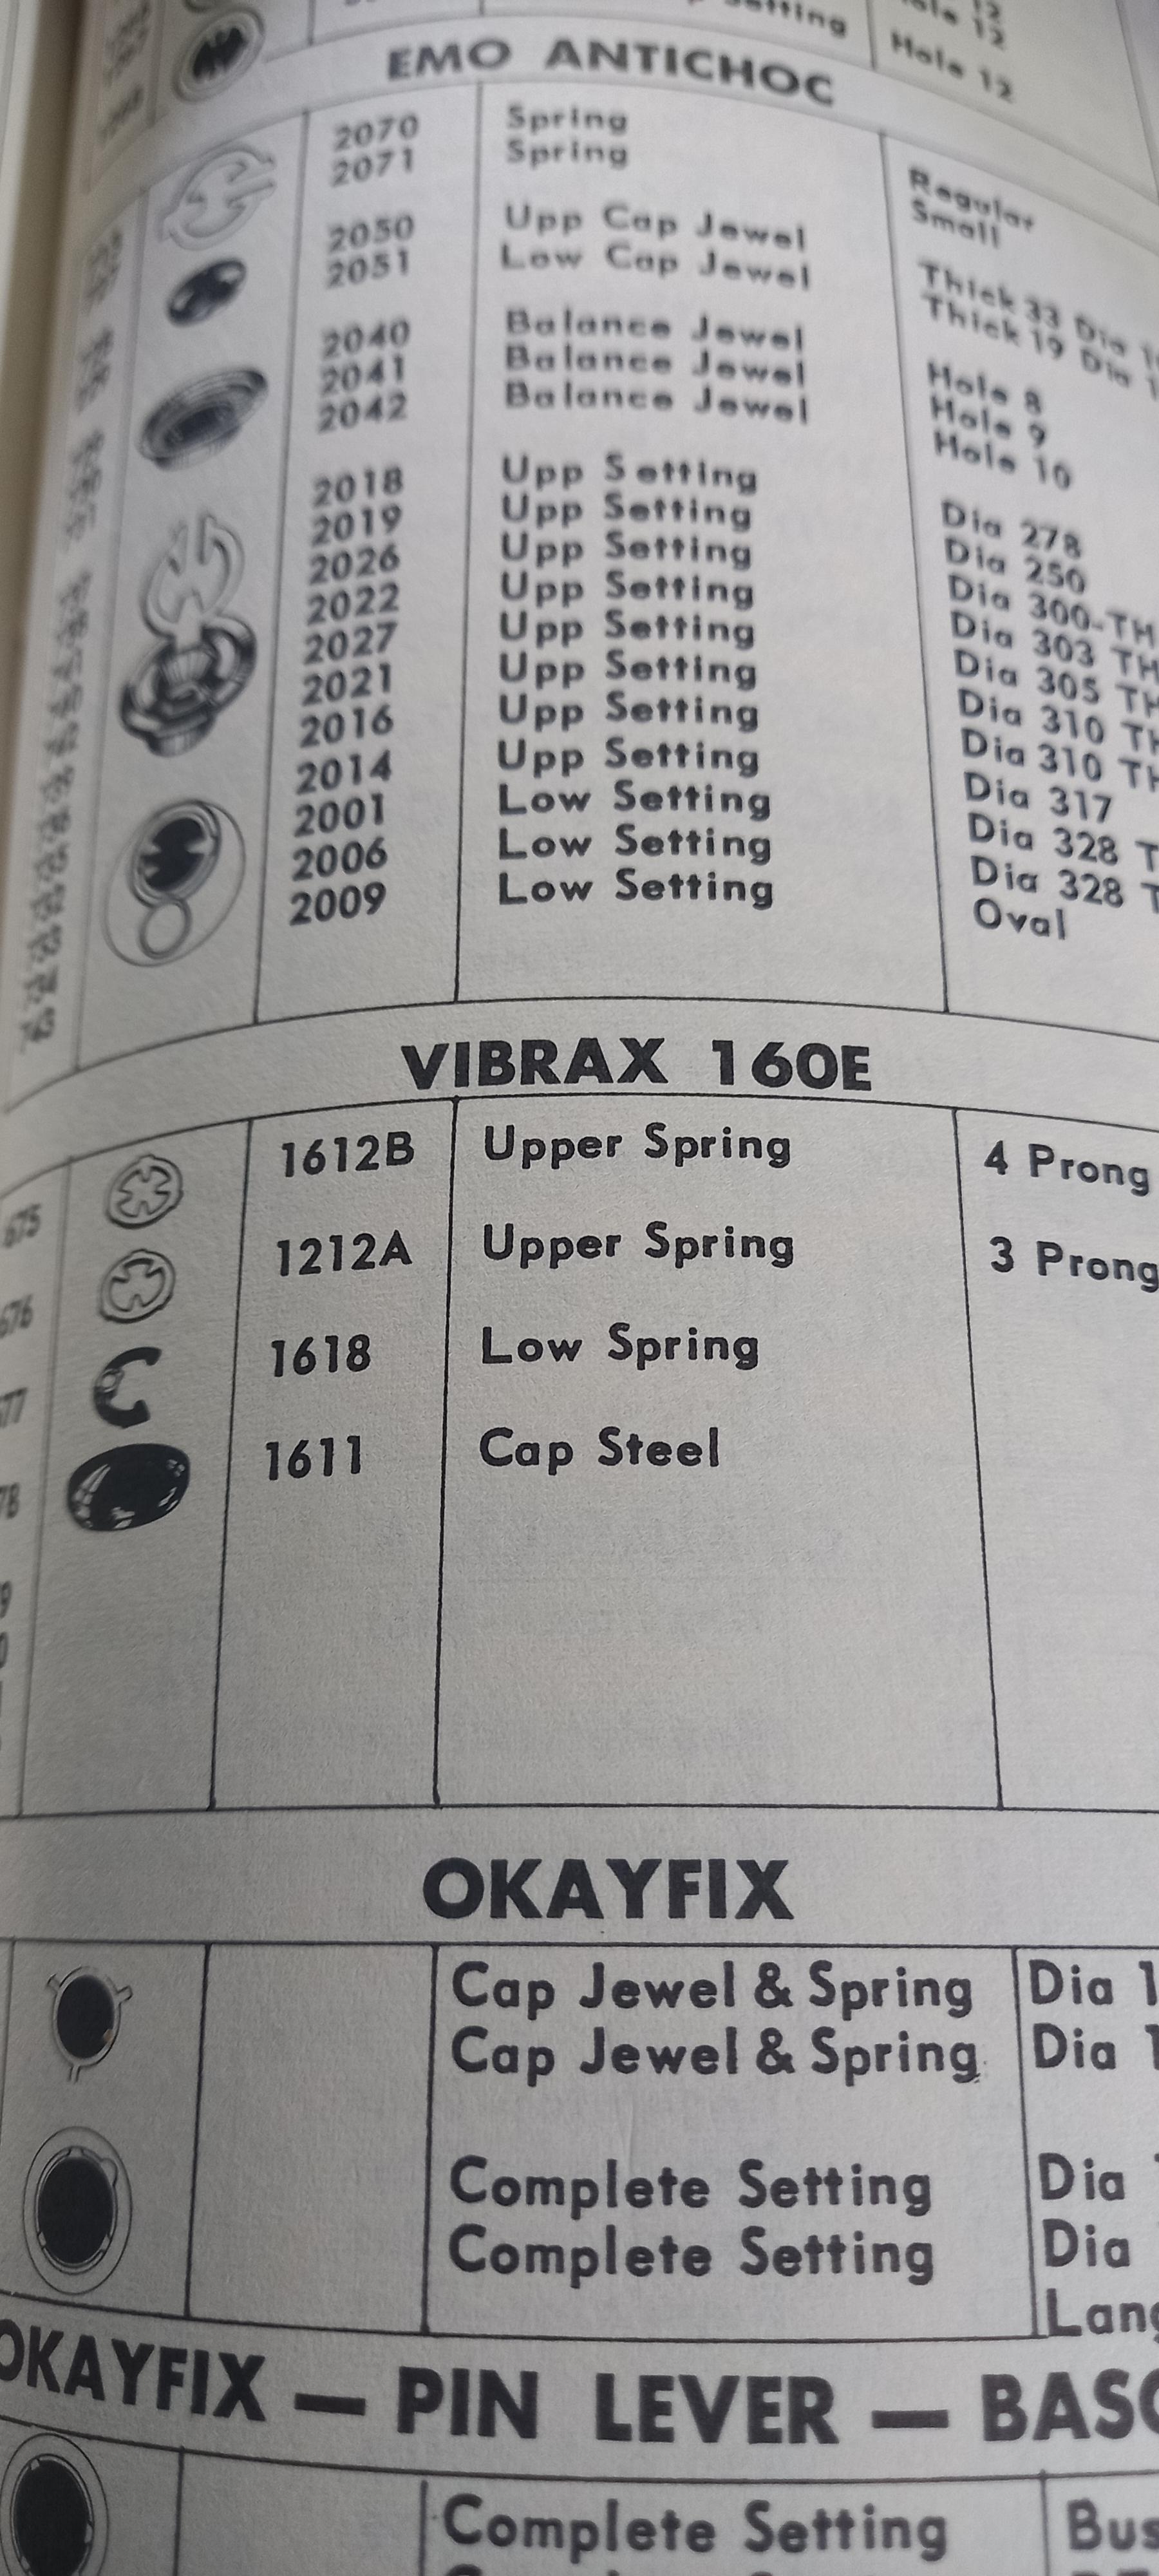
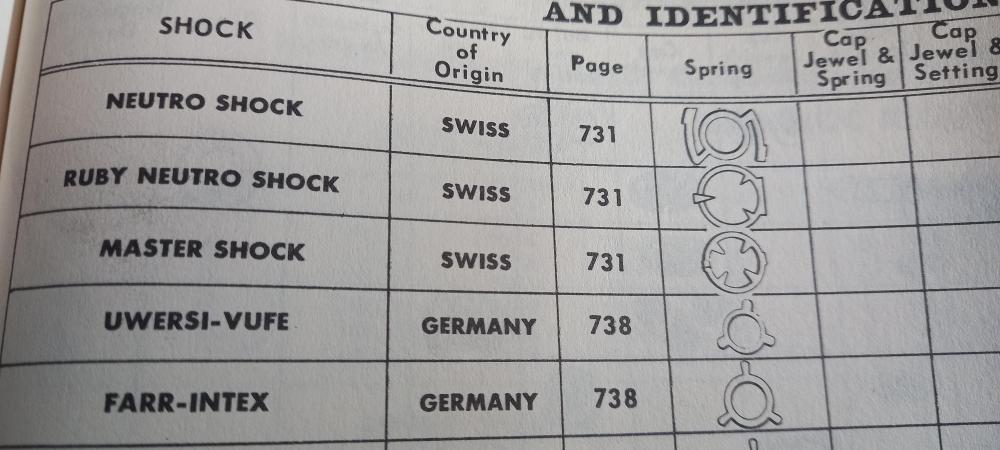
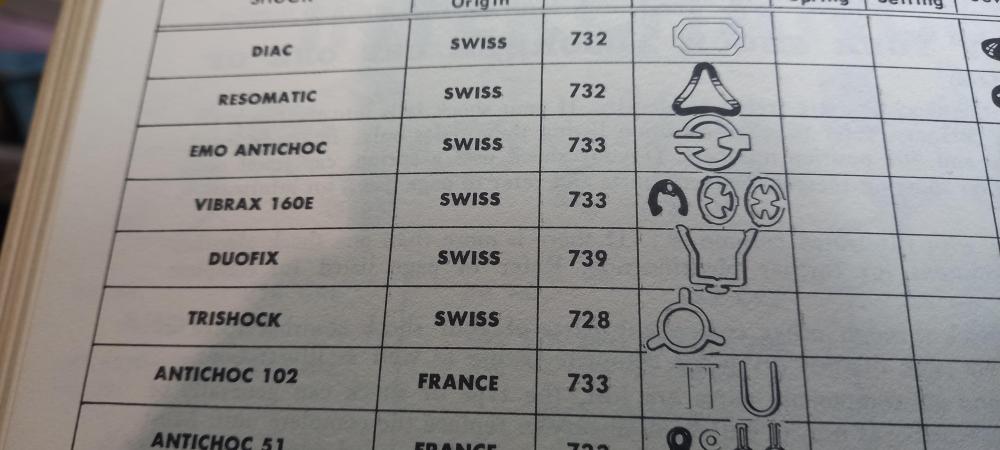
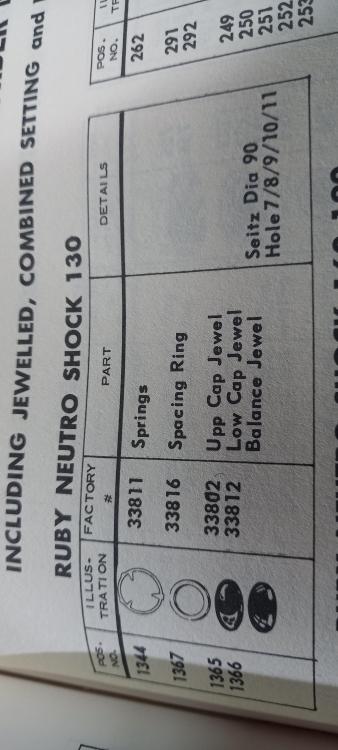
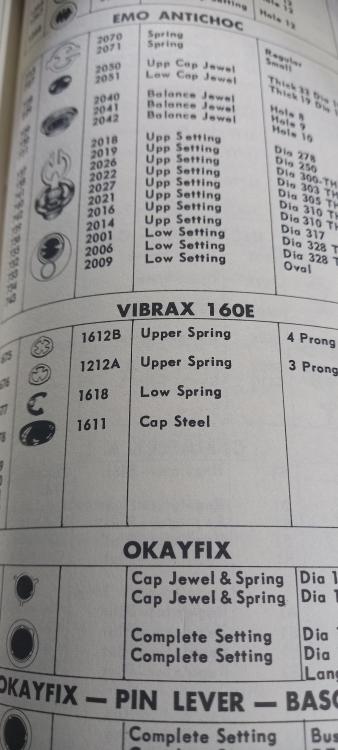
Pretty sure this is a swiss ruby neutro shock, your picture is not clear enough but there aren't many like this stupid design. Vibrax is another but the catalogue shows a steel cap. Ive stripped a similar one down which i think is from a citizen, japan also used some neutro shock types. Clipping off the stud holder releases the regulator arm then you can get in with a sharp blade to prise the setting out of the cock. This is about as far as you can go with disassembly unless you want to risk bending up the spring prongs . Getting them pressed back down tight over the cap will be near impossible. I thought the setting had a seam at the bottom end that might press apart, so i gave it a go . It came apart but nevet to be reassembled, split in half and from inside there is no seam so everything goes in from the front. Personally i would break it down to the setting and flush it out best you can then push oil in from the underside with a whisker. Of course yours may not be identical, so post more pictures as you strip it down.
 3 points
 -
I believe that the fundamental principals of shaping and moving metal with punches remain the same irrespective of what metal you are considering; i.e the material under consideration has to be sufficiently malleable to deform rather than break, the punches that you are using to push the metal around must be harder than the material that you are trying to move, and you need to hit the punch hard enough to to move it. In the case of steel you have to consider the grade of the material. Any kind of carbon or tool steel is going to present problems on at least two counts. Firstly it is unlikely to be malleable enough to deform before it breaks, especially if it hasn't been tempered from its full hardened state, in which case it could well just shatter. Secondly, the punches in your staking set are made of the same material and are therefore going to have about the same level of hardness as the material that you are trying to form. As a result you are going to deform you punches to the same extent as the work piece. If we're talking about mild steel or some other free machining alloy then this is likely to be softer so you will have a greater chance of success, although you may have to use more force to achieve the same level of deformation as you would with brass. This is a perfectly reasonable and sensible question to ask. You have deduced that the plates in your Timex are made from steel, which would be an unusual choice of material for this application but not impossible. Someone who doesn't absolutely know if your deduction is right or wrong and has doubts about your conclusion might well be reluctant to provide an answer on the grounds that they get it wrong, so a request for further information is perfectly reasonable and sensible. It is in fact a "good response" in the "Safe zone for learners" as it helps to encourage a more thorough investigative approach to identifying the problem, something that is of enormous value if if the most appropriate solution is to be found. In this instance your conclusion is incorrect. In common with general horological* practice Timex watch plates are made from brass. Timex (and a lot of other manufacturers) have then electroplated it with another material, either for aesthetic reasons or to protect the underlying brass, or both. Whatever Timex use is silver in colour, but it is not steel. One simple test for this is a magnet, but if you're feeling a little more adventurous and don't mind the damage then try lightly running a file over the edge of the plate in a non-critical area, you'll very quickly see the silver colour come off and the yellow brass colour show through. This of course is good news as it means that you are dealing with a material that you already know. *One of the more notable exceptions to this is the use of an alloy called German Silver, which is actually a copper alloy with zinc and nickel (no actual silver). It is silver in colour but is non-magnetic.3 points
-
Hey @mikepilk , just to let you know that I have now adopted your approach of oiling these kinds of settings. It's definitely easier and, after checking with my brand-new microscope, very effective and precise. To "push the oi through", I use a thin (red) oiler with a broken off tip, which I additionally sharpened to the right thickness. It's nice and sturdy/stiff, yet just thin enough.2 points
-
I had one for awhile. I ended up selling it. It is actually quite a good press for the money. But I bought a vintage Robur press for a good price, so it became expendable. However, I was way too premature on selling that Chinese press. The Robur press got lost in the US Postal system and never arrived (it's been several months now). I at least got my money back from the seller. I've been using a cheaper Chinese press. I'll likely eventually buy a new Robur press from Cousins (just the press) and 3D print an adapter so I can use my screw on dies.2 points
-
On the jewelling tools I use they are 0.01 increments, but appreciate pointing out that it may be 0.02 mm in other tools. I think whatever tool a watchmaker uses, they know what the measurements are before starting to use it2 points
-
I see your getting help so my warning will be a waste of time but a lot of times you don't get help if we've never seen the watch before or never worked on it. Which sometimes happens if this watch is a proprietary Swatch group watch so be careful what you break you may not be able to replace whatever you break. Swatch group doesn't like all watchmakers only their chosen ones and even then they barely tolerate them.2 points
-
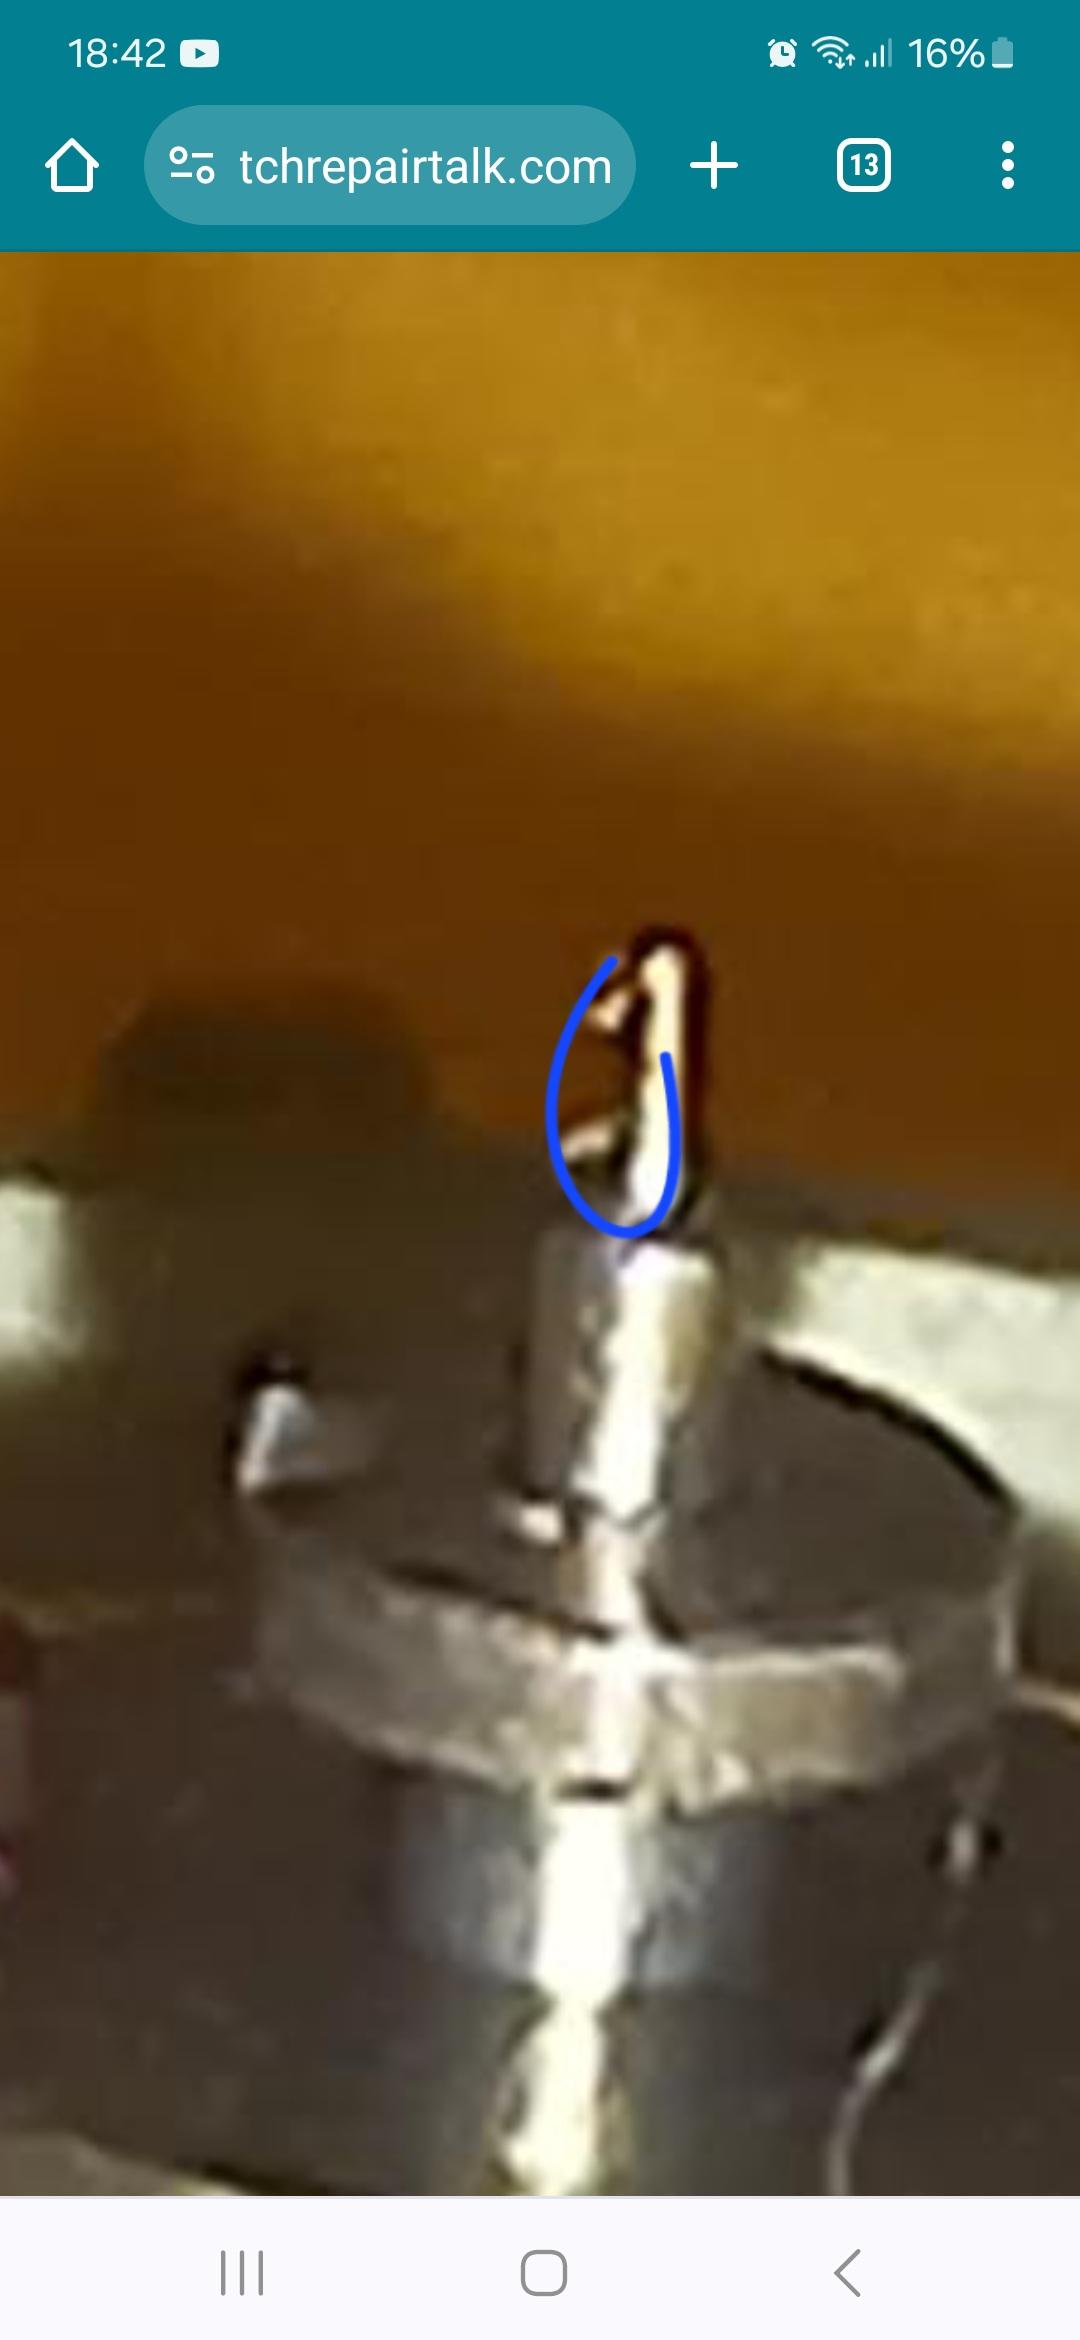
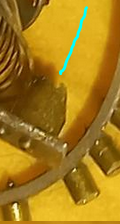
There is a screw missing in the green circle. Without it, the (-) terminal is not making proper contact with the circuit board.1 point
-
Hello hello, well, maybe to close this topic with my final update. Of course, my obsessive side got the better of me People who know me personally wouldn't be surprised. I just kept wondering if I had made a mistake or if there was any dirt somewhere. So I ended up disassembling/cleaning/reassembling/reoiling the watch two more times (except the mainspring barrel, because I don't have a mainspring winder).. Well, what did it do? NOTHING. Exact some outcome (amplitude at full wind and after 24h). A bit frustrating (especially, since I lost one cap jewel in the process which cost me 35 EUR to replace) to do all this work for nothing, BUT now I have certainty that there definitely is nothing wrong. The last assembly/oiling and inspection was also with my brand-new stereo microscope (see post linked below). So I am sure that everything is spotless and oiled really well. But one additional thing, and @Jon mentioned this in his post earlier in the thread: when I install the automatic works and rotor-wind the watch a little bit (swerving the watch around for 2min) after a full manual wind, amplitude will shoot up to 295 degrees for about one minute. Then it settles back to 270, then 260 where it stays for a while. In the end, I'm happy with the final result. As @JohnR725 always says: what matters (for most watch company specifications) is amplitude AFTER 24h -- and timekeeping, of course. Both are perfectly within spec. So, done and done. )1 point
-
Hi khan. Where the tracks have been destroyed it may be possible ti re connect them using conductive paint to bridge the gaps. The same stuff used in repairing car window heaters and larger circuit boards. Can be used to repair scuffed coils.1 point
-
Happy Birthday, @Knebo. You've got a good wife.1 point
-
Hello all, So for my birthday, I asked my wife for a stereo-microscope (actually, I told her exactly which one I wanted). I've read many times (and seen this video of Alex https://youtu.be/tAtATqwI5A4?si=NlU3TwHFBwpDKitw) that a good stereo microscope would be a "game changer". I resisted for the longest time, and ended up buying a staking set, jewelling set, glass press... heck, even a Jacot tool. But now I made the jump. And OH MY GOODNESS, it is so much more amazing and "game changing" than I ever imagined. I go the Amscope SM-3TP (https://amscope.com/products/c-sm-3tp-hd), with light ring and 0.5 Barlow lens. It delivers the perfect amount of magnification and working distance. (Please note that the 3TP version allows you to use full stereo vision while using the camera port at the same time. The 3T version used by Alex (see video link about) will force you to either use stereo-vision for your eyes and NOT use the camera port at all, OR use the camera port but only have mono-vision on your eyes. The camera port and the left eyepiece share the same "tunnel" and there's a lever that you pull/push to decide which one is active. I definitely recommend paying 20 bucks more to get the 3TP.) I think that one really needs to experience a stereo microscope like this to fully appreciate how incredible it is. Pictures (which are two-dimensional) will never do it justice. To see three-dimensionally is SOOOOO useful. I've never oiled a pallet stone with such perfect accuracy and ease. And I can see in perfect clarity how the drop of oil spreads over the next 3-5 escape wheel teeth. Until I apply another perfect drop in the perfect spot. And INSPECTION: my goodness. You'll find the tiniest speck of dust or debris with ease. Honestly, I'm over the moon with this new acquisition. After using it for 3 days, I can't even imaging how I lived without it.1 point
-
How can this be fine?1 point
-
Oops, sorry I meant remove the hairspring not unpin it.1 point
-
you do not have to unpin the hairspring but you do have to remove the balance wheel from the bridge which are going to have to do for cleaning purposes anyway. To remove the balance wheel there are two separate steps of getting it off the bridge. first you need to loosen the hairspring stud screw. It's in the image below this will allow you to push the stud out but not yet and once it's out gently screw it back in again so doesn't fall out it's a pain to put them back in when they fall out then you remove the balance bridge with wheel flip lid upside down because you need to release the hairspring between the regulator pin and boot. you can see a side view picture here of understand better of how to free the hairspring up we can see a side view here notice I marked something that's basically a screwdriver slot. So with the bridge upside down you put a screwdriver in here gently turn 90° or just enough to free up the hairspring so I can slide out then you can gently flip the whole thing over and pushed the hairspring stud out and in the whole thing should be free of the balance bridge. here's something that would help out in addition to the help from the group. a PDF on servicing platform escapement's Servicing a Platform.pdf
 1 point
 -
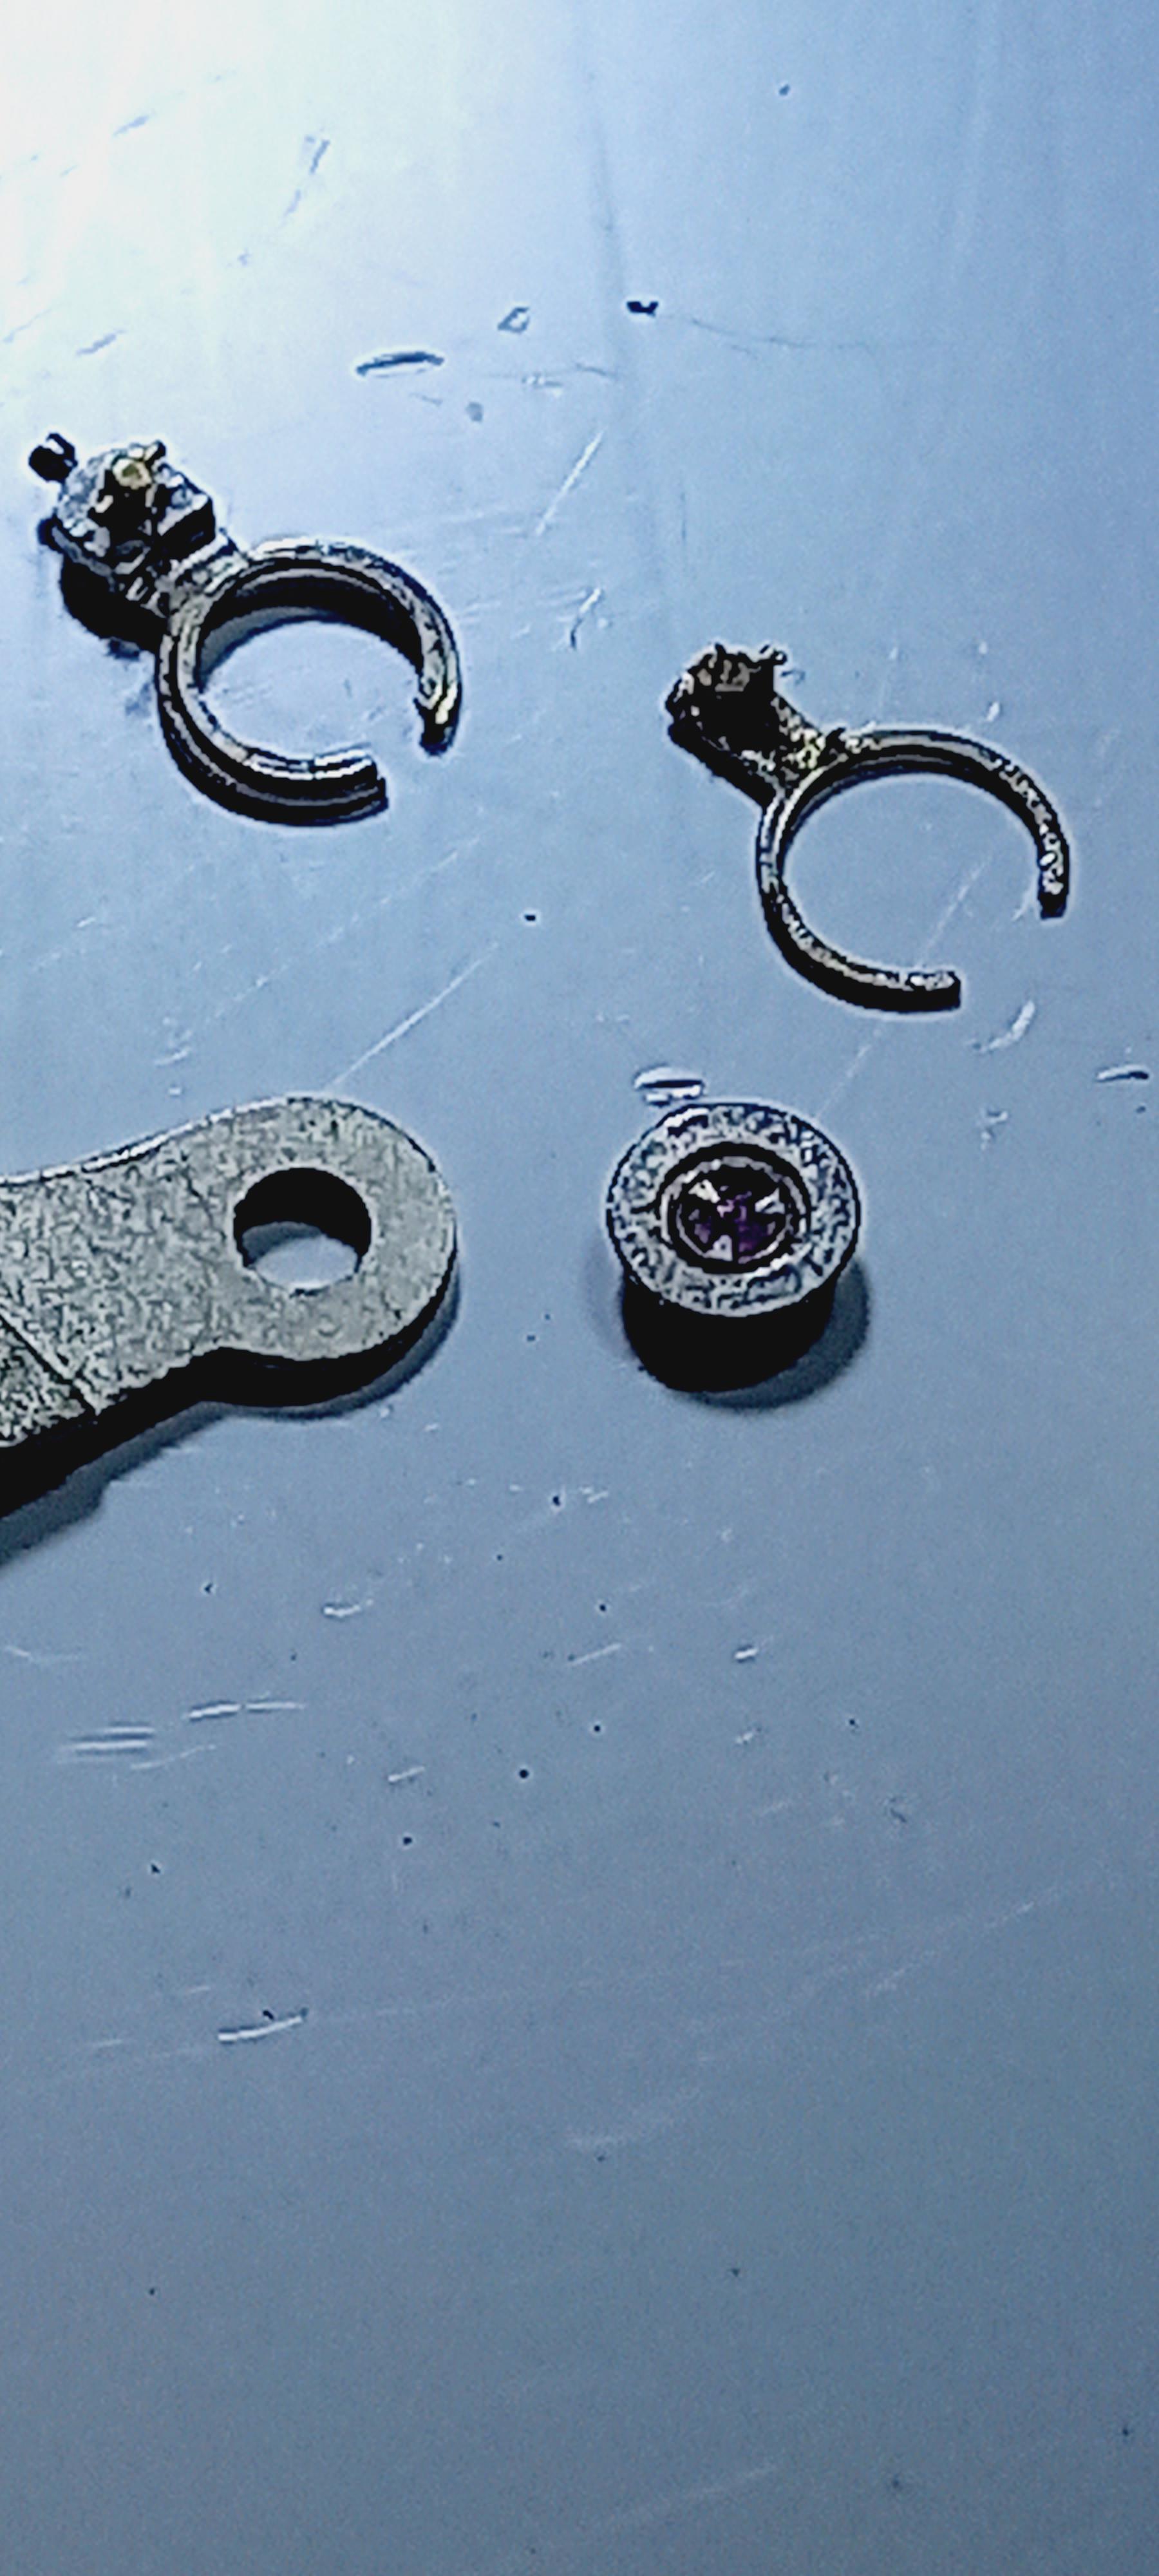
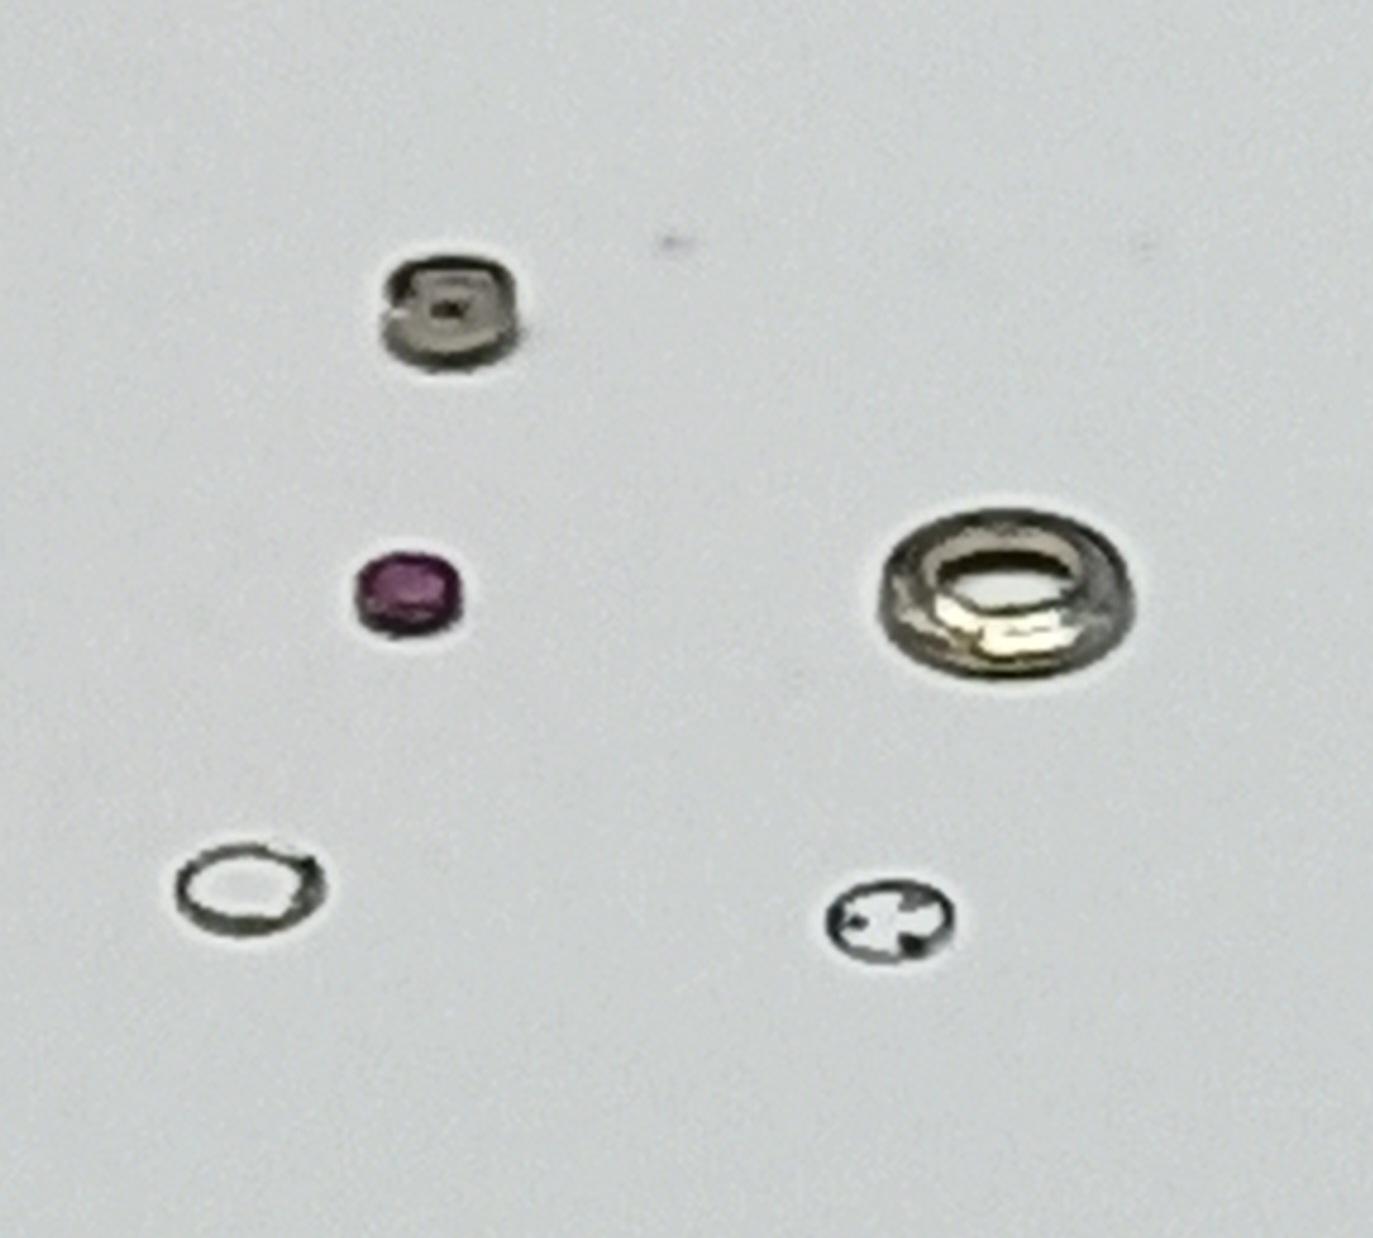
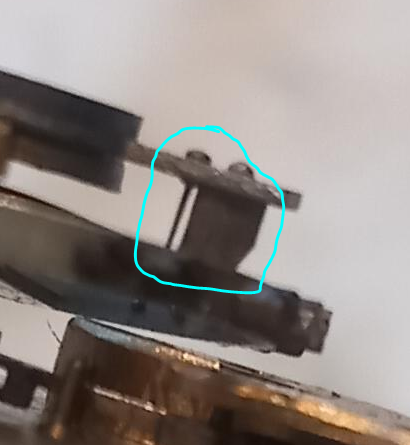
What are these bits? You may have to unpin the hairspring to see the top pivot properly. I don't know much about clocks but others on here do, hopefully they will assist soon. @oldhippy.
 1 point
 -
@valleyguy this is worth a look for a Robur type press Tom1 point
-
I wouldn't be one bit surprised if the screw-type crystal press I have made an overview video about has already been covered in this big thread, but I thought I would contribute to it by linking to my post about the video.1 point
-
Hector go for the 36000 beaters, wow.1 point
-
I used a feeler gauge to confirm what the settings are on my jewelling tool1 point
-
Grip the bezel with the ball and turn anti clockwise. More than likely it will grip the crystal, but that shouldn't be a problem, as the crystal will be fitted very tightly into the bezel with a gasket1 point
-
In the lesson is an error that may cause severe trouble: Here the increment is 0.02 not 0.01 mm
 1 point
 -
What makes You think that there are steel plates in Timex movements?1 point
-
The Eakins has finally arrived in one very heavy box, now I need to sort out a suitable camera and dedicated desk as I currently on,y have my computer desk. I’m thinking those electric sit stand desks might work as I can adjust the height as needed.1 point
-
You're very welcome. the bezel isn't going to be that hard to remove. It is either a screw down bezel or a friction fit. try using a 'sticky ball' to remove it first by gripping it with the ball and turning1 point
-
If I'm understanding you, you said how to fit a new lyre spring. To fit a new incabloc lyre spring, it is in slide 16 of the presentation. press out the Inca setting enough so the 'T' part of the spring can fit in the slot of the Incabloc setting, then press it back into place with a jewelling tool. If you mean how to attach the lyre spring arms over the cap jewel, let me know and I'll post something Many thanks! I use the term 'Goldilocks' a lot in my lessons. And yes, there are always three bears. I call them Peter, Paul and Jill. In watchmaking, especially stuff involving the escapement I tell my students, "If you're going to rob Peter, then Paul is somewhere in the shadows with a baseball bat wanting paying and just when you think you've paid him off, Jill comes out from behind Paul with a flick knife because you fell into the trap of making an assumption. If you're gonna rob Peter, you have to pay Paul, so if you adjust the endshake of the pallet jewel , you have to take into account the height of the guard pin with the safety roller and Jill is the escape wheel hitting the top half to three quarters of the impulse face of the pallet jewel. Peter, Paul and Jill, I love those three!1 point
-
Hello Martin and welcome to the forum . Plenty to enjoy.1 point
-
I've just posted this on the forum to help understand the theory in conjunction with the practical aspects of end-shake. Unfortunately the videos won't play because of the conversion to PDF. Enjoy!1 point
-
I usually clean battery leaks with white vinegar. Use a brush or cotton bud and dab the vinegar all over the corroded parts. Let it soak for about 5 minutes, then rinse with distilled water. Sometimes the battery juice (potassium hydroxide) gets soaked into the substrate of the circuit board and causes a short. Other times, it eats away all the copper of the pcb track. After the board has dried, use a multimeter in resistance mode and test for continuity of the copper tracks and then for shorts between adjacent tracks. Test the battery contacts very carefully. Sometimes they may look clean but there can be corrosion under the rivets and have several hundred ohms of resistance. If everything looks good, then put a battery in and test that it gives a pulse on the pulse meter. I would also test the current consumption with a microammeter but that is not a tool that most hobbyist have.1 point
-
So far so good with using the hand presser. I use this holder with it. It is really just a platform to set the movement on and fits perfectly into the cup of the hand presser. It does have an adjustable central pin to support the center jewel. Though, you have to adjust it from under the holder, which isn't ideal. It would have been better if you could spin the top of the holder and that would adjust how much the pin protrudes. I thought about modifying it to do so, but had not gotten around to it.
 1 point
 -
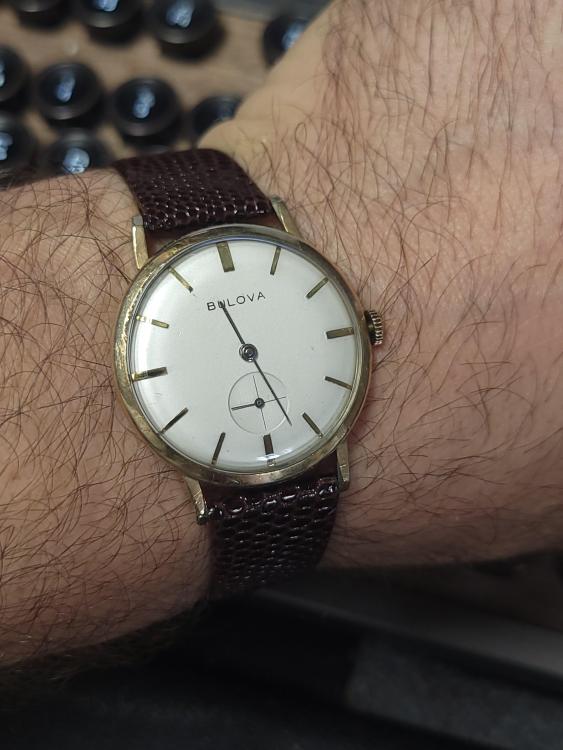
Just arrived, 1959 Bulova President "A". Allegedly recently serviced, but the hand setting feels pretty crunchy. Still, I really love these guys.
 1 point
 -
They are not difficult to take apart. Just put a screwdriver blade in the slot, and turn, until the 3 cut-outs line up with the 3 prongly bits. Clean in ultrasonic, and assembly is just the reverse. Assemble before oiling to prevent an oily mess. Put a small amount of oil in the cup of the jewel, poke a fine wire (I use an old sharpened oiler) through to the cap jewel, and capillary action will take it through. Repeat until about the oil disk covers about 1/2 the cap jewel. BTW I avoid taking out the stud screws - they can be fiddly to get back in. I just tighten them before ultrasonic cleaning.1 point