Leaderboard


Popular Content
Showing content with the highest reputation on 03/05/24 in all areas
-
It's no difference using a platex tool or any other method to perform the same task. The risk comes from the rivet being forced through the hole in the balance arms and potentially opening up the hole and not the tool itself. You're correct that removing the rivet or hub when in a lathe isn't fool proof, just as any operation in watchmaking, but from personal experience it is a lot safer than just forcing a balance through the hole of the balance arms. When you perform this task using both methods, then you will more than likely favour cutting the hub off first, as this minimises the risk we are talking about. As I've already said, there are many ways to perform a task in watchmaking and I never want to dispute what works for someone. If it works, then carry on. I'm not trying to change anyone's mind to how someone should remove a balance. I've used both ways to do this and they both work, but it is safer to cut the hub or rivet first, as I have opened up the hole like the OP is experiencing now. The one thing I love about this forum is we can discuss different ways to do things and learn from each other. From knowledge comes experience, which then leads to wisdom You're most welcome. I'm glad I could help6 points
-
In school we were shown the punching out method, using a K&D tool that presses down on the balance arms to keep things flat (as the Platax tool does), but were told the proper technique was cutting away the hub. They showed us the punch method simply because many professional watchmakers only ever do it that way. On a Glucydur balance, which is heat treated beryllium copper and very hard, there is less risk of enlarging the hole; likewise with steel balance arms. But not all bimetallic balances are heat treated, and many monometallic balances are made of nickel, and these will almost certainly see their holes enlarged from punching. I don't do much Rolex work, but I understand that on the modern pieces they instruct to press the staff out with a Horia tool. As I heard the staff is designed in a way that the rivet breaks away during this process. I wouldn't try it on anything else!6 points
-
I think there maybe a perception issue around Marks video for @nevenbekriev , Mark targets videos towards us who are trying to learn about it all and would find the idea never mind the expense of one a lathe for best current practice to be out of reach. To this end I suspect that the staking set method of driving out the balance staff is actually a well accepted practice for professional watchmakers , although perhaps not the best. Having spent a lot of my life teaching people how to do my job and creating best practice on a per customer basis I maybe understand more how this misunderstanding could come about. I truly believe both nev and Mark have our best interests at heart and only want us to improve as we go and become the best watchfiddlers we can be. my tuppence Tom6 points
-
Time to test my skills 3 watches, all working. In need of servicing. From purchase to end. Lets see how I go. Herlin. Grand Prix. Roma (facet crystal)
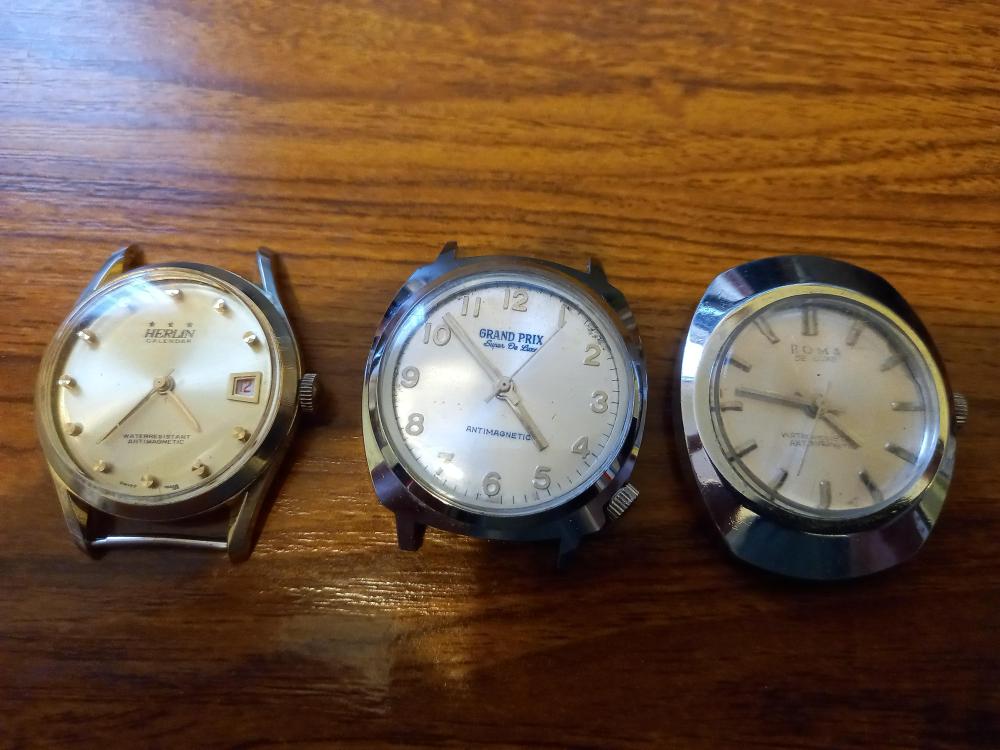 4 points
 -
I concur with @nevenbekriev and @nickelsilver. It is a better and safer method to cut away the hub before removing the balance staff. The rivet can be cut back, but I find the hub is a better way to do it. If someone decides to use a platax tool and knows there is a real risk of enlarging the hole in the balance arms, that seems a little foolish to me, regardless of who they are. If you don't have a lathe, then I can see why punching the staff out is the only option I knew of a client who he always asked a potential watchmaker who he wanted to do either repair or servicing of his watches, how they removed the balance staff from the balance, and if the watchmaker said they punched it out with a platax tool or similar, he would walk away and find someone who cut the hub or rivet first. There are obviously more than one way to skin a cat and watchmaking is a very subjective matter based on experience, but I'm sure that anyone who has the experience of cutting the hub off first before removing the staff will realise it is the better method, which is infinitely safer. I would try closing up the hole, because if there is a gap the rivet isn't going to alleviate that. You can use a domed stake on both sides if you have an inverto staking tool, but make sure the domed stakes are the correct size, so when the work is gripped between the stakes, the work doesn't turn and the stakes don't touch each other. Be incredibly light with the hammer! Once the staff is fitted, because you have closed the hole, you may find the staff might not be true to the balance, but you would put it in calipers anyway to true it up so it spun without a wobble
 4 points
 -
That depends on how it's worn and whether it had shock protection or not; I do see broken or otherwise mangled pivots even on shock protected watches though. I suppose you could make a tool to use in the slide rest, but I was taught to do it by hand, and to take off the hub. As you cut away the hub, concentrating toward the center, when you get to the balance it falls off as a ring. In some cases the staff still needs a light tap to come out, in some the balance falls away too. Cutting the rivet sufficiently is very hard to do without also cutting the balance.4 points
-
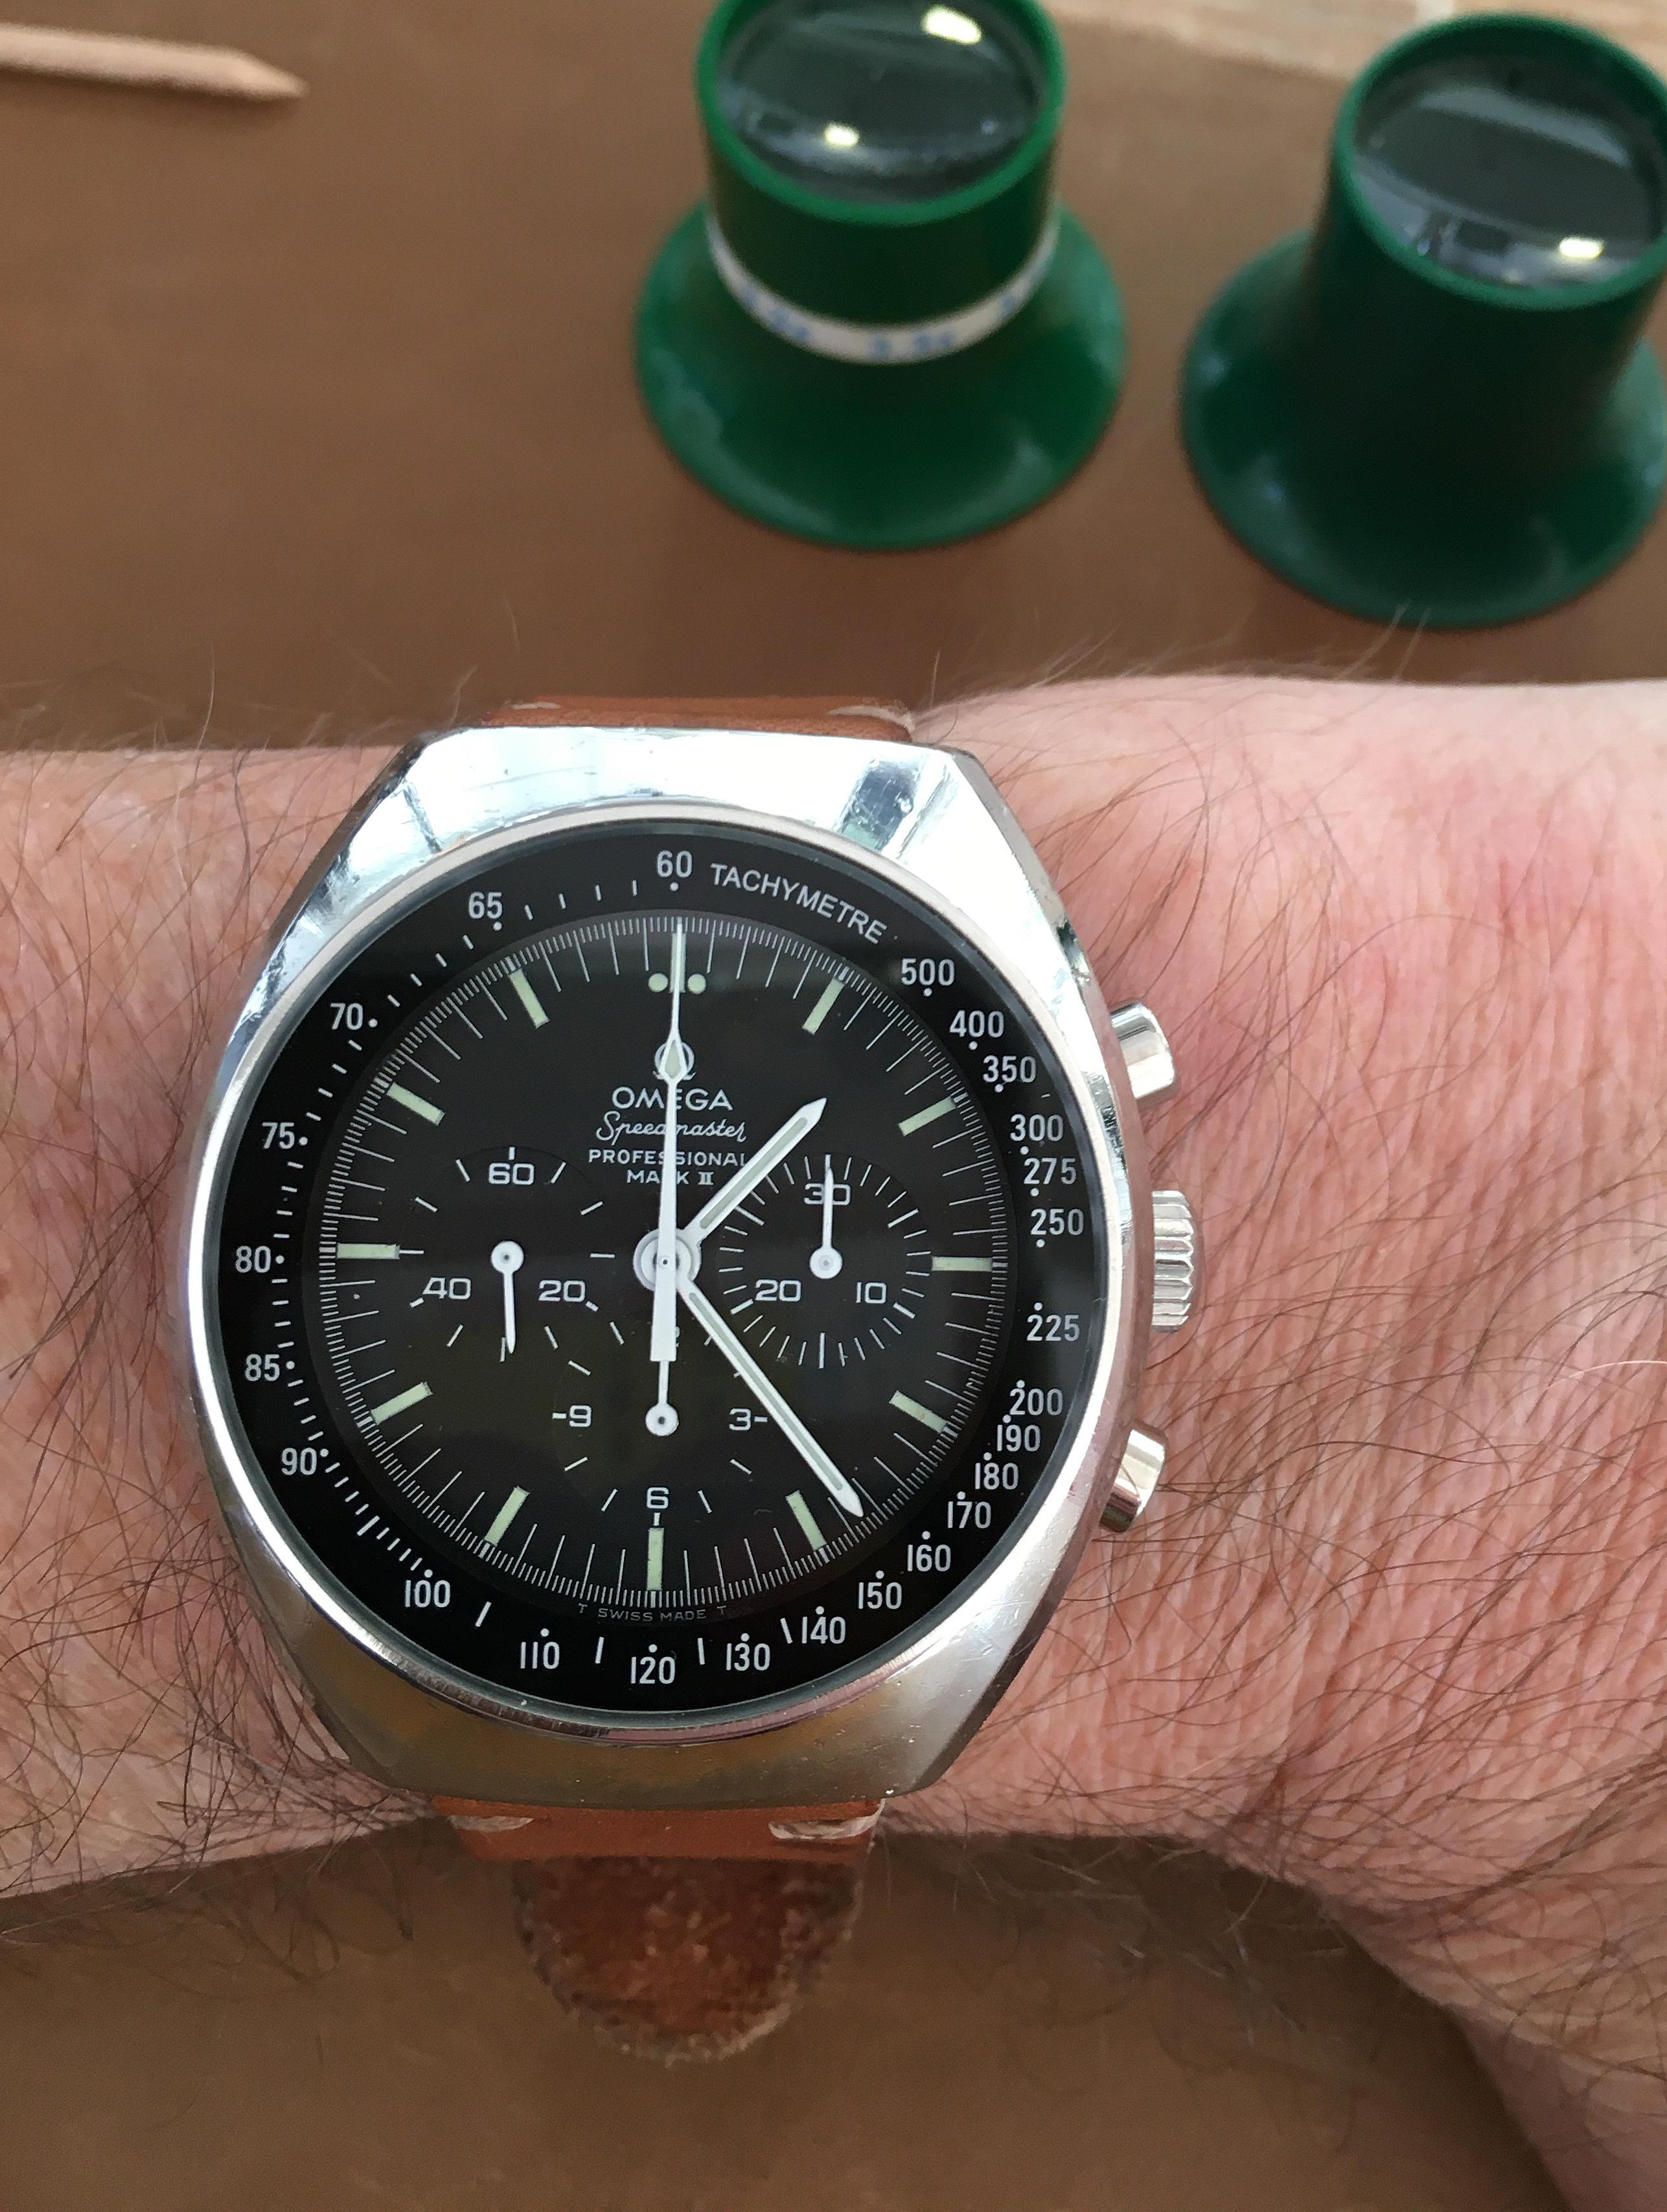
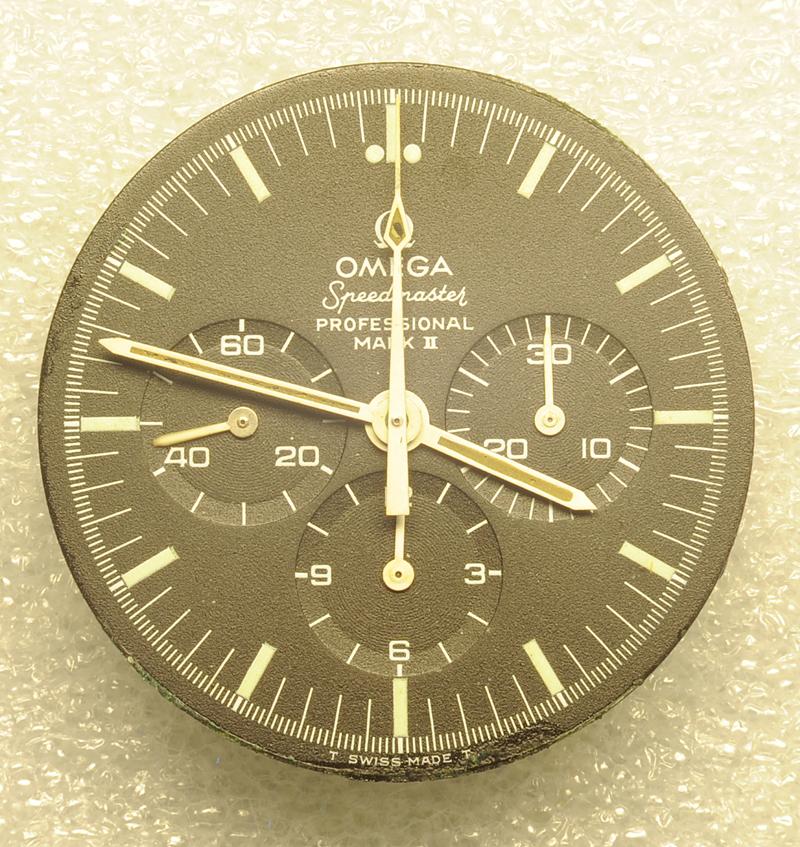
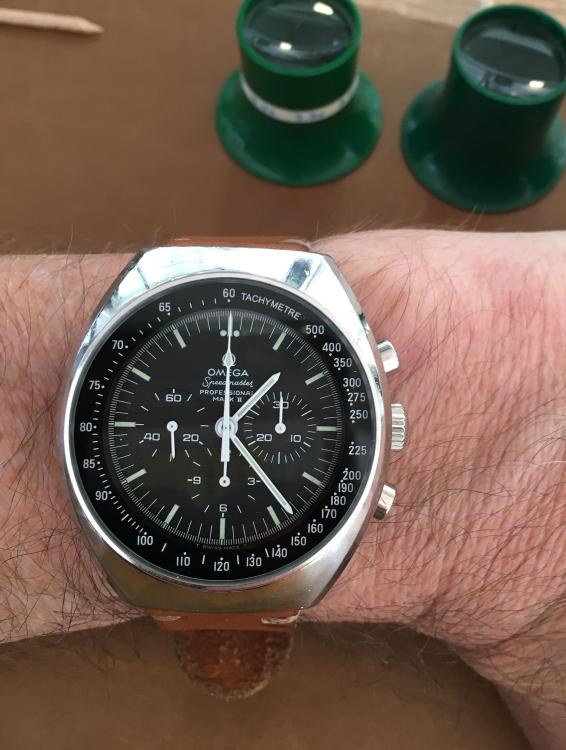
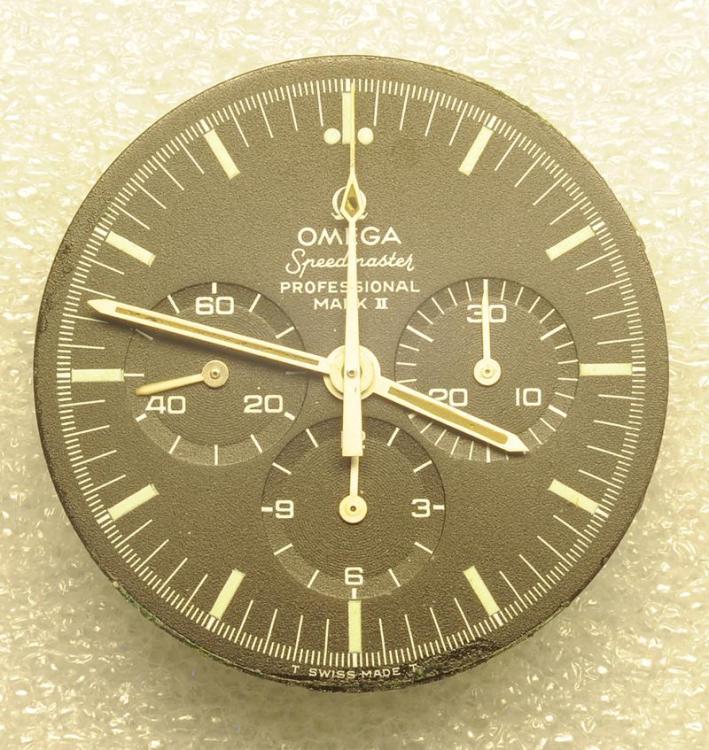
I don't think you need to chuck them. They look in good shape. How are they supposed to look like from a '69 Omega? Is that a statement or a question? If they are brass, the can be copper / nickel / sliver / gold plated. My 1975 Speedmaster Mark II original hands looked terrible (picture before I took the hands off. As soon as I touched them, the loose paint fell off everywhere) I bought a set of generic hands. Later, luckily, I decided to restore the old hands, much higher and better quality than the generic. They are spray painted, which is a different ball game than plating ...... but now I'm very happy that I decided to restore the original hands and to have them back on If you can restore the original hands, do so
 4 points
 -
I watched the entire video again and I can't recall him mentioning that, but he does state that the Platax "breaks the rivet without damaging the balance wheel". Also, I think it is worth noting that there is a significant difference between punching out a staff using a staking set and using a Platax tool. When using a Platax there's zero risk that the punch reaches down to the hole in the balance as the punch is hindered from reaching that far. It is the very idea behind the Platax. I think the risk of enlarging the hole in the balance is minimal when using a Platax and no greater or even less than when riveting the new staff. Also, as I understand it, using a lathe to remove the rivet isn't foolproof either.3 points
-
Welcome Corky. My great uncle used to build and repair violins and my uncle built guitars in his spare time. I tried both building and playing instruments a long time ago, but all I ended up doing was annoying the neighborhood cats.3 points
-
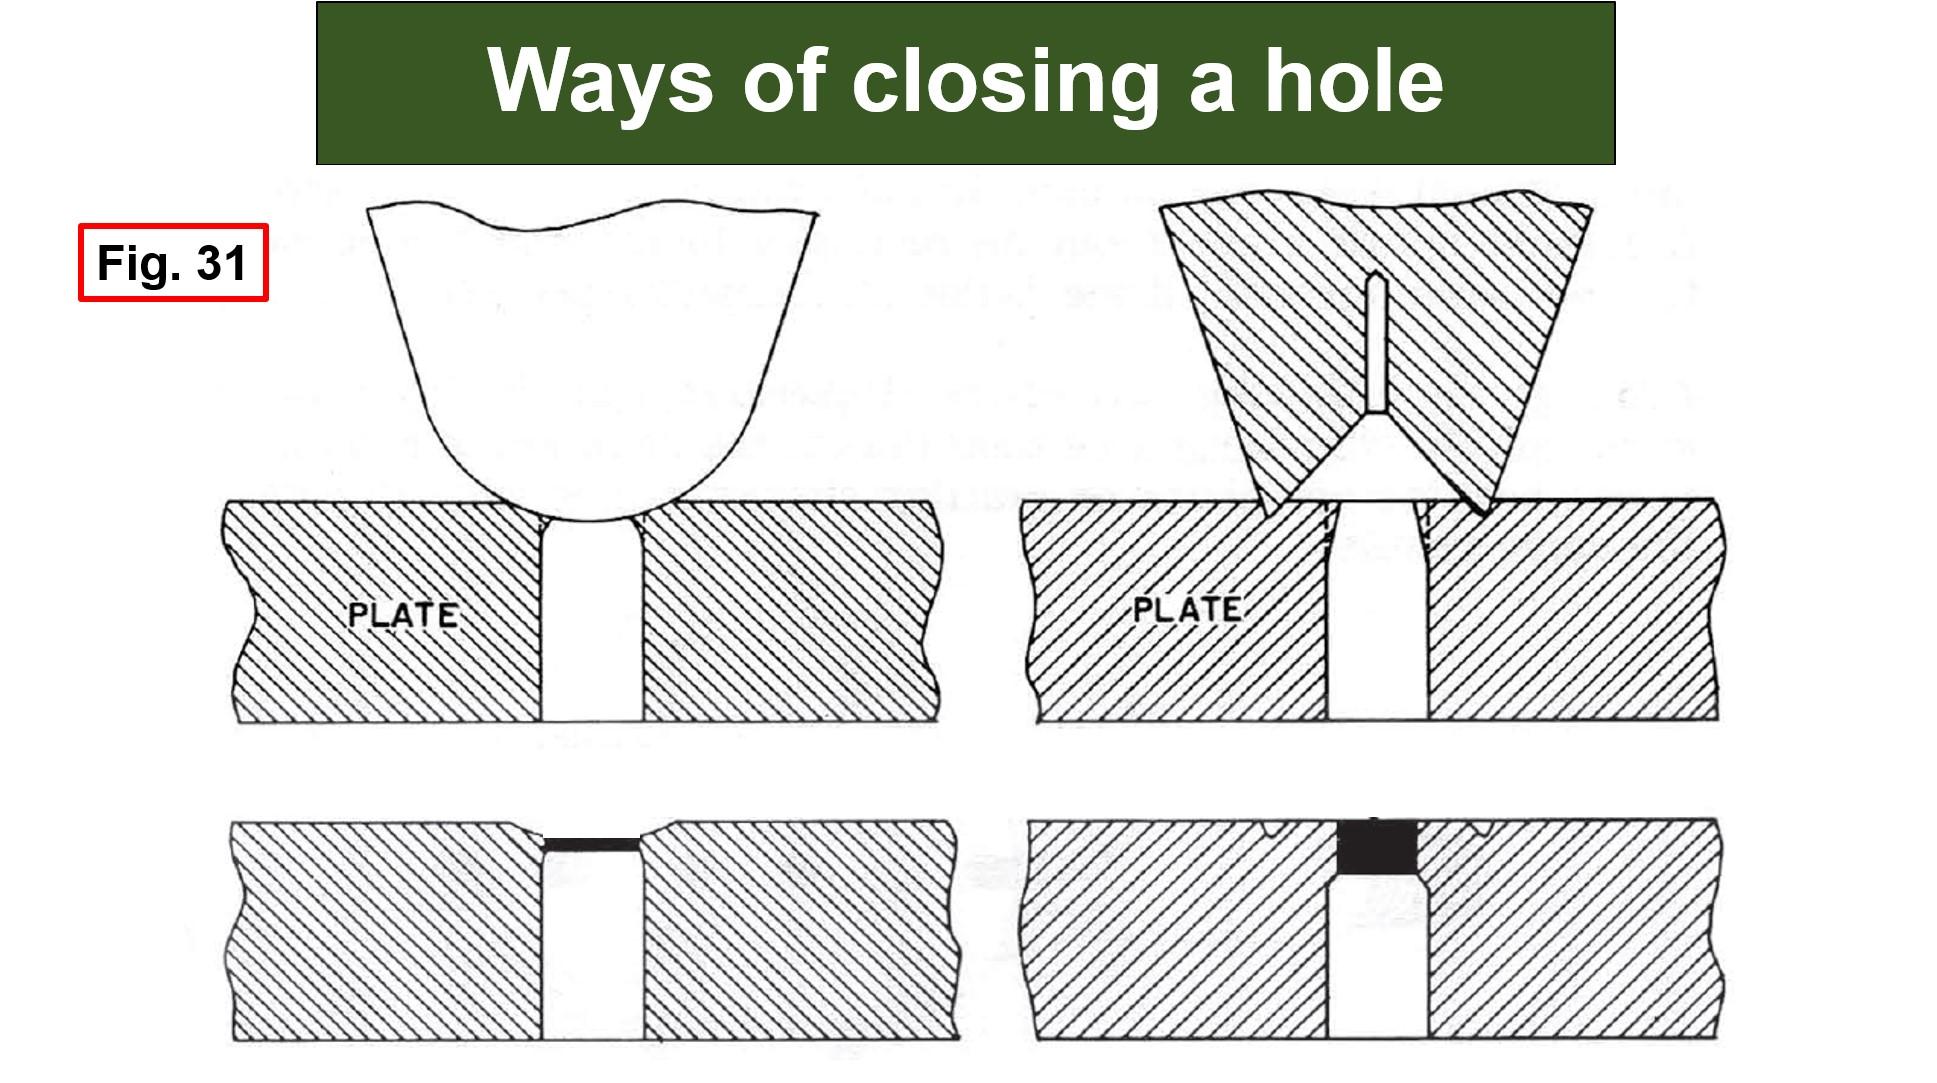
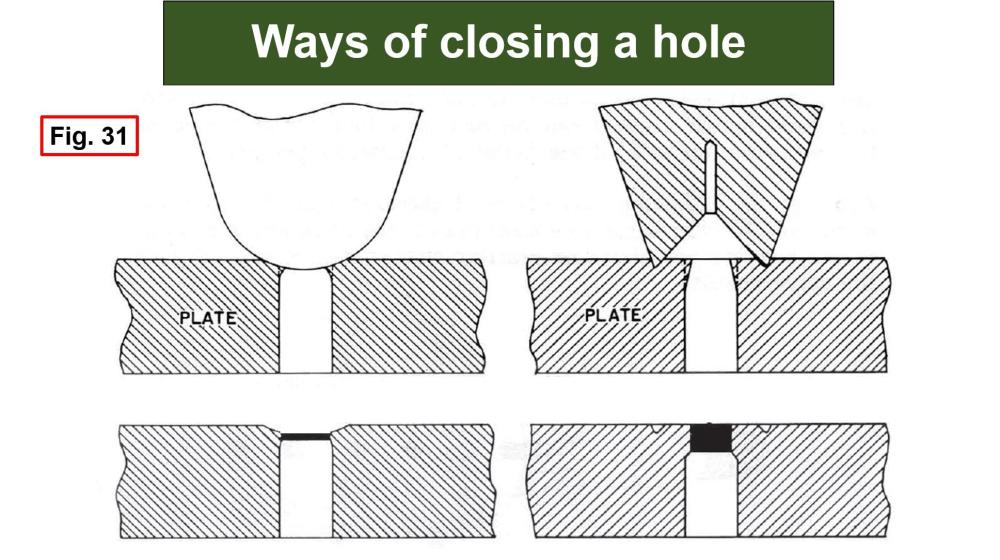
OK, As all can guess, I didn't know that the guy from the video is Mark. Now I am sorry, but what is done is done. Probably all have seen that my pen sometimes is sharper than needed, but that's me and I rather try to obtain beter expressiveness than meaning to offend somebody. But, i sometimes miss... Now to the point - my opinion is that Platax tool is good for taking off the double roller, but should be not used for staff punching. Call me 'radical', but I have said in other forums, that if You have platax tool, make it a present to You enemy. What i didn't like in the result in the video is that balance wobbles eccentricly to much. A Great Person (He is in beter place now) who I consider as my teasher once said that no wobble (both in plane and eccentrical) should be seen under 2,5X magnification when balance rotates. I always do my best to folow this. Now to the OP: See, closing a hole in a plate is to much different from closing of hole in balance arm. A hole in a big plate has many material around the hole and it helps to make the hole smaller as the material has no room where to spread araound so it has to go to the center. The balance arm is narrow and smashing it in the center usually just elongates the arm itself and makes it bend as elongation is different on the both narrowest places where the hole is. And, the hole as a result doesn't want to get smaller at all, but instead of it, the balance deforms badly and forever. So, my advice is not to try to close the hole. The best way to solve the problem is to make custom staff, and if the hole is not in balance center, to center the balance and turn the hole on lathe (this is not for compensation balances). But, I see that in You case this is not possible... What to do now? Do not use moment glue. Do not use shellac. I know that many wil not agree with me here, but I will advise to solder the staff to the balance arm. Use good flux, small quantity of led containing sloder and if the flux is acid containing, use alcaline solution to quickly wash the flux remains after soldering.2 points
-
I don't take it like that, so no worries. I understand that both Cousins and Gleave advertise the same GR mainspring as 2377X, but the point I'm making is sometimes what mainspring advertised isn't what is sold. That's why I said about the mainspring for the ETA 2824-2. So, Cousins have that spring as a GR57162 which is 1.23 x .134 x 400 x 10.5. Gleave and Co. have the spring for an ETA 2824-2 as a GR3149X which is advertised as 1.23 x .134 x 400 x 10.8 and a GR3149X on Cousins website is down as 1.25 x .125 x 420 x 10.5 Now look at the GR mainspring size table I've attached and it says a GR57162 is 1.25 x .125 x 420 x 12 and the GR 3149X is 1.25 x .125 x 420 x 12 There is a lot of conflicting information right there! So, when I bought a mainspring from Gleave and Co. for the 7S26C, I actually bought an original Seiko 7009 spring from them and not a GR spring that they advertise, now I don't know what Gleave and Co. will actually send you here and now today, but last year it wasn't what they advertise now as the spring needed. You can email or phone them and ask for an original Seiko spring if they still have them. I've bought springs from Cousins in the past and when measured they are not the size that was advertised, so I'm assuming that people assume what they have been sold is what was advertised and what they require, which isn't always the case. 99.5% of the time I buy my mainsprings from Gleave and Co. and so do many watchmakers here in London, because if there is a problem with the wrong size being advertised or being received they will sort it out, where as Cousins more than likely won't, because they believe that they sent you the correct spring from the start and once the spring is out of its retaining ring, all bets are off, so to speak. Those same watchmakers, who I personally know, have been through all this with Cousins, so don't really bother with that kind of crap shoot anymore and rely on Gleave and Co. not to make those kind of mistakes. I think what I have said is a pretty important issue that many aren't aware about, especially when the springs inner coil won't fit the arbor and several springs are trashed in the process. I always tell my students, 'Never make assumptions!' Unless someone is measuring the dimensions of the mainspring, then don't assume it is the correct size just because someone says it is and relying on a sticker with a GR number on it that has been put on the packet by the seller. Me too!
 2 points
 -
Good idea ! Will give that a try I have had that too, but in my case it was Royal Mails fault. Ever since, CousinsUK ships only with the more expensive registered mail(s). Still, it seems that IOSS is (deliberately?) not well understood. And yes, for sure, the EUSR is discouraging trade from outside the EU, and especially trade with the UK, since they had the audacity to leave the EU. "Kindergarten" mentality comes to my mind.2 points
-
I don't know what the official stance is at Omega but all the ones I've removed look like they had Loctite. As well as a little metal crush washer. I haven't run into any so far that were ultra tight or broke off in the case or anything, and haven't used heat but it wouldn't hurt. Before I got the tool I would grip the cap in a lathe collet and use it to turn the tube.2 points
-
There's the Horotec tool set that covers these and a lot of other things, but it starts at 180 CHF (which is a great deal actually). But, you can just get the bits, which are 13 each. I checked an old tube from Omega, it measures 3.65mm across the tips of the splines, and the MSA03.620-P39 fits well, a little loose (it's marked as 3.60mm diameter), and the MSA03.620-P27 fits perfectly- it's marked as "3.50mm". So not sure how or what they are measuring, but it looks like either would work. You can buy directly from Horotec, or I see Cousins have it, just a bit more expensive. You don't have to have the handle to use the bit, you can hold it in a stout pin vice or even use pliers across the flats on it to loosen the tube. But the handle is only 26 pounds, and you could add bits as needed.
 2 points
 -
I'd be tempted to soak in acetone over night to make sure any residual paint or other stuff is gone before you start trying to fix them, at least you know that you are then playing with a clean sheet, so to speak. Then maybe look at very high grit wet and dry paper and then polishing sticks (12,000 grit) to get a mirror finish in them. Other thing to remember is that we are looking at them under high magnification, and nothing looks great under high magnification (even brand new hands), with the naked eye they will look much better. The good news is that the hand shape is fairly generic, I am sure someone will educate us to the hand shape name. Therefore, if all goes wrong they can be replaced with very similar ones.2 points
-
Hi. A little TLC with a glass fibre brush will clean them up ok. As for blueing there are chemicals used for blueing such as rifle barrel and other metals. Its painted on and gives the blued finish without heat.2 points
-
I did gringe when i read that "ouch" and not the most delicate expression of criticism. I don't think Nev quitehas the right words in his head and obviously doesn't realise who mark is. Oopsie..2 points
-
is our generous host. Not saying that puts him above criticism, but just bear that in mind.2 points
-
I serviced and repaired a 4006A last year, I ended up breaking the mainspring eye, because it was too large for my mainspring winder, tried to squeeze it tighter without annealing as I found out later is the correct way. I purchased GR2378X for the mainspring and GR40781 for the alarm barrel. The GR2378X eyelet was way to large for the 4006A arbour, and I broke it too trying to squeeze it to make it smaller. So this spring is unsiutable in its standard form. The GR40781 eyelet was too small for the alarm arbour, but I managed to get it in with great difficulty, I think I was close to damaging it too. I solved the mainspring problem by fitting a GR2377X (Seiko 7005 to 7019 series) which is only .01mm thinner than the GR2378X and the eyelet was ideal fit for the 4006A arbour. The watch after service returned an amplitude of 270 degrees DU/DD which surprised me. I now loathe buying aftermarket mainsprings as you never know if the arbour is going to fit or not. Being honest I don't think my skills are up their yet to try and heat up mainspring eyelets and manipulate them to the correct size Wouldn't be great if the arbour diameters was listed for aftermarket mainsprings ?????? Good Luck2 points
-
Hi everyone! I'm David and I'm pleased to meet all of you. I inherited some ship's clocks which didn't work (of course) and that started my interest in clock repair and watchmaking. I learned the basics of watch operation from these clocks since they are very similar to your watches in most respects.... Once the word got out that I can repair clocks and watches, the floodgates have opened! Everyone wants a watch or clock repaired. So I'm taking my time but working through them one-by-one. I can see how professional watchmakers get so backlogged. Fun hobby and open to learning more and passing on any tips I learn along the way!1 point
-
Welcome Shane. We're not so much enthusiasts as we are psycho neurotic micro-mechanical fanatics. And tool addicts.1 point
-
That's extremely helpful. thanks and have a great day.1 point
-
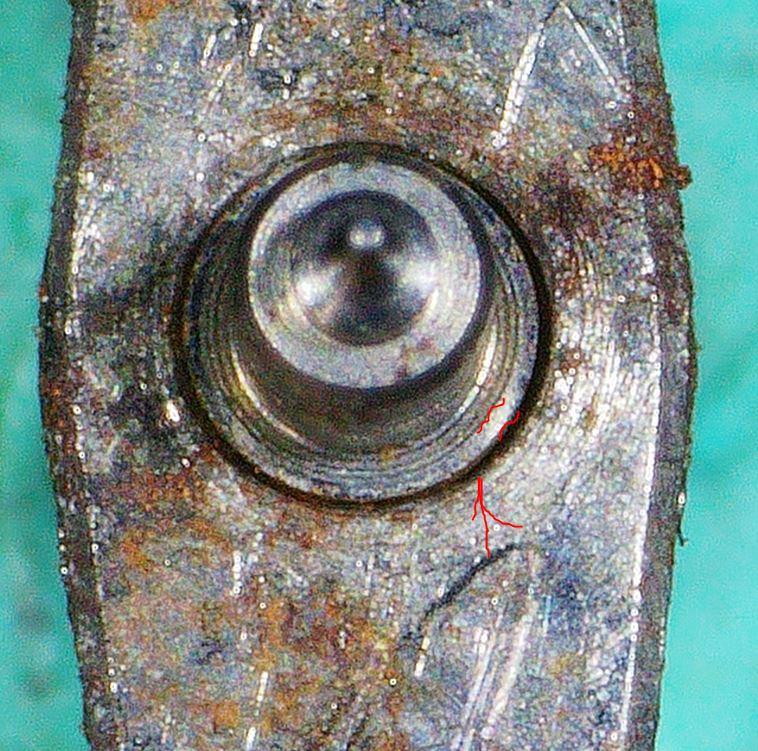
The rivet really needs to be proud of the top of the balance arms, so if the rivet has been flattened too much then it won't be able to do its job. have a look at the pic I've attached and if the rivet has been flattened too much it won't work as a rivet or grip the balance arms how it should. Inspect the balance staff under high magnification and you see if it still has that back-cut to the rivet or not. I'm guessing that the rivet has been flattened a little too much in trying to get it to grip, but I could be wrong
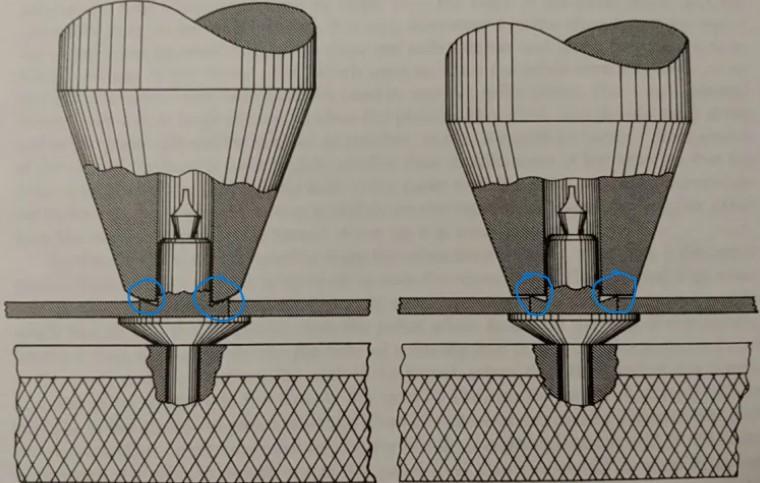 1 point
 -
Thanks Jon. Can I still use the staff I have or do I need to buy another one that doesn't have the rivet ridge flattened already?1 point
-
I was taught the same and I apply it to most things but it never occurred to me to apply it to mainsprings. Learnt something new yet again.1 point
-
I'm not smart enough to wade into the debate about the best method to remove the staff (I punched mine out using the K&D tool), but I did take some more photos to see if that will assist in determining where I go from here. The first picture shows in between the two red lines a definite flat spot where the ridge of the rivet would be. I looked at another new rivet and it shows a sharp ridge at the top of the rivet. So I'm guessing that one of my domed punches pushed the sharp edge flat. You can also see around the circumference of the rivet, there is some space between the staff and the balance (it's not as pronounced as the dark circle would suggest however). So, as was suggested above, it appears that the hole is too wide for the rivet to grip. So what would be your next move? 1) use more force to smash the rivet enough to grip the balance? 2) use a punch to reduce the size of the hole (if so which stake do I use?). Or 3) something else? Thanks guys.

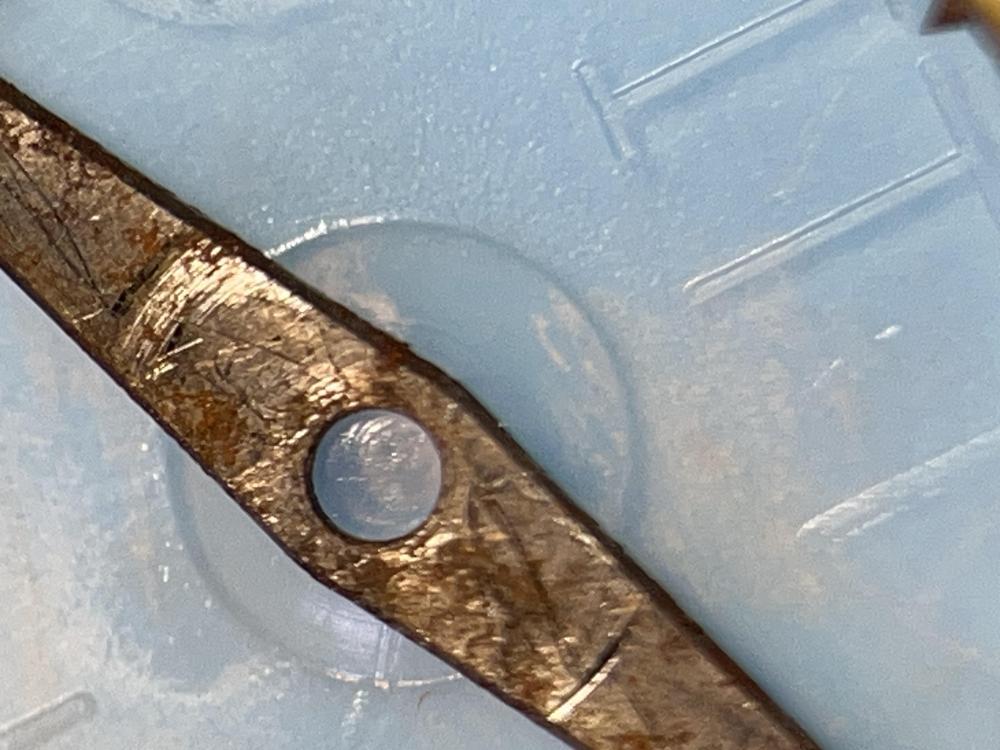
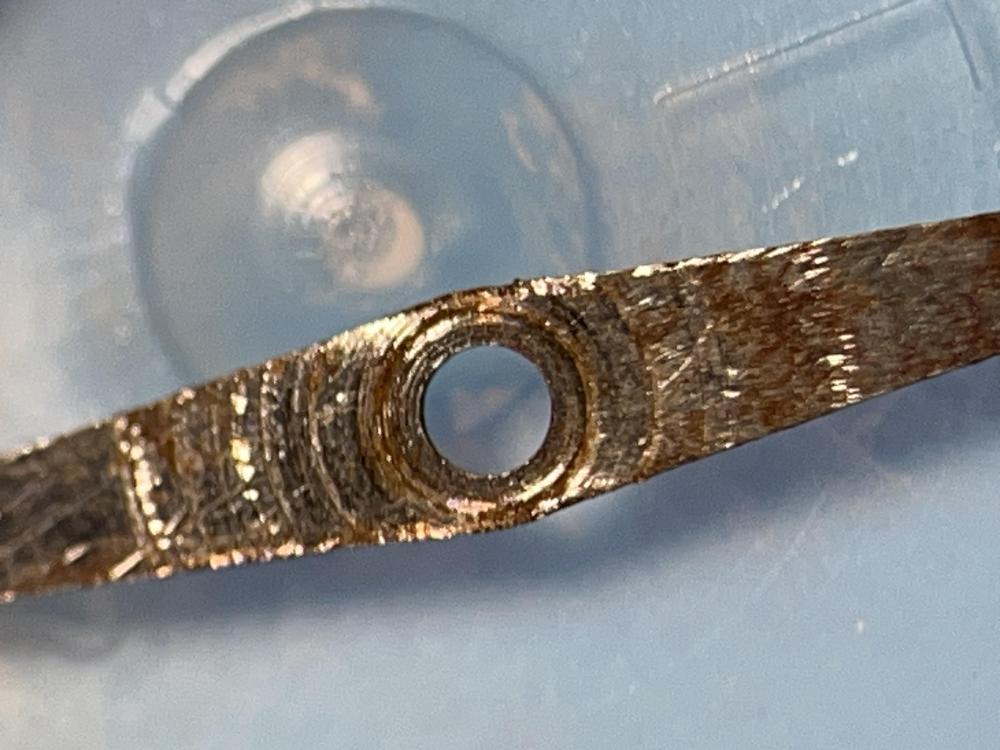 1 point
 -
Maybe give them a light rub over with a stick having a soft leather glued to it, surprising how gentle/abrasive it can be. do that first and take it from there is what I would try. Tom1 point
-
Welcome to this friendly forum.1 point
-
Hello and welcome from Leeds, England.1 point
-
Those in the 1st post are rather „Dauphine“1 point
-
I use the proper tools - but maybe an old cap, silver soldered to a brass tube, may do?1 point
-
I wonder what there is to be "ashamed" about? What is it that he is doing wrong? Let us know and perhaps we can learn something.1 point
-
There is very specific stuff for chemical blueing of brass, you need to get the right one. They can be pretty nasty chemicals depending on the material to be blued. Tom1 point
-
My english is not good enough to understand the meaning of Yes I know all the worsd, but I can't still get the meaning. I suspect You do not what is needed, and what is needed is to use a punch wit hole in which will go the hairspring seat (with minimal free play), but the rivet will not go. So, the punch should never touch the balance spoke with the hole, but just the 'rivet' of the staff. And, I don't see on the picture signs of riveting on the staff, nider i see signs of punch on the balance spoke, so I wonder if You understanding of 'moderately harder taps' is close to mine. Then, please watch this video. It shows one of the correct ways of old balance staff removing from the balance in a manner that will not enlarge and distort the hole. Simply punching out the staff is wrong as the hole gets larger and every next riveting of new staff will need more and more harder hammering, and this leads to loosing of balance center and roundness. If You watch just the end of this video, You will see the awfull result this guy proudly shows instead of being ashamed of what He has done... So, when the balance hole has get larger, this means that normal staff wil not fit, but one will need to make custom staff to fit the hole.1 point
-
Where exactly does your punch fit? Has it left any marks?1 point
-
I use a fine-tipped oiler, approximately like your blue one, for almost everything. Occasionally I'll use a thicker one, where I want to apply a larger amount of lubricant, just to save time. I would certainly want to use my finest oiler to apply 9415 to pallet stones. I use the same four products you do (plus a braking grease for automatic barrel walls, and a silicone grease for seals).1 point
-
Hello and welcome from Leeds, England.1 point
-
It is a bit tricky and catastrophes happen. Keeping some pressure on the plunger with a palm helps keep the space inside the cylinder smaller. When pushing the bridle in with hand the other hand has to keep winder tight against the handle and also prevent it from unwinding. Once the bridle is comptletely inside, wind backwards to unhook the spring. Then with exacto knife carefully pry out the winder/arbor enough so that you can fit tweezers inside. Pull arbor off while securing spring with tweezers. Put handle tightly against level surface and press plunger to pack the spring level with the edge. If the spring spring is old and not so level it's harder to get it wound inside the handle. Yeah really stressful. Better have new mainsprings in stock in case you fail, it takes off some of the pressure1 point
-
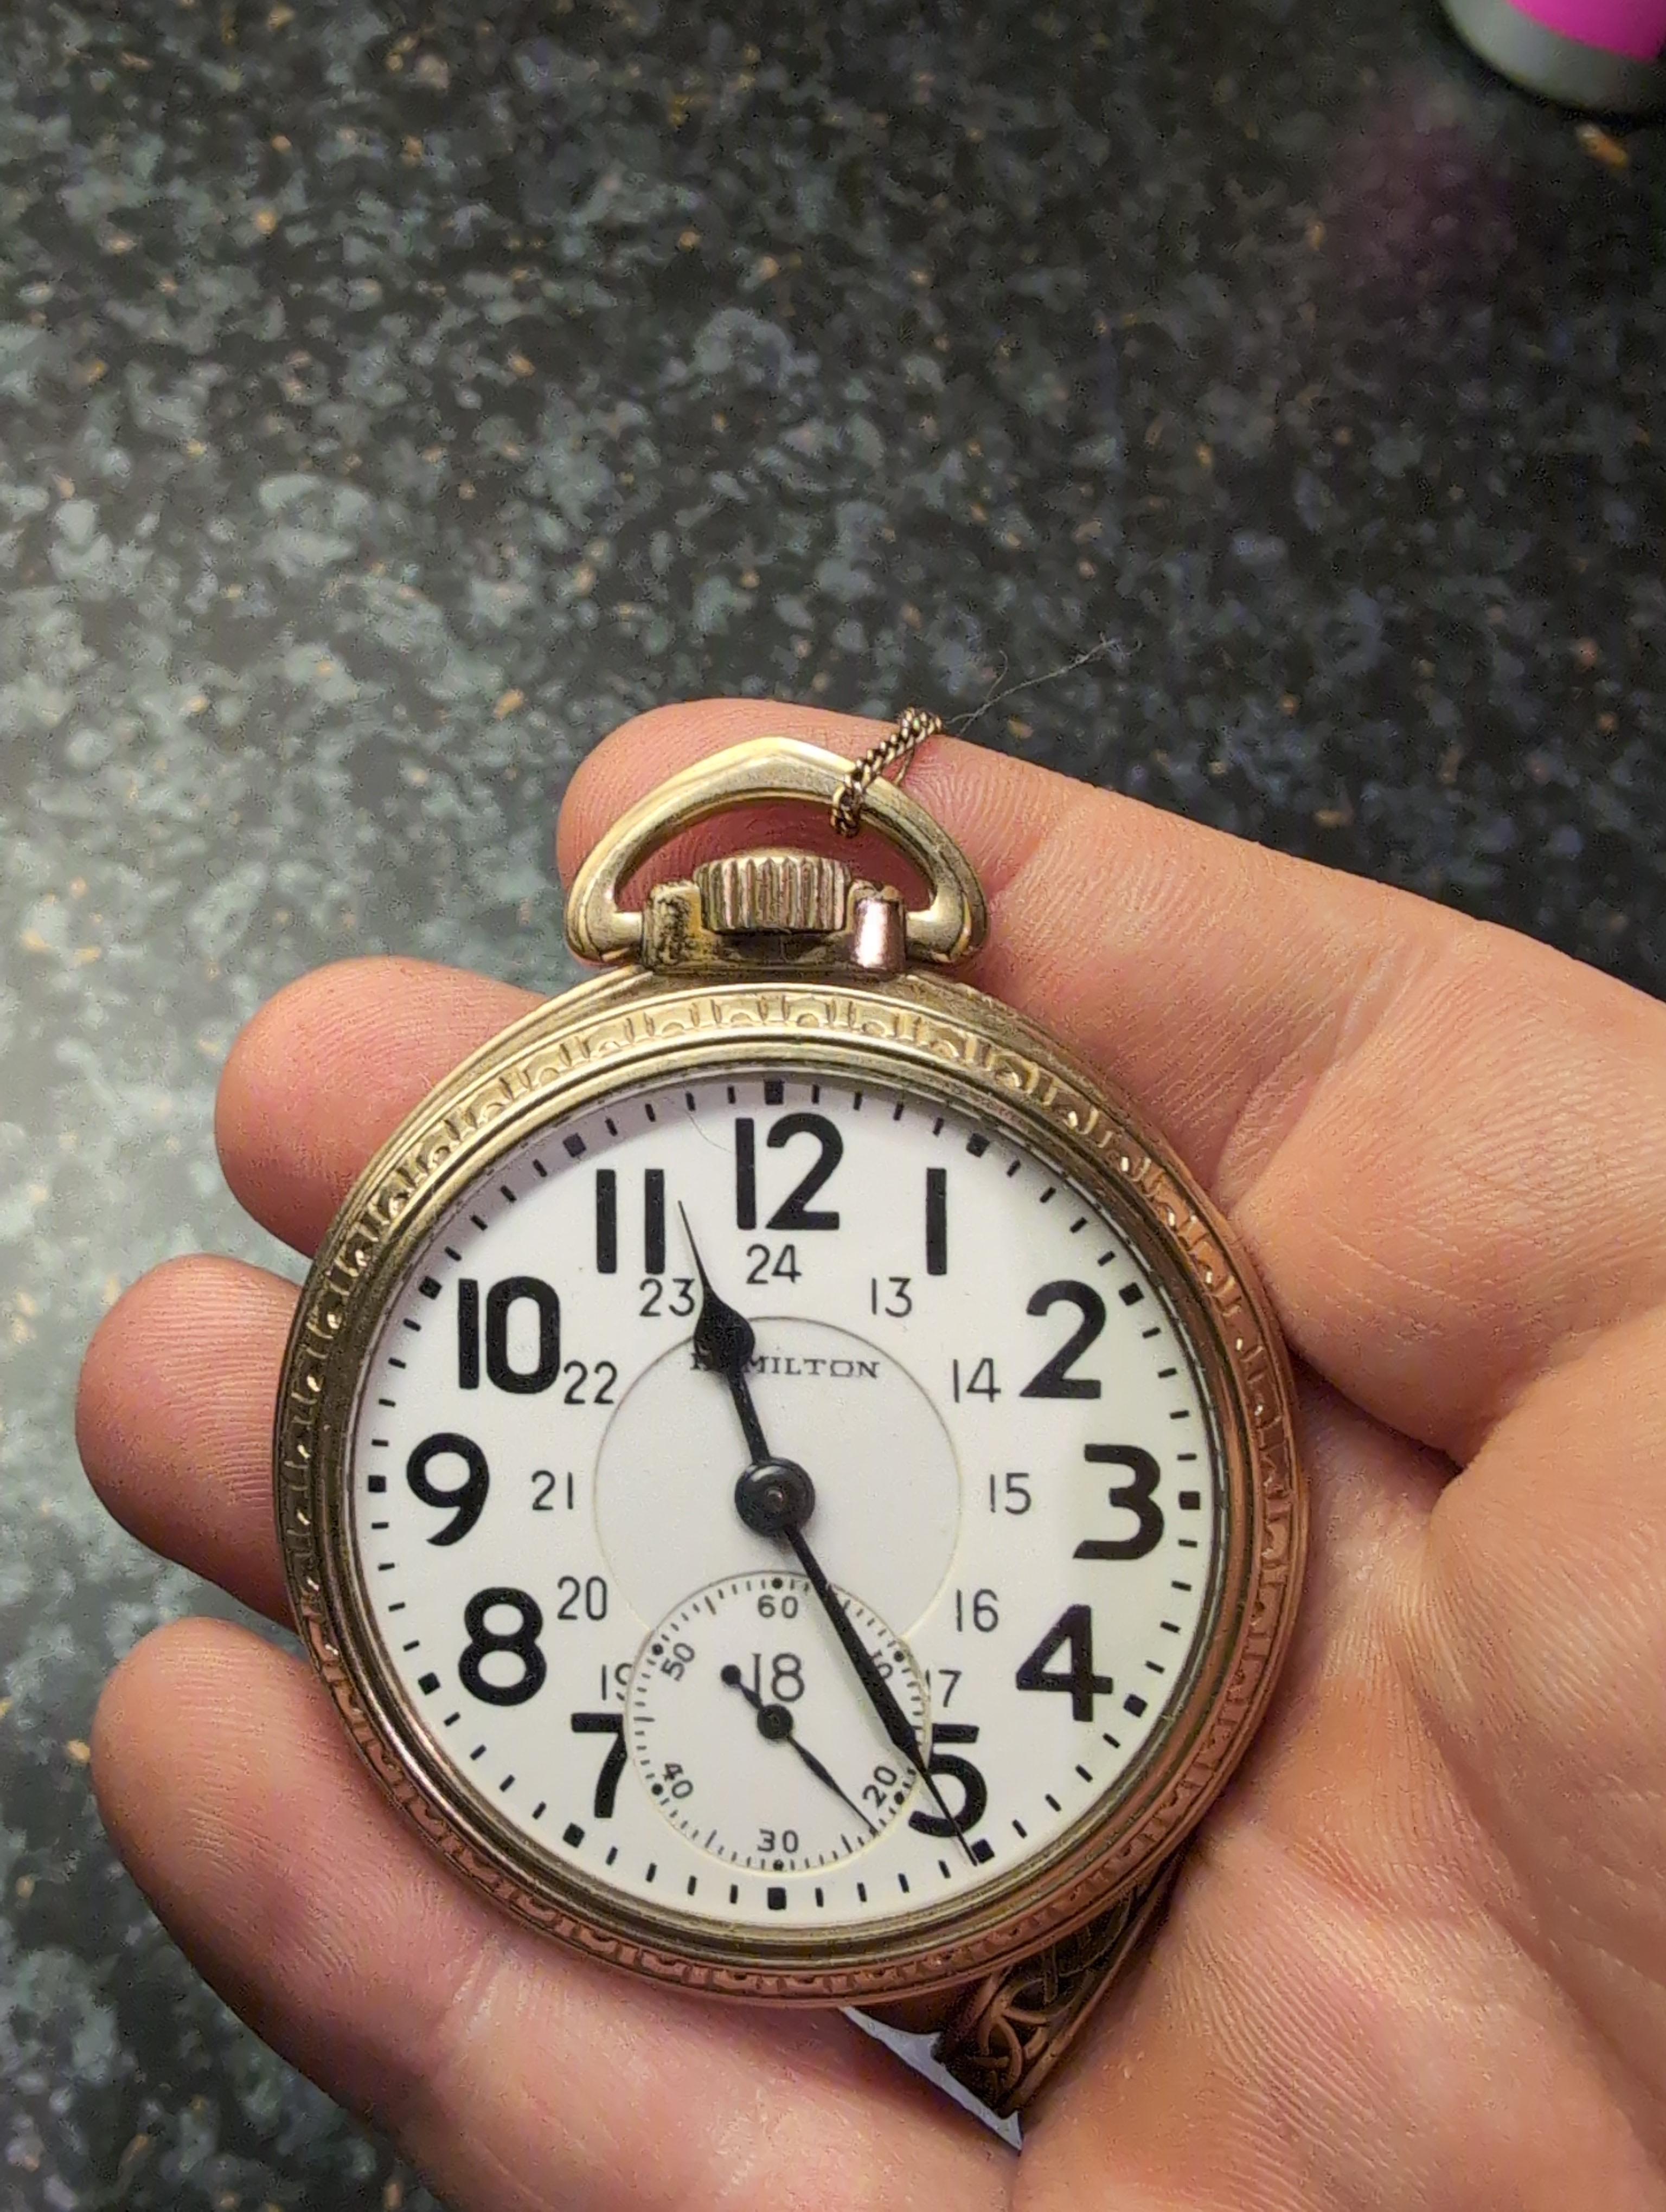
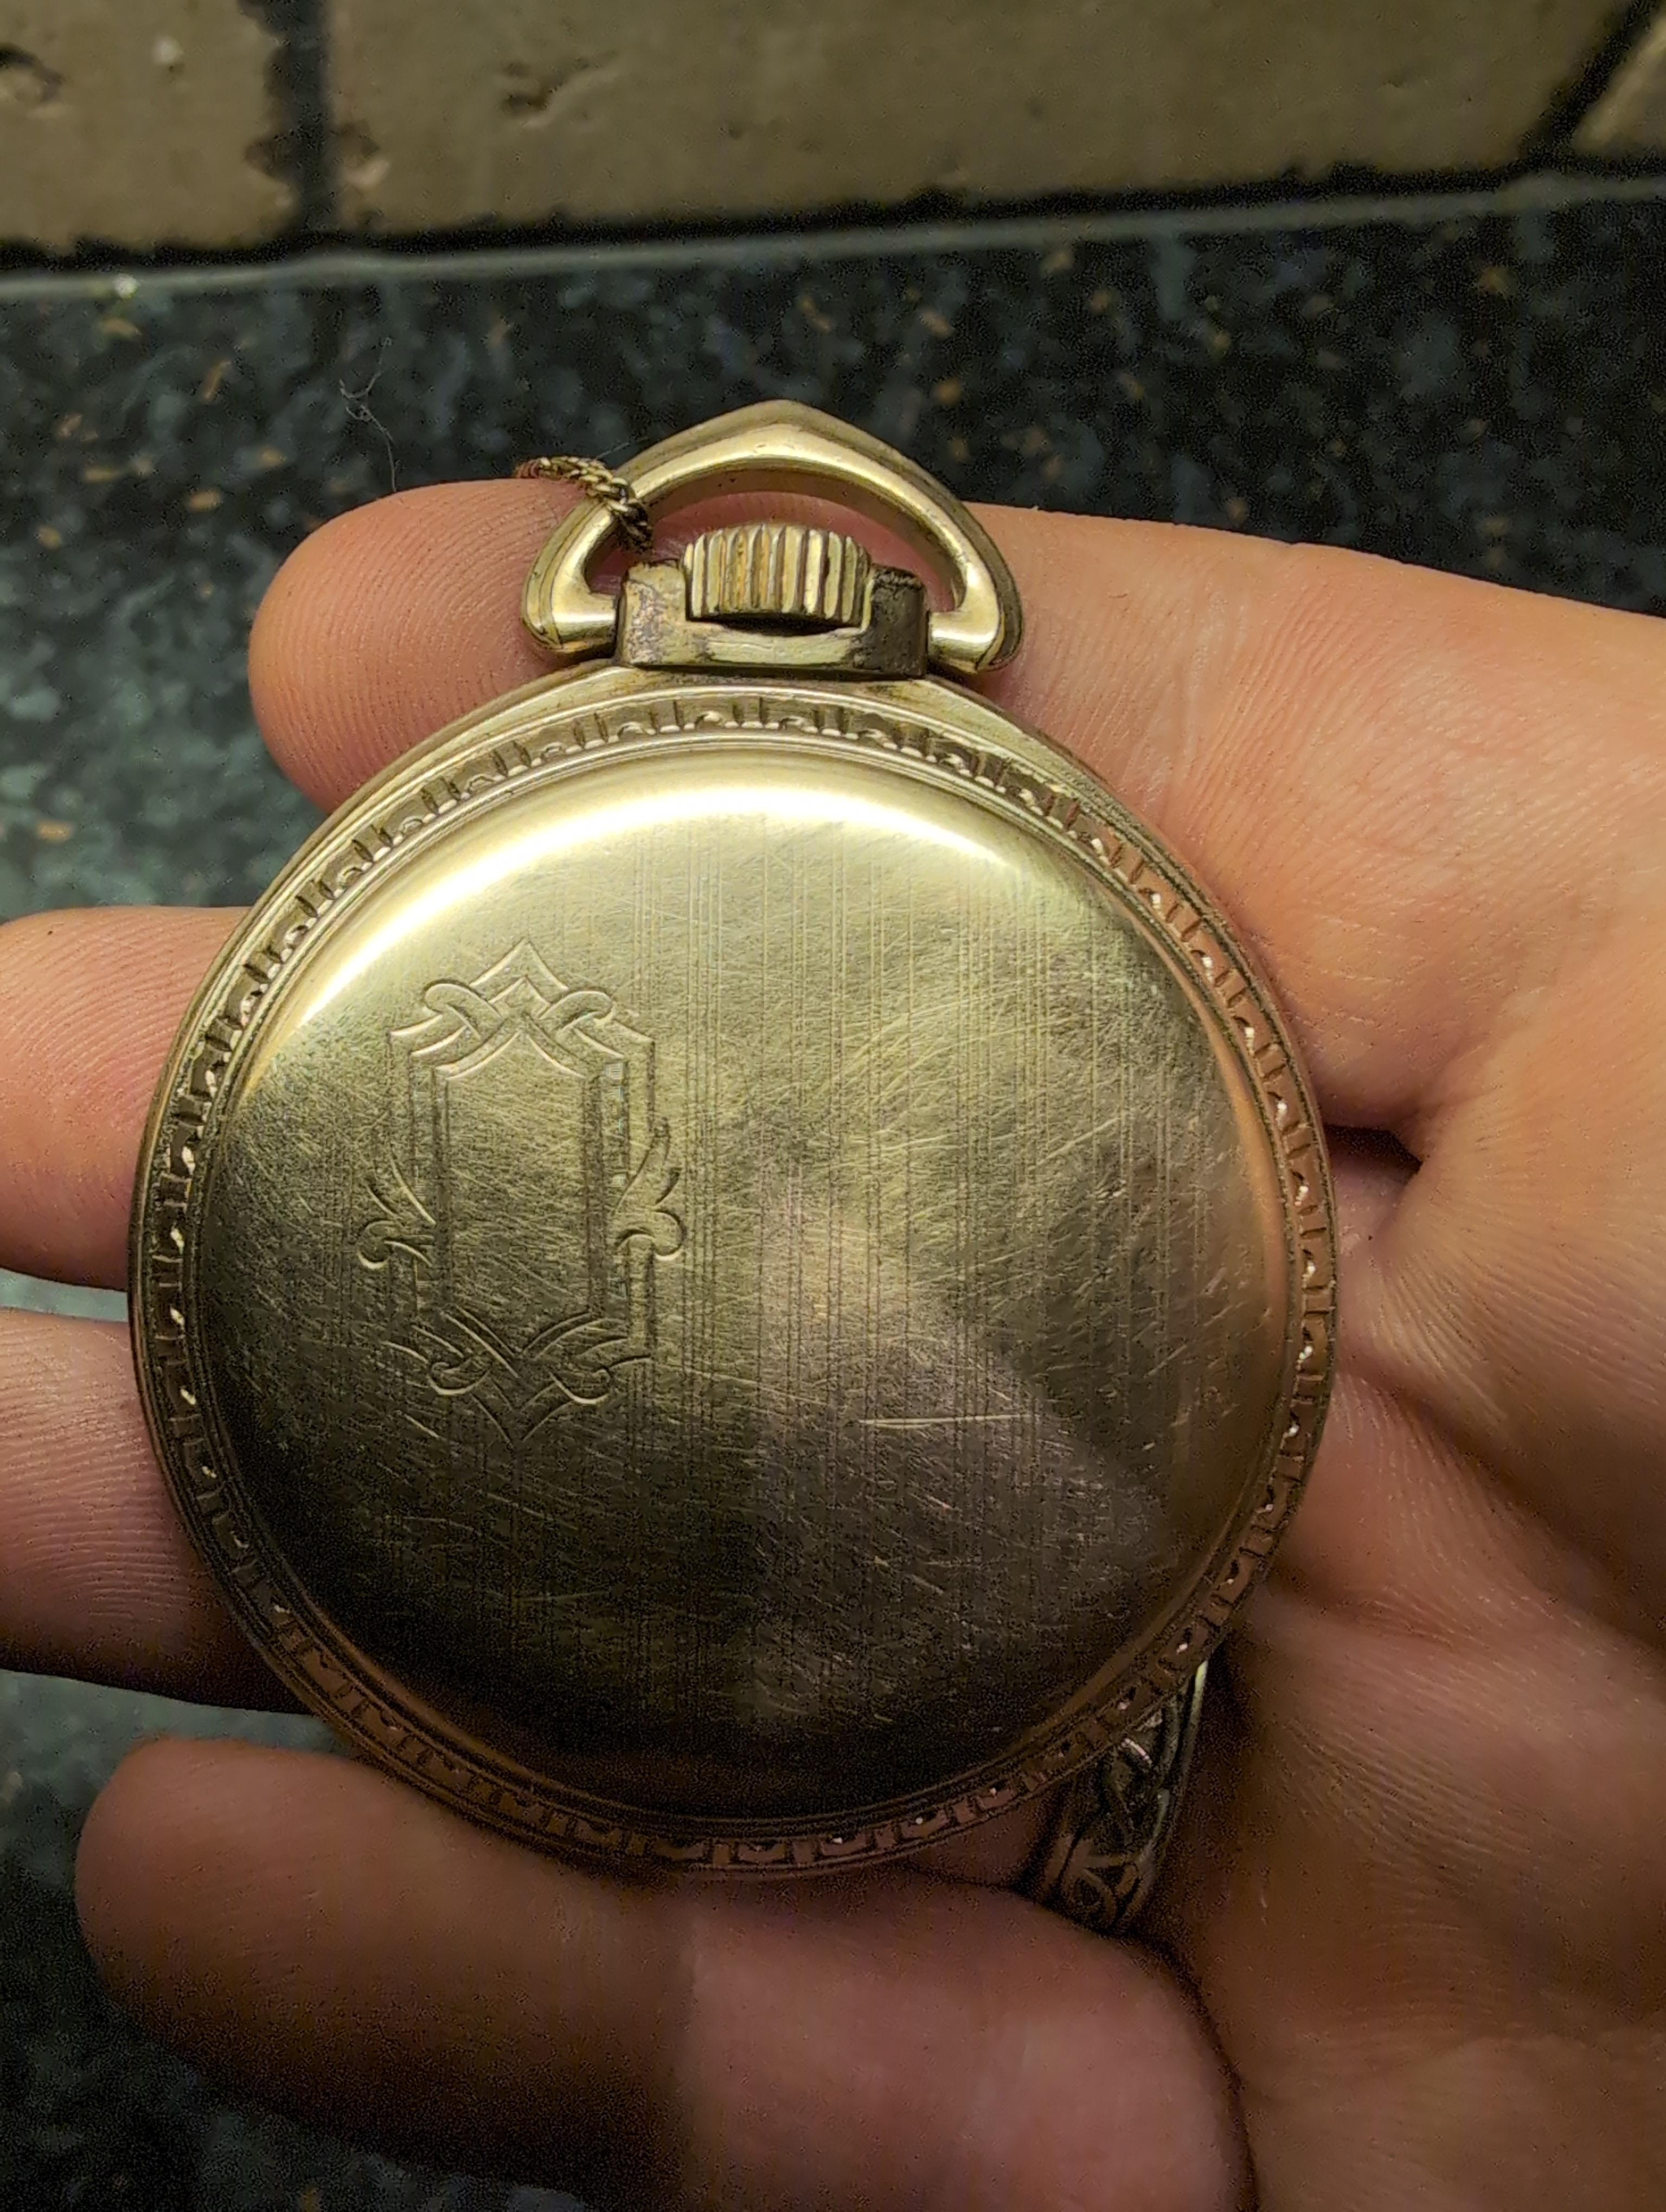
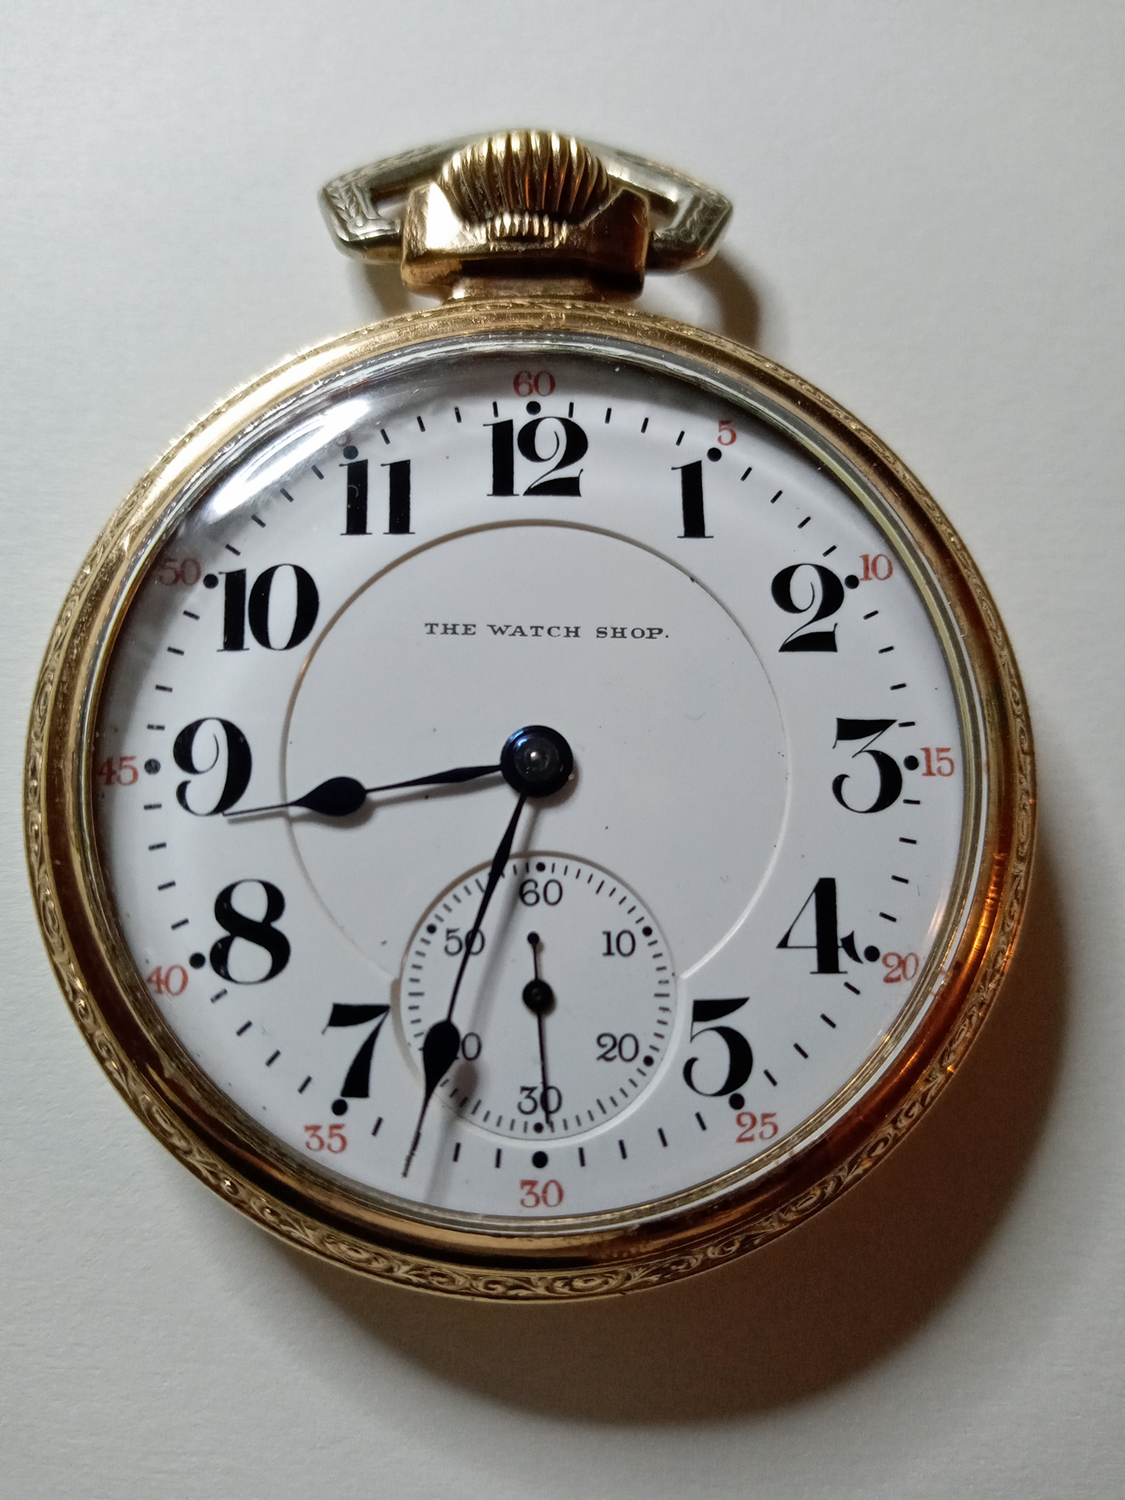
Hello, I have this watch after my great grandfather. He bought it on a long trip to America (I believe Seattle). This was in 1925, so the watch is close to 100 years old. It still works. Is it possible to open it up on the back, and if so is the case, how? My grandmother told my father that it is gold, but it could be just golden steel or whatever. I tried searching for it on Google, and found one that looked similar, but miss the markings on the backside, and is at least 20 years younger.

 1 point
 -
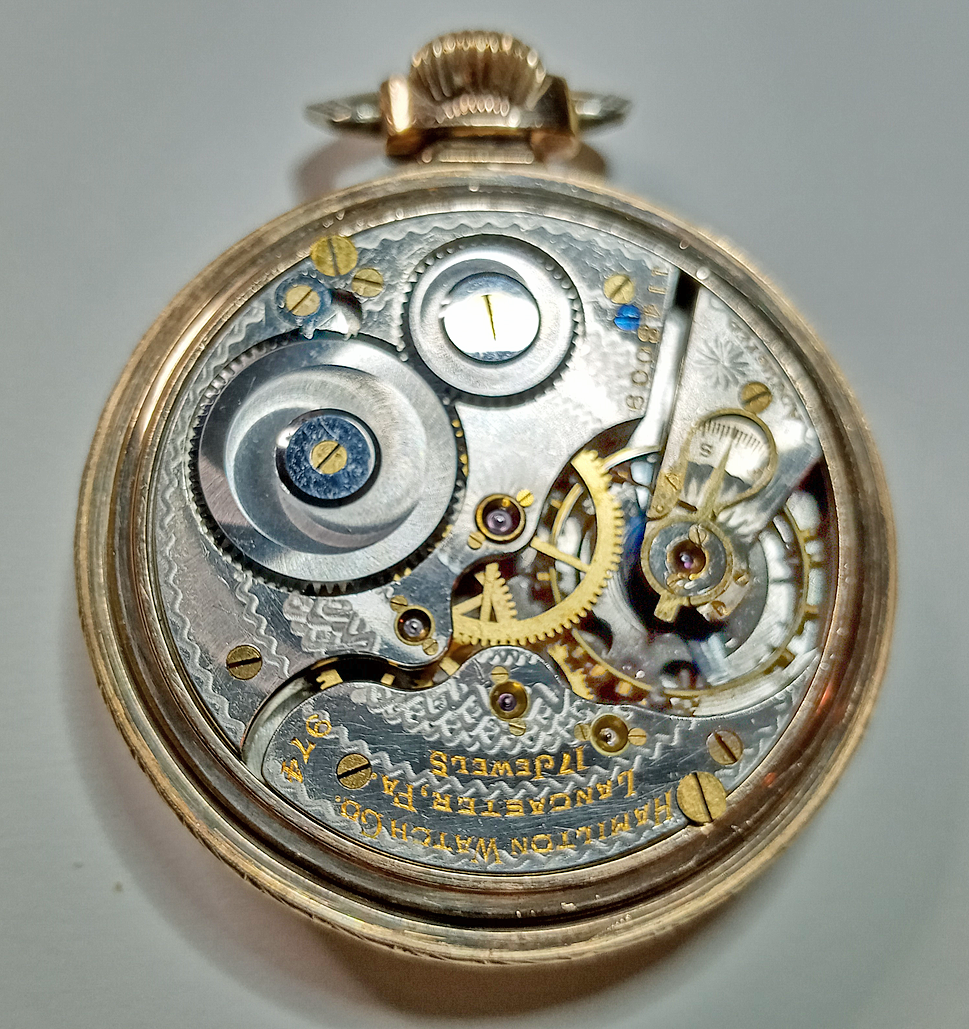
The dial on the Hamilton 974 I just serviced has markings in red at the outside edge of the dial. I guess there were many variations and the other may be a railroad style dial. Interesting that my dial also has the name of the shop "The Watch Shop" instead of Hamilton. I love the gold details in the movement.

 1 point
 -
I had to go look at the picture and I usually associate the 18 with 6 o'clock for those of us that had a 24 hour dial at one time. Then yes it is interesting how the 18 seems to be all by itself until all this they realize oh look there's the rest of the numbers. Then it's interesting how the numbers on either side got trimmed off or just work printed with the dial is made which of course adds to the mystery of the 18 floating around all by itself. Oh and then regarding the movement yes always nice to see a picture of a beautiful railroad grade Hamilton pocket watch. But that would assume that the original posting person comes back to us and? It'd be interesting to see statistics on the message board of how many people post a question and never come back at all. On the other hand if the person would come back and post a picture of the moment we get a serial number and find out approximately when it was made and information on the movement and of course the case which is probably not solid gold it's probably a gold filled case which is basically very heavy gold but not solid.1 point
-
I would love to see what movement is inside. Does anyone know what the large number 18 on the seconds dial signifies? I see this on some Hamilton watches. **Edit I see that it is part of the inner dial markings for 24.1 point
-
This is one of the weird features the message board I didn't see this either until @CYCLOPS brought it back to life. You want to be extremely careful with the suggestion you just made. This is a screw back and I would agree with Cyclops as to what exactly this is. It looks like a railroad grade watch the back screws off. One of the problems with overenthusiastic people who try to open a pocket watch cases is prying a screw back. Somewhere in another discussion group several years ago someone had a very nice Hamilton 950 pocket watch. They attempted to open it with a knife and of course now for ever are the marks on the side of the case which are not what they appear to be at all they are mutilation of the case. But to the untrained eye it looks like this is where you should pry the back off. But they said it was a screw off back this watch very clearly looks like railroad grade the screw off back. Although sometimes I can be on dreadfully hard and require effort to get off1 point
-
its a screw-back and front, you have to un-screw the front an pull a lever out around the 1 on the dial to set the hands, I think it is gold-filled, 16s Hamilton 992, 992B, 950 or 950B which would be awesome as they are rail road watches and highly jeweled, could be a 17 jewel, Hamilton made some of the best pocket movements, you have a keeper.1 point
-
Sorry, only just seen this. Some backs screw on , some are snap on. Try looking for a small indentation on the back to put a case opener in or Try to unscrew it. Post photos if the sides.1 point