Leaderboard


Popular Content
Showing content with the highest reputation on 06/01/24 in Posts
-
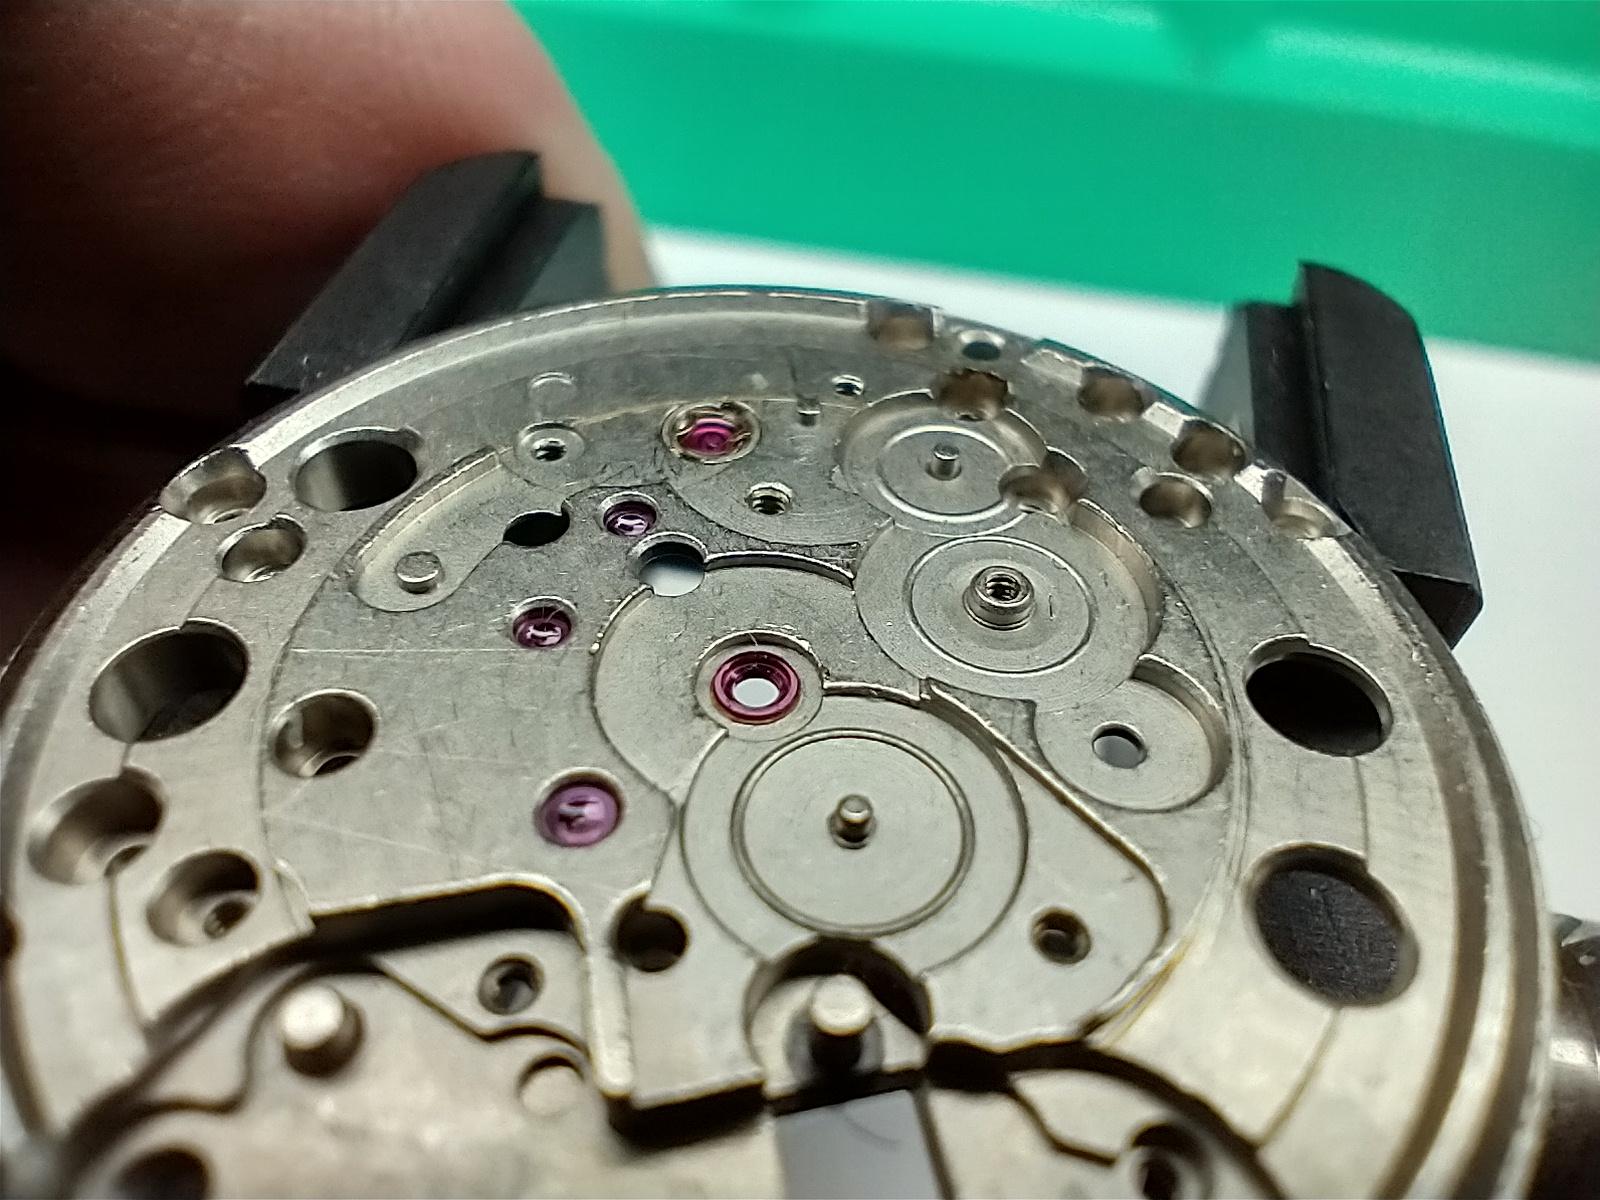
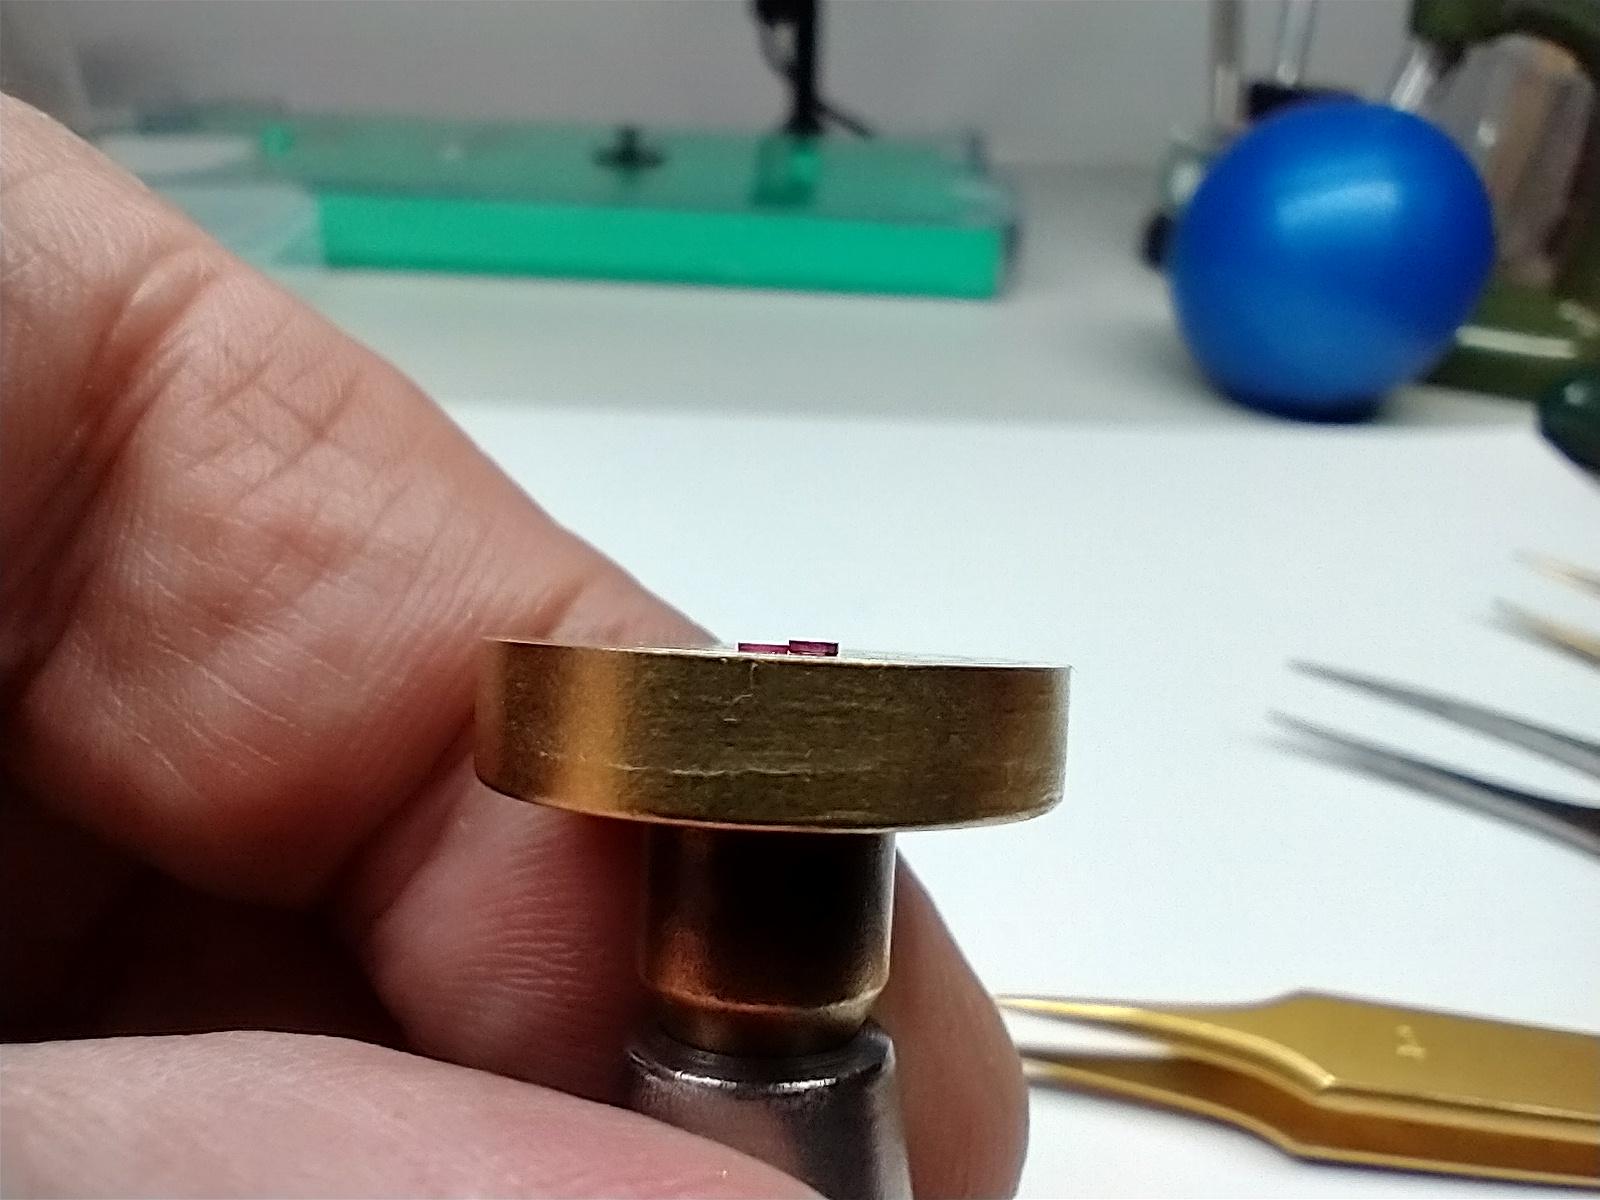
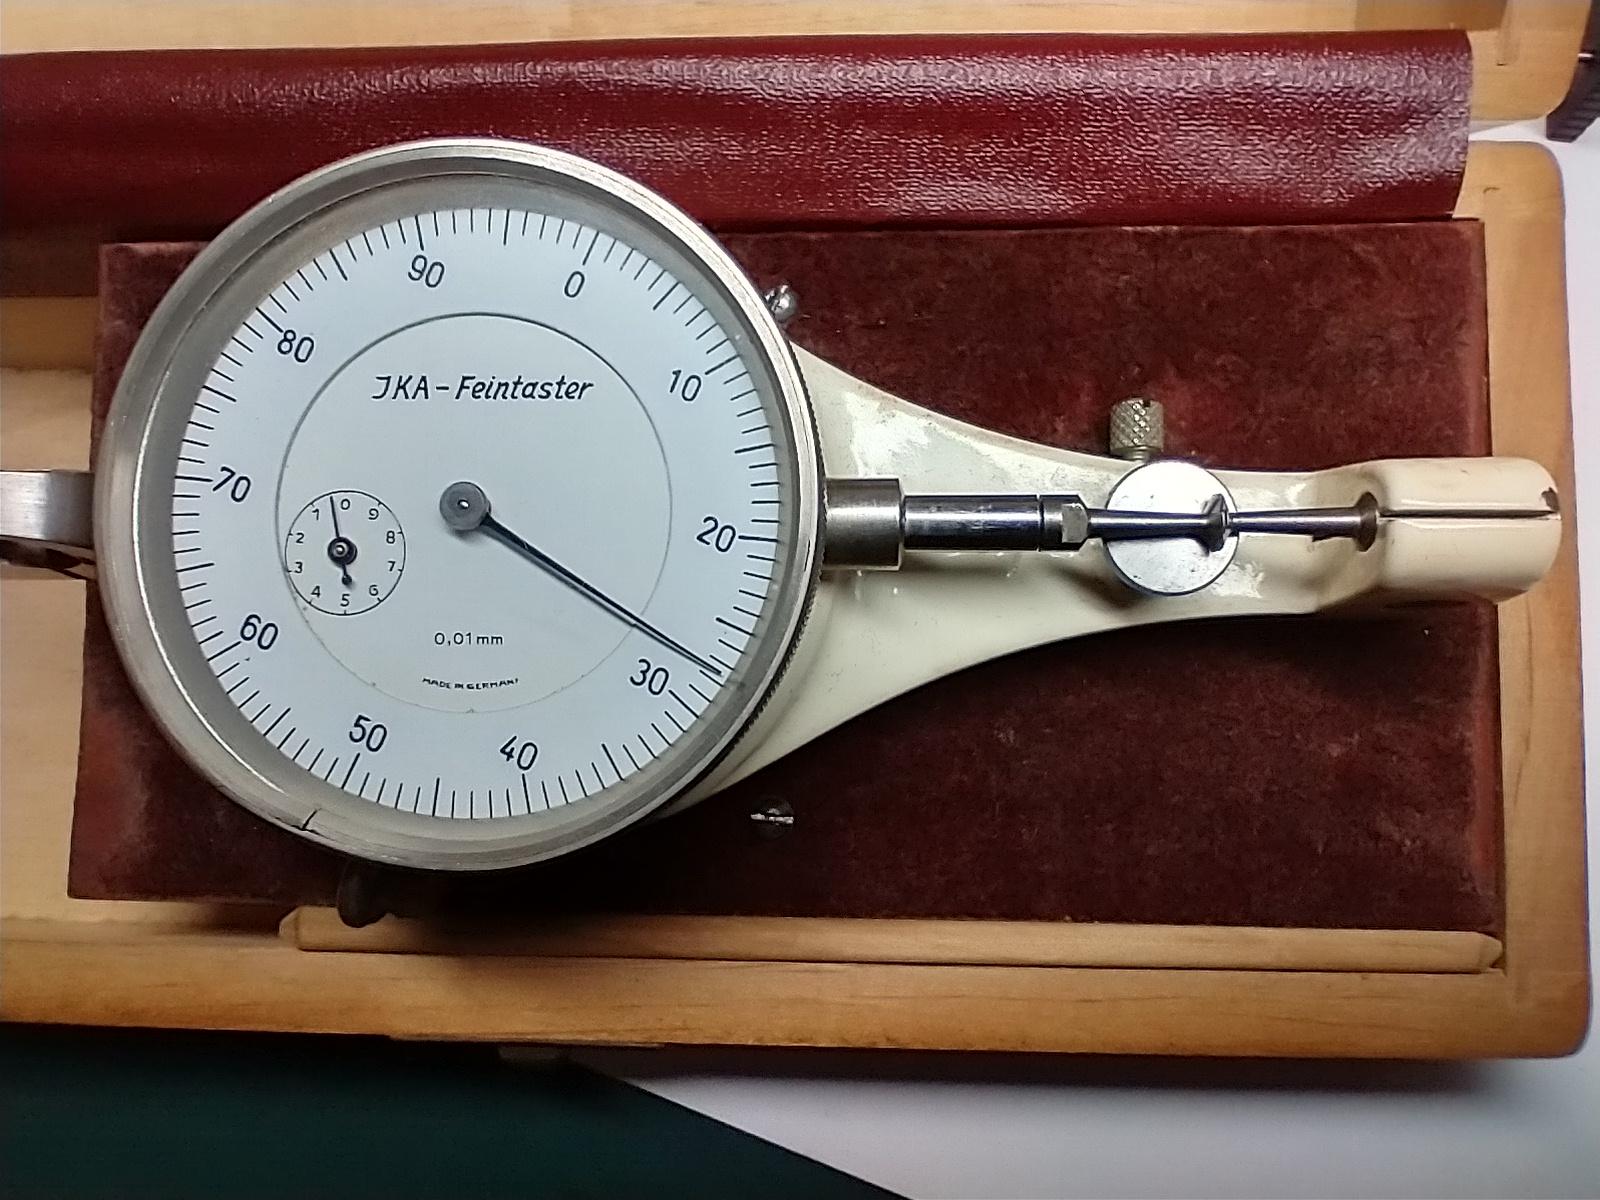
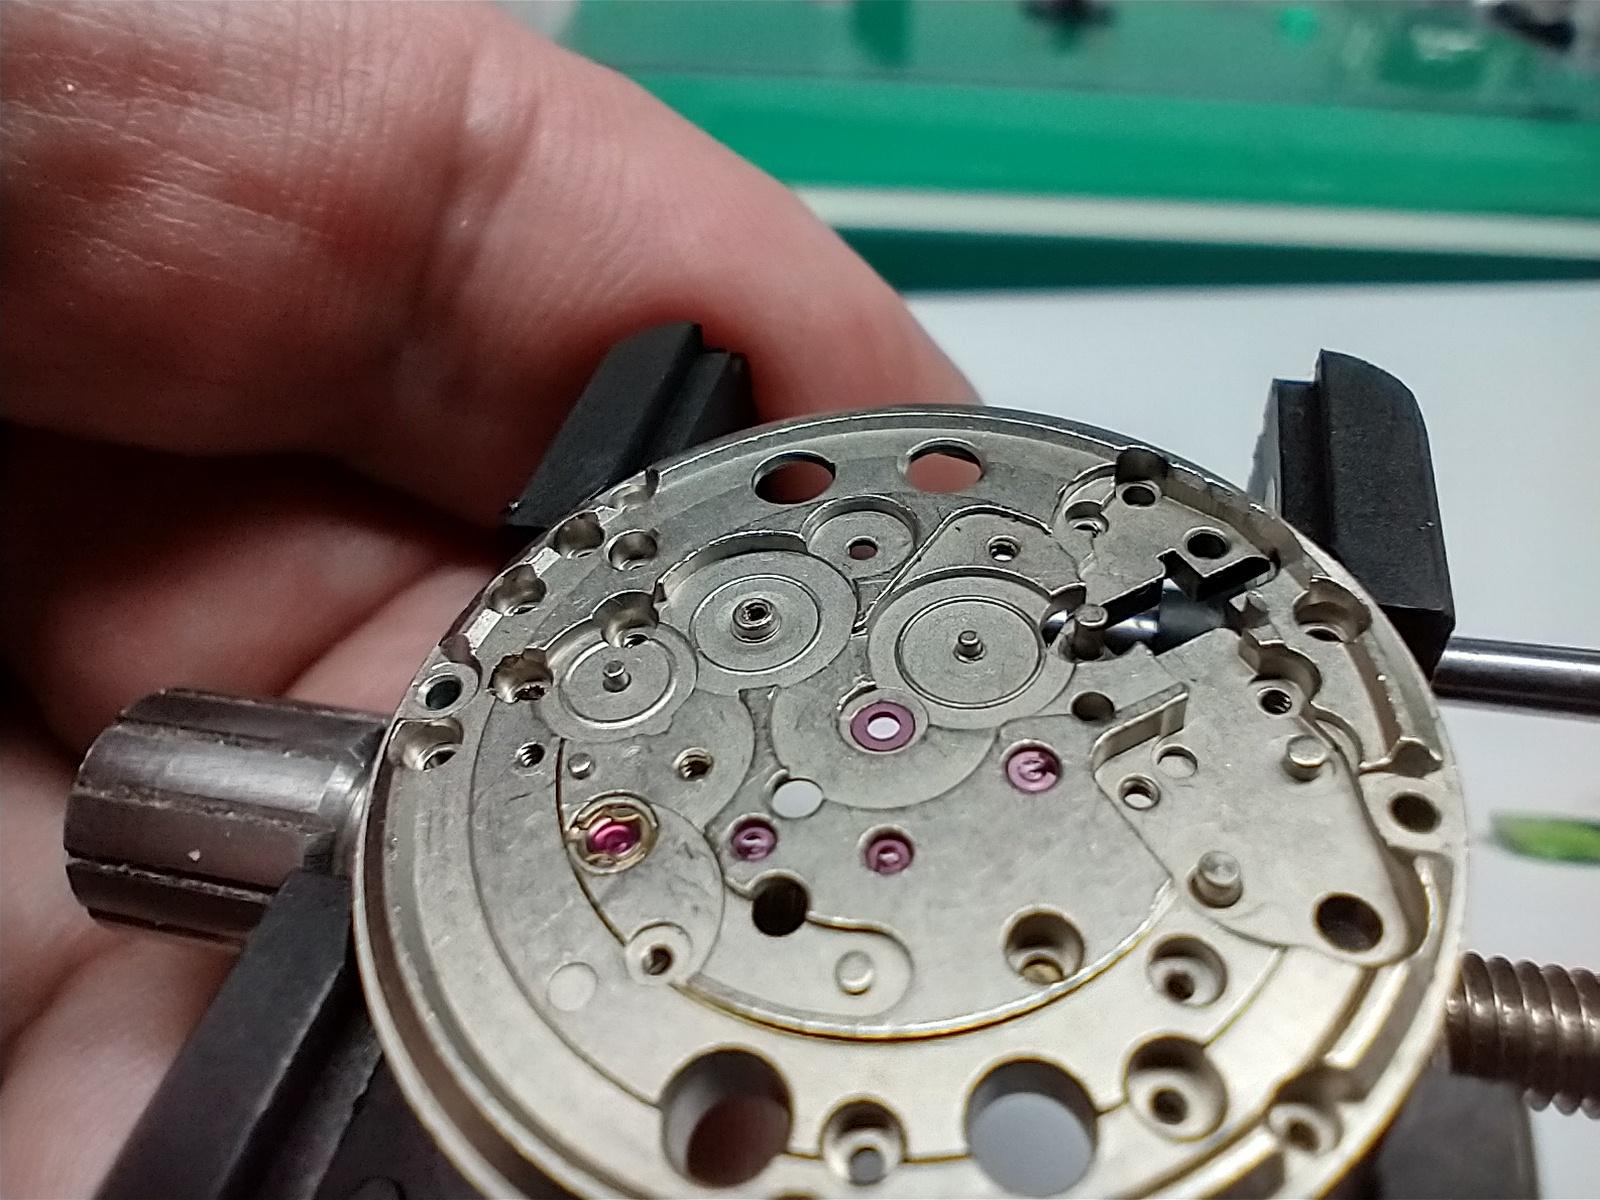
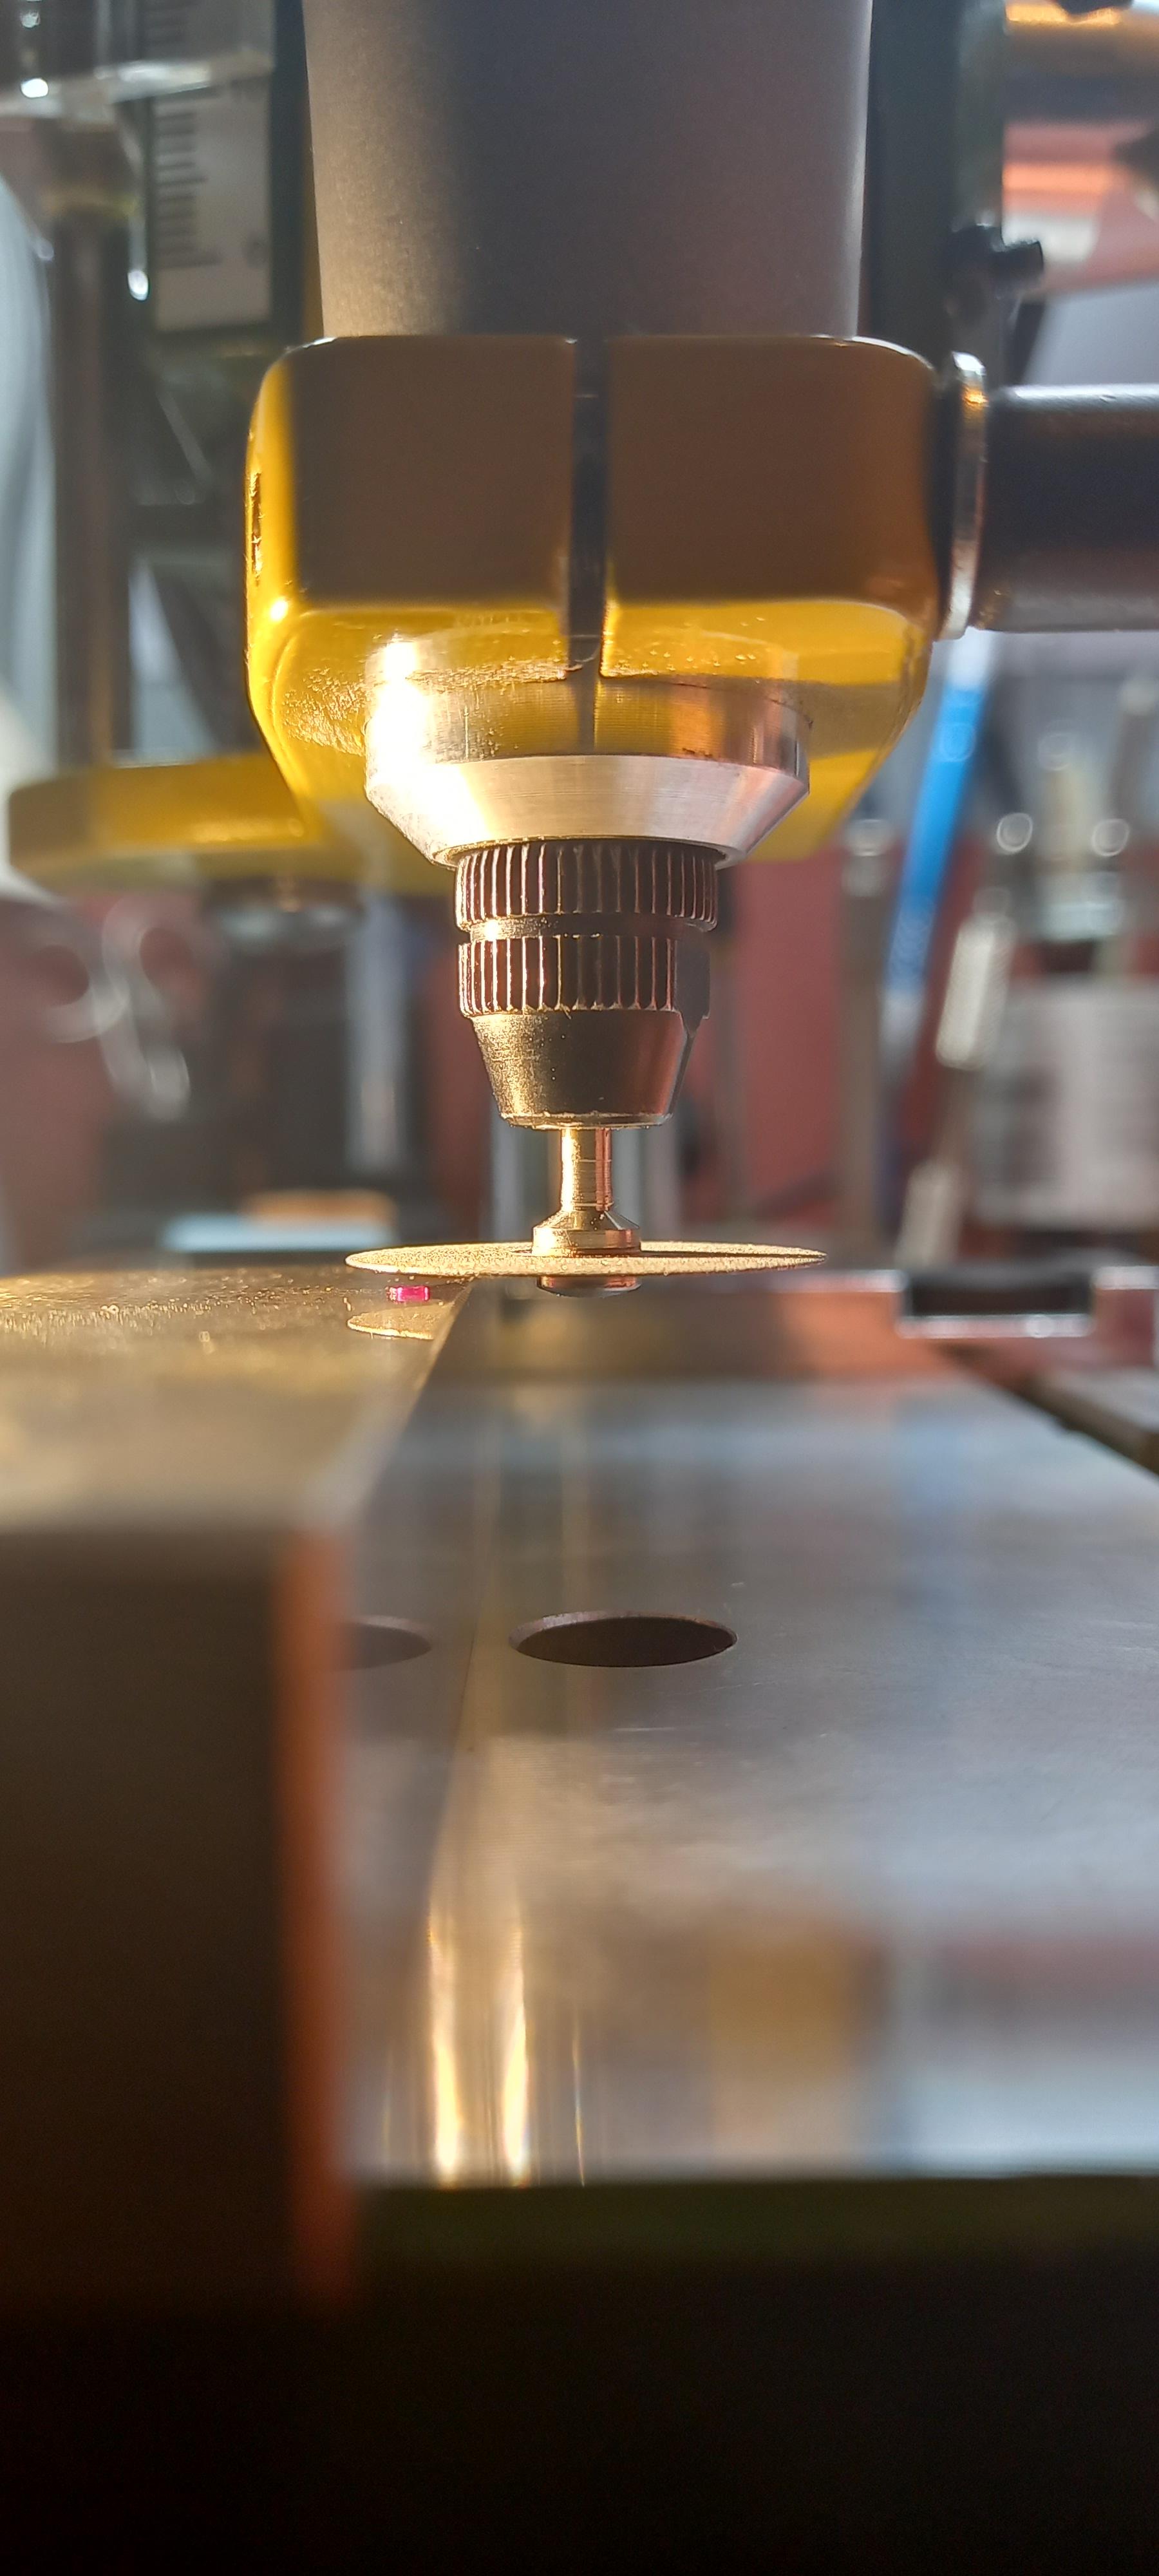
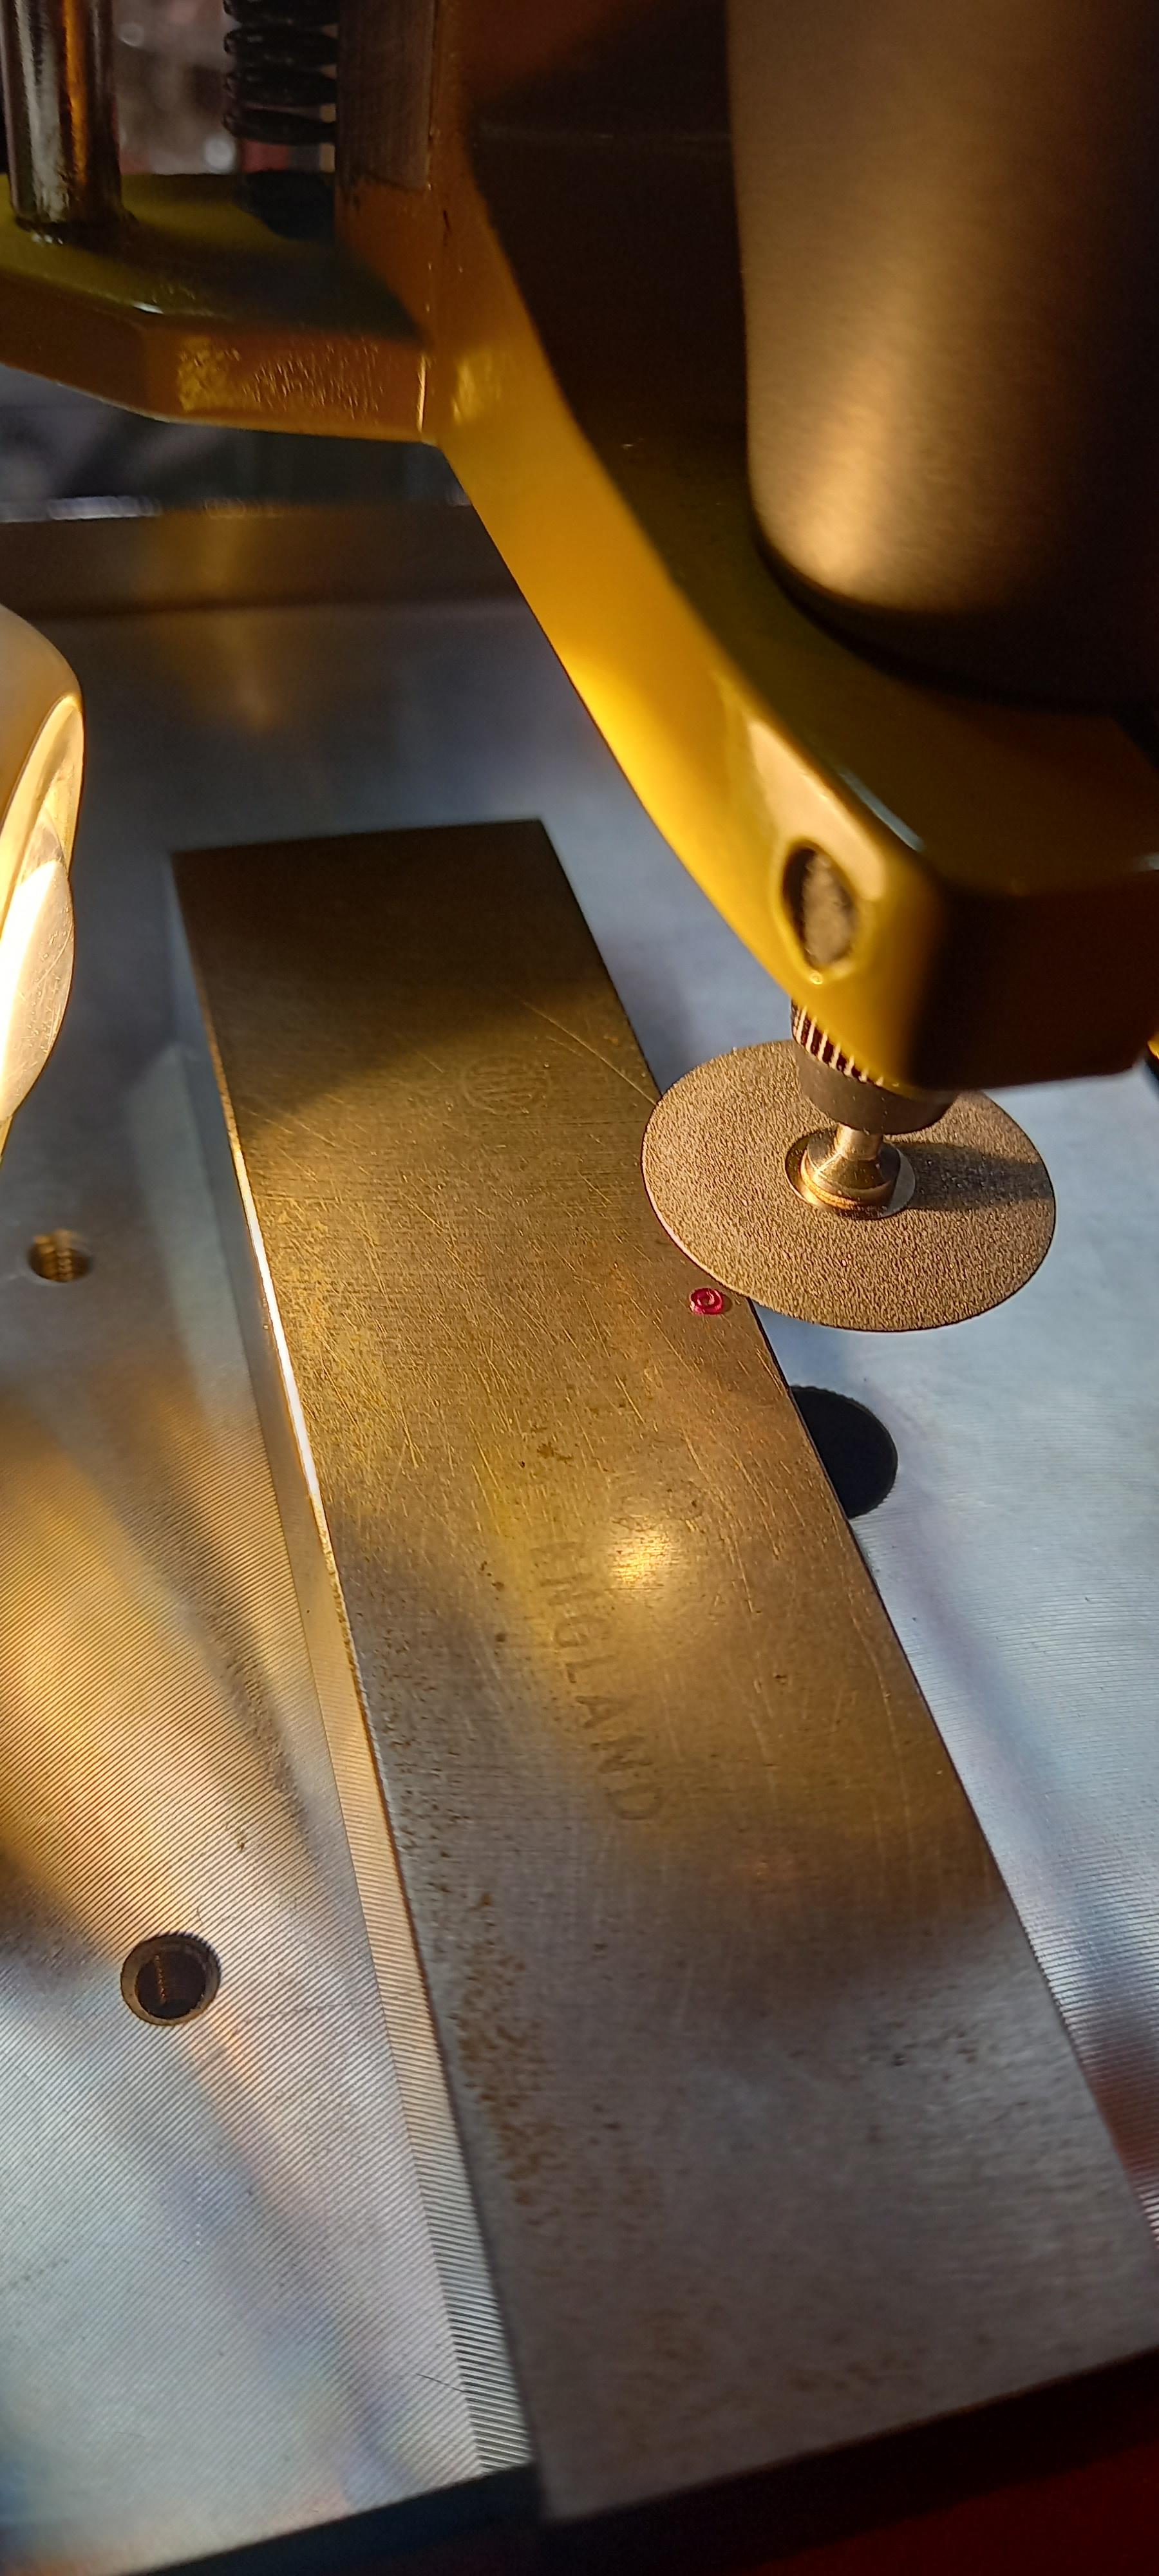
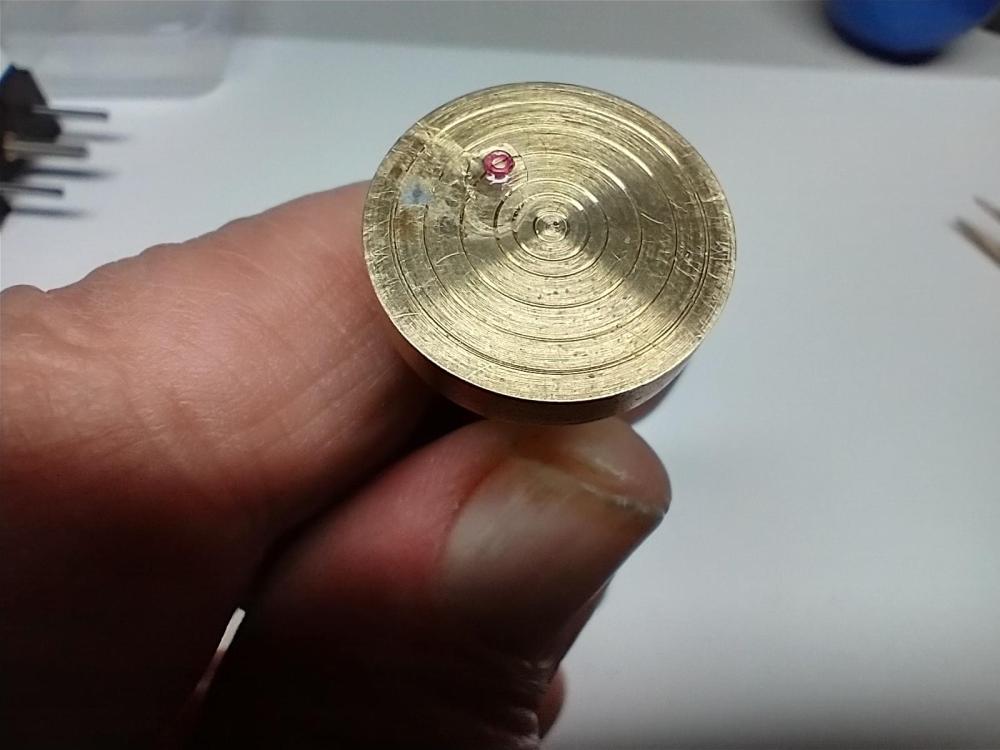
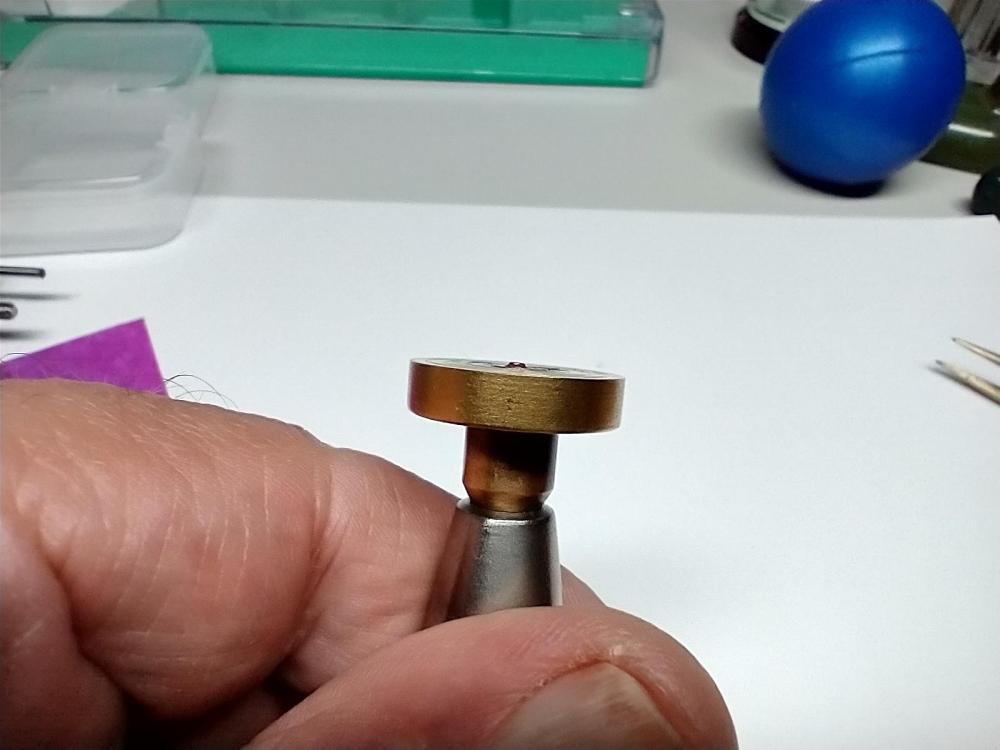
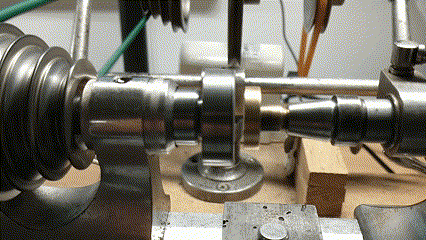
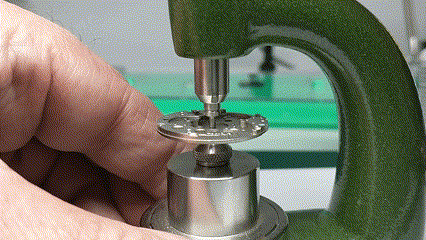
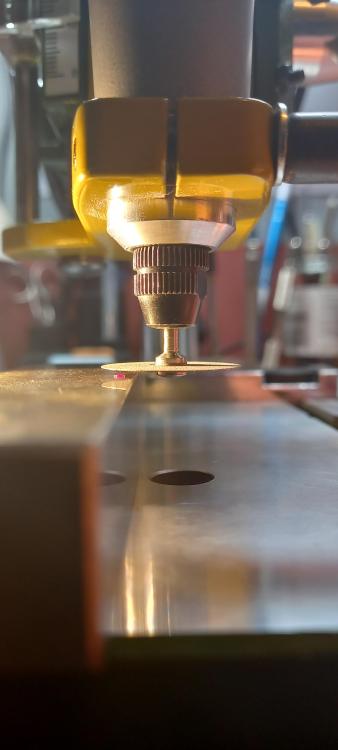
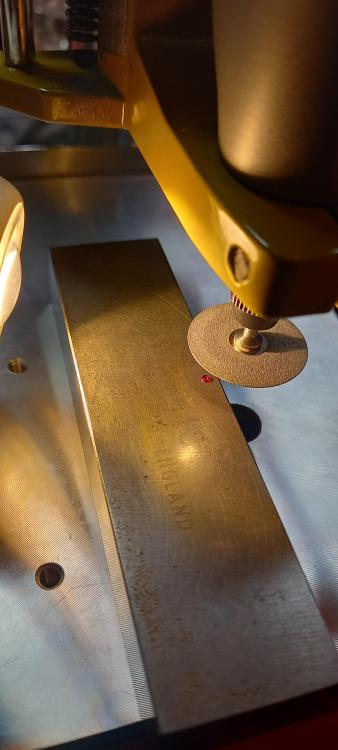
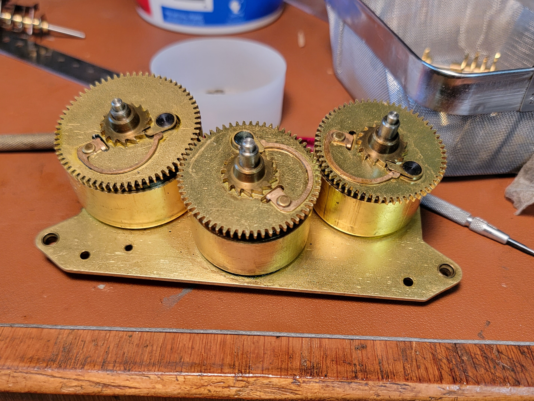
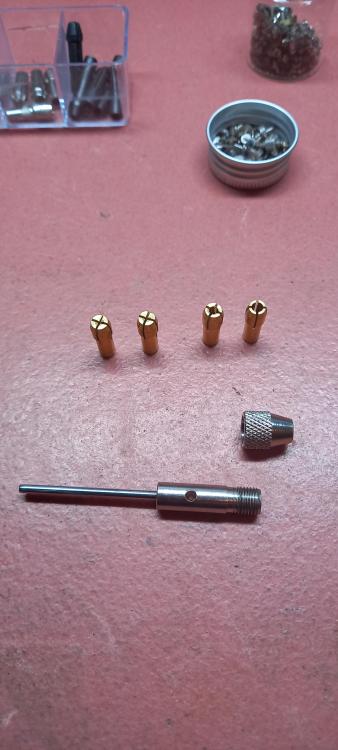
Hi guys, Some of you who have been stuck down the rabbit hole of watchmaking know that a fair part of it is finding a solution to a particular problem, especially when it come to vintage watches and all their idiosyncrasies. And, to find the solution, some unorthodox approaches and methods are employed. I find a good watchmaker will find a way to overcome. So, I'm servicing this Tissot 784.2 and find the centre wheel jewel is toast. The flat side of the jewel which the centre wheel sits on is intact, but the oil sink/dial side is crumbling and half of it is gone. It might last this way for some time, but maybe not and I'm guessing more on the latter. When I pressed it out, it fell apart. I teach my students there are two golden rules of watchmaking. Rule one: You are like the S.A.S. with servicing. You are in and out with no one knowing you were ever there. Not leaving gnarled screw heads and scratched bridges, etc. Rule two: Always think and consider the next watchmaker who is going to work on the watch. Don't leave obvious problems, or bodge something together, knowing it will create problems for the next watchmaker who works on the movement. If rule one is adhered to, rule two covers itself. The point I'm making here is, I could have left the centre wheel jewel and it might have lasted, but that's leaving the problem for the next guy and not very SAS. For some reason Seitz have discontinued the jewel size I needed (Sods law!), so I found one in a scrap movement that was the correct inside diameter. 0.8 mm to take a 0.79 centre wheel arbor. The outside diameter of the replacement jewel was 1.5 mm, so I had to ream the centre hole a little bigger from 1.19 mm to 1.49 mm. The problem was the jewel was 0.4 mm deep, so sat proud on the dial side and stopped the cannon pinion from seating properly, as you can see from this photo. I needed the jewel to be 0.27 mm deep like the cracked old one. Now, synthetic jewels are made from aluminium oxide with some colouring thrown in. Aluminium oxide is what is coated on wet and dry paper and as I don't have a diamond honing wheel, I decided to glue a piece of 400 grit onto a blank 8 mm collet and glue the jewel to a faced off wax chuck. Make sure the jewel is off-centre. Then I used my 8 mm lathe to hone the jewel from 0.4 to 0.27 mm. I can only use a GIF, so here it is... Then I lay another jewel that is 0.4 mm deep next to the one I'm honing and compare how much has been honed. I use a feeler gauge between the wax chuck and the wet and dry to gauge how deep the jewel is, so when I remove the jewel from the chuck using acetone, I know it is pretty close to what I want and found on my bench micrometre that I had honed it to 0.275 mm, so 0.005 mm bigger, which I'll force myself to live with. I was pretty impressed by the accuracy of doing this by eye with no CNC or even micrometre gauges whilst honing, just a rudimentary feeler gauge I made. Then I pressed in the jewel with a jewelling tool and set the correct end-shake for the centre wheel and ensured the cannon pinion sat correctly without touching the centre wheel jewel. There was no real need to polish the face of the jewel, as it isn't an acting surface, but could have done using the same method with different diamond micron pastes to get a mirror finish. The whole process probably took me close to an hour to figure out and work. Obviously the next time, it would be half as long. The diamond wheels would have made the job a lot quicker, as the wet and dry was wearing out making honing more difficult. I think with a diamond wheel, this could be done in a matter of minutes. A lot of the time was taken soaking the wax chuck in acetone and gently teasing the jewel away from the chuck. Because the jewel is so slim it is also very brittle and will easily break if this stage is rushed, so it's a matter of being patient and letting the acetone do its work and wipe away the melted superglue and gently prying it off with your fingers, not tweezers. You can't gauge how much pressure you are putting on the side of the jewel if you use tweezers. I could have saved myself time and effort by making a brass bush to fit, but I didn't like that idea I had robbed a jewel and broken one of my cardinal rules, which was more 'Dad's Army' rather than S.A.S.! It's a very similar way I hone down brass bushes, as parting them off on a lathe can't get total accuracy on the depth, so I finish them off like this. Now I've been successful using this method, I'm going to invest in some different grade diamond wheels for my lathe. These kind of skills and problem solving, I teach here in South London in evening first and second year courses. I hope this gives you ideas of overcoming obstacles and another reason to buy a lathe!


 6 points
 -
An update to my post above, i got this type of bezel remover yesterday, absolutely perfect, the build quality is very good, no slop or play, perfectly aligned, no manufacturing defects, i've tried it on a couple bezels and it just works how it should, it's a solid bit of kit, i'm more than impressed. The scores on the door say it's a 10 out of 10 from me. What a difference in build quality from the first bezel remover i got, i slagged the first bezel remover off as chinese junk but this one makes up for it.
 4 points
 -
Might not be quite as accurate Jon, but do i get points for initiative?
 3 points
 -
I've used this kind of tool for a couple of years to remove bezels. The trick is not to rely on the screw knob to exert the force to pop the bezel off. I think I've shared how I use this tool before. The trick is to screw the blades down into the gap between the bezel and the watch case, and apply slight pressure only. Then I use a nylon faced hammer and tap on the movable jaws. The small amount of slack in the screw threads allow the tapping to push the blades a little further into the gap. This can be confirmed by the loosening of the knob after a few taps. Retighten the knob and repeat until the tapping does not loosen the knob any further. The blade would have reached the vertical lip of the case. By now, the gap would have widened enough to allow a thicker blade of a case knife to finish the job. I usually put the watch dial up instead of dial down. This way, I can sometimes press down on the watch crystal and the bezel would pop off. But my tool is Korean made, not Chinese. The blades have not shown any wear or damage after two years of use.3 points
-
I picked a nice ST 124 for $75. It is very very close to the E701 electric clock (I have serviced maybe four or five), so I am familiar with all of the little calibrations you must do during assembly. This is the first fully spring-driven version I have worked on. The mainsprings were a real pain. The barrels are riveted in, so I did not think I could use the mainspring tool, so I did it by hand. It was not horrible, but challenging. Anyway, it is done now. In retrospect, there might have been a way to do this on the winder if I manufactured an arbor just for this purpose. Who knows.
 2 points
 -
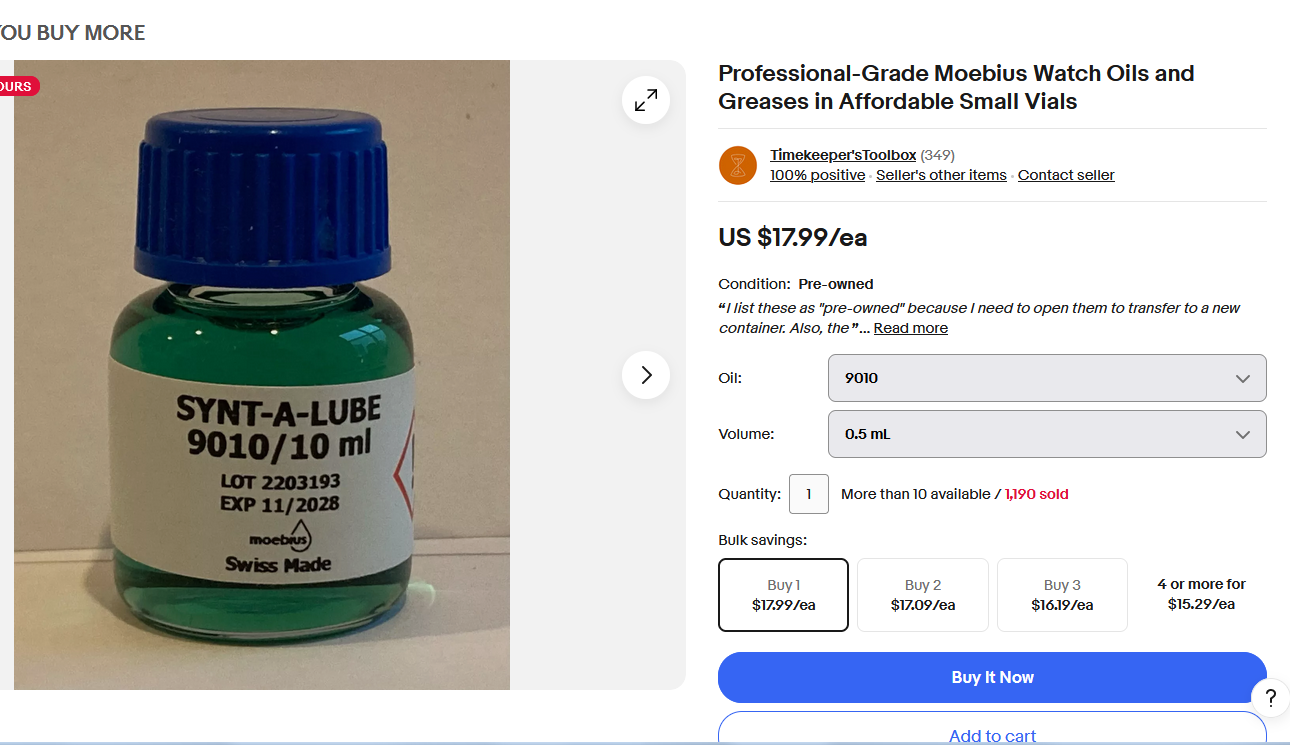
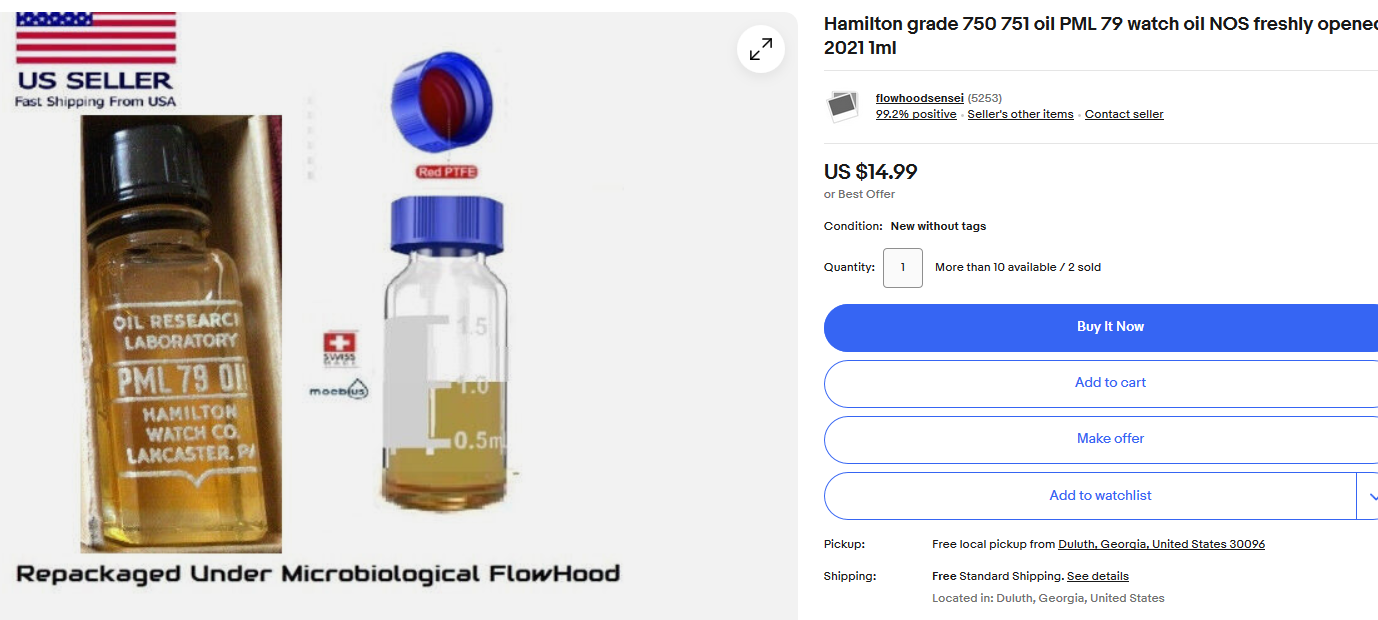
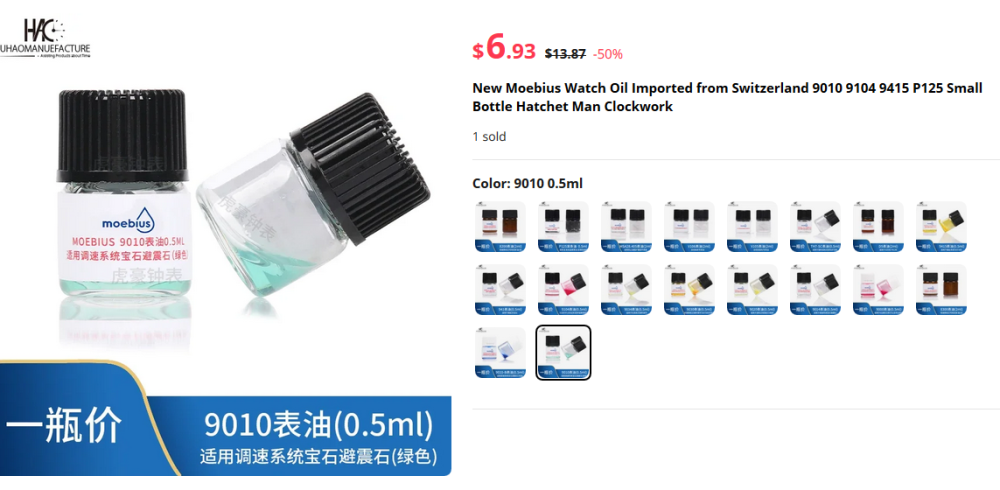
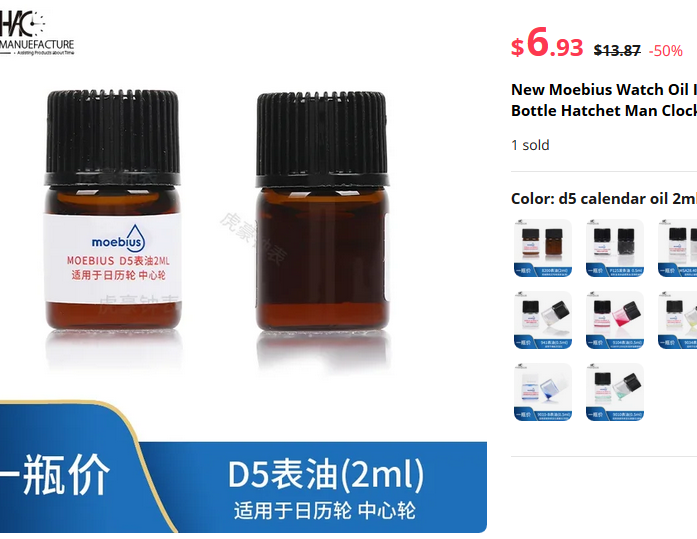
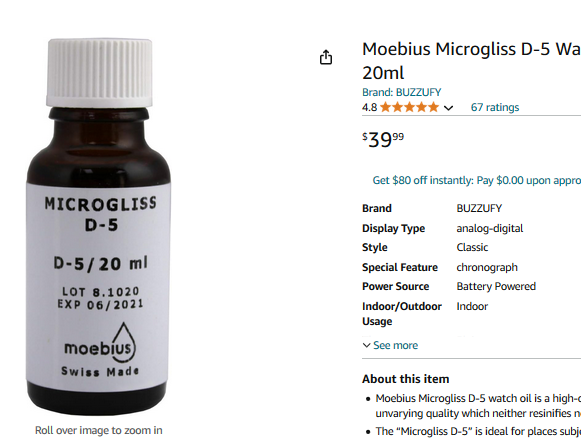
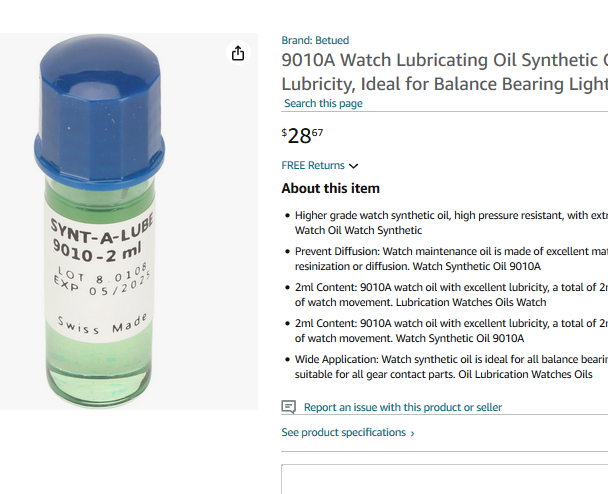
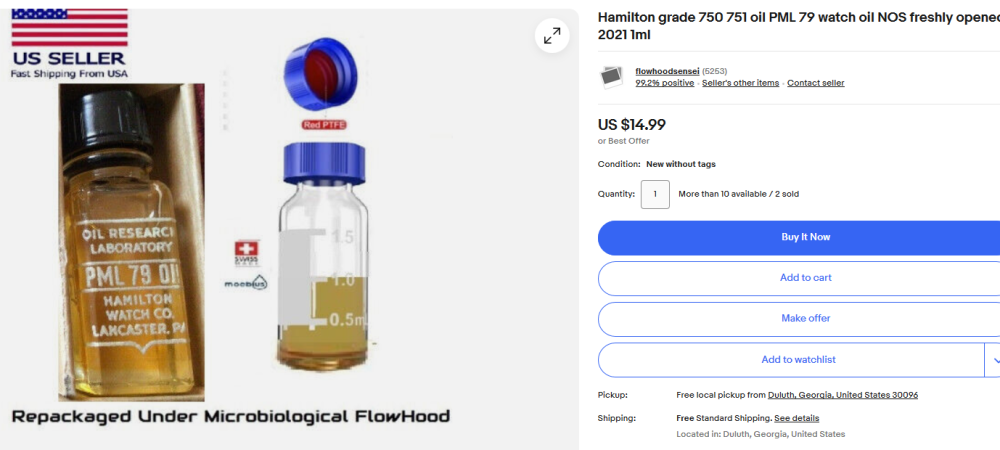
I've seen something similar to this on eBay. Someone seemingly helping you out by breaking up those really expensive bottles into? It brings up all kinds of interesting questions like if you're purchasing oil brand-new in original bottles it has an expiring date. These do not have any such dates so you're going to pay a premium price for oil that you don't actually know how old it is. Then when the biggest concerns anyone has is how does the oil get out of the bottle I'm assuming they use a syringe. So realistically if they wore gloves and a dust free environment you could get clean quantities of the exact amount of oil they claim. Then I remember the seller on eBay helping you out giving you these good deals etc. but are they? For instance I snipped out some images for 9010 and D5. Let's start with D5 if we purchased a 20 mL bottle off of Amazon the cost would beBasically $40 and purchasing our bargain oil in little teeny-weeny bottles were getting 2 mL at a price of? Oh there's a 50% off sale normal price would be and now are getting at a sale price. But let's look at the Amazon price it should be four dollars per 2 mL. Instead the sale price the bargain price $6.93 and the regular price $13.87. Notice a minor discrepancy on pricing that bargain really isn't that big of a bargain. Then we have the 9010 Amazon price varied by quite a bit it depended upon which seller I was looking at. Basically anywhere from roughly $30 for 2 mL all the way up to a bargain for them $50. Now instead a getting to milliliters I could did for the D5 you're only going get .5 mL which would run you $7.50 versus their price of $6.93 at least the sales price so I guess you are saving a few pennies.
 2 points
 -
I assume you have all seen how jewels were made. It's a long video, and poor quality, but I found it facinating.2 points
-
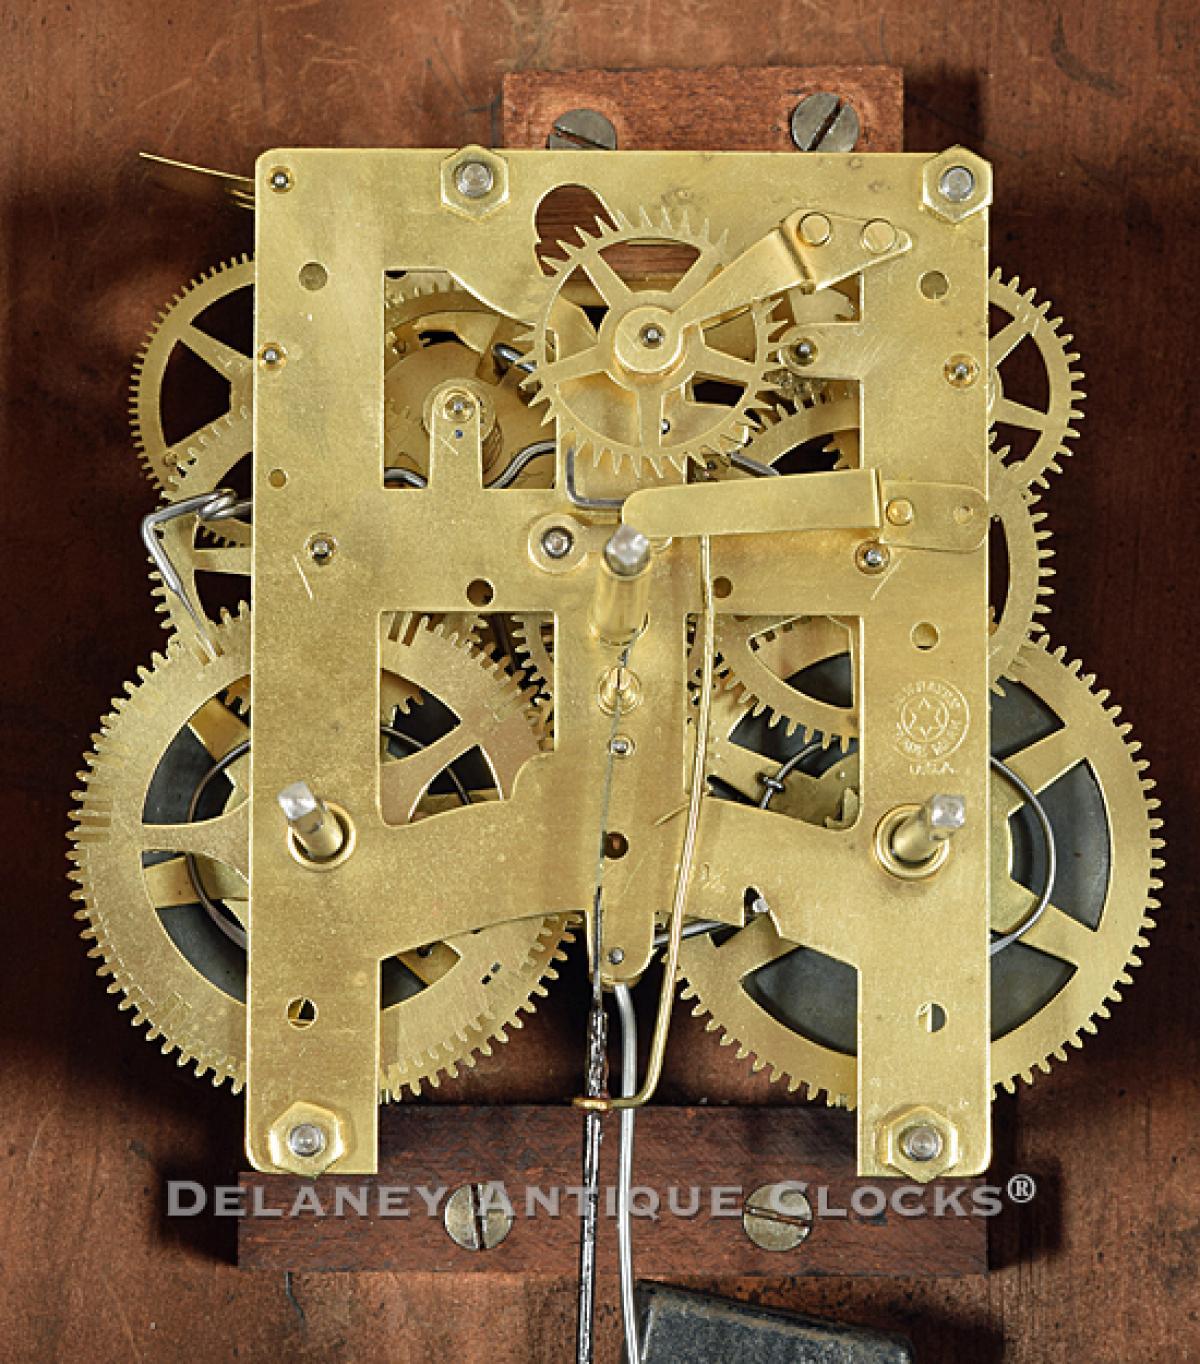
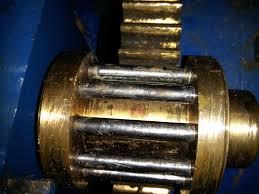
This is quite common with these clocks. The problem cause the springs are so powerful but the brass? is soft so wear occurs on one side of the teeth. Clean up the bur and with needle files shape them a little but do not file them shorter as the depth will be wrong and they will not run smooth. Your photo doesn't show it but I expect the wheel train has lantern pinions which can take wear so the pivots can be loose in there holes a little more than the fixed type. This is the style of lantern pinions.
 2 points
 -
I see no reason why you can't have points, if it works, it works.2 points
-
Update on this. Since I now have all I need for cleaning and lubricating a movement and since it is a week end. I restarted working on this movement. Is to practice cleaning and lubricating. But as I was doing, so I thought I might as well try to repair the hairspring. After all, I know it is an advanced skill, but I also know I can’t really make it worse than it is. I am happy to say I made it better enough that it now ticks. I can see that the spring still doesn’t have the correct geometry. I is still a bit out of plane ( I have a really hard time correcting that although I made it quite a bit better than when I started) also a bit out of round which I got better at fixing but now the out of plane part makes it harder to improve. Anyway, I decided it was as good as I could get it at this point. So I reinstalled the balance on the balance cock. I had a pretty hard time doing that, but it is now done and the movement is ticking. Considering that it can never be used in a real watch due to the broken setting lever screw. I am satisfied for now and will go on with the disassembly cleaning reassembling and lubricating it. Once that is done, I will do the same with the correctly working ST36. that one is supposed to end up in a watch so I hope I will not break it2 points
-
It is a good example of what happens if you use a mop wheel in the wrong way. You can see that the engravings have been rounded off. The correct method would probably have been to sand it by hand with wet sandpaper to an increasingly fine degree on an aluminium sanding block. But now I just had the goal of getting the case back clean and scratch-free quickly. After all, I paid no more than £11 for the watch and had originally only intended to use it as an everyday watch. Had it been someone else's watch, I would have asked the owner first. However, when I polished the lugs and the case, I was very careful to preserve the original shape of the case, especially the lugs, which easily become rounded otherwise. I feel that I succeeded well with that. It's all about having a strategy and using Kapton tape. Yes, it is! The problem was finding a new glass gasket because the ones I found were either a tenth of a millimetre too wide or too narrow. In the end, I chose a glass gasket that was a tenth of a millimetre too wide. However, it fitted better than I expected so maybe I measured wrong, despite being very careful, or maybe it's not all that sensitive. To make it easier to press in the glass, I first lubricated the glass gasket with a little silicone. It worked perfectly and the glass sits as if it was moulded into the case.
 2 points
 -
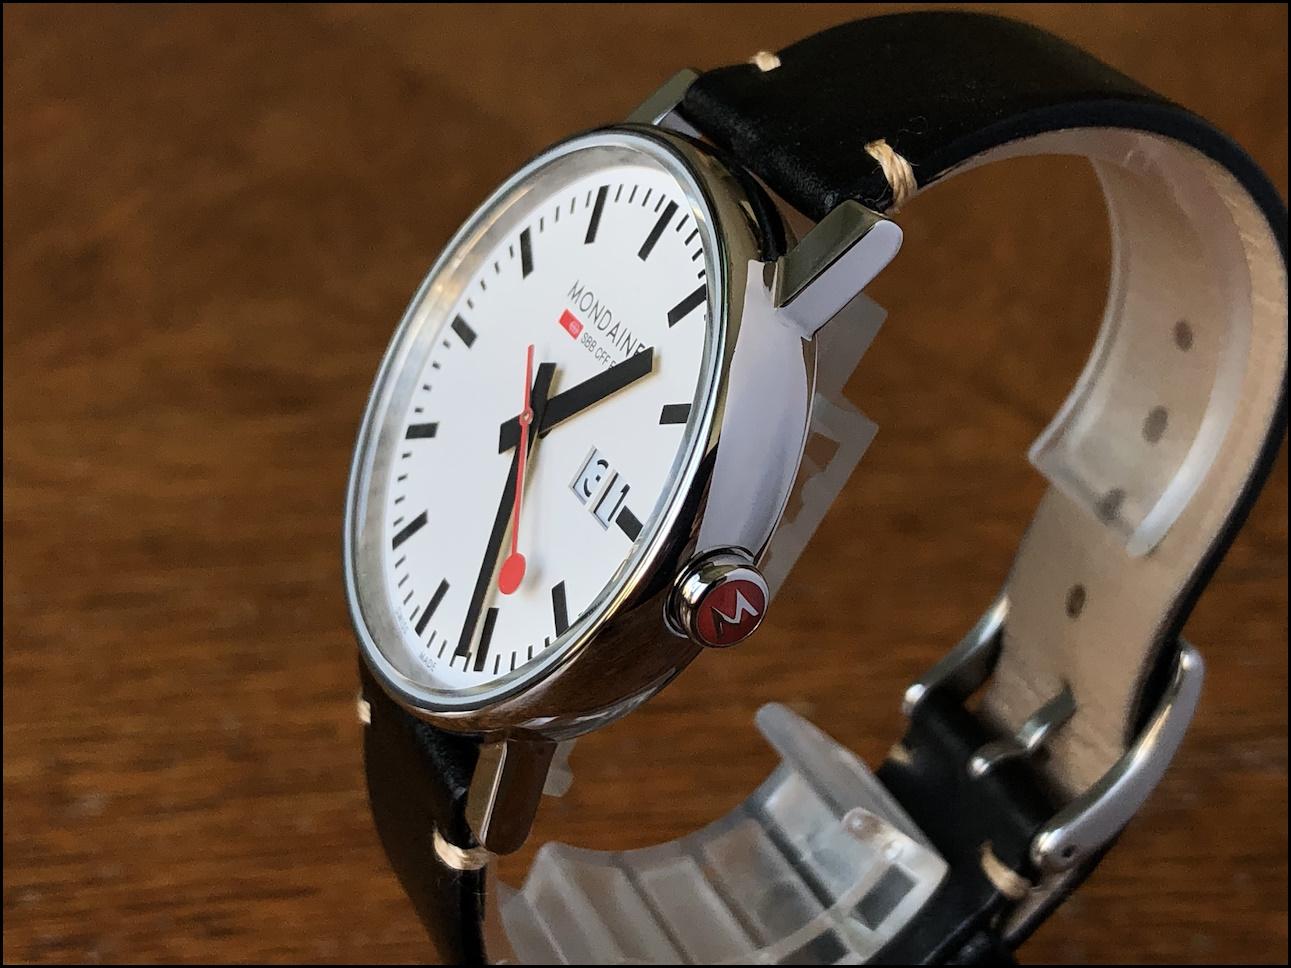
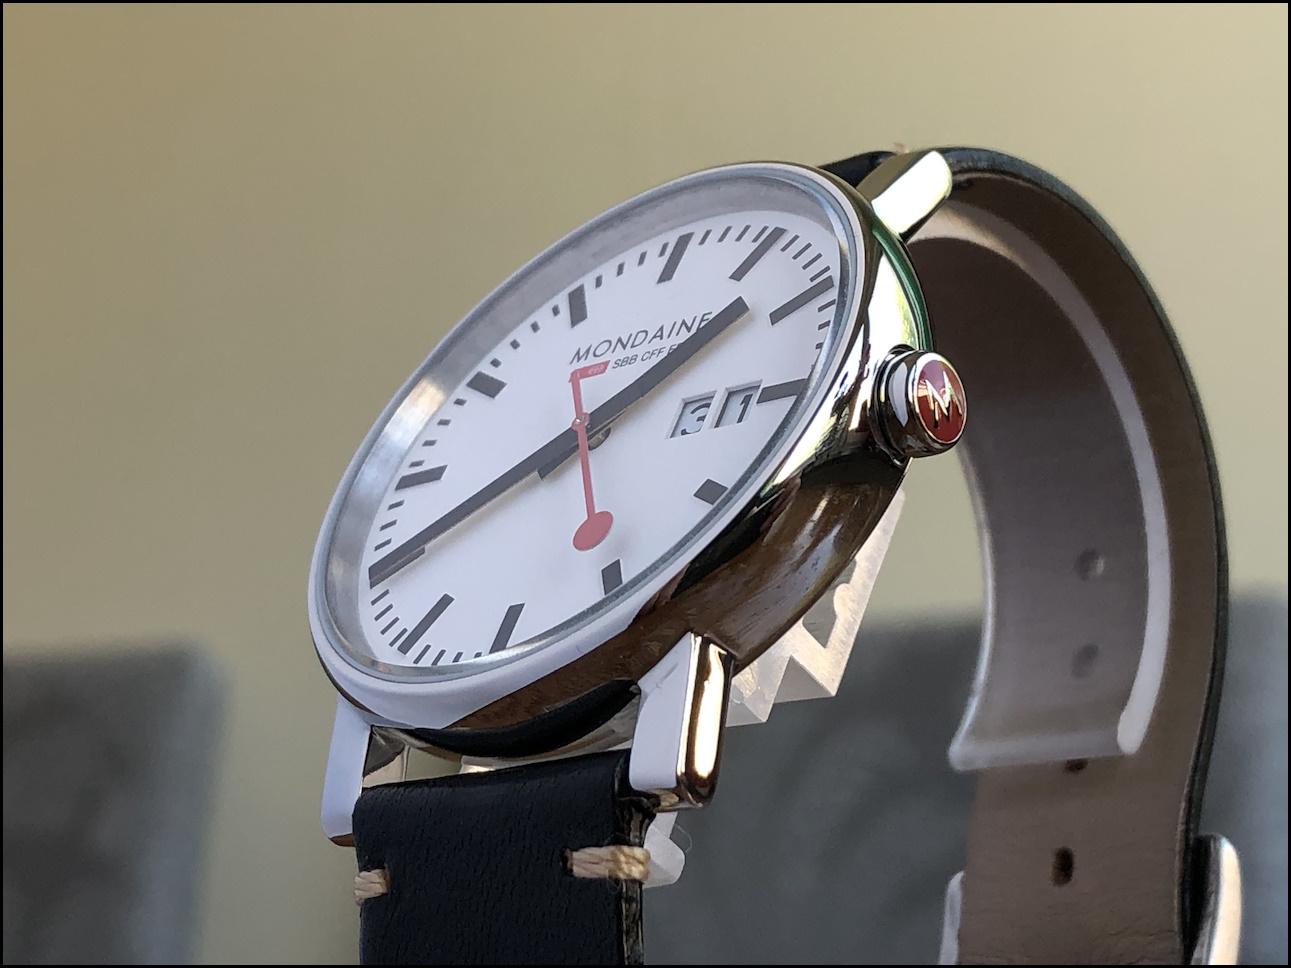
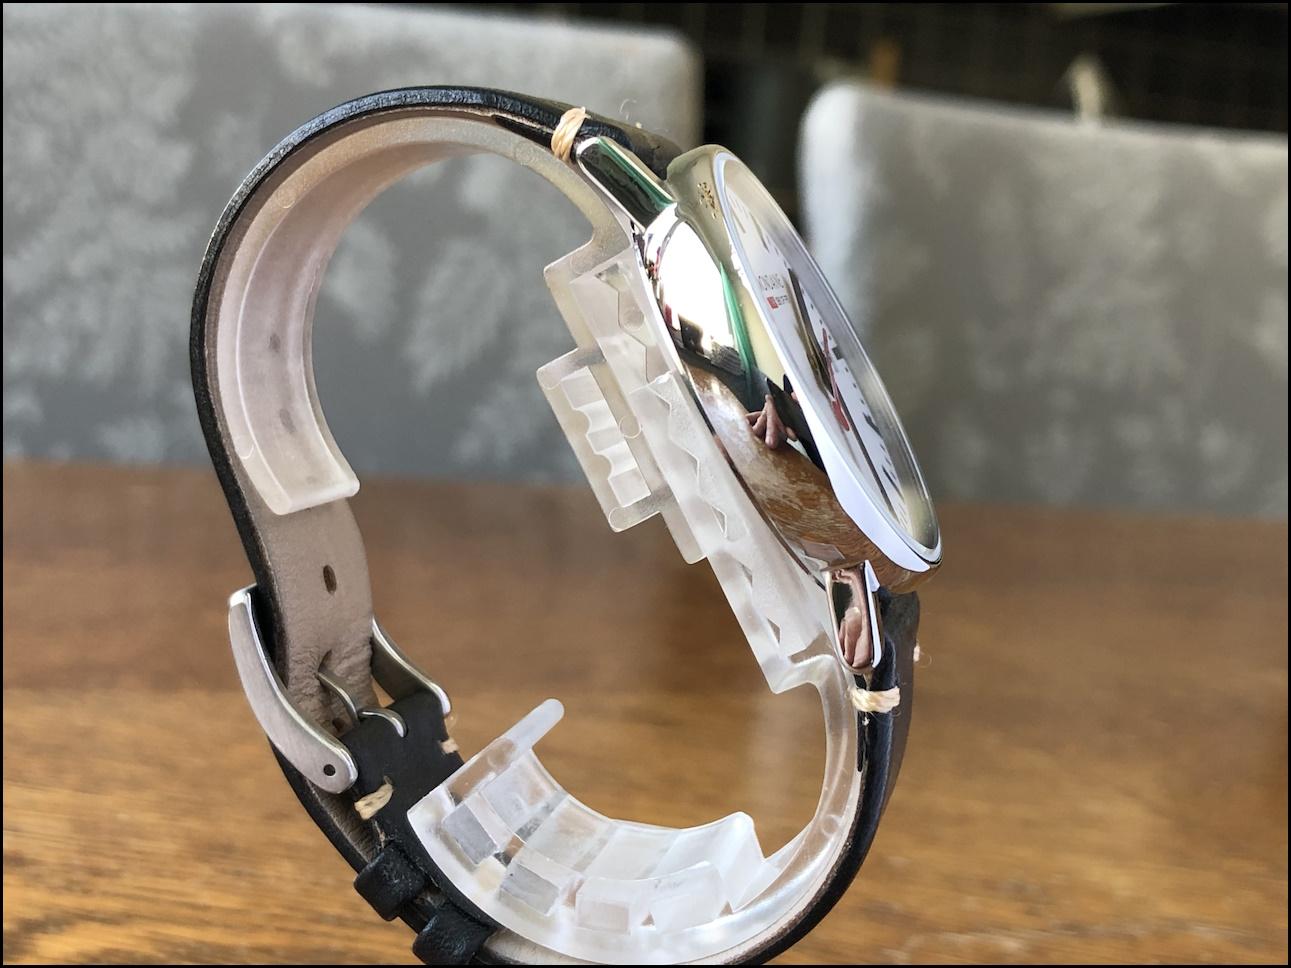
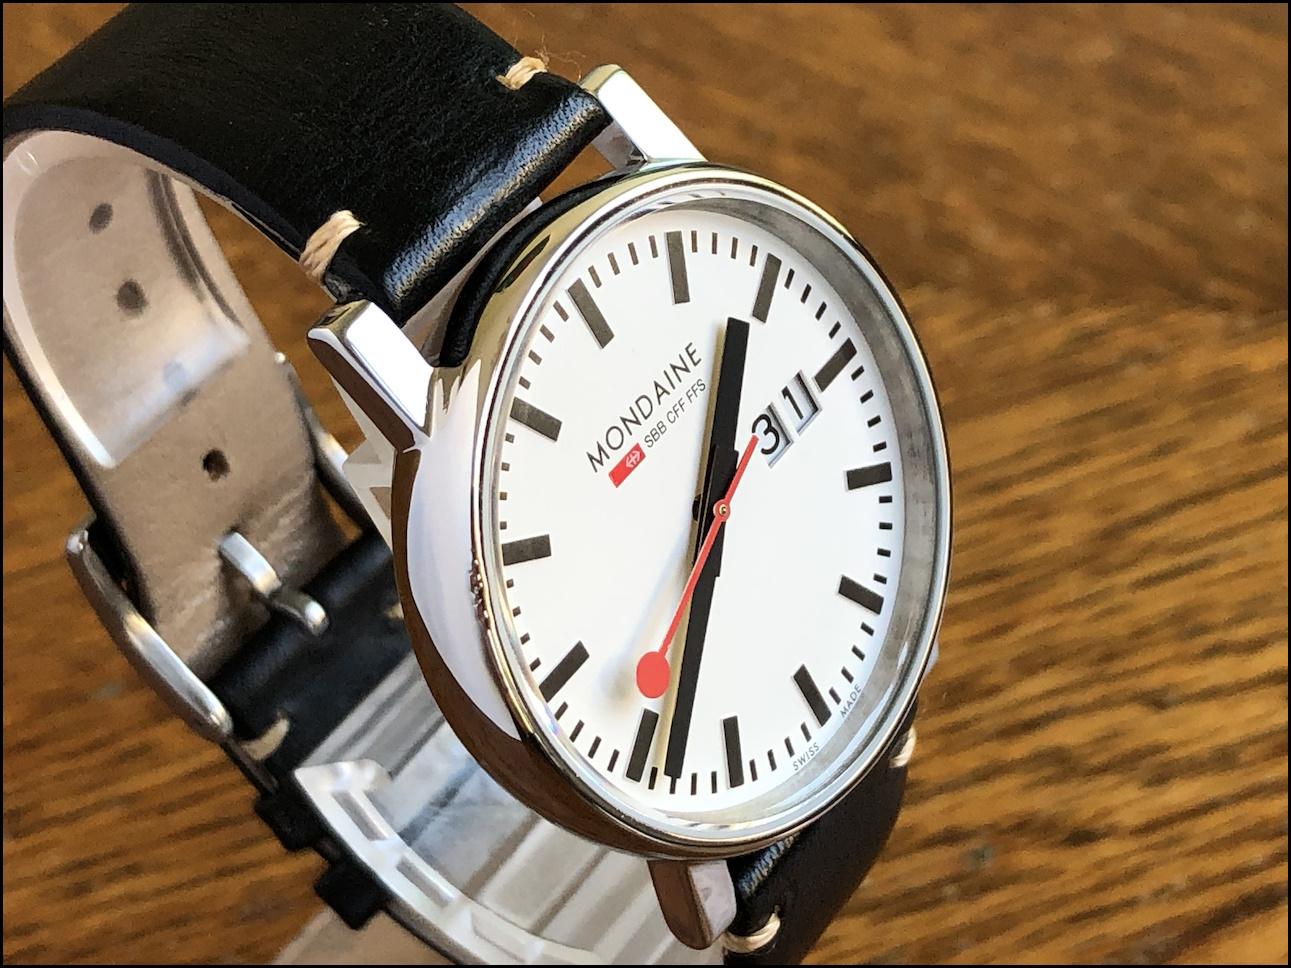
Five months ago I decided it was time to learn basic polishing and received much-appreciated help in the "Please help me buy a polishing machine" thread. Usually, I prefer to keep the patina especially if I or the owner of the watch has had it in their possession for a long time and shares a history with it. That the watch and of course the movement should always be clinically clean after a service I consider a matter of course. I also think that really expensive watches should avoid polishing, at least if you can't do it correctly and preserve the original shape of the case. I have learnt during this period that accidents can happen very quickly if you don't really know what you are doing, so training is a necessity. Having said that, although the result is not perfect, I feel very proud of my achievements so far, and I hope you like the before and after pictures because there are quite a few. Before the refurbishment: After the refurbishment:


 1 point
 -
OK, bad video... Almost all of them are. To attach the spring (stud) to the cock: 1. Put the cock on the table top upside down. Open the regulator if closed. 2. Put the balance on , align the stud above the hole for it in the stud carrier. 3. Help the stud to get in the hole by gentle pressing. 4. When it is in, grasp the cock with balance with tweezers (from aside, not from above), then get it between fingers, not changing the horizontal position, then tighten slightly the screw. This is the moment to correct the high position of the stud - it's top must be even with the carrier. Now tighten the screw. 5. If the outer coil is out of the regulator, move the regulator to the max to '+' position, then guide the spring to get in the regulator. Now You can return the regulator where it was and close it above the spring1 point
-
Ok, still work to do. The watch will go fast and with lo amplitude with this hairspring, But it looks easy to repair. But, please remove the balance from the cock again and show pictures where the spring is not forced by the parts where it stays in place. Make pictures too in the plain of the spring, so it will be seen the place where the coil lifts above the plain1 point
-
Out of curiosity I went to eBay as that's where I previously saw this interesting practice of ripping off the scared hobbyist. Initially what seemed like an amusing endeavor has turned somewhat depressing as there is some really greedy people out here seemingly trying to help you out but maybe I'm just misunderstanding their intentions. So for instance here's somebody selling a nice huge bottle of 0.5 mL at basically $18. Similarly I guess on the surface this doesn't look too bad. That only works out to $72 per standard 2 mL bottle. Although I did see another seller selling you one of those 2 mL bottles for $50 which I thought was a ripoff. Yes the amusement started wearing off with things like this 0.2 mL or basically 1/10 of a standard 2 mL bottle. Or $170 for standard bottle I guess then this is a bargain for somebody. It looks like the best price I'm finding for the HP oils in the standard 2 mL bottle on eBay are about $40. This one is very amusing new old stock freshly opened bottle of lubrication this actually supposed to be quite good. Problem is it was made when exactly? Yes there really is a reason why they put expiring dates on bottles although the Elgin synthetic oil seems to last forever and the Hamilton is supposed to be just as good so conceivably it does last forever. So once again you're getting a's spacious huge quantity of 0.2 mL at $15 So enough fun of looking at the ripoff price ofEBay lubrication. But if you take your time not everybody on eBay's ripping you I did find someone selling 2 mL bottles of HP oil for $40 which seems much more reasonable compared to the other sellers were breaking it up and it's super tiny little droplets of oil.


 1 point
 -
Well, disassembly went fine but I decided to disassemble the barrel. A first for me in part because I was/am afraid of the winding back into the barrel which will have to be done by hand. I should have been afraid of the disassembly. The lid popped open as well as the spring. Parts flew everywhere. I easily found the 2 parts of the barrel and the spring of course but the barrel arbor took 30mn to find. Of course after flying it had bounced of me and skidded or rolled under a stack of organizer boxes. Now I know to be more careful. This is what the mainspring looks like now. Did it get damaged when it sprung out of the barrel?
 1 point
 -
I am very sceptical about these, even buying 100ml from Switzerland, parting it out to 2ml bottles the losses and labour costs even in China would likely make it unprofitable. Tom1 point
-
Nice! Now that's what I'm talking about. Definitely points for that.1 point
-
They are nasty to work with. Who ever designed it that way they need shooting.1 point
-
To my untrained eyes, wheel 1 does not look too bad. Wheel 2 appears to be showing some wear on the left hand face of the teeth. Wheel 3 appears to be a little bit worse than wheel 2 in the same place. The faces on the pinion on wheel 3 appear to be rolled over/deformed as well. I'm not sure what the tooth profile should be, but I think the wheels are showing some wear. It might be the angle of the photos though.1 point
-
The watch that got me into watches was a Cyma... I had it serviced shortly after I got it, and the watchmaker informed me it was a German issued officer's watch from WWII. Little tangs around the crystal from a battlefield repair via the tip of a bayonet to hold it in staring at me each time I check to see if I'm late for class... Deep dark history on my wrist without even knowing it... $35 on eBay from Ukraine with no hint of provenance unless you really knew what you were looking at... Which I most certainly did not! I just thought it was cool; didn't even know hand wound watches existed prior to purchasing it! This is definitely a thing. I'm an elder millennial, and graduated college right as the Great Recession hit. Of everyone I went to school with, I knew of precisely one other person to land a job on graduation (excluding things like retail and waiting tables). That gave me just enough of a head start to be able to buy a house right before the market went crazy. I have a few friends that have been able to buy houses, but very few. Not many friends with kids, and those that have them are all older (medically, 35 is the start of "old" for pregnancy). It's anecdotal, but it seems to thoroughly reflect the demographics and statistics I keep seeing...1 point
-
Sorry about that! I sometimes forget politics are off-limits on WRT (which is a good thing!). I edited my post.1 point
-
I would leave the politics aside. Now they fight for their freedom and potentially ours.1 point
-
Many of us have tried this type of bezel remover but had no success at all. I've never tried this particular model though so I guess you should never say never. Anyway, there is a thread with a video showing how @Jon (a pro) removes bezels that I really recommend!1 point
-
I remembered that when Lititz Watch Technicum's YouTube channel existed, they had a video about polishing. As I recall, many experts thought that video was among the best on the subject of polishing. It's a real shame that their videos are no longer available and I've been in touch with them regularly to see if they can get these videos back. Unfortunately, it seems that these videos are gone forever. The last message I received from them on 21 January read: "I'm sorry, but not yet. In a nutshell: the school is scheduled to be shut down next year - a new school is bring opened in Dallas, Texas. Because of that all video access is blocked. If a decision is made to not close the school, then at some point the videos will likely be made available. We just do not know that yet. So, just check in again in a month or three; sorry I can't be more specific than that." Well, as I recall, there was a section in the video that was about how to preserve the edges of a watch case, that is, how to avoid rounding off the edges when using a mop wheel. I don't remember all the details but what I do remember is that it's about keeping a high speed on the mop wheel and keeping a light pressure on it. I didn't think of this when I was polishing the case back but the next time I'll try it and see what difference it makes.1 point
-
I have the same tool from AliExpress and get the same anxiety when when using it. But you have to admit it looks awesome on your tool shelf. Makes you look like a pro. Looking at the photo of the Horotec tool, it looks equally flimsy. It probably comes from the same factory. I was thinking of using the pushers supplied with the tool and making a hand tool from a cranked jeweller's punch. I'll grind off the tip of the punch and drill a hole at the end to fit the pusher in. The cranked shank would be able to clear the watch case give a straight in-line axis to exert force to tap the pendant tube out. Should be robust enough to last several lifetimes. I wonder why nobody makes it.
 1 point
 -
It reminds me of Ukrainian eBay sellers of Russian watches. More often than not the listings include the phrase "Serviced by Master Watchmaker". Of course, they never are, and it should be expected.1 point
-
These days I never use tweezers to fit a barrel arbor. I got myself two Bergeon barrel arbor holders (1.5mm and 1.0mm) and I'm super happy with them as they take the stress and fear out of fitting arbors. As with all things Bergeon, they are costly, but it's still worth it in this case. Also, should I ever have or want to retire from repairing the second-hand market for quality tools is excellent.1 point
-
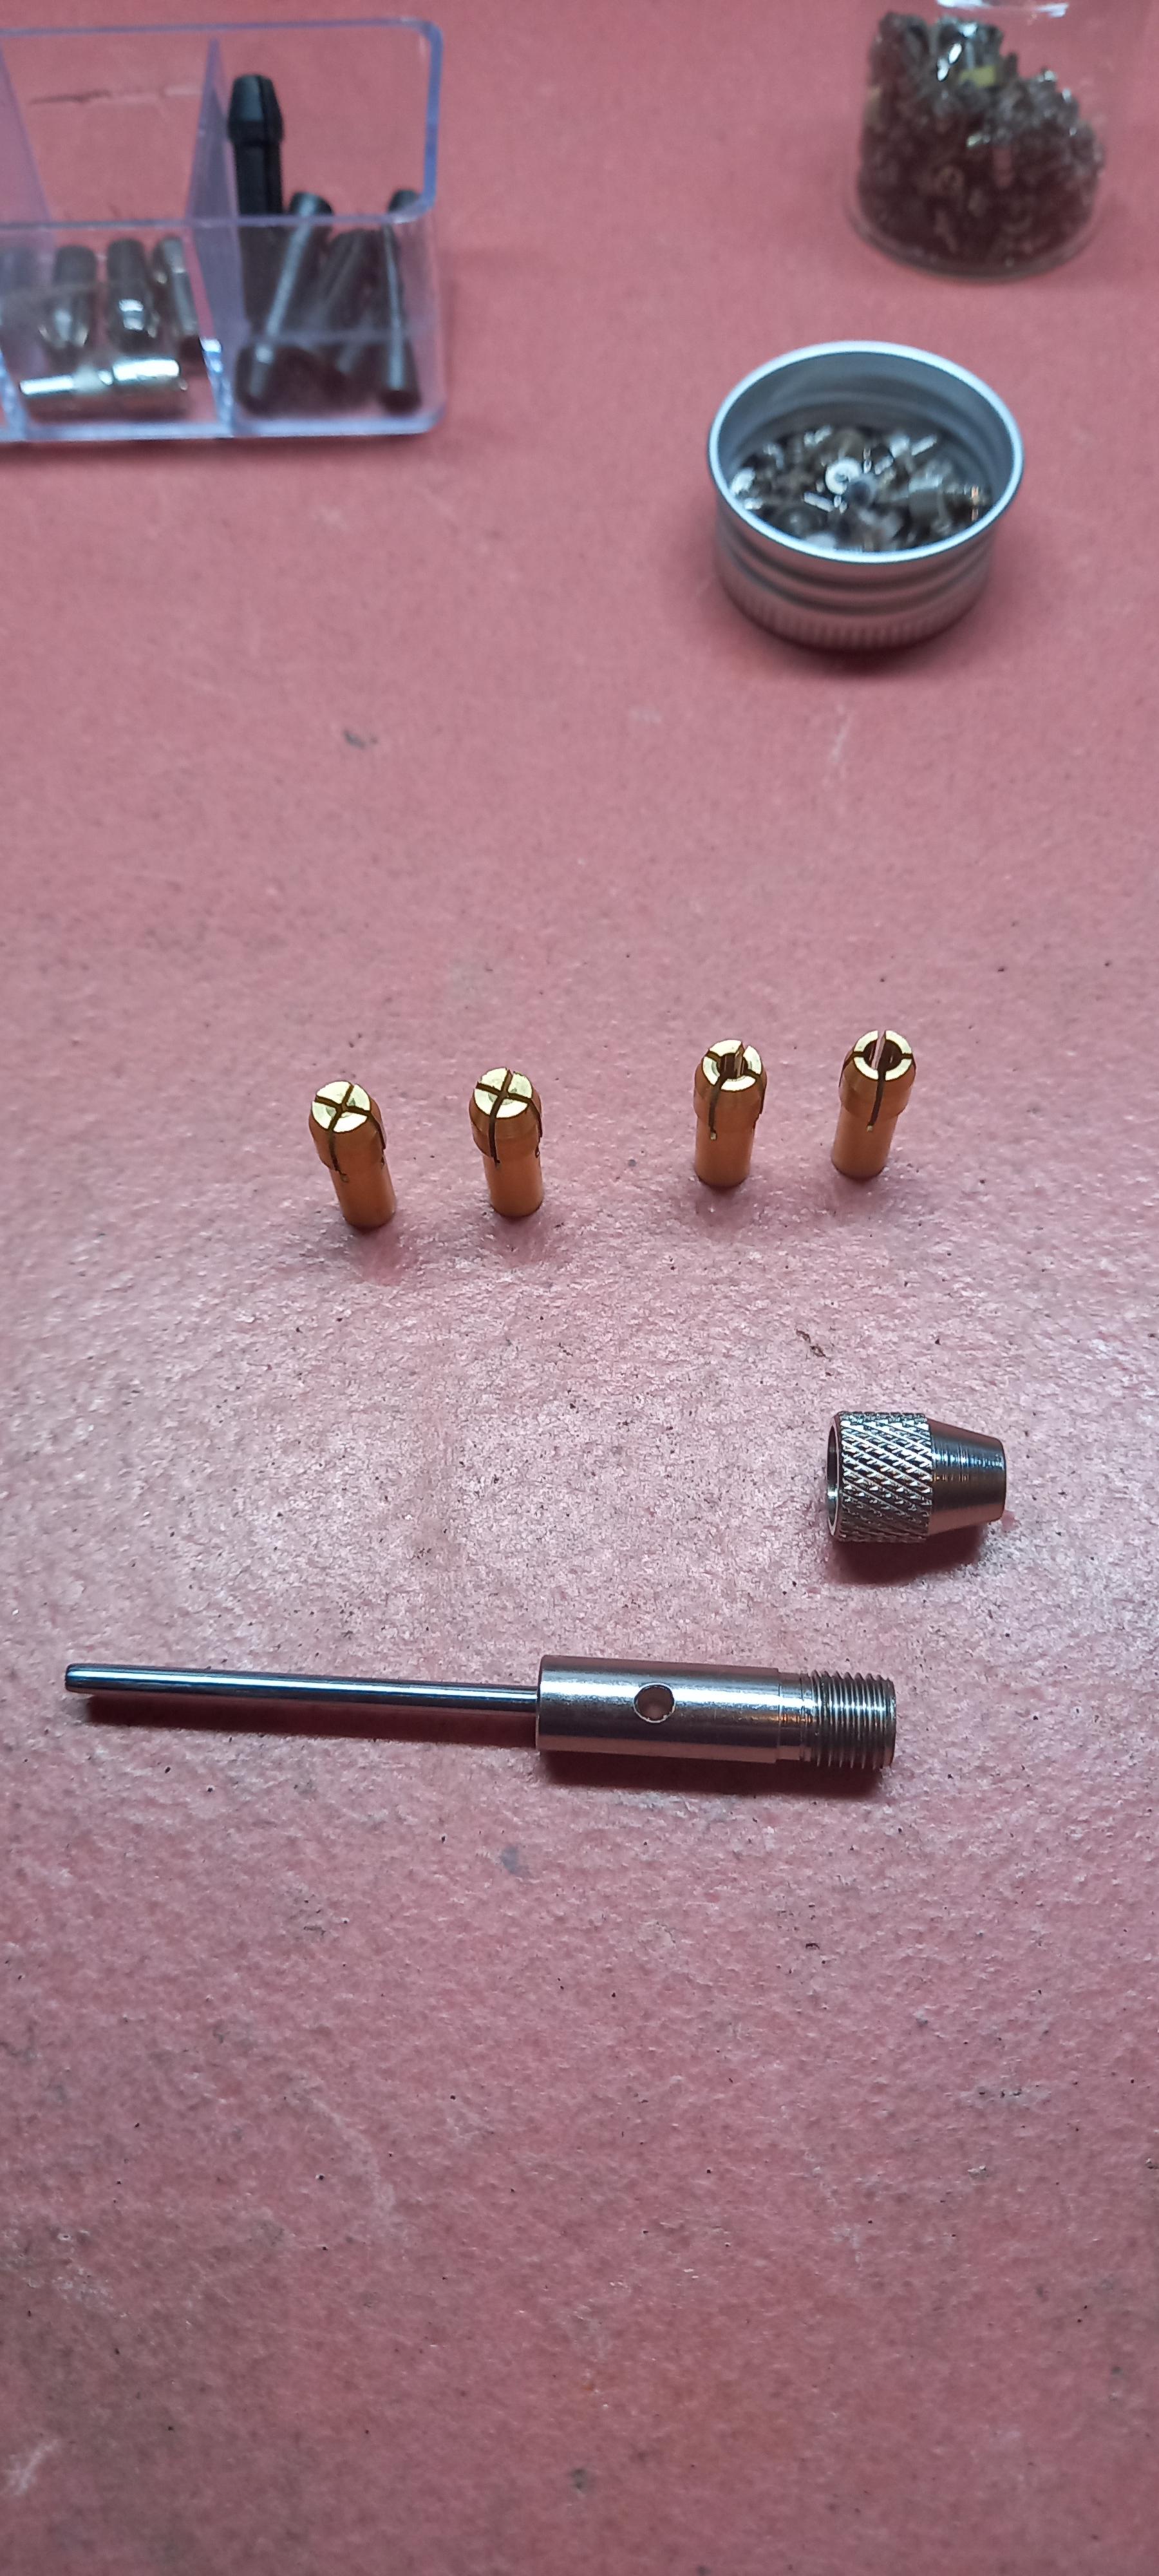
I used to worry about the jaws of a pinvice scratching the arbor's shaft at the lid end. After polishing up the arbor and using a pin vice to hold it i couldn't see much of any marks at x10. I thought about using these a while back, Dremmel collets , i have a few but not enough of the right size, i like the fact that the inside is a nice round smooth finish and they dont have a sharp gripping surface on the jaws like some pinvices do, also these ones are made of brass. You can buy the holder separately.
 1 point
 -
Hi looks like a copy of the Ansonia clock movemet (American). Look up La Bounty on the net he is the American clock guru at the NAWCC setting up the “ J” levers is a bit of a faf1 point
-
The case style and the movement are in the style of American. If you take it apart you will need mainspring clamps as the springs are strong and very long

 1 point
 -
The 1A is great, makes cap jewel oiling a breeze and those fiddly Seiko train jewels which you're guaranteed to fit first attempt when dry but push out of place so you have to clean and re oil several times when you try to oil before placing. May I make a recommendation which comes from having much practise with spilling things over the years doing this and model kit making. Keep a lump of blu tack handy and place a blob on the bottom of any bottle you're decanting liquid from, until the cap is back on firmly. 9010 is very expensive to accidentally swipe across your desk.1 point
-
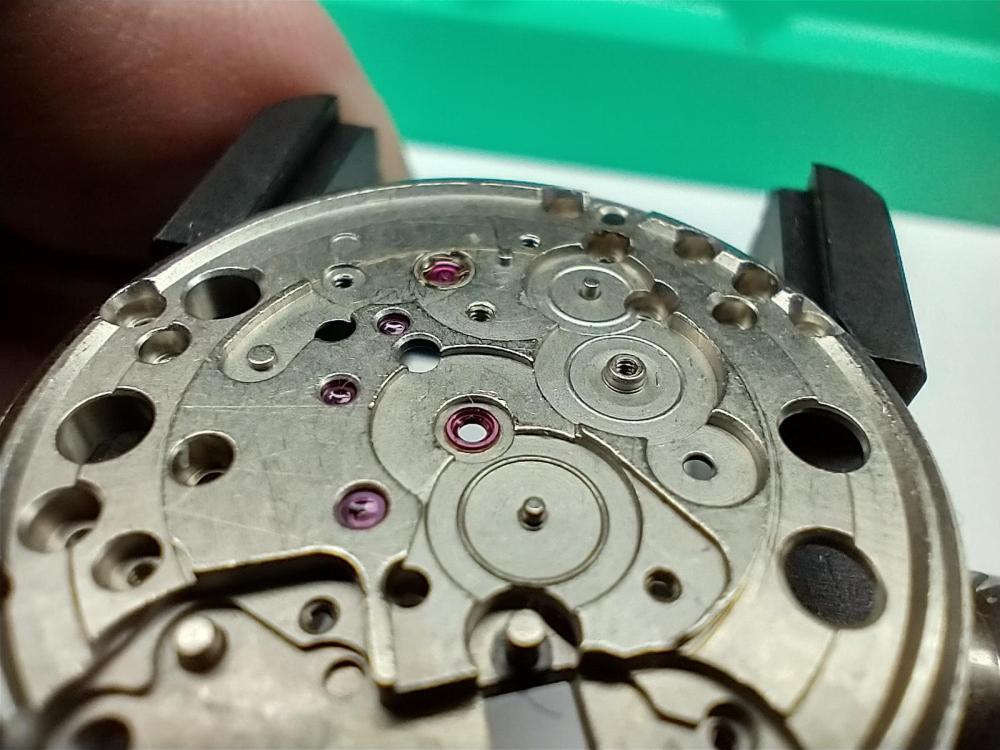
No real question here, I managed to clean and reinstall this straight. But I just thought I would share this silly design for a balance cap jewel on an old Junghans pocket watch caliber J32. The screw is in the center, the jewel eccentric; the opposite design from every other cap jewel I have ever seen. But it has no steady pins beneath so tightening the screw means the cap jewel wants to rotate away from the hole jewel. Without an automatic oiler, this took about 6 tries to oil and screw down the cap without spinning it away. A tiny bit of Rodico didn't really help. Happily they don't make them like this anymore.
 0 points