Leaderboard


Popular Content
Showing content with the highest reputation on 06/03/24 in all areas
-
My way works every time. My faithful little pot with it's screw on lid and inside Ronsonol lighter fluid put them in that, most muck will float off, take each one out, put on tissue paper and fold, the paper will absorb any liquid and you can use your blower just to make sure. No more tiny springs flying all over the place or getting down on your hands and knees sweeping the floor.3 points
-
The cleaning solution can be strained through a coffee filter, to recover any small parts.3 points
-
BOUGHT! SOLD! PURCHASED! Un-real, with everyone’s help and information not only did I get a chance to see how powerful a forum could be but I’ve learnt ALOT about movements share/swap uses/information which has resulted in finding and buying the part! Thank you very much mate2 points
-
Whatever method or level you decide to take it too, can I suggest when you get there you put 3-4 thin coats of renaissance wax on it and buff it well. This will give a good protection against finger marks and oxidising in the future. Tom2 points
-
leave it with me, I'll see what I can do2 points
-
My proud uncle: "I bought it in 1972 and it never needed a service.."
 2 points
 -
This will surely provide less run time Frank2 points
-
thank's guys, I figured it out in the end. Was quite rewarding to see it work correctly. I did wonder how it triggered the half hour, but I noticed that the width of the slots on the count wheel allow for it to drop into the same slot twice, once for the hour and another single strike for the half hour. What I didnt realise was that I had to align those things you mentioned, oldhippy, as I'm fitting the wheels and levers to the plates. I understand it now, I think the next time will be much easier.2 points
-
I'm not a fan of adding power to a vintage movement. I would go for the original specs or even slightly weaker.2 points
-
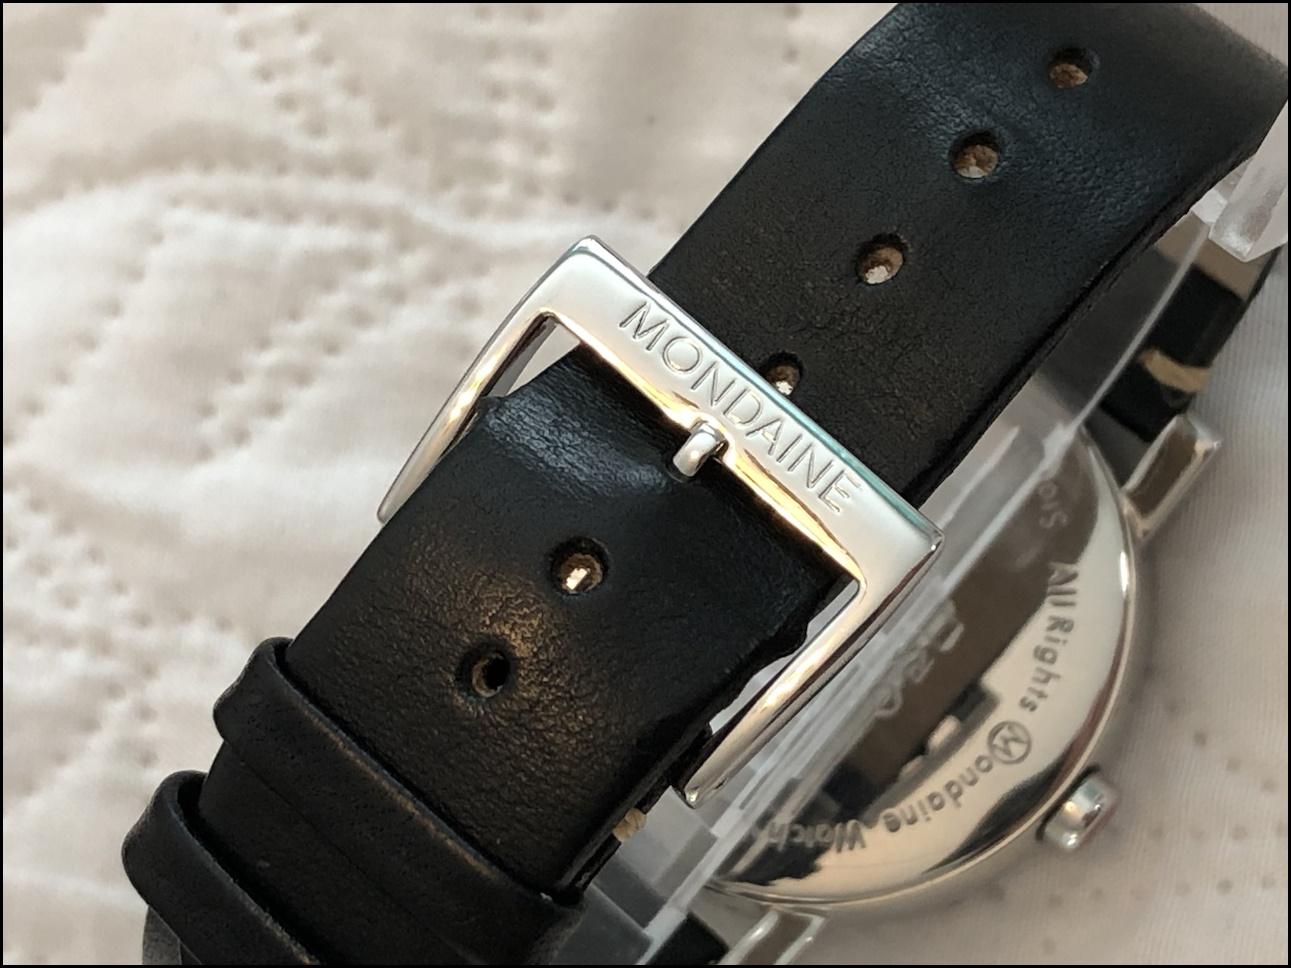
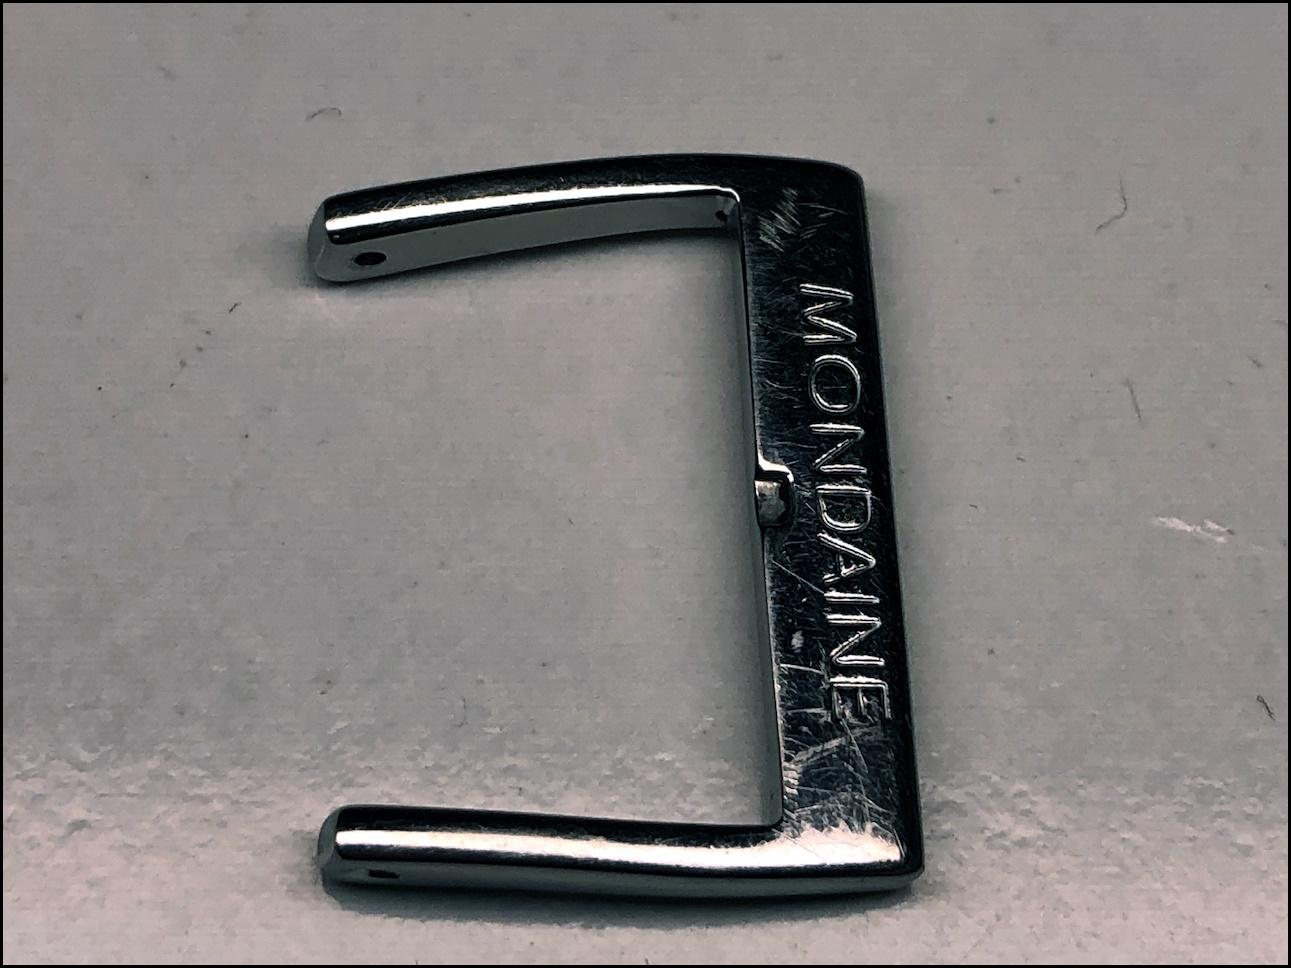
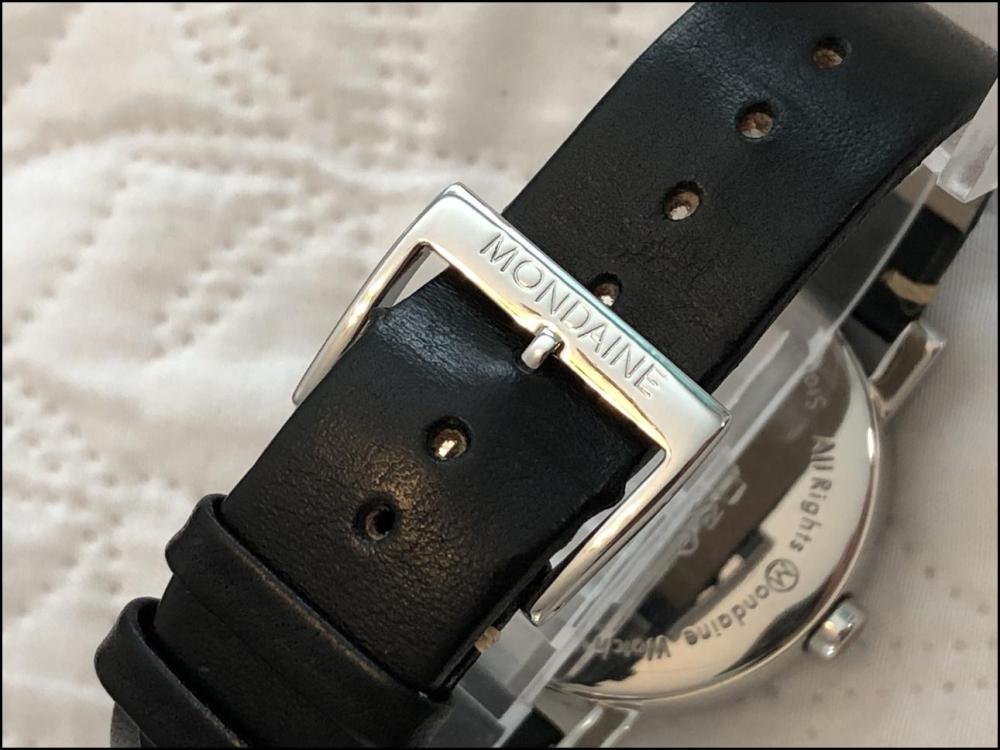
Buckle before polishing Buckle after polishing I don't think I've ever heard of or seen anyone polish a buckle, but I thought "Why not?". This time I kept a high speed on the mop and applied only a light pressure against the metal surface with the engraving "Mondaine". I did this to avoid rounding off the engraving and I'm pretty sure it helped. A high speed on the mop creates significantly more heat in less time so you have to be careful not to burn your fingertips. I am still looking for good protection for my fingers. The pin for the buckle was way too small to hold with my fingers so I clamped it in a vice. It's a bit scary if such a small and hard piece of metal flies away when the wheel spins at 7500 rpm (over 125 rounds per second) so not without safety glasses which should be used regardless. It could be that the original polish on the buckle was satin-brushed and I have a couple of mops for that too. It's easier to satin brush because you don't need to use any polishing compound, but it's nice when it shines
 2 points
 -
Alcohol is a polar solvent, which isn't very good for cleaning grease. Benzine (lighter fluid), hexane etc. are non-polar solvents and are far better for grease. Essence Renata is heptane, which is also non-polar.2 points
-
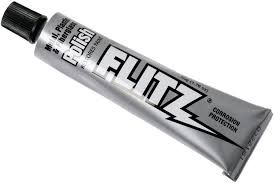
There is polishing with cleaning pastes and then there is polishing as in buffers. I understand your dilemma, if it is pewter then any polish will fade quickly back to a dull grey, so if you use a buffer or Dremel you will have removed the history for nothing. If I were in your shews I would clean it with a paste type polish, my go-to for unusual materials is Flitz, it is mild, but does a great job - every time I use it I think "how come I don't use this more often!?!?" Also, if its a real ceramic dial then you can use denture tablets to clean it, I have only done it a few times myself with great results, maybe more experienced people on here who are used to dealing with ceramic dials could weigh in to support or comment on this method?
 2 points
 -
I found this presentation interesting.2 points
-
Depends on how much radium was used on the numbers
 2 points
 -
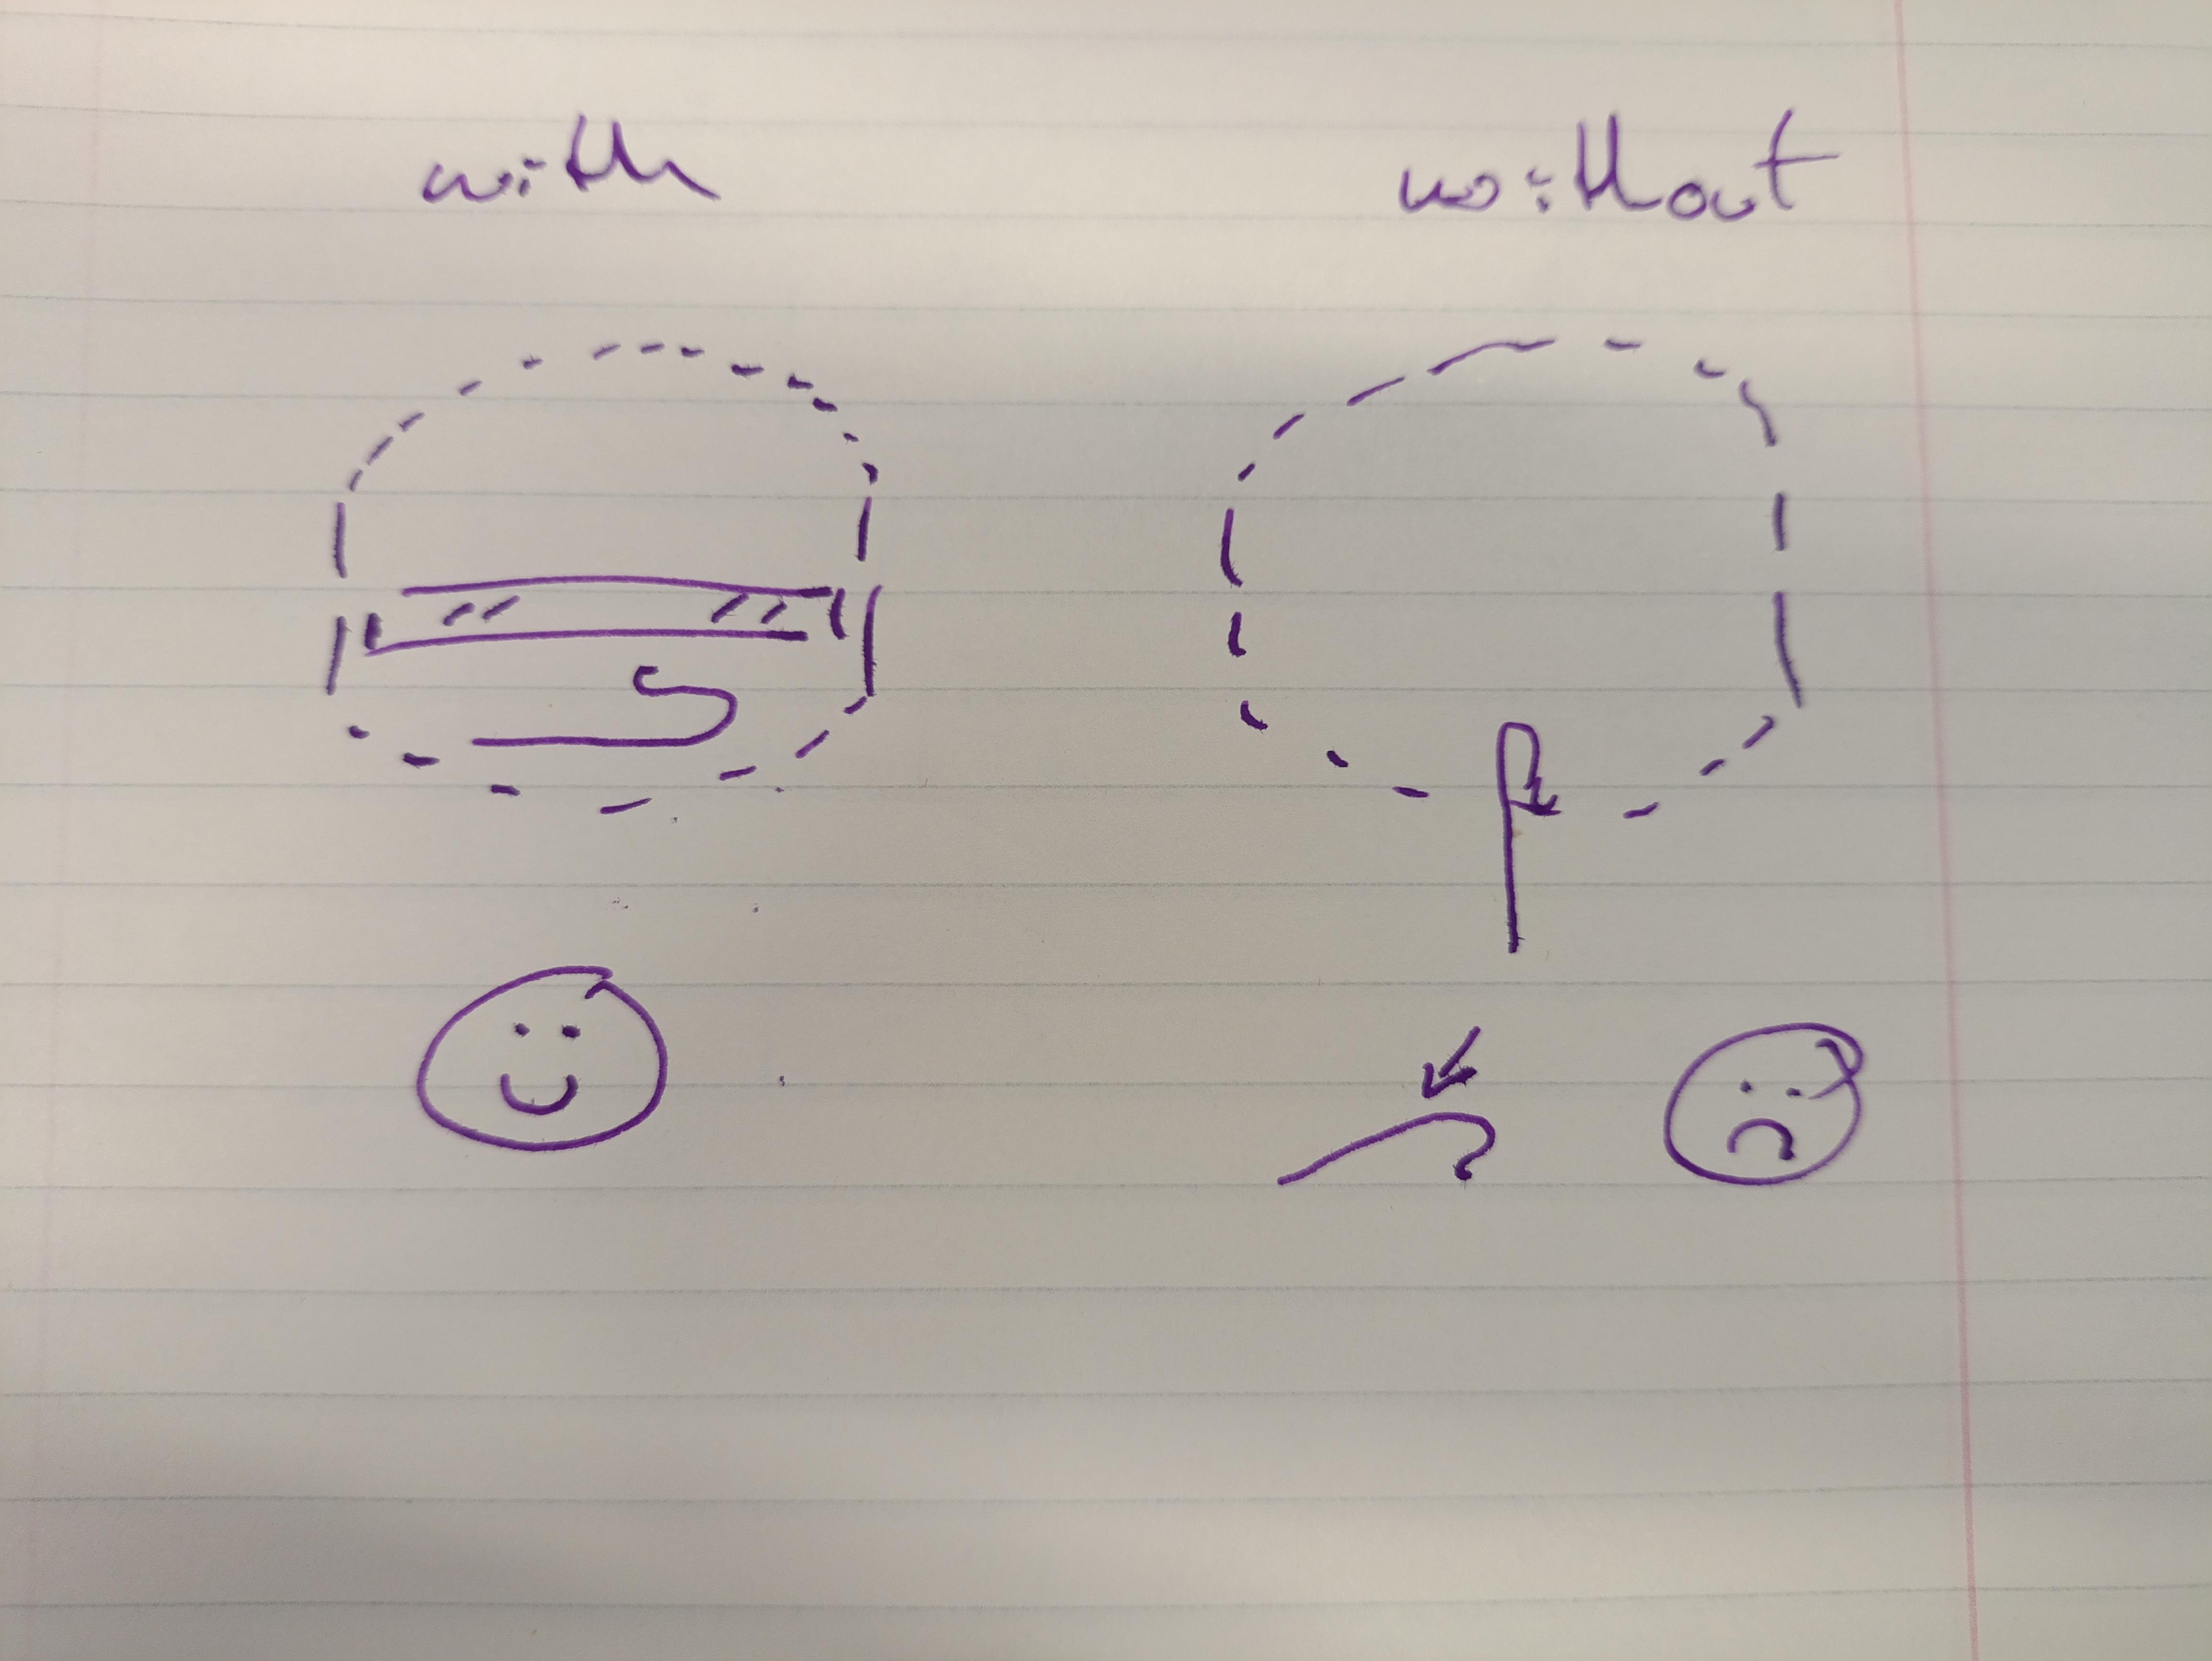
I used to do the same and had the same issue, but I had a cunning plan...... "as cunning as a fox what used to be Professor of Cunning at Oxford University but has moved on and is now working for the U.N. at the High Commission of International Cunning Planning." I now use the same setup, but I place an old glass crystal from a ladies watch on top on the spring inside the mesh basket, this prevents the spring from standing up and it cannot now slip through the mesh:
 2 points
 -
Moved to a more correct area Tom2 points
-
I find working up to 1200 grit wet and dry works fine and finish with Brasso. As long as you are light with the wet and dry and let the paper do the work, rather any real pressure put on the crystal. Here's a before and after of this Rolex acrylic crystal I polished this week just using 1200 grit and then Brasso. Circular motion of the lint free pad or bud you use. I think the quality of the acrylic makes a difference. Some crystals won't polish well just using 1200 and Brasso and need higher grit count pastes before the Brasso Personally, I think Polywatch for what it is, is a stupid amount of money for a small amount of abrasive that's very watered down if you compare it to diamond pastes. Before. After.
 2 points
 -
My usual method of pre-cleaning is to use peg wood to 'peg the jewels' then once this has removed/dislodged the gunk use a pointy type cotton bud dipped in IPA to clean the jewels and larger watch items. However, this weekend I was trying to remove that awful graphite grease (or at least I think it was) and the IPA was having a tough time lifting it. I switched to naphtha (lighter fluid) and the gunk was gone in a second. I am now questioning my use of IPA, why don't I switch to naphtha as my follow up cleaning solvent after pegging? Thoughts?1 point
-
You might want to look for "thickness gauges". They are used for measuring things like paper or leather etc. They are spring loaded like the feintaster. If you file a small section out of one of the anvils, you can measure balance staffs the same way as you can with a feintaster. They are cheap as well (found these for €10..).
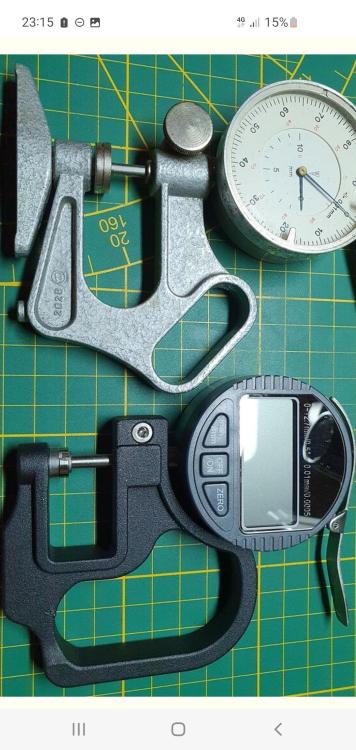 1 point
 -
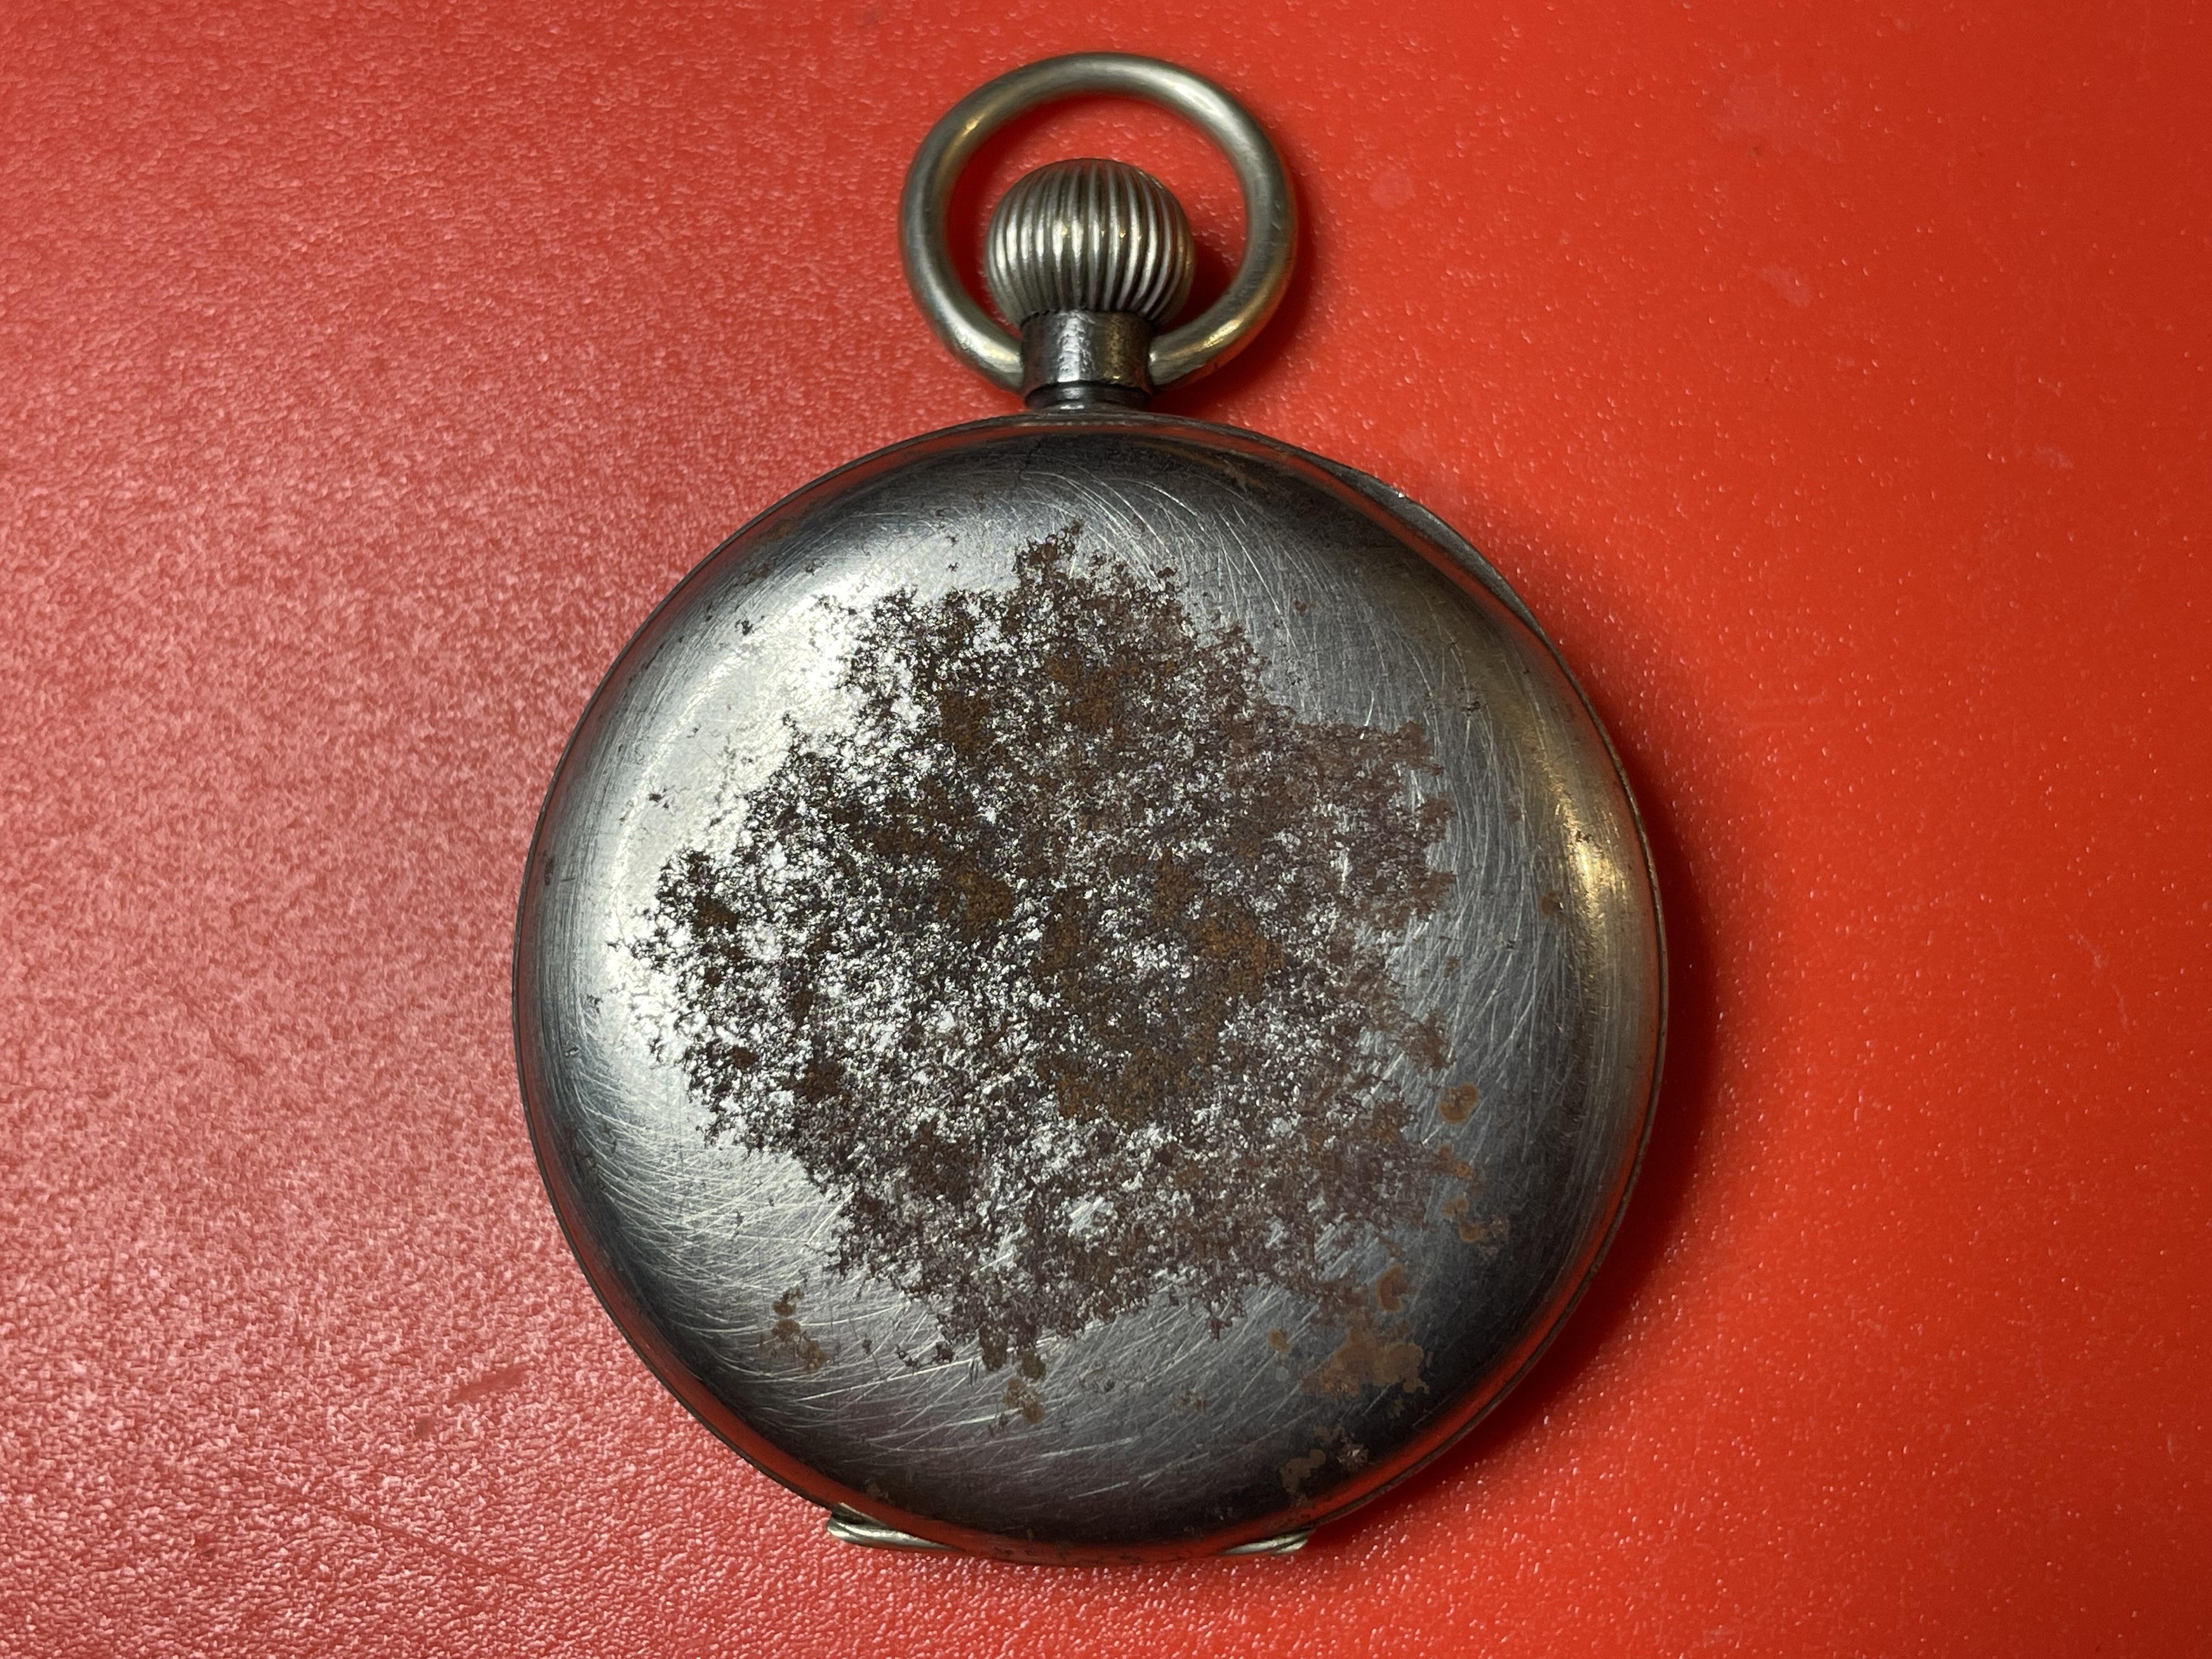
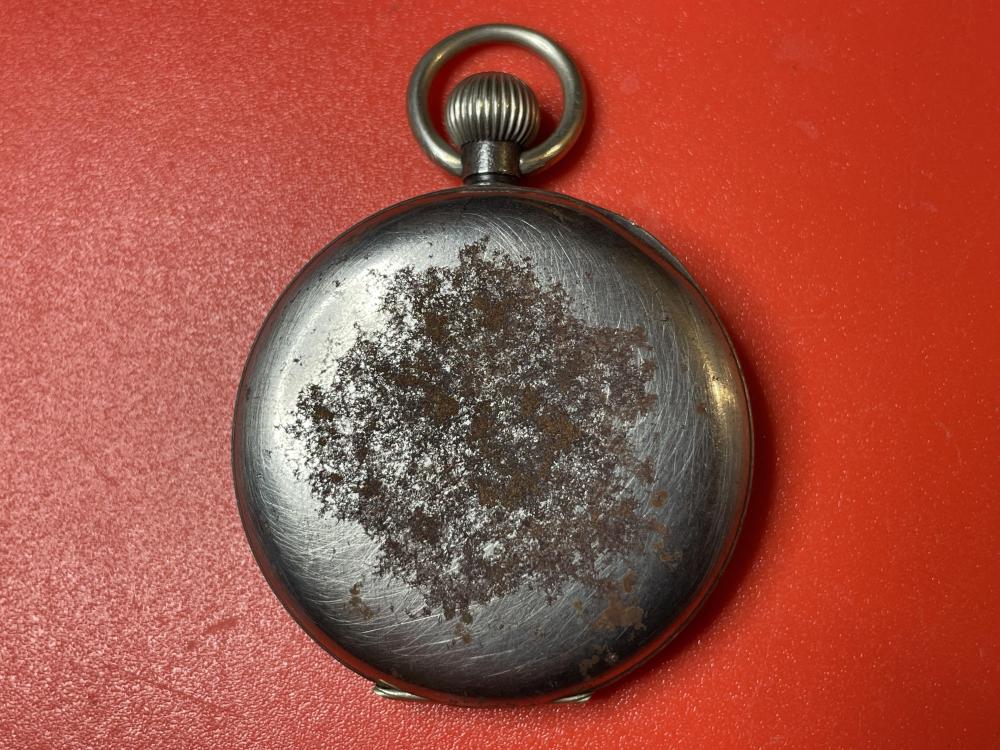
That is made of gunmetal and it should be left as it is. Those marks on the back if removed will make the back thin. With age that is what happens to gunmetal which is part of the watch history.1 point
-
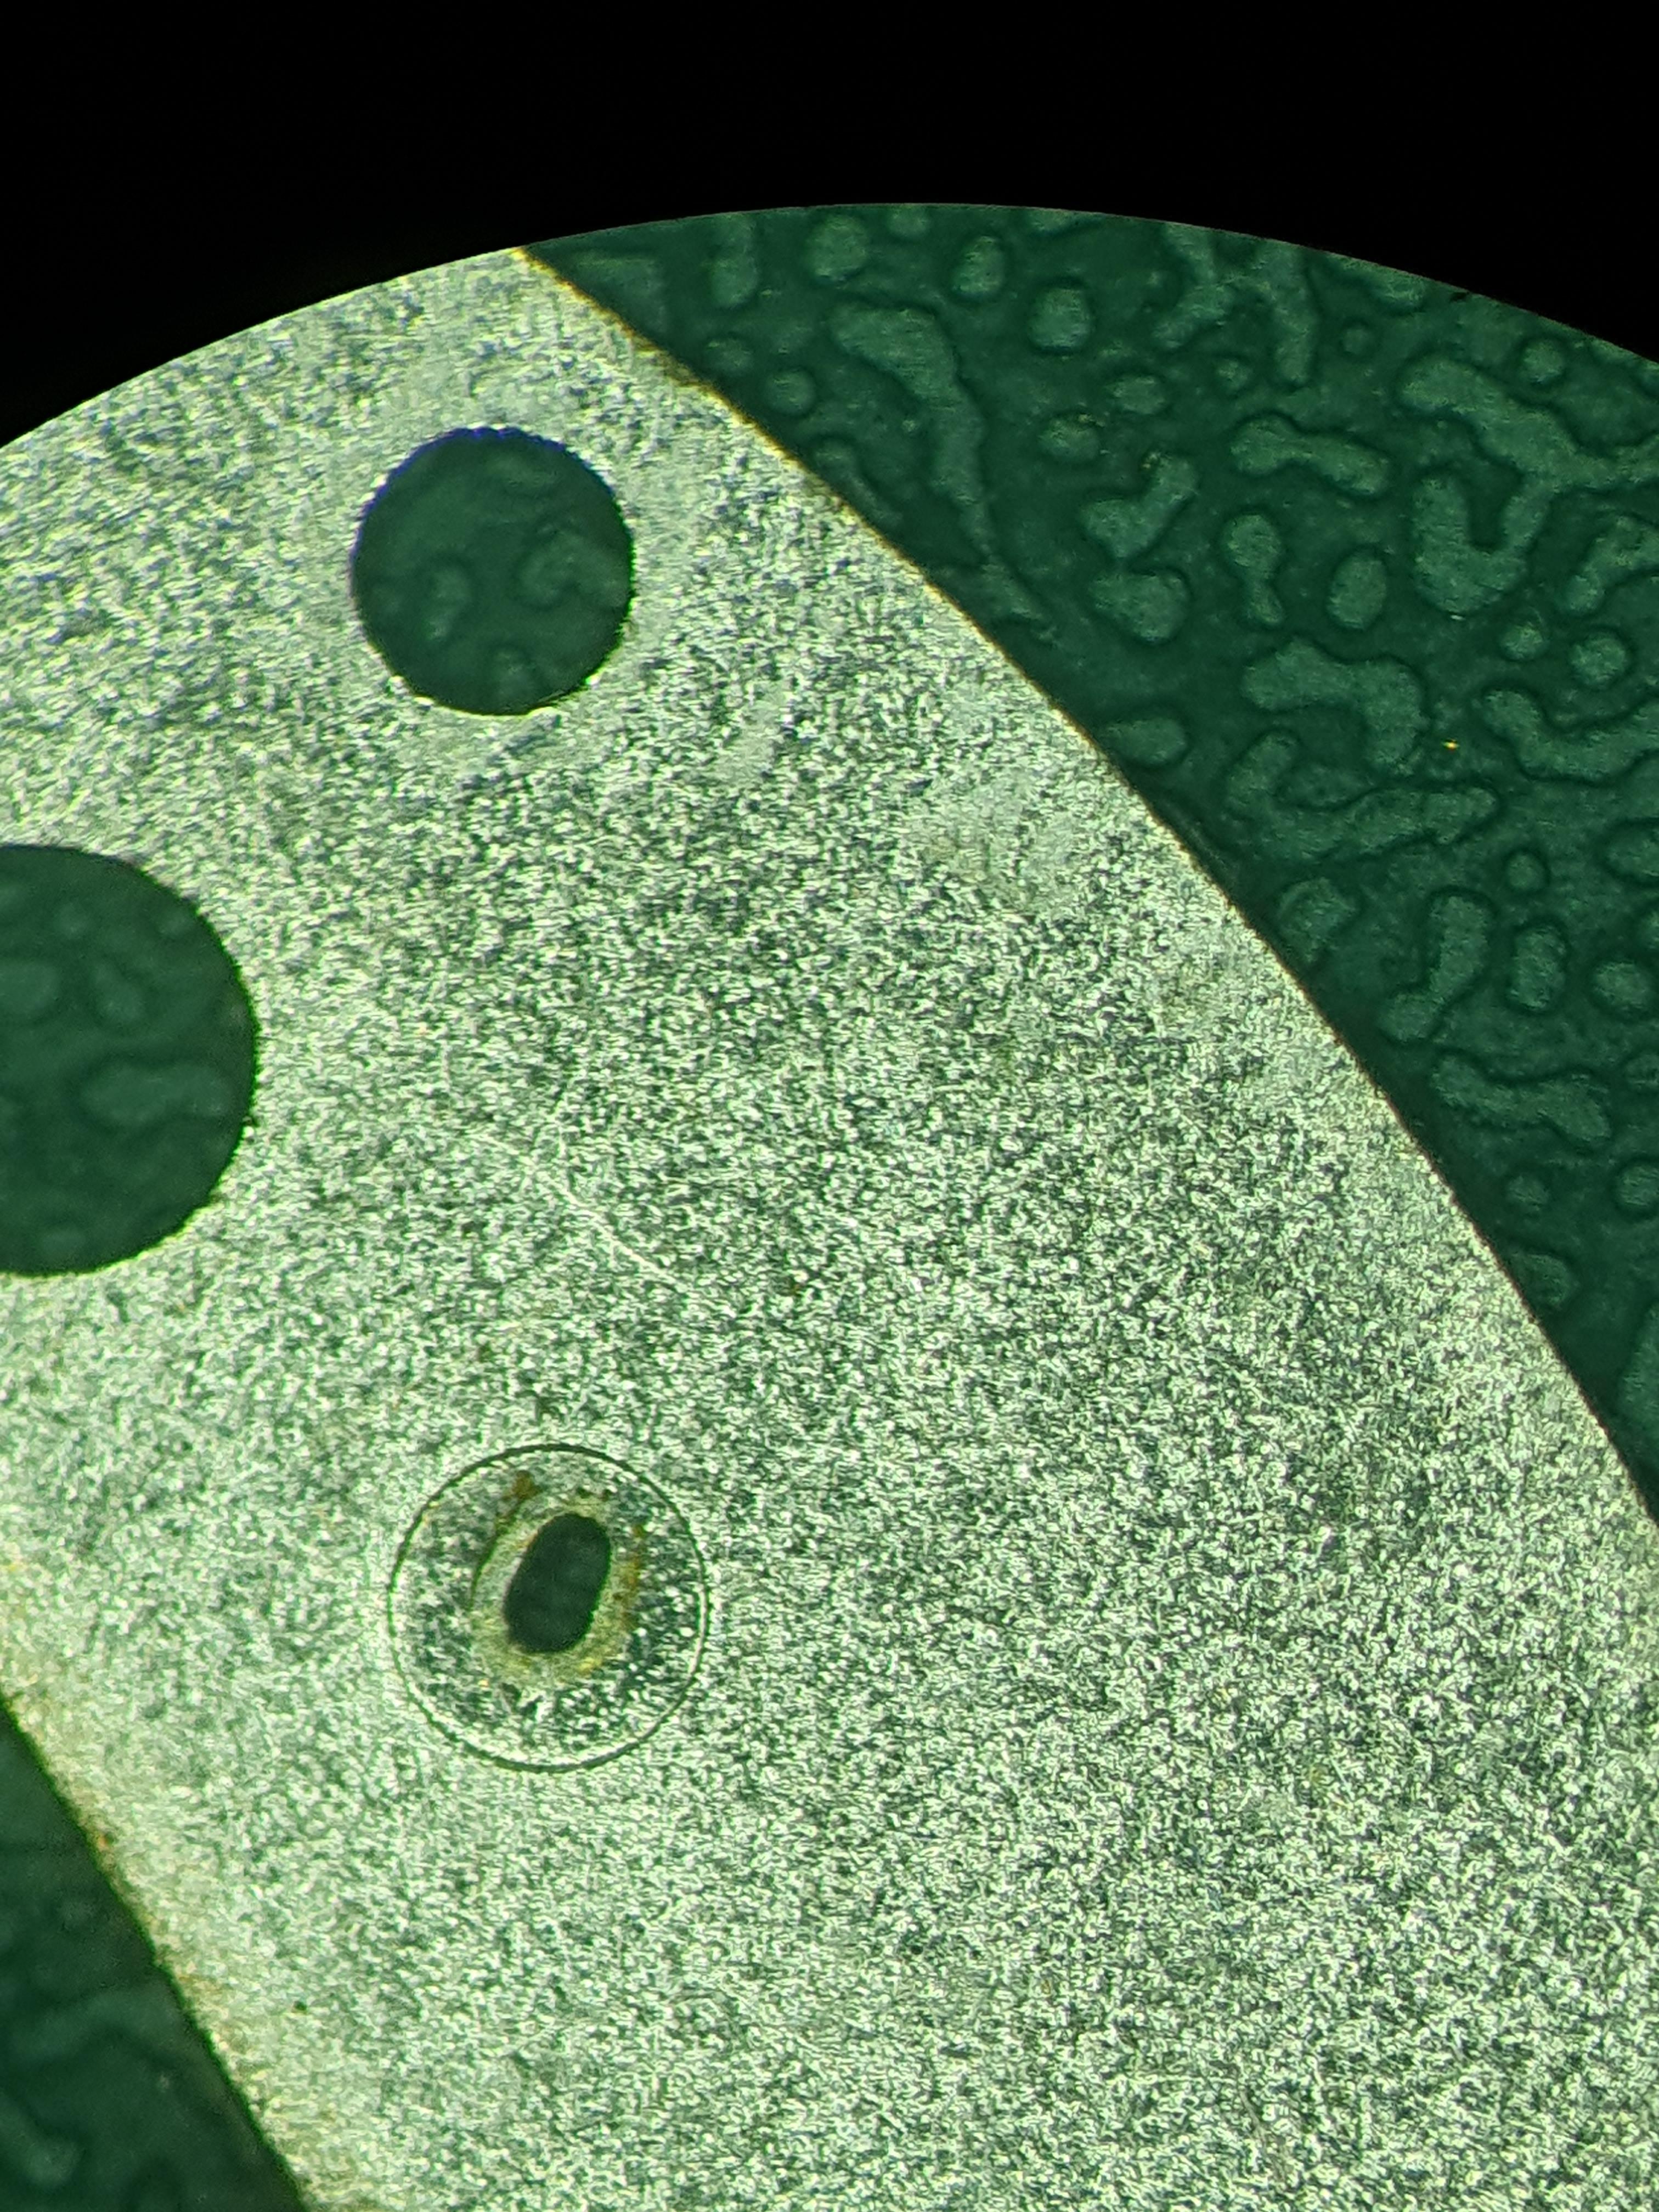
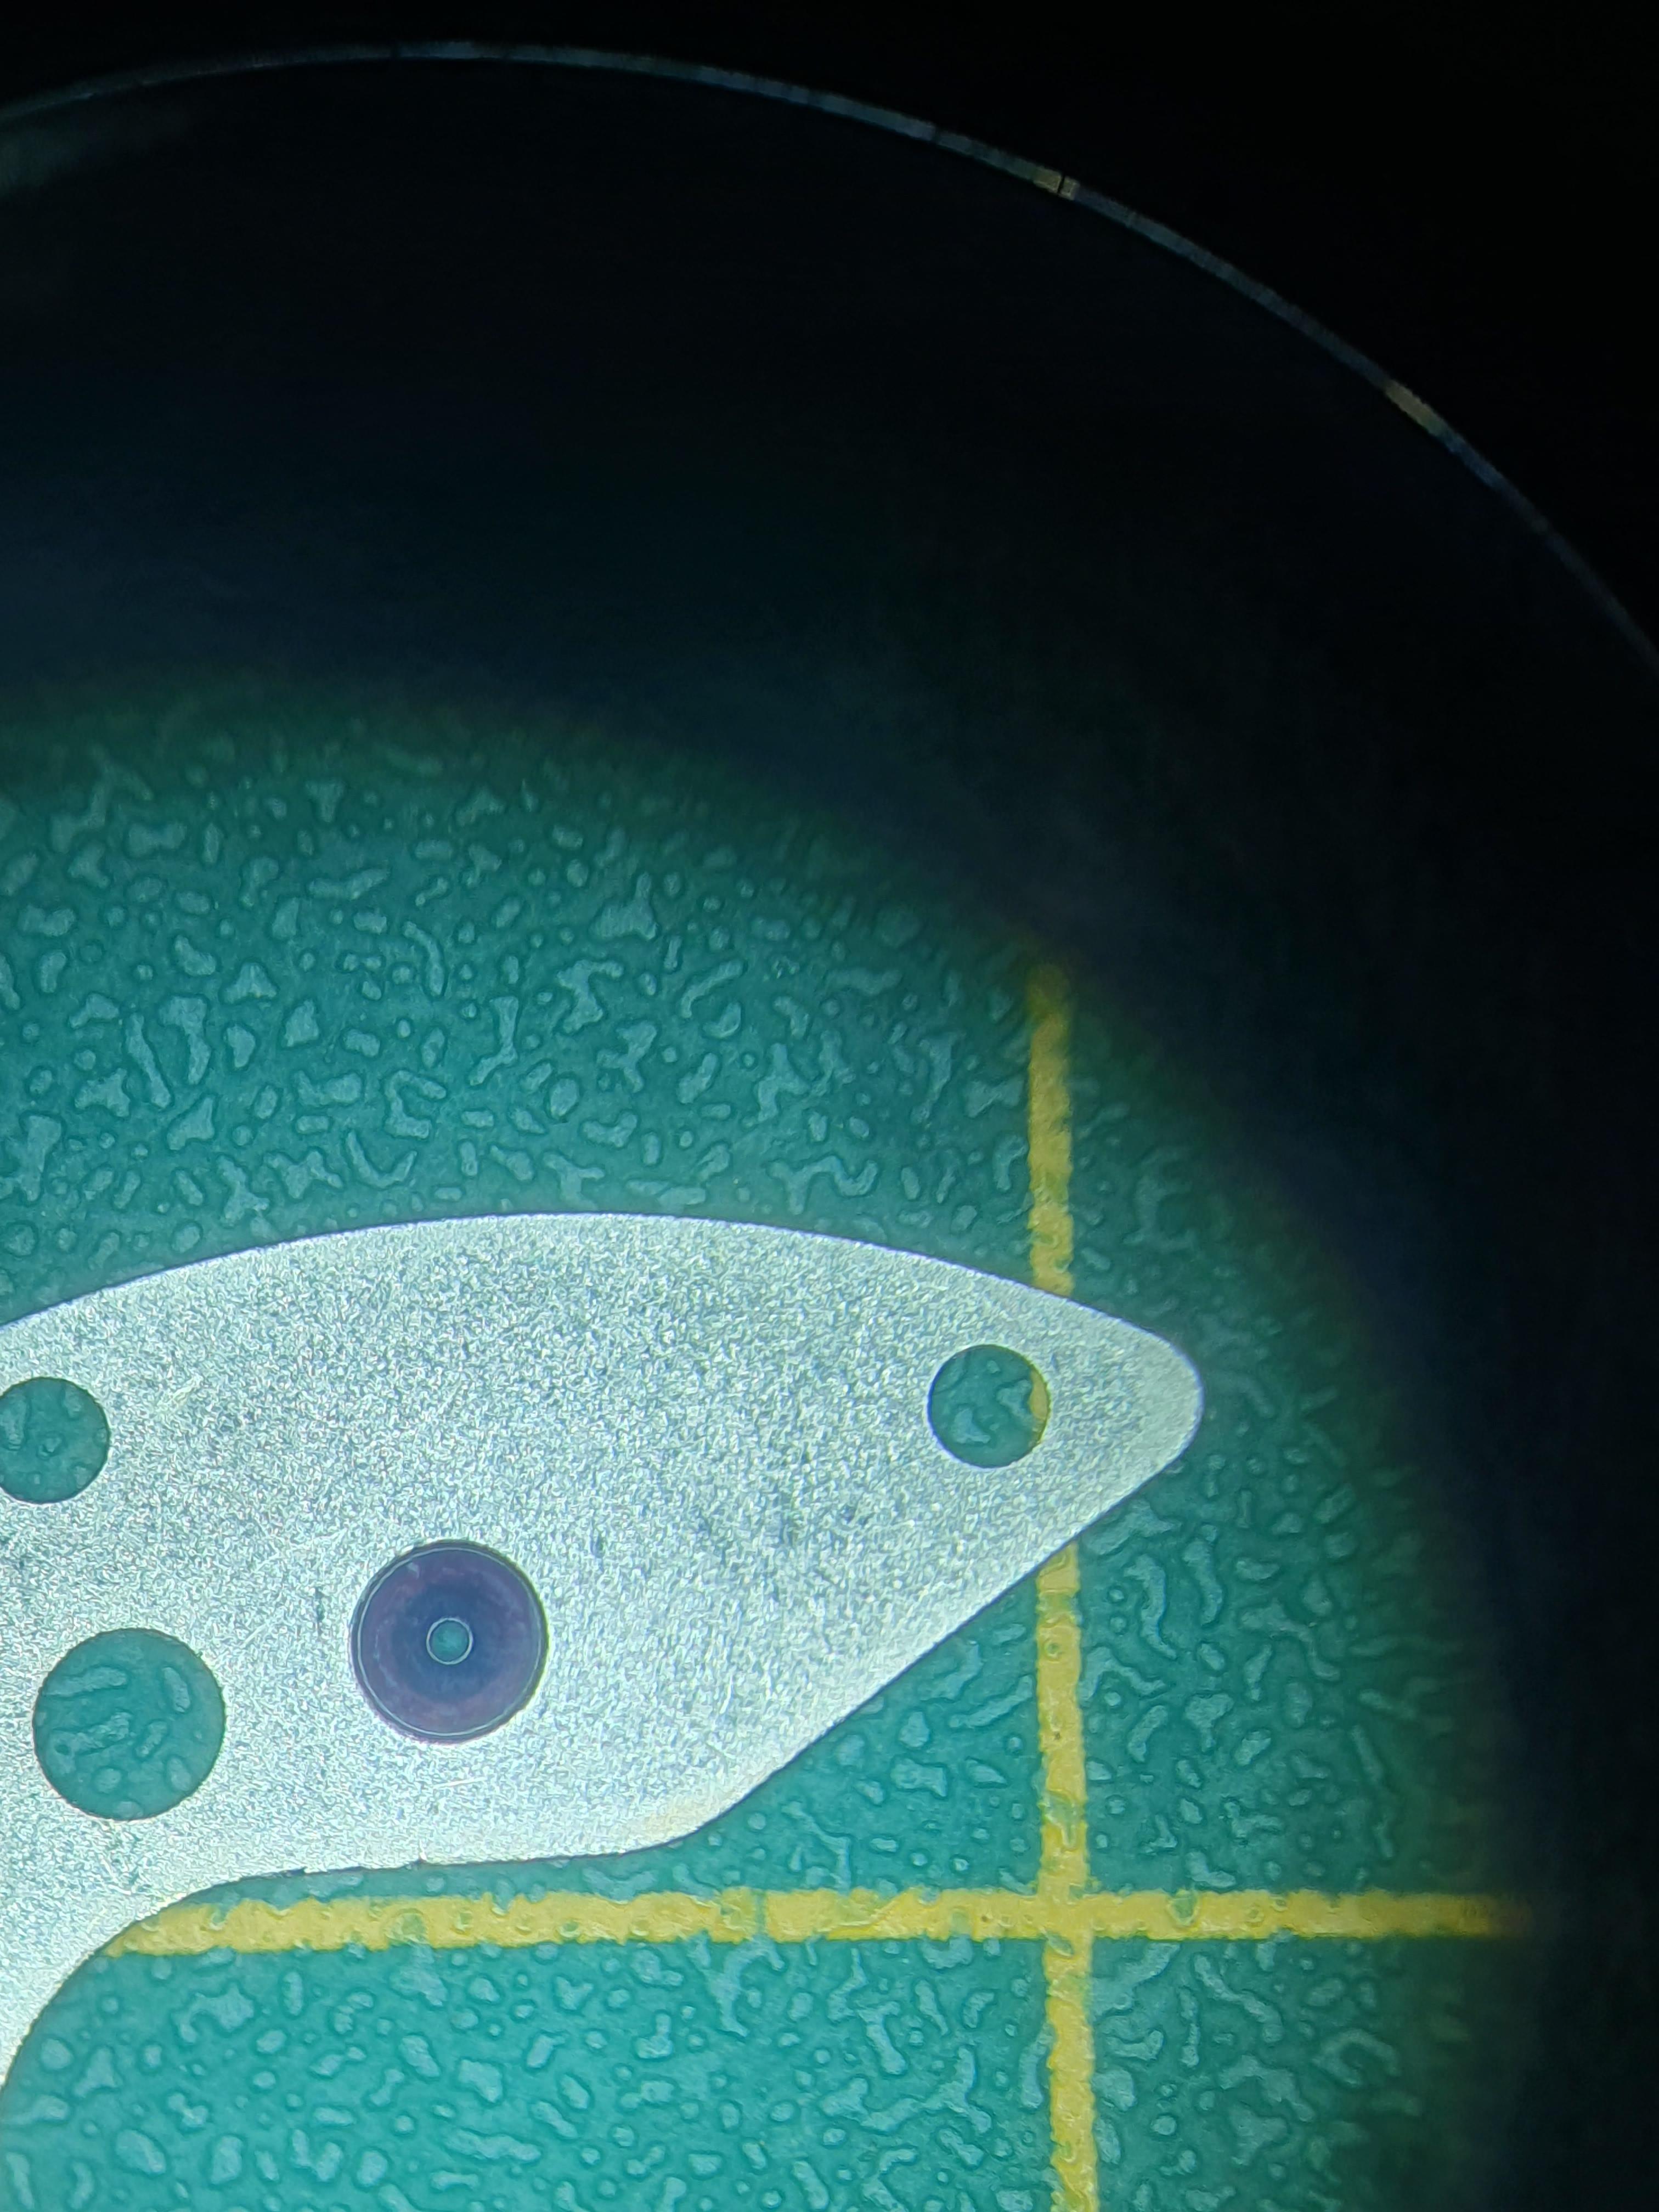
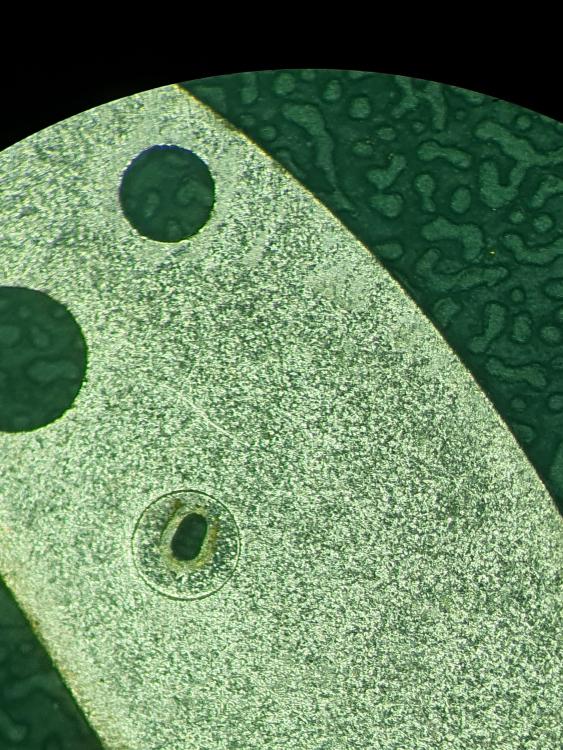
Correct but we only see at X1 magnification. Not visible to the human eye.1 point
-
Thank you everyone, I have located and bought a part, I appreciate all the replies and have really enjoyed the process…… I’ll let you know which parts I break during re-assembly and we can do it all again1 point
-
I also use autosol rich, cases definitely, as with all polishes it does abrade surfaces. At x10 fairly noticable Polinum and Polinoxx are the finest finish I've come across up to now, brilliant stuff1 point
-
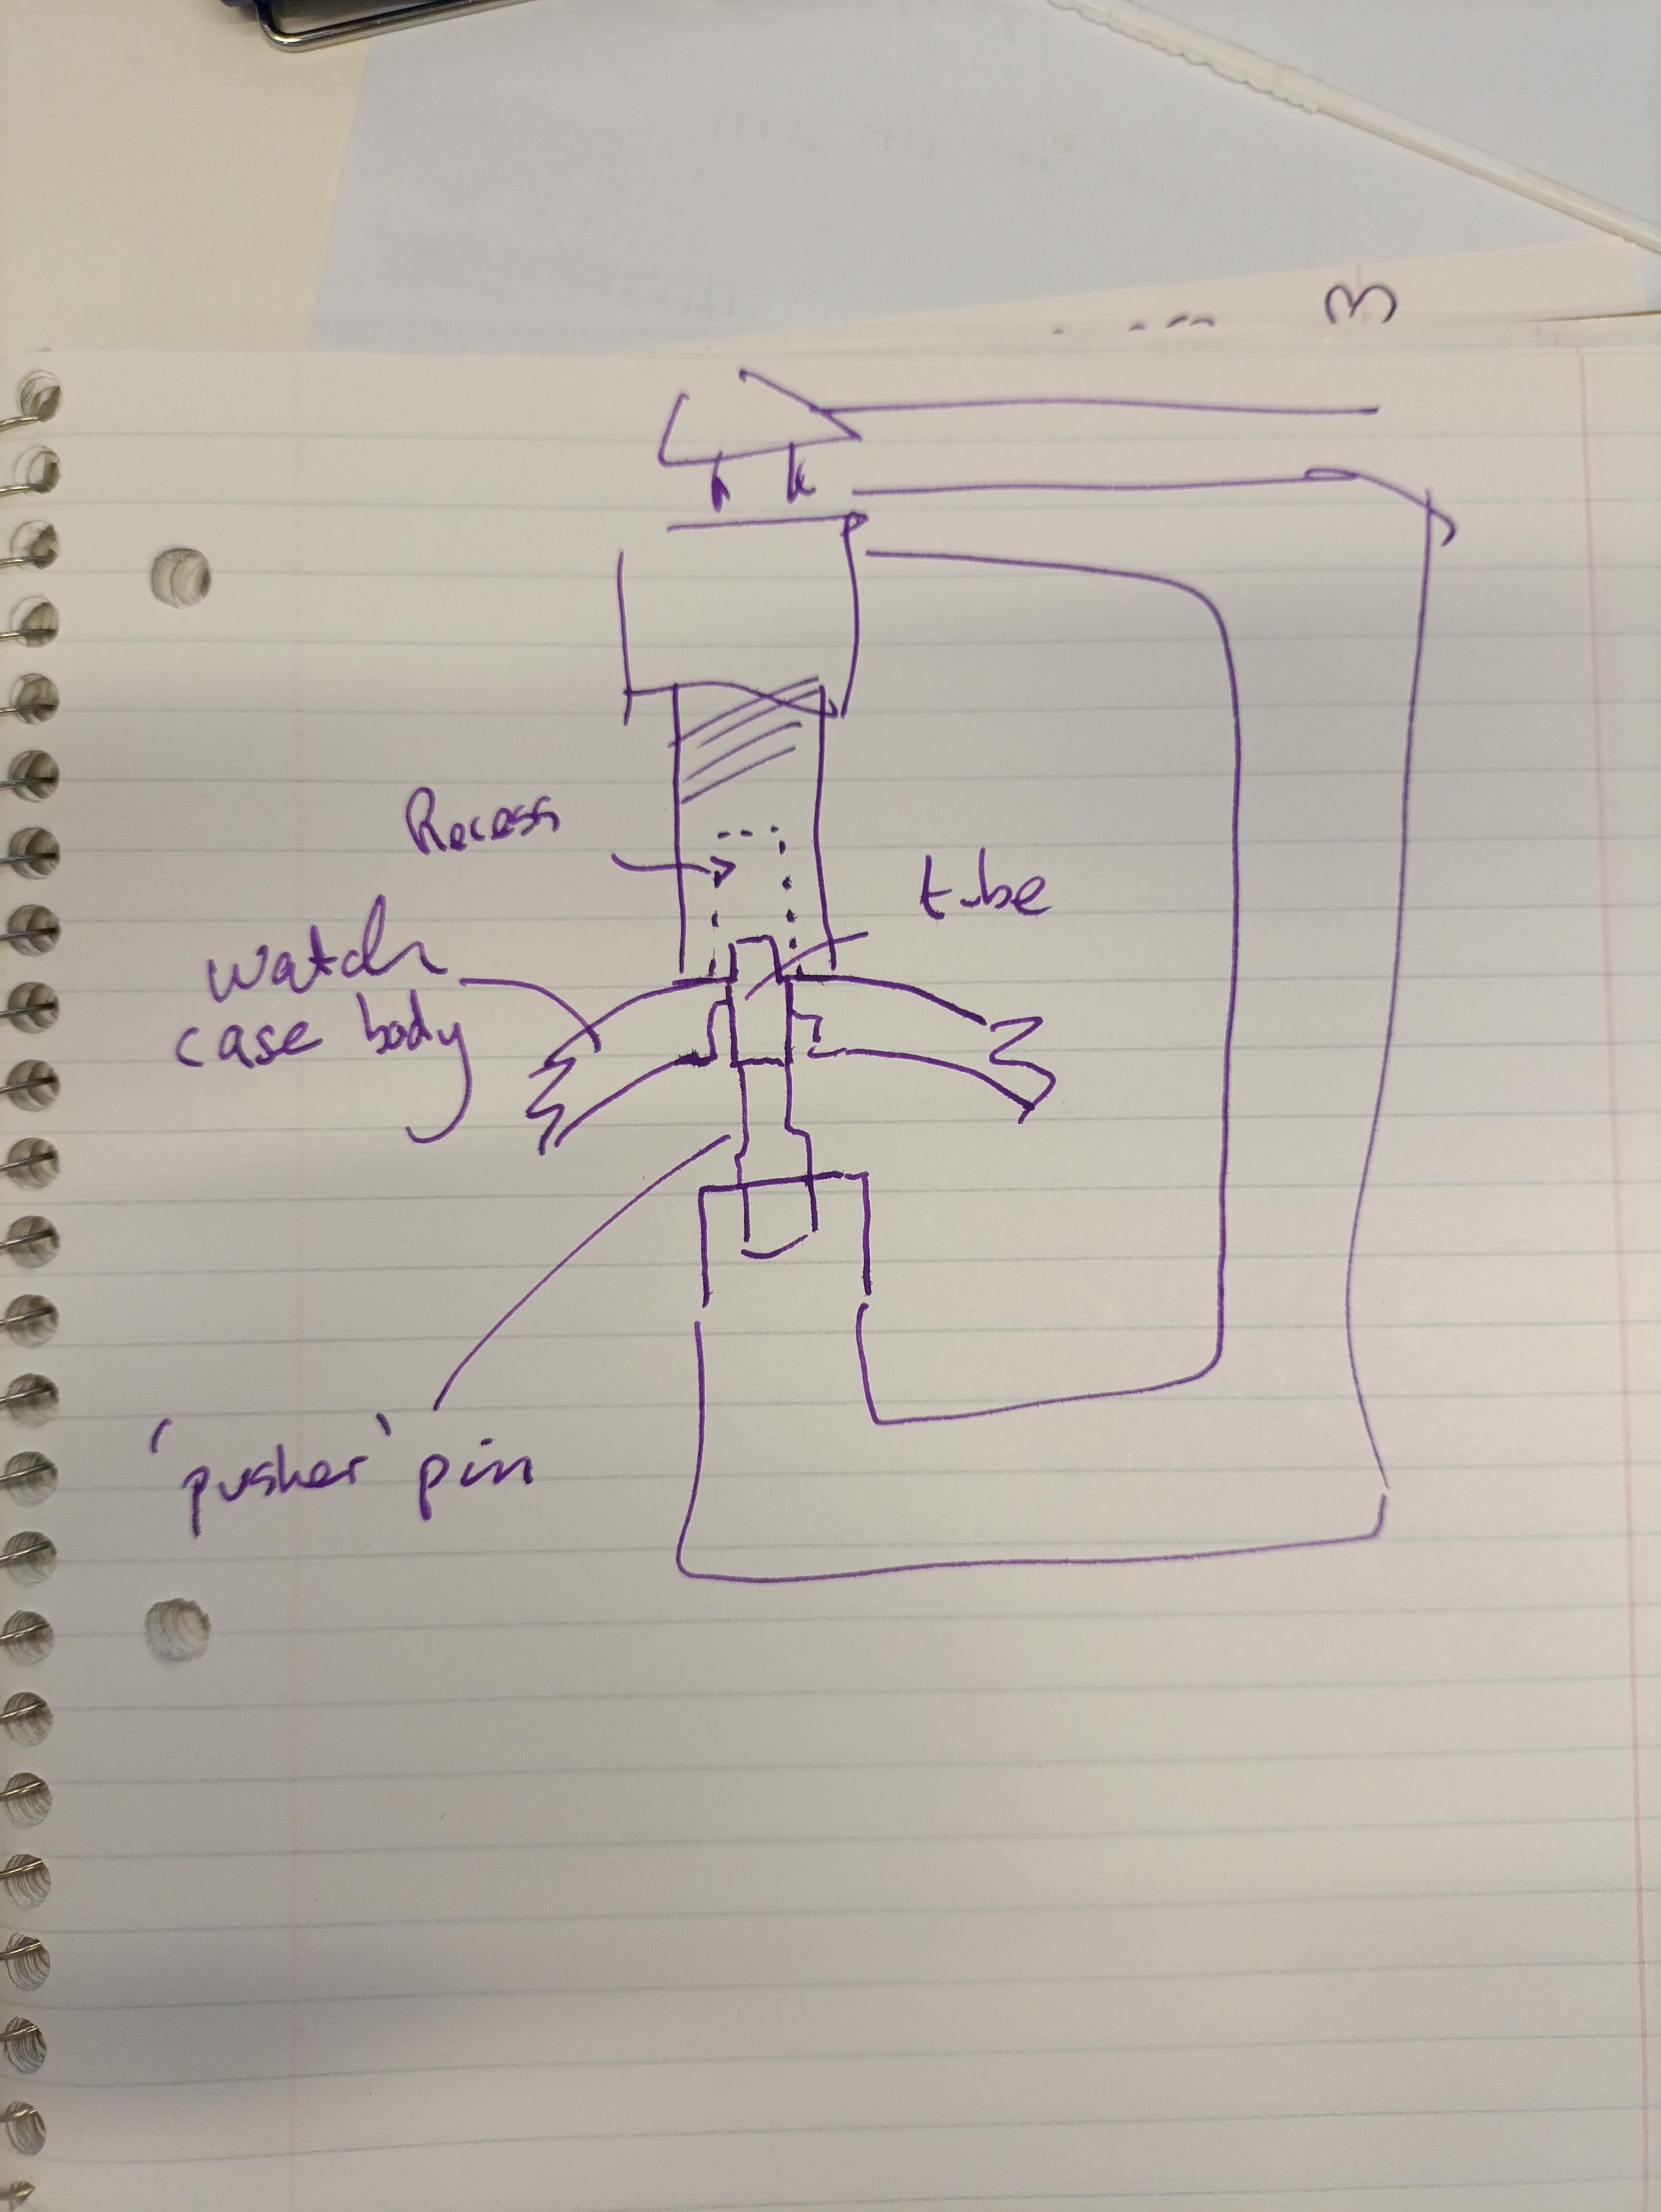
if you're in watch repair long enough you'll find all sorts of strange and interesting things. unfortunately this morning I can't quite remember a very peculiar Seiko I once worked on. I was working in a shop in downtown Seattle and in the early days all the watch stuff was basically around one particular part of the city and the raw so within basically across the street from each other three watch material houses. It made it really easy to get parts when you're doing watch work psychiatric quite remember the peculiar Seiko watch where the movement went into a plastic ring and I think it was sandwiched between one or two pieces of the metal case. The crown fit on a plastic tube that was part of the ring so basically it's all destroyed disassembly you had to have a brand-new one to put it back together. so I went downstairs and asked and got one plastic I think was called the gasket even though it was rigid plastic with the tube for the crown. How do curiosity I remember asking and he had a whole bag of them at least 100 of them slim must've been popular at one time. But it does bring up the problem of unusual cases with unusual things that they probably didn't makewhatever this was called forever which means you'd never build a put the watch back together today.1 point
-
Acetone is a pretty good solvent degreaser for metal parts, and is rather safer than either naphtha or benzine, as small amounts are naturally produced and metabolised in the body. Just keep it away from most plastics & finishes! (OSHA limits for a eight hour exposure: Acetone 1000ppm, Heptane 500ppm, Benzine/Light naphtha 350ppm, Naphtha 100ppm). Naphtha (the 100ppm one) can contain trace amounts of Benzene, which is a carcinogen. [I used the US standards as Naphtha is not generally listed in the UK documents & I wanted all data from the same source].1 point
-
Thnx. Finding the right size jewel can be a pain in the.., but I recently replaced a Landeron 48 chronograph bridge that had a cracked jewel. The remaining jewel was a perfect fit after reaming the hole to 1.29mm.1 point
-
Some of those very cheap screwdriver set actually have a selection of small size wrenches:
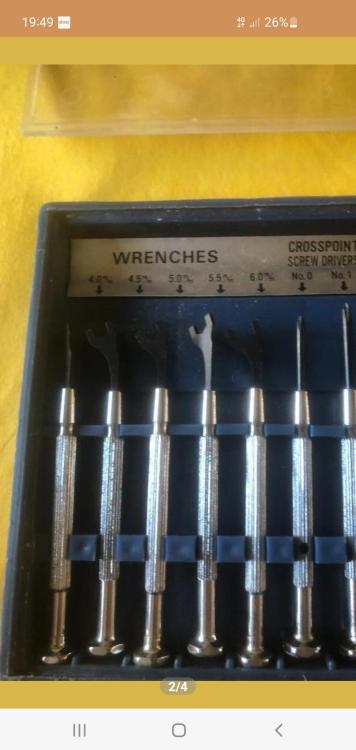 1 point
 -
Finally I've managed to identify the movement, Hooray It's a Guba cal 12001 point
-
I use coffee filters to filter out large particulates, hairs etc from cleaning fluids, i put them inside a plastic funnel to keep the filter to shape. The fluid can be quite slow to drain through, i thought about getting a reusable mesh filter instead.
 1 point
 -
https://miyotamovement.com/product/6T28/ The internal part of the rotor bearing is a nut that is tighten on a threaded post that sits on the middle of the bridge. You need to unscrew it, just like You have tried, but with more proper tool.1 point
-
@oldhippy - yes, cleaning them by hand in solvent removes the risk and all the time searching for them when they wander. I do the same for the very small screws. I also really like the coffee filter paper recovery technique, Richard - wish I’d thought of that before I sent a couple of dial feet screws down the drain one fateful day.1 point
-
Your father in law has asked for it cleaning so you should go ahead. Clean first and then as Waggy said said polish by hand. I use autosol but it is probably very similar to Flitz, it depends on what is available in your country.1 point
-
normal that would be true but there appears to be a problem here. When I went looking for the cross reference parts list of the 1688 it referred me to another caliber which seemed suspicious? A little more research indicated what the problem is. Let me quote something for the first link. notice for both the 6887 and the 1688 that it's the base caliber and the part about unknown whether the base caliber actually exist at all? https://ranfft.org/caliber/777-AS-1688 https://ranfft.org/caliber/5946-Girard-Perregaux-3009 notice what happens when you go looking for the parts yes the first link has a few of them but basically refers you to another watch in the second one only refers you to have a watch which is the last link. http://cgi.julesborel.com/cgi-bin/matcgi2?ref=AS_1687 http://cgi.julesborel.com/cgi-bin/matcgi2?ref=AS_1688 http://cgi.julesborel.com/cgi-bin/matcgi2?ref=ZOD_61_OLD
 1 point
 -
Something like this: I did look at this, and there are clones on Ali Express and eBay.... worth thinking about
 1 point
 -
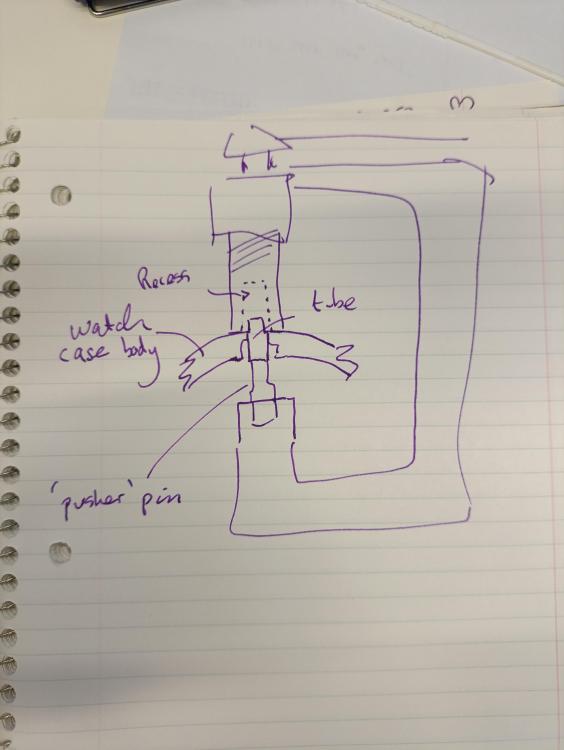
I've never seen one like this. It is almost completely invisible on my bench, and it's extremely difficult to tell top from bottom. No real questions, just sharing.
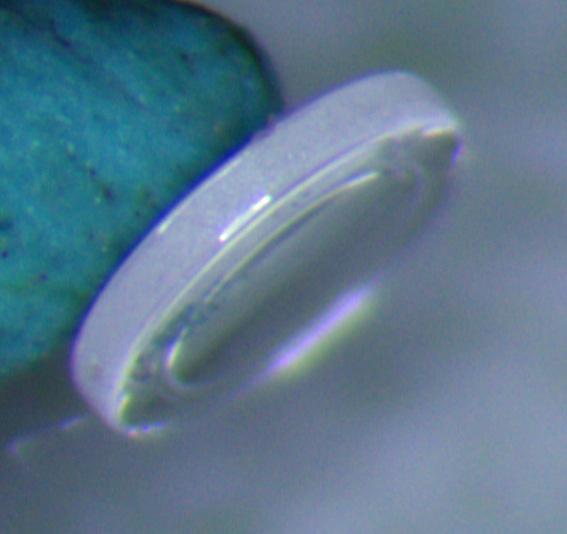
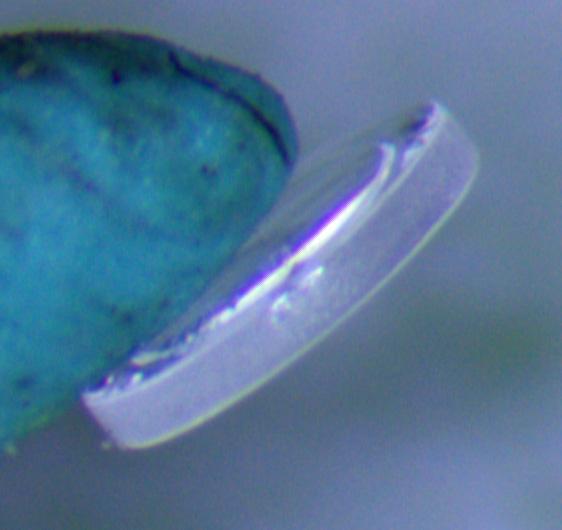
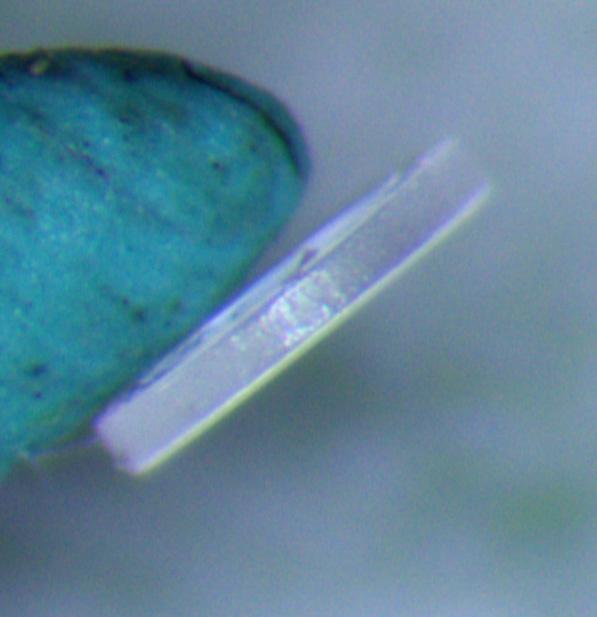
 1 point
 -
Several years ago I was at a lecture where I learned that lubrication expires? So armed with my new information I replaced all the lubricants I had and? Yes several hundred dollars and all new oils. Have I replaced them after they expired because all the new lubricants do have expiring dates in the answer is no. Not only have I not replace them but I have no intention of ever replacing them. Not only that but I was really excited several months ago to purchase some brand-new Elgin oil which hasn't been made by Elgin since probably the 60s and that oil is still highly sought after. So on this group and other groups of the endless debate over why lubrication is so expensive and why does it expire is occurring. One of the problems with a bottle lubrication is it's hard to tell how old it is it doesn't change color when it expires doesn't explode it looks identical to what it was made even of its 2030 years old there is no way of telling. So they put expiring dates on it so you can see how old it is. If you are a professional watchmaker charging money to do repair work then it would probably be worthwhile to replace the oil on a regular basis just because. But as a hobbyist I really wouldn't worry about it all. If you're really concerned keep an eye on your watches see what the performance of them is if you see a performance issue just clean the watch again and use the same oil that has expires as it's probably just fine.1 point
-
Shellac starts to melt at around 70°c, The balance ! , the impulse pins have shellac to keep them in place if not friction fitted, the hairsprings can sometimes be attached to the stud with shellac or adhesive as well.1 point
-
Update. Clock is assembled and running like a champ! Previous clockmaker replace the convex glass with a flat glass. LOL It did not allow the bezel to close. Yesterday, I was driving home from Bryan Tx and passed through the little town of Kyle. The wife was driving so I was on FB marketplace. Up popped a little Smiths-Enfield clock for 20 bucks. It was on my way, so I got it. Next day, I stole the convex glass from it and put it on my ST 124. The donor's dilemma!!1 point
-
Answering part of my own question. Putting the springs into the mason jar directly was as dumb an idea as they come. I still have hope to find my click spring but not very high. After the cycle and after removing the different baskets and bridges. I emptied the washing fluid into another jar through a coffee filter. But still haven’t found it. I guess it is stuck in something by capillarity so there is still a chance to find it. Update: found the click spring at the bottom of the wash jar. Very hard to see as that jar is murky1 point
-
An update to my post above, i got this type of bezel remover yesterday, absolutely perfect, the build quality is very good, no slop or play, perfectly aligned, no manufacturing defects, i've tried it on a couple bezels and it just works how it should, it's a solid bit of kit, i'm more than impressed. The scores on the door say it's a 10 out of 10 from me. What a difference in build quality from the first bezel remover i got, i slagged the first bezel remover off as chinese junk but this one makes up for it.
 1 point
 -
Good idea, I was thinking of something similar but using a drill press. Apologies, all the other comments have just appeared. I was replying to @HectorLooi , the chain pusher is a good idea too.1 point
-
How about this.
 1 point
 -
Just tap it in with a small hammer, but not one like this
 1 point
 -
My old trusted way. Pull them out with a pair of round nose pliers.1 point
-
Well put John! Yes, isn't it amazing what imaginative conclusions ignorant people draw? Having been involved with watches as my main hobby for eight years, I still cannot understand how one can earn enough money to make a living repairing and servicing watches. I have just spent more than a full working day refurbishing a quartz watch (Mondaine) that cost about $300 new. If I'm lucky, someone might be willing to pay half of that at best to own the watch. After my own expenses and taxes, I'd be left with pretty much nothing. Me and my family would starve to death! What it takes is of course to be experienced and quick, and have the most efficient tools. There are already several excellent videos on YouTube showing how to service the Rolex calibre 3135. As always, there are bad examples too. Fortunately, I am experienced enough to quickly identify clunkers. If I recall correctly, Mark has at least two excellent videos on his channel for servicing the Rolex calibre 3135. When I create a service walkthrough, it is primarily for my benefit. Partly because I find it very stimulating and partly because it makes it easier and saves time when I service the next movement of the same or similar calibre. I see it as a complement to the good videos that exist because these videos rarely name parts, describe which oils have been used, the exact assembly order, and so on. A good example I think is my service walkthrough of the ETA calibre 2892-A2 which even Mark to my delight appreciated. Wow, you are reading way too much into my use of the word "perfect". What I should have written is that I want to have enough time to do a first-class job without stress. That is, should any unexpected problems or issues arise, I want to be able to take the time needed to deal with them in a correct or at least professionally accepted manner. I have fought and am still fighting my ambition towards perfection and feel that I have come some way! This means that I now enjoy working with watches much more. Here are some quotes about perfection that I appreciate very much and that I remind myself of when the "perfection devil" comes to visit. "Don't let perfection be the enemy of the good." ~ @LittleWatchShop "Perfection is expensive to approach and impossible to achieve!" ~ @Waggy1 point
-
I was given a 1920s? Limit pocket watch in very poor condition a few days ago. The case back was very badly rusted with deep pitting. Someone on here advised me that the case was originally blued gunmetal, so I thought I'd see what was possible with it, to make it not quite so bad at least! Heat bluing seemed out, as the hinge looks to be brazed in place & I did not want to risk it falling apart! I got a bottle of "Jenolite gun blue" to try. First, I sanded the back to remove all visible rust, working from 1000 down to 7000 grade. There was no visible brown at that but still remains of deep pitting, that I though would take too much metal off to fully remove. An ultrasonic clean in weak Ajax floor cleaner solution for a degrease, as I usually do with case parts, rinses in the ultrasonic then a wash with deionised water followed by IPA to ty and ensure no parts would be "un-wet" in the chemicals. The gun blue mixes 1:3 with deionised water, then soak the parts for 15 minutes; I used a glass jar just big enough to completely submerse the case, and moved it around every couple of minutes to try and ensure an even effect. I did the bezel with a cotton bud, flat in a jar lid, glass in, and the solution applied around the outside with a cotton bud every few minutes, so it did not get on the inner silvered surface. Everything had a good rinse under the tap once done, then a brief deionised water rinse & dried. The finish it totally matt black as it comes out the solution, with the black sediment rubbing off on anything it touches! There were some traces or brown rust after it dried, so I tried boiling it for half an hour, as apparently that should convert brown rust to black?? Once everything had cooled and been dried out, I tried burnishing the surface with thick kitchen towel dry. That seems to work quite well, removing the loose particles and gradually brining it to a dull shine - but it's quite sensitive to pressure and a crease or fingernail pressure leaves a different level of shine to a smooth pad, until that wears through and creases.... It's not finished, my fingers are aching so giving it a break. I'm hoping the finish will even out with further burnishing, though the residual pits in the back are probably there for good & I'm not sure what to do about the traces of brown that have re-appeared. The instructions for the chemical blue say it should be oiled as soon as dry, then left to cure for 24 hours - but I'm not sure about soaking a watch case in oil? I did leave it overnight before boiling & burnishing. It still need more work and detailing! But the effect looks promising. Before: After, still needing further burnishing. All the streaks are pressure marks, where the burnishing has smoother or removed more of the surface material. I'm hoping that a fine brush will clean the details and edges, where a cloth cannot do anything.


 1 point
 -
@Hawaiikook808 I have got to the point now if I see something interesting on eBay I check cousinsuk etc. for new prices as a lot of stuff is often posted for more than new for some strange reason. Tom1 point