Leaderboard


Popular Content
Showing content with the highest reputation on 06/12/24 in Posts
-
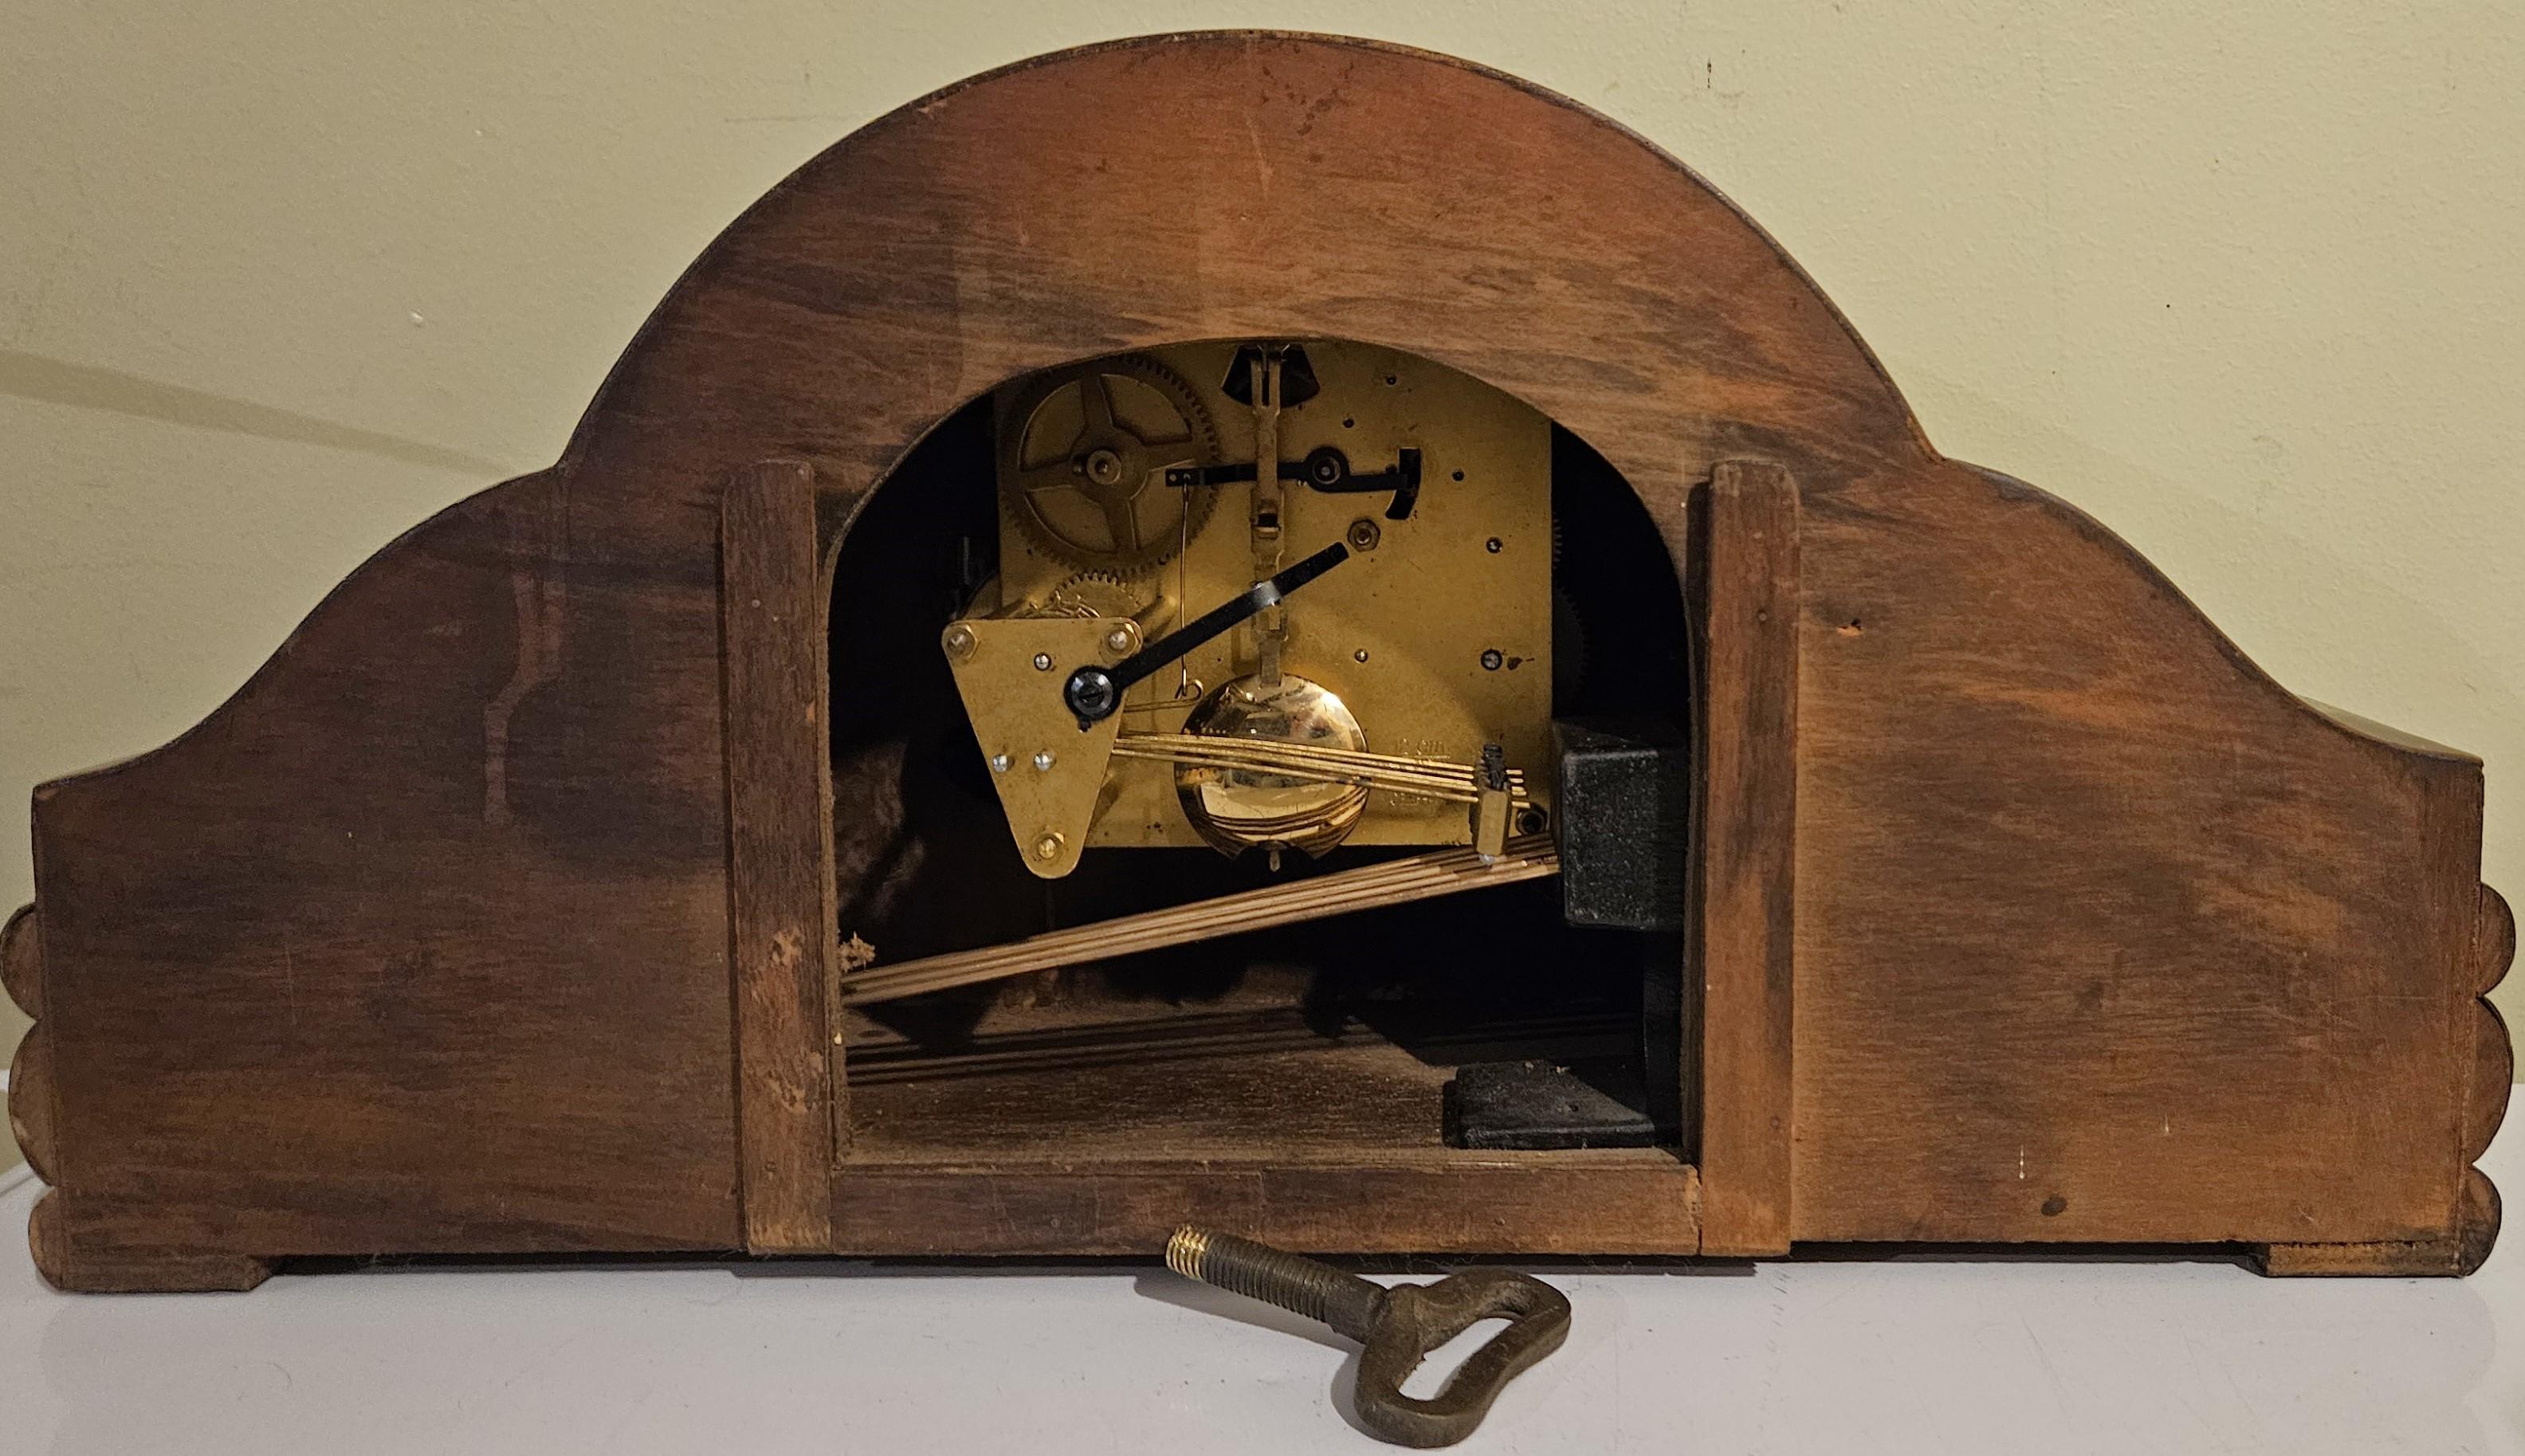
Episode 5: Done and done. One mainspring, 2 bolts and some thorough cleaning, adjusting, a bit of oil here and there and voilà! Mainspring: Although the watch does run pretty good, I would still love to have an original mainspring, or at least the one I mentioned in an earlier post as it matches the original spec a bit better. Screws: Well there was more than one bad screw. I did end up buying some original ones from this movement. Came out a tad more expensive, but I couldn't find anything alike from Cousins. Also I would have had to polish them. Which to be honest is not a bad thing, as I was preparing for that and built my self a little screw polishing jig. Case: Case has some wear, and its sadly gold-plated. Sadly because repairing such a case is a pain in the butt, or 1500.- euro if someone else is going to do that. Frankly I do not know if its worth it. You tell me? Other than that, I am very happy with the results. Thank you everyone for the support and let me know what you think.
 4 points
 -
Industrial electronics, programming and machine tool repairs, primarily - but we have customers that work in such as miniature precision instrumentation & gearboxes etc. (as well as very large scale), so it is a legitimate resale situation if any of those need such tooling. The watch tool side is also of curiosity as well, though out of my personal budget! (I'm not giving the full company name etc. as this not intended to advertise anything).3 points
-
spellin chek iz goood Think its your browser not this site that flags spelling errors - check you browser settings, let me know which browser you use and maybe I can help
 3 points
 -
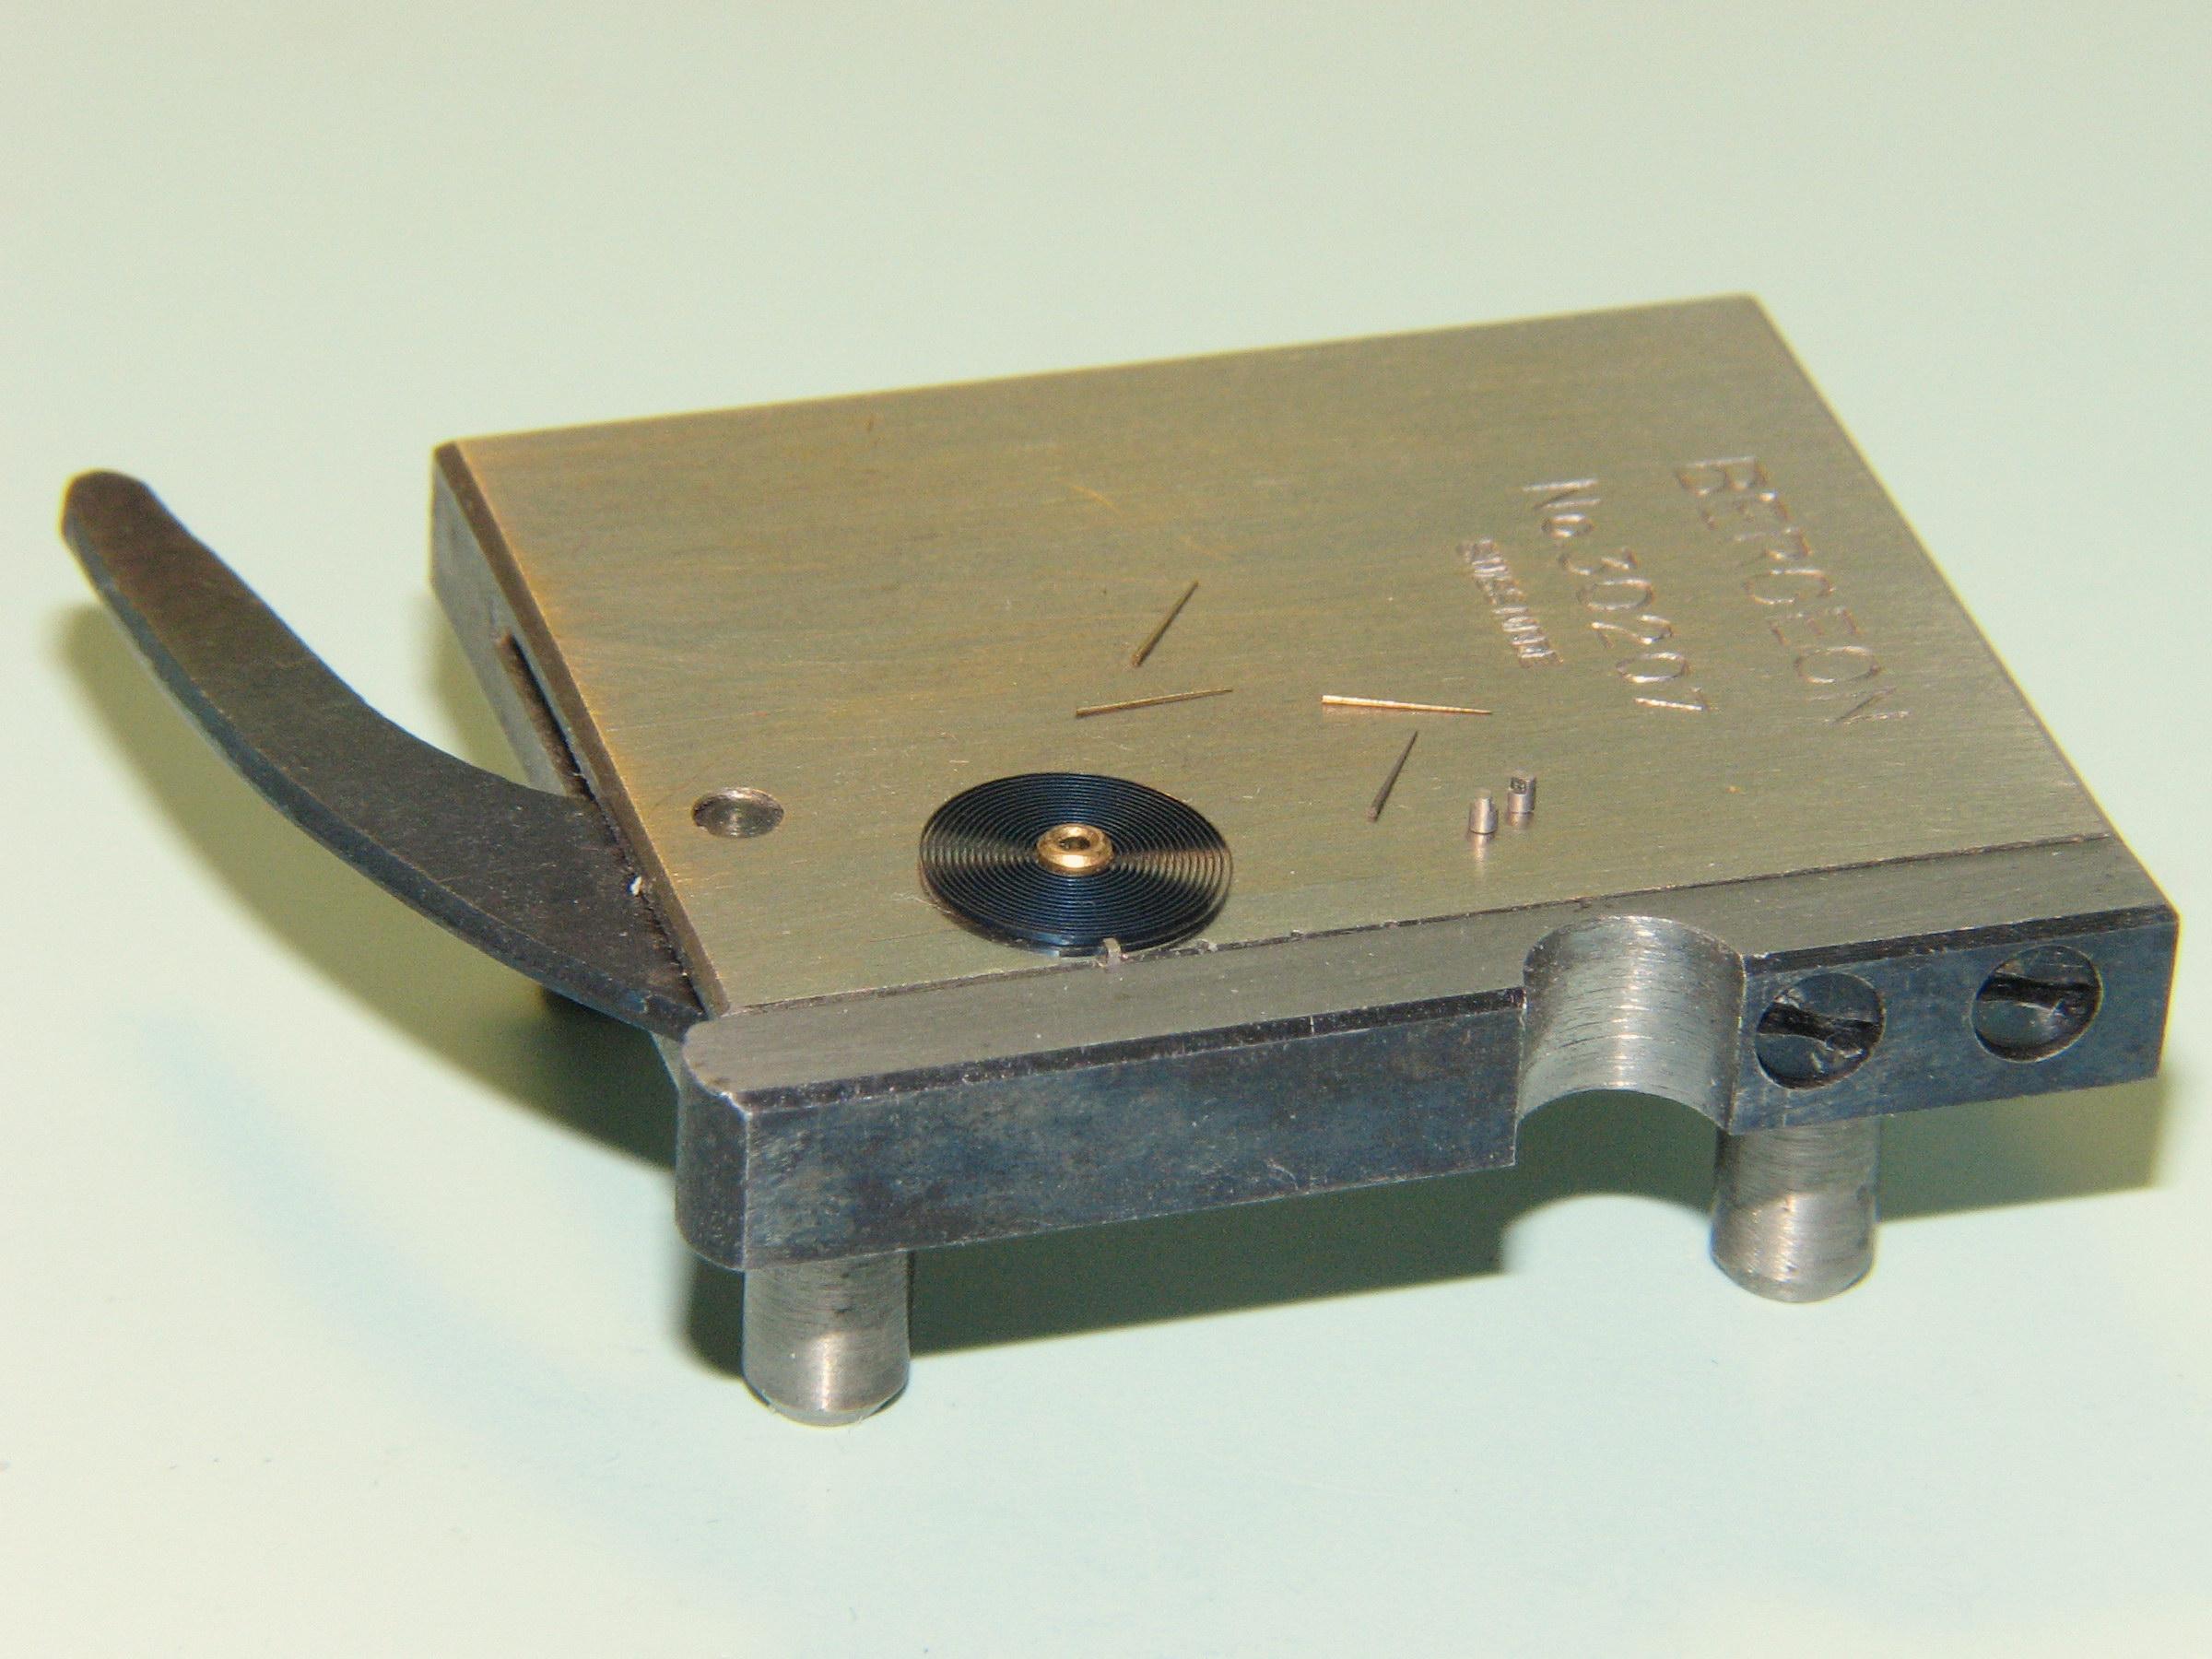
I imagine in modern production they are stamped, then finished by machining. For this one it was machined from scratch. It was distorted enough that I couldn't get a great measurement of it (using a profile projector), so using the escape wheel and roller dimensions, and the center distances between wheel/fork/balance, I drew it up. I did it in the lathe, using the milling attachment and dividing attachment. It was a lot of work! And it had a screwed on counterpoise weight, very small holes for locating pins and screw. As it was a really high-end piece, with the bankings machined in the mainplate (no adjustment), I adjusted the drop lock using a depthing tool, and filed the fork where it contacted the bankings for run to the banking and final lock. Pallet stones were fitted all the way to back of the slot and the faces lapped to bring it to correct drop lock, as the original was done. More recently I did one for an old Patek, again split fork. That one was funny as the balance was off the line of centers of the escapement by 0.12mm, so the fork had to be made "skewed" to have correct function. You can see in the image- this would be the null point, in beat with balance at rest.
 3 points
 -
Yes, agree, the pallet fork staffs are small and not easier to make than balance staff for example. Just I am not used to search and buy parts, I make what I need by default. I am not sure where I shoud search for one if I need to... Just to say that here I expect the staff to be threaded type, looking at the type of movement.3 points
-
Video editing. I know I could do it with another. But Davinci Resolve is free and I had paid for a Udemy course. Plus. My computer blew itself to pieces when I spilled coffee on it when I sneezed. Coffee in Desktop unit. Knacked motherboard and most internals. Phtttp! My bride took pity on me. I had 14 month savings, plus a birthday present of some cash. I'm only 76 once. 1/2 of Currys price Did it. Ta2 points
-
Thank you folks. Same brower as always. Microsoft Edge outlook. Although it is the new one on Windows 11. Hope you can help. Update. Done it. Thank you2 points
-
VWatchie I have followed Adam since his start just over a year ago. His videos are full of information and usually diplay a full disassembly and build. What is interesting for us beiginners is that he shows screw removal and placement. Plus he talks about what he is looking for when completing the install of items. Also, he includes the errors so that we can see where not to make the same mistake. His oiling and cleaning process has altered. Less is more, but enough to be enough. Adam of 'Weekend watch repair' is a member of this forum and has given information freely to many. As do you members. I am doing another build of a Seoko Mellmatic 4006, so am using https://www.youtube.com/watch?v=H2UOIUcUEYA&t=3290s His latest shows the difference in his oil and cleaniing application. Like him, I also have adapted. Don't have his equipment, but feature his system. ish... https://www.youtube.com/watch?v=_UCNqdRq6mI2 points
-
@Malocchio @GuyMontag I received the recommended adapter and could make it work. Thanks the camera view is now going to a monitor and I am getting a memory card to be able to take pictures and videos.2 points
-
100% agree- I would rather make a balance staff than a pallet fork arbor. Unless: -unless they are threaded. Not that making the thread is so hard (though it can be), but you have to really have all your measurements spot on as there is no recourse for height adjustment. Funny thing, well funny to me- the first fork I made was because of a threaded arbor. Watchmaker tried to knock out the arbor thinking it was friction fitted, but it was threaded, and the fork split in two. Maybe it's funny to me because it was my brother who did it .2 points
-
I asked how freely the balance runs without the pallet in place. Remove the pallet fork and check for freedom of movement of the balance wheel.2 points
-
That is not a split stem. Cheap watches do not use split stems as that costs money. The correct way is to pop the back off and release the stem. The battery is also accessed via the back. When you get your caseback knife, practice on the old watch first. And another advice I almost forgot to give is... if it's that difficult to open, it'll be difficult to close. You'll need a caseback/crystal press.2 points
-
Definitely. An alternative is placing a thin/transparency sheet of plastic on top of it and working "through it". That also works really well when you want to re-insert it. Also reduces the risks that @Nucejoe is referring to with a bit less hassle. Frankly, most beginners/intermediates are more likely to damage the hairspring/balance when removing it from the cock. But you raise a good point. When turning the arms of these shock springs, make sure you're just exerting sideways pressure, not pushing down too much.2 points
-
May help if you place something in the hole of the spring (toothpick is good) with one hand whilst you rotate it with the other, then if it jumps out the toothpick will catch it.... may same you hours on your hands and knees looking for it.2 points
-
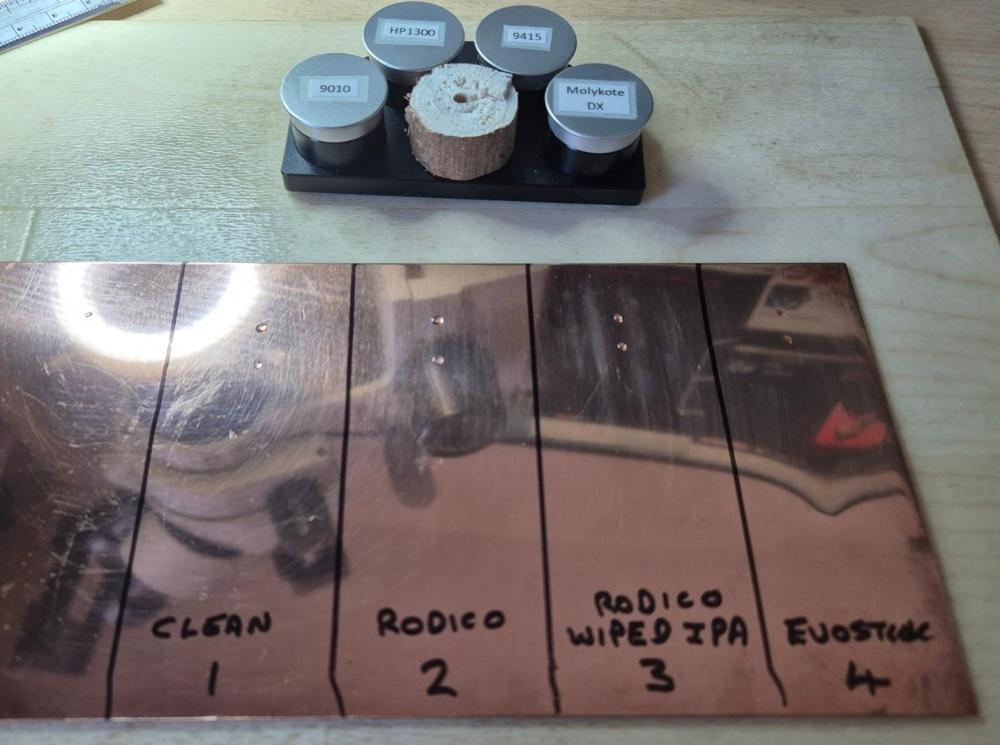
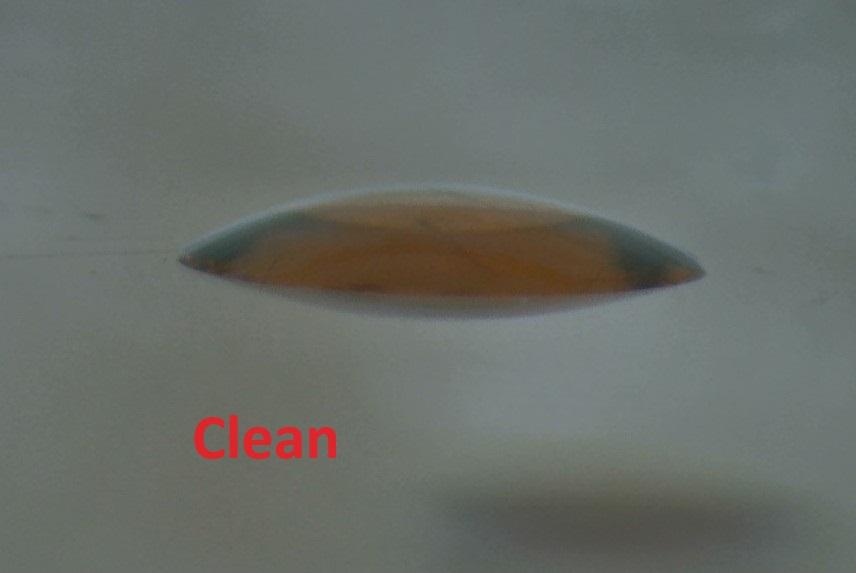
I thought a little experiment was due (as I currently have no watches to work on ) I cleaned a copper plate (scrubbed with soap, wiped with 99.9% IPA, so it passes the "water break test") On test were : (1) a clean section (2) one where I'd wiped with some clean Rodico, (3) wiped with Rodico but then wiped with IPA on a cotton bud (4) clean, then wiped with dried Evostick on pegwood (to see if Evostick leaves any residue) I put on drops of HP1300 and 9010. Unfortunately I don't have an automatic oiler to put same size drops on each section. So the drop size did vary a bit. After 30 minutes - all the dots look similar. Maybe the Rodico section have spread a touch? Looking under the microscope at an angle, there is definitely less surface tension on the Rodico drops (the drop is flatter) for both HP1300 and 9010. See pics below. All other drops look similar. (Maybe I should have done multiple drops) Conclusions. a) The Rodico wiped section did seem to effect surface tension on the oil droplets. b) After using Rodico, a wipe with IPA seems to remove the residue. c) Evostick does not seem to leave a residue d) I desperately need to get a watch to work on, so I stop doing silly experiments
 2 points
 -
Art nouveau style 1930's1 point
-
Quite a powerful P C you now have. I'm still running Windows 7 64bit. I hate windows 10 it's a hog.1 point
-
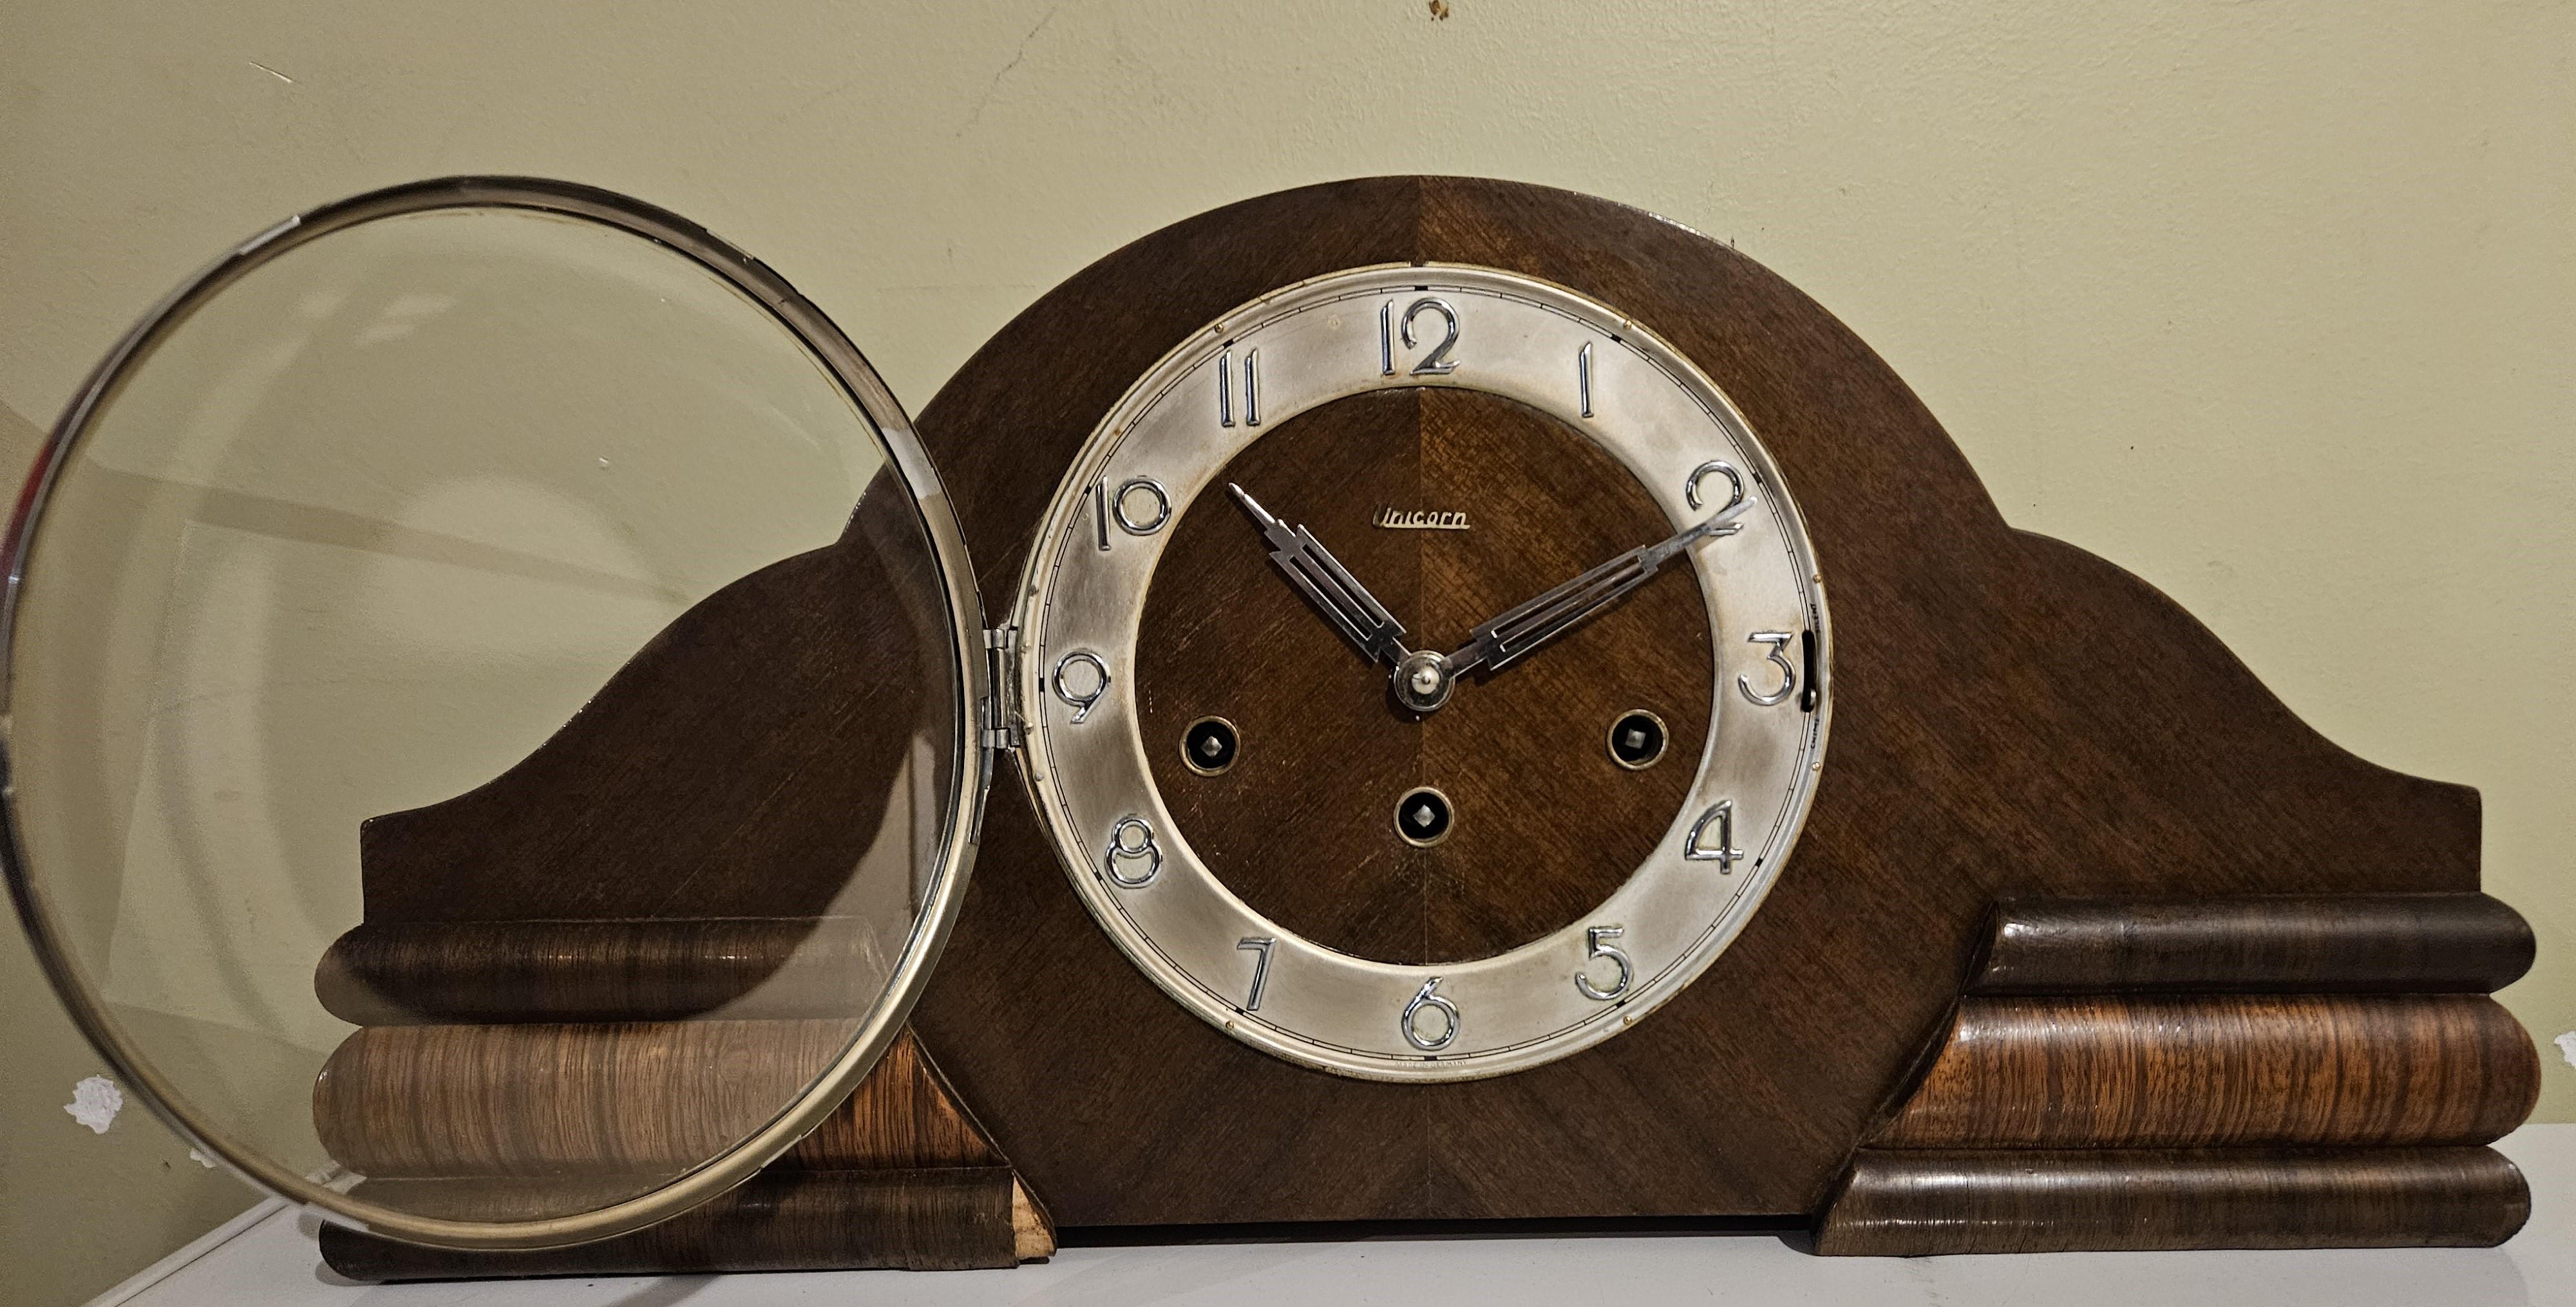
Possibly a Suevia Sindelfingen - there are a few of their movements with very similar features. Some info & photos here: https://mb.nawcc.org/threads/please-help-identify-date-mantel-clock.80163/1 point
-
As the links I included in my first post may not have worked I will try and insert photos below:


 1 point
 -
Someone who knows more about clocks will help you. Click the add files button and select your photos.1 point
-
I don't think any forum rules have been broken yet and I really do think that @rjenkinsgbintentions are good but if you need to discuss buying from a member, please do it by PM. Having someone on here who can access tools that others can't is a bonus. You could PM Mark and explain the situation, he might give you permission or add you to the resource section.1 point
-
I love it when Microsoft moves settings and changes default values without ever telling anyone. Click on the windows menu (start menu) and go to settings, or simply press The go to time & language>typing and make sure highlight misspelled words and auto correct is enabled.

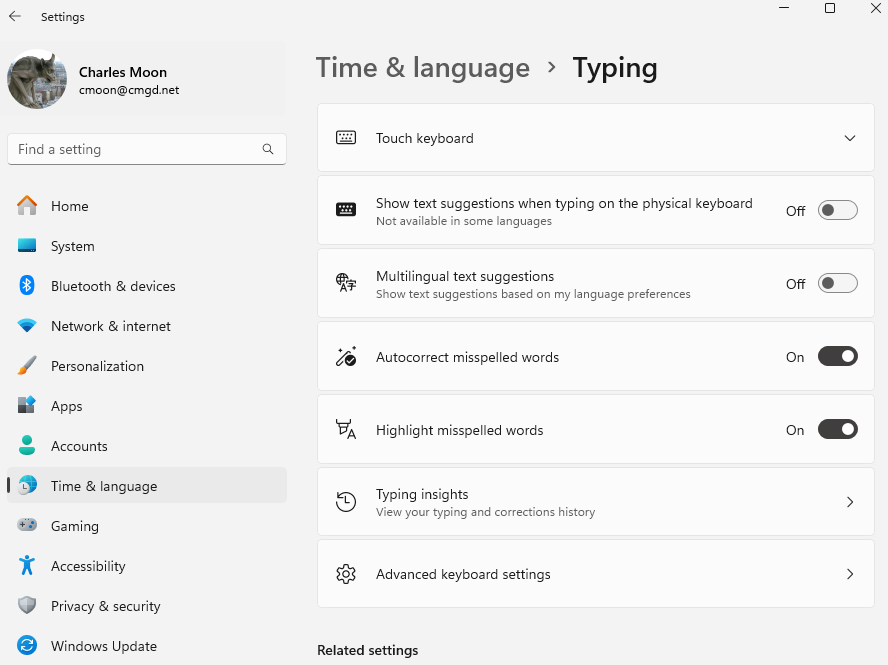 1 point
 -
I contacted an eBay seller selling the quick change posts for about £100 as advertised for watchmakers lathes and the 'T' foot is 12 mm and it was too thick as well so like you couldn't fit my cross-slide, unless you start hacking it down, which I really didn't want to do. That's handy! I thought they only sell to suppliers etc, rather than trade. What does your company do, JRW? I'm saving up to buy one of Michael's lathes. I was thinking of a Schaublin 70 for about £5000, but that is going to be shot and will need some work on the headstock first, I should imagine and Michaels's CZ50 is in the same ball park price, so hey. Yeah, they certainly are at Swiss prices, but everyone that uses them doesn't complain, as they are that good1 point
-
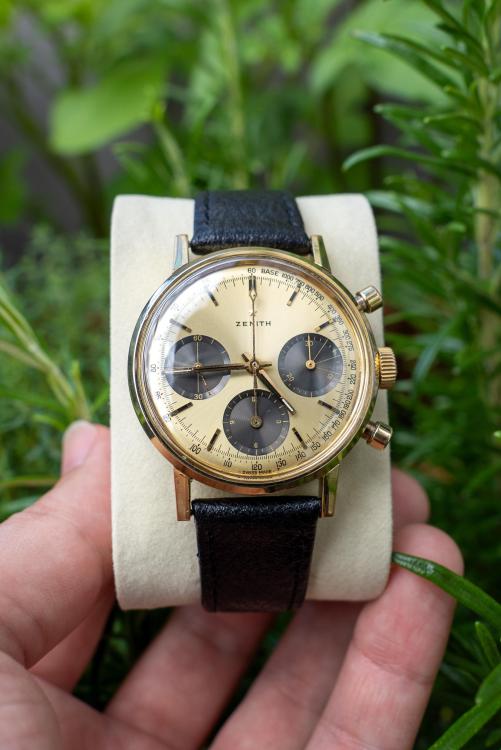
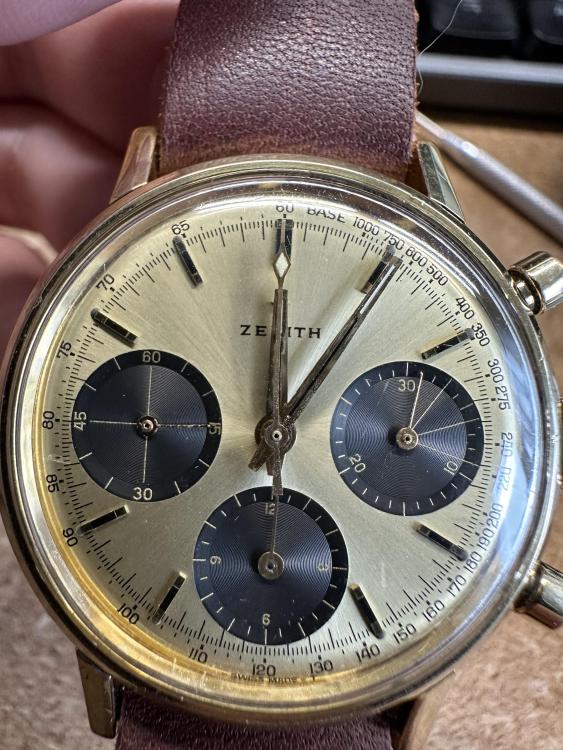
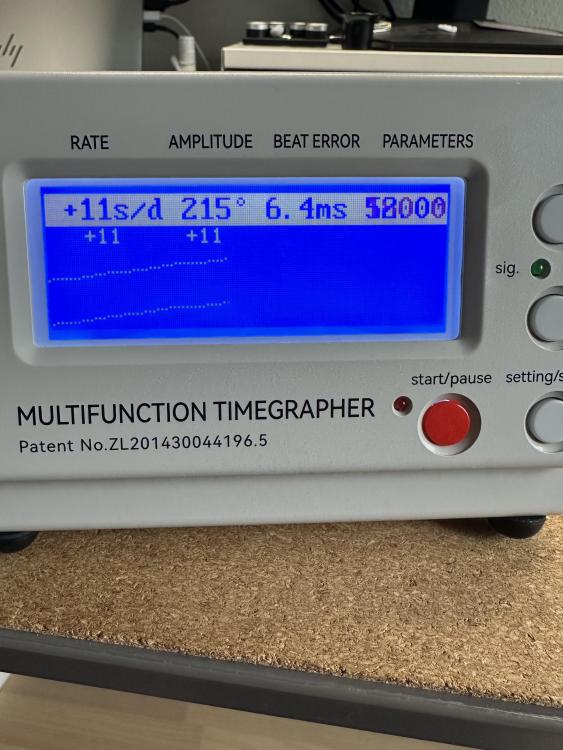
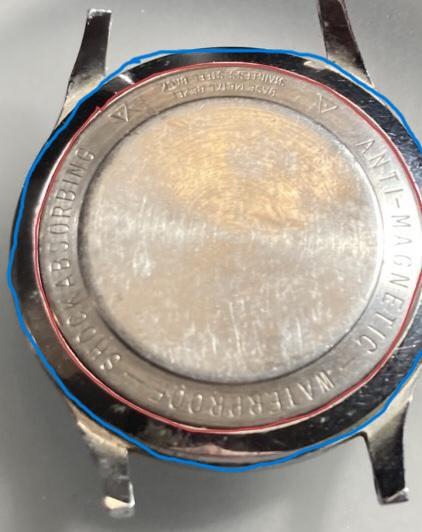
“It’s serviced and in perfect condition” so they told me. Found this nice piece in Italy. Manual wind, column wheel chronograph from the 60s (or so). Seller was swearing on his mothers grave that the watch is at its best condition. Better than from the factory. Sure, the price was nice, it did sound sketchy, but I bought it anyways. Hour hands are not set correctly, the chrono hand is bent, guess why :), chronograph does not reset properly, 6.5 beat error and so on. Something tells me I only sketched the surface.


 1 point
 -
Thats not really the issue, a piece of trapped finger cot you can see and remove. Hand winding can distort the spring in way that you can't exactly see when it is in the barrel. A spring can be become coned, it can become coned even just from removing it, but hand winding it back in will only add to it. Look at the next one you take out and honestly ask yourself if it looks raised at the center coils. Look inside a barrel, can you see wear ? Not saying i dont do it but there are better ways that cause less stress to the spring. I think we try to find ways of justifying why we hand wind when really we know we just shouldn't do it1 point
-
I don't think the red line you've marked as the case back is actually a split. Think you'll find as per normal the complete back removes.
 1 point
 -
I think we can be fairly certain that the propper cleaning fluids and rinses would remove the rodico residue based on some of the experiments recently carried out1 point
-
I've never done any tests, though I imagine it would be easy enough to do with glass. For pallet stones, if they don't come out of the machine spotless (it does happen), I clean them with freshly cut pithwood soaked in benzine. Any bits of pithwood left come off with a blower. If I mess up oiling an Incabloc, back in the machine it goes; I'm never happy with how clean they look even out of fresh clean benzine, and I can do other stuff while the (automatic) machine re-cleans them.1 point
-
Just thinking about the above, if the banking pins are angled 'V' shape (which they look like in the photo) then due to end shake of the pallet fork the distance the pallet fork will travel when in the dial up will be different from the distance it will travel in the dial down, which will make regulation very difficult if not impossible.1 point
-
Yes, I always detach the balance complete, before working on shock spring. It also gives me a chance to check the coil ( nothing replaces looking directly down the coil ) , check the collet, alignment of hair spring leaving the collet with stud pinning. Also the hole of settings housing, have plenty to show where pivot has rubbed and grind the hole, and many more checking & adjusting. Detach & instal balance complete is a very neccesary task in mechanical watch repair, pivots break, H/ S ruined beyond repair, rotating the collet ... etc. I find pegging upper balance pivot risky with balance attached. Rgds1 point
-
Oh! Sorry misunderstanding. I don't know how this never crossed my mind, I usually do this every time before assembling the movement. I'll try once I go home today.1 point
-
I don't suppose you have a picture of banking pins before you attempted streightening=ruined now. It's always helpful to take many pictures, as you disassemble. Banking pins were in all likelihood bent for basic adjustments in escapement at the manufacturer assembly line. Rgds1 point
-
How does the balance run without the pallet fork in place?1 point
-
Buy a new movement with stem included. It‘s cheap!
 1 point
 -
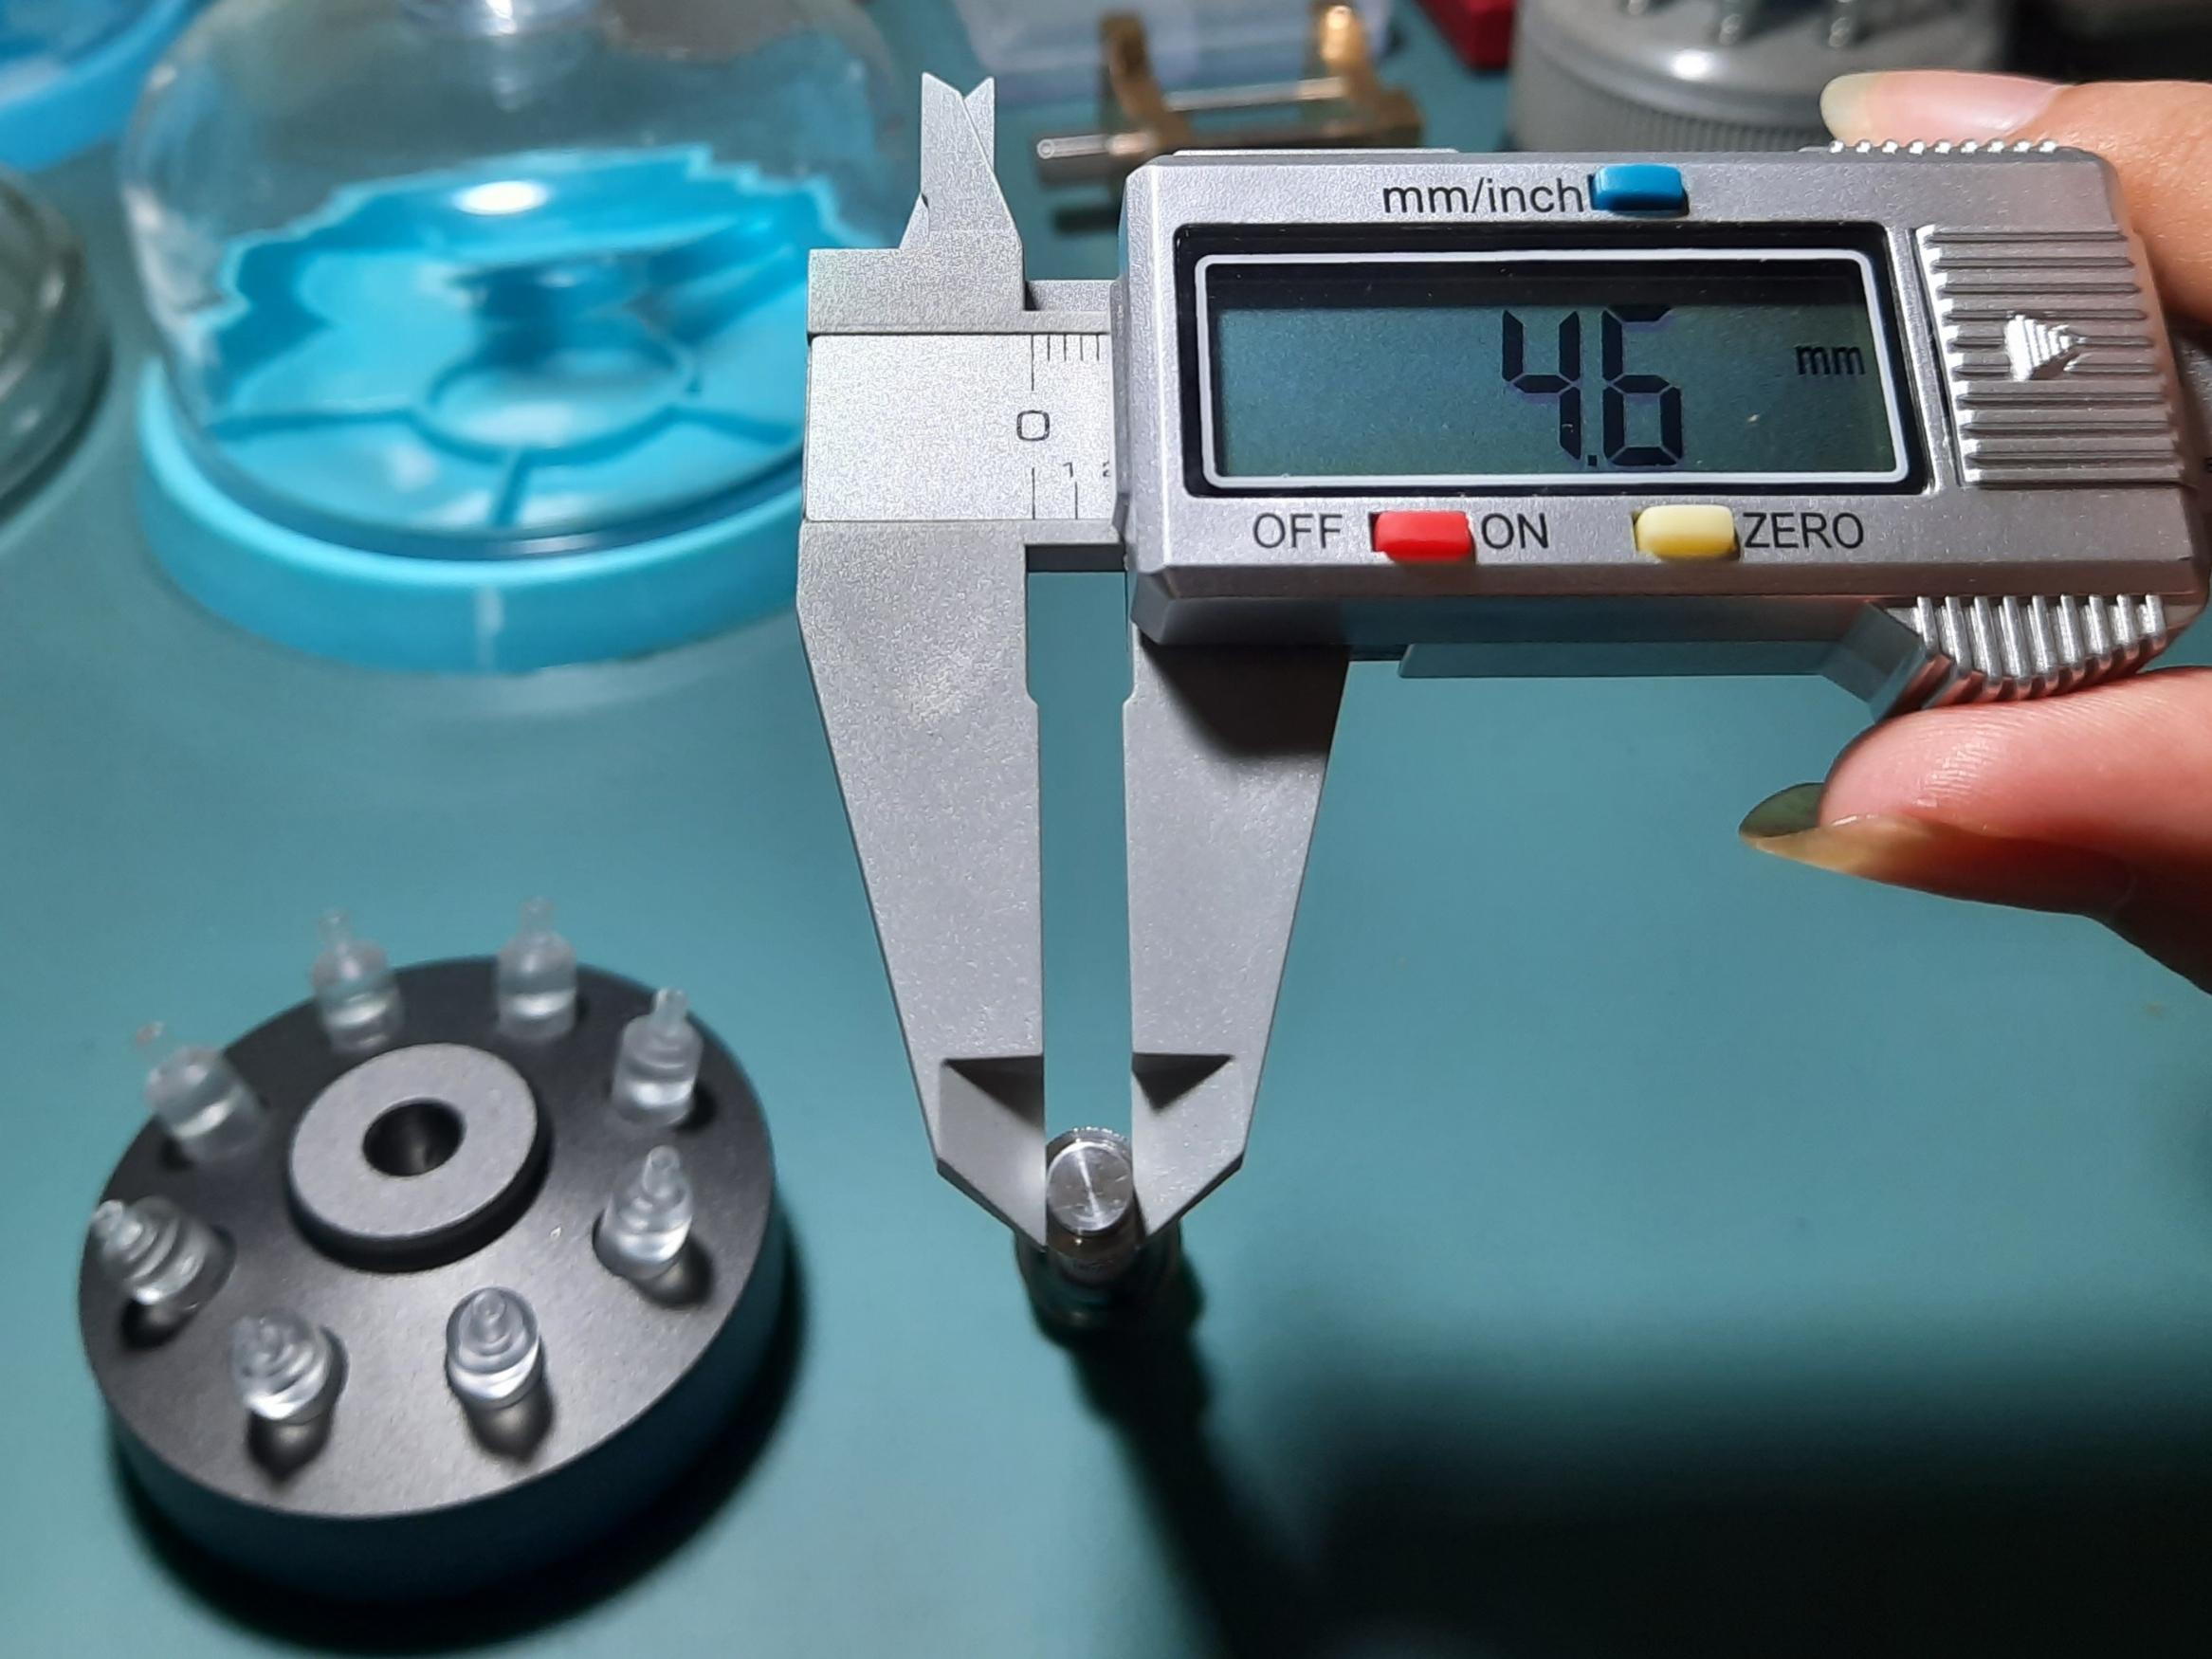
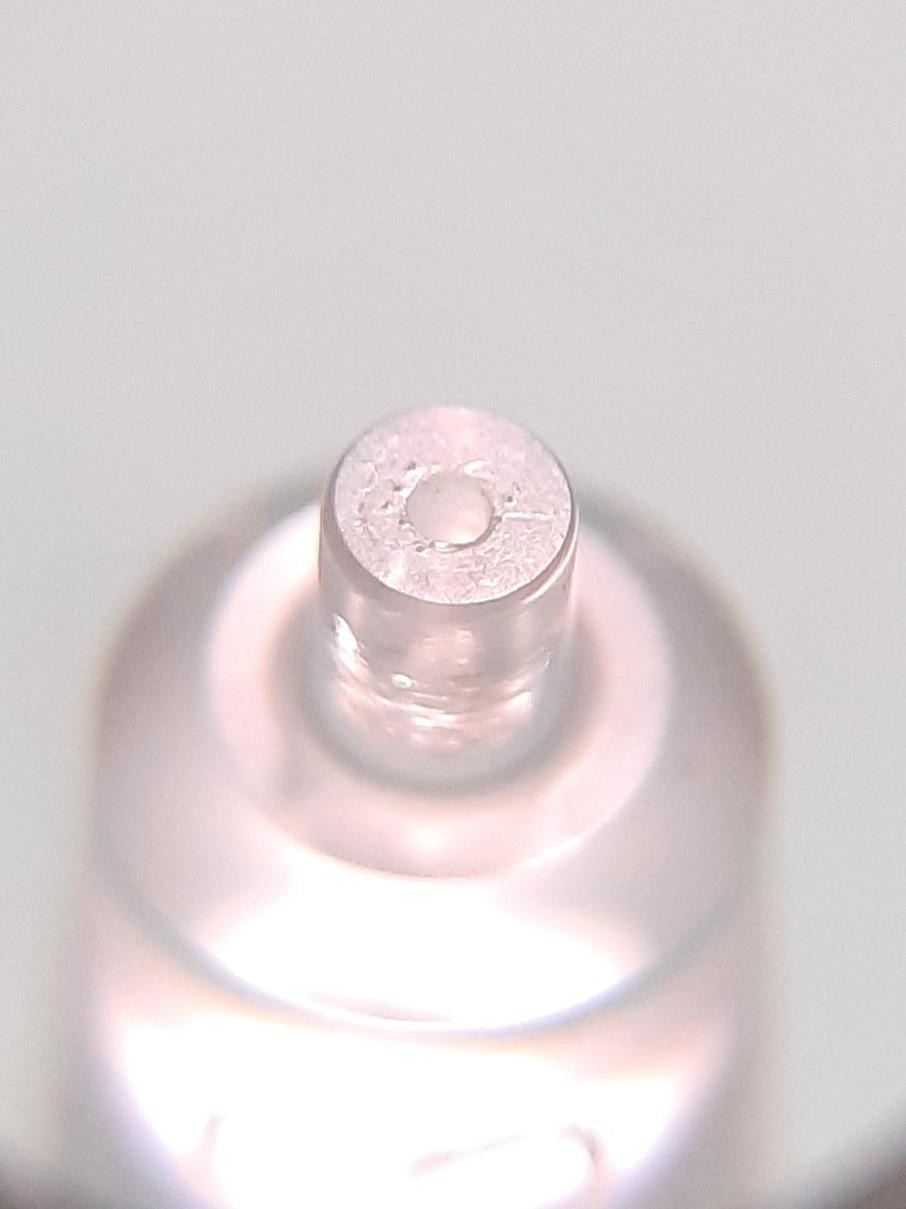
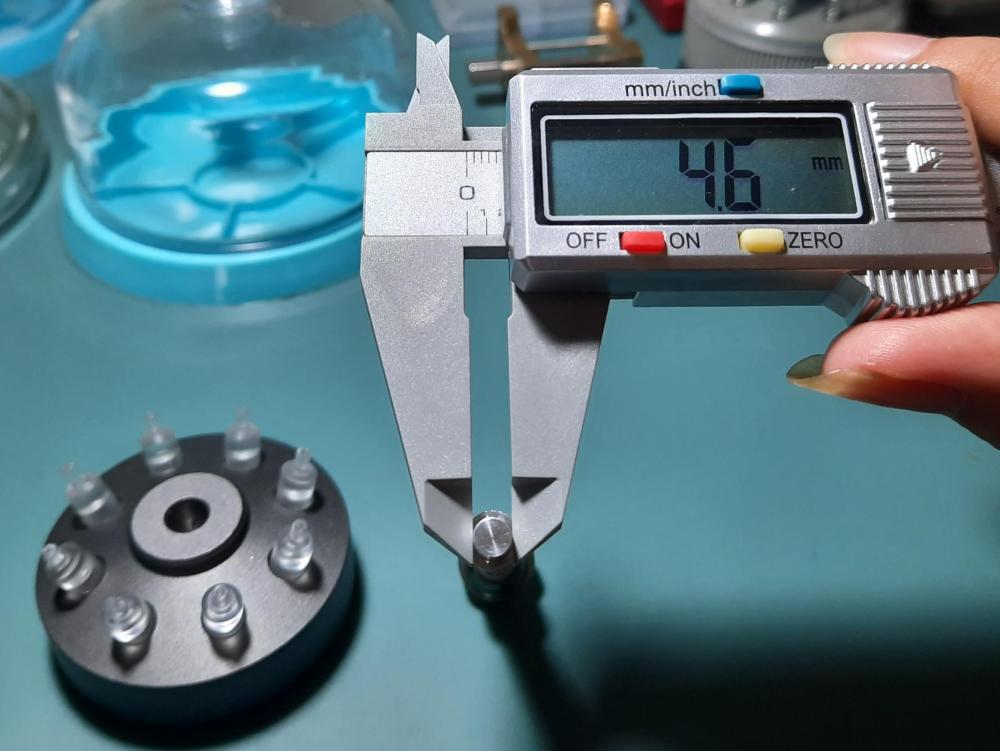
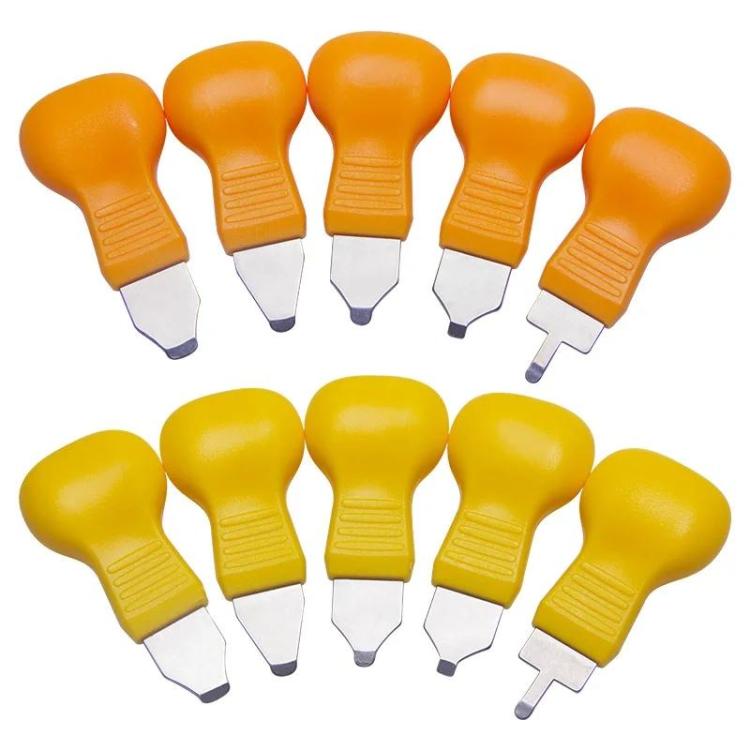
It's 4.6mm, my set looks a bit different but specs should be identical. This is a good set imo, clear plastic tips make the work easier and I don't like any metal tools to go near the hands or dial. The only negative about it is the smallest tip 0.8mm is actually not small enough for me, the inside of these tips are beveled it goes a bit over the cannon pinion, so the minute hand could be push in too far down. I don't like it so I grind the beveled out of the 0.8 tip (see photo). After modded the set works flawlessly.
 1 point
 -
Thank you for your introduction and welcome to this friendly forum. We all look forward to your contributions and continued involvement. Those pinball machines look wonderful. What is the oldest one you have. Where do you pick them up, what sort of price do you pay and what would each one be worth.1 point
-
Hello and welcome from Leeds, England.1 point
-
Ok, sorry, I have underestimated You skills. What You describe, that the rack tail goes under the snail, may be is because someone has hammered thinner the rack tail in order to elongate it, which sometimes is needed for adjustment of correct strike numbers. If the snail/star wheel has big free play, then decision is rather to make new post for it. I am curiose to see how much the free play is present there. The post and the bearing are made of steel and will never wear, unless someone will decide to ream the hole. What is the free play of the bearing/post of the lever on which the snail wheel sits? But may be the beter way to solve the problem is to bend a little only the tip of the rack tail up.1 point
-
Benrus Waterproof Case Series Crystal Info.pdfThe manufacturer's info on this era of cases/crystals/stems/crowns is included in the set of repair/replacement parts Benrus sold at the time. I'll attach that insert. There was also a 3-ring notebook style catalog, parts list and instruction manual that was sent out in the 1950's and updated a few times. These come up for sale on eBay every now and then, and if you are truly interested in Benrus it's worth grabbing one or more (to cobble together a complete set). Some of that information has been shared online in various places so you can also do a web search for Benrus-associated pdf files. A few of those manuals sold last week: https://www.ebay.com/sch/i.html?_nkw=benrus+repair+manual&_sacat=0&LH_Sold=1 Benrus Waterproof Case Series Crystal Info.pdf1 point
-
VWatchie. I do have to agree with you. I started oiling 2 1/2 years ago. Looking back, I'm sure I would have filled the swimming pool. I now base my oiling on Adam's demonstrations of Weekend watch repair. Very lucid views. I have noticed the differece in the final outcome of my movements. My preperation and cleaning is noticeable in what it produces. Good smooth wheel trains and easy controlled motion of the keyless. Yes I do, as I hope others do, take note of the comments of members.1 point
-
This is a supershock spring. Rotate until one of the arms reaches the notch in the setting then lift out the spring. The cap jewel may be held in with dried up oil. If you are finding it difficult to remove place a drop of lighter fluid on the jewel and let it soak in to loosen up the oil.1 point
-
My company (JRW) now has a trade account with Boley. The chuck adapter, on its own, looks like it would cost around £170 after taxes and shipping; ouch..1 point
-
I find that a caseback knife of the above design is best. The conventional caseback knife is prone to slippage and scratching up the cover, as you have discovered. This Seiko style knife is used with a palm grip, with the handle sitting in the middle of your palm. The blade is wedged into the crack between the case and the caseback. You may have to experiment whether to use the blade with the bevel facing up or down. I find that facing up works 90% of the time. The blade is pushed into the crack without any levering action. This is not a tin can, do not lever the cover off. You are basically using the bevel to wedge the cover off. This method prevents slippages and damage to the caseback. If you are worried of hurting yourself, use a glove on your left hand. The only time I use a levering action is on watches with the tiny lip on the caseback that is specifically designed to be levered off. Sometimes cheap watches have incredibly tight casebacks that can only be taken off with more advanced opening tools. Hope yours isn't one if them.
 1 point
 -
I realized I left out one additional component that could easily be confused as the ring from an armored crystal if you come across one during disassembly. Depending on the movement, some of their watches in this style had what Benrus called a dial frame. These came in gold and silver (toned) and were for specific case/movement combinations. For the series #7001, two movements are listed as requiring the dial frame, the DR (ETA 2370) and EM (ETA 2390). It is also listed as possible for the automatic FE (ETA 2451) but with the caveat "use a dial frame only if it fits easily over the dial". These rings were the same diameter as the crystal and sat between the crystal and dial inside the case, so they didn't really play a role in waterproofing but were a spacer to secure the dial.1 point
-
if you have lots of money and the desire to acquire another tool. a very specialized tool with only one purpose kinda hard to justify the price though but still another tool to impress your friends.
 1 point
 -
That is modern so any decent clock maker will be able to under take such a job. There shouldn't be a problem.1 point
-
Those case #'s are from the 3rd and final iteration of the Benrus waterproof design. They had some other case designs in their final years as the quartz crisis came on, but by that time US legal restrictions made them change to advertising only as water "resistant.": There is no gasket, glue, sealant, crystal ring or separate bezel, just a tight fitting flexible crystal meant to fit the machined groove on the case and be installed (and removed) from the front with a crystal lift or wrench. There is a gasket in the crown. Their waterproof guarantee always included the disclaimer that the case, crystal and crown needed to be intact for this functionality. Not sure how these did on a pressure tester, but it was good enough to secure multiple government contracts for a series of military watch models. Most of the civilian cases cover the joint in the split stem, so you can't manipulate them to slide in and out from the side (as you can with some of the military models), you just have to trust the system and yank on the crown! I enjoy working on that era of Benrus watches. Their ETA movements are reasonable to service, they have parts that can still be sourced, and most were tritium lumed so the dials have nice patina without radium burn marks.1 point
-
Sovereign was the 3rd-tier brand made by Benrus (Benrus > Belforte > Sovereign) and nearly all of their watches from this period were front-loaders. Many Sovereign watches had aluminum cases, but this one is more similar to the Belforte versions which were partially stainless steel. If I was working on it the first assumption would be that it is a front-loader, so you should definitely try to remove the crown and split portion of the stem. If it comes out, then you can use a crystal lift of one style or another to take out the crystal, after which the movement can be tilted out.1 point
-
I received the ESA 944.111 movement today from Germany. I successfully reassembled the watch with the new movement and everything is working perfectly. I realize that this is very basic work for those of you who have helped me with your comments but I have to say it was extremely rewarding to bring a 42 year old watch with sentimental value back to life after being broken for 19 years. I also have to say, it was not quite as straightforward as I imagined . As always I learned a lot so that it’ll be easier next time. On to the next project. Thanks to everyone for your help.
 1 point
 -
Nicknamed the "Bill Knows Best" syndrome, as it started when Bill Gates was in charge. (You do it the Microsoft way, or not at all, if reliant on their tools).0 points


.thumb.jpg.cb17a66989f1e796fd4217db2e9ca9df.jpg)