Leaderboard


Popular Content
Showing content with the highest reputation on 06/22/24 in all areas
-
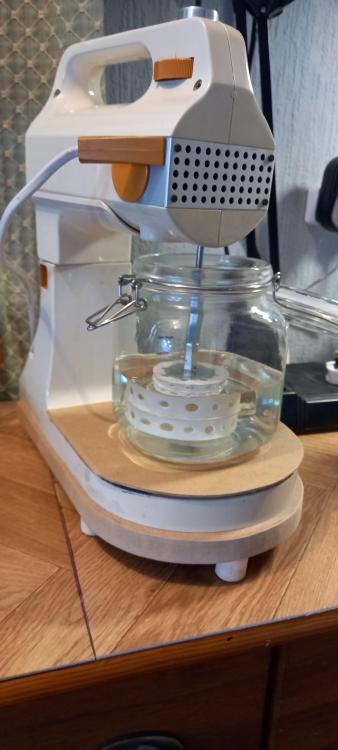
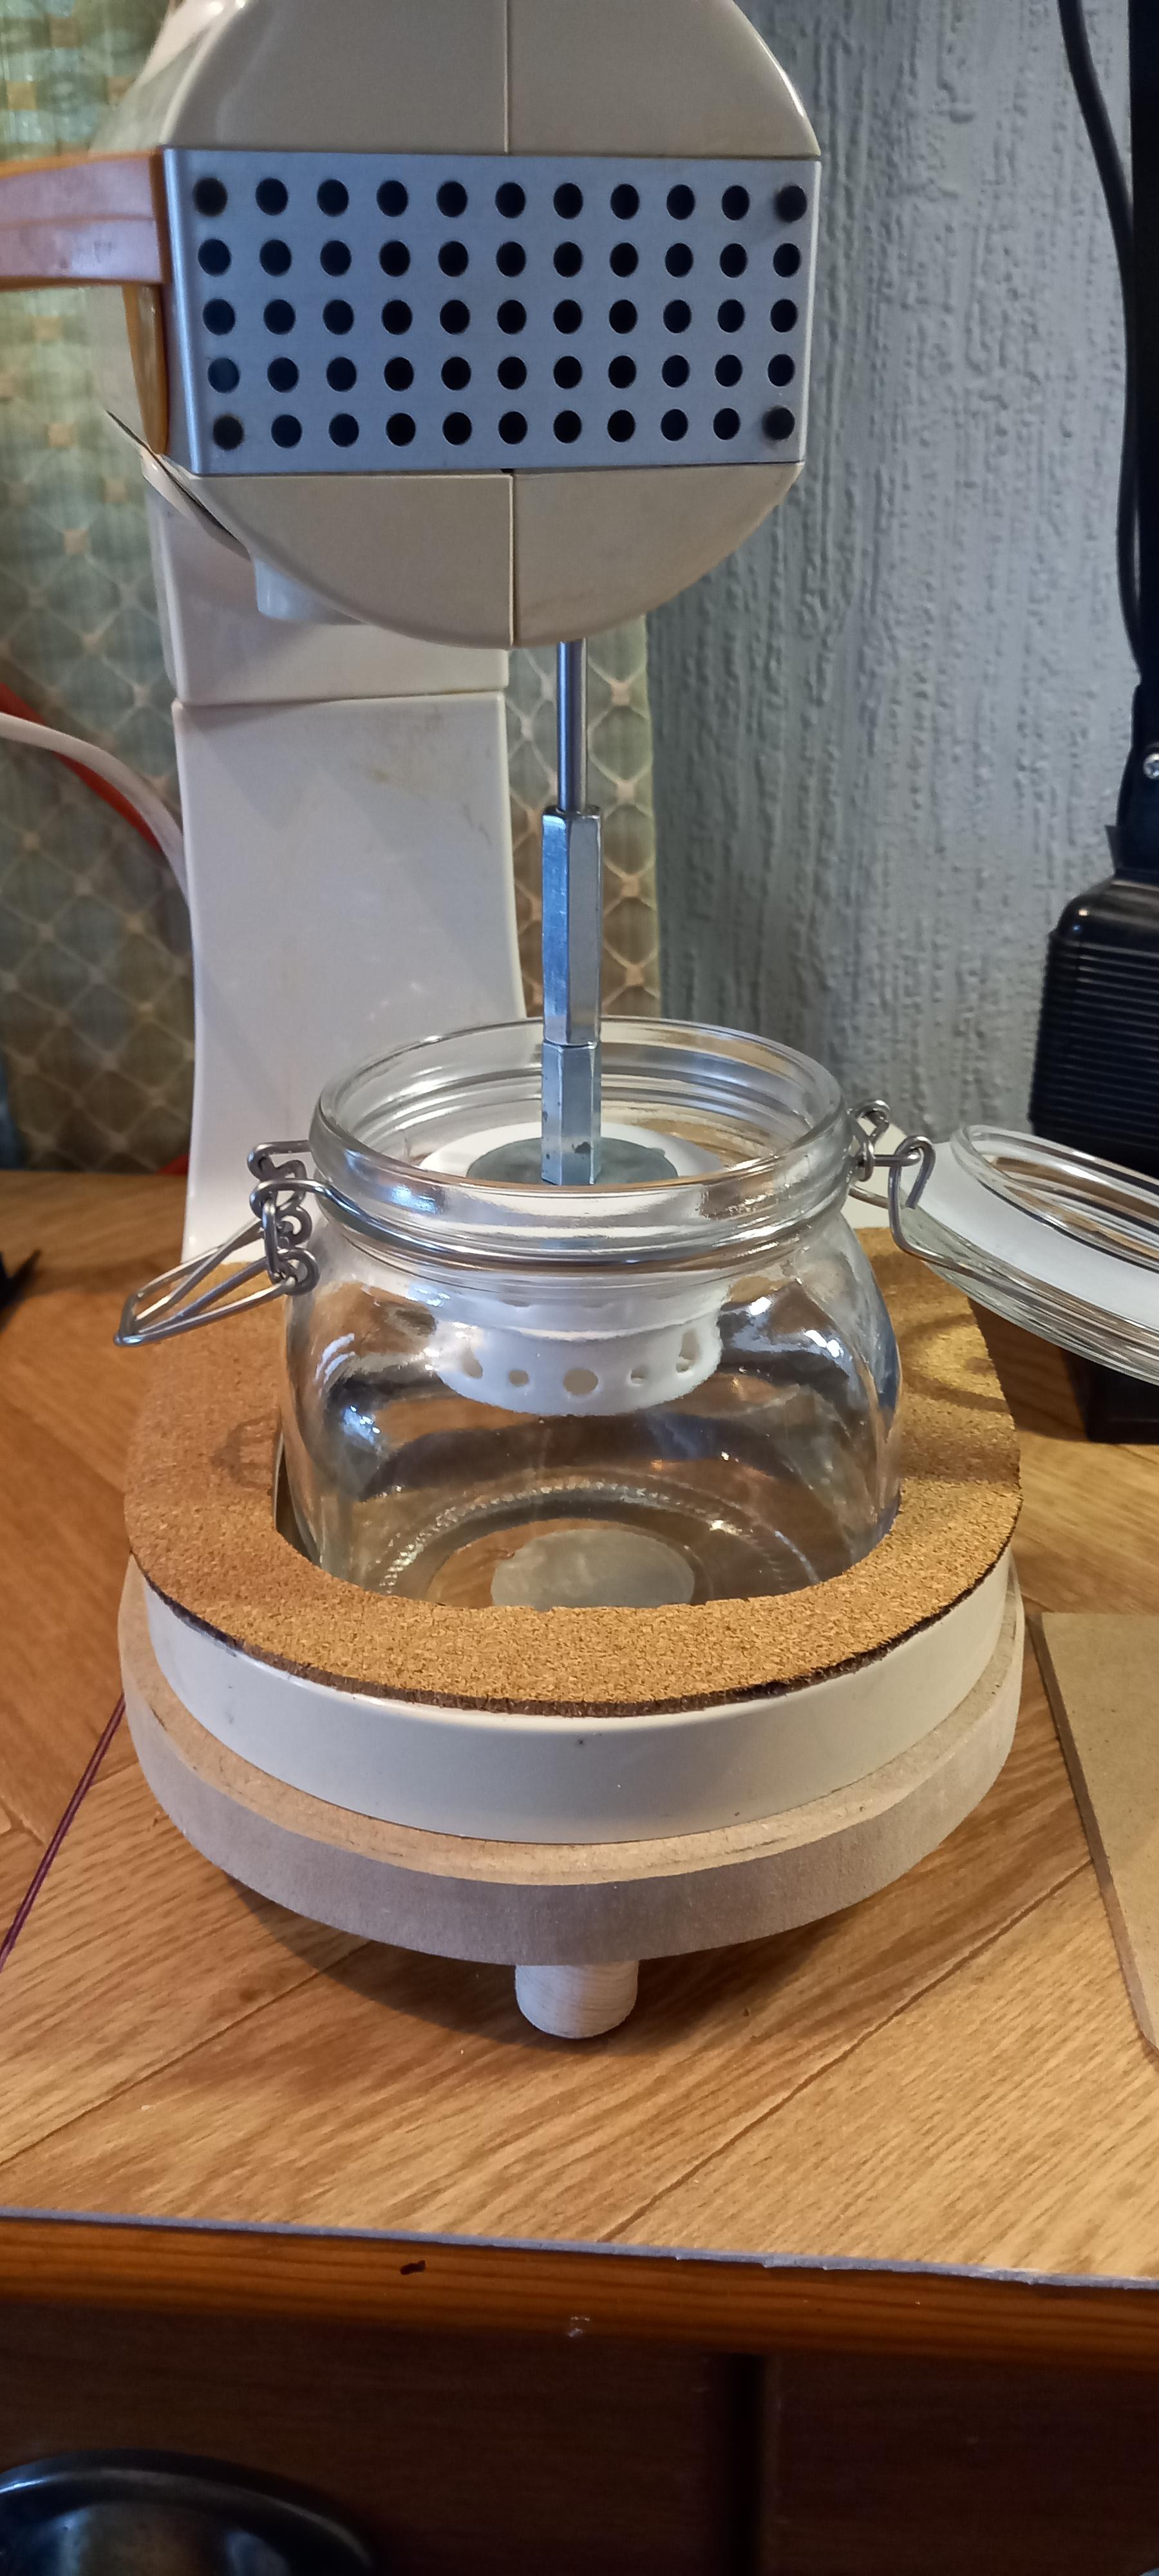
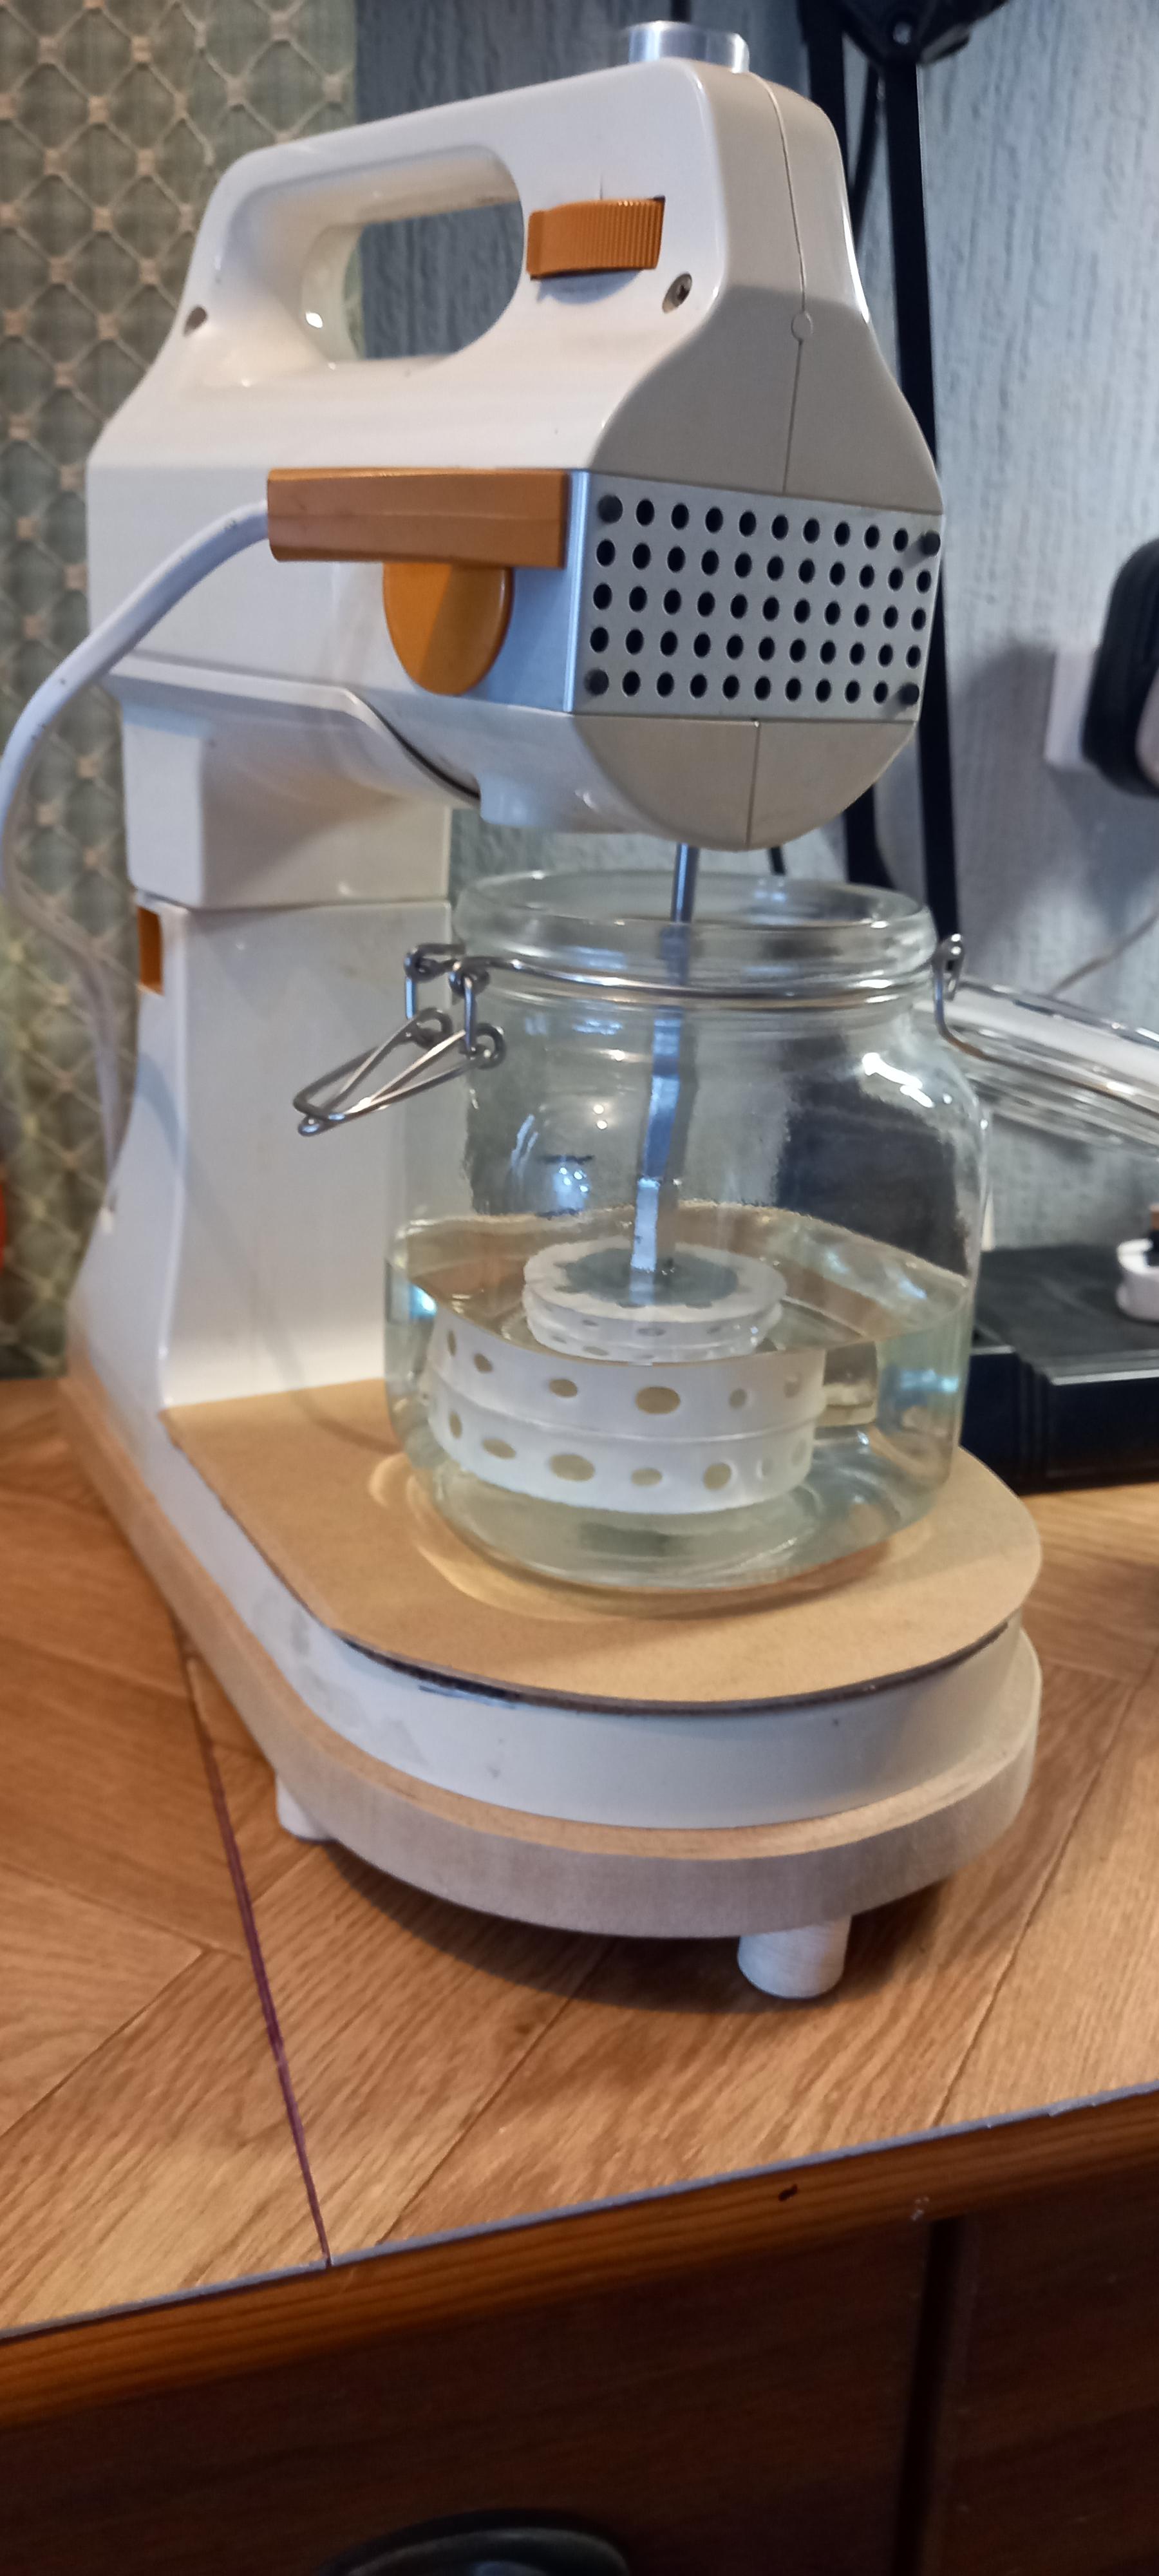
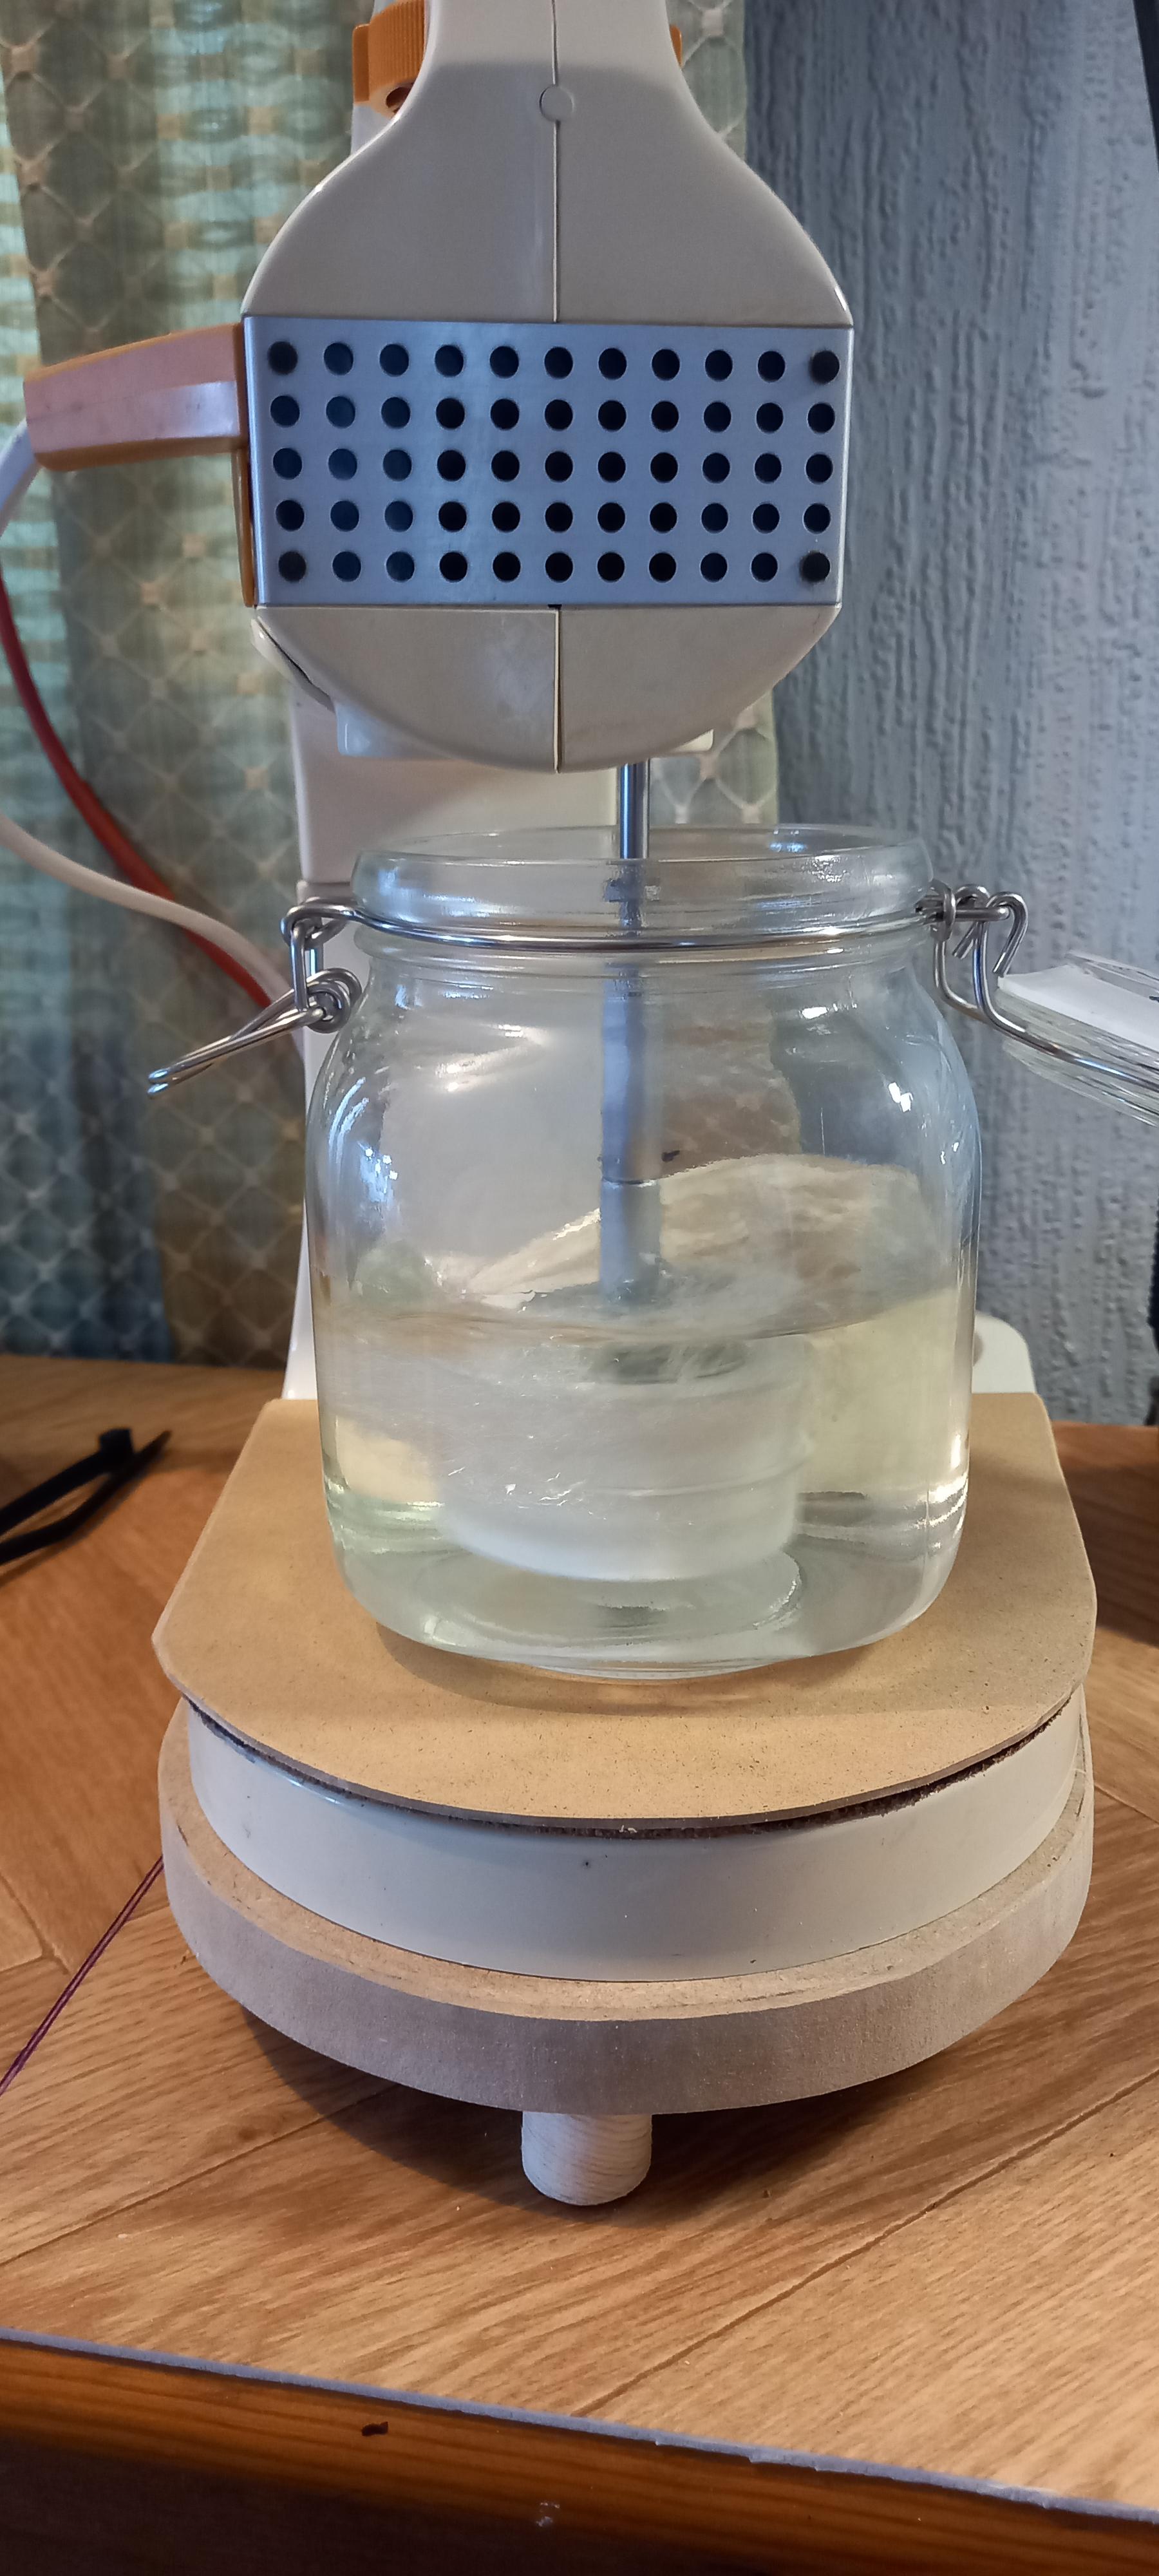
Final mod to the cleaner. The lack of room under the machine meant that i had to swap out the cleaning jars for an empty jar so i could spin off fluid inbetween cleaner and rinses. Simple solution to this was to drop a hole in the base, add another one and raise it up on some feet for the extra height needed. This way the mixer tilts back and forward and clears the edge of the jar as it exits and enters. An mdf plate slips under the jar so the fluid can cover the basket. Very simple and effective, no messing with knobs to raise and lower baskets. A very easy appliance adaptation that has provided me with a good controllable cleaner for under 20 quid. Lets get making something useful chaps .


 3 points
 -
Back in the 70's and 80's we never had the internet or these videos you have now. We had to learn from scratch. You could write it down, learn from memory or find your own way of how to go about it. Service manuals were hard to get, you had to wait a long time to get some of them and not all were available. Customers wanted their watches repaired ASAP. Cameras were no good for this type of work you had to get the film developed and that cost money. It is so easier these days to service complicated watches.3 points
-
Perhaps its time for me to set up a new search in ebay.. thus hastening bankruptcy, and more complaints about the number of watches in the house. I'll keep you all posted if I pick up anything spectacular for membership of the new branch of the budget beauties club.3 points
-
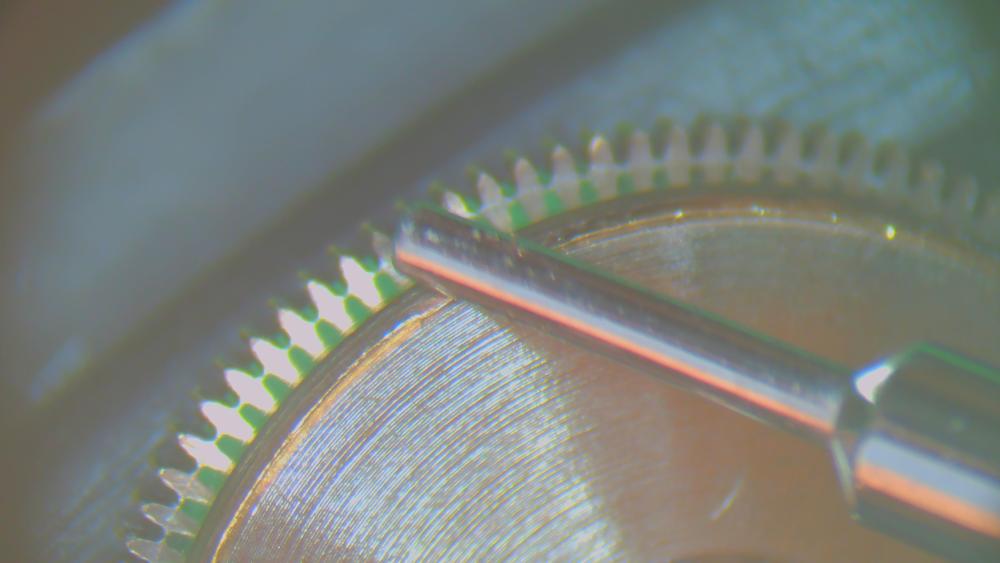
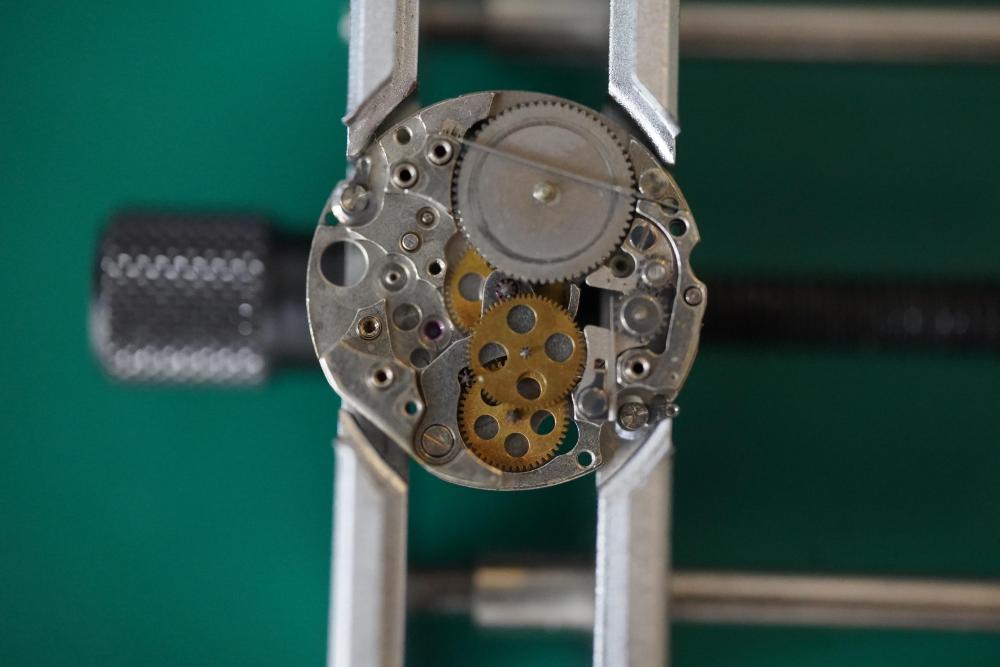
I throughly enjoy getting the most i can from these non jewelled movements. The wear in the plate and bridge bearings makes it tough though, this is where you need to be looking, excessive end and sideshakes is likely the cause and not really fixable below a well skilled watchmaker. I would start by inspecting all the sideshake ( look for pivots and arbors wobbling around a lot in their holes ) in the train beginning with the barrel, the sideshake is very important for maintaining good wheel teeth and pinion leaf meshing. You will learn a lot from a movement like this that will have very obvious defects that can be subtle and overlooked in jewelled movements. It will give you an idea of the precision required for movements to run smoothly. Enjoy.3 points
-
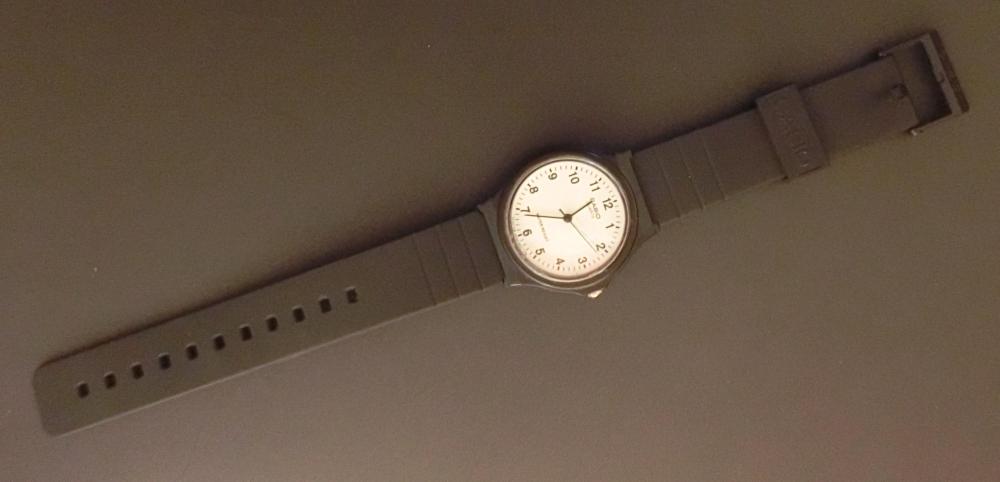
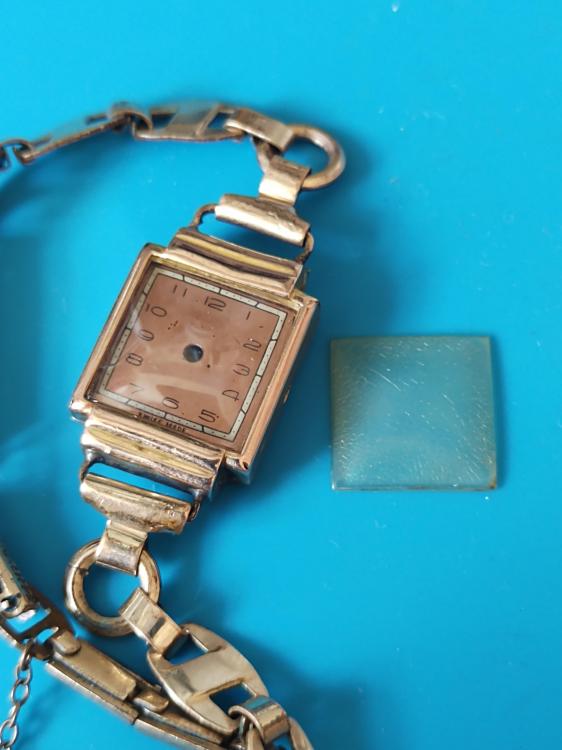
The 0.99p Casio MQ-24 turned up. It is brand new, never worn, still with the plastic protection film on the front. RRP is apparently £59.00 but you can pick them up for less. It did however have a flat battery, but since I have a bunch of brand new AG4, I picked up recently, that wasn't an issue. Guess what I will be wearing in the garden tomorrow.
 3 points
 -
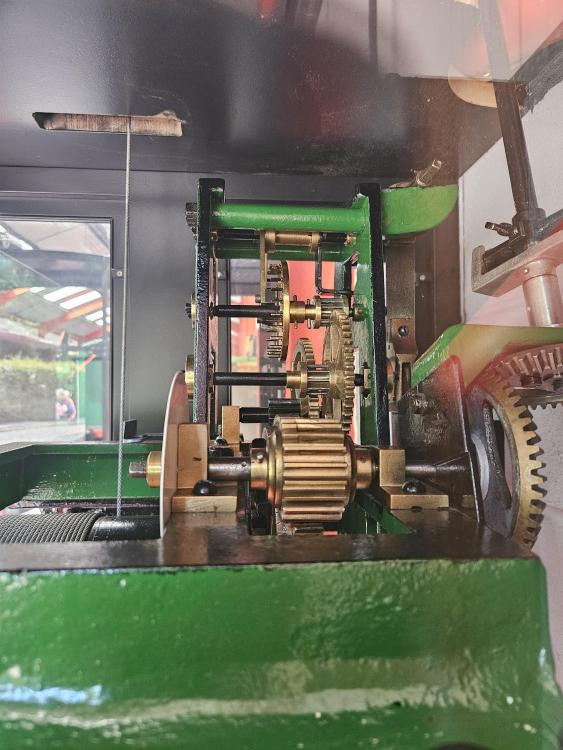
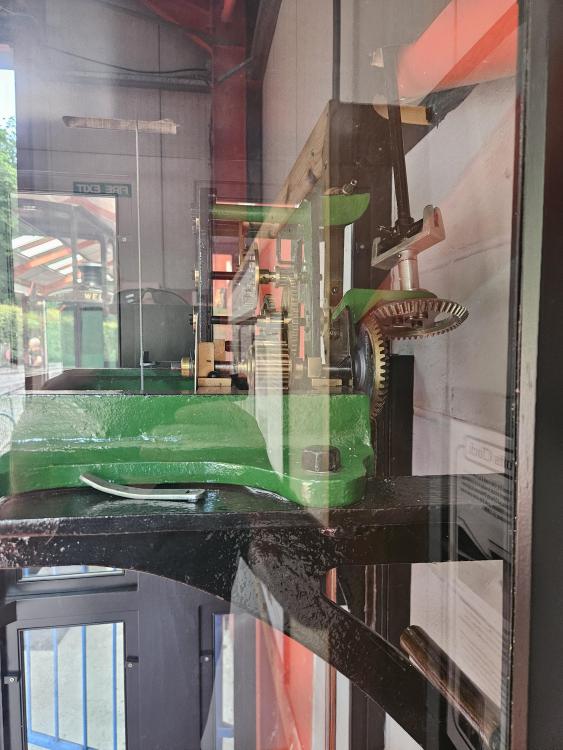
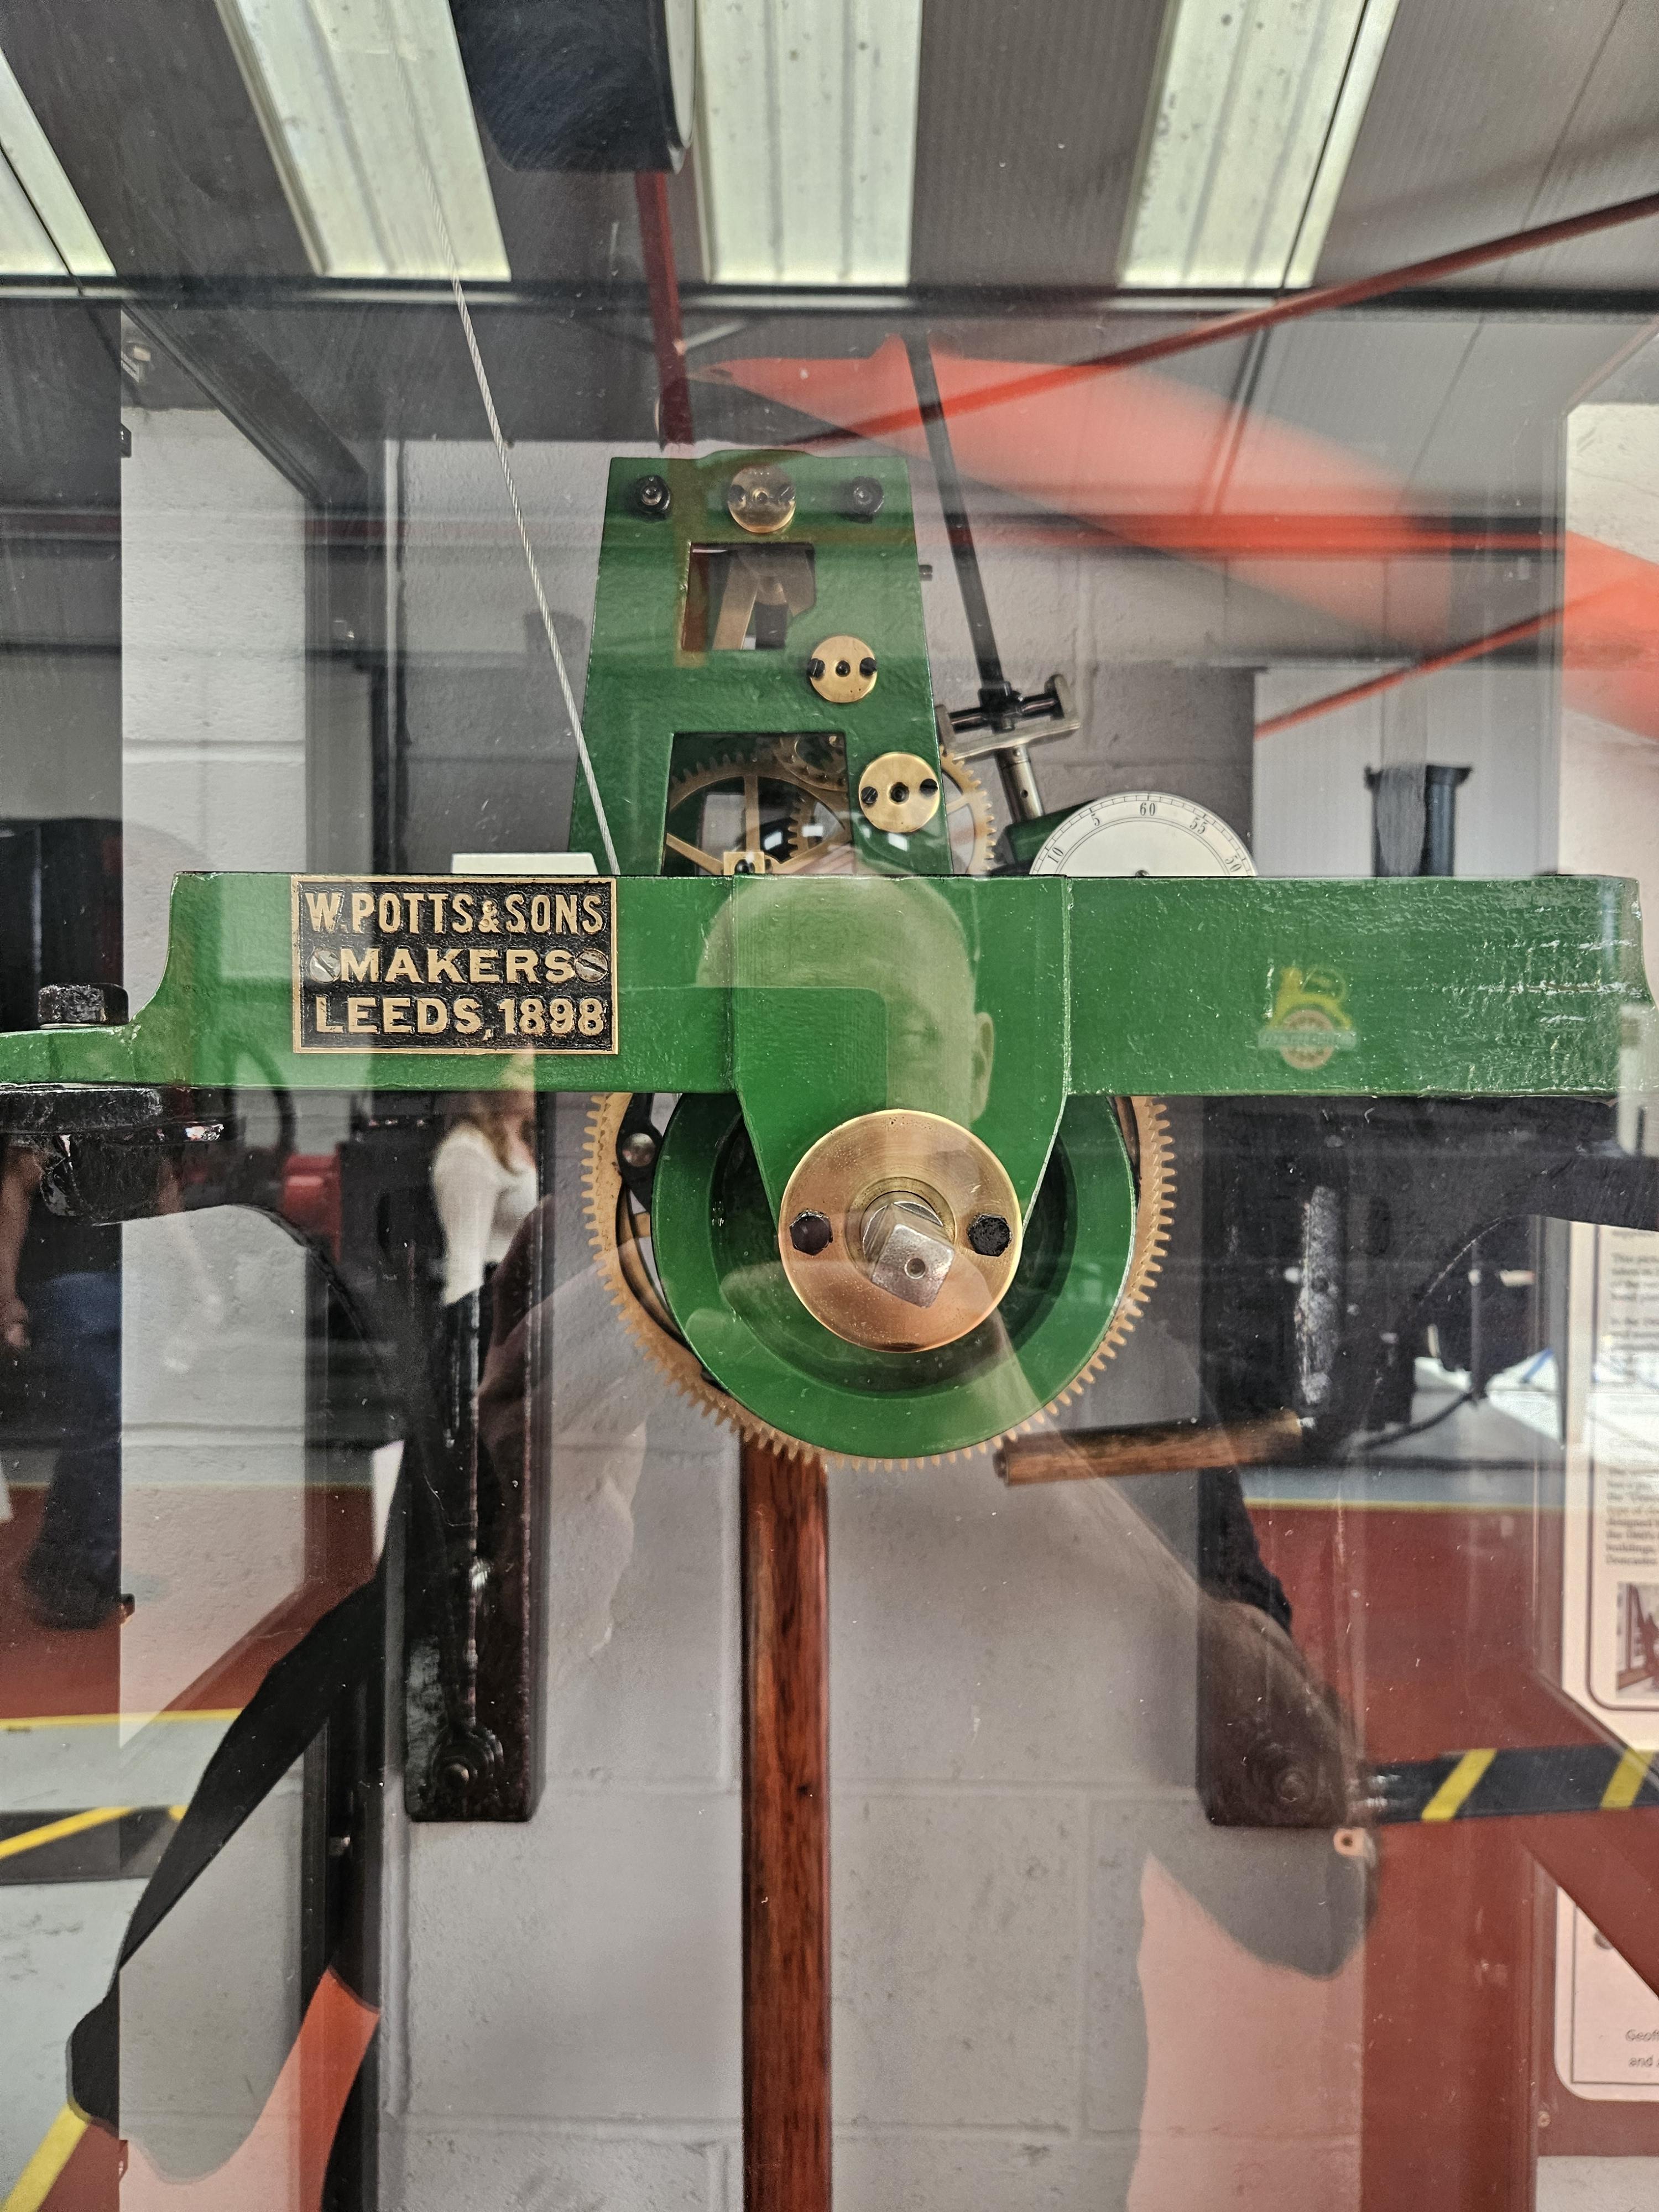
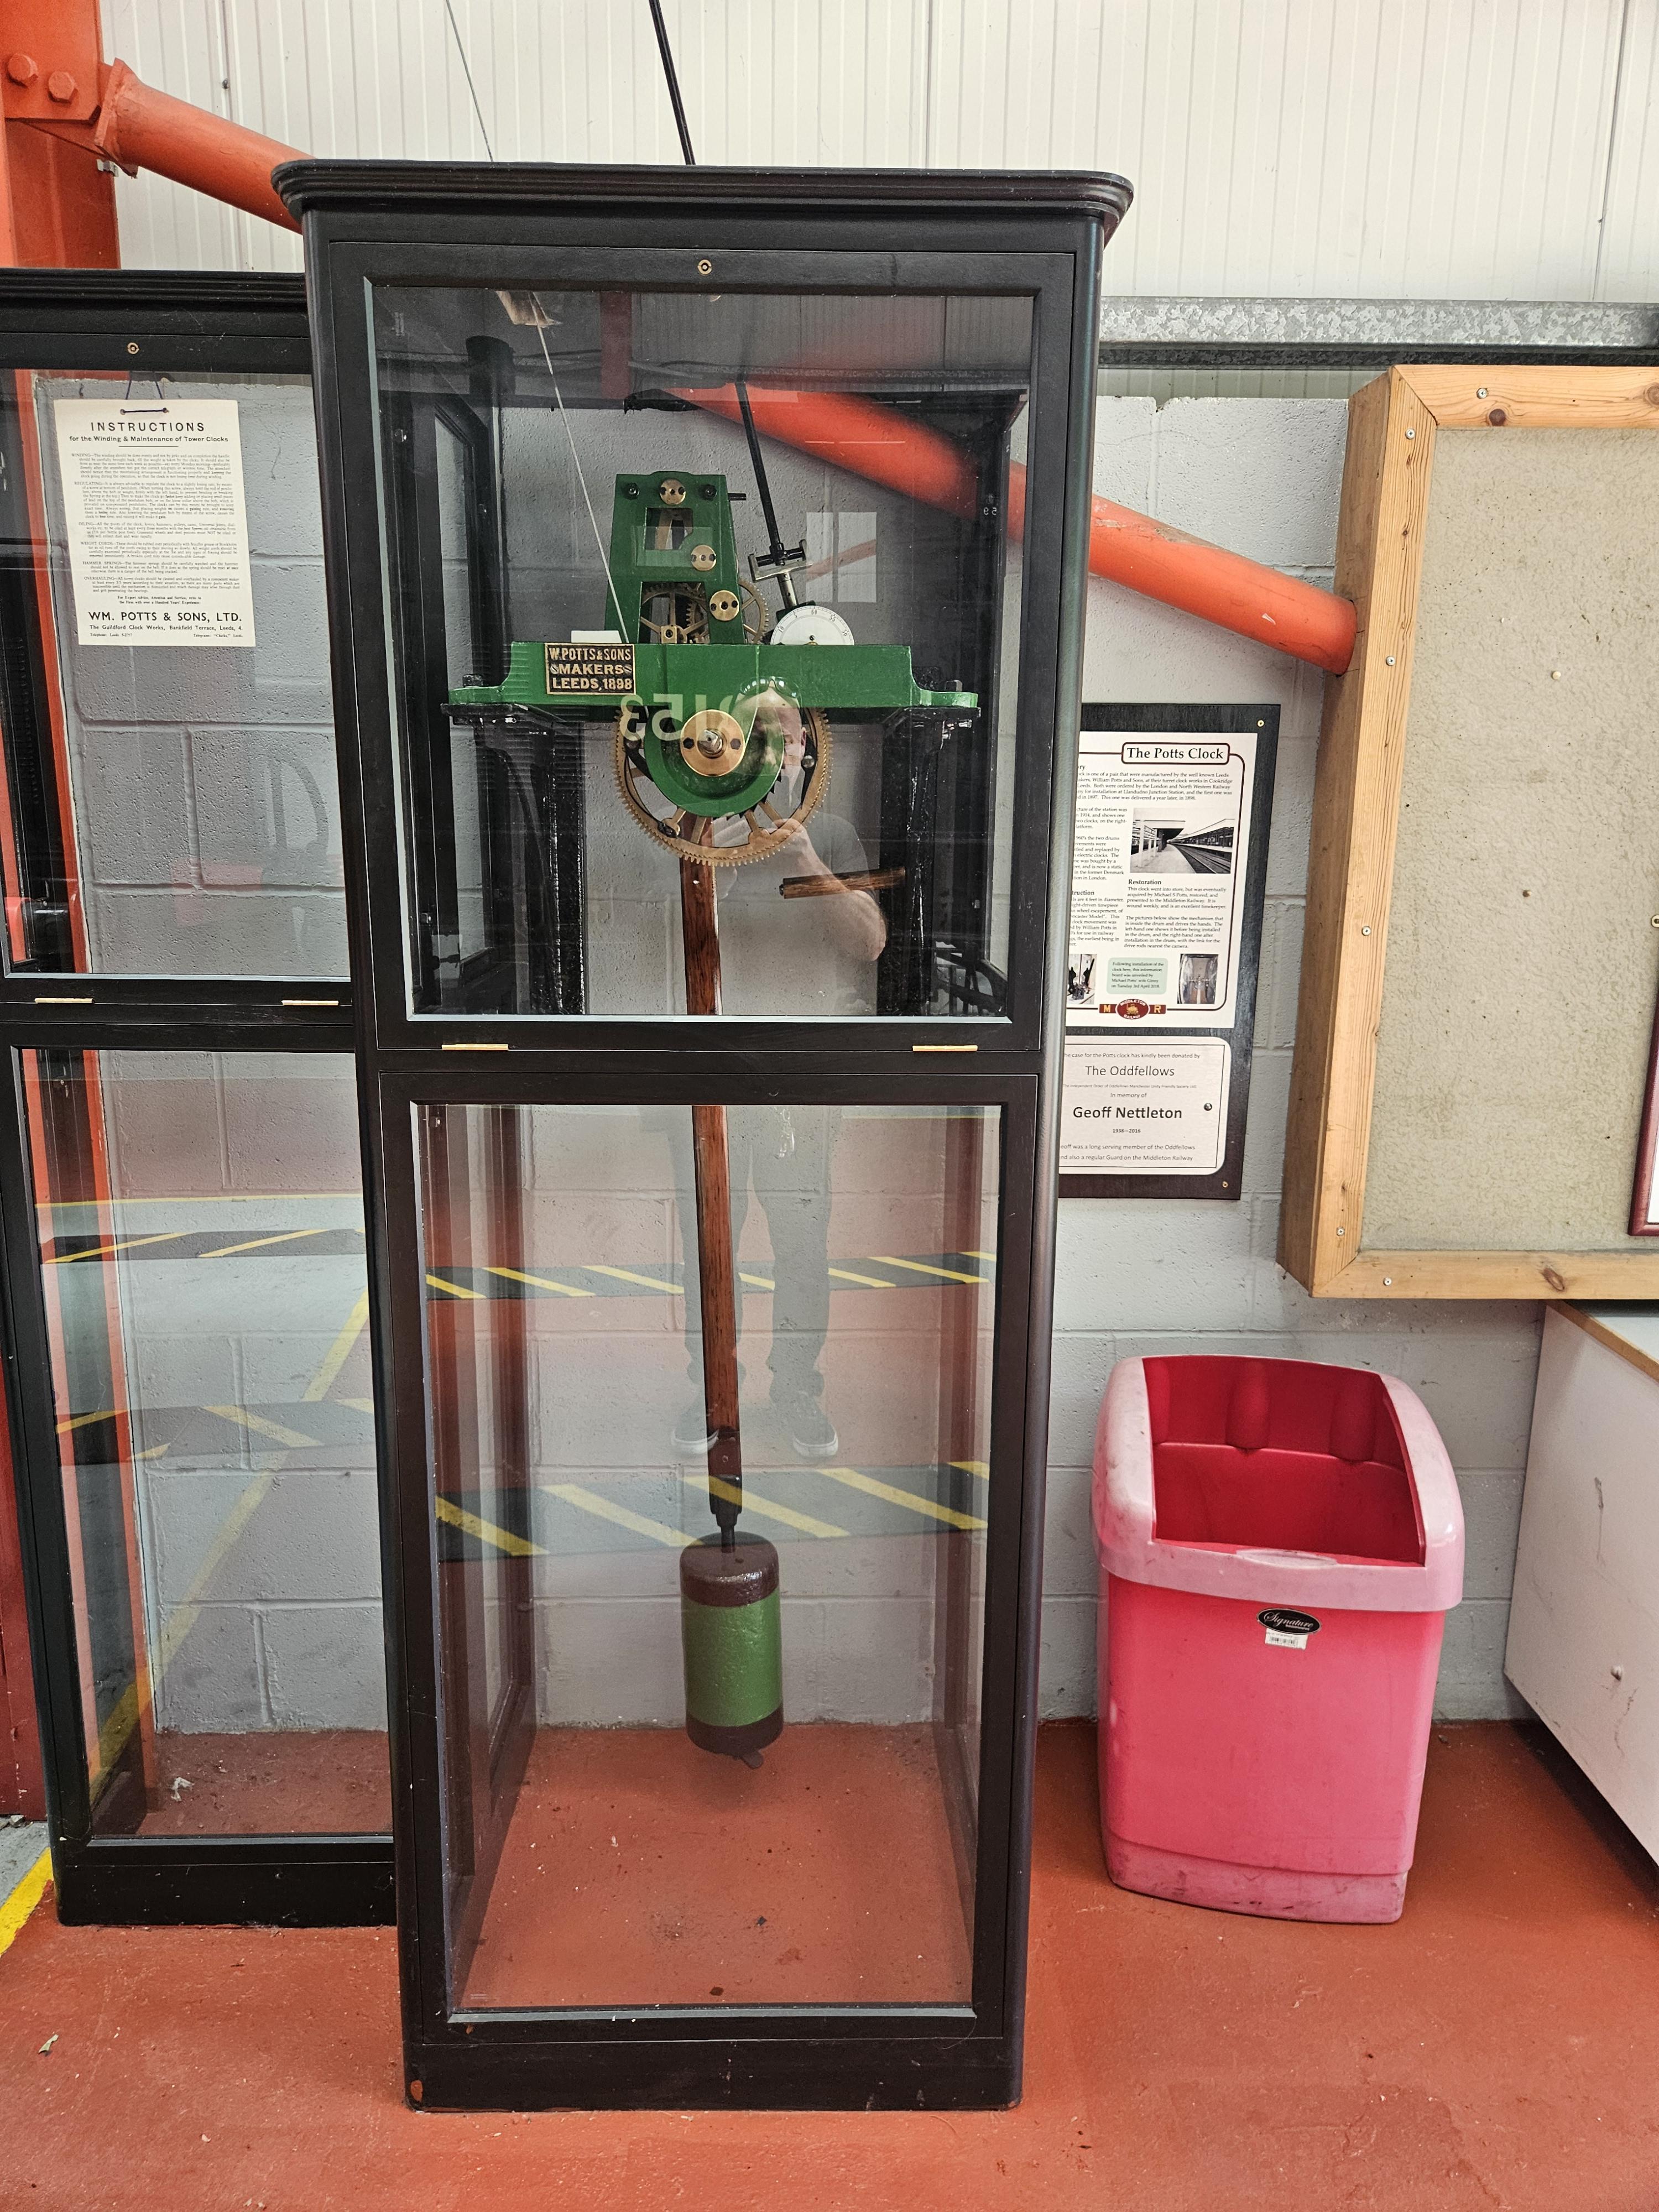
Hello all. I saw this today and thought you would like some photos.

 2 points
 -
It’s not perfect but it works, plus learned loads from turning it. So I’m a bit chuffed
 2 points
 -
Well done Dan, looks good.2 points
-
Well, if they are already bent (probably in the factory), does it mean that bending them more will cause something awfull? I would check if there is 'healthy' free play between the guard finger and the guard roller on both sides and between imulse jewel and fork horns too. This will make things clear and will help to make the right decision what to do in order to solve the problem.2 points
-
This certainly opens up a much larger field of options. I had been considering £8.08 as a possible ceiling for future "budget beauties", but £10.10 may be a more realistic figure. The 404 club is still welcoming new members though.2 points
-
A design flaw Rolex refuse to let go of is the fixed axle, when others use bearings and because people listen to that chat about waiting for your watch to lose time, feeling stiff to wind, blah, blah... This is the obvious result of waiting for something to go wrong, which is a rotor turning without any lubrication which wears the axle to ridiculous proportions and takes the plating off the movement and rotor. If it is serviced often then this doesn't happen so often. The customer will give you a story with their watch, but the movement will always tell you the real story. I usually replace the axle, and definitely when it is like this Two things to watch out for, leave the calendar cam jumper spring in situ when cleaning and make sure you part the friction fitted cannon pinion that turns the date corrector. If it isn't taken apart, cleaned, lubricated, it will likely fail as a safety feature to stop damage if the quickset is engaged whilst close to midnight. Easily missed. Great movement to work on. Be careful not to mix screws up, as two are really similar and I've made that mistake. I think it was the crown wheel screw that is under the bridge, hence a normal right hand thread. All that wear created a great abrasive dust throughout the whole movement which settles in where there was something to stick to, such as lubricant. Now that has dissipated it has left that abrasive dust to do its work. Hopefully the damage isn't too bad, but I reckon you'll have some pivots to polish at least.
 2 points
 -
This is very good advice and here is a video showing how to inspect simply and practically.2 points
-
It's why it's always nice to have a picture of the watch you're working on just so that we all know what it is. Then you're having the same problem on Two watches. This is where you need to take a step back and reevaluate the situation and identify the common factor. So the common factor of two watches doing the exact same thing would be the watchmaker as the most likely cause of a problem. Then as a newbie starting out usually not always but newbies will look at all the obscure or things that could be a problem and will typically not see the big problem or the elephant in the room as I sometimes call it. A lot of times it could be just procedural things or something else. Then out of curiosity what was the condition of both watches before you started in other words did they run at all or were they already Nonfunctional? This is because a lot of times newbies want to start with broken watches learning how to fix them and then we have to try it figure out what the problem is something you're doing or whether the watch had a problem initially.2 points
-
Always nice if you give us a picture of the watch in the discussion to avoid confusions? My confusion is I'm reasonably sure that the Hamilton 980 is supposed to have 17 jewels? Yes that's not a good sign at all Unfortunate not all watches have back spin. But even without the backspin the gear train still should turn very very easily which this one does not sound like it is.2 points
-
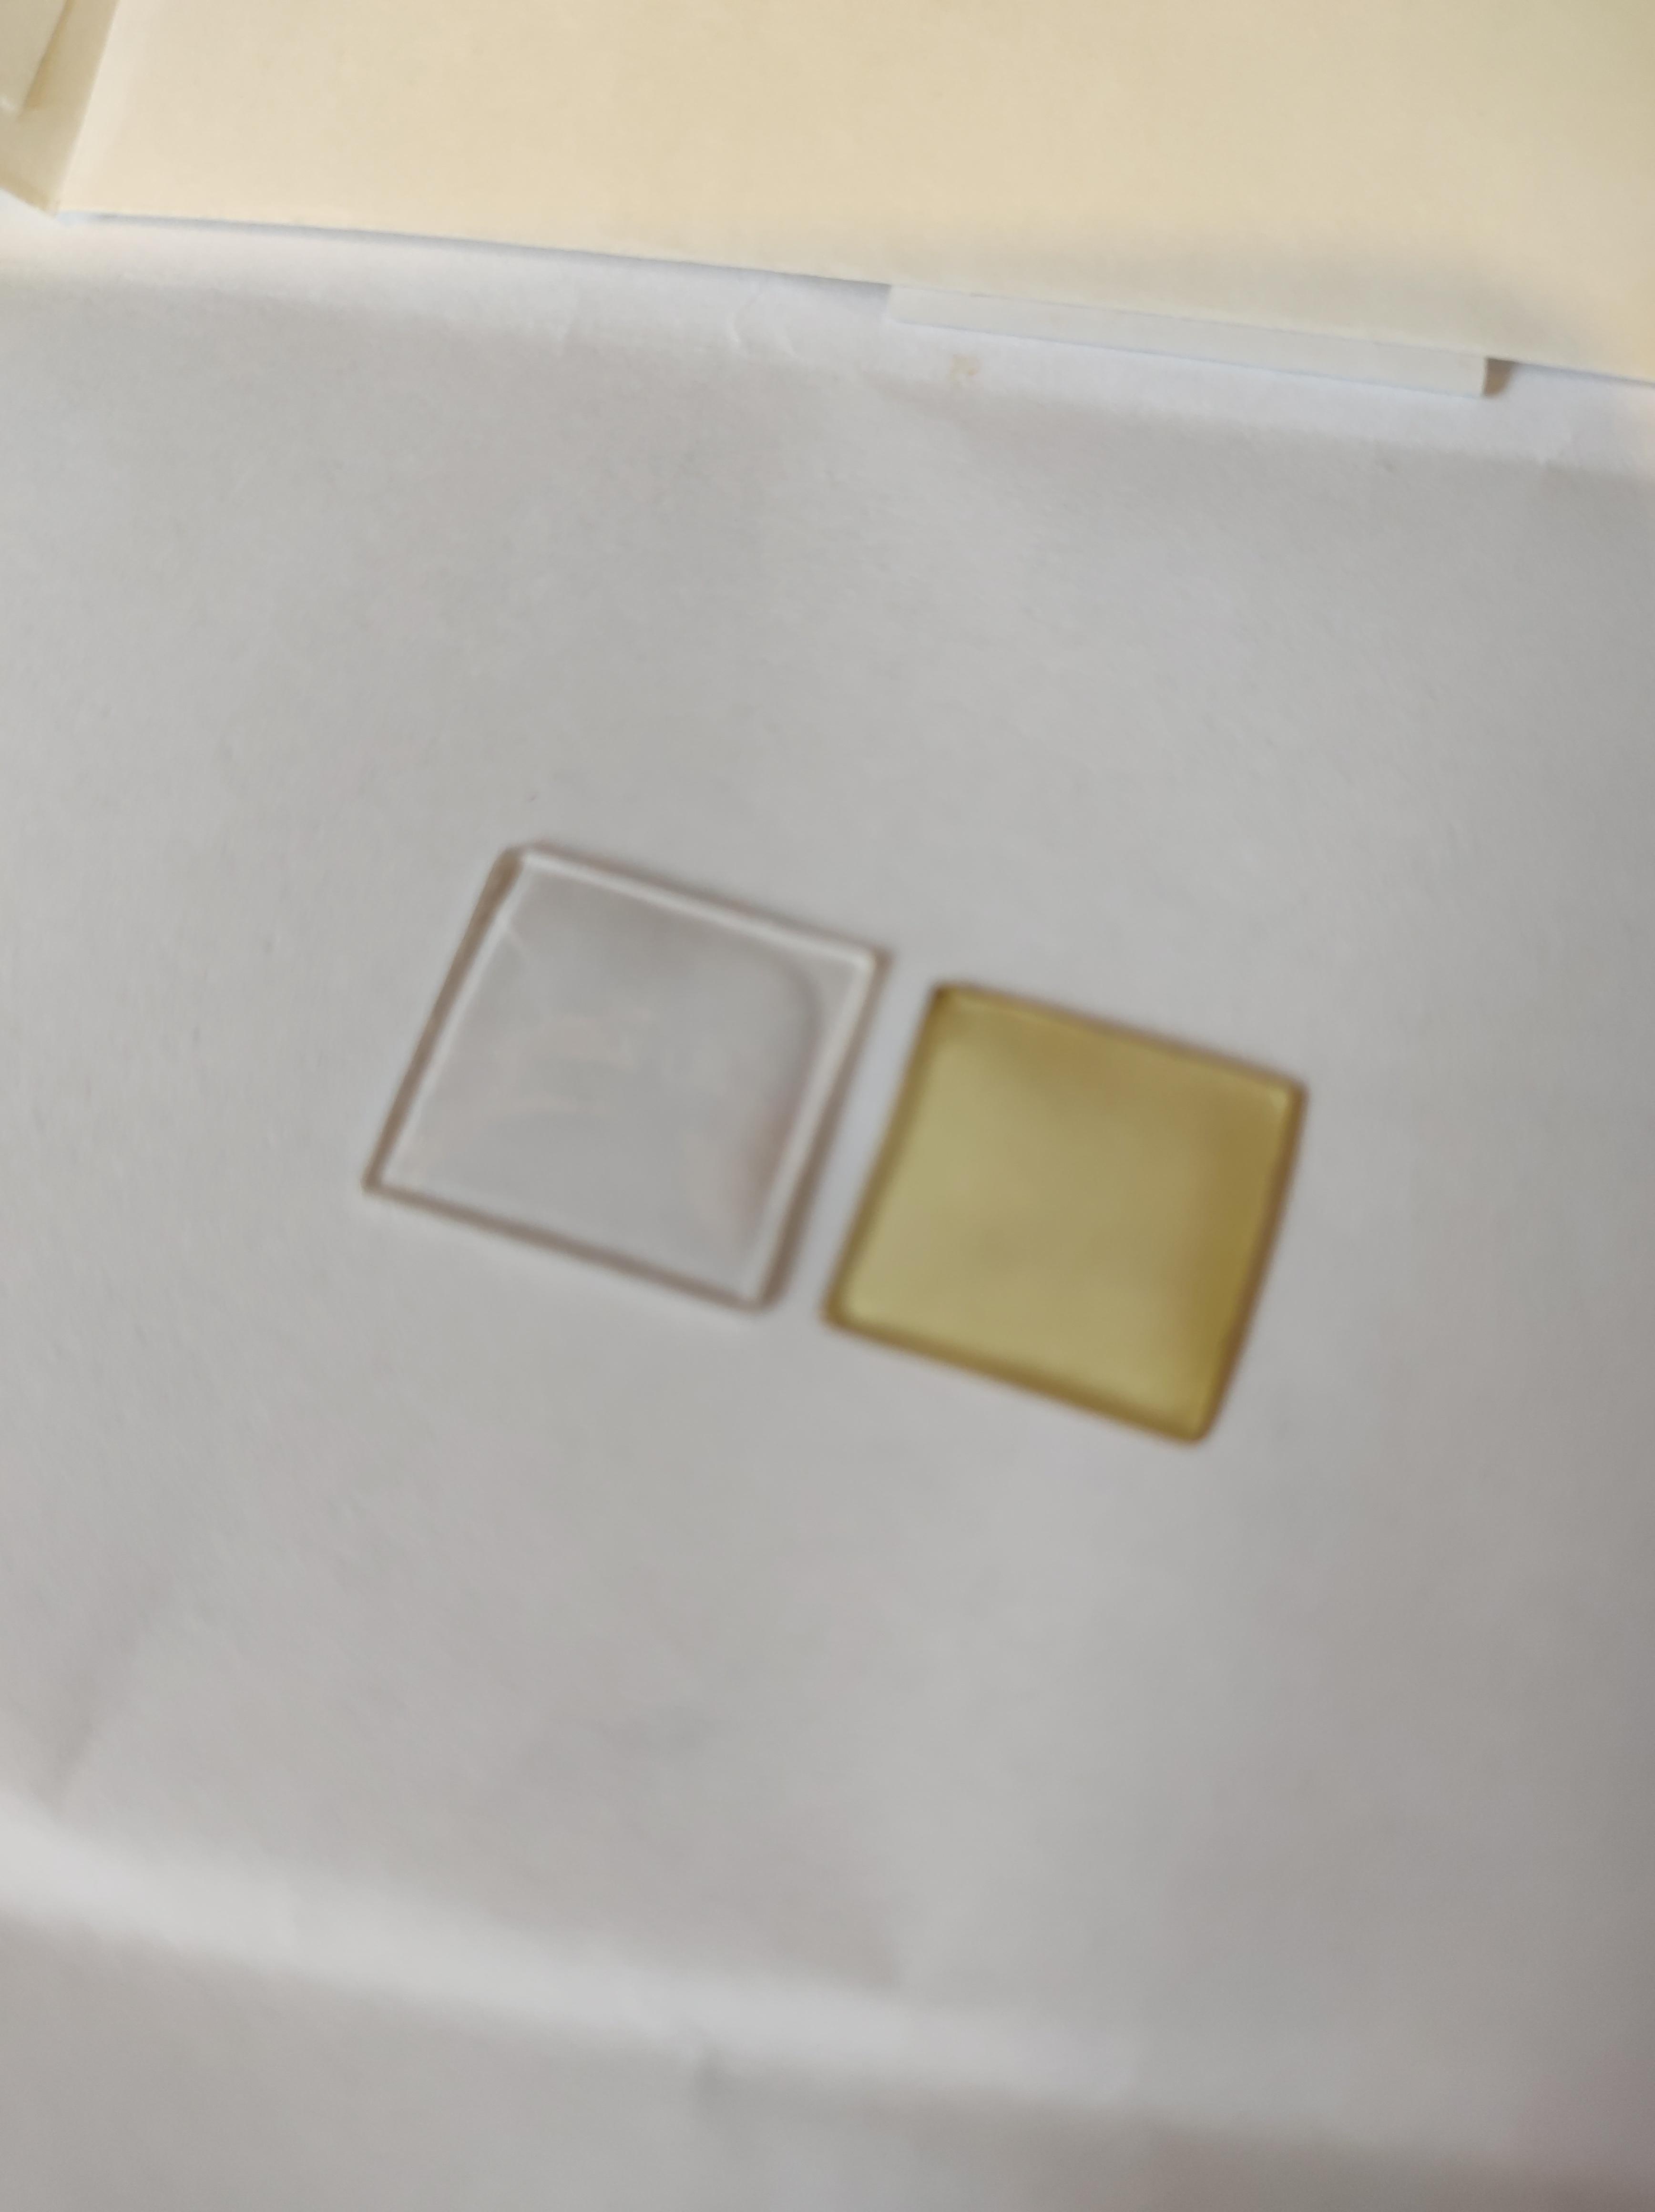
Hi, I wanted to share my replacement of an old yellowed crystal. Original crystal was yellowed and it was not possible to make it clear with abrasive and polywatch. In fact the polywatch seemed to dissolve the crystal making a sticky mess. I think the crystal was nitro cellulose and not acrylic. Crystal dimensions were 13.3 x 13.3mm and I found one on eBay described as 14 x 14 and model S7. Upon receipt it was found to measure 14.5 x 14.5. After careful rubbing on 600 grit abrasive sheet I got it to size so it would just snap into place. I had to be very careful to keep the edges square. I finished the edges with some finer paper and polywatch aiming to produce a nice 45 degree bevel on the edge. I finished off with some Minecol UV glue and had to illuminate with UV from the back side for nearly an hour to get it to set. Never had much luck with that glue as I have read that it should work in minutes. Result is a big improvement. The watch has an FEF270 movement by the way, just waiting on a donor movement for some parts (stem and balance).

 1 point
 -
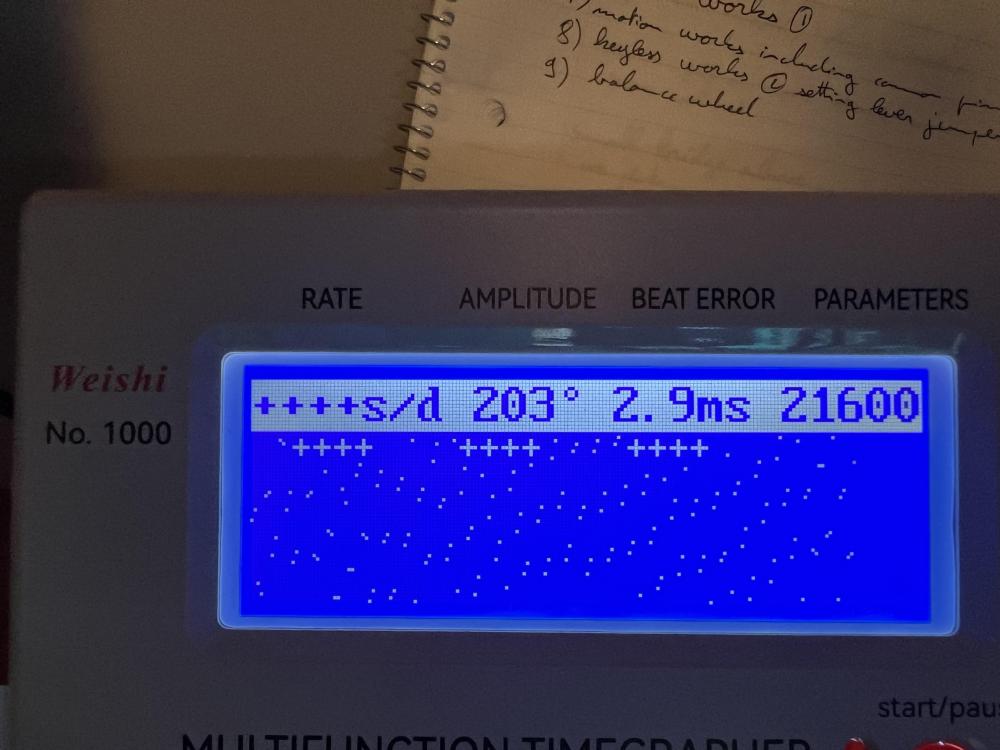
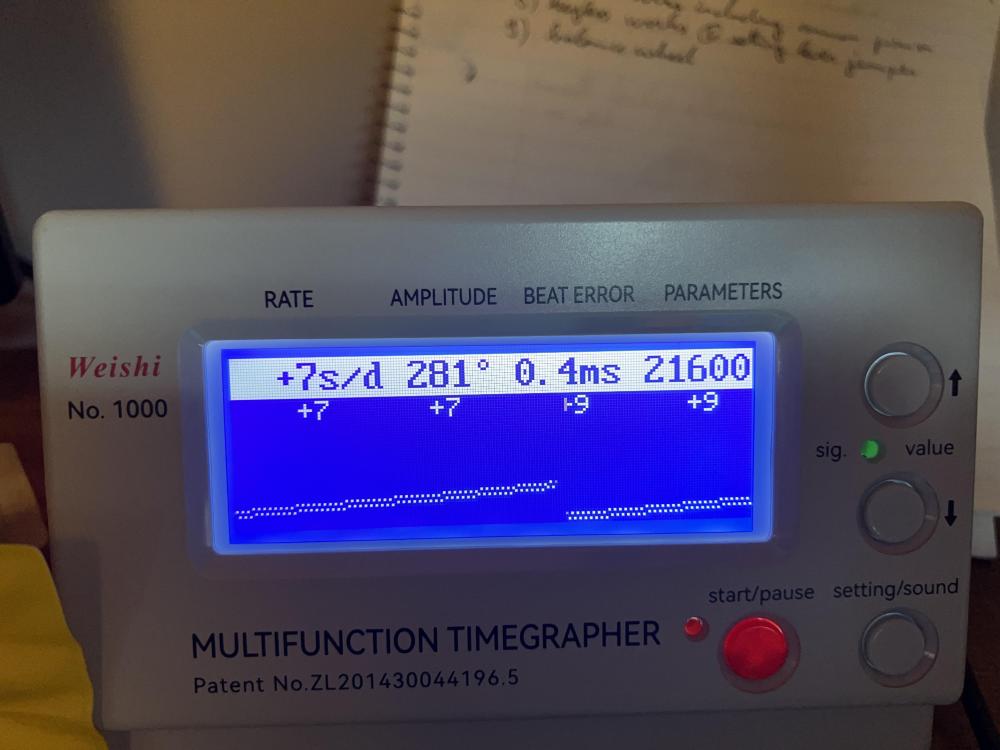
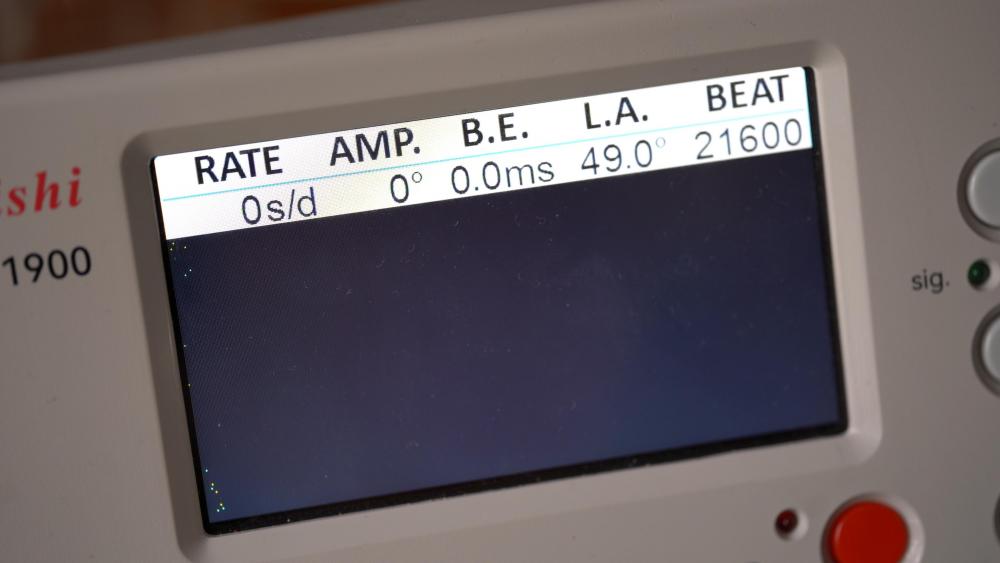
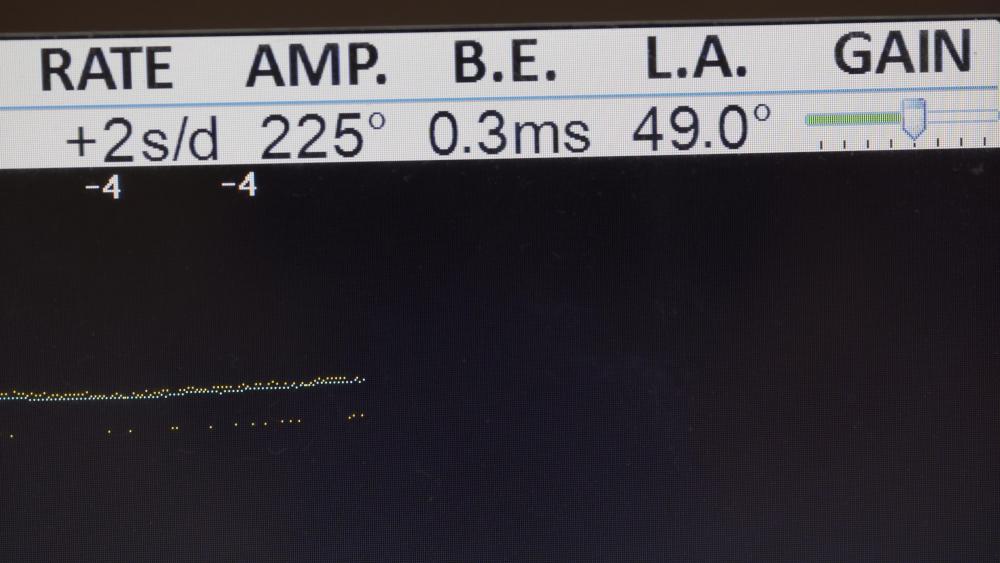
watch repair is all about practice. Like for instance take your practice movement apart put it back together don't worry about cleaning or lubricating not yet. Just for the fun of it put it back on the timing machine is it still running out as a luck? Taken apart put it back together you'd need lots and lots and lots of practice it's good to practice on something that's disposable. It's also good the practice on something that is running because of give you timing machine experience. Then you can get experience when mysteriously it quits running because sometimes practice timepieces do that. This is where if you wife kids.cats you could blame them. Or maybe are timing machines defective somehow just in case it doesn't run ever again not saying that's what happened but just in case the problem isn't necessarily with the apps themselves a lot of the problem is the pickup. We hear the watch ticking as an audio sound a lot of the apps pick up the audio and that's not the best way to do it. Traditional watch timing machines have a sensor that picks up the vibration. for instance the pickup image above does work with some of the phone apps. Although you typically have to get the adapter so you can plug it in. you need to develop a timing procedure/ In other words you wind the watch up and wait at least 15 minutes up to one hour is considered fully wound up. then in watch repair think of it as diagnostics not regulation at least initially. In other words you put the watch on the timing machine look at it dial down, dial up and a crown down at the minimum. Dial up and down should be basically identical in one of the crown positions you typically lose amplitude but it's a good diagnostics because a lot of times people only look at their watch in one position and then they wonder why it has problems when it doesn't run on the wrist. Oh and then typically the only regulate or check the regulation one position then they ponder why they're having timing issues. Then ideally you want to wait 24 hours and reevaluate your watch to see how it's doing. Then your timing machine results are really interesting? are the images the two extremes that you see or what has the second screen looks better but the amplitude is too low especially if it's wound up. Typically at the end of 24 hours in one of the crown positions you should have at least 200°. then serviced in 2010 and now it's 2024 which is 14 years ago. Just as reminder if this is your daily watch at some point in time the gaskets will disintegrate water will slowly seep in and the cost of the repair will become very expensive. Then timing Rolex as a procedure? So in other words they do not put her on timing machine like you just did in time it in one position they follow a procedure. The procedure is the time the watch in five positions fully wound up and as I said they wait a little bit for the settled down then they time and again 24 hours later and they look for the maximum difference between those had that number can be up to 25 for your watch. Then the second procedure is to time the watch and all five positions fully wound up and average those together in other words all those numbers divided by five as they typically don't check and six positions because they don't have to and that number is supposed to be between -1 all the way up to +6 seconds. So yes conceivably you can check the watch in one position and it will exceed that because you're supposed to be doing an average. Then a big disappointment for this group would be the maximum amplitude that your watch is supposed to have either dial up or dial down is 280° which is sad because for this group the minimum amplitude any watch should be should be at least 300° on the other hand those people don't care if the watch keeps time they are only concerned about the amplitude. then at 24 hours the minimum amplitude is 200° in any of the crown positions. This is a real good way to tell how your watches doing is to lead wind down for 24 hours and see what it's doing because initially watches wound up tight can look pretty good at the very beginning but 24 hours later that may be another issue1 point
-
Do you know how many years I have been having to correct the time every couple days? I could shoot that guy that said it couldn't be adjusted.1 point
-
Yes but it takes time to order them and get them delivered.... As soon as it arrives, I can install and post here1 point
-
Because people like us watch enthusiasts find the movements fascinating. A simple movement, no complications, should be a relatively simple device, consisting of relatively few components but as we all know it it's actually incredibly complicated. You are far more experienced than me, so I don't have to mention tolerances, poise etc. Some people aren't into watch repair but appreciate the quality of a mechanical movement, even if they had never seen a movement, nor undestand them. Finally, posers who want Rolex et al because they are vain.1 point
-
I think you have a Hermle 340 020 floating balance clock. There are videos on YouTube that show you how to regulate the clock. Let me search for one.1 point
-
I am really looking for a fix. Maybe just one time. I'm 81 years old retired from servicing computers for over 40 years - world wide. Had a lot of mechanical repairs during that time also. I'm a lifetime tinker. Very little experience with clocks or watches.1 point
-
There is something satisfying about that, innit?1 point
-
And did you follow them (the flaked suggestions)? Frank1 point
-
Thats great rob thank you. The ones i was looking at cost more than i paid for the machine , i know as Yorkshiremen we are tight but that one goes against our cardinal rule of " we dont pay more to fix something than we paid for it "1 point
-
Any X2 rated cap around 0.1uF and 275V AC or higher should be fine. If this keeps the selection, just pick anything of suitable physical size to fit in place of the original: https://www.mouser.co.uk/c/passive-components/capacitors/safety-capacitors/?capacitance=0.1 uF&product=Safety Film Capacitors&safety rating=X2&voltage rating ac=275 VAC~~350 VAC&instock=y&rp=passive-components%2Fcapacitors%2Fsafety-capacitors|~Voltage Rating AC You could get it from RS, Farnell, CPC or whichever component supplier is easiest & cheapest - some places are now adding steep minimum order charges..1 point
-
Evaporates like crazy.1 point
-
Back to the original topic (I went back and posted what I could about the 6T15 in the other thread but not making much progress. I cleaned the ST36 and reassembled and attempted to lubricate it. I have a video of that but it will need editing before I can upload it. I am also trying to have a second angle from my phone and some voice but I am not sure I’ll have the time and capability to put it together nicely. Anyway here is a recounting. 1) I didn’t remove the mainspring or clean the barrel as I didn’t want to risk kinking it I have successfully manually rewound one but I’ll keep my practice to the already broken watch. 2) I still have not taken apart and oiled the shock protection and cap jewels. I’ll get to it but I am a bit afraid of manipulating such tiny pieces I’ll practice more off camera first. With that said after the disassembly I cleaned all the parts except balance assembly and pallet fork (and click spring + yoke spring). The cleaning is done by putting the parts in small brass and mesh baskets writing down which part went I which basket and which were not cleaned and which compartments they are stored in (that latest is not really needed with the st36 as all parts are easy to recognize and the screws are big enough that I put them I the baskets on the Slava movements it was needed to keep track of which screws are which when they were too small to go in baskets I used an ultrasonic machine to clean the parts I do 3 20mn passes with the parts (in their baskets) in a mason jar first 2 passes are in 2 different jars of lighter fluid and the 3rd pass is with IPA. Then dried them by keeping them in the baskets and using a hairdryer to avoid condensation (I found that this is actually not working well as a drying method and I should take them out of the baskets first I think ) The balance and pallet fork spent 10mn in a jar of Hexane. Then reassembled the movement this went mostly ok with some fumbling which you’ll see in the video when I put it up. The put it on the timegrapher and here is the horror I looked better at the balance assembly and found that the coils of the hairspring were sticking to each other (even after demagnetizing). I realized it had to do with the cleaning and drying so I gave the balance a quick 10s IPA bath (I know shellac) and dried it using the hairdryer. Result was the coils looked good. Here is the timegrapher result after this. So I am pretty happy.
 1 point
 -
Hello friends, here's an update on this "interesting" barrel. First, a bit off topic, my technique of applying breaking grease (I have 8217). I apply a dot, then smear it gently in the direction where the bridle will slip. Rather than ending up with a couple of dots, I rather have a thin film all around. I see the risk that inserting the mainspring from the retaining ring would actually push down the dots to the bottom of the barrel and away from the wall. This risk is reduced when the breaking grease is already thinly spread out along the wall. Anyways, more a side-note.. Now back to the main topic. After inserting the mainspring and arbor, I use the basic barrel closing tool to click on the lid. As a matter of precaution, I use the tool upside down: I put the barrel on the flat bottom of the tool and use the concave side to push down the lid. I'm thinking that it may ever so slightly compress the lid (like inserting an acrylic crystal into a bezel with a press). May not do anything, but felt smart Once the barrel is closed without any problems, I burnish the edge of the barrel wall towards the lid again. You can see the process in the two pictures. No image of the final product, but I tell you: it looks nice.

 1 point
 -
Reverse electroplating1 point
-
I totally agree with @Mercurial's points on starting with a known-running watch, and the ST36 being larger and easier to service. That said, my first repair was an Elgin 345, which taught me an awful lot about non-interchangeable parts. My next one was a very similar Caravelle, and I have to say I really love those Bulova movements and have done many since. They are very nice to work on, and as you noted parts are readily available. For the most part you can get away with the phone camera's zoom, especially for assembly/disassembly pictures. One piece of hard-learned advice: take more than you think you need. Unless I know for a fact that screws are the same, I keep them segregated with the parts they were holding on. Right up until I bump my parts tray and mix them all up, at least. You can see here how the automatic works are in one compartment, the train bridge in another, keyless works in another. I like to keep the balance and pallet fork in the center with their associated screws--I clean them separately and want to make sure they're kept safely away from other parts. I heard a great phrase on someone's Youtube video that stuck with me: "good screw discipline." Yes, definitely a 4x or 5x loupe. With a 10x you get much shorter working distance (you have to be around 1" from the work) and shallower depth of field. I know it's a little spendy, but a stereo microscope is hands-down the best purchase I've made. Honestly if I had only loupes to work with I might not have stuck with the hobby. It's such a pleasure for my rapidly aging eyes and back. I've even figured out how to tilt it so I can use it to install hands and work with my staking set. Having both eyes also helps with depth perception. Hope that helps, and good luck!
 1 point
 -
Whilst you could go ahead and use the 11DP movement, the ST36 has the advantage of being larger and therefore easier to work on. It will also be running quite well when it arrives, so you know any decrease in performance after you’ve serviced it is down to you. If you do a great job servicing it, the ST36 will be running even better than it did initially. If the 11DP doesn’t run well after you service it, it’s hard for a beginner to know if this is due to issues with the movement or their technique. The iPhone I have (iPhone 13) is more than adequate to capture clear, detailed images of watch parts and would be fine for keeping a visual record of the disassembly. If your iPhone is not up to the task, consider looking at the cheaper digital microscopes from China. They have an LCD screen to show the field of view and can capture still images and some capture video too. There is a slight lag between the workpiece and the image on the screen, which makes them unsuitable as a microscope to work through, but for inspection purposes and capturing step by step images of the disassembly they will work well. In terms of keeping parts and screws sorted, I suggest a plastic storage box with lots of small compartments. Some fishing tackle boxes would be suitable. Once you’ve removed for example the balance cock, put the screw that held it down into the neighboring compartment. For the other bridges and cocks, put each in a separate compartment along with the screws that belong with it. I suggested a separate compartment for the balance cock screw because you want to keep all loose parts away from the hairspring. Put the ratchet wheel and its screw in a compartment, the crown wheel and screw in another compartment and so on. Pallet fork cock/bridge and screw(s) in another compartment etc. You can even put a bit of paper with a description of the part into each compartment. You can also write on the compartment or lid with a marker and (usually) remove the writing afterwards with an alcohol swab. As you gain experience you’ll find you get more comfortable grouping more parts together in a single compartment without losing track of where they go. Another alternative is to make a screw holder for the movement from a disk of wood or metal. You need one for each side of the movement. Sketch out the movement bridges and screw locations on the disk and drill a small hole in each location. Place each screw into its corresponding hole as you remove it from the movement. These screw holders were sold by watch material houses in the past and do turn up on eBay from time to time. Until you are ready to make the step up to a stereomicroscope, should you eventually choose to, a 5x, 10x and 20x loupe should be enough. Good lighting is also very important. Hope that helps, Mark1 point
-
Try using a hair dryer that way you can watch the fluid evaporate, you will soon find out how much heat you will need.1 point
-
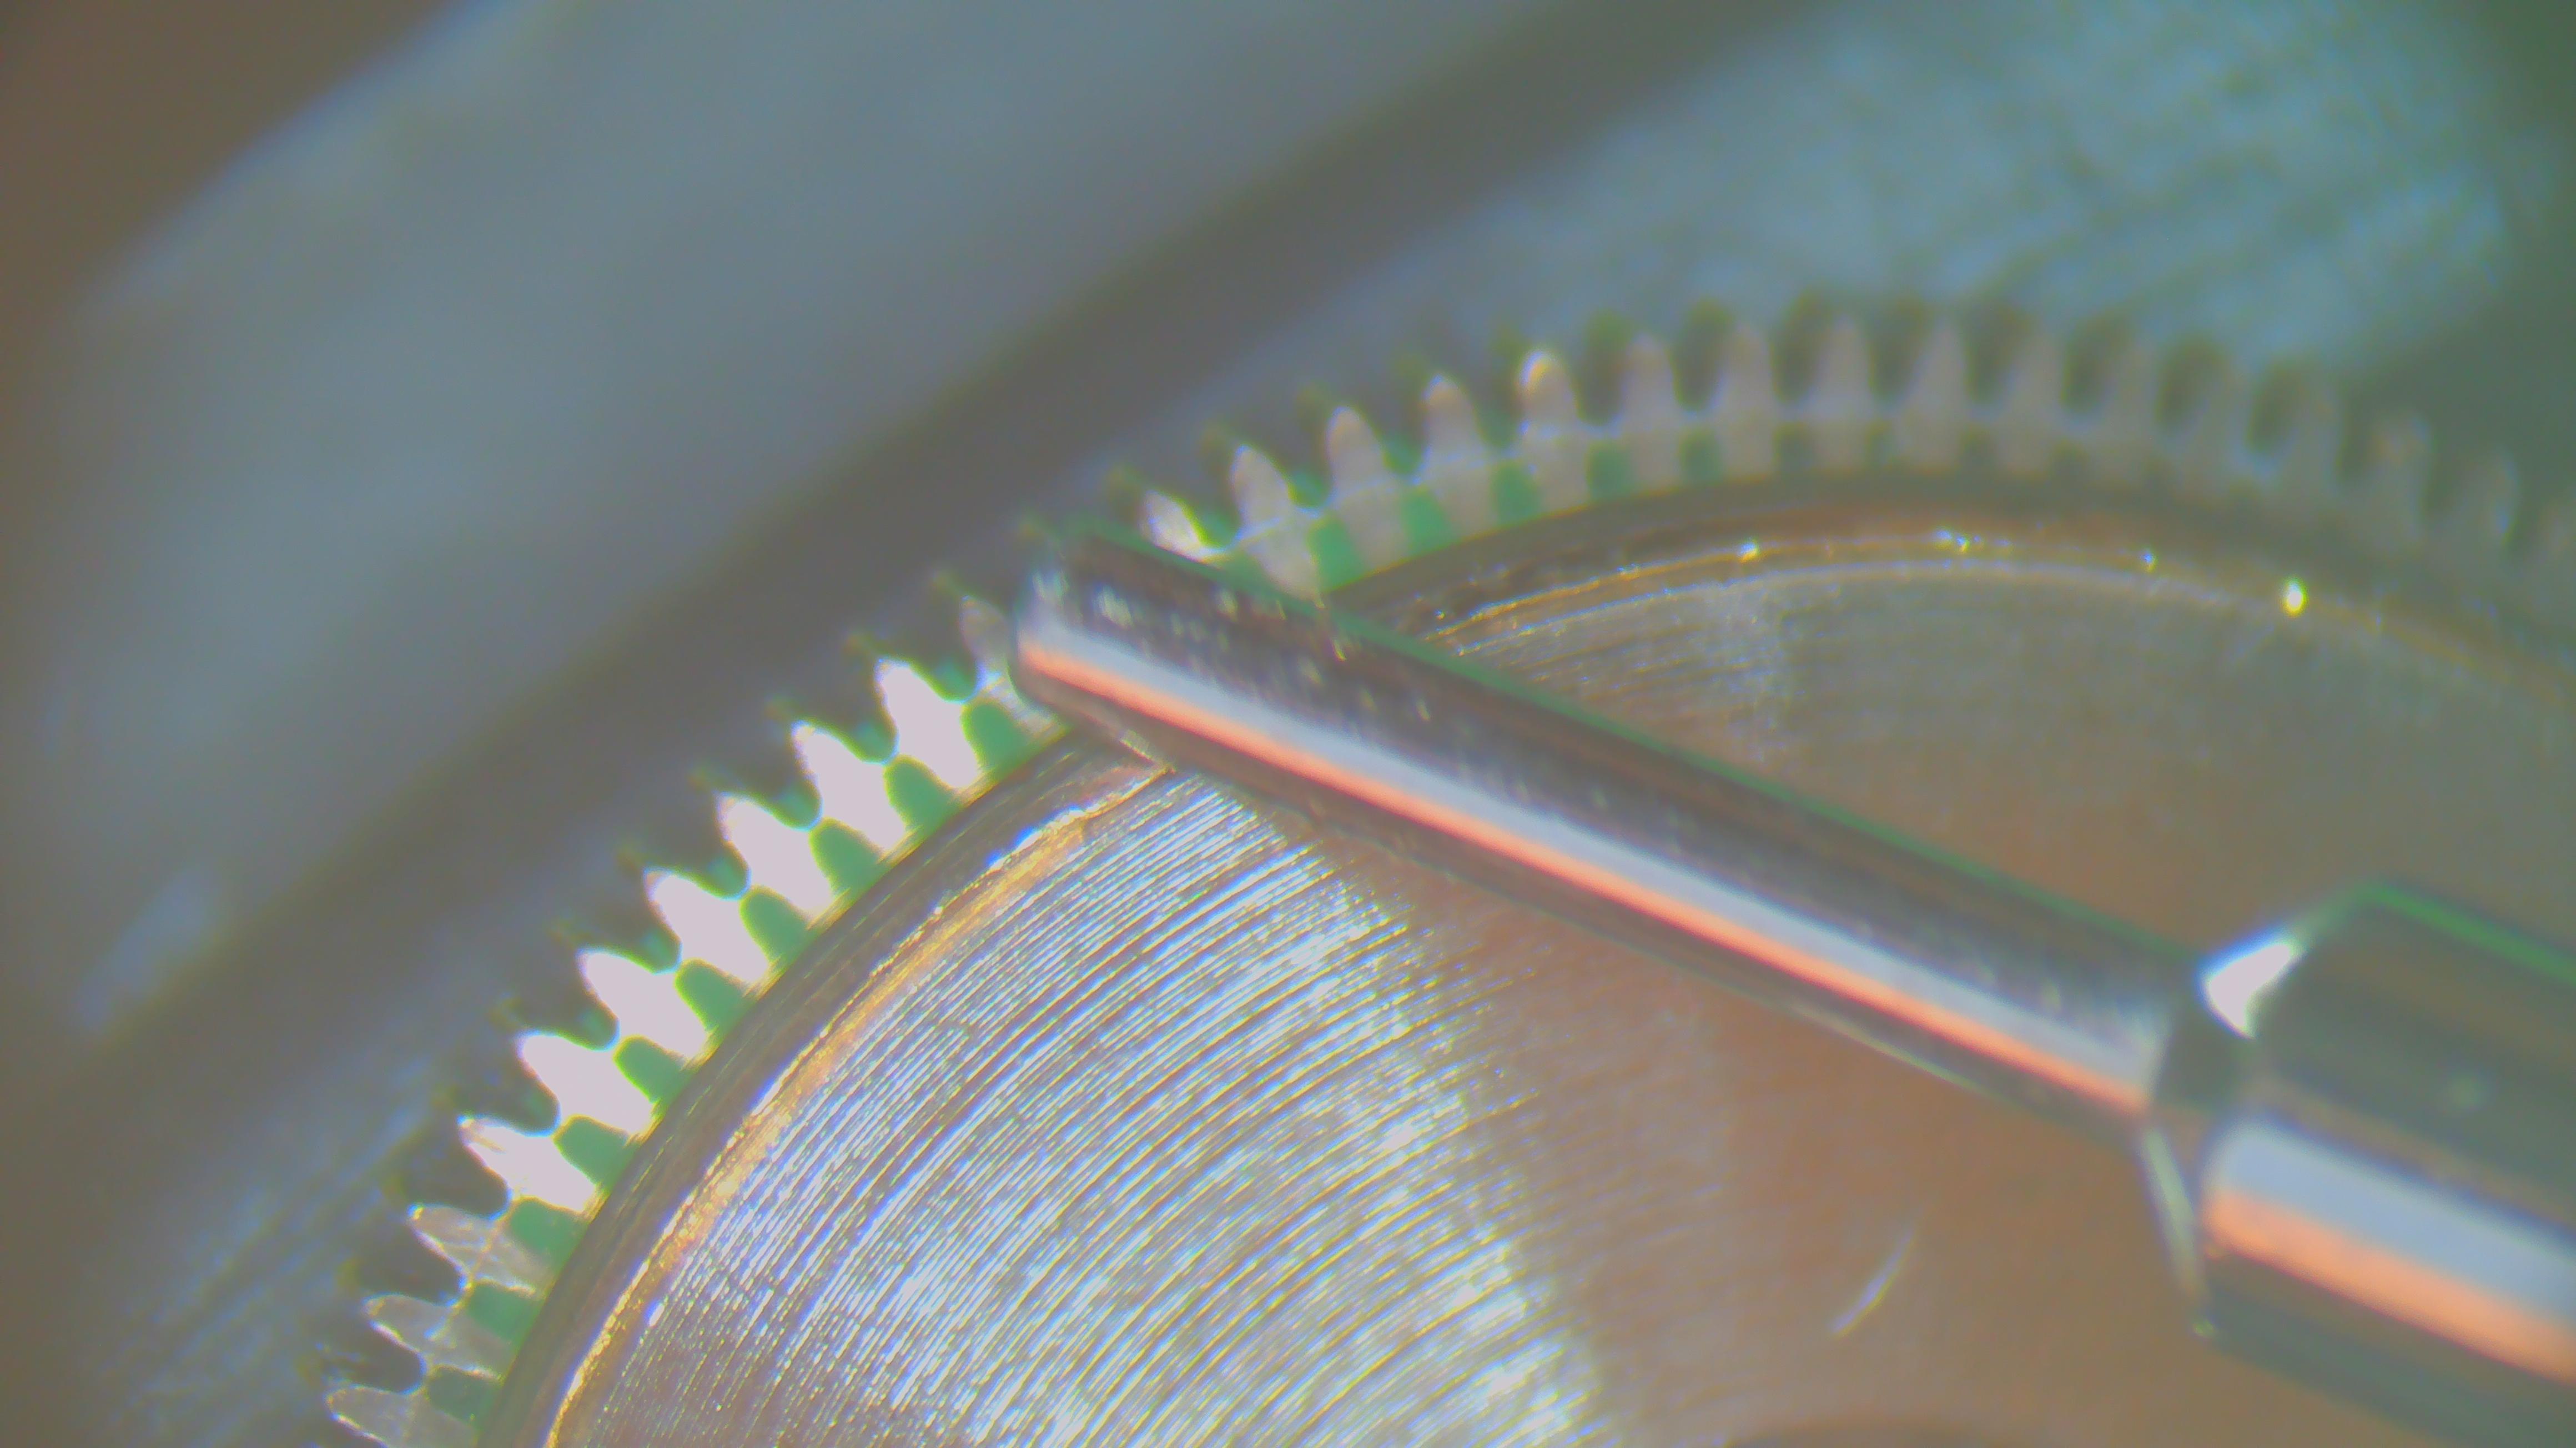
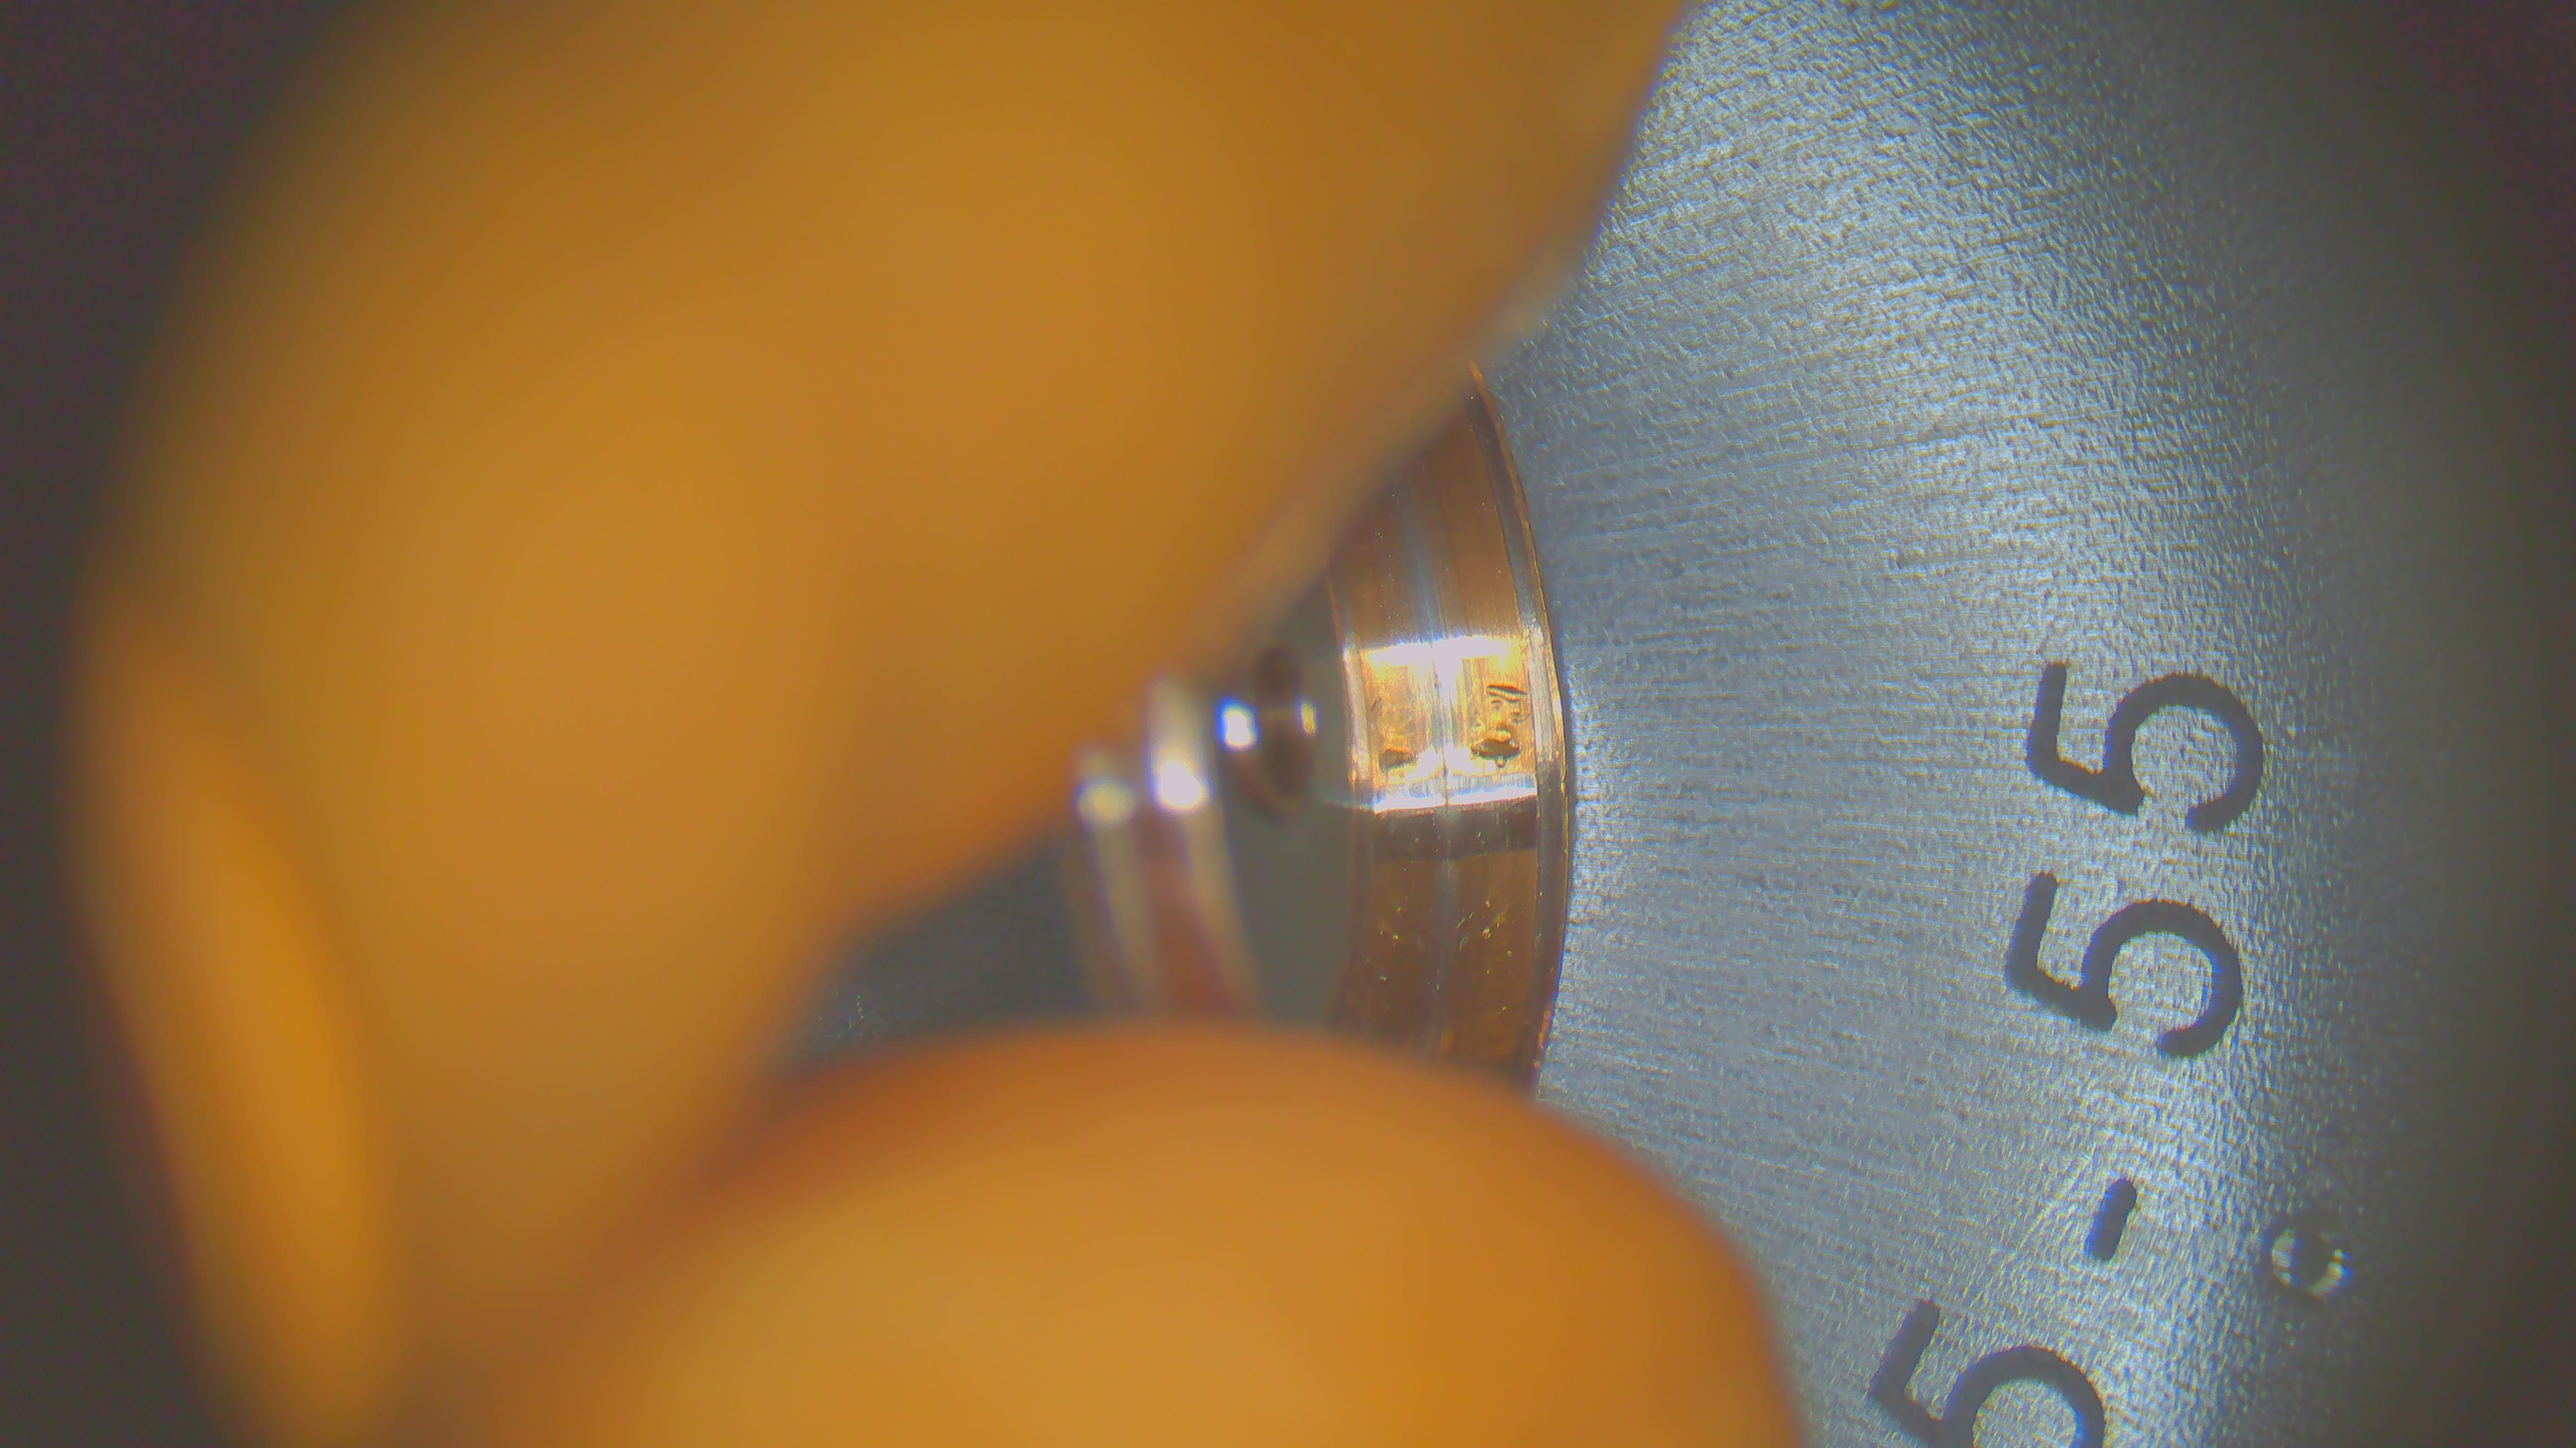
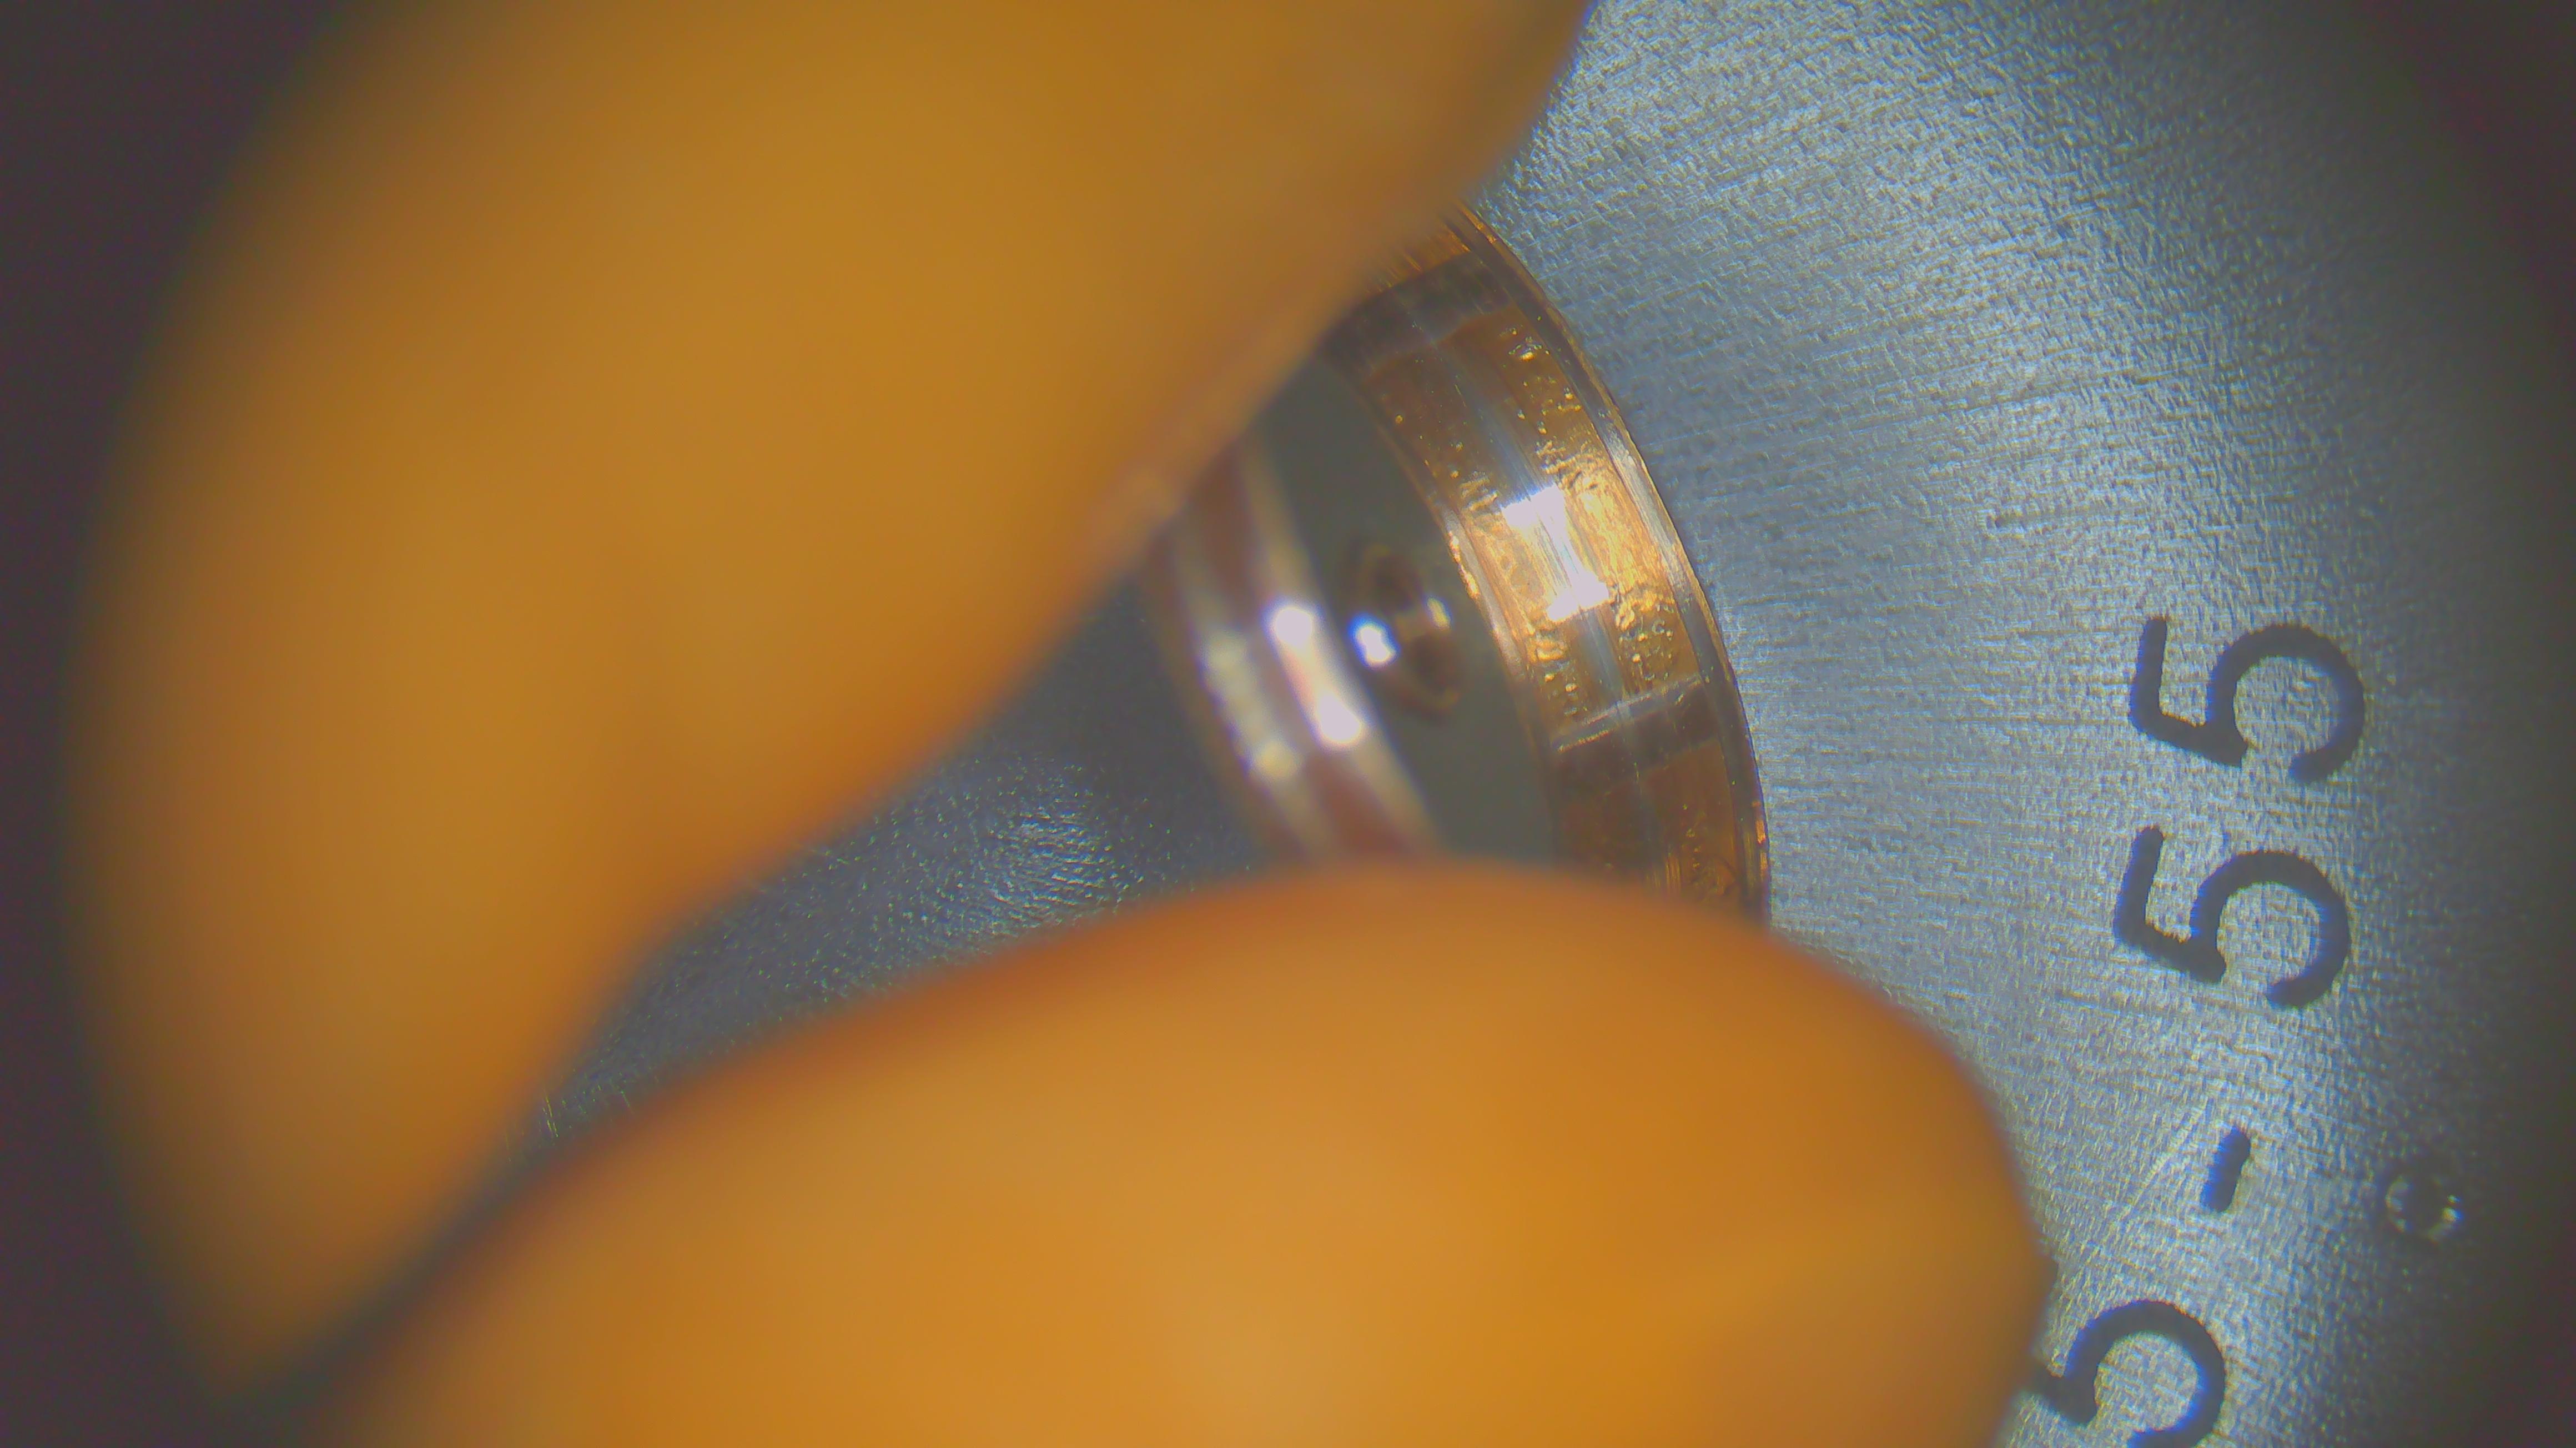
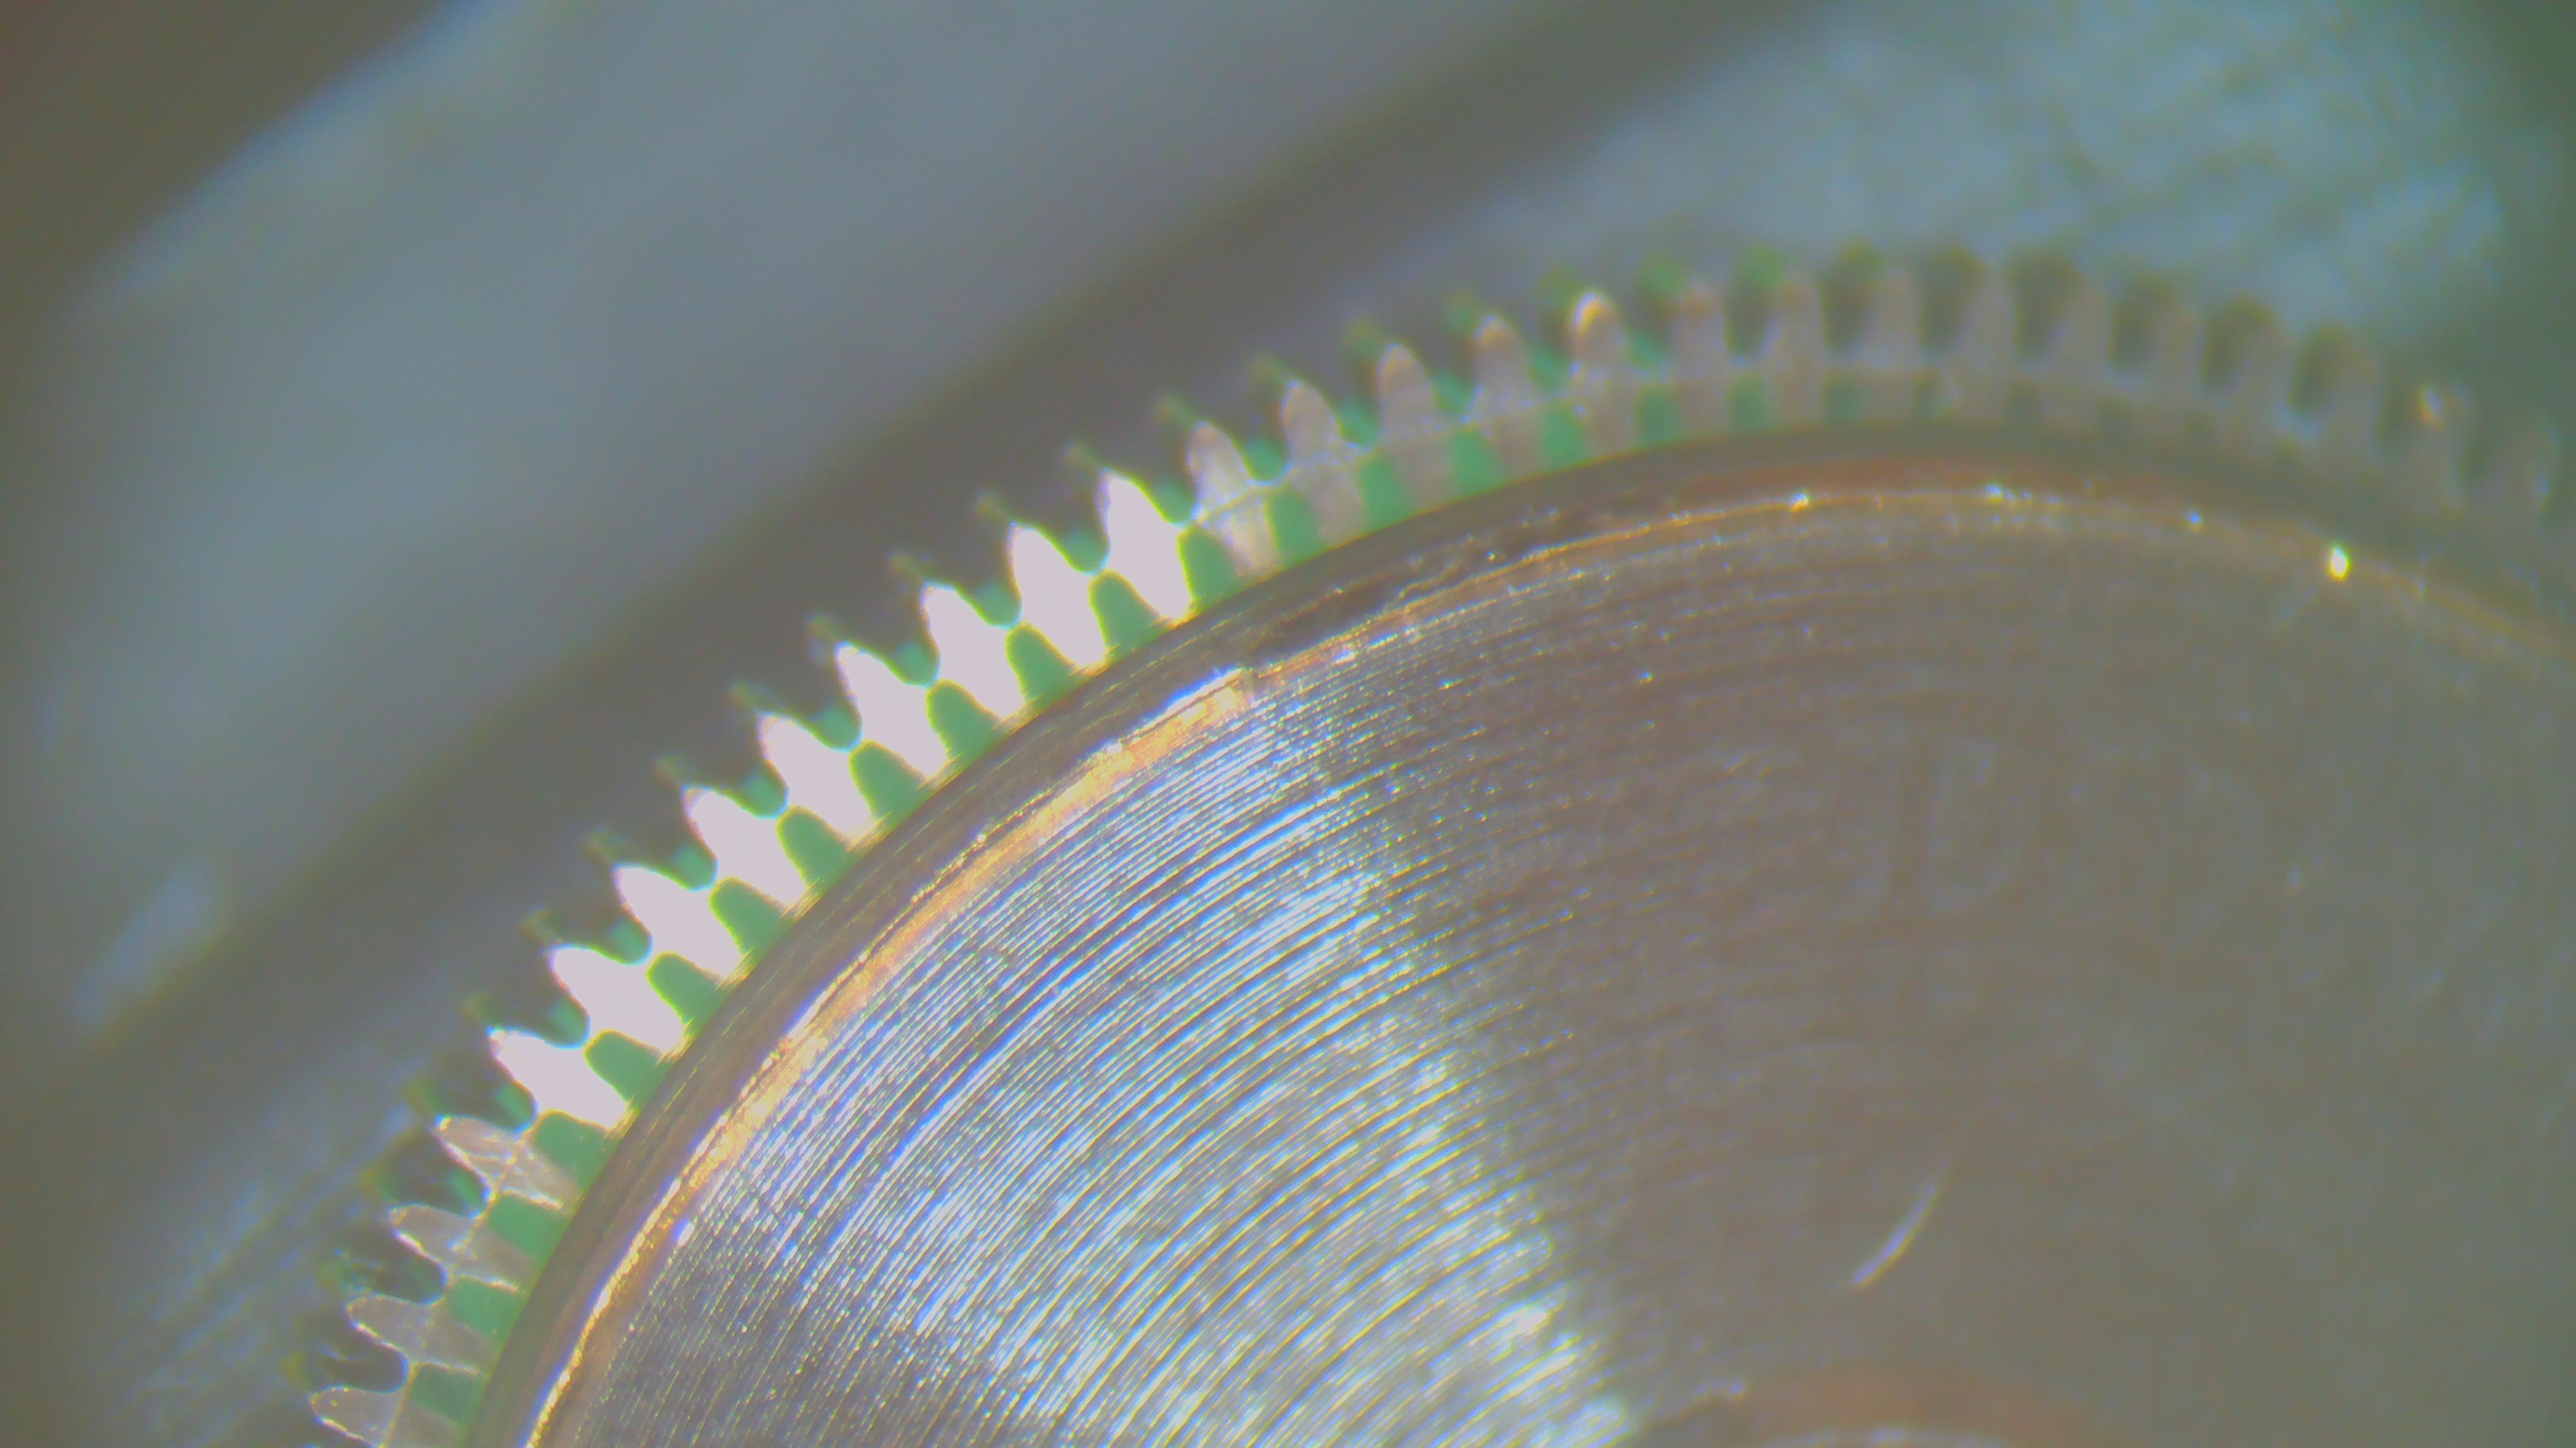
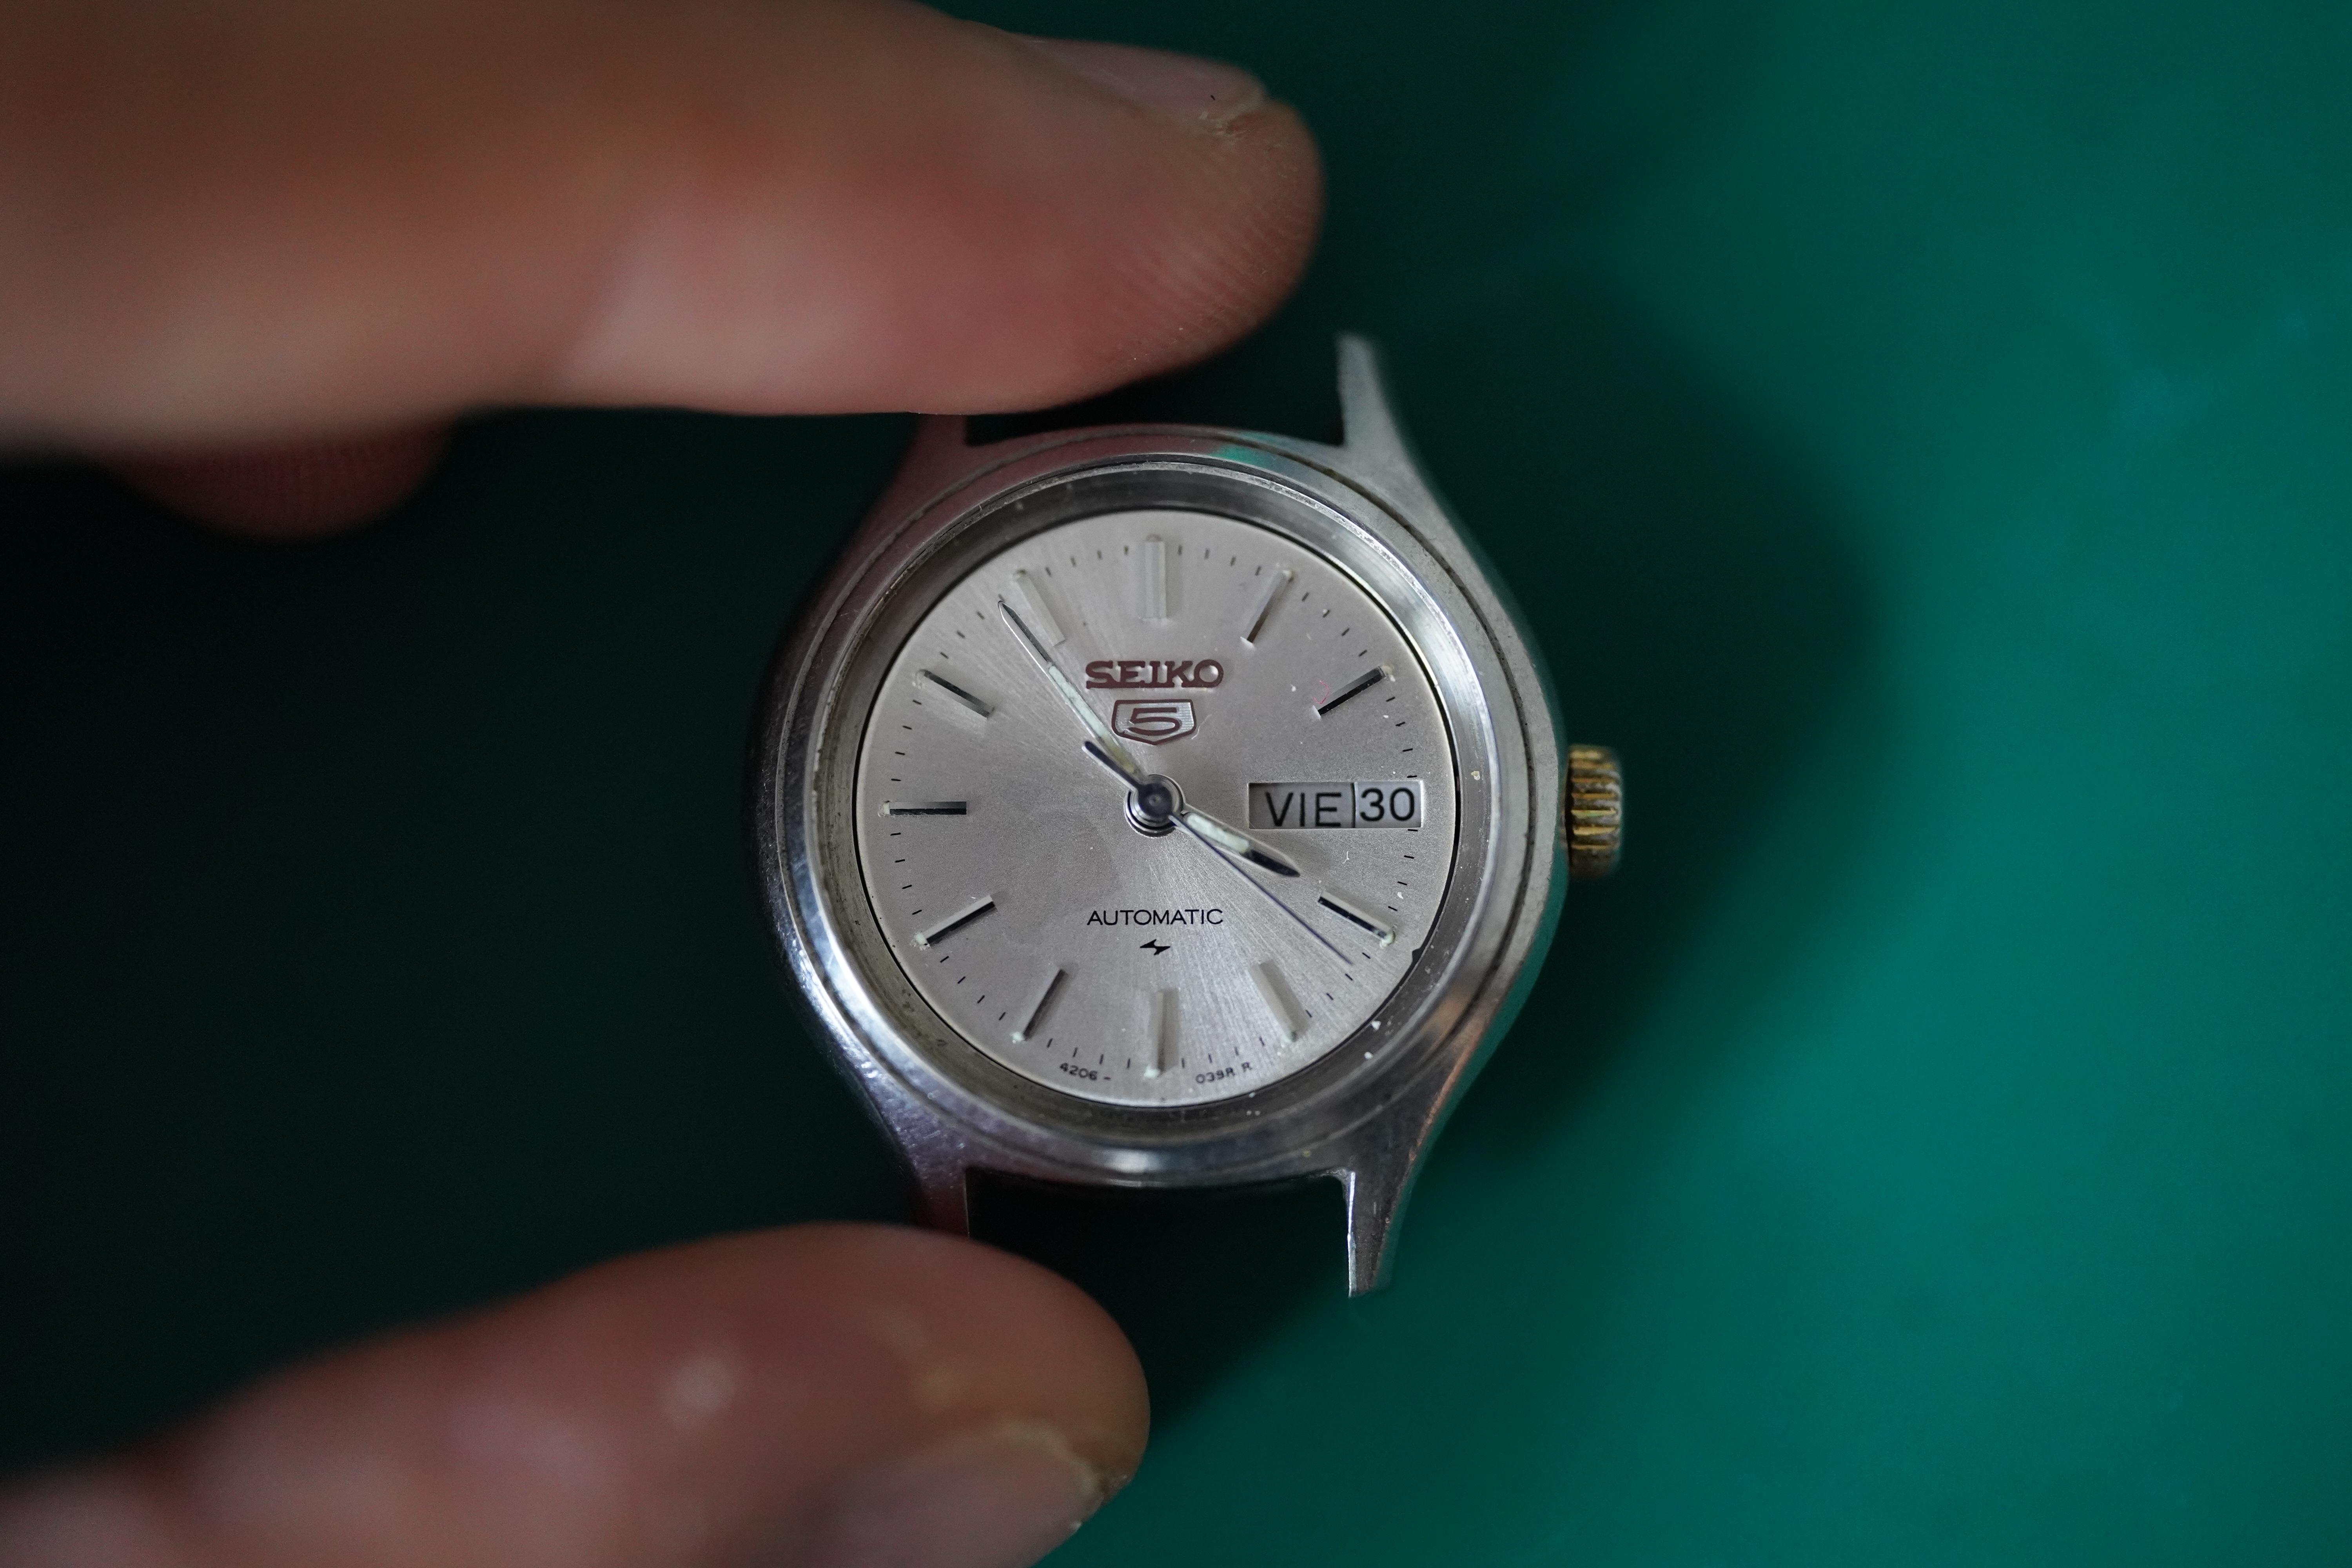
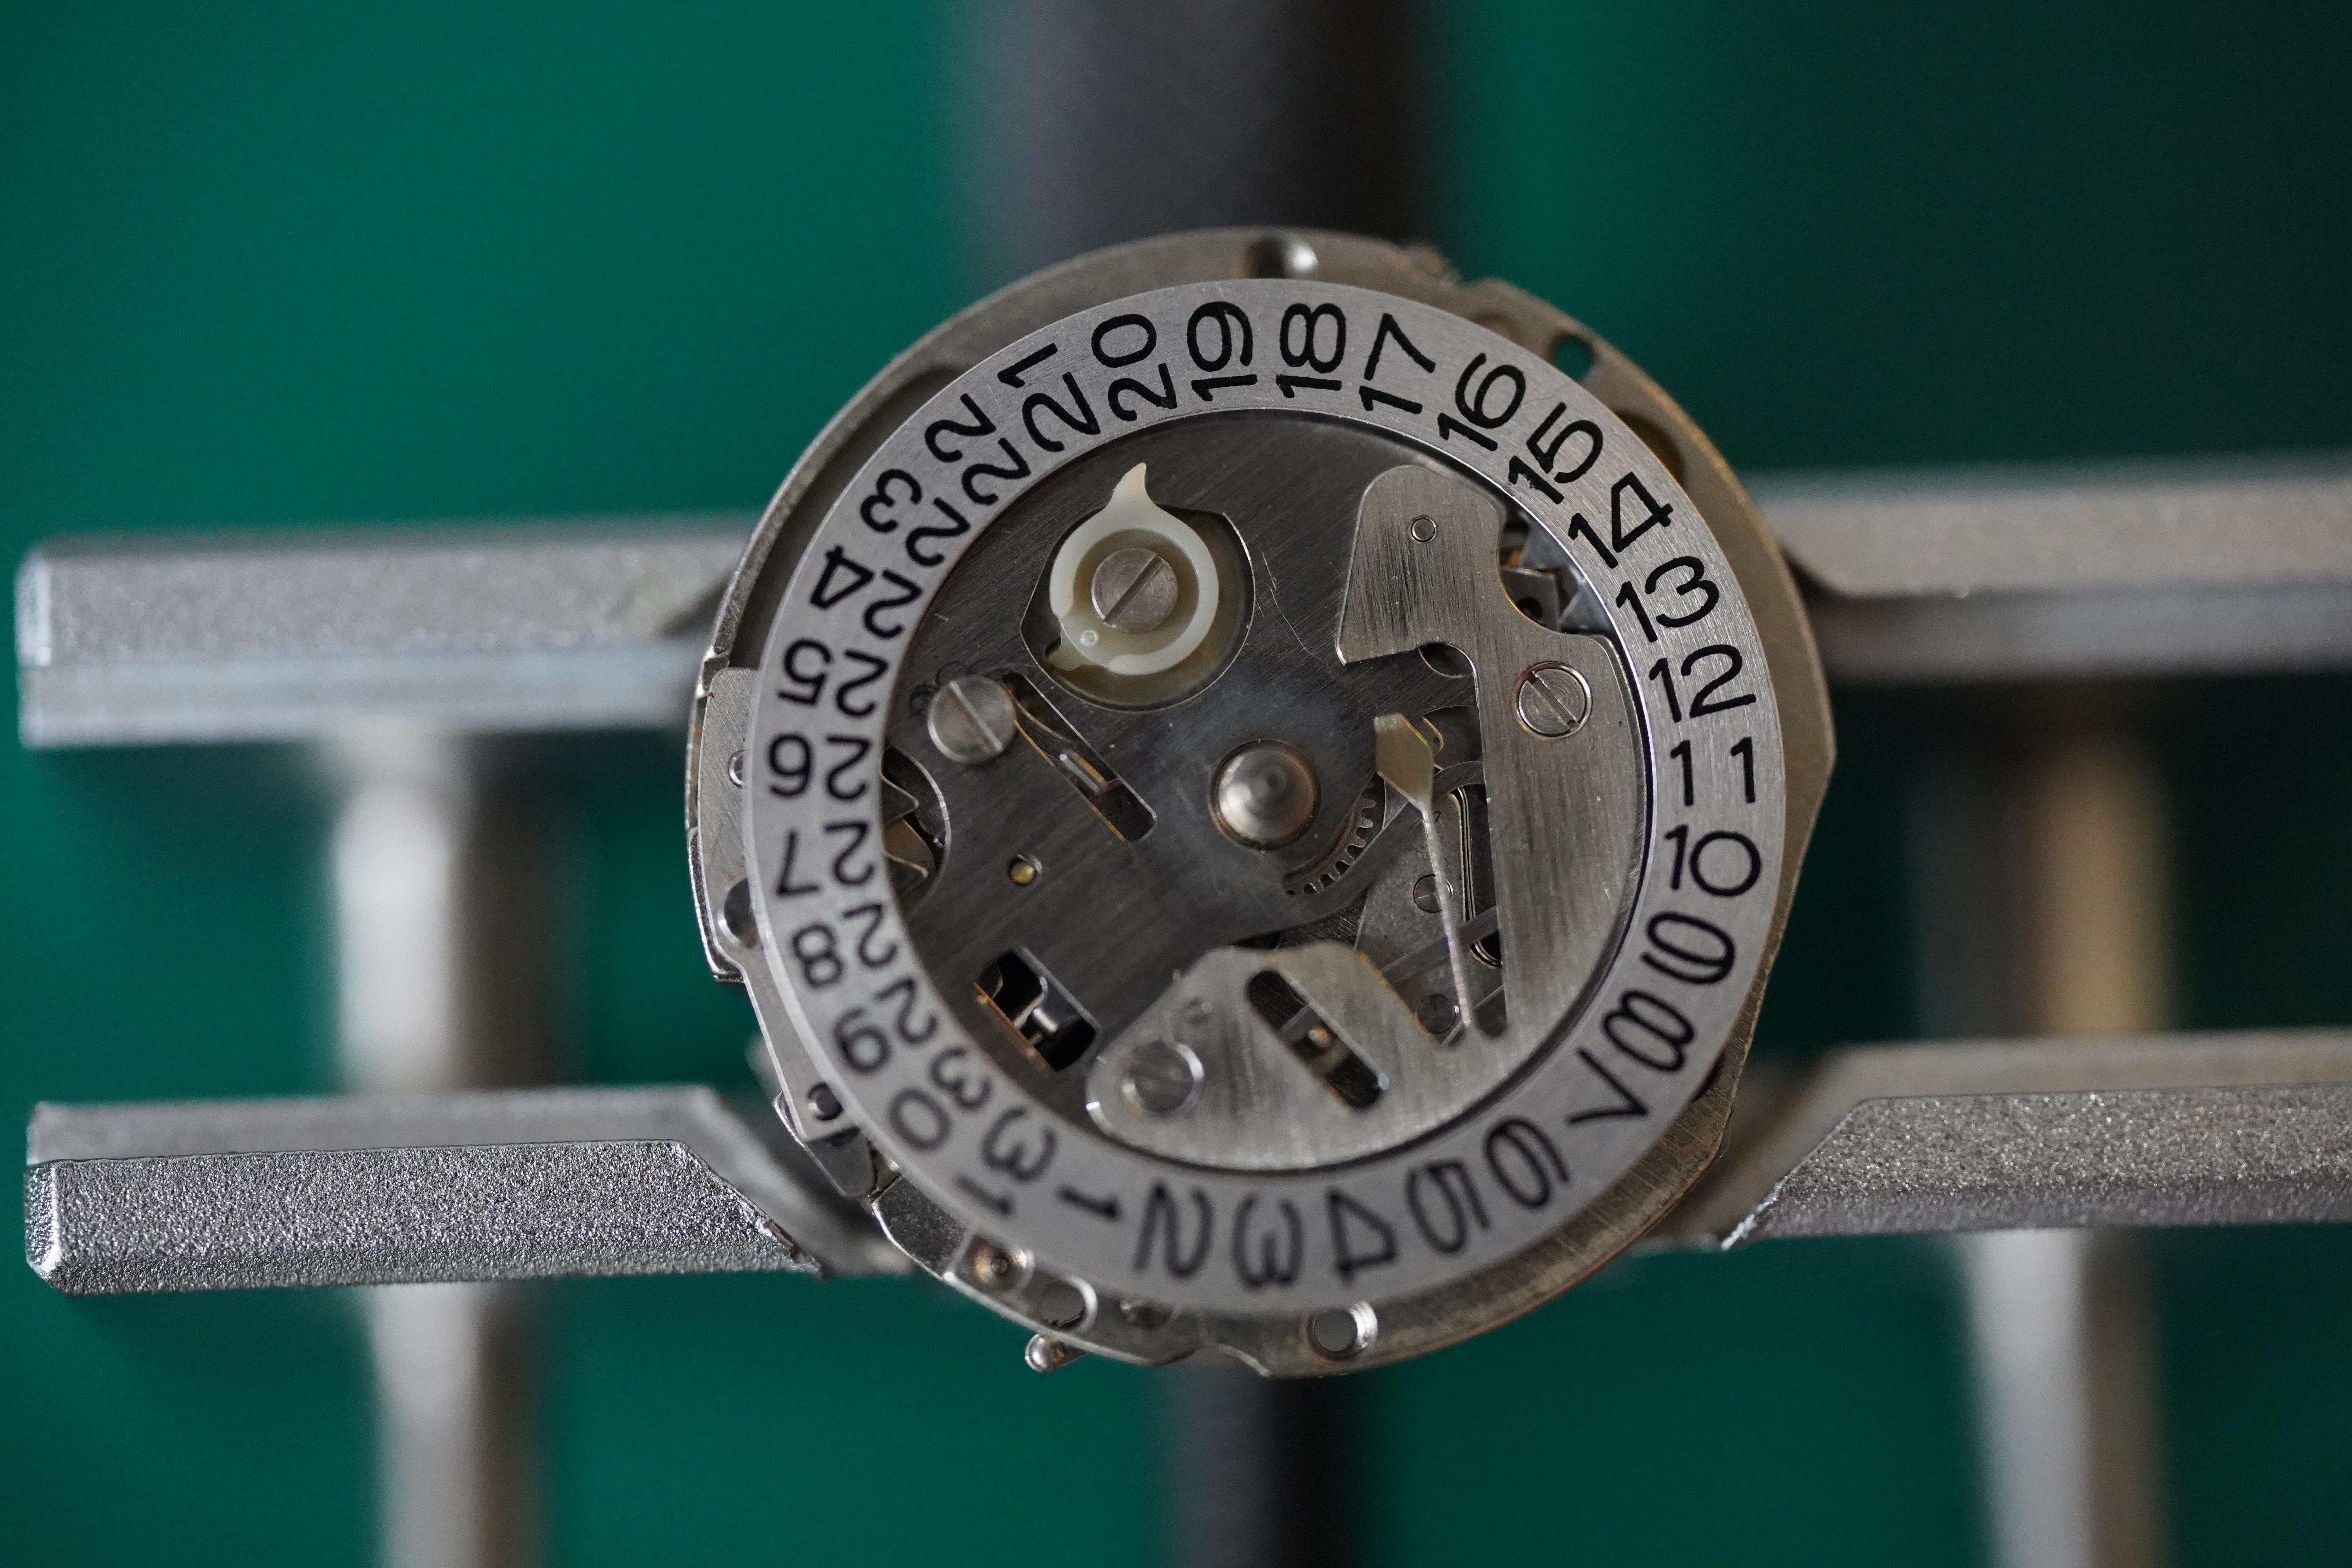
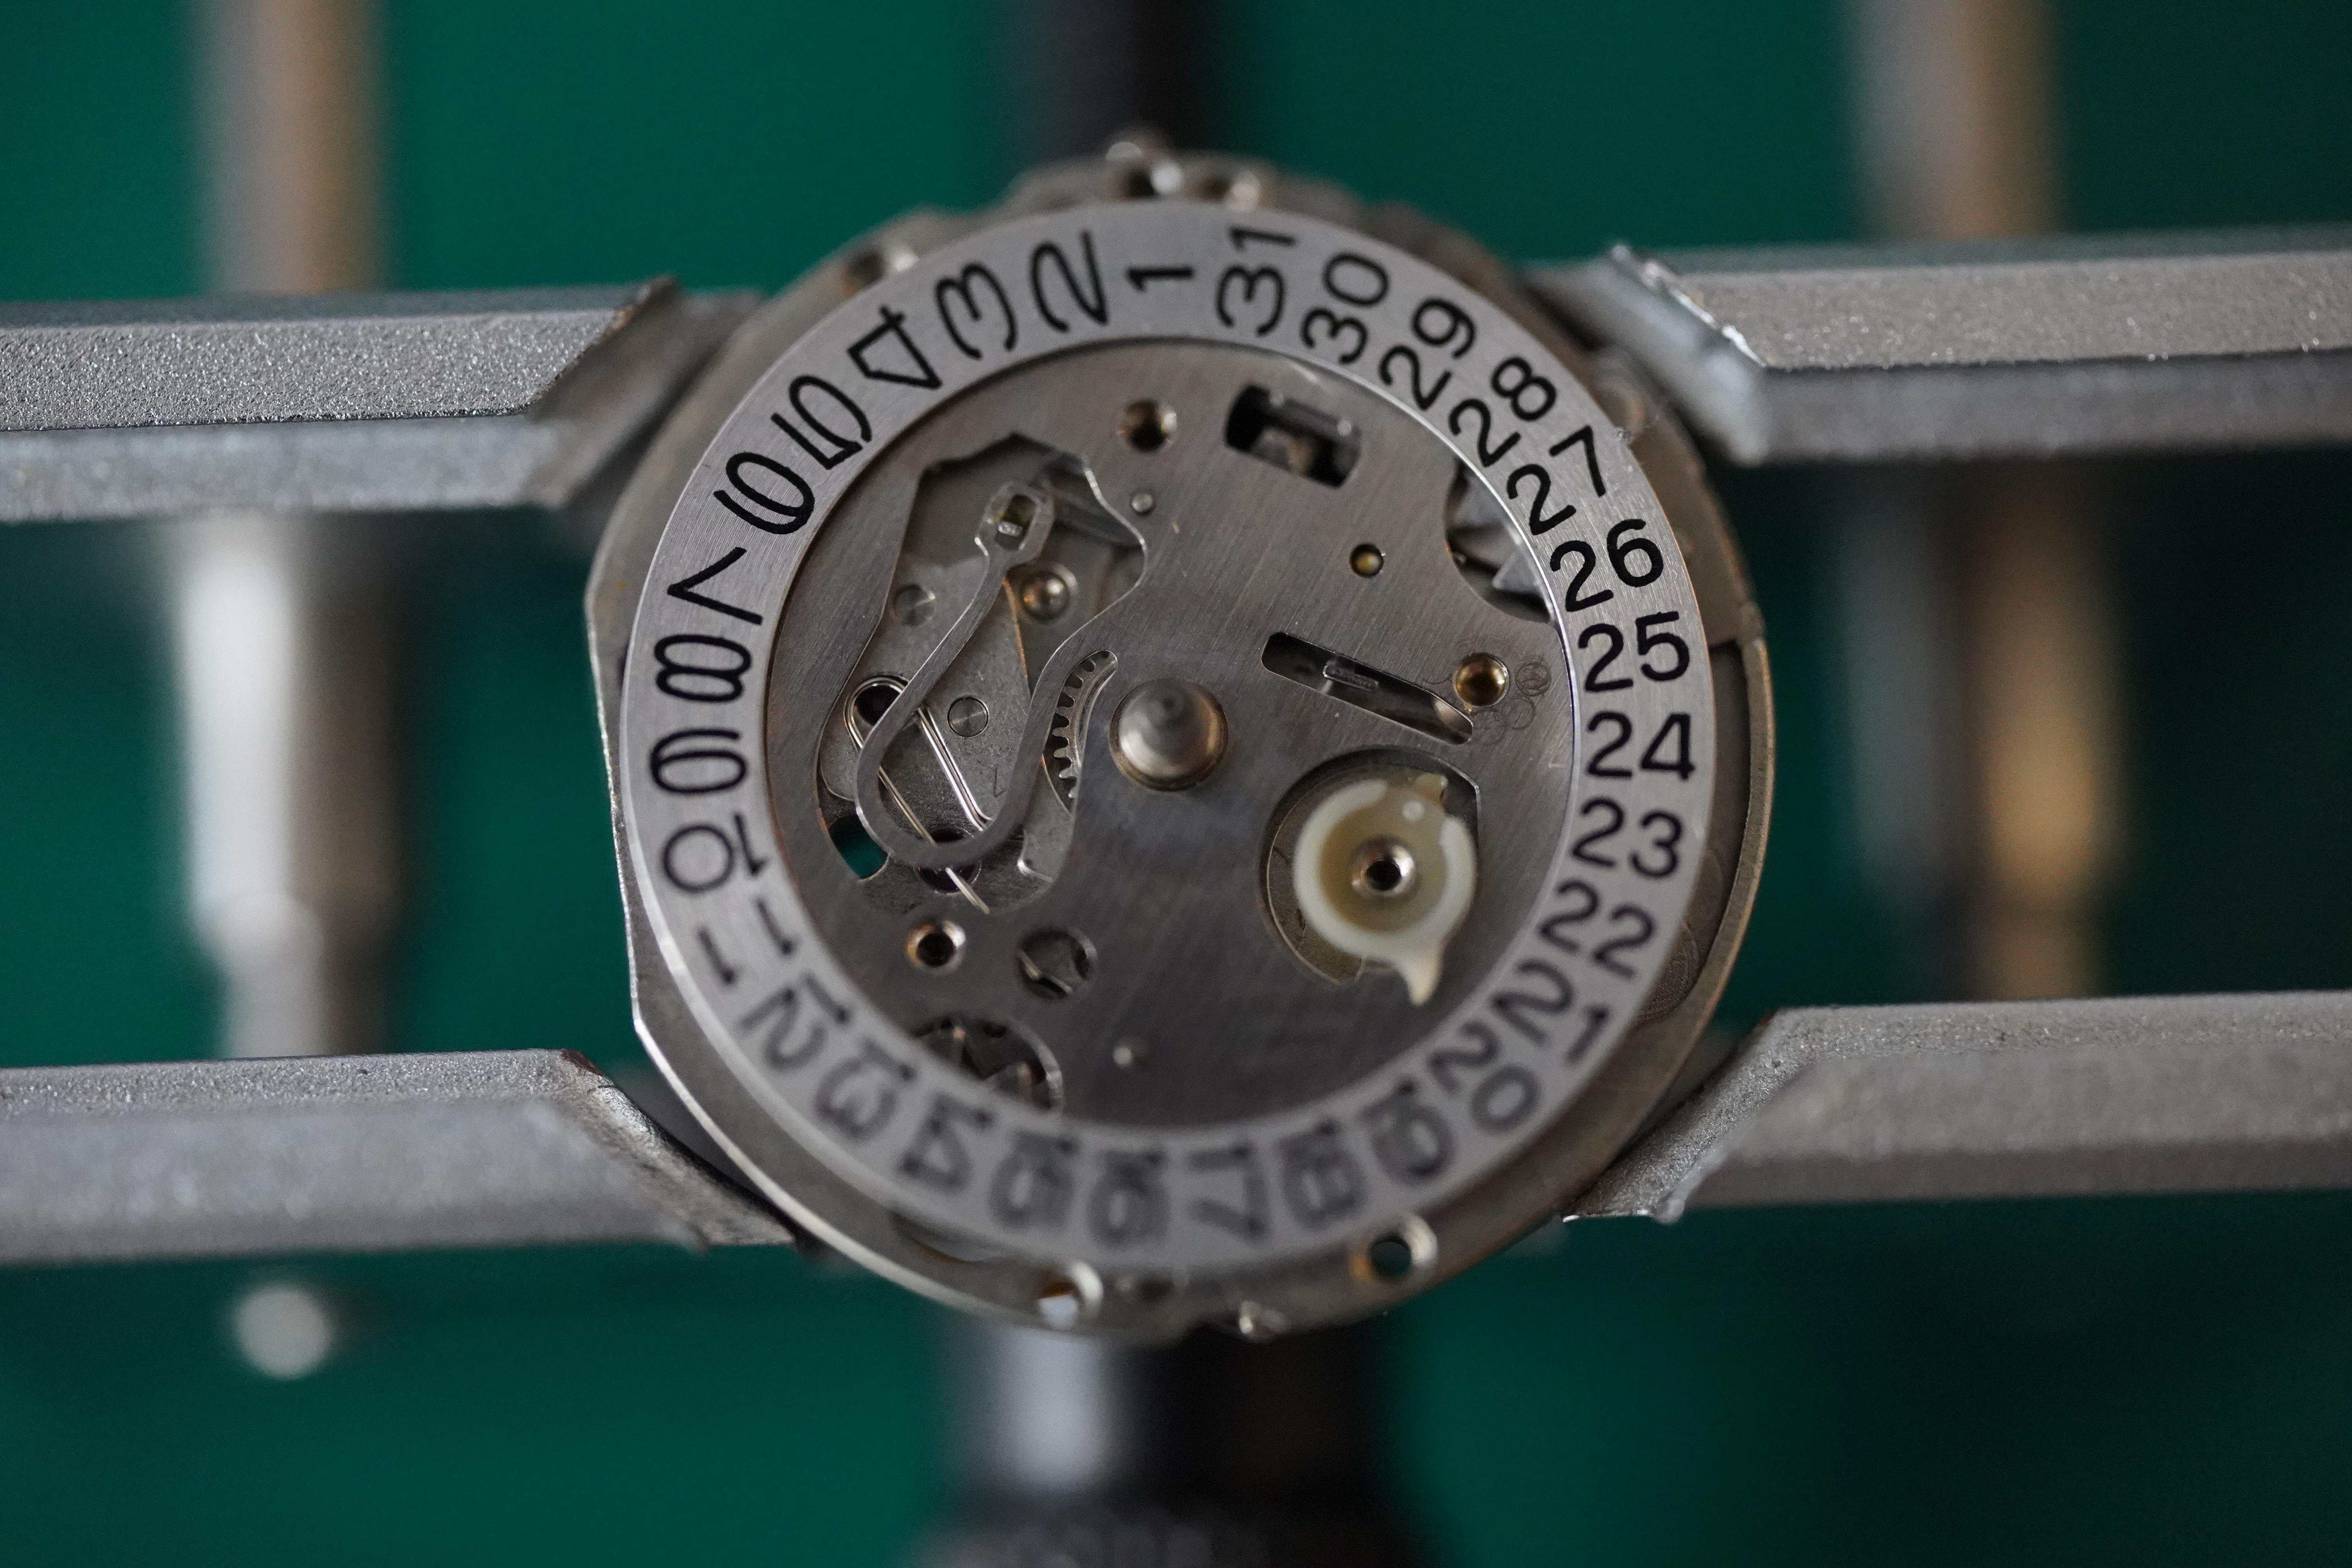
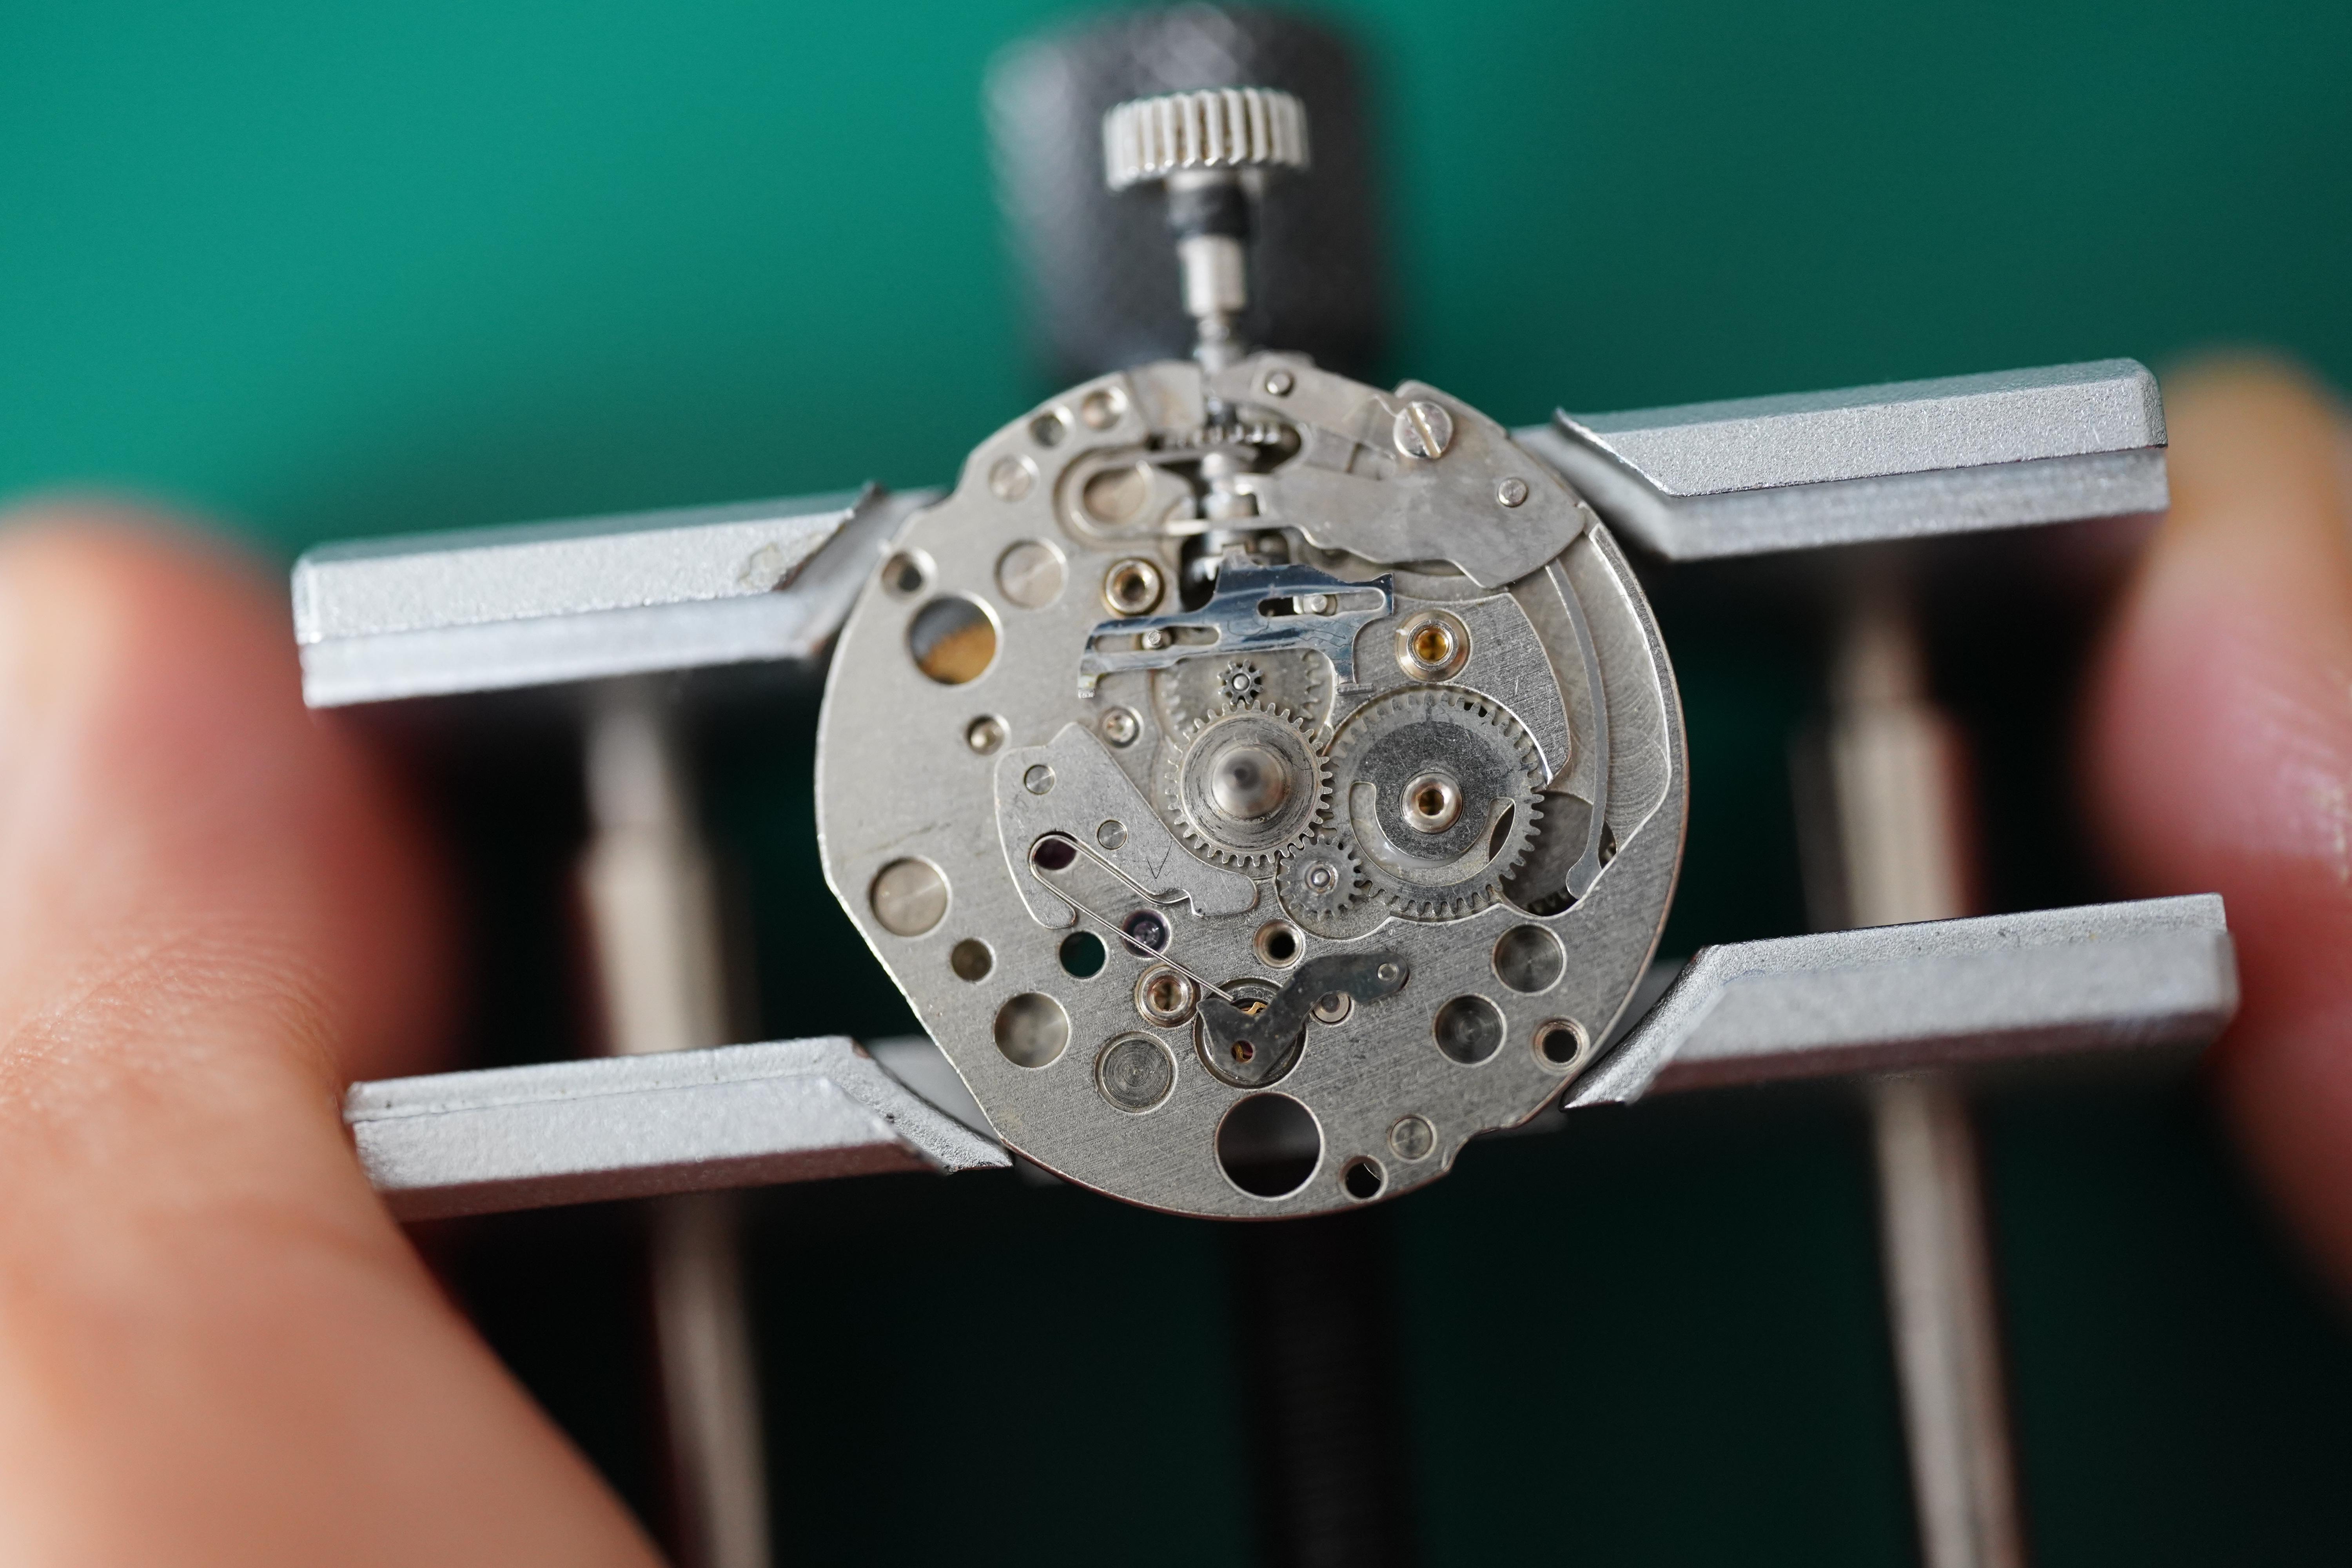
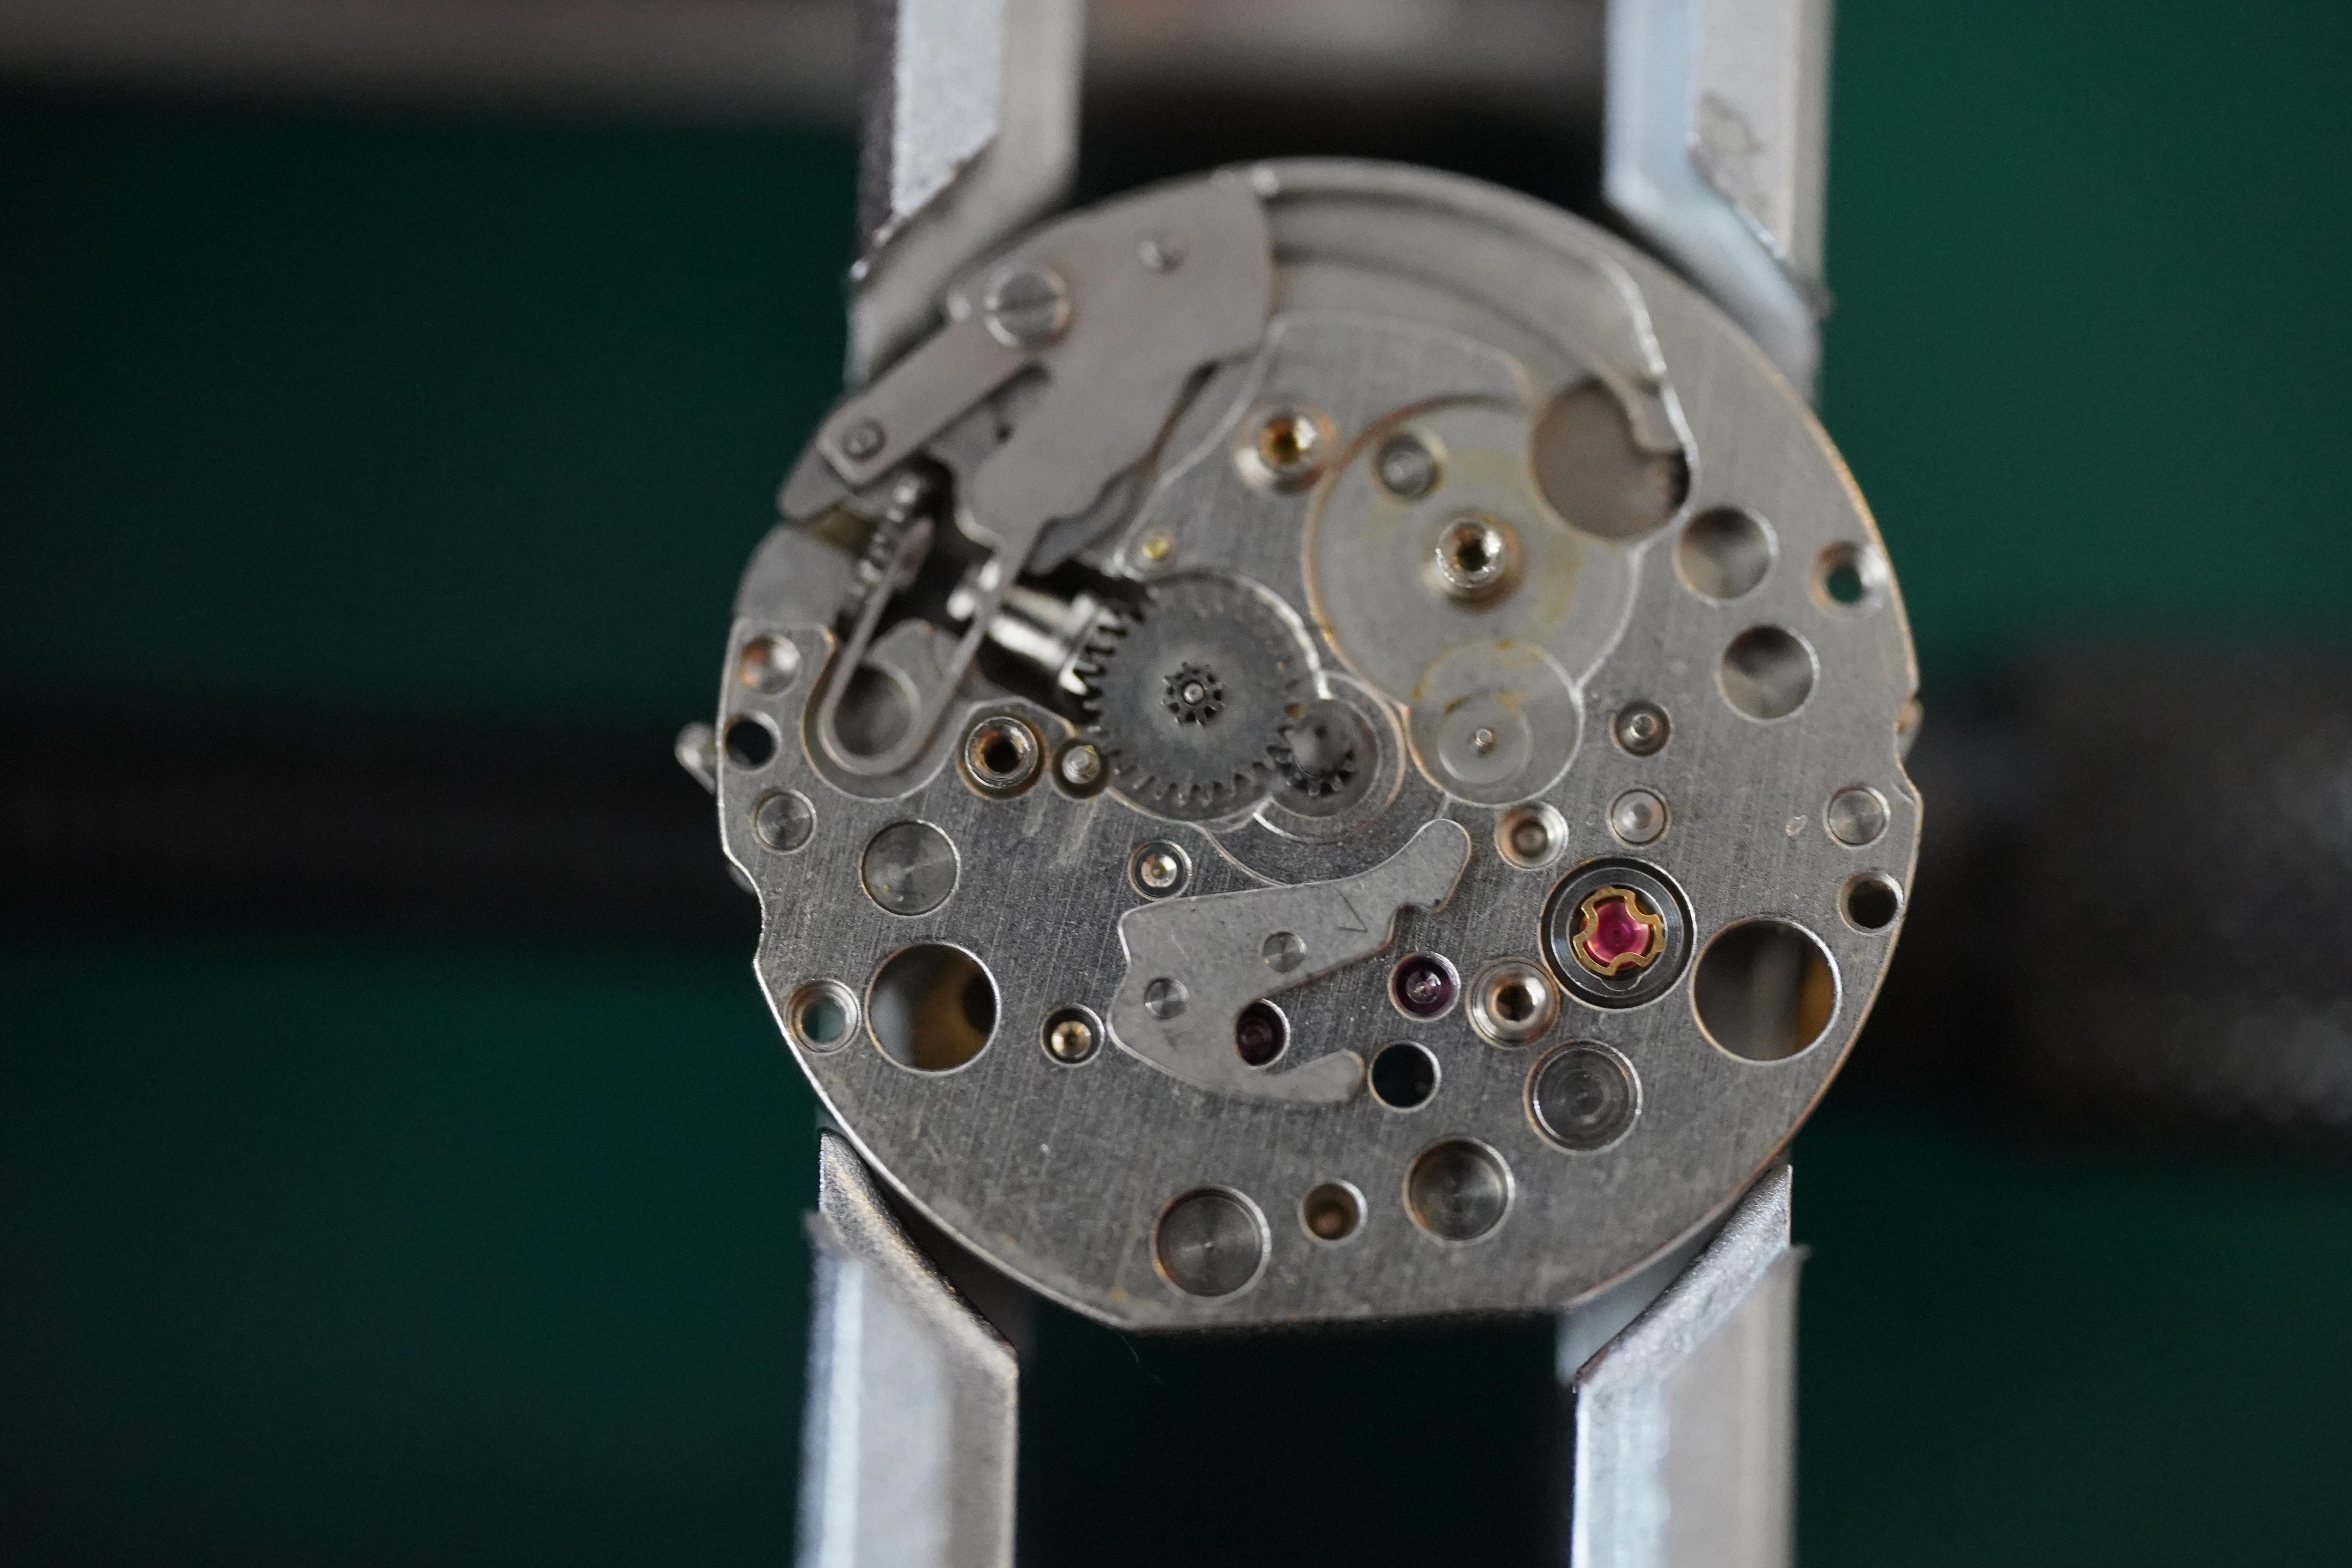
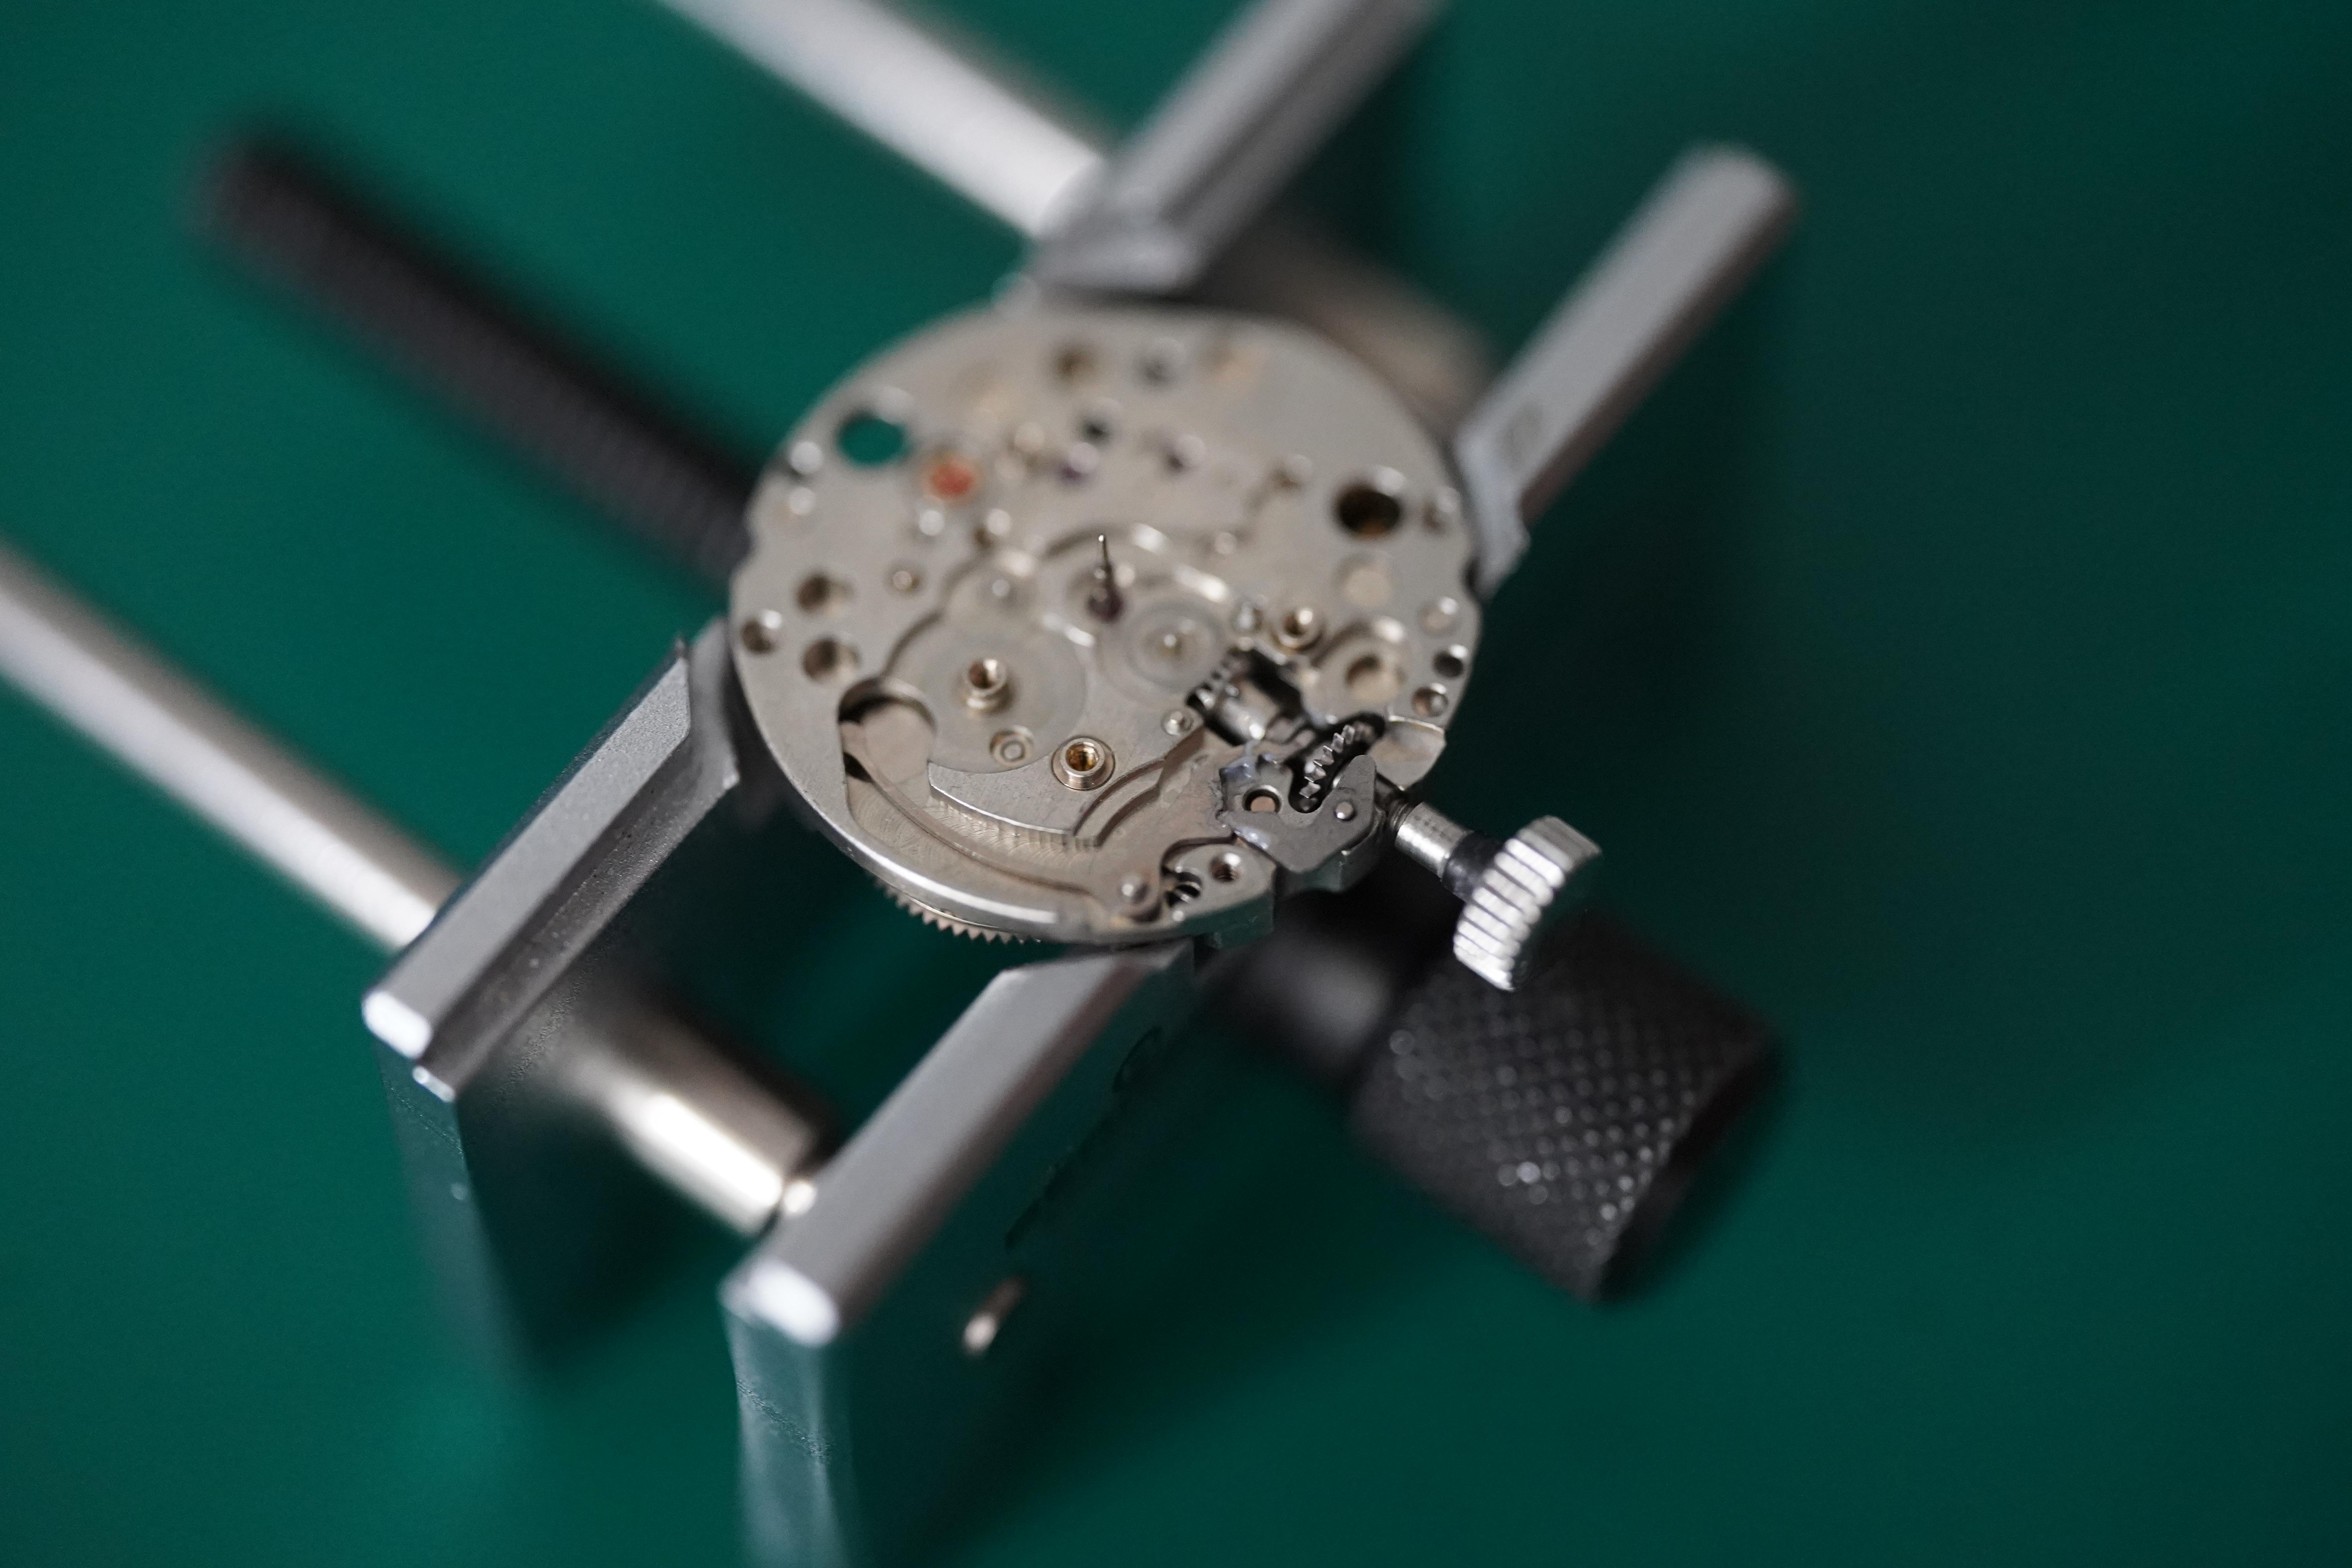
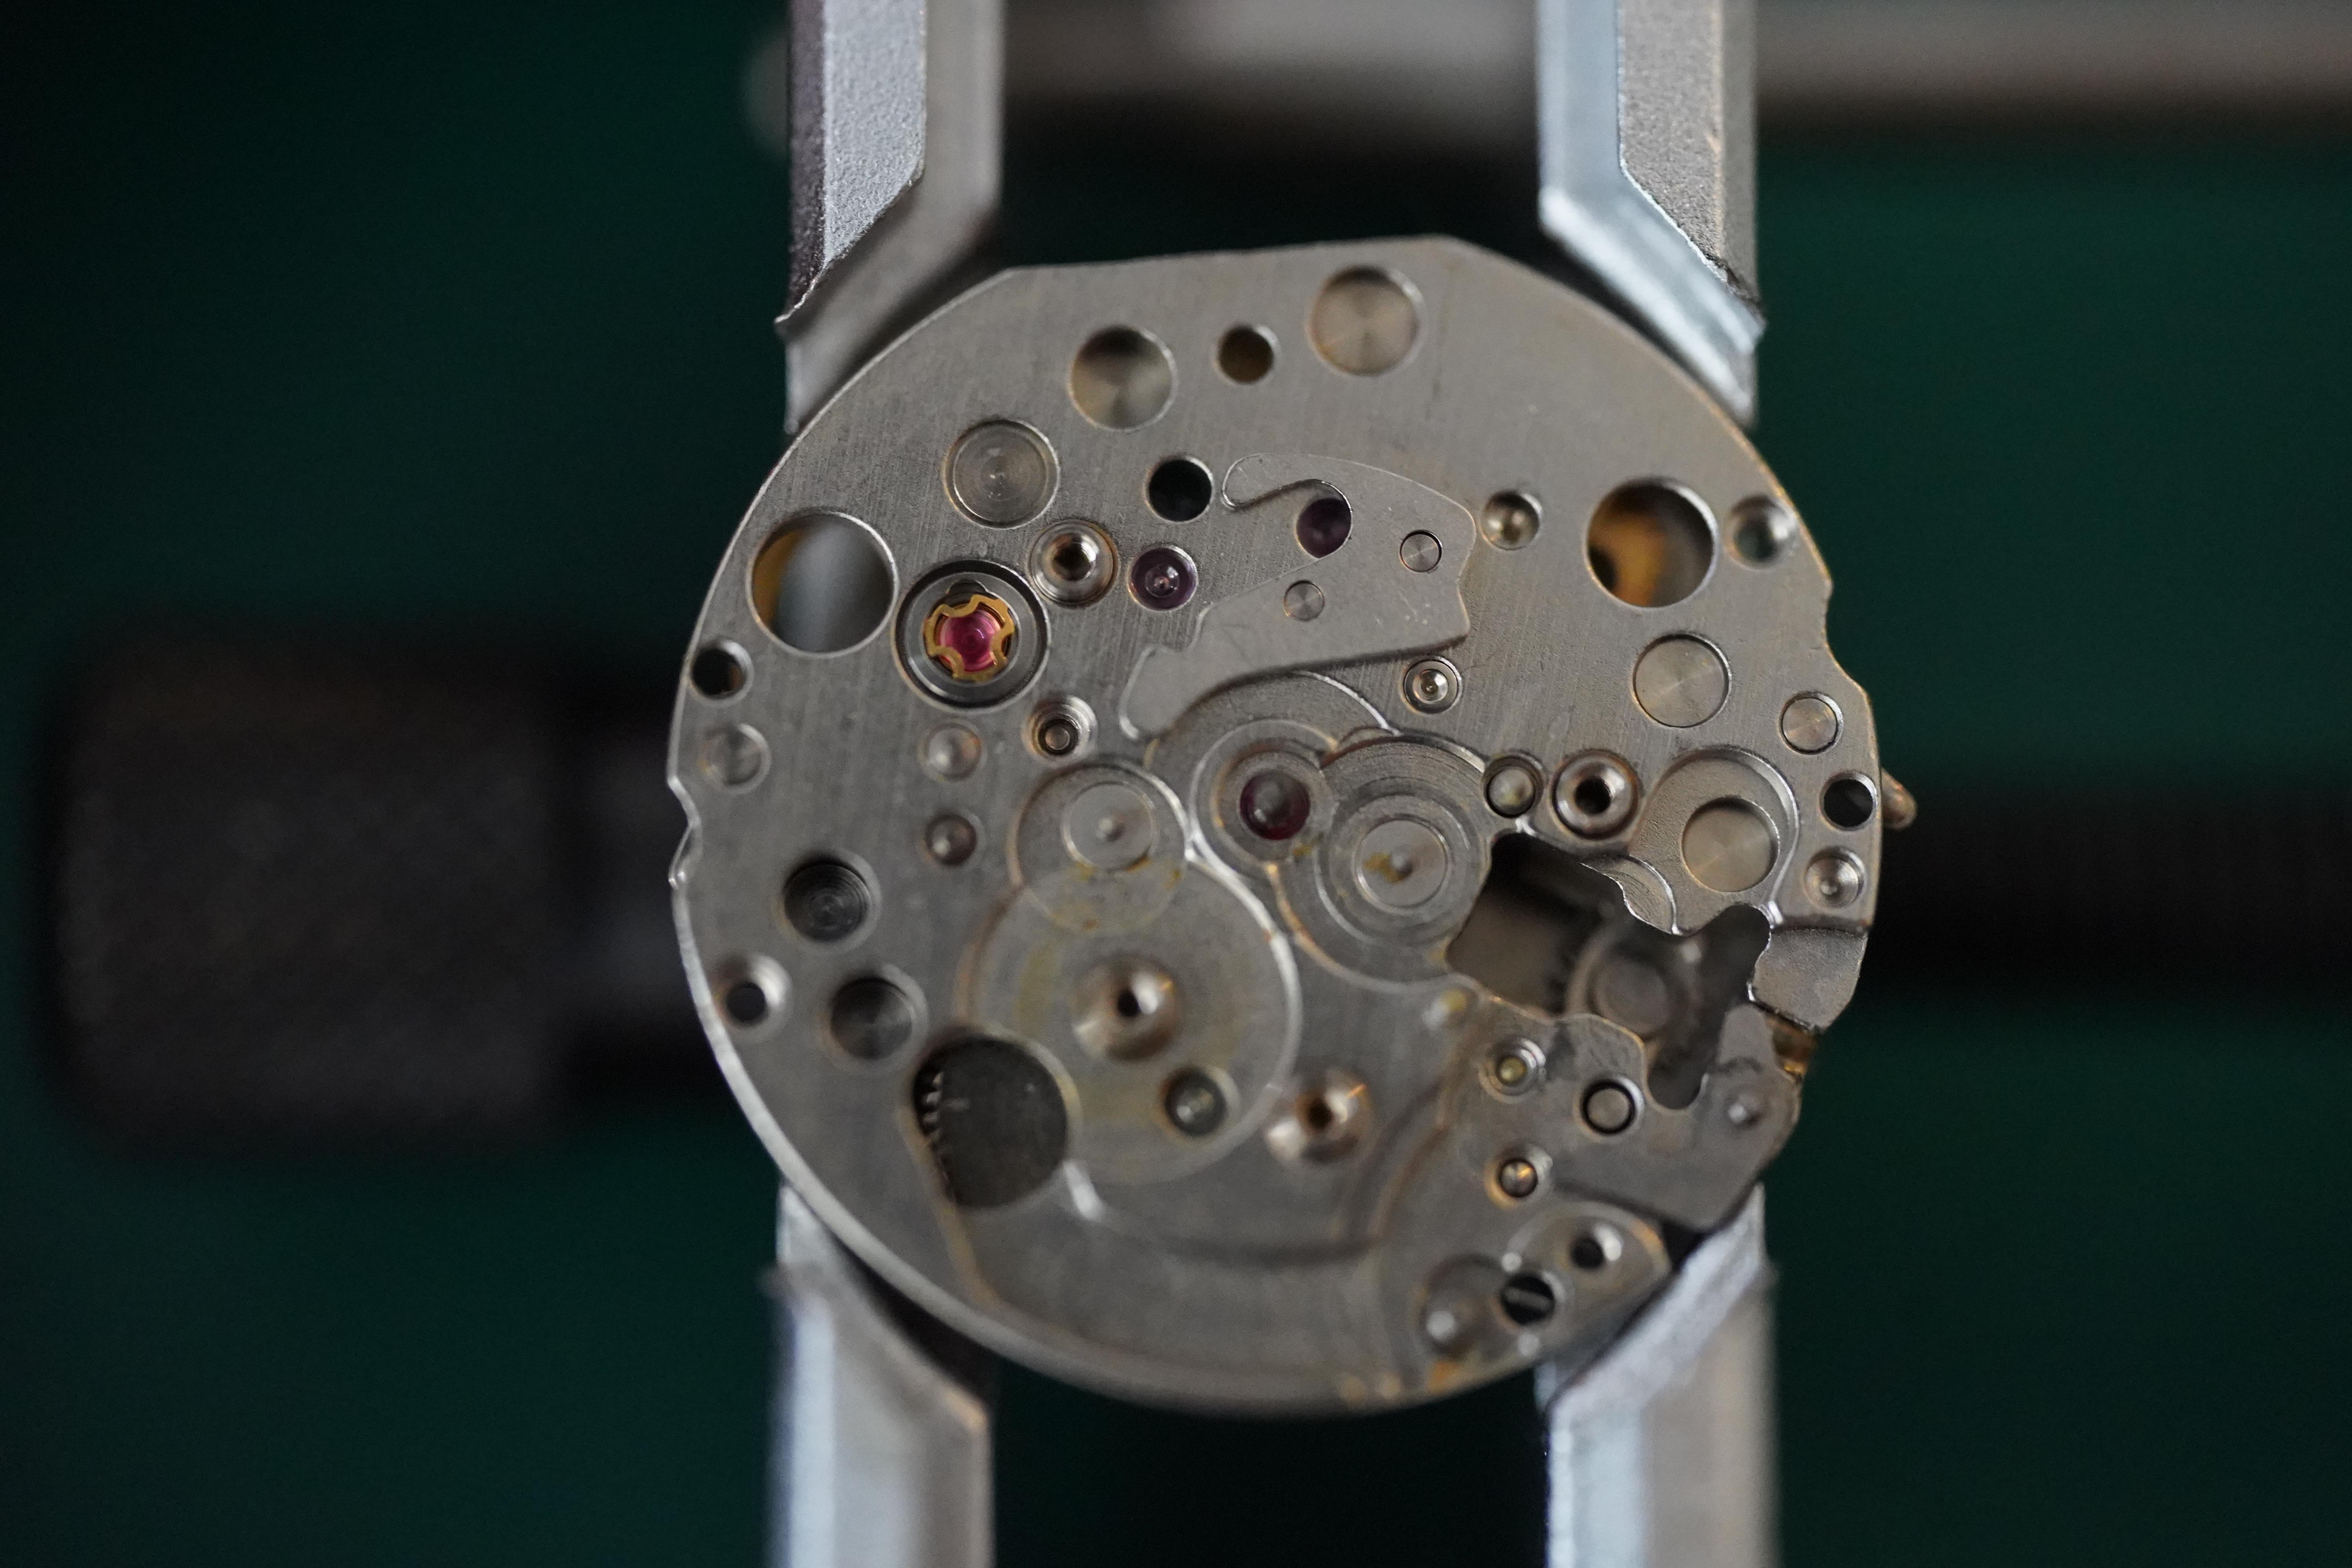
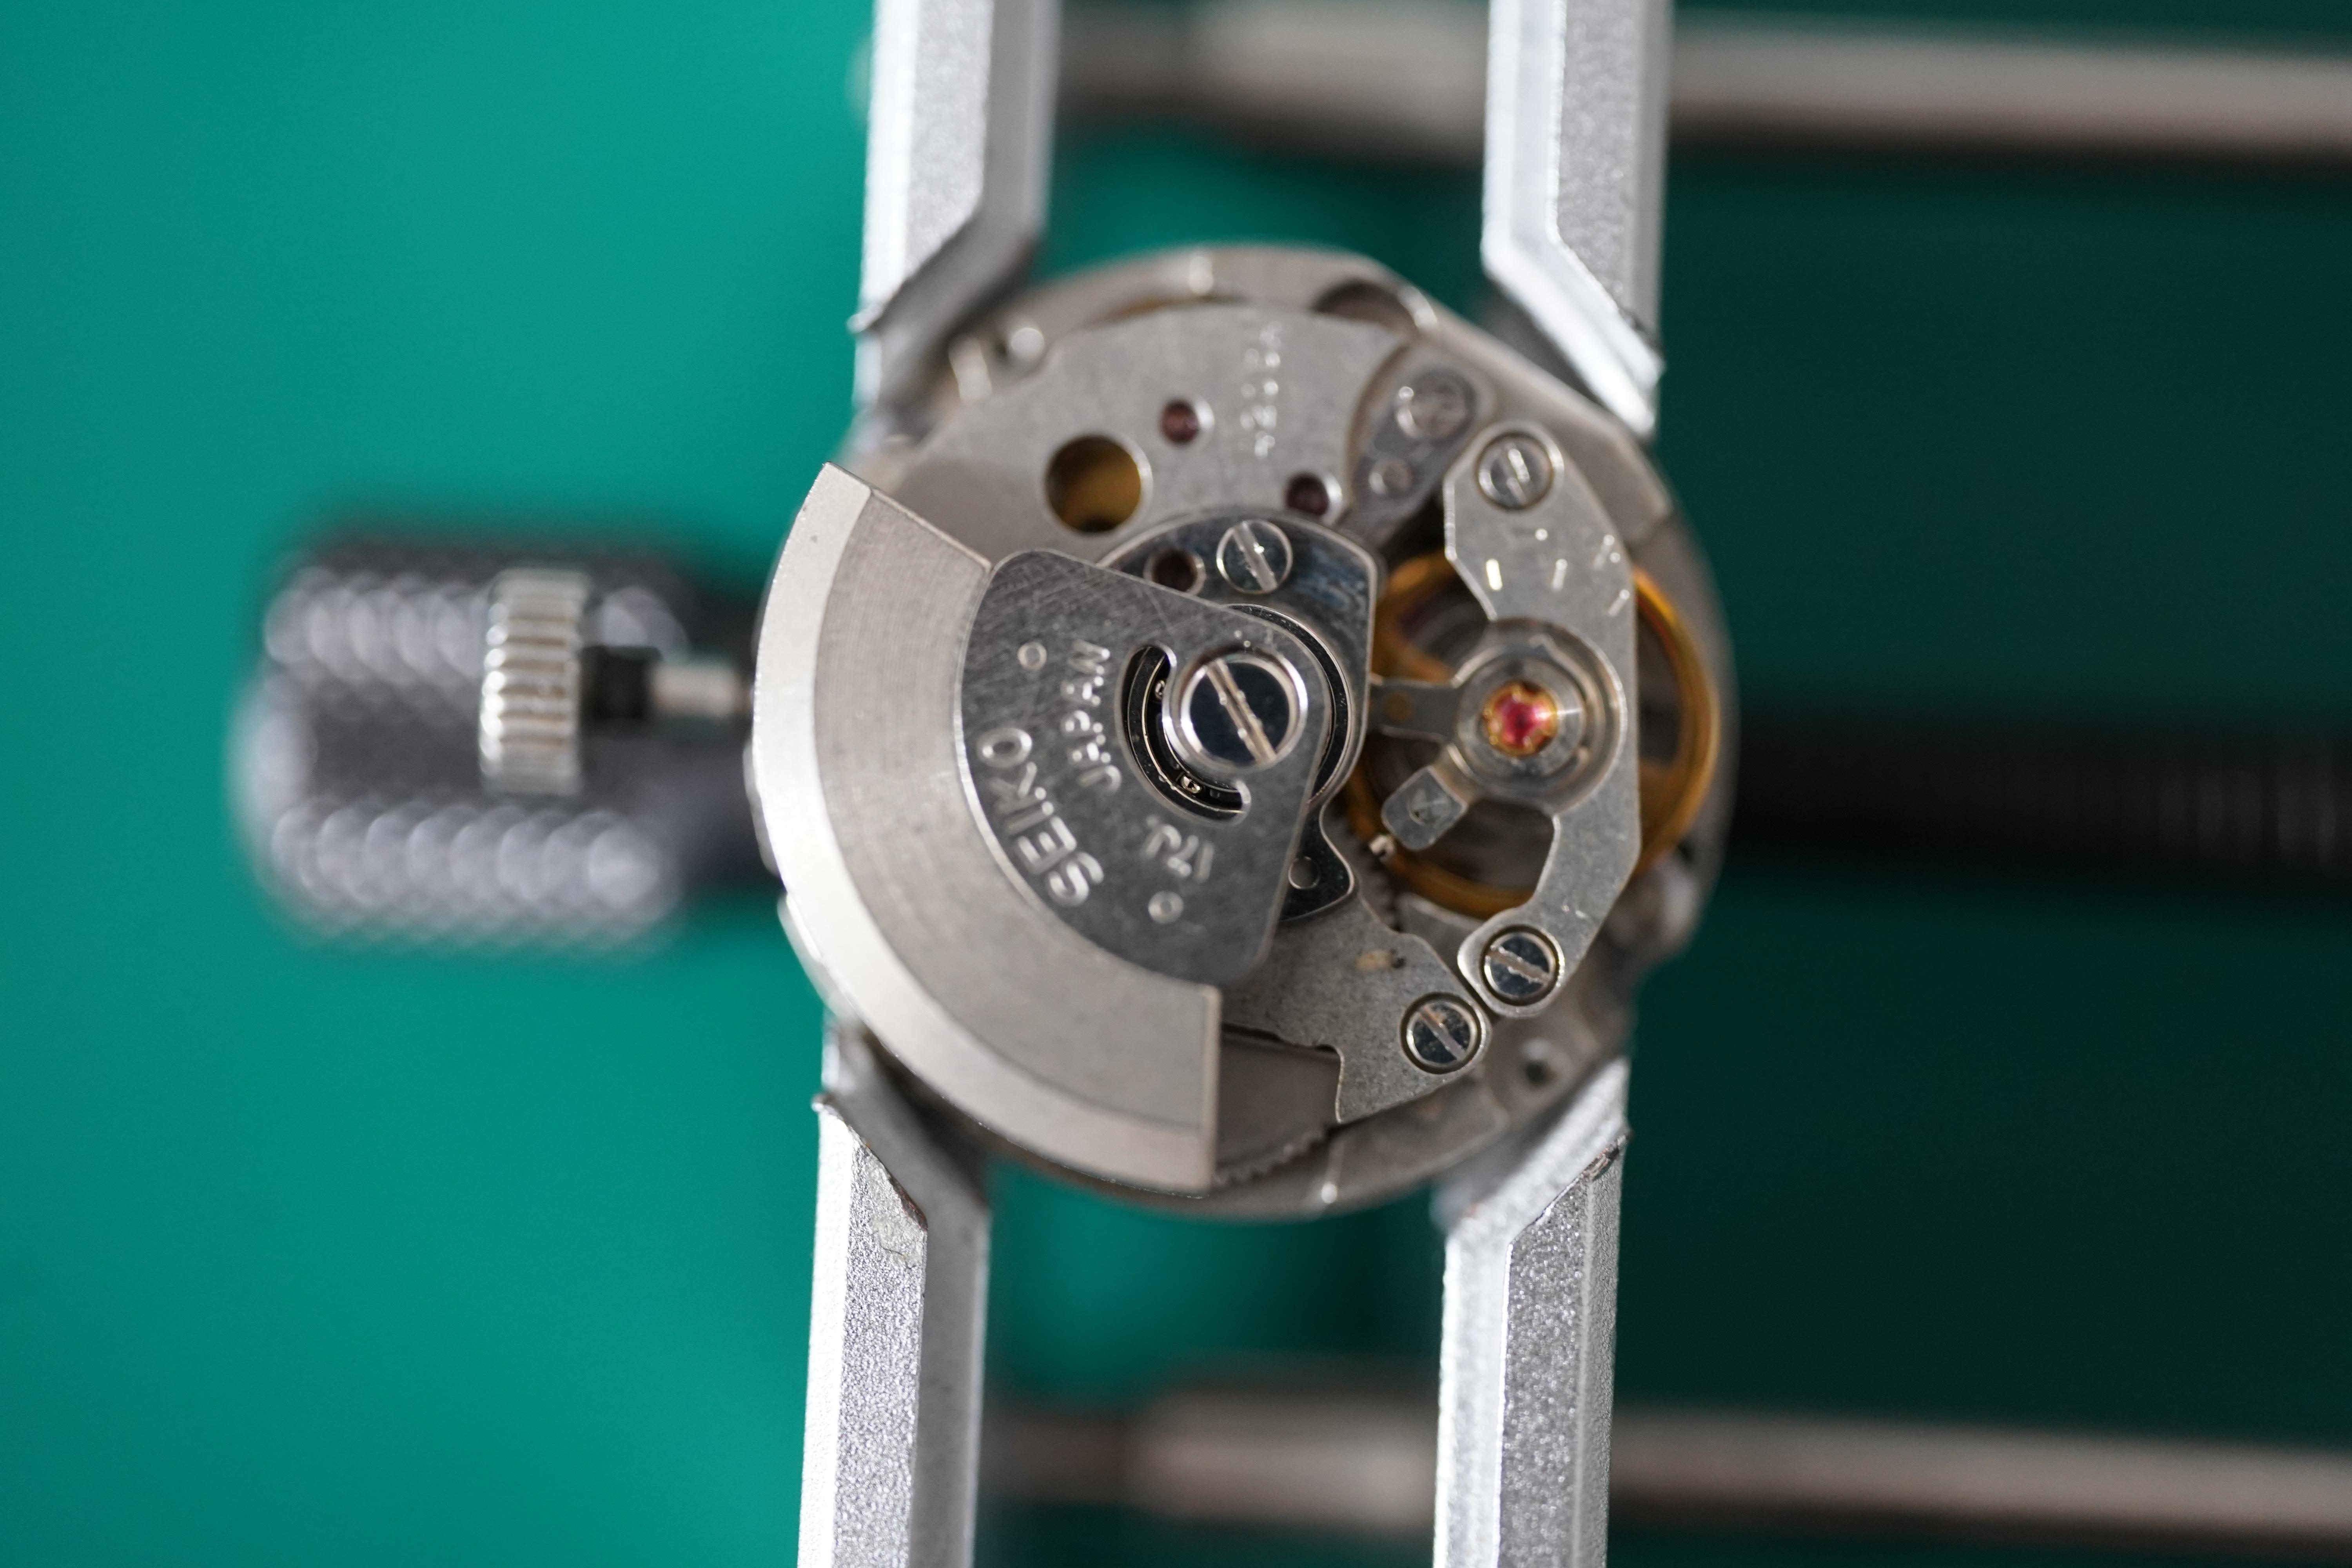
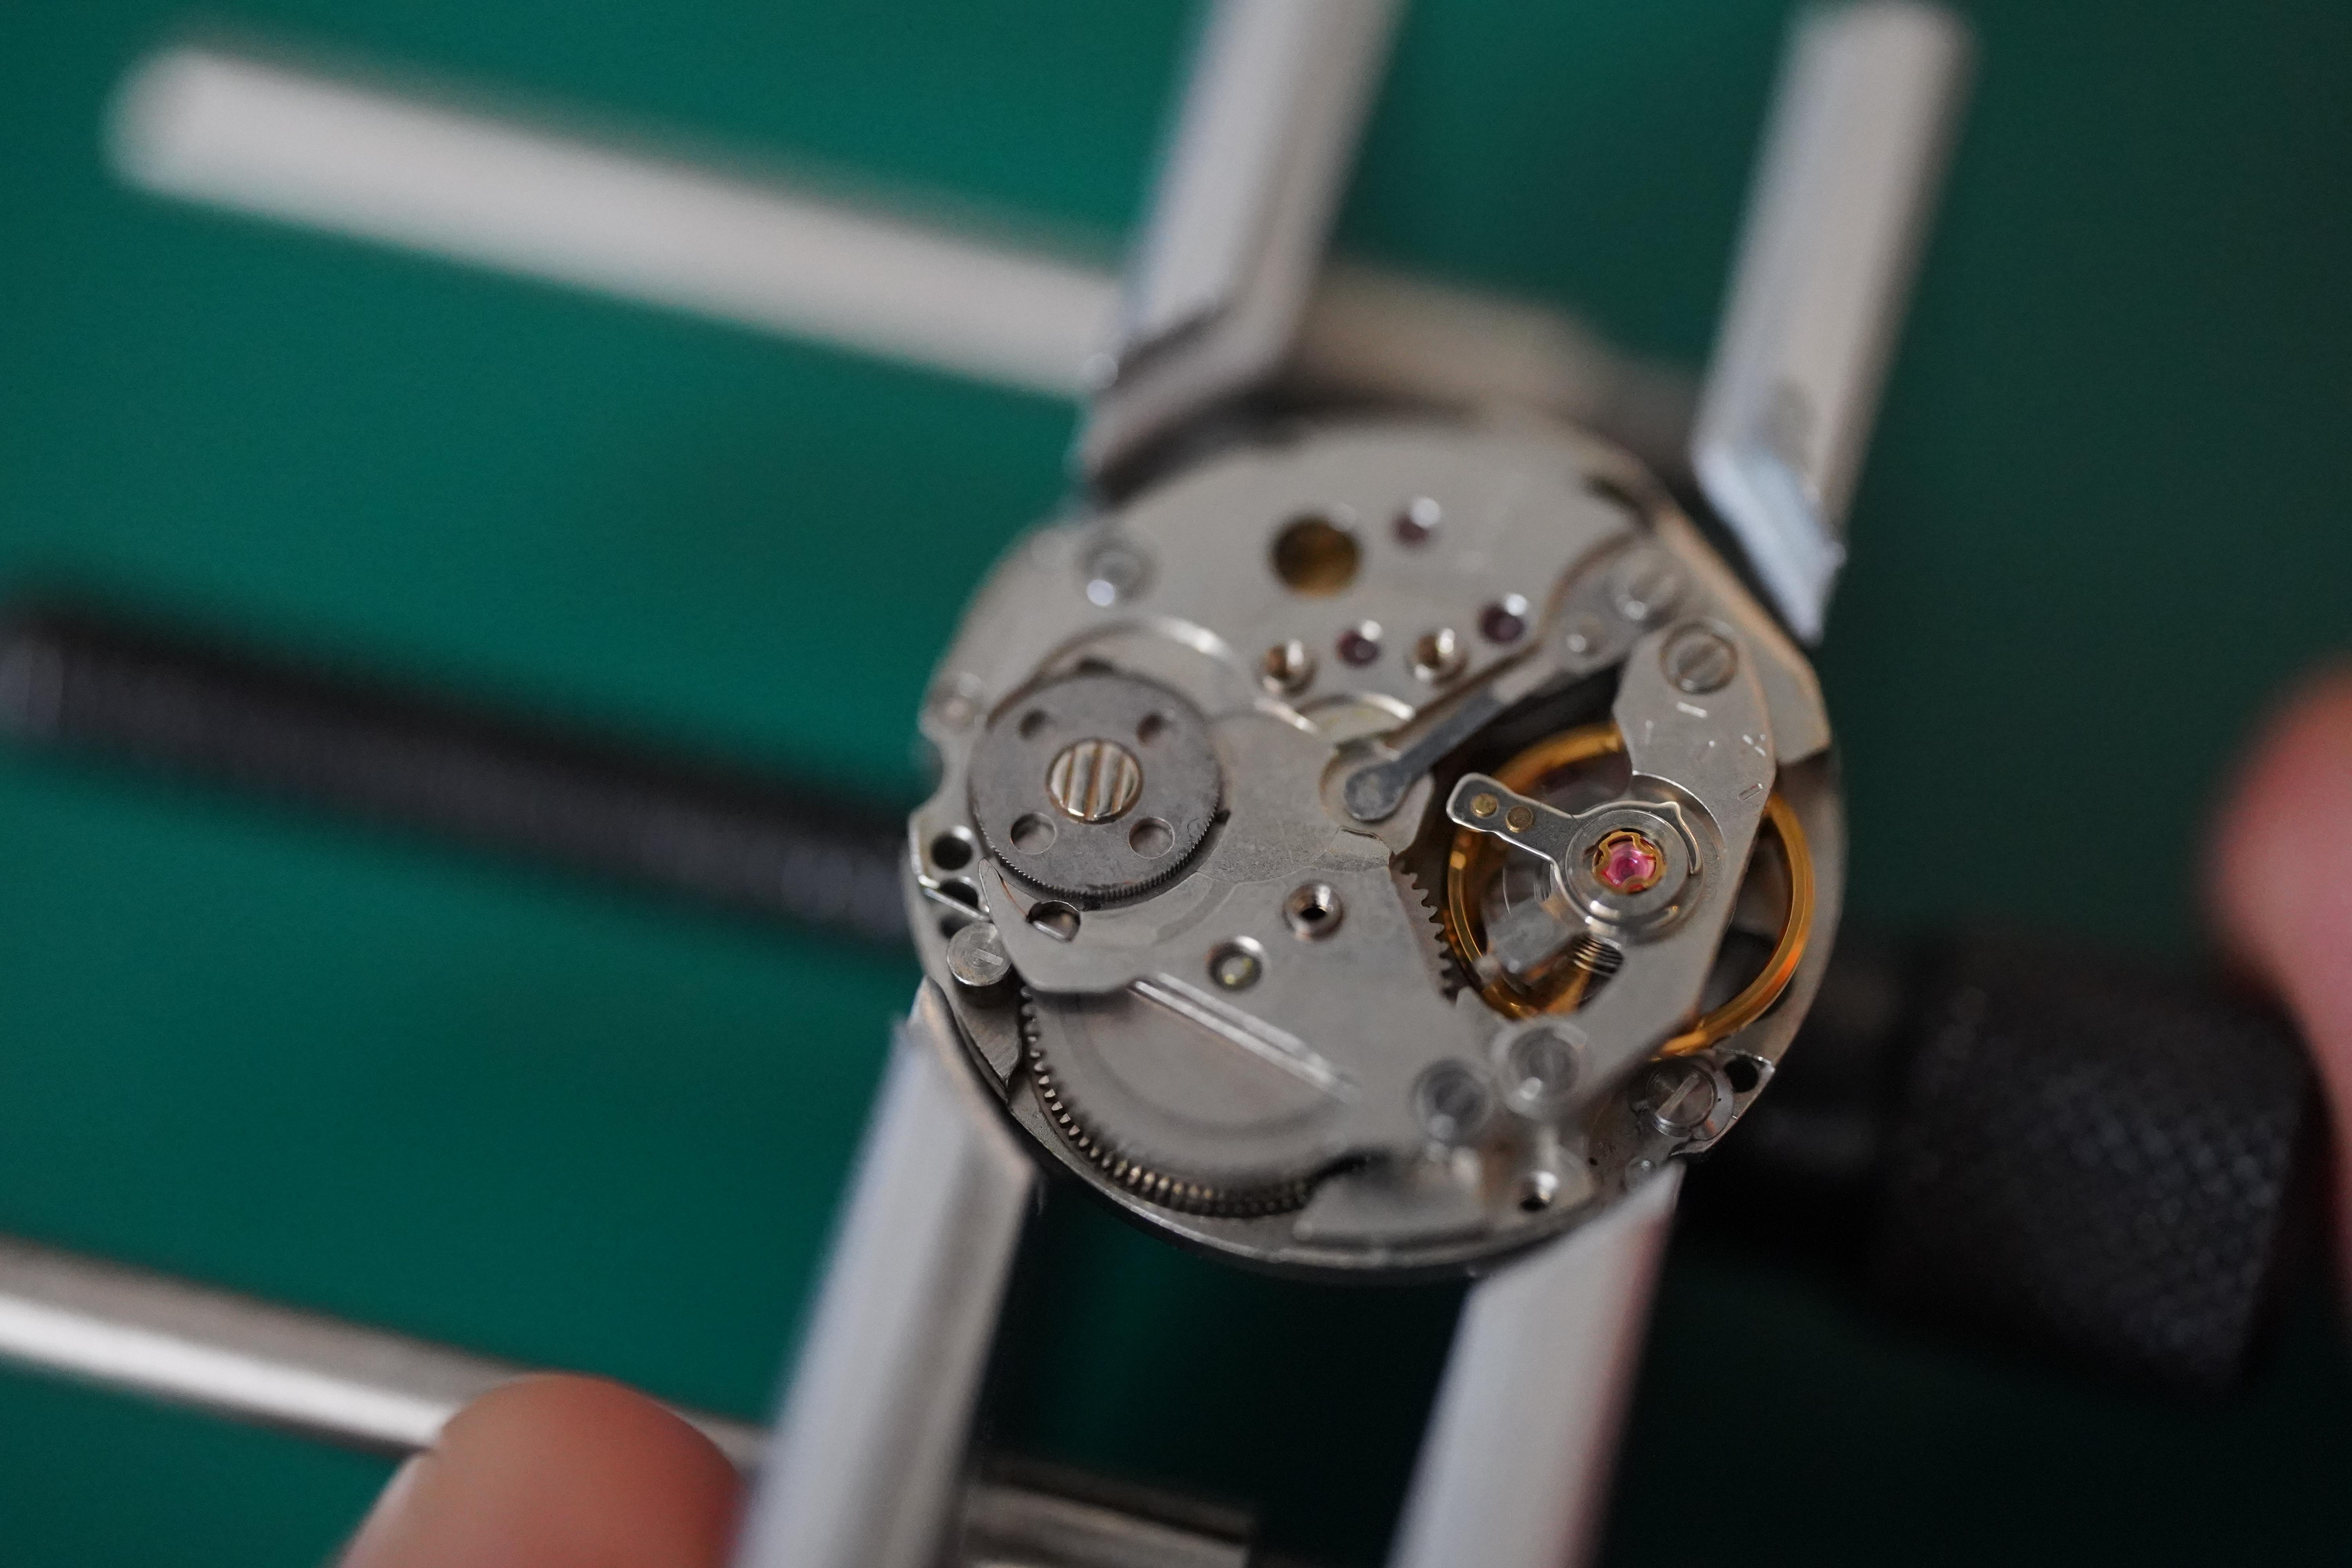
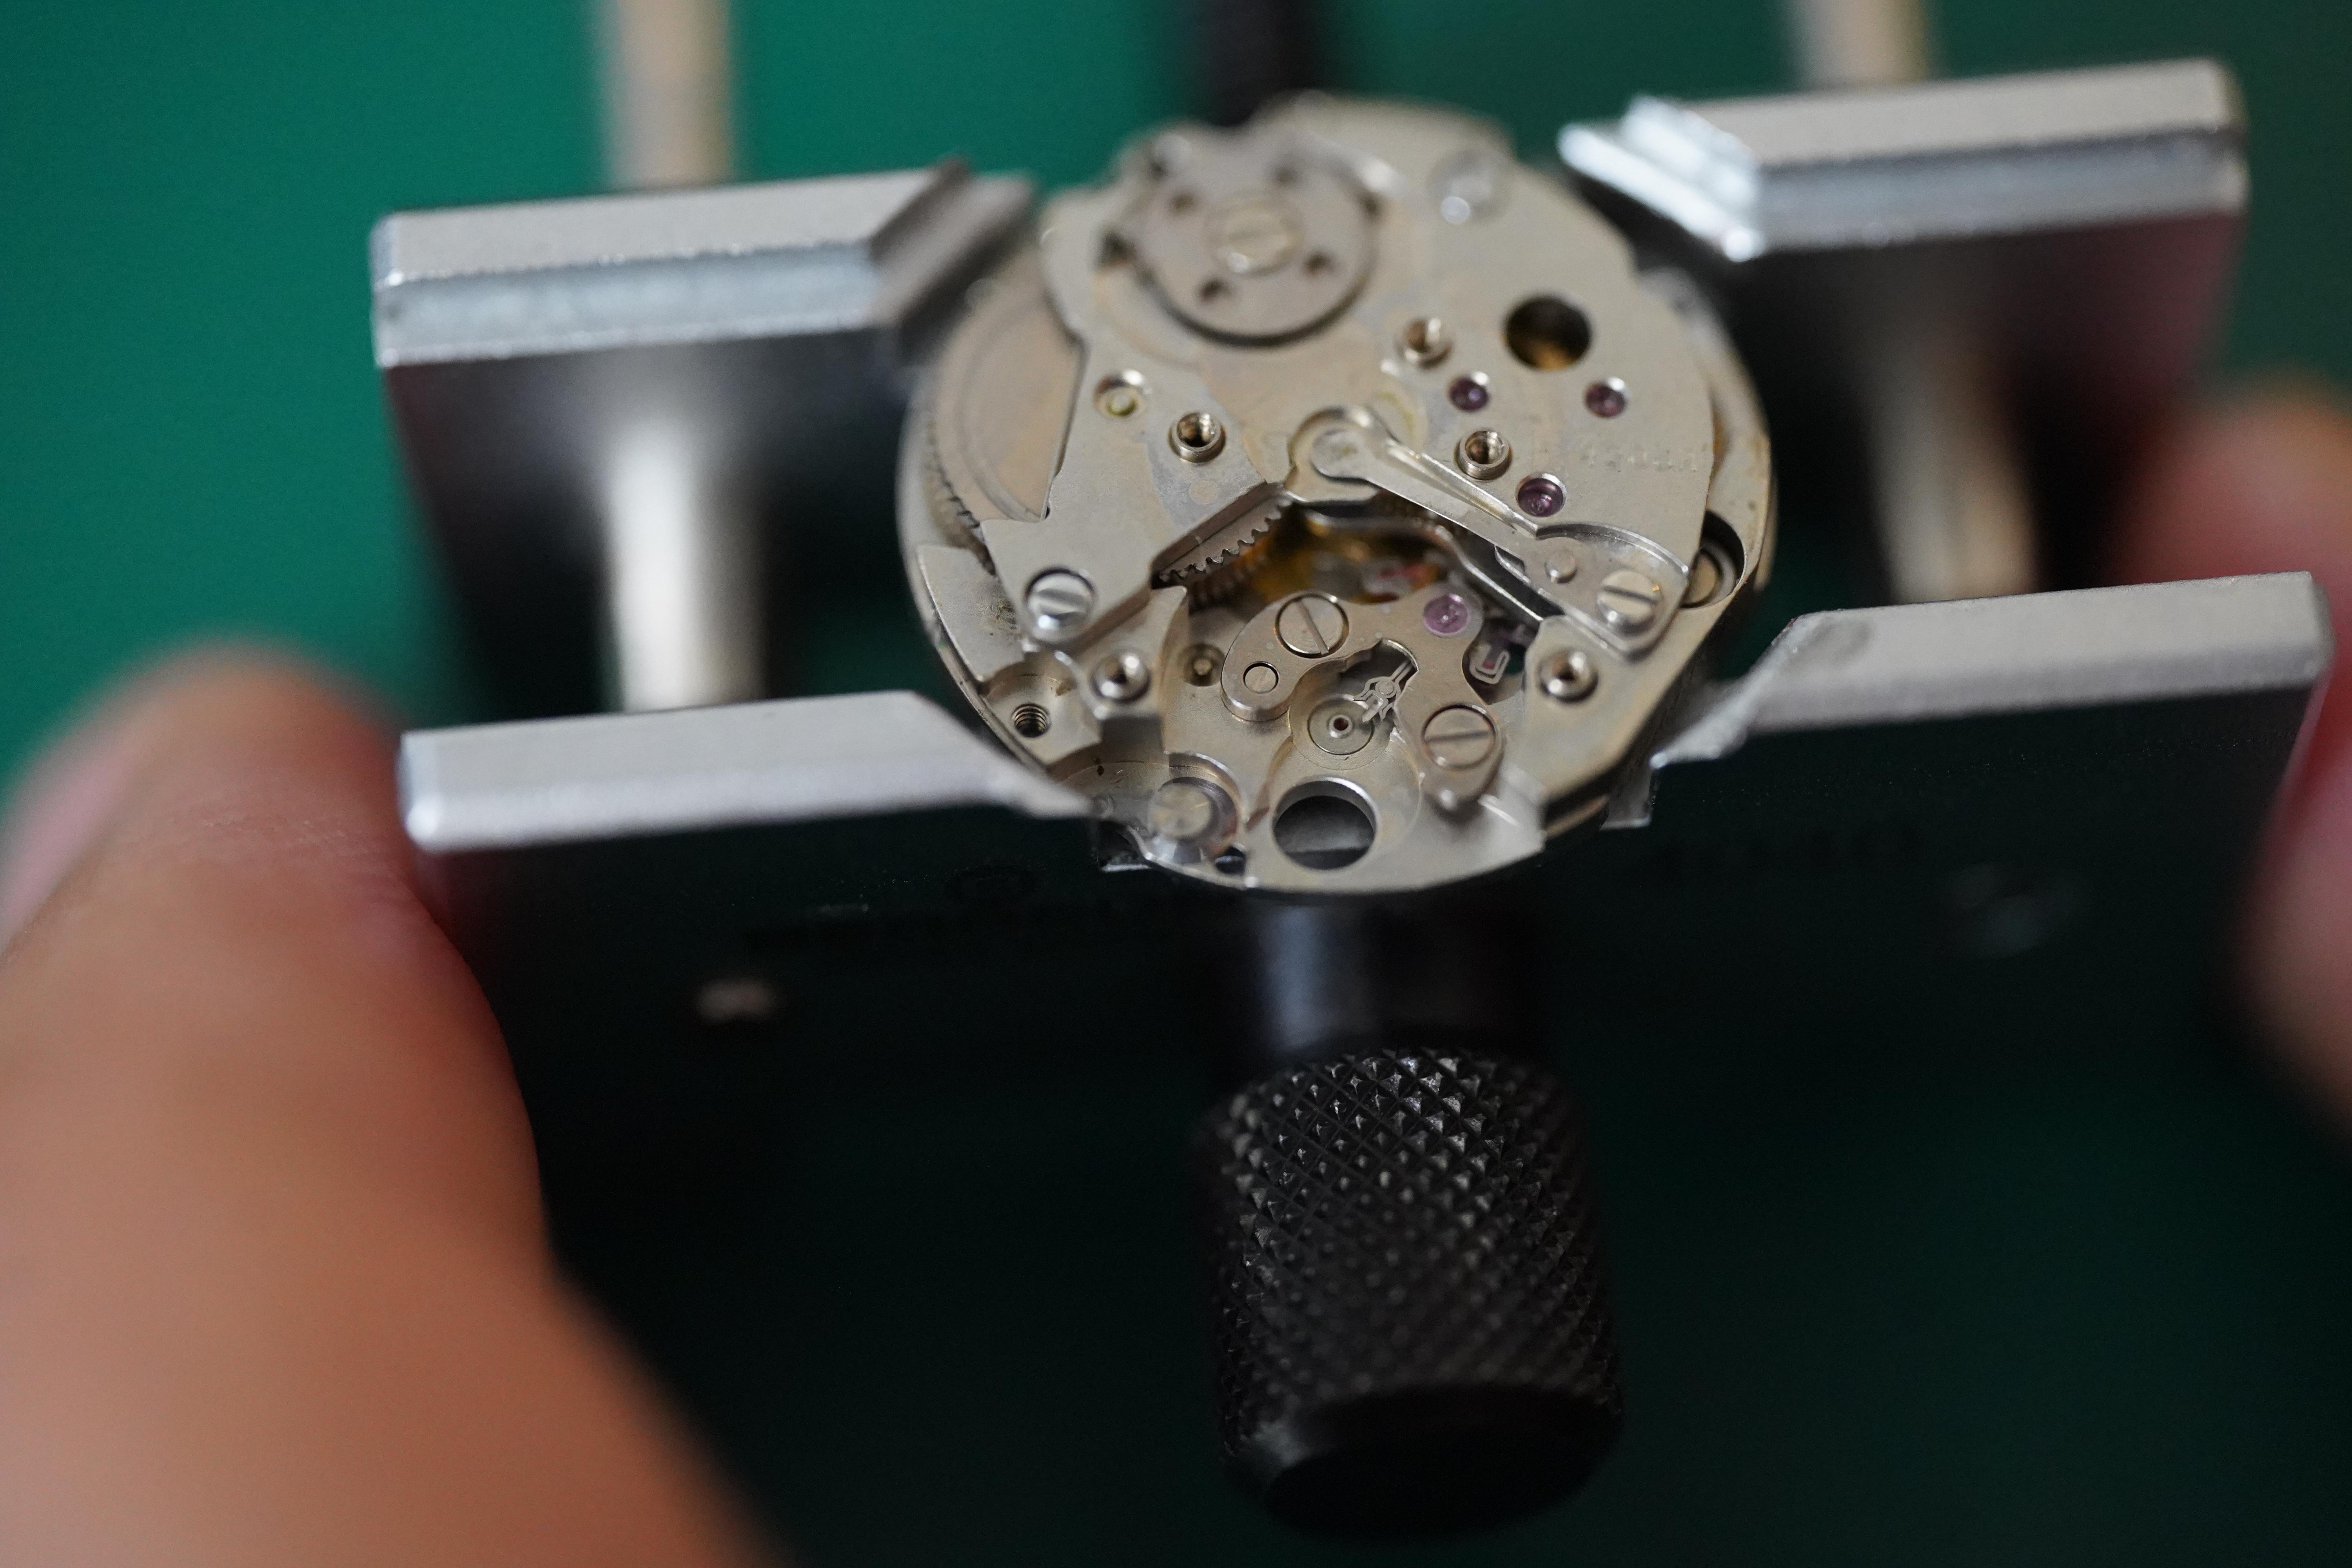
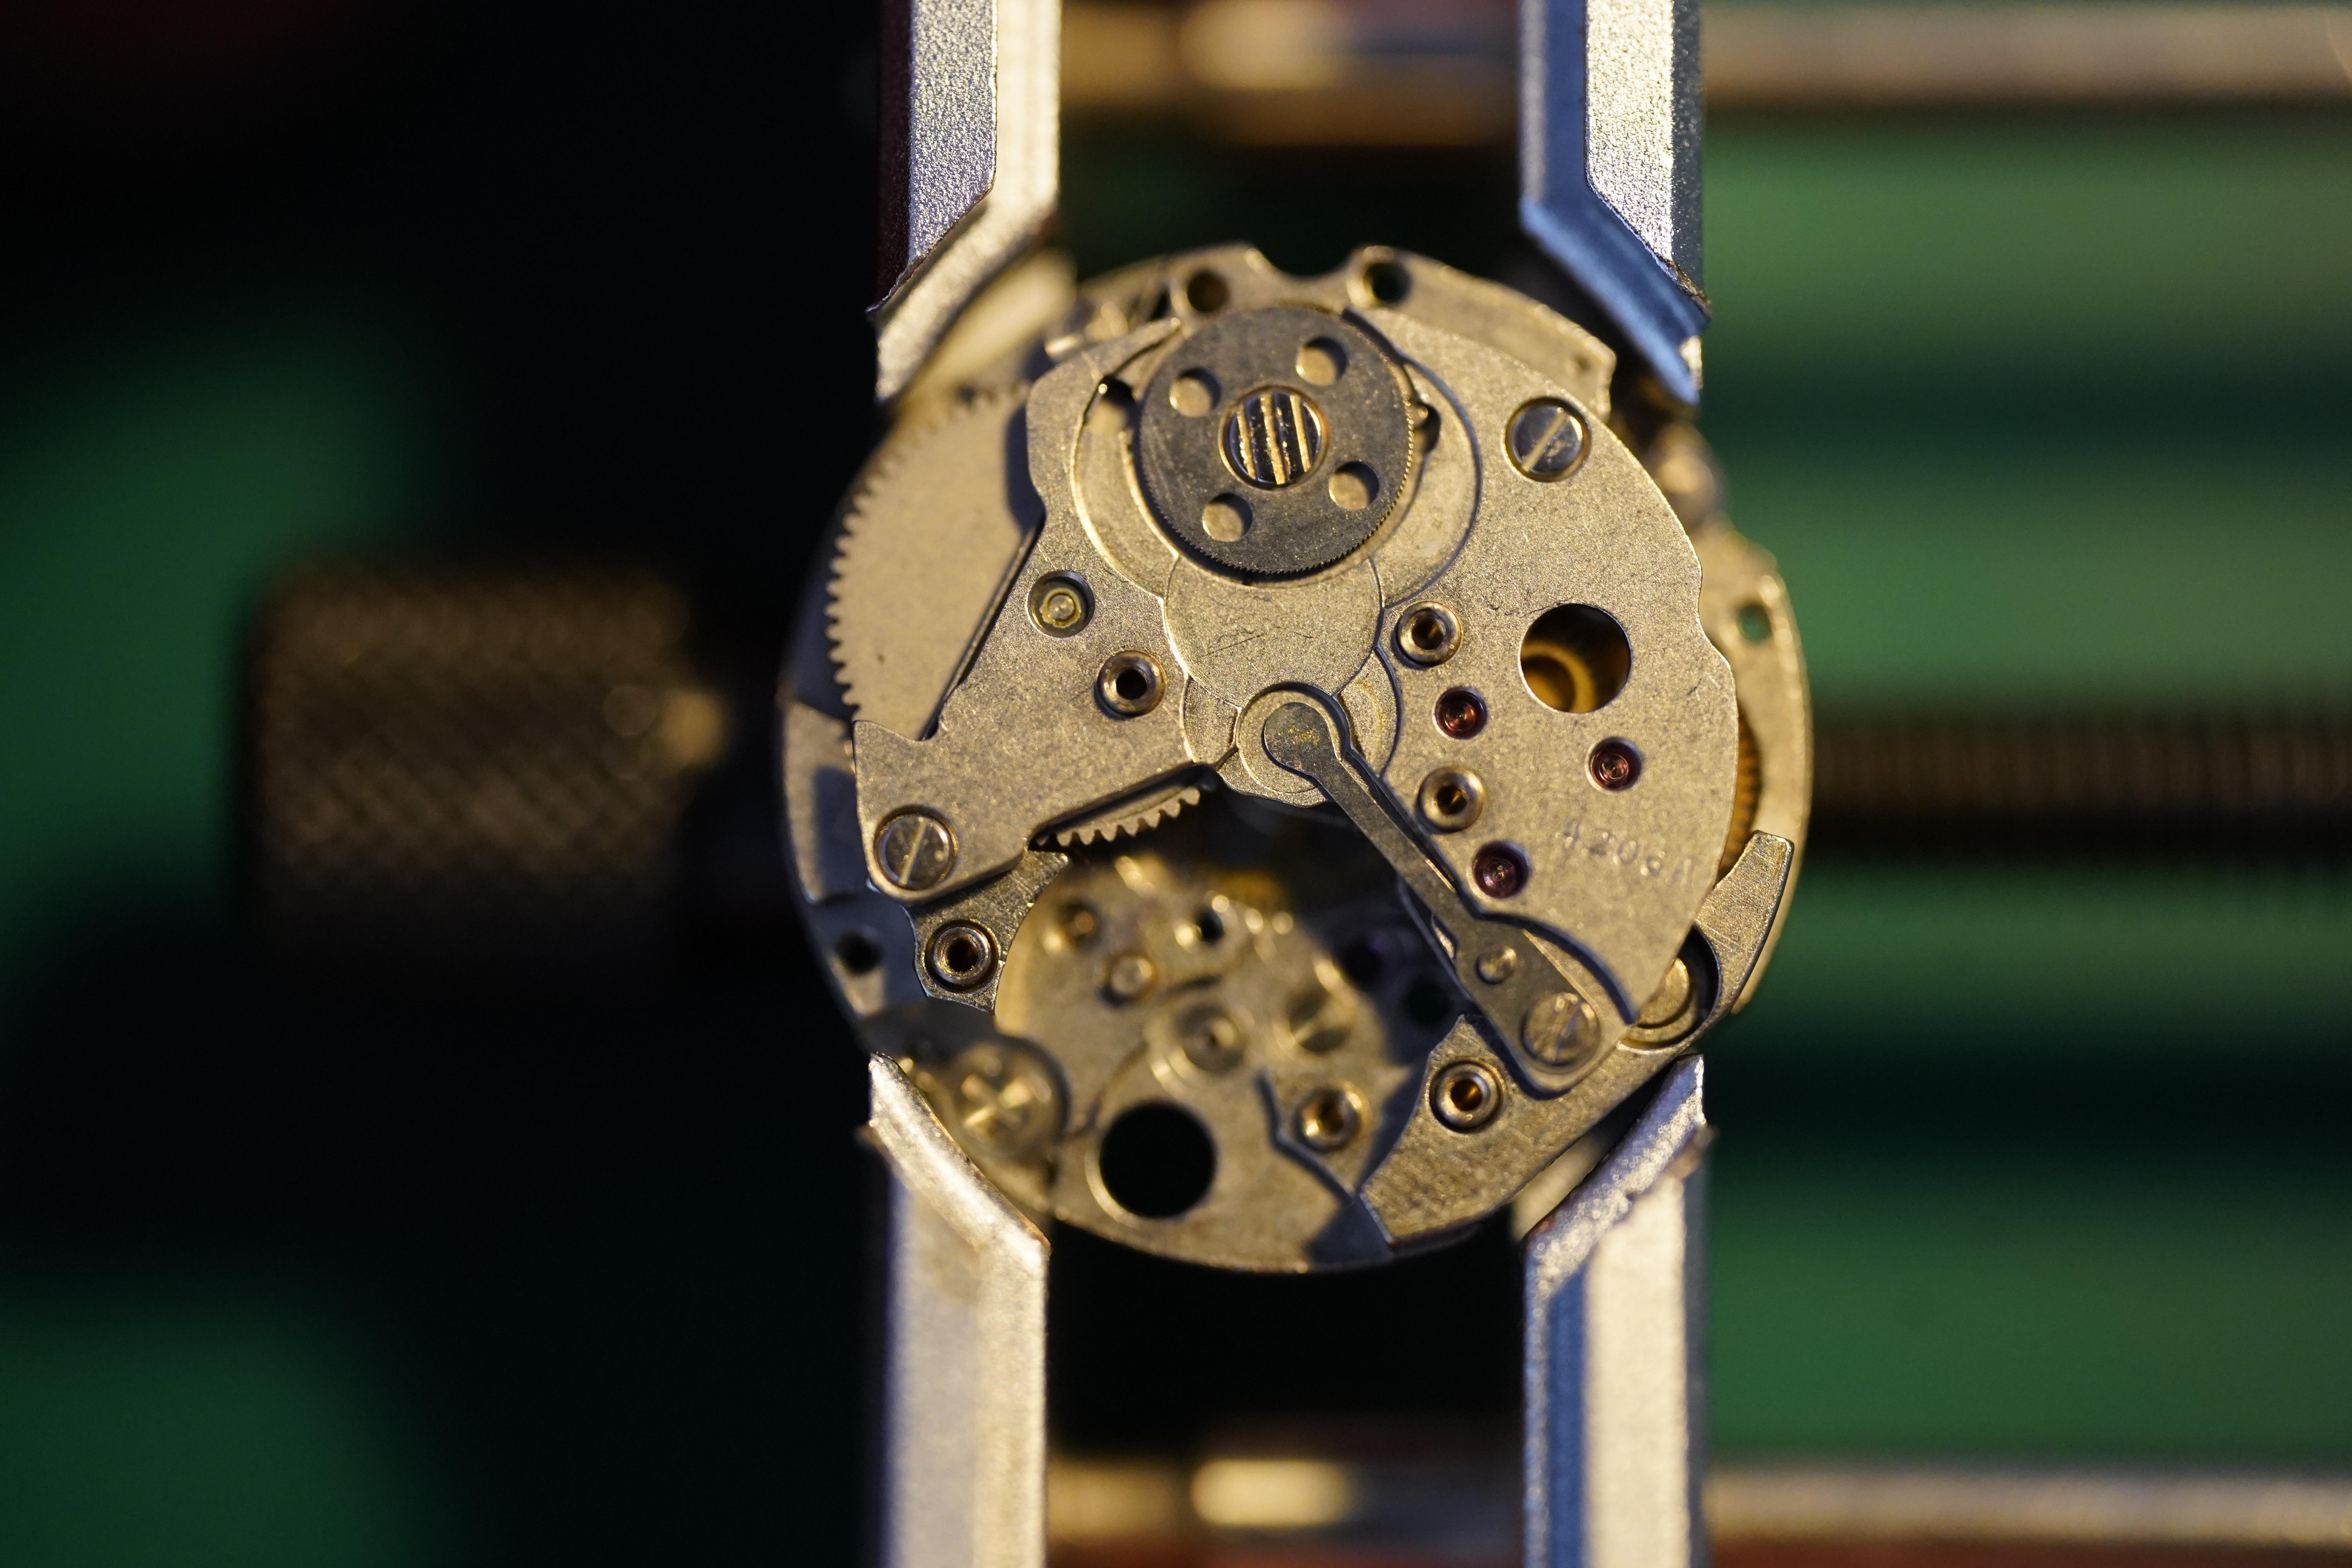
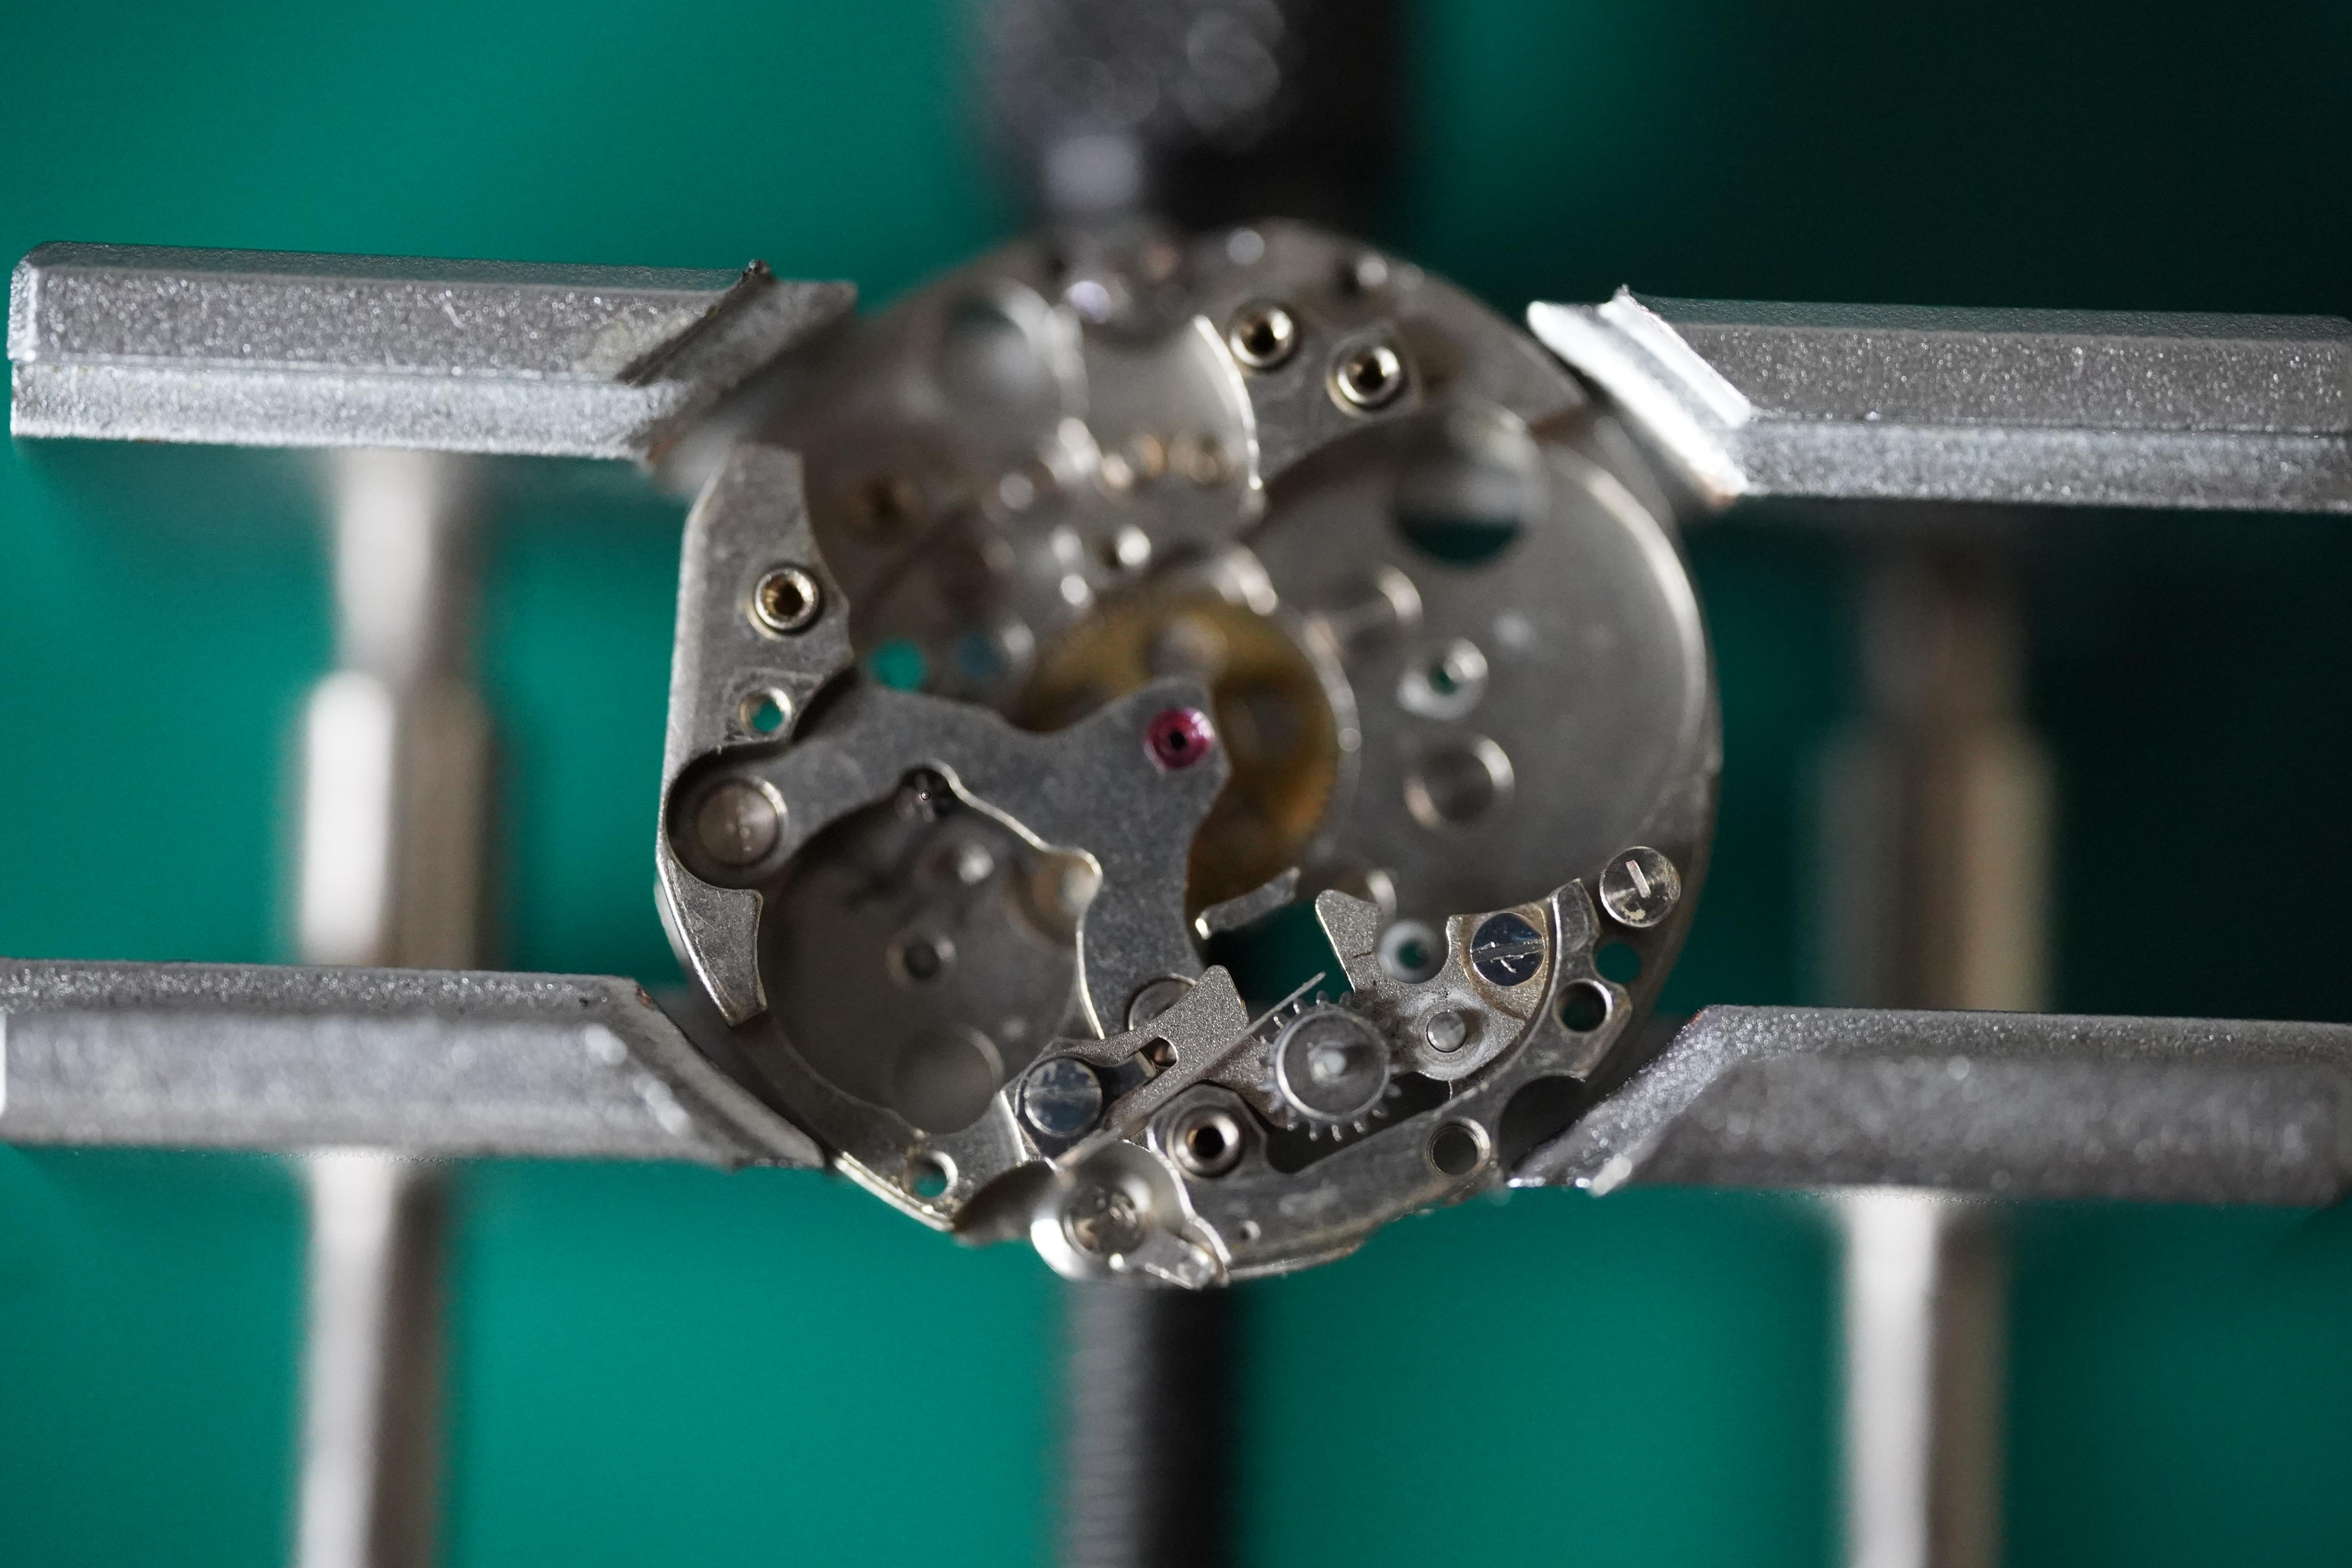
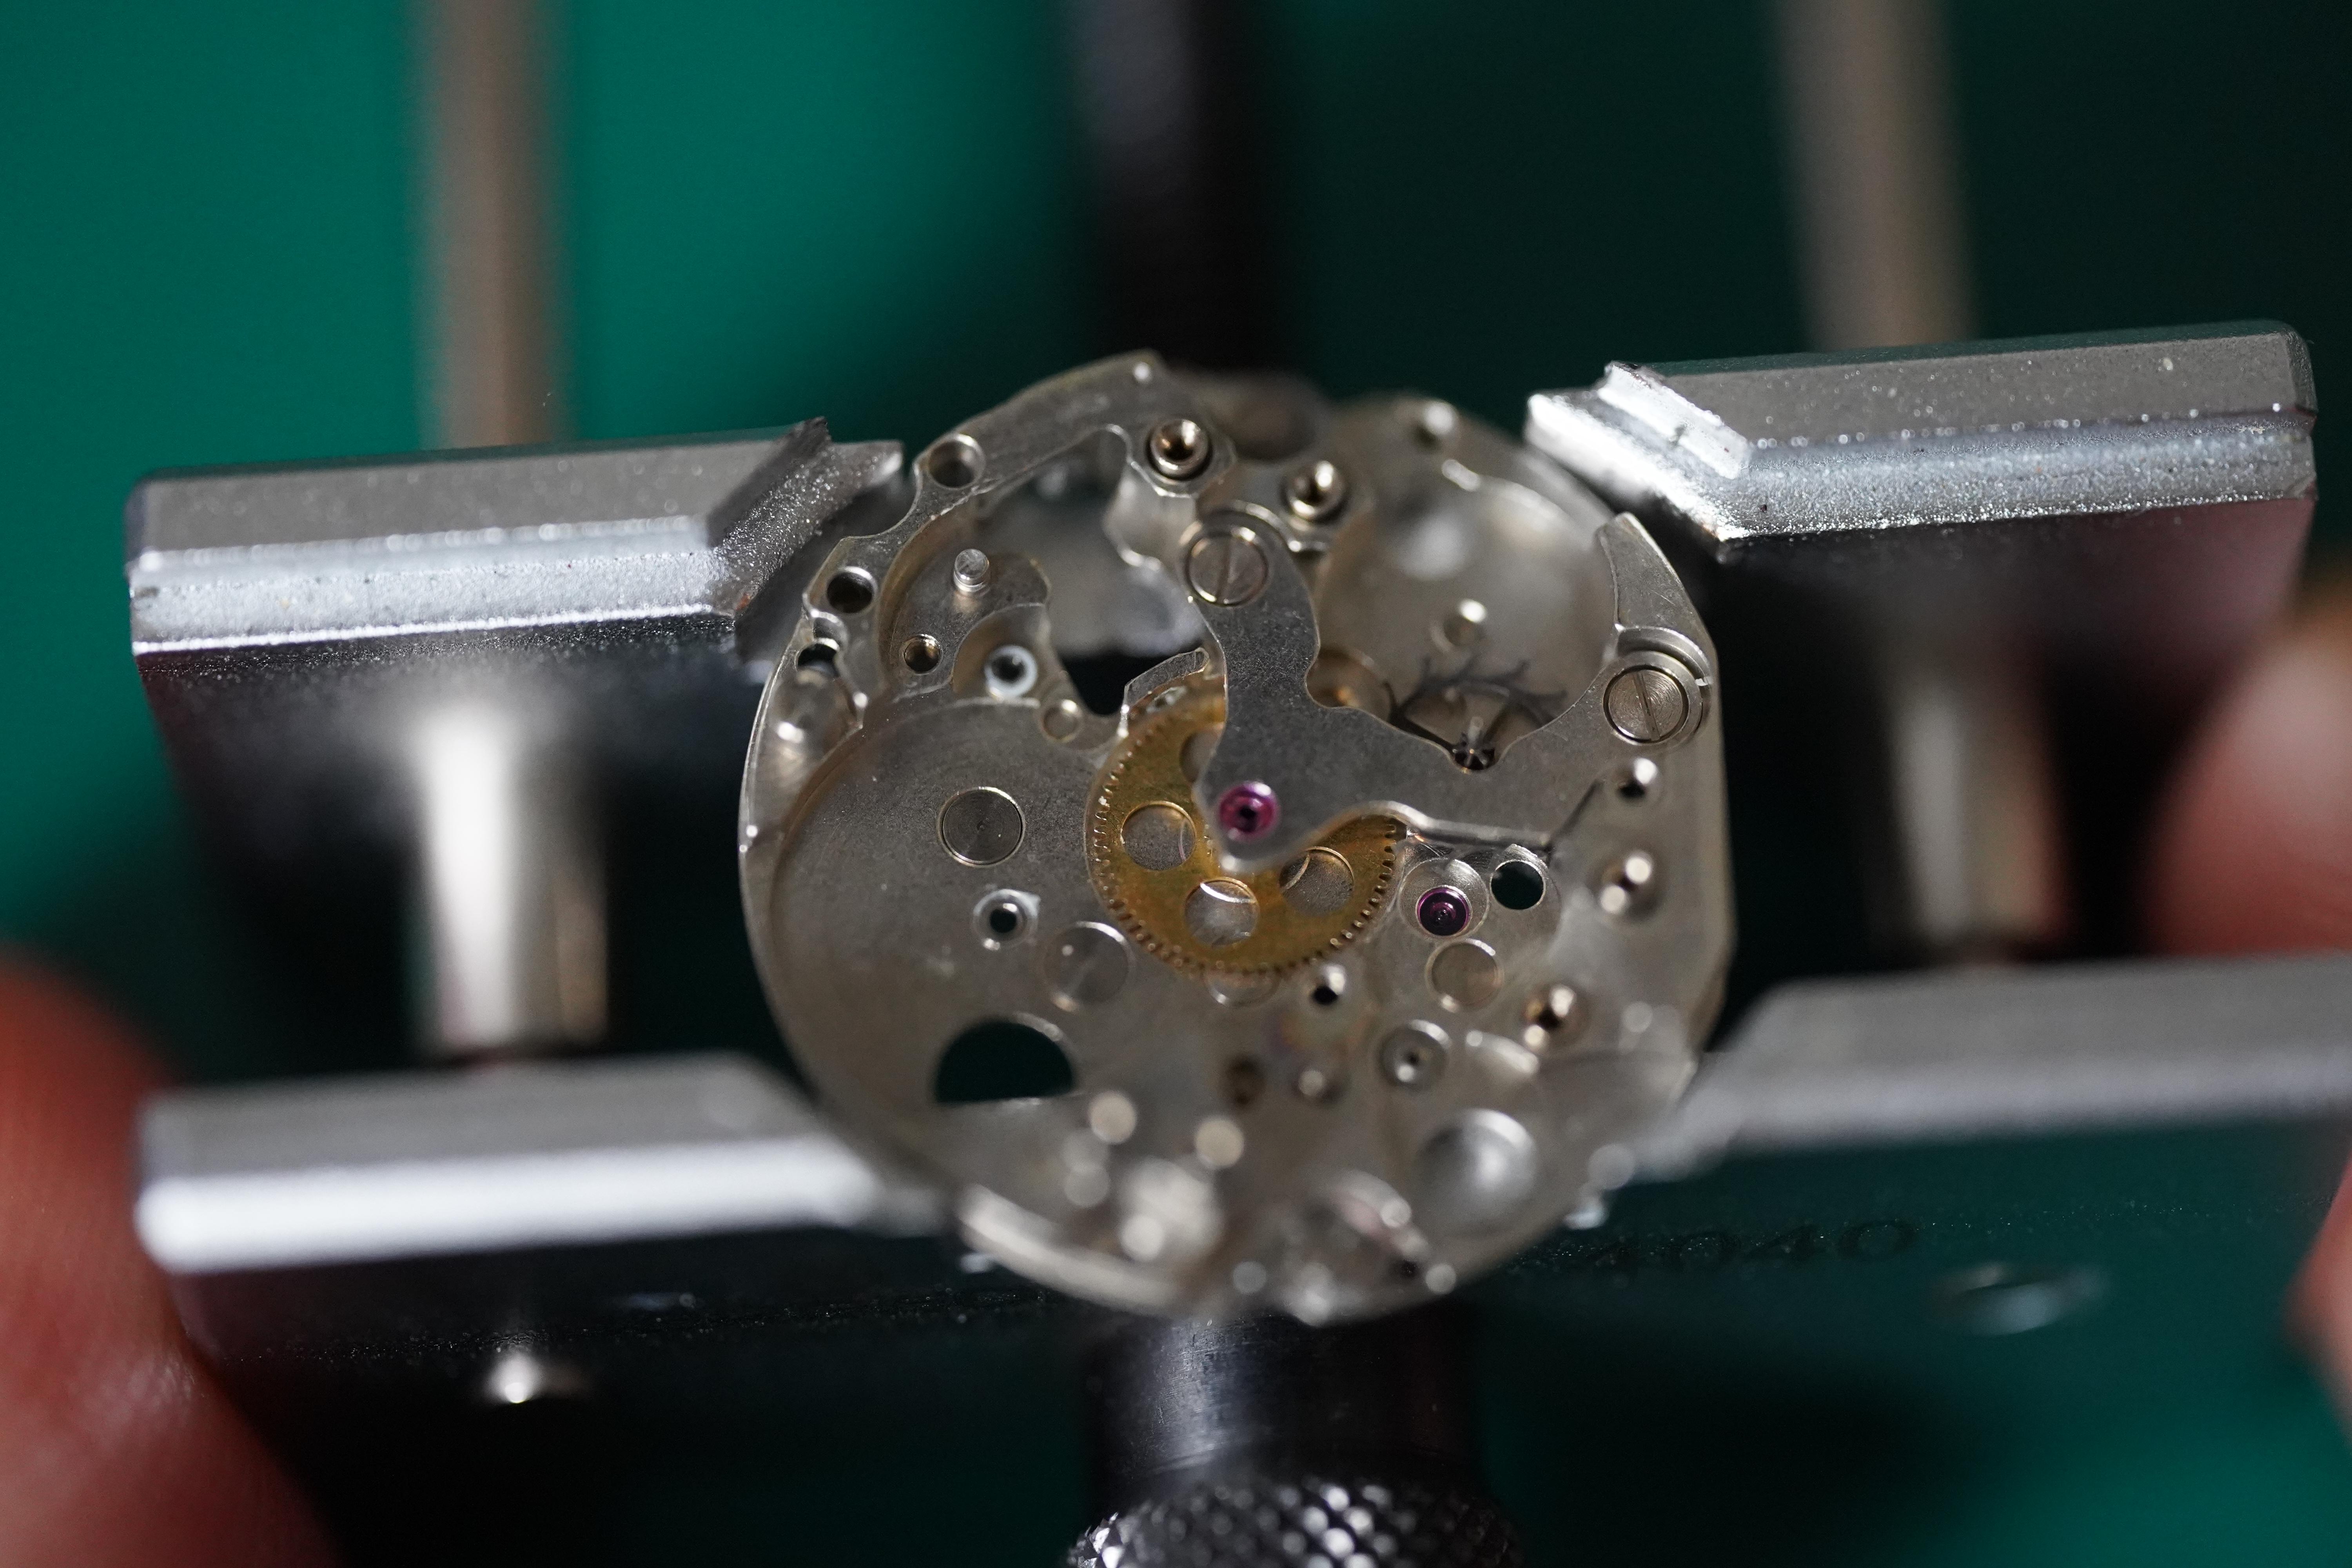
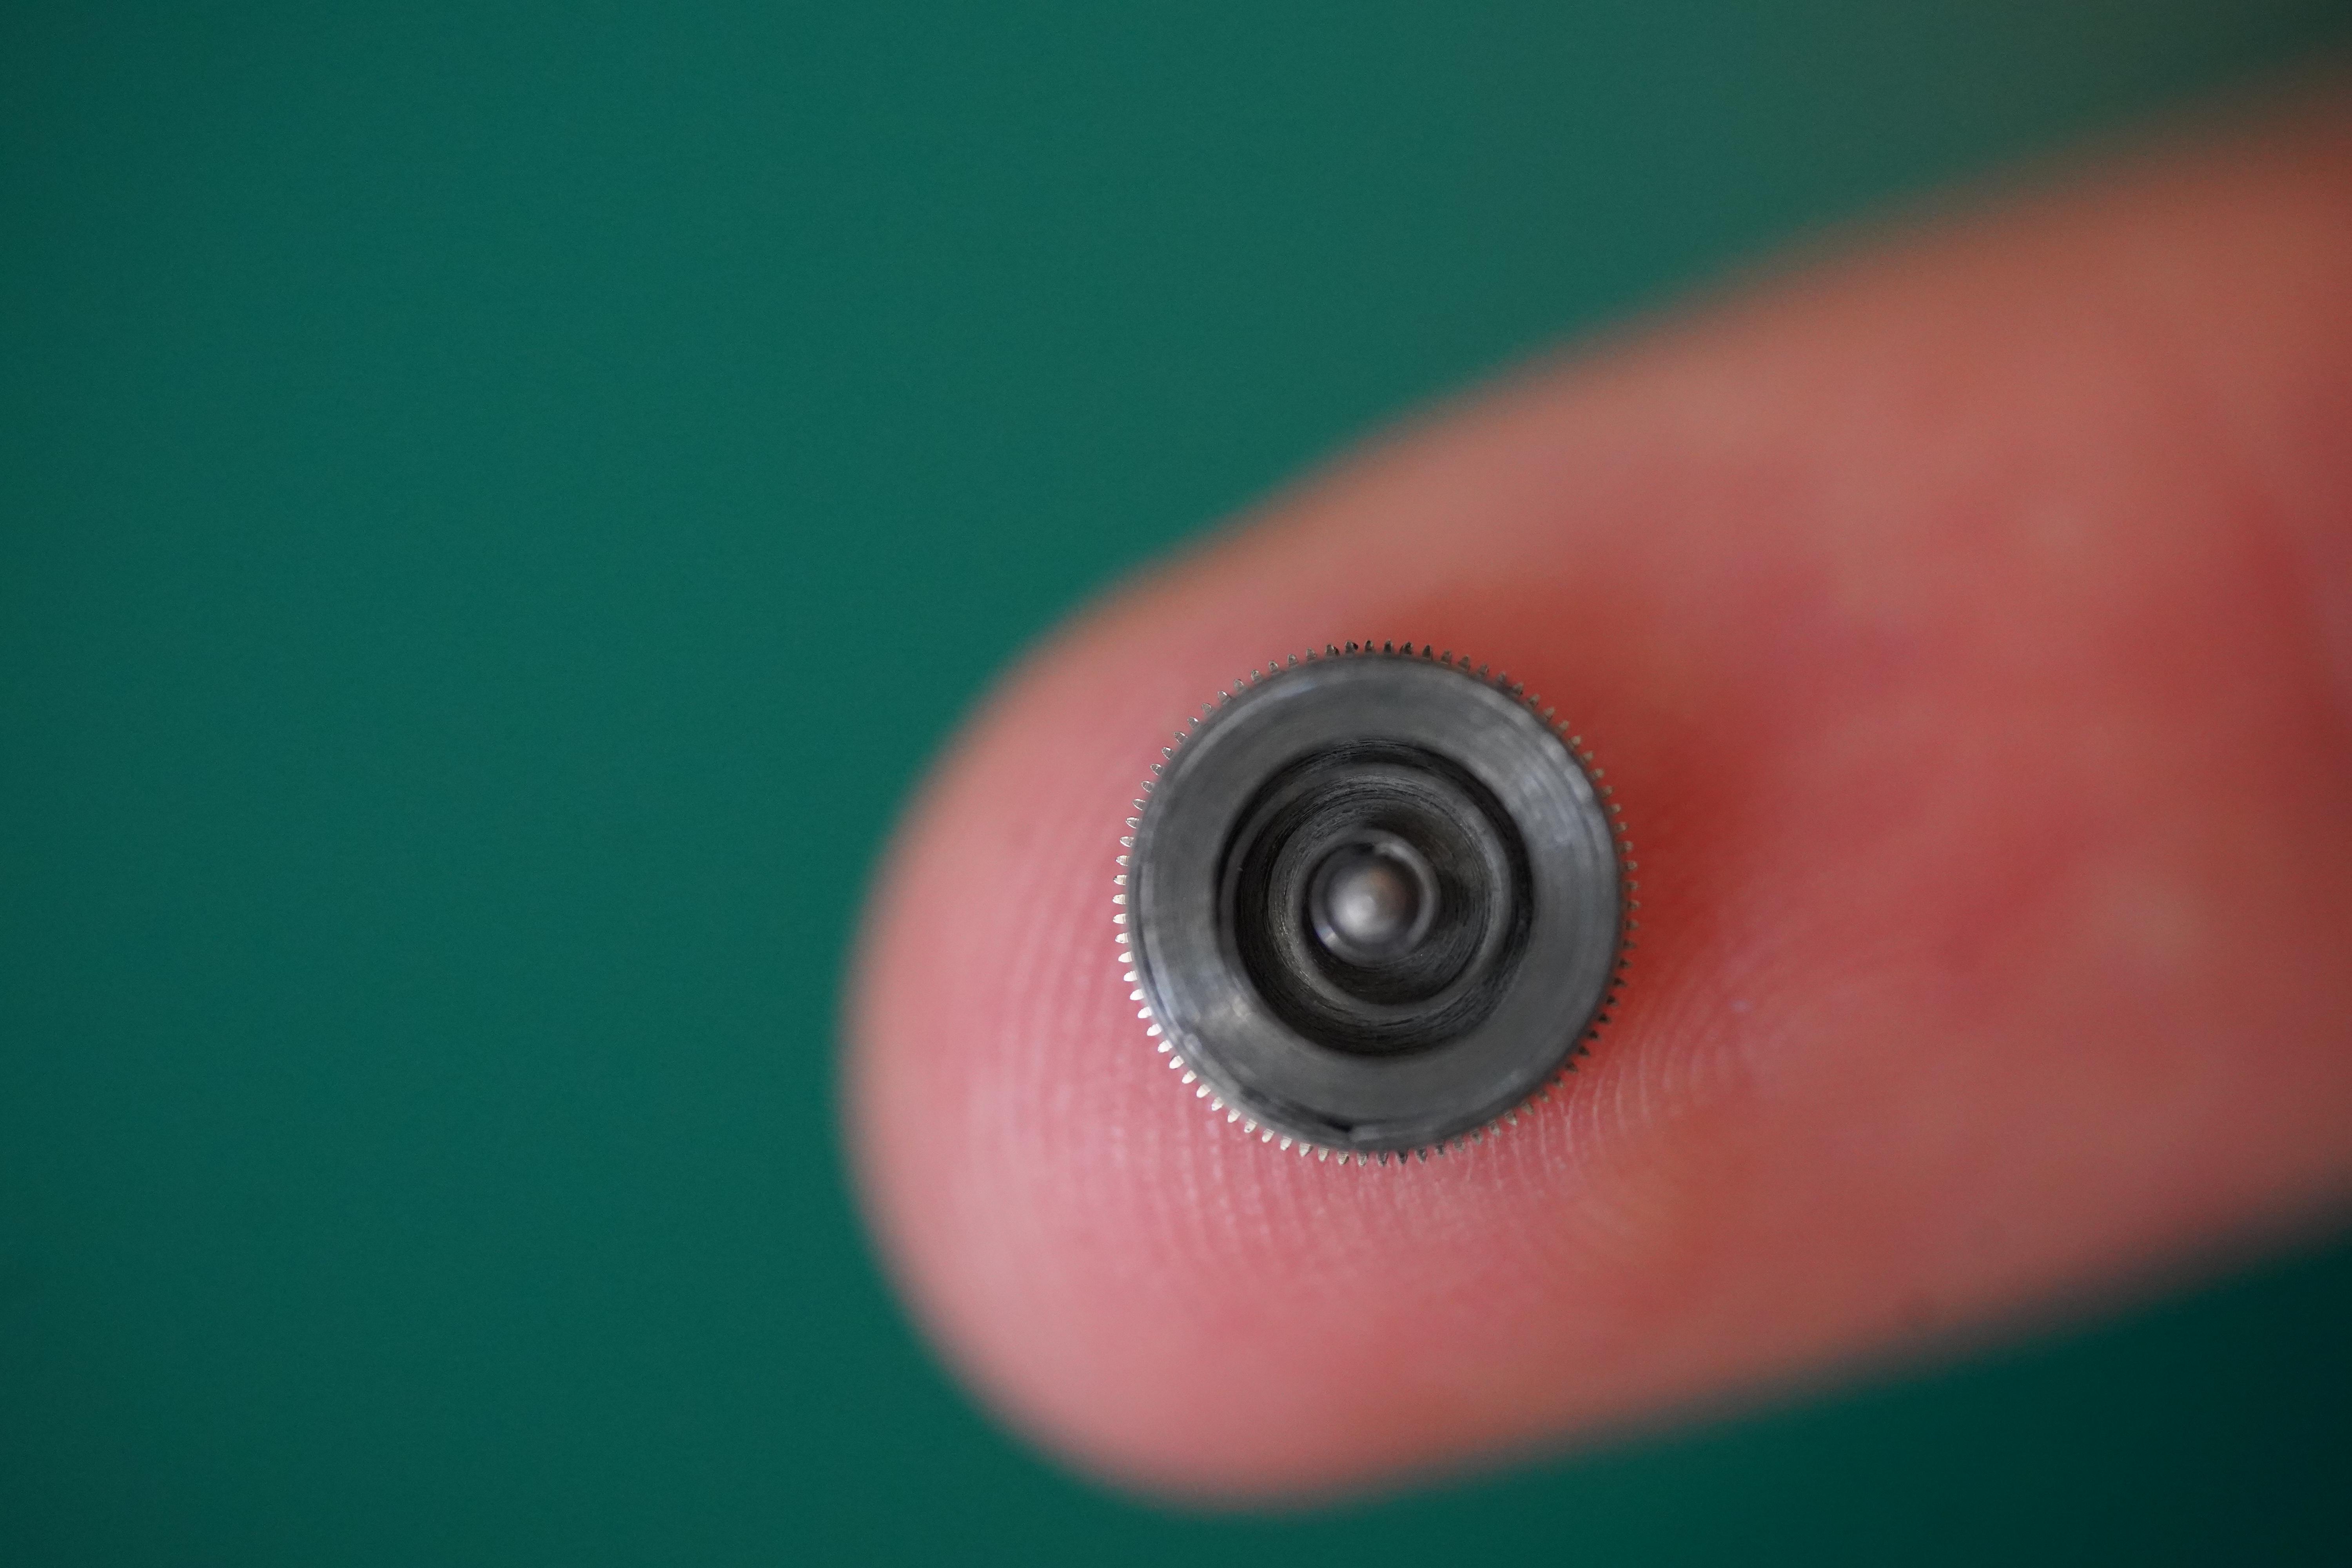
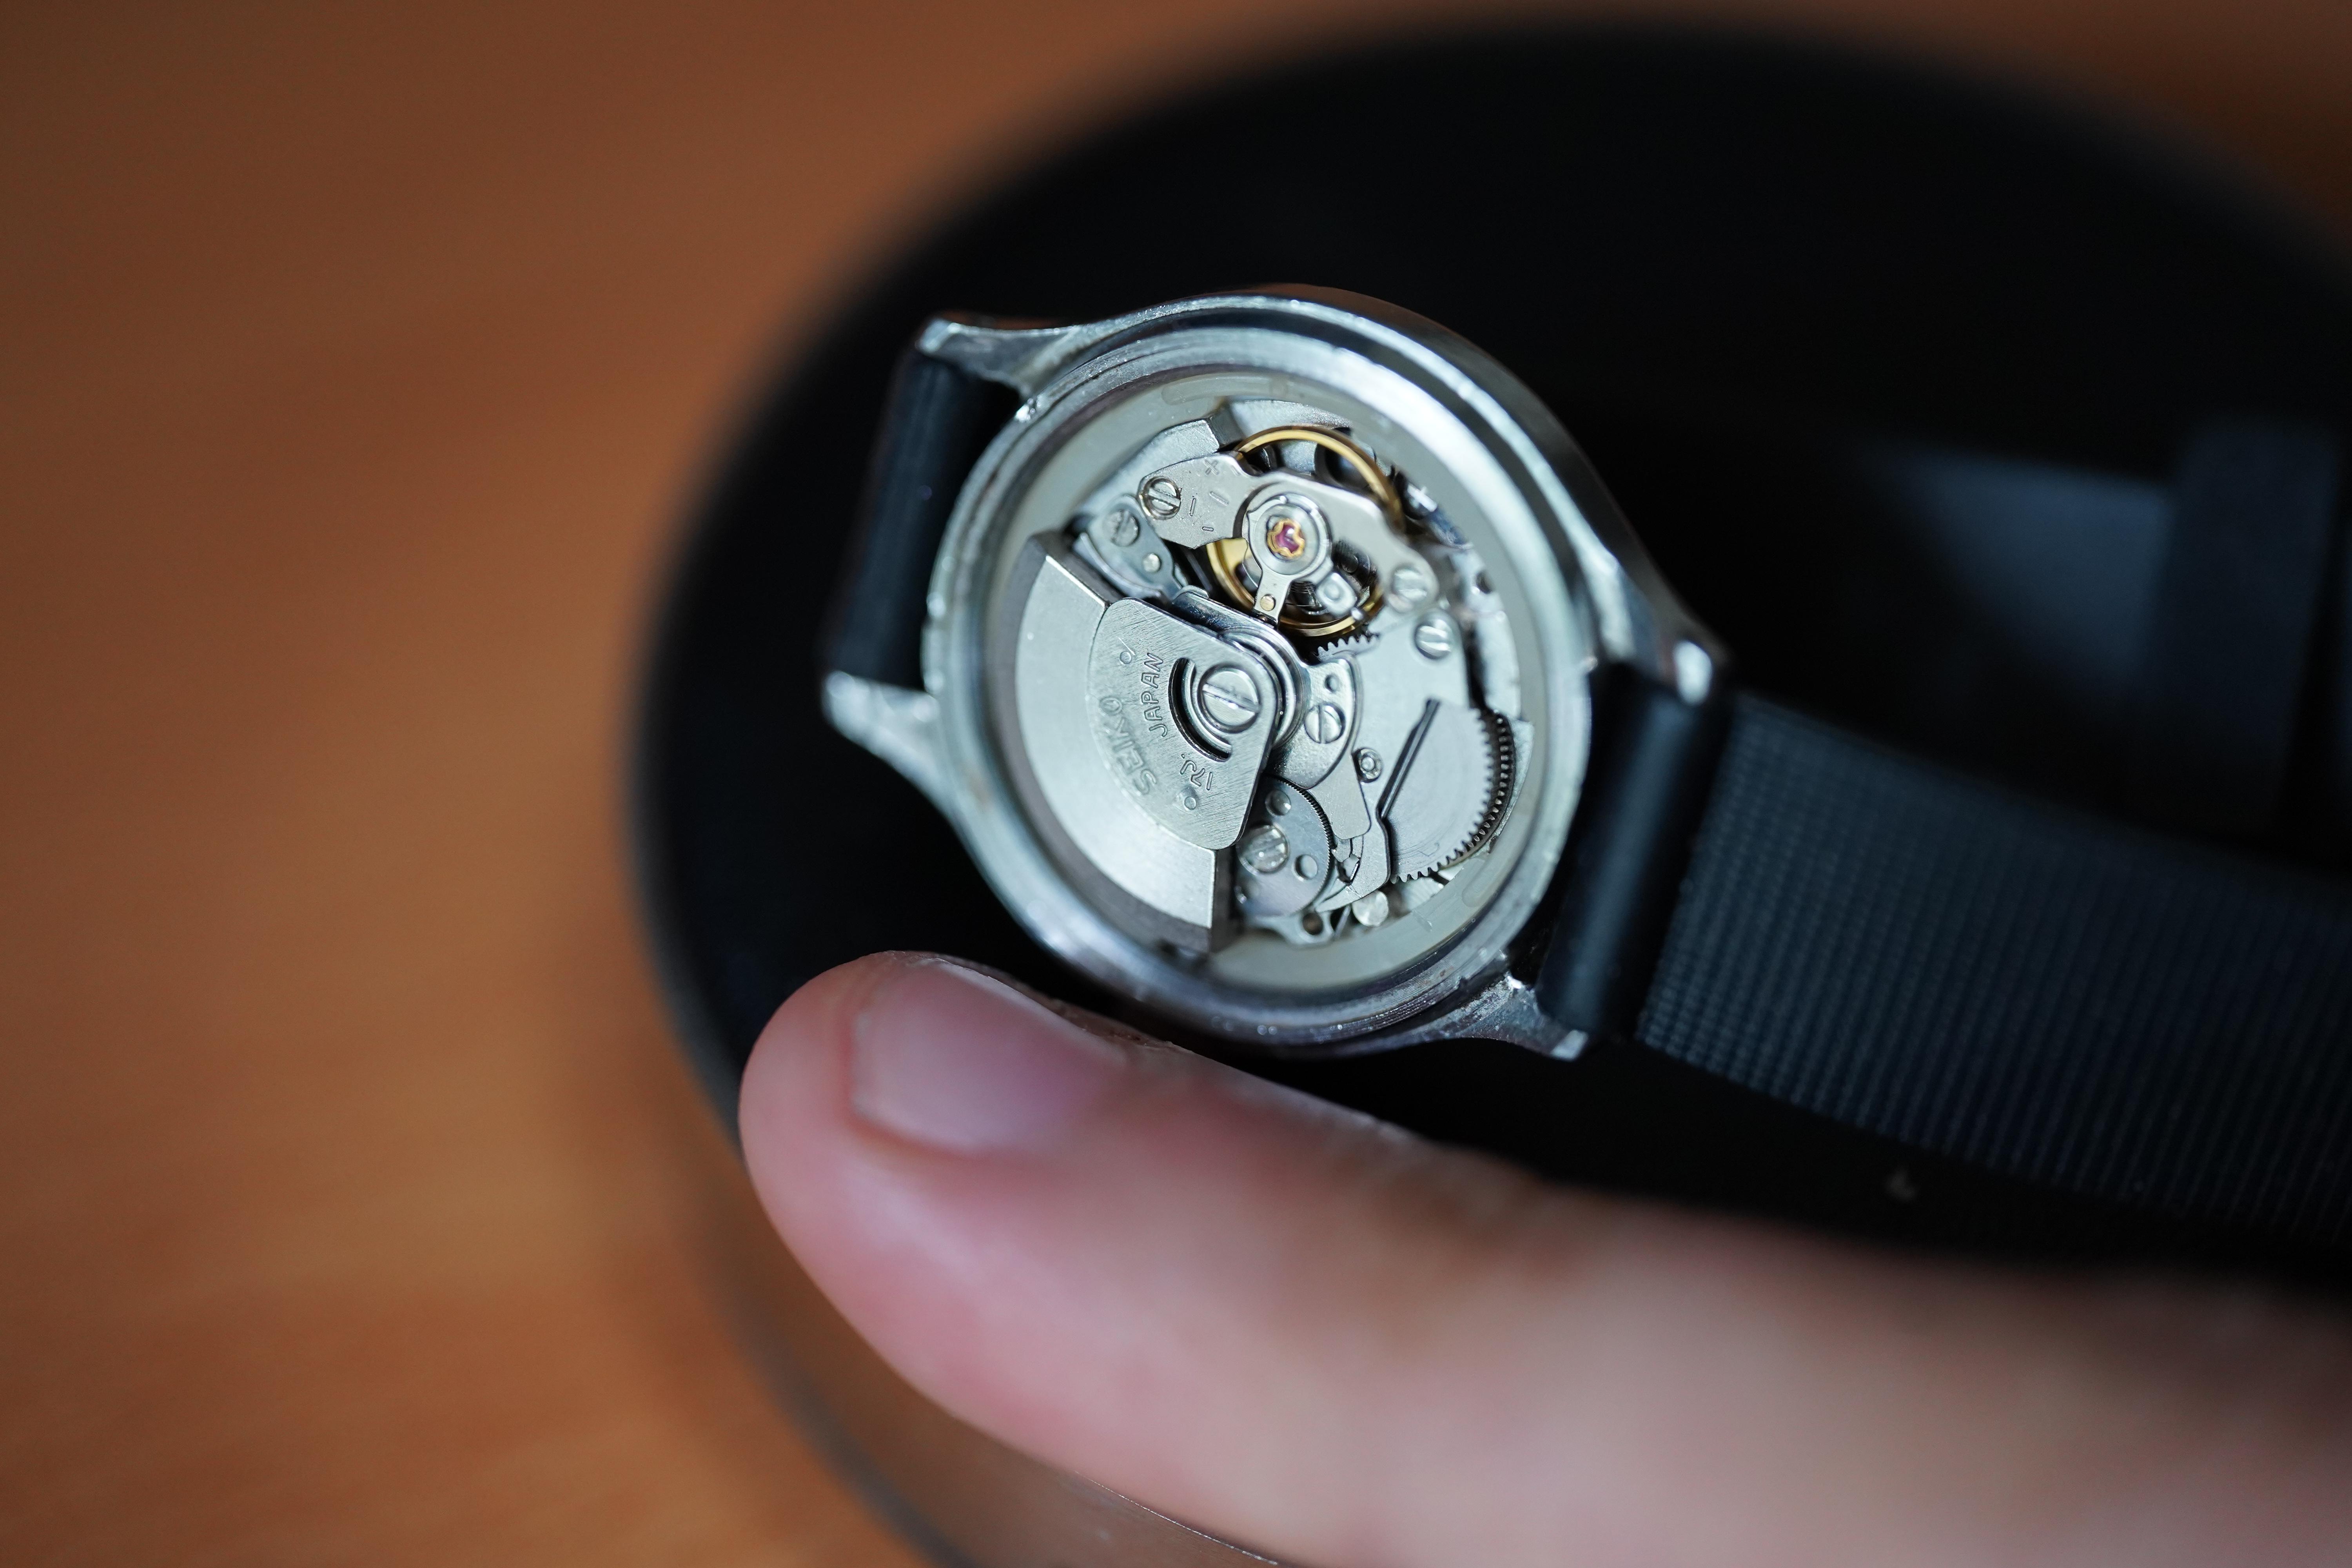
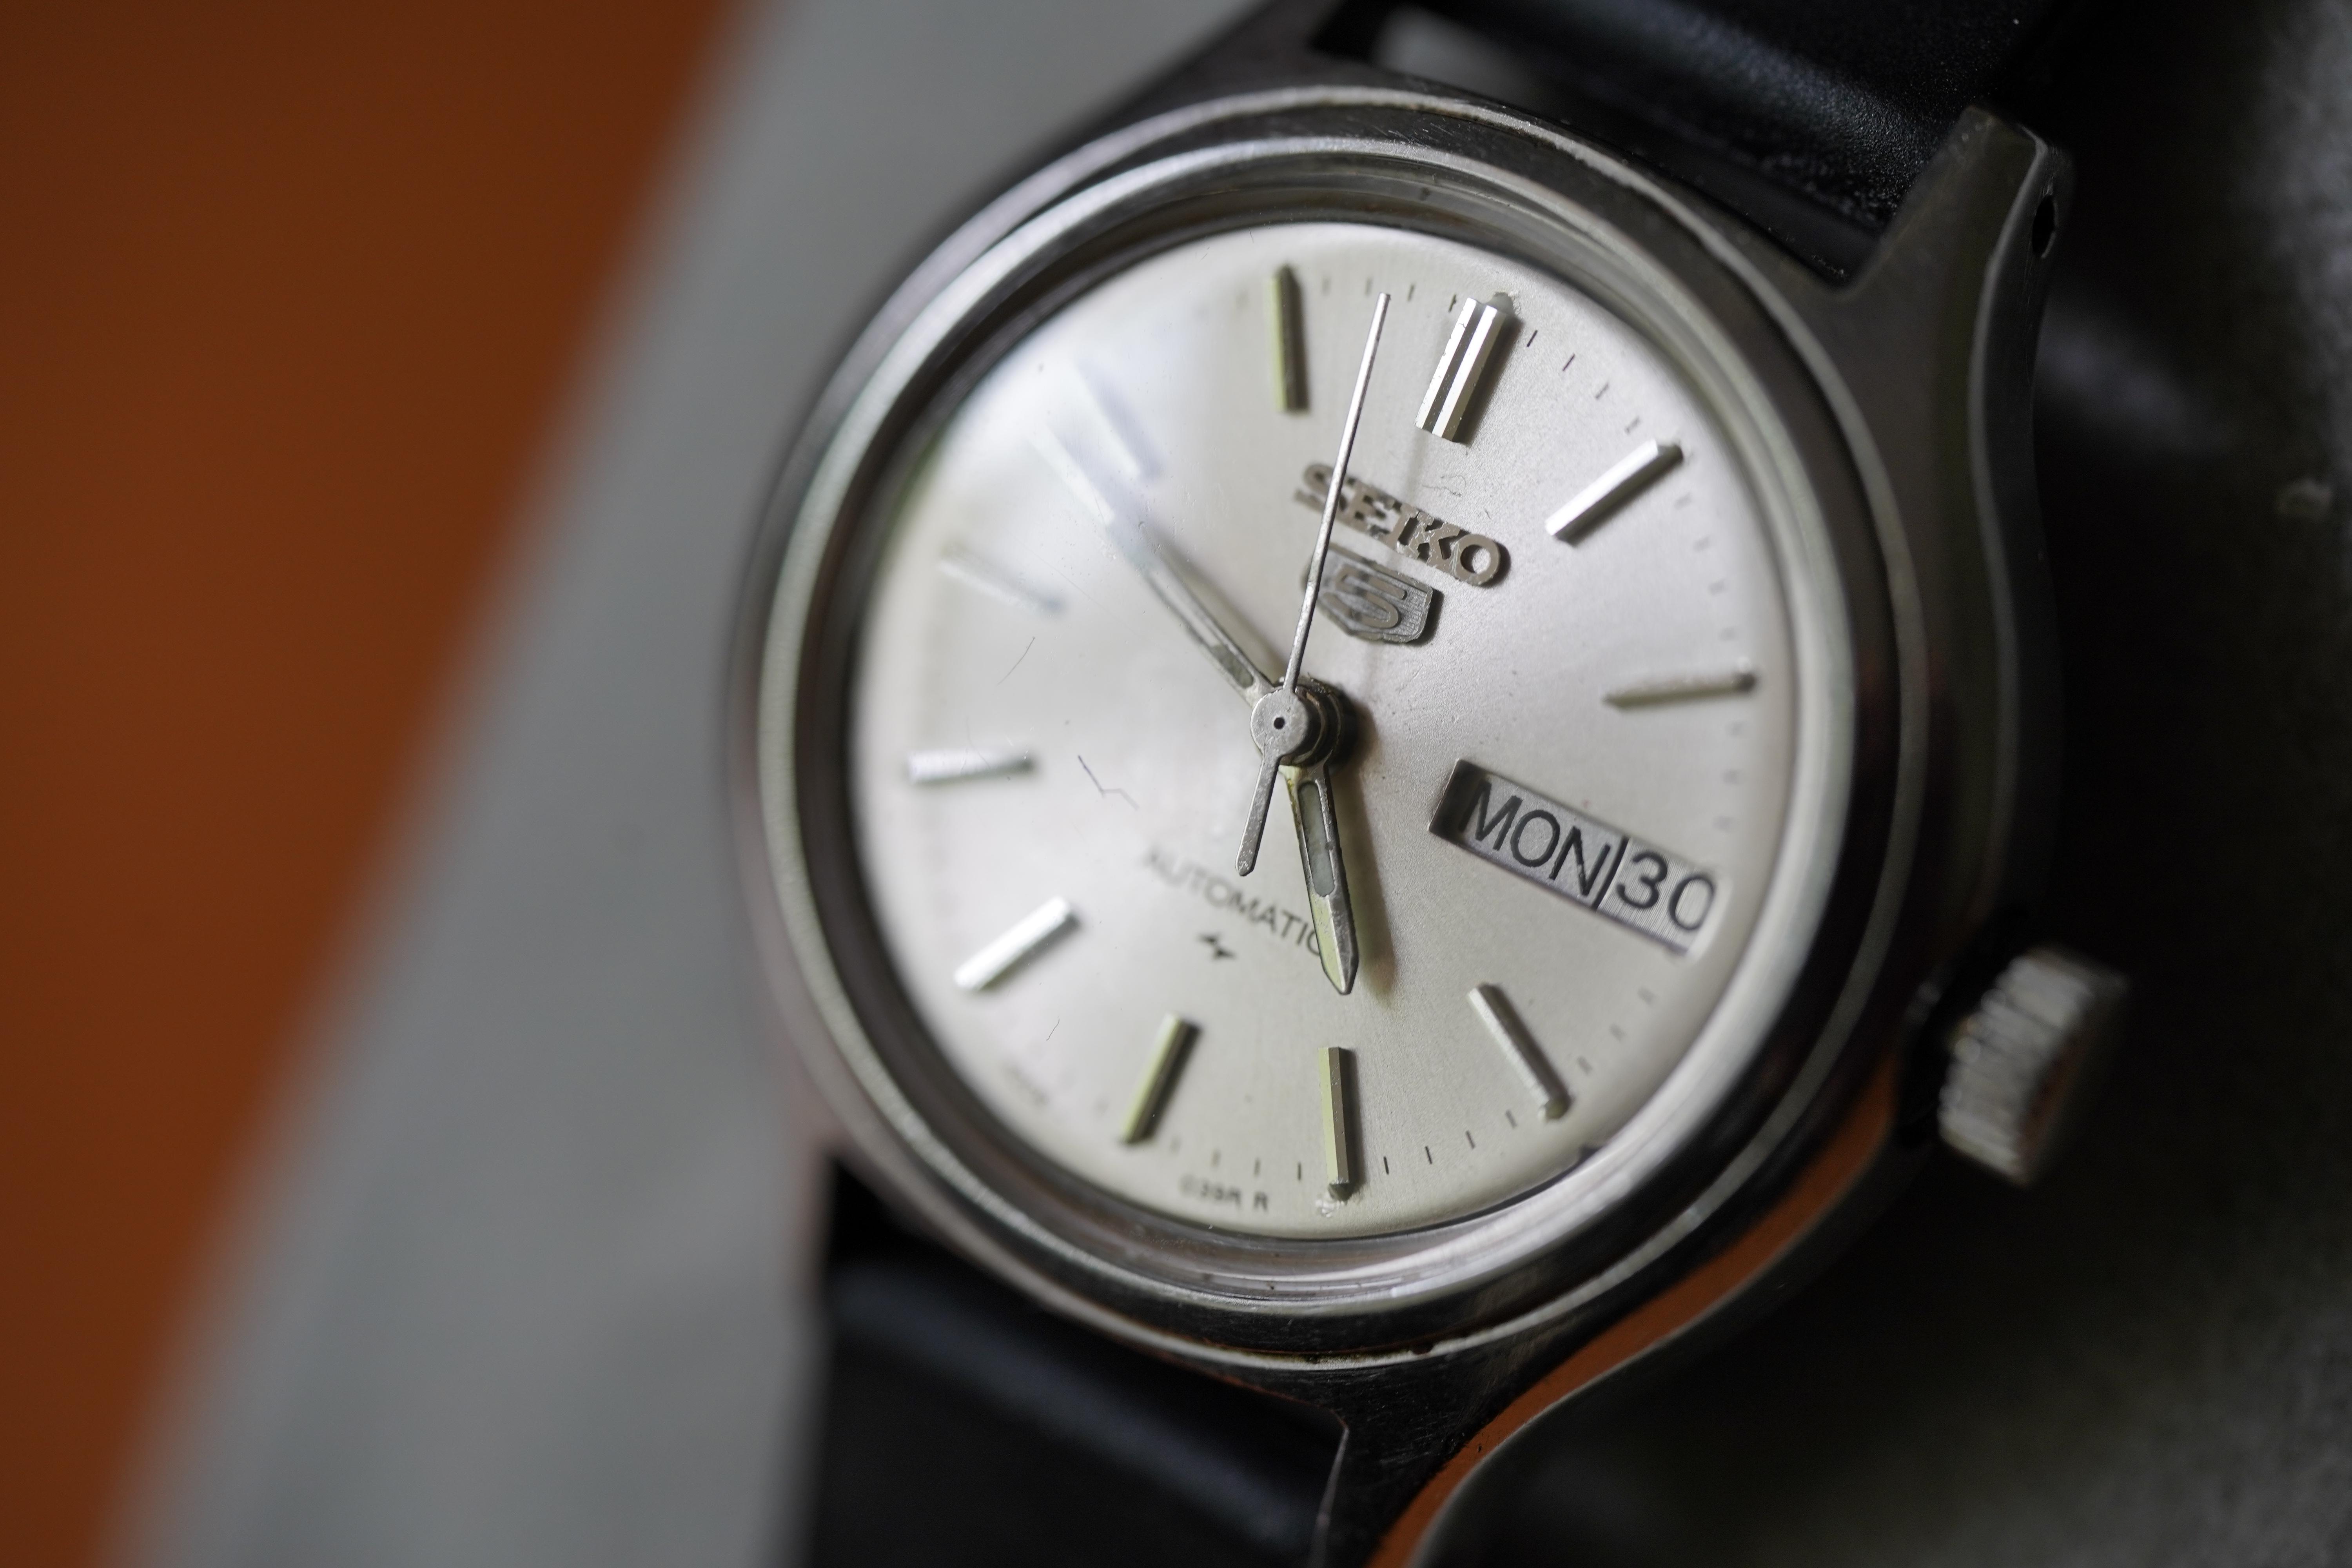
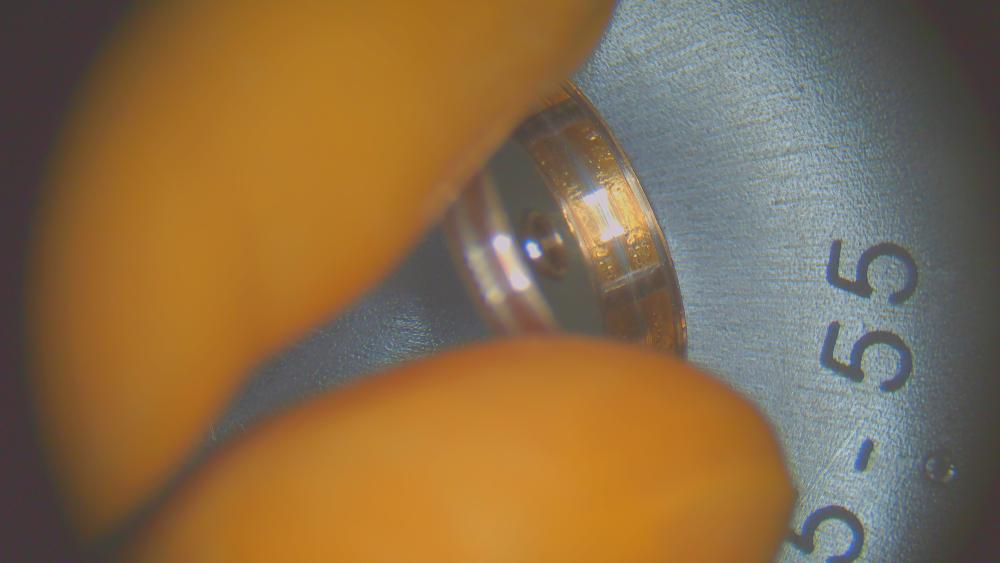
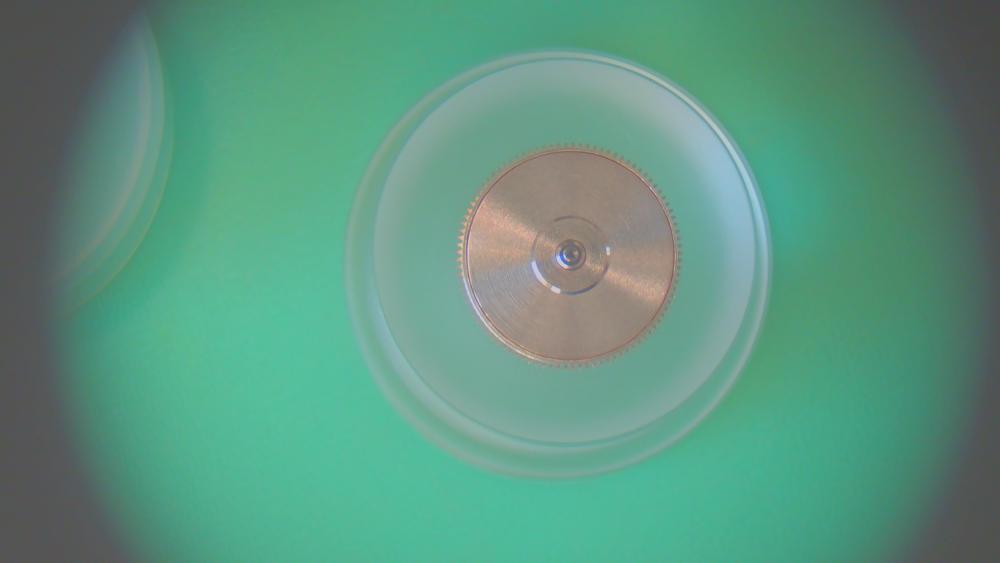
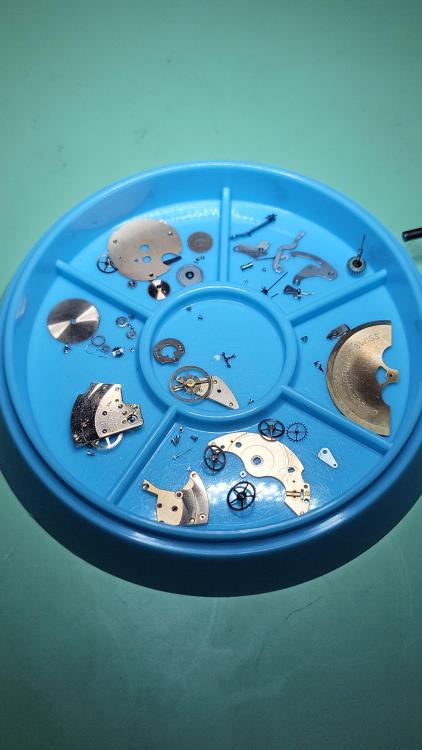
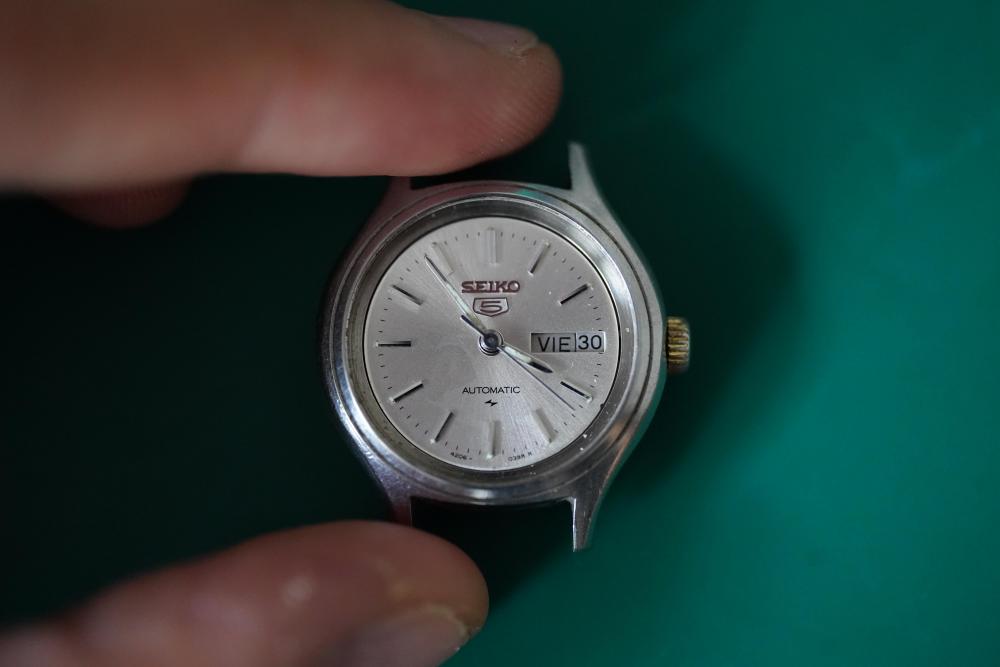
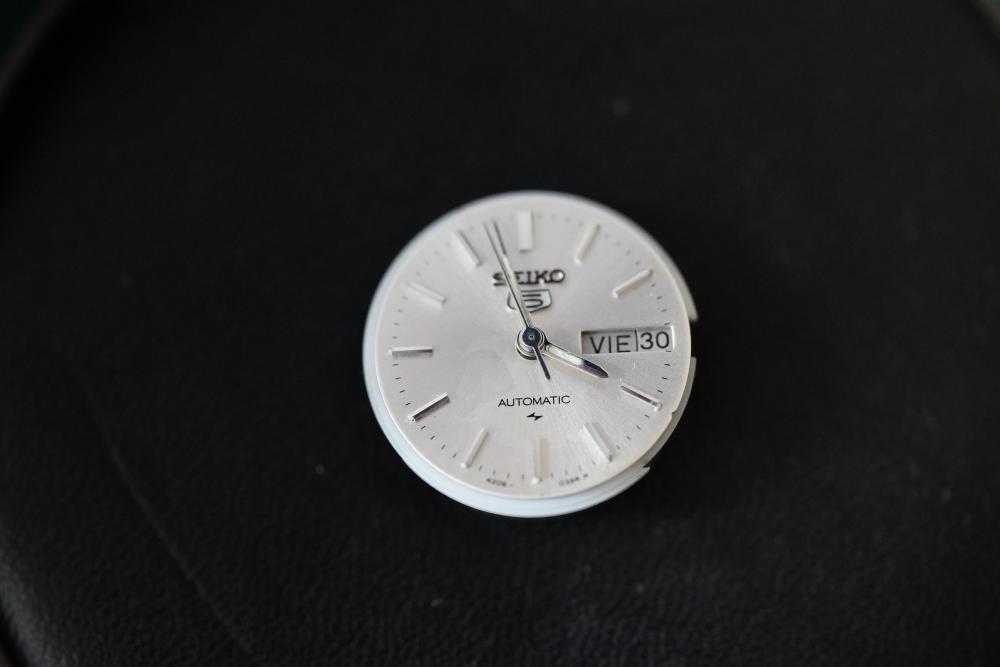
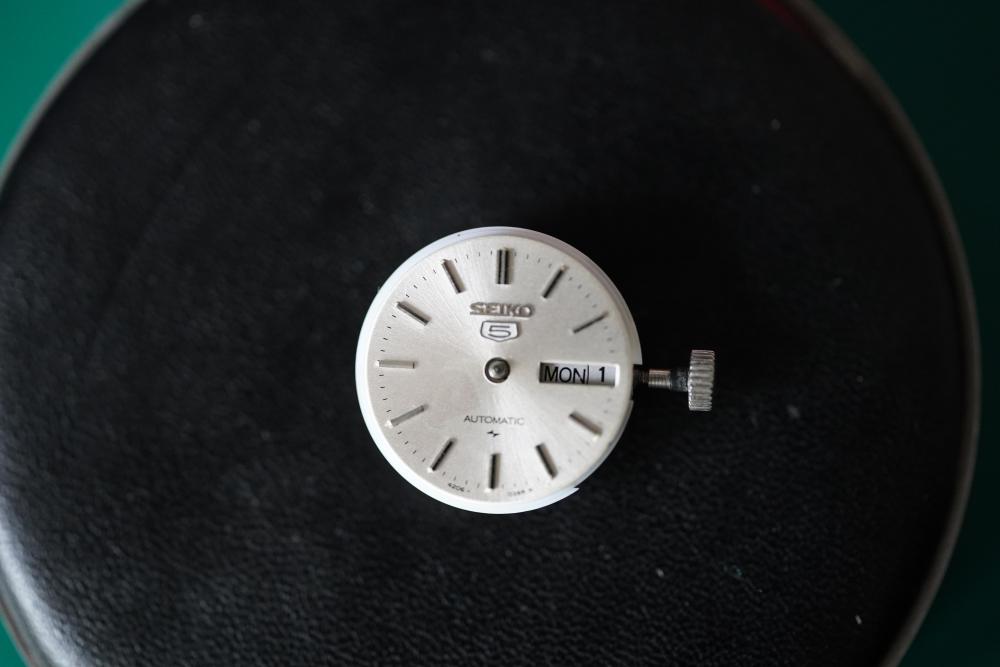
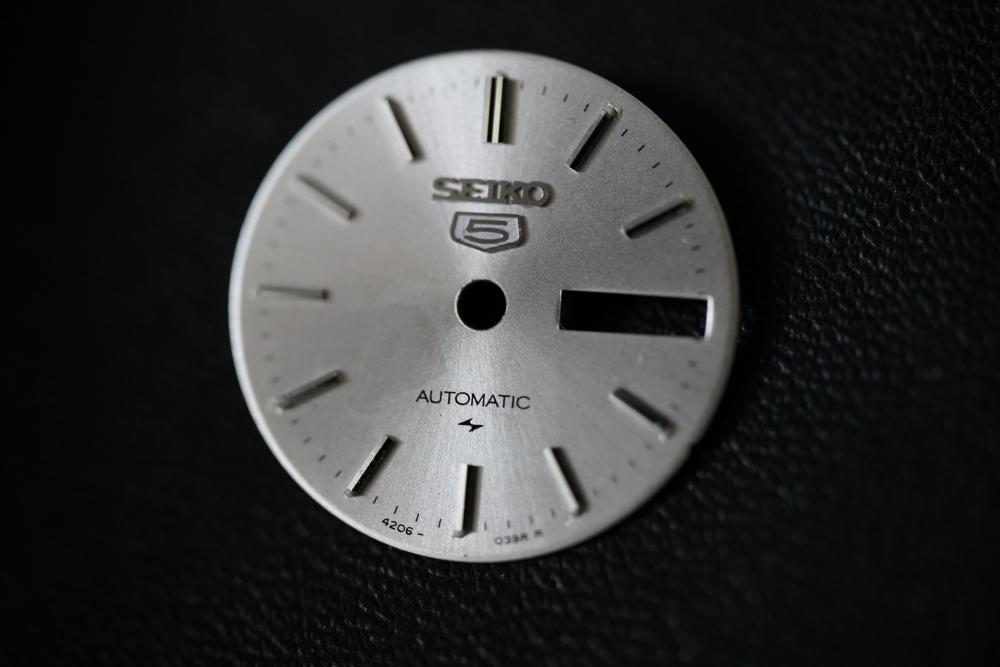
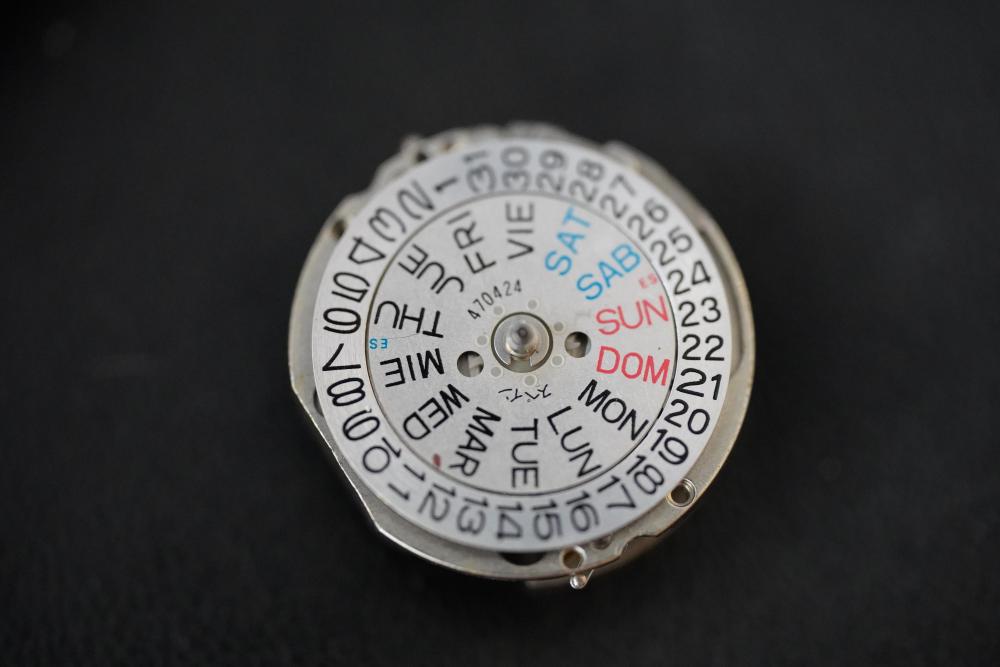
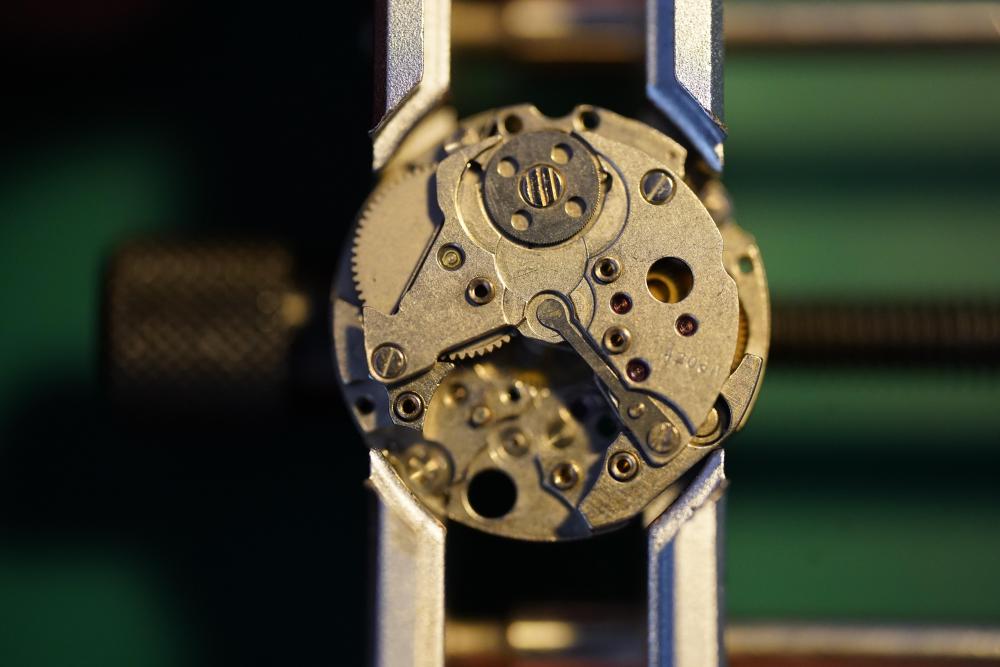
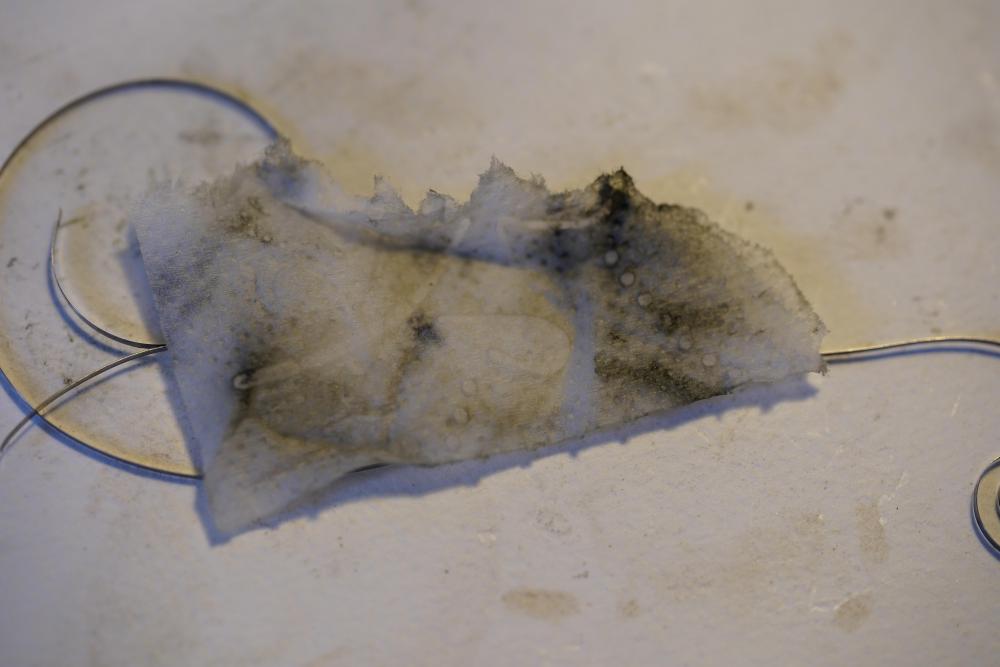
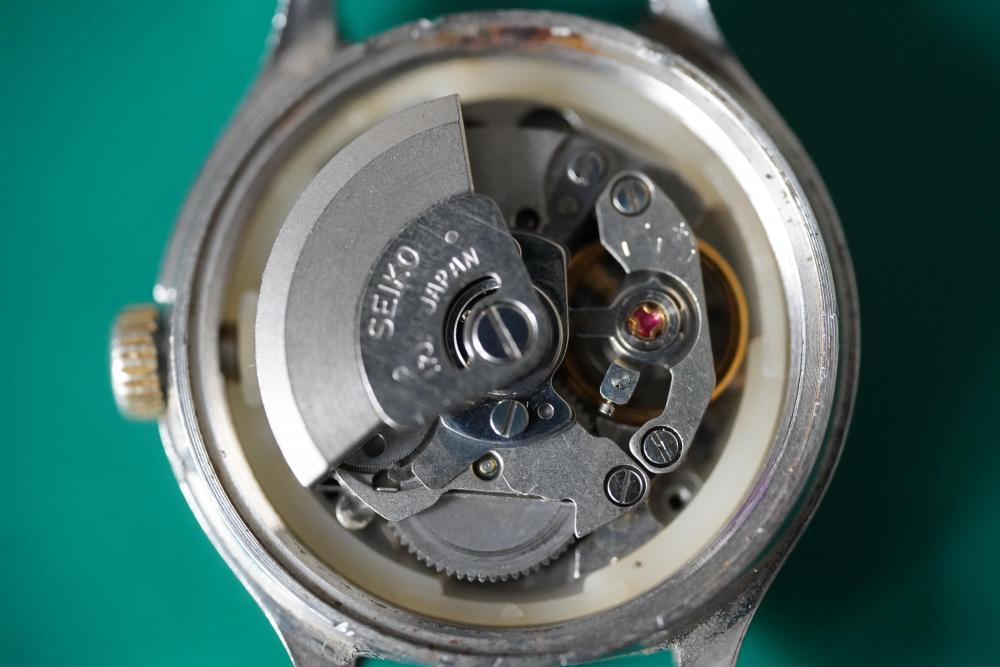
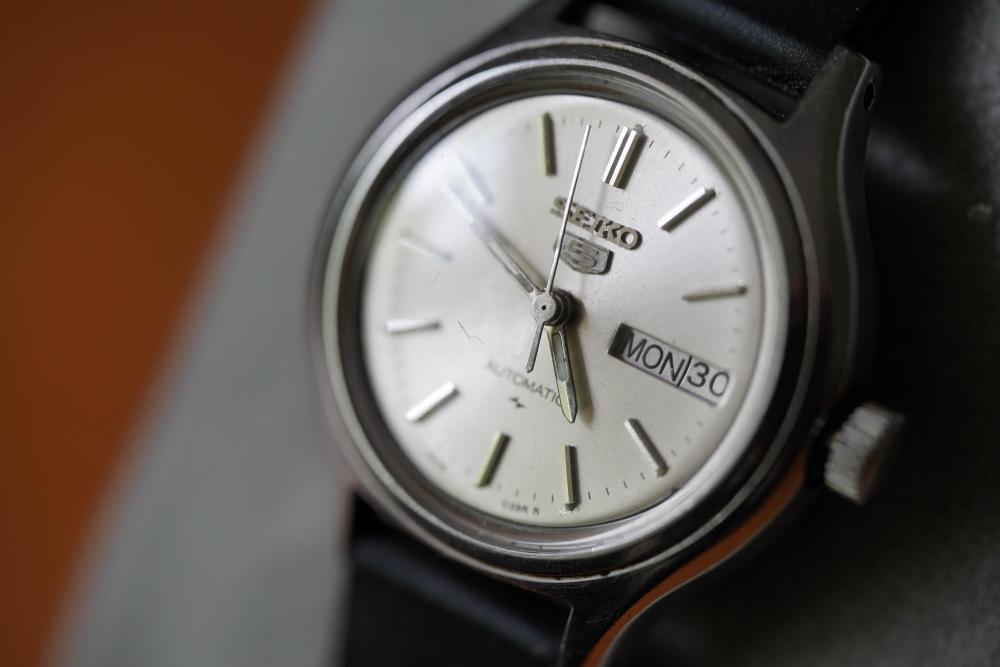
Hi Watch bangers! I did actually make it a personal goal of mine to present a watch every week but real-life caught up and ive been busy helping people move around haha. Bit nevertheless I am a week late but have another beautifull watch and project report for you guys! This watch was one of a few which I presented my Mother for her birthday to let her decide which one I should fix for her. She chose this vintage Seiko 4206A which I got from Ebay and so I sat down and got to work. Now I bought this watch online because I was really surprised at the remaining quality of the original dials and how there where still so many of them. After purchasing one and reading up a bit online it turned out that this movement line was particularly prone to behave irrationally or to repair so I kind of messe dup but nevertheless, I faced my challenge! The watch on arrival: Disassembly 1. Remove the watch case by unscrewing the back and removing the stem 2. Remove the Watch hands 3. Release the Dial feet from the back with the small levelr at the 10 and the 4 Position I think and remove the dial. As you can see it is in pretty good condition and has a very pretty sunbust effect. There is a slight stain though around the “ Automatic” text which left me kind of clueless since it is a metal surface and I wouldn’t really know what would stain it in such a way. I decided to leave it be to minimize the risk of further damage. Heres a close up picture: 4. Remove the Day clip and the Day wheel underneath it. This revealed a very interesting sping-like swan neck system for the day-wheel quick set system. Never seen that before! 5. Then remove the Day wheel spring and the 24 Hour day turning wheel. 6. Now you can unscrew and remove the main setting cover plate and the attached date wheel. 7. Take away the ( im not sure what this part really is called) but it is part of the quick set system which hooks into the second clutch wheel. 8. Now remove the Date Spring and lever, the bottom day wheel and the hour wheel to remove some more from the front side. 9. Remove the one translation wheel and the setting system sub cover which also separated the two clutches. 10. And finally take out the clitches and the yoke, setting system to completely disassembly the front side. Now you can turn the movement so we can work further on the back side. 11. Remove the Rotor 12. Take off the Automatic module 13. Remove the Winding wheel Y ratchet. I did try to remove the winding wheel in the first run but for some reason the screw did not watch to budge so I left it in for the picture. Off camera however I eventually did make. 14. Remove the elegant arching balance wheel. I was really surprised to see this in this kind of movement since I thought that this kind of design was only present in really high end watches. Interestingly enough the 4206 B however has the classical one winged balance. 15. Remove the Pallet fork system ( sorry for the blurry focus) 16. Take off the main bridge and and the small spring attached to one of the screws. 17. Pick out the Barrel, its ratchet and the 4th and 5th wheel. Interestingly enough the gears wheels have as many holes in them as the number which is kind of cool! 18. Now focus on the little winding module on the bottom right. Remove the translation wheel, the spring and the small bridge to take it out completely. 19. Almost done! Take of the final bridge which holds down the 6th wheel and the escapement. 20. And finally remove the 6th wheel and the escapement wheel. With that, we have completed the disassembly of the Seiko 4206A. Cleaning For cleaning im still sticking to the good old hand cleaning method. So this means that I let the individual parts marinade in lighter fuel for a while before giving them a scrub and rinsing them of in Isopropanal alcohol. I was thinking about dipping my toes into the ultrasonic cleaning branch but im unsure what fluids to buy and what parts I cannot drop into the cleaner so I think ill stay with what works at the moment. Additionally im broke haha. Mainspring service Now as always I did not have a spare Mainspring at hand so I removed the spring by hand and checked it out: As you can see it is / was absolutely disgusting haha so I gave It a good rub down in lighter fluid and isopropanol and the paper used for that was absolutely nasty in the end, see for yourself: However, I did clean it nicely I think and lubricated the spring with Moebius 8200 and the barrel wit Moebius 8217 before winding the spring back in carefully. After closing the barrel I did a mainspring wind test with the winding wheel and it had tension on it so it seems like I did a decent enough job. Lubrication Moebius 9010 – All jewels aside from the pallet fork jewel pivots Moebius HP 1300 – For parts which turn a bit slower. Between the arbour and the watches wheel, the barrel pivot in the main bridge or the metal pivots for translation wheels for example. But that’s just my personal tase Moebius 8200 – Used to lubricate the mainspring Moebius 8217 – Braking grease for automatic barrel wall Moebius 9415 – For the tip of the pallet fork jewels. Molycote DX Paste – Any strong friction contact points. So the setting and winding system basically Reassembly For the reassembly of course you just follow the above given steps and pictures from the disassembly backwards. Ive been thinking about making reassembly pictures as well, it would make the report way more comprehensive and would show more difficult nifty parts for example shock and balance jewel lubrication. However it would be way more annoying to take the pictures and it would cost me a lot more time. What do you all think? Timegrapher Test Okey, so once I’ve cleaned everything it was time to put my work to the test and I strapped the watch into the timegrapher. And this is the catastrophic result: This was the start of the snowstorm like reading which followed. It couldn’t really pick anything up and I was just devastated. Because I did not have any replacement balance on hand, I was desperate and opted to measuring the Rate my eye and stop watch. As you can think, this did not end up well so I ordered a lot of a few spare movement to butcher them for the balance. After placing in the 4th replacement balance however, I managed to get a decent reading. The Amplitide could be better, but this is the way I left it in the end haha. Final Results: After the timegrapher drama I closed the back up and attached a basic rubber strap for testing purposes. And from here on its basically B-Roll pictures! Here is a comparison of the movements size to my pinkie finger! And here the final satisfying shot: So yeah all in all a stressful but also fun little project which I could conclude by gifting the watch to my mother. I was very surprised to see the winged balance as well as challenged by working on a movement of this size but in the end I managed! I hope you all enjoyed reading this and that the guide may help other hobbysts or even professionals ( haha who am I kidding) in the future. Any comments, questions or criticism is of course welcome! If you guys would like the full commentated 4K Macro video of the whole process, ive uploaded it to my Youtube channel here and it would bring me great joy if you would watch it! And so as always watch bangers... Stay safe and healthy and till next time!


 1 point


.thumb.jpg.cb17a66989f1e796fd4217db2e9ca9df.jpg)