Leaderboard

.thumb.jpg.cb17a66989f1e796fd4217db2e9ca9df.jpg)


Popular Content
Showing content with the highest reputation on 06/25/24 in Posts
-
This is a really cool forum with a lot of very interesting, like minded people from all over the world, and yet it's microscopic. Sounds like @Nucejoe (Iran) spent some time very near where I used to live here in Colorado decades ago. @JohnC's (Canada) brother worked/s in the same lab as my best friend up in Boulder. @AndyHull (Scotland) shares my enthusiasm for cheap thrills and technology. @SparkyLB (Florida) shares my enthusiasm for woodworking, and we've exchanged many texts on the subject. @LittleWatchShop (Texas) gave me some good advice on patent matters for the tech I'm trying to turn into a business. And finally, a huge, massive thanks to @gpraceman (Colorado). He lives down the hill from me about 20 minutes away. We met for burgers and beers a while back since it's somewhat rare to find people on here that are actually close by. I started a car club (theme is social wrenching), and he came out with his awesome BMW Z4M to help me and a group of car enthusiasts modify my Jeep. Lately, he's been coming up to my house pretty much daily to help me with some major home repairs in preparation for the baby we're having in the next week (hopefully Sunday, and no sooner!). I've made real life friends on the internet before, but while the variety of people here is probably the most broad in many aspects, the quality is simply outstanding. Kudos to @Mark and the moderators for setting up this thriving community! Thank you all!10 points
-
Hi guys, I had a videographer in my workshop last week whilst I was teaching the ladies from Mr Jones Watches, here in London https://www.instagram.com/p/C8mWgjnohG8/?img_index=1 He made a short film of what I do and thought I would share it with you6 points
-
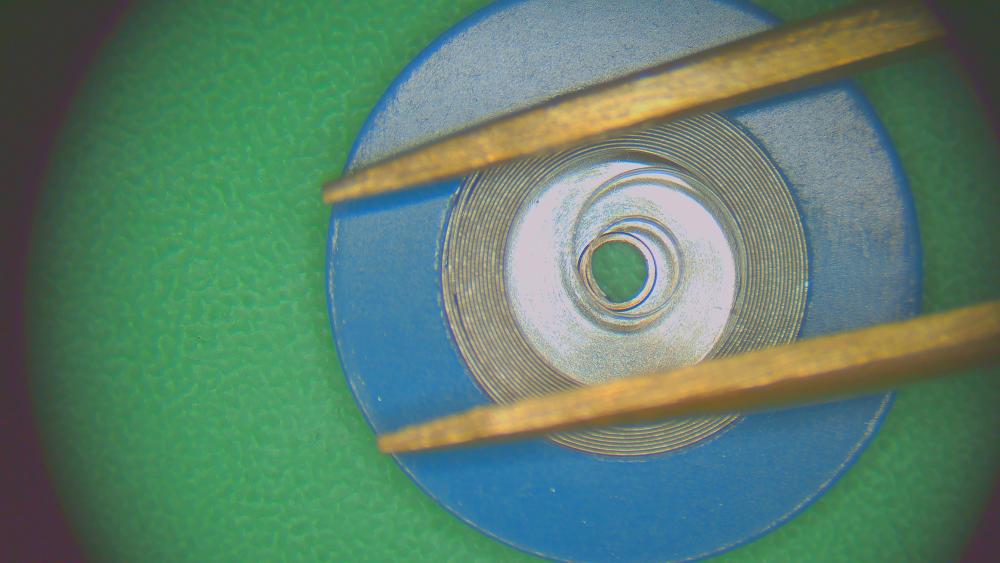
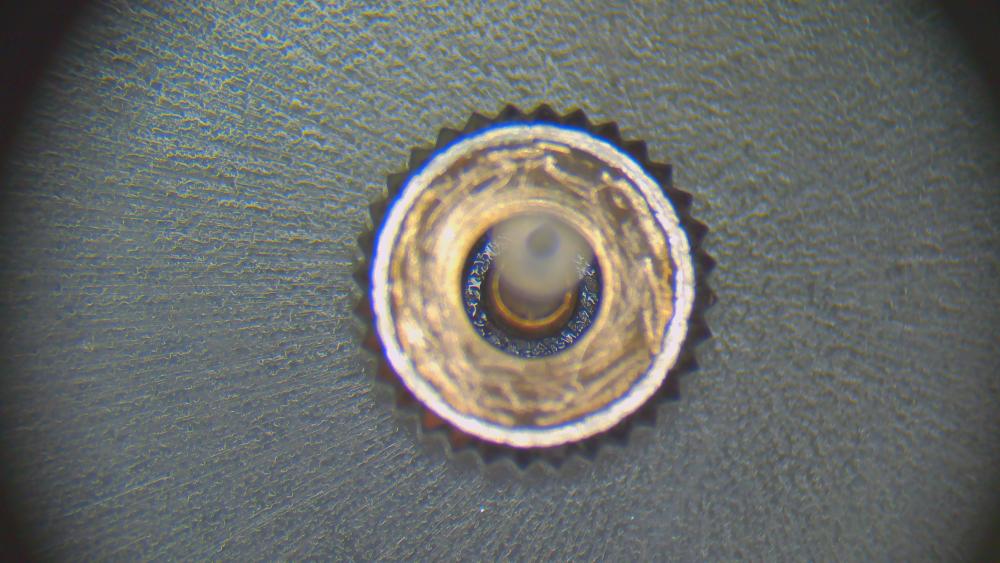
The diameter of mainsprings is that of the container ring! It must be smaller than the barrel, if you want to mount the spring without special winder. Frank5 points
-
Thank you. I know we probably have ideas in our heads what someone looks like and even sounds like. I know I definitely do about all of you guys, especially @Neverenoughwatchesas it's such a epic profile photo. Wouldn't it be great if we all did a few minutes film on YouTube or Vimeo of what we are about and what our principles and ethos' when it comes to watchmaking and life in general. Just a thought...3 points
-
How does the gap of the regulator pin look? It should be fairly close, like 1.5 to two hairspring thicknesses (as a rule of thumb). Just a little more gap can cause a large drop in rate.3 points
-
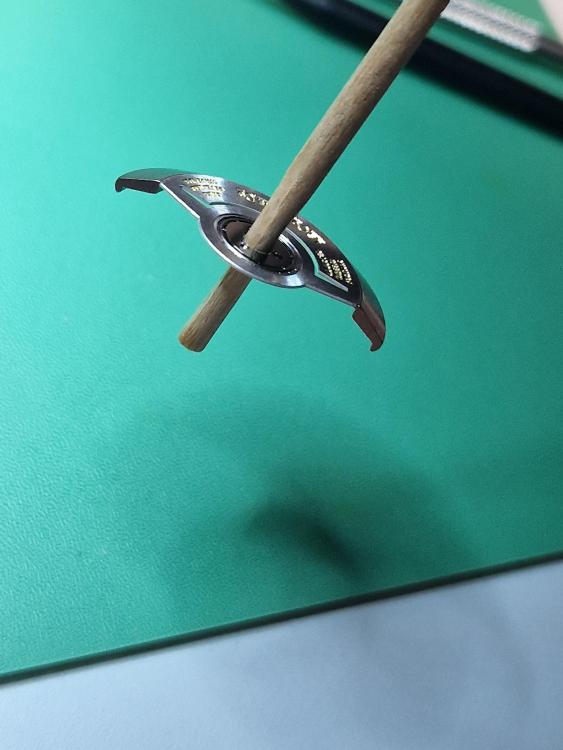
Refer to the attached. You can hold A while moving B. Move A to the middle, B will also move anticlockwise. Hold your tweezers against A from the left so that A cannot move to the left. While holding A stationary, move B clockwise with another set of tweezers. B will move while A stays in the middle. Then use A to fine tune. Hope that helps.
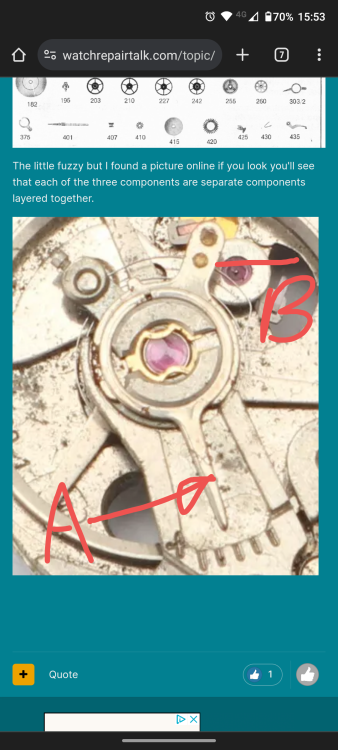 3 points
 -
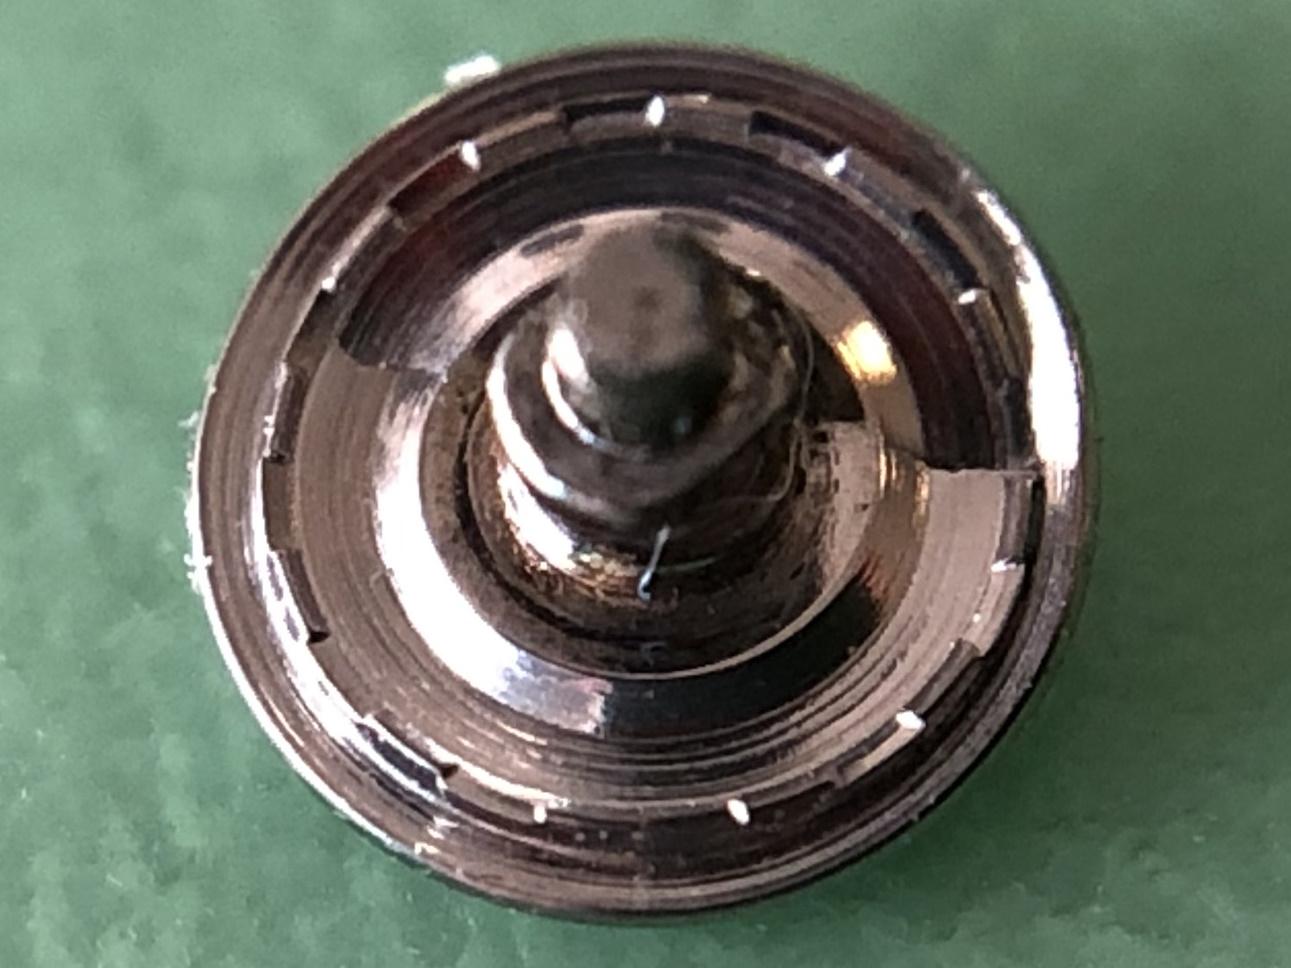
The screw should of been loosened, not removed, the setting lever has fallen off. You need to remove the dial, to get to the keyless works.
 3 points
 -
Unfortunately, it is not only watch owners who are denied the right to buy spare parts but also professional independent watchmakers. It is shameful beyond all limits. Of course, everyone should have the right to buy spare parts without any reservations whatsoever. It should work in the same way as it does for cars, but unfortunately, the legal system does not bother to prosecute this practice. Fraud exists but there is another side that is not obvious from the owner's perspective. The symptoms of a problem may be obvious but the cause is quite different. If the symptoms are eliminated, the cause may still exist and the watch will not work properly anyway. This is why repairers are not happy just to fix the obvious fault but need to go through the whole watch to guarantee its functionality. Many repairers have made it a rule never to fix just one symptom to avoid disappointment and claims. I recently convinced a Rolex owner that the movement needs to be serviced and repaired even though the watch is running just fine. It seemed that only the rotor needed an overhaul but on closer inspection, it turned out that the problems were much more extensive. If you want to know more, click on these links: https://www.watchrepairtalk.com/topic/29655-rolex-cal-3135-issues/#comment-251377 https://www.watchrepairtalk.com/topic/29655-rolex-cal-3135-issues/page/2/#comment-2535983 points
-
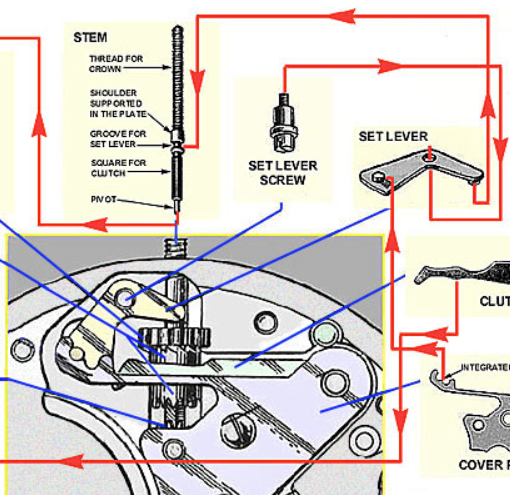
From a quick bit of research, that watch appears to have an Oris 649 movement which is based on the ETA 2836-2 https://watchbase.com/oris/caliber/oris-649 Stems for the ETA branded version are readily available from about £3 upwards, If you want to compare the movement in your to that, the ETA service info is here: https://www.cousinsuk.com/pdf/categories/29_eta2801.2-eta2836.2.pdf and a service walkthrough by VWatchie here: For the crown & tube, it's probably secondhand markets. There are some Oris crowns and a couple of tube on Chrono24, if by chance anything matches? https://www.chrono24.co.uk/search/index.htm?accessoryTypes=&dosearch=true&query=Oris+Big+Crown&searchexplain=1&showpage=3&watchTypes=Z3 points
-
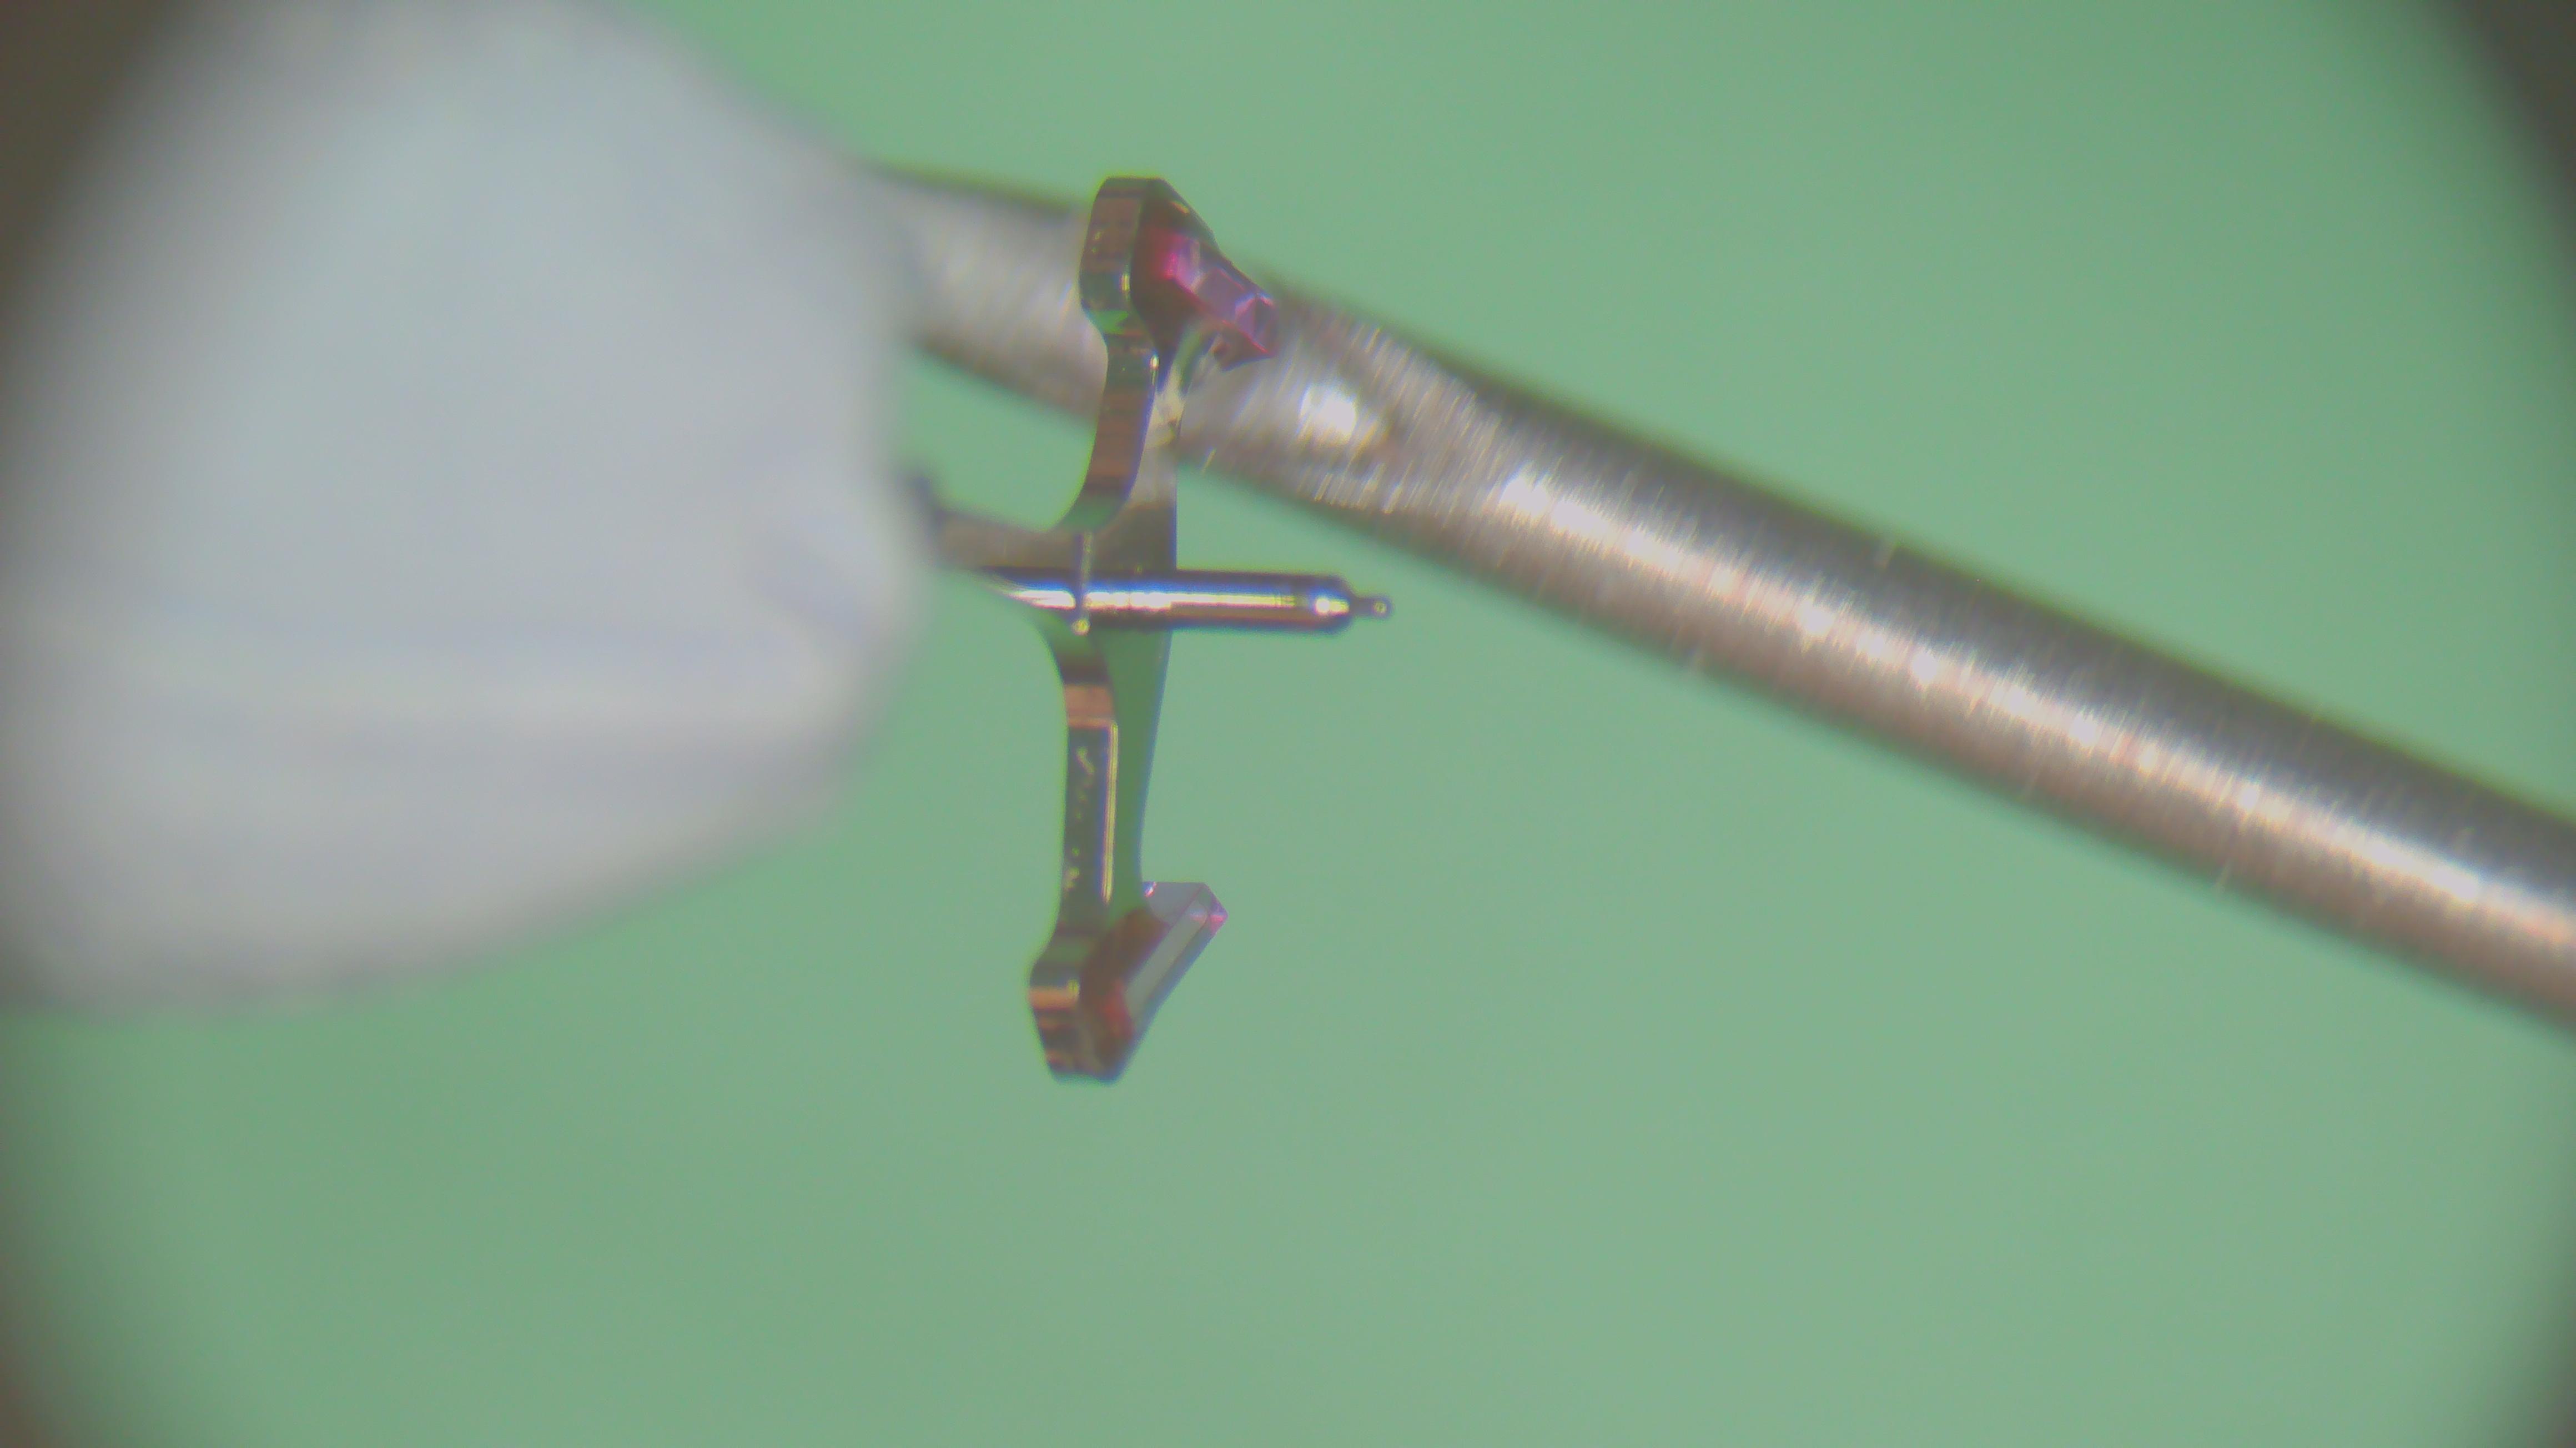
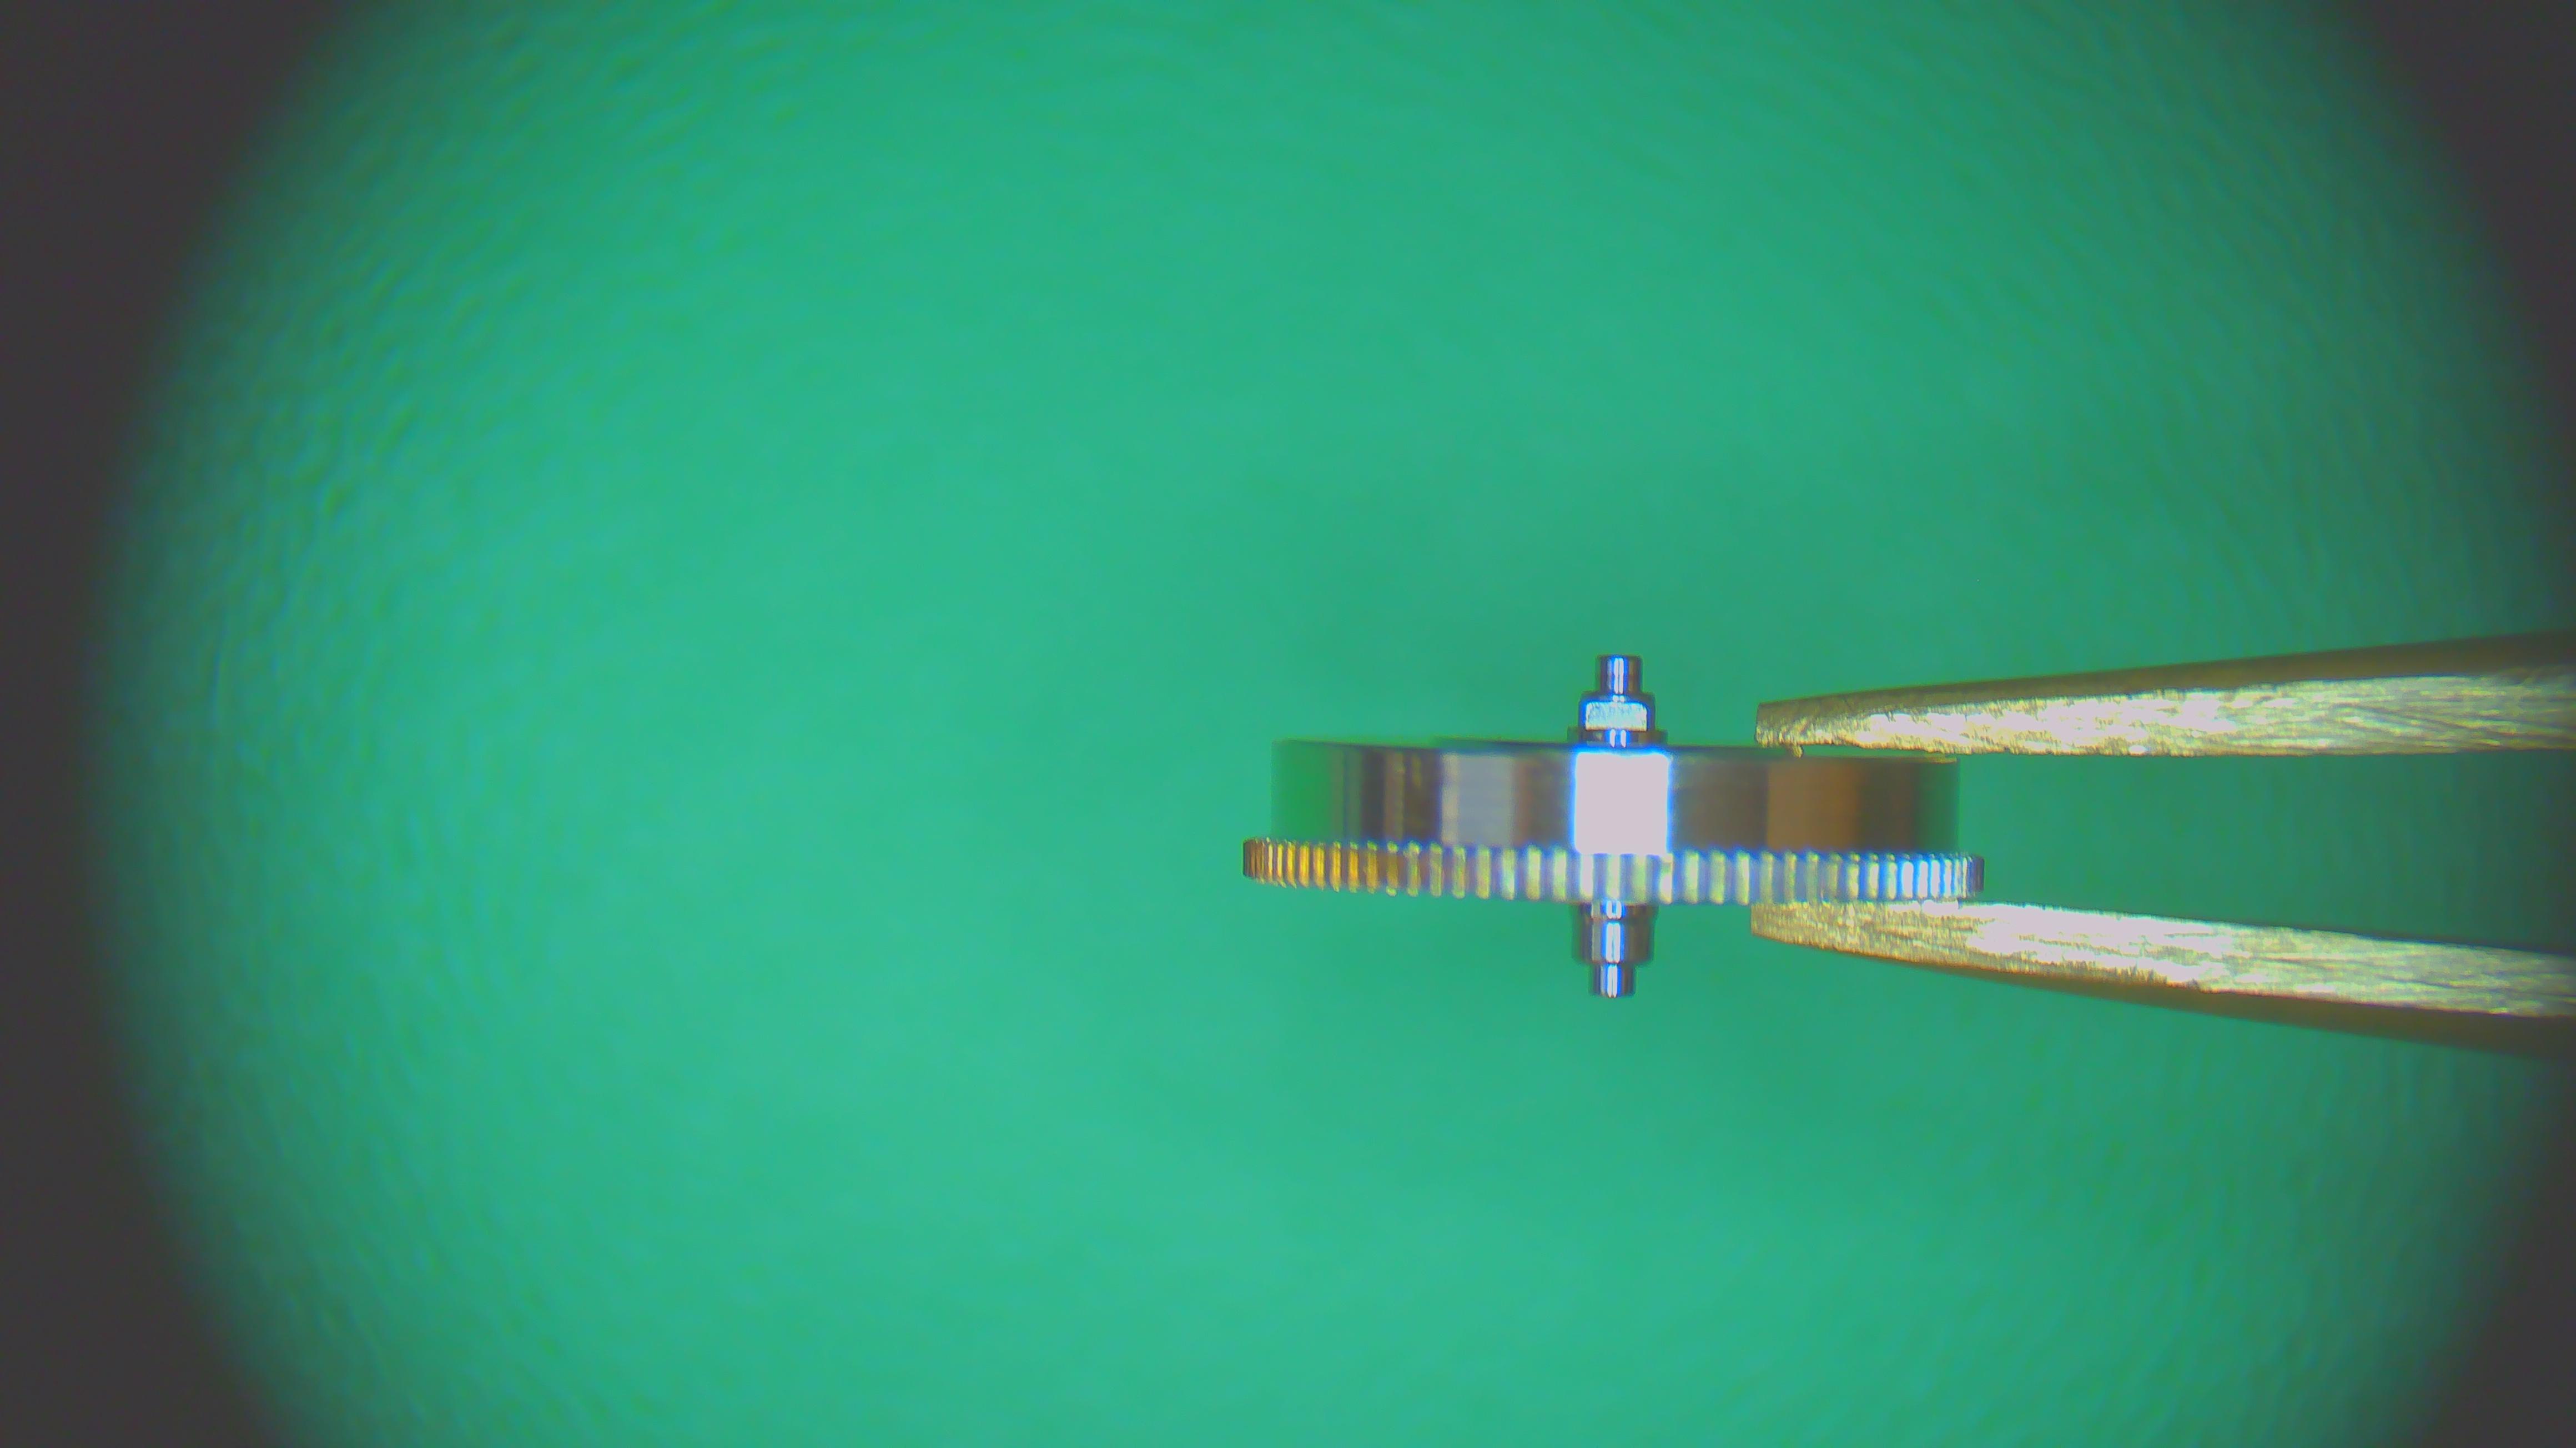
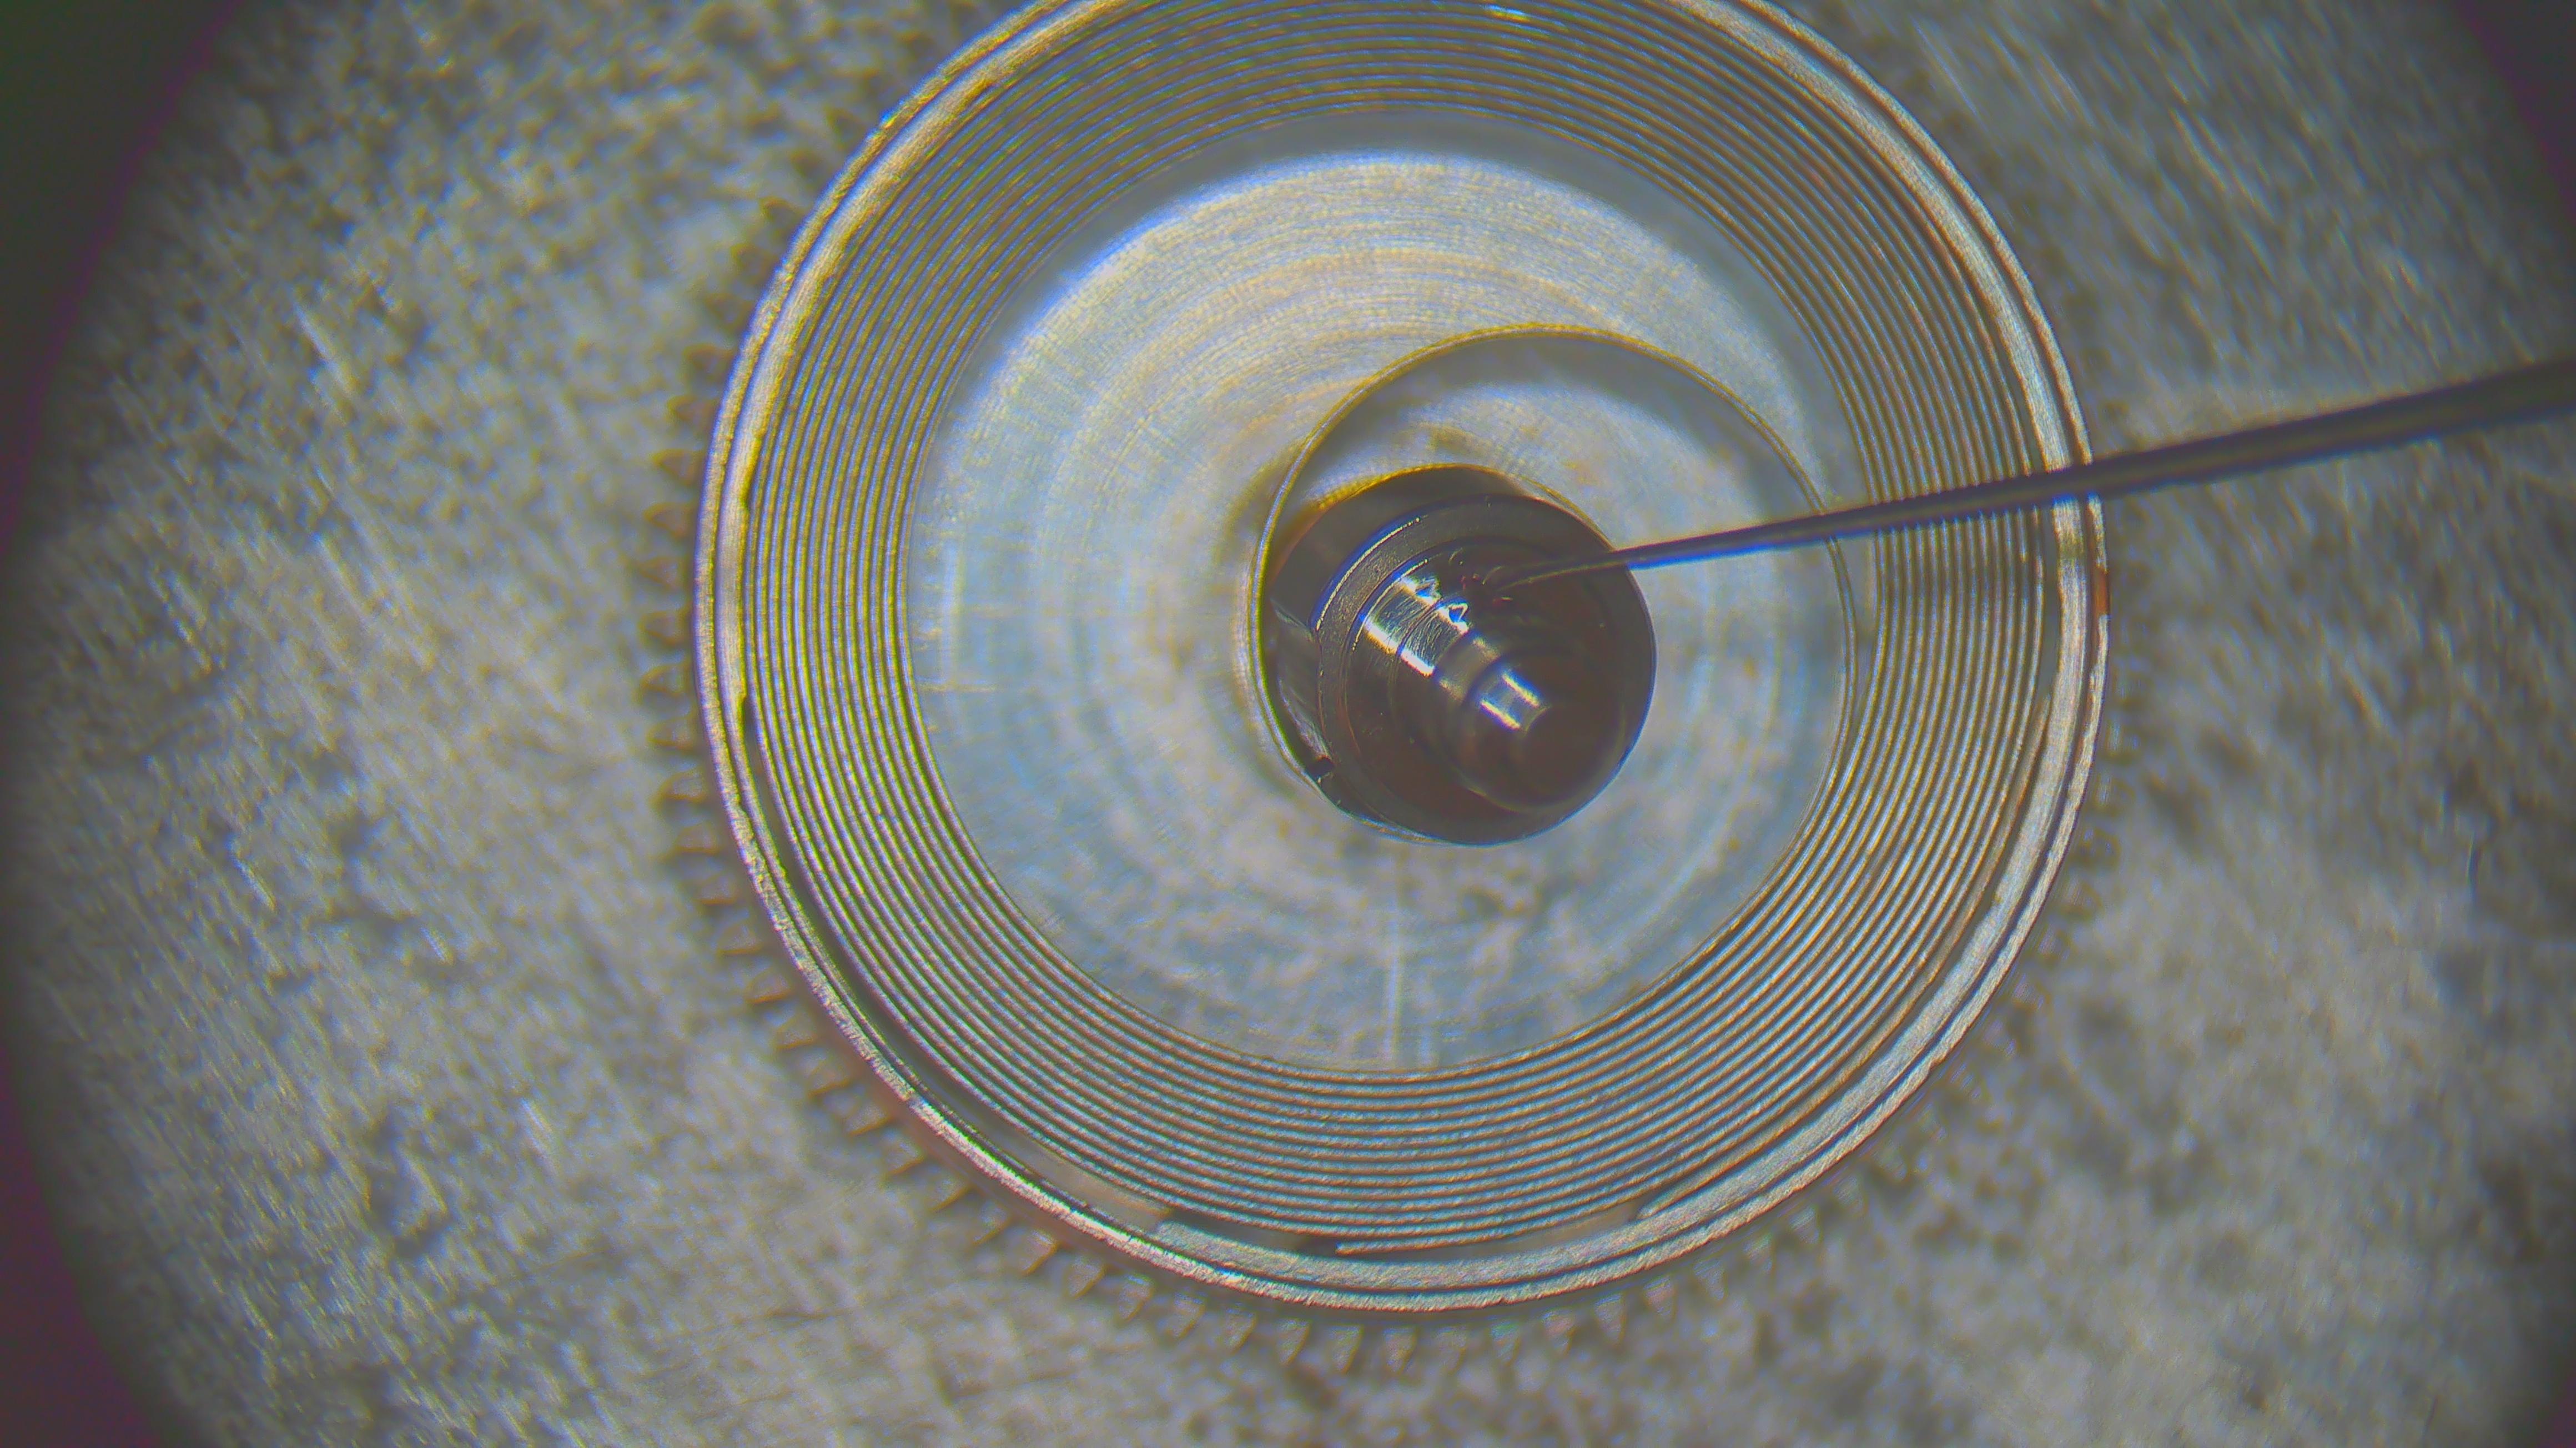
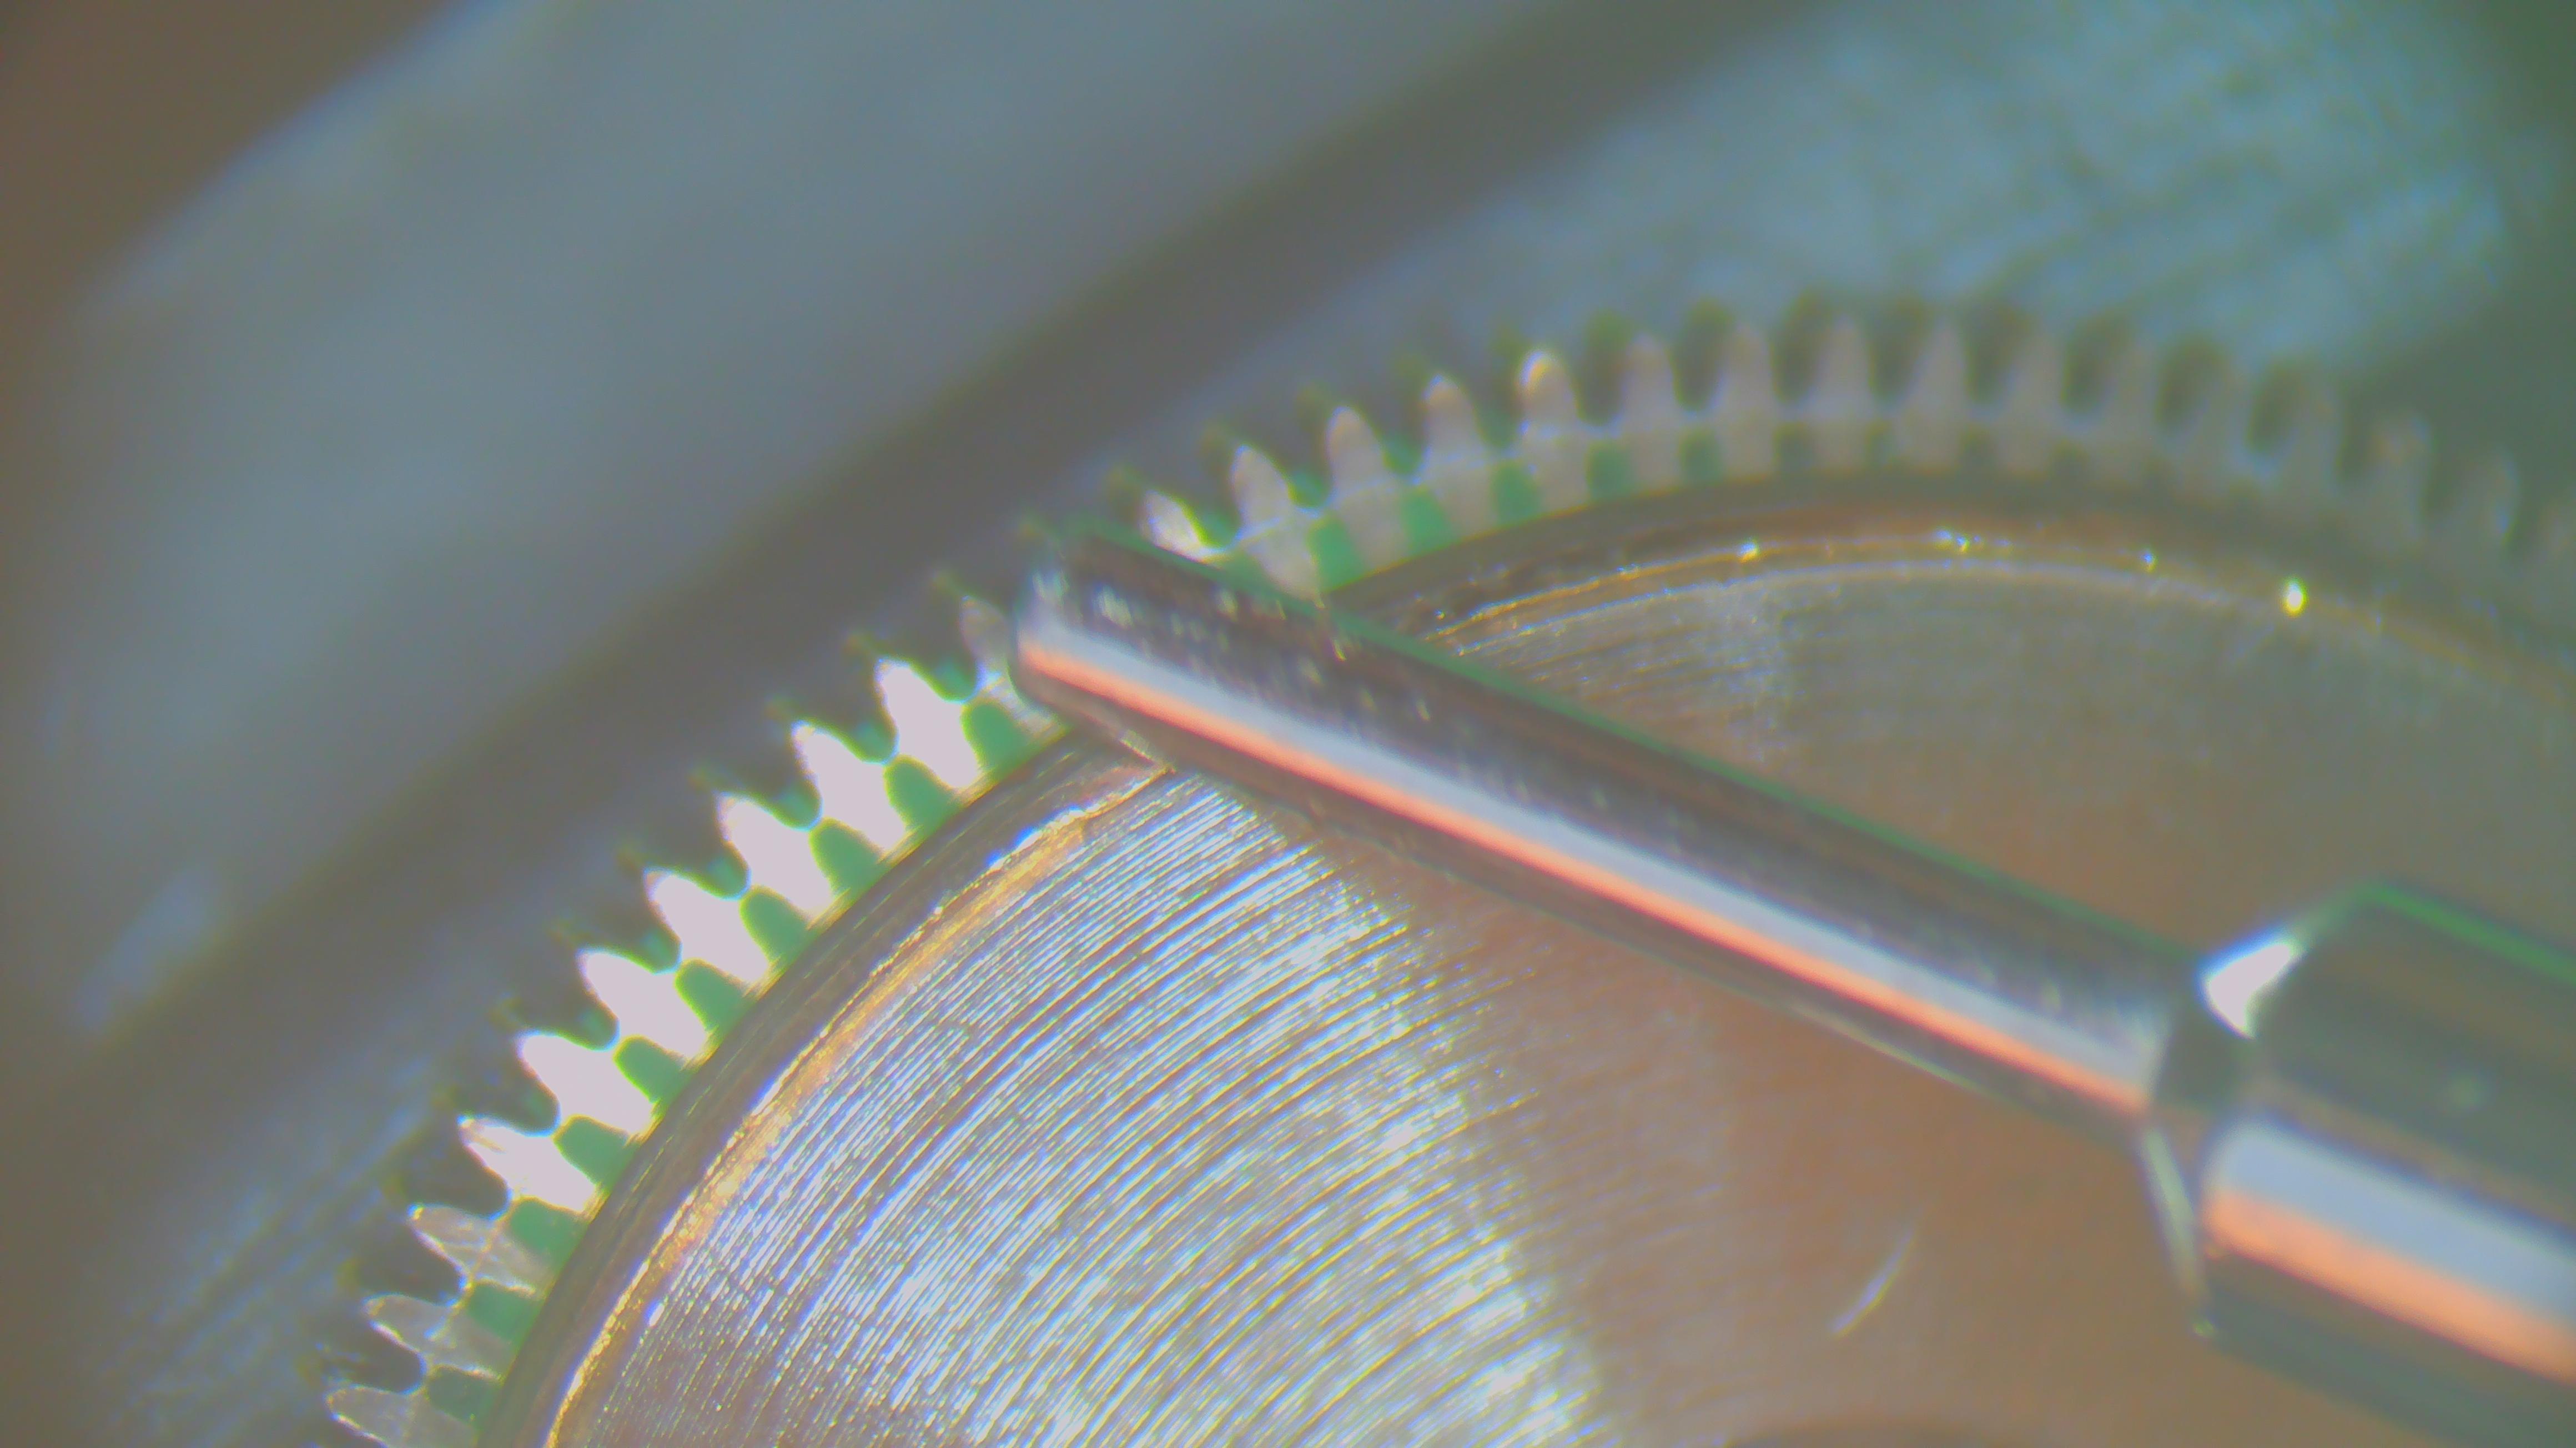
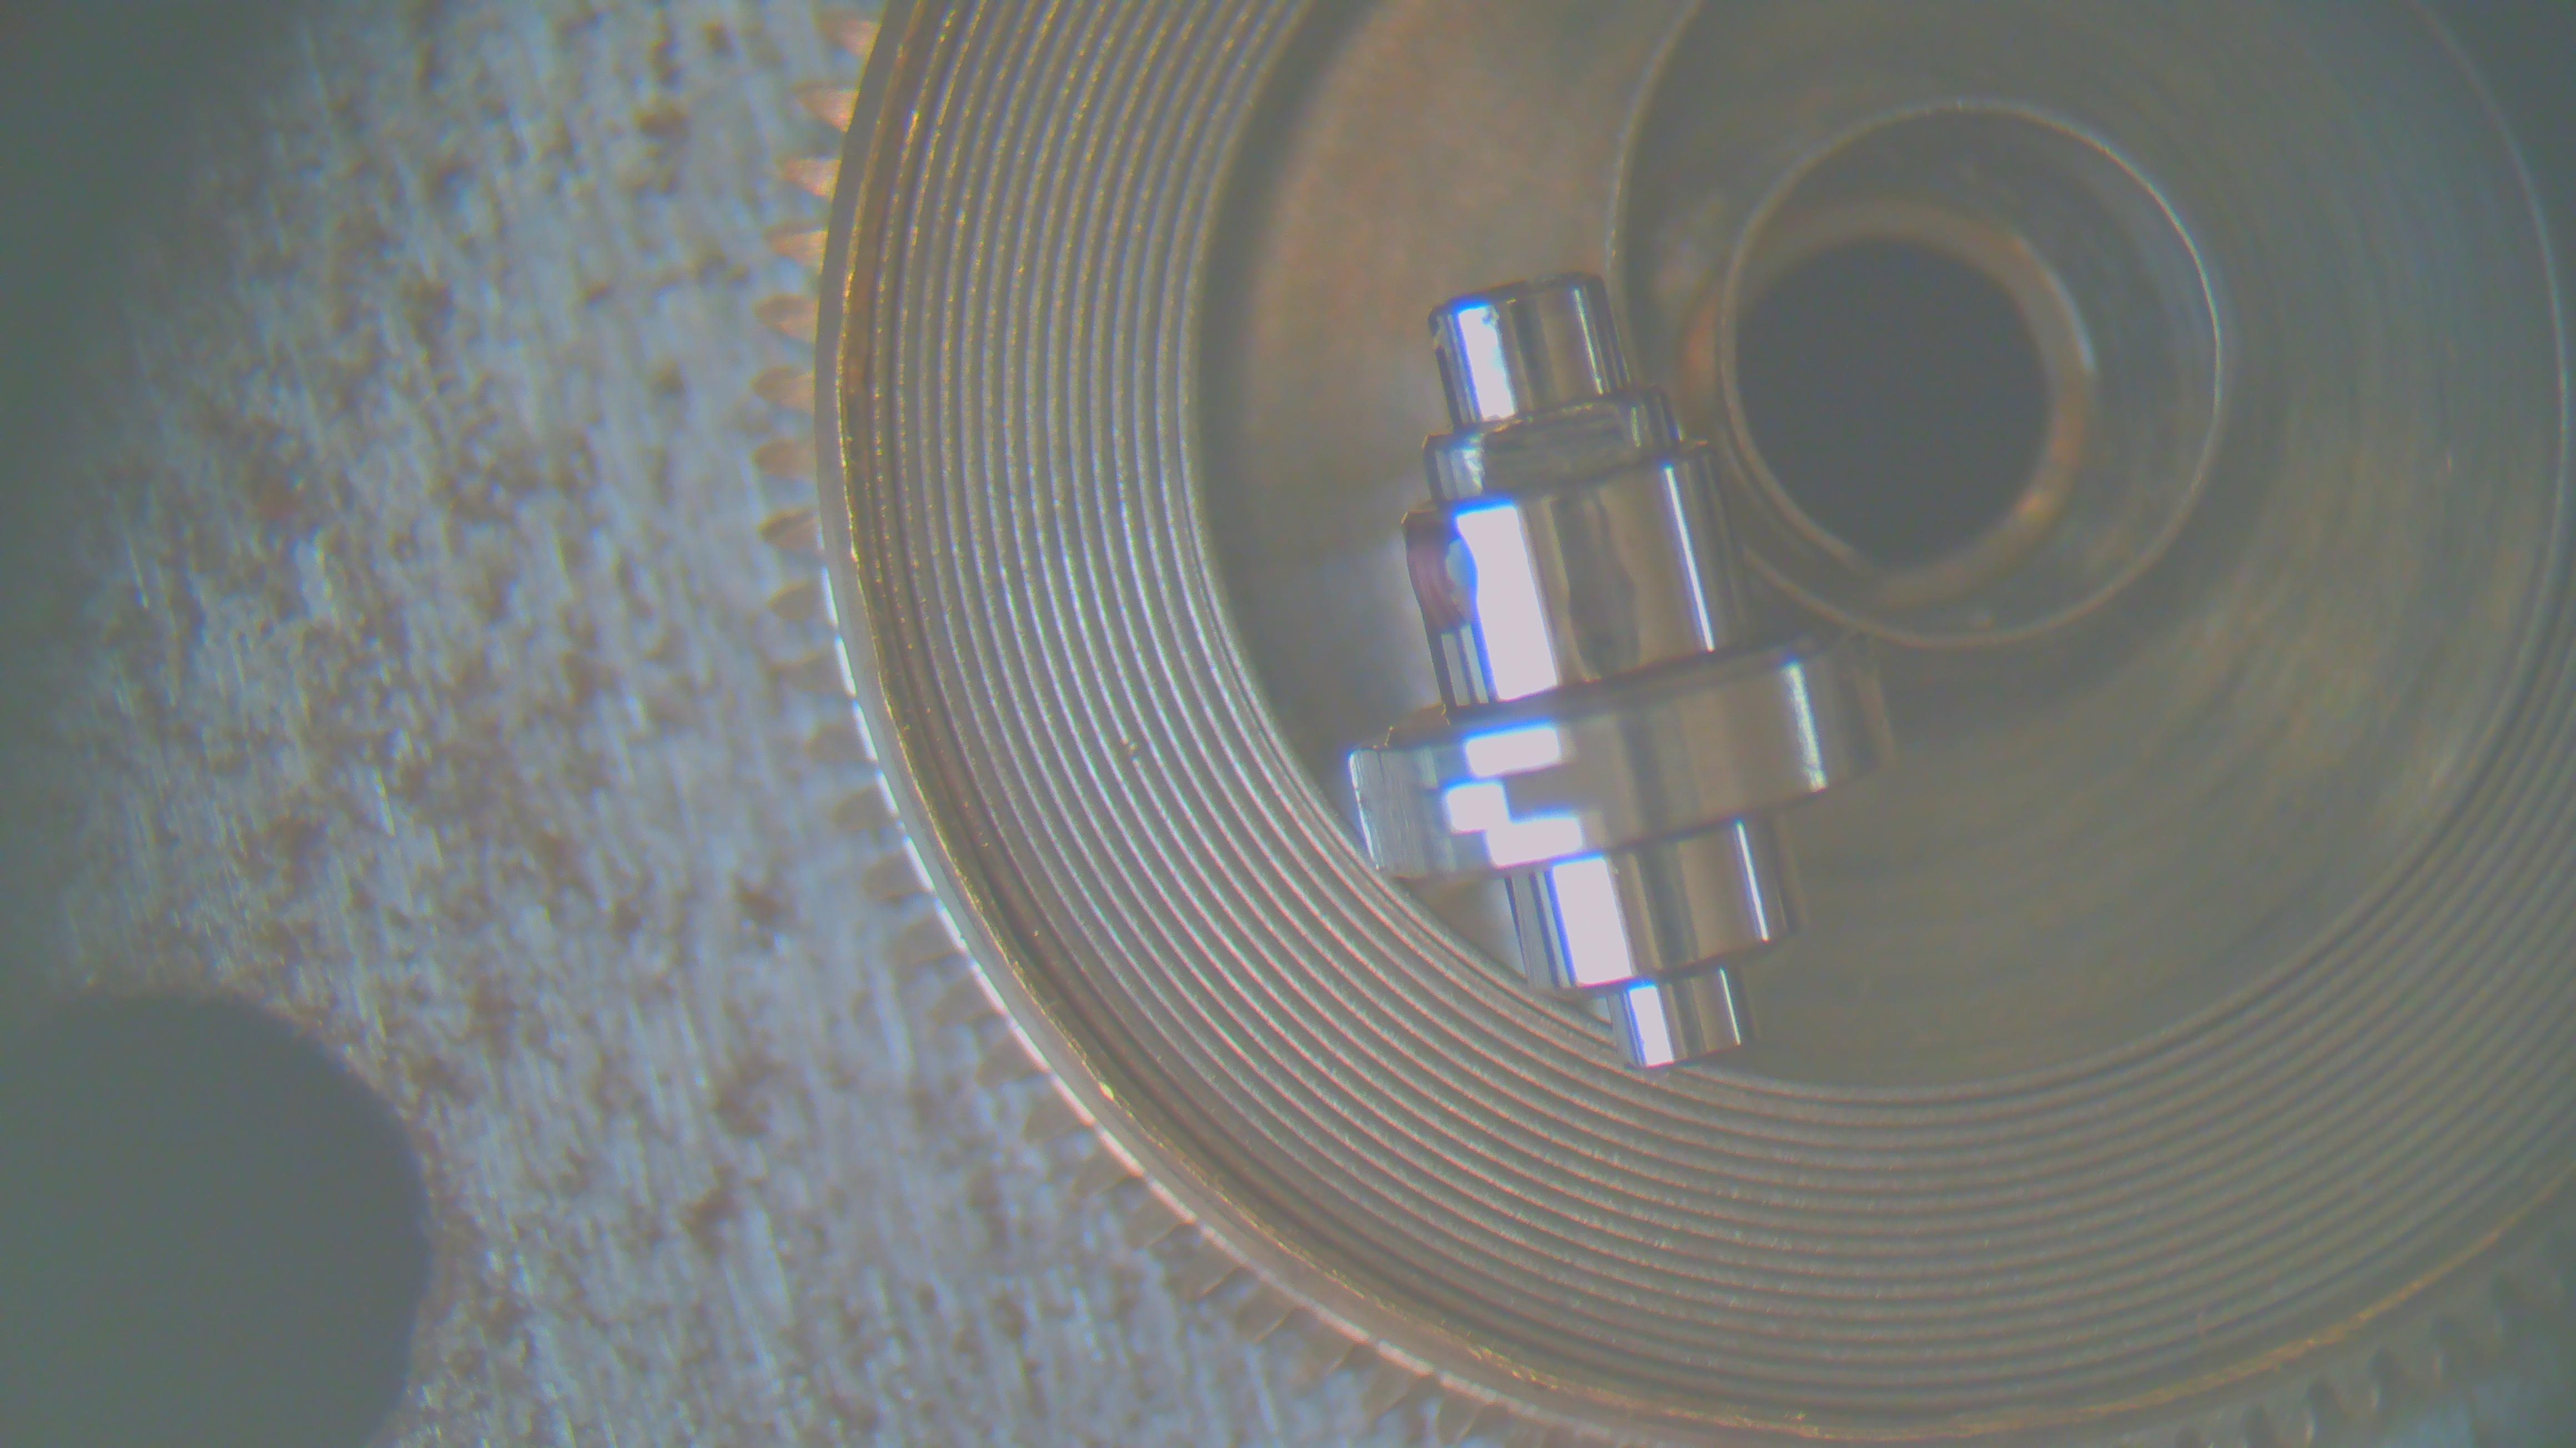
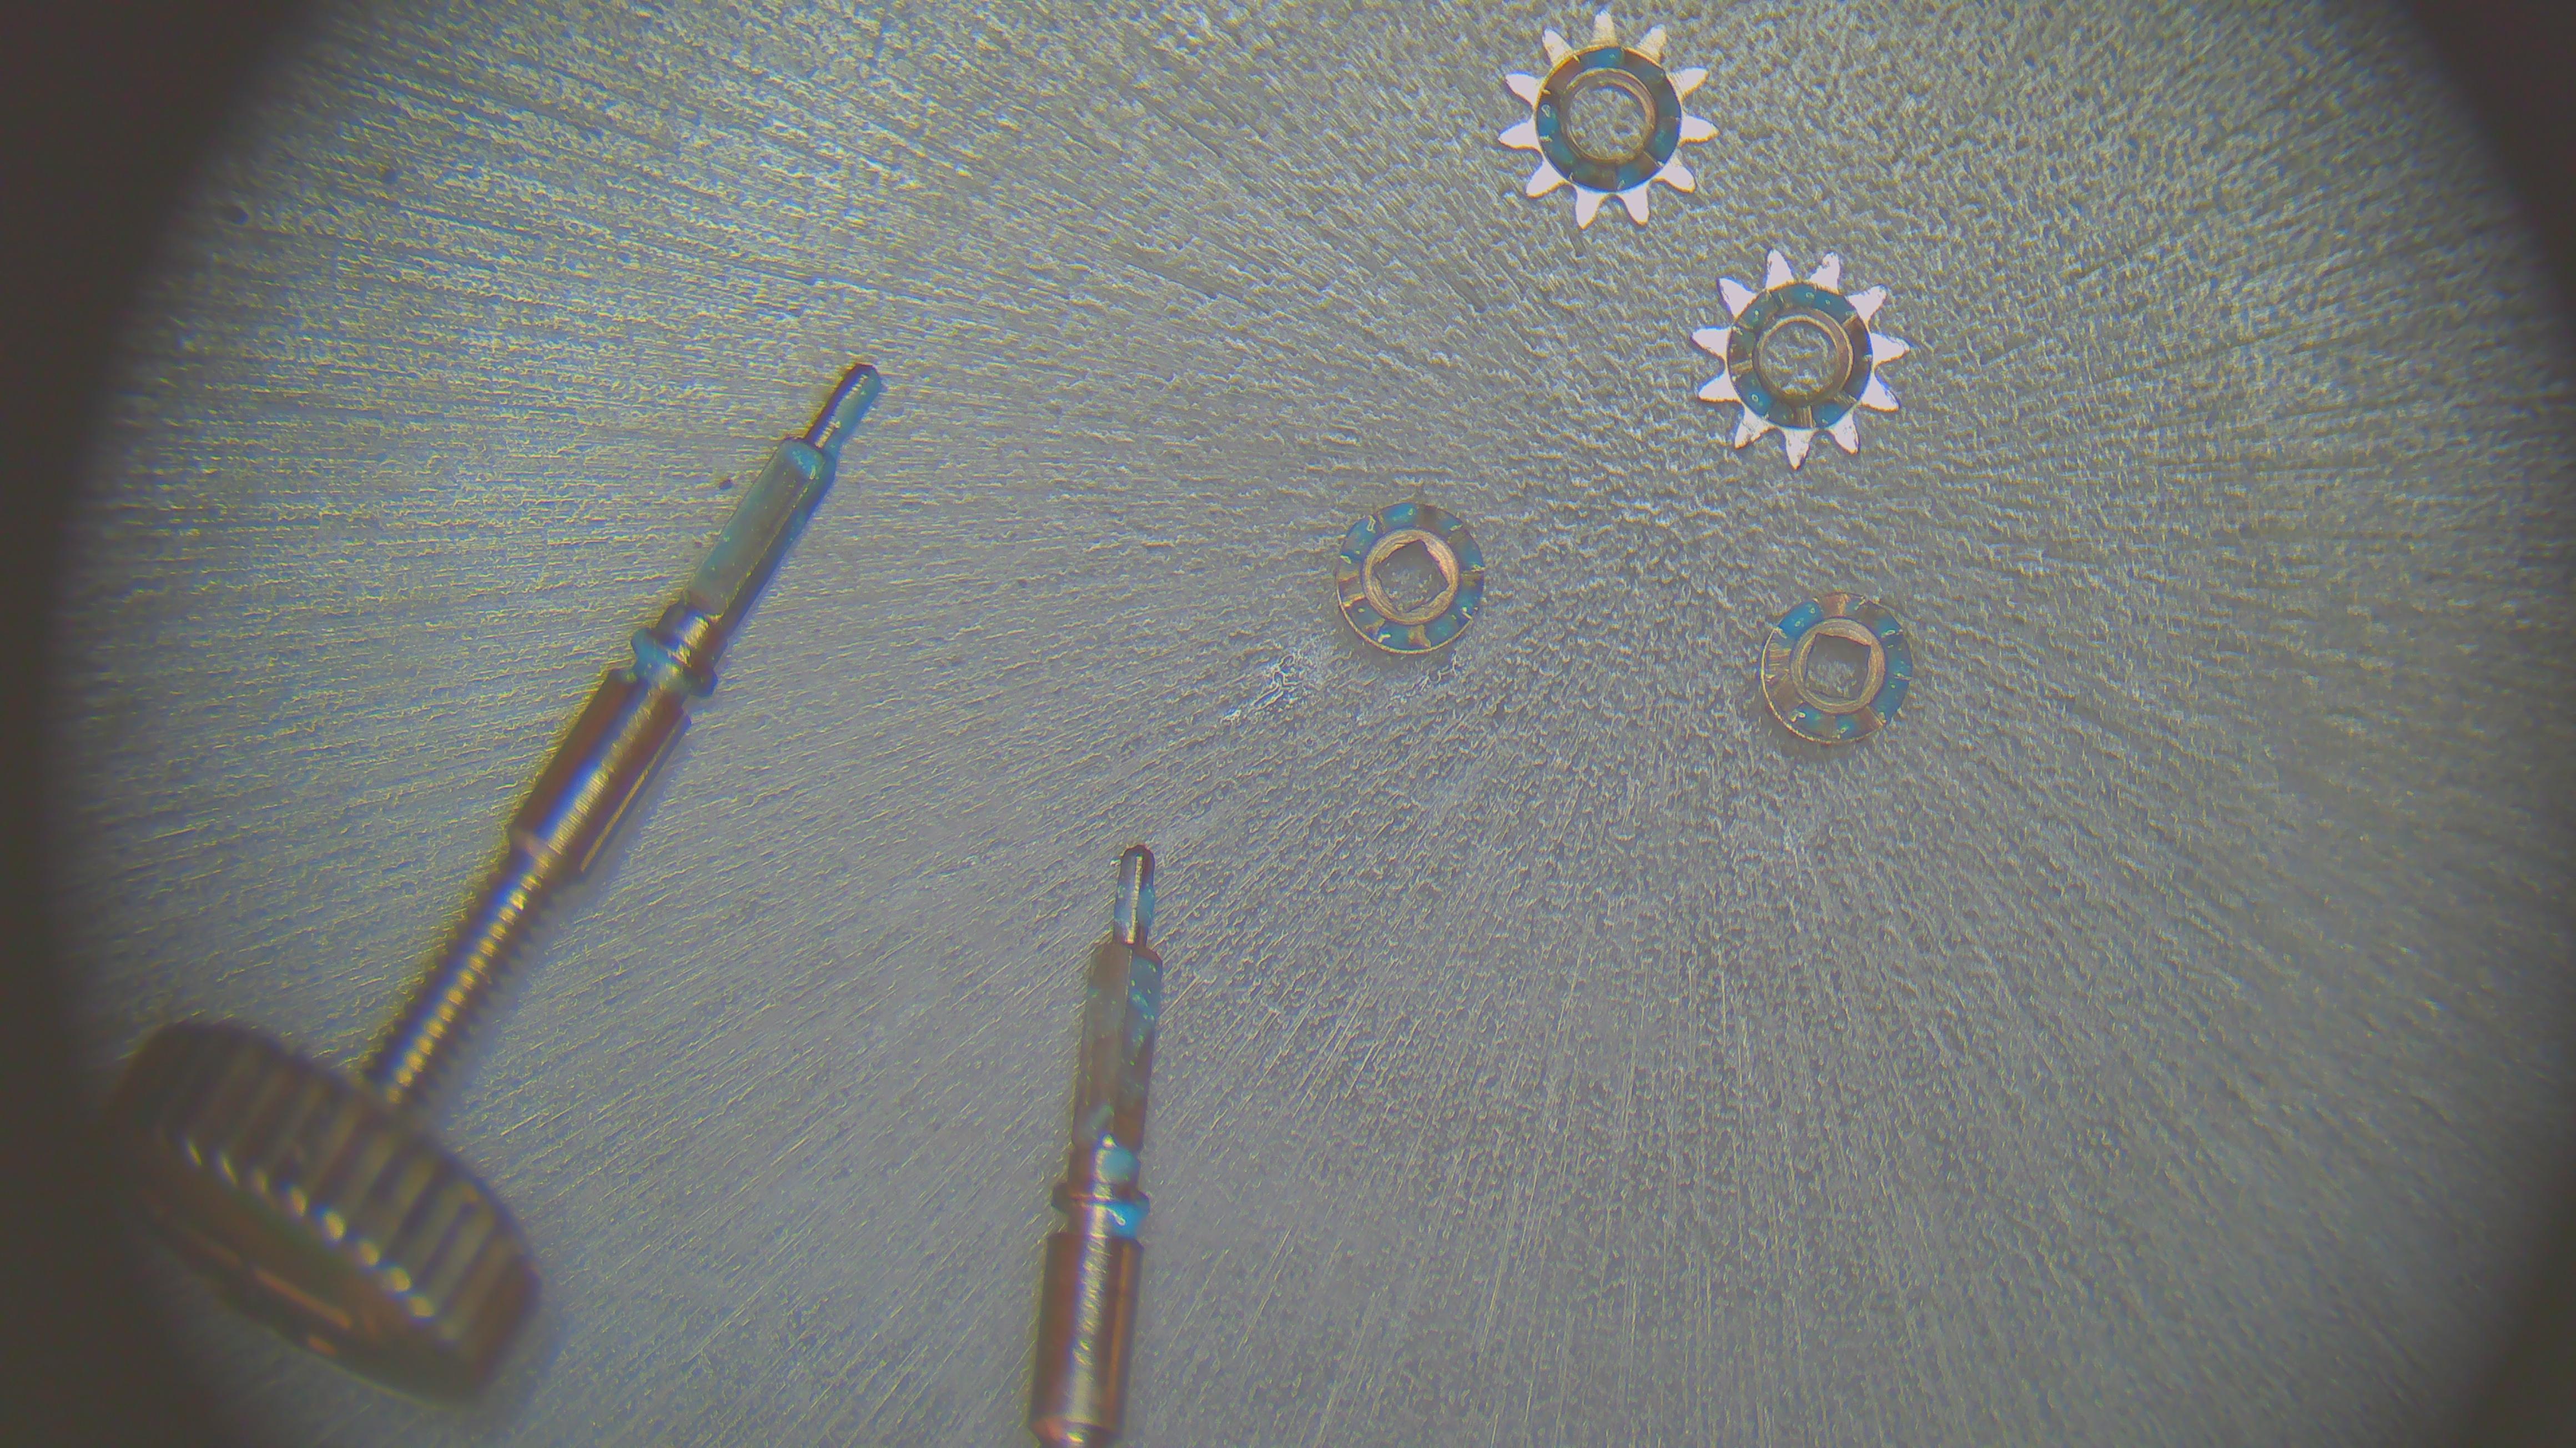
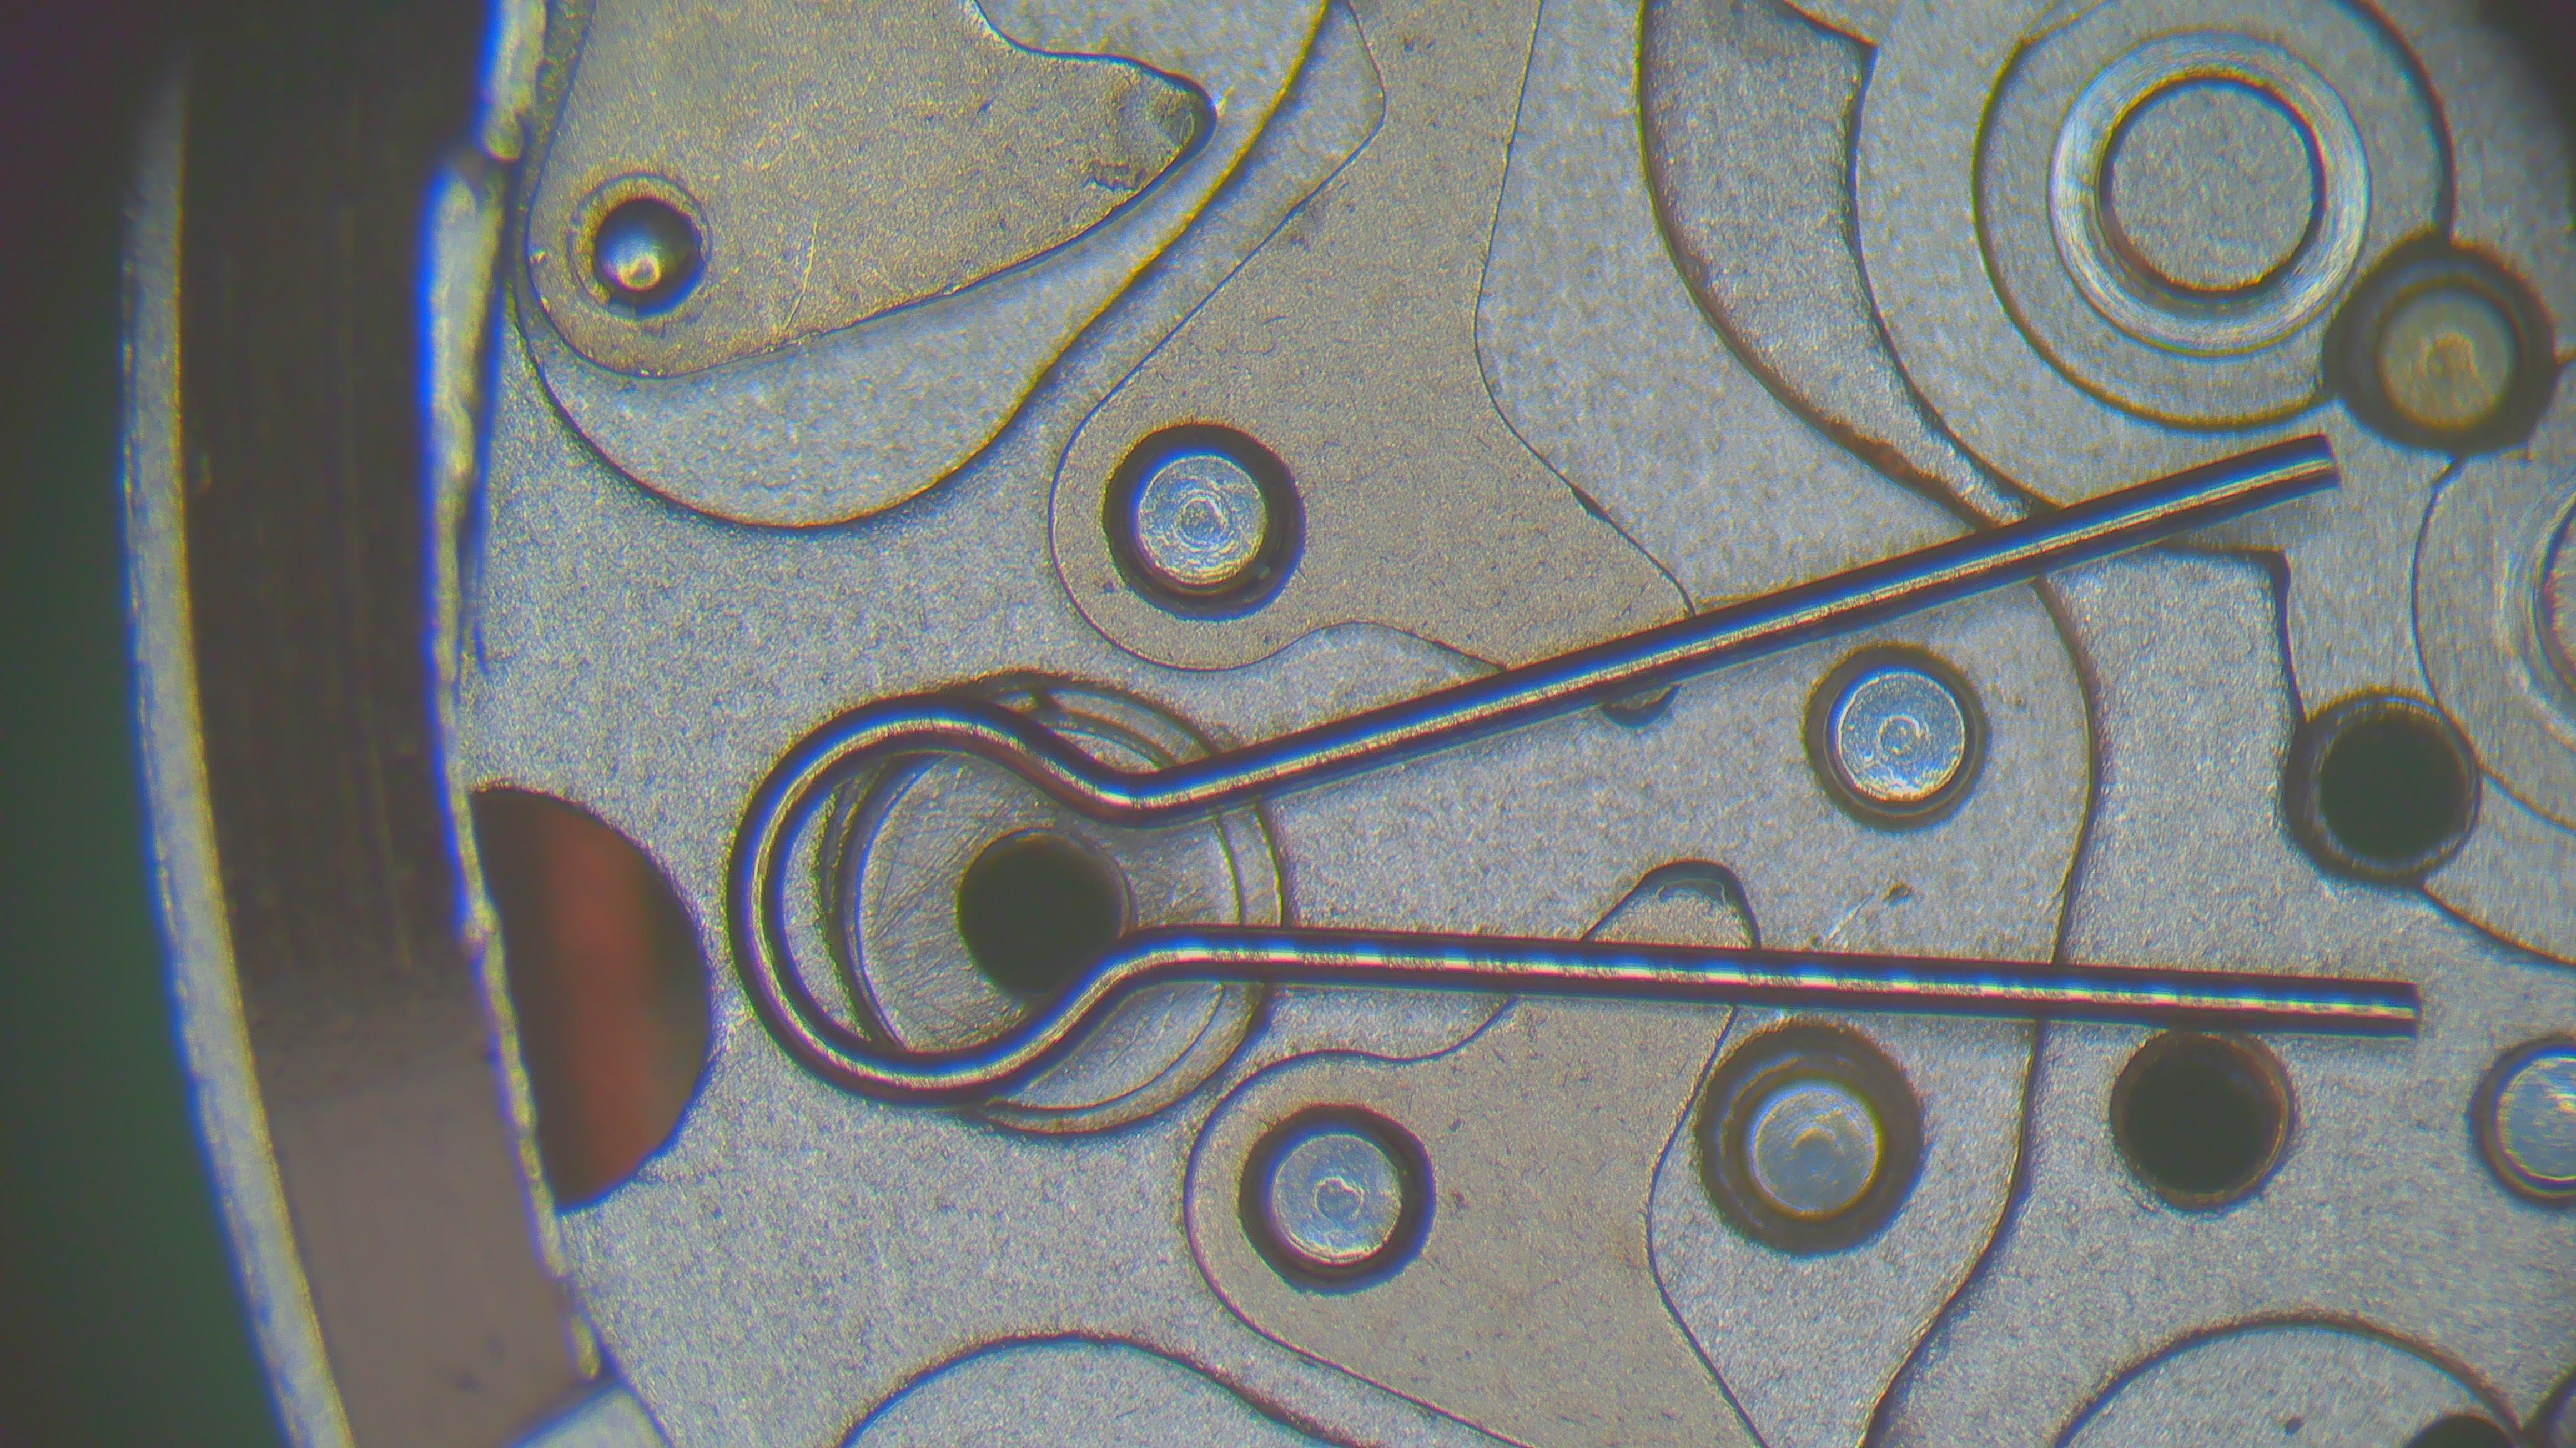
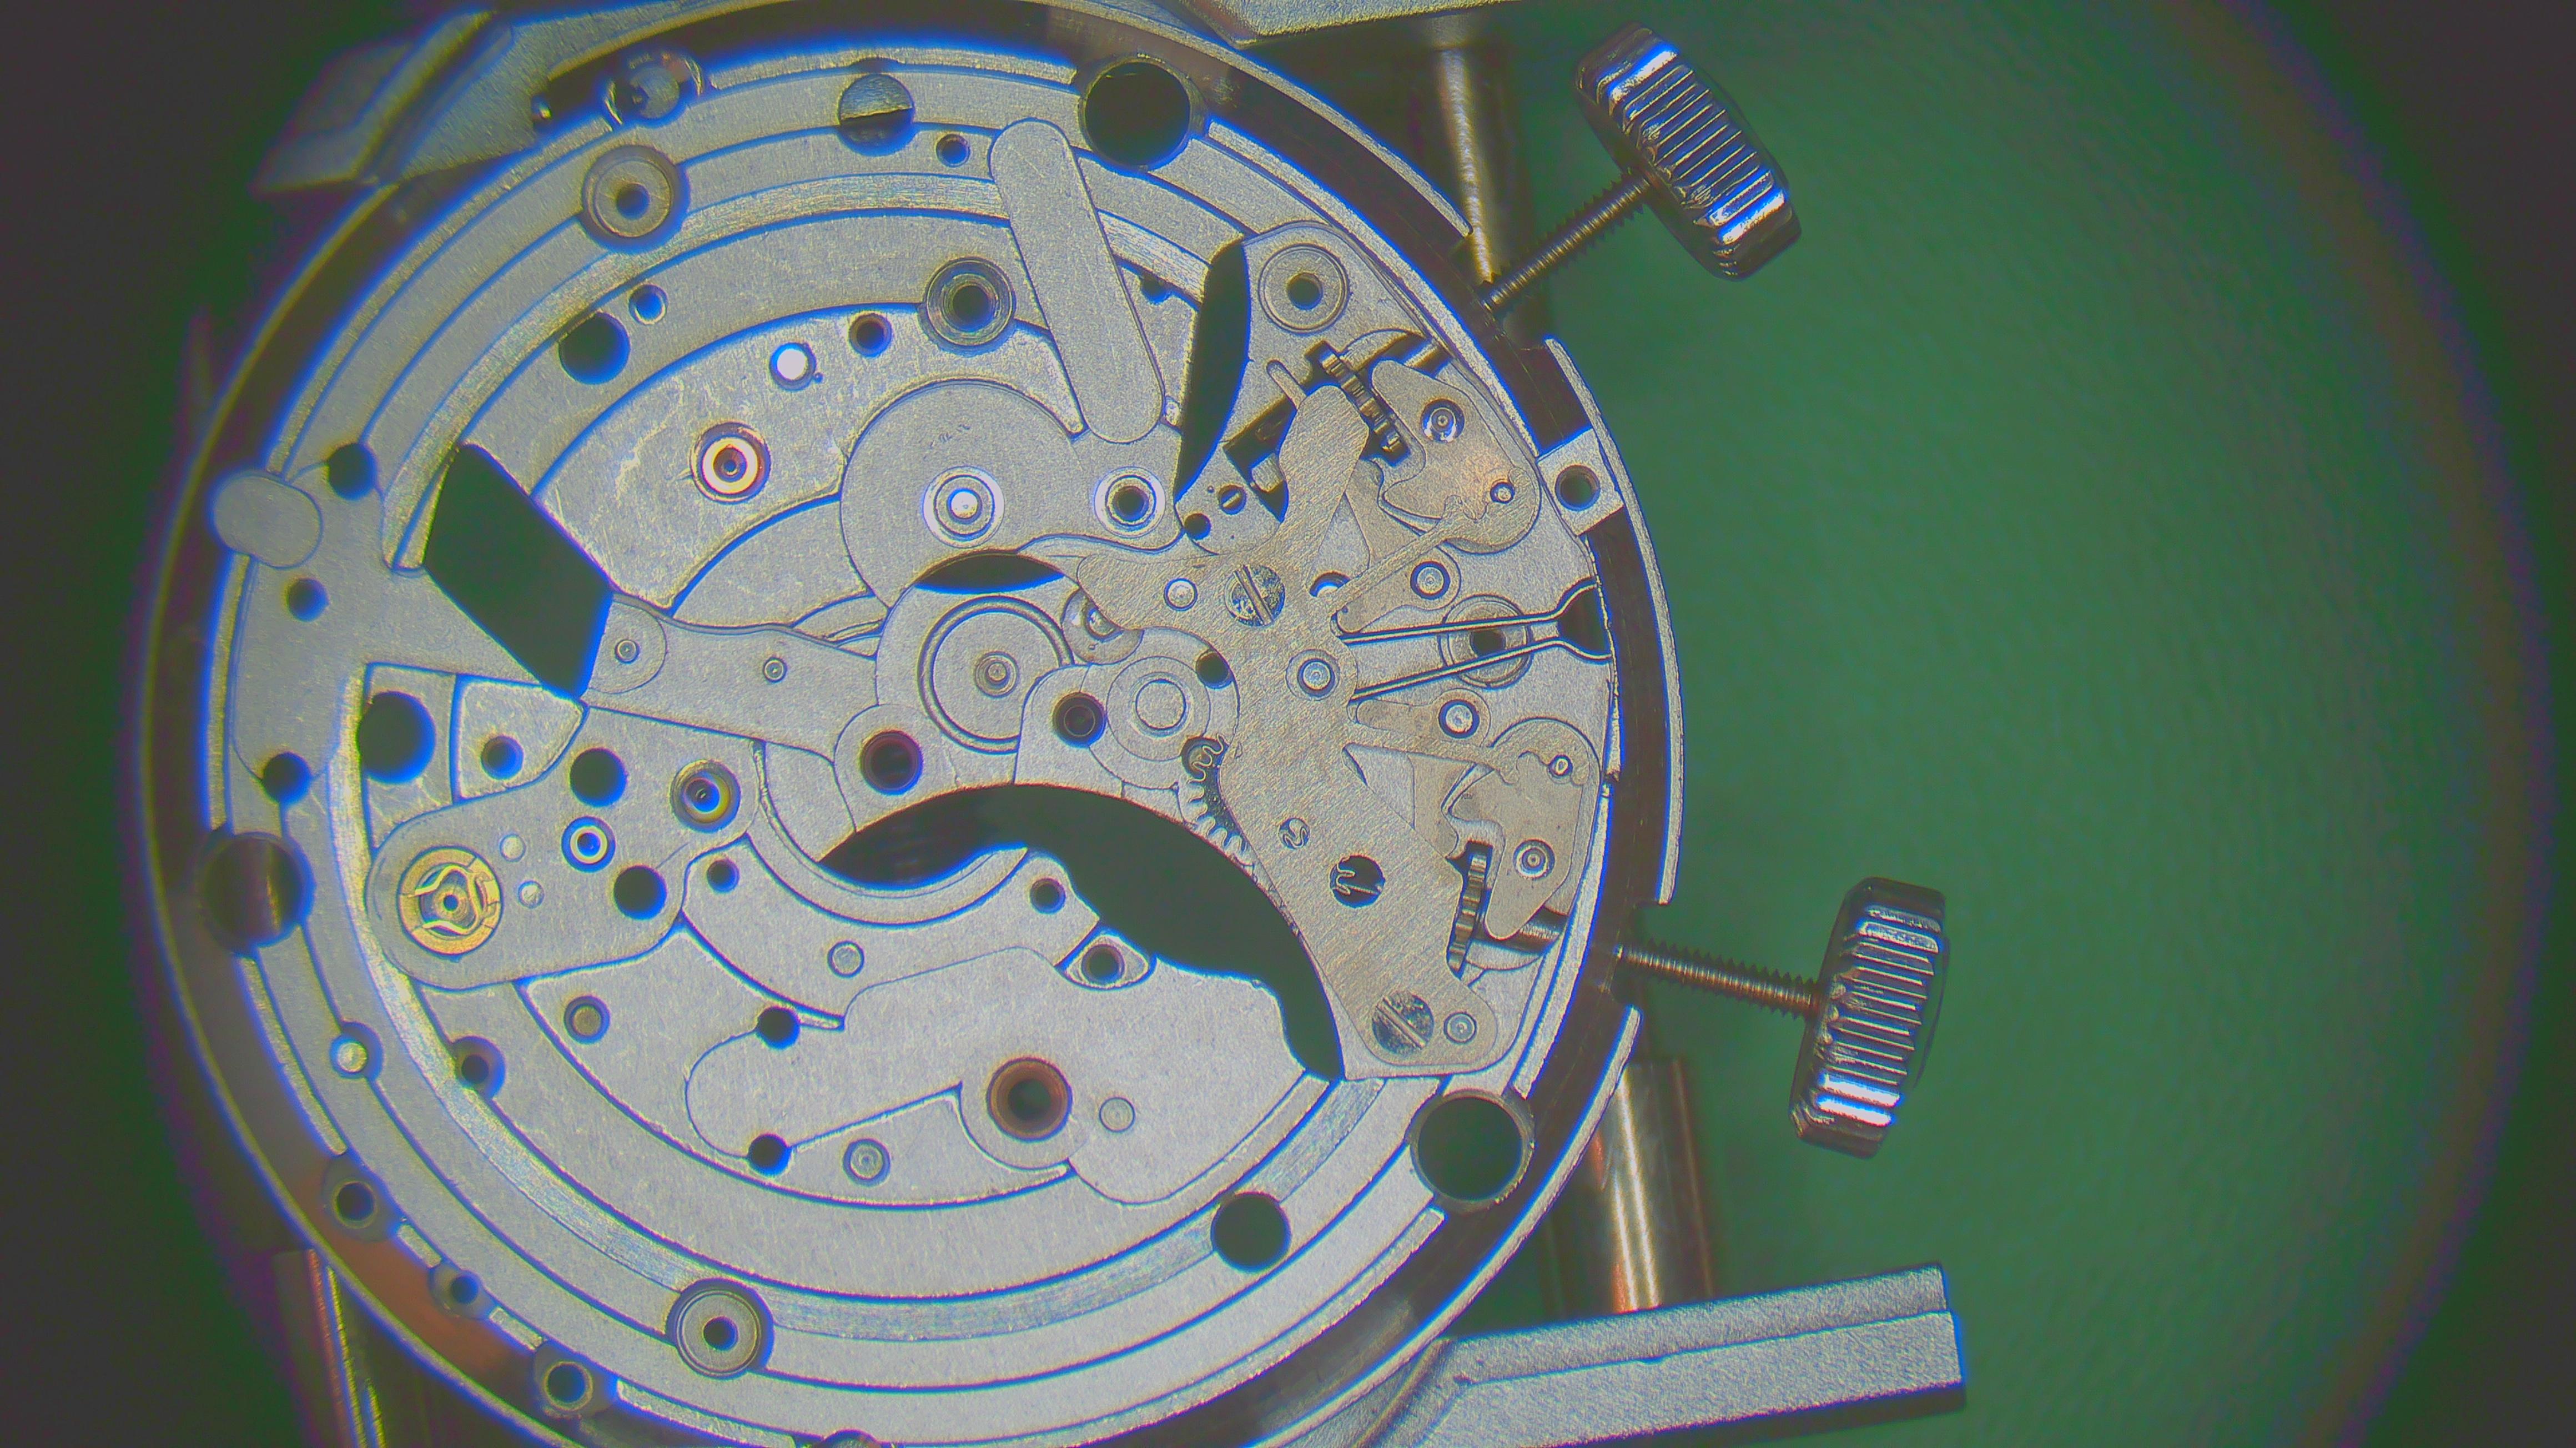
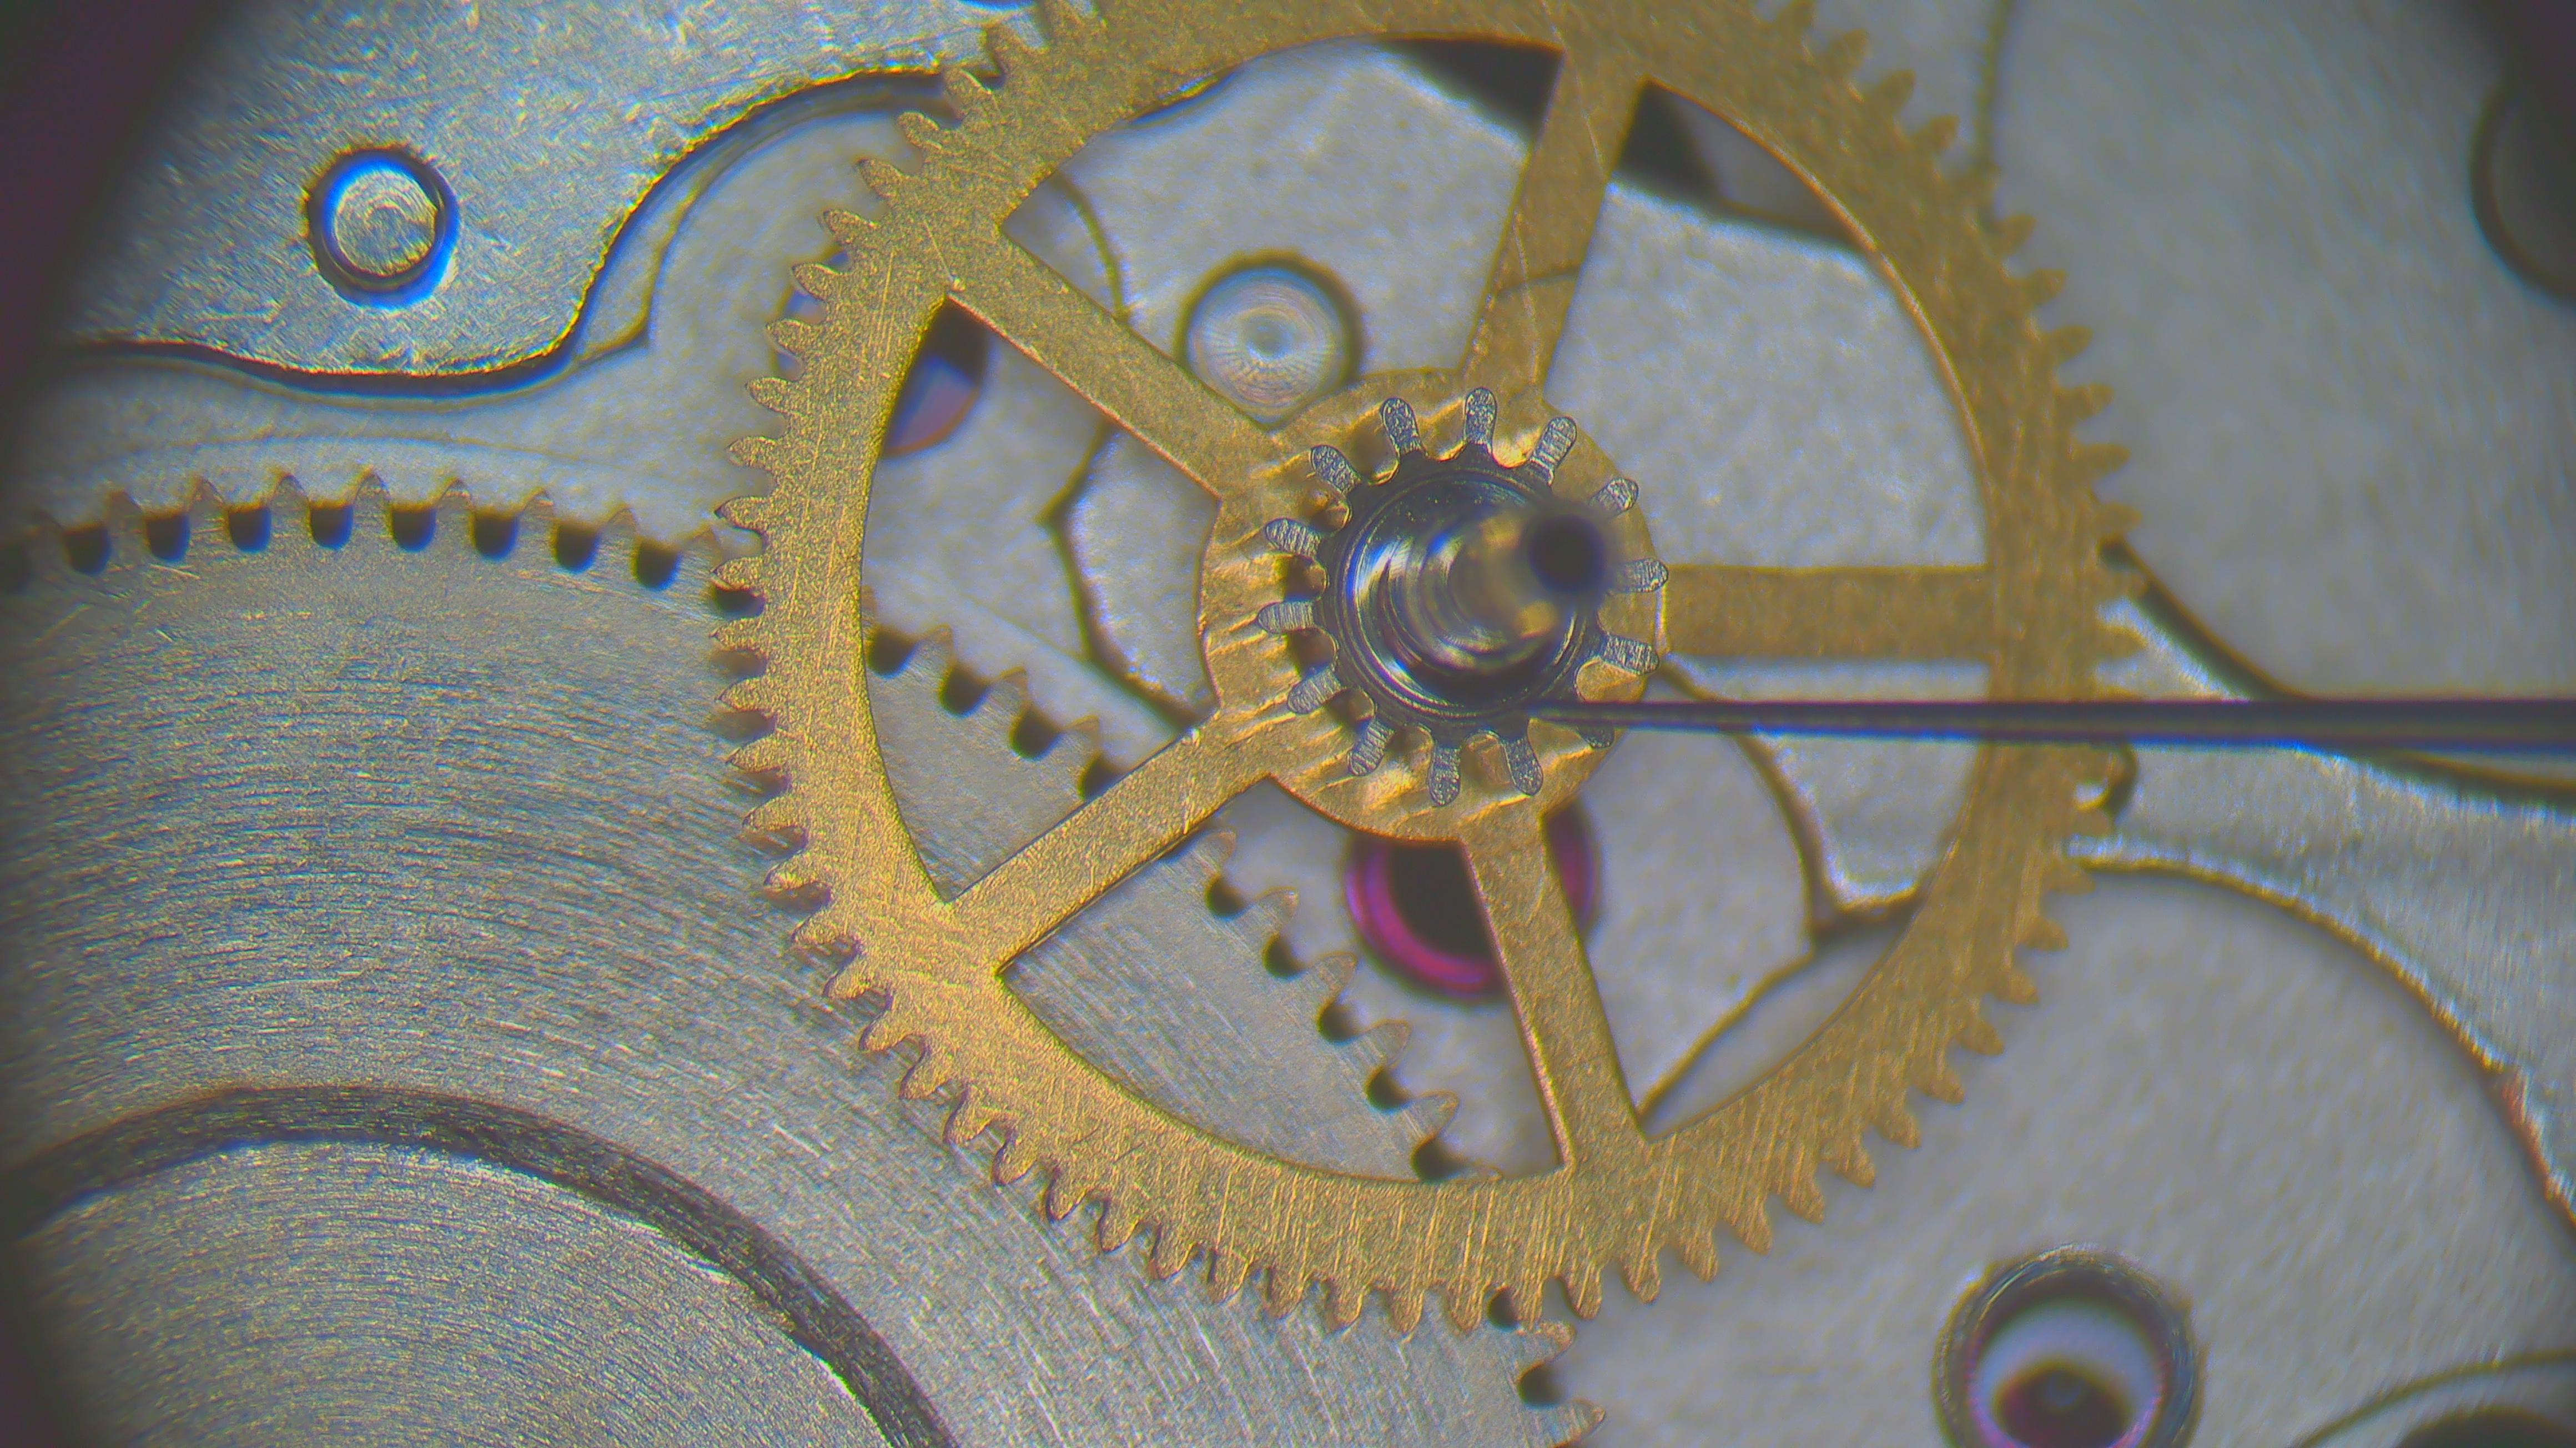
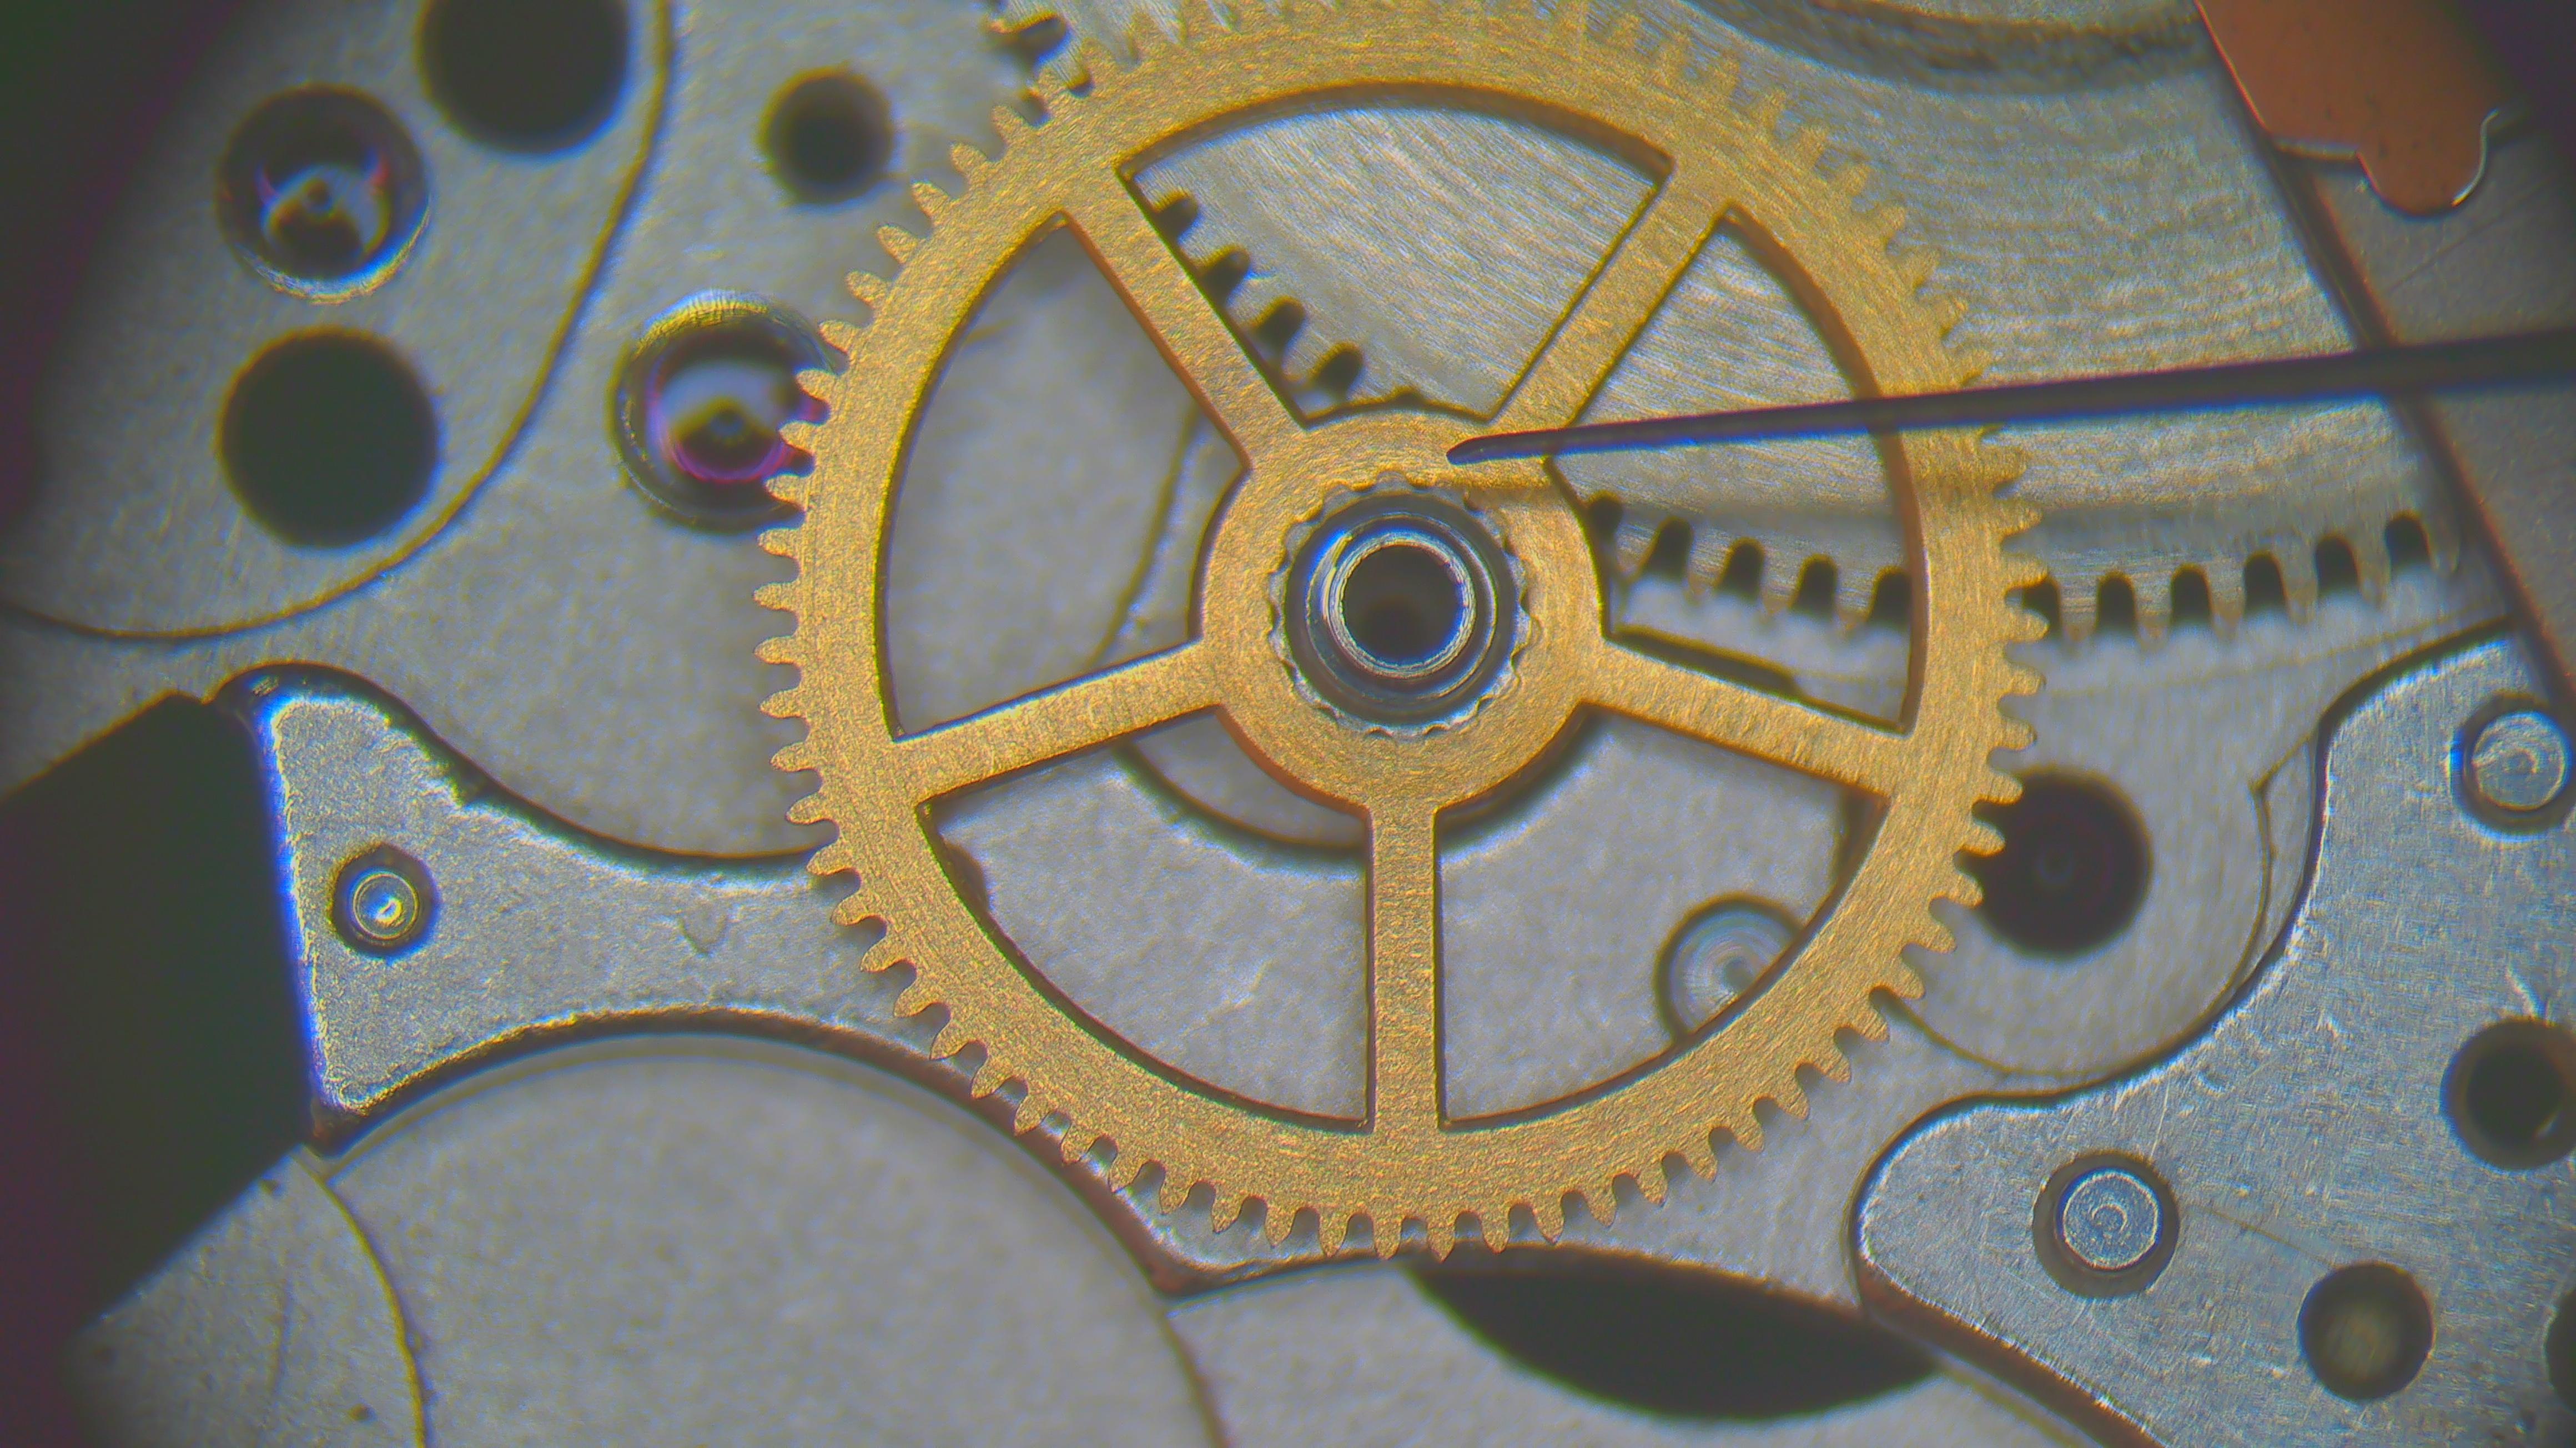
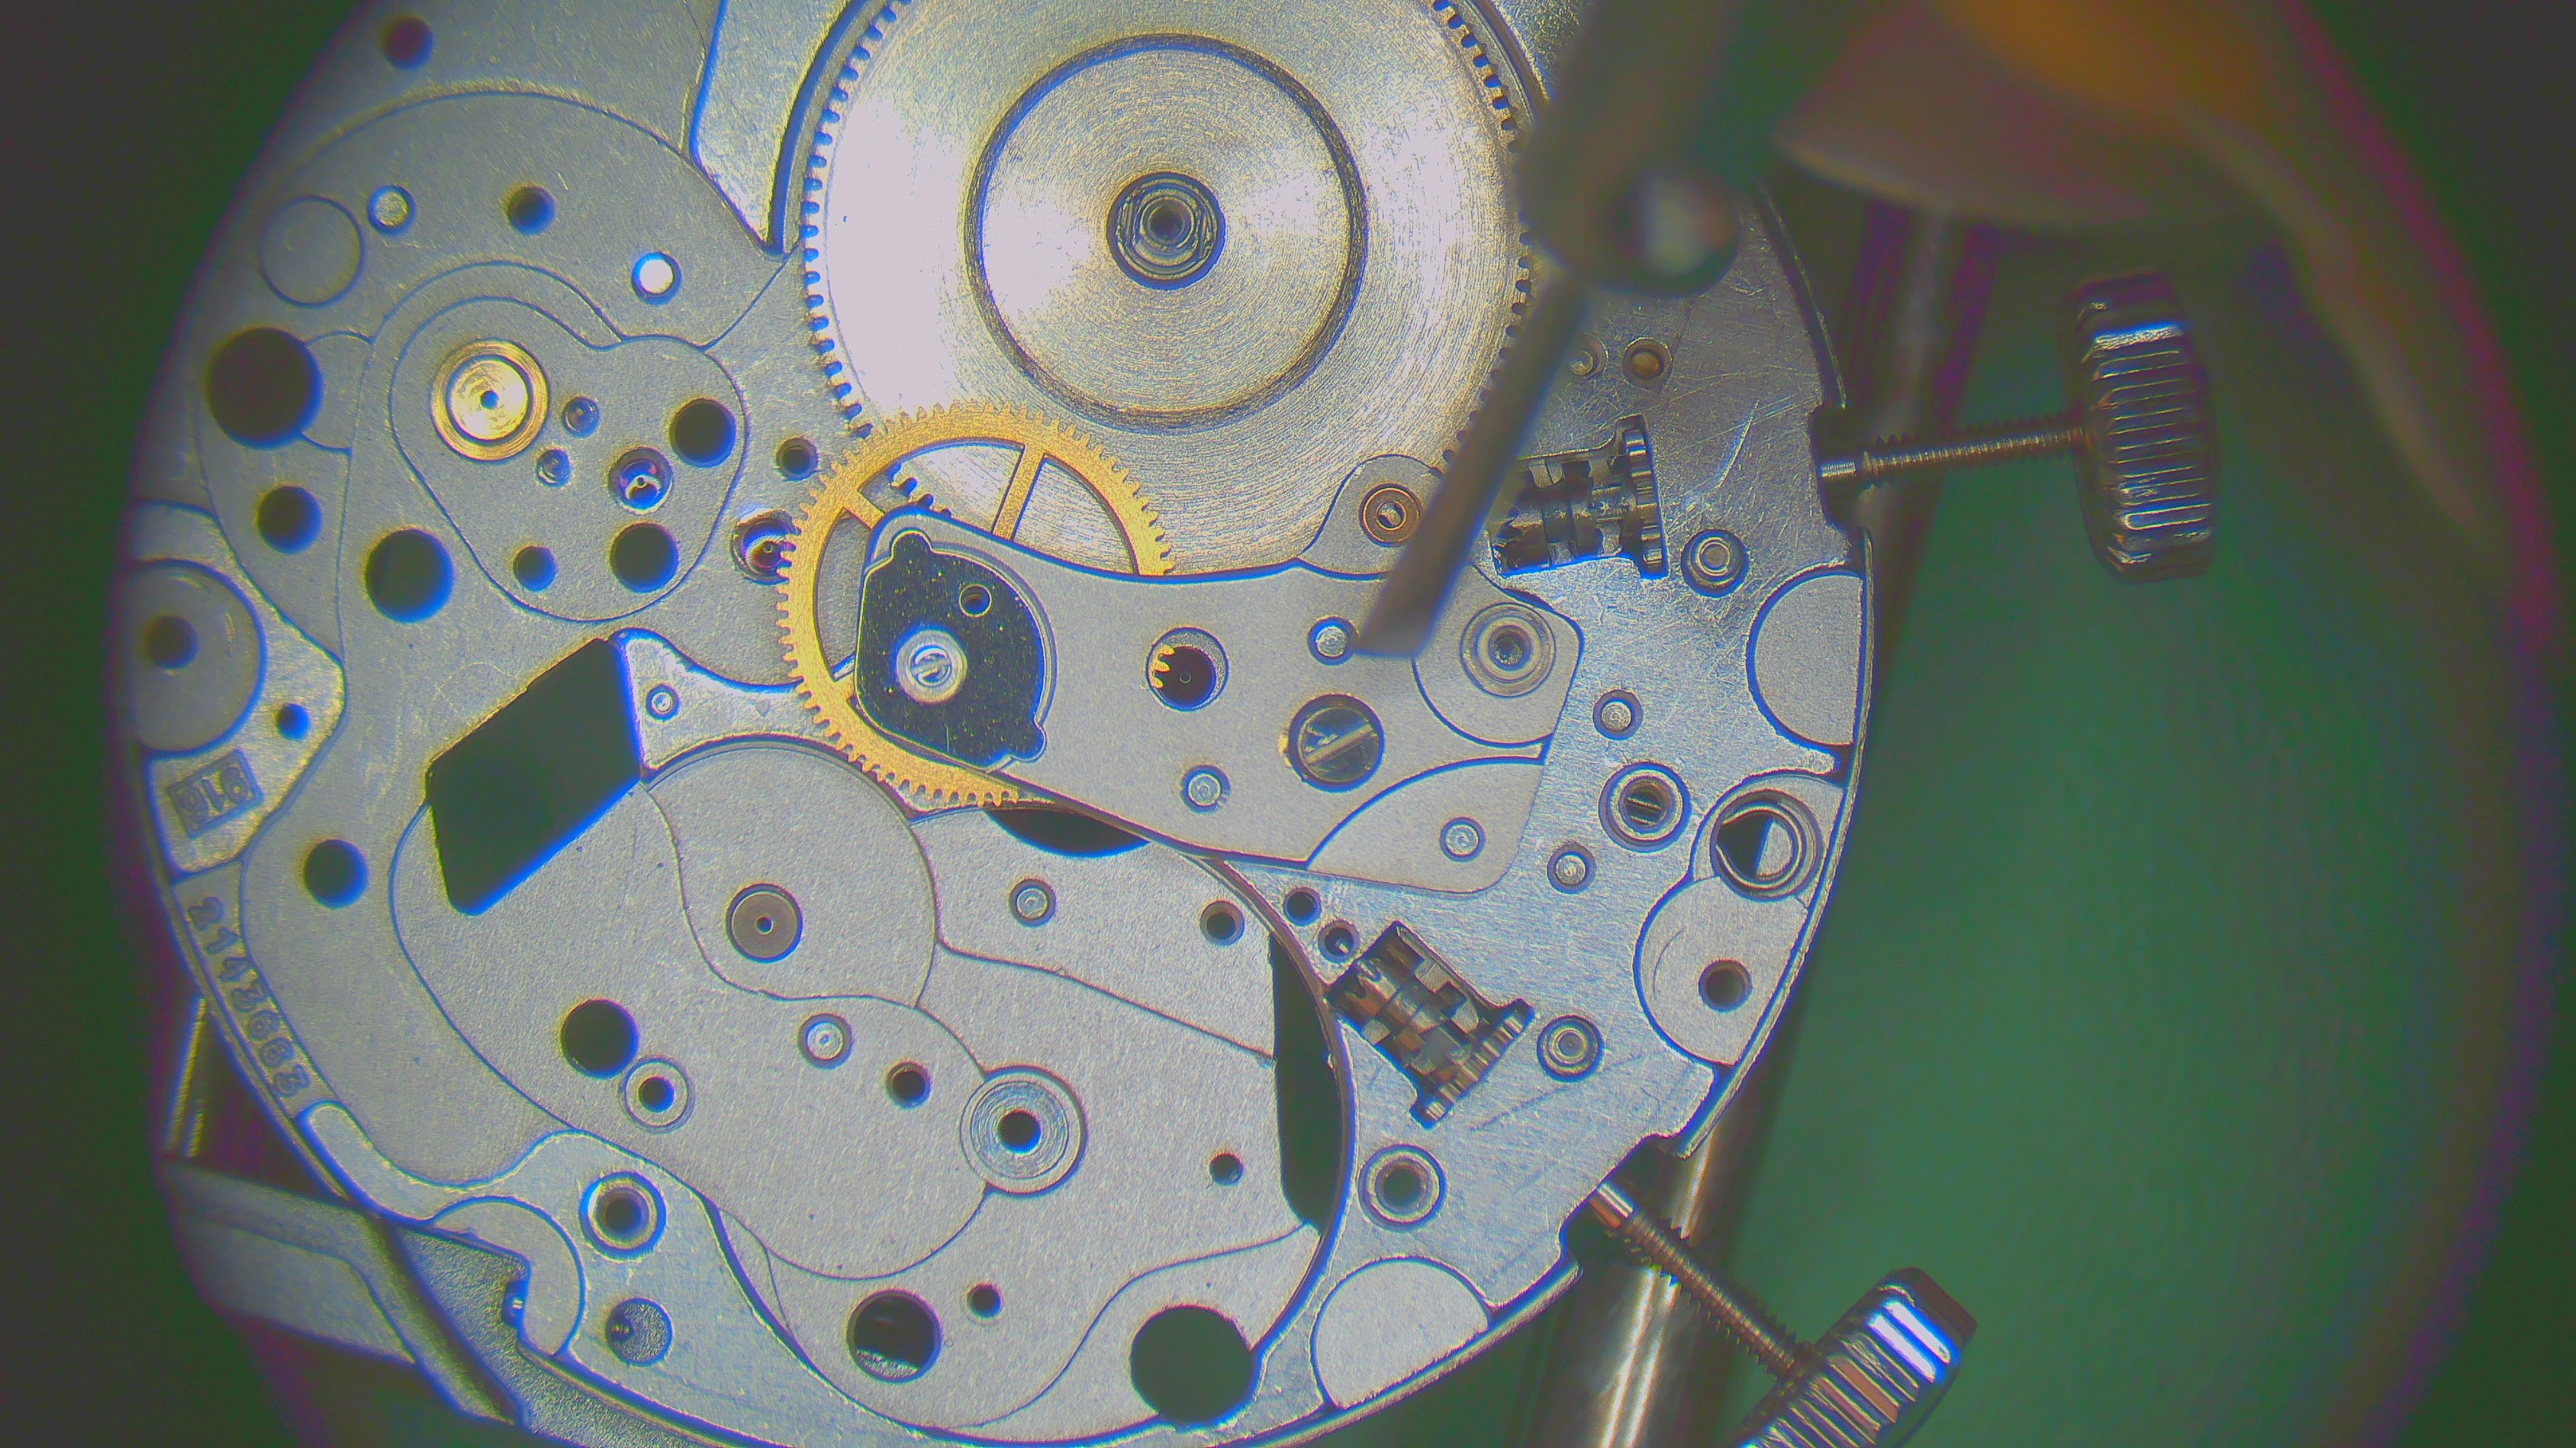
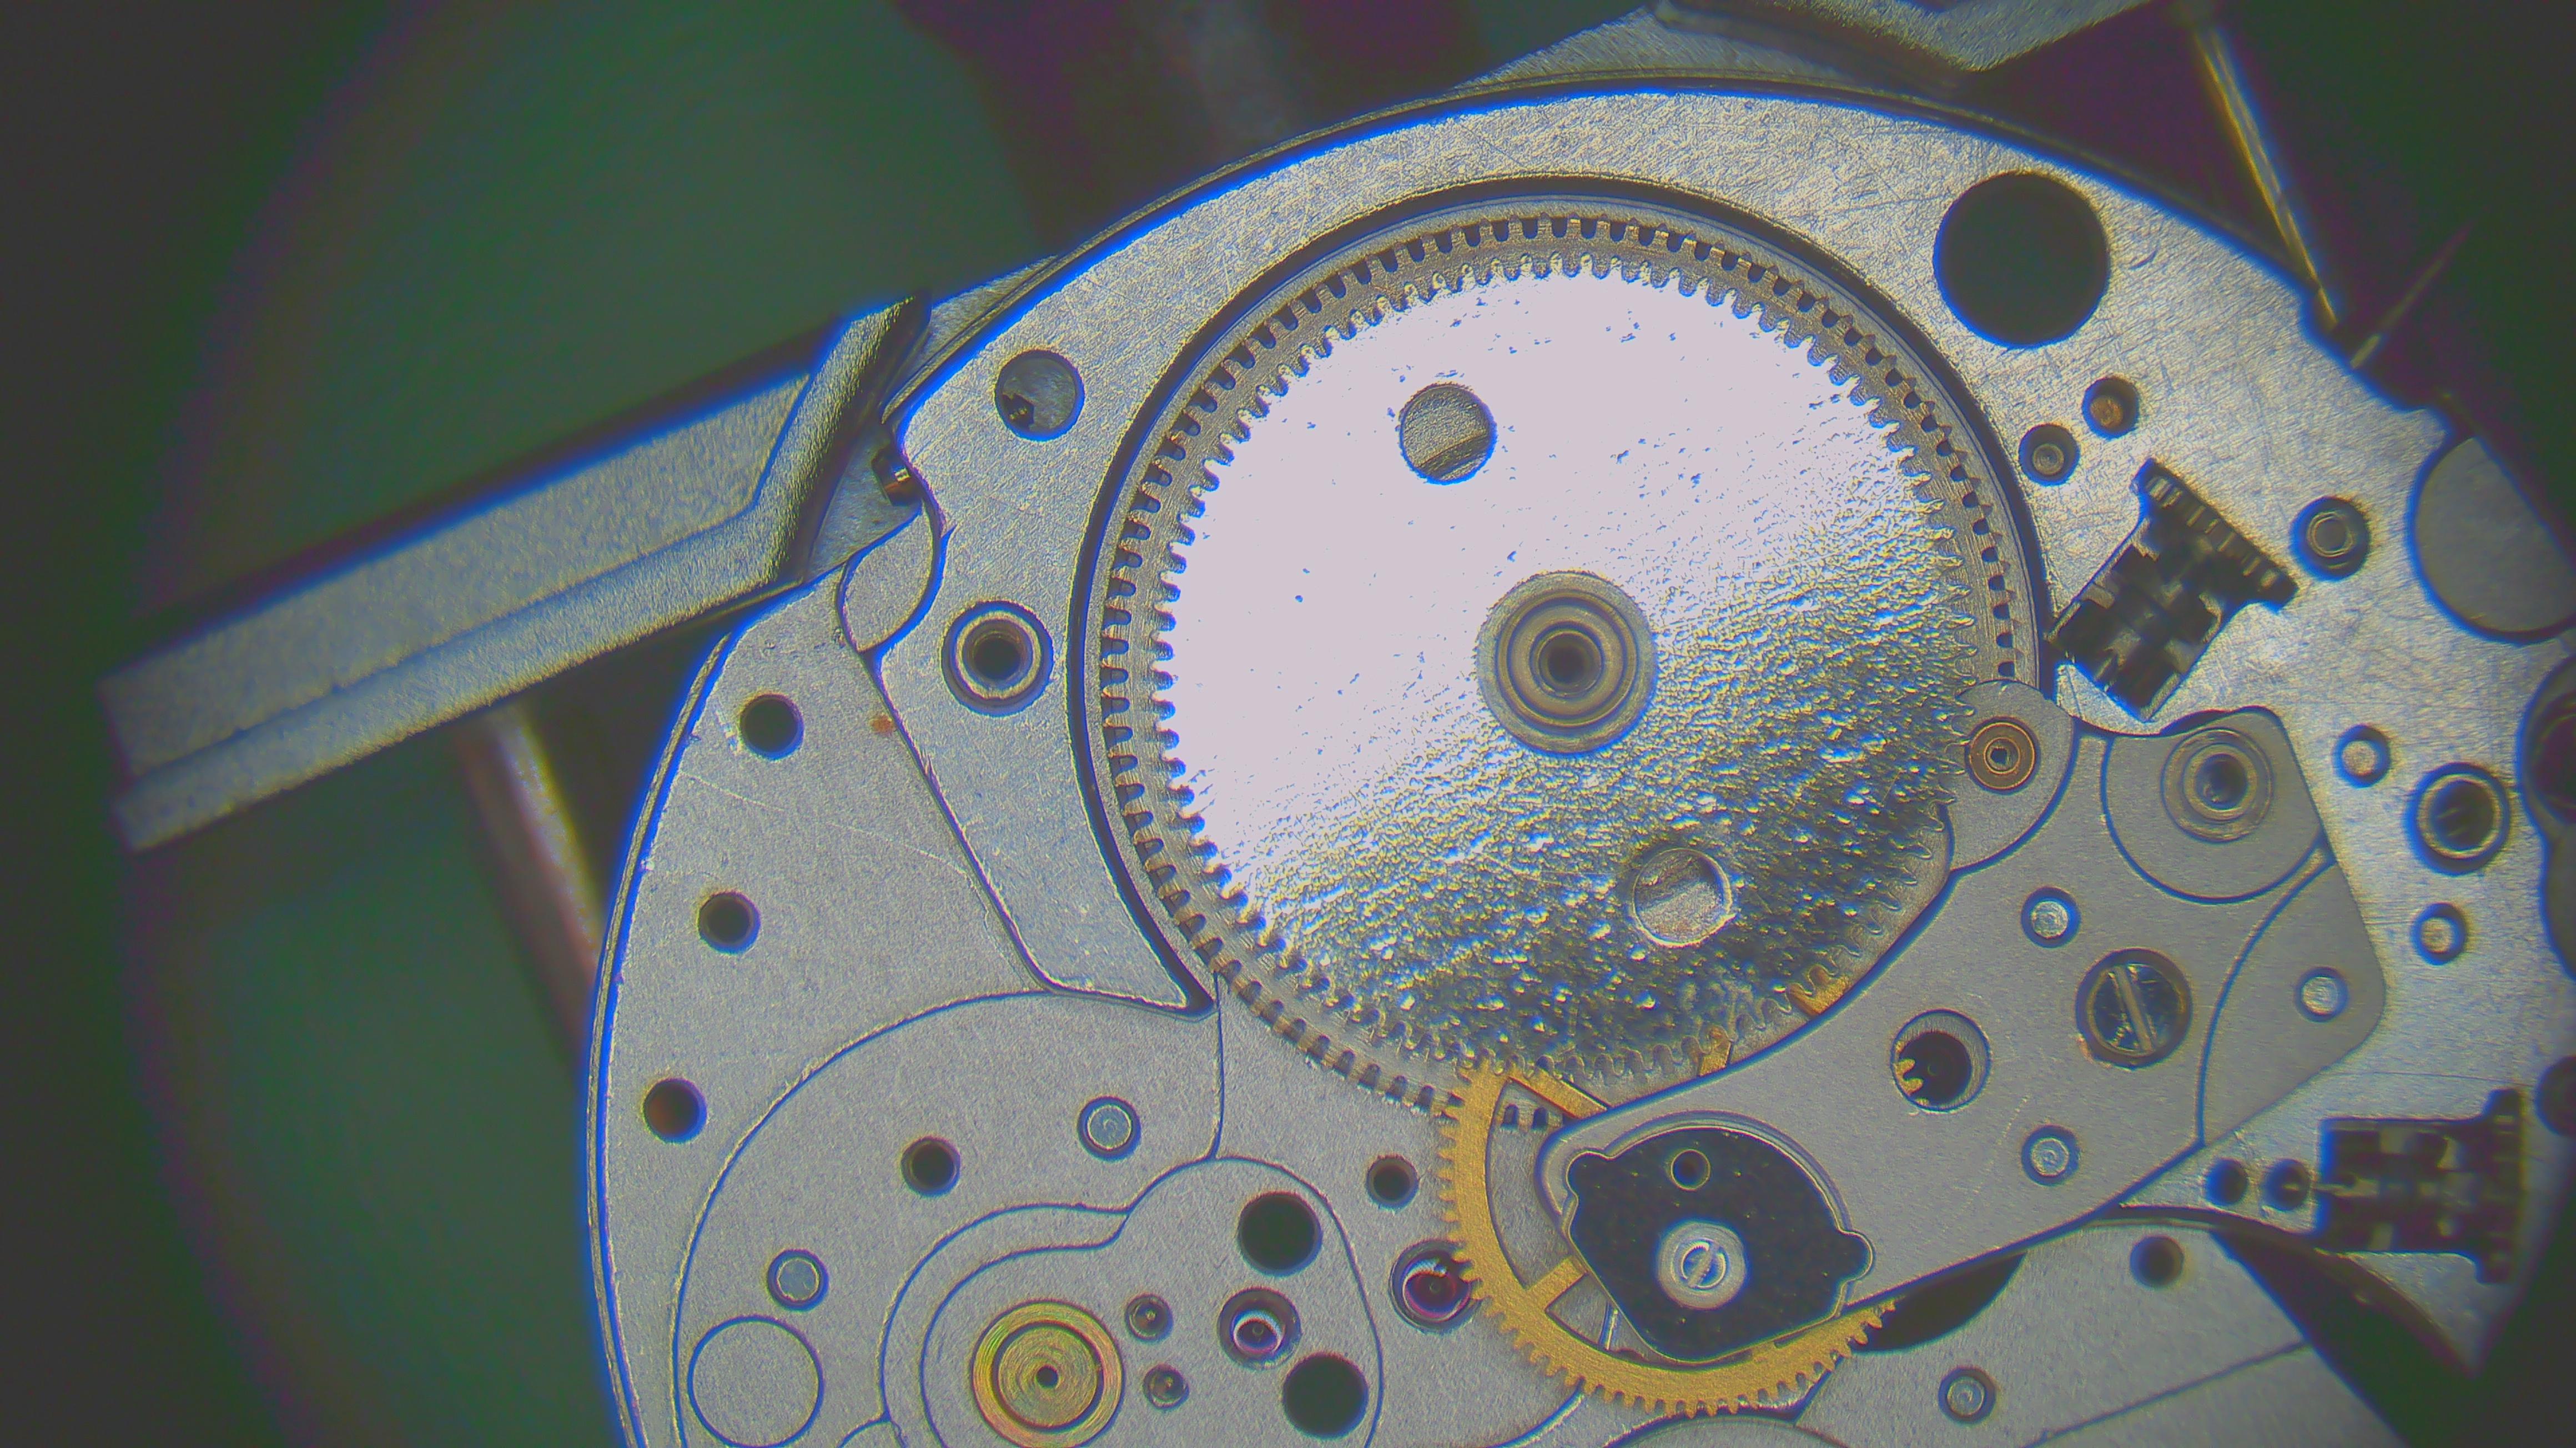
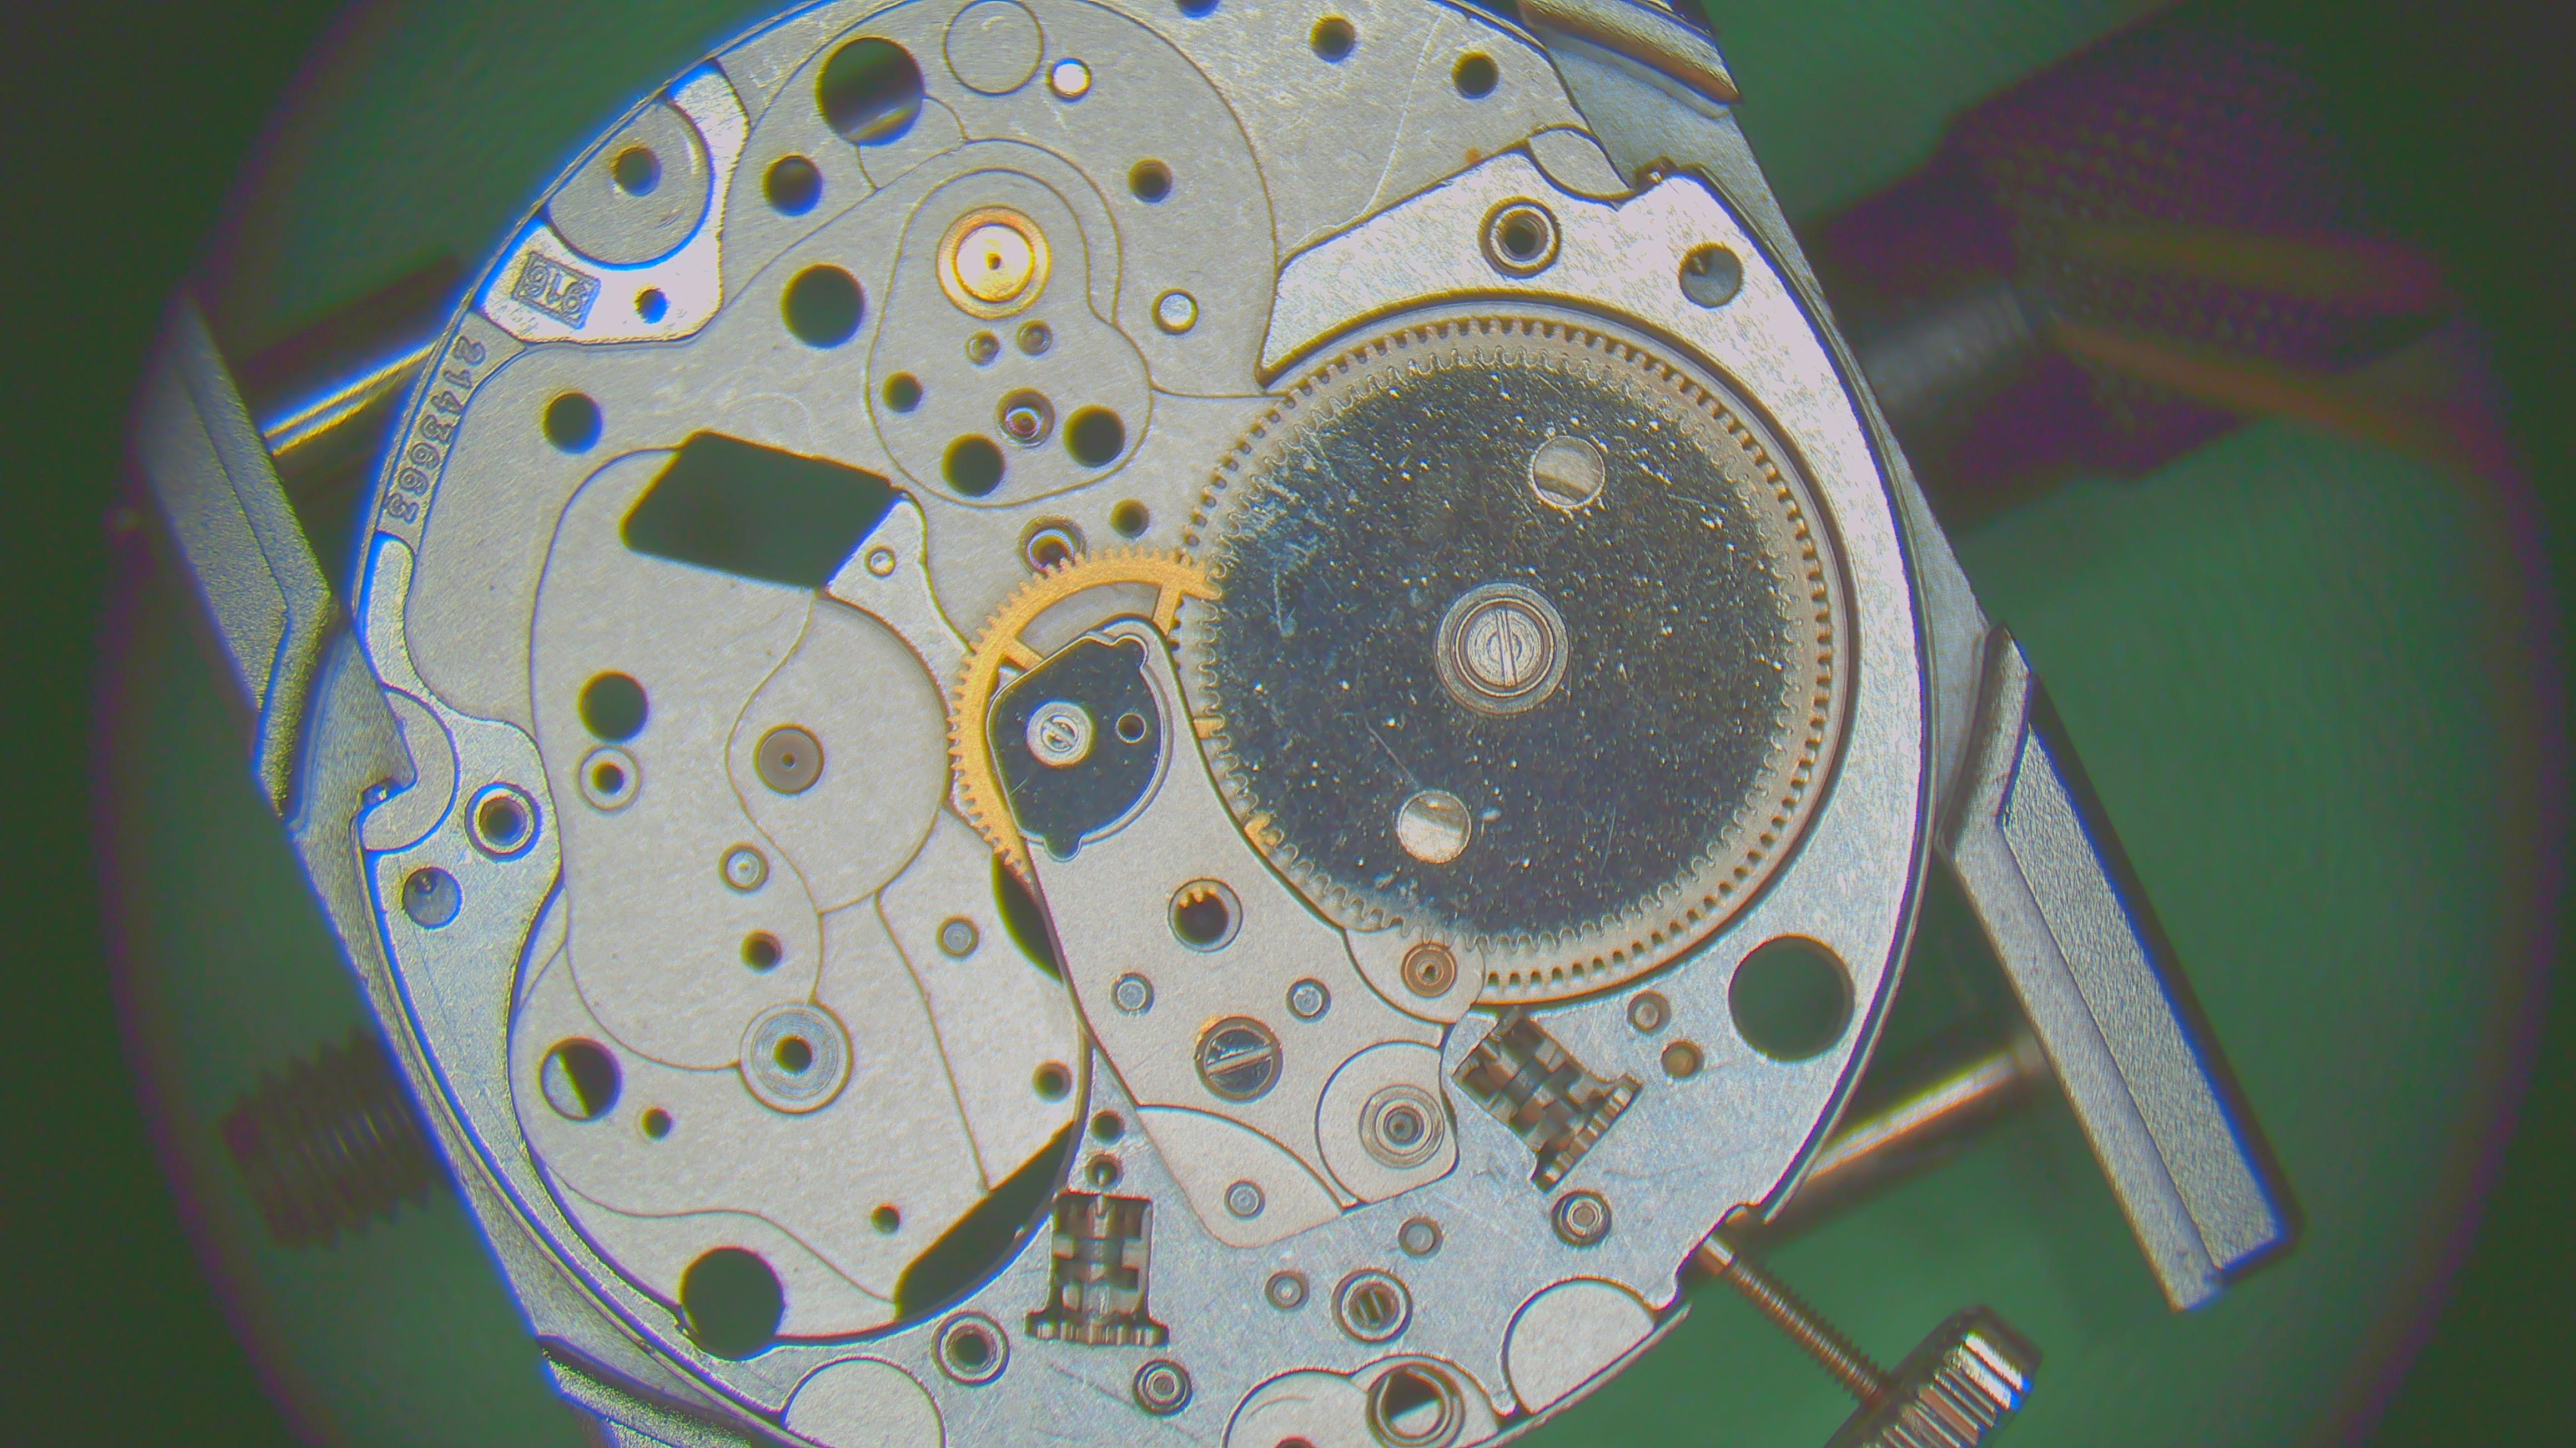
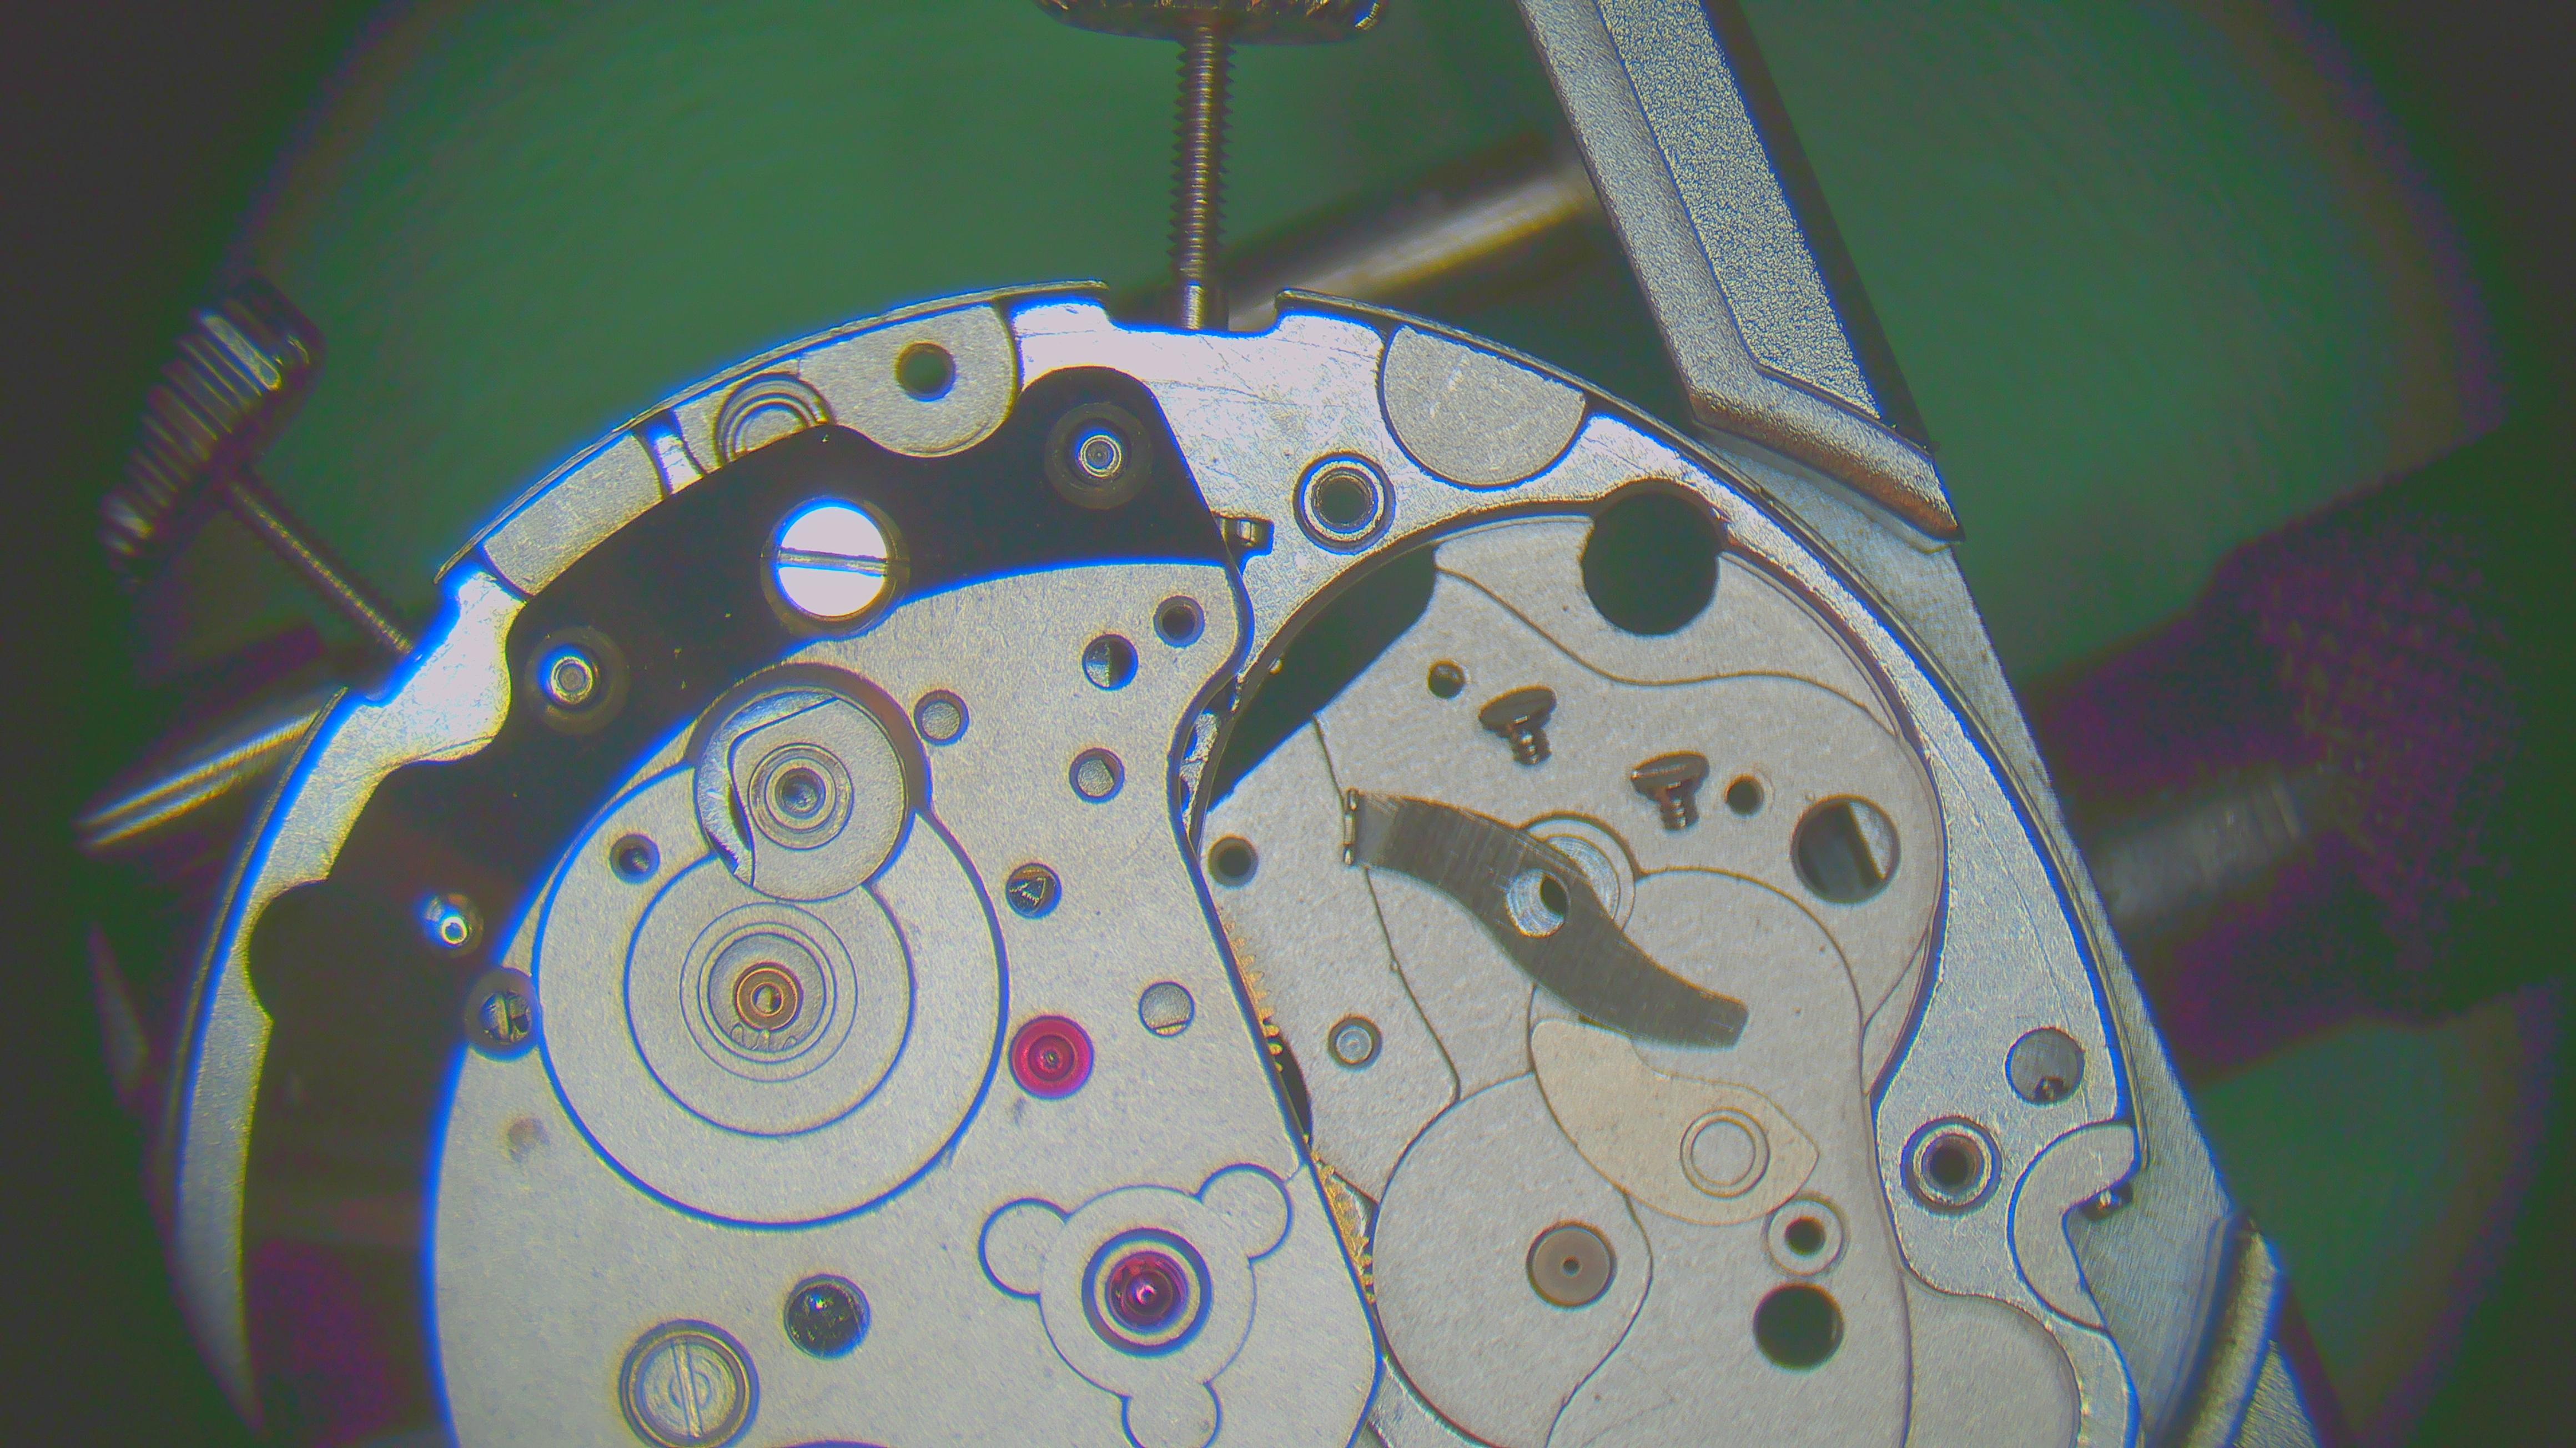
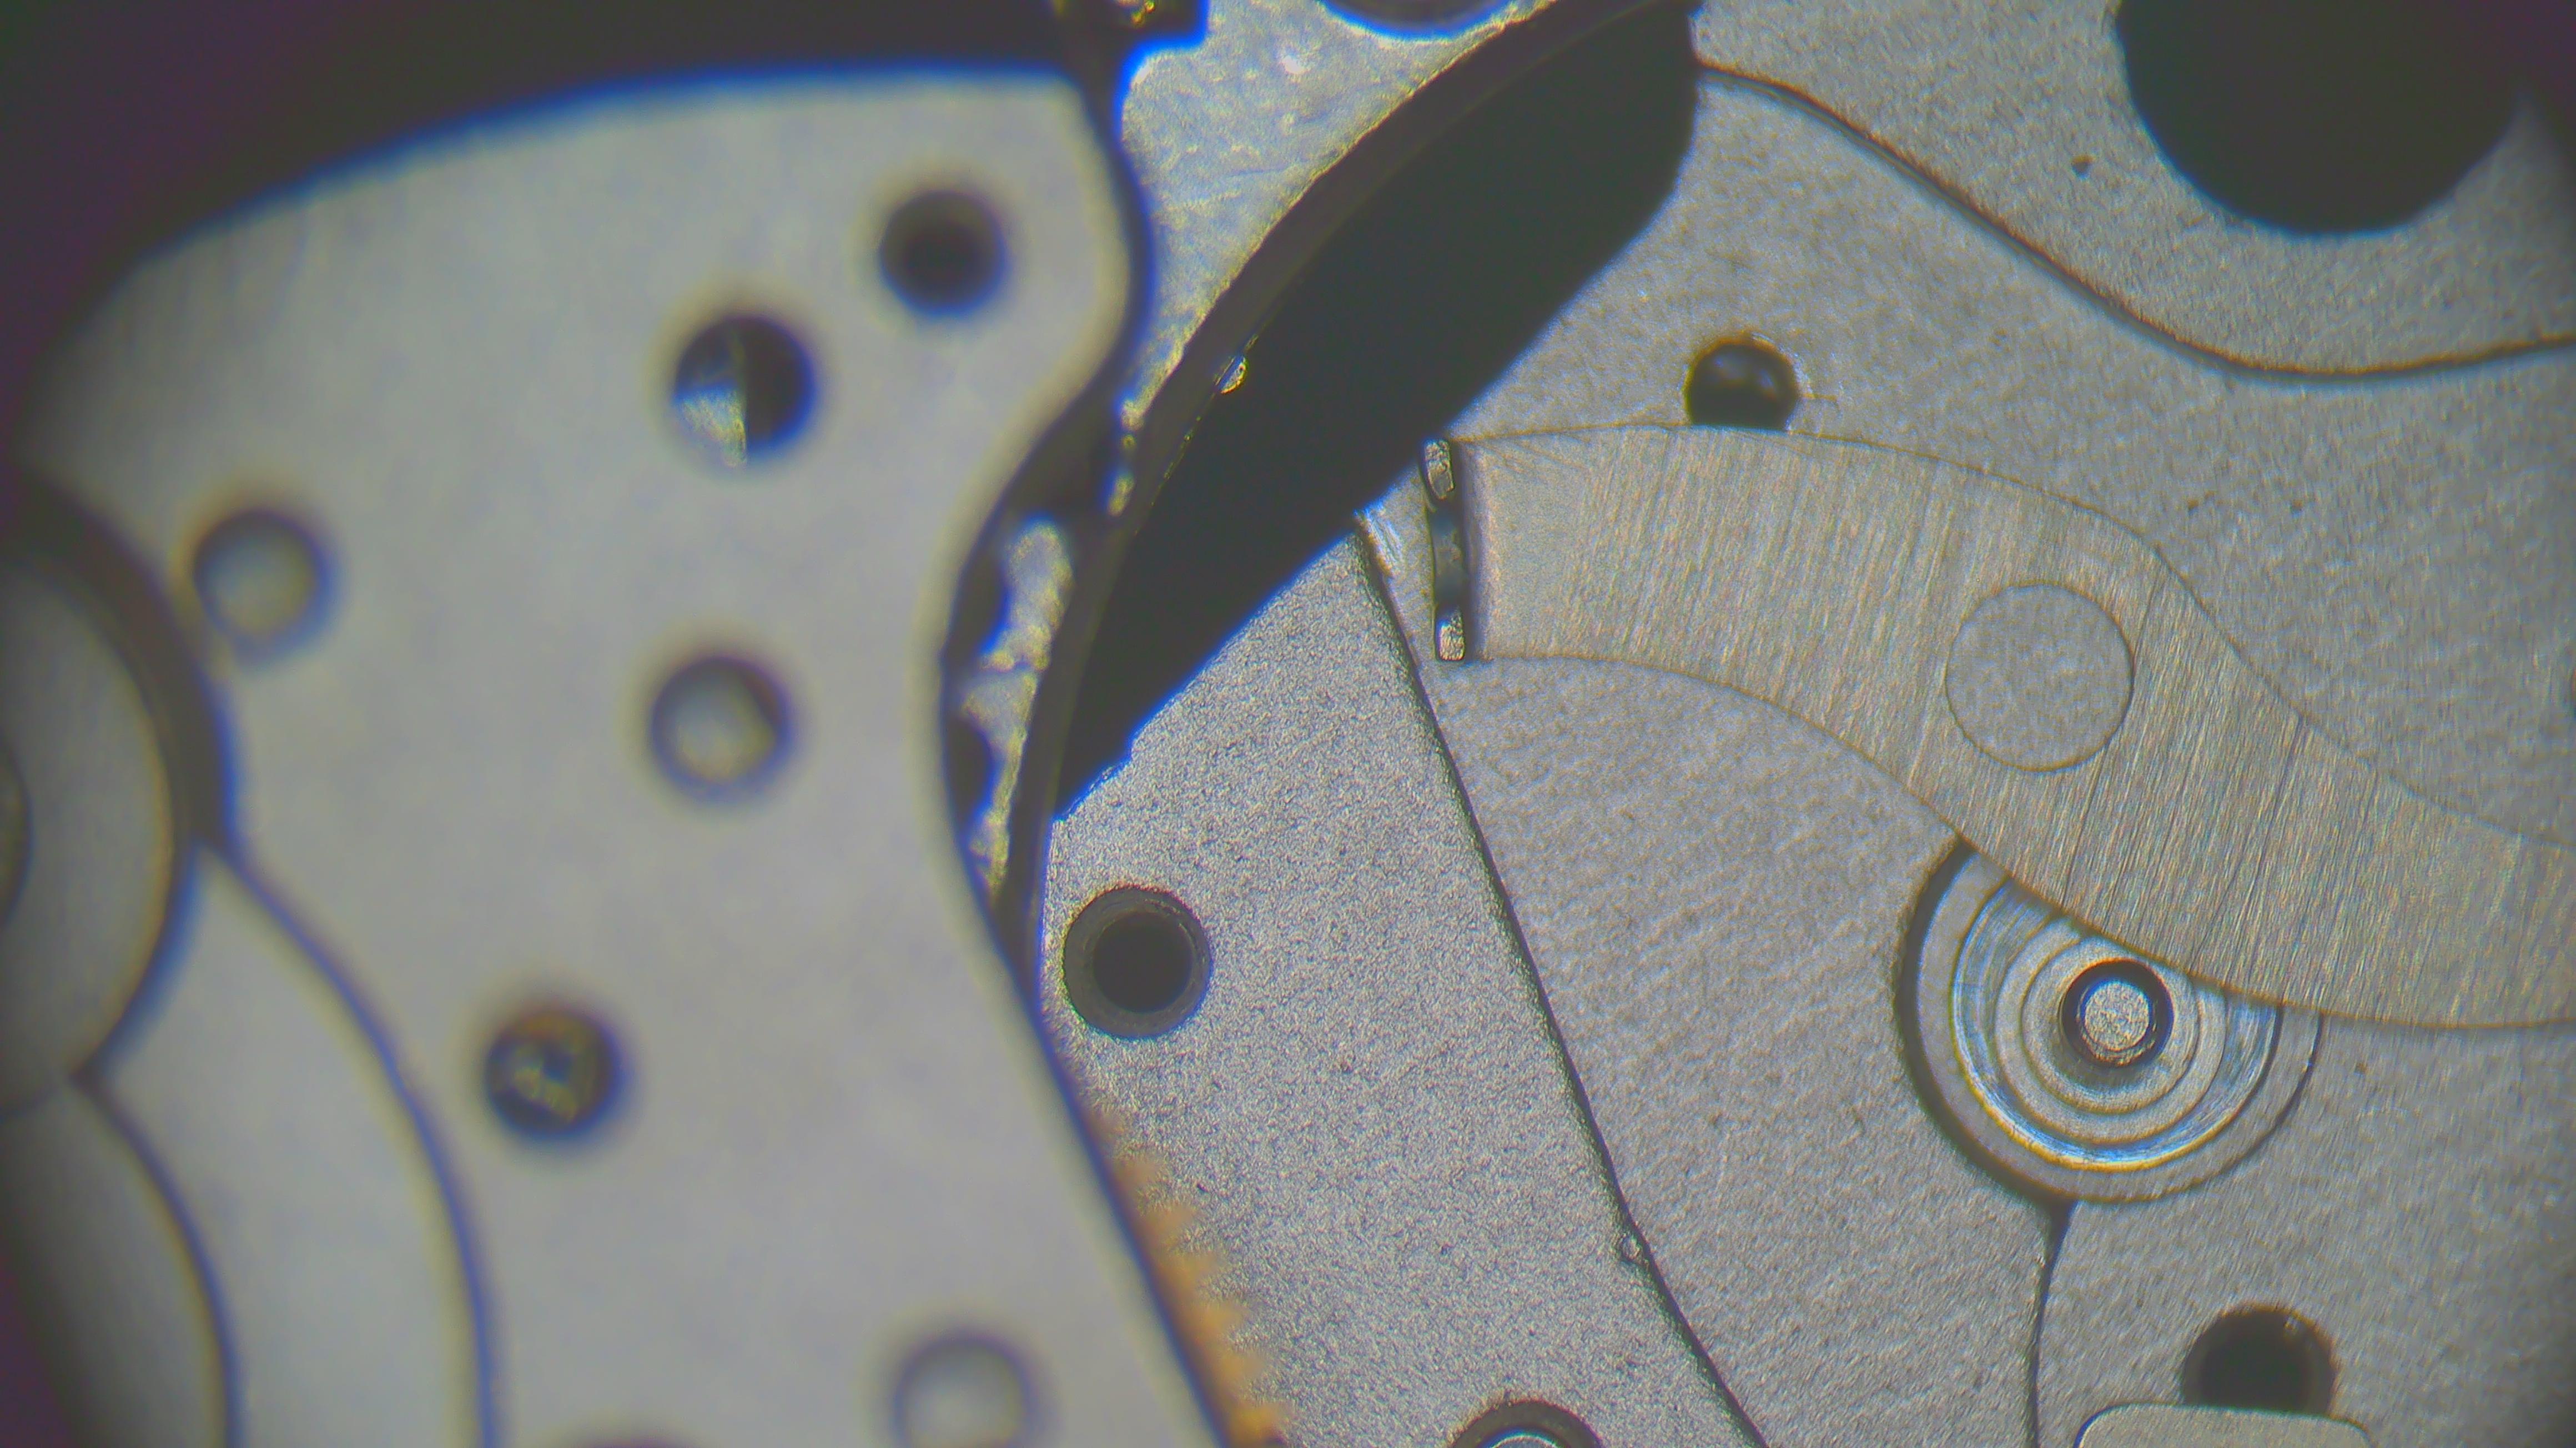
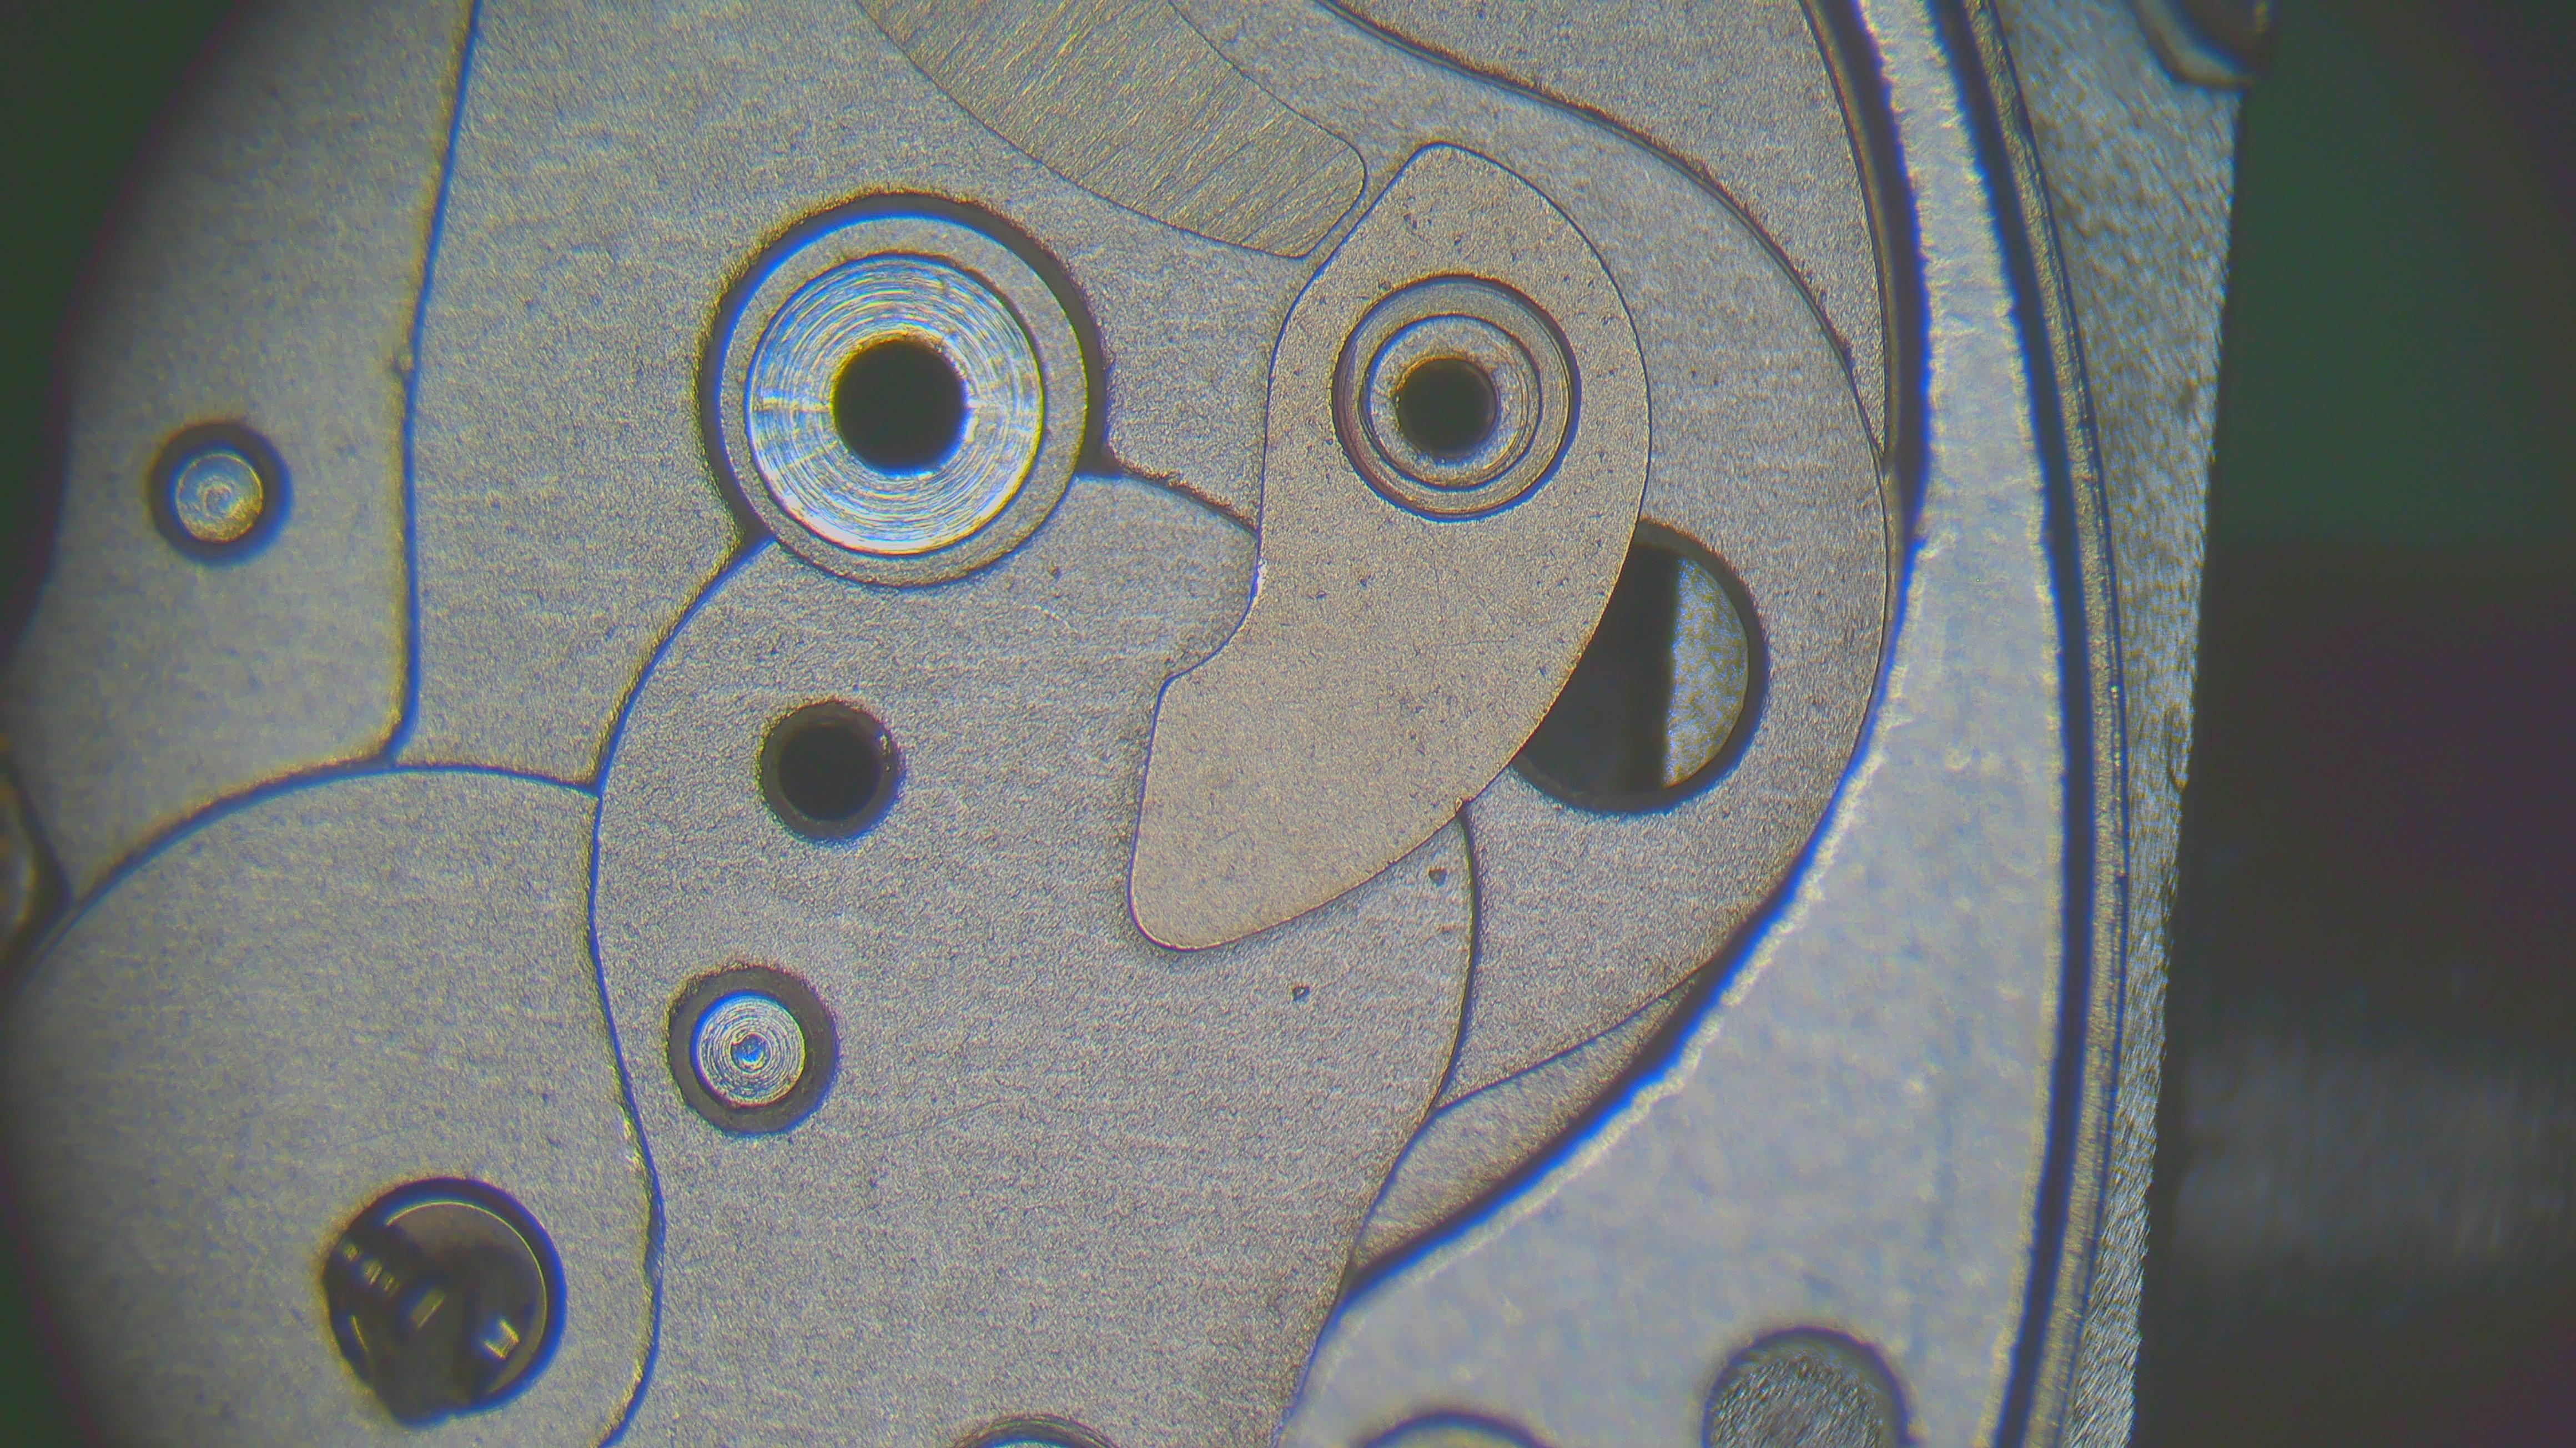
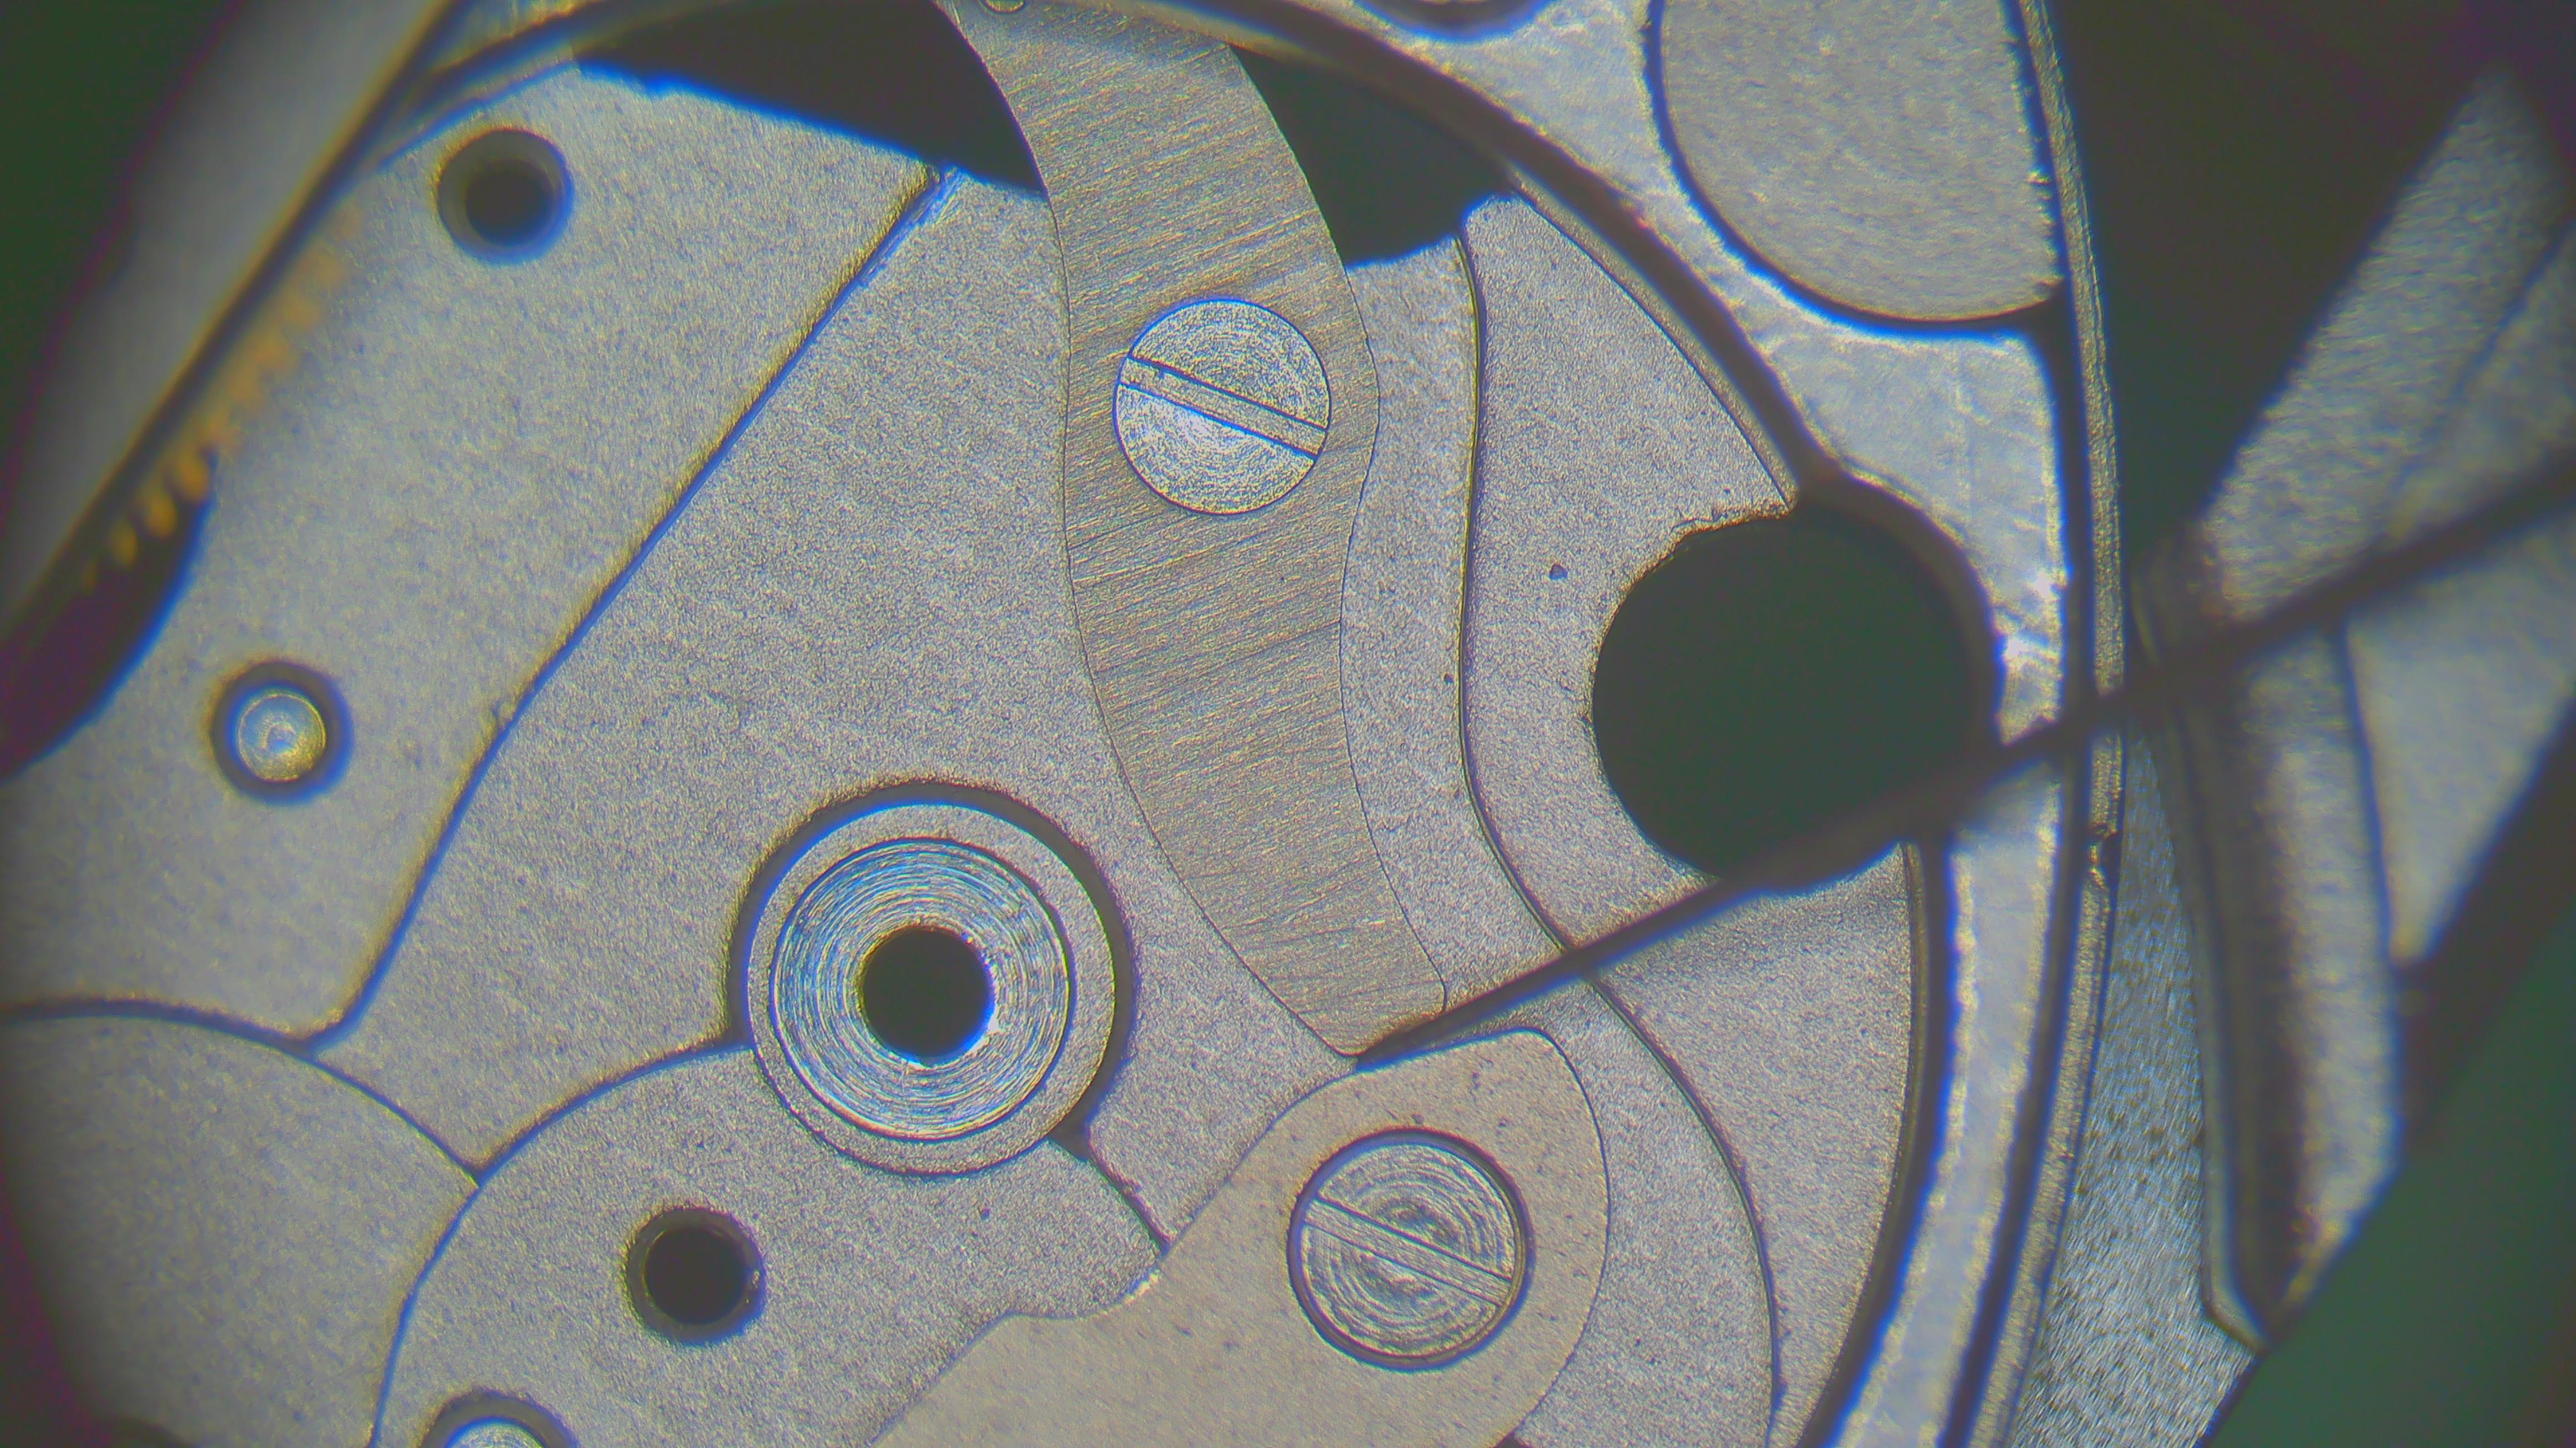
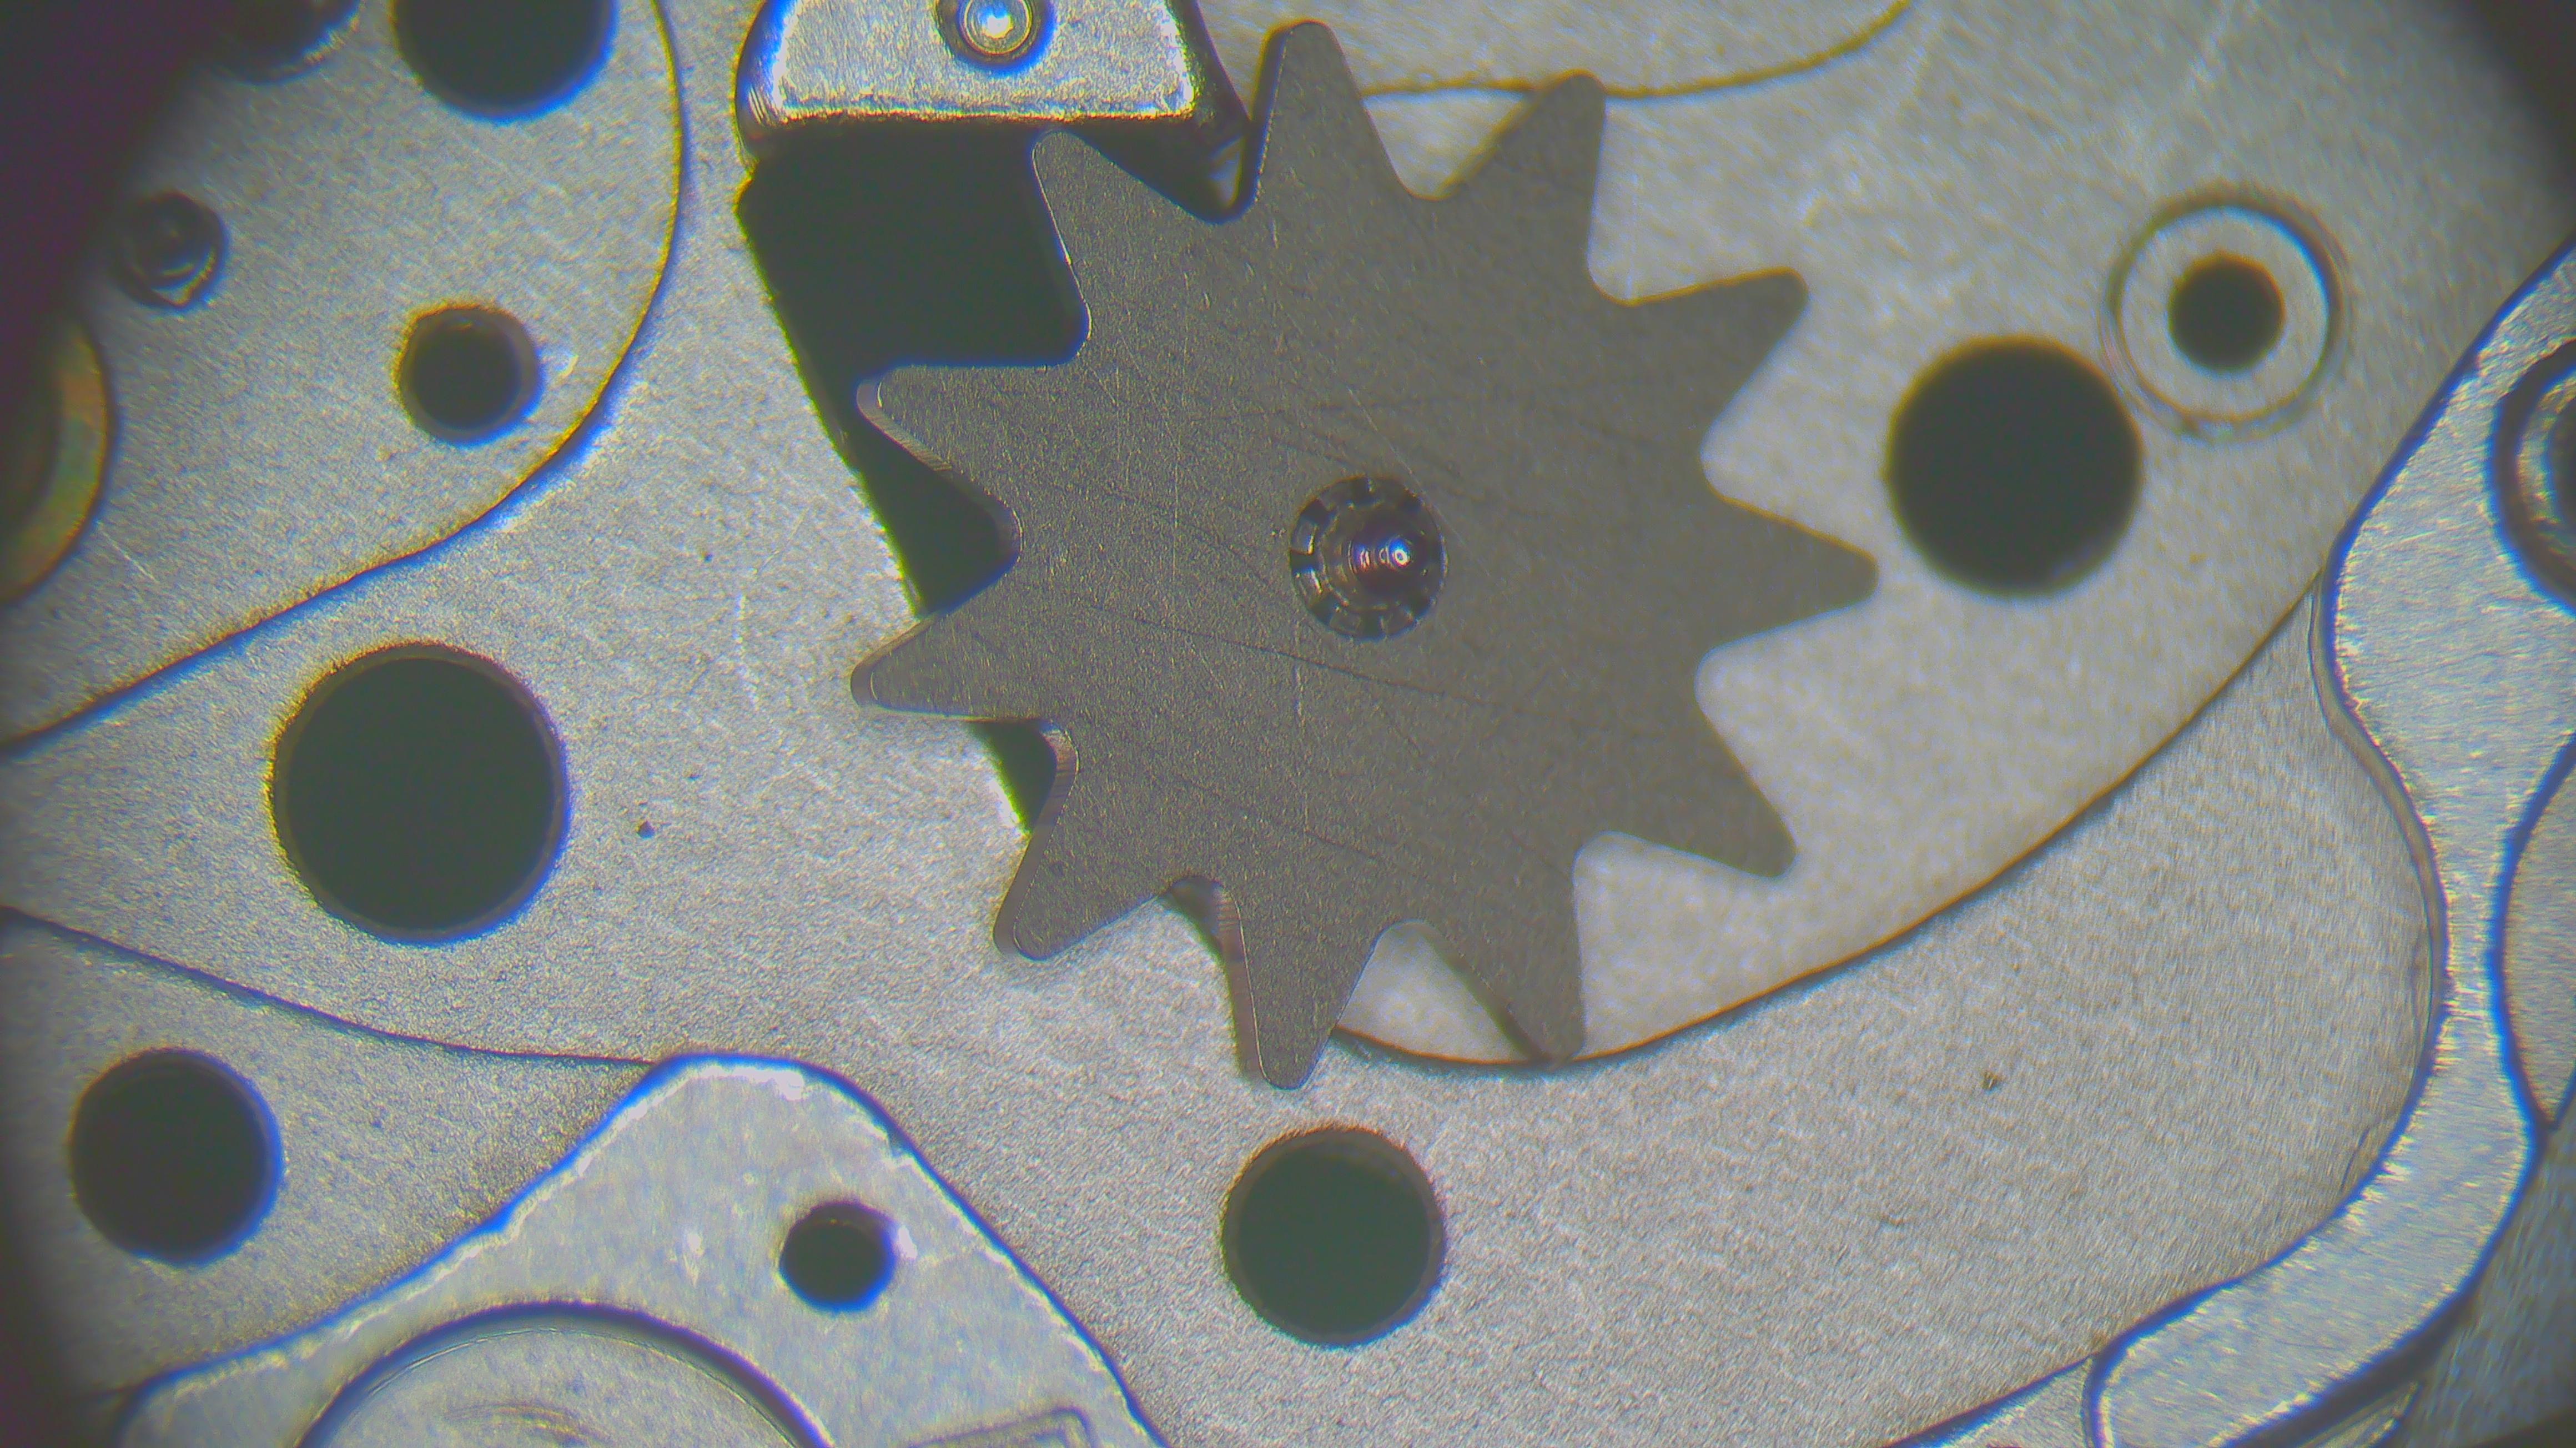
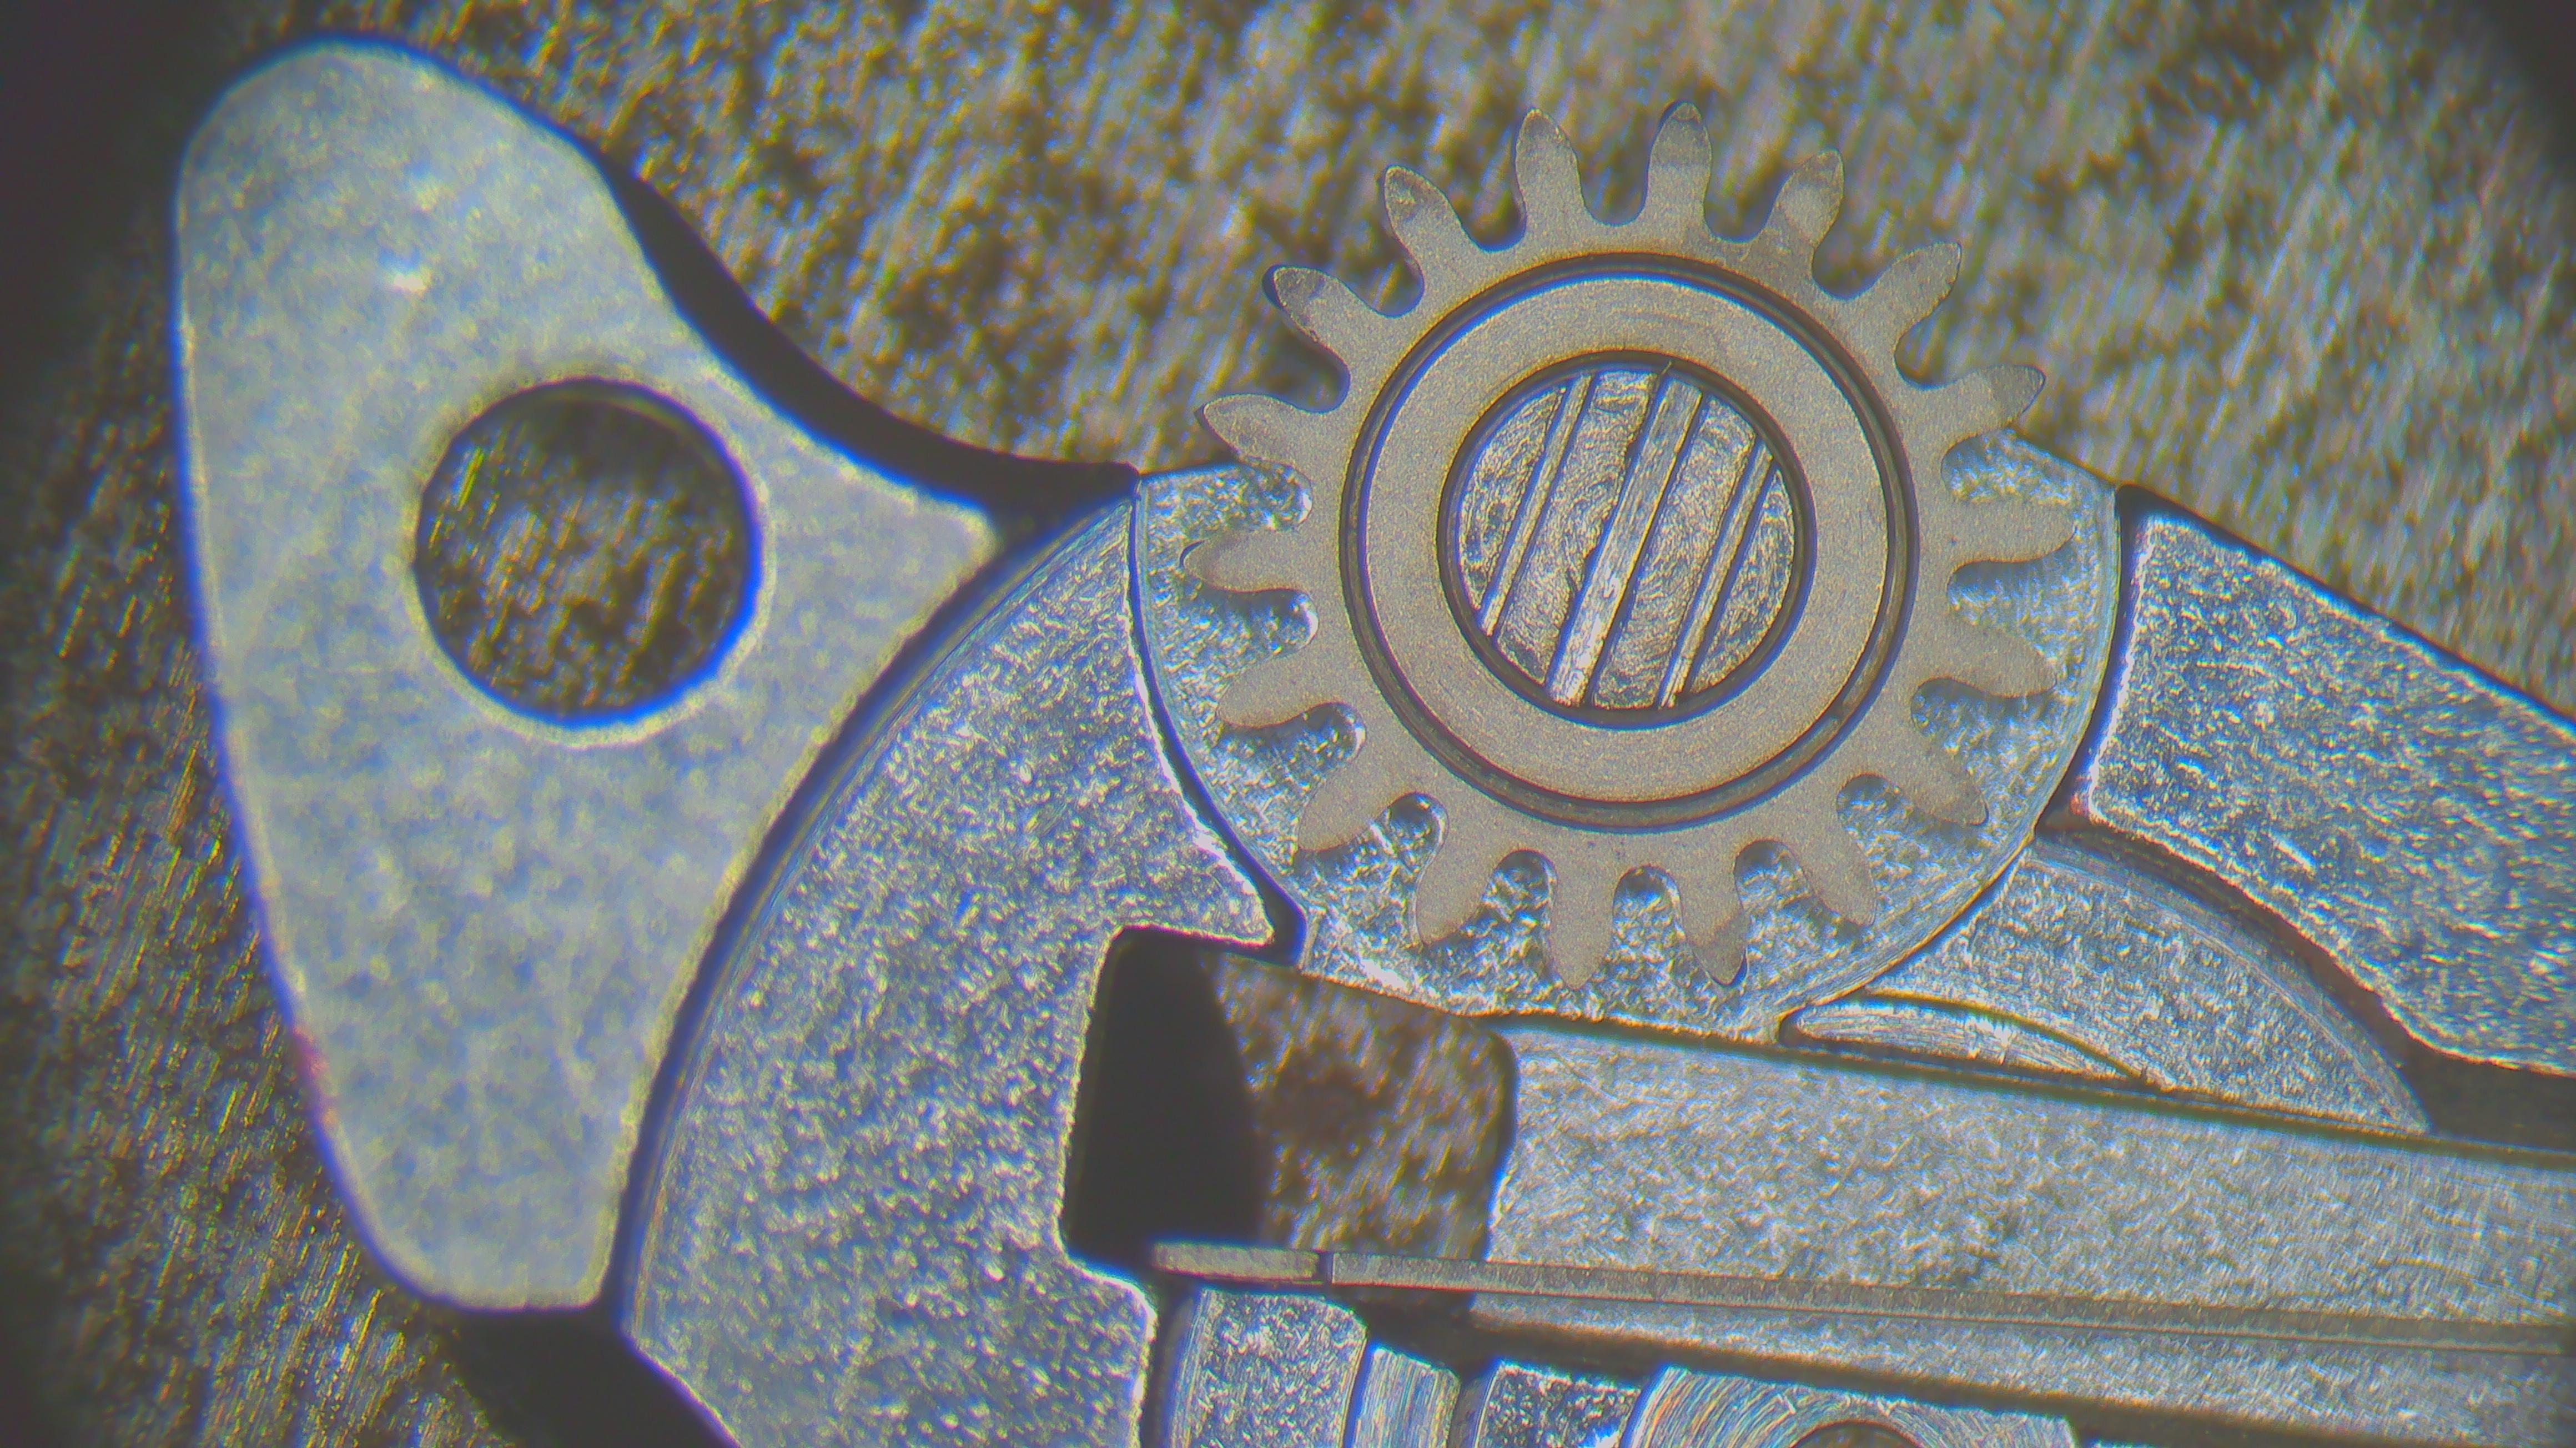
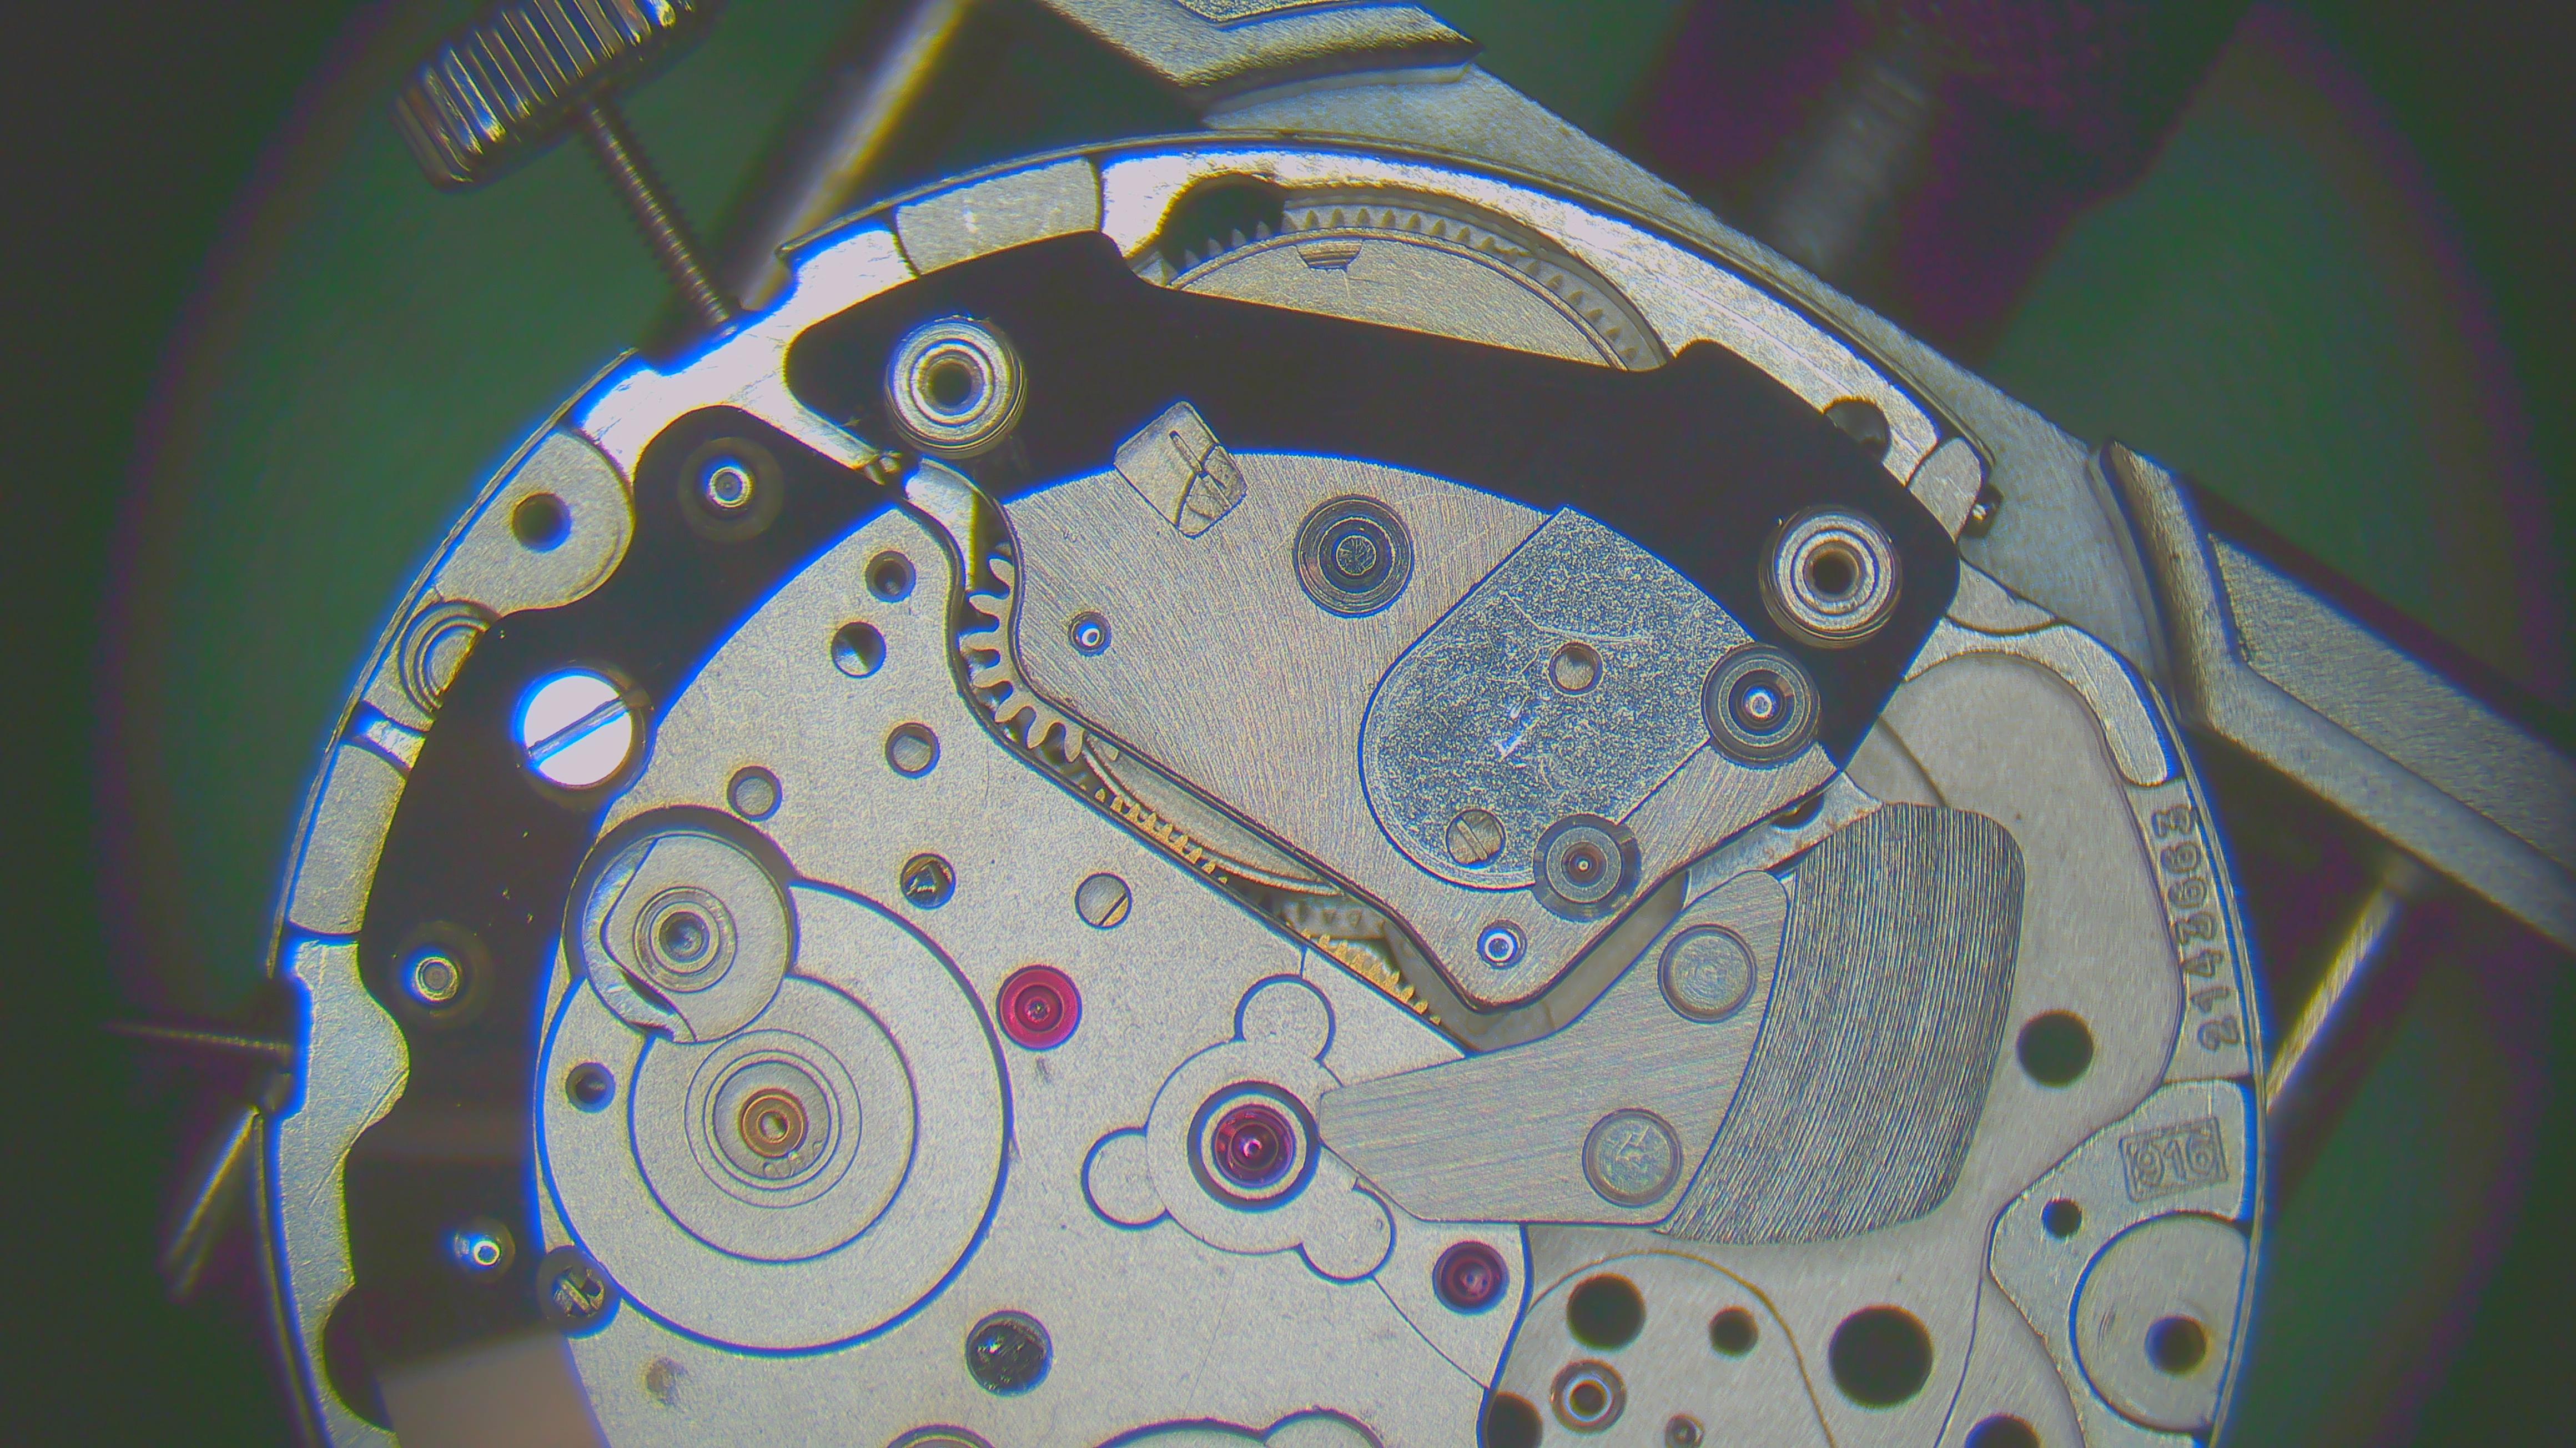
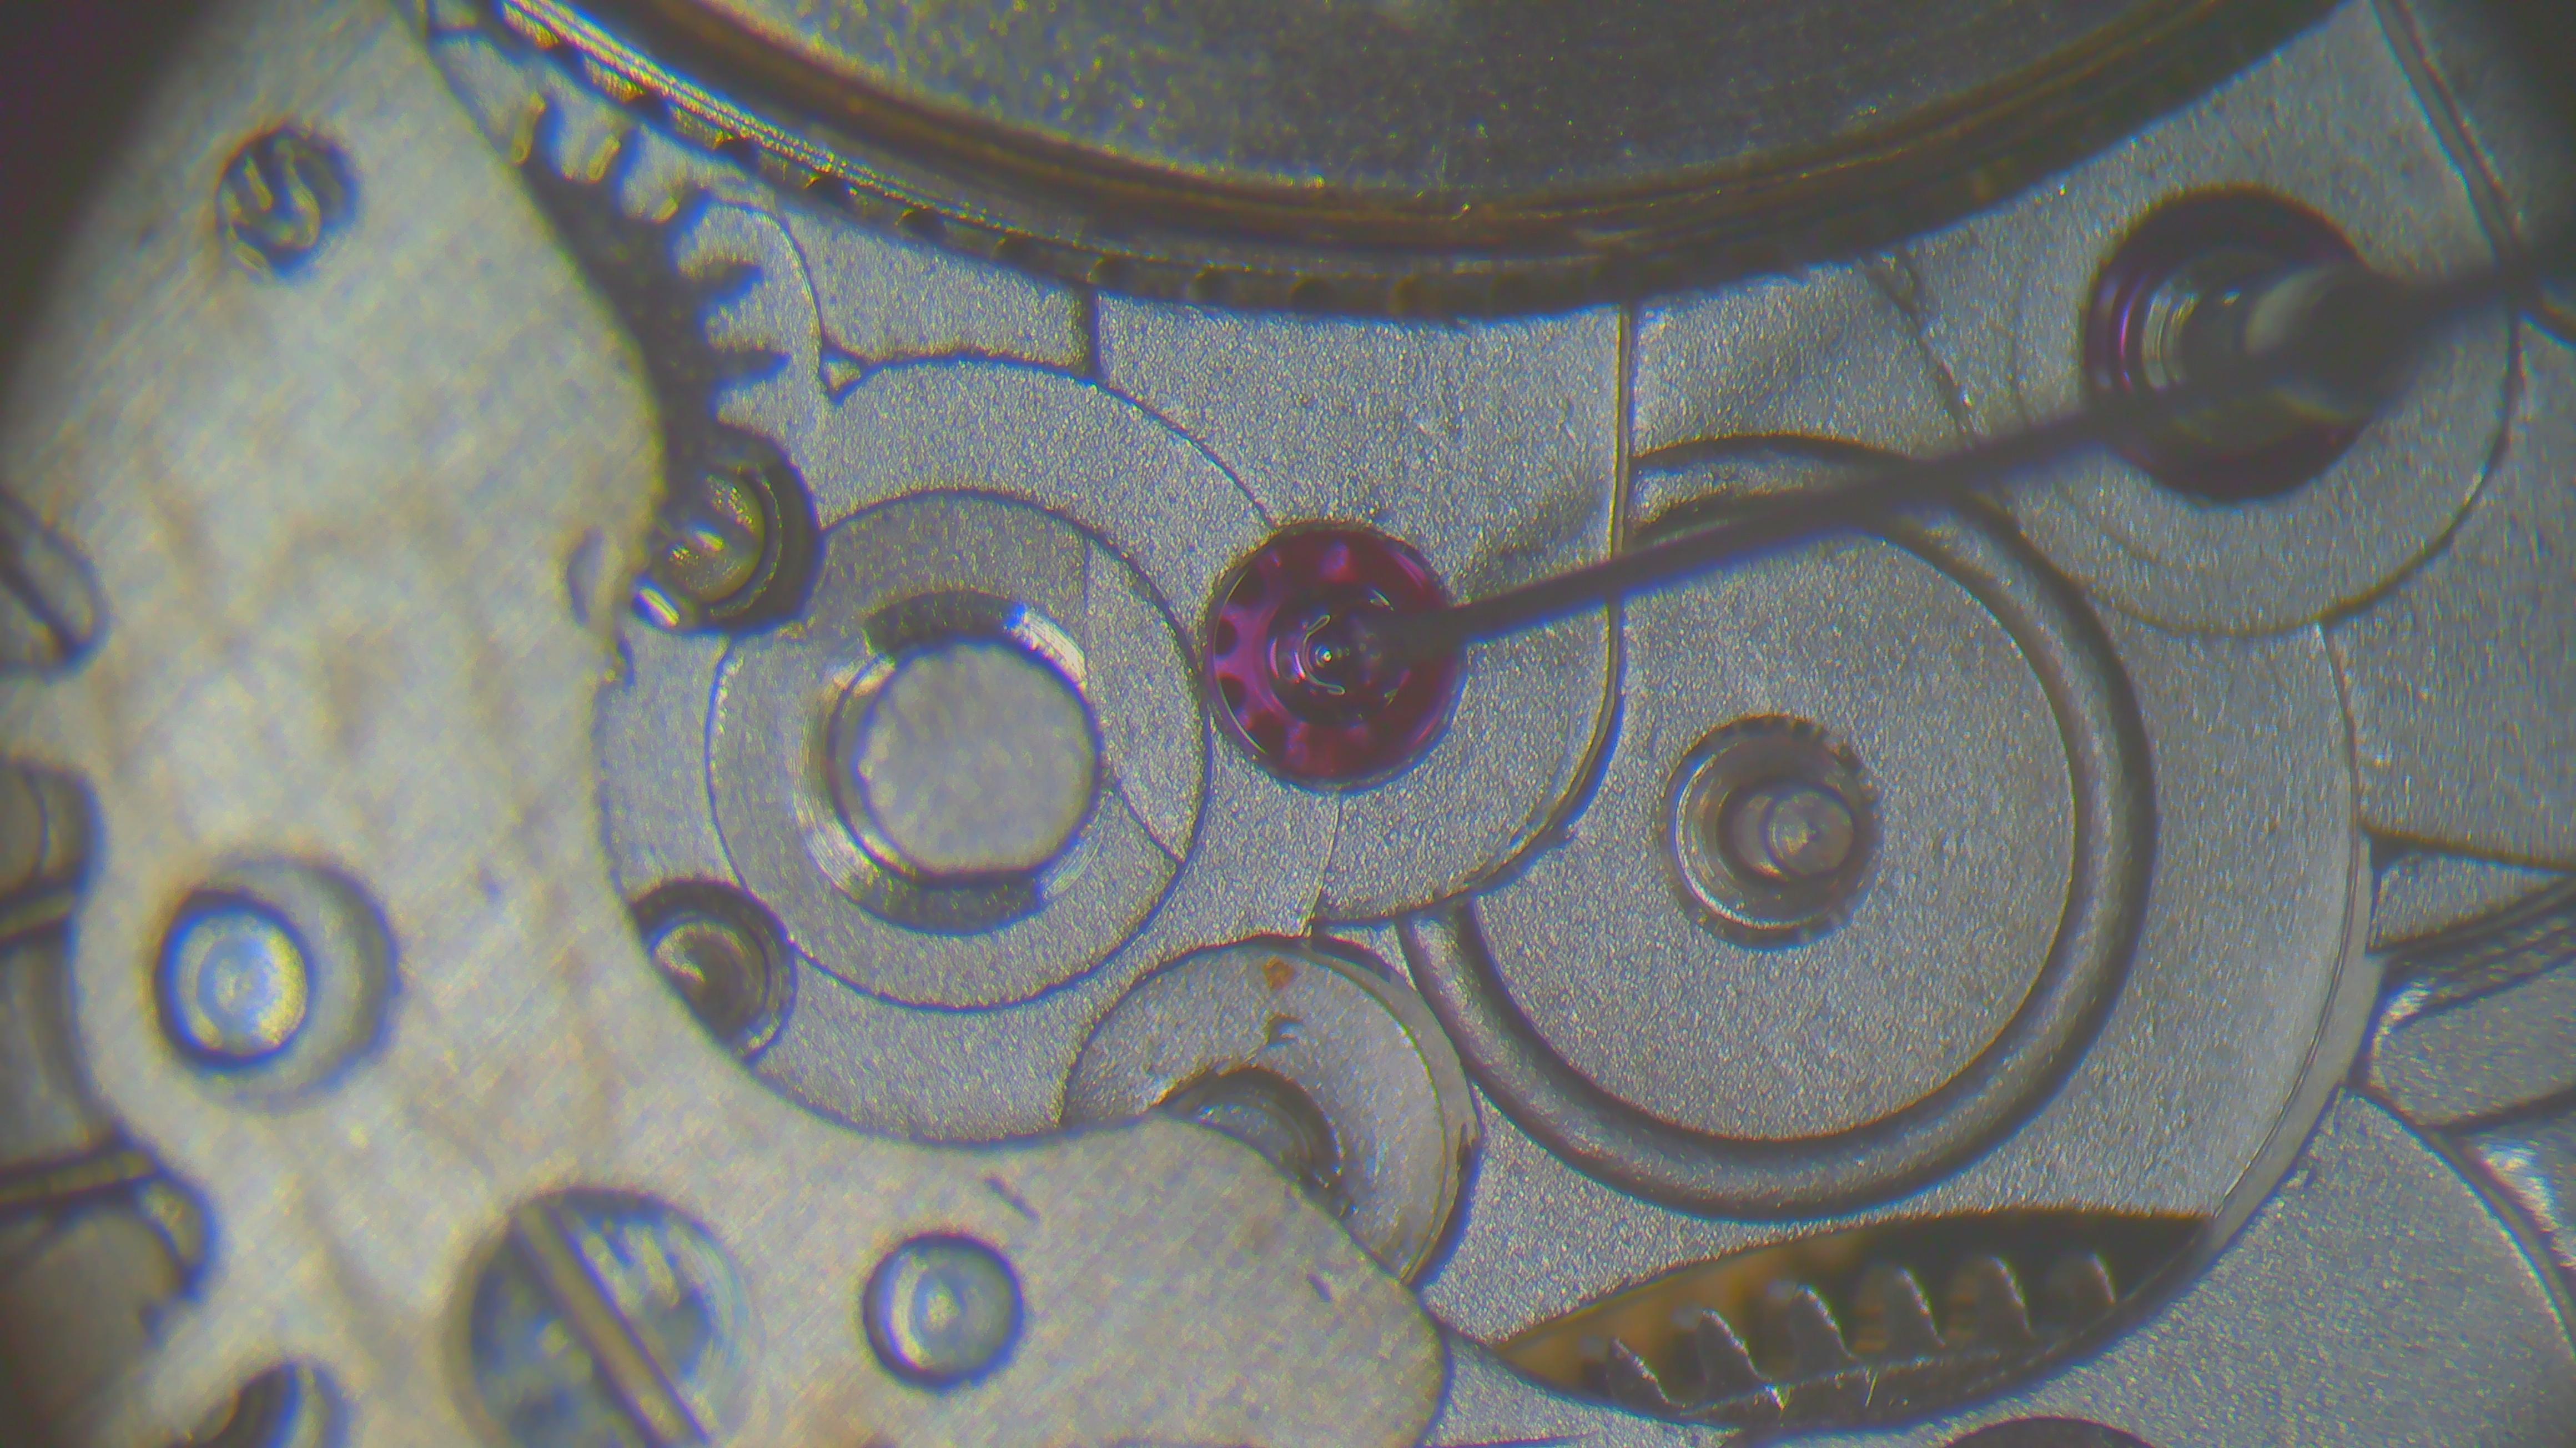
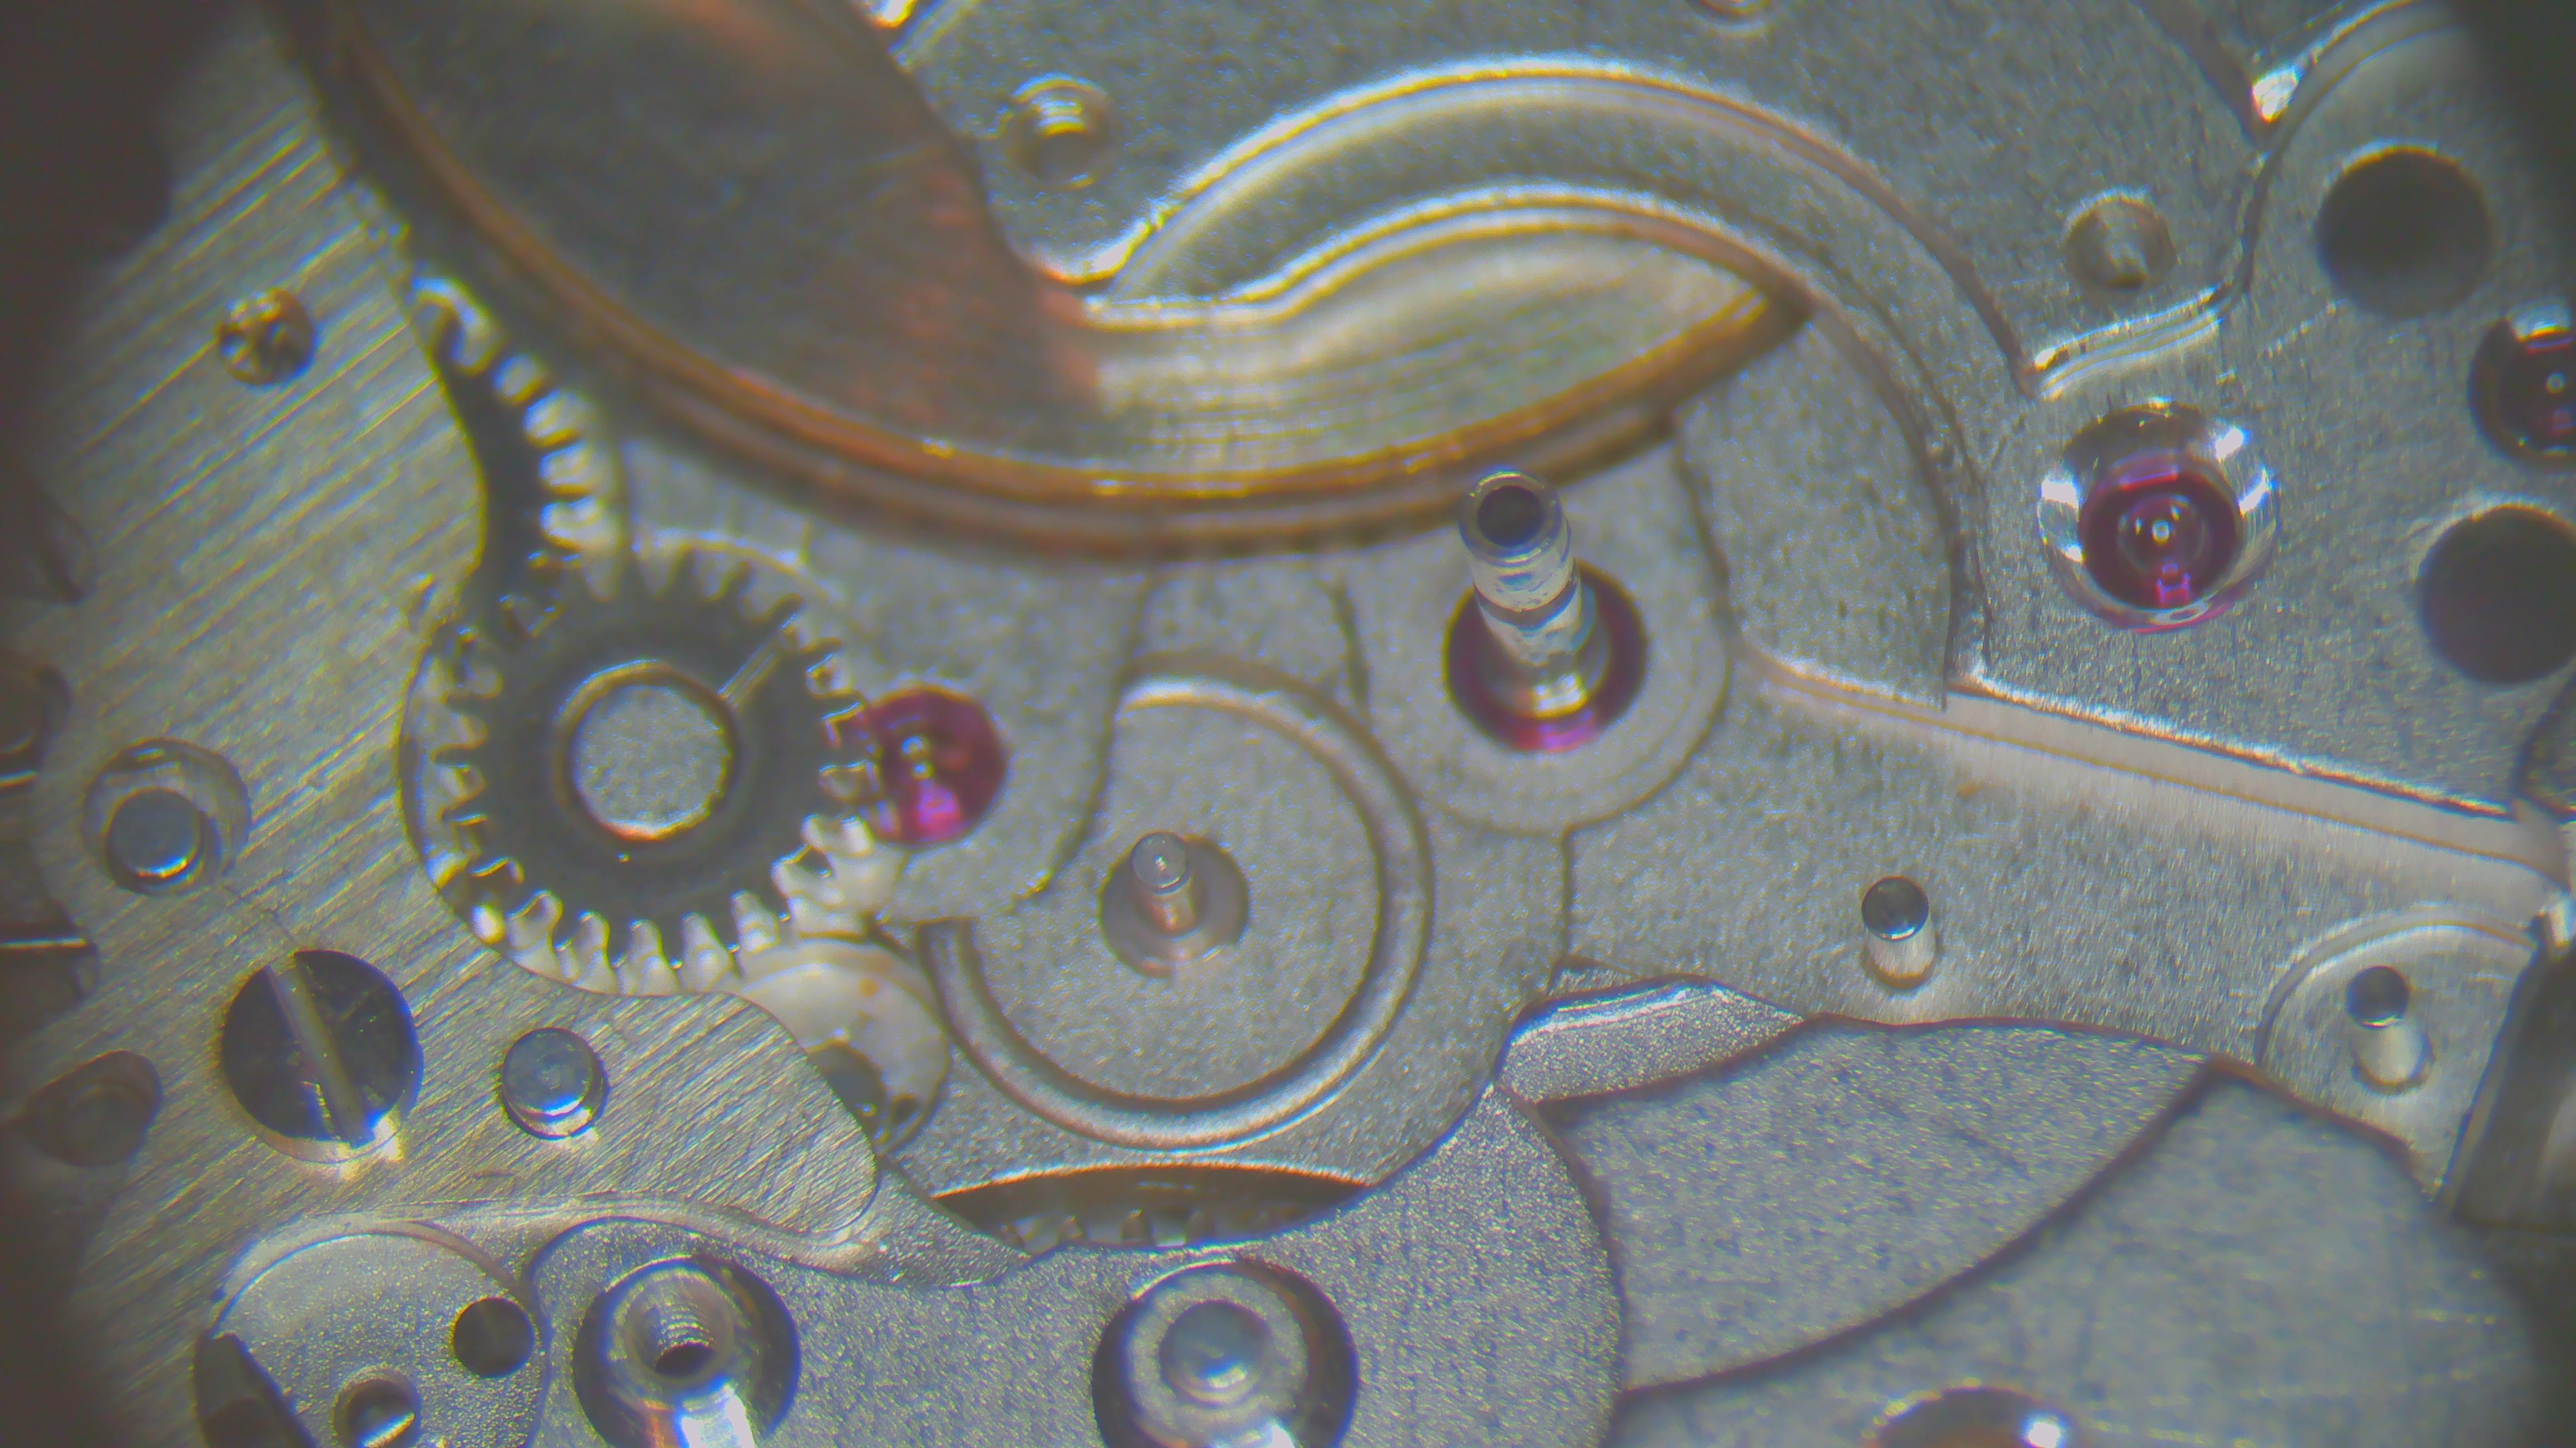
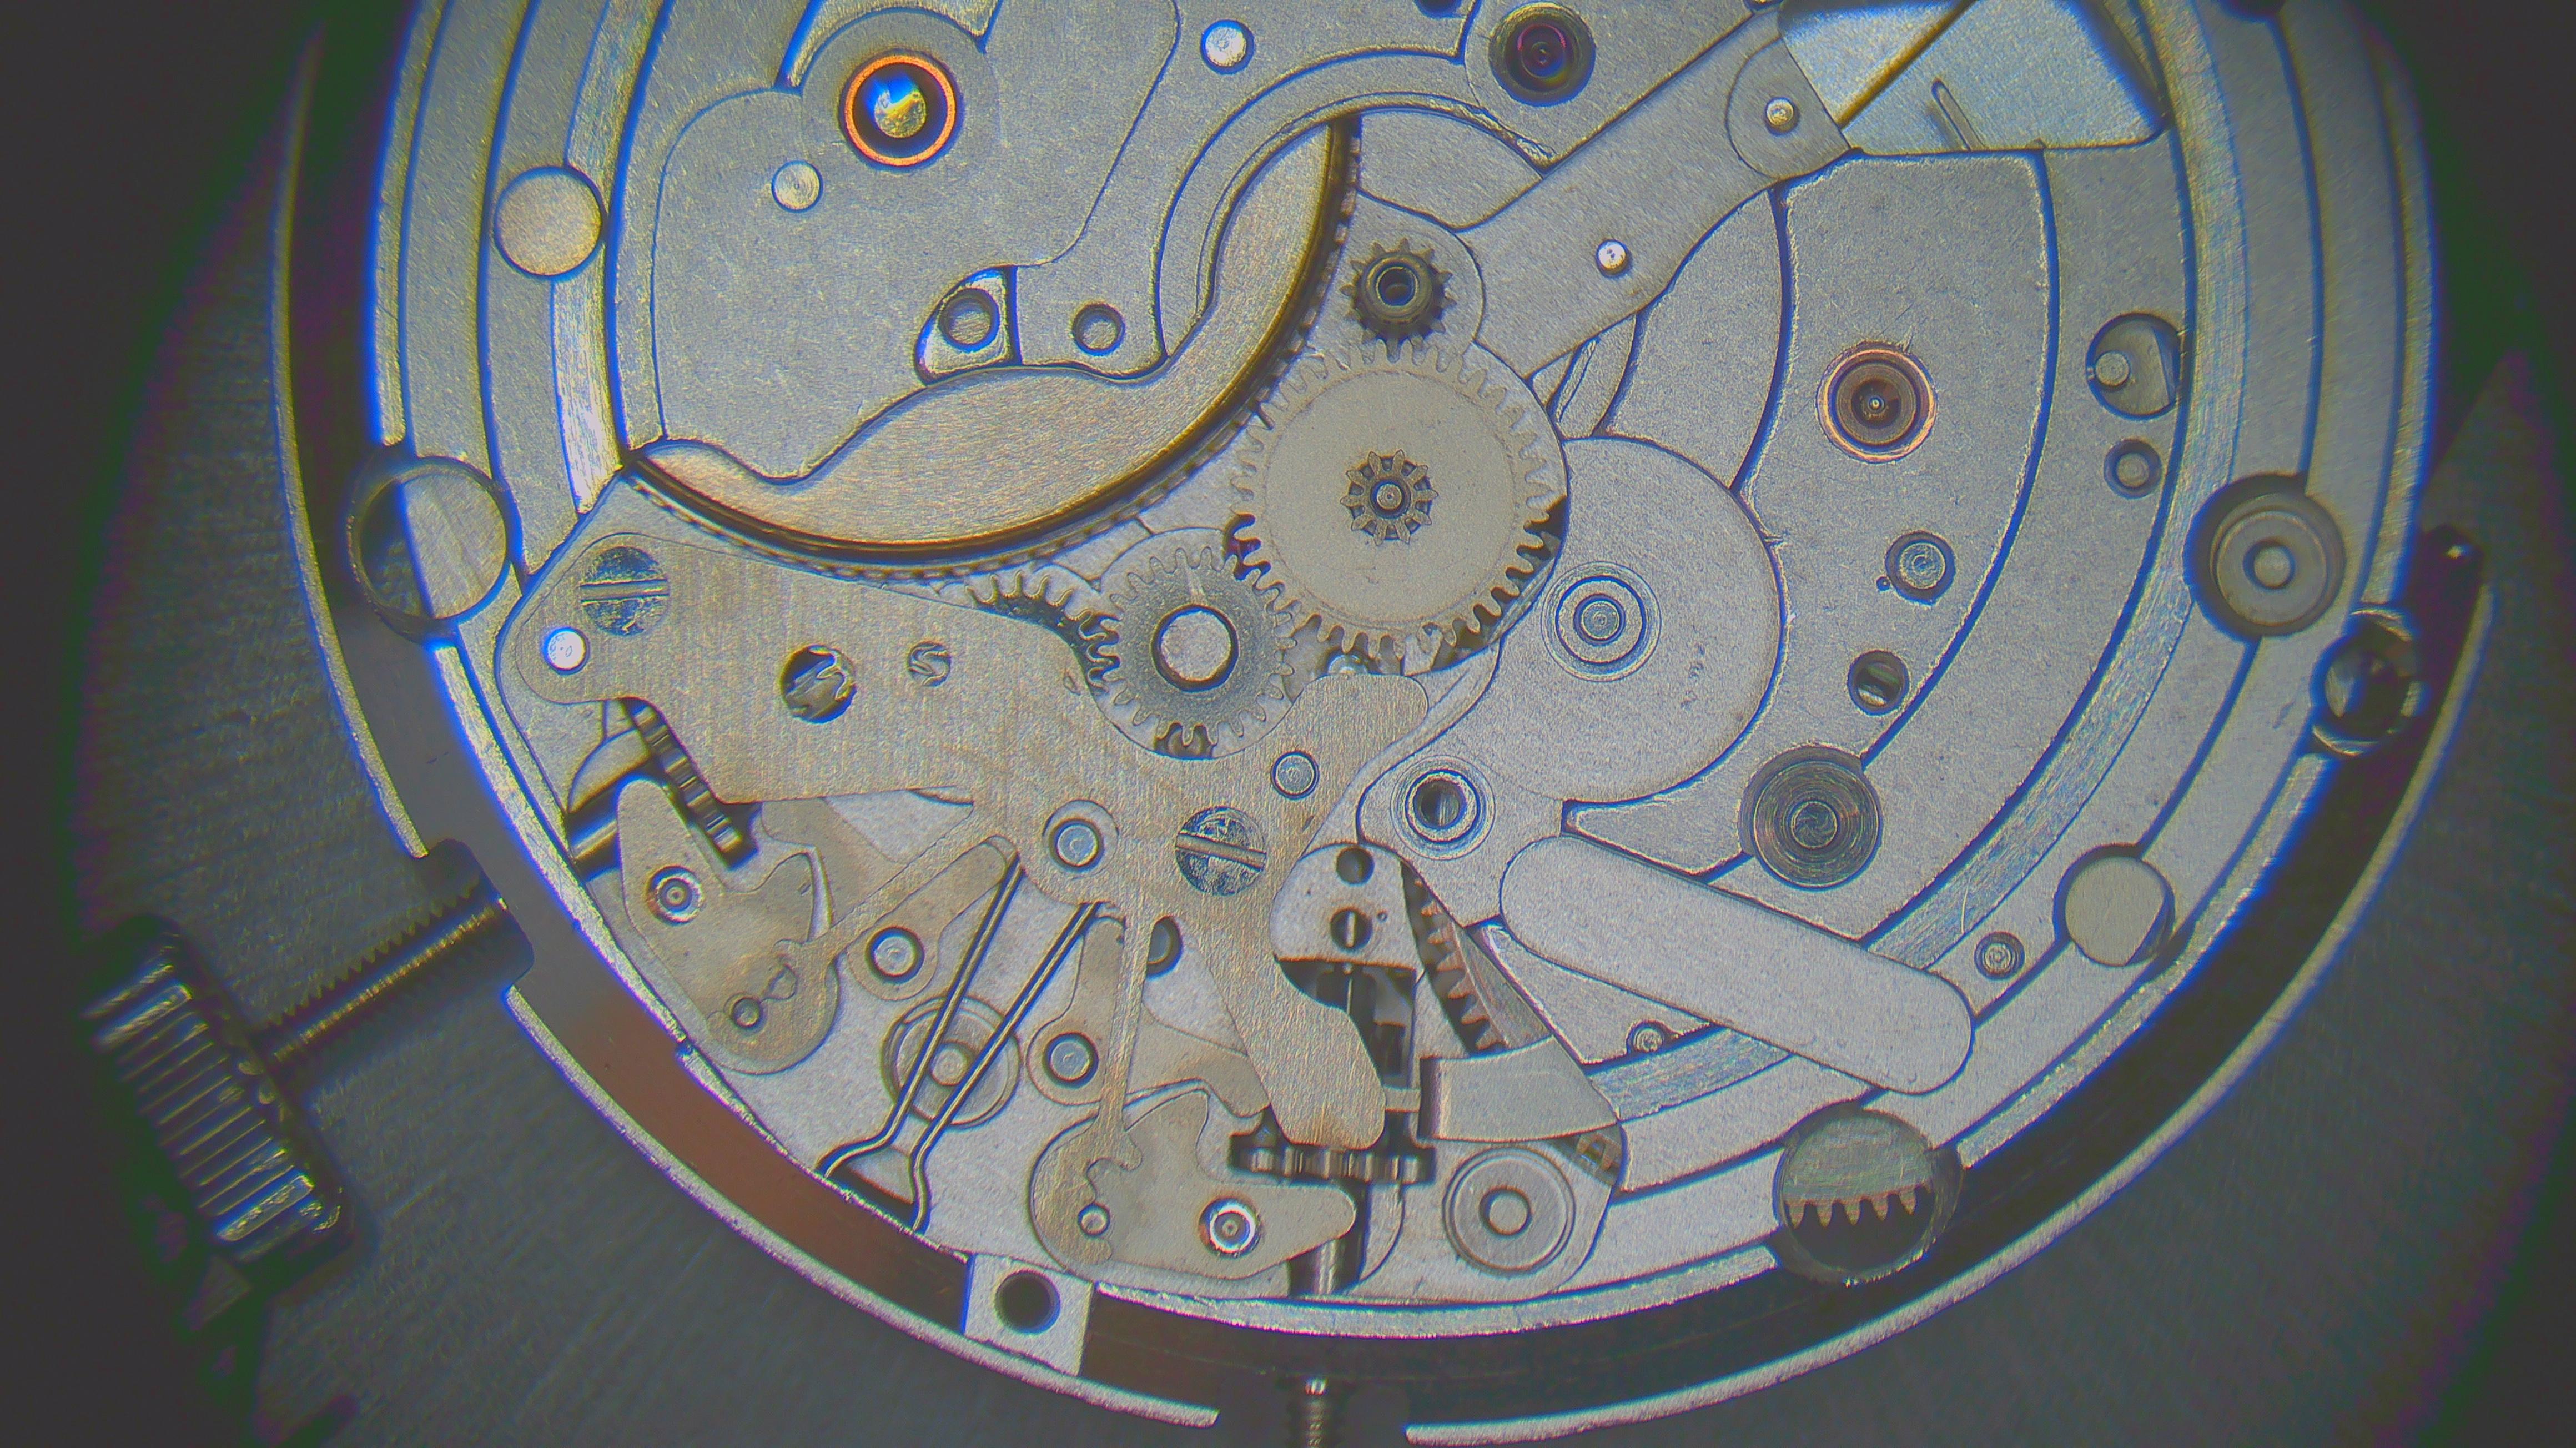
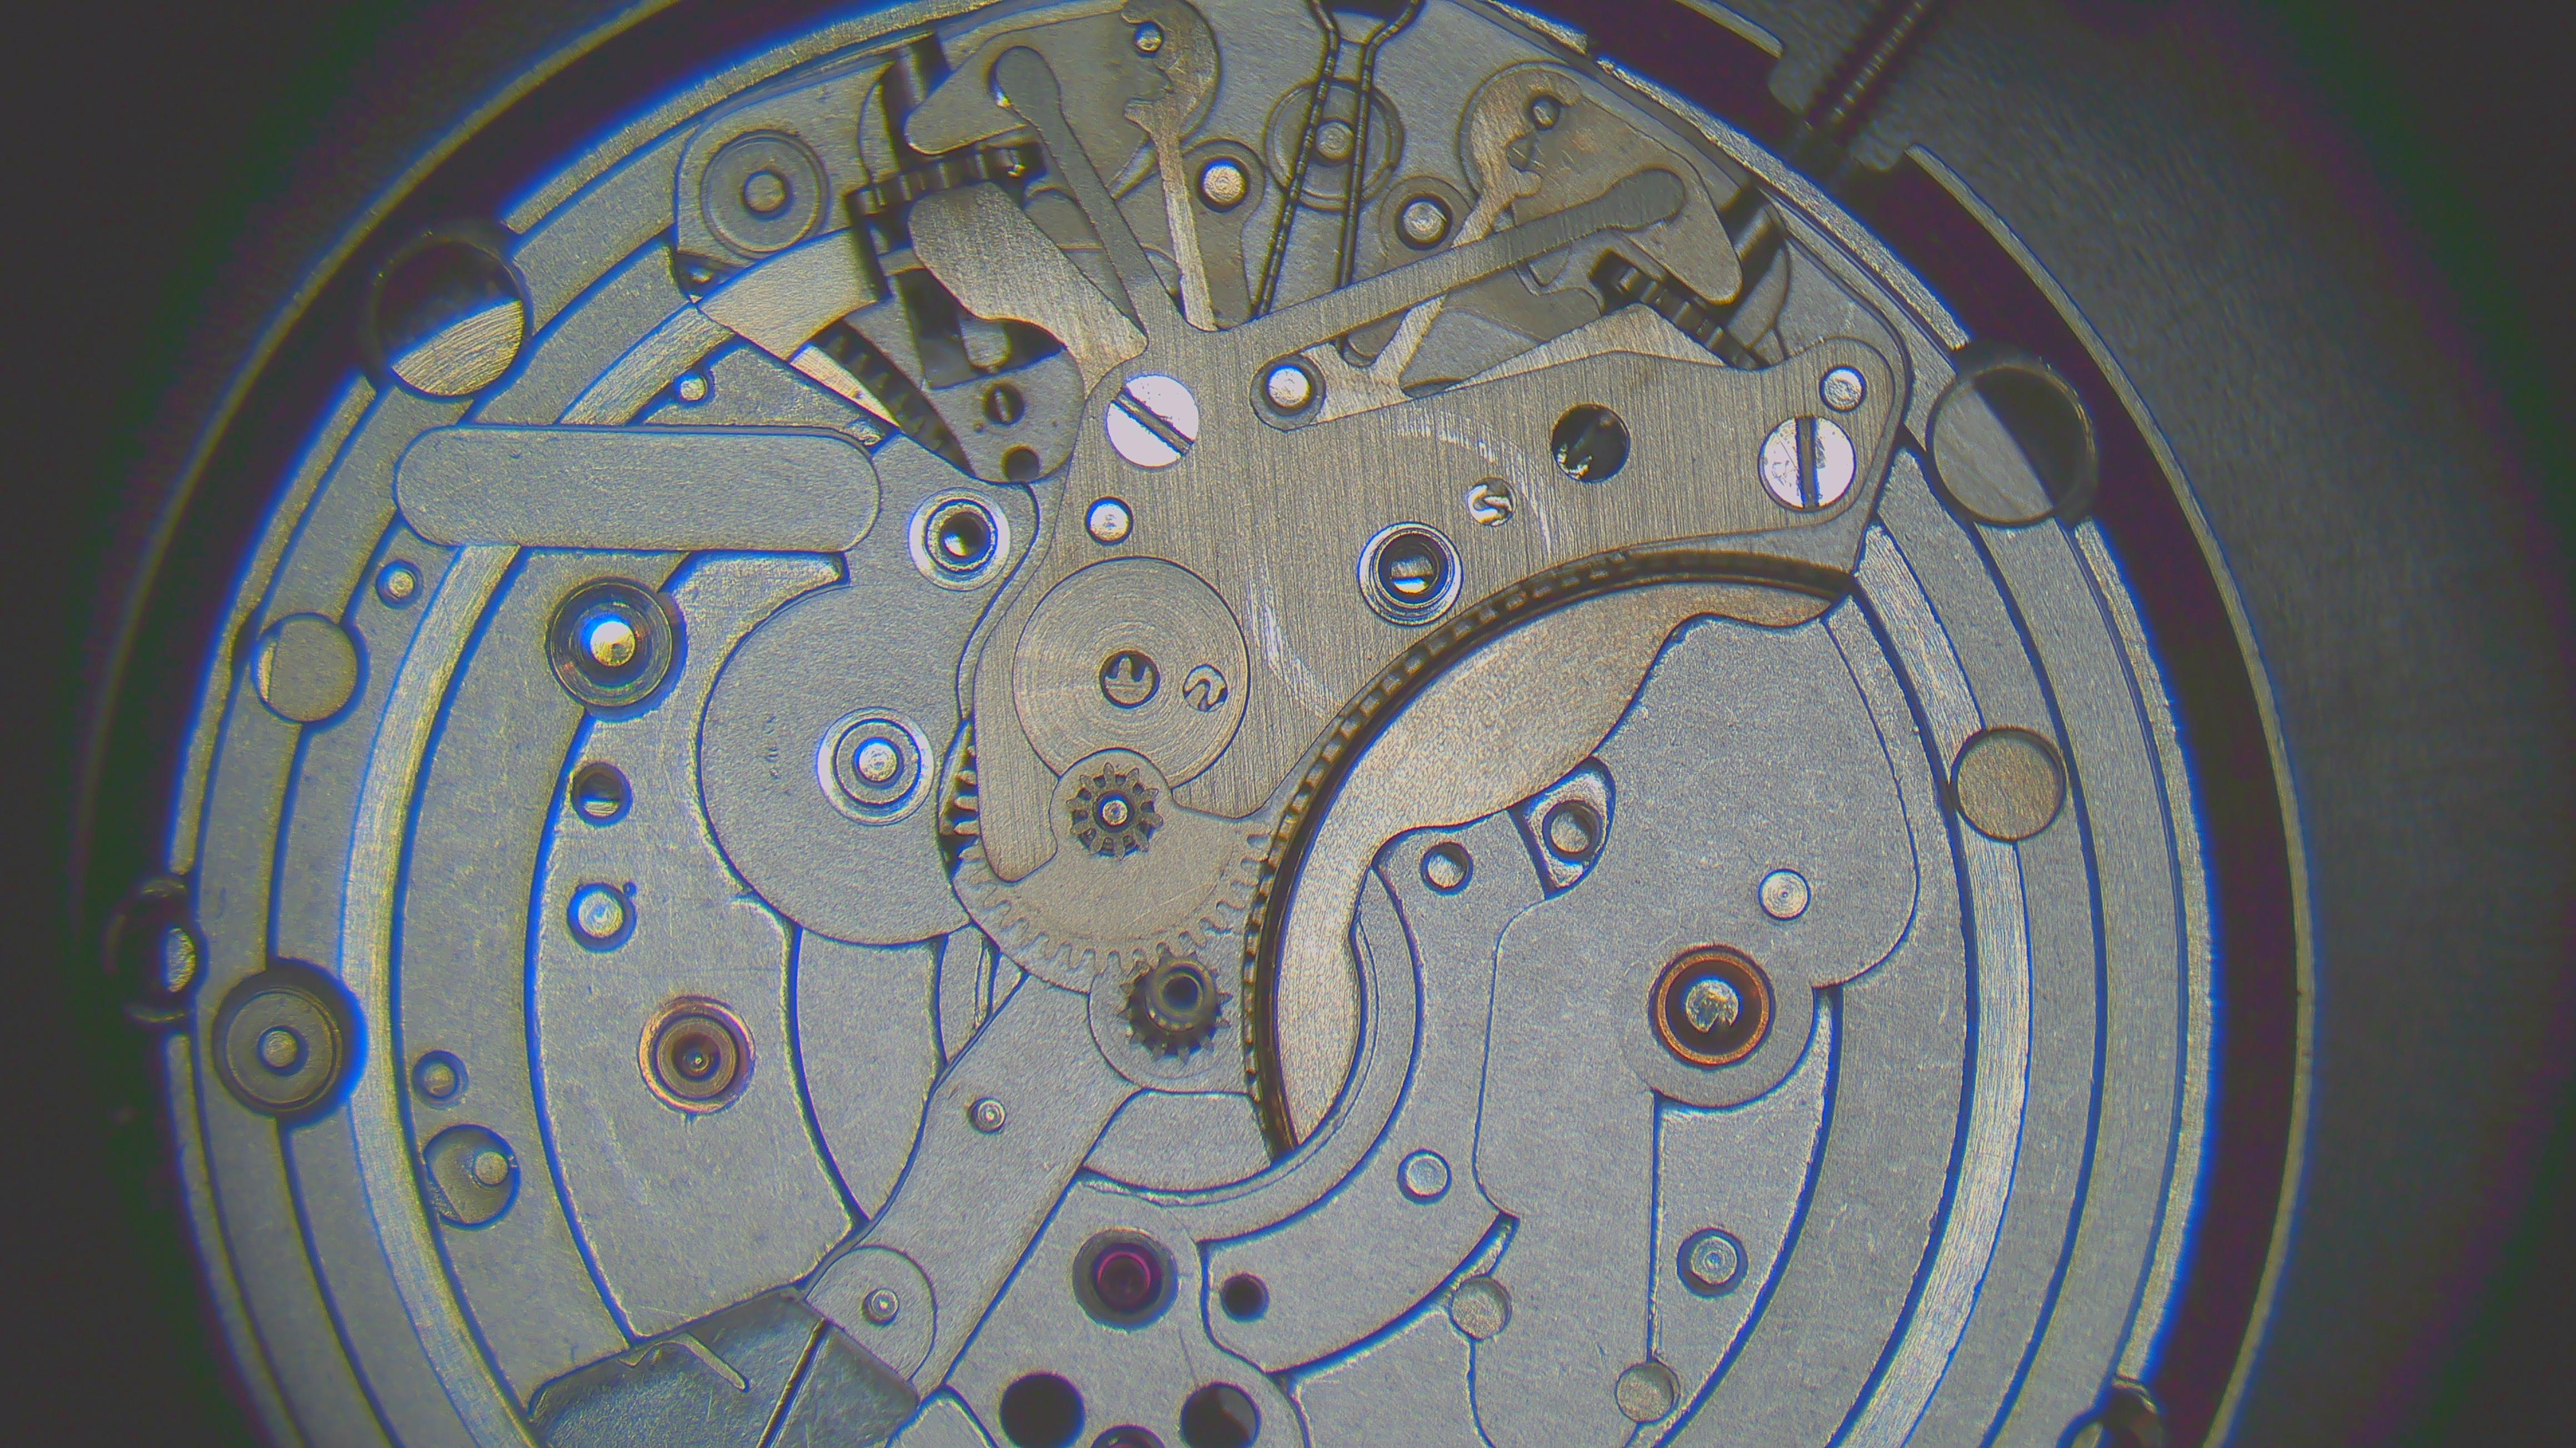
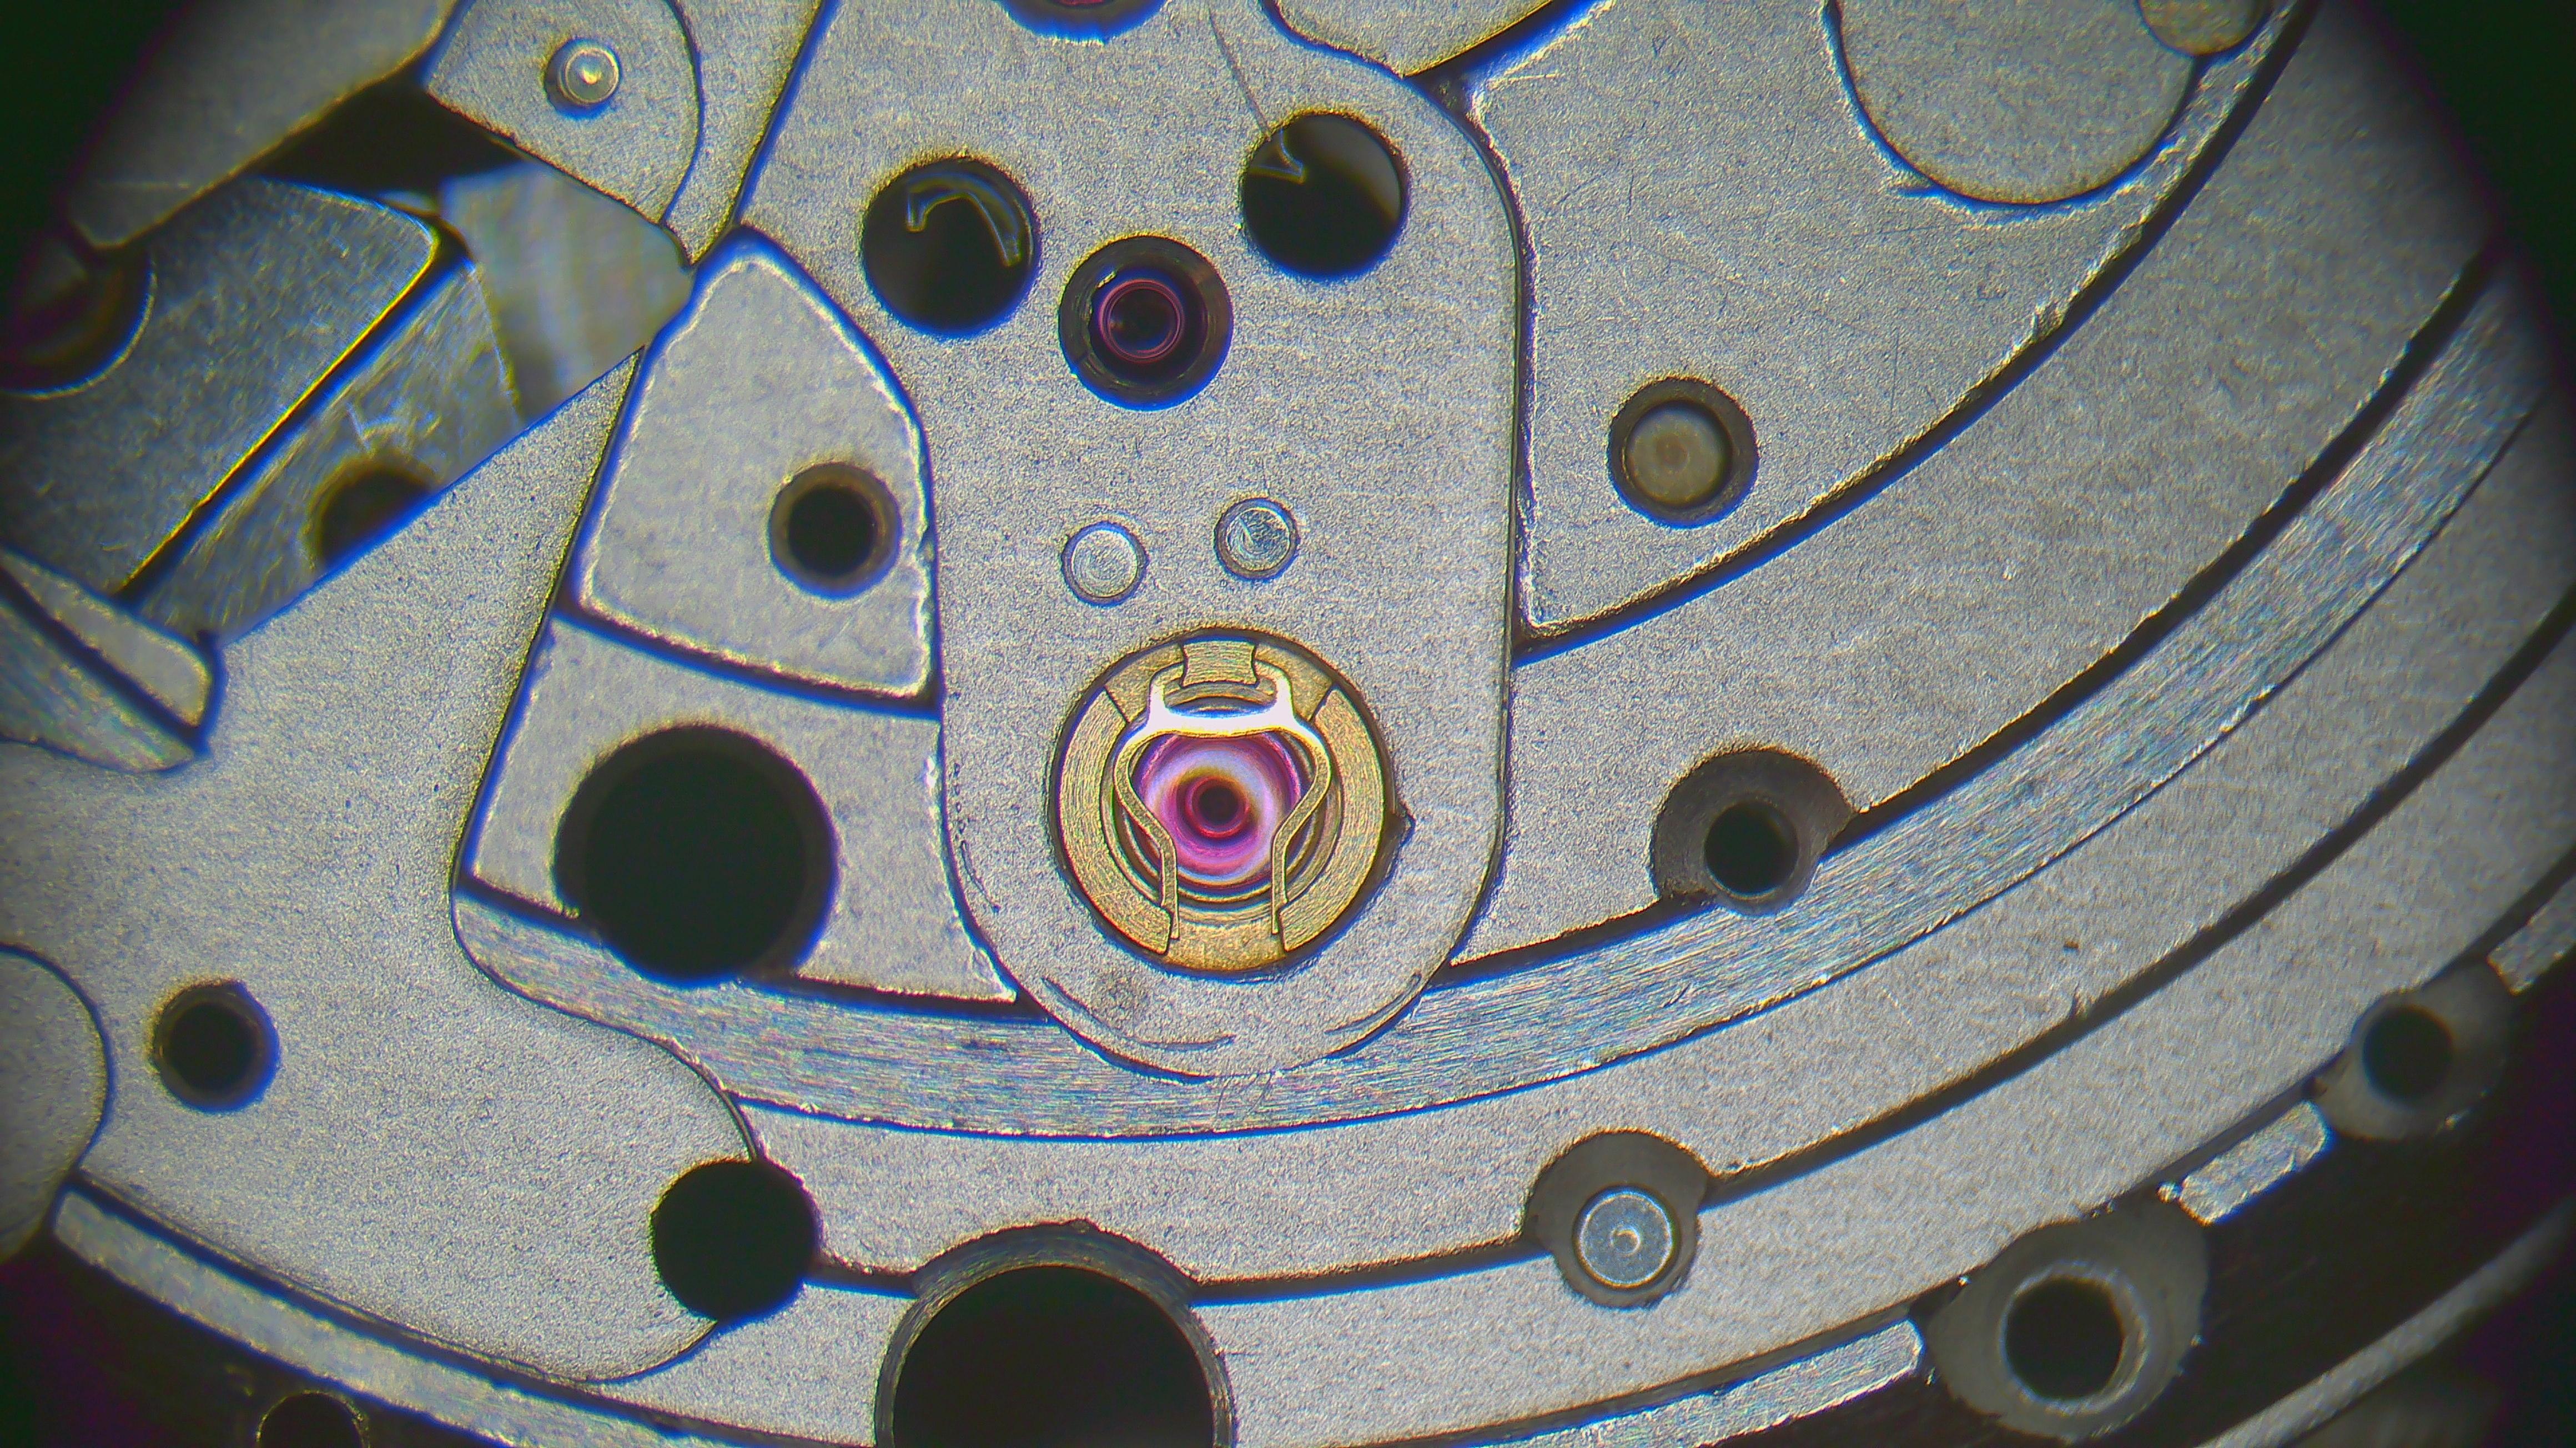
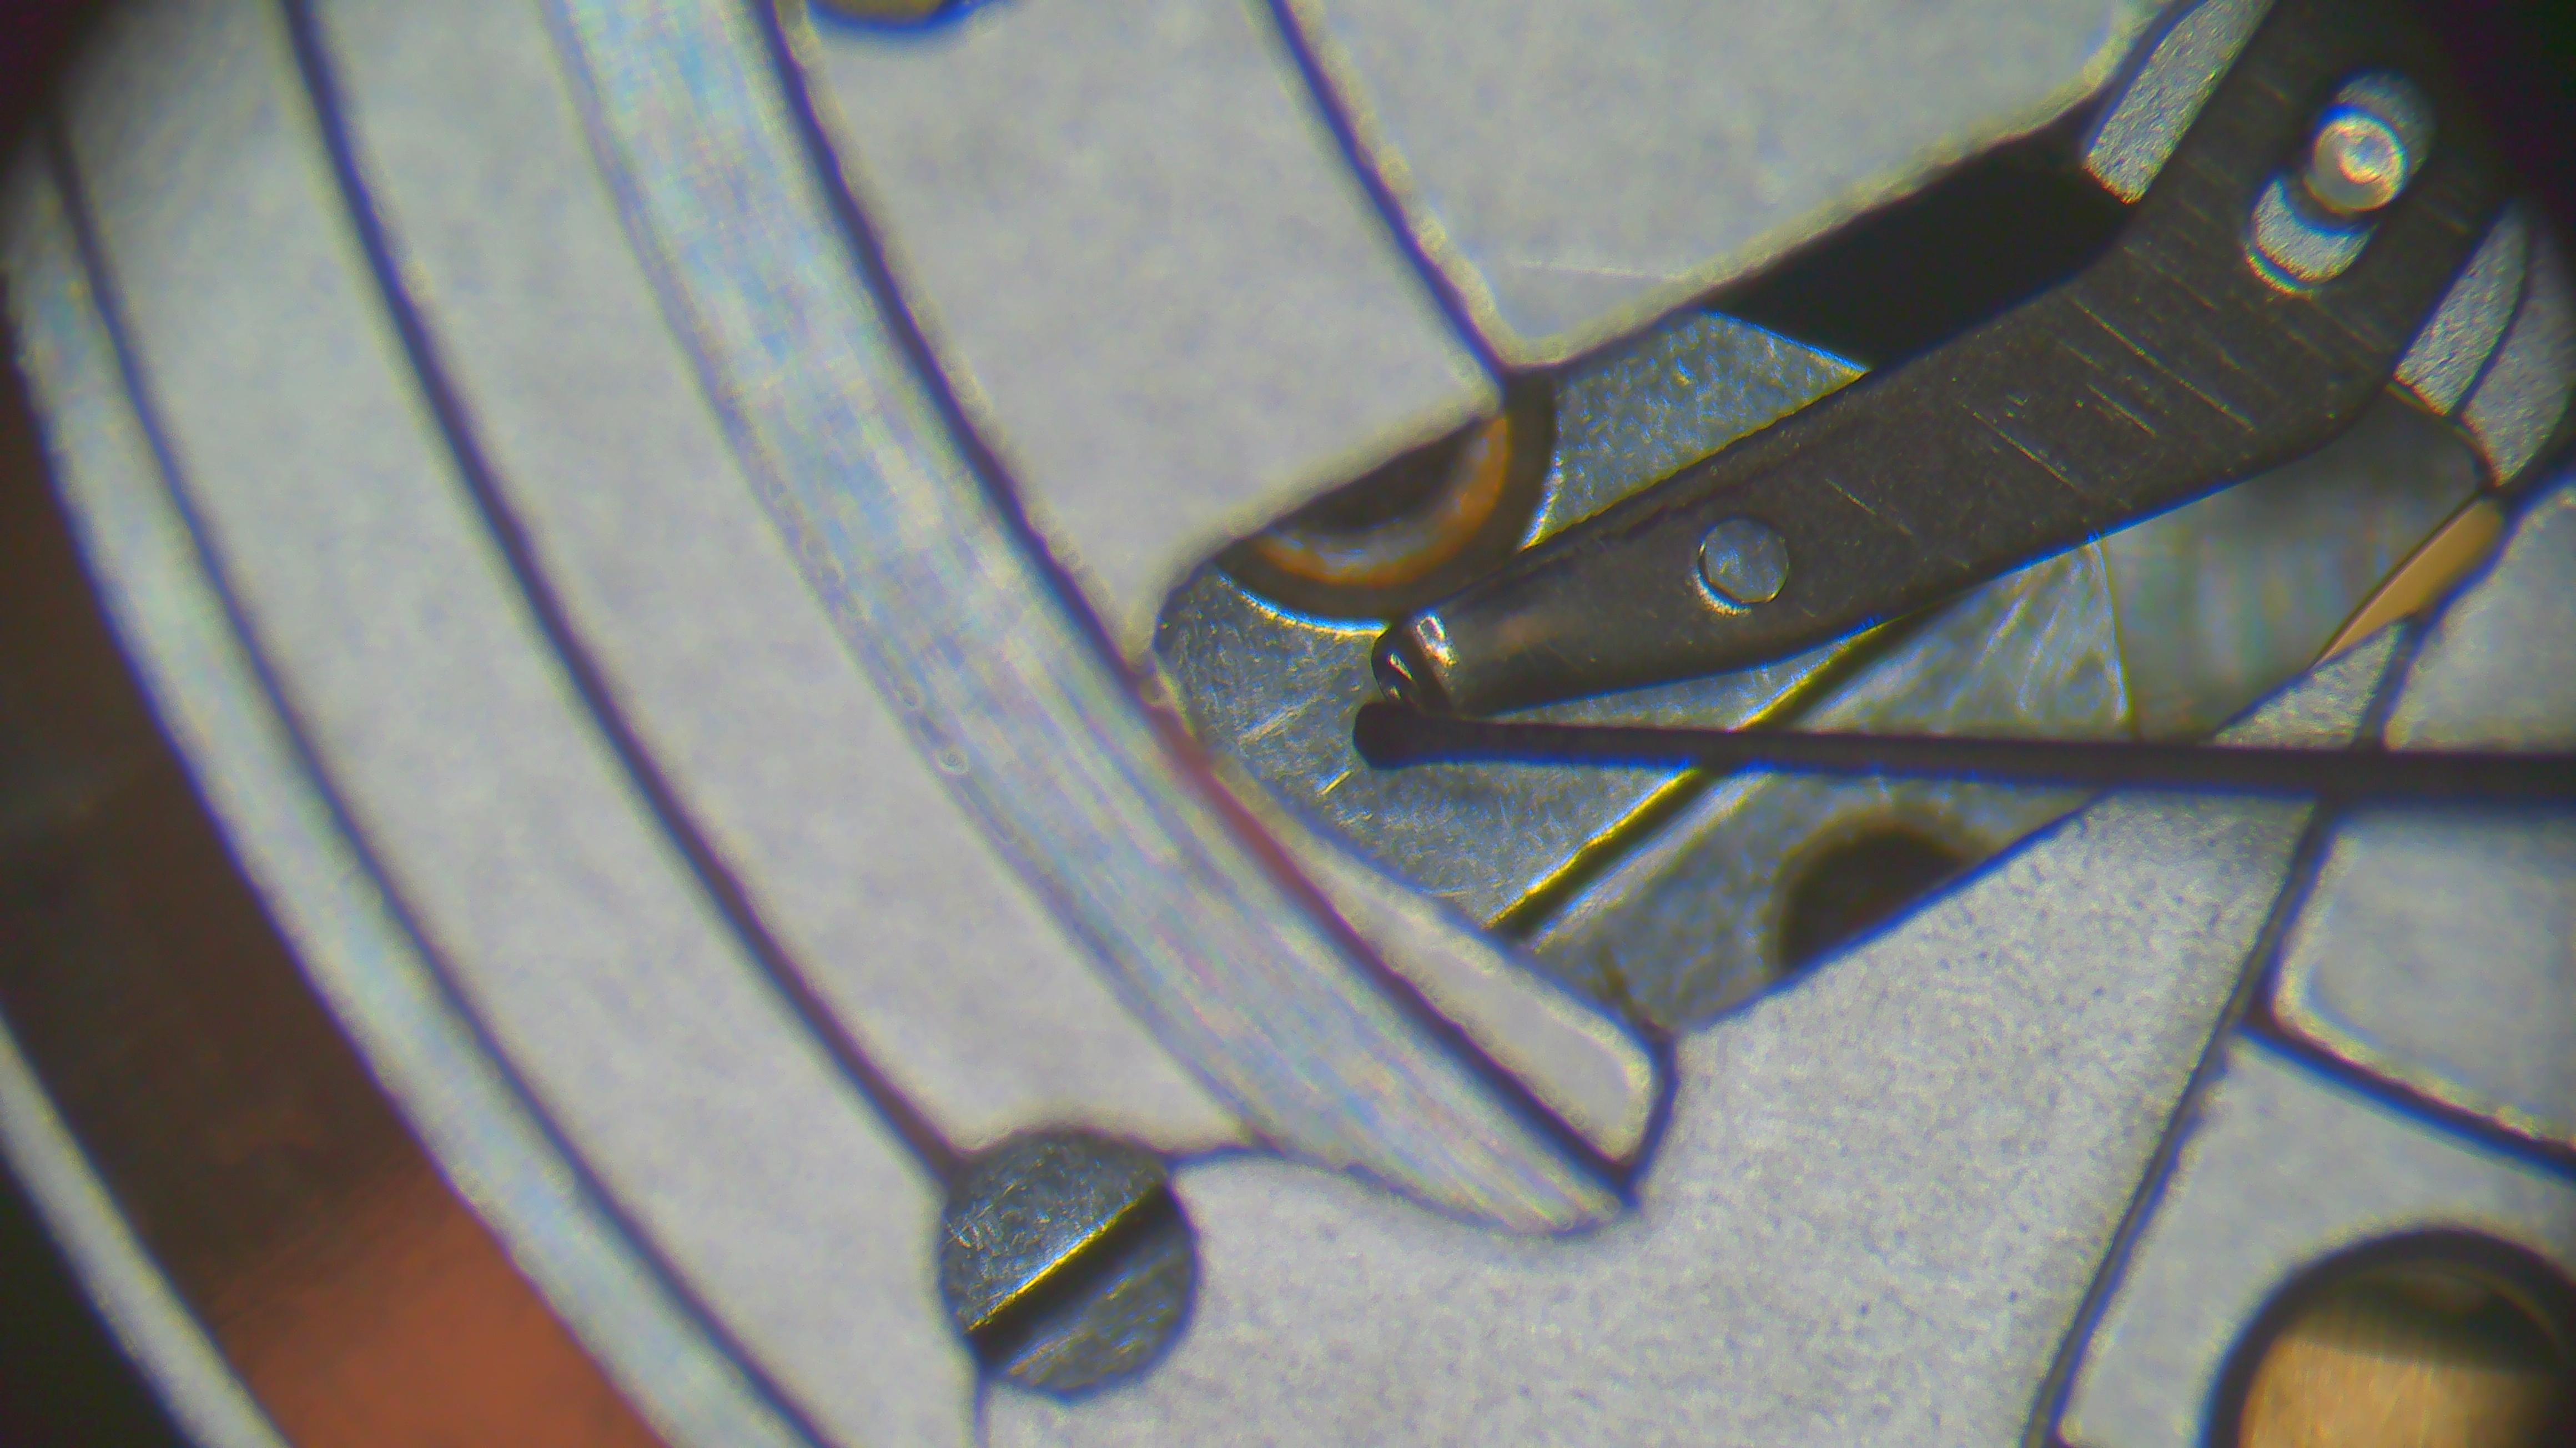
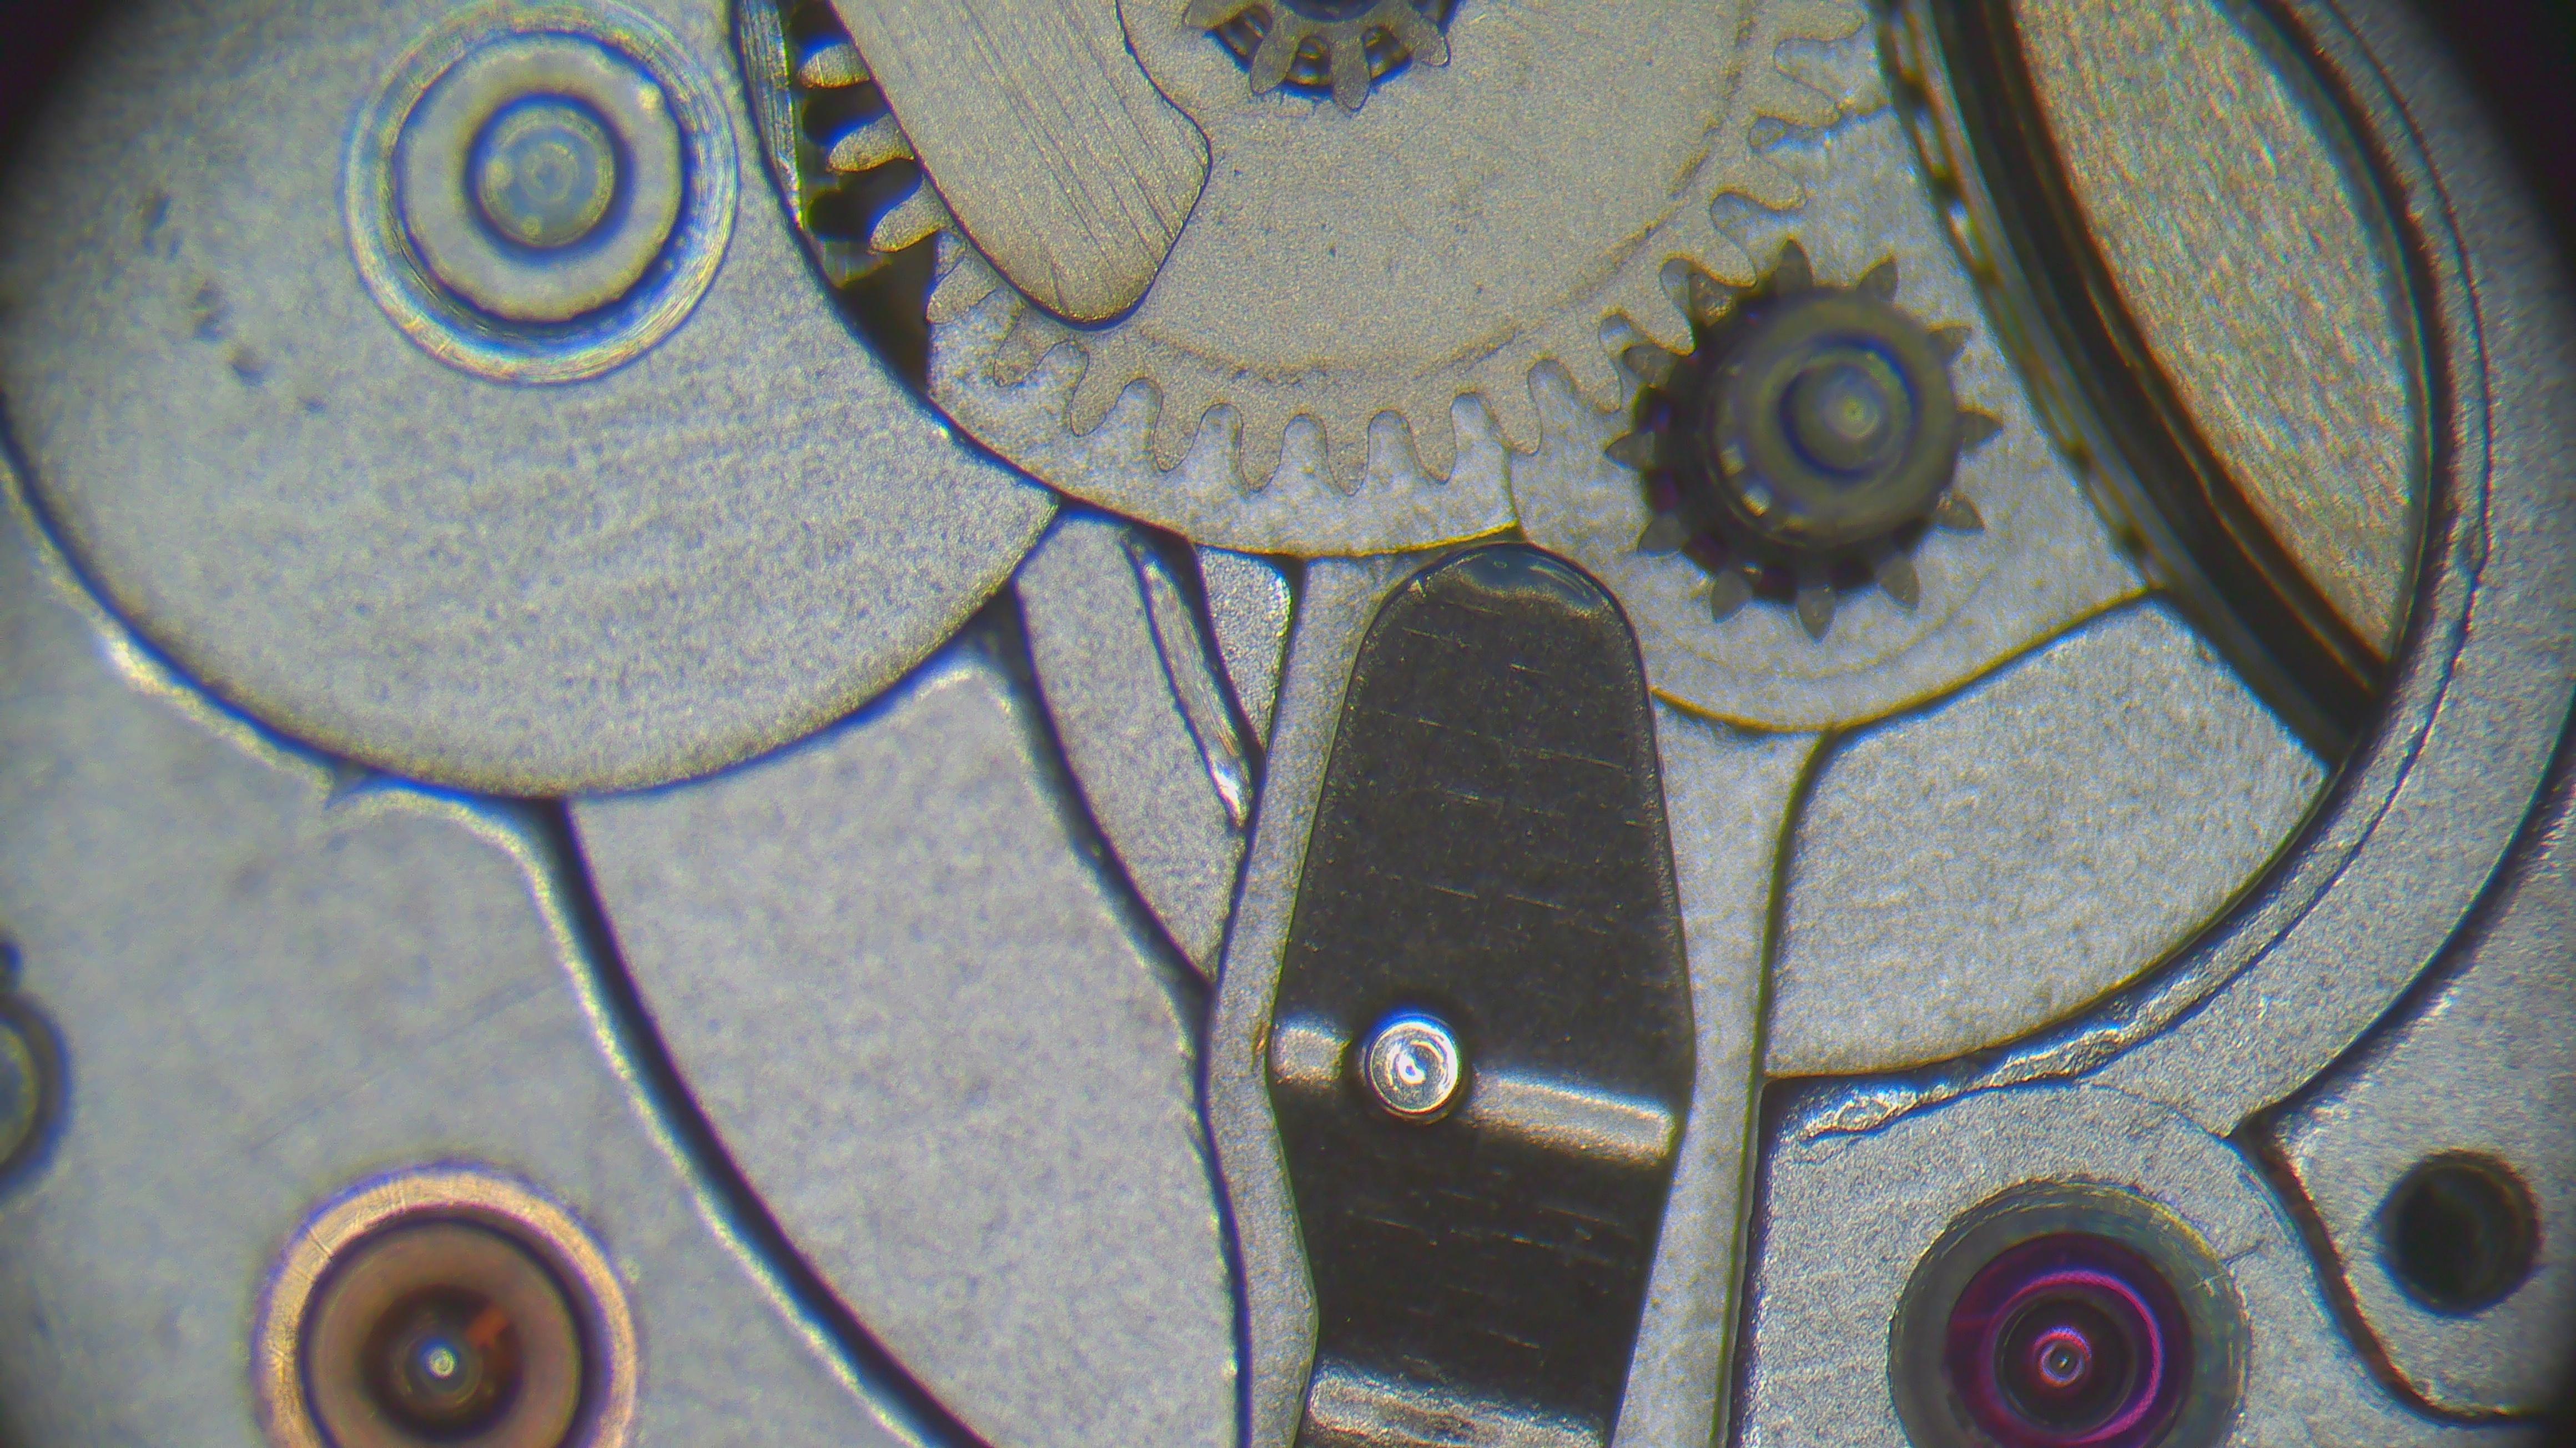
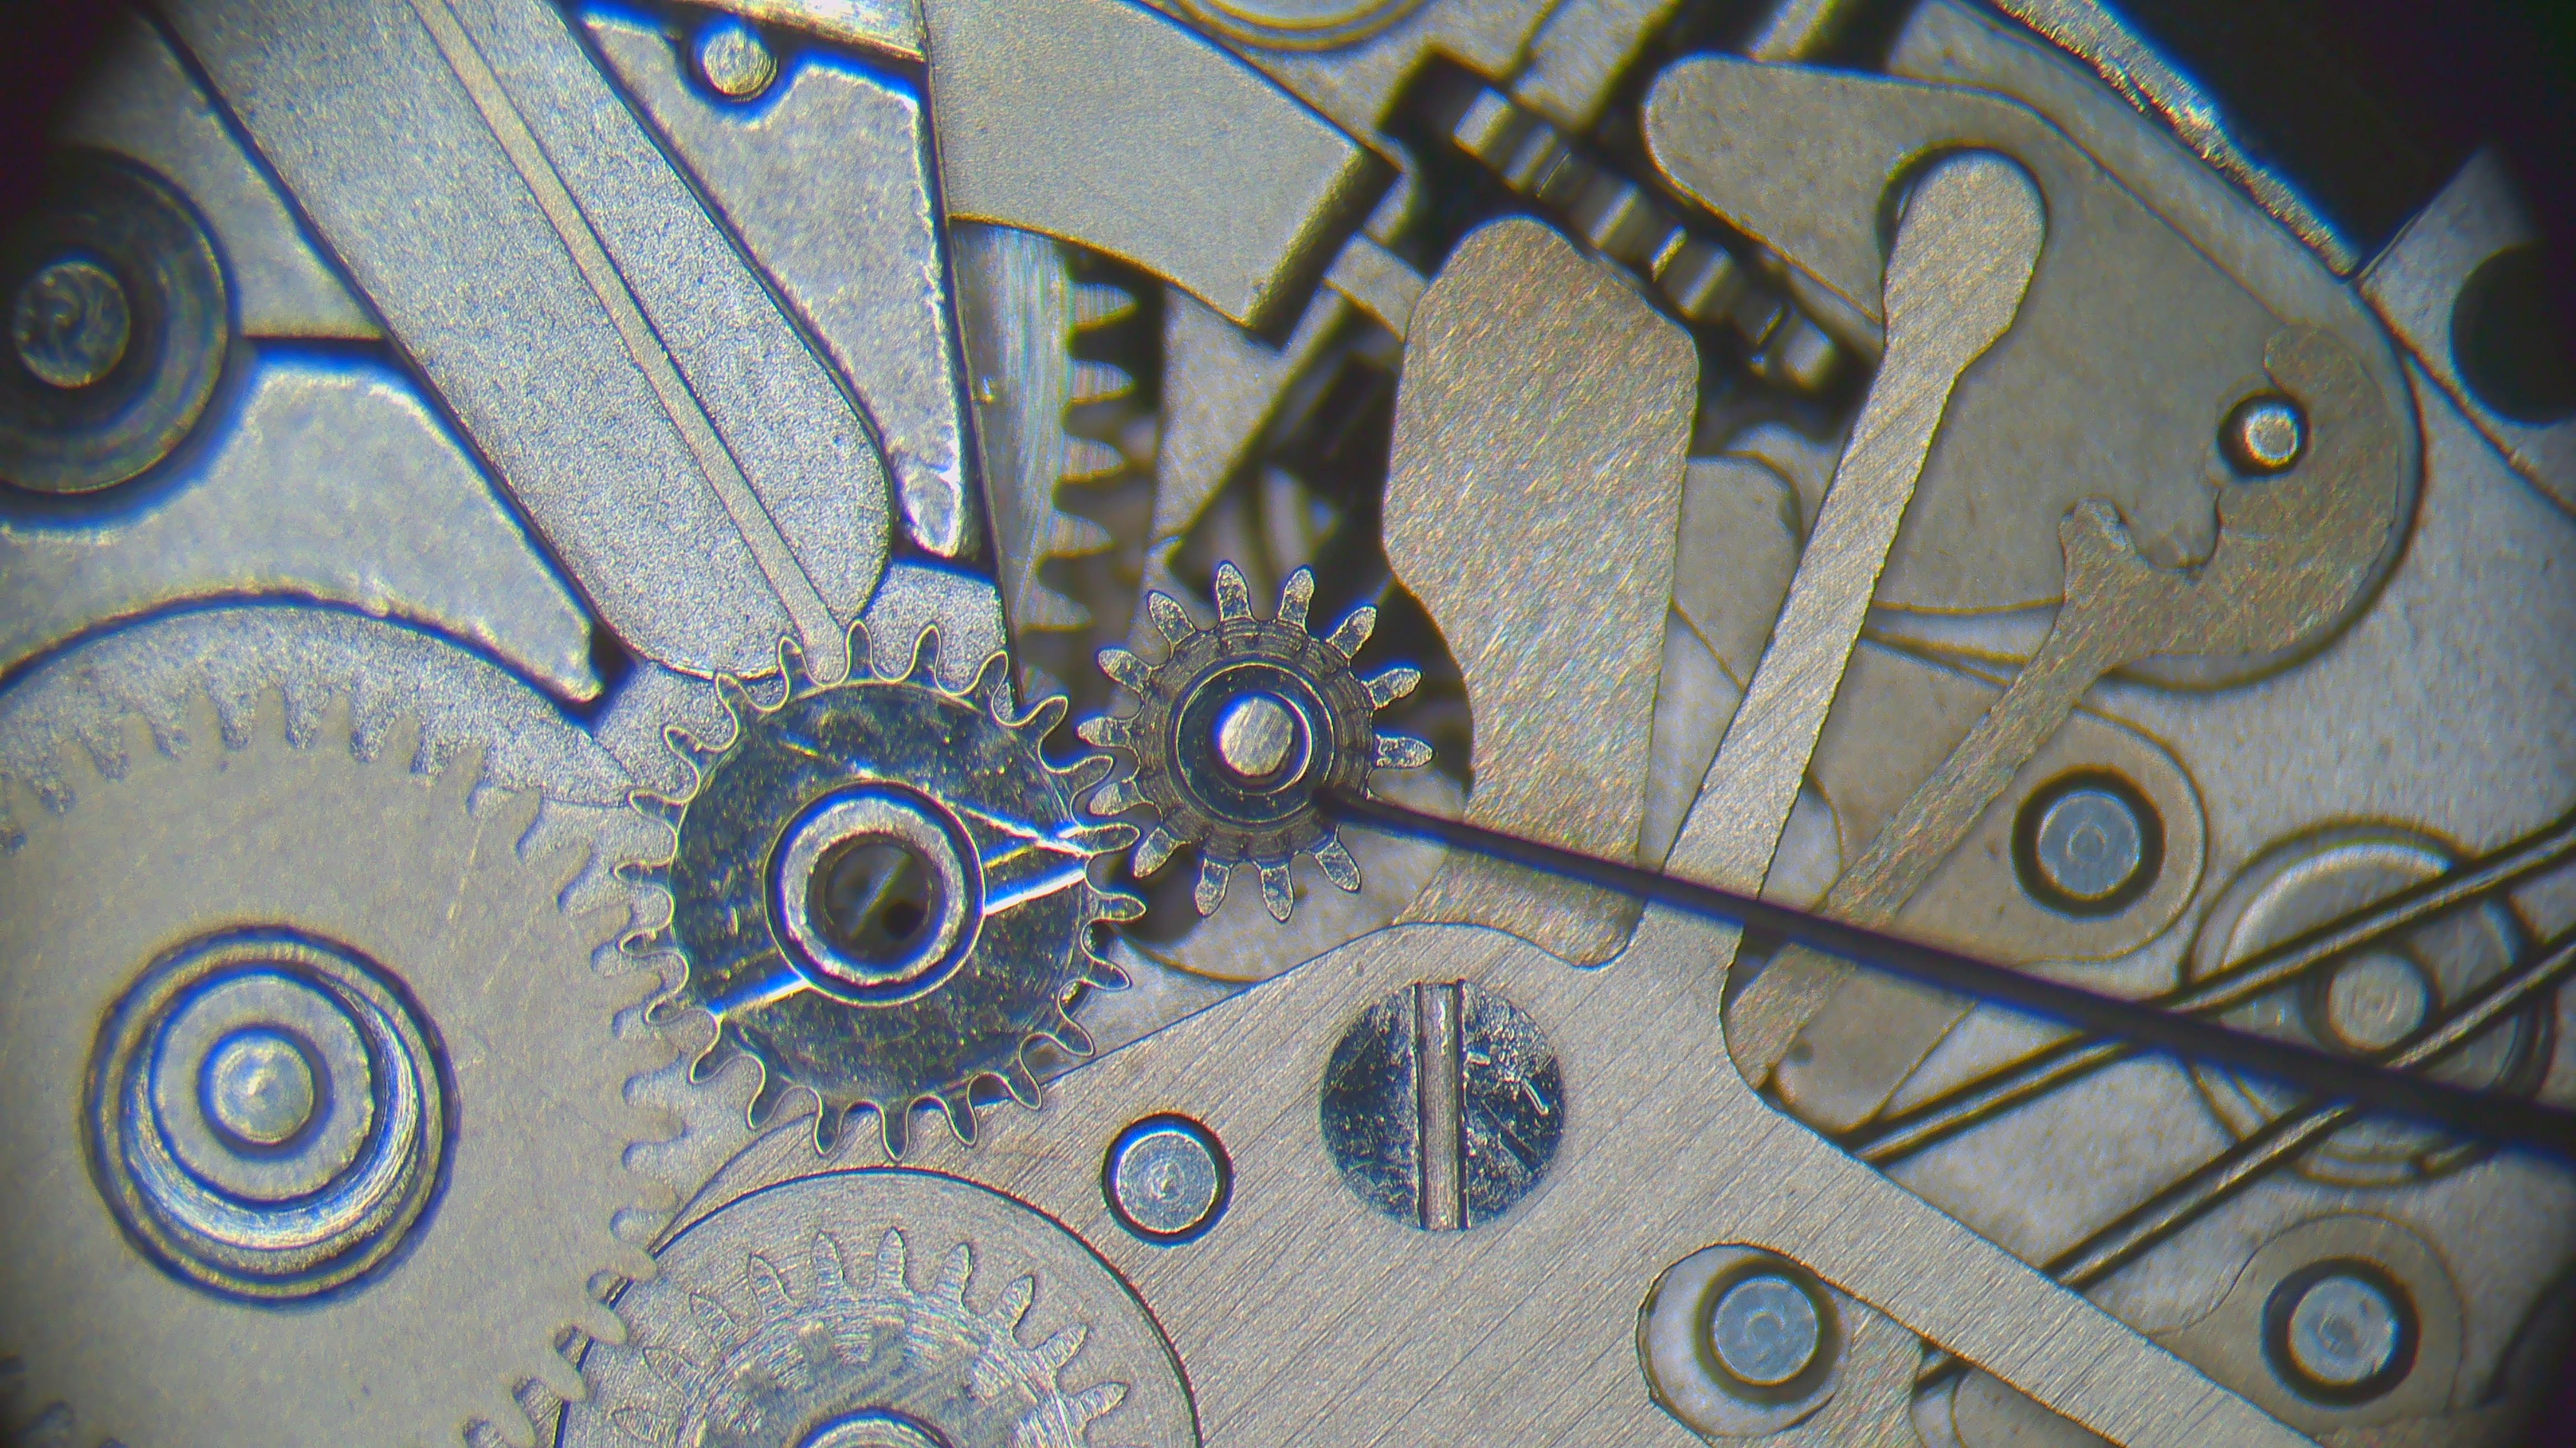
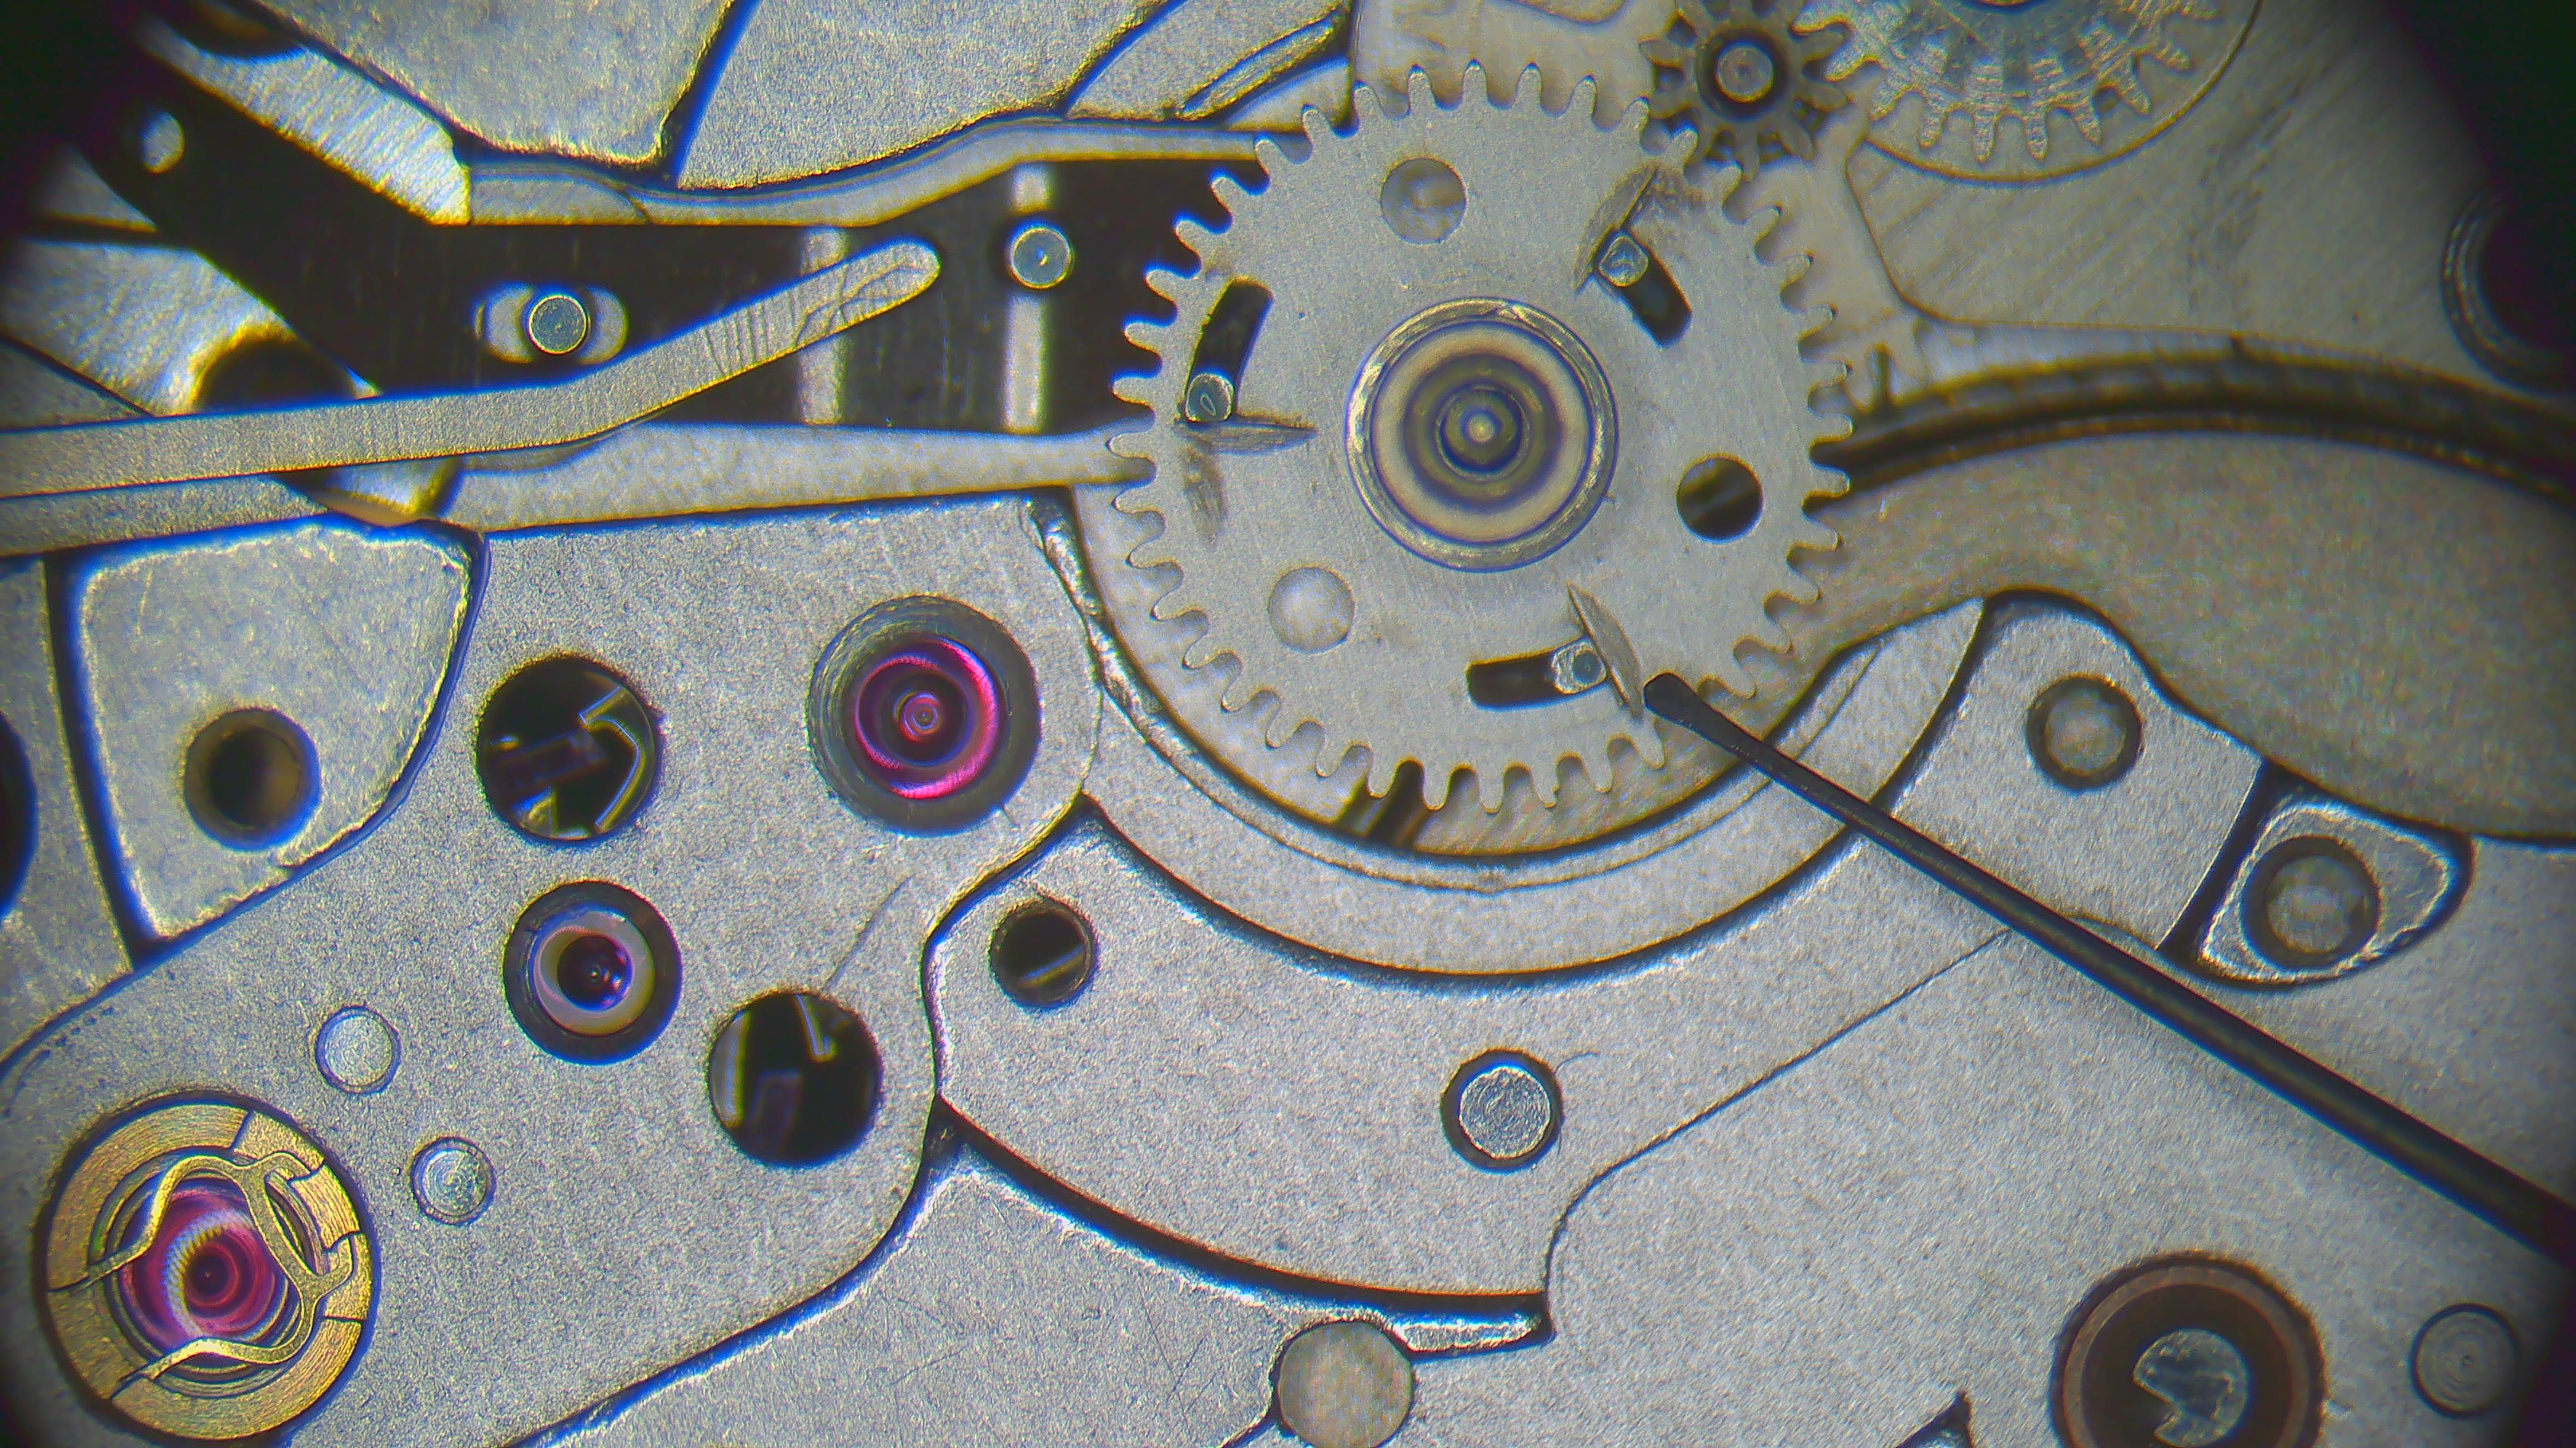
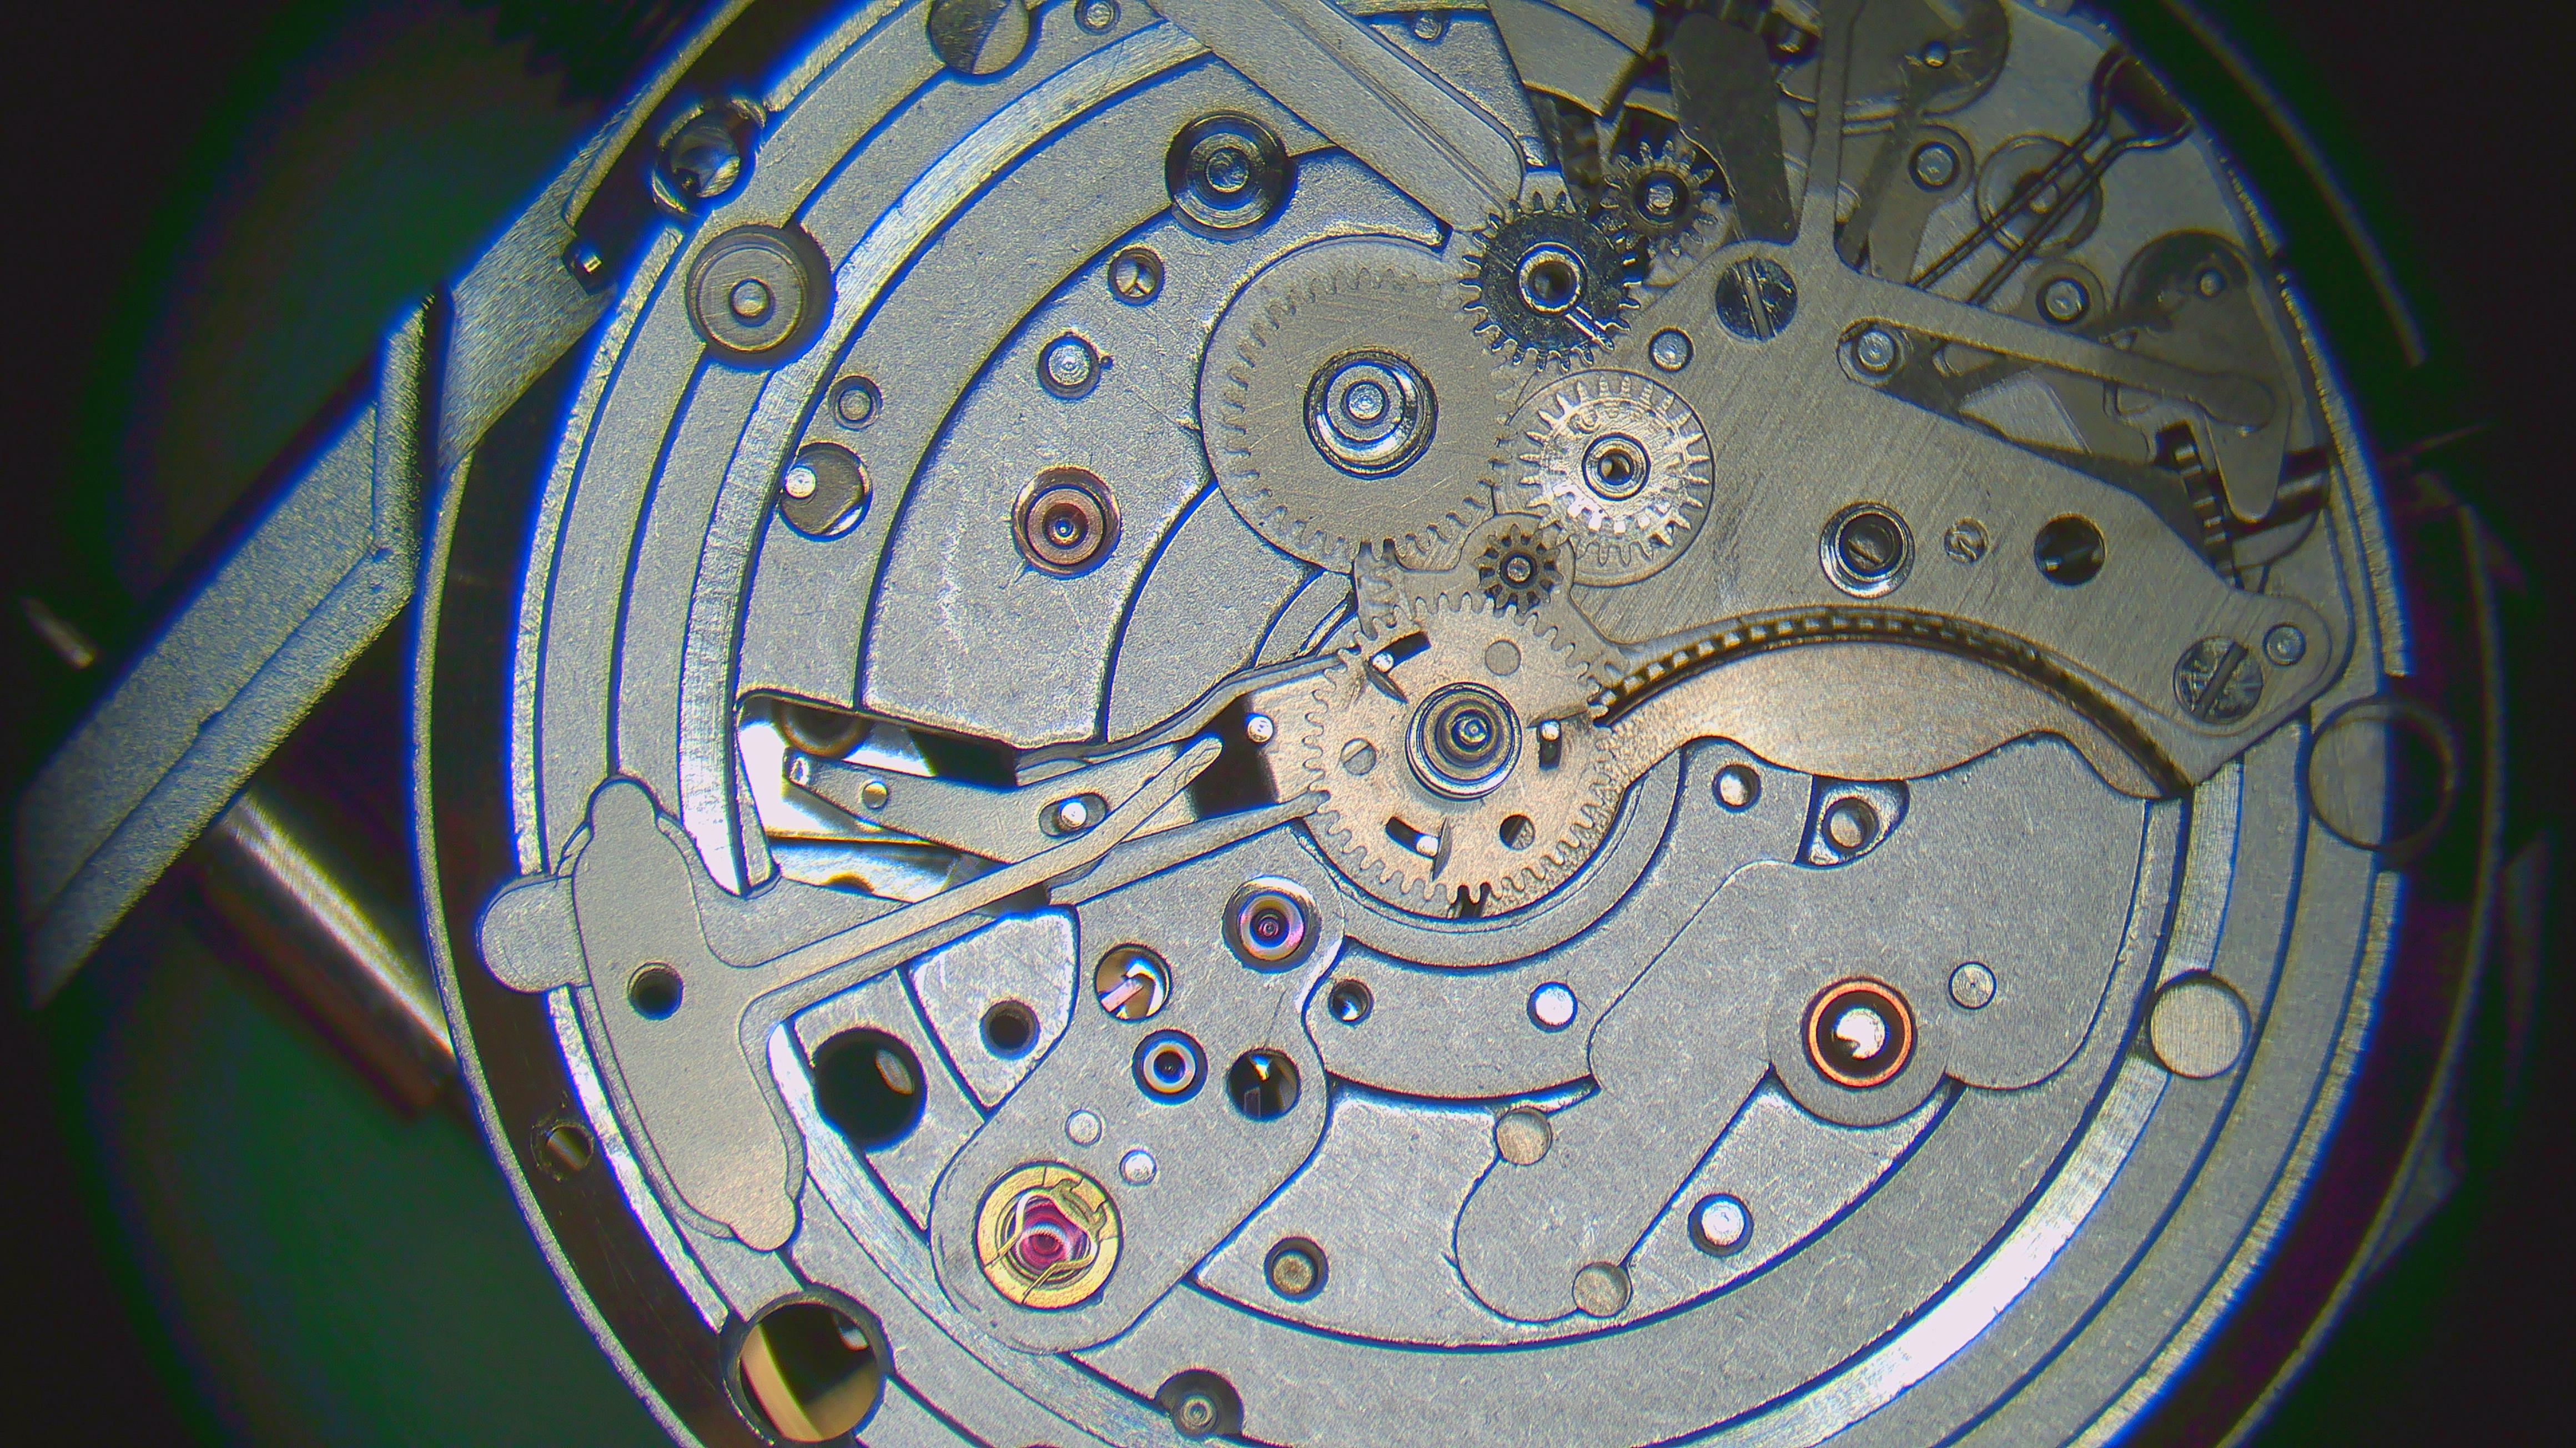
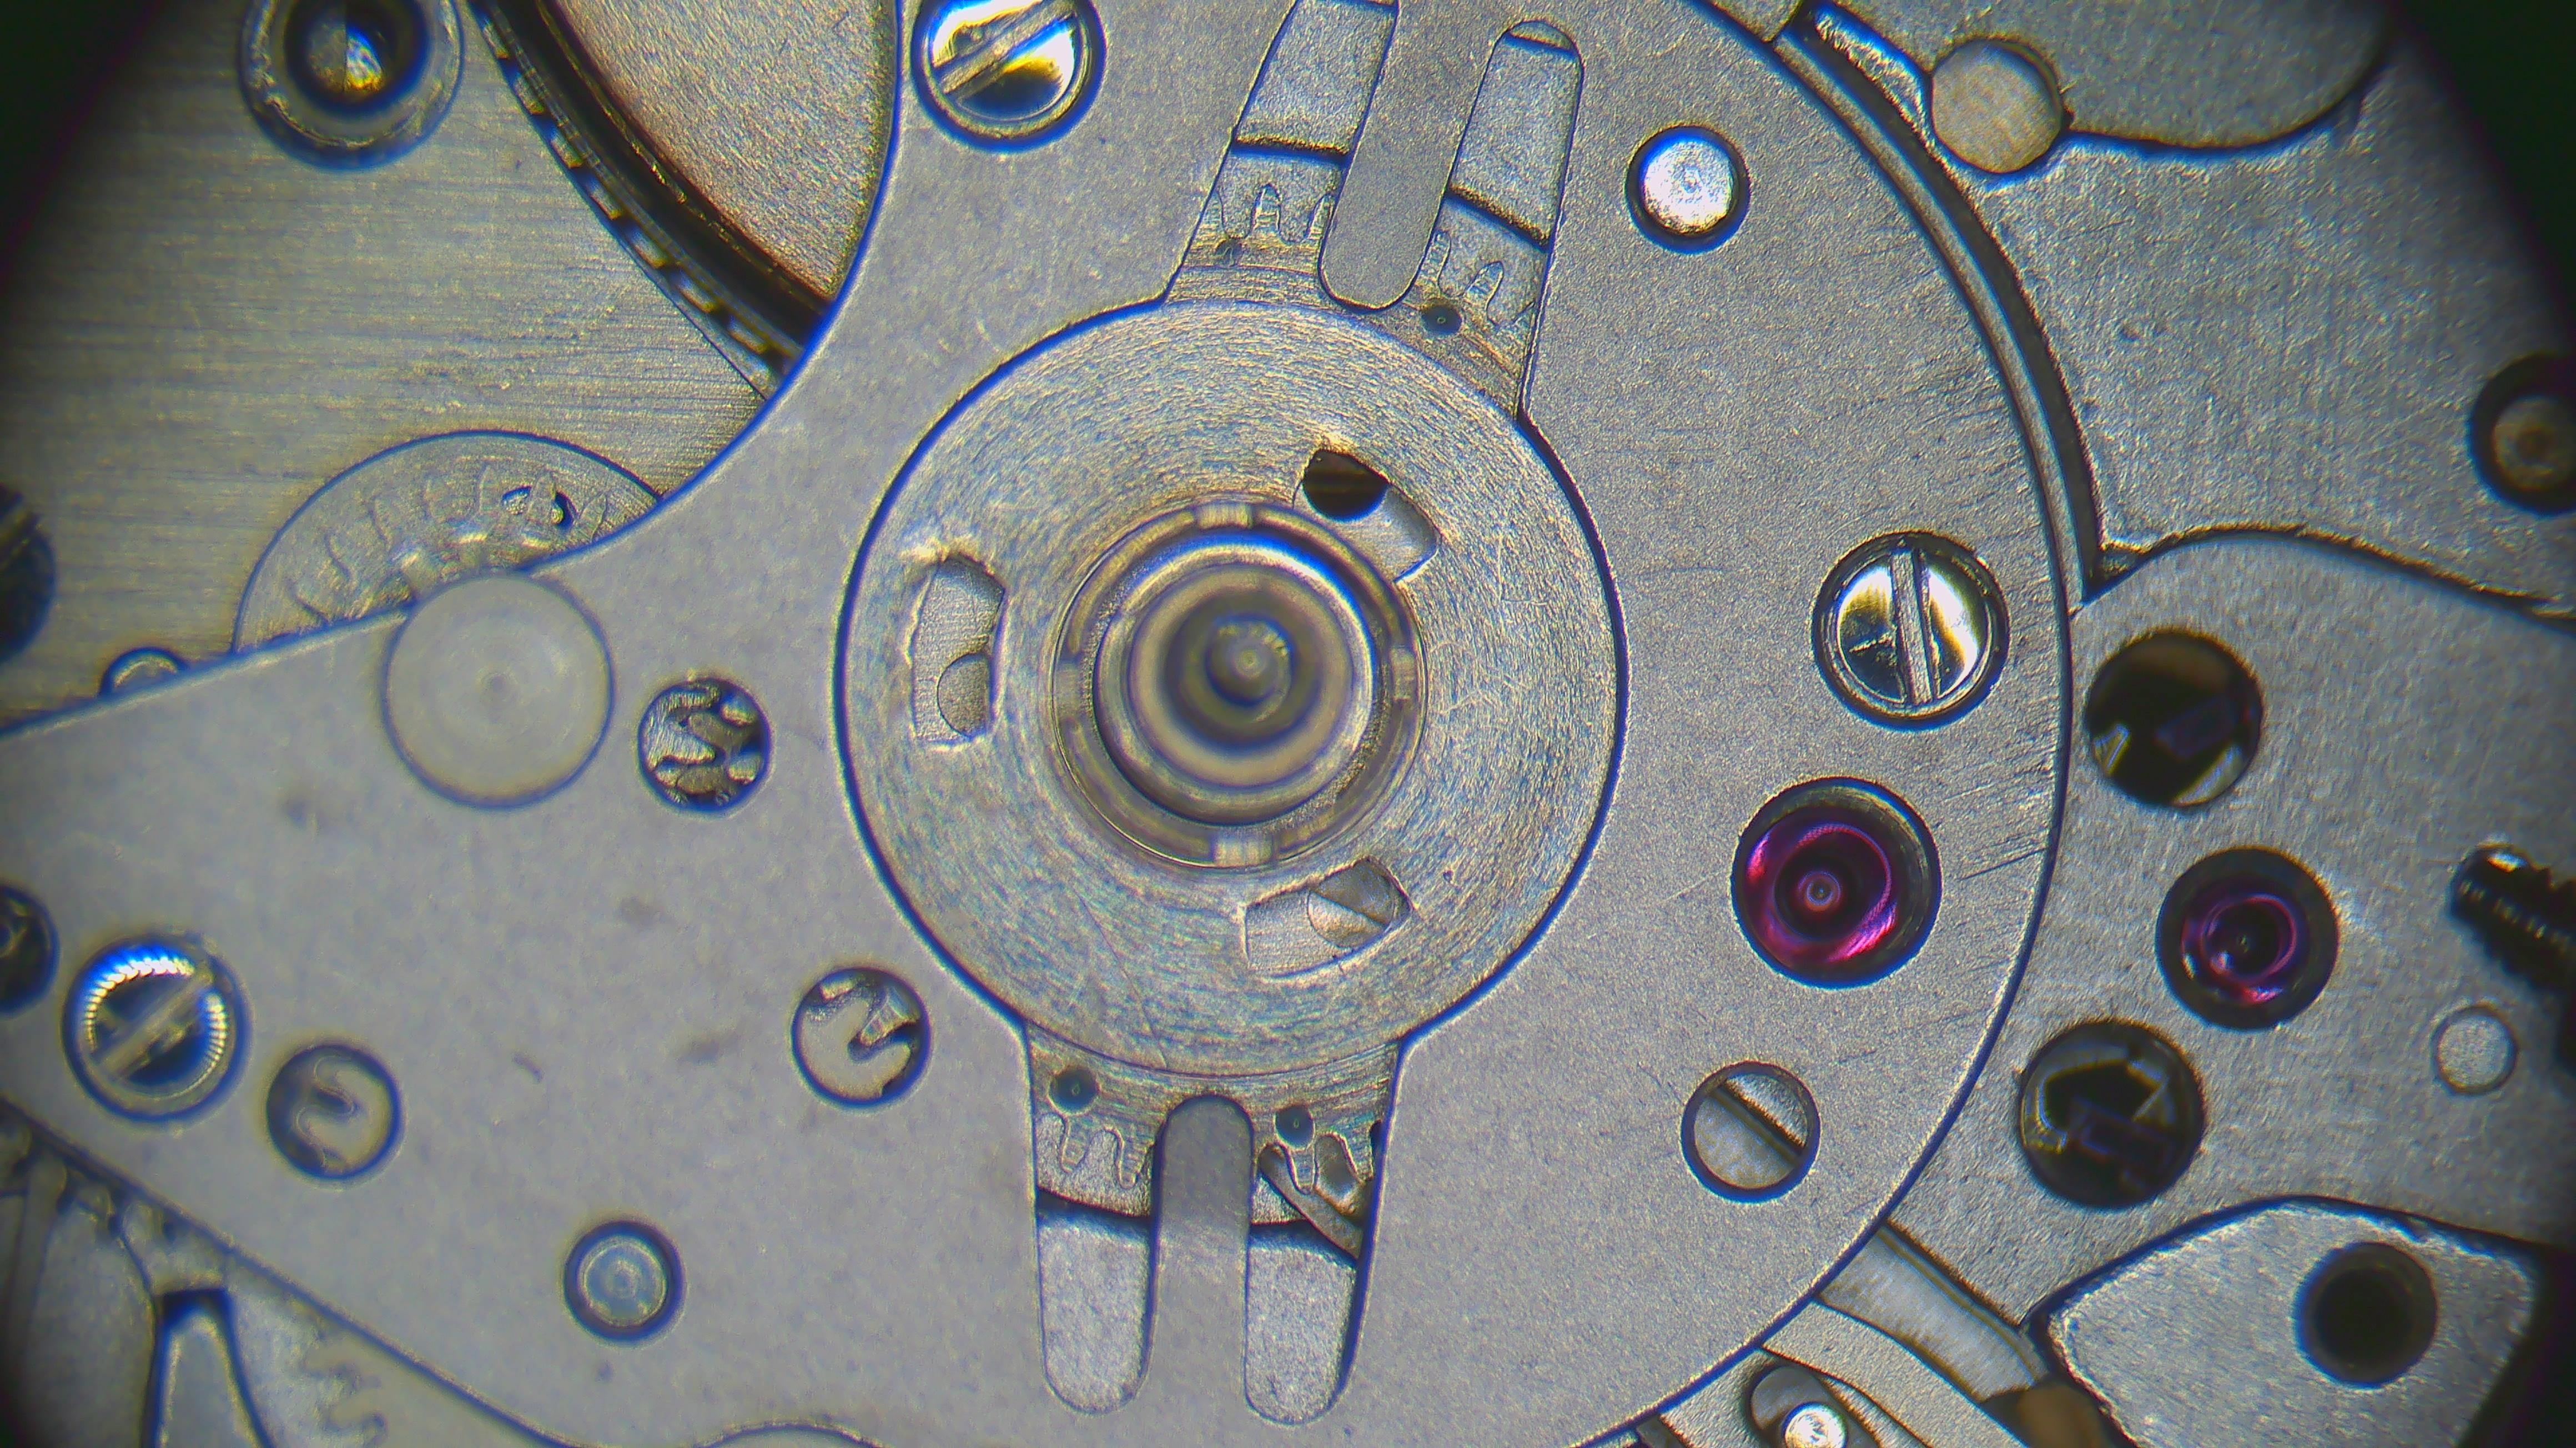
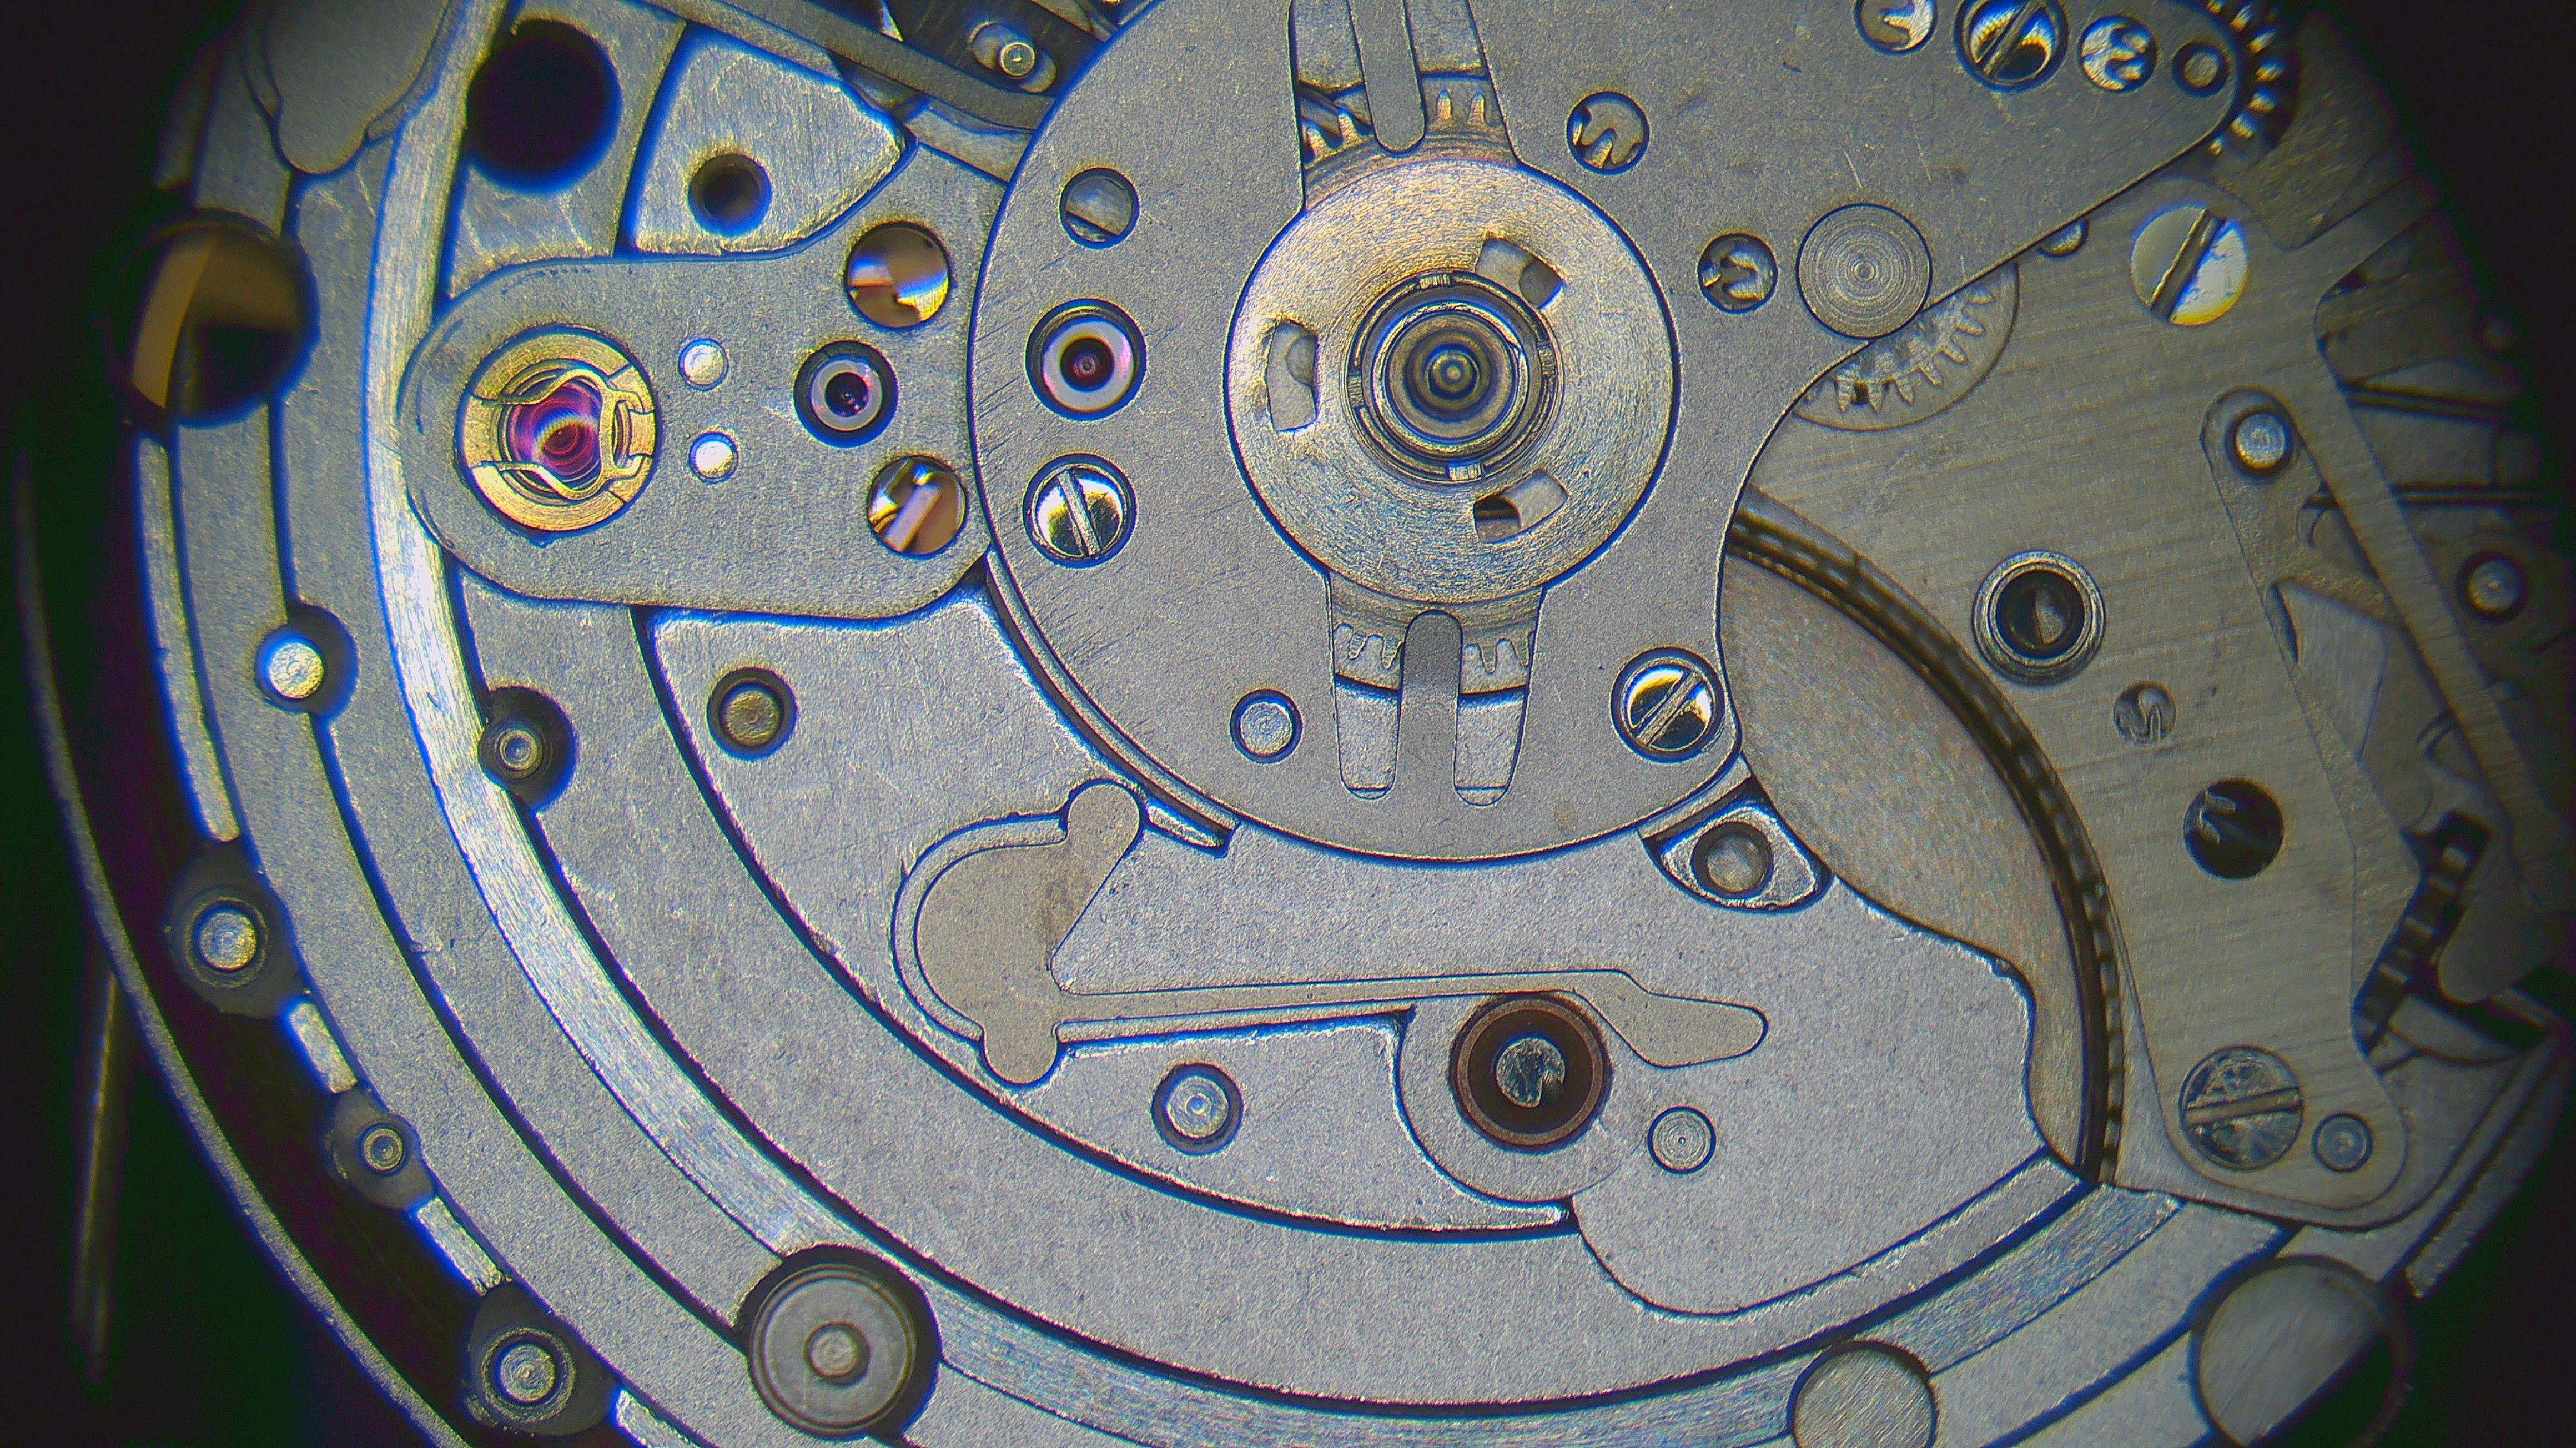
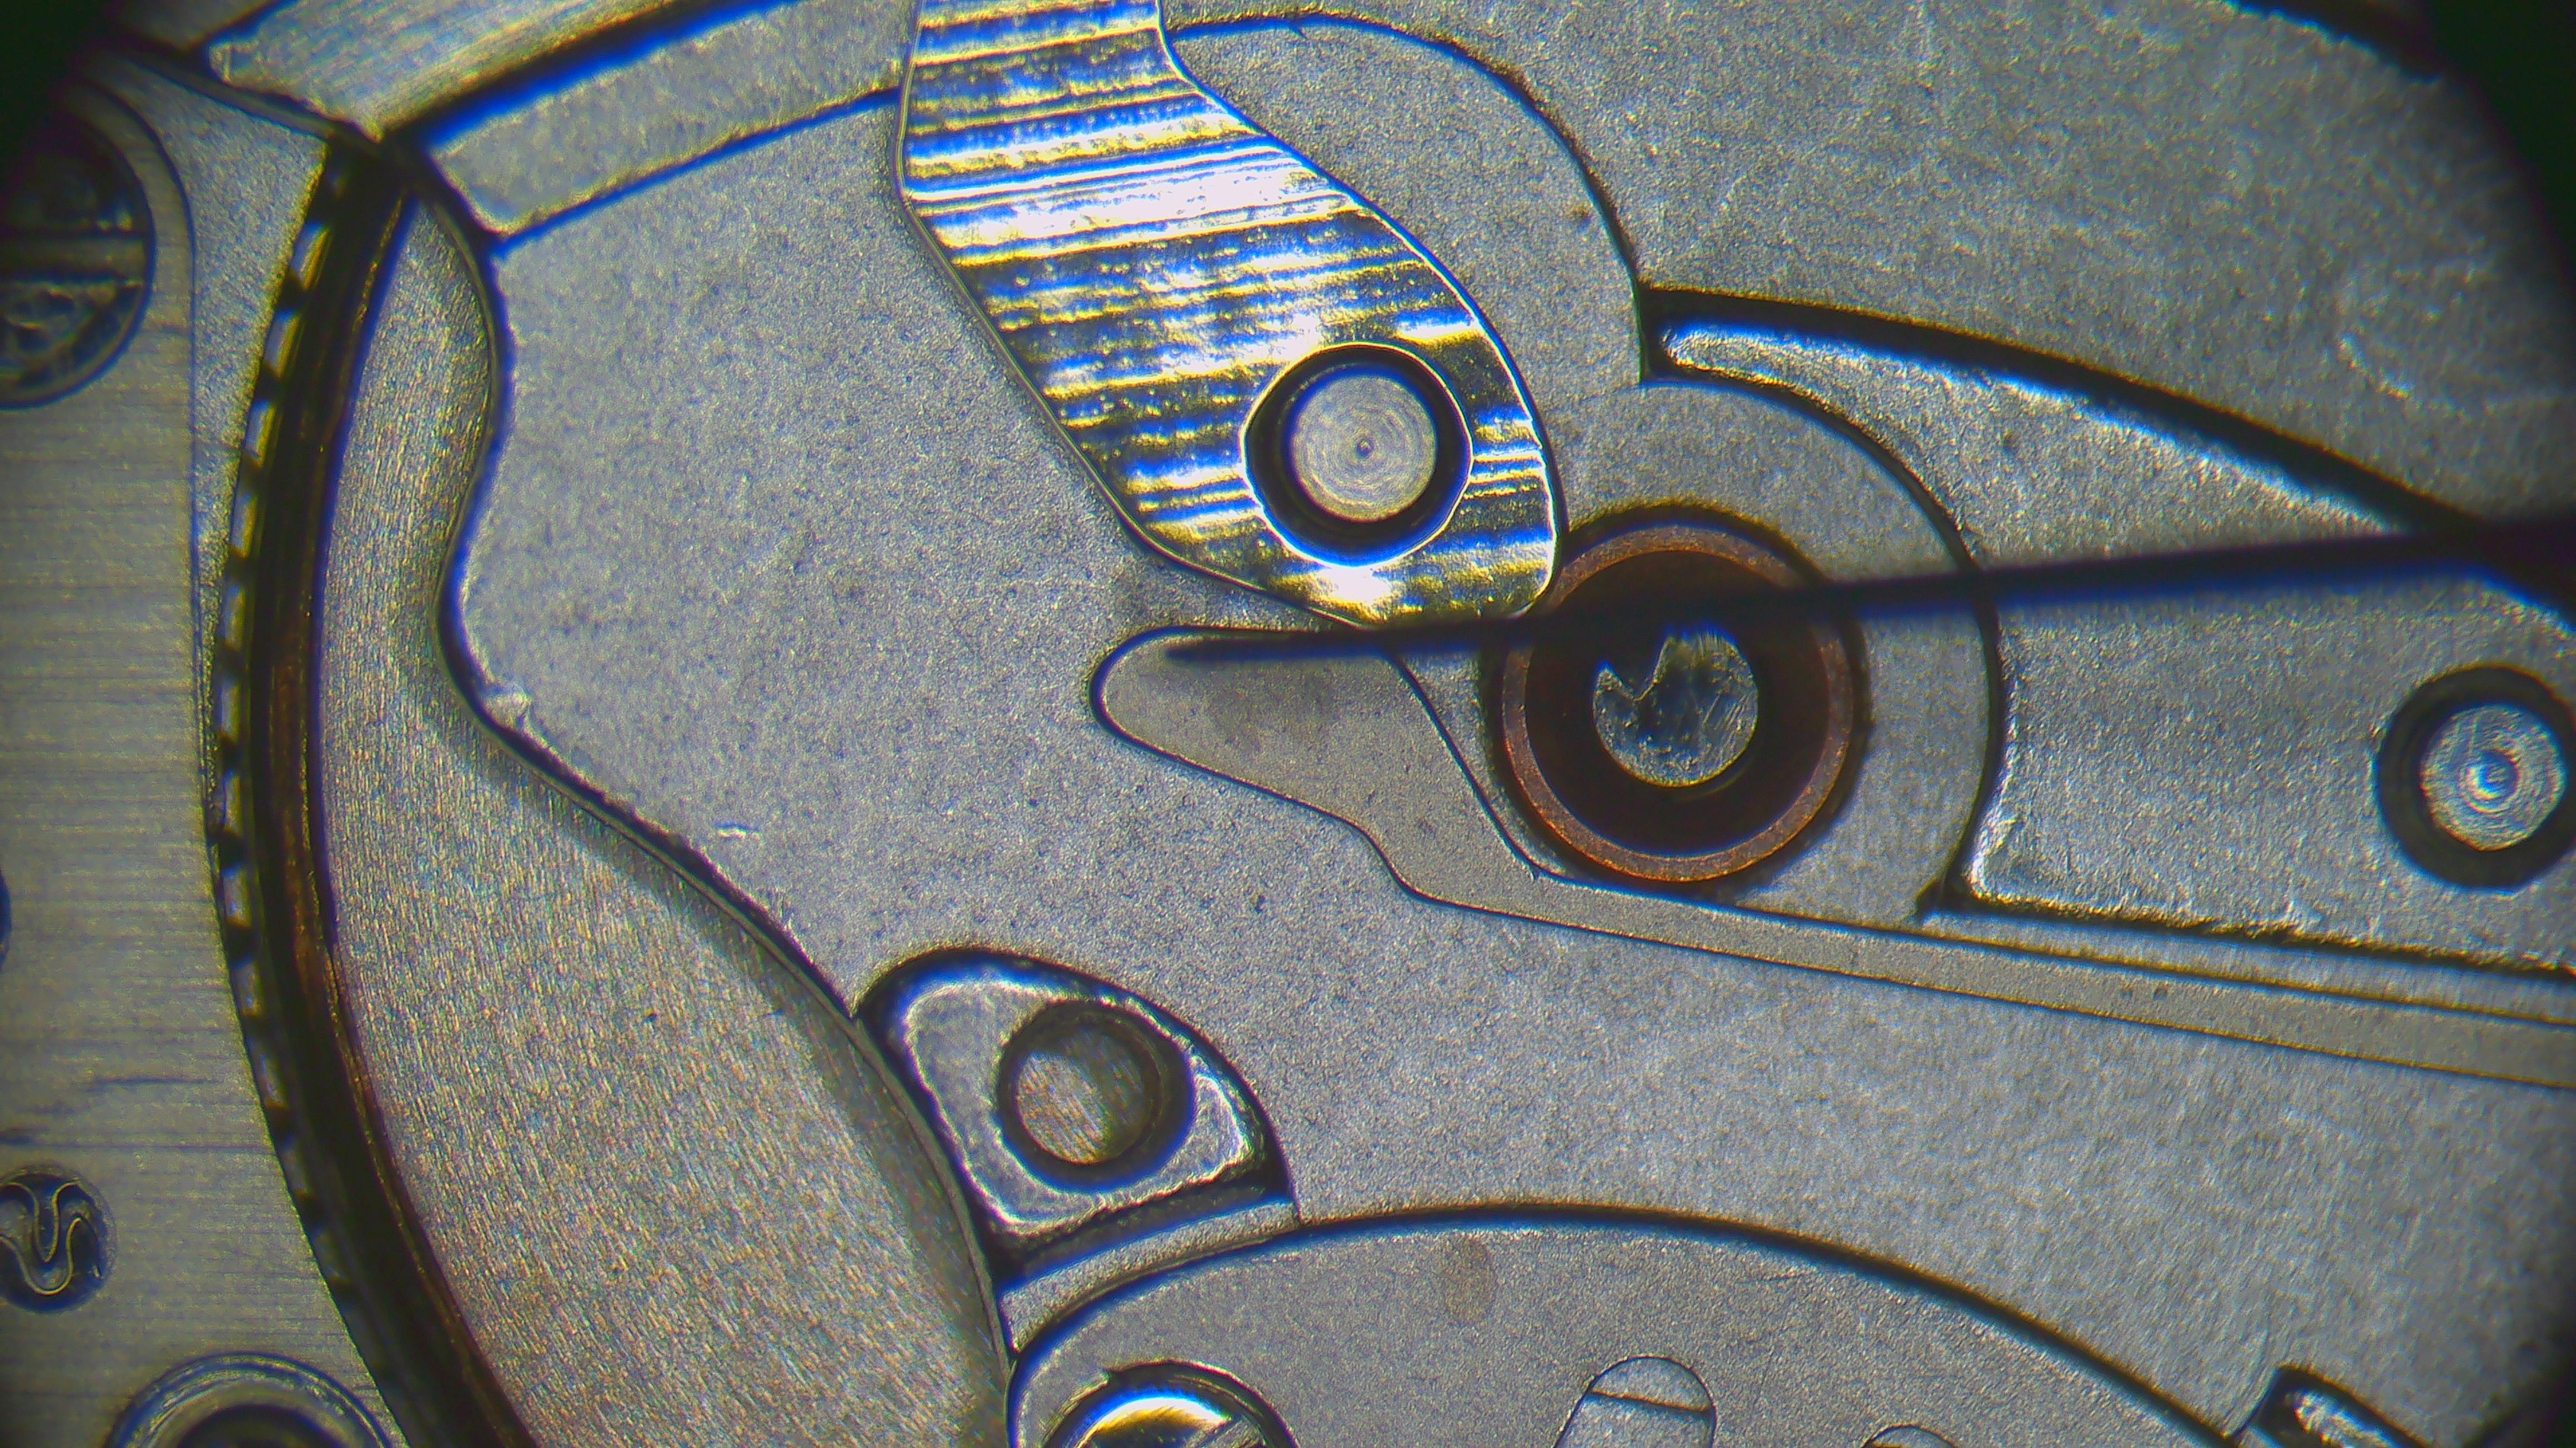
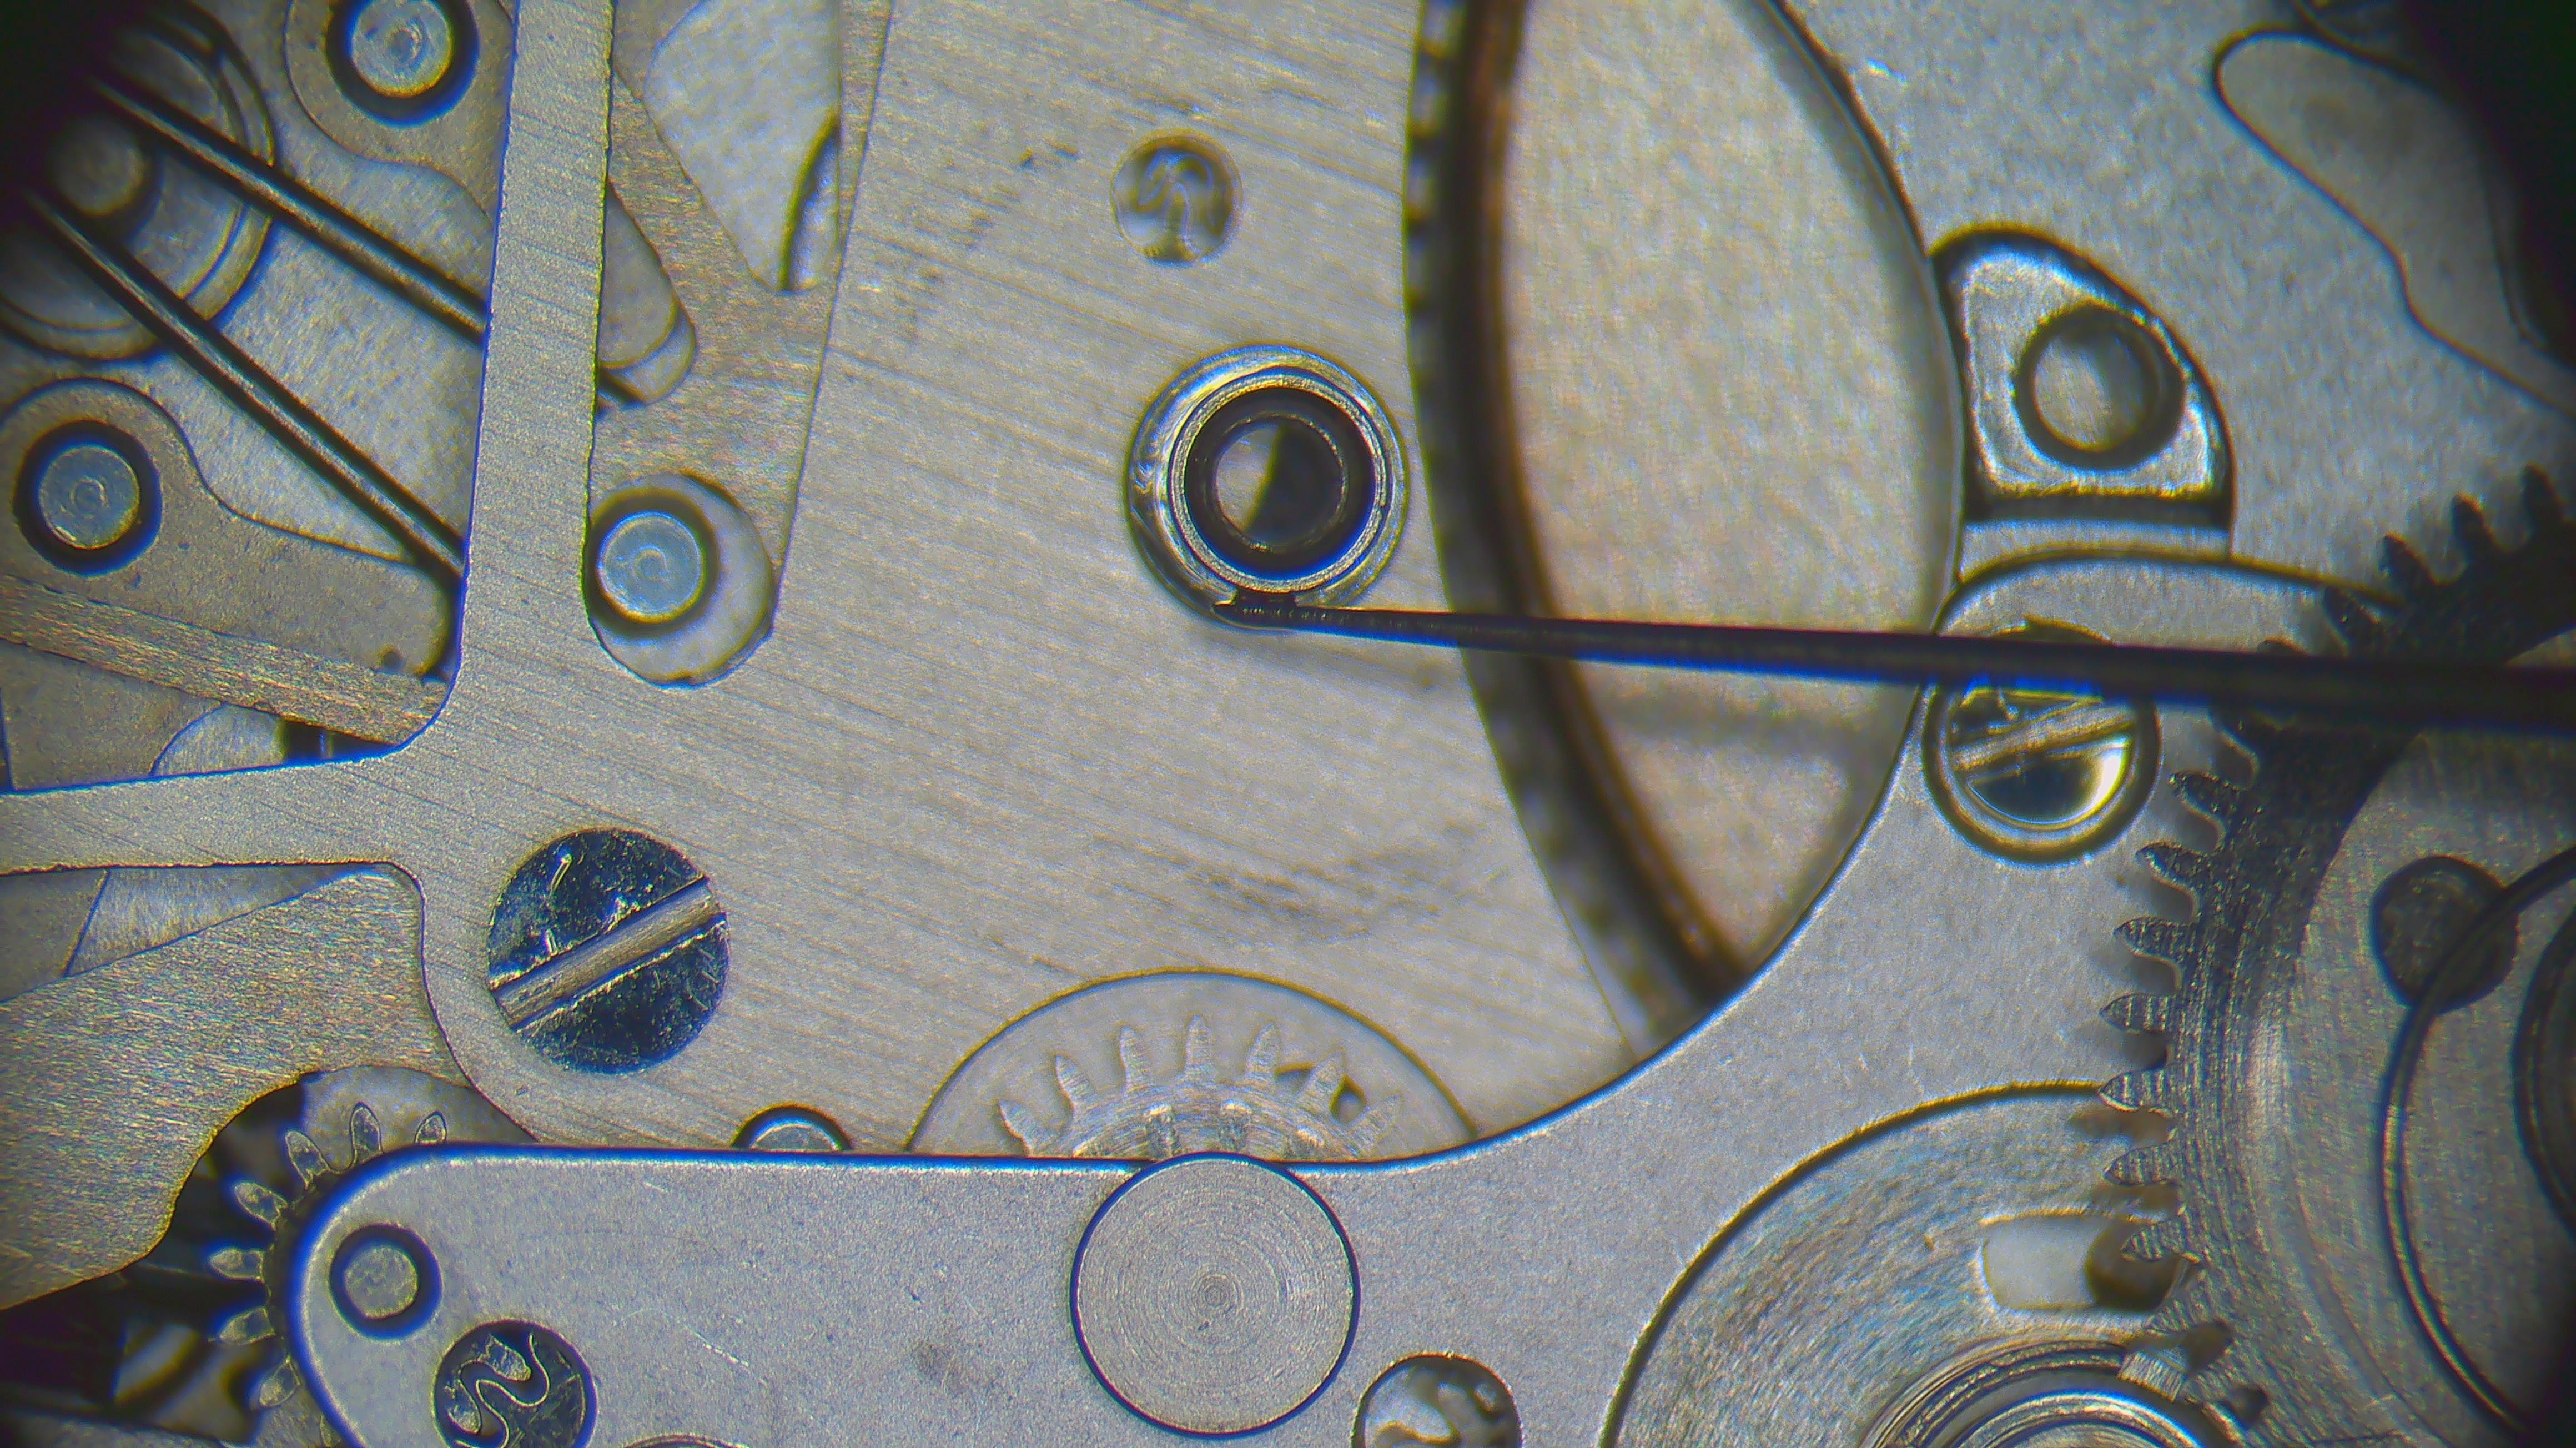
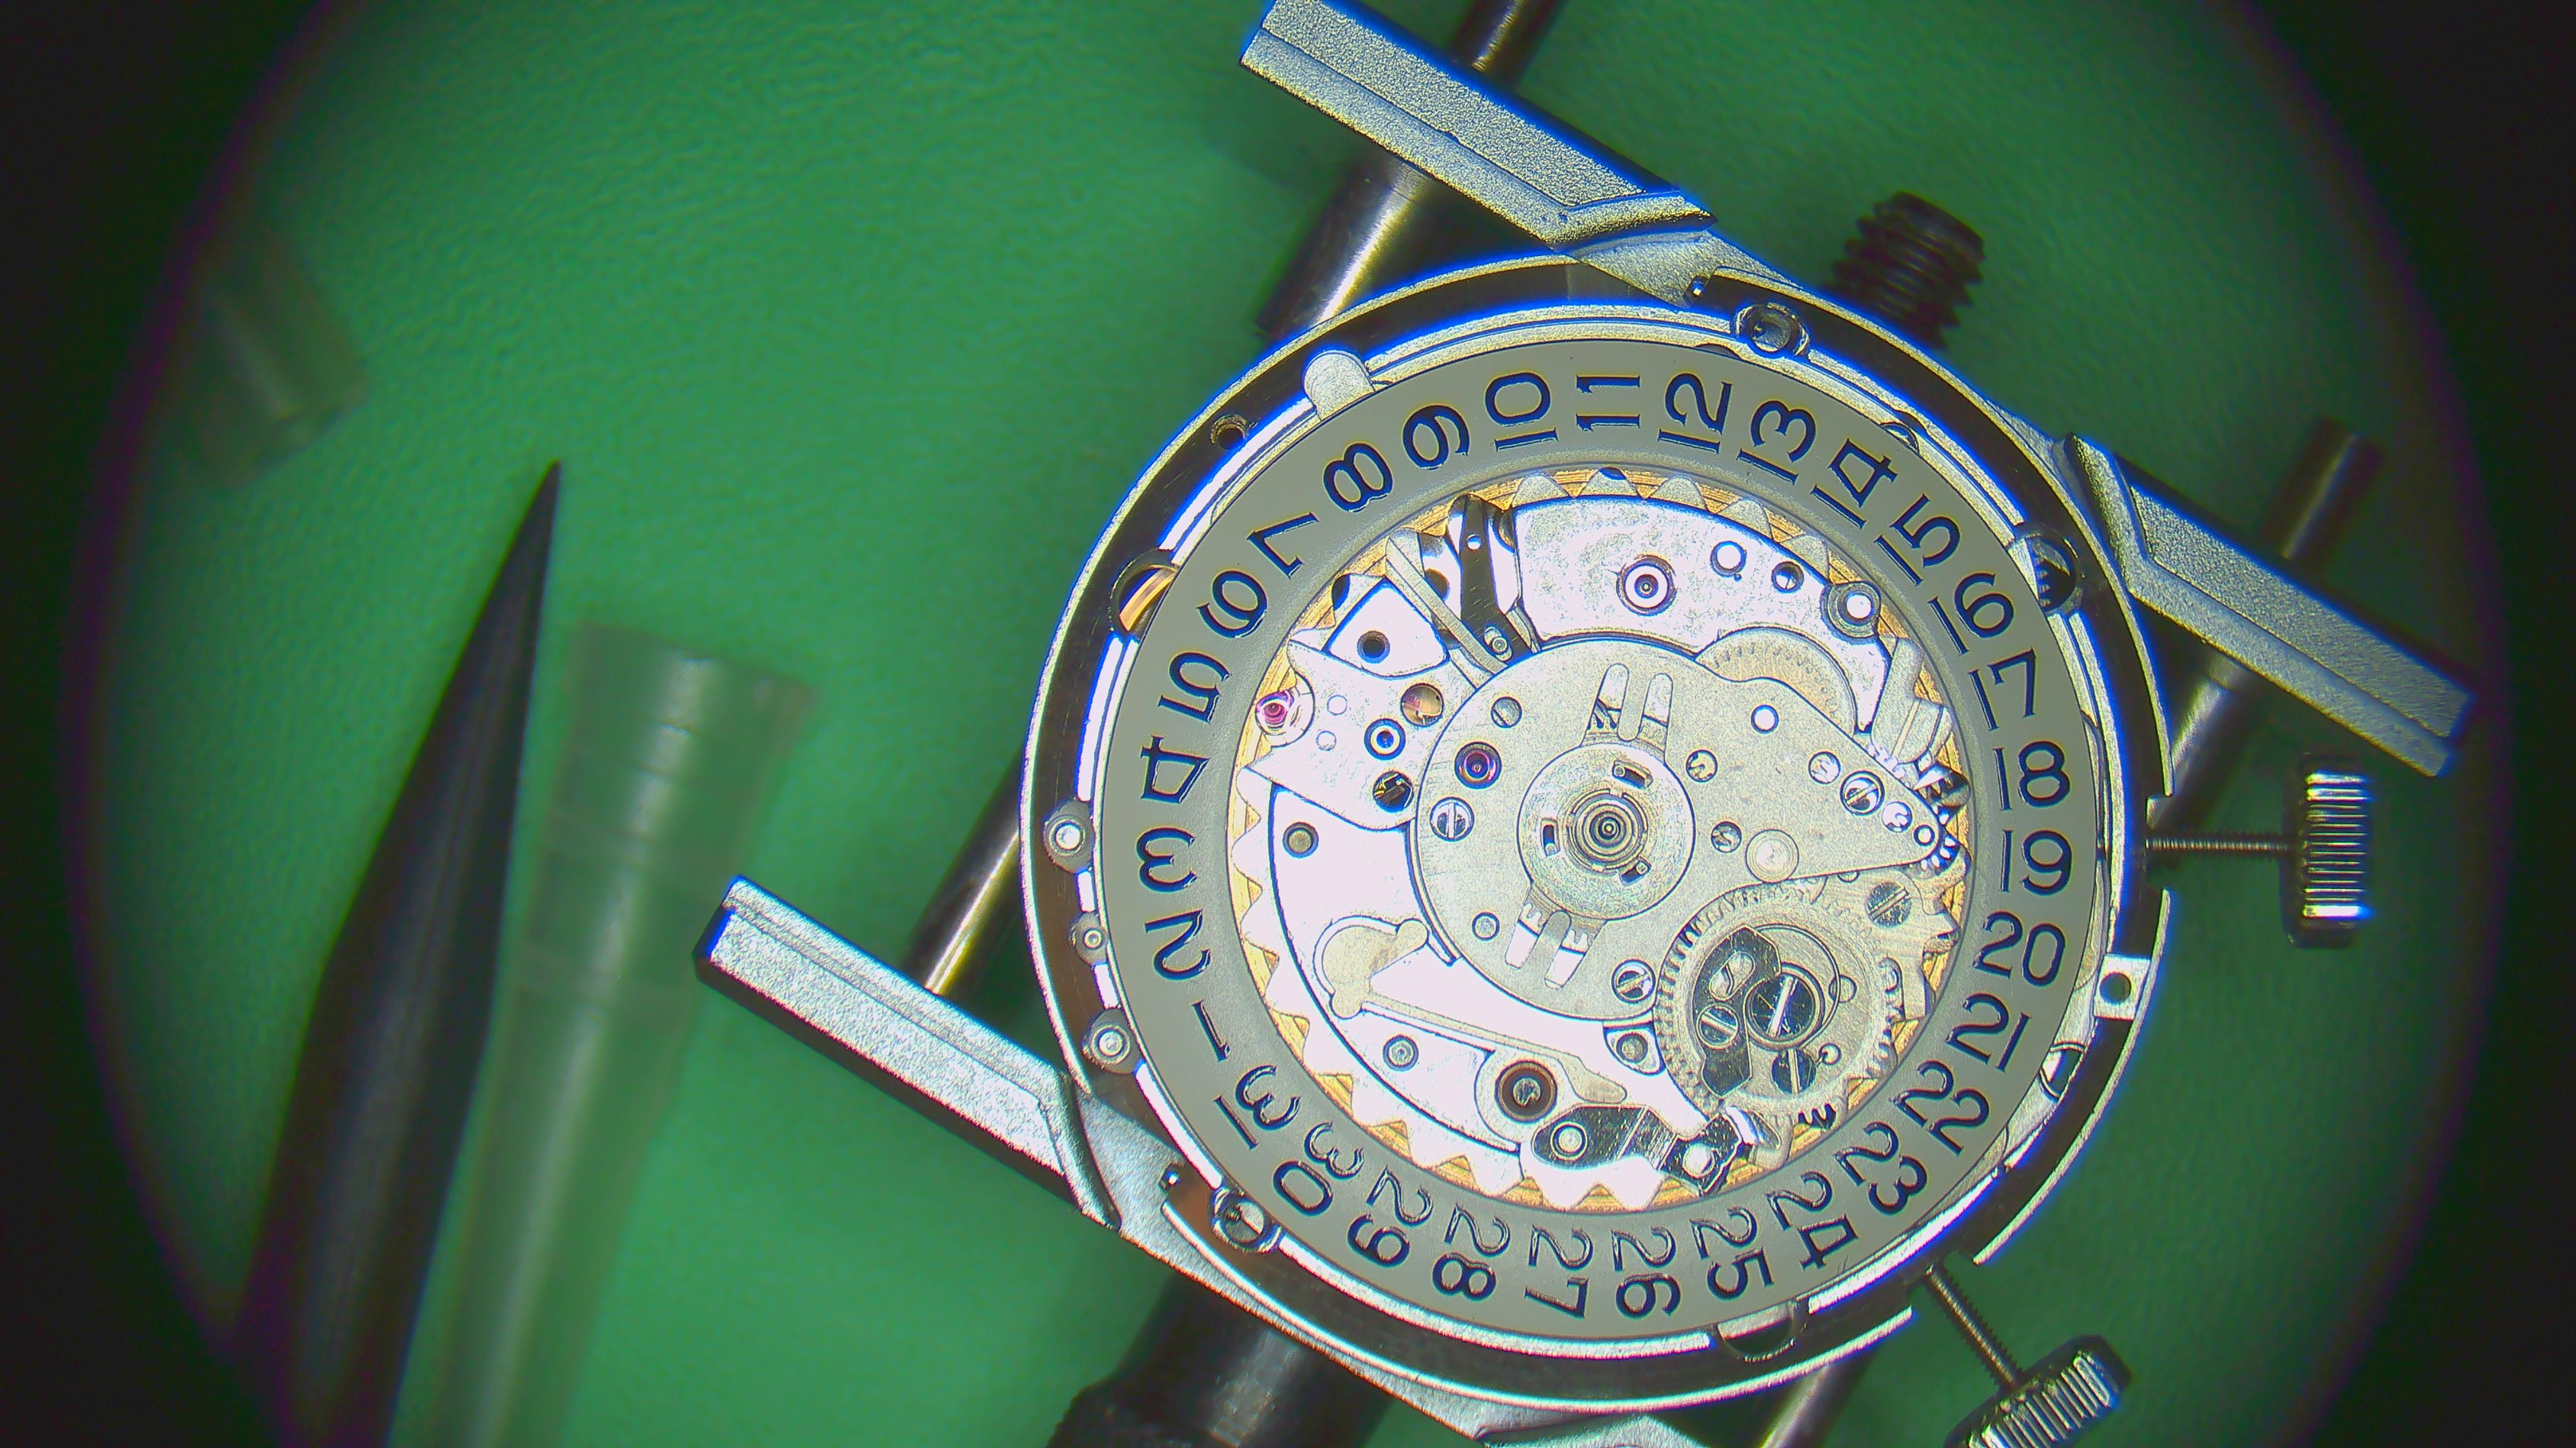
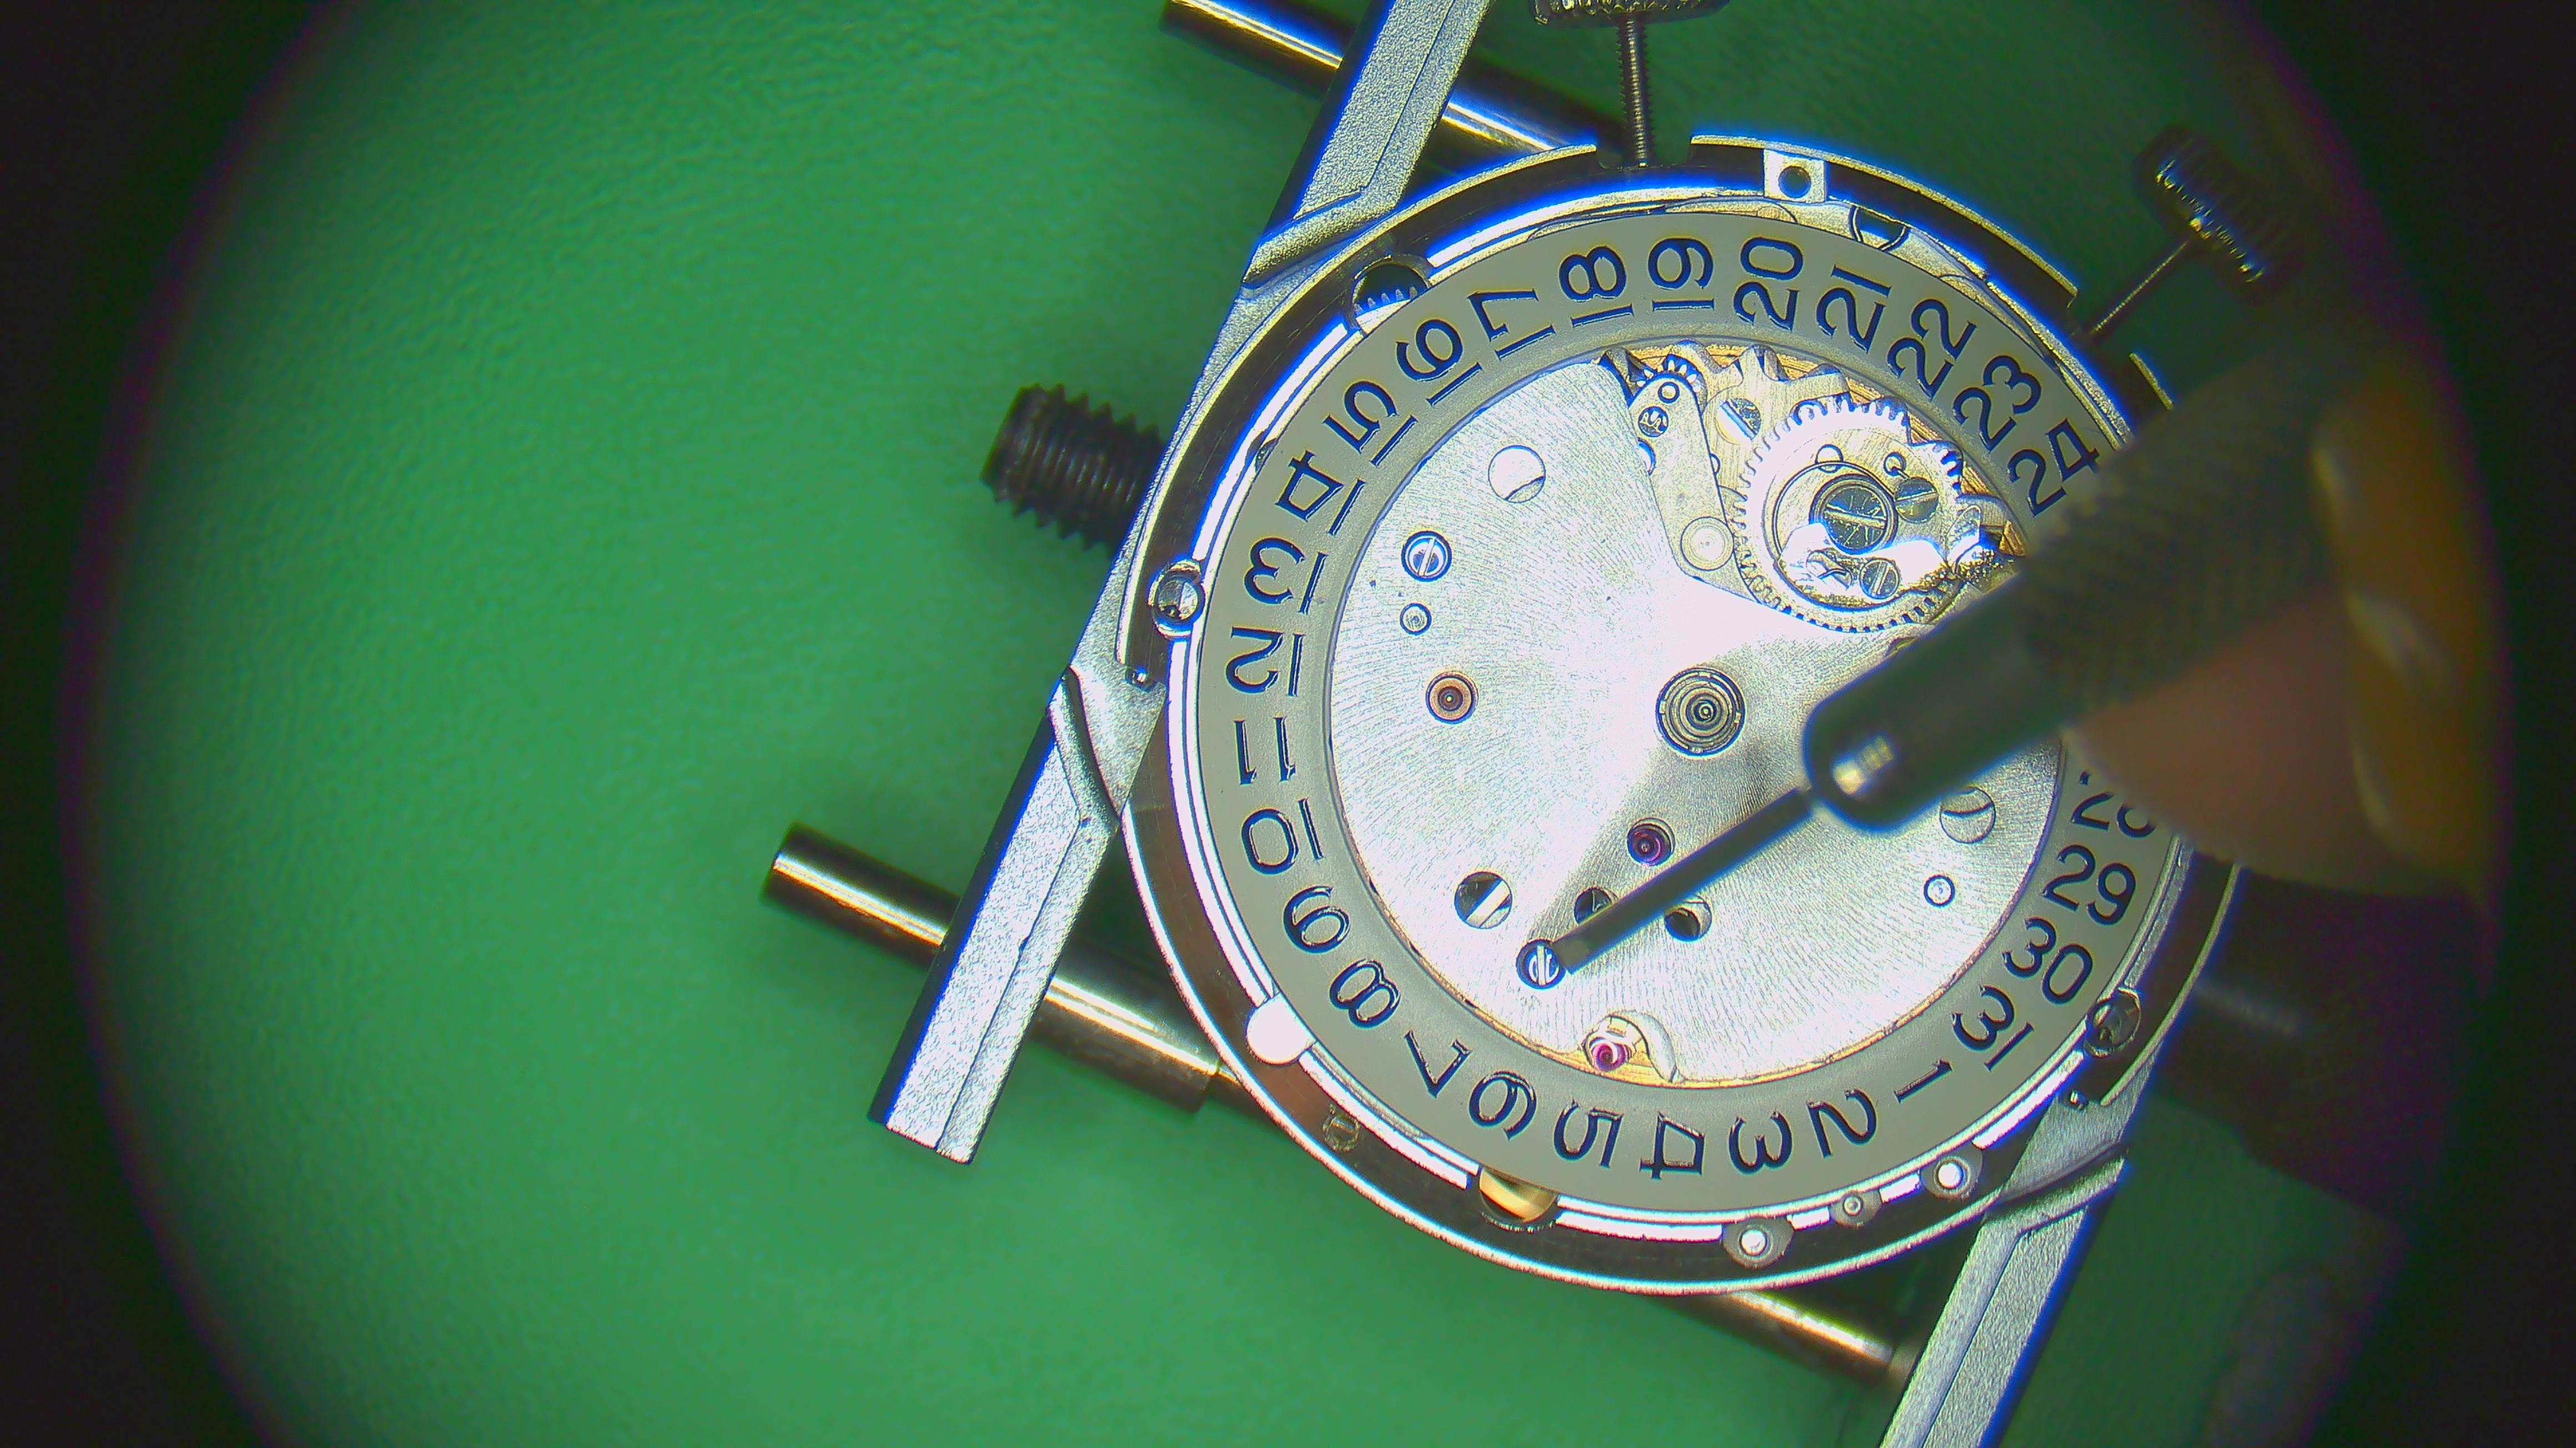
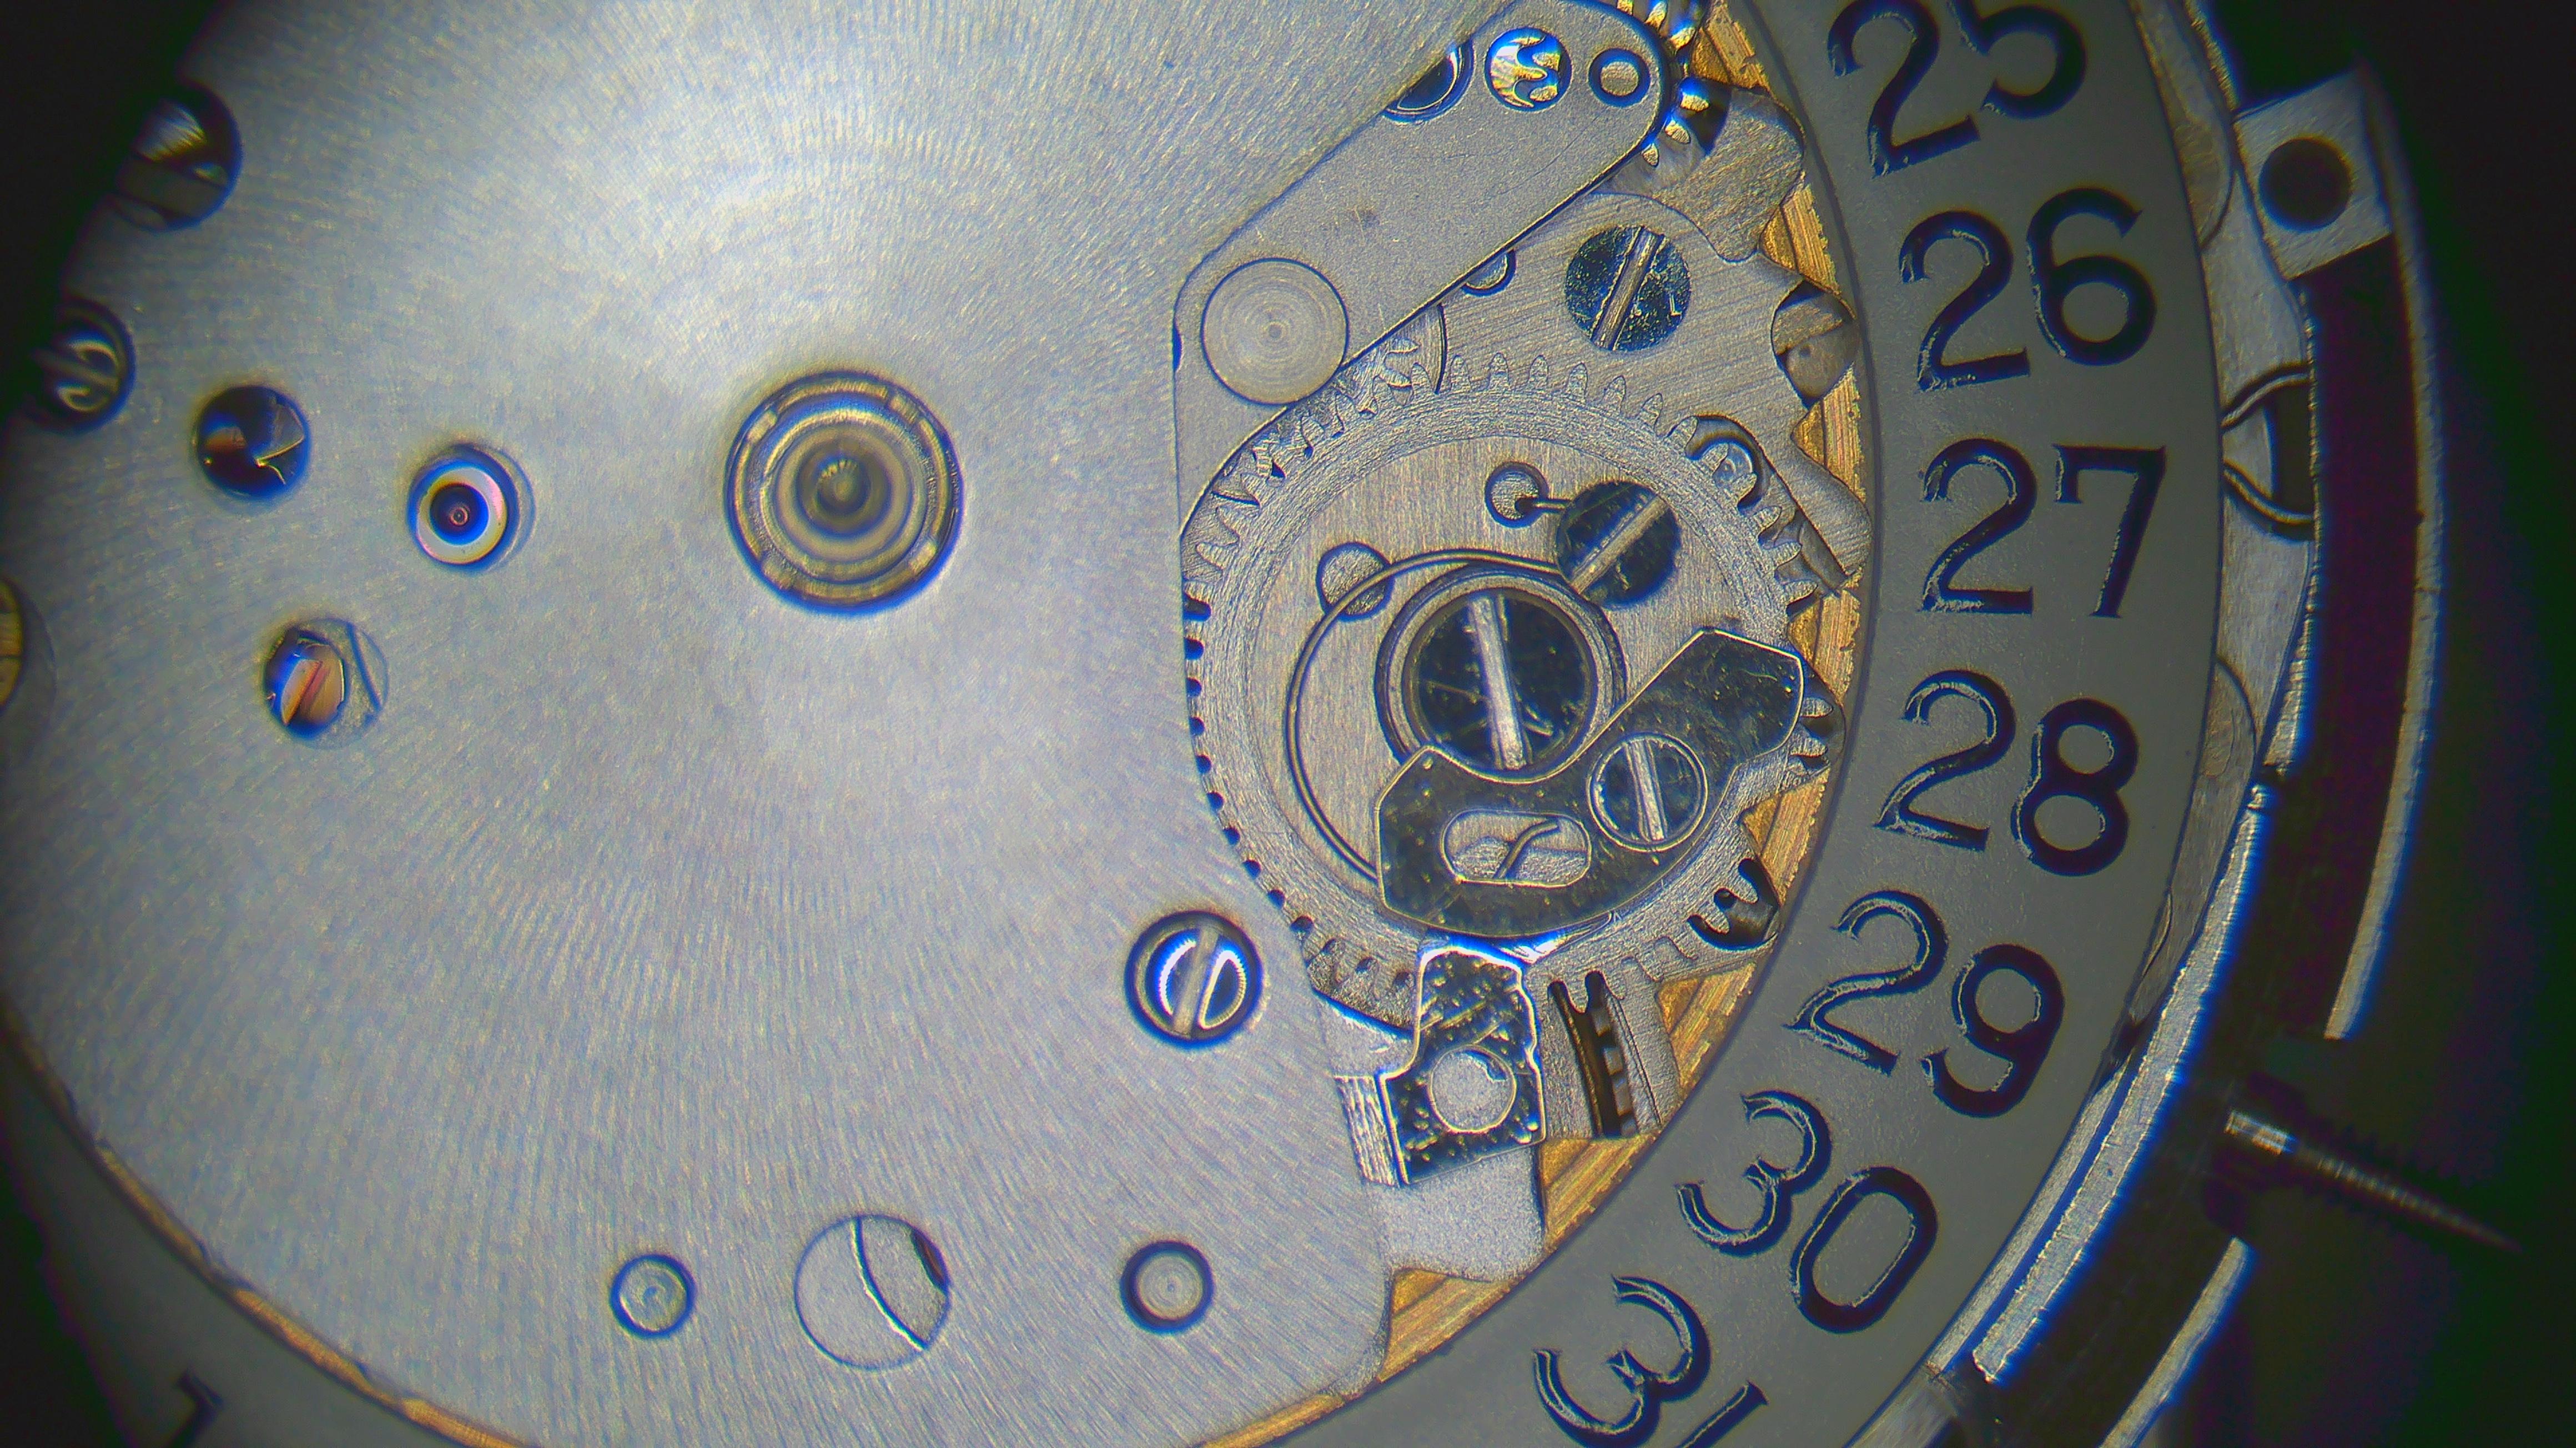
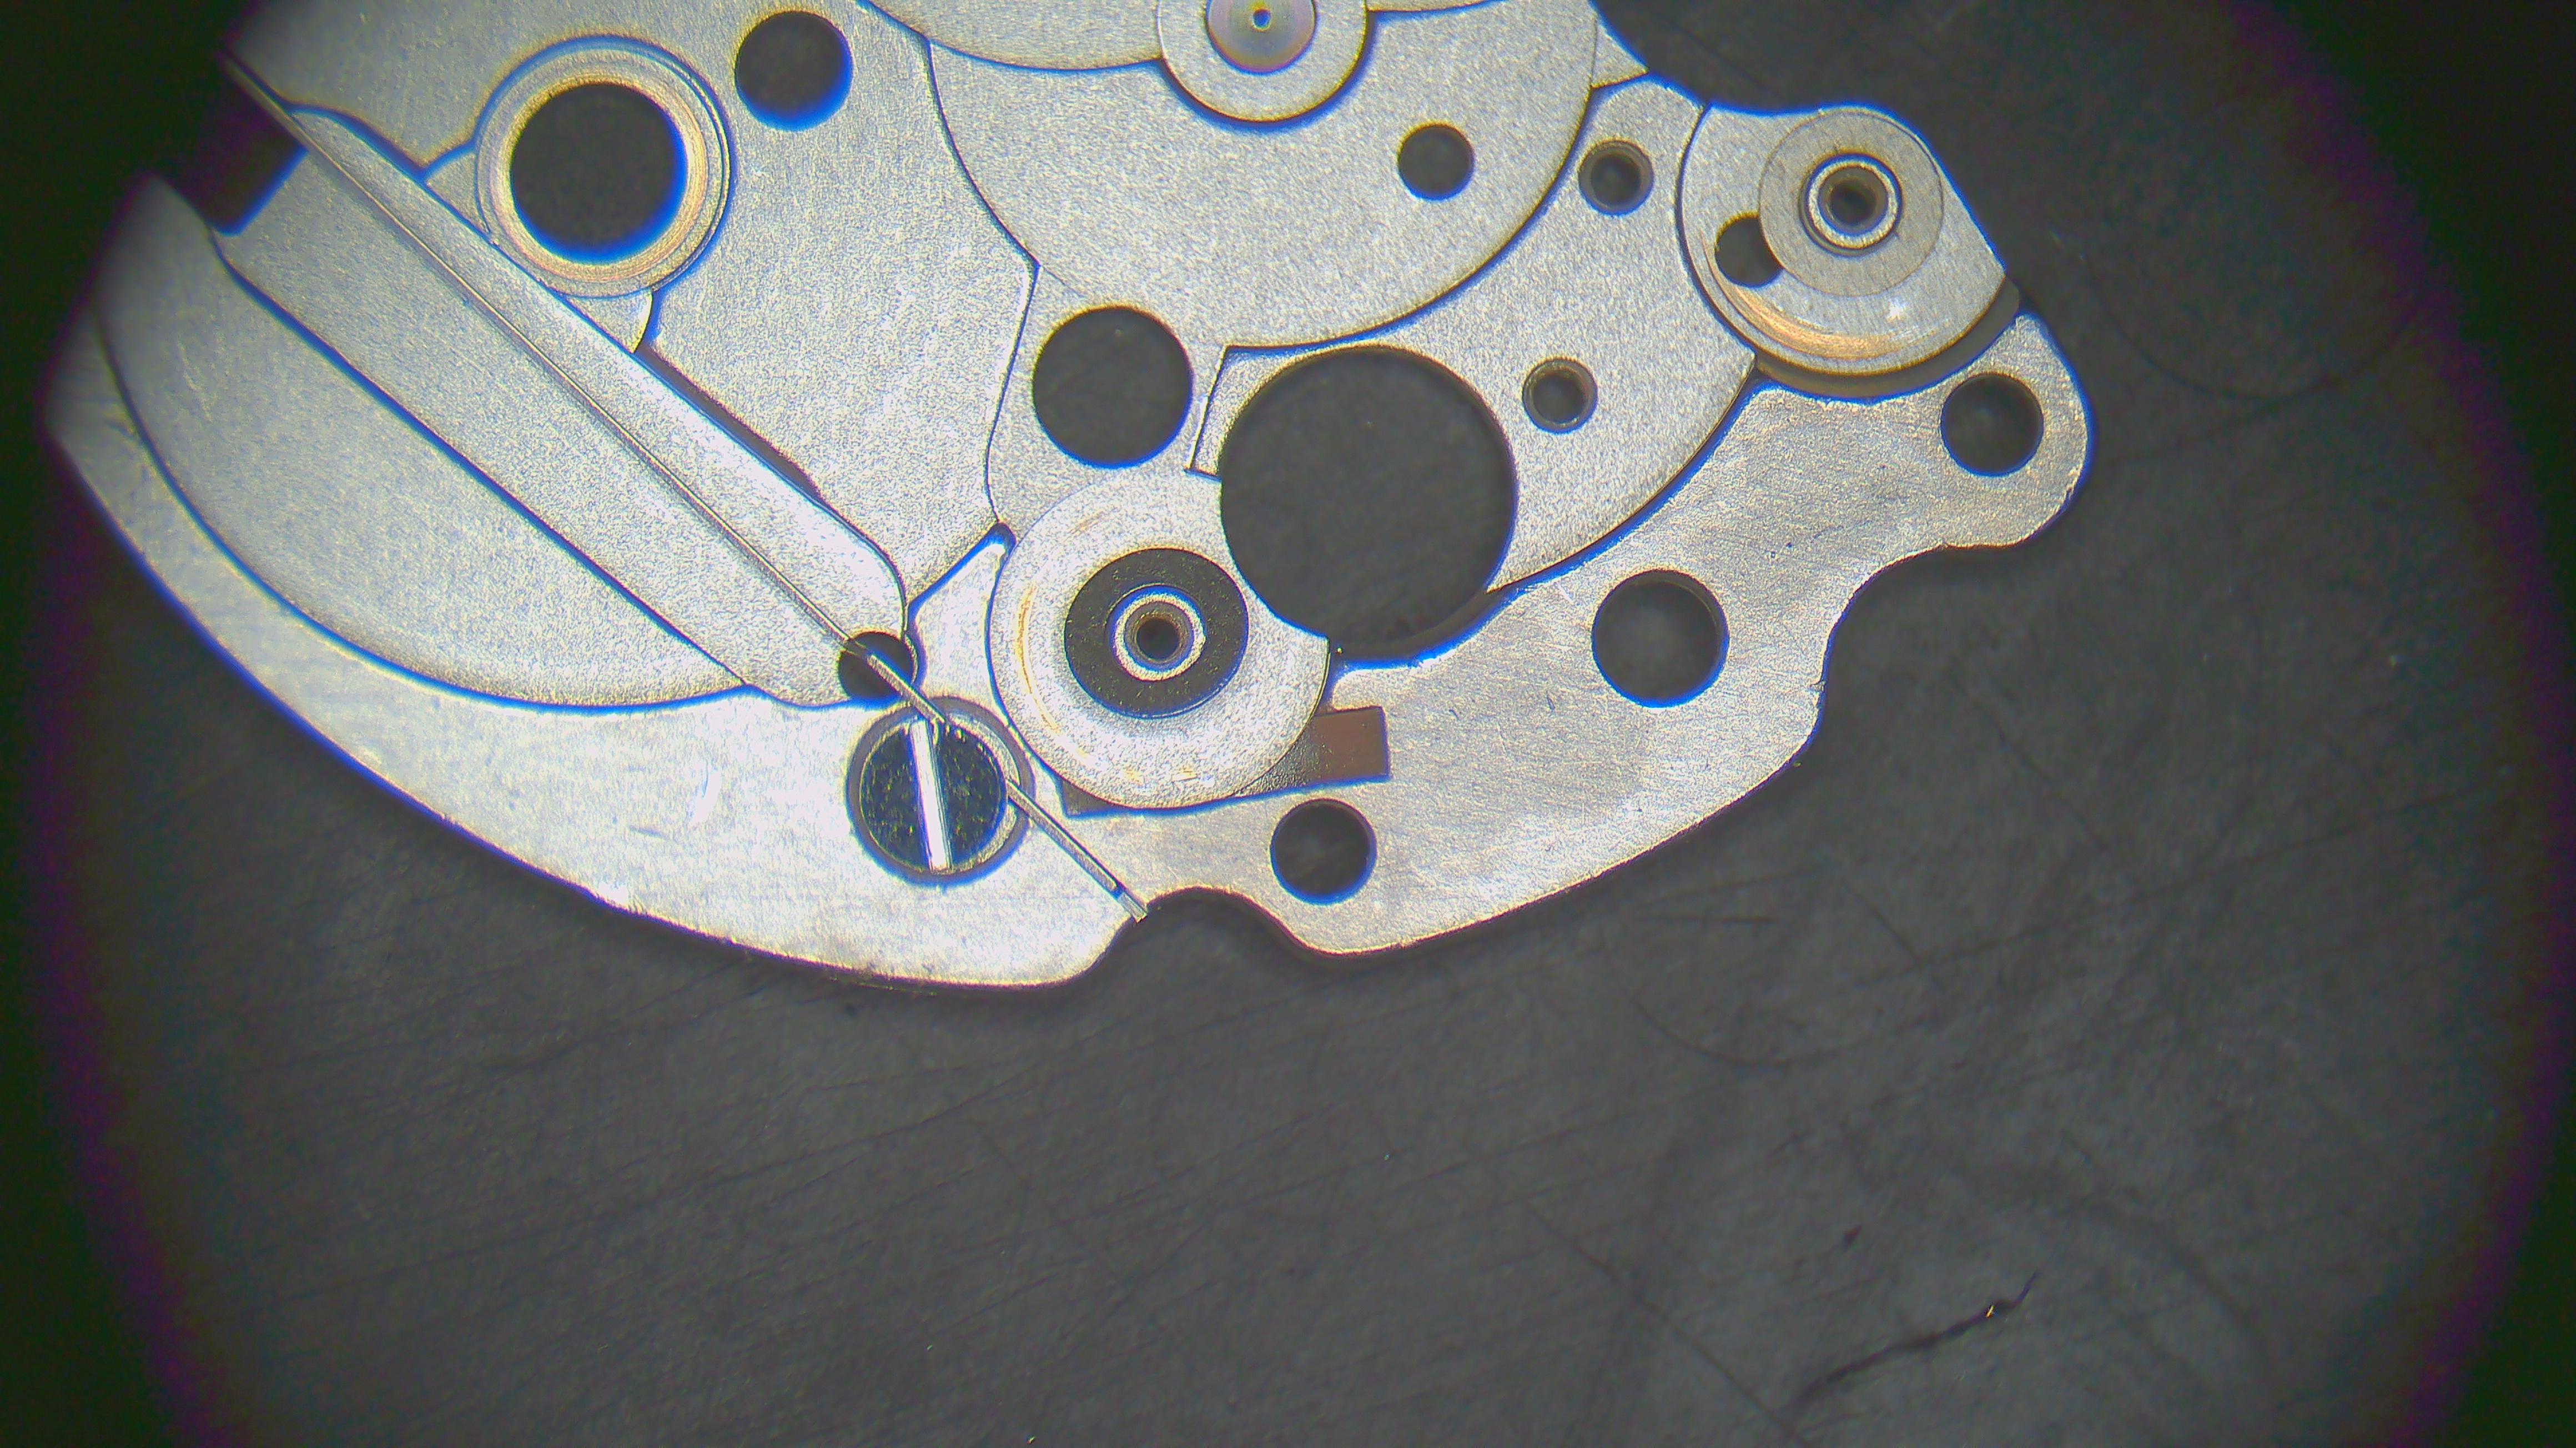
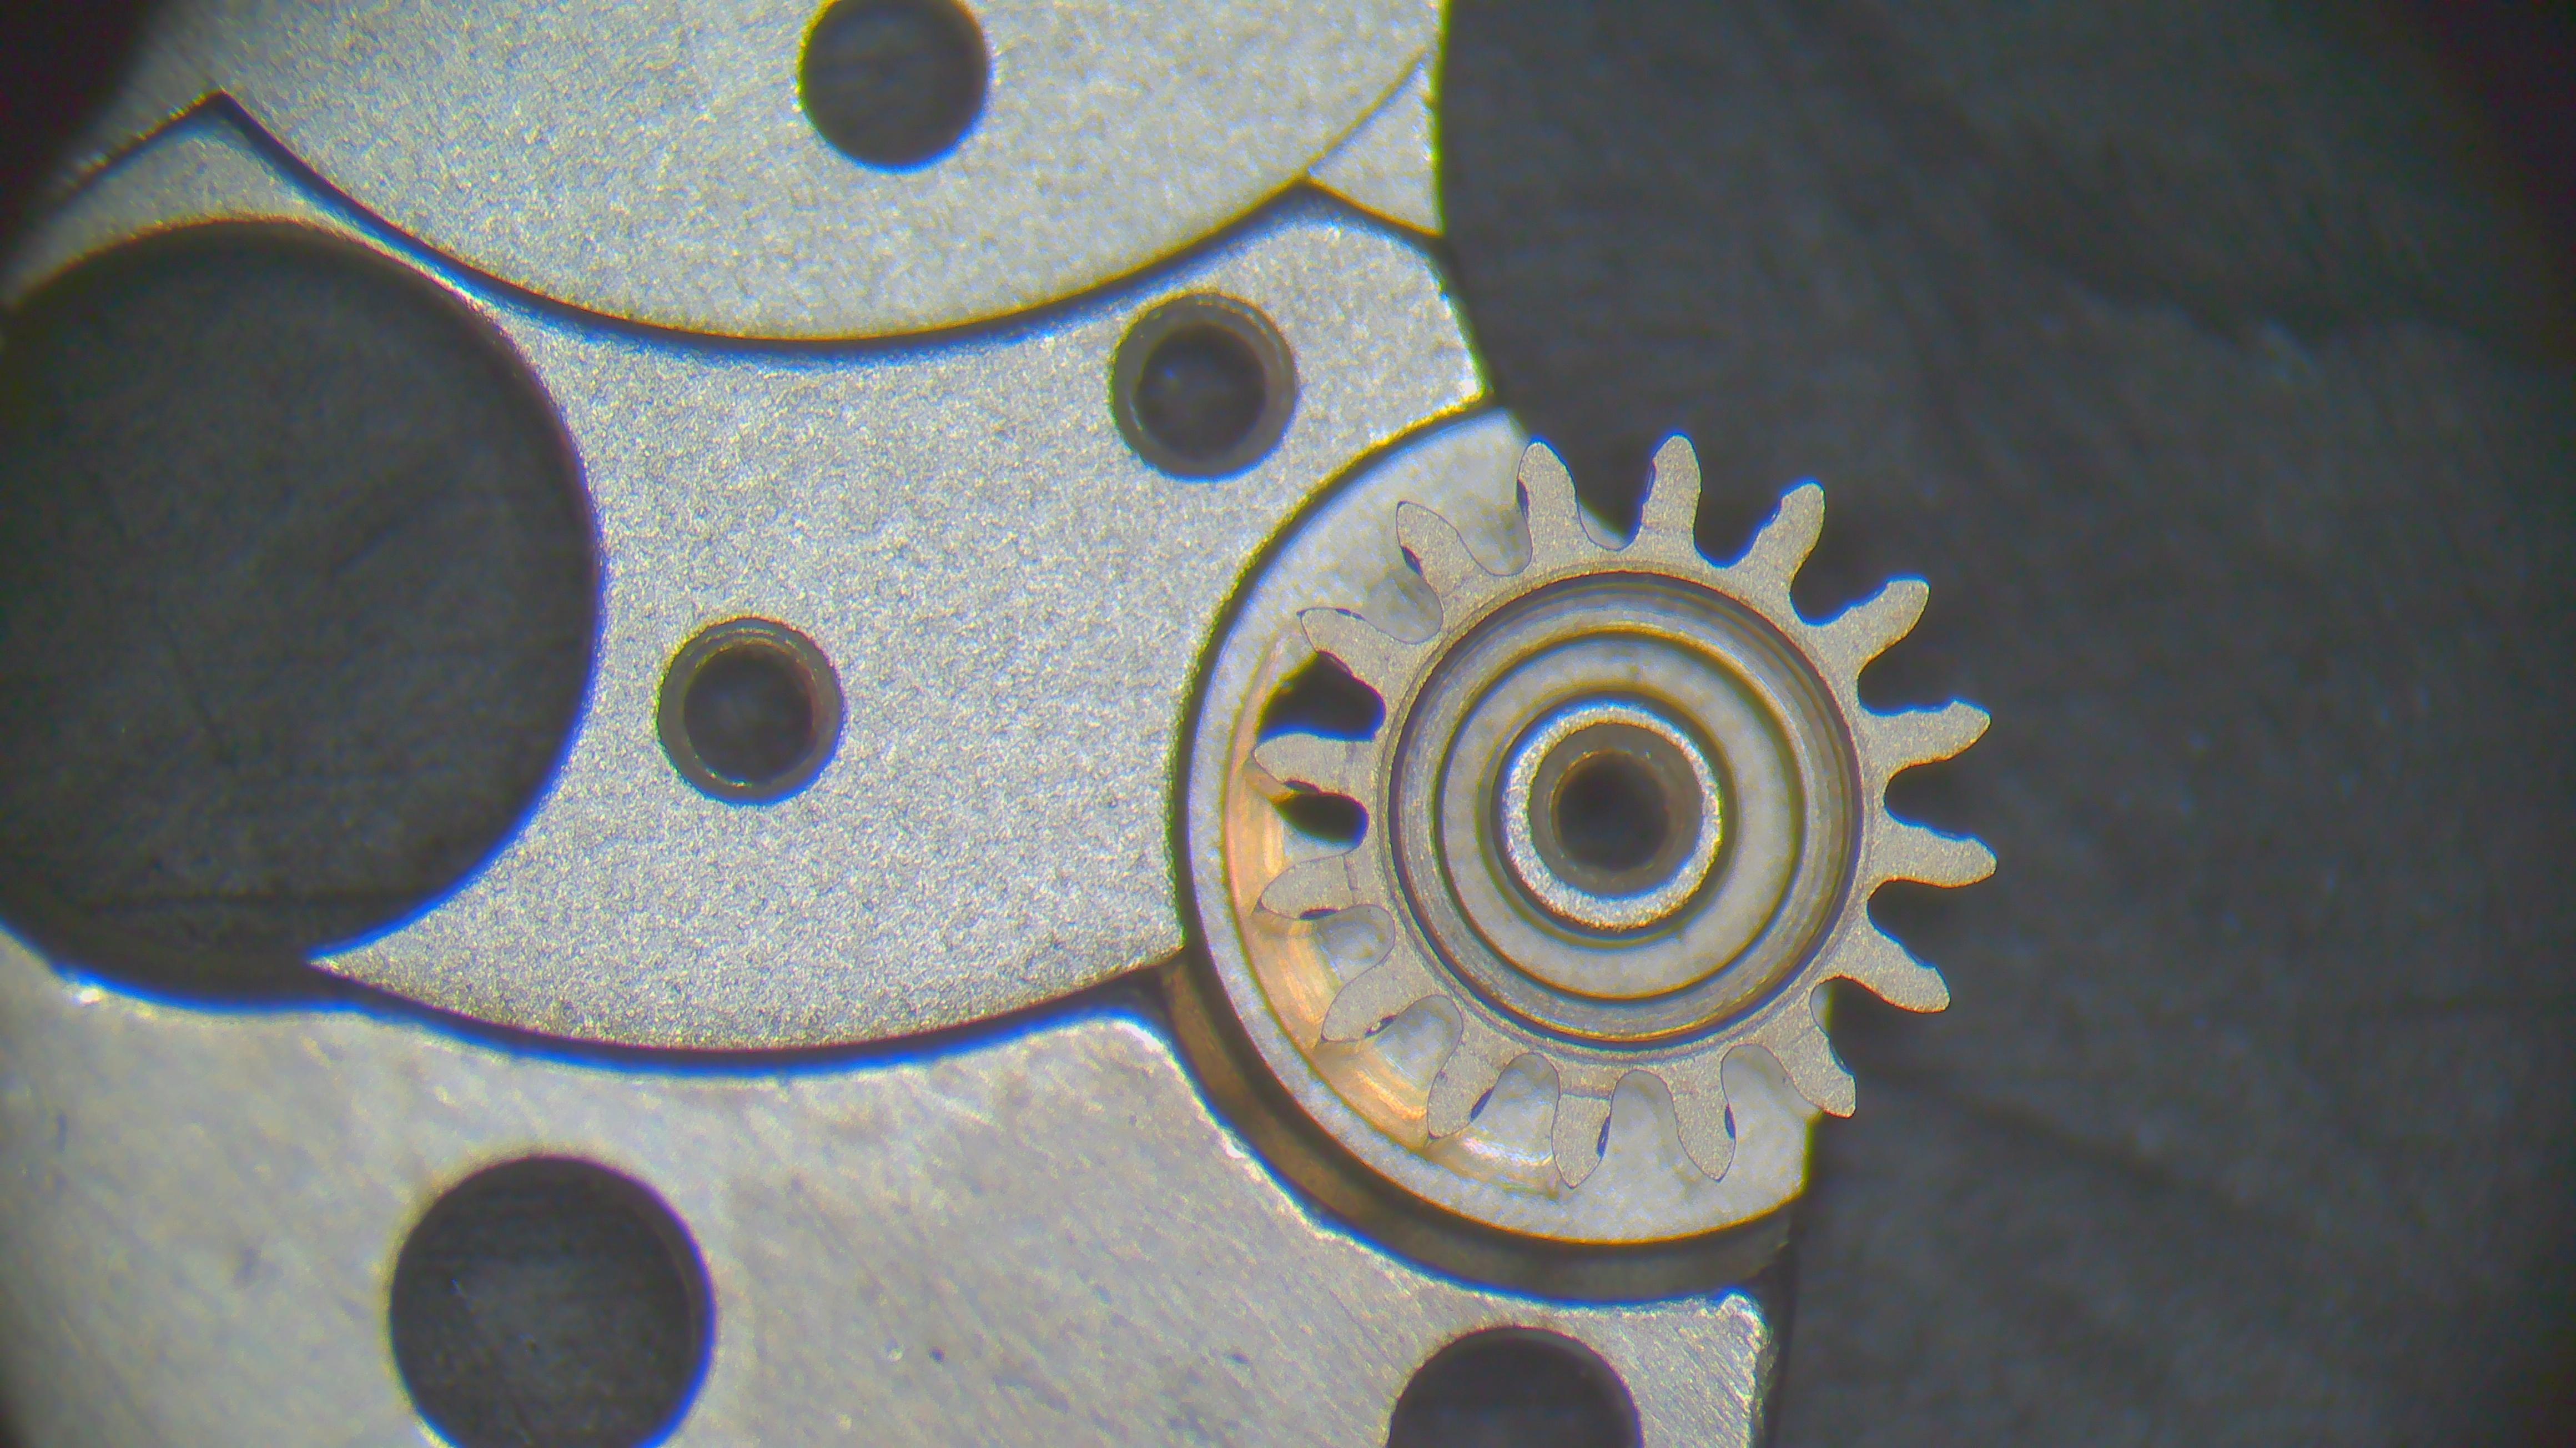
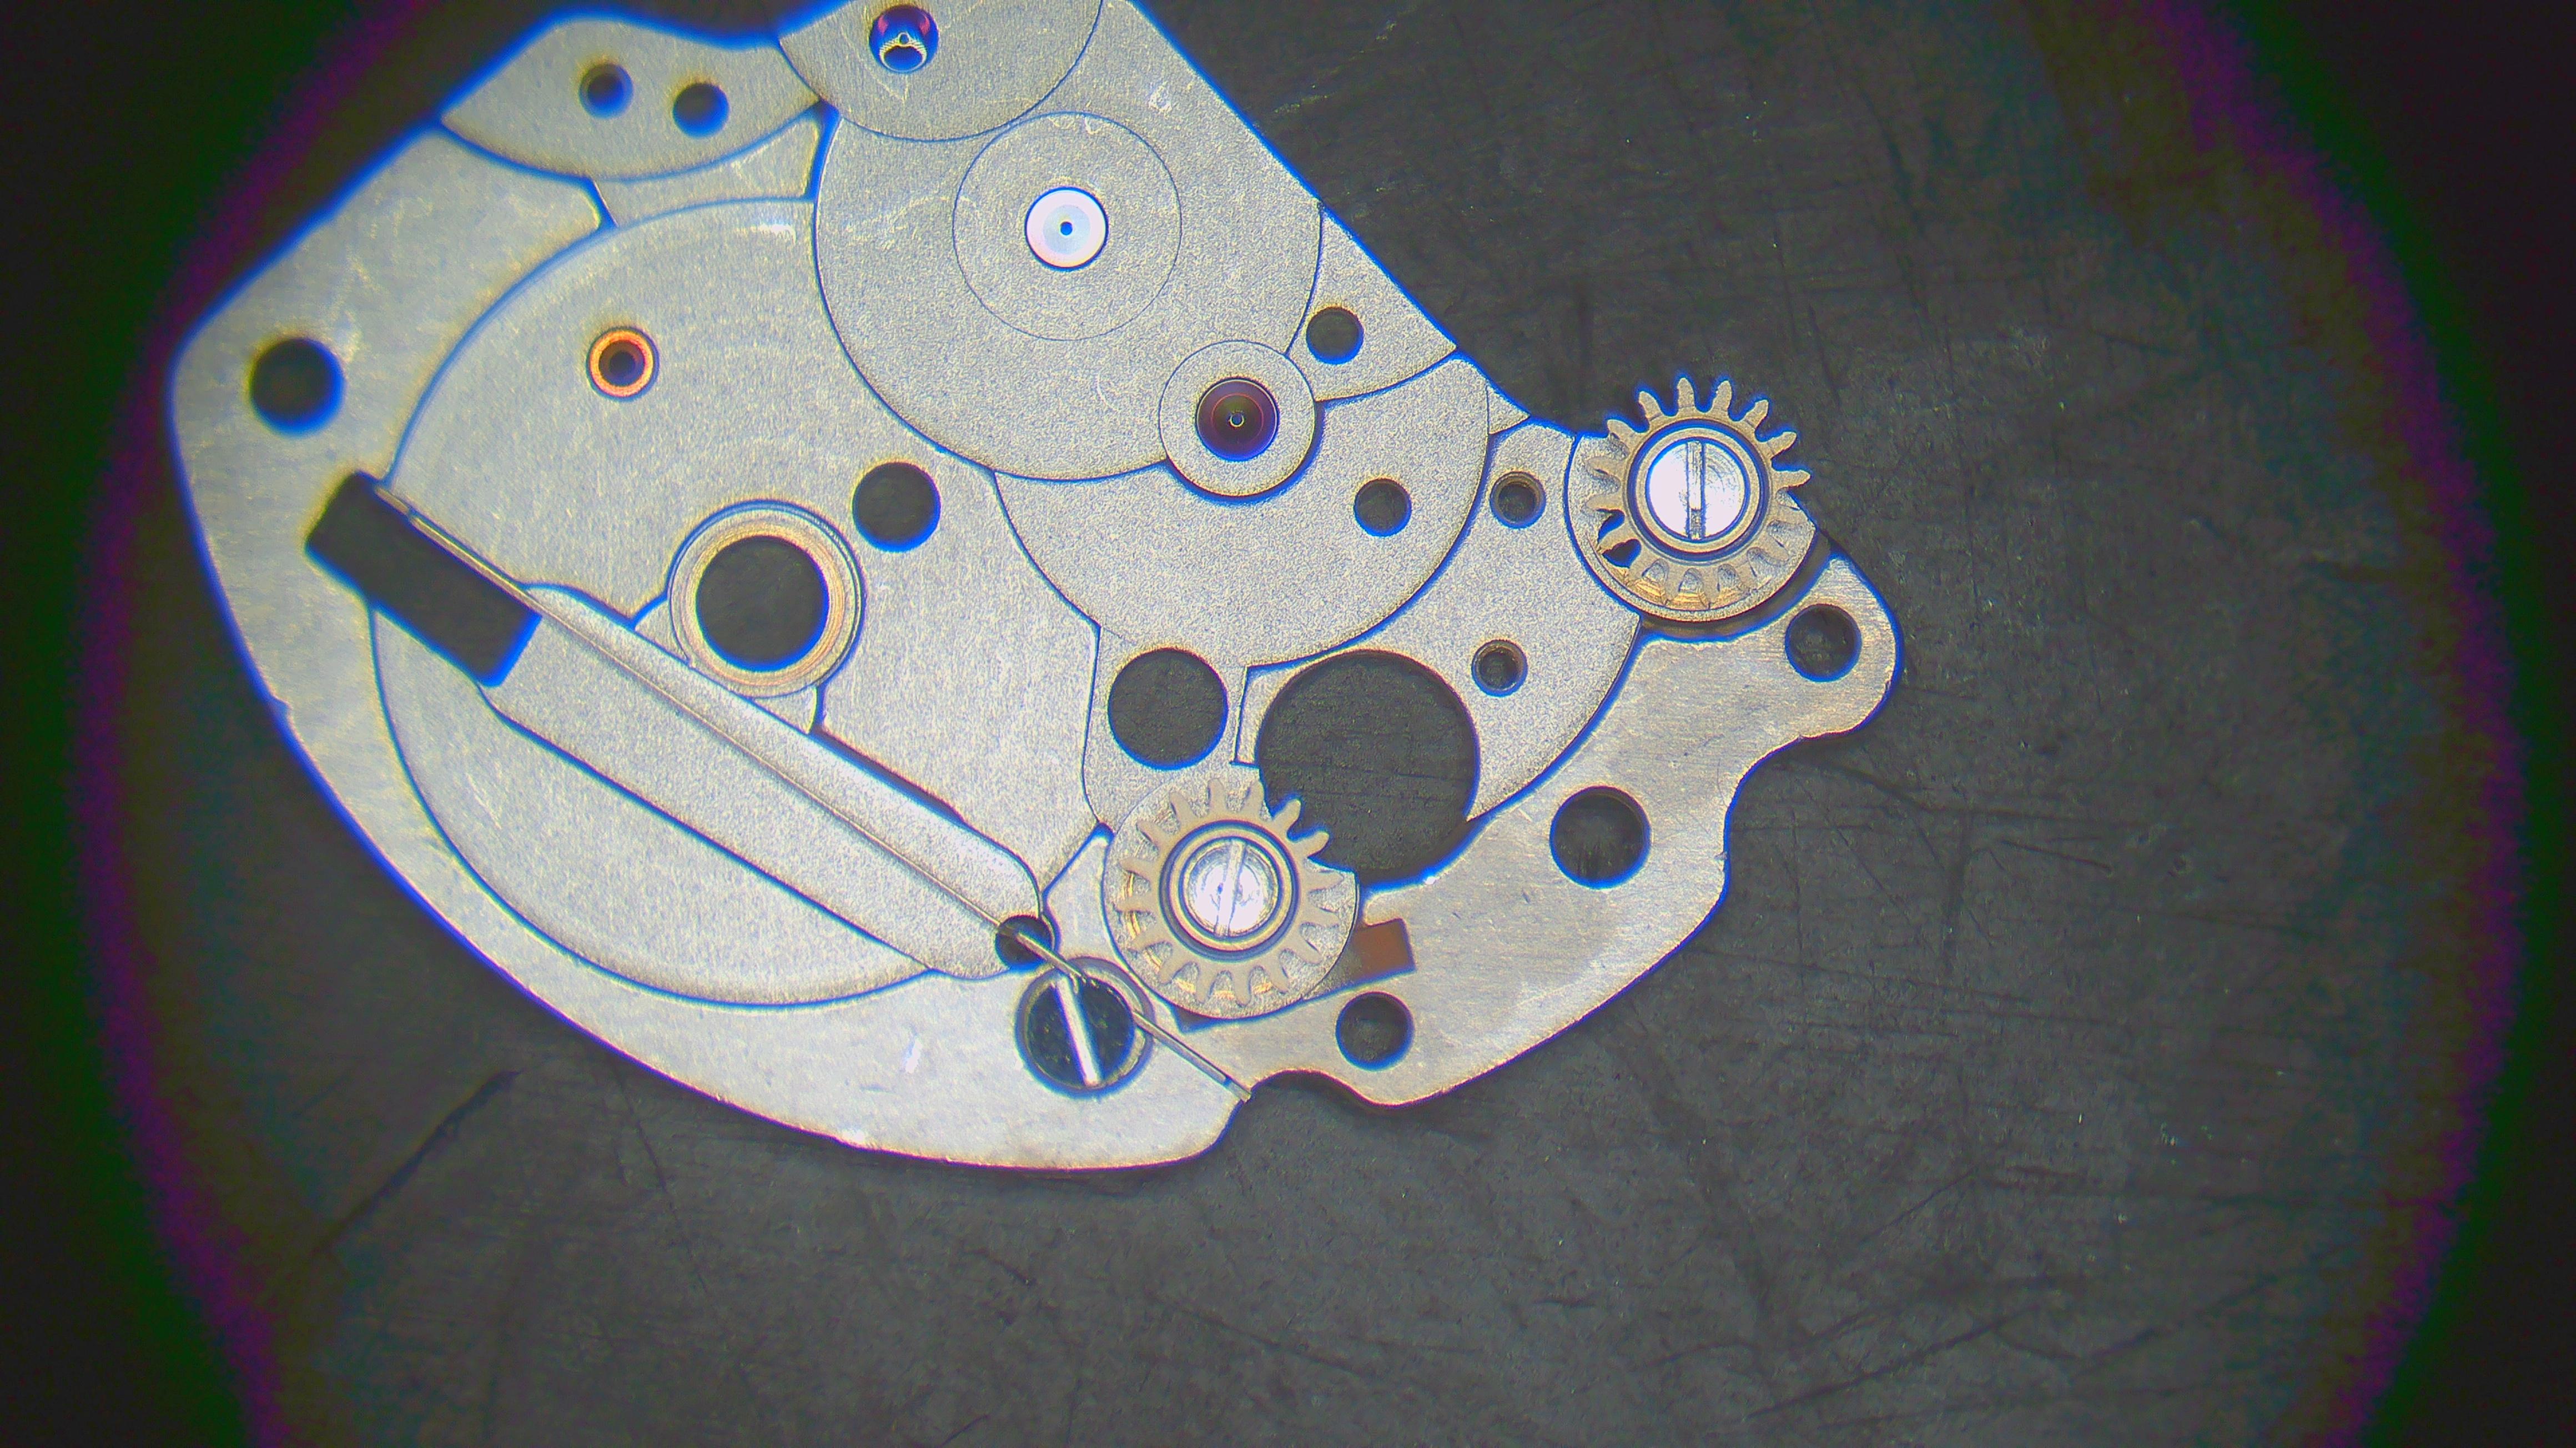
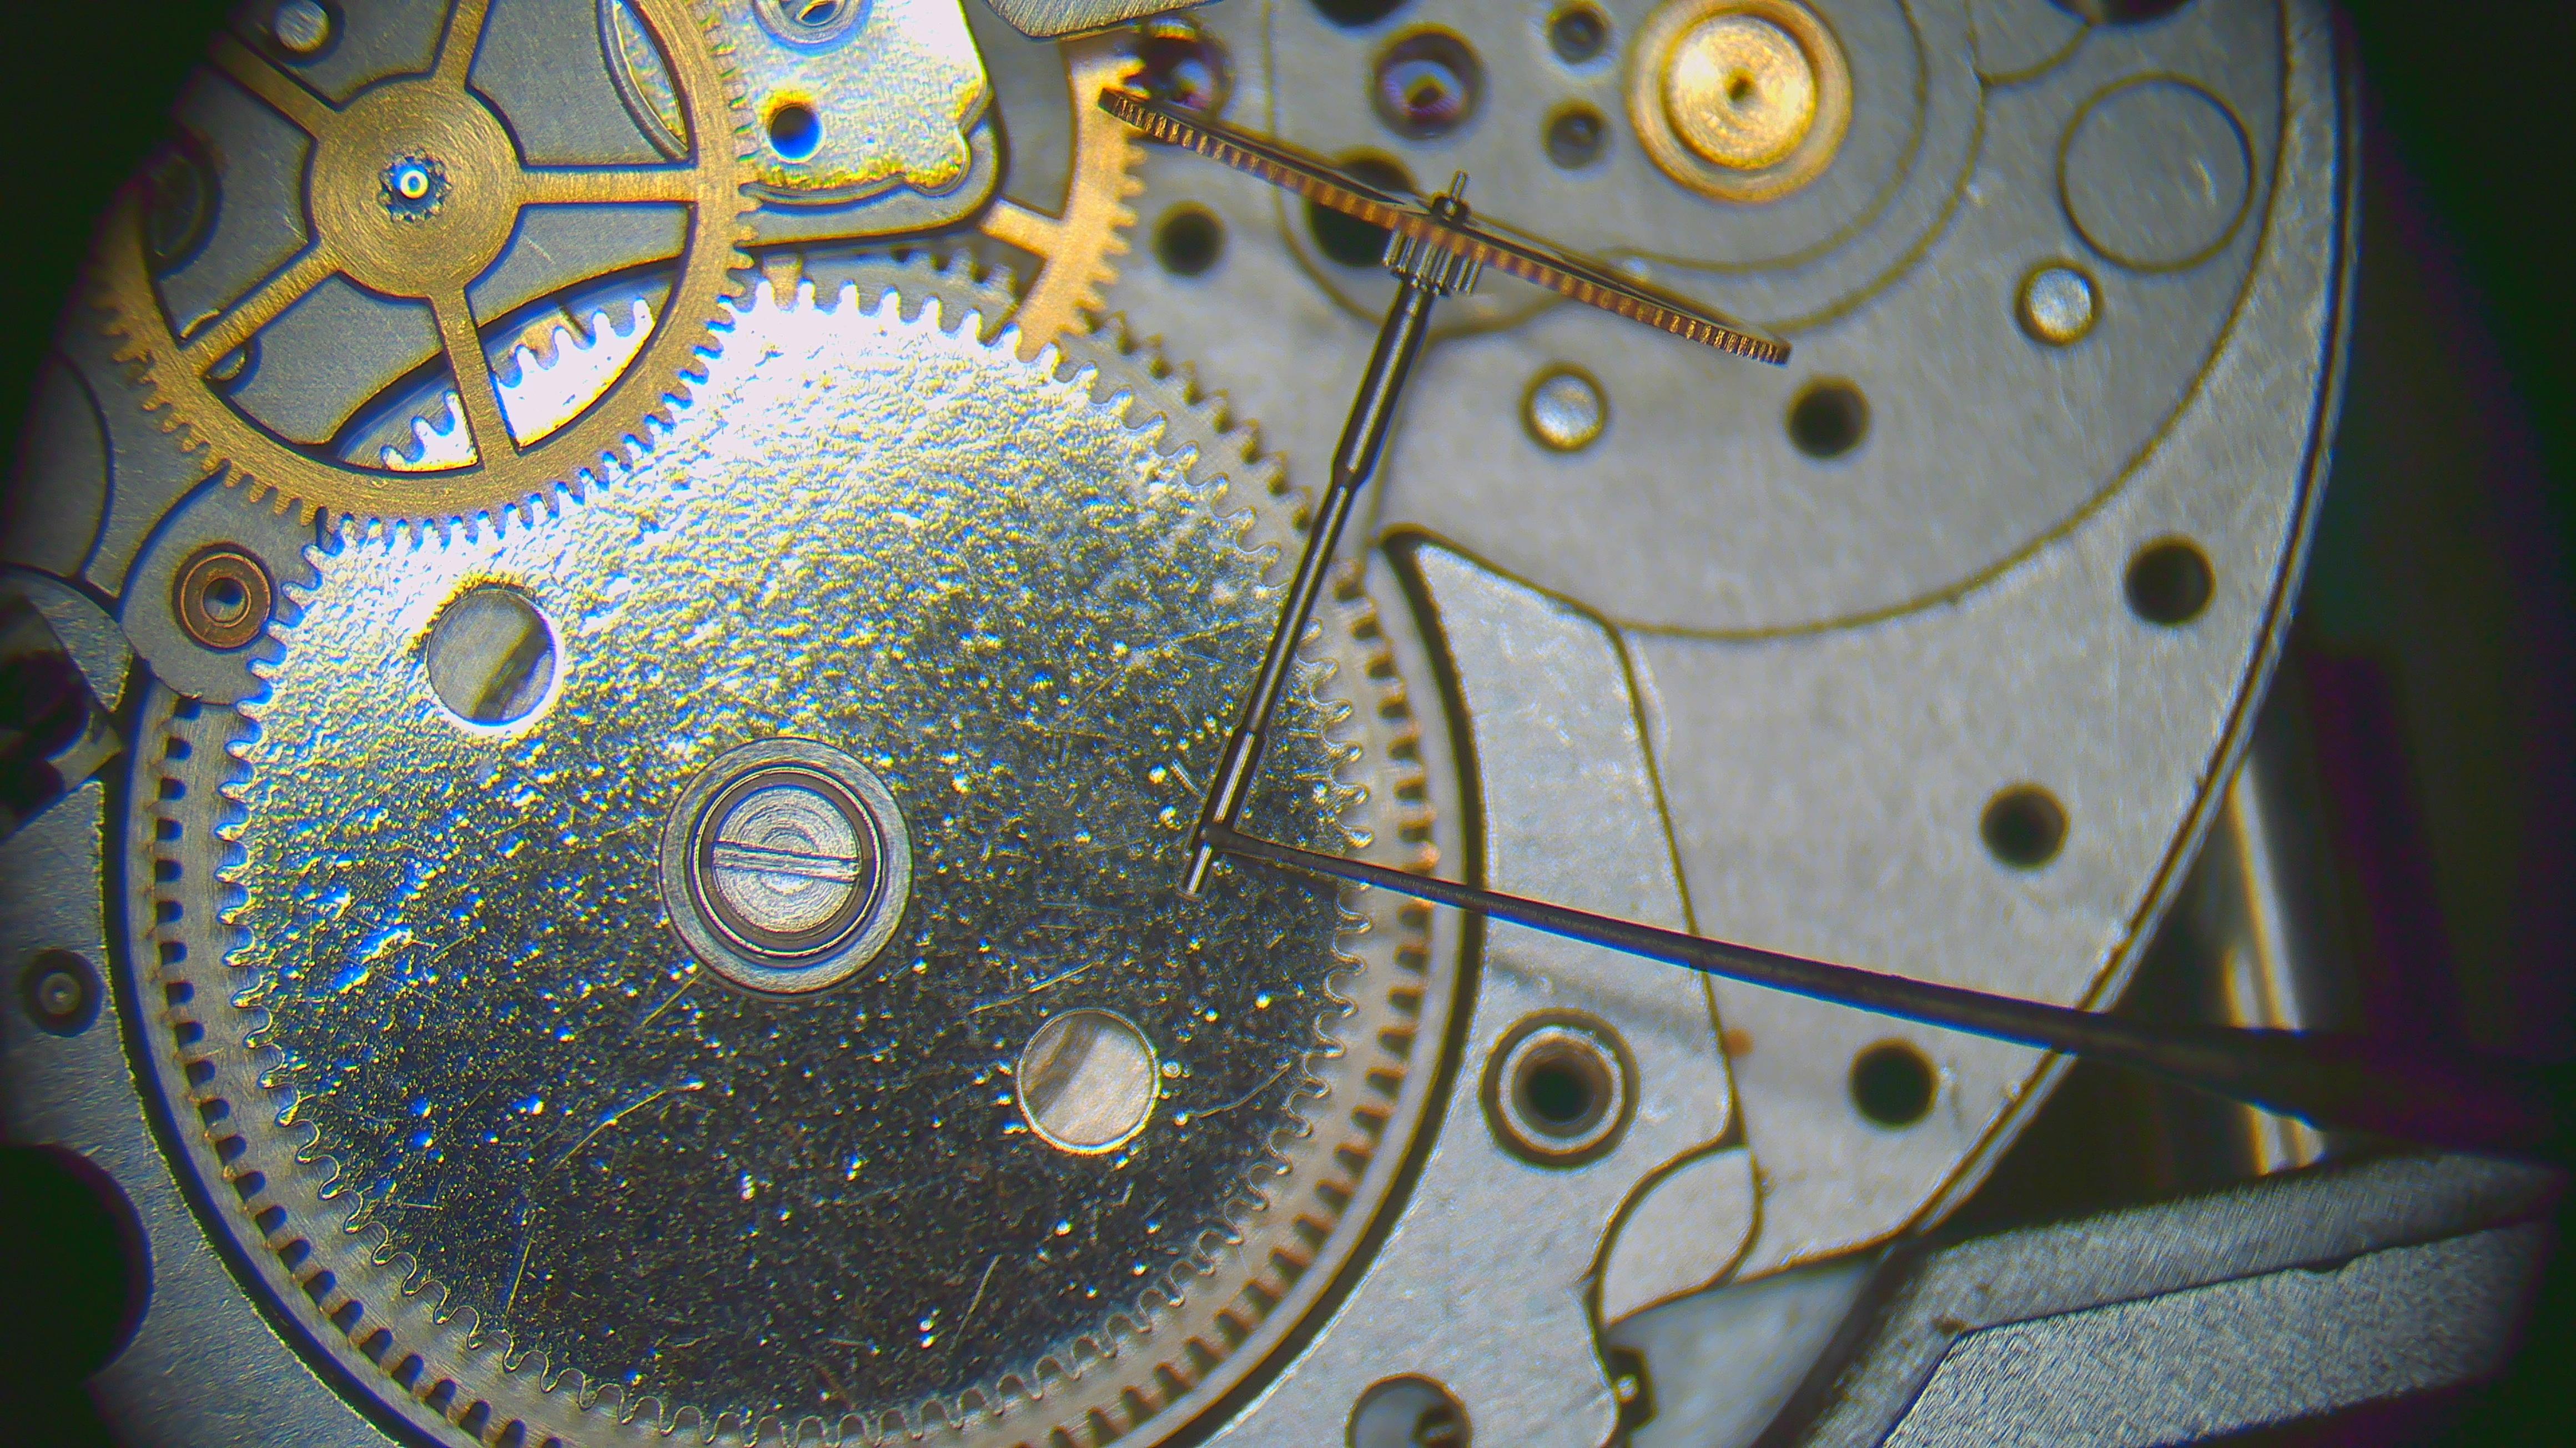
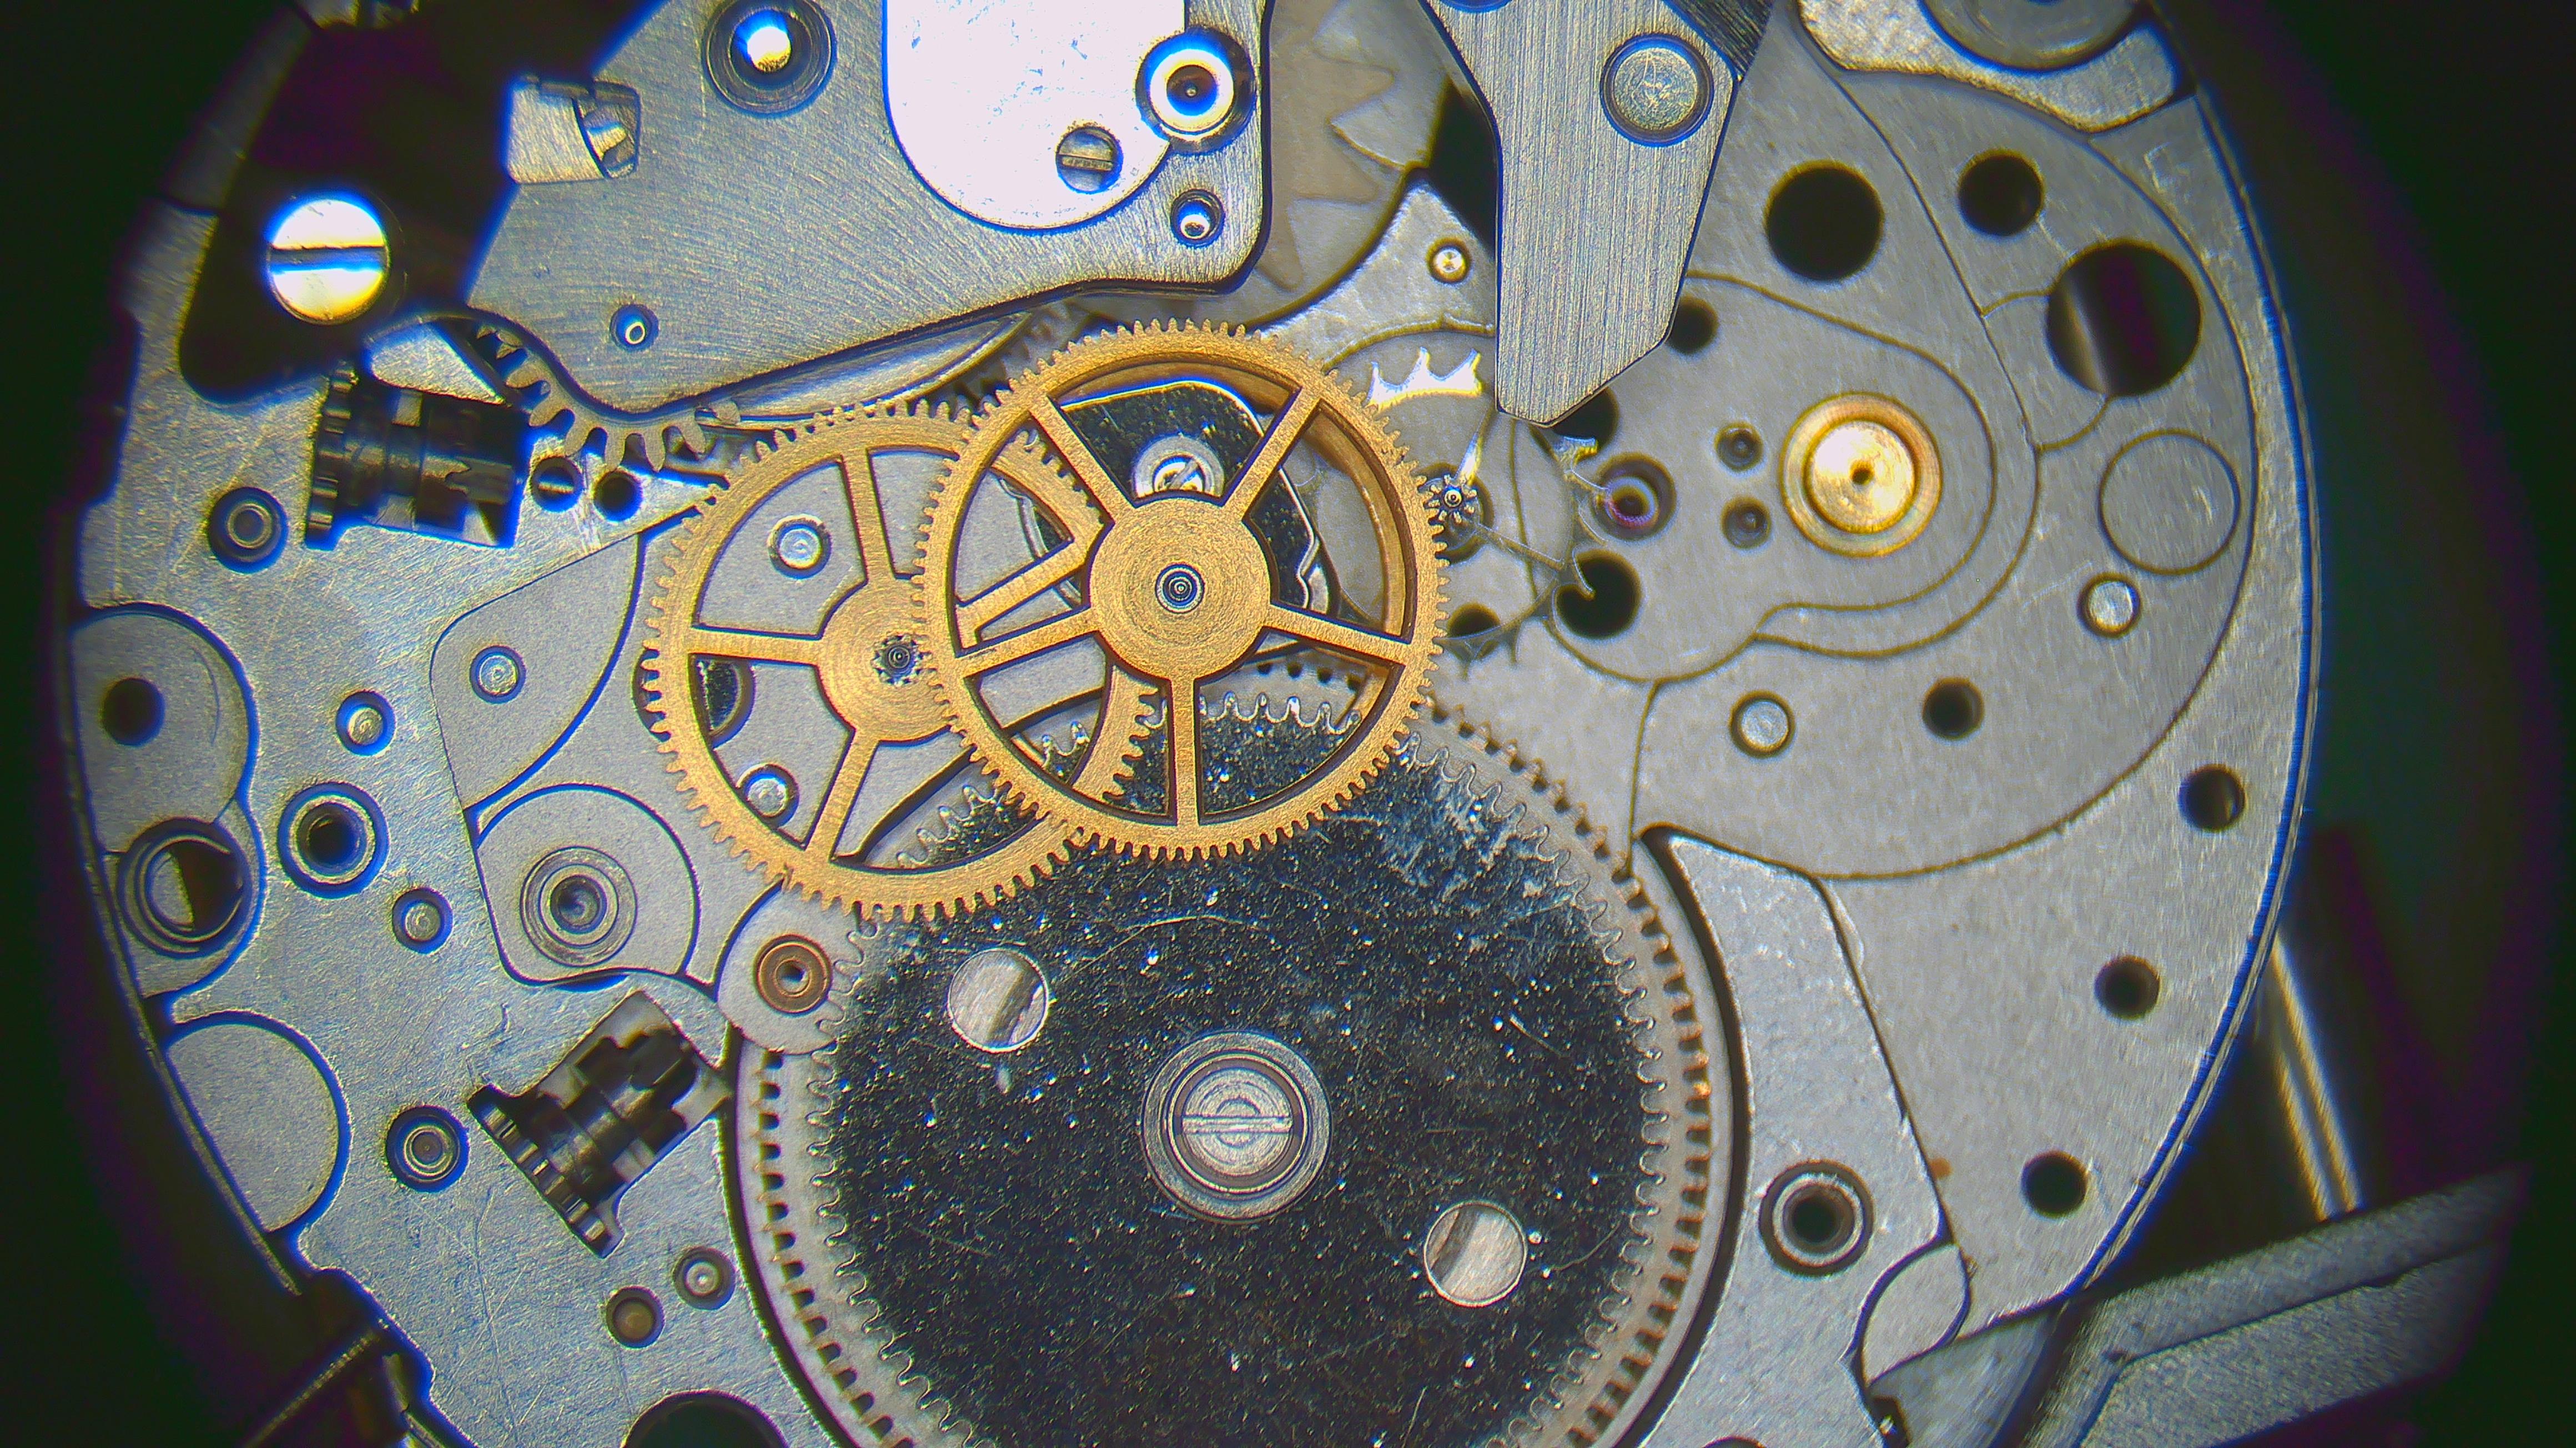
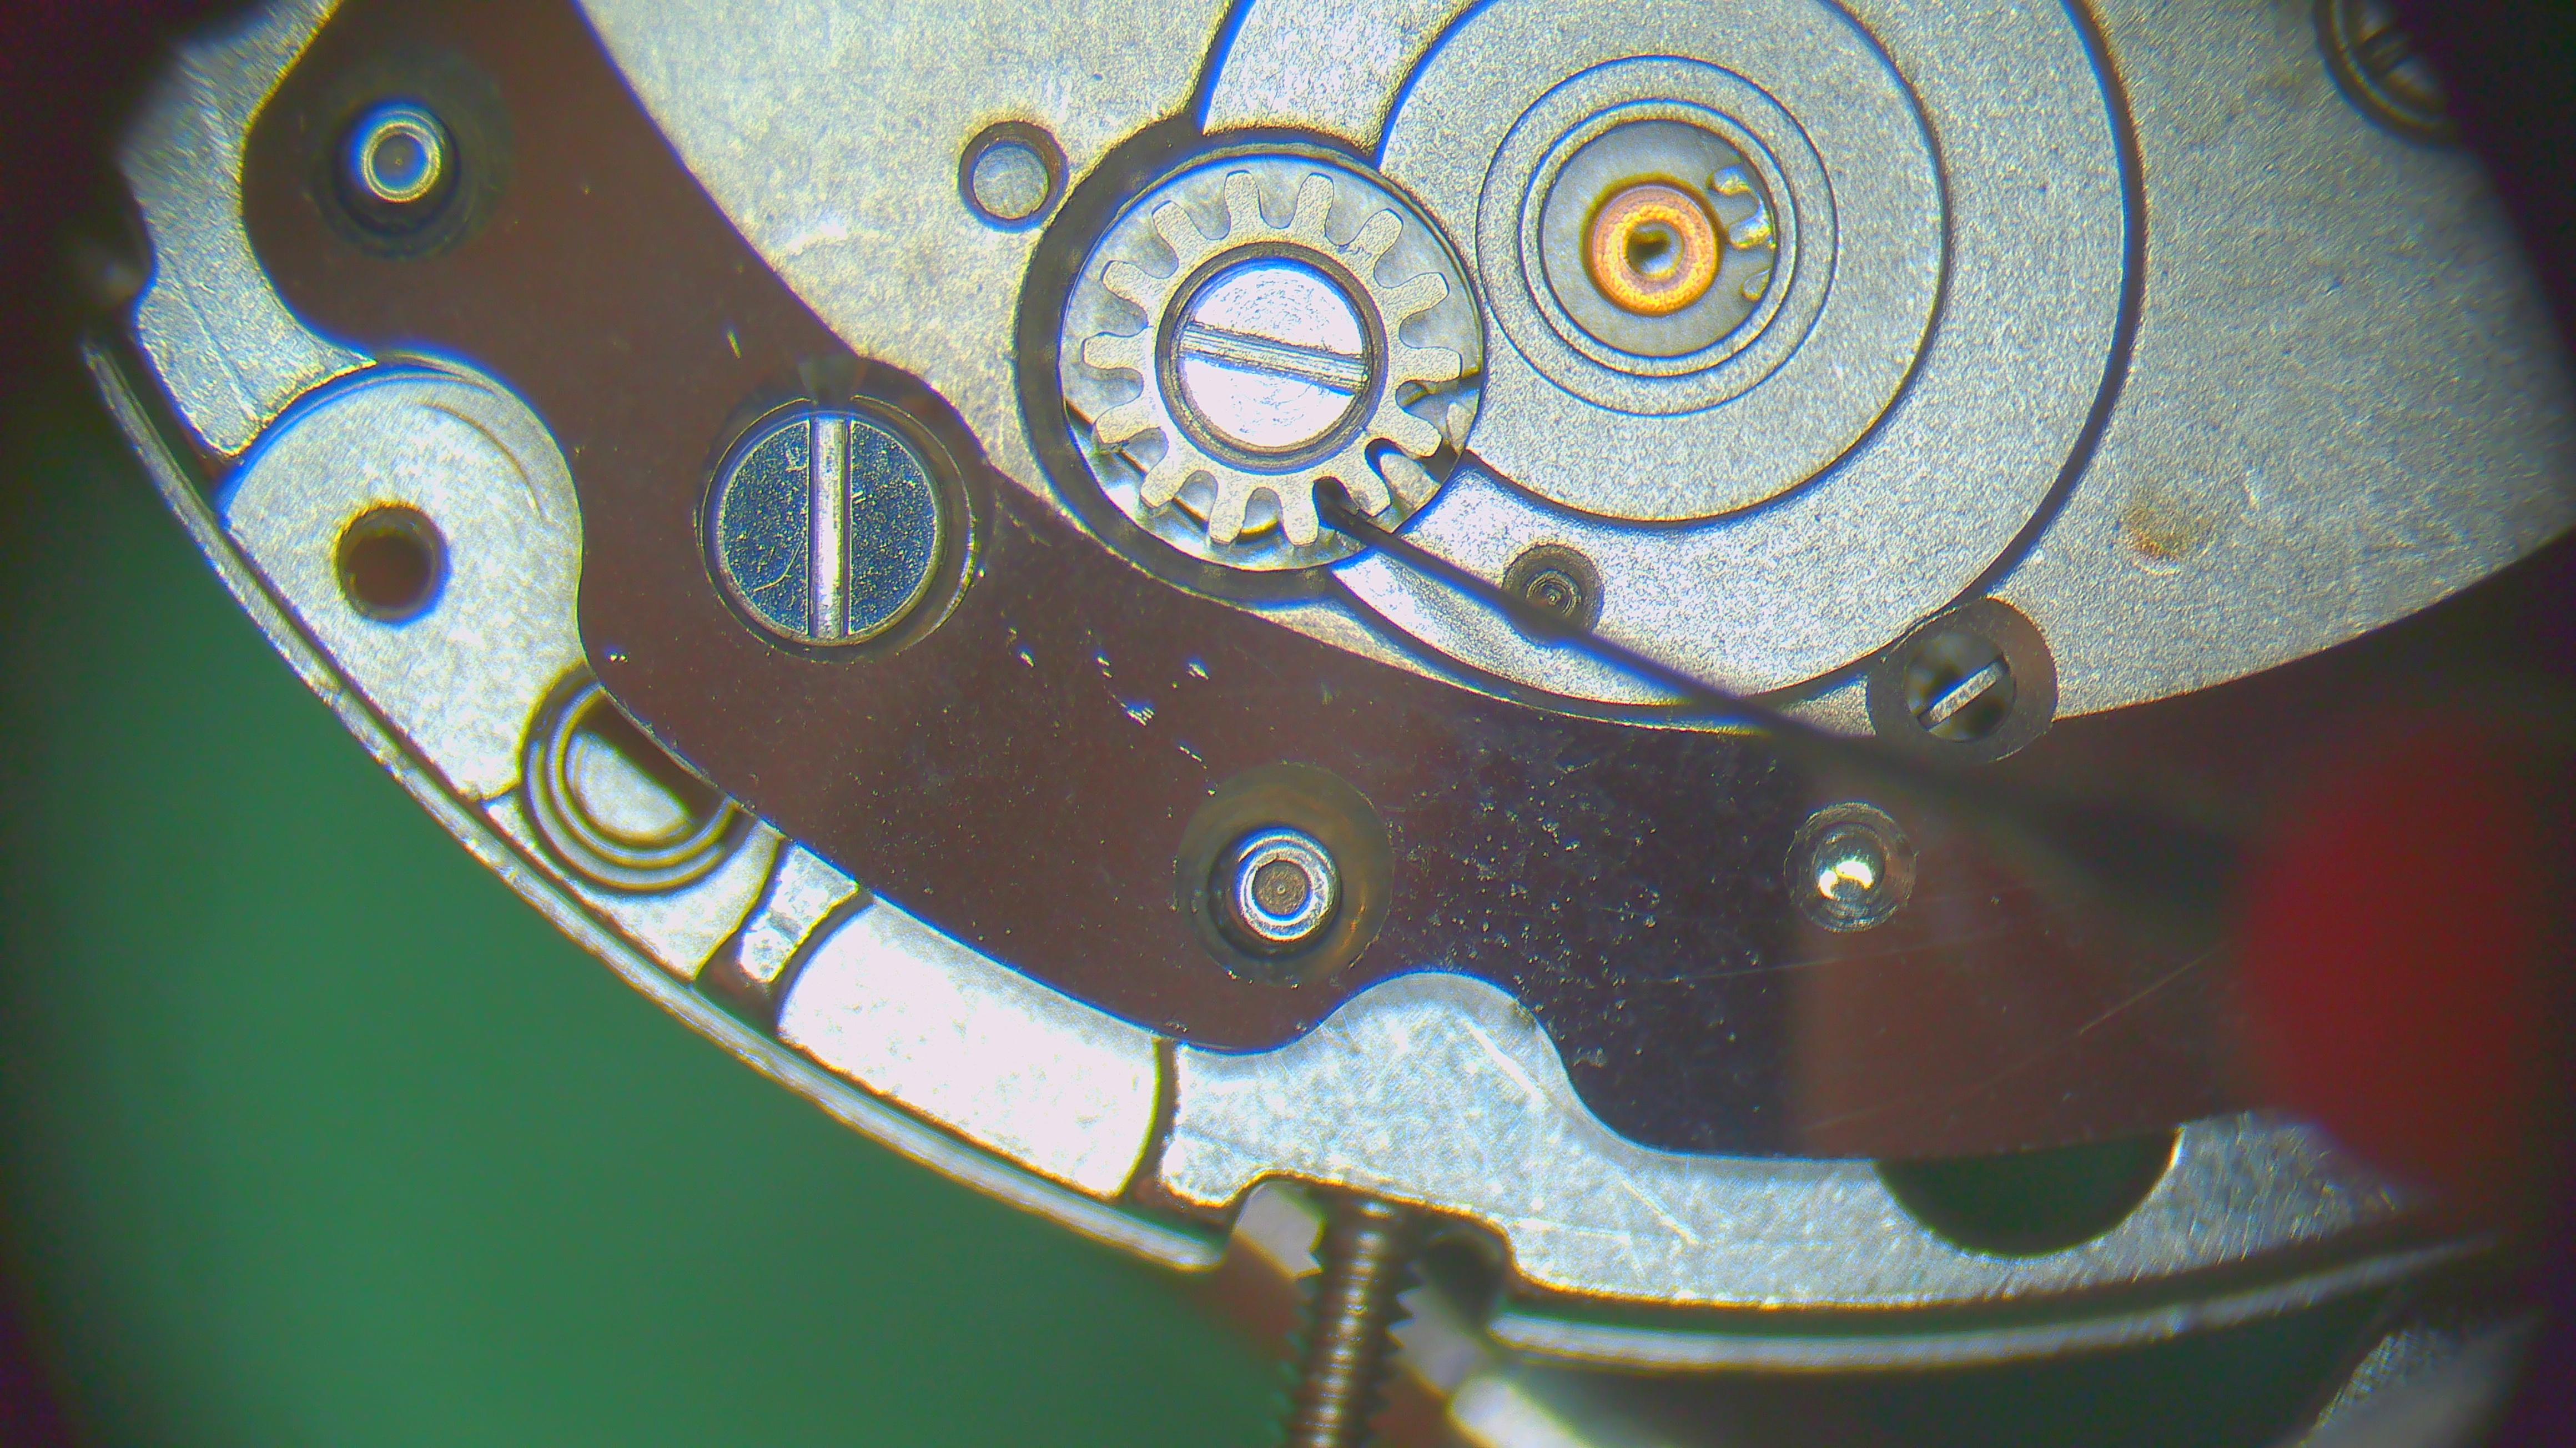
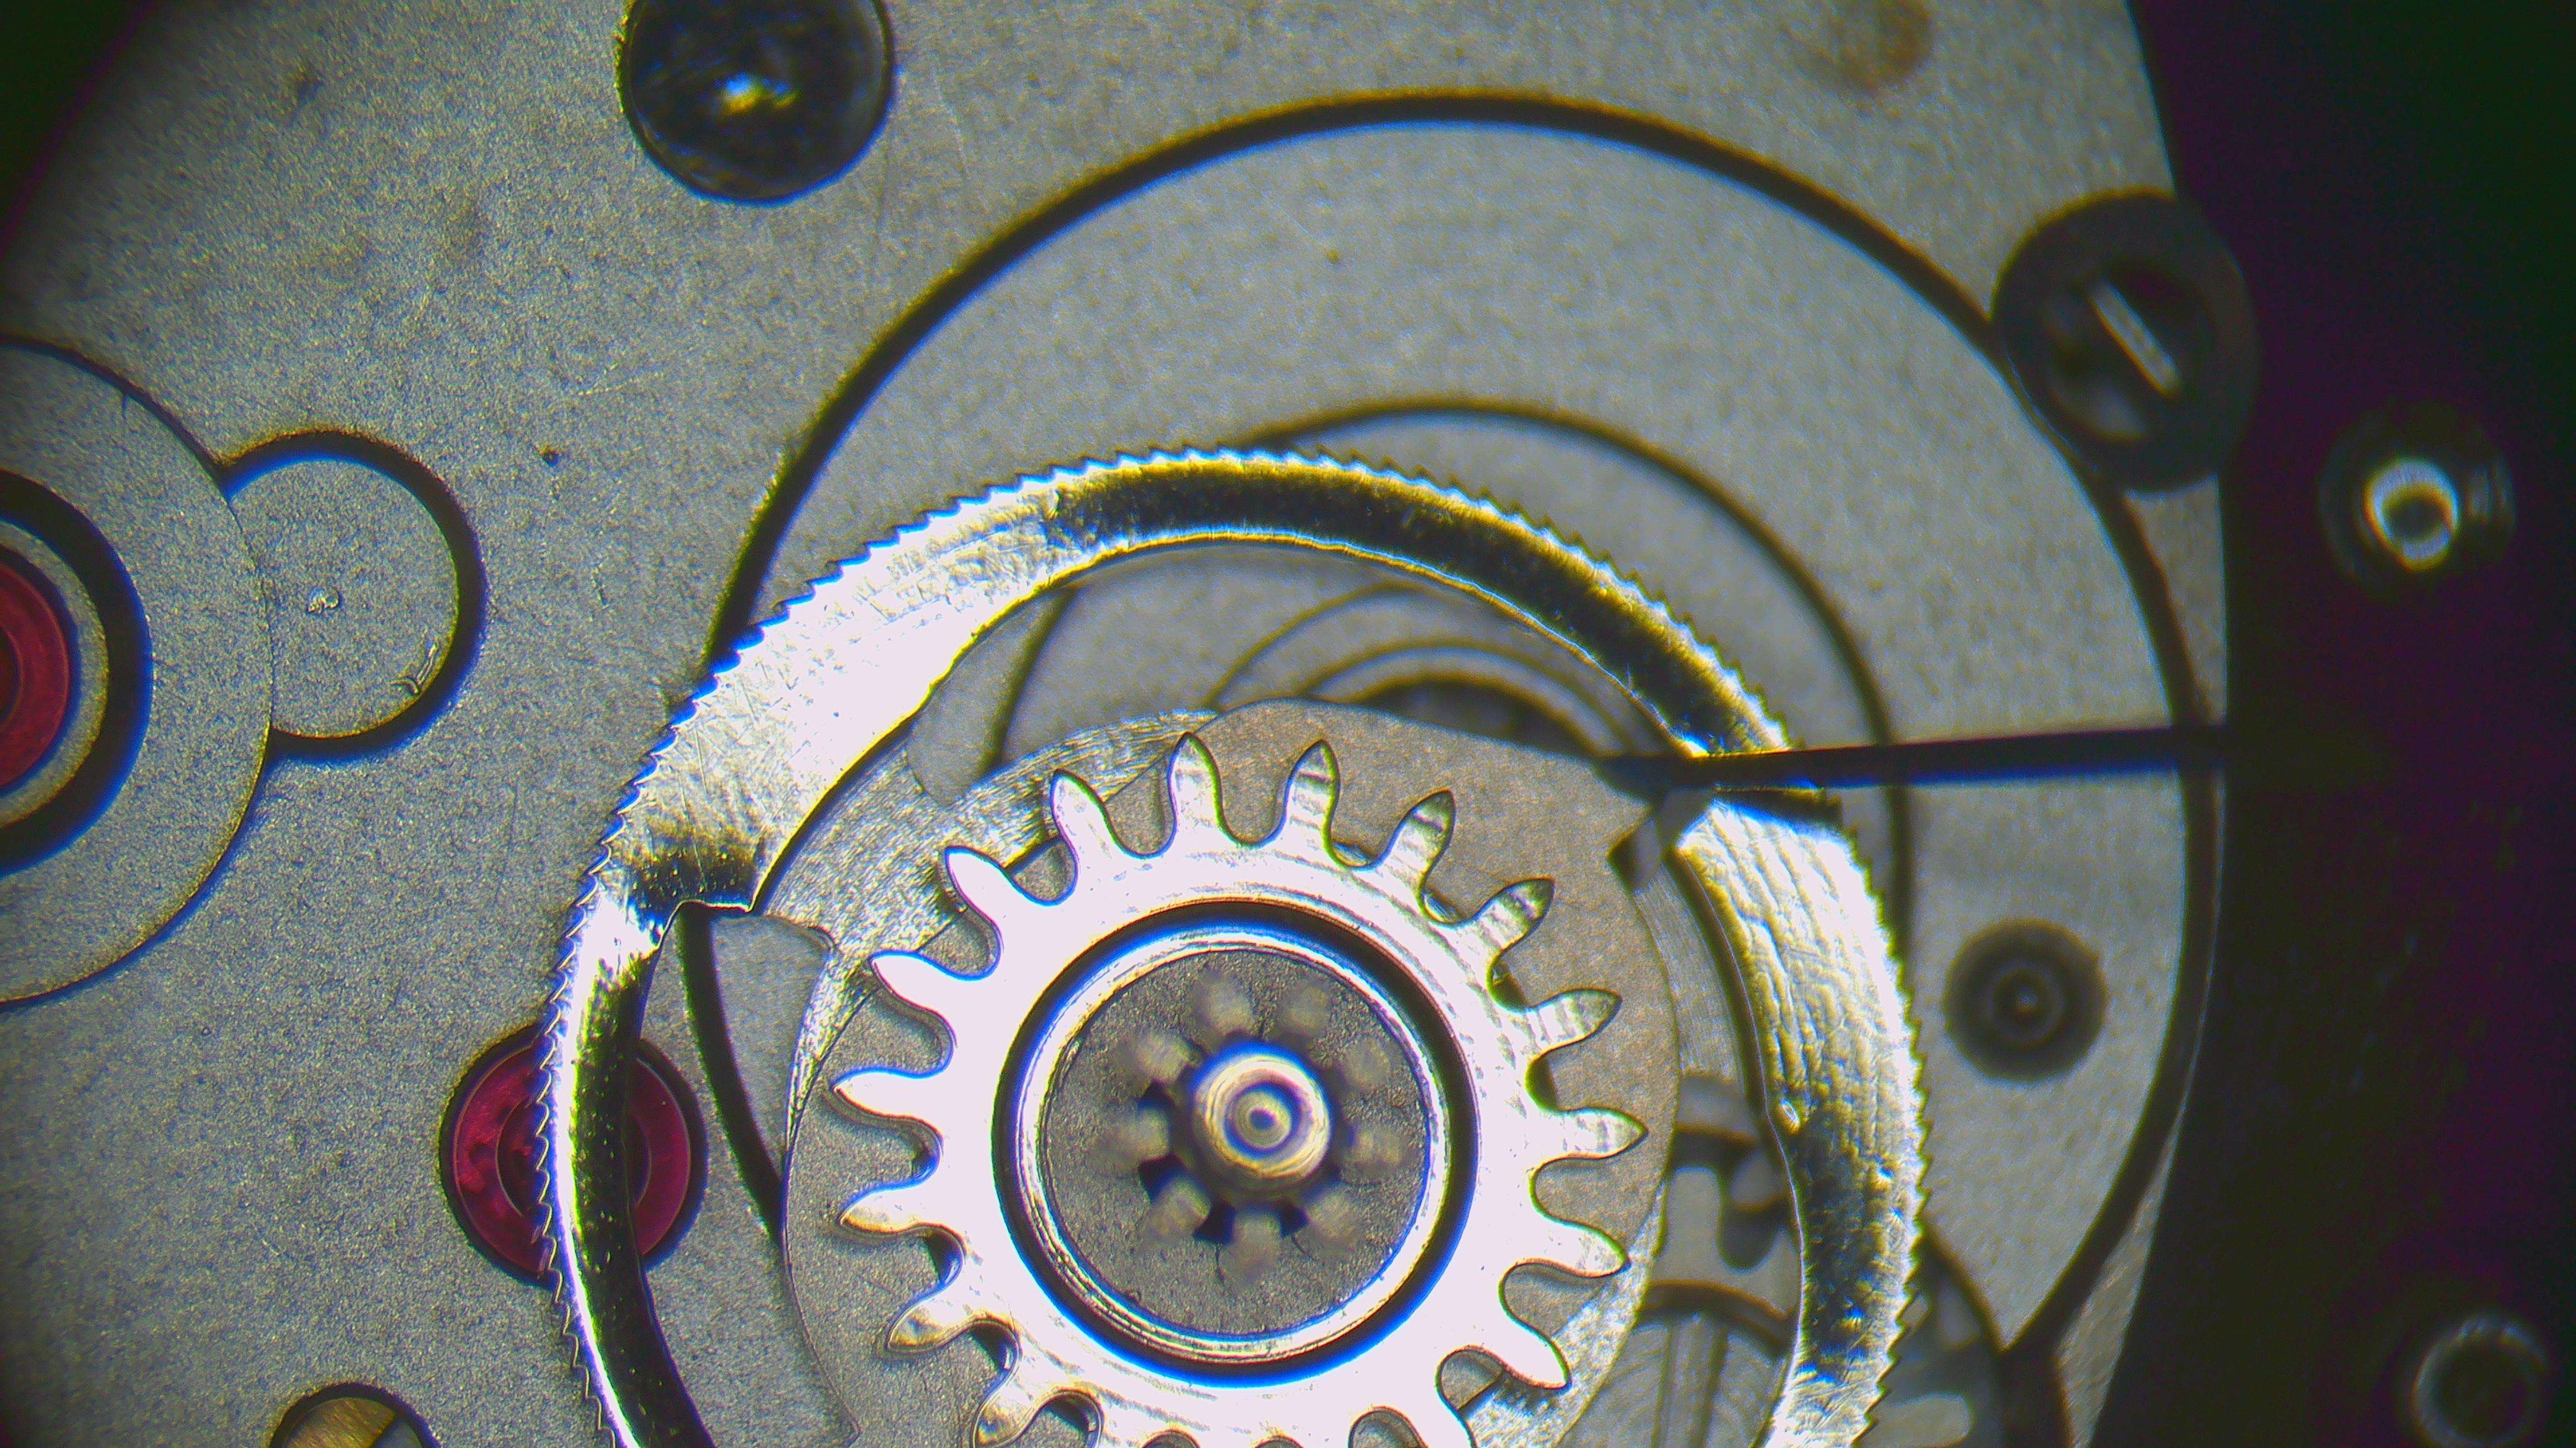
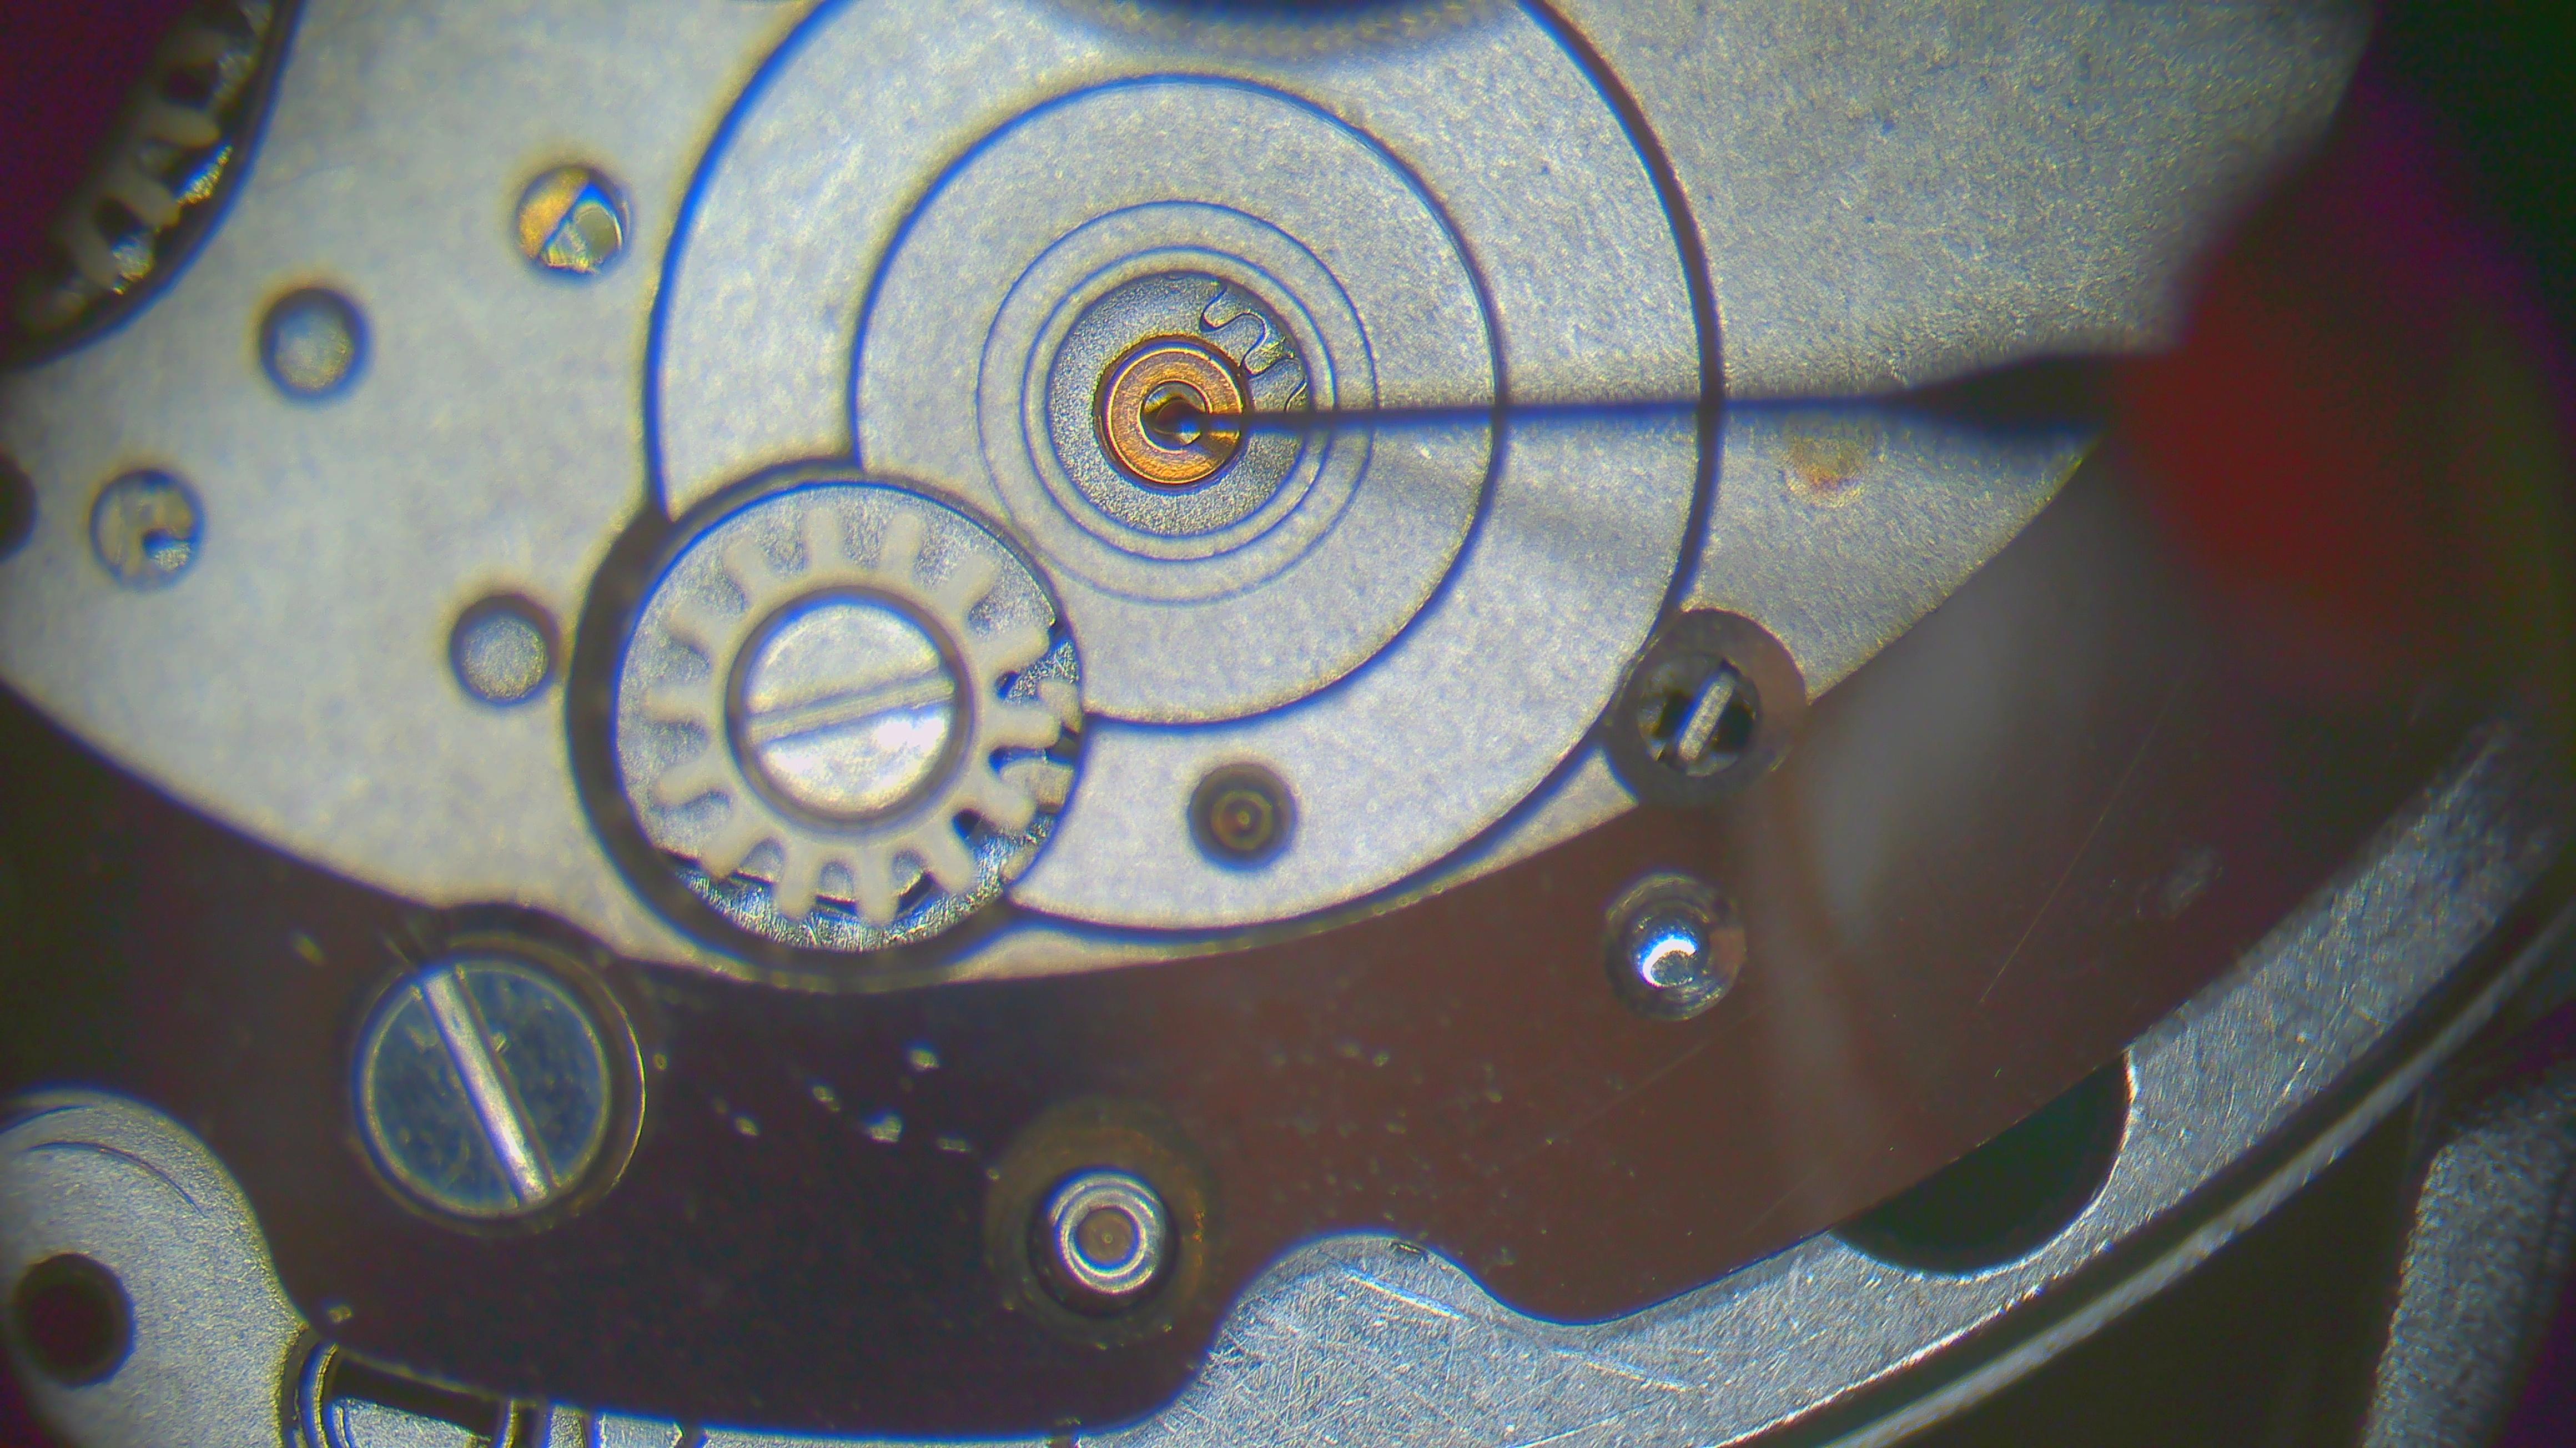
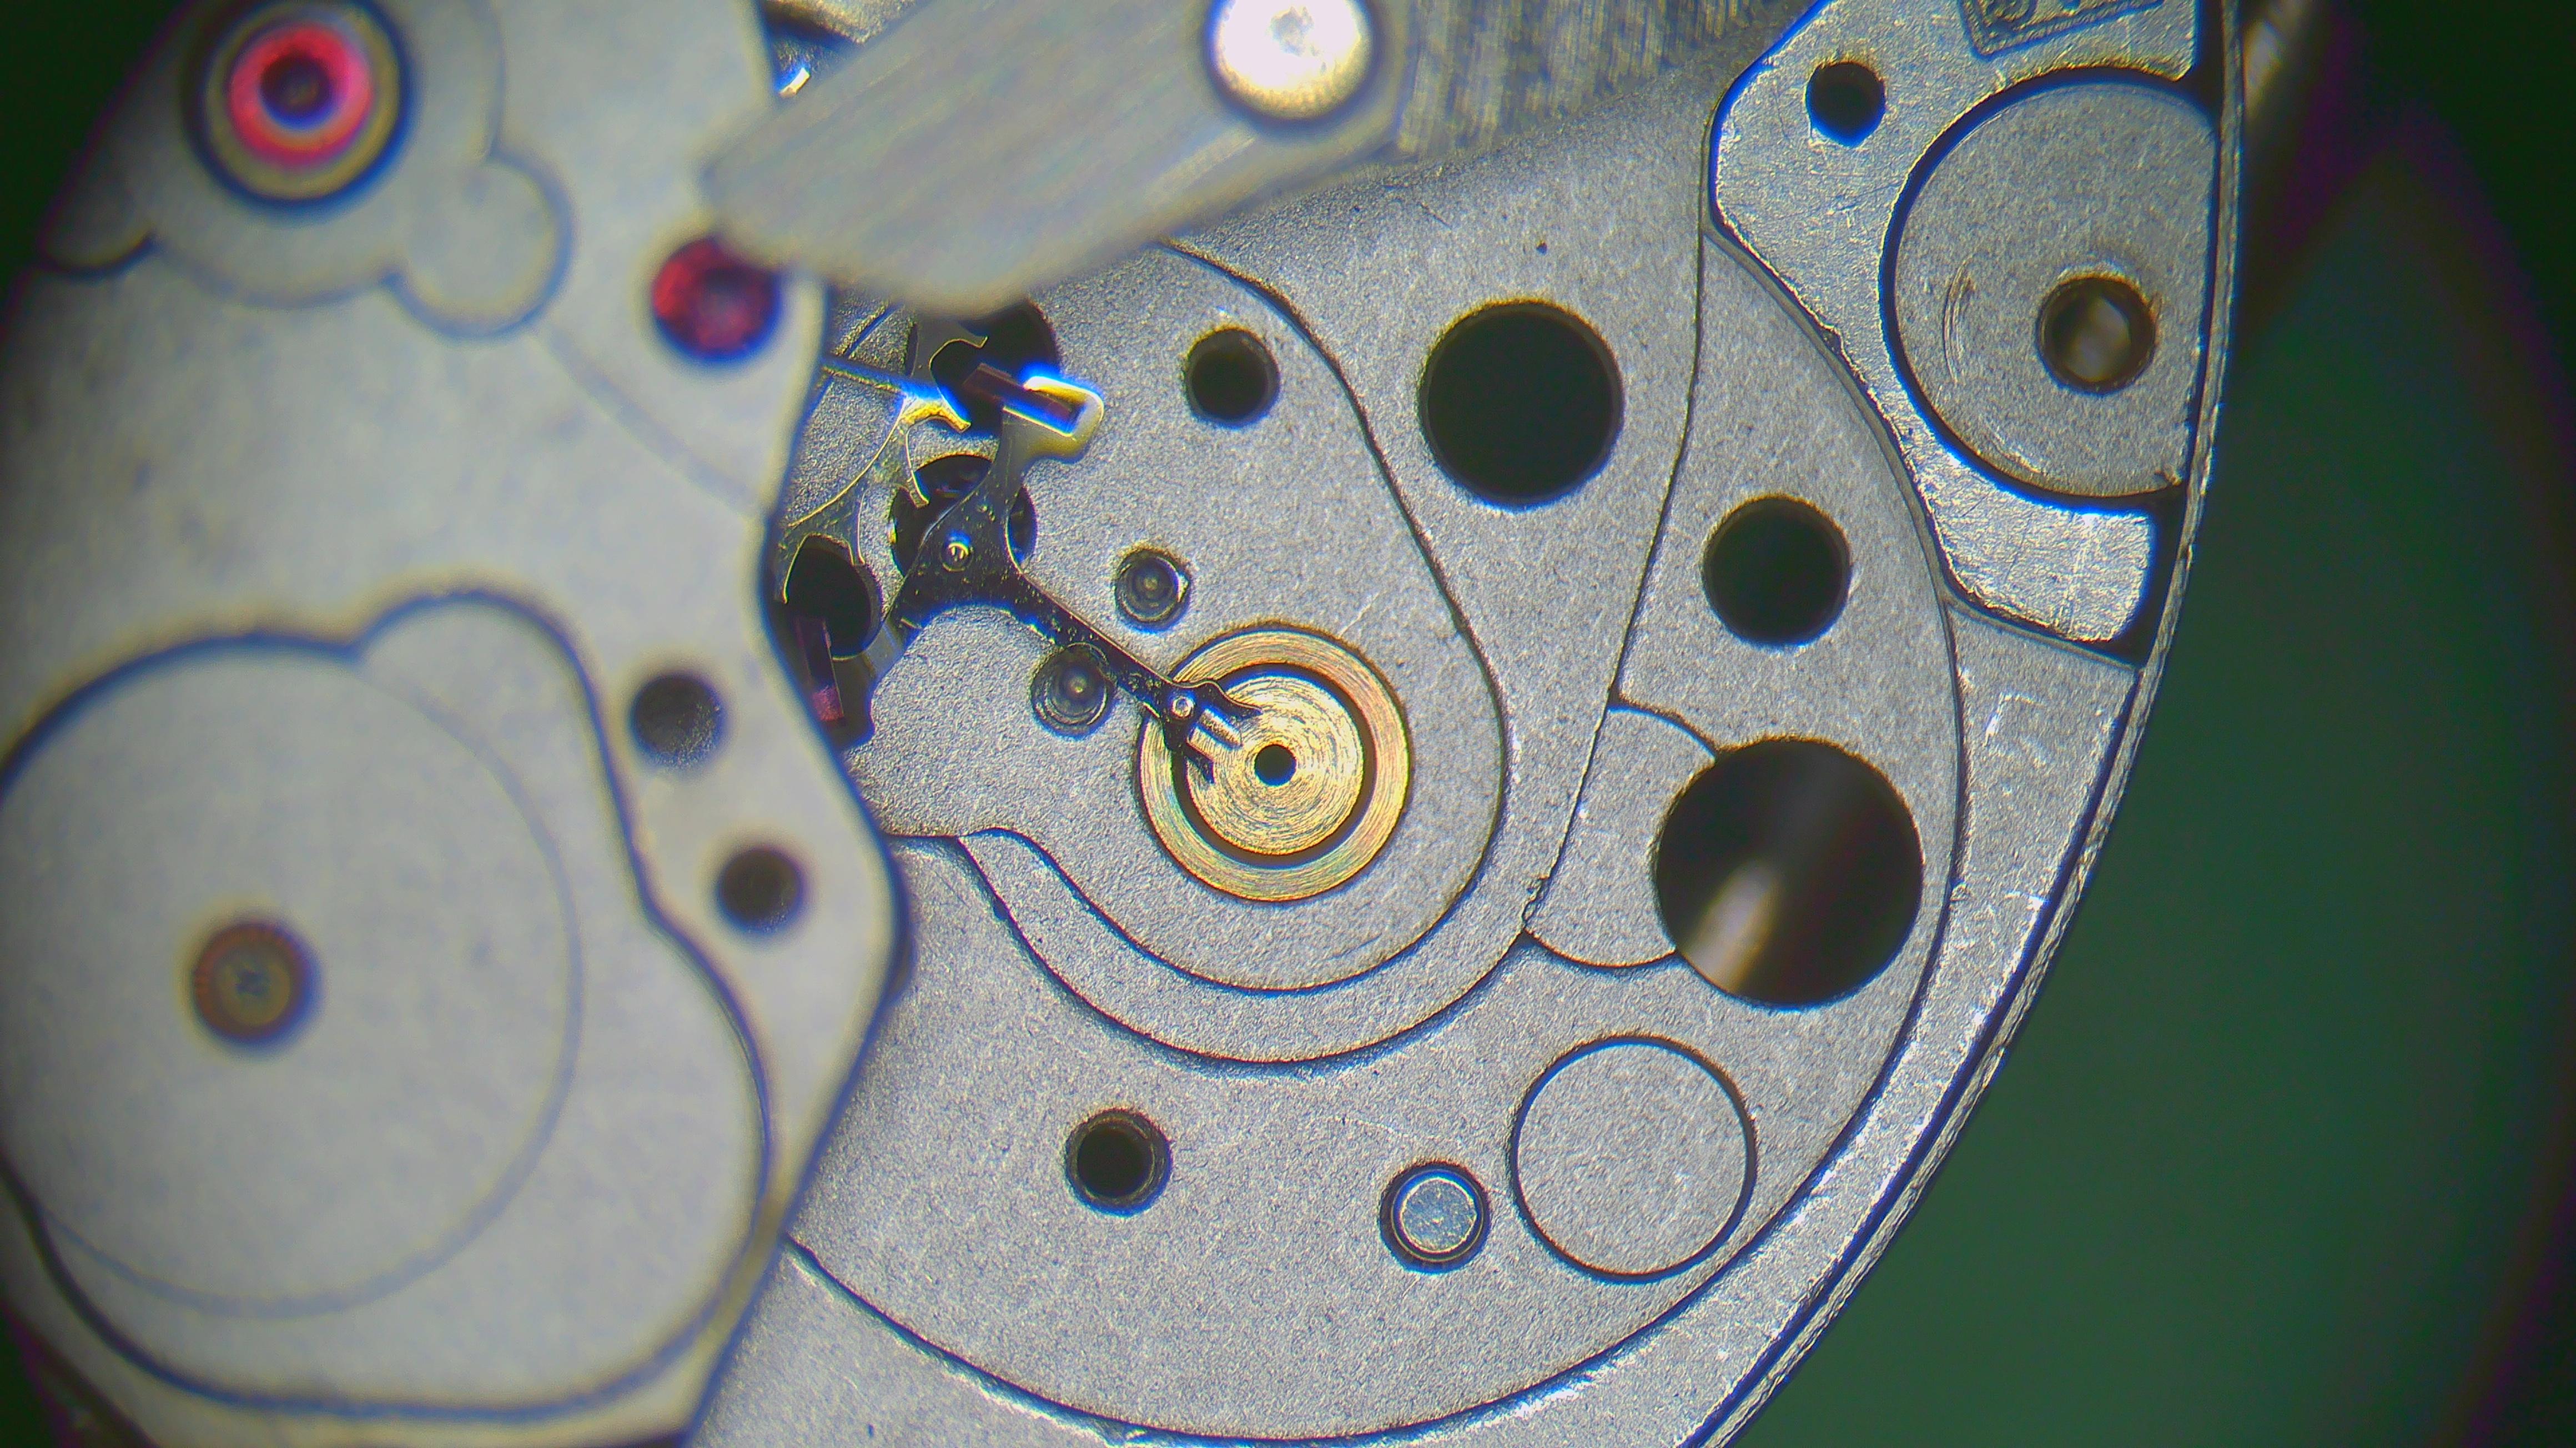
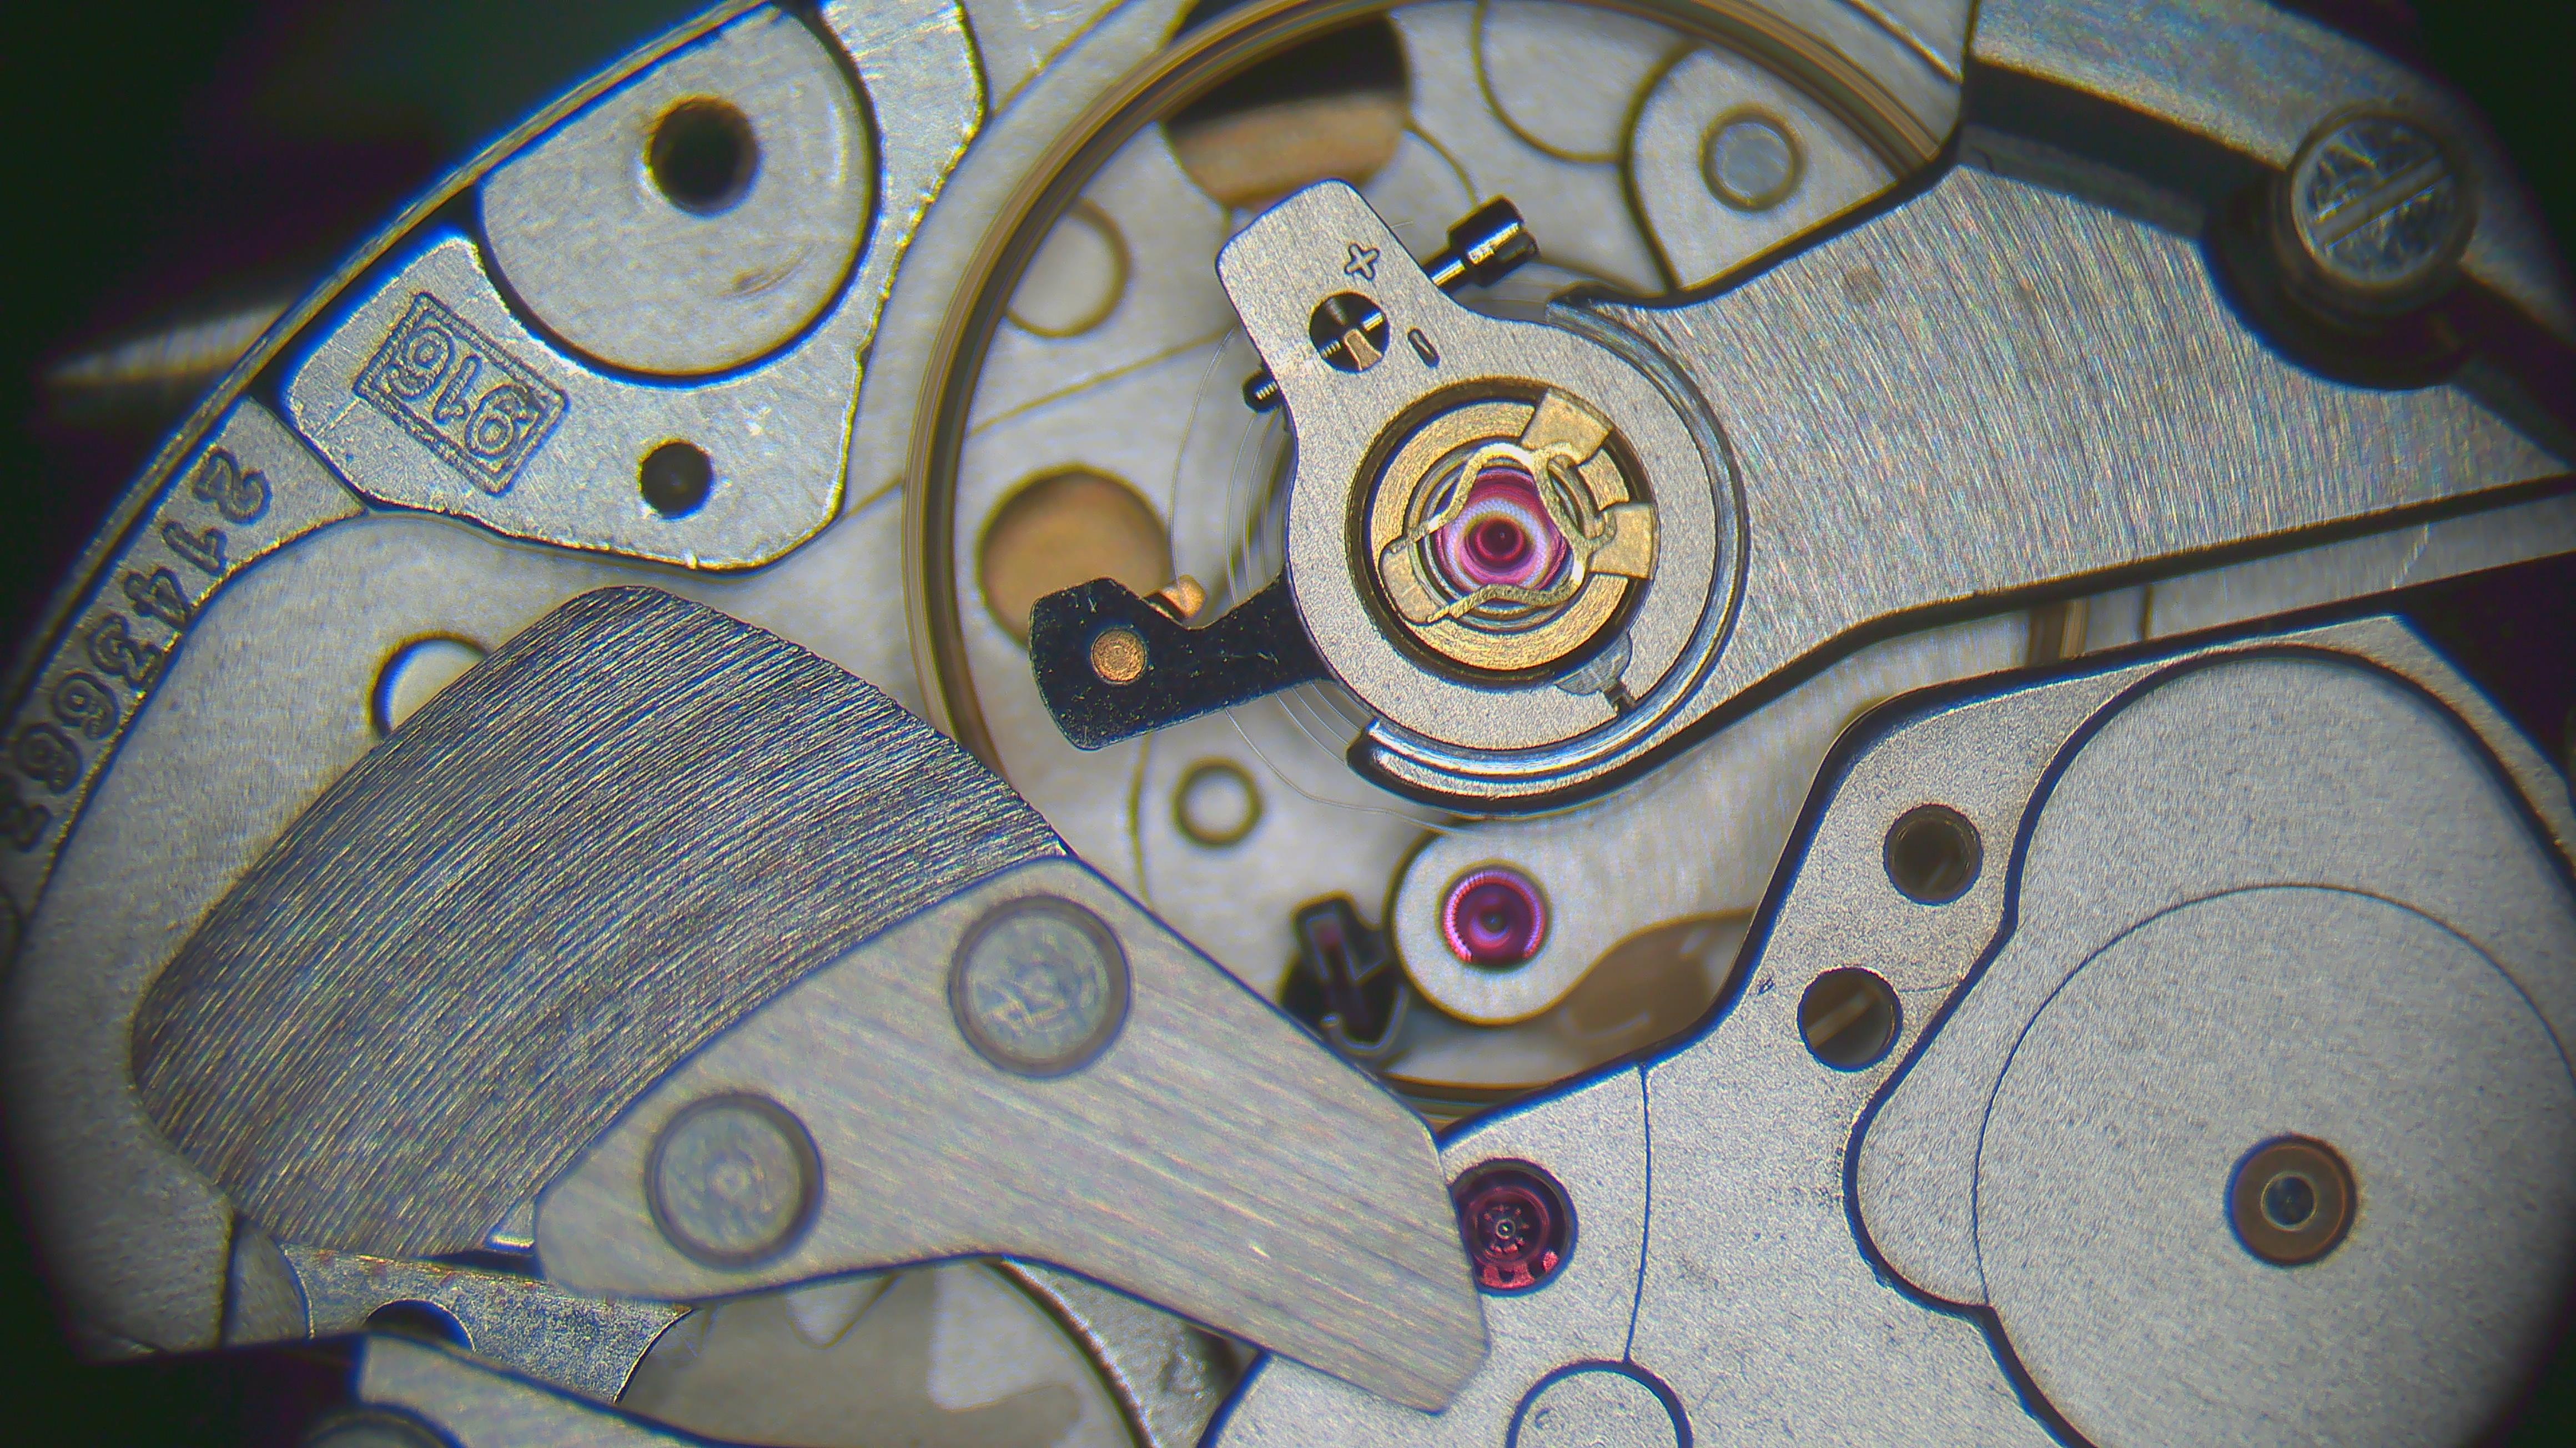
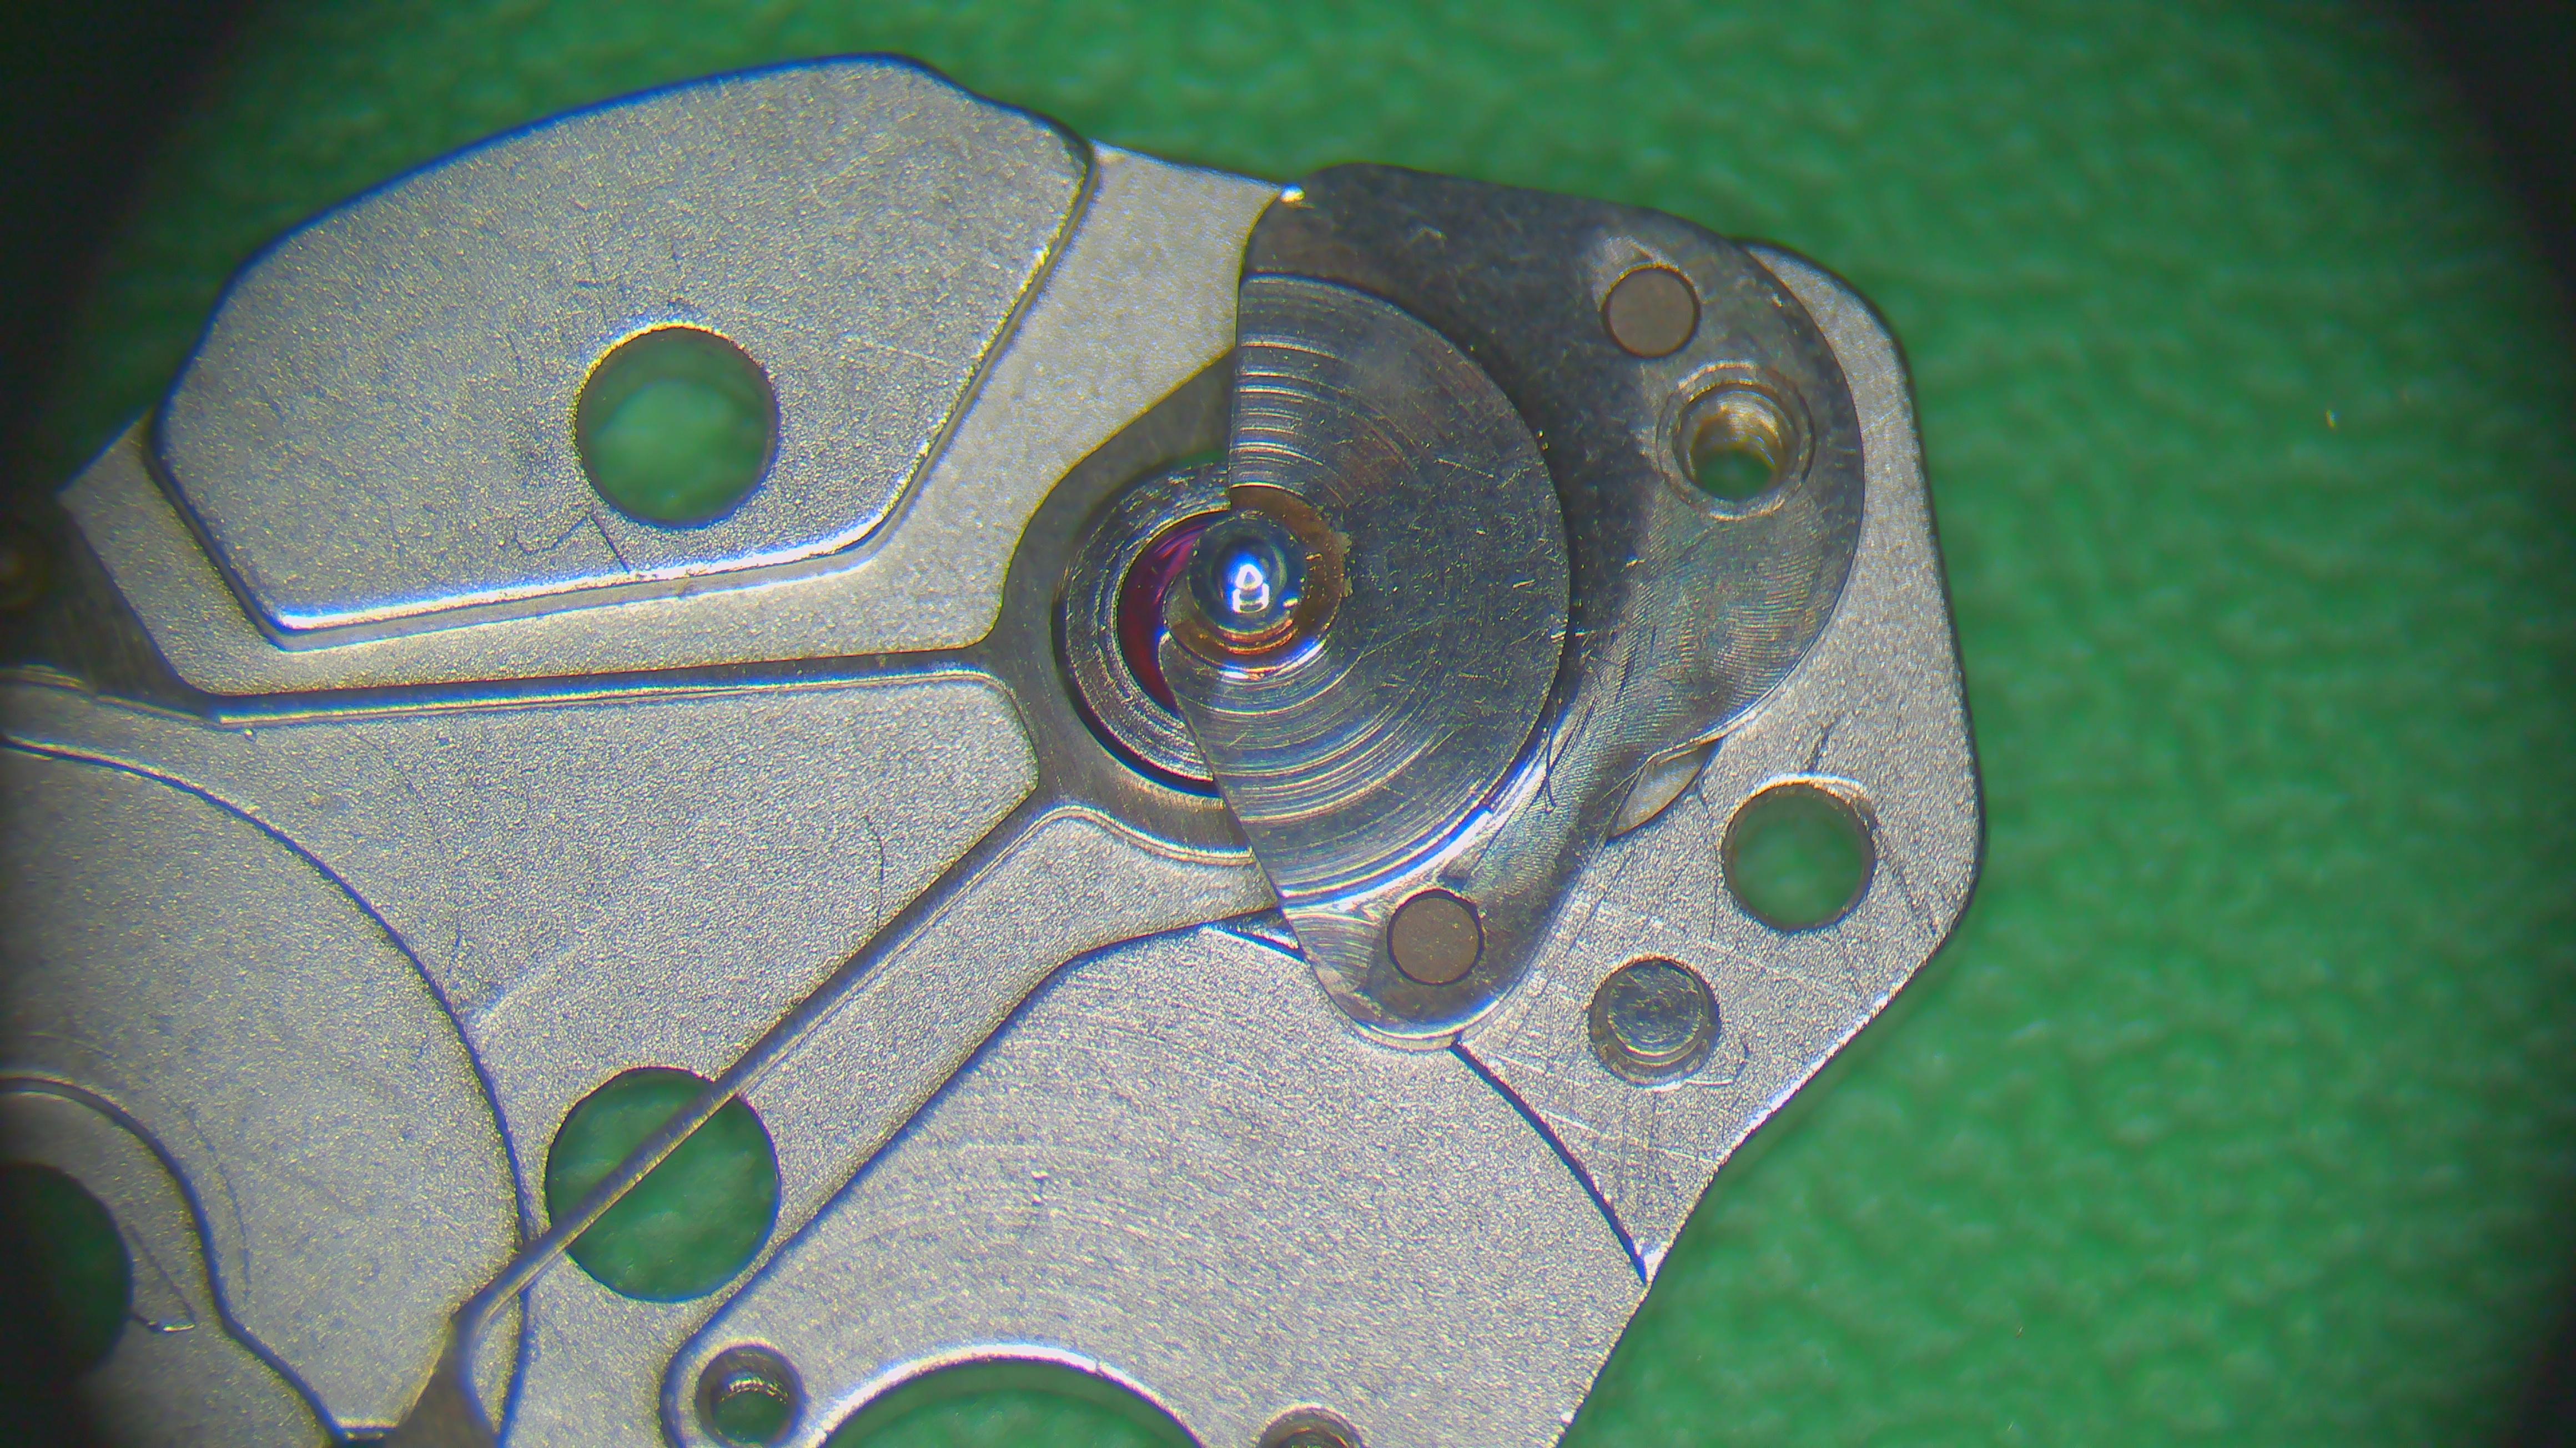
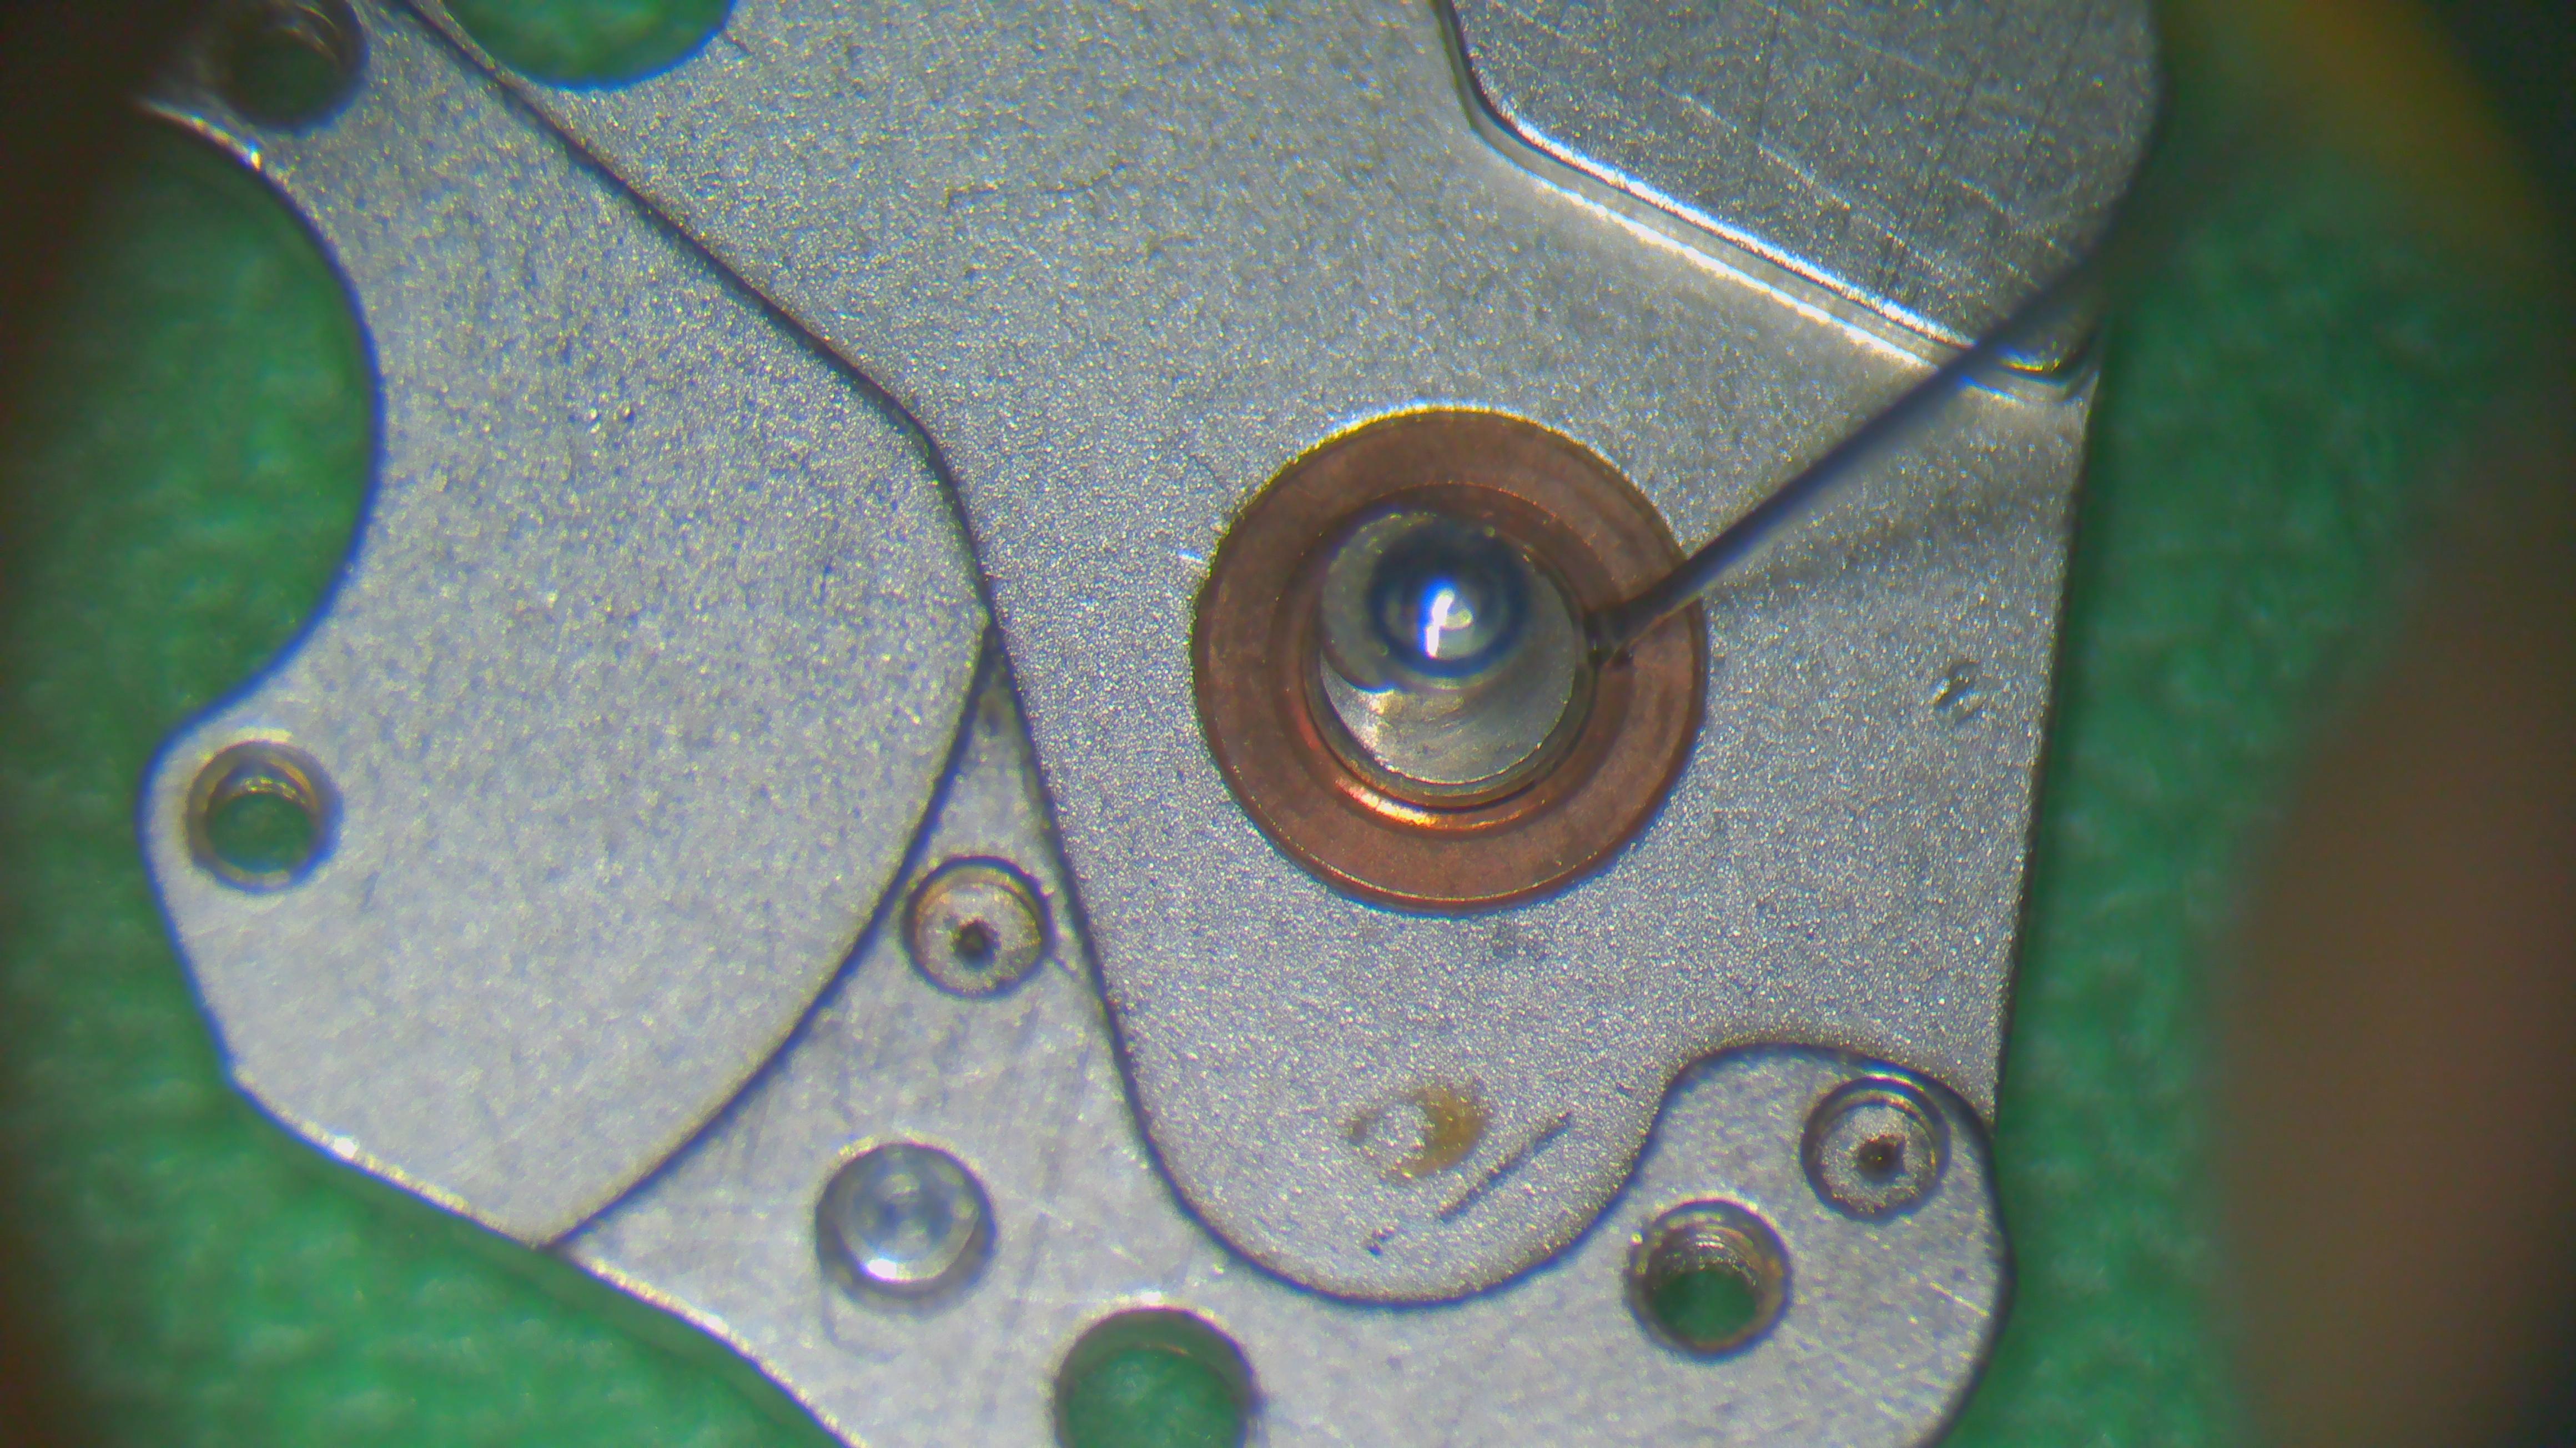
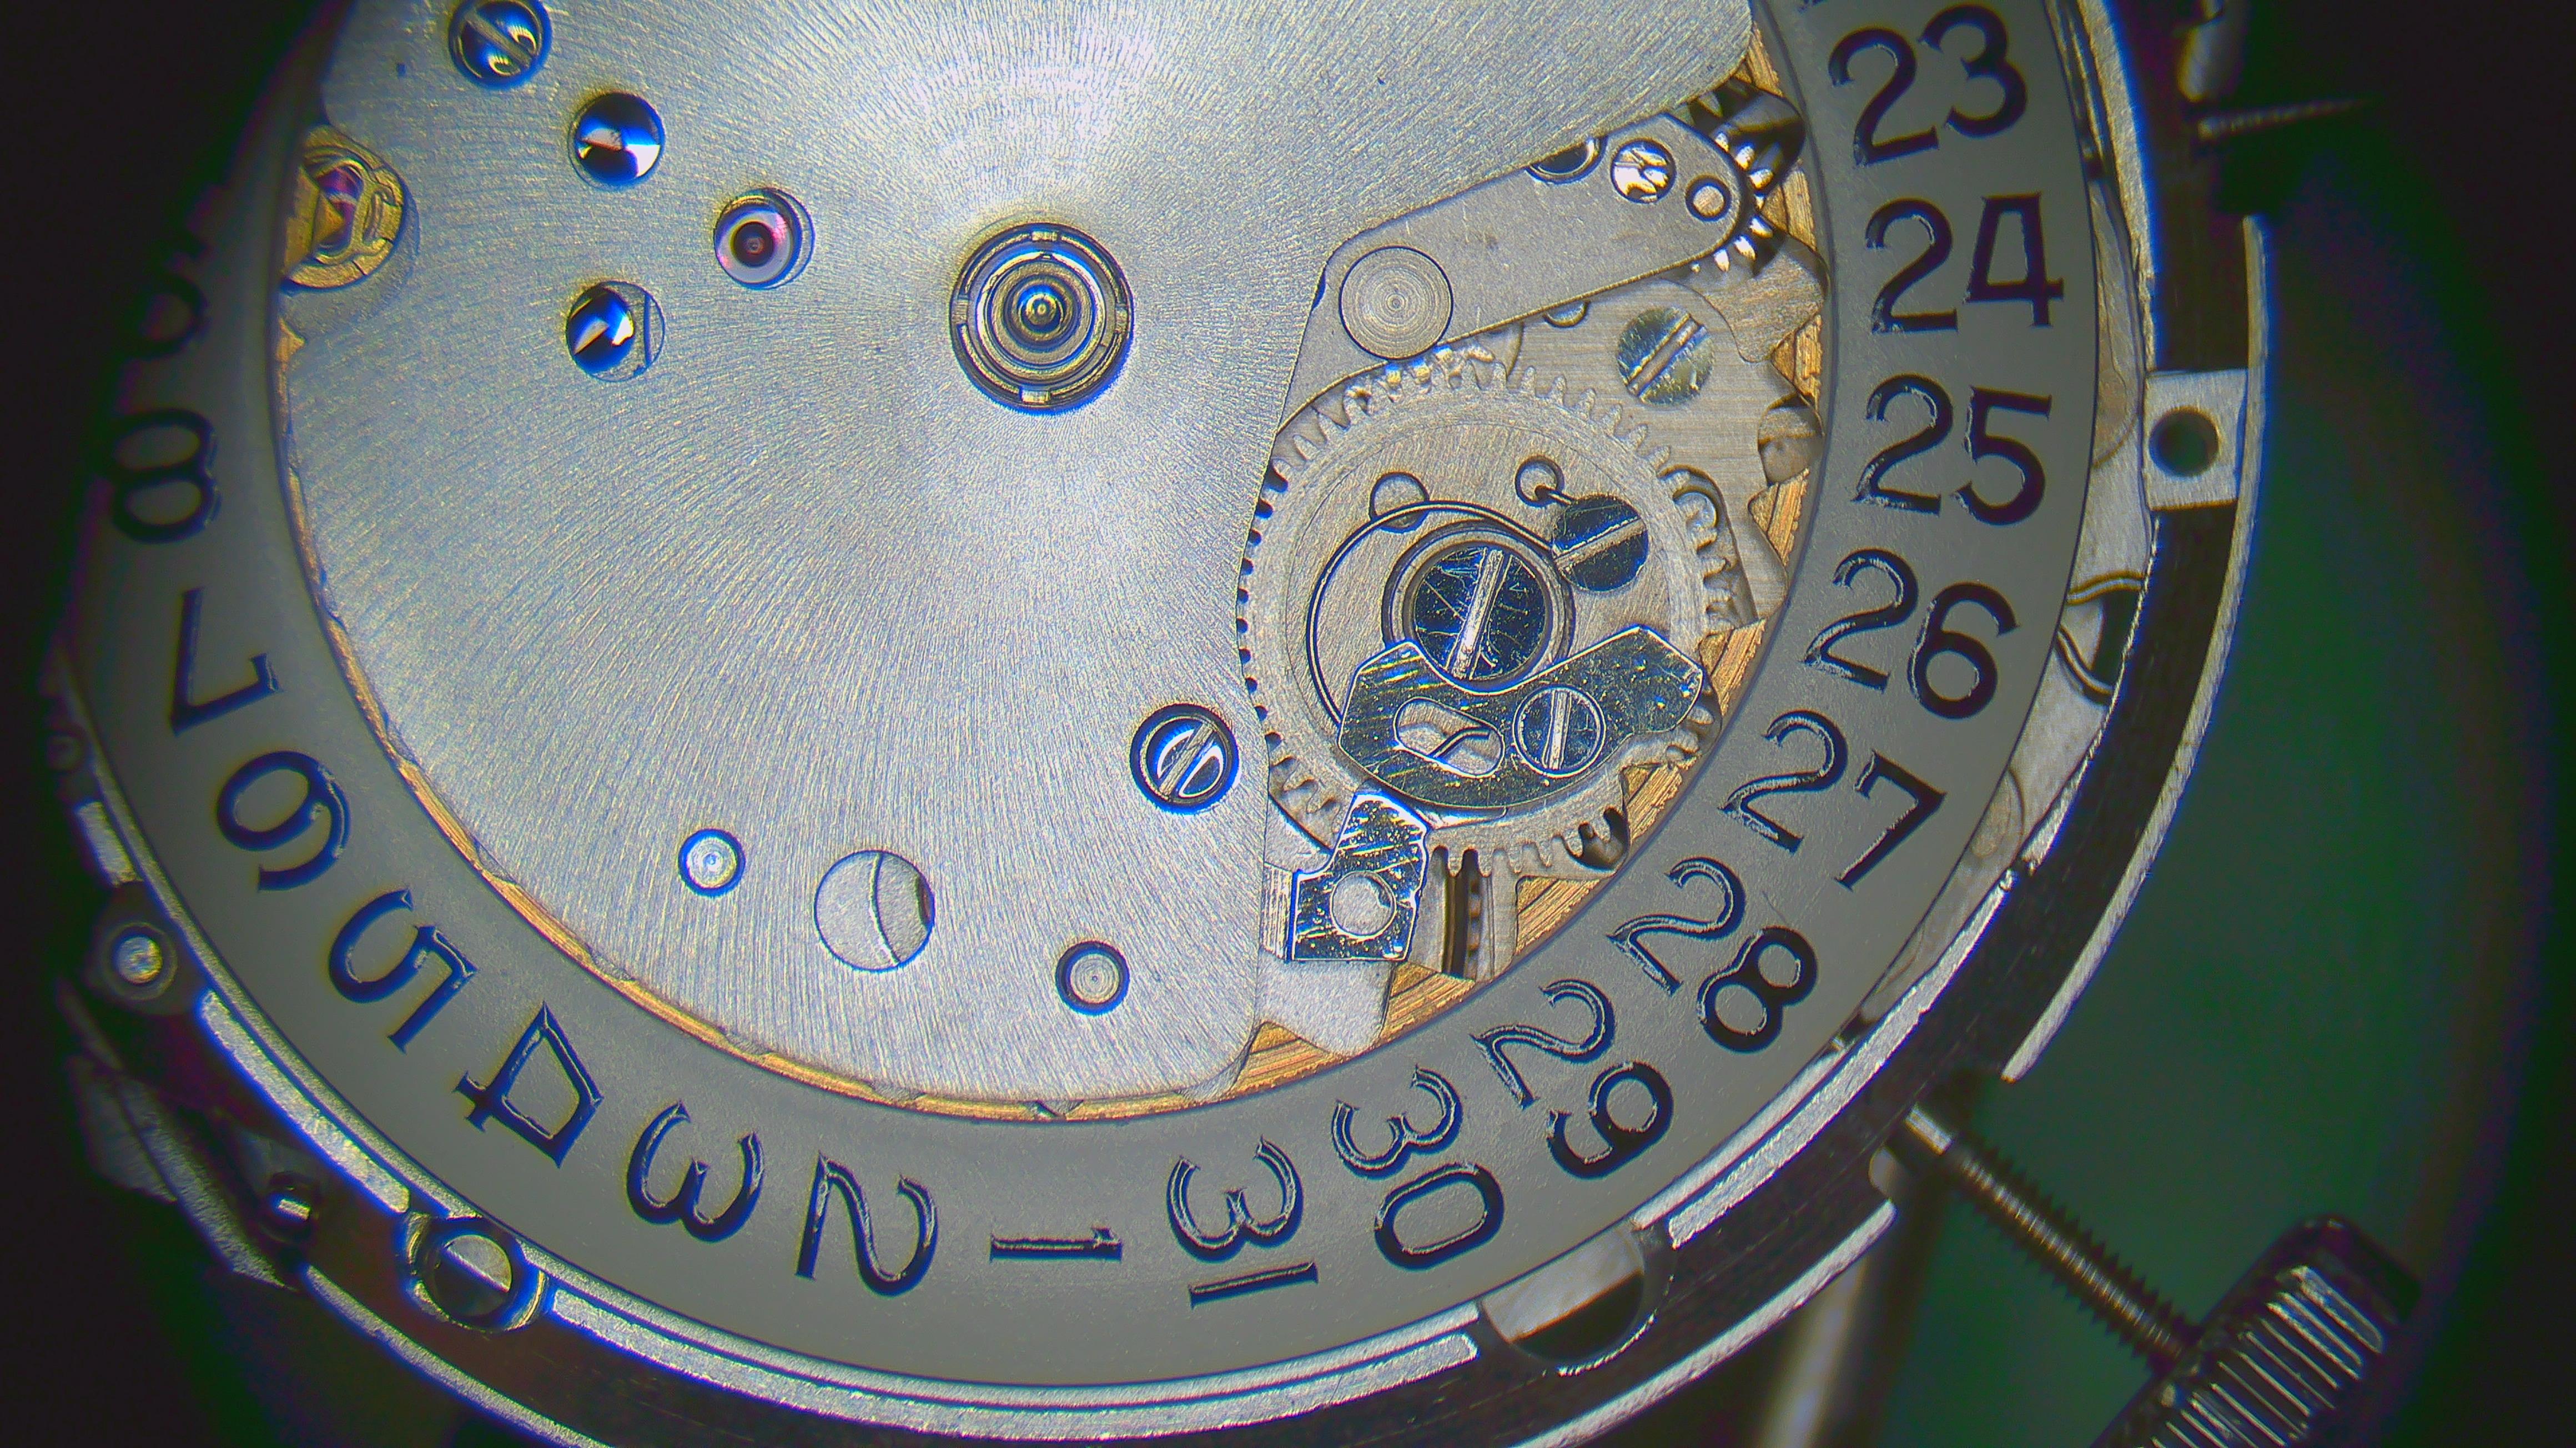
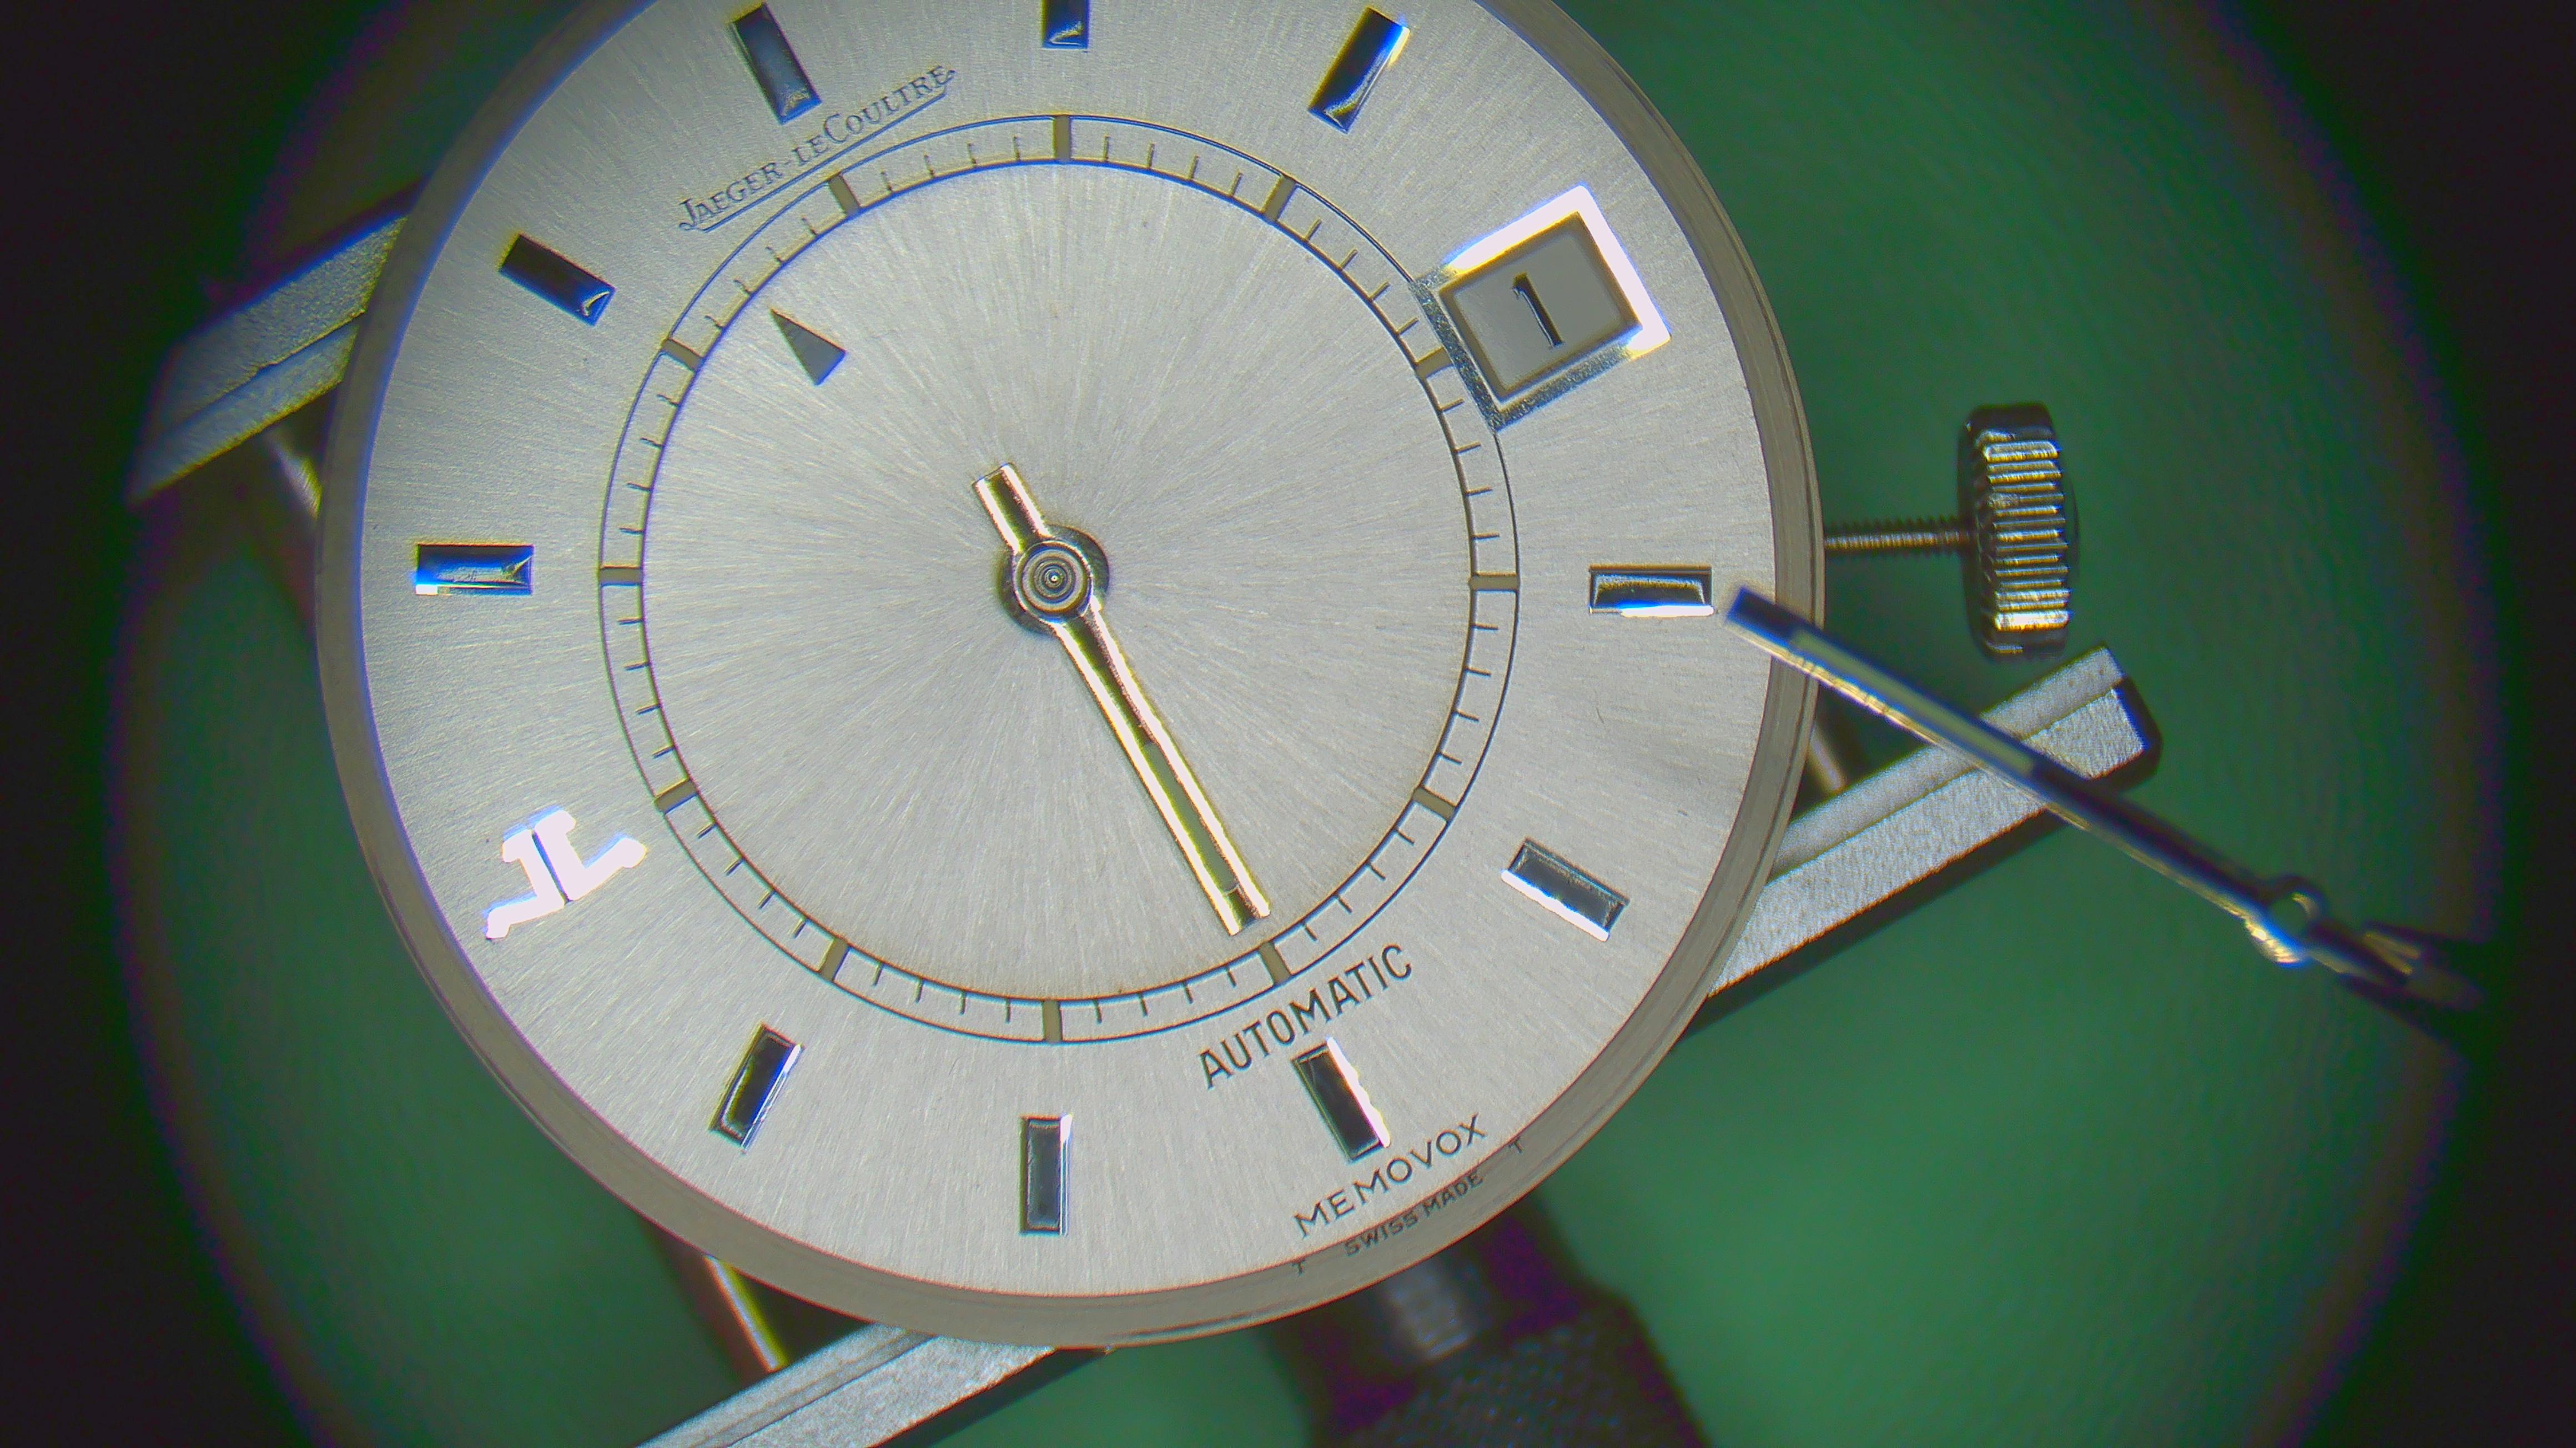
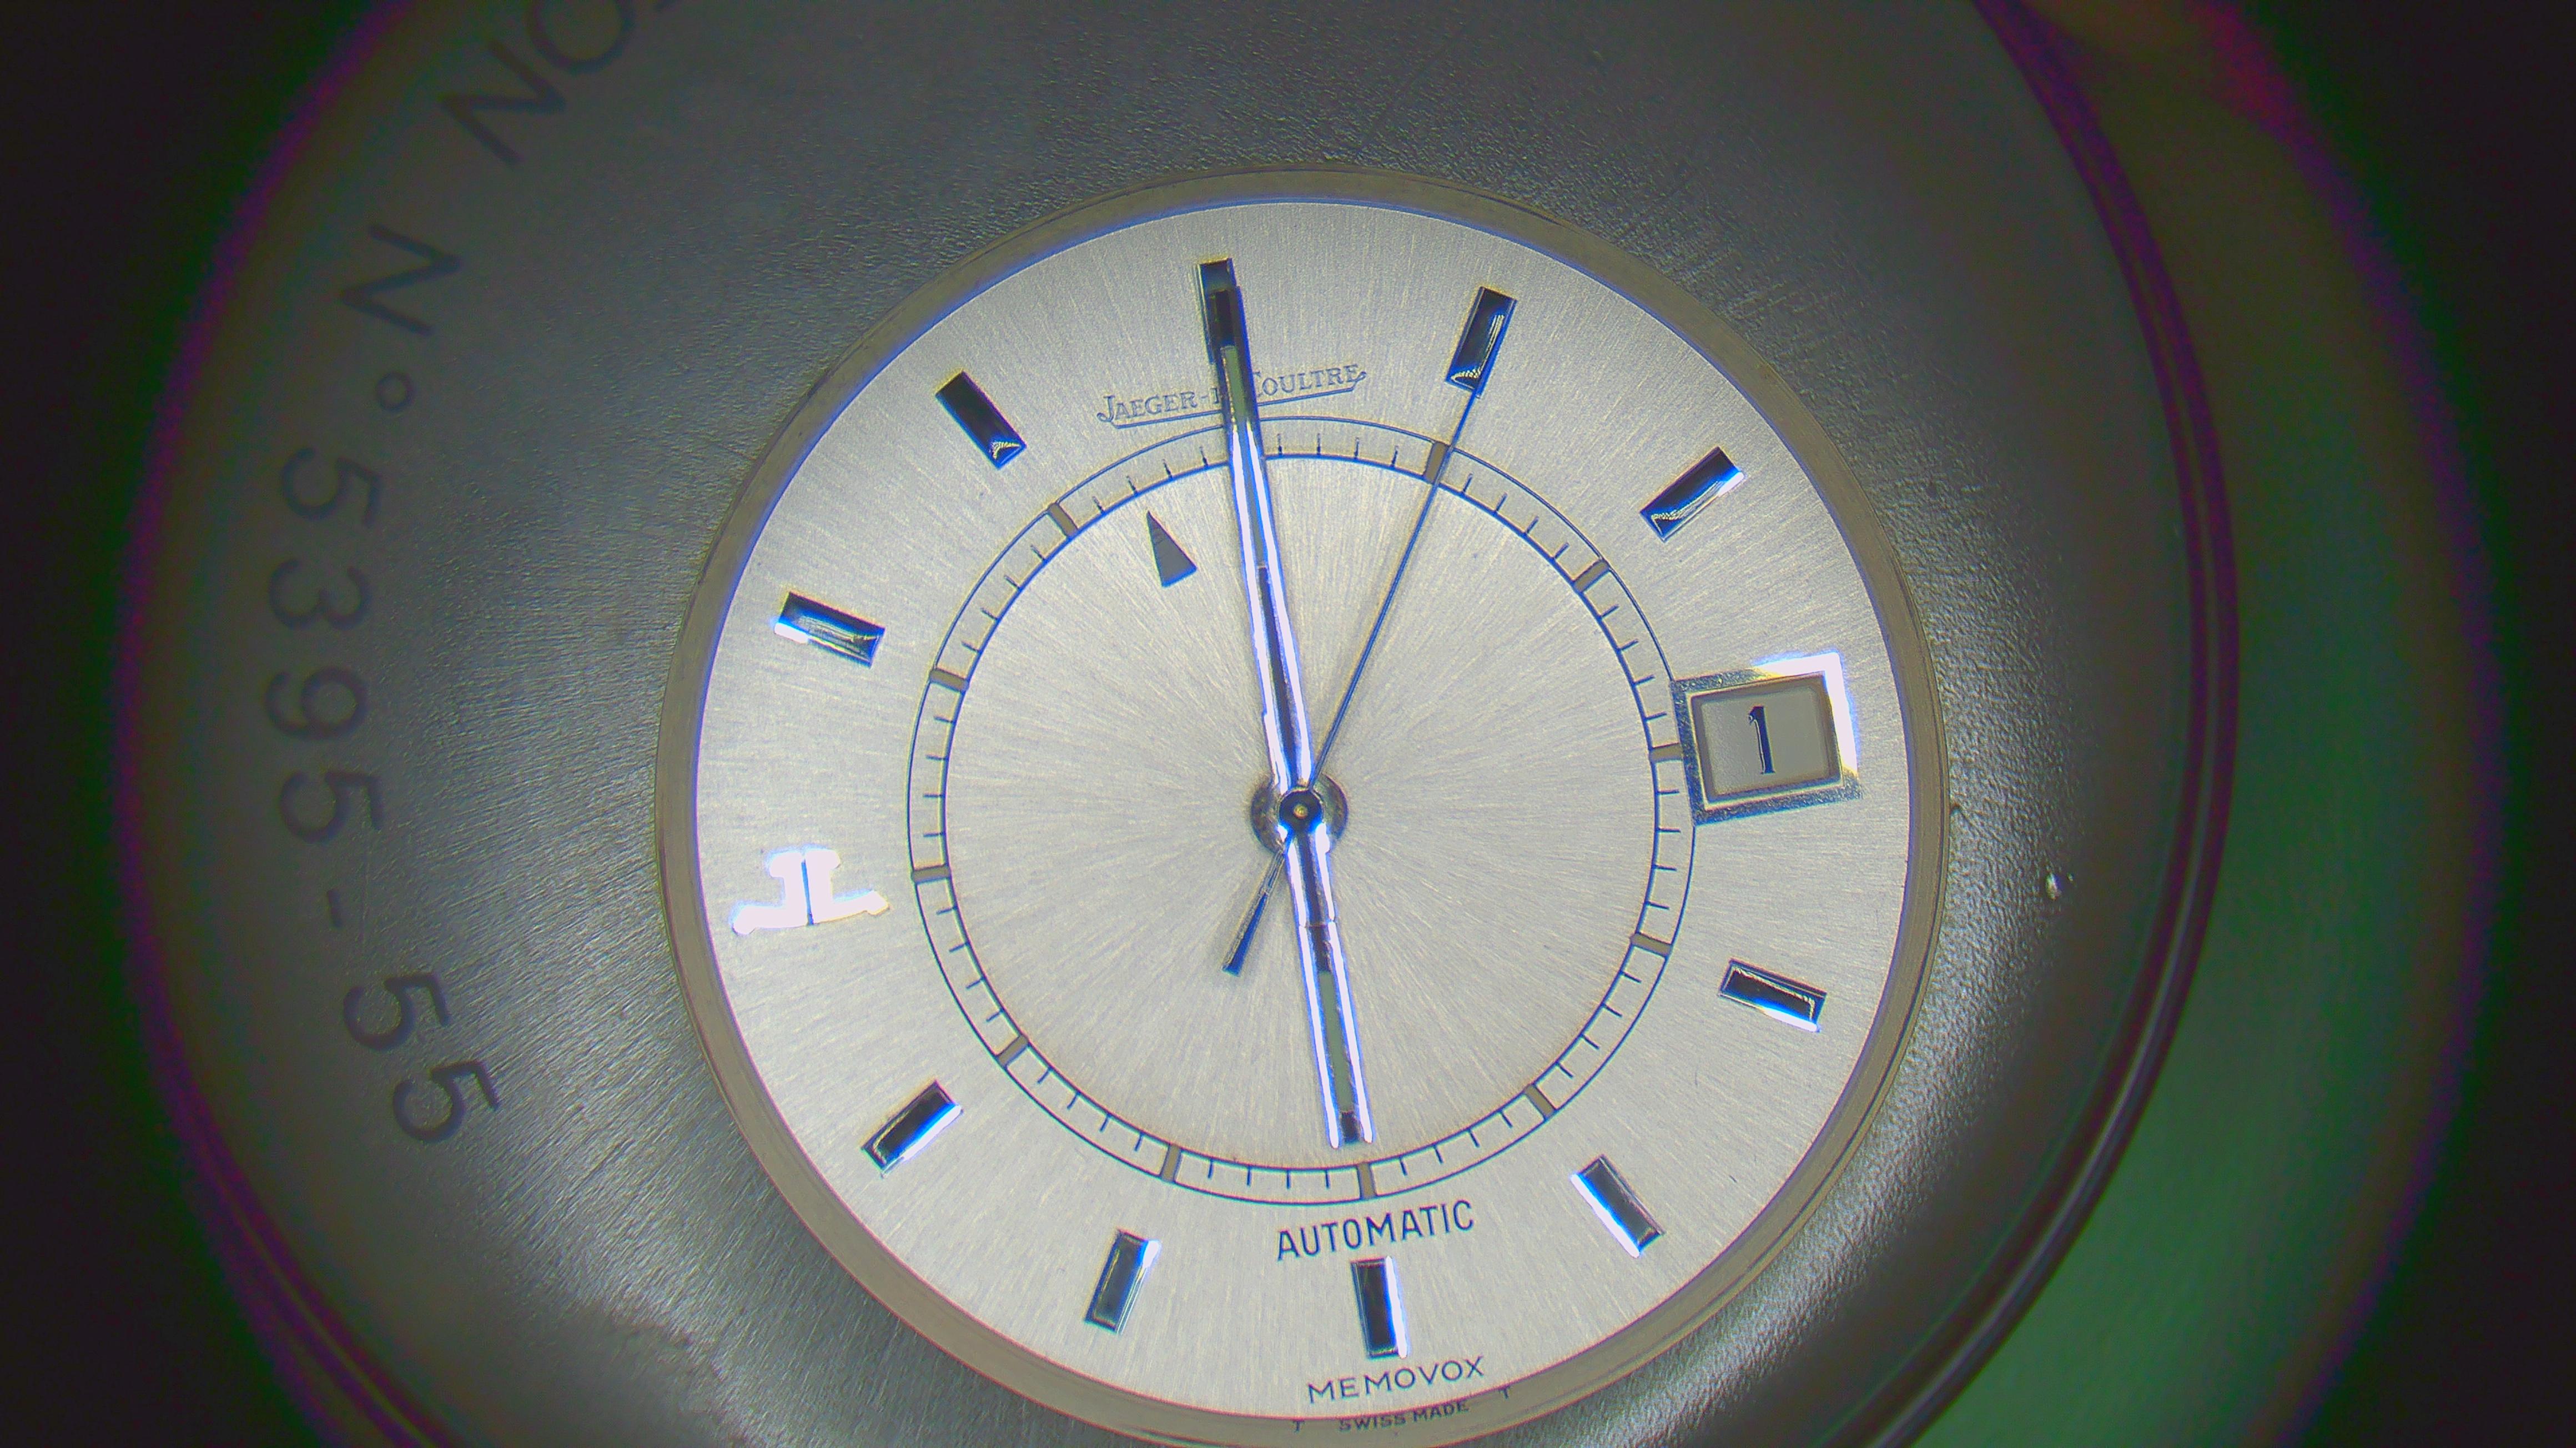
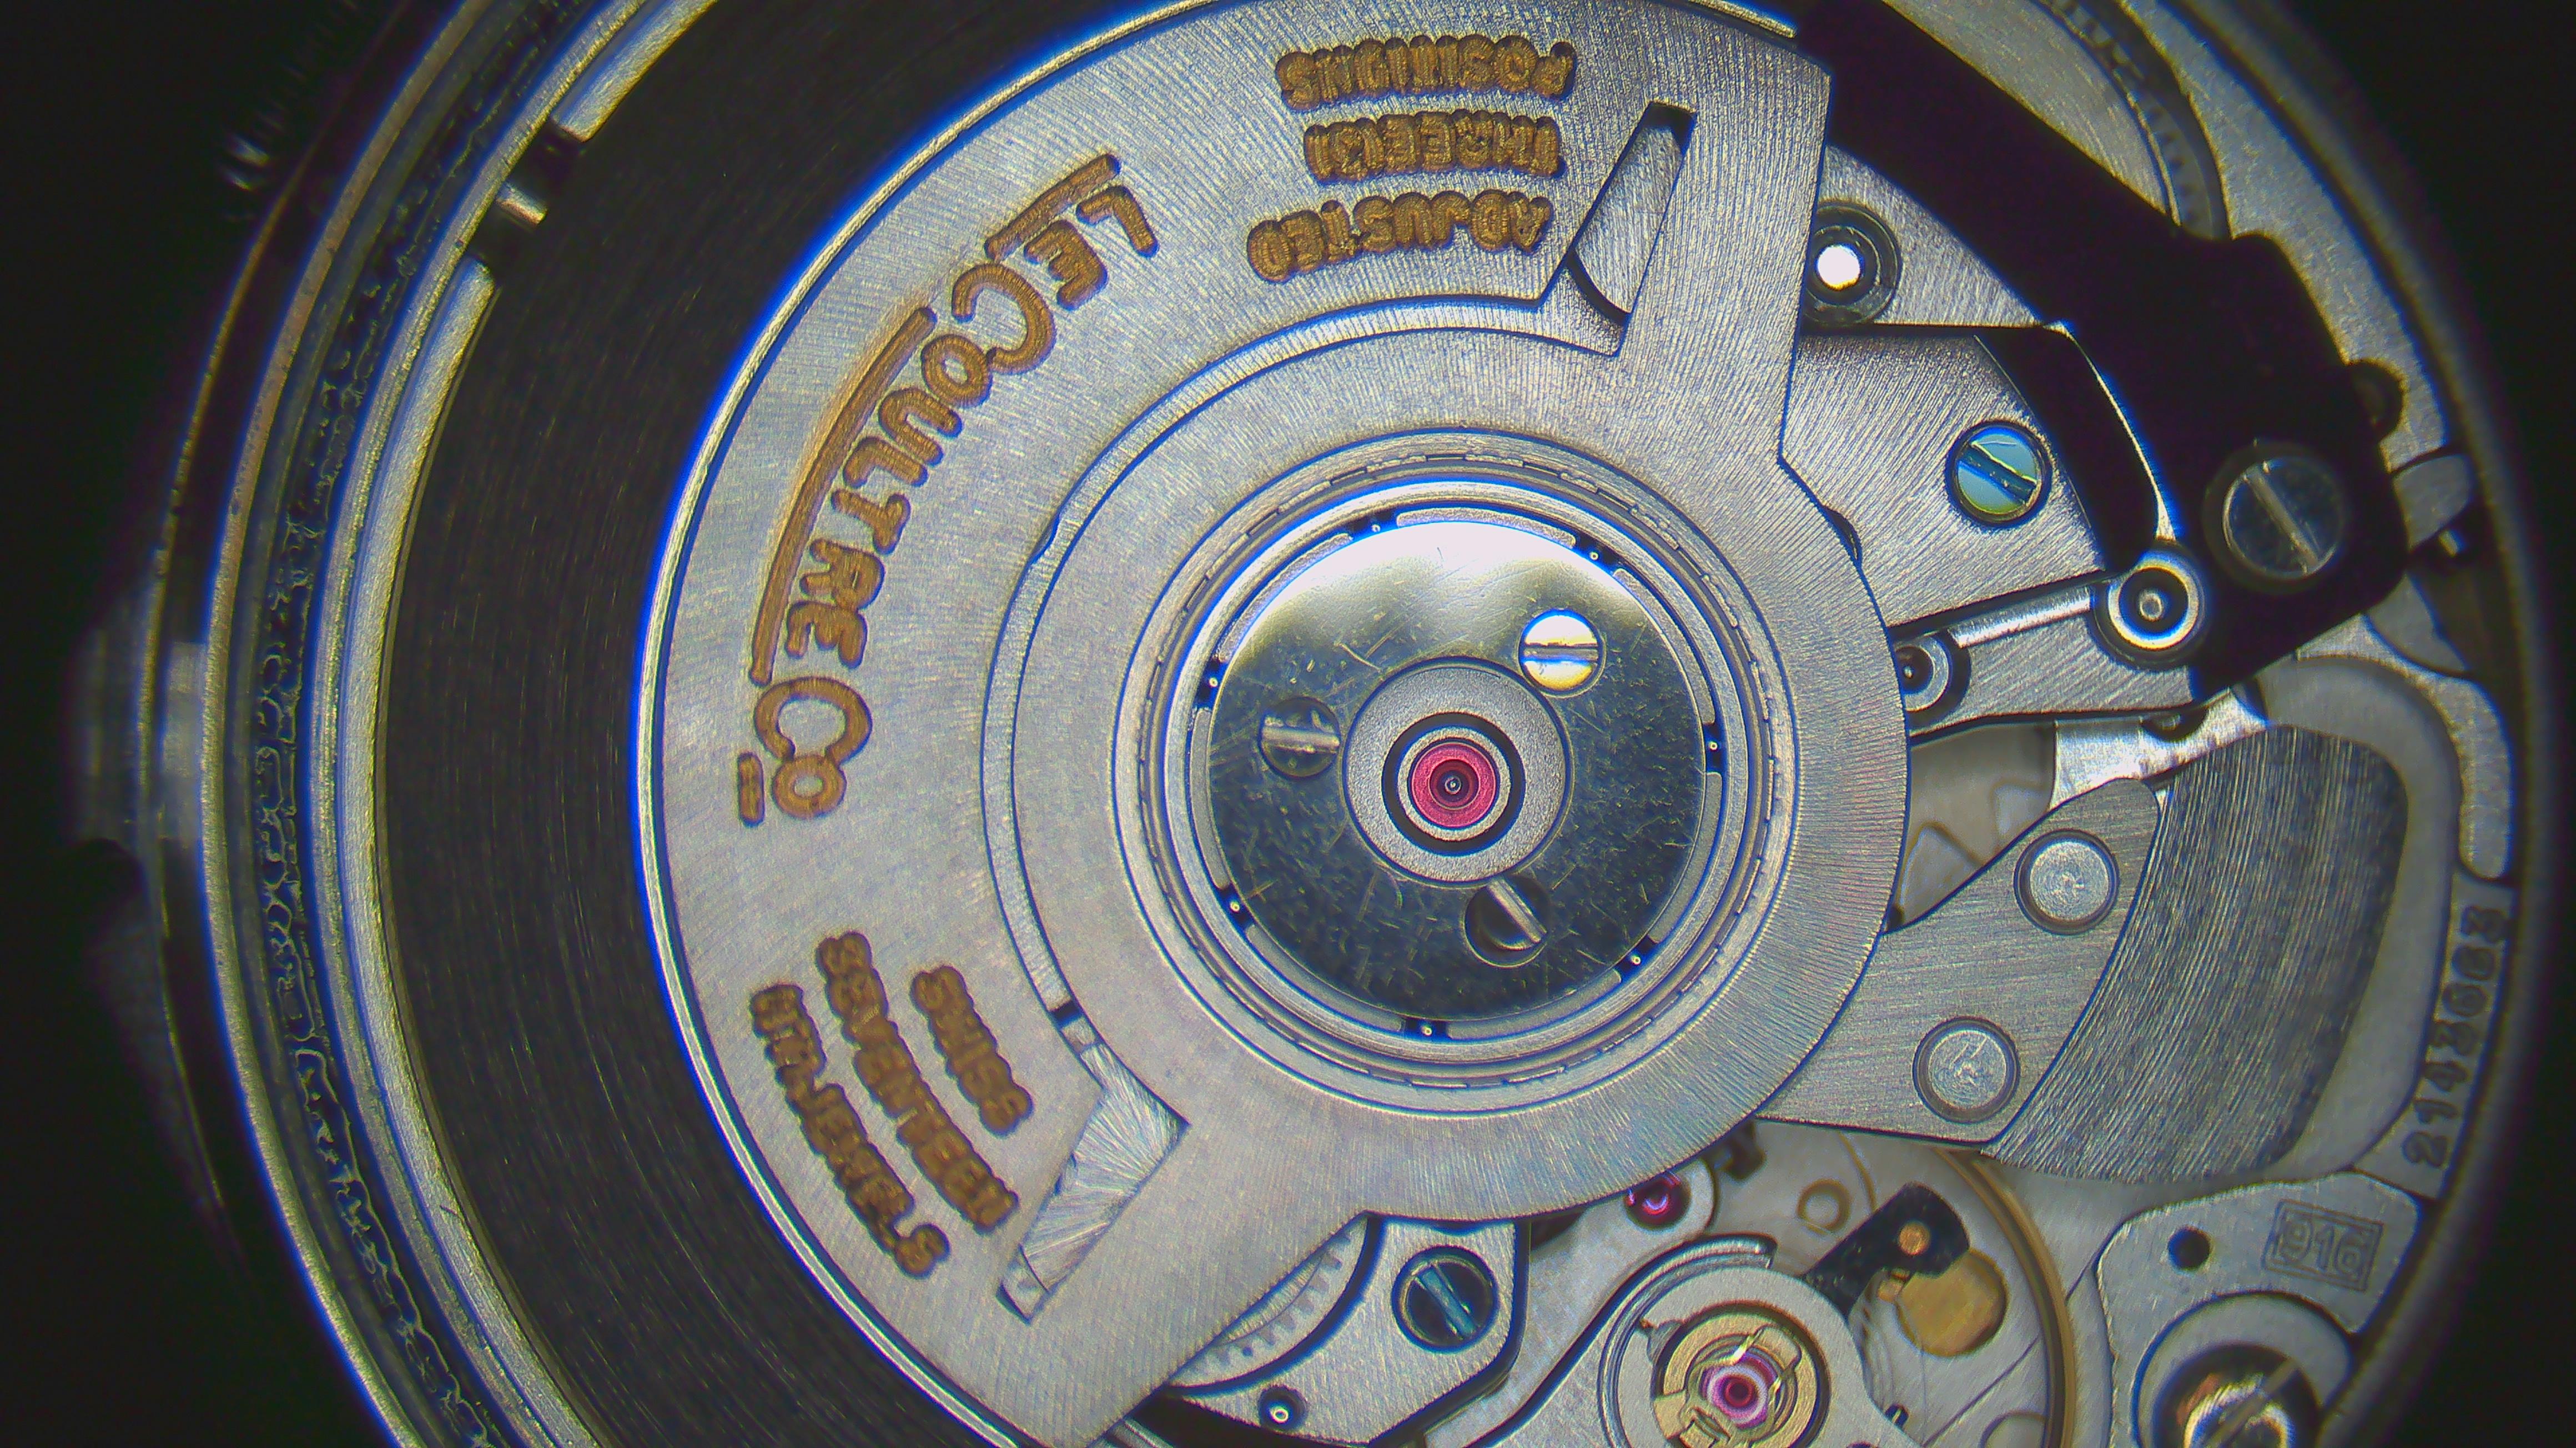
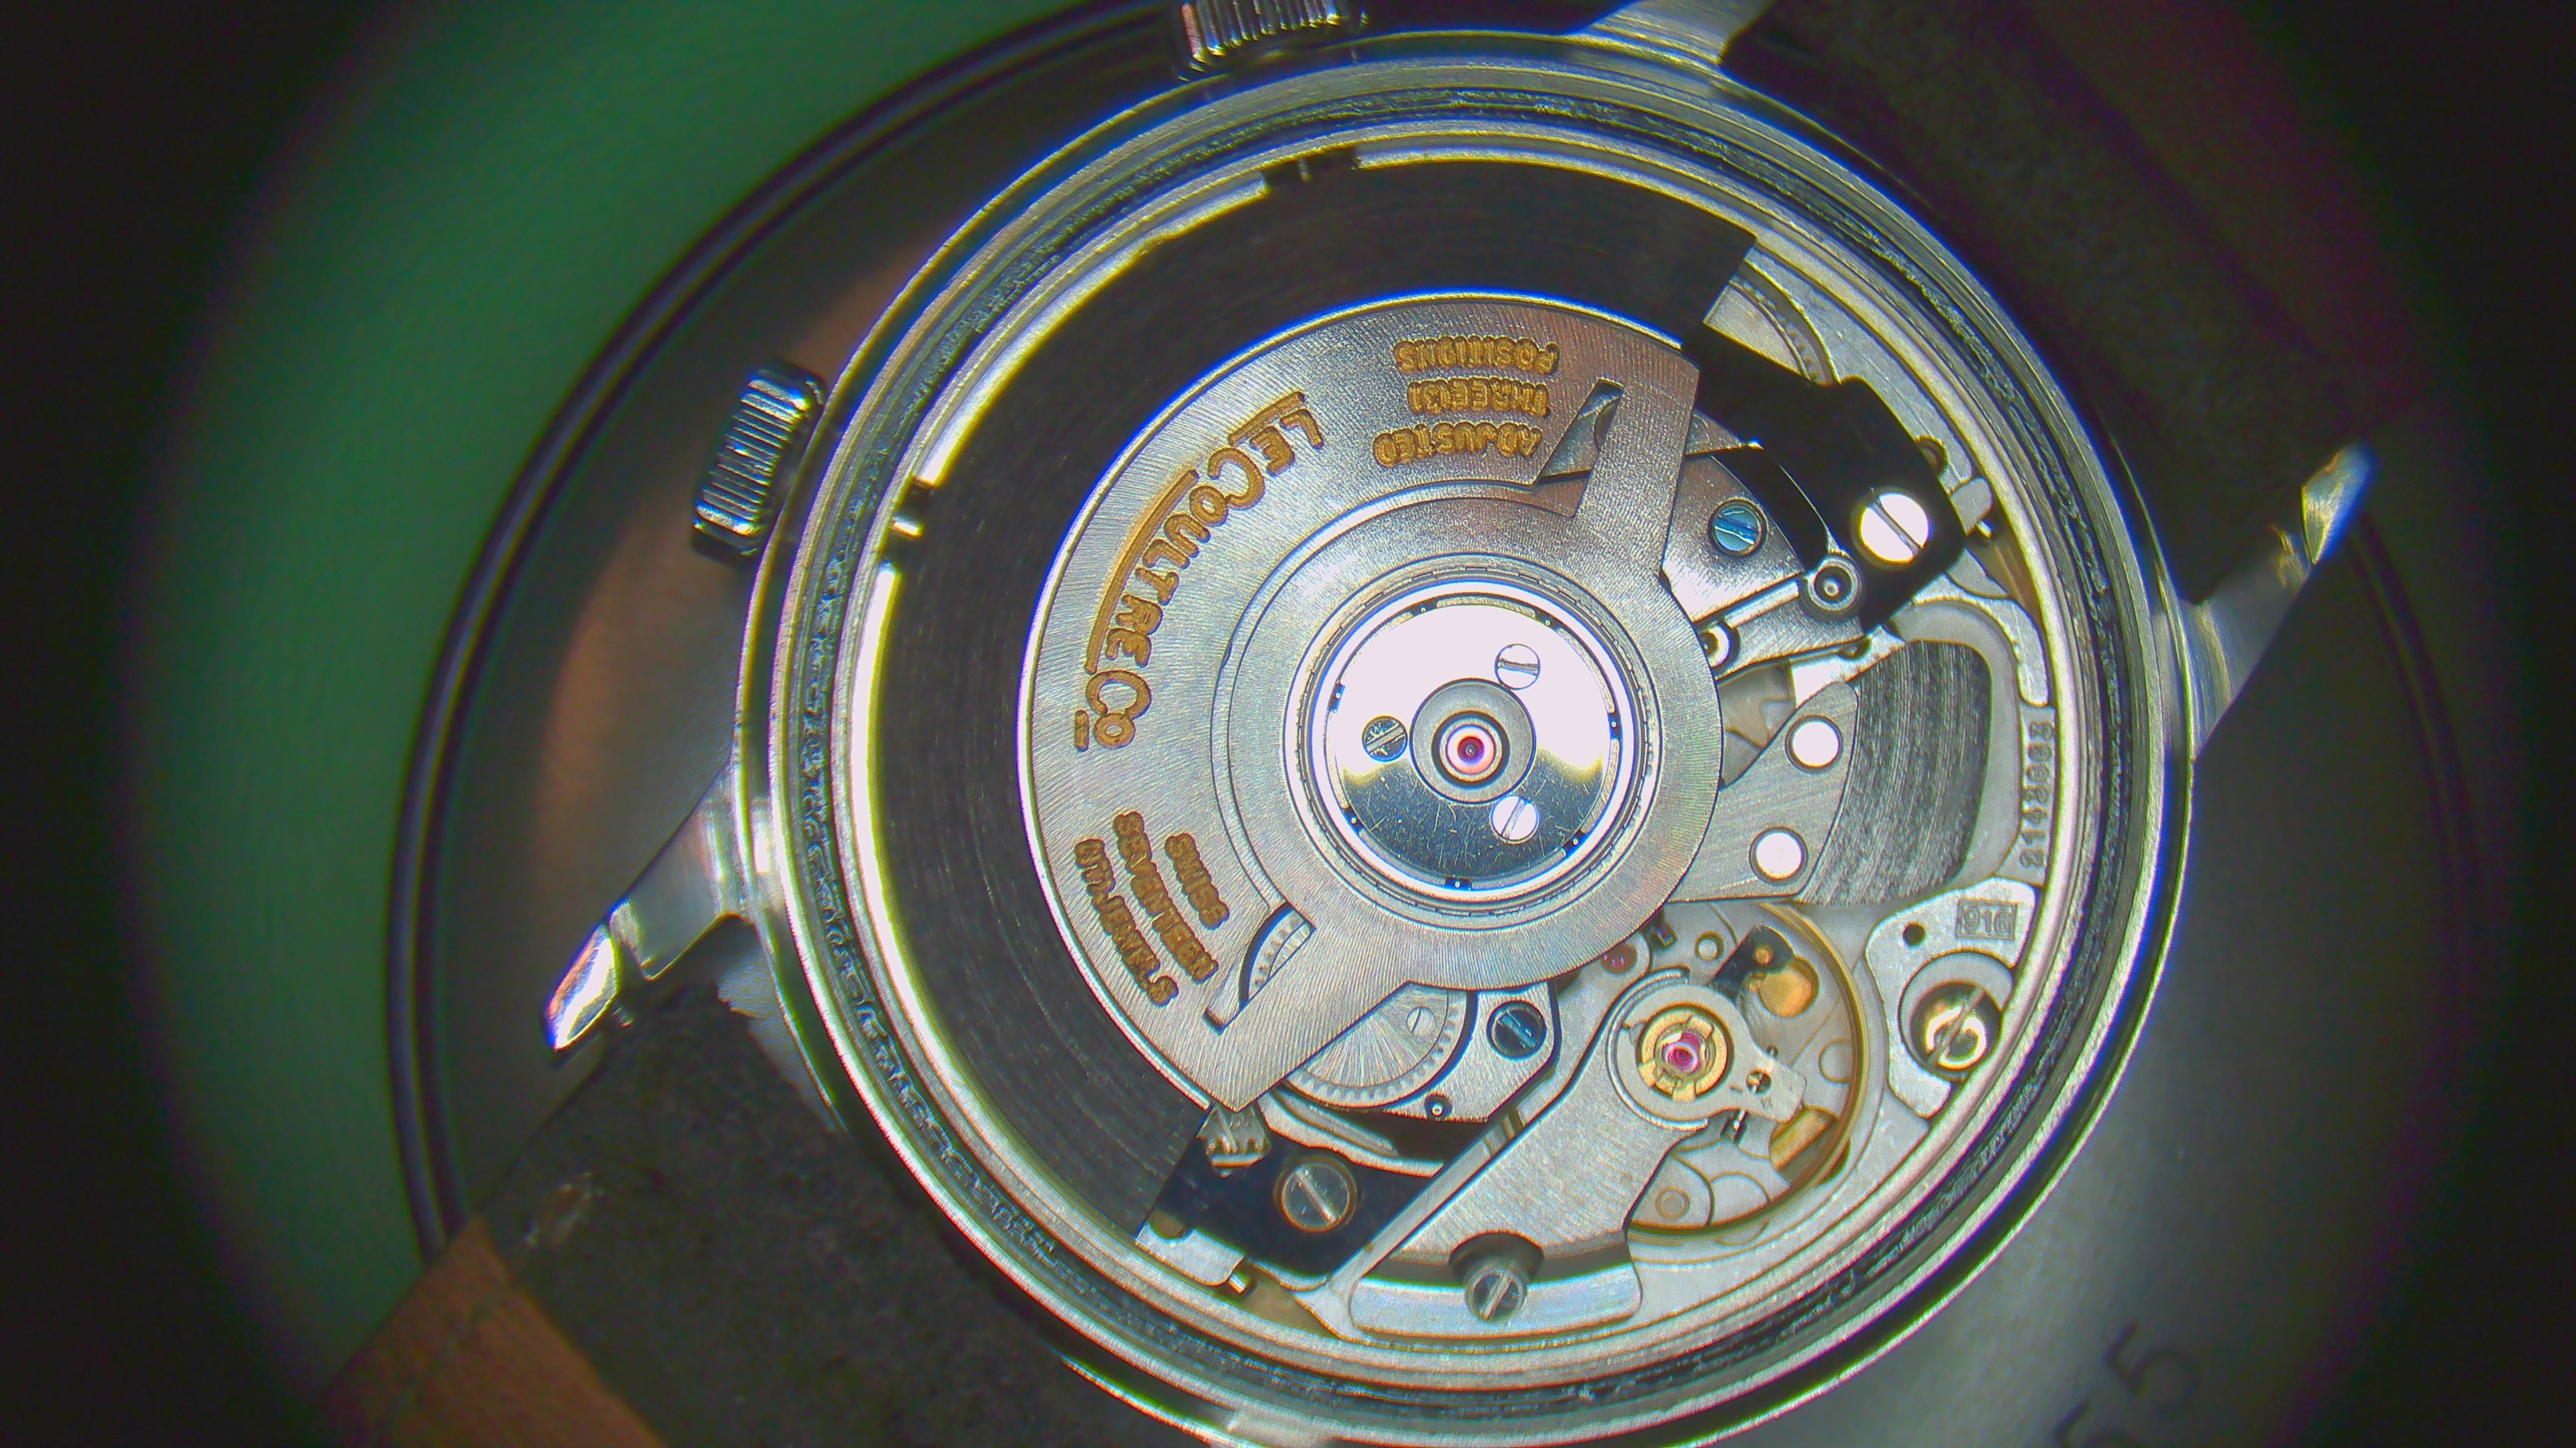
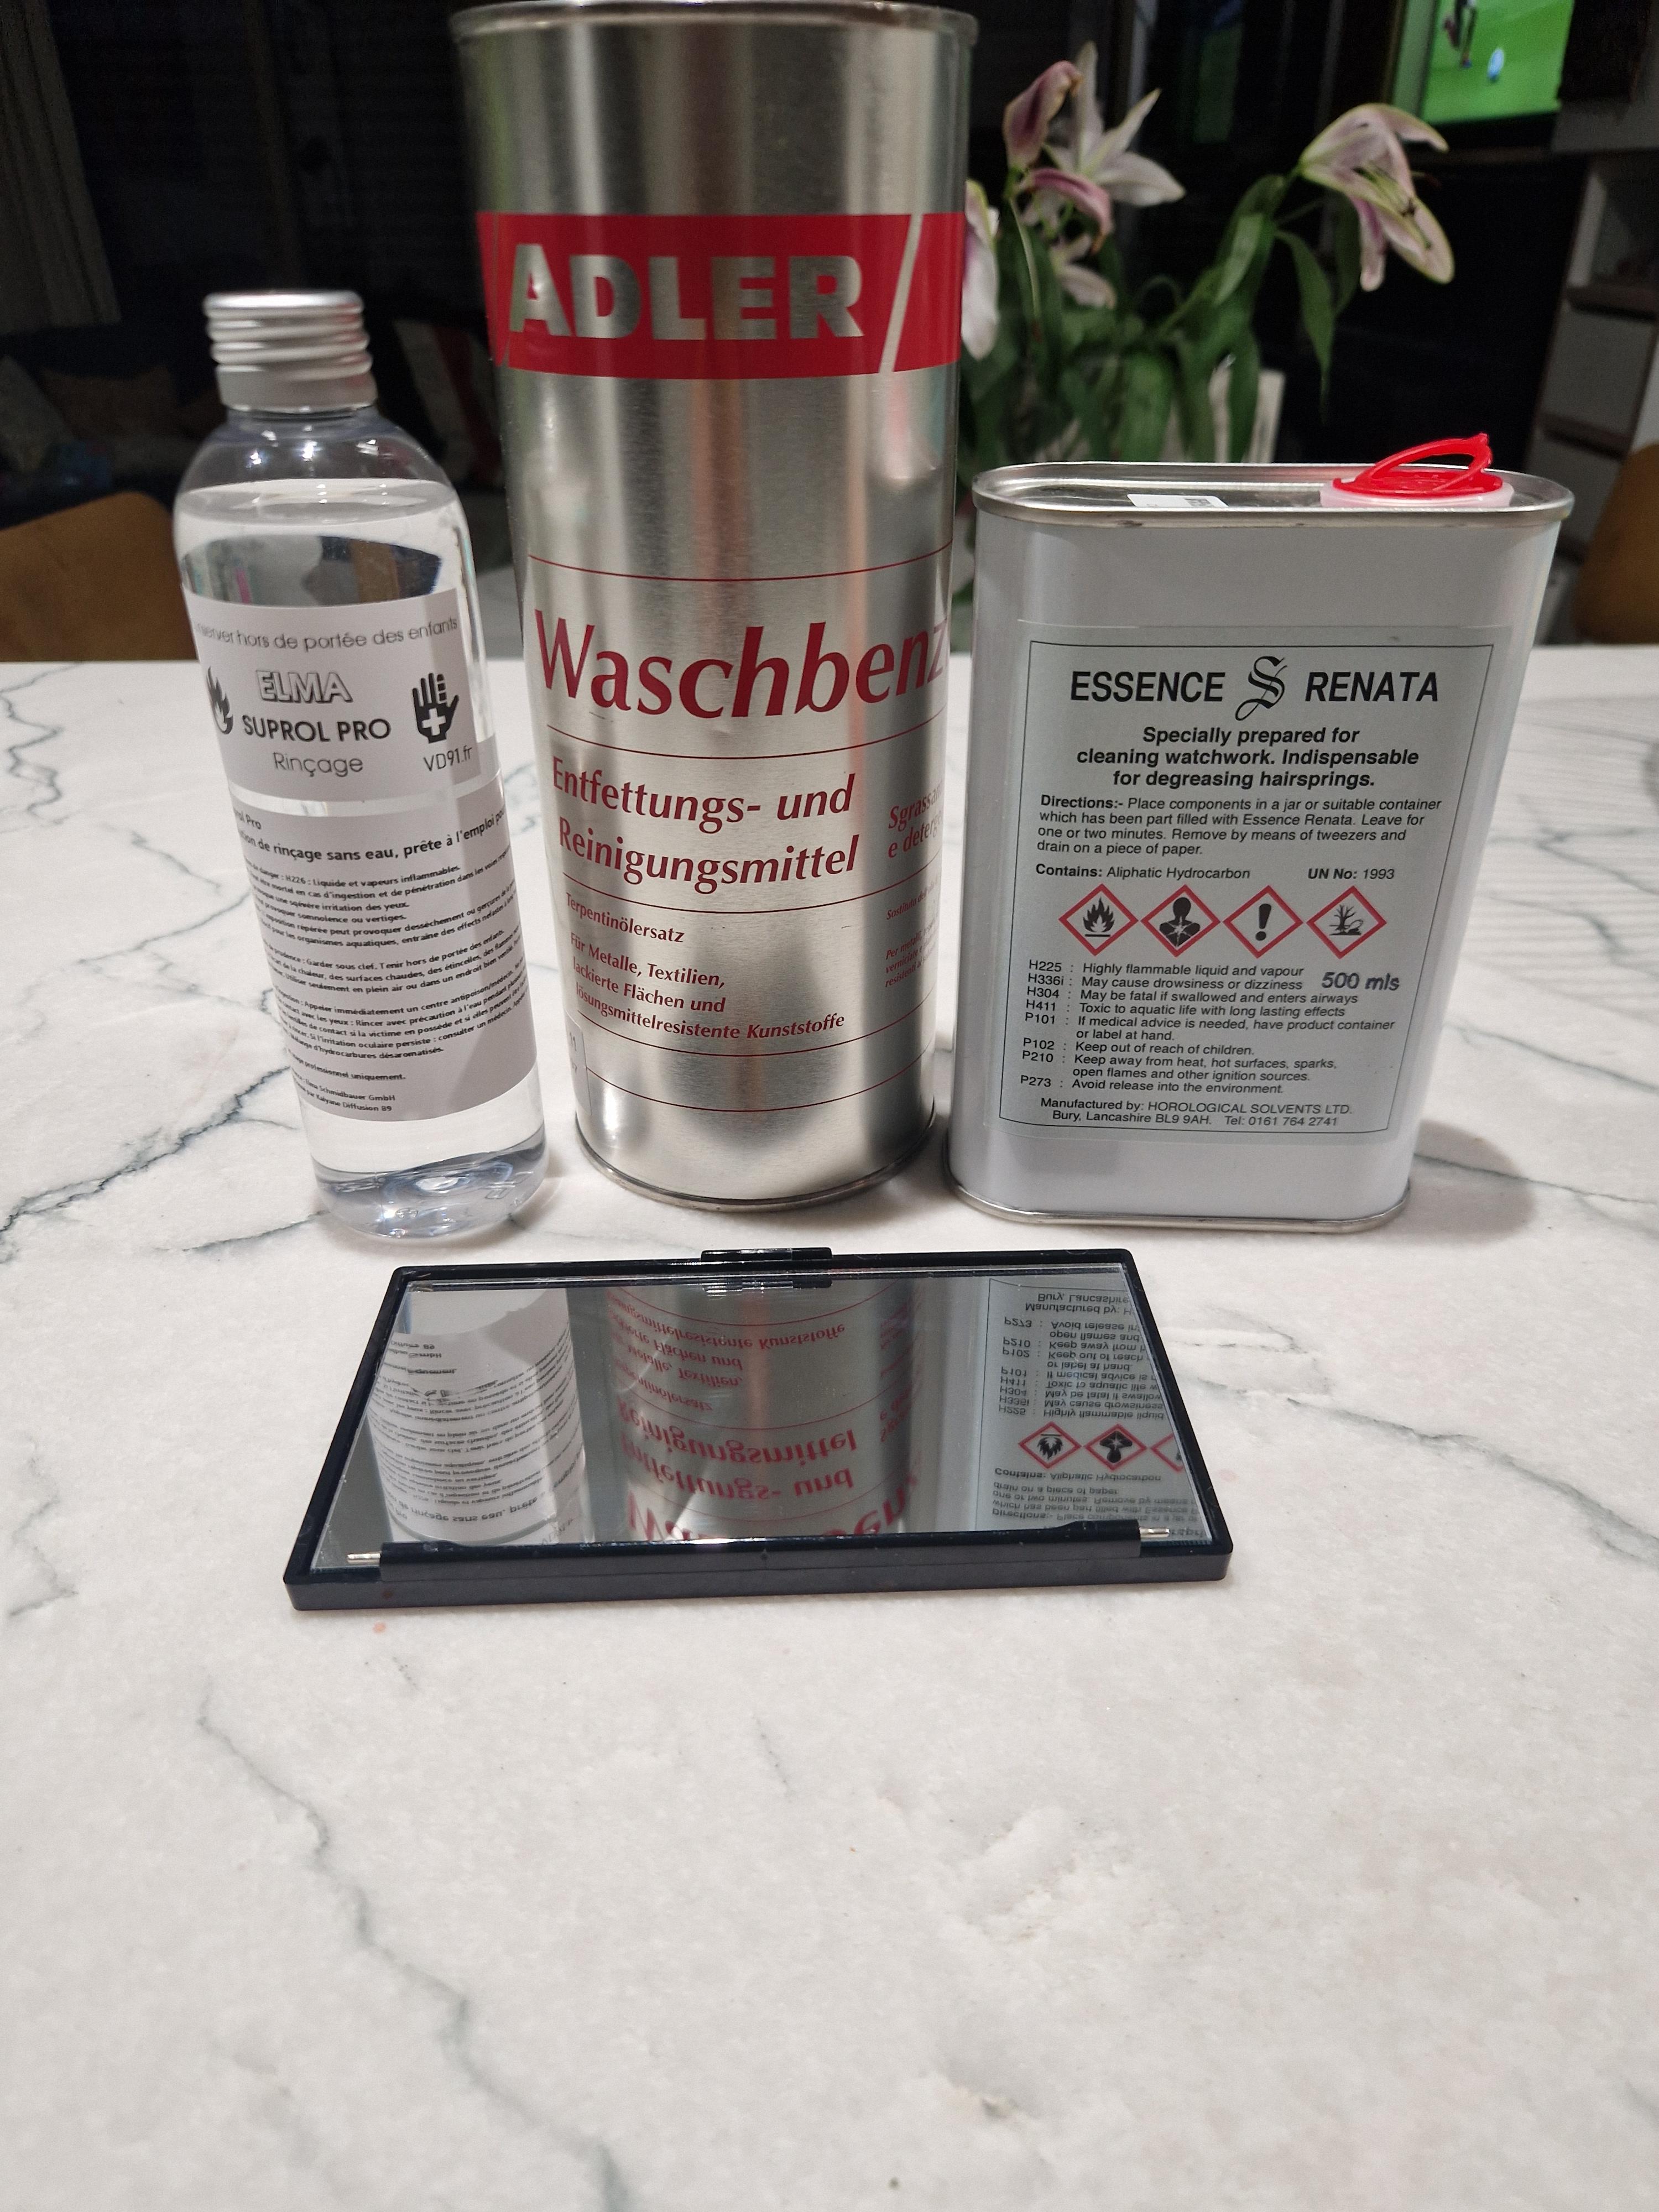
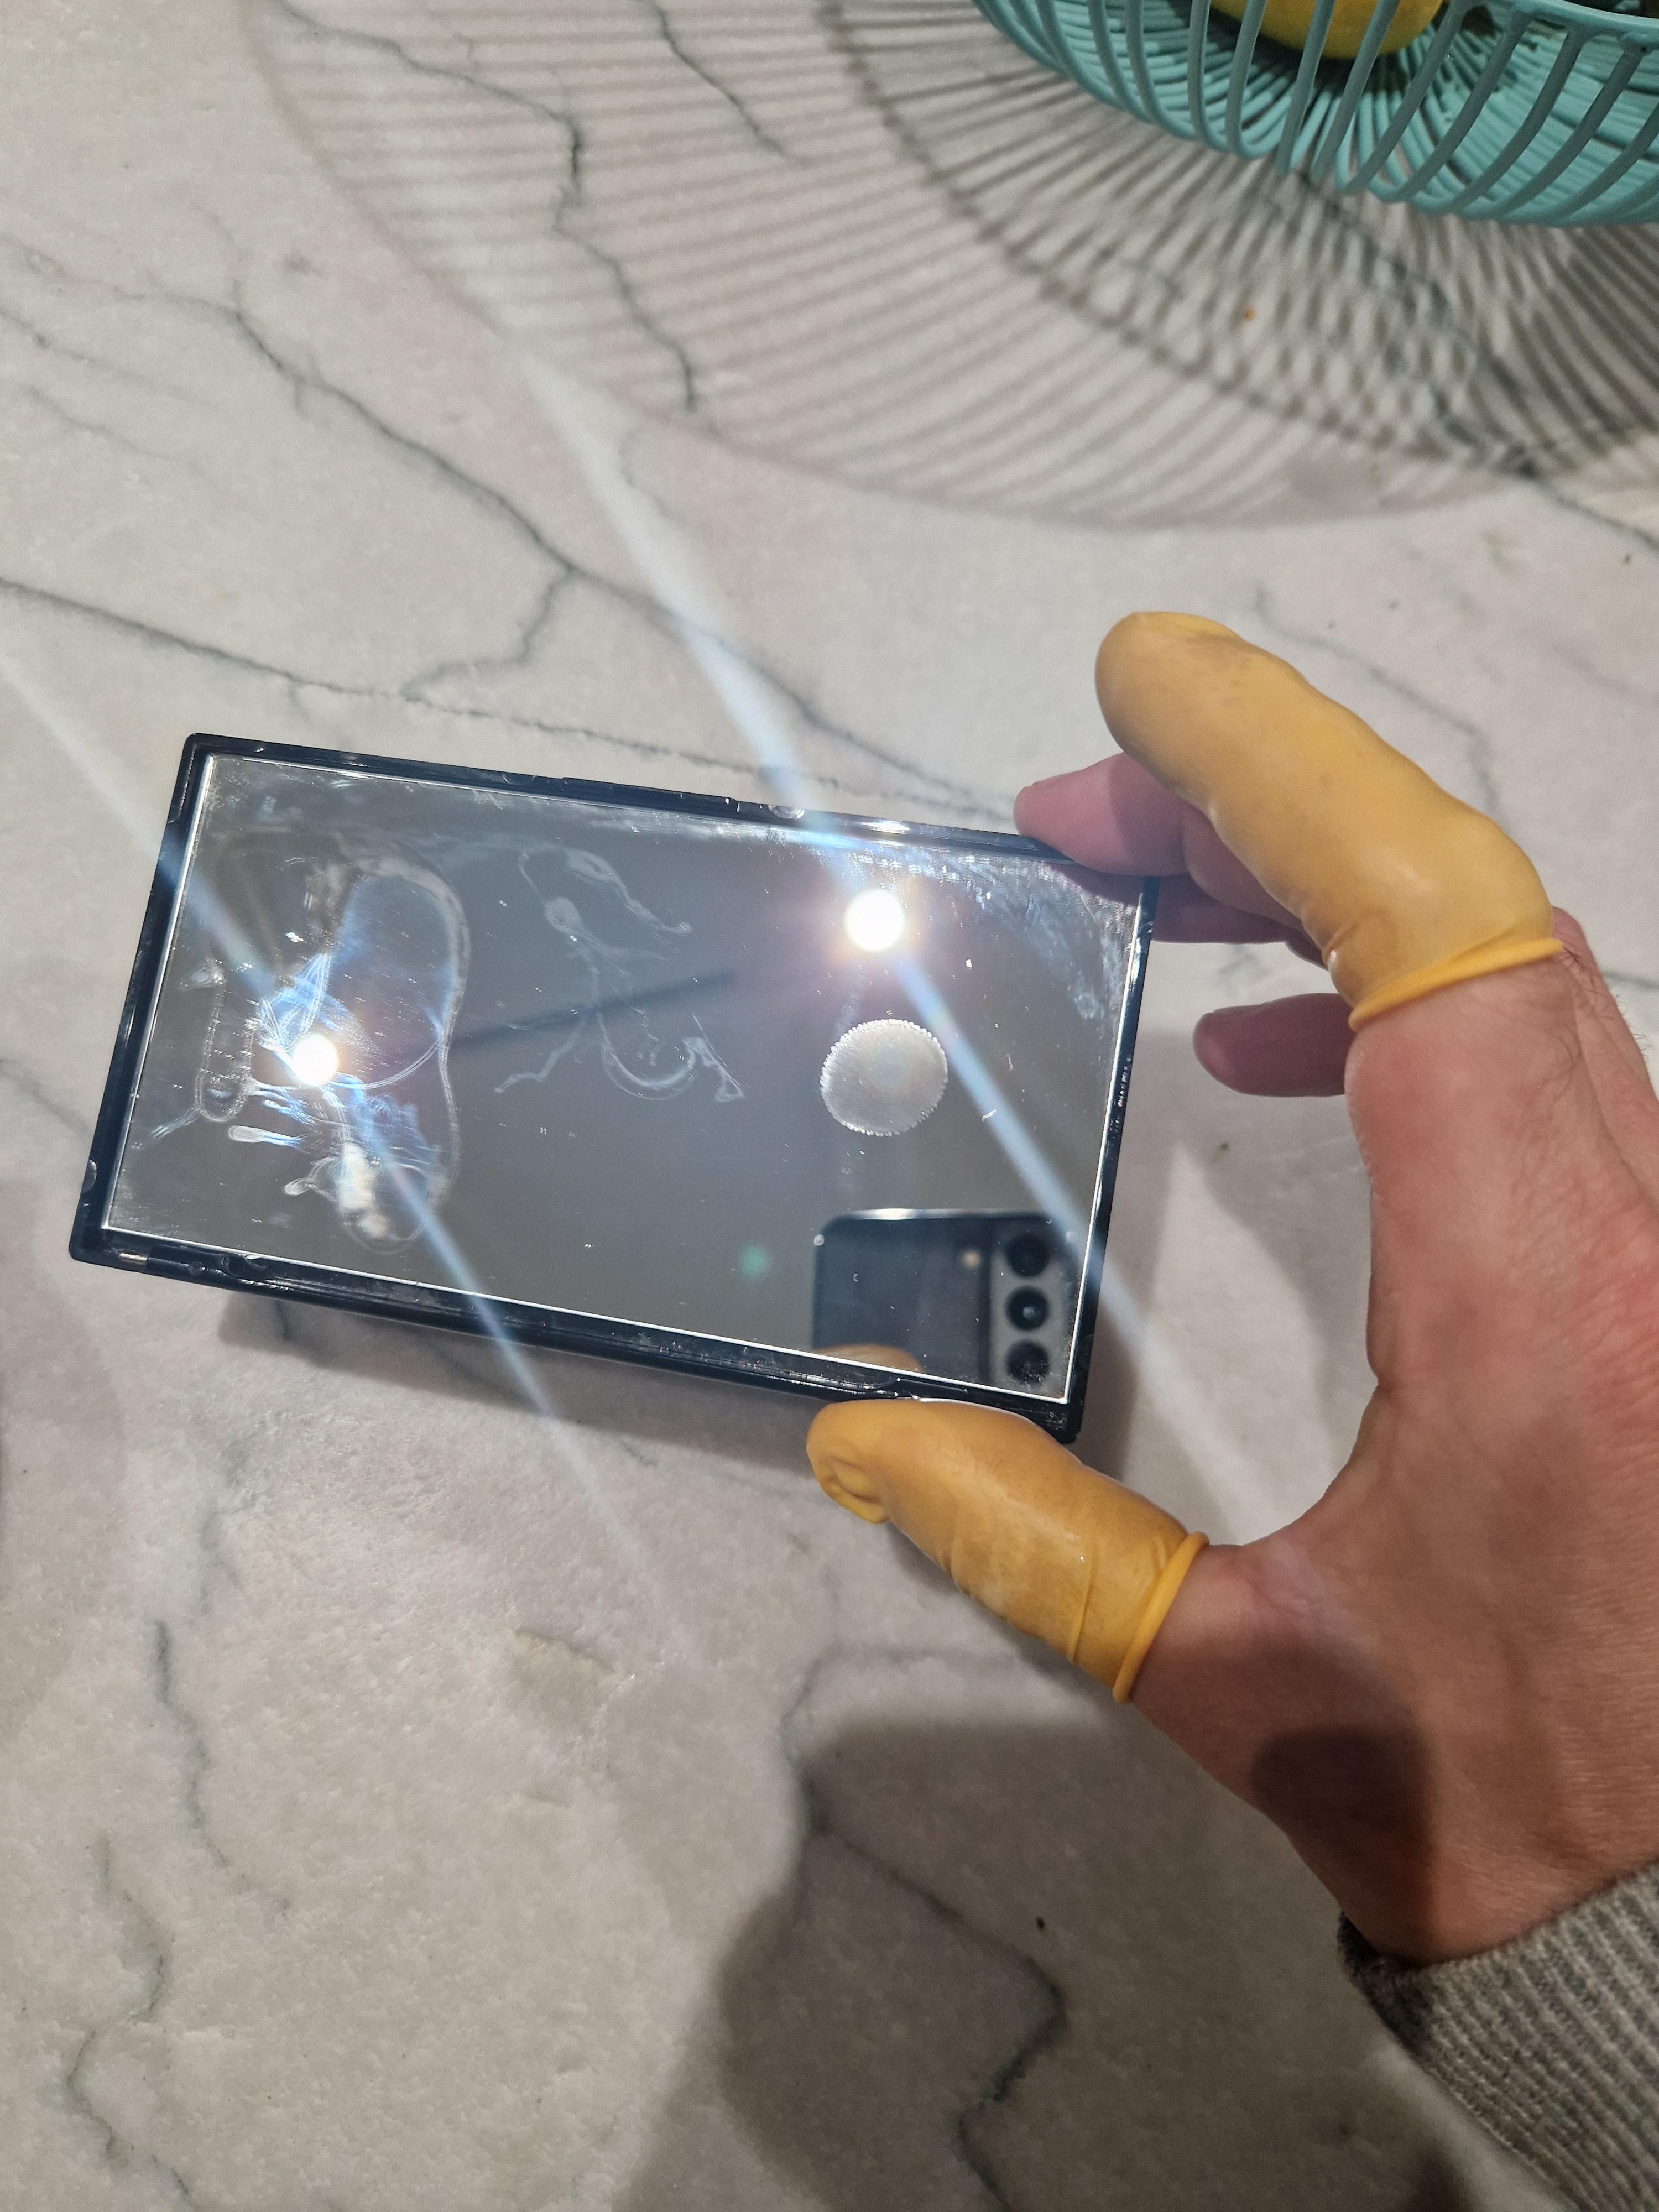
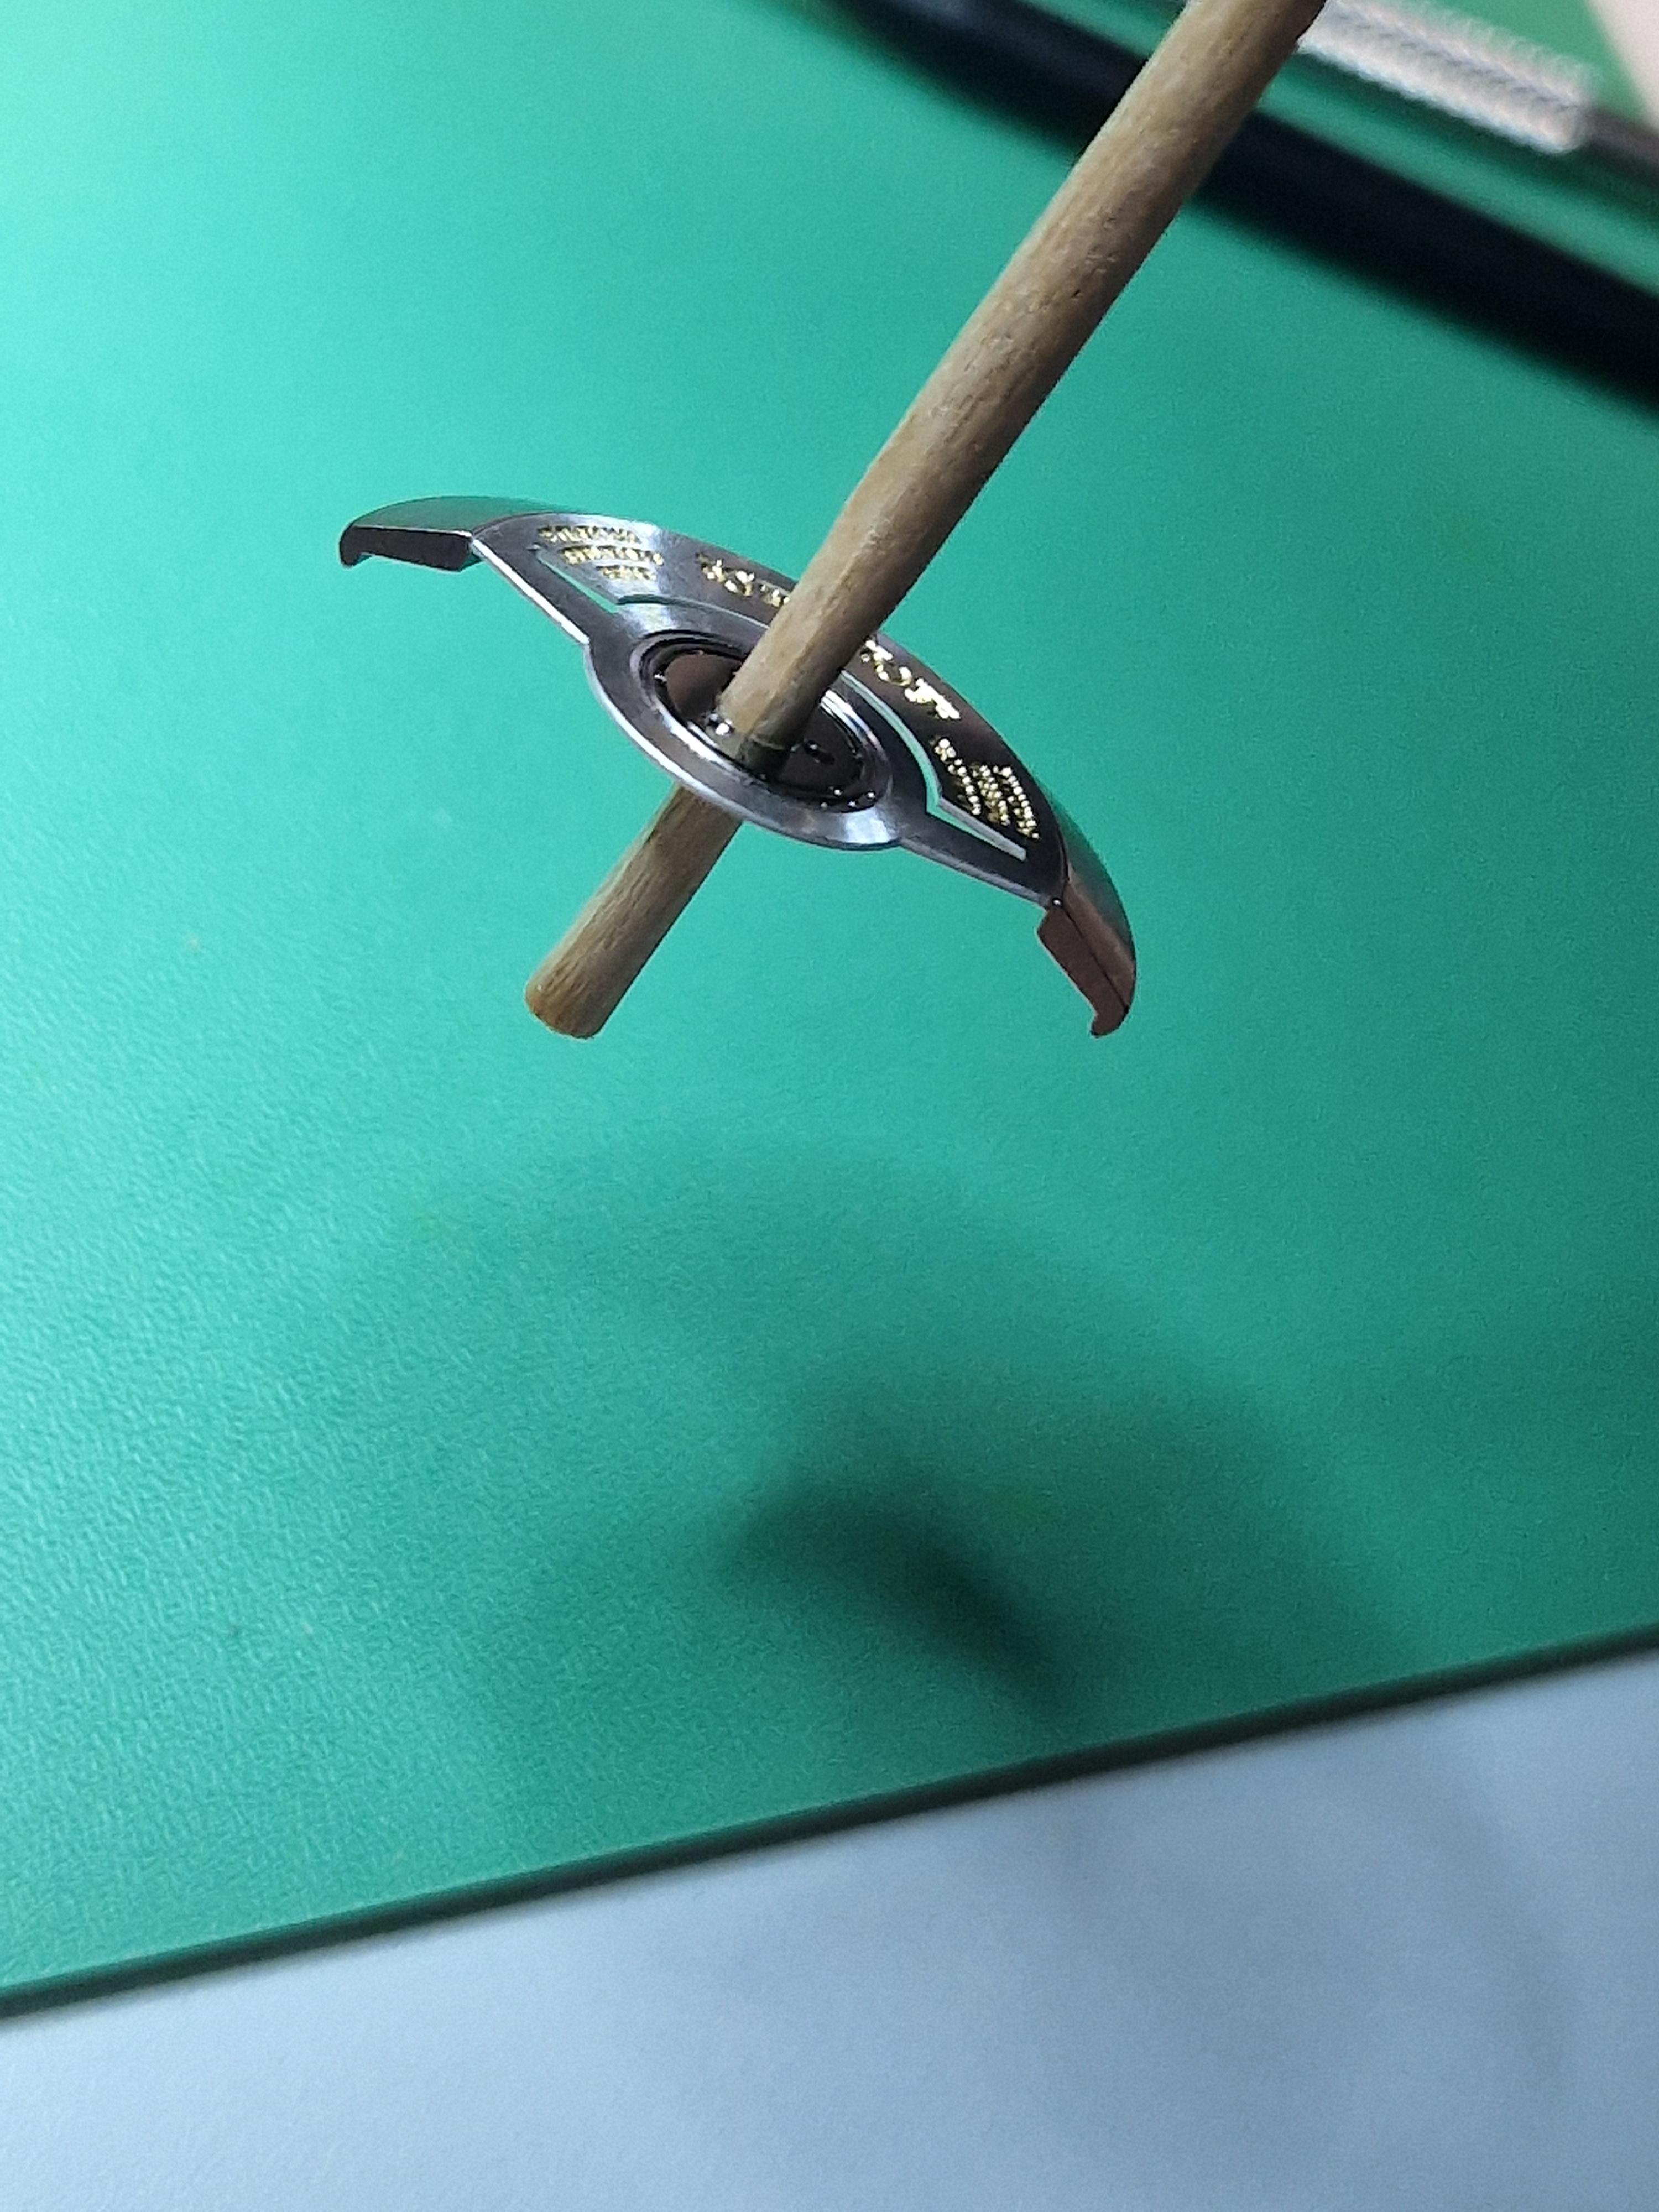
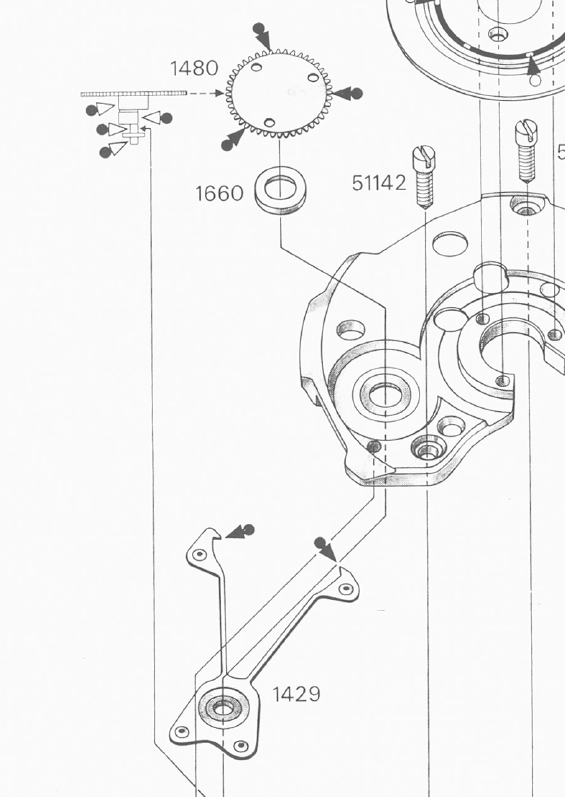
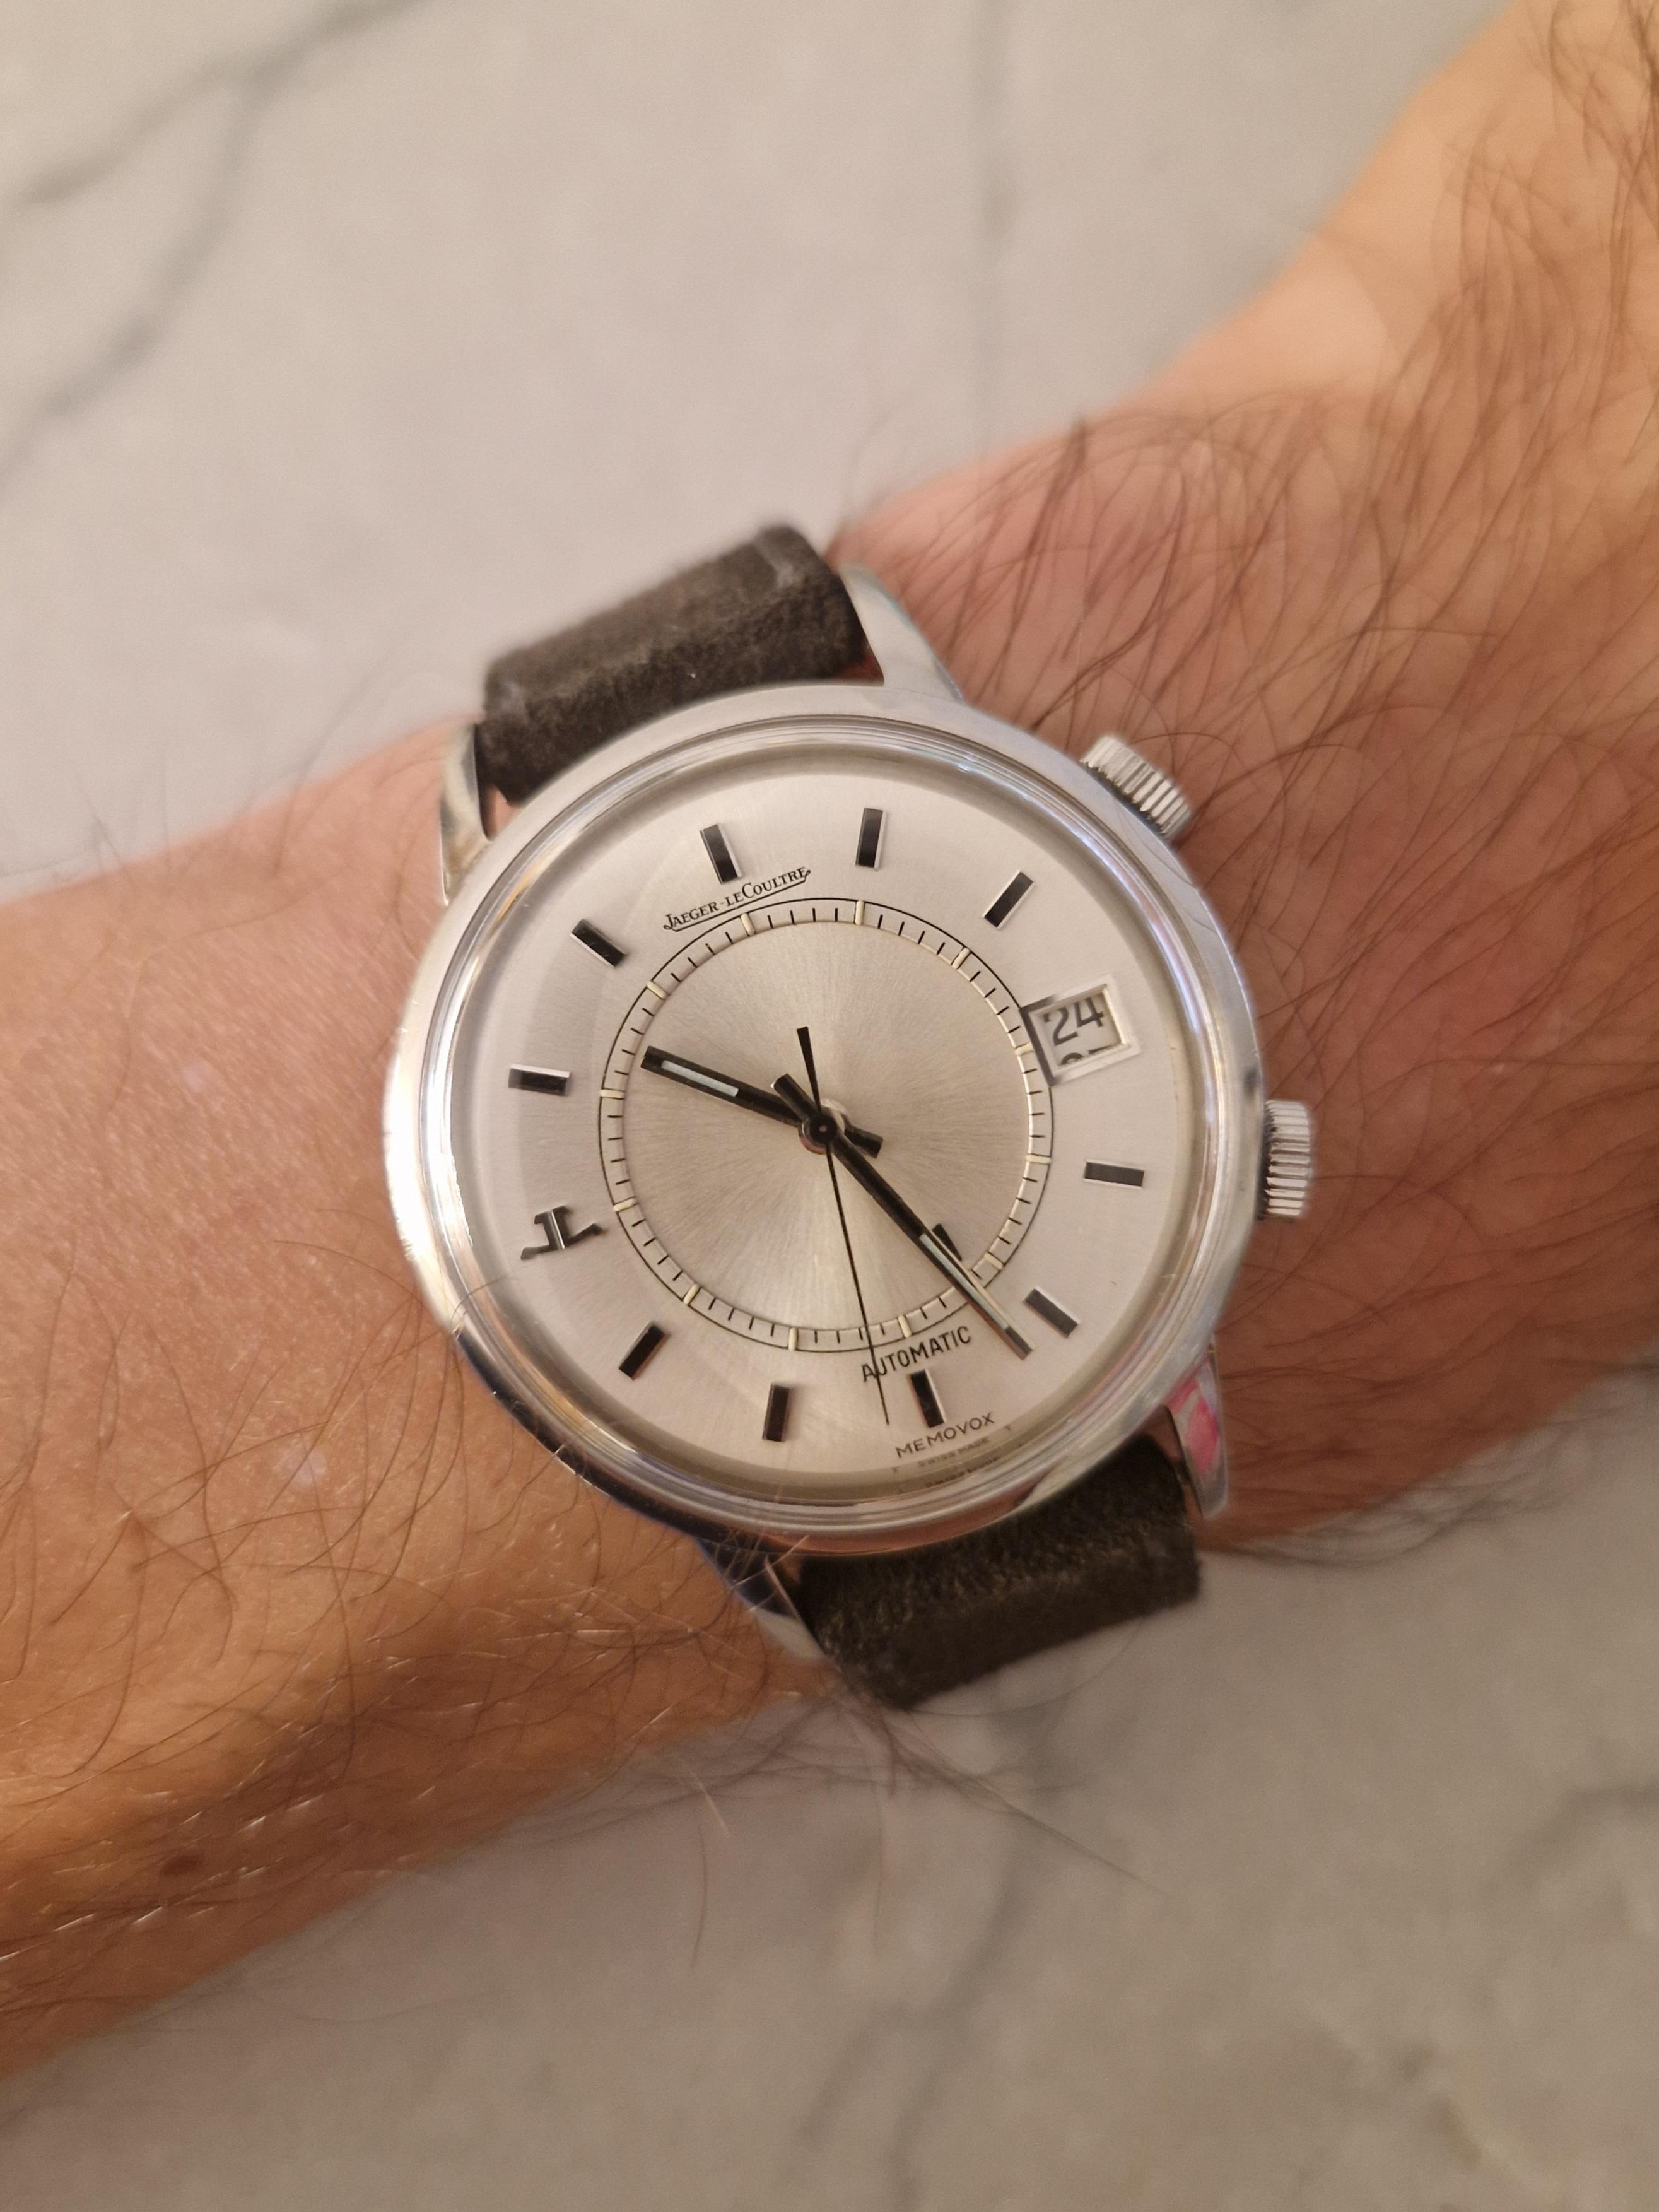
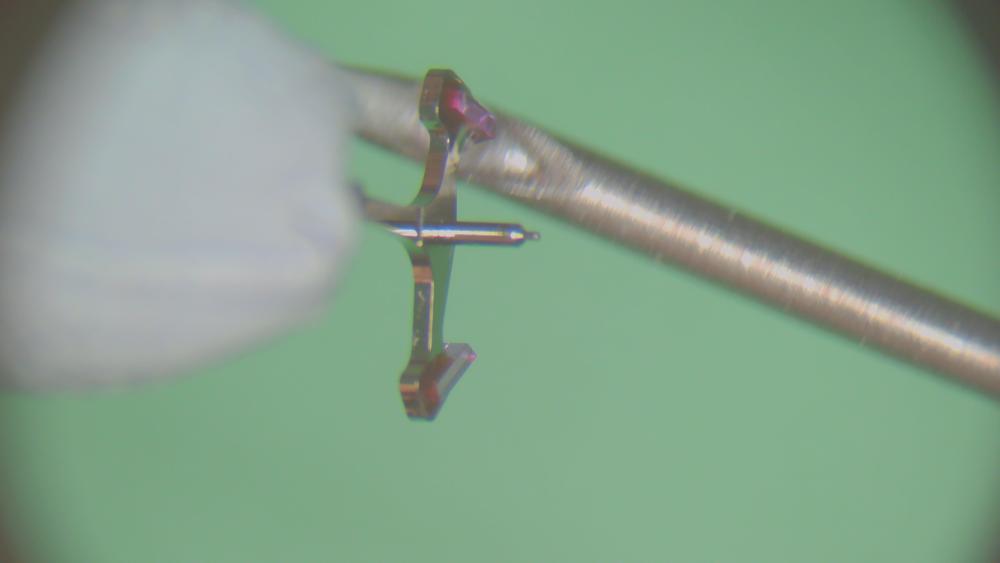
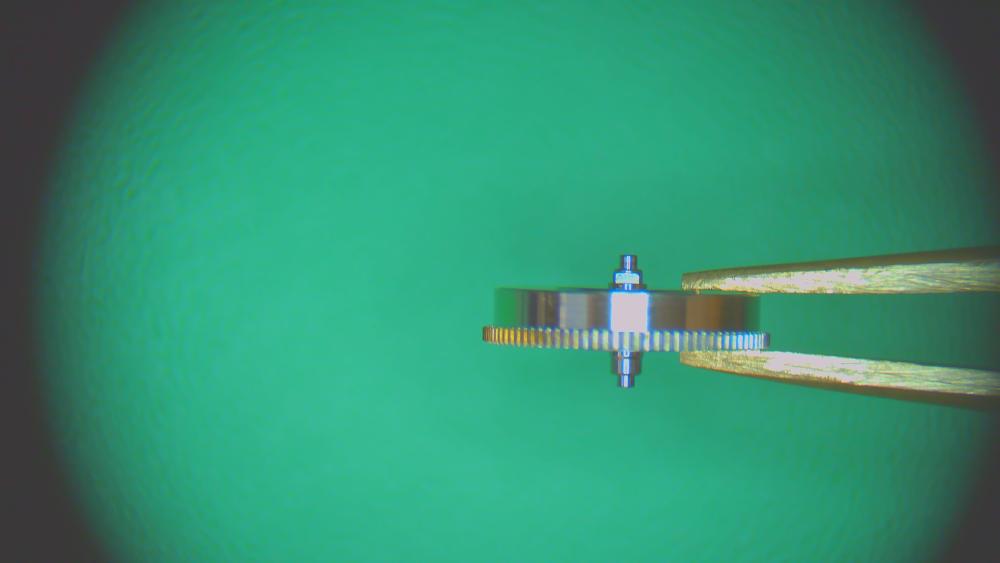
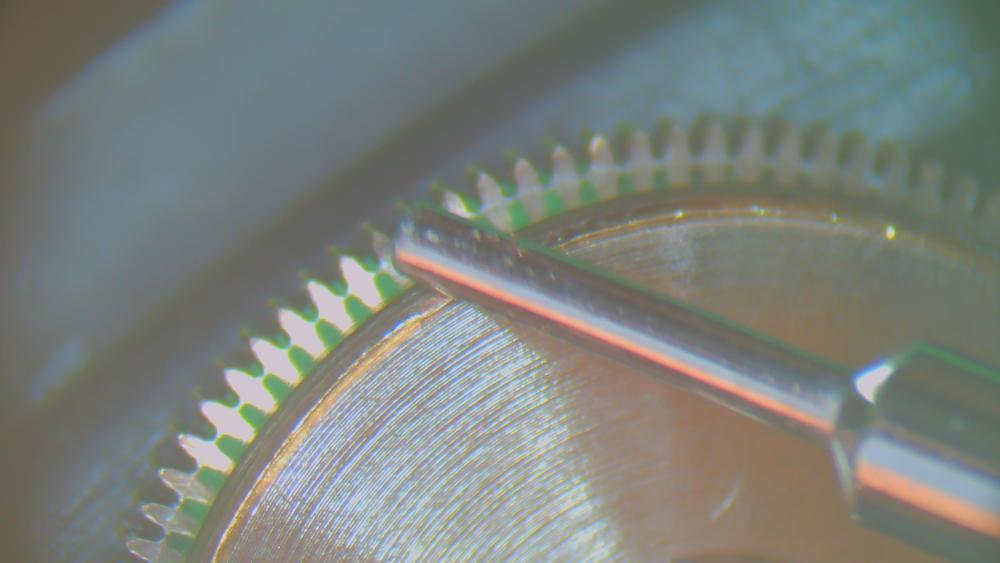
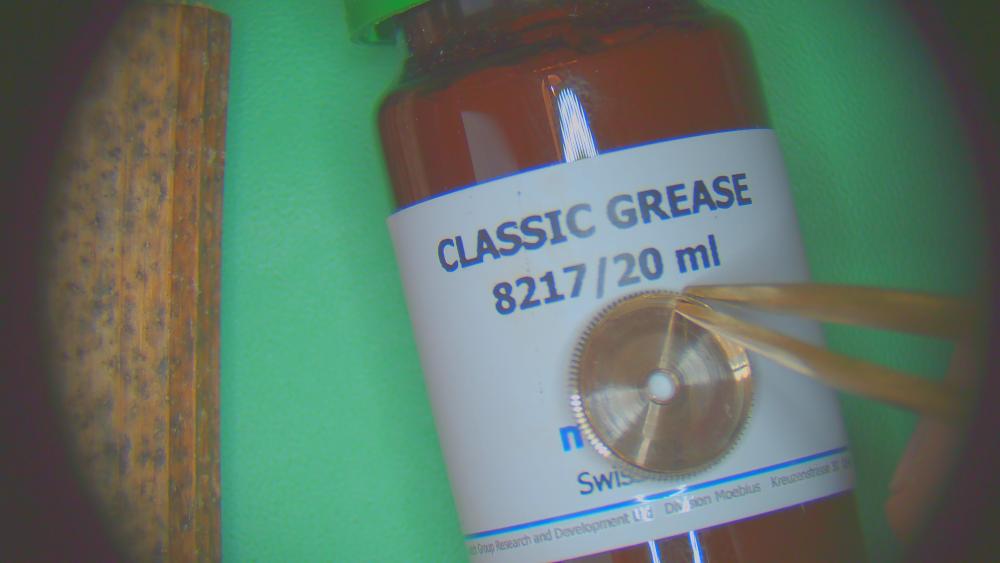
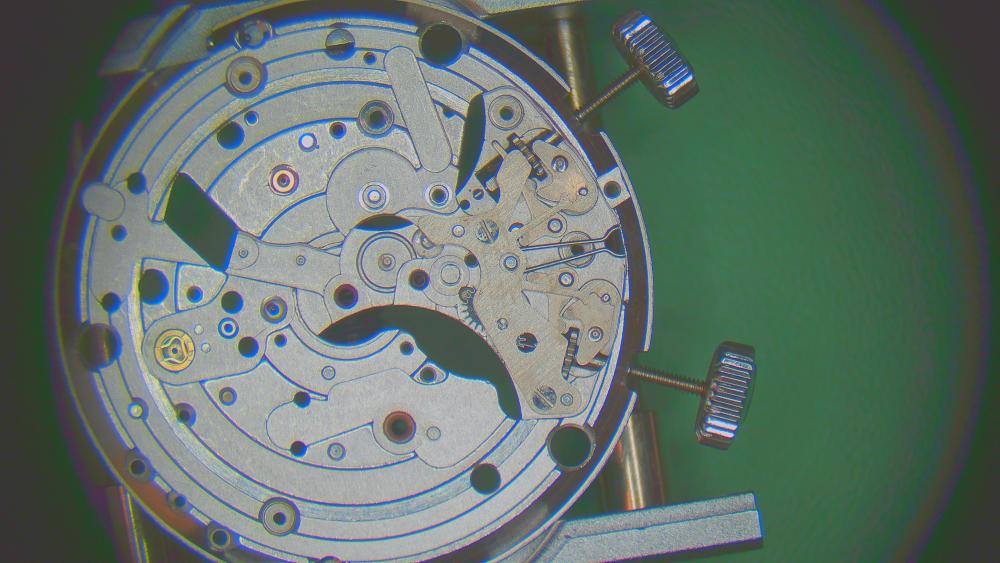
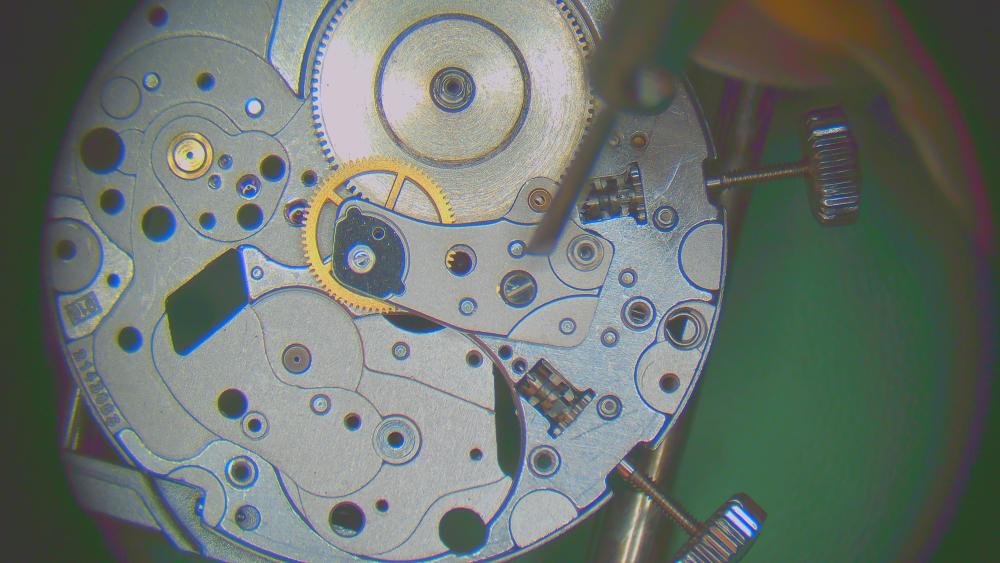
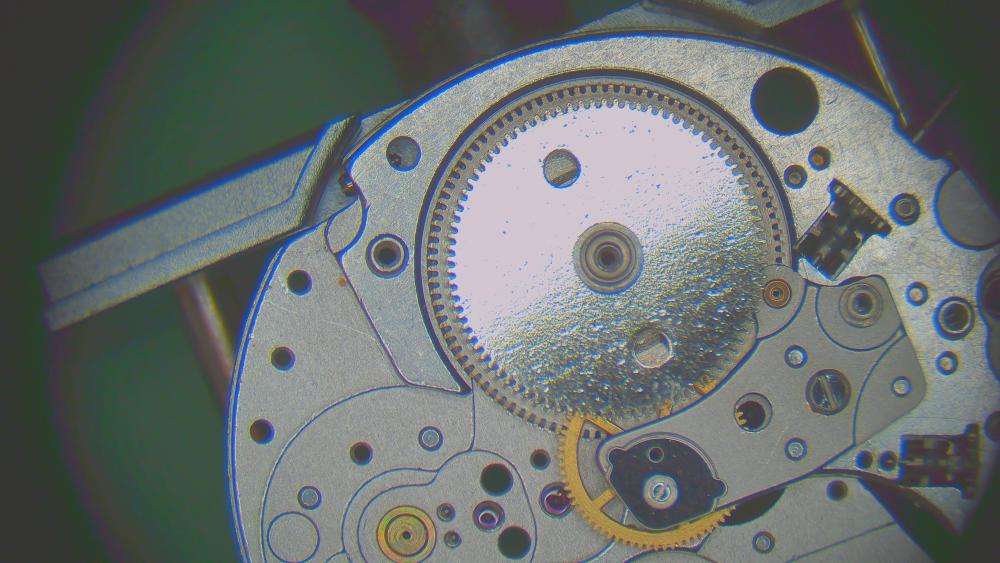
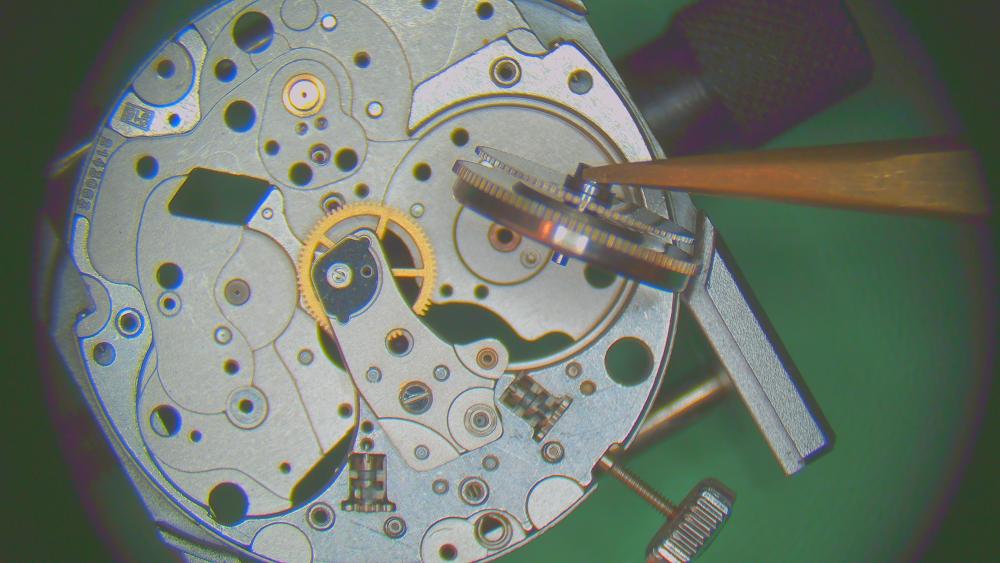
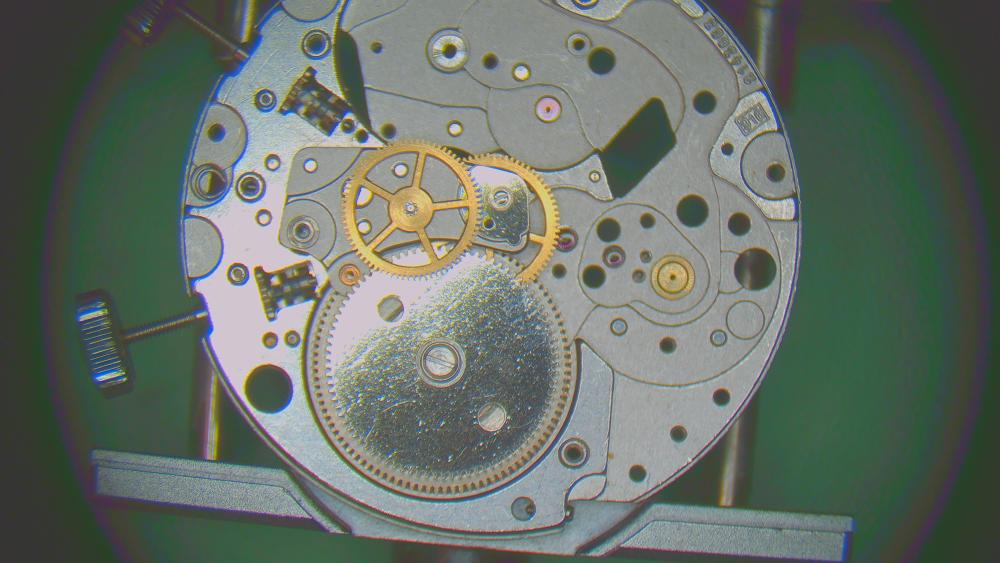
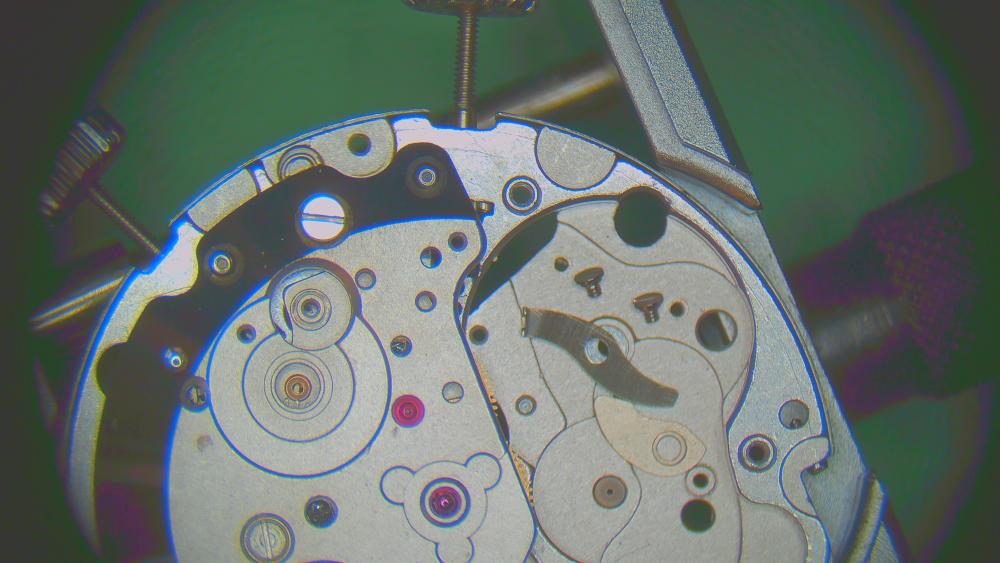
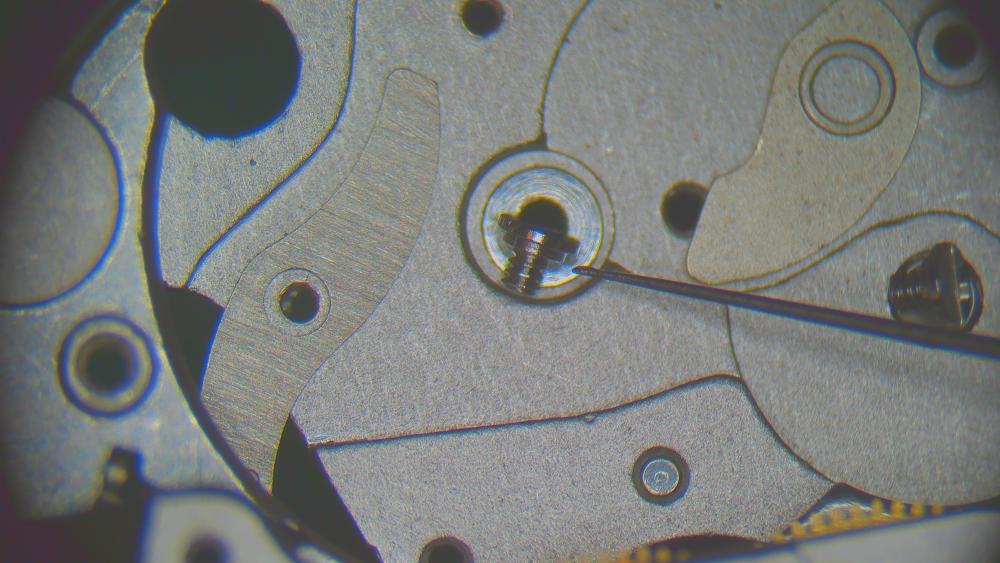
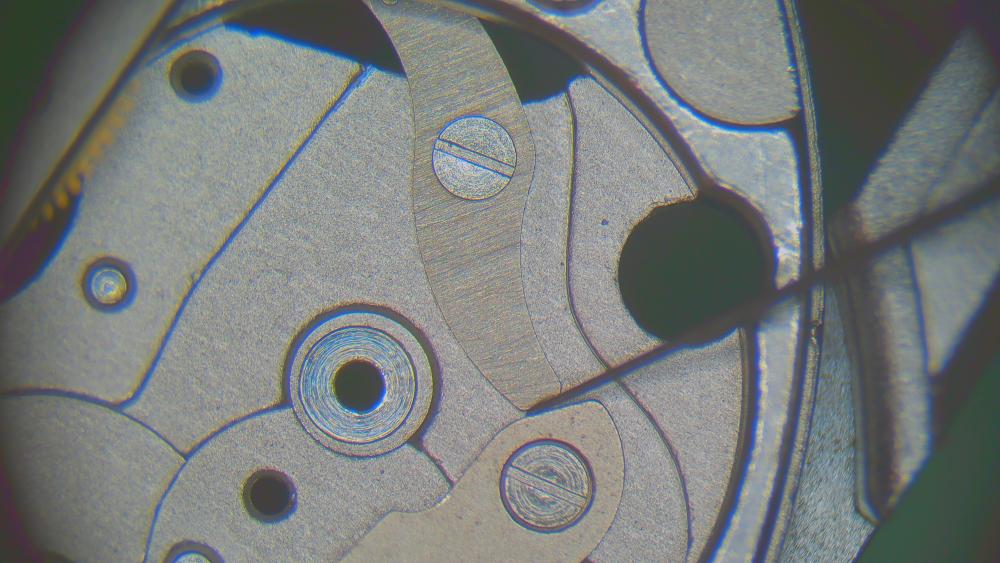
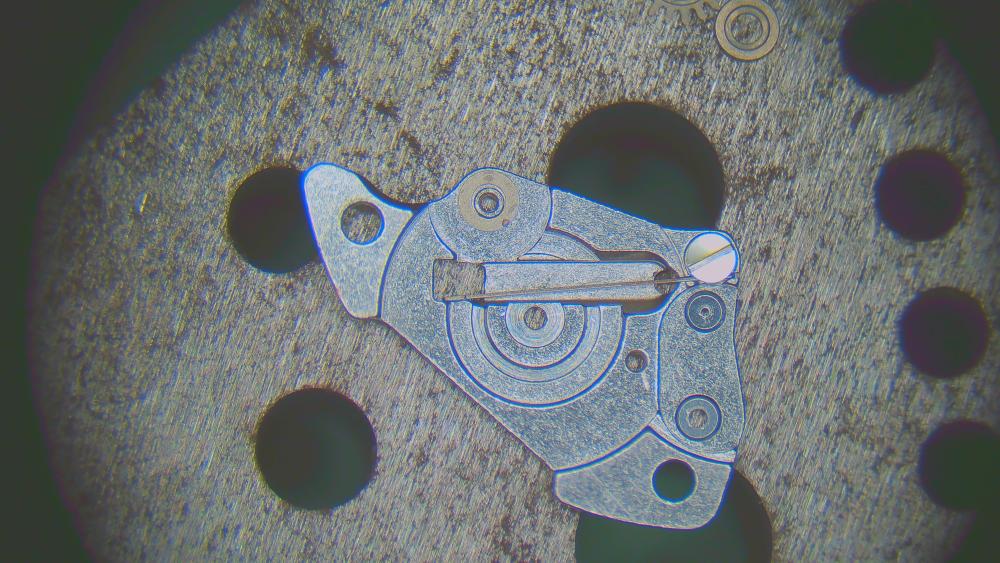
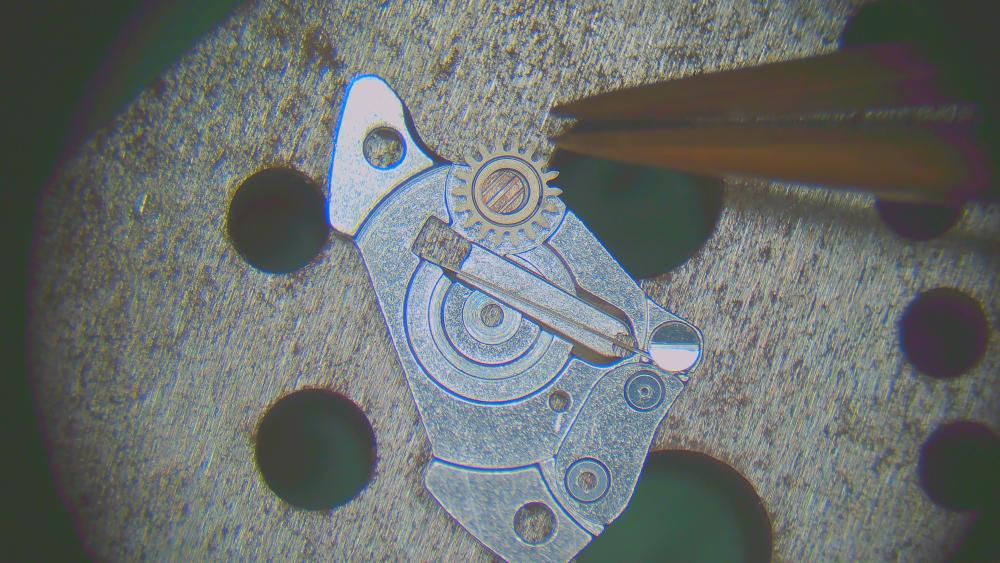
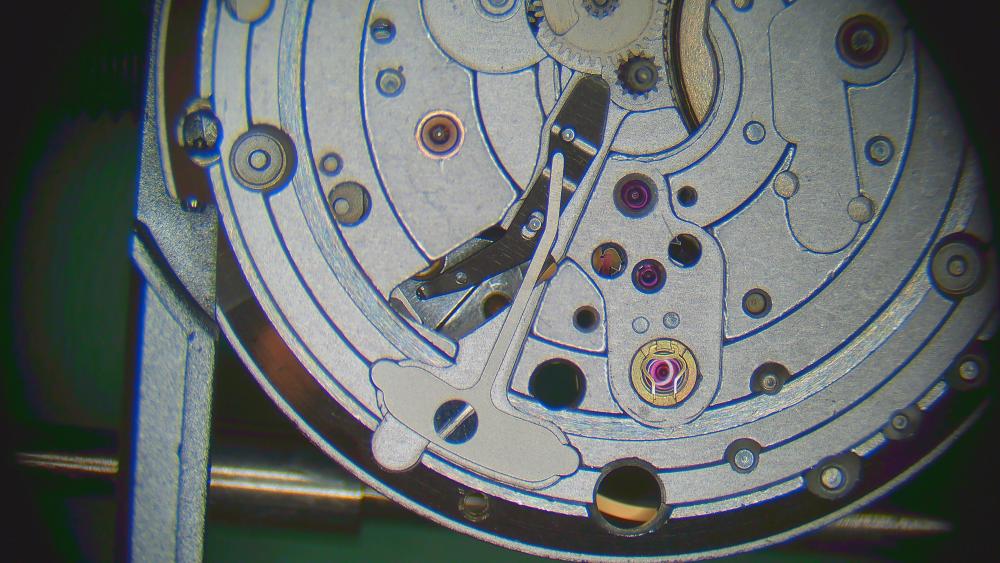
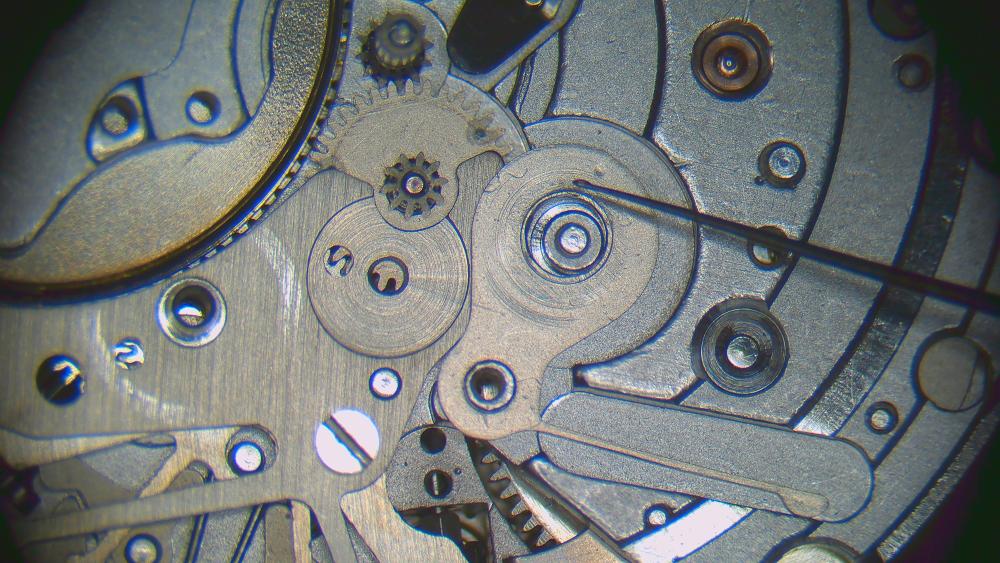
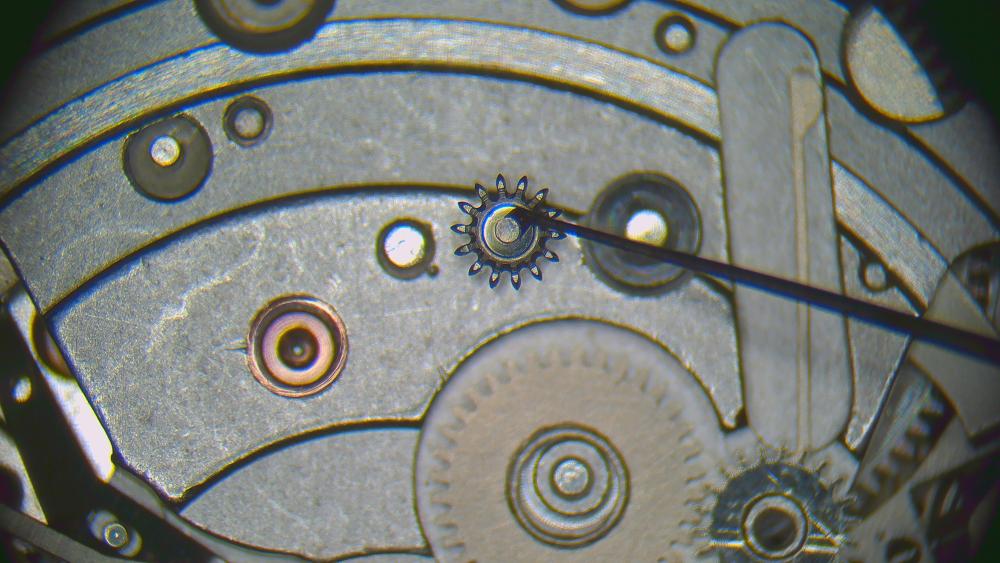
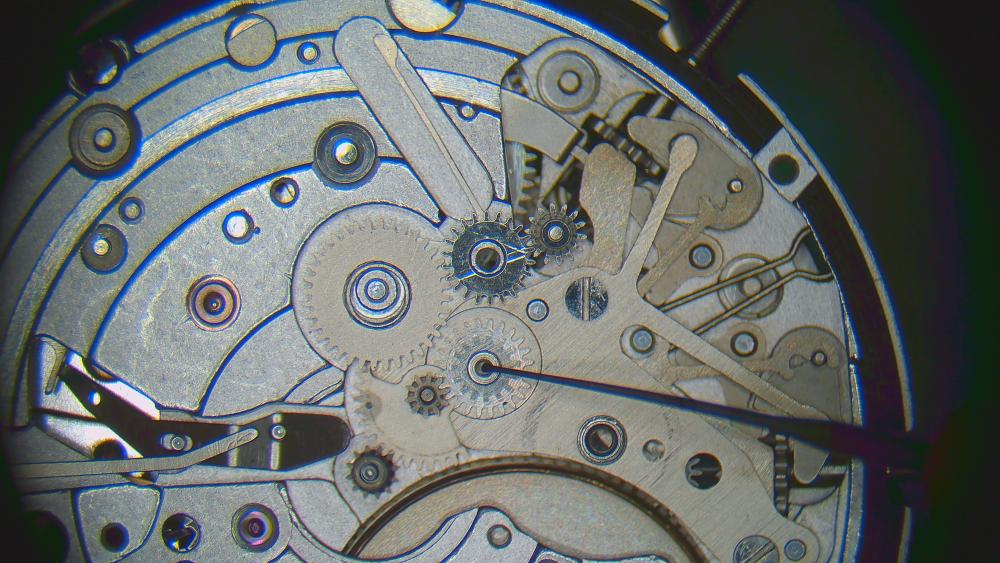
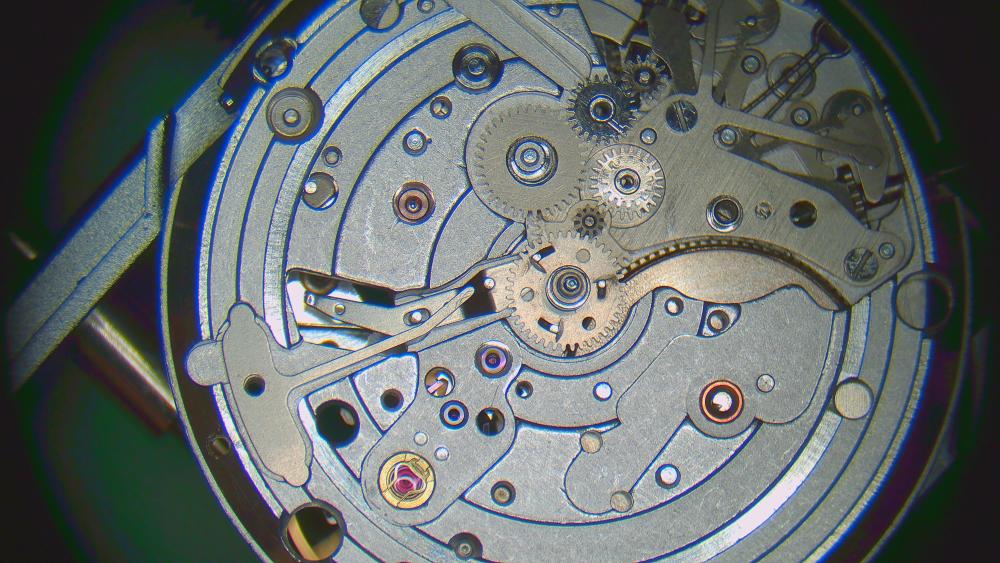
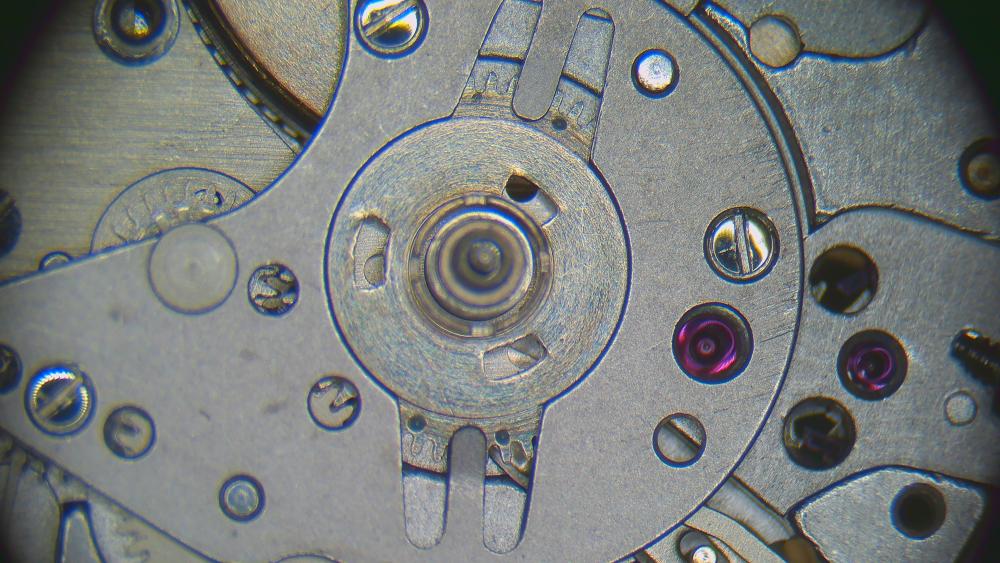
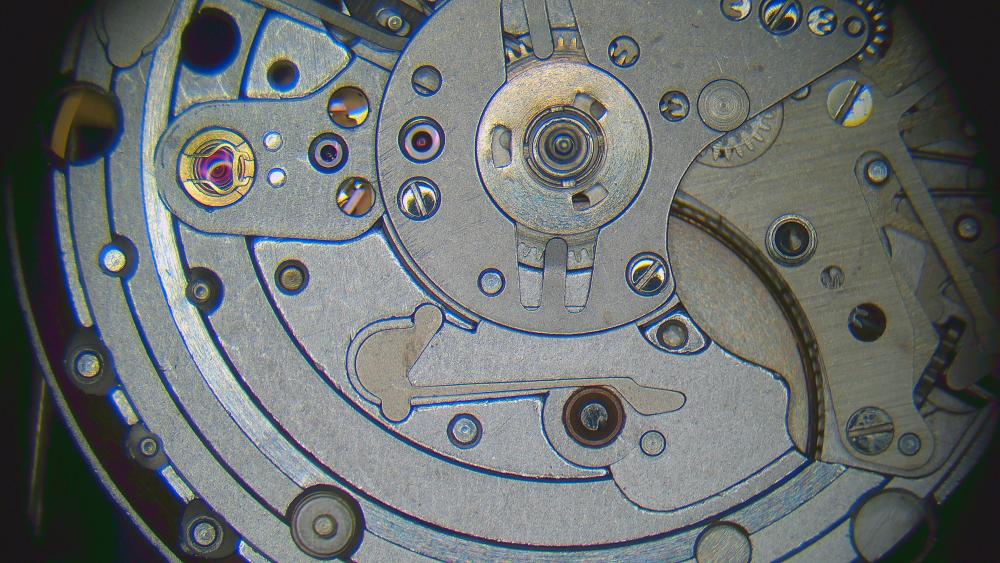
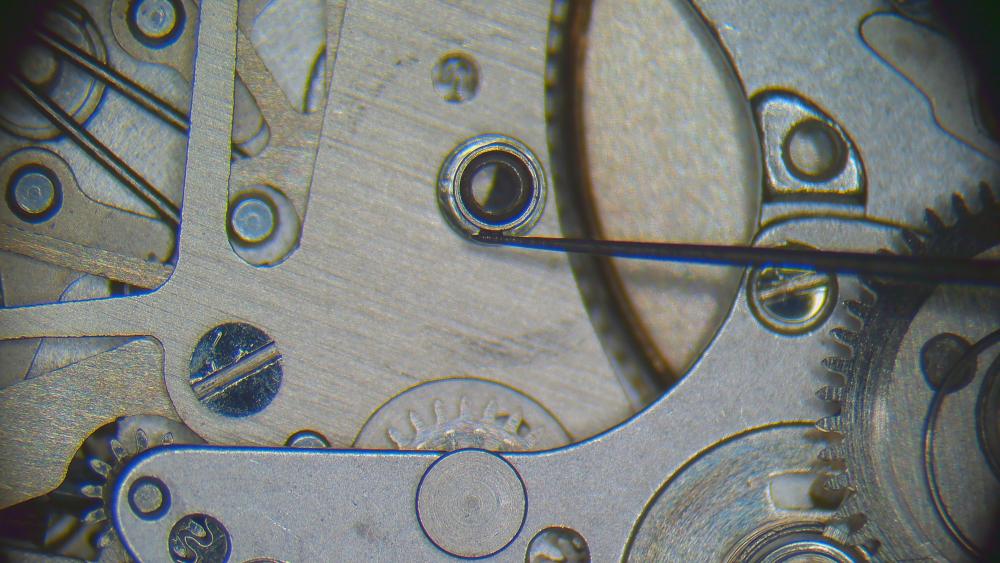
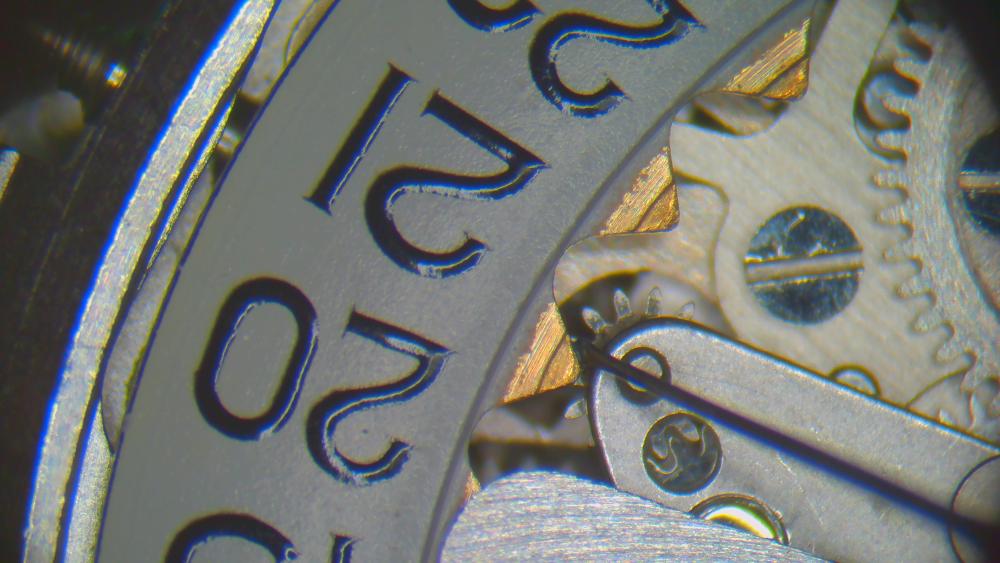
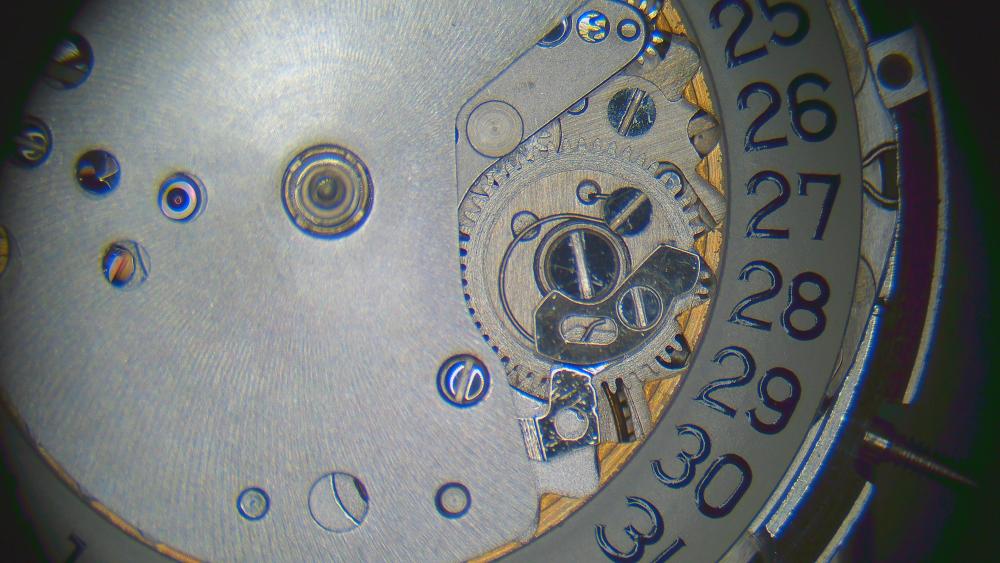
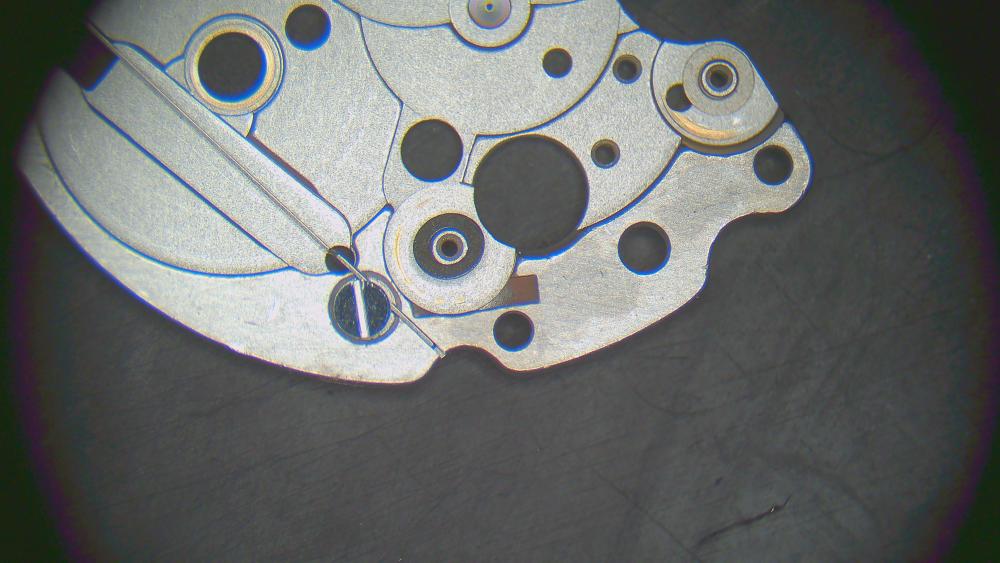
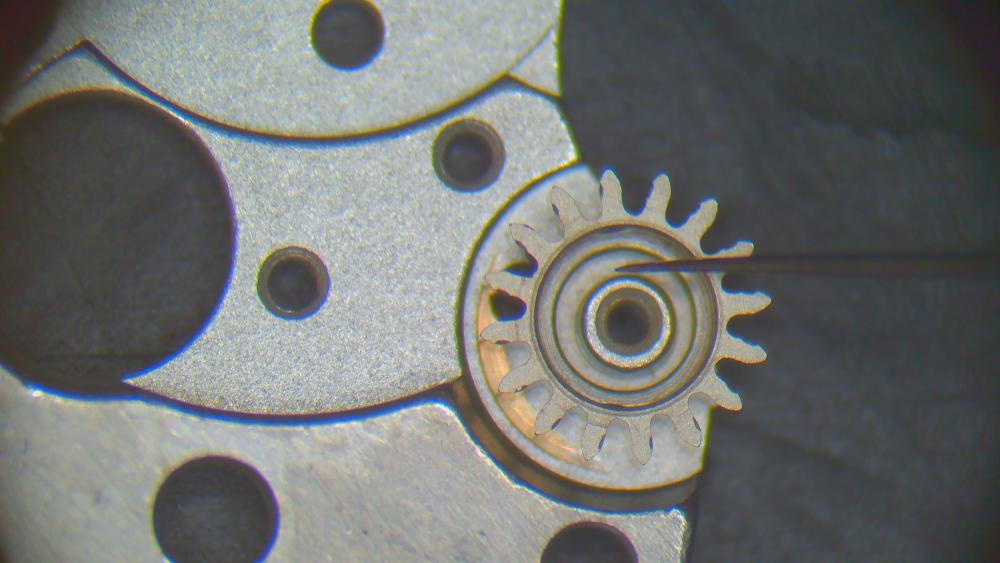
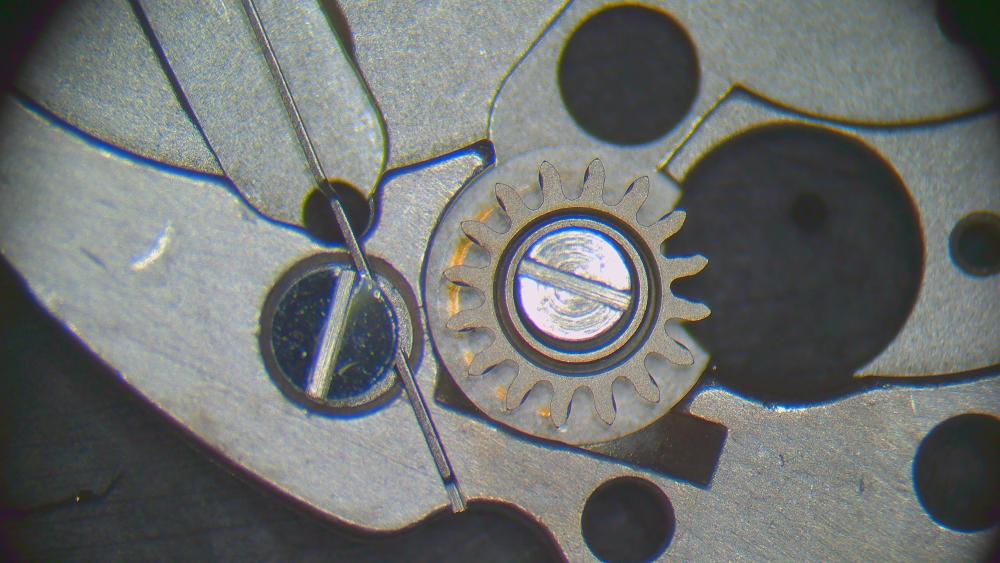
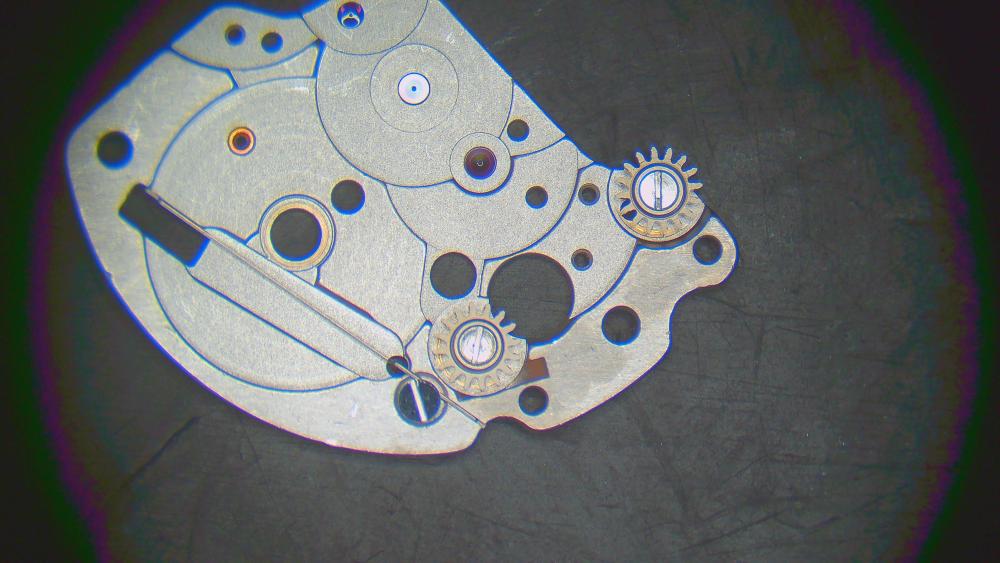
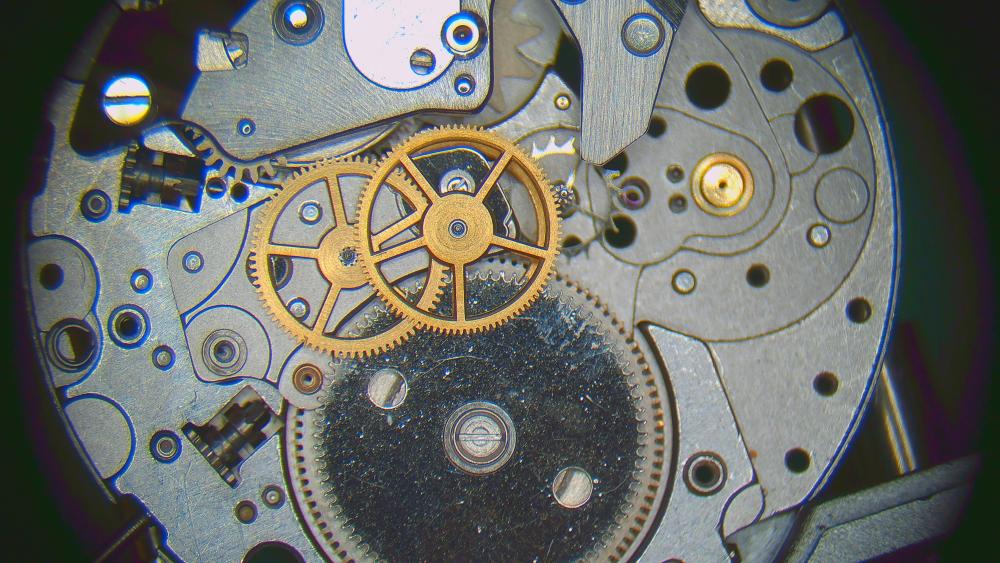
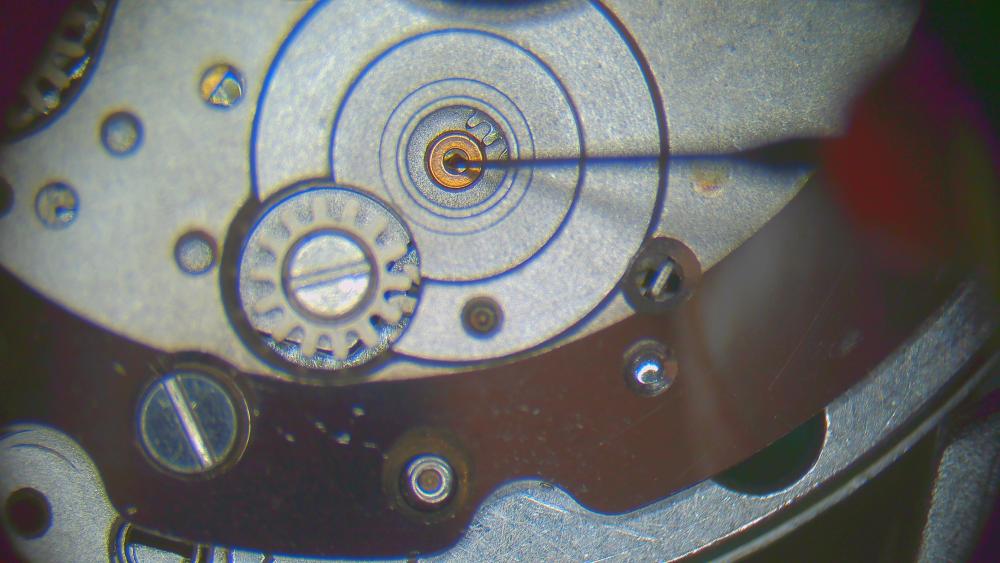
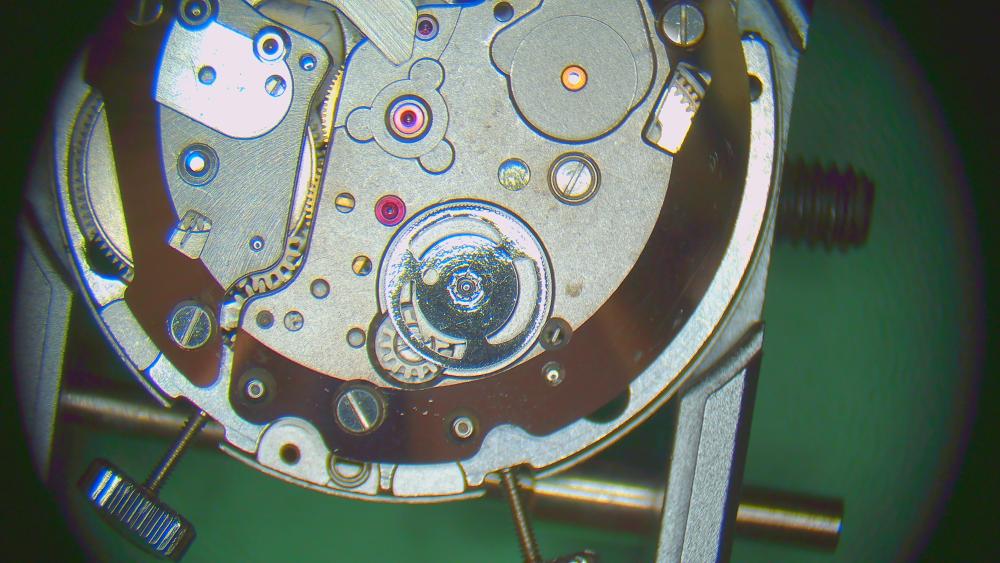
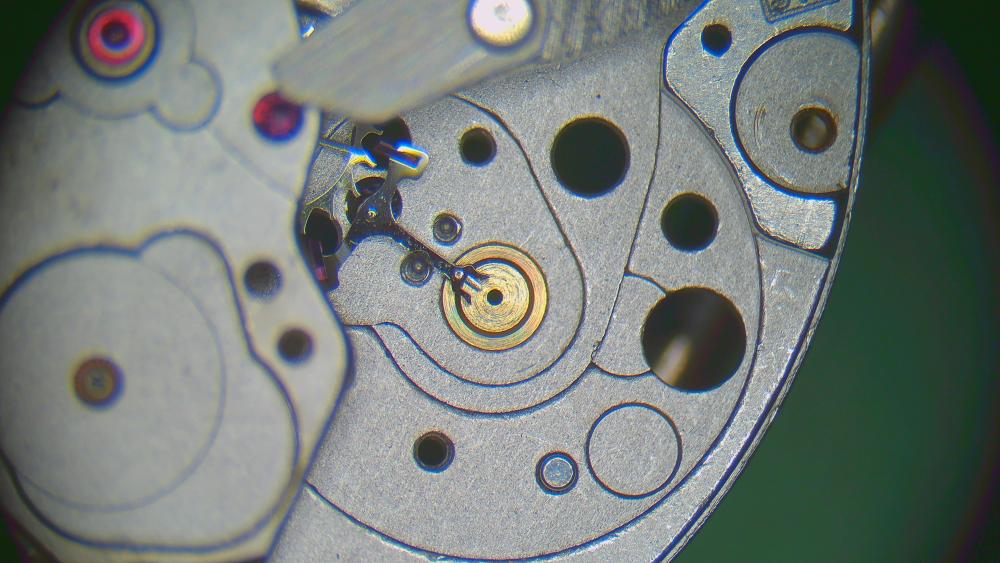
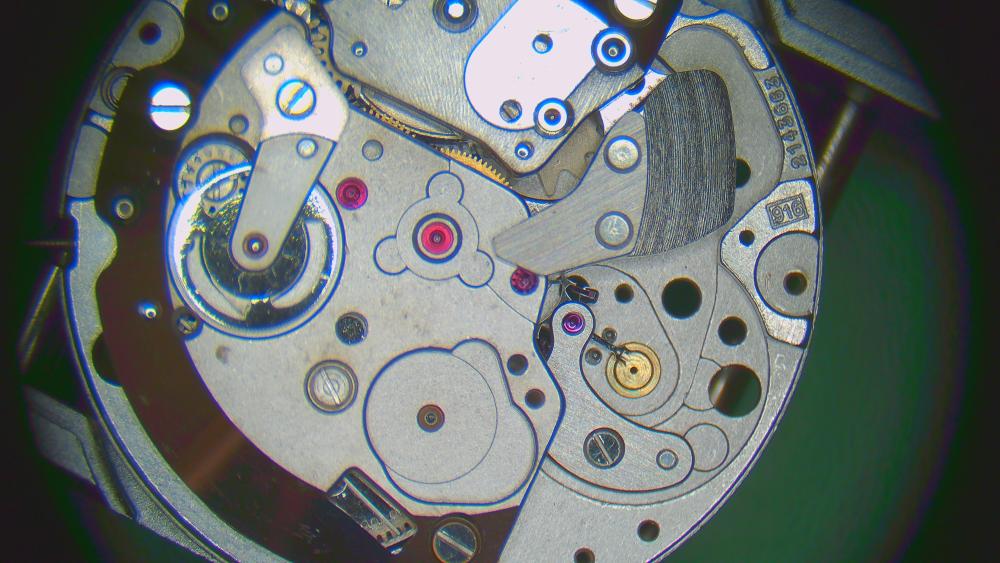
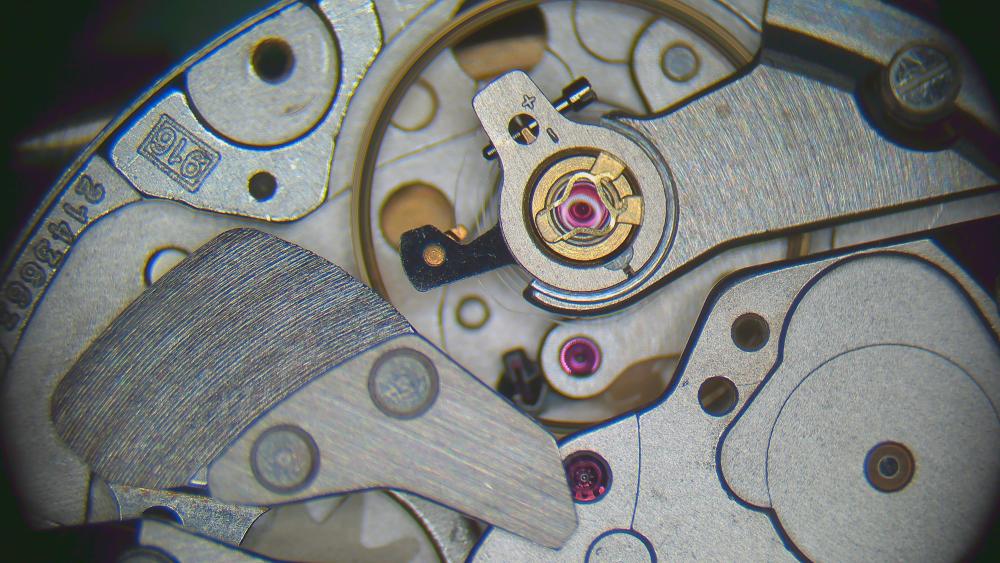
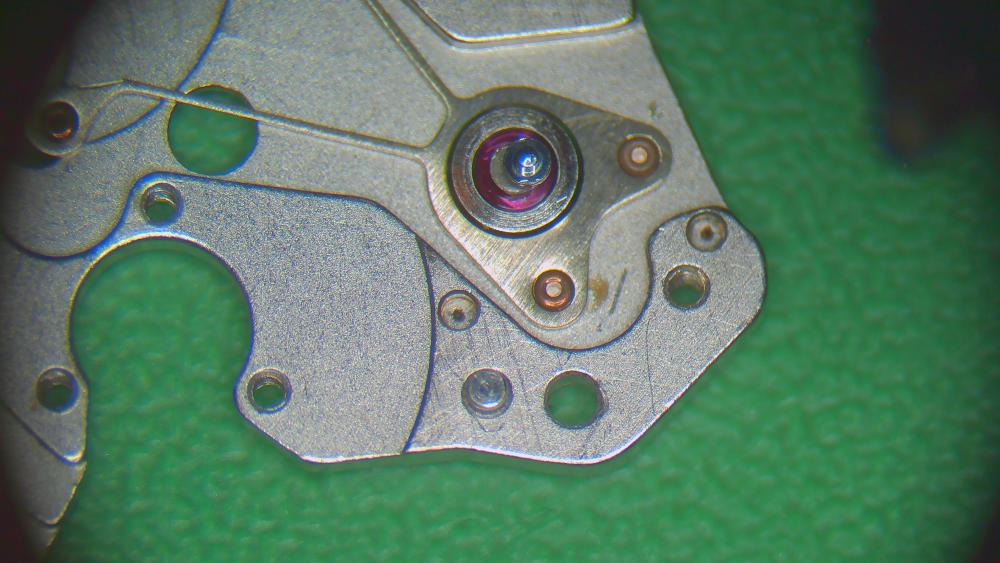
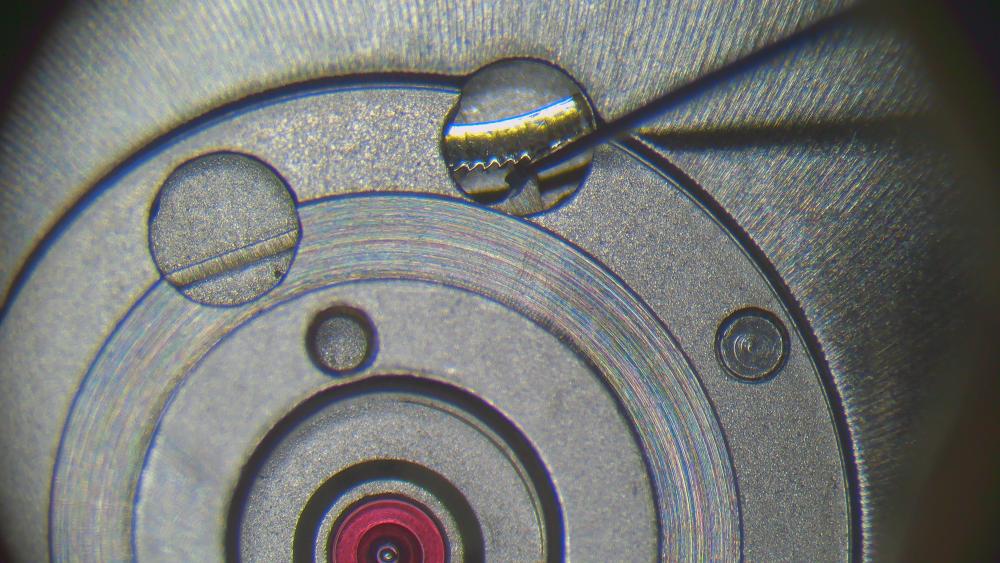
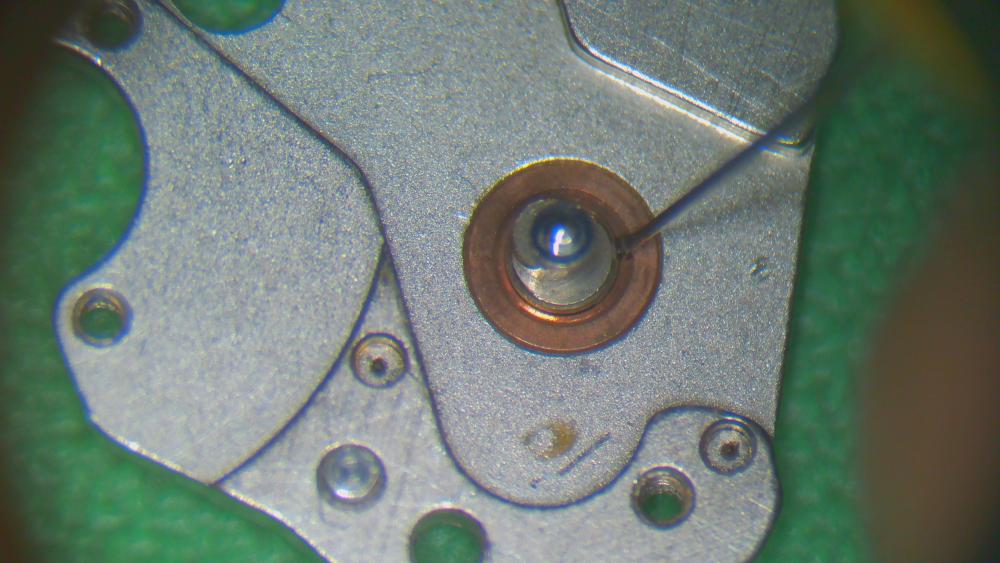
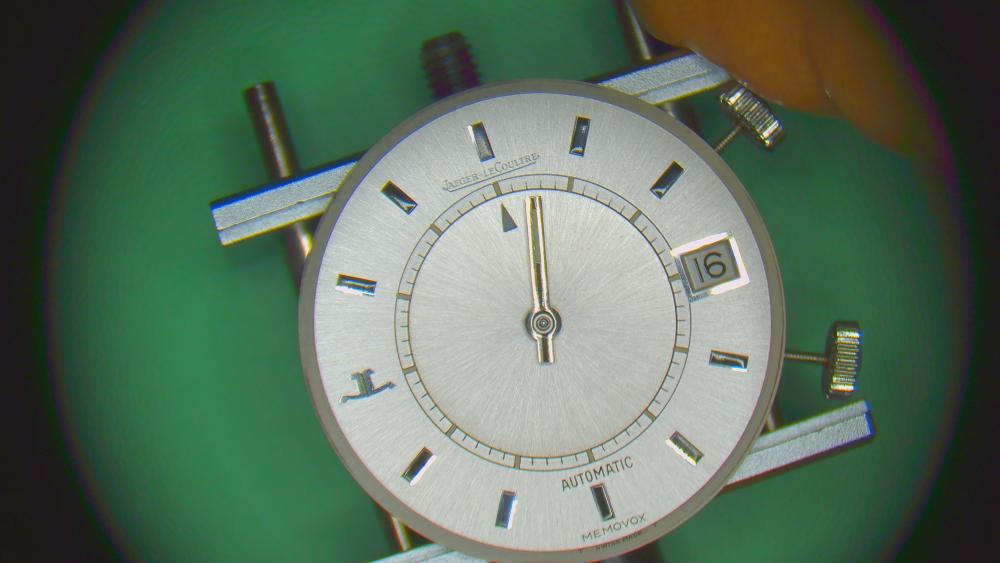
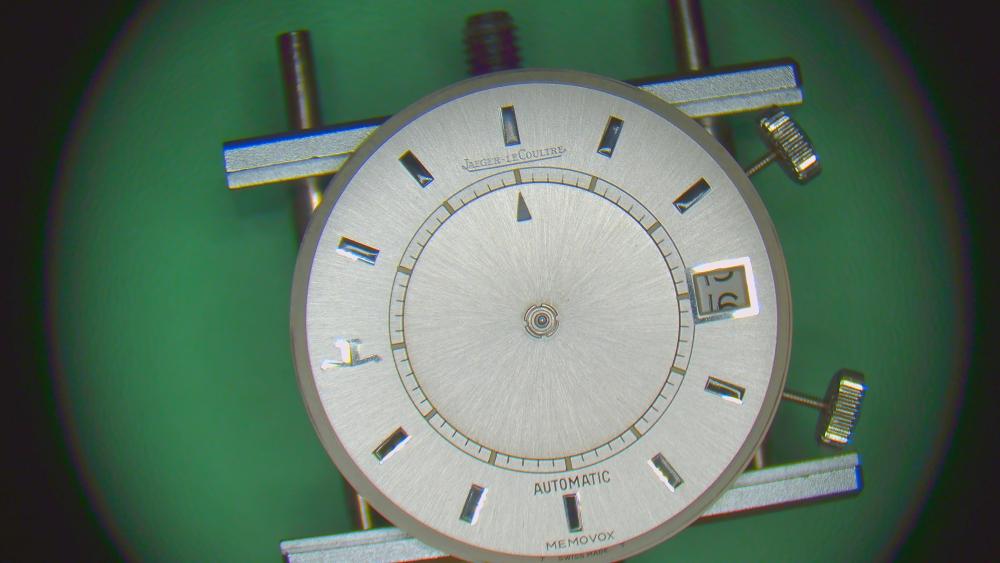
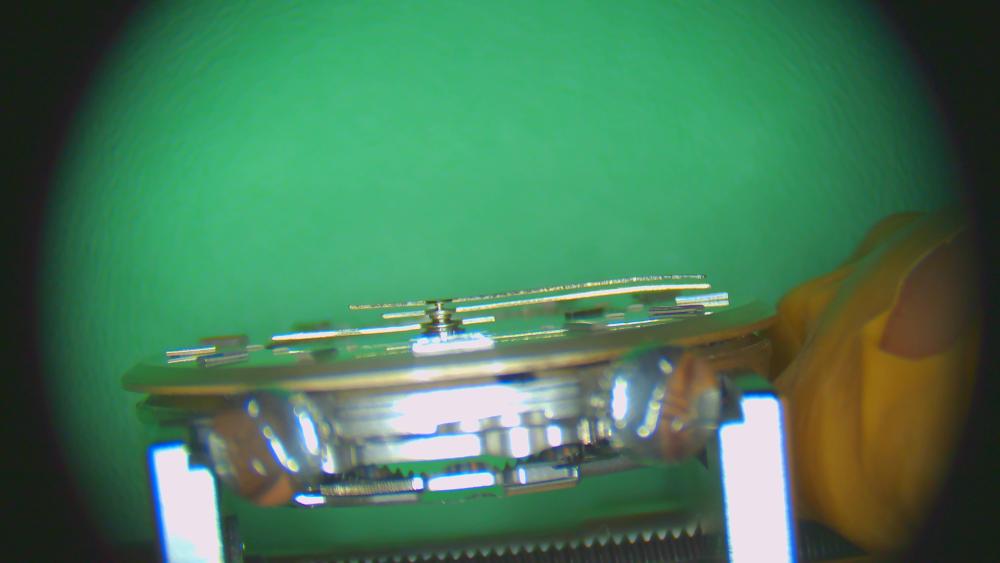
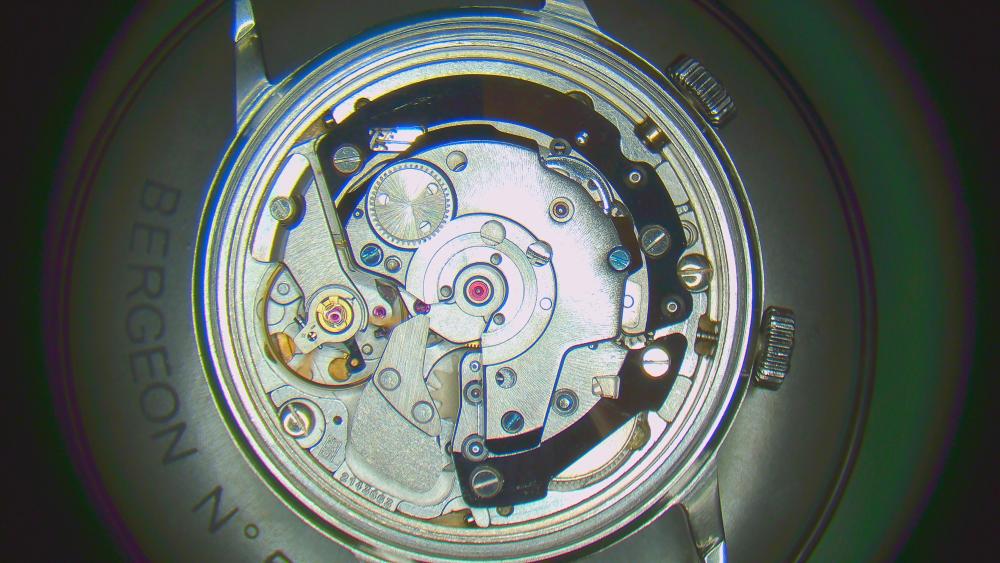
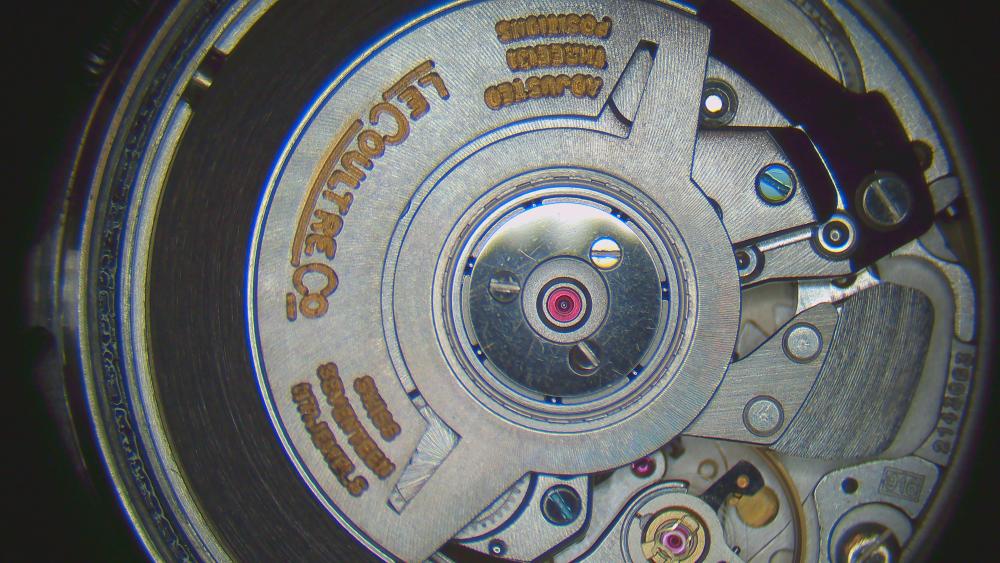
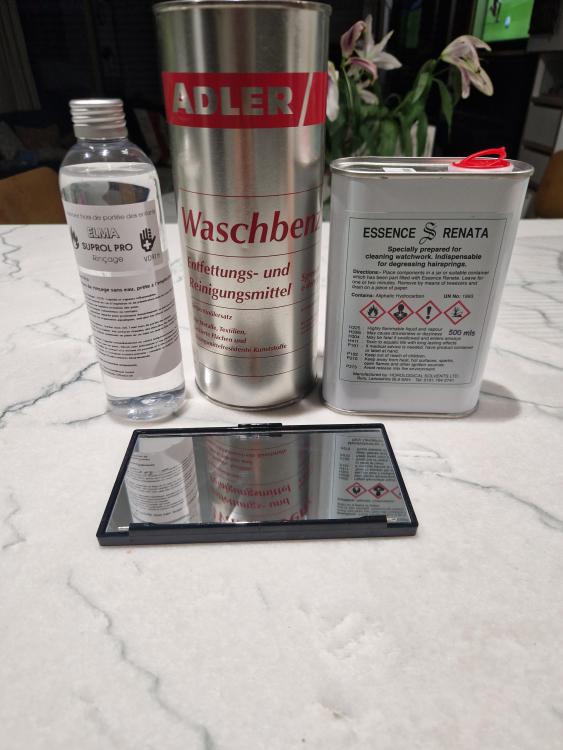
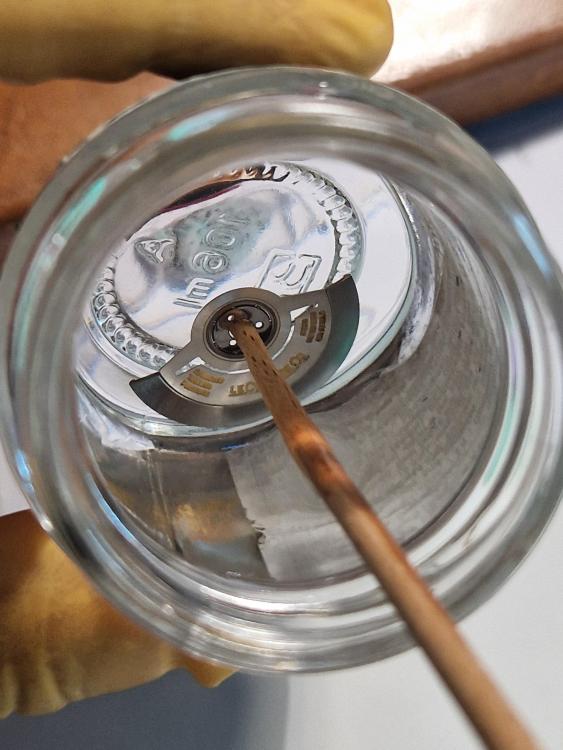
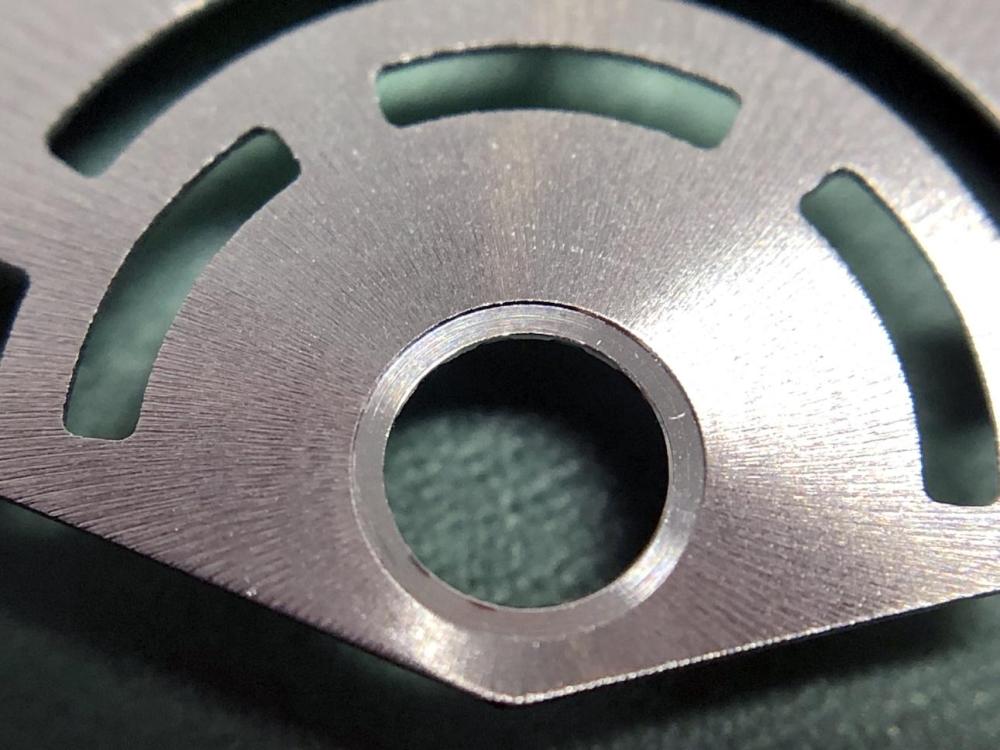
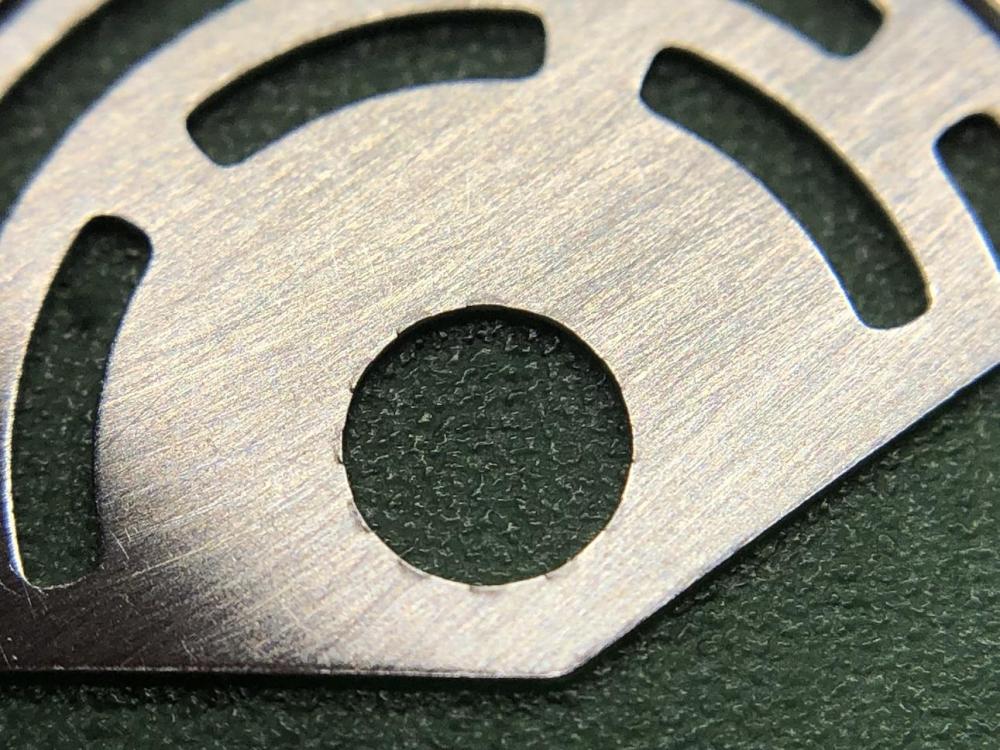
Hello all! Now I finally made time to upload these endless pictures of my assembly. First, a few DISCLAIMER: - while I took photos of a lot of the oiling points, I didn't capture all of it. I lubricated every point indicated in the manual, which is available here: https://watchguy.co.uk/tmp/JLC 916.pdf - oils/greases used: 9010 (as indicated in the manual), HP1300 (where 8141 is indicated in the manual), 9415 (where 941 is indicated in the manual; except for the rotor ball bearing where I also used 9010), 9405 grease (where manual indicates PML Hamilton), and 8217 as breaking grease for the mainspring barrel wall. - IMPORTANT: as I started assembly while I was still waiting for a spare part for the train bridge (a crown wheel seat), I didn't follow the order of assembly that was recommended in the manual (which suggests assembling the train first). I'm just showing how I did it (and how it also worked just fine). 1. Prep work: 1a. Epilame of pallet stones and escape wheel (and cleaning its pivots afterwards): using my trusty syringe to apply Fixodrop only on the pallet stones and not the pivots. cleaning Epliame off the pivots 1b. Alarm barrel standard non-automatic barrel/mainspring for the alarm. 1c. Mainspring barrel I apply breaking grease next to the notches... ...and spread it out... ...so that no grease protrudes from the barrel wall... ... when I push in the new mainspring (NOS JLC original) the edge of the barrel wall is burnished back towards the lid, as it was before work in progress, but obviously done all around 2. Keyless works (first half) lubricating hole for setting leverS both setting levers installed, posts for both yokes lubricated and installed. Contact points between them lubricated. The the spring. contact points lubricated lubricating two posts wheels on NOTE: mistake here! The setting lever spring plate should not be screwed in at this point. The minute work cock/plate should be installed first and the two screws hold both plates! No issues caused by this, though. 3. Centre wheel before installing canon pinion and minute wheel on the dial side, I go to the train side for the centre wheel. lubrication first. center wheel cock the barrel and ratchet wheel are unusual in that there is a "ratchet wheel cap" which rotates in the train bridge bearing, not the actual barrel arbor. I found that screwing on the cap needed too much force (and I was afraid of pushing out the brass bearing in the mainplate), so I removed the whole assembly and screwed in the cap on a bench block. The whole assemble then slides onto the mainplate and around the center wheel (if you are a bit careful). I should normally assemble the whole train at this stage, but since I was still waiting for part (seat for crown wheel) for the train bridge, I am proceeding with whatever else I can assemble. To keep things in place, I will still put on the train bridge, but without crown wheels and gear wheels. However, I put in the third wheel at this stage, because the mainplate jewel hole is under the dial-side minute wheel. Putting the wheel now will allow me to lubricate it and and to continue the assembly of the dial side. 4. Alarm system (train side) But first I do the alarm system on the train side. Screws are shouldered and are lubricated accordingly. the U-shape at the tip of this lever is greased... ..and is then engaged with the (dial side) yoke of the alarm winding mechanism. the contact point between the levers is also greased the star wheel for the alarm hammer the alarm hammer is greased at the "thorn" which engages with the alarm star wheel. almost all in place now the alarm barrel and the alarm ratchet wheel now to the alarm bridge. There's another seated intermediate crown wheel (with a reverse-threaded screw!). all in place 5. Keyless works (part 2): back to the dial side. and now (as indicated a bit before), I can lubricate the dial side jewel of the third wheel... before continuing with lubricating the posts for the wheels and the center wheel for the canon pinion. and putting them in place. as mentioned before, the double-setting-lever spring plate should not have been screwed in before. I remove the screws and put the minute work plate on and use the same screws to secure BOTH plates. it take advantage of this moment and also put in place the lower balance jewels. NOTE: I don't use Epilame on these as I've heard rumours that Rolex recommends not to do that to avoid wear from the residue. Also, the service guide explicitly mentions "stop oil" for palate fork and escape wheel, but not balance jewels. still on the dial side, I now turn to the alarm disconnector, which is lubricated in four places the disconnector is held in place by a spring. the alarm coupling yoke and the wheels, particularly the alarm setting connection wheel are a bit fiddle to lubricate and position when putting down the cover plate. the three notches of the special hour wheel are greased on top NOTE that I've remove the screw from the spring holding down the disconnector. This makes it a lot easier to fit the plate. (if not, the unlocking wheel on top of the hour wheel will keep pushing up, making it difficult to position the plate. note the little grease dots on the unlocking wheel where it slides on the plate (there was evidence of wear). now I can secure the spring for the disconnector again. over to the date jumper and jumper spring contact point greased oil on the post of the date wheel date wheel screwed in and date ring positioned. cover plate secured greasing some of the notches (is that the word?) of the disc 6. Back to the train!! by now, I've received the missing seat for the crown wheel and I take of the train bridge again (leaving the third wheel in its pivot because I already lubricated it from the dial side). the click is still in place (no need to remove for cleaning) the seatS get a bit of oil on the outer edges the the crown wheel lubricating.. putting the core and screwing in all that times two. the service guide only indicates lubricating this part of the seconds wheel (apart from the top pivot in its jewel hole). I do NOT see a recommendation of lubricating the other thick part that goes into the centre wheel... and I didn't lubricate there. But I'm having second thoughts about that... any opinions? all train wheel in place fitting train bridge: NOTE: remember that the click for the mainspring barrel as well as two "crown" wheels on the underside of the bridge also need to engage. So don't force anything down when it looks like the trains wheels are in their pivots but the bridge isn't going down. after the train bridge, there's another intermediate crown wheel to install (through a hole in the bridge). now the "driving gear for ratchet assembly". these special shark teeth will engage with the magic lever of the automatic works. The service guide indicates that forgot a picture of the bridge for the driving wheel, but it's visible below. [oiling train jewels] positioning the pallet fork and its bridge. putting the balance. And it ticks! I let it run without lubrication on the pallet jewels to scrape of a channel of the epilame. Then I remove the balance again and lubricate the pallet exit jewel 4 times. 7. automatic works - magic lever! "magic" wheel inserted to plate and lubricated magic lever in place. jewel lubrication. funny two-thirds bearing.. now careful! Place the auto works on the movement and move the "magic wheel" (with the three holes) until the magic levers have properly engaged with the driving wheel. Only when sure about that, screw down the plate. lubricating the magic lever and some shark teeth of the driving wheel. I can't upload a video, but I find the operation of the magic lever truly magical!!! 8. synchronizing alarm disc, hands and calendar.. now the most annoying part of the movement! synchronizing the alarm, hands and the date jump.... a. first, you're supposed to put alarm disc and dial into place without screwing it in. b. then pull out the movement stem and rotate anti-clockwise (as if setting time backwards). At some point, the alarm indicator will "catch" and move anti-clockwise and indicate the correct position of the hour hand. So far, that's easy. c. but now synchronizing with the data change is tough. The manual says to set the alarm indicator (and implicitly the hands) to 12/midnight. d. and then take of the dial and date disc, partly unscrew the date wheel and reposition it manually in such a way that it's at the tipping point of clicking to the next date.... Then install the hour hand and test the date change and the alarm function (hand to match up with alarm indicator). Below is my best attempt at doing so (see that the date jumper is right on the tip). BUT, this is still 20-30min from the actual date change... in other words, it the date changed at 0.20h. So I kept going back and forth (setting the time/alarm indicator to 23.30 instead of 24h... and trying again). I managed to get it to 10min before midnight. But that was after about 2 hours of trying. I called it a day. looks promising: "invisible" hour hand and alarm indicator aligned at midnight and date about to change... ...but after installing the hour hand, it see that the actual date change occurs too late so uninstall, repeat... when half-happy, I install all hands nice and parallel I'm not sure the watch was designed with crown gaskets (at least I didn't see any when I disassembled). But I buy fitting ones with the thinnest available thickness (0.3mm, flat). The go in nicely and the crowns/stems still go in fully. I may have improved the water resistance rating of the original watch On that note, these watches seem to have water damage very often. Finding reference E875 without water damage is not so easy. Now for the rotor... The manual asks for a particular cleaning procedure: I wasn't sure if it's necessary because my cleaning procedure already cleaned it in the ultrasonic and with ammonia liquids. So I did a test. My three cleaning liquids lined up (from left to right): Elma Suprol Pro RINSE (i.e. the last liquid in my cleaning cycle), washing benzine, Essence of Renata. All applied to a my wife's makeup mirror (don't tell her!!!). To my surprise, the cheapest of the liquids (the washing benzine) leaves the least residual. Essence of Renata, shockingly, the most. I don't have a fitting brass shaft laying around, so I use pegwood (which I previously left in in washing benzine for a while, to eliminate the risk of contaminating the benzine for the rotor). You don't actually have to spin the rotor itself. When rotating the pegwood, the ball bearing turns and the rotor stands still. I do that for a minute or so and dry it quickly afterwards. I then lubricated the balls with 9010 (after some debate with myself because the manual says 941, which I don't have). But 9010 seems to oil of choice for most modern ETA movements, so I guess it'll do fine. screwing in the rotor now. DONE! Last thing! The regulator is a bit unusual... The method of regulating is the same as always, though. BUT I ran into some confusion.. I managed to regulate it pretty much to 0sec/day (and 0.0 beat error). But when I can back an hour later, the watch somehow ran at minus 30sec/day... very bizarre. I repeated the regulation. Same phenomenon an hour later... My theory: since the "buckle" is in permanent contact, there may be a bit for friction between it and the hairspring. So, when moving the regulators "buckle", it may pull the hairspring along just a bit. Thus, "pretending" to be regulated to a certain rate. But as the hairspring oscillates for an hour or so, it gradually moves to the actual permanent position of the regulator buckle. In this process it moves from 0sec/day to -30sec/day. Consequently, I intentionally regulated the watch to +30 sec/day. And waited an hour. And yes, what a pleasant surprise, it ends up pretty much dead-on. I can't say for sure that my theory is correct, but at least I know that there's nothing really wrong with the regulator. Testing results: power reserve 46h (online I find 40, 44h or 45h for this movement. The manual, strangely, doesn't indicate any) test of winding efficiency: from dead, wearing for 8h in moderately active use (mostly office, but a few walks and some driving): watch is fully wound. Peak amplitude straight from the wrist: 294° Rates and amplitudes at full wind (+1h) and after 24h. Dial up: -6@275° ; -1@244° Dial down: +1@274° ; +5@240° Crown(s) down: 0@260° ; 0@222° Crown(s) left: +4@255° ; +6@223° Crown(s) up: +3@249° ; +6@225° [Crown(s) right: -3@252° ; -1@225°] Beat error: between 0.0 and 0.1ms. And here is the final product (also with a new crystal)


 3 points
 -
Hi All ... A further update.... It lives!!!! I replaced the bottom hole jewel. However before I did that I tried to push the original back into place just as an experiment to see how the balance performed. I managed to move it slightly before it disintegrated and the balance started to swing ...not brilliantly...but was 'better'. After replacing the Jewell with a 1.2 x 0.12 hole jewel I had to get the end shake just right. Replacing the jewel did lift the roller table off the bottom plate and after a few tweaks with the seitz tool I got the end shake right.....so a lesson learned there. The balance now swings and the watch runs and has been running for the last 6 hrs with a loss of about a minute...so it's been repaired for £9....which I'm happy with and it now goes into my collection... Before you ask I have got a timegrapher and will put the watch on test tomorrow....I'm not expecting anything good but considering this 80 year old watch was dead it now lives on to fight another day. To answer some questions... Yes the impulse jewel is chipped but I'm not at the level of replacing one of those yet! I used the Ronda 588 balance staff on what appears to be a Beguelin 23 at a size of 18.5 lignes. Thanks everyone for your help I'm very grateful to you all. I've learnt quite a bit and bouncing ideas about has given me the confidence to try things out. My next watch is going to be a nice silver cased Cyma Tavannes 9192 points
-
Thats why i dont wear a tie when I'm working with machine tools, come to think of it i dont wear a tie at all which makes my comment completely irrelevant.2 points
-
This is so cool! I'm still relatively new to the forum (soon 1.5 years) and I feel that I'm getting to know some of you through your writing... but that's only one side of you. So, actually seeing and hearing @Jon is very nice.2 points
-
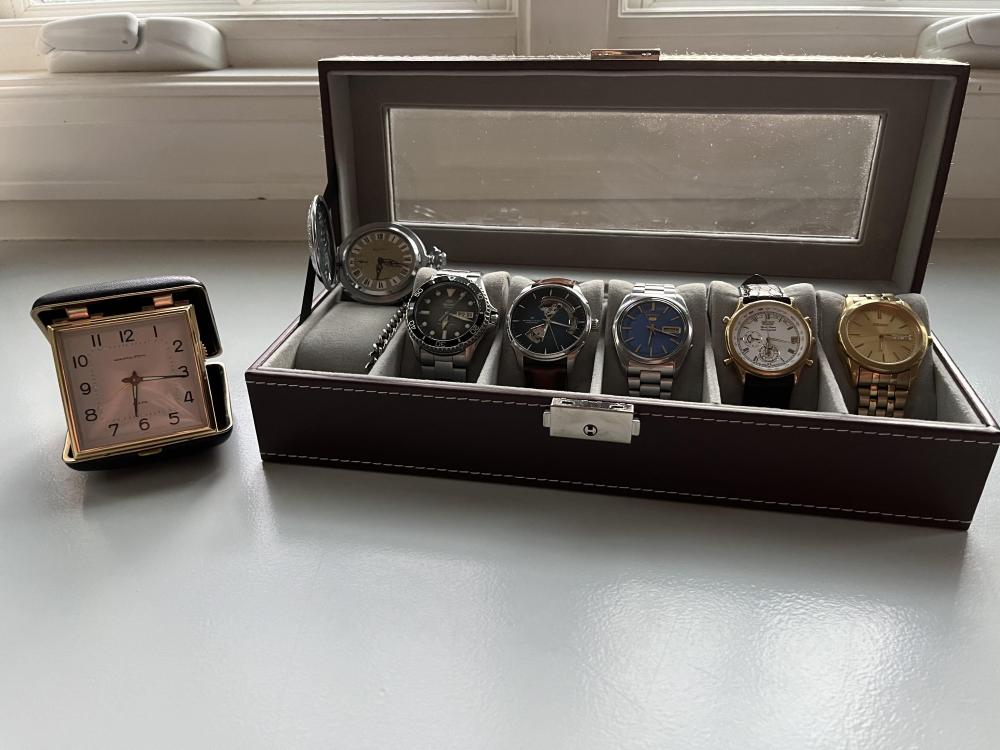
Hello everyone! I just found this amazing form after looking for some help on some clock questions I had! So a little about me! I am probably much younger than most people here as I’m still a teenager haha, but I have quite the passion for watches! Currently my collection is rather small consisting of 5 watches a Orient Kamasu II, Hamilton Jazzmaster open heart (in the beautiful blue dial); although I know that’s not everyone’s cup of tea, and 3 vintage Seikos from my late granddad still all running well! Although my Seiko 5 appears to have a problem where it will only show the day every 2 days the in between day it just appears blank as it hasn’t turned over correctly? Very odd. I also have a Russian pocket watch and a Hamilton folding travel clock from I believe the 1960s, got for $6 yesterday so I couldn’t pass it up. I currently have one watch that I’m saving up for and it’s my I would say “grail” watch I’m hoping to get a Omega Speedmaster Moonwatch with that beautiful tritium dial, I just love the way the hour markers go cream with time! Shows character that most modern watches are missing. Along with the obvious reason that the watch is stunning front and back with the amazing view of the Co-axial chronograph movement! I would say I’ve always been quite interested in repairing watches, as I’ve always had an interest in repairing things such as my Porsche 944 Im getting as my first car and have been planning to work on! I would say Marshall at Wrist Watch Revival has been a huge help in helping me understand how complex and beautiful these watch movements are as I’ve always had an appreciation of how such a delicate thing can work so well! (Until they don’t haha…) Speaking of that… My Hamilton clock (pocket watch? I’m not sure how to classify it) had one problem, so it is my reason for joining this form! It appears to not run for very long perhaps 12 hours or so (is that all these clocks run?). So if someone could direct me to the right place to ask that question along with perhaps a solution for the Seiko, that would be great! And here is a quick photo of the collection! Left to right ~1960s Hamilton folding clock Soviet era Molnija pocket watch Orient Kamasu II Hamilton Jazzmaster Open Heart 1972/1982 Seiko 5 (unsure on the exact year) 1994 Seiko World Timer Chronograph Alarm (dancing clock hands!!) 1993/2003 Seiko dress watch Wonderful to meet all of you, -Max aka Ireiaand
 2 points
 -
Great video Jon, I'm right in saying that we here are very fortunate to have you in our group and appreciate you giving up your free time to advise us2 points
-
That was so great having a glimpse of your studio, your personality, and the way you approach watches, people, and teaching, which is very close to my heart as a teacher. Thanks!2 points
-
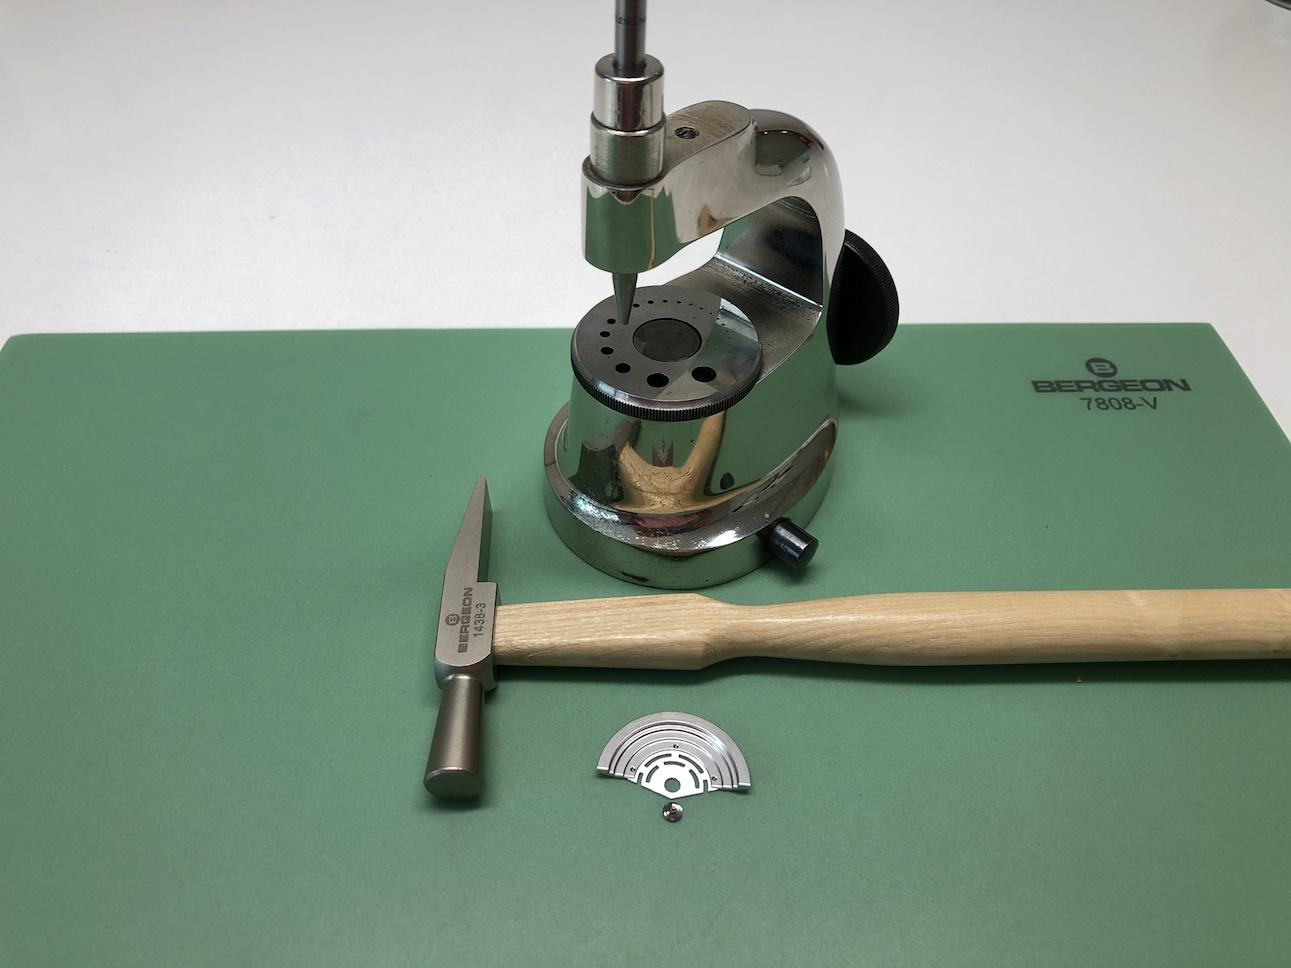
Use a hammer you feel comfortable and are used to using. It has to be suitably heavy enough though. I find a watchmaker hammer with a 25 - 30 g head is way too light in weight, so I use a brass hammer. in a job like this I like a heavier hammer and reduce the weight of the blow on the stake, because all the action is in the wrist, rather than a hammer that is slightly too light and you end up hitting it much harder with less control. I don't think you realise how hard this has to be hit, but you have to be careful going over the top and destroying the axle and damaging the rotor in the process. I've got one or two axles to do this week, so I'll see if I can shoot a quick video of the process.2 points
-
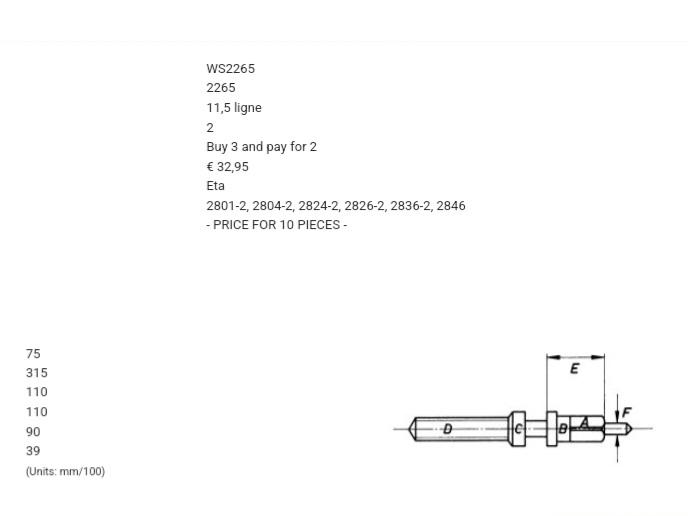
This list here from WatchGuyUK is also very helpful: https://watchguy.co.uk/cgi-bin/mainsprings With the info you find there (by size and/or GR reference), you can go to CousinsUK and see if they also list your calibre for that spring. If both agree, you can be quite sure.2 points
-
I only ever do it on extraordinary pieces, where it's worth preserving the original staff. I find it's more work (done correctly) than making a new staff.2 points
-
If you're just needing a crown and stem and are happy to fit it yourself as you've done others, then you only need to identify the movement, remove the stem , check its dimensions to verify you have the correct one, order a new stem and crown, simples. Here you go , ive done your homework for you
 2 points
 -
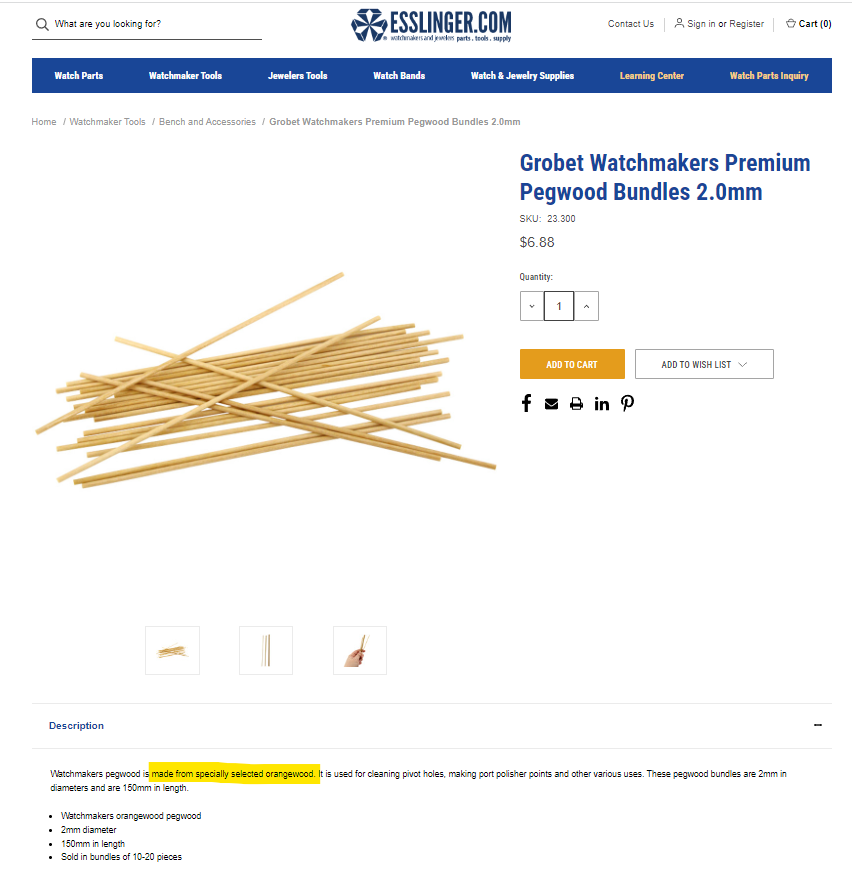
Think I may have previously posted this before, but pegwood = orangewood: Raided my wife's makeup desk.... much cheapness on Amazon!

 2 points
 -
Is it the crown thread that’s faulty or the case tube. I came across this issue last year with a vintage Longines. On close inspection the tube thread was very dirty but the main issue was the crowns thread was damaged. Fortunately I found one on eBay. If it is not the tube then a replacement crown will be the answer but might not necessarily have the correct makers mark.2 points
-
Thats because most other forums are a bunch of crap and ours is totally awesome . Tell me which forum it was so I can sort em out for yer . I've haven't been banned from one before , so it will be loads of fun for me1 point
-
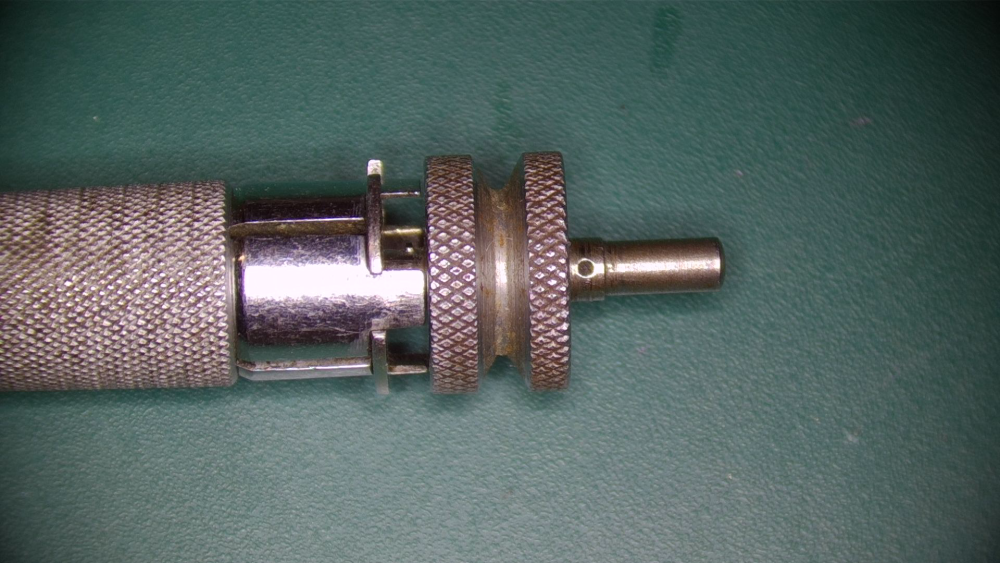
I've had a couple of these adjustable winders of different sizes for a while. I thought they were useless but I encountered a problem so I decided to give them a one more go. So the problem. Seiko 5606 barrel is just a bit too small for Bergeon #7 and #6 is too small so that the mainspring gets packet way too tight. The pins in the adjustable winder are symmetric. If you manage to wind the spring, there's no way getting the spring unhooked. That probably has to do with incorrect size/pin protruting too far. I filed one side of the pin sloped so you can get the spring unhooked while turning backwards. I haven't even had any trouble with the automatic bridle. Really great once you figure it out and have a winder with proper arbor/hook size. I originally bought these when I saw Spencer Klein use one. I think he still uses them. K&D winder This is how the opposite side still looks. I filed this pin on one side to be able to unhook the spring. It's like Bergeon right handed now.
 1 point
 -
I should mention, I posted this question on another watchmaker forum and got an incredibly different, pretty aggressive, unfriendly and unhelpful set of responses, which couldn't be more different from the hugely helpful replies above. Thanks so much to all of you for understanding. I should also mention, the thread was damaged before the service, so the only work required is to fit a new tube/crown. The watch keeps better time than ever (all previous services being at Oris ADs, accompanied by a LOT of problems due to poor workmanship. There is absolutely no reason to service the watch again.1 point
-
The hot one with long dark hair , if it is, someone's going to be getting lots of private messages1 point
-
While hesitant to share a video of myself, I took inspiration from @VWatchie's strategy of posting a non-English video. That's me in my day job as an economist.1 point
-
You will see that I have repivoted useless broken balance. It is just to show that repivoting is possible and how I think it must be done. I made the video because a friend asked me to. The right way is to turn new balance staff thow1 point
-
Well, since you mention it I like you have a YouTube channel. I only started it so that I could illustrate my questions on WRT. Then I thought it would be fun to try my hand at some reviews and tutorials. Perhaps I should try to make a one or two minute video just to let people know a bit about who I am. So yes, that is a thought!1 point
-
I hope the baby with its sunshine it will bring to your lives will make this problem with sourcing decent movements a distant memory! Have you tried making an account with Sellita and buying the top grade from them. I would also go down the route of buying an SW500 rather than a 7750. I know the 7750 is a better movement marginally in my book, but parts for the SW500 are widely available and in five to ten years 7750 parts are going to be in unicorn poo territory, trust me!1 point
-
Have you still got any of them? If so, please post a photo. Hehe.1 point
-
My master insisted I wore a tie. I wore those big wide flower power ones. Sometimes I used to serve in the shop it gave me extra training in helping customers and explaining what their watch or clock needed.1 point
-
At least part and information for the Cyma 919 are more readily available. I just need to find a click spring now for mine and see if she'll run.1 point
-
Indeed, I don't understand anything, hahaha. But still great to see you!1 point
-
I hate annoying ads. I can't watch YouTube on my TV as the ads every 5 minutes drive me crazy - I watch it on my PC using uBlock add-on, so I don't see any ads at all. I just turned uBlock off on this site to see what I'm missing - there's ads all over the place !1 point
-
Love it! I had a cringe moment watching the lady with the dark curly hair working on the lathe, though. Those locks were getting awfully close to moving belts and turning spindles.1 point
-
ST movements are ideal for learning. When you are ready to progress try and stick to ETA. and AS movements with a 15-17 jewel count. Seconda movements mimic Swiss movements and you can pick them up dirt cheap. These will give you a good grounding when you want to try your hand at fixing something broken. Rold Rotary watches (pre-80s manual and autos) often have decent movements in them and you can get them at a reasonable price. I still use a phone. If you thought a stereoscope is out of the question, wait until you enter the lion's den that is macro photography. Be very careful, there is a LOT of rubbish out there. I use those blue coloured, round dishes with a clear lid. They work pretty well. Invest in some membrane boxes for hands and the round containers with a support for dials.. They are not expensive and you only need a couple If you're not ready for a stereoscope, I use a x5,x10,x20. My goto is the x10, mainly for lathe work and regulator adjustment. I use the x5 for lathe work on larger items and the x20 mainly for balance inspection when the balance is installed. (i.e. if you want to check if the spring is flat and it's movement between the regulator pins) Lots and lots. My main point would be not to scrimp on screwdrivers and tweezers. You use them all the time but there are many things you'l begin to accumulate on the way Last tip - Stay away from Seiko for now. Most online are Frankenwatches, in a terrible mess. The shock springs are just about the hardest to install and remove. Get an old 21+ jewel Seiko movement and practice removing and inserting the jewels, setting and springs. Keep doing this until you are comfortable. Keep going back and practicing. I use size 5 tweezers a home made probe (1mm hole drilled in peg wood with a sewing needle bonded into the hole and shaped on a stone) along with a "jewel picker upper" a stick with gel on the end. Ideal for removing the jewel and setting without pinging them into orbit. You can buy a jewel picker upper for a few quid on Amazon / eBay / Cousins1 point
-
I requested replacements rather than a refund, and the seller has gone completely silent. Very, very frustrating. I'll be sending them back as soon as I can find the bandwidth (baby coming Sunday, and hopefully not sooner), and once I get my refund, I'll leave a rare scathing review. I need to track down TOP grade ETA 7750 and TOP grade Selitta SW200-1. Sounds like I have a bead on a 7750, but the SW200-1 is eluding me. Any leads? ::hits post:: ::receives email from eBay re: seller finally responding:: Looks like replacements are happening. That is a relief. Hopefully that all goes smoothly and quickly. Still worthwhile to track down sources for TOP grade movements. Probably worth a dedicated thread though.1 point
-
Haha yea, I assume most people here are! Great to be with fellow watch enthusiasts however.1 point
-
The shock that broke the pivot also damaged the hole in bottom jewel, and pushed the jewel down away from the balance. Obvious !!! replace the jewel with new, adjust it flush level with mainplate. Good luck.1 point
-
Hi Daniel, If you go through Mark Lovick's videos on Youtube, I am sure he does one on repivoting a part of a watch movement. I just can't remember which part of the movement he did. Here is the video, but it's not a balance staff. A new balance staff may be an easier answer. Try turning one?1 point
-
Agreed, It's not the most reliable source.1 point
-
The rivet will do the job of holding the axle in place even with a small amount of play in the rotor, unless the hole is really sloppy.1 point
-
Yes, found it! Starting st 9.52, he starts talking about this issue and the flat punch he uses.1 point
-
Hate to be the one bringing you the bad news. If it got damaged after Oris serviced the watch, there is a chance pieces of metal found their way inside the movement. The rubber O ring on the stem might tell us how bad things might be inside the movement. Watch movements don't welcome metal pieces touring around inside their belly. Welcome to the WRT forum.1 point
-
Well, thanks everyone who pitched in on this. I was able to recover a smattering of adjustbility but overall not a lot of improvement re: there simply isn't that much room on the beat error armature to go much further to the left (if you're looking down on the balance as in my picture. While this is frustrating, the movement itself is running well (+270 amp du/dd with 0-5 s/d at 0-3ms beat error dd/du respectively). Similar for cu/cd and cl/cr with just -30-40 amp from du/dd. I'm thinking the hairspring might not be the correct length, but I lack the skills to shorten it. I could also purchase a NOS balance complete for $25, but since the movement is running strong I'll probably leave it be and move on (I'm a hobbyest, so this watch will just go back onto eBay once I finish restoring the case). Thanks again--Jay1 point
-
I read this solution on a post. Go to Settings - Connections - Mobile Networks- Network Mode. Choose a network mode that doesn't have 5G.1 point
-
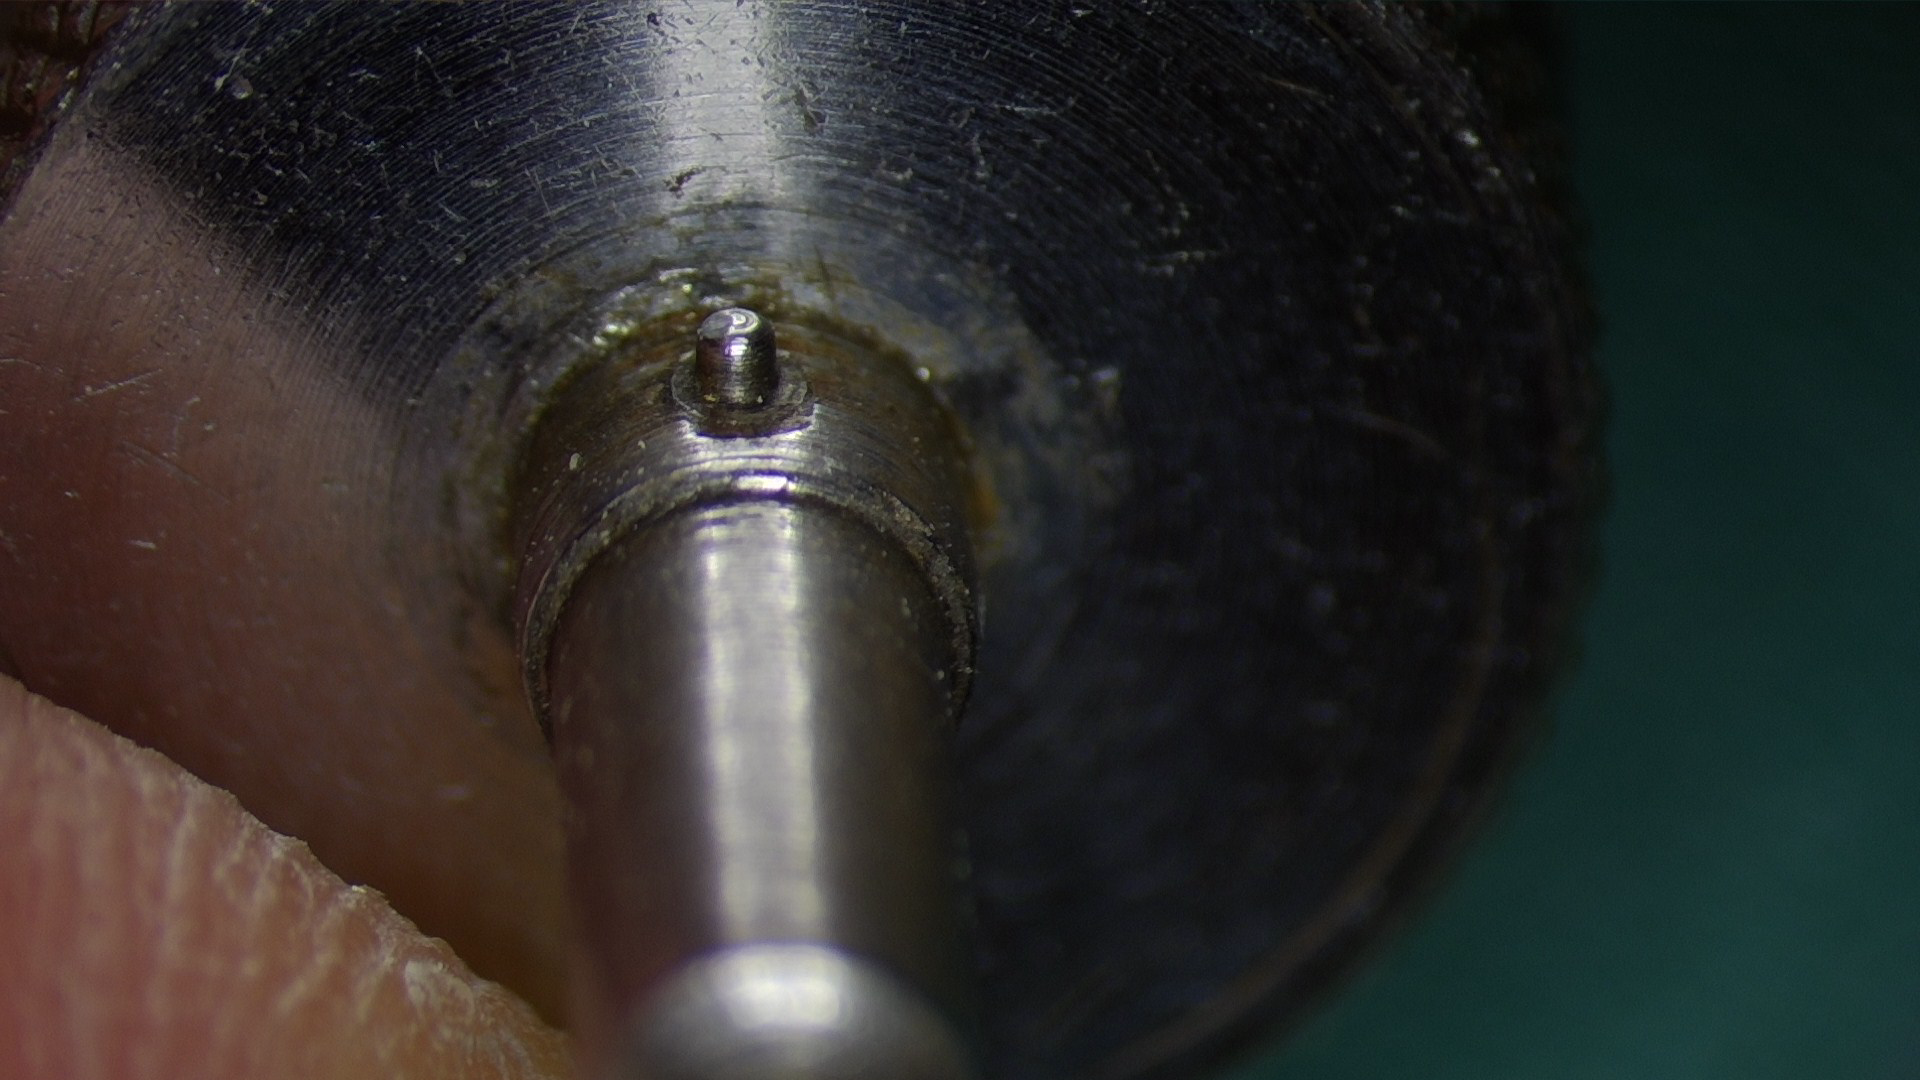
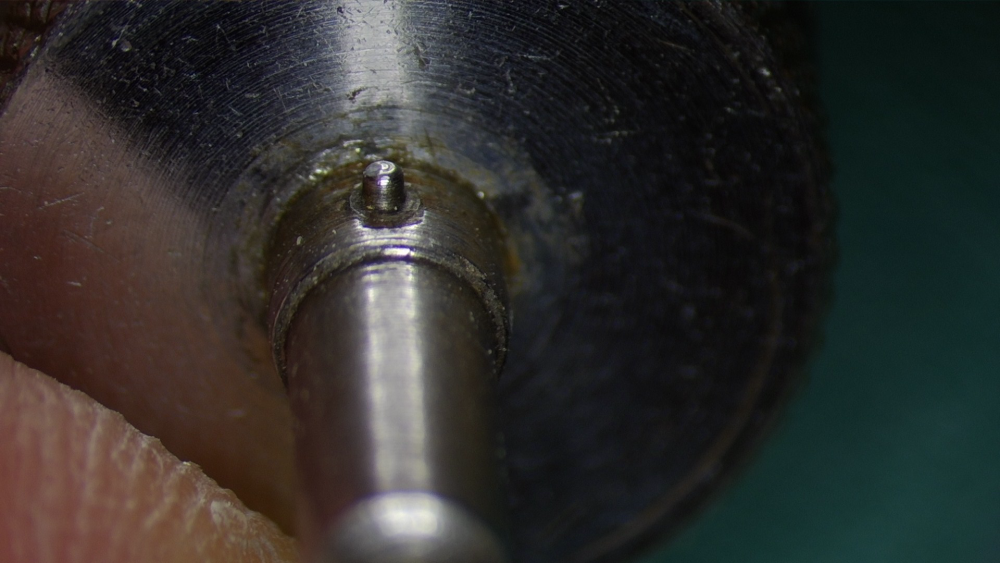
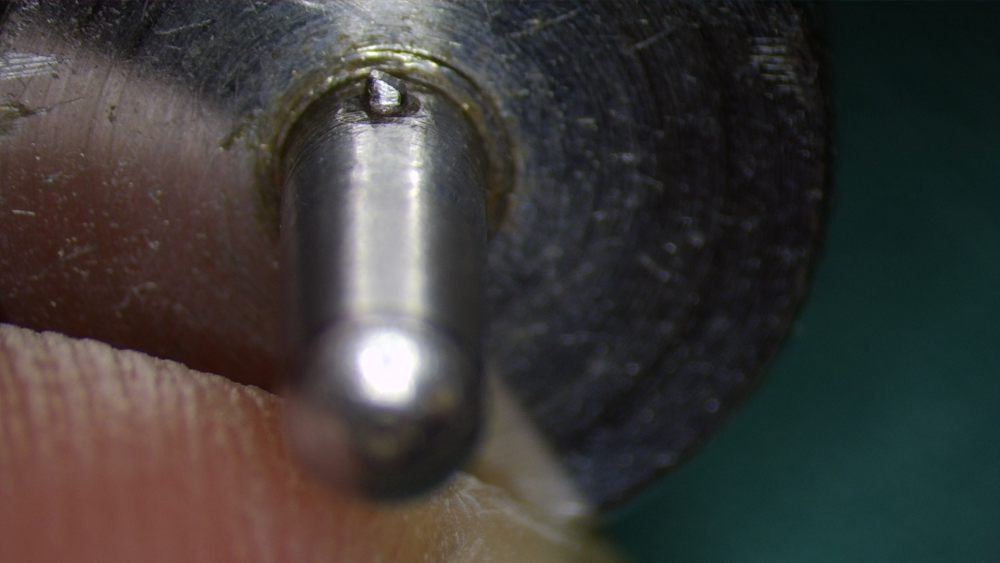
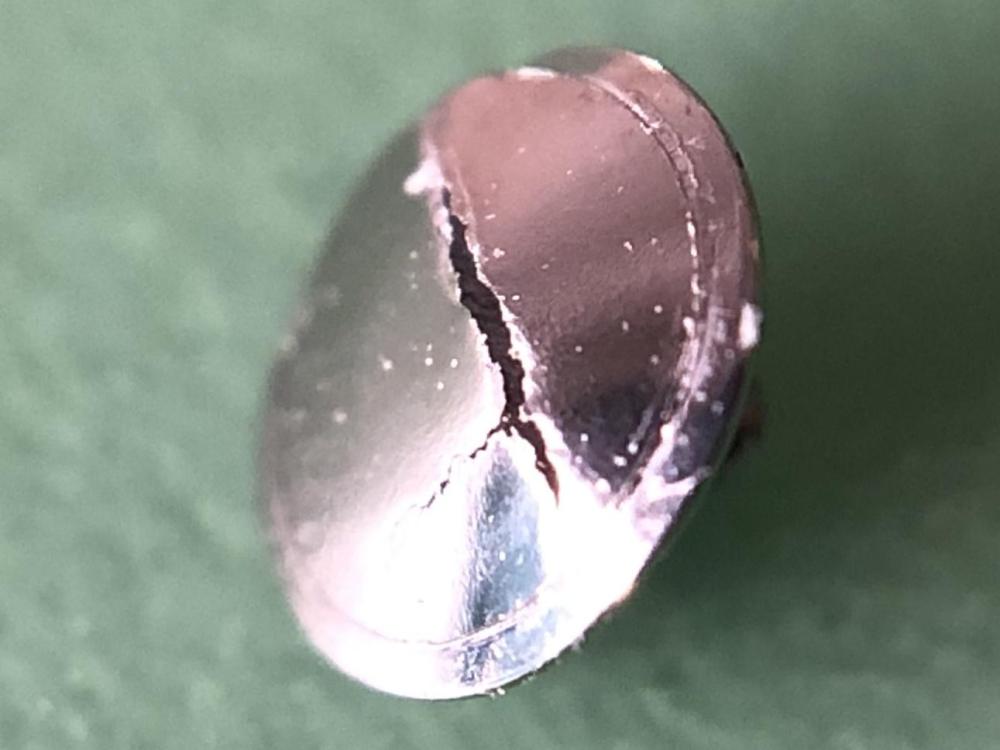
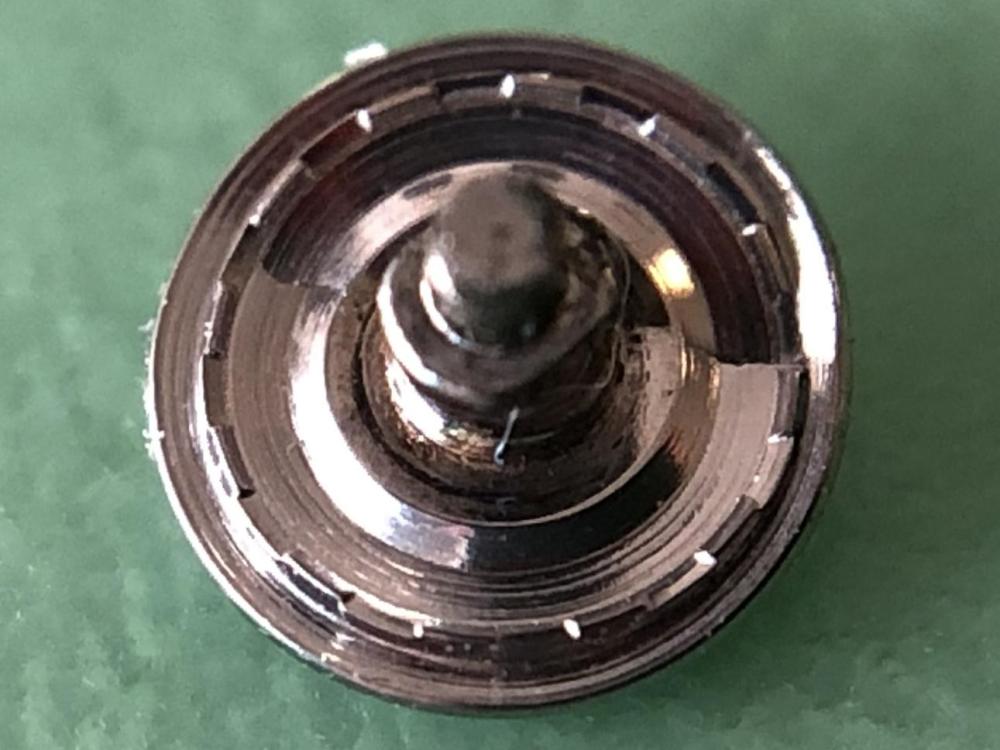
The first step is now complete. Hard to avoid "a slightly" elevated pulse before the first hammer blow but it may not be so strange when what is under the hammer can cost several hundreds to replace if something goes wrong. Repairing a Rolex by hitting it hard with a hammer feels unreal The operation appears to have been successful so far. The rotor looks completely intact without a trace of impact. I was worried that the decoration would be damaged or even worse that it would bend, but I now understand why the rotor is not at risk of damage. 100% of the energy from the hammer blow ends up on the rotor axle. I had hoped that the axle would come off after the first blow but I had to hit it three or four times, and really hard before the axle came off and the rotor jumped up a bit. Now the next pulse-booster remains, to rivet the new axle. Wish me luck and shout if you see anything strange in the pictures. Now I'm going to have a cup of coffee with real cream and breathe out
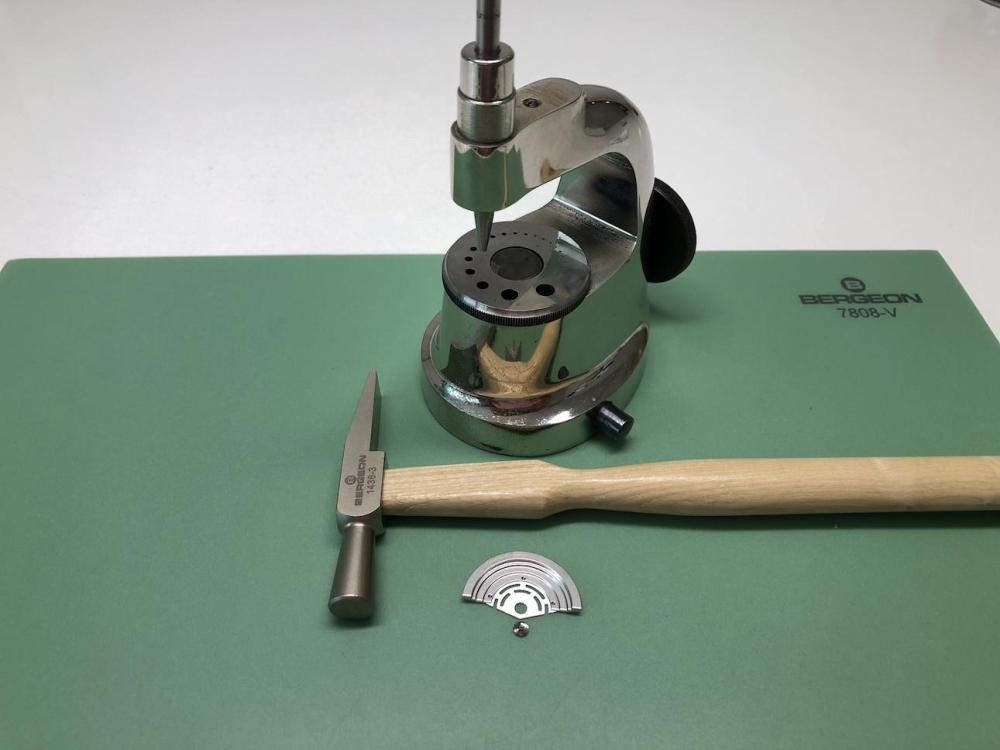
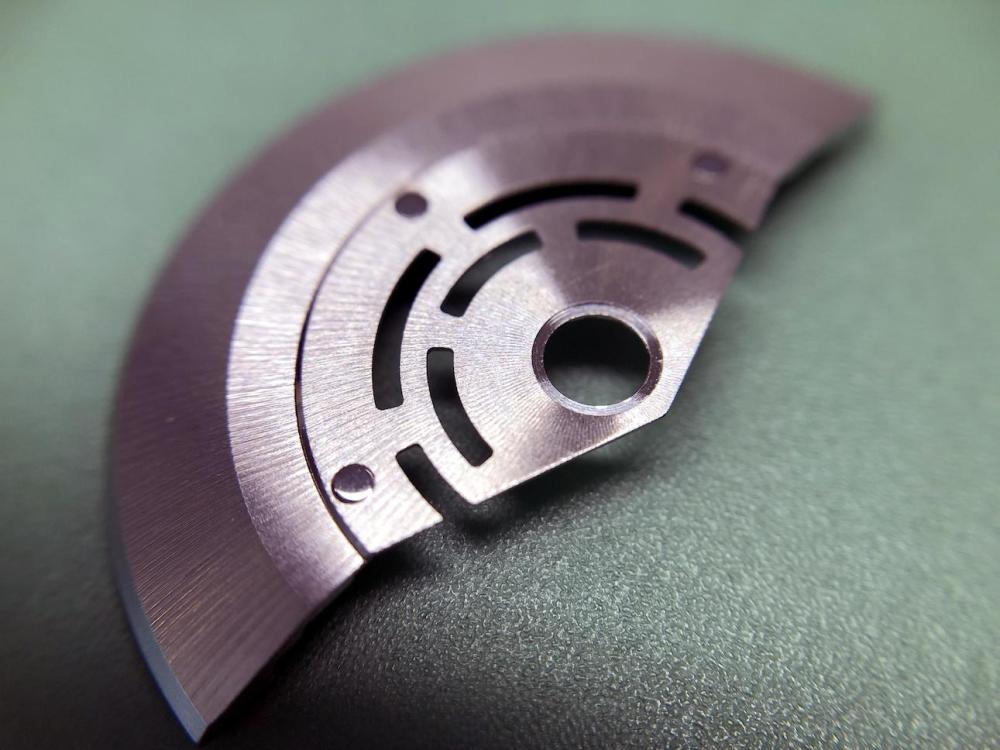
 1 point
 -
Hi Mike I used the same stuff (typeclean) when servicing typewriters may years ago for cleaning the type heads once it was used up and dirty it went in the bin. The old stuff from using on watches can be reused for holding parts on the bench when measuring or other like tasks but the bin is where it usually ends up. Premium Rodico is likly to be an altered formula designed to remove money from your pocket it will be a bit more tacky so it collects more dollars/pounds .1 point