Leaderboard


.thumb.jpg.cb17a66989f1e796fd4217db2e9ca9df.jpg)

Popular Content
Showing content with the highest reputation on 06/27/24 in Posts
-
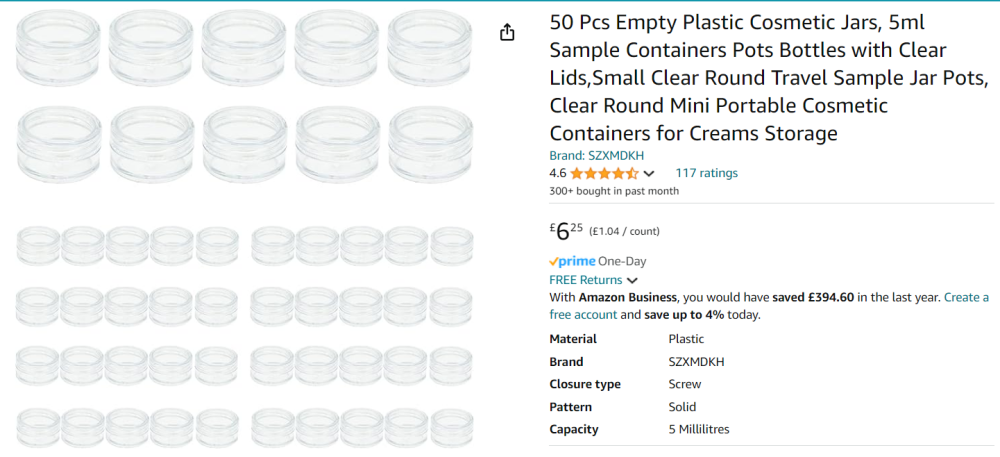
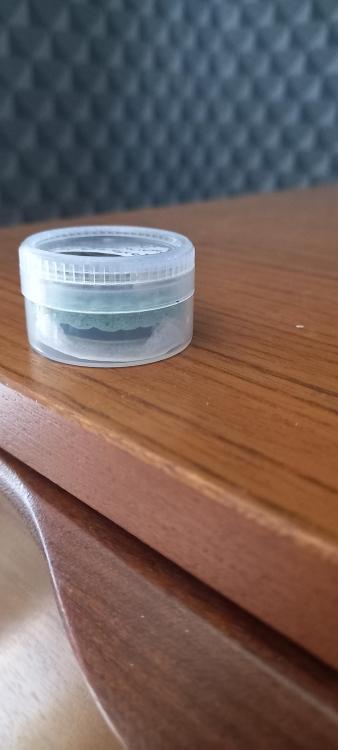
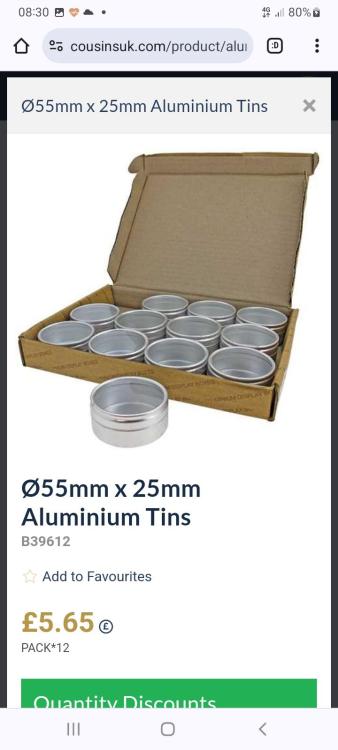
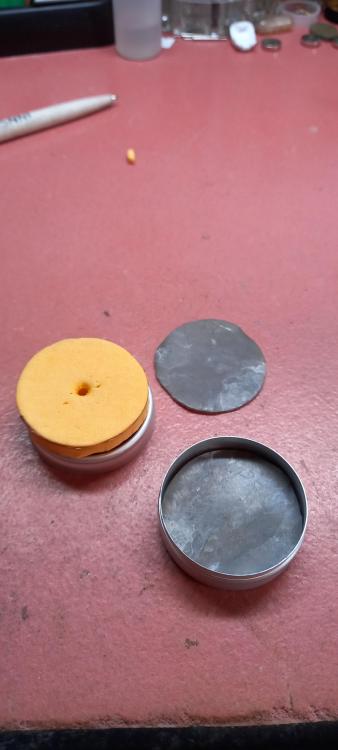
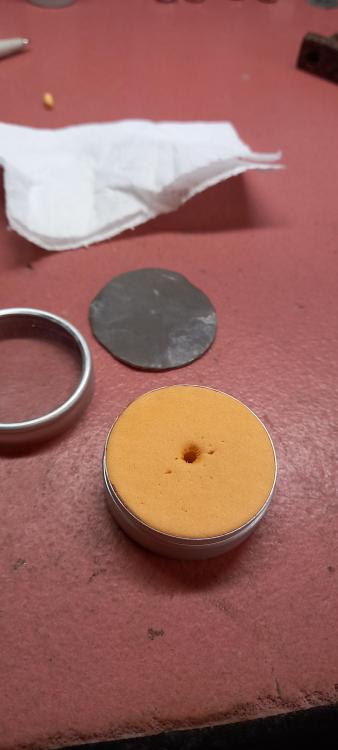
I use 5ml & 10ml makeup pots for storing parts and have thin neoprene discs to pad the bottom depending on the part.
 3 points
 -
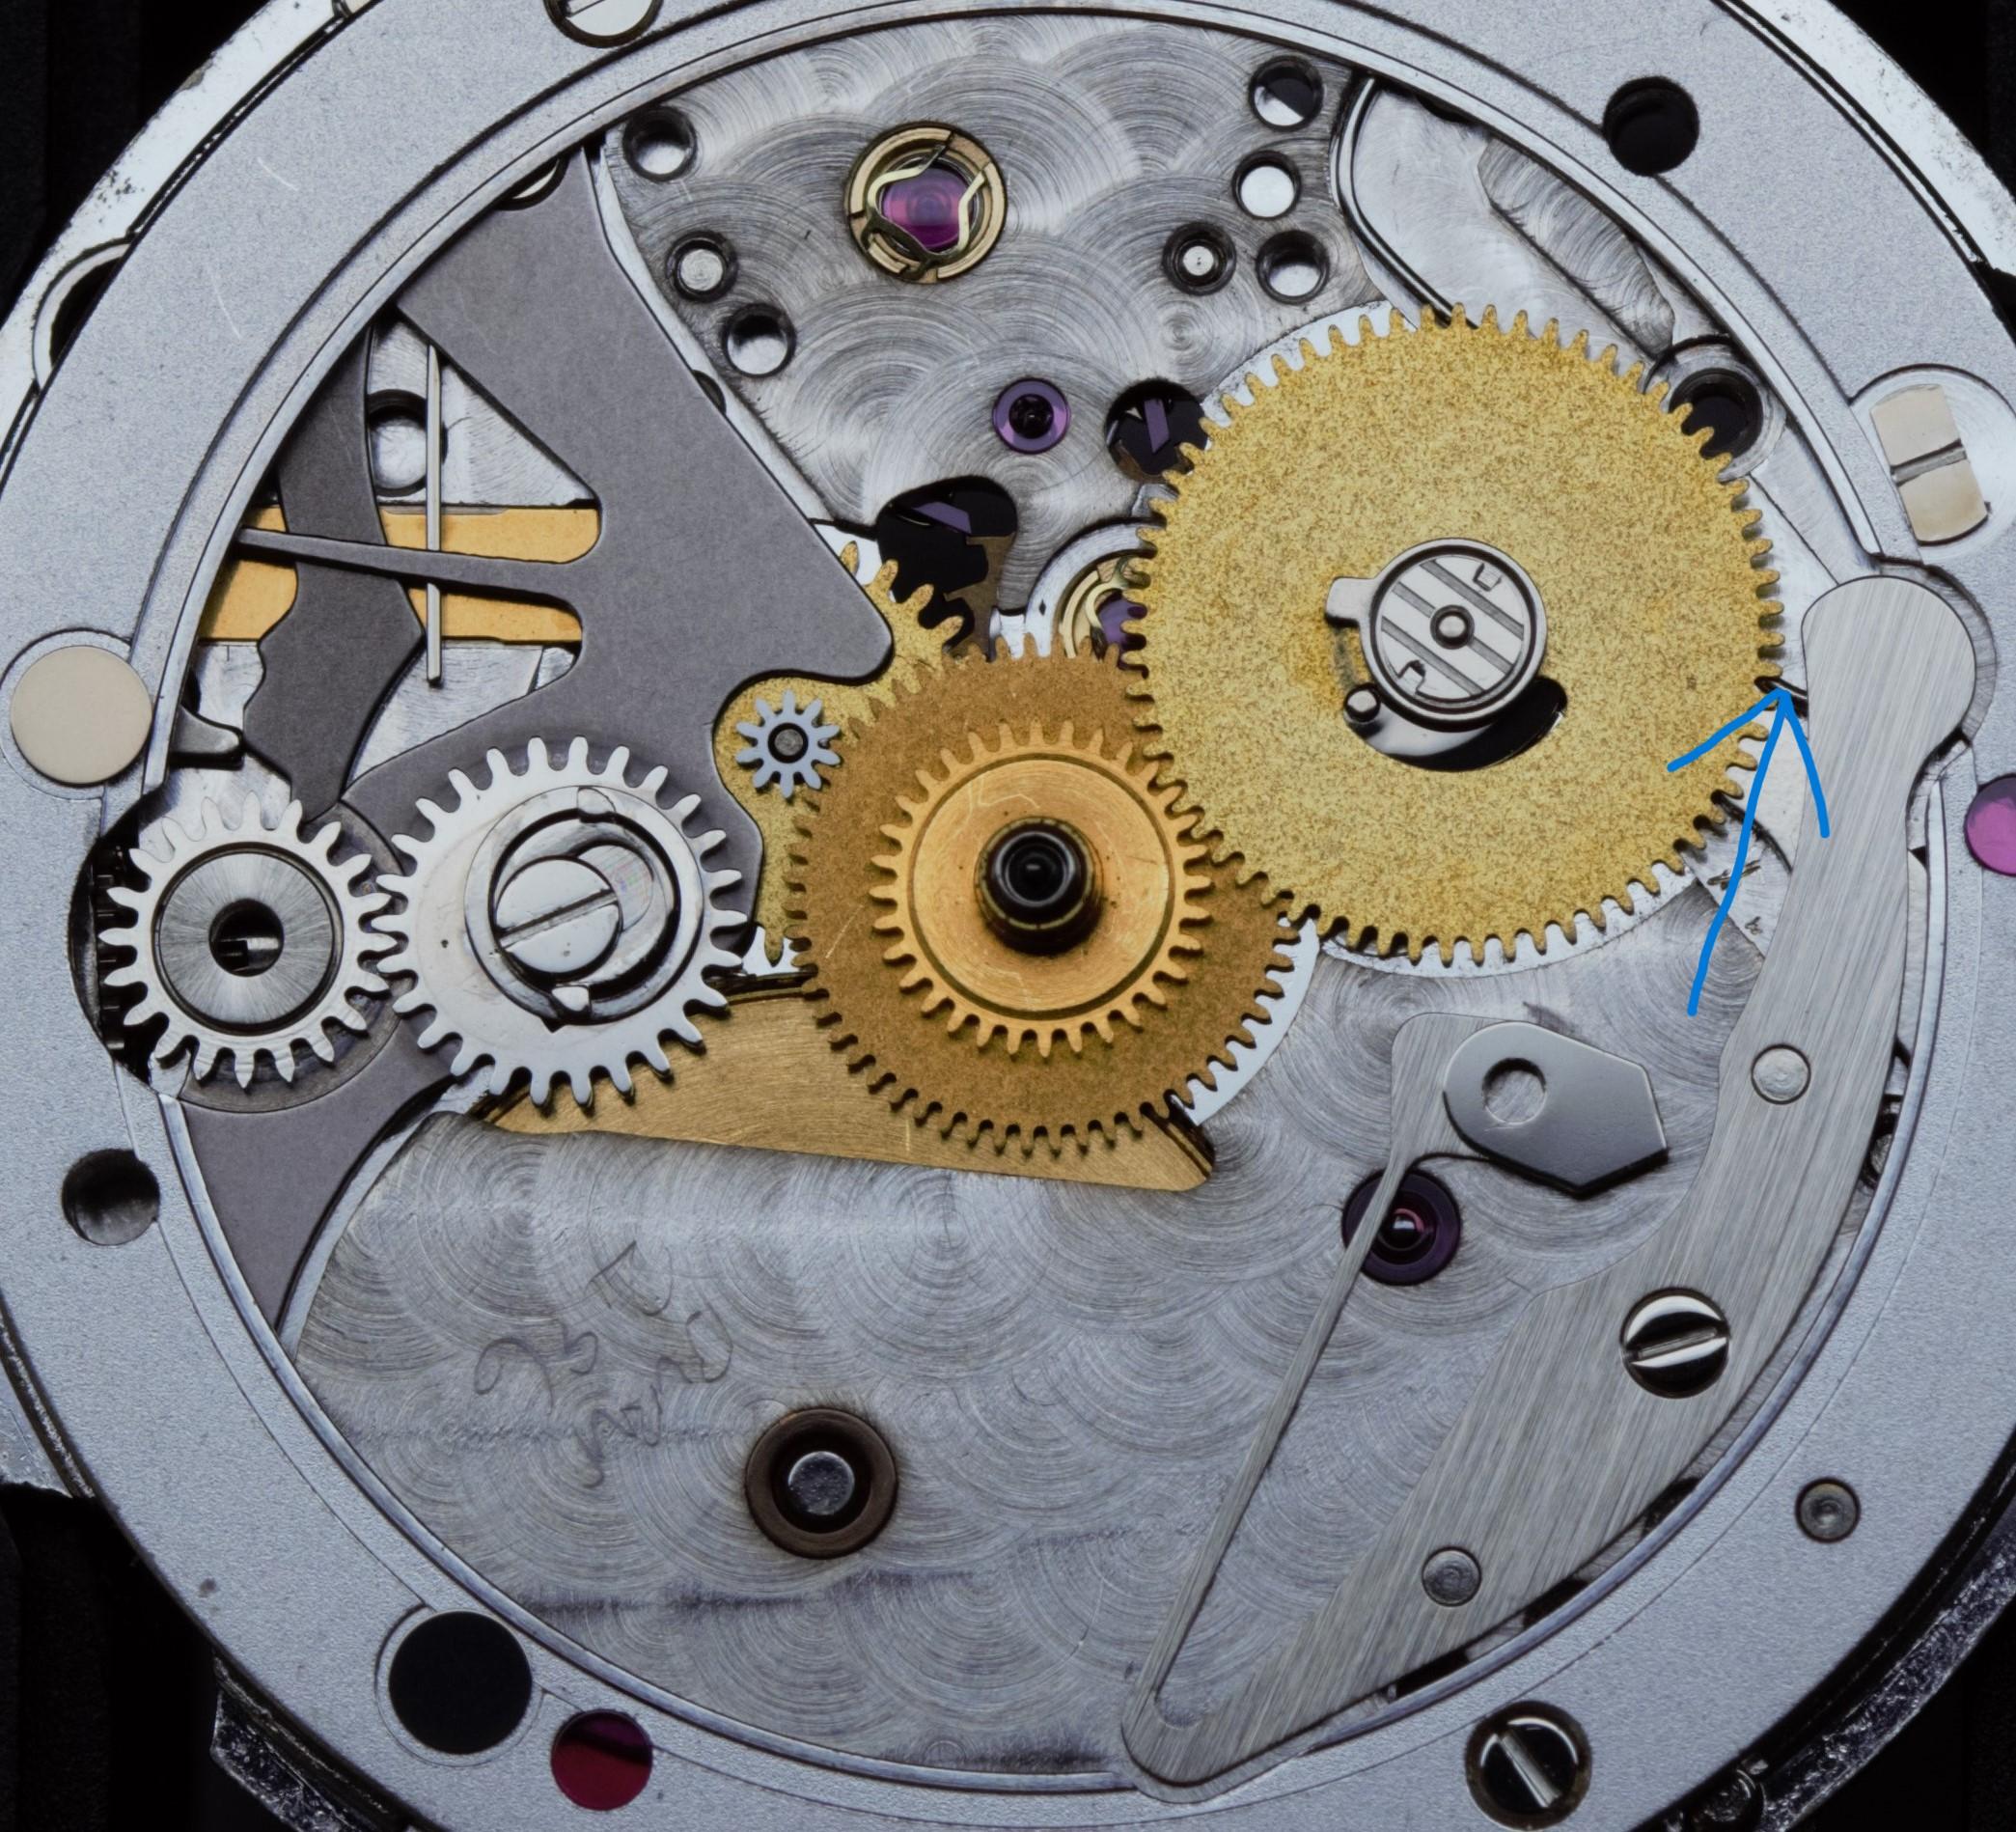
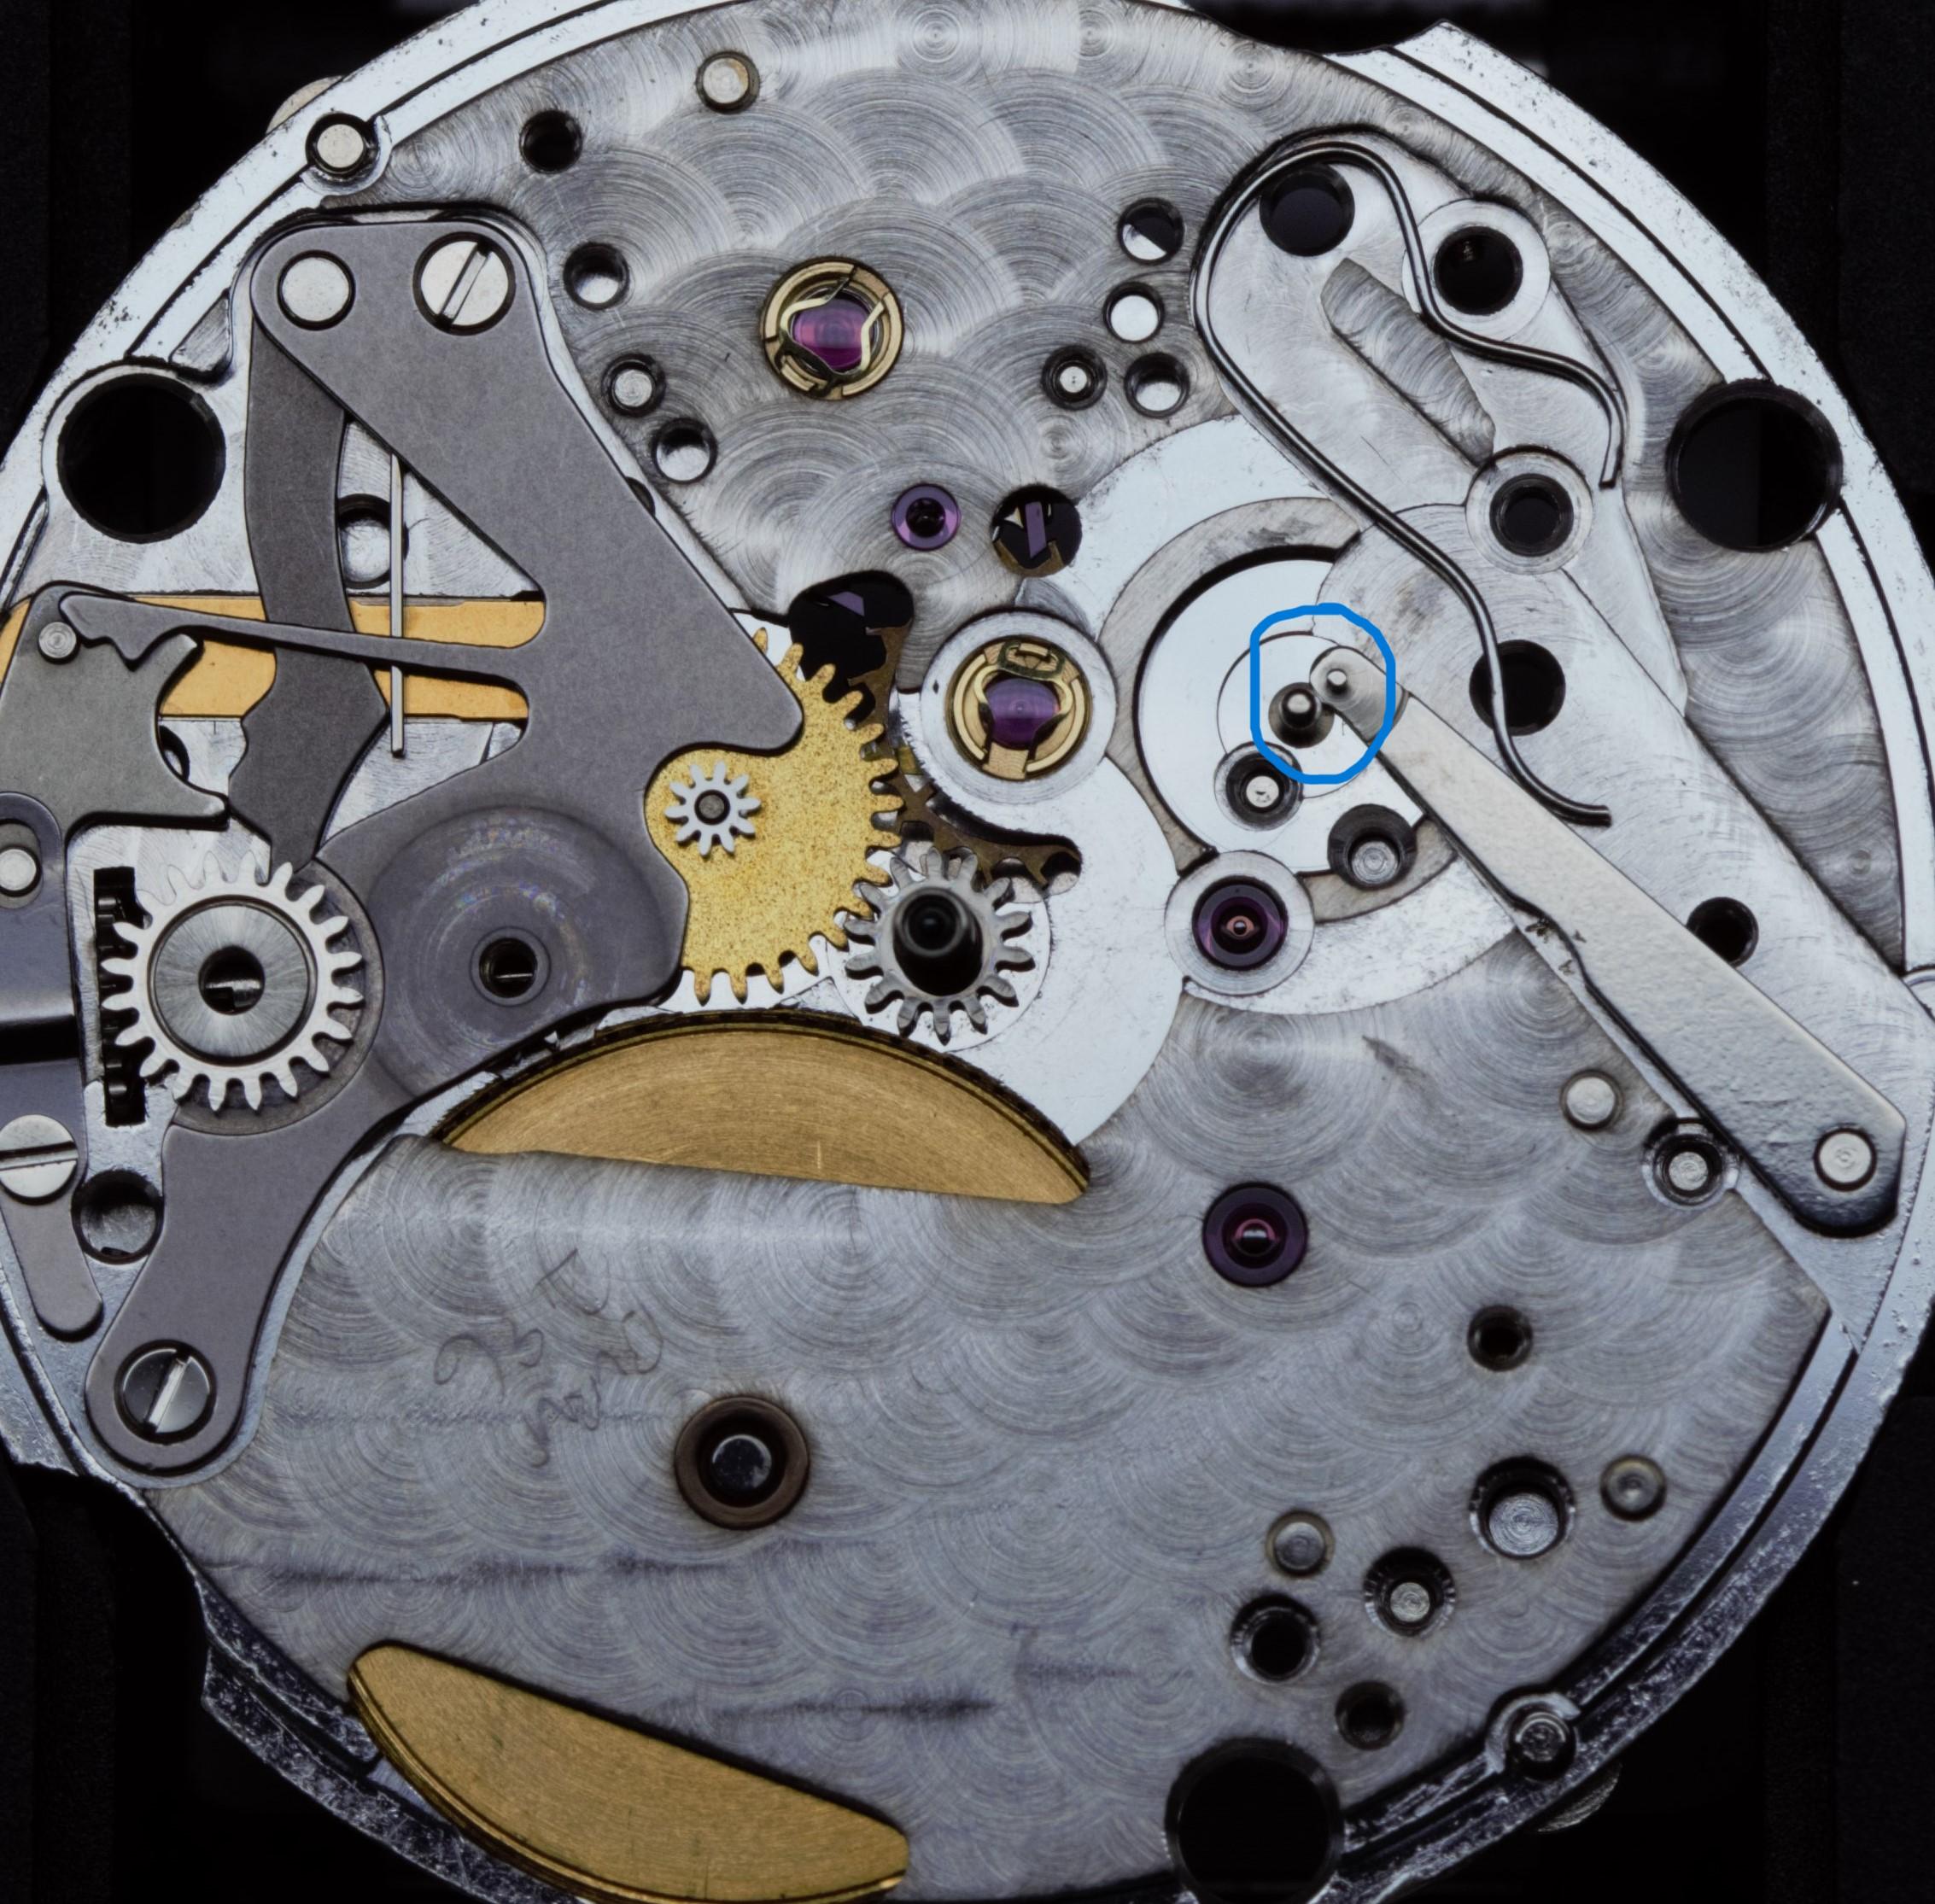
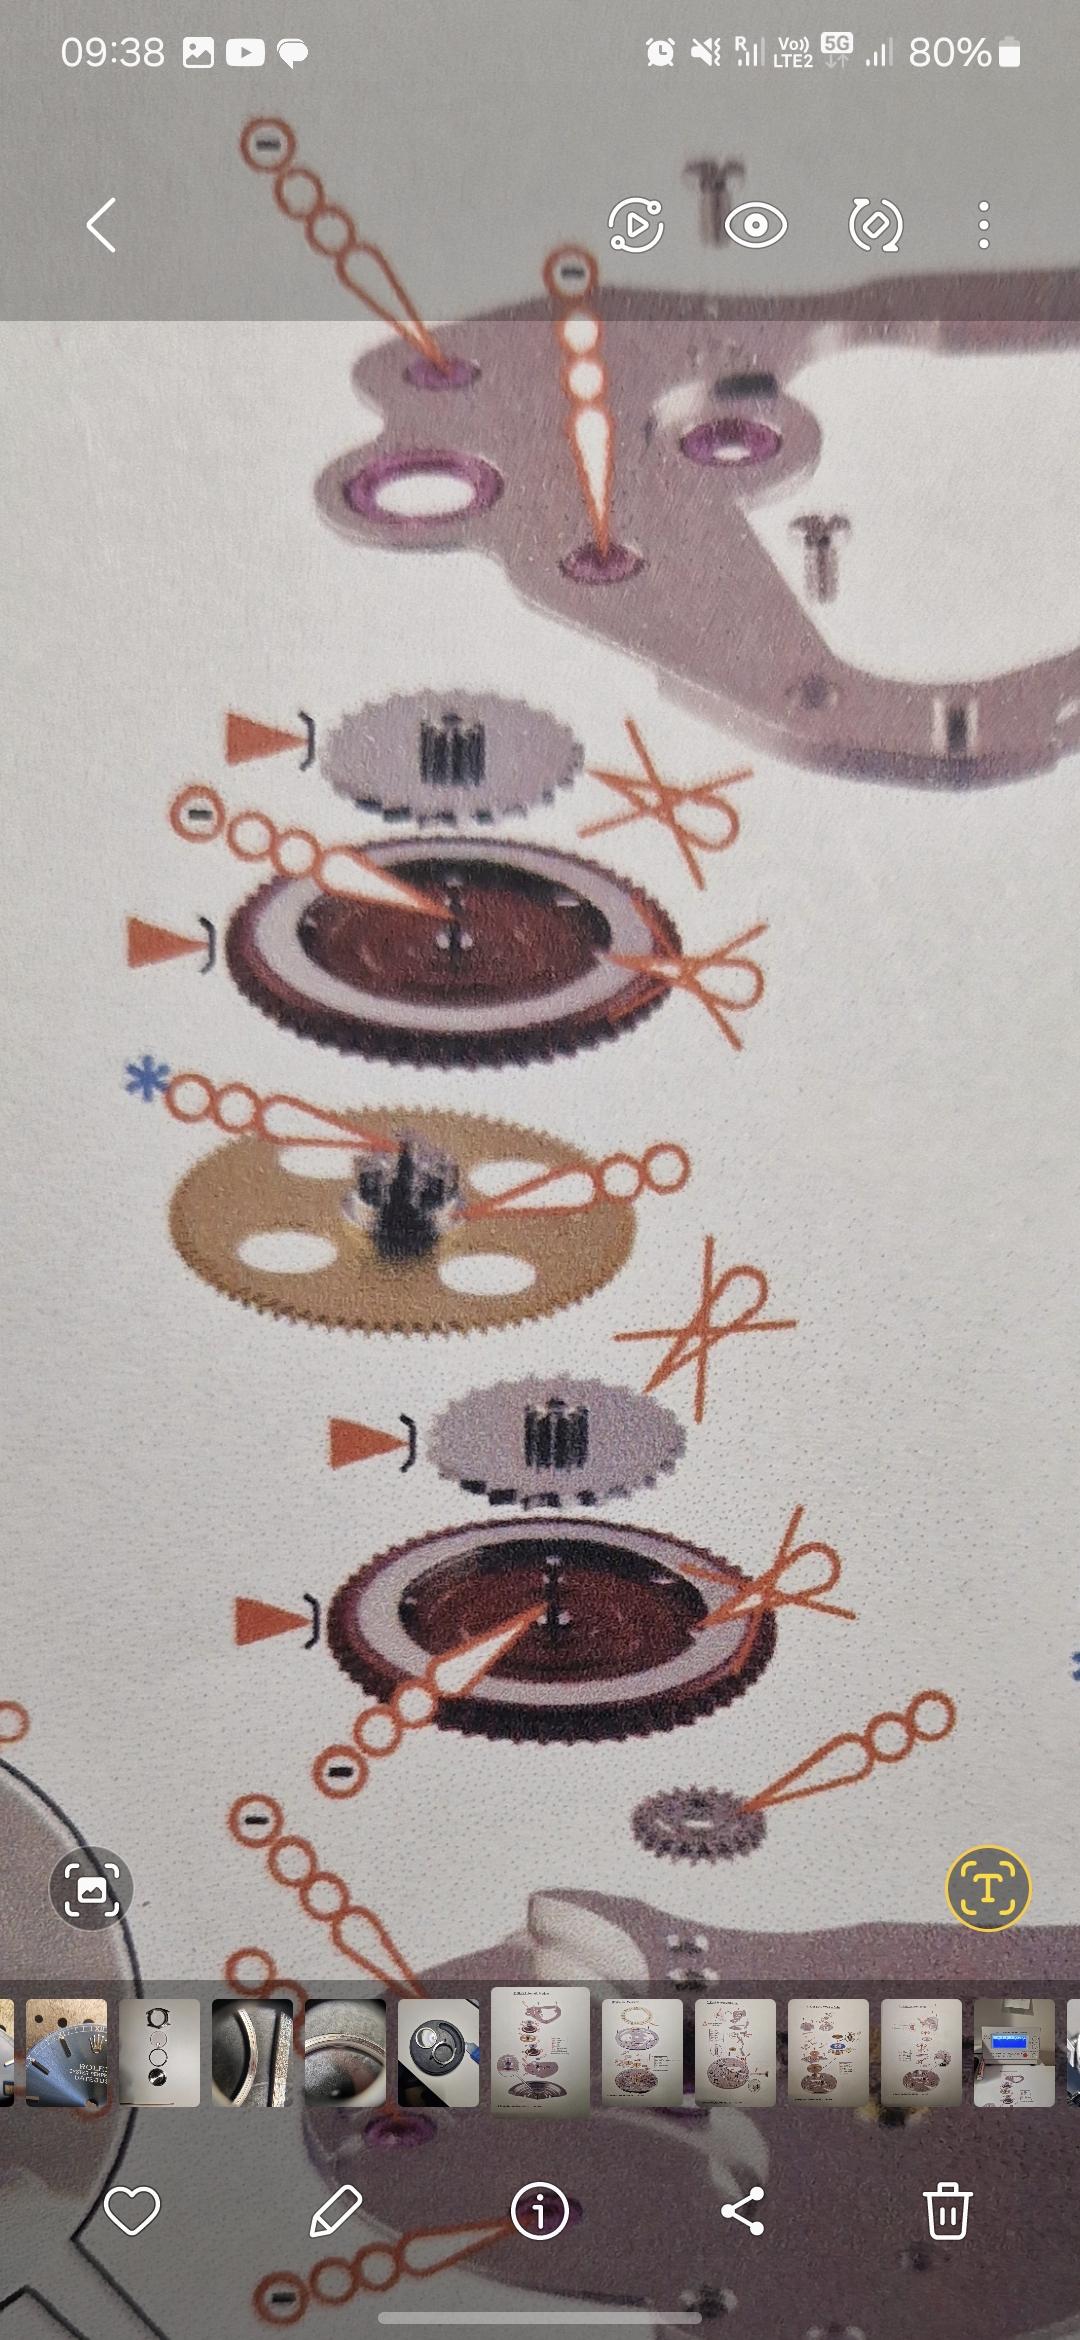
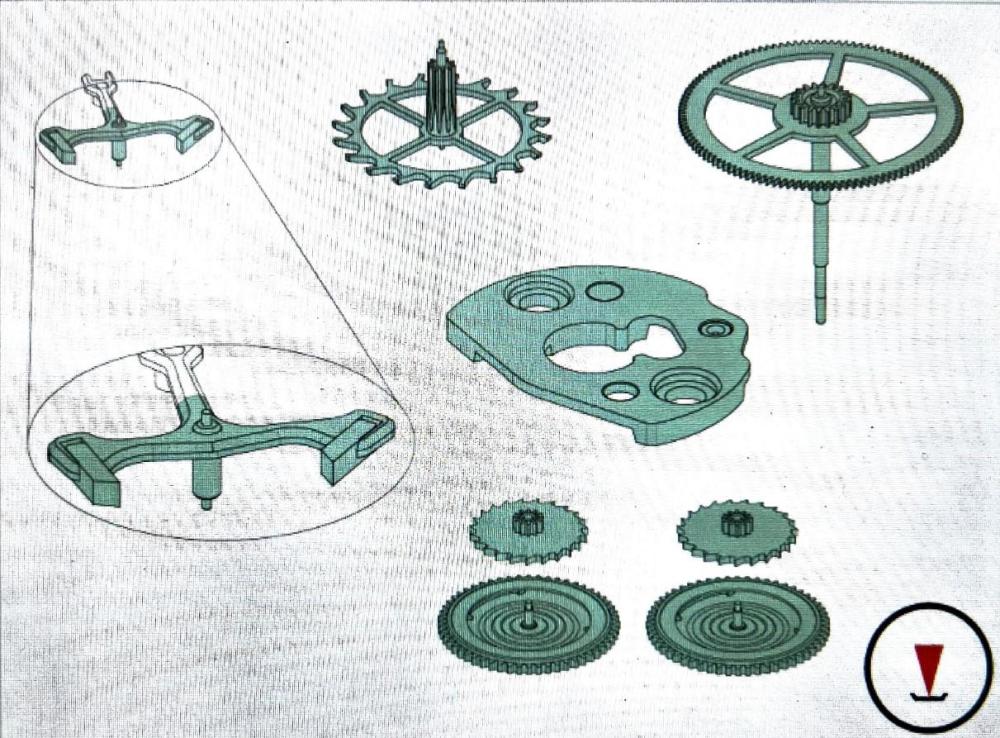
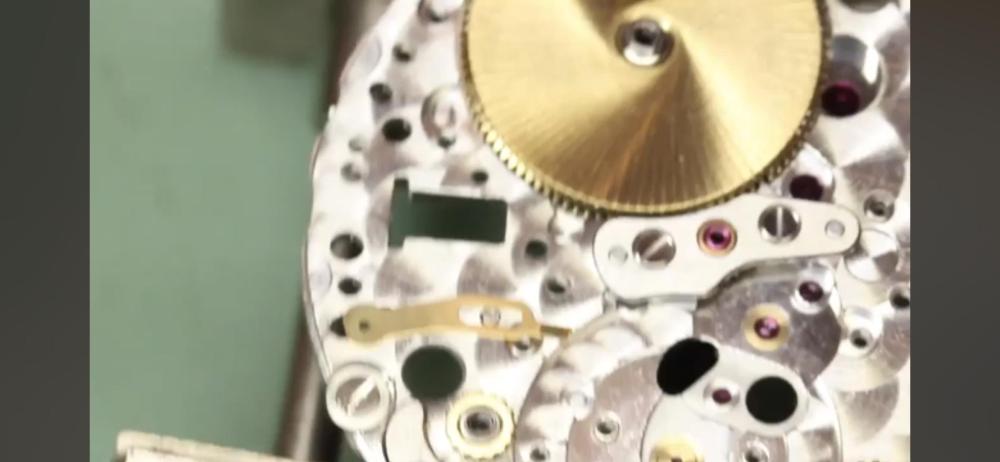
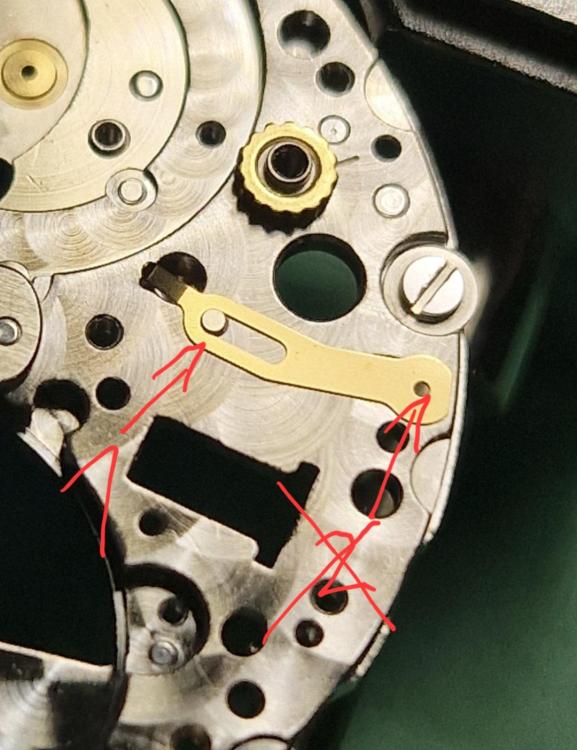
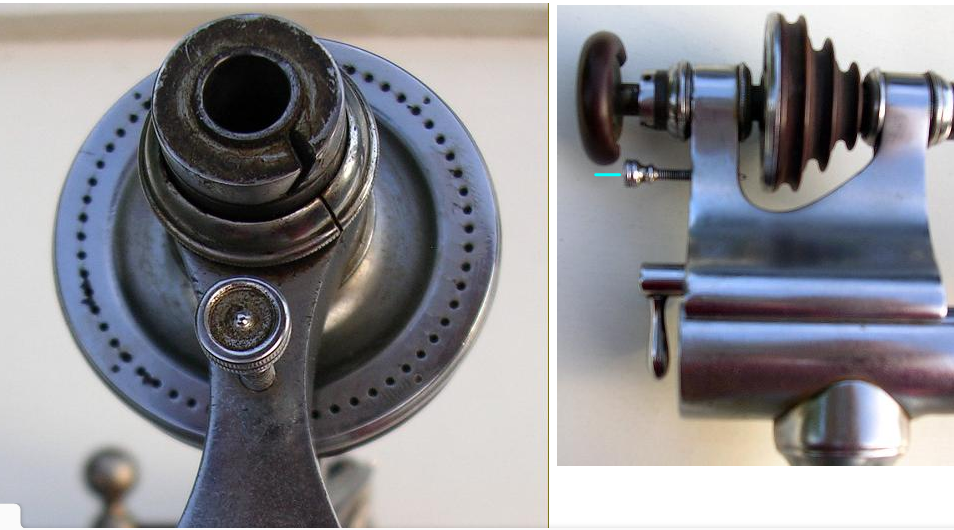
The left handed screw on the date driving wheel has a special screwdriver head to fit, so beware. it can be undone with a screwdriver, but careful not to slip! The date driving wheel needs to have pressure of the jewel that is on the arm pushed against the cam under the driving wheel taken off. When the left handed screw is removed, take the tension off the spring shown with a blue arrow, then remove the driving wheel and release the tension. When it comes to service manual for any watch movements, if you know why you use a lubricant in a certain situation, then I wouldn't pay too much attention to them. I certainly don't as I don't believe in most assembly order, or what lubrication. Reversing wheels don't get lubricated with 9010, maybe several decades ago, they are lubricated with HP1300, as all modern automatic watches are. I know I'm opening a can of worms here! Old service manuals will say to use 9010, but we don't do it like that anymore. I always start with the gear train or barrel, never the keyless work, as the clutch and winding pinion have to be held in mid air to pass the winding stem through them. Once the calendar plate is removed, you'll see the jewel hard against the calendar driving wheel post. This pic doesn't have the jewel in situ, but I have highlighted where the jewel will be. Take a little tension off the spring and rodico the jewel off. Keep that spring in situ when cleaning. It is might break if you remove and replace it. When it comes to epilame on a modern Rolex, these are the parts to do in the picture. Don't oil any teeth on the reversing wheels. The risk of oil migrating between the teeth and the red disk is big and will jam the reversing wheels eventually, so nothing is used, except HP 1300 on the arbors


 3 points
 -
What about spong, that is soft and harmless unless you decide to eat it. You could use Rishe Suniaks head because that is empty.2 points
-
Although, most service manuals from 25 years or more back will say use 9010. Old service manuals for Felsa 690 use 9010 in the auto works and as @JohnR725has said the progression from 9010 to 9020 and then HP 1300 showed some bad lubrication decisions in the early days. The Rolex service manual pic was from an up to date service manual, so what you see is epilamed. Personally, I dip the pallet jewels in so the pivots don't get any epilame, but I don't worry about the escape wheel pivots. I know it's fine, by opening up automatic watches I serviced five years ago and not seeing any brown dust around the escape wheel pivots or any problems in their timing, amplitude or general running.2 points
-
My understanding of why there is no oil on the clicks is because they have to move with absolutely zero friction. The danger of oil is it can have a dampening effect and of course it can go bad with time. So basically it's designed to work with no oil at all at least that's my understanding. It's also why they use epilam to keep oil from spreading across the wheel to the clicks. I always find the order of reassembling a watch quite interesting? Like the silly YouTube videos with the first thing they put in is the pallet fork which is definitely not the first thing you put in. Or keyless versus the gear train? When I was first in school the instructor George commented about putting the keyless together first on the grounds it would give you a stem to hold onto. So personalities found assembling the keyless First is what I would prefer to do.2 points
-
Unfortunately poise cannot be determined by looking at still images we would need a video. If you give the balance wheel a Porsche so it rotates it must rotate and come to a stop without rocking backwards and forwards. At least if you are in school for absolute perfection that's what would happen it would just roll along and come to a stop. Oh and the jewels on the tool have to be spotlessly clean and so to the pivots. In real life the balance wheel comes to a stop they can still rock back and forth very slowly and you're going to be reasonably close. But you really need to see a video or we need to see the video of how the balance wheel looks on the tool For instance in this YouTube video he gives the balance wheel is gentle puff of air that rotates and comes to a stop no rocking back and forth at all. Now in this video he shows the importance of leveling the tool but even though often times the level is in the base ideally the level should be removable and placed on the jaws themselves because sometimes the jaws are not level with the base. But usually I find with my tool is as close enough but if you're really perfect about it the level supposed to be removable Then he simulates and out of weight condition by removing a screw. Ill notice when he gives the balance wheel a Porsche it rotates but when it comes to a stop it aggressively rocks backwards and forwards. Whereas if it's reasonably close it will still rock backwards and forwards but it will be very very slowly So really only with a video can we tell Let's hope that's an optical illusion because of it is bent it will totally screw up poising as that will take control over the whole issue and make poising a waste of time.2 points
-
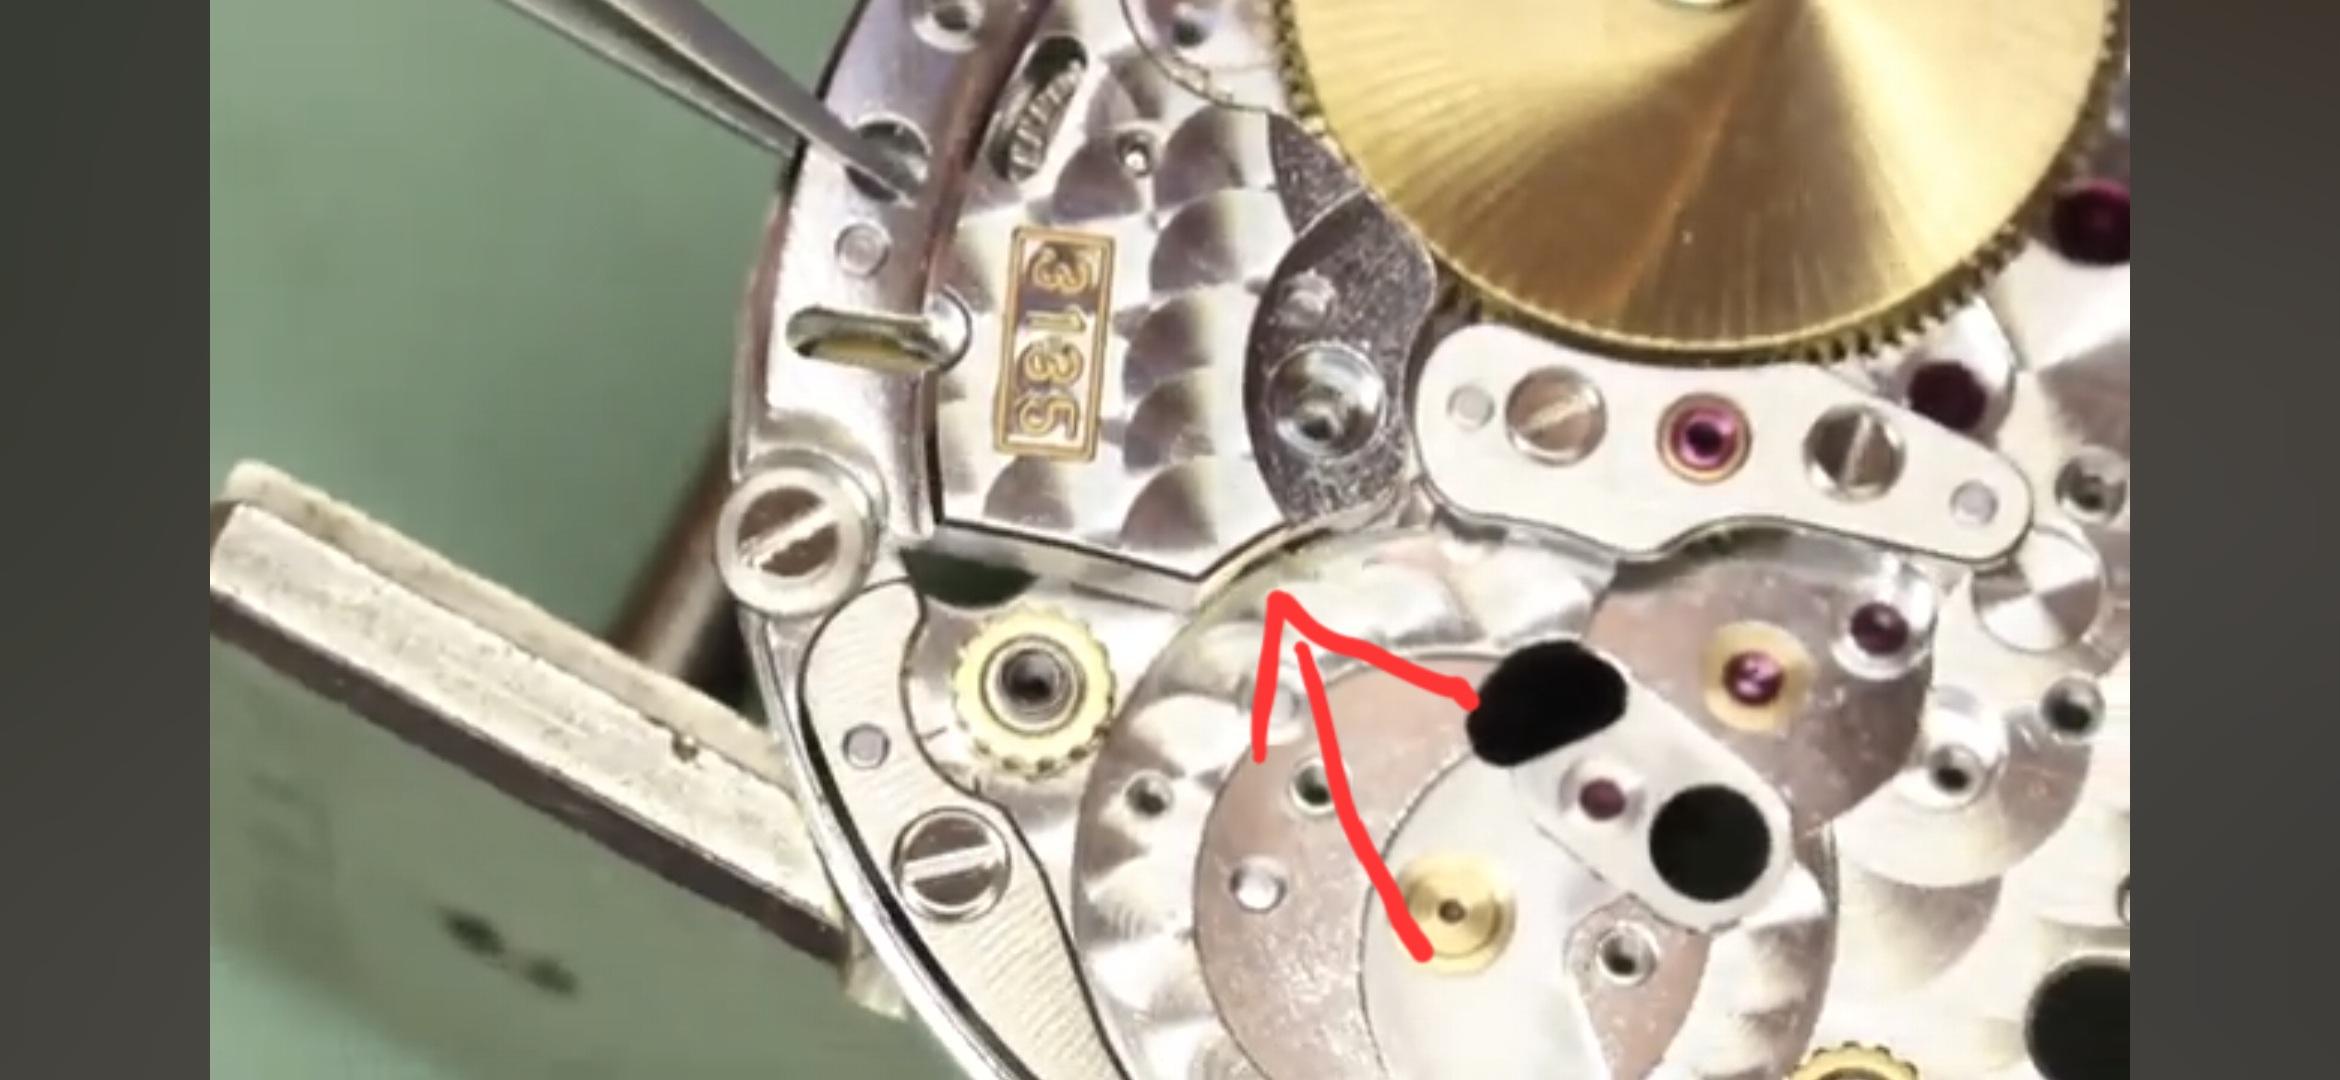
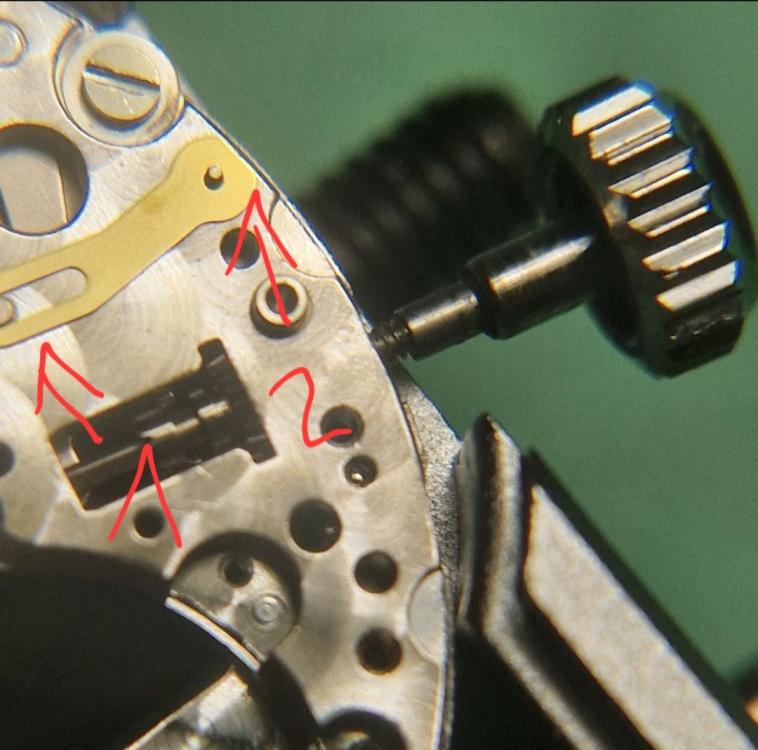
As I understand it, but please let me know if I'm wrong, the two reversing wheels should be treated with Fixodrop and then only the side of the arbor should be oiled. Correct? Yes, Fixodrop and then only a tiny amount of HP130p on the arbor as shown below. This is my one main concern about Mark's video (and I can't believe I'm saying this in HIS forum he also applies a bit of oil on the clicks which os clearly not what Rolex suggests. While he probably knows what he's doing and is maybe so precise that the oil will forever stay on the vertical surface of the click (and never travel between the steel wheel and the purple surface)... but it's certainly not necessary and a risk I'd avoid. Yes, it sounds dramatic and Mark warns about it in his series of videos where he does a complete service of the 3135 calibre. By the way, have you looked through Mark's videos for this calibre? Do you have any comments or additions, or can I follow the series with a clear conscience? When he removes these parts, he starts with the jewel. Shouldn't it be easier or safer to first remove the cam yoke that the jewel sits on, then remove the jewel from the cam yoke, and finally remove the spring? I think both approaches can work. If you do slip and let the spring snap back, it may damage the jewel but the yoke would be ok. Maybe that's why Mark deals with the jewel first. Not that tolerances in Rolex movements are very small. Concretely, the yoke maye be difficult to remove because the it's hole is very tight on the post. So it may be good to have thr jewel out of the way already. Yes, not obvious. The hack spring does have a groove on the mainplate. So it's correct positioning relies on two pins/posts. One of which is only there of you have previously already assembled the keyless works (which Mark does afterwards). If you don't previously assemble the keyless works (to get the second pin), you need to position the hack spring careful and also watch out not to move it too much in the process of putting the bridge. Otherwise there's a risk of flattening/breaking the tip that is supposed to touch the balance. Later, when assembling the keyless works, you also have to be careful that the pin from the setting setting lever goes into the hole of the hack spring and does damage it. In sum, I feel that it may be better to assemble the keyless works first! Avoids both risks in this regard... I did it that way and it didn't cause my any other problems. But Mark and Rolex manual suggest doing the train side first... These pictures from the first two seconds of Mark's second video in the series. You see, only one post for positioning of the hack. But he knows what he's doing, of course. And the tip of the hack spring (arrow on last pic) doesn't get squeezed between mainplate and bridge. And from my own pictures: - without keyless works: - with keyless works:


 2 points
 -
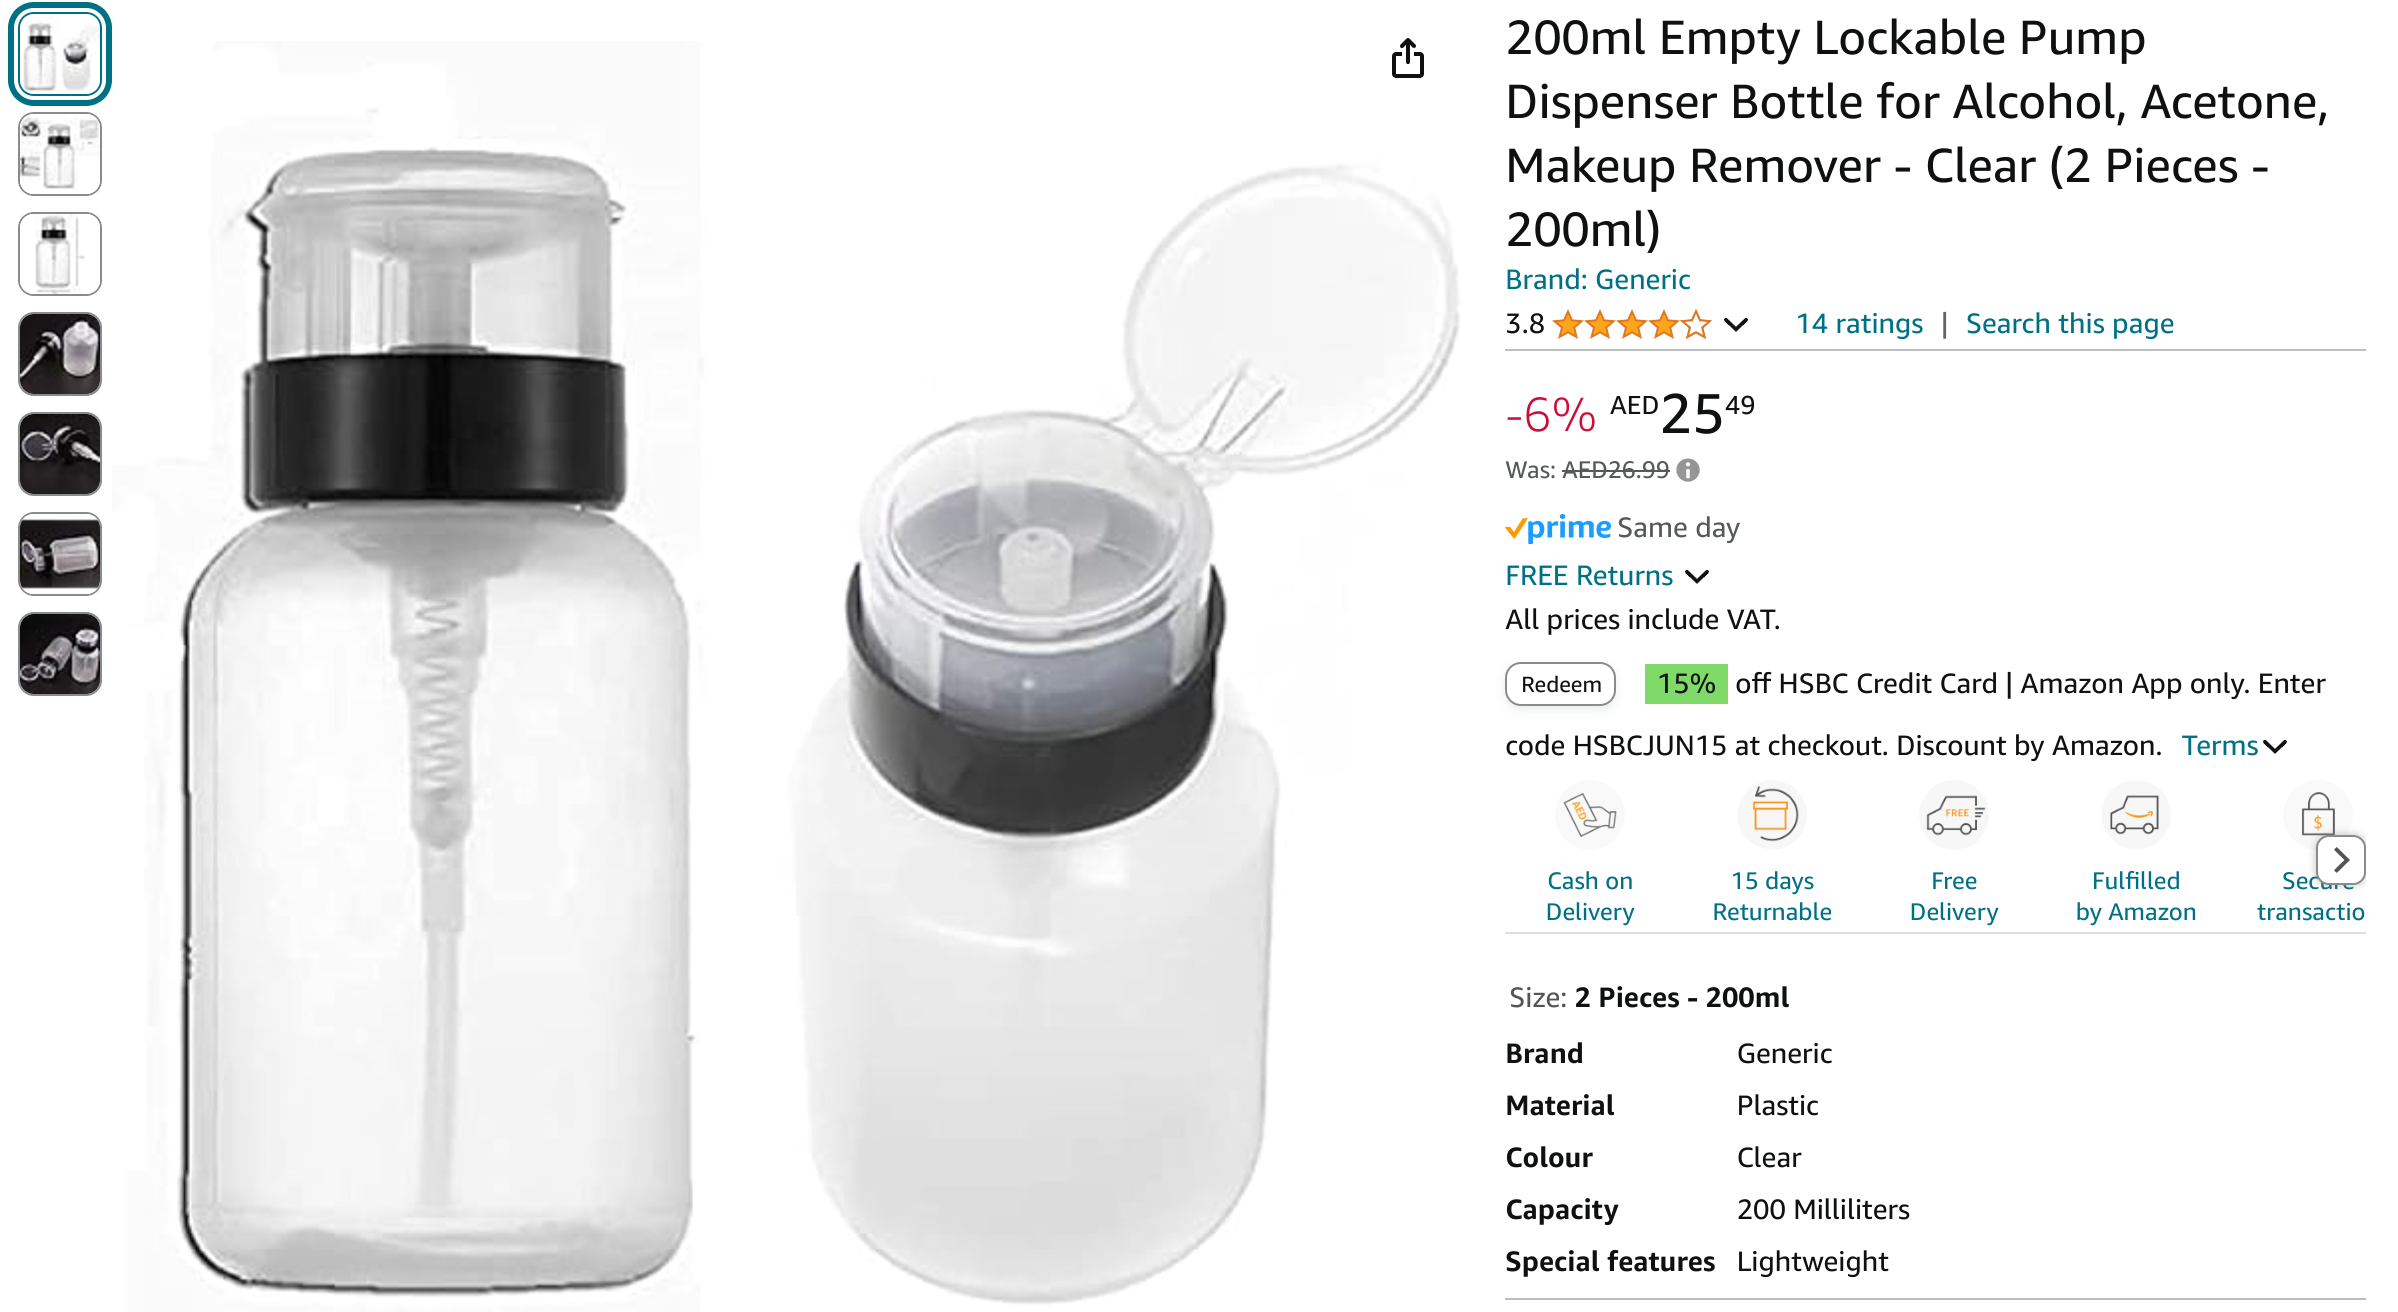
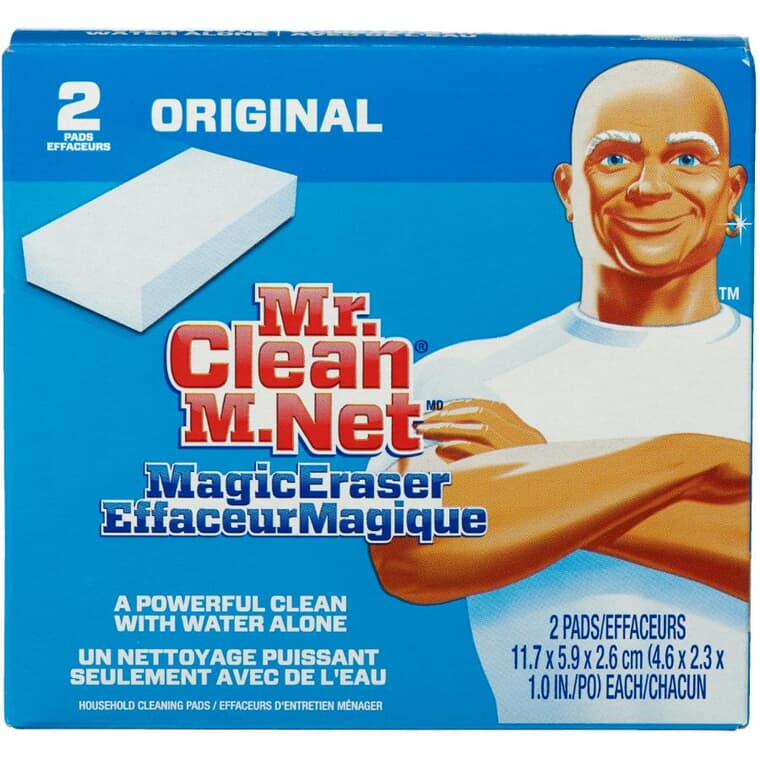
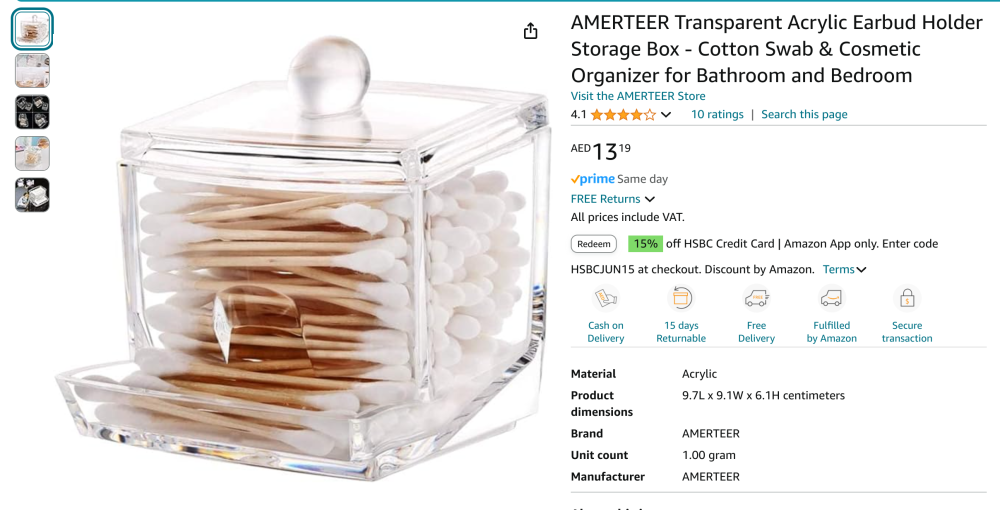
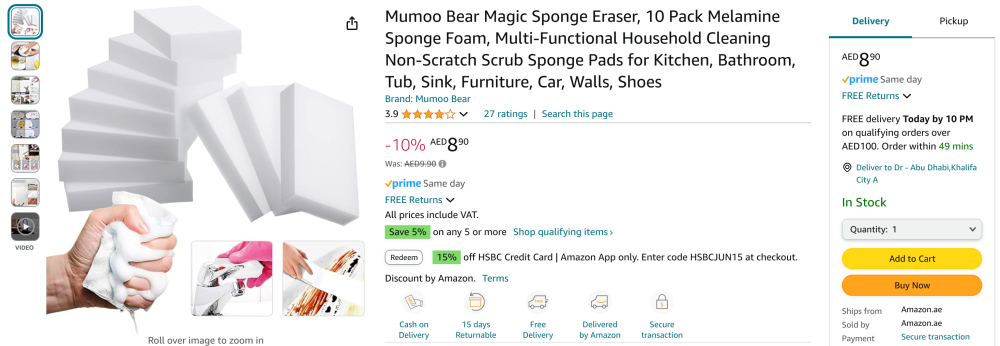
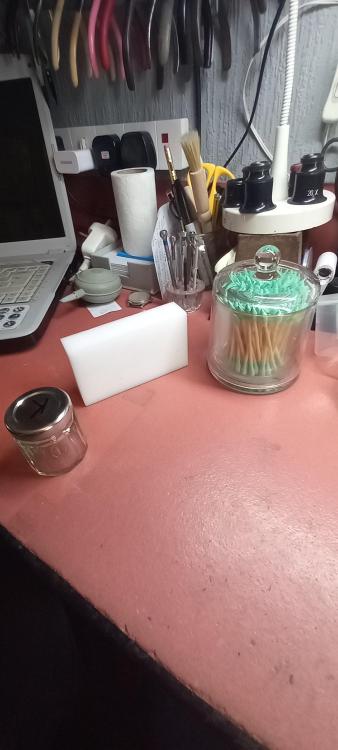
Another idea stolen from Mrs W. The pointed cotton buds allow better cleaning in the nooks and crannies of the main-plate and mainspring barrels etc than the normal rounded ones do. The holder makes it neat and tidy on the desk, and the squishy top dispensers work for IPA and acetone, however naphtha seems to light and it drains from the tube/plunger mechanism before it gets to the outlet. If this watch thing doesn't work out I can switch to a nail salon Note 1 AED = 22p = $0.27 And I use these for small jobs like removing rust from screws or small parts with evaporust, or dissolving out a broken stem with alum etc. Best part is that they are free (Mrs W's eyes roll each time I scavenge the used ones from the hotel dining table) and seal much better than anything else I have bought on Amazon, and the metal lids do not react (swell) with chemicals like naphtha etc. On a roll here..... I got this a while ago too for finding cracked jewels, beats trying to balance the main-plate on top of a torch/phone and focus your scope at the same time. Just put this on the desk top, turn your room/scope lights off, place your main-plate on it and turn it on (powered by USB cable). You then have hands free experience to focus/zoom your scope and poke the plate around to search fro those cracks. There are smaller cheaper version out there (this one is +/- A4), but this was on half price when i got it so couldn't resist a bargain! I also confirmed that these generic Mr Clean magic erasers (Melamine Sponges) are the same as the Bergeon 'pith wood' alternatives OK this is my last one for today.... This is what I mix my lume powder with when doing watch hands, find it much easier and convenient than the resin and thinner that you find in lume kits. just mix it directly with the powder and apply.


 2 points
 -
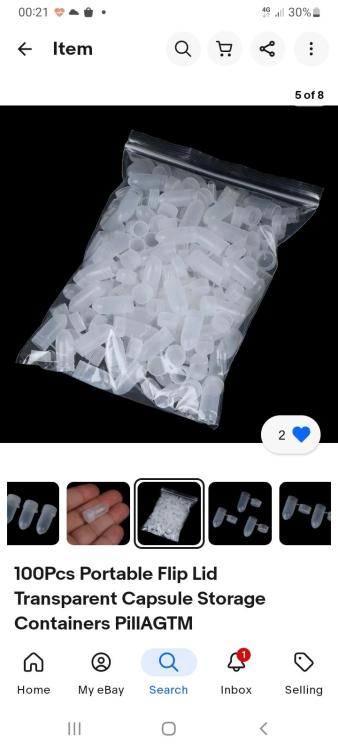
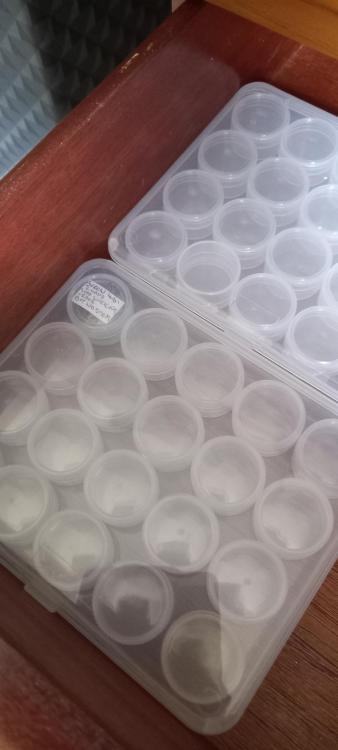
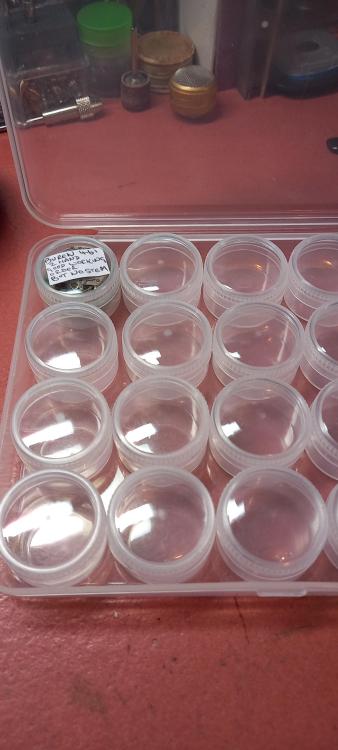
I saw those great idea scott, i like the meds gel caps for storing small stuff although the big ones have good volume for wheels etc, extremely cheap 1000 for around 15 quid, enough to last most of us a lifetime and they've been used for decades so a proven storage idea. These with a lid on as well if you want to pop a member something in the post and not be damaged.
 2 points
 -
Being a Yorkshireman like you Rich, I don't like to waste £££ on bits of Bergeon plastic when it's not necessary. I had a very cheap (and nasty) cushion, threw away the middle, and in the ring put some 15mm thick packing foam. It's perfect for the job. Soft enough not to cause damage, and wipe clean. I don't like the idea of gel cushions, as they can catch hands/pivots etc and cause damage.
 2 points
 -
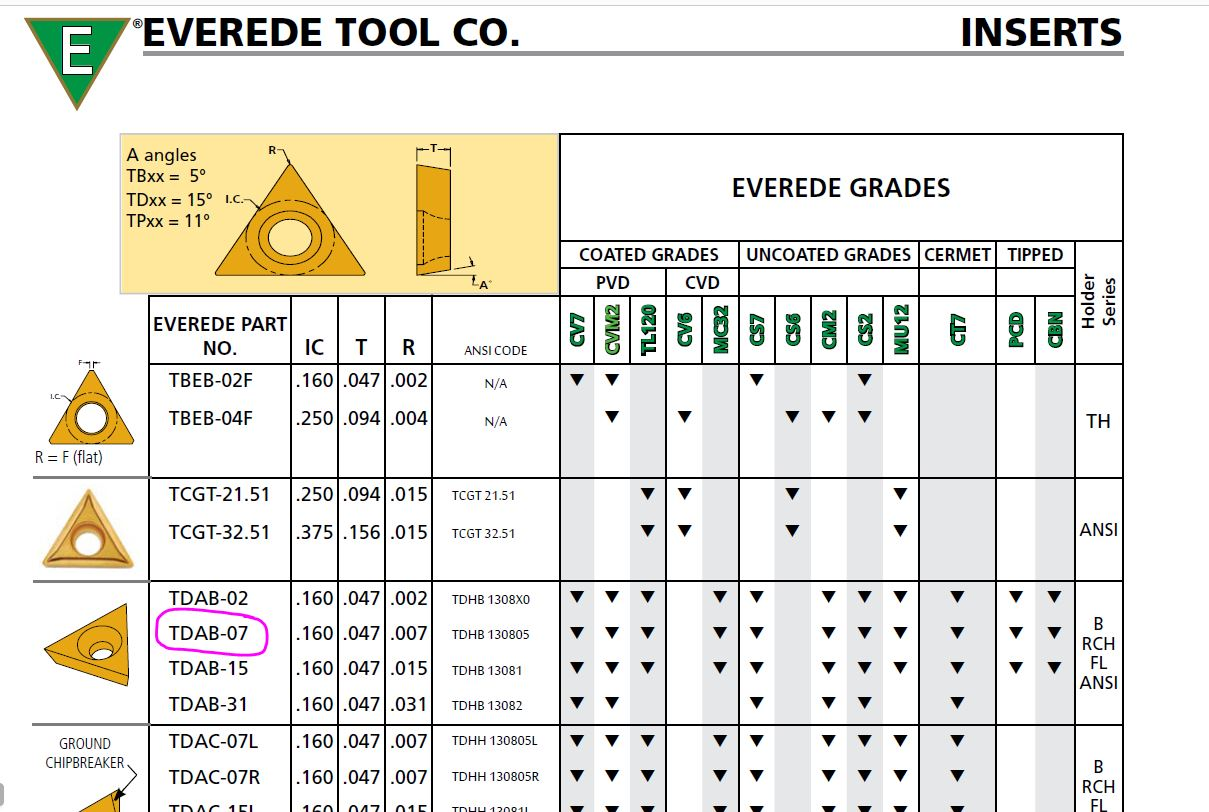
To get you started I have an image. One of my friends was starting to make a watch before his eyesight took him out so he never finished unfortunately. But I did get to see some of the tools that he had made for the watchmaking. His fun was really designing and making tools to solve problems. So on one occasion I saw how he was going to cut his pivots it worked really really nicely and I was very impressed with the little tiny carbide insert. I carefully wrote the number down looked it up and suitable for us properly labeled an image so I know exactly what it is. Jazz UNC carbide inserts come in all different sizes this is just the beginning. What makes the inserts nice is they are precisely made and have very nice radius is I will make very nice smooth cuts. Then normally these are for inside pipe cutting or inside whole cutting or you do need really tiny cutters but they work really nice as a tiny cutter. Then somewhere around here I probably the catalog as you can see they come in a whole bunch of grades basically there's a heck of a lot to choose from.
 1 point
 -
This is just to say a heartfelt thank you to everyone who hangs out on this forum. I was browsing one of the bigger watchmaking Reddit subs today and was struck (as usual) by just how comically bad the advice tends to be over there, and how poorly researched or formulated so many of the questions are. What a difference here on this old fashioned web forum. I've been around here about two years now and every time I arrive with a question, I get a bunch of thoughtful responses from experienced hobbyists and working professionals, without any snark or condescension. For years, I was a major contributor (still on some global leader boards!) on the computer programming site Stack Overflow; the techies here know what I mean. That place is famously unkind to new members and non-professional programmers, with required adherence to a bunch of strict community customs and no tolerance for questions from people who just don't know yet what they need to ask. In fact, a lot of others in my specific areas of specialty over there really disliked me for wanting to take time to tutor novices. It's such a different world here. Any little watchmaking hurdle, no matter how commonplace, begets a stream of really helpful advice that solves the immediate issue and then anticipates the next one. It's been great for skill building. And without the peanut gallery of redditors who mostly don't have a clue what they're talking about. Thanks so much to all of you.1 point
-
I think you need to set the lift angle to 44°. Amplitude will read quite a bit lower, but still good.1 point
-
The idea with the Seagull is dismantle, reassemble, does it still work? Disassemble, reassemble, lubricate, does it run better. Both are a learning curve.1 point
-
If you look at machinist Lathes they use carbide inserts maybe we should do the same thing?1 point
-
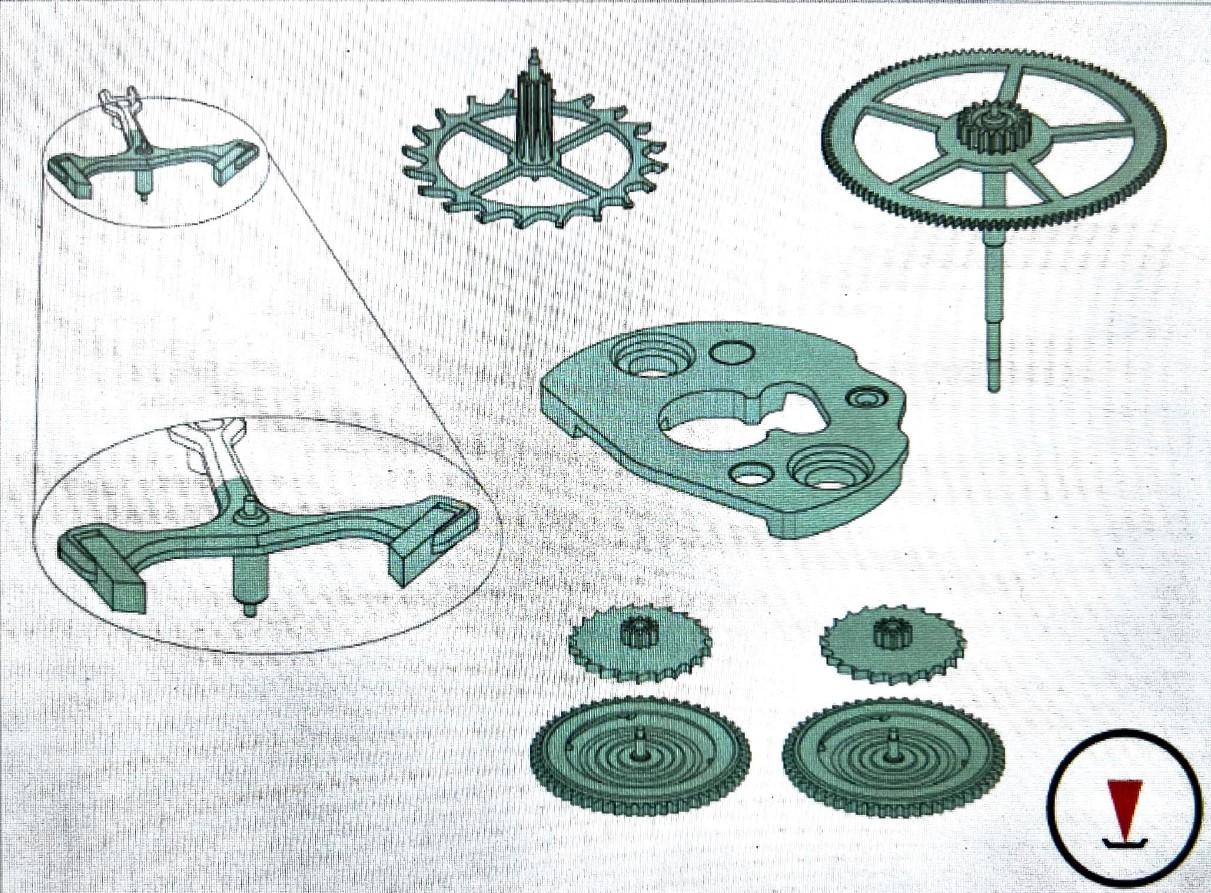
Then the nice thing about the typical watchmaker's lathe is it comes with its own indexing fixture. I found a nice picture online the show this they usually a Pin that's used to stop the head from rotating it goes into a circle of holes which you can use for indexing to make things like squares. This is a really interesting idea that definitely would never work. First off are talking about a really tiny place that you're supposed to put this I'm not sure how you'd ever get it in there it only in there. Then when it's busy dissolving away no guarantee of exactly the pattern it will take and if it ever touches the threads of course will dissolve those at once it makes it to the threads conceivably it might leak all over the place and dissolve everything. Nice fantasy plan but it's purely a fantasy Carbide drills are interesting in how some of them are made. Some of them actually have only carbide drills and the rest of the base is not carbide others are solid carbide. If there's solid carbide the other part the base works really good for cutters but if it's not solid then you basically Have steel of some kind. If you get desperate you can buy carbide gravers https://www.eternaltools.com/carbide-gravers
 1 point
 -
There's very little chance of shutting me up Ross . Since a kid of 5 I've been into making things,it keeps the old grey matter active. Lol , thats so funny , i was doing exactly that at 1.00 am this morning with donor movementsI layering the tub , loose parts on the bothom hands etc, dial movement on top and the dial sandwiched inbetween. I need to get myself job or just get out more, problem is i dont like people .
 1 point
 -
I'll also continue doing that out of precaution and habit... ...but this is definitely good to know!1 point
-
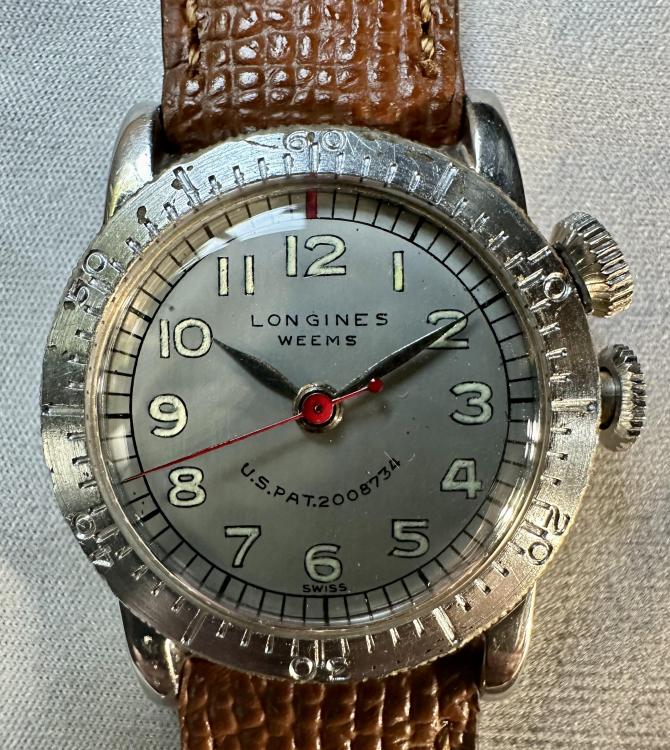
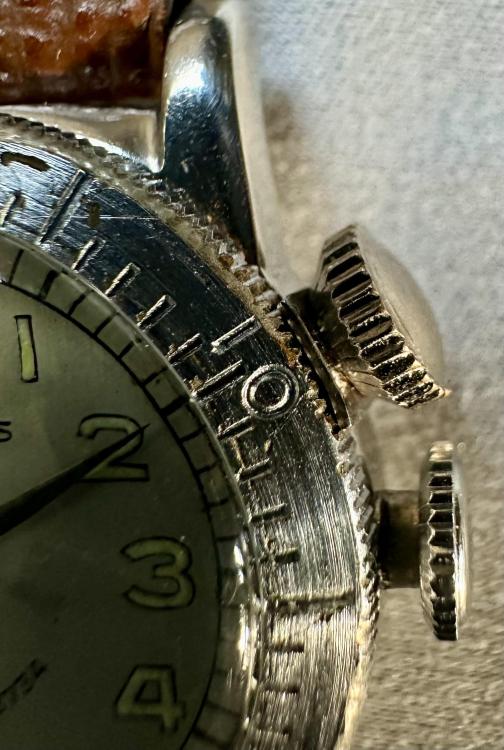
Project update- now completed. I saw another weems where the locking crown was threaded and matched the thick diameter of the threaded case, the end inside was mushroomed so it would lock out before becoming detached. The crown I have had only the internal threads so I hunted for a replacement screw that would fit like the 'original'. A setting lever screw from a scrap movement had a .8 pitch and a head wide enough to wedge into the case and allow for unscrewing of the crown. I wish the screw was longer but it will allow the bezel to be unlocked and turned. The watch is a gift for a young pilot so I'll warn not to unscrew the crown too much. I found a donor movement with the extra long version of the seconds pinion spring so movement is working brilliant... I made the little wedge part from a tiny piece of .015 annealed 1075 steel shim. My work is quick and dirty and wouldn't fly on a nicely finished case but my rough finish doesn't really show under the locking crown and matches the damage on the bezel quite nicely thank you ... I have a bigger version weems on the bench at the moment. There are so many variants of case and movement they feel more like the days of hand made. I'll post the other soon....
 1 point
 -
Yes the endless amusement over lubrication choices. Having more Omega documents and in the late 50s for the keyless Omega recommended 9010. Later they moved to 9020 and now like Swatch group its HP 1300. I would like to think once they started servicing their own watches they may have discovered how stupid they were with early lubrication choices. Although personally I still don't like HP oil for a lot of things where I think grease would be more suitable. Think about 9010 I went back the Rolex service mail and at least my manual doesn't actually say that the says things like this That does not look like the definition of 9010 so it's definitely something heavier. Thinking about heavier lubrication I'm attaching a PDF they are recommending HP 1000's but there isn't really a lot a different Between 1000 And 1300 so I'd use whatever you have and definitely use epilam to keep it from spreading all over the place. Yes another endless debate subject. Plus occasionally it depends upon a specific watch where whatever method you normally do may not actually work in that particular case. Or my favorite some American pocket watches stuff on both sides of the main plate react with each other so the order assembly is critical usually figuring out after you've partially assembled the watch that you not doing it in the correct order. Rolex oil chart 3135.pdf
 1 point
 -
True! I corrected that in my post. Yes, that's the downside. My preferred way for watches in general is barrel bridge, keyless works, train. In the case of the 3135, the barrel bridge is not below the winding stem. So it doesn't help in holding clutch/winding pinion. The pivots of the pallet fork? Or do they mention cleaning off the epilame afterwards (also escape wheel pivots)? The Rolex manual that I managed to find only refers to the pallet jewels to be treated.
 1 point
 -
If you move the rotor manually can you see the barrel winding?1 point
-
Not holding power might suggest that the mainspring is prematurely slipping. What sort of breaking grease did you use on the barrel wall for instance? What exactly is your definition of the auto mechanism? In other words what parts we talking about exactly? So just to be clear if you manually wind the watch all the way up set it down and walk away it stops how long after wound up? This is one of the ways to separate whether you're having an auto winding problem versus something else in other words how long will the watch run until it comes to a stop preferably setting on a table with no external influences. Then this watch does have a 38 hour power reserve.1 point
-
Hahaha, recipe for disaster. I'm glad that I'm not the only one!1 point
-
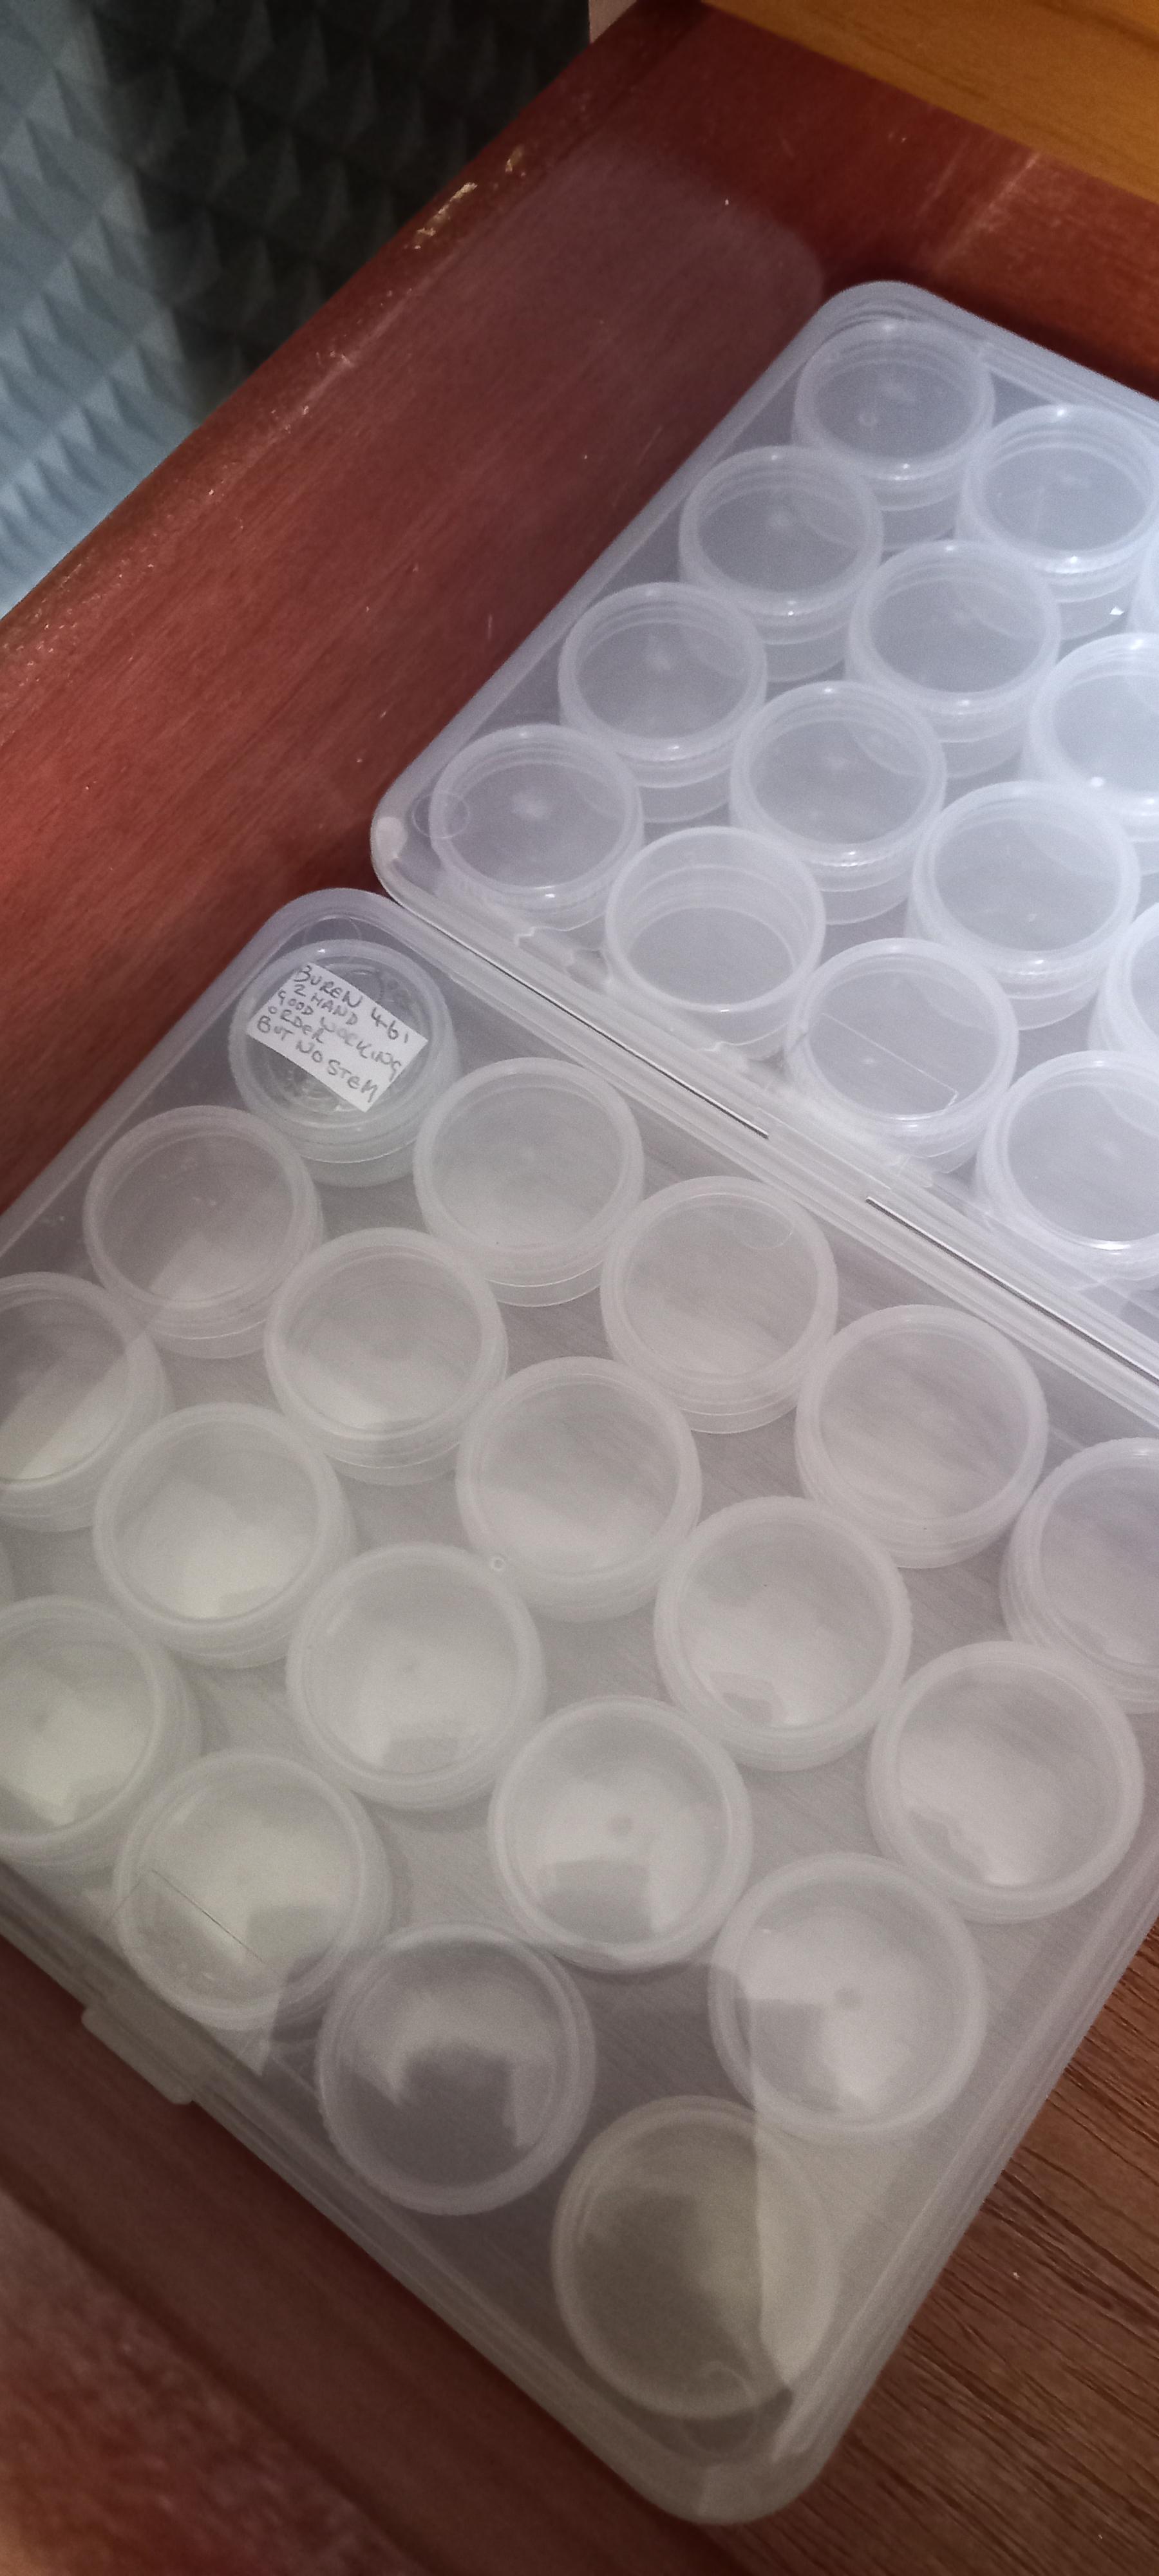
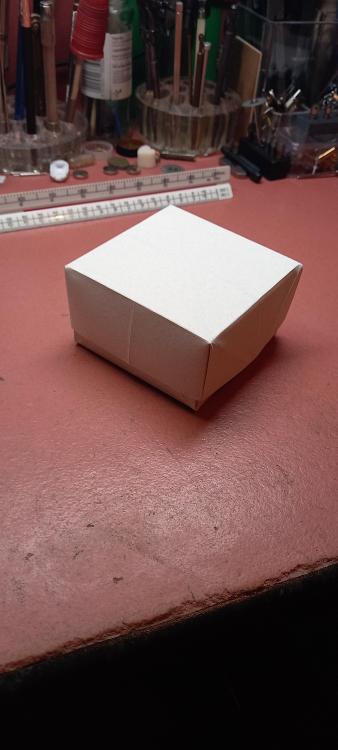
Some really good ideas Scott ,I'm ahead of the game on 3 of em, the magic erasers clean up hands and raised hour markers like nothing on the planet,and the glass matchstick/pointy cotton bud holder looks incredibly cool and swarve on my bench but i particularly like your light board one. So now I'm going cheapy cheap here ( I'm far too competitive for my own good ie. trying to outbench a guy bigger than me and half my age resulted in a one year repair partial rotator cuff tear ) . Origami boxes , i wont get into how to make them becauses there is more than one way and a youtube vid can show it quicker and better than i can explain it, so just planting a seed here if you have some nice vintage tools that came without a box ,thicker paper makes for a tougher box. And 3 movement cushions with lids, a coffee jar top, a trinket jar and shaving cream tub. Oh and a donor movement case from cousins.
 1 point
 -
Haha you know you want to do it1 point
-
thats the sort of idea I was going for Mike, i thought the same about the gel ones ripping an extended pivot off if it dug into the cushion,the foam has more give in it.1 point
-
I haven't tried making an account with them, no. I would be shocked if they'd sell me anything in any reasonable quantities (one) as just some schmuck out here fooling around in the mountains somewhere. As for ETA vs. Selitta, that's the reason for the SW200-1 instead of the equally available 2824-2. I just haven't been able to find anyone that would sell me a single SW500 TOP grade at any price. I considered a La Joux Perret that has all the same external measurements as a 7750, but it lacked the day function (required for the dial I have), and was a lower grade/accuracy. Also, I was pretty sure the SW500 and 7750 parts were almost entirely interchangeable re: future proofing. That's the case with the SW200-1/2824-2 save for a very few components last I looked.1 point
-
Jon A pleasure to have seen you, and to have you in part of my life. The industry will not die as long as life is breathed into it. You are a breath of fresh air. On a personal note. You have already given me much advice and encouragement. Regards Ross1 point
-
Thank you for sharing this @Jon , it really shows your passion for watchmaking and teaching. Like others have said I too am grateful for the knowledge and insights you share here and on your YouTube channel. I have benefited greatly from your knowledge and sharing. Tom1 point
-
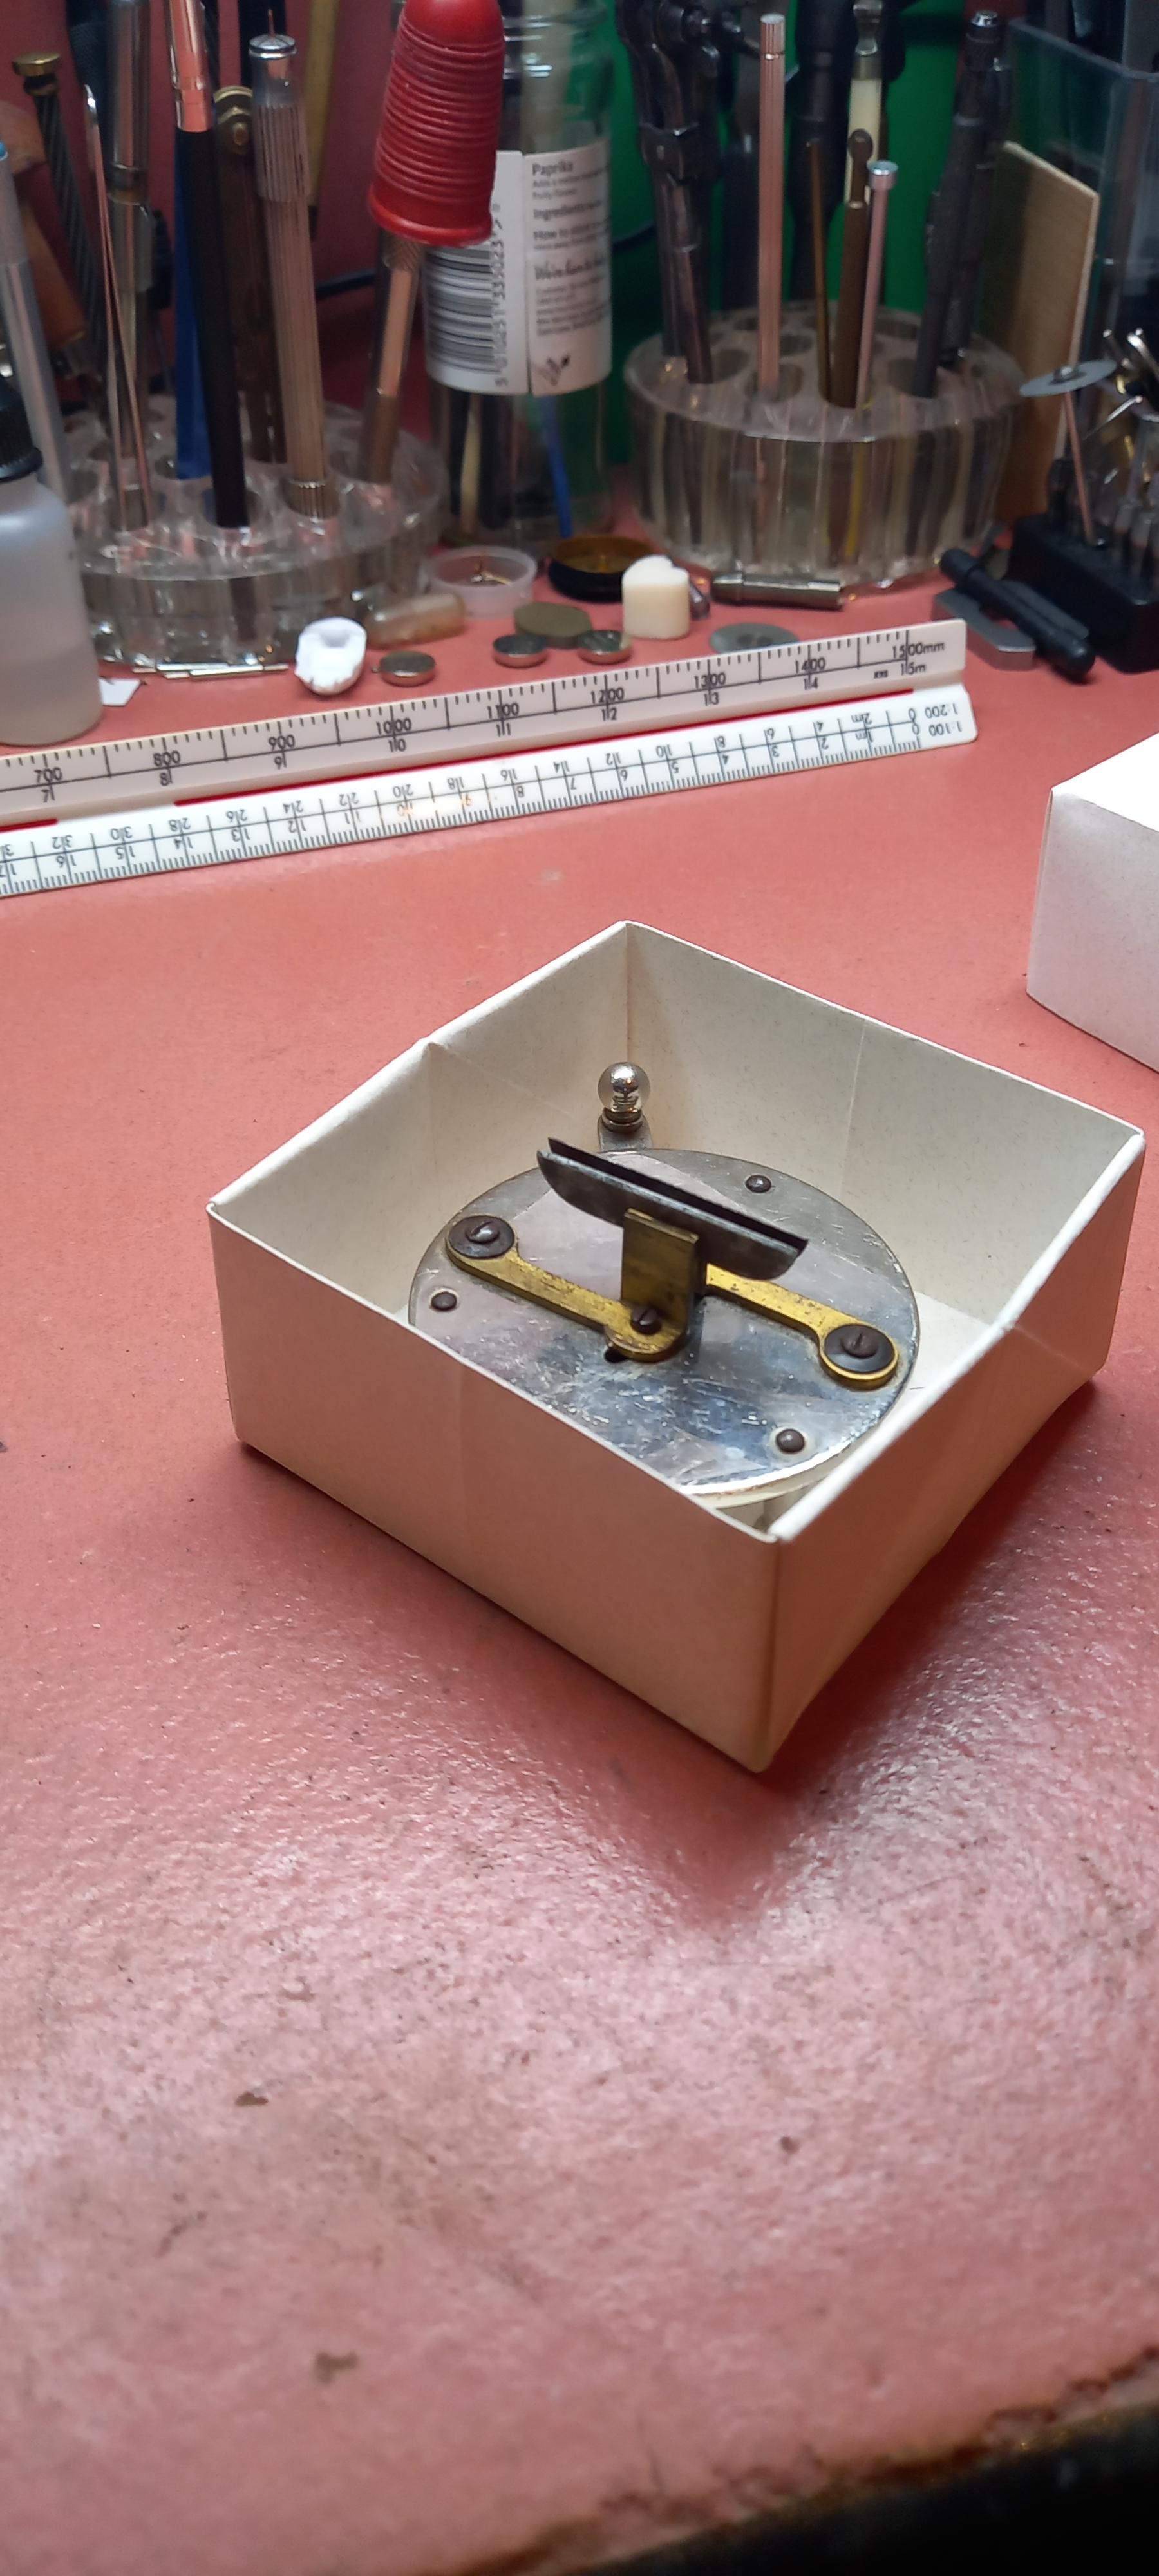
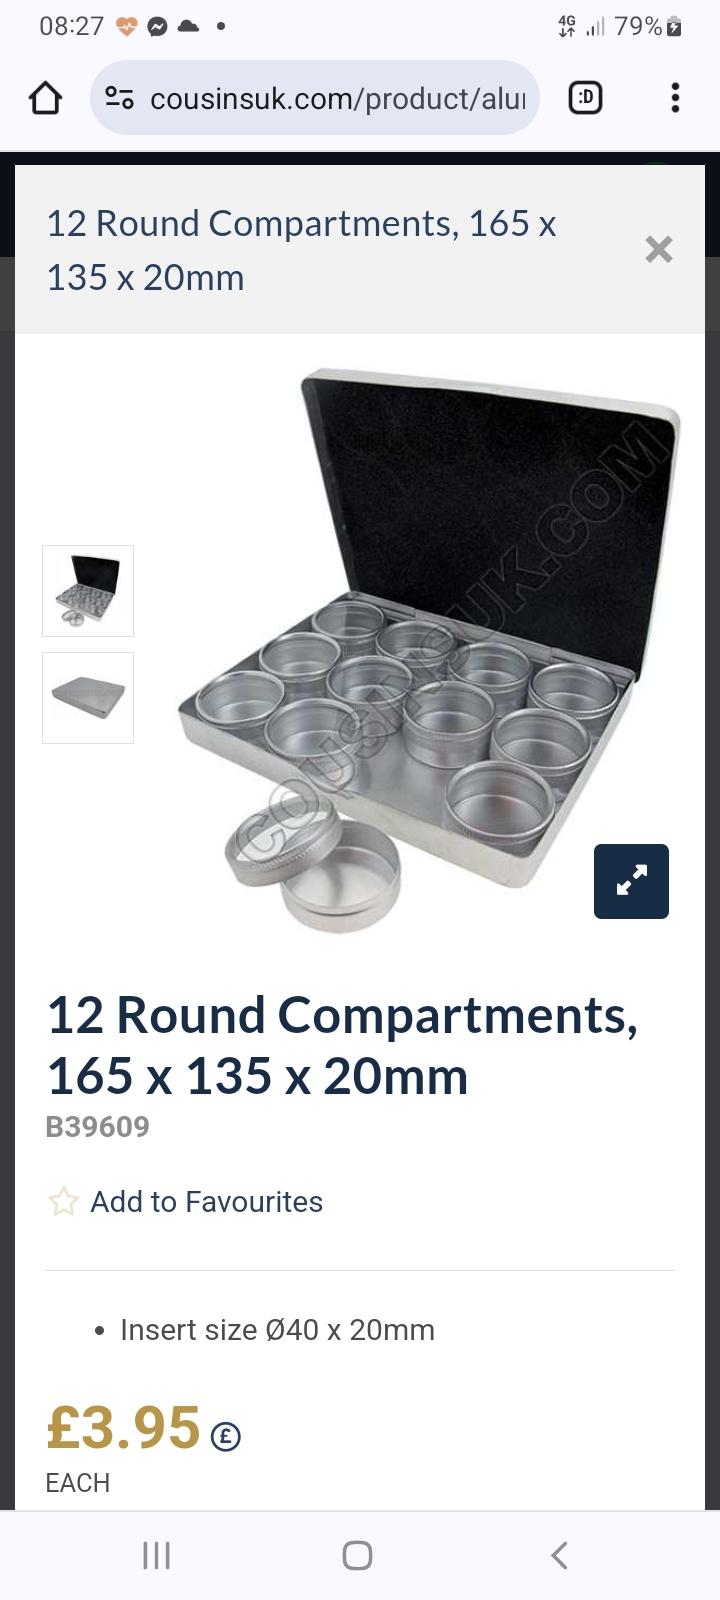
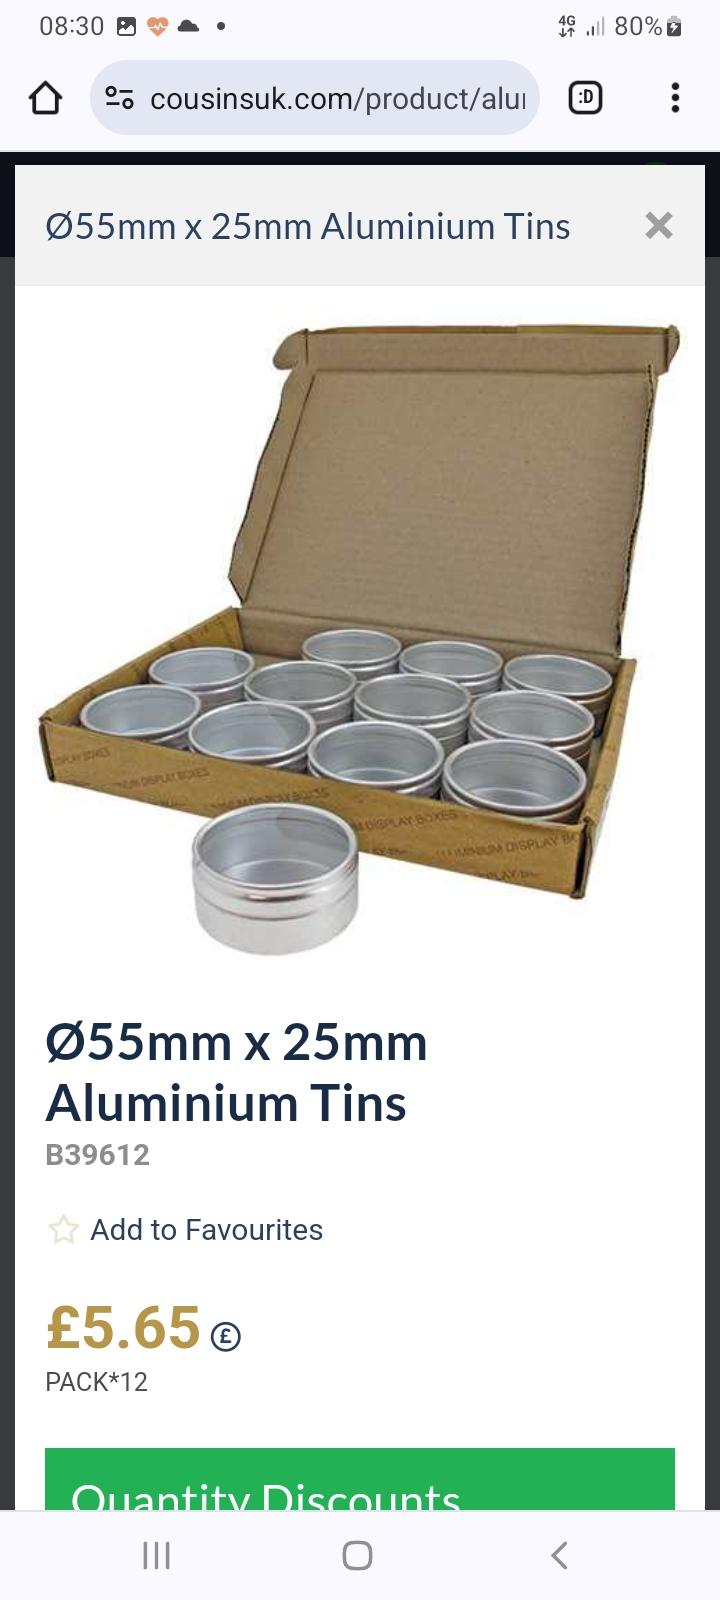
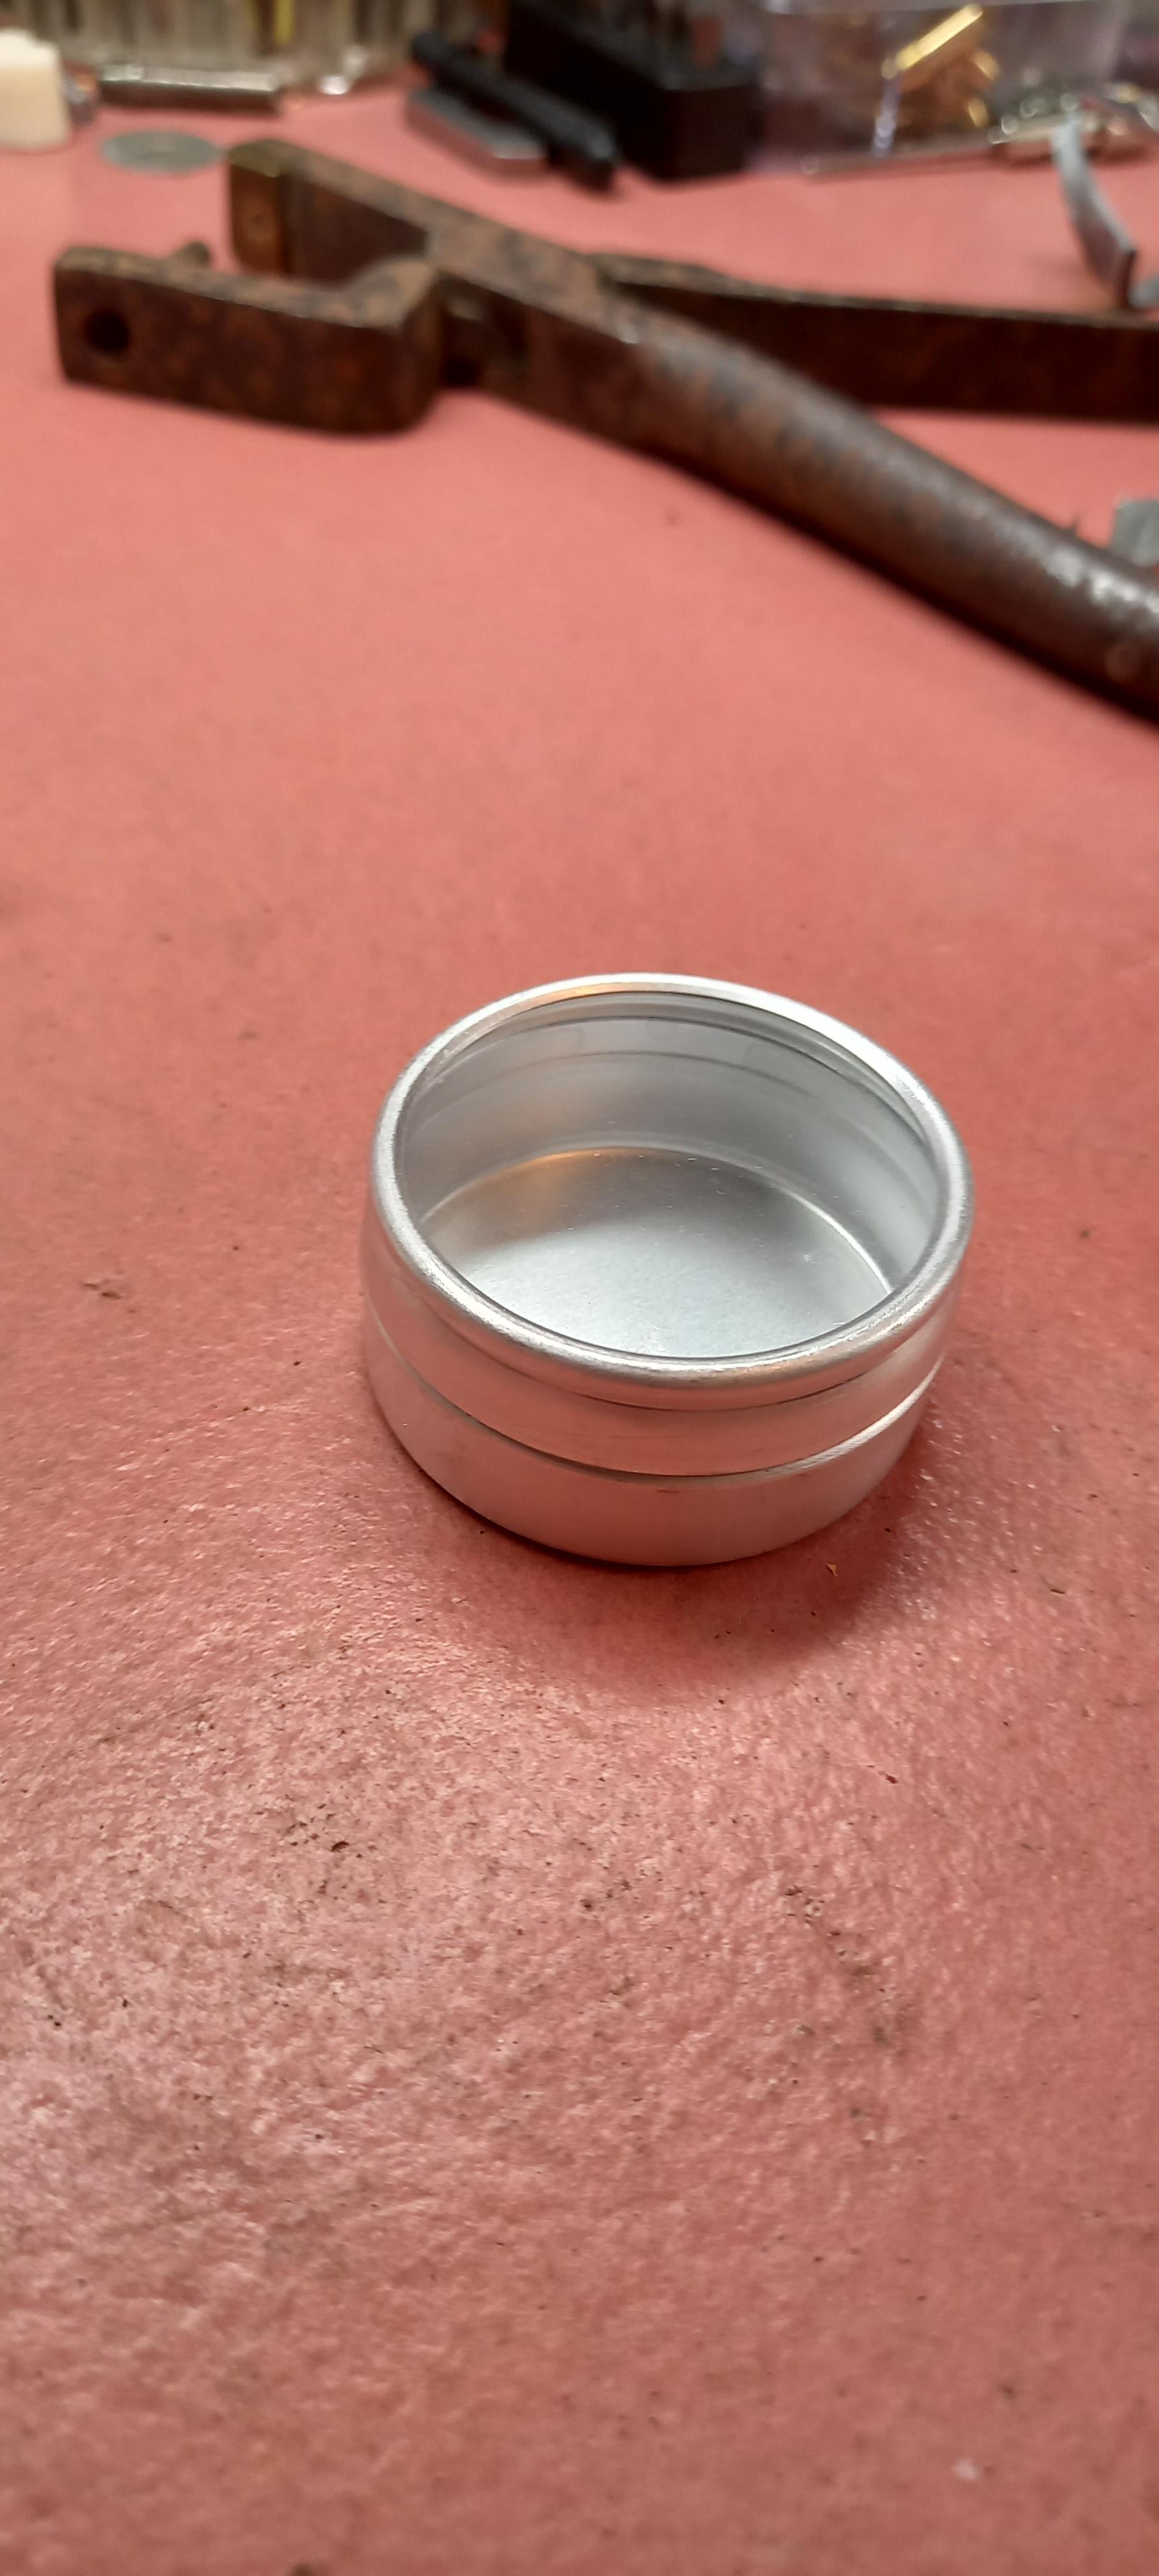
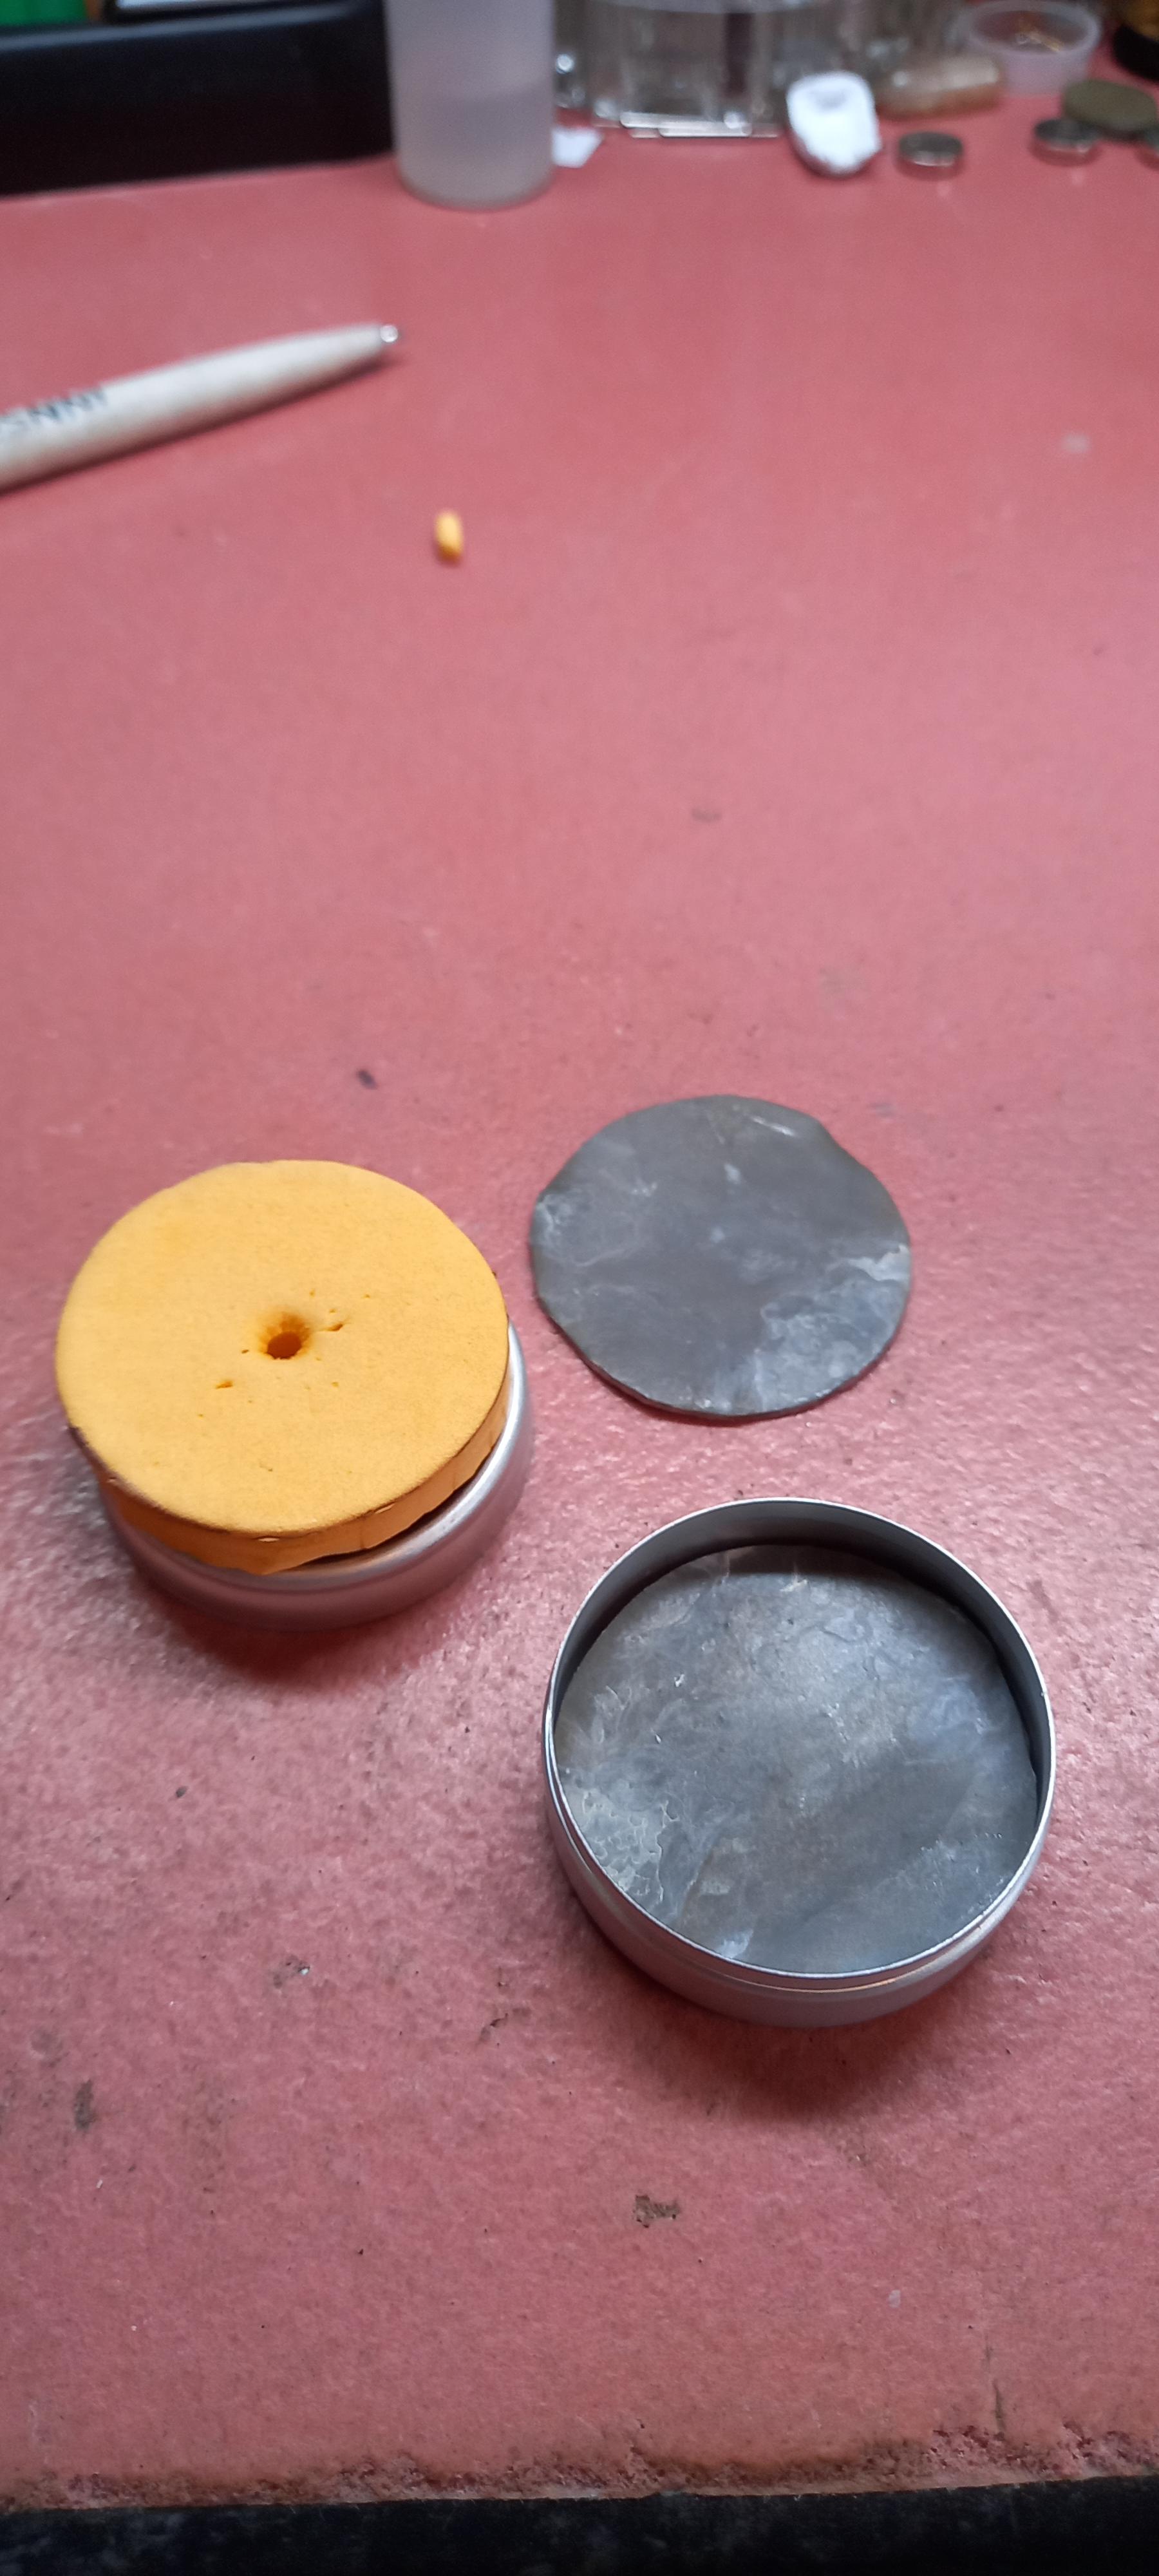
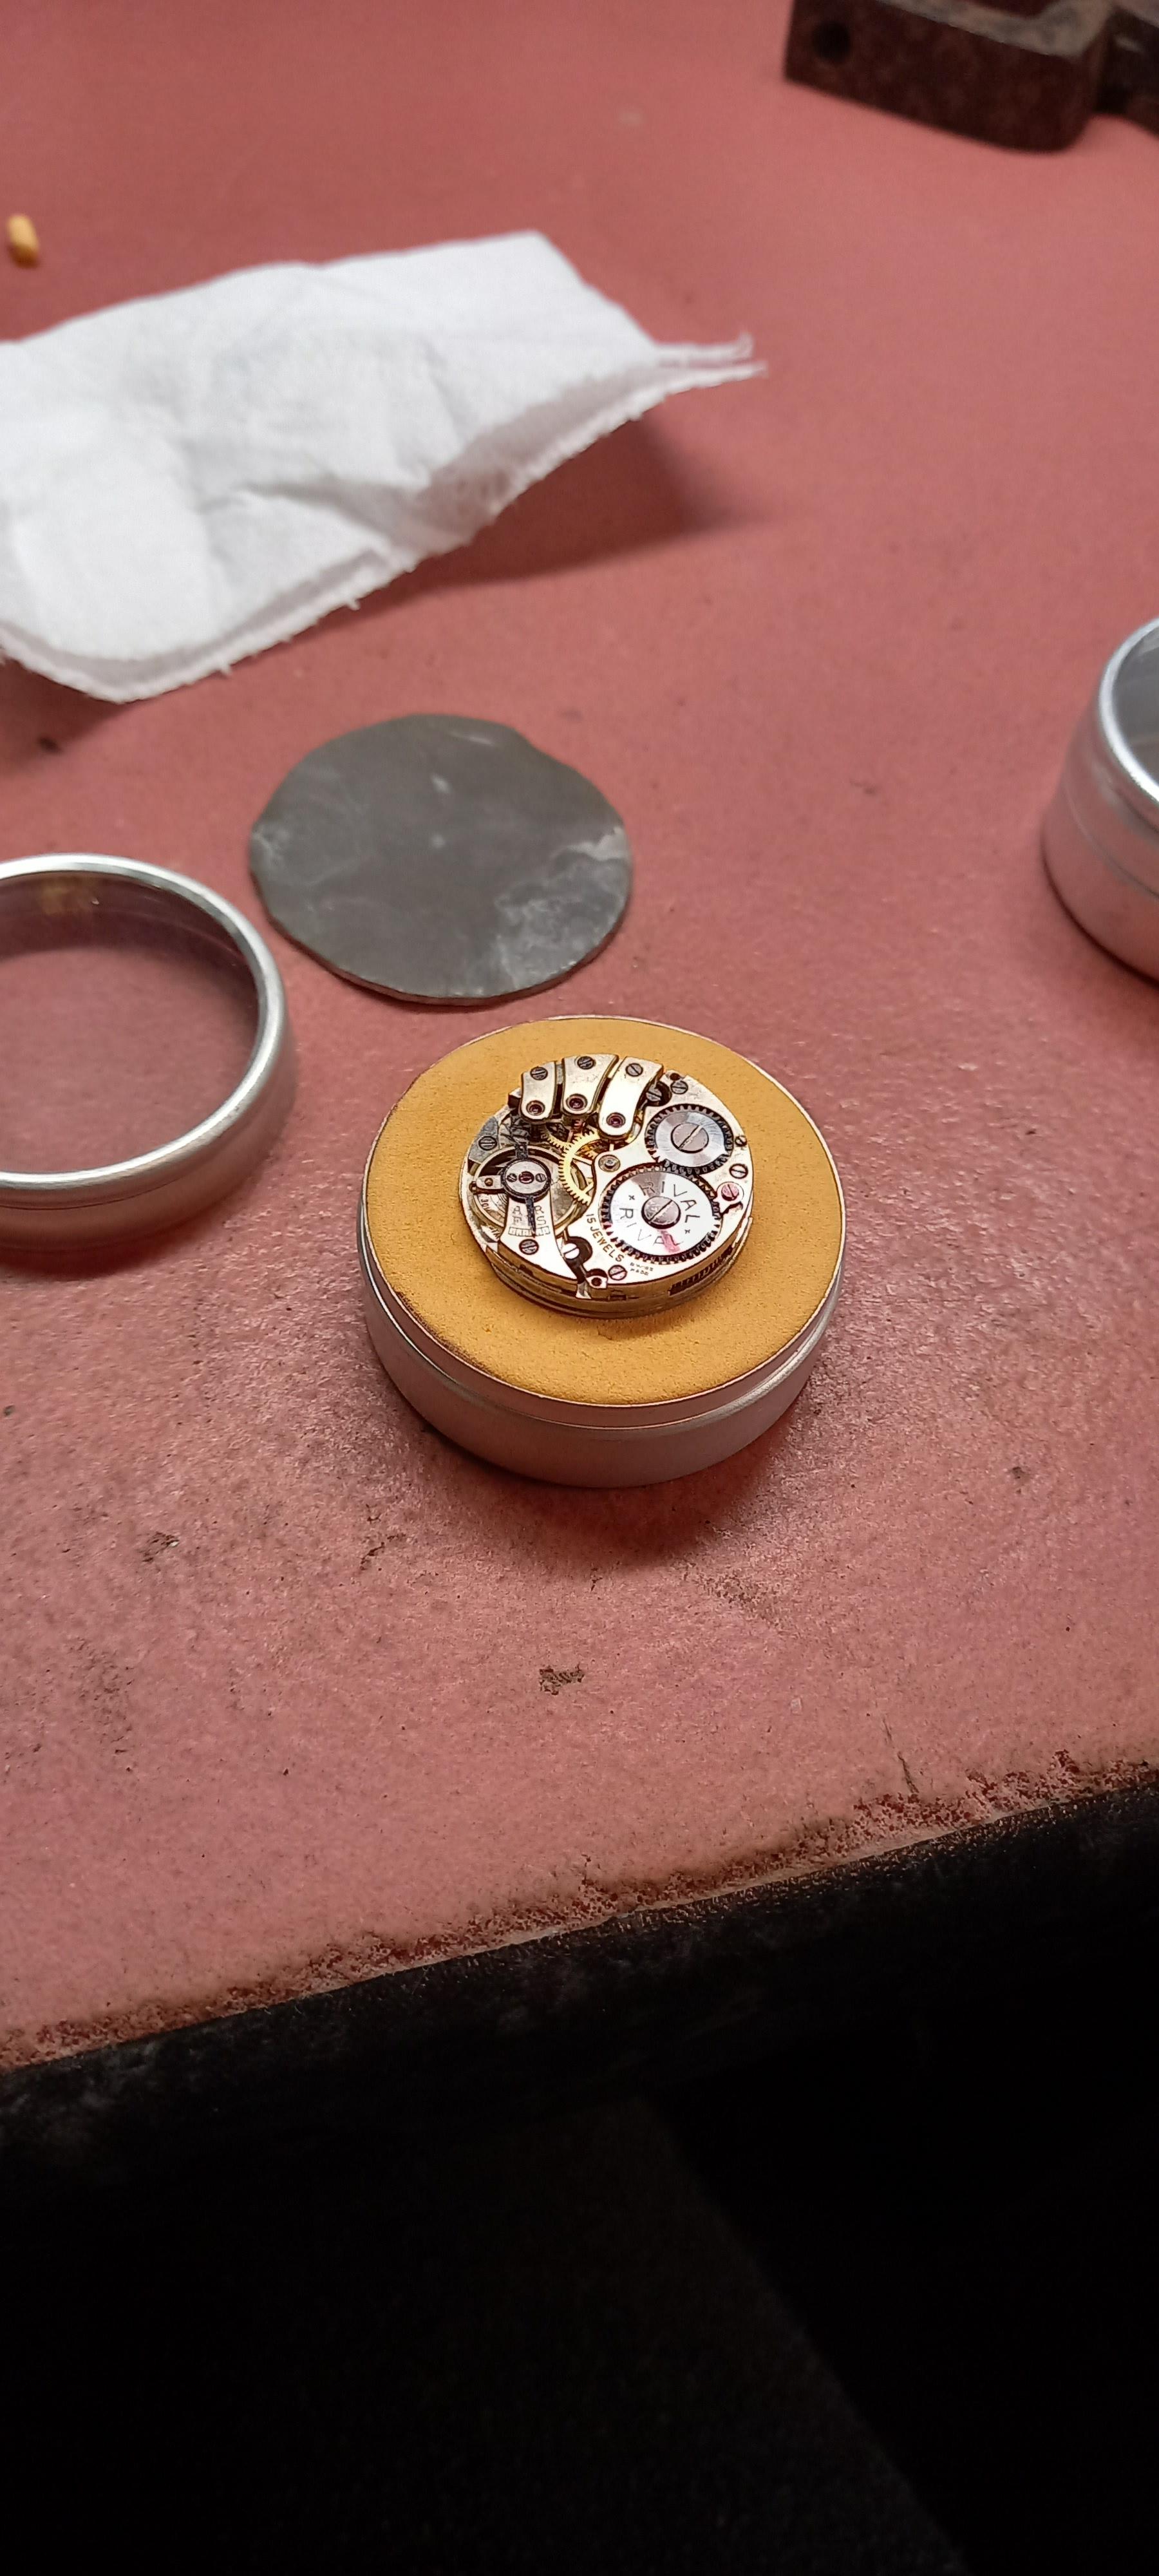
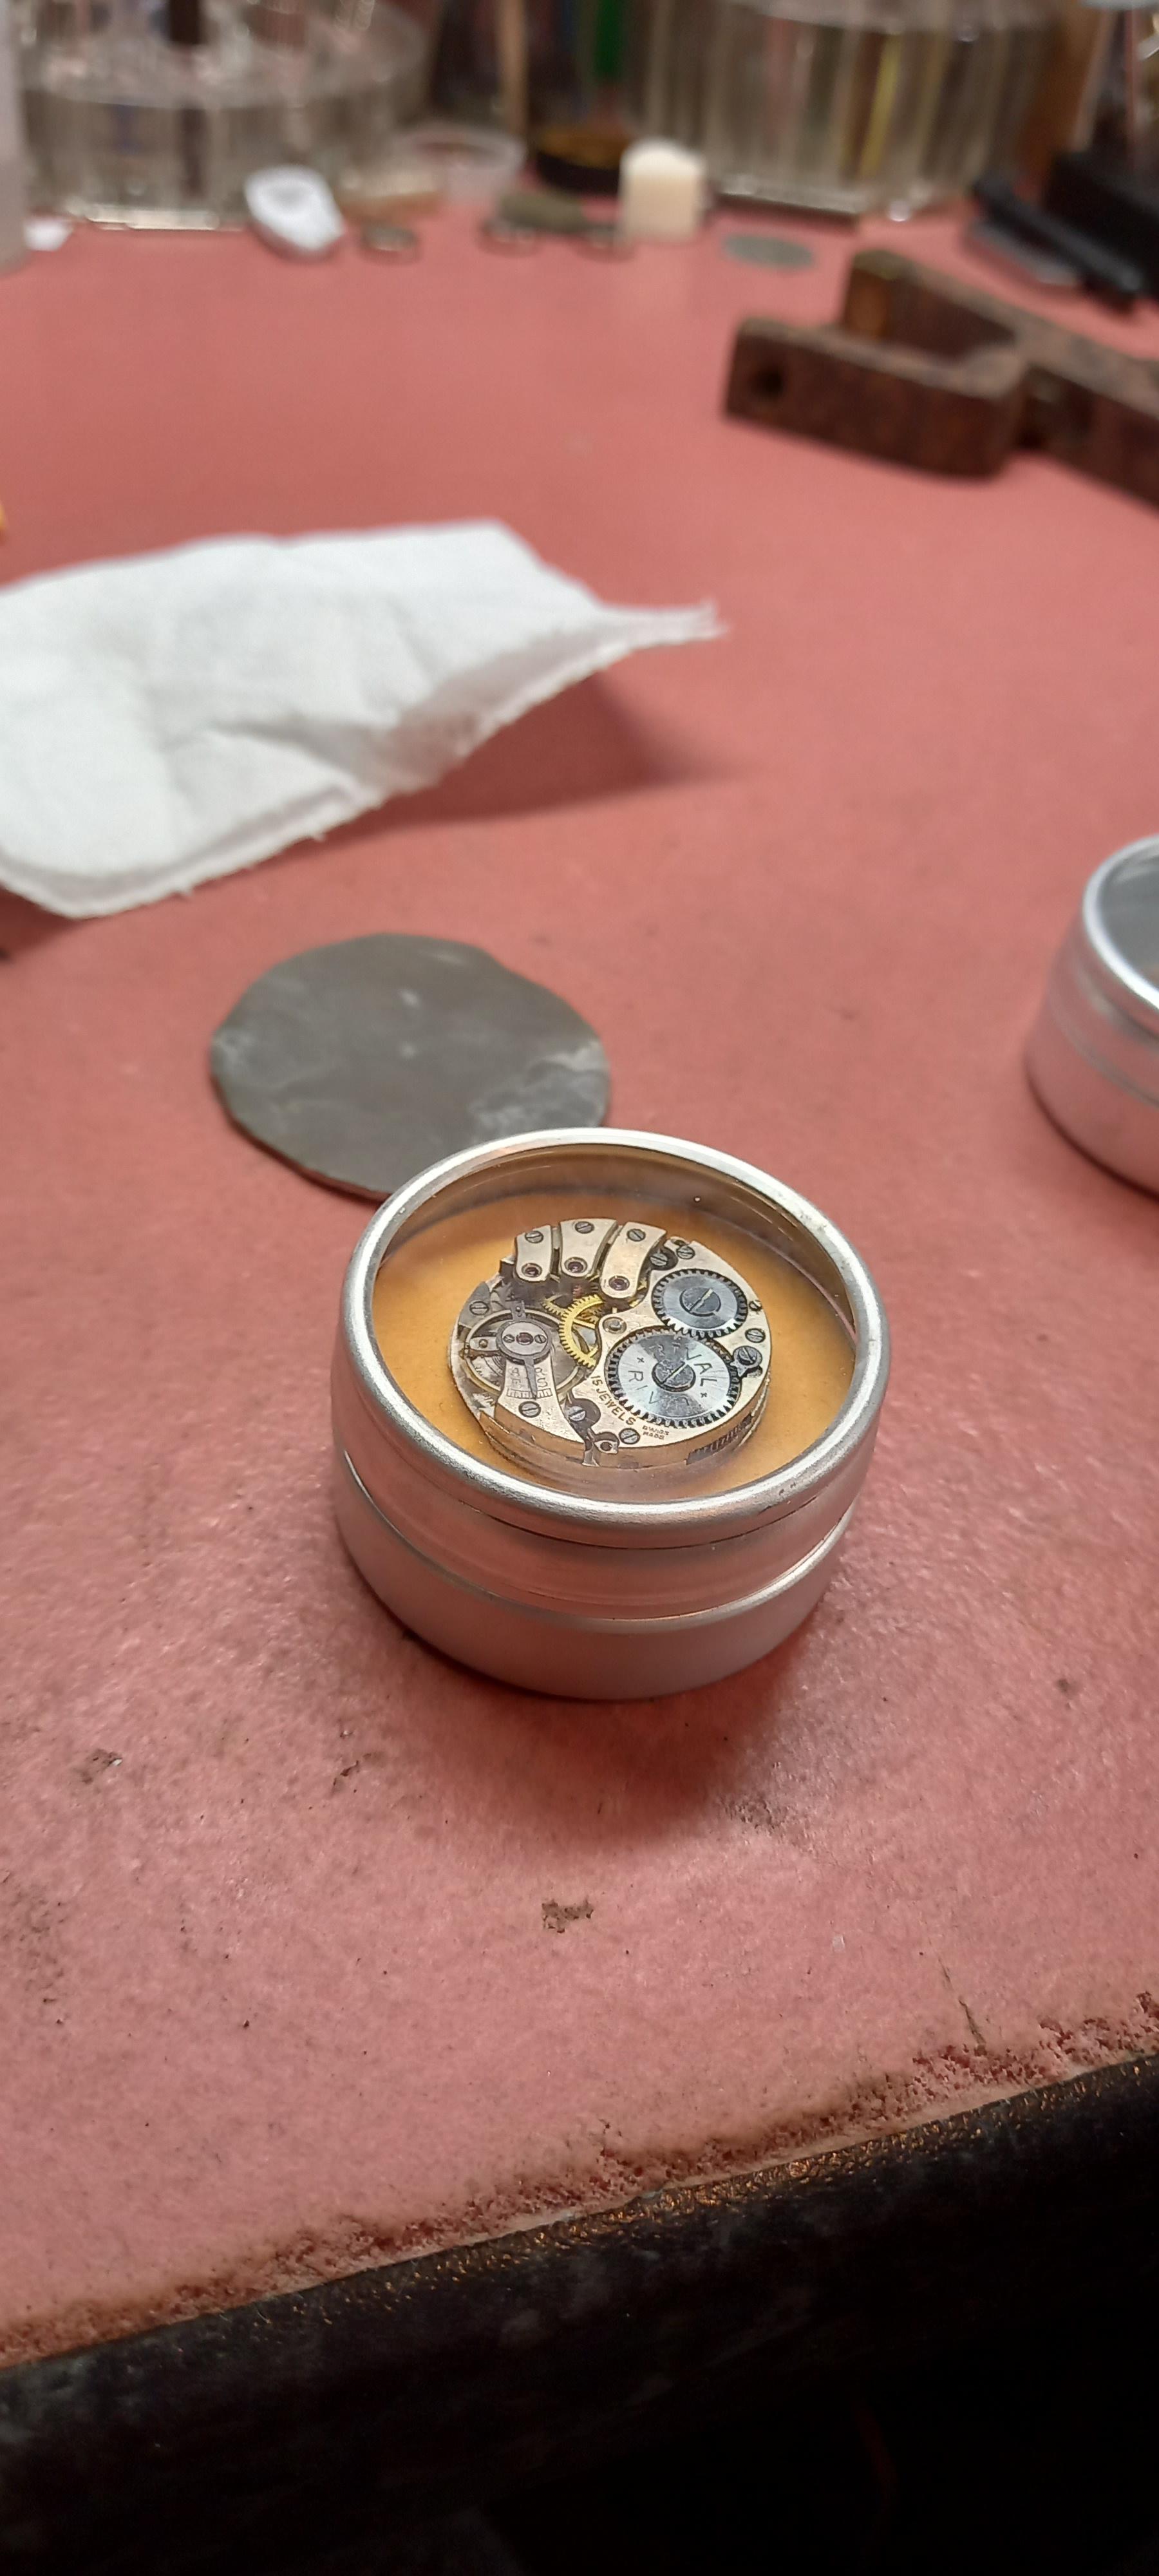
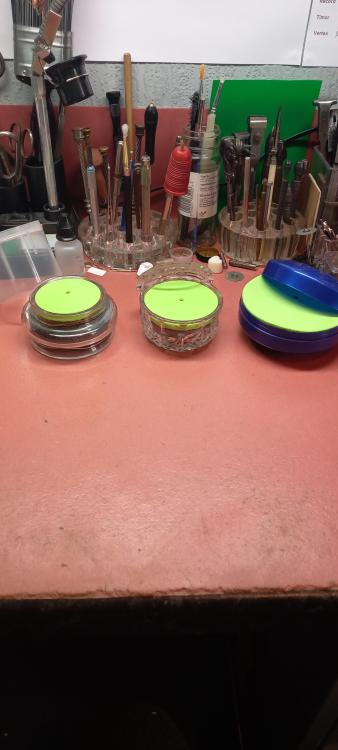
Another little idea , for a movement cushion this time. Always made my own cushions but i like this one it has built in features. The pot is from cousins , add lead circles for weight , light cushions move far too easy for my liking, a foam mat cushion, yoga mats and those click together floor mats are about the right density punch out the center. The lid acts as a dust protector when you want a coffee break, saves on those glass movement covers.


 1 point
 -
Thats why i dont wear a tie when I'm working with machine tools, come to think of it i dont wear a tie at all which makes my comment completely irrelevant.1 point
-
Well done with the video.1 point
-
I've been considering the bolt on inserts as well, i have another idea of what i can use for now.0 points