Leaderboard


Popular Content
Showing content with the highest reputation on 06/30/24 in all areas
-
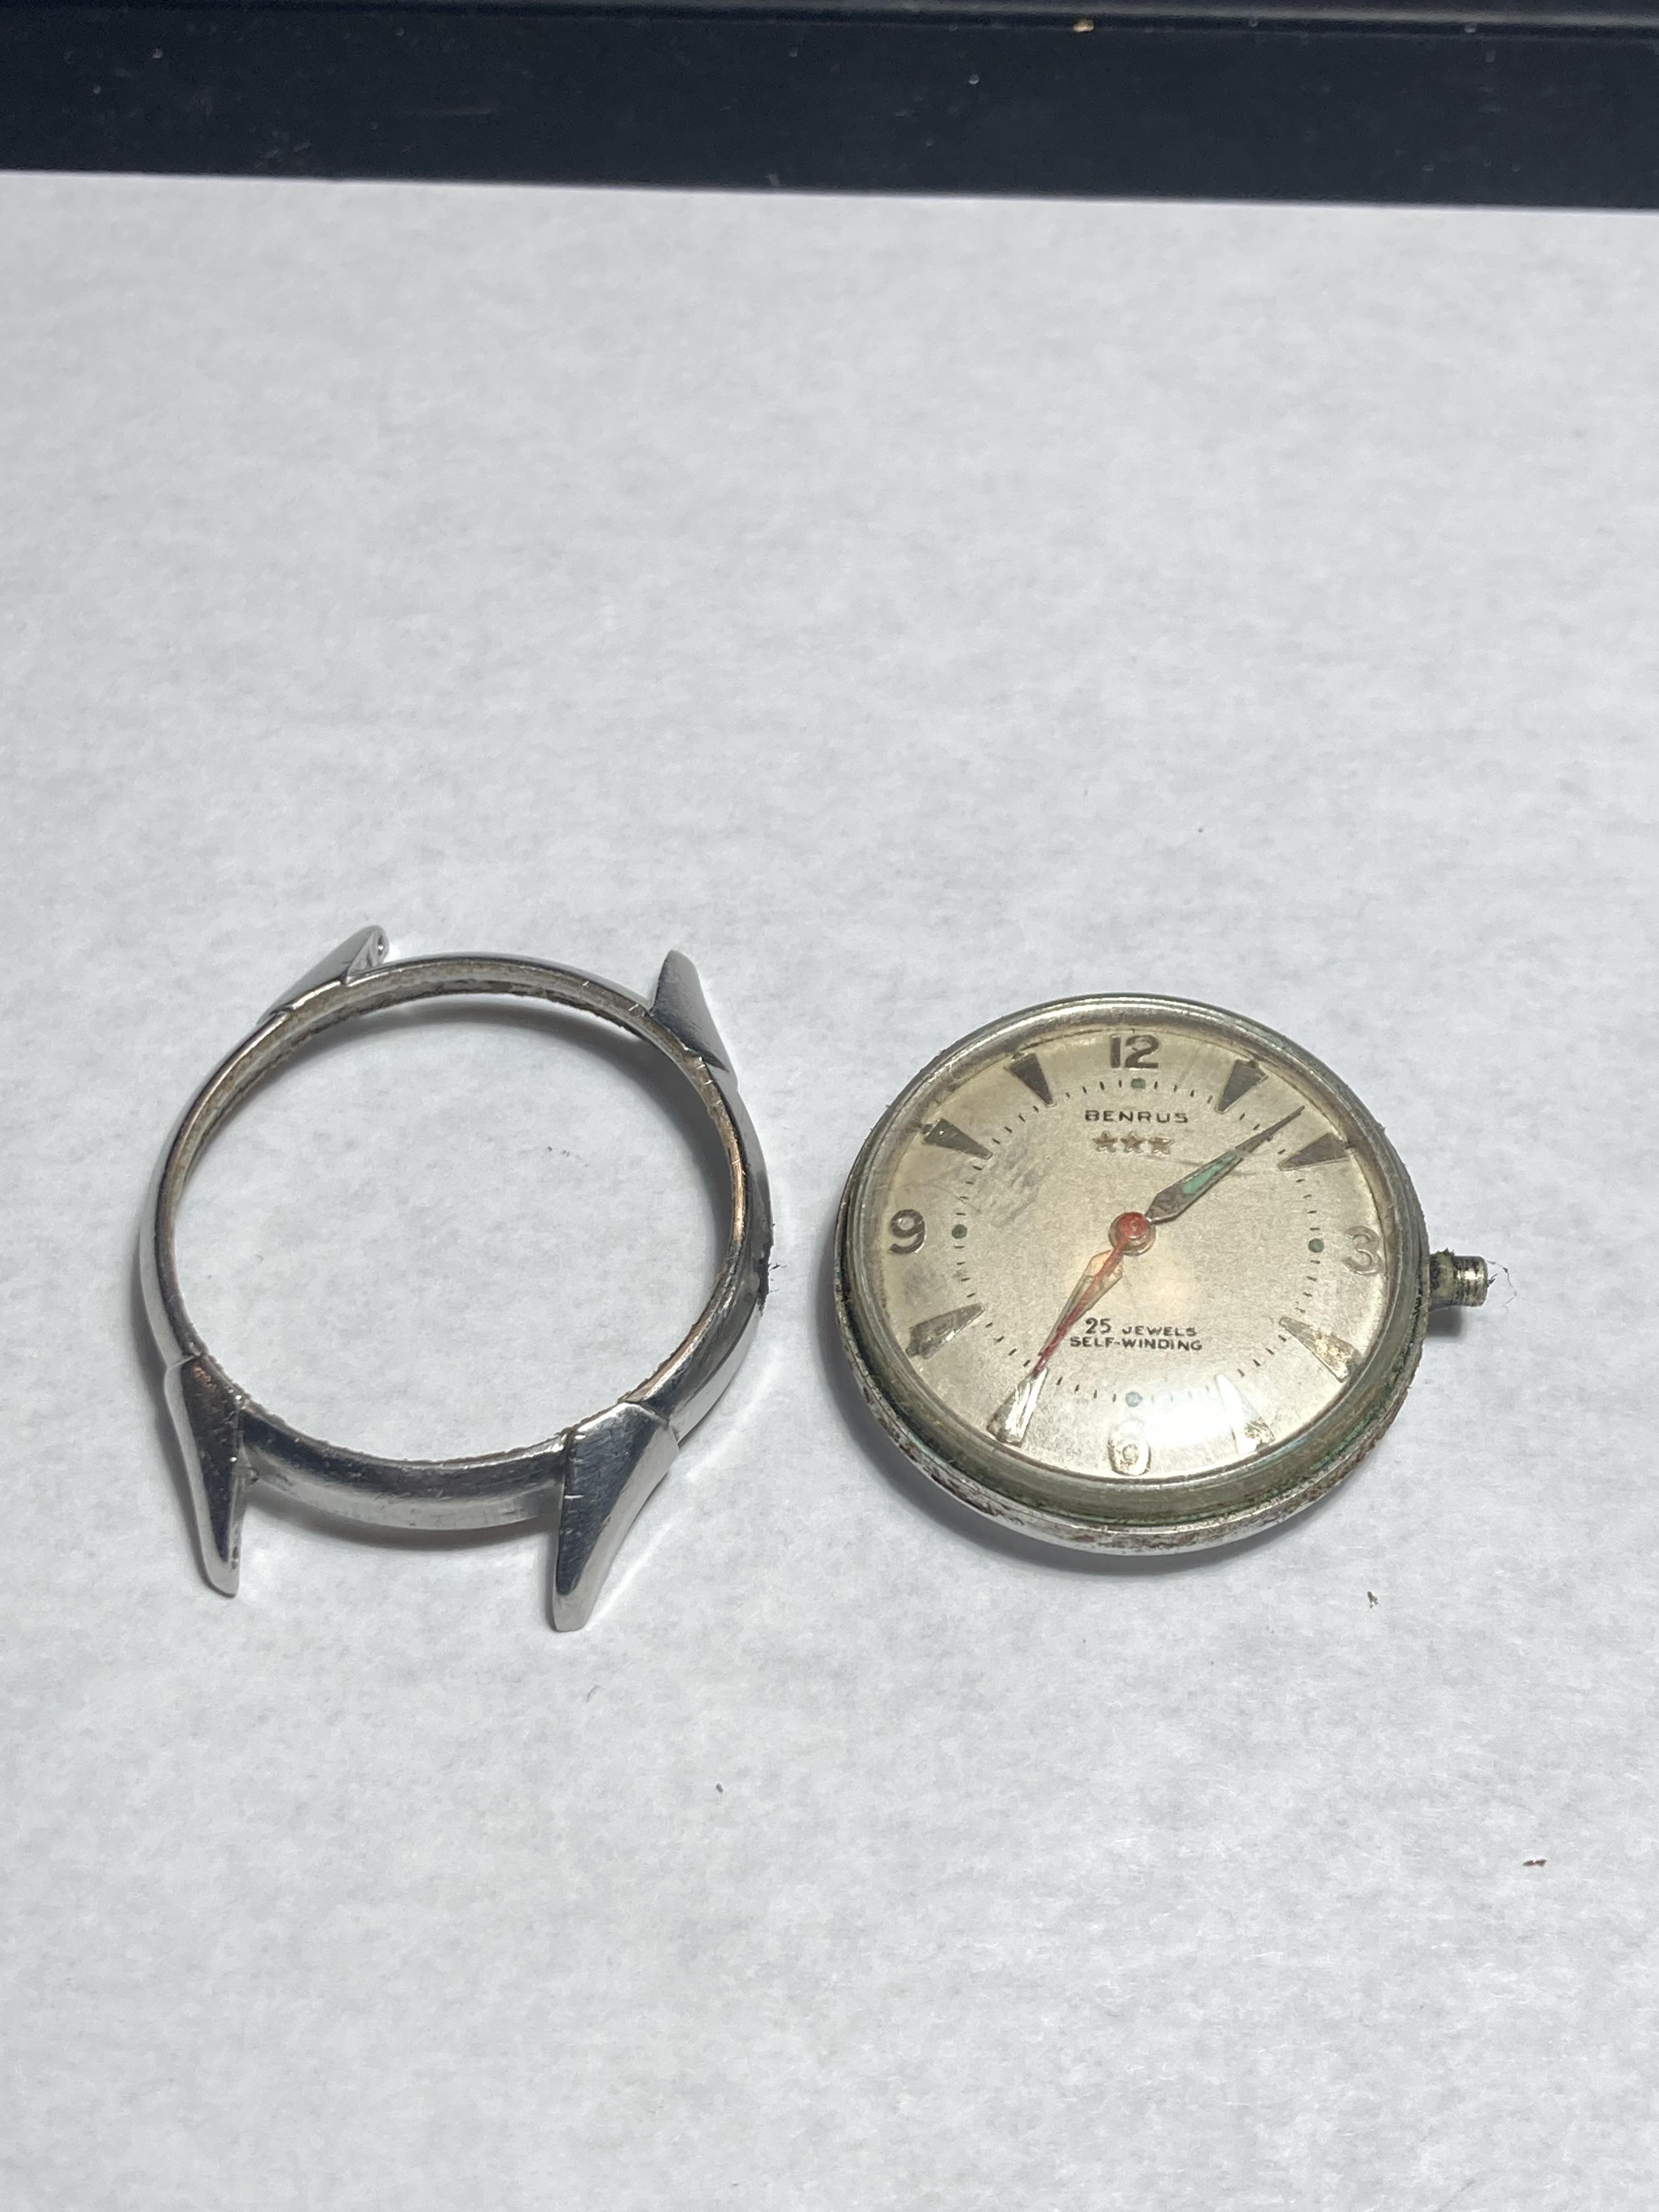
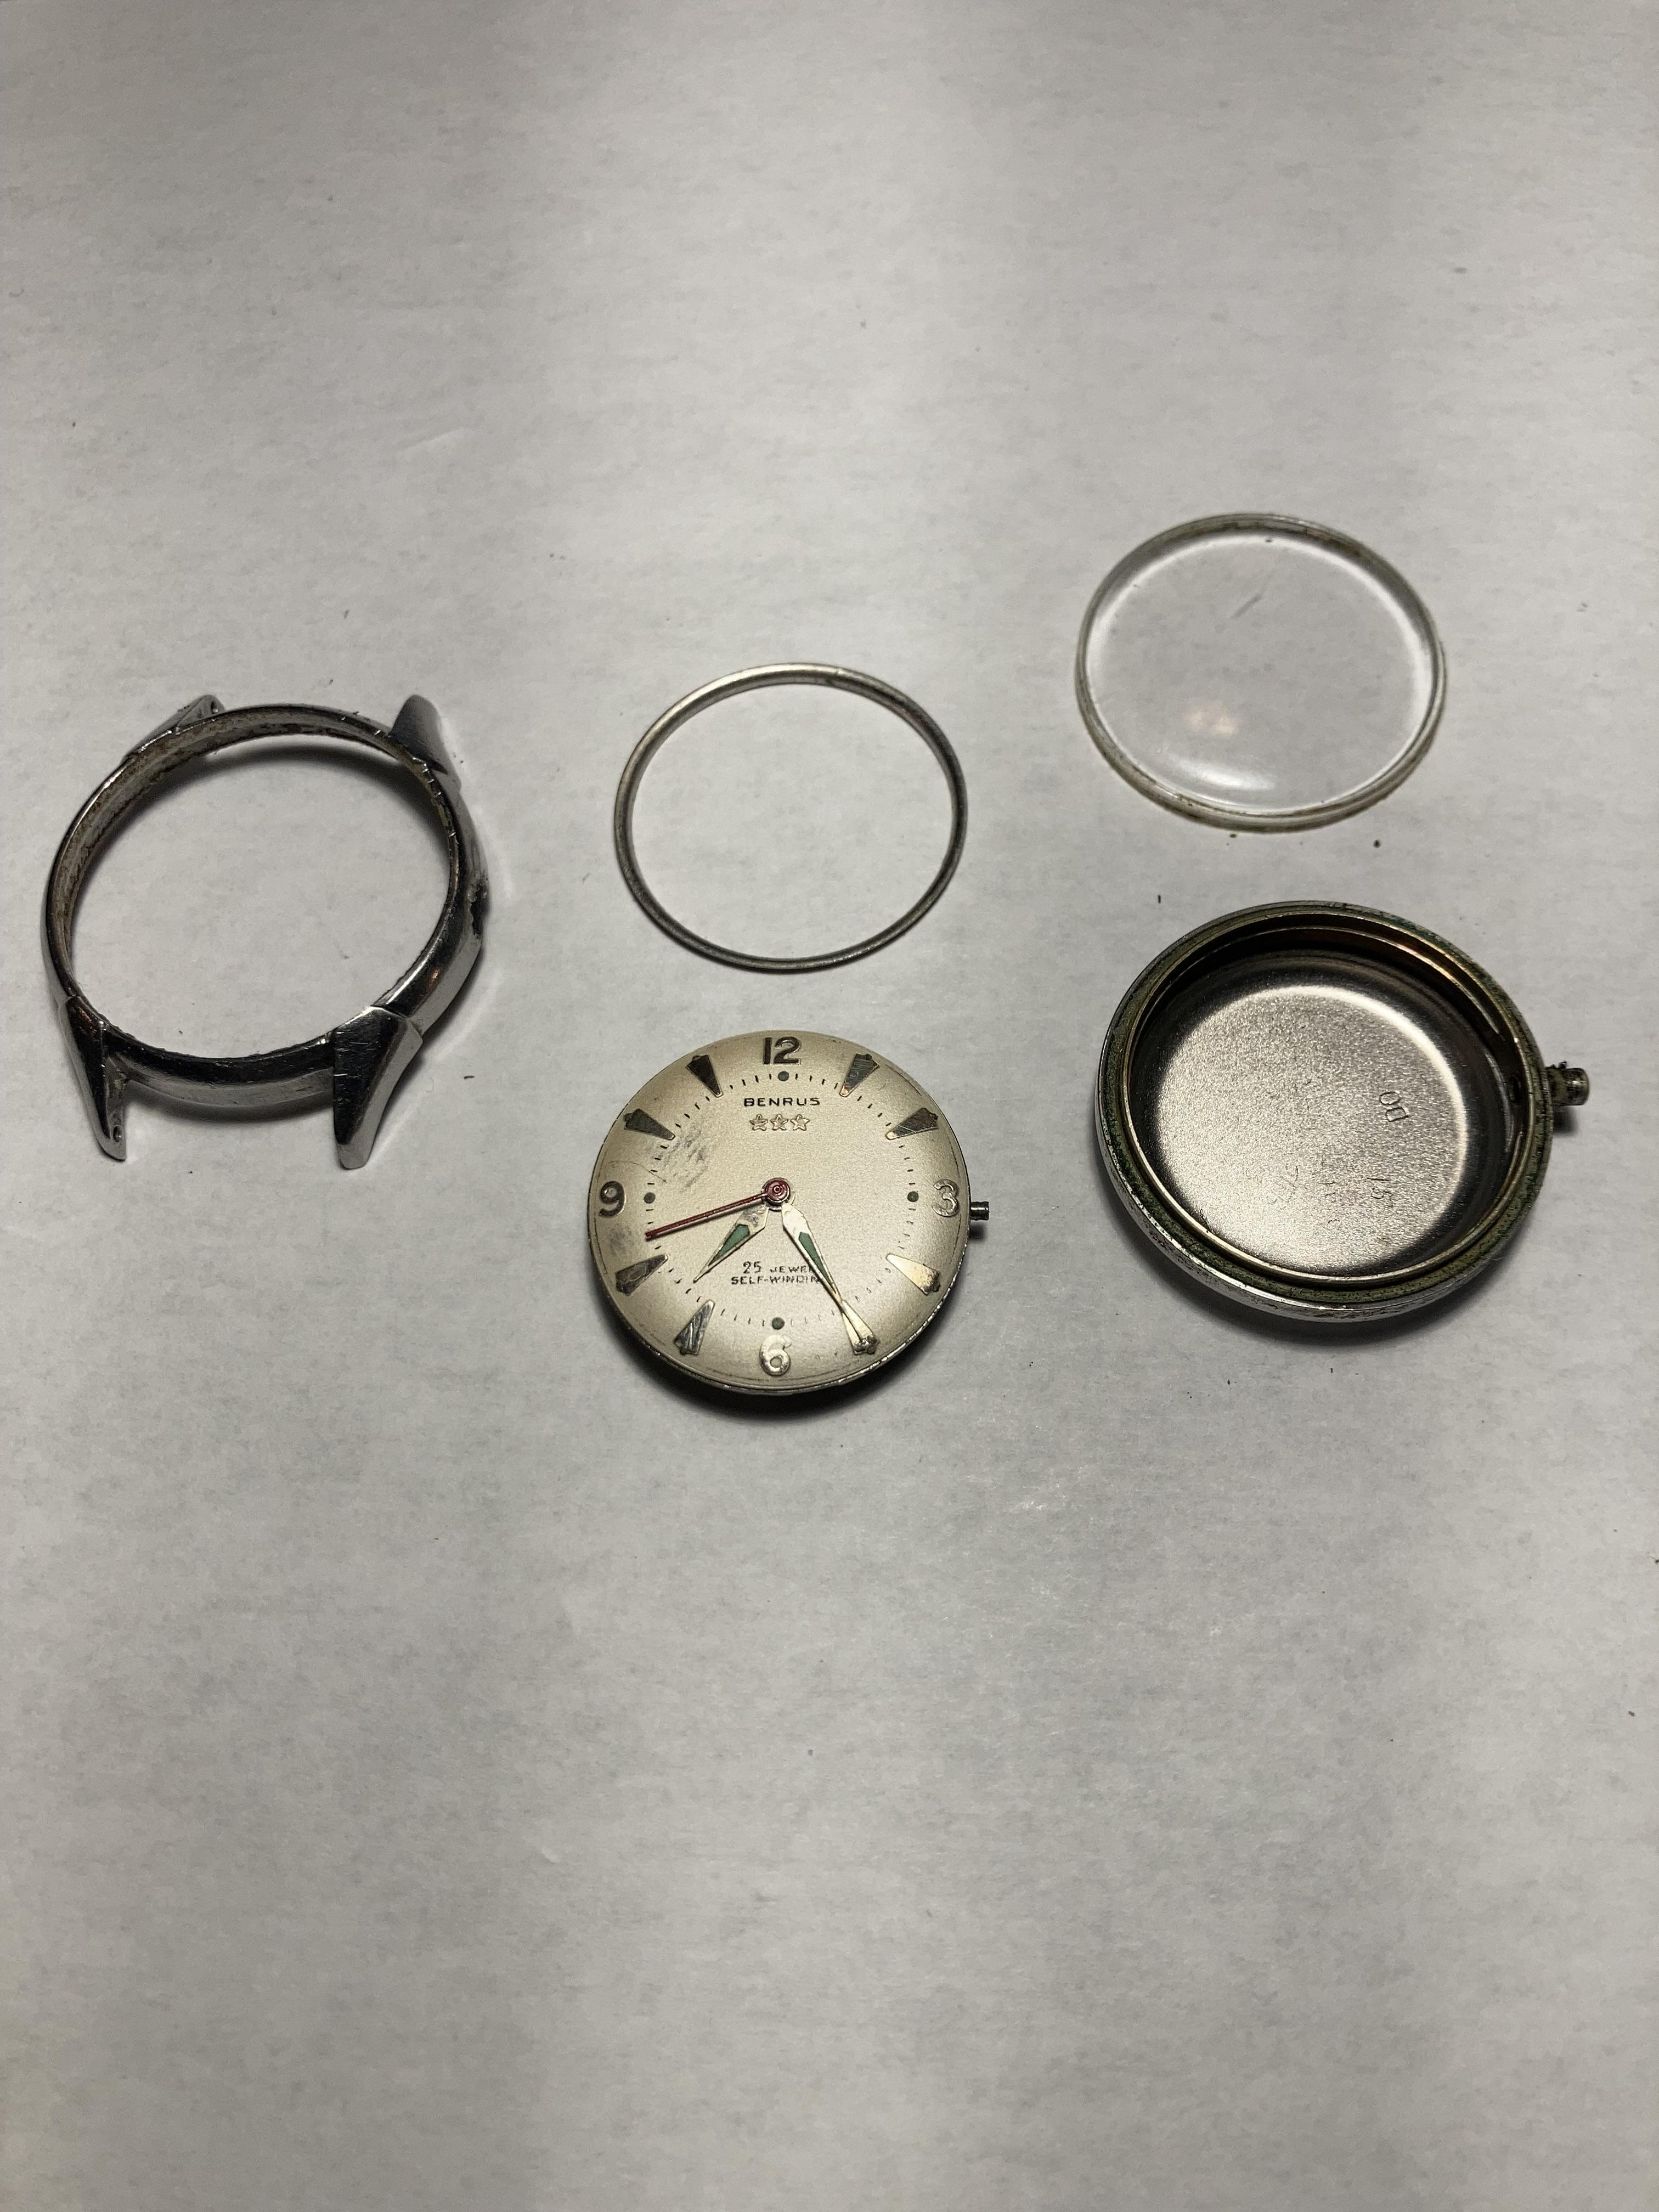
Thanks again guys! Always great advice. Popped off the stem, put the watch in the press and the crystal, movement and case back came right out with just a little bit of pressure. And it looks as if it’s been many years since it’s been out.


 4 points
 -
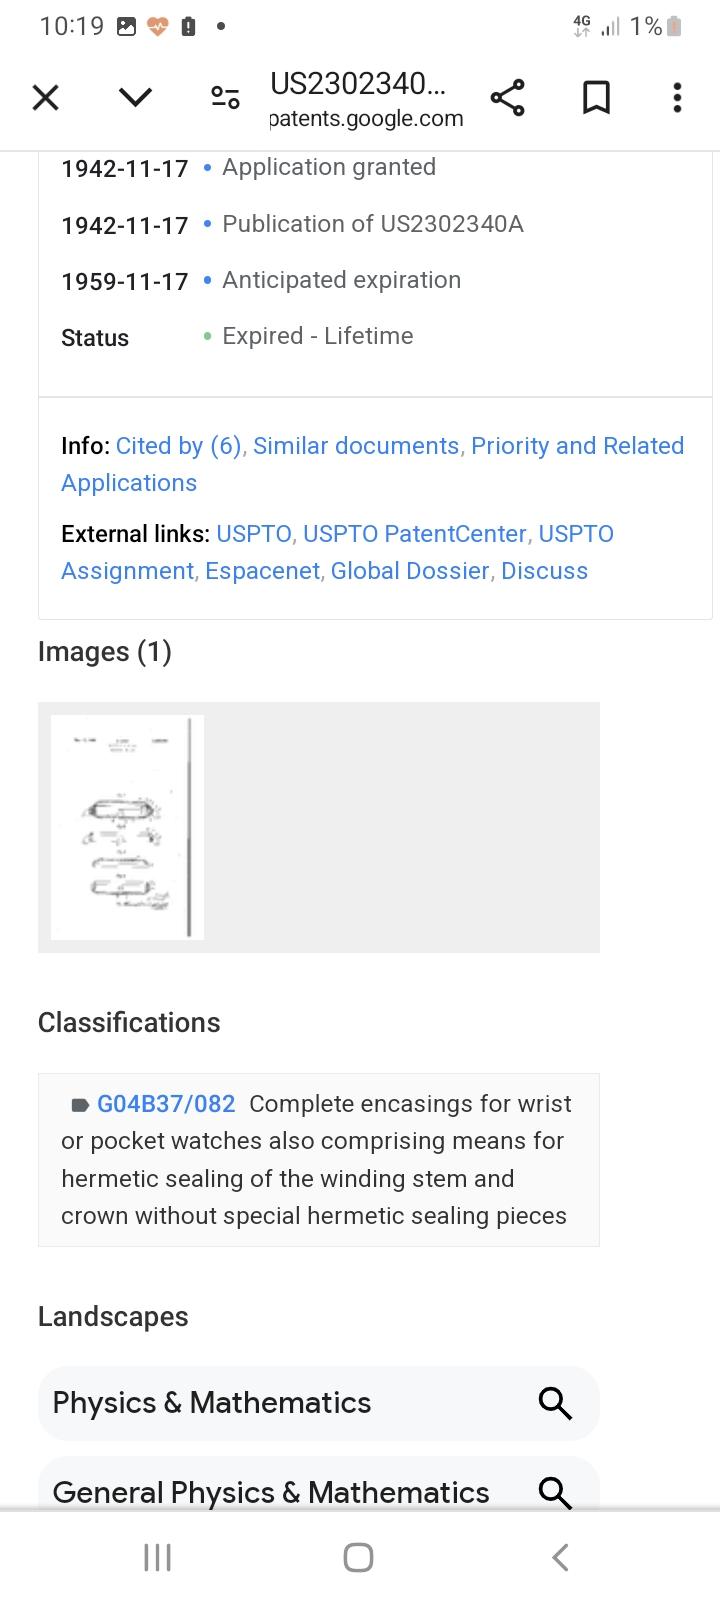
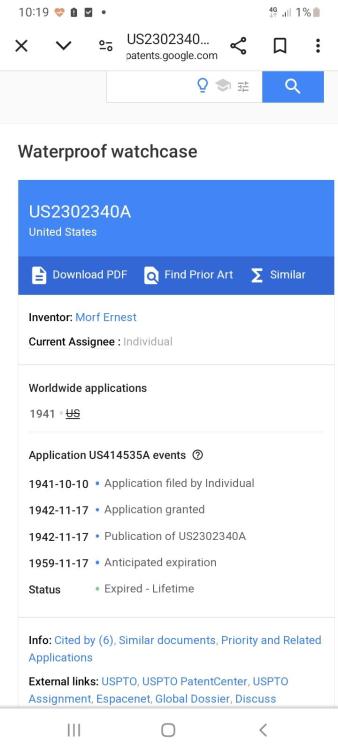
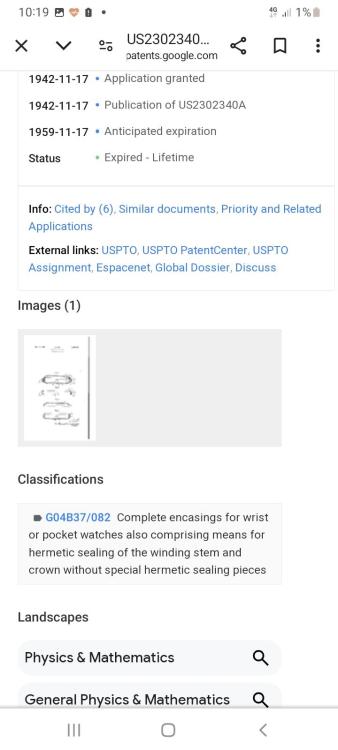
Well in this case compressed air will probably blow the crystal off, and you need that to push the back / centre piece of the case out. Good digging! Indeed the same principle as Roamer's. Different patent?
 4 points
 -
Patent numbers can sometimes give us clues to things like this .
 3 points
 -
Hi Ross. Consider this, taking the watch as a whole. The Mspring supplies the power through a train of wheels , the escapement fork and lastly the balance. Now as we all know any interference in any of these areas can stop a watch ,it doesn’t take much. Now when a watch stops positional ie dial up dial down etc one has to understand what changes. In fact everything changes all the wheels run in another jewel bearing probably the only constant is the mainspring.the balance is very light and requires litt to stop it. You seem to have answered your own question with the fact the problem has gone away due to rigours pegging of jewel holes which means you were thinking on the right line diagnostically which is a brownie point to you . The answer is a grain of dirt, bit of dried up oil in a jewel hole which only affects the movement positionaly3 points
-
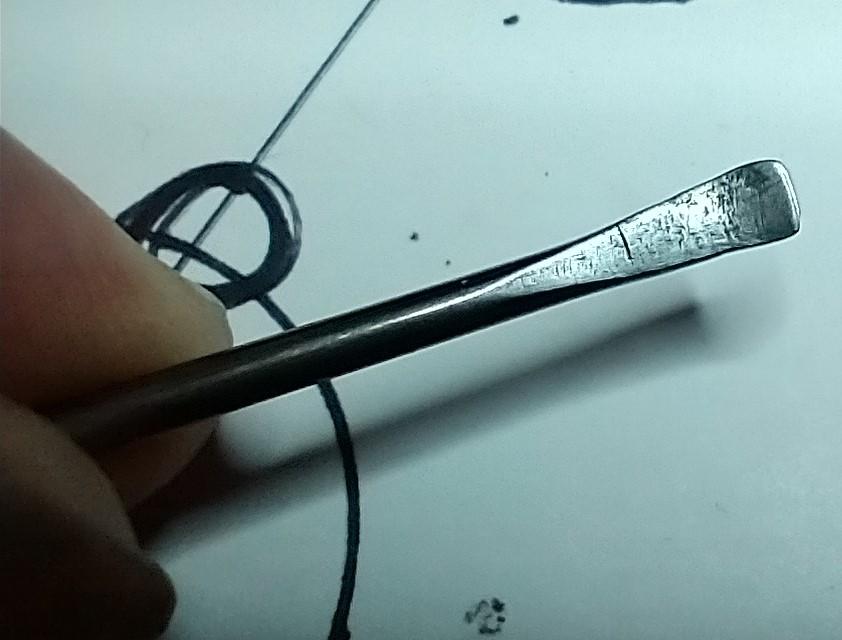
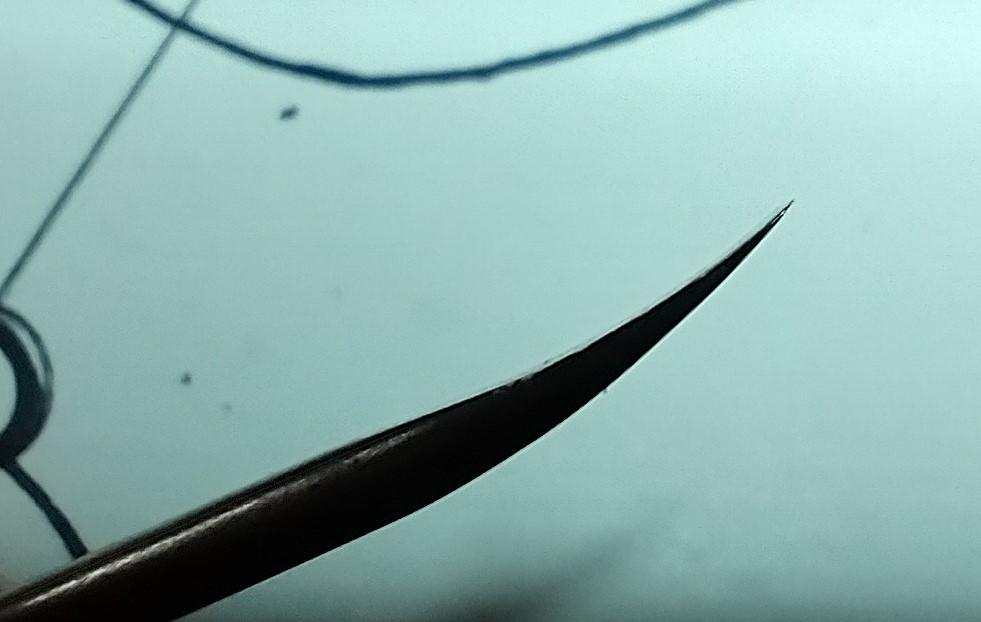
My hand removal tools are crap. I ordered them through Cousins and the tips are too thick. They did remove the seconds and minutes hands because their height from the dial ground is greater than the thickness of the tips. I have several hones from 350, 1000, 5000, 8000 and a natural Belgium Coticule with unknown grit, probably around 10k~12k. I might grind them and file them a bit until the tips are flattened. It will be difficult since I don't have anything to lay the tools to get a fixed angle and hone evenly, but I'll figure out something. Anyway, as much as I file the tips and turn them into a really slim wedge, this won't be enough to stick under the hour hand. Thanks for the idea! I'll definitely will grind the tips to turn them into a proper hand removal tool.2 points
-
Hello to all Working on my own, as many of us do, we gain our experience from practice. Unless we ask a question about something we never realise that answer. Like many, I have become good at basic service and no longer have a problem in certain fields. Still working on some. But that's another story. When I was learning I always had a particular problem . Doing a build on the 'drive' side of the movement. I complete the build and install the balance. It oscillates well. Happy chappy! Even demagnetise and place on the Timegrapher. All ok. Until Rotate the movement to 'dial up' and the oscillation stops. Dial down, starts again. No matter what I did. Dial down, ok. Dial up, stopped. Dial up, starts again. This occurred for many of my first builds. Infuriating. I no longer have that problem. My pegging is rigorous. My clean is rigorous, My oiling is achieving good results. Here's my question of my original problem. Why did the oscillation stop? I've tried to find the answer in various locations in Youtube and in my books, but to no effect. It would be nice to know what caused it? Any possible information please? Sorry to ask such a basic question. But, as I said. Working on you own at your desk. No one to ask. Practice makes perfect. But without the knowledge? What did practice overcome? Regards Ross2 points
-
I did the math meanwhile: @Jon, I have to apologize for my harsh response! Yes, your math does not correctly convert time to angle of a part of a swing. But funny enough neglected facts compensate each other here and the result is in the ballpark, sufficient precise to work with (in this limited range around middle position). @Zendoc I have no reliable and easy method in which direction to turn the collet. If a coarse error, I observe the impulse jewel as described and turn the collet the same direction the jewel is off the center. With small errors I am wrong every 2nd case . The dot on the balance rim is reliable only with untouched units, but who knows? Changed staff or removed/mounted roller makes this dot worthless. Frank2 points
-
For me up to now it has always been this way. Its good to check the pin positioning before reassembly of the movement. Its possible to get it close enough this way, within 0.5 - 1 ms.2 points
-
Slightly tweak to push the coil to one side, push right after the bend of terminal curve, you can actually see the balance rotate a bit . Do this with the movement on TG while running, observe !! see if BE get smaller or wider. If BE gets bigger , your beat was advance, and vice versa. ---Slight push is so you don't cause a permanent bend , you want the coil to bounce back unbent. https://redirect.viglink.com/?format=go&jsonp=vglnk_171969890606813&key=7384788ce4aeab830f00b905bbcc0552&libId=ly0qhzdj010050gq000ULau7hbs8i&loc=https%3A%2F%2Frwg.cc%2Ftopic%2F188093-yuki-3135-hairspring%2F&v=1&opt=true&out=http%3A%2F%2Fimg.timezone.com%2Fimg%2Farticles%2Fhorologium631675494030170118%2Fmark12-2.reg.schematic.numbered.jpg&ref=https%3A%2F%2Fwww.google.com%2F&title=Yuki 3135 hairspring - General Discussion - RWG&txt= Tweak section one. Play with beat error in the name of practice is Okay. In practical watch repair, I wouldn't' touch a 2ms BE. Good luck2 points
-
Oh definitely!2 points
-
If you've got some tool steel rod, something like 2 mm, shape the end like a screwdriver and beat it flat on an anvil with a hammer it will work harden the tips and they will be really slim. Finish them off on some wet and dry and you've got some really good slim hand removers. I use mine I made for things just like this. They will find the smallest gap and open it up. I buy my tool steel from these guys https://www.groundflatstock.com/ Brilliant for making tools and parts. always good to have a supply of 2, 3 and 5 mm rod. I buy tool steel sheet from elsewhere to make things like yokes and setting lever springs. Great as collet removal tools as well! They chip every now and then but I just hone it back. I've been using these for over seven years now
 2 points
 -
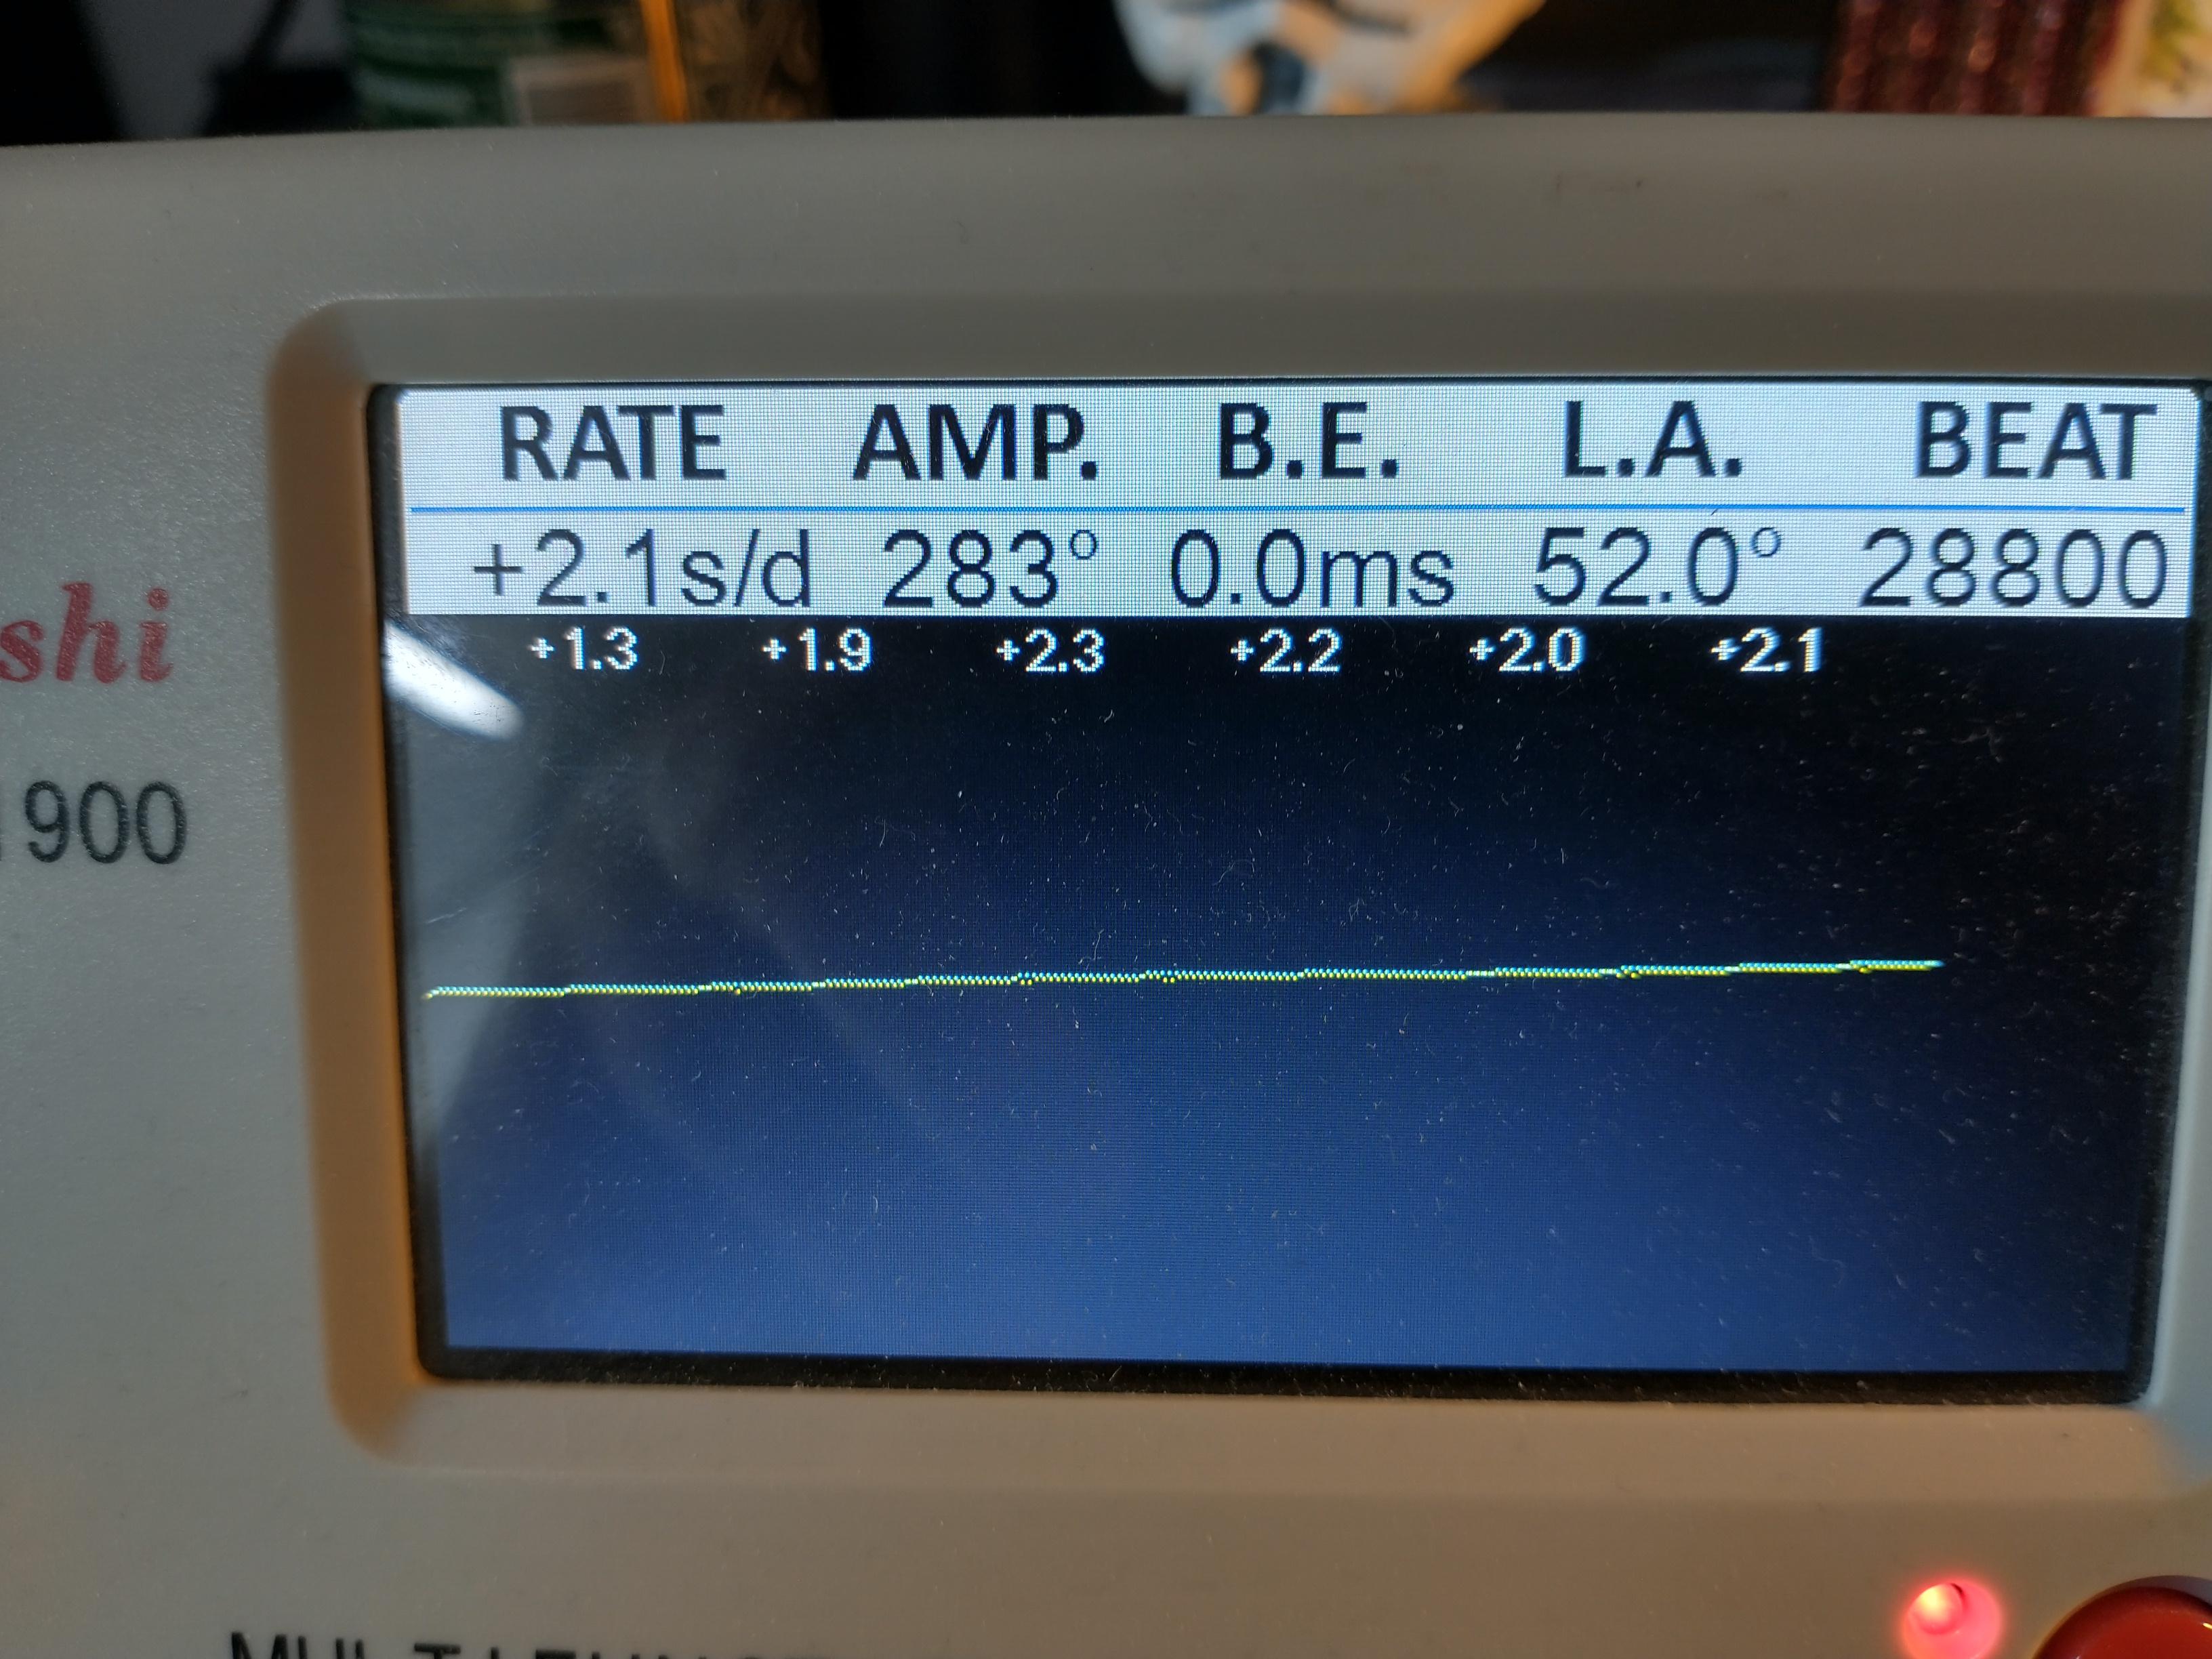
Hopefully this doesn't raise too much ire. Very often when someone presents a timing machine result on a newly serviced watch and the amplitude is on the low side, someone will chime in right away to say something to the effect of "don't bother reading those results until you get the amplitude closer to 270, take it apart and clean again." Then I remembered watching Mark's service of a 1960's Cyma where he states "we would normally expect a vintage watch such as this one to be within the range of 180 to 220 degrees." Later after servicing and troubleshooting that movement to fix the barrel arbor bearing, it reaches somewhere around 195 degrees and he says he is much happier with that result. Ultimately it goes to about 215 (and somehow then 245 when shown on the Weishi 1000, unexplained). 200-210 is closer to what I am typically able to achieve on an older Swiss movement, even with a new mainspring and I have been working under the assumption that I need to keep doing better. But do I? Is the "270 or start again" mentality shared by most professional watchmakers or is this "180-220 is probably pretty good for a 70 year old movement" attitude okay?1 point
-
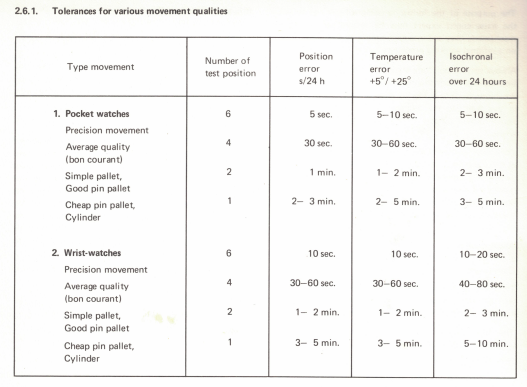
I can't tell you how reassuring it is to see 1min/day positional error & 2-3min isochronal error as an acceptable tolerance for a simple pallet or good pin pallet watch. This makes me much more confident in the performance I recently got out of a 7 jewel and not at all well built Junghans pocket watch caliber. Good time to buy stock in Casio. I almost never work on good quality movements. The handful of Unitas 6498's I have done all had no difficulty reaching >290 (and though 40-50 years old, all those were in like new condition). But otherwise, I mainly have serviced everyday workhorse movements out of old watches like the AS 1187, or Soviet movements. Nothing anyone would classify as high quality. I was seeing something on Watch U Seek or similar, where somebody complained about low amplitude on a Timex. A Timex! I'm still not all the way there with my tooling though. I don't have a microscope, I don't have a Jacot tool. I'm mostly stuck with whatever condition my pivots are in, beyond cleaning them. I imagine there's quite a bit of potential power being lost there. (and still, my question here isn't "how do I get more amplitude" - it's more like "is it just internet hobbyists who are hopelessly obsessed with high amplitude")1 point
-
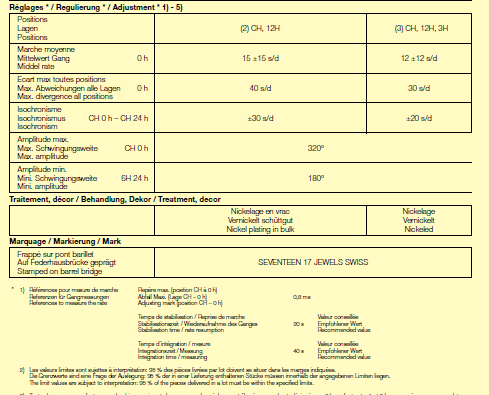
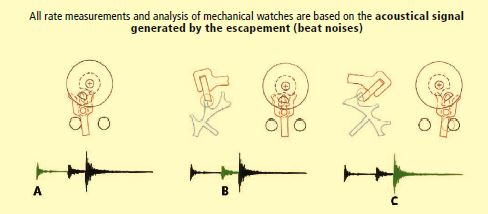
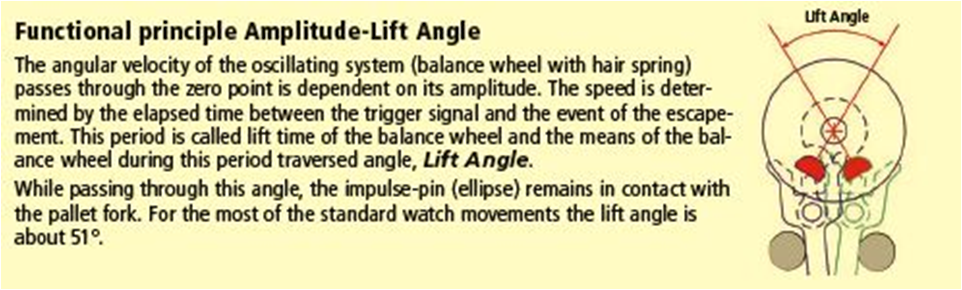
Why settle for 270? You should strive for more never ever accept less especially with this group I'm assuming for your vintage movement you have the lift angle set correctly? Then proper timing procedure like checking dial-up and dial down looking for pivot faults. Checking the escapement lubrication the condition of the pivots etc. you do end up with some interesting problems on vintage like why don't they publish amplitude specifications? Or for that matter why don't they would publish timekeeping specifications? As the watch companies usually don't publish lift angle before certain point in time because timing machines didn't exist that would measure amplitude which brings up the question of how Did the watchmaker survive without having a timing machine To please. As the most important function as a watchmaker is pleasing the timing machine by getting it acceptably high amplitude numbers who cares about timekeeping? So if you look on timing machine manuals typically they'll make suggestions like in the witschi training course we find this Obviously witschi doesn't know what they're talking about amplitude from 250 hasn't even hit that magical 270. But there is a reference to timekeeping and the beat error. Now is amplitude really that important? Let's look at this in a little different fashion?For instance image out of one of the witschi documents escapement where to the sounds come from? Now let's combine it with another image Let's look at this a little different than you normally do lift angle with the image above tells you the time span that the escapement is screwing up the oscillation of our balance wheel. From the impact of the roller jewel on the fork until locking the escapement is exerting and influence on our timekeeping. The loss of energy on impact with the fork the artificially pushing from the mainspring or basically screwing up timekeeping. So if we were to make comparisons like a watch running at 100° versus maybe 250° with a typical lift angle around 50°. Then on the lower amplitude 50% of our amplitude is under artificial influence versus a higher amplitude where 1/5 influence. So typically a higher amplitude the escapement isn't screwing up things as much. But it also depends on the quality of the escapement the adjustments. Then somewhere in all of this would be the physics of the spinning balance wheel bigger amplitudes possibly better immunity to vibrations shock twisting motion etc. but it also stands on the type of the balance wheel a larger pocket watch friends since the timing machine especially if you have a nifty microphone that rotates by itself it needs more time to settle just because it does and of course amplitude will come into play here so a lot of things amplitude is better but a magical number or death well that's only acceptable on this group.anywhere else timekeeping that's what I spent a lot of time at work doing trying to get vintage pocket watches to keep time. I'm less concerned about amplitude and I don't have a magical amplitude or else. I'm typically looking at things like the difference in dial-up and dial down indicating pivot problems or if it looks really too low than I might go through in figure out the lift angle to make sure that's correct. But the biggest thing is it has to keep time on the timing machine I must please the timing machine or my boss gets unhappy. Fortunately I get paid by the hour so that takes lots of time to please the timing machine So my boss is pleased the world will be good. But the big thing is timekeeping not amplitude unless it looks really bad. Yes the classic problem watch repair discussion groups with the obsession of worshiping their timing machine and a magical amplitude versus what does the watch Due on a wrist where we don't have a timing machine to verify its amplitude. Somebody really needs to get a phone app with clip on microphone with recording so we can keep track of that amplitude when it's on the wrist timekeeping specifications become a problem as I mentioned before as we typically don't get specifications for anything vintage. Timing machine manuals are good as they would give specifications like this comes out the Greiner manual notice no amplitude though how sad Then let's look at typical Swiss not vintage unfortunately. I'm attaching a eta document one of my favorite documents they do is the manufacturing information sheets hard defined as far as I can tell every mechanical and quartz watch probably had one. Filled with all the nifty specifications of everything. Typically when looking at basically anything relatively modern can find timing specifications this is what you're going to see. Number of testing positions better quality watches get more positions normal watches you'd only check at least for specifications I would still personally check in more positions just as a good way of looking for problems or issues but officially for timekeeping purposes they only look at a couple positions increasing as the quality the watch does of course. Then they give you a timing. Timing difference between the various positions this is why a lower grade watches zero I'm looking between two positions not six as this gets harder to do as a number positions go up. The isochronal number this is quite interesting. Basically the difference in amplitude this is where watch that would maintain a even amplitude over 24 hours even if it's not the magical whatever the group expects will keep better time typically the watch that starts at 300 and drops to some lower number. It's also where the shape of the mainspring comes in as the shape of the mainspring will change the power curve. Then we get the classic what is the maximum amplitude because anything over this can cause issues. Note we do not get a target amplitude target timekeeping but not amplitude. Then at the end of 24 hours this is the minimum and it varies between the watch companies. I think Omega might have some watches as low as 160° but they still have to keep time. So yes the most important thing in the universe except for this discussion group is does the watch keep time? How many customers are how many people wearing a watch are concerned about their amplitude?, A Rolex customers are concerned about the amplitude they get really cranky of their watches off by more than one second a day. Oh and no one not kidding about the Rolex customers we had somebody come and they were unhappy with the servicing done some more elsewhere in the past there were happy but this time somebody adjusted the Rolex to the actual specifications but the customer expected much closer to zero. Yes people with watches are obsessed with timekeeping. Witschi Training Course.pdf ETA 6497-1 Manufacturing Information.pdf
 1 point
 -
…with my amateur experience I’m able to achieve that magic 270 or better so often that I do go looking for faults when I don’t. Sometimes the movement might not be capable of those amplitude numbers but quality Swiss movements from the early 20th century respond well to modern lubricants and cleaners, Seikos and a few Swiss are lower amplitude by design. The bigger question to answer is will it keep accurate time worn on the wrist? …but if you’re consistently getting those lower numbers with good quality movements I’d take the time to audit what you’re doing…esp if you replace mainsprings…1 point
-
If you add the app Ublock (it's free) to your web browser, you will see no adverts at all on Youtube. I couldn't watch Youtube without it. I forgot to adda link https://chromewebstore.google.com/detail/ublock-origin/cjpalhdlnbpafiamejdnhcphjbkeiagm1 point
-
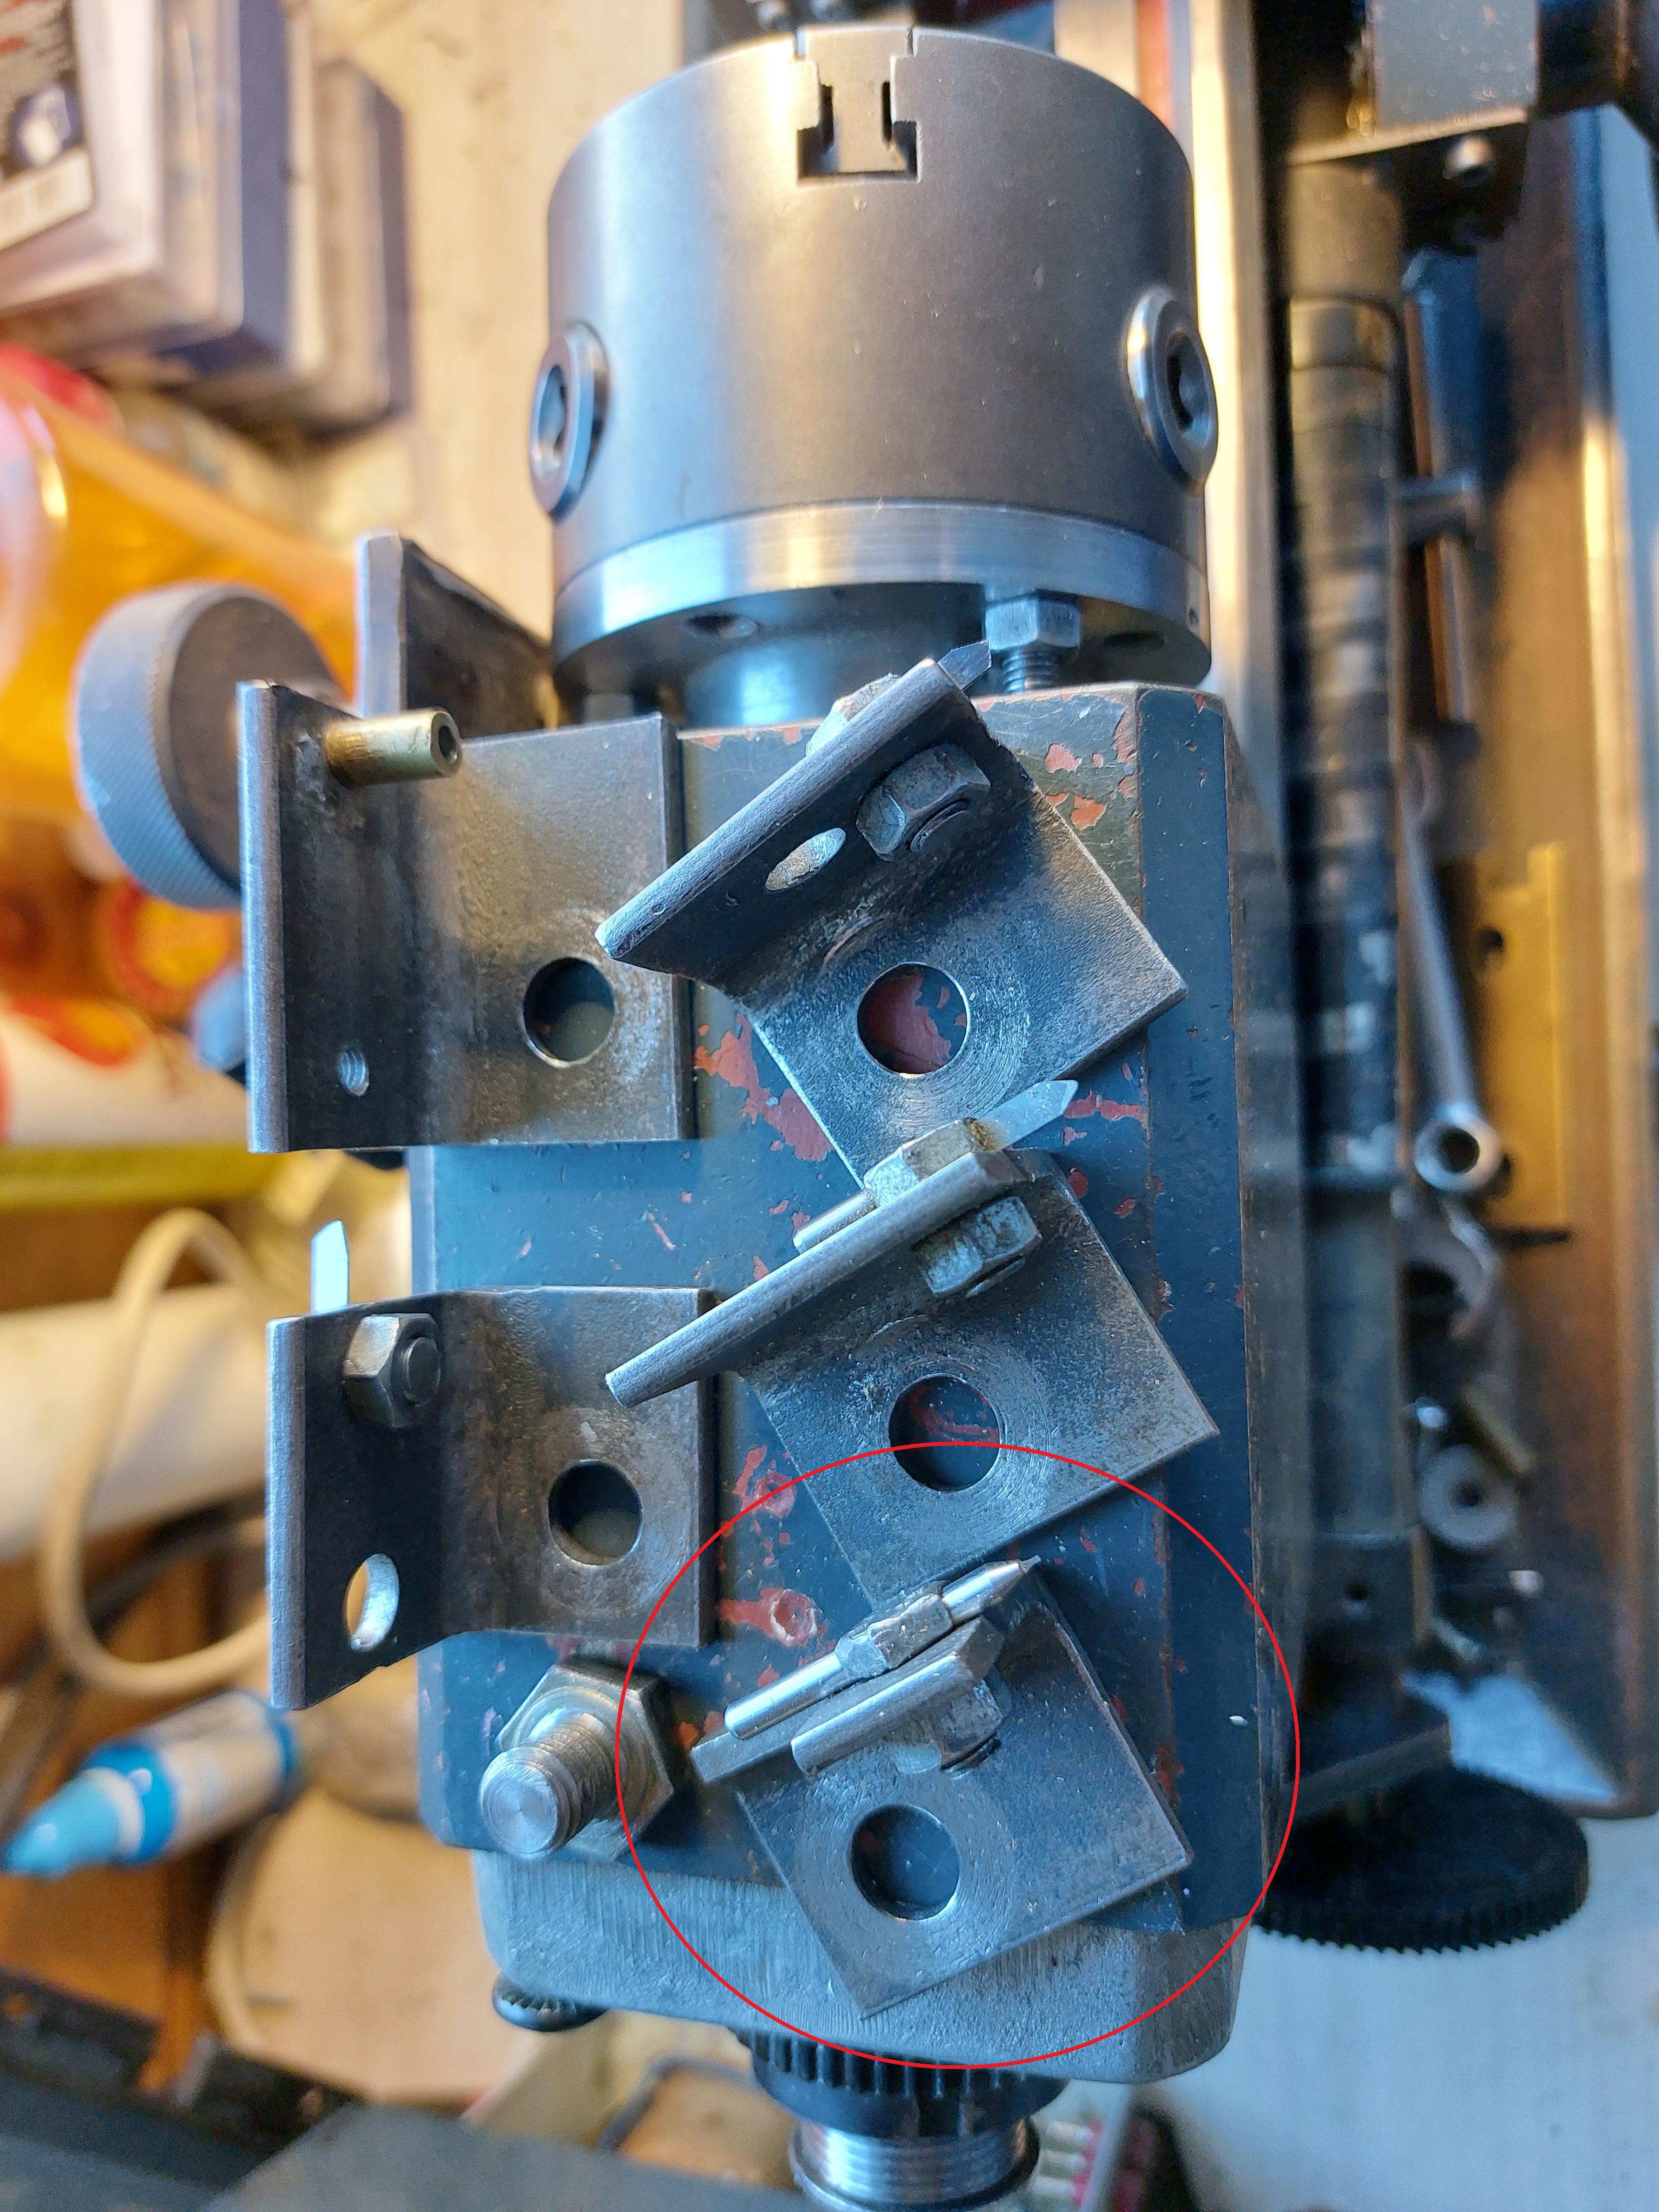
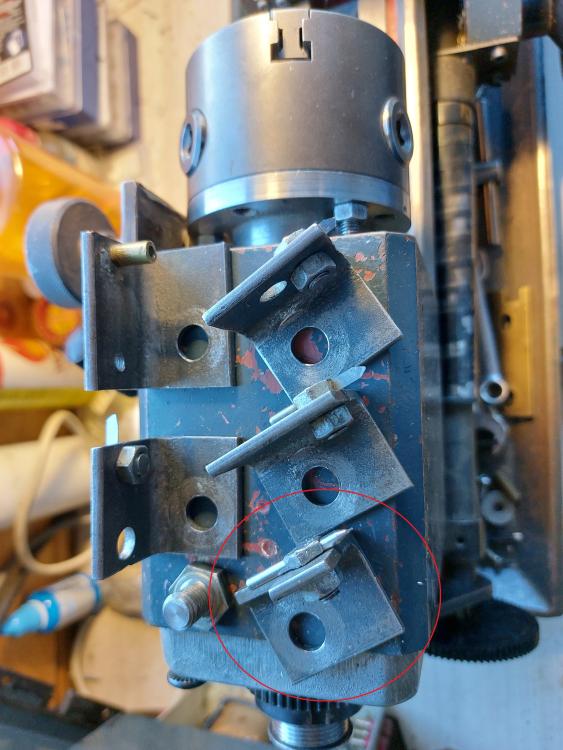
All the holes on the cutter holders are drilled on the lathe. The drill bit in the chuck on the spingle, the holder in place. The holes in the bolt heads are drilled after the bolts are tightened in place, the holders are mounted in order to hold the bolts perprndiculat to the drill bit. After drilling, the heads of the bolts are turned on their down side as to alow tightening of the cutter when the nut is tightened. Height position of the cutter tip is adjusted by slight turning of the bolt head by force. The cutters are preset and ready to use, and sharpenning them practically doesn't change height adjustment.1 point
-
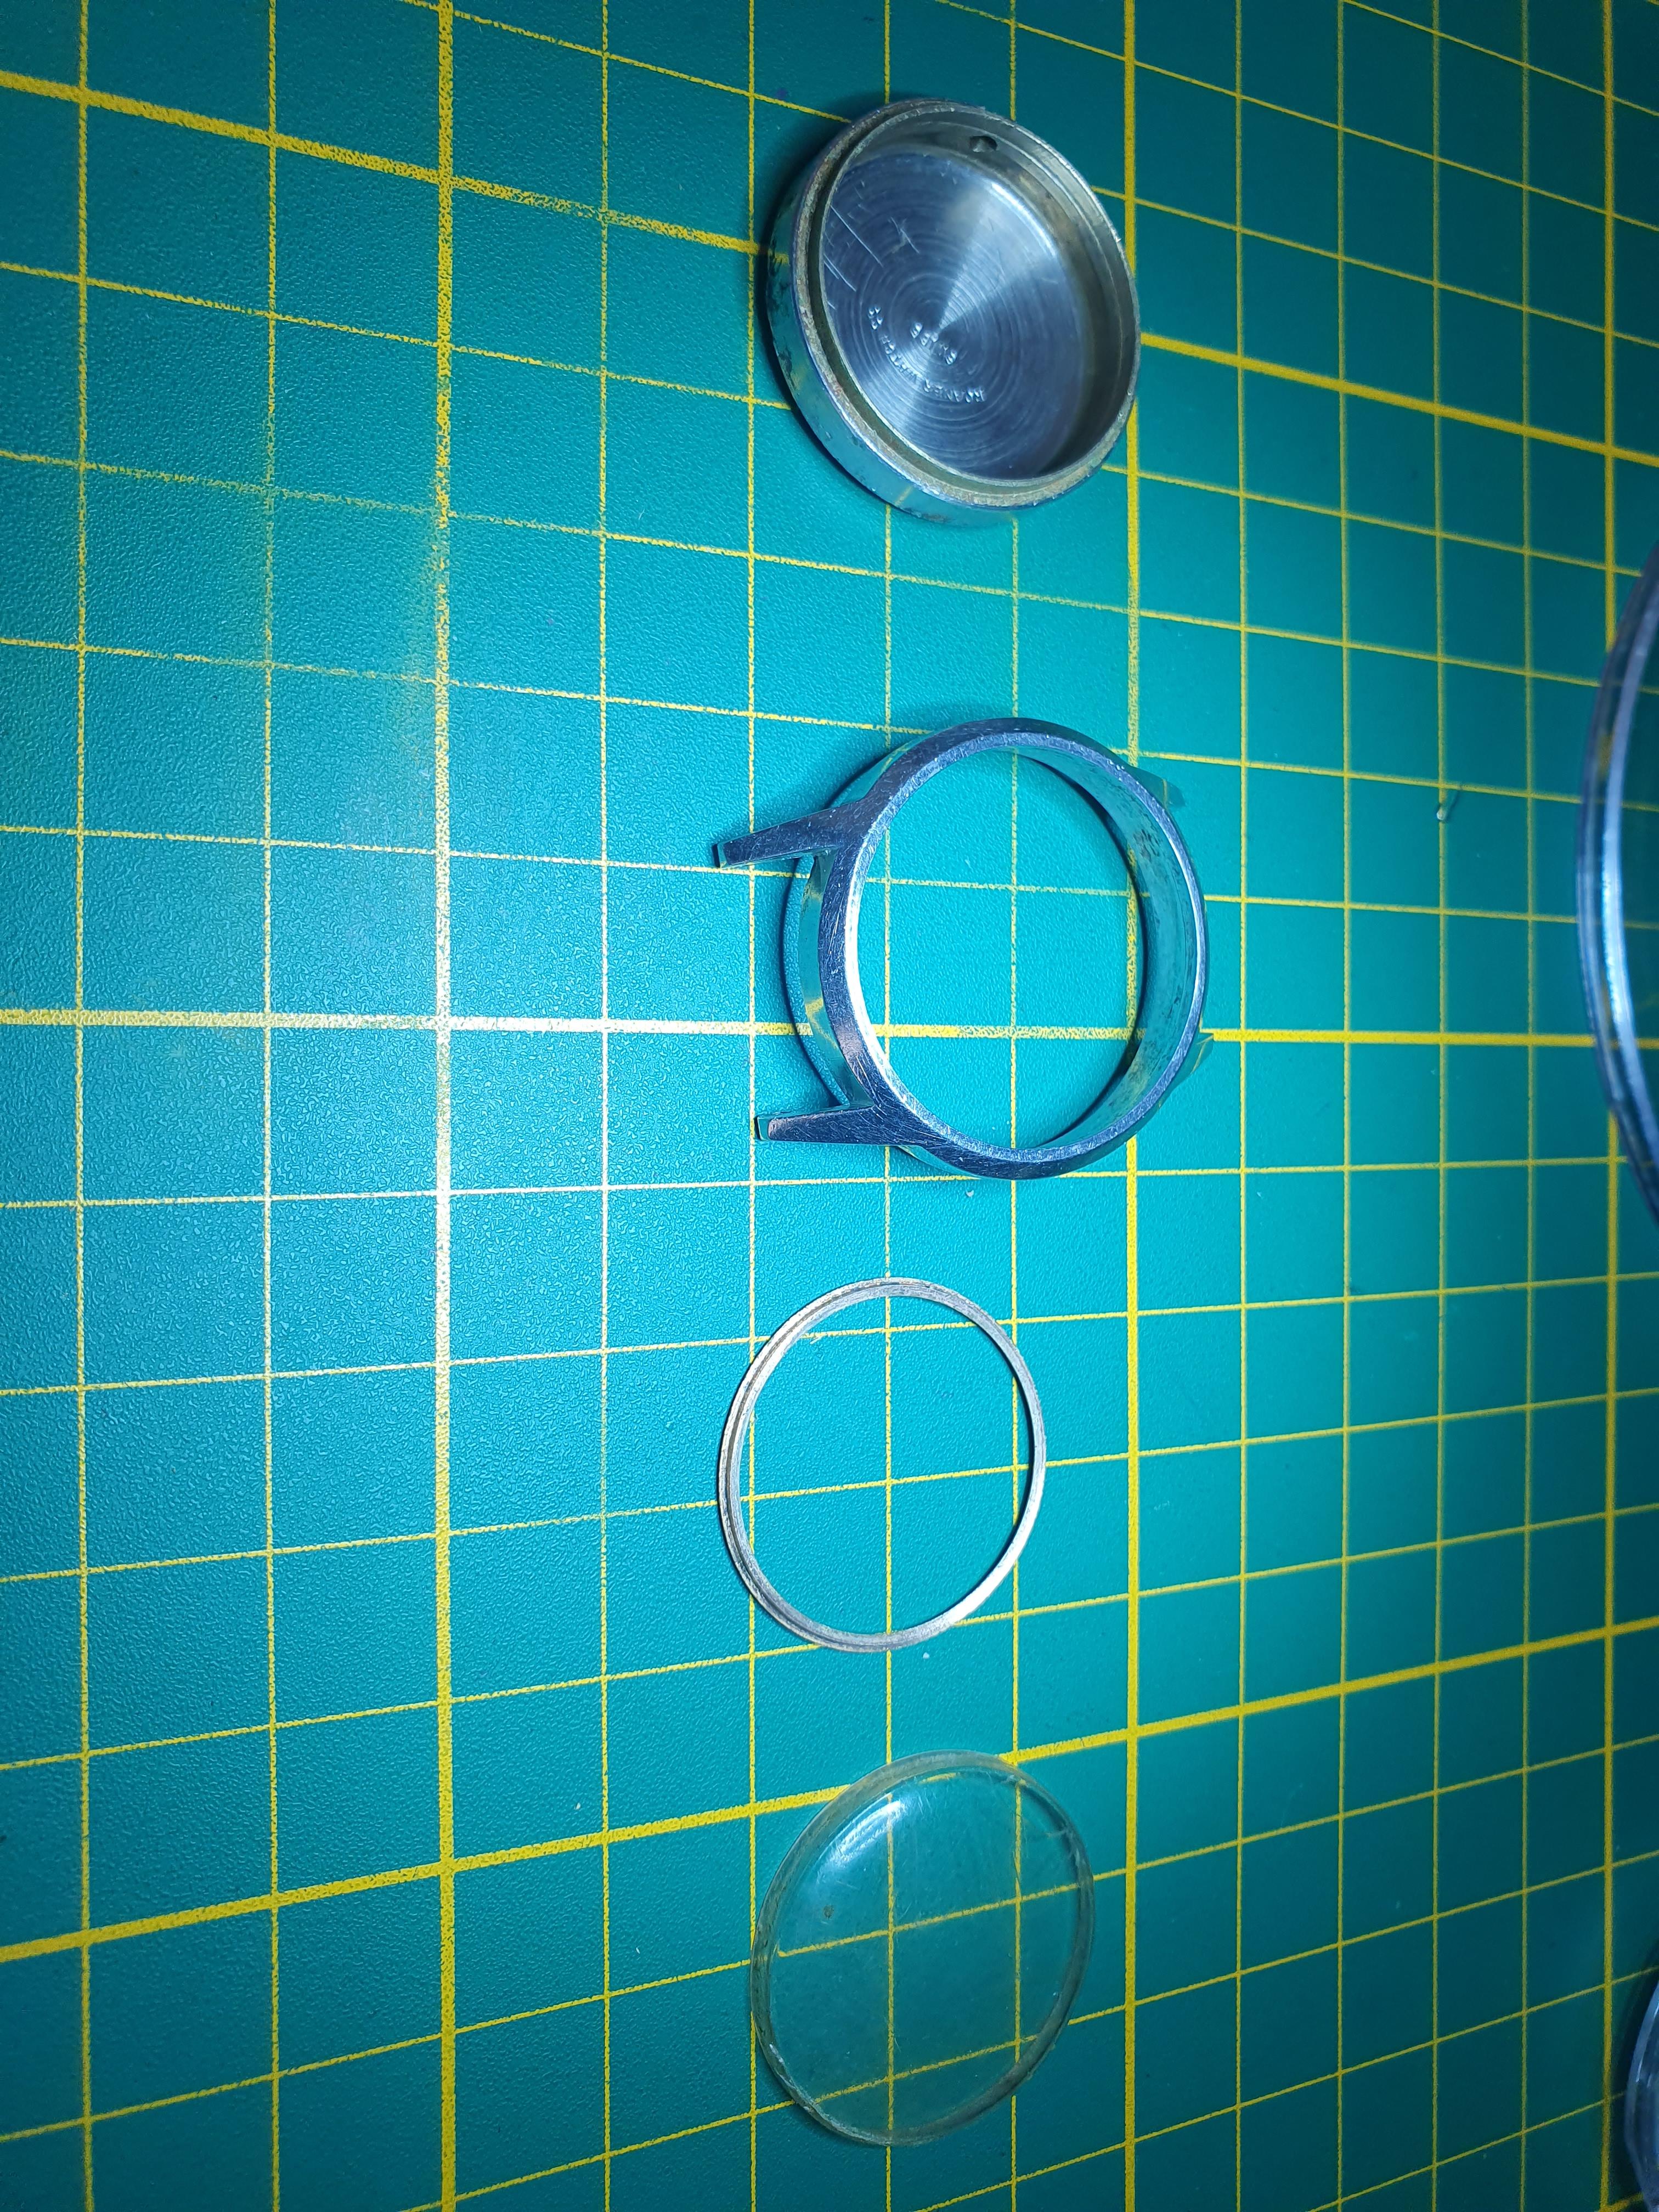
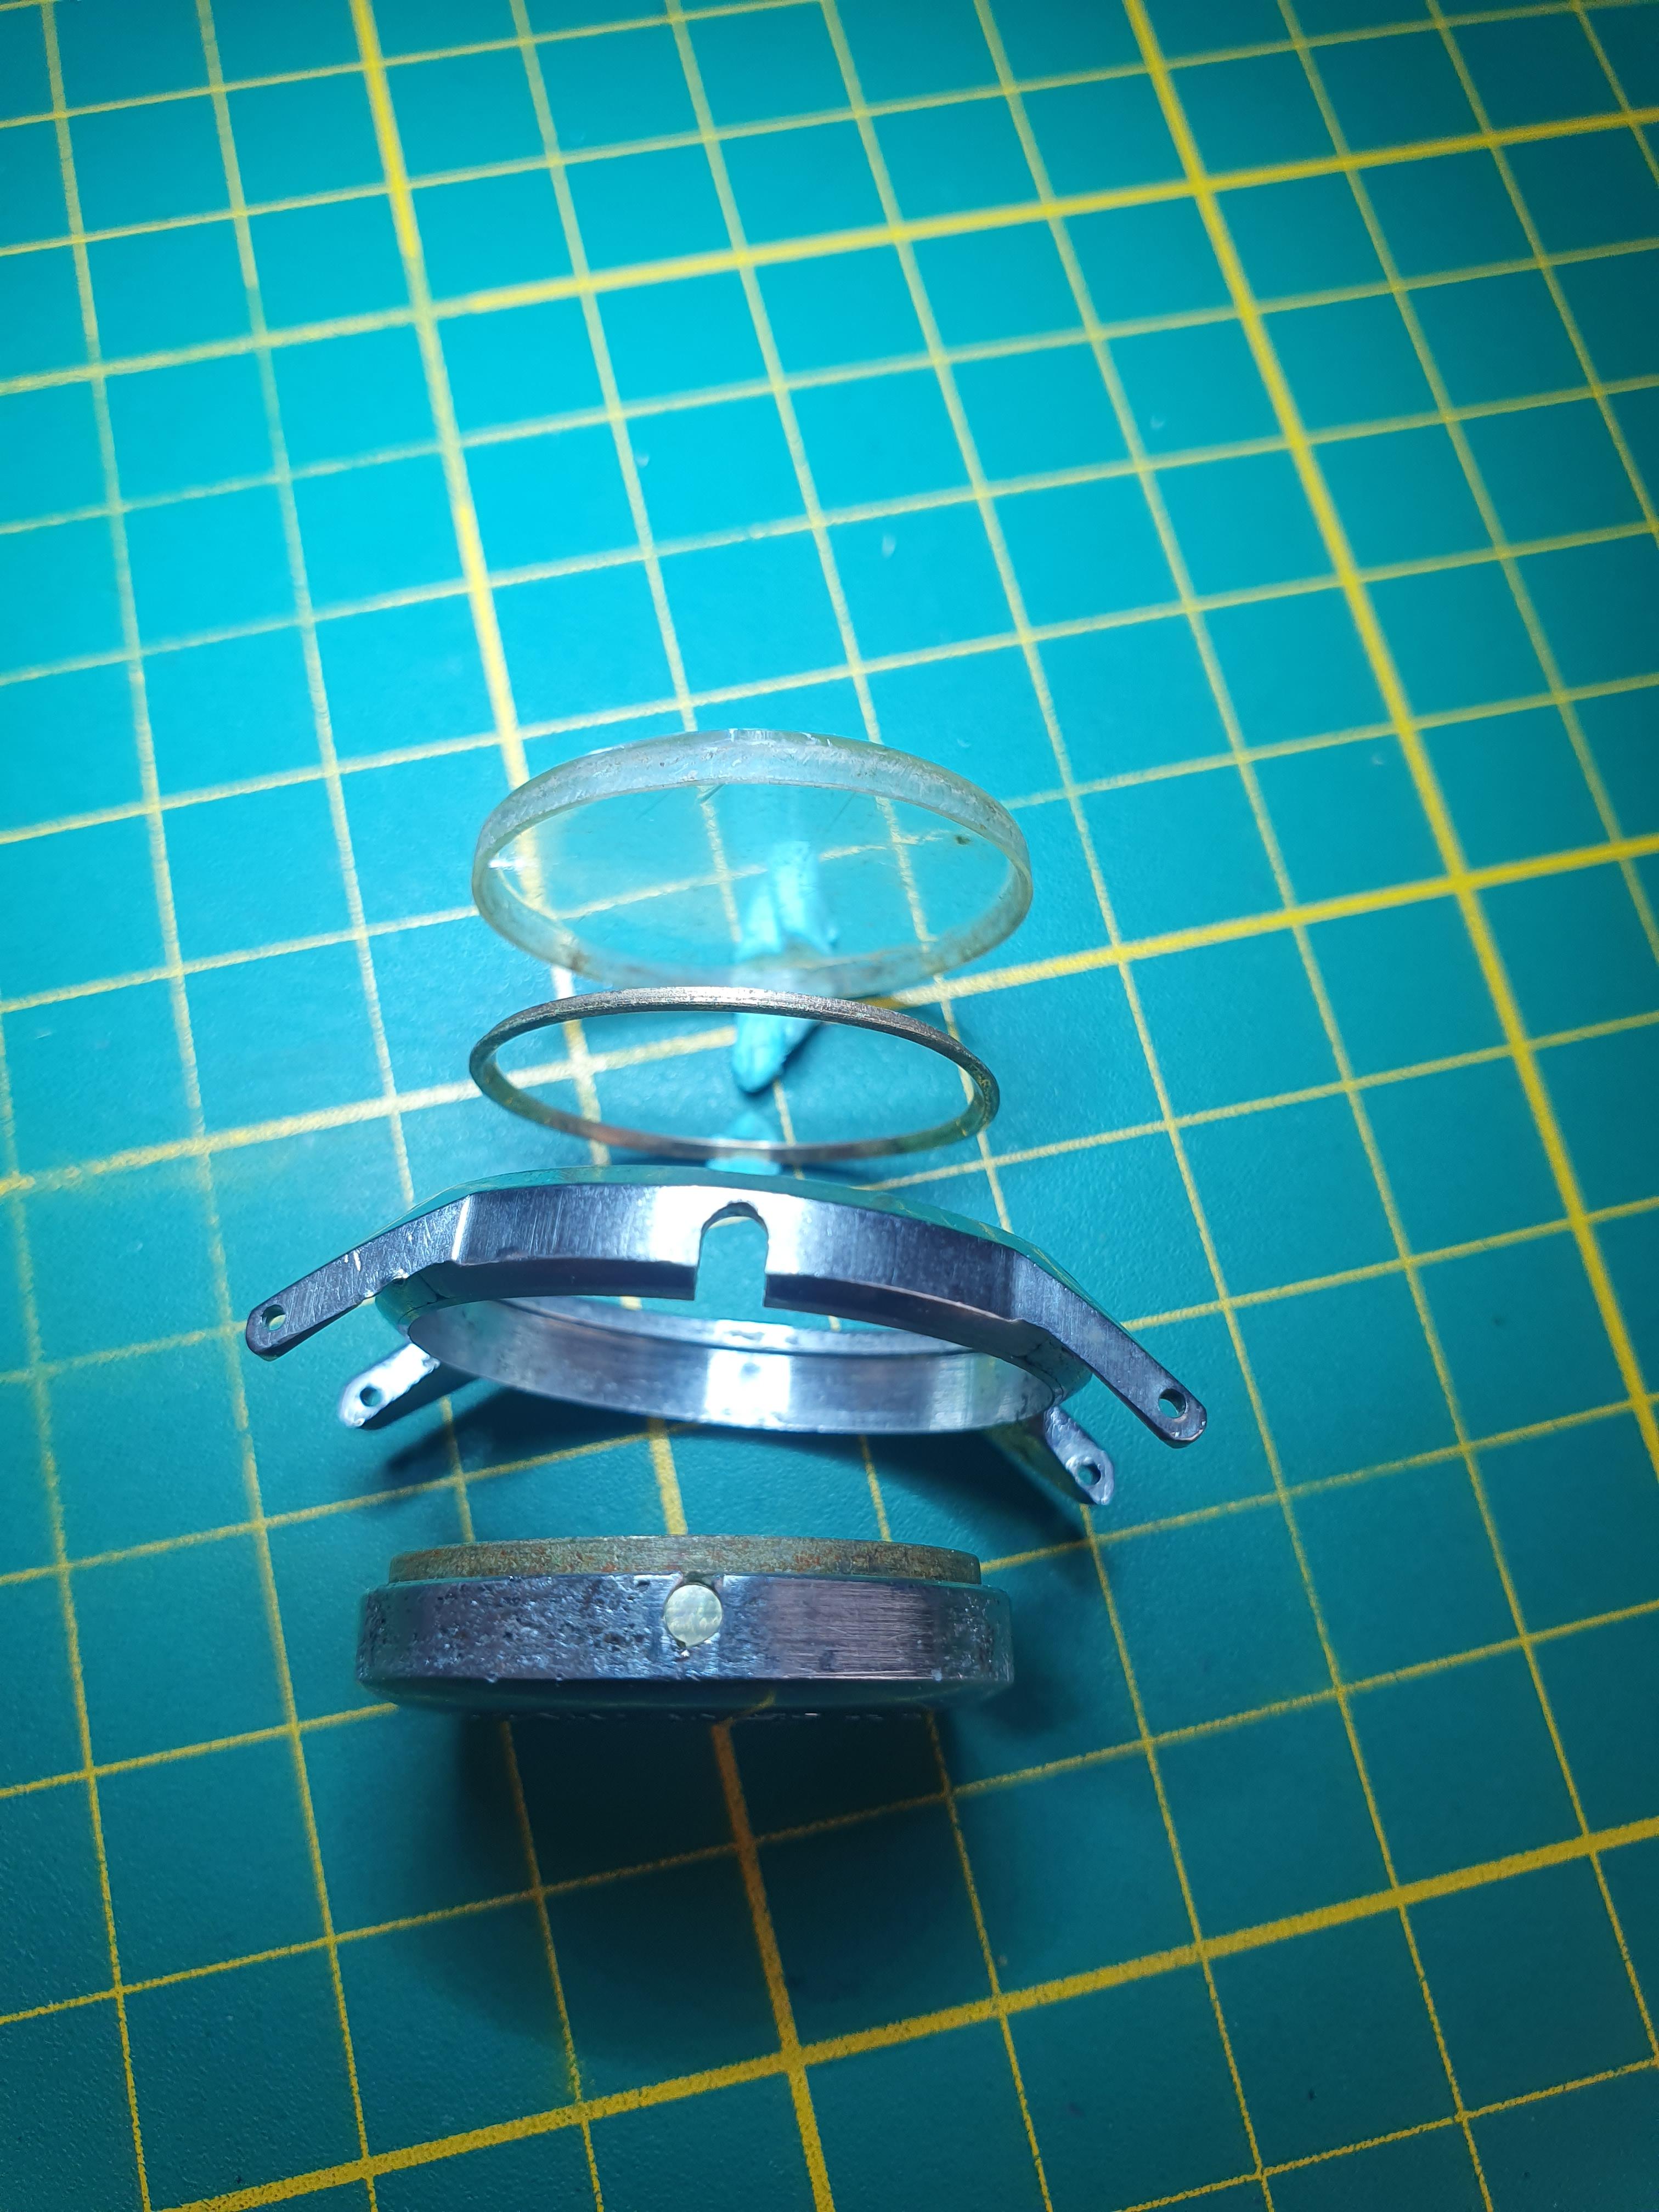
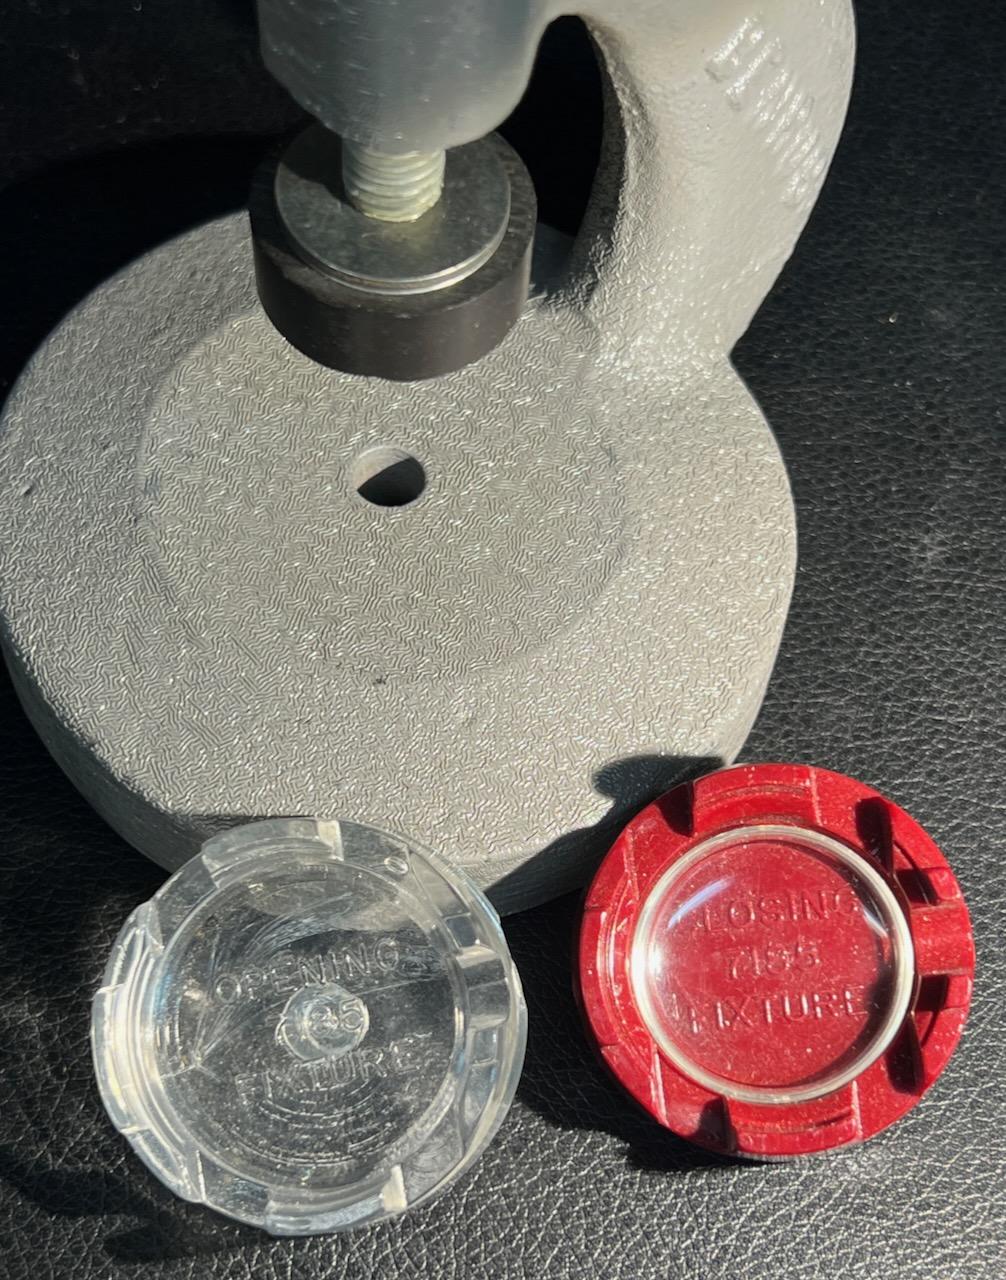
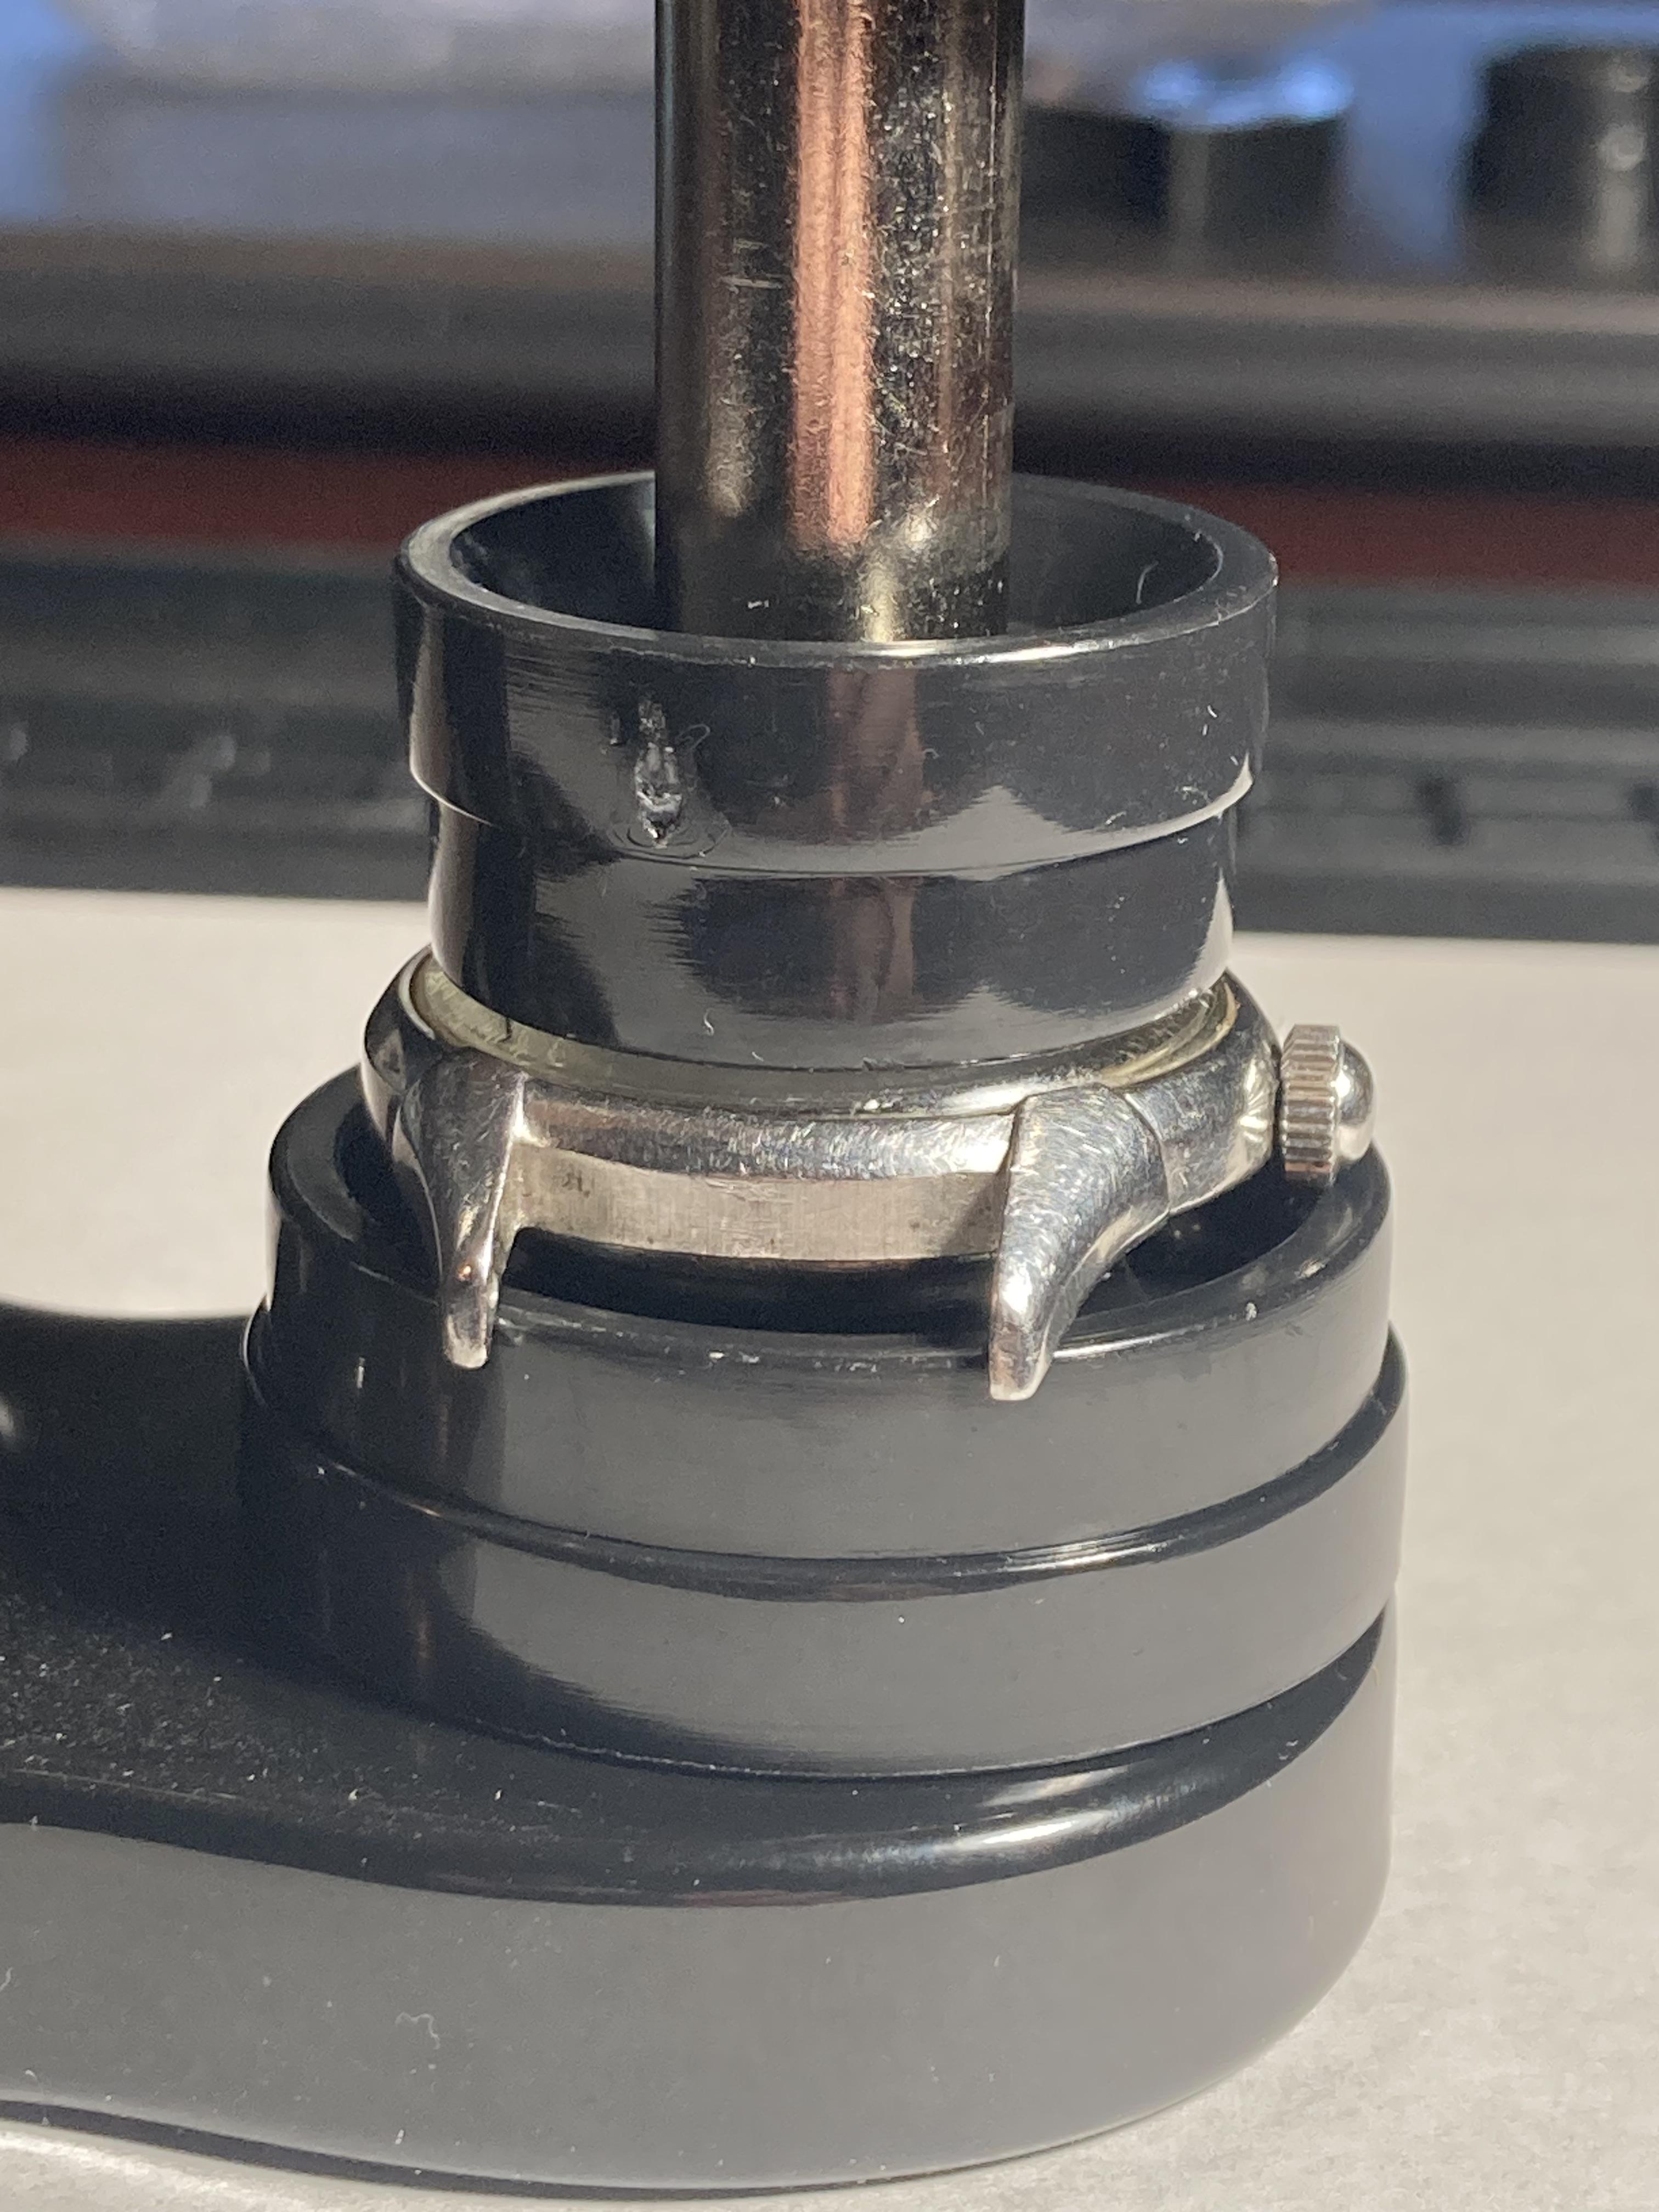
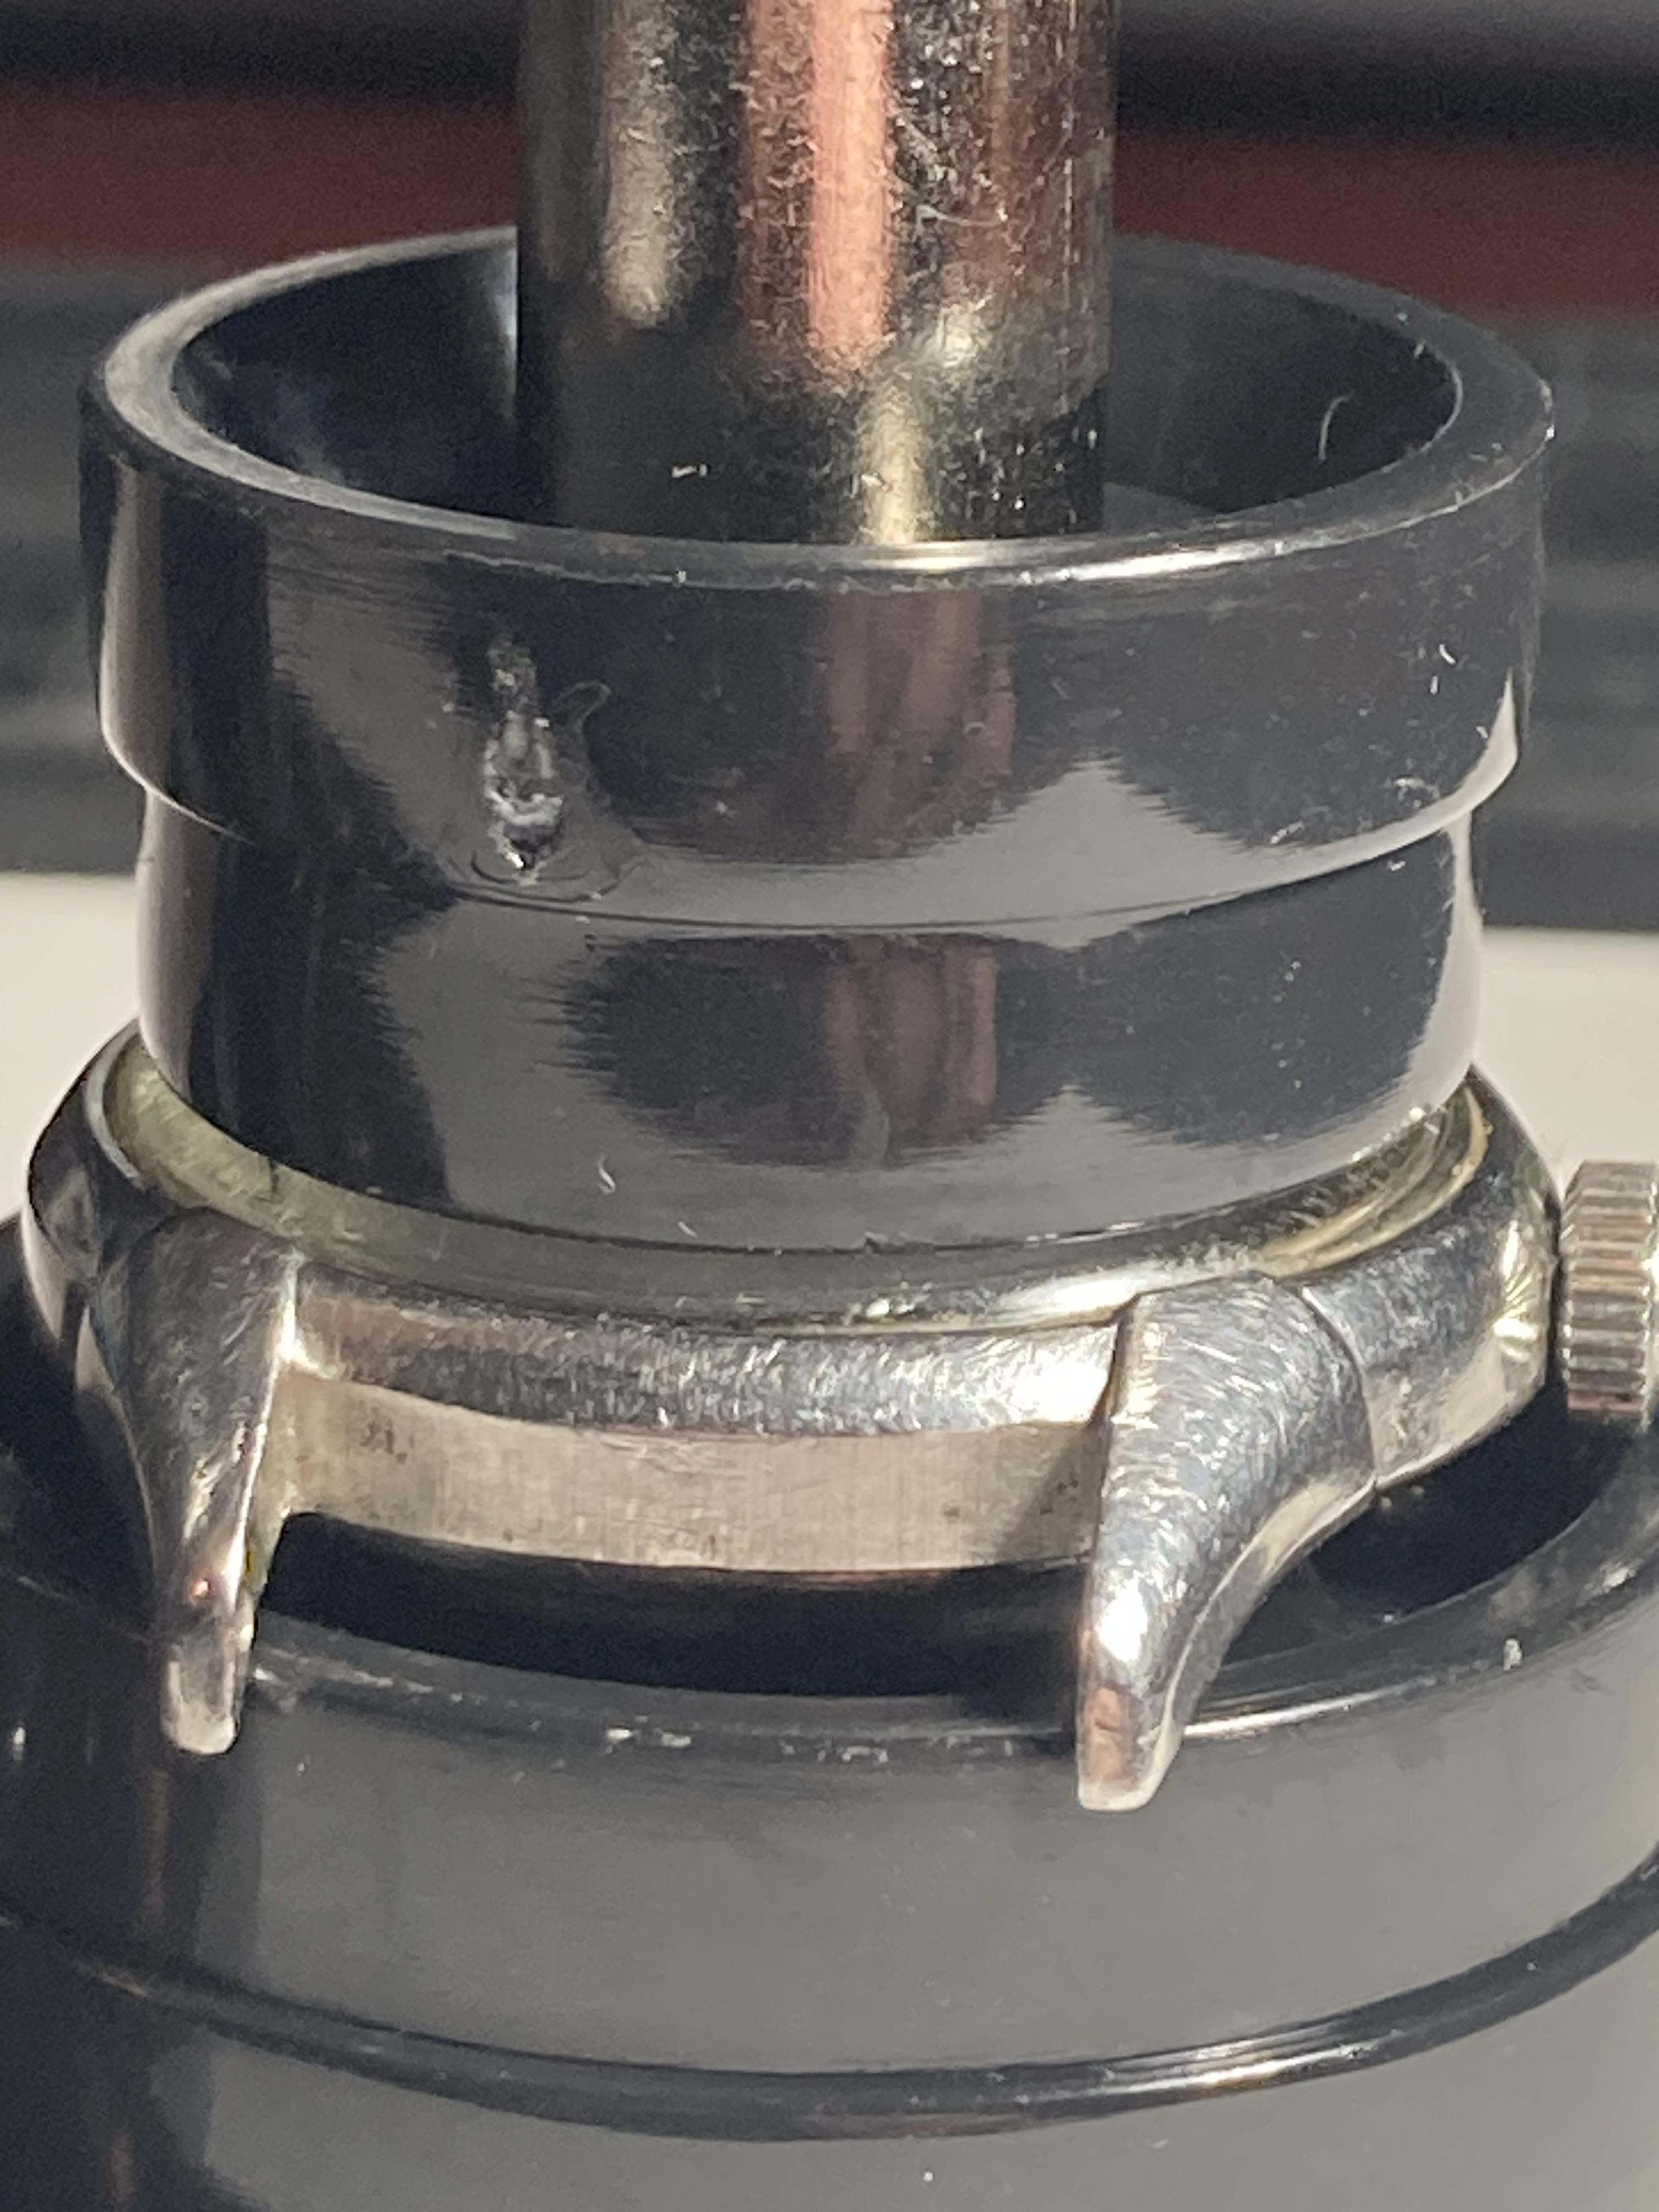
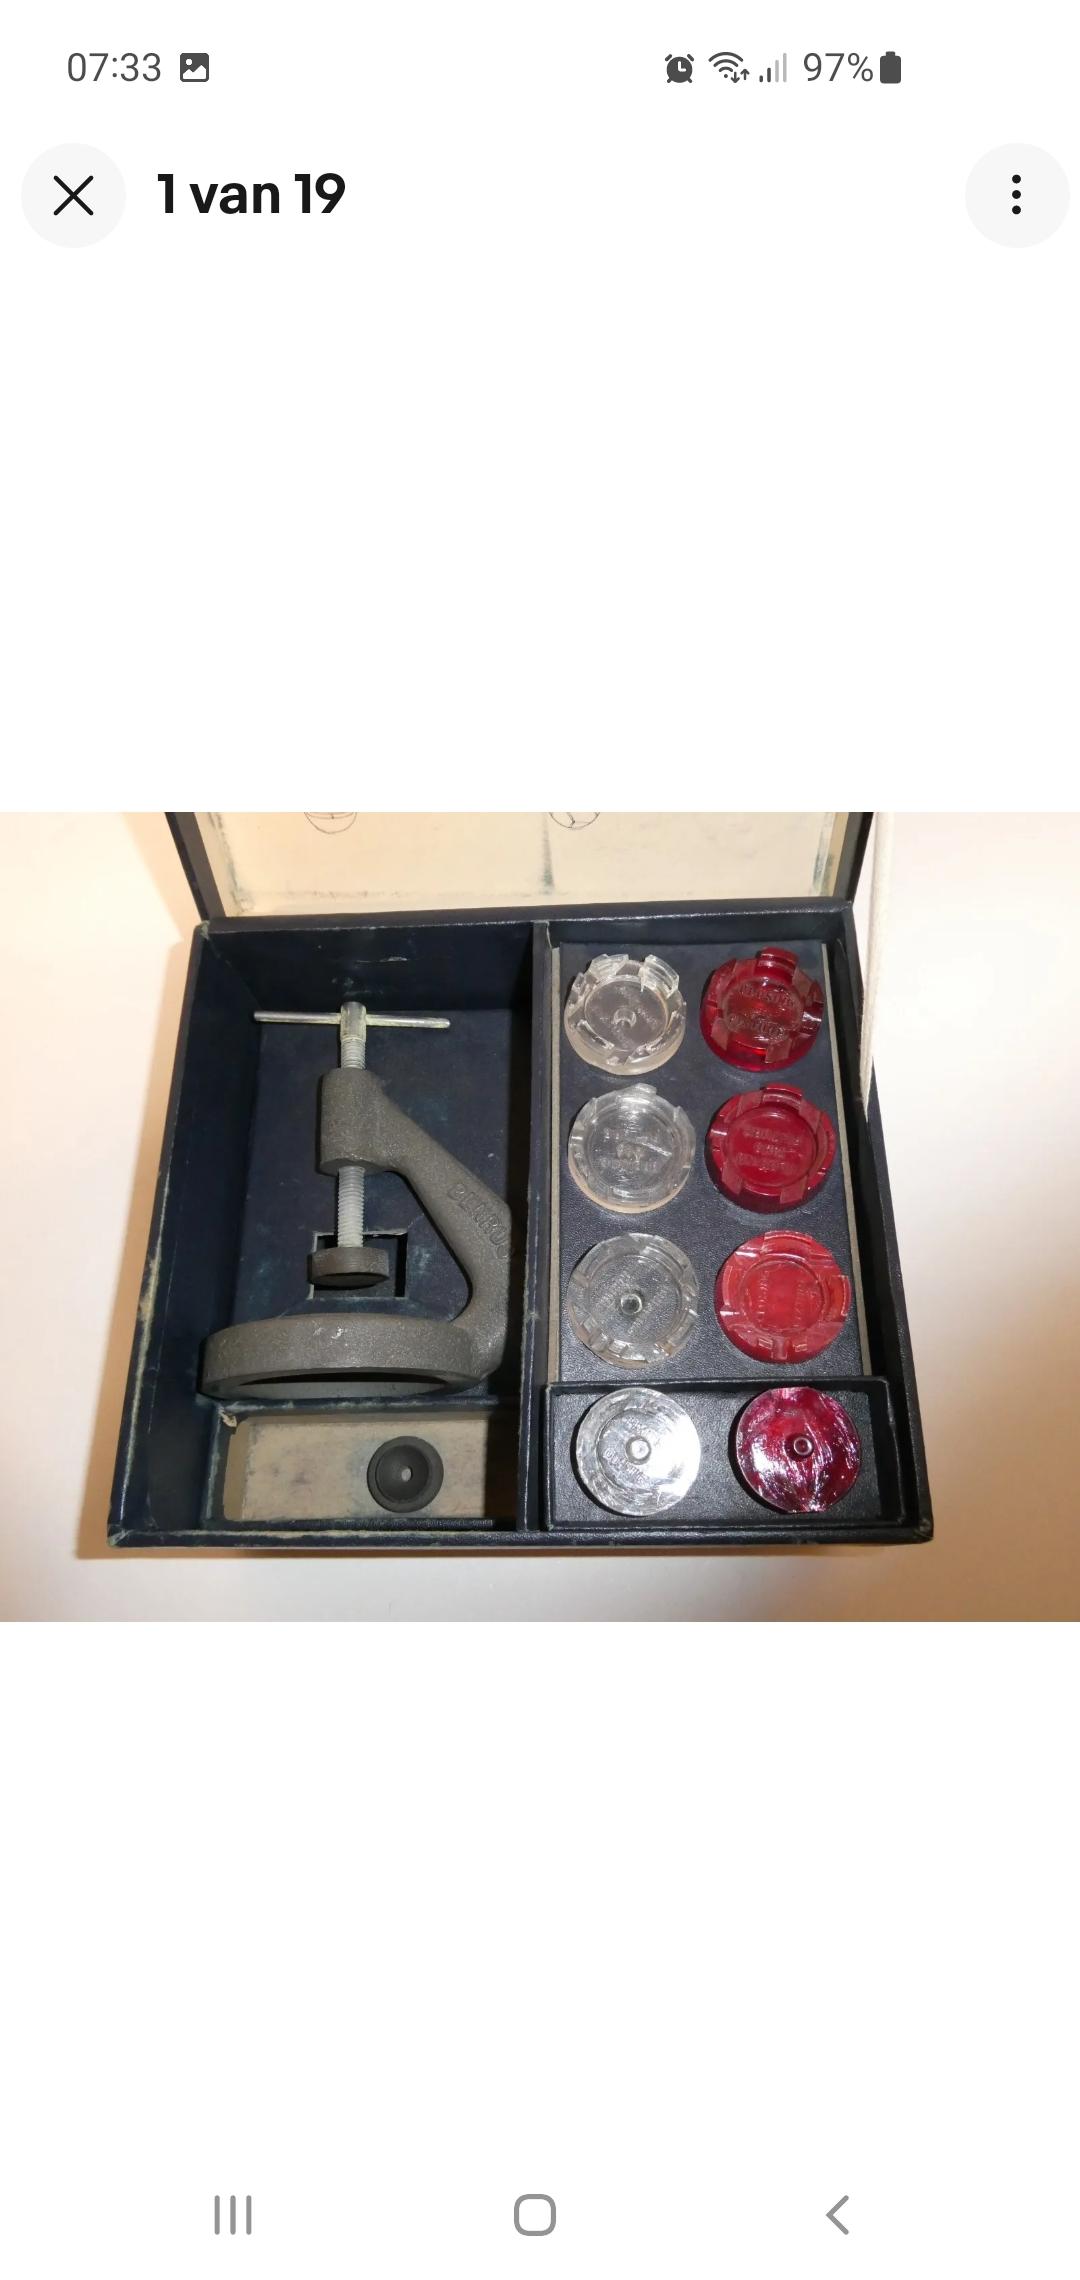
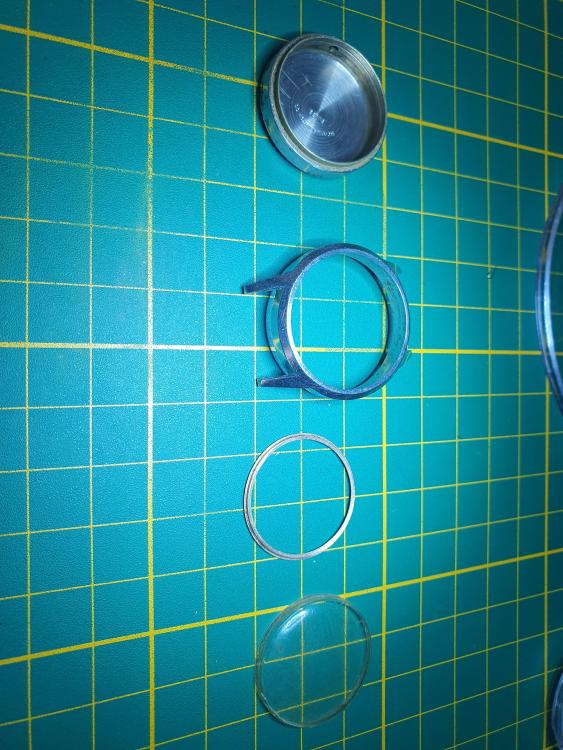
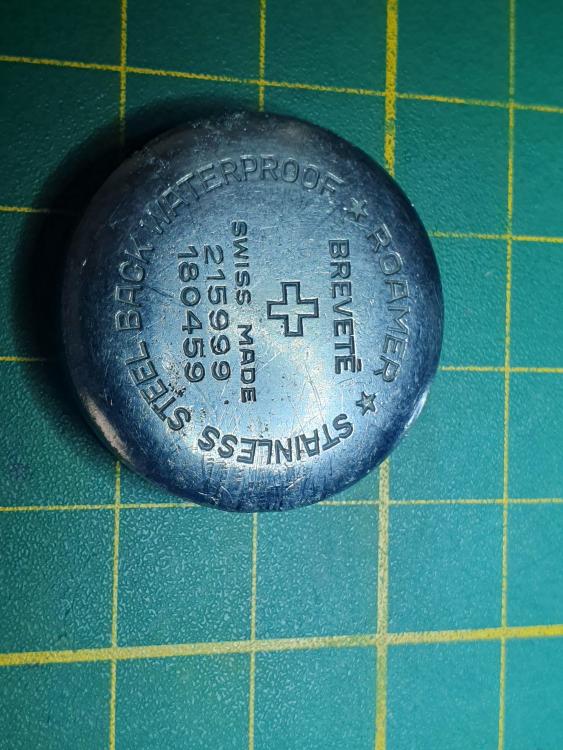
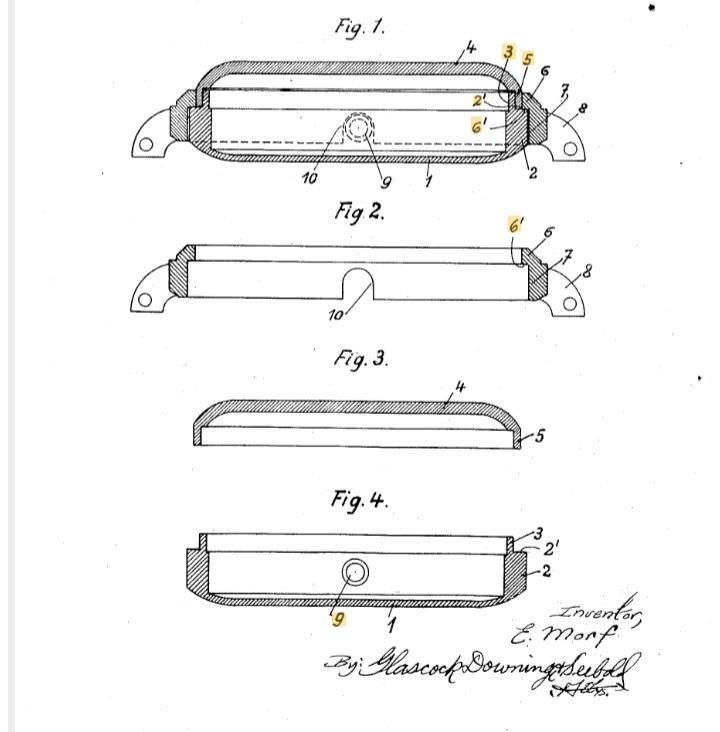
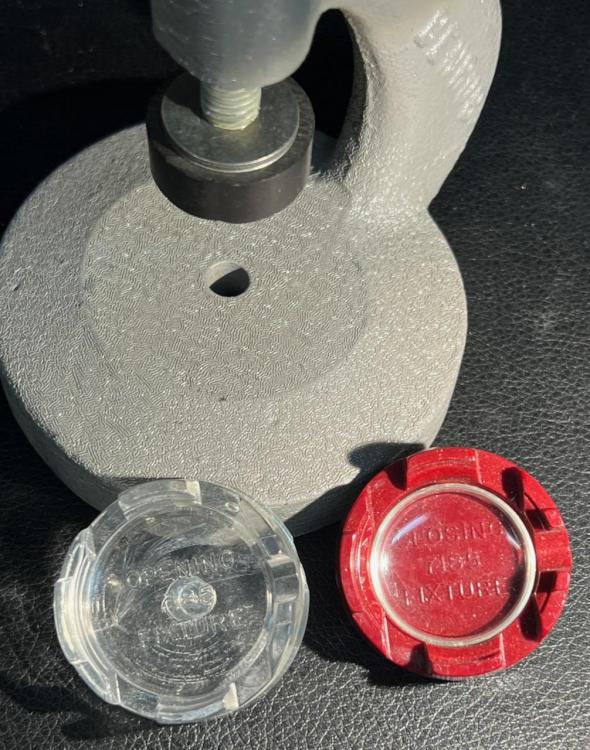
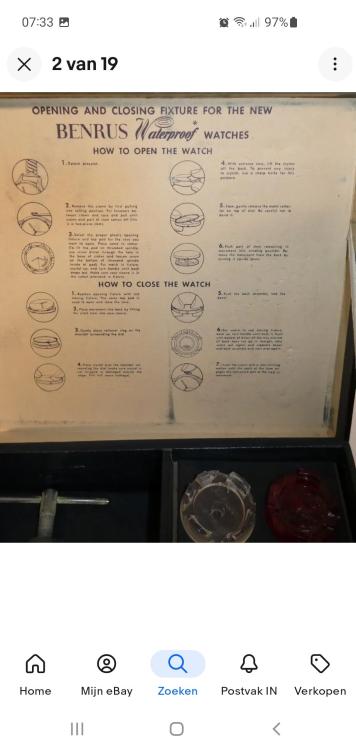
Bulova also had watches with this style case so they also sold their version of a press. These purpose-made tools are nice, but as you found out you can find other ways to push them apart and together. My advice is to be careful with the crystal on these - they have a unique side wall geometry (as shown on the patent diagram above) and are not that easy to replace. Some NOS crystals are out there, and there are some ways to bodge other crystals to work (you can search for some other threads here on WRT) but it's best to maintain what you have if it's not badly damaged. The "official" opening fixture has a wide clearance so the crystal isn't subjected to pressure when the case is popped apart, and the closing fixture very tightly conforms to the crystal so the pressure is evenly distributed during closing (see picture).
 1 point
 -
My bet: Wanted to remove the 2nd pic, no I have 3 - I give up!


 1 point
 -
If the balance stops, there will be more than a bit of dirt. Did you check freedom of the hairspring to balance wheel and cock? Freedom of pallet fork to roller table? You probably did DD, the easy position. But everything changes by vertical play of all staffs in DU, the uncomfortable position. Here rubbing of components can occur, check in this position, too.1 point
-
Just realised this thread is 5 years old... lol!1 point
-
Hi given we assume you have no access to a laser welder, silver solder is the next best option but failing that the method as described by old hippy is the more common method. But clean up and tin both joints before soldering together.1 point
-
A fresh breakage I would quickly silver solder or have it laser welded. Both no more possible with soft solder on the parts.1 point
-
As with all watches to get the movement out employed different methods, screw back, Press on backs etc but we cannot assume they are all the same. I have had watches that to get the movement out entails first removing the back. Then the glass and bezel , then removing the case screws and lifting the movement through the front. When investigating how it opens up be very careful and explore all avenues don’t just dive in with a case knife, I have come across some gouged up cases in the past.1 point
-
I often observe improved amplitude after adjustment…1 point
-
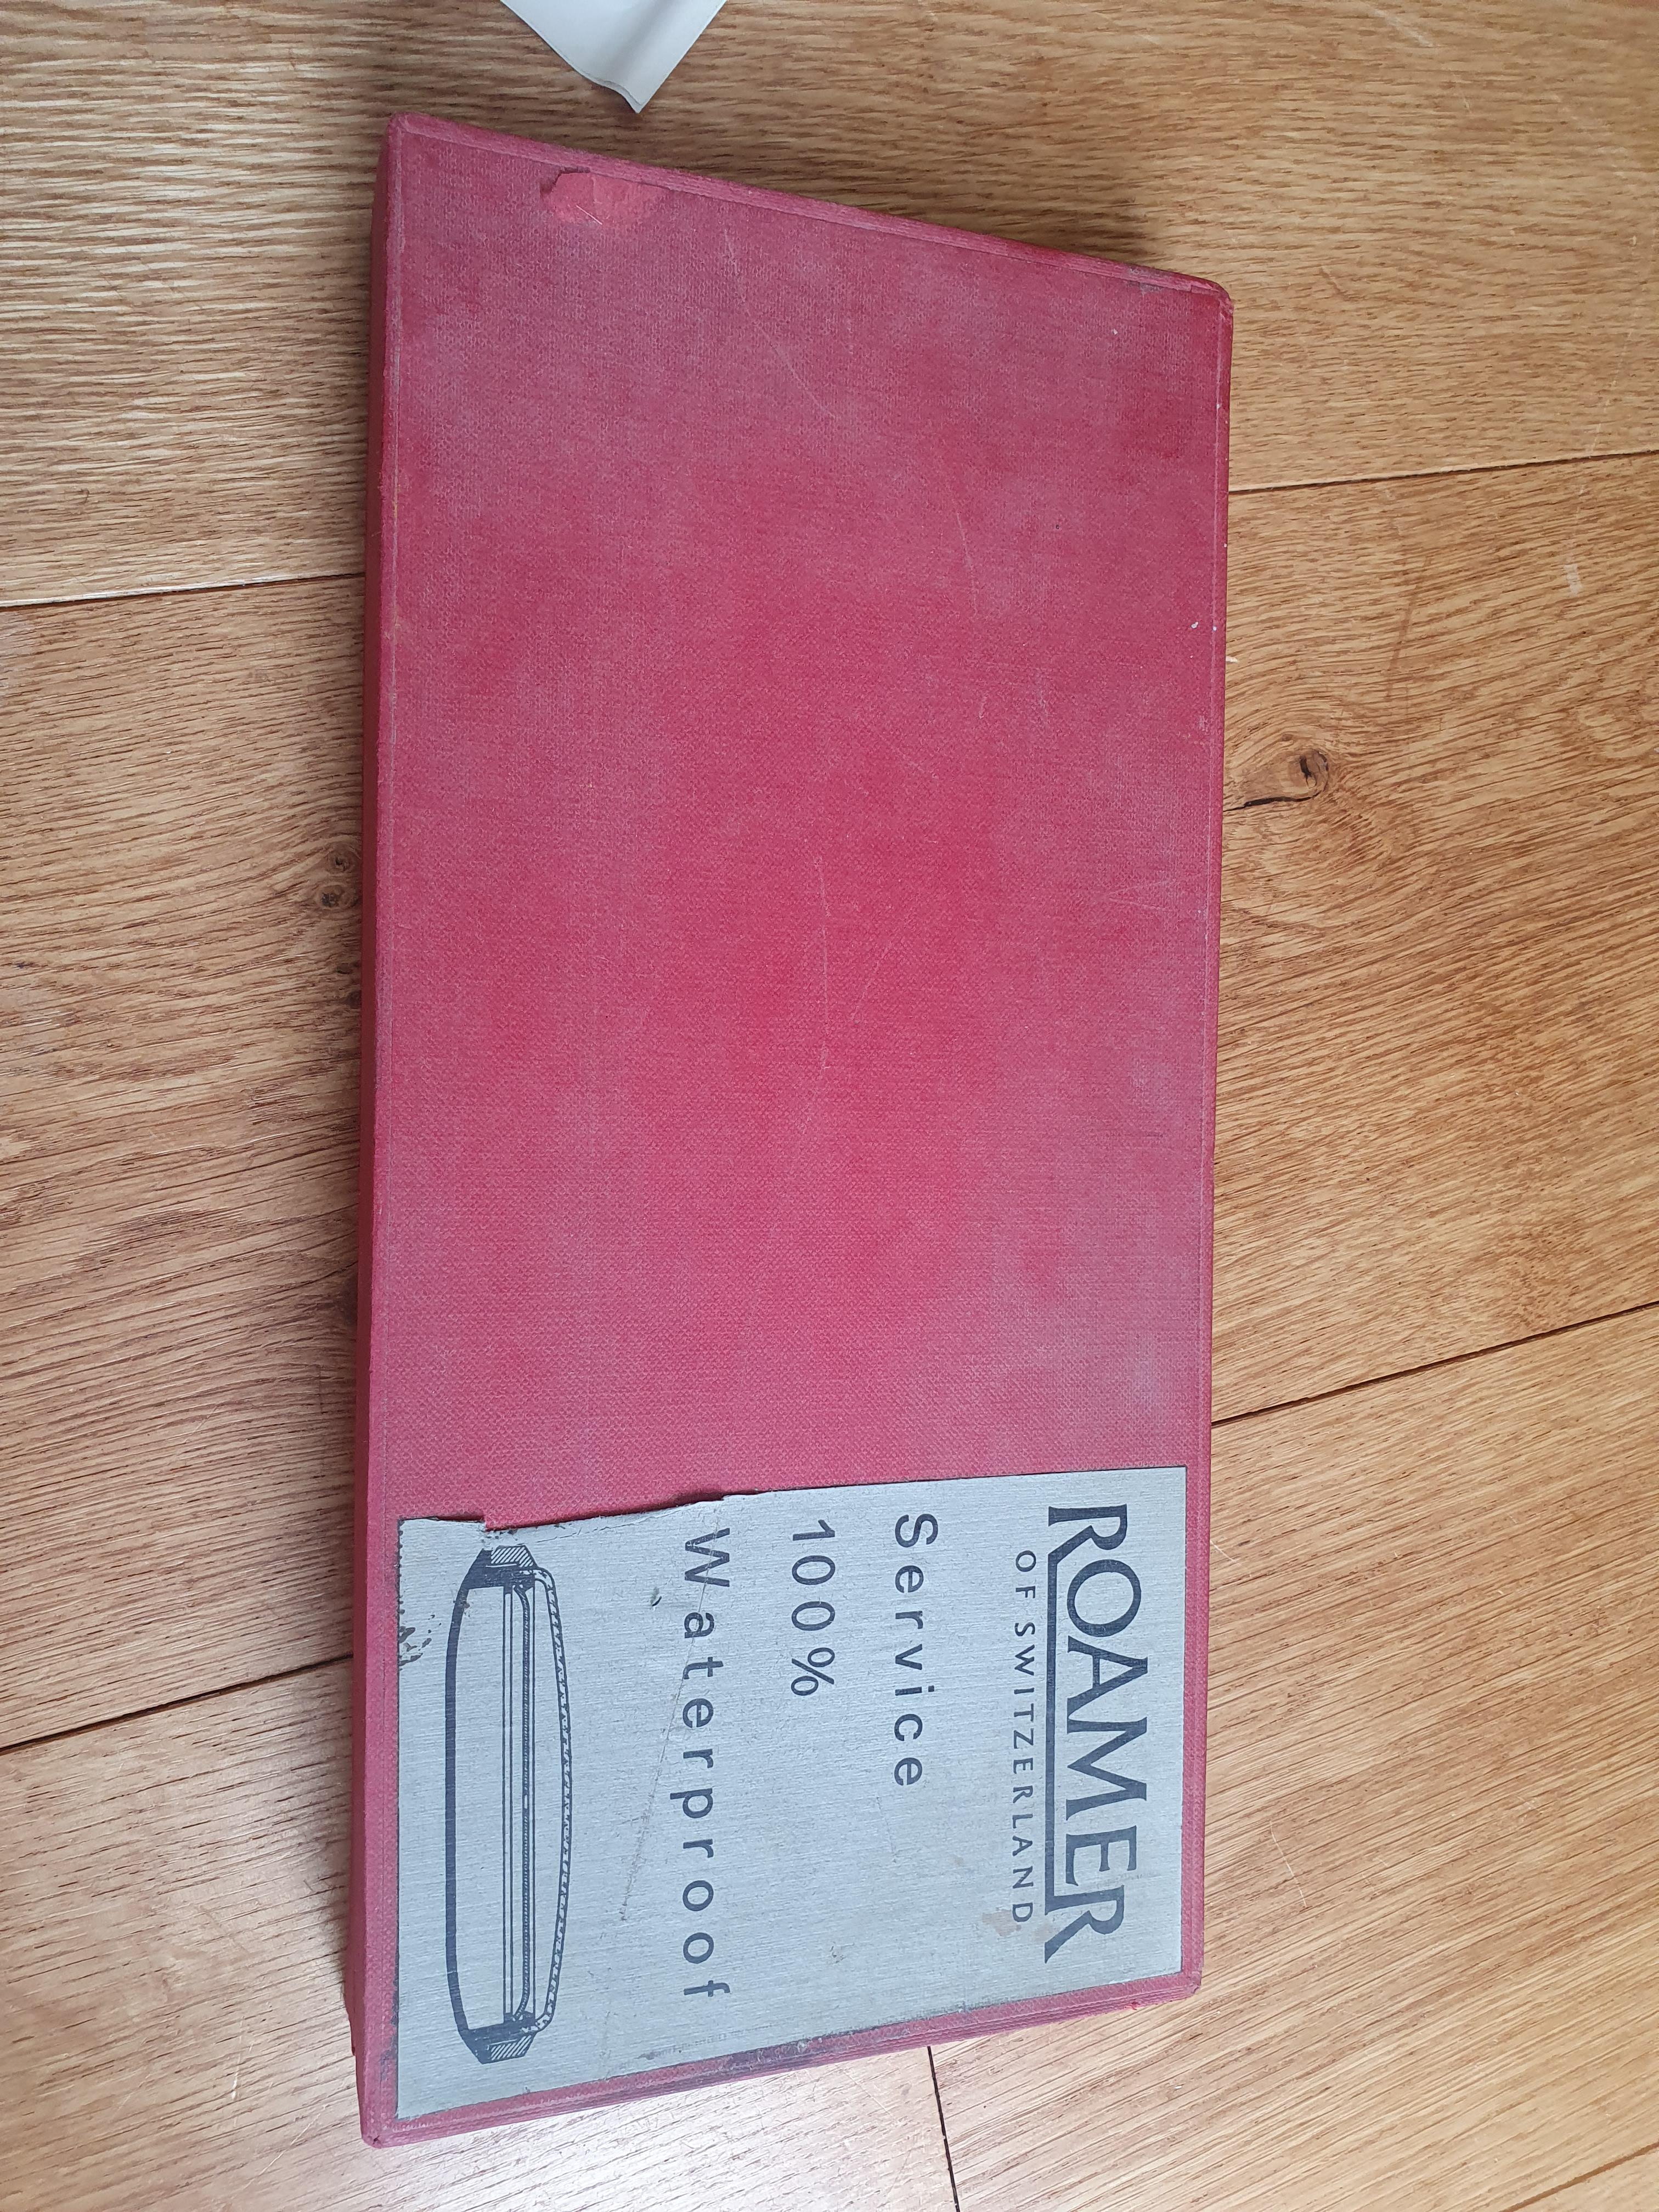
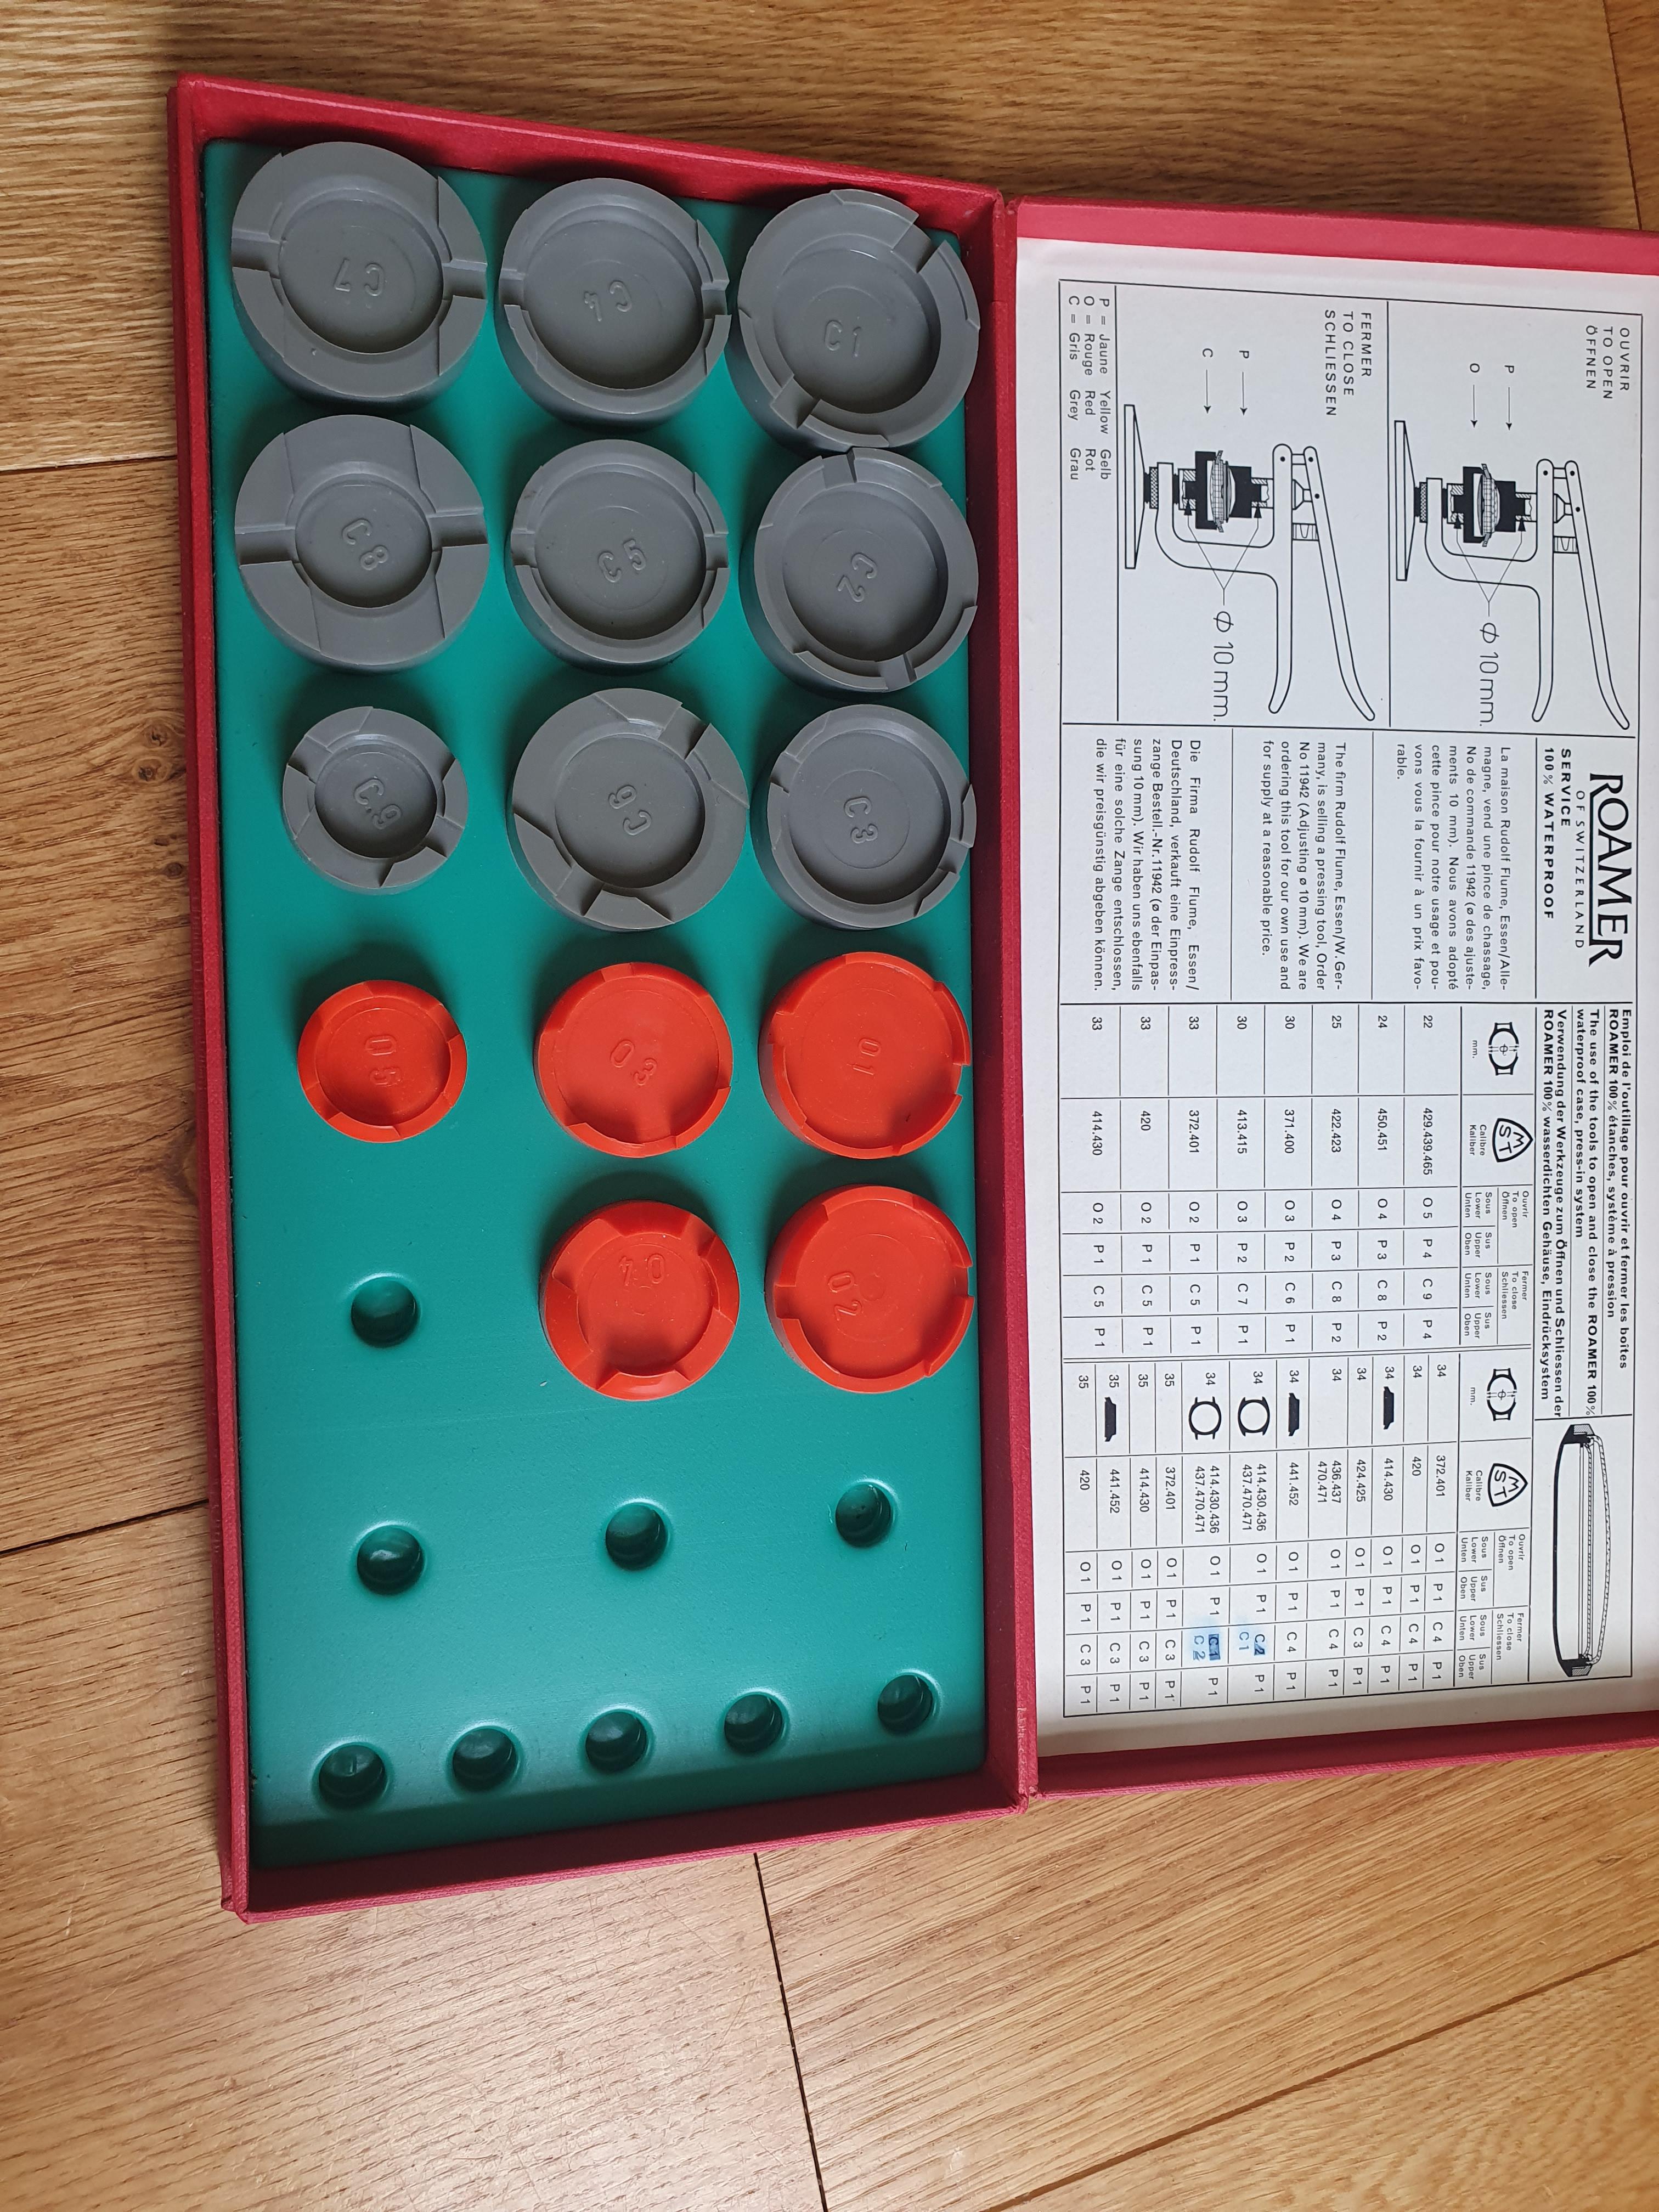
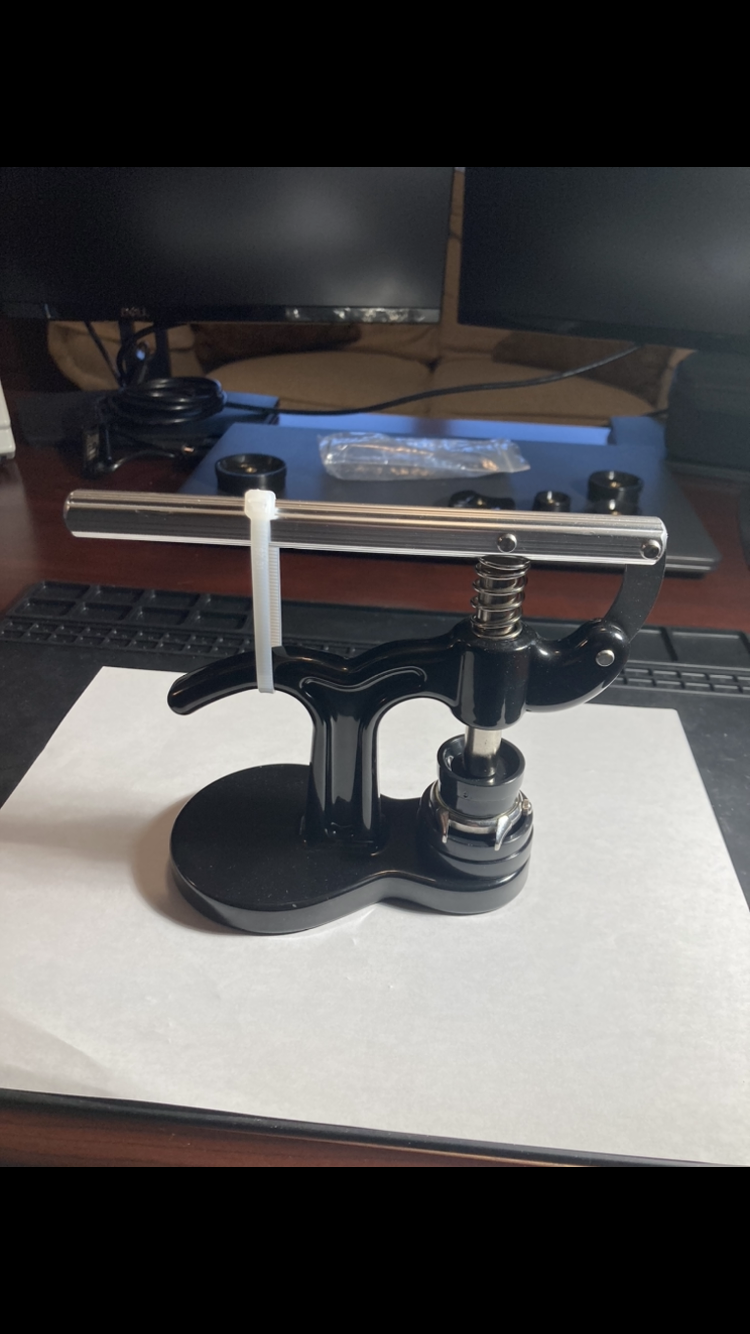
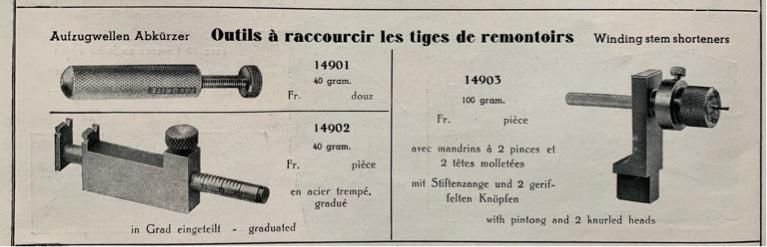
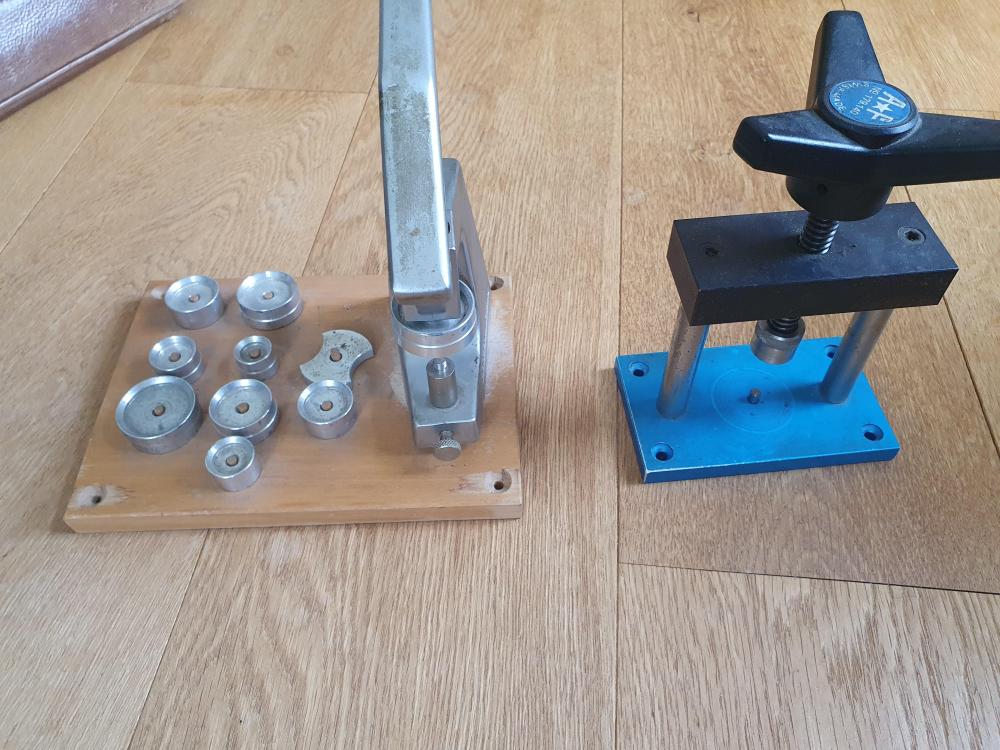
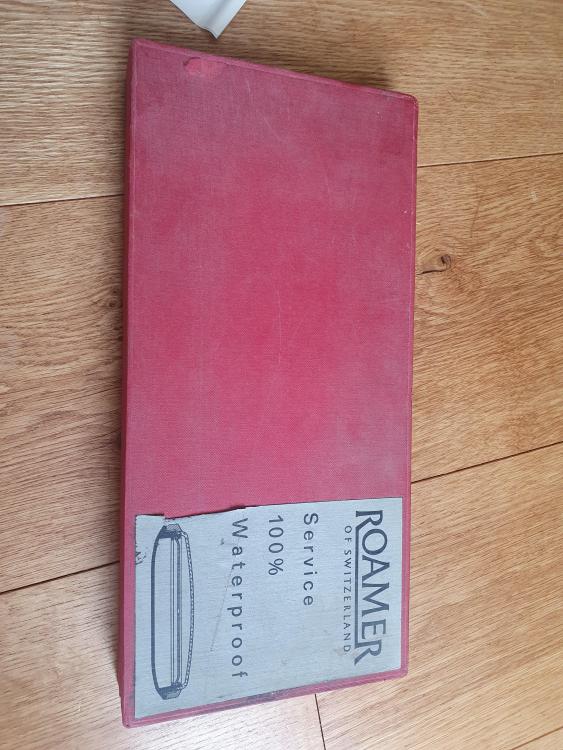
Worth a try. Should work. I'm not a big fan of these presses though, as it is difficult to "manage" the amount of force. That's why I practically never use the Bergeon 5500 but prefer the screw down type press: The Roamer sets come up for sale often, and are usually cheap. And as a watchmaker's purpose in life is to collect tools....
 1 point
 -
One side of cap stone is flat " flat " , other side is not true dome " domed " as domes in Kremlin are, its just a bit domed plus the stones edge is tapered, this all lets it enter the oil sink of balance jewel. I am sure you know, pivots are suppose to protrude from the hole a bit, so pivot wouldn't jump out of the hole easy and in the event of a shock. Entry of tapered side into the oil sink, reduced the protrusion of the pivot which as a result lifted the balance , as you can see it did in this case. This is not a good practice in watch repair, because as I explained above, the said pivot protrusion is needed, to prevent the pivot jump out of the hole of the jewel in the event of a shock. The problem with OP's watch is " the bottom balance jewel is pushed deep inside the mainplate, thus letting roller table rub and leaving OP with excess end shake. Rgds Joe1 point
-
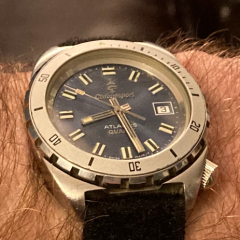
Thank you all for your input and information. So, I know this isn’t the tool specifically intended for the job, but do you think I could get away with using this case press tool as shown in the attached pics? I already have it and I don’t know if I want to invest in the Benrus tool since I don’t really anticipate working on a lot of these watches. I’m thinking there’s a risk the lugs may not be able to withstand the pressure but they seem pretty solid. Am I missing something else? Thanks. And I obviously would need to remove the stem first.


 1 point
 -
Until you have a means of cleaning the parts of the disassembled movement and the right lubricants to lubricate it, focus on disassembling it and reassembling it and having it run. You can also practice particular tasks, like placing the wheels of the train (centre wheel, third wheel, fourth wheel and escape wheel), placing the bridges and getting all the pivots in their respect jewel holes. You can practice installing the balance cock & balance wheel onto the mainplate, with the pivots in their jewel holes. Once you have an ultrasonic cleaner and cleaning fluids, or means to clean the parts by hand, you can practice disassembly, cleaning, reassembly and lubrication, with the ultimate goal of it running better than when it first arrived. Once you’re oiling is on point (right amount of the right oils in the right places). these movements will run better than when they were delivered to you and it’s really satisfying to achieve that. In terms of having the right lubricants, at a minimum I suggest you need 9010 for the balance and fast moving pivots, HP1300 for the slower turning wheels, arbours, mainspring and keyless works. Then you need something to oil the pallet fork jewels (the entry and exit stones, not the pivots). I suggest that you buy some Moebius 9415 for this. You can use 941 on these slower beat movements, but you’ll need 9415 once you want to service a faster beat movements (28,800 and up). You can use 9415 on all Swiss lever escapements, regardless of beat rate. If you buy this you’re covered for high beat and slower beat watches. As you progress you may decide to use a wider variety of greases and oils, each better suited to their specific use, such as specific greases for keyless works and braking grease for automatic mainspring barrels, but 9010, HP1300 and some 9415 is sufficient to reach the goal of having this ST36 run better than when it arrived. If your $12 blue box demagnetiser didn’t come with instructions, be sure to find out how to use it properly, or you might end up magnetising instead of demagnetising things. There are plenty of demonstration videos for these on YouTube. Hope this helps, Mark1 point
-
If it is a split stem, you could try the compressed air method.1 point
-
I was going to comment on this as i didn't actually read an explanation to this main part of your question, it started to become a " get em out and lets see whos got the biggest " . But it is explained in the video so i left it. So anyway looking from the escape wheel end if the impulse pin is to the right of the center of banking pins then the collet is turned in the opposite direction to which the pin would be turned to correct it, so from above the balance that would be turning the collet anticlockwise.1 point
-
Even basic questions need answering Ross and its good that you still want to know what the issue was even though it has gone away. As we know different issues can have the same symptoms, but can you think of anything in particular that you changed ? could it be that you just got much better all round ?1 point
-
Benrus indeed has models with a kind of 2-piece case where you have to press on the crystal to remove the back after you remove the crown (split stem). Roamer had a simular system. Benrus sold specific tools for that purpose. I had one of those tools, but it was incomplete (just the box and the press) so I sold that to a Benrus collector. You can still find these sets. Often the pictures also show the instructions for removing and assembly. There's on on the bay right now:

 1 point
 -
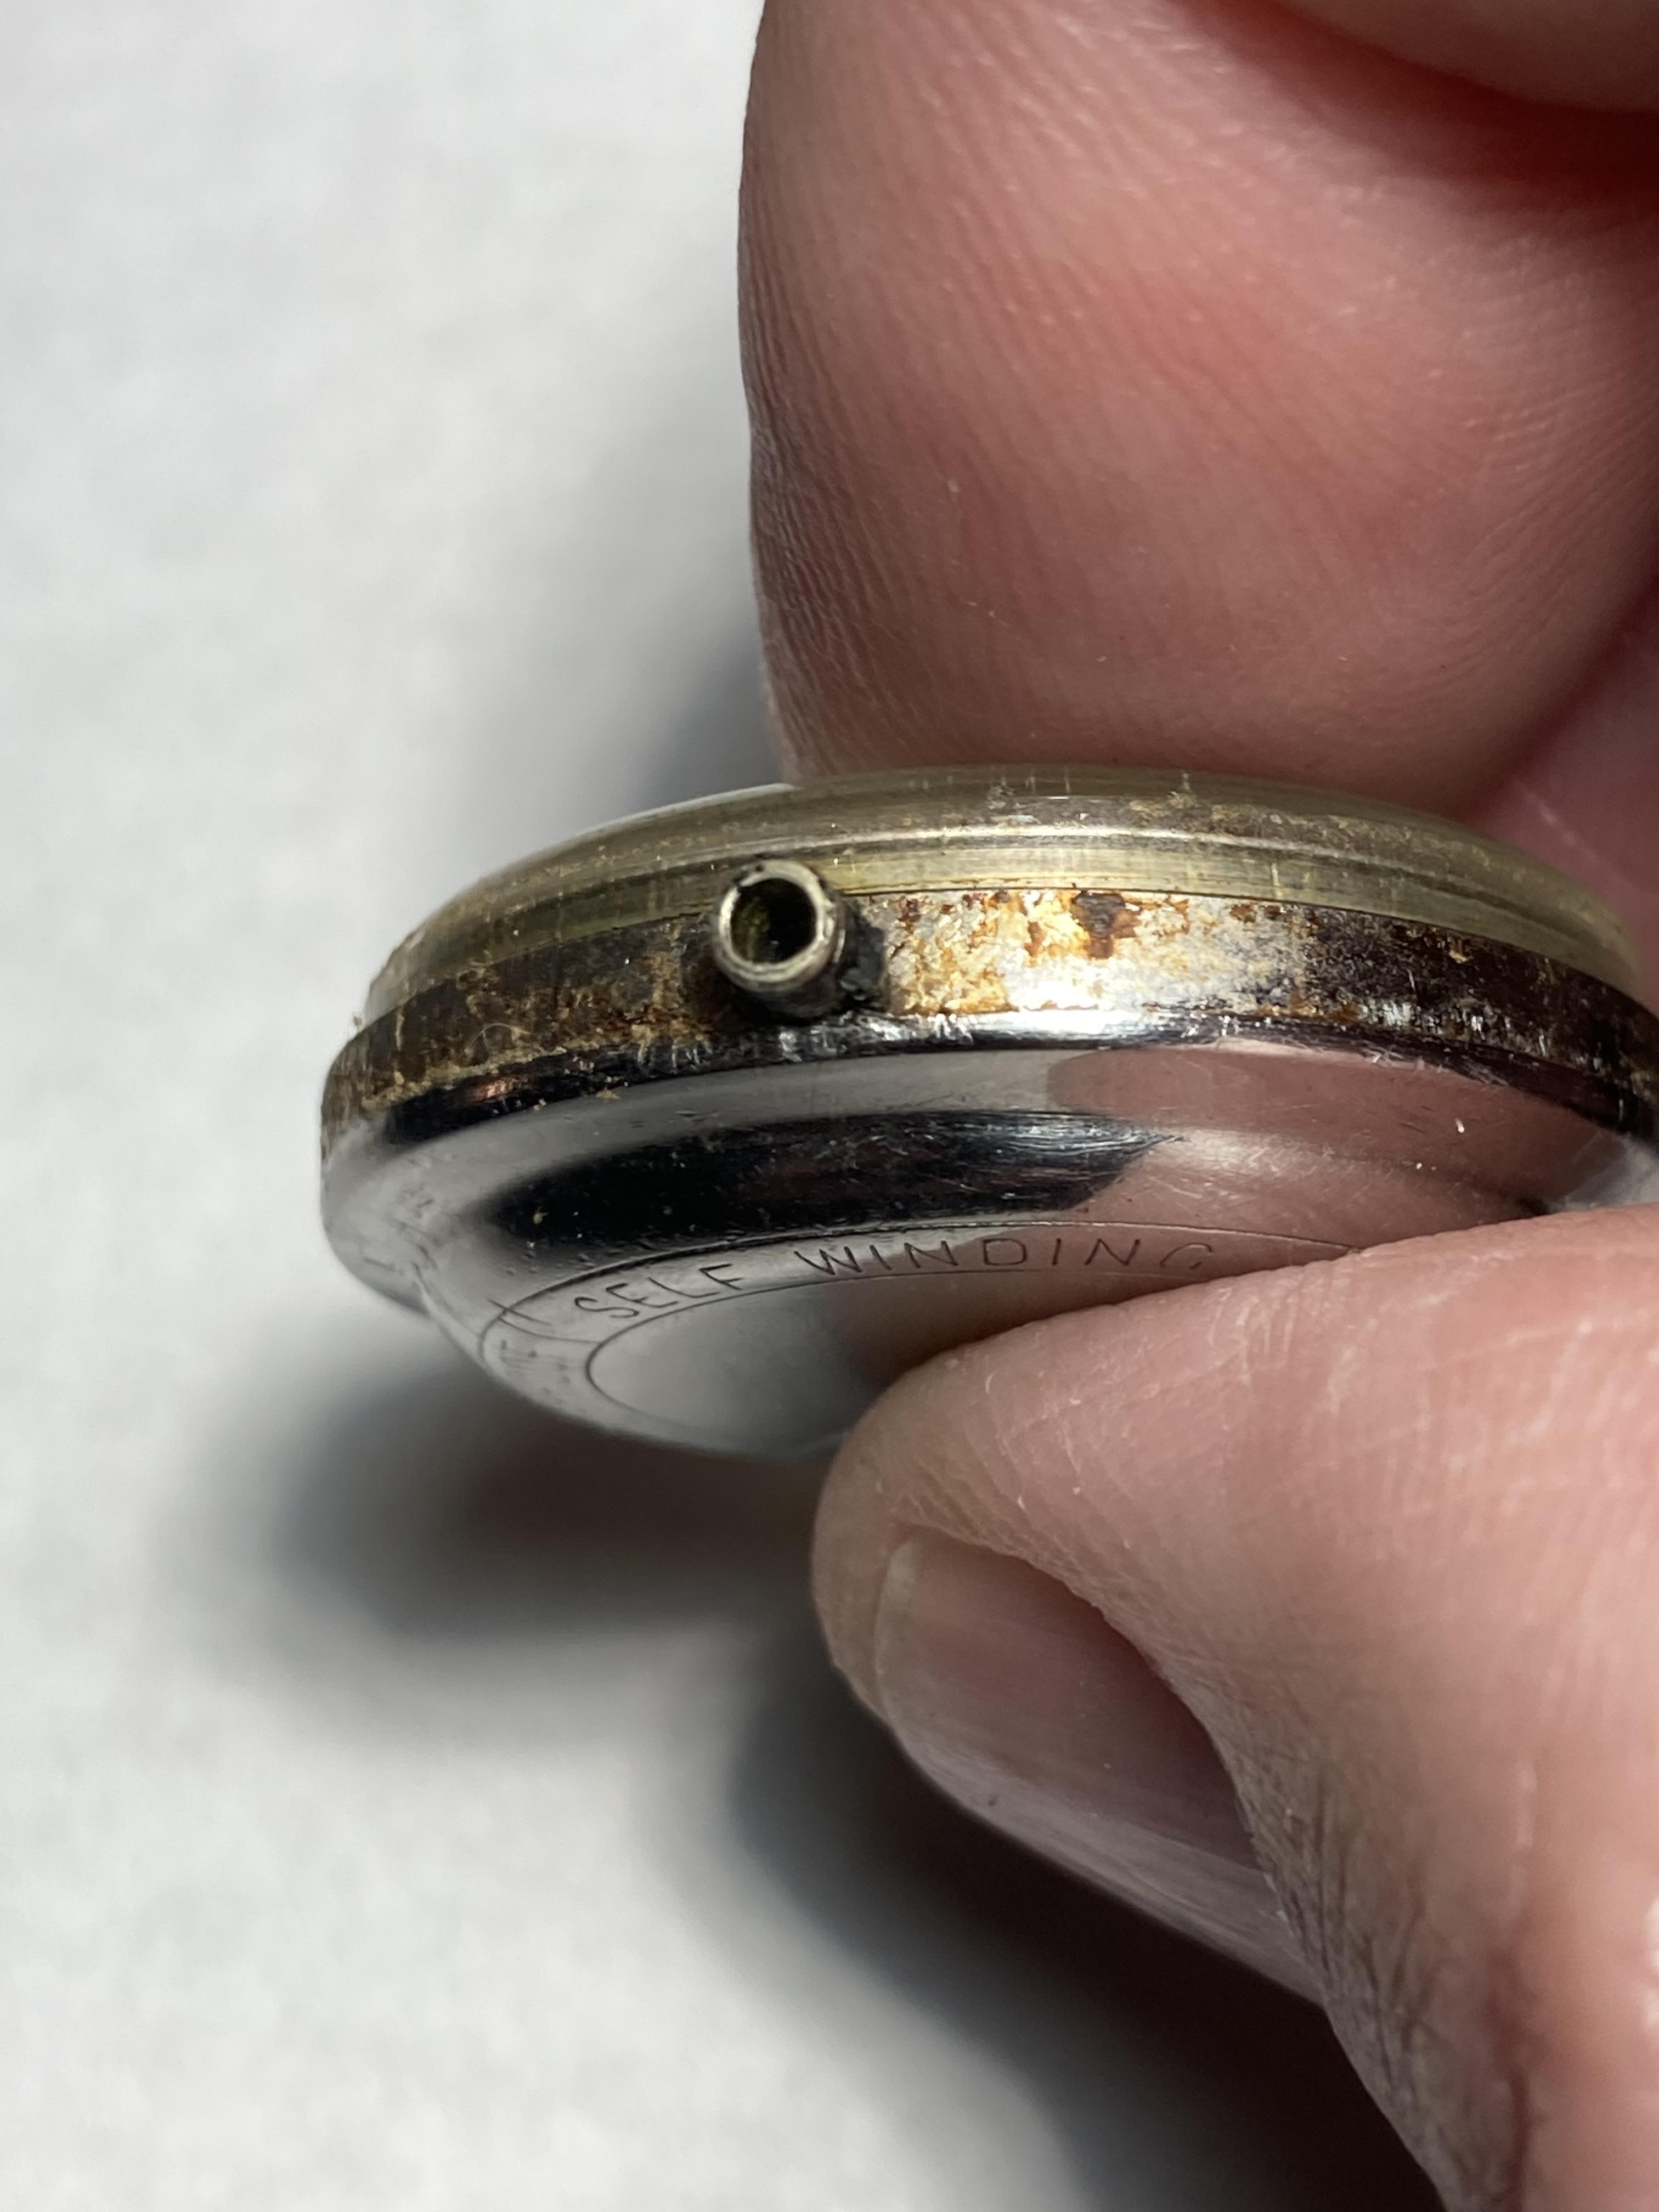
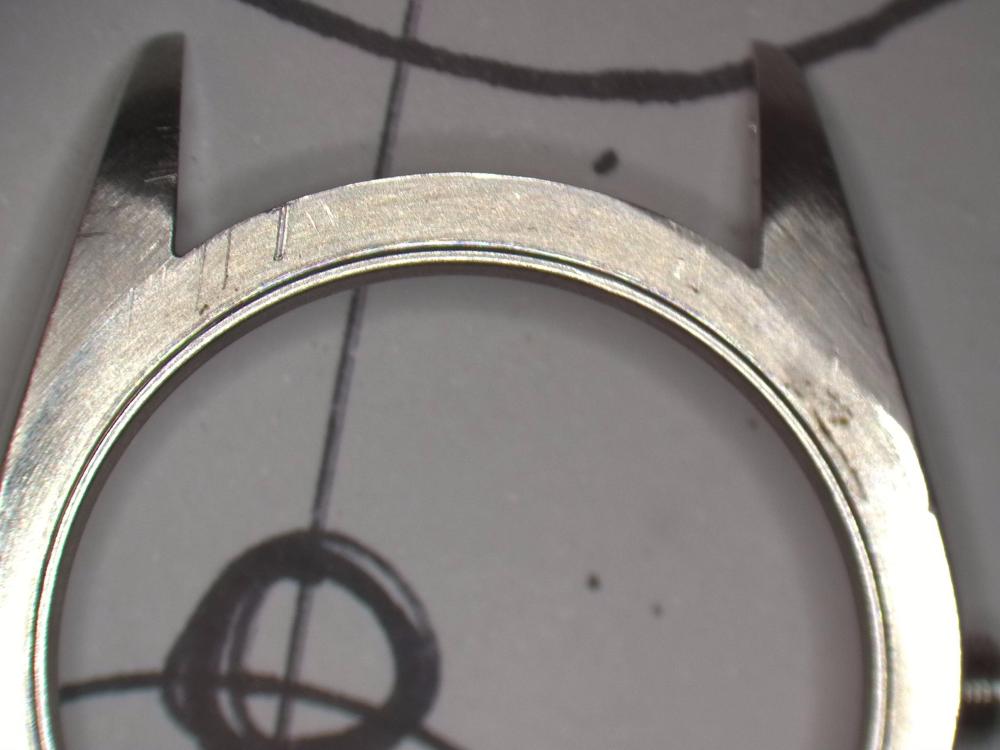
To me, that looks like a removable back. The slot around the stem in the front case half appears to be for the movement to release through the back, plus the rear text is not in perfect alignment with the case, which implies the back has been removed in the past. I'd expect it to split at the "step" level, behind the stem & front case body, not at the bezel or crystal.1 point
-
I guess to figure out what you were getting at John you'd have to be clever!? I would expect a higher amplitude and we can't get enough of that, can we? Also, it will be easier to get the balance going once it stops and we wind the mainspring up from 0. I haven't personally investigated if that's true but it sounded reasonable when Kalle Slaap described it. Maybe the difference is negligible when the beat error is 2.0ms or less?1 point
-
For me, it depends on the movement. If it's a fairly expensive watch, where hairsprings are rare as rocking horse poo, anything within 2ms would be fine. Any tweak you make risks damaging the precious hairspring. If it's a cheap AS movement, I'm not so worried about trashing the hairspring, so might tweak a bit more. But I wouldn't be over worried with 2ms.1 point
-
Hi Hector, actually I don't use such thing. When I need to cut something, I use dremel with thin cutting disk or jewellers saw. Sometimes, for example for stems channel, I use this kind of cutter shape It is made of carbide drill bit
 1 point
 -
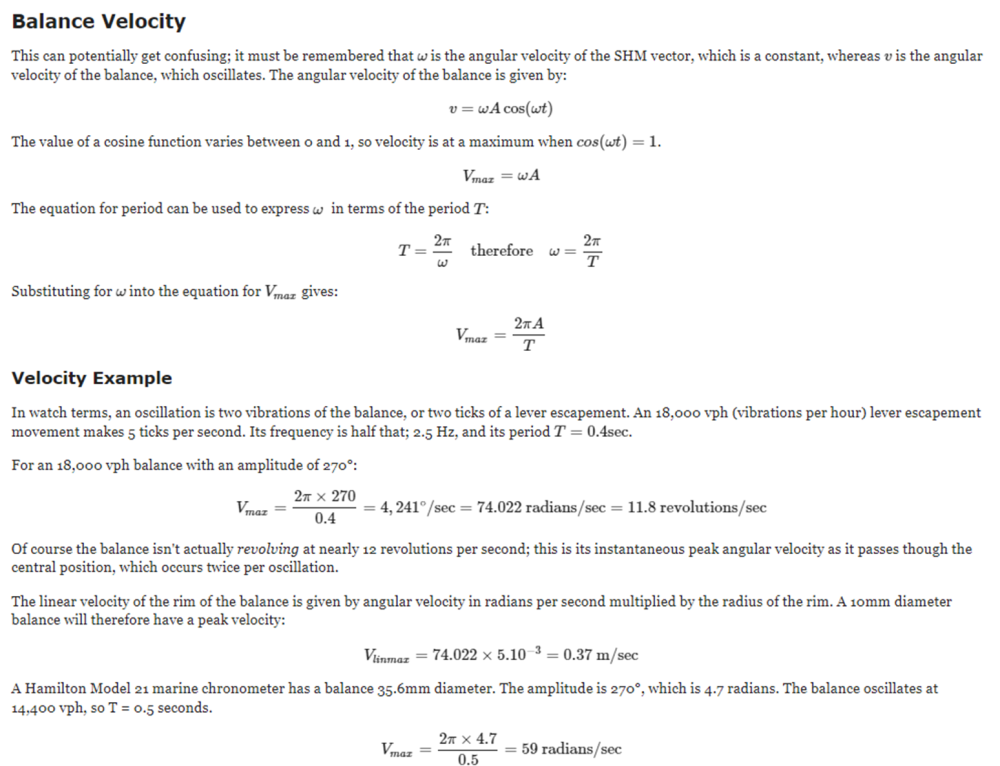
My figures are not far from yours @Jon There's an article on SHM and beat error/angle calculations here https://www.vintagewatchstraps.com/shm.php (I paste some of it below) I wrote a spreadsheet to work it out. For 18000 A/h, 270° amplitude. 2ms error is 4.24°
 1 point
 -
For support, you could first try with a flat piece of pithwood. It could possibly be soft enough to push the hour wheel tube down a few tenths of a millimetre and sturdy enough not to be deformed. Then finish it off with hand levers. I've never tried it so it's just an idea.1 point
-
Do you think there's space to fit anything under that hand? I'm surprised it was even running and not scraping the dial to bits.1 point
-
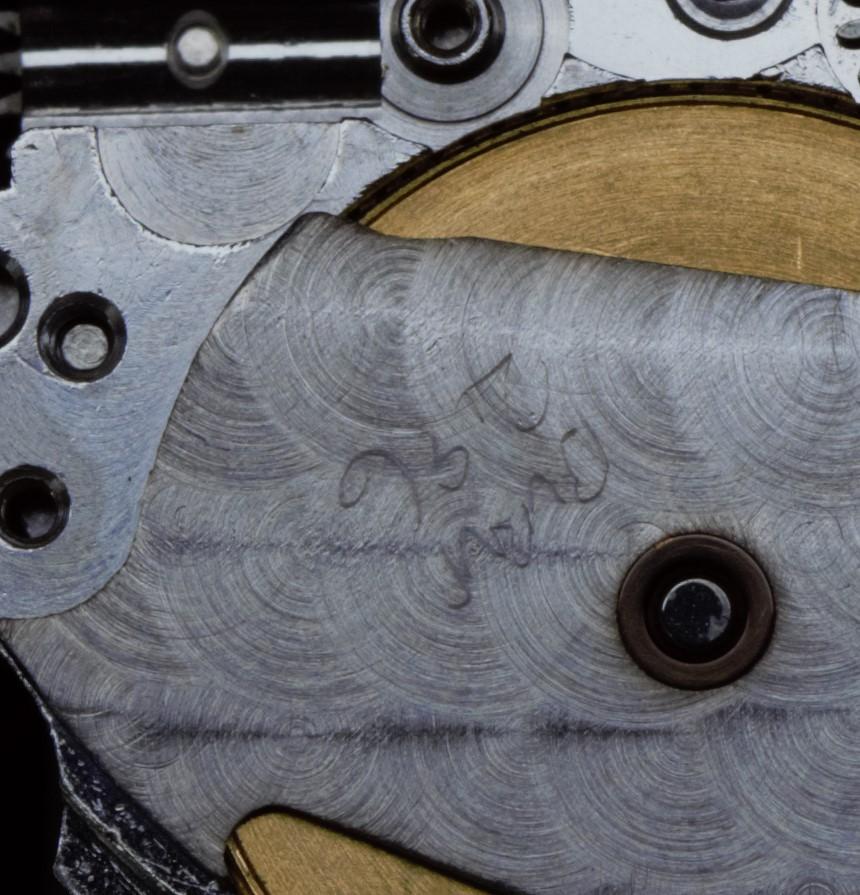
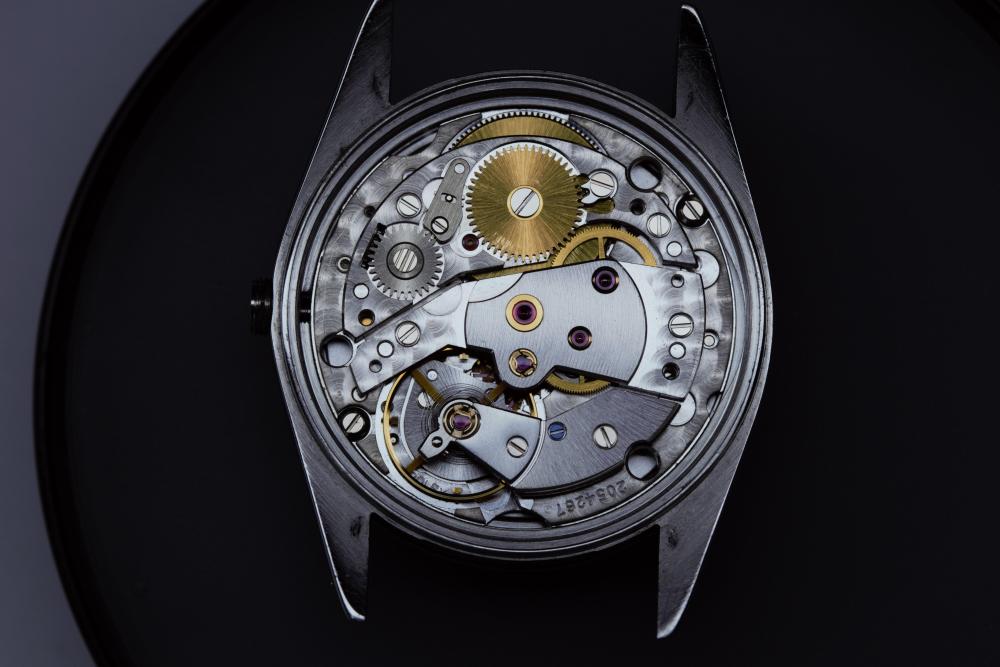
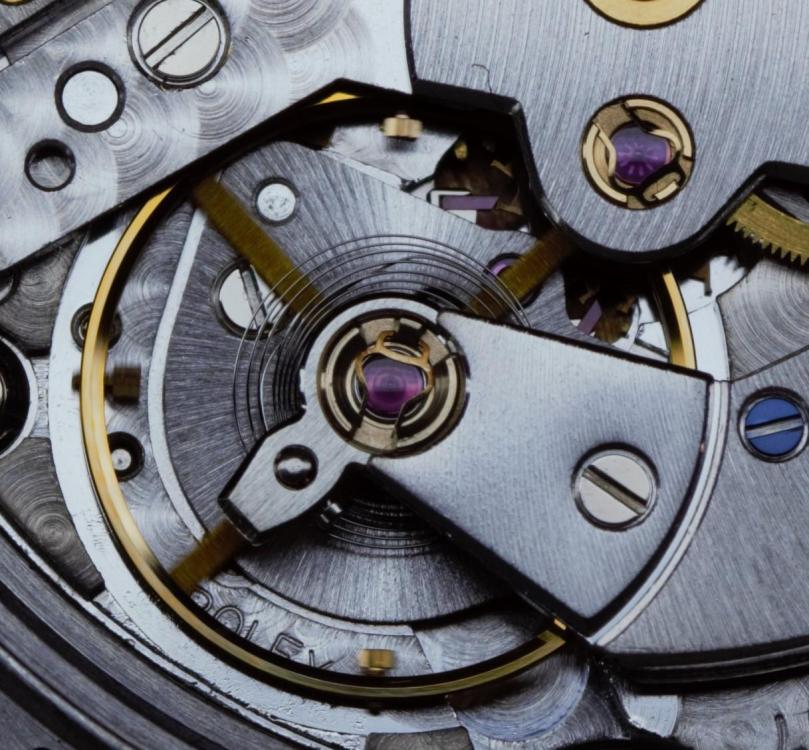
You can now see why you part a lot of money for these and where that money goes, especially the exceptional engineering. They practically service themselves and results are truly amazing. Here's a 3035 from this week. As you can see from the second to last pic, the hairspring was in a right tangled mess. Either someone had tried taking it out and back in again, or the watch had taken quite a hard tumble. I'm guessing the latter. The last pic is the carnage that someone inflicted on the case trying to get the bezel off! Jeez! That is one deep groove! Even one of the bridges had the part number scratched into it. Classy!

 1 point
 -
Do as suggested by Richard, i would slide a piece of paper under the hand as well to protect the dial .1 point
-
Why not thin down a couple of hand removal tools? That would seem the most logical to me. Tom1 point
-
I don't anything would penetrate enough to make it worth while and you don't want to be getting oil on the dial.1 point
-
Sounds like the oscillating weight has come adrift could have have broken the axcel. If you have a good case opener just have a look, no harm in taking a look at least you will be able to tell him what is wrong. Post a good photo here and we will be able to confirm for you.1 point
-
The force/torque of tightening has nothing to do with watertightness. You tighten the back untill it lays on the case firmly. Tightening it more would only tear the thread, but will not get the back closer to the case. There is space for the O-ring in a groove made specially for it between the back and the case and if the size of the ring is correct and the surfaces of the case and back that form this groove are clean and smooth, then watertightness will be OK.1 point
-
One is staked to the pinion, one is free. They both engage the sweep pinion, but only the free one engages the 4th pinion. The result is the sweep pinion leaf engaged gets sandwiched; the staked wheel pushes, the free one must turn too, but it is stopped by the 4th pinion. It’s a great system that gives a perfectly stable sweep and doesn't suck amplitude like friction springs.1 point
-
Follow up - I found a data sheet on the ETA 955.424 here.1 point
-
A few points to note about " polishing ", if you are trying to remove damage to a casing or bracelet you don't polish it out ( unless very minor scratches ). Polishing is a means to finish a piece, not to repair damage. When you want to remove deep scratches and dents it is called buffing, after you remove the damage and need to finish the metal ( either mirror or satin etc ) it then becomes polishing. It is important to note that when you want to remove damage you don't want to remove the metal you merely want to heat up and manipulate the metal back into the desired shape, almost like moving really hard playdoh. There are several means to achieving the result you need but you must run through some questions to establish how to proceed. 1) What metal am i working with ? Seems obvious enough but each metal reacts differently to different treatments and what works for one may not work for another. Some metals are softer than others ( even between different grades of steel ) so choosing the right product/s for the job will make the result better and also less hard work for you. 2) Is the metal plated or solid ? Sounds obvious again but some casings are made from a base metal ( such as brass ) and then plated ( nickel chrome & gold plating are most common ). Over polishing on these types of casings will result in a rather nasty surprise and a case that will end up worse than when you begin :( If you can establish the casing is plated then the utmost care should be taken in polishing or buffing as removing the plating is all too easy and unsightly damage is even easier still. This isn't to say that plated casings can not be polished back to good order, it just requires a good judgement and experience to know how to proceed. 3) Which compounds / polishing pastes shall i use ? Again this varies depending on the materials hardness and type but luckily there are lots of easily available products that can help to restore that beaten up old casing. There are lots of easily available polishing compounds( dialux, autosol,peek,braso etc ), but if you want to remove deep scratches to Steel/Stainless Steel then id recommend SteelCut by Cannings or similar high/medium grit compound. Steelcut is a high grit compound that will act like sandpaper when used with a rotary tool, but be aware the compound if used too aggressively will easily damage and mis-shapen steel casing & bracelets. The ideal use for this is either via a bench mounted polishing/buffing wheel or a rotary type tool such as a dremel. To apply the compound you would need soft to medium hard felt wheels. The key to removing damage and keeping the original shape comes down to using the correct tool with the correct compound or material and also more importantly....heat. As i said earlier , to remove damage you don't want to remove metal but merely soften the existing metal and manipulate it back to the original shape, this is where heat plays a big role. By using a rotary tool and felt wheel with the right compound ( for example ) you can gently heat the metal up and slowly re shape it back to a smooth finish. The technique is not easy to pick up but with practice you will soon see how metal can be worked. You dont want to press too hard or too softly, and you don't want to keep the felt wheel in the same spot. To retain the casing or bracelets original shape will require learning techniques in buffing ( there are some videos online which can aid you with this ). Fine finishing or mirror polishing is an art form in itself and there are several methods that can be used. Since ive rattled on long enough i will leave a list below of the compounds and products i use for my work, im sure the other guys here will have some great tips of their own :) Removing Damage - SteelCut ( various grits ), Dialux Gris ( Grey ), Abrasive 3M Paper 80-3000 Grit, Silicone Carbide powder, High Micron Diamond paste. General Polishing - Dialux Blue,Red Green , Autosol, Peek, Medium Diamond pastes, Selvet Cloths, High Grit 3M Papers 1200-3000+ Mirror Polishing - Pegwood, Orange Wood, Pith Wood, Beech ( each wood has great polishing properties so experiment ! ), Lavender Oil + Fine Diamond paste 0.25 micron or less, Various Fish Oils, Lavender oil + Flat Zinc plate, Olive Oil , various burnishing tools, polished metal scraps Most important of all .....patience !1 point
-
Polishing has been a real tough nut for me to crack. I'll have to give that autosol and pegwood thing a try, never thought to use pegwood as a medium of polishing. Personally I've been able to get good mirror finishes with a hobby motor (like a dremel) with green dialux and chamois/loose cotton wheels, before that I might use fine grades of emery, to get out light scratches that were too deep for the dialux, and grey dialux on a nylon bristle wheel as sort of a pre-polish to get any graining out. Trying to get deep scratches out with courser grades of emery, I've found I've not been able to really take out the damage I've put in, the result is a mirror finish on a surface that isn't entirely flat so you see straight ridges waving across the surface if you look at it closely, so at this point in time I'm resigned to accepting moderate to deep scratches. As for satin finishes, this should be fairly easy, as long as you're not accidentally scratching the mirror surfaces. (you can get special protective tape if it's necessary) You can use scotch bright wheel on a motorised tool or by hand with roebuck/garyflex abrasive rubber. finish off by scrubbing up with some isopropyl alcohol or mentholated spirits and an ultrasonic clean if you have a tank for it. (you'll also want to do that between using different compounds, like the grey/green dialux.)1 point