Leaderboard


Popular Content
Showing content with the highest reputation on 07/02/24 in Posts
-
Yes, hairdryers work really well when blown through the baskets (from both sides). Then I tip the basket contents on to some tissue paper to check the parts. No need for fancy spinning devices or hot plates.4 points
-
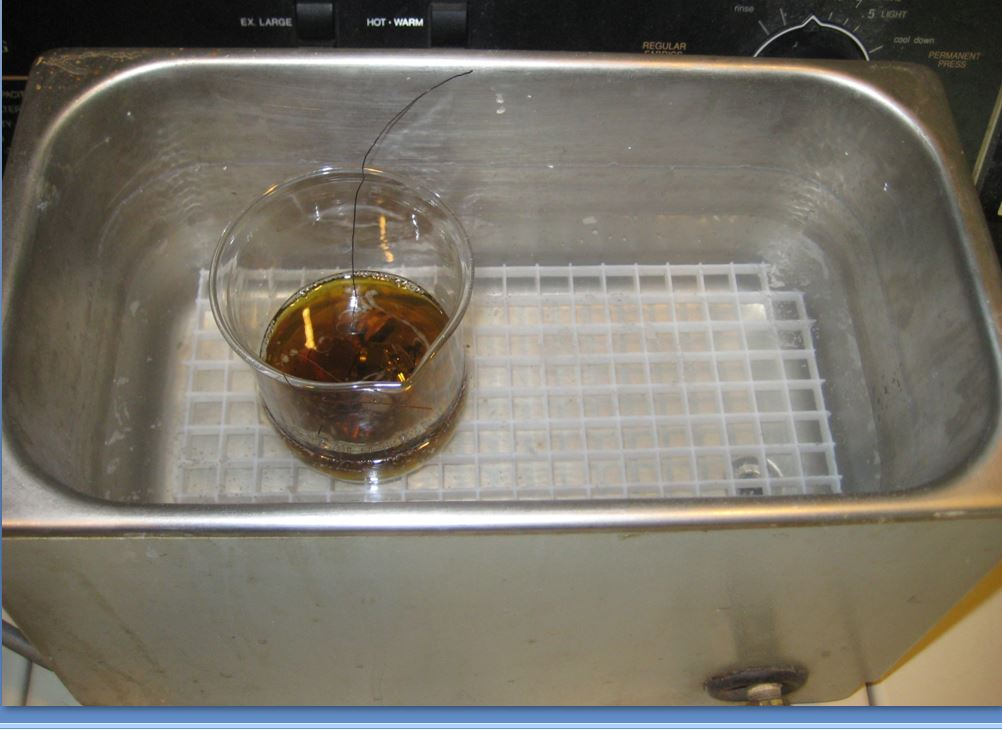
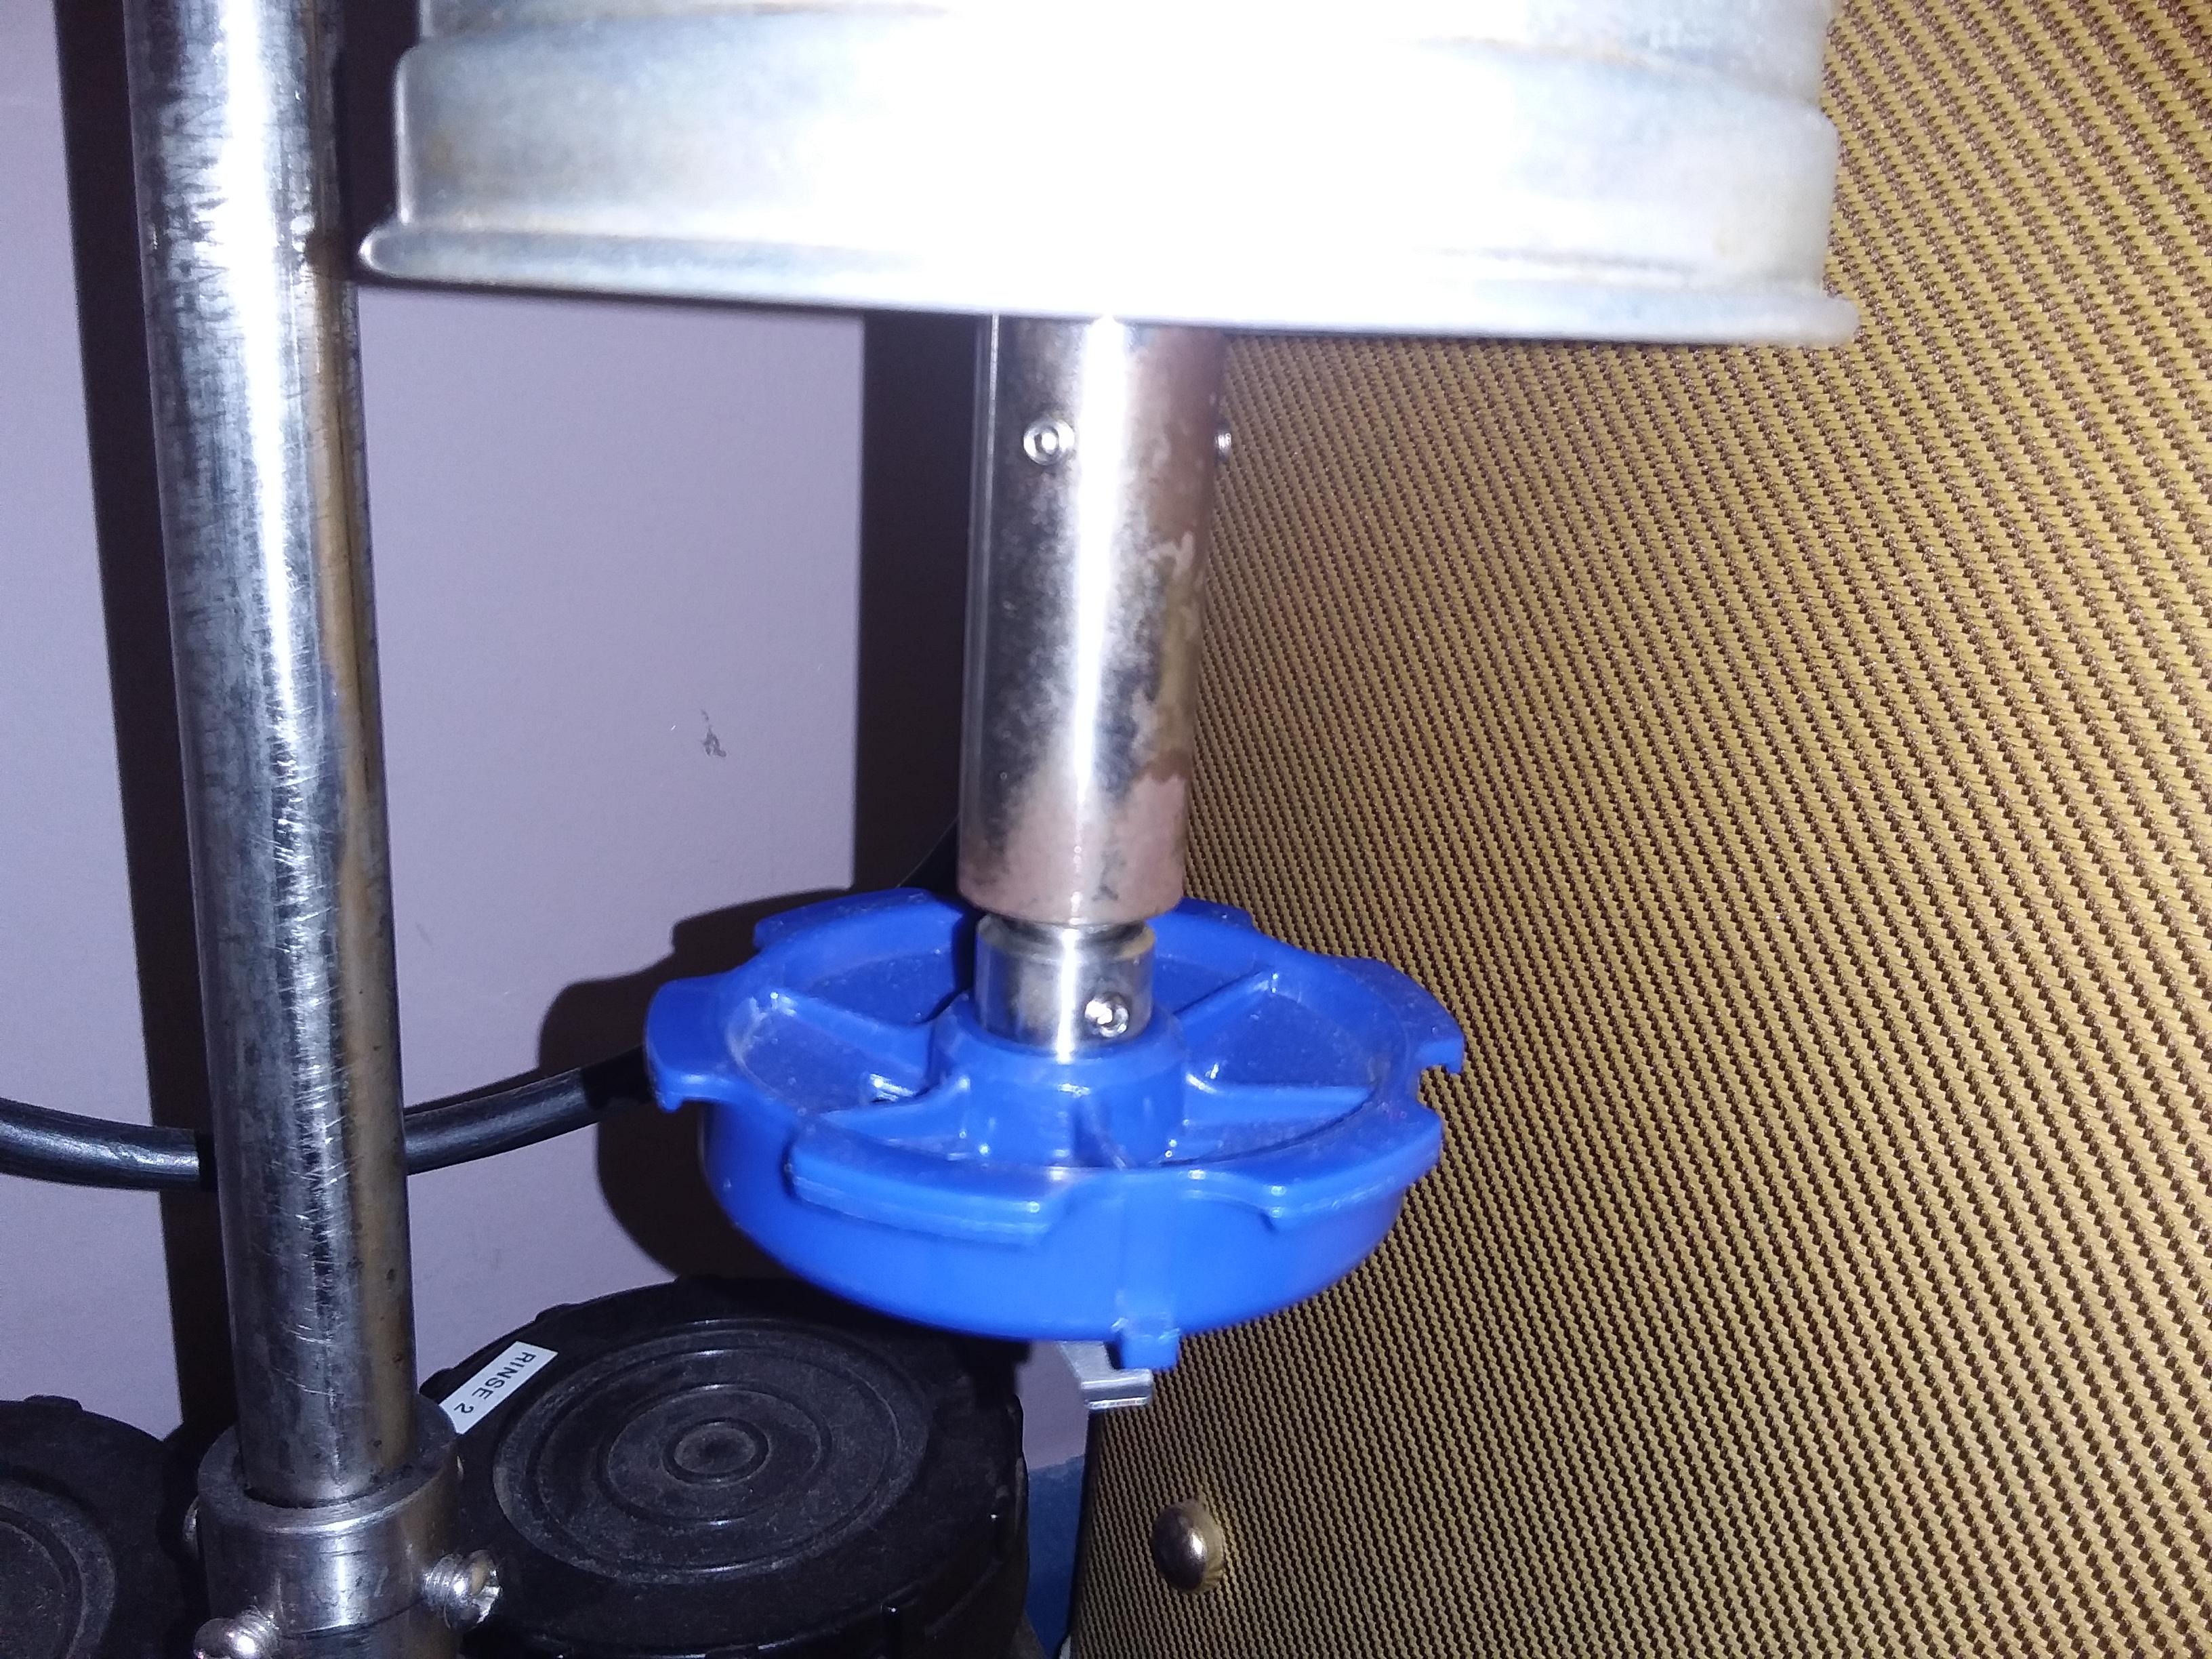
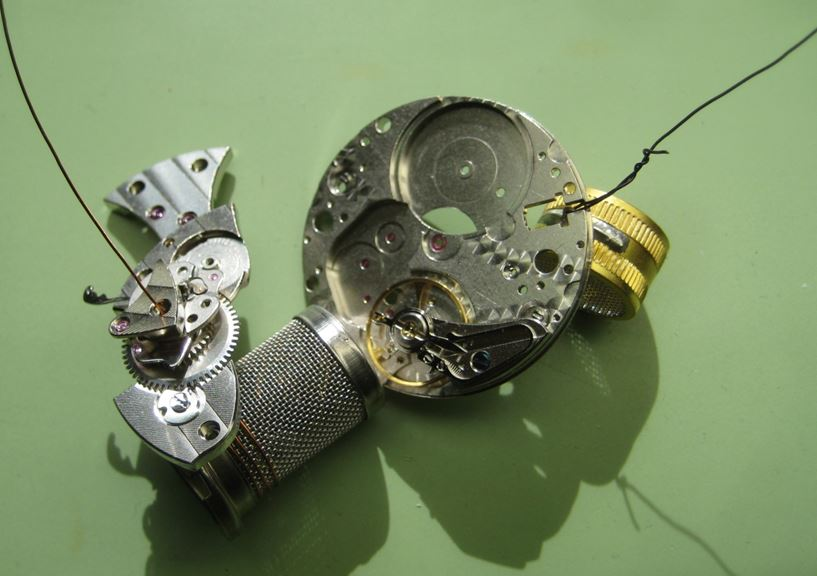
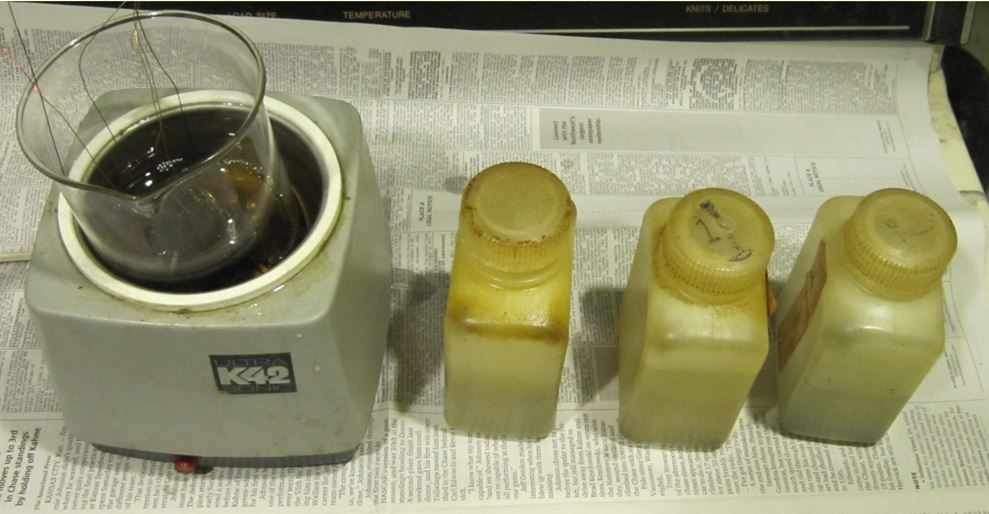
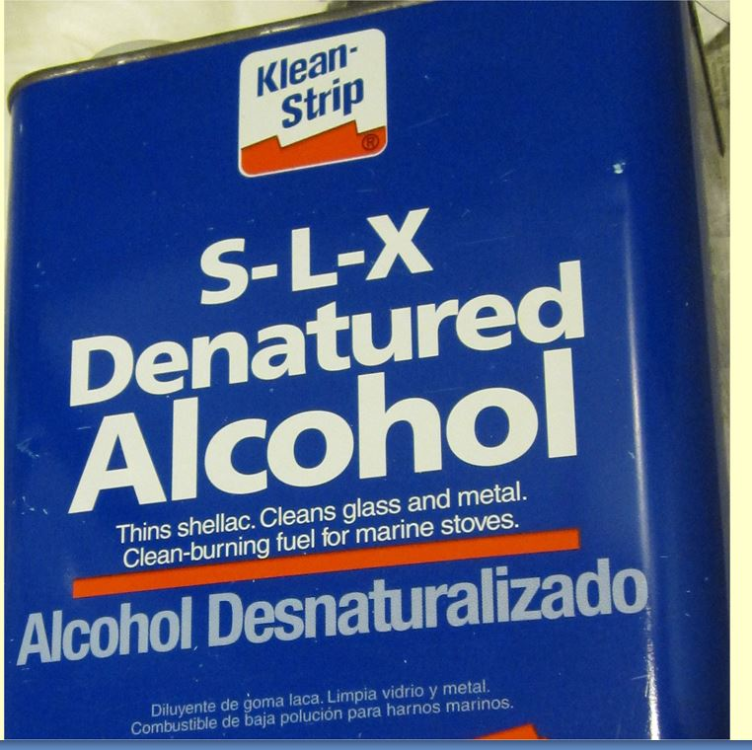
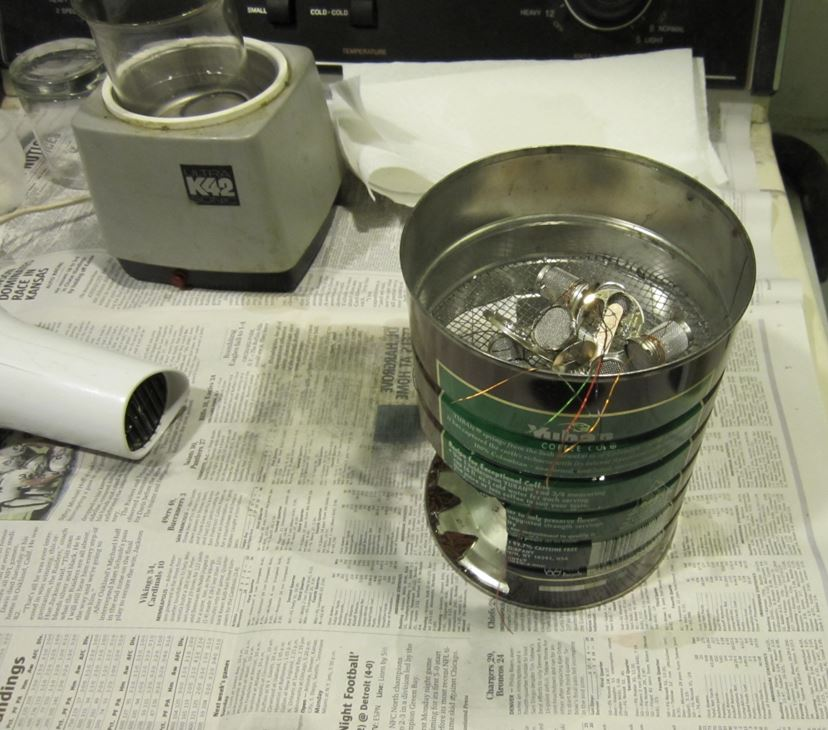
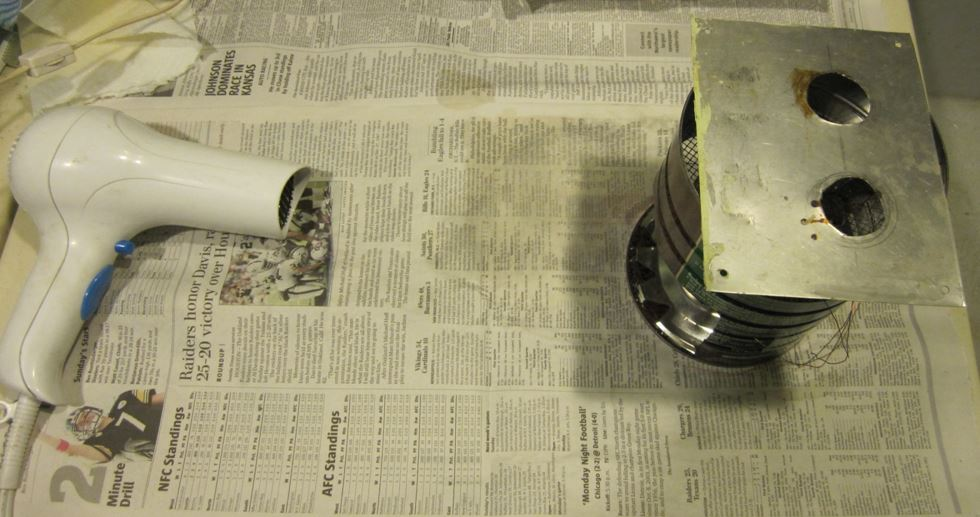
yes I was being serious but? yes always one of the amusements in the universe when people aren't exactly on the same page and answers don't make sense. Usually much better when you're dealing with a person right in front a you you can see immediately that something isn't quite right. I think a better way to do this is I will just show you what I used to use at home. It worked fine for many many years then I had a time span where I wasn't doing any work at home and the plastic containers last time I looked had disintegrated. Even though those were rated for chemicals and as I said lasted for many years they didn't last forever so glass might've been better so you can't see the cleaning location as the newspaper hides it. So the cleaning location is the room for normally washing clothes the newspapers on top of the washing machine. I was just like the idea of a newspaper keeps things from falling where they shouldn't be and it's easy to throw away when I'm all through. two types of baskets purchased off of eBay. The larger one is supposed to go in some other machine typically it's supposed to be up right because the lid doesn't fit super tight and really tiny parts could escape. Which is why everything super tiny goes in the basket with the screw on lid. Then a fine wire attaches to each of the basket so I can pick them up at all the larger parts are strong on the wire in this image the balance jewels have been removed the balance wheel is back in as it will clean just fine and everything's protected. Otherwise the balance wheel has to go out and either be strong on a wire or a large enough basket but typically it would've been strong on the wire. different image showing how to do things then cleaning machine people frown on what's being shown here. Although thinking about it on YouTube they frown on ultrasonic and probably just about everything in the universe. Classically with ultrasonic machines you never want to place anything directly over the transducer like a beaker for instance but this is the way the machine was sold local drugstore had them on sale a very long time ago I think this thing must've lasted almost 20 years before it disintegrated. Cleaning fluid goes in the beaker parts in the beaker in the machine with water around its yes is a lot of taking the parts out I usually put them on a paper towel to spin dry oh wait there is no spinning there but I put on paper towel the drip off while changing the fluids in the beaker it would actually better if you had separate jars 80 1F be swapping the fluids around but it didn't work then at some point in time they changed the rinse where basically it will not draw no matter how hot it got it would not 100% dry. I asked a friend what he was doing and he recommended alcohol. Isopropyl would be better but this is what I used and yes it does dissolves shellac. But it was only in there for a few seconds the purpose was to rinse off the rinse and goes immediately and in dryer and it was never an issue. yes today it probably use isopropyl alcohol but what's the fun in that? Then after a very long time very very long time the little ultrasonic like they typically do decided no longer to function. Fortunately somebody had given me this and you will note there's a piece of plastic to keep the beaker off the bottom of the tank. Then there is water in the whole tank enough that things function correctly but not so much that the beaker is in danger of floating away. Yes various YouTube people would really frown on this procedure but I don't recall any problems at all in originally freeze-drying the hand-held hairdryer that I would just put on the newspaper and put the baskets in front didn't blow super intently and it worked perfect. But it finally disintegrated so I think I purchased this and not sure where it came from but the new one gets much hotter and blows much more intently so usually what I do is I would keep the spacing between it and the baskets much farther away. But then I got creative and made which you see in the image. then I got even more creative and found a piece of scrap metal as I wasn't sure what the actual error pattern was I probably should conducted smoke and windtunnel tests the see the pattern of the air flow so I put a piece of sheet metal on top. Also still had a hair dryer back a distance because I did feel that it was very very hot I really can't see how anyone could dry their hair was something like that it seems like you'd get burnt but maybe that's why got it cheap someplace? so there is how I used to clean watches at home. Now if I needed to clean a watch a just go to work and use an astronomically expensive machine that does a really nice job. But even without the astronomically expensive machine DIY works quite well.

 3 points
 -
Hi Daniel, It is important to inform what way of turning the staff You have choosen. Is it on T-rest with hand held gravers or with cros-slide support? This are quite different approaches and we will give beter advices if we know what You are doing. As I understand, You have HSS gravers. Well, HSS this days is not what it was say 50 years before, as they don't put tunsten in it any more. So, in practice, modern HSS tools are good for nothing. Old ones will probably do. New HSS tools with cobalt perform beter and are close to performance of old HSS tools. One possible reason for pivot turning problems is the steel is soft. Soft steel will tend to bend and stick to the tip of the graver. The other possible reason is the steel is to hard for the graver. If You let the material to get burnished instead of cut clear, the surface gets even more hard and thus HSS graver tip will get dull and will burnish further instead of cutting. So, turning needs correct position of the graver and attack angles, this is especially magnified when cutter is HSS. So, my advice is to use carbide cutters. The hardening of the steel is another, different craft, that needs a lot of learning. Preparing of the steel for balance staffs (and all other parts) needs to be made avoiding risks of incorrect heat treatment. The main risk is to overheat the steel - this makes it brittle and useless. Of course, one must know what kind of steel is to be hardened and what are it's critical temperatures. But typically for tool steel with 1% carbon content, heating for the hardening must be about 750 degr. celsius and no more than 790. Heating above 800 degr. ruins the steel making it with big crystals in the structure and brittle. So If You will heat treat the steel by Youself, make experiments with examples that You will break after hardening and bluing to ensure that the structure is uniform grey color with very small crystals. The easier way for beginner is to use rollers from roller bearings. They are (usually) made from good steel and need only blue tempering.3 points
-
Maybe of indian origin and unknown quality. You can use silversteel, harden it and temper (heat) it to light blue.3 points
-
It was typical in schools to spend weeks (or even months) hand turning; I don't know how much experience you have, but it does take some time to get the feel. In a school setting you would start off with brass, then move to steel in its annealed state, making tools and such, and finally get to turning blued steel making larger items, then pivot gages, and finally balance staffs. Even with that build up students frequently struggled with the staffs- so don't feel bad if it isn't going great right away! Also, many people run the lathe way too fast, especially for turning heat treated steel. 1500rpm is plenty.3 points
-
When I repair an issue like this, I center up in a faceplate (with a scope like Hector says), turn the post until it's clean, and friction fit a tube to the remaining post. The tube is usually in steel, but I have done them in beryllium copper as well, either will last 10x longer than the original brass. Drilling and fitting a new post is tricky at best; this post is just above where the stem pivot fits, so you either have to drill (bore) quite oversize, fit up, then redrill the hole for the stem, or you end up with a very shallow fit for pressing in the new post. Using a scope for faceplate centering sounds fancy and expensive, but you just need some sort of scope like 20x or so, with some sort of a cross hair or such in the viewpath, and it can be held any way you find convenient to view the workpiece. When turning the faceplate by hand, any eccentricity is instantly visible, and it's actually very nice to be able to move the scope to line up the cross hair with the perimeter of what you're centering. I have old "analog" scopes I use for this, but I'm sure the plethora of cheap digital scopes offer an easy option.3 points
-
What kind of graver are you using? Should be able to cut to basically "zero" even with steel, if it's really sharp. With steel you do have to sharpen frequently when cutting blued steel. With carbide, it really helps to have the finest finish possible. When I was young diamond grinding wheels were expensive, so is was normal to have a fairly rough one and that was that. For a finer finish on gravers, we used a lap with diamond paste, like 3 micron. The lap can be almost anything, I have used brass, steel, plexi, it all works. Now you can get quite fine diamond wheels for a reasonable price, a D14 is already quite good, or if you want close to mirror a D7 is nice. The angle at which you approach the work is very critical, more and more so as the diameter decreases. You should be seeing nice curly clean chips coming off the work, certainly at larger diameters. As the diameter goes down you need to still be getting proper chips, but you won't have the 10cm long curls coming off anymore, they will be really small. But you need to be making chips, not dust. If you have to increase pressure to cut, either the steel is too hard, or there's a sharpness issue or angle of attack issue. I'm not a big fan of premade blue steel rod, but I have yet to encounter any that couldn't be cut with a steel graver.3 points
-
No. Just the opposite. Cannon pinion not pressed all the way down, so the pinion leaves were just glancing off the teeth of the minute wheel.3 points
-
I'm sure this works on larger pieces, but with a piece the size of a balance staff, even air cooling can affect hardness, I don't know how you could measure it before its cooled down. But I don't know how measuring it works. When I harden my steel for turning, its held over a jar of oil and the flame is maybe an inch above it, so it can be dropped immediately. These small pieces just don't hold heat that well, and its hard to judge hardness. Do you know what the graver steel is? HSS is good for most stuff, but I prefer O1 steel as I think it holds an edge better.2 points
-
Im not nev, but color is what you use.2 points
-
Split up the parts into more baskets 6,8,10 baskets if needed so the parts aren't over crowded .Little difference compared to an average dedicated parts cleaner basket. Big pieces can be dried as they are. If you want a drying plate then wax melt heaters are a good size , but warm air needs blowing through to dry parts quickly and thoroughly2 points
-
I need to see the movement. If there is enough 'meat' under the post to drill a hole and to press new seel post there, this is a piece of cake. Of course, one can do it on the late with face plate. If I have to do it this way, will center by the undamaged part of the post. I don't have scope and never have used one. My Optivisor (#7) glasses is what I use and this is enough. placing the cutter tip close to the object (the post) and observind the distance between them while rotating the spindle helps to find the needed direction for moving the movement in the face plate. The easier way is to file the post with dremel and drill the hole by hand, the drill bit in pin wise. Centering with center drill bit, which donesn't bend and moving the center when turning the wise and pressing in needed direction is possible. The circular traces from mashining the post in the plate are enough to find the center. Another way is to use depthing tool to find the correct distance between posts of the minute and intermediate wheels and the distance between intermediate and the wheel in the rocker when rocker is in setting position and to draw arches, the crossing point will be the center for the post. For sure the cannon pinion must be checked, such wear is not normal in this place. Is there a calendar on the movement? Setting the calendar and cannon seizing due lack of lubrication may explain this kind of wear.2 points
-
I use Sandvik 20AP, which I get from Klein Metals. For "blue" steel, I have some old stock and got some from Selva more recently which has proven decent. I see Cousins has blue steel bars listed as UK Made, and then other stuff with no country of origin at a much lower price. I would steer clear of the cheap stuff. Over there I see you can get "silver steel", also known as Stubbs steel, quite reasonably; Coventry Grinders has it in small quantities. This is a nice material and easy to heat treat with a propane torch and a glass of thin oil. While technically it's a water quenching steel, at small diameters like you'd encounter for watch work oil works fine and decreases the chance of deformation during quench. I use blue steel for random things like pins and such, but for making a staff or other more demanding items, I use proper steel with a known makeup and heat treat it myself. If making a staff or stem, I make it prior to heat treatment (though I leave the pivots way oversize and finish turn post heat treat). Especially for stems, you don't want to thread it heat treated, unless you like tracking down and paying for expensive and hard to find dies!.2 points
-
You leave them in the basket you cleaned them in.2 points
-
I remember purchasing an assortment of blued steel wire once and I had to wonder if maybe it was actually died blue as opposed to actually blued steel and I'm sure it was from India even though is a long time ago. My favorite examples of things like this I was at a lecture were somebody made a cutter of fly cutter for cutting clock gears and skipped one of the steps for hardening. Normally when you harden something it should be very very hard before you draw the tempera you normally take a file to verify that it is actually hard that step was skipped. Off he went to cut his wheel and is cutter actually folded over on itself because I think it might've been stainless steel. Or somebody else was in someone else's shop needed some flat steel ran down to the miscellaneous scrap found a piece of I think it was packing steel but it was blue in color. In other words the steel tape they put around big packages like pallets and things and whatever it was it totally sucked for the part he was making as usual typically finding out way too late in the process say yes it really works better if you know exactly what you're dealing with even if it did come in a package with says blued steel. Just because it's blue doesn't actually mean well much of anything to be honest.2 points
-
So I think I'll go for the regular online course without the feedback option and instead lean on all my BFFs here to help out if I get out of my depth. Mrs W's christmas present to me, so will start it in the new year2 points
-
Hi all the speculation in the world is not going to fix the problem it’s going to have to come apart carefully checking as we go. Hectors advice is best followed first as it’s the least invasive. Just power down the movement remove balance and pallet then check the train for freedom , if still stuck the bridge will need to come off to go further. Take pictures at every stage and ant notes that may be aplicable2 points
-
Yes the classic problem of watch repair it takes time to learn. Going to school is all about practicing continuous practicing and when you get out of school were still practicing we are forever practicing. The other thing that comes to play is what exactly is the balance staff made out of? Then have you hardened it at all before cutting?2 points
-
My personal favorites is at four minutes and 54 seconds. The machine with how many parts? All before CNC on the other hand if they Needed to change the tooling to a new watch plate how long would that take? Then if you like the movie there is a book different watch company few years before but still it talks about the tools or some of them https://archive.org/details/evolutionofautom00mars_02 points
-
Convention method would need a lathe, a face plate, optical centering scope and drills. I would like to hear what @nevenbekriev would do in a case like this.2 points
-
I go along with that Scott, its still a recognised qualification at the end of the day and no disrespect to anyone that takes that route and something that I'm seriously considering ( i have a few back door qualifications myself that enable me to do more in my trade legally ). The approx study time is around 400 hours which does fall well short of the 1800 1st year UK schooling and there cant be a comparison, but its a step forward in my book. I would contact them, a phone call if possible , i found both of the women heads at Upton really helpful. You might be able to add on the tutor after starting the course if you think you need it. Giz a shout when you've made some enquiries, I'd be interested to hear if things are still the same.2 points
-
That's the intermediate minute wheel and there looks more wear to it than the post. Can you measure how worn the wheel is? If it is the post that's worn then I'd consider a collar to resize it.2 points
-
Yes that would be problematic but the Elgin watch company did employ everybody. For instance here's a video shows the Elgin watch company.2 points
-
Depending how small you're looking for try doing a search for dental carbide or diamond broach. https://henryschein.com.au/burs/dental-burs/diamond-highspeed-burs/diamond-bur-komet-822-008-pear-small-fg-pack-of-5 Edit There are cheeps sets of these all over the place and think I may have something like it at work. https://www.etsy.com/uk/listing/385421052/economical-burr-set-30-pieces?ga_order=most_relevant&ga_search_type=all&ga_view_type=gallery&ga_search_query=Diamond+Burr&ref=sc_gallery-1-1&sts=1&search_preloaded_img=1&plkey=7ad5eff48207d490322e81d4ca0fd5ca3280f29f%3A385421052&variation0=43592818781 point
-
Most silver tool steel hardens at around 1000 C, so I'm not sure it would fully get hardened. I know I've had some instances where I was hardening silver steel and I didn't get it to glass hardened and I had to start the piece over. That's not a big deal with a pivot as its small. But if making a cutting tool, you have to re anneal it to its original state and that can be a pain, as they want it held at the annealing temp for a long time. Since I make my own cutting tools, i really focus on the hardening aspect because it will really cause me issues if I don't take it far enough, or if I go too far.1 point
-
You will not get good amplitude unless You sharpen the cones1 point
-
Interesting idea. Must be tested. I am not sure if the stream of the torch will not 'blow away' the piece.1 point
-
Have you got a quartz tester to do some basic tests on the faulty movement as I don't think you'll get a NOS Y100 for love nor money. There are still a few NOS Crystals about though if needs be. https://www.ebay.co.uk/itm/134583041270?itmmeta=01J1TK74SEG4ZAQTCH1BK7QGCJ&hash=item1f55c63cf6:g:~gUAAOSwr4lkbN~p&itmprp=enc%3AAQAJAAAA4JFXXvygZg230CIDcDOy0Yt%2FATQeH2P1b%2Fu61kSPKRLsDUEjZxR%2BITVZA8x6qeX%2Fb8dxFOdzE01SYN0NQc6GgrXaycmywakQXlHvo5YqCoxAQlkIDllkaxXnYLW0s5B%2FpCNn%2Bq7P0FeqU%2FKR3%2BHb%2FgBndjeeBShouuNWL5ybHvntw8%2BpOl1j5qjUemMPtlfx7fvzDYiFyPrvgsD6XTS771LPD%2B4Nzaq8OjJX%2BhnxnmyaHBMgjm5W54b4KyMF7qbhv73DCUwUrVIsadI4bLyVS5ByVYt9tCrOypxaln7PYR8l|tkp%3ABk9SR-zMnNOOZA1 point
-
Glad I could help and maybe you do need a professional but we are really helpful on here.1 point
-
Many industrial processes use colour to determine temperature.1 point
-
OK, some practice and things will get beter. Trust me, I don't have microscope , I use only Optivisor #7 glasses. Before having them, I only used watchmakers loupe 5X on one eye. In the beginning, when I was learning (at age of 14), I had only this loupe and actually I coud not use it for work but only for observation, as was not able to grasp things with the tweezers - grasped in front of the thing or behind it. So I worked with naked eyes only. The temperature of the heated steel is indicated by the color of the light that it shines with1 point
-
For buffing crystal you need to remove the scratches, depending on how deep they are, 400 grit, followed by 600 grit , wet and dry, keep going up the grits and then polish. The 400 grit will make it look worse at first. Plenty of videos, advice on the Internet. Ps. You might be able to start at 600 grit, depending on the depth of the scratches. As for the movements, I don't work on quartz.1 point
-
Thanks @AndyGSi, I appreciate you having taken a look, Rotating counter clock wise (to open) @RichardHarris123 Thanks! actually that did the trick, unfortunately I ended up bending a bit the cover, but it did close which is good. I will need to take it to a Pro for sure Thanks for the help guys!1 point
-
Hi, I’m using a diamond graver I’ll try holding it like a pencil, but I reckon the steel is to hard1 point
-
Can you confirm which way you were rotating it when this happened? I'd say you've applied too much pressure while trying to unscrew it and crossed the threads. To be honest I don't know of any safe way to open this where you'll keep the threads intact but other may be able to help.1 point
-
How are you holding the graver? I make sure I hold it similar to a pencil, to say I'm not really holding the handle. Hardened steel is a bit harder to turn, but I havent found it to be that much more difficult. I get my steel in the US from McMaster Carr, but that might not be an option for you. What is your graver shape? Diamond? that is easiest to use I think. I shape the tips on a diamond wheel, then polish them with a ruby stone. I have been able to turn this way down to 0.05mm. Again, the steel must be hard, as stated above, or it will be too sticky, like aluminum.1 point
-
Fantastic help here. Thank you.1 point
-
first thing I found was Wikipedia but Wikipedia isn't always right people make silly assumptions and they don't actually know things I found a video much better. It does confirm something that I long ago suspected Elgin was a very very big company when it was at its peak.1 point
-
Hi pap3r, sorry for not getting back to you sooner. I used steel rod, i made a hole in one end to fit over the shaft of the motor, i used 3 grub screws to lock it into place. I lathed down the other end to fit the elma basket frame lid, that is also held in place by a grub screw. I have used the machine alot since this modification and it has worked perfectly, as long as you don't use a water based cleaner you won't have any problems with rust. Hope this helps.
 1 point
 -
Thanks for the tip! Is it an idea or have you tried it? I honestly read this as a cruel joke, use a large reamer to undo all the work you just did reducing the hole to refit the barrel arbor. Now I get it - reamer only on the very outer edge, but I have a deburring tool for that anyway. I can't believe they had an in-house astronomer and in-house observatory at the Elgin factory to determine the reference time from a known star.1 point
-
Interesting pictures on the timing machine? The problem with timing machine diagnostics is it's missing information a lot of times? Like for instance all the questions that were asked up above would be helpful for us to understand what's going on. Then the classic question I like to ask is what is the prior history of the watch? Was it serviced before you is a brand-new movement and then there's probably a dozen other questions but we just need more information timing machine looks good in one and bad and the other and that's not enough to understand the problem other than it's definitely looking bad oh and when you have what's called the snow globe effect the numbers are worthless also they mean nothing. Oh I did think of a question when it's doing that how long does it do it and if you change the position of the microphone like I assume this is dial down changing to another position does anything change at all?1 point
-
That’s helpful thanks, the gravers are Valorbe from Cousins. It may well be the angle or how I am sharpening. I’ll will start again on new balance, it may be I need to practice sharpening first.1 point
-
If you want to do it, go for it but I wouldn't bother with the tutor.1 point
-
looks like the cp hasn't been pushed down and riding on top of the minute wheel, possible wear under the cp as well. Open up the int. wheel hole to fit ? You going to need a lathe to center it accurately . This comment has brought a question to mind1 point
-
Here’s a couple pics showing how rough the case and crystal were.
 1 point
 -
Cannon pinion hammered on too tight?1 point
-
If the time is out I would say it might need working on. The floating balance normally keep good time.1 point
-
Even if you open the watch and determine whether or not excessive play of the rotor is responsible for the rattling noise, what then? There could, as has been pointed out, be damage elsewhere in the movement due to the metal lost from the rotor bearing being free in the watch. There could be other wear and tear that is not visible until the movement is disassembled, cleaned and inspected. There is a danger of being blamed (rightly or wrongly) for any problems that surface after you opened the watch. In this game, the last person who did anything to the watch is ‘it’ and often unfairly blamed for problems that arise later. Unless you are able to repair and service the watch, I see little to gain, and potentially much to lose by opening it. It is a beautiful vintage Omega, I hope the owner can find a good watchmaker to repair it. At the end of the day, you know your manager and your abilities and are best placed to make this decision, but do consider what potential gains there are if you opening the watch before proceeding. Also worth considering is that professional repairman may inflate his quote to repair this watch if he’s told a hobbyist has opened and diagnosed it, being wary of the hidden damage that may lurk within as a result. The most difficult watches to repair are those that have been subject to poor quality botch work in the past. Best Regards, Mark1 point
-
Hi Stuart. I trust you're well. Sorry to start up an old thread, but I am interest in how you did the extender for the Brenray? What did you do. Did you take a steel/alumium rod and added the appropriate threading? What's the length did you choose? What was your procedure? Got clearer pictures of it? Please kindly advise. Thank you!1 point