Leaderboard


Popular Content
Showing content with the highest reputation on 07/05/24 in all areas
-
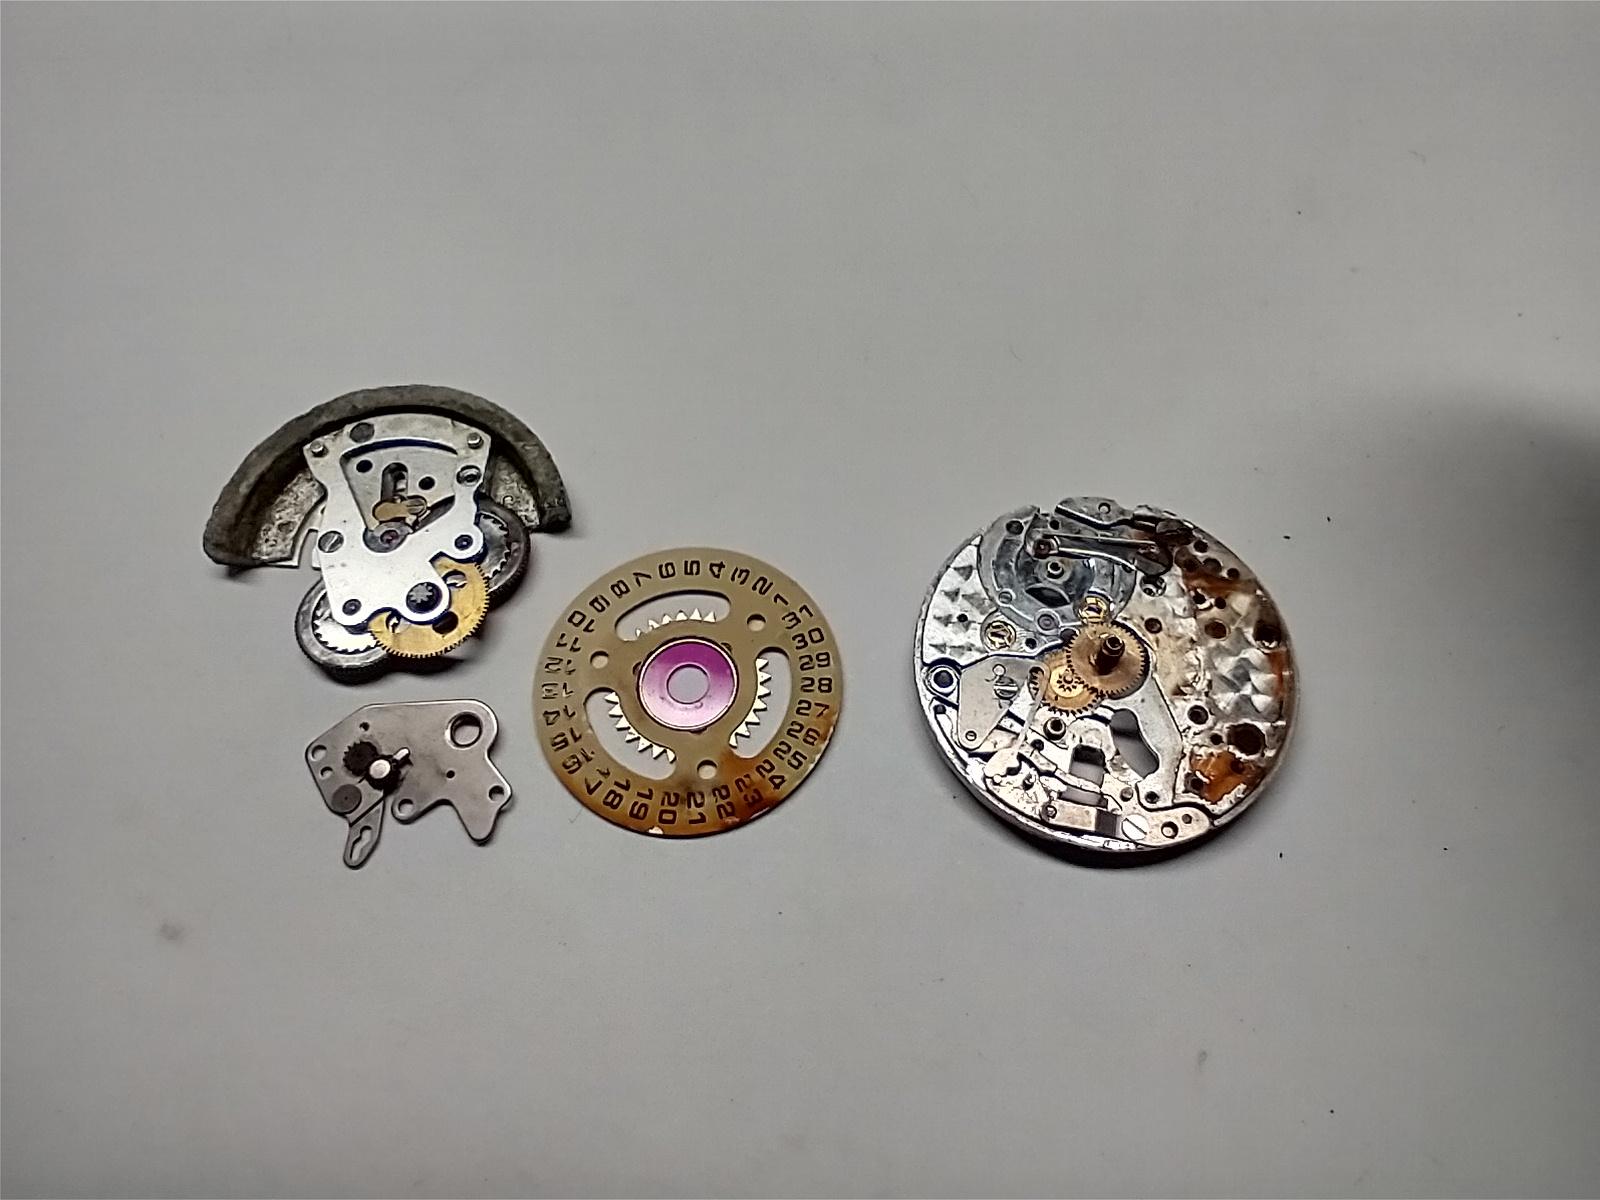
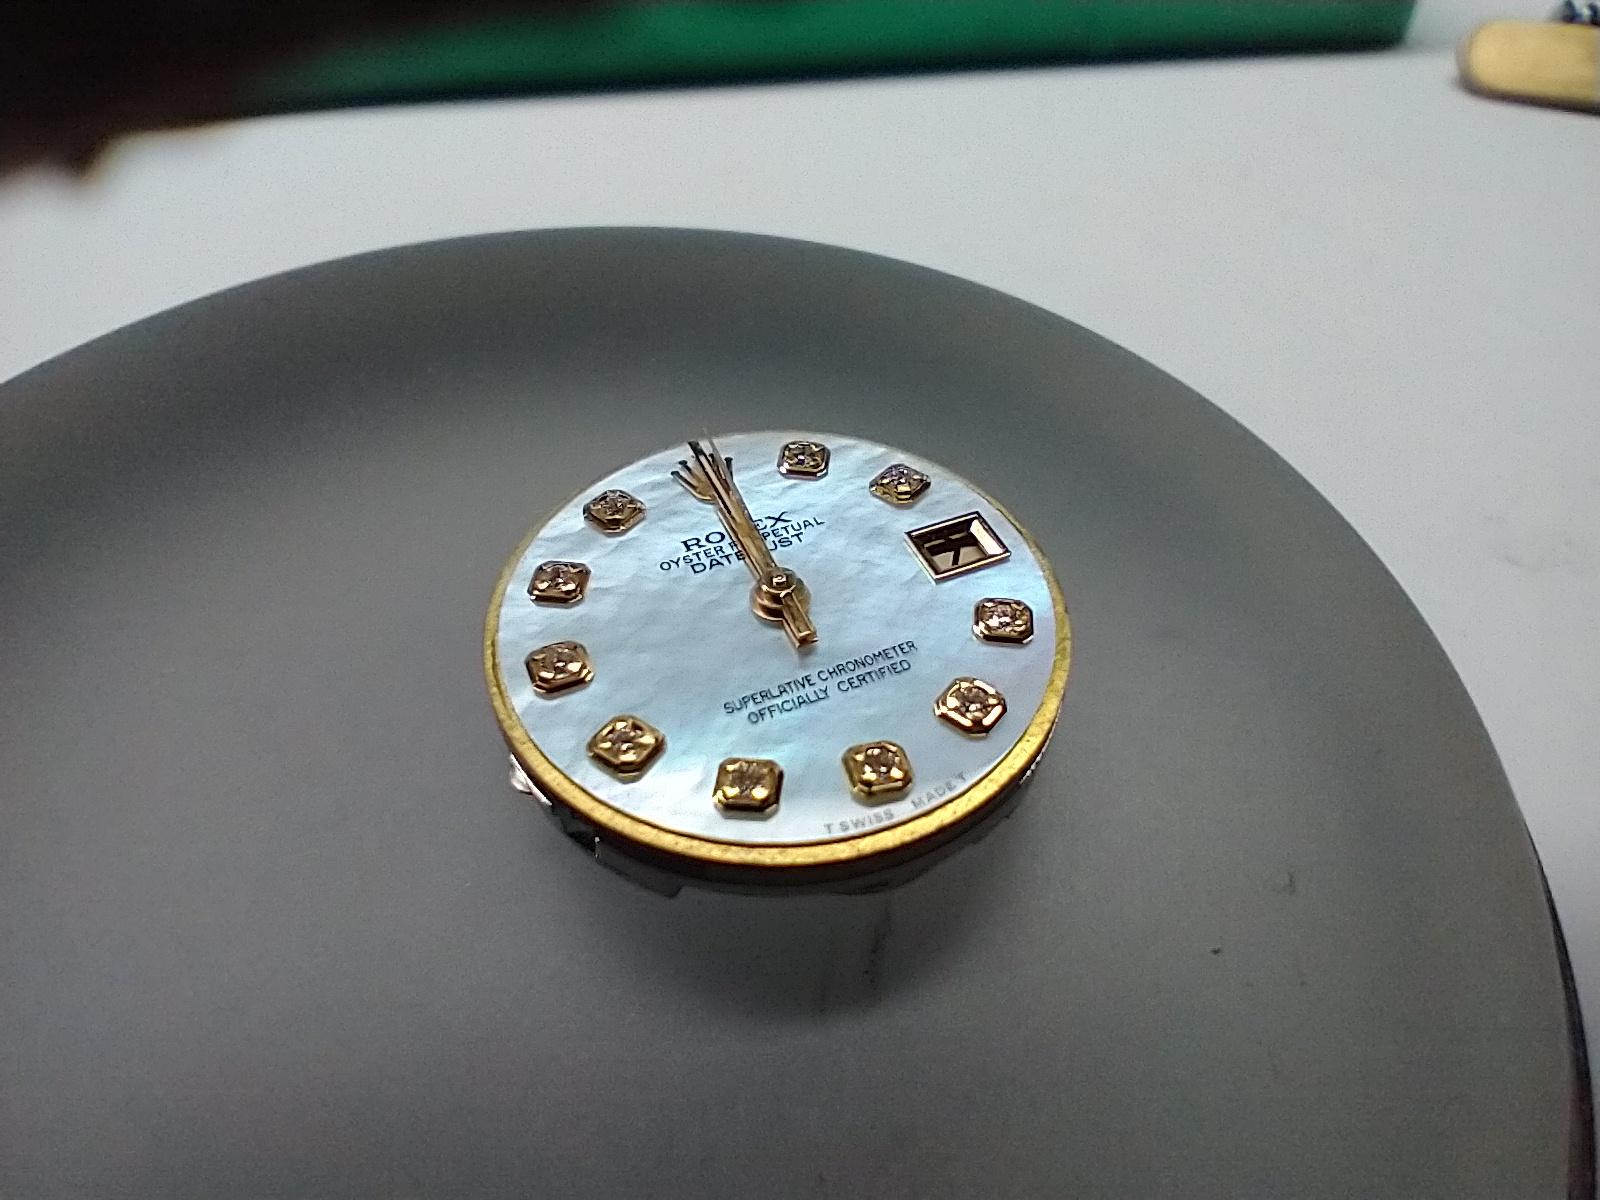
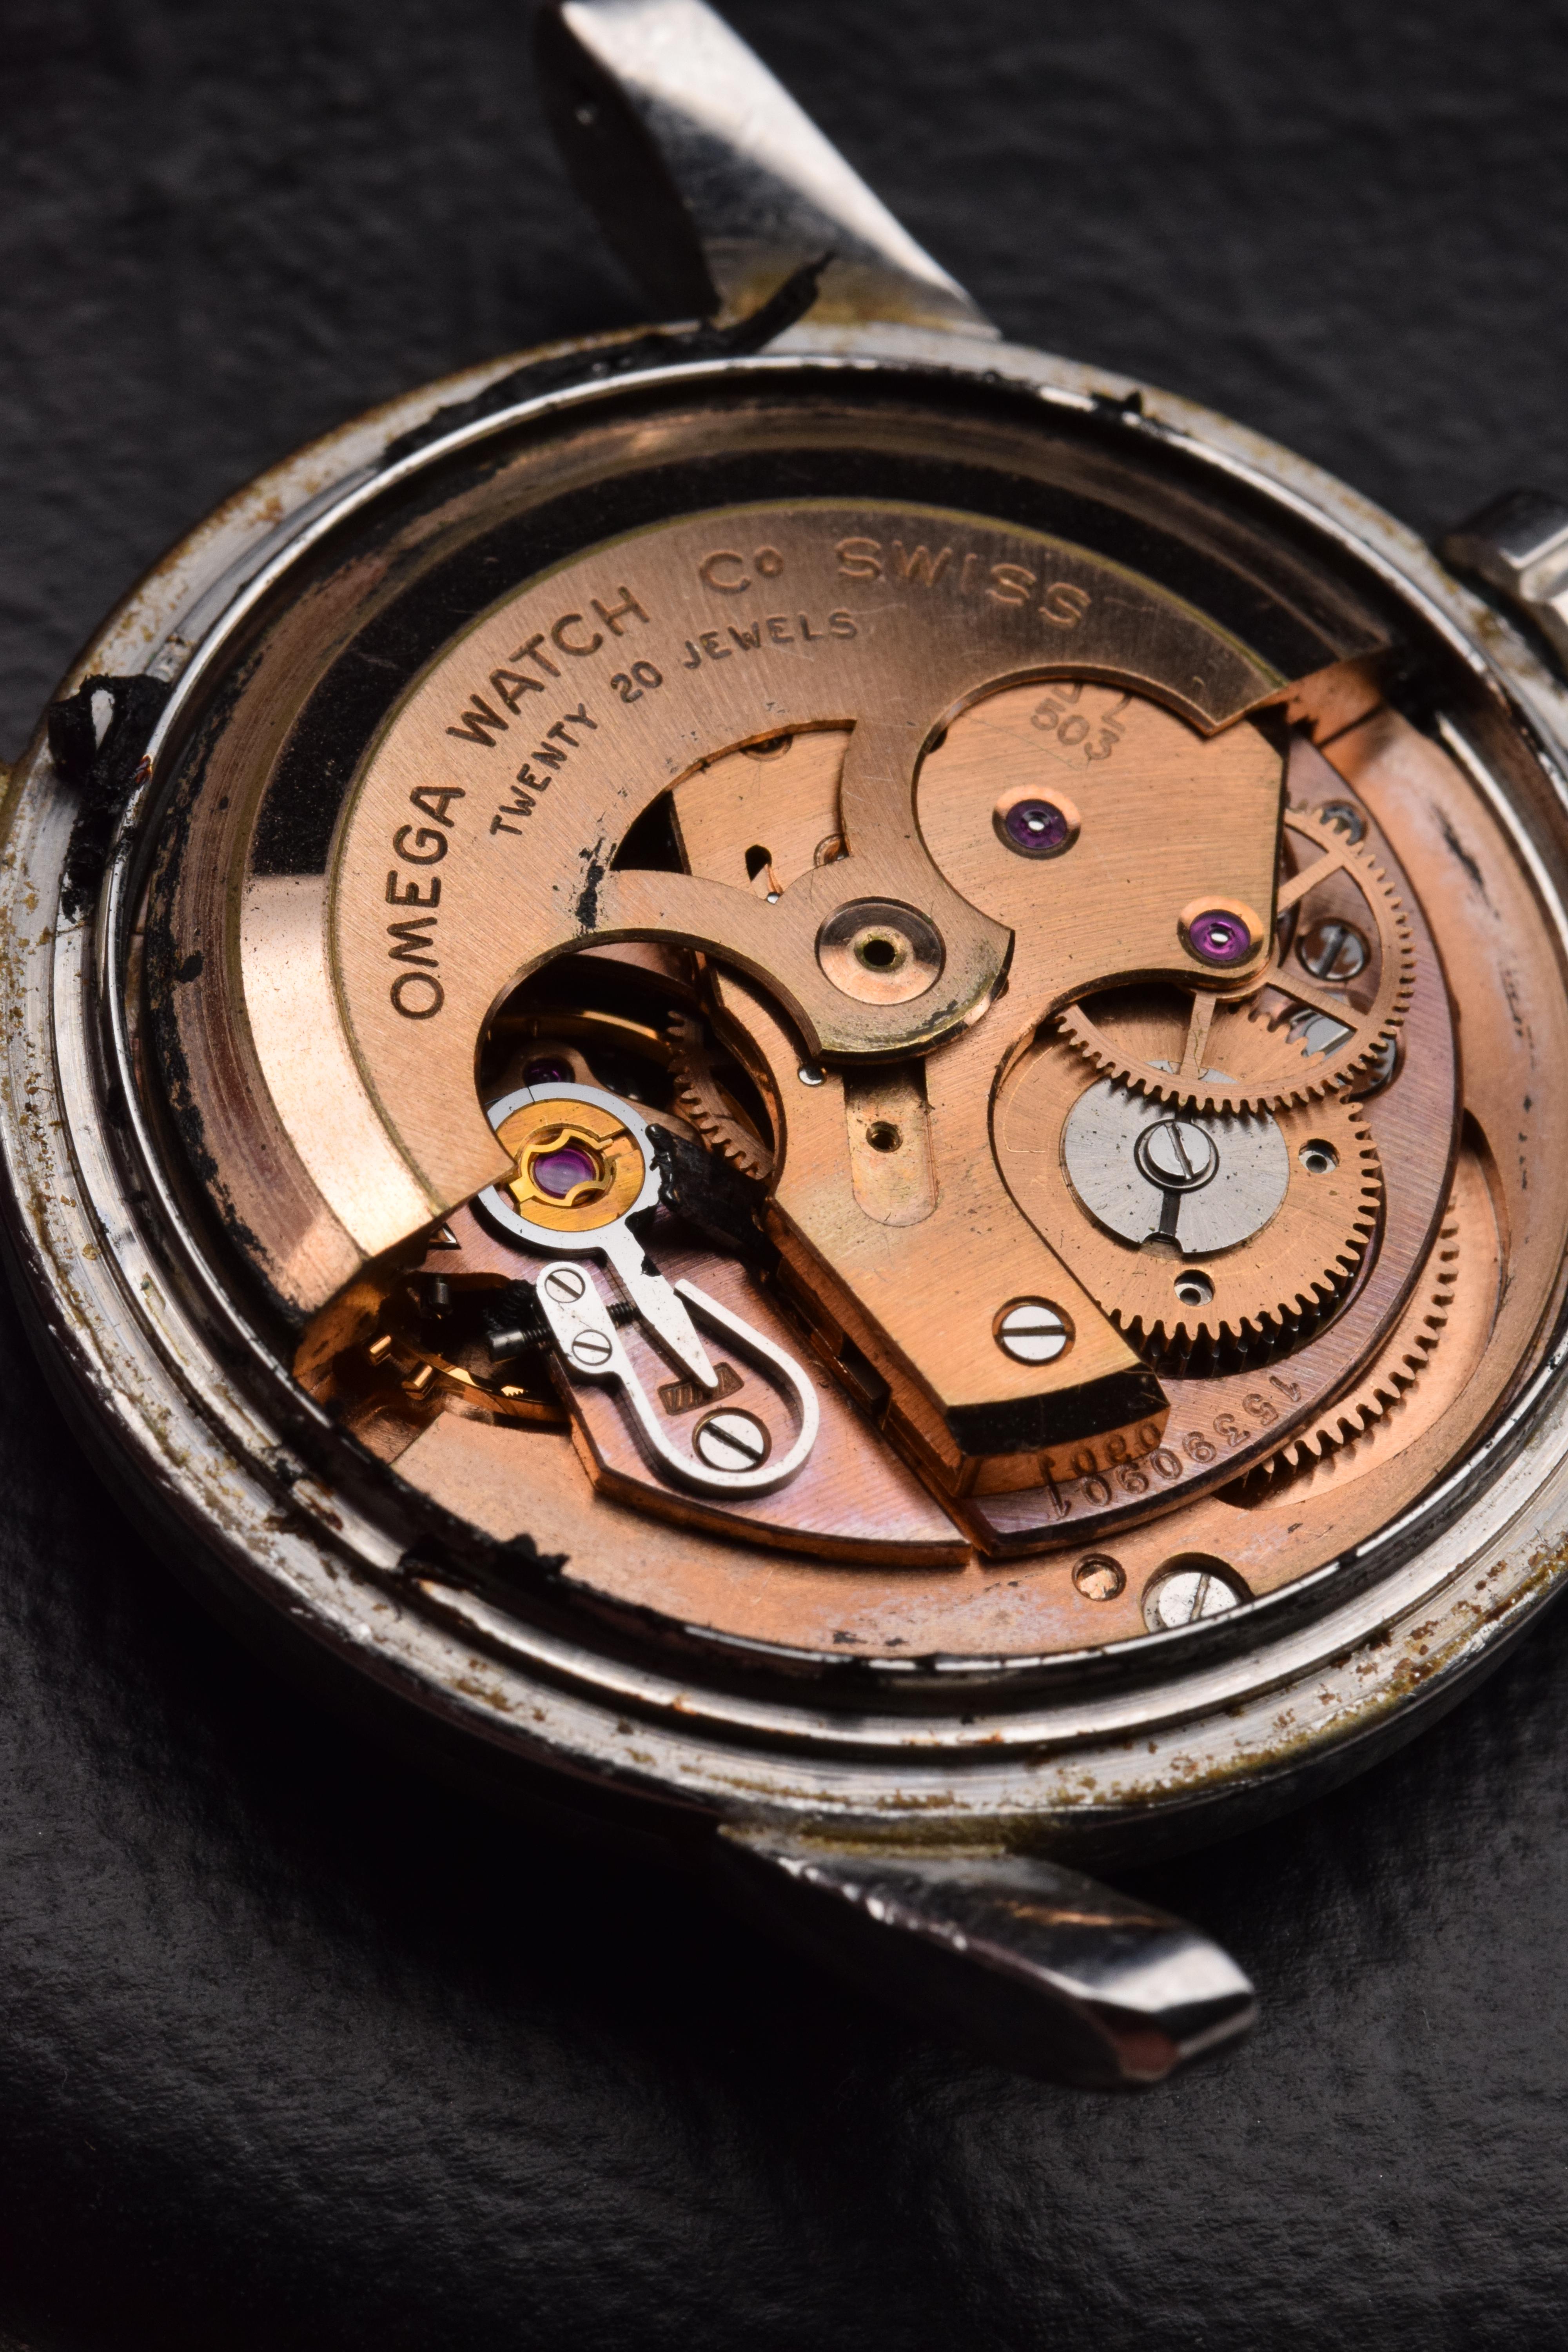
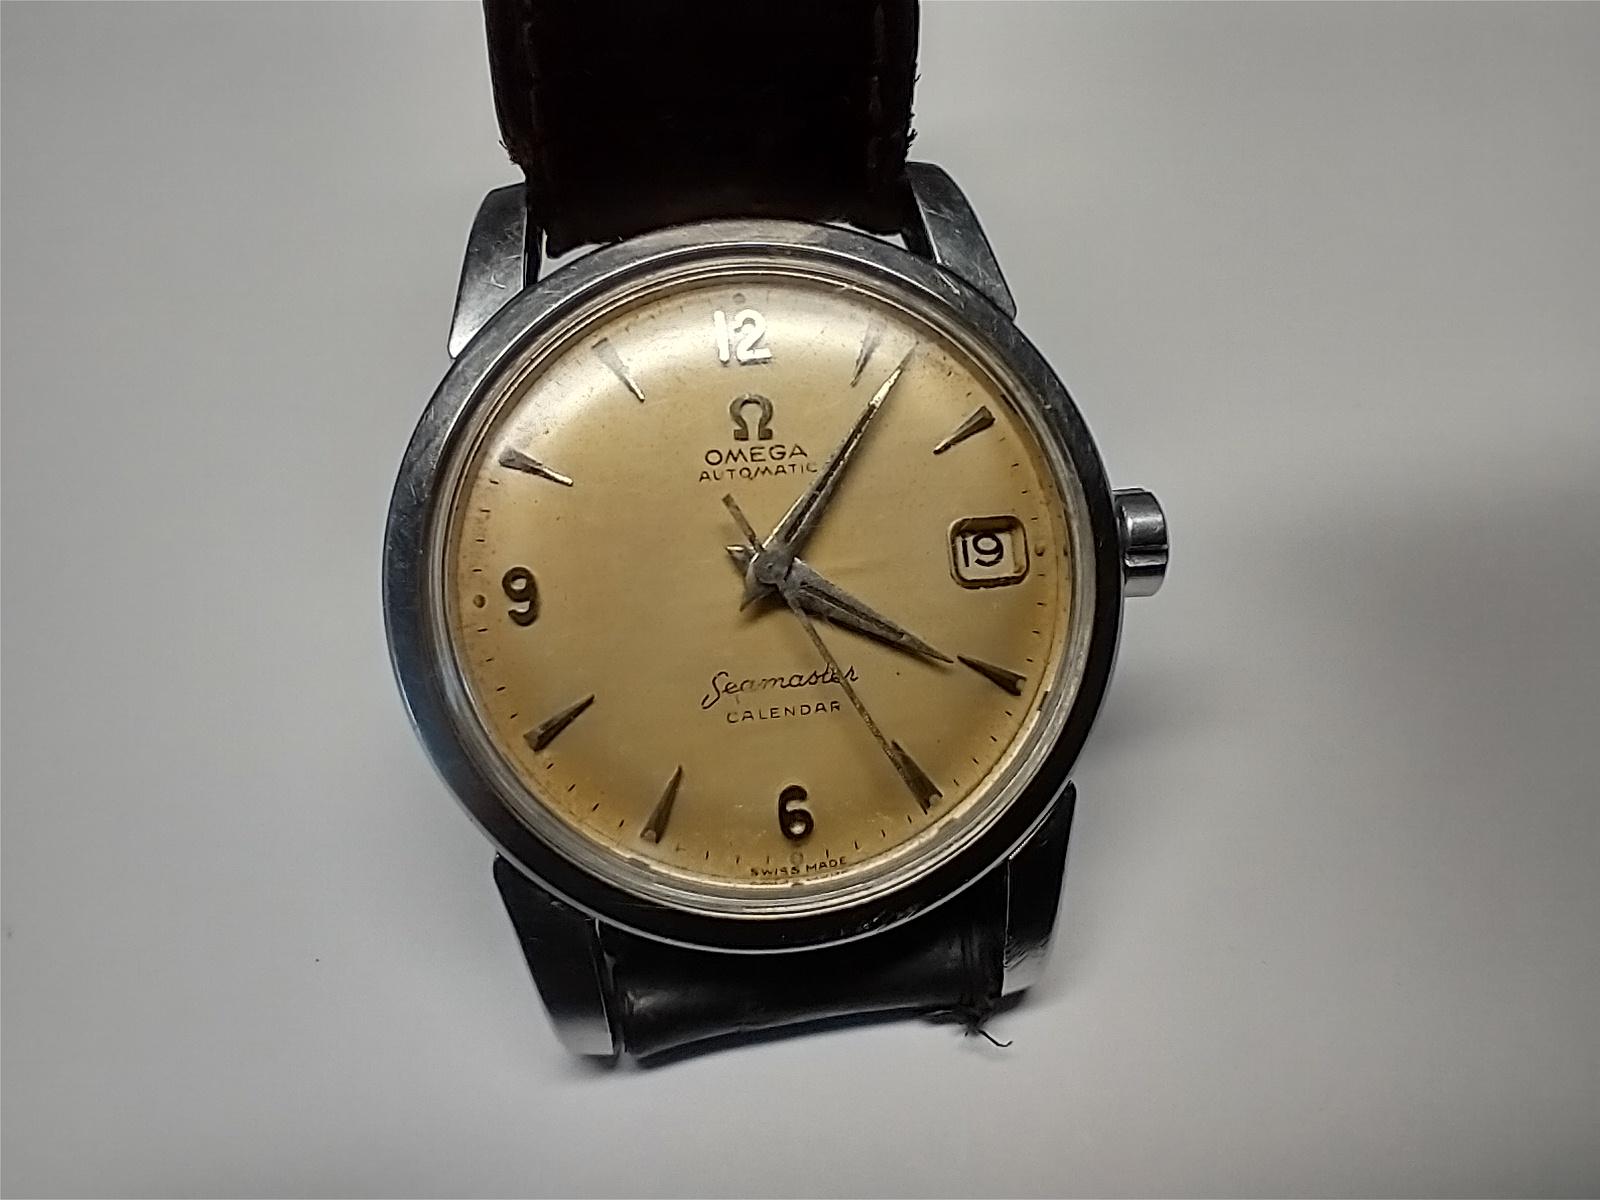
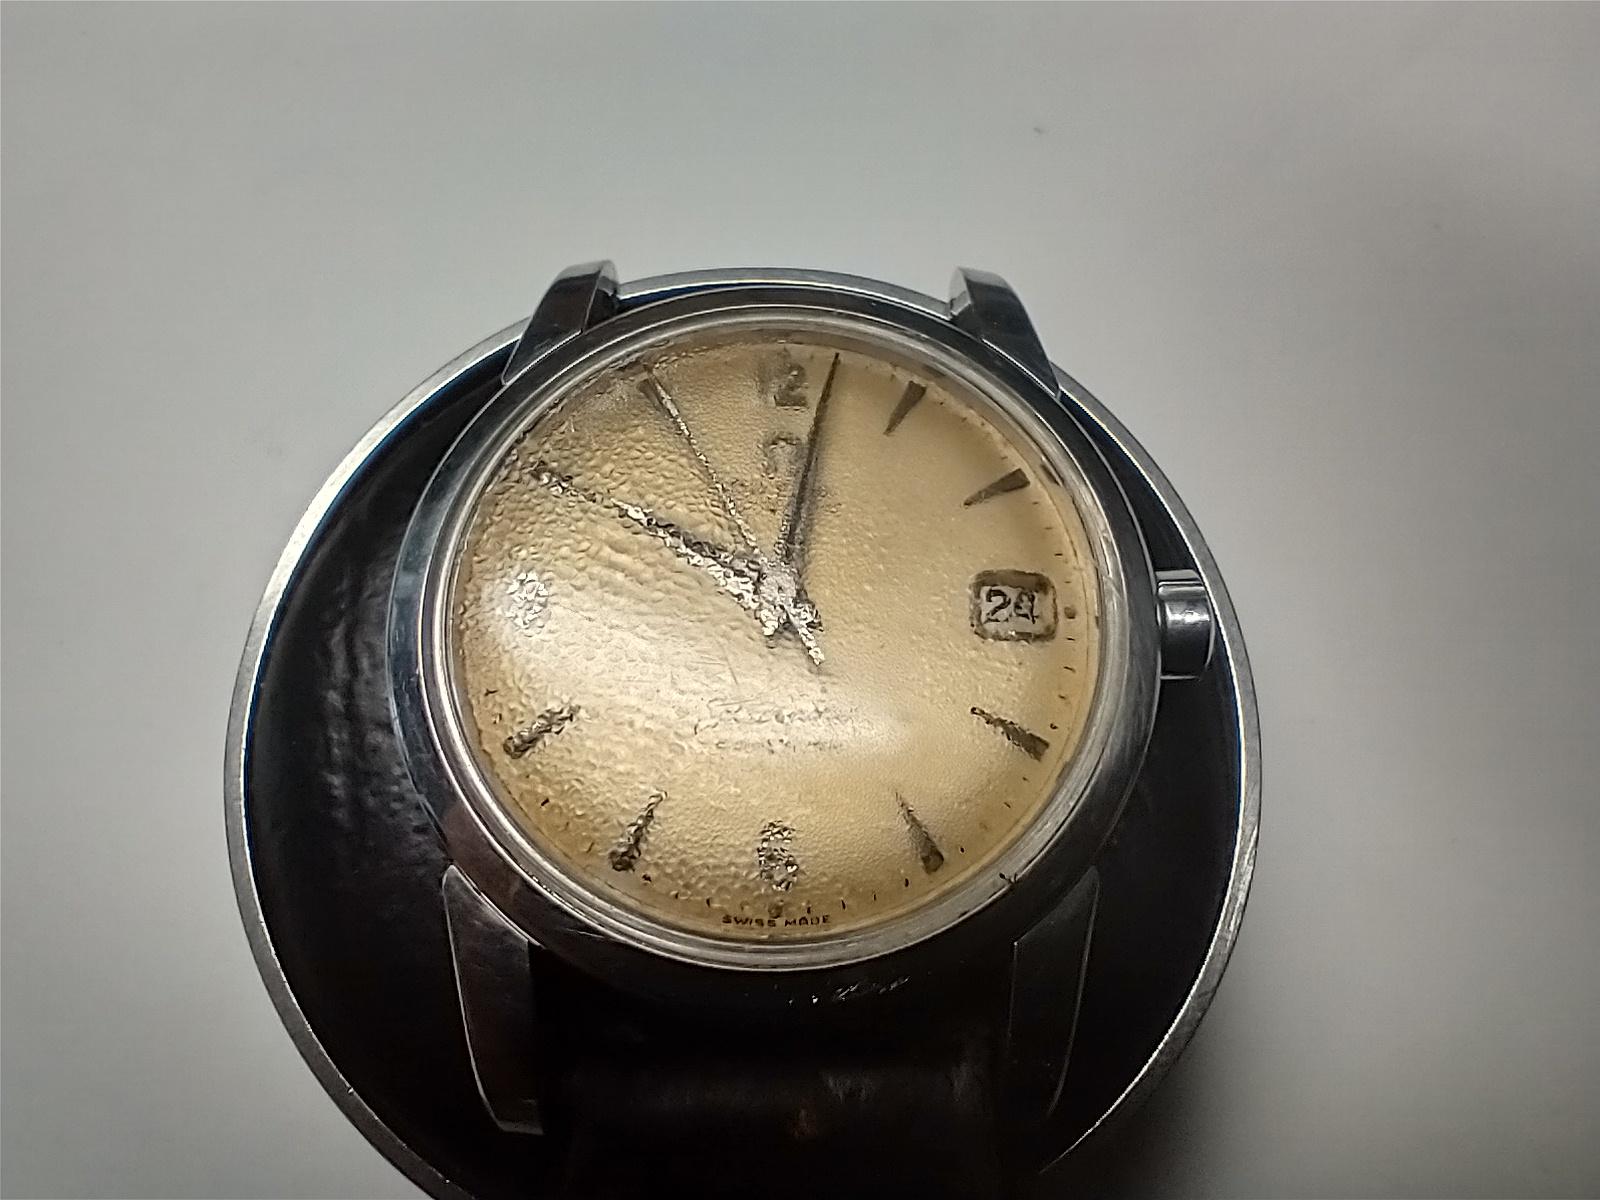
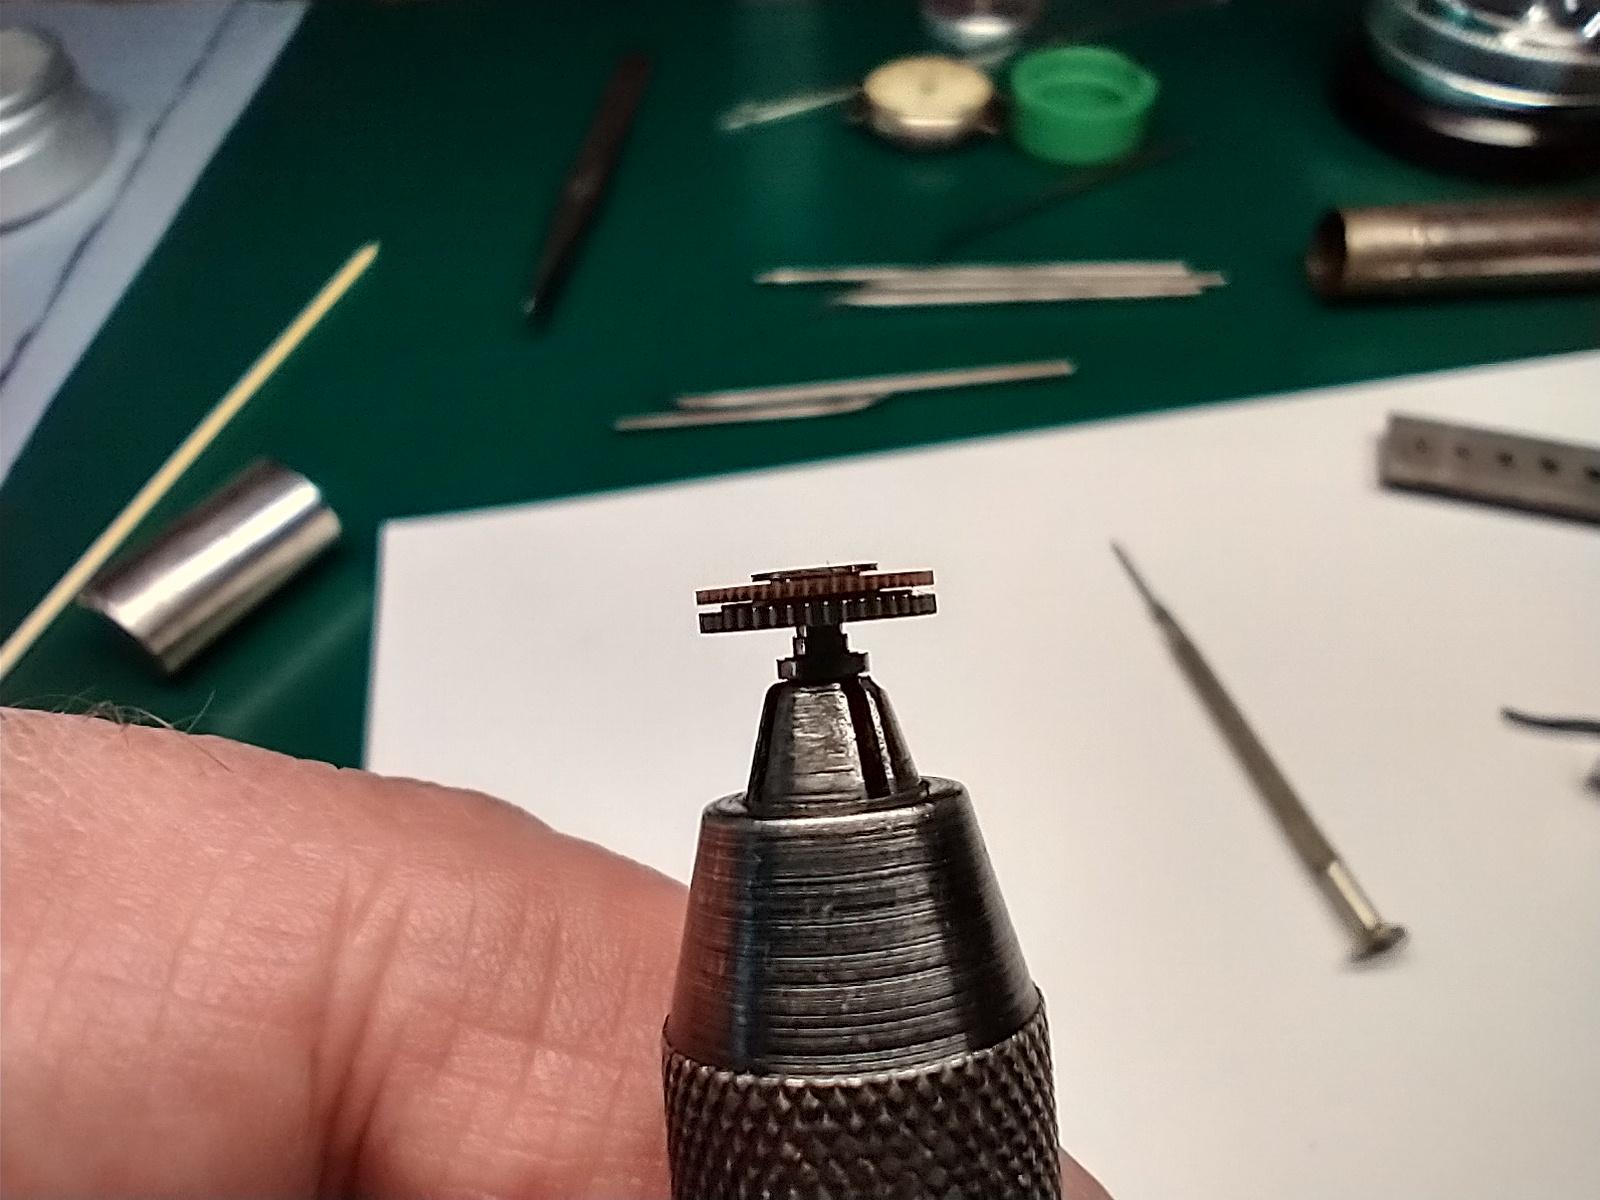
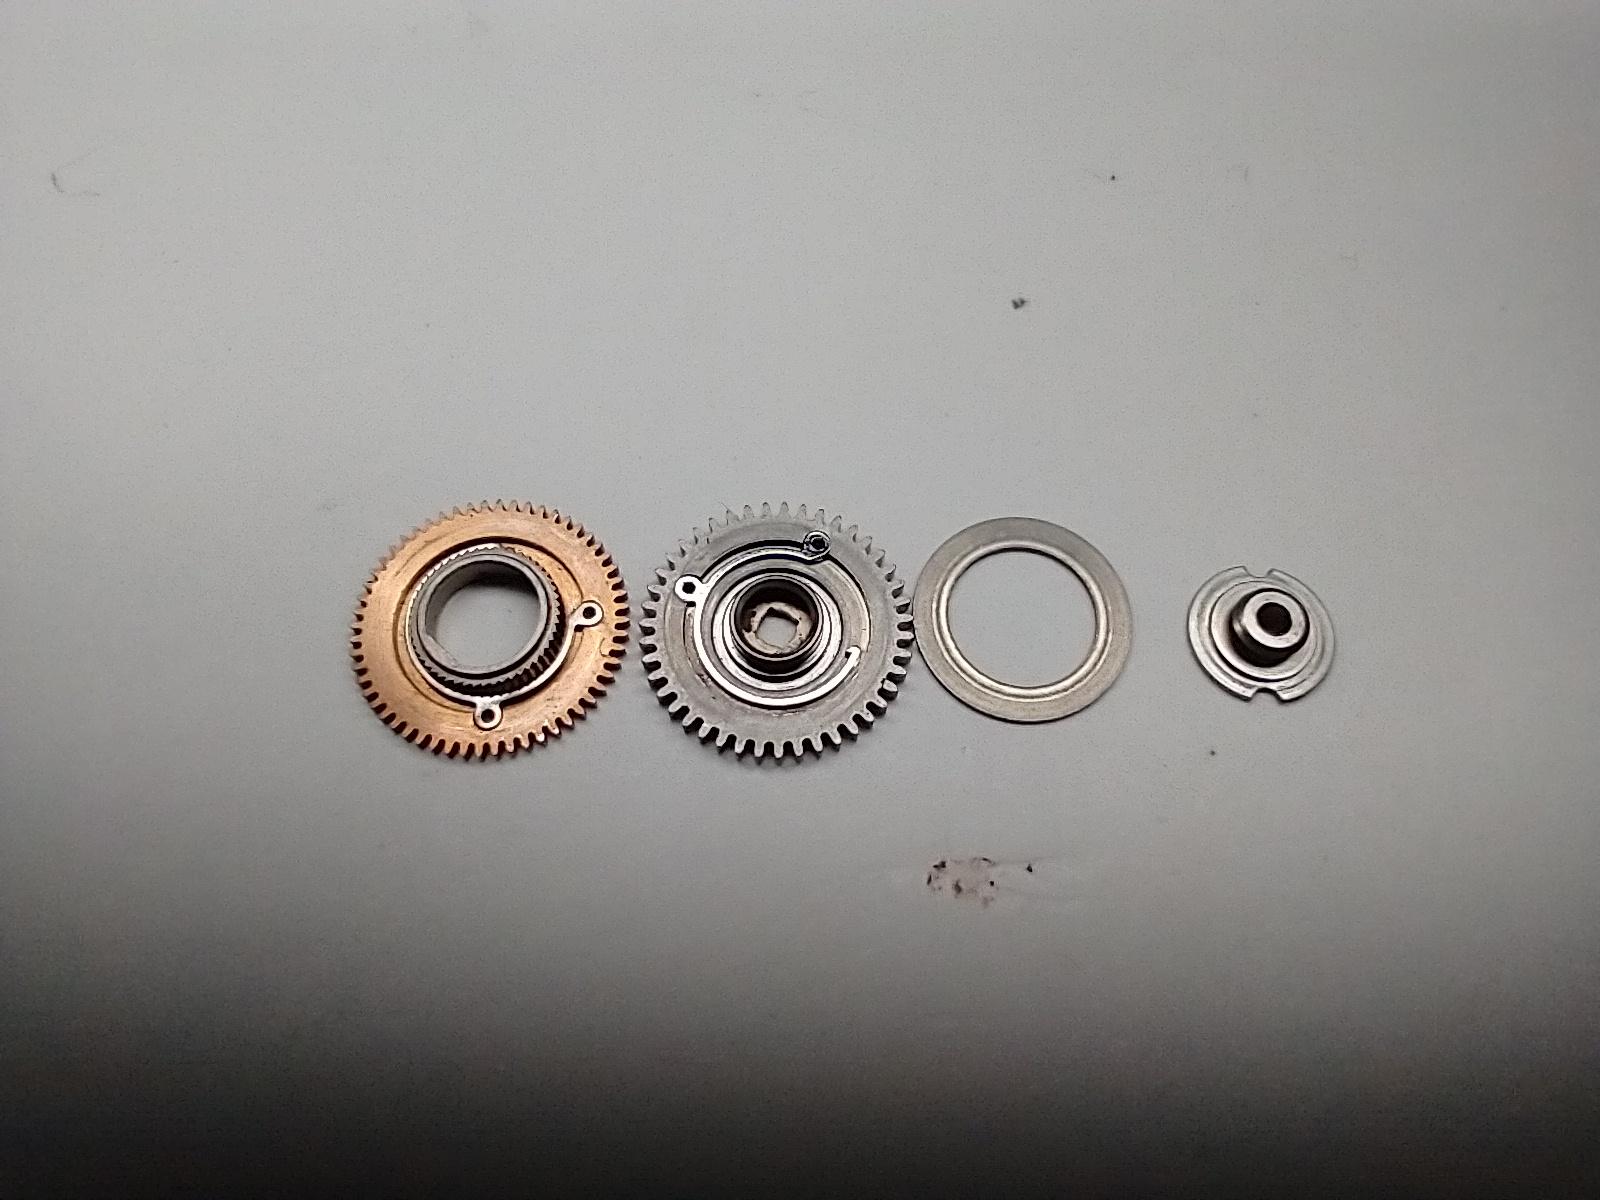
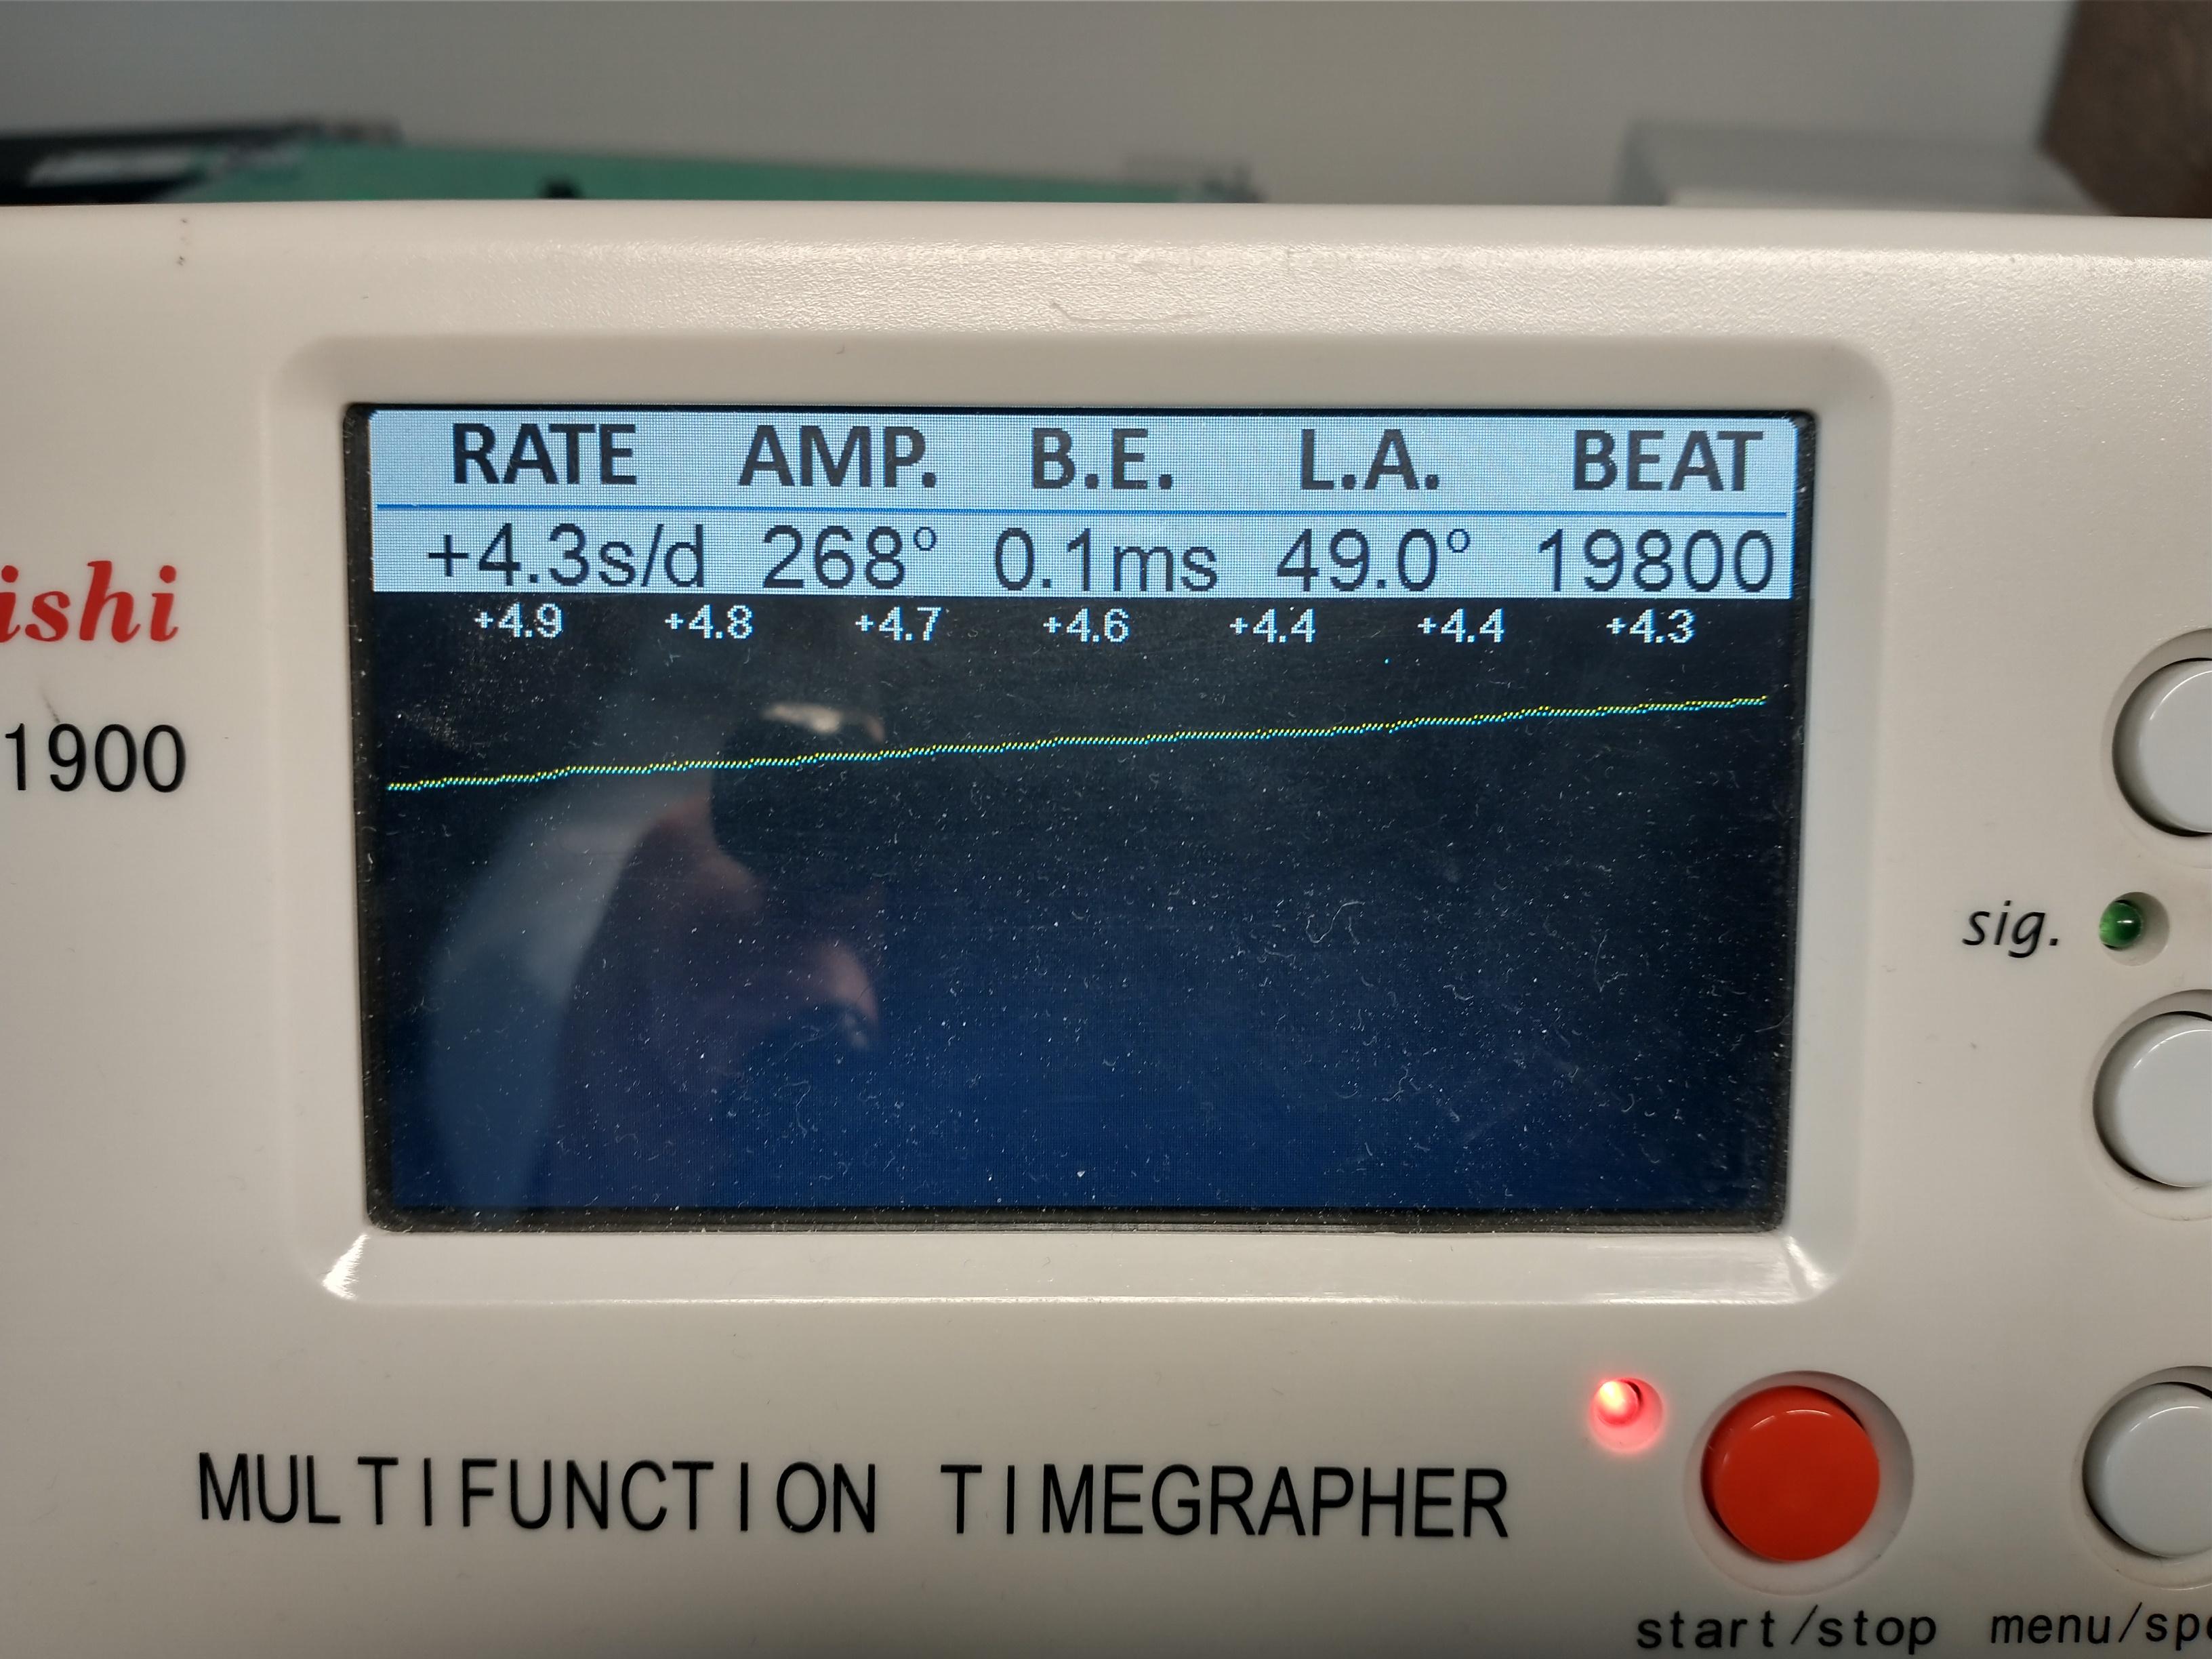
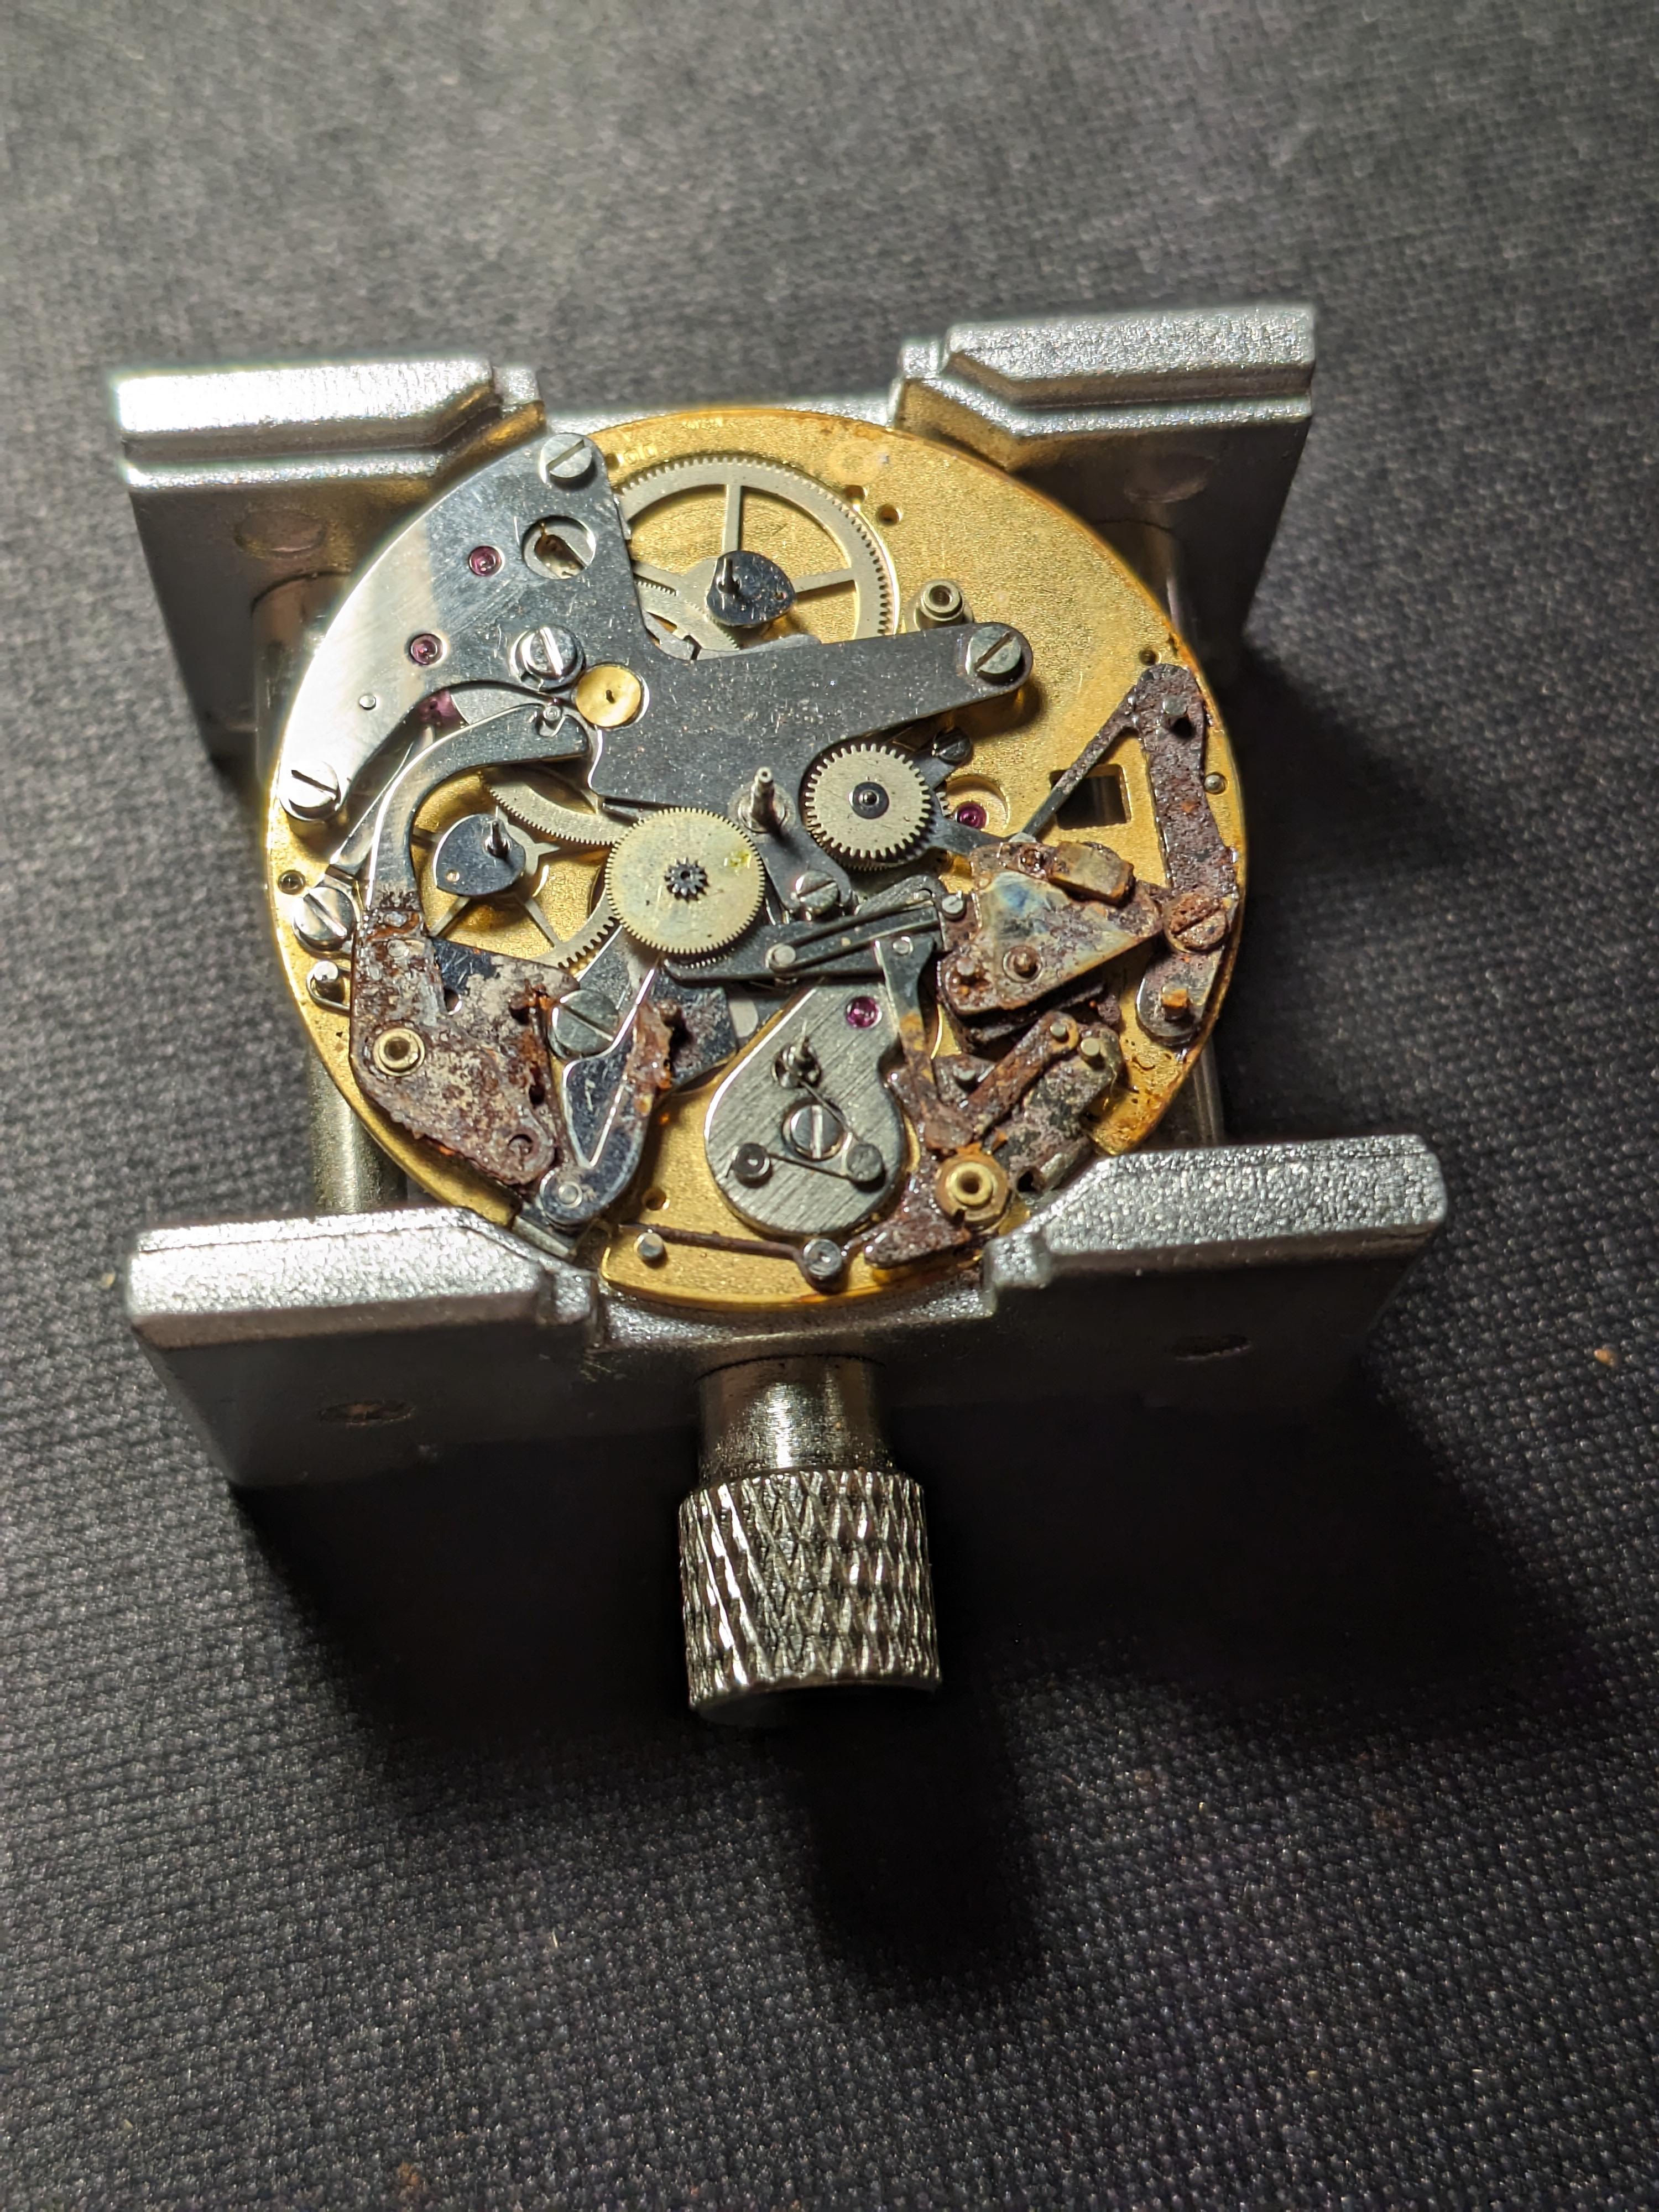
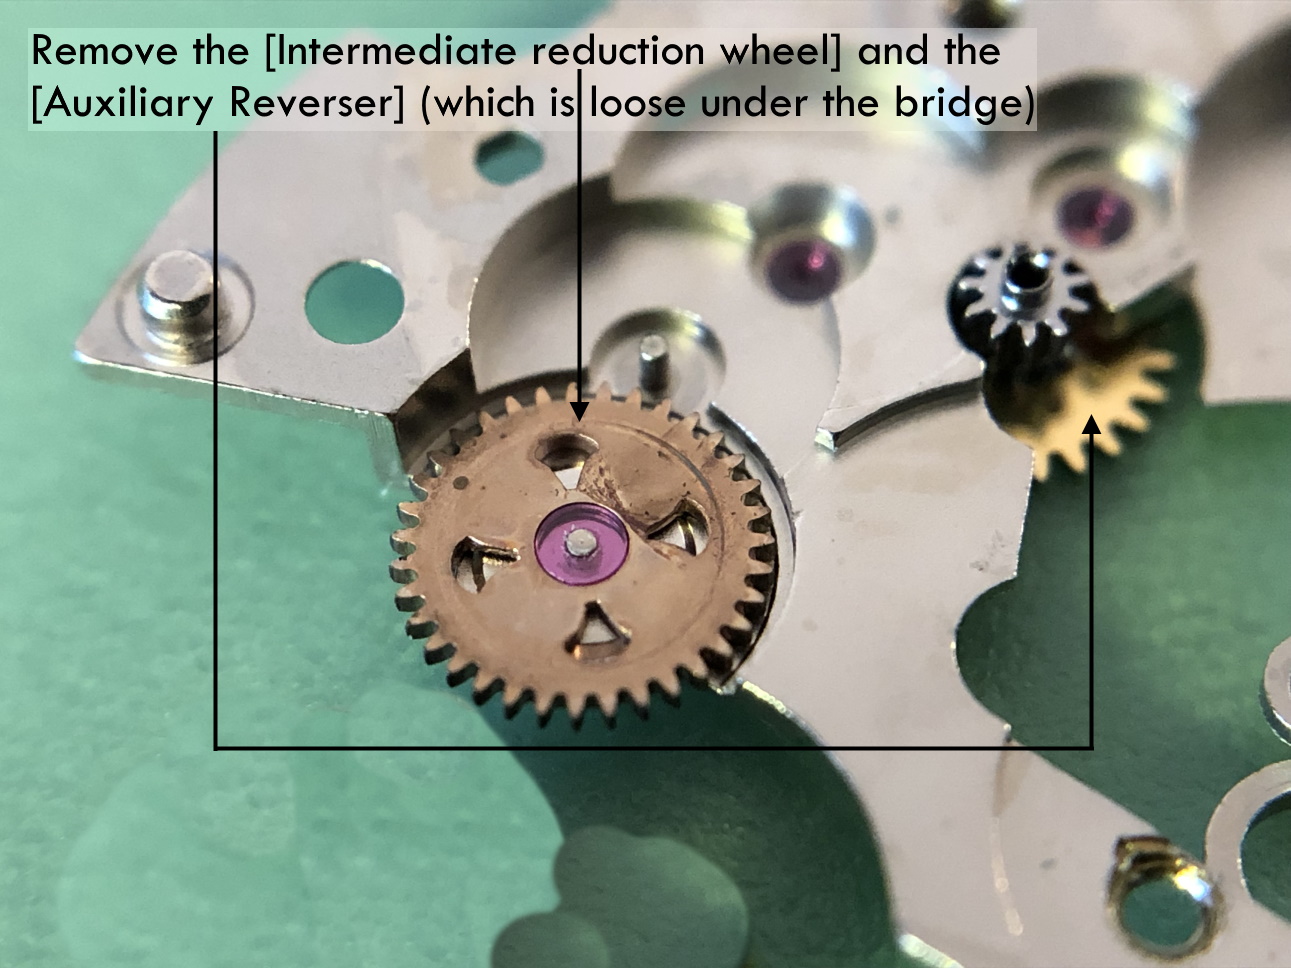
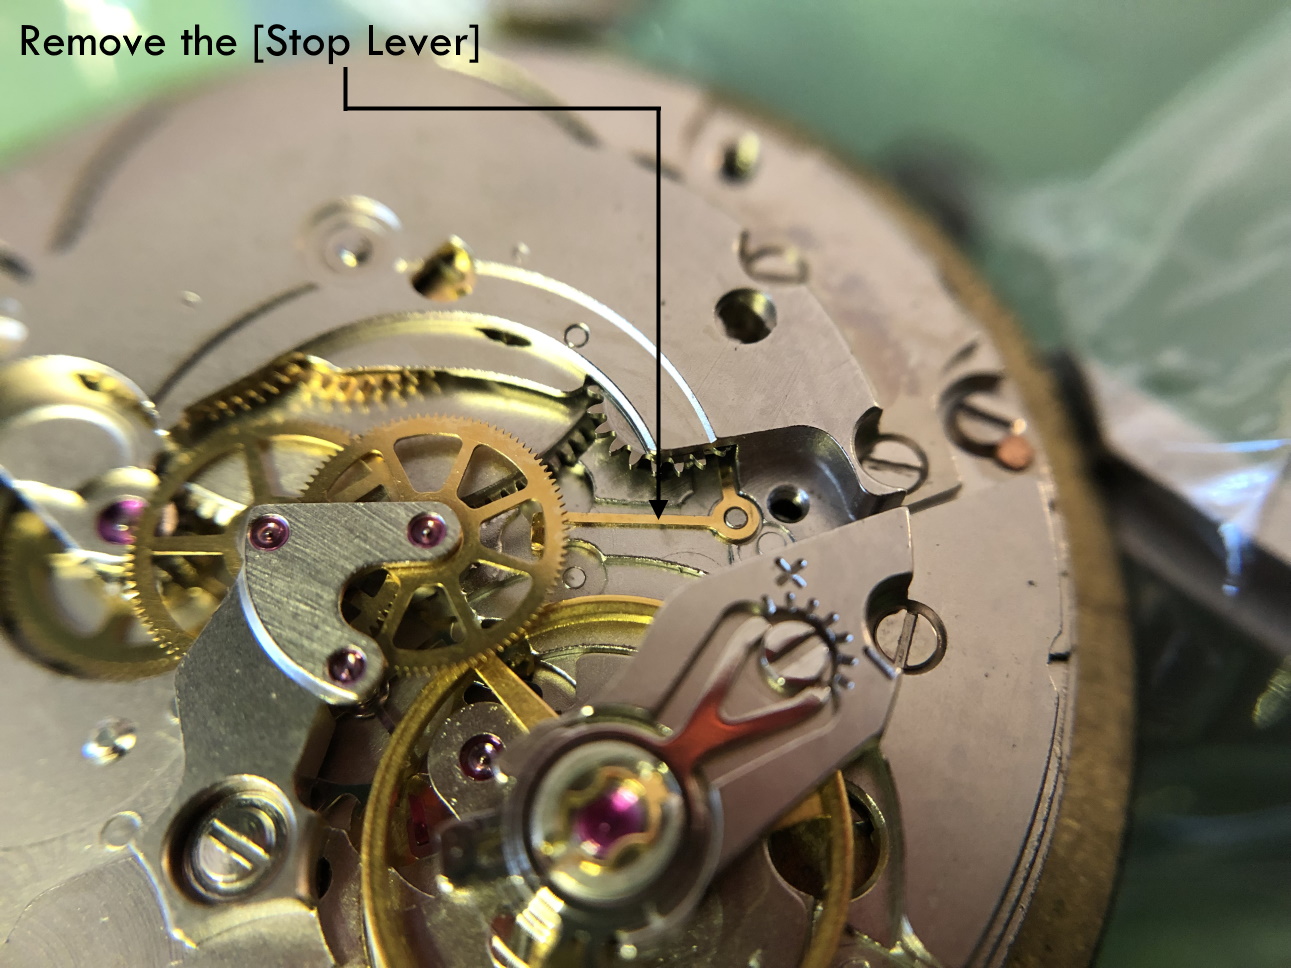
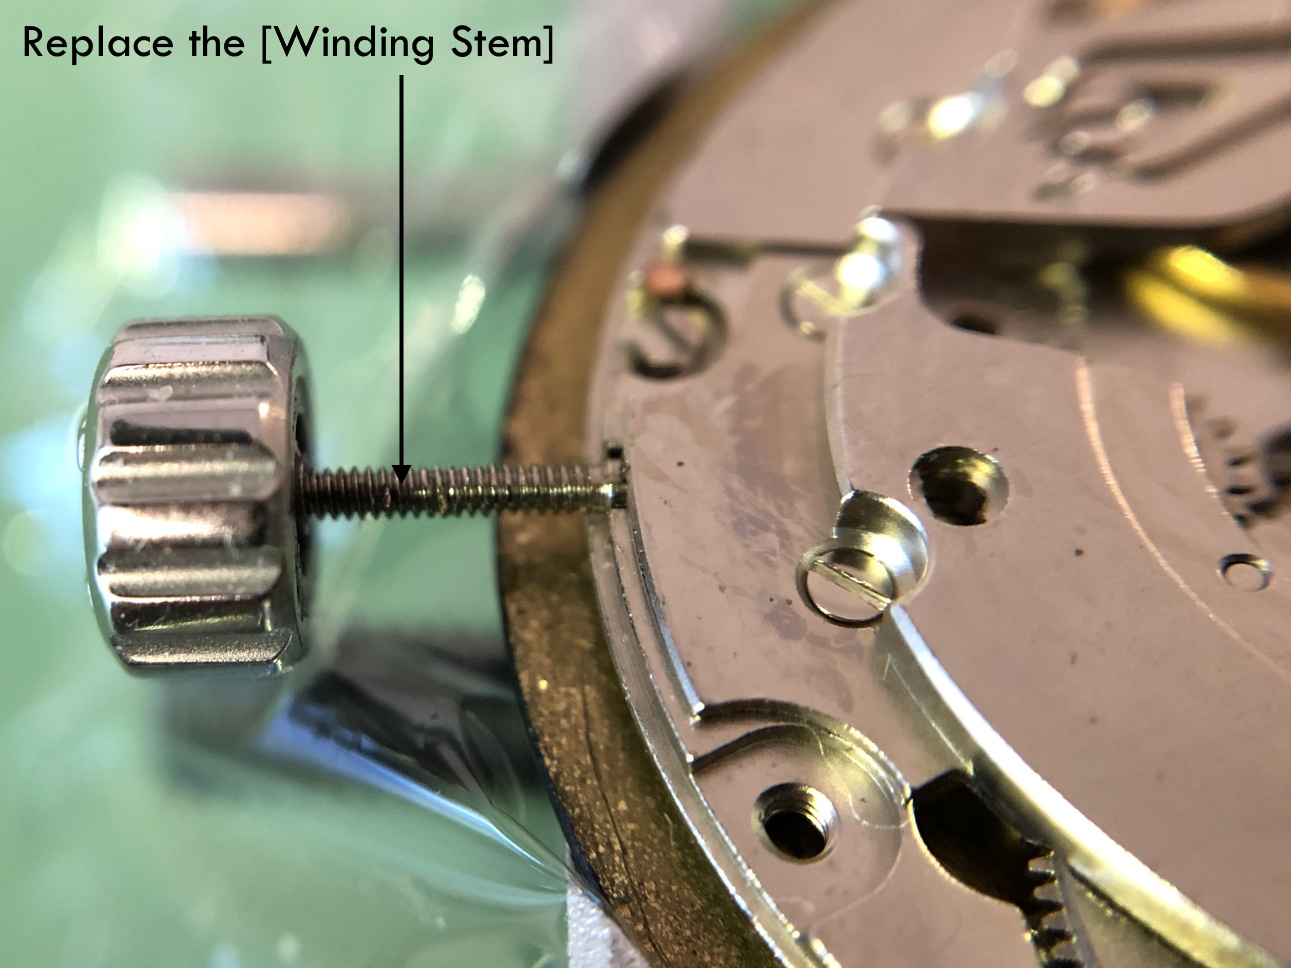
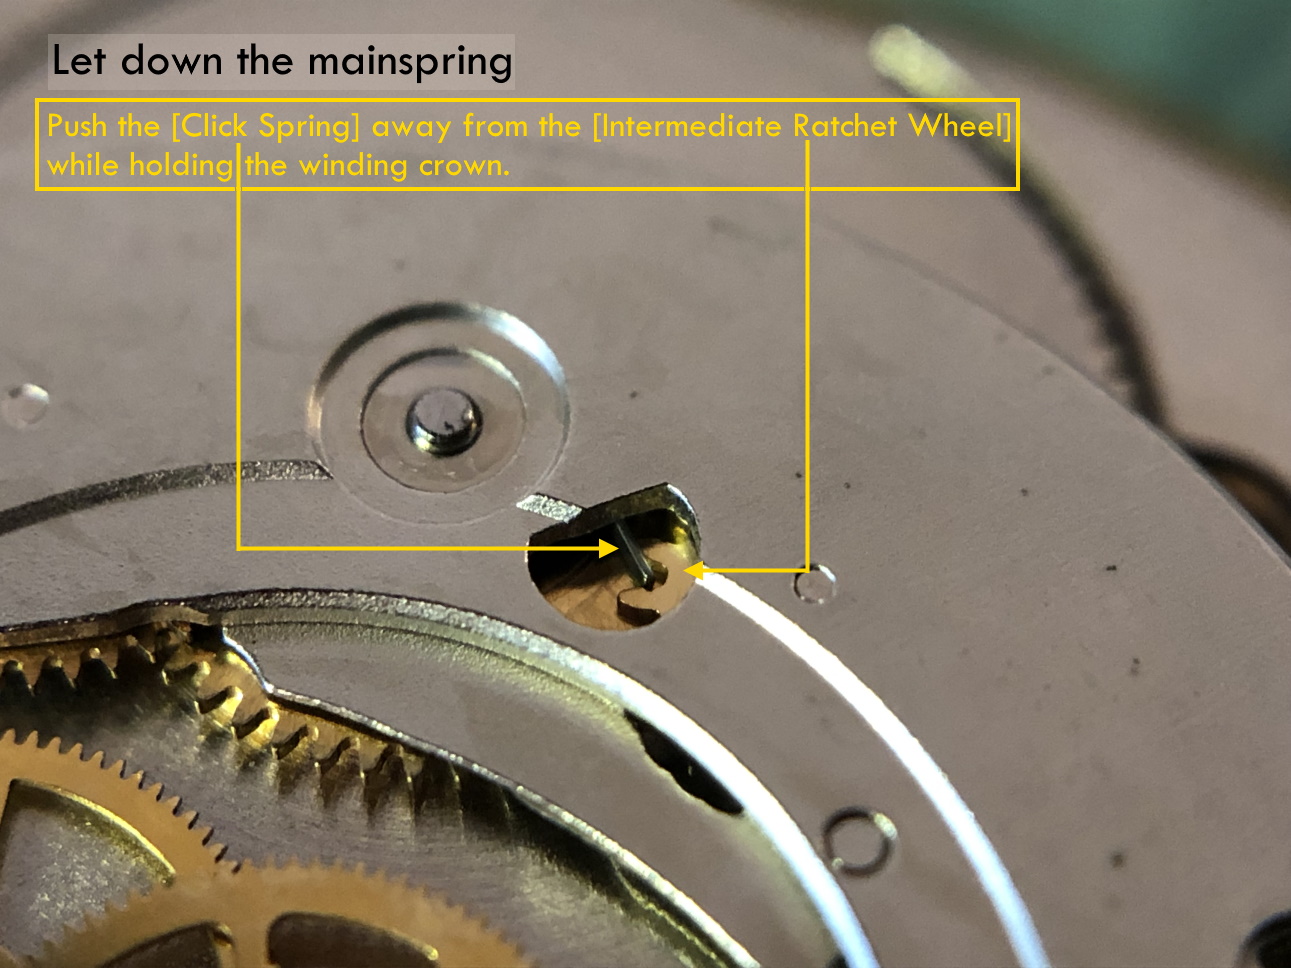
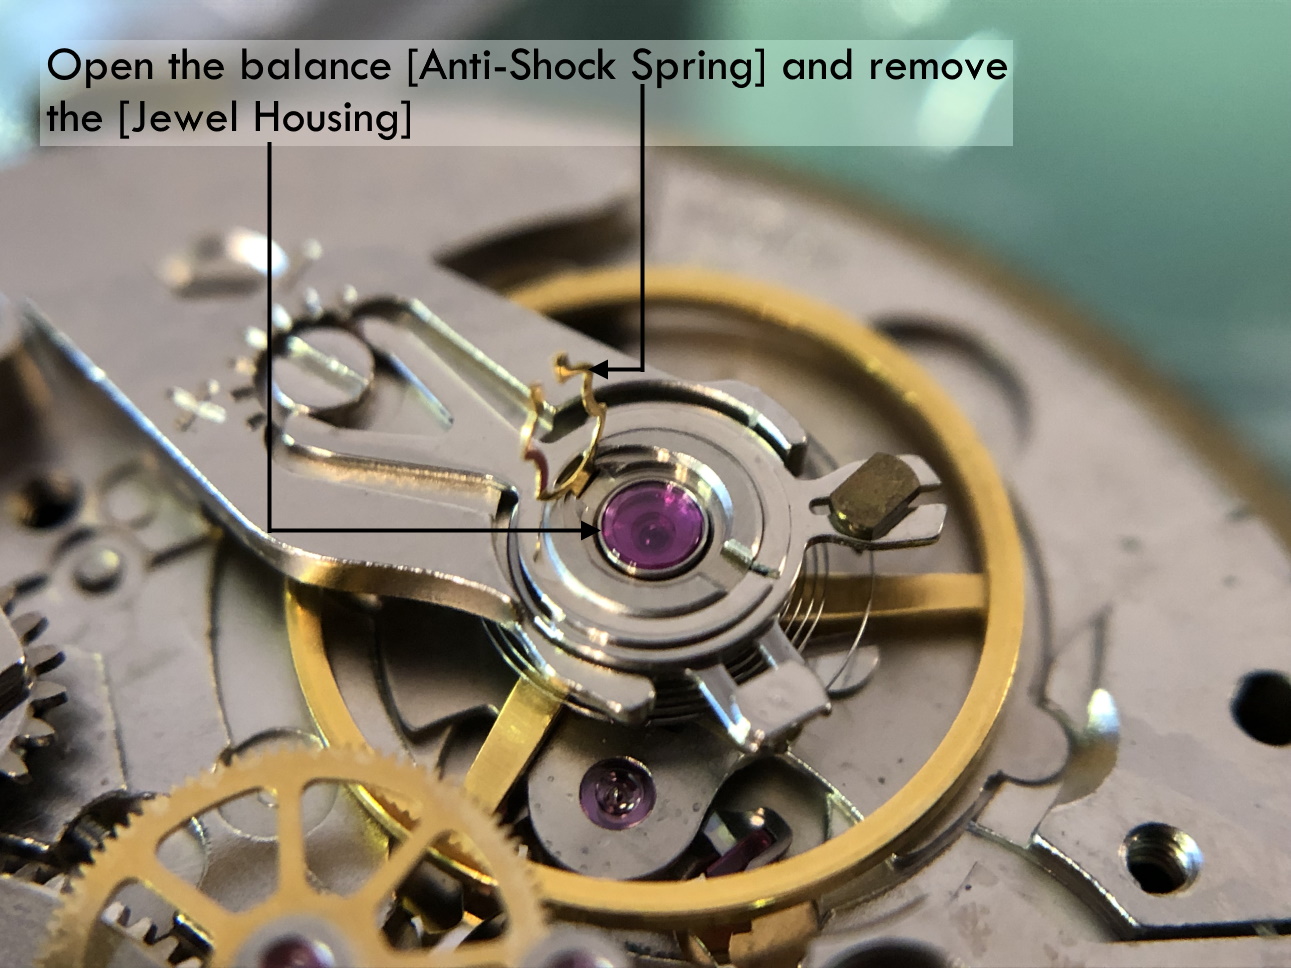
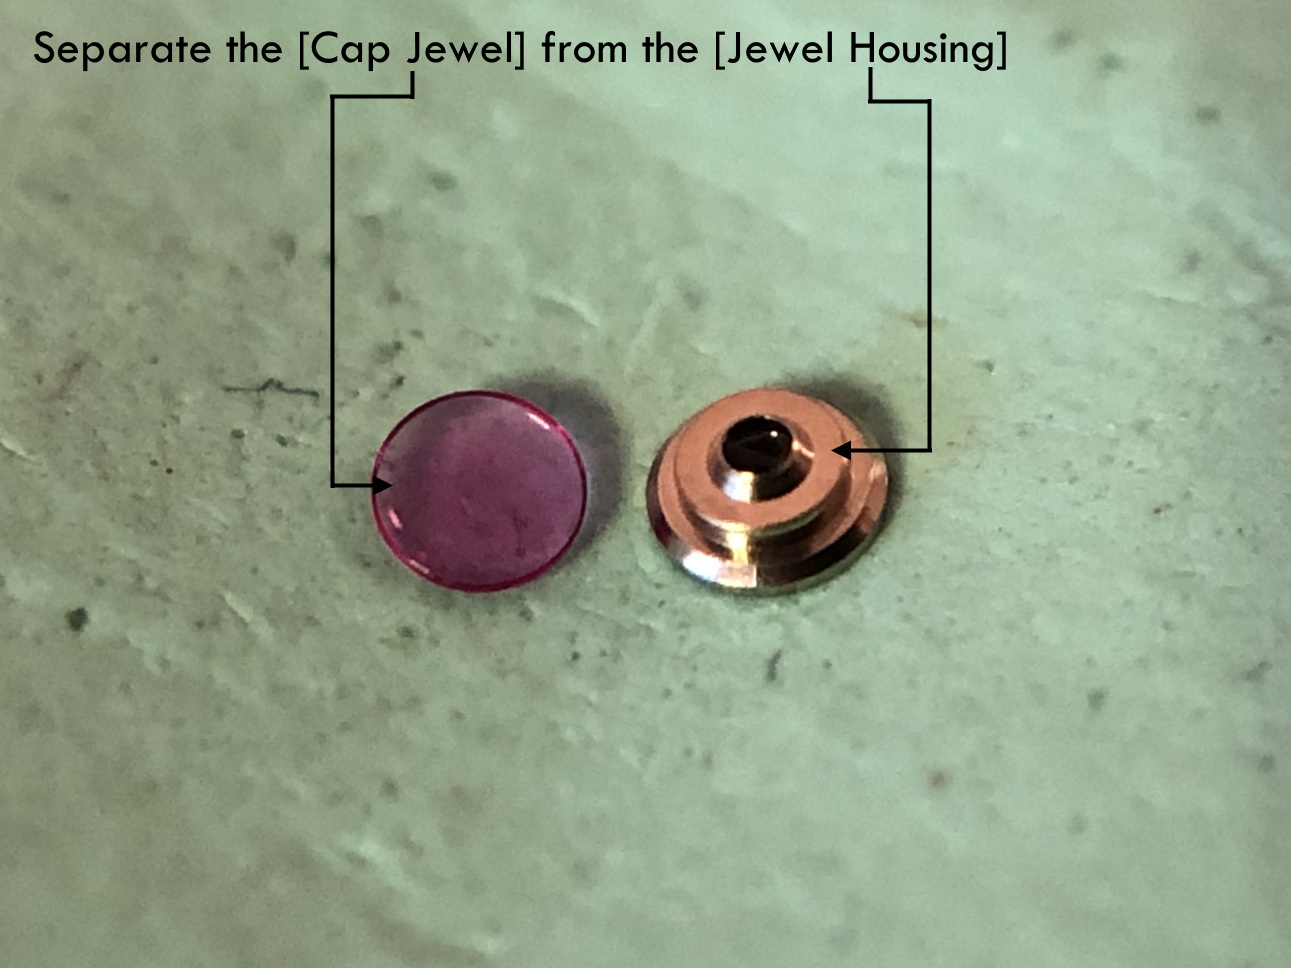
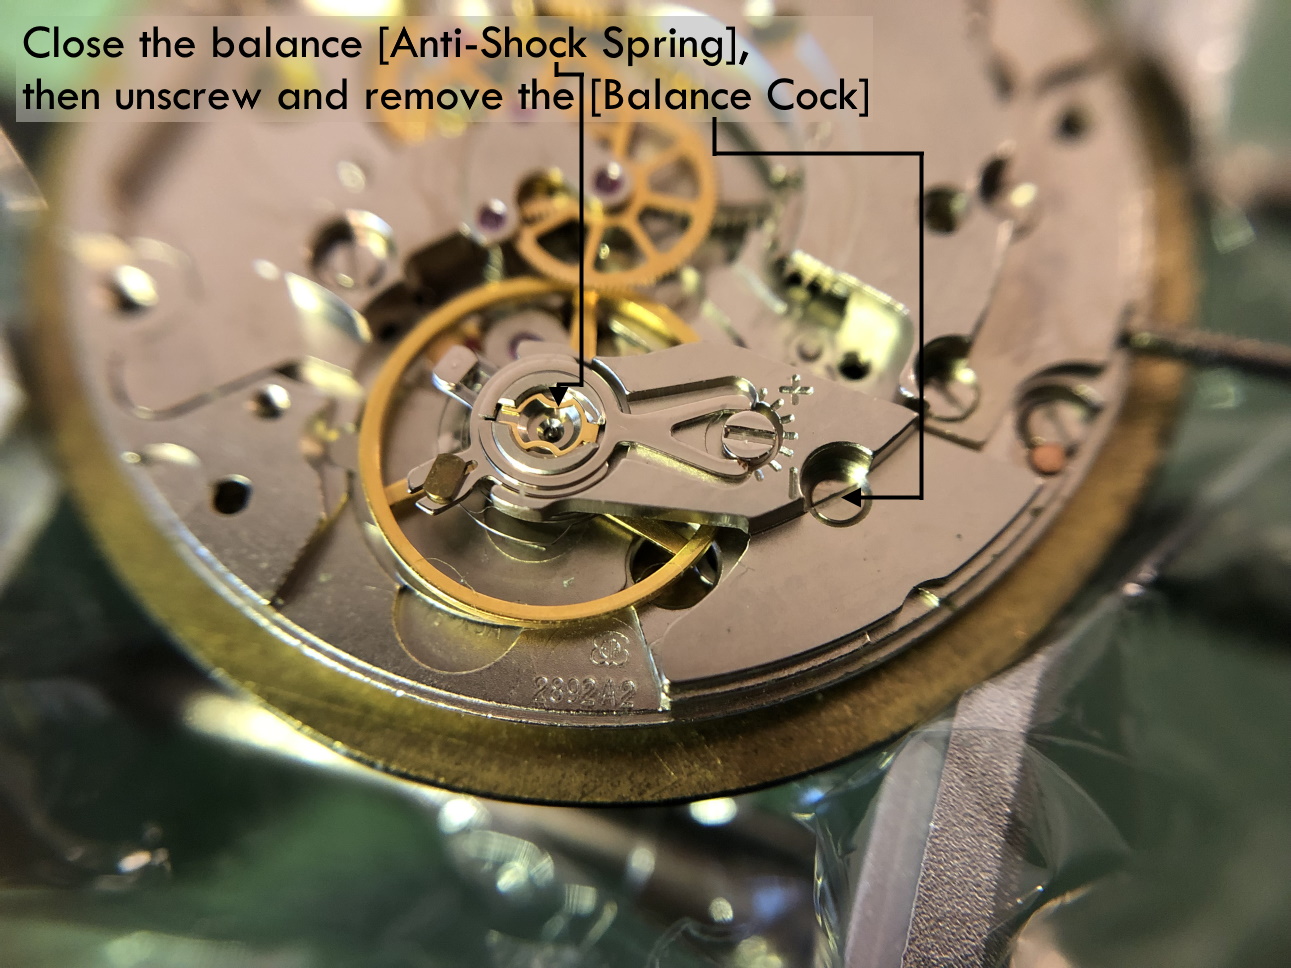
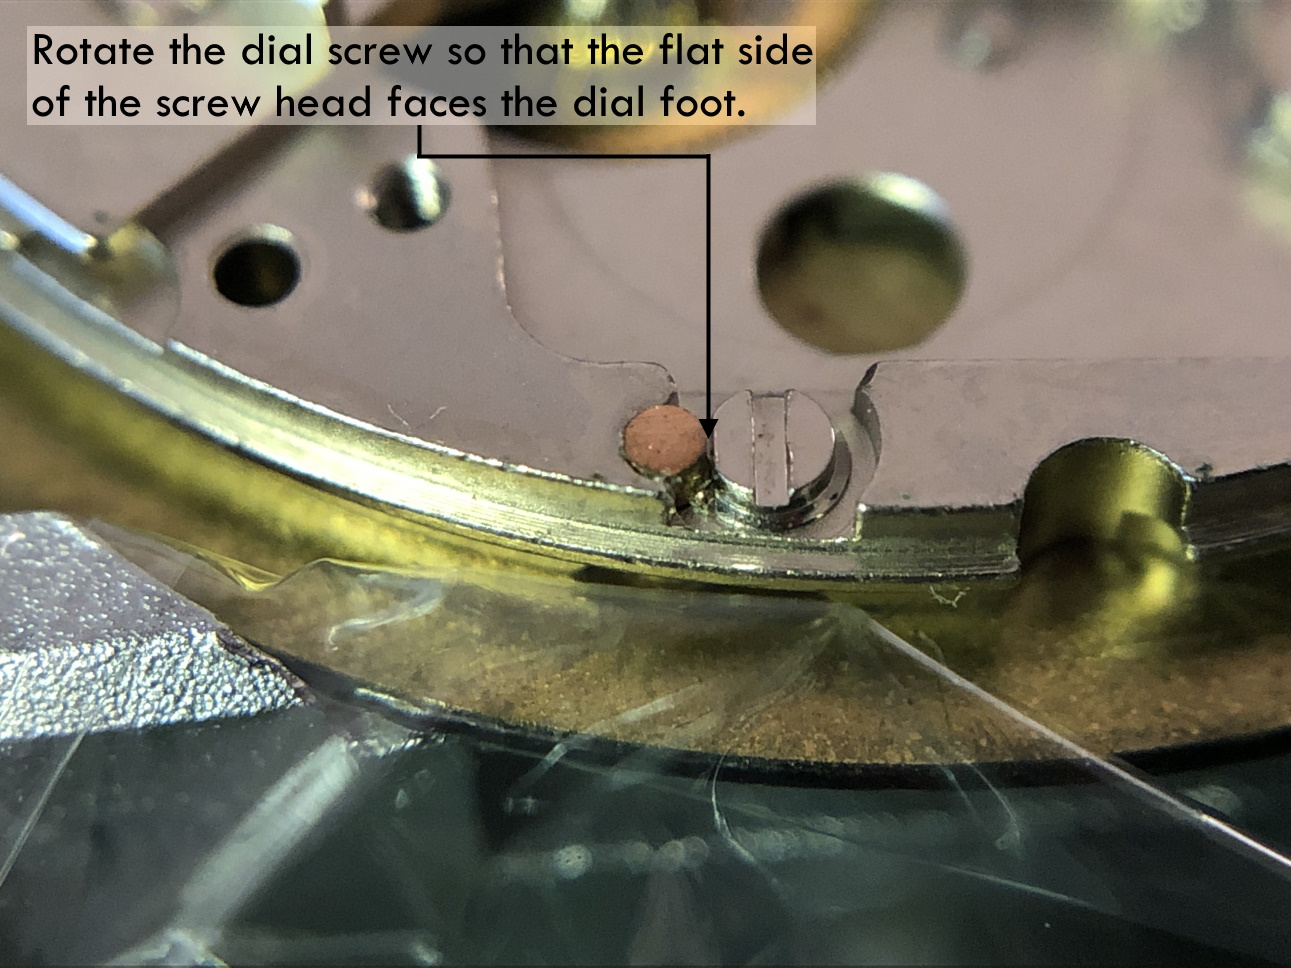
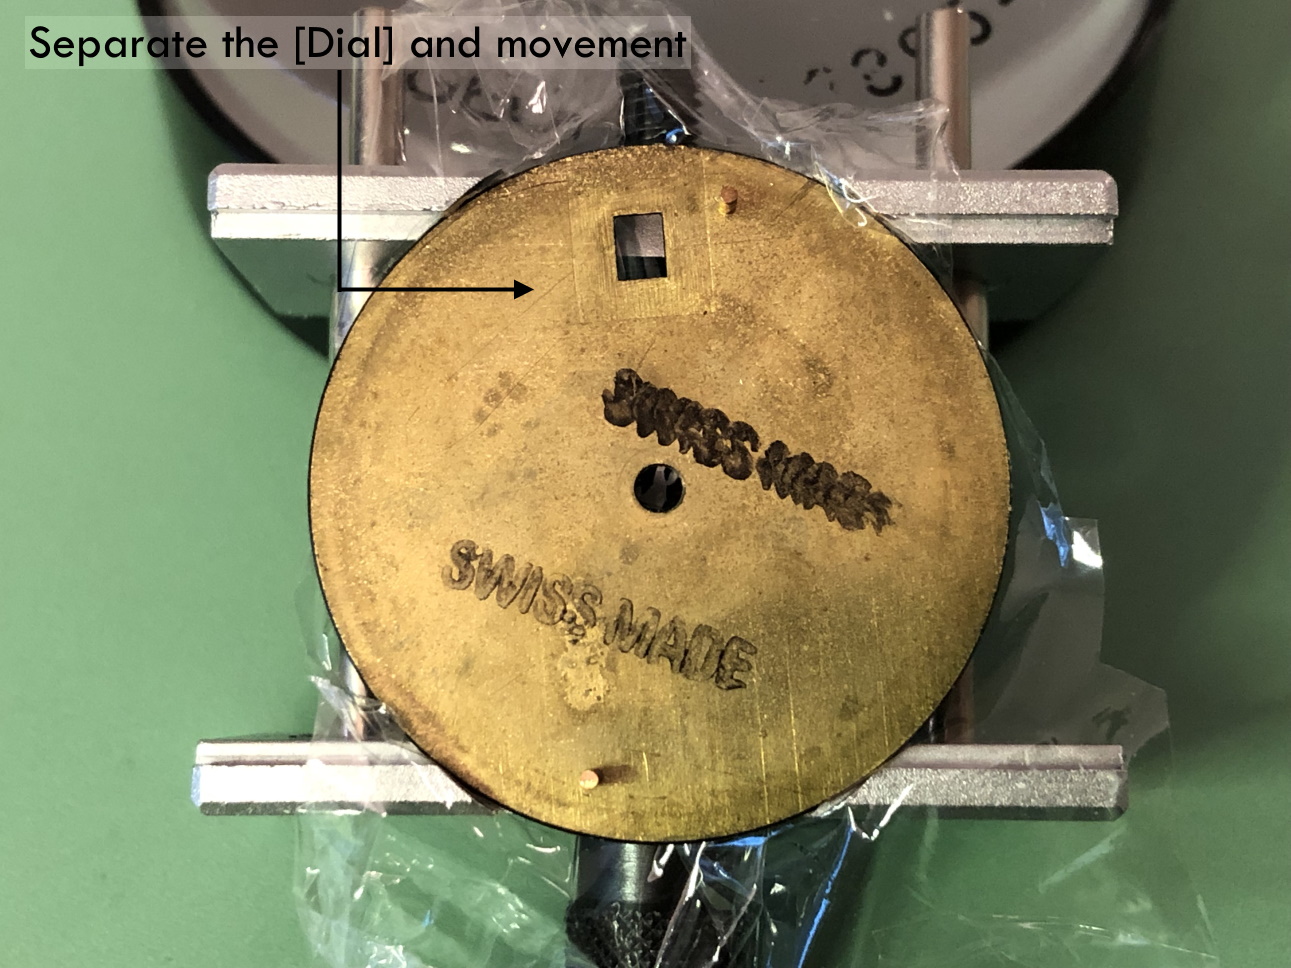
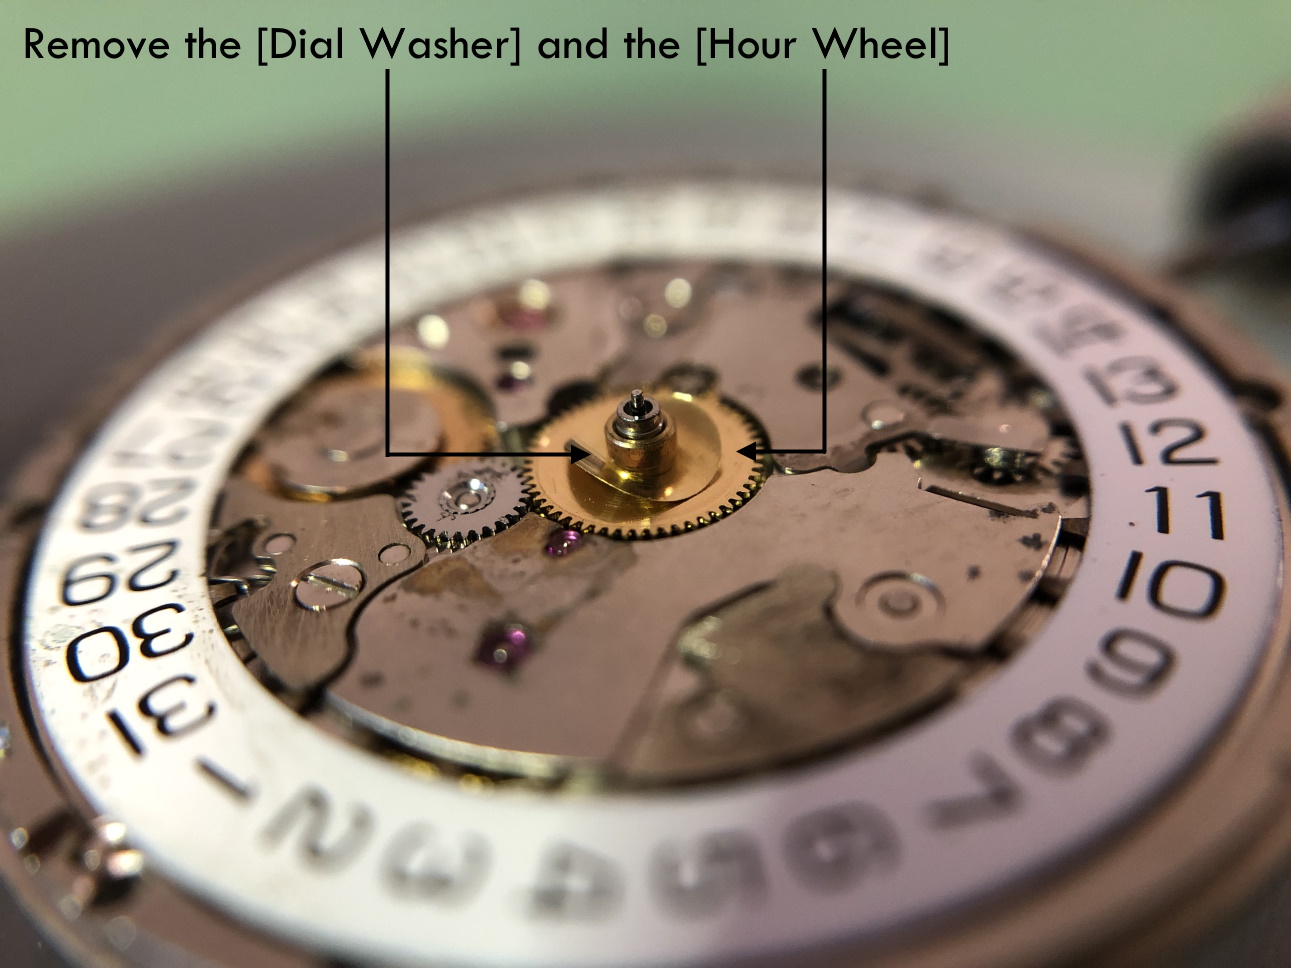
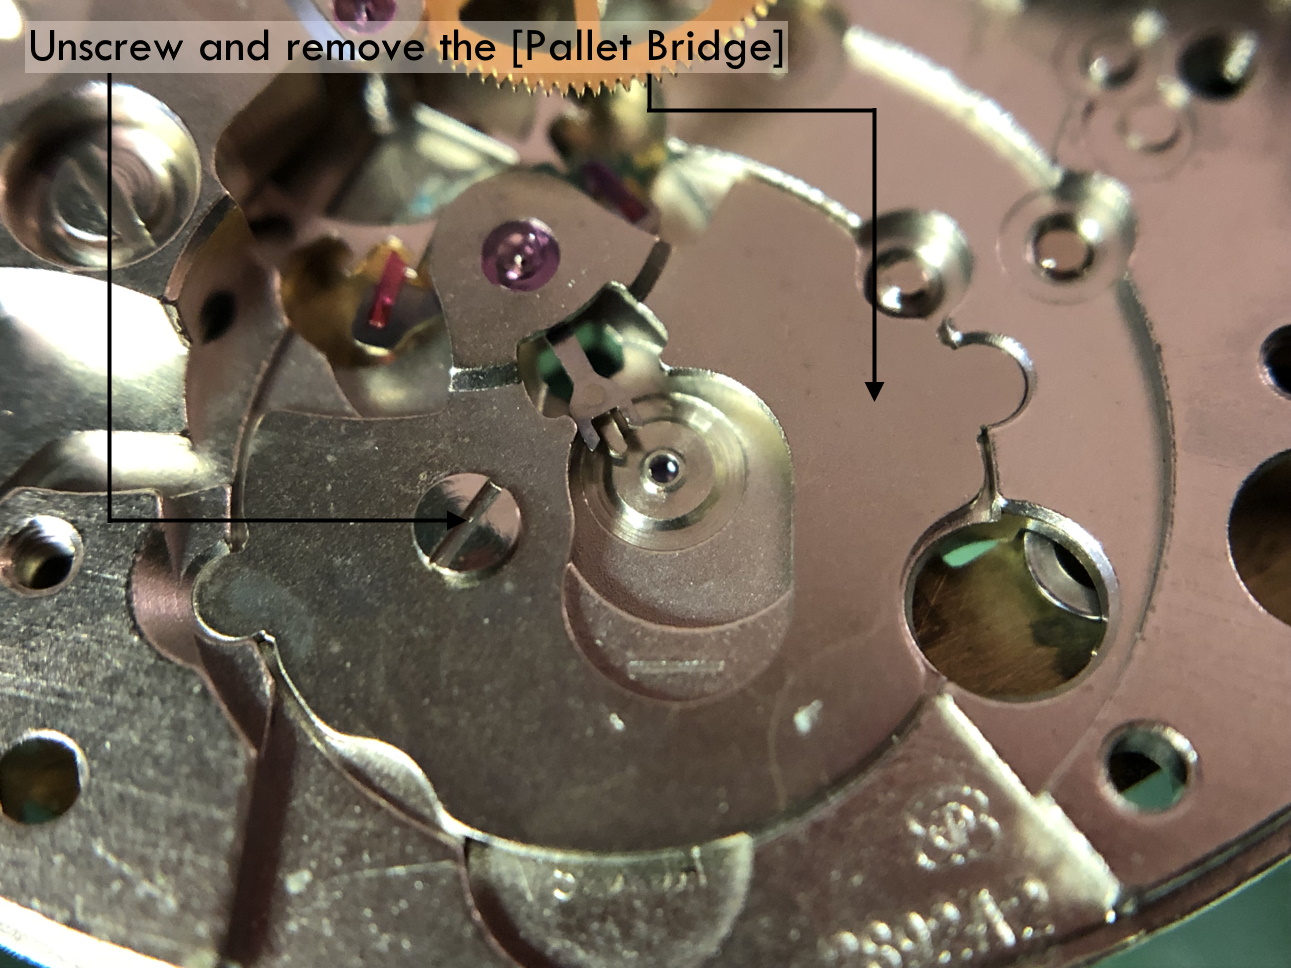
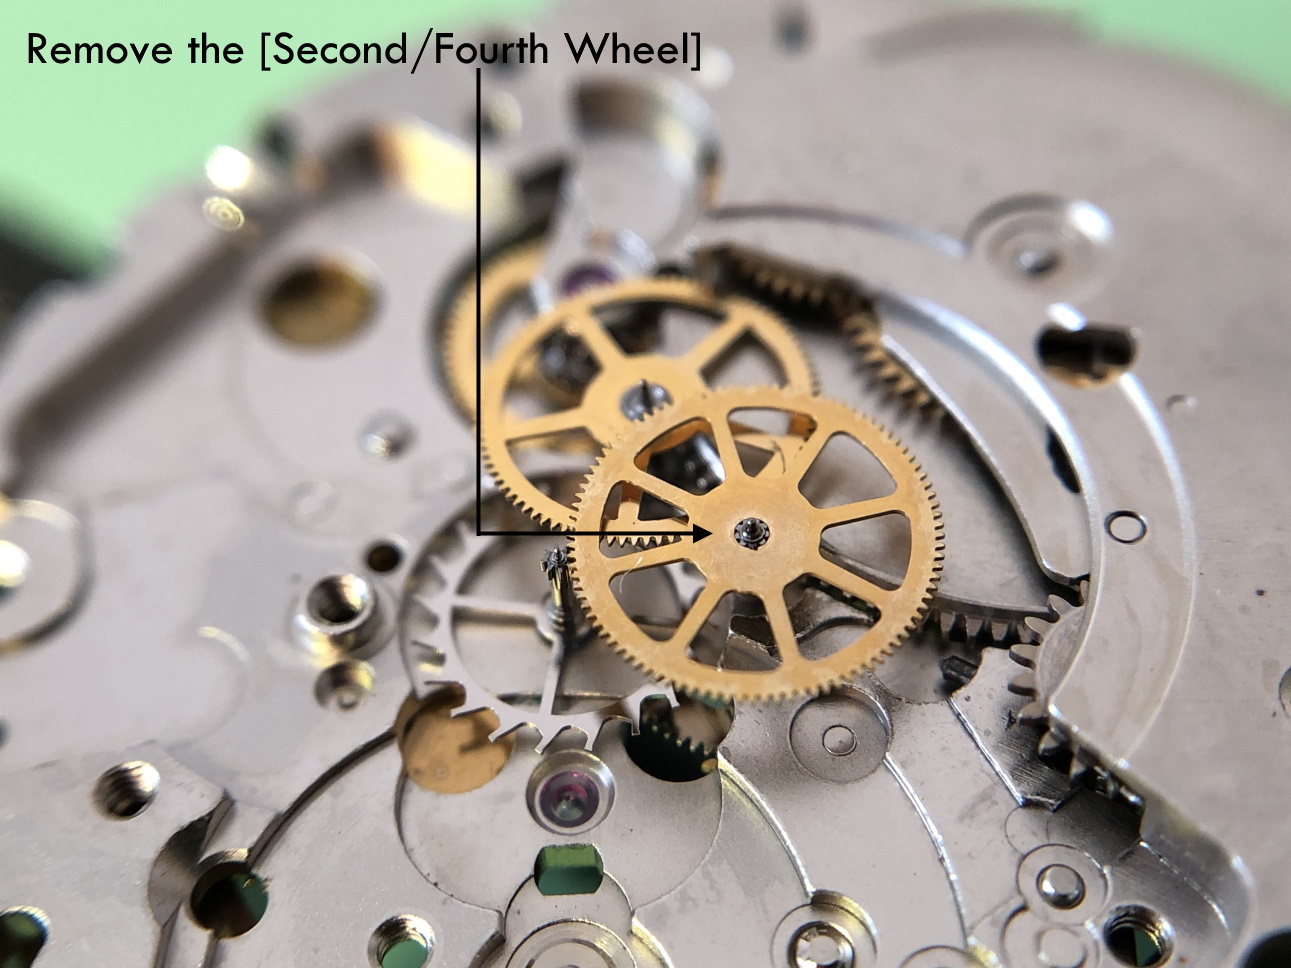
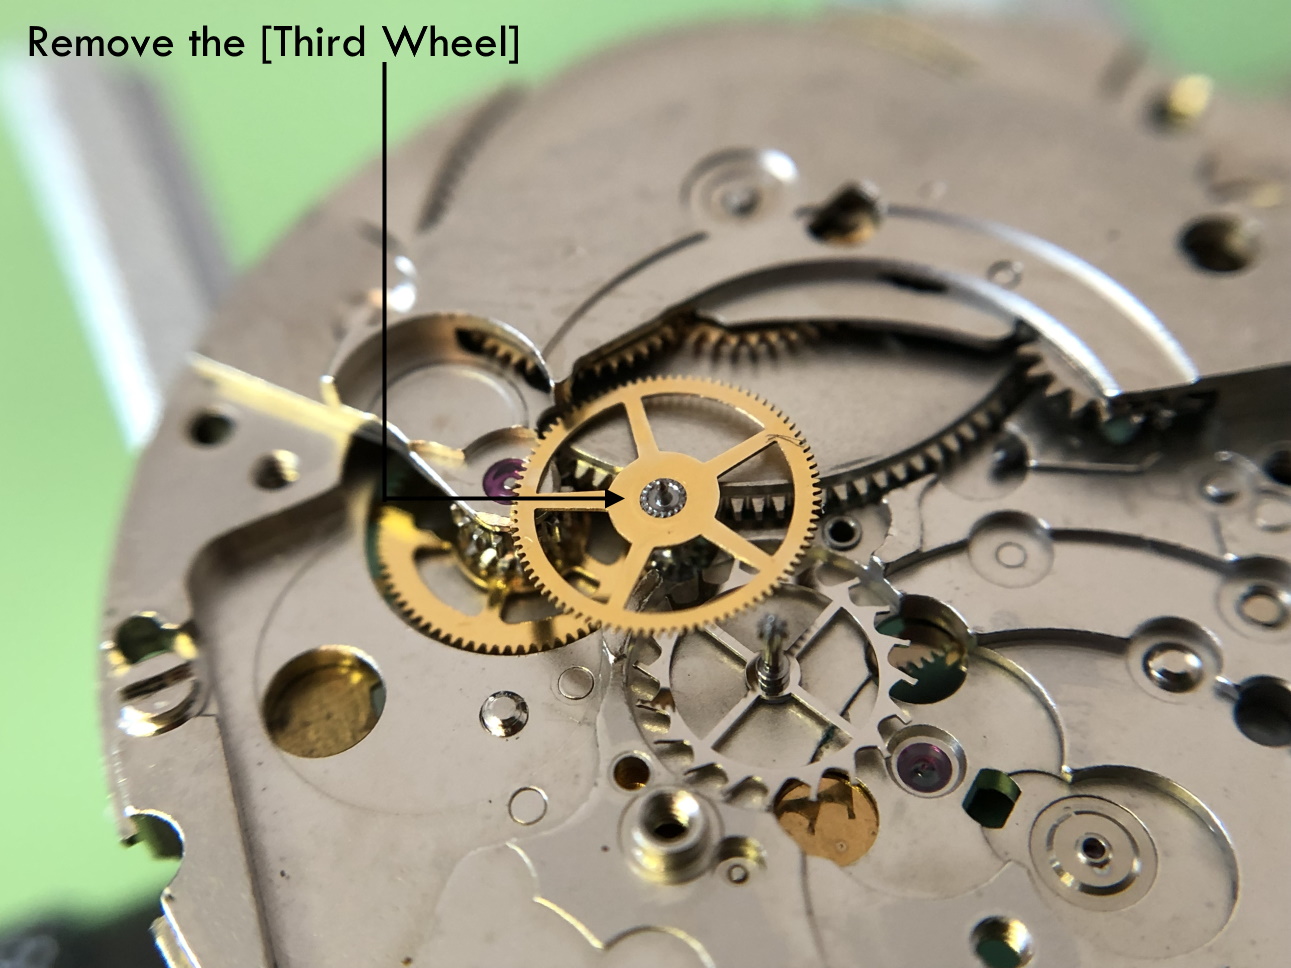
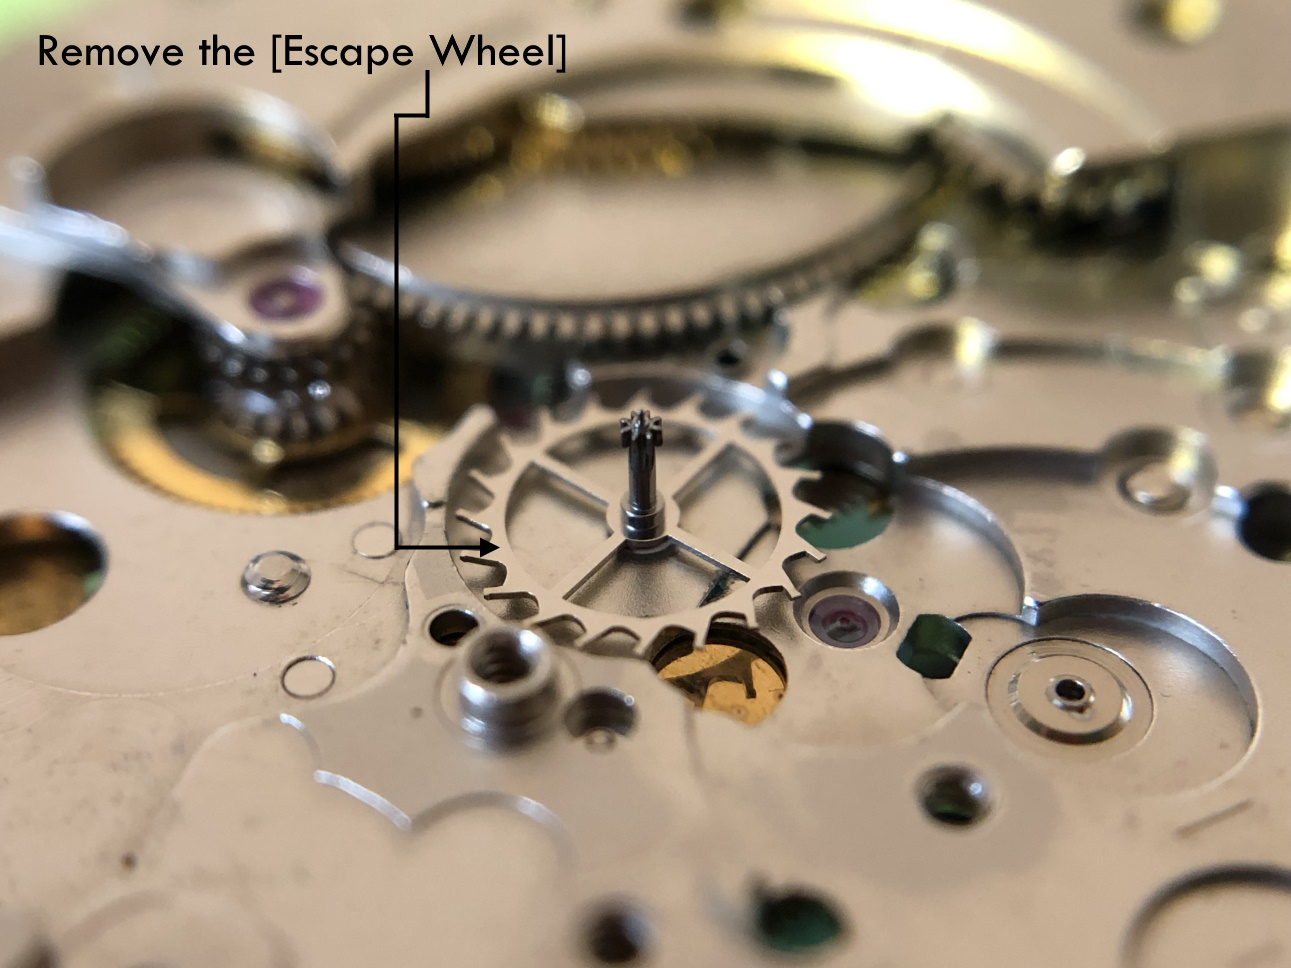
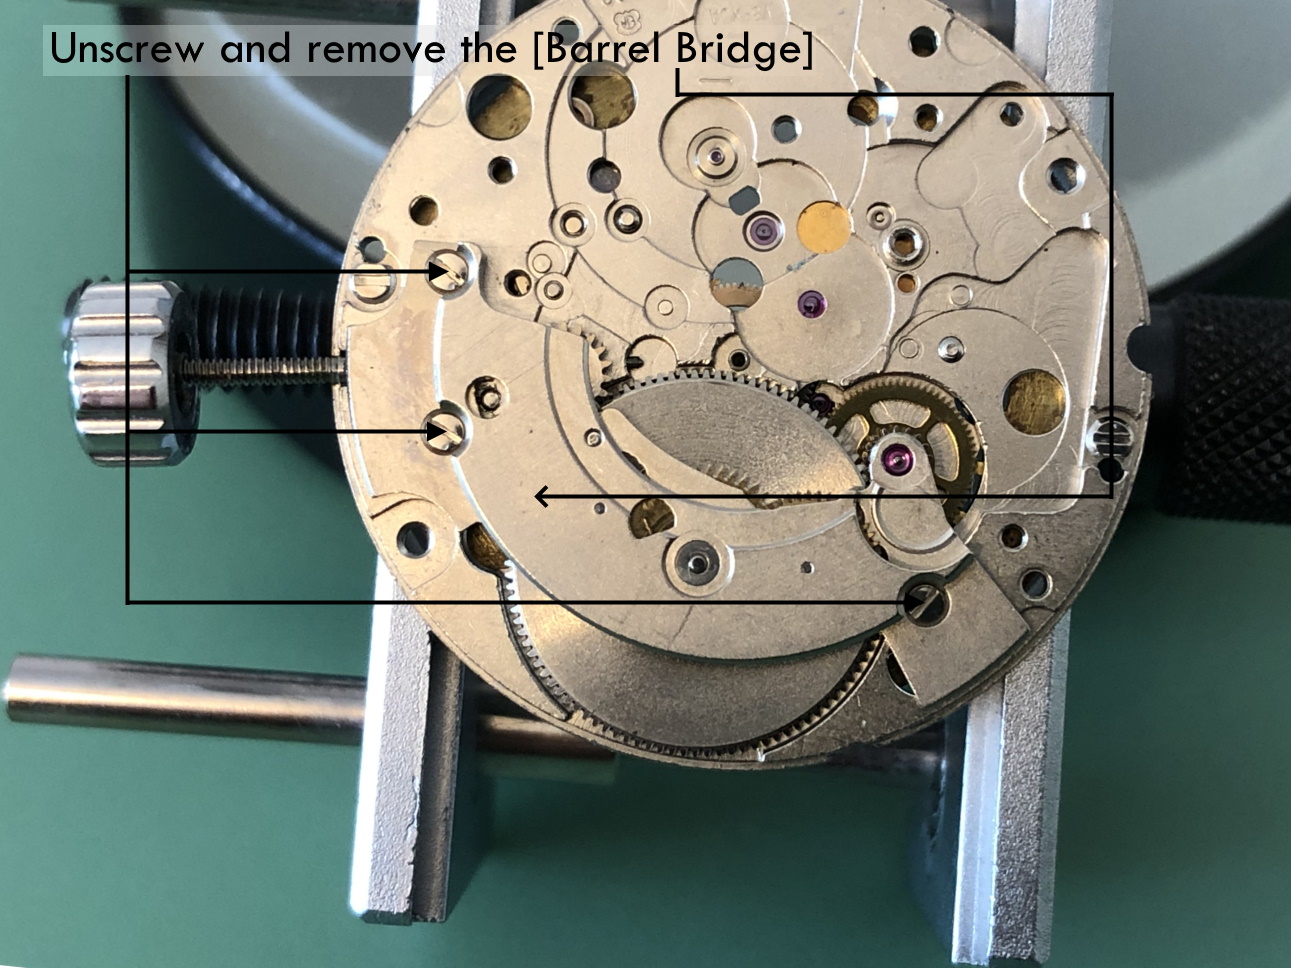
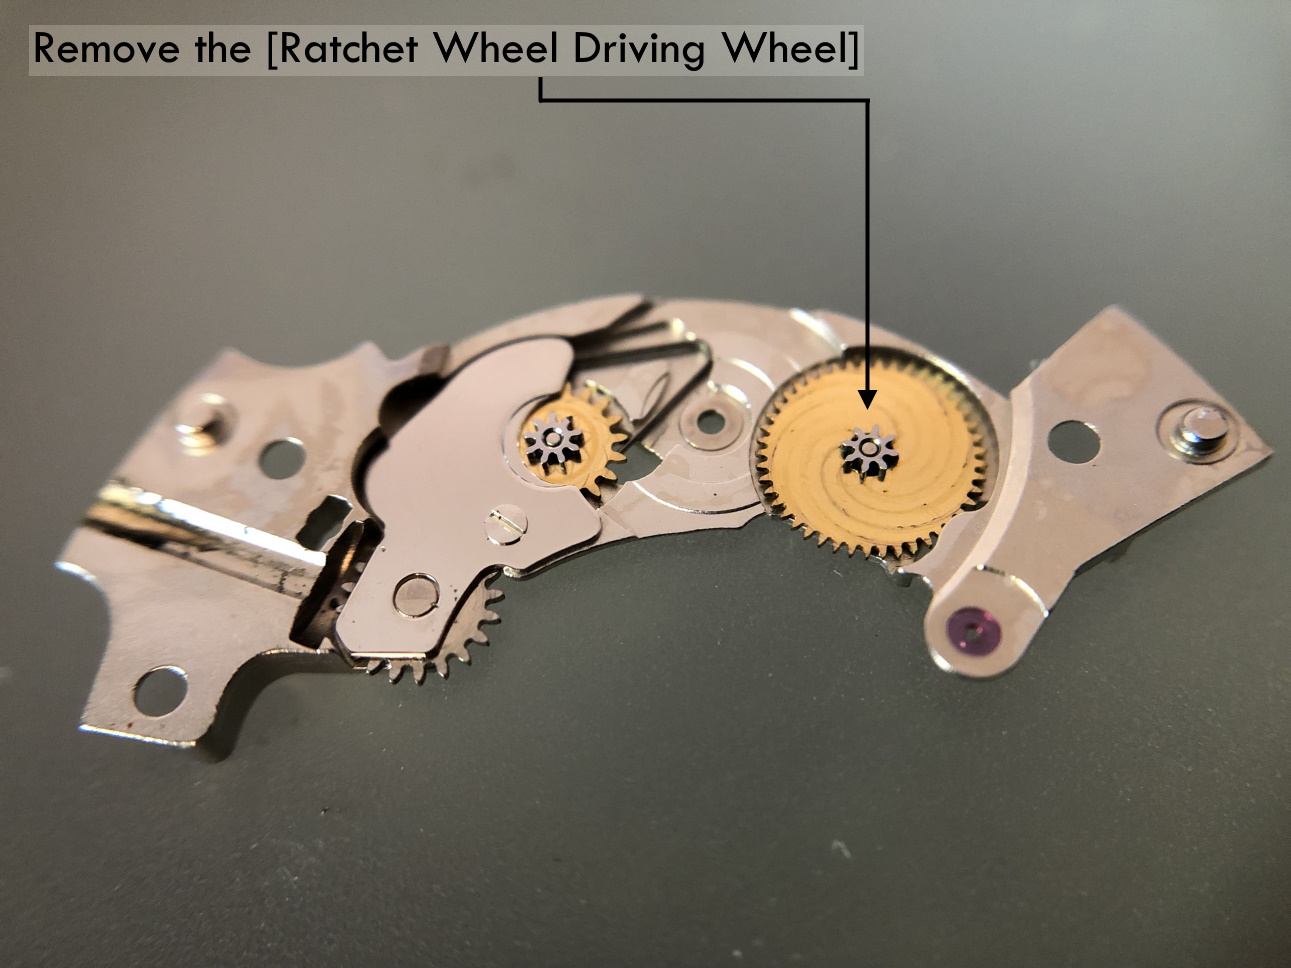
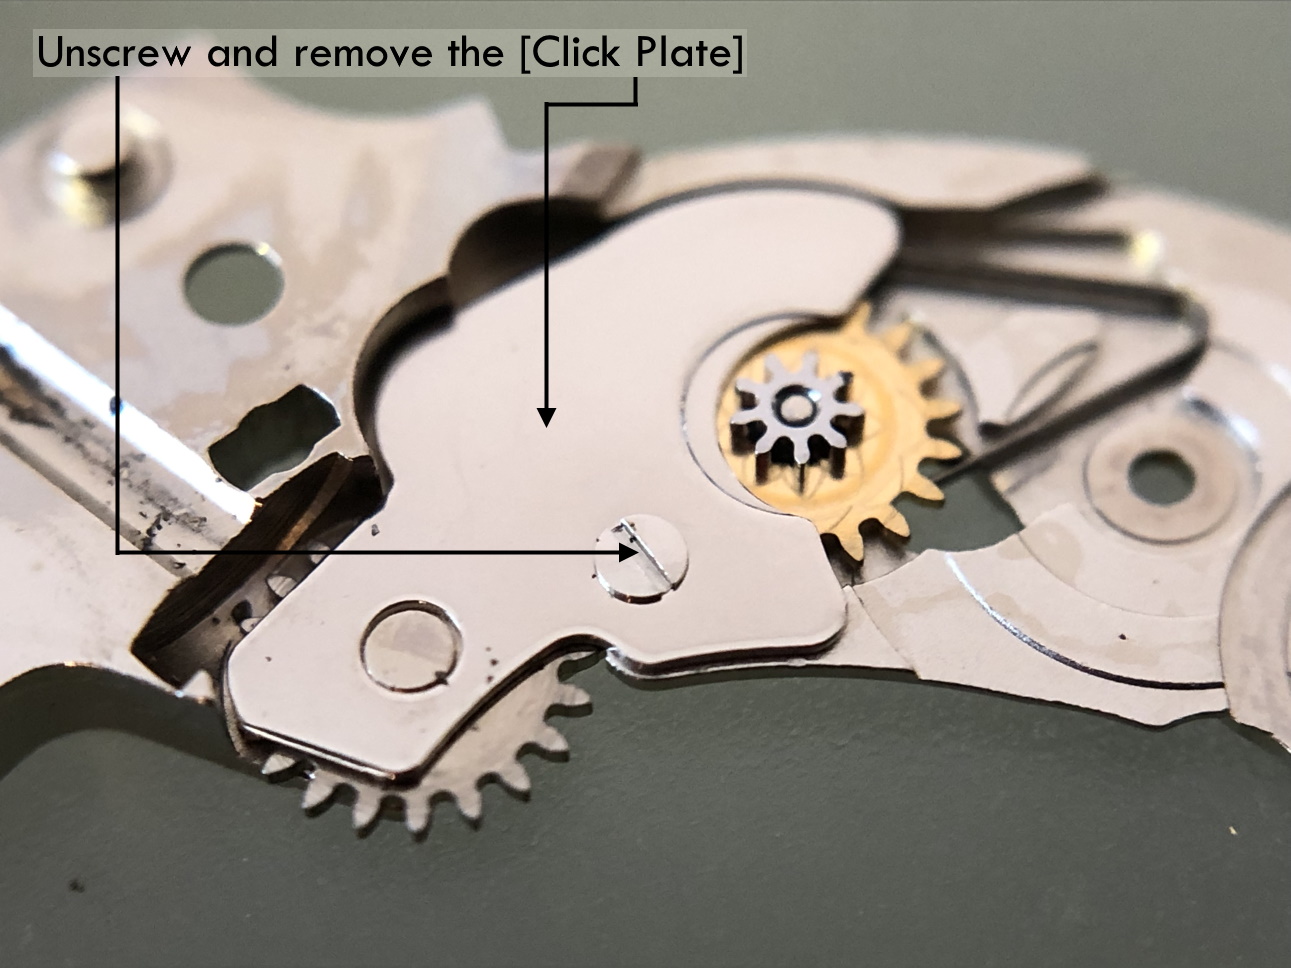
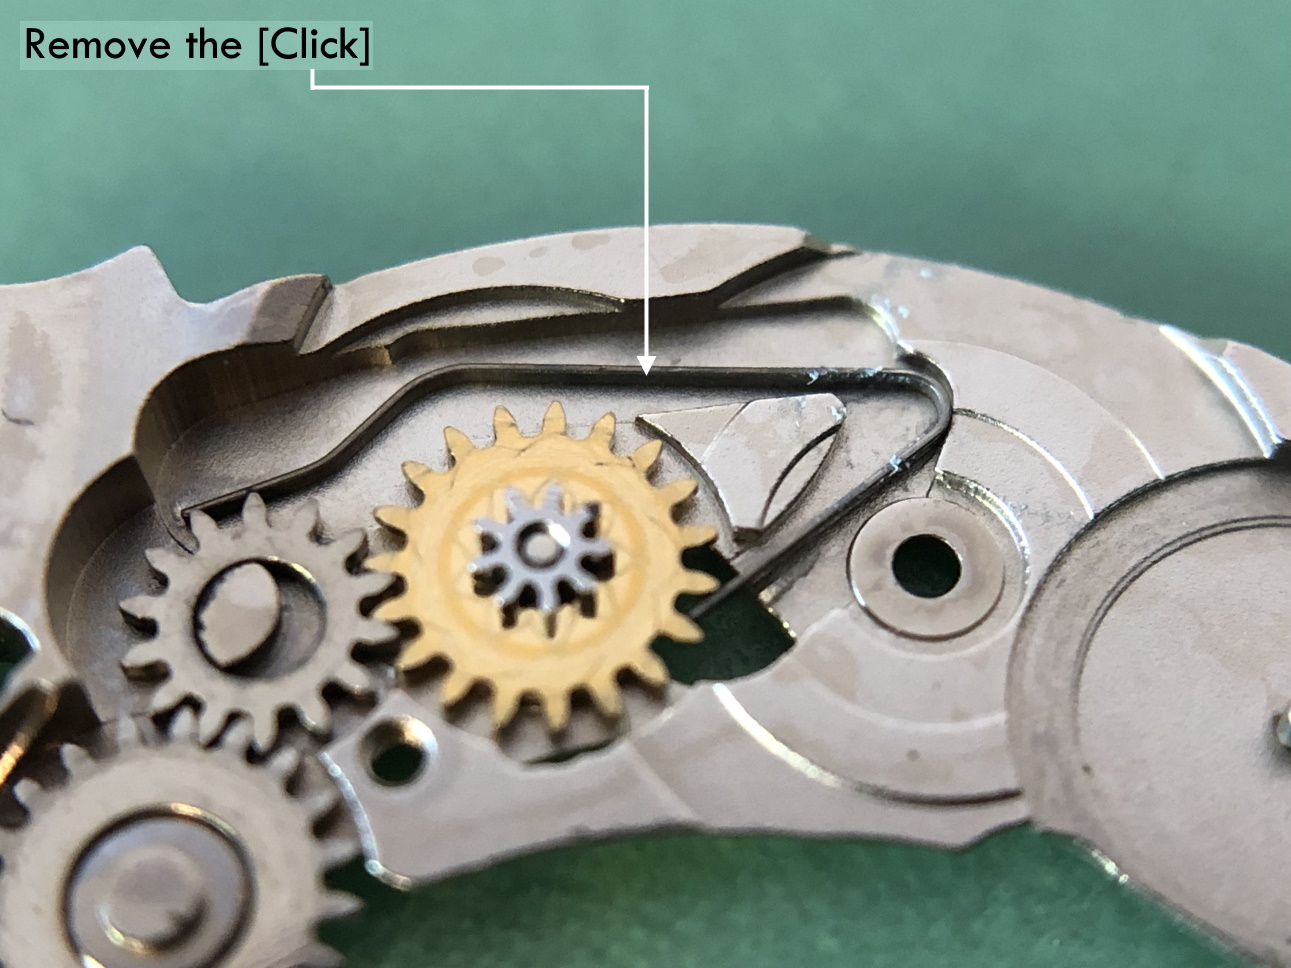
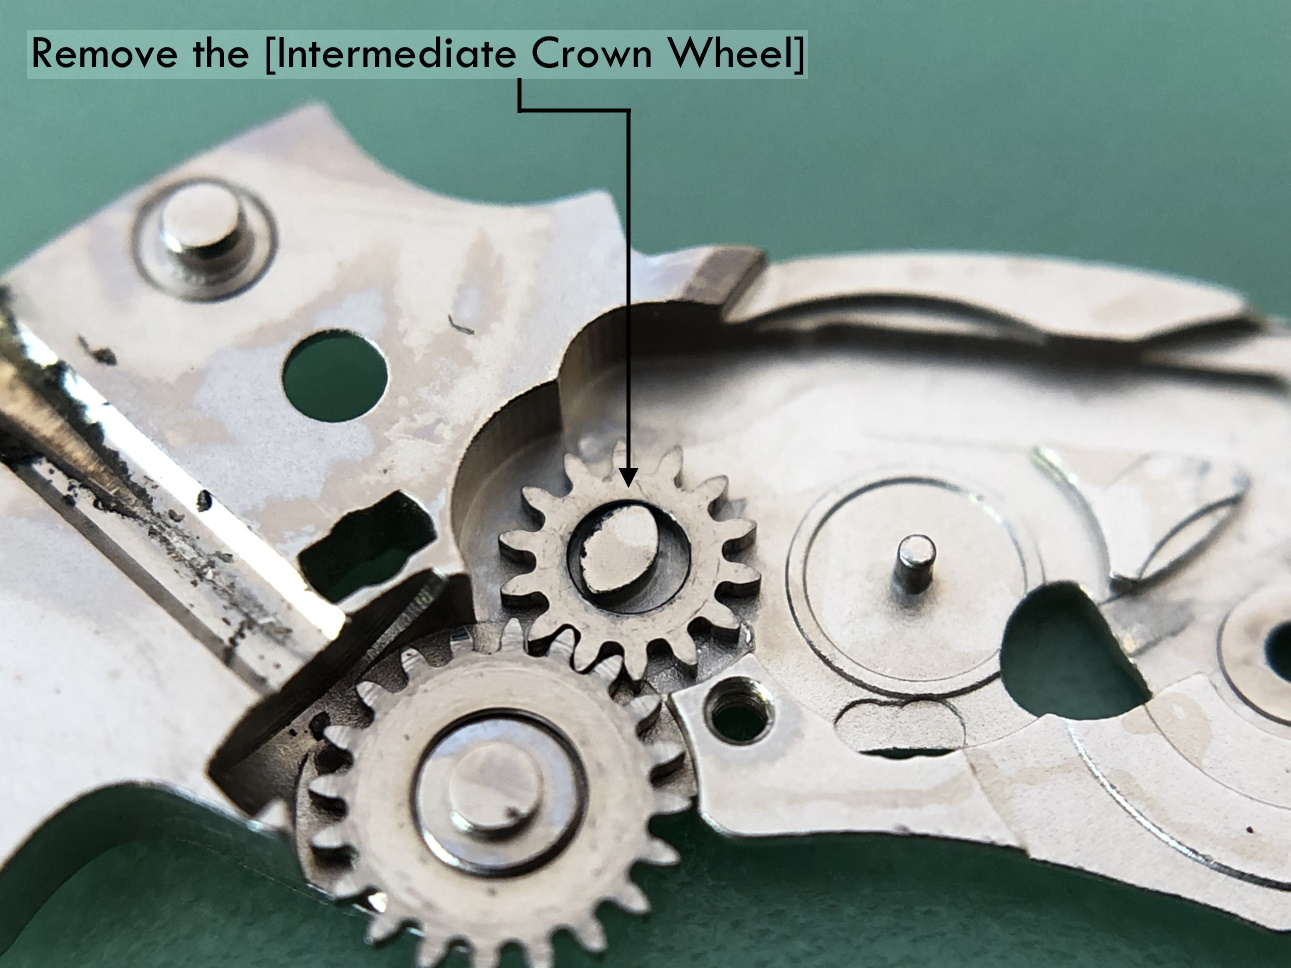
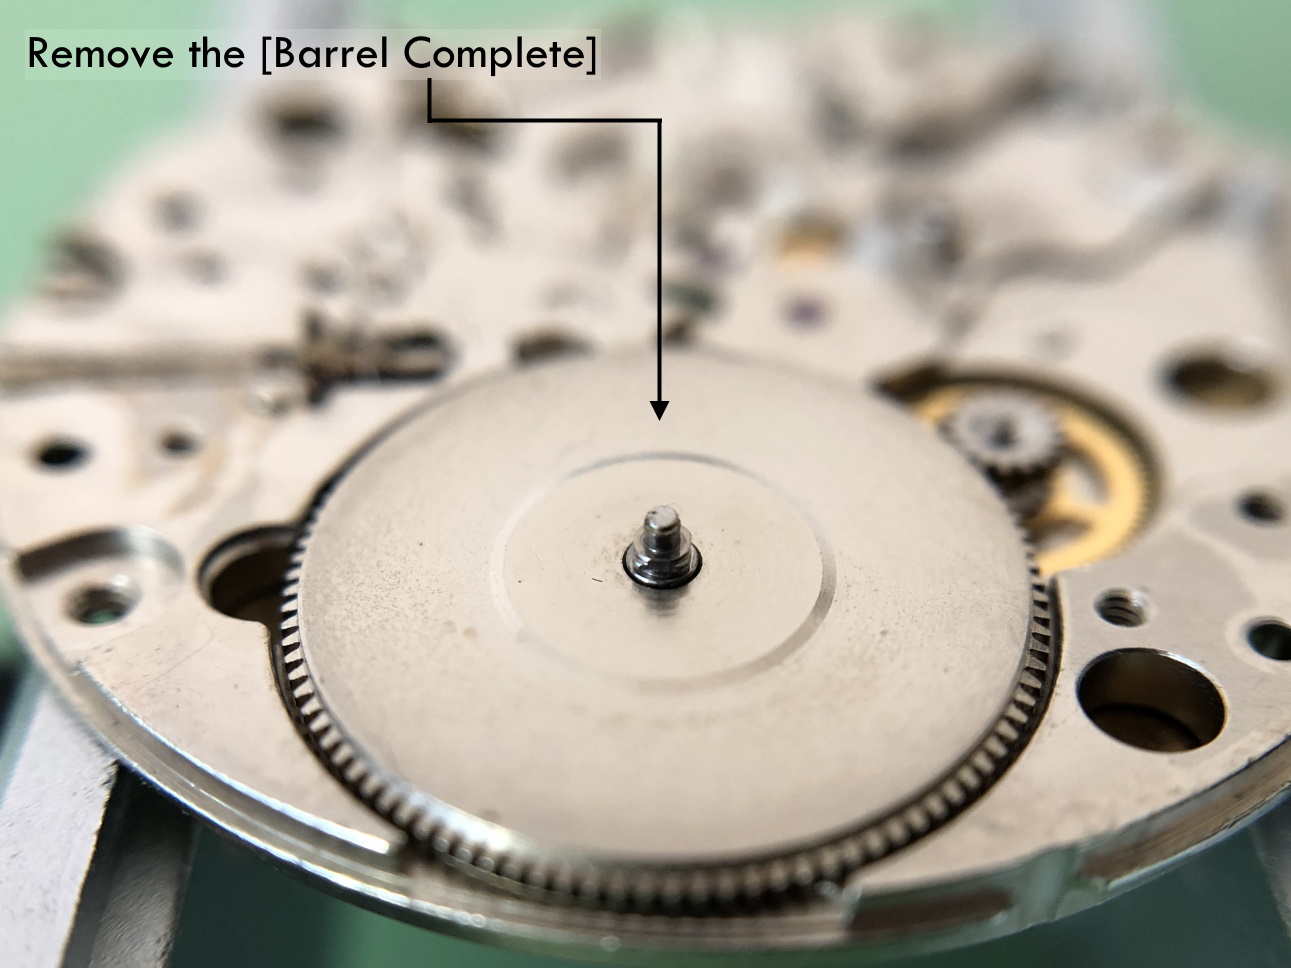
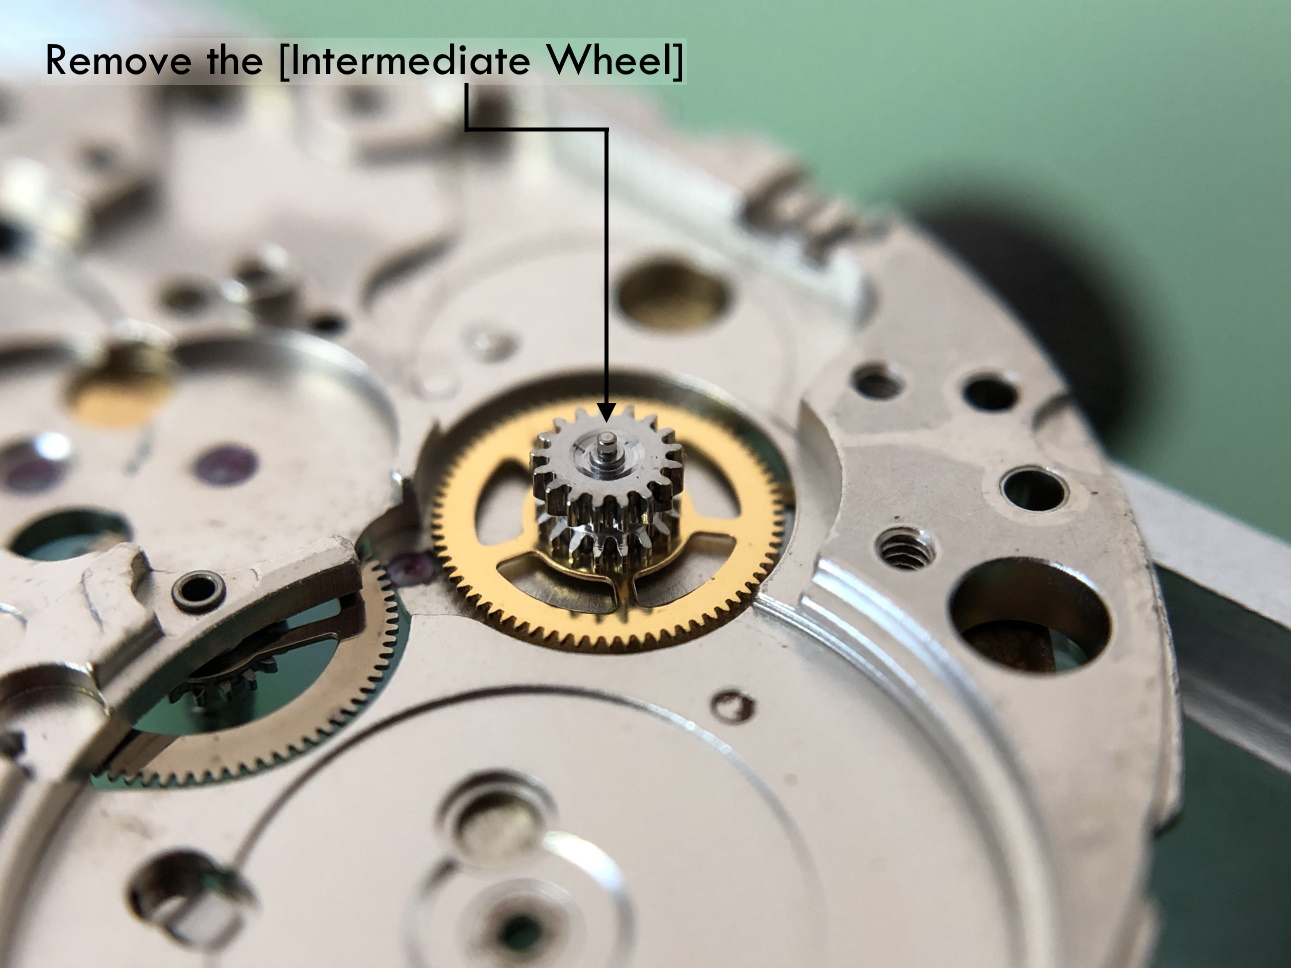
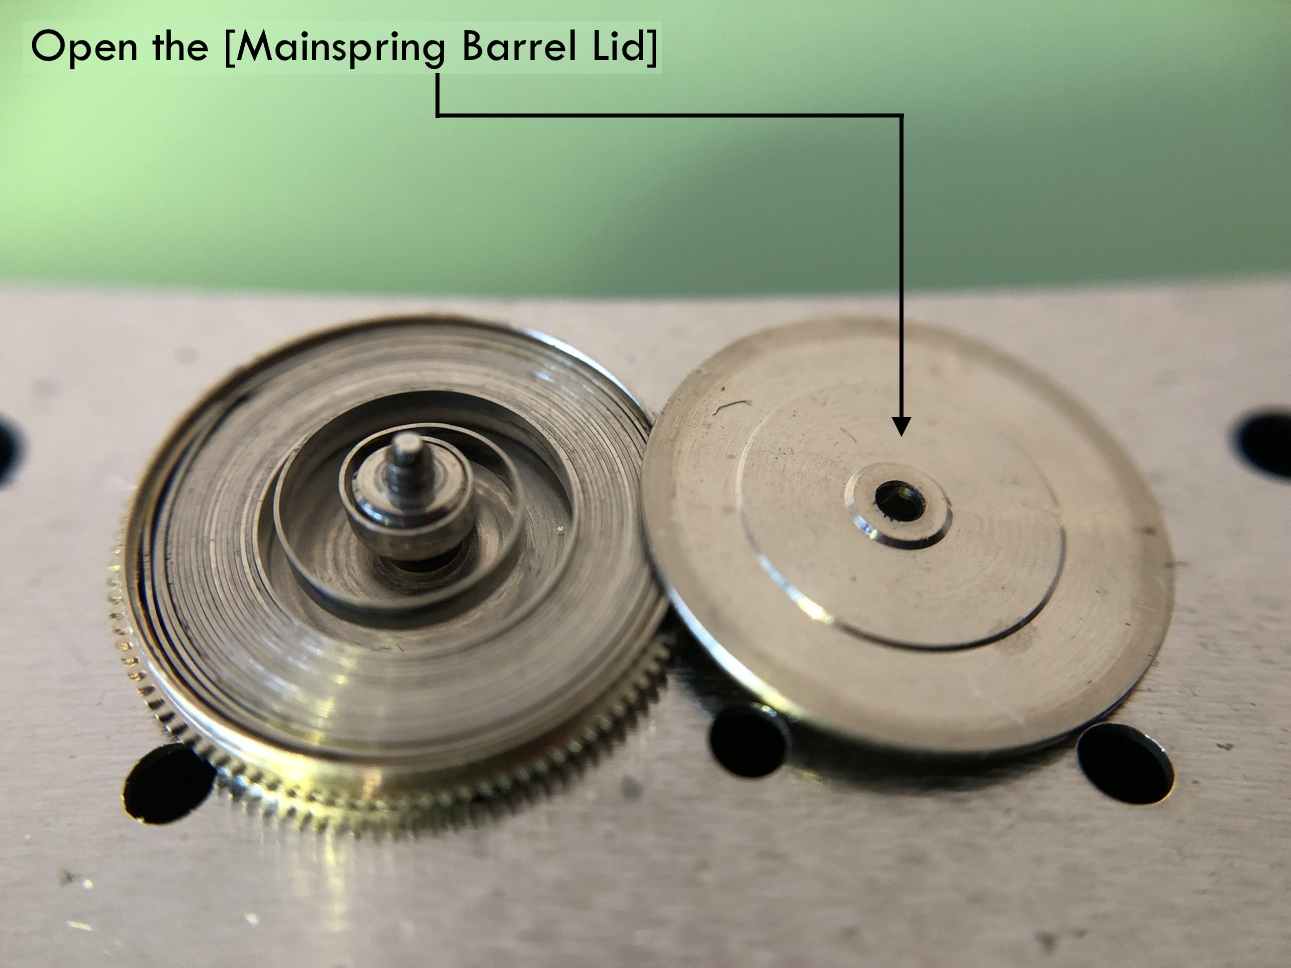
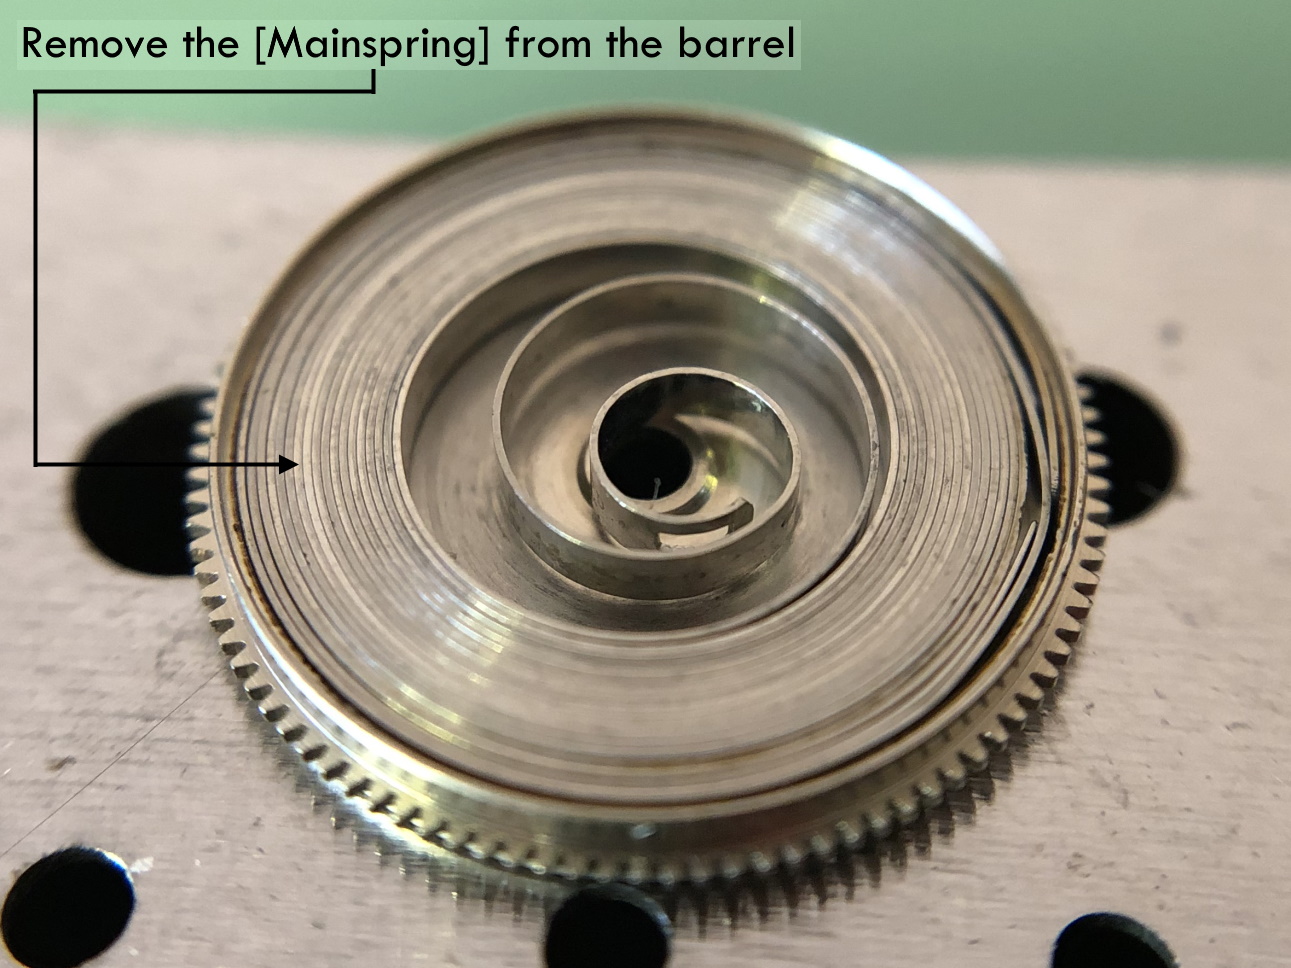
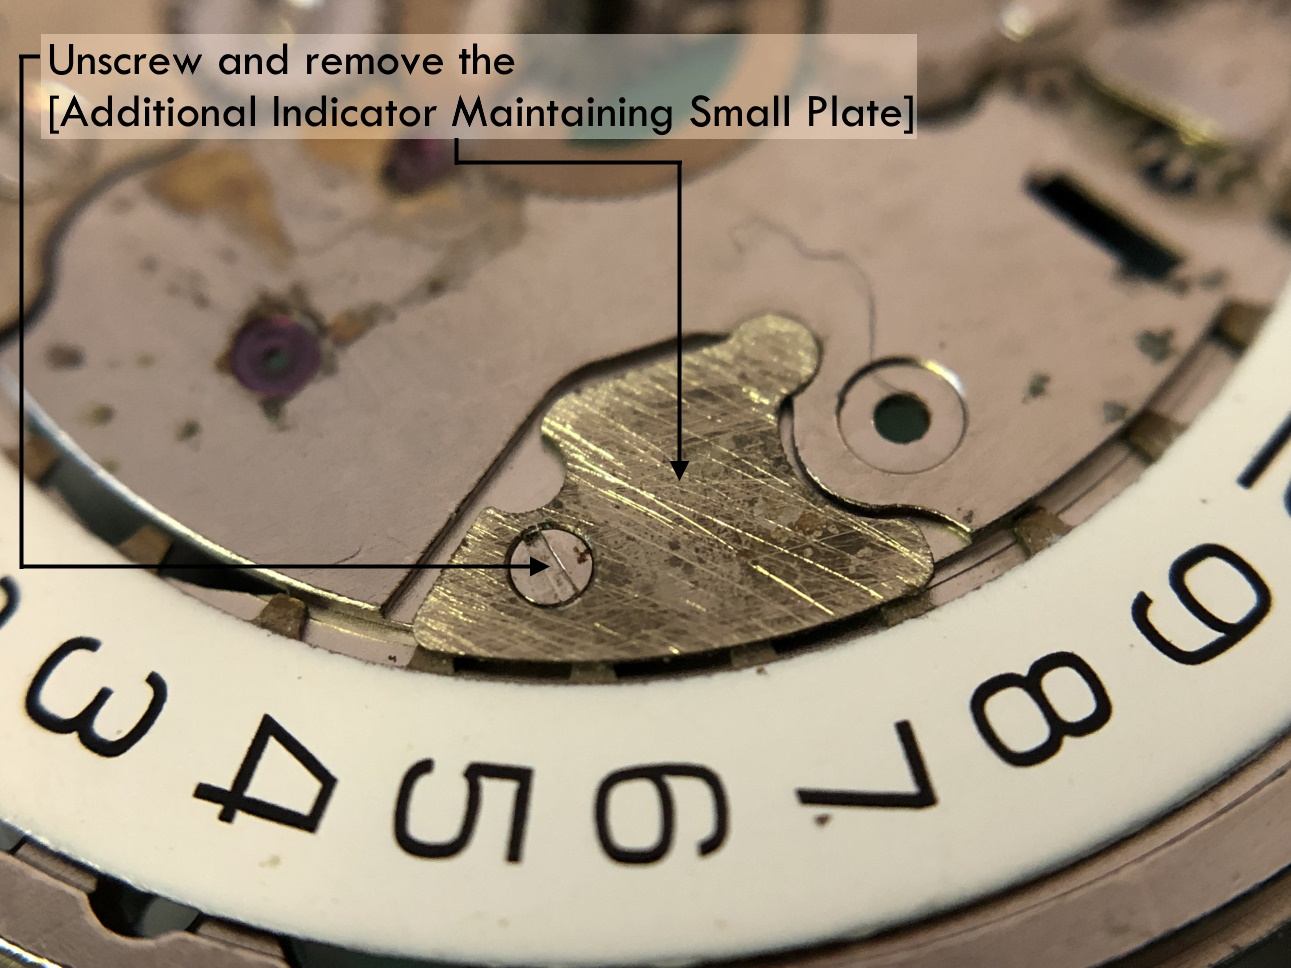
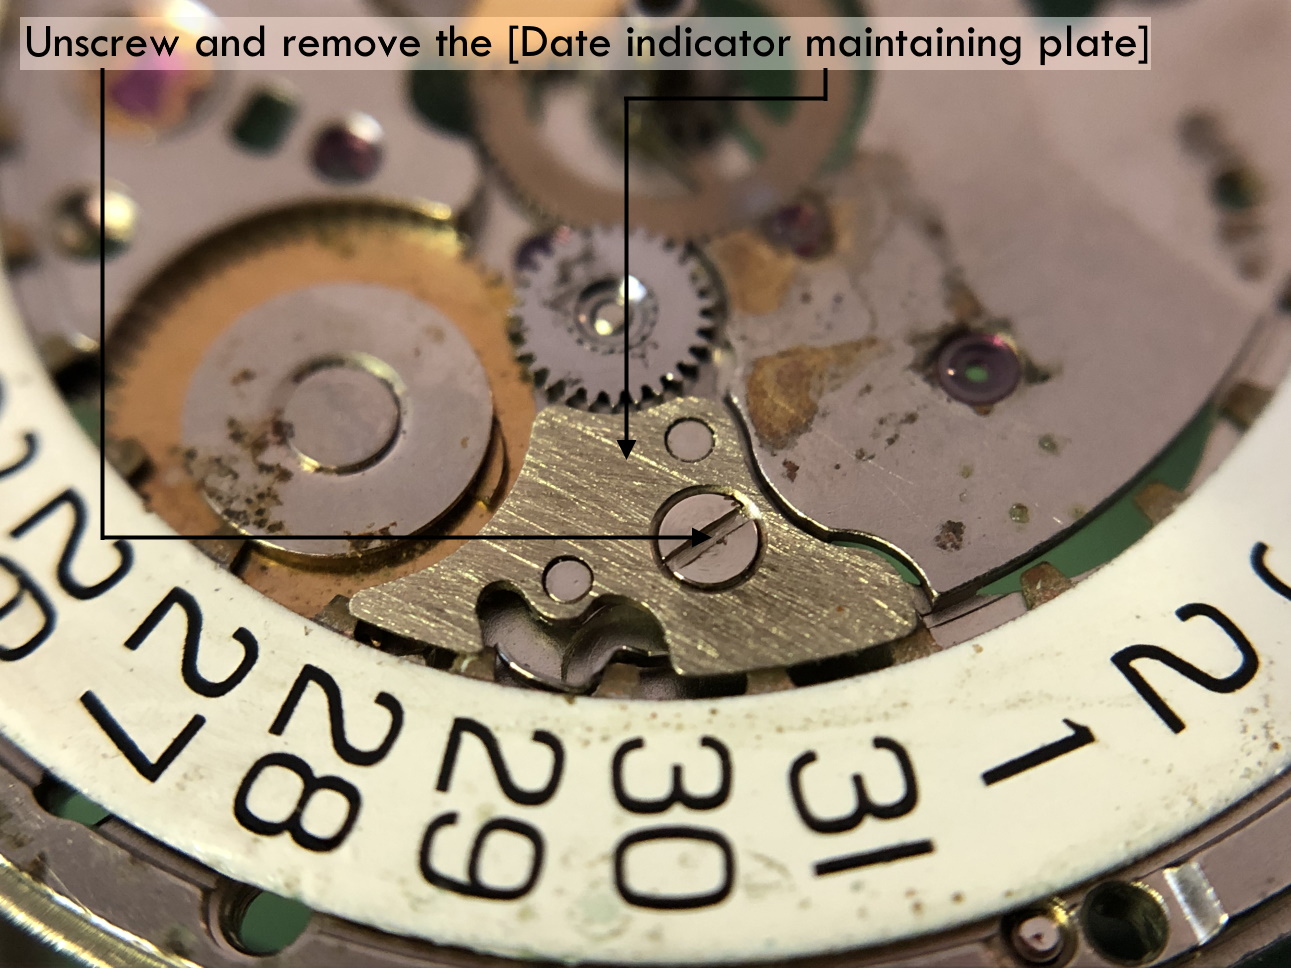
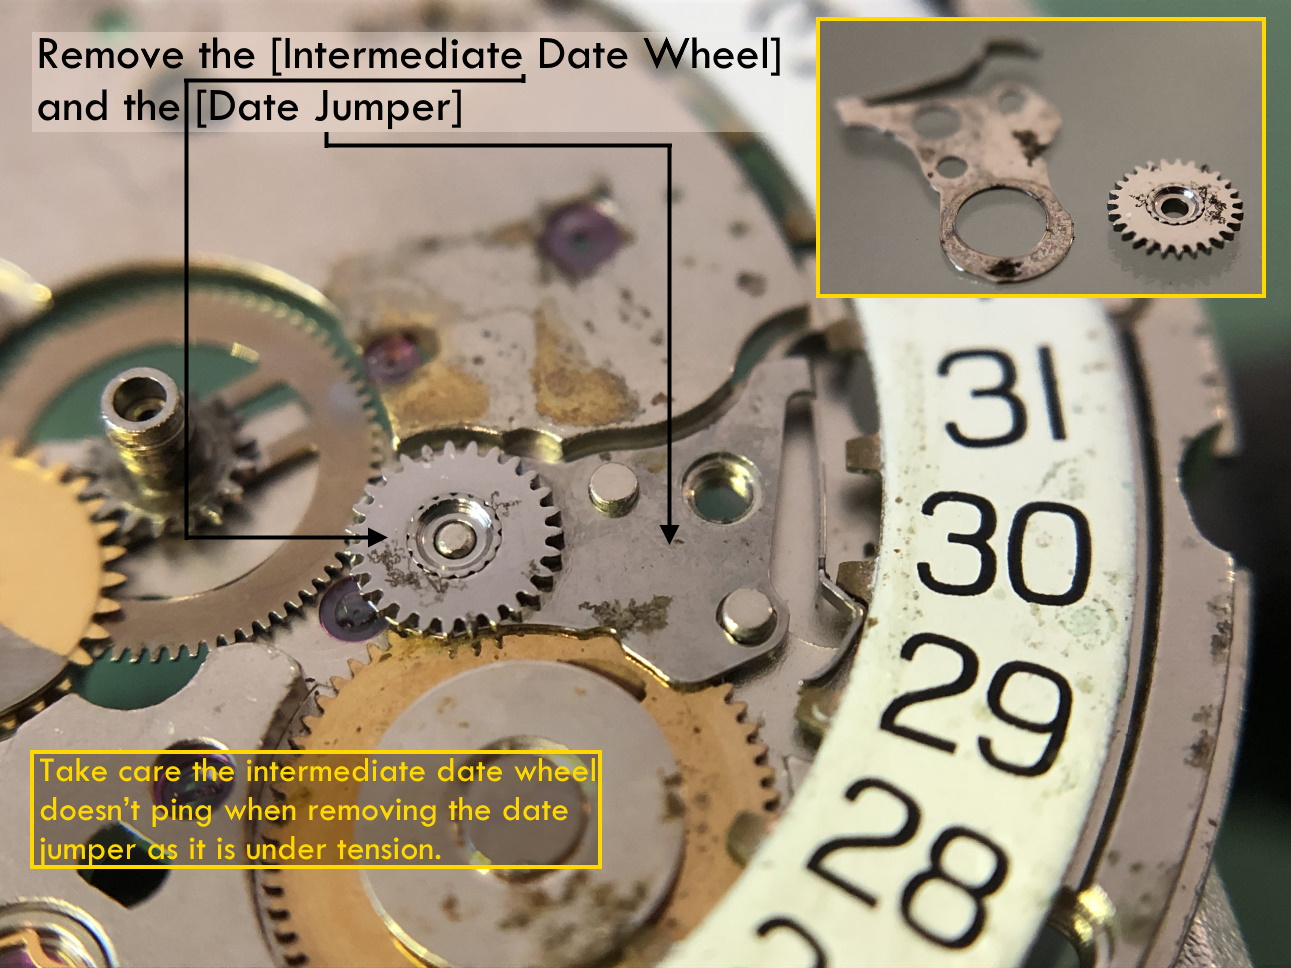
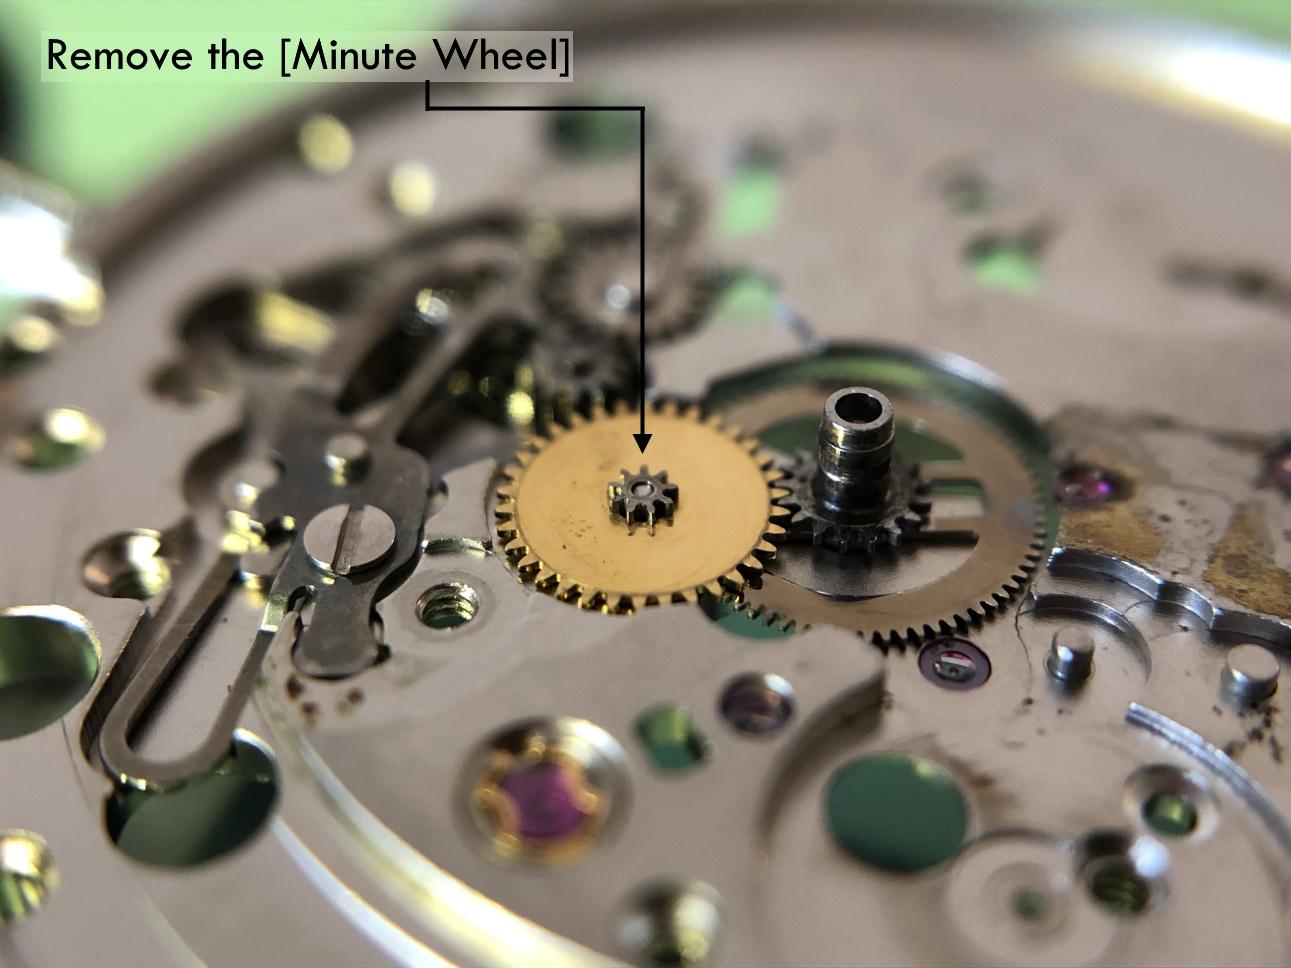
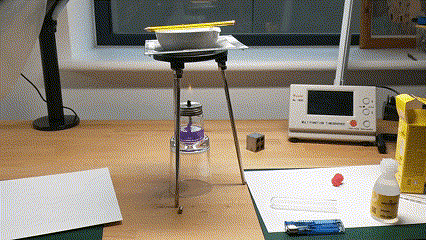
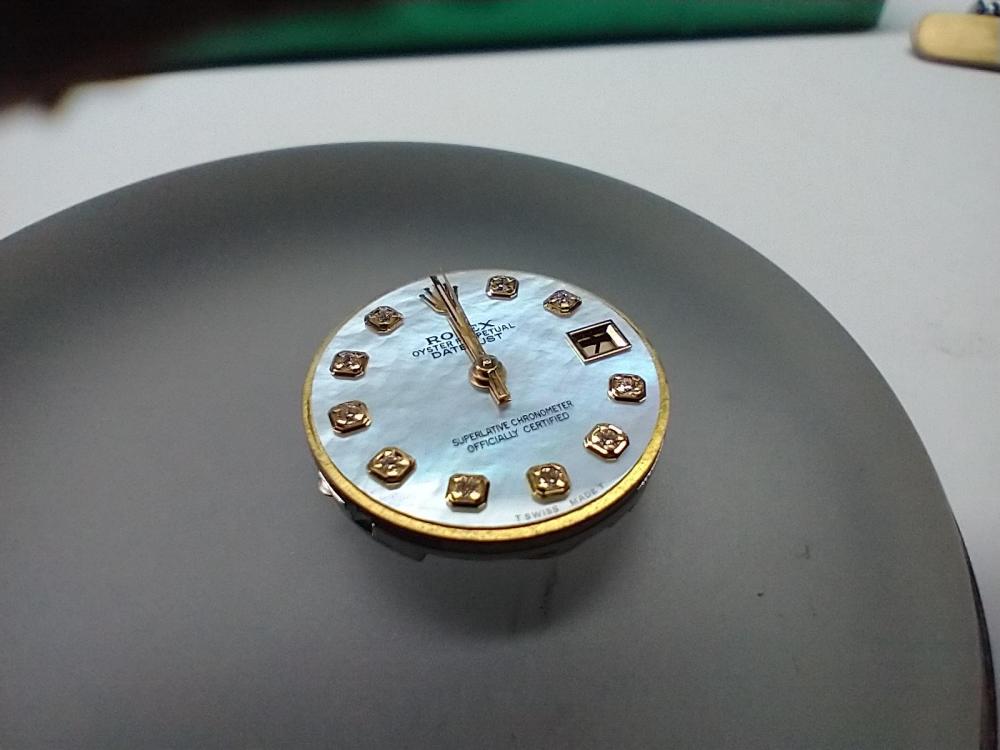
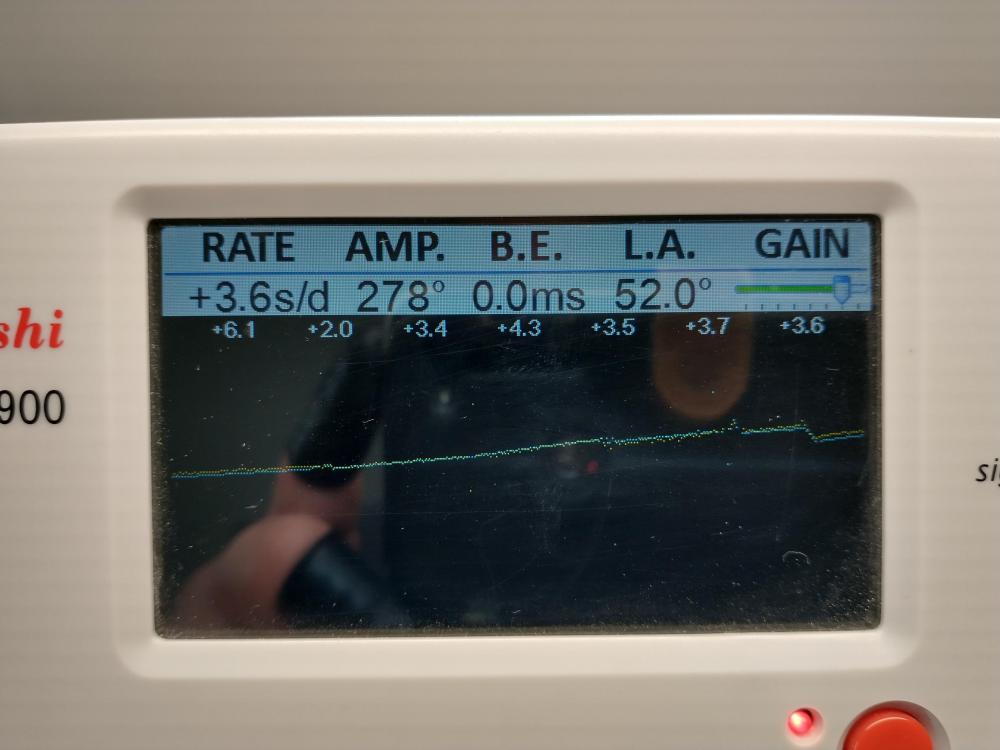
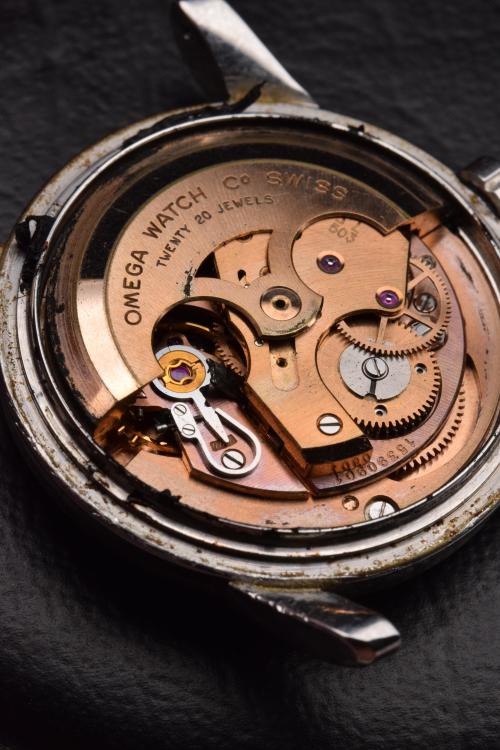
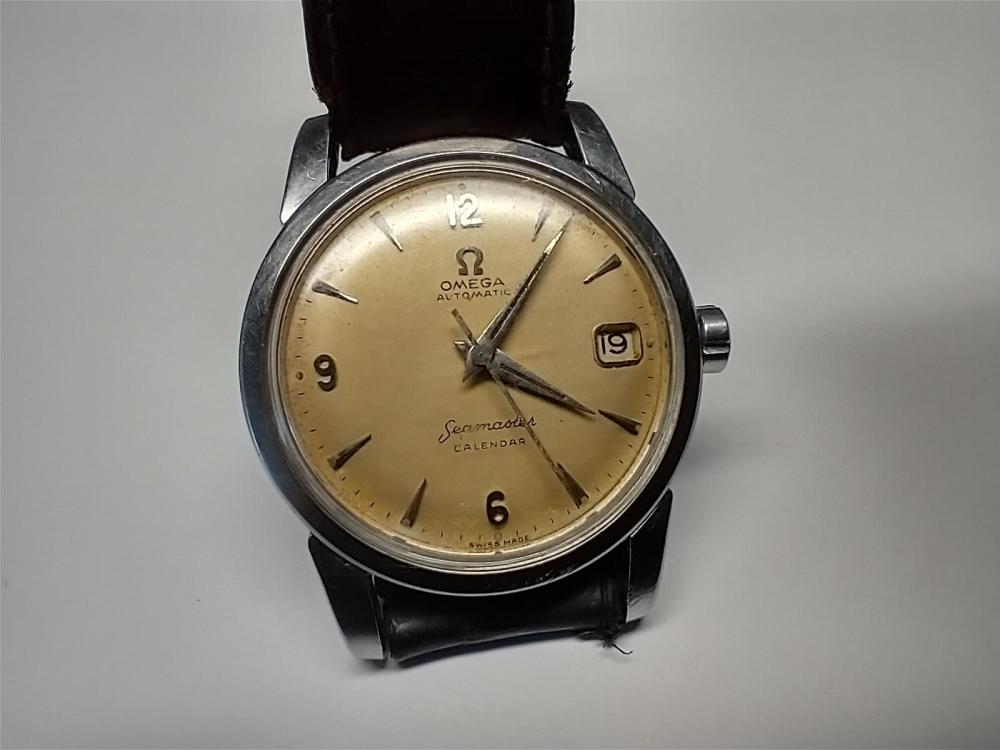
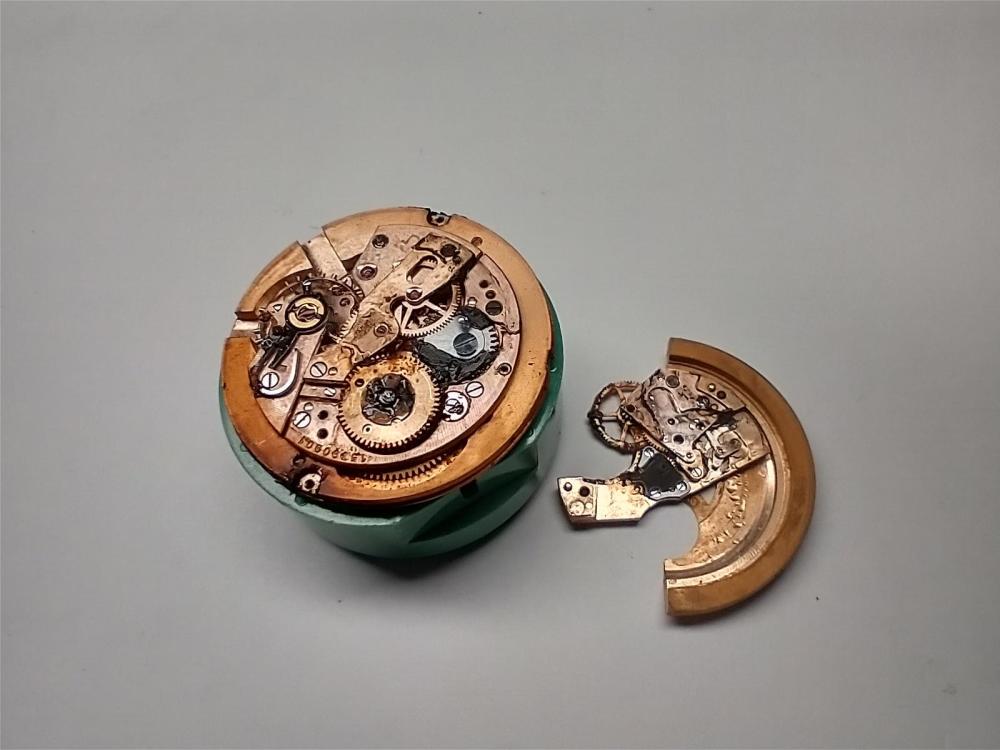
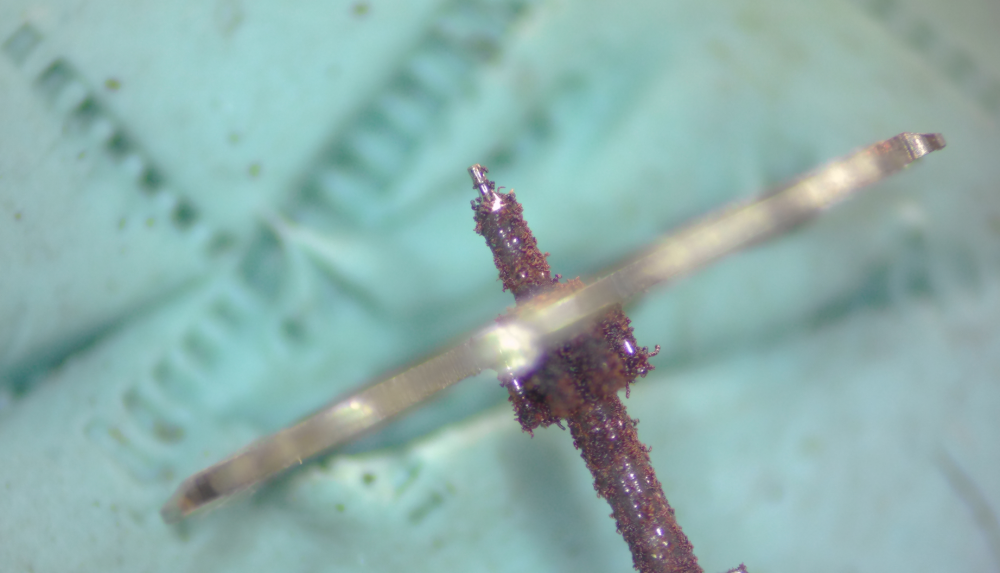
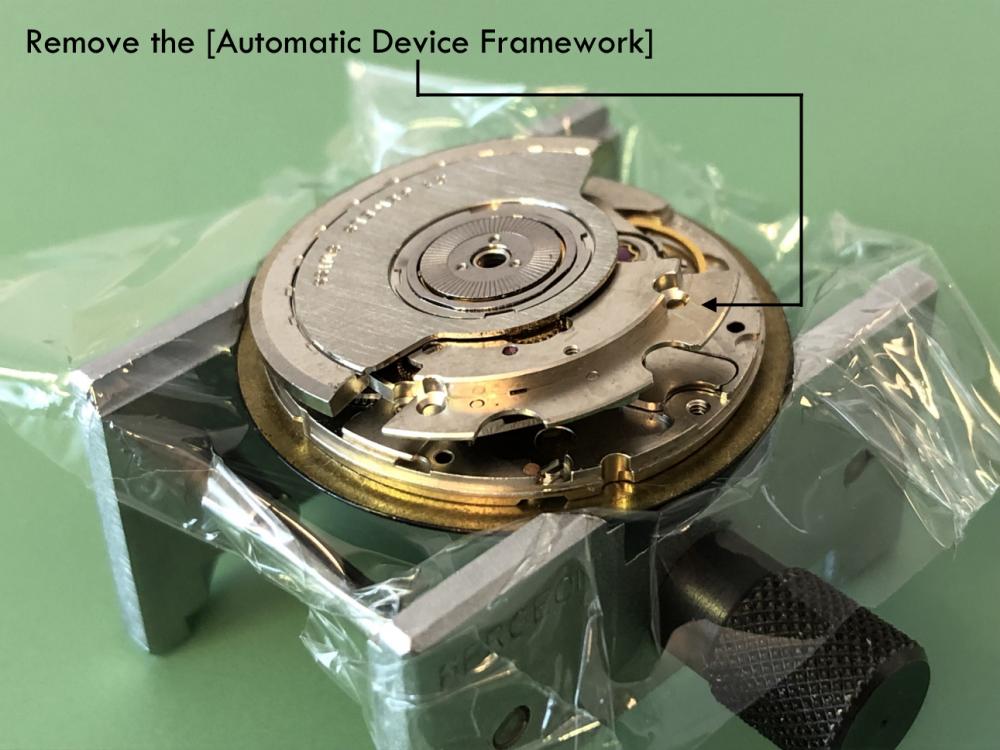
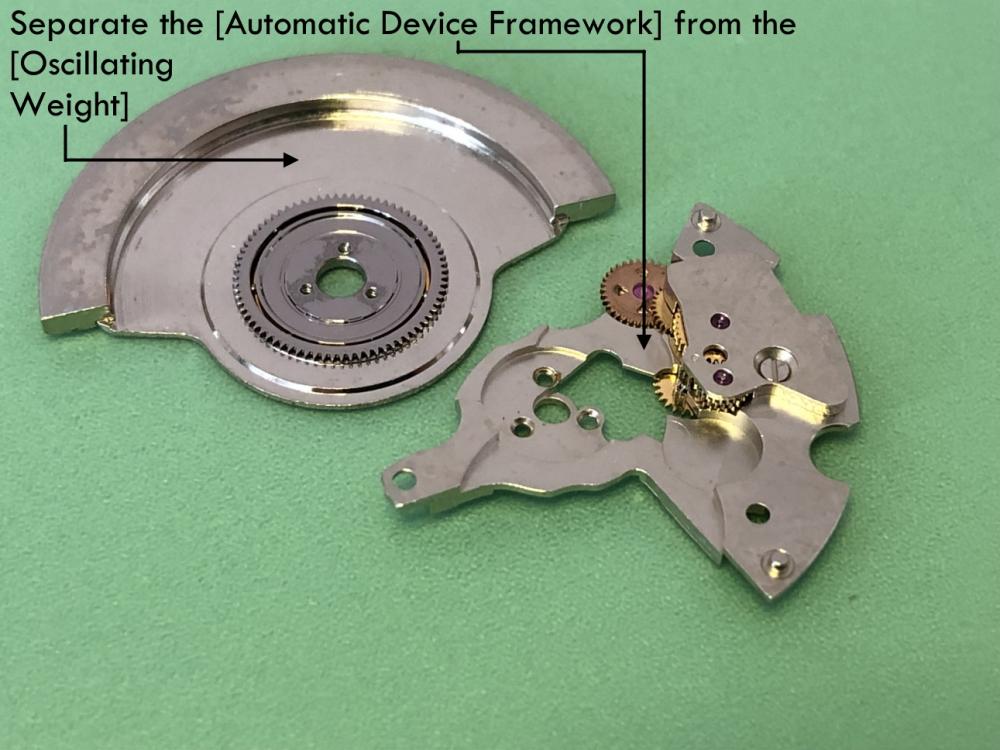
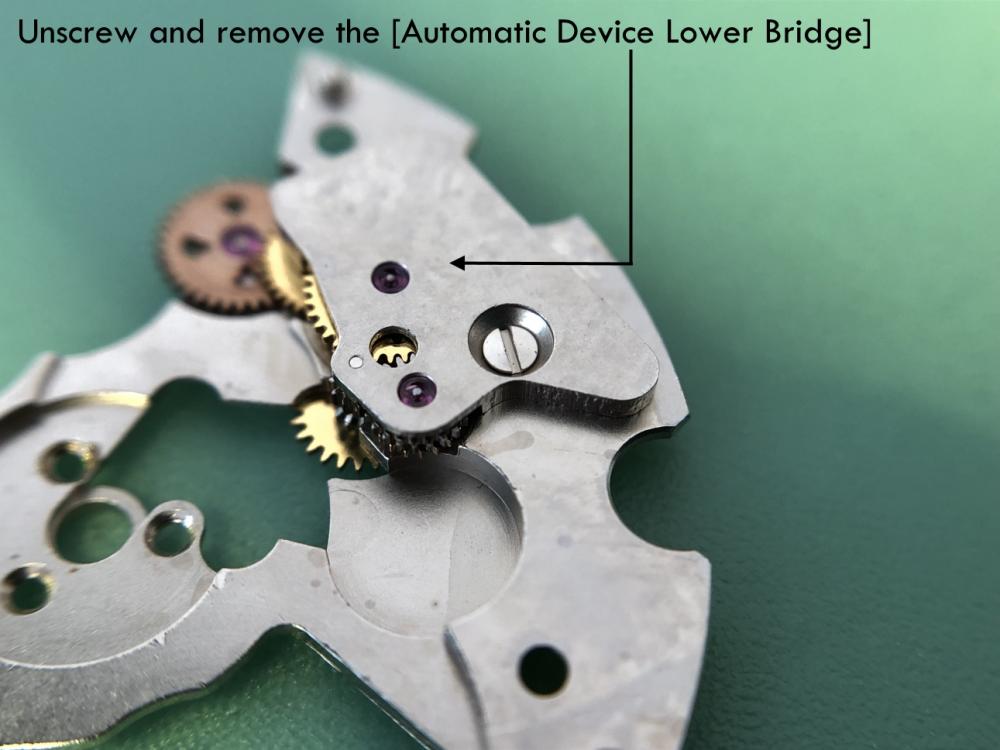
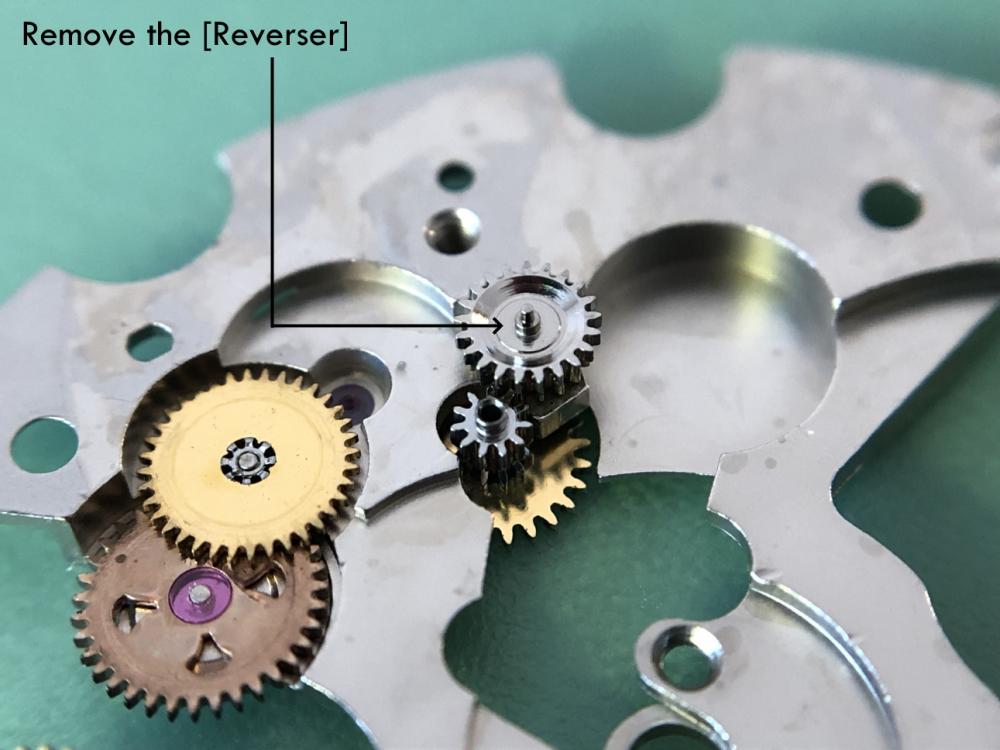
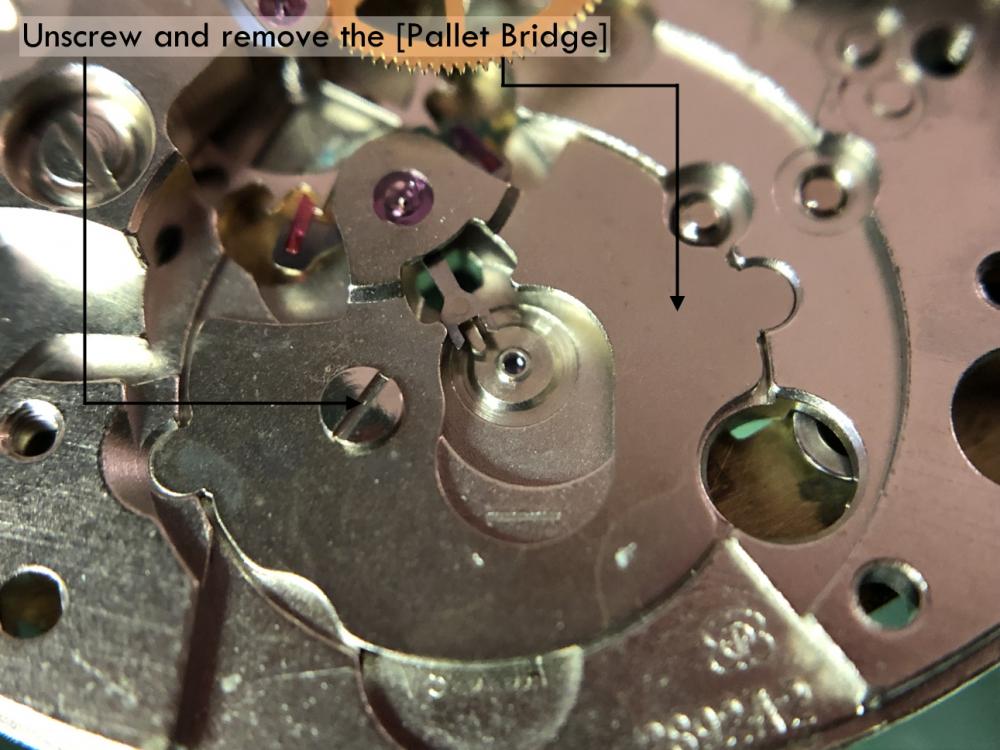
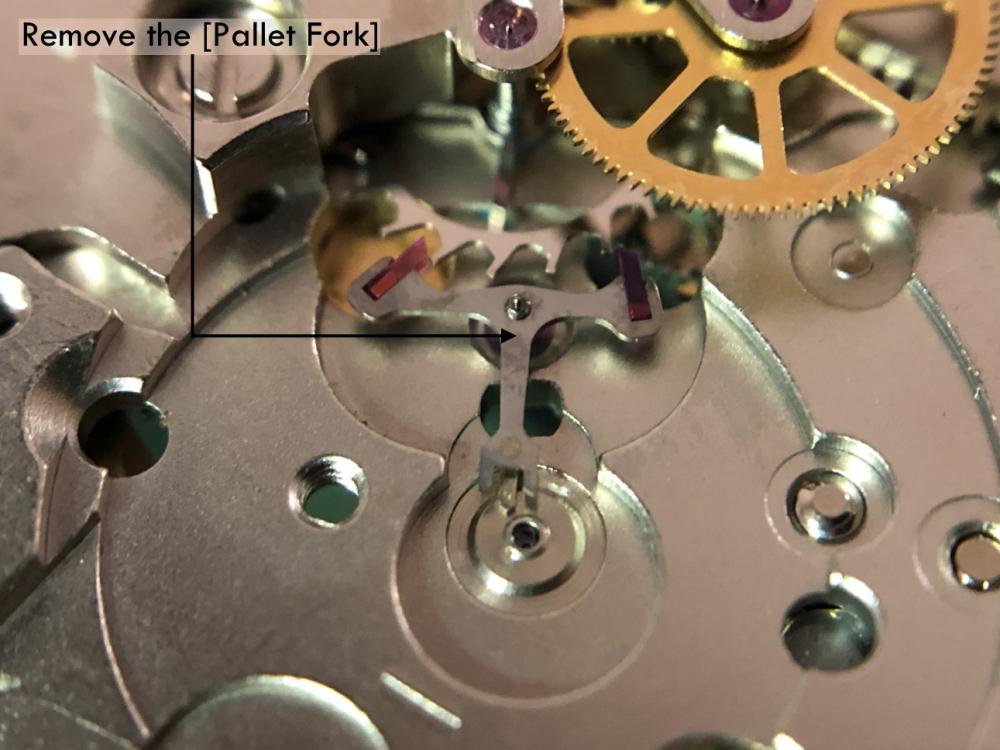
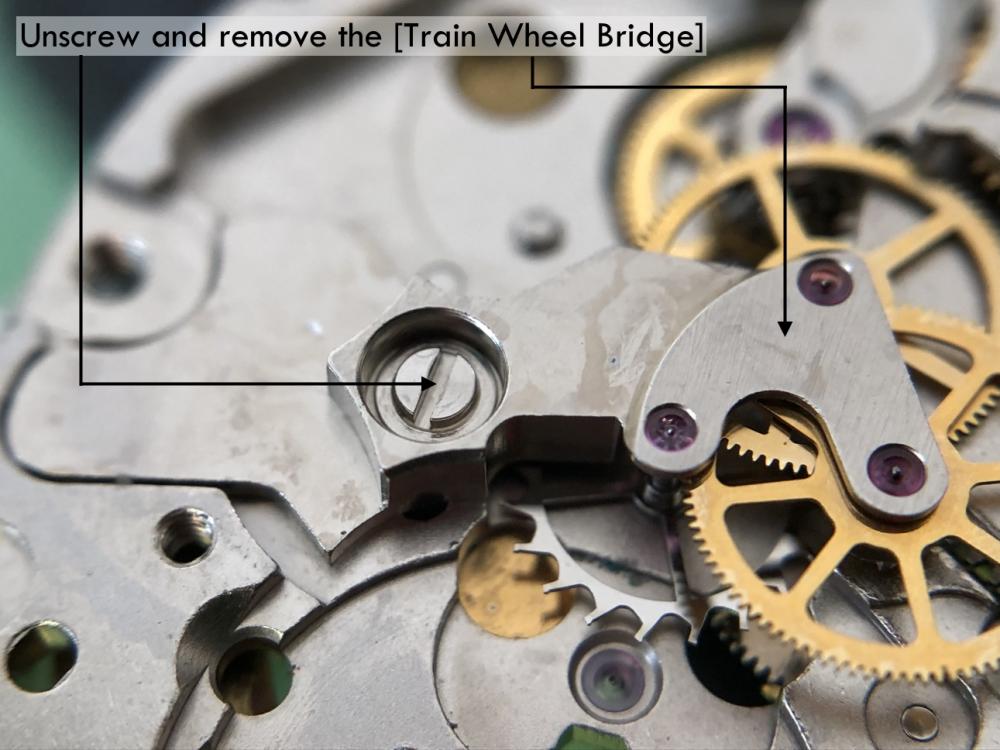
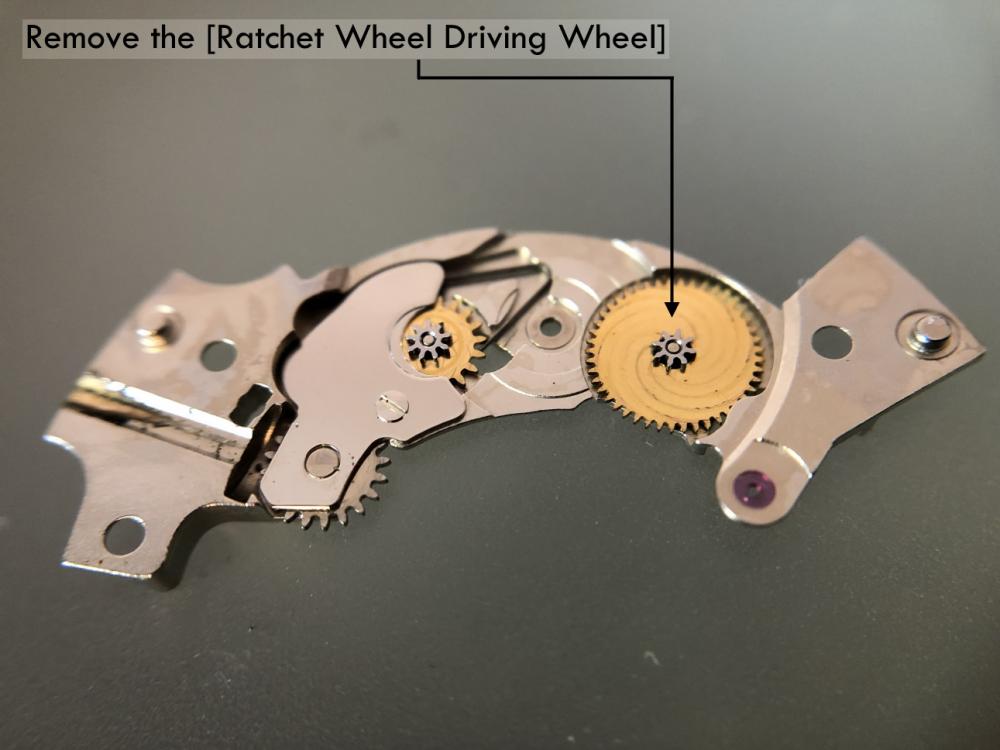
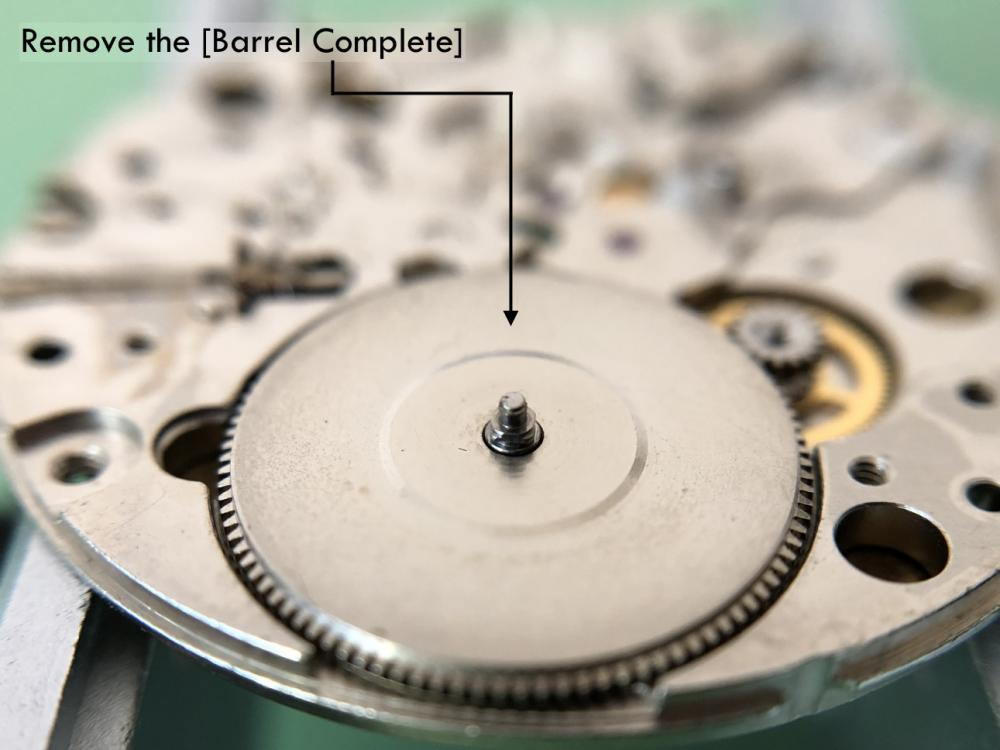
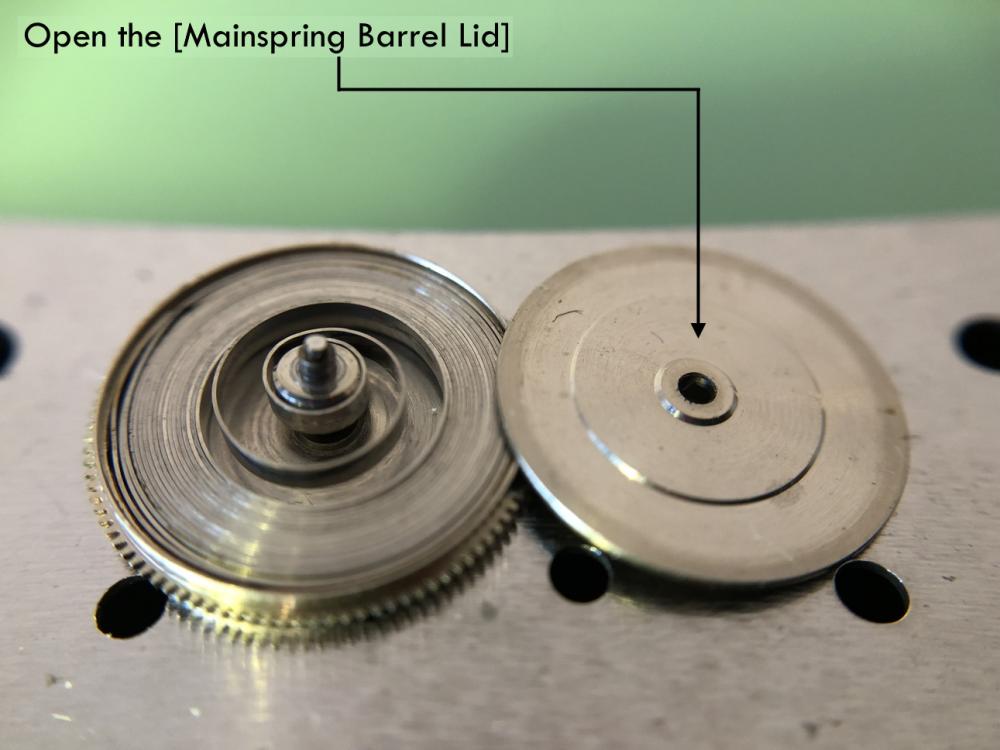
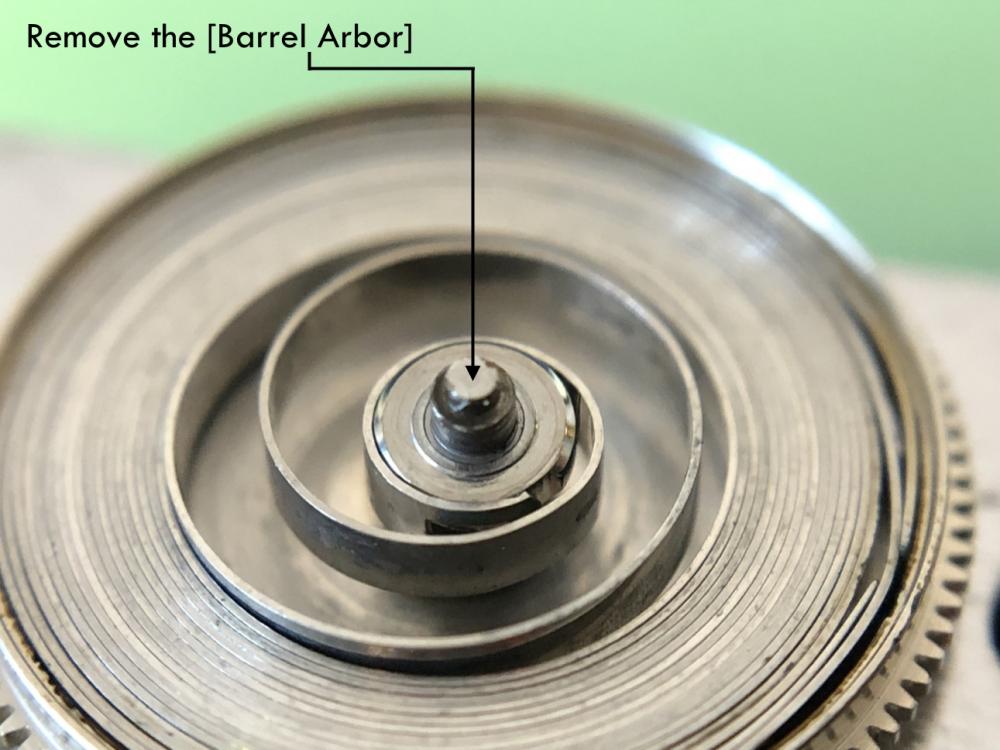
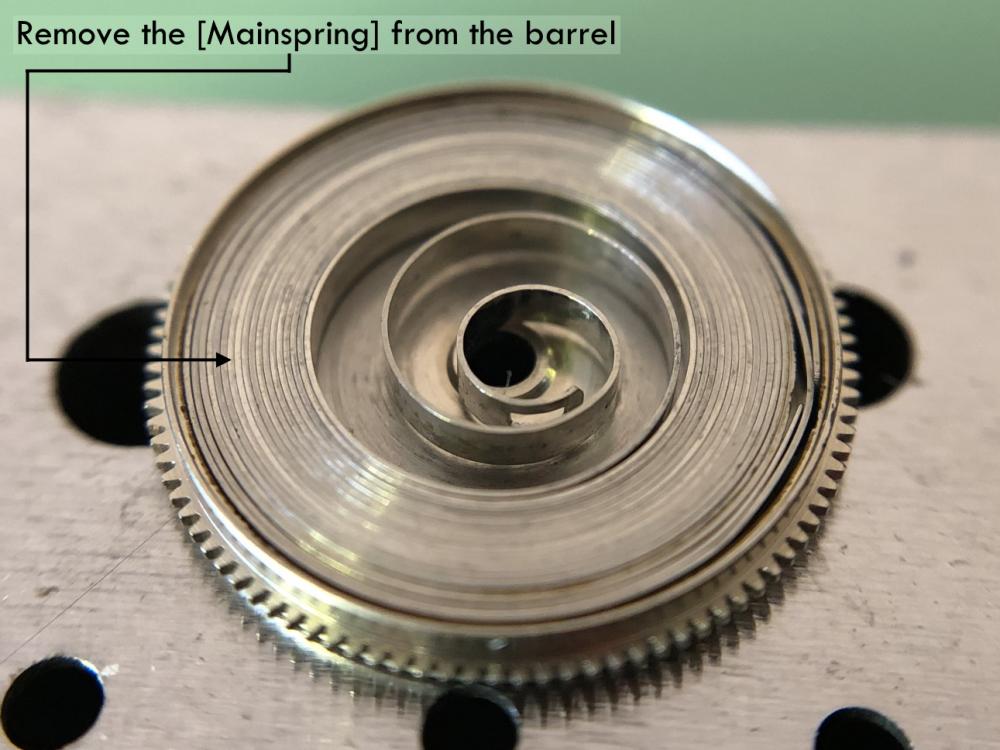
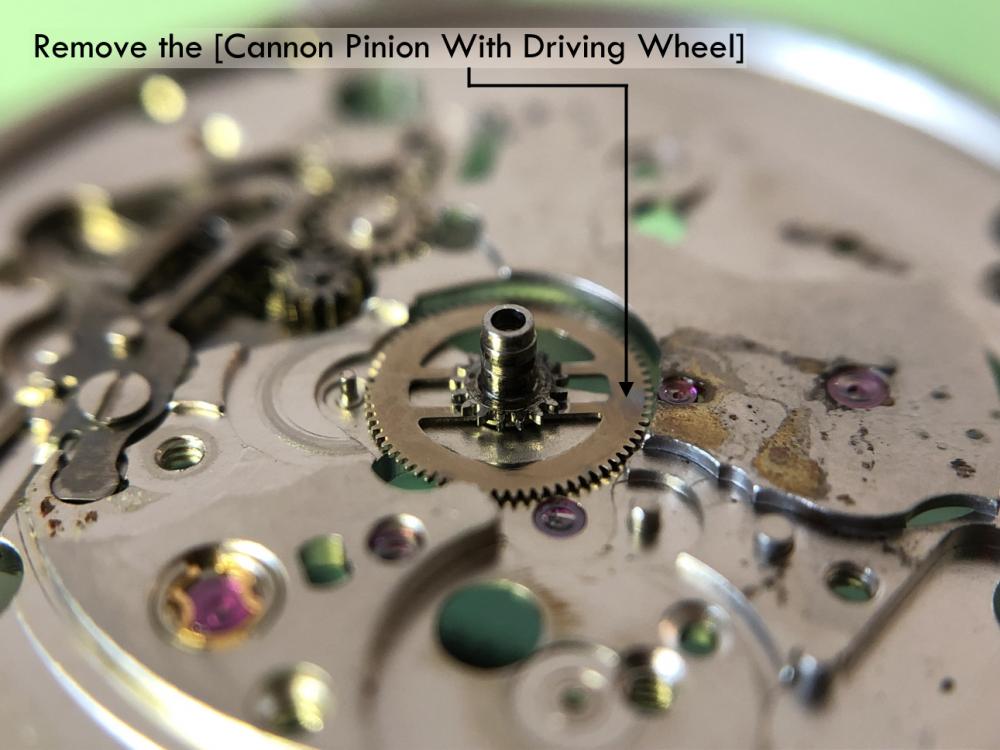
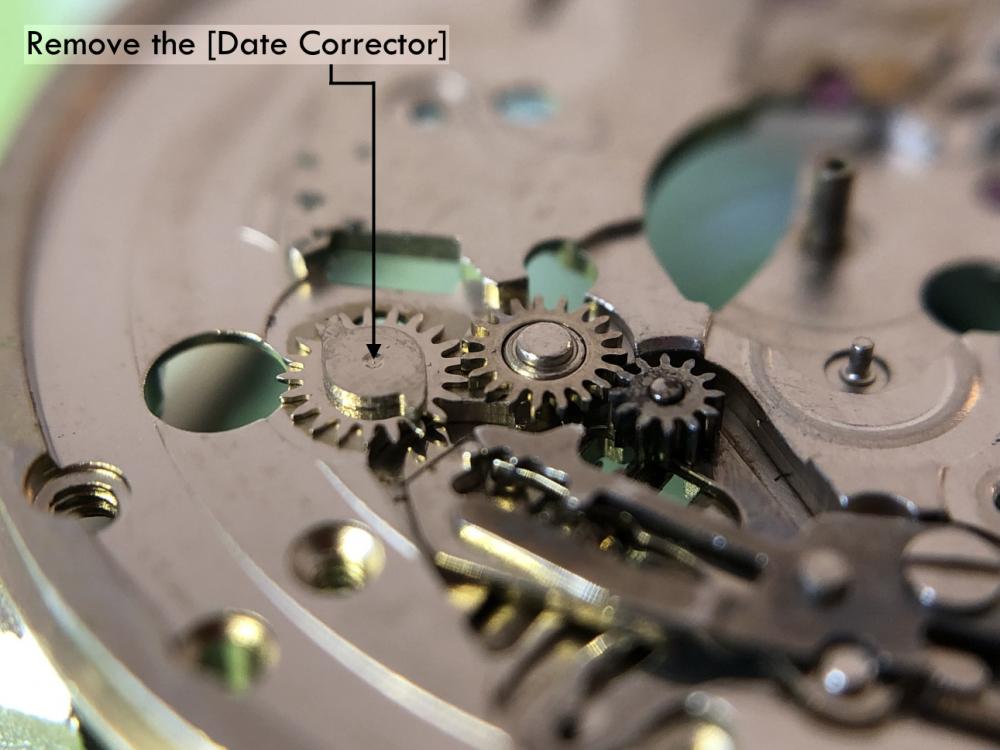
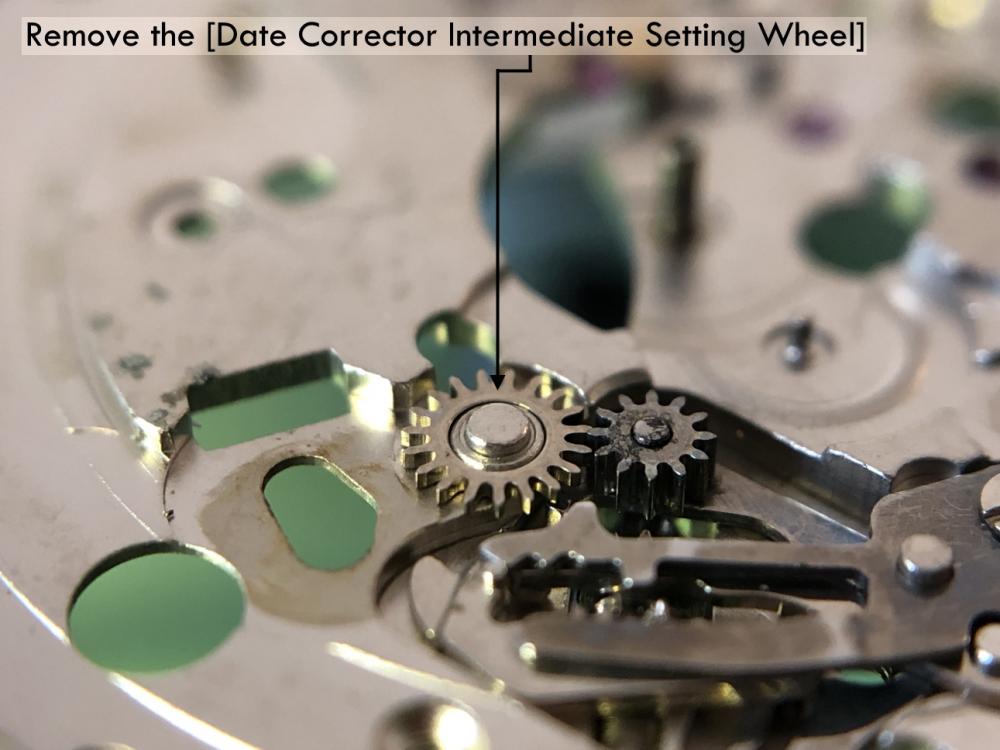
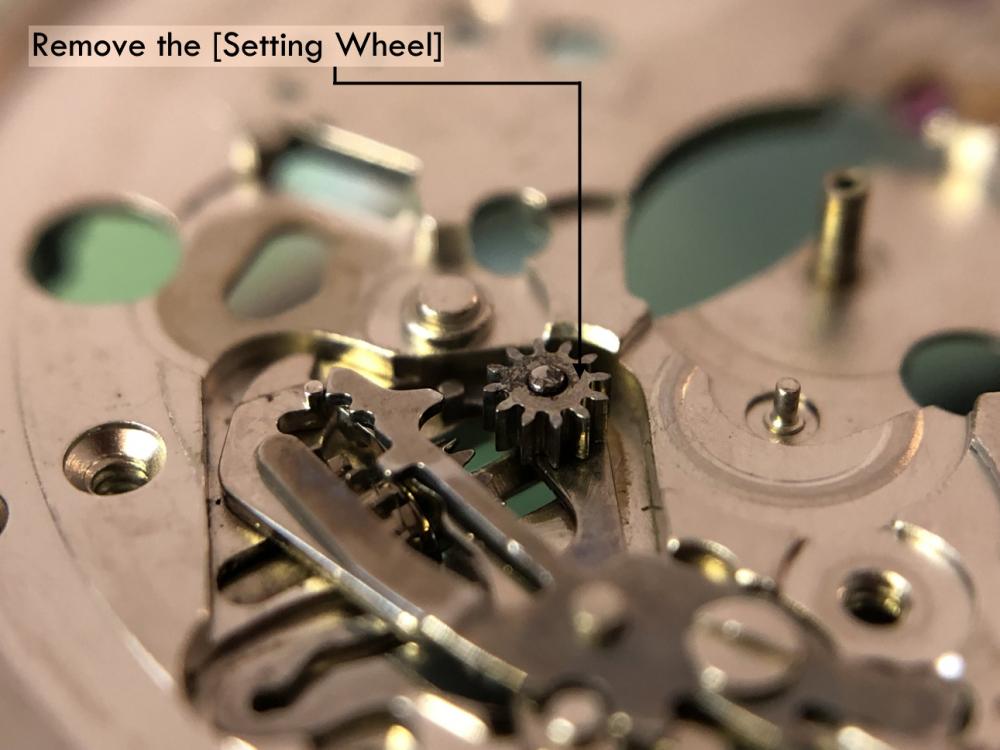
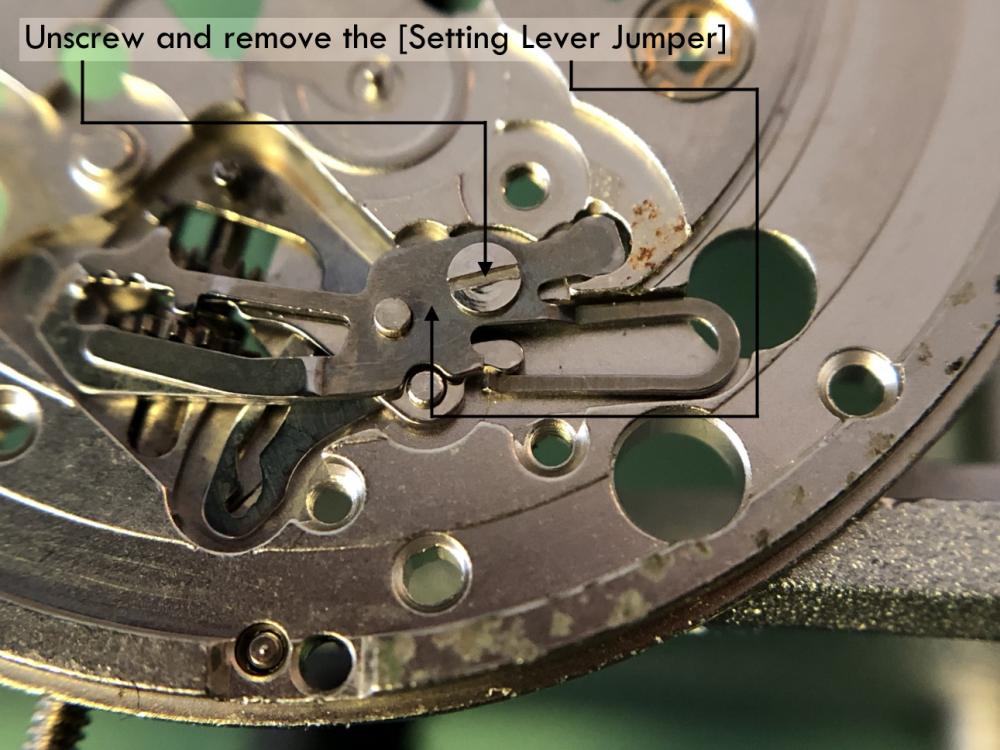
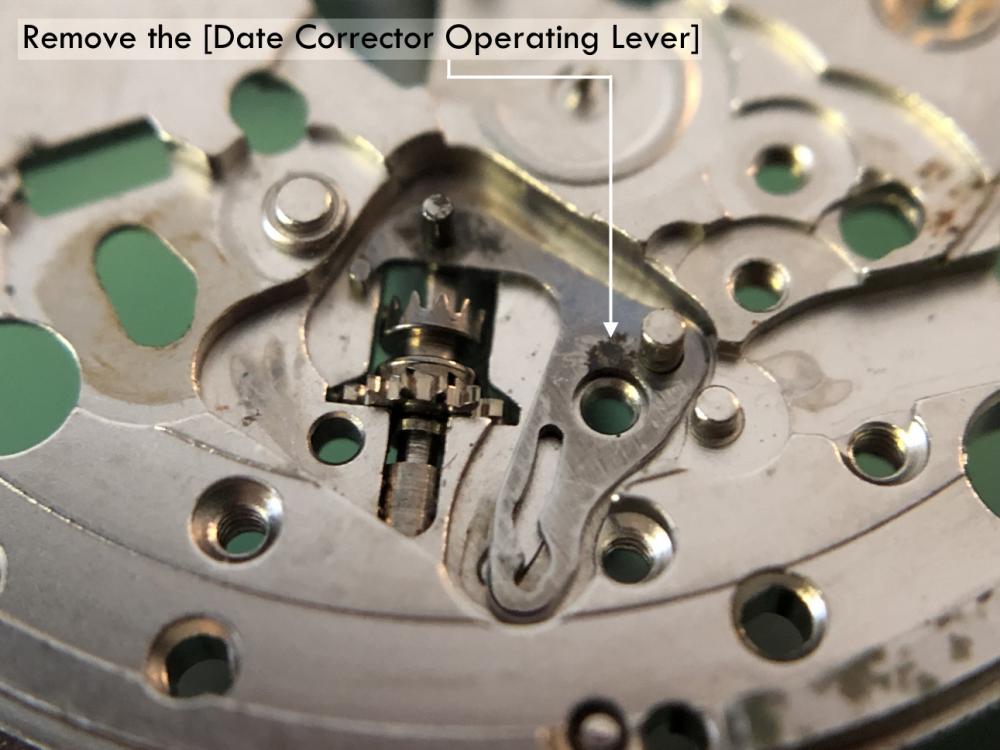
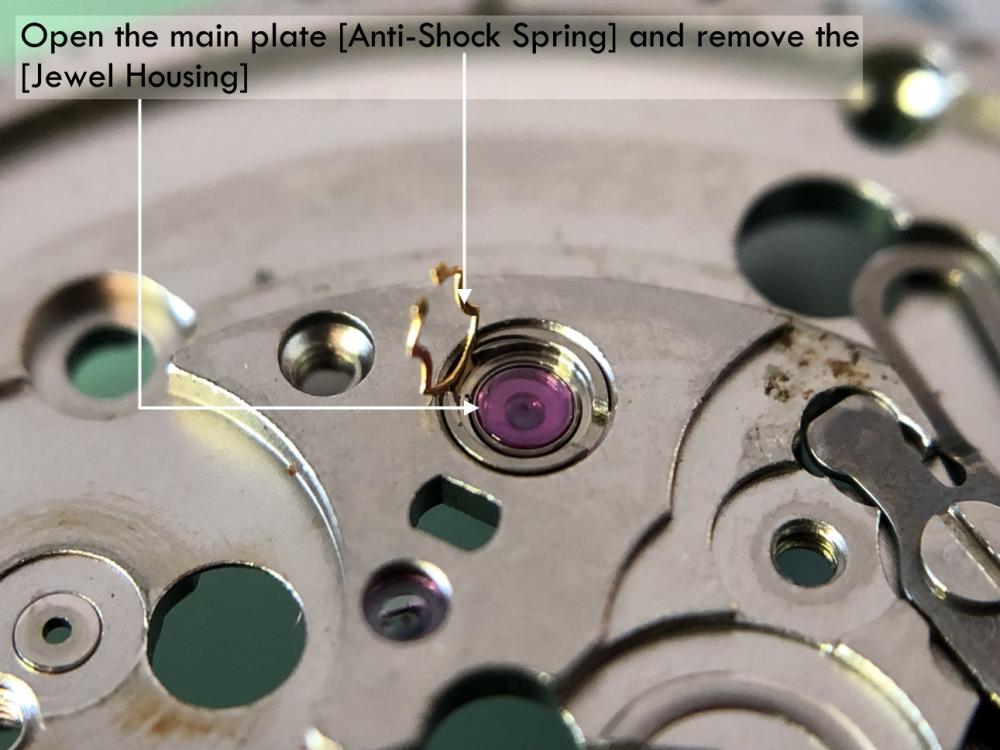
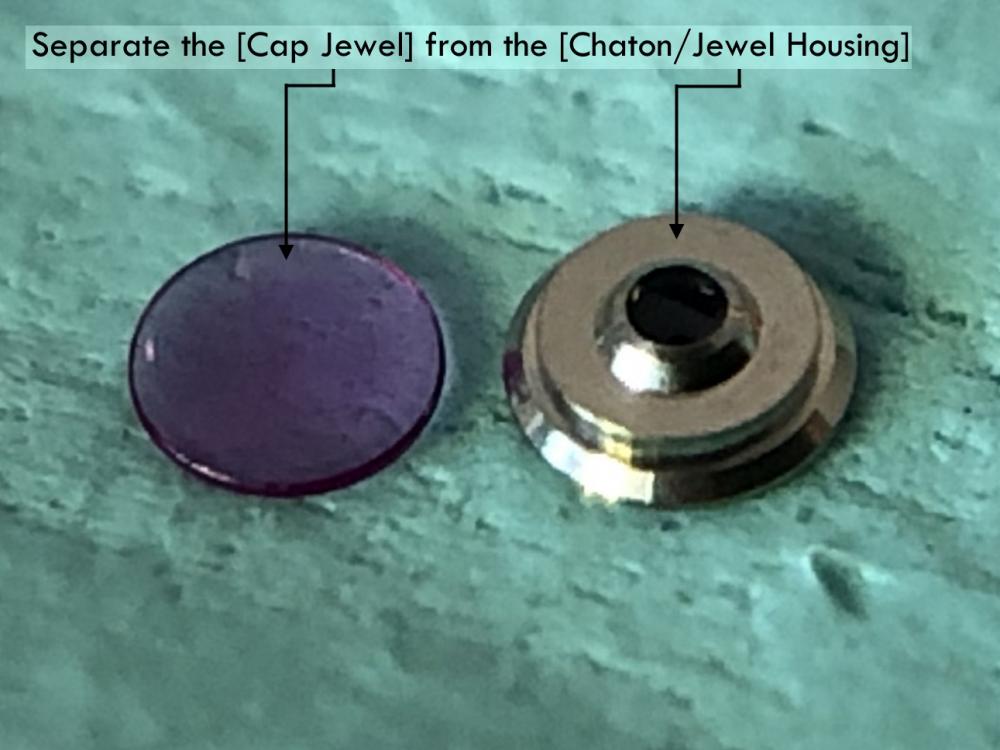
One of the things I love about my job as a watchmaker is the variation in what I'm servicing or/and repairing. One day will be a modern Omega Seamaster with a coaxial escapement, the next a Baumgartner pin pallet and the next a Goliath pocket watch. So the vast array of quality to the not so quality of movements. In fact that has been several of the watches across my bench this month, as well as the usual bread and butter work of vintage Rolex and Omegas, which personally I like working on, as you can get such great results from a 50 year old watch and even get them to chronometer standards again, which is very satisfying. This ladies Rolex watch with a 2135 under the hood came to me with a story, as all watches tend to. Now, the story that the client tells you is sometimes a lot different to what the watch movement is telling you. The watch never lies, but clients have a habit of missing bits out and massaging the truth, so to speak. Here's an example of what the watch is telling you and what the client is.... You decide. This watch had been sitting in a draw for almost ten years, said the customer and prior to that it had been working fine. Now, looking at some of the damage from water ingress and rust and the blob of metal that used to be called a rotor and I would say that unless that draw was in the swimming pool, I doubt very much what I'm being told is even marginally close to the truth The Gif shows dissolving a rusted in screw using Bergeon Vissin. The reason the movement is held upright in the Vissin, is because I didn't want to remove everything that was steel like the IncaBloc setting and minute wheel post, etc. Remember that this watch was in working order to prior to safely putting it in the swimming pool.... I mean the draw in their bedroom. What I usually ask is, 'Are there any children in the house?' because that throws a different light on everything. What one of their little treasures could have done with that watch is anyone's guess and the 'story' the client is giving you is now seeming a little more truthful with throwing in the 'X' child factor, but alas they didn't have children, not even a random niece or nephew we could possibly pin this on. It was looking more that the version of events or non-events that was being fed to me, didn't add up. The underside of the rotor actually still had moisture on it! When I showed the photos of the damage and the estimated repair bill, they didn't seem phased by it and a passing 'Oh, I wonder how water could have gotten inside?' In the end she cleaned up really nicely. I wish I had taken a shot inside the case. The last shot of the timegrapher shows the timing in all six positions For some reason, some Rolex movements you will only get 286 amplitude out of them in horizontal positions. For some reason 286 is the magic number. I've seen this many times. with a new spring and getting 286 amplitude, I'm happy. Another watchmaker friend of mine who works for an accredited Rolex watchmaker told me the same. This isn't all Rolex movements. On a side note, I serviced a beautiful Omega Seamaster a few years ago. The rubber gasket had turned into a sticky paste just like Marmite, which had gotten everywhere The movement had an intricate slipping pawl ratchet wheel to stop the keyless work from turning as the rotor turned this to put power in the mainspring and vice-versa if I can recall. Great to discover this over engineered piece of kit and see the similarity of this to a reversing wheel! It was serviced and returned to it's owner and unfortunately because it has 'Seamaster' written on the dial he thought it would be alright to get into the shower with it! This only had one outcome, which water logged the case and movement within seconds. The watch wasn't returned to me for two weeks, so I had to get to work quickly, but the damage was already done and set in and I wasn't sure if the old girl wasn't going to pull through this one. The client didn't try to dress this story up! There was no cosy warm dry bedroom draw to talk about. No niece, nephew or child to hang this one on! The thing with a movement with power in the mainspring and a jammed gear train is, it's like playing Jenga. You know at some point it's coming crashing down, just like the movement, you know as you remove parts at some point the power is going to hammer through a train you are taking the bridge off, so it's minimising the least expensive replacement part to break, so holding back the train to remove the escape wheel as a priority because this is the most delicate part to break and then if you can the fourth wheel. The third and second wheel might come off lightly. In fact, I was able to remove all the train by holding back the second wheel which wasn't that hard because of the rust was doing a great job at that. The only parts that was permanently damaged beyond repair was the whiplash regulator on the top of the balance and a few bits and pieces from the auto works, which had fused together. The timegrapher results were pleasing once it had been cleaned and serviced again. Even with all that water and the work needed, a perfectly working vintage Omega 503 brought to within Chronometer standards. It's so pleasing to bring that look of joy to a clients face when they tell you they've been to several watch service places and they've said it can't be repaired and you tell them that you will get her working again. Priceless! Two services and a complete de-rusting in less than three weeks was a costly mistake


 7 points
 -
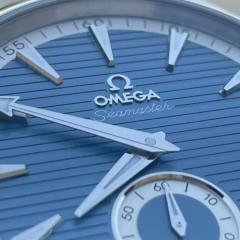
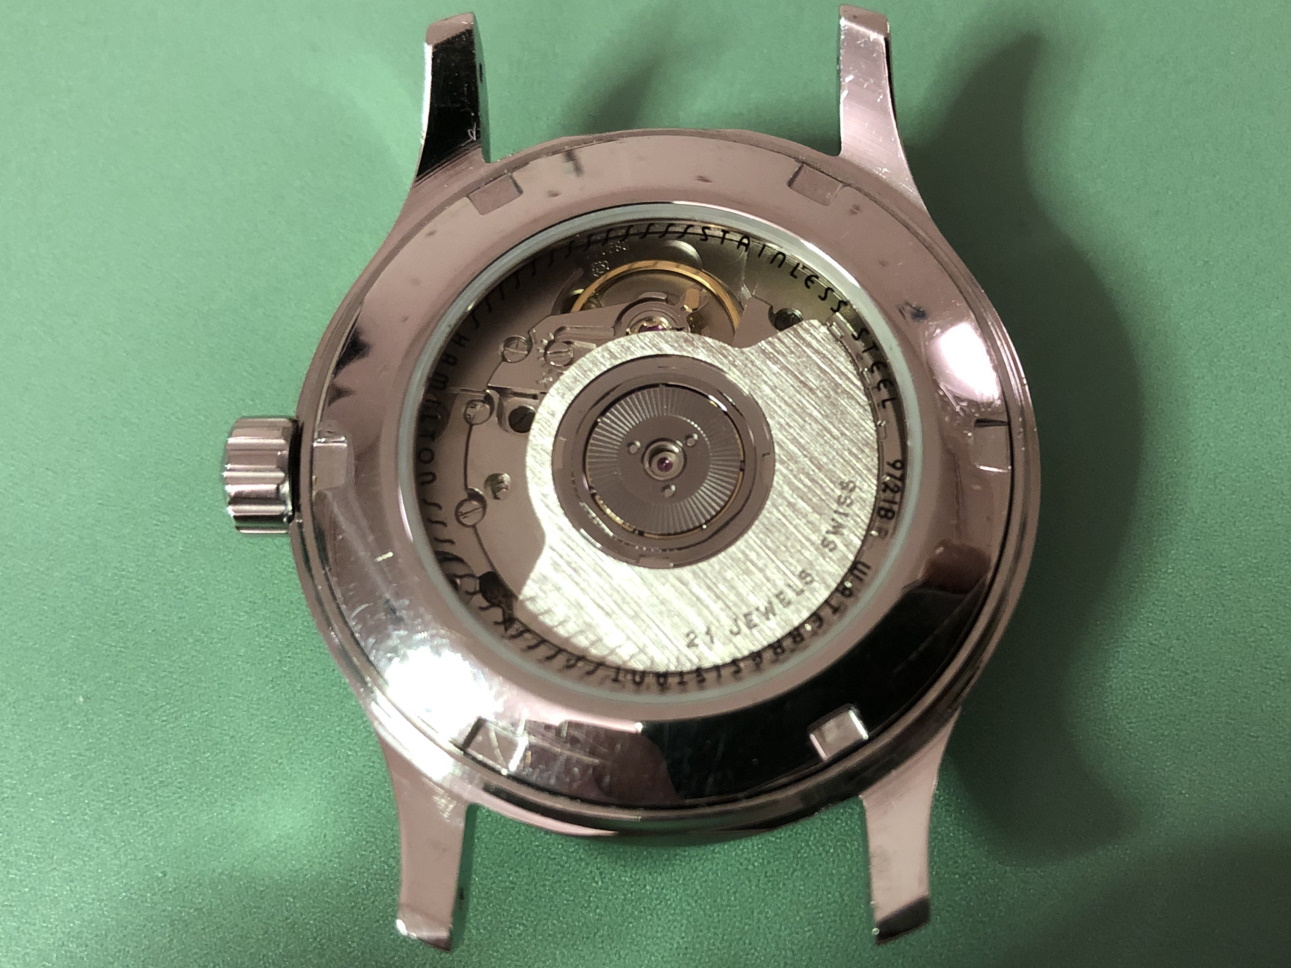
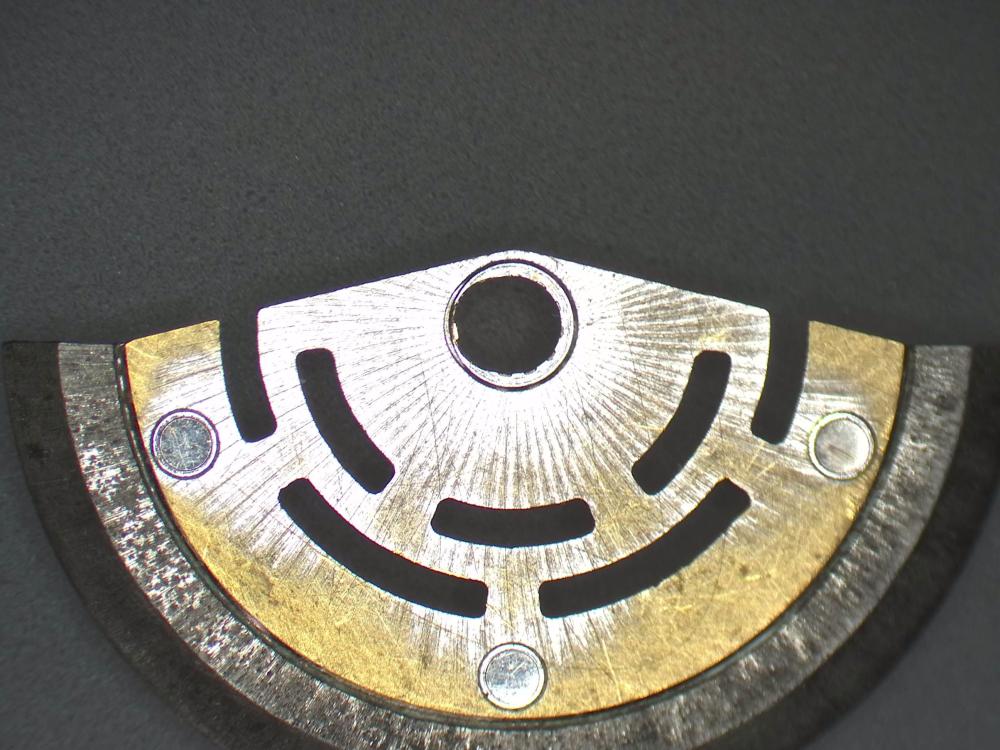
I just came across this beauty last night.
 4 points
 -
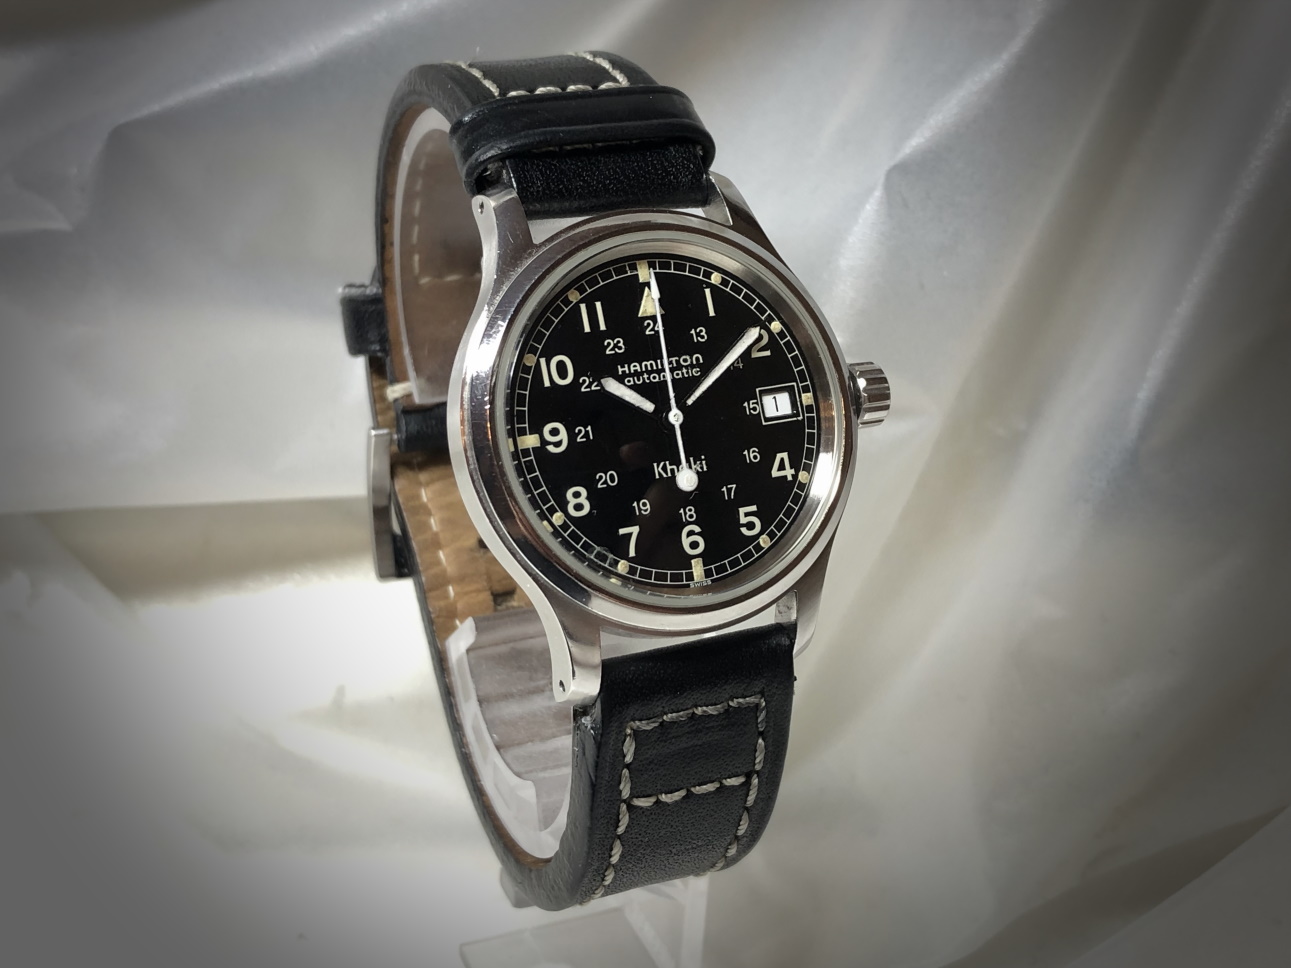
Very nice! Water ingress is the bane of my existence. I just wish we would get them as soon as the water got in so we could mitigate damage. Here's a speedmaster reduced I did that apparently got water in it 15 years ago and then it just sat. I'm happy to say it's back to running, but was a pain to get that way.
 4 points
 -
yep i forgot i liked Free, mines a little eclectic but mostly rock and blues DeepPurple,Rainbow,Sabbath,Zeppelin, Whitesnake, Marillion, Santana, Gary Moore, Thin Lizzy, AC DC, Guns and Roses, ZZ Top, Def Leppard, Aerosmith,Van Halen, Heart,Thunder, Paul Weller, BB king, John Lee Hooker, anyone that makes heavy use of the pentatonic box, Tenacious D, Mark Knopler, Peter Gabriel, Genesis, Steve Miller, Eagles,Queen,Fleetwood Mac, Floyd, Foo Fighers, Chilli Peppers, etc. etc And what an amazing combination of acoustic guitar and sax by Stewart and Dulfer, she can play my saxophone any day of the week .3 points
-
I'm going to make a speculation on something? If you look at the watch companies they have timing procedures so in the case of Omega a fully wound watch is fully wound up wait 30 up to 90 minutes and that's considered fully wound up. so it interesting problem may occur with a watch on your wrist that you wouldn't notice if you followed your timing procedure of letting it settle. So on your wrist is it conceivable you to get that last little bit before the mainspring slips what if it doesn't slip exactly where it's supposed to what if you go past which you probably do. So if you're actively moving a wrist and you go past the fully wound up position just before it slips could you have enough energy to be too much energy? So maybe they have a safety factor here. looking at Rolex we get some amusing conflicts because one of the service manuals I know is 310° whereas the other source I'm looking at is 300 for the most part with the 1520, 1530 series 280°. then Omega has way more watches the Rolex covering multiple pages of documentation fortunately maximum amplitude is specified on the various specifications page so I'll just snipped that out. Of course the amusements with Omega is minimum amplitude at 24 hours unlike Rolex it's 200° Omega I could take as low as 160 on some caliber's. Or basically scattered across several pages is 160, 170, 180, 190 and 200 just depends upon which caliber it is.
 2 points
 -
Lol. Yeah, I don't have what it takes on a mineral glass!2 points
-
Looks like that wheel arbor is wearing a bear suit onesie2 points
-
Interesting about the amplitude. I serviced a similar movement for a friend (cal 2230) and without a new mainspring, amplitude was about 300°. I remember reading something about some manufacturer (it was either Omega or Rolex) not wanting amplitude above 290° for some movements. Don't know why. Maybe some movements more prone to re-banking? I wish I could remember more. Maybe someone who services Omega/Rolex ( @nickelsilver, @JohnR725 could elaborate (or was I dreaming)?2 points
-
Australia has a scarcity of watchmaking training, but @Michael1962 I believe both of those courses you mentioned are still running. Watch and Clock School of Western Australia are accepting registrations for next year (2025) according to their website. I was looking into their course options at one point but the logistics of me flying over to Perth to do a course wasn't going to work (I'm in Melbourne). TAFE NSW still offers a Certificate III in Watch and Clock Service and Repair. Usually you would need to be doing an apprenticeship within the industry to be able to enrol, but I recall there being some way of taking the course without the apprenticeship. I ended up signing up for the BHI distance course and have since been ambling along trying to make my way through all the lessons of the Technician grade. I haven't signed up for tutor feedback but as already mentioned this can be added at any point. A large part of the course involves learning about clocks, and many of the practical exercises start you off making small tools and clock components. Unfortunately various life factors have meant I've made little progress in two years. I also find myself using my free time to repair my actual watches rather than engage with the course - I seem to learn better when I come across a particular skill I need to learn or an actual problem to be solved in something I'm working on.2 points
-
This how my master taught me when it comes to progress in watch repairing. Gents, simple large movement, sweep seconds, calendar, day date calendar, auto, auto sweep, auto calendar, auto day date calendar. The same order with ladies watches. This would also include learning about replacing mainsprings, buttons and stema and crystals. Then complicated gents which would start with gents chronograph watches, the same with ladies. When this was achieved it was high grade movements. Balance staff replacing and making, making stems. Escapement work such as dealing with hairsprings setting pallet stones jewels and all the other things I have missed out were included in the process of learning.2 points
-
The word of the day is " BIGMAGNET " its actually 2 words but i combined them to make it look important and very special. In the same way that "NEVERENOUGHWATCHES " is important and very special2 points
-
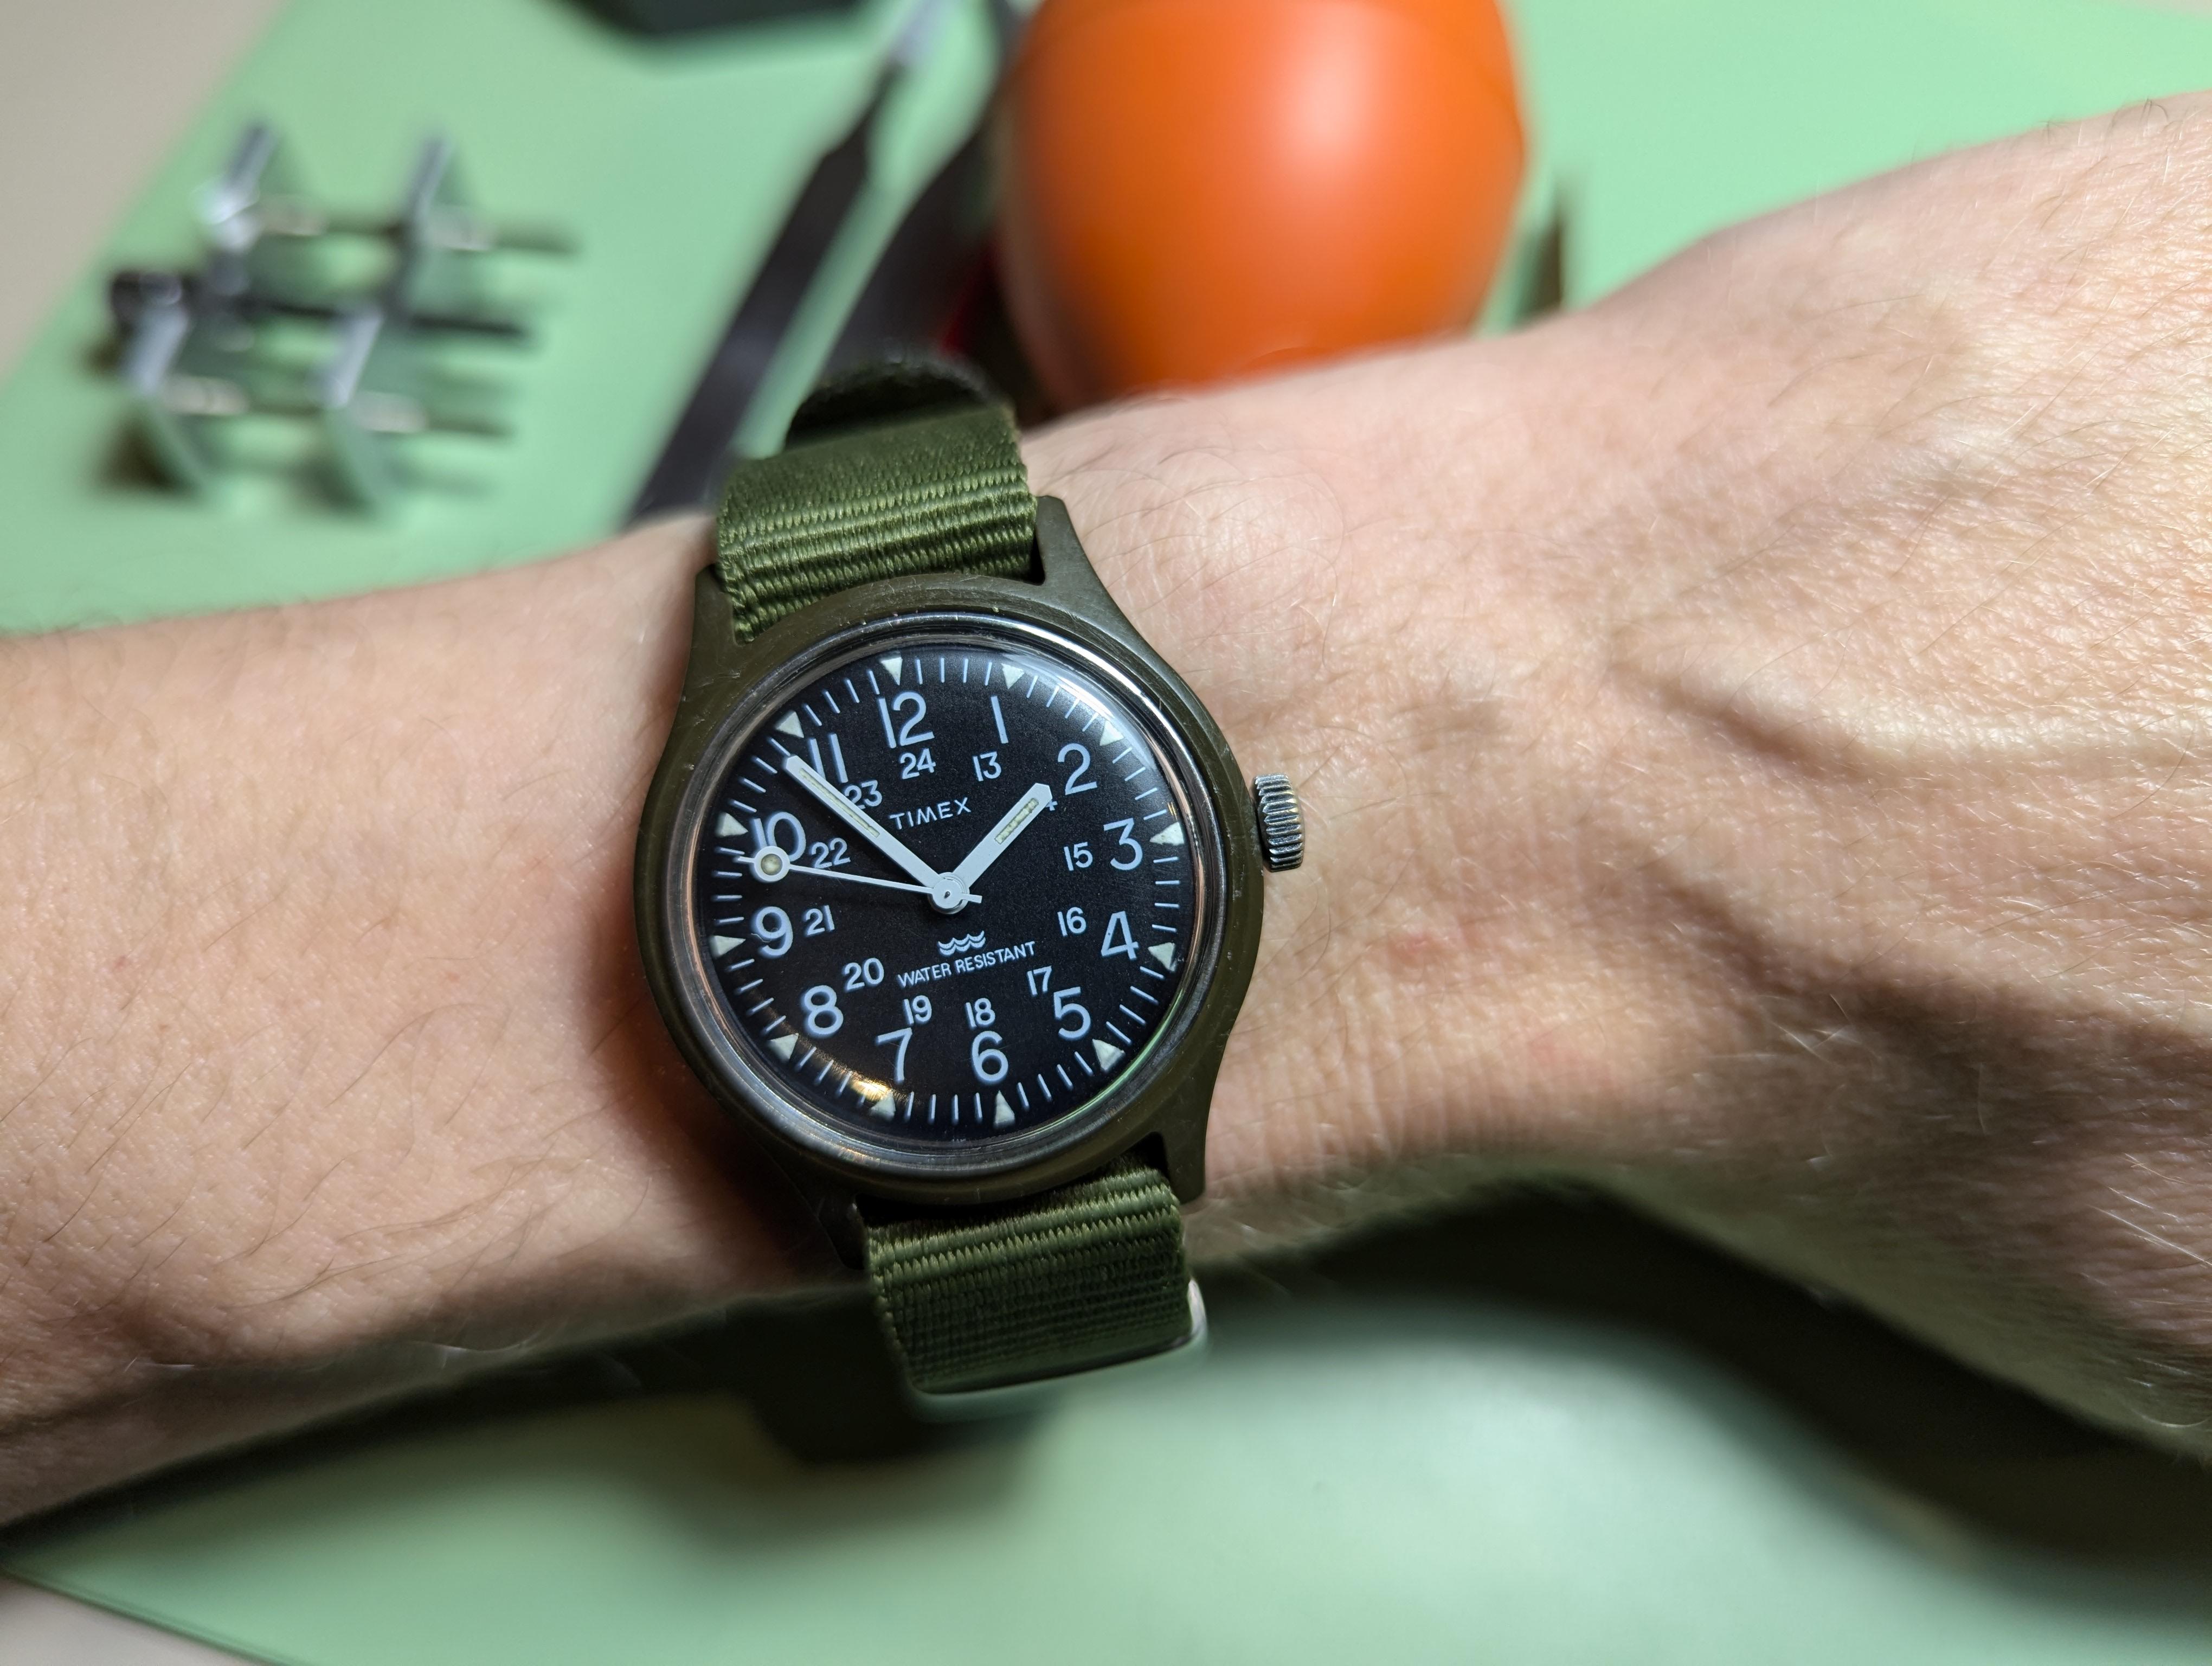
Here's my eighteen dollar Timex MacGuyver field watch from a couple of weeks ago. The case has a couple of scrapes, the movement cleaned up and runs not the best Timex M104 I've done but acceptably. The crystal sanded up like new and the dial and hands are perfect.
 2 points
 -
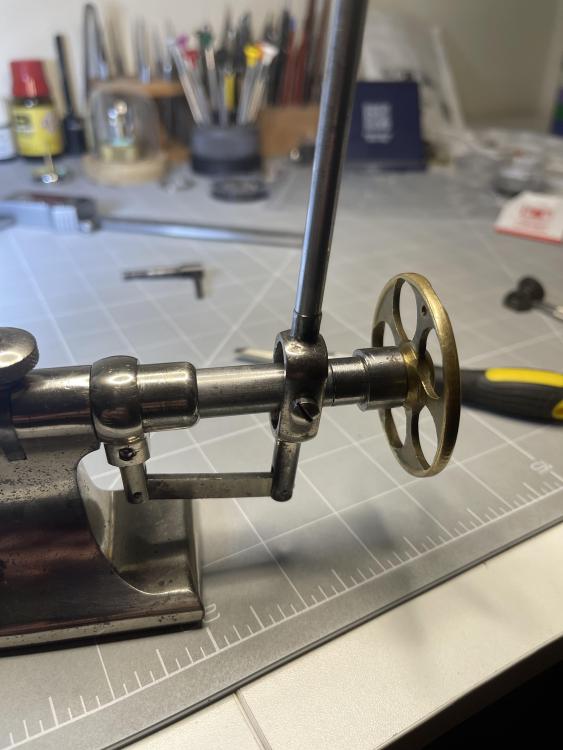
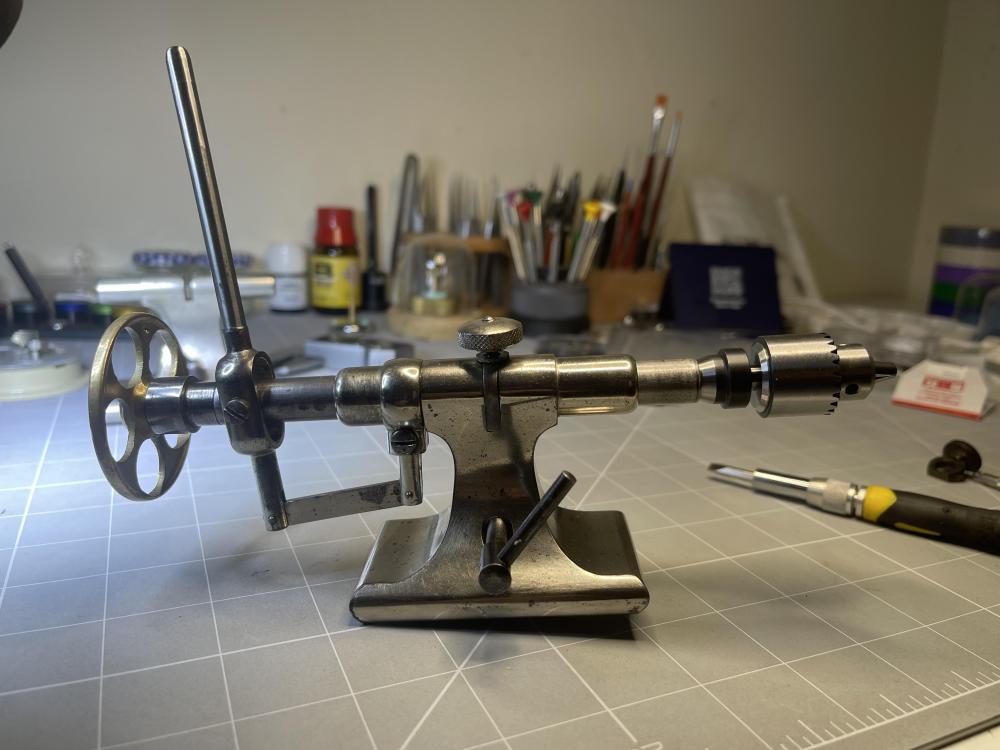
It depends on the quality of the chuck and the 8mm body it mounts to, and how well they are mated. I have used them for years, drilling holes down to 0.15mm regularly. If I'm drilling a tricky hardened steel arbor then I use a pinvice though, with a bar in the tailstock I slide up the rear of the pinvice for a little more stability. (Also depends of course how well the tailstock fits the bed and its alignment)2 points
-
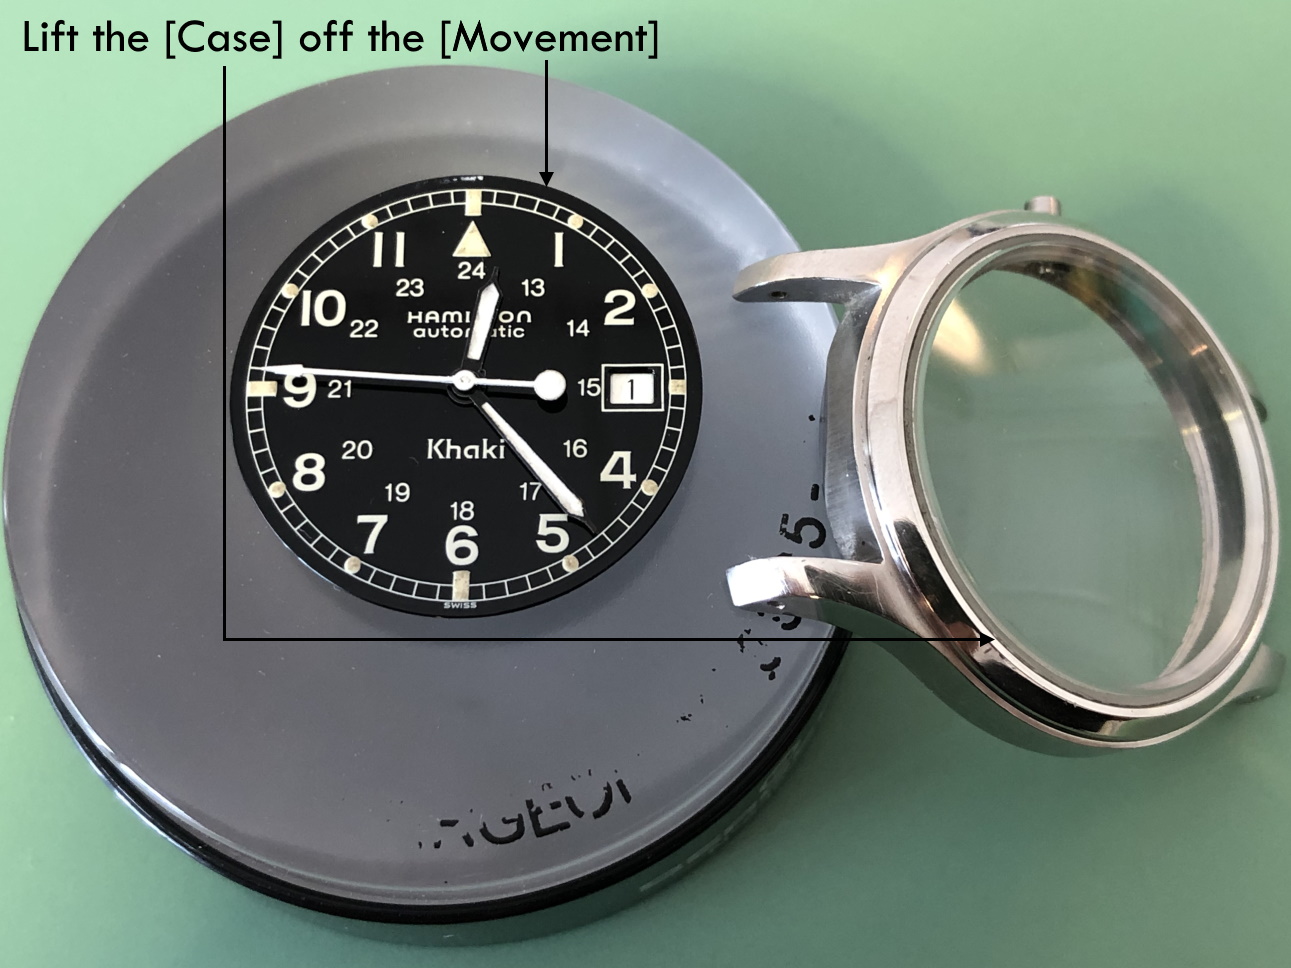
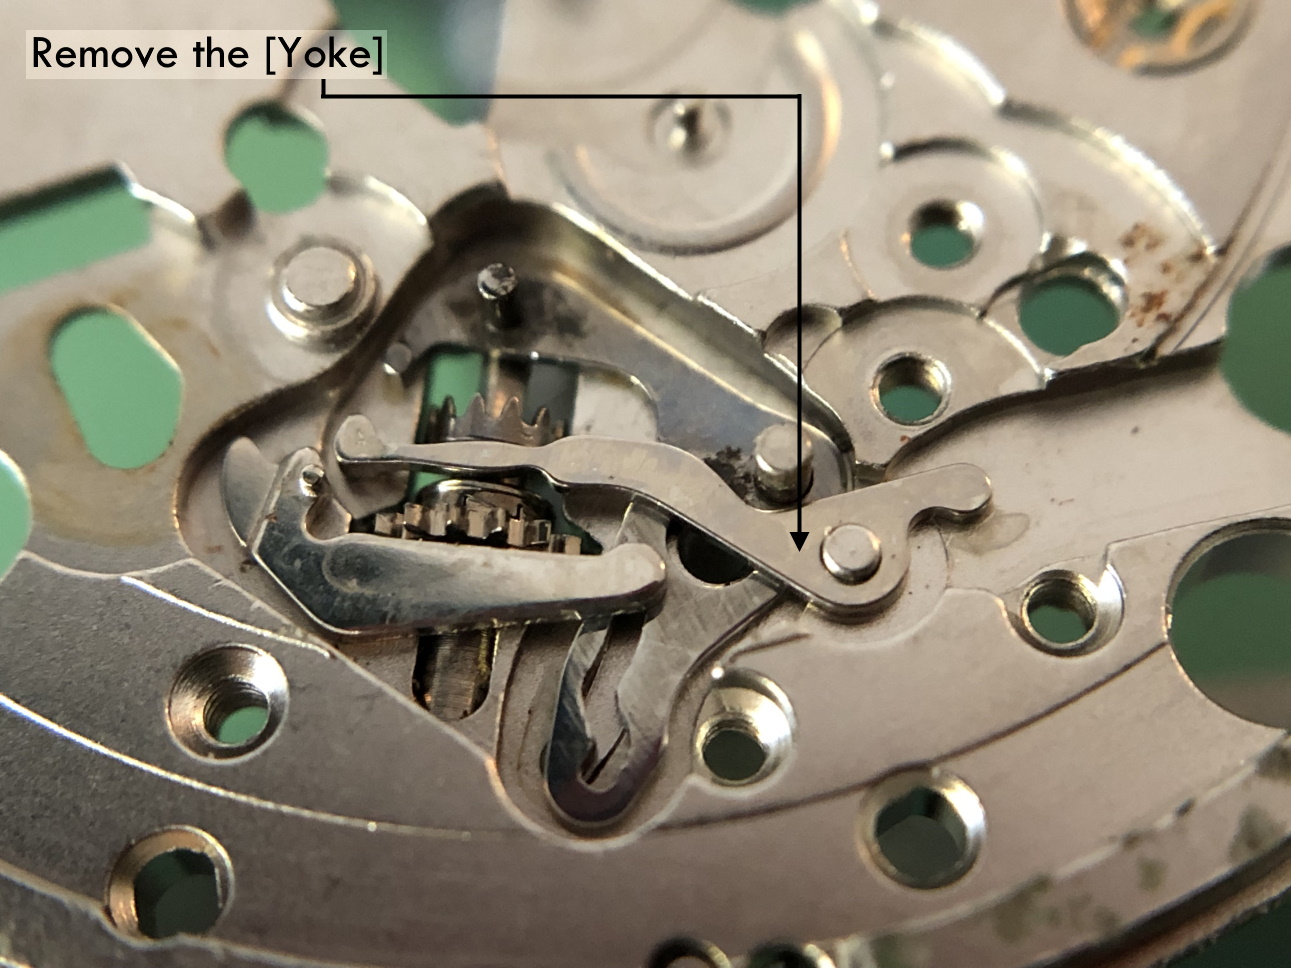
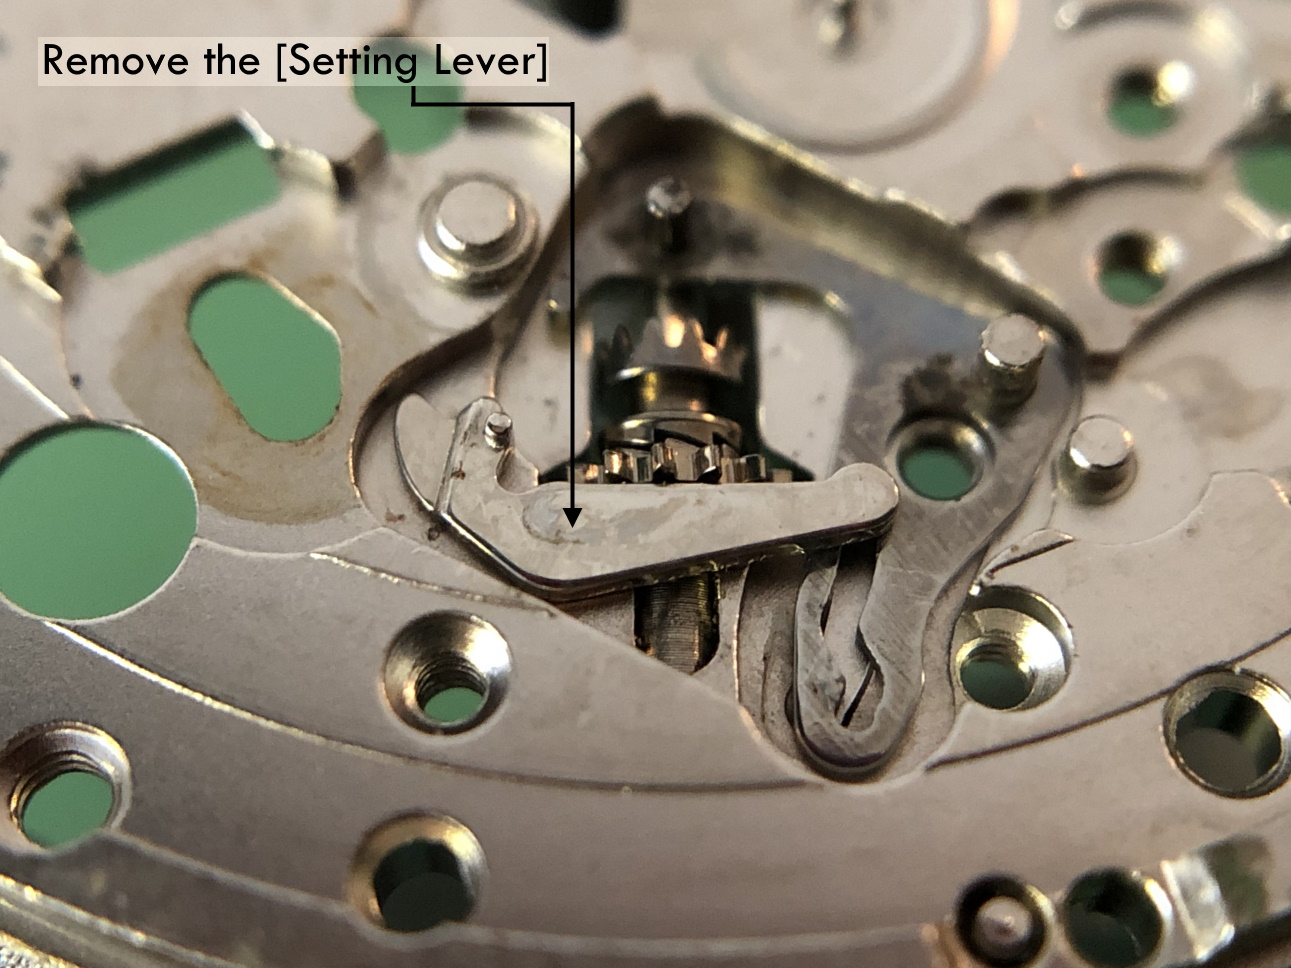
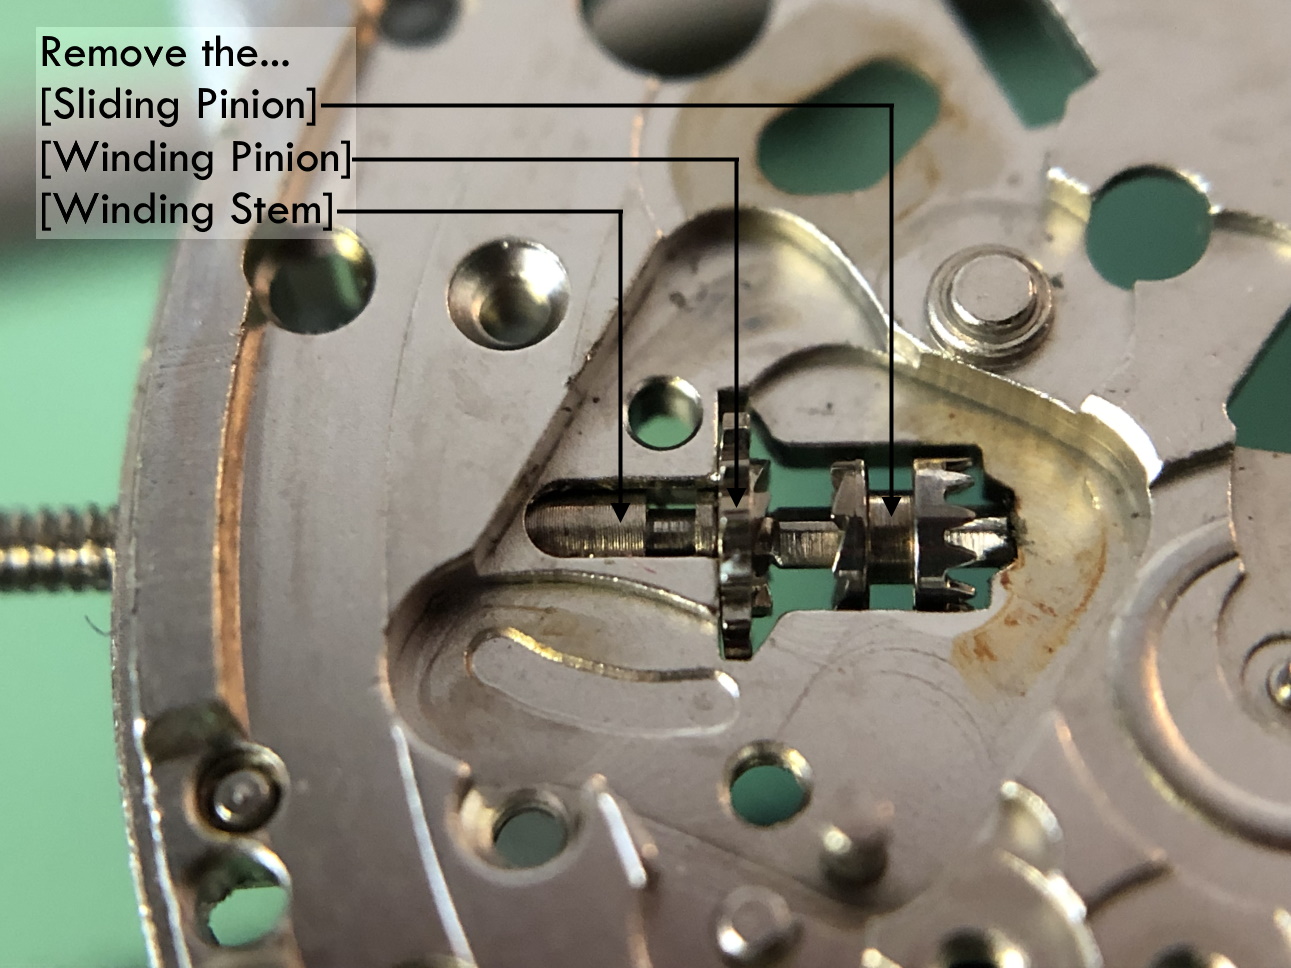
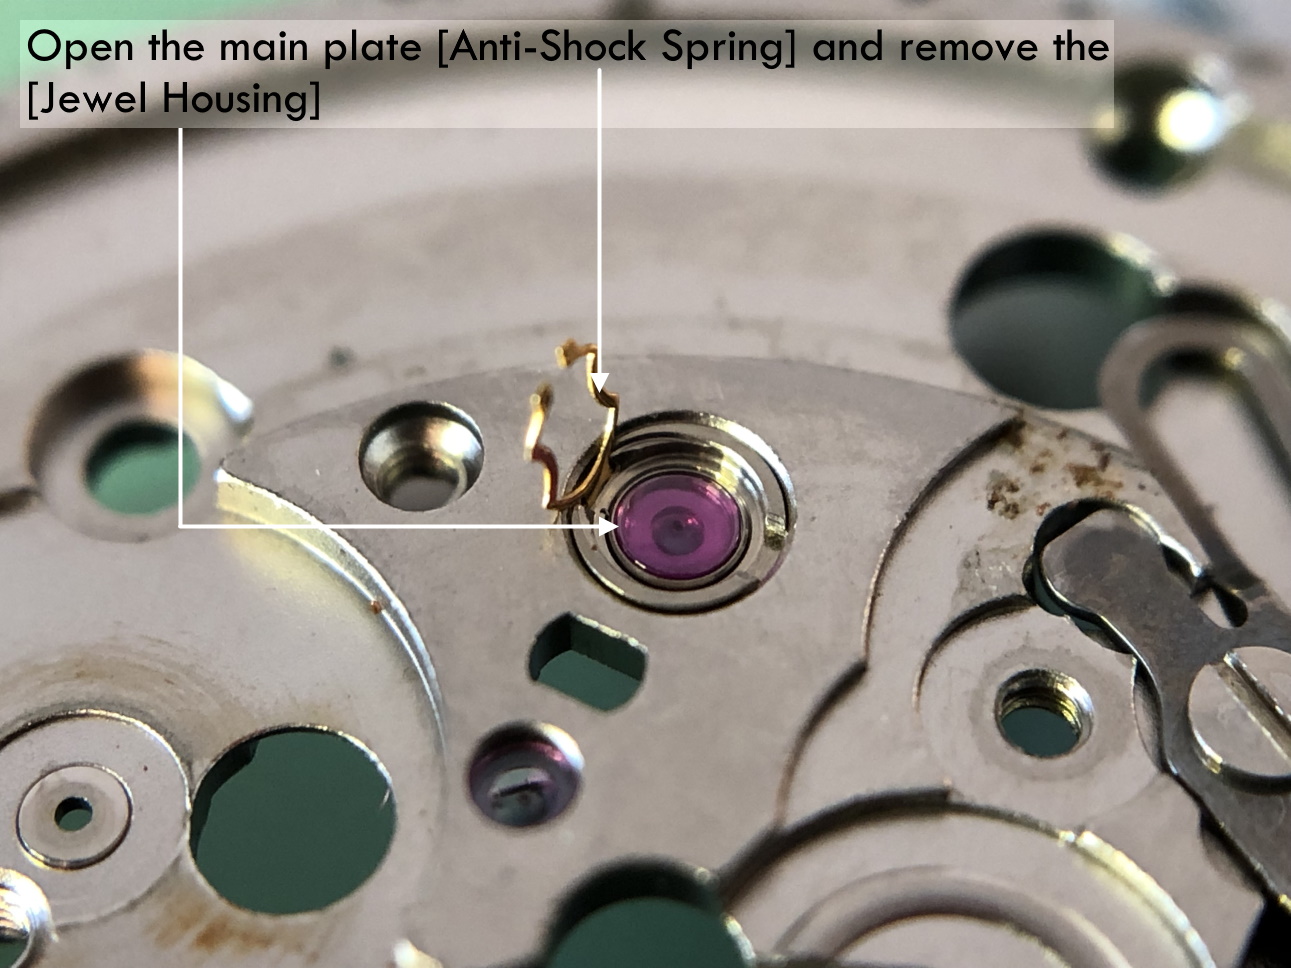
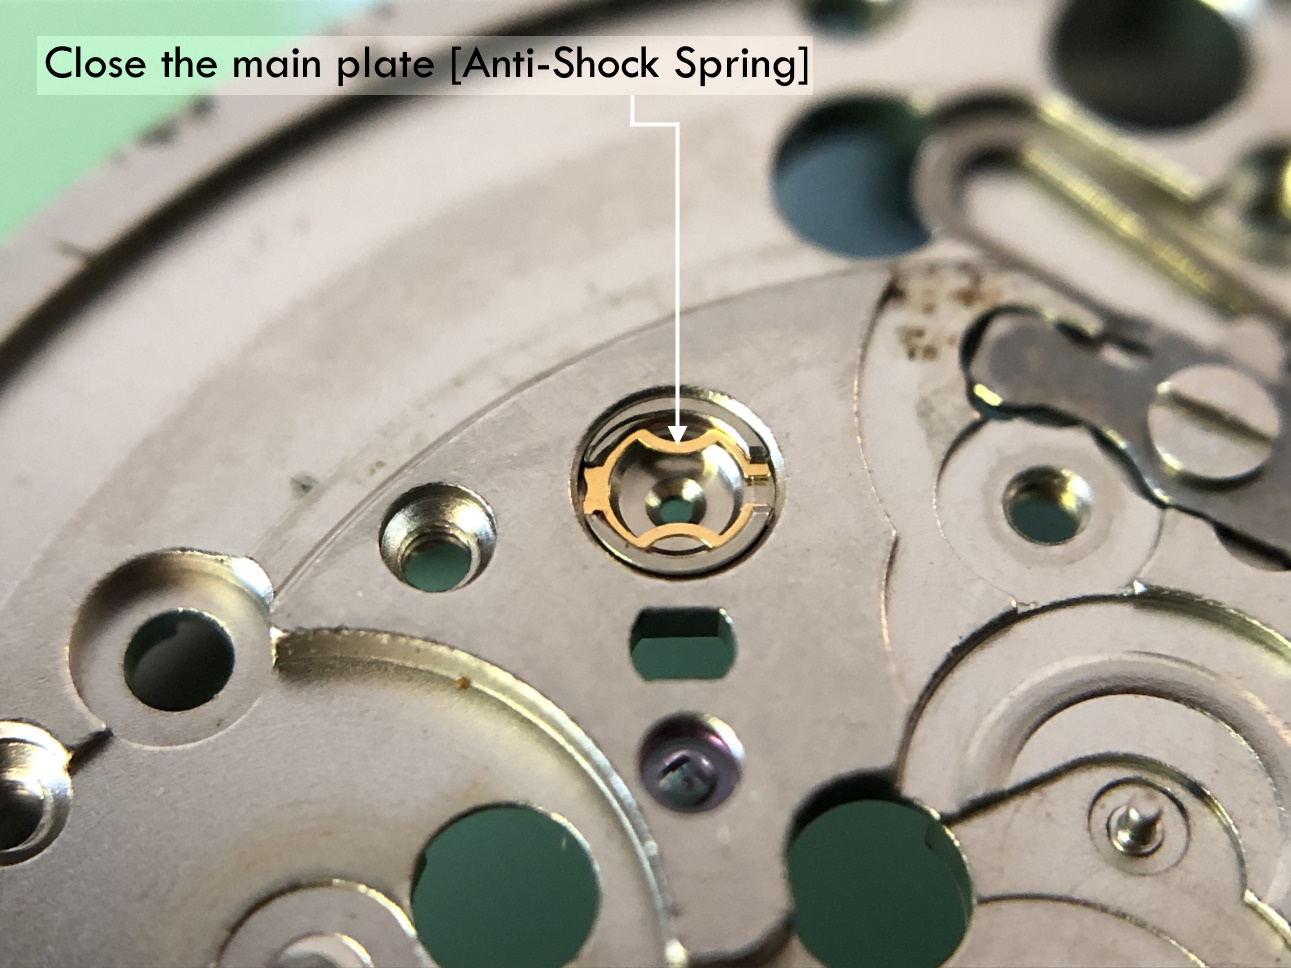
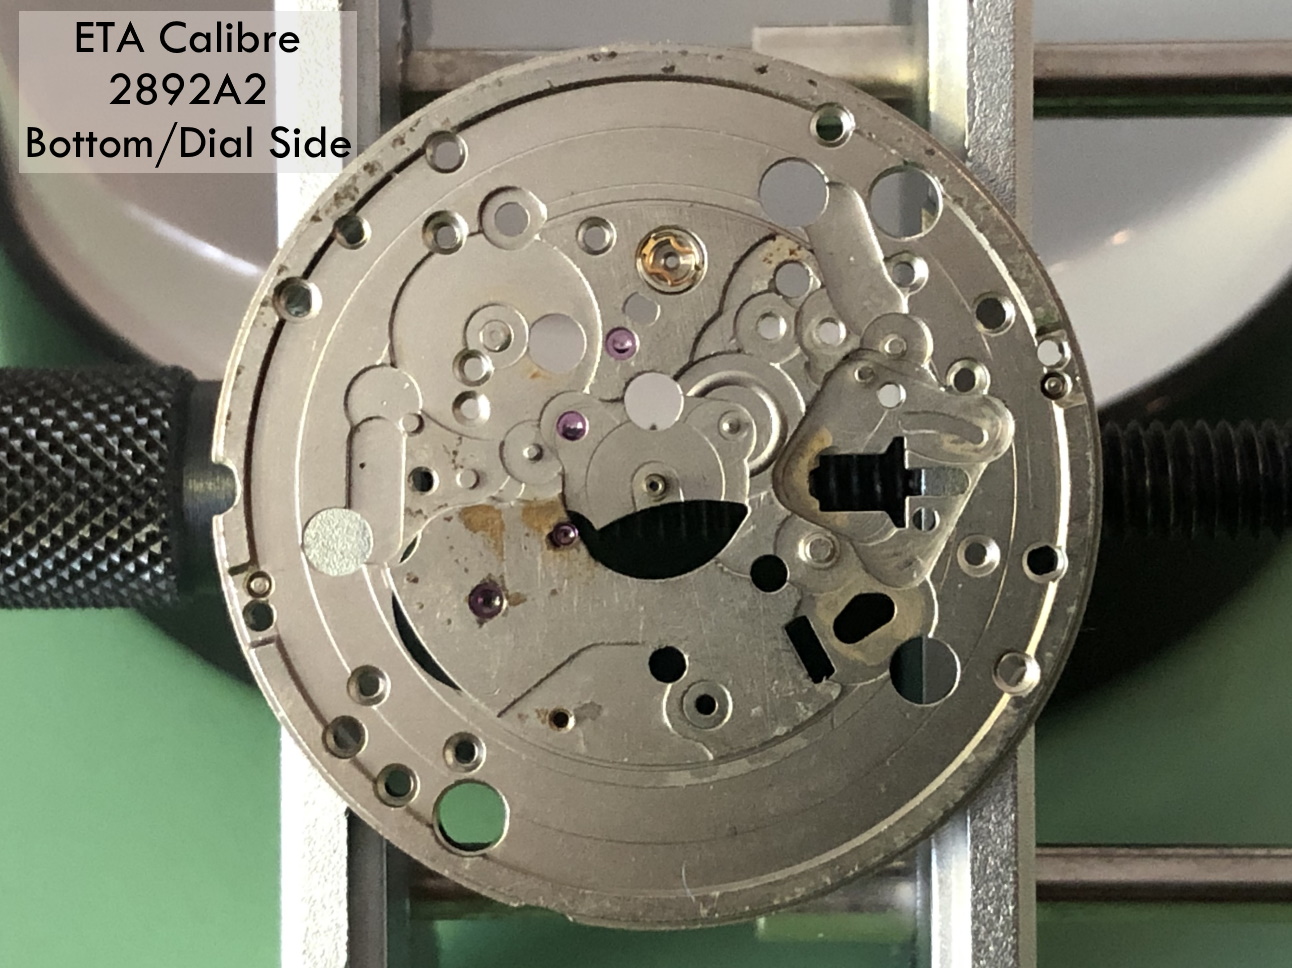
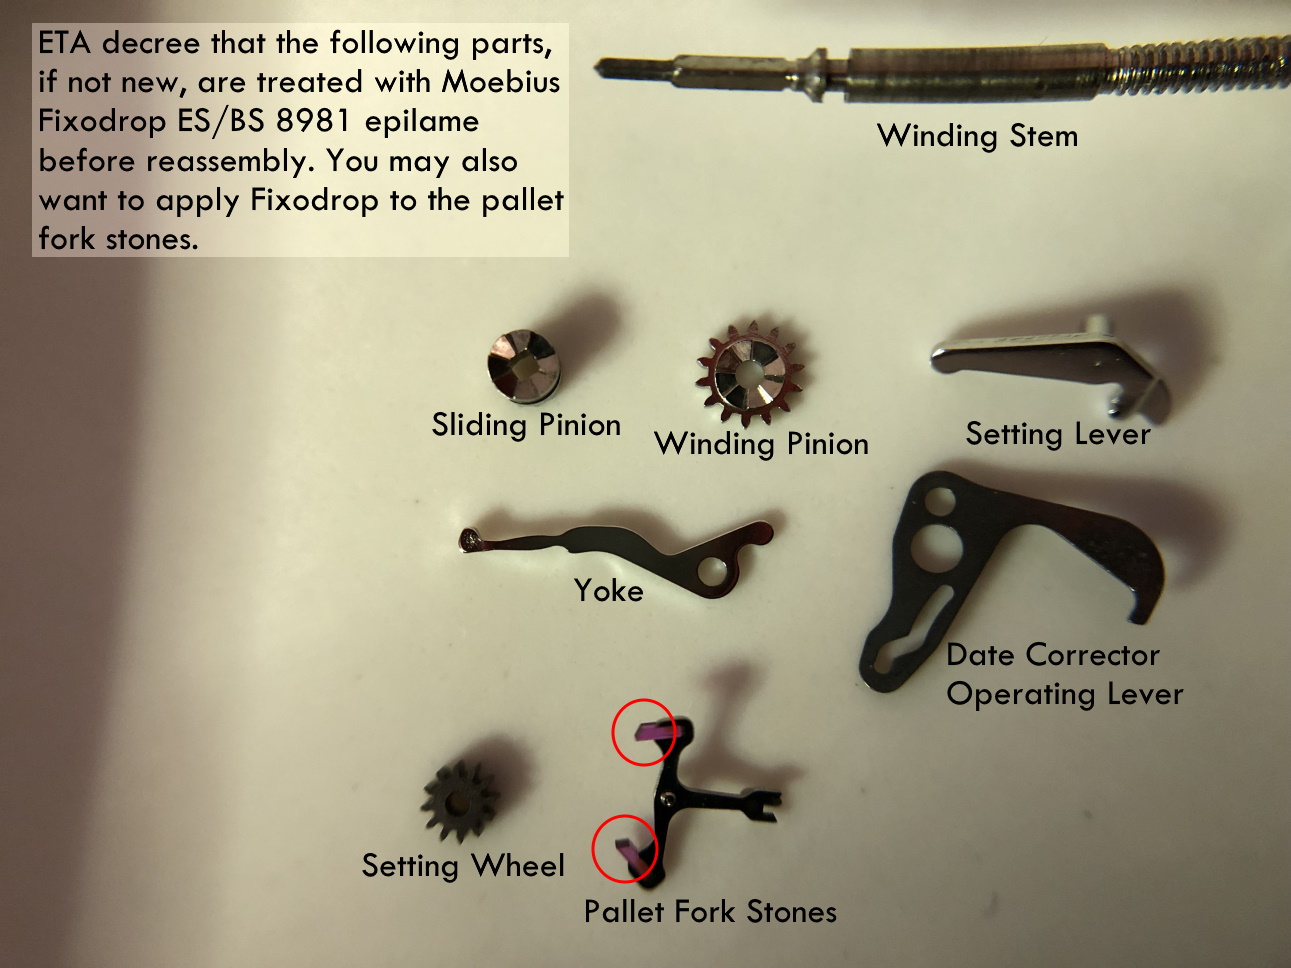
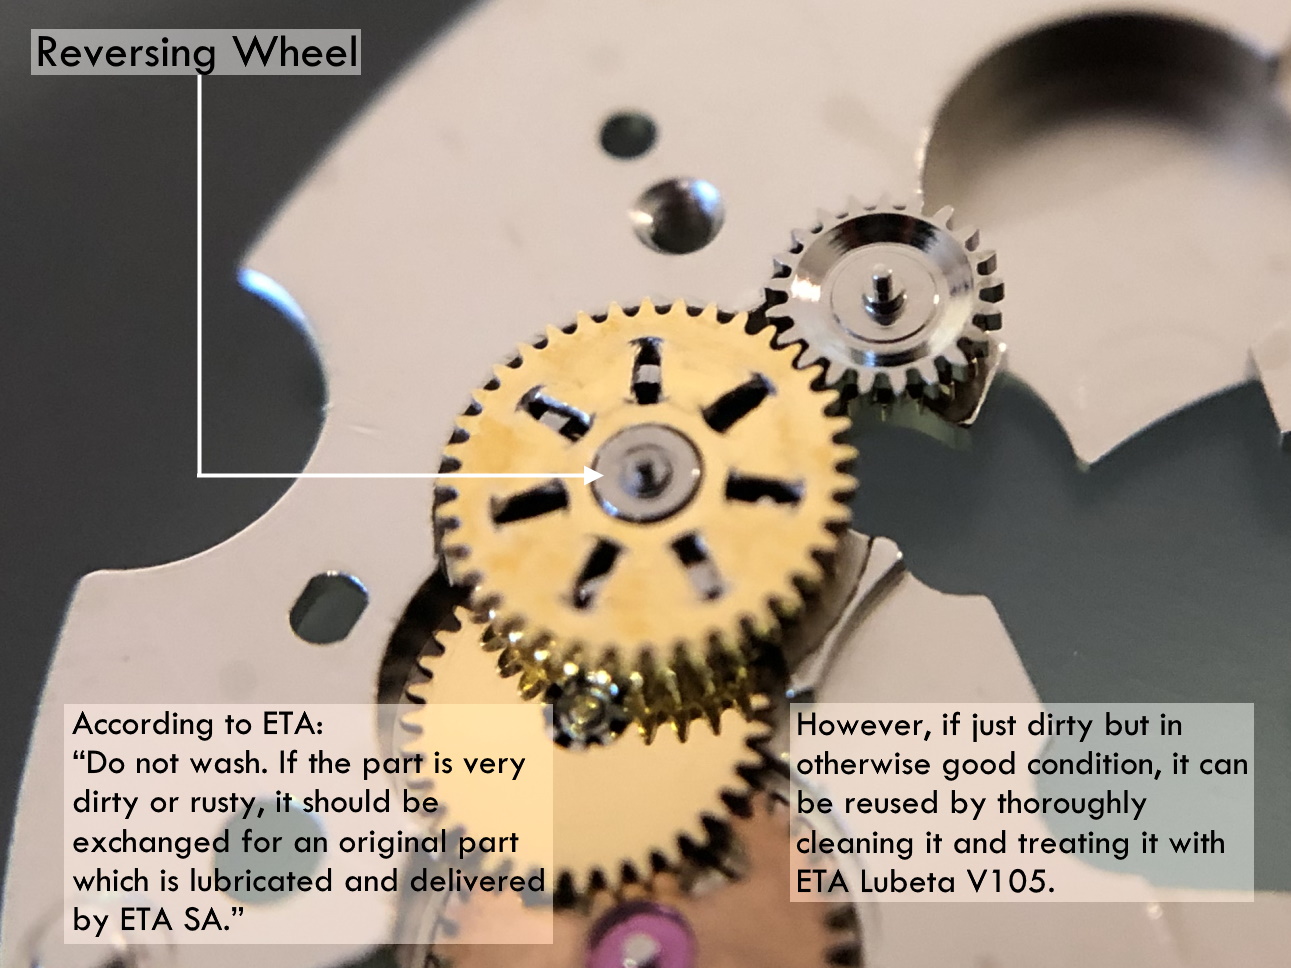
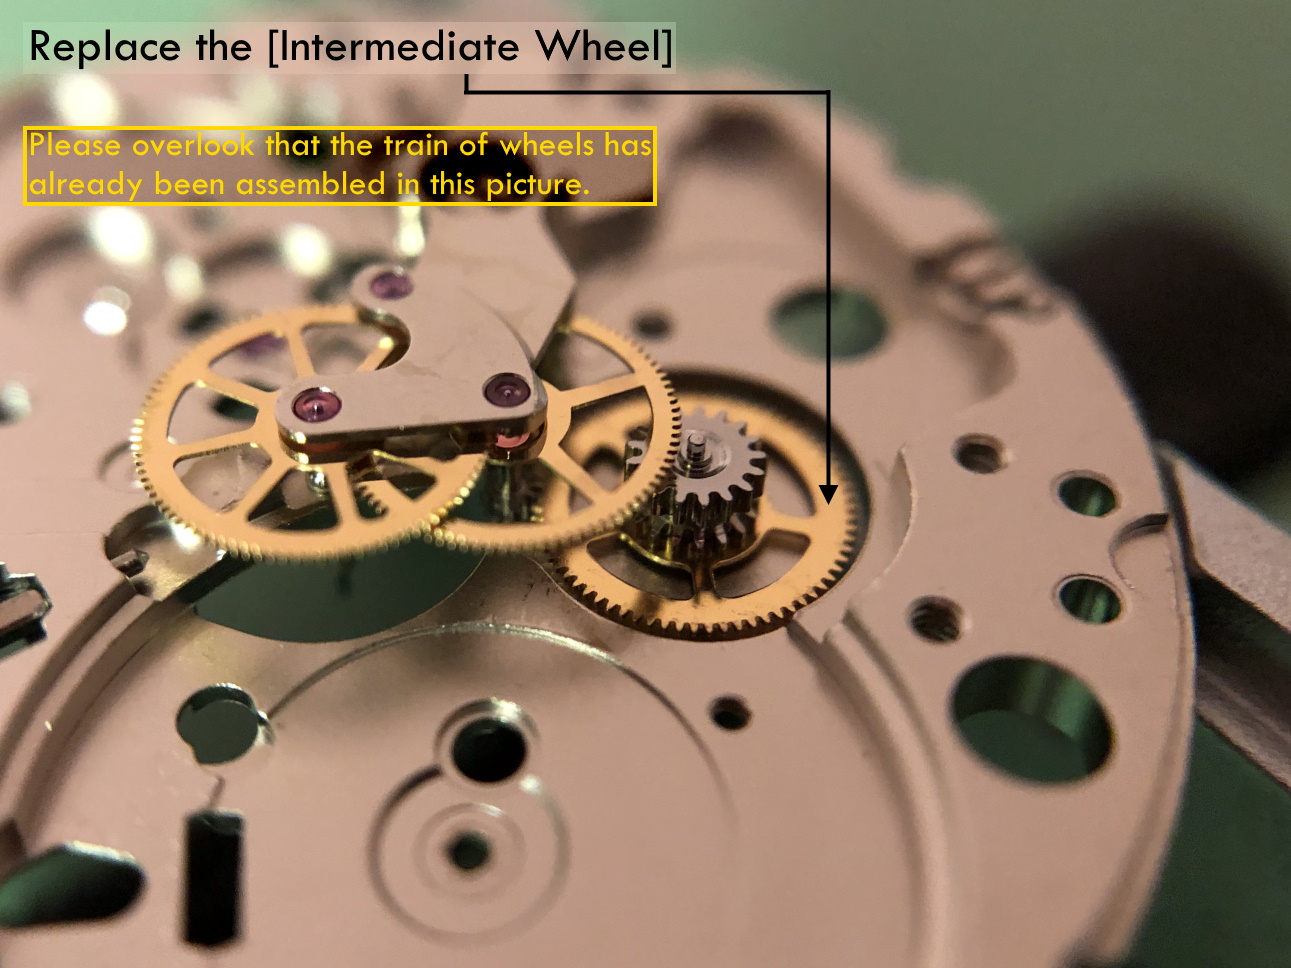
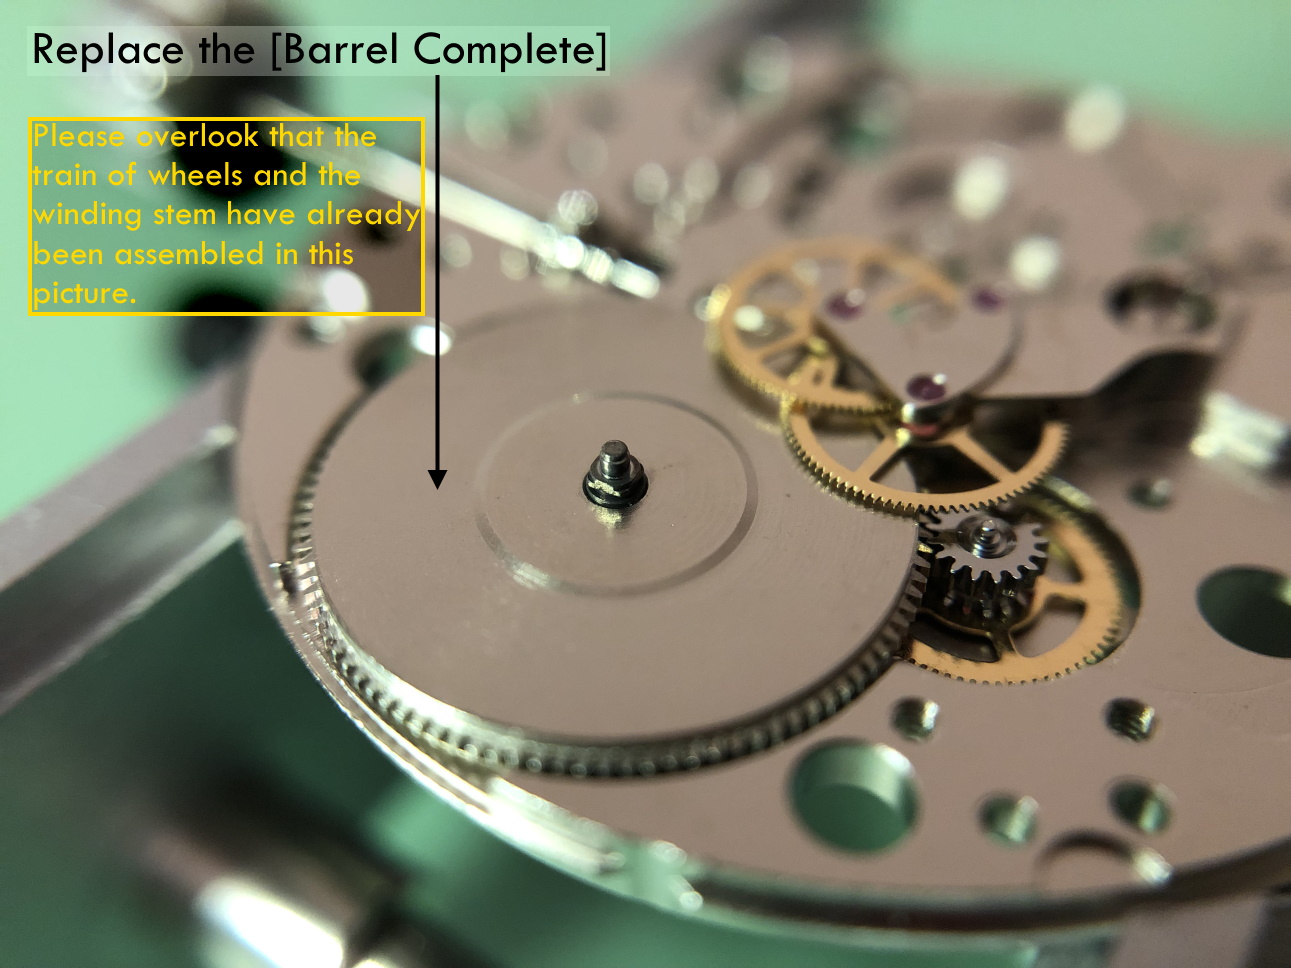
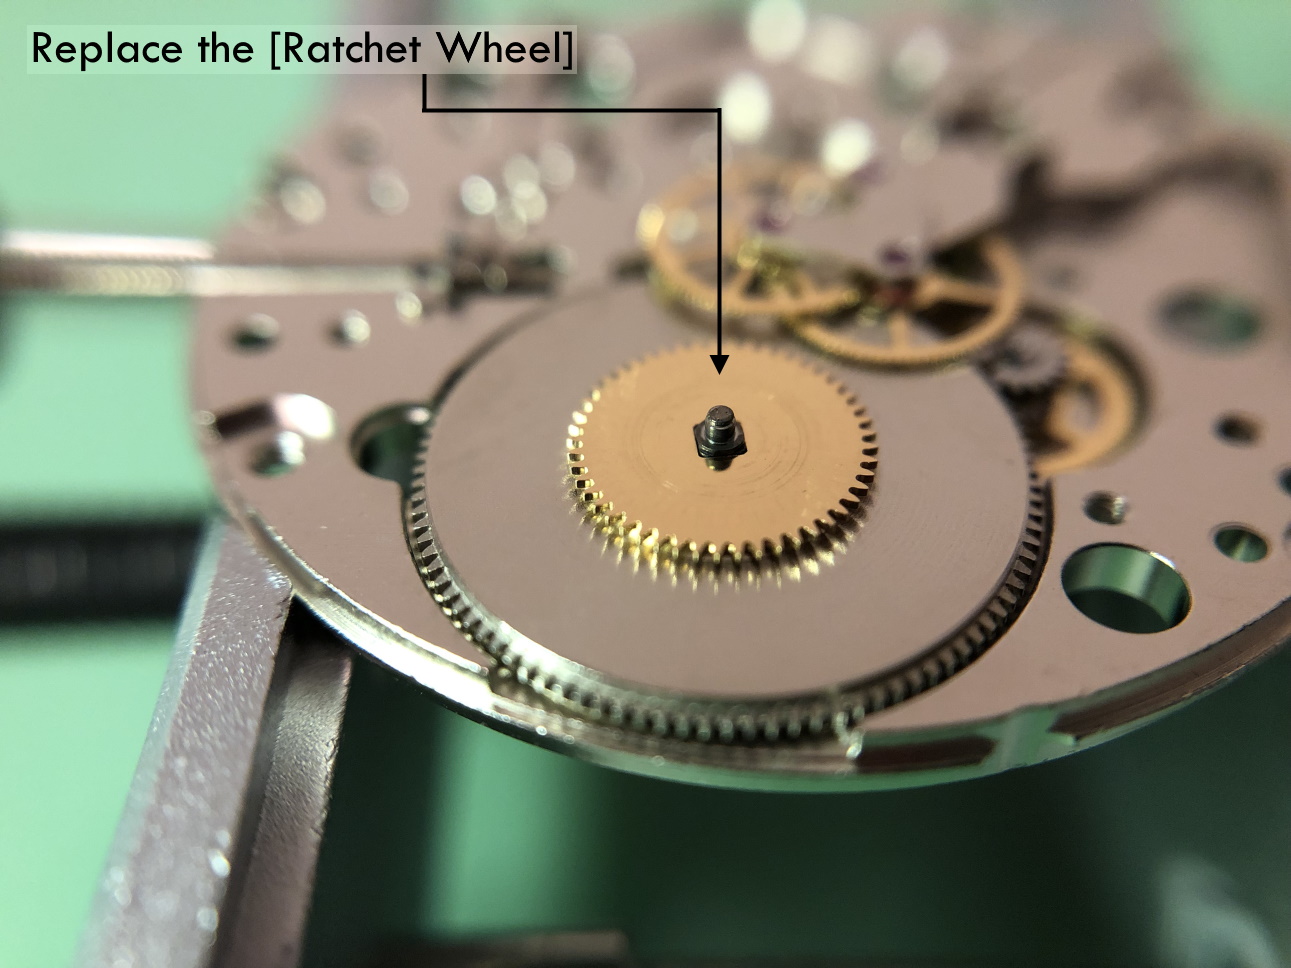
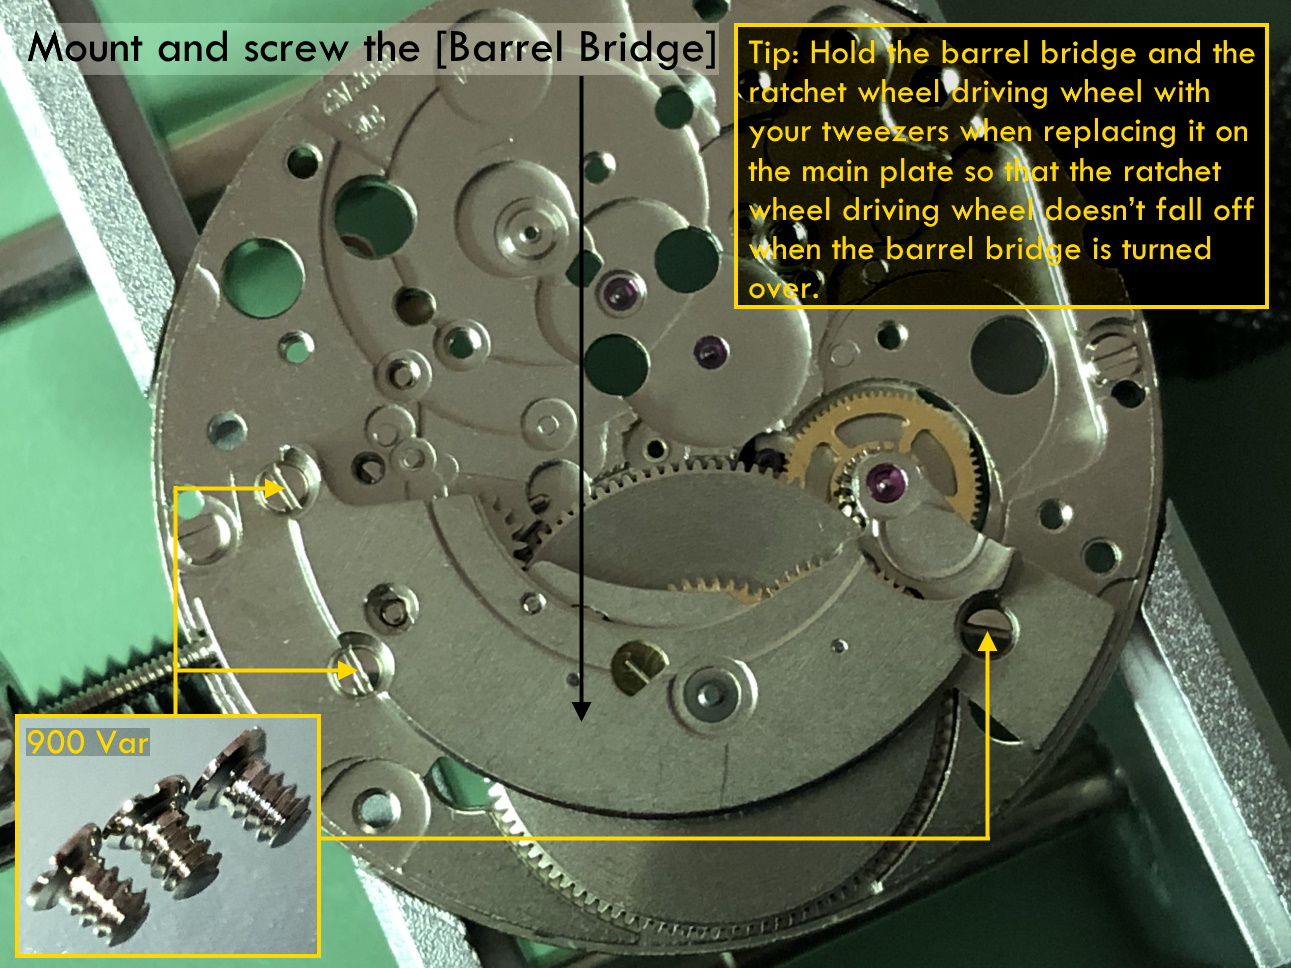
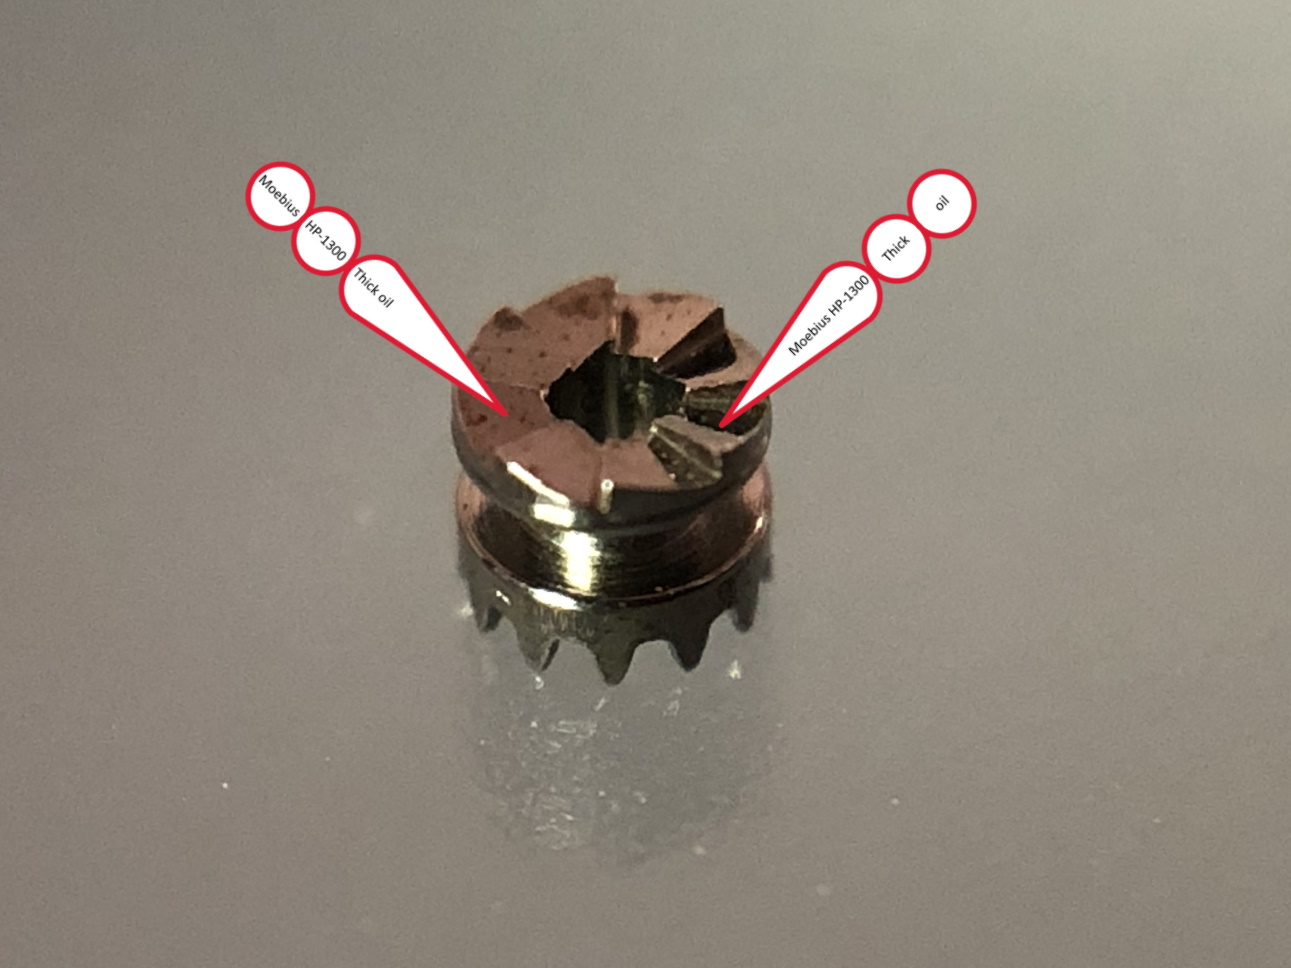
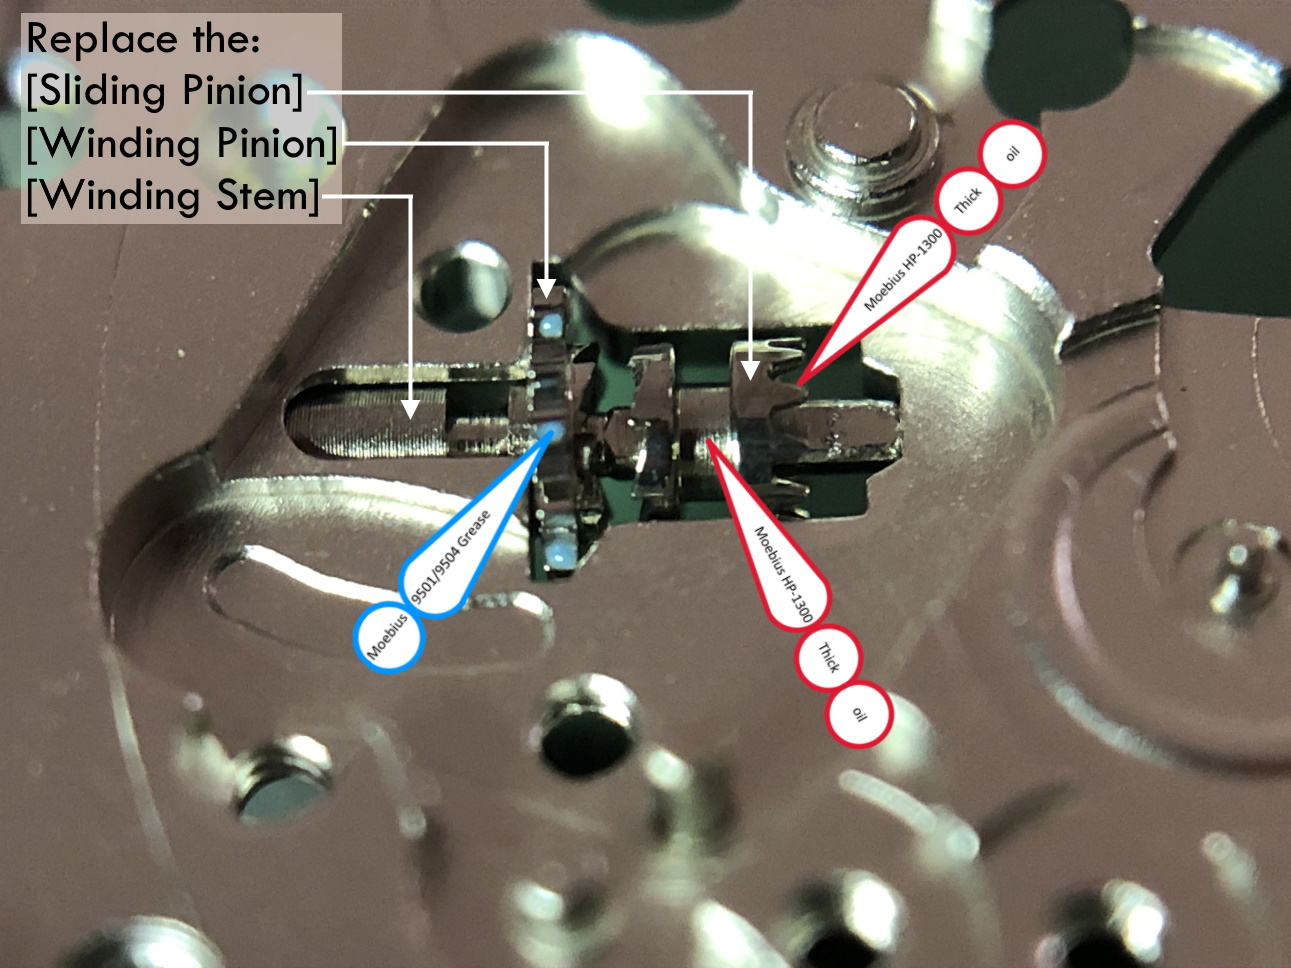
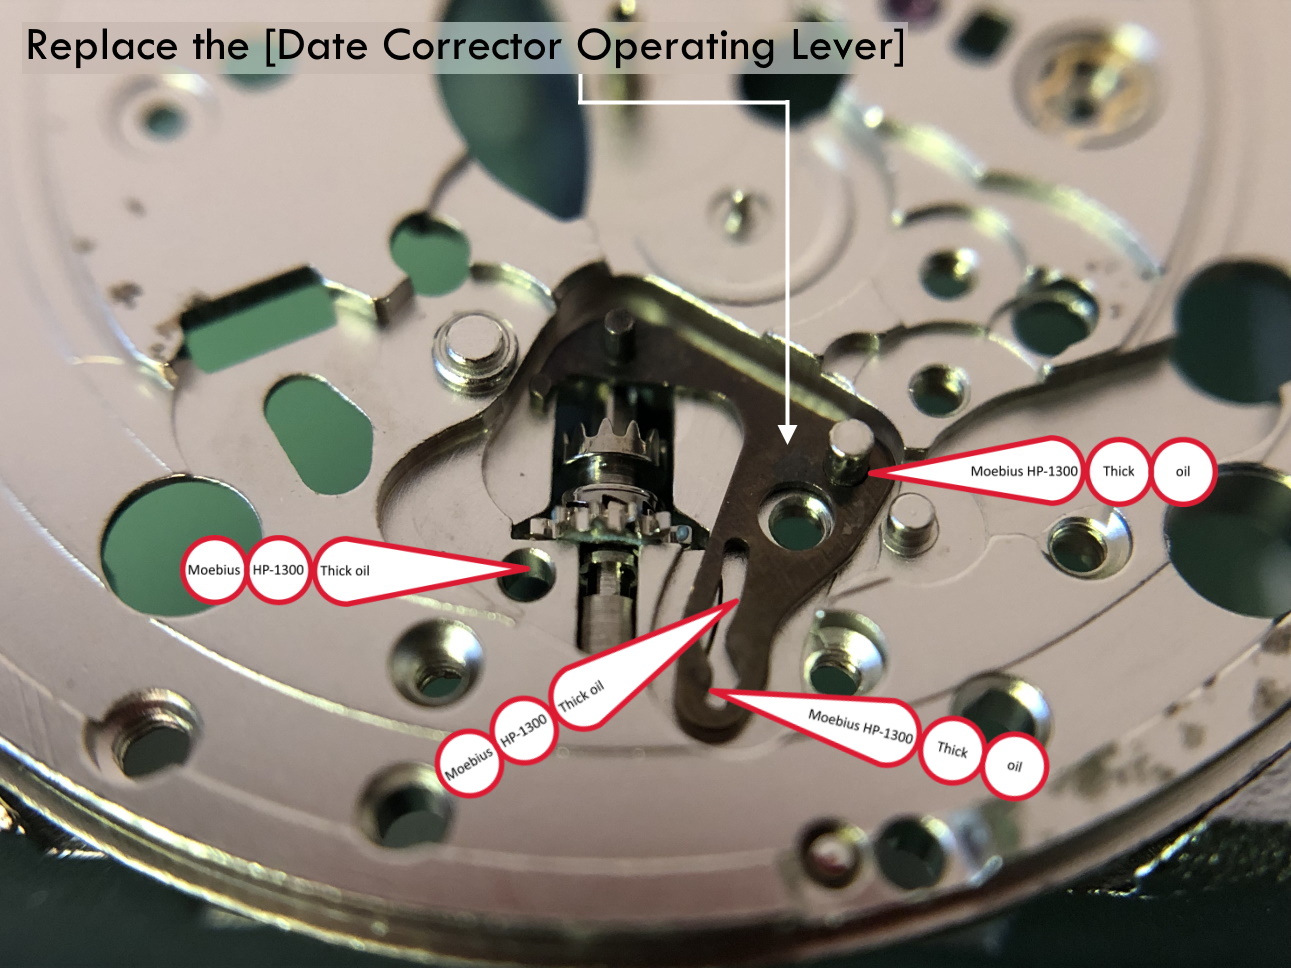
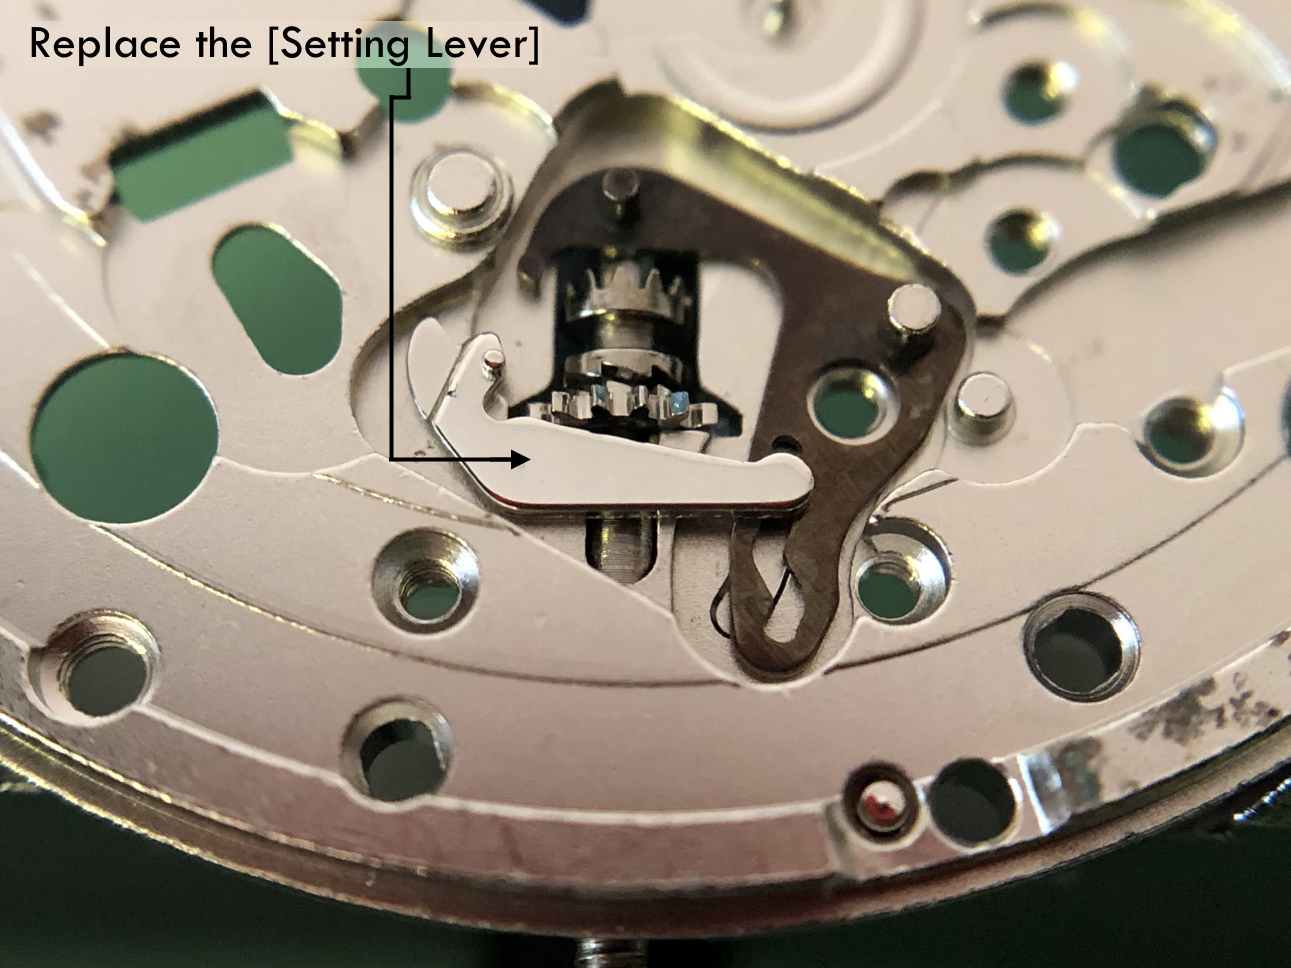
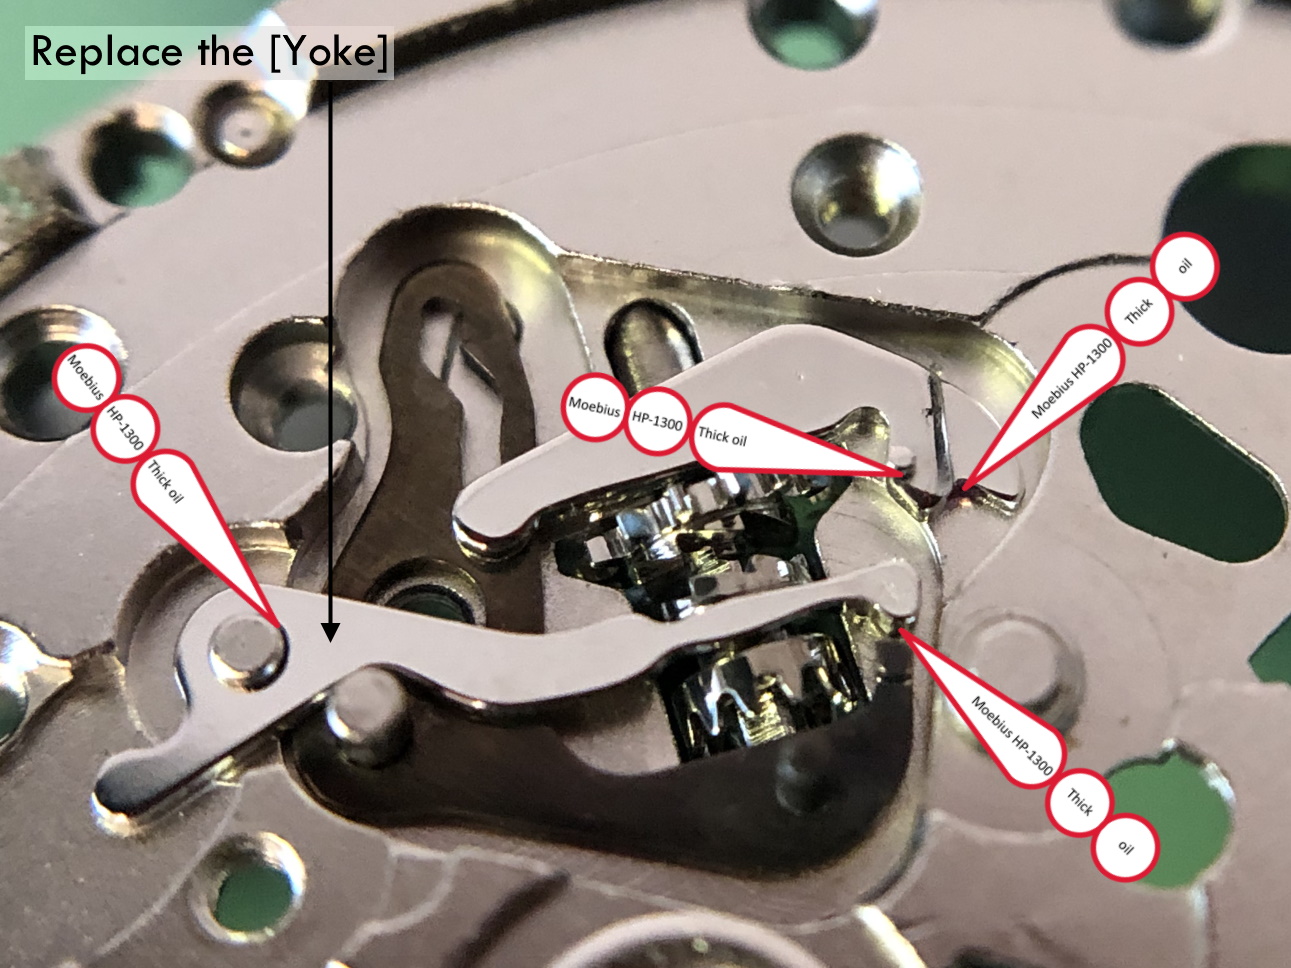
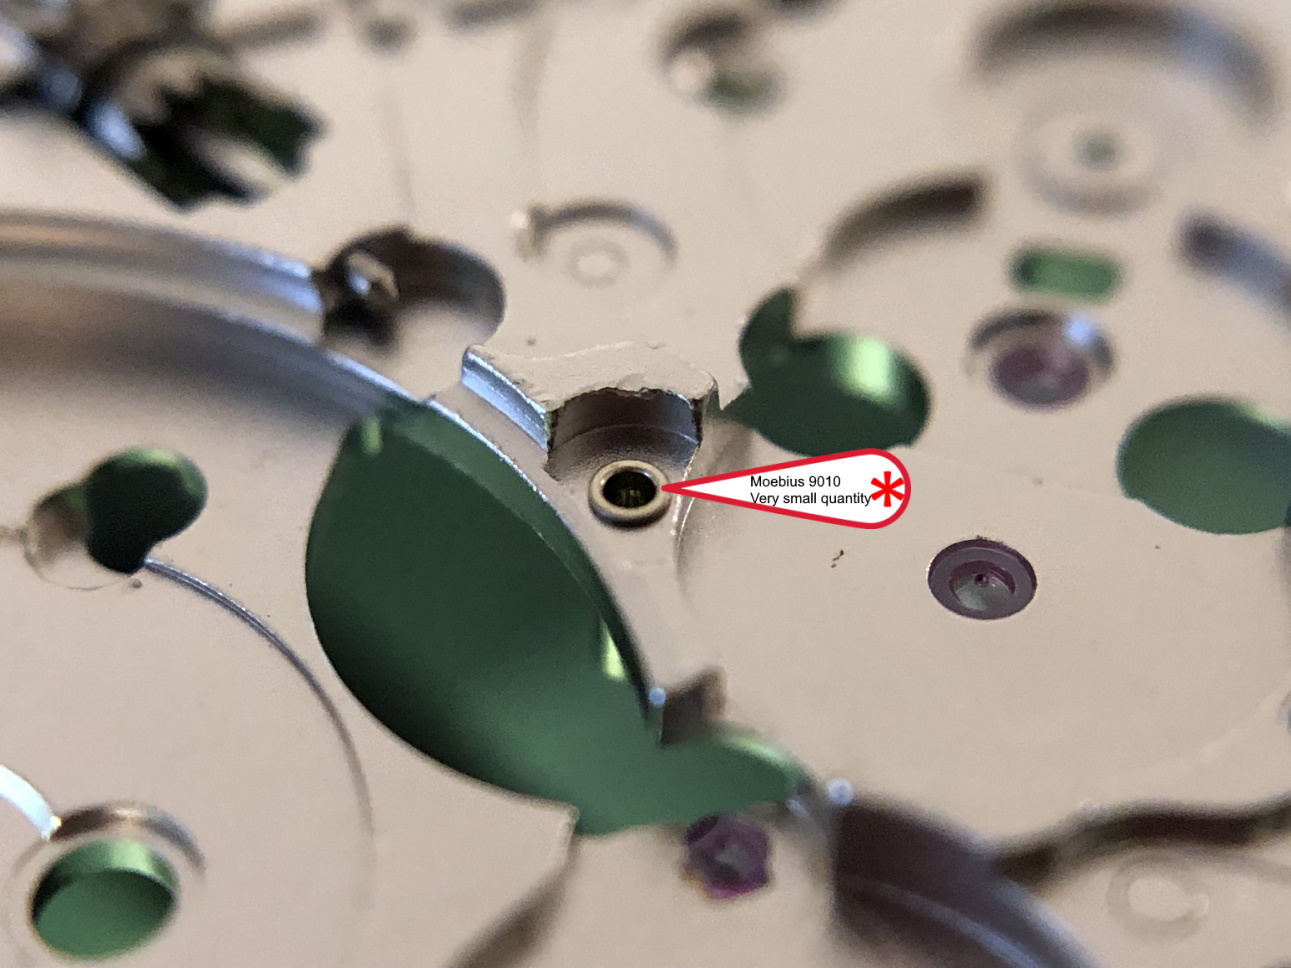
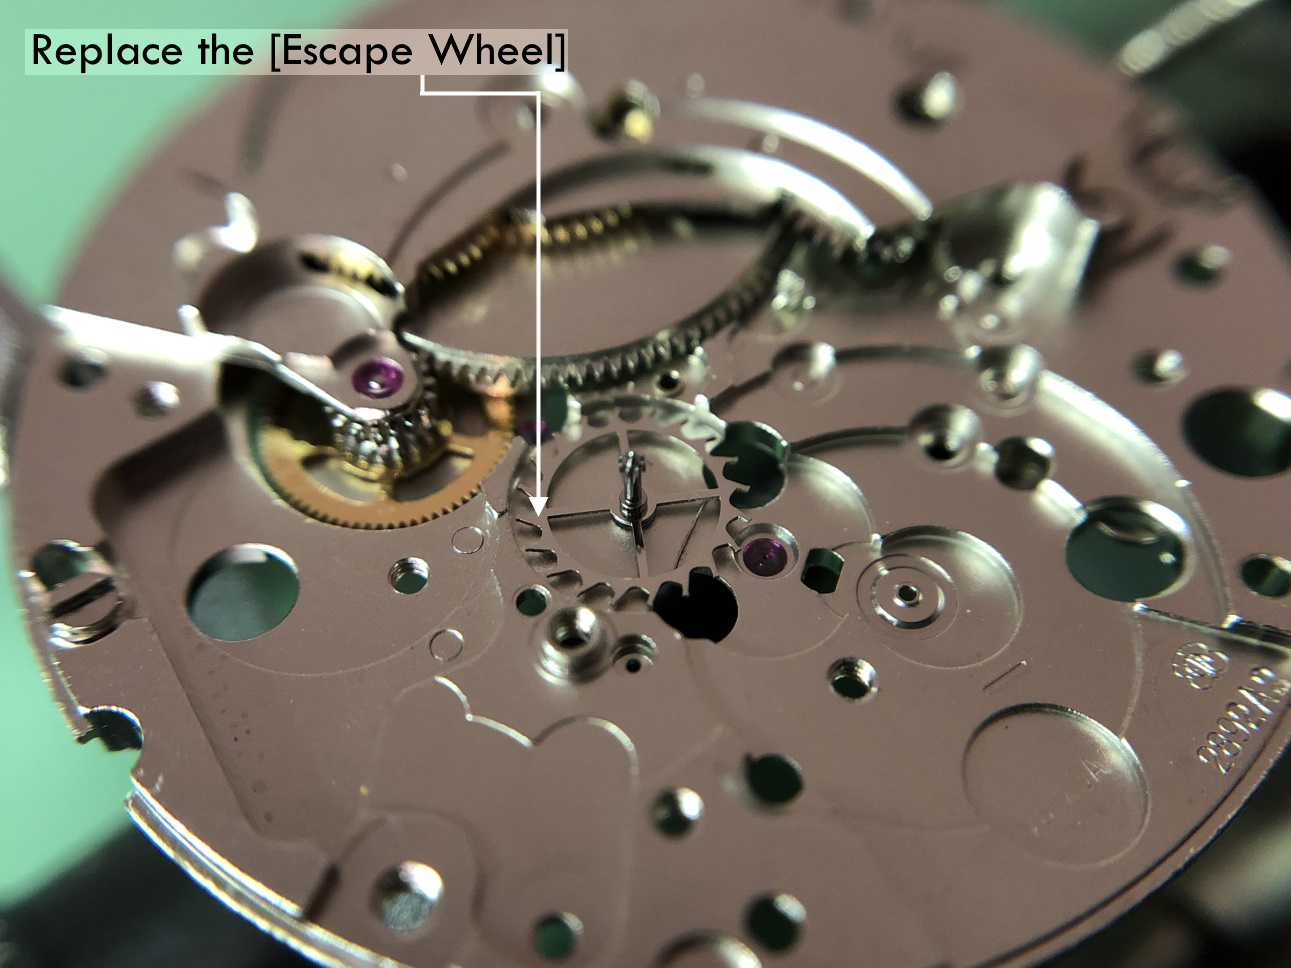
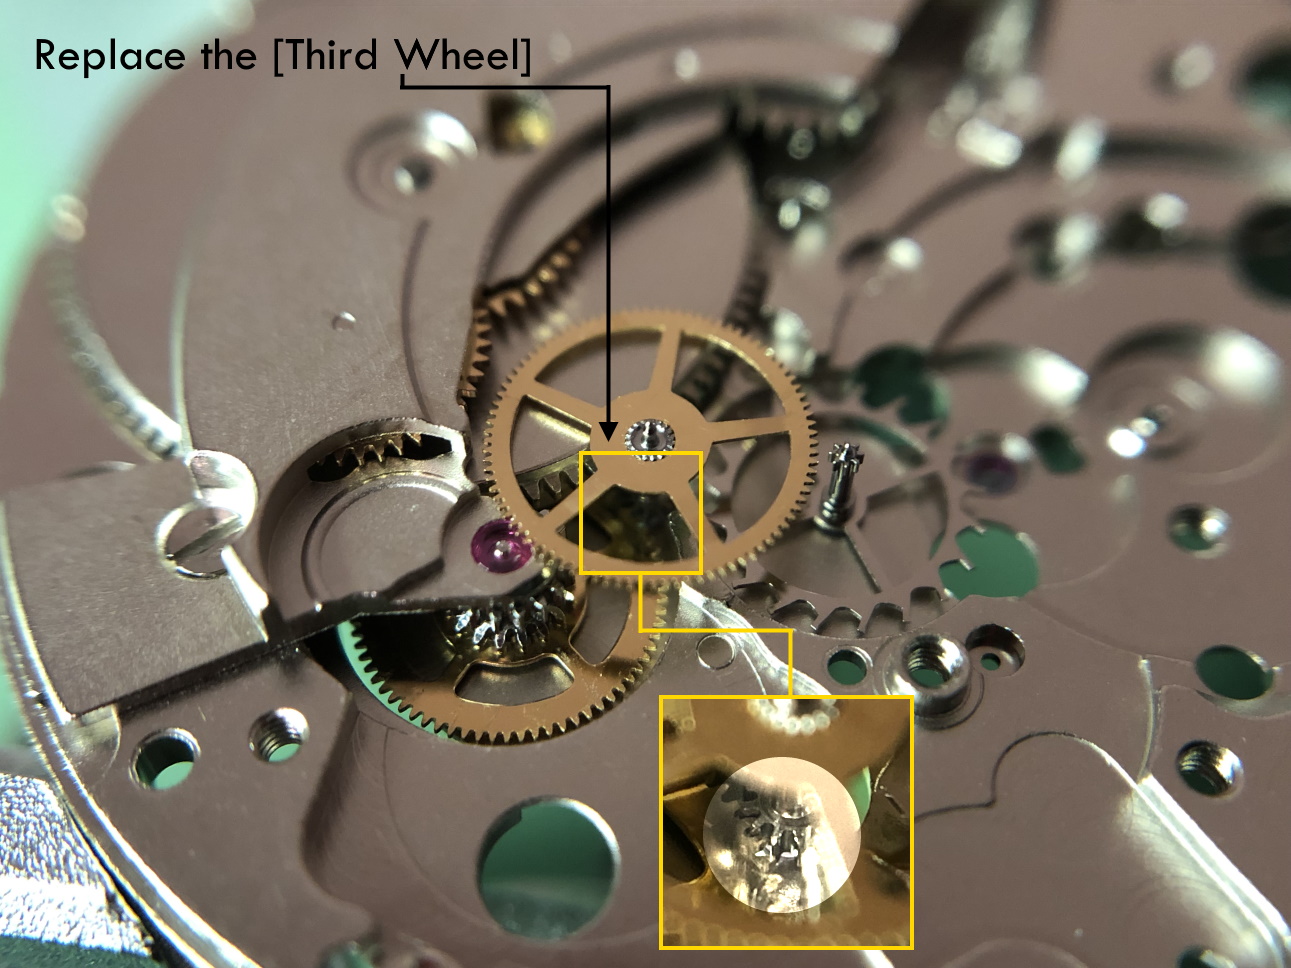
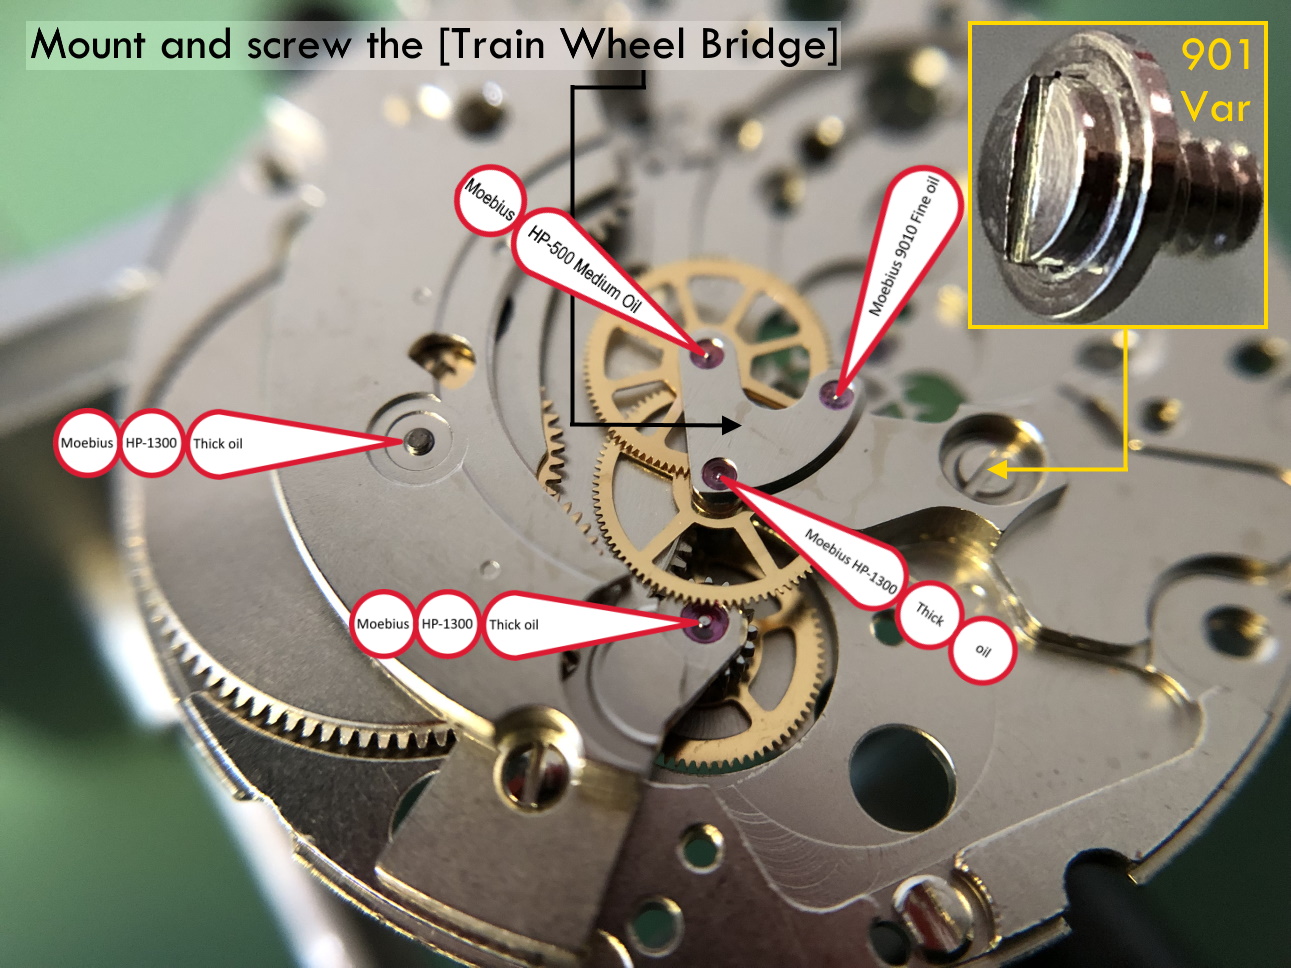
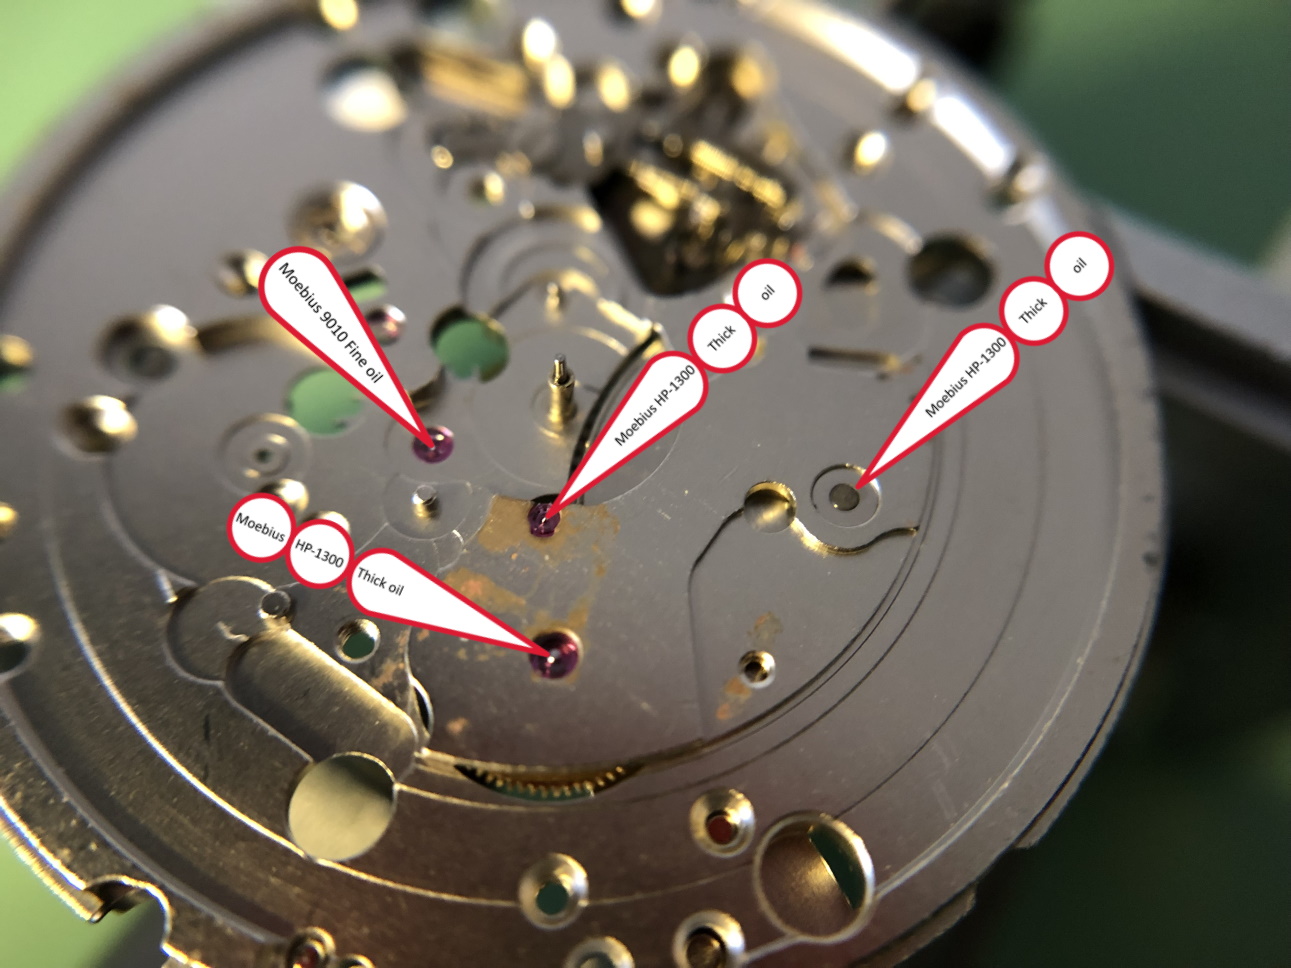
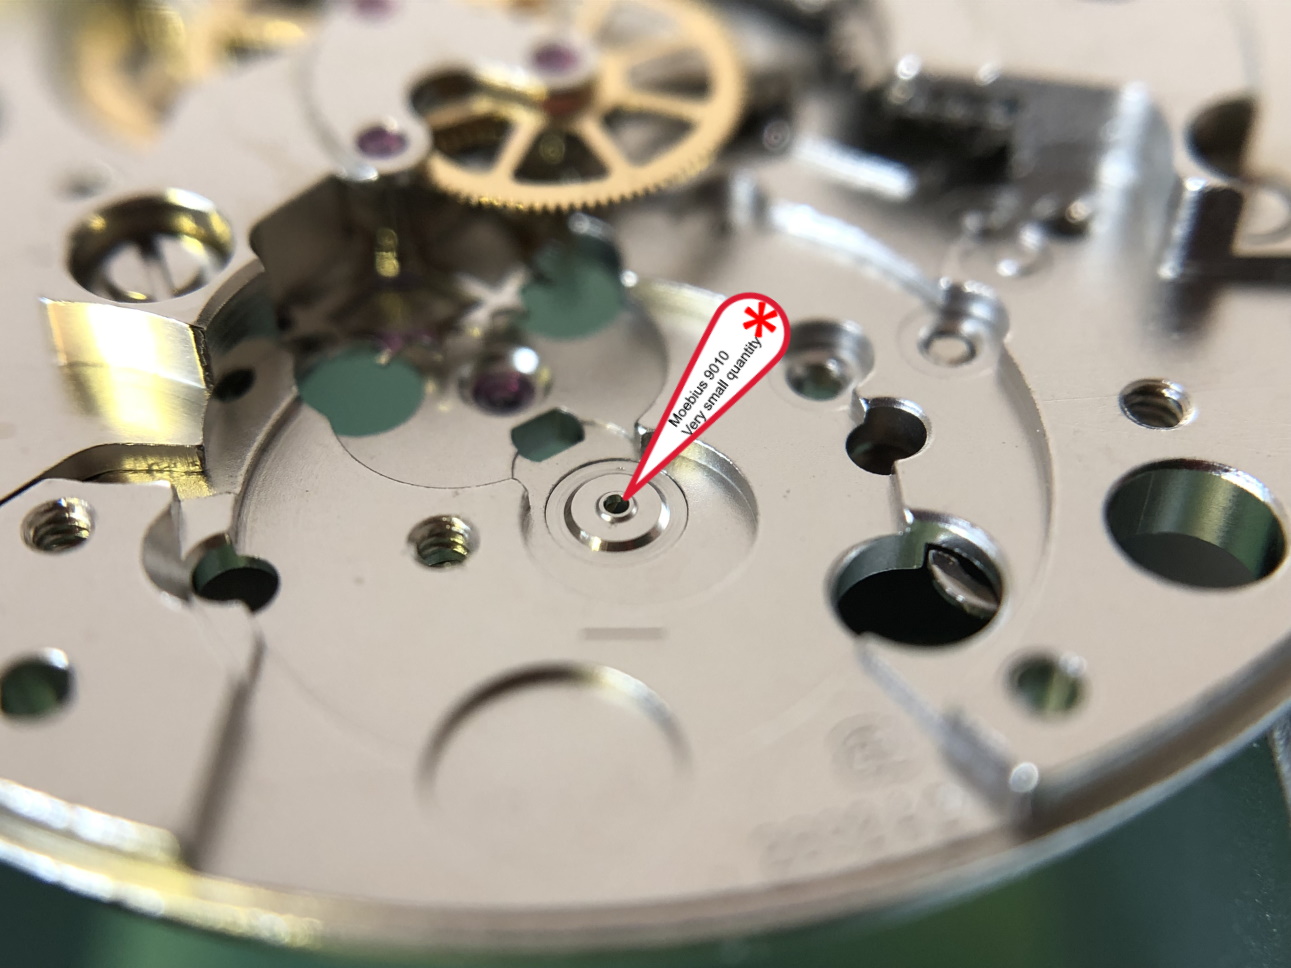
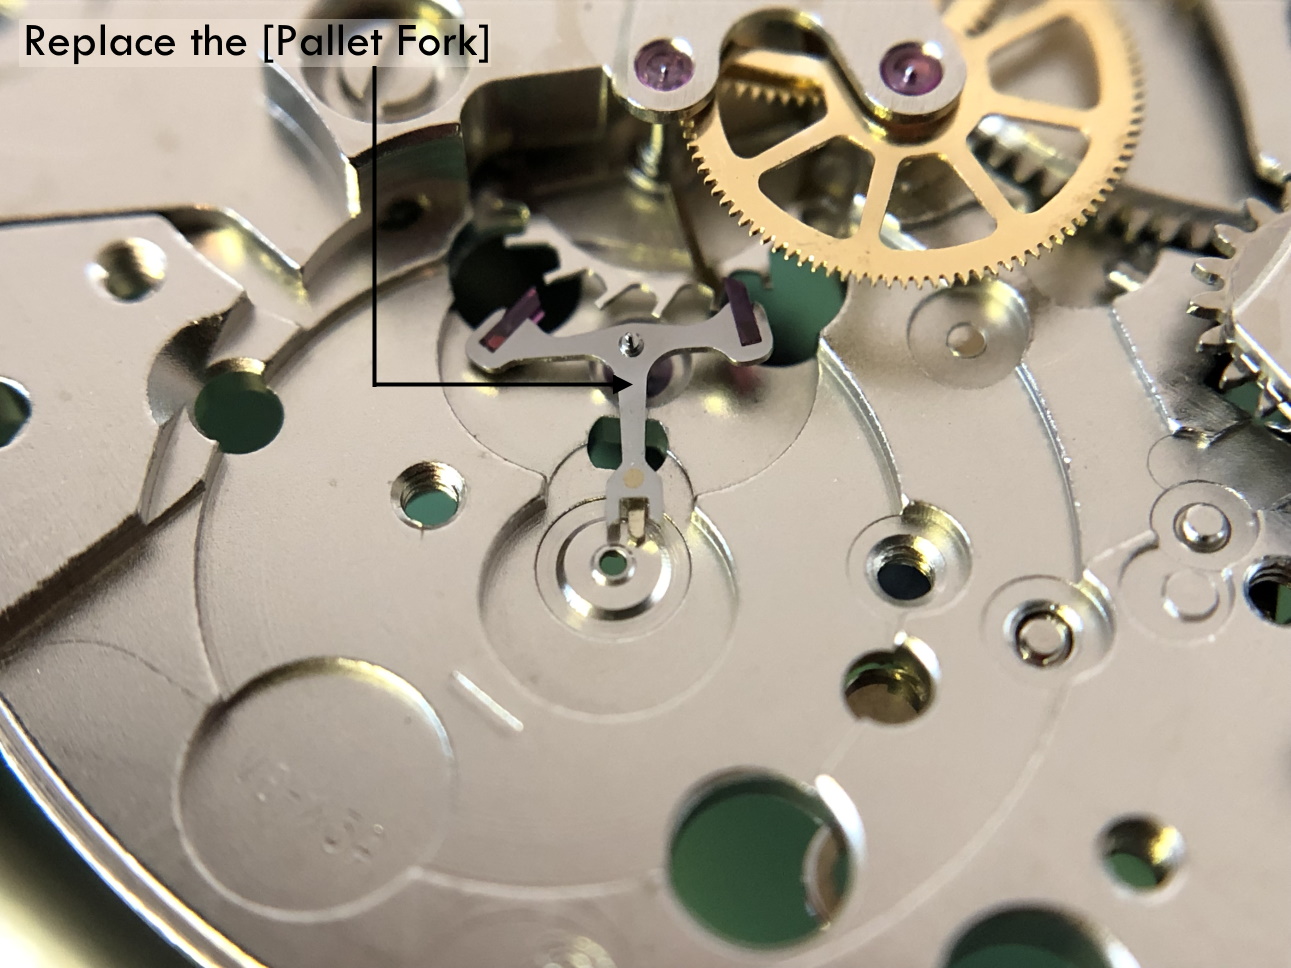
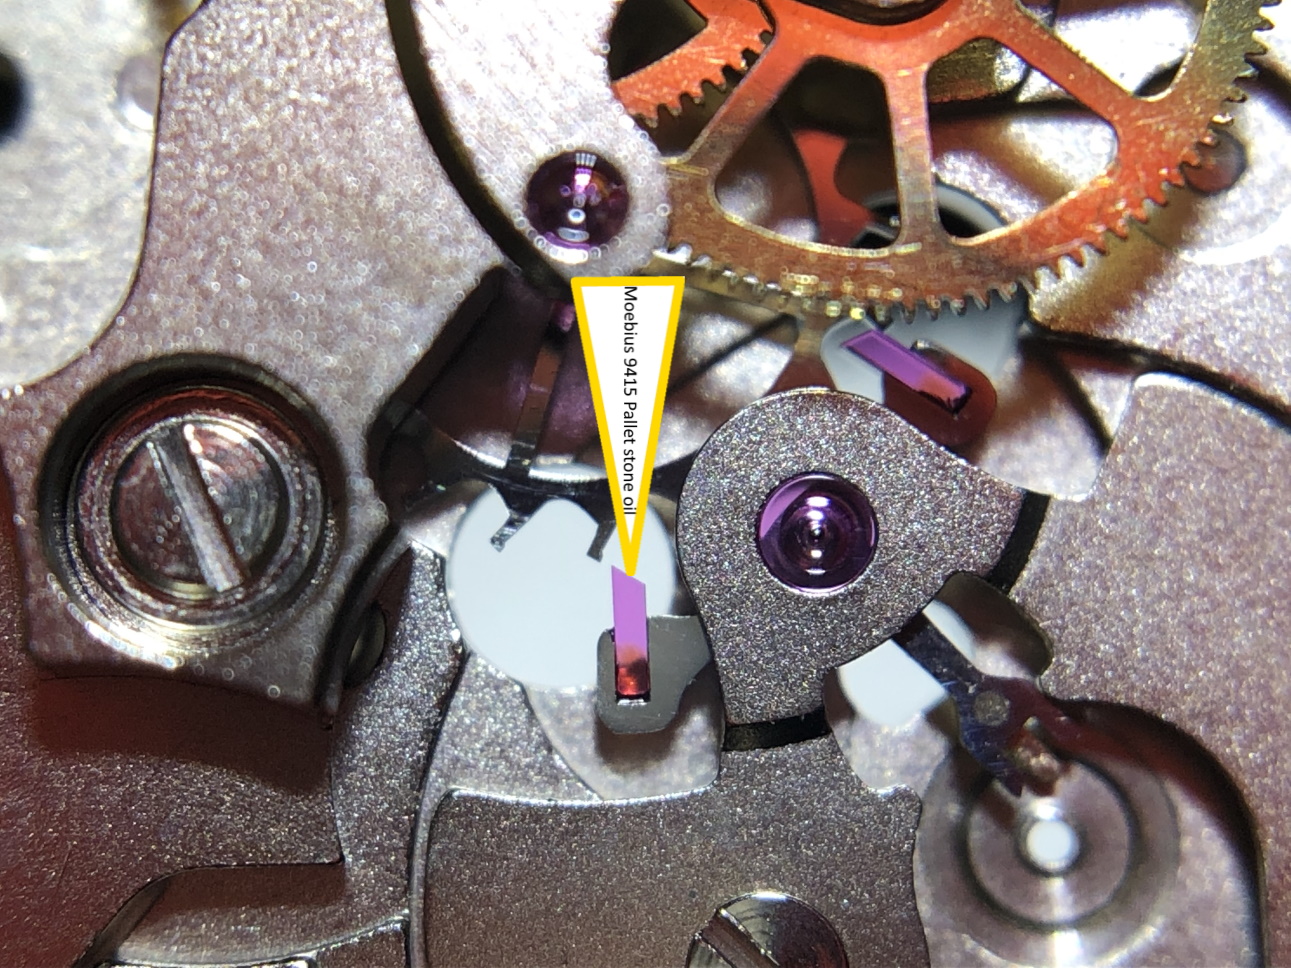
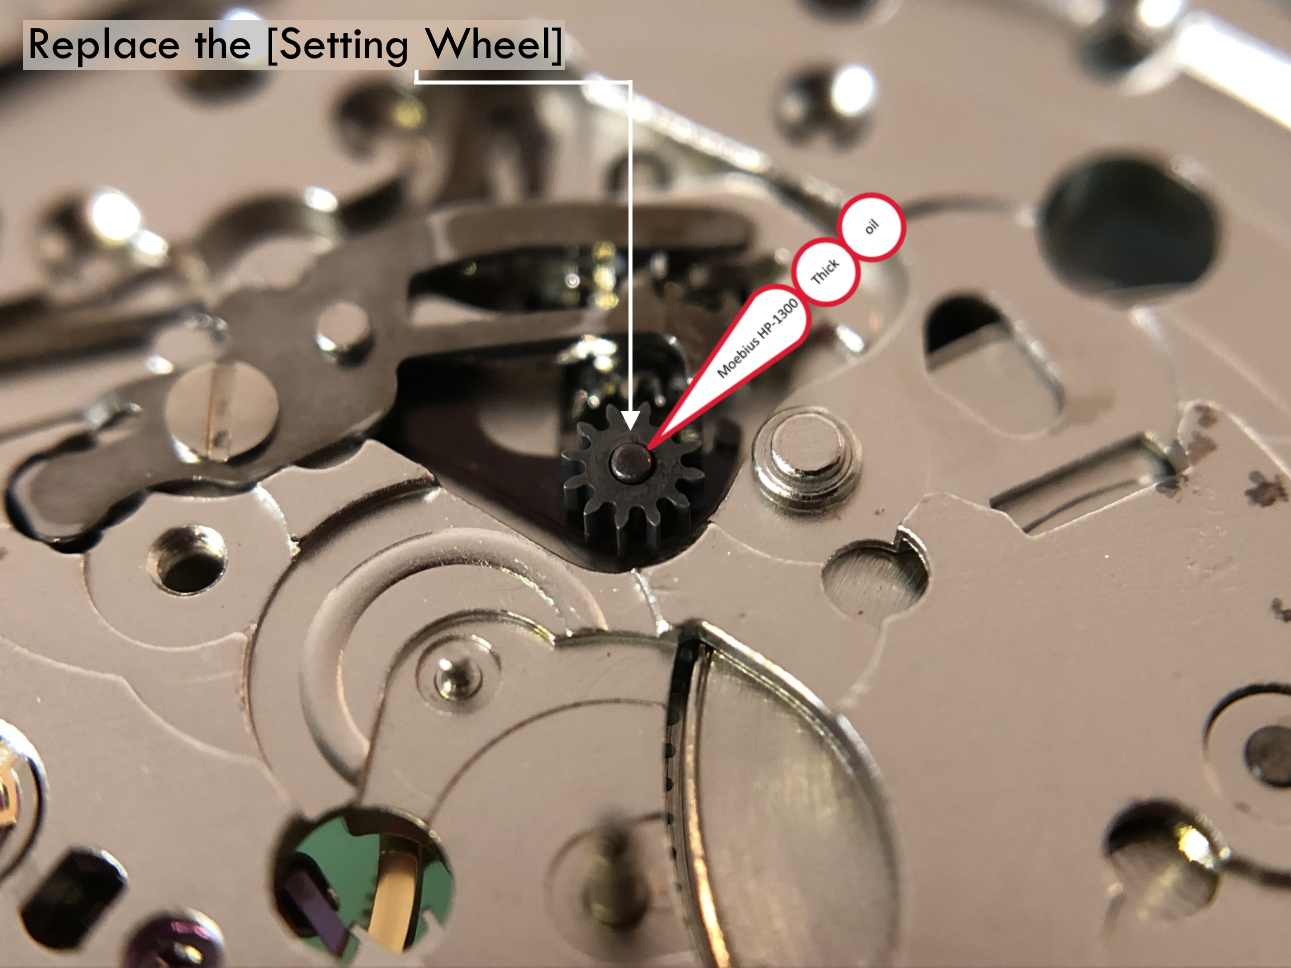
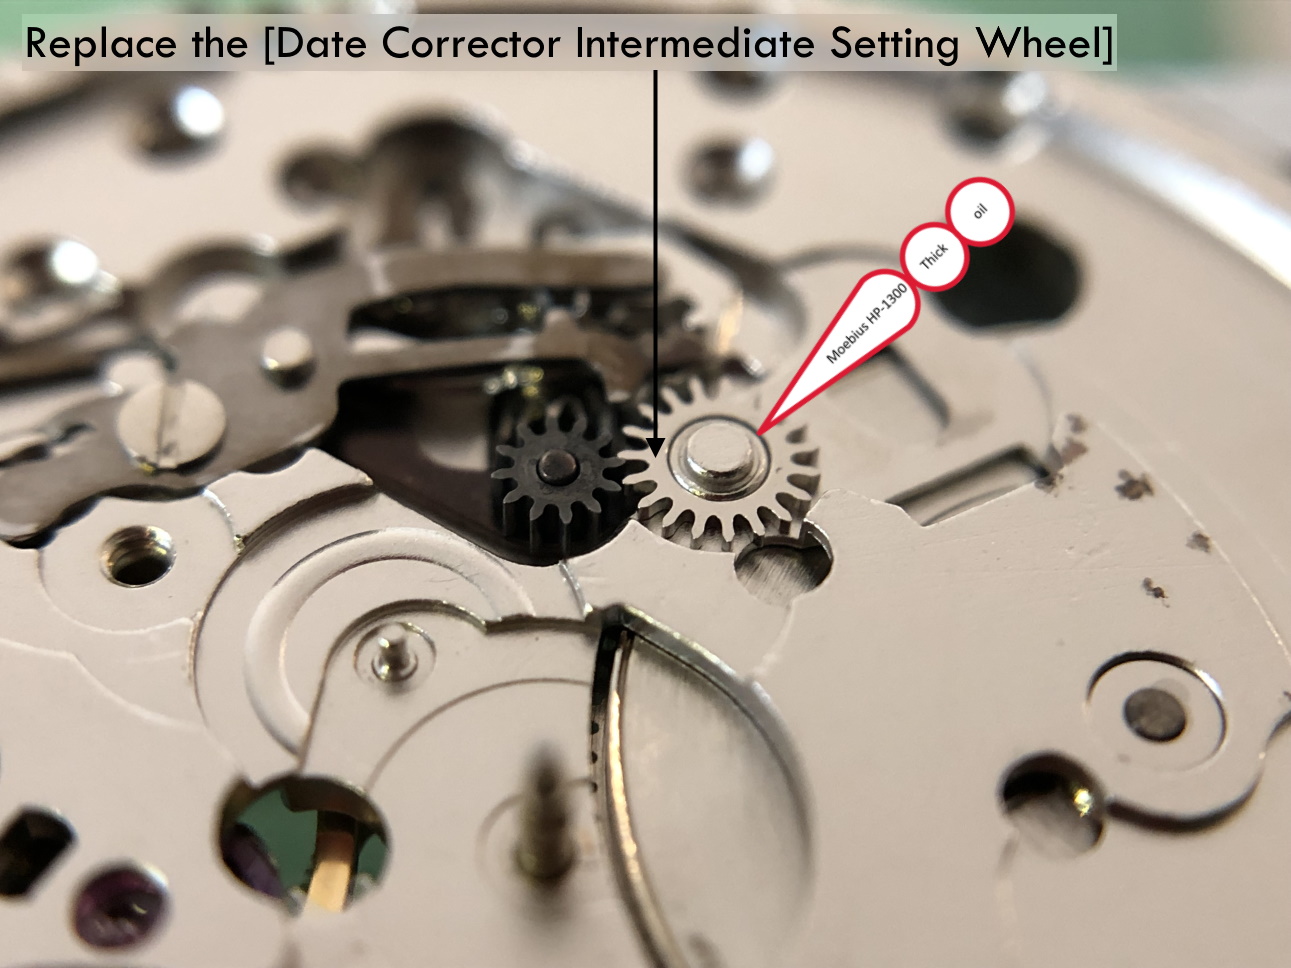
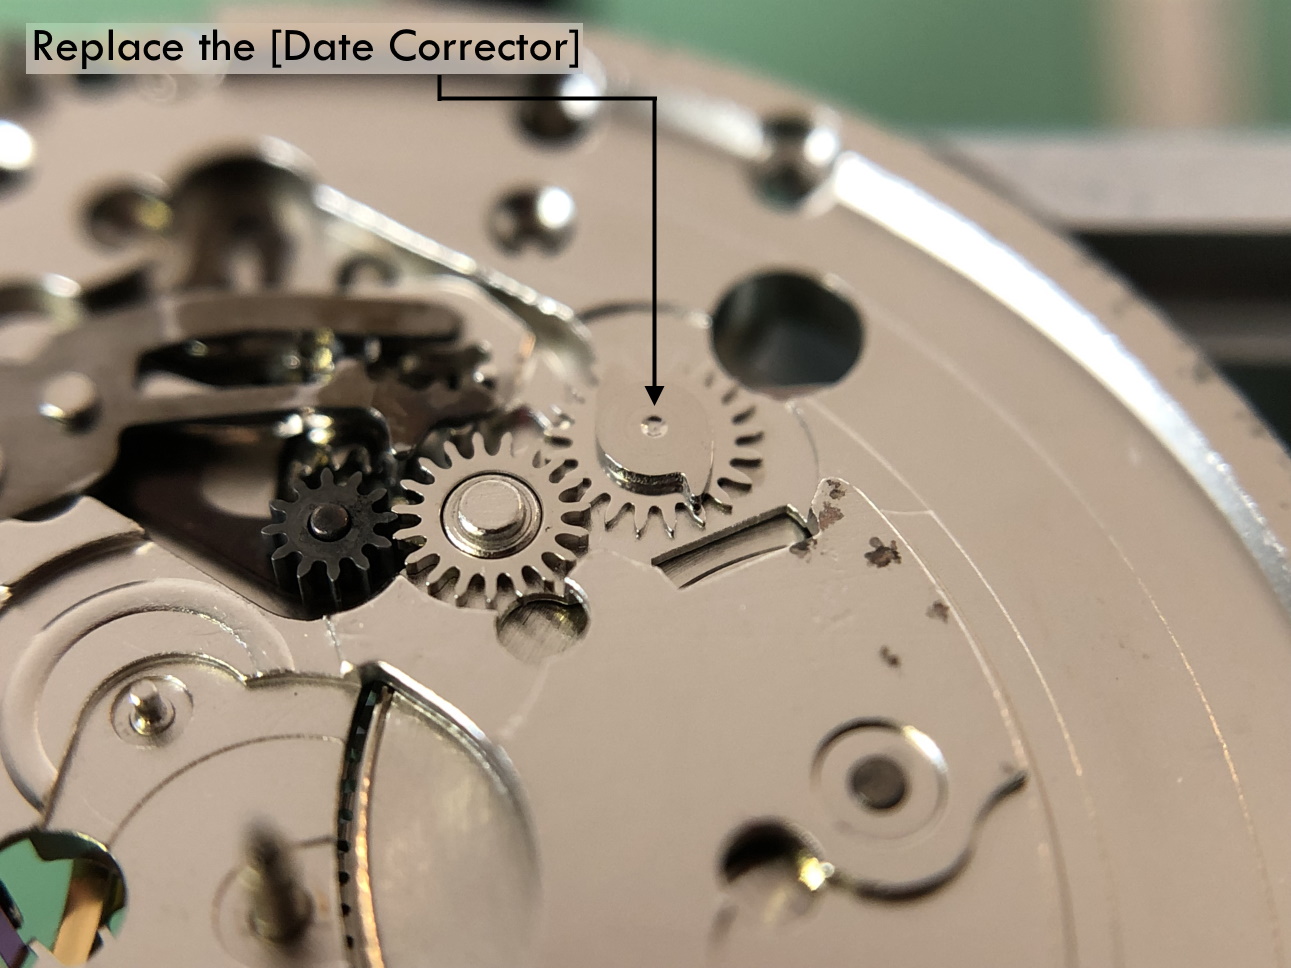
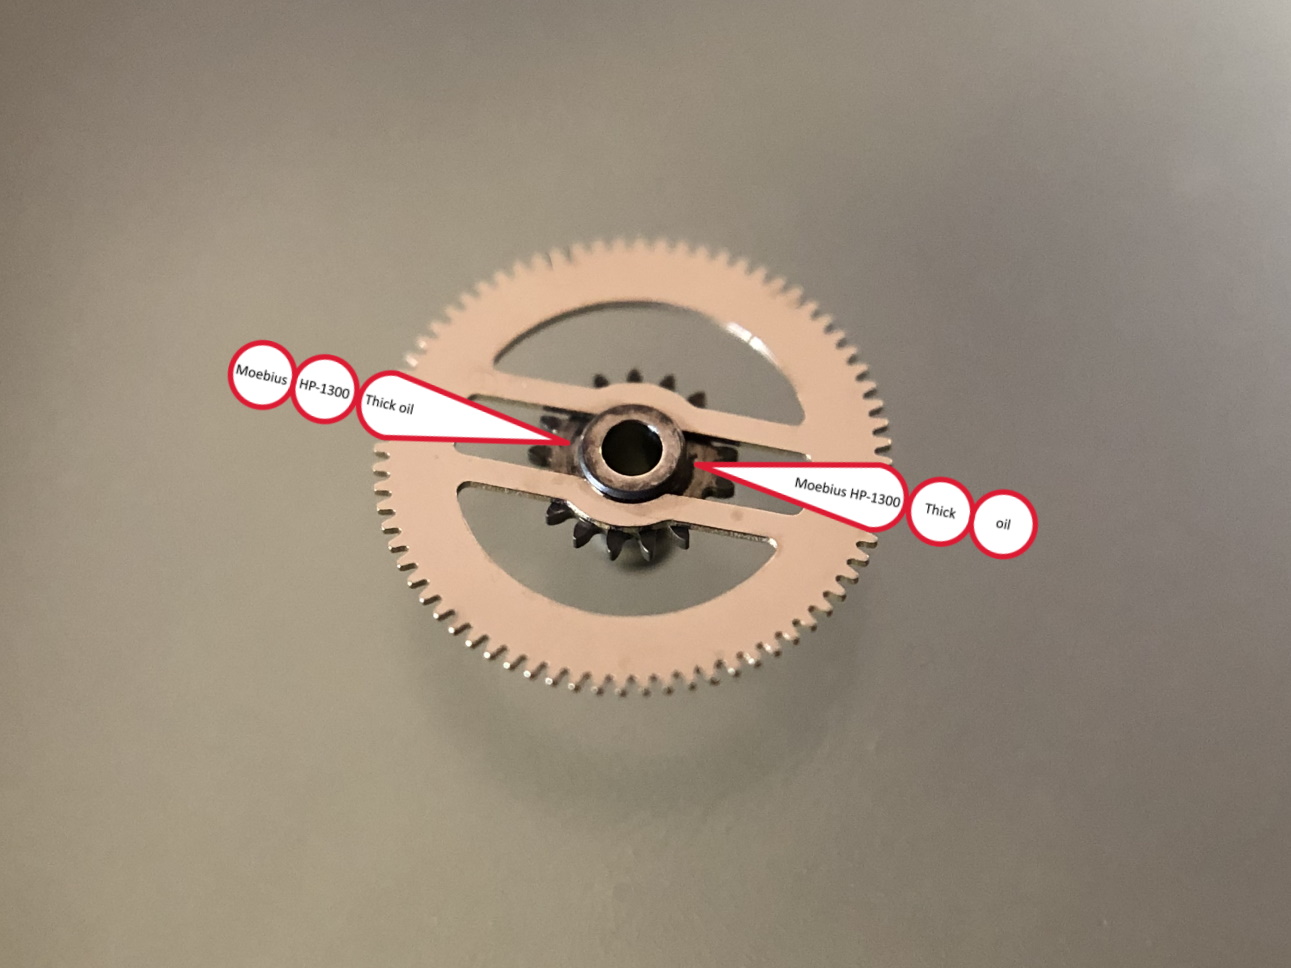
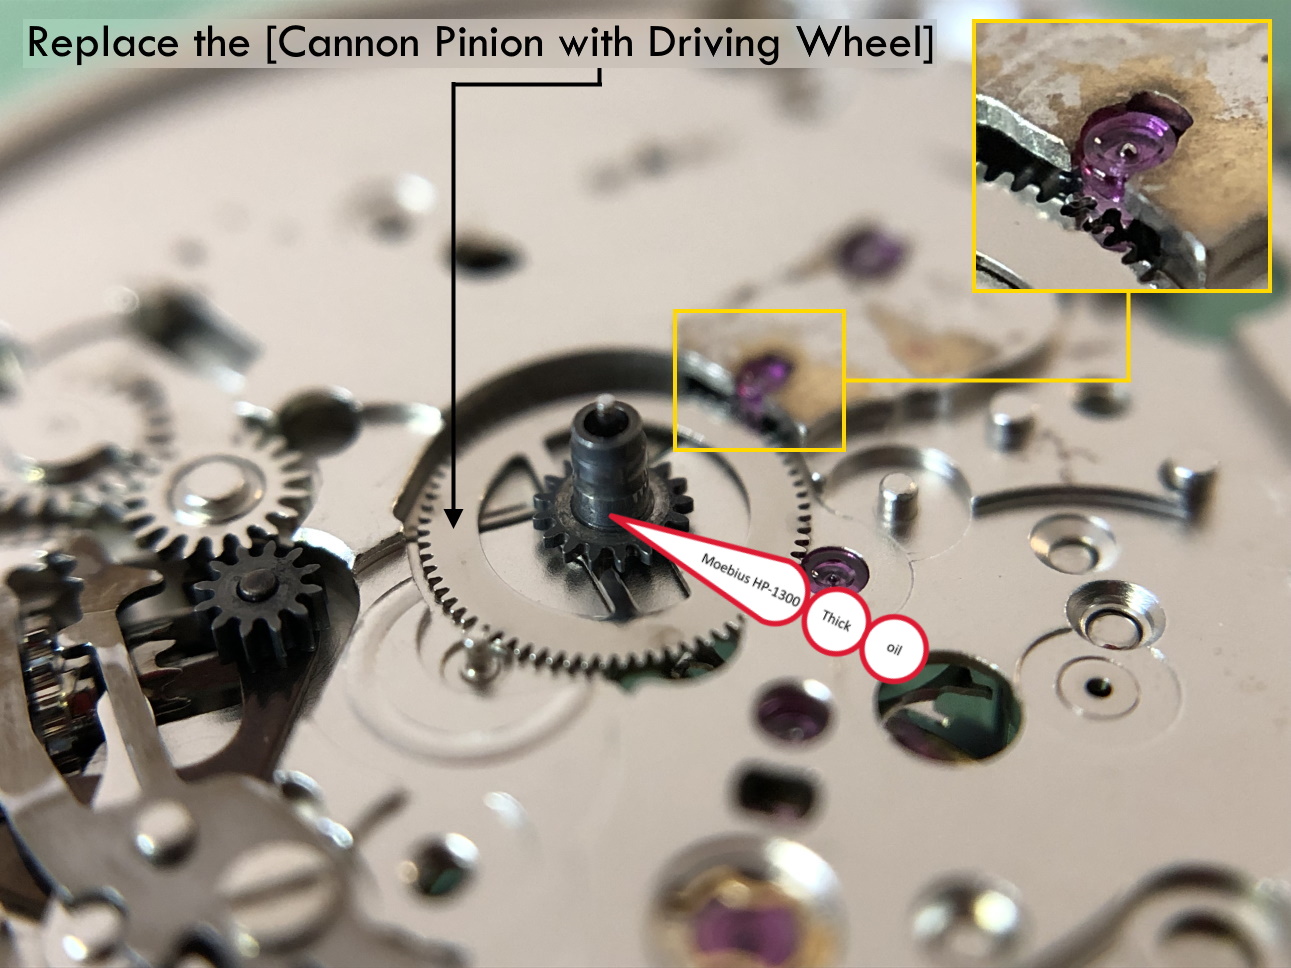
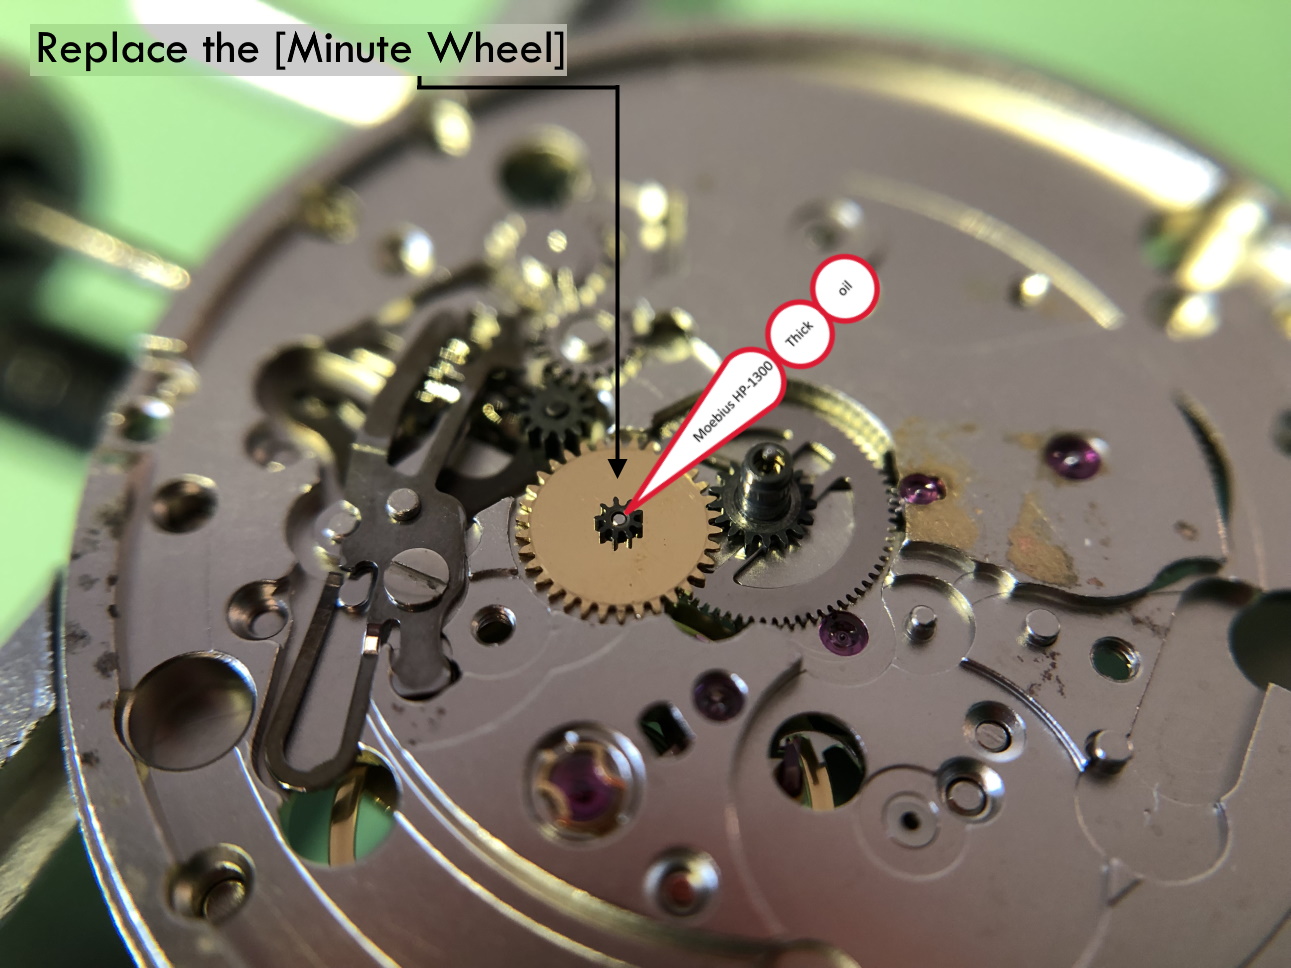
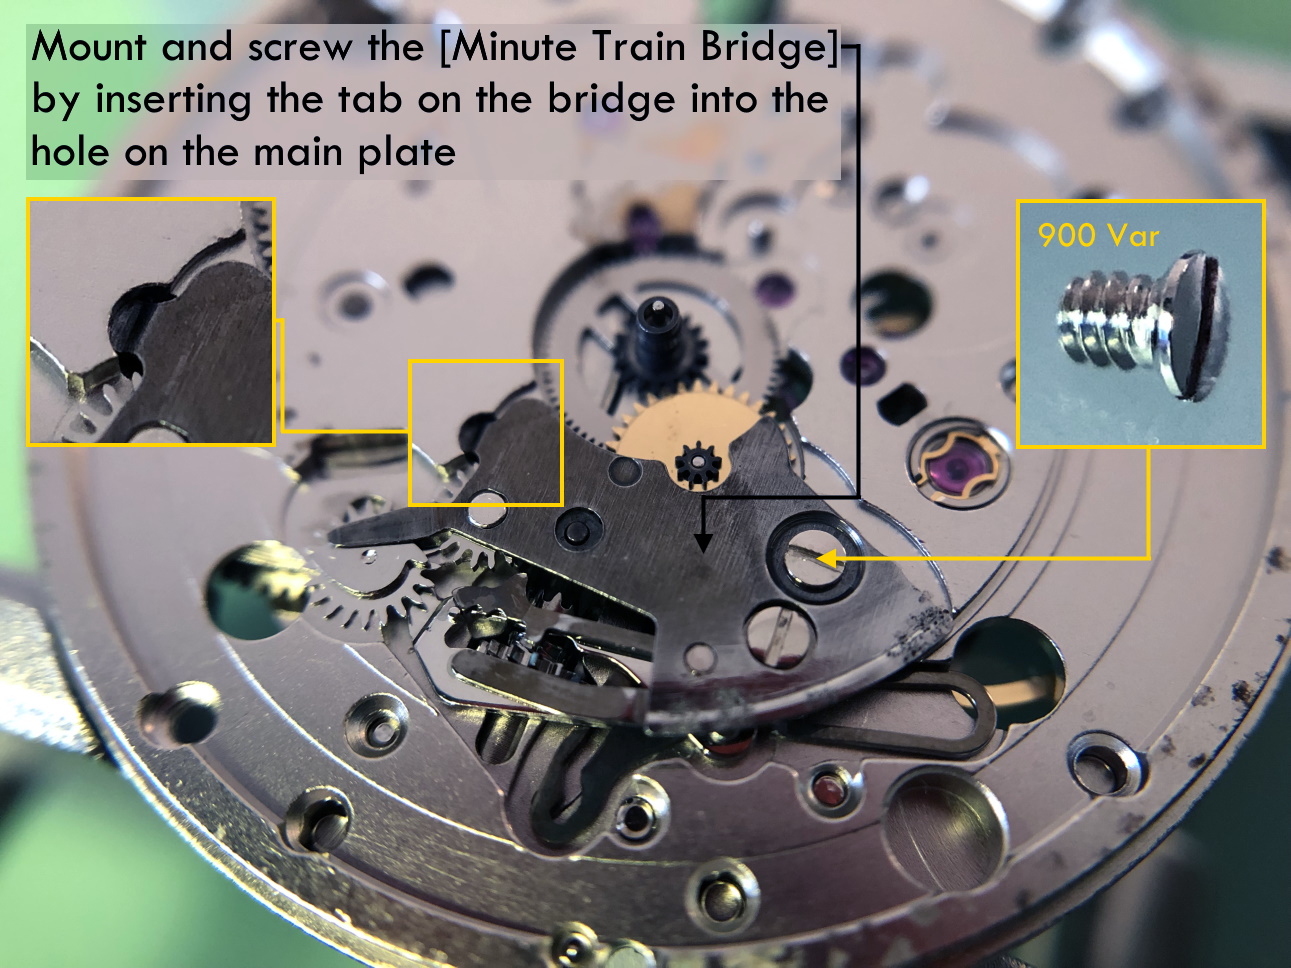
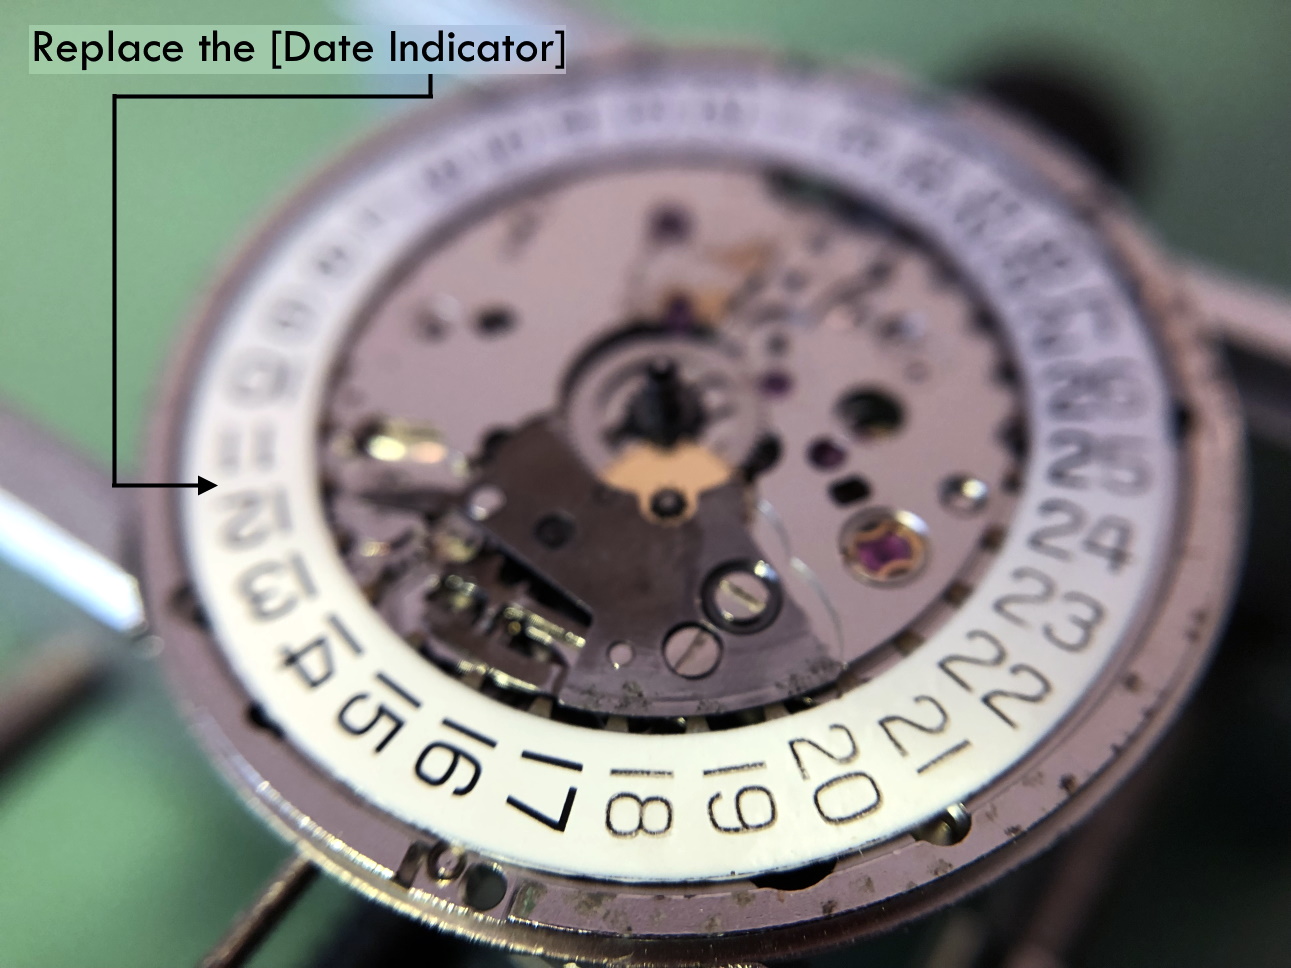
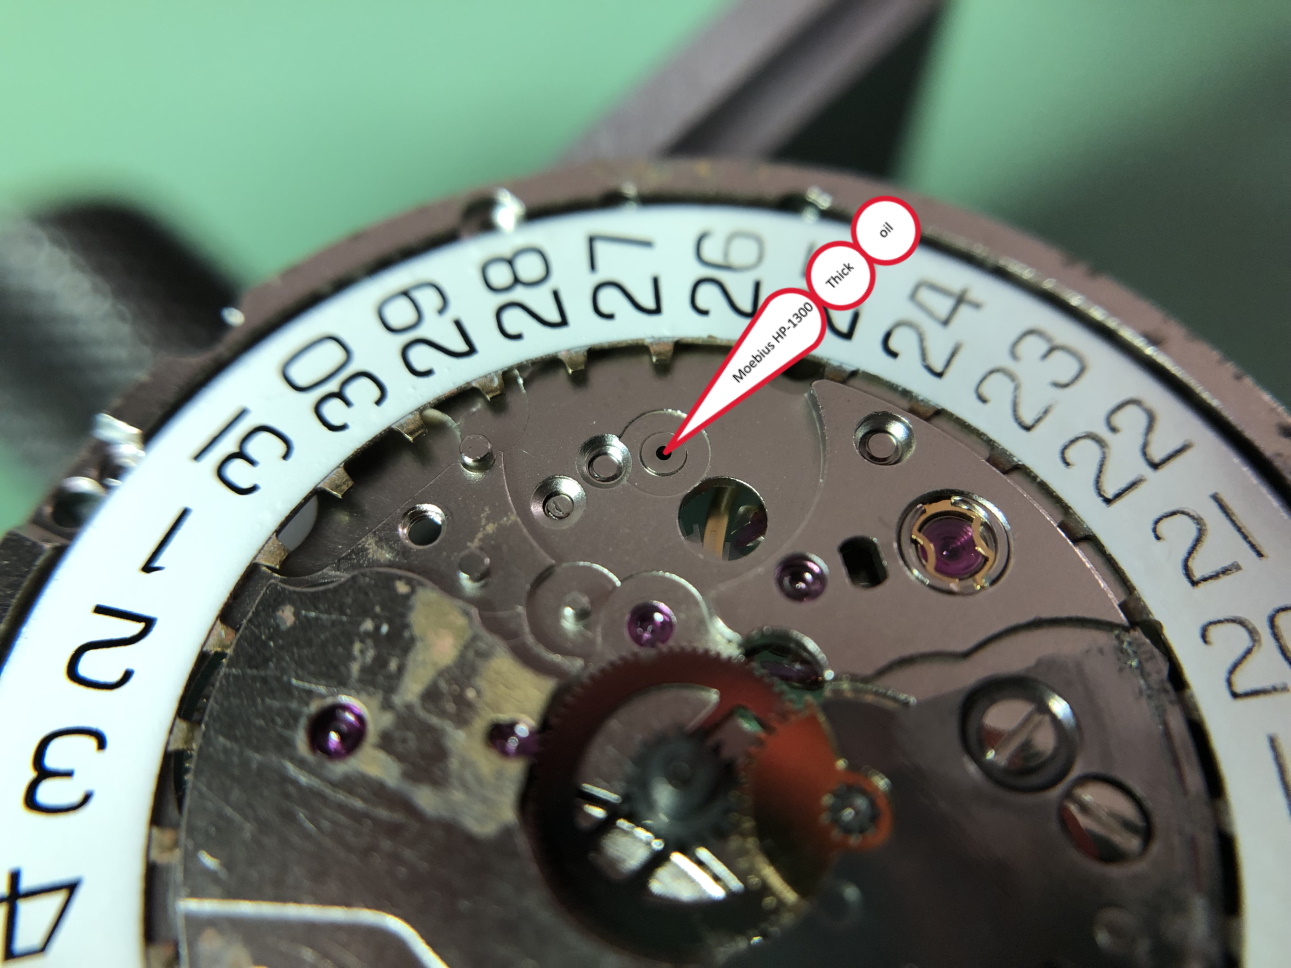
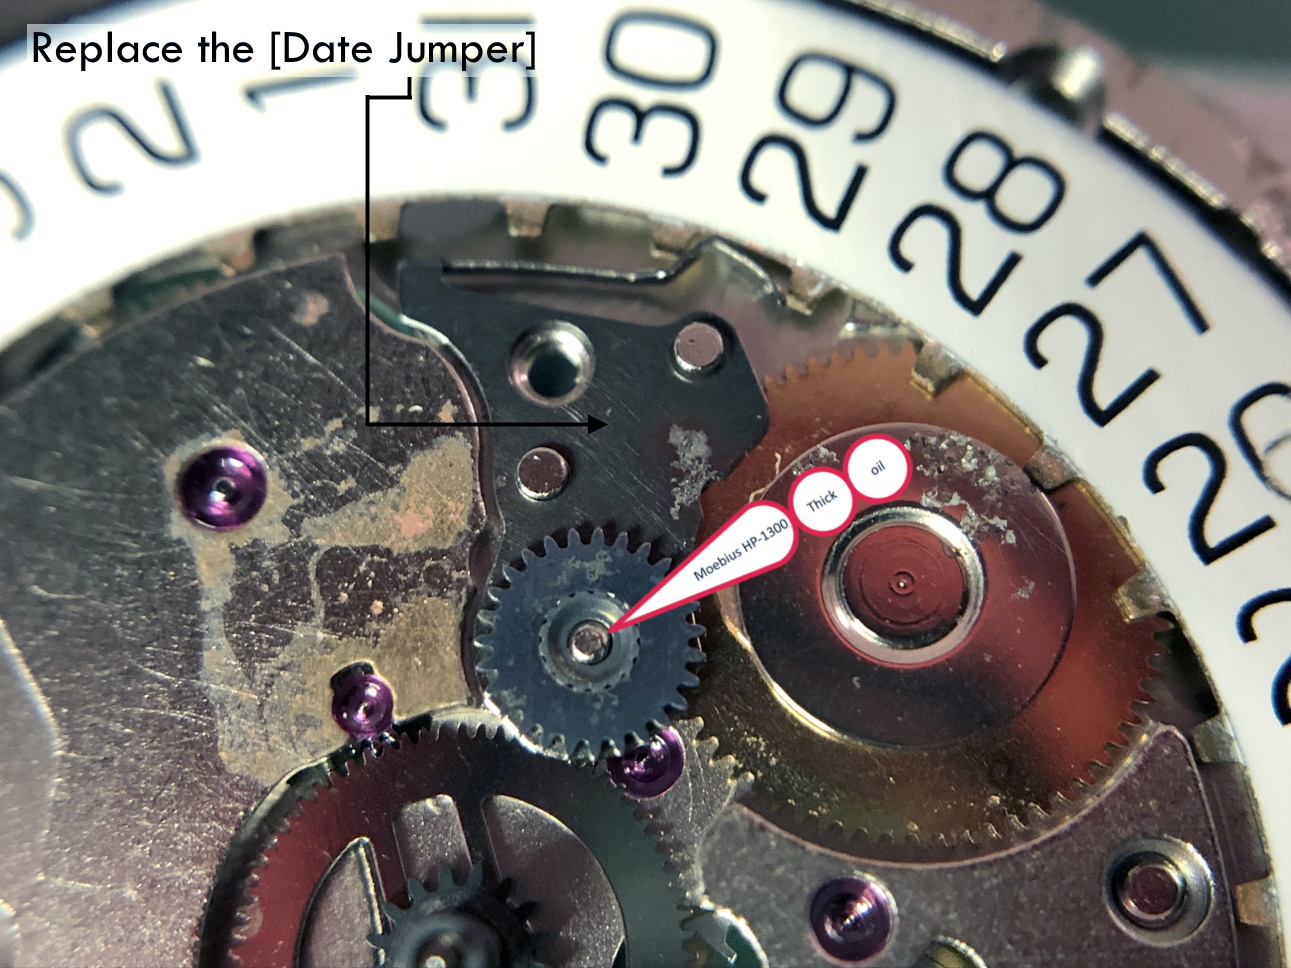
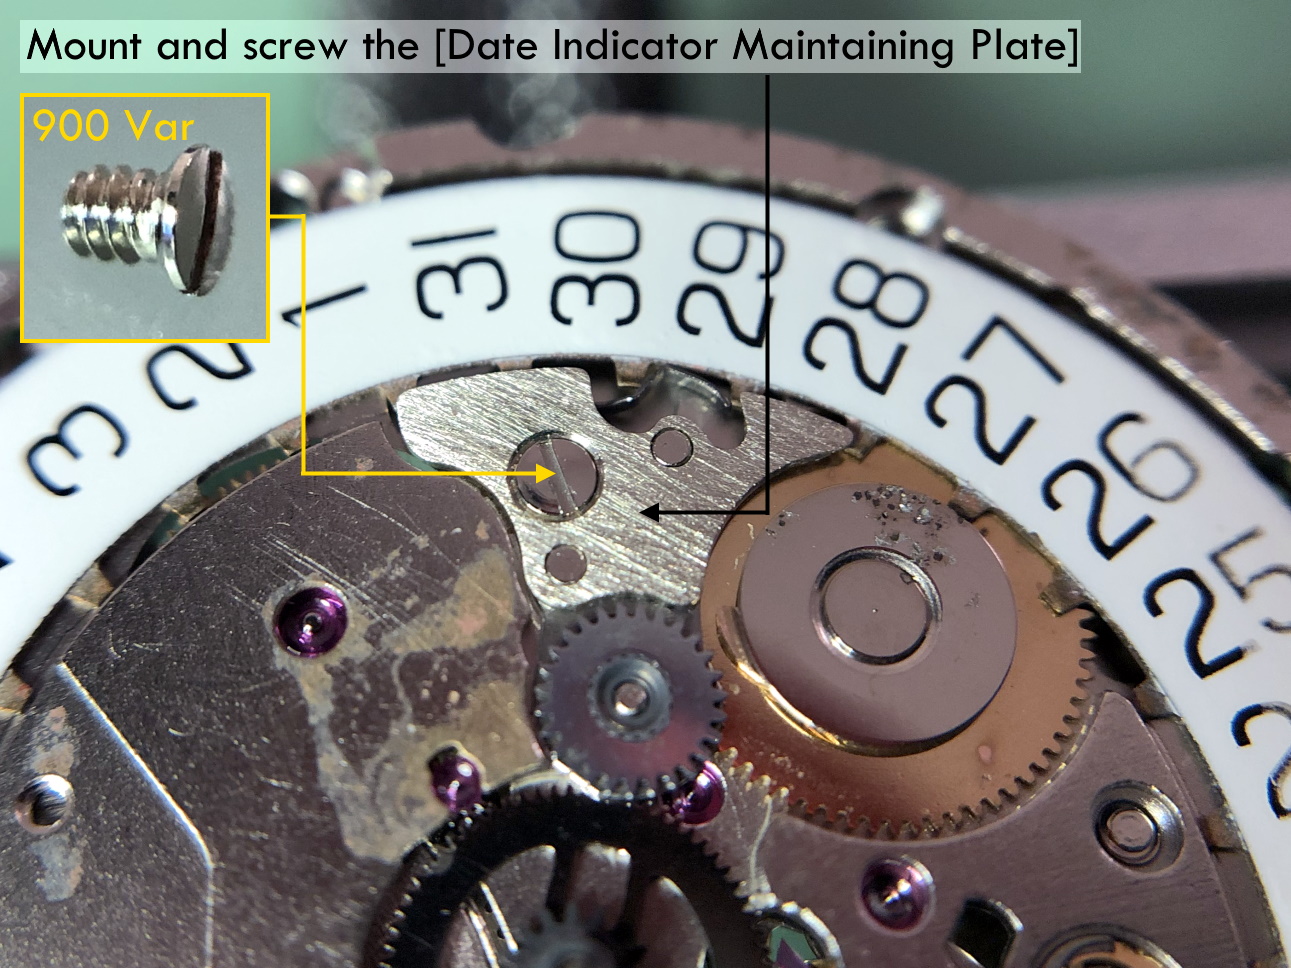
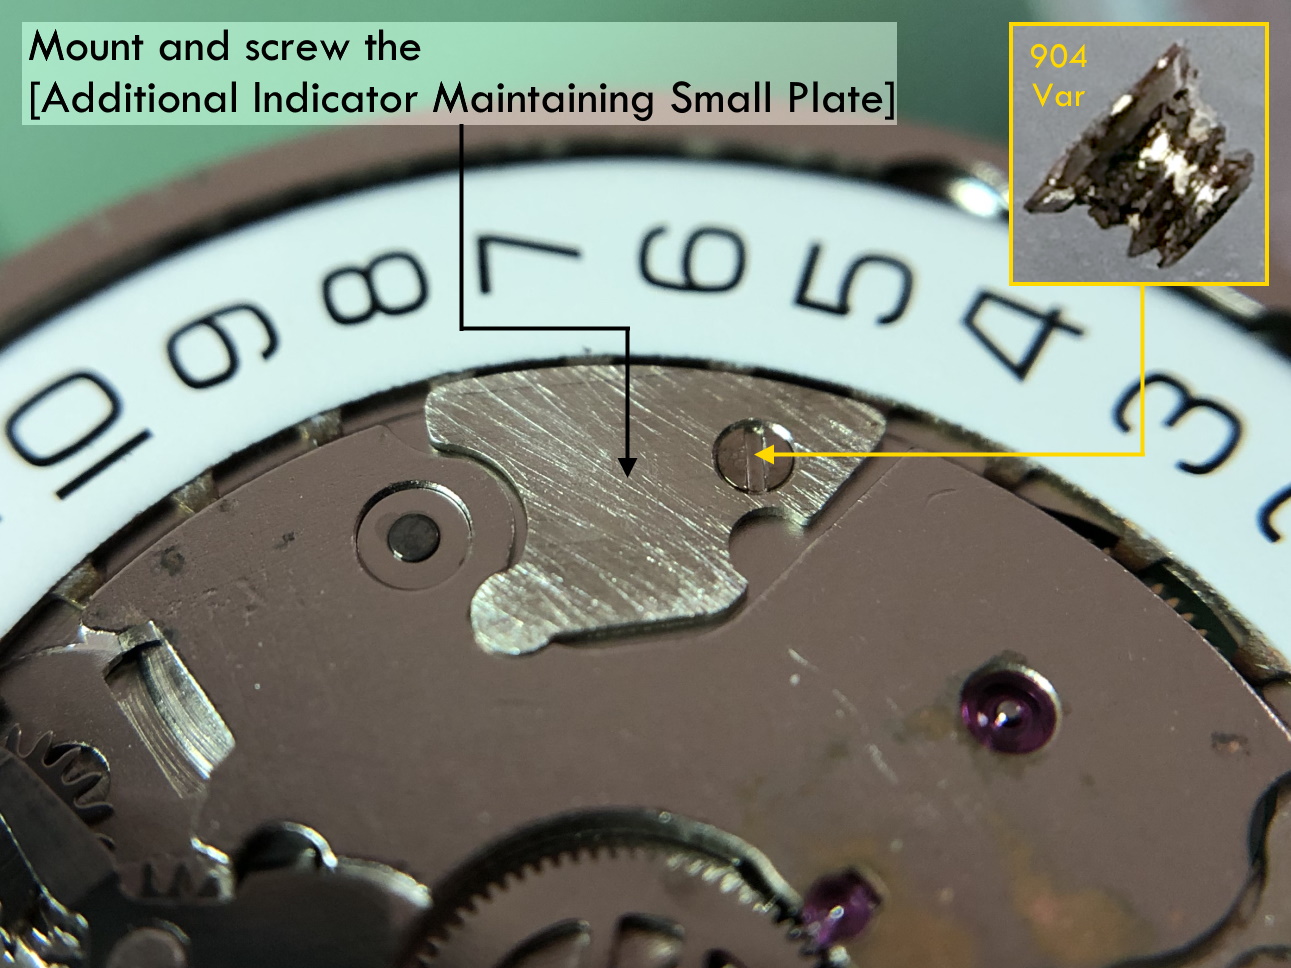
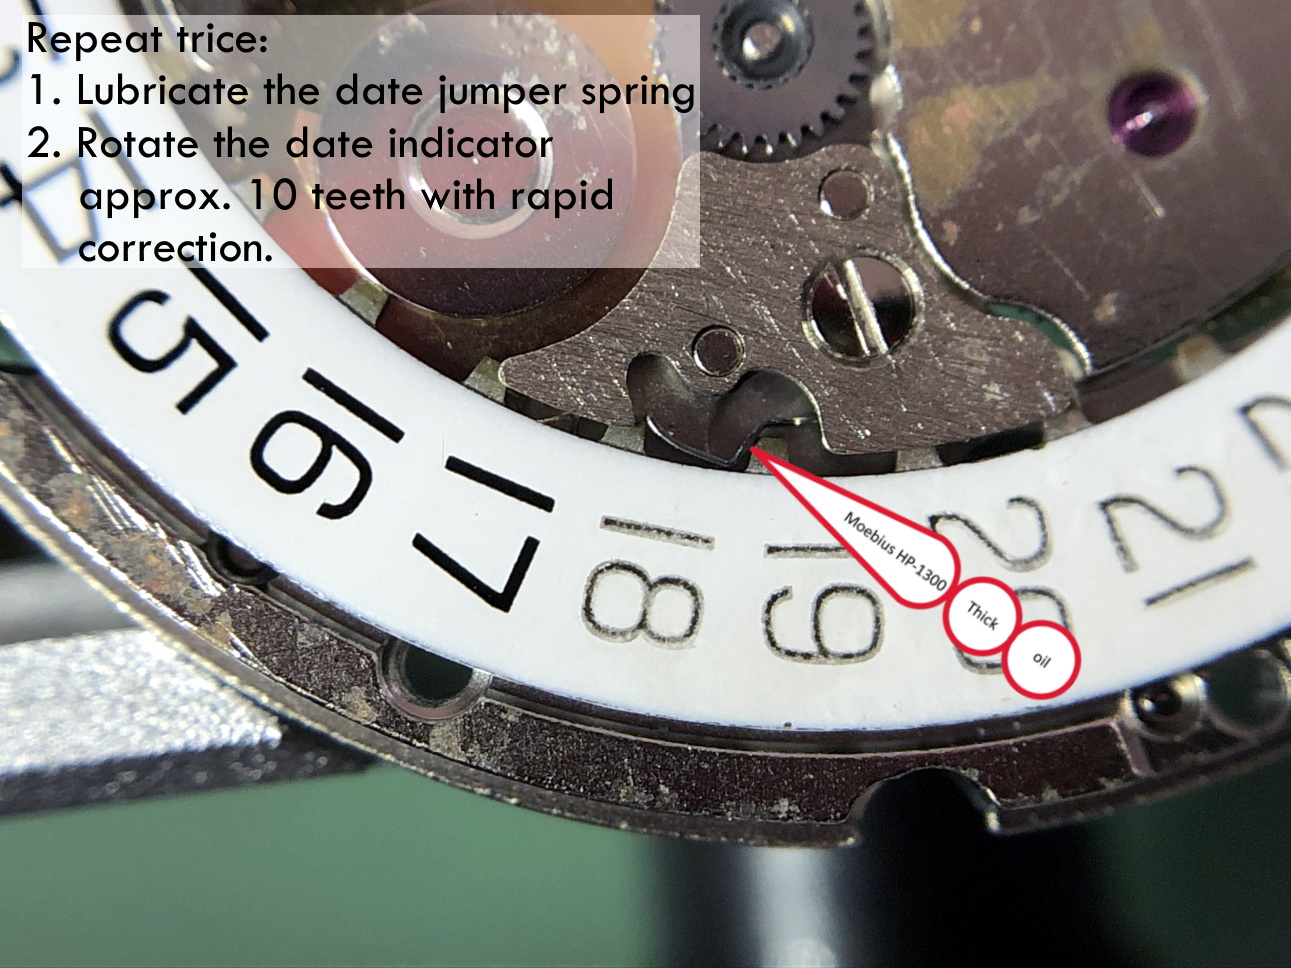
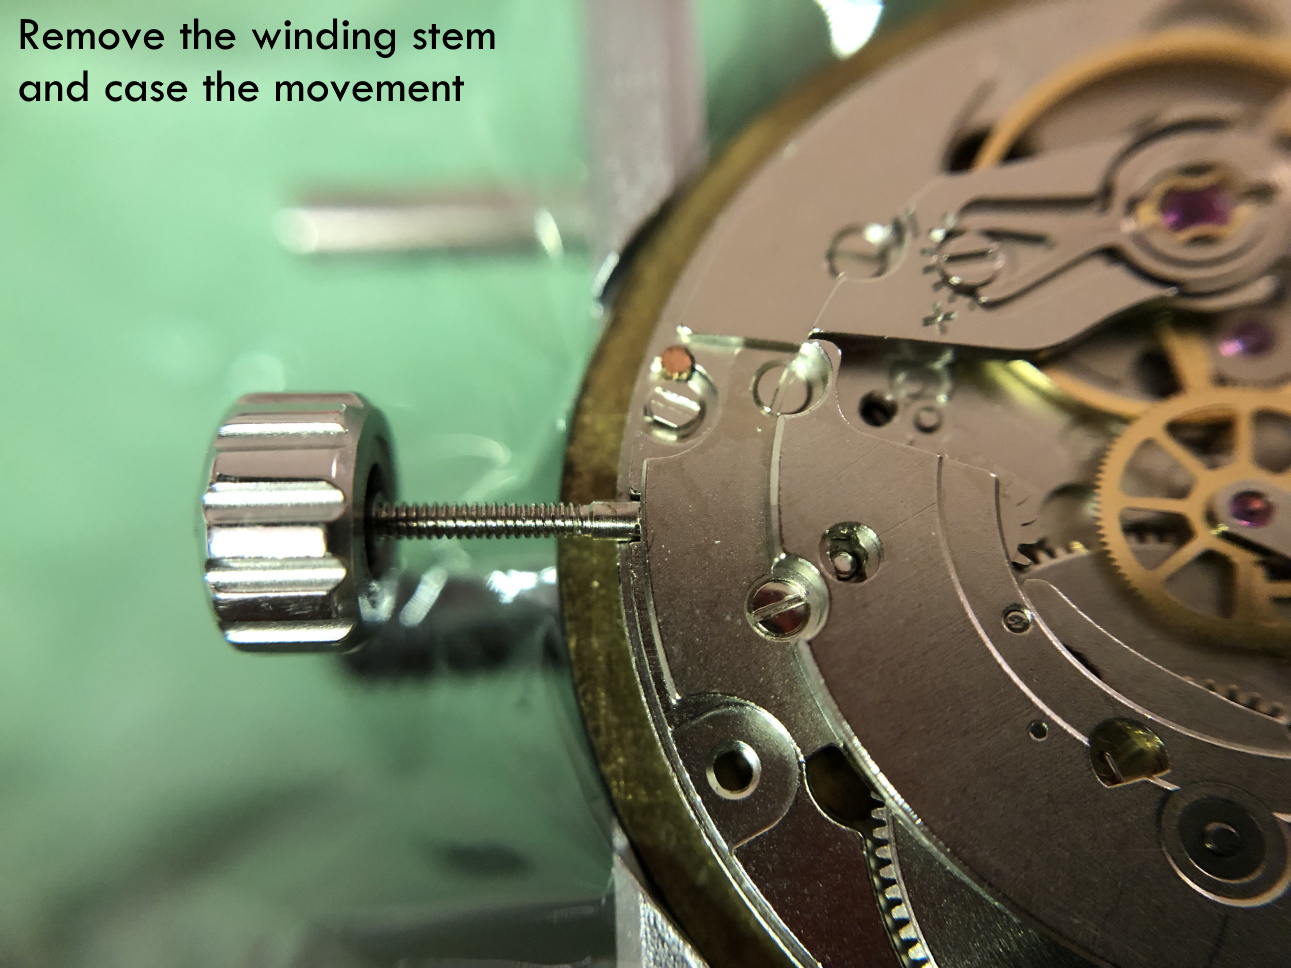
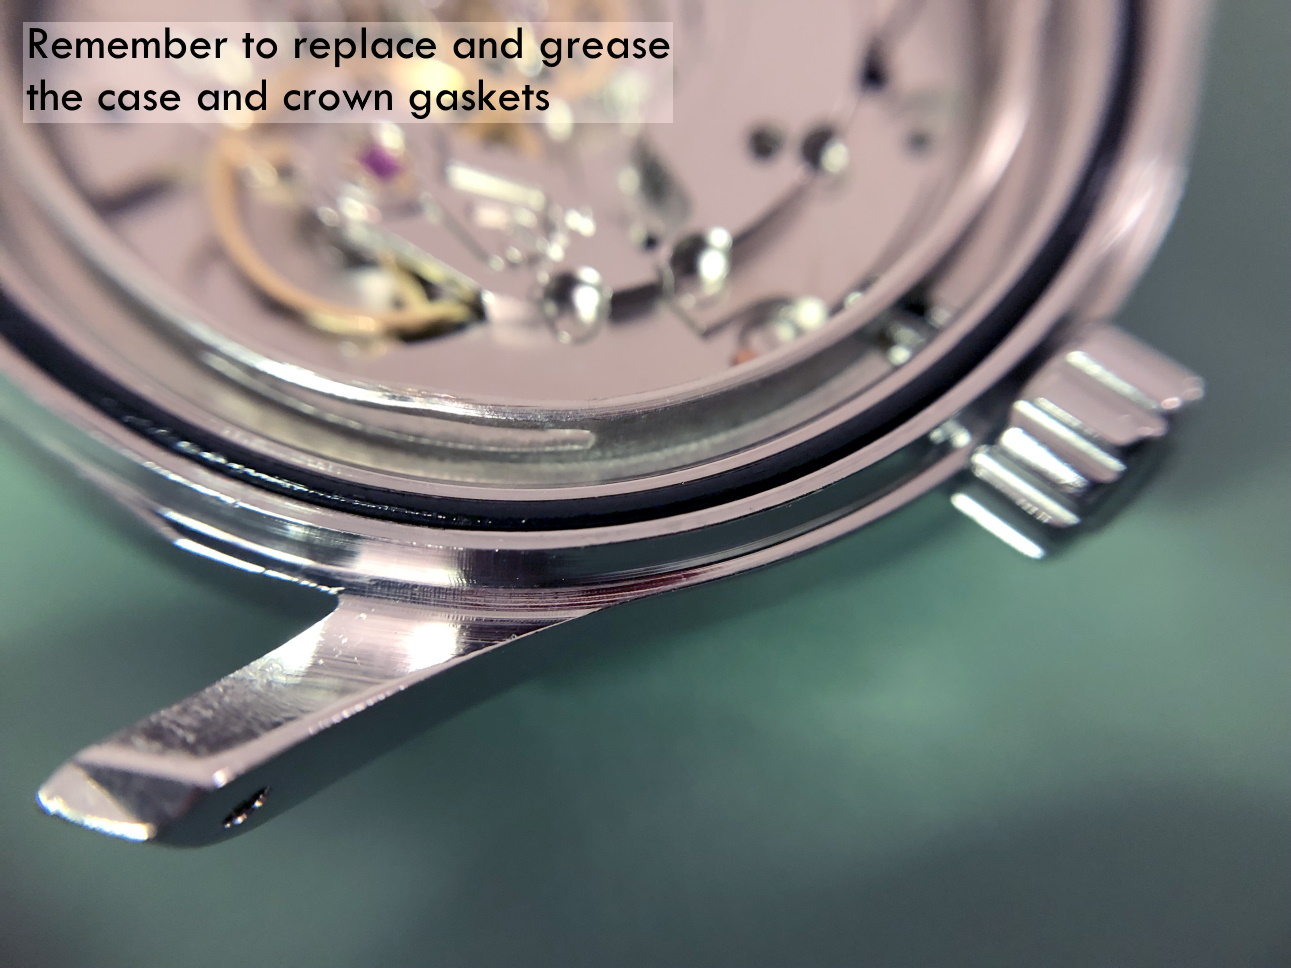
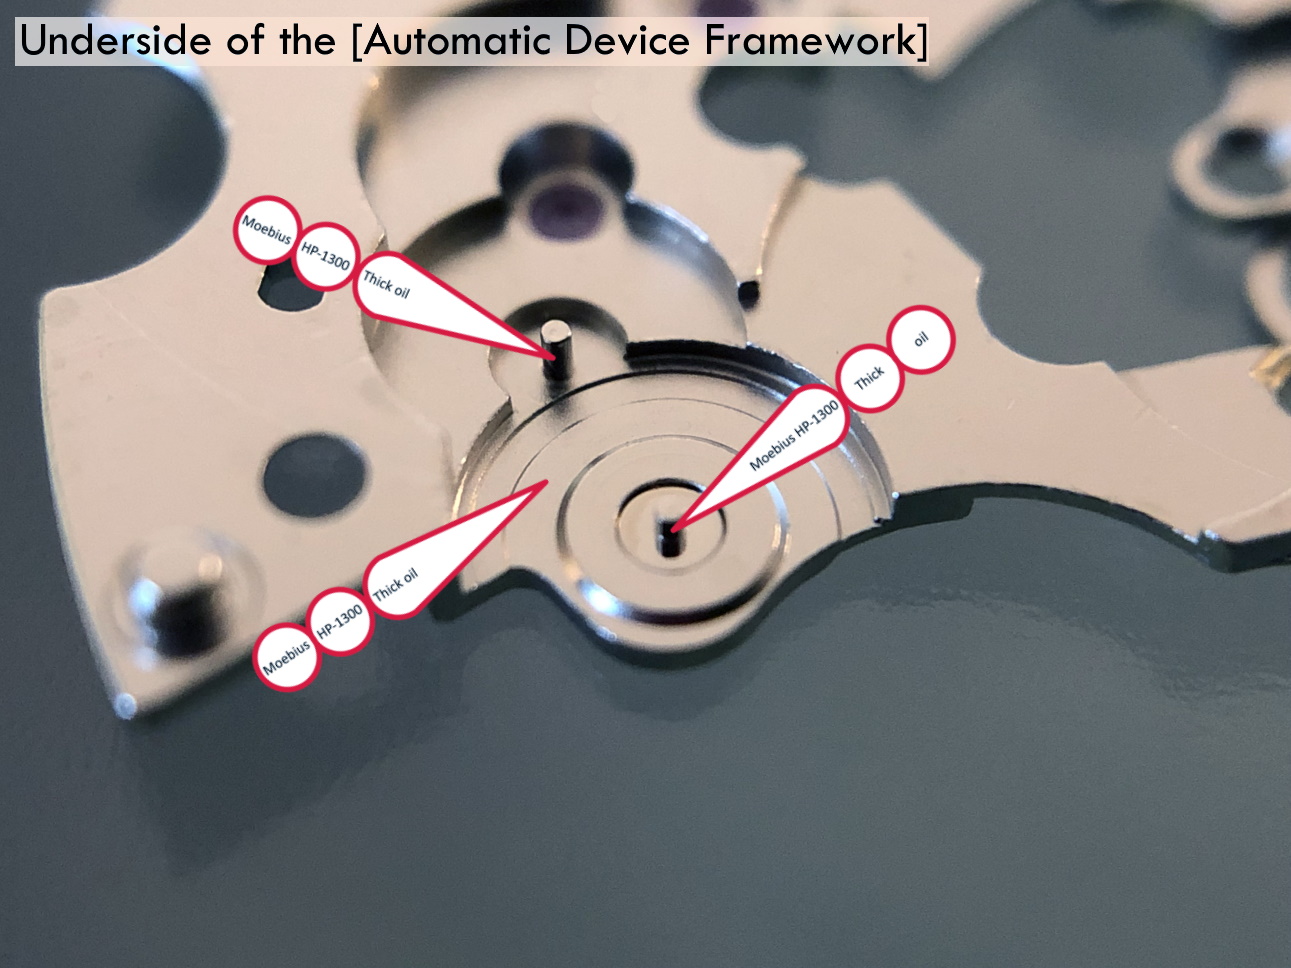
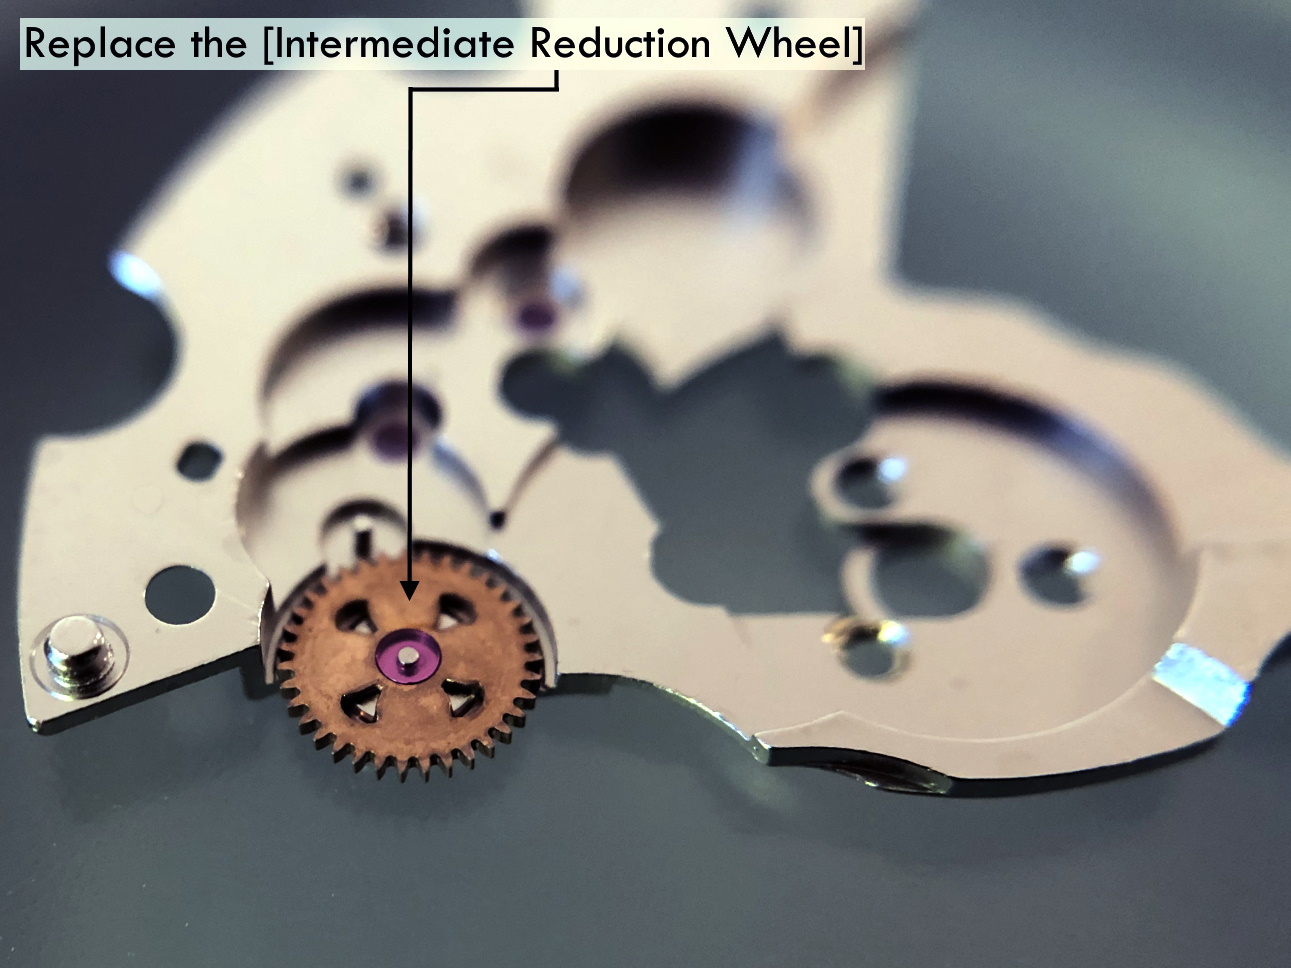
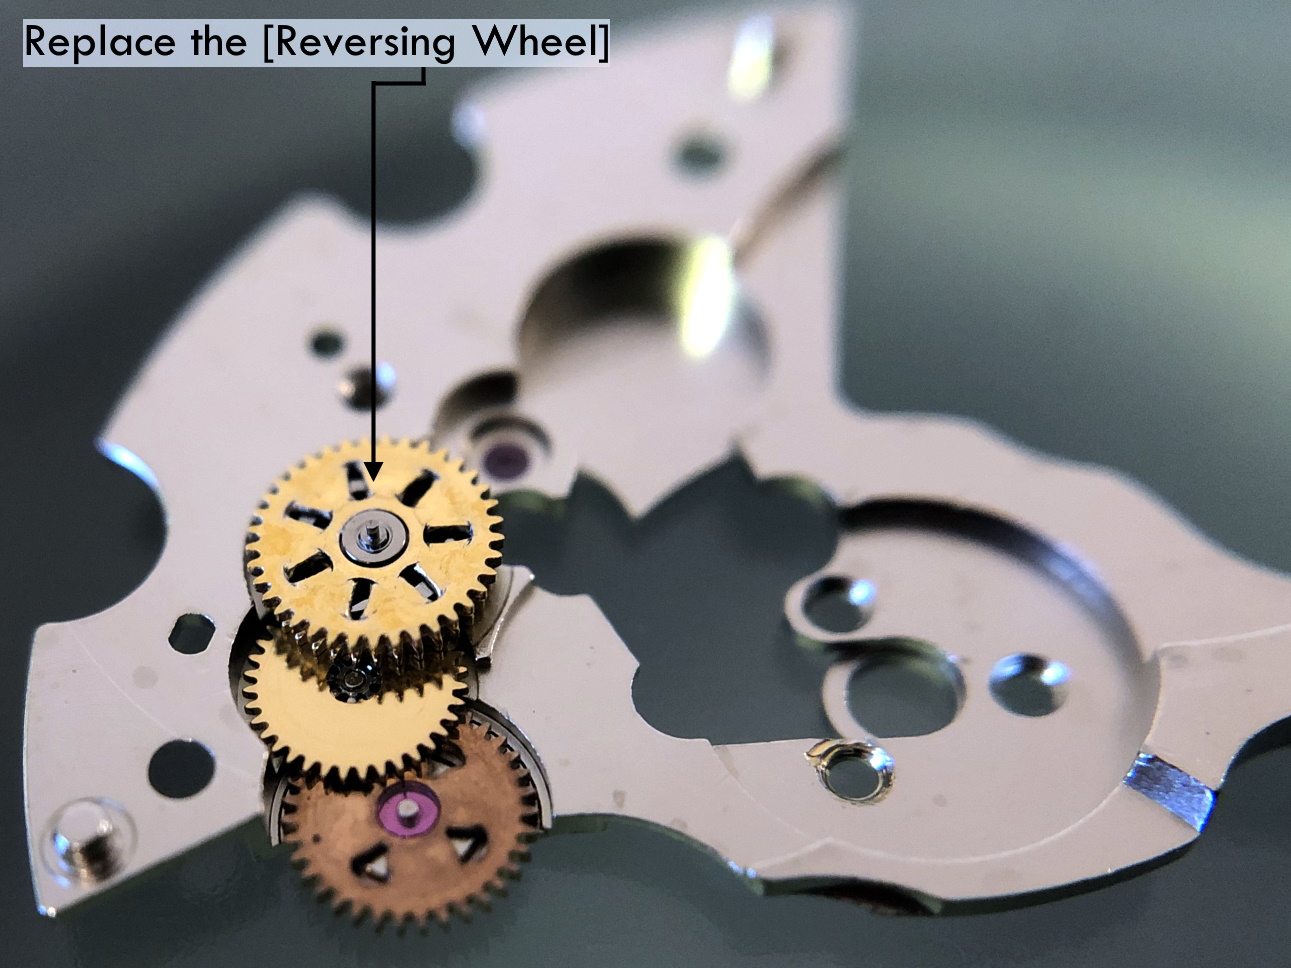
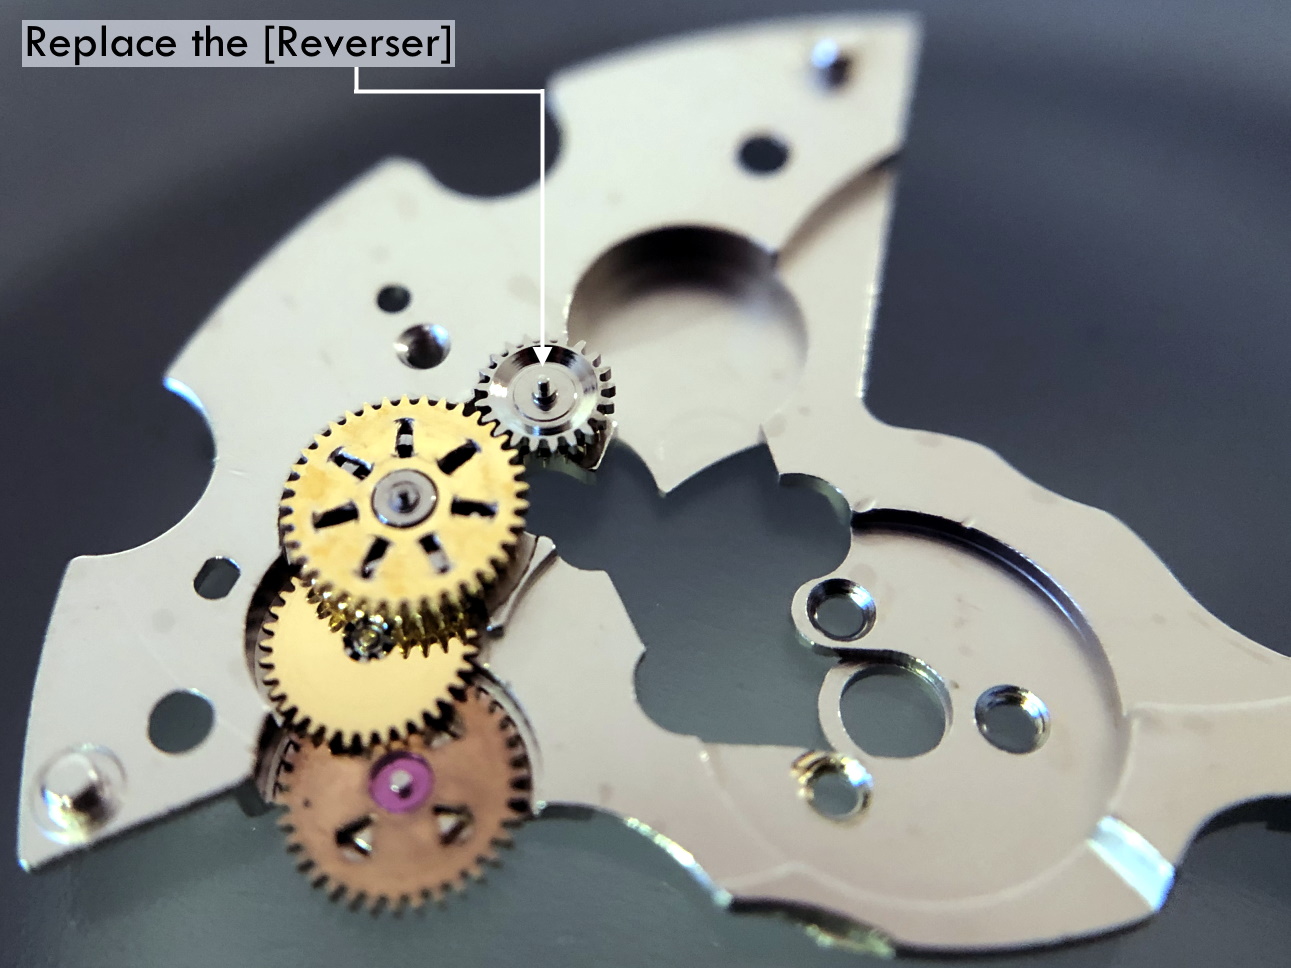
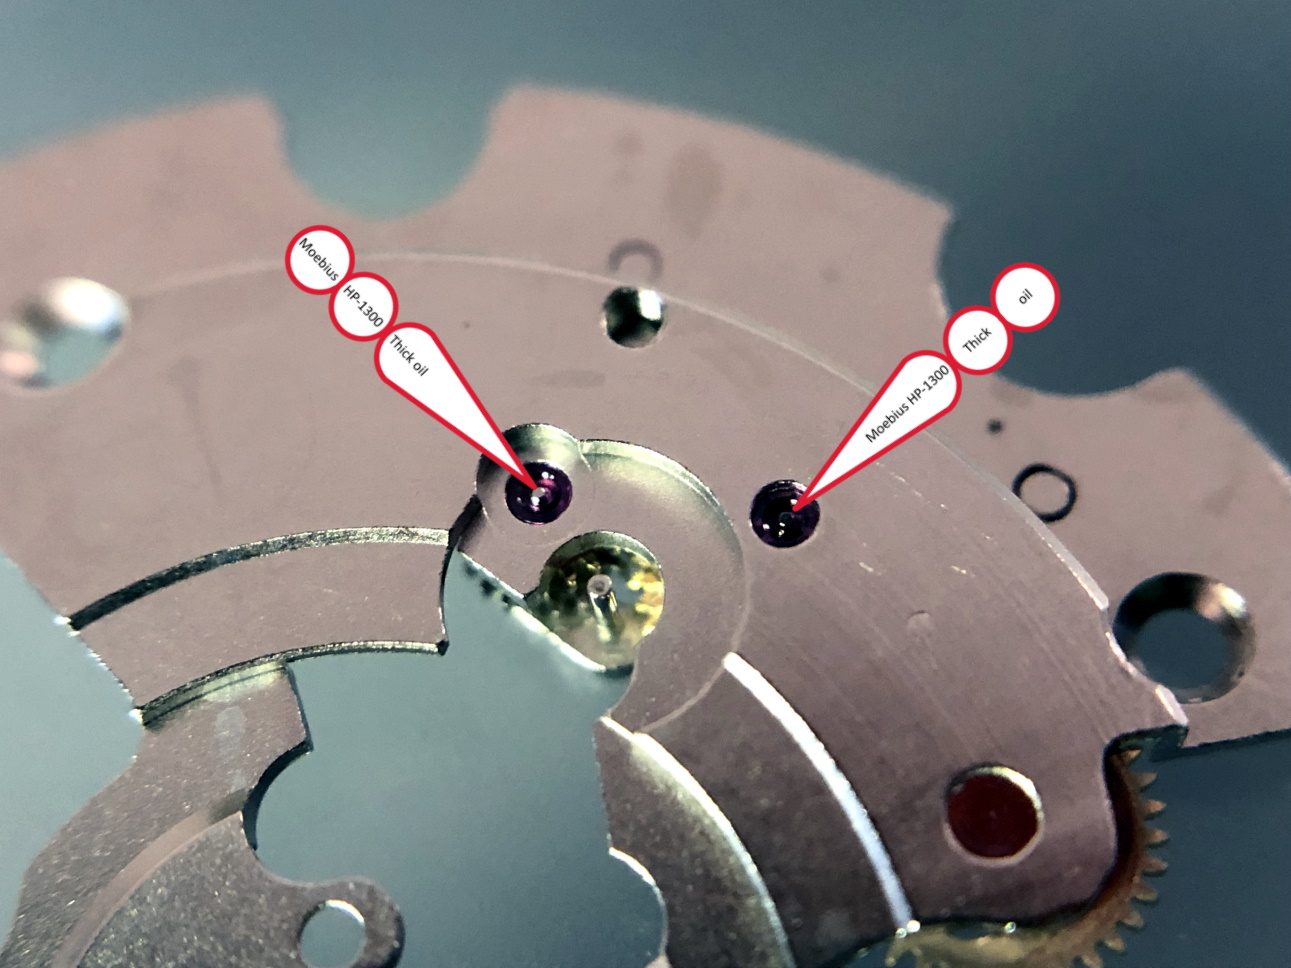
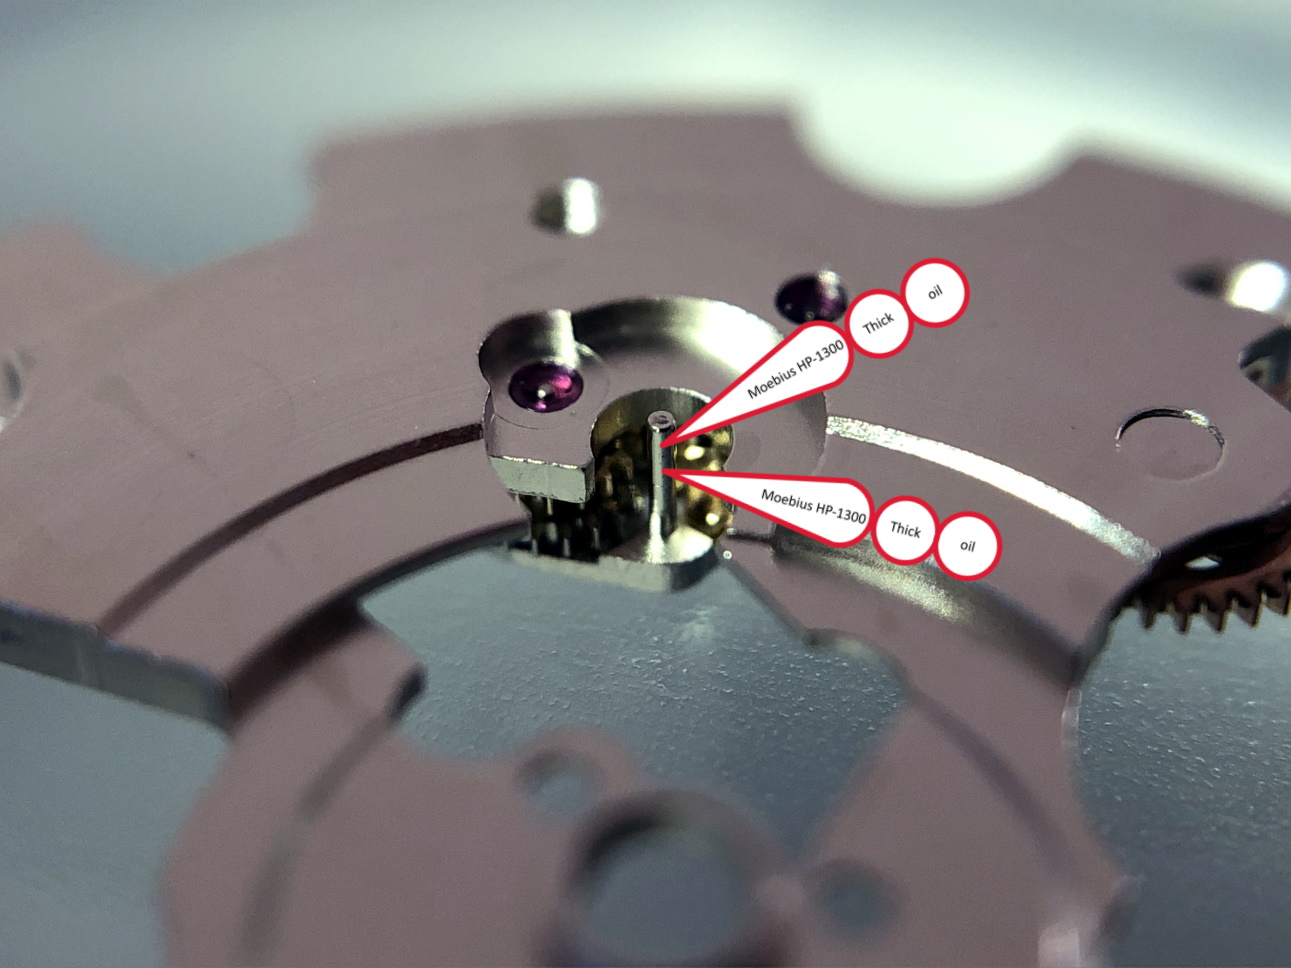
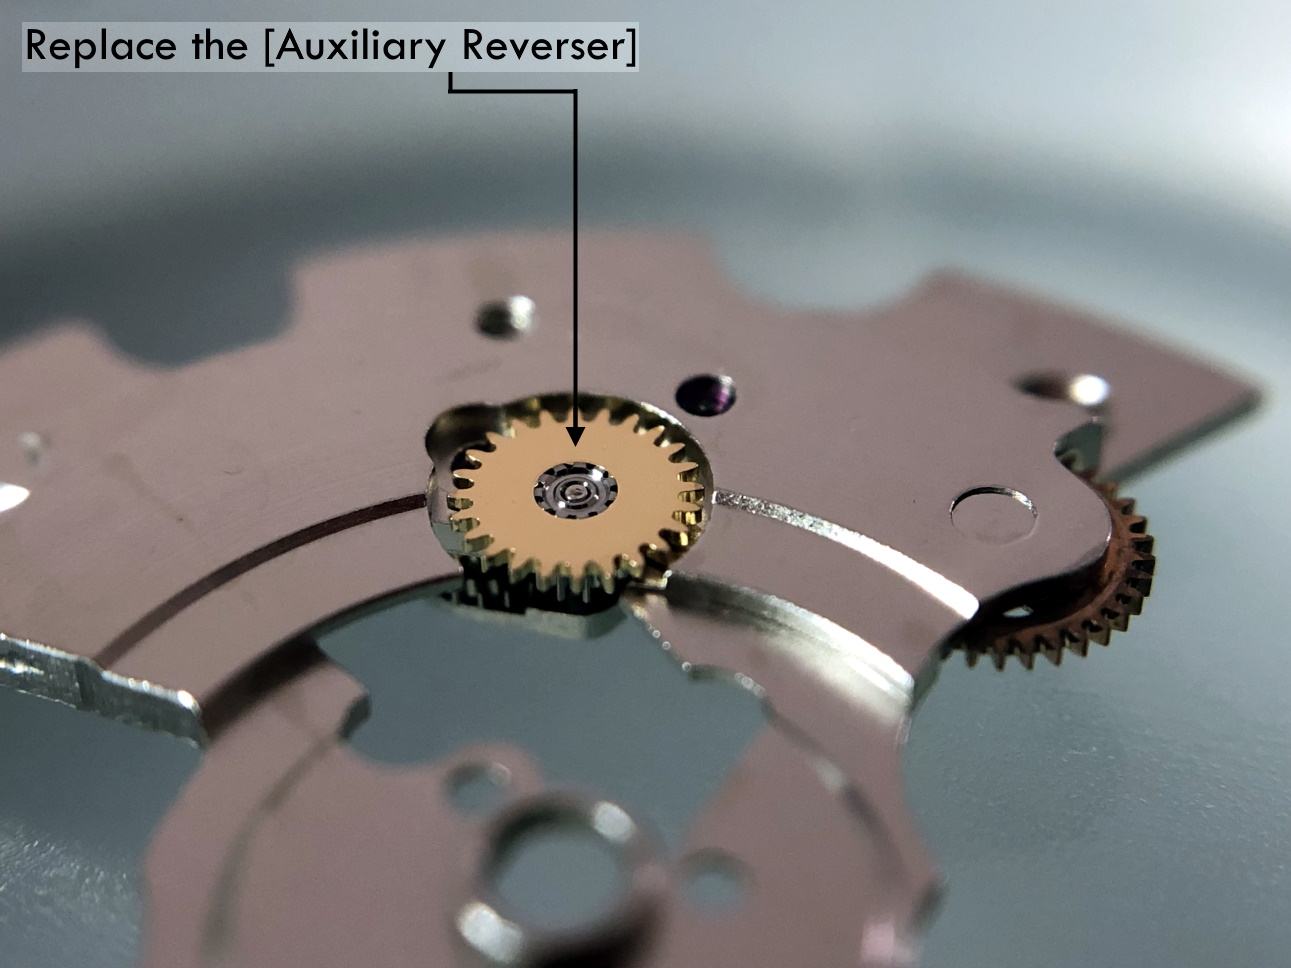
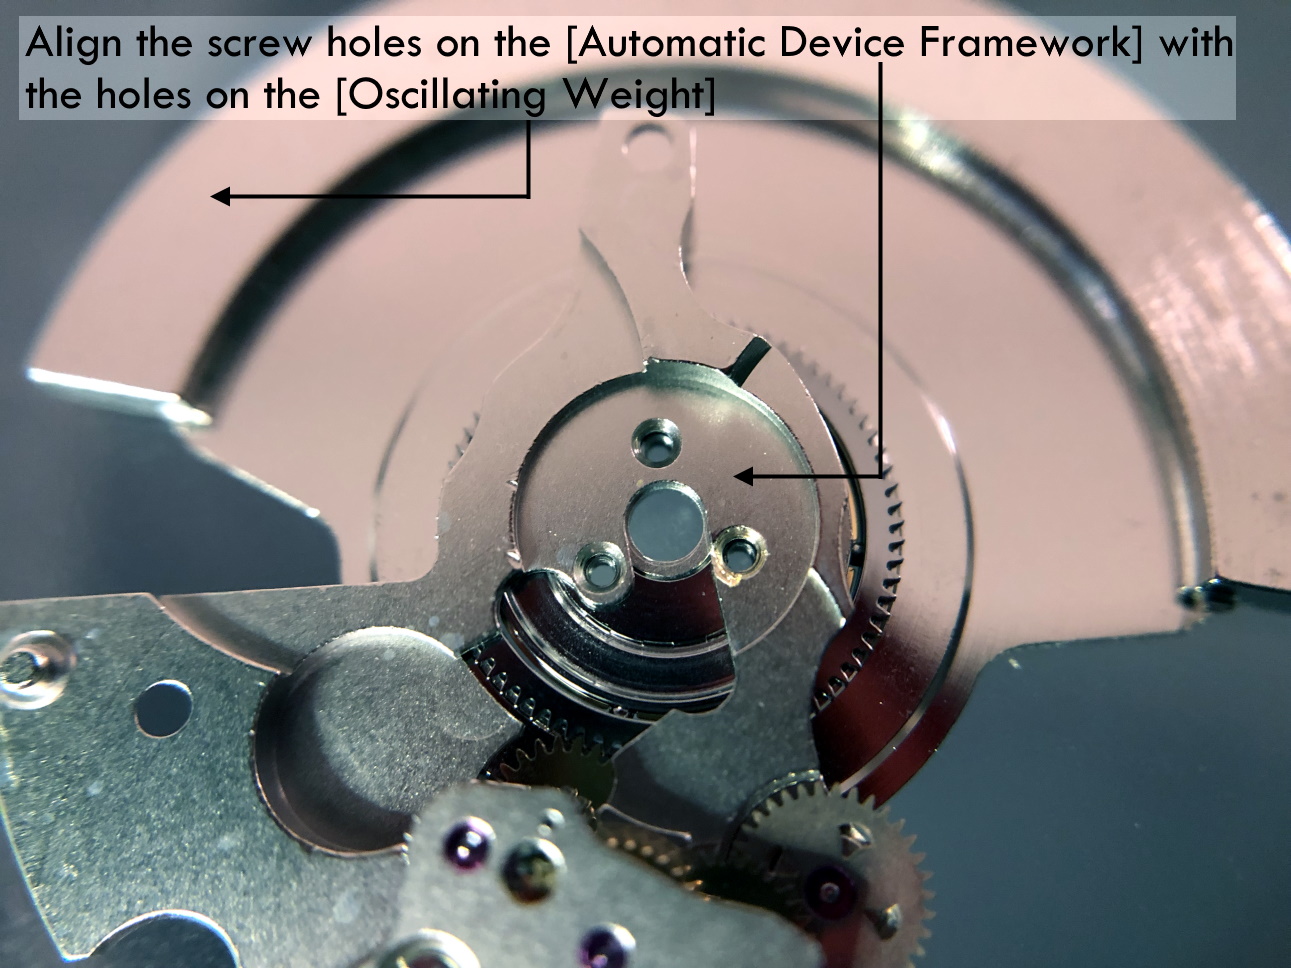
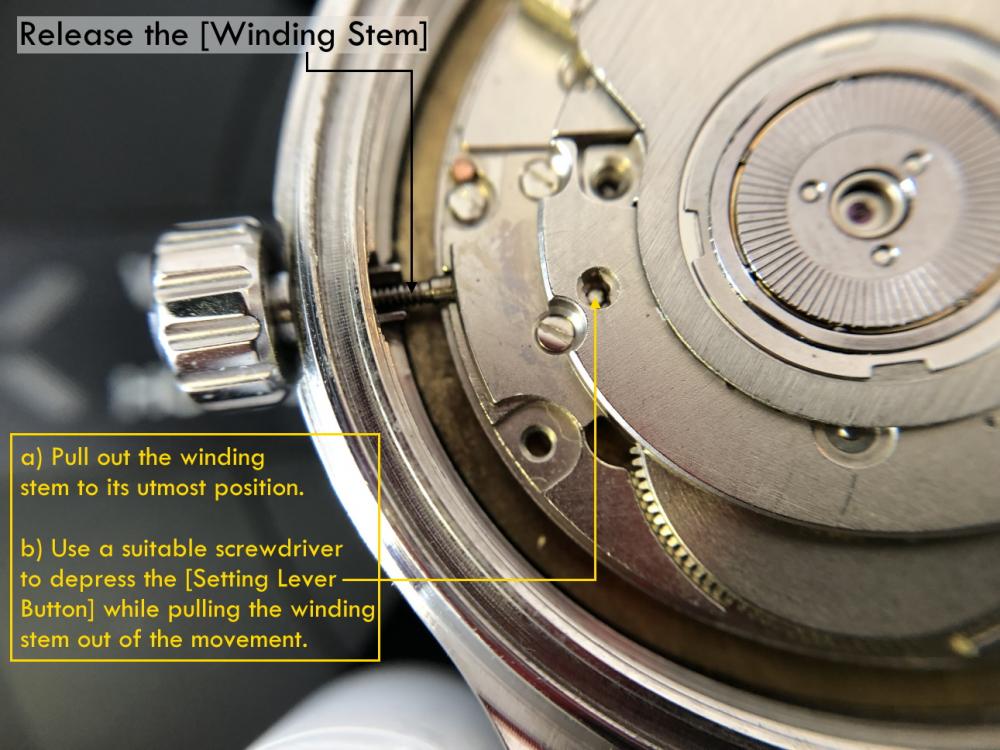
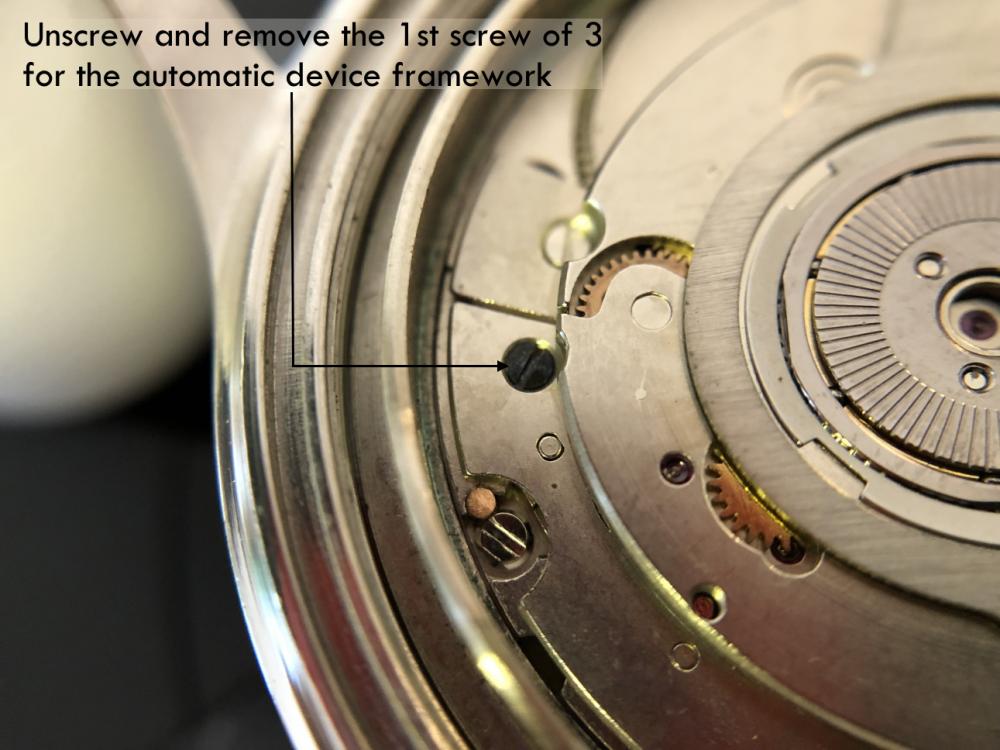
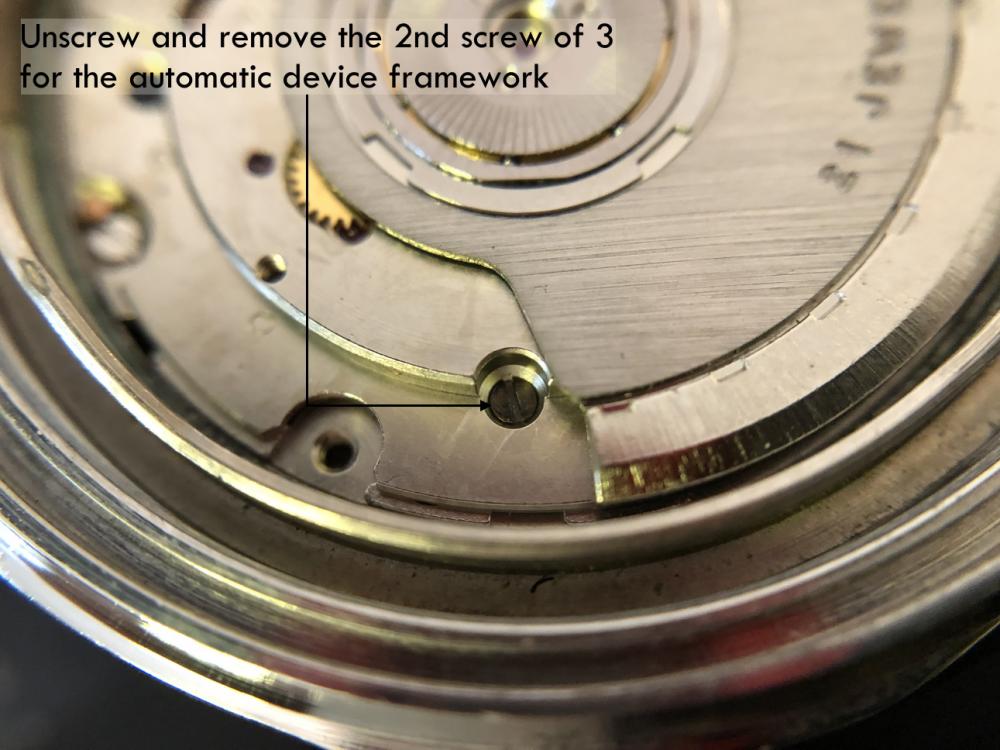
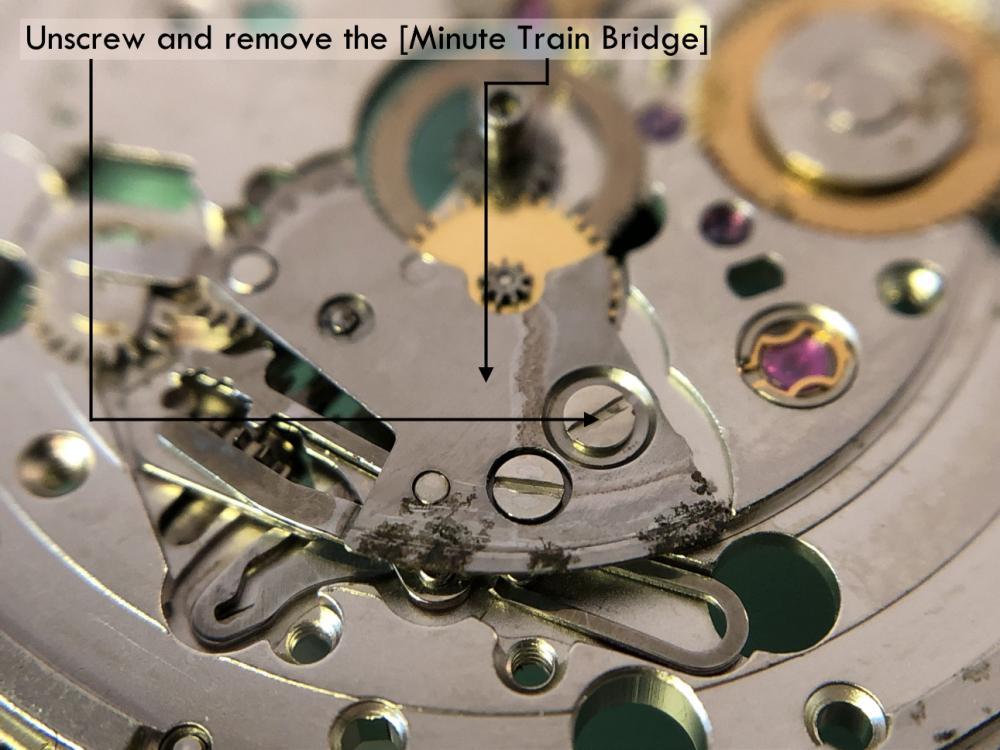
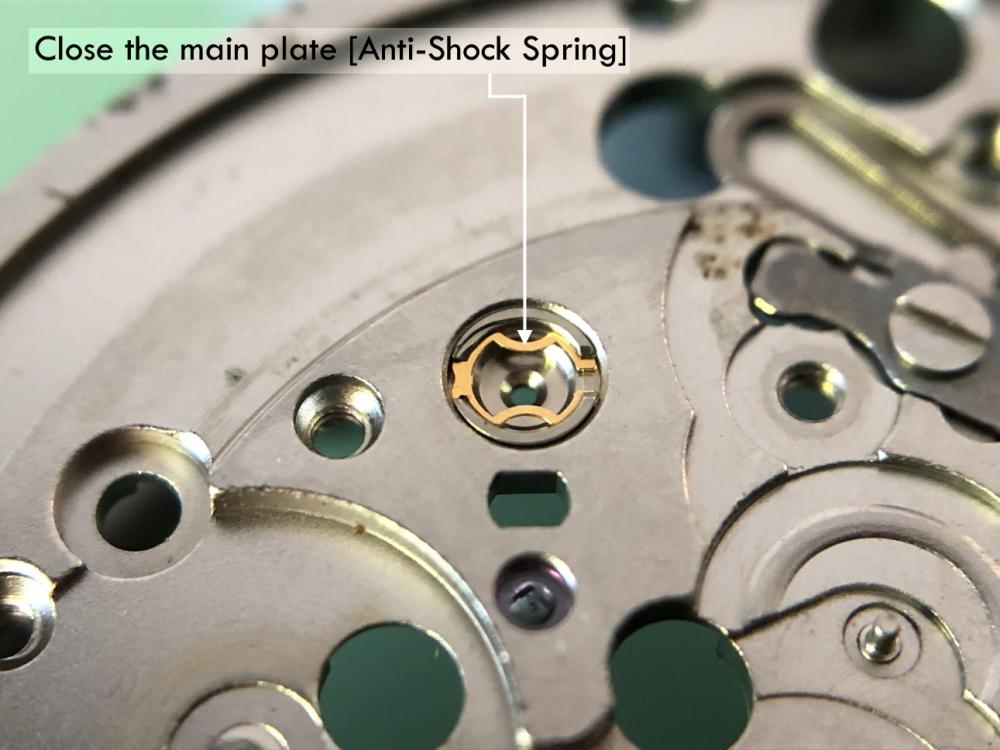
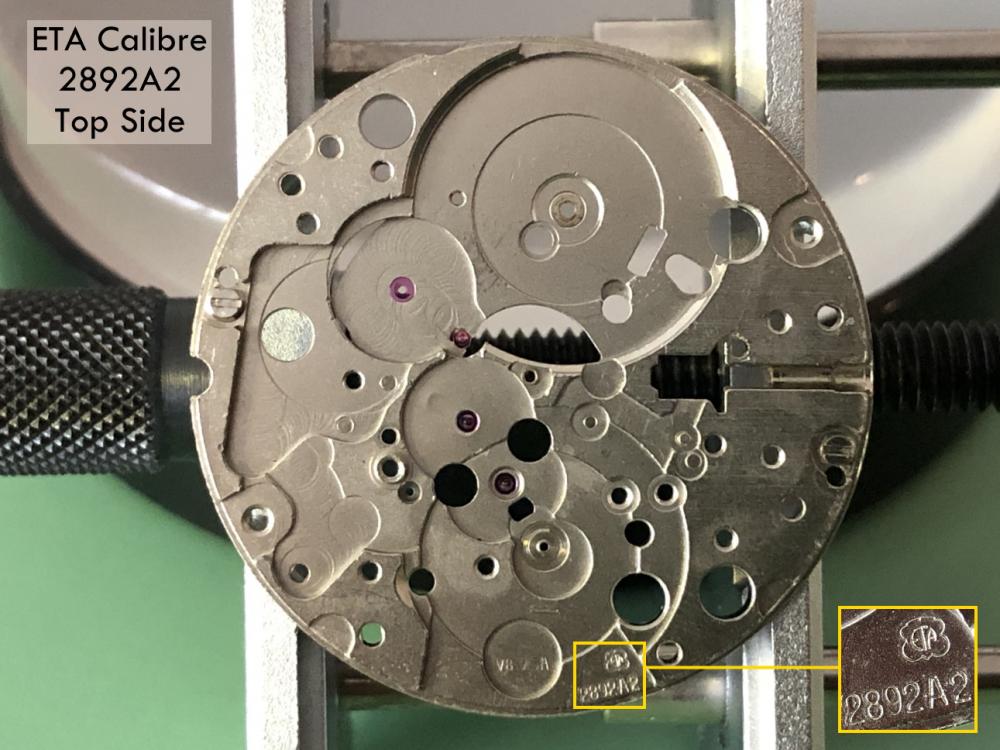
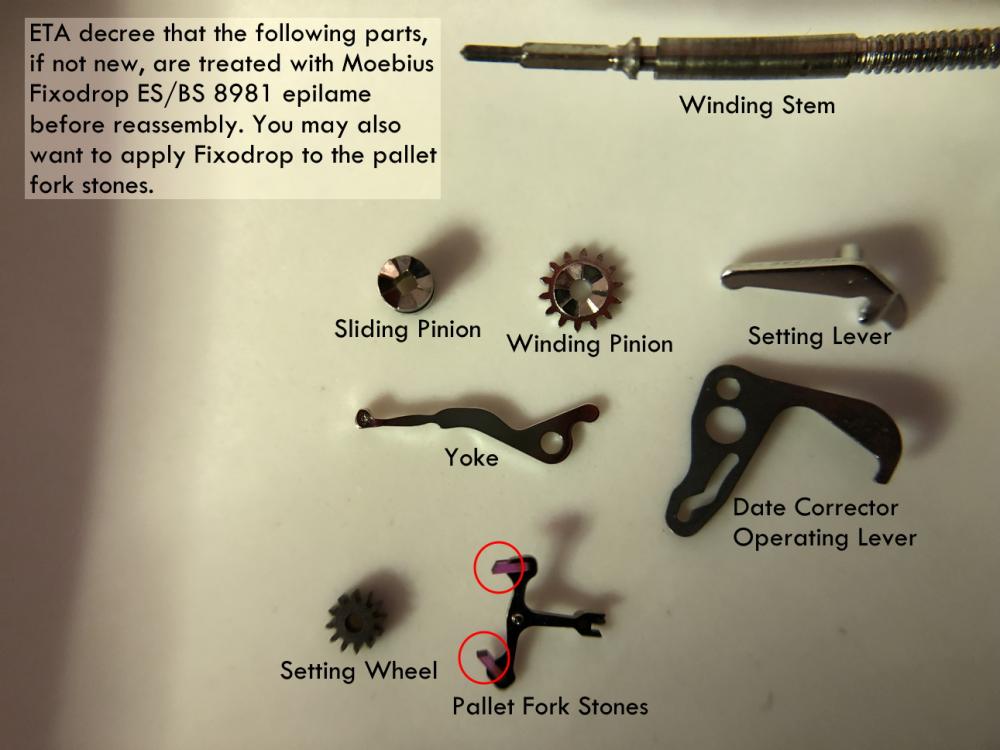
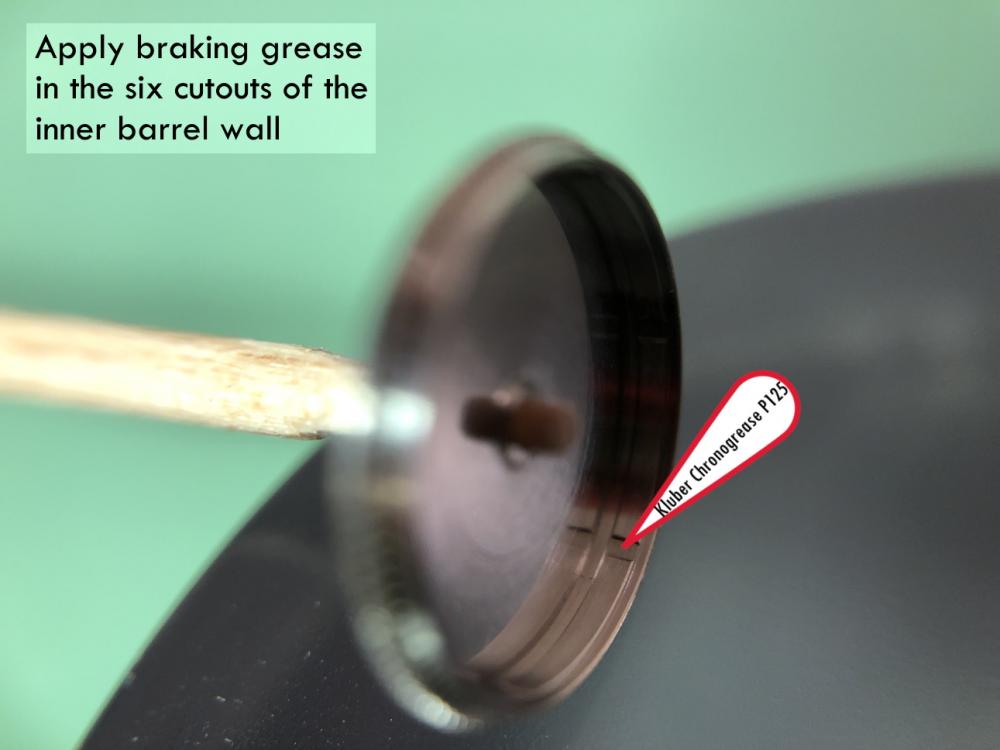
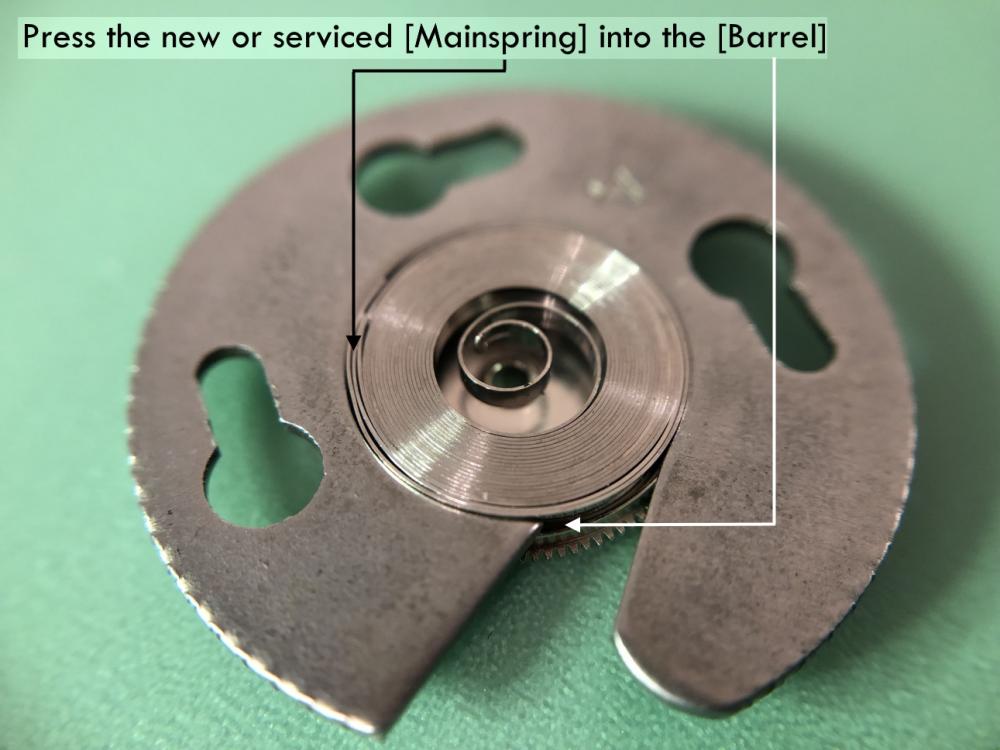
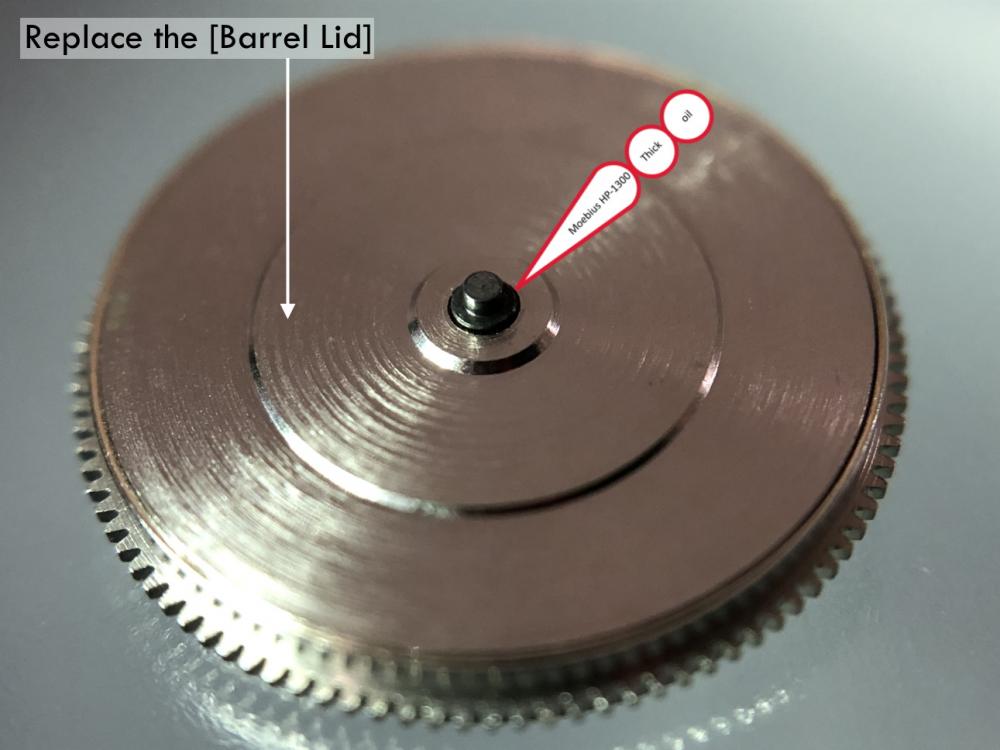
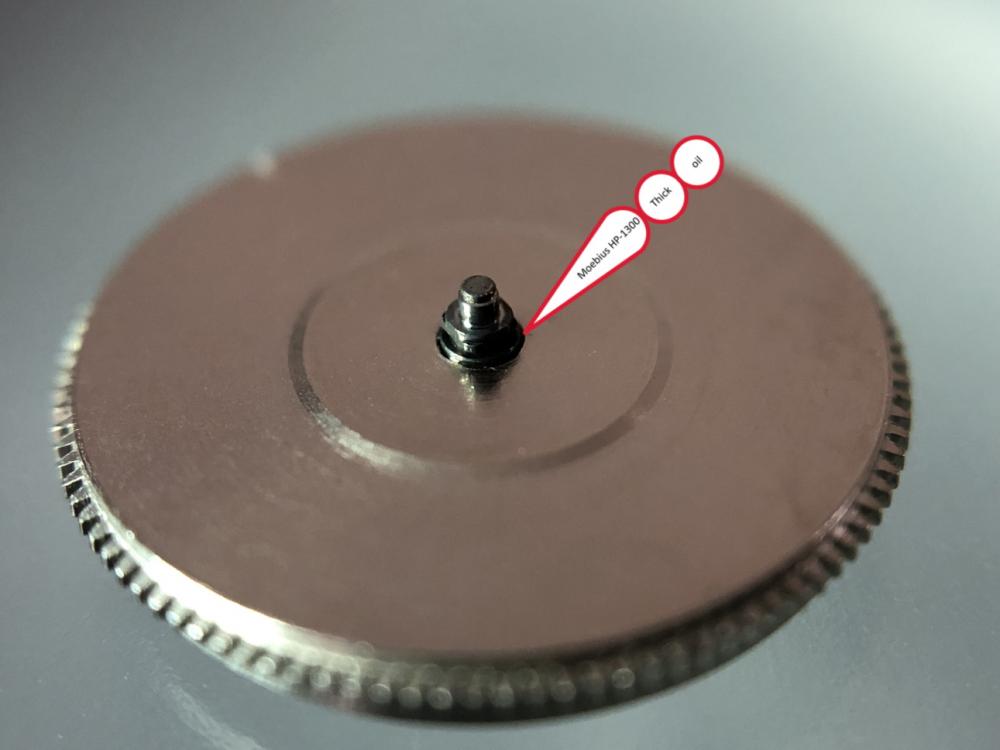
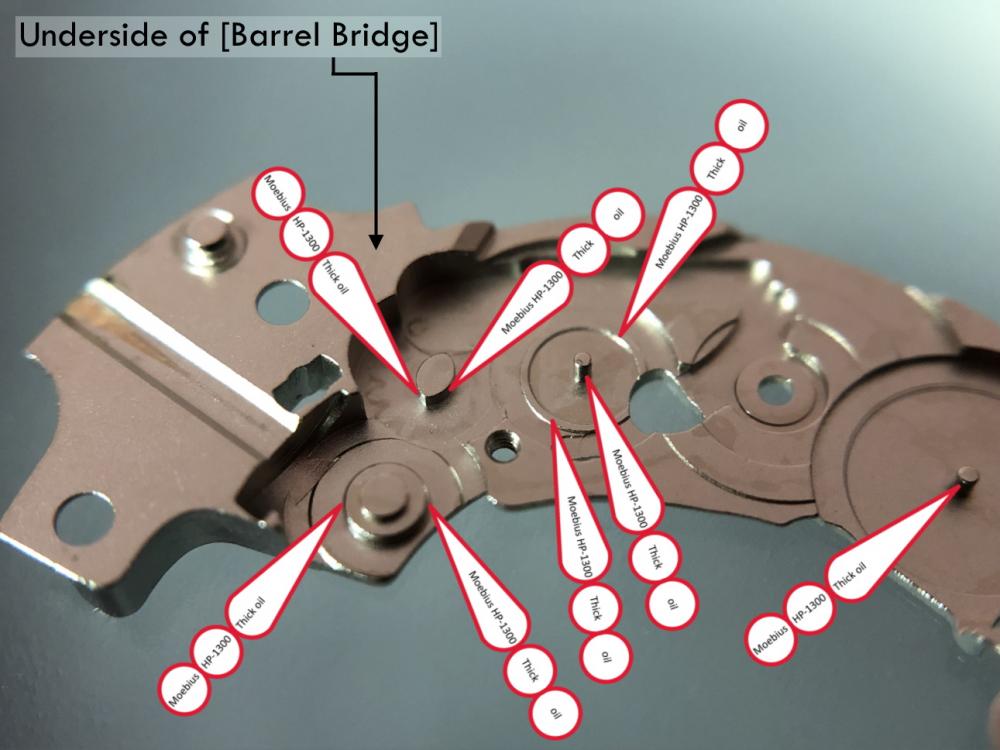
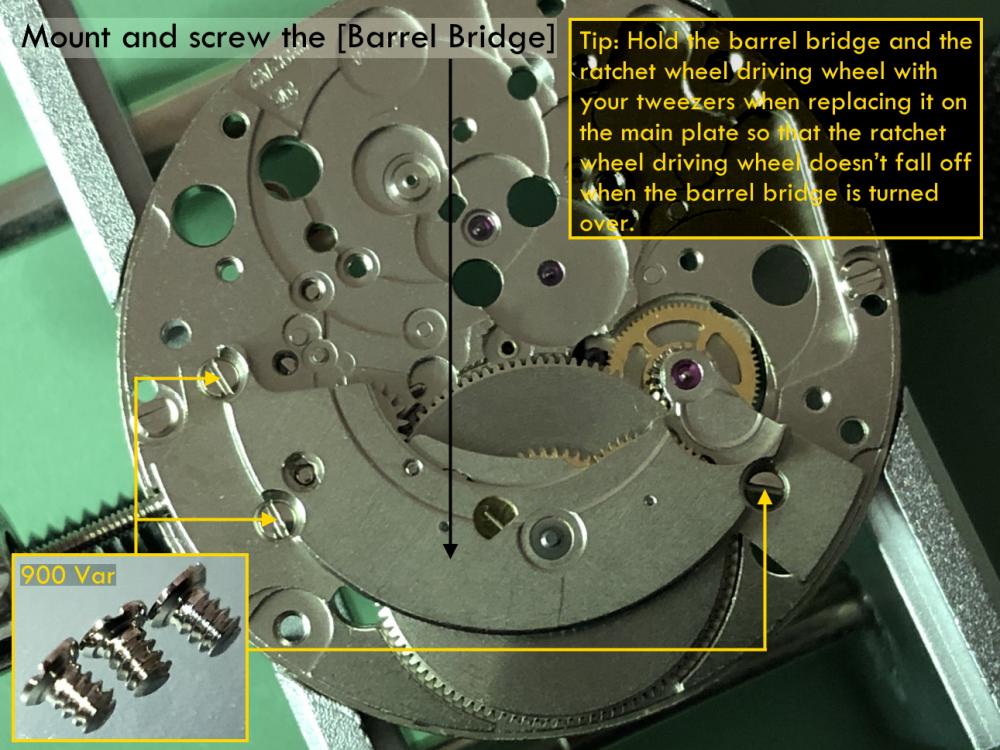
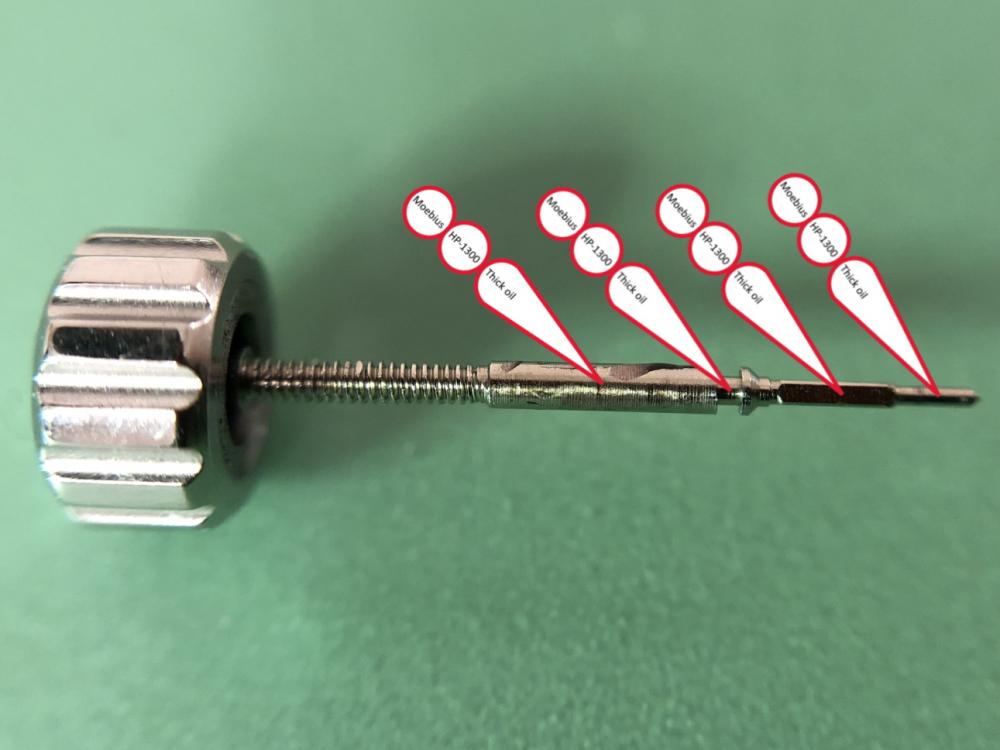
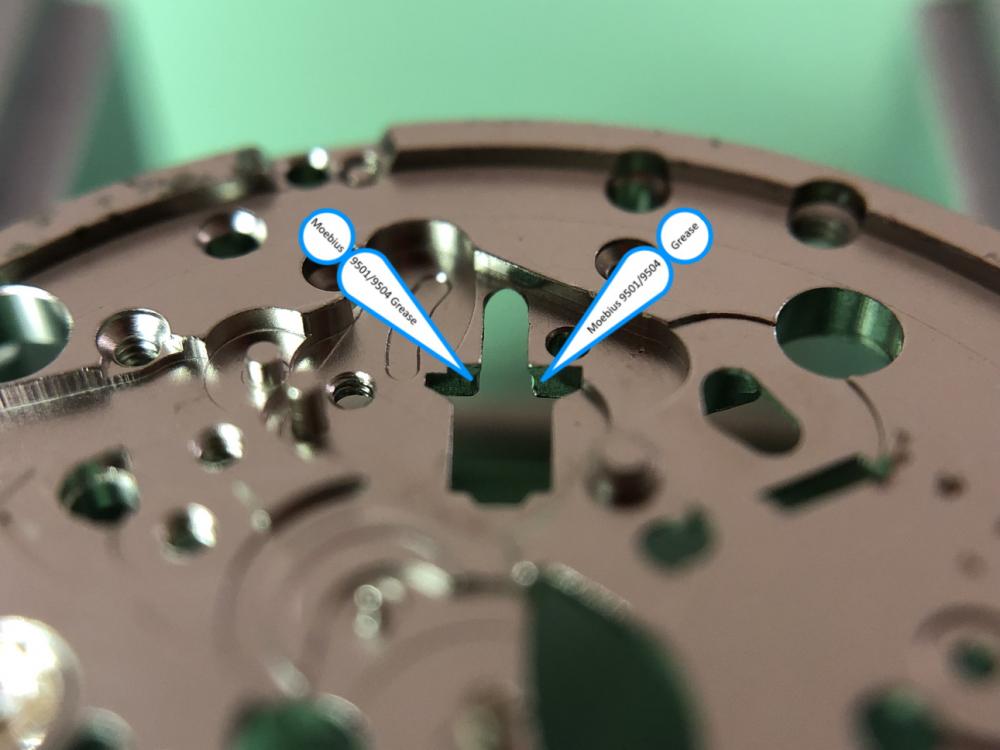
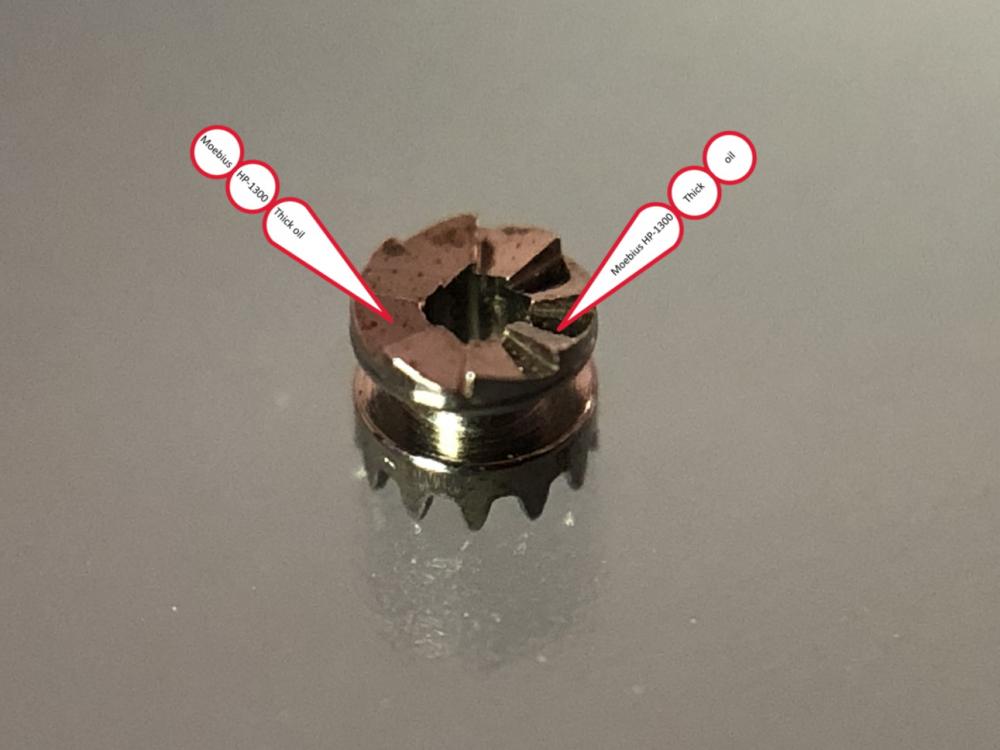
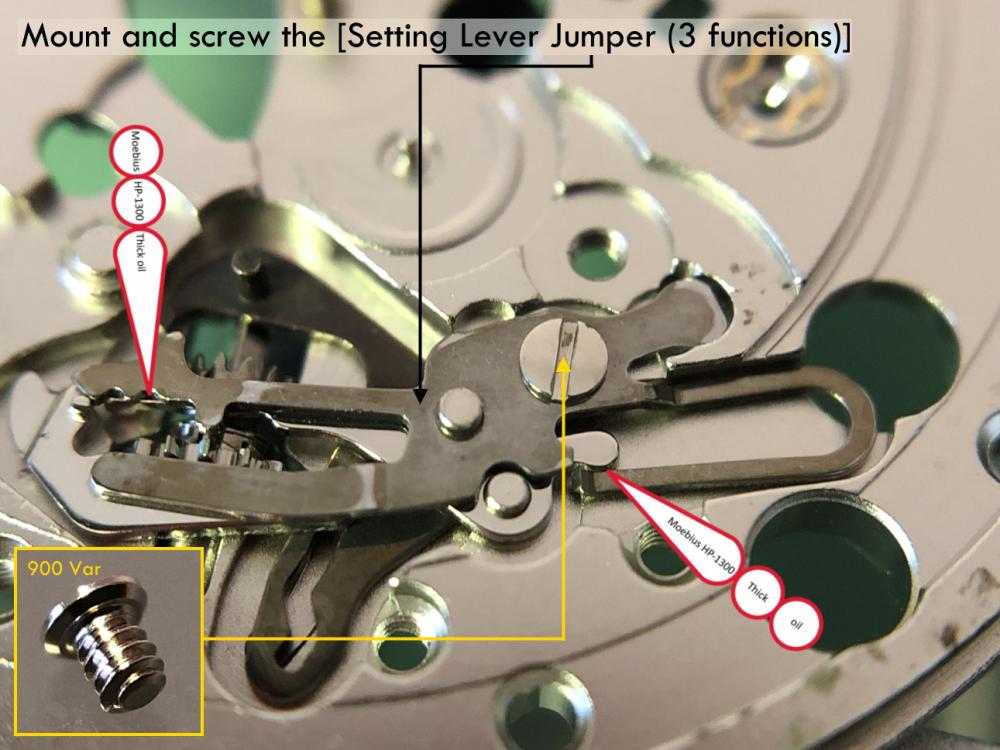
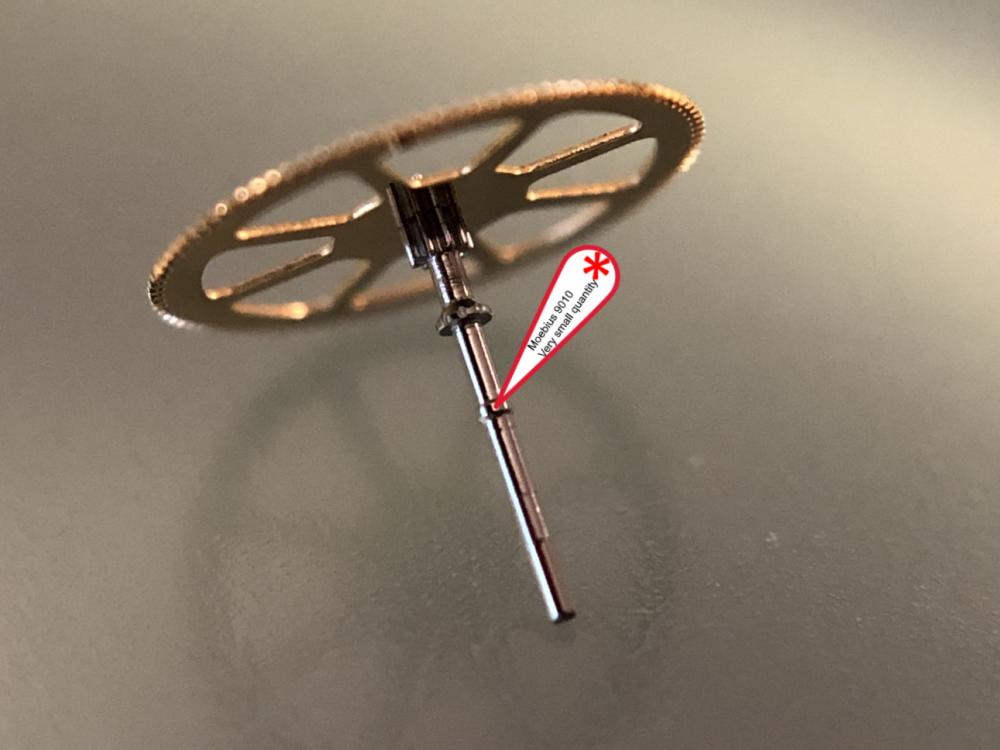
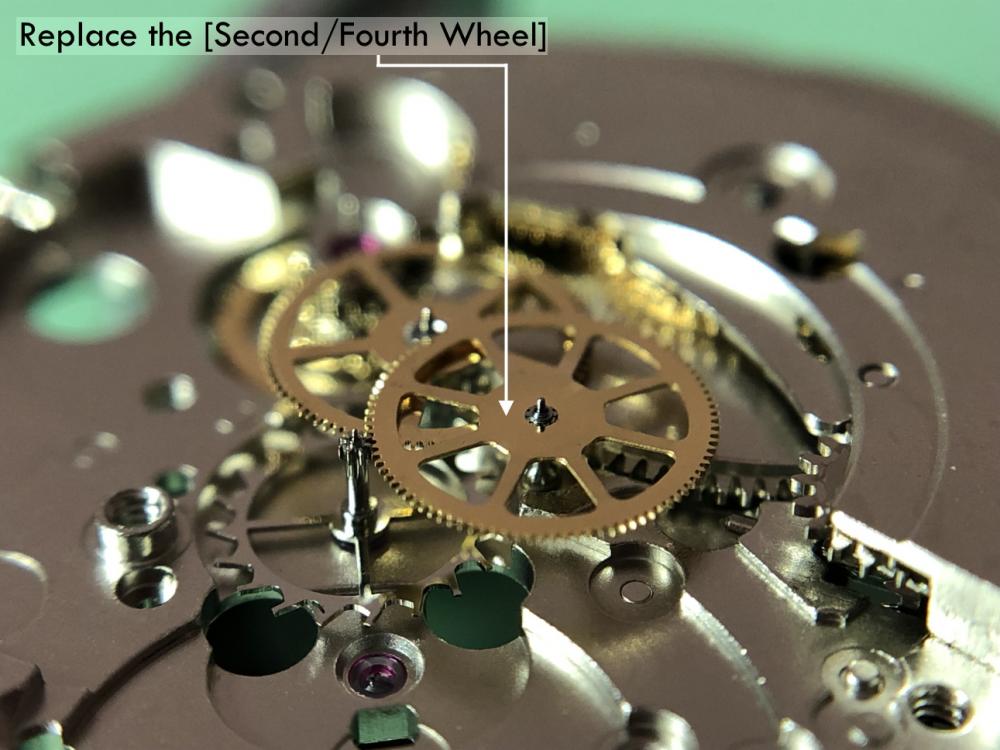
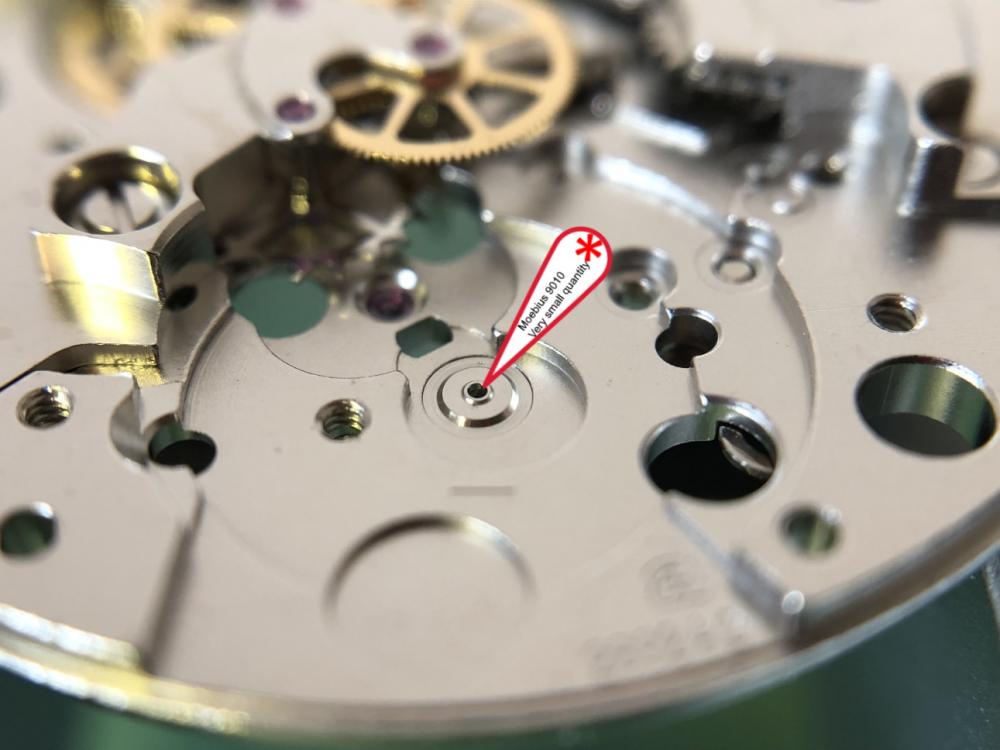
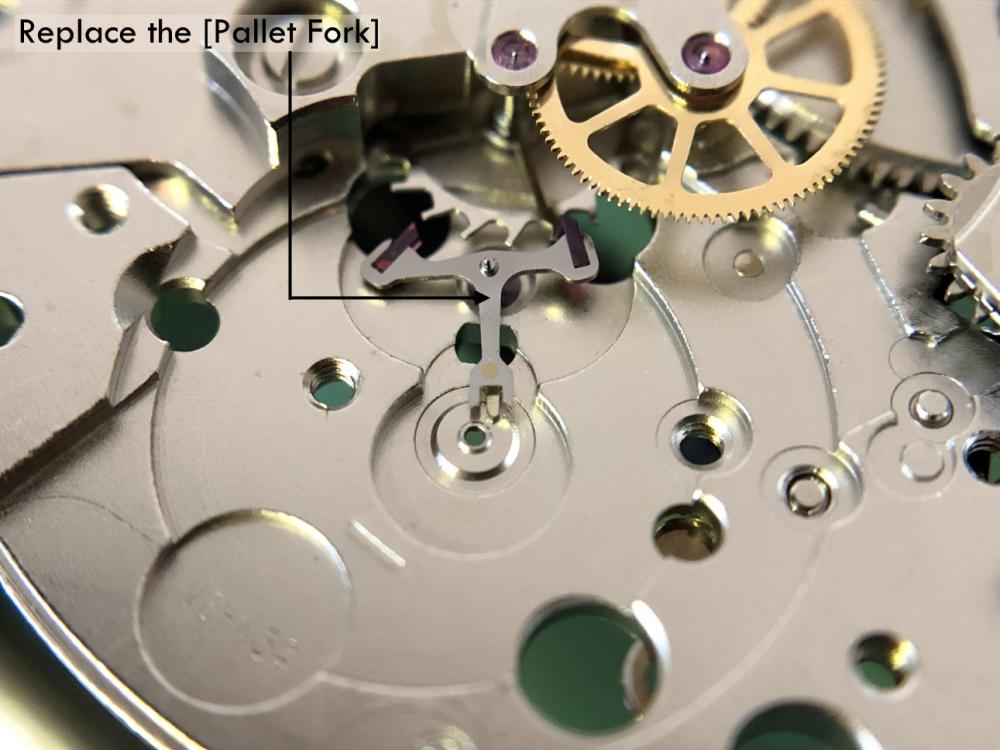
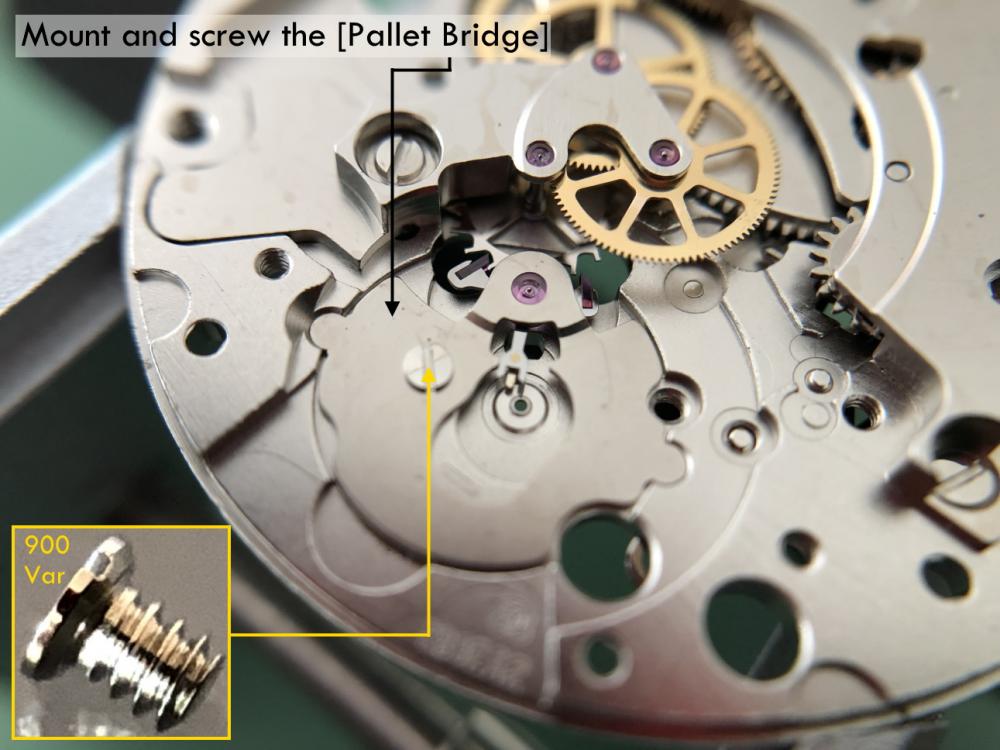
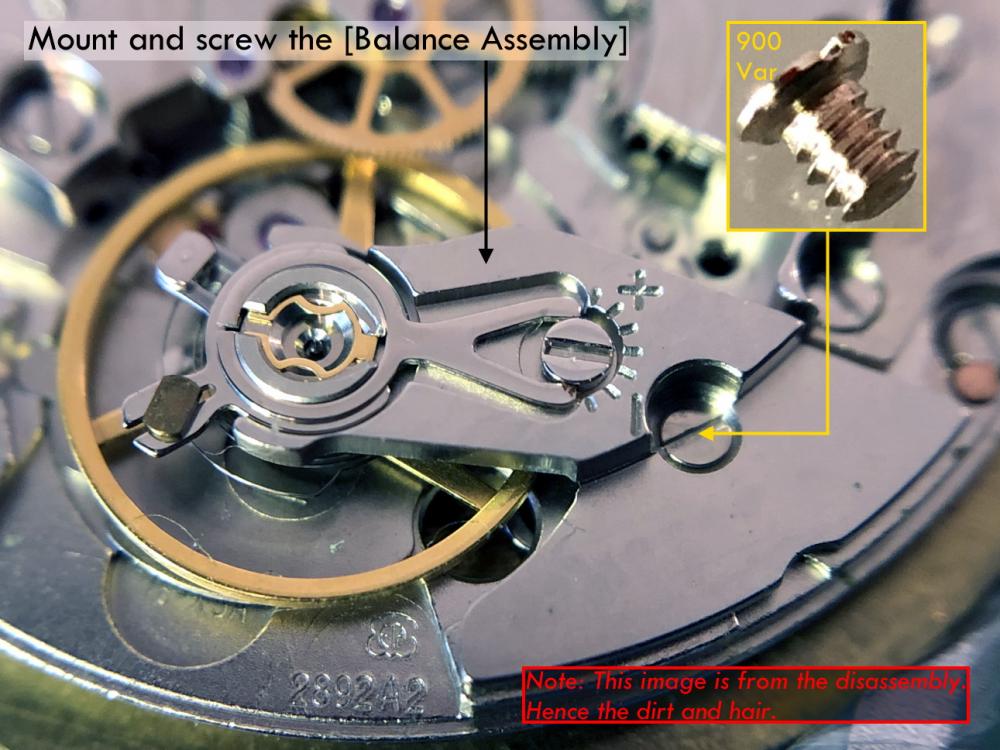
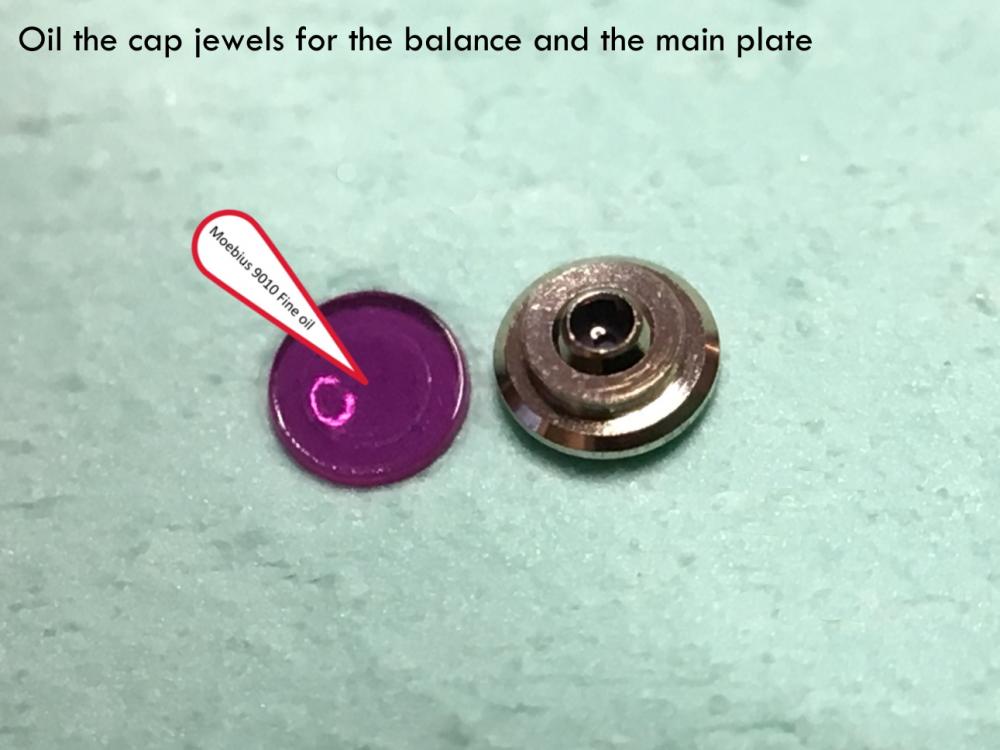
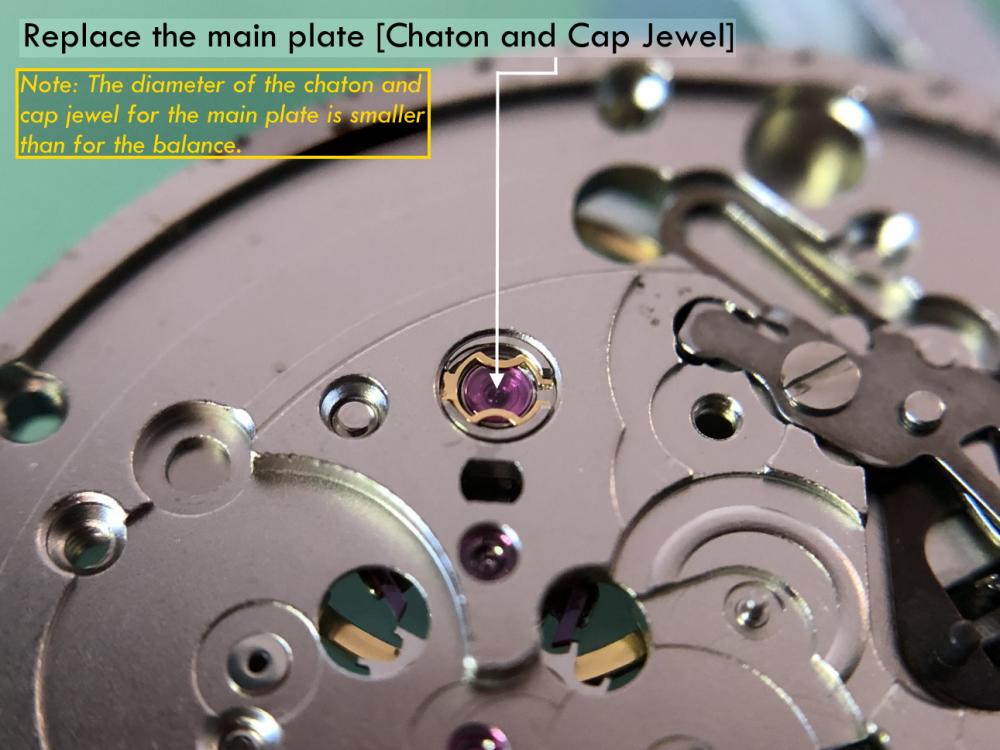
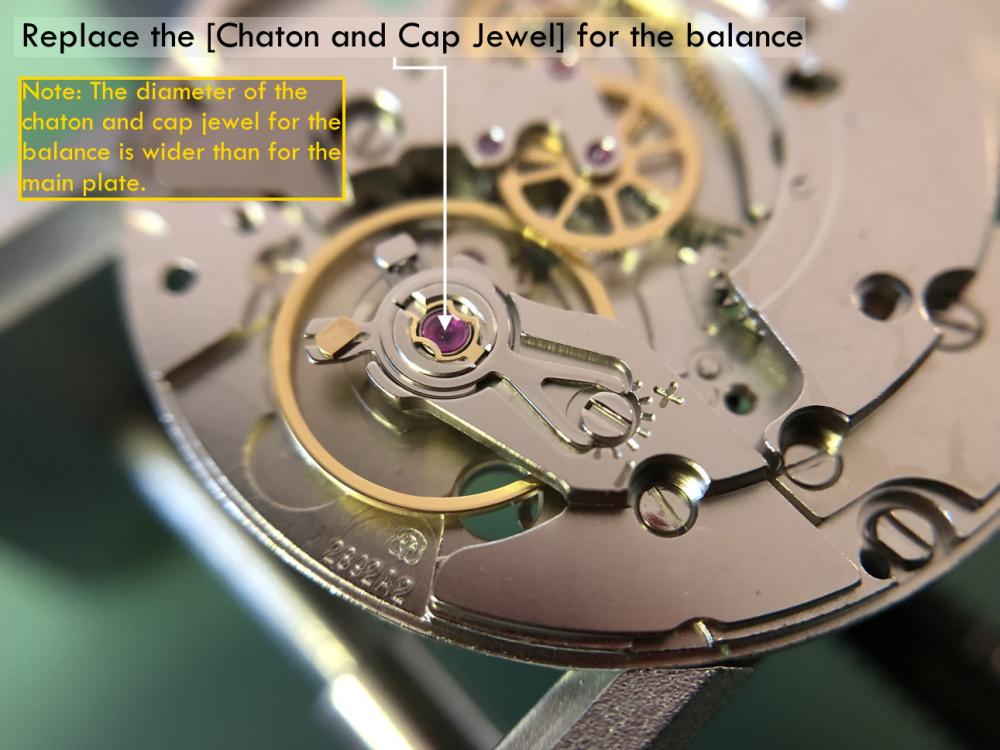
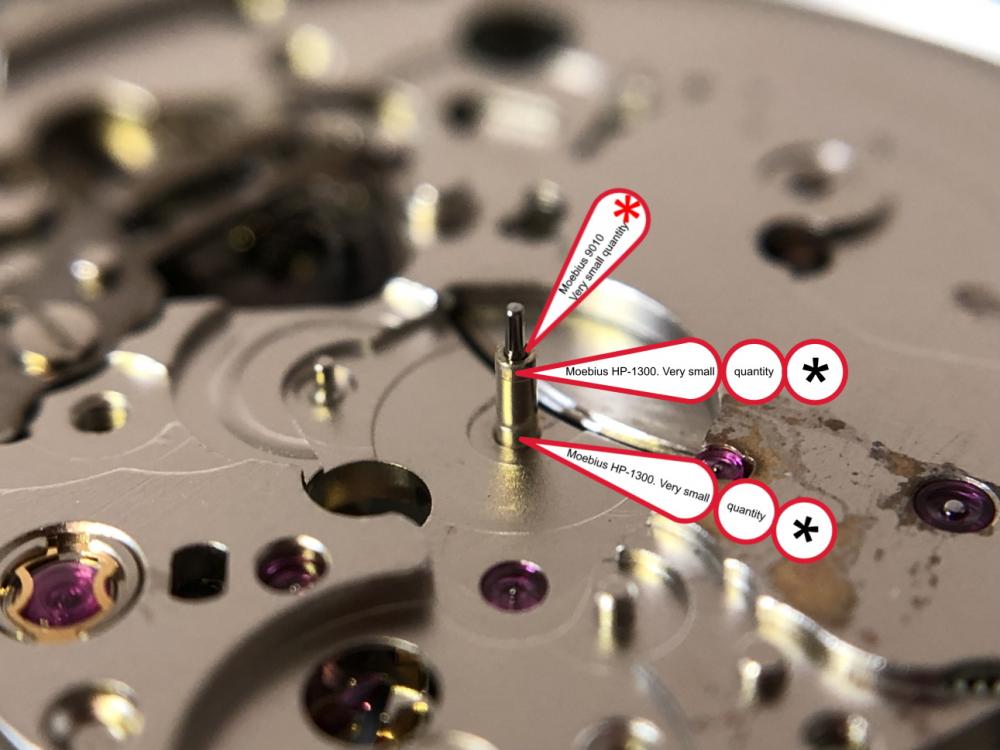
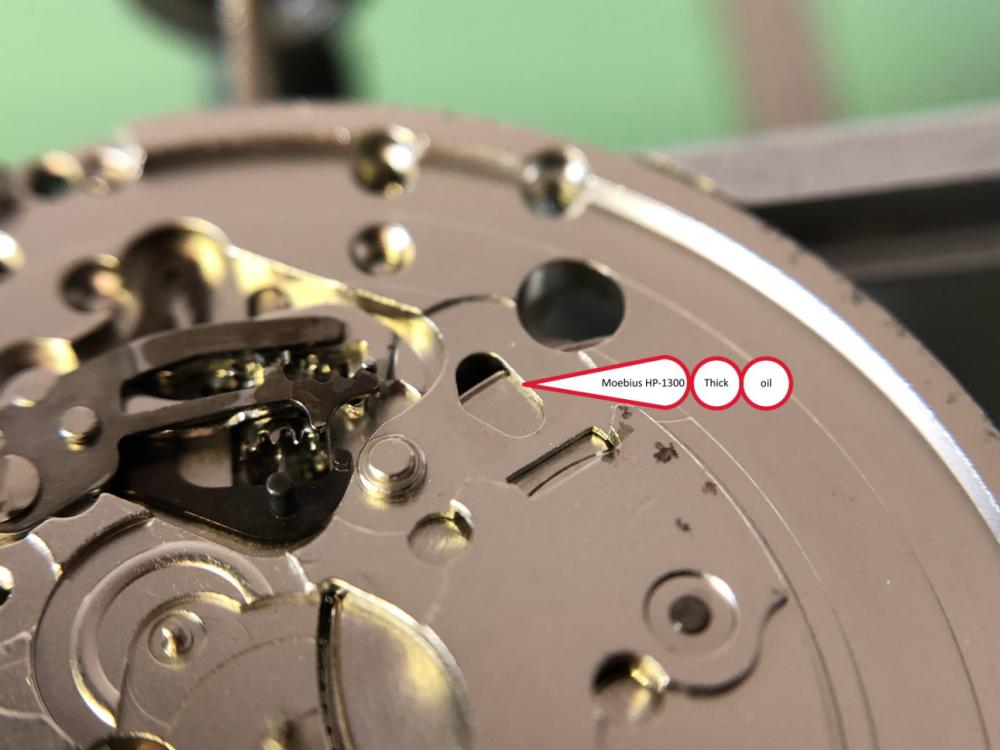
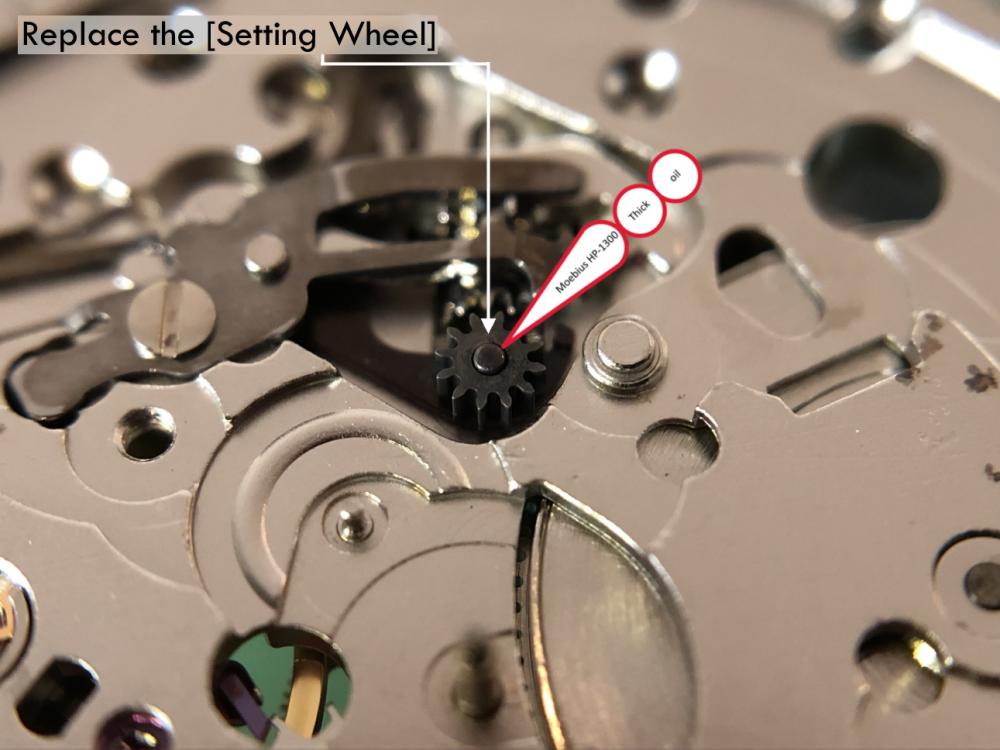
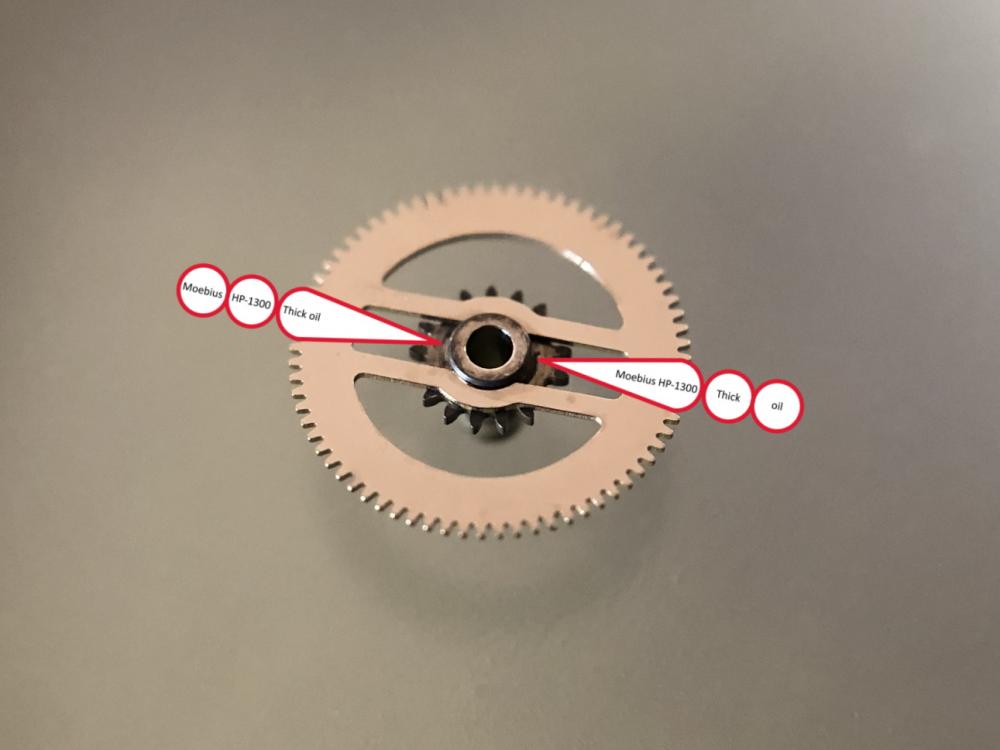
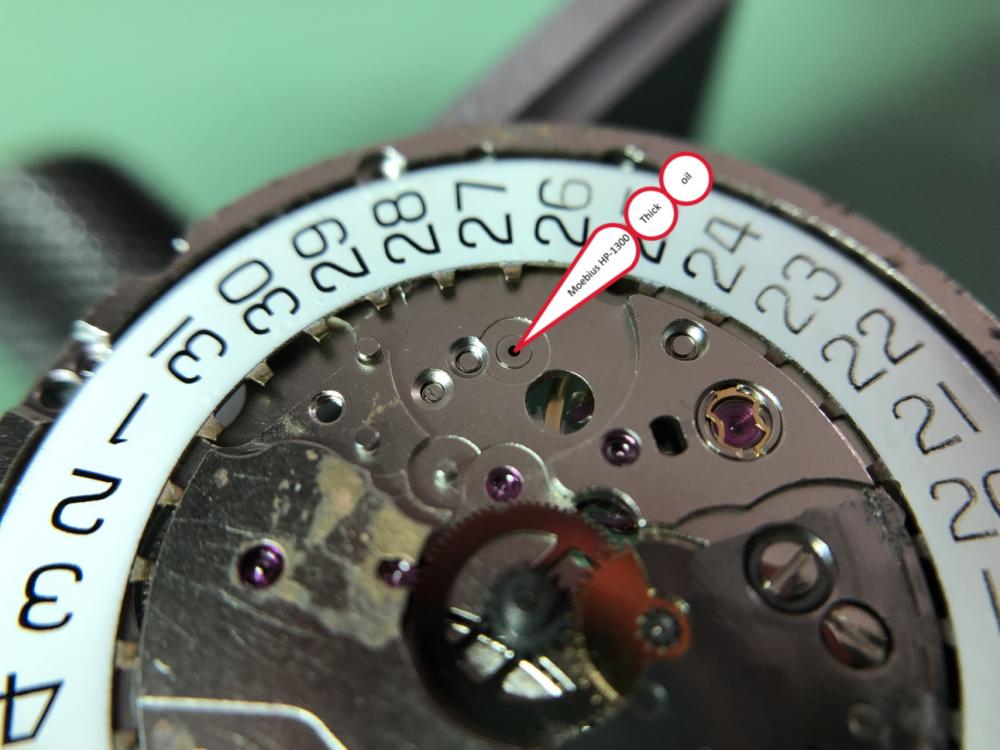
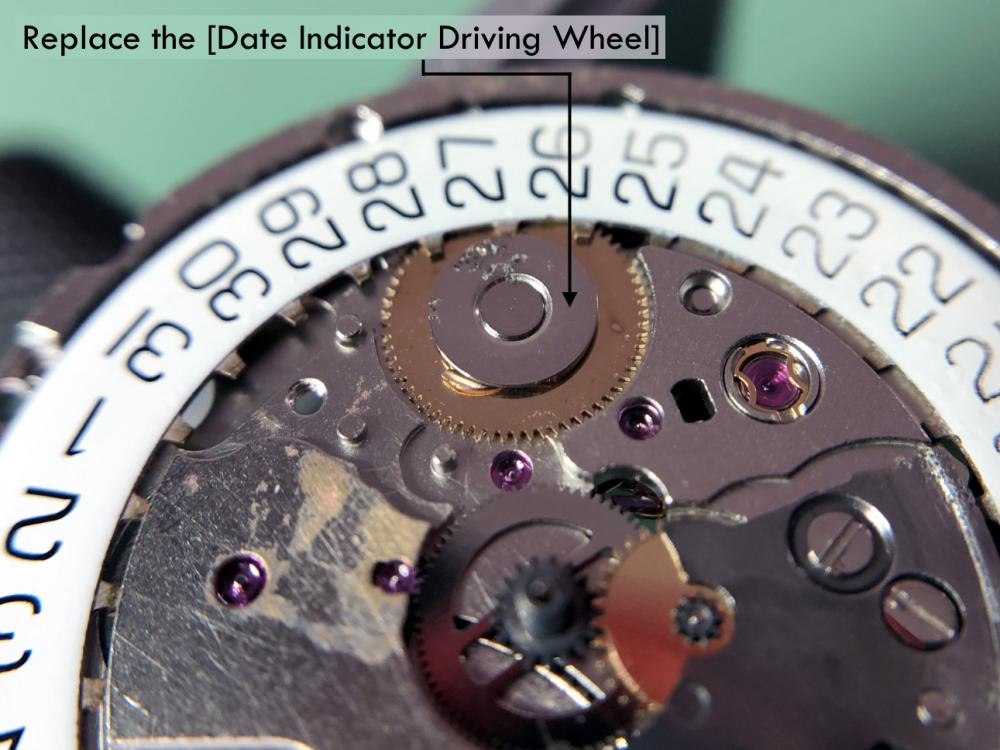
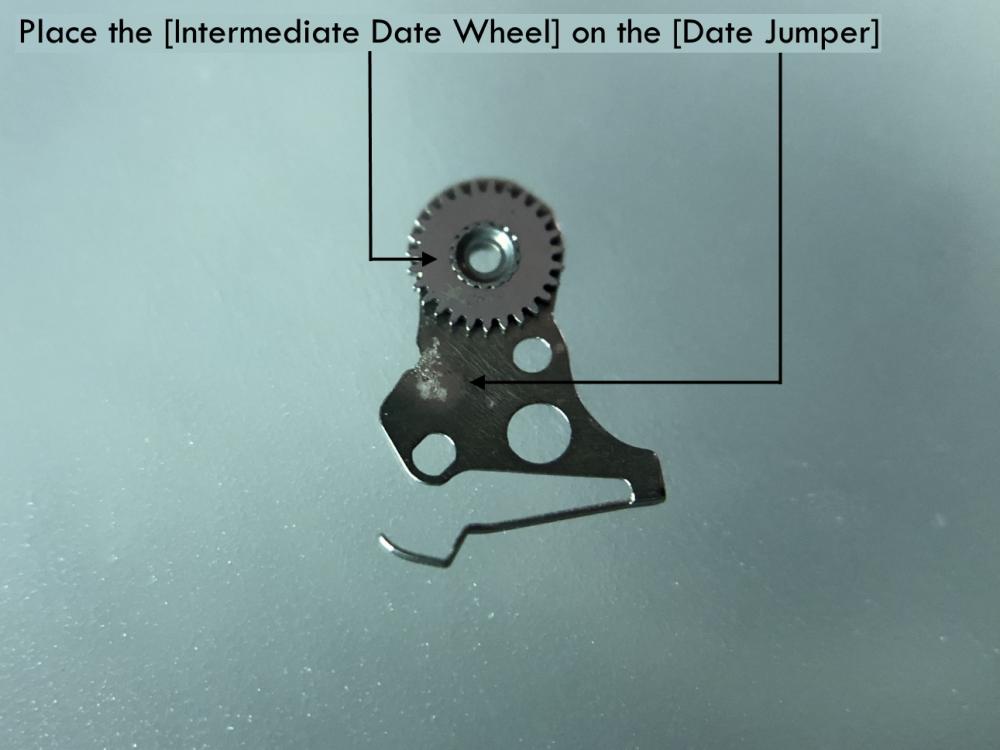
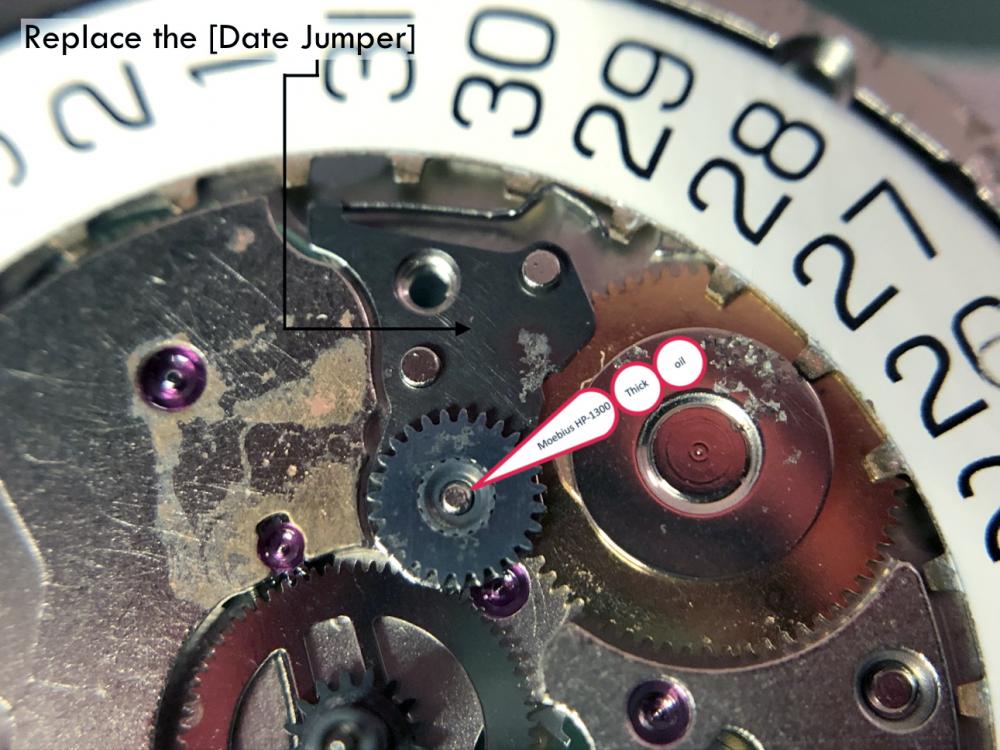
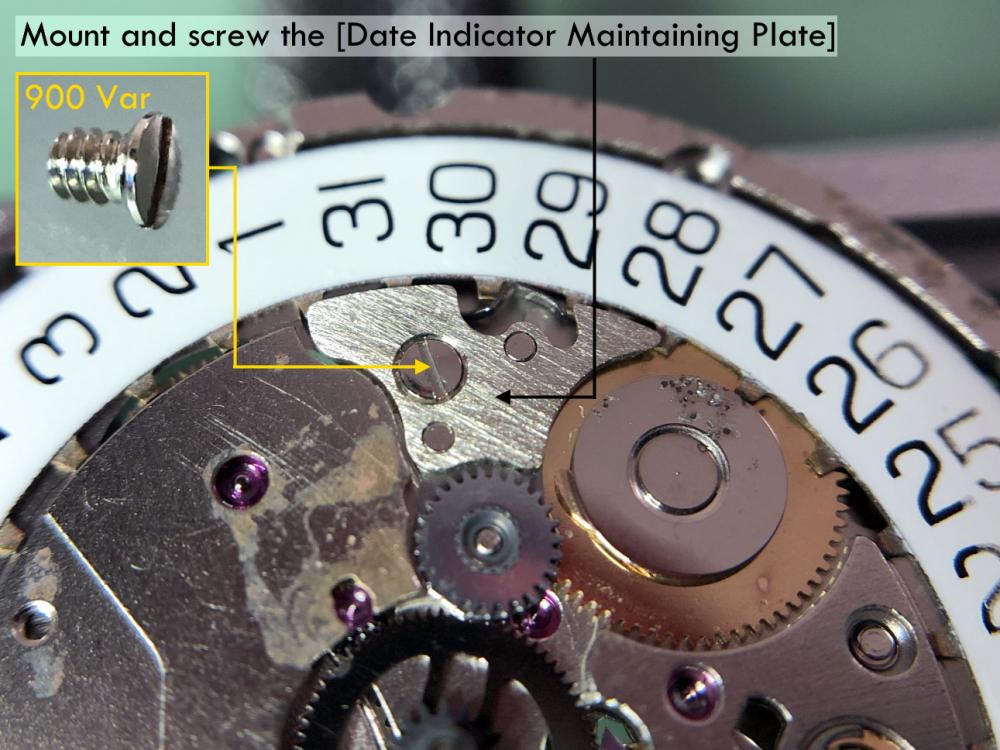
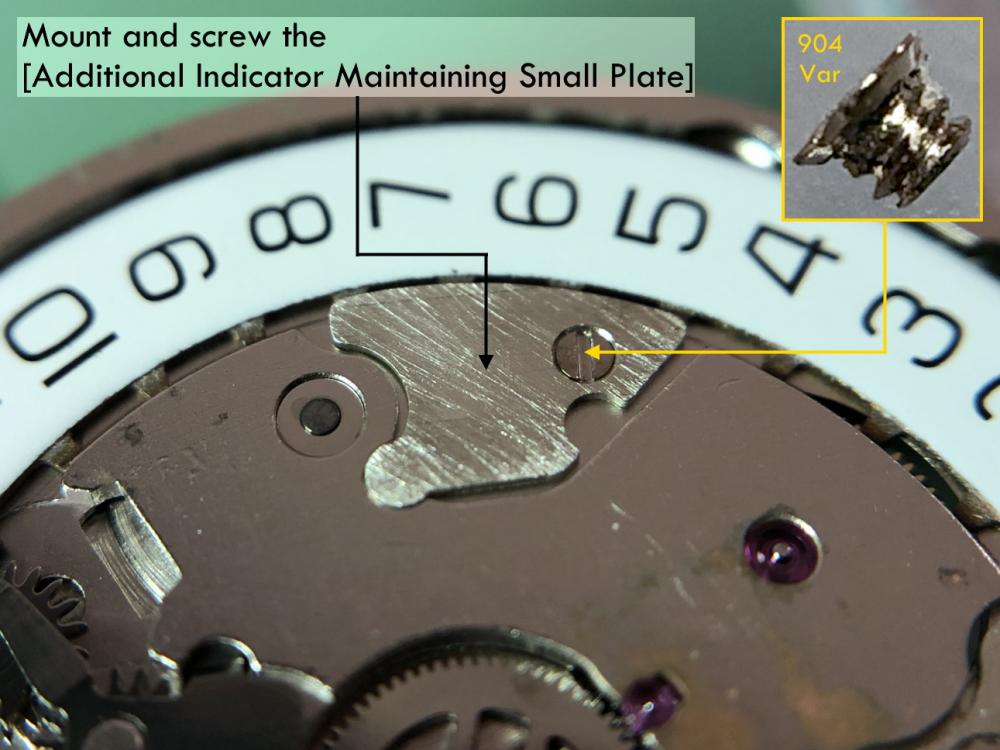
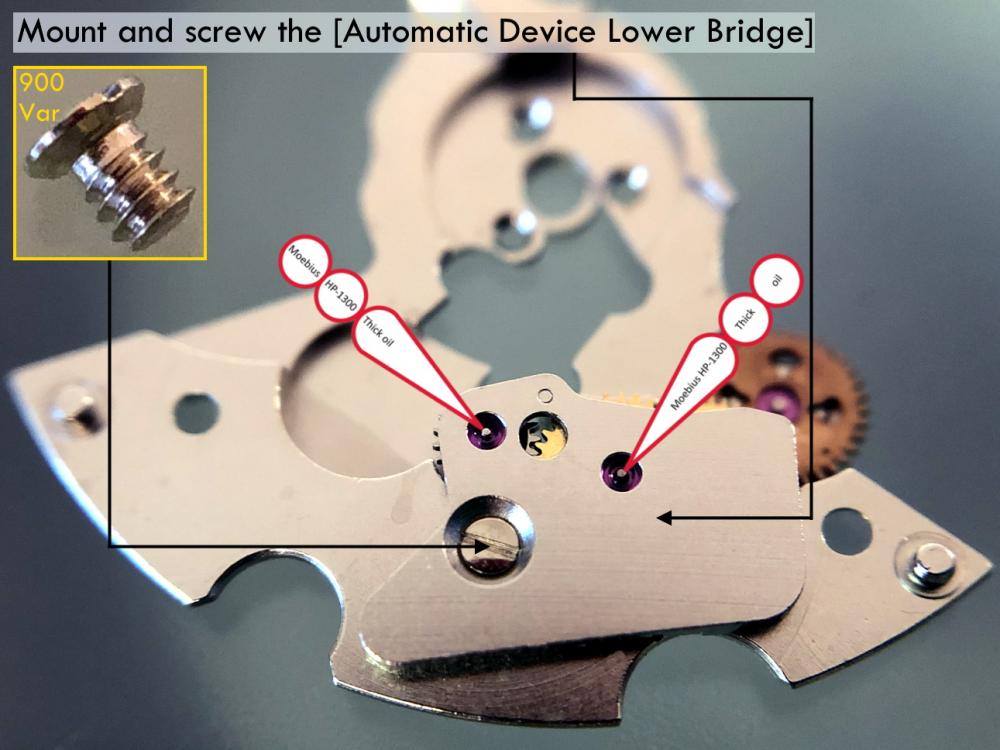
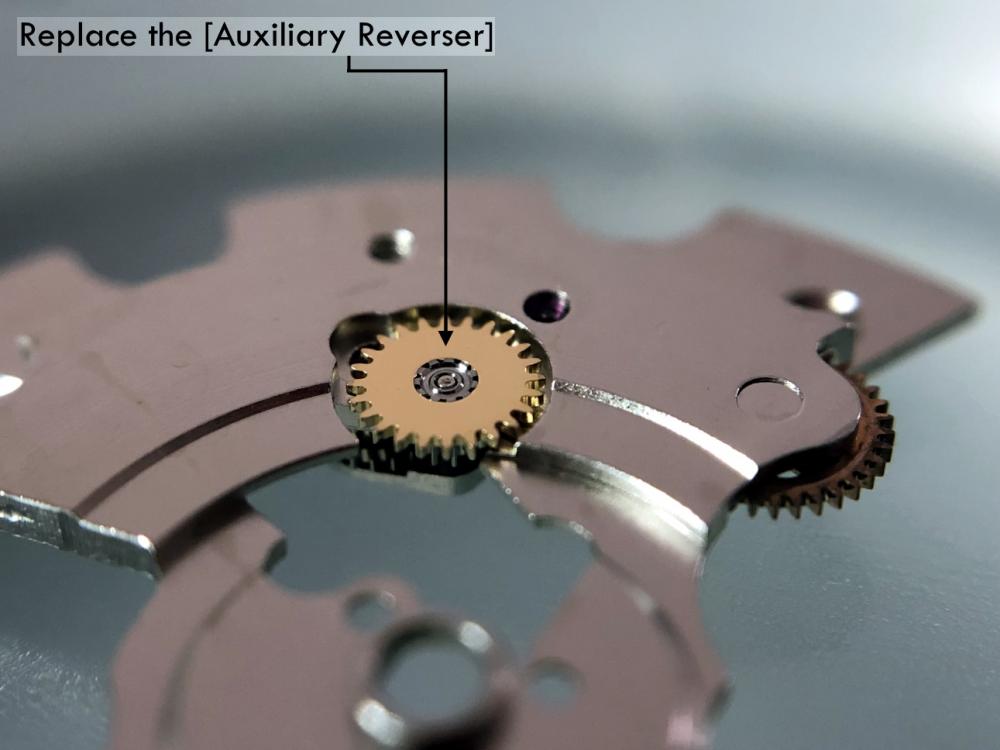
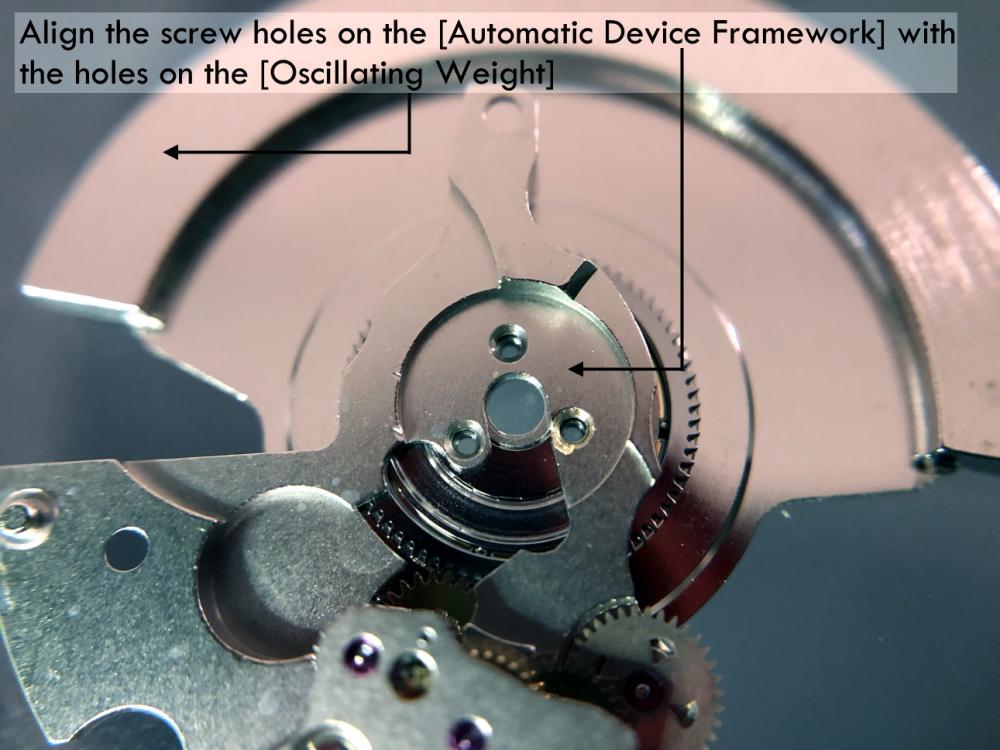
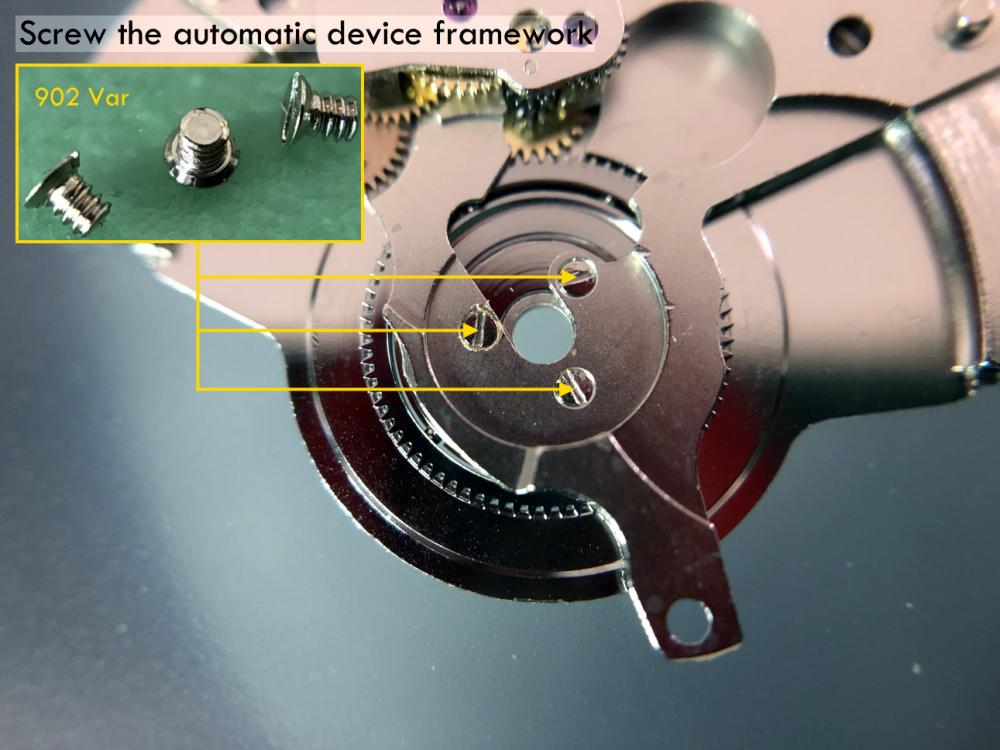
It is my impression that ETA's calibre 2892-A2 is usually found in more expensive watches and in luxury watches where oftentimes the movement has been modified. Mechanically, I don't think the 2892-A2 is superior to ETA’s classic 2824-2. Both movements have the same diameter (11 ½´´´ Ø 25.60 mm), the same frequency (28’800 A/h), and the same date complication. The decisive difference is the thickness where the 2892-A2 is one-millimetre thinner (3.6mm). That, combined with being a reliable and well-functioning movement, has made it popular for additional complications and alterations such as moon phase, power reserve display, co-axial escapement, chronograph modules from Dubois Depraz, and so on. The Swiss Sellita Calibre SW300-1 is, as far as I understand, an excellent clone of the 2892-A2. There is also a Chinese clone, the Seagull Calibre ST1812 (reviewed by @Markin the video “Chinese eta 2892-A2 Clone - Service and Review - Seagull ST1812”), and possibly others. Mark has made a playlist of videos that excellently demonstrate how to service the ETA 2892-A2 movement. The playlist is named: "Omega 2500 Co-Axial Stripdown and Service (ETA 2892-A2)" I recommend Mark’s playlist for several reasons. Among other things, he shows how to mount the barrel bridge safely and how to hold the minute train bridge with your tweezers to easily get it into place on the main plate (which I found a bit fiddly). In addition, he shows and compares the parts that are all too easy to mix up. One thing that is not shown in Mark's service video is that the Incabloc setting (chaton and cap jewel) for the balance and the main plate have different diameters. The main plate Incabloc setting diameter is smaller than that of the balance. The reason this is not shown in the video is probably that Mark removes, cleans, and lubricates the Incabloc settings one at a time after he reassembles the balance, so he wouldn’t notice. Anyway, don't mix up the two sets! Something that I appreciate about Mark's videos in general and that sets him apart from basically all other watch repairers on YouTube is that he doesn't continuously babble in his videos but mainly talks to make clarifications. I enjoy those segments of silence where I can just focus on the work being done. When I started my service, I decided to follow Mark's disassembly which worked perfectly. But for the assembly, I made up my mind to follow ETA's technical documentation to the letter. It turned out to be a mistake. In ETA's documentation, the assembly of the movement begins with the keyless works, then the train of wheels and then the barrel bridge. The crucial problem with this arrangement is that it is physically impossible to mount the barrel bridge if the train of wheels is already mounted. It is also very fiddly and difficult to baste the end of the winding stem into the winding pinion hole because the hole for the winding stem in the main plate is both open and tapered and therefore does not hold the winding stem. Mark takes a considerably more hands-on approach. He begins the assembly with the barrel bridge. He then mounts the keyless works whose constituent parts (the winding stem, the winding pinion, and the sliding pinion) are supported by the underside of the barrel bridge, making it considerably easier to get the keyless works in place. After I revised my strategy, this service walkthrough now follows Mark’s approach. It surprises me, but it seems like no watchmaker has proofread ETA's technical documentation. Alternatively, ETA follows an established practice and expects those using the documentation to understand that the assembly order in the document is not significant. I am also somewhat sceptical of ETA's recommendations regarding lubrication. Where we traditionally use grease, for example in the keyless works, ETA chooses mainly oil (HP-1300). I guess that ETA treats all parts of the movement with epilame (Fixodrop) and that oil may then be a better alternative. For better or for worse, my service walkthrough follows ETA's lubrication recommendations. As usual, I would like to remind those of you with no previous experience in watch servicing that this service walkthrough should not be seen as a tutorial on how to service a watch movement. A lot of tools, consumables, training and know-how are required to succeed. Fortunately, there are several excellent resources and watchmaking schools online. When looking through the pictures you’ll see that a few screws and plates are either marred or have pits and grooves in them. None of this is my doing but is either the result of rust (that I removed) or the doings of a less scrupulous repairer than myself. Finally, someone may ask, “Why to bother to do a service walkthrough with pictures when there is such an excellent video?" The main answer to the question is that I find it interesting and fun, and I see it as a complement to Mark's service video. Using this walkthrough, you can quickly scroll through the pictures to read what the different parts are called and where and in what order they should go, what the screws to be used look like, and to read ETA's lubrication recommendations. So, I hope you’ll find this ETA 2892-A2 service walkthrough useful, now or in the future. *** ETA Calibre 2892-A2 Disassembly *** ' *** ETA Calibre 2892-A2 Assembly ***


 1 point
 -
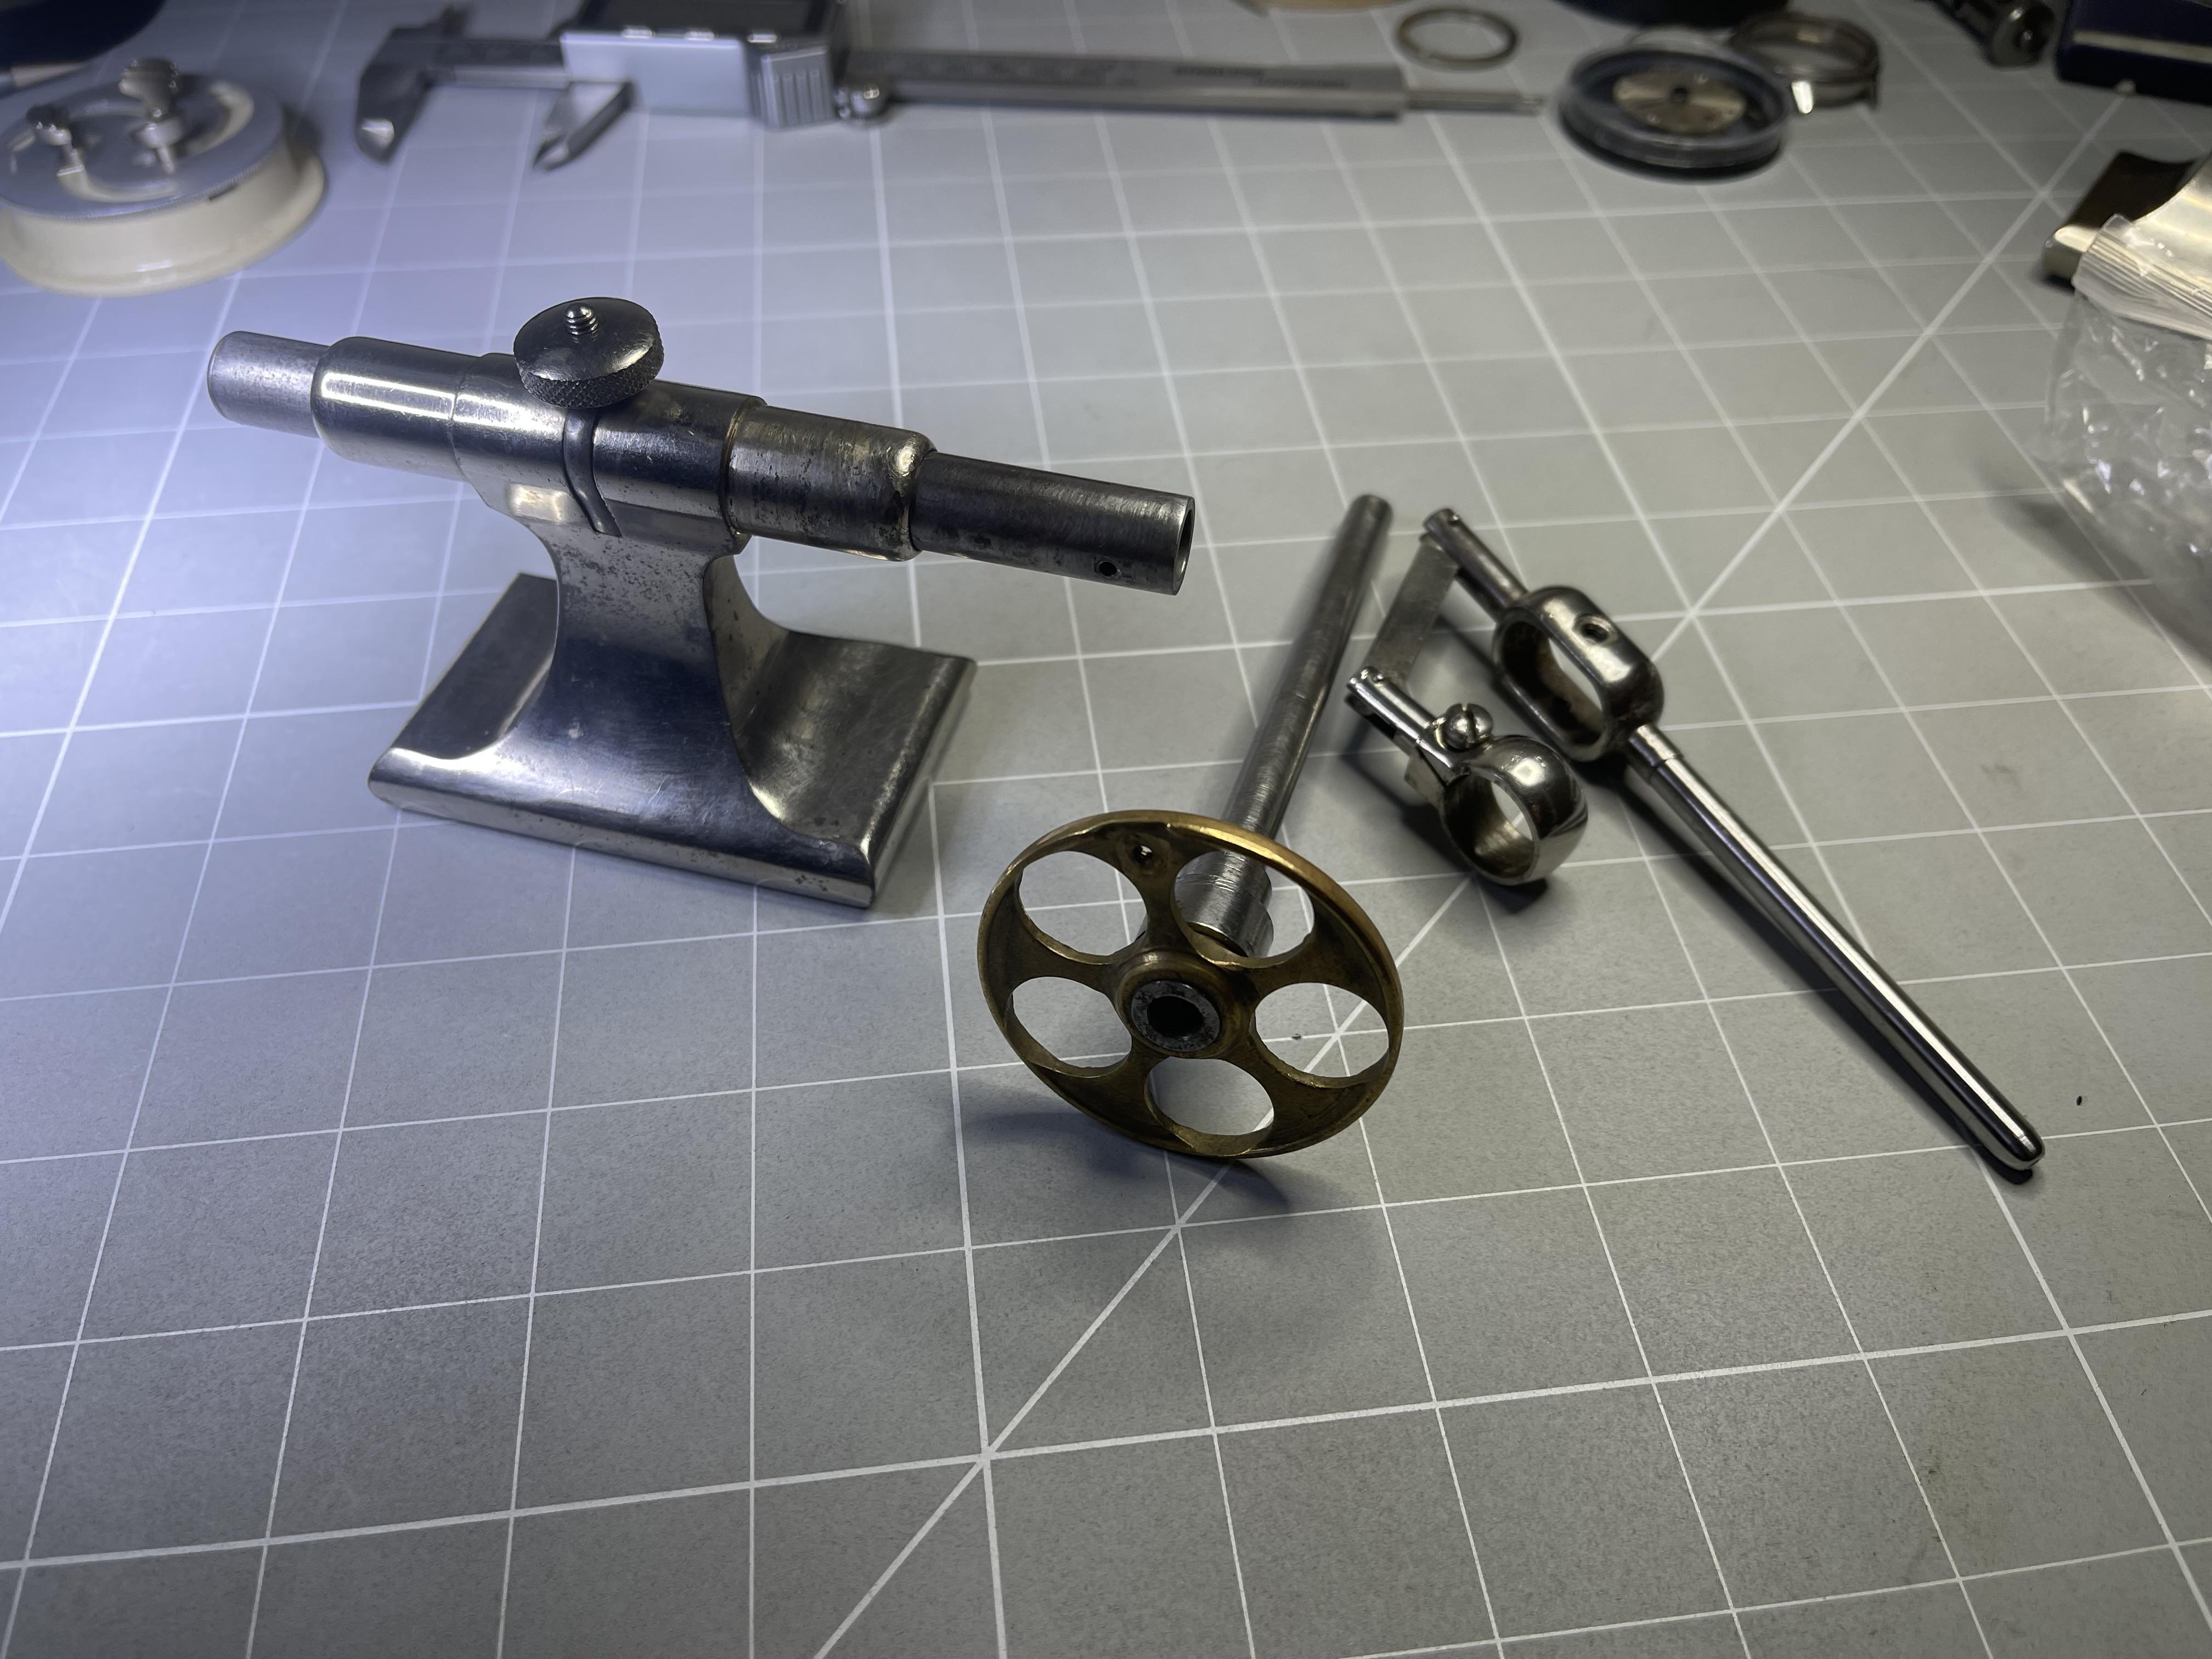
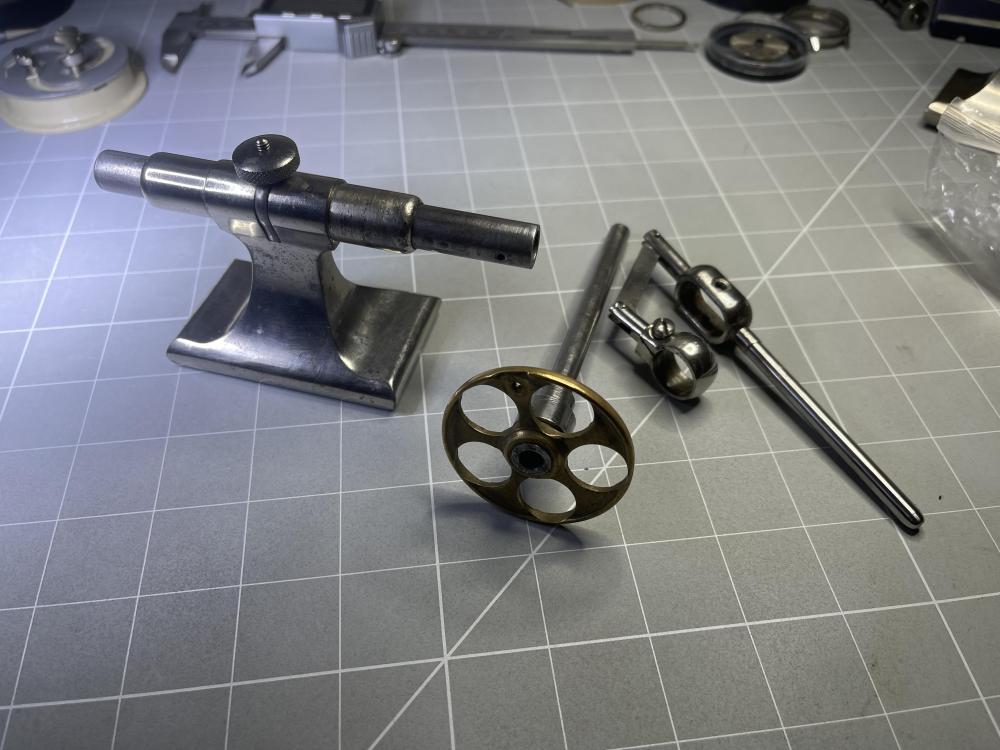
I don't know why I was limited to a 3DPrinting forum, but oh well. I managed to grab a much coveted Meyer's No.58 Movement holder off ebay, but it only came with the second to smallest jaw inserts. Not to be detered I reverse engineered how to machine the jaw inserts. Here is the Flickr Album. https://flic.kr/s/aHBqjAGuFJ I made a small insert set as a test and then made a set for size 16s pocket watches. I'll make a few more to fill out the set. I made these from Aluminum, but might try glass-filled Delrin as an experiment The drawing could easily be used to design the jaw inserts for 3D printing in Nylon or a hard Urethane1 point
-
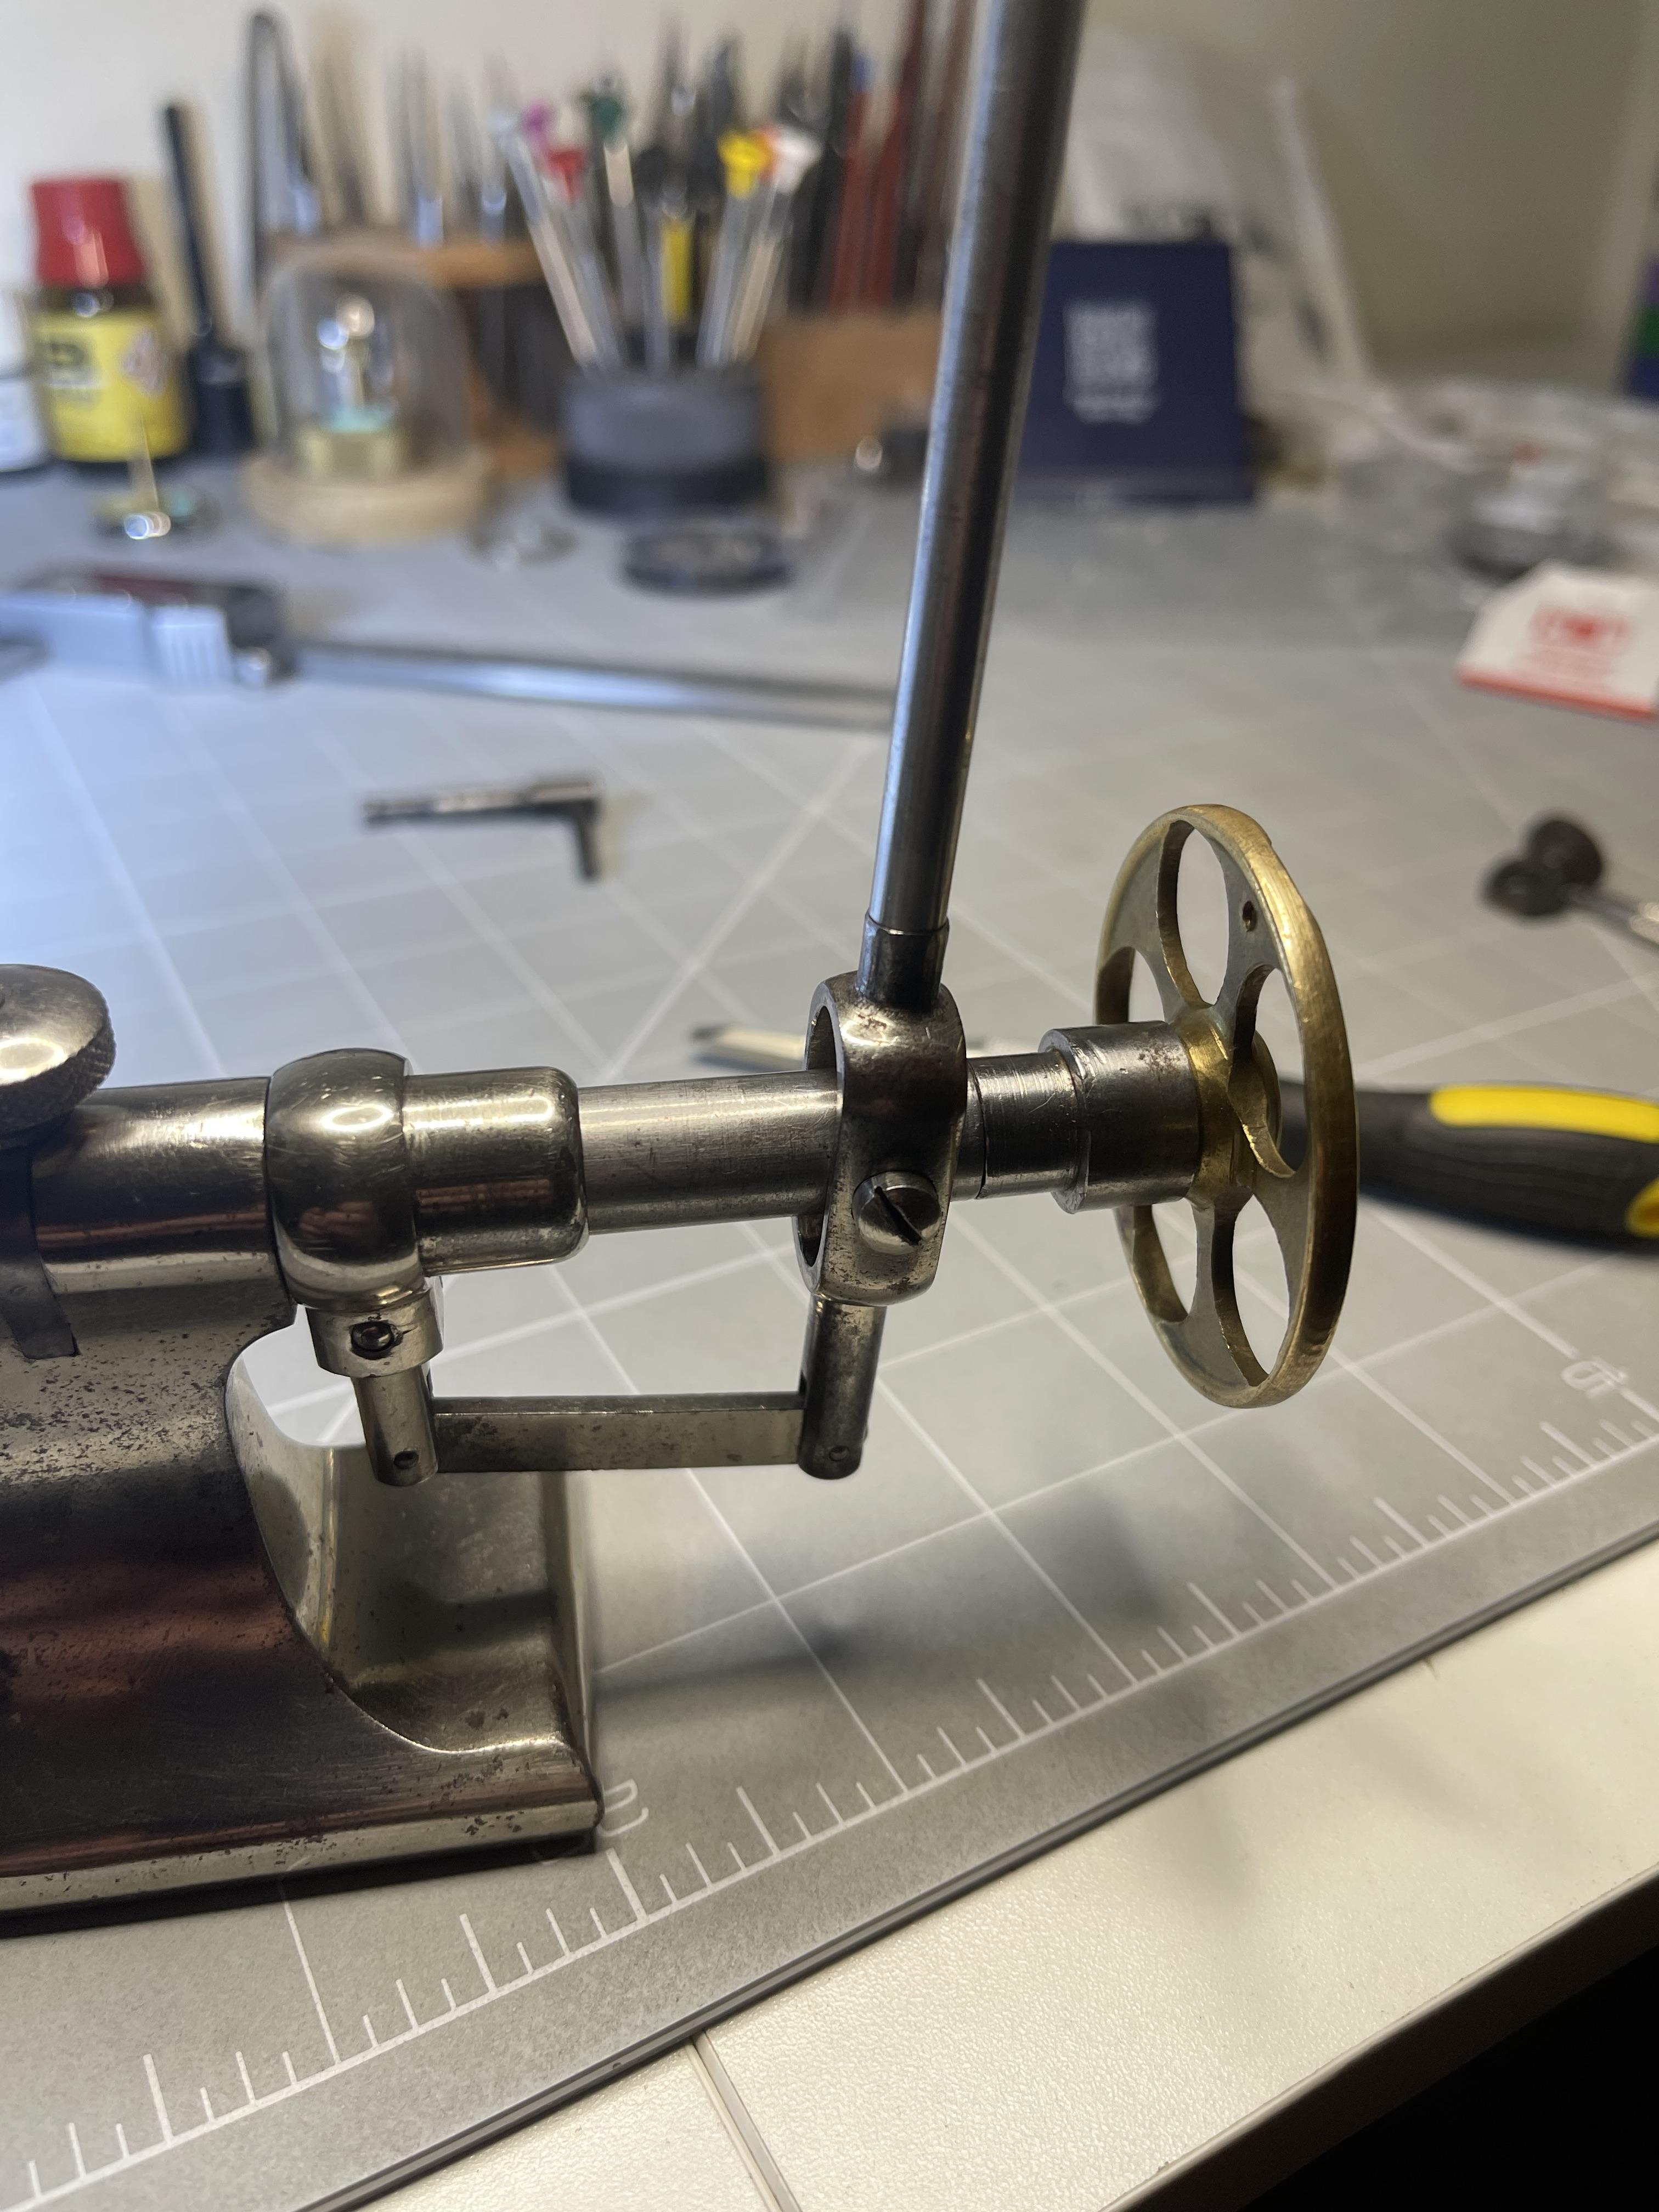
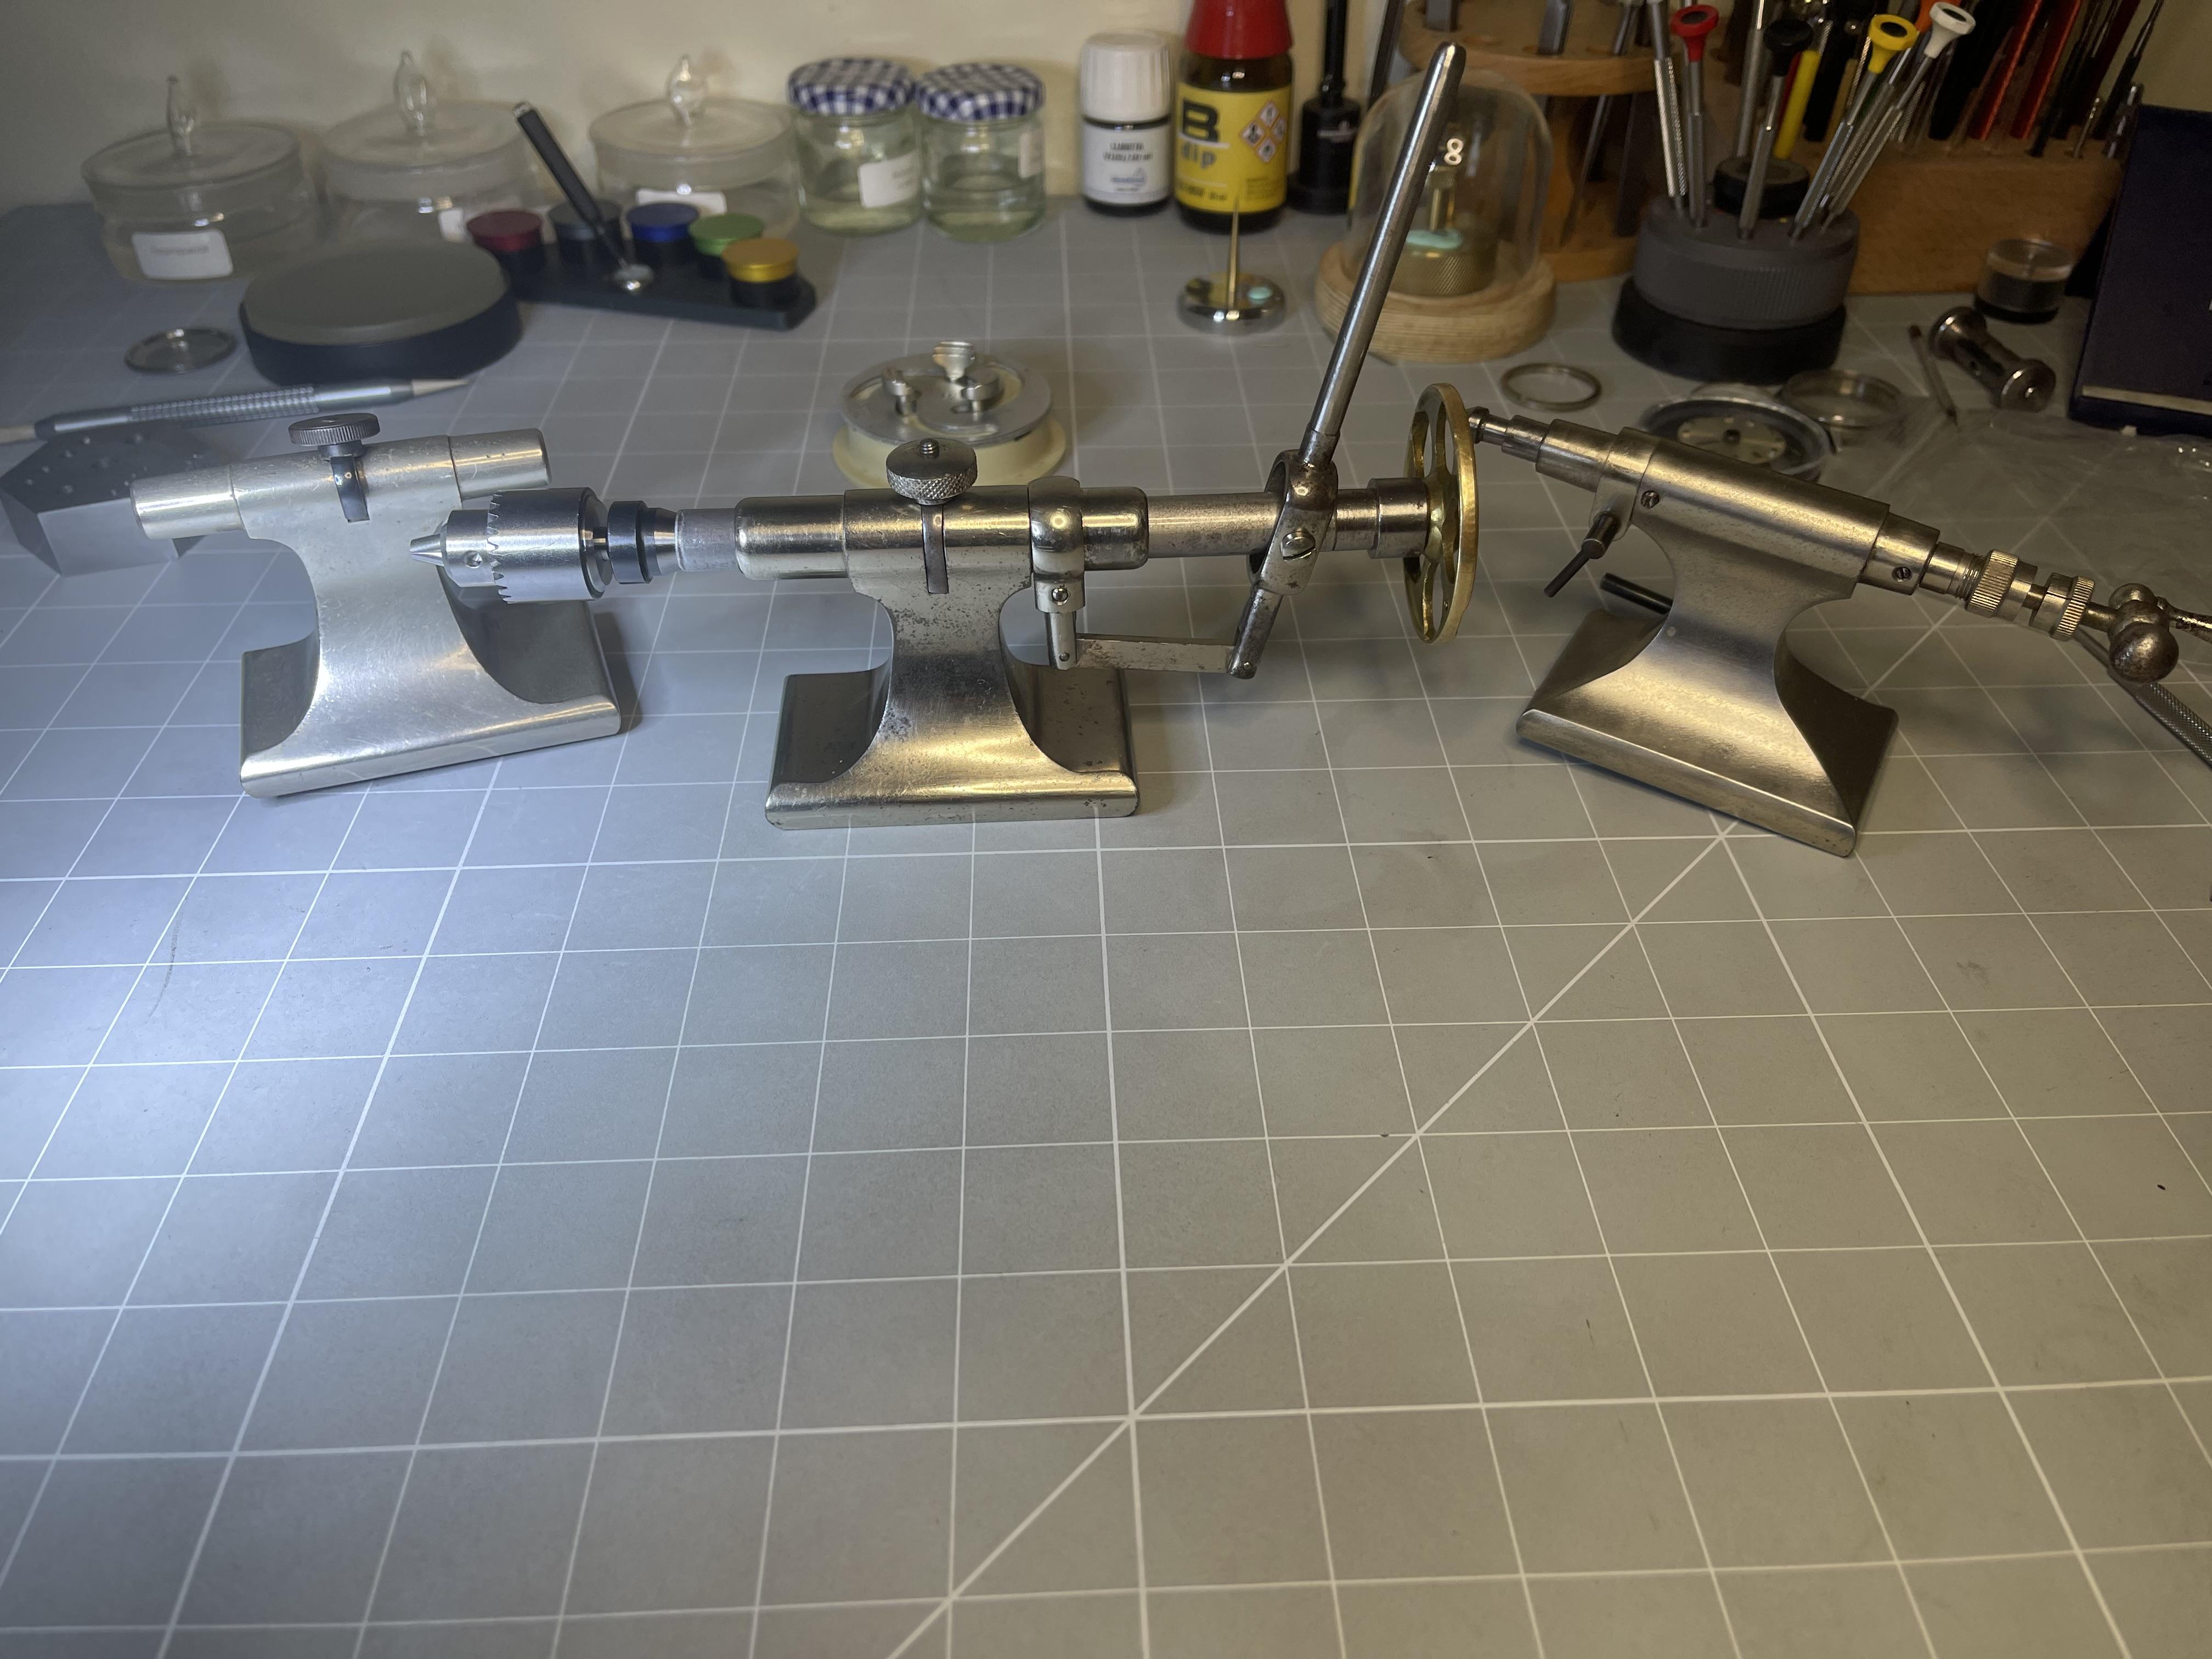
As discussed previously on this forum, I was having problem sourcing parts for my tailstock for drilling. I got lots of help and advice, thanks for that. Having read the feedback and looking around, I finally found a tailstock with a slide that takes 8mm collets. It was a bit steep but, I received it today and, after a strip-down and service, it's working very nicely. I also got myself another "standard" tailstock for £40 which I was going to use for parts but I don't need them so I now have three! Incidentally, I know that I can use the collets but I found a 8mm collet with a JT0 taper and got myself a JT0 chuck so I am very much ready to go! Thanks again for the advice and help.
 1 point
 -
The part you are pointing to is the disconnector. It's purpose is to stop the alarm from working unless one end slips through a space in the hour wheel/unlocking wheel at a certain point. I would try removing the hour wheel and unlocking wheel and make sure that the disconnector has proper play first. Without the unlocking wheel the alarm should work right away when wound as the disconnector will be free.1 point
-
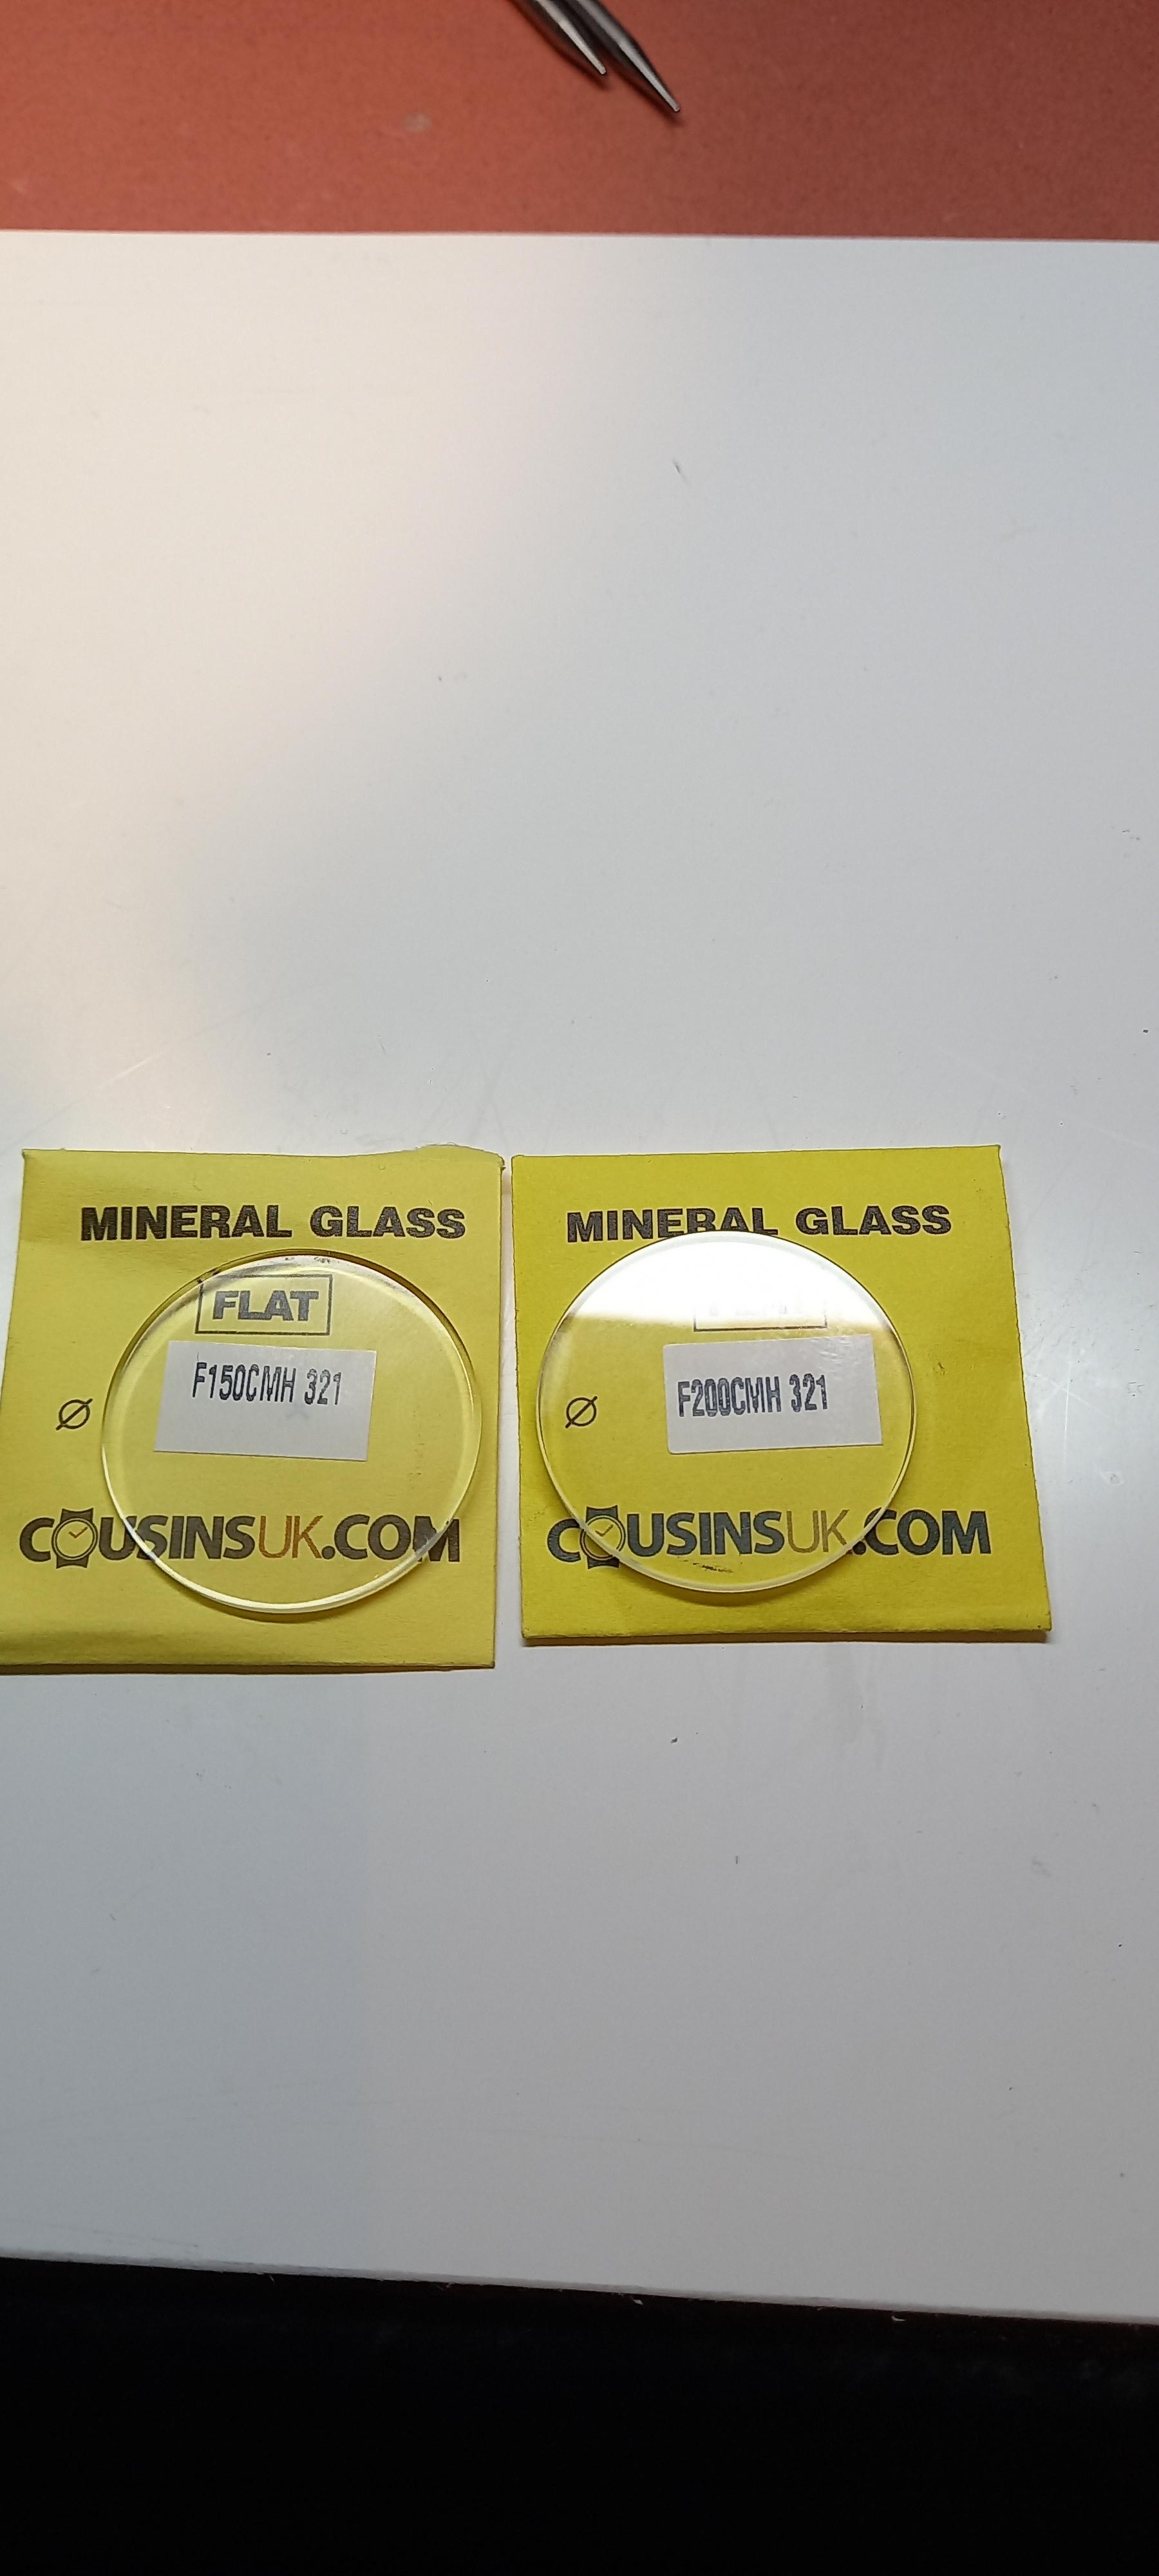
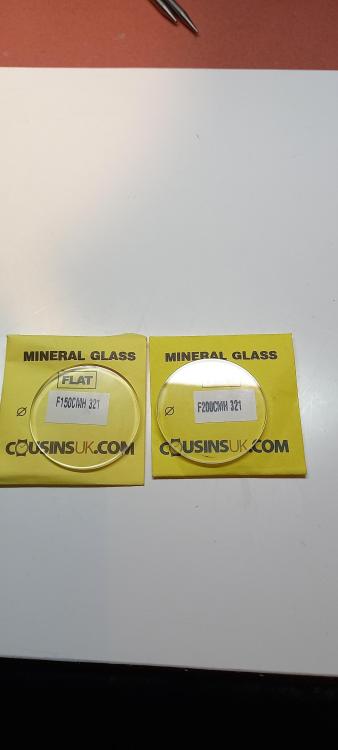
After over an hour of sanding disks and not really getting anywhere I thought to myself " what the hell am I doing " a new glass from cousins is a couple of quid . The one on the left is my effort, looks clear but is covered in micro scratches with the highest grit of wet and dry i had, anything less than diamond compound isn't getting them out.
 1 point
 -
Depending upon when it was manufactured it could be Thury, Löwenherz, BA, Metric or even made with a thread plate as oldhippy said best re tap and make a new screw with the head to match any other screws , my suggestion would be either BA or Metric and as both threads are very similar with BA being based upon the metric measurement no one would know apart from you. just my suggestion Dell1 point
-
Thats how I've always learnt right from the start. Is there no time limit involved in completing the BHI course ?1 point
-
Hi, your machine could be different to mine so work out how far the basket needs to be in the jar and how far down the motor is and measure the distance, that is your length, make sure you allow for the dowel end that goes into the lid of the basket.1 point
-
I just wanted to circle back to this, as my advice was for the untreated steel that you have ordered. In order to reharden your current graver, you will need to anneal it first. This is a process that does take some time, but with the small pieces we are working with, its not bad, maybe a 20 minuet process. Let me know if you want help annealing it, but I think you should still be able to cut with the factory treatment.1 point
-
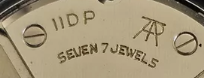
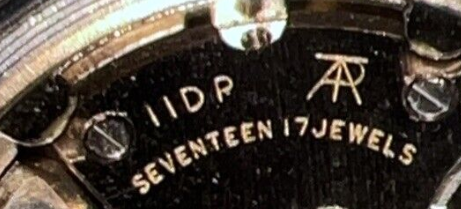
Spell check! My apologies. Advice not Advise. There not Their. Sigh... First, hunting down pinged parts. I had way too much junk on the table. Good lesson when I get home. I have read the advice, clean, sterile work area. Nothing but what you need on the table. Neither time had they gone far but I looked afar. I thought it went to the right but found it on the left. And yes, I was struggling with the ST36 click spring as it looks symmetrical. It would be hard to visually note it was asymmetrical. All I got right was its orientation, not which way went up. Good lesson on what to pay closer attention too. As for my theory on 11DP. Seems I am wrong, found this last night. 7J with same logo. And the logic that later 11DP had fewer jewels also wrong. The N2 had 7, N3 has 17. To add more confusion, the 17J N3 has T on dial while the 7J N2 has JAPAN on dial. eBay offerings, if you can't see the movement, it is a crap shoot it would seem.
 1 point
 -
I might try this. It is seriously stuck and i have tried some percussive persuasion and I was starting to mar the tailstock body. I full plan on making a new spindle for it, as this one is marred up from hammering. I dont want to have to buy an additional tailstock1 point
-
I take the ideas and 3D print a box to put everything together. The tricky part is the probe with spring loaded tip and articulated arm. It turns out to be quite versatile. The unit is powered by three 18650 battery to get at least 10 volts for the LED volt meter. There are still some minor things to optimize, but I am happy with the initial result.

 1 point
 -
I have so much music on my P C some I have never played I like collecting from little known bands as well as the normal rock. Two bands I have been listening to these past few weeks Widespread Panic I think I have nearly everything by them. Mostly Autumn I have all their stuff. I can't stand this modern pop crap such as Taylor Swift type rubbish and that rap crap.1 point
-
Among many other less desirable names Richard, water off a duck's back mate1 point
-
Modern ashion type casebacks can be difficult to open, the seams can be extremely tight. I use one if not two razor blades to work around the seam, no or very little prying though even when tempted, the tool's edge will dig into the back or the case itself. Better to use a thicker blade to wedge in and avoid working near the crown you're sure to lever off of it if its there.1 point
-
Yes, I have heard many people call you "special". Hehe.1 point
-
A 50-50 mix of acetone and automatic transmission fluid makes a penetrating fluid that is as good or better than anything you can buy (as long as no plastic is involved).1 point
-
First, most appreciative of everyone's input. I know it takes time, thought and interest in responding to newbs. As in any challenging hobby, I bet only 15% of the newbs hang in their for more than 12 months. I have been lurking for 2 years and have, today, finally taken apart and put back together my first watch. With your guidance, I put the 11DP on the back burner. I did get my ST36 and today it came apart and, amazingly, went back together and is now running. No cleaning, no lubrication. I did not mess with the balance jewels which have end cap incabloc style jewels. Left that for another day. With 44 deg lift angle she now reads +2s/d 274 deg 0.0ms 44.0 deg vs as shipped below +15s/d 286 deg 0.3ms 44.0 deg. Losing amplitude...lubrication. I hope this is not an indication of a greater sin. A few lessons. Take more photos. I got crossed up on which way the click part went in. The small screw to release the crown....screw back in after crown is removed. The click spring escaped 2x with light tweezer pressure. Wasted a huge amount of time and emotional despair but found it both times and ... not sure I understand how it can jump out of the tweezers so easily and what I need to do differently. Somehow one of my screwdrivers (1.40m) became magnetized. Cheap blue box solved it. But what could I have done to cause that? Odd. Worked at a farmhouse kitchen table. Too low. I suspect the advise is "repeat" and this time service the incabloc jewel capture system. I did print off the Lubrication manifesto. Some reading. I can see more lube is in my future. Resist the temptation to take the 11DPs apart until I learn more. The 11DP. I have two now as I needed a parts watch. The parts watch is a 17J version of the 11DP and looks to run better than the first candidate. They both have the Citizen 0241 stamped. But the 17J has the below logo. My speculation this is an early version. Later versions lost 7 jewels and the logo. Perhaps there is more to the story. As for old Rotary watches. They don't seem to be as abundant in US eBay. The only reasonable candidate I found last night is HERE.
 1 point
 -
Designed by Citizen decades earlier and manufactured on tooling bought from Citizen, but totally independently with Indian materials and local QC standards.1 point
-
For working on cases before replating. I like to start with 600 grit, then 1000 to 1500 before polishing with a Dremel1 point
-
Did you read the other posts and look at the pics, this is NOT a snap-on case back, using a knife or tool for snap-ons will cause great irreversible damage ! The screws under the bezel click [which some incorrectly labeled as the bezel spring] hold the caseback and need to be removed first, Seiko MM models use similar set-up, it's elaborate but not unusual...1 point
-
The case opener in your first picture is for Rolex style casebacks. The case holding vice in the second picture is cr*p. The moment you start turning the caseback, the entire vice would turn together with it. The crystal/caseback press in picture three would probably work. But you have to make sure that the screws of the upper and lower tool holders are properly aligned. Some of them don't line up properly. If you're using a traditional caseback knife or a Swiss Army knife, you're chances of slipping and scratching the caseback is very high. No paper or plastic sheet will be able to protect the surface if you slip. The secret is not to slip. A Seiko style caseback knife is less likely to slip. It is used with a stabbing action to wedge the blade under the caseback. Don't try to pry/lever the caseback off like a tin can, that would only lead to slippage. The wedging action would pop the caseback off in most cases. Only in really stubborn cases where the blade has wedged in but the caseback still hasn't popped off, then some twisting and levering is permitted to lift caseback to pop it off. Very rarely, you'll come across some really tough casebacks that would require specialized tools to open the watch. But we'll leave that alone for now.
 1 point
 -
The autosol is good for acrylic, but removing scratches from glass is much more difficult. If you can feel the scratch with your nails then its not going to be easy1 point
-
Yes, like polywatch but much cheaper. Metal polish is obviously good for cases too but you can buy acrylic polish.1 point
-
@Jon, let us know how the bushing attempt goes.1 point
-
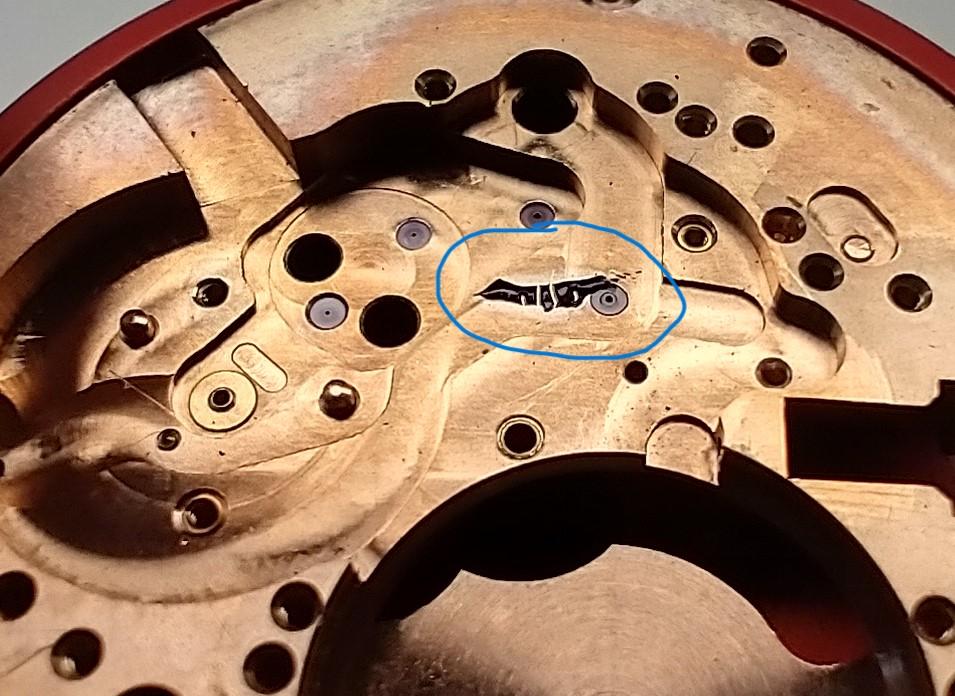
@VWatchieIf there is a bit of room between the axle and the inside of the hole in the rotor, I think you'll find trying to close up the hole very difficult because of the small amount of material that can move to close up the hole. Give it a go, but be careful not to deform it. I would be tempted to use something to keep the axle in the hole like some Loctite. This will give you the stability knowing that the axle isn't going to move whilst you position it on the stump and before that first blow of the hammer. Just enough to keep it in place just under the polished top part on the top of the rotor. I've got a rotor from a 2135 that has a hole that has been completely deform by hitting the axle when it wasn't centred, so I'm going to completely bore out the hole and turn and fit a custom made stepped bush to accommodate the new axle snuggly. well, that's the plan. Not sure if it will work, but it's worth a go and I haven't seen anyone else try it. A replacement rotor is about £150
 1 point
 -
Hi & welcome to this helpful forum, there is a lot of help and knowledge here, a stainless steel watch should be allergy free I would think, and affordable ......1 point
-
I was pleasantly surprised with my first attempt of your way of drilling Nev, free-hand with a carbide drill. I did use a pinvice to hold the drill as the knurling on the vice helped to feel what was happening and made it easier to spin the drill in and back off when needed. But i found it trouble free with a 0.3mm drill. Using a tailstock with feed lever with small bits doesn't give you that feedback to understand what is going on.1 point
-
Just to say, most of the people who still have no experience, believe that the tail stock will solve their problems with the drilling. Well, it depends on the kind of the drilling and the drilling bits type, but in case of small holes for repivoting or similar, using tail stock with lever for pressing the bit to the work can only do harm. At least, this is what I came to in my practice.1 point
-
Hi i used 20mm steel bar but it doesn't have to be that thick. The connection to the motor is not threaded and is just held in place by 3 grub screws.1 point
-
Thank you for your introduction and welcome to this friendly forum. We all look forward to your contributions and continued involvement. If there is anything we can help you with don’t be afraid to ask. Nice clear photos can help a lot.1 point
-
Welcome to the WRT forum.1 point
-
Hello and welcome from Leeds, England.1 point
-
Just speaking for myself, I started buying relatively inexpensive watches that I liked the look of on eBay and fixing those up. I learned something new with every one. Then it turned out I really started enjoying Bulova movements and 70s styling, so it moved my focus in that direction. I got into Bulova Accutrons because my mom gave me her late father's, which she bought him new in 1973. Before I worked on that, I found some eBay movements to practice on until I could get my confidence up. So I guess my advice is start looking around for things to fix that you would enjoy, without the pressure of working on a family heirloom. Having watches around that you've fixed and can pop on your wrist is super rewarding and will help keep you interested.1 point
-
Have a look at this 2 part series don’t know how good it is though.1 point
-
I think it should be between the red and black. Couple of things to take into consideration, the spring could be set affecting the power reserve or a shorter spring with will have the same effect.1 point
-
The 1st one is a pallet jewel warmer. The 2nd is a roller jewel warmer.1 point