Leaderboard
The search index is currently processing. Leaderboard results may not be complete.


Popular Content
Showing content with the highest reputation on 09/16/24 in Posts
-
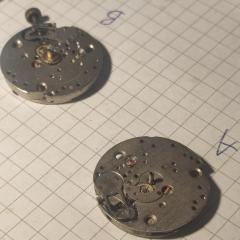
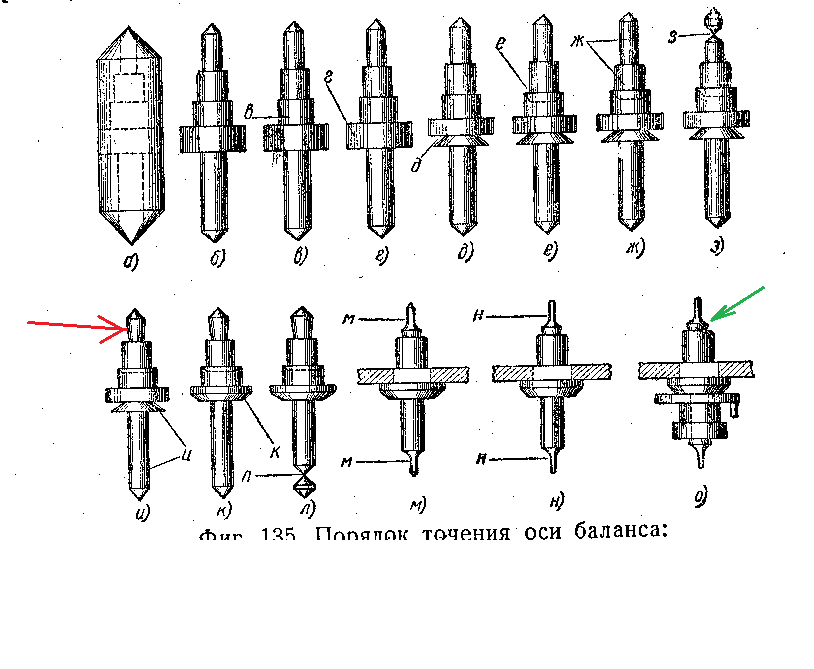
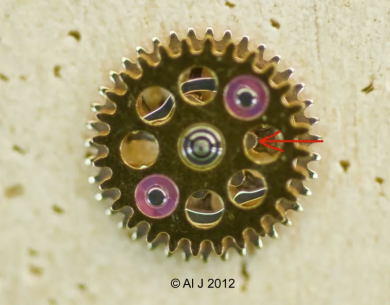
I am so glad to see someone doing so well. Actually, it looks almost perfect. I feel I need to explain the purpose of some things in the balance staff so when somebody knows this things, then they will be made better. The first thing here is the shape of this part, pointed with red arrow. The figure shows the order of actions when staff turned between still centers in old fashion swiss turns. But no matter, this is the same in all other ways of turning staff. You see the part pointed with red in previous image 'з' is cylindrical, and then it is conical in 'и'. And the cone here is reverse oriented against the pivot. It is done with one only purpose - to prevent the oil from climbing down (or up) the staff and keep it where it should stay - on the thin cylindrical part of the pivot. But to be such function possible, most important is at the end, the edge, pointed with green at the last image, to be sharp as knife. This sharp edge is formed by two surfaces - they both must be conical and prefectly polished. In the good quality old movements, the staffs have such part on both sides, not on upper side only. But in simple staffs, again, the edge has to be sharp as knife, no matter there is no reverse oriented cone. In modern watches with antishock devices, this reverse cone has disappeared due to the design of antishock system, and, may be it is found that it's presence is not that important as old watchmakers believed, but the sharp edge and polished surfaces is still something obligatory. The pivots of You staff need some more attention - the common rule is that the cylindrical part must be long 3X it's diameter. But, have in mind that sometimes in old (130+ years) movements, the pivots have to be longer. The pivots of You staff are much longer than needed, but this is something that will come in place with the practice. And, the internal angles must be sharp too, now the roller will may be not go to the end as the angle there is not sharp. Again, some practice will make things perfect. As for first attempt, the staff shown here is more than ideal. Believe me, I have seen a lot first attempts and know what I am talking.
 7 points
 -
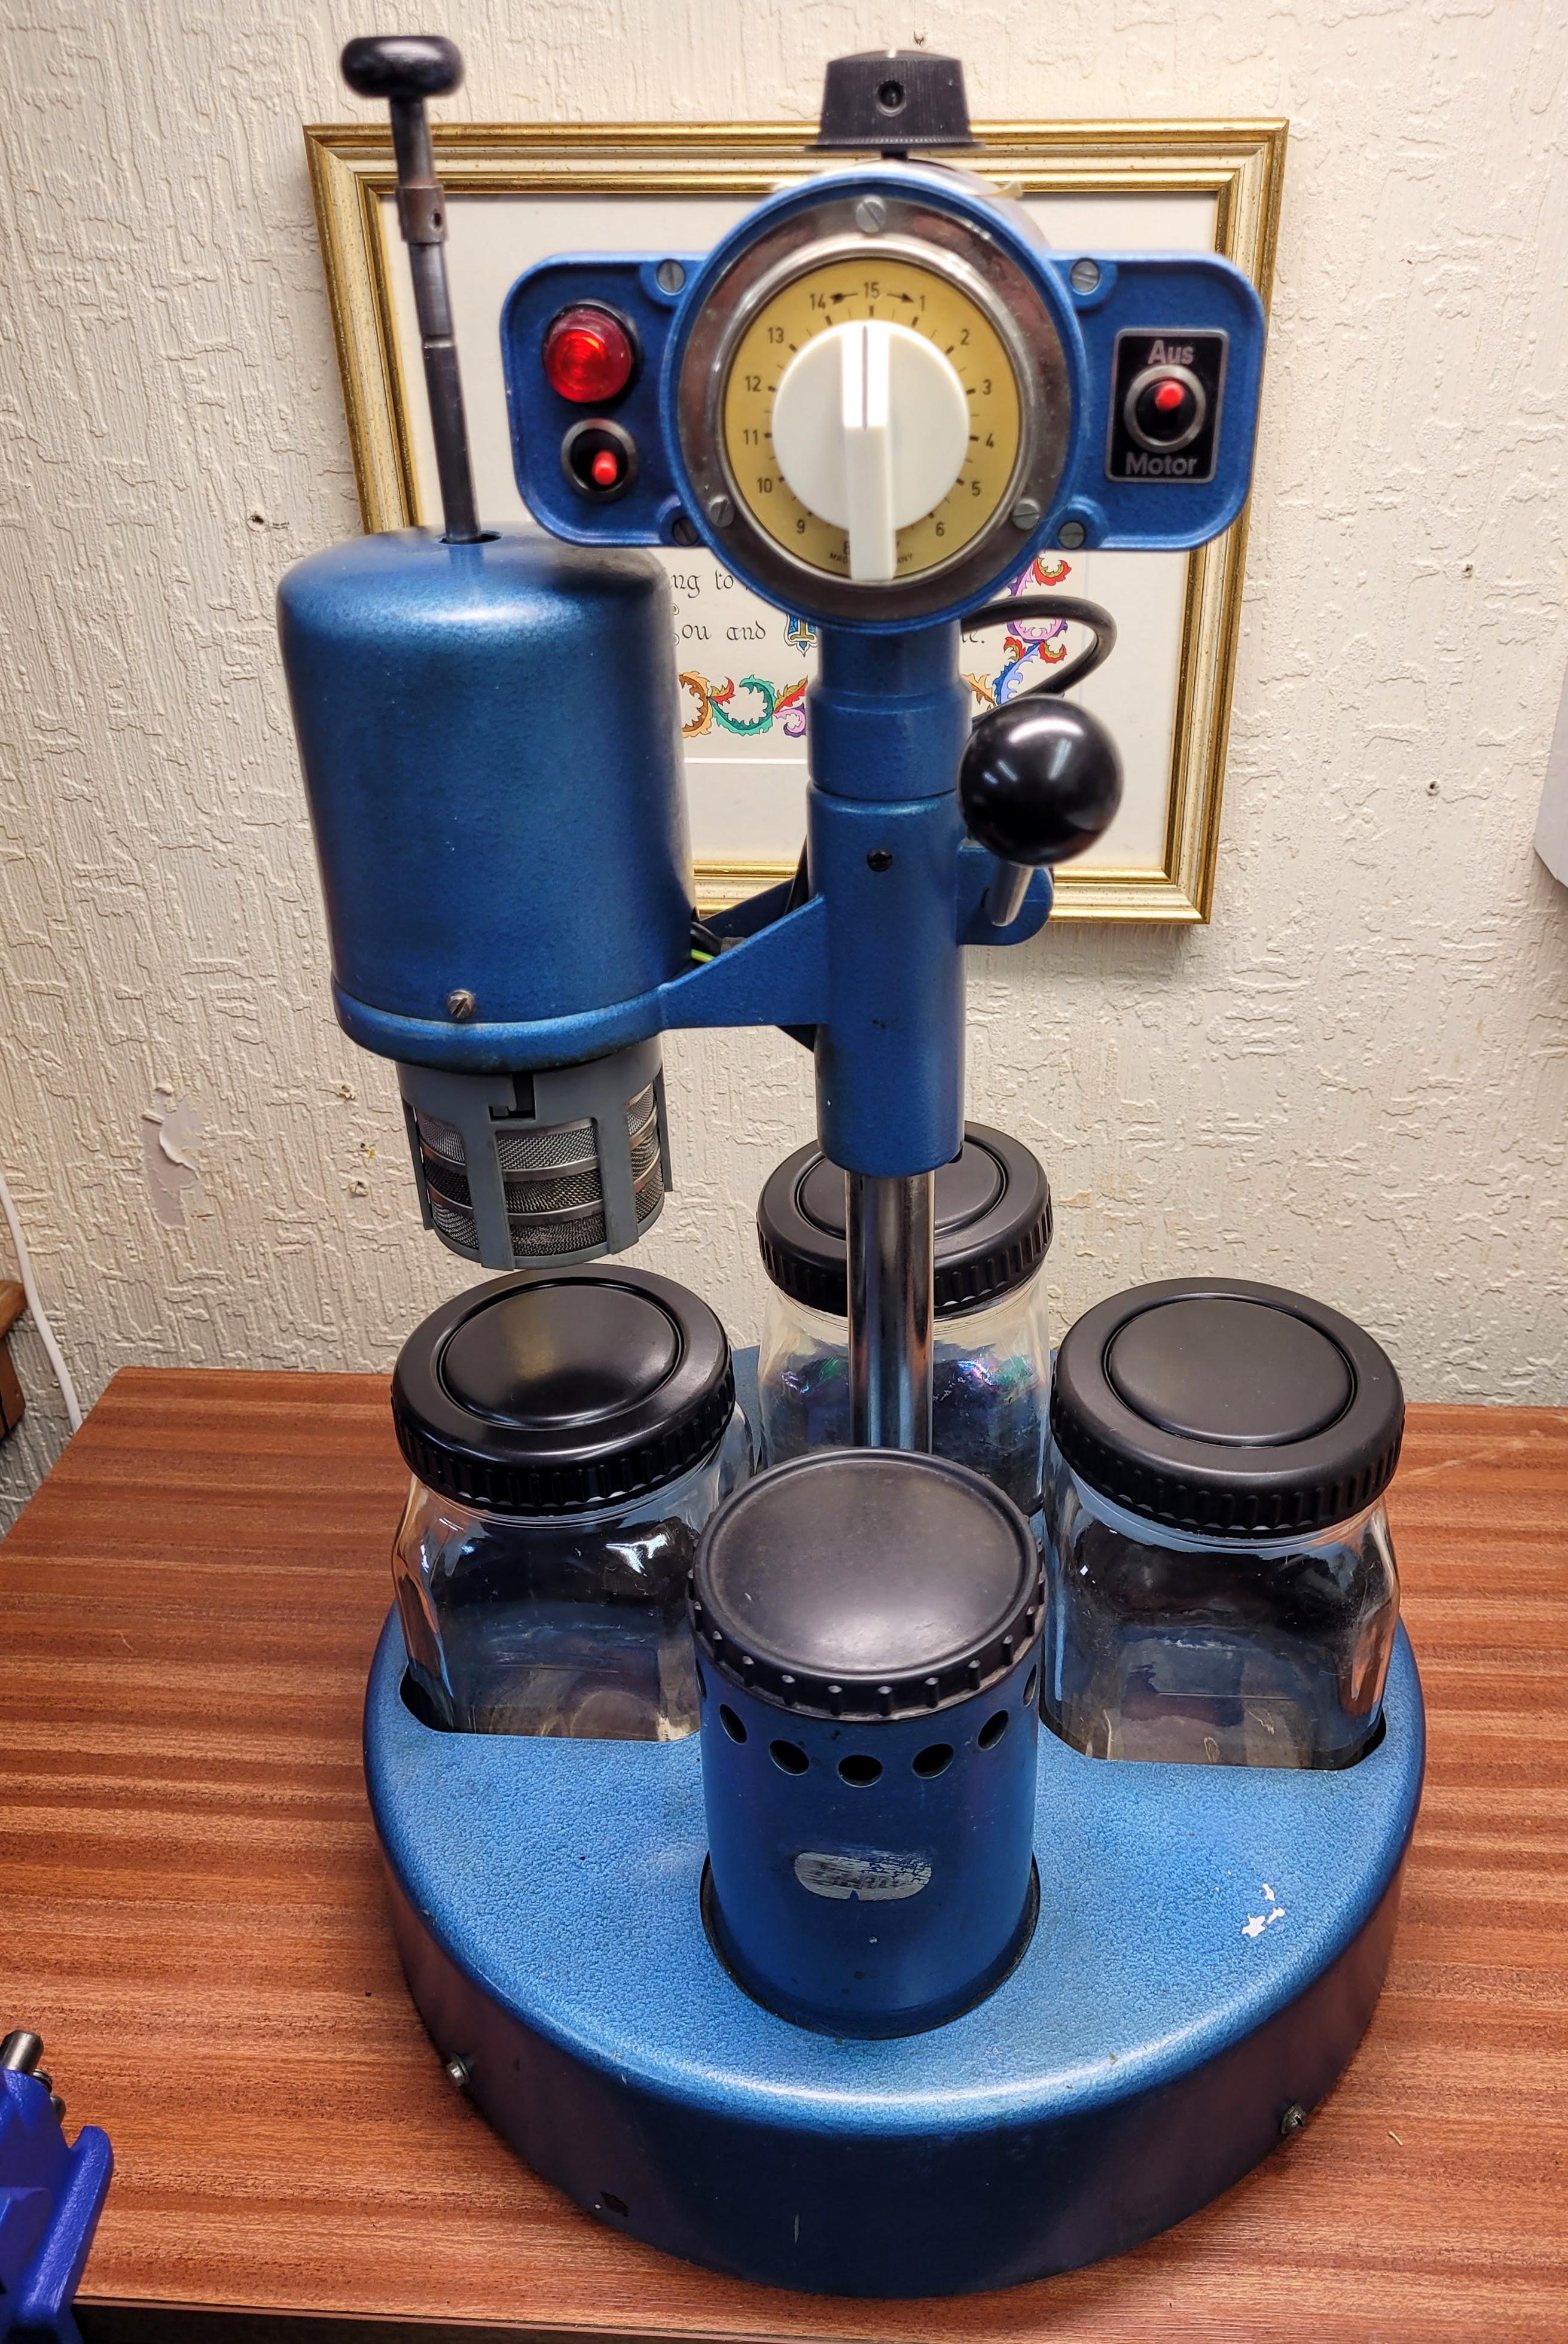
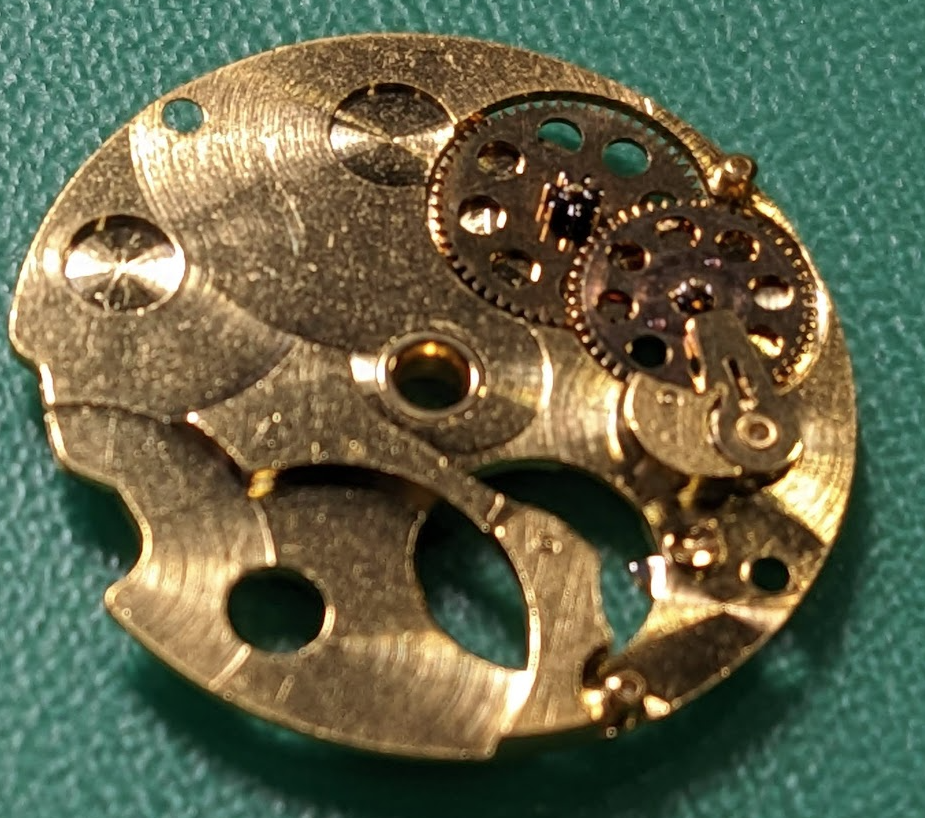
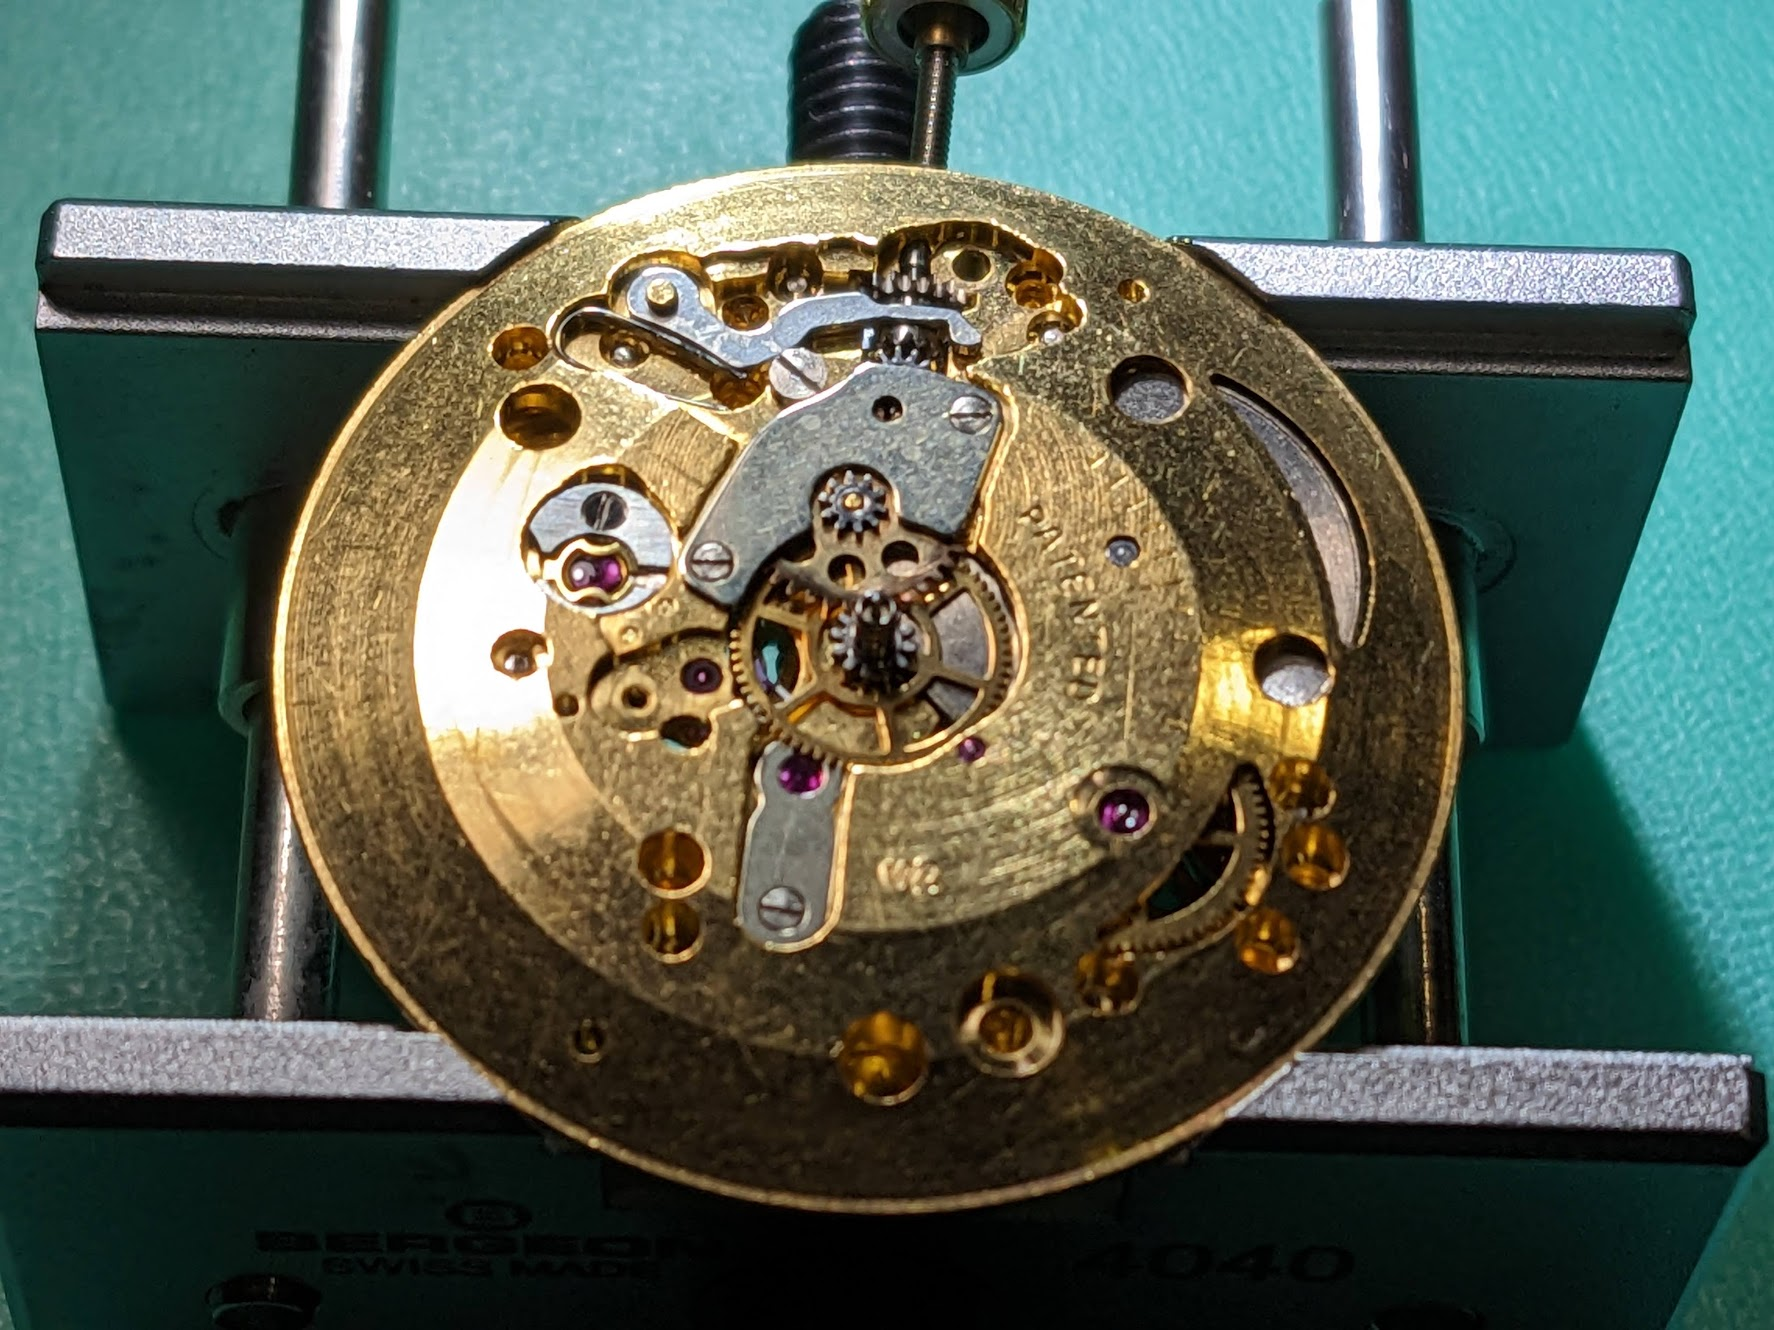
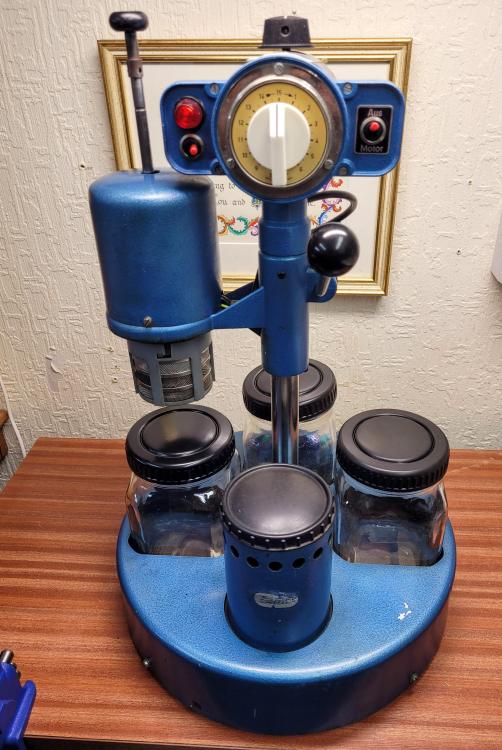
I pulled the plug and bought this Elma watch cleaning machine. I payed quite a bit for it, but I reckoned that it was the right thing to do. It works perfectly but was pretty dirty, so after a good clean it looks a lot better. I'm going to replace all the cork gaskets though, so when they arrive I'll probably strip the whole thing down and give it a 'deep clean' and re-wire. I haven't seen many of these for sale, it's normally the off white version, and I'm really looking forward to using it.
 4 points
 -
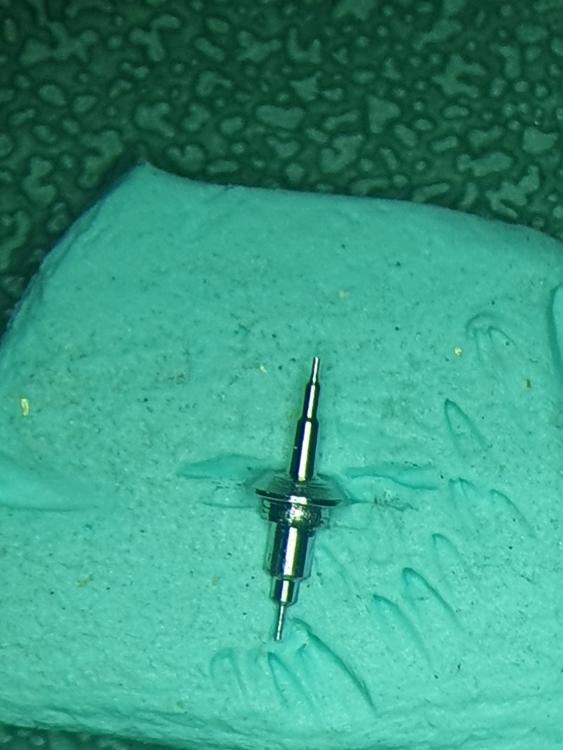
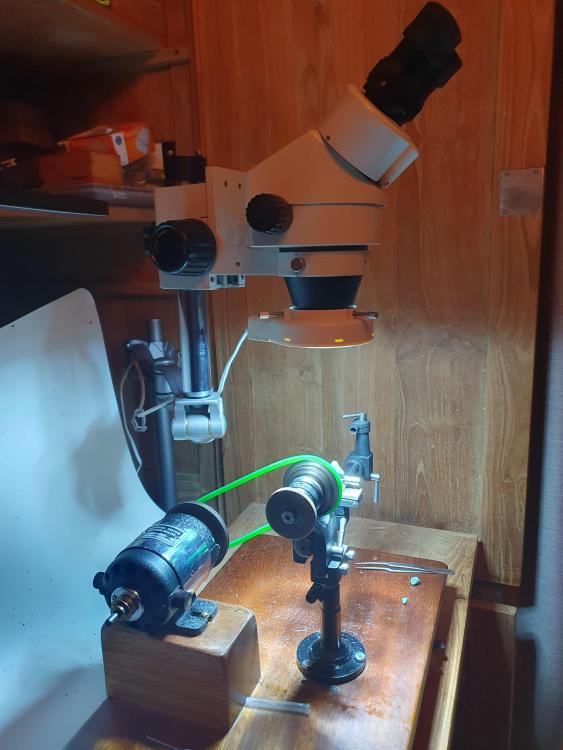
I know it's far from perfect, but nevertheless.. for a first attempt at making something resembling a balance staff..it could have gone worse.. So I'm happy and I wanted to share this and say thanks for everyone on this friendly forum for sharing their knowledge. Much appreciated!! It's small. I used 1.2mm blued steel. The cheap hand gravers @nevenbekriev mentioned (Thnx Nev!) performed like advertised. Having your lathe under a microscope makes it easier as well.
 4 points
 -
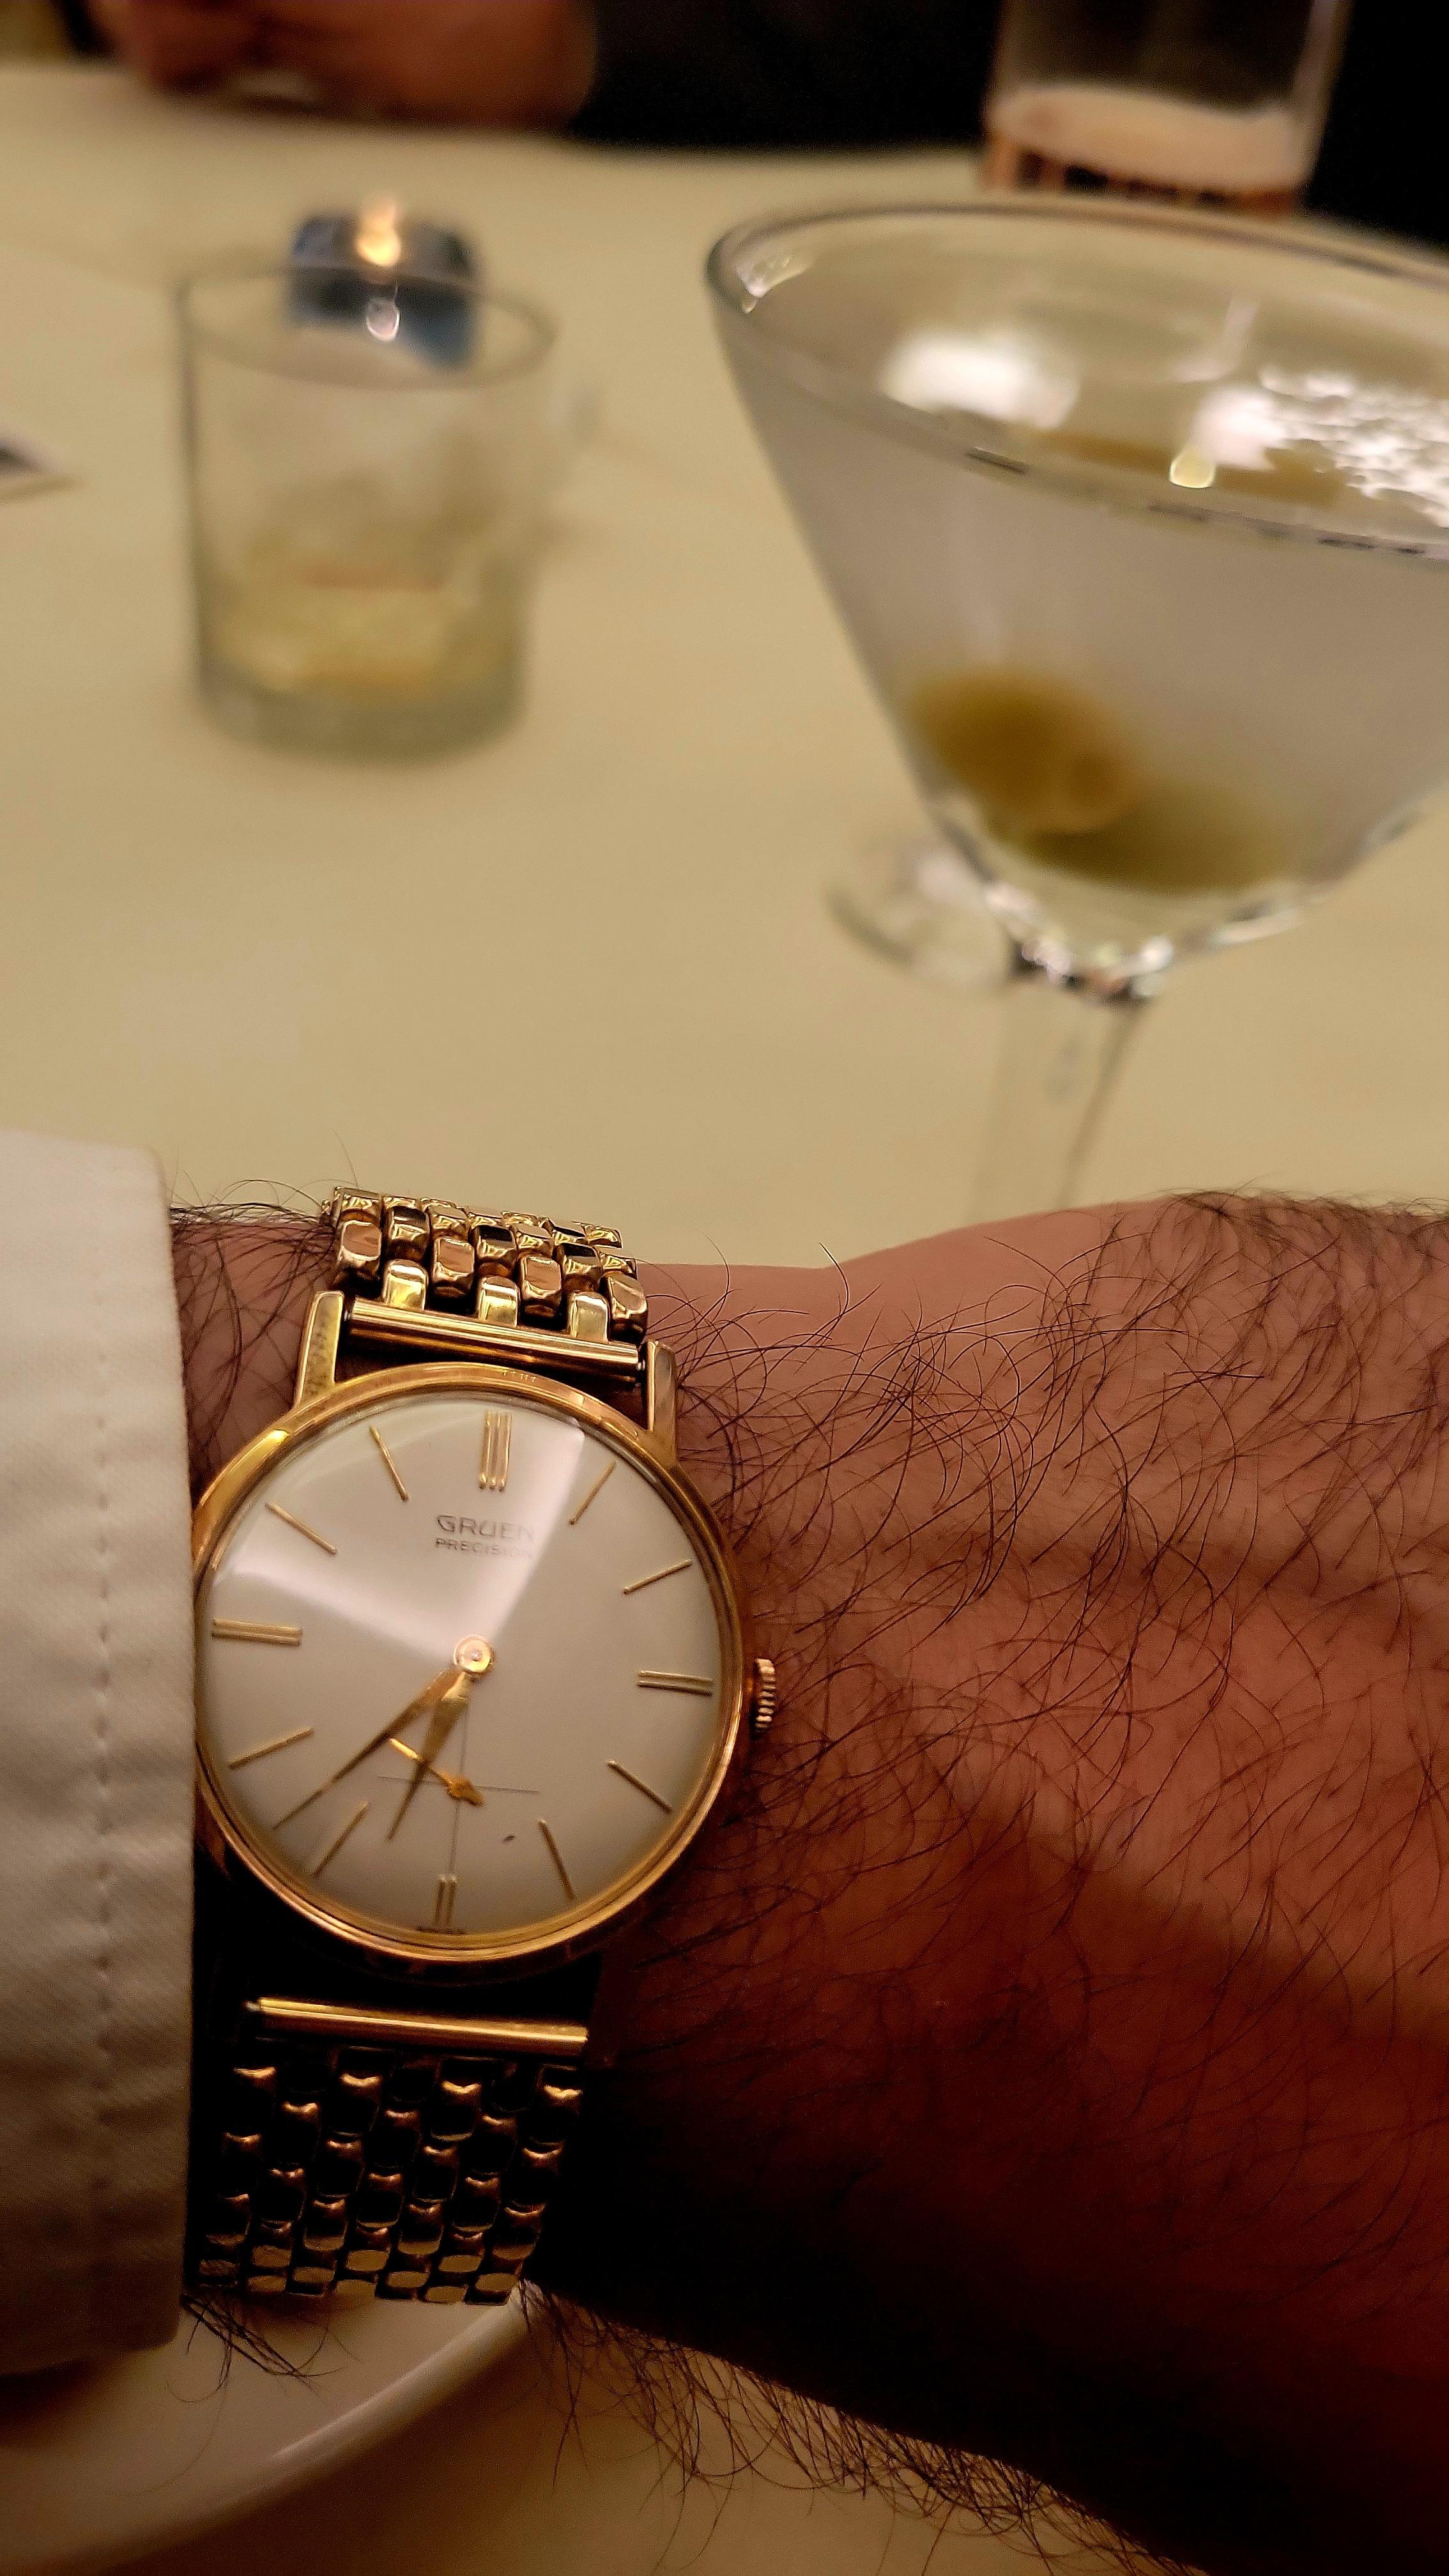
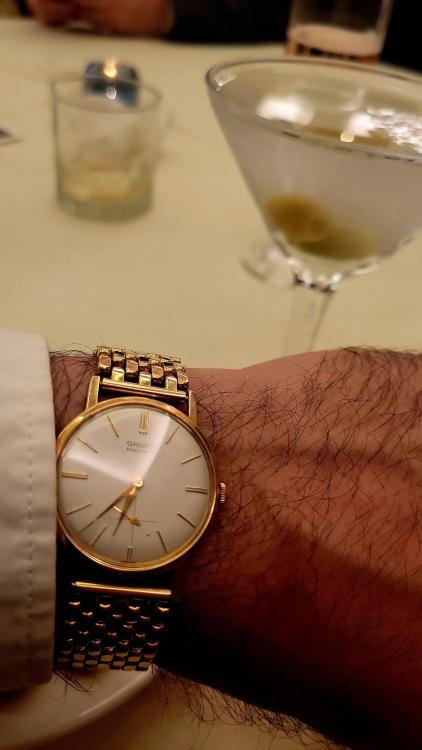
Went full Bond last night with my Gruen 510 and a dry gin martini. I know, I know, Bond's martini is vodka, but I just enjoy flavor too much.
 3 points
 -
Maybe look for something with an AS 1187 - usually $20-$30 on ebay and there are loads of spares. A lot of military style watches from the 1950's will have that movement. They work super well and fit together very well, plus you will have to adjust the collet and they still have balance screws to practice poising. (or try any pre-1950 pocket watch)2 points
-
You said you had this running? Can you show a close up of the arbor as to me the spring is wound the wrong way. I've got a 1560 somewhere if I can dig it out and see how that's wound. Edit Just found this from a 1560.
 2 points
 -
Bleh, warning. The screw that goes into that annoying setting lever goes UNDER the barrel bridge. It didn't look like there was room for it so i assumed it went on top of it, which actually worked but then i was confused why i couldn't get the stem out. I unscrewed it a little too much and lost the setting lever. Annoying design but i do appreciate having a separate bridge for the barrel as i didn't compromise my oiling on the rest of the train like i would have with a seiko when i had to remove the bridge barrel to get to the setting lever. Putting together the automatic works. I got no frame of reference for lubrication so just using my head. Doing the center posts with hp1300 and a tiny dot of molykote on the areas where i can clearly see the wheels make contact with other metal parts. So i had no idea what to do with the reverer wheels. PUt a little hp1300 on the posts they go around. After doing a little research there's a special lube for them called lubeta, which was surprisingly cheap so i ordered some but i want to wear the thing now. Apparently this is the lubrication point if you don't use lubeta. So i hit it with a tiny bit of 9010 and when the other stuff arrives ill clean and use that. Now, gonna put the dial and hands on and get it back together and get it on the wrist finally! Aand pretty much done. I"ll shorten the stem tomorrow. I'm assuming stems for these are still readily available cuz this was the closest to a crown match i could get and it's clearly too long.

 2 points
 -
Well done caseback, I'm looking forward to my first, not quite ready.......to embarrass myself2 points
-
That's a great job! Neven's commentary is excellent as well. By your third one it will look "factory" .2 points
-
A set from cousins aren't that expensive even when you add the VAT.
 2 points
 -
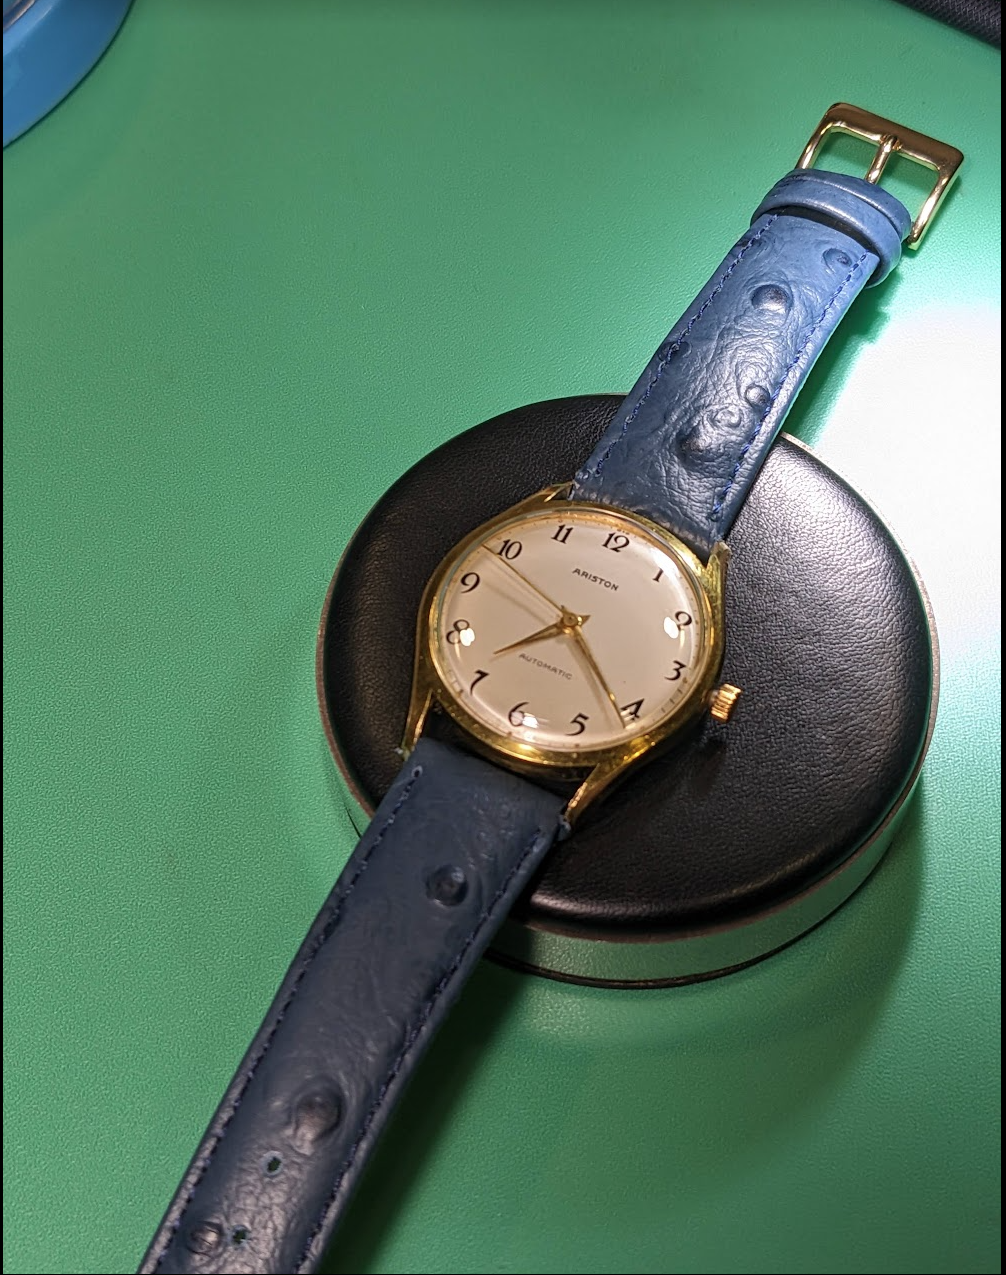
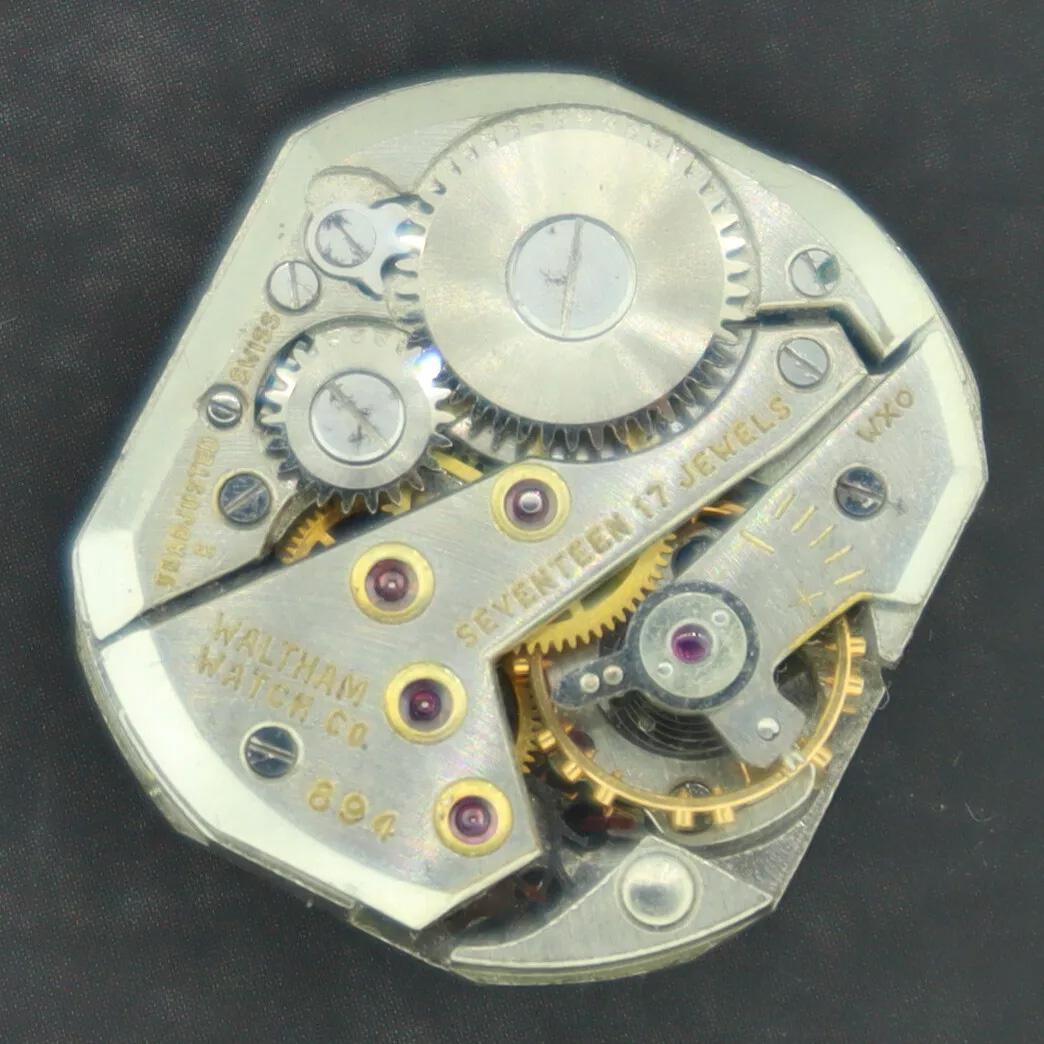
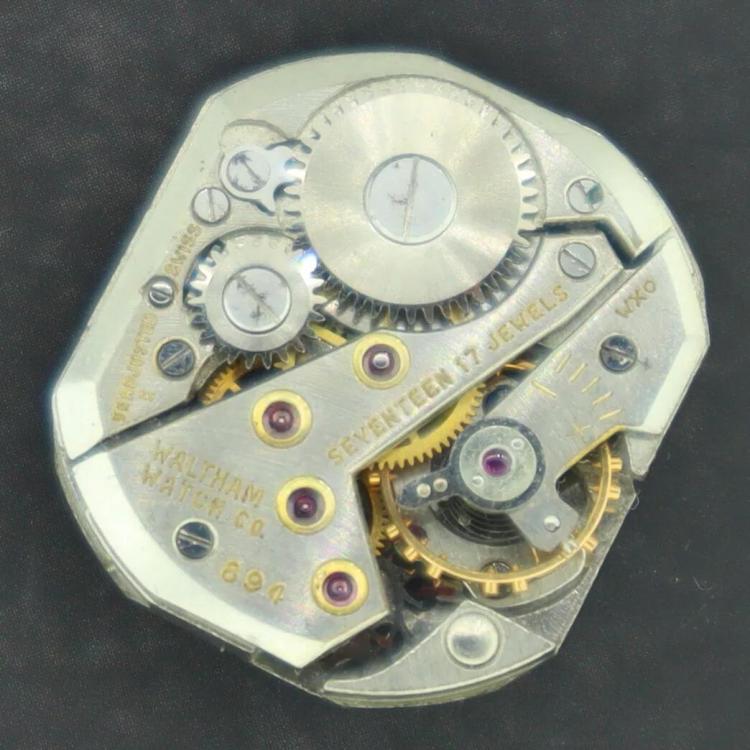
After a but more searching for that "Ulysse Nardin" movement (without finding any exact match), I wonder if it is another variation or development of an AS1130? There are many similarities, and those were made with varying bridge designs, eg: https://horology-student.org/movements/important-vintage-movements/as-1130/ https://ranfft.org/caliber/496-AS-1130 I do get the impression that Ulysse Nardin is a Pay-for-the-name brand rather than a Pay-for-the-movement quality maker? eg. This is the movement in a Ulysse Nardin presently on ebay at ~$1600 https://www.ebay.co.uk/itm/195061900006 It has a re-branded Waltham 894 movement, which sells for £10 - £20 from what I can find. https://speedtimerkollektion.com/product/90669

 2 points
 -
so far so good, i managed to make a working one,(that paletfork is a real pain to install). it is still running a bit slugish so i wil probably need to still give it a good service but we are one step closer to having a watch on my wrist.2 points
-
Lol It doesn't and that will teach me not to do multiple things at once and not read a post in full2 points
-
Update: went to cousins' house and found they have parts for the BFG 866 and the crystal dimensions seem to match so ordered one! Also order a tap7 crown and another stem in case I jack this one up or to use in the donor movement...thinking on a red strap for the old RWB look...


 2 points
 -
OK, not OH but still can give some thoughts. I don't understand the meaning of Sorry, I am not English, know all the words, but still can't get the meaning. But what I see on the photo is that the exit pallet is not correctly sharpened. It needs good sharpening or shaping, then burnishing/polishing. The tick....Tock sound as described and the uneven advancing of the second hand just point incorrect setting of the depth and (coverage?) of the escapement. Sorry, I here use 'coverage' as direct translation of Russian term 'охват', which is the needed Russian term for the case. But I am not sure if coverage is the correct word here... The pallets must 'cover' whole number and a half teeth of the escape wheel. For example 7.5 or 9.5 or 12.5... I don't know the number, it is not important, but .5 after the whole part is. The 'coverage' is regulated by changing the distance between the escape wheel and the anchor (by moving the anchor bridge). Changing the distance affects the depth too. In anchors that 'cover' small amount of teeth, like 3.5, the distance almost doesn't affect the coverage, but strongly affects the depth. In reverse, in the anchors with big coverage, the distance almost doesn't affect the depth, but strongly affects coverage. In anchors where the pallets are on diameter sides of the wheel, the distance doesn't affect the depth at all, but only affects the coverage, and extremely strong. To have regular movement of the seconds hand, You need correct coverage. What it means? Well, when a tooth leaves one pallet, the another tooth tip will fall on the rest surface of the other pallet. It's tip will make small flight until it happens, the wheel will turn suddenly a little ahead and will stop. The same thing will happen again when this tooth leaves the impulse surface of the pallet and another tooth will meet the first pallet... The free flights of the teeth before hitting the both pallets must be equal. If they are not, then the sound of the hitting on the one pallet (for ehamle the exit) will be louder than the other (entrance), this means the coverage is not correctly set. The coverage is correct when the free flights (and advancing of the wheel) to both pallets are equal. So, regulate the anchor bridge (the distance between the wheel and the anchor) until the correct coverage is reached. The depth of the escapment is regulated by moving the pallets in the slots here, not by moving the anchor bridge. The depth is correct when the tip of the tooth folls on the rest surface, just a little below the edge of the impulse surface (there must be drop lock on both pallets ) in this escapement.1 point
-
@JohnR725 has pointed out that there's multiple different stems and sleaves. Will the one you have posted fit, who knows.1 point
-
oh dear bad attitude. I remember somebody scolded not sure who but seem to think that the his YouTube gods did more for watch repair then well anybody in the universe. But it does bring up the problem of today have any idea what they're doing at all and often times none at all. Plus being a YouTube God has gone to their head I'm quite sure there are more bad instructors than good youtube people.1 point
-
Long tubes can be tightened like canon pinion. Suppose the tube is 1mm long, use a nail clipper to tighten the tube at .5mm . You want the free end of the tube wide open , makes it easy to fit the hand on the seconds pinion.1 point
-
Got the other one to work. At least I think it works. I will see when I get the new pallet fork. I took out the mainspring barrel, and made sure everything was correct. And now it seems to take my wind.1 point
-
Cousins set are about half the price I paid but that was sometime ago. And they are quite thick and capable of withstanding a fair amount of spring power.1 point
-
Changing the chaton jewel? I've never tried it, not sure how you would get the jewel out without damage. Might be easier to try to find if the parts on common on cheaper movements, then look for one of those for parts.1 point
-
Close up of the barrel wall ledge will varify Andy's detection The hook of the barrel arbor and barrel wall ledge should face against each other.1 point
-
I can't measure a thing.... sigh. 1.4 overall diameter, 0.9mm jewel diameter and hole of 0.15mm is probably closer.1 point
-
I was thinking exactly the same.. couldn’t see how the hook should grab that spring. This one was a spare one, gonna take the one out that’s in the movement and send photos1 point
-
The problem with these is the arbor is part of the lid so you can't see how it interacts with the spring.1 point
-
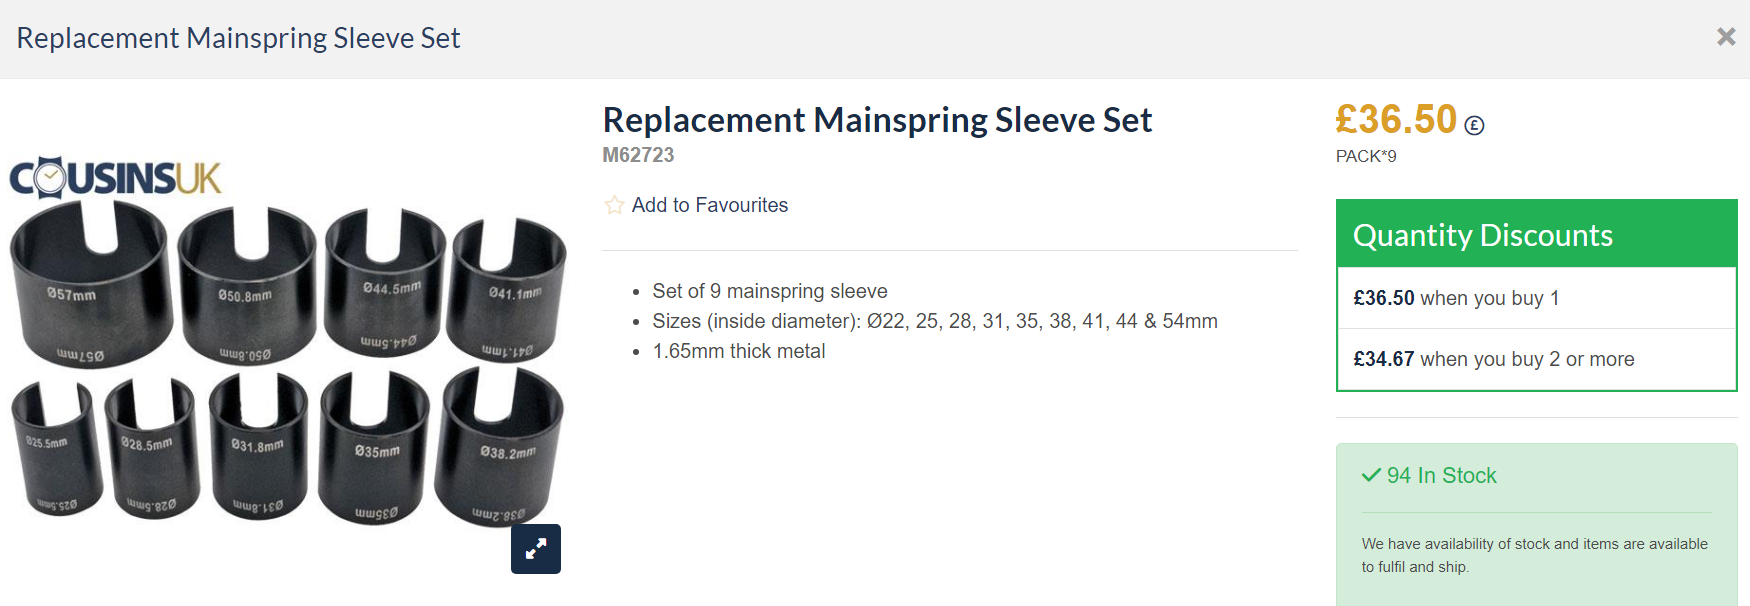
Mainspring sleeves 50-45-40-38-35-32-28-22mmall sizes appropriate. Dell
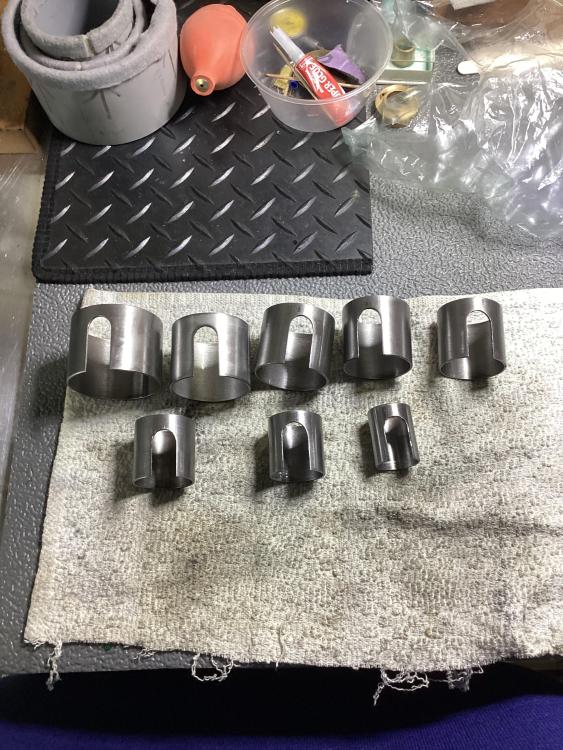
 1 point
 -
Measure the old one and purchase a new one.. Cousins UK would be a good site visit. I recommend you use silicone grease to lubricate the new gasket.1 point
-
I'd seen this but it's a completely different size of movement. Edit This is a similar style and size watch. https://www.ebay.co.uk/itm/387144657777?_skw=Ulysse+Nardin&itmmeta=01J7WX0BN9RBXFPPQM32VFCP2K&hash=item5a239eab71:g:Ka4AAOSw7mJmgYbP&itmprp=enc%3AAQAJAAAA8HoV3kP08IDx%2BKZ9MfhVJKkIPbQEKL8cjp4MdJGP6pgNQ2O%2B1UZcqN3n1SKccbz8QG6EKCNtWVPpRa8tsFlo9ts1A%2FlAh47sBeSLVm%2B2OCS0RR5zCVo5YHWYUGIFo26smSwxVyrj65JwaHwONLWFQibTbqF%2Bc8qEvcQfVPvnGpCuaLPMY%2B6BStjUTfs6zSsre2HQxuPEK4UcSWIJtBgxuciJcRPUcMlTawKcnAhl17PIQZQAtdmloRFfmbf2jde3EP%2BVwgt1%2Fl4R8oxepDuMvtMXLF9m%2BtK1nuXMROkLVizWuwXwgsAF6D7CWdb7OrNG1A%3D%3D|tkp%3ABk9SR-S6gZ2_ZA1 point
-
it's hard to tell in the picture but is there a movement retaining ring in the case? Then it's possible it goes out through the front?1 point
-
These guys are professionals i can assure you. They're not unknown people in the space. And i was thinking it could be a poise issue that would probably be corrected by adjusting the screws on the balance. I'm not touching em. This should keep decent time on the wrist. Anyways. IF anybody's reading this and working on this. If you think you got that U shaped spring retained, be really careful. I definitely lost it, Pinged about six feet away when i was sure it couldn't possibly go anywhere. Thank god for my magnetic tool holder rod, found it real fast. Weird very fiddly construction with the setting lever. you have to screw it in from the backside. I'm sure there's a better way to do it than what i did which was just luck. I had to hold the movement sideways and get the screw to just the right depth and through trial and error i got it to finally thread without pushing the setting lever out of place. You gotta do this before putting the setting lever spring in.
 1 point
 -
Problem is with YouTube its full of folk that don't have a clue trying to make some money by spouting bullshit. Applies to every subject imaginable. I enjoy learning from folk that have spent years learning their craft and above that from thinking a process through in my head and any mistakes i make that follow. If there's one person that you really should trust, it's yourself.1 point
-
That is very good for a first time. I can tell you my first go never looked like a balance staff.1 point
-
Does the auction listing still exist? Google image search finds three cached images of that exact watch with the same strap, all from ebay - but none of the listings they came from now exist?1 point
-
Not at £45, it's not I have saved the pic for future reference though. Thanks for the link, much appreciated.1 point
-
Is this possibly the required part? https://www.ebay.co.uk/itm/2860552066381 point
-
typically if you go to cousins website for documentation and search for the number 156 as is usually better to drop off all the other numbers we would find? but not this time we do get a tool of them stainless steel and whatever the other one is 156.0002 all attached the PDF probably may be? Then I also have the link below that has a couple of parts listed. http://cgi.julesborel.com/cgi-bin/matcgi2?ref=OME_CS^156.0001 typically with most watches and a watch like this the split stem will pop out. Some Omega watches from you take the crystal off you can see the locking ring you can even see where the split stem is. So you just move the locking rings the movement comes out and rotate and turn the movement over and the thing just pops out. Otherwise typically you can just split a split stem but I always like to urge caution for anyone doing mido watch as they most definitely do not pop out well they can win a watchmaker in the shop do that then he attempted to tighten the mess that he had and one year later we got all the bits and pieces to put the watch back together again. So yes it's always best to use some caution but typically on a split stem not like 99% of the time they will just pop apart 4723_Omega 156.0002 ST Case-1.pdf1 point
-
Nothing special to do here matey ,done this many times with generic stock hands used on movements that have missing or damaged hands. Reduce the hole with appropriate domed stakes then broach out carefully. If you have a good hand gauge this will help determine the correct size needed and speed up the process. You can do this no problem fella1 point
-
probably the screw in sleeve style like your old case, it will be threaded inside, a sleeve wrench is used to remove and adjust the depth, but like said earlier you might have a hard time finding the correct size, maybe it will have the sleeve still in it and only missing the crown and stem or maybe your old cases sleeve will work, you will find out soon when you receive the case...
 1 point
 -
I don't know but I'm sure it's not for truing, nothing to reference against.1 point
-
For me its removal in winding on this model, yes there is a risk of mis-aligning the clutch wheel upon re-entry so go slow and rotate a little till it slides in, if done in setting mode and you have to push the setting lever for the stem to clear sometimes the clutch lever can slip under the set lever, these circumstances don't usually happen but possibly could......just my thoughts....thats a nice movement1 point
-
There's the 10:10 club for most of the rest of your haul. Sounds like a ritzy ReStore! I don't think I've ever seen watches or anything even watch adjacent at the one near me!1 point
-
Similar to @caseback my suggestion would to be make a simple screw polishing tripod and it can be used as a screw vice as well as flattening/black polishing screw heads. here is one such thread which should help. Tom1 point
-
Nice haul. The Racine/Galco with the…what, not sub second dial. Haut seconds?1 point
-
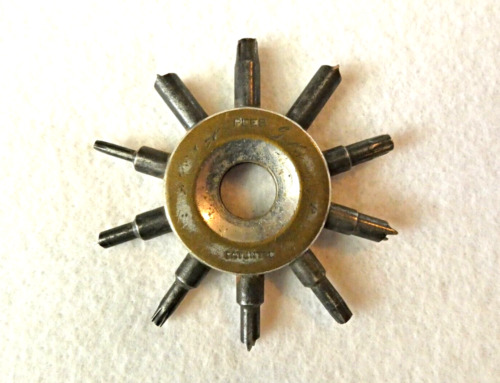
There are loads of watchmakers screw plates about. Just do a google search for watchmakers screw plate and click on images.1 point
-
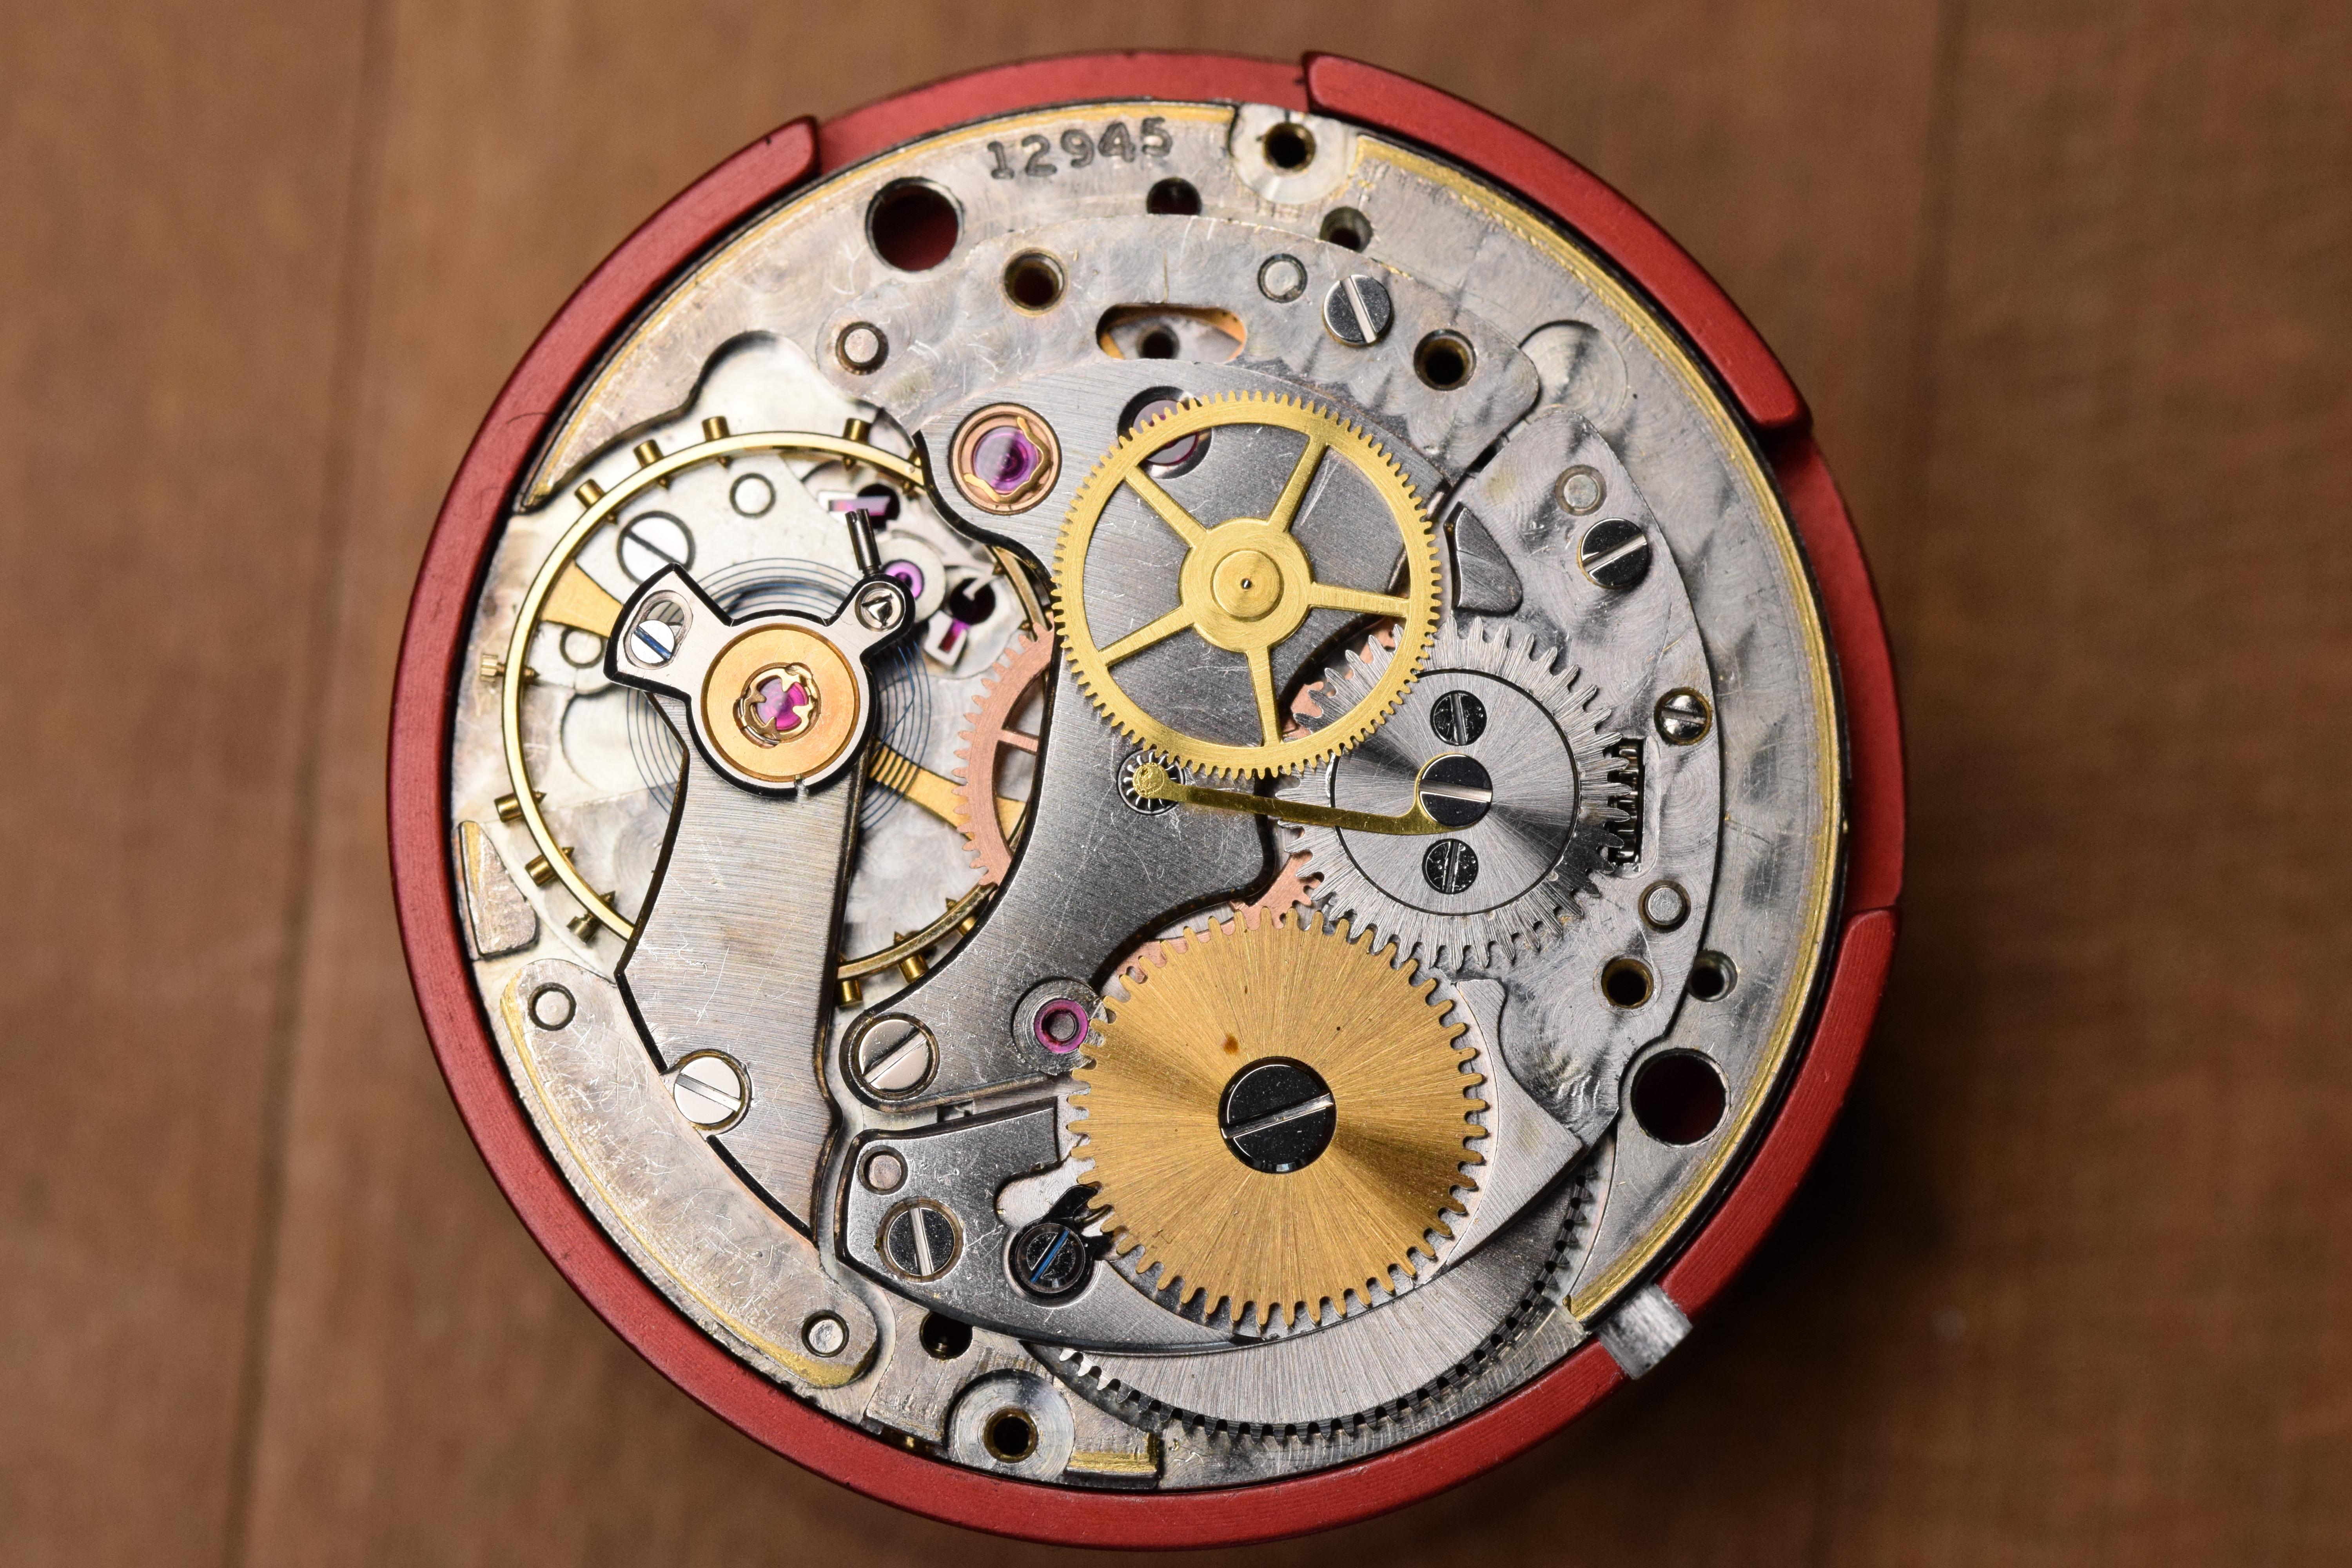
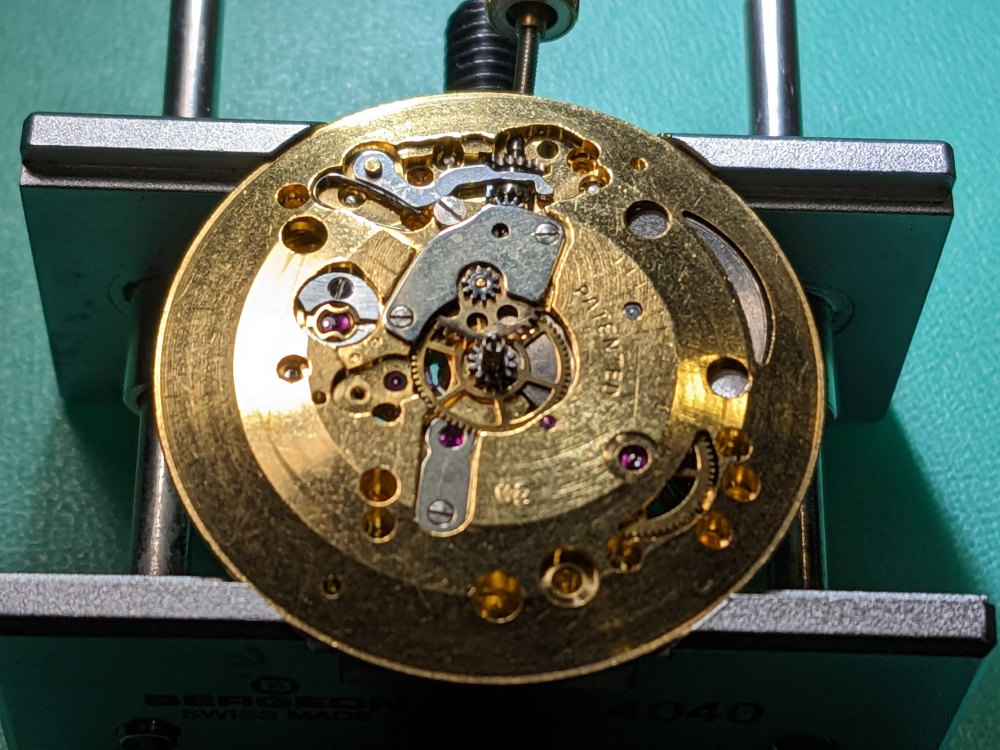
Thanks, Knebo, much appreciated! I thought I was alone in this. Nothing is as comforting as an unfortunate brother so you sharing the same experience made me feel much better as well! I will! I believe most of the heavy lifting has now been done, in this case getting rid of all the metal paste that had spread from the rim of the oscillating weight to just about everywhere. Before going into my Elma cleaning machine I carefully brushed every single part in Horosolv Still, that wasn't enough! In my stereo microscope, I could detect the paste between pinion leaves on small gears and on some pivot shoulders. Before cleaning, all jewels were completely void of oil and many jewel holes were filled with the metal paste, but to my delight, the only pivot that needed a bit of burnishing was the fourth wheel. I guess that shows the phenomenal quality of the alloy used in these Rolex movements. Surprisingly, the balance spring came out of the cleaning machine in perfect condition! Now all that remains is the fun part (unless something unexpected happens), which is to finish the reassembly of the movement and the watch. In the long term, I plan to create a service walkthrough and for this purpose, I am taking lots of pictures of which I will probably only use a quarter. For those of you who want to see all of these pictures, you can click on the link below. https://1drv.ms/f/s!AnVrKJ9agkNWkokVhogLYtvc6xAqdQ?e=qjlJ4w (Sort by name in ascending order)1 point
-
I think you'll find there are too many sizes and pitches of thread across different brands for it to be possible. I've been considering one of these that may work to hold screws but would probably make some plastic jaws. You could try putting rodico in the holes but not sure if this would hold the screws well enough.
 1 point
 -
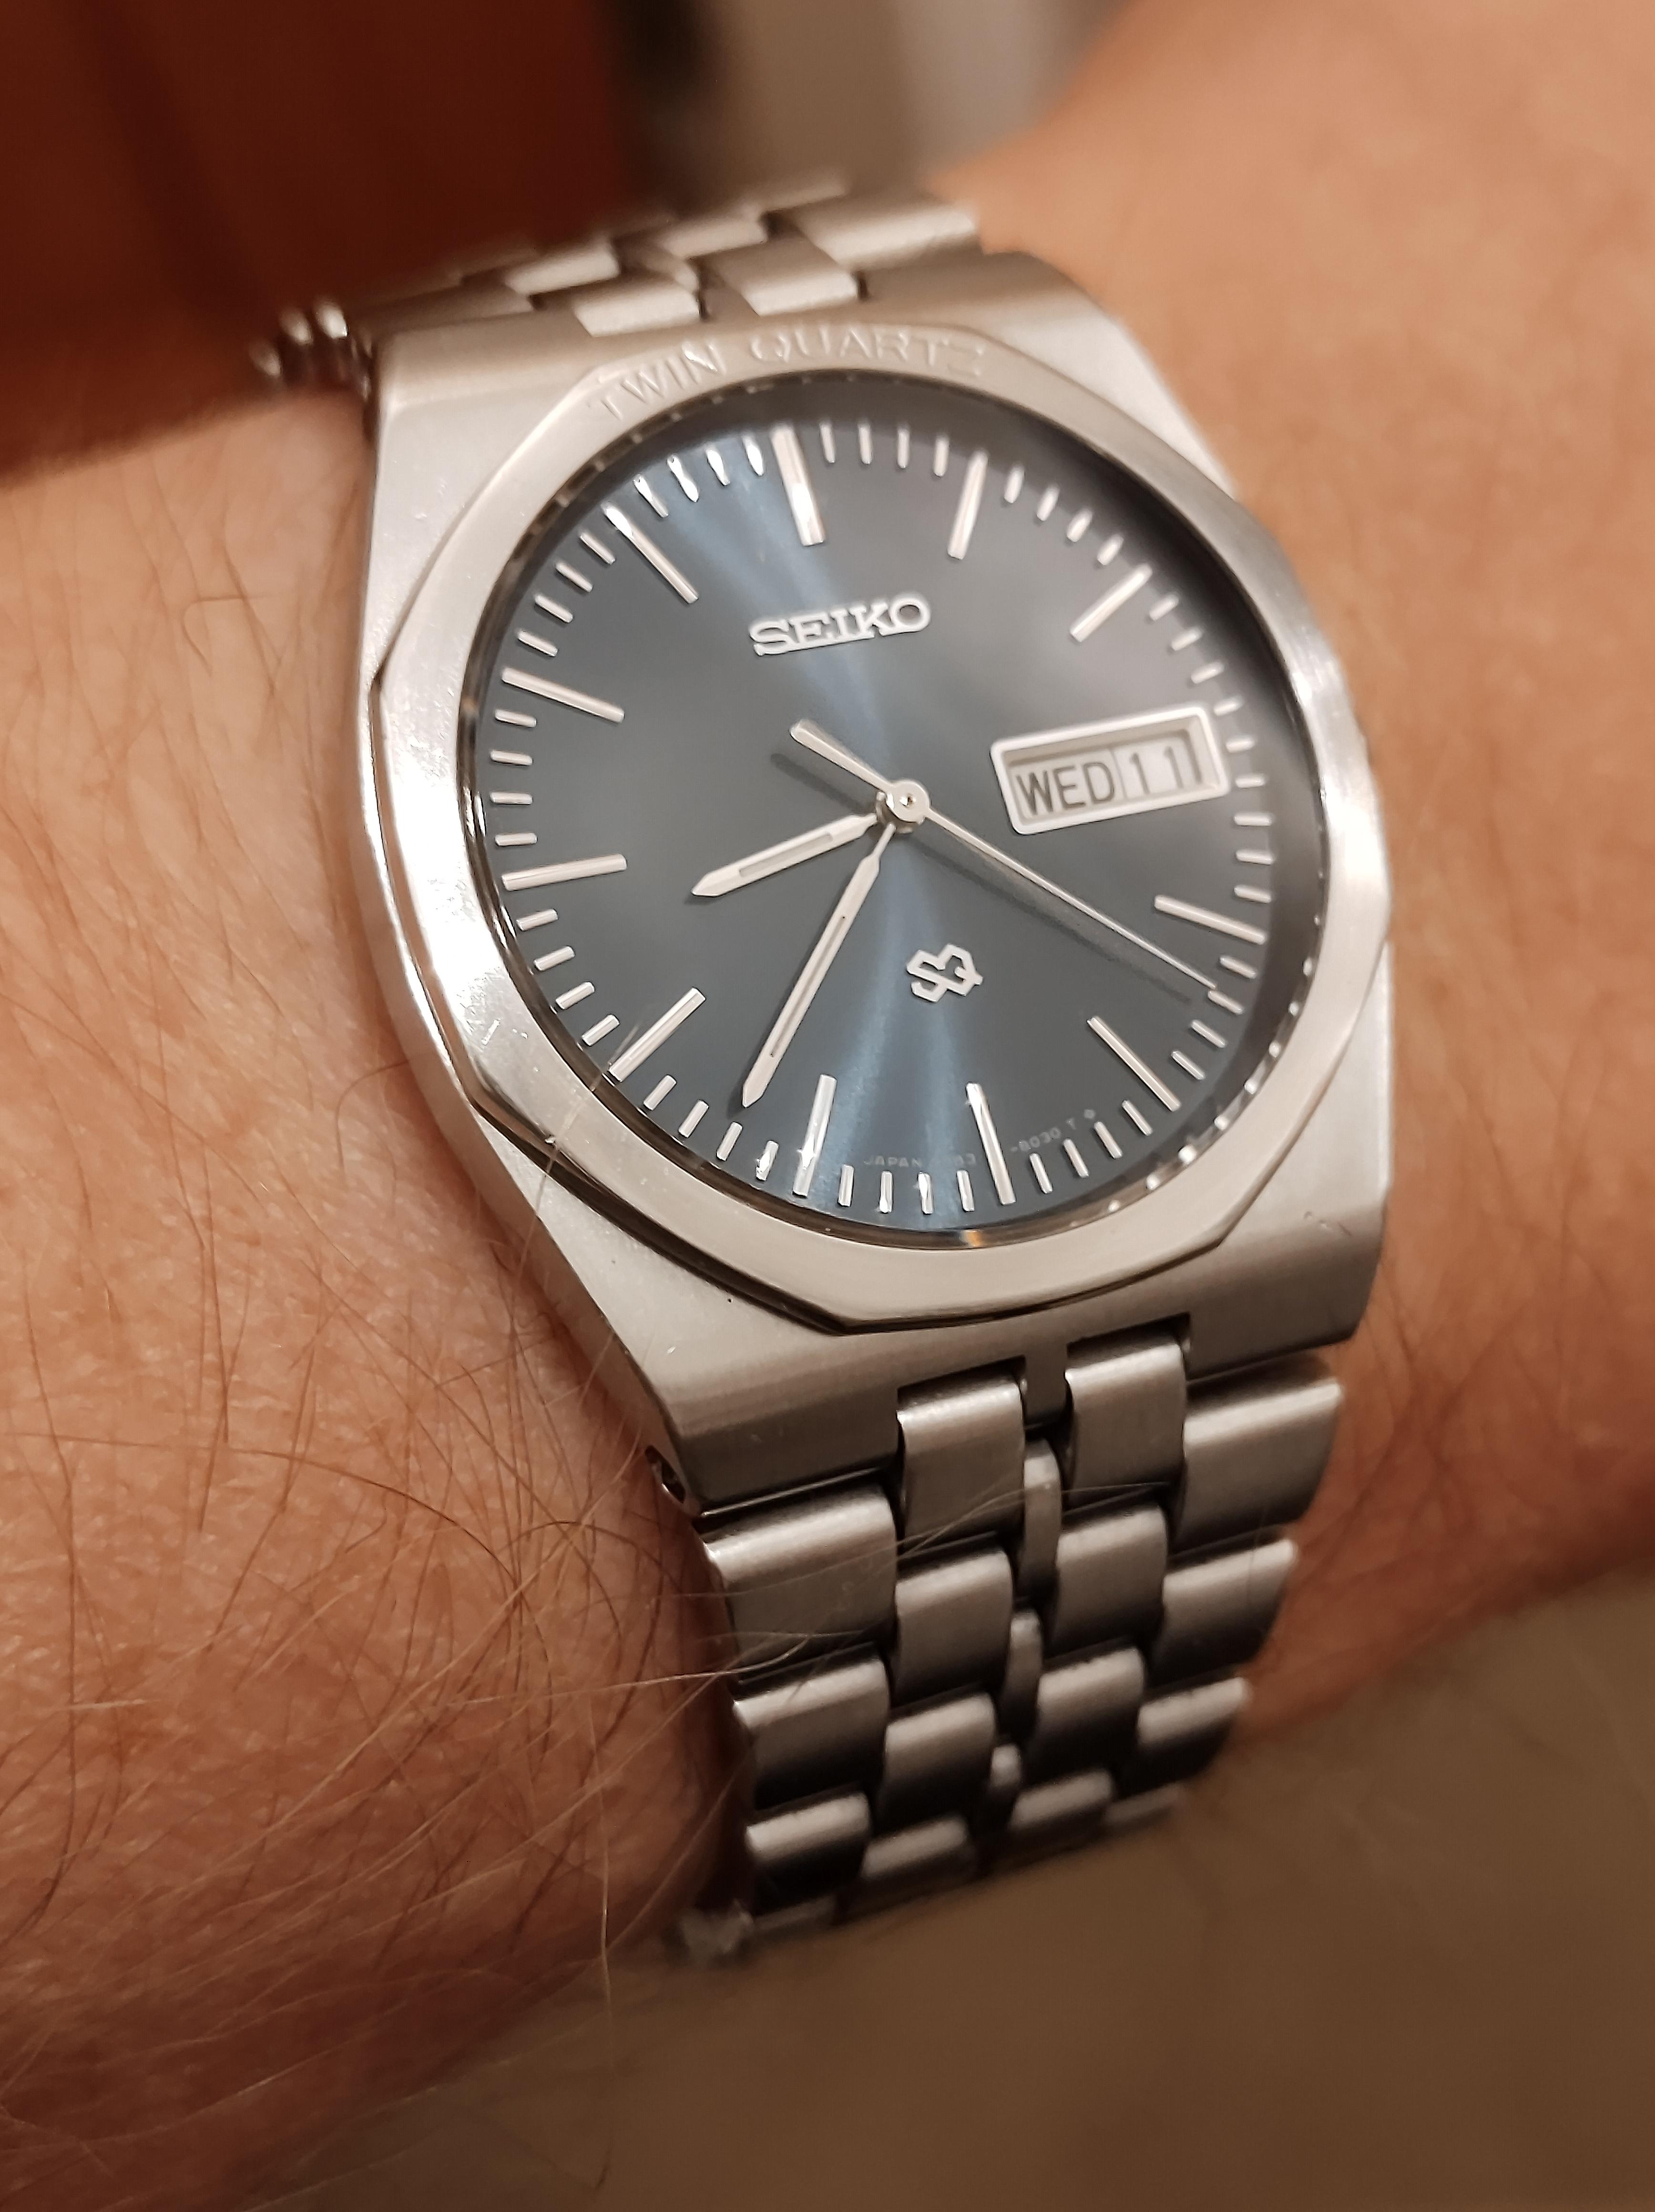
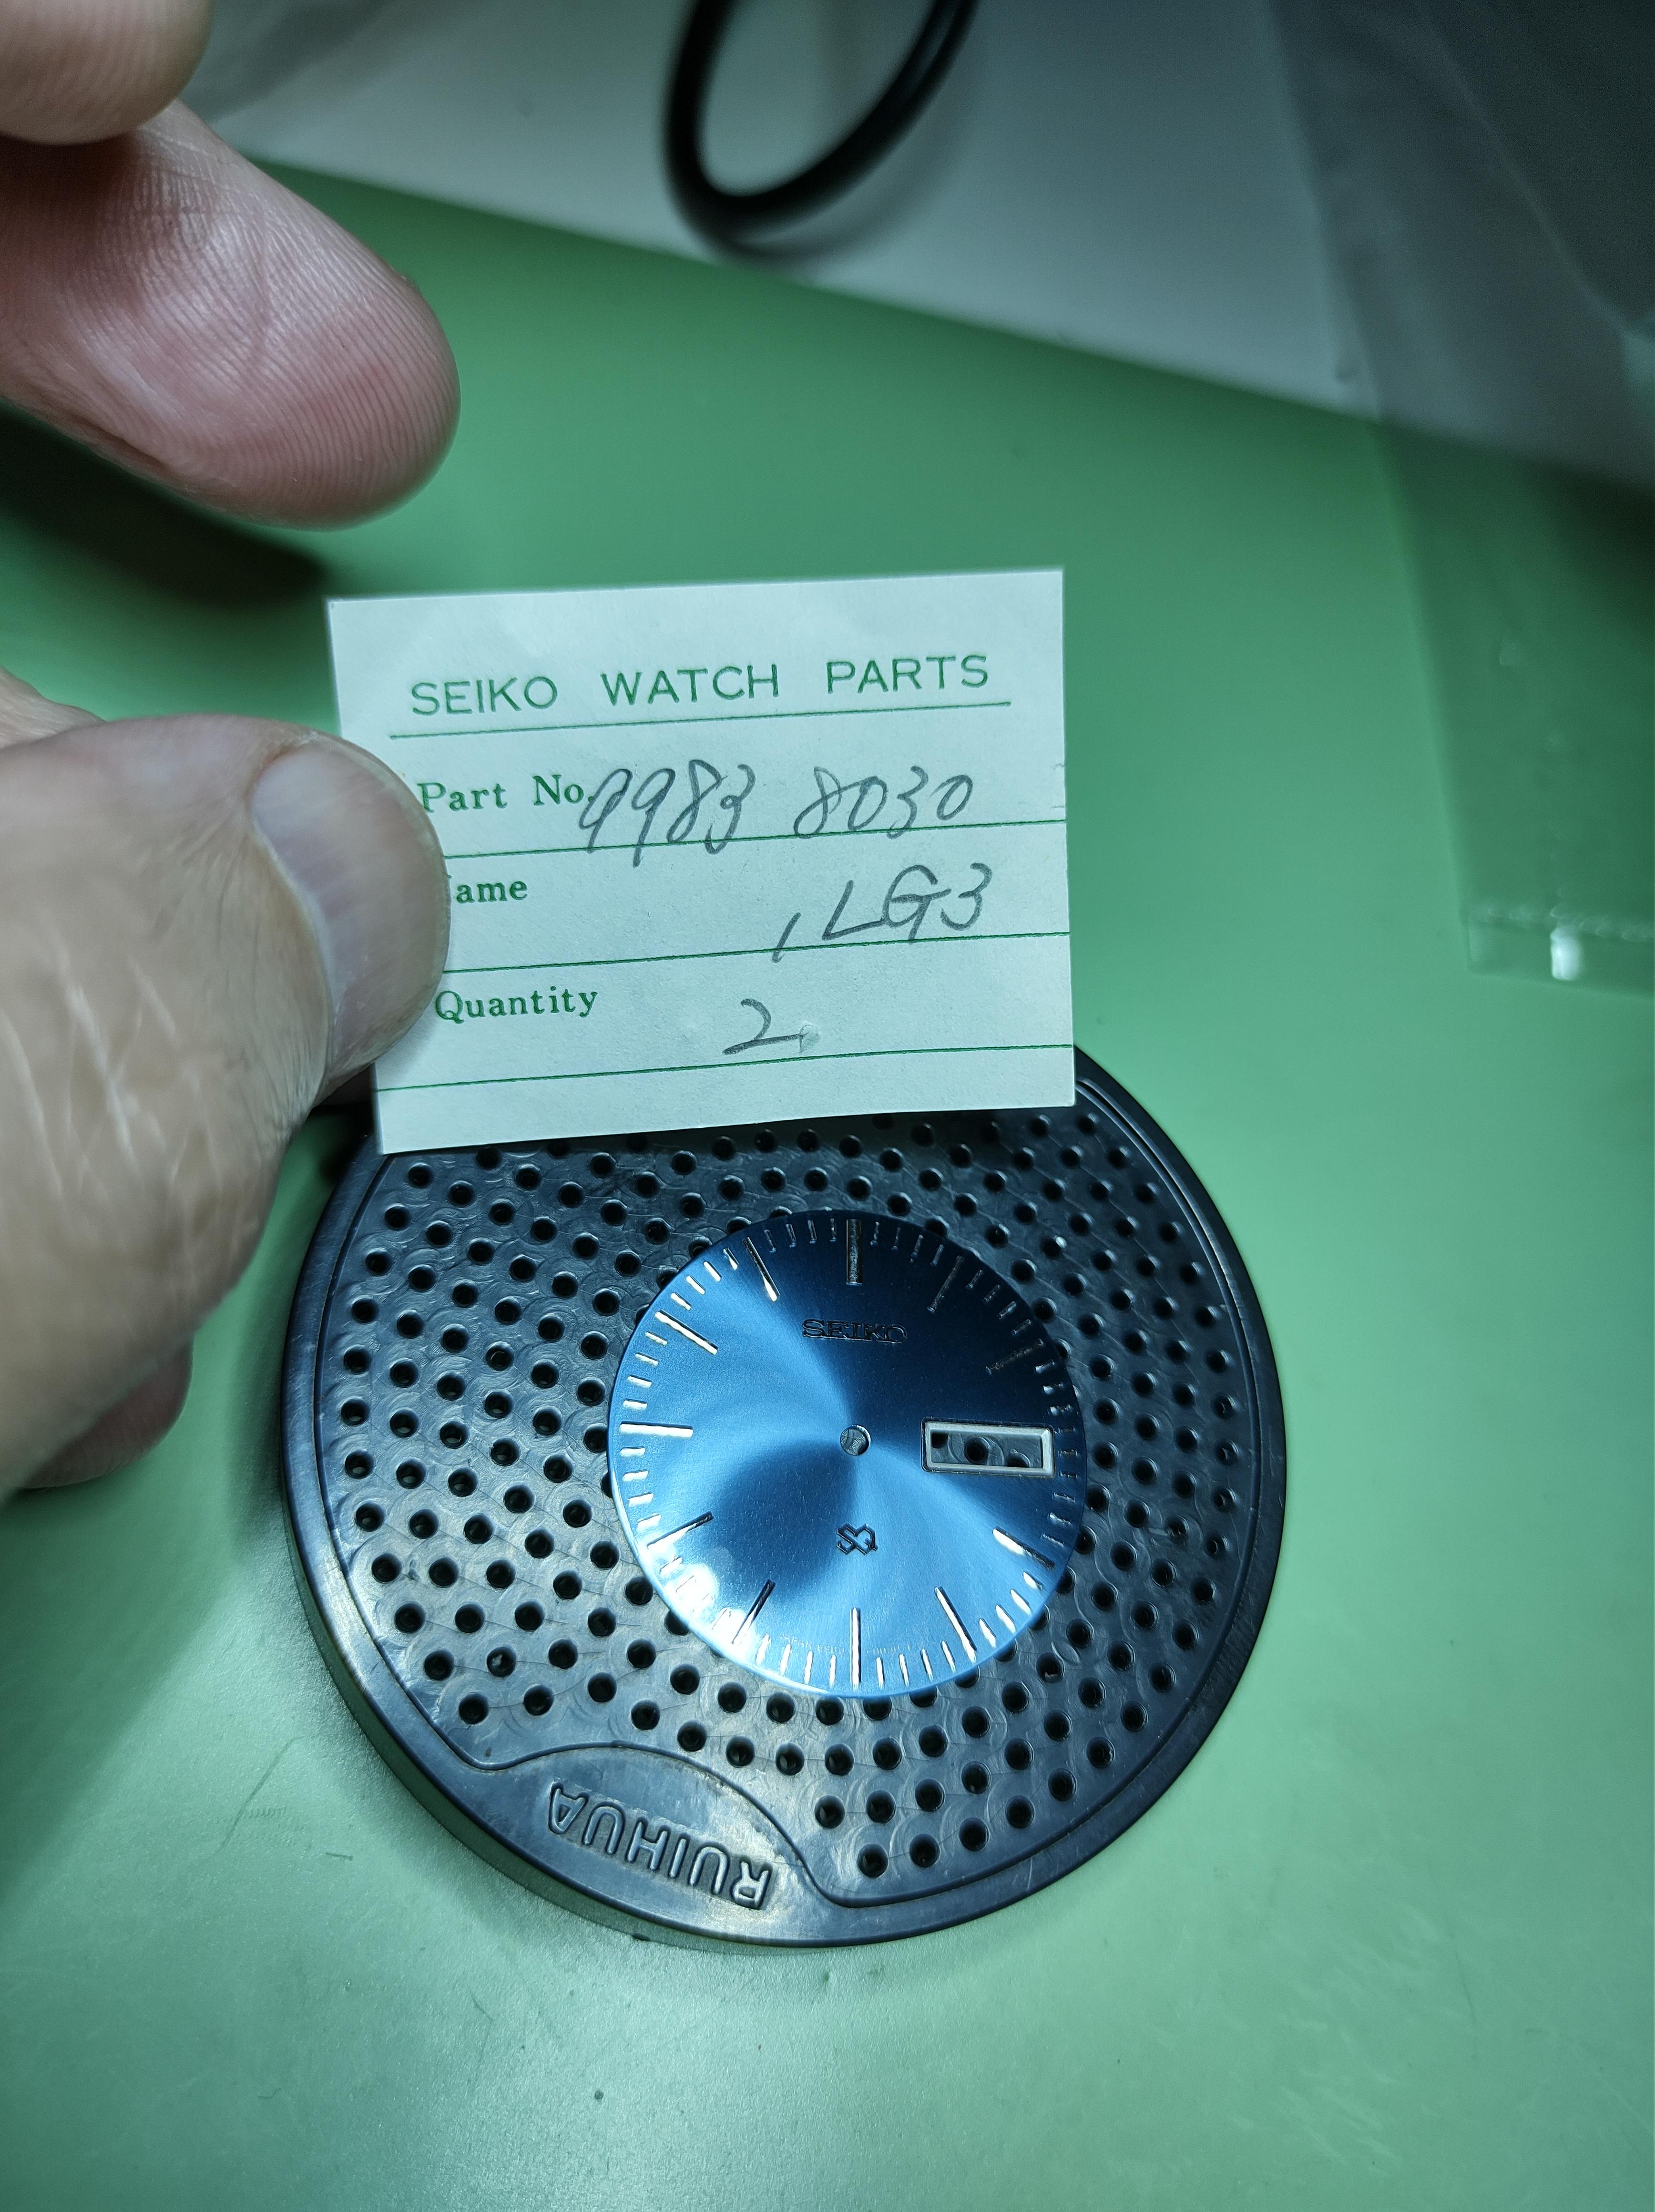
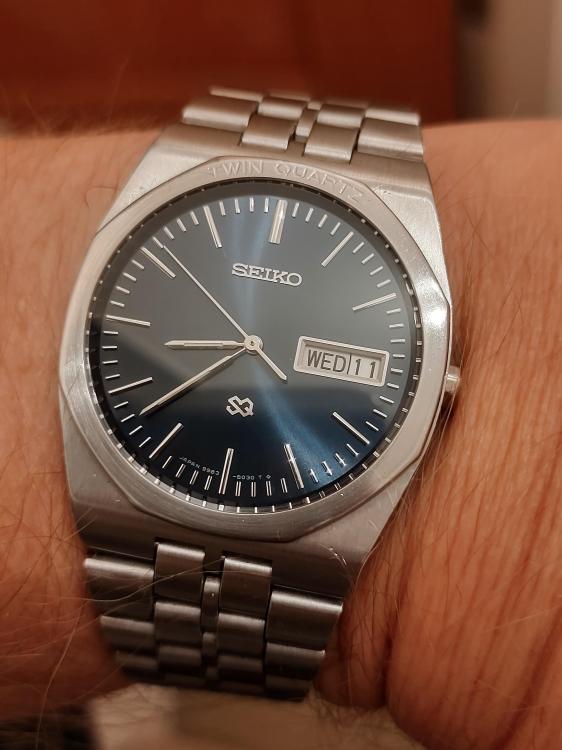
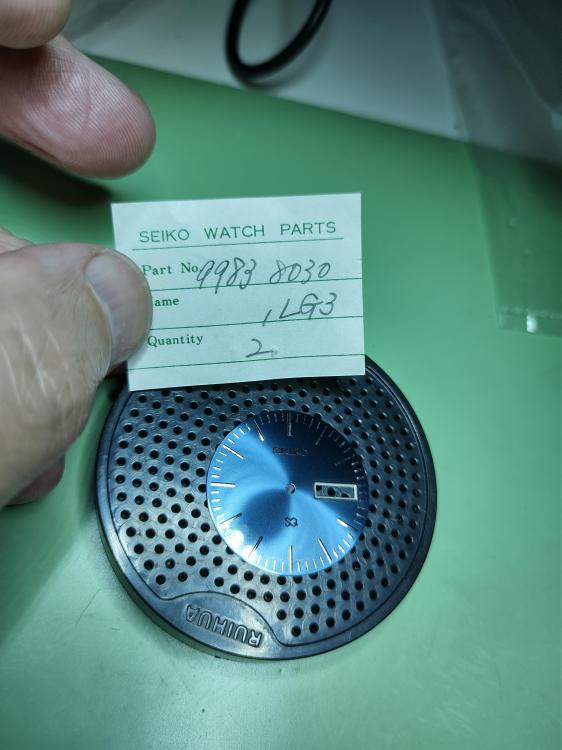
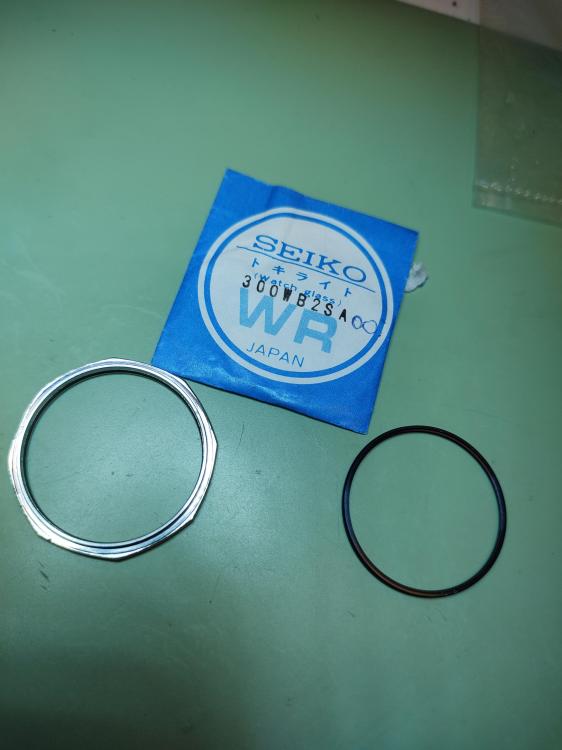
Seiko 9983-8039 Twin Quartz Finally got it running to spec across all temperatures+-5 Seconds per Year. Treated it to a new dial and crystal that I had been searching for for over 8 months. A single dial finally turned up on Cousins and I pounced on it along with the sapphire crystal. The equivalent JDM 'Superior Quartz' model apparently cost as much as a Toyota Corolla back in 1979. Cost my uncle £500 back then and that was a lot, more than a Rolex back then. Also did a bit of work on the case and bezel to bring it back a bit as it had had a really rough life.

 1 point
 -
I think that hook is for putting the wheels into there pivot holes between the clock plates.1 point
-
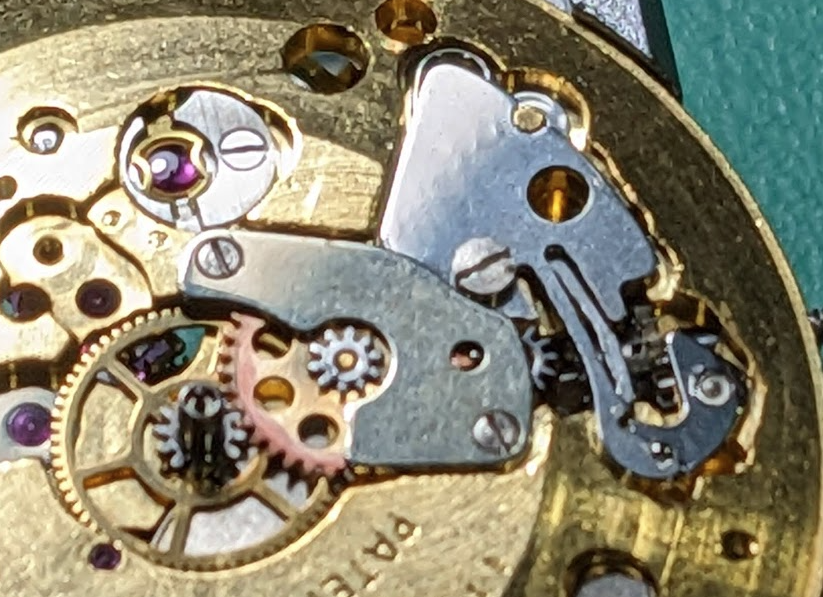
The reason the brake spring should be in the 6 O'clock position is because when the pinion turns in an anti-clockwise direction the pinion leaves should be dragging away from the end of the spring. In this orientation there is no chance the spring will catch on the pinion leaves as they turn, especially if the end of the spring is damaged in any way. If the spring was in a 12 O'clock position, which is incorrect, as the pinion leaves turn they are turning into the spring and as I've said if the end of the brake spring is damaged it may catch the pinion leaves and bring the watch to a stop as the spring lodges itself into a pinion leaf. In the 6 O'clock position this could not happen. This type of centre seconds hand, which is known as an 'indirectly driven' sweep second movement, as opposed to a directly driven sweep seconds movement, which has a fourth wheel passing through a hollow centre wheel or like ETA do it, the fourth wheel (which they call the 'seconds wheel'- not confusing at all!... lol) passing through a fixed centre pipe and cannon pinion and driving wheel which is synonymous with ETA design. Anyway, I got away from the point I was trying to make, that most modern watch designs don't tend to use a brake springs, sweep second pinions, or an 'indirect drive' sweep second design. These are old types of movement layouts. The spring that goes underneath the sweep second pinion obviously has a cock that goes over it, as the spring pushes the pinion upwards towards the jewel. The other sort is what you would find on vintage Rolex's and the like, with a brake spring on top of the sweep second pinion, as in the photo of this Rolex 1570 The problem is that because many fettlers have been at these types of watch movements and have fitted the second hand without properly supporting the pinion and brake spring by putting a small slither of mainspring between the the top of the pinion and the underside of the brake spring and then support the lot on a block as you fit the second hand, otherwise the spring will get a nice dent in it where it makes contact with the pinion and that will drastically decrease the amplitude. I would say about half of all brake springs of this type are dented. Always best to try and flatten it back out. The good thing about brake springs are if the amplitude is too high and causing knocking, you can increase the tension of the spring against the pinion to reduce it. In the ideal world, there should be just enough tension to stop 'flutter' or what is known as 'backlash' where the second hand stutters instead of sweeps. There should be no more than about a 10 to 20 degree drop in amplitude when the spring is fitted; the less the better without creating flutter
 1 point
 -
Pretty sure OH didn't mention politics, it was more an opinion of a complete muppet and lets face it thats a very light comment . Even his missus pulls a face when his brain shuts down. I occasionally see the odd one stagger past my microscope making his way home to the book shelf after a night out on my solvents.1 point