Leaderboard


Popular Content
Showing content with the highest reputation on 09/28/24 in Posts
-
Thanks, Jon! I assembled the automatic works this afternoon and although I haven't mounted it and tested it on the watch I expect it to work perfectly. I can't feel any shake spinning the rotor. Of course, there is some shake (or it wouldn't spin), but it appears minimal (as it should) and within the specifications so I feel pleased about that. Given how extremely loose the rotor was before I started the repair, I was worried that other parts, besides the axle, would be damaged, but that fear has been put to rest. There is not much remaining before I can return it to the owner!
 5 points
 -
It decreases friction. Depending on which braking grease you use will make a small difference to when the spring slips, as well as how much grease is used and the barrel material. I always use 8217 and have never had any real problems on a multitude of barrels from modern to vintage. I believe it is how much grease is used rather than which braking grease which makes the spring slip earlier or later, but that is my opinion and experience based on many barrels and springs3 points
-
I’m now eagerly awaiting the “I made my first pallet fork” post well done on your achievements @caseback Tom3 points
-
I was always under the impression that especially if you look up the definition of breaking grease is that it has holding power. In other words it holds in place like the mainspring allowing you to wind it up to a point of where it breaks free and then it actually is a grease of some sort up until it grabs again. Maybe I'm having one of my dyslexia moments and this is backwards? What's interesting about this is if you look at Seiko watches they literally fulfilled their mainspring barrels with graphite grease and they work fine. Because realistically any grease can be a breaking grease I think technically all lubrication's have a dampening effect anyway so that would mean all lubrication's have a breaking effect. But my experience with wrong type of grease on the barrel wall is that the mainspring will slip prematurely and when it slips degrees does a wonderful job and it continues the slip for quite some distance with zero breaking effect at all. On the other hand I remember once at work with the previous watchmaker when I was doing an automatic which typically I don't do anymore and I asked how to use the nasty black really sticky stuff I used way too much on the outer wall and then it had almost 0 breaking. It was a Seiko and is why you get up with the screw on the ratchet wheel like you're allowed to do and when it came time to break I thought the screw head was going to break off. So some breaking greases if applied to heavily will not break at all or very very difficult to break. It's a shame they used to be a really a wonderful video by perplxr Where he showed too much energy because of it wasn't breaking properly then he used the Rolex lubrication which looks like a very light toothpaste Probably Teflon base and he applied it around the entire outer wall which if you did that with the black grease would be no slipping at all and a case he went around the entire wall and that was the proper amount which brings up the problem of the various greases probably do have an ideal amount that you're supposed to use as opposed to one method fits all.2 points
-
https://www.scienceservices.eu/dumont-tweezers-style-25b-h-p-grade-inox-02-inventory-sale.html Have a look at the above link. Does that look familiar.2 points
-
I am with Richard. Though no means expert I suspect braking grease is more about creating a more constant coefficient of friction than you would get metal-to-metal with the surface variation on the barrel wall. My thinking is just enough braking grease will do this however too much will reduce friction potentially to the point there is none. probably totally wrong but this makes sense to me. Tom2 points
-
I will have to disagree this time.2 points
-
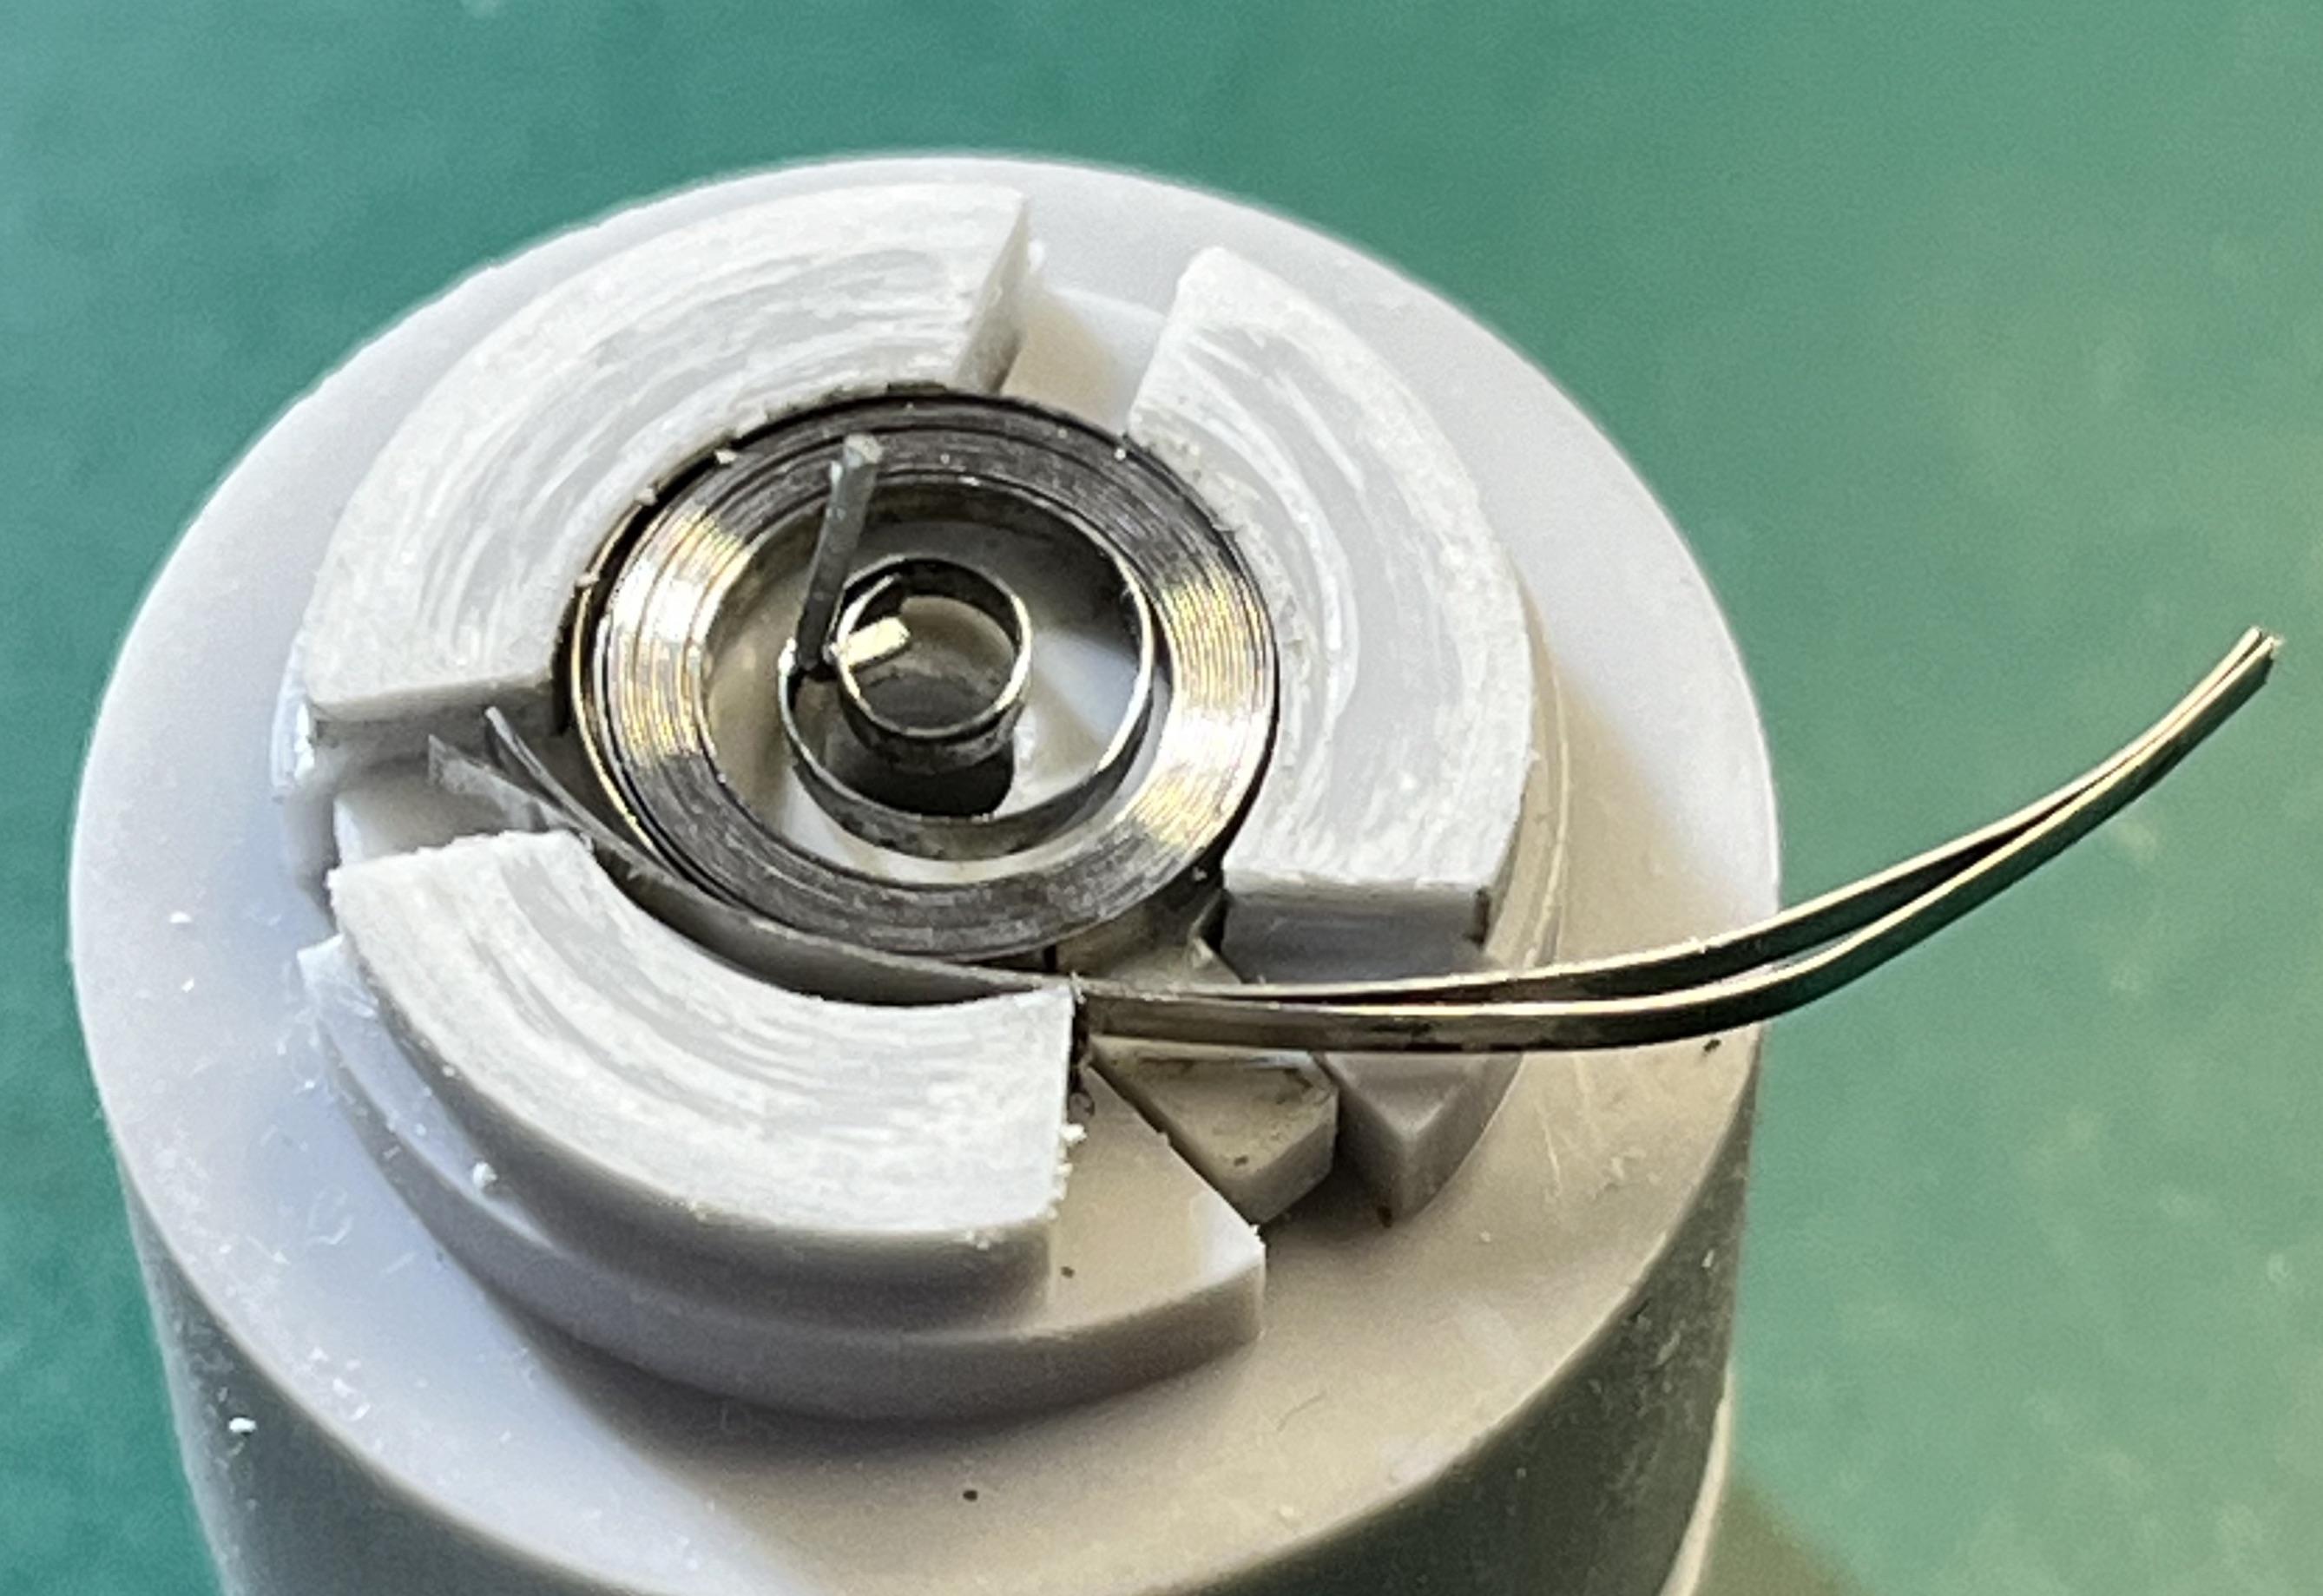
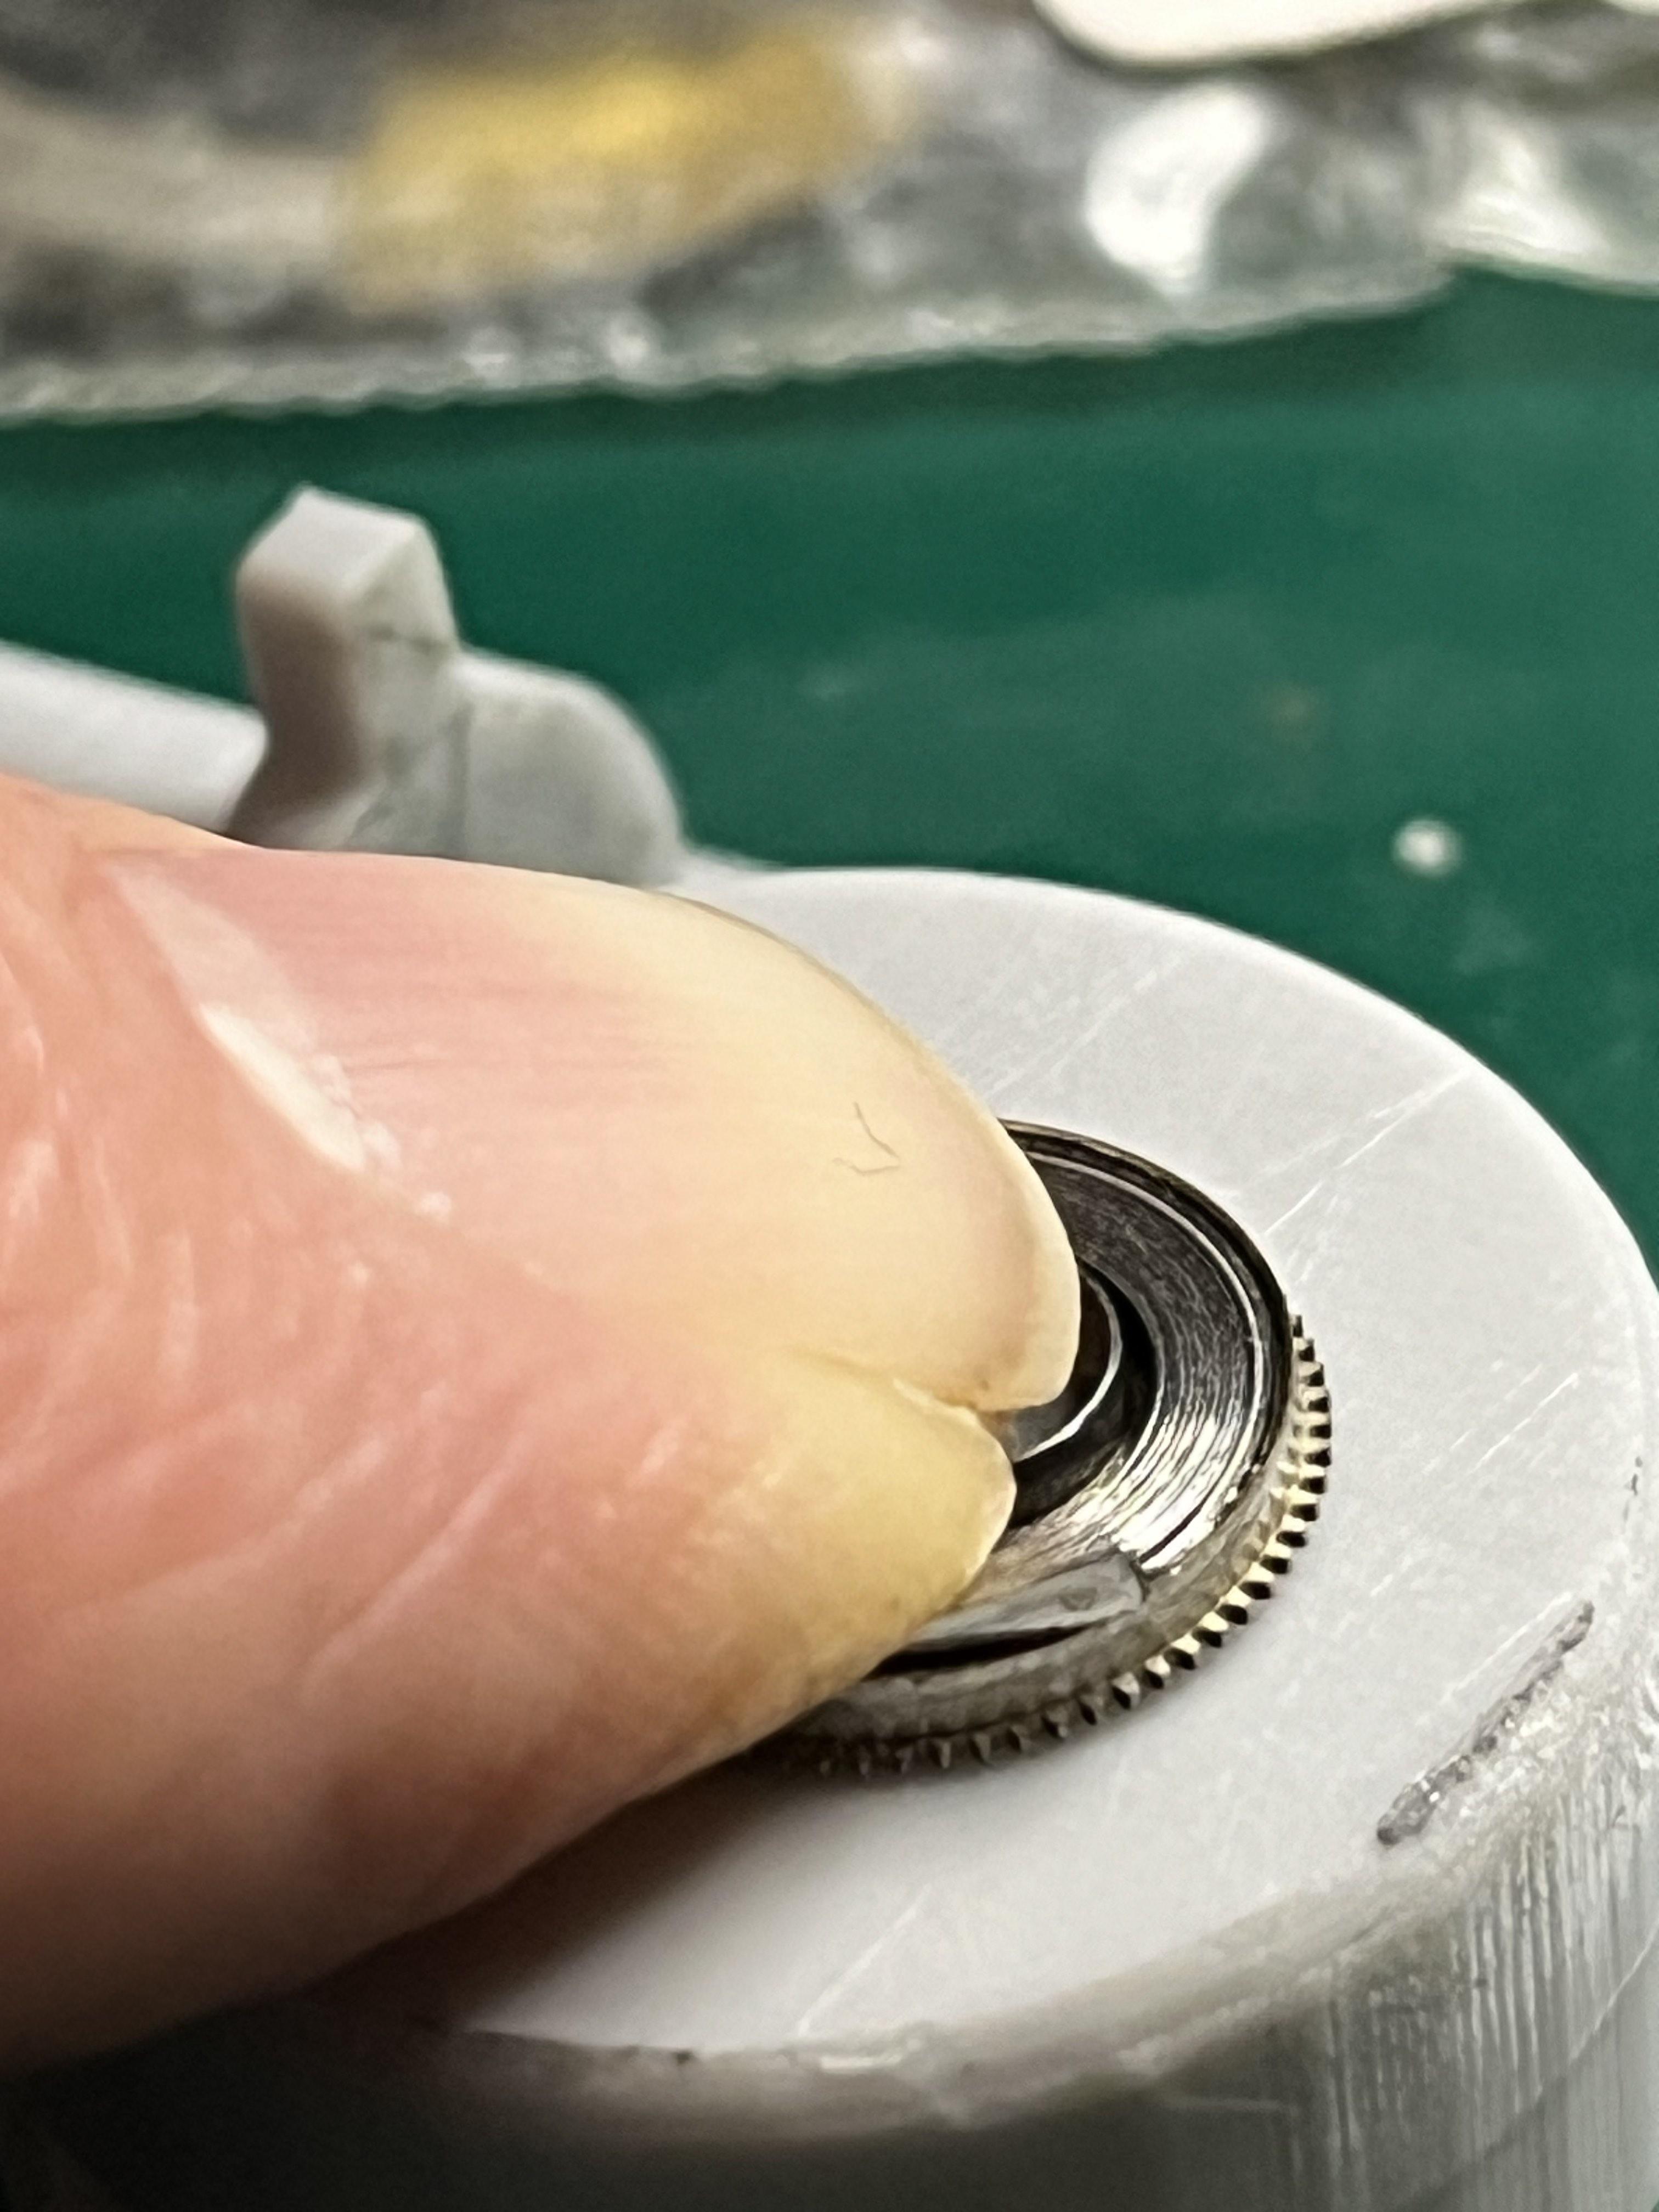
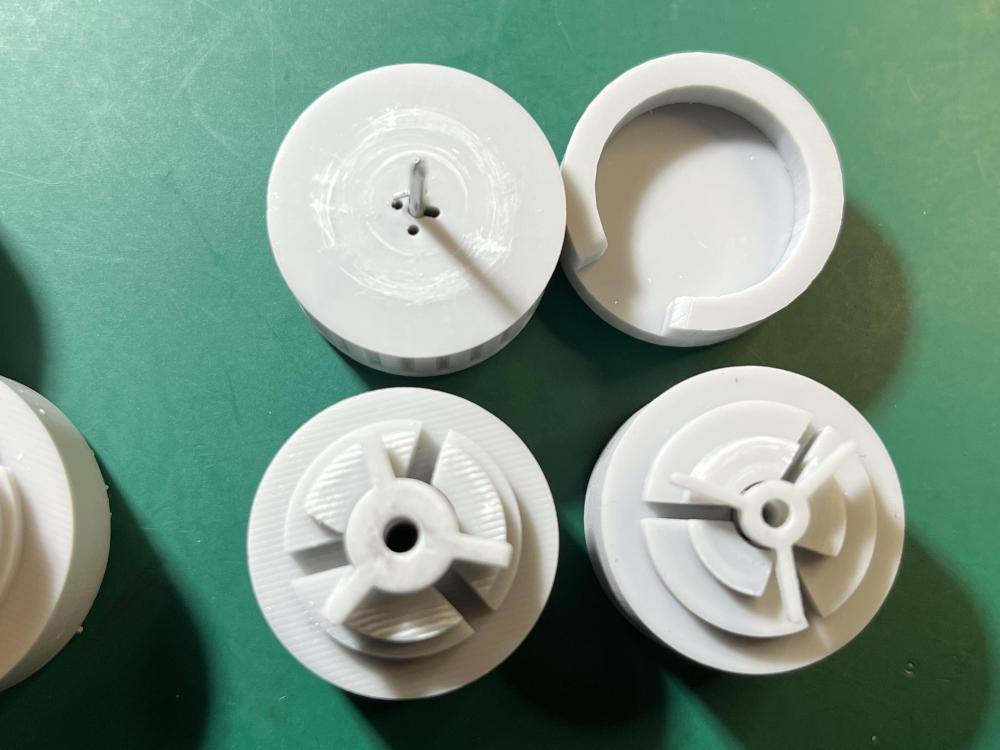
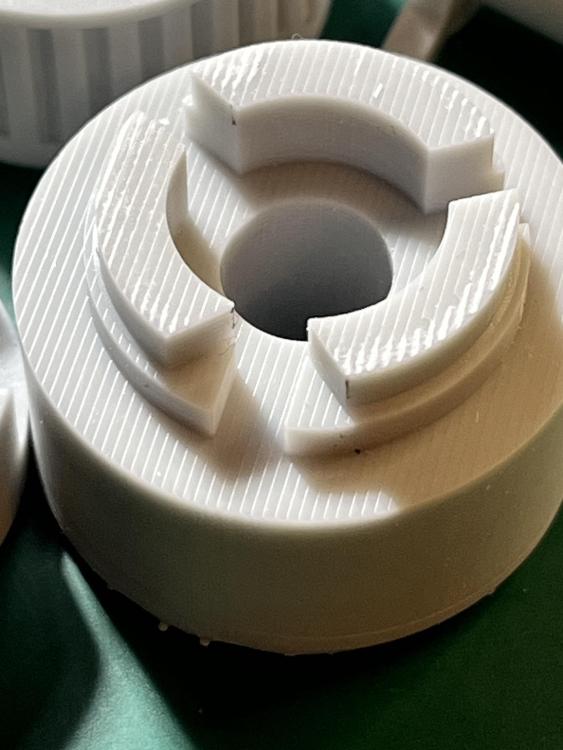
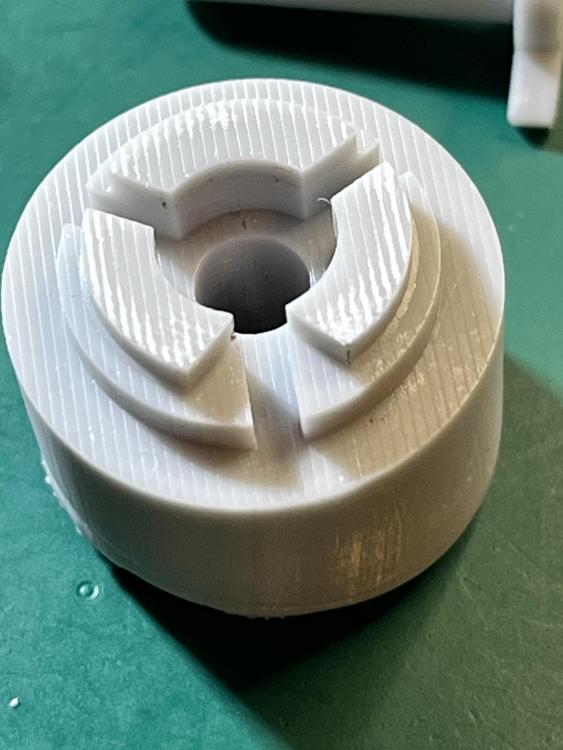
Here you go. 6.0: https://www.dropbox.com/scl/fo/gmw2oajp90cqg6rjgpqvf/ABjP2kUyq3uoIRF_bhv67XA?rlkey=hje4j5h4l9ygmq9bg5mzt25wb&st=uyqortxw&dl=0 6.5: https://www.dropbox.com/scl/fo/n2wcxy4iz1zholmpfwfx9/AG4BdCZIVCluwEpOySHLoRY?rlkey=md621fslbute05og5aykqwwo9&st=pl36794o&dl=0 and for good measure, here's one I made earlier, 5.5: https://www.dropbox.com/scl/fo/pjd7frxzcbe99ga96t4k0/ABgpEeXL3yF4nokmIqB4yk8?rlkey=jvdp4rhmi0hap8gxtdbj7x1zu&st=4voiirfc&dl=0 (I have used the 5.5 so I know it's ok.) I've done a couple of manual wind springs and feel I have a pretty good handle on winding them now, but I'm not having much success with automatic springs. In my first attempt, I had started to feed the bridle into the winder then when I was trying to wind it in, the arbor end broke (first pic below). Today trying another spring, when trying to 'encourage' the bridle into the winder I realised it was coming out one of the pusher holes ... the whole tail and bridle had snapped (second pic). Just now on a third practice spring I thought I had wound it successfully. I started the bridle in the winder then wound it in before gently releasing the tension. It looked good in the winder so I did the transfer to the barrel. I'd checked that the barrel was flush with the winder housing, then pushed the spring home, checking again that the plunger had come all the way down to the barrel, but as soon as I took the winder away the spring jumped out ... in two pieces, with the tail again broken off at the beginning of the bridle. I'm rapidly running out of automatic springs I can practice on. These springs were probably all 20+ years old, and the first two might be closer to 40 or 50 so it's possible that it was their time to break anyway, but if it's me, I want to work out what I might be doing wrong. Once the bridle is in position, should I just let the winder pull it in, or should I give it a push as well? The first one I tried to just pull in but it broke at the arbor. The second one I tried to give the bridle a push at the same time as winding to try to ease the pressure on the arbor, but ended up shearing off the tail. I don't know what the story was with the third, whether it was already broken when I tried to transfer it to the barrel, or if it broke as it flew out. Any suggestions?
 2 points
 -
I would use the existing staff to determine is this fork able to work correctly with this movement. This means the rear part to work well with the balance roller and the front part with the escape wheel. If You need guidance, I will explain everything that needs to be checked, but it will need some writing. Actually, the pallet fork is complicated part that have to comply with many things in the movement1 point
-
Hello and welcome from Leeds, England.1 point
-
Holding tissue/ skin they don't slip.1 point
-
Perhaps it's wise to check the condition of the movement first before further investing in parts. It looks like the dial has been damaged by the hour hand as well.1 point
-
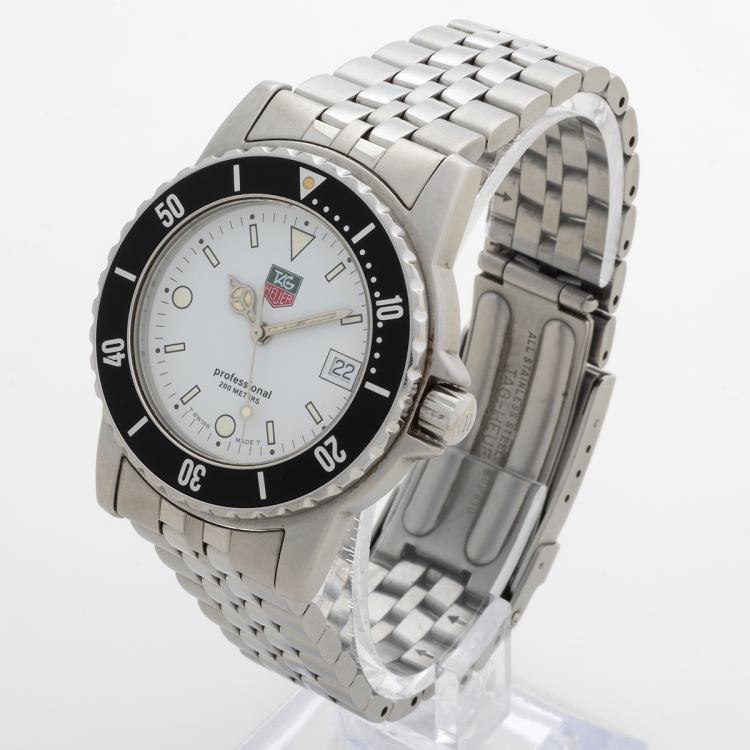
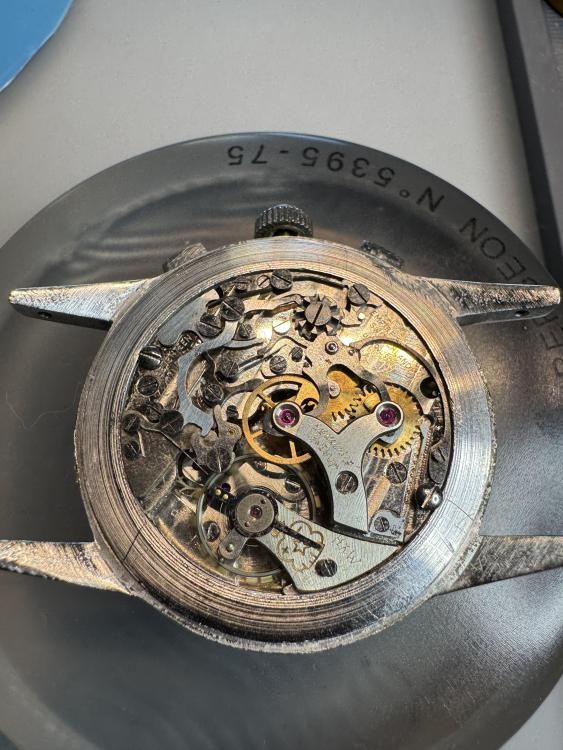
Welcome to the forum. Was it a screw down crown and can you post some dimensions based on this photo.
 1 point
 -
Living here in Indiana - USA - I can confirm the United States is a legal and political minefield at present. With a dumpster fire in the middle of it. And that is all I feel safe saying.1 point
-
That's what I'd try to do, but I'm lazy and they are not easy to find. Top marks to you for perseverance.1 point
-
Don‘t connect wires blindly and don‘t rely on colors! Check first if the wiring matches the schematic! Frank1 point
-
No truer words spoken1 point
-
I see 2 option, both of which are fraught with danger. Get a very thin blade and cut through the bar where it meets the lug. Drill out the bar in the slot to get to the spring and be able to retract it.1 point
-
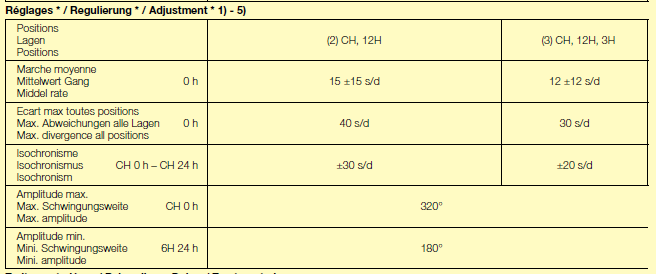
Actually You have more problems with the pallet fork. The entrance pallet is wrong - it is actually an exit one. The slope of the impulse plain is much bigger than it should be. Then the staff - Yes, it is threaded, but I don't remember how it should be on this Junghans. Seems like somebody modified the staff to fit here, the pivots look as shaped by almost blind watchmaker. Anyway, You can make new staff and there is no need it to be threaded, but have in mind that the fork can be deformed due the experiments of the previous master so the angles and distance between stones tips may need correction by deforming of the body of the fork. And the entrance pallet must be replaced, or reshaped at least.1 point
-
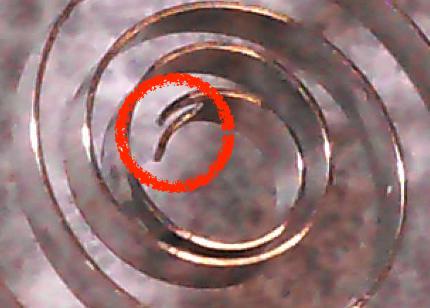
You need to rotate the hairspring. You can usually do it by pushing something sharp in to the gap in the collet, and rotating it. See here for how to get it the correct position (you don't need to be exact as you have an adjustable stud holder)1 point
-
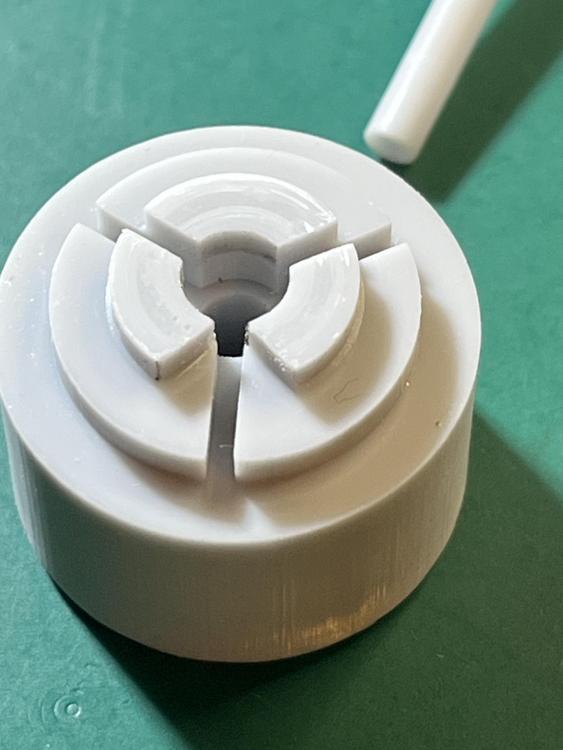
Follow-up: I've been practicing with another spring from a donor movement and I think I've sussed what's happening. My first failure may have been because I hadn't started the bridle properly. It wants to go in around the spring in the barrel rather than alongside, and that may be why the arbor end failed before it wound in. My second failure may be because I was pushing instead of letting the spring draw the tail and bridle in. My third failure I think I have been able to reproduce a little less destructively. The end of the spring is not being pushed out but catching between the housing and the plunger. I repeated the process, taking photos at each step to be sure. Below is the pic just after plunging into the barrel but before pulling the winder away. After plunging, however, when I lifted the winder away the barrel lifted away with it ... something was caught. Gently easing the barrel away revealed that the end of the spring was not in the barrel (second pic). I walked the spring out of the barrel and did the winding process again. This time I took a pic of the spring in the winder after using the bowl setter (third pic). Here you can see the very end of the spring, left, has not been properly set for positioning into the barrel. I think the fix is to re-print the plungers with a snugger fit to the housing. Has nobody else experienced this?

 1 point
 -
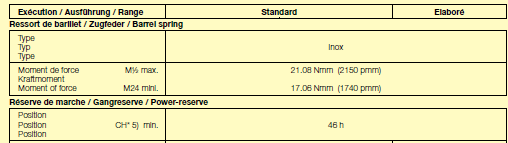
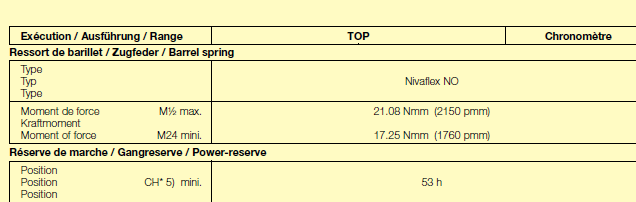
The running time of the watches by the design of the watch with the length of the mainspring being very important. So in other ways we can get you a really powerful mainspring that's really short and you're going to have no run time at all. This is a interesting solution because? I would be really curious as to where you found the listing for ETA and the mainspring. The problem is for the 6498 it's been around forever and specifications of the mainspring are readily available. But the – two version does not come up in the typical parts listing that I look at. But let's look at the technical documentation. In the technical communication for the 6498 –1 We get a minimum running time of 46 hours with atypical of 53 hours. With the problem of the modern tech sheet not even giving a part number other than a note of variations? It's the problem of the modern documentation that even if we did get a part number it's typically going to be for the barrel complete I need to find a much older documents. But let's see what happens with the newer version for the running time they just say 53 hours. For better idea currently looking at bestfit online and I know we discussed the mainspring before and I know they're supposed to be different. So according to the listing the mainspring barrels themselves have differing part numbers and the barrel arbor is different. Five over going to get as is what typically happens which is why there's an assumption that they're both the same when I'm surely not all we do get is a mainspring listing for the original one which is this MSPG 6X5X18.5 48-16L. Now for nitpicky manufacturing information for the 1 version is slightly different than the second version but not much. - 2 version One last thing to look at which is somebody has a list of mainspring winder sizes versus watch calibers. The tool diameters the same at 14.6 mm but the winders themselves have a minor size difference I wonder if perhaps there's a slight difference in length of the Springs?The -1 4.5 mm versus the -2 at 4.0 mm. Sometimes I wonder about these modern newfangled cleaning methods that How many of the rest of us are using this? One of the reasons I bring this up is I saw a nice article on refinishing clock pivots where they use the electron microscope. Where sometimes things that are bright shiny in reality are not actually good pivots they only look bright and shiny but looking at the website here of providing you get the right grit it does indicate you can polish but the wrong Grit you could start doing damaged your pivots https://eternaltools.com/products/eveflex-mounted-rubber-polishing-burrs Then I'm not sure what you meant by you didn't disassemble but you do need to expose ideally your cleaning fluid to the pivots themselves and disassemble the jewel assembly to get them clean. Amplitude versus positional errors is really quite interesting. Which becomes quite amusing for this group where they would be very unhappy if your watch did 220°. But if you can have a watch running at 220° for 50 hours it would providing nothing else was incorrect would keep phenomenal timekeeping. Versus this group that wants to see a certain minimum amplitude or else of very very high and almost never pays attention the amplitude 24 hours Here's an interesting image out of the Greiner timing machine manual. We can say that has the amplitude goes beyond 220° there is less influence on positional errors then at lower Amplitudes Now let's go back to the original problem is your watch behaving as the manufactured specified? So for the – one version they're not as obsessed with timekeeping as much as they were with the – two version. In other words here they're only looking at into positions versus three for the newer and the amplitude is different at least for the low amplitude here the older version as long as you're over 180° at 24 hours that would be acceptable providing a watch is still keeping time contrary to this discussion group the most important thing to a consumer or typically a watch owner is does my watch keep time. Then by keeping time that does not mean impressing the timing machine that means 24 hours later your watch is still on time now back to your original problem of I assume your winding up the watch nice and tight are probably not following a timing procedure of letting it run about 15 minutes before placing it on the timing machine? So which case you're going to artificially high numbers. As you can see ETA could care less about amplitude at the maximum other than not exceeding the maximum but your vertical positions are dropping way too low and my guess of me at 24 hours you're going to fall below the minimum to your watch is having a problem.
 1 point
 -
You can make a better staff than that one with your eyes closed!1 point
-
If your government wants to persecute people for their political views, they will always find a way, through the legal system or otherwise.1 point
-
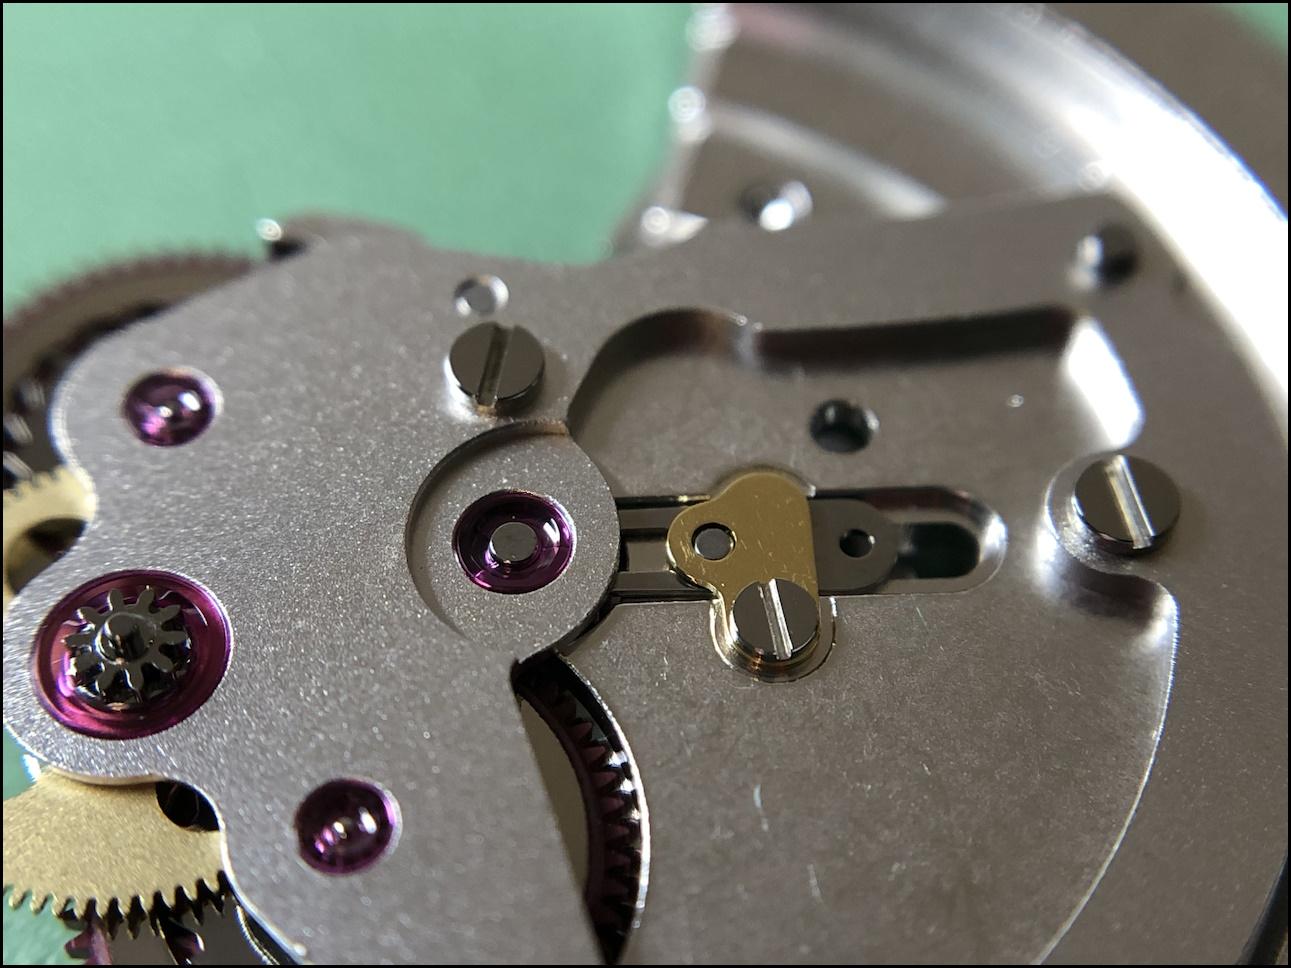
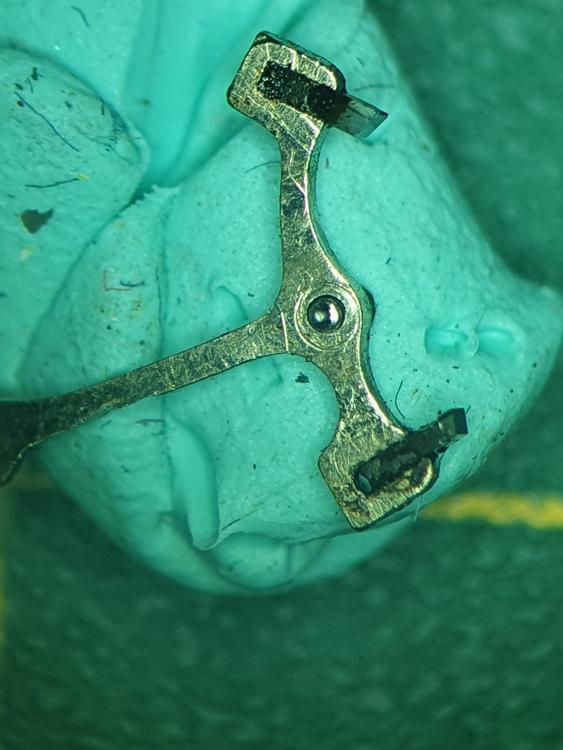
My plan for tonight was to assemble the balance complete and get it on the main plate with the pallet fork to check if that fit was ok as well. When I fitted the pallet fork, I noticed a lot(!) of play. Turned out the staff is loose.. Someone has put a hammer on it by the looks of it. So, apart from the brokenbalance staff, the bent balance cock, the bent extended pivot for the sub seconds hand and the missing tooth on the rachet wheel, I also have to fix the pallet fork (and apply some fresh shellac). Nice project. At least I got the balance spinning nicely. Added: I removed the pallet fork staff. This is turning out to be a project with a lot of new challenges for me. I'll probably have to make a new staff for the pallet fork as well.
 1 point
 -
Any part of the housing will do. on my Elma, there is no earth going to the motor, as it is earthed in the housing where the timer is. I've attached a photo of the red earth wire (50s German wiring) earthing at the rheostat switch. If it is tripping with an earth in place. I would find out why before using it. There is no way anyone in their right mind would use this without an earth.
 1 point
 -
Usually you'd be fine connecting it to a random metal piece of the housing. But, could it be cut because it made a earth leakage circuit breaker trip perhaps?1 point
-
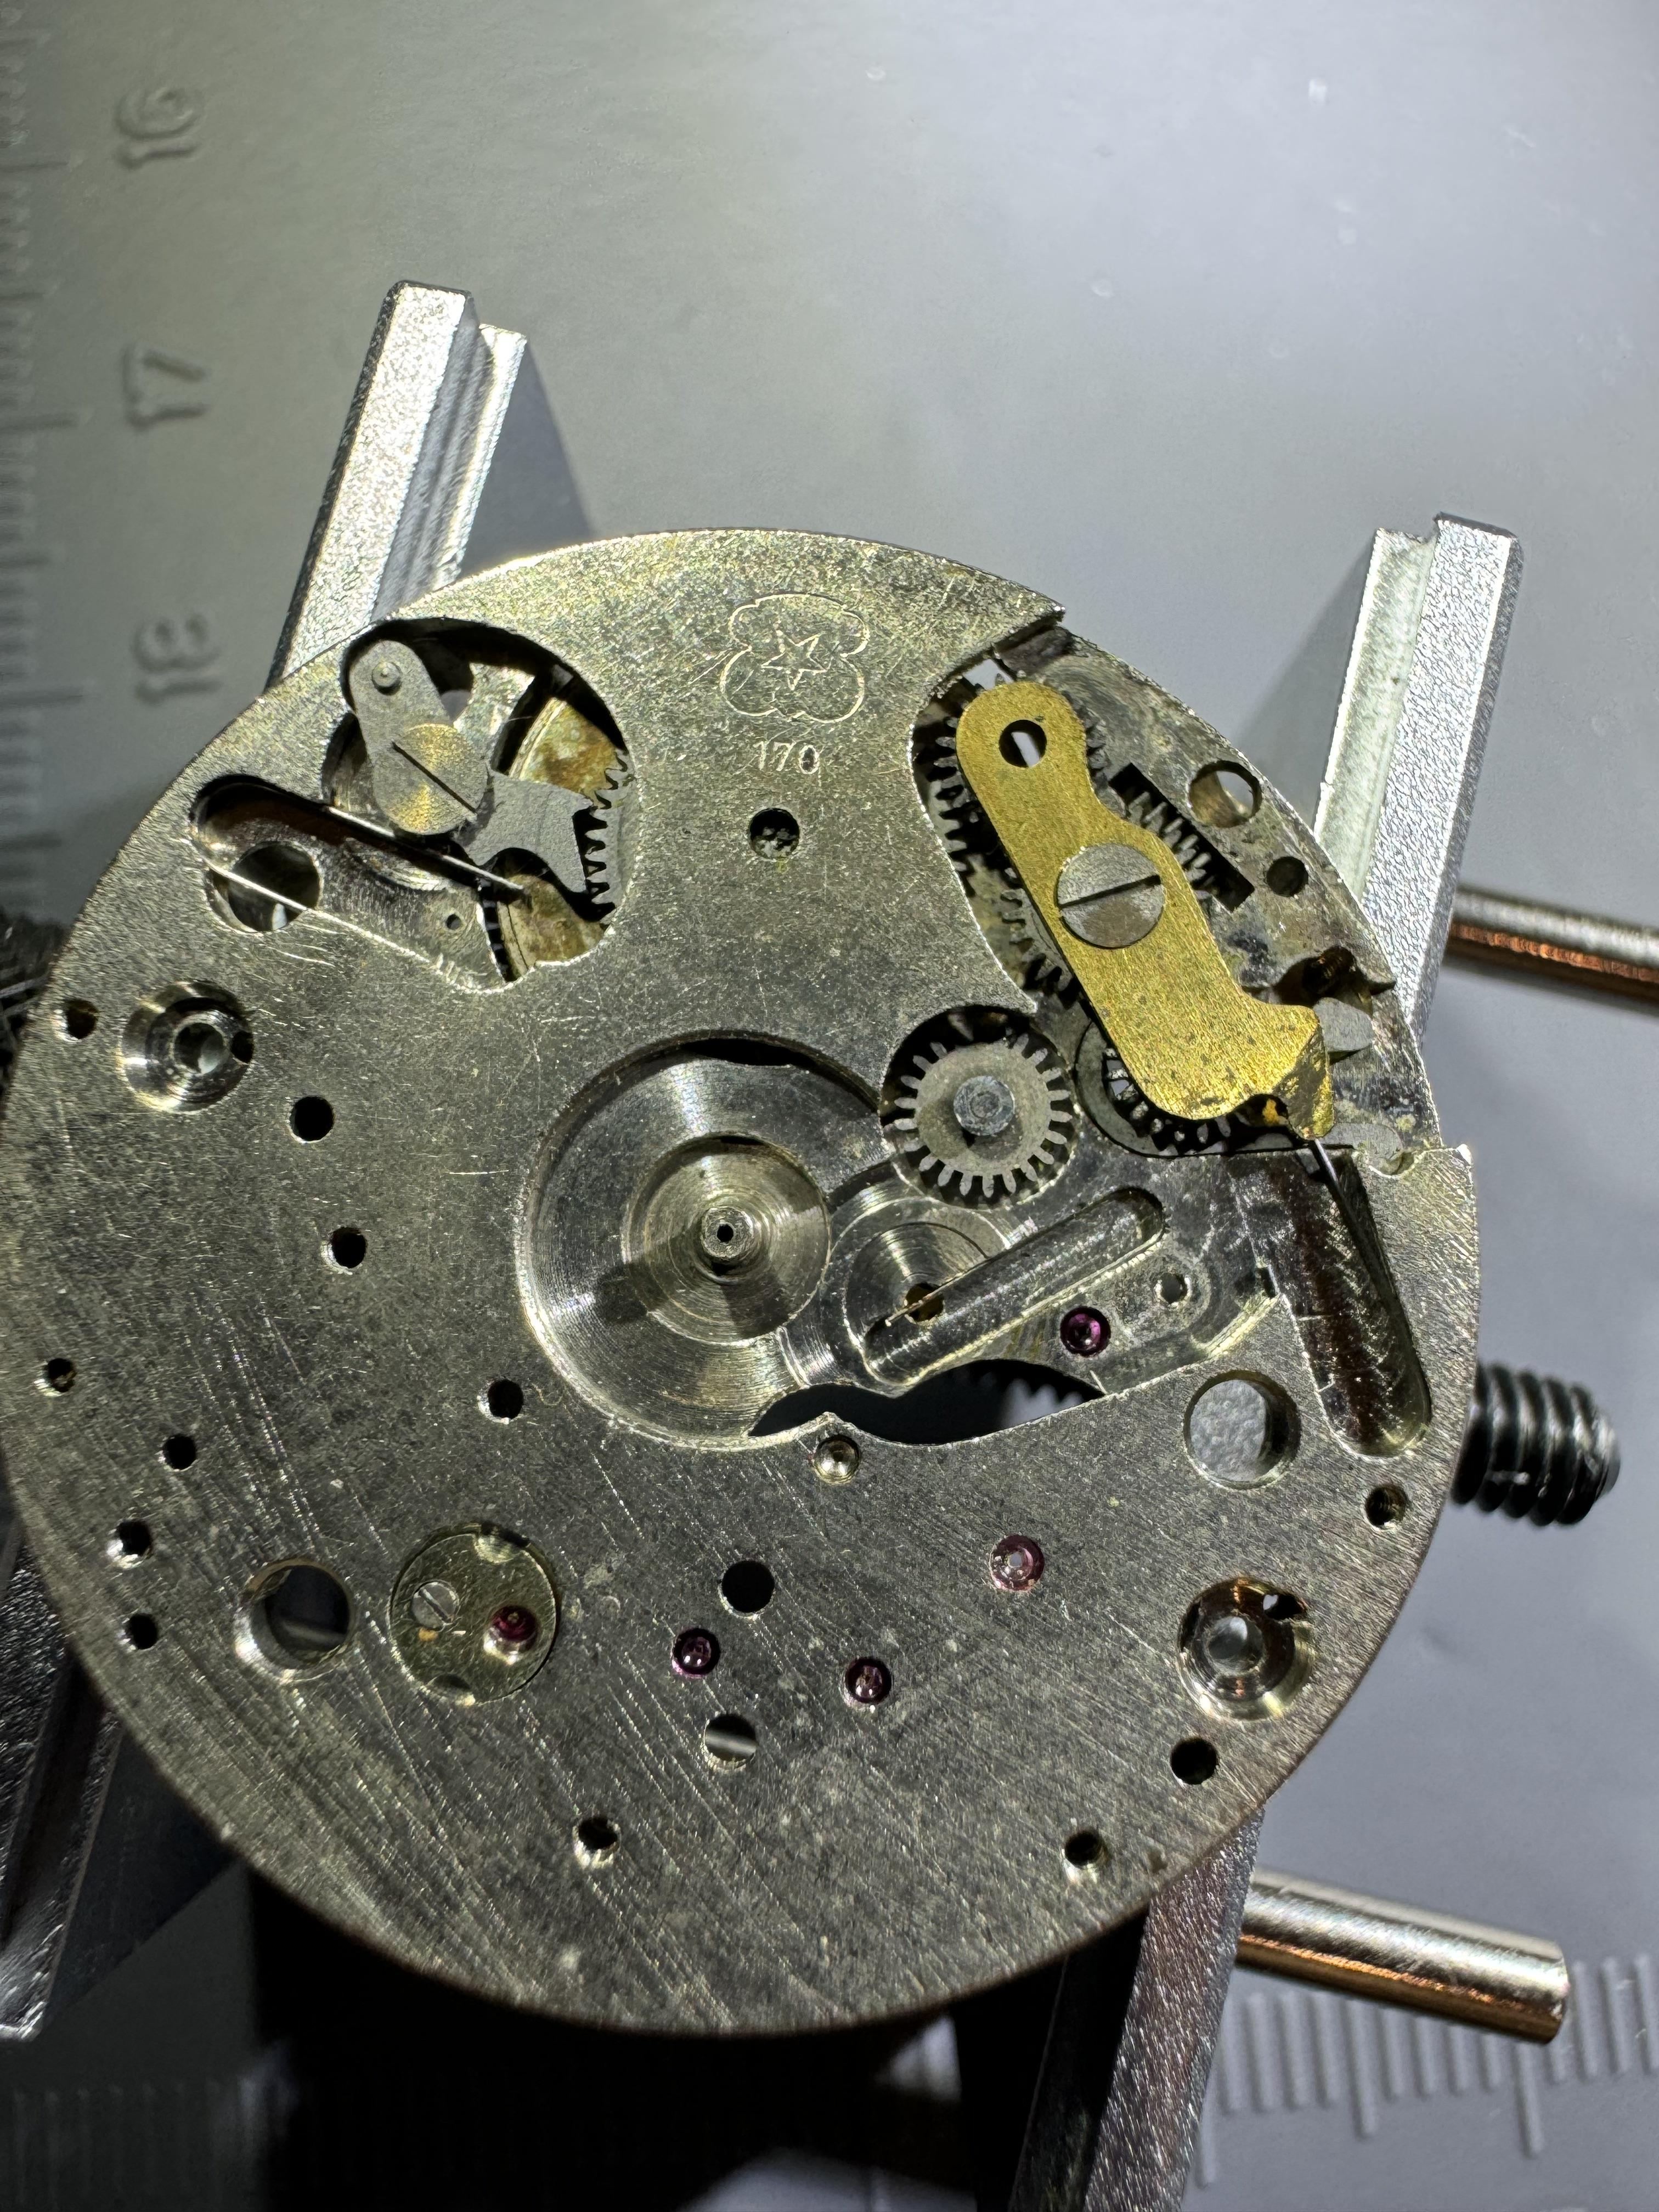
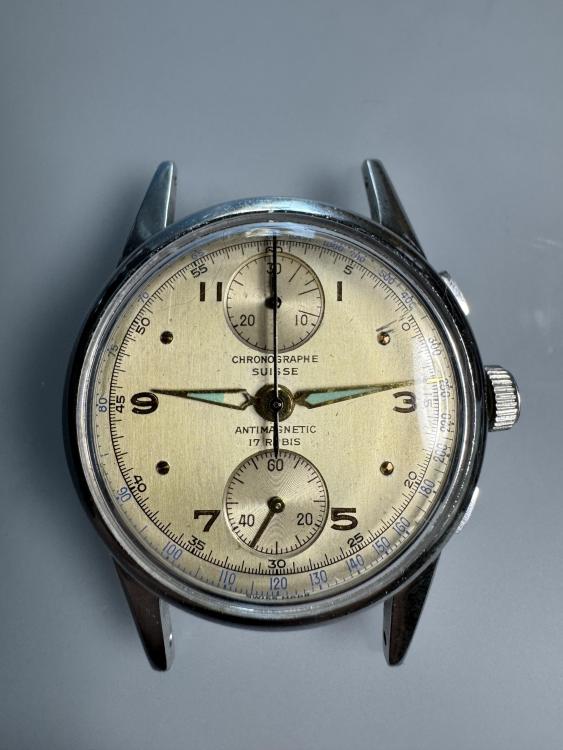
I just finished a somewhat long running restoration on a Chronographe Suisse Venus 170, and as a new forum member I wanted to share some thoughts on the movement based on my experiences with it in the hopes it might be helpful or perhaps spark an interesting discussion. First off, the Venus 170 seems to be well regarded, and it does have some nice features, including the column wheel mechanism, the use of an oscillating pinion to for chronograph engagement, and the fact that the top/bottom orientation of the subdials allows the stop/start button to be placed immediately adjacent to the column wheel, which in turn makes for very smooth and low-effort actuation of the chronograph functions. All that said, the Venus 170 has some... interesting design choices that make this movement, in my admittedly limited experience, a somewhat cantankerous beast, even compared to later chronograph movements (for the record, I have also restored several subsequent common chronograph movements at this point including the Venus 188 and 200, Landeron 48 and 149, and a Valjoux 236). Here are some of the things I didn't like, as a watchmaker, about this movement: First off, the chronograph operation depends on several rather small and delicate springs. Only two are of the more robust "engineered" type - the column wheel jumper and the hammer spring. The others are cheap "bent wire" springs that tend to get a little tired with age, which can lead to unreliable operation. Most of the chronographs I have worked on have a very simple & classic train-of-wheels layout. Not so the 170, which has a offset 2nd wheel and canon pinion, which is significantly more difficult to remove than a convention center canon pinion. It also has an unusual keyless & motion works design to go with it (pictured above). The use of rocker bar mechanism for the keyless works, as opposed to the more typical (at least in swiss movements) sliding clutch makes sense, as it allows the winding wheel and click to be placed on the dial side, away from the chronograph parts. A bit more baffling (at least to me) is the design of the motion works, which uses a wigwag mechanism for the minute wheel with a spring tensioner, which you can see in the photo with the minute wheel removed. I'm generally pretty good at puzzling out the rationale behind even odd or unusual design choices in watch movements at this point, but I have not been able to deduce why this wigwag design was necessary, and it was the source of multiple headaches when I was trying to get the watch working properly. In particular, the wigwag-ing minute wheel tends to disengage from the hour wheel if there is even a small amount of friction affecting the minute pinion or hour wheel, particularly when the setting mode is engaged and the watch is adjusted in the retrograde (counter clockwise) direction. This combined with the fact that the minute pinion (which fits around a fixed post in the center of the movement as the canon pinion is offset) and the hour wheel are closely coupled and fit together very snugly means that it is very easy to provoke this mechanism such that the minute and hour hand actually start moving together, which completely throws off the hand alignment in a way that can only be fixed by taking the hands off (at least this particular Chronograph Suisse model has a removable bezel so you can do this without uncasing the movement, but removing and re-installing the chronograph second hand is a huge PITA since it has to be aligned so carefully!). I wrestled with this problem quite a bit, ultimately resorting to polishing the interior and bottom of the hour wheel to minimize friction with the minute pinion and applying more lubrication to these parts than I normally would, before I got the watch in a state where I could set the time reliably. By the way, I had to steal some parts from a donor movement in order to get this watch running, and another thing I noticed is that there were some surprisingly significant design differences between the two movements, even though they were both Venus 170. This meant that, while most of the parts were interchangeable, some were not. A good thing to keep in mind if you're working on one of these. In any event, I know the 170 is much-loved, but in general I can see why later chronograph movements by Venus and others didn't carry forward some of these unusual design decisions.
 1 point
 -
I have a healthy mistrust of the administrative state. There was a case in USA where the Lacy act was used as lawfare against Gibson Guitar company because they held the incorrect political views.1 point
-
It looks like there is an earth screw inside the main casing, with a green & yellow wire coming out of the left hand switch & going to it? Can you put a solder tag or crimp eylet on the stray wire and add it to that screw?1 point
-
Yes, if there is a poise error - and there always is. We had discussed this in several threads about dynamic poising or just poising. Frank1 point
-
Hello, a stronger mainspring cannot heal a too big difference between flat and vertical amplitude, it will just shift values to a higher range. Reasons are elsewhere as mentioned by nickelsilver. And you do not want 275 deg vertical, for you will get differing rates in the vertical positions then - 220 is optimal. Frank1 point
-
ETA lists the same spring for the 6497-1 and -2, at a thickness of 0.175mm (GR 4307-1). It's not uncommon though for a maker to use a stronger spring when going to a higher frequency on the same base caliber. The 6497-1 is 18,000bph, the -2 is 21,600. Perhaps the ST36, which is 21,600bph, does use a stronger spring. It doesn't take much to cause rebanking. An old Unitas 6497 that's hitting 275 in horizontal really shouldn't see more than 40 degrees drop in verticals. Could be a pivot issue with the balance, or if the locks on the escapement are a bit heavy that shows up more in the verticals. Curious what the size difference is between the mainsprings.1 point
-
The chinese spring may not be correct for the Unitas movement. You could measure the chinese spring, then compare it with the recommended dimensions for the Unitas movement. If they are different, as I suspect, buy the correct spring. Or you could just be satisfied with the old spring. A 10 second delta across the positions is not bad. What do you see after 24h?1 point
-
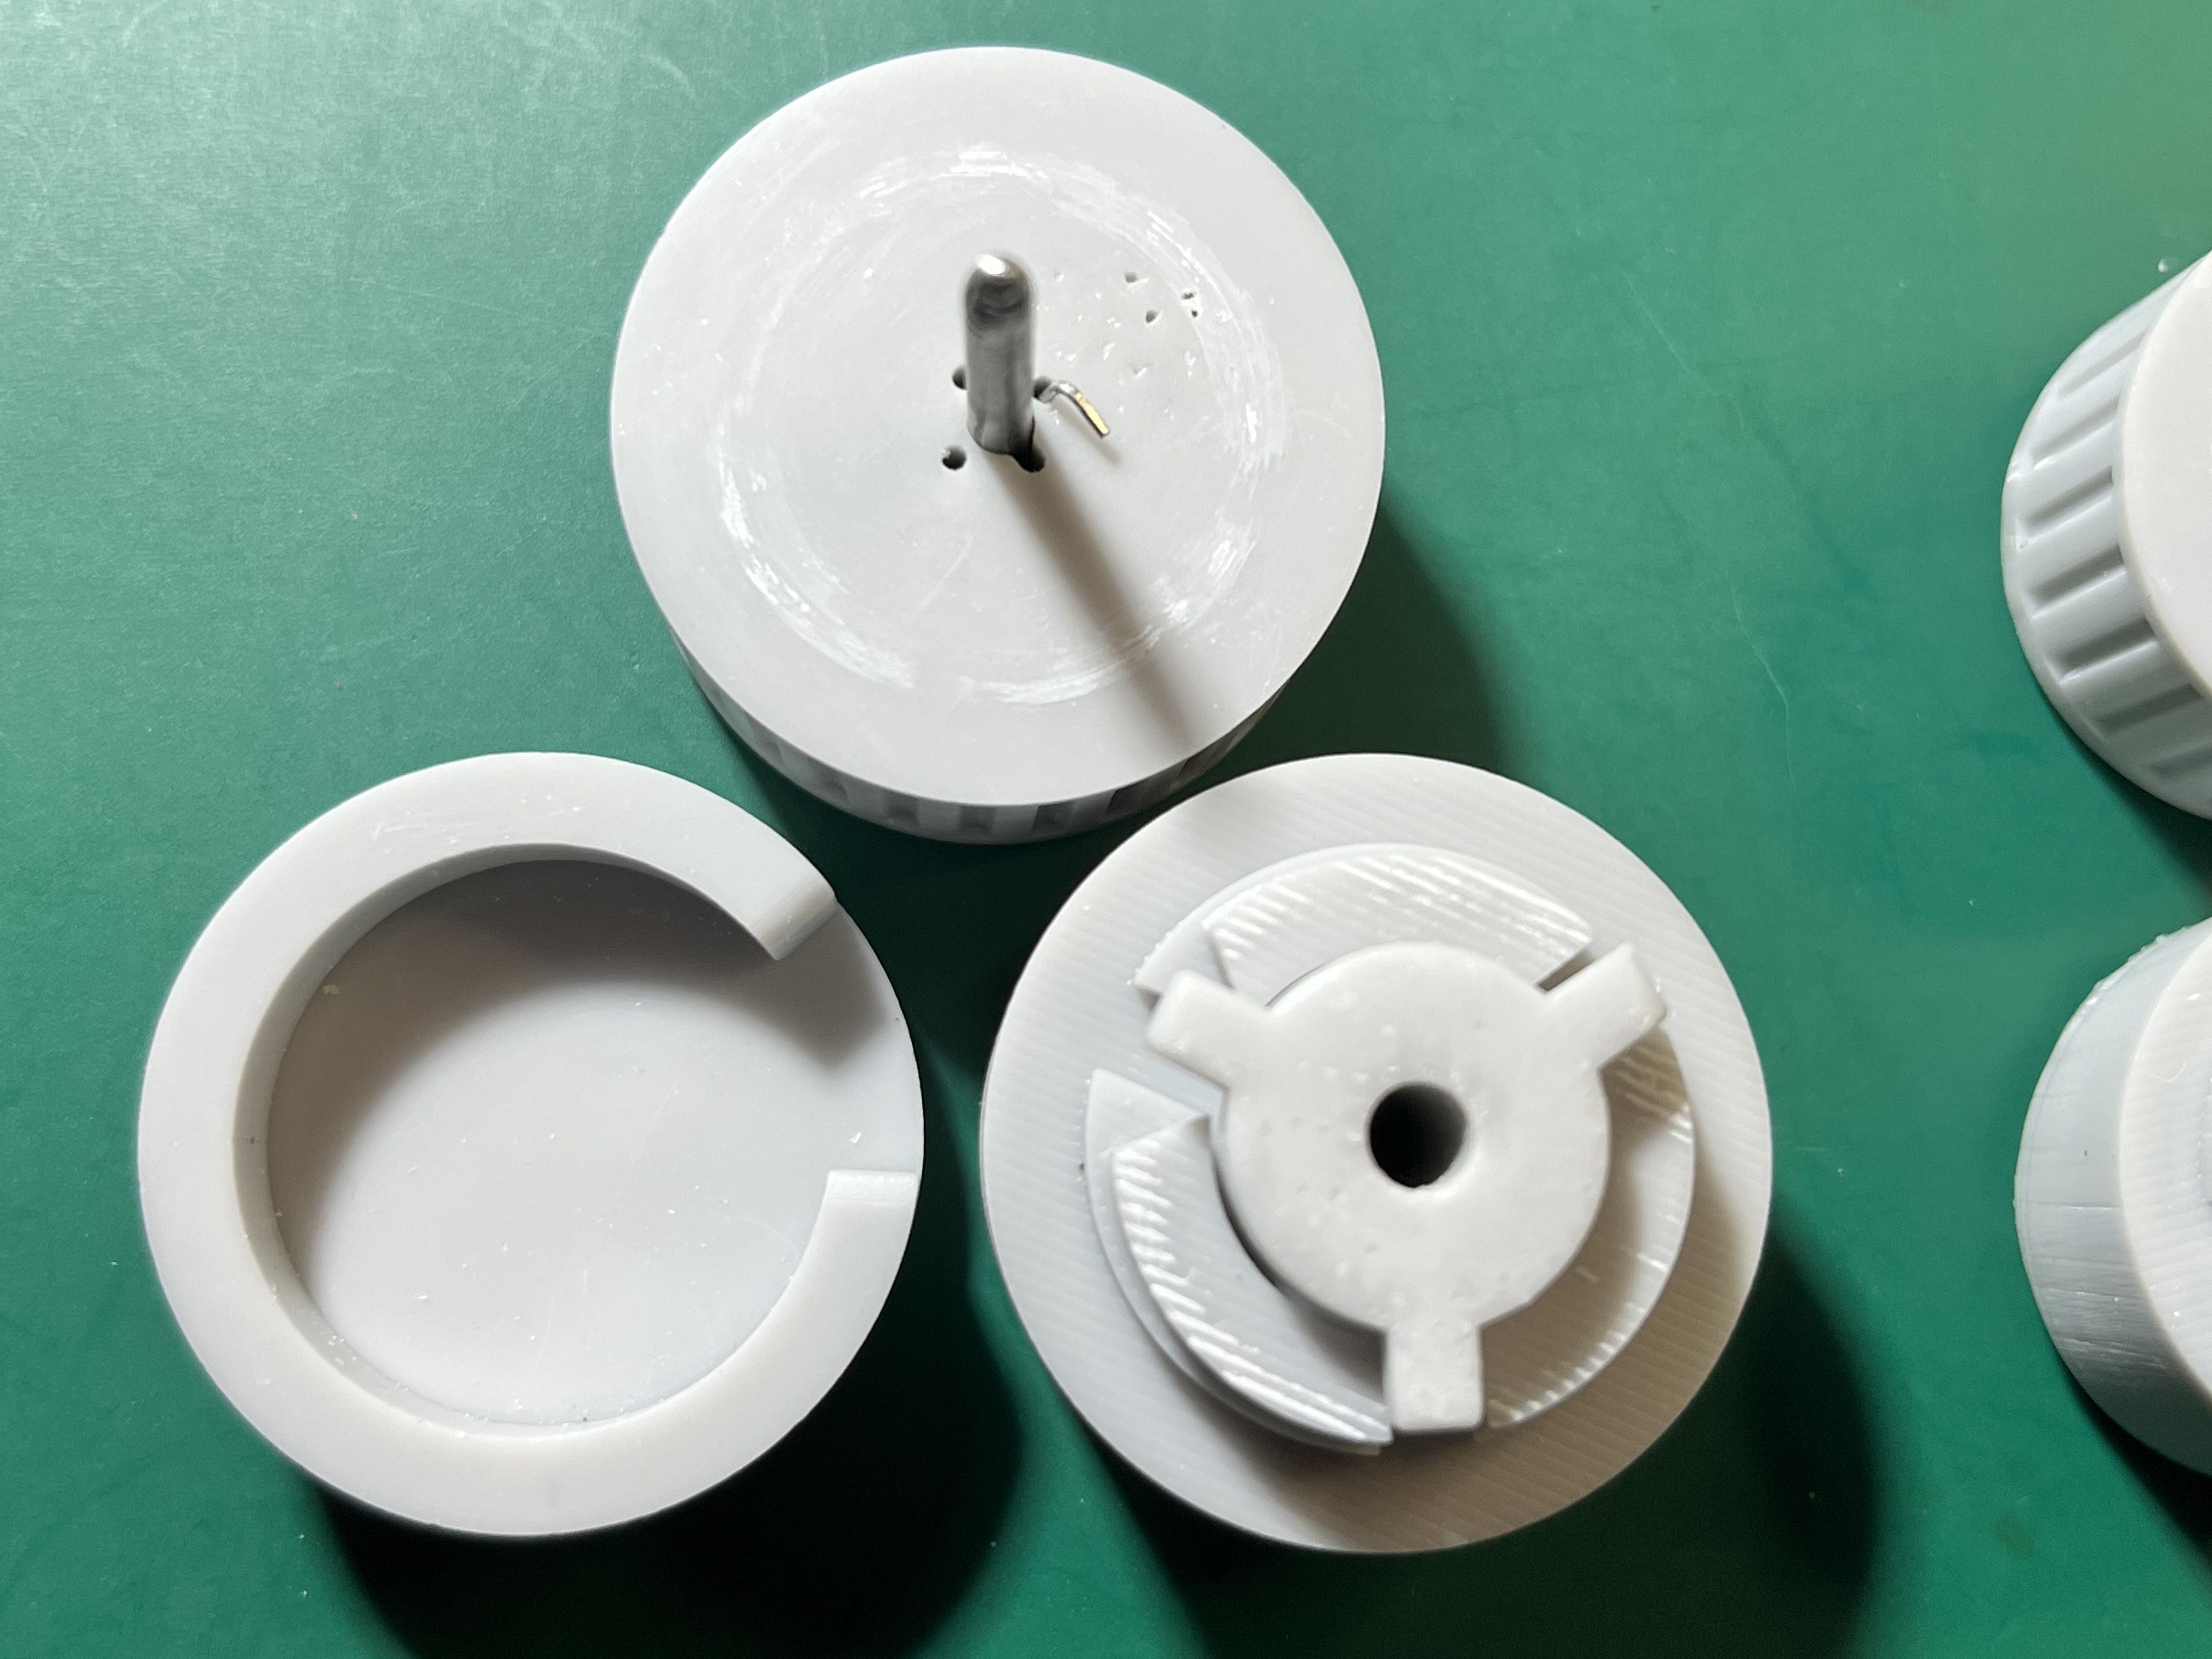
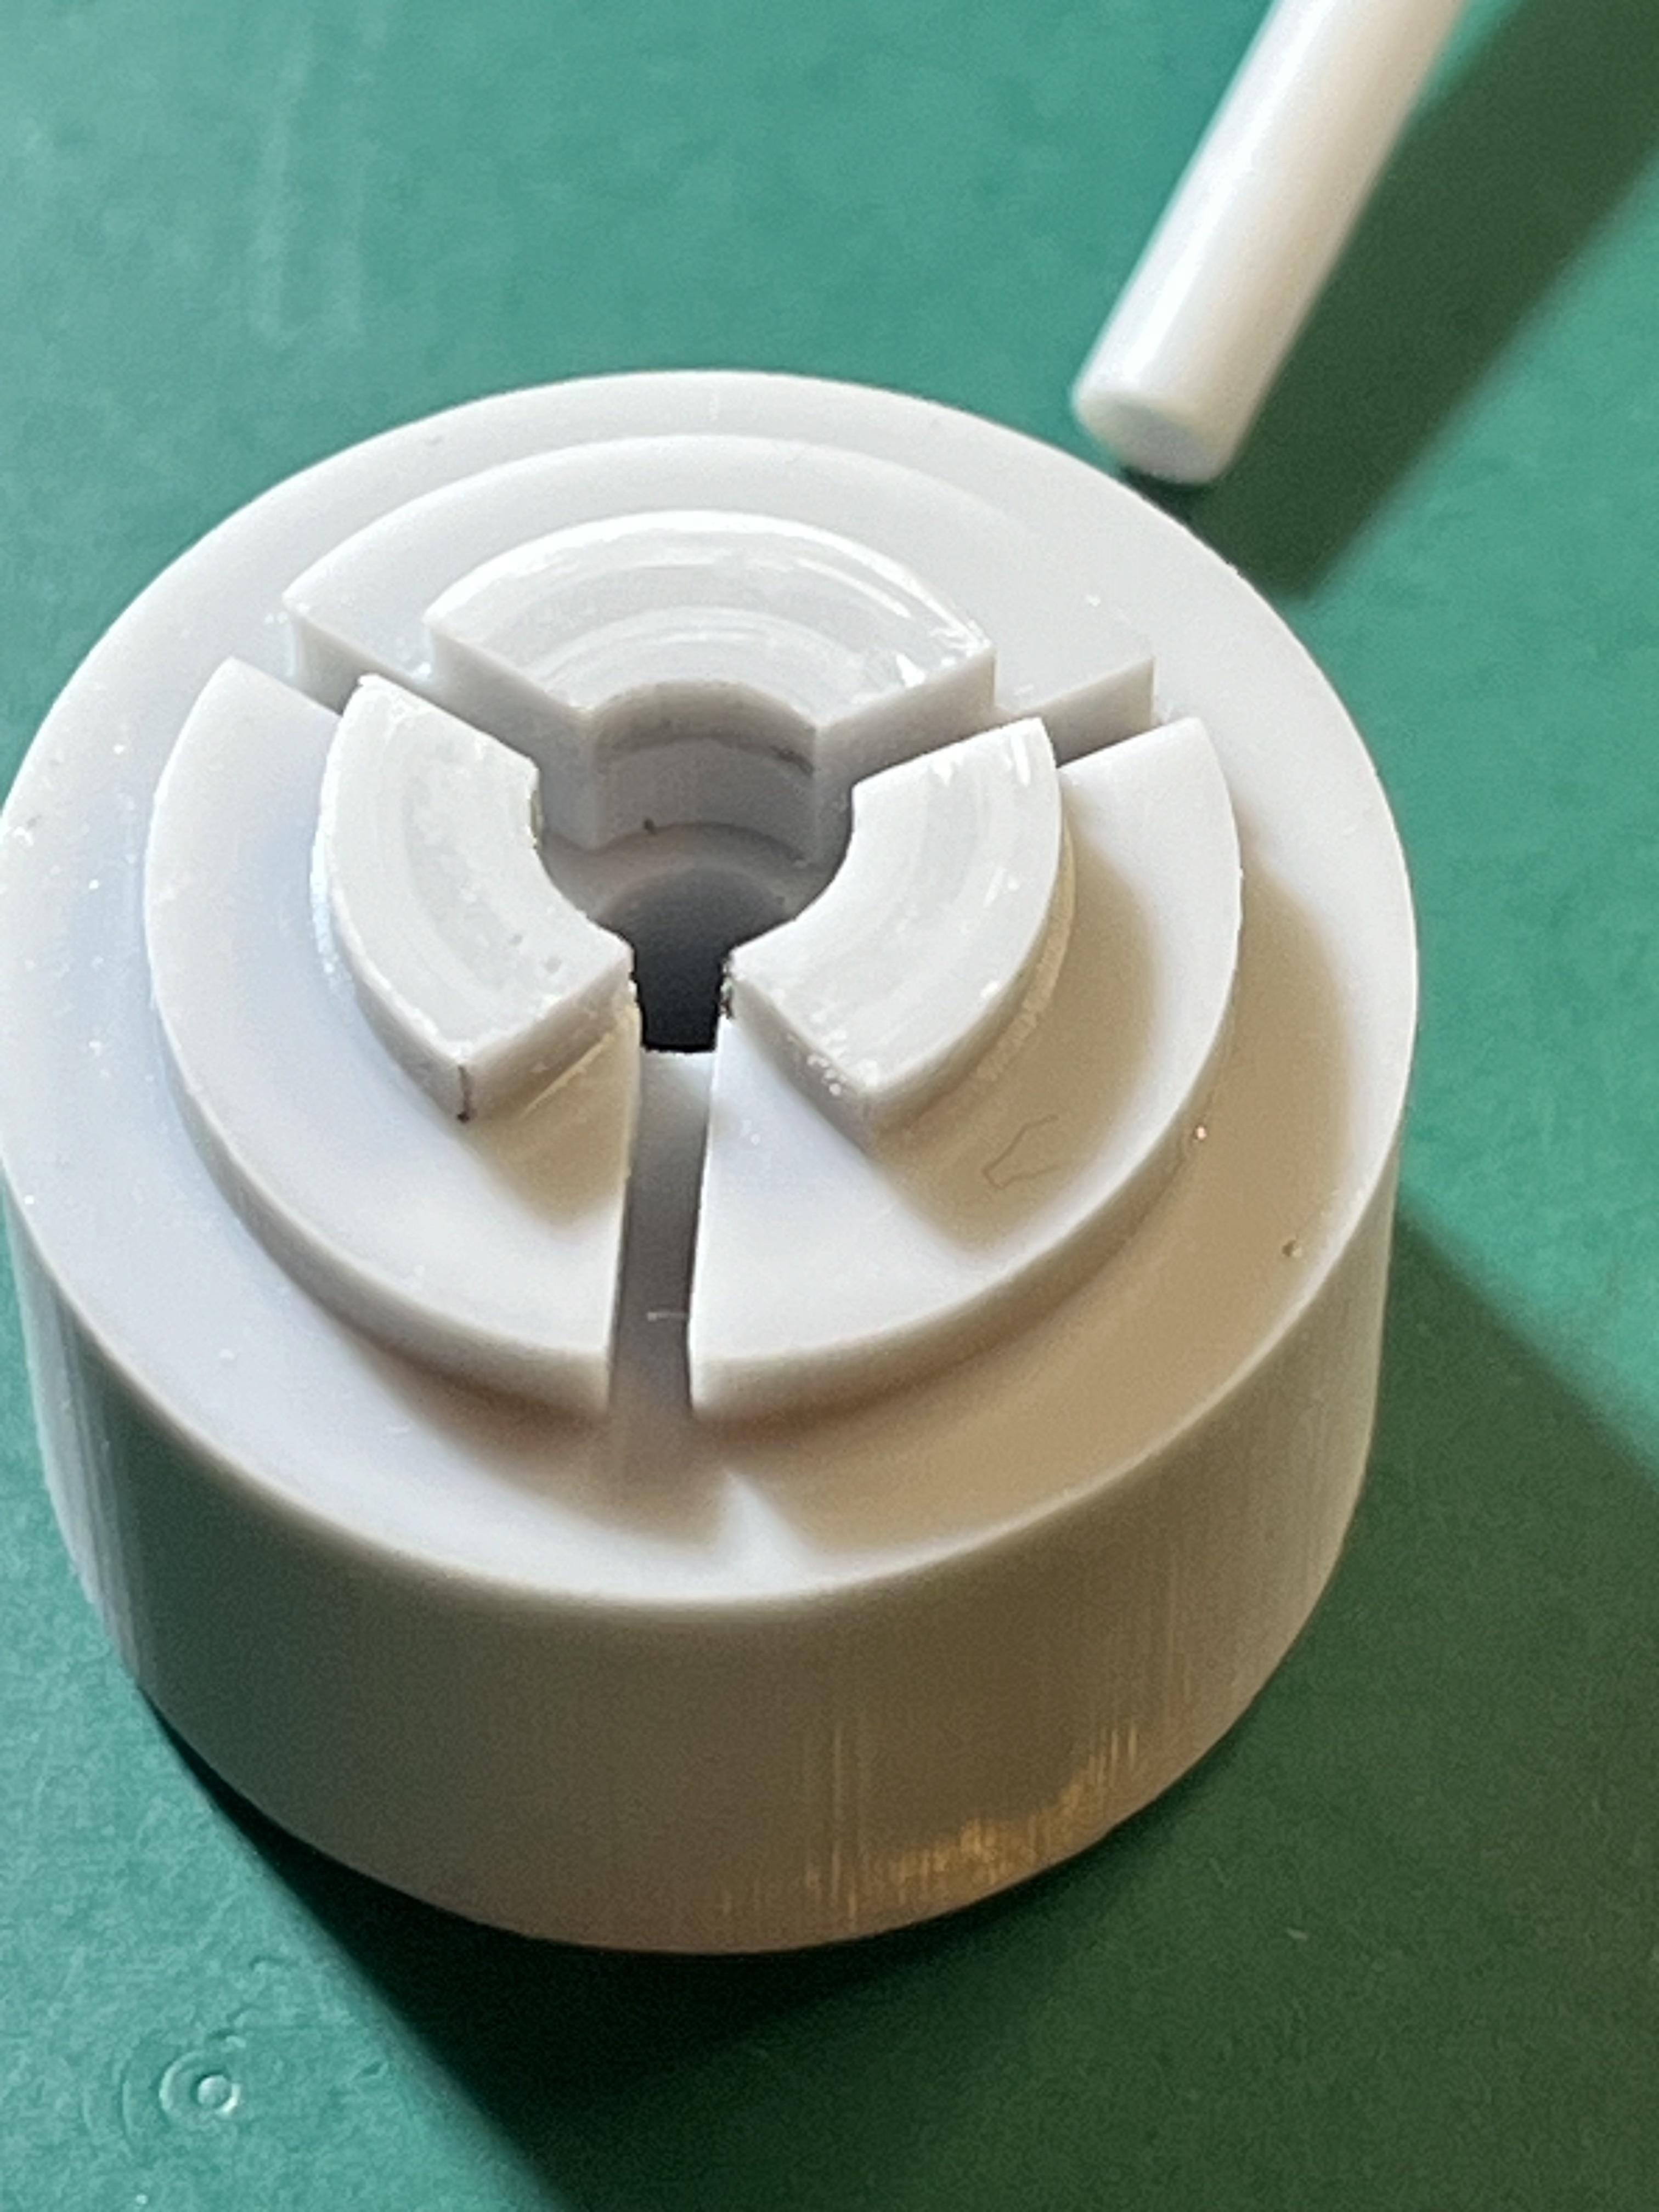
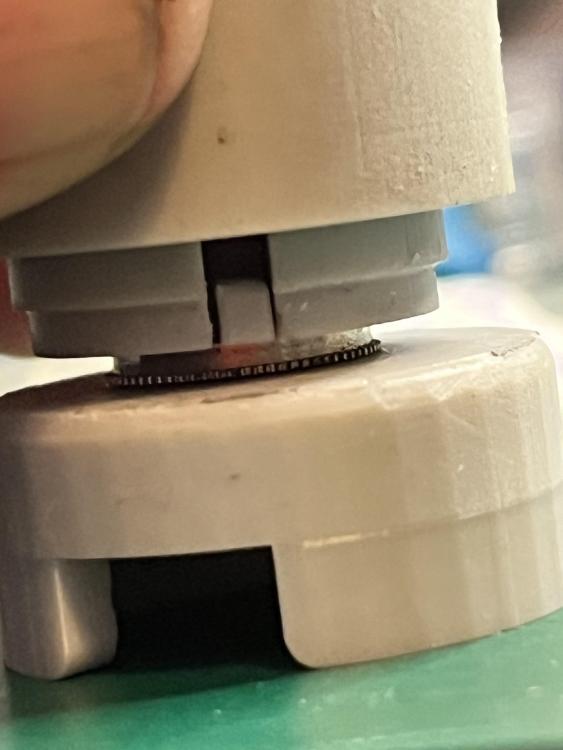
To date I've made three: 14.0, 9.0 and a custom 5.5mm. I initially printed directly onto the build plate, but I had difficulty getting the larger winders off the plate and broke some so I've ended up angling them by 5 degrees and printing with supports (which is why the two larger winders look stripey ... 50 micron layers at 5 degrees gives roughly half millimeter stripes). I printed the 5.5 first and used it once for practice on the broken spring before using it on the replacement, and I've used the 14.0 just once, I think. I printed the 9.0 yesterday and used it twice today (for the same spring ... I didn't notice that the tail was sitting in one of the slots and didn't position it properly in the barrel before pushing it out of the winder ... sproing -- glad I was wearing eye protection!). The spring scrapes the resin a little and I clean the spring before and after pushing it into the barrel (so I get both sides) with some Rodico. There is a little 'polishing' where resin rubs against resin but otherwise the winders look almost untouched and look like they could easily do dozens of springs. These were printed using Monocure Tensile (https://monocure3d.com.au/product/tensile-industrial-strength-resin/) but the pieces are so 'chunky' that I don't think the brittleness of regular modelling resin is likely to be a problem.

 1 point
 -
WTF. What is the logic with that ? I bet that has caused some appliances to go bang.1 point
-
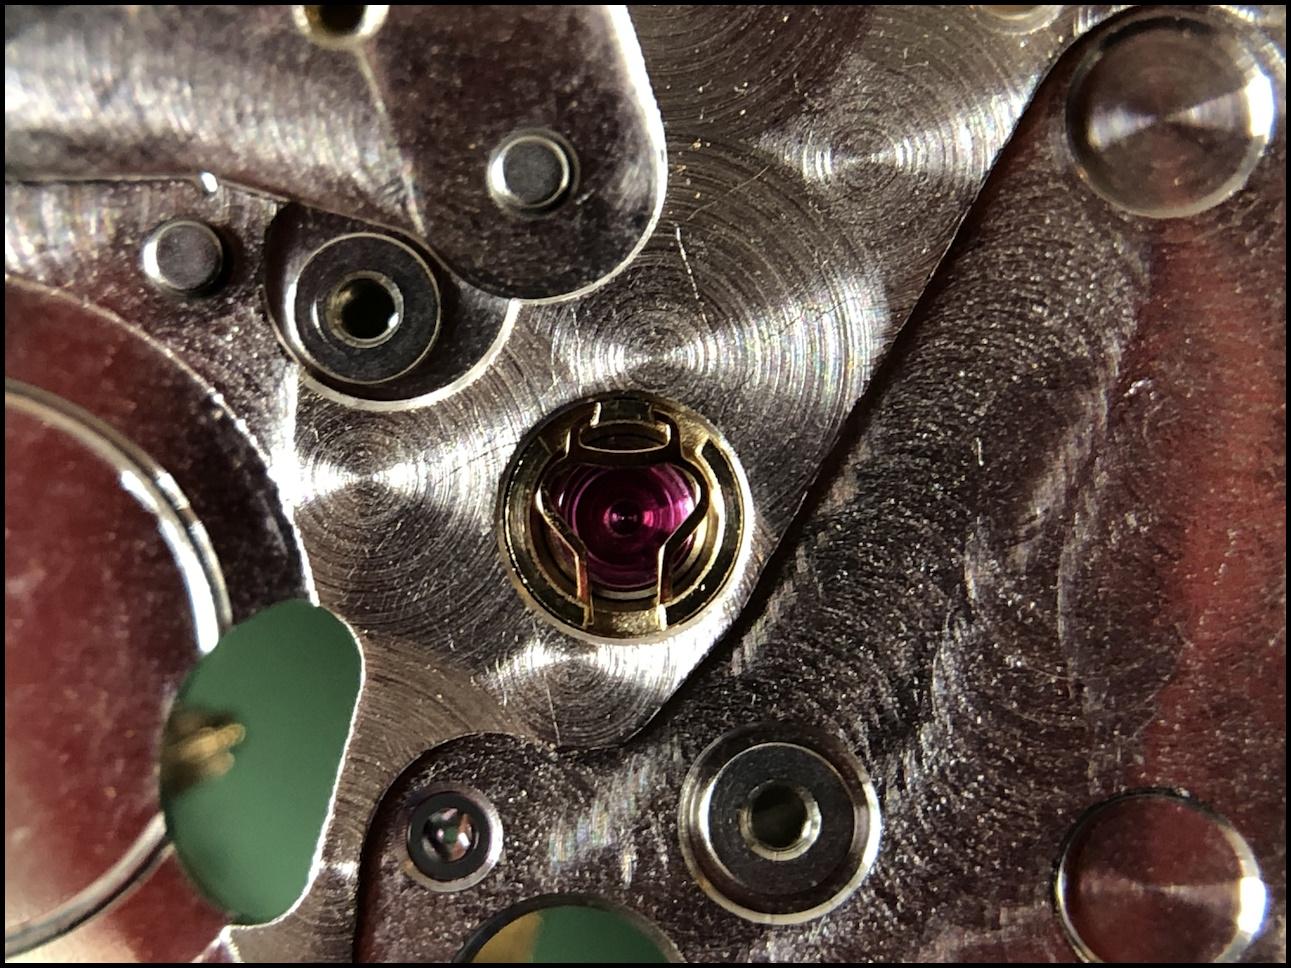
I can't wait for it! This is a very interesting, and I believe an underestimated question. It makes me think of the many YouTube channels where they often are very careless with the oiling. Everything looks fine on the timing machine (when they occasionally show it), but what about a week or a month later? Probably a disaster when the oil has spread leaving jewel holes dry and other parts contaminated. Here is an update for those of you who are interested. Yesterday I tried to oil the anti-shock system but failed miserably. I tried between five and ten times. It was not a pleasant experience. I got it somewhat right but far from acceptable so I gave up. I took a long walk to relieve the pressure and felt defeated, not to say failed After a good night's sleep, I looked through my stereomicroscope (40X) in the morning (having a day off) and realised that it was even worse than I had allowed myself to accept yesterday. However, filled with new energy, I removed the cap jewels and chatons, cleaned them in Horosolv and rinsed them in IPA. What I had failed to do over and over again was to place the chaton perfectly on the cap jewel, causing the oil to end up sticking on the chaton and spread out. The margin between the cap jewel and the chaton is almost non-existent, so if you fail to lower the chaton perfectly, you're screwed. This is in line with the precise fit between the parts of a Rolex watch but in this case, it was no help. It probably works if you have an extremely steady hand and practice long enough but you shouldn't wobble more than a few hundredth of a millimetre. I then remembered that I had an automatic oiler (Bergeon Automatic Oiler 1A) that I had not used for several years because I learned to oil cap jewels manually with good precision. When you lower the chaton towards a cap jewel on the IncaBloc, the margin between the cap jewel and the chaton is wider so you do not need to be as precise. By lubricating using the automatic oiler I got a satisfactory result. Maybe it was a tad too much oil but I still feel very satisfied. I don't think there is much risk of the oil spreading if the movement is subjected to severe trauma, which is why you want to avoid too much oil. Too little oil would shorten the service interval. Now that I look at the pictures again I think the amount of oil looks more or less perfect! When everything was done, I tested the free oscillation of the balance in all positions (apologies for the background music that I did not think of) and if I may say it myself, it looks wonderful

 1 point
 -
When you have really tough setbacks, it is easy to get the feeling of wanting to give up and many times I have given up and thought that enough is enough, and I think that can be a good thing even if it sounds contradictory. Sometimes you simply have to let time pass before you are ready to try again or try something new. When the brain have calmly and subconsciously processed the problem, you automatically get the urge to make a new attempt and not infrequently it leads to success, or at least getting a little further. You will succeed! Sooner or later!1 point
-
The only one I follow is Chronoglide Watchmakers.1 point