Leaderboard


Popular Content
Showing content with the highest reputation on 09/30/24 in all areas
-
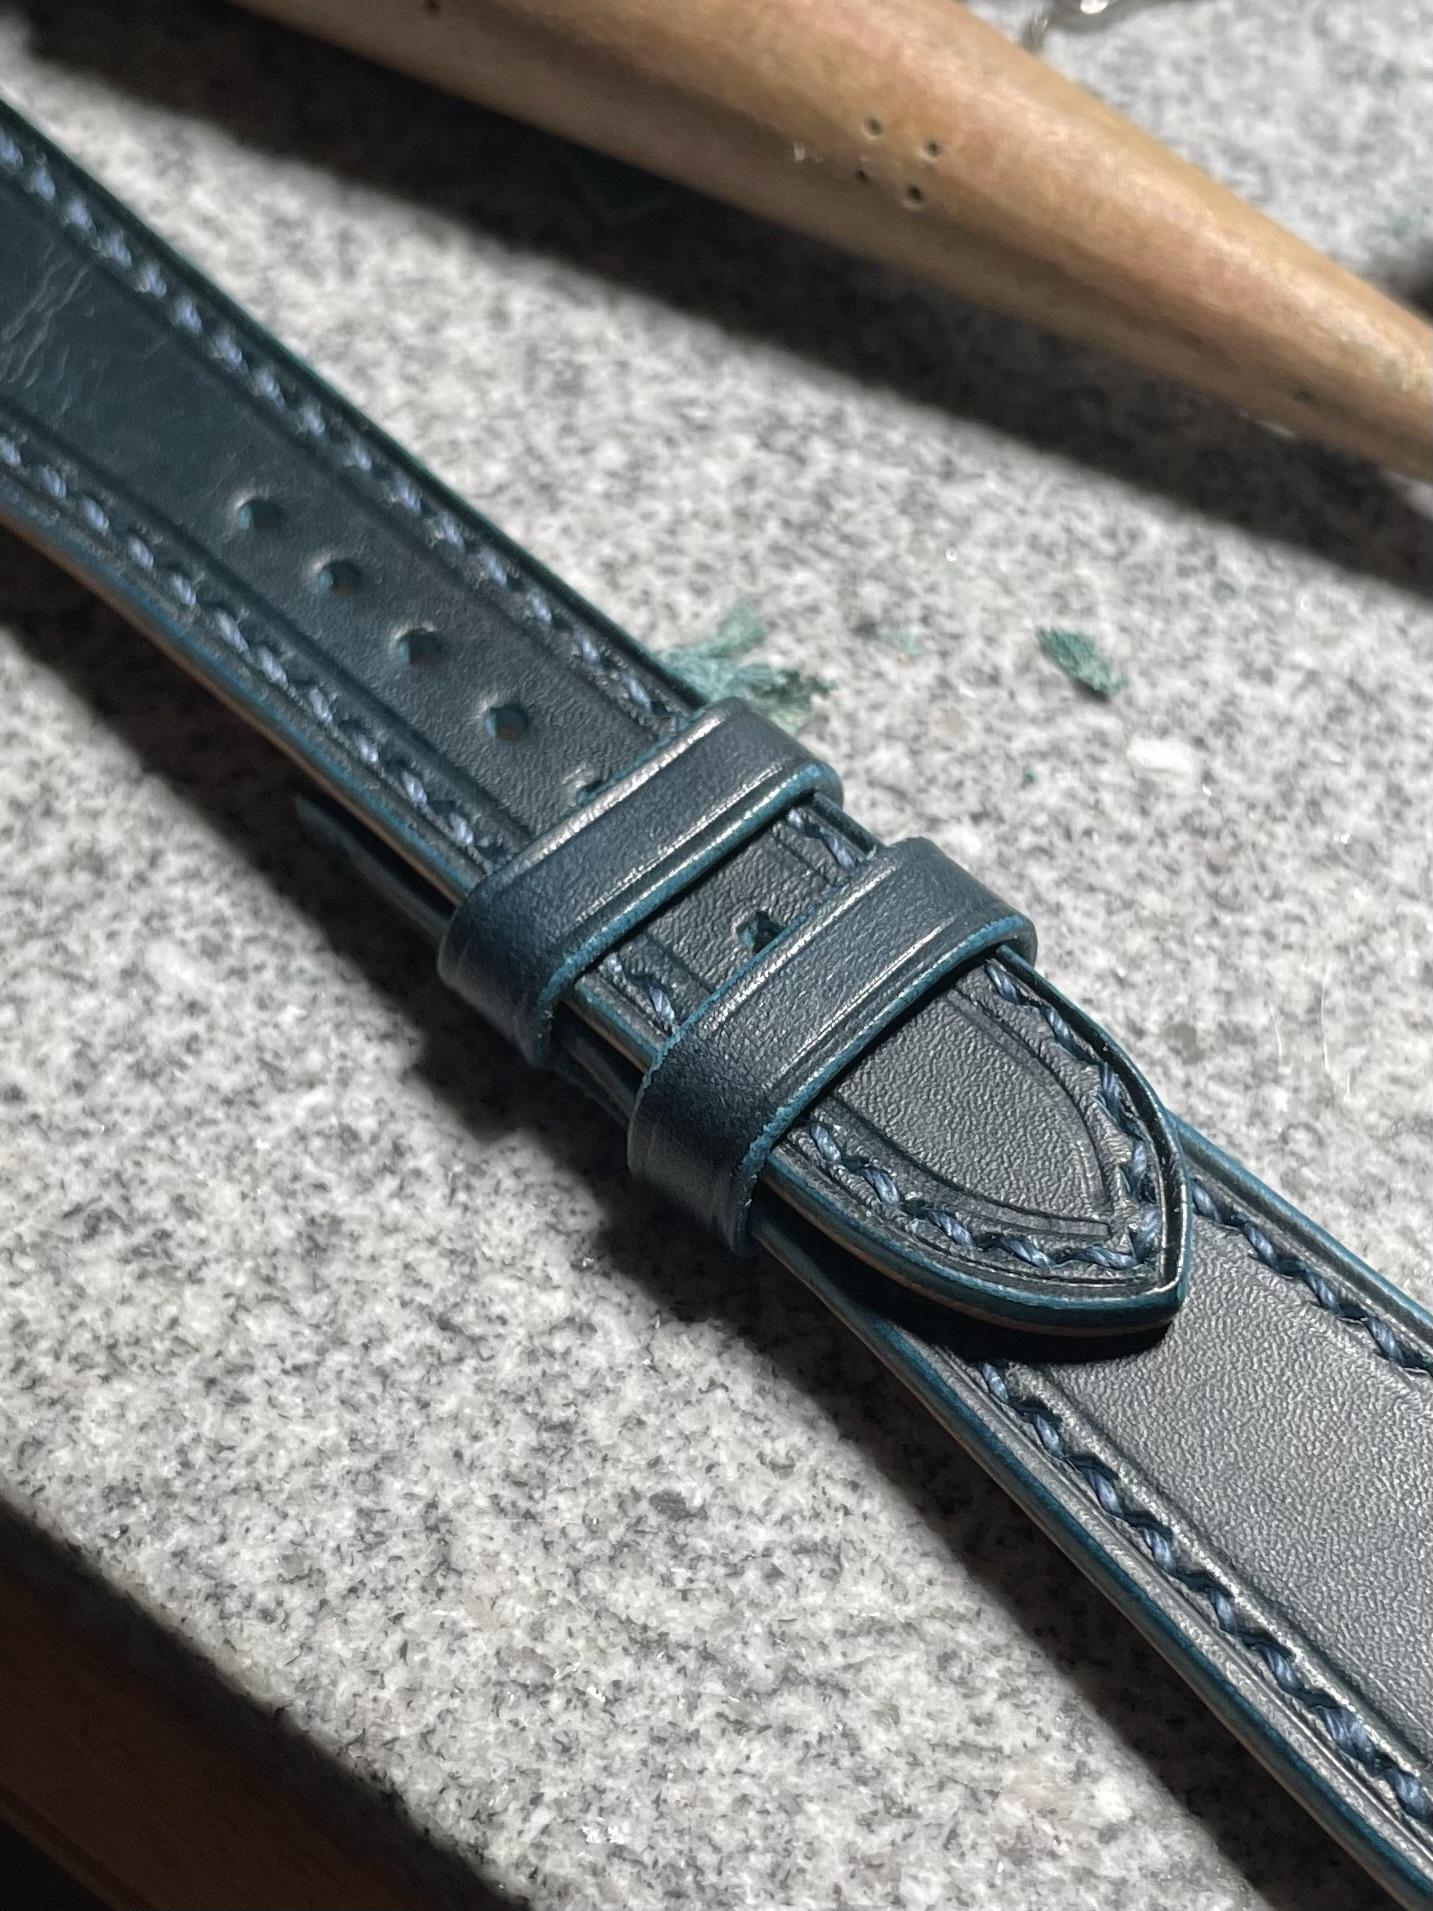
I primarily use Badalassi Carlo Pueblo, Badalassi Carlo Wax, and Walpier Buttero (standard or museum). I usually buy these in A4 sheets of 1.2 - 1.4mm thickness. I buy mine from Artisanleather or Leatherforcraft. make sure you use the correct needles and thread. Not many people talk about this but it is crucial. I use Amy rose polyester thread in 0.45mm with an either a 3mm or 3.5mm stitch gap. I also use John James small saddles needles (size 4 if I recall correctly). I will post some photos of the sort of results I'm getting.
 3 points
 -
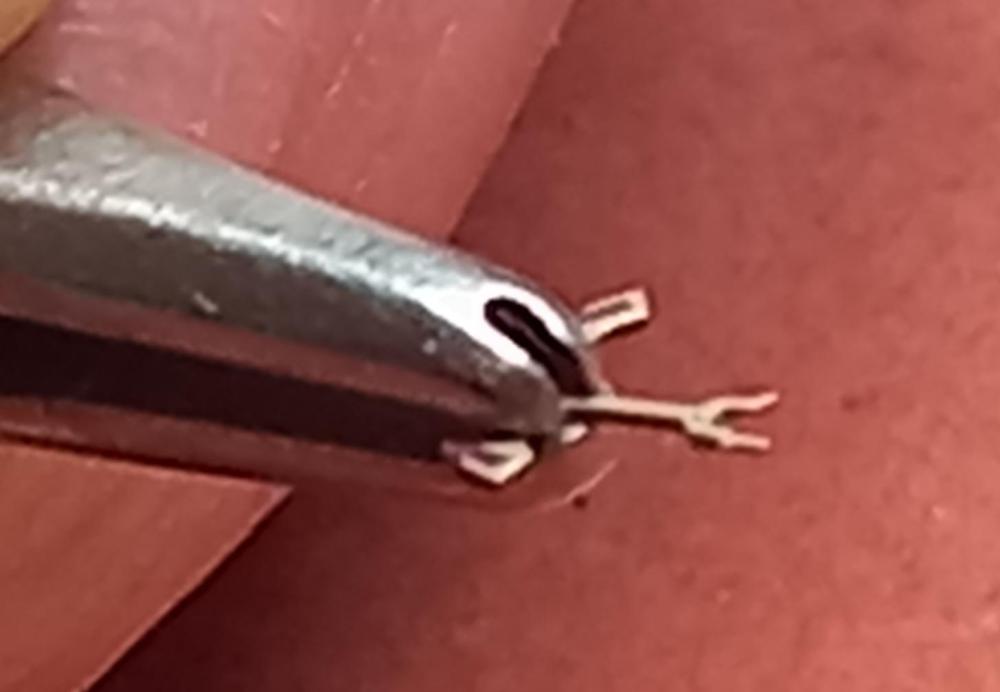
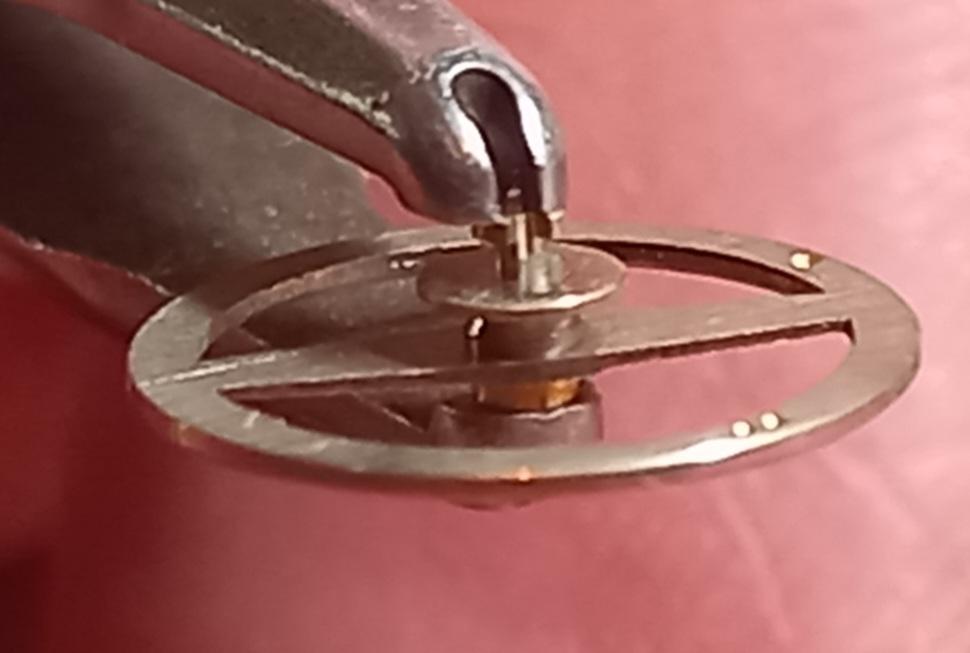
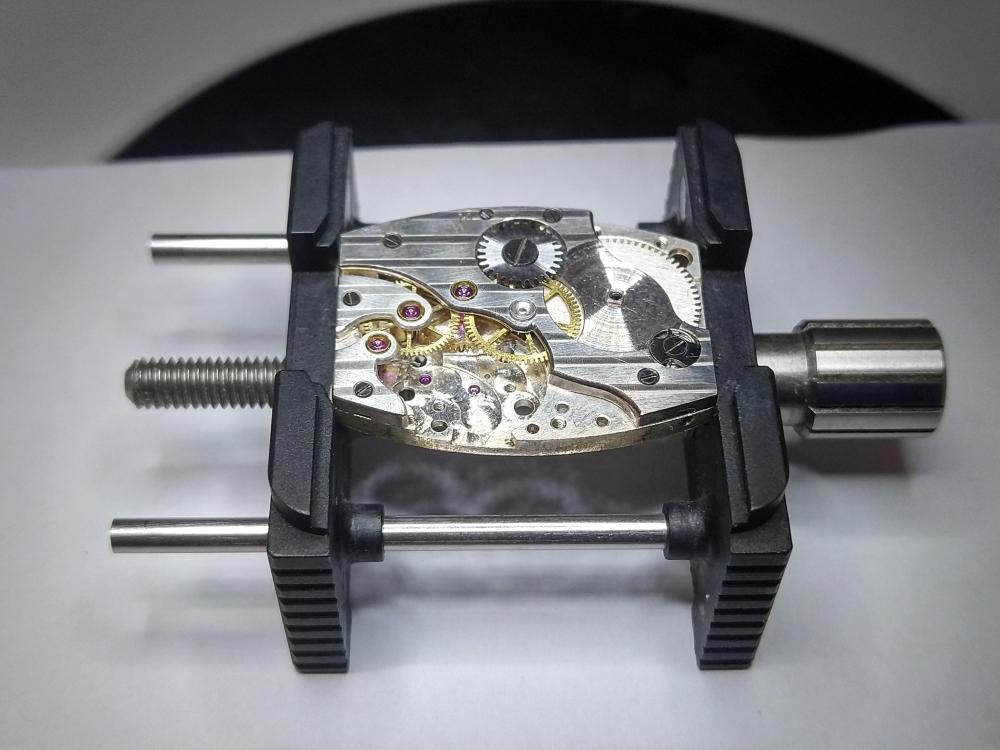
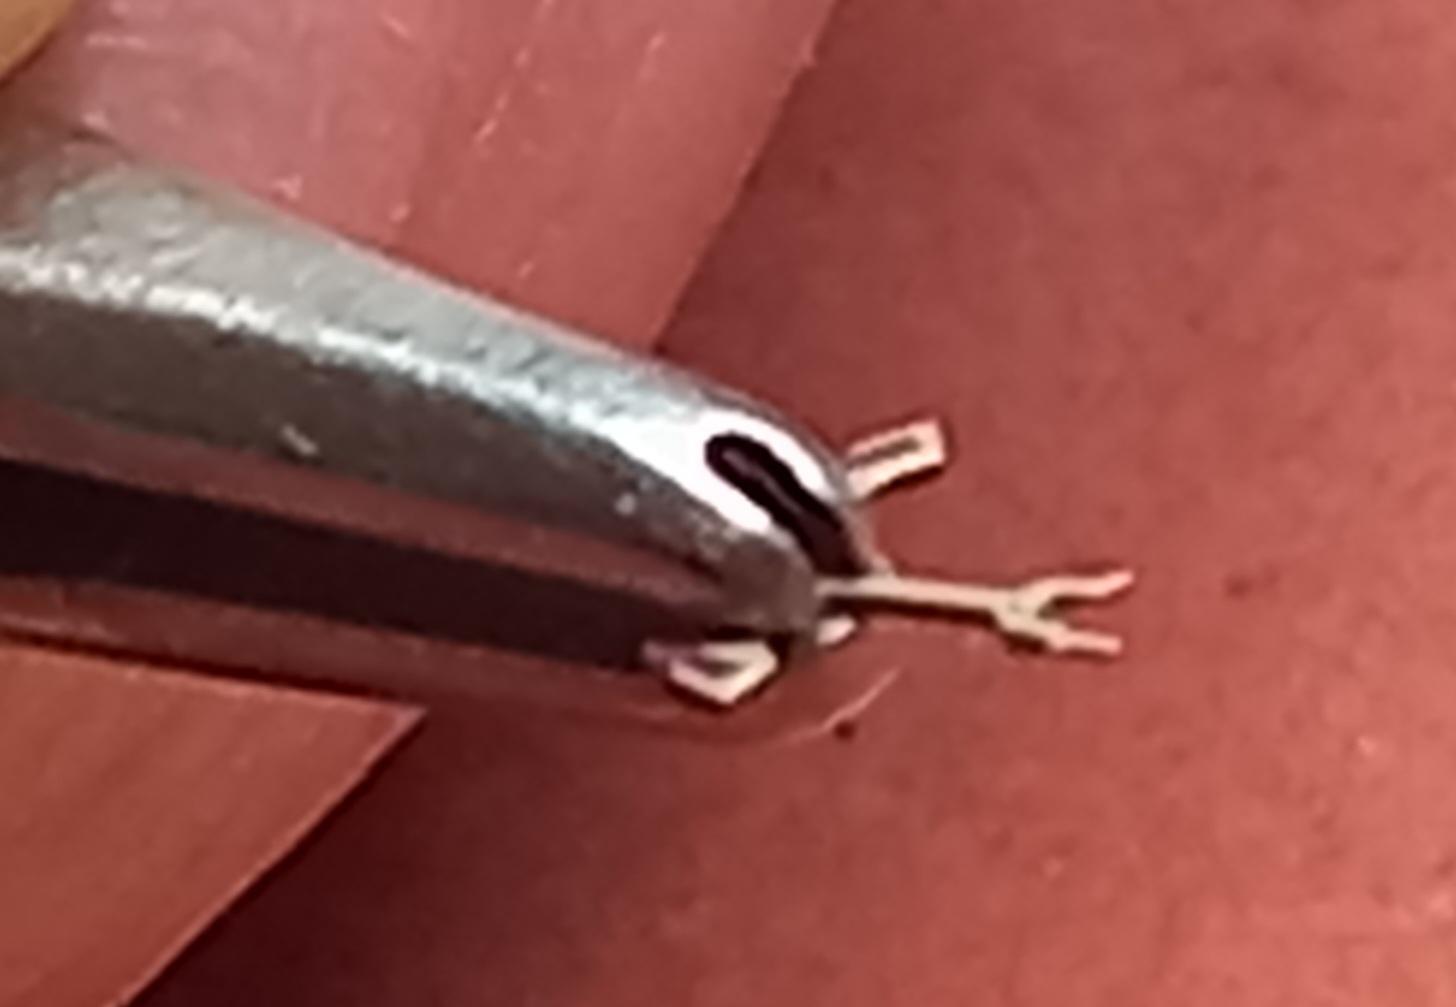
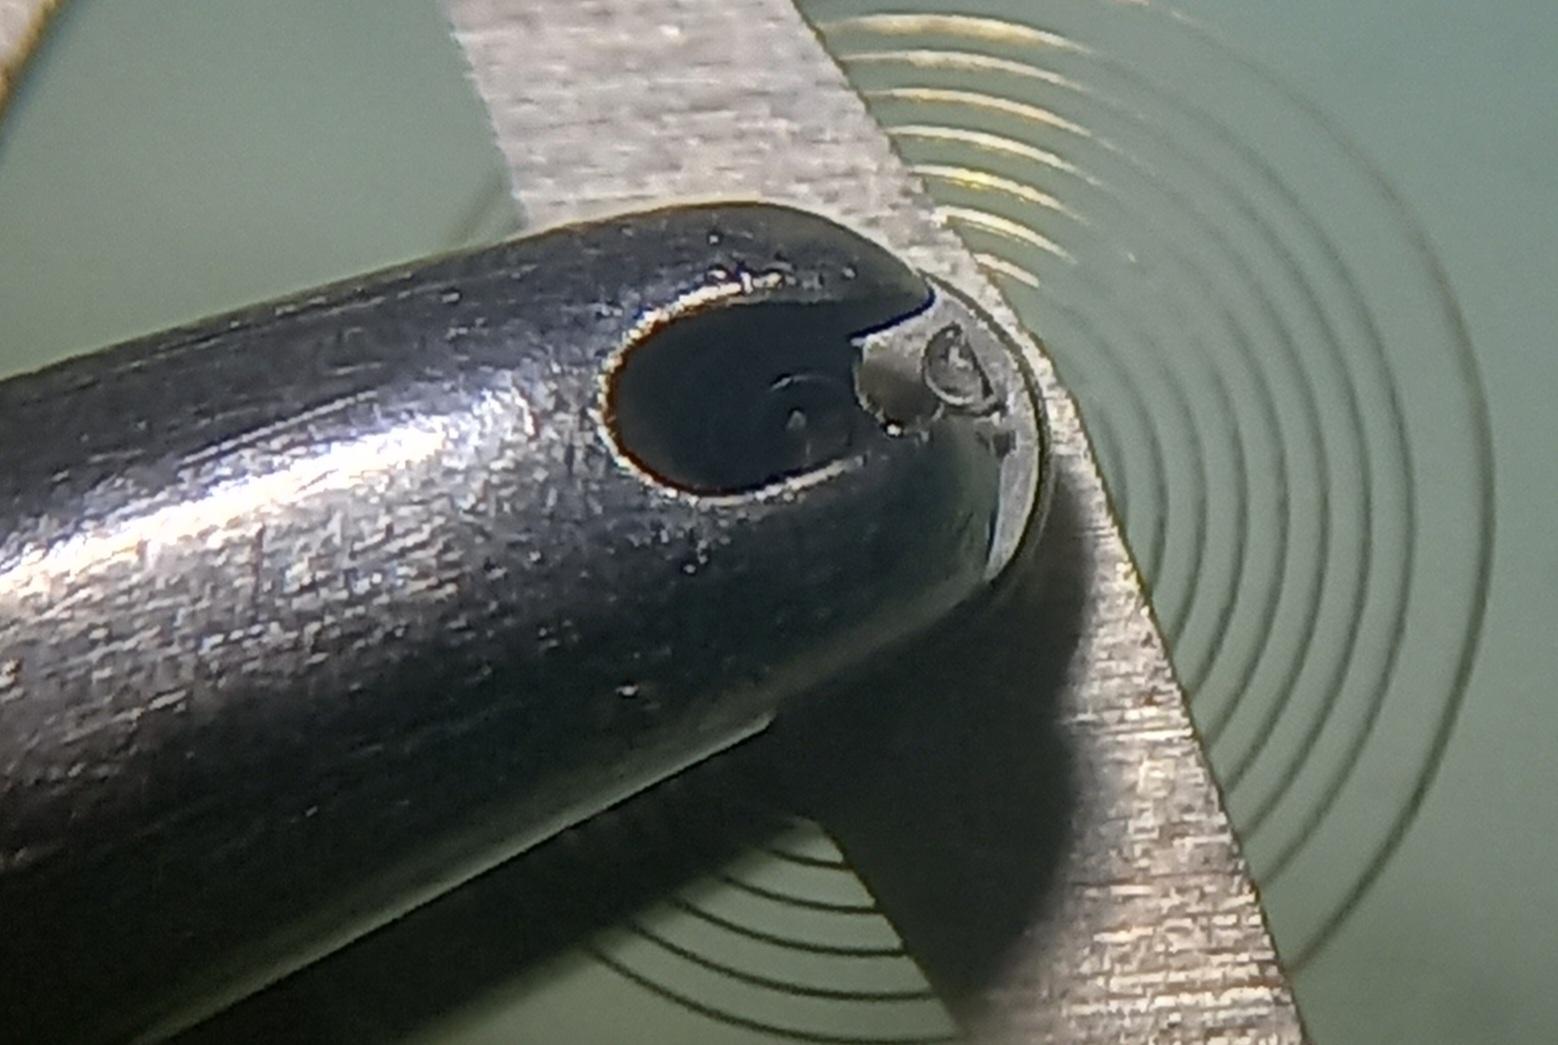
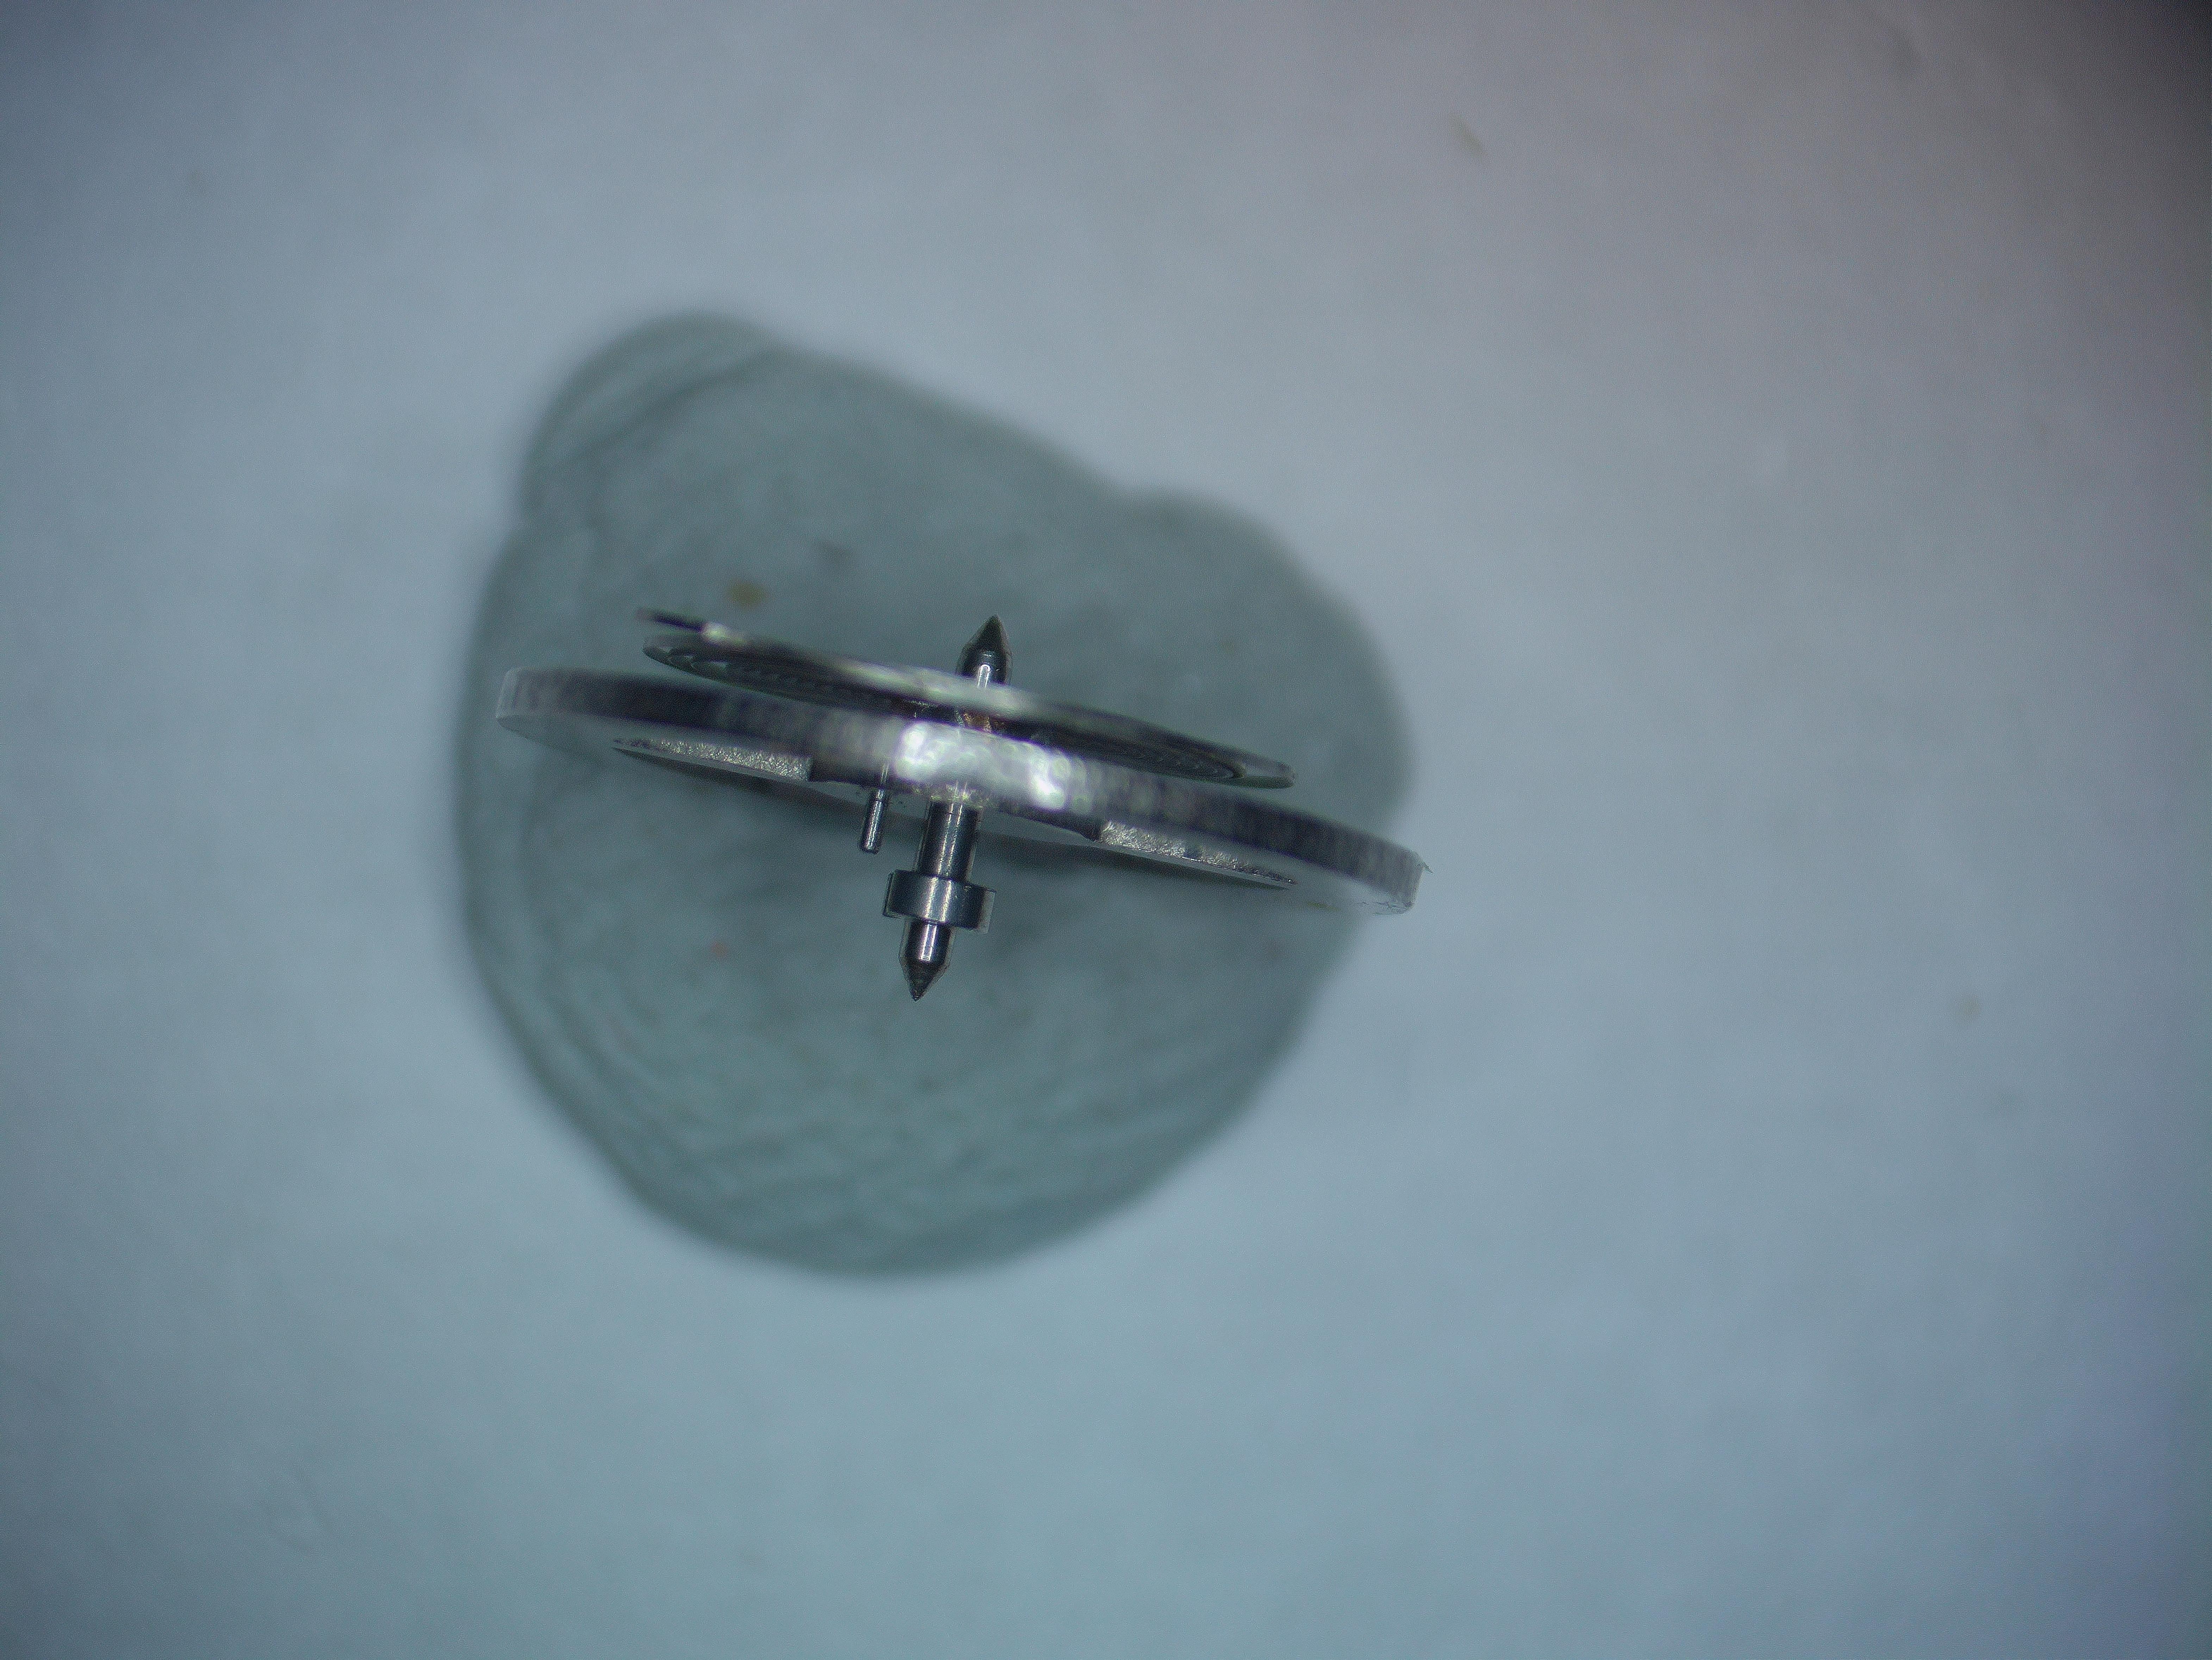
That's what i would have normally expected Tom, Hector's example appears to grip the pallet arms, maybe that stops any twisting motion of the pallet fork while working on it. The pair i have tbh i dont think is for holding the pallet fork, sellers dont always know what they are selling ( Hector's picture ).......correction sellers often dont know what they are selling....if they can attach a fancy use that they've heard before to the item's description that might mean a few extra bucks coming from an unwitting newbie. Let me dig out a spare balance, hold it in my tweezers and post a picture then compare notes on their use again, I'll try find a single roller which is what i think fits it's impulse pin in the one side of the tweezer's tip that's cut away. Couple of pictures, they can actually hold a pallet fork and a balance, the slot in one tip i guess would provide some extra grip on the fork but also would accommodate the impulse pin of a single roller ( double roller shown ). Wristwatch pallet fork.......a bit small, Wristwatch balance.... more or less perfect. Pocket watch pallet fork.... probably about right , pocket watch balance....also about right and tip slot would accommodate a long staff as the opening width is too small for pocketwatch staff.
 3 points
 -
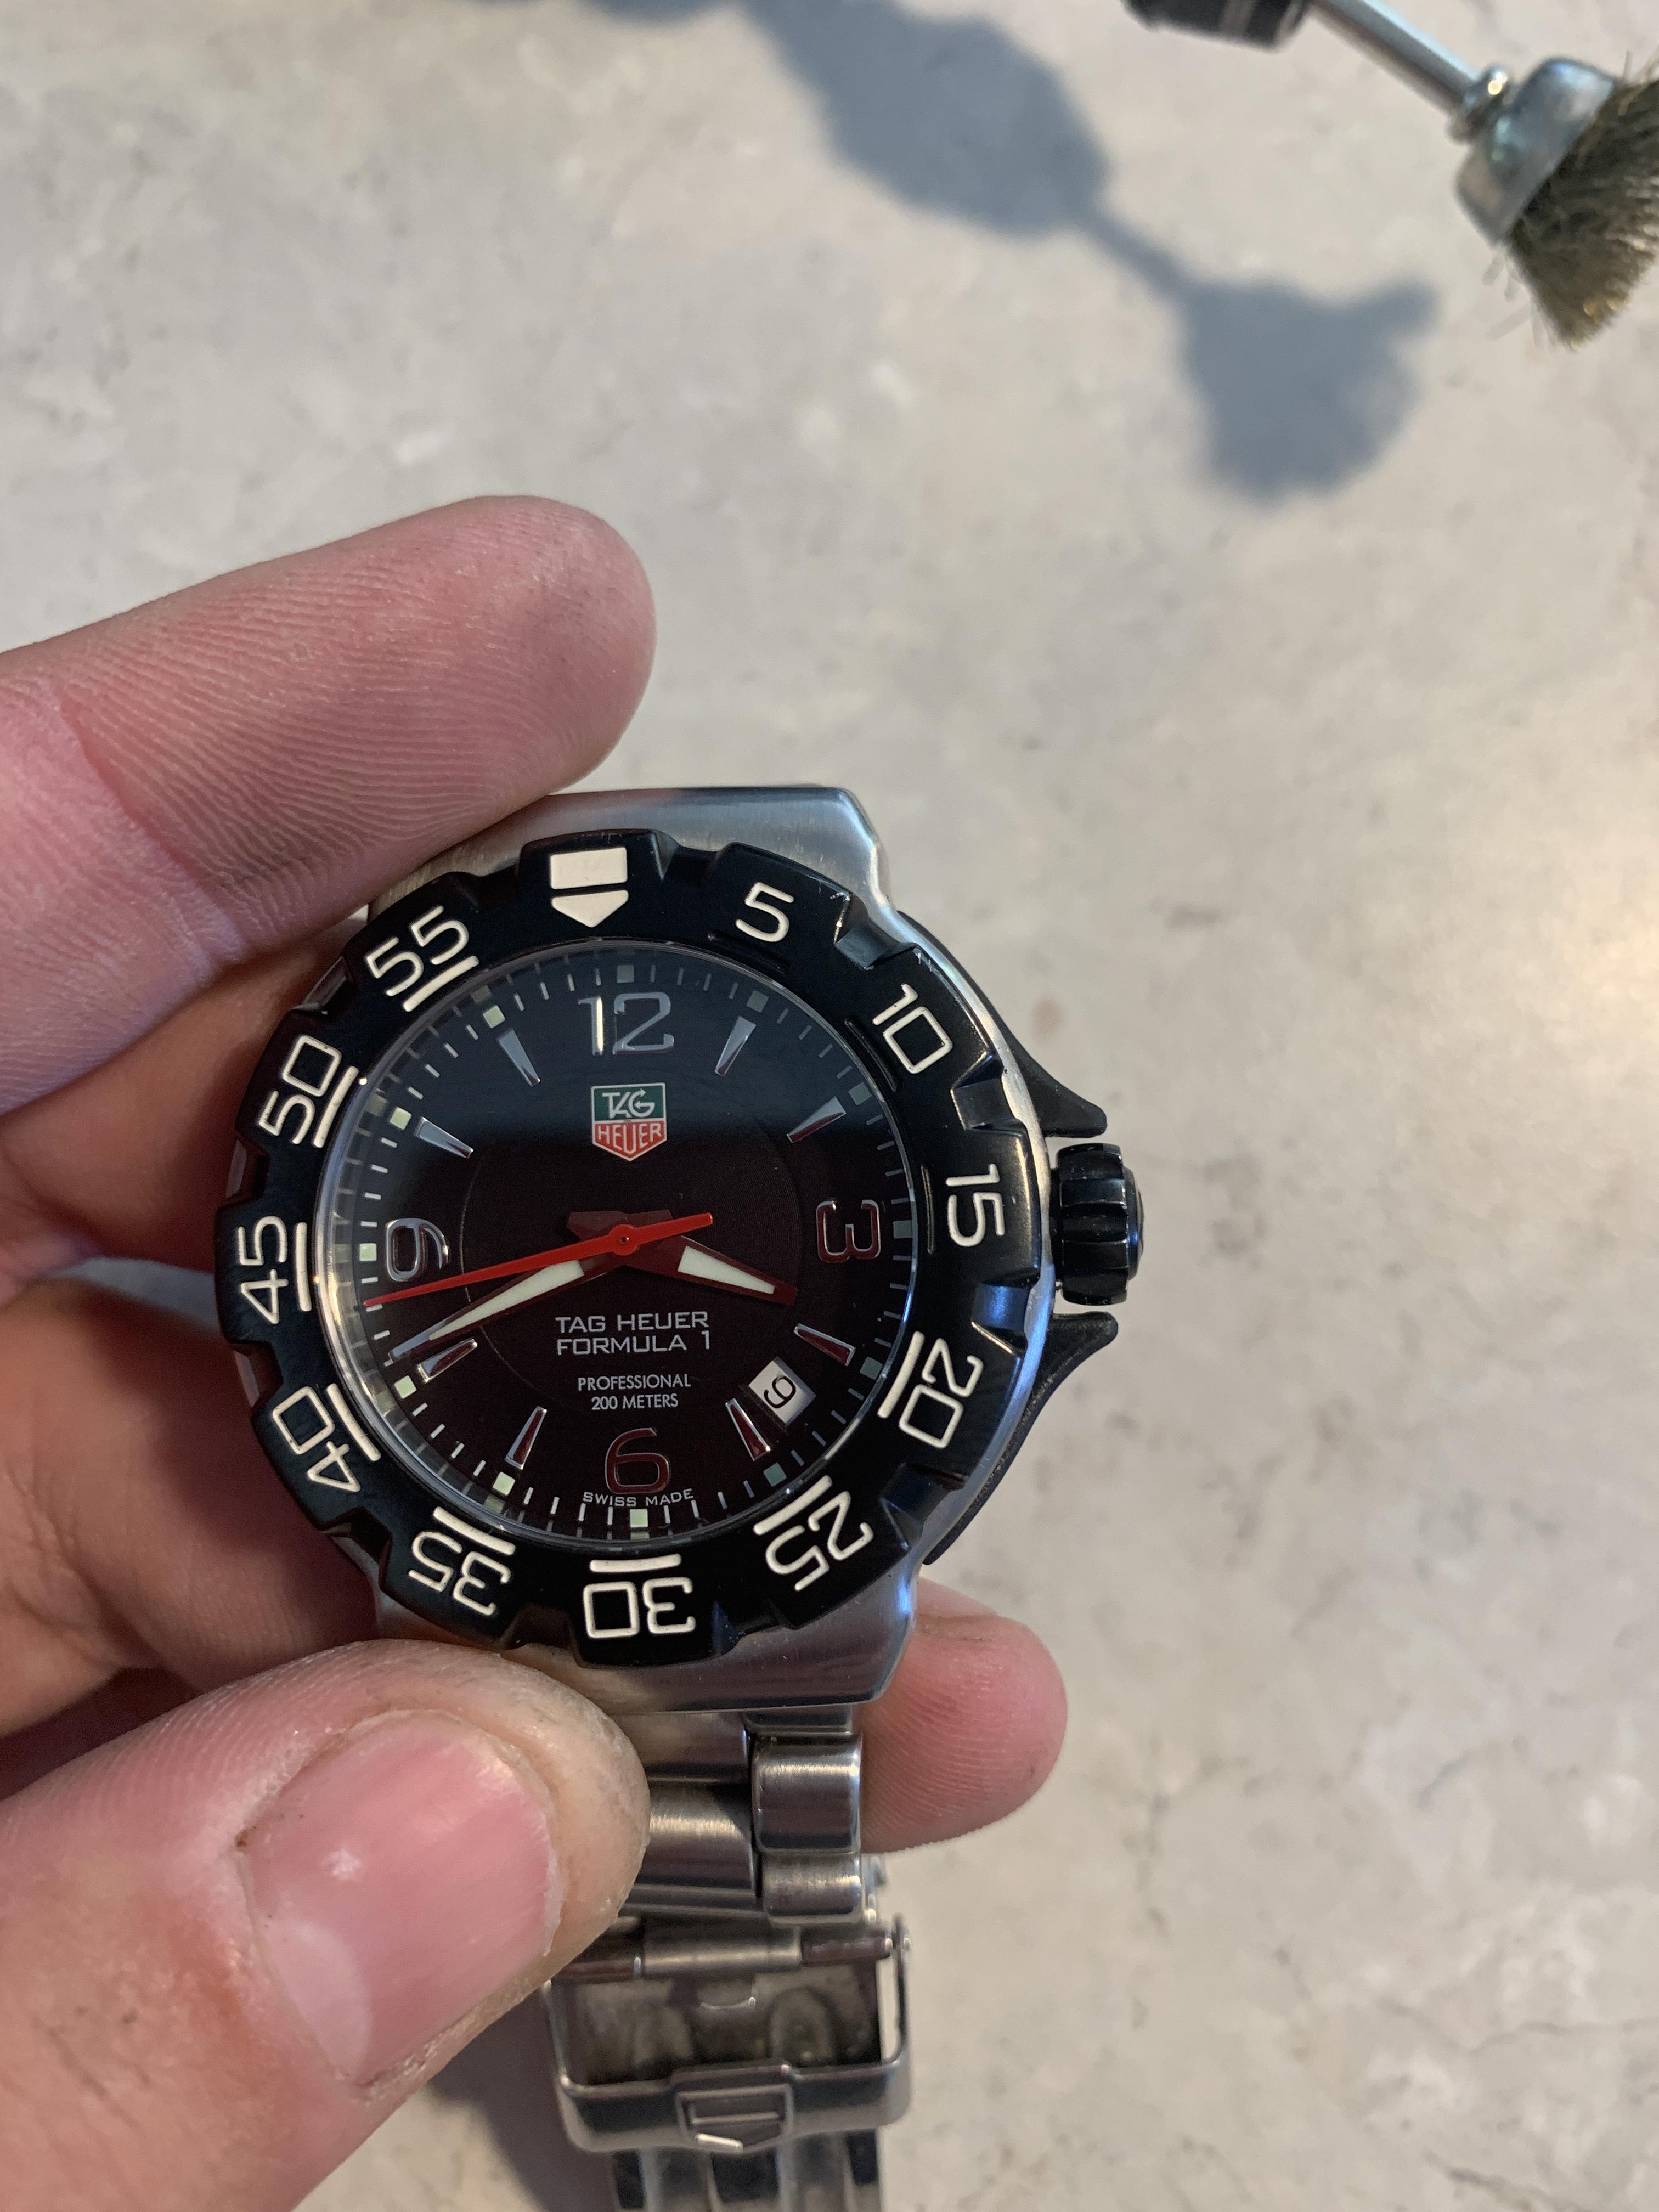
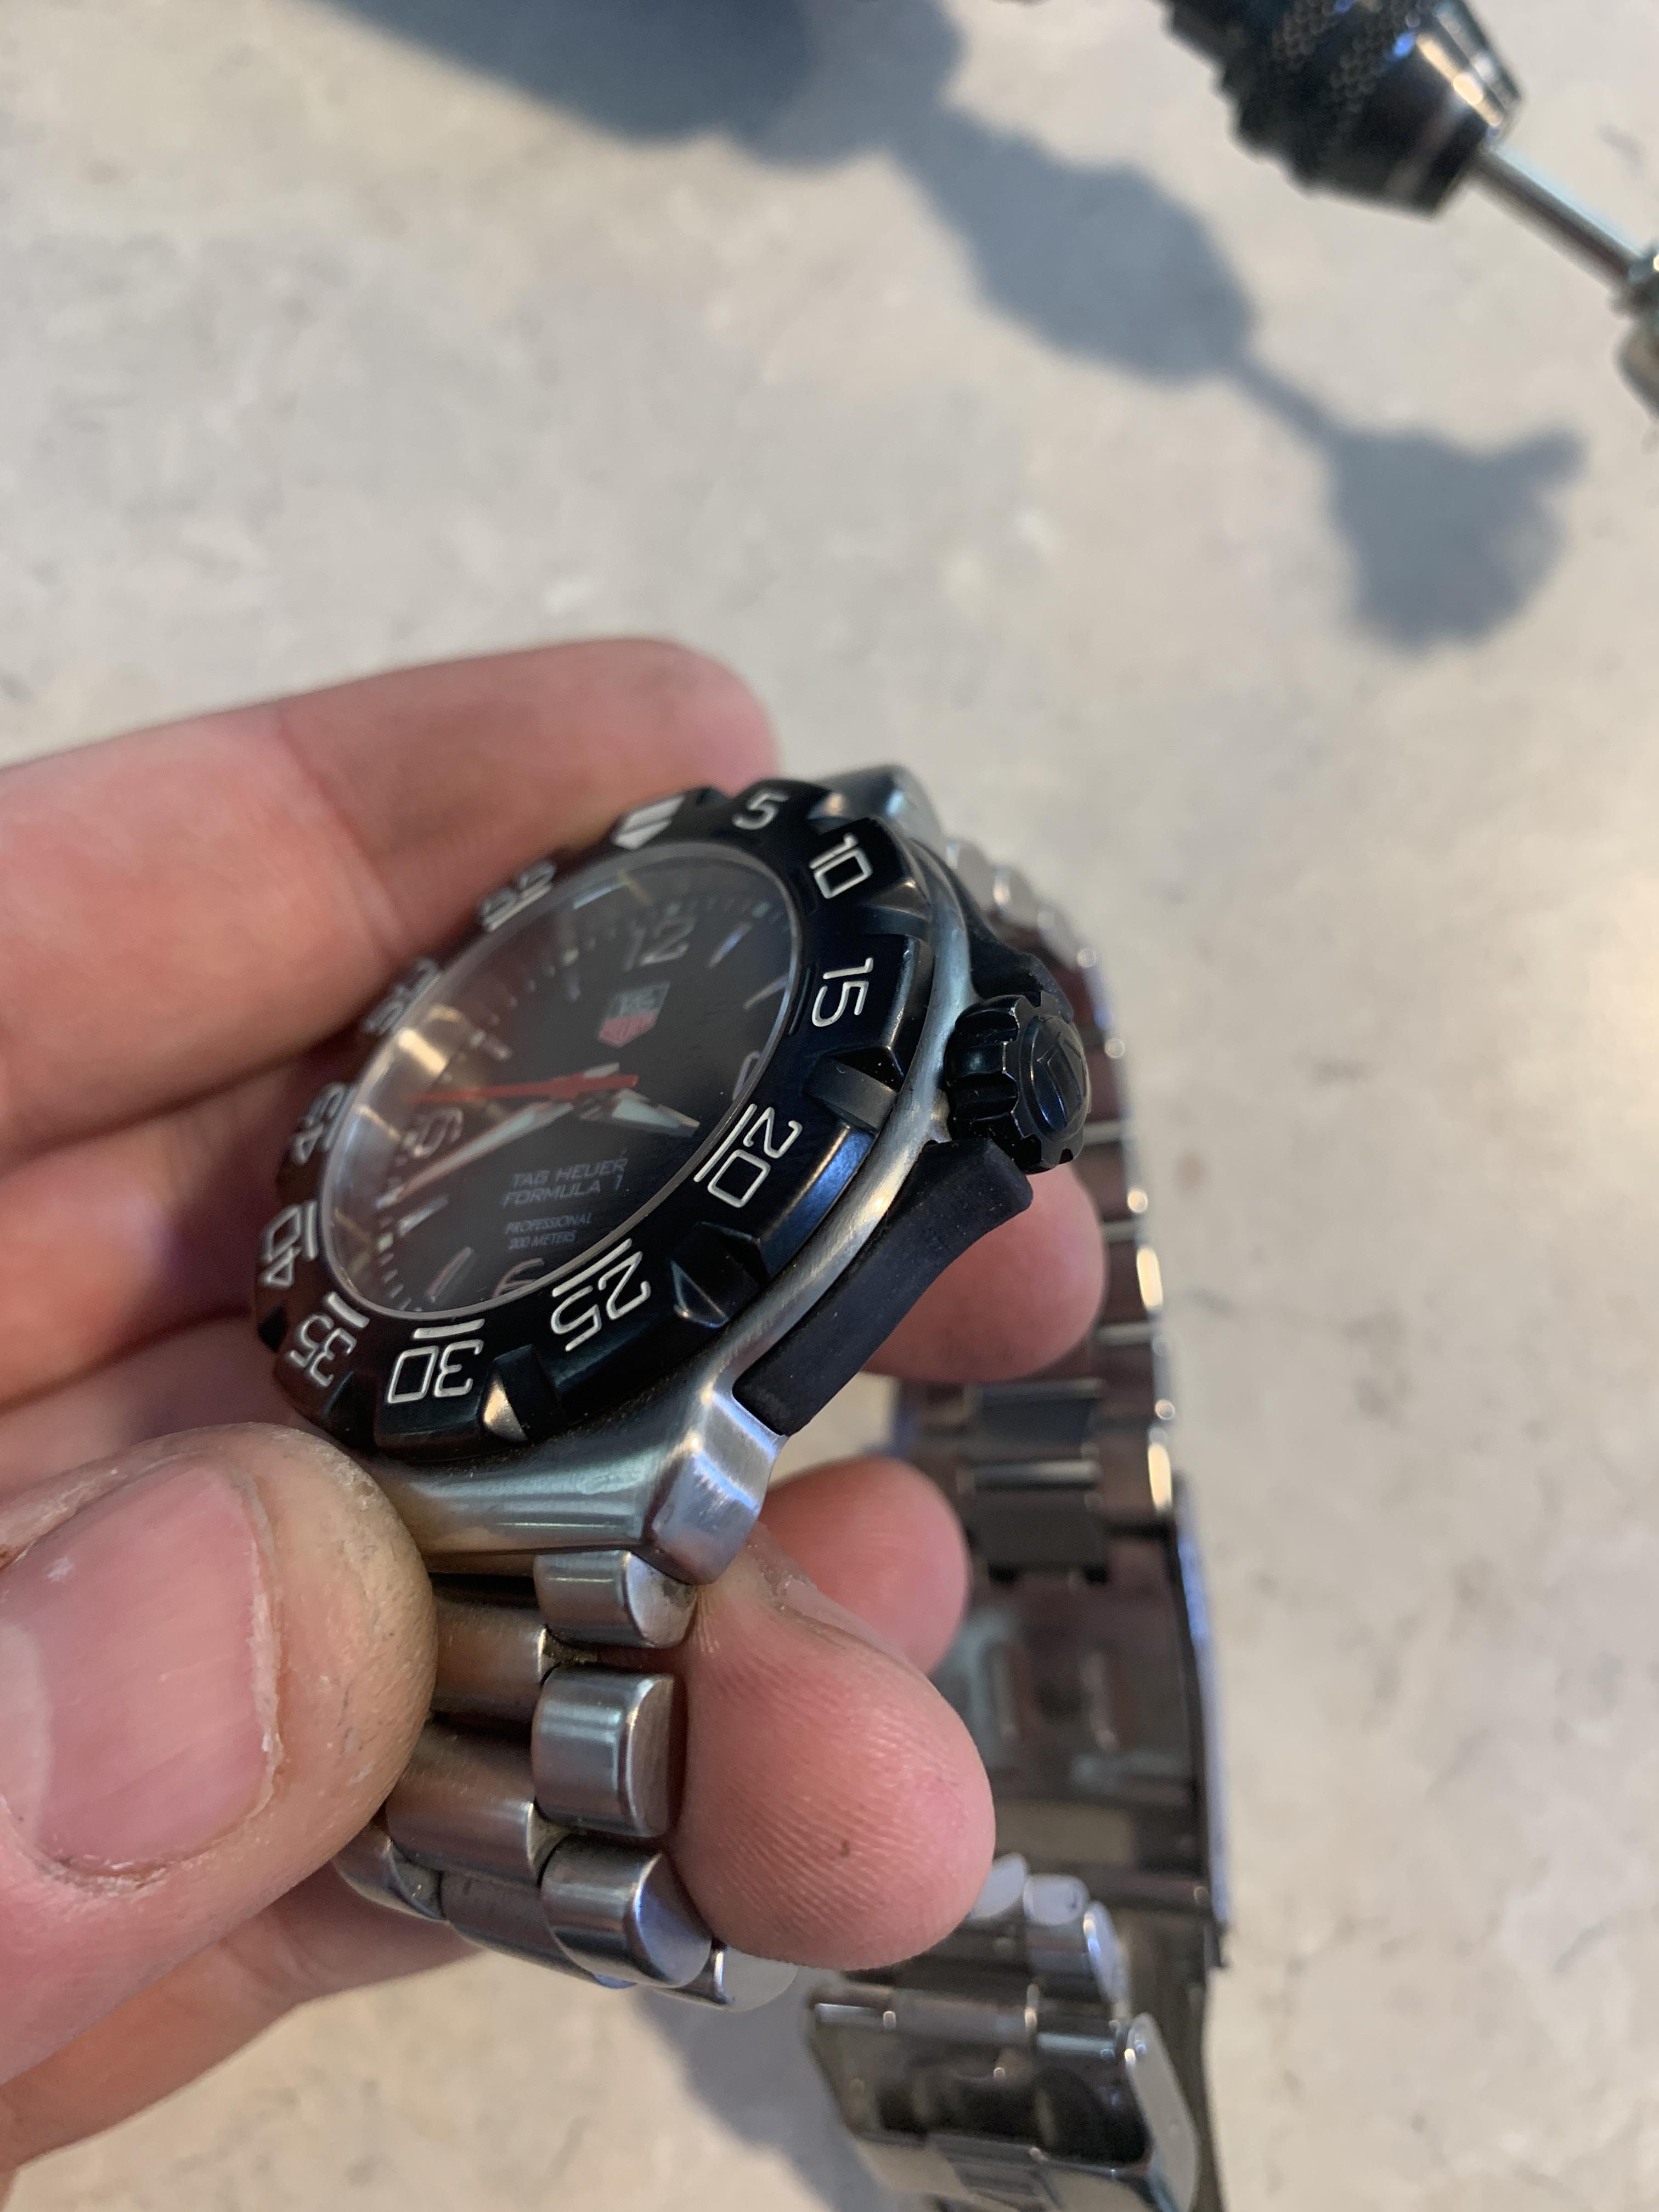
I finally took action to fix my Formula 1 Haikonen bumpers. I keep thinking how Tag could put plastic outside the watch? And on a Formula 1? The perfect everyday watch? Well I imagine some people wont agree with me on that... I removed the broken ones and that rubber was just so dry and broke like chalk. Had to try so many prototypes till I could get the perfect fit. The resin 3d printer is just amazing the amount of detail you can get at home. Also the rubber resin worked perfectly for this one. I could sell those on Ebay as I imagine there are a big number of Formula Tag owners pissed off with these bumpers and no official replacement. A couple things I think still need improvement. I have to dye the resin in black a bit more. I got to learn a way to create the plastic texture while modeling the object. I got really curious about exploring a laser engraver. I have a little pad print machine but yet to decide how to make the cliches for dials. So far the photopolimer idea get stuck on an inkjet printer capable of printing a motif, specially dial's tiny small lines. I just saw a laserpecker and I think that would be a better idea. Have anyone tried to create a cliche with a laser engraver?

 2 points
 -
I make all my own leather straps. I use Ecostick 5019N. It's a water based contact adhesive specifically designed for leather. Its the strongest glue in the Ecostick range and was designed for shoe making if I remember correctly.2 points
-
Aw poor baby, all alone Great job Knebo as SS states not a simple movement, with moonphase and date pointer. A adequate positional 30° amp drop and still good amp after 24h.2 points
-
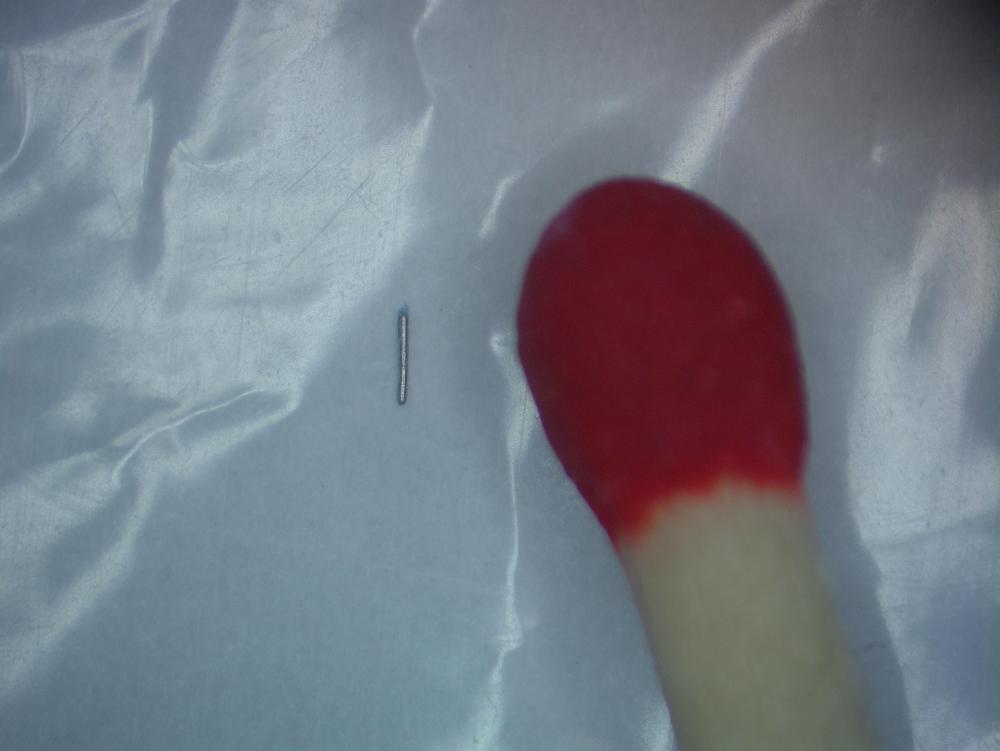
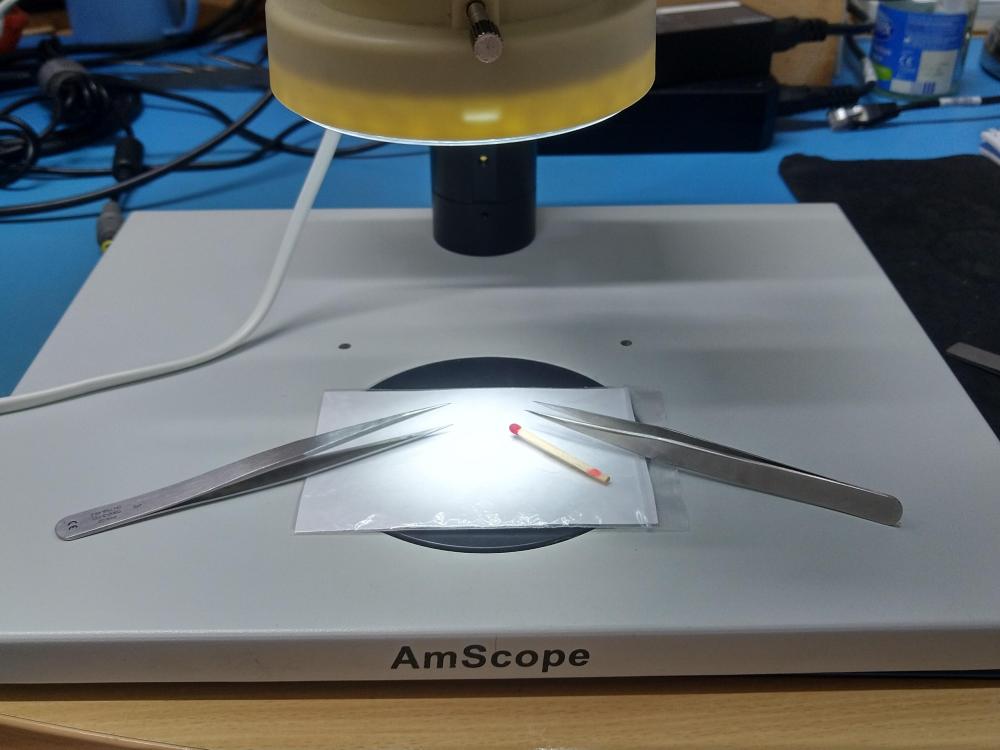
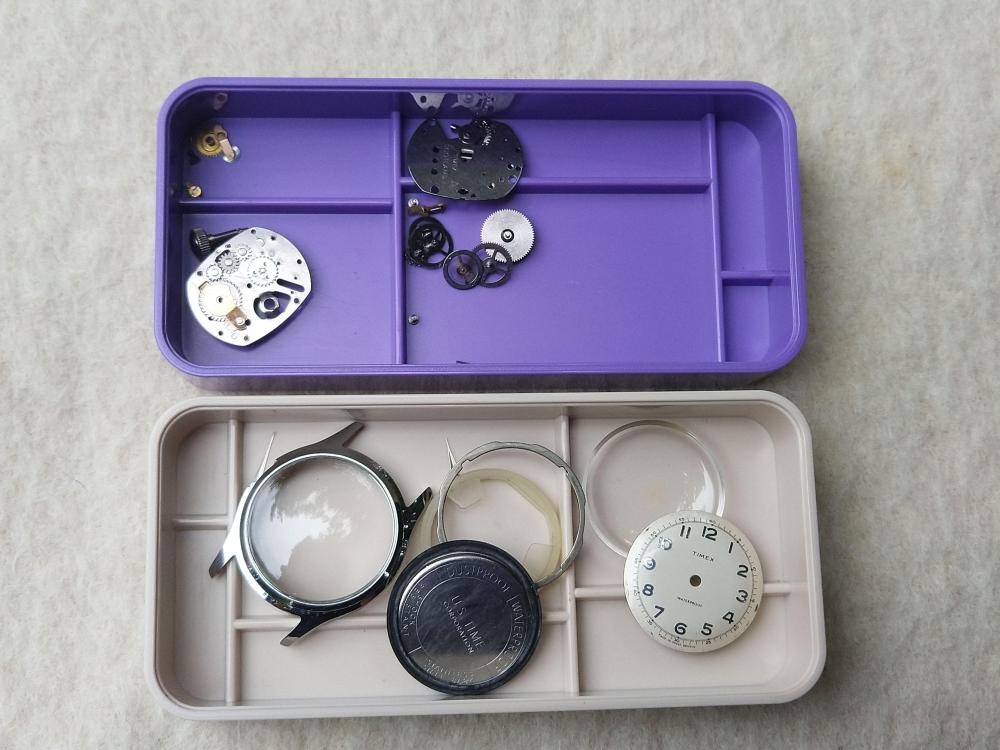
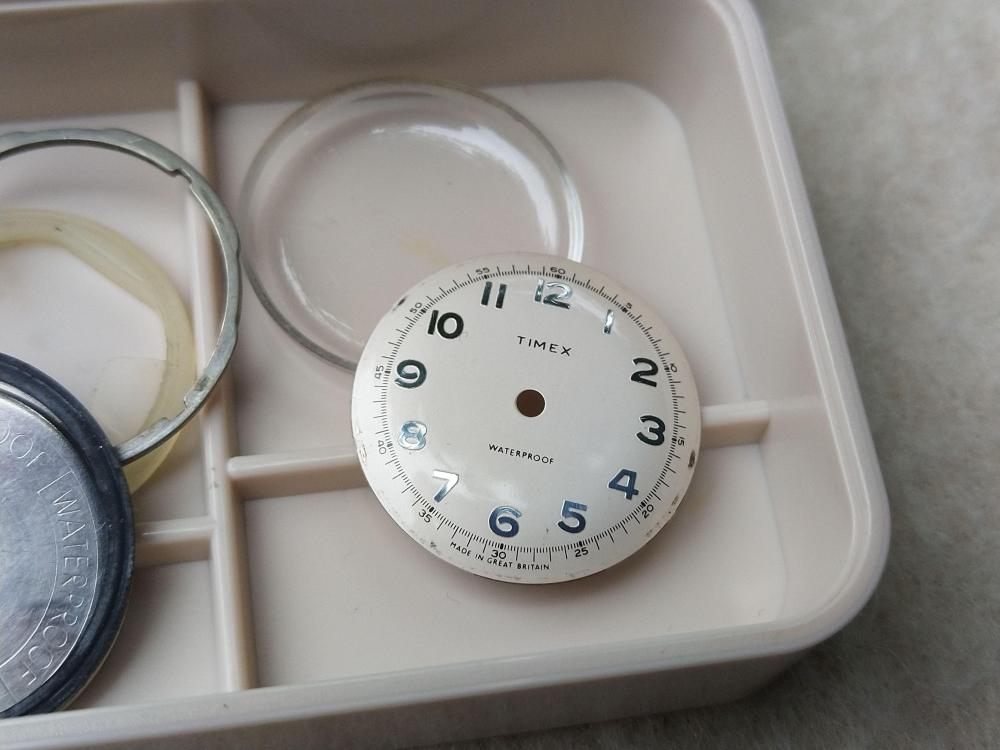
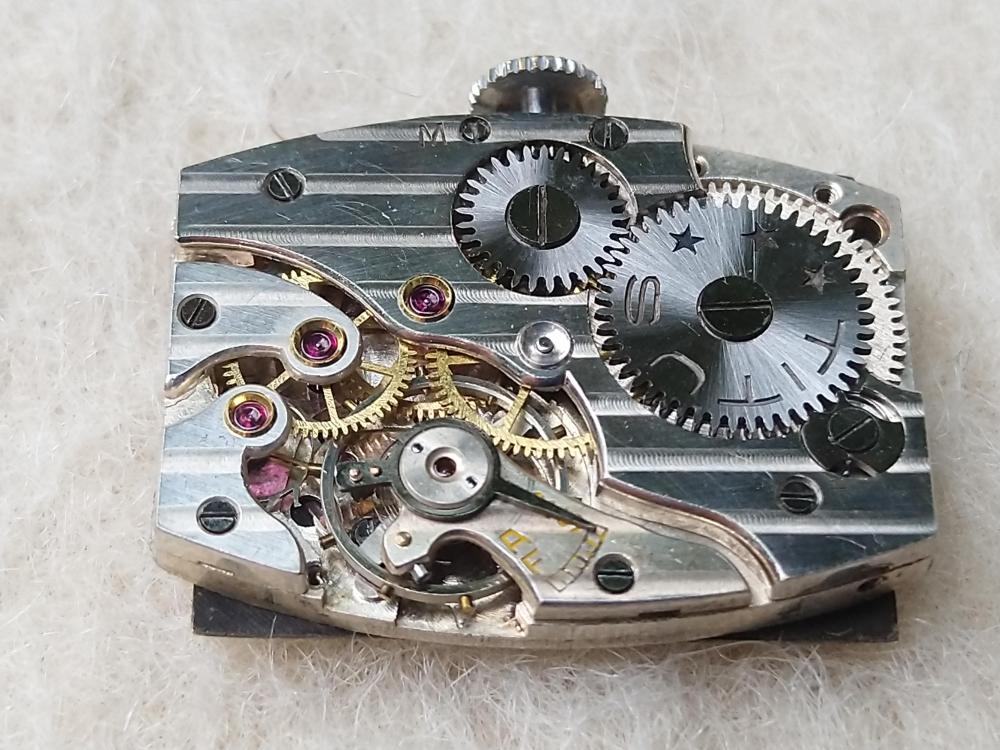
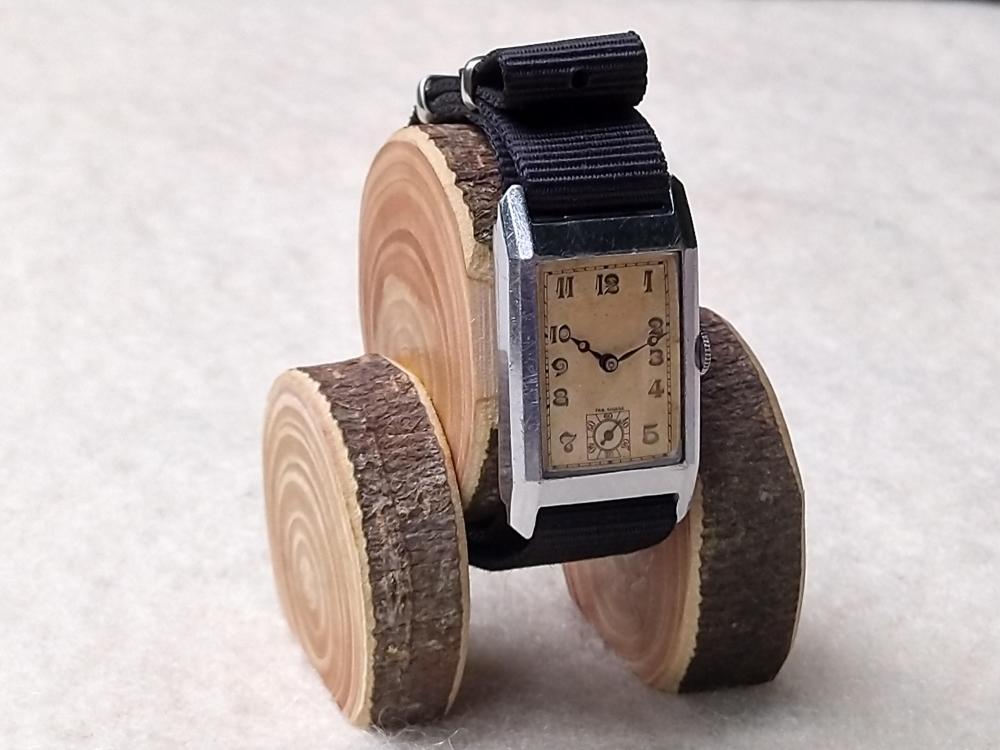
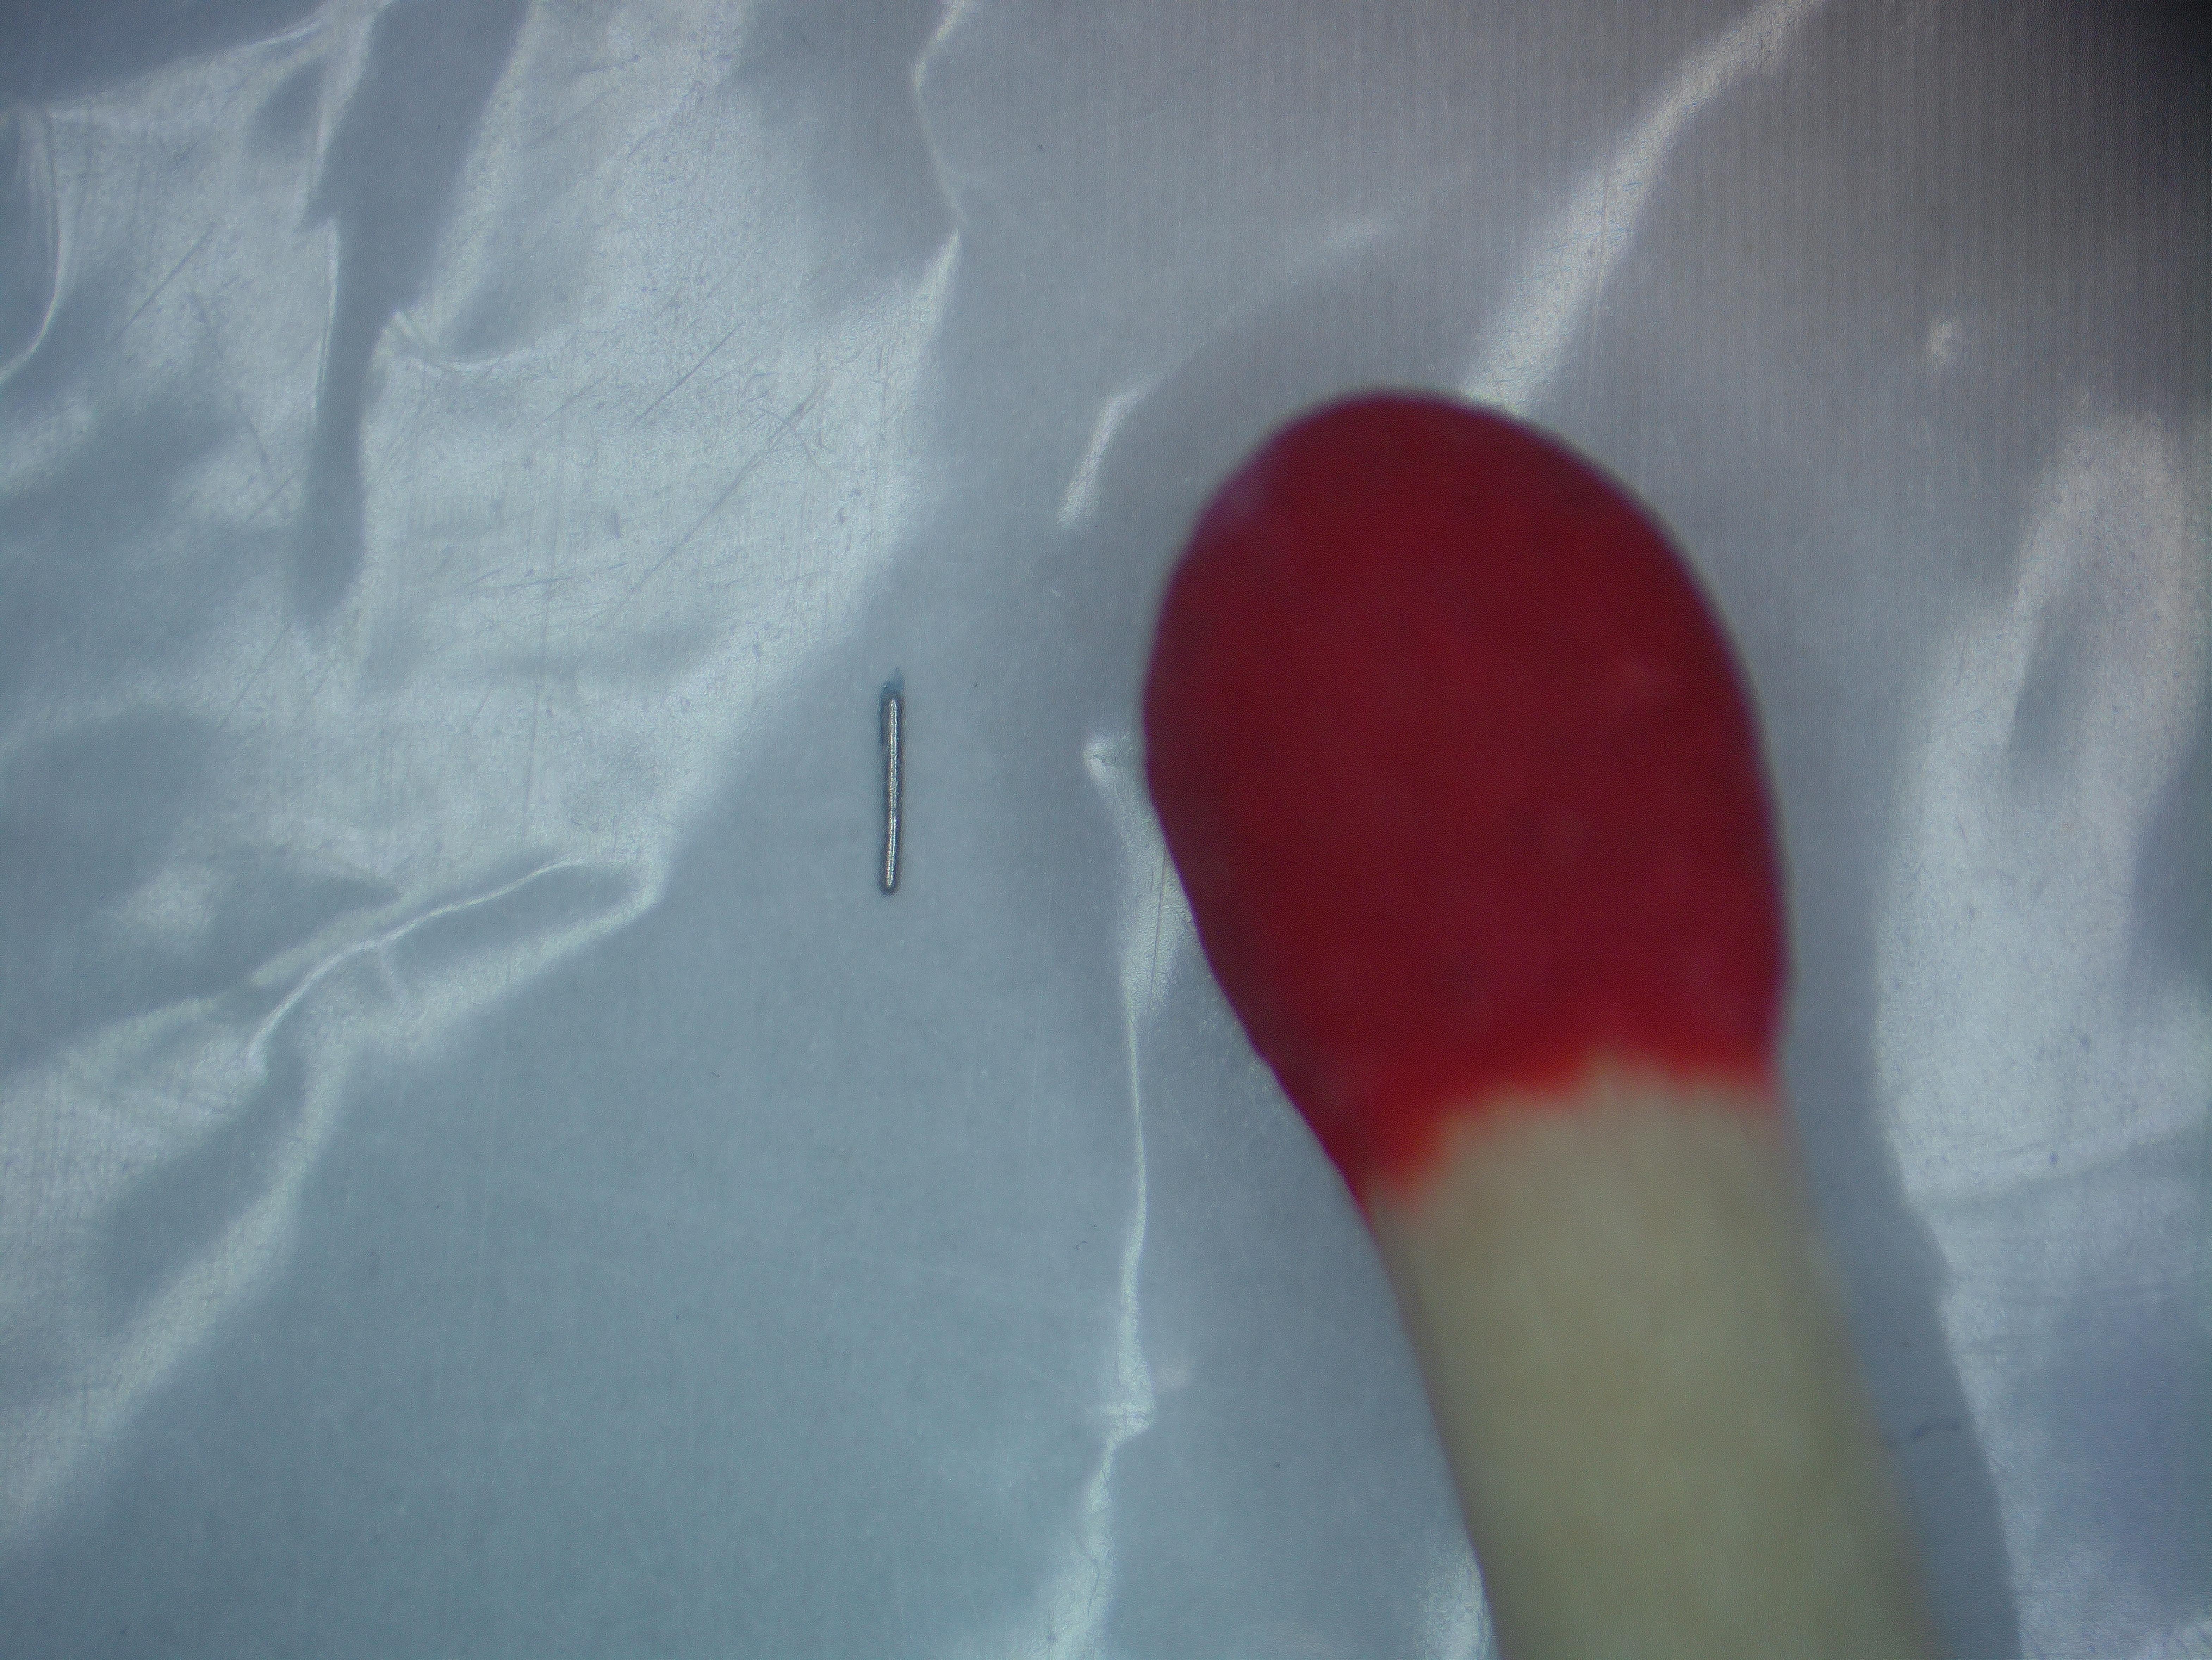
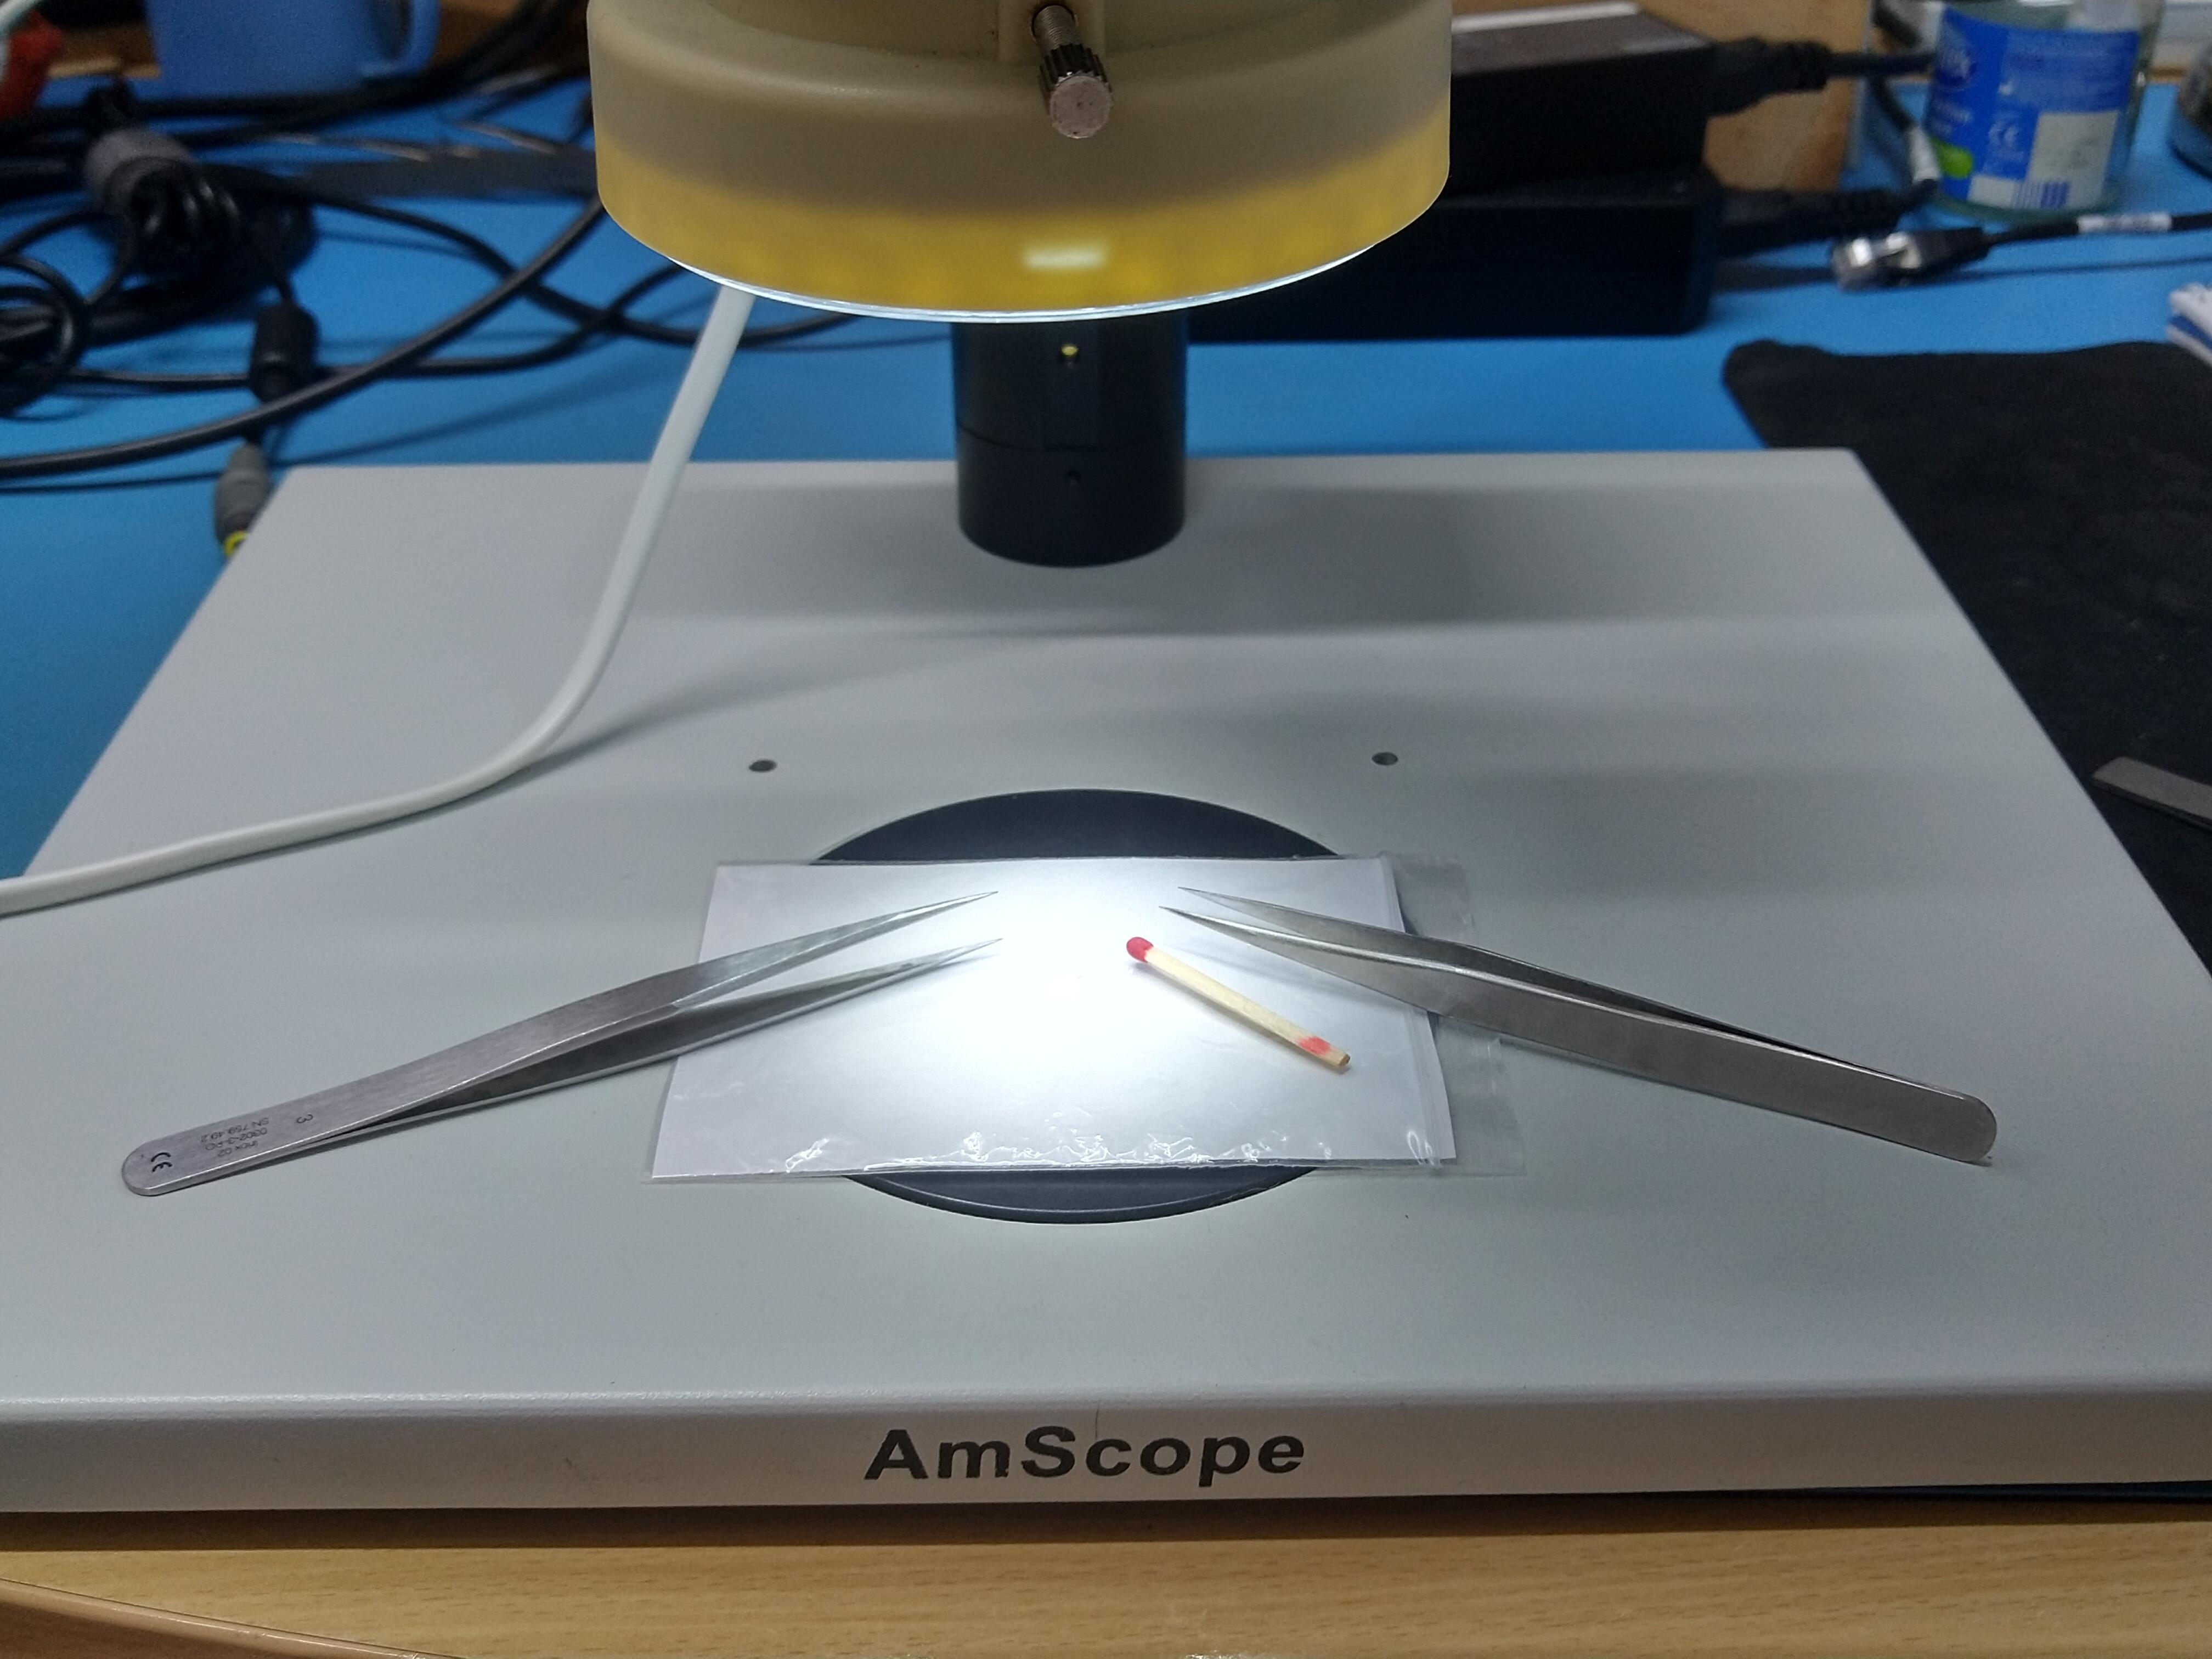
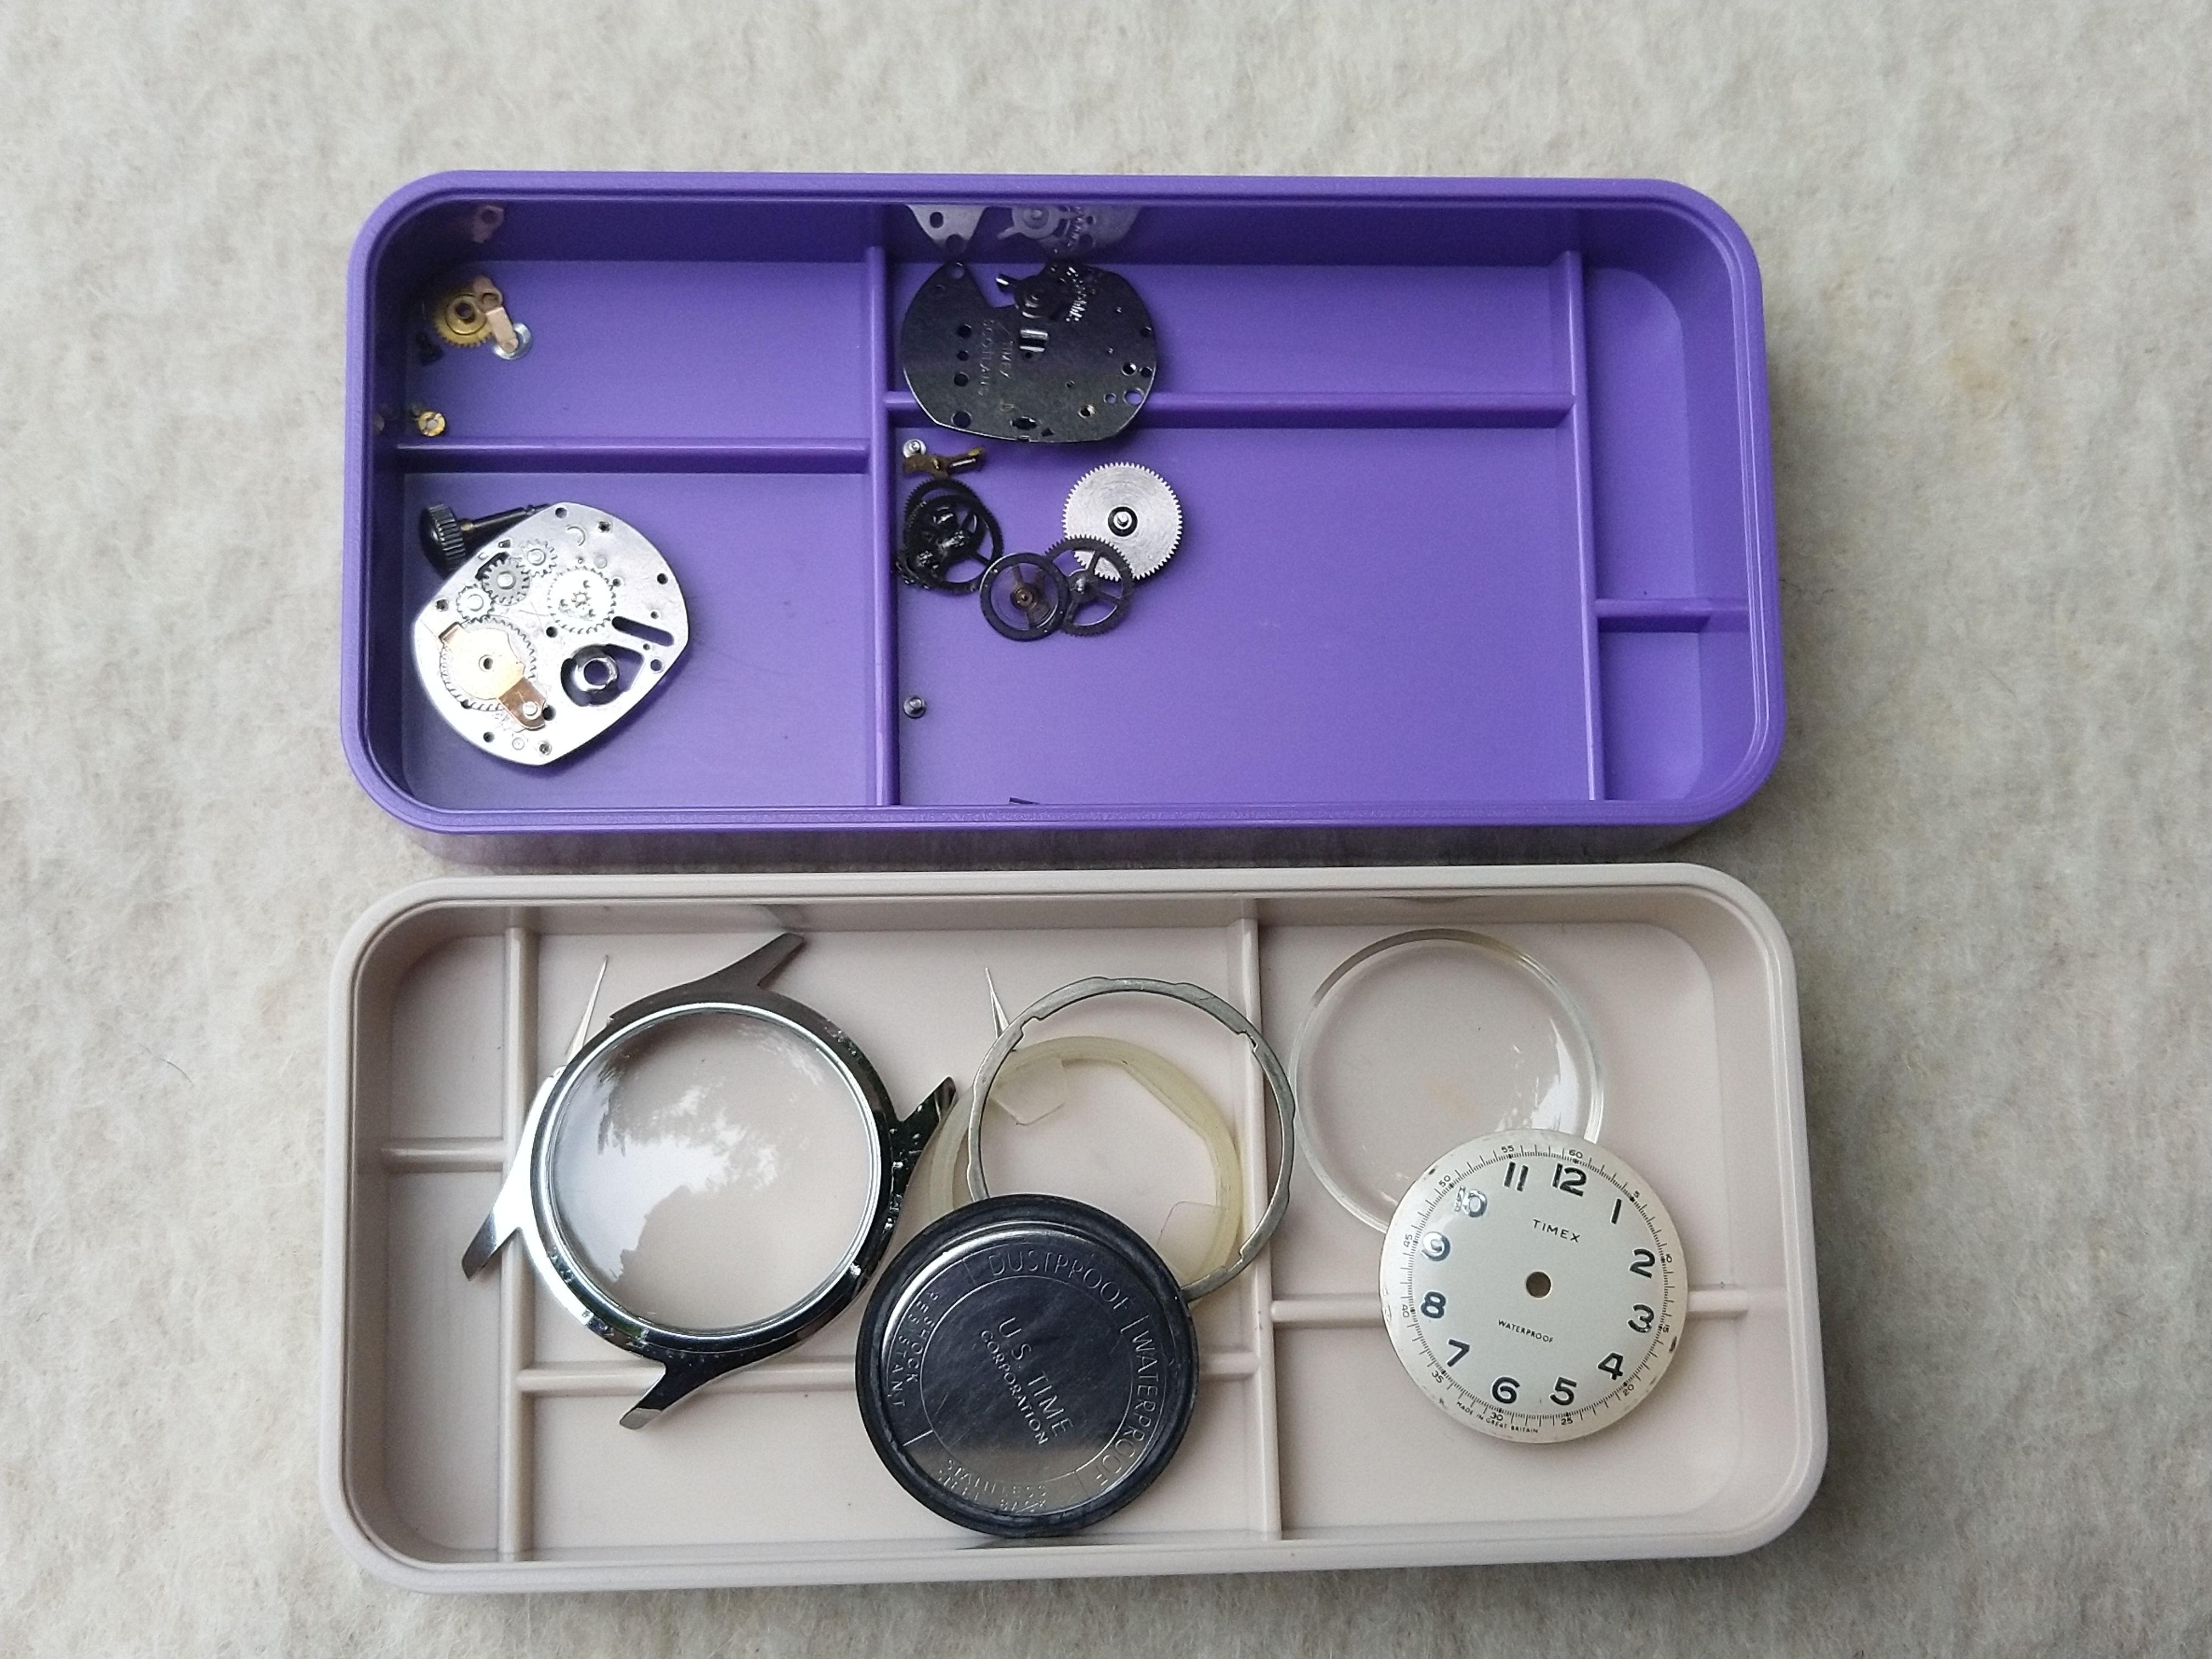
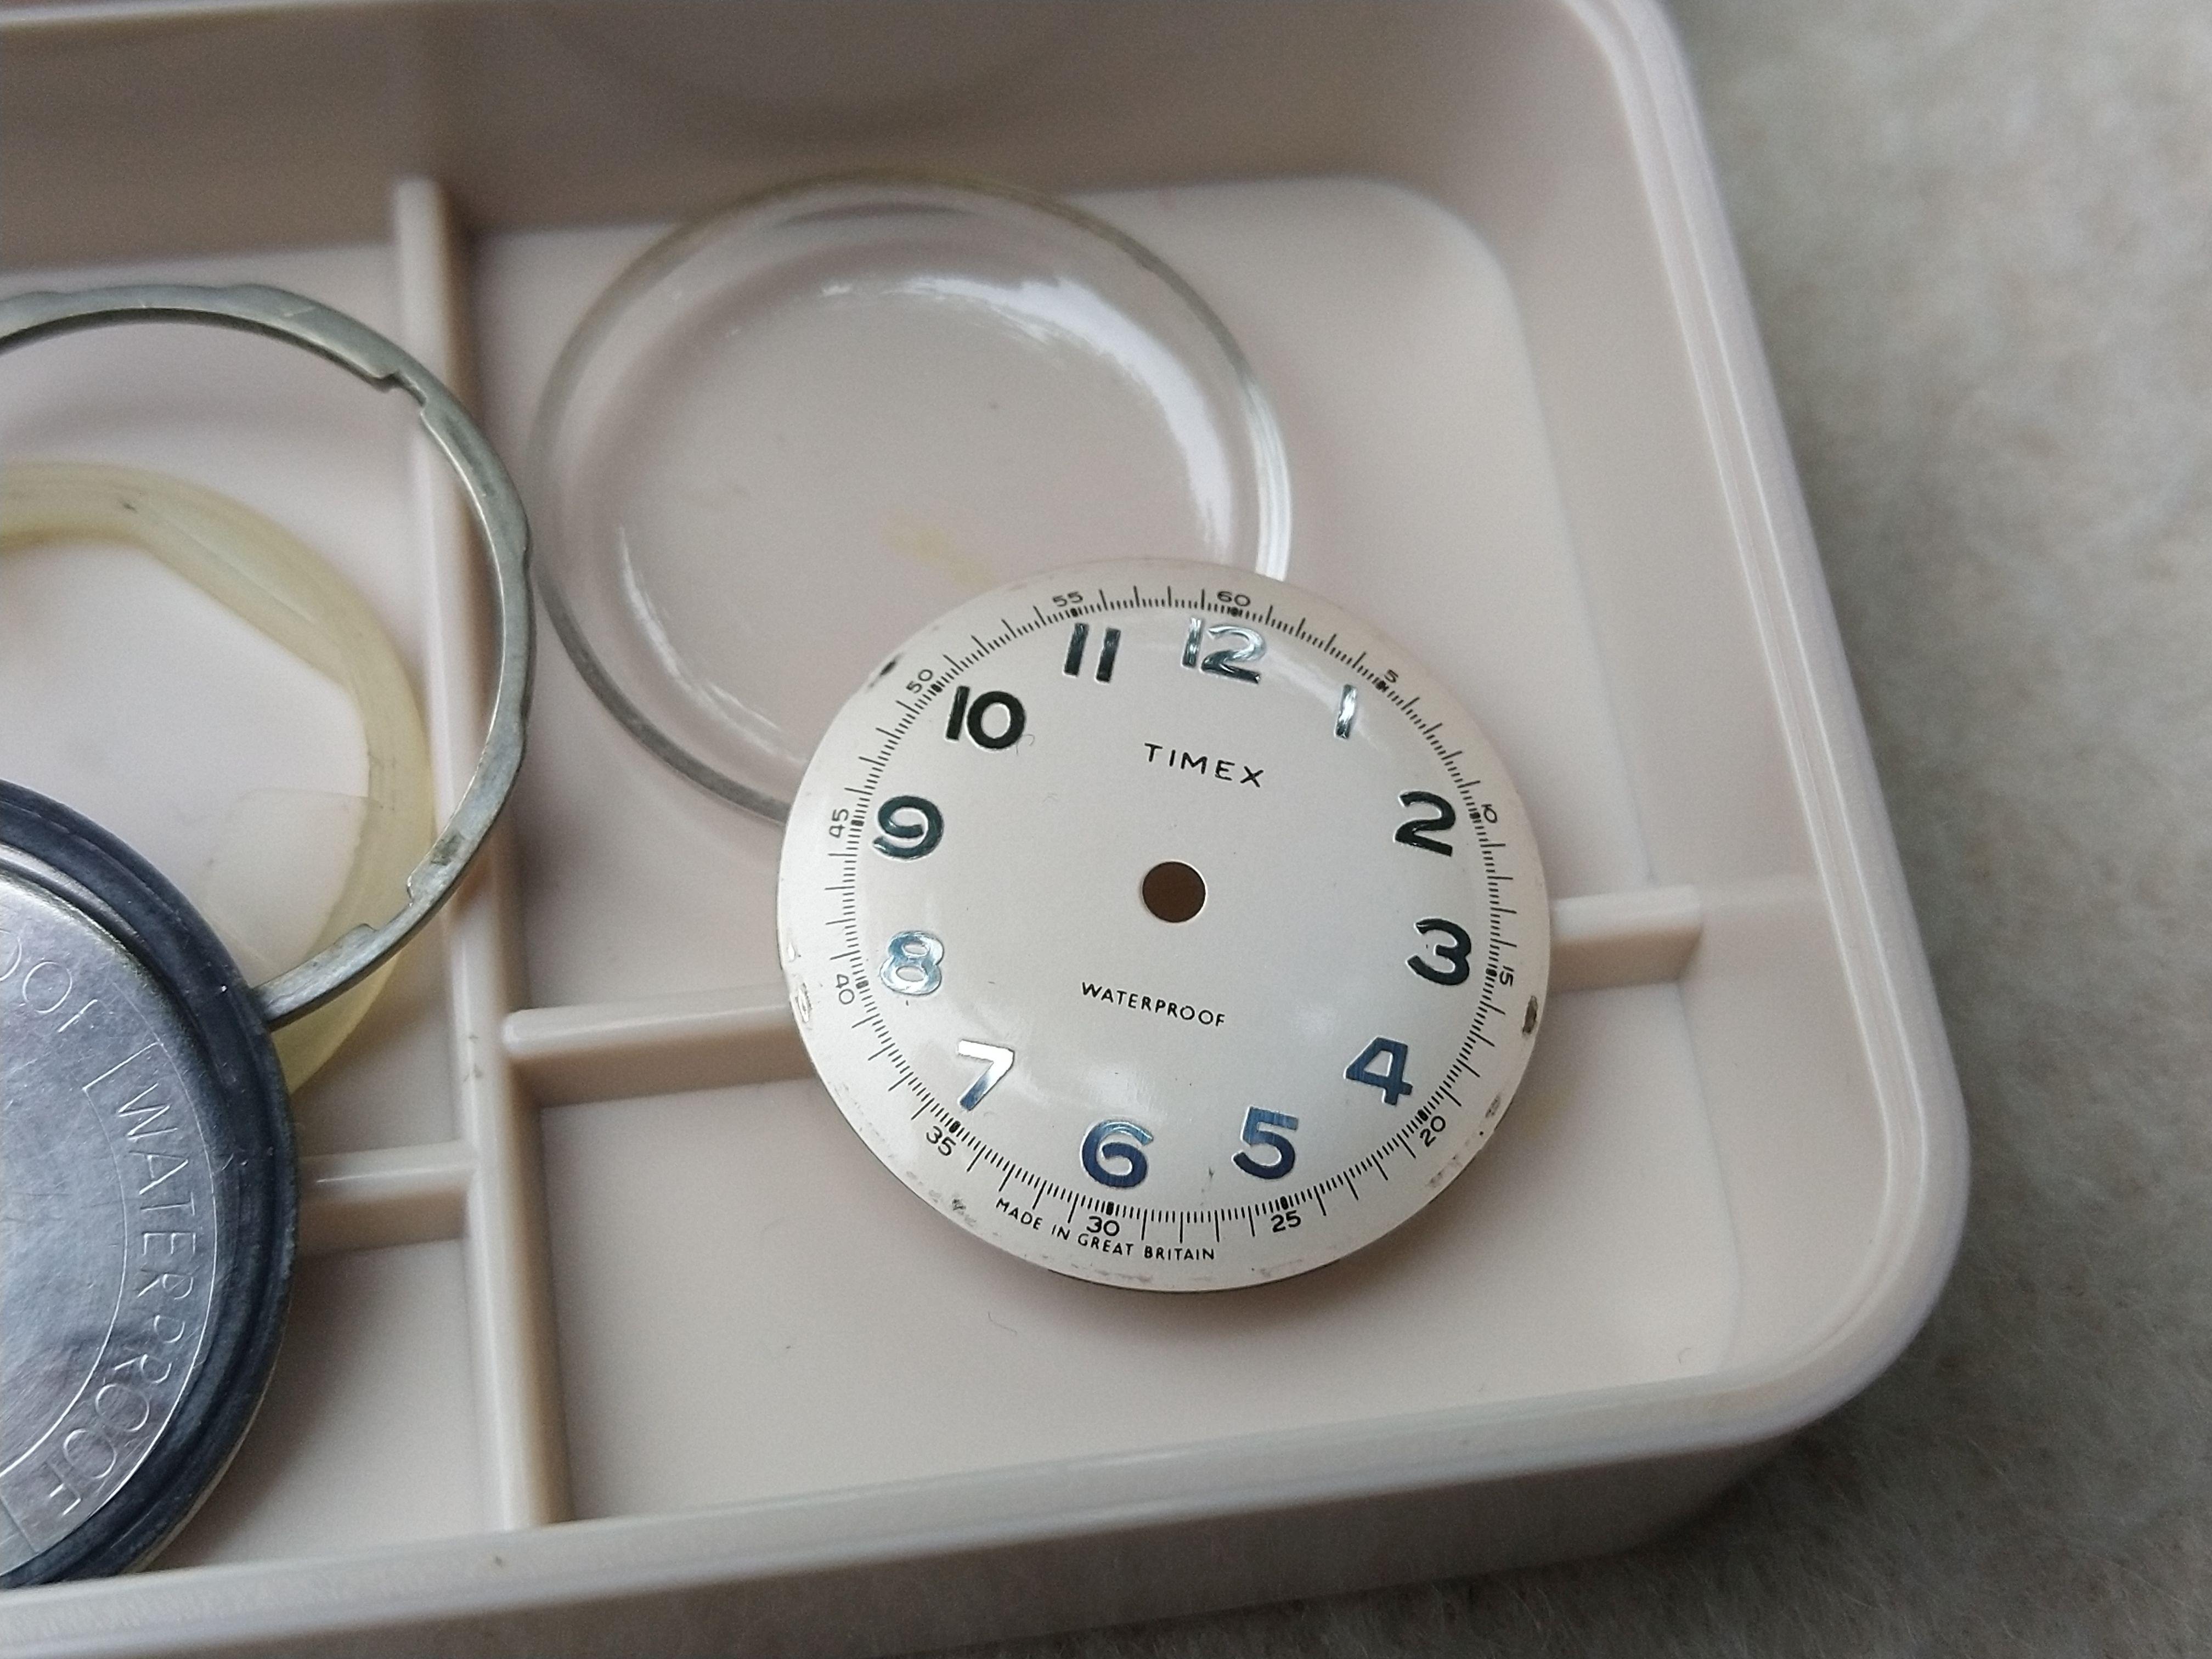
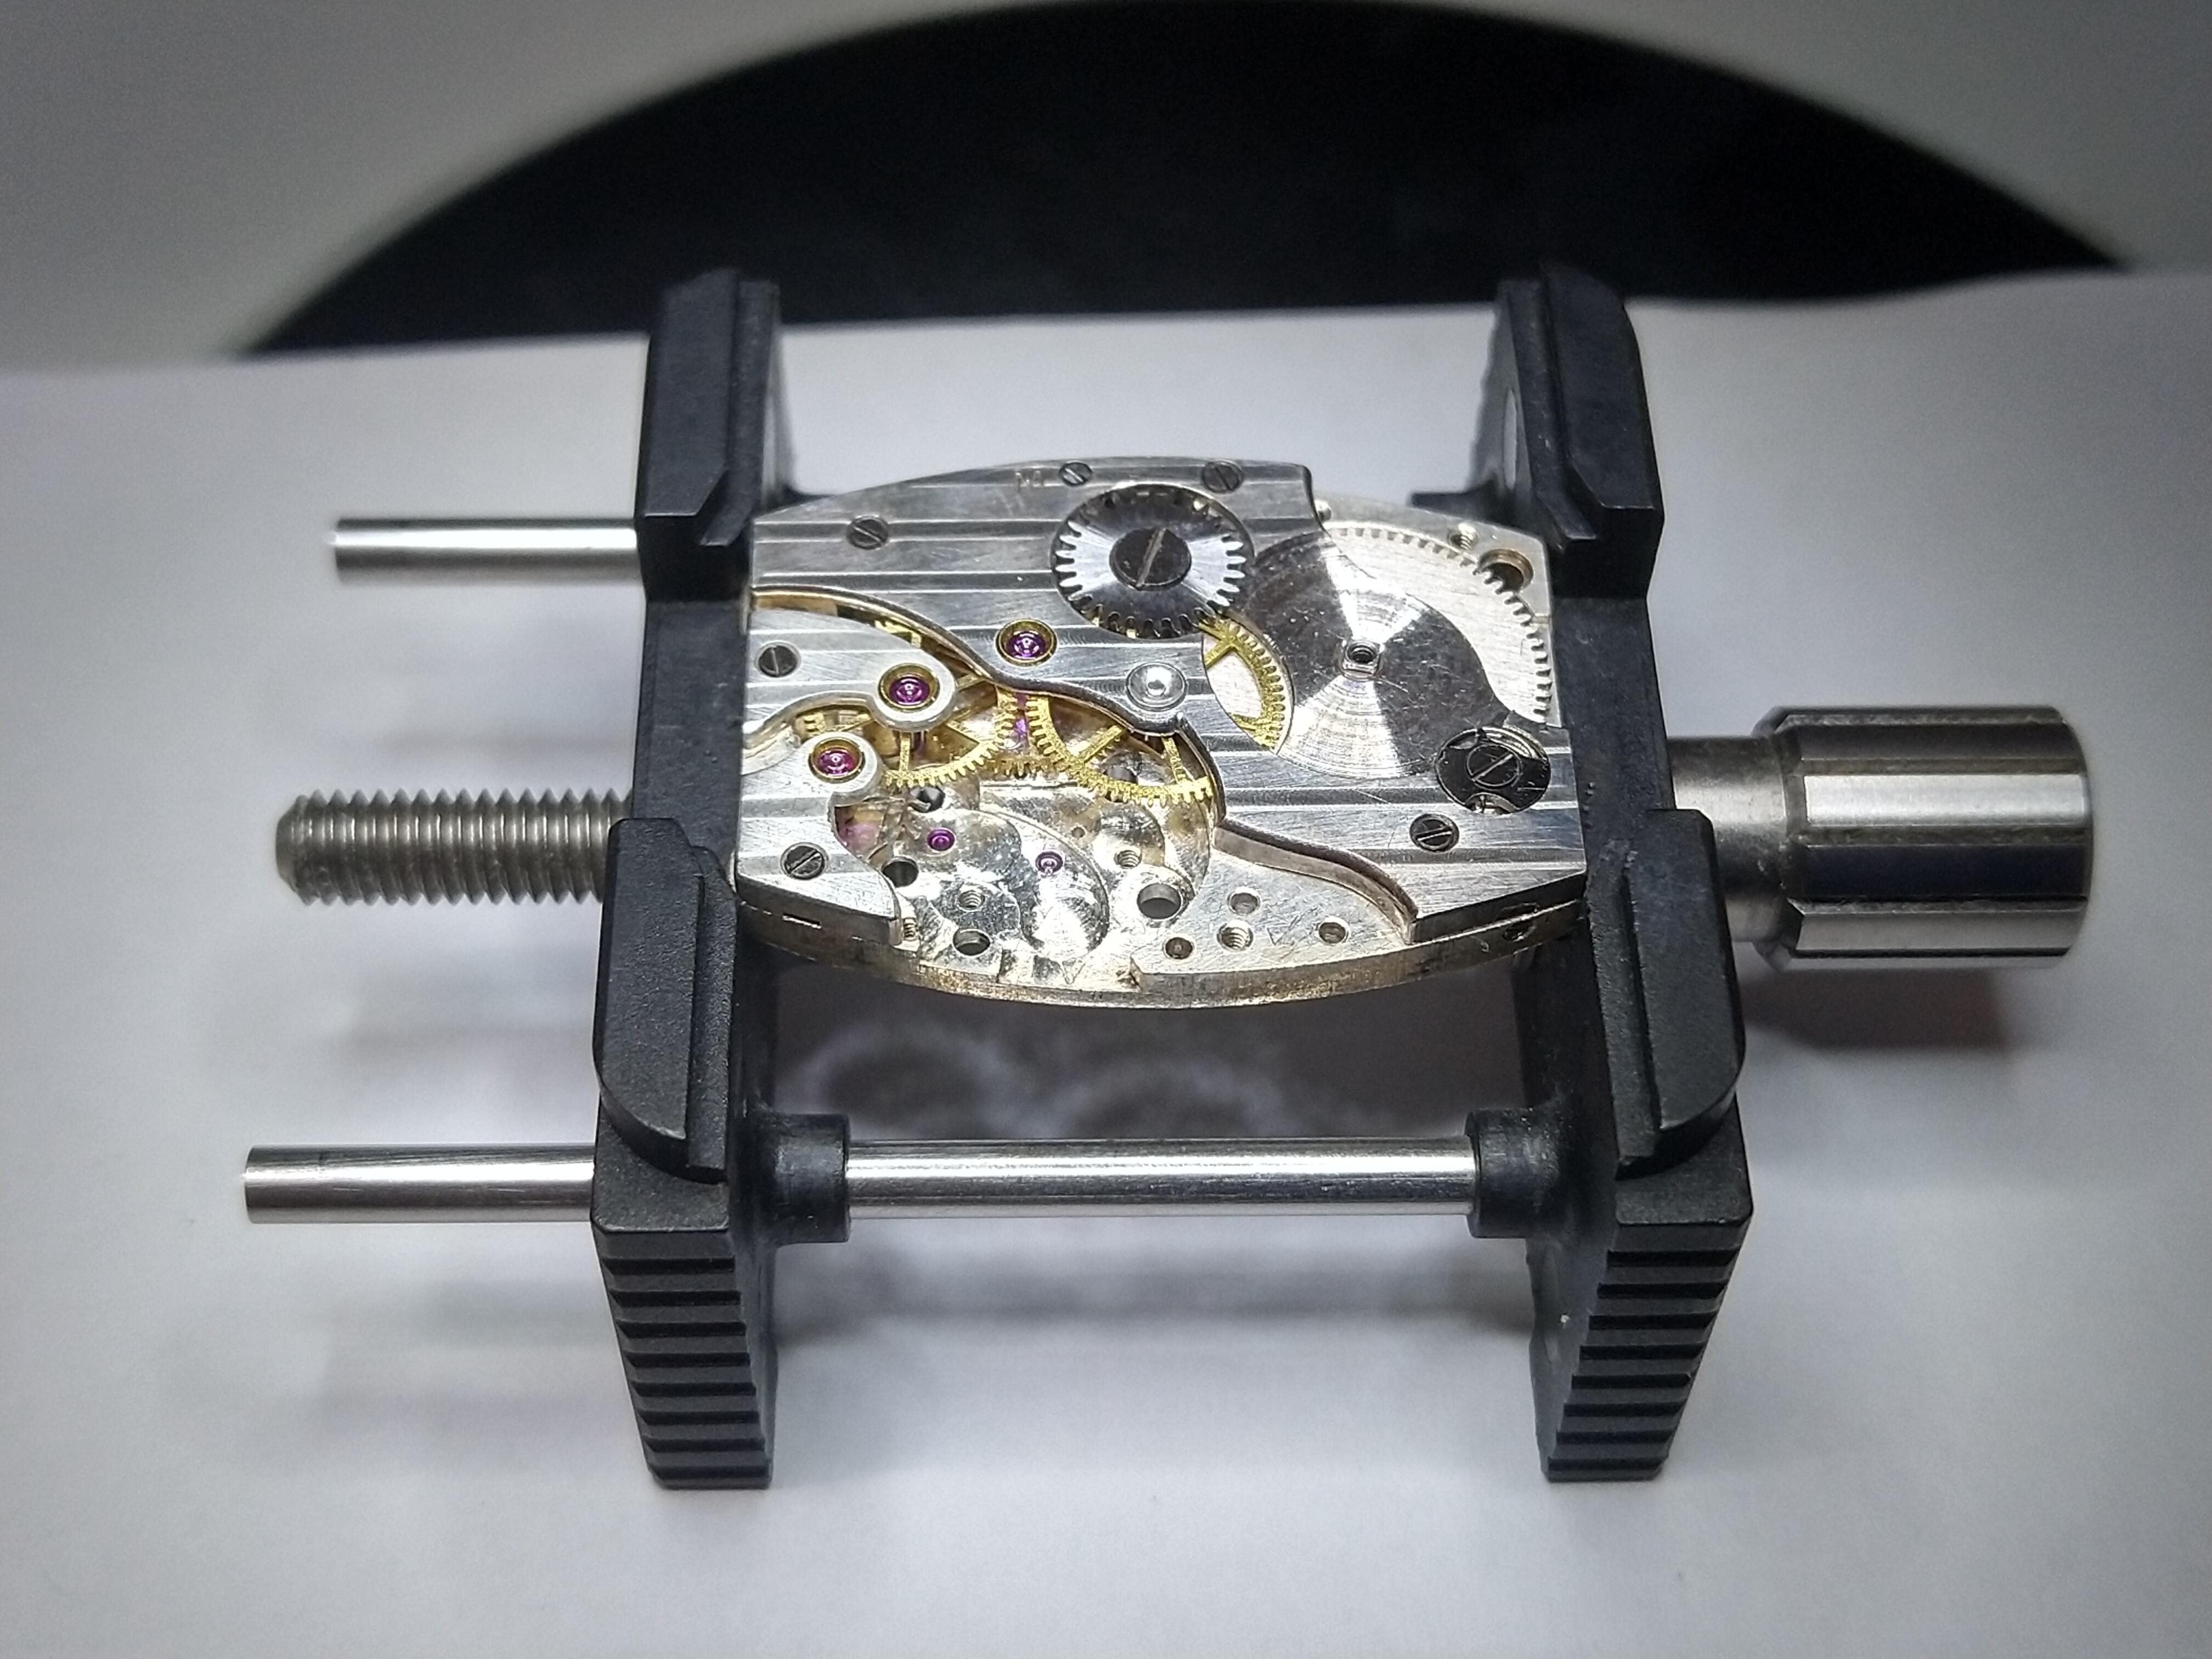
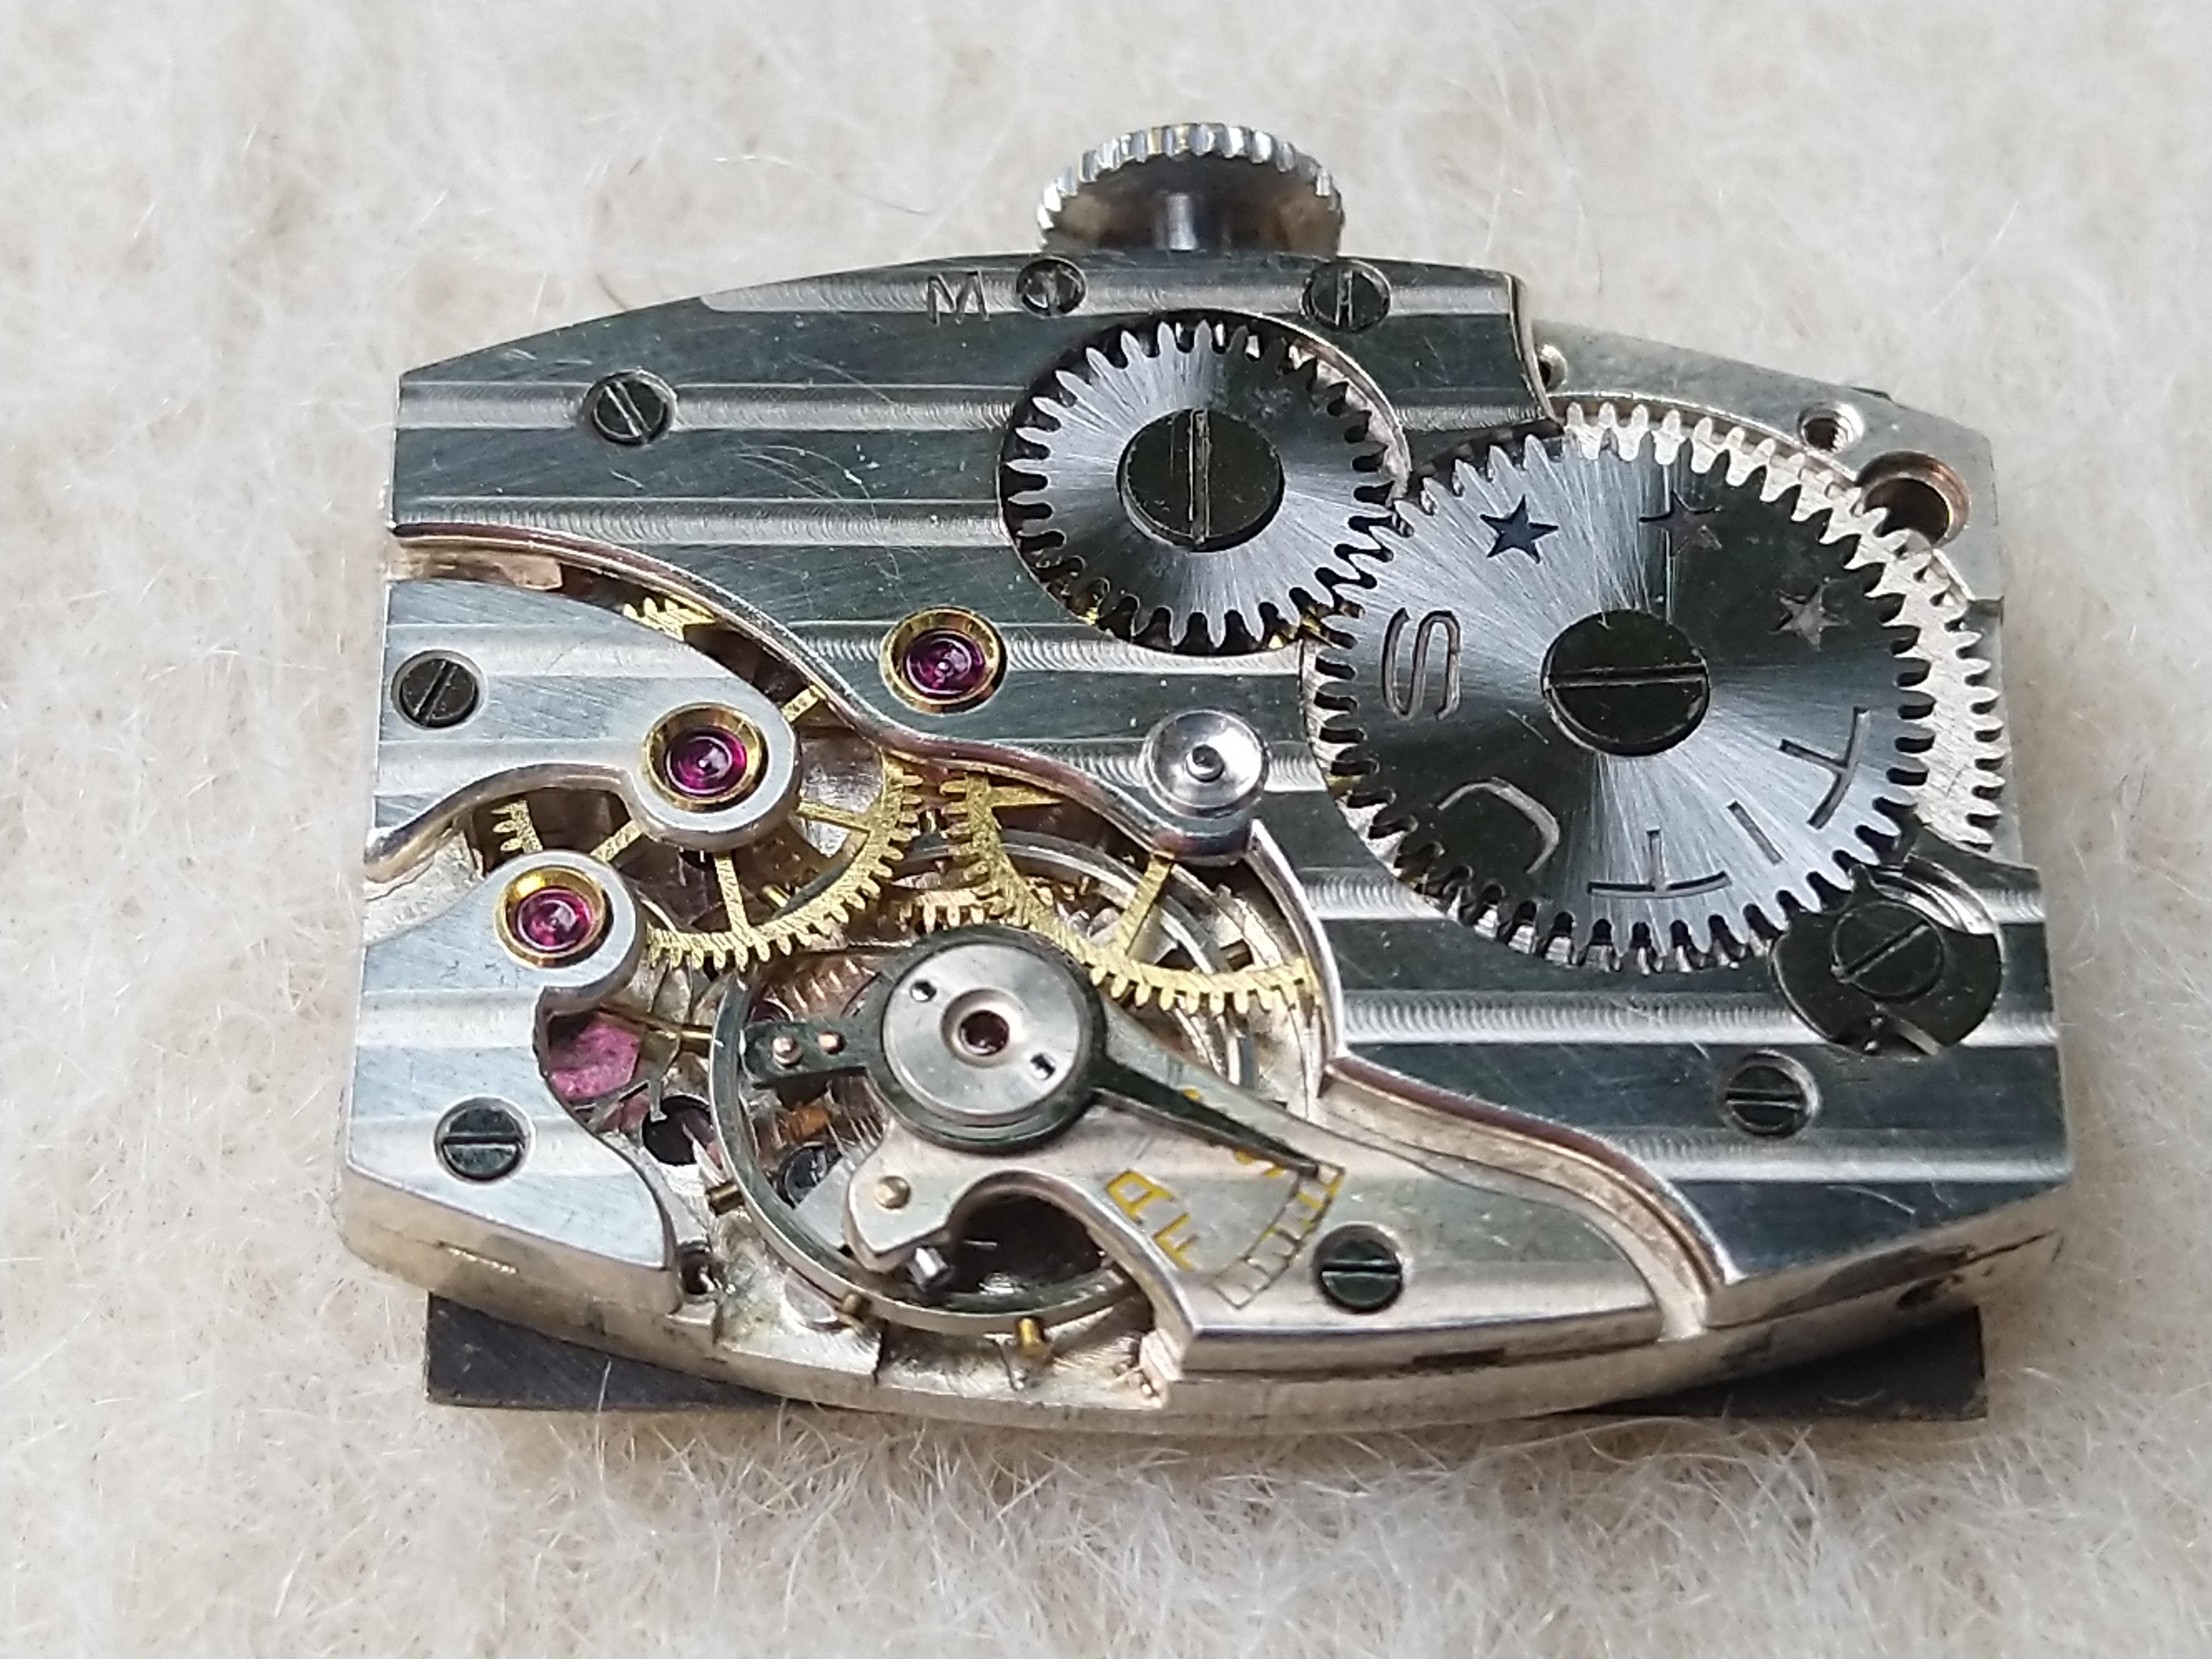
HWGIKE#22 Timex M22/23? Started as a full service.. ended up like a disaster! A 100 quest would not be complete without a Timex would it? when I started my watchmaker carrier I started with some of these (I thought it was a good idea... it wasn't) so I had already some ideas as how to deal with these old Timex movements. This one is like the mixture of the M22 and M23? US made. I put the main plate back with relative ease after cleaning but then it was non runner... went on for a bit but then stopped... one of the pin was bent... wanted to straighten it in situ with a suitable staking tool, but the hole of the tool was jammed with dirt... did not check it beforehand so i pushed the pin to the other side of the pallet... ohh dear.. i took it out then.. the pin.. started to straighten it with tweezers... jumped... what a luck stayed on the table.... jumped again... ~ 30 mins magnet fishing on the carpet.... what a miracle, found it... built a barricade around my microscope... jumped again... penetrated my defense lines... long long search... no result... then I lifted that plastic plate on the microscope to see if it went there into the small space between the plate and the base... there it was... what a miracle again... then I asked a friend who is an experienced watchmaker what to do and carried on following his advice.... in a plastic bag this time i straightened the pin completely by rolling it on a glass sheet... then with great difficulties I tightened the hole for the pin on the pallet using my staking tool.. and I managed again with great difficulty to place the pallet flat on the staking tool anvil and put the pin back in place... but then I bent the ping again with the staking tool... not even using the hammer just by lightly tapping the pin with the tool bit itself.... i took it out again and started straightening again rolling it again on the glass sheet pressing a plastic bag on top of the operation.... but the pin was not in the bag.... it was just on the top... pinged again... managed to escape somehow... started looking for it.... magnet fishing on the carpet, cleaning the desk....searching searching searching and a bit more searching.... lost forever... I am still happy I now understand the difficulties and developed a bit of sense what to do and what not to do... what is the force required etc.. i cannot say that the next time I will be more successful, but it will be a lot easier so start the operation... I now also have two staking sets organized... i never spent the time to organize my 2nd hand staking sets so far. HWGIKE#23 Titus Unknow movement Full service, swiss level. New mainspring, new glass. Hole for the main spring arbor tightened. Nice performance with the renewed bearing and new mainspring. It was a bit dirty because somebody in the past could not find the right crystal for it and instead of a rectangular crystal a hexagon was used. The movement itself is beautiful. These 15/17 jeweled swiss lever movements without the complications are my favorites. Nice to work on them, they are reliable and they are a beauty in my opinion.


 2 points
 -
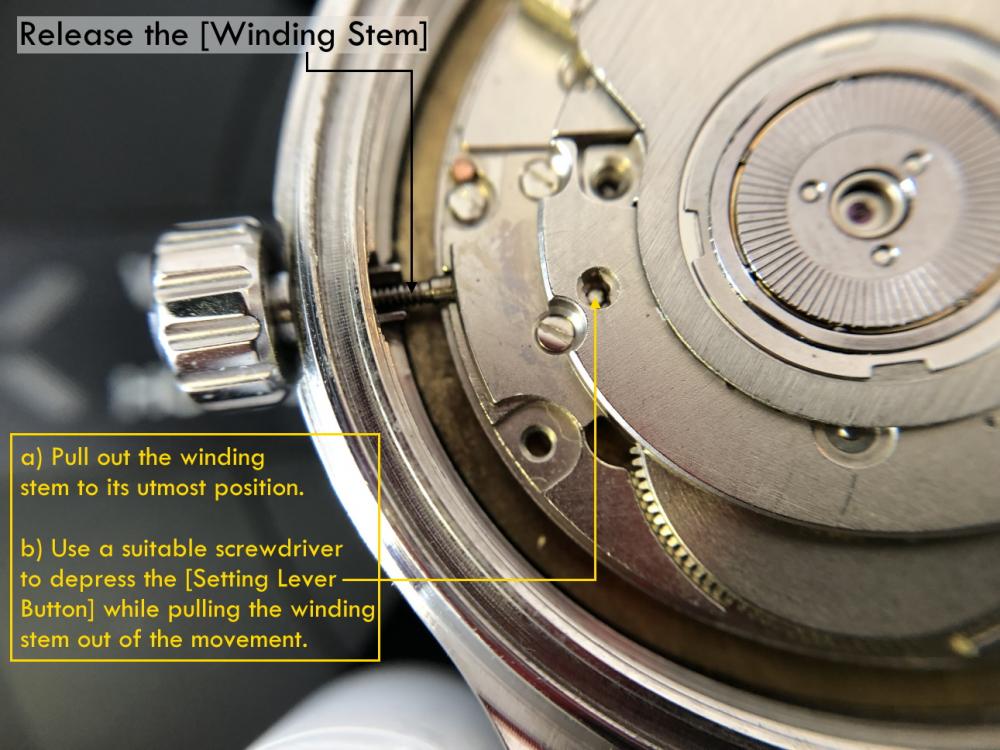
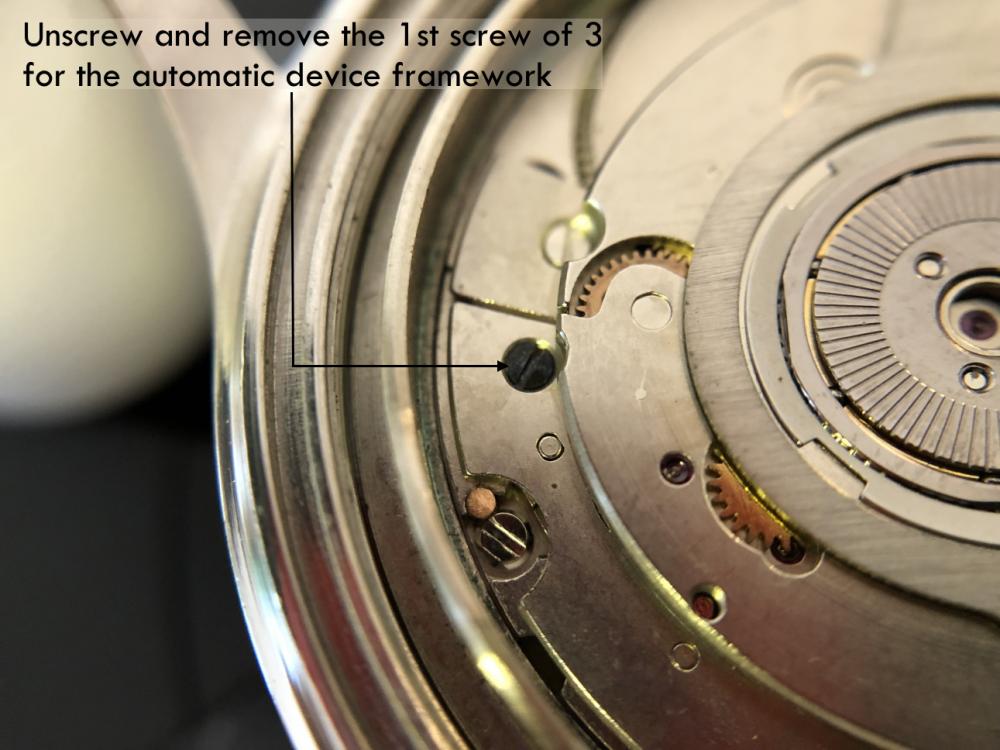
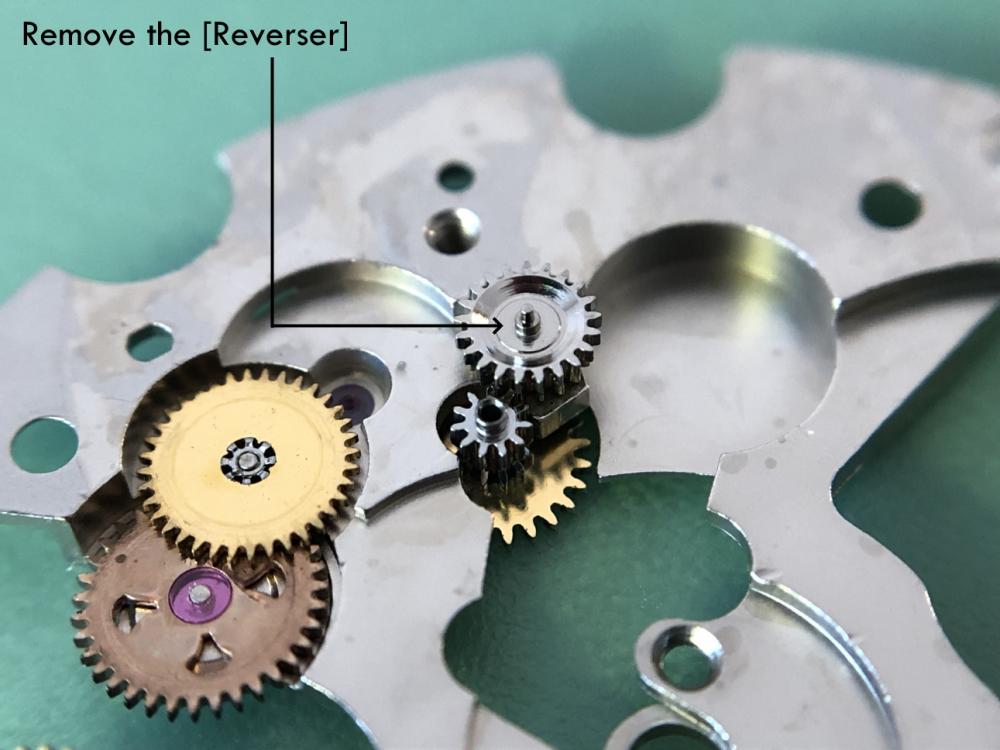
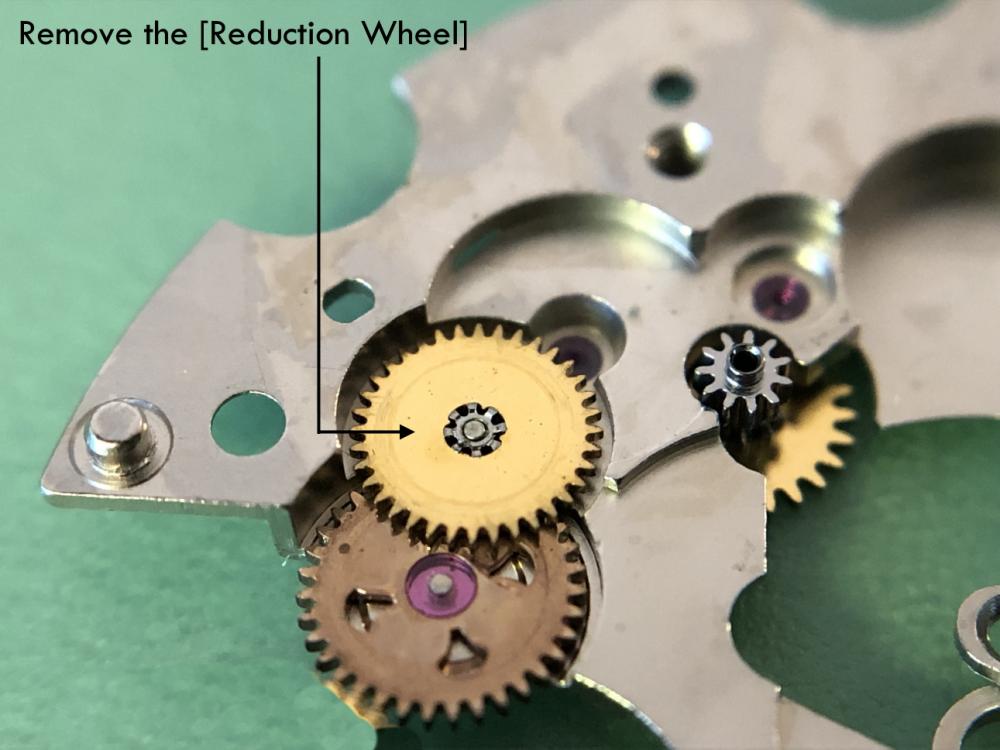
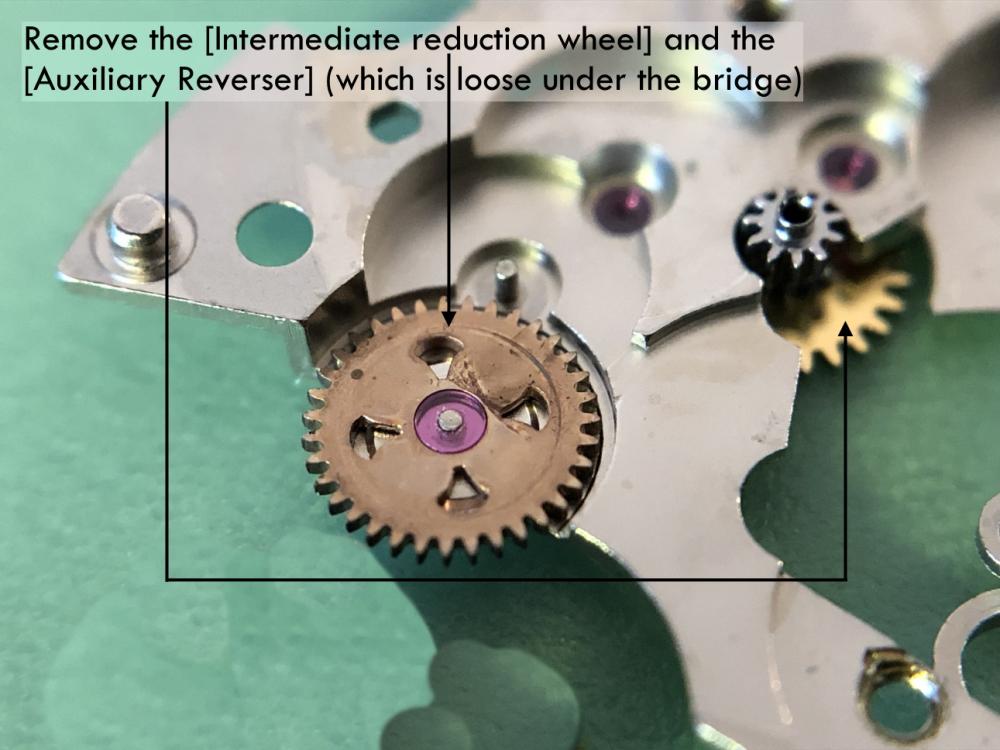
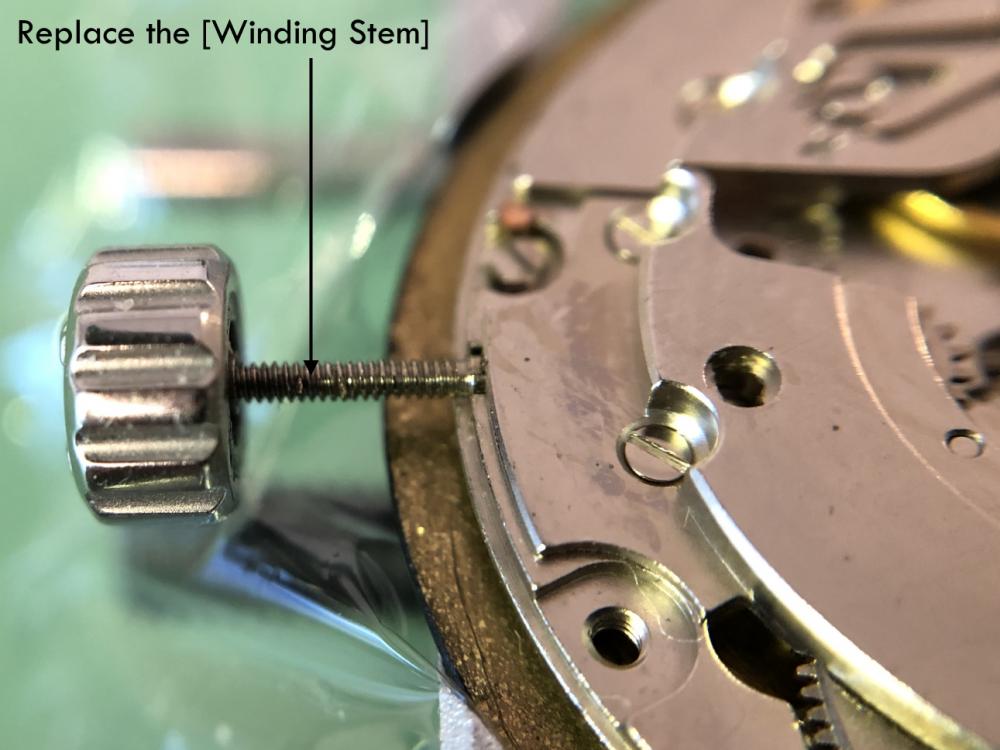
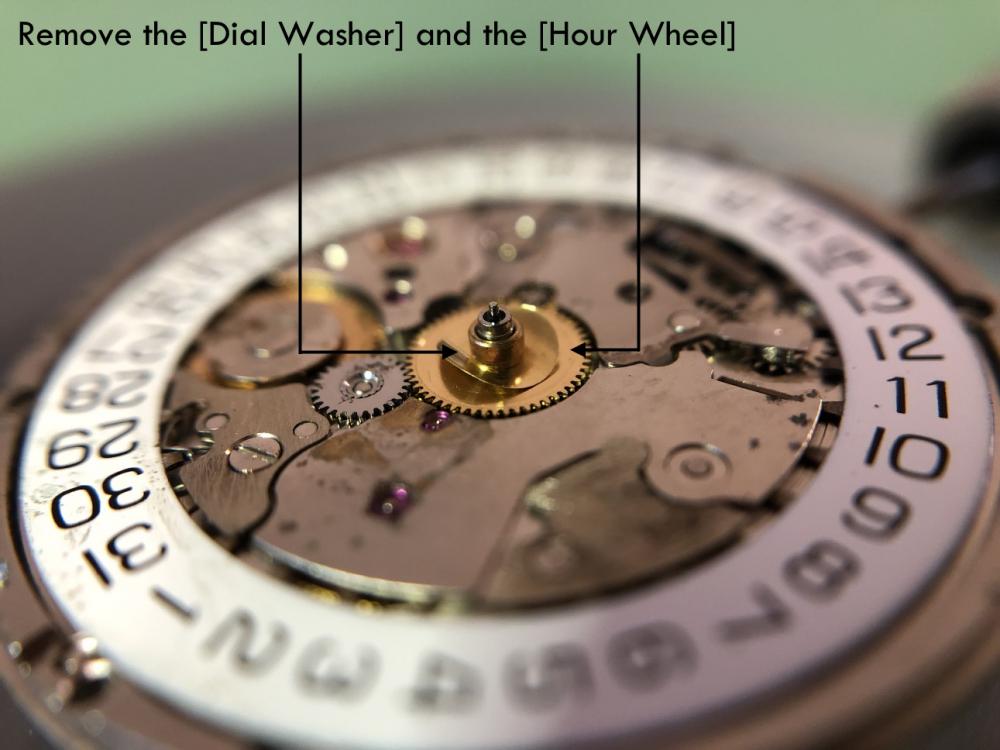
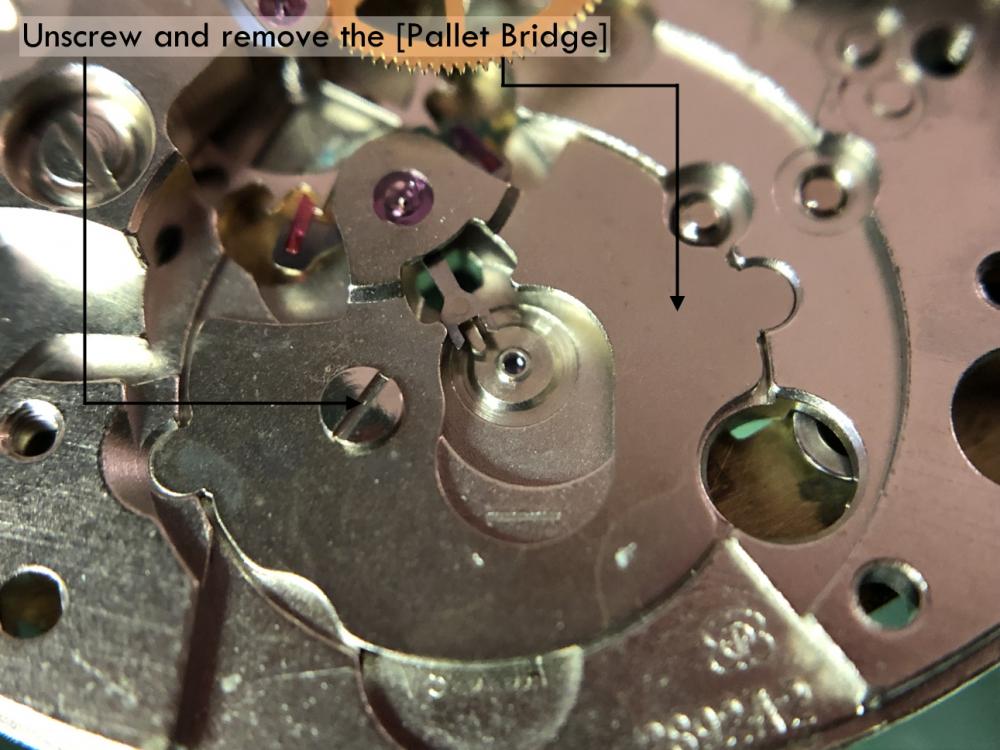
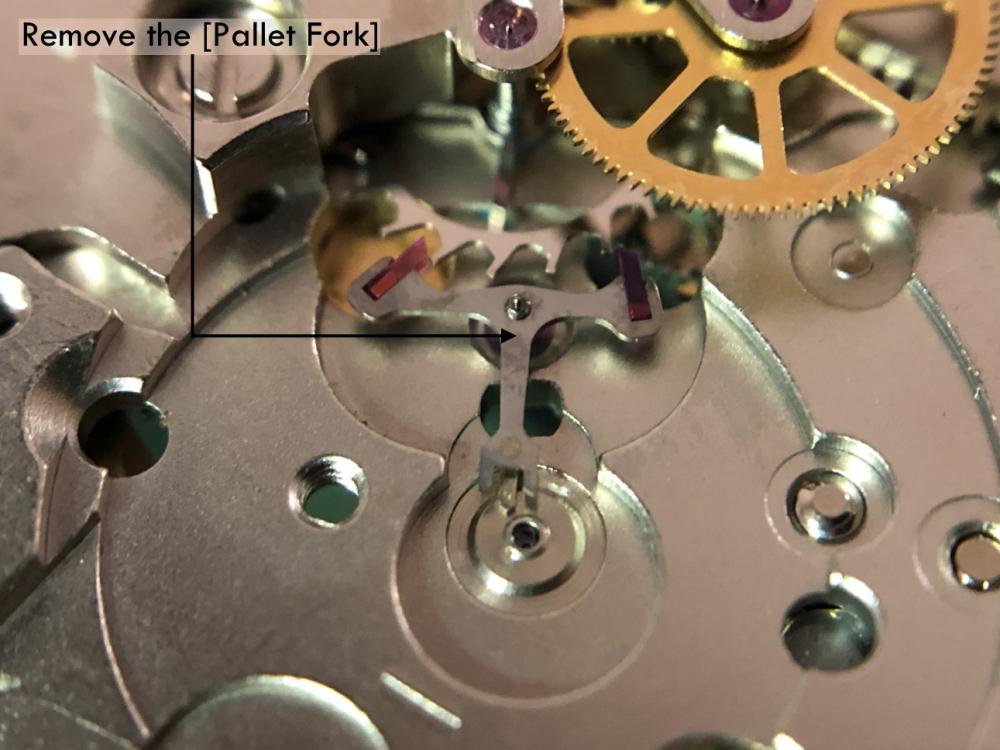
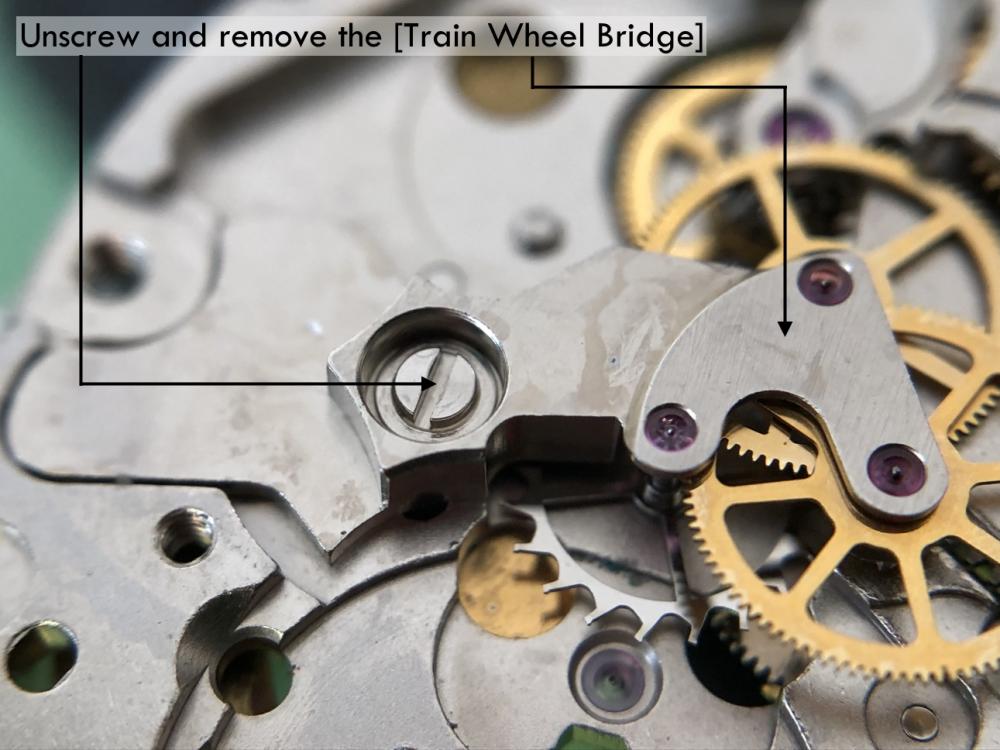
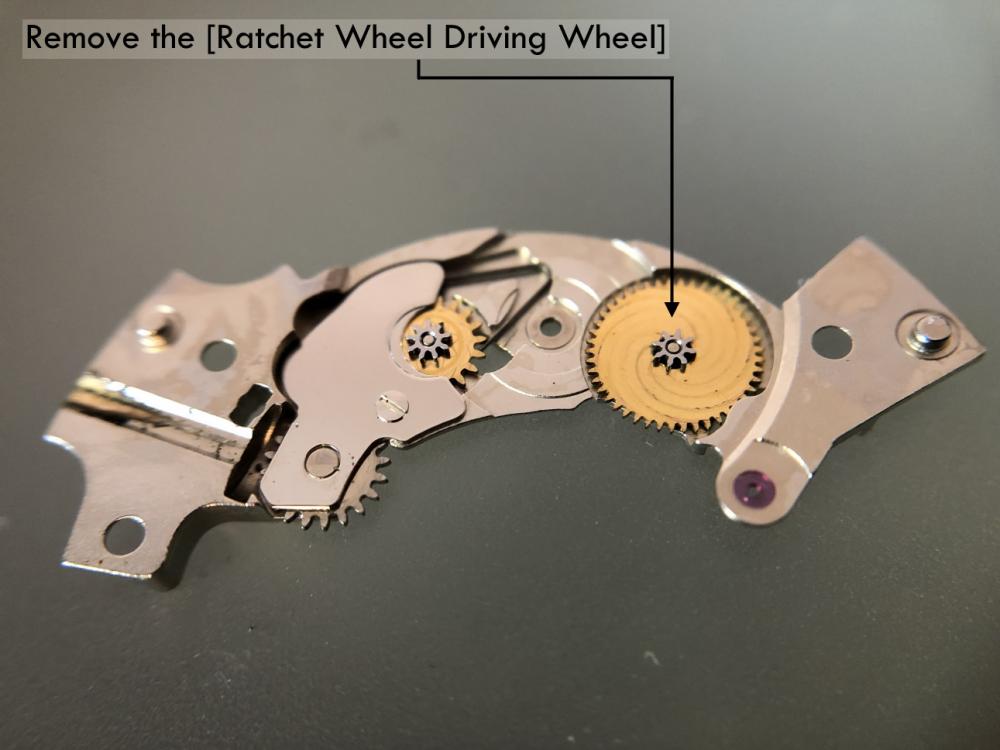
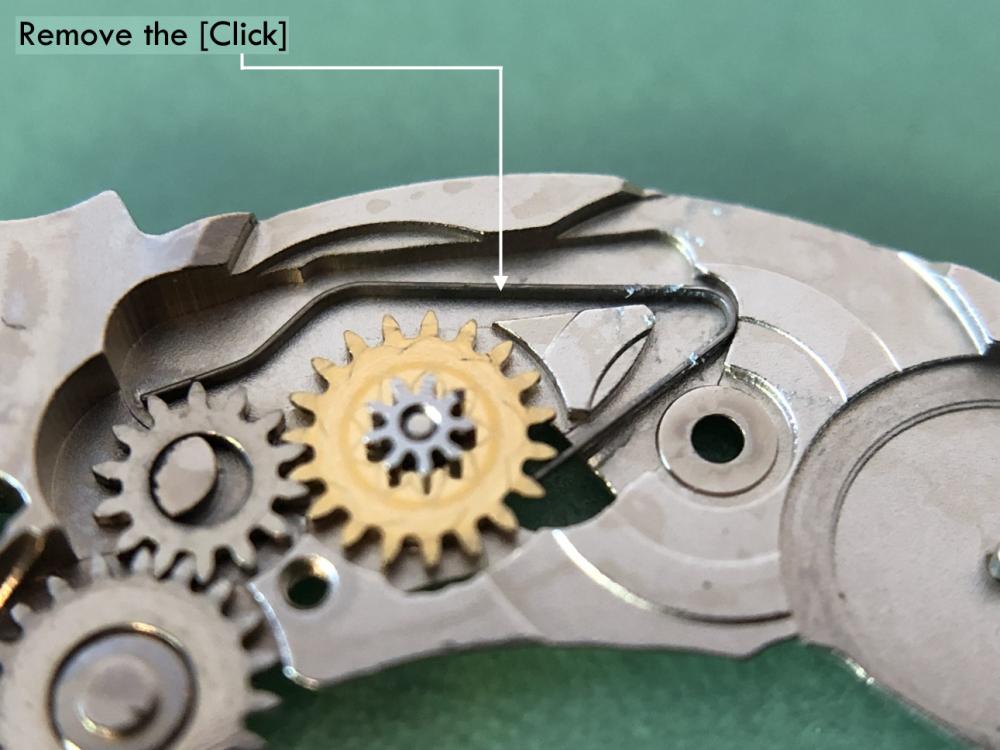
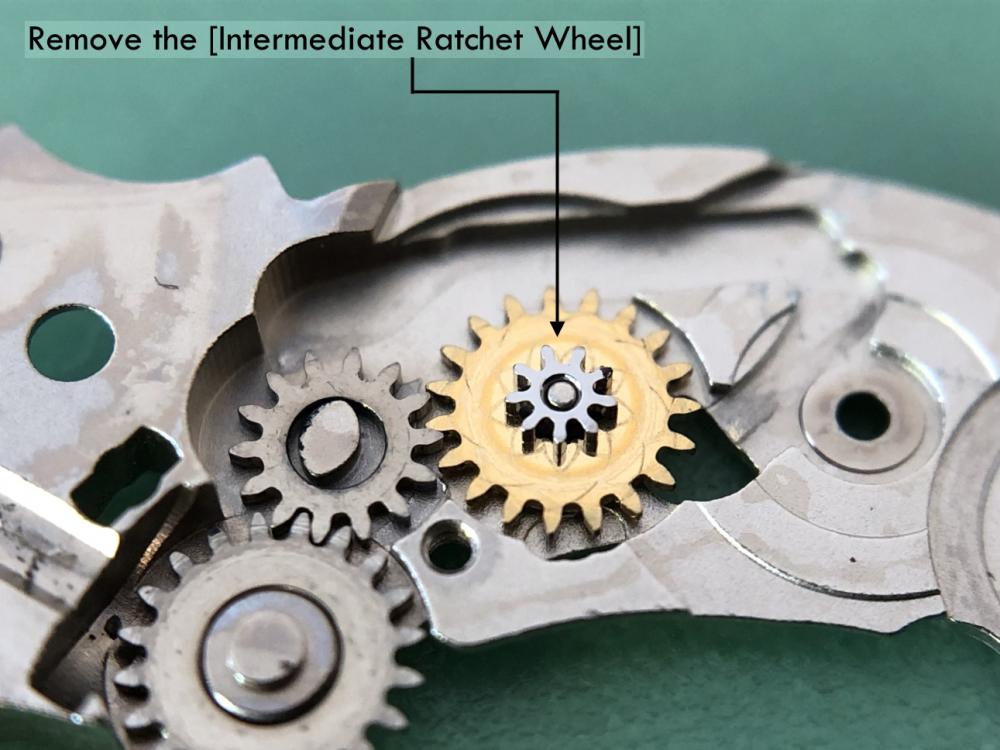
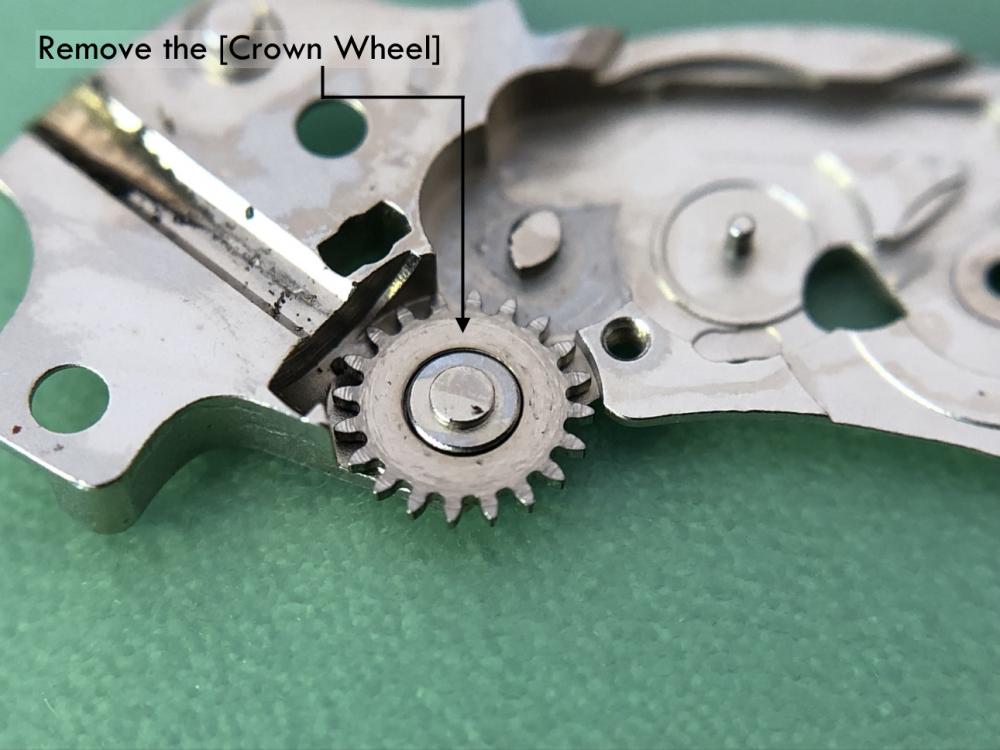
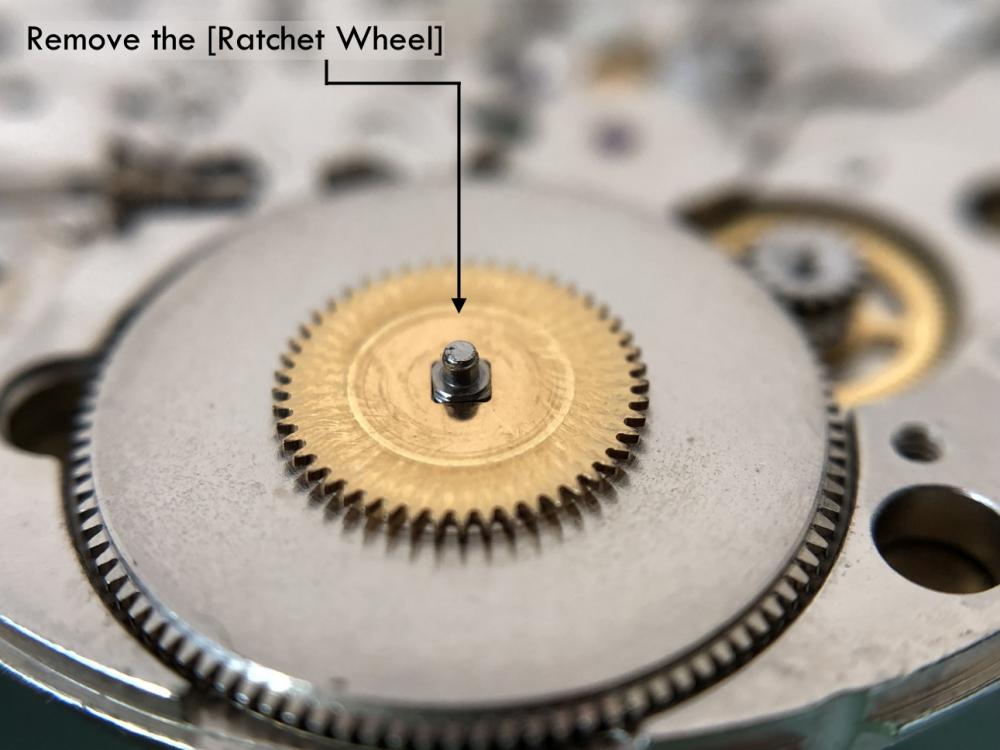
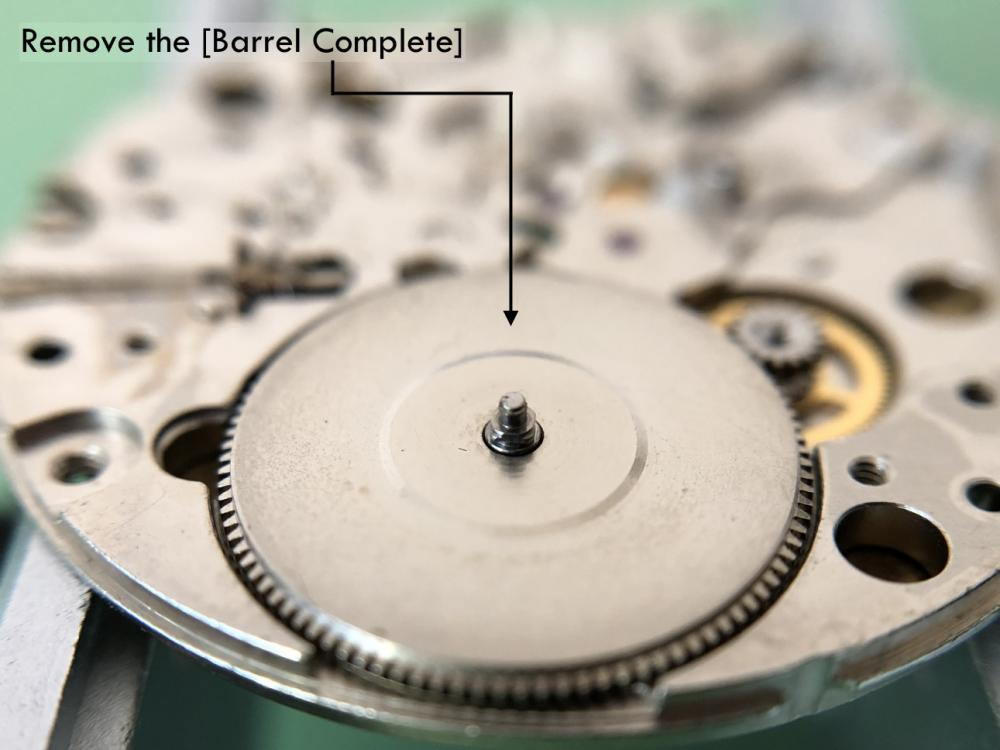
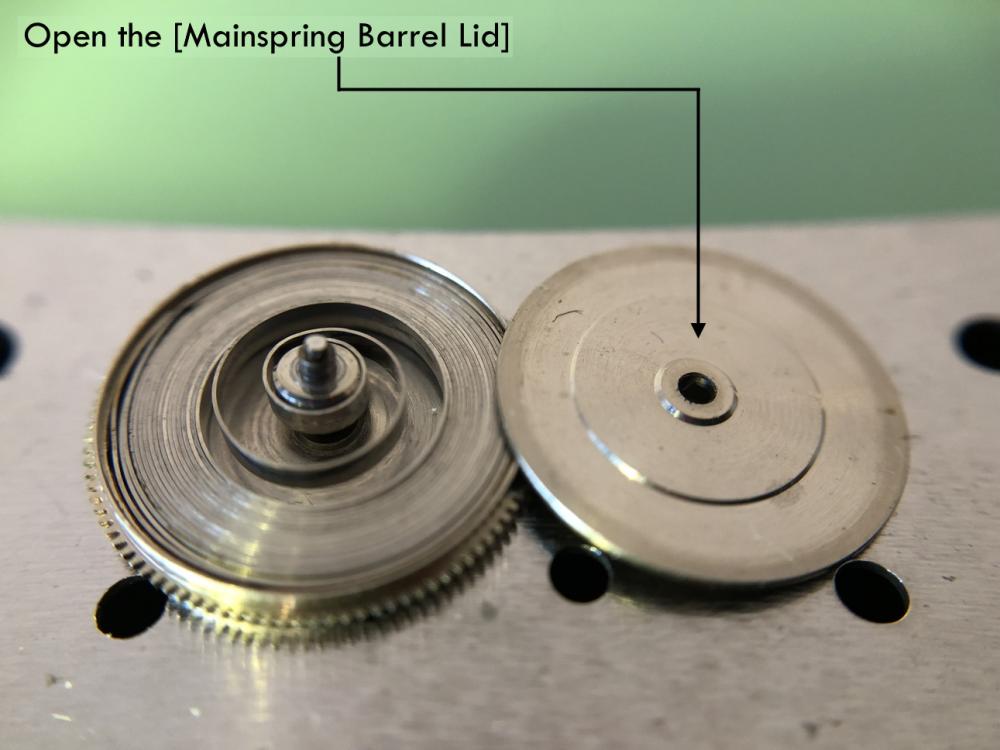
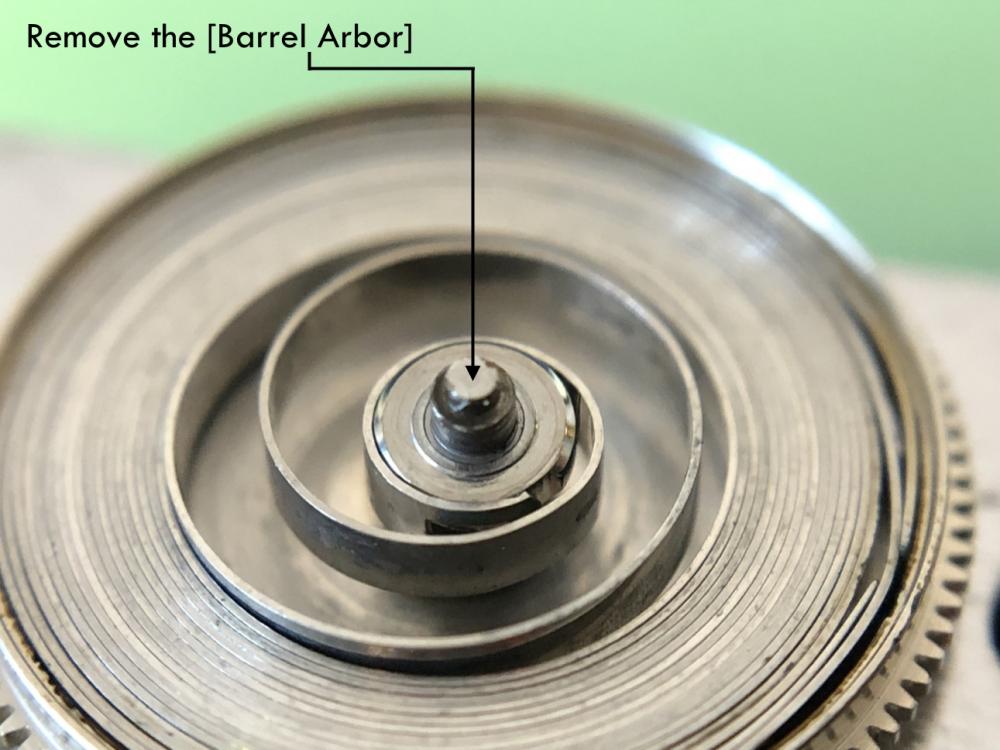
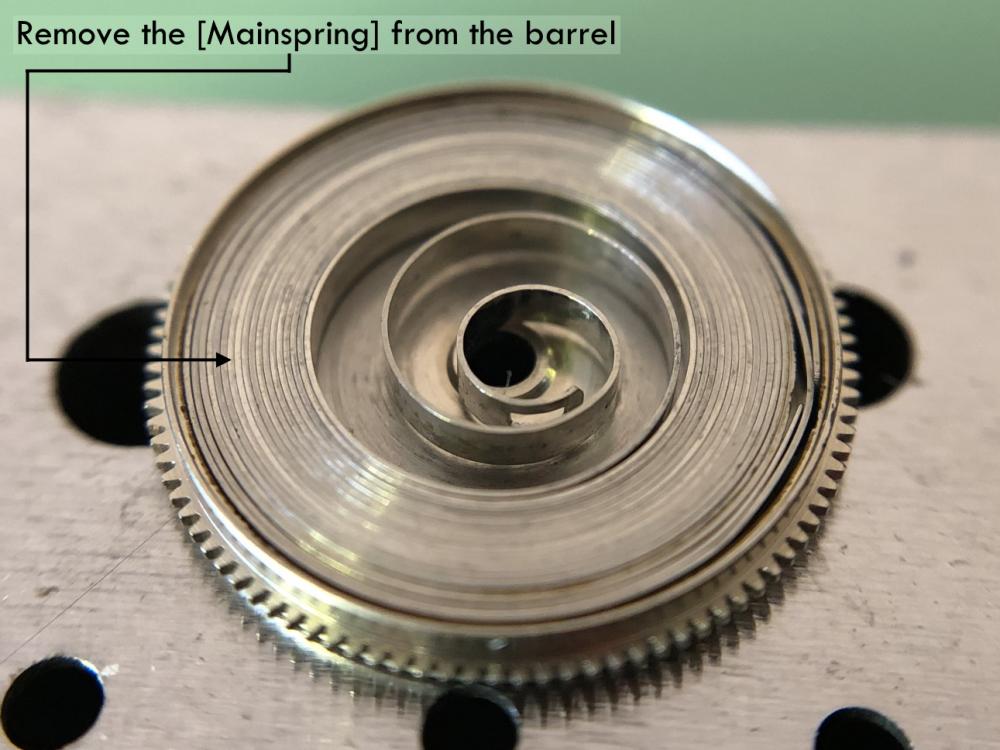
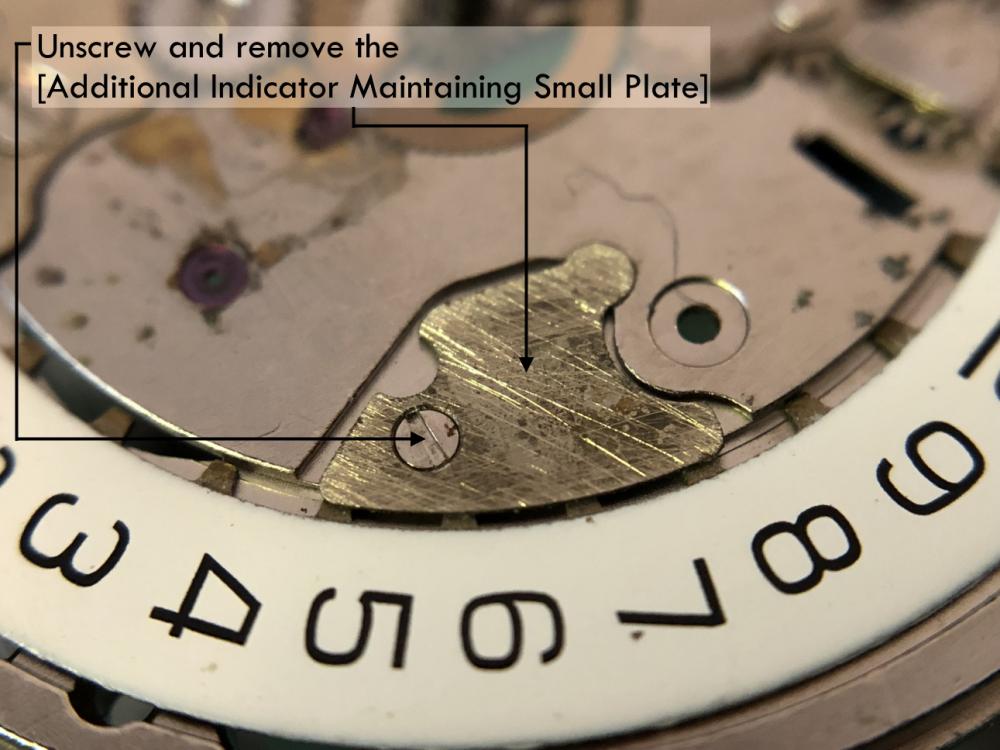
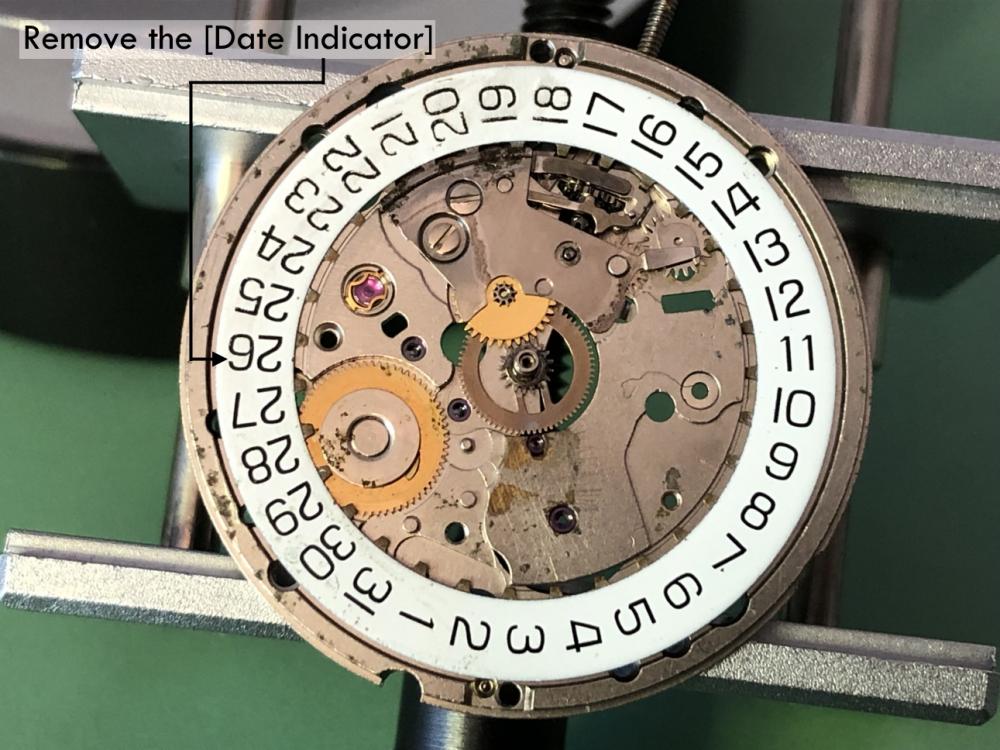
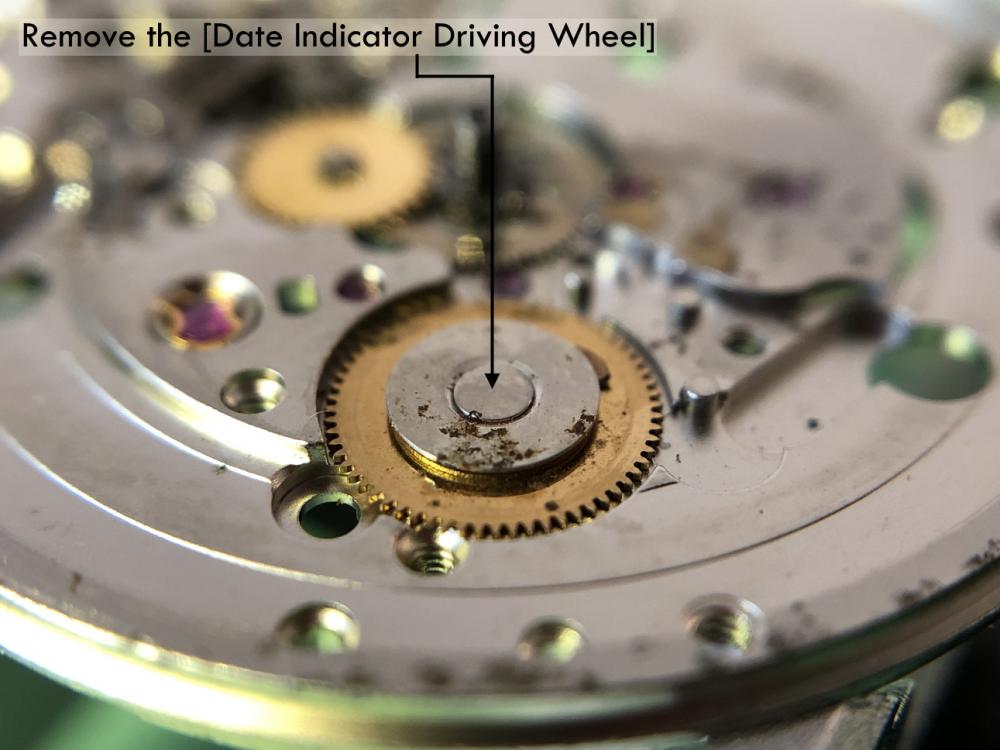
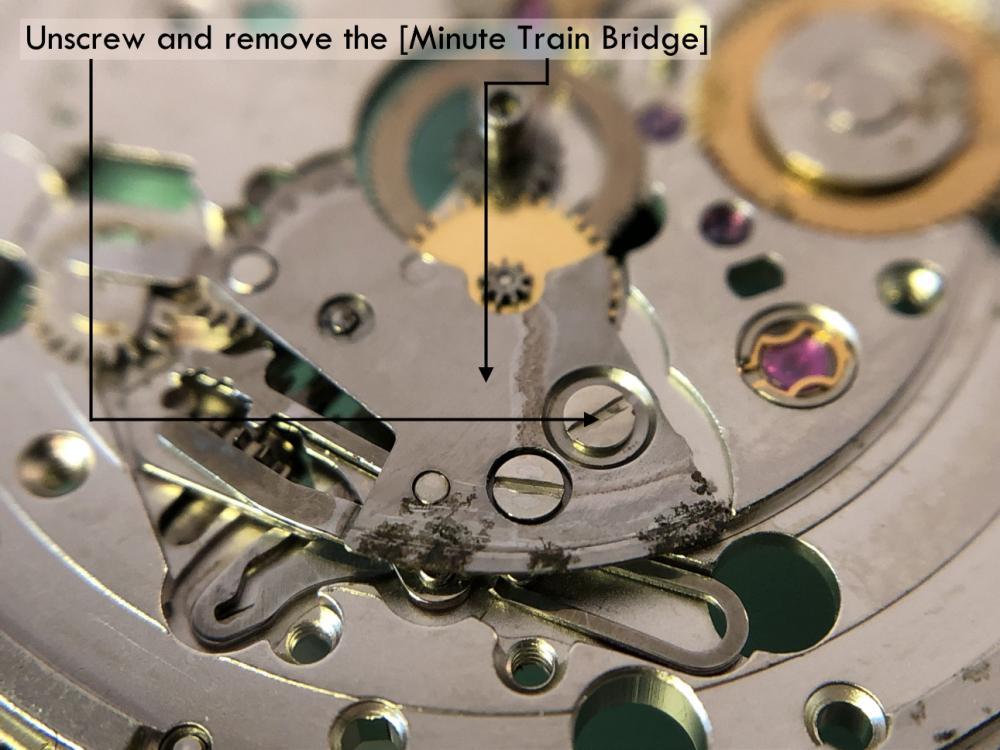
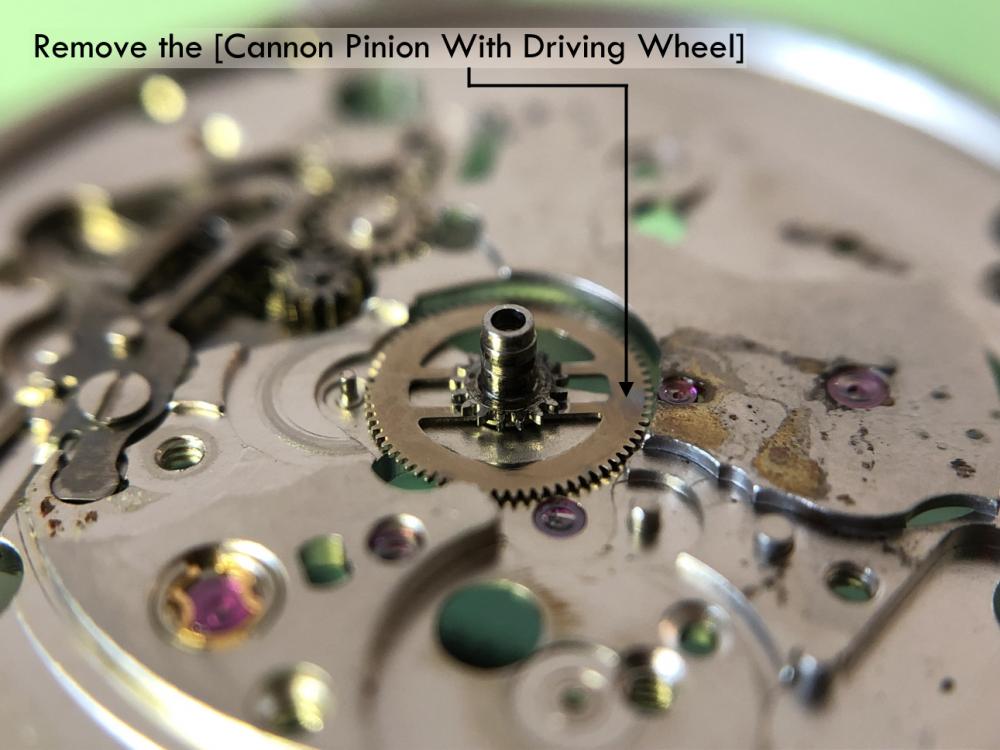
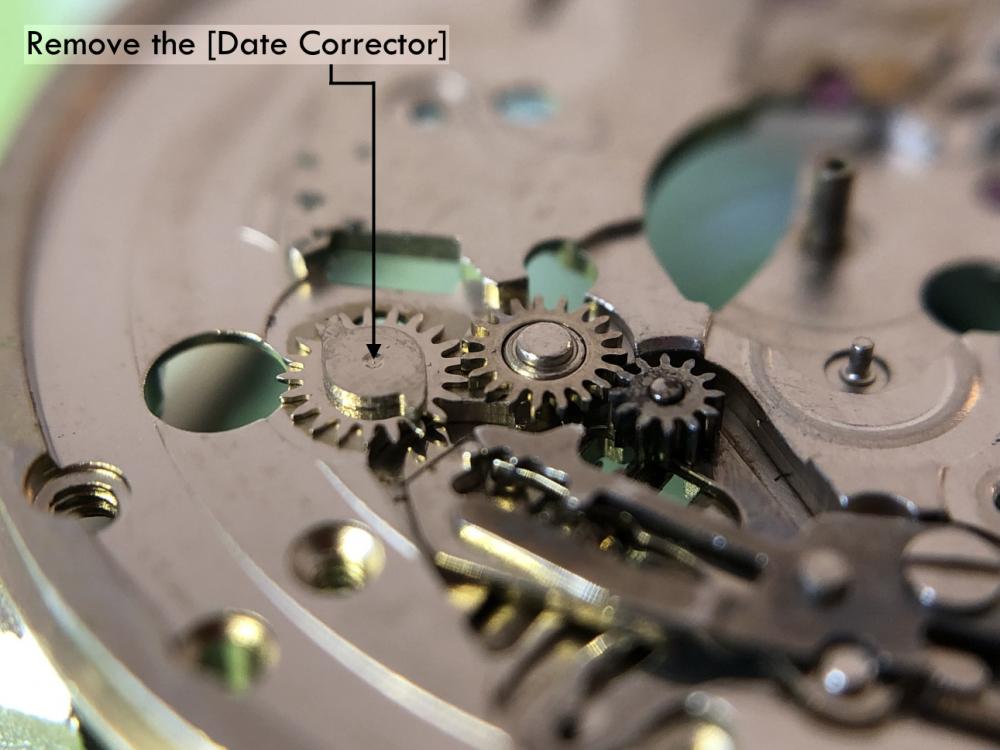
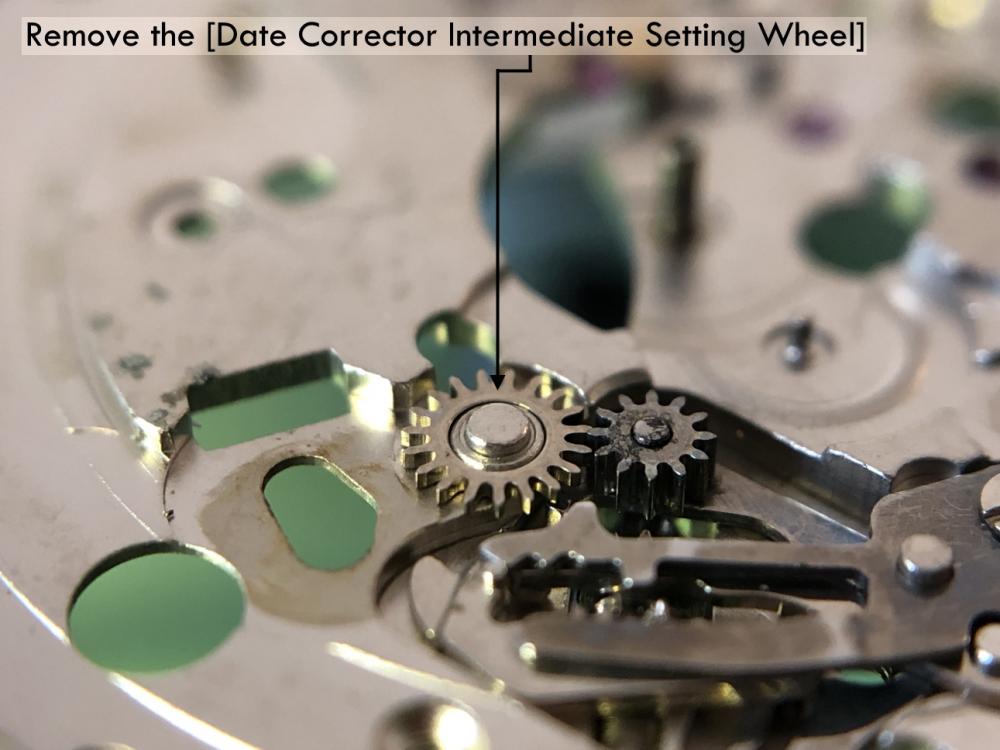
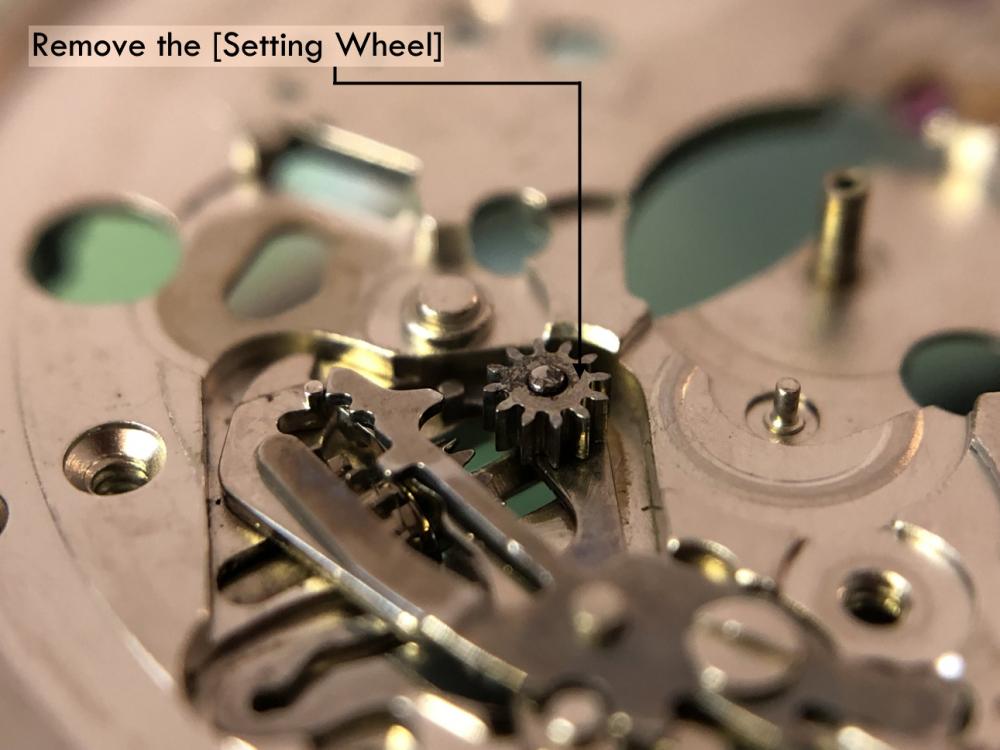
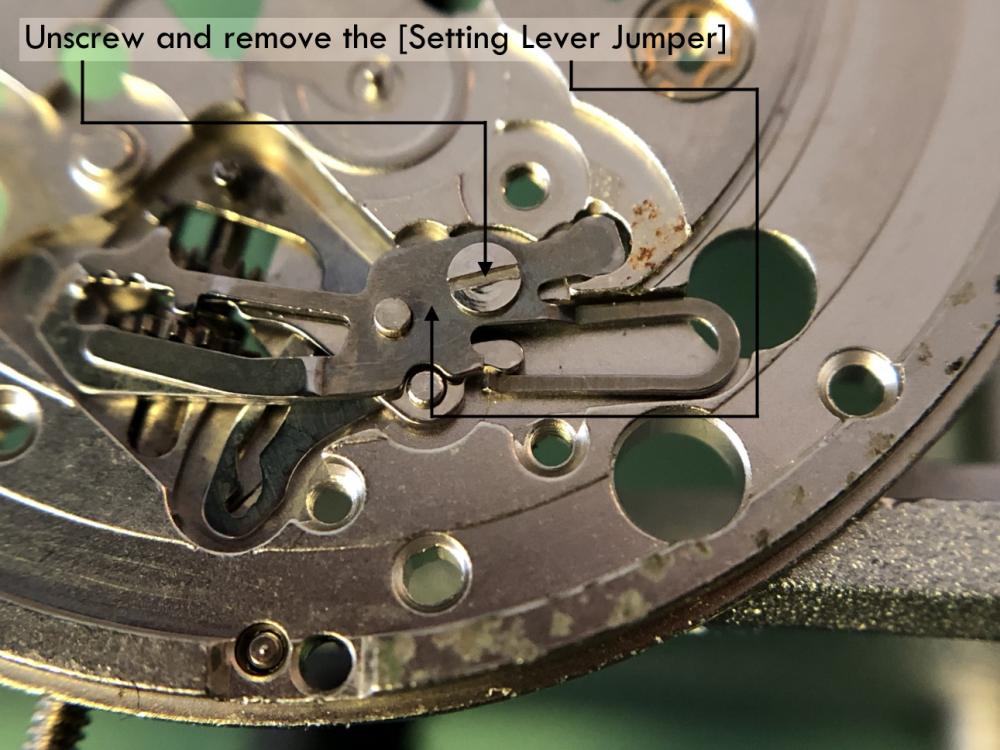
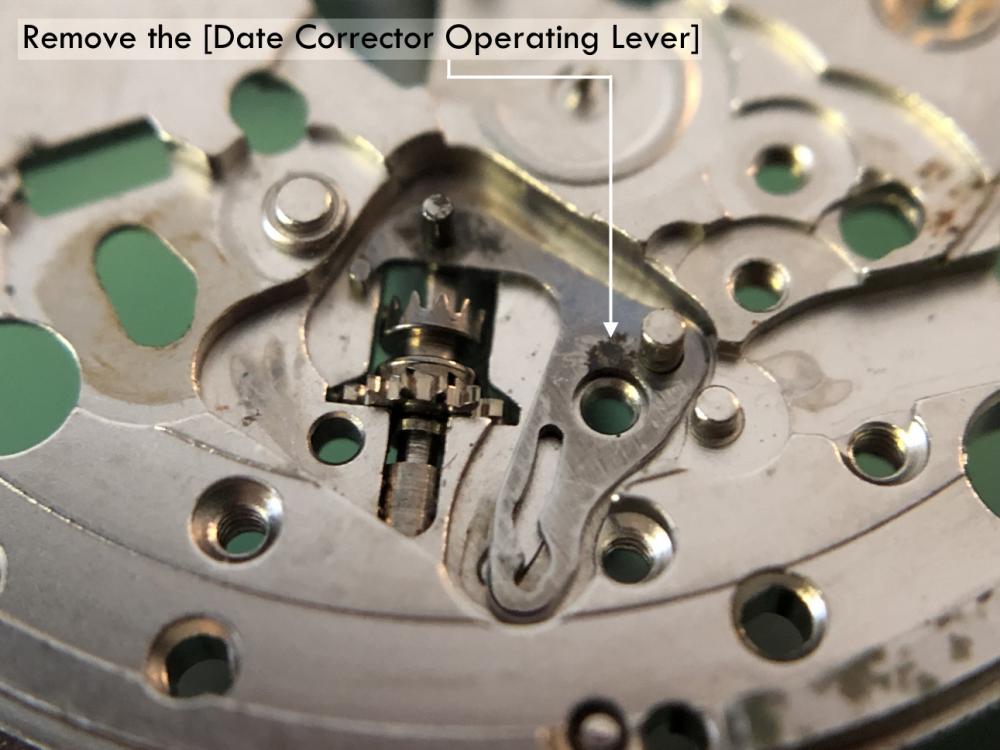
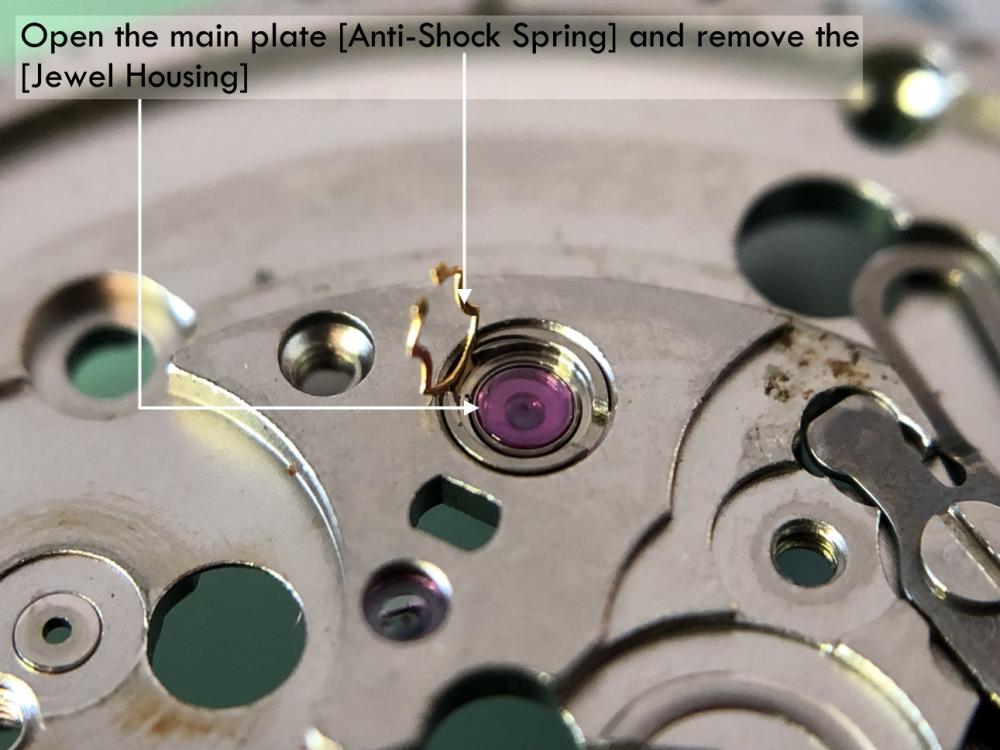
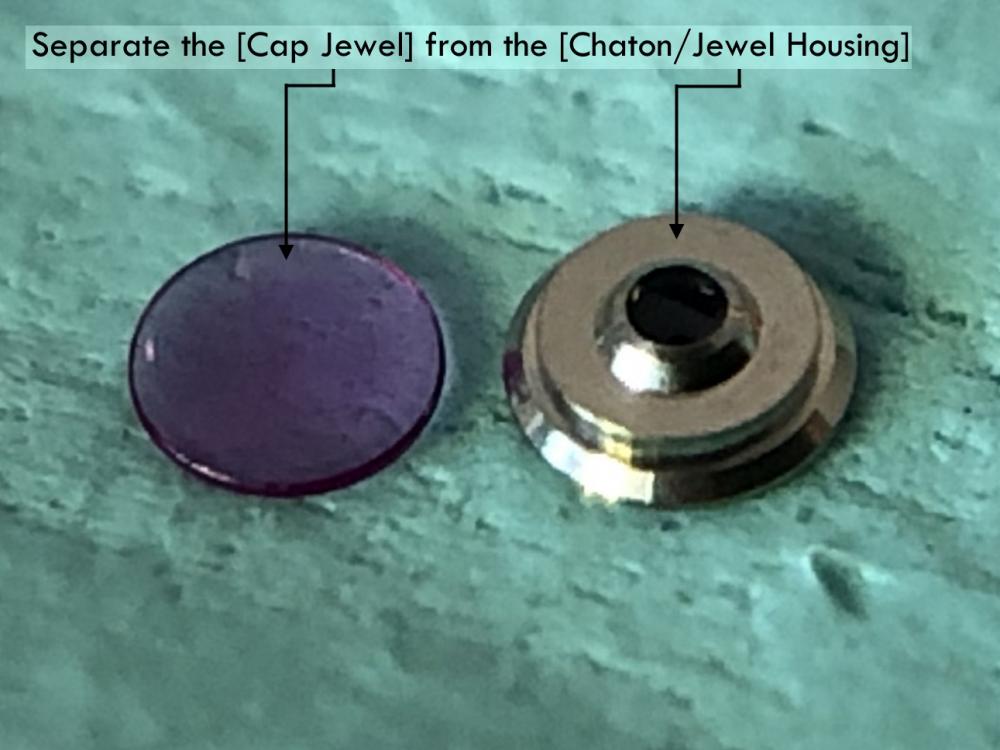
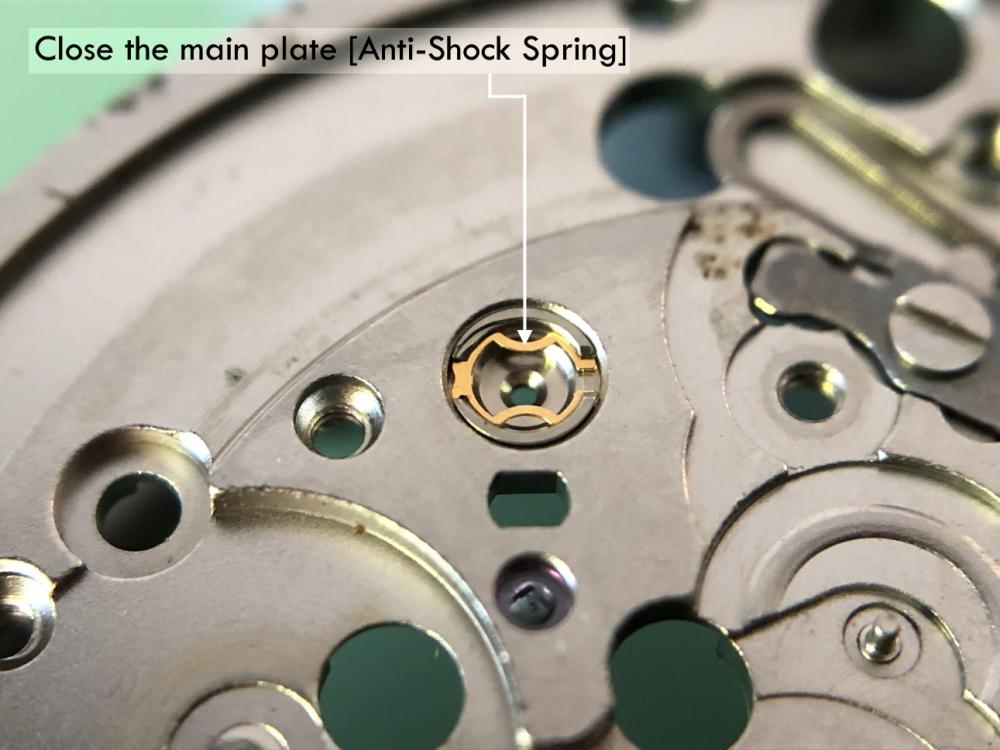
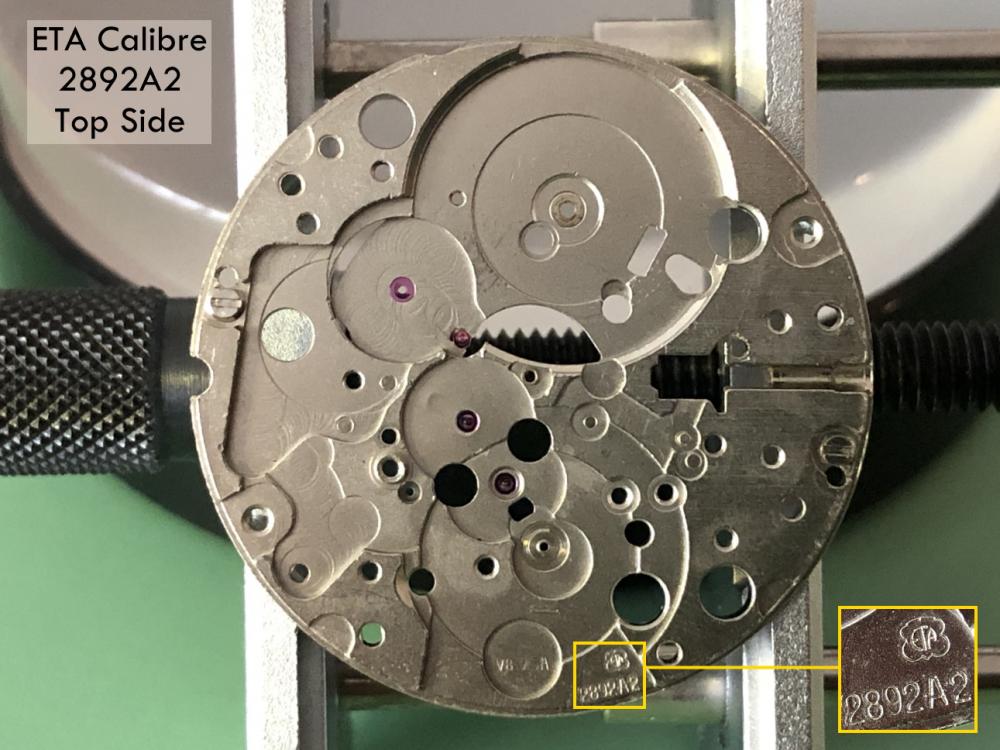
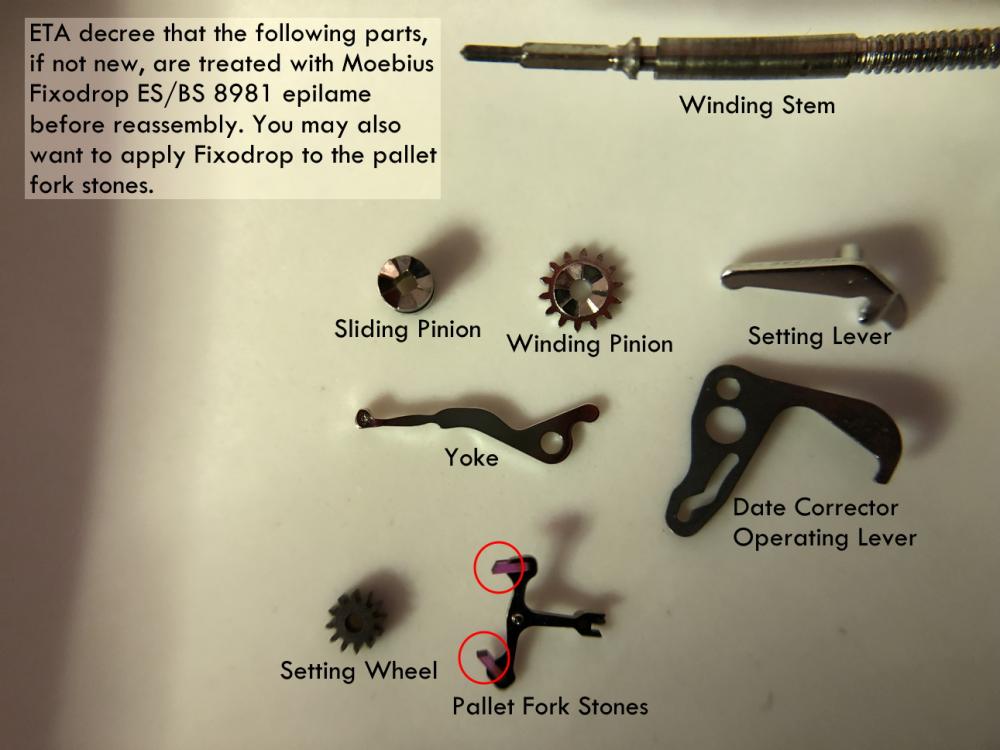
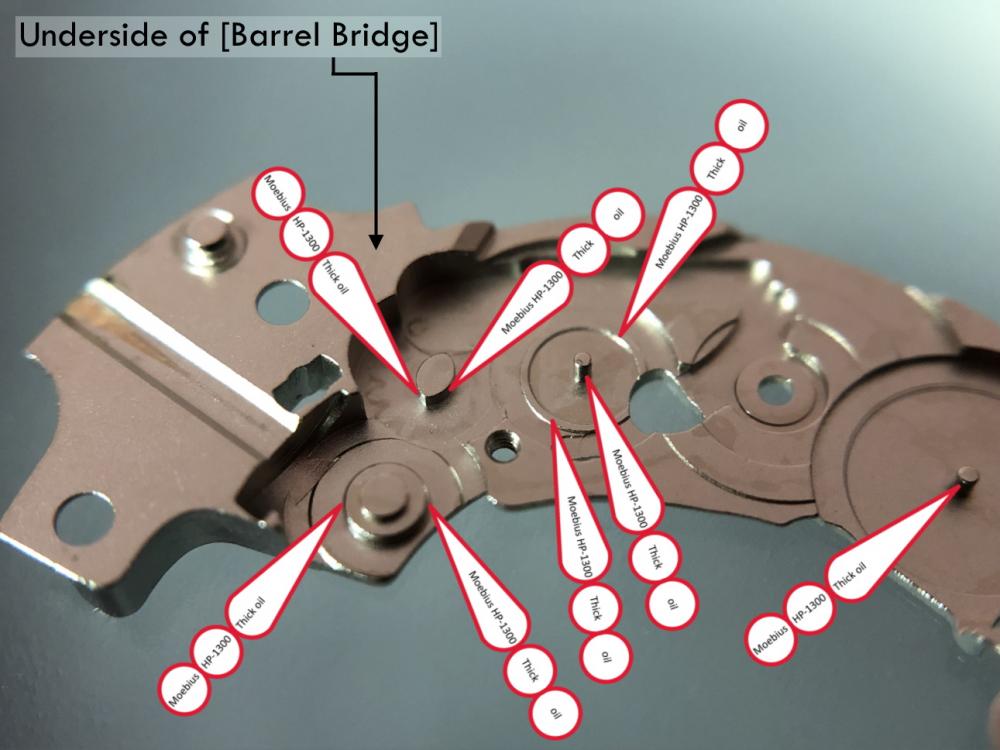
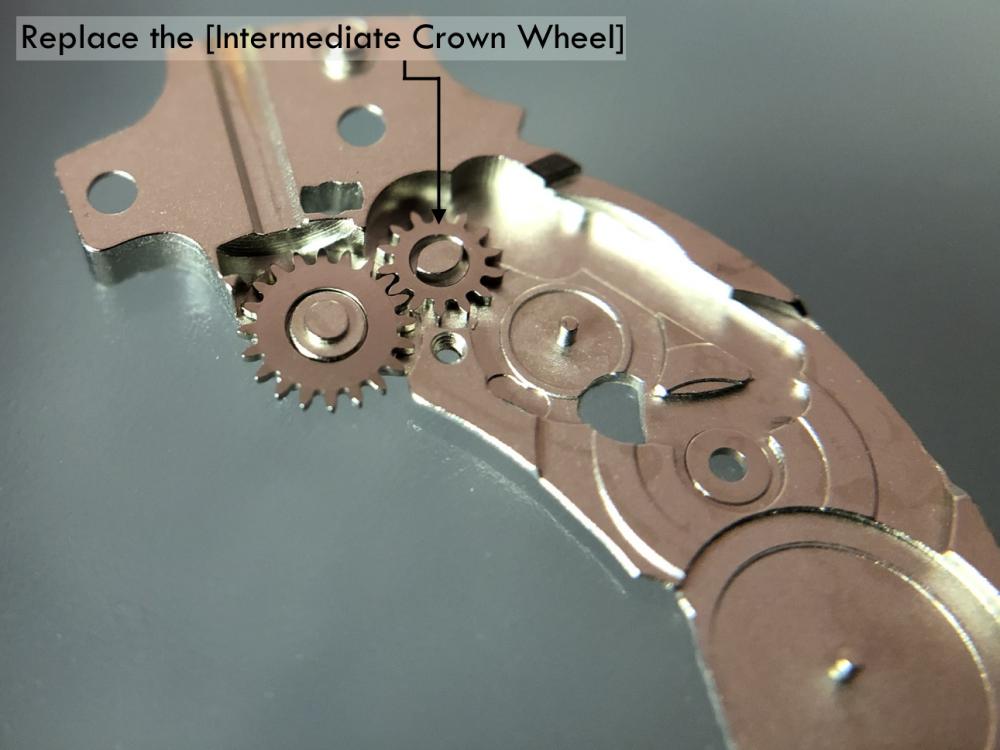
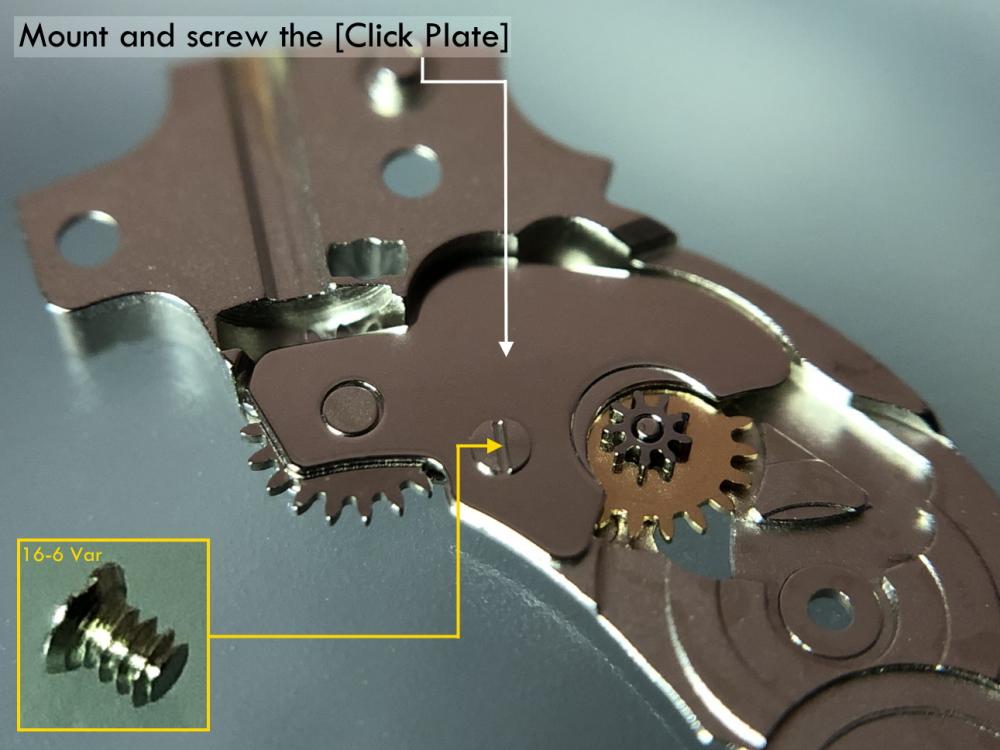
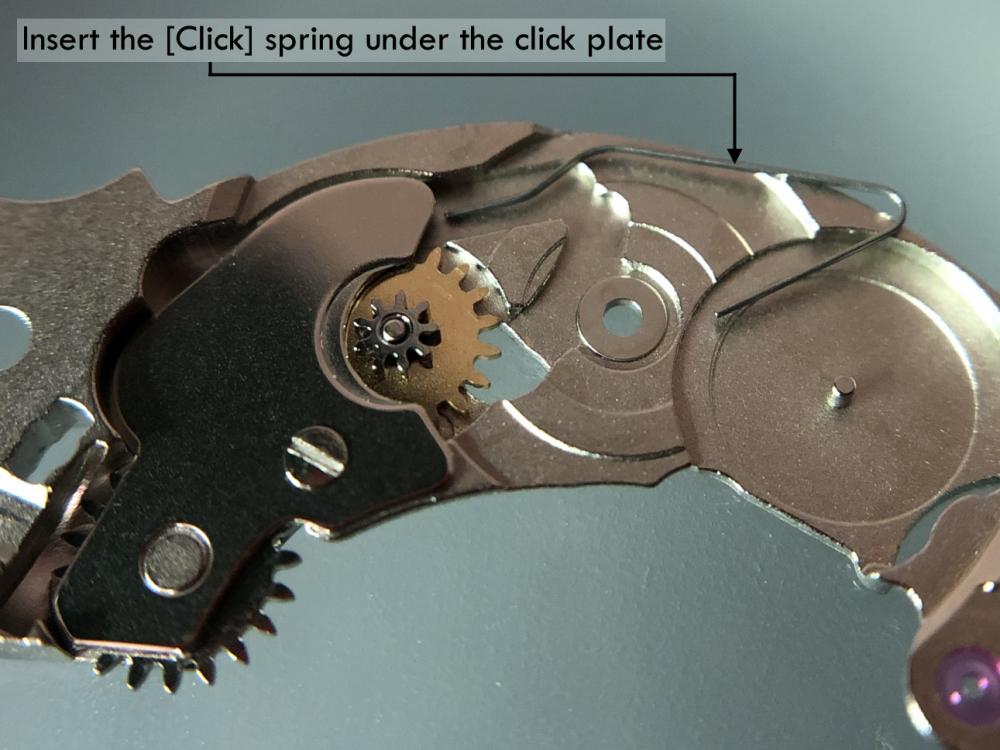
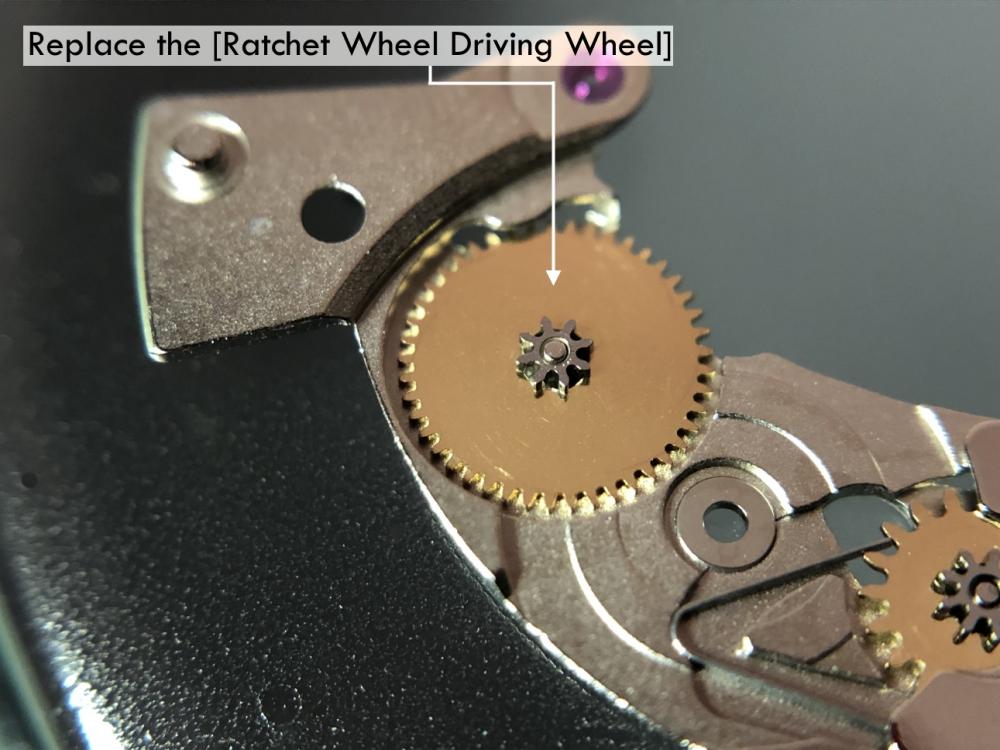
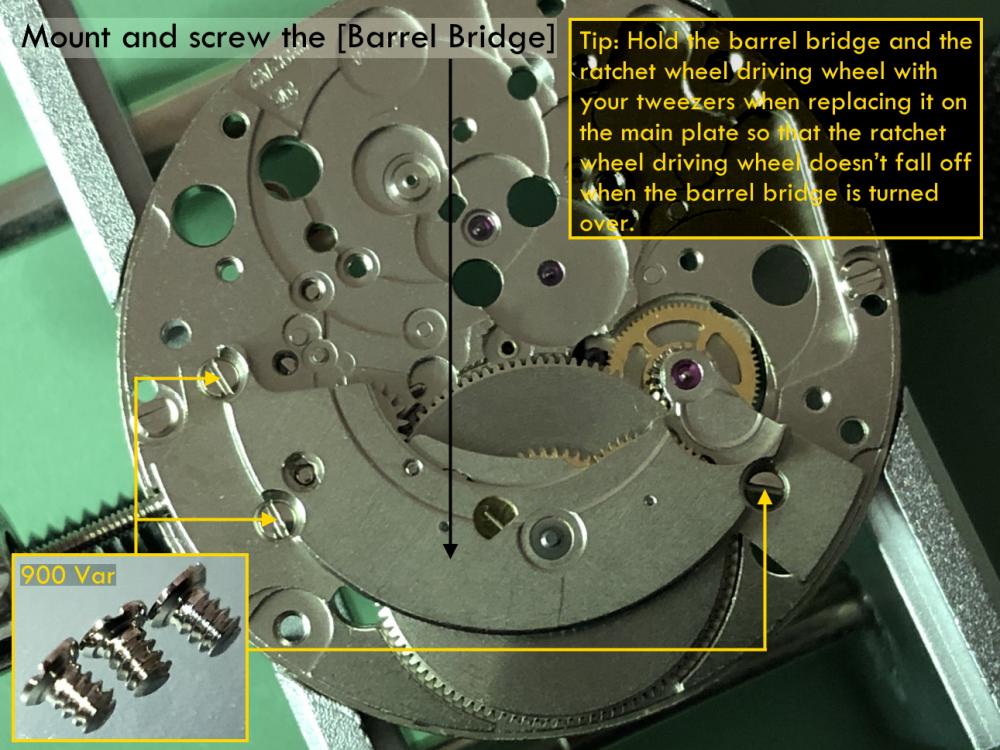
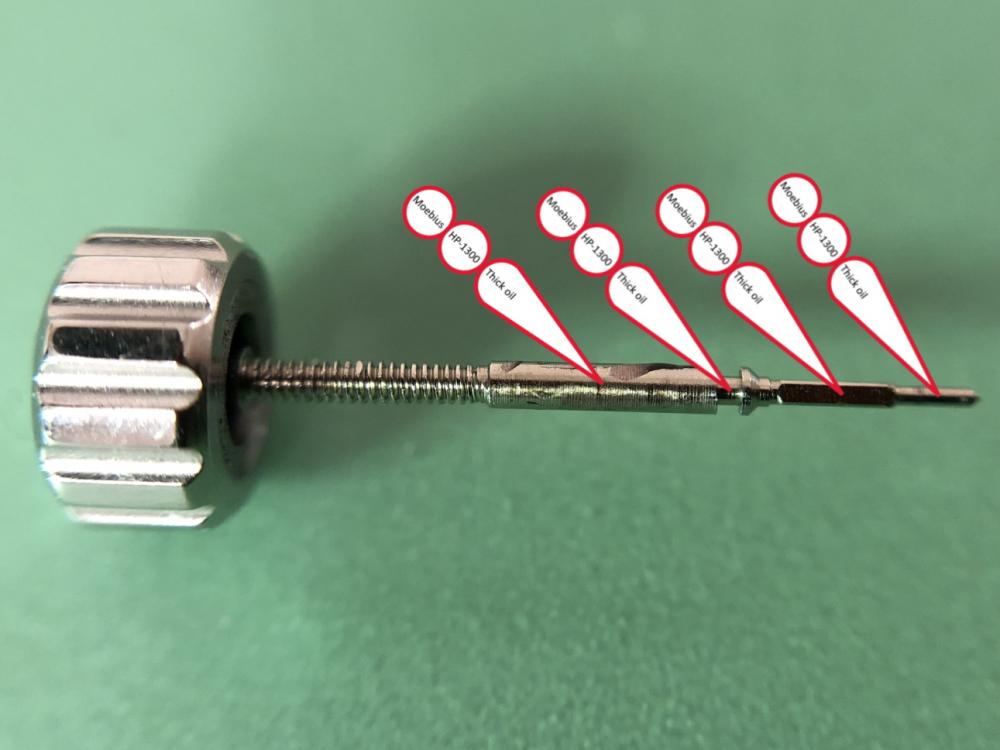
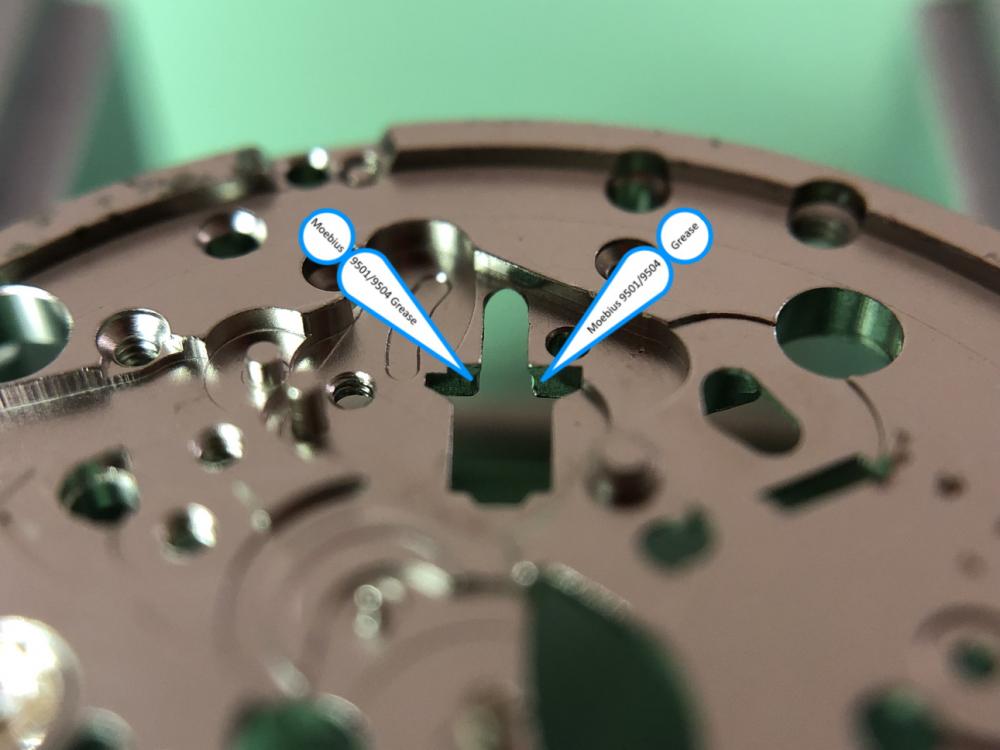
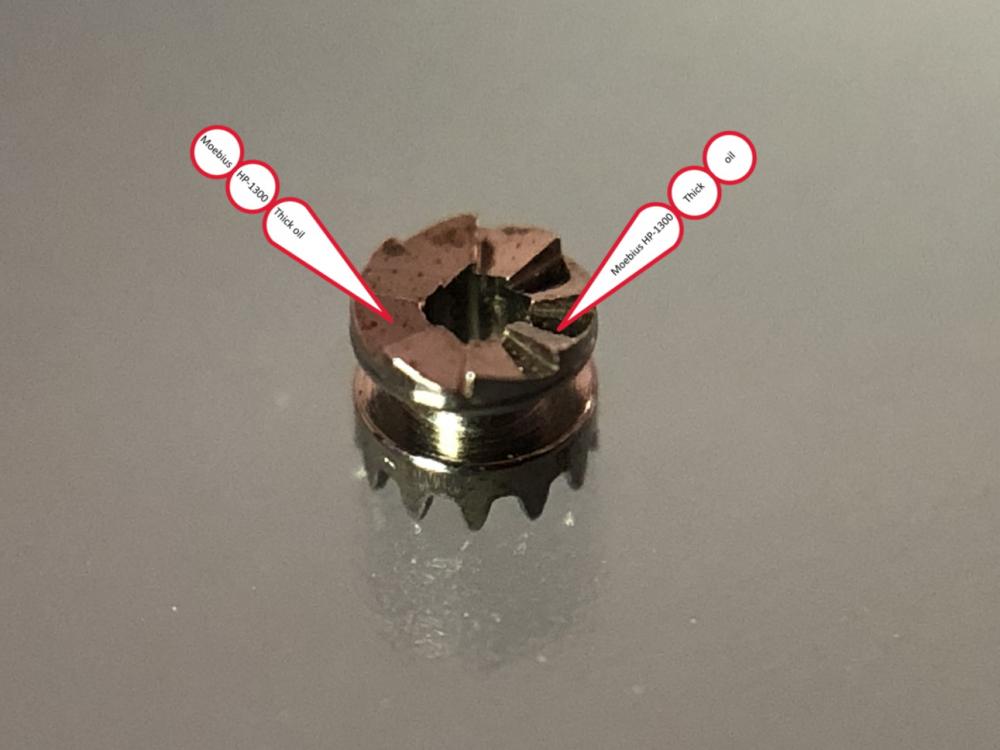
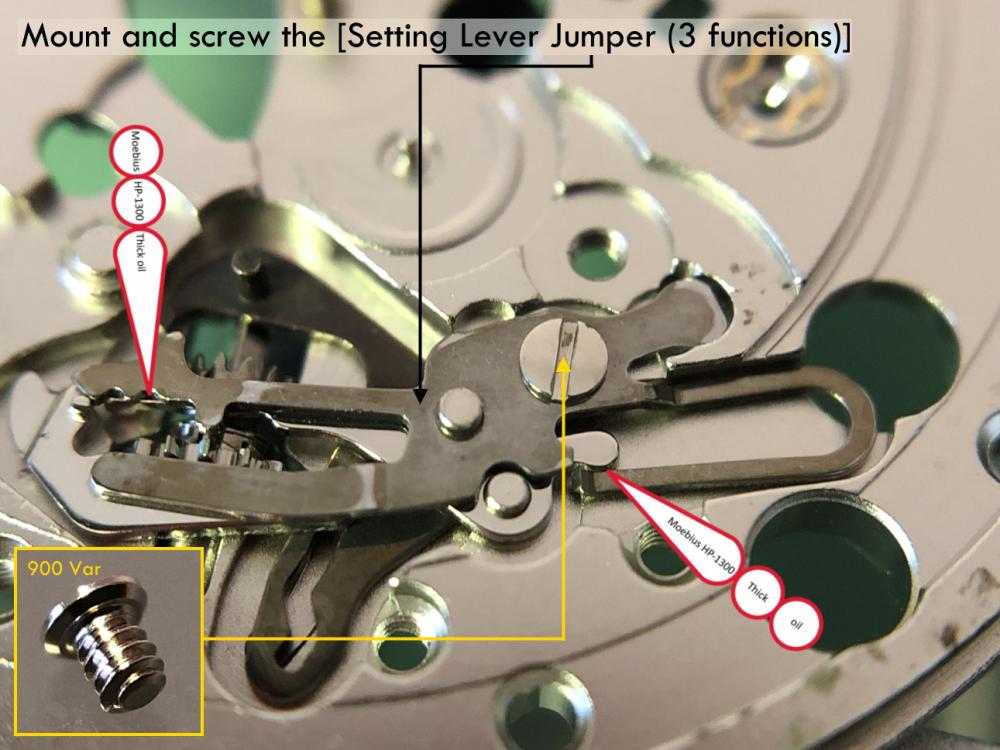
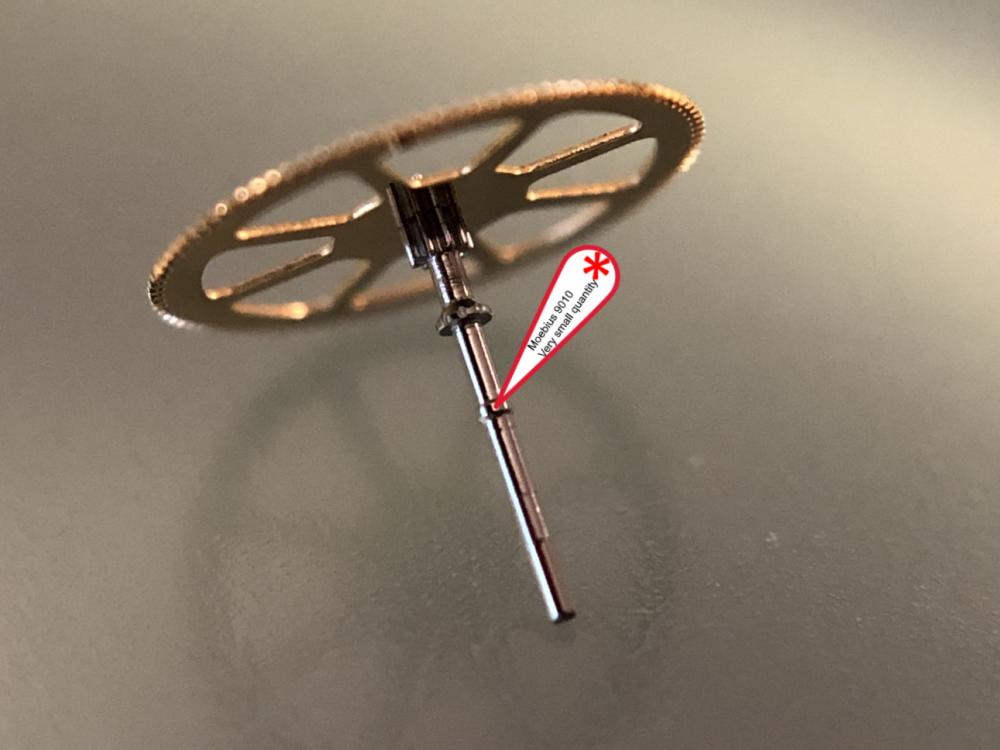
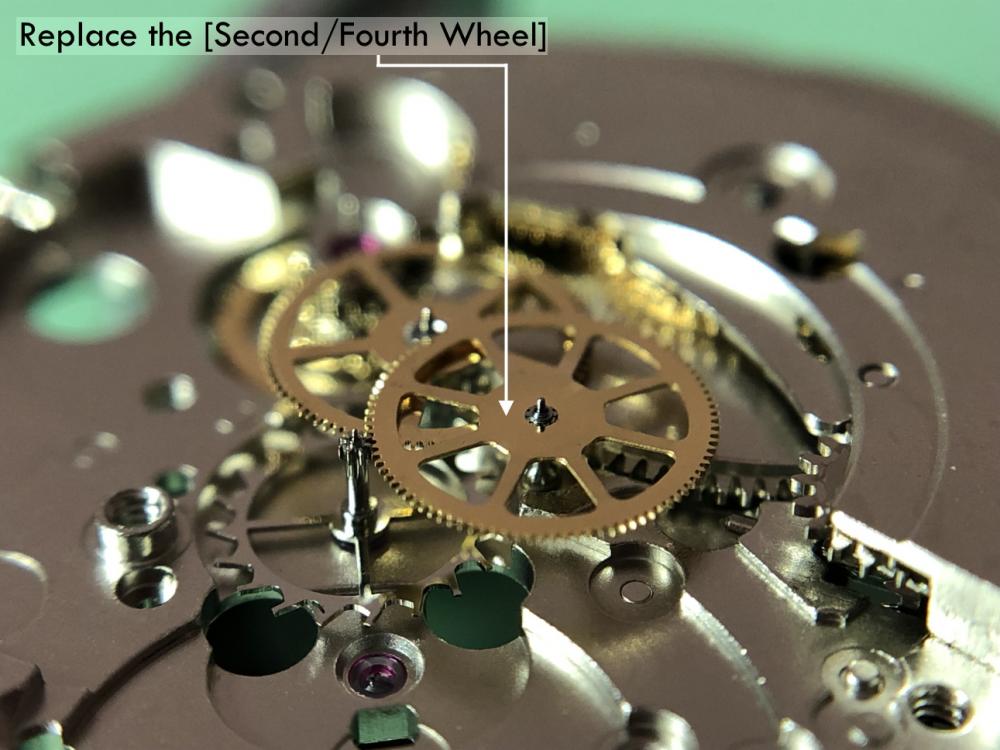
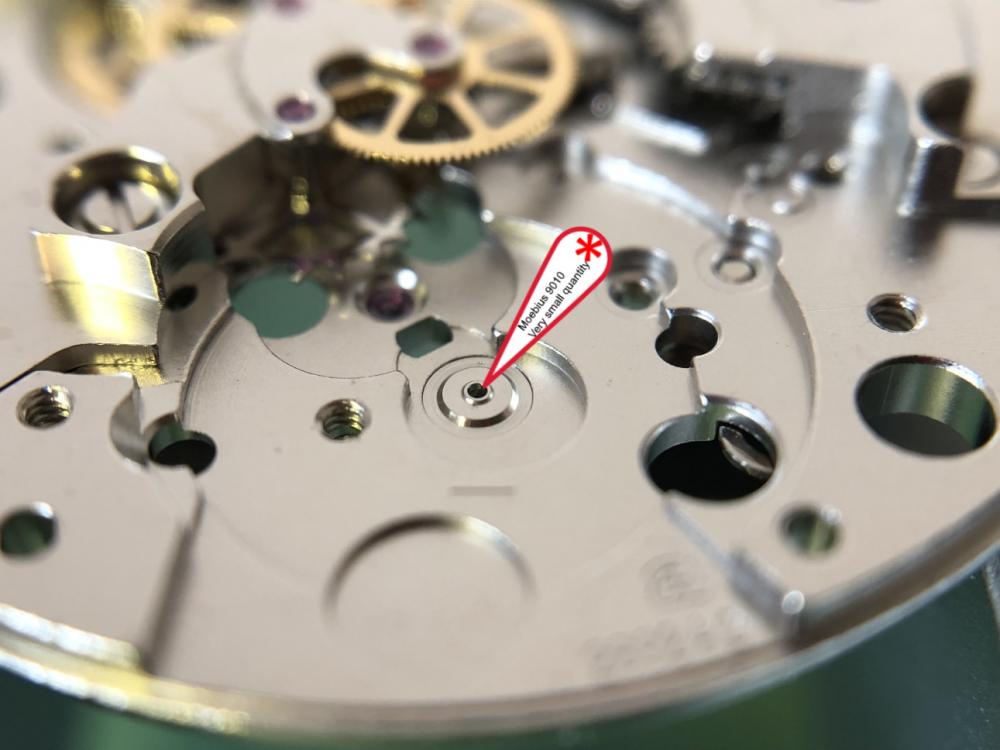
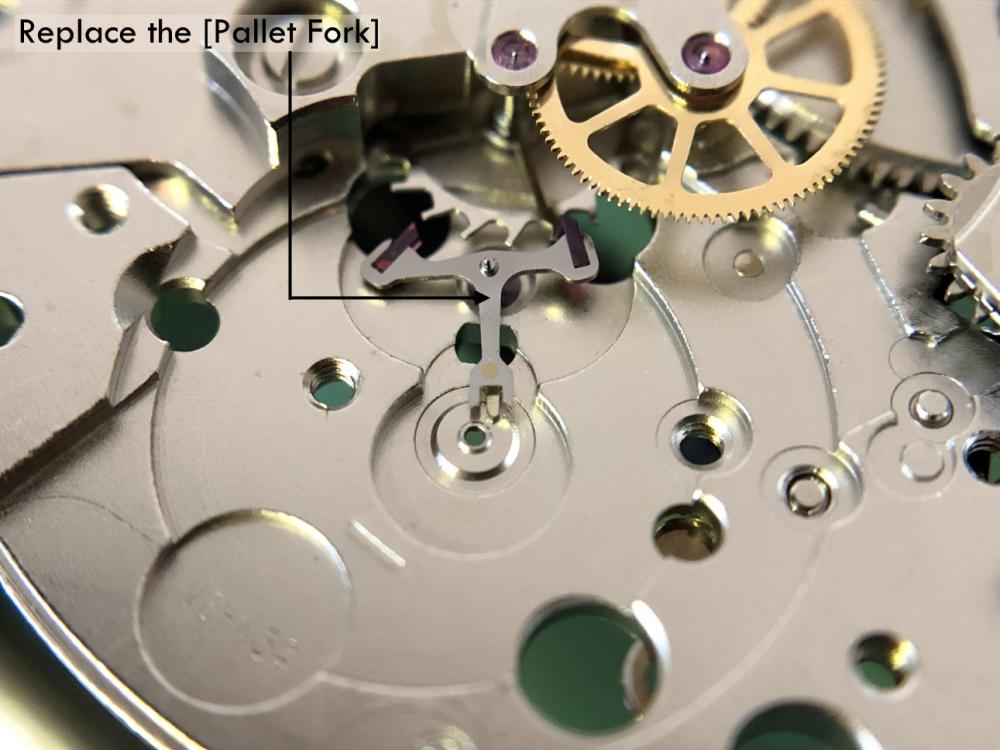
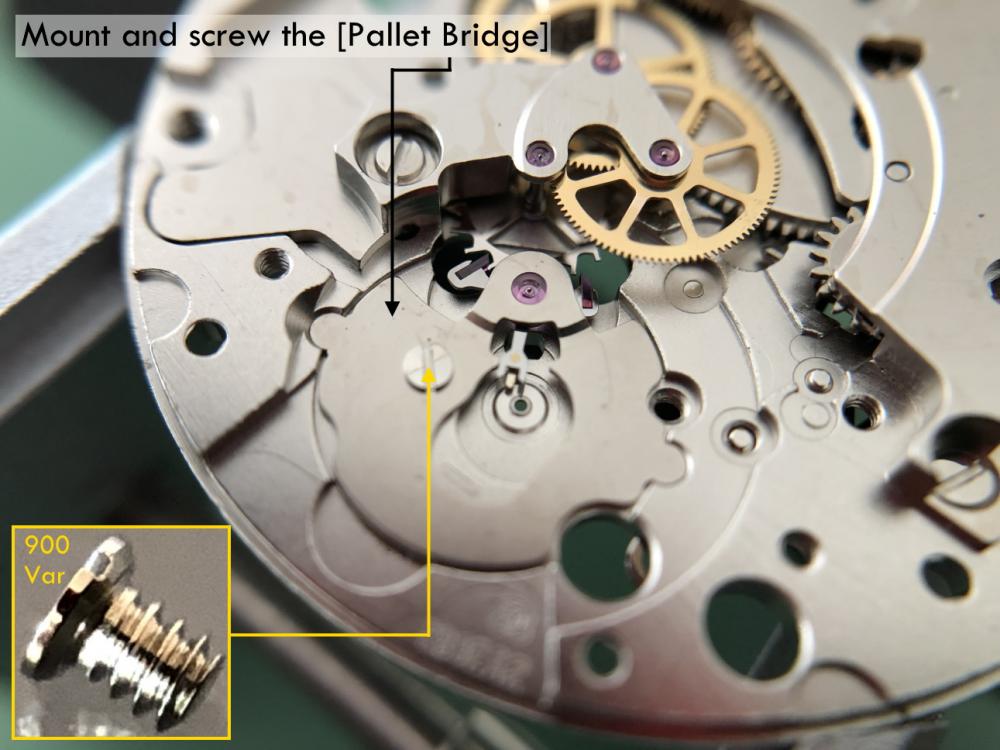
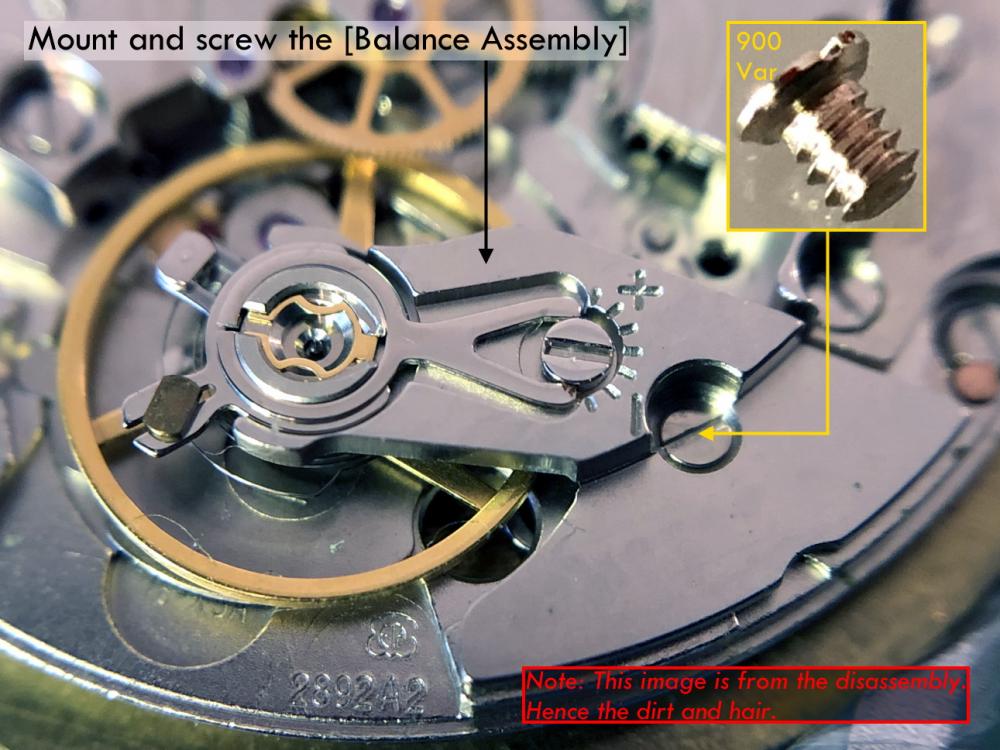
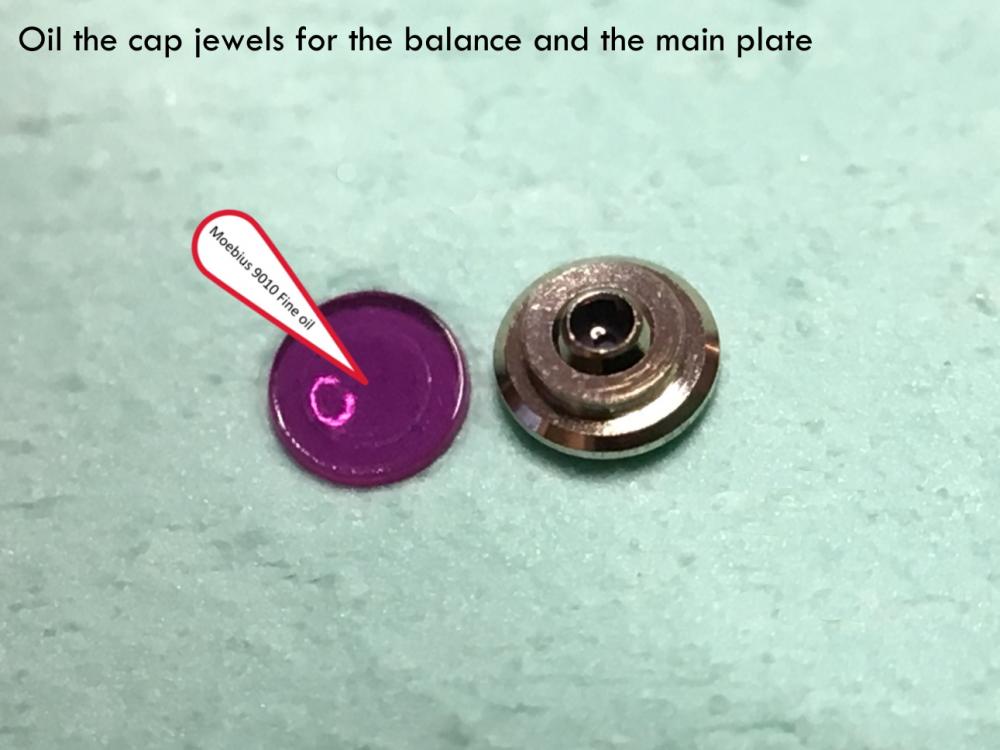
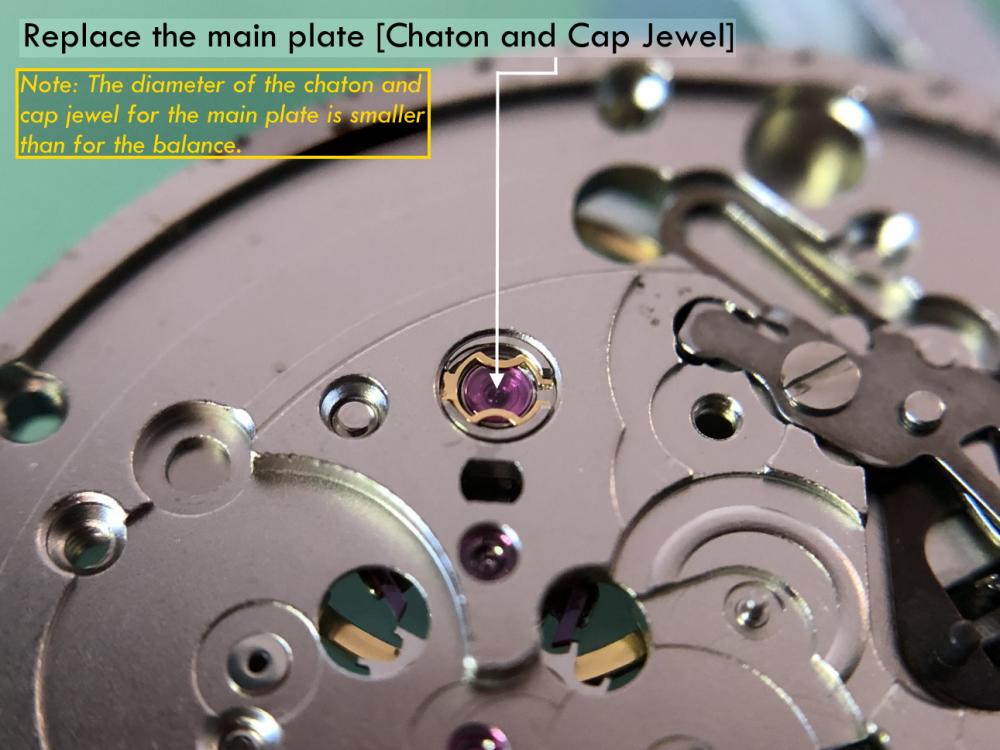
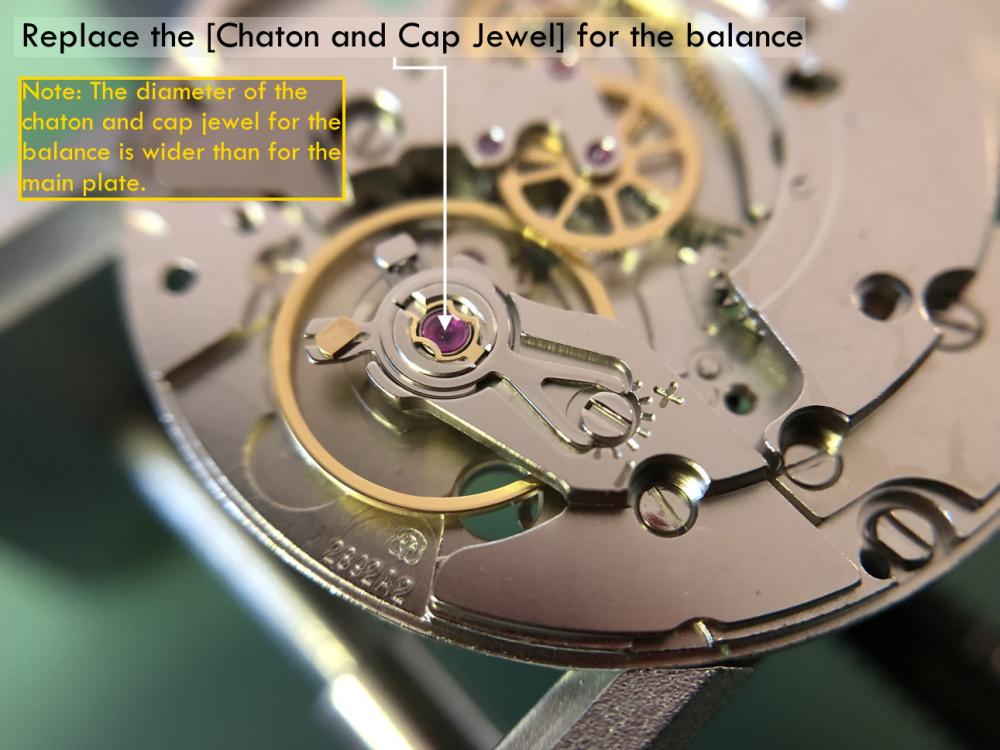
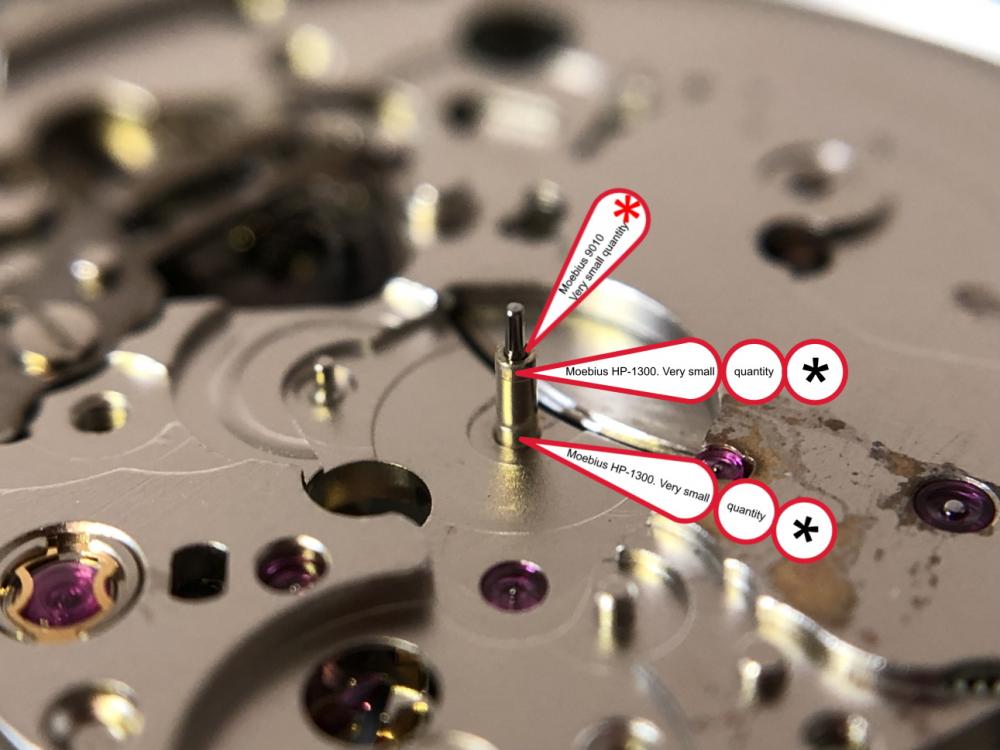
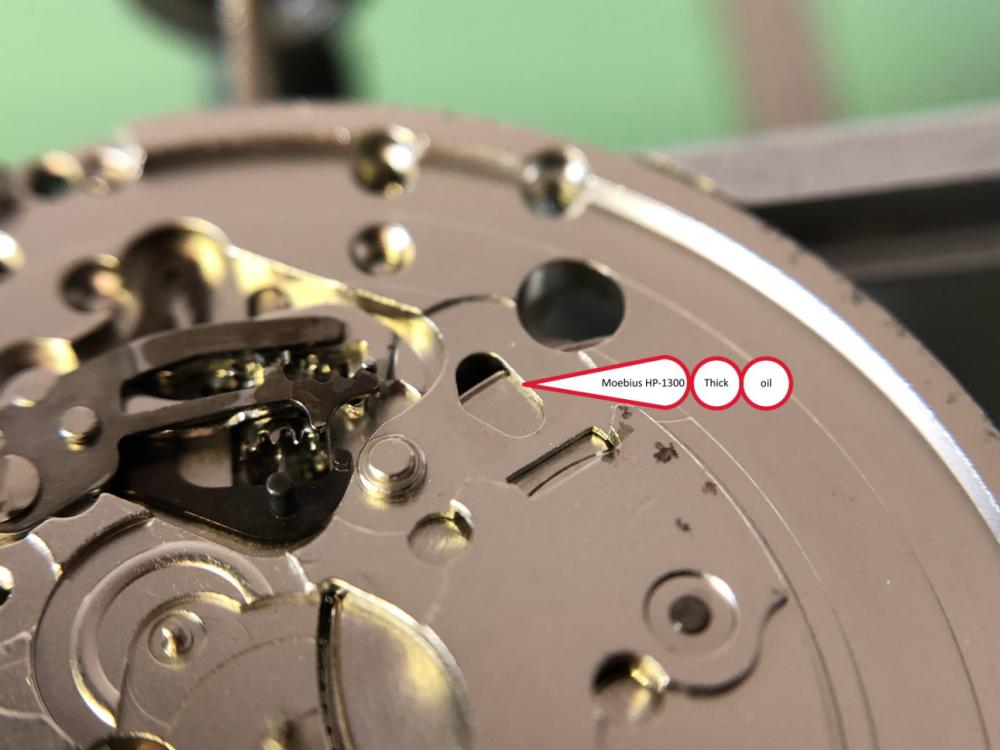
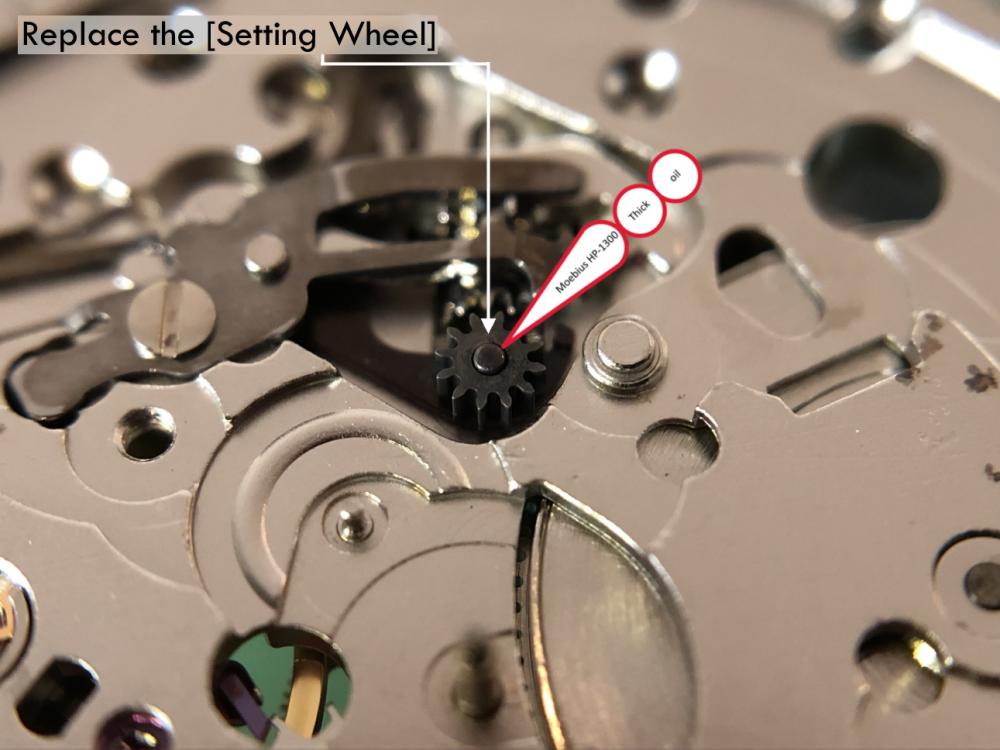
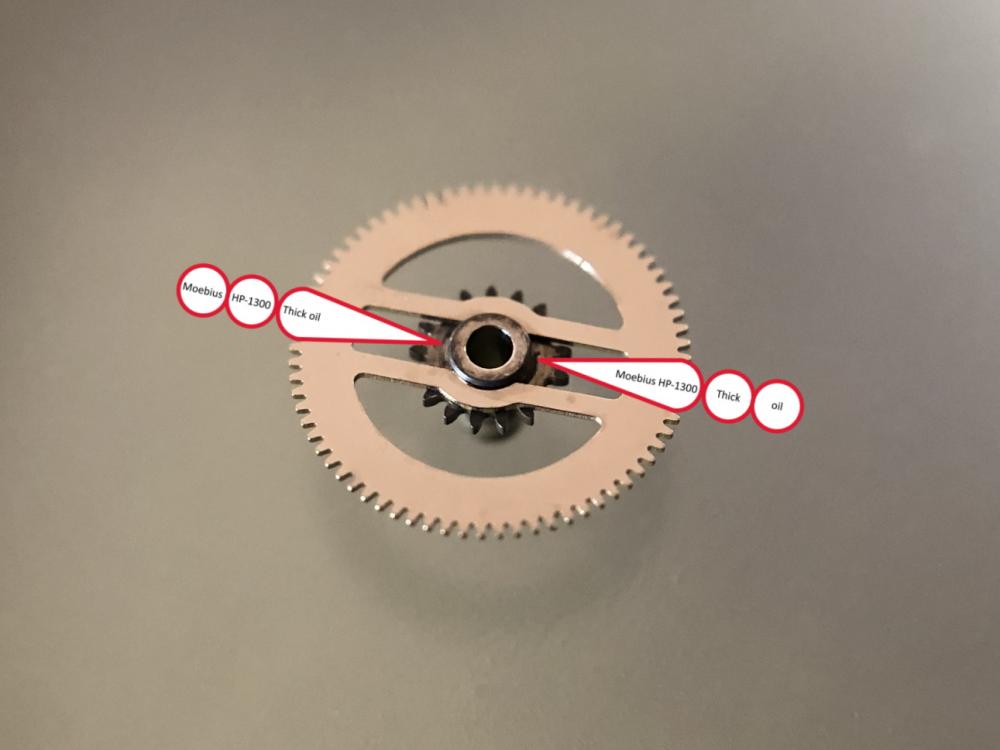
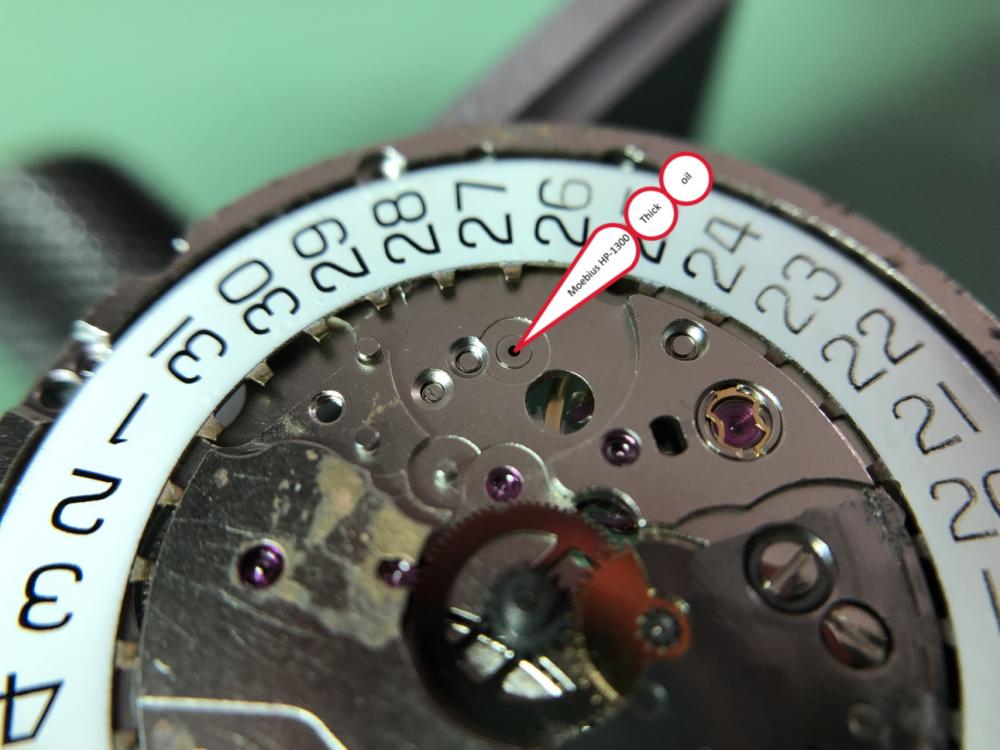
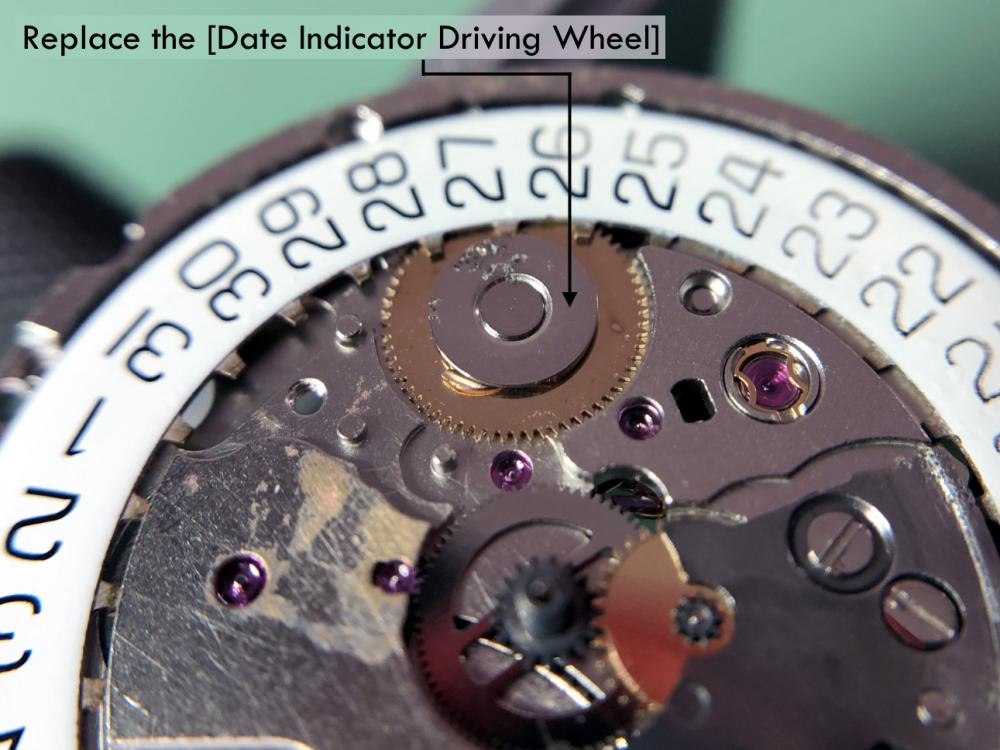
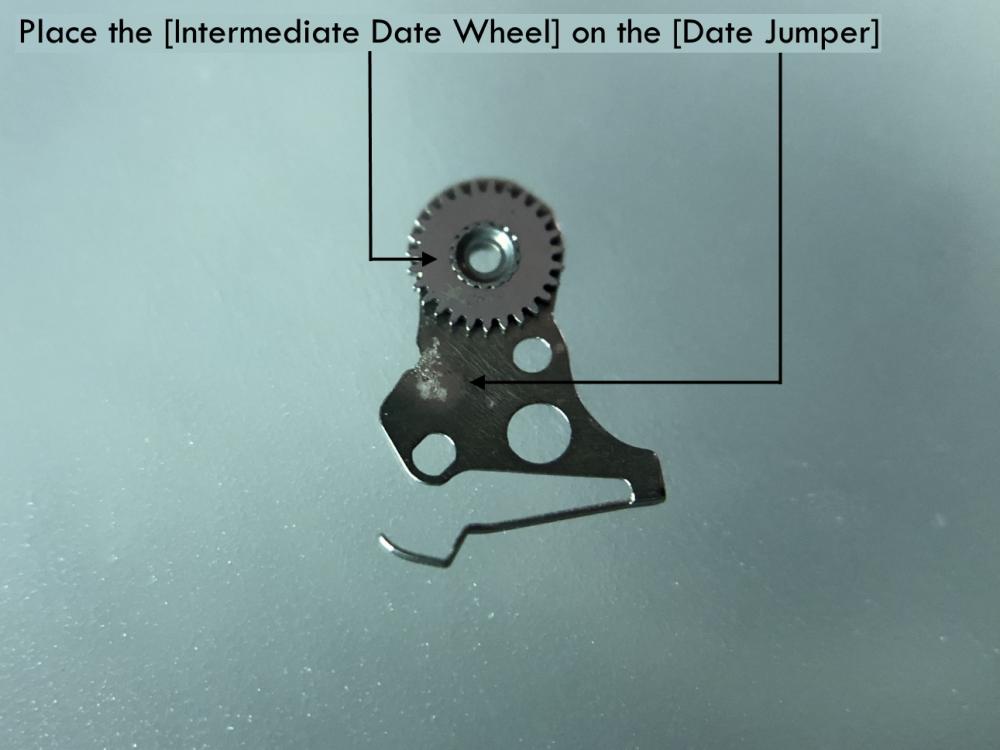
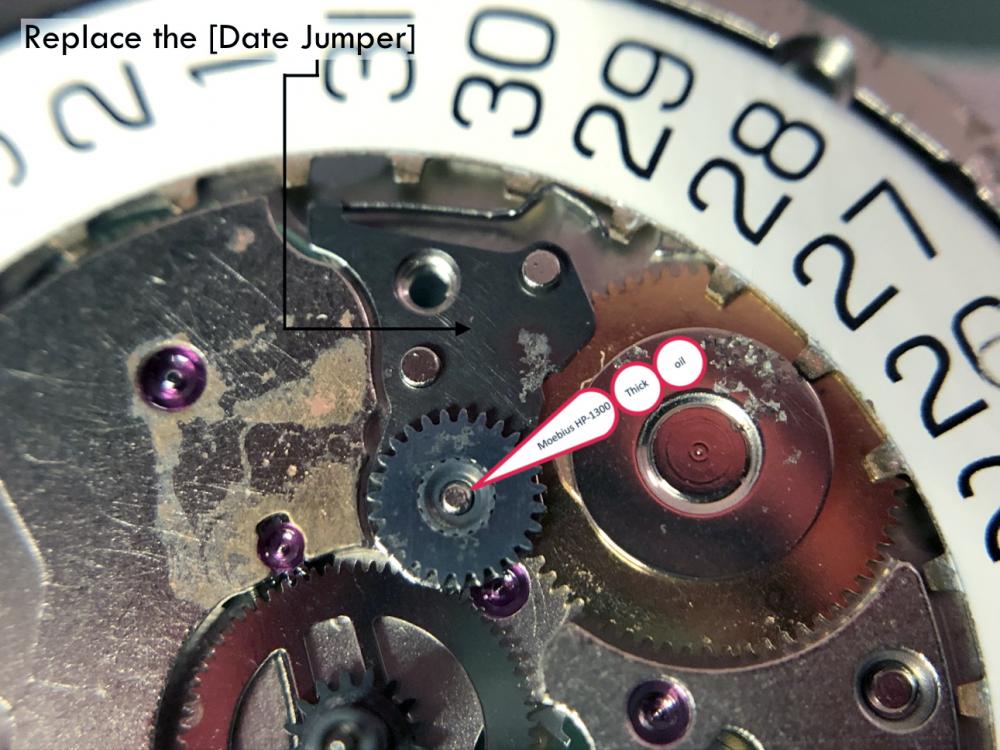
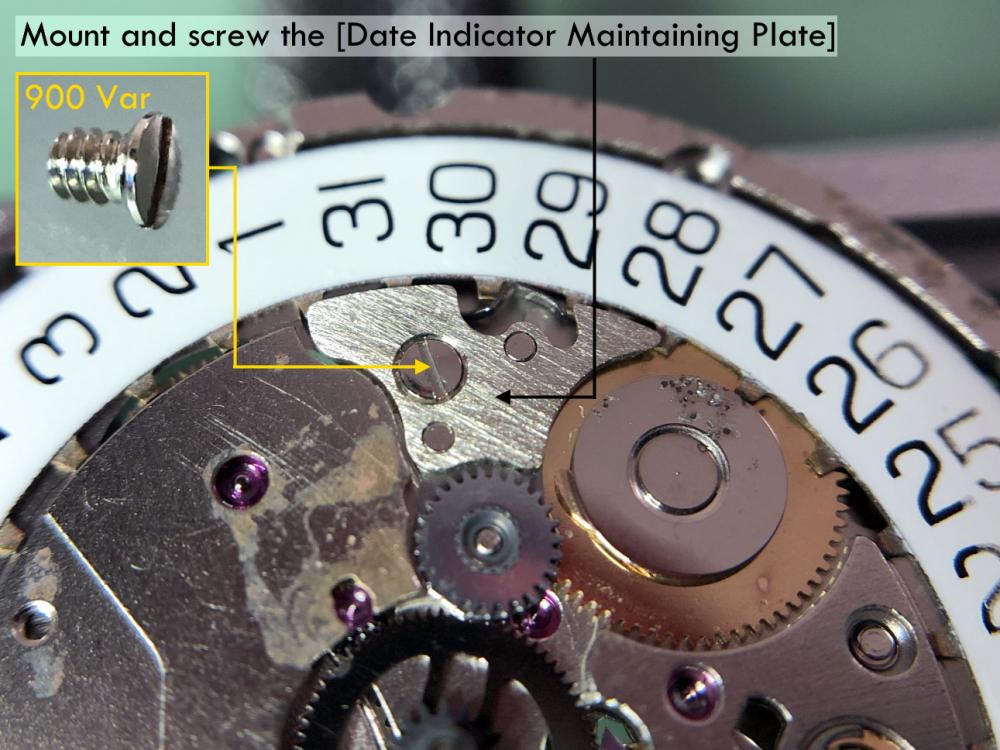
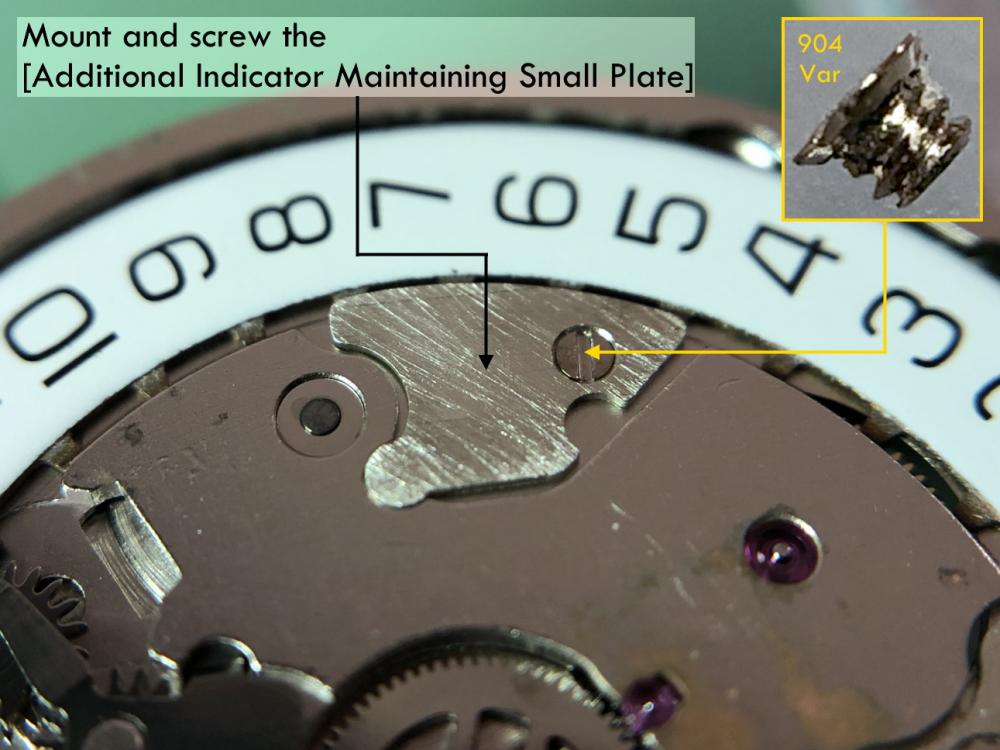
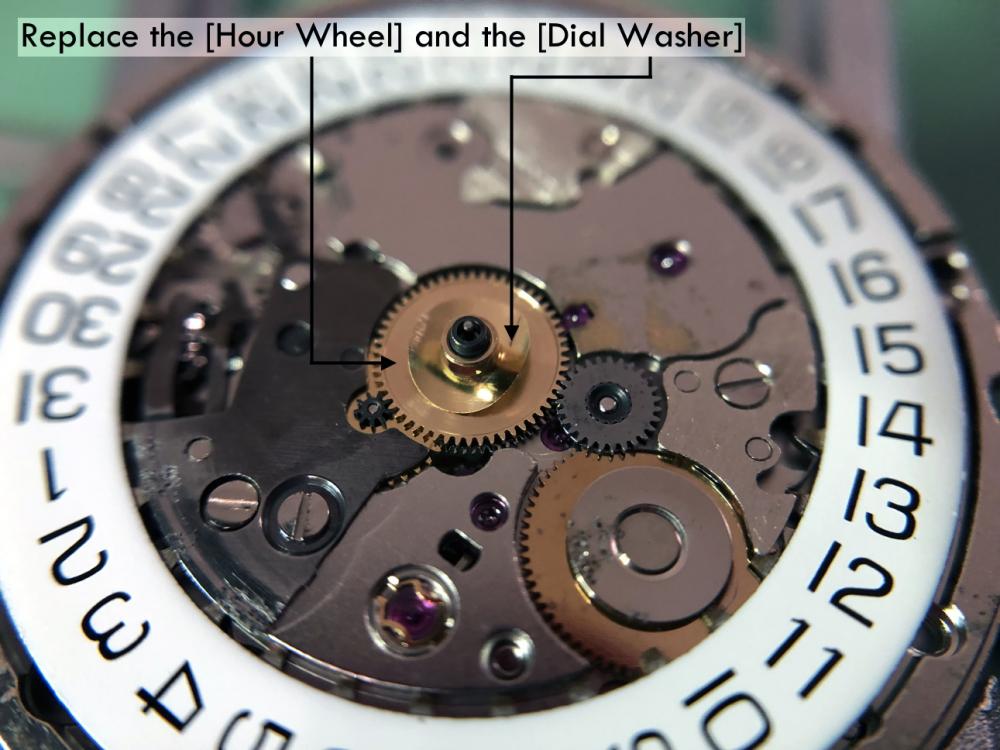
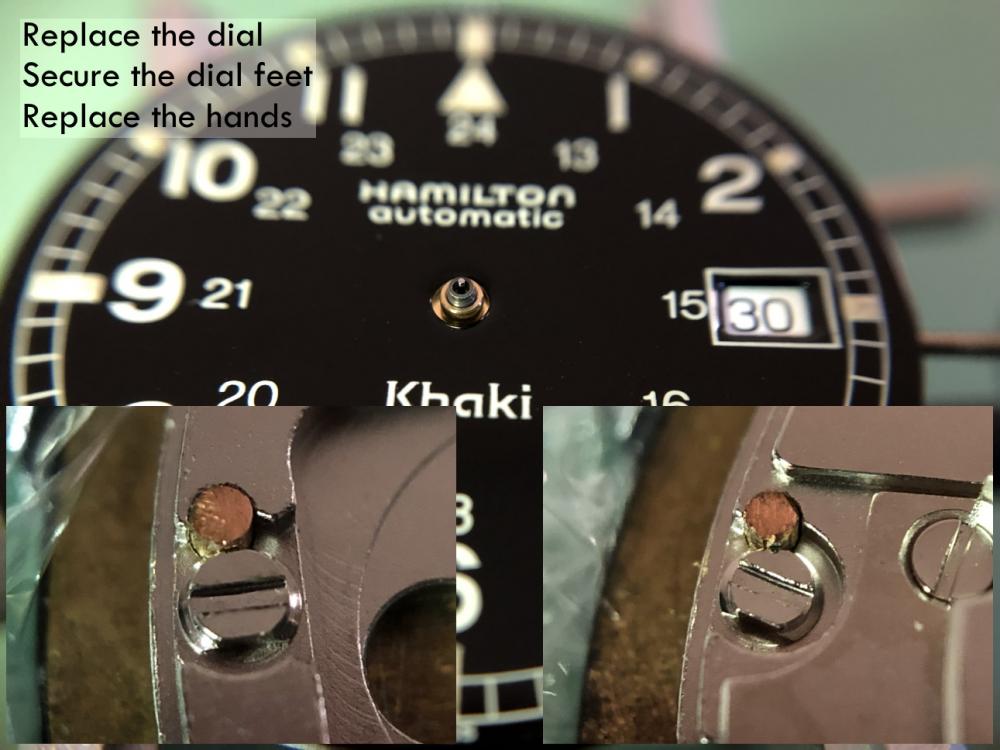
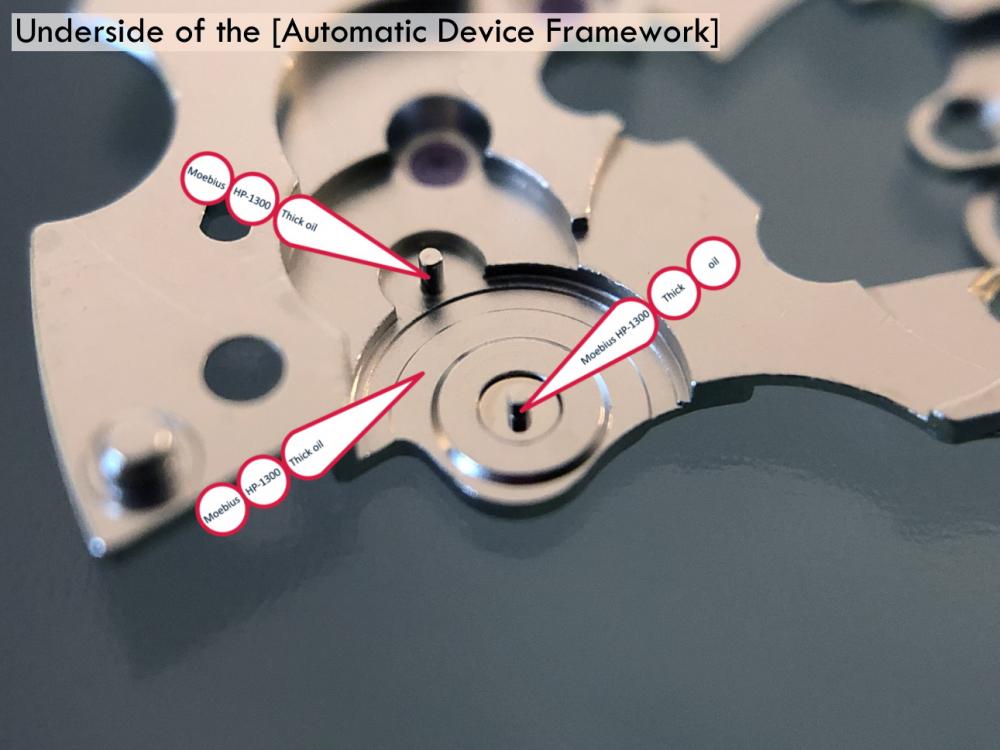
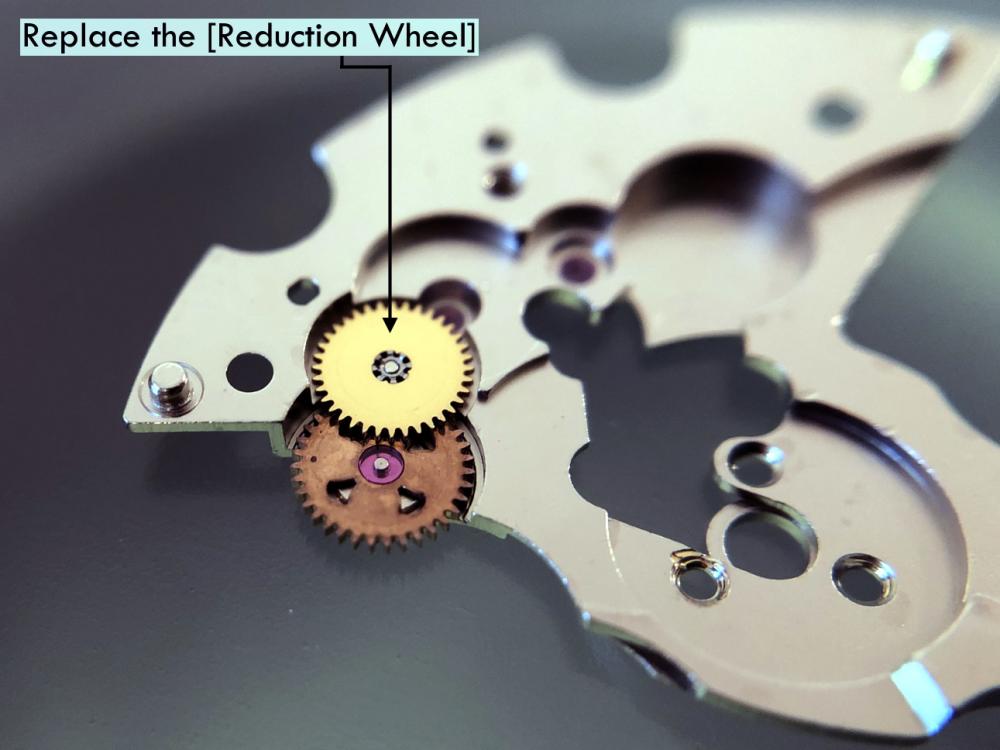
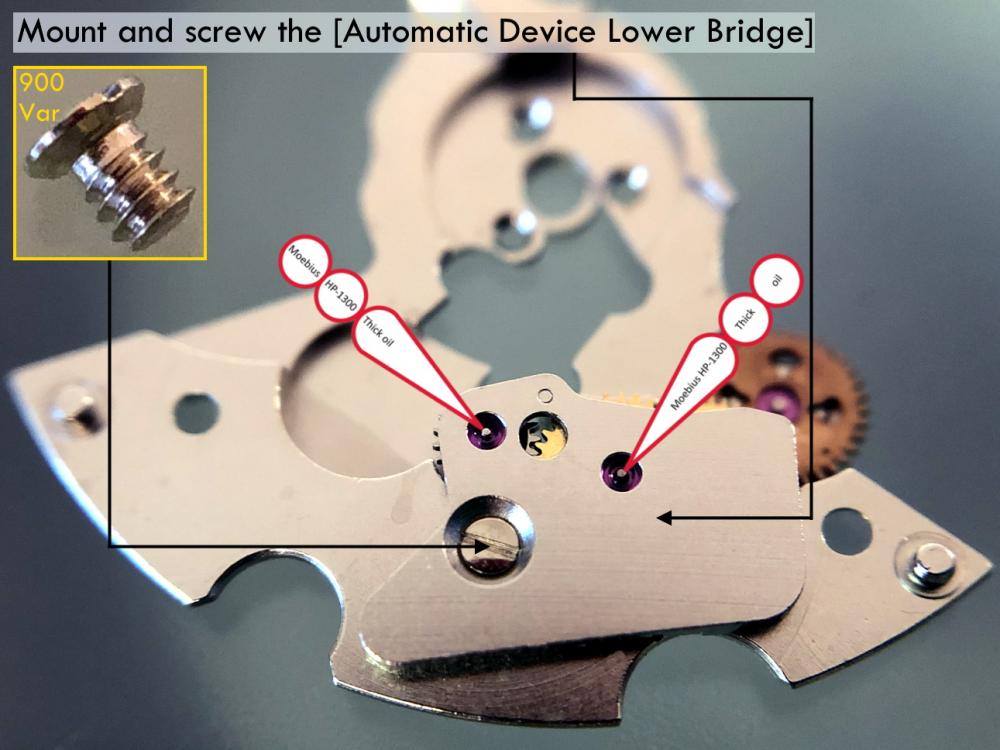
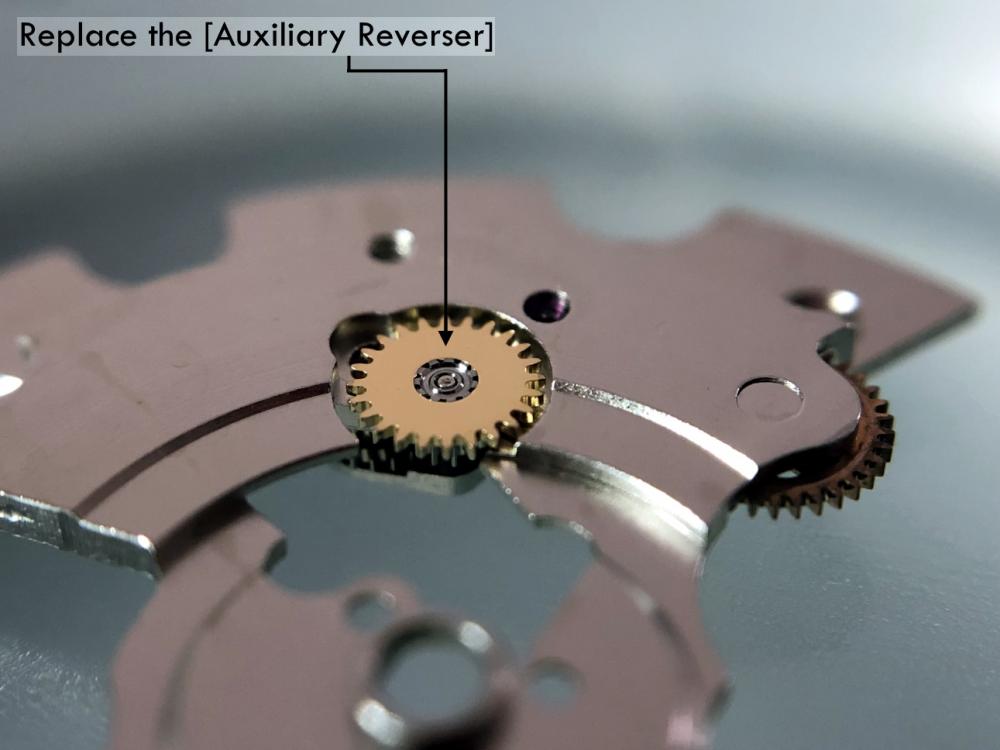
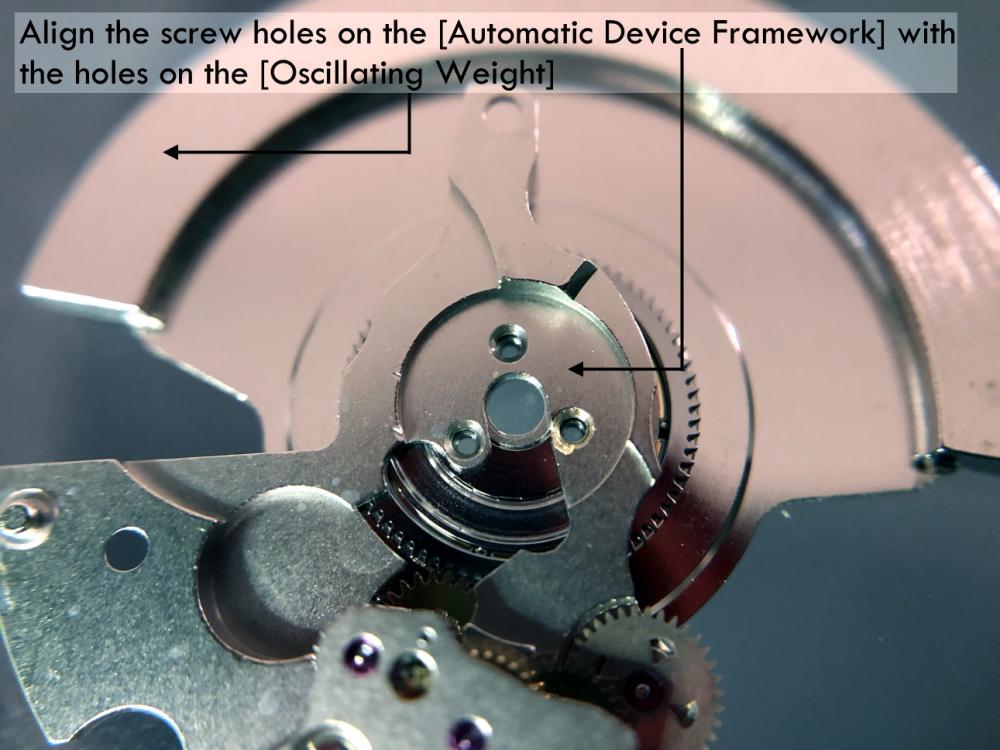
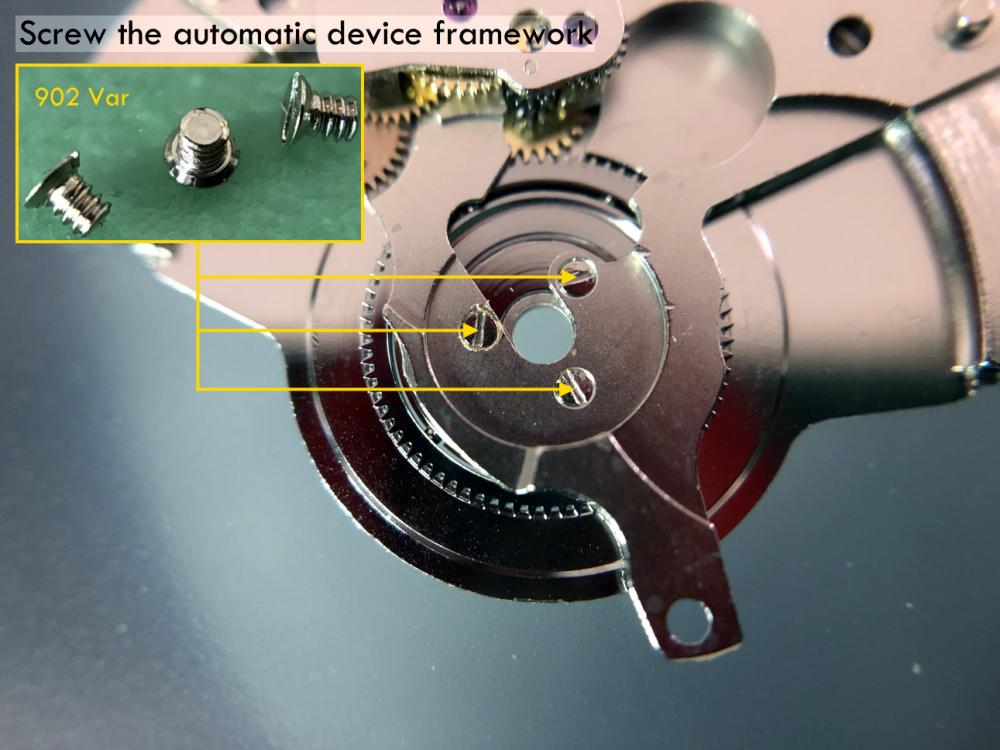
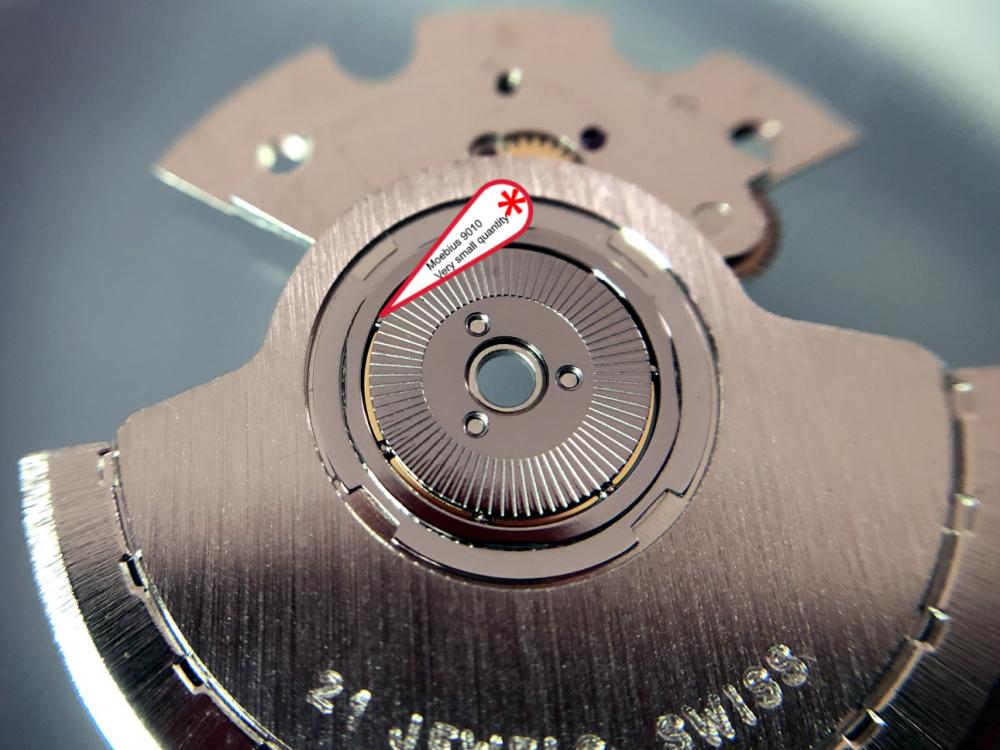
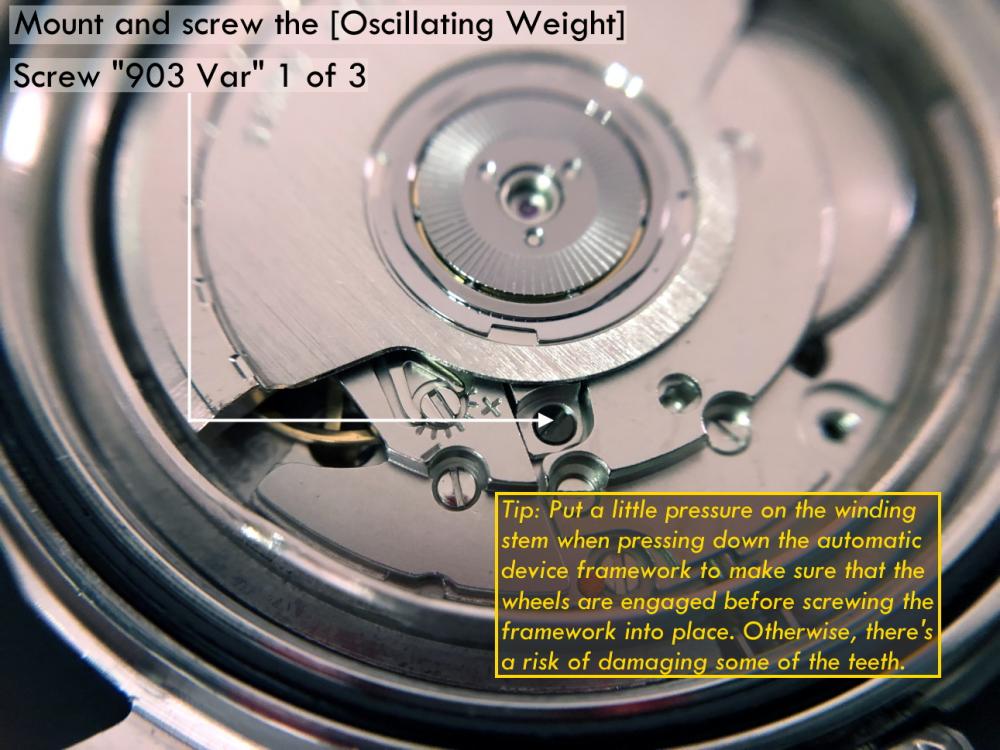
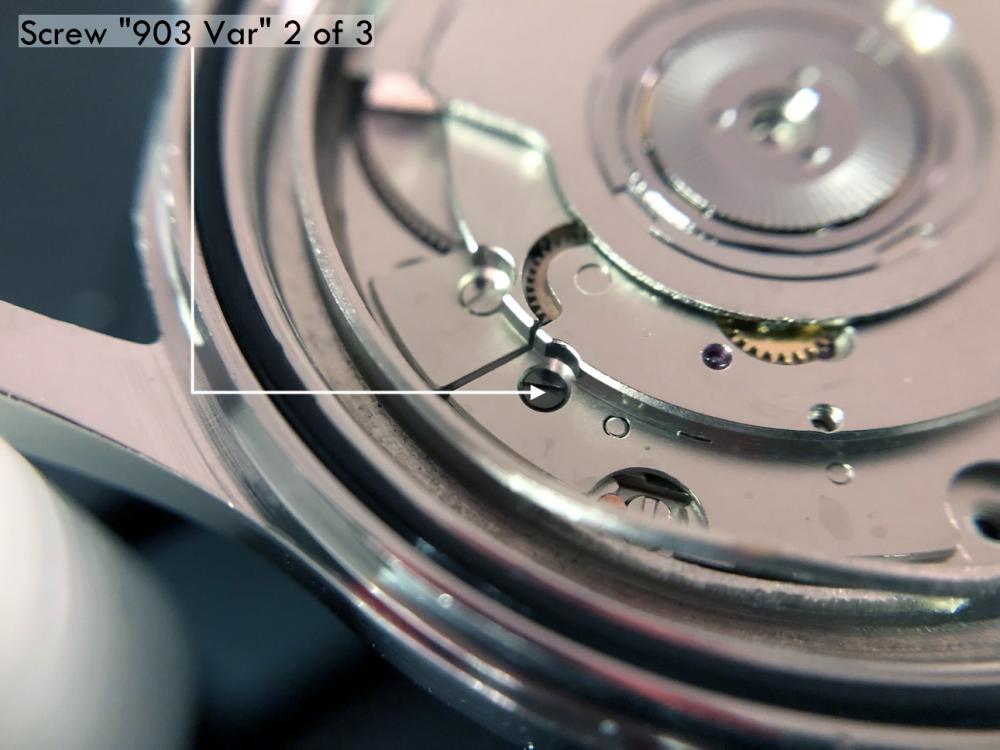
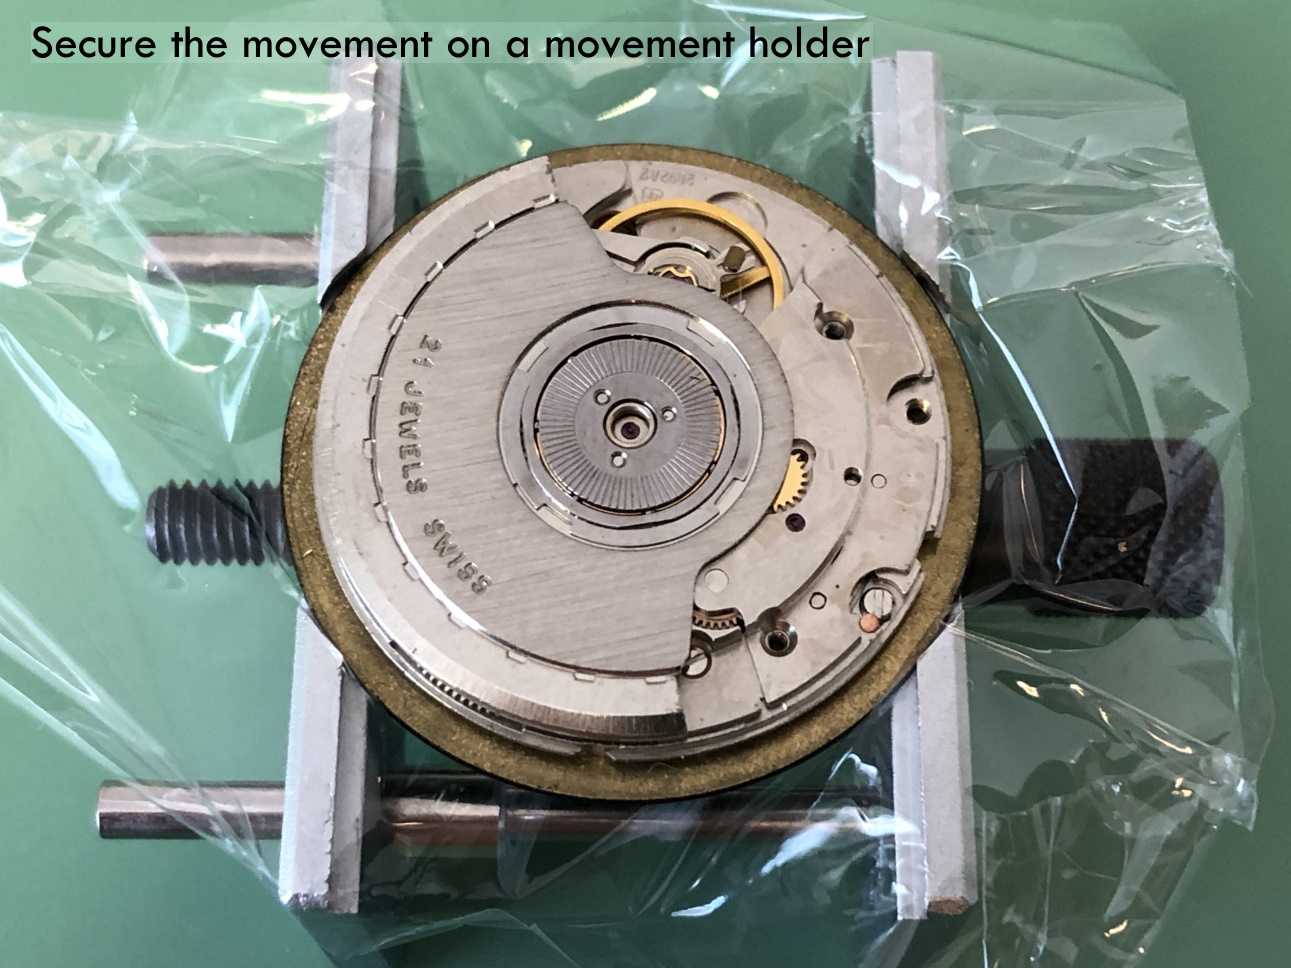
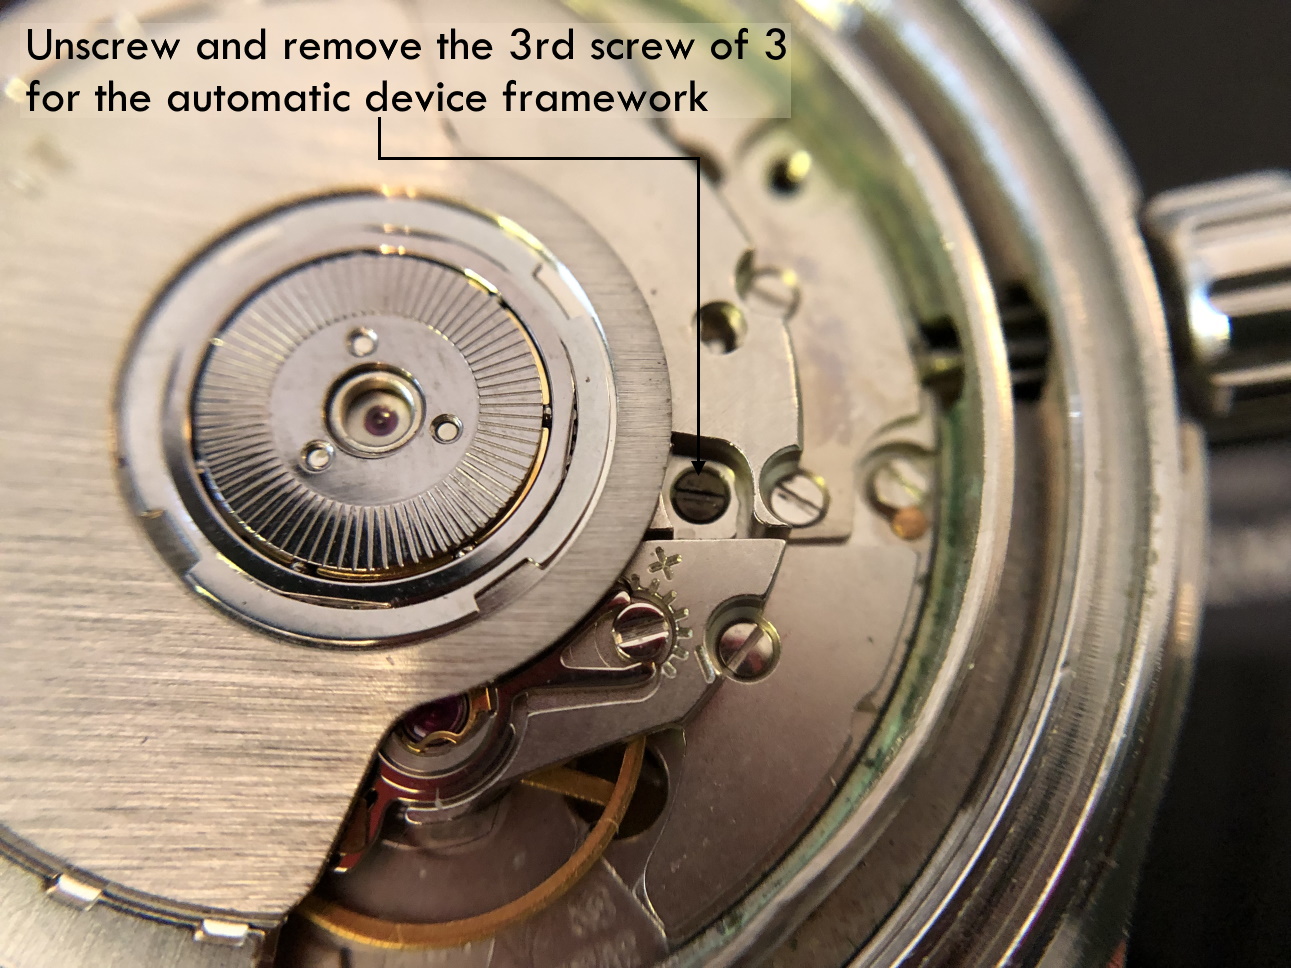
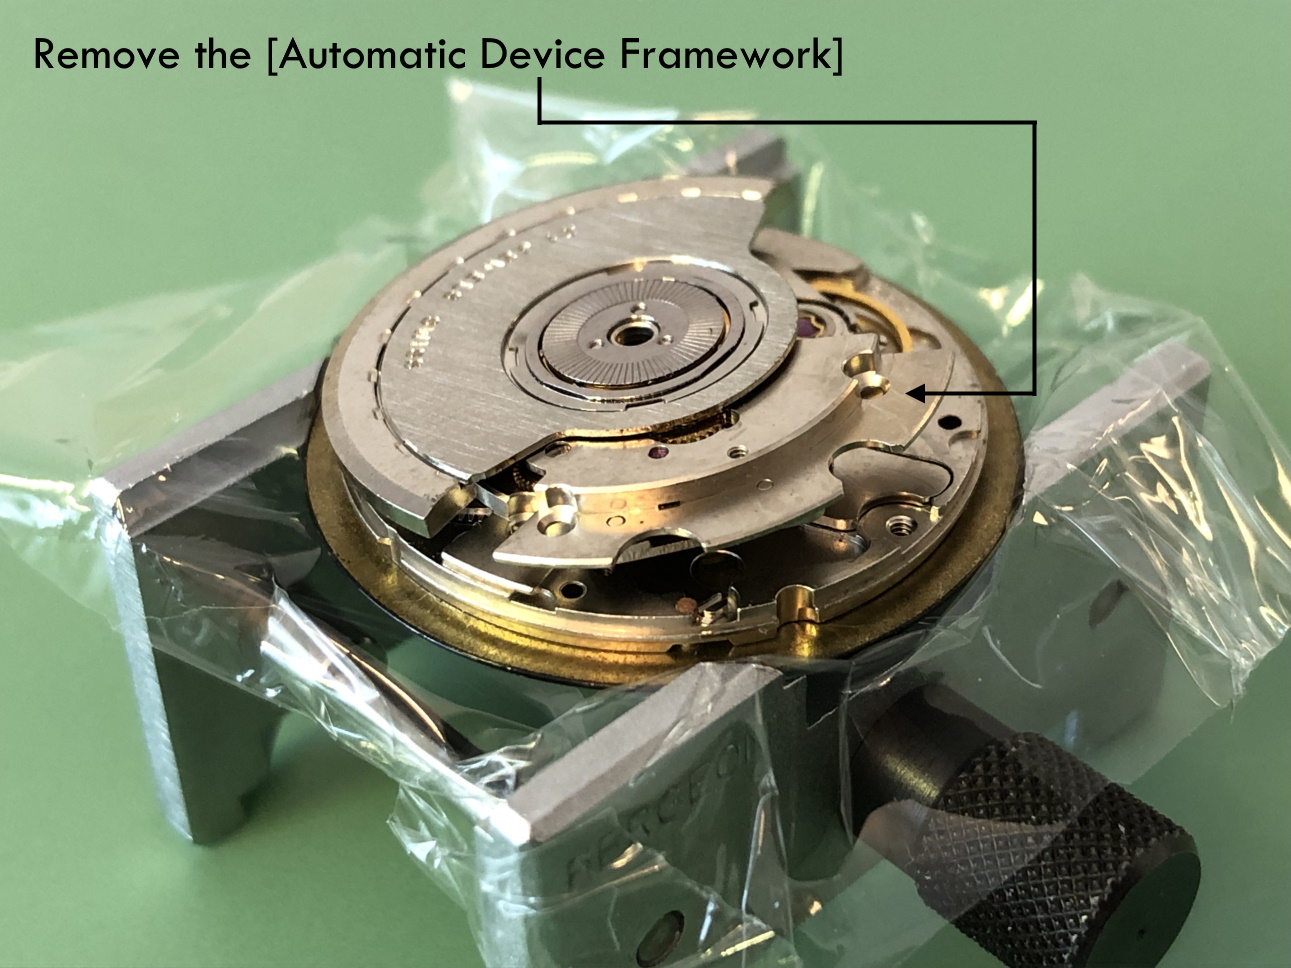
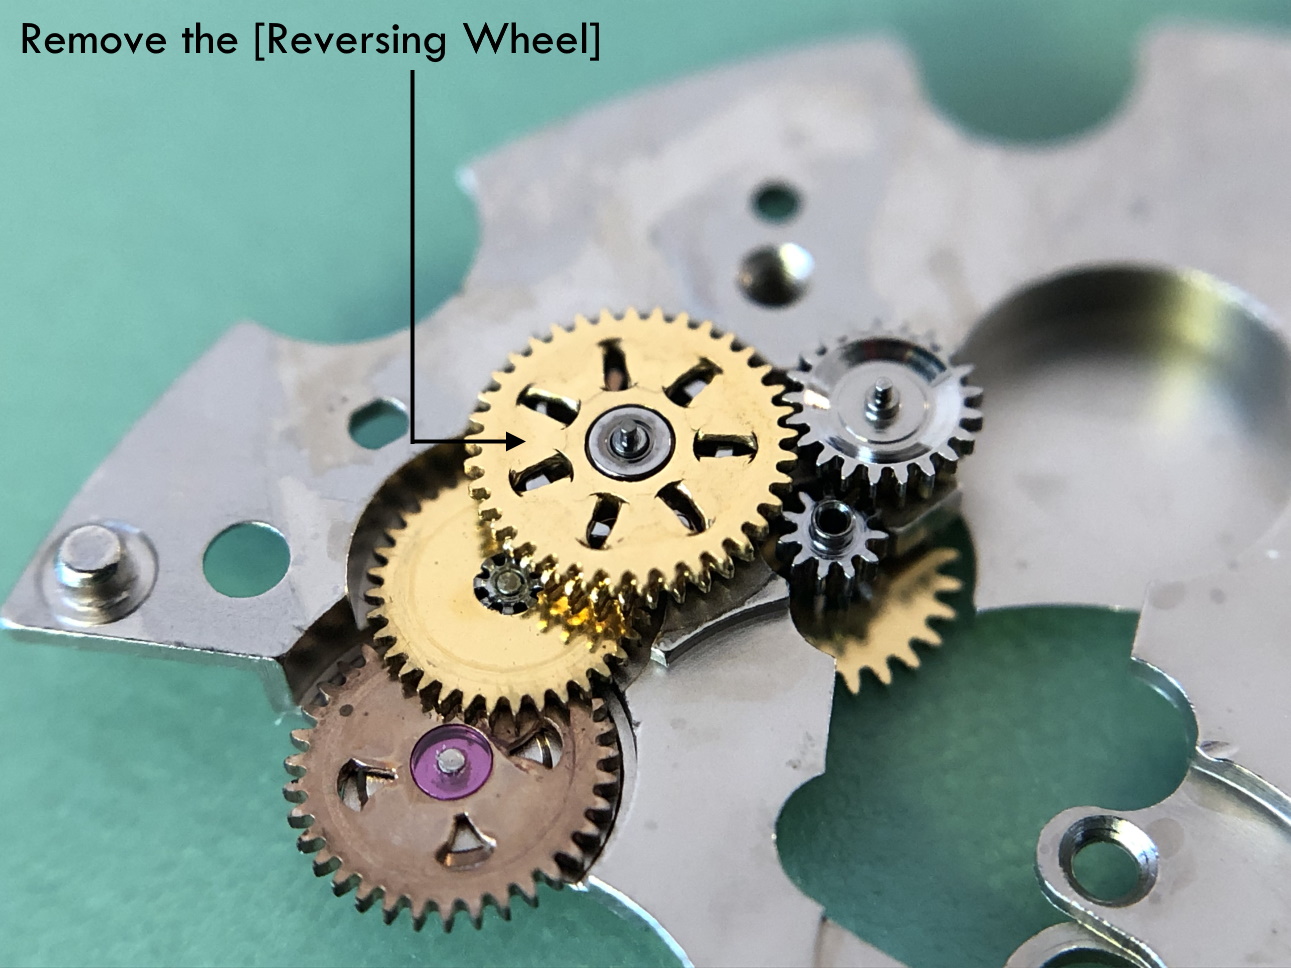
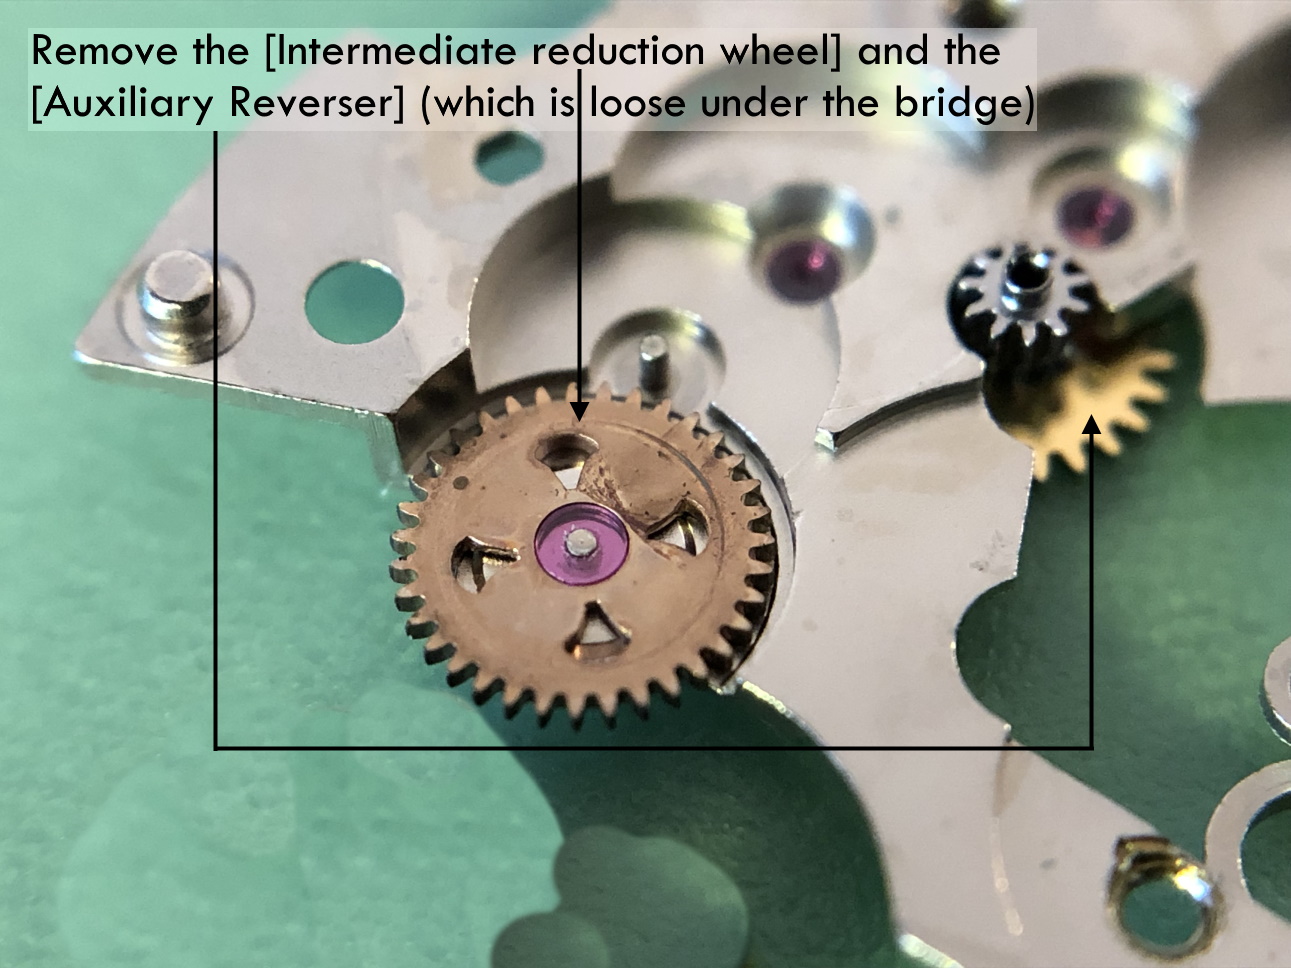
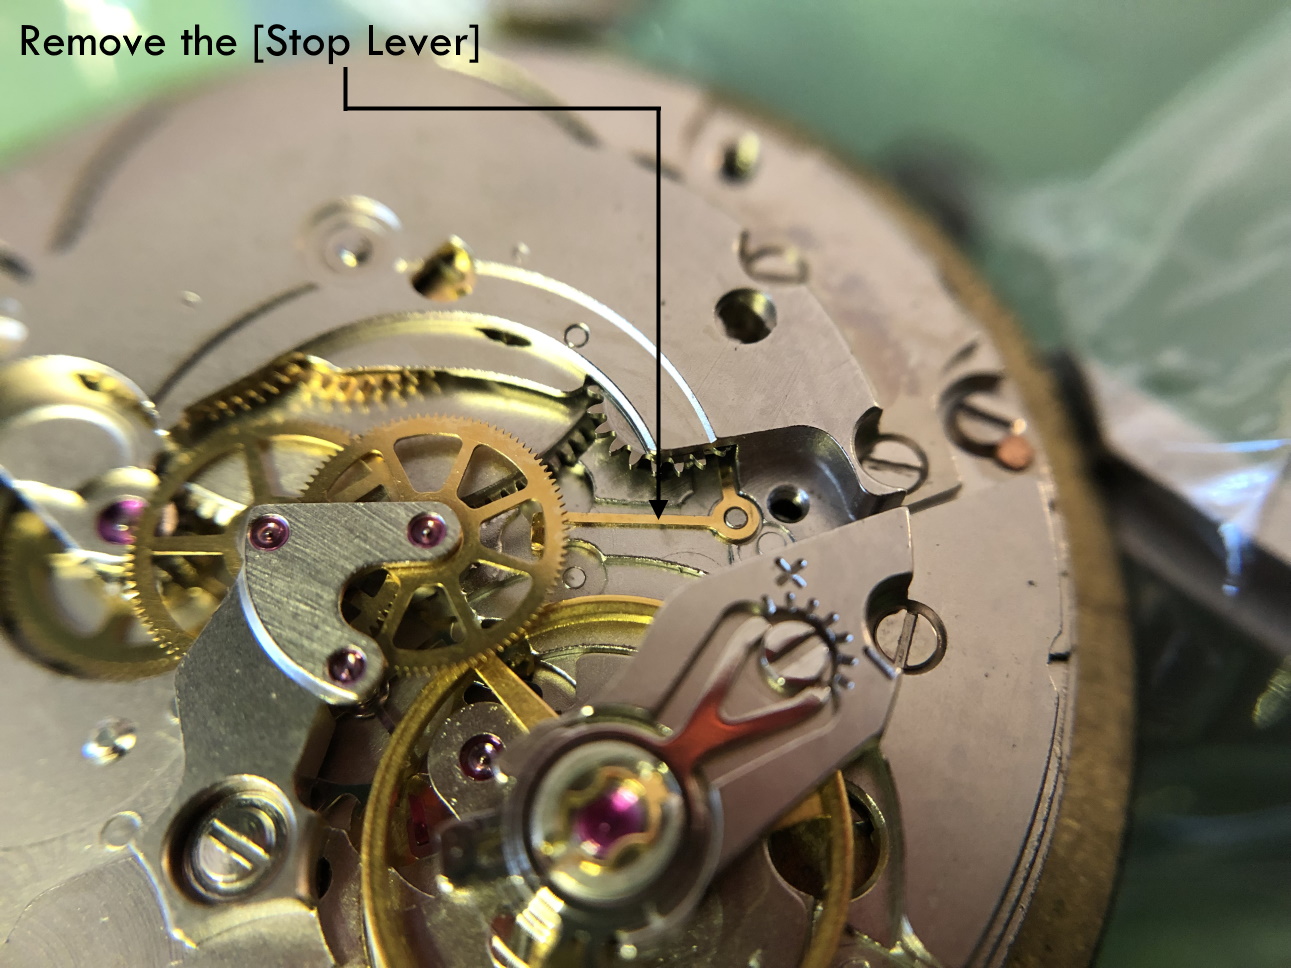
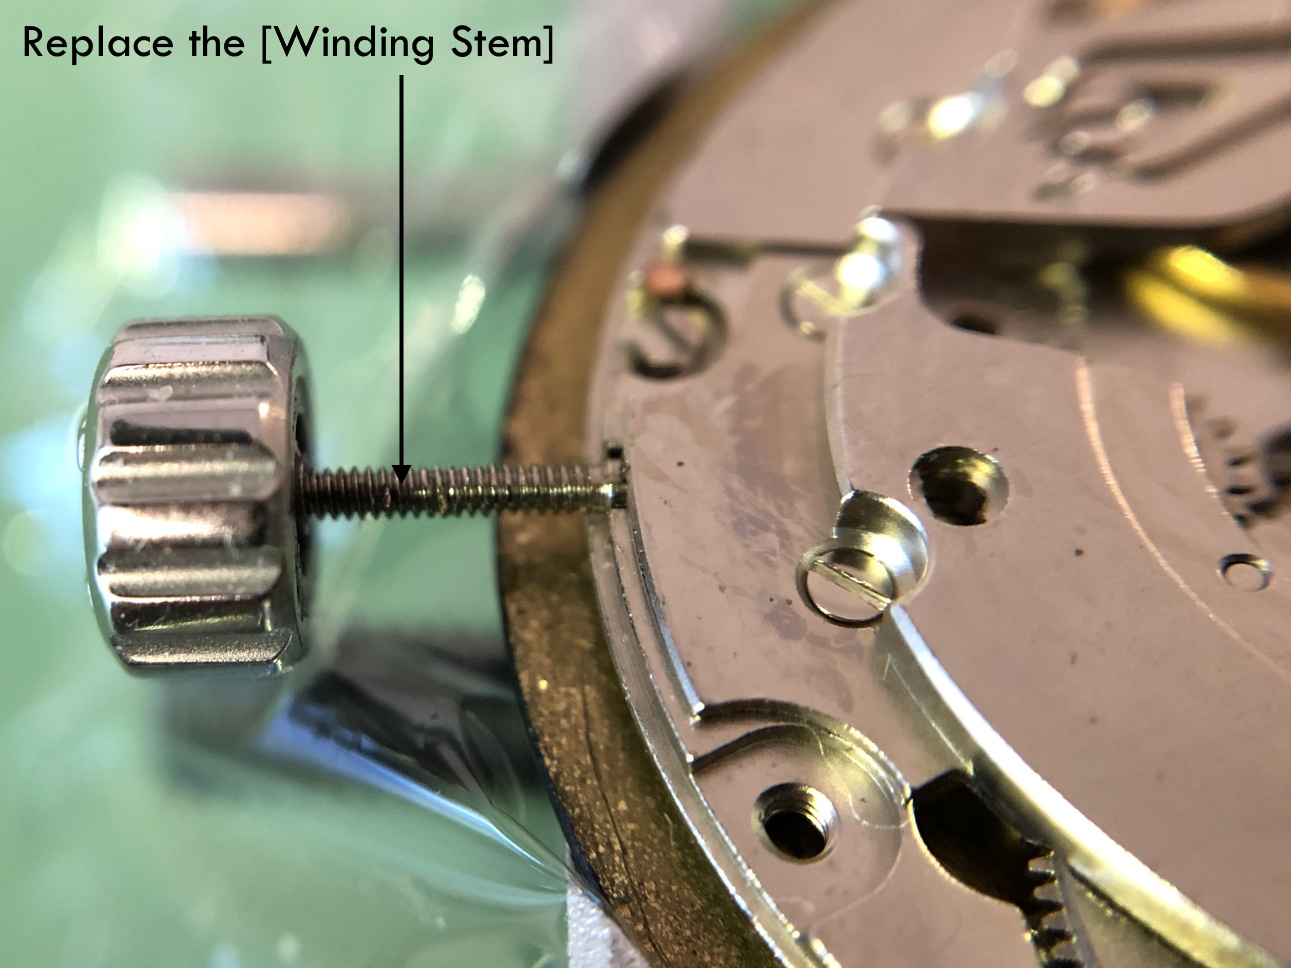
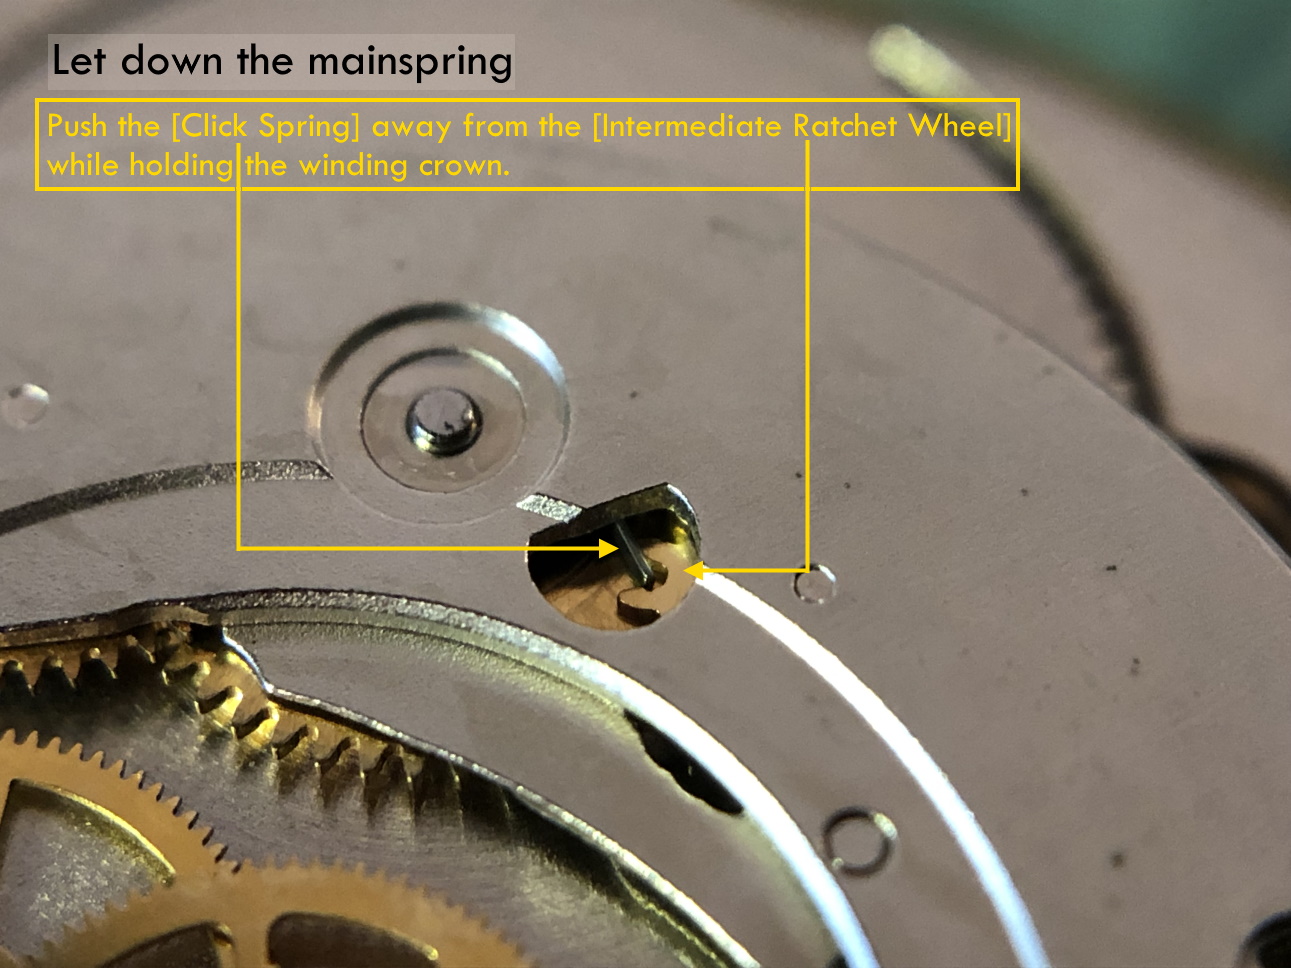
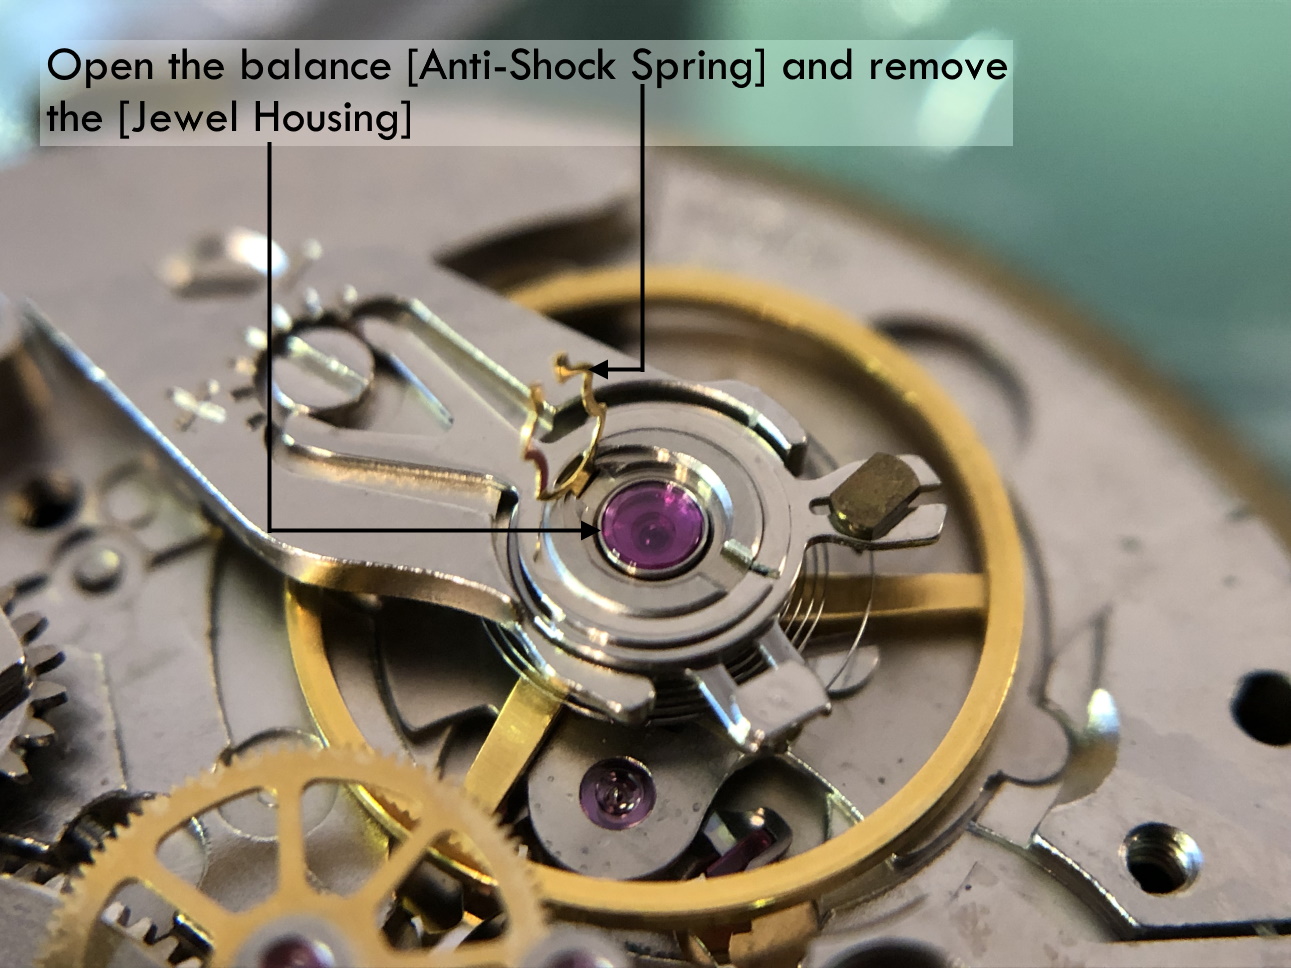
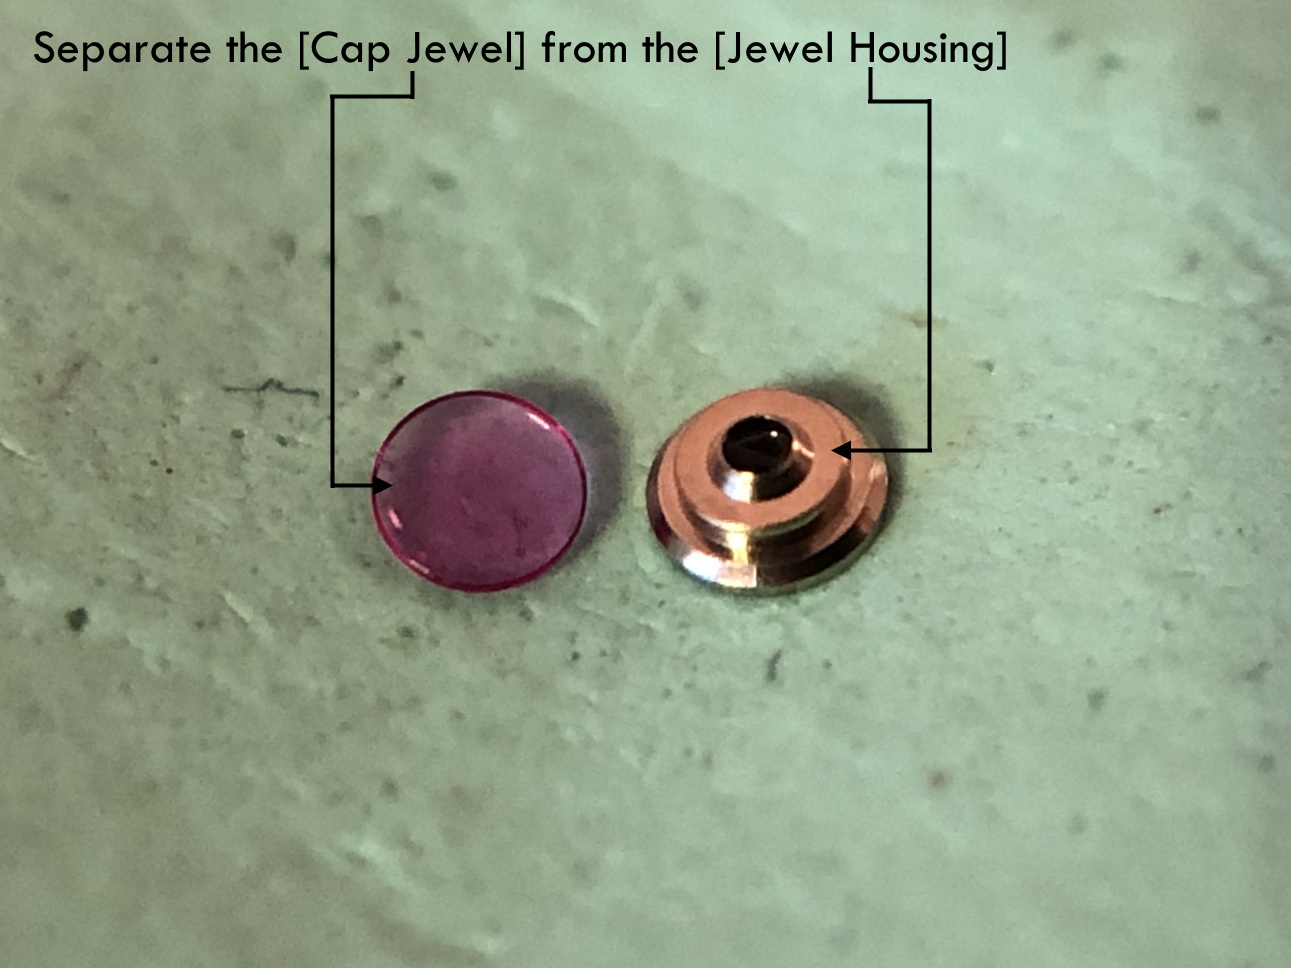
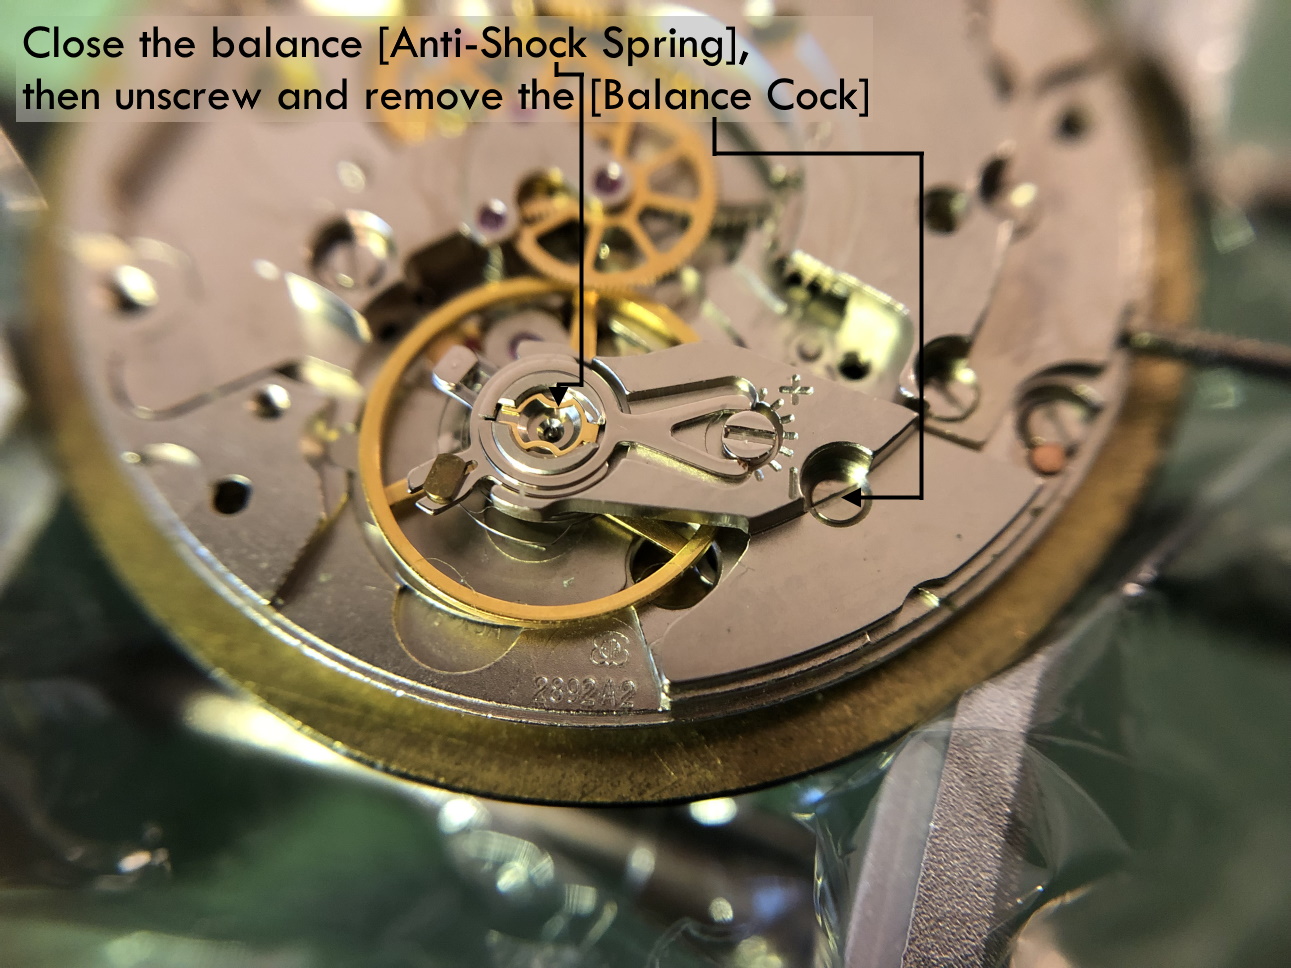
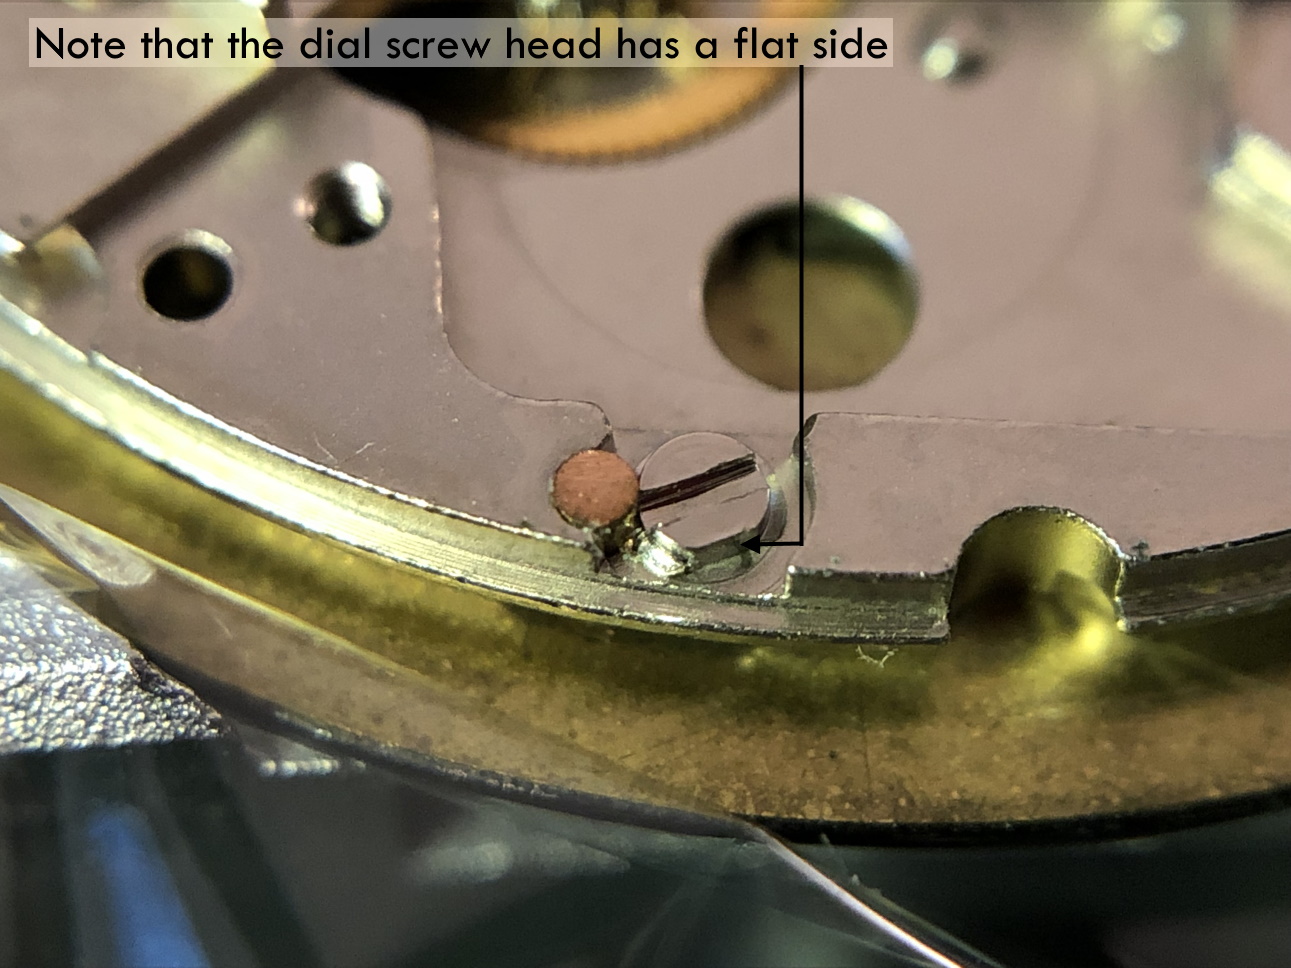
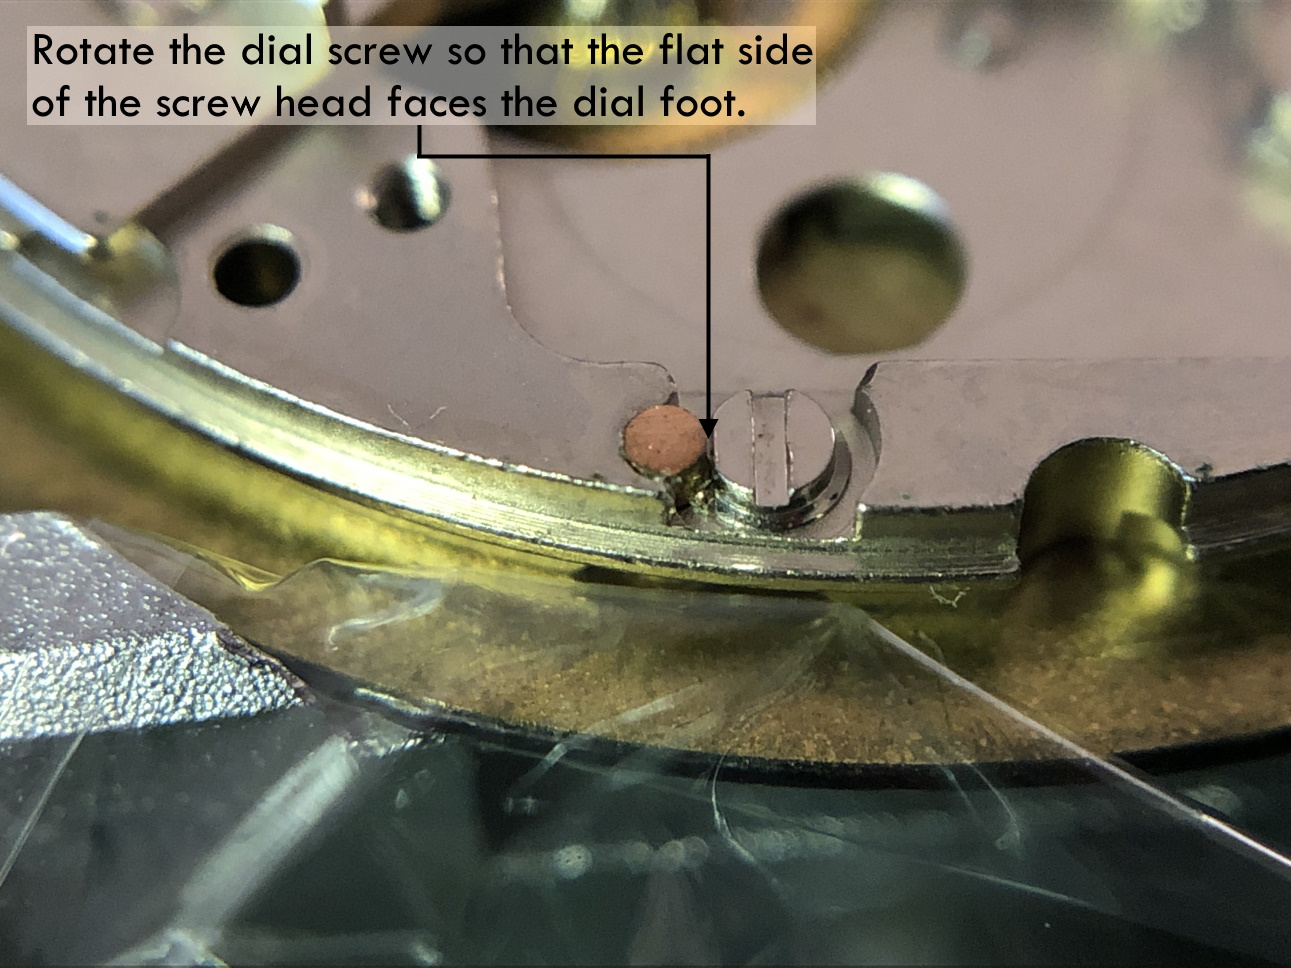
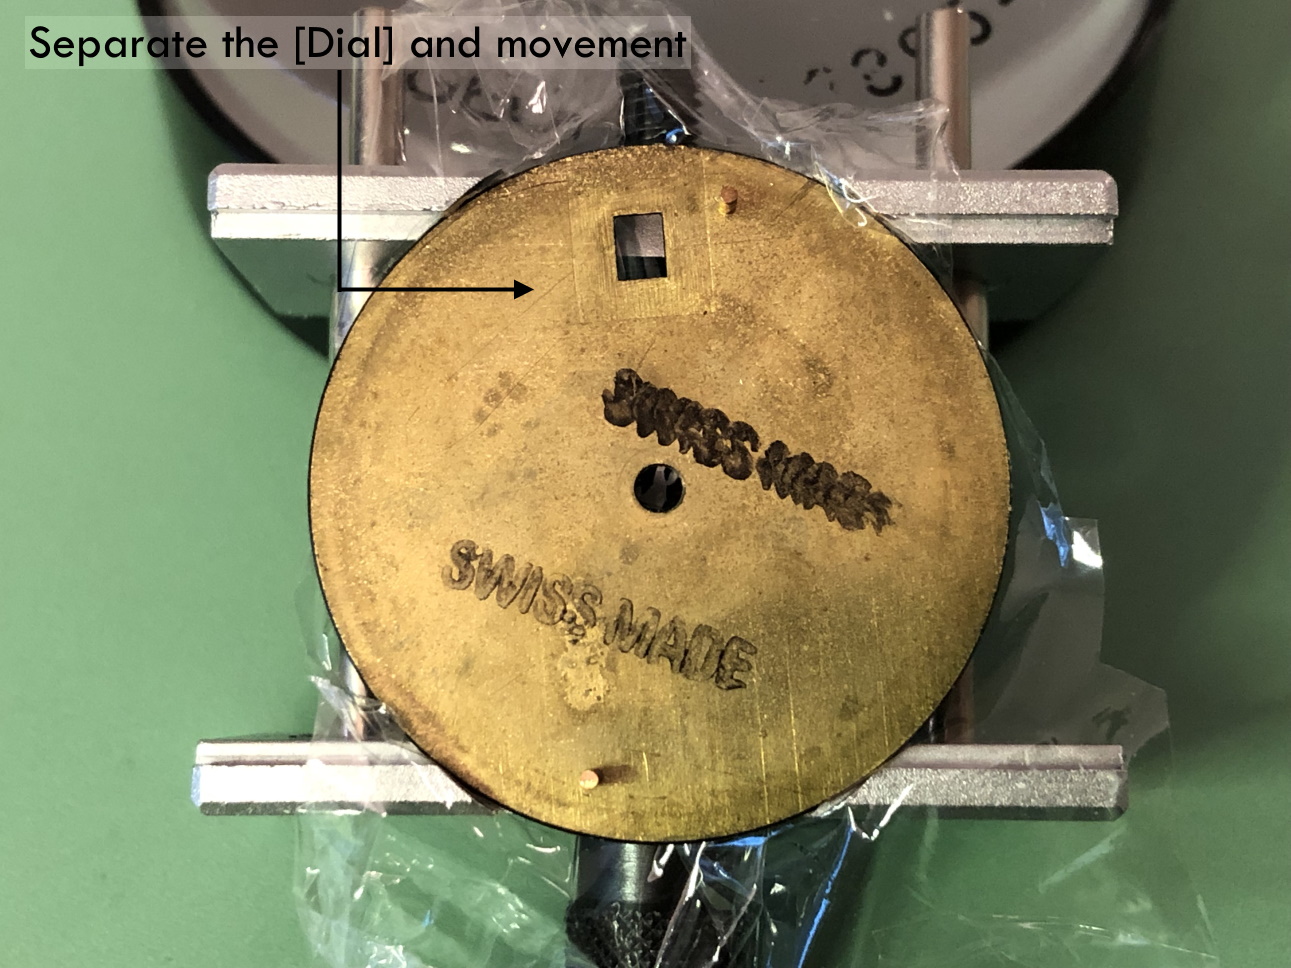
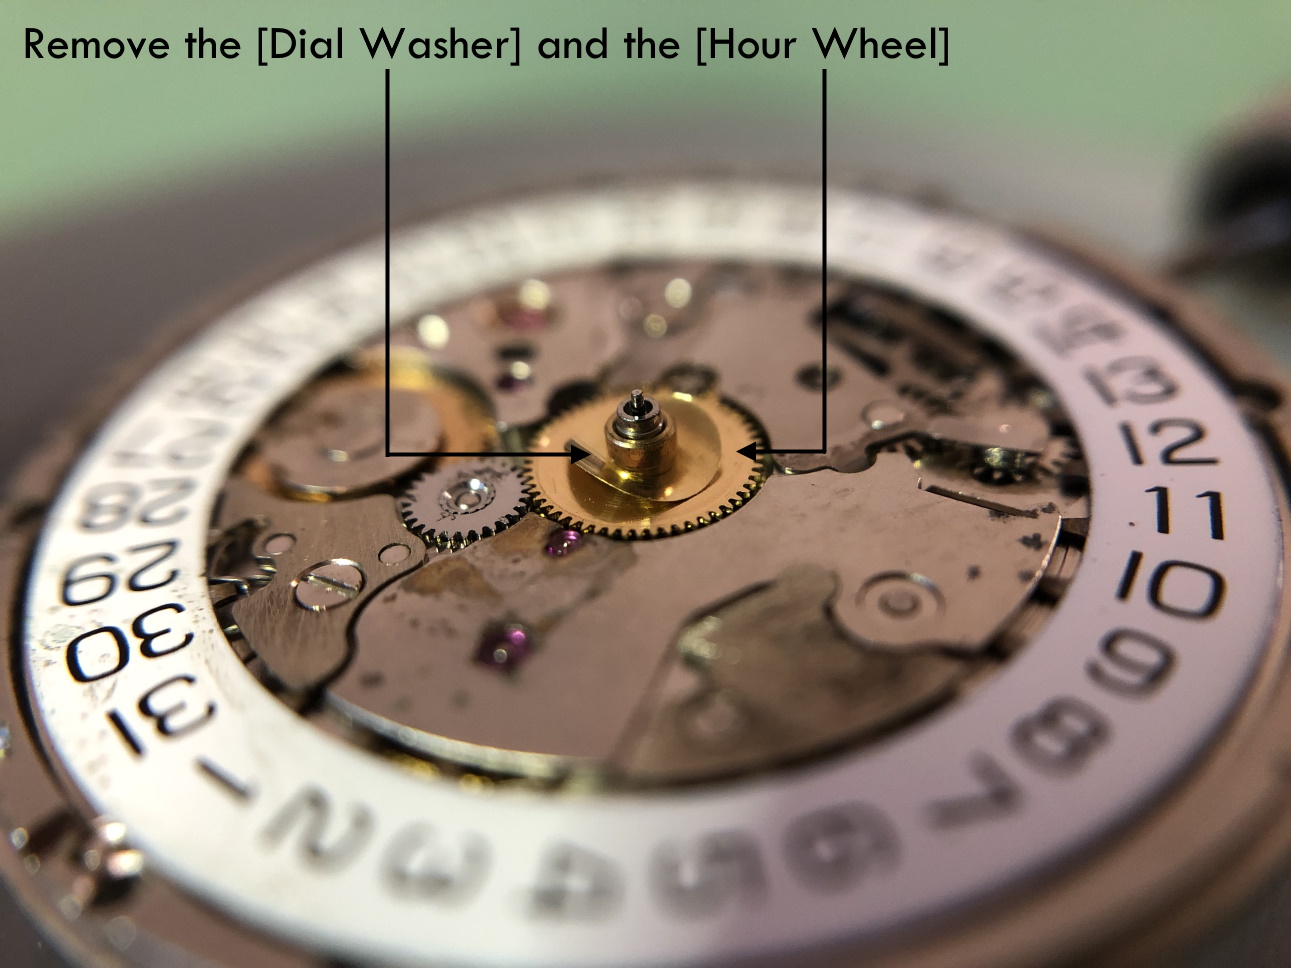
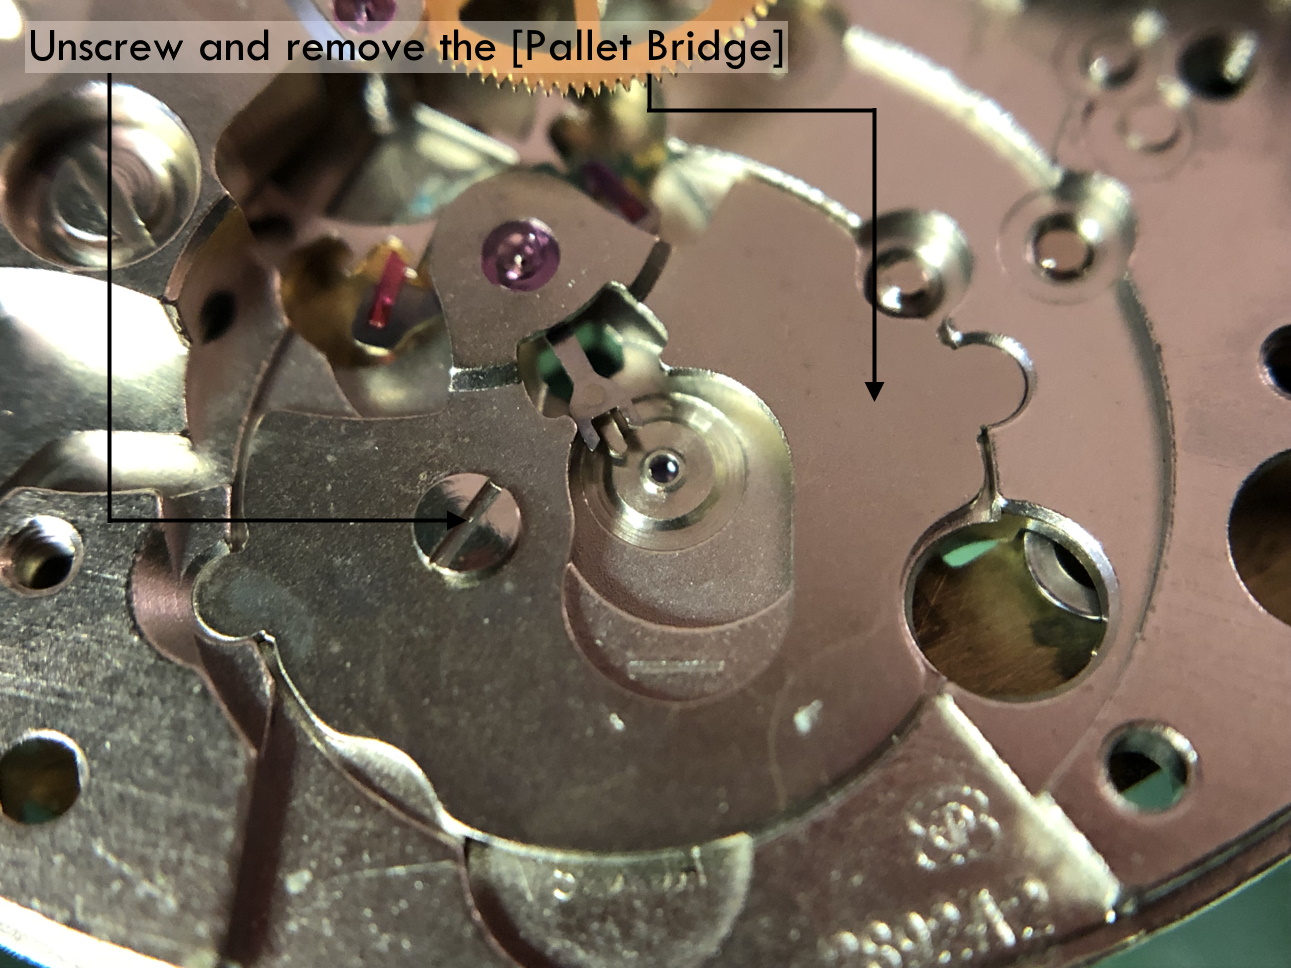
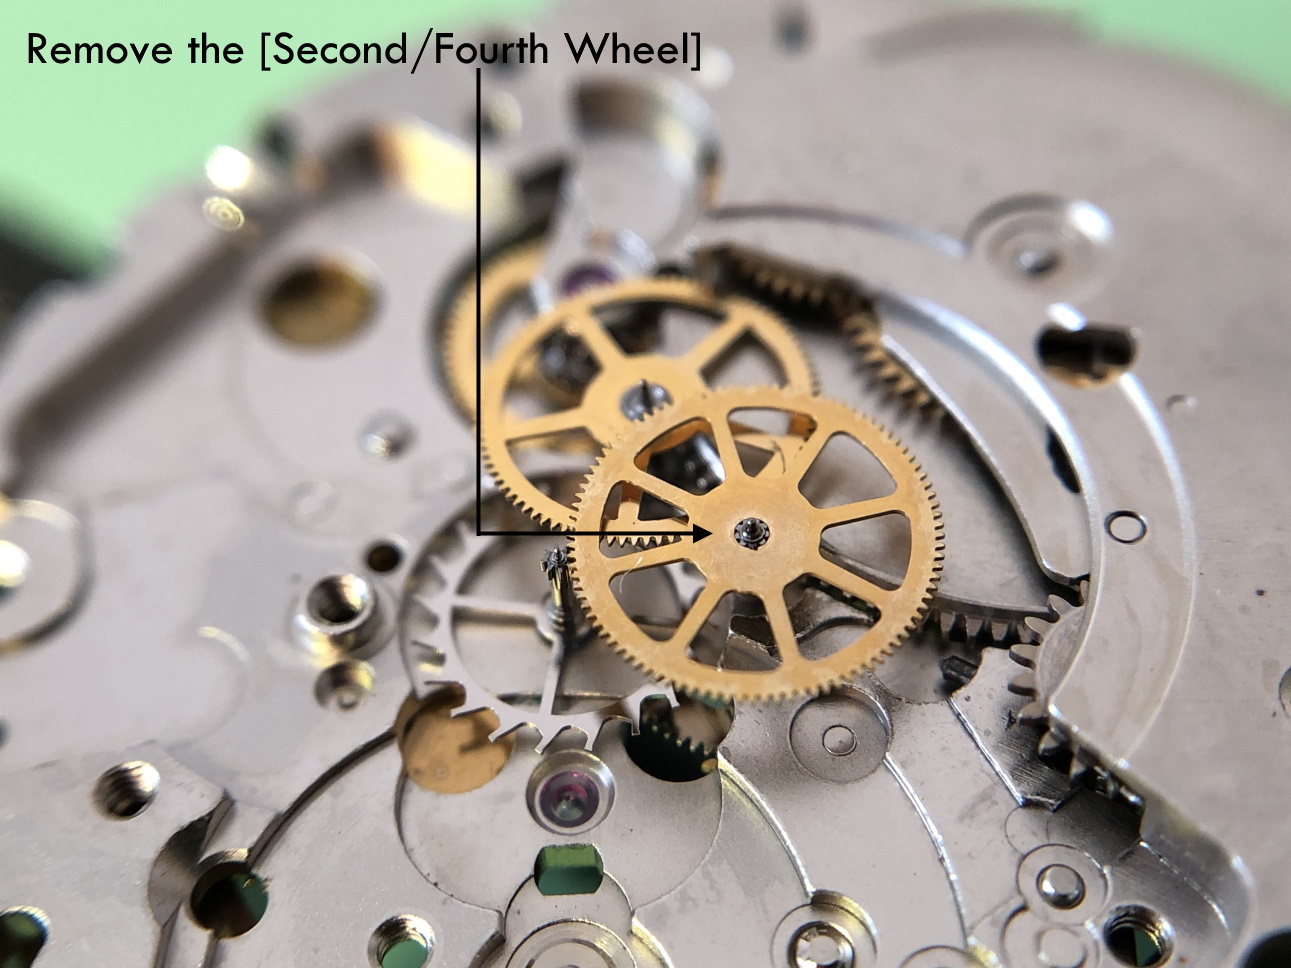
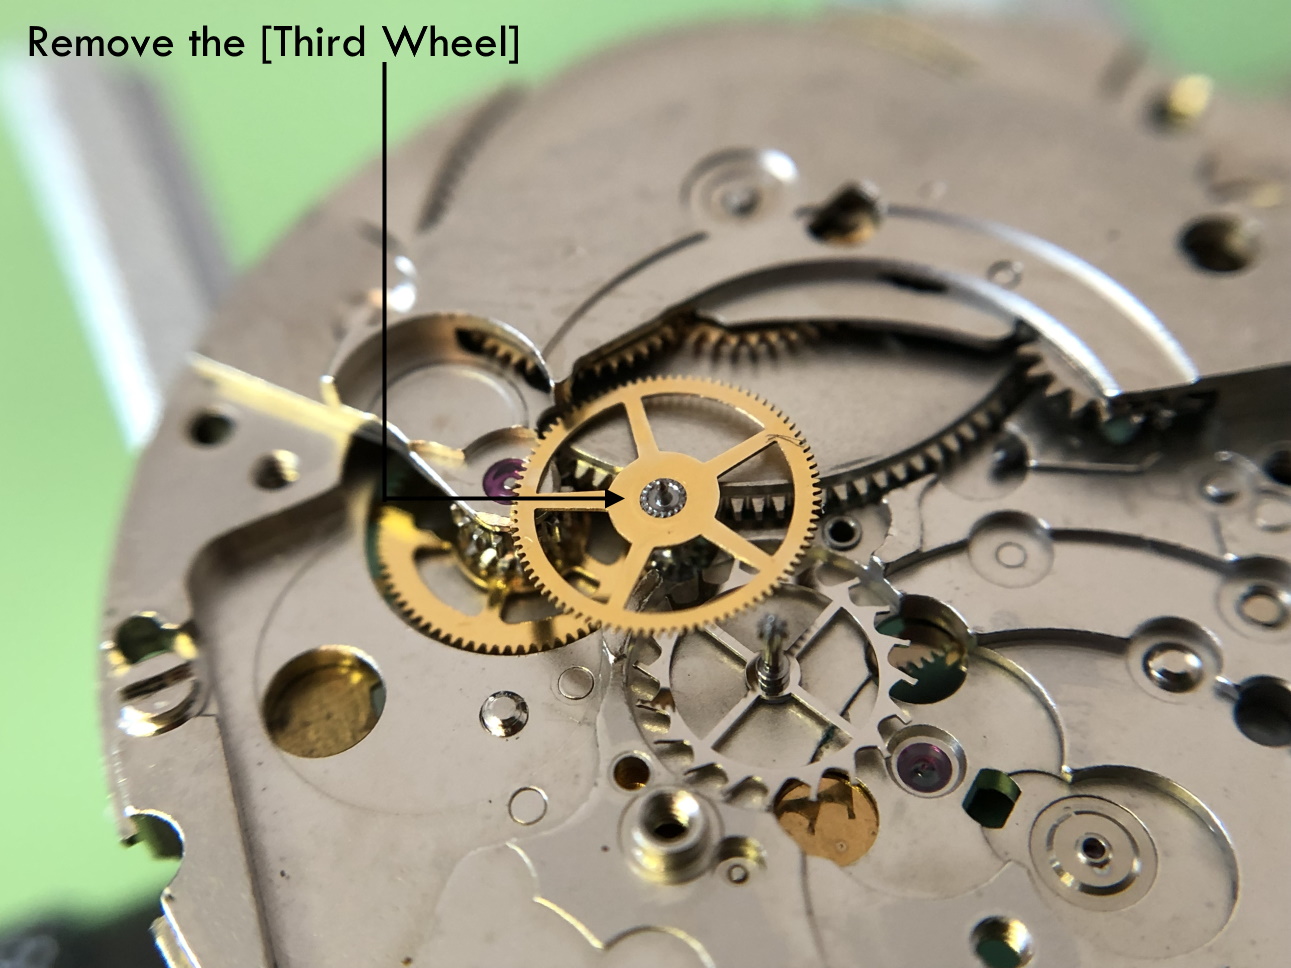
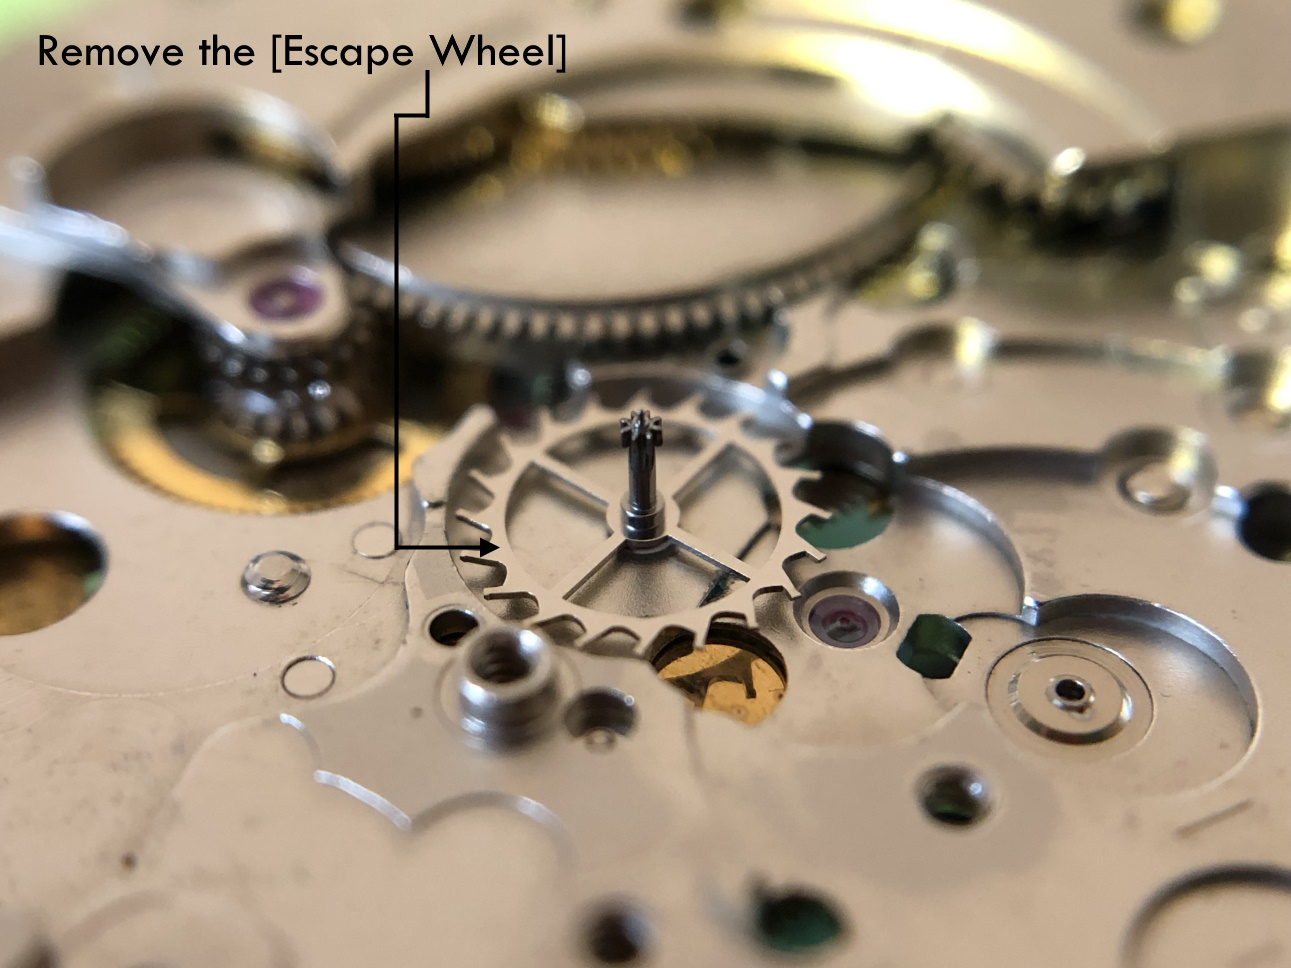
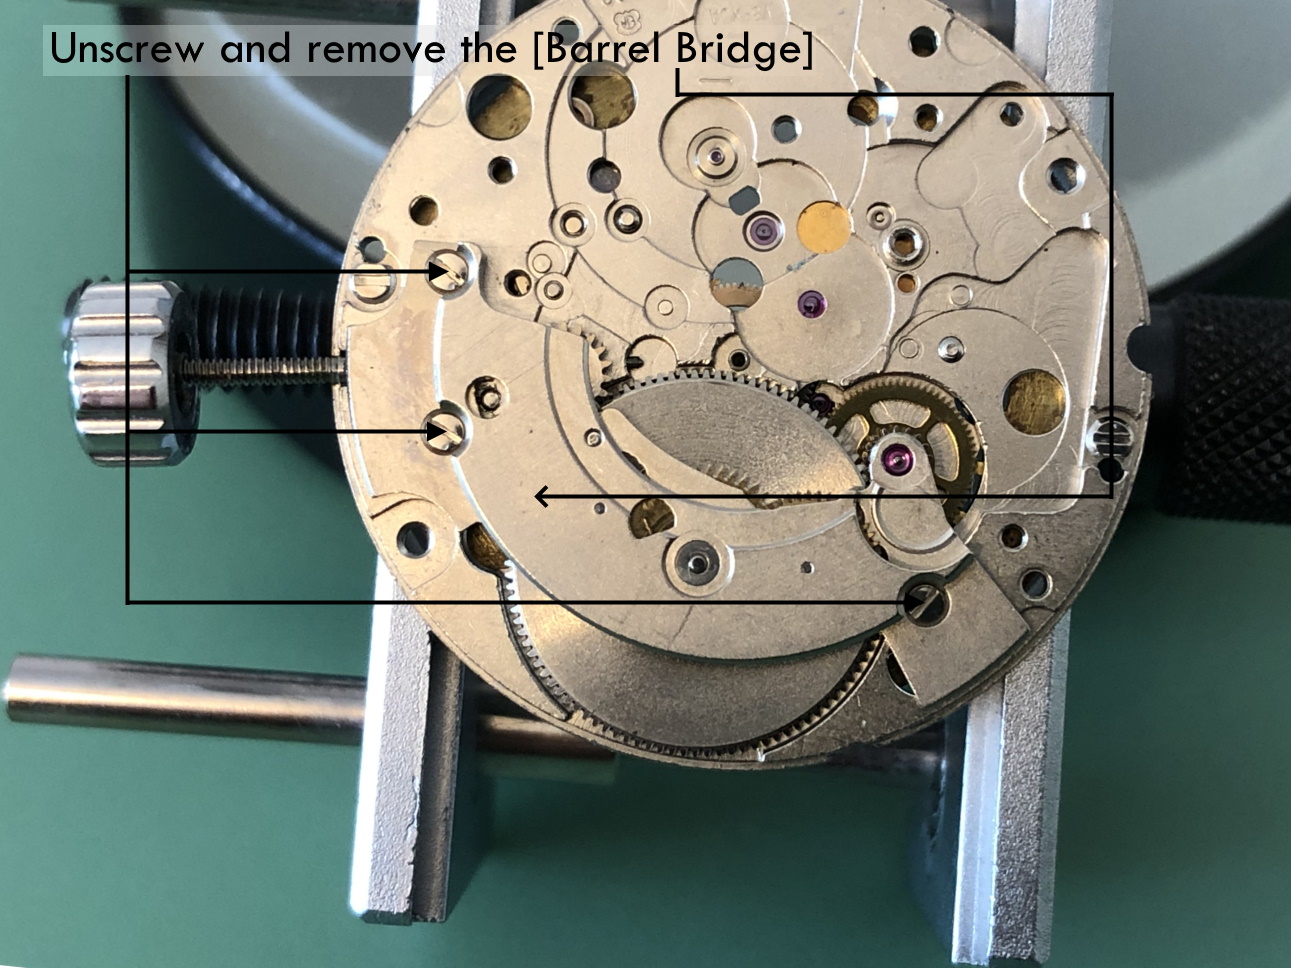
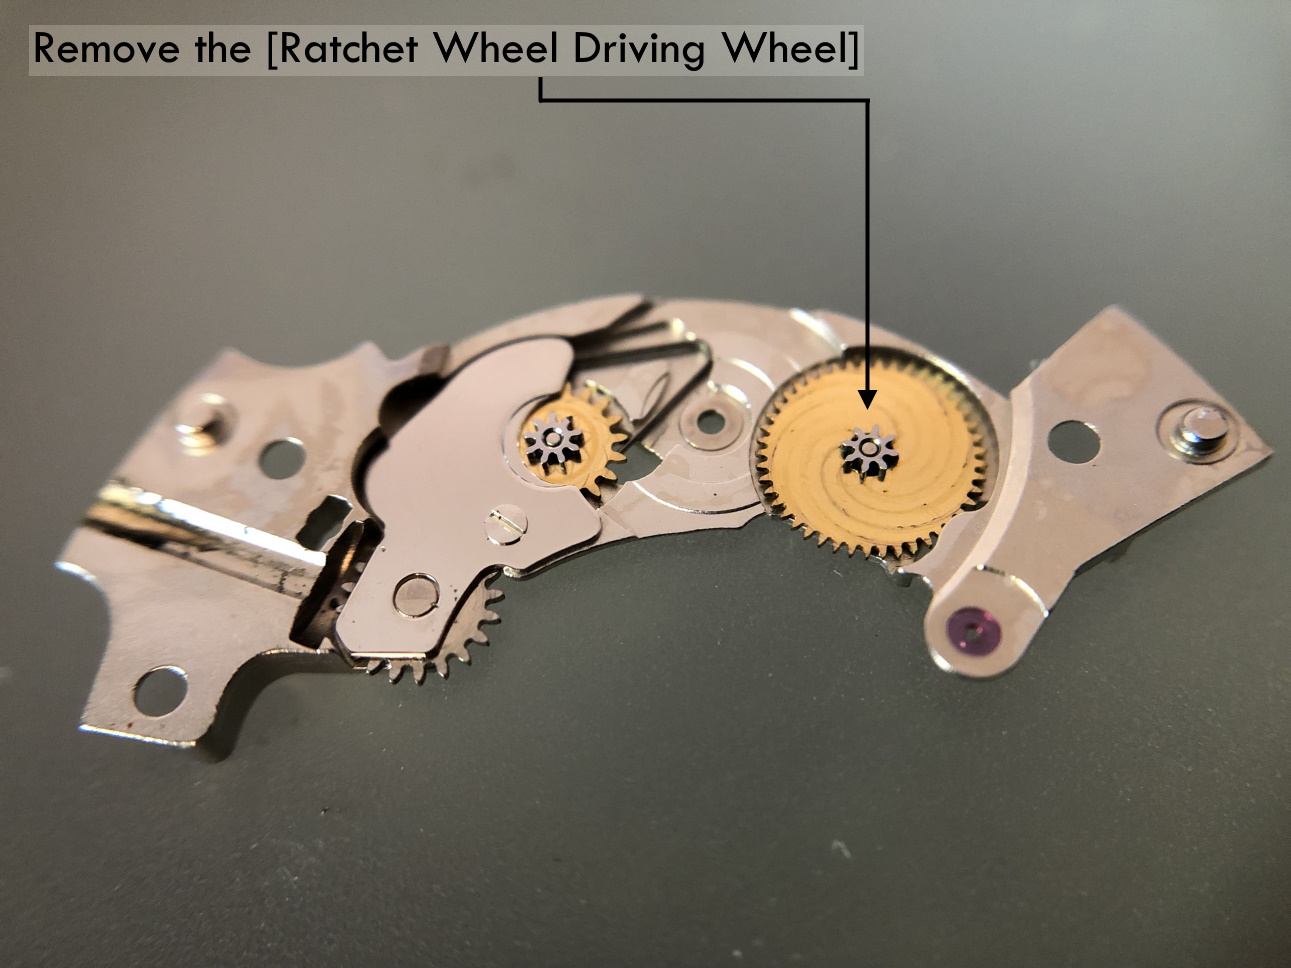
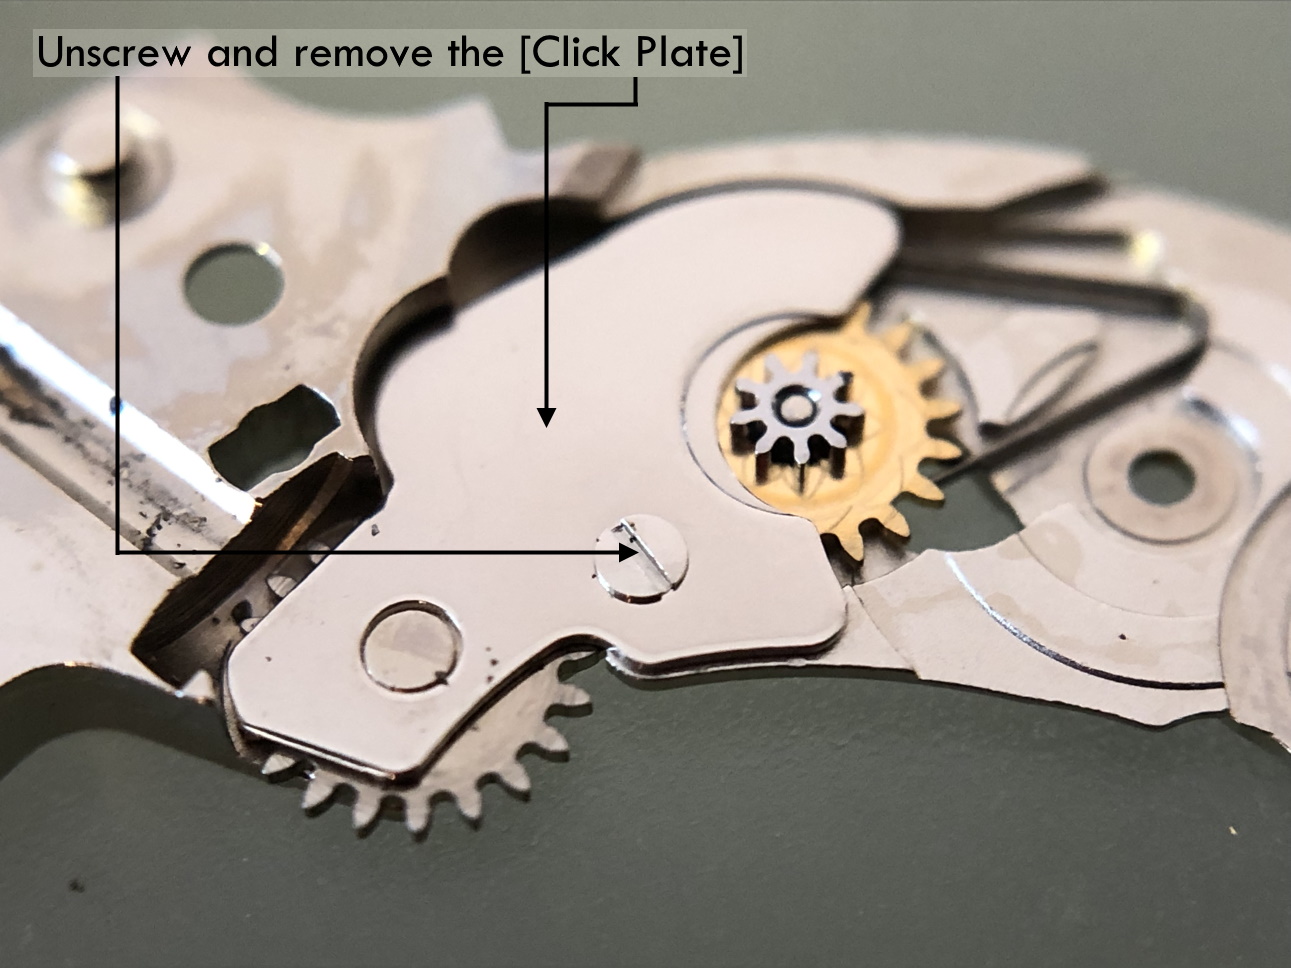
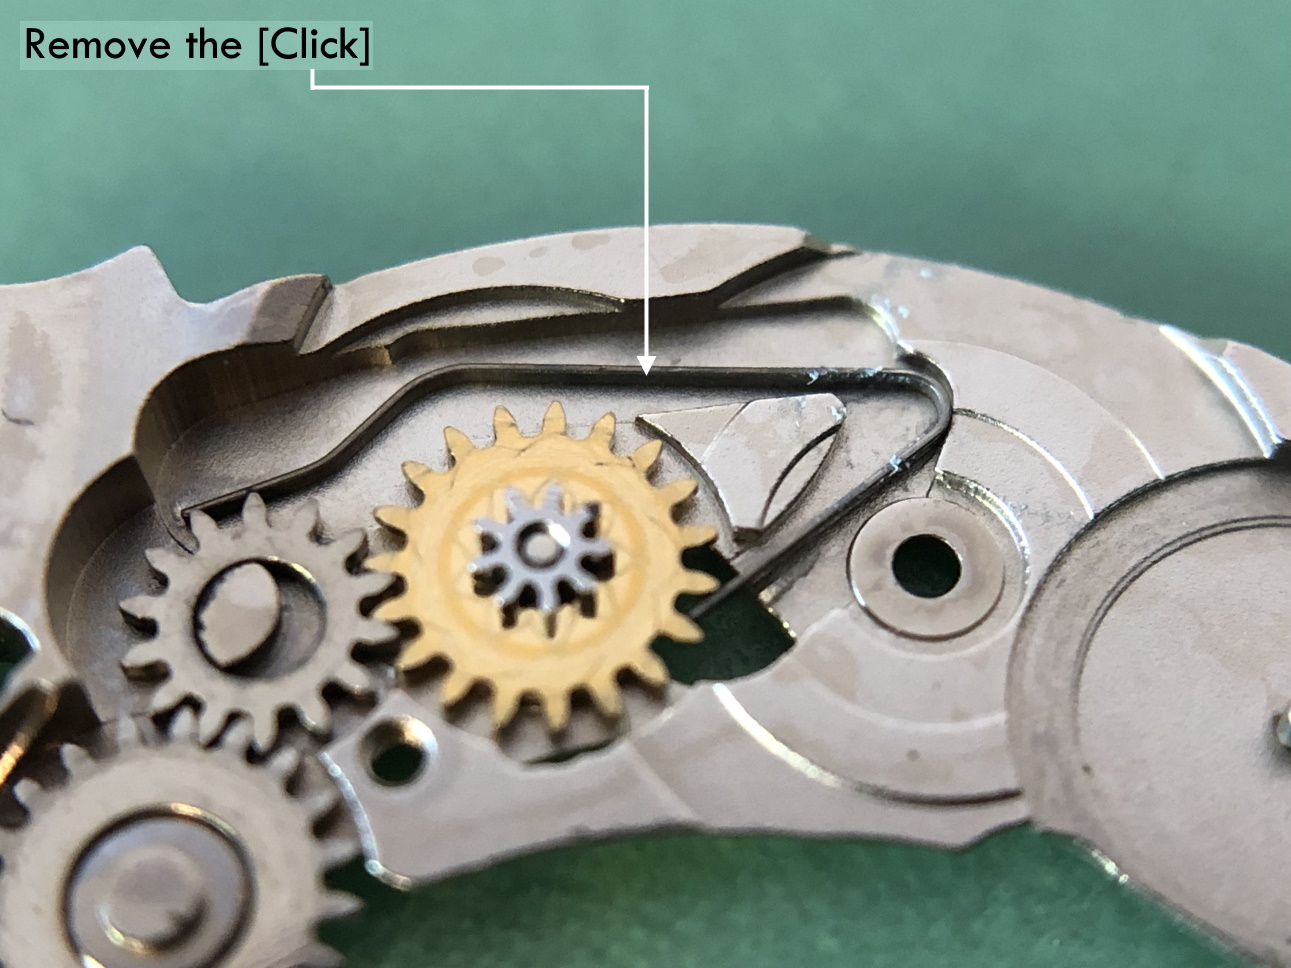
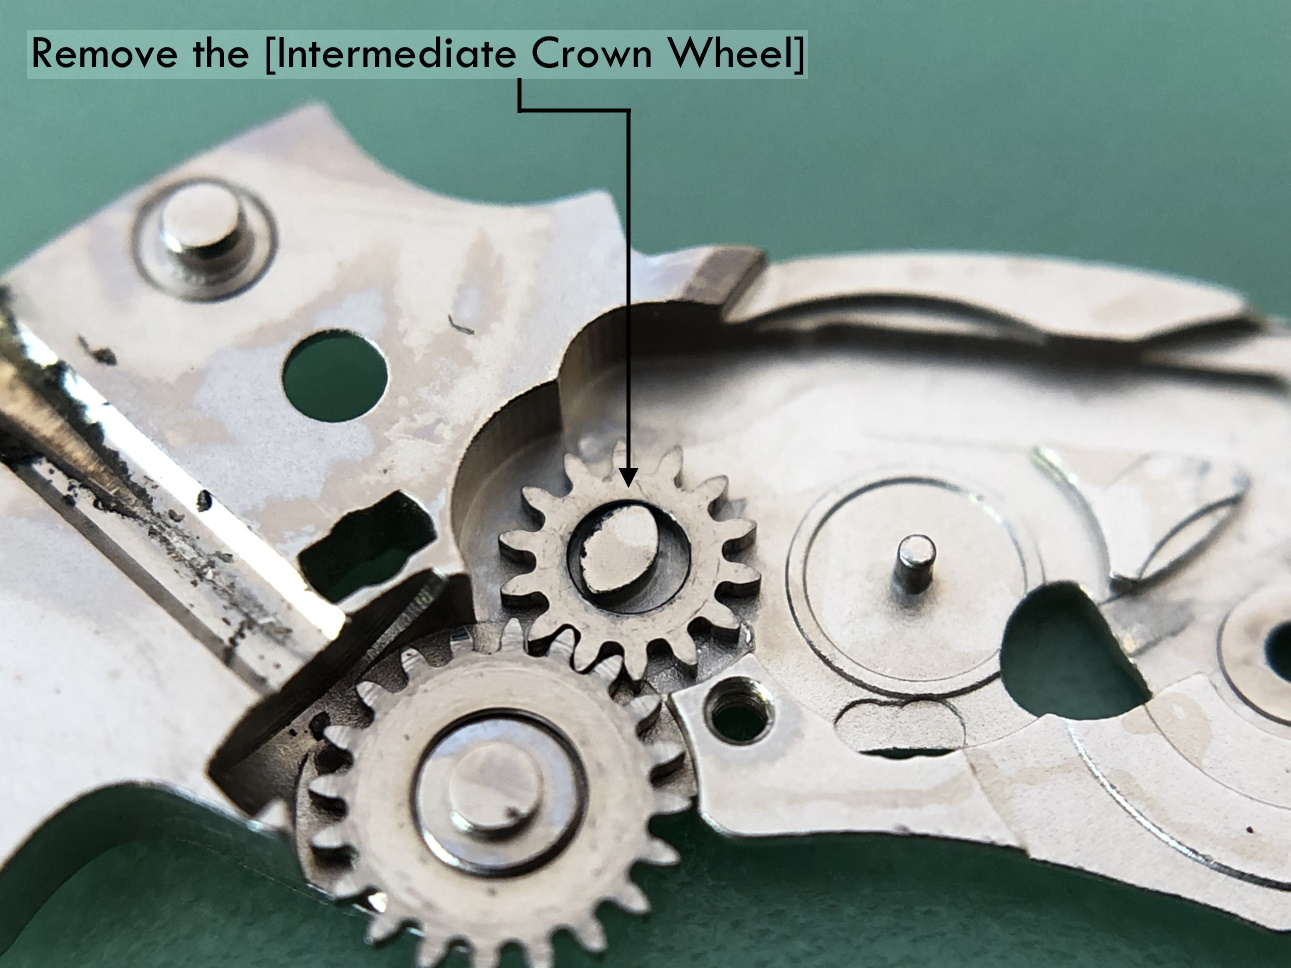
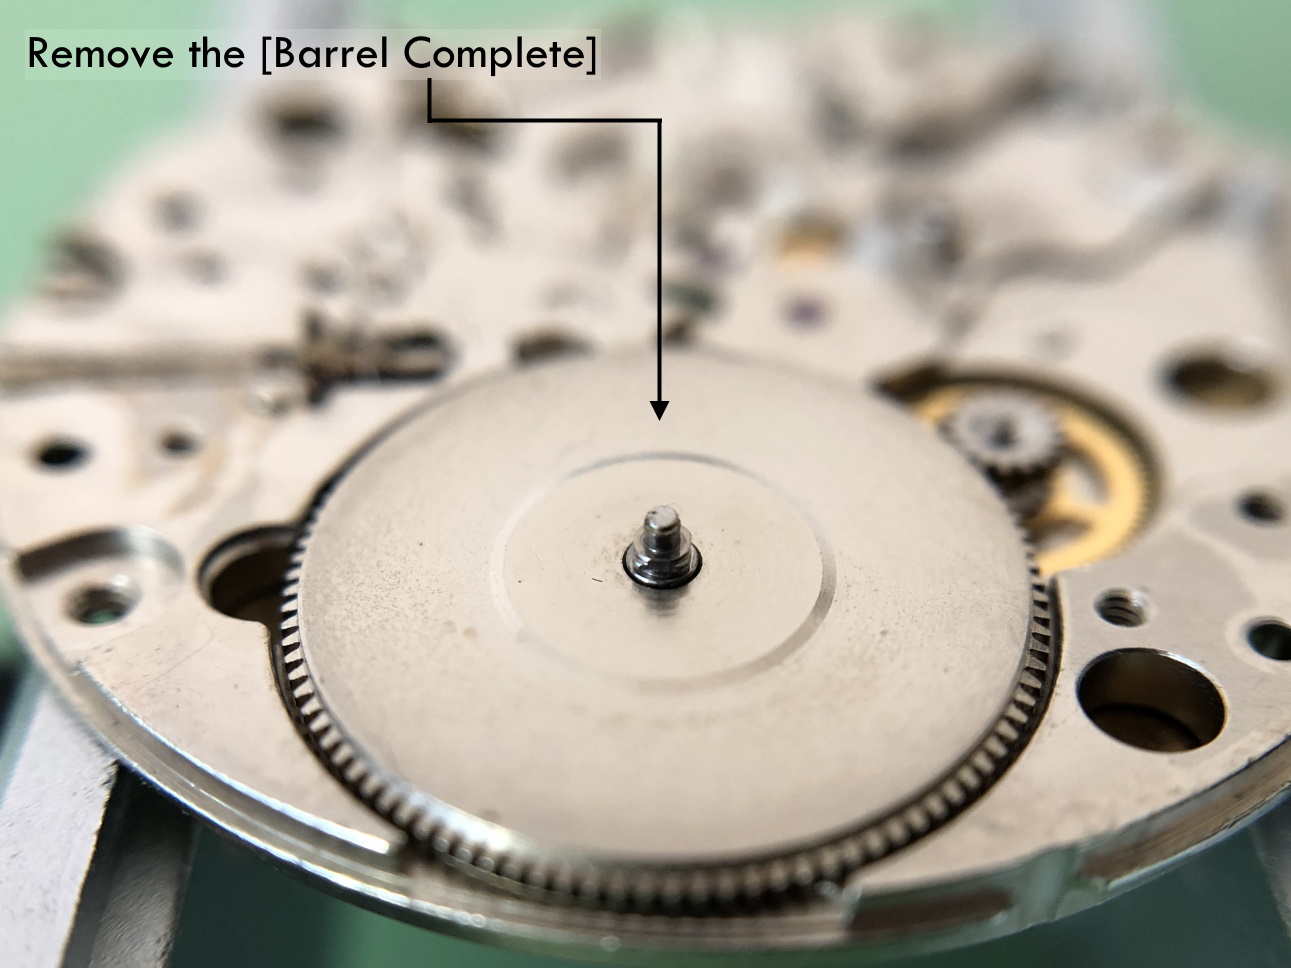
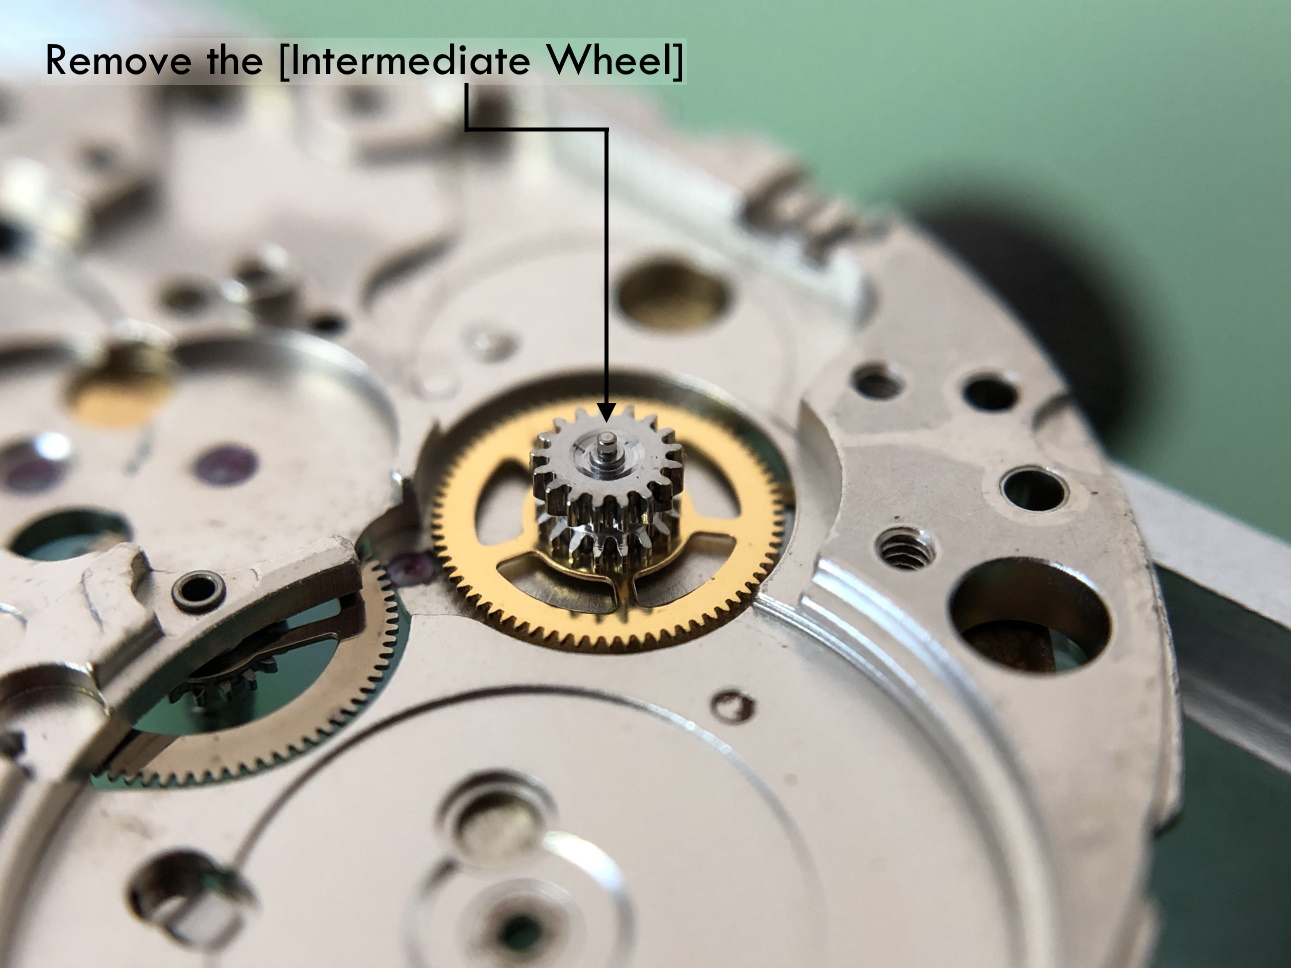
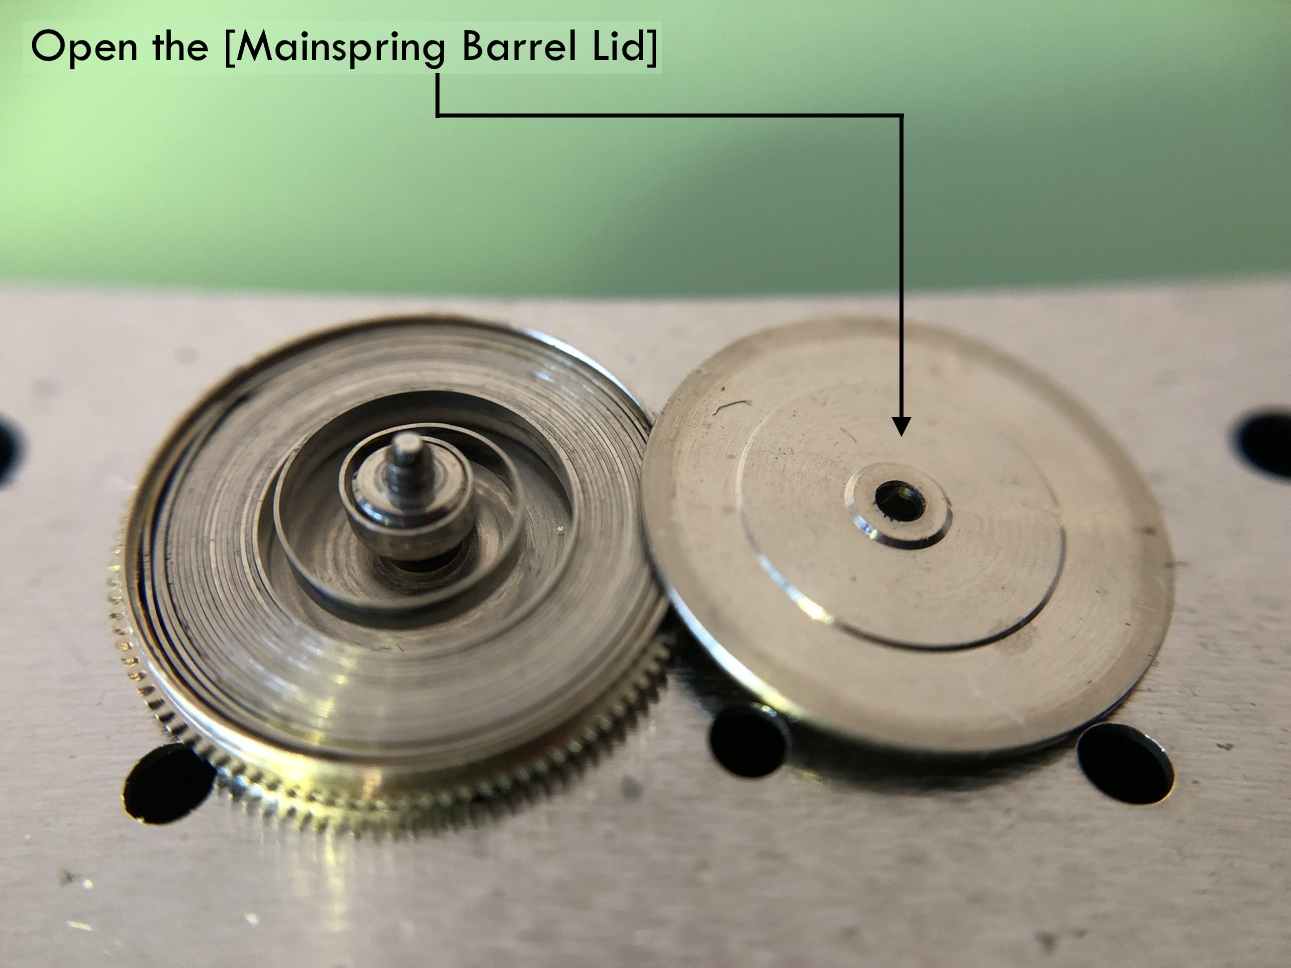
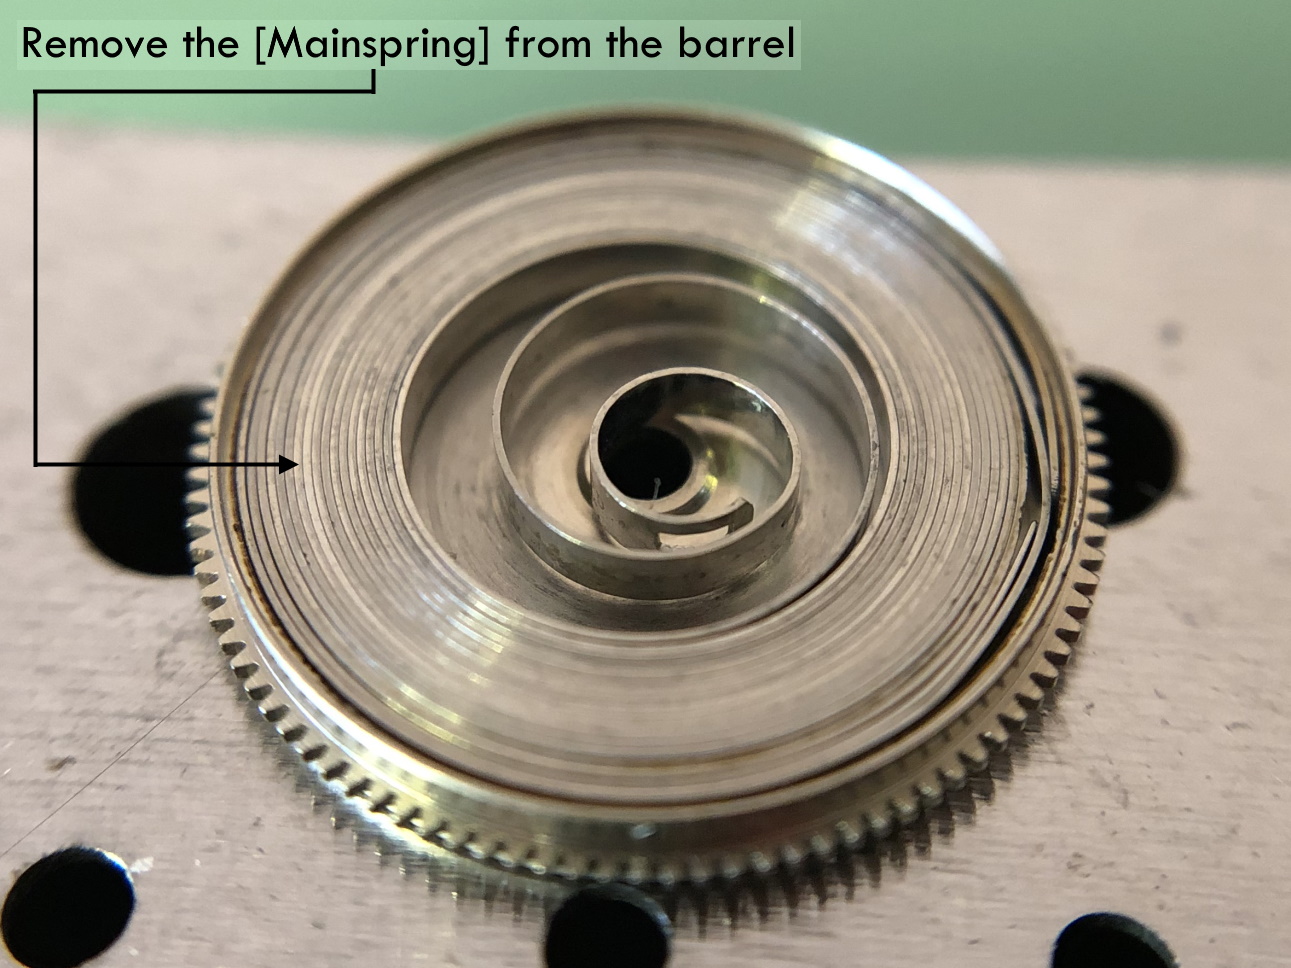
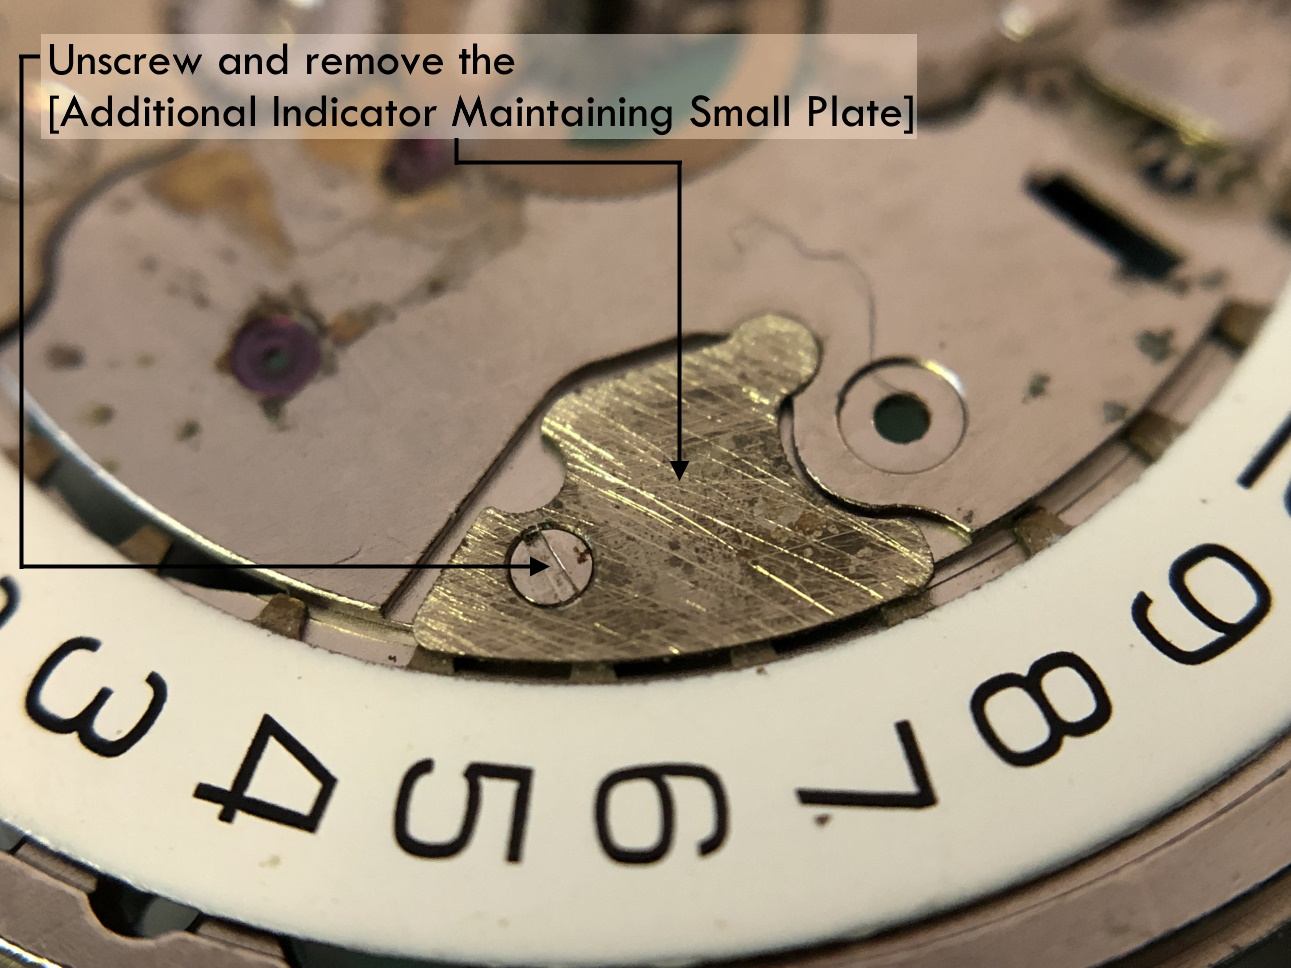
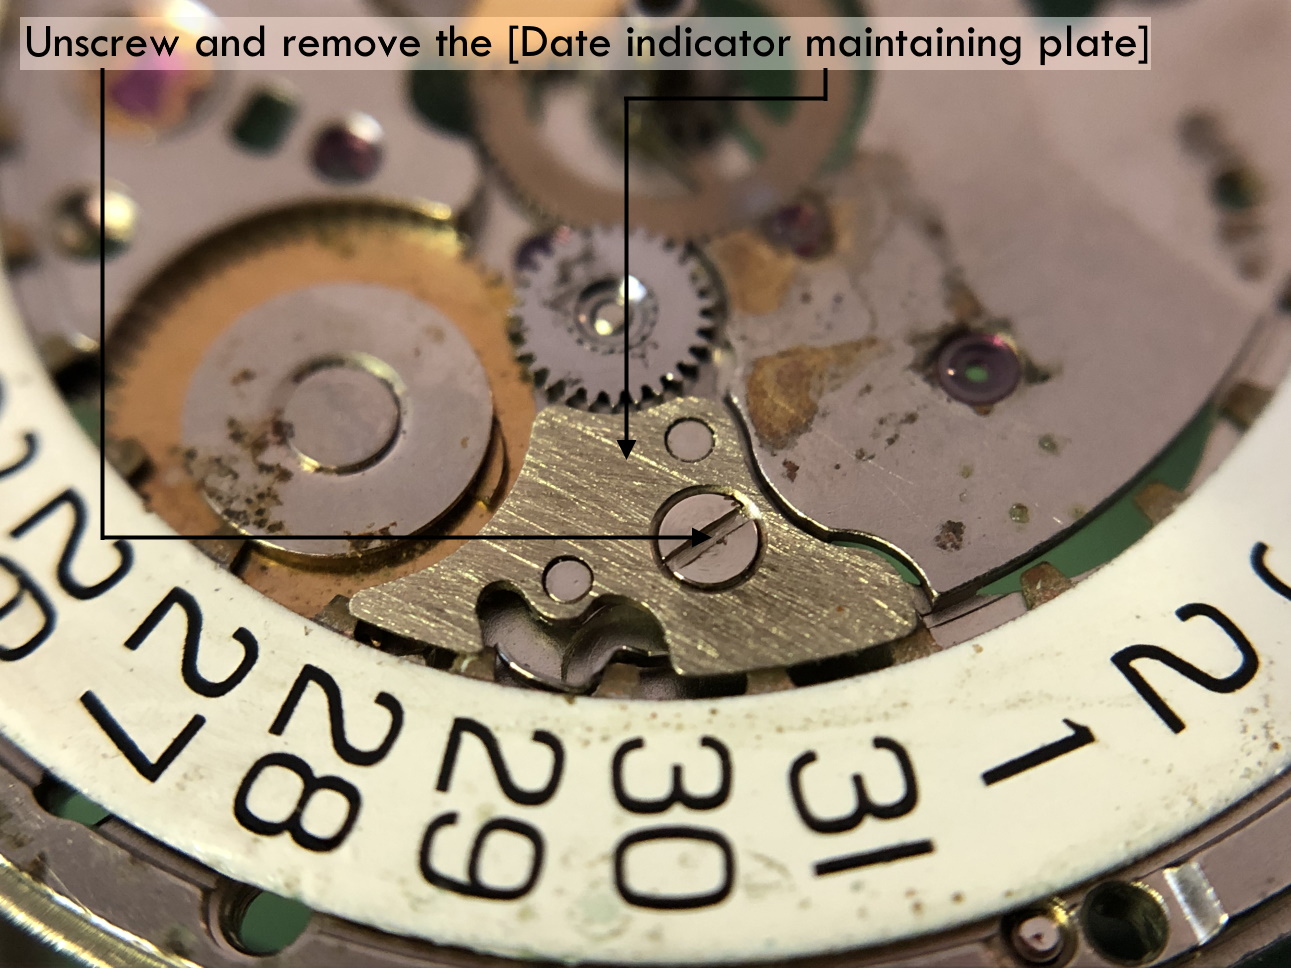
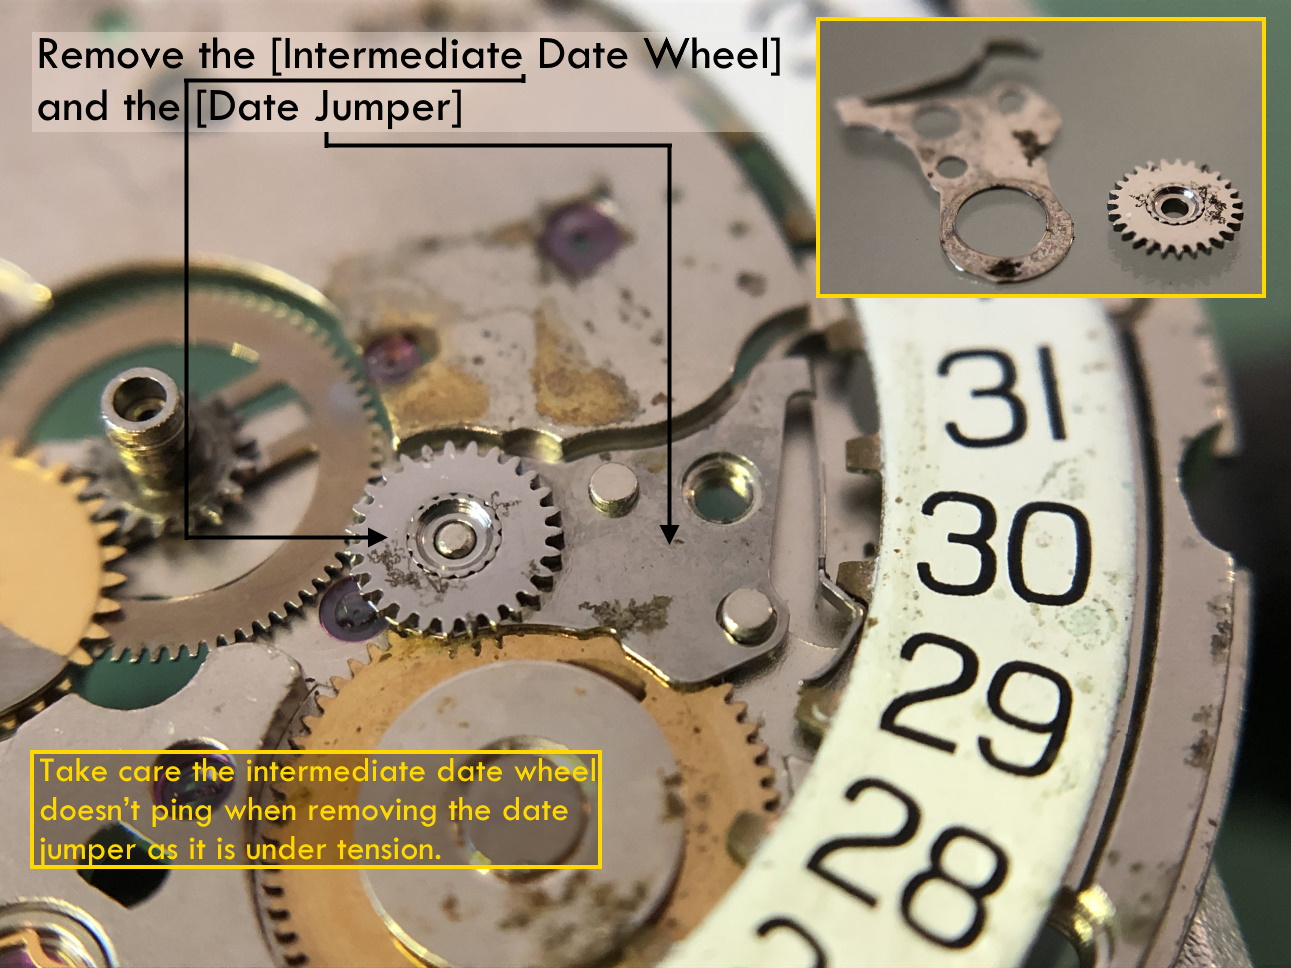
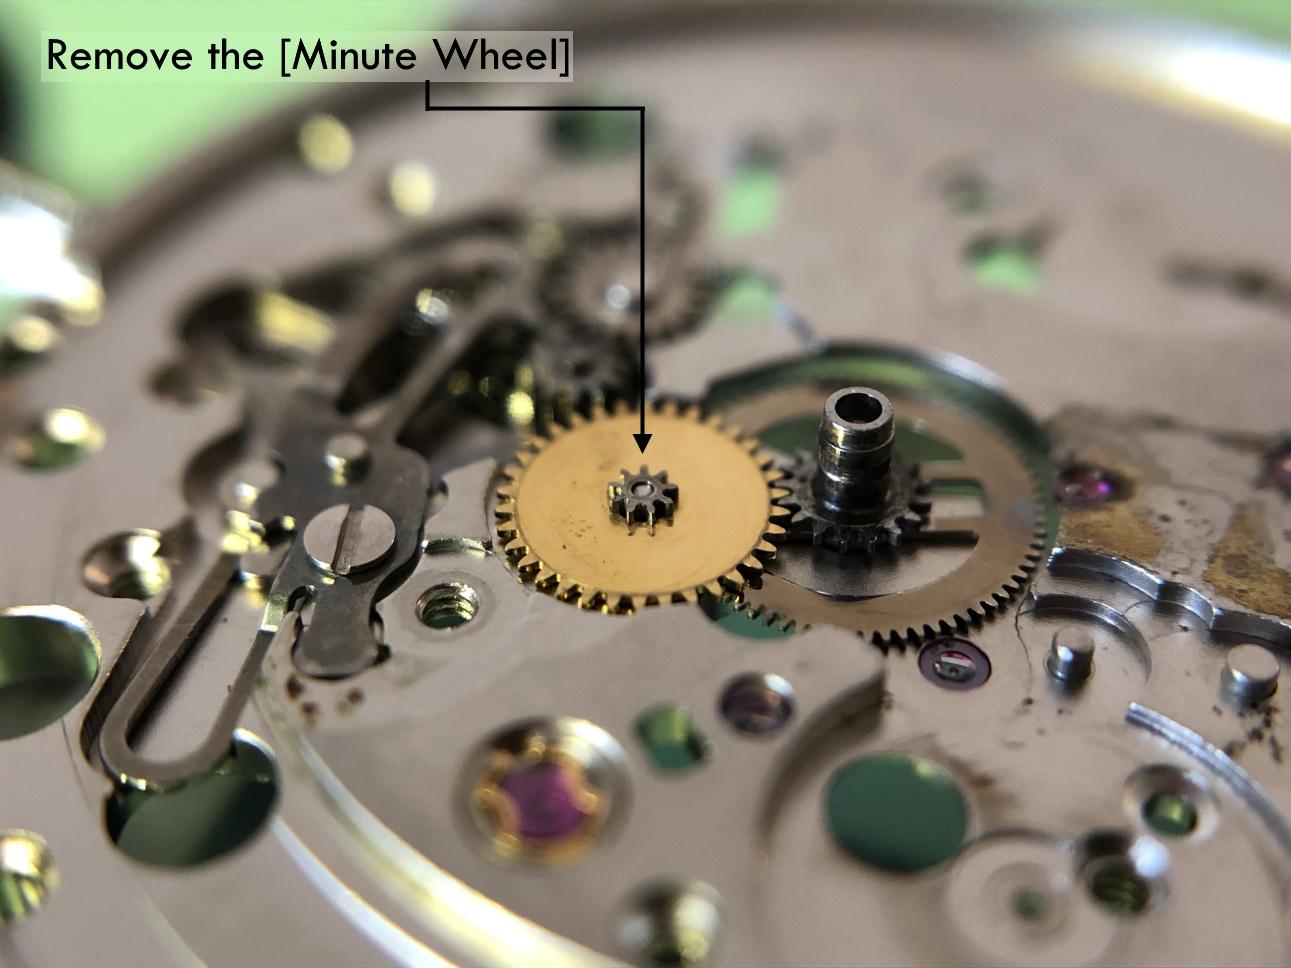
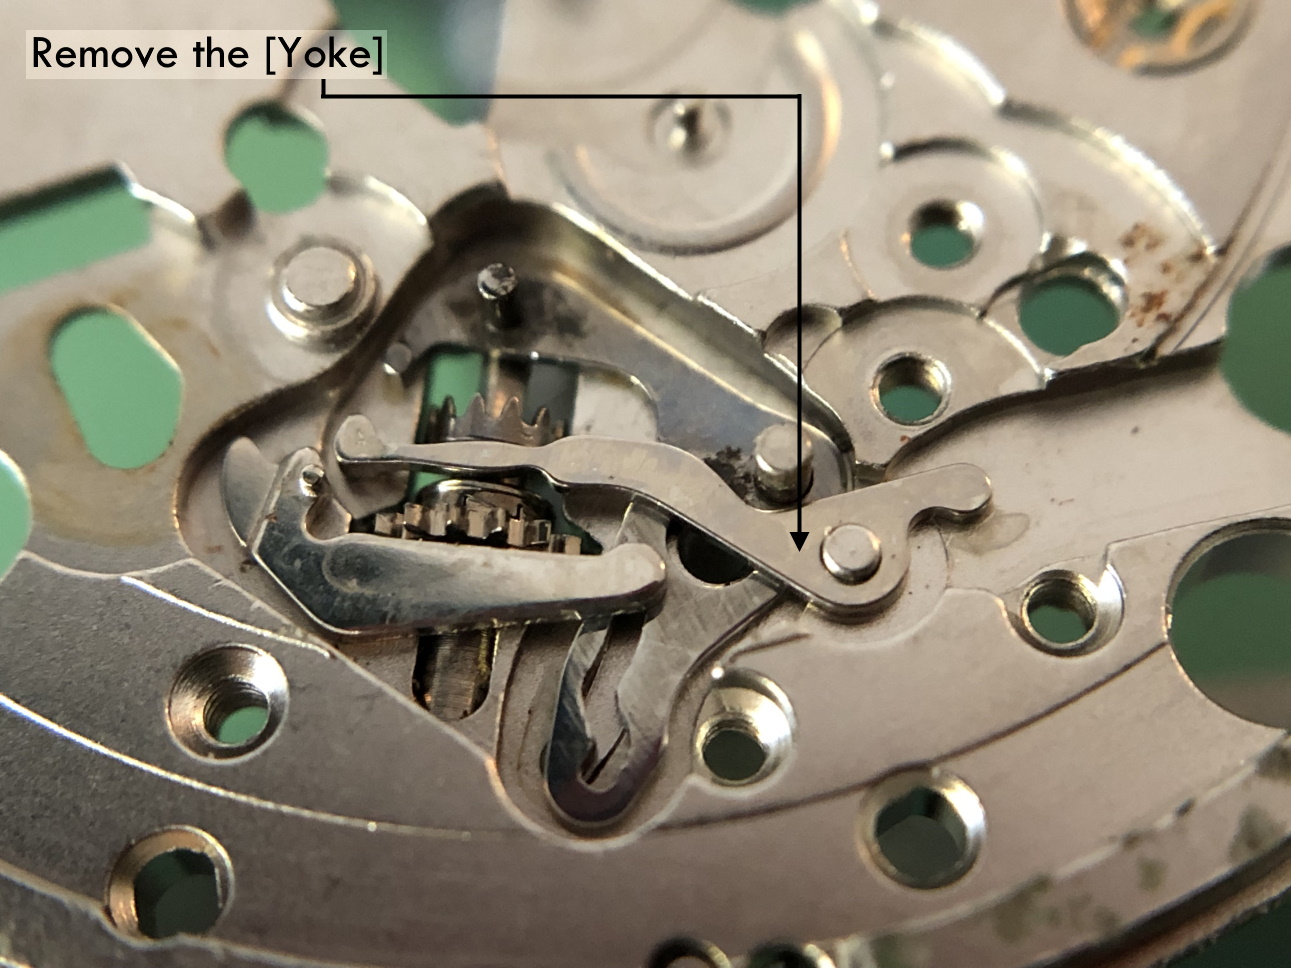
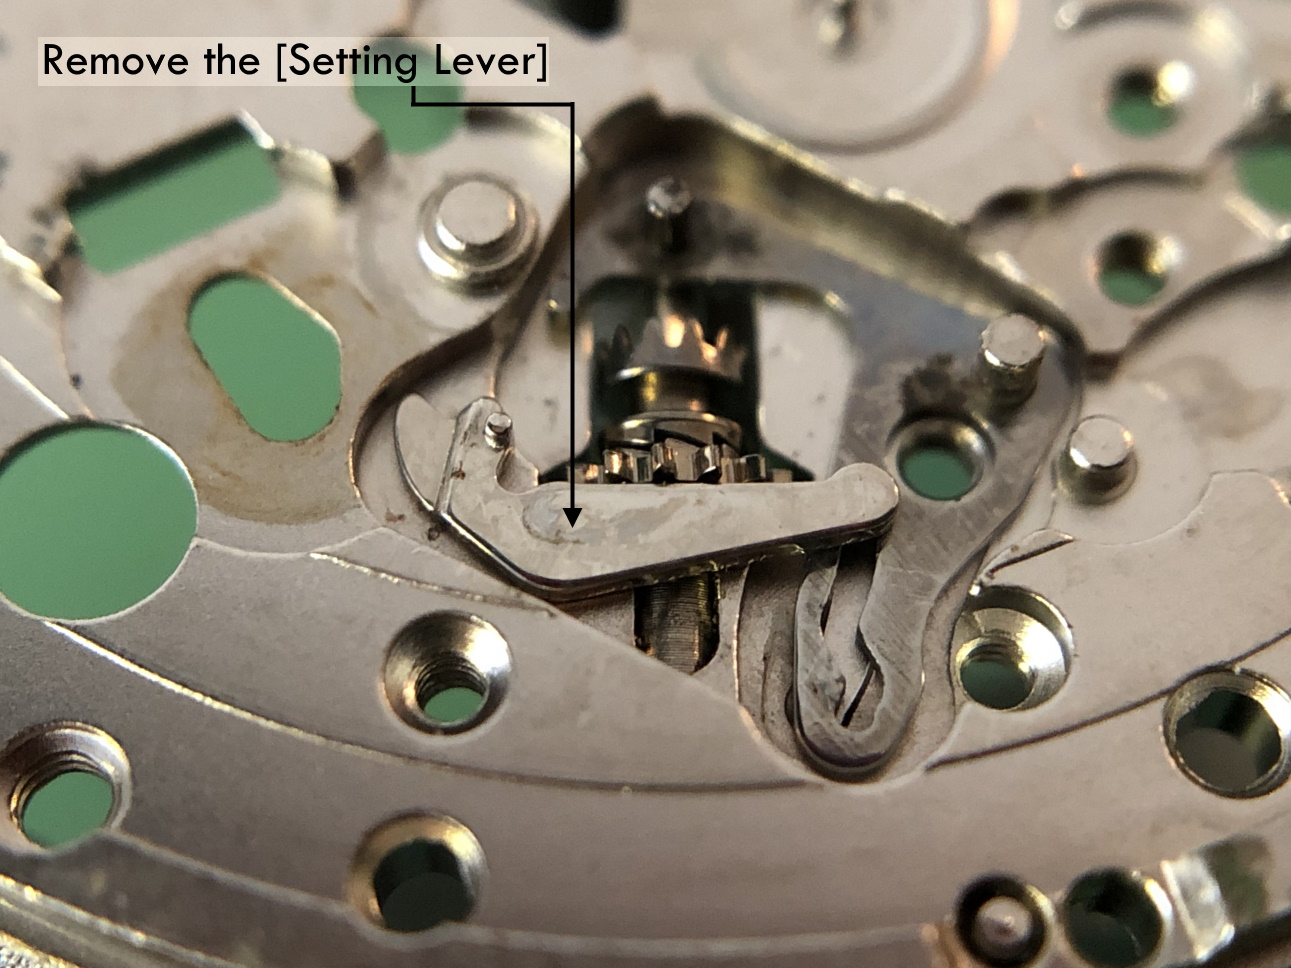
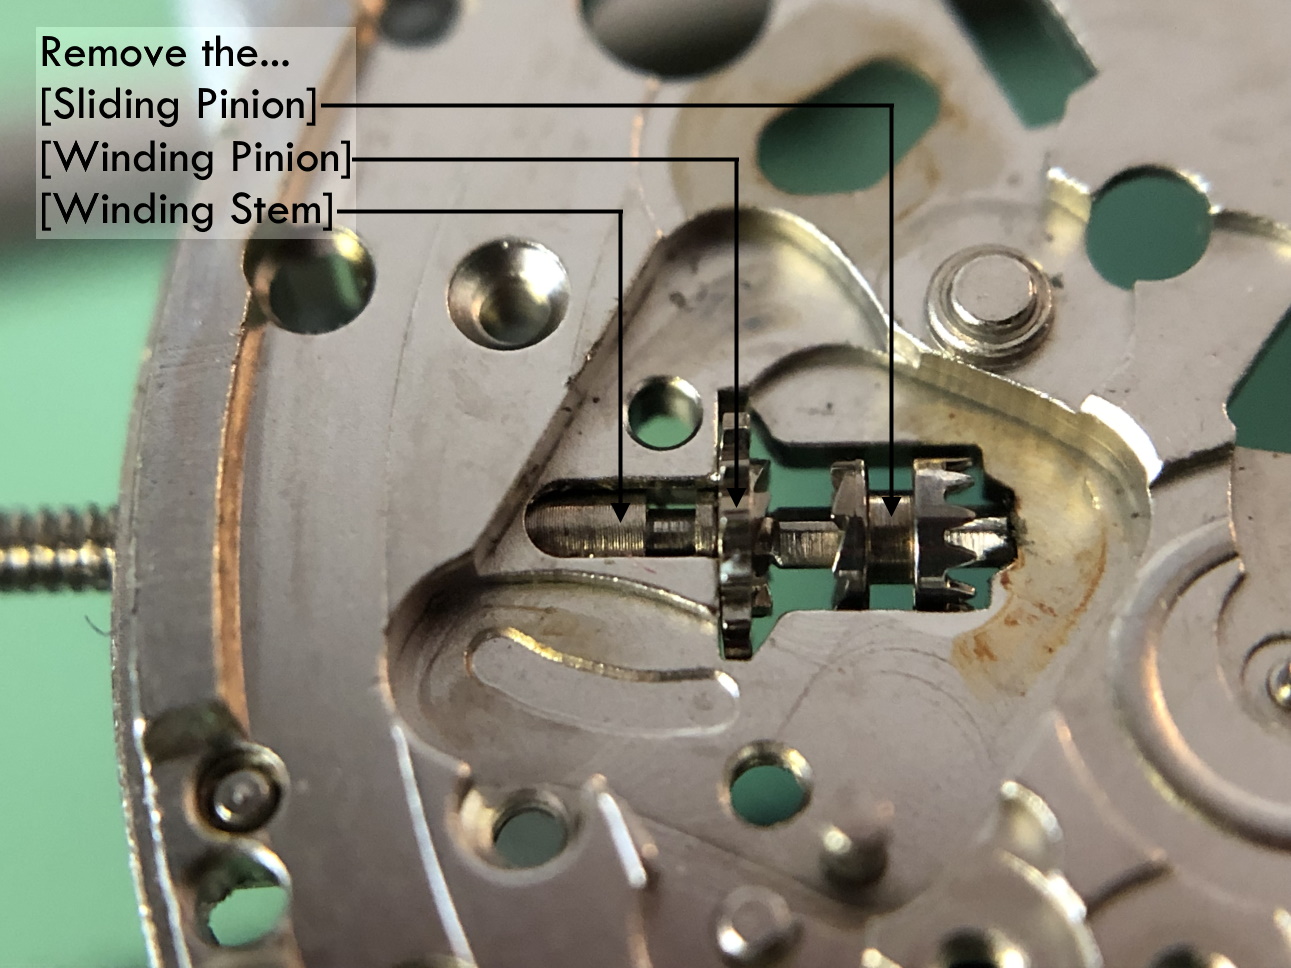
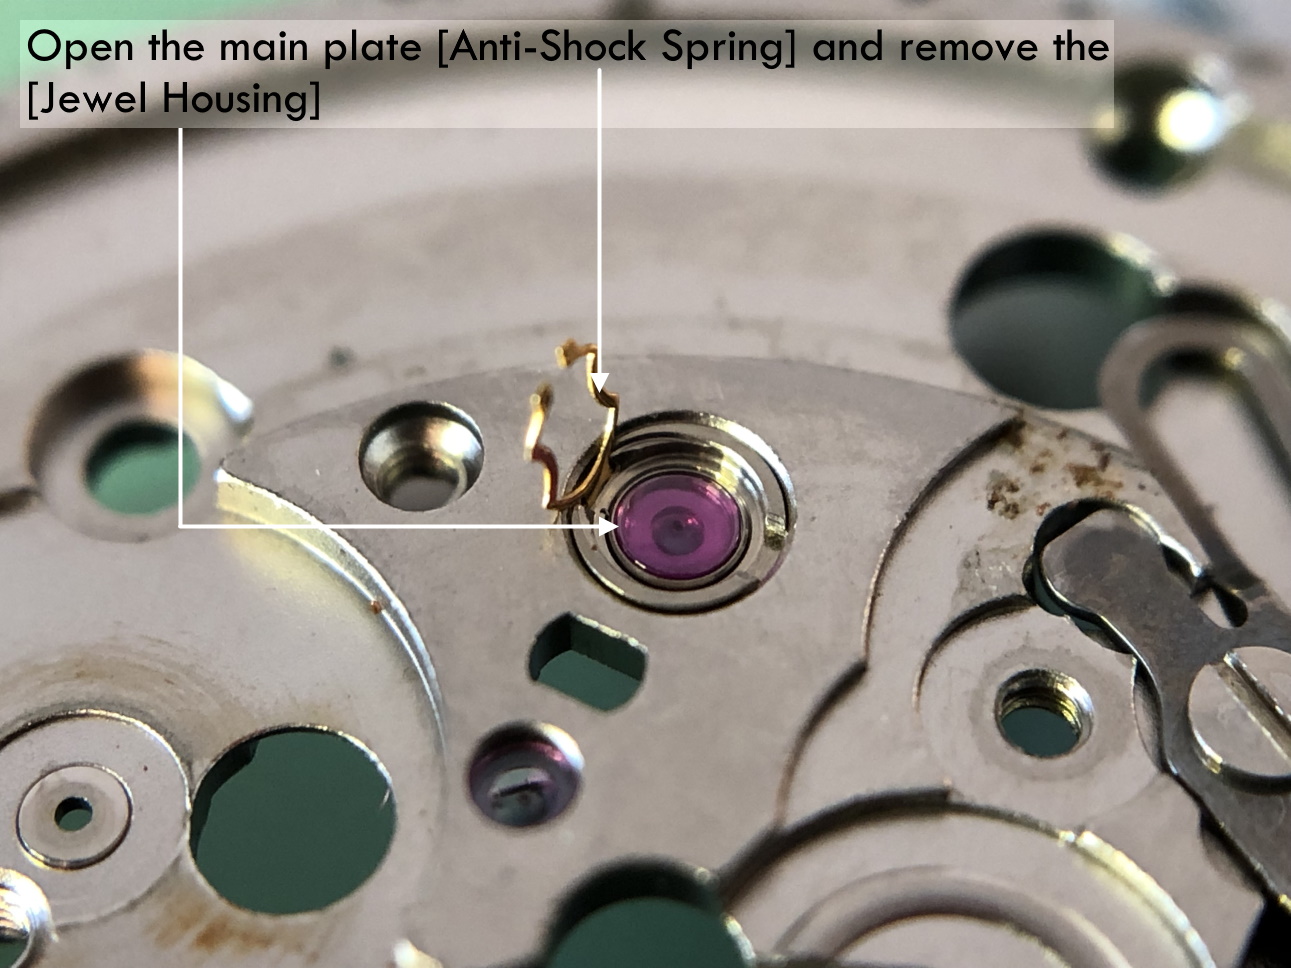
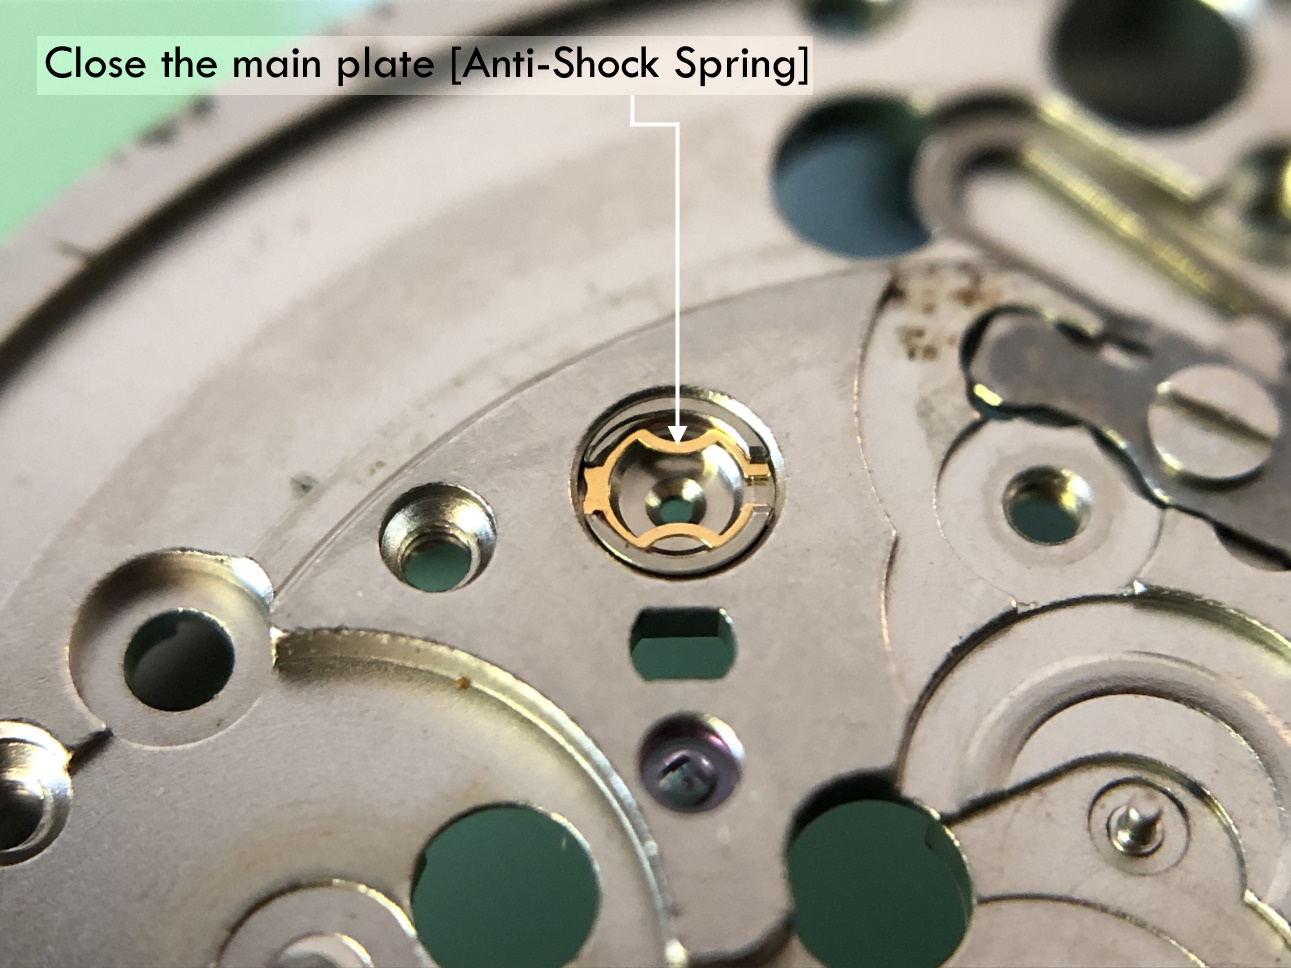
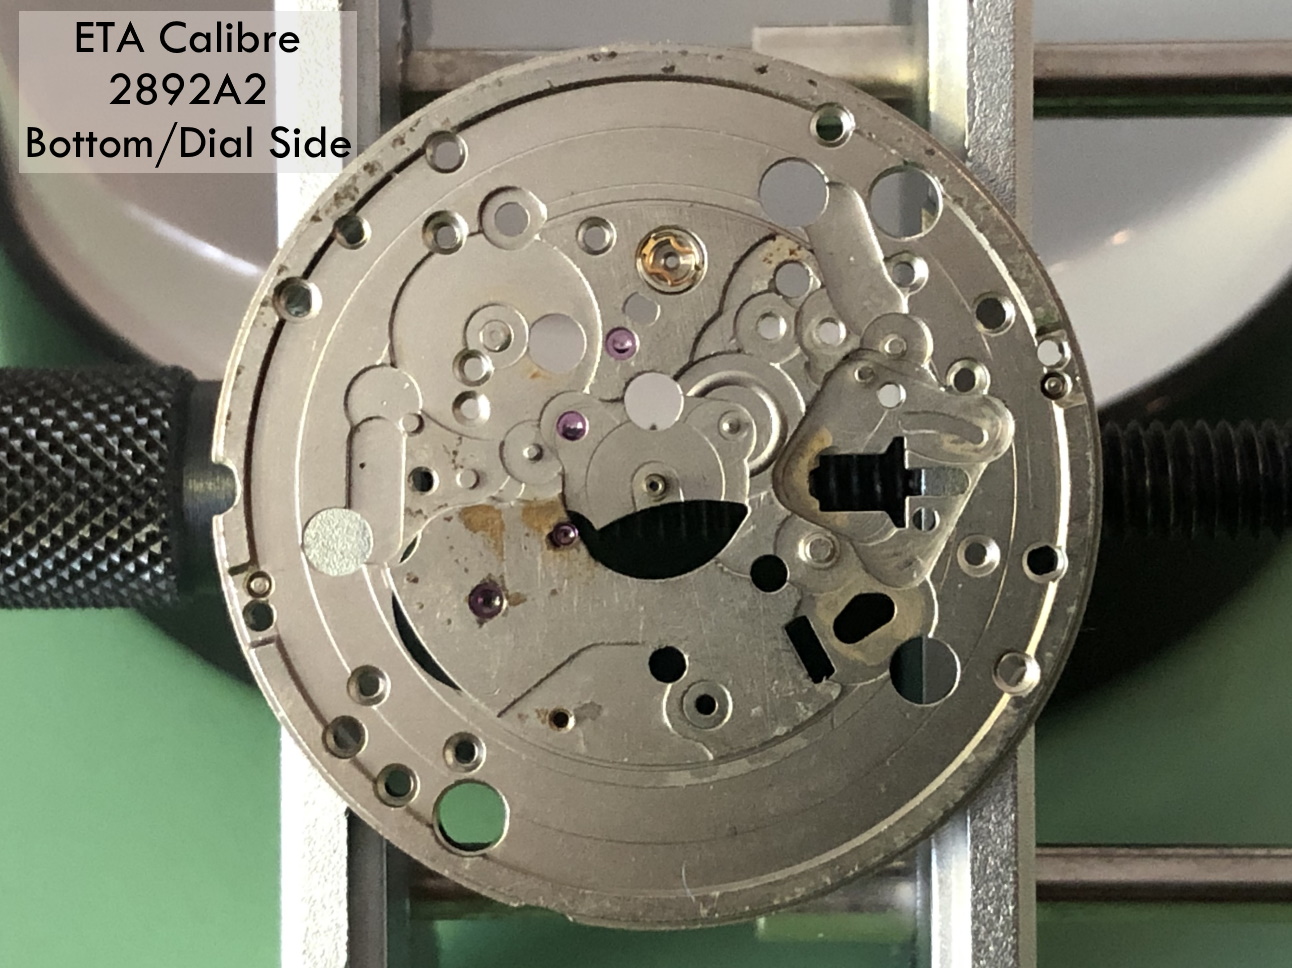
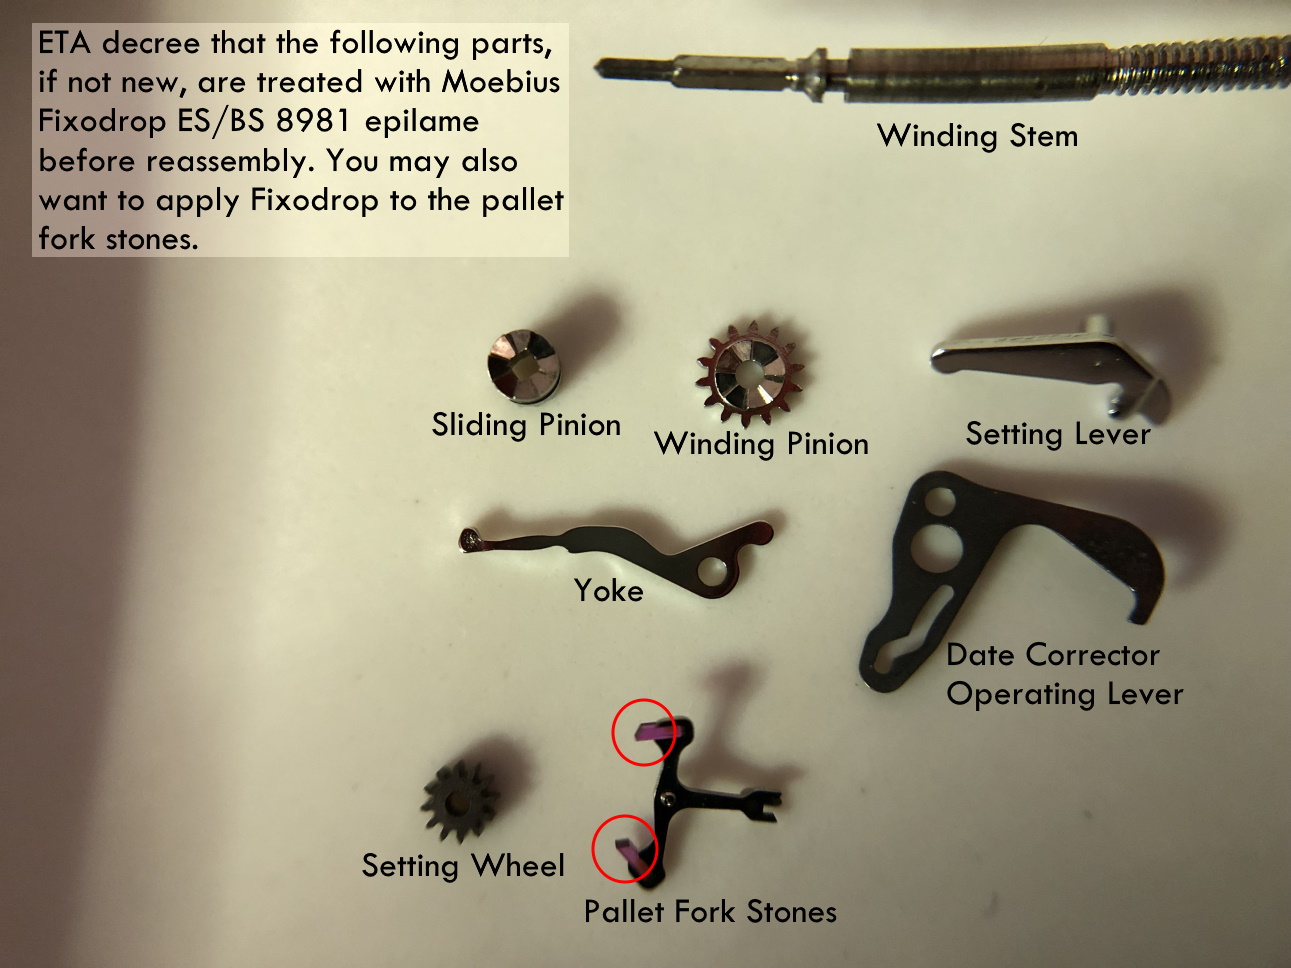
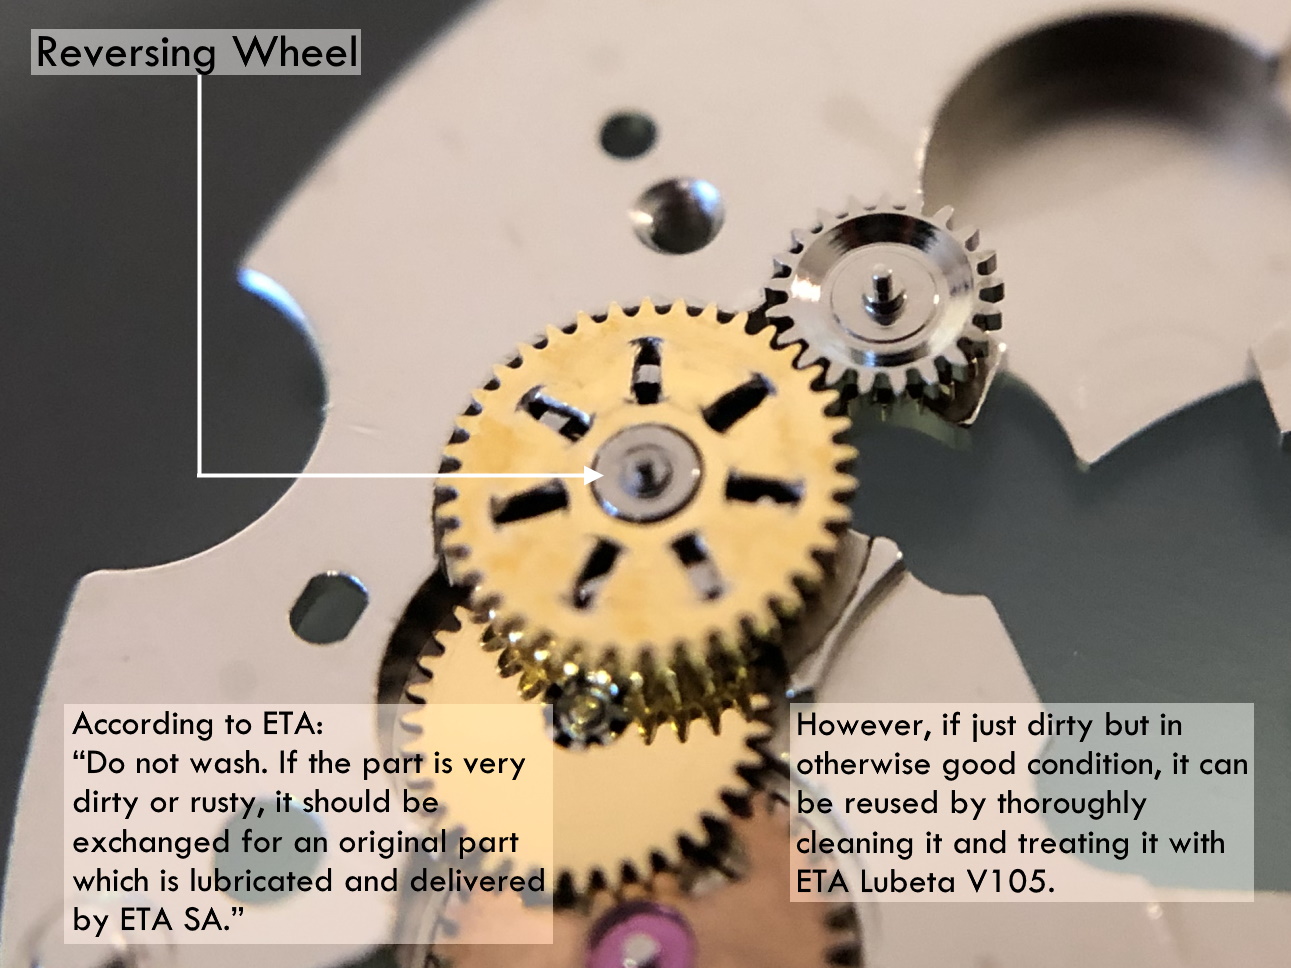
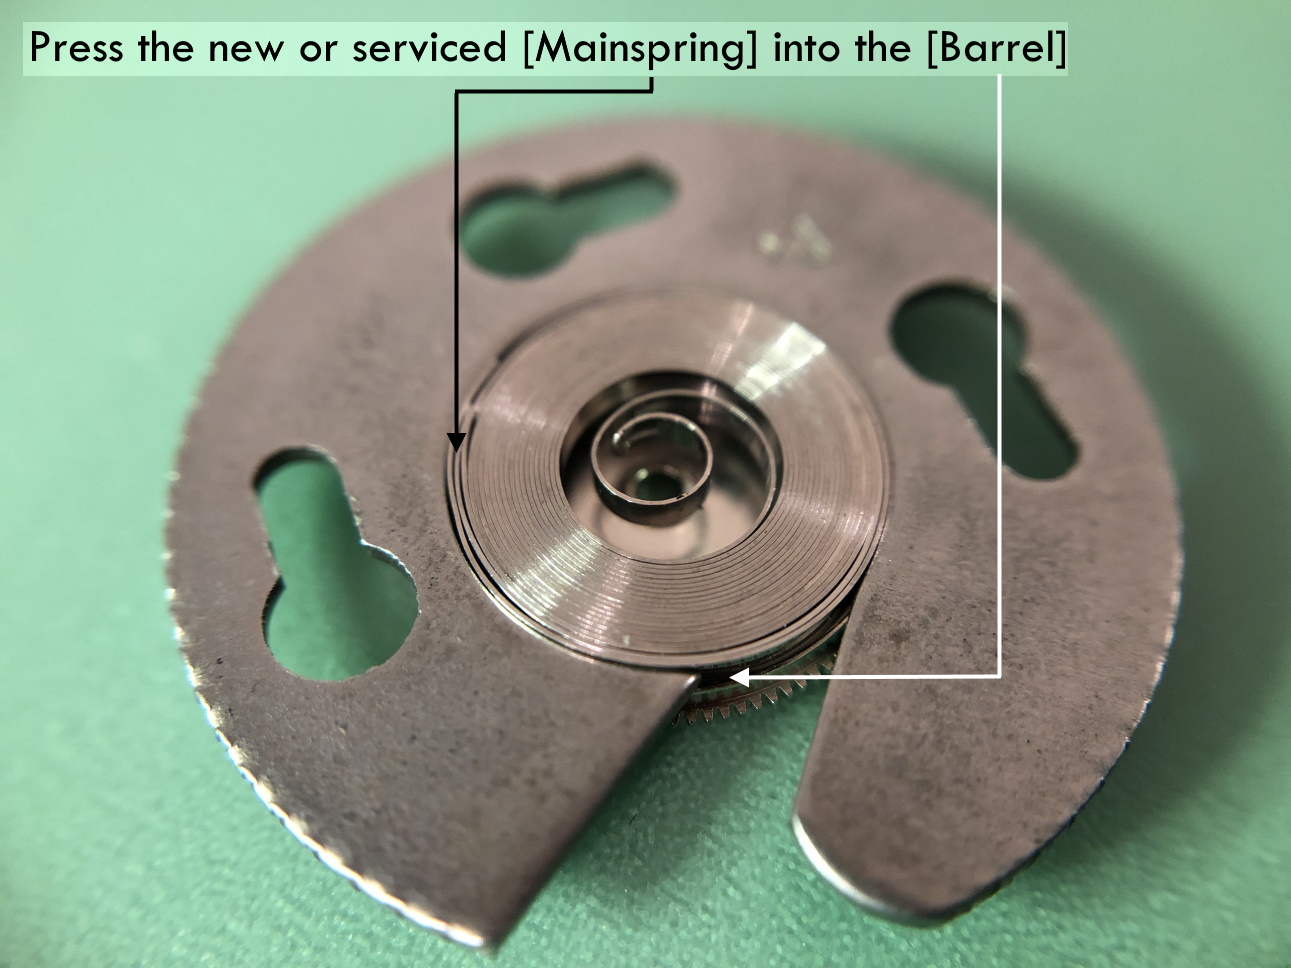
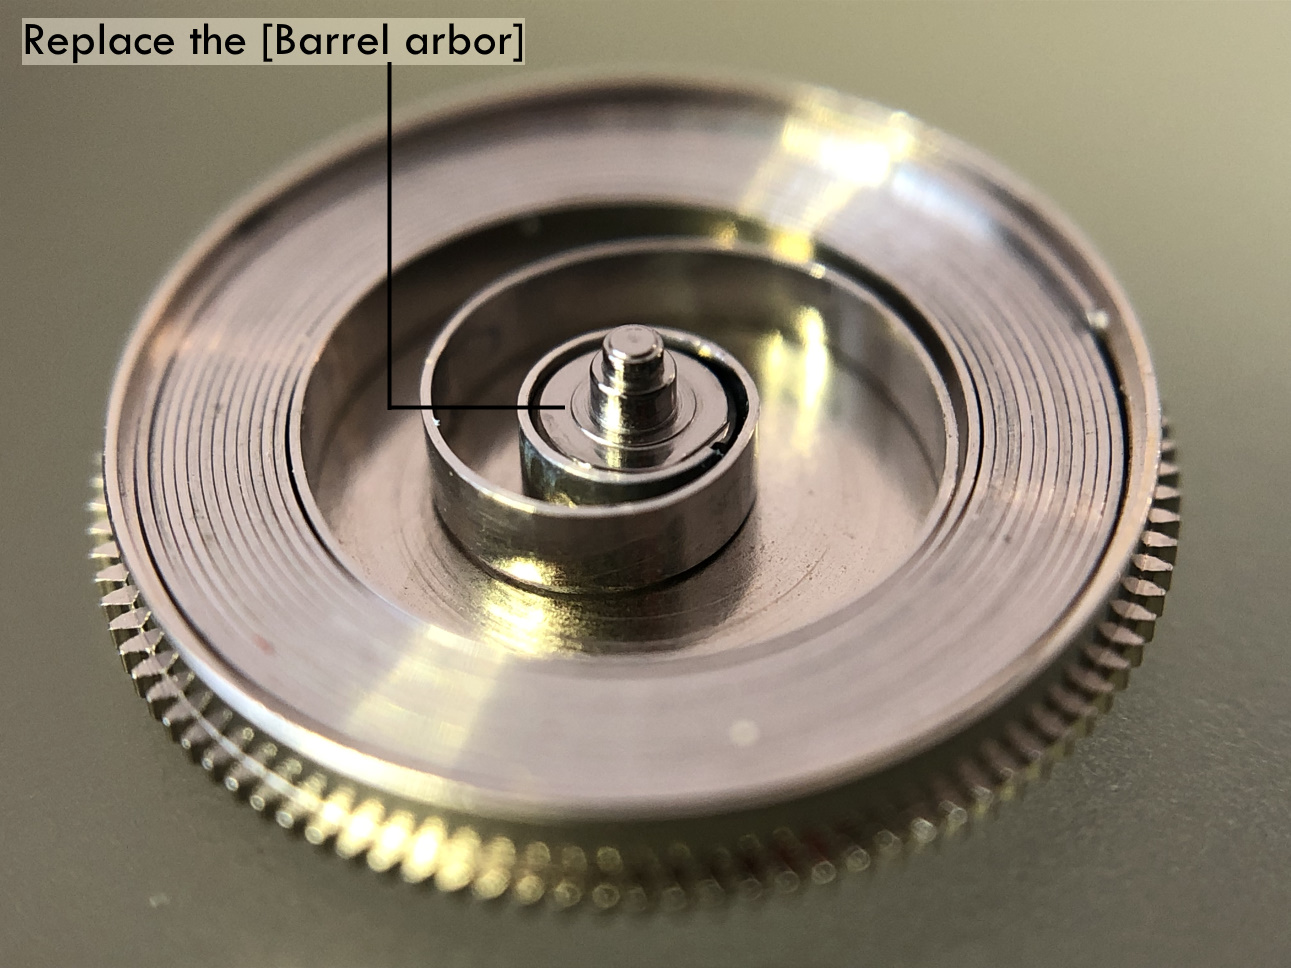
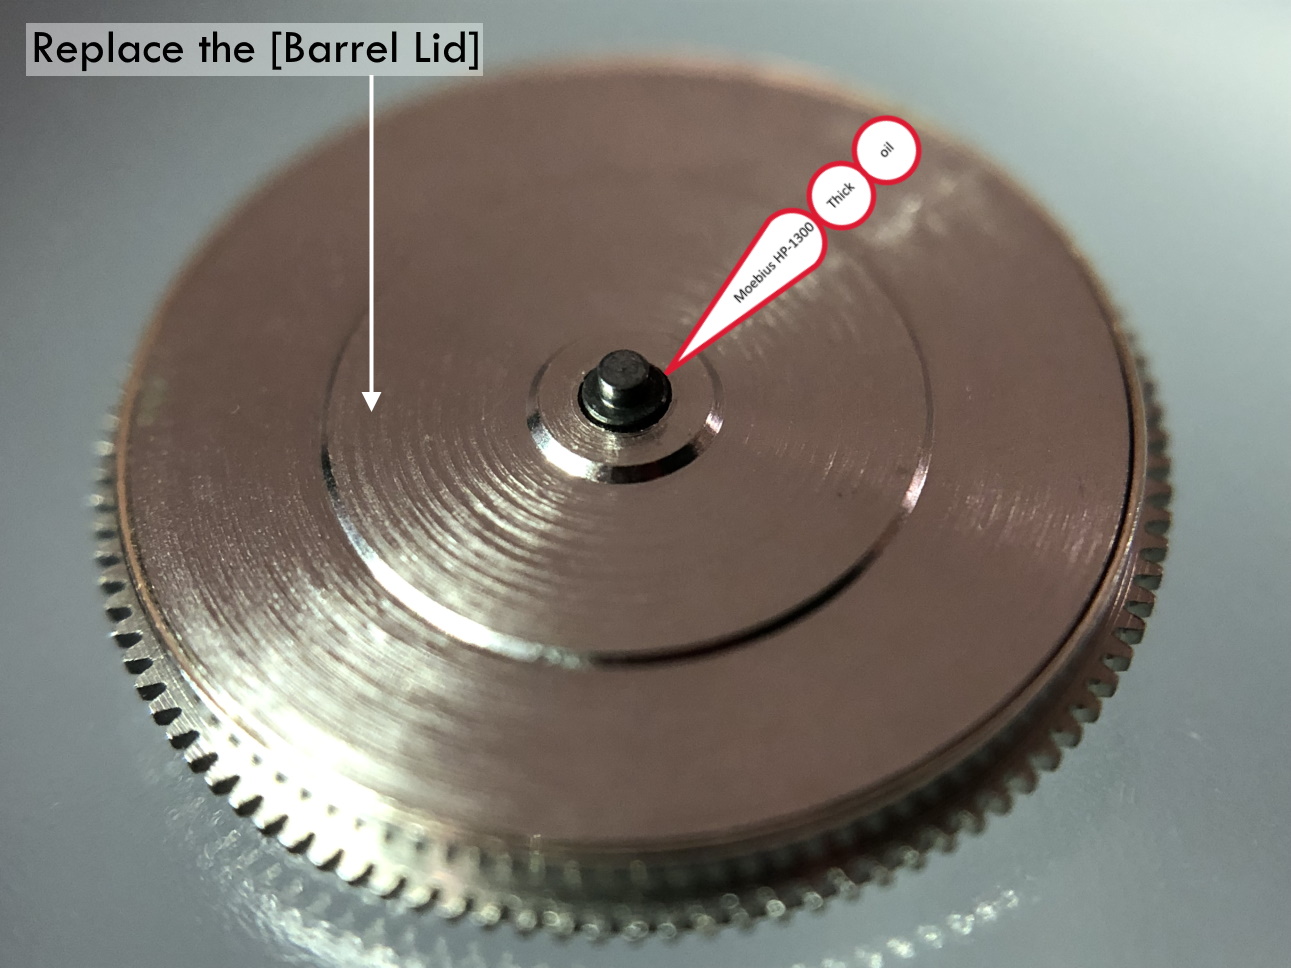
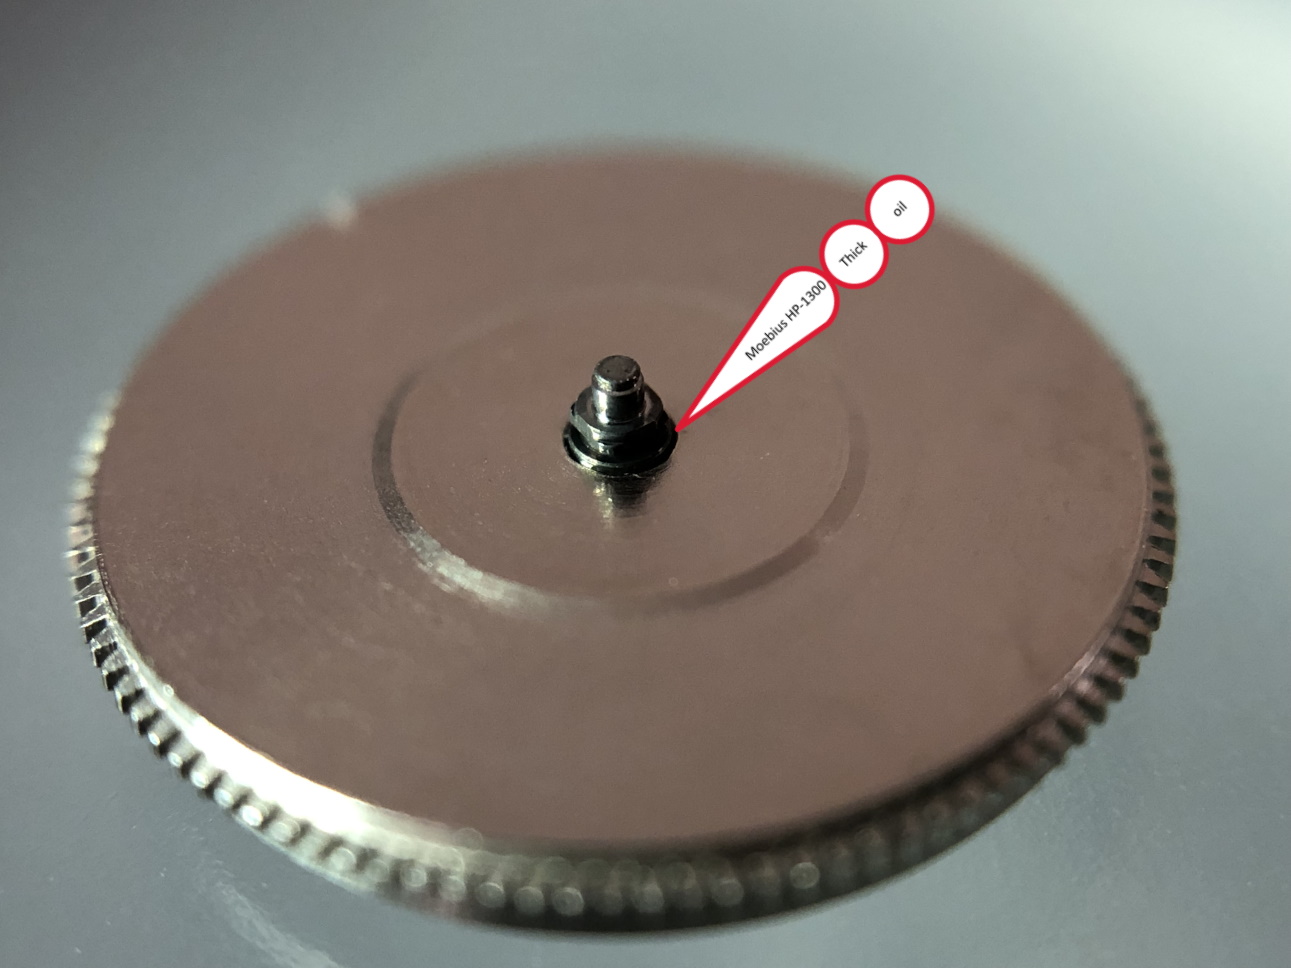
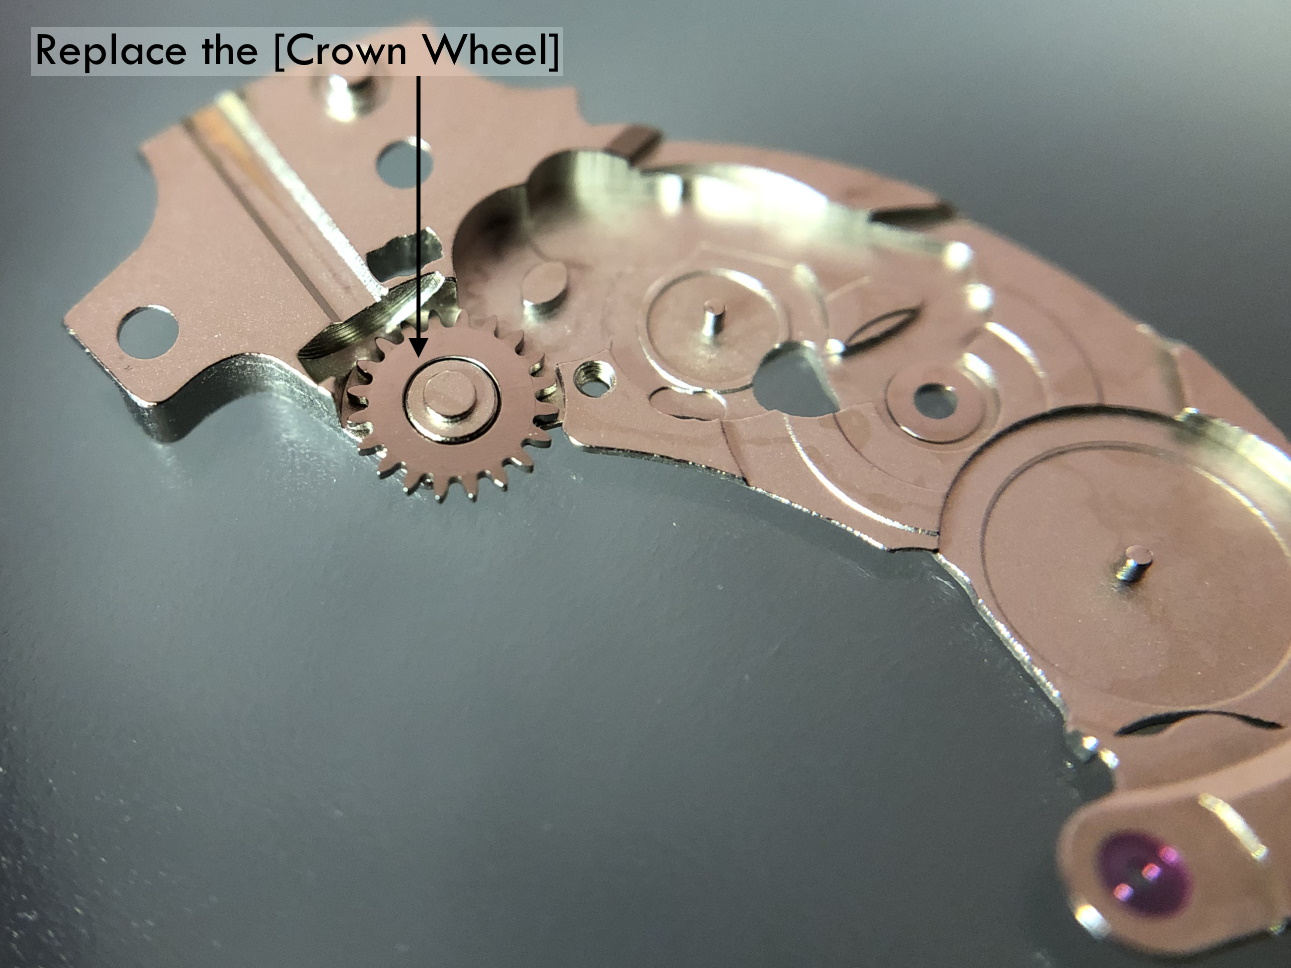
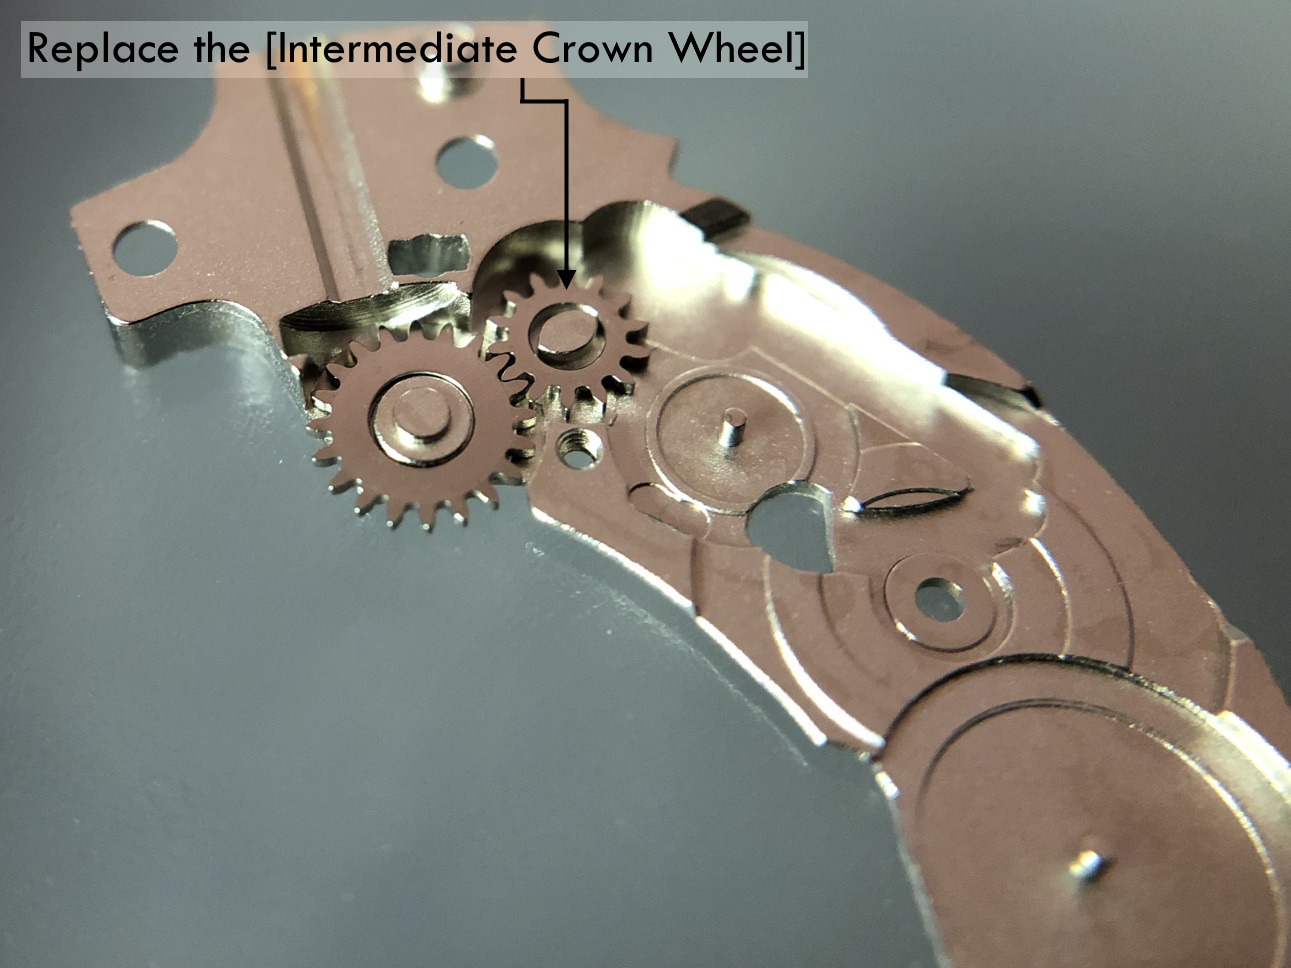
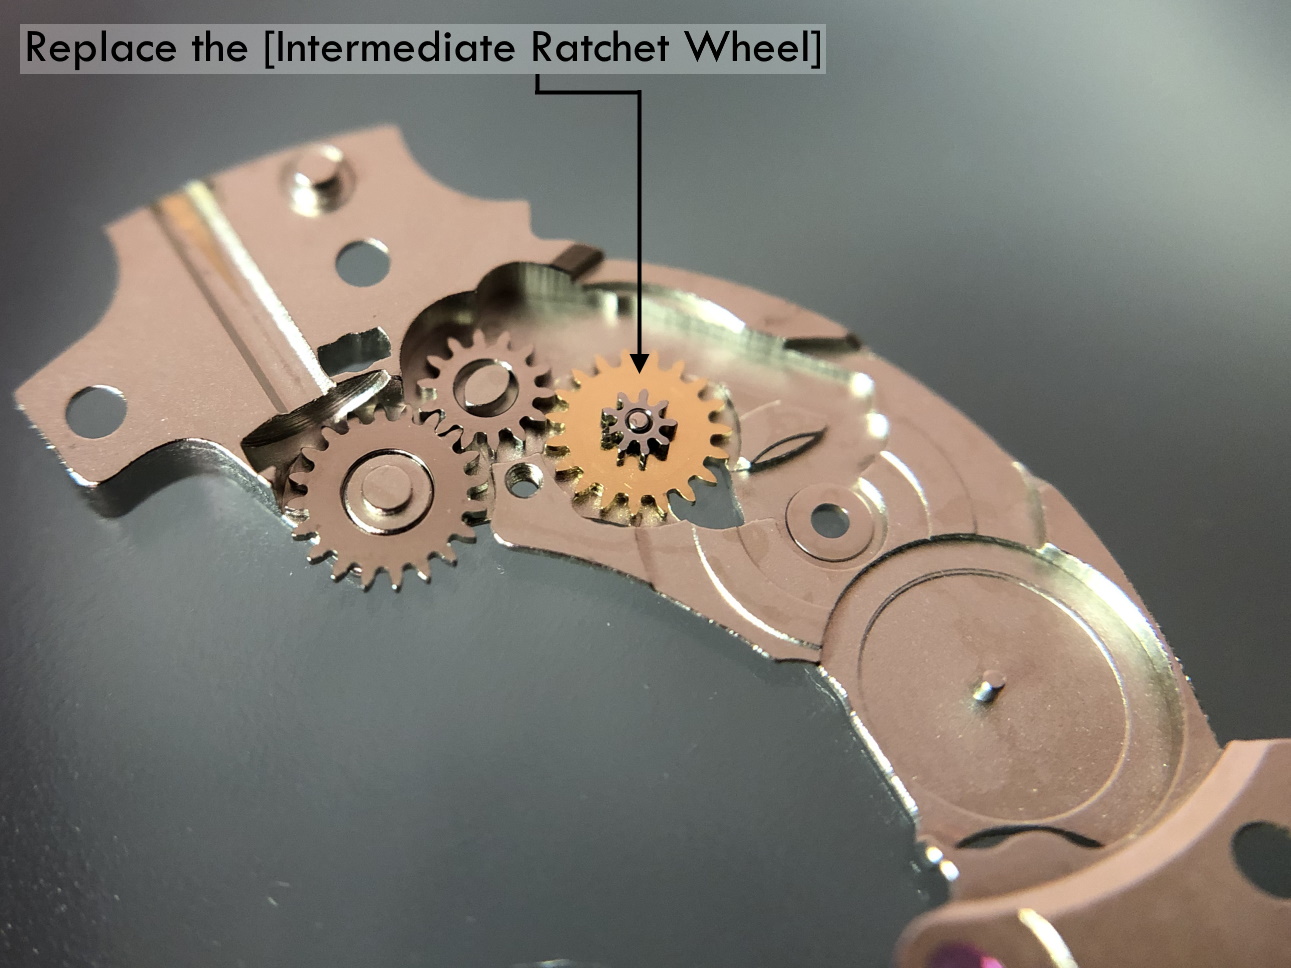
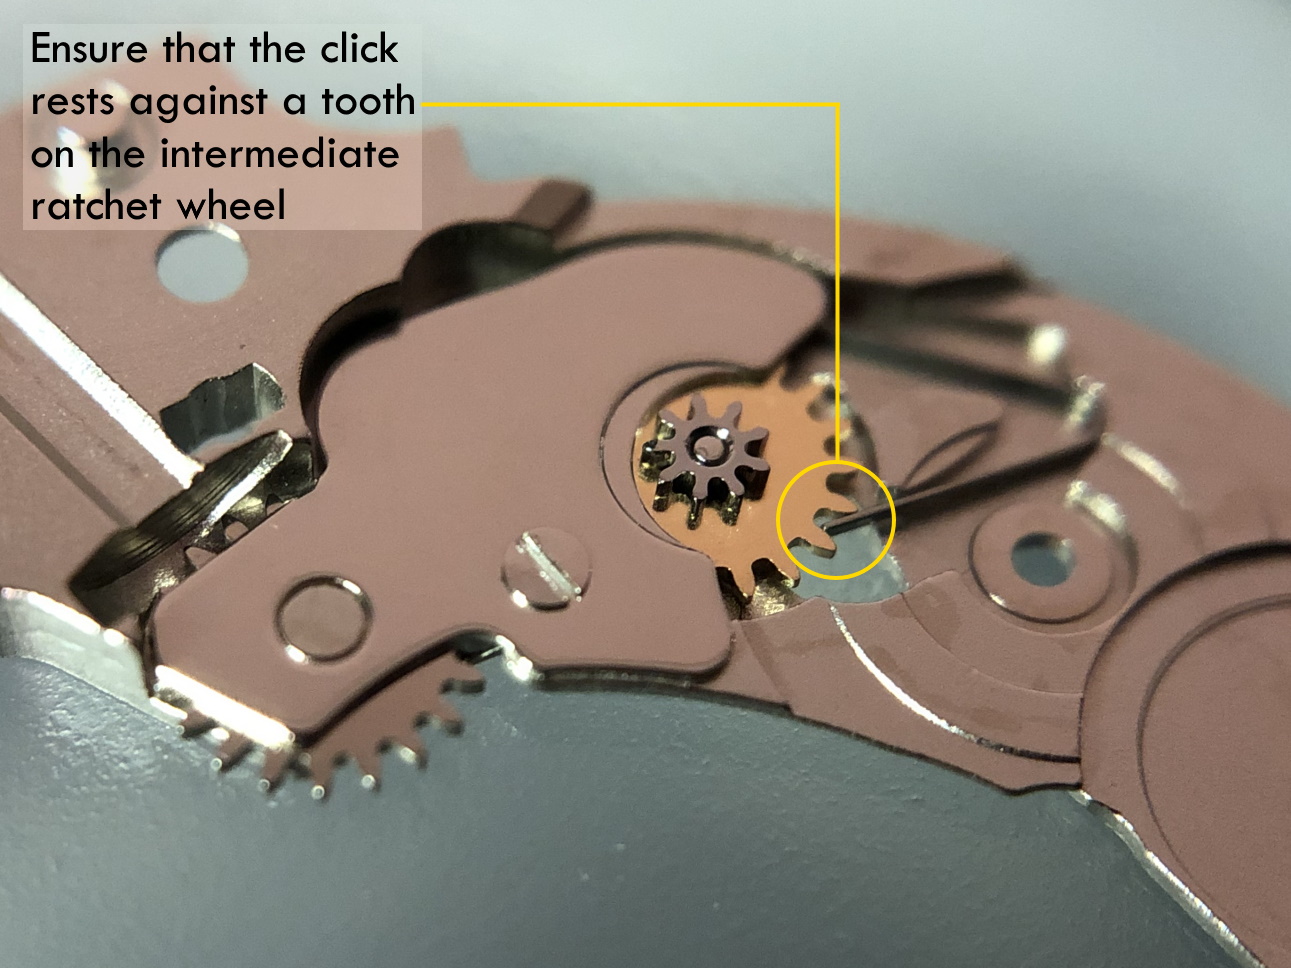
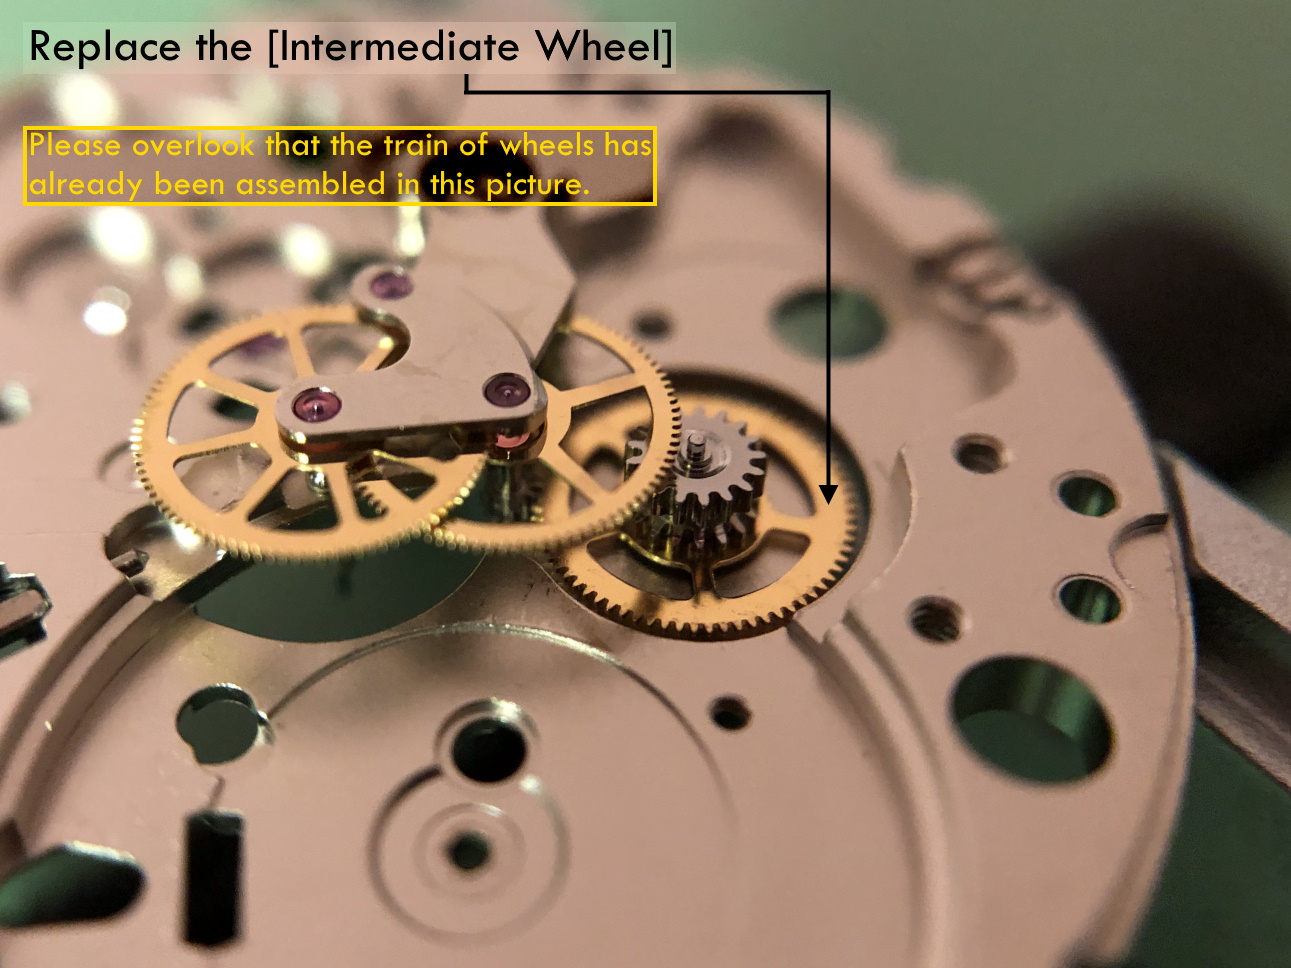
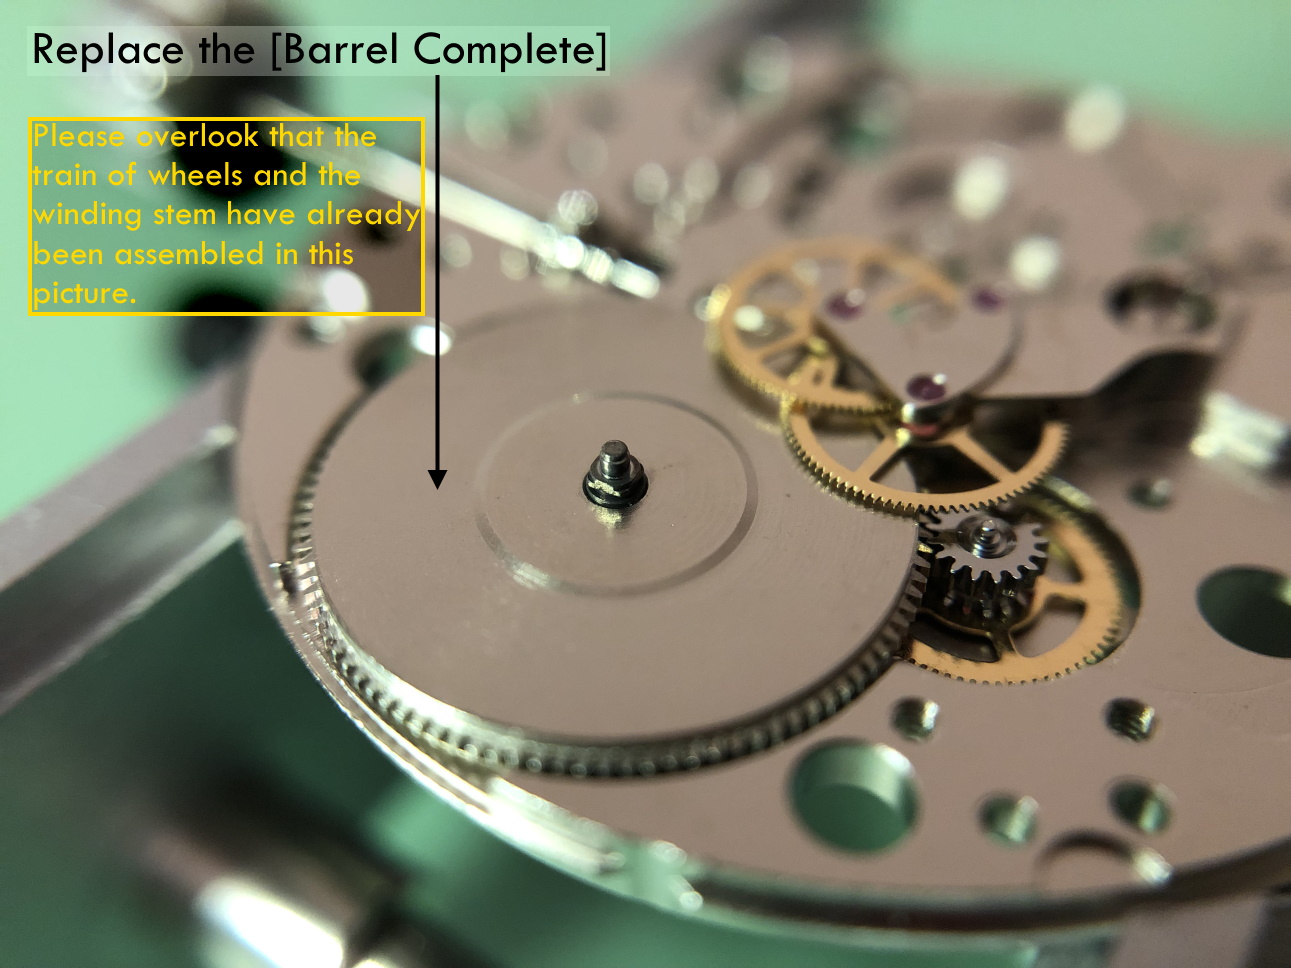
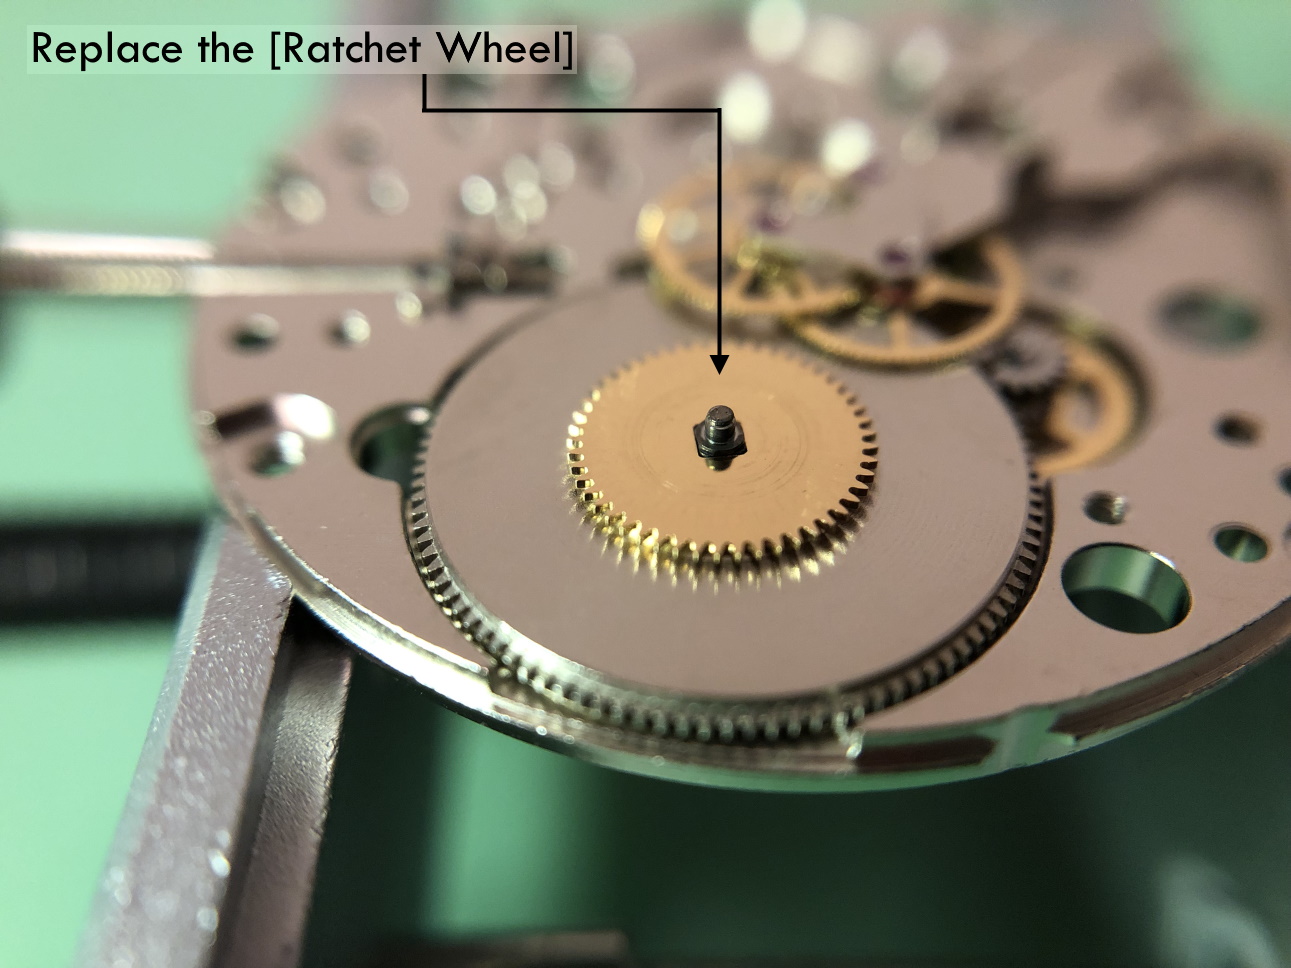
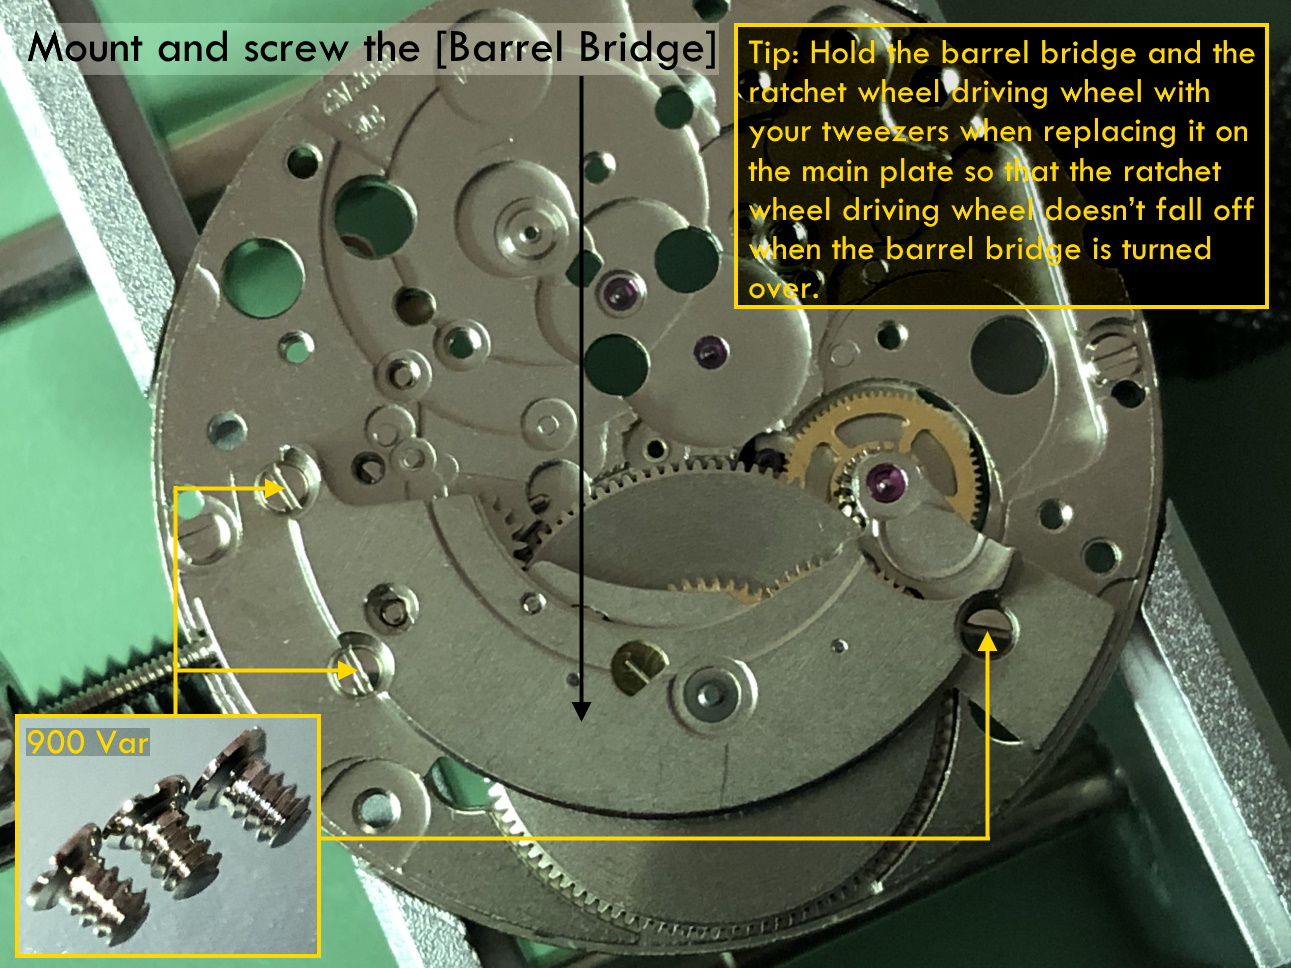
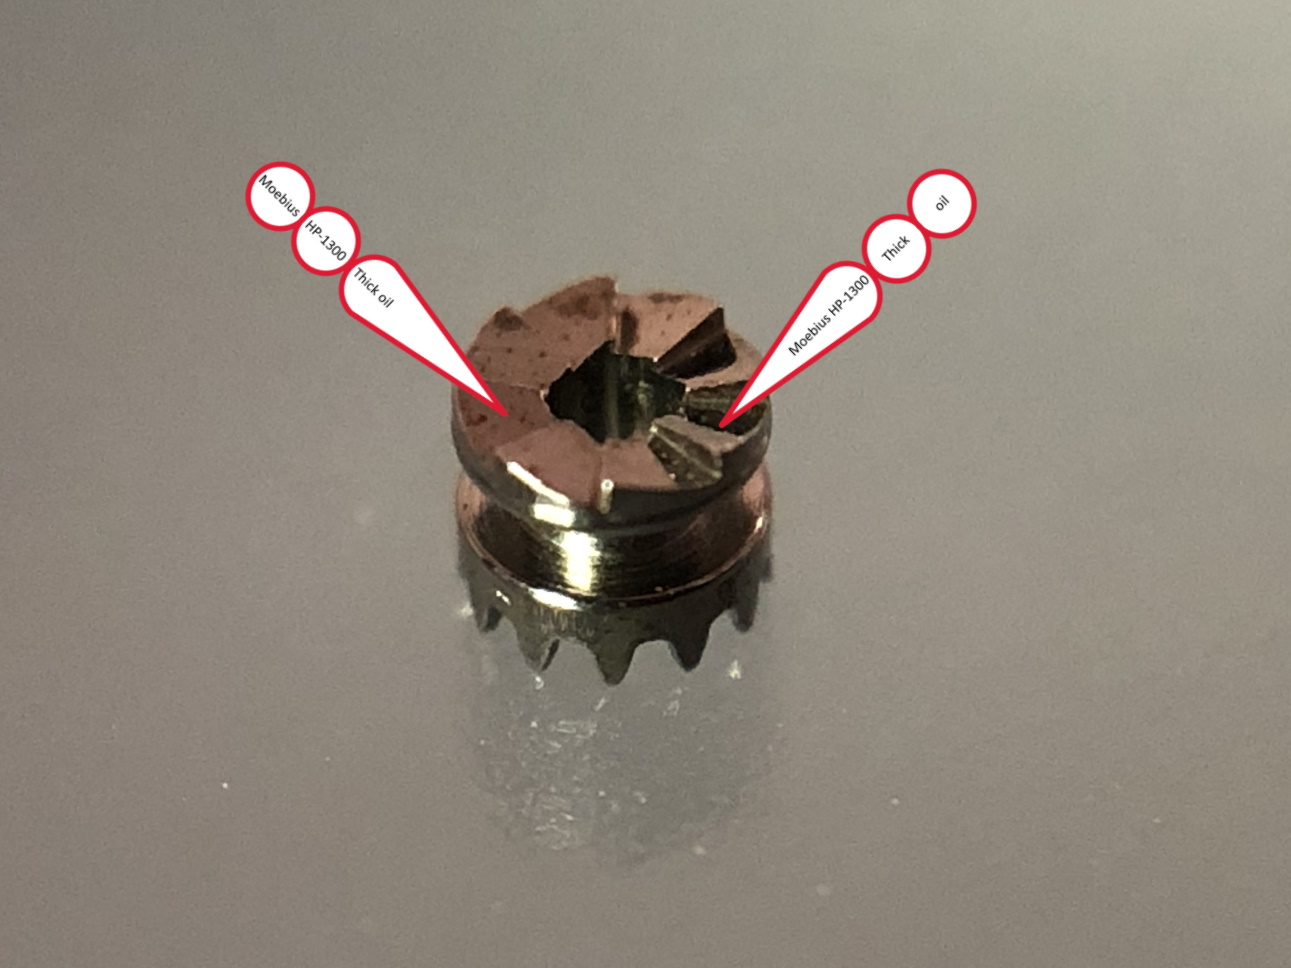
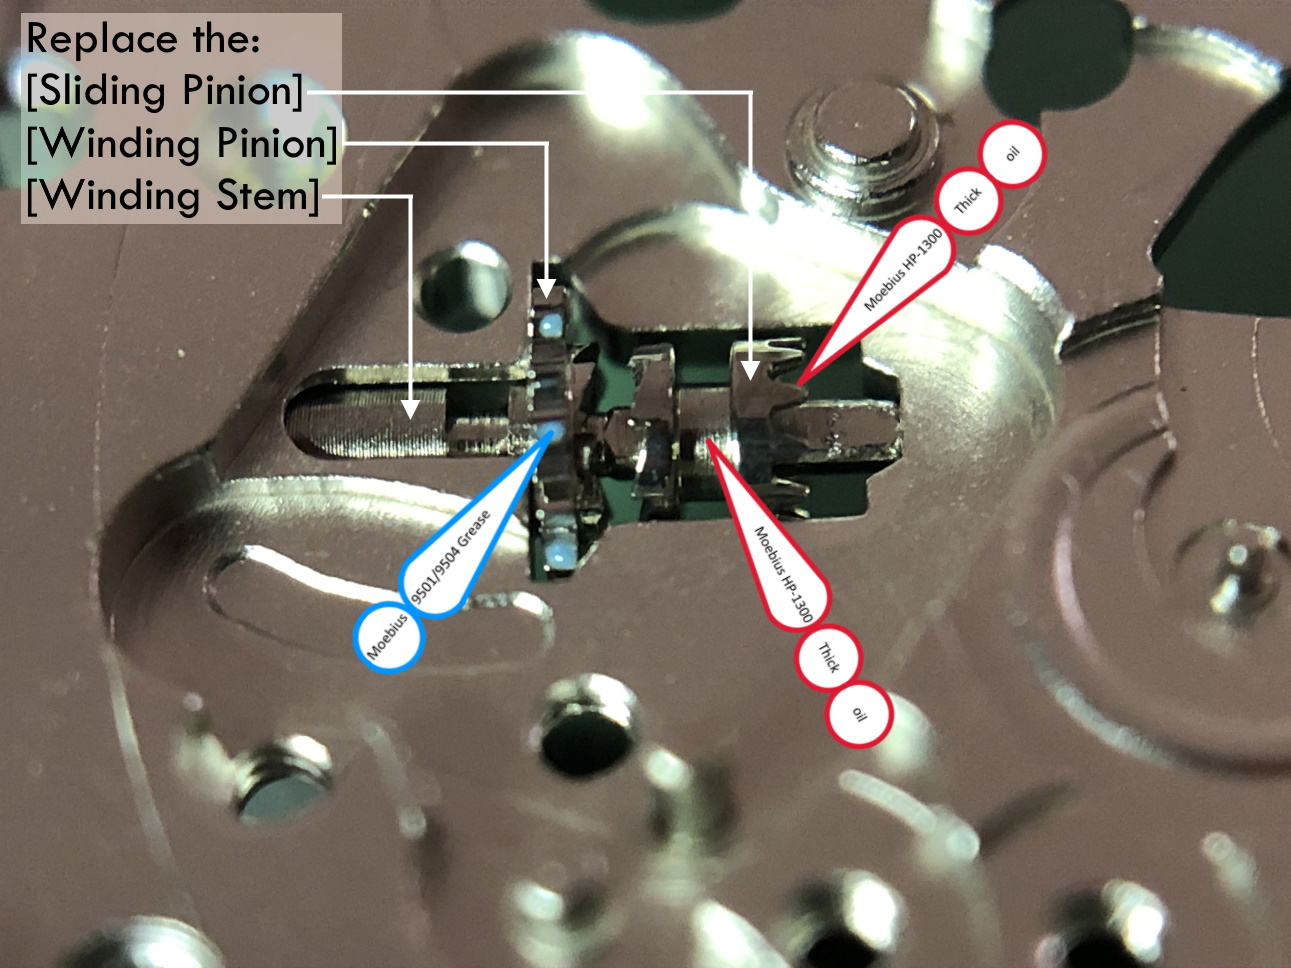
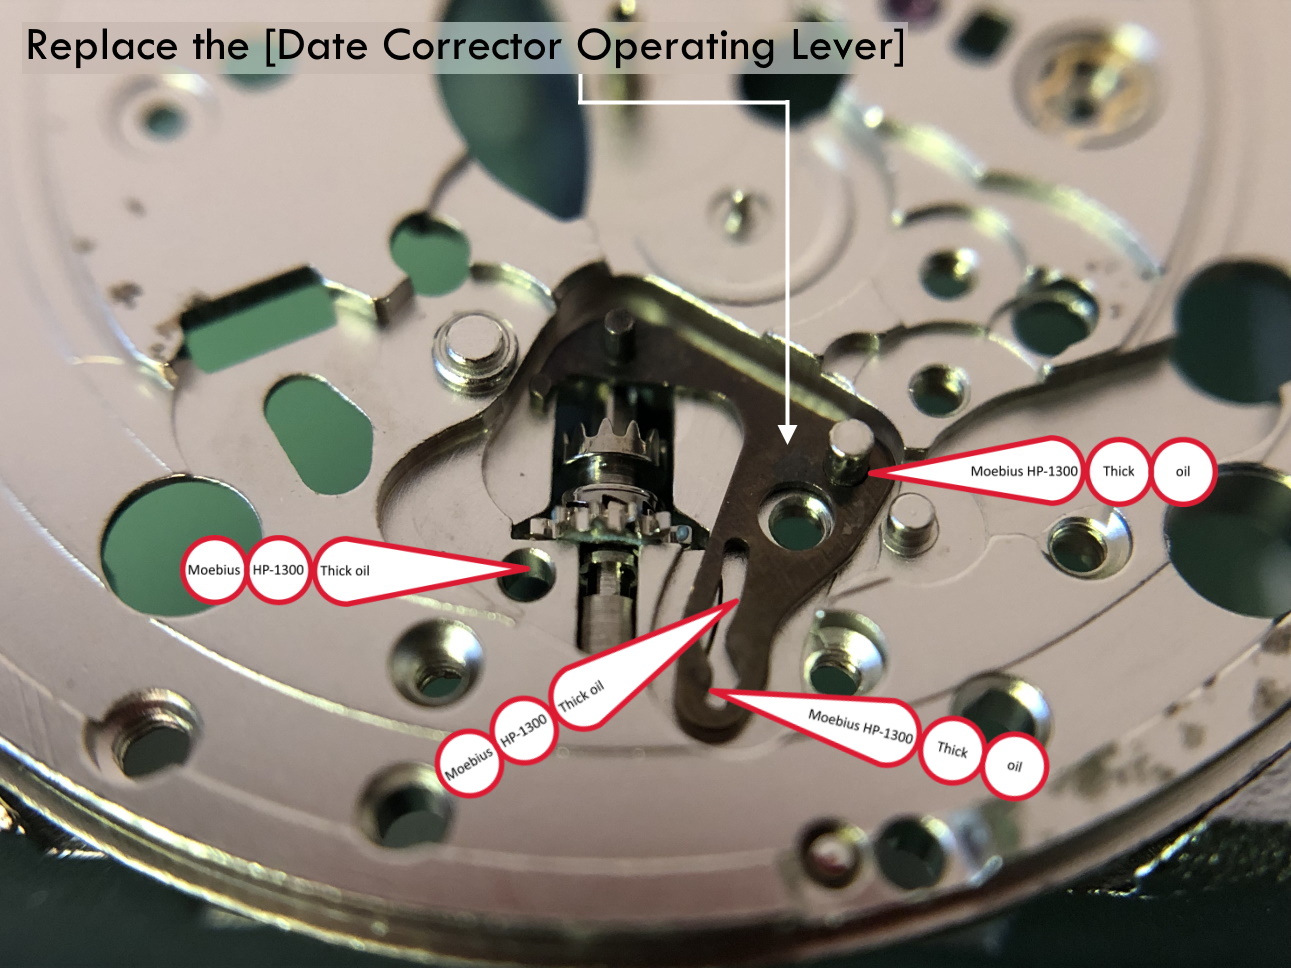
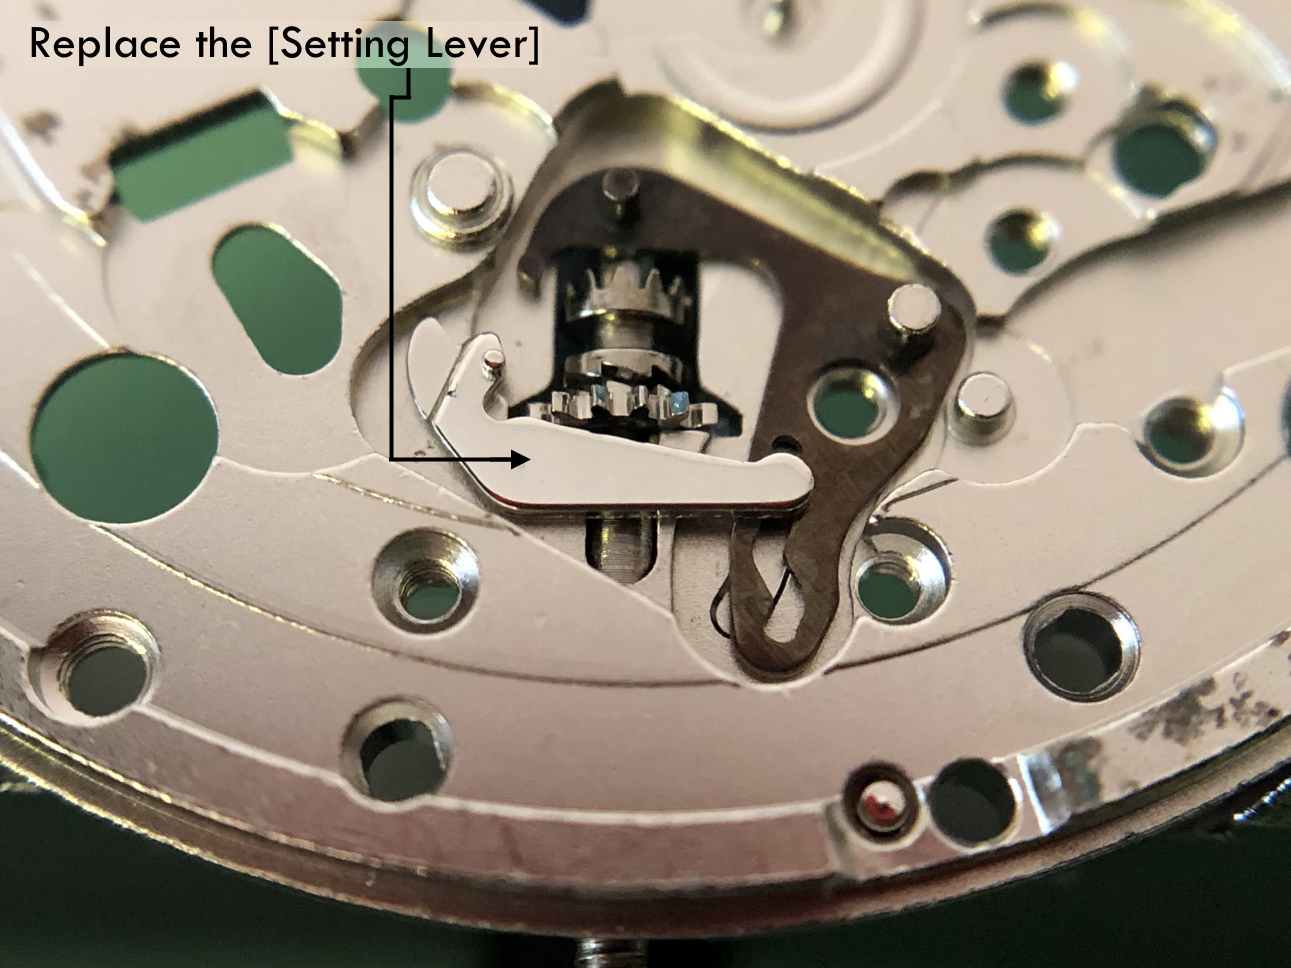
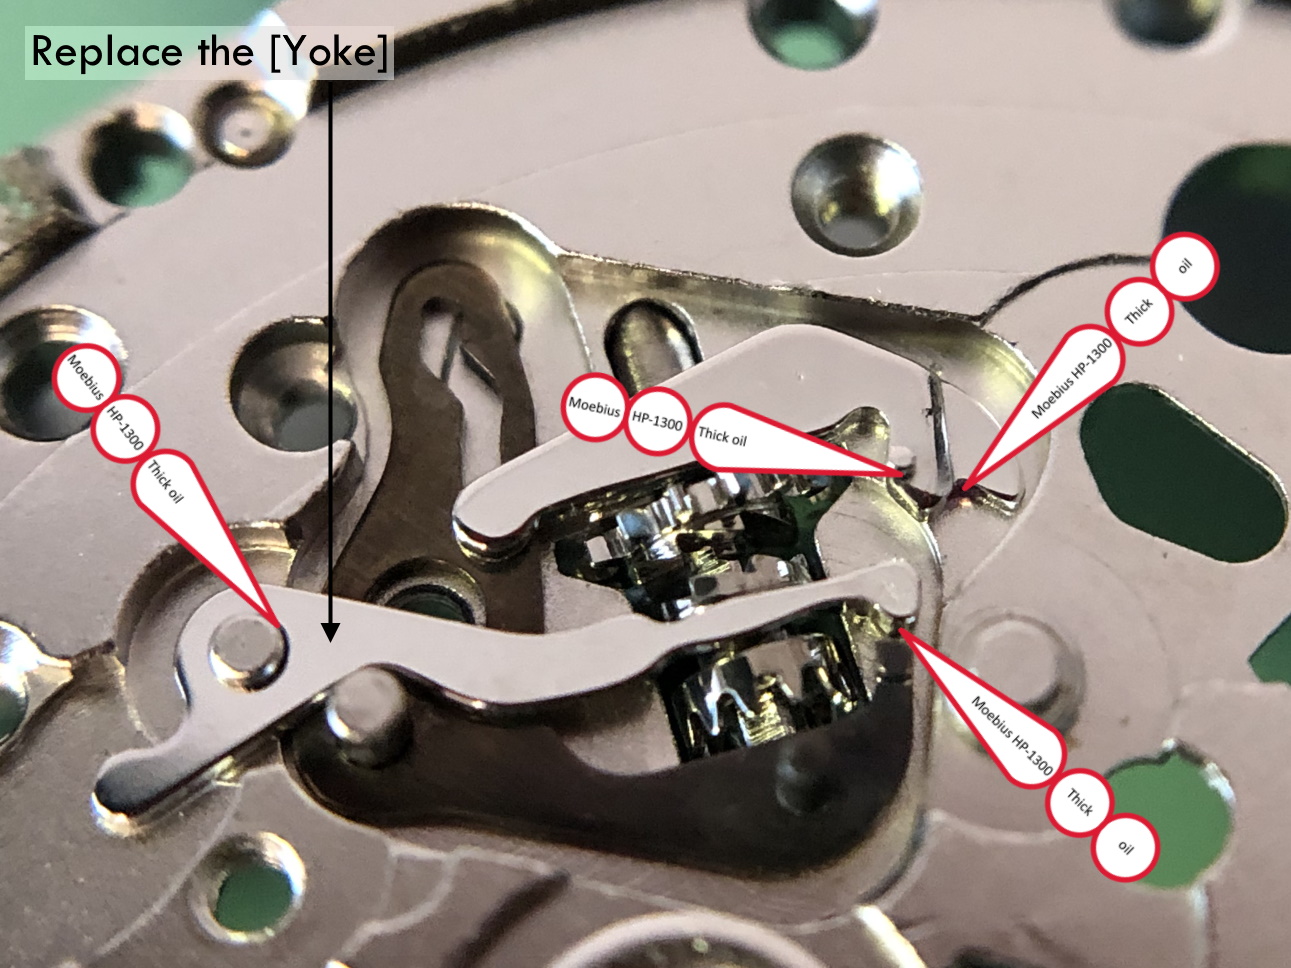
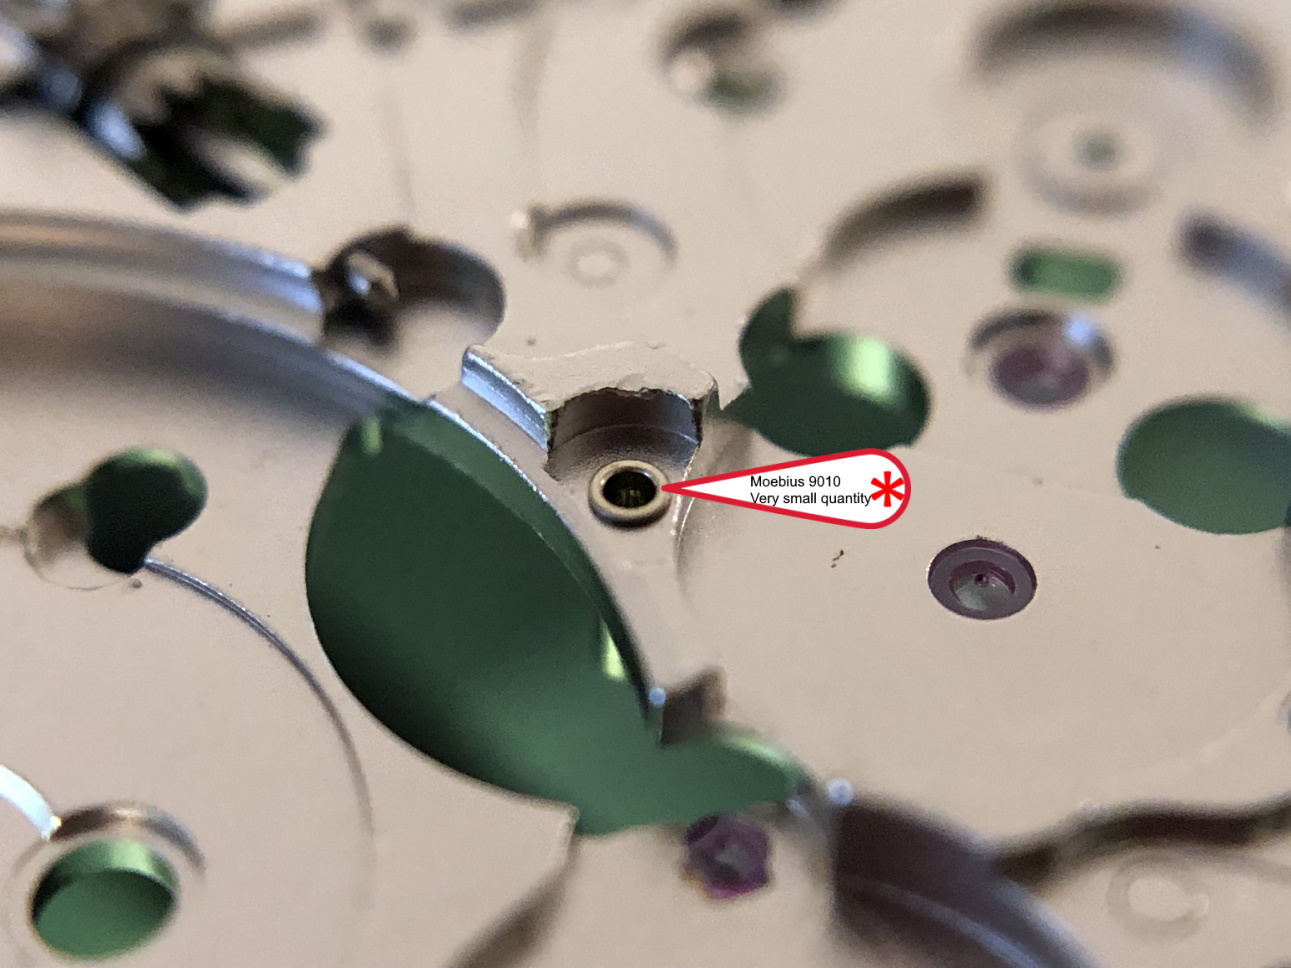
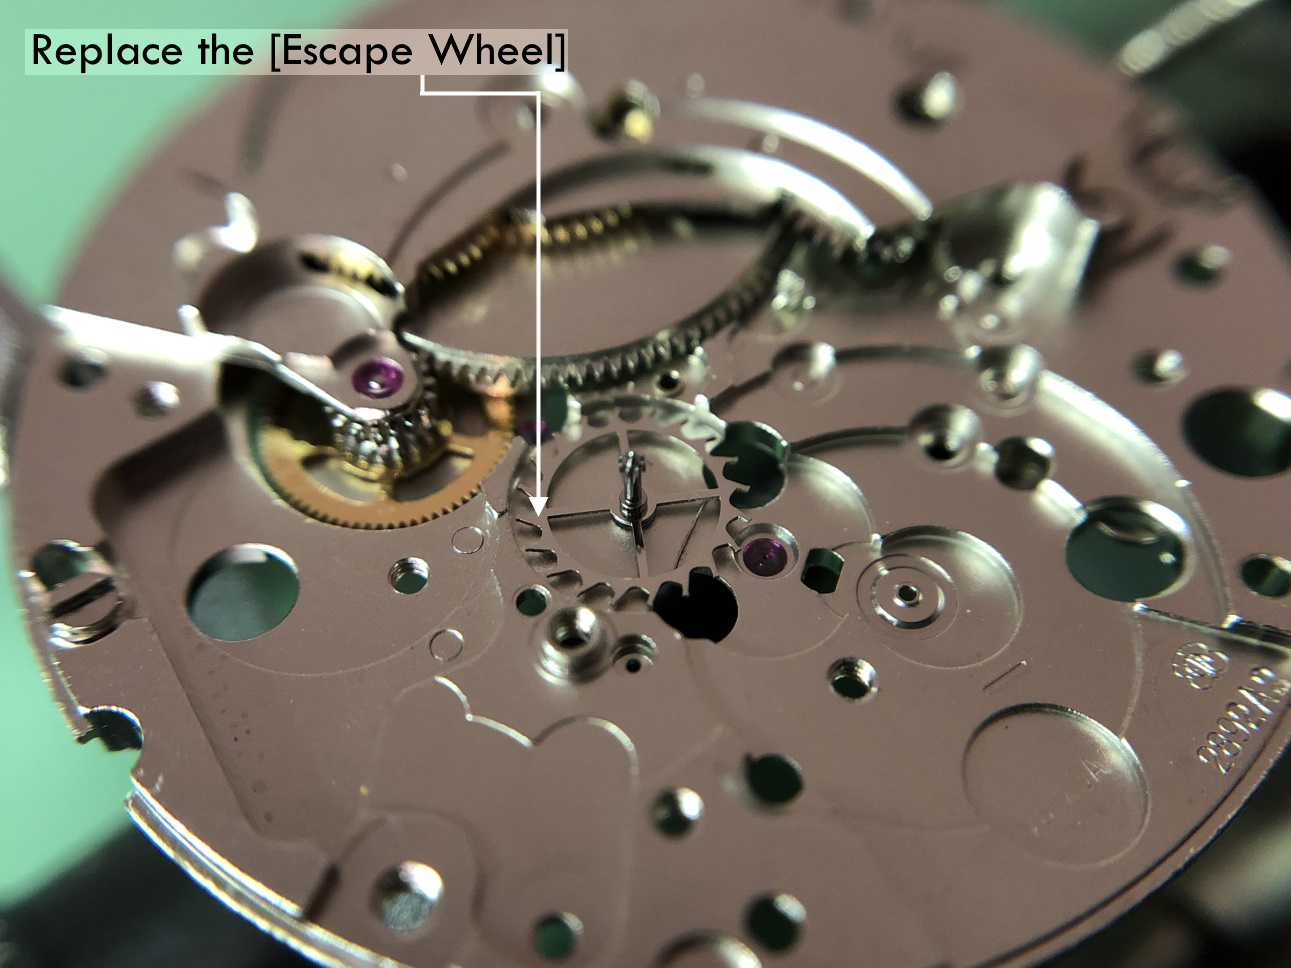
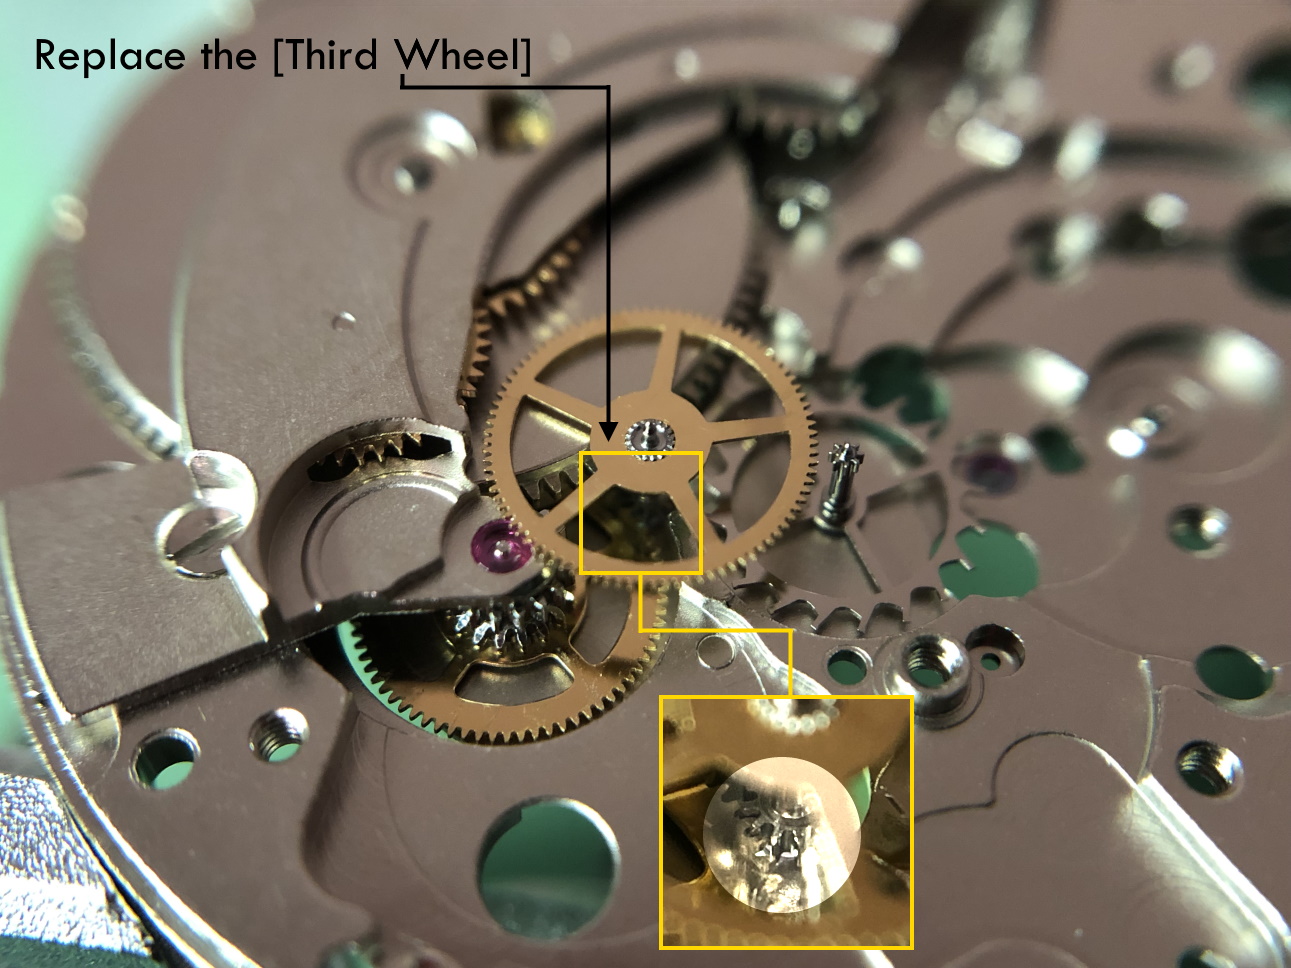
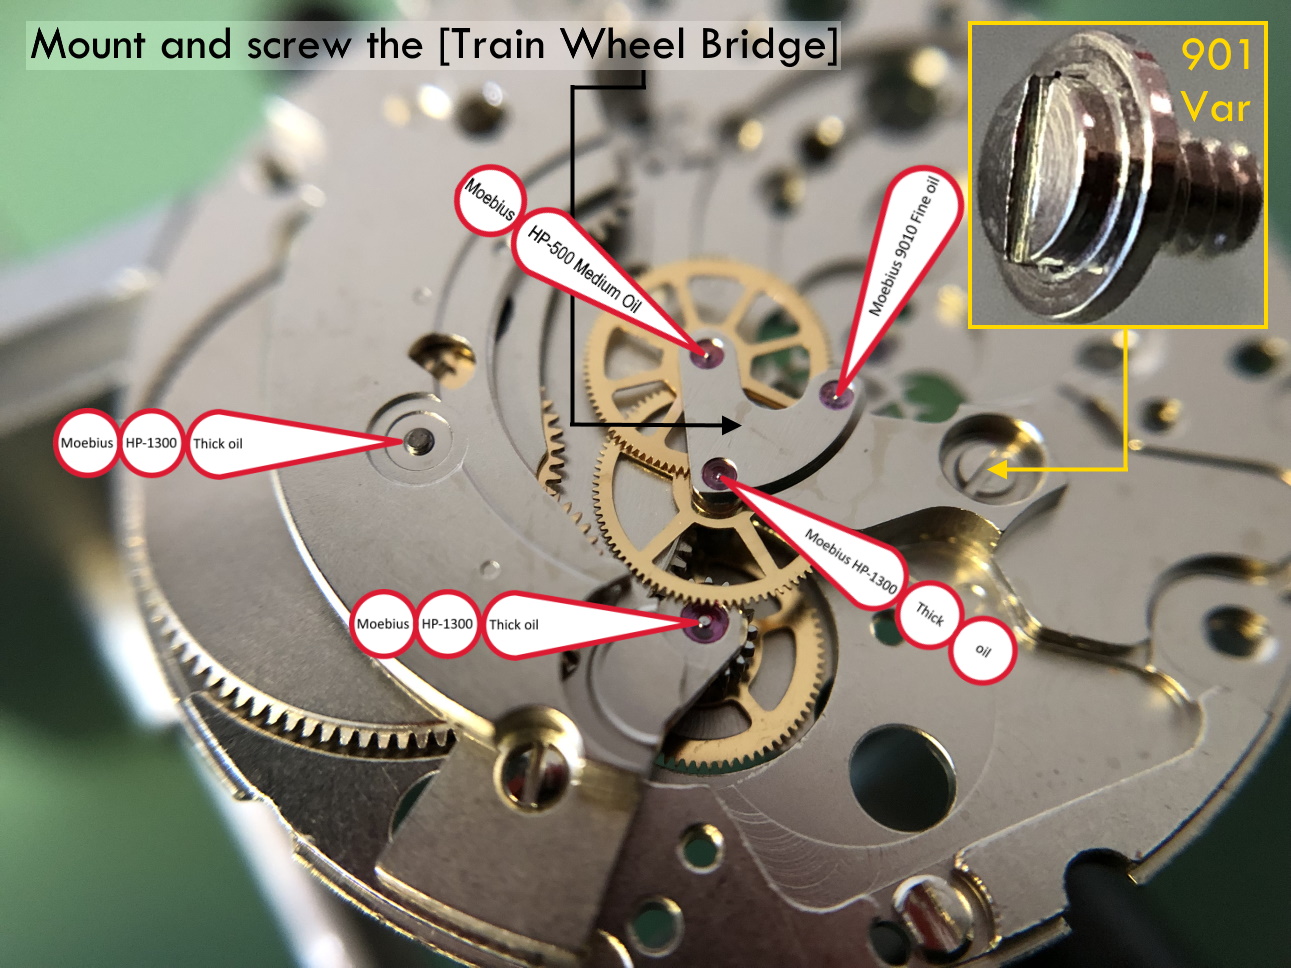
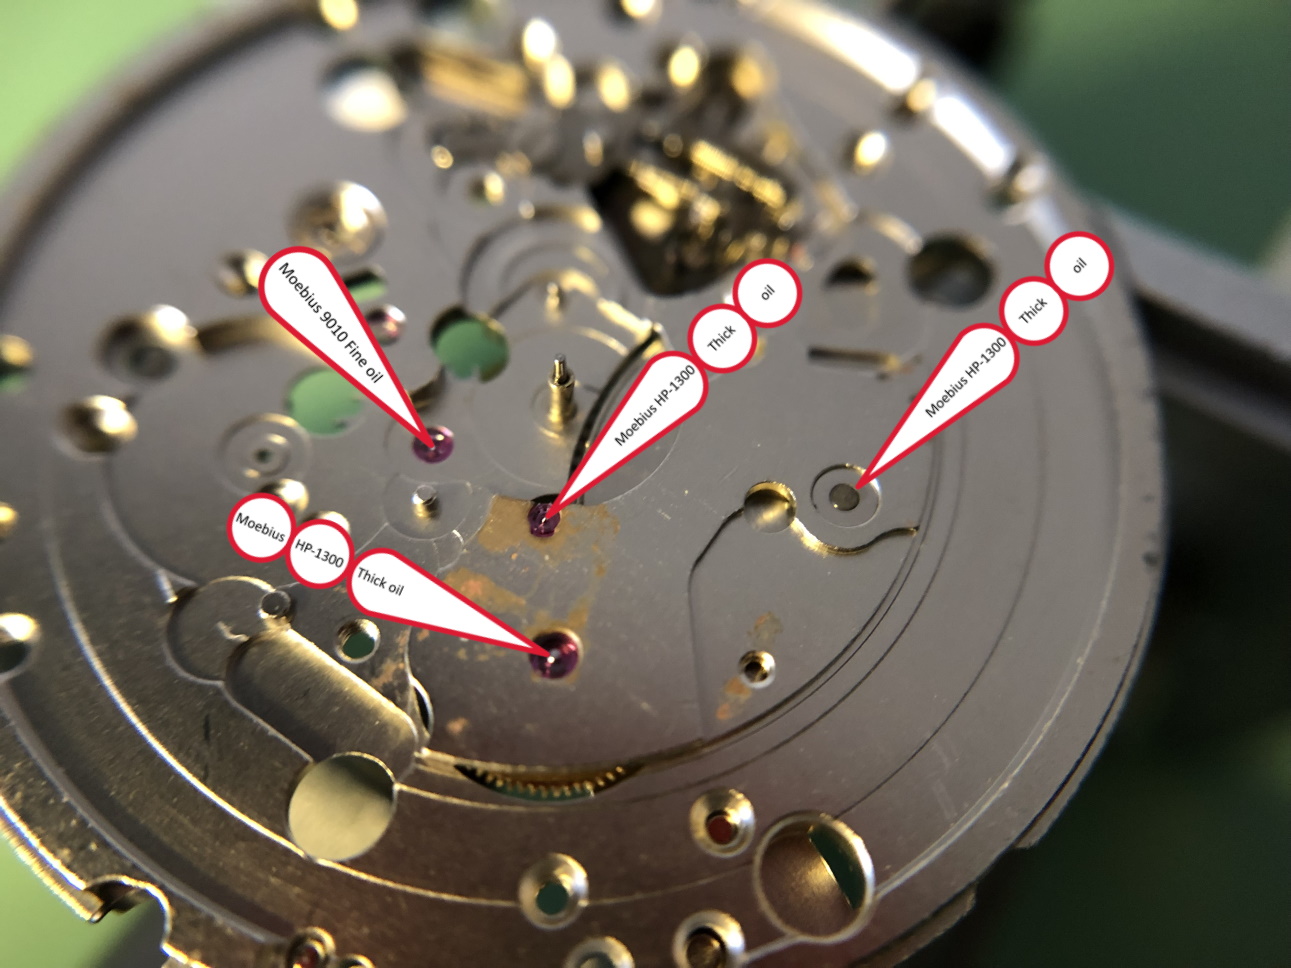
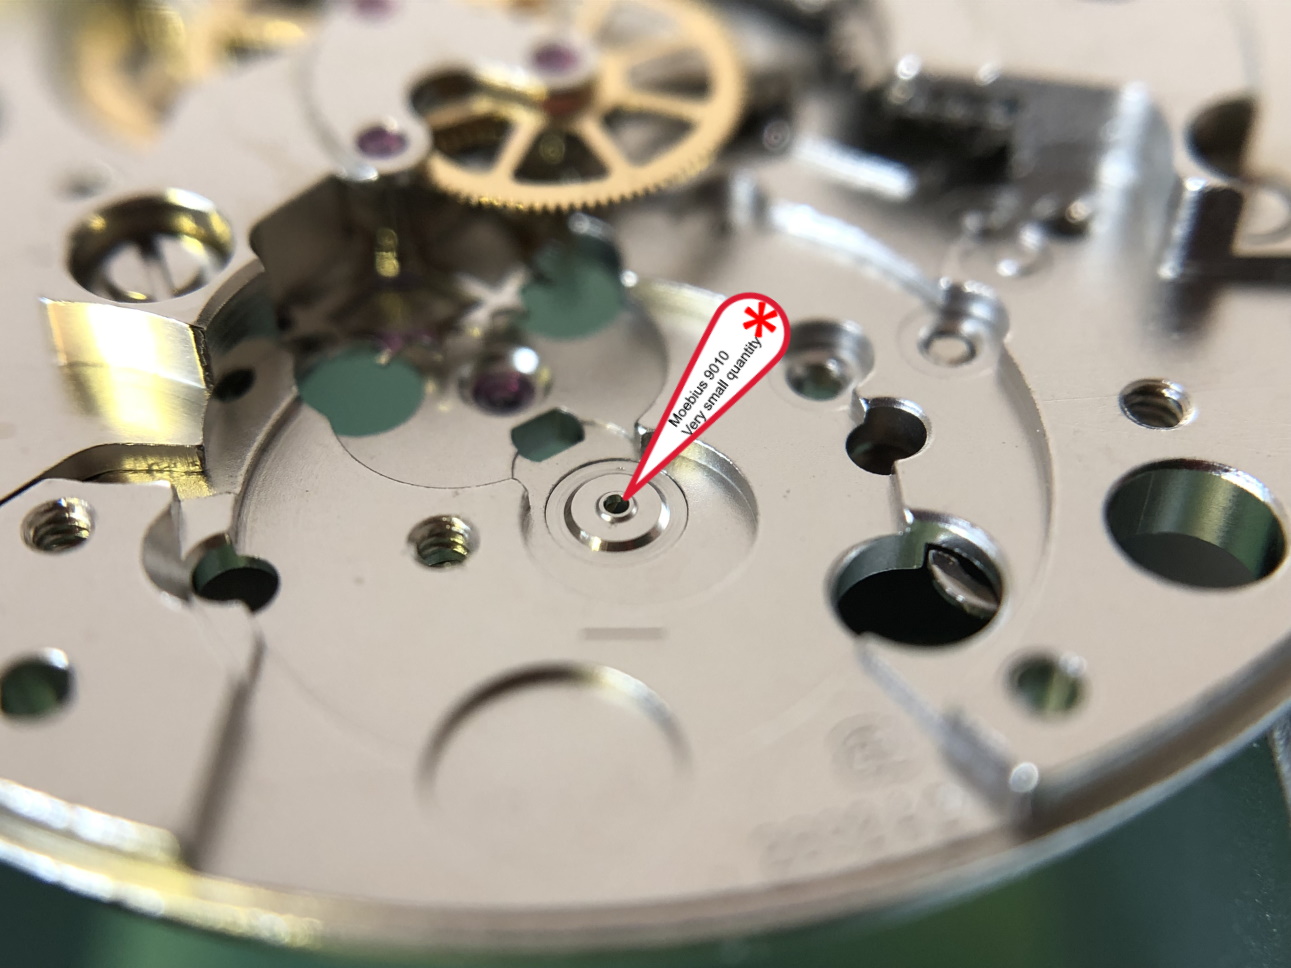
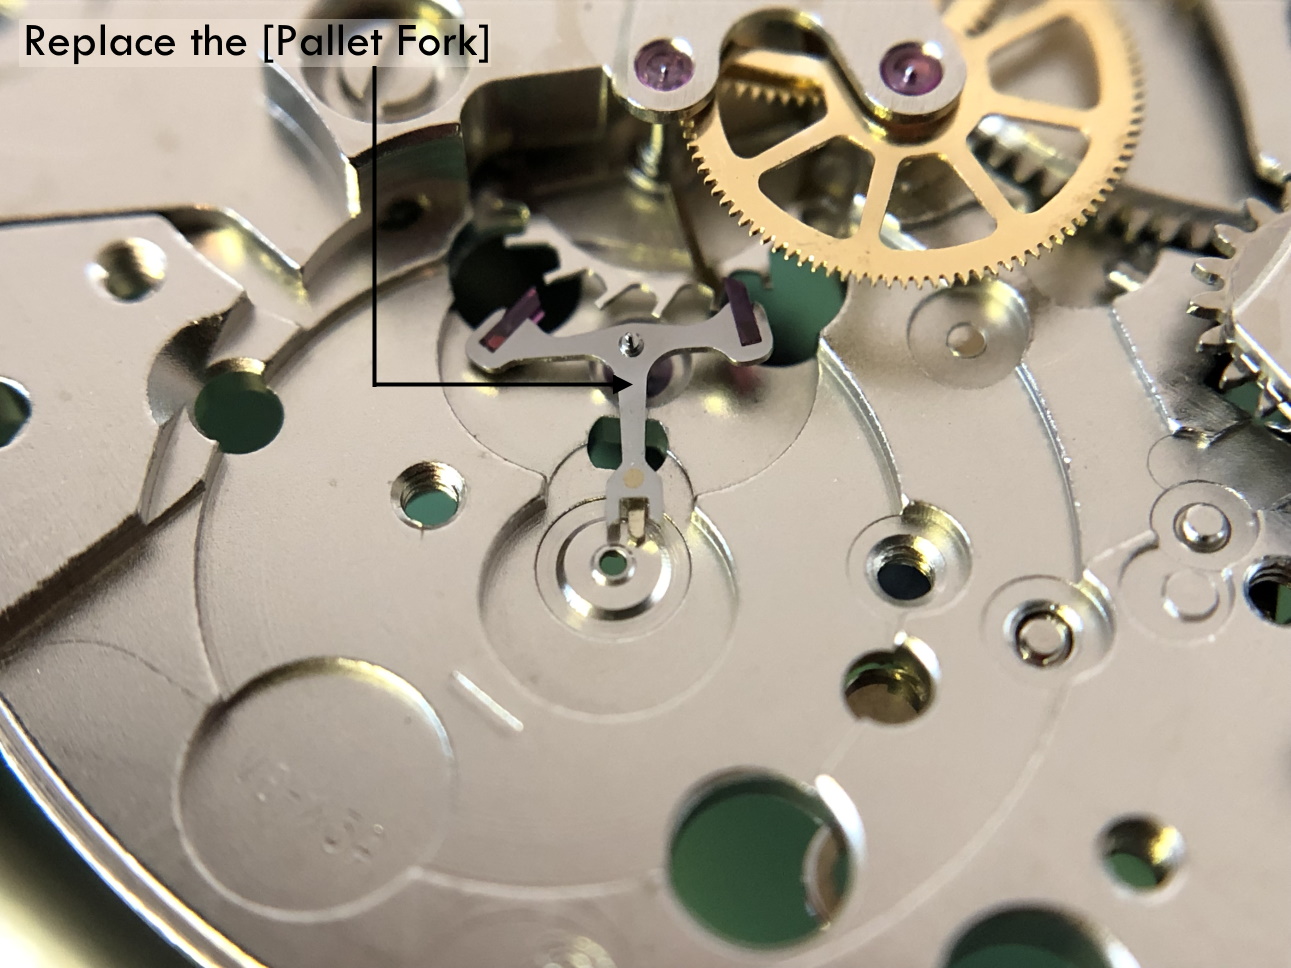
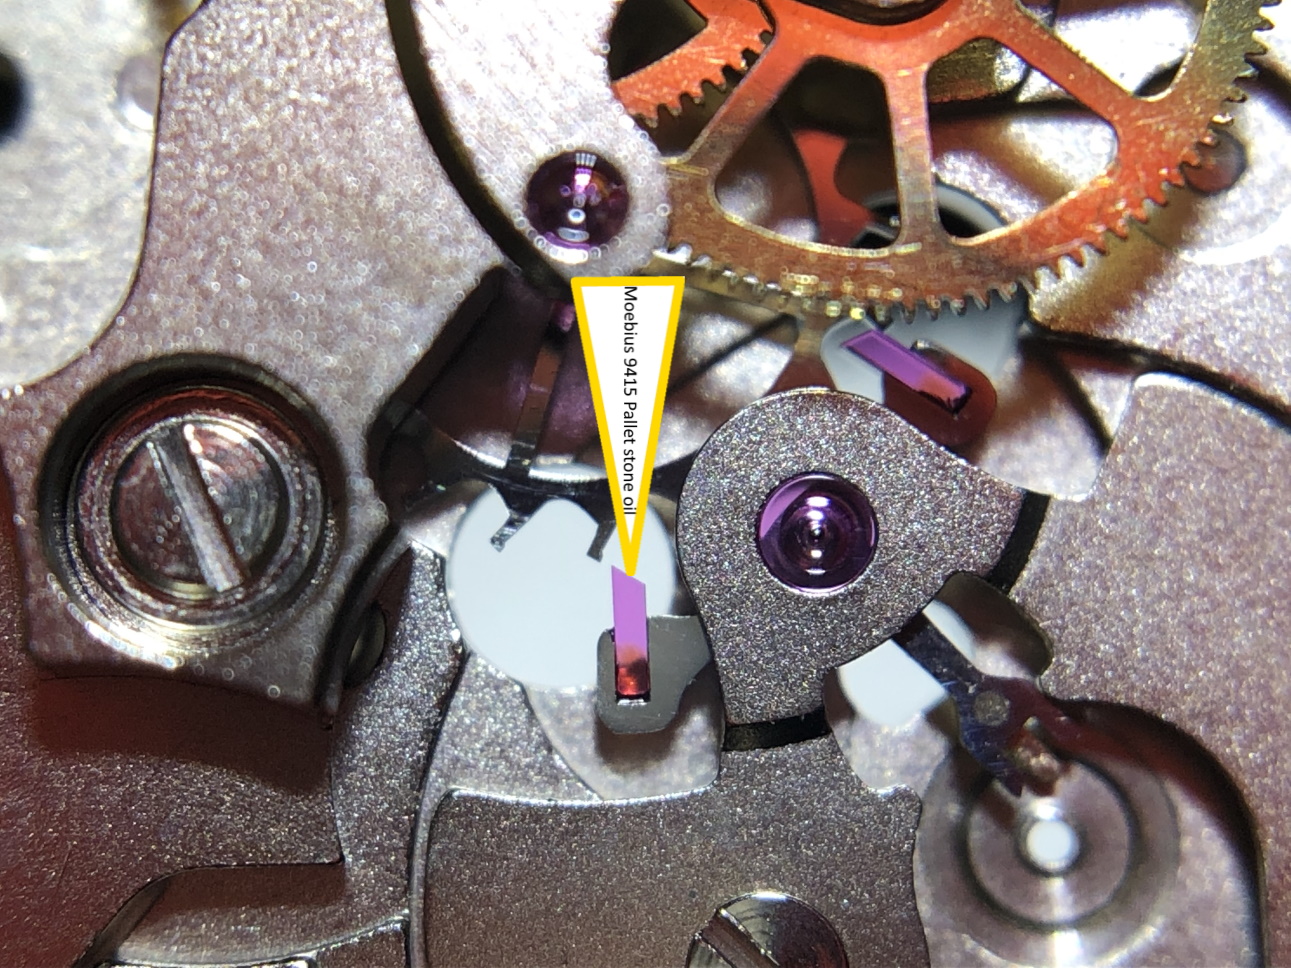
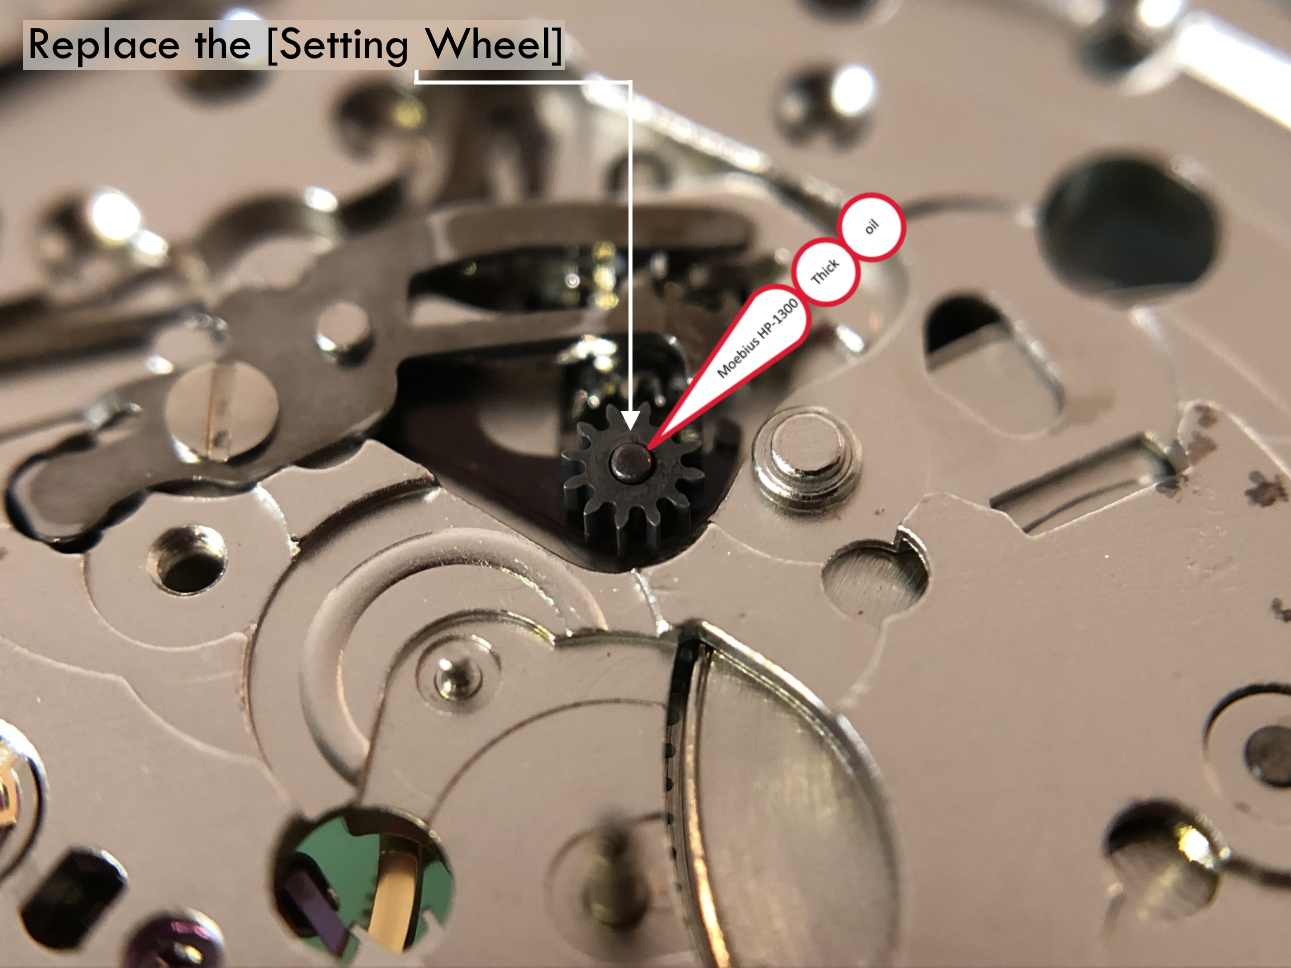
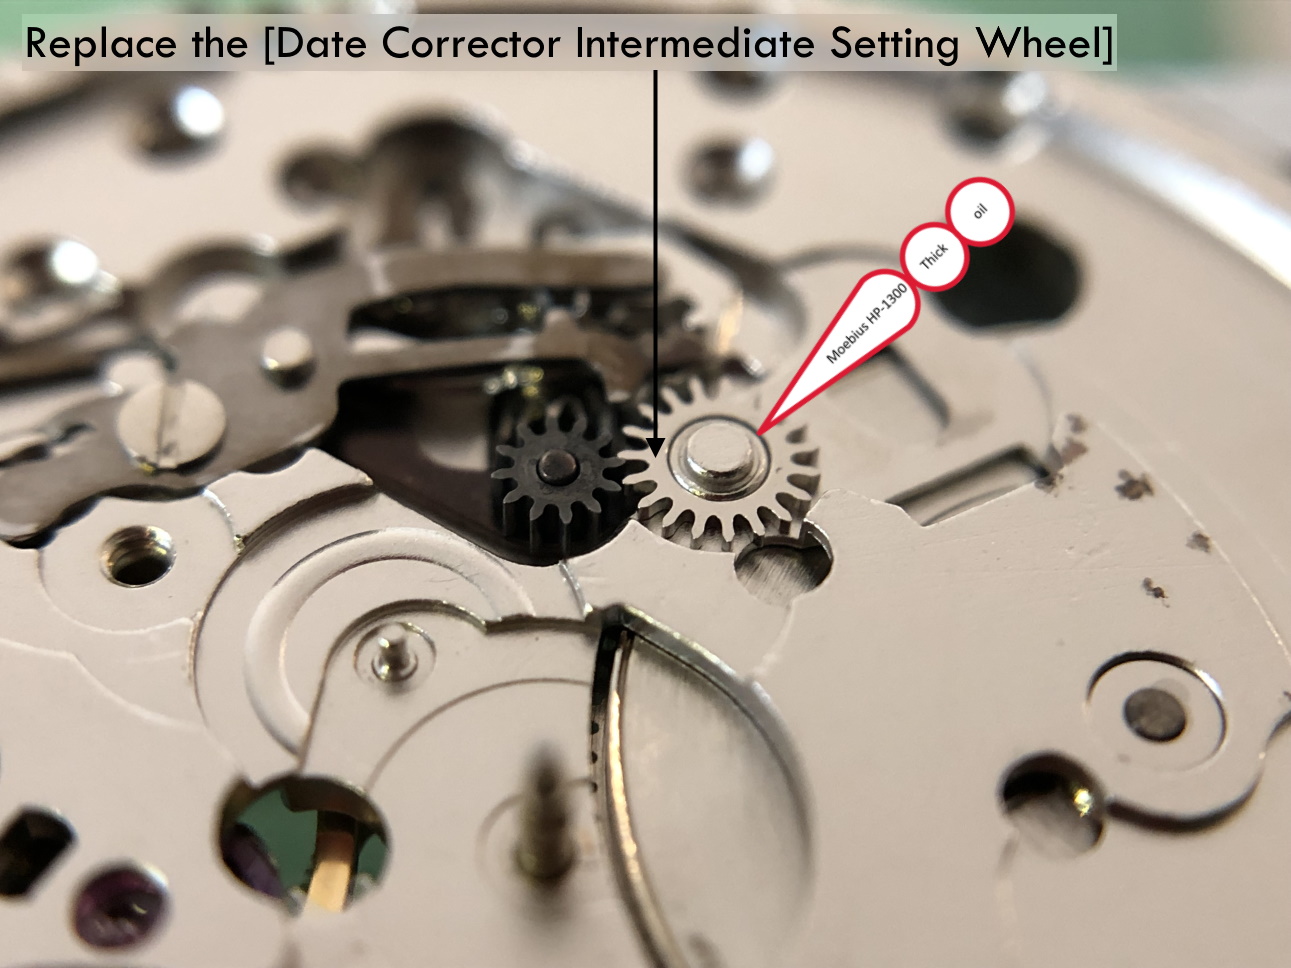
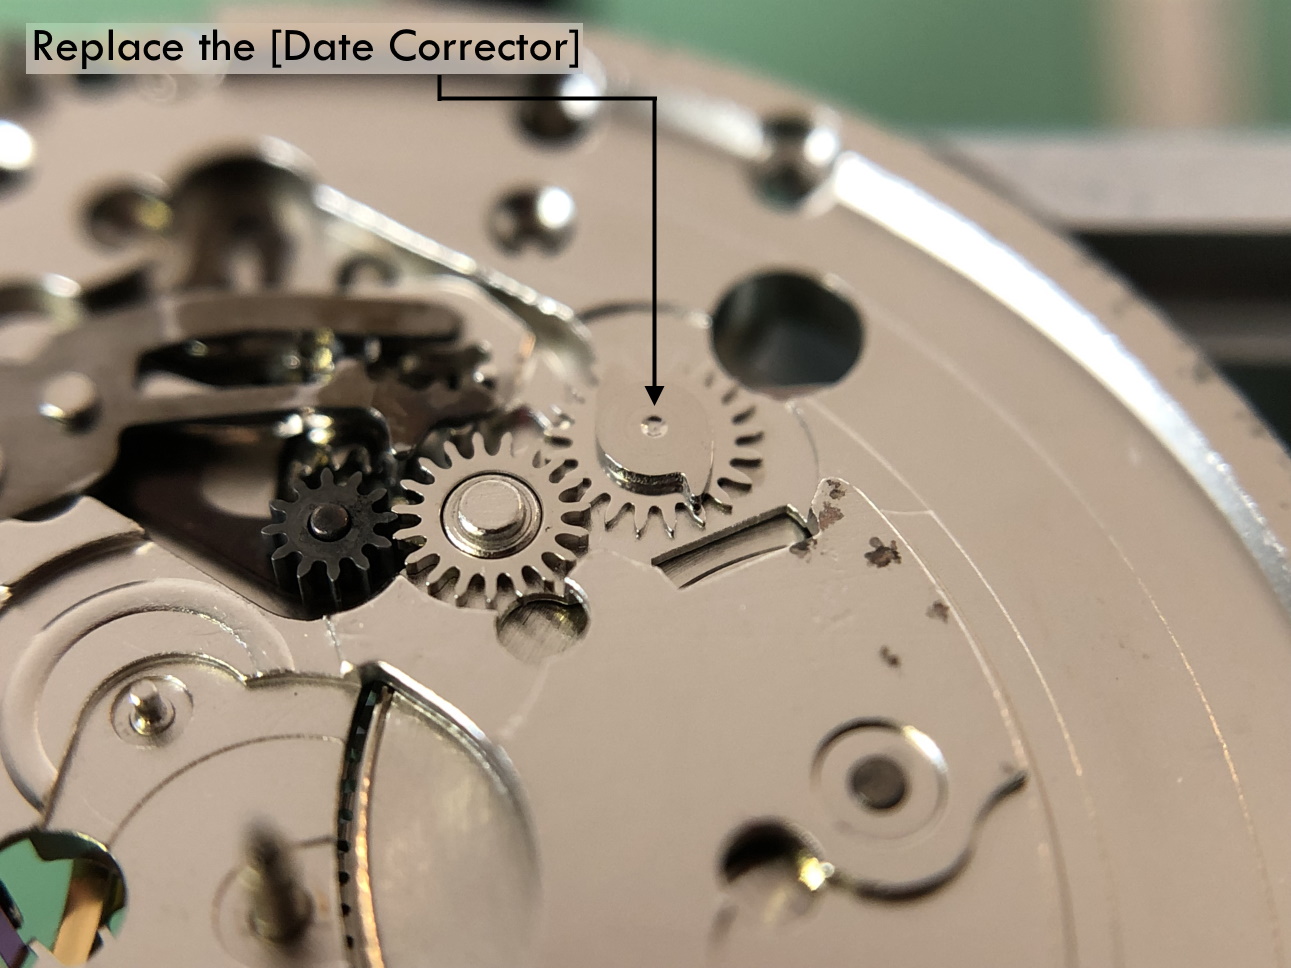
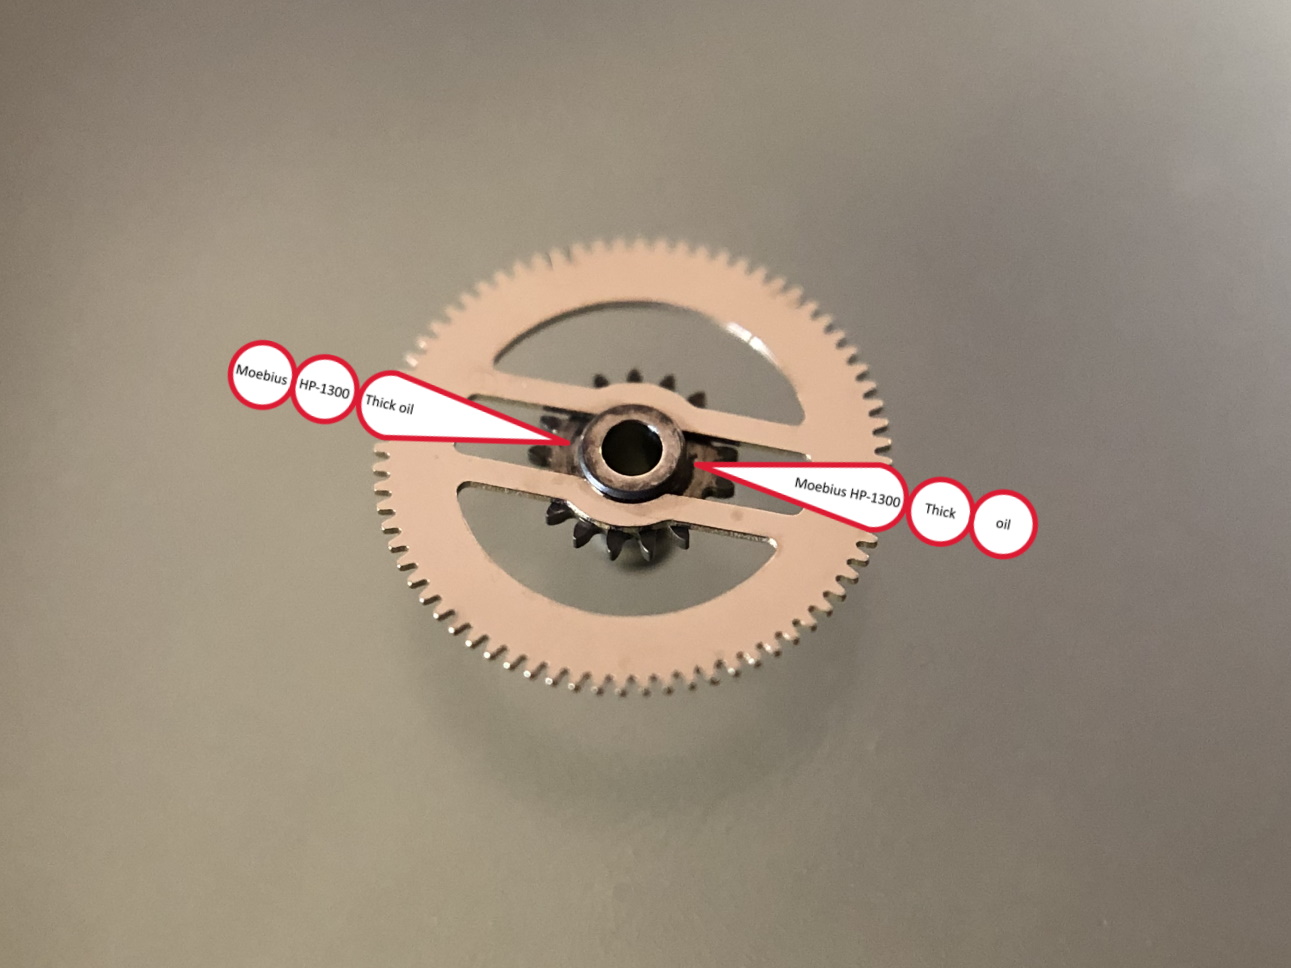
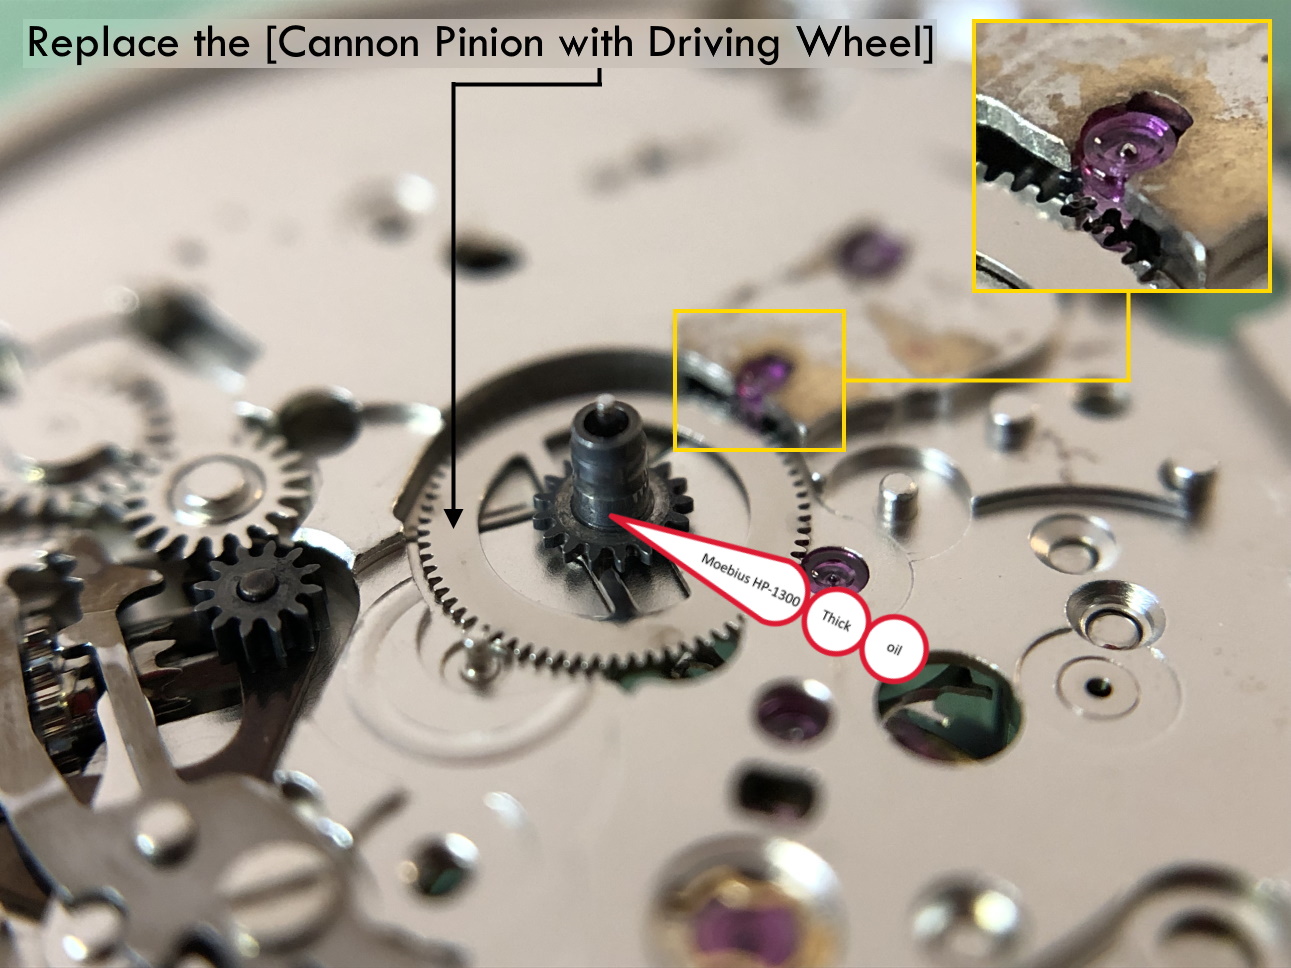
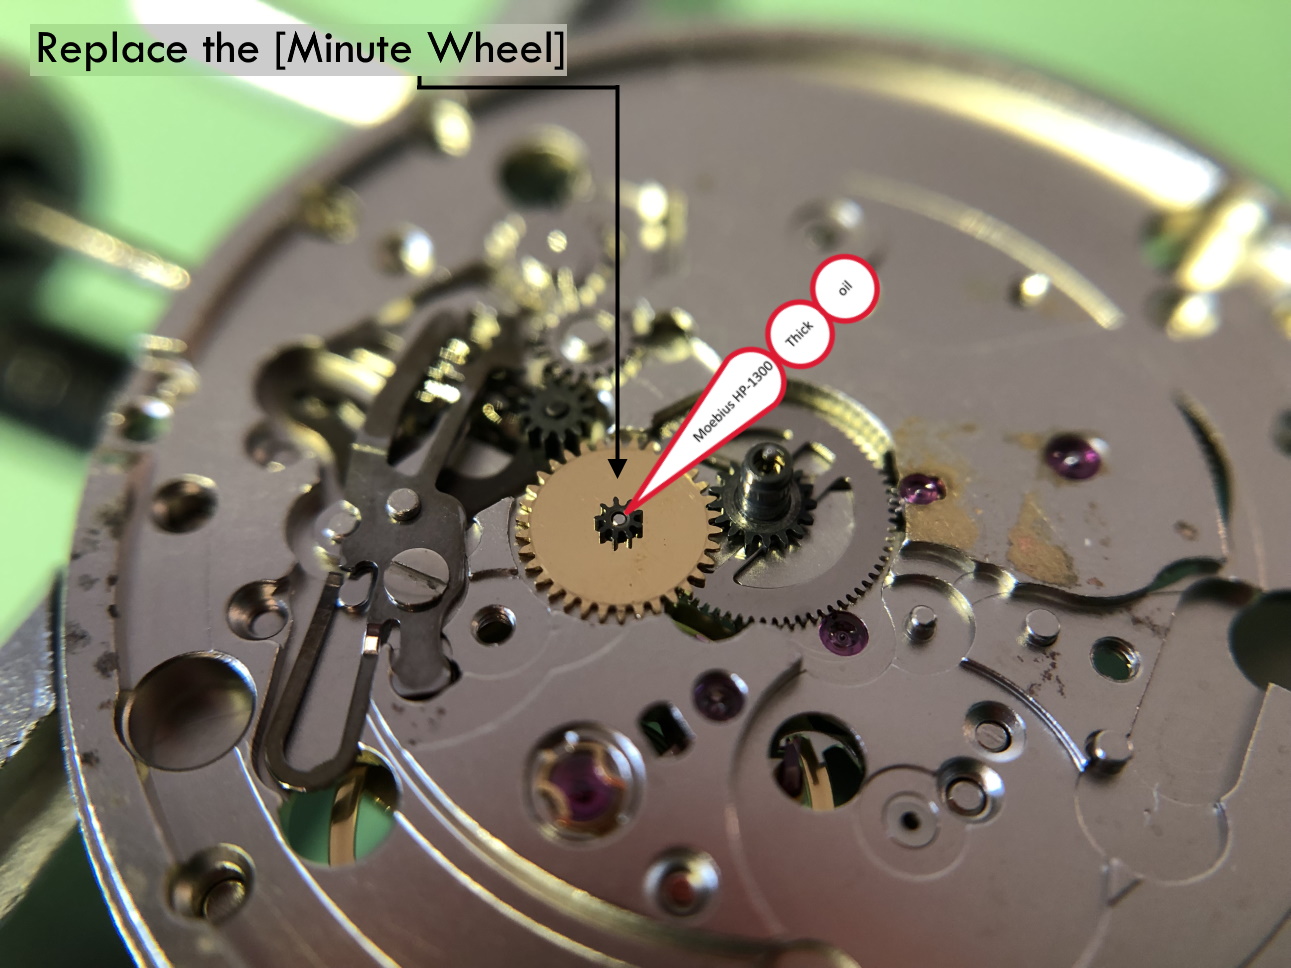
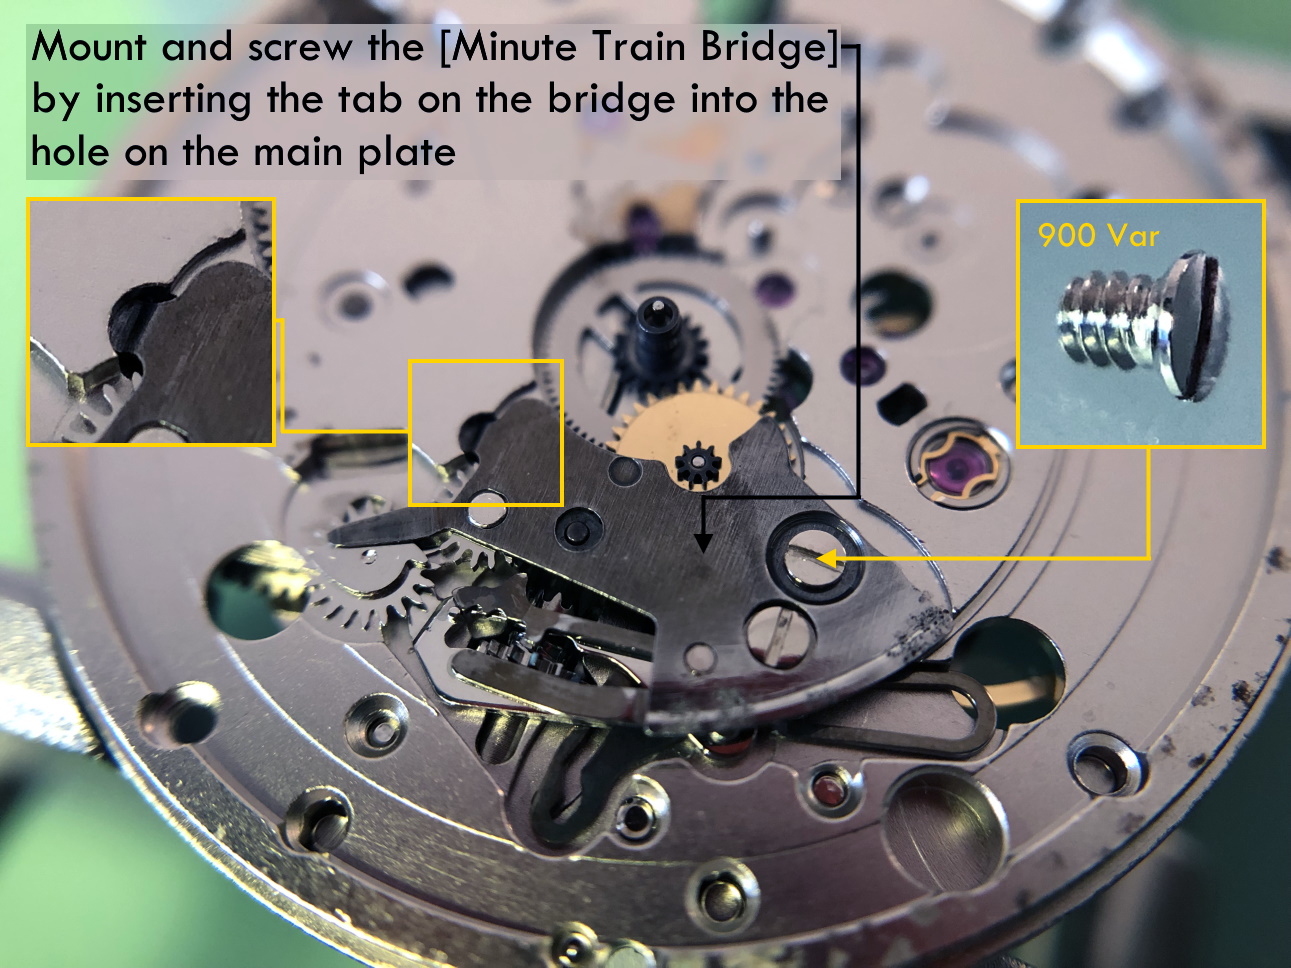
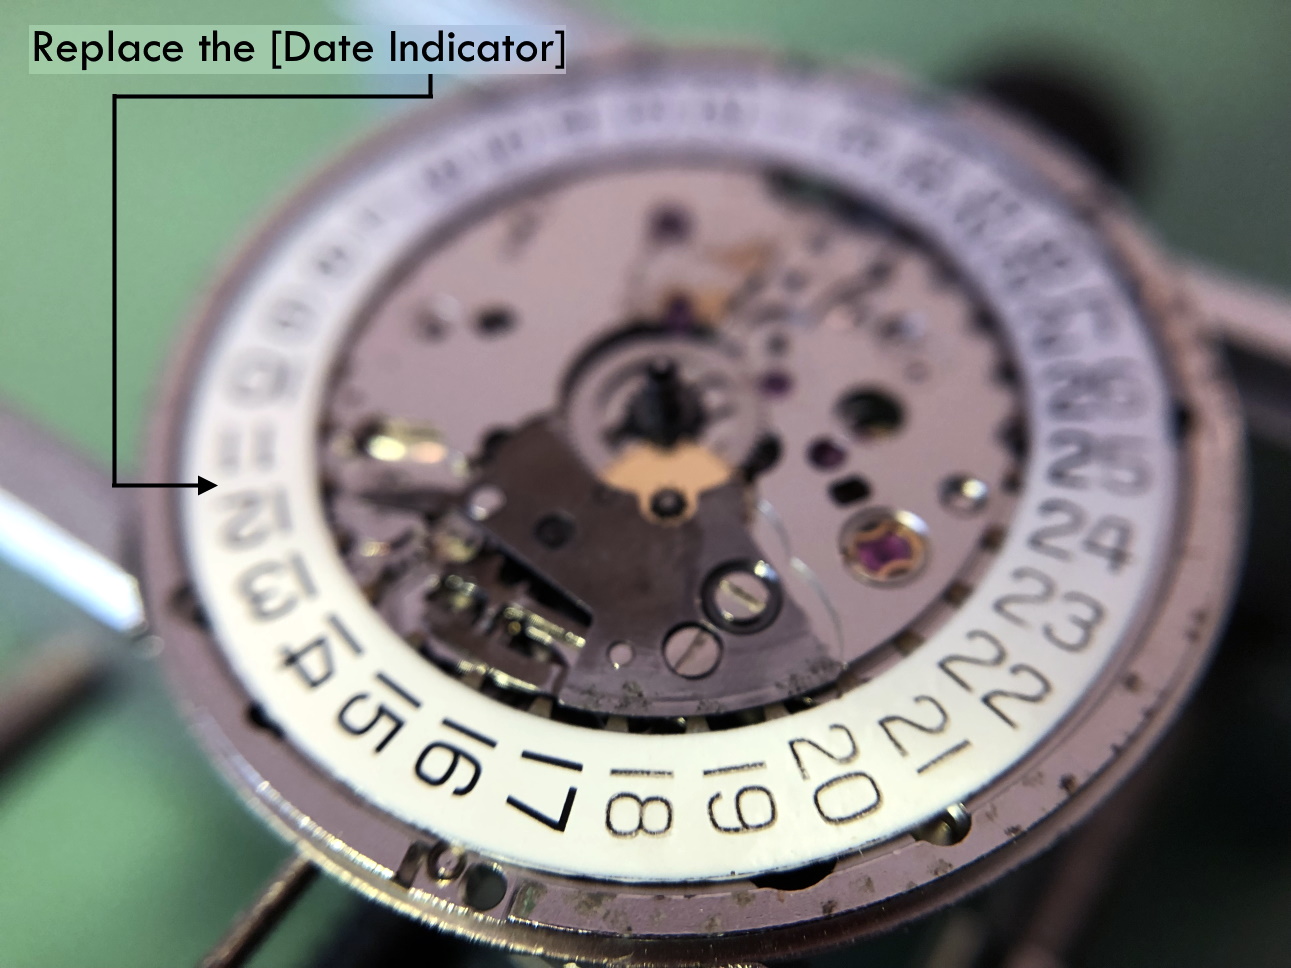
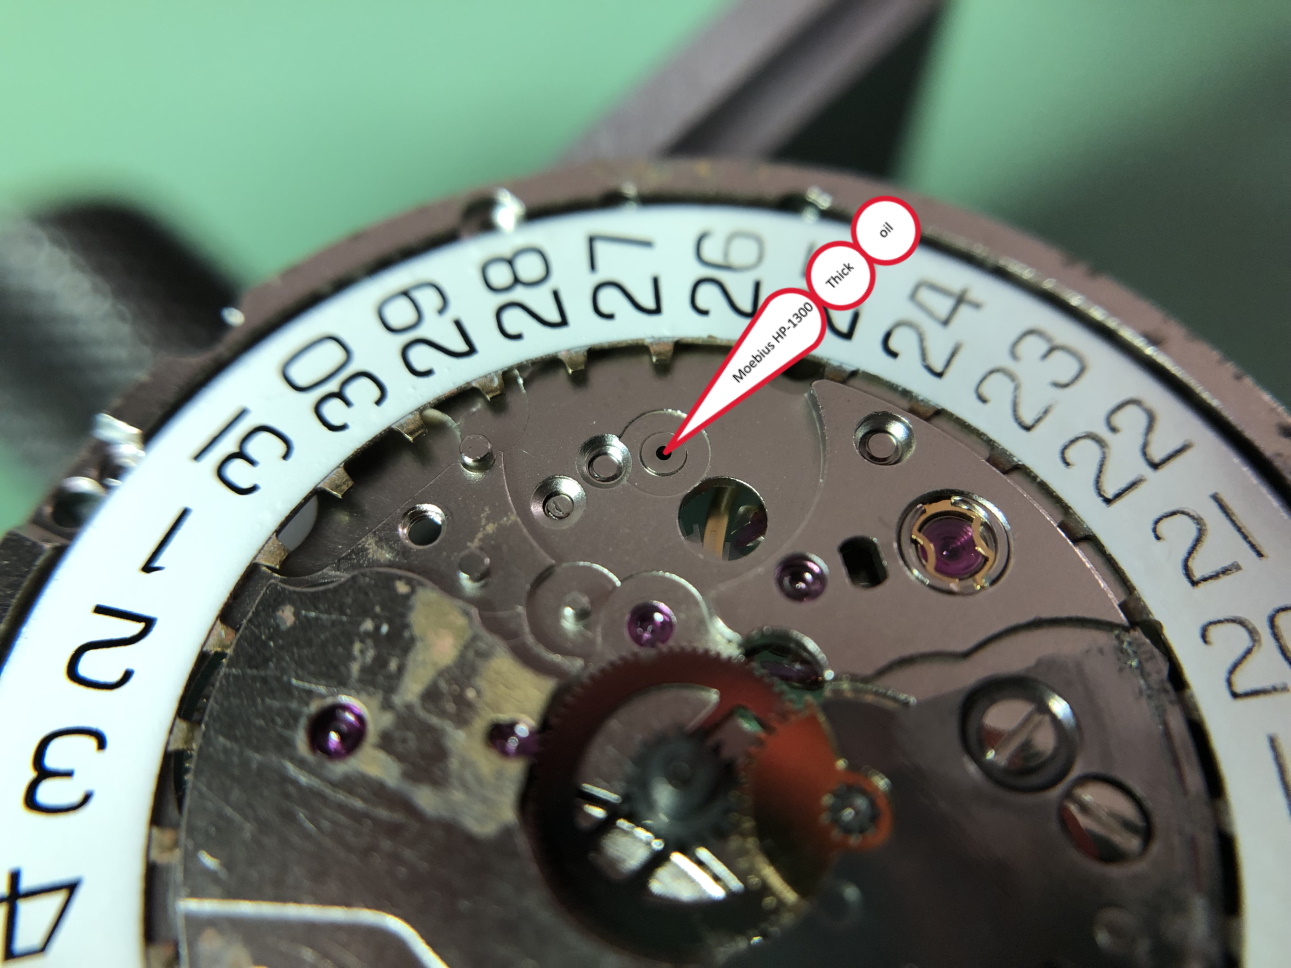
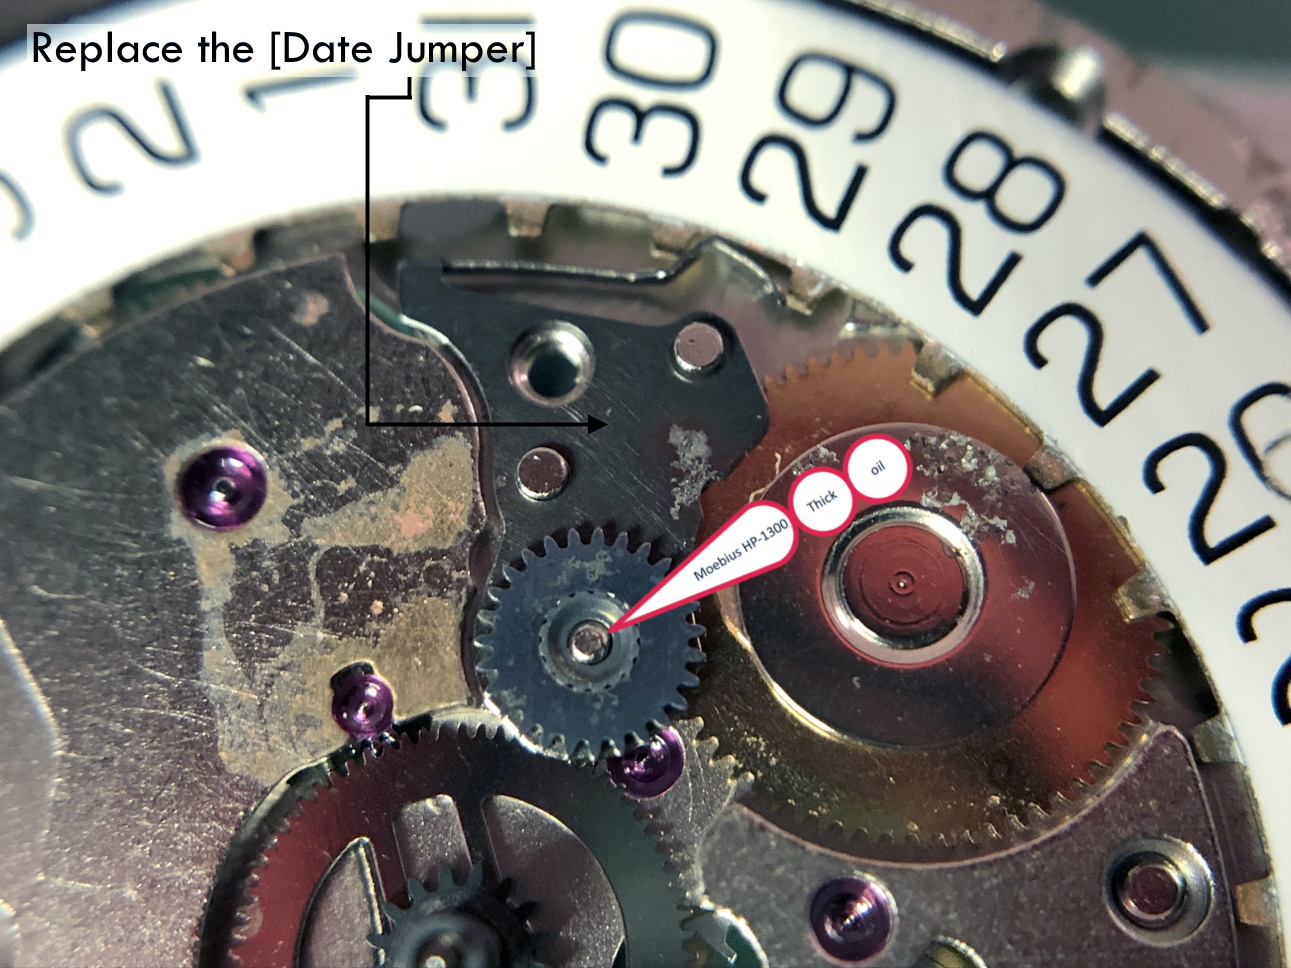
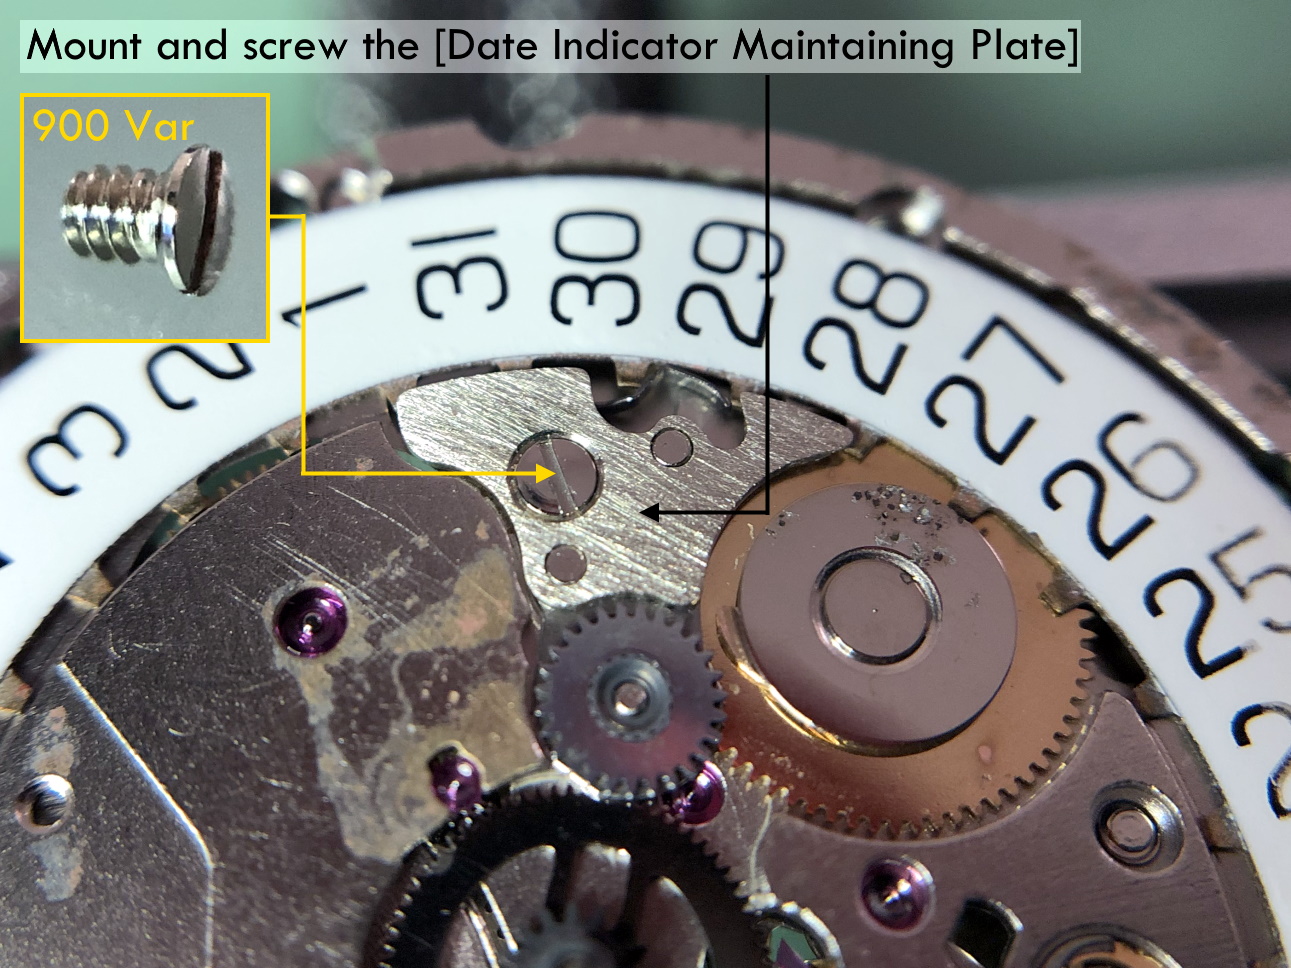
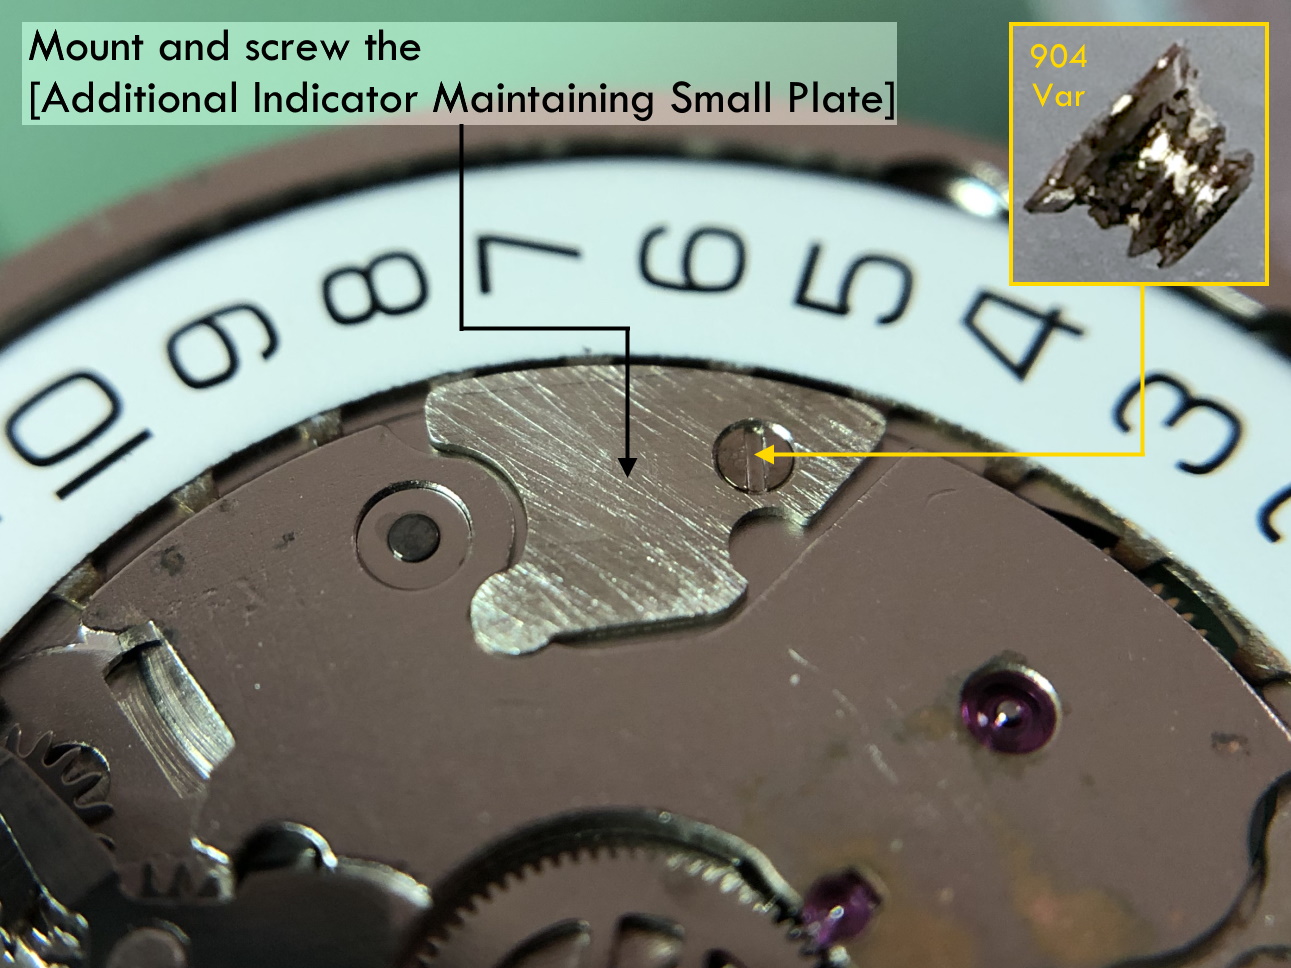
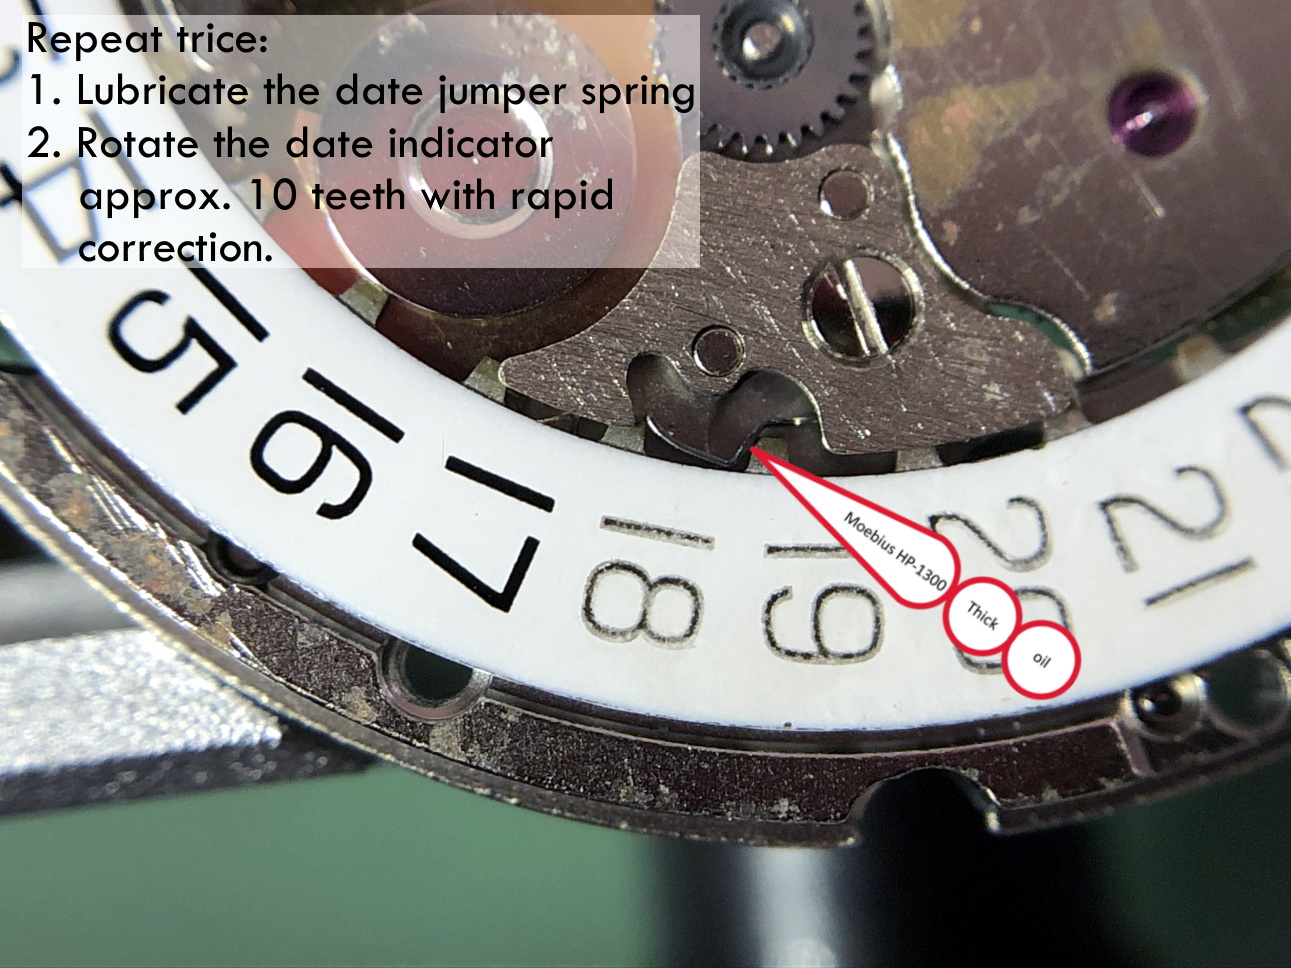
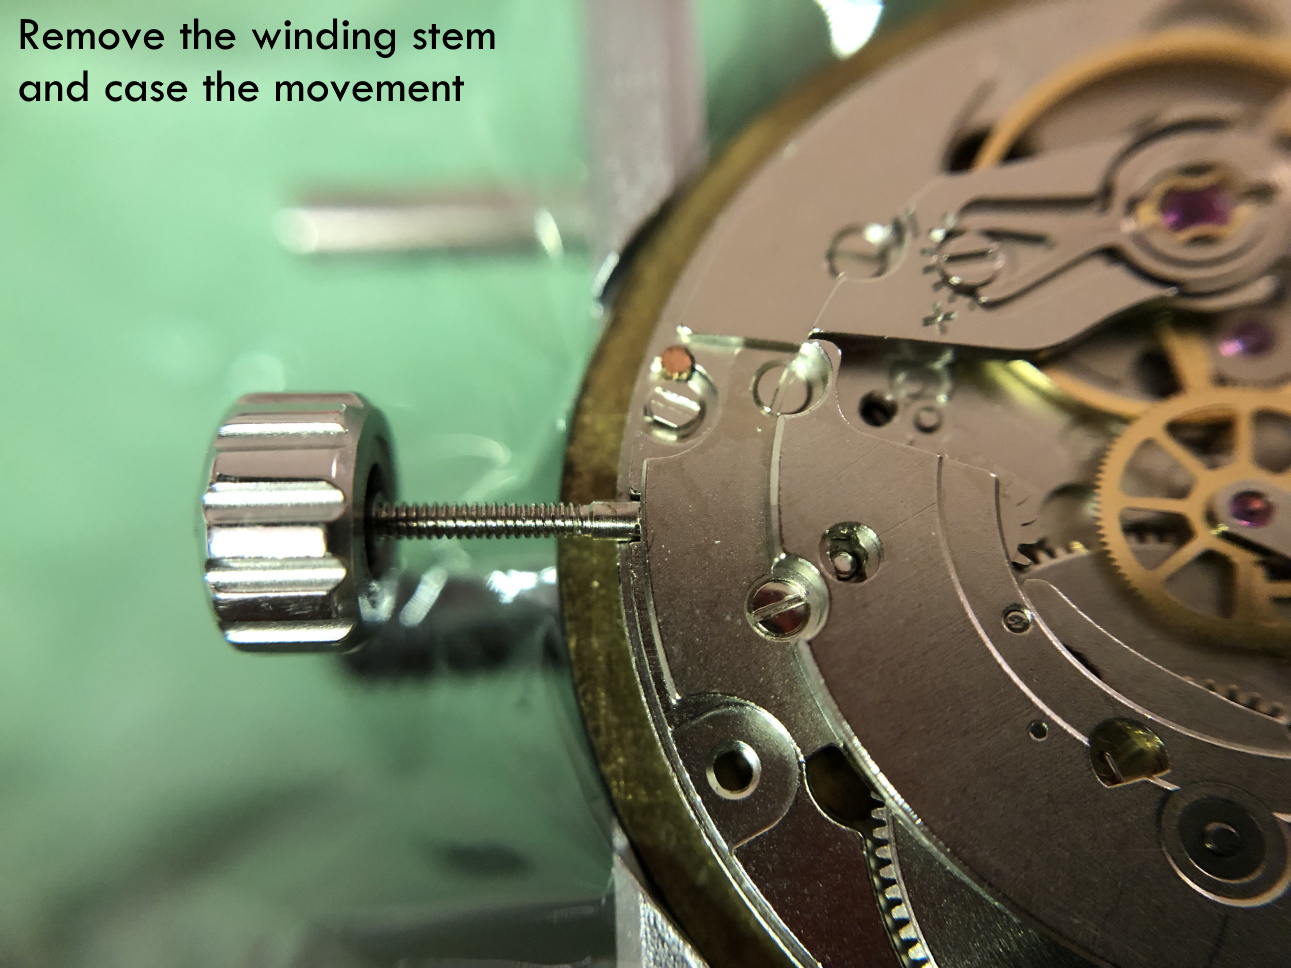
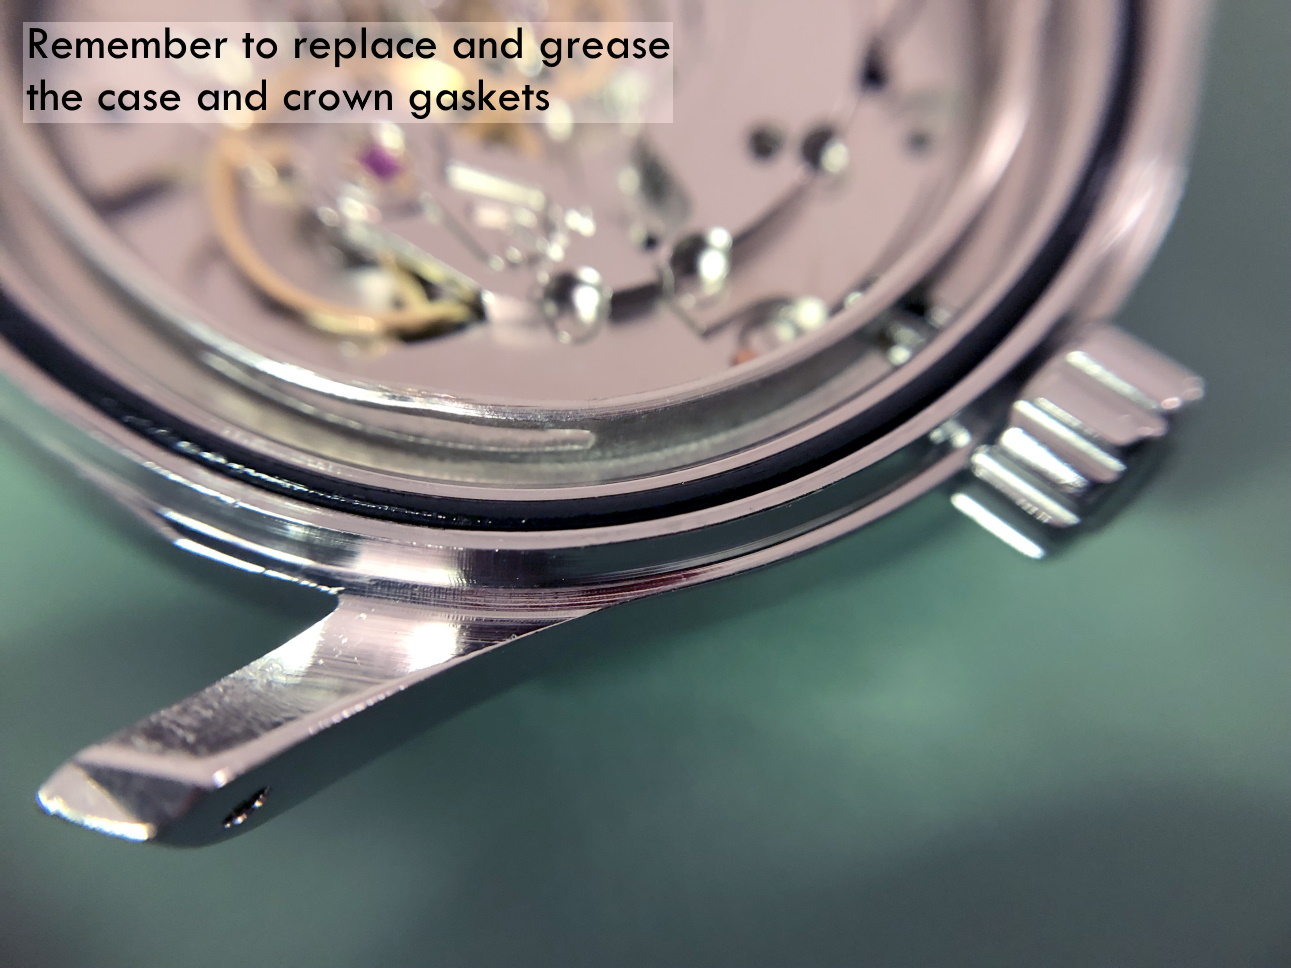
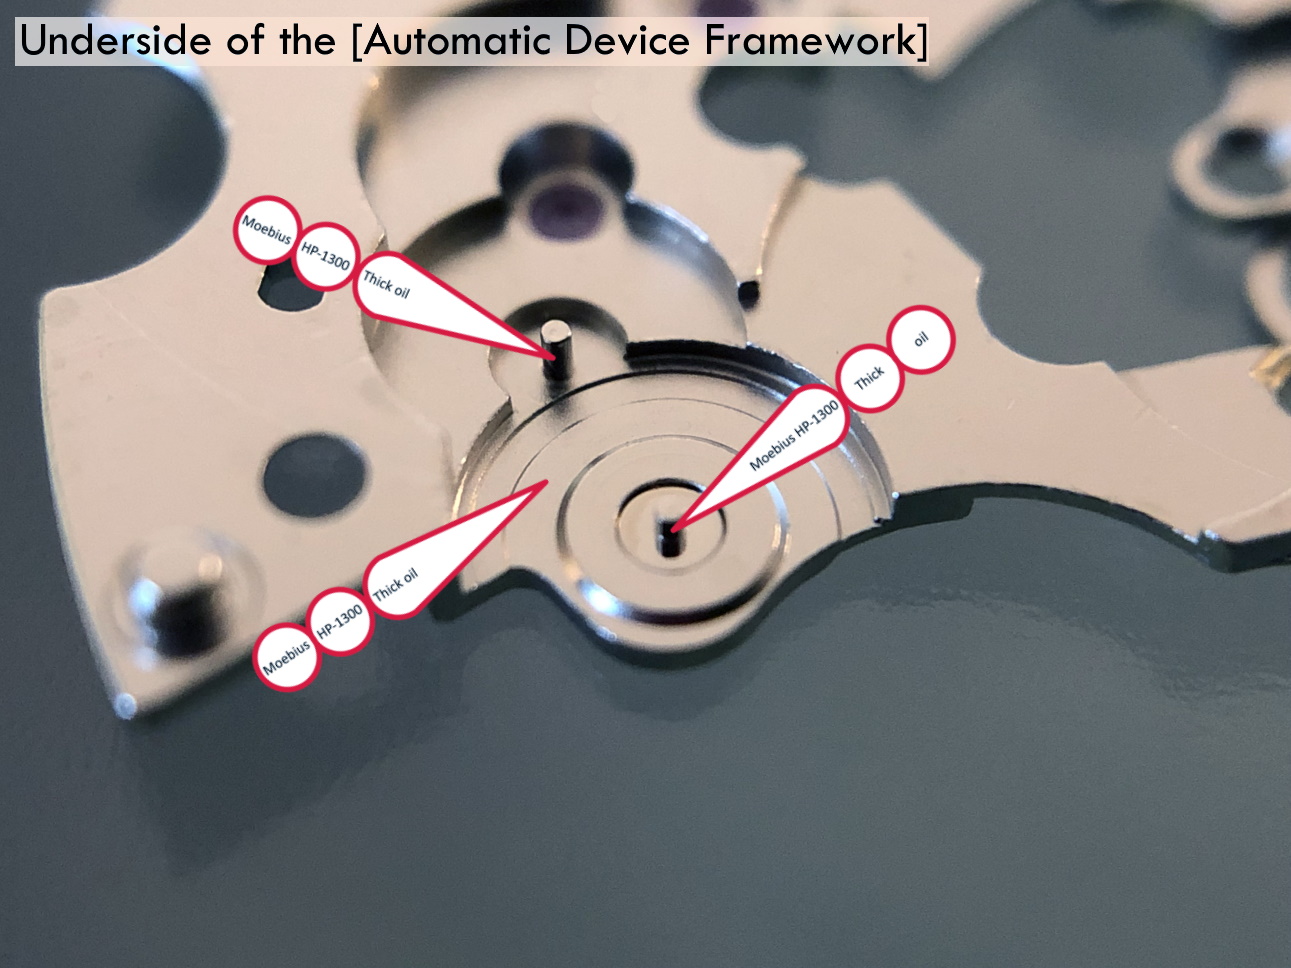
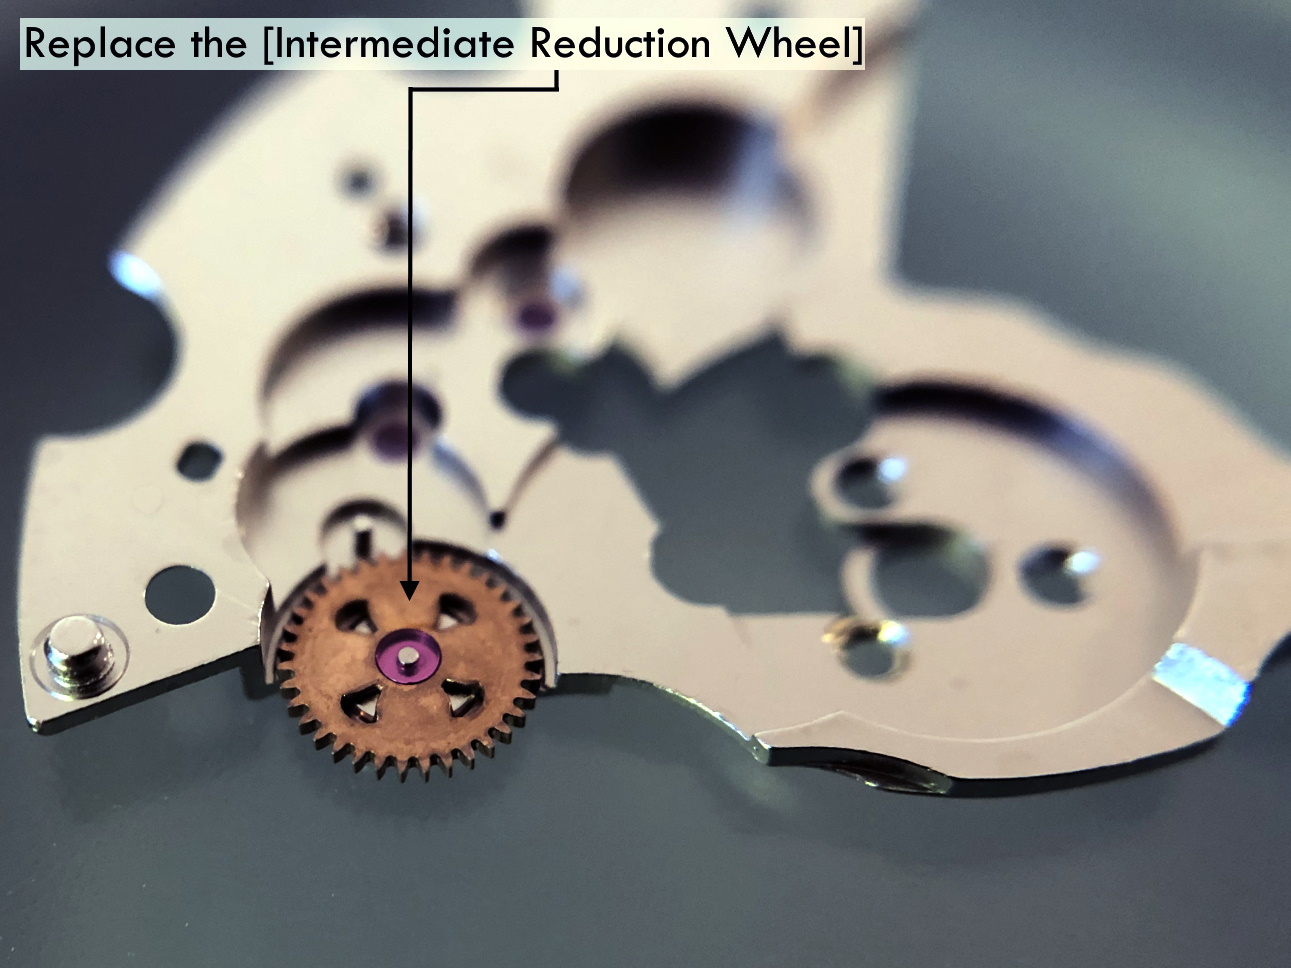
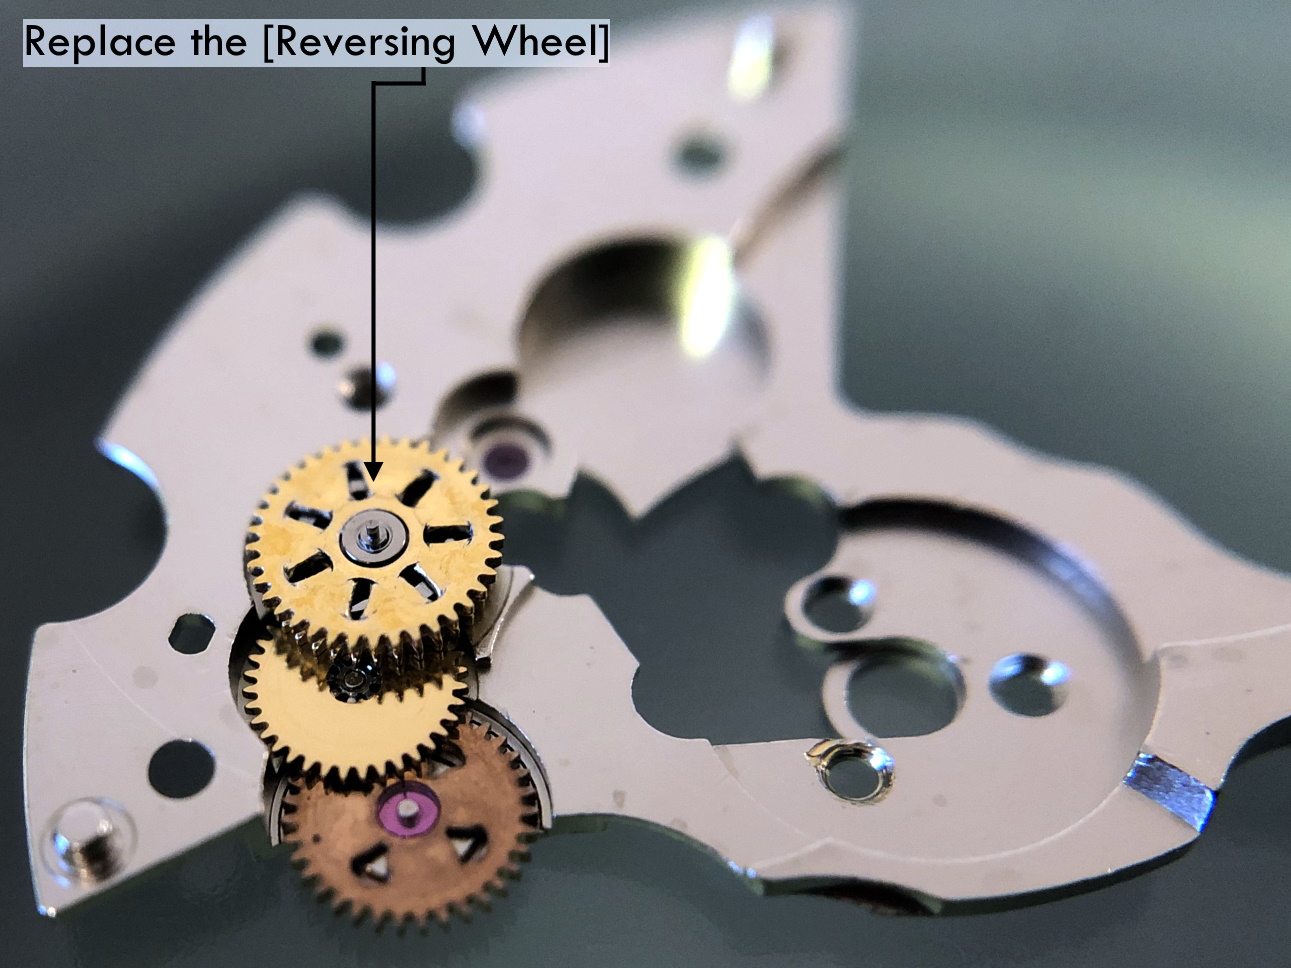
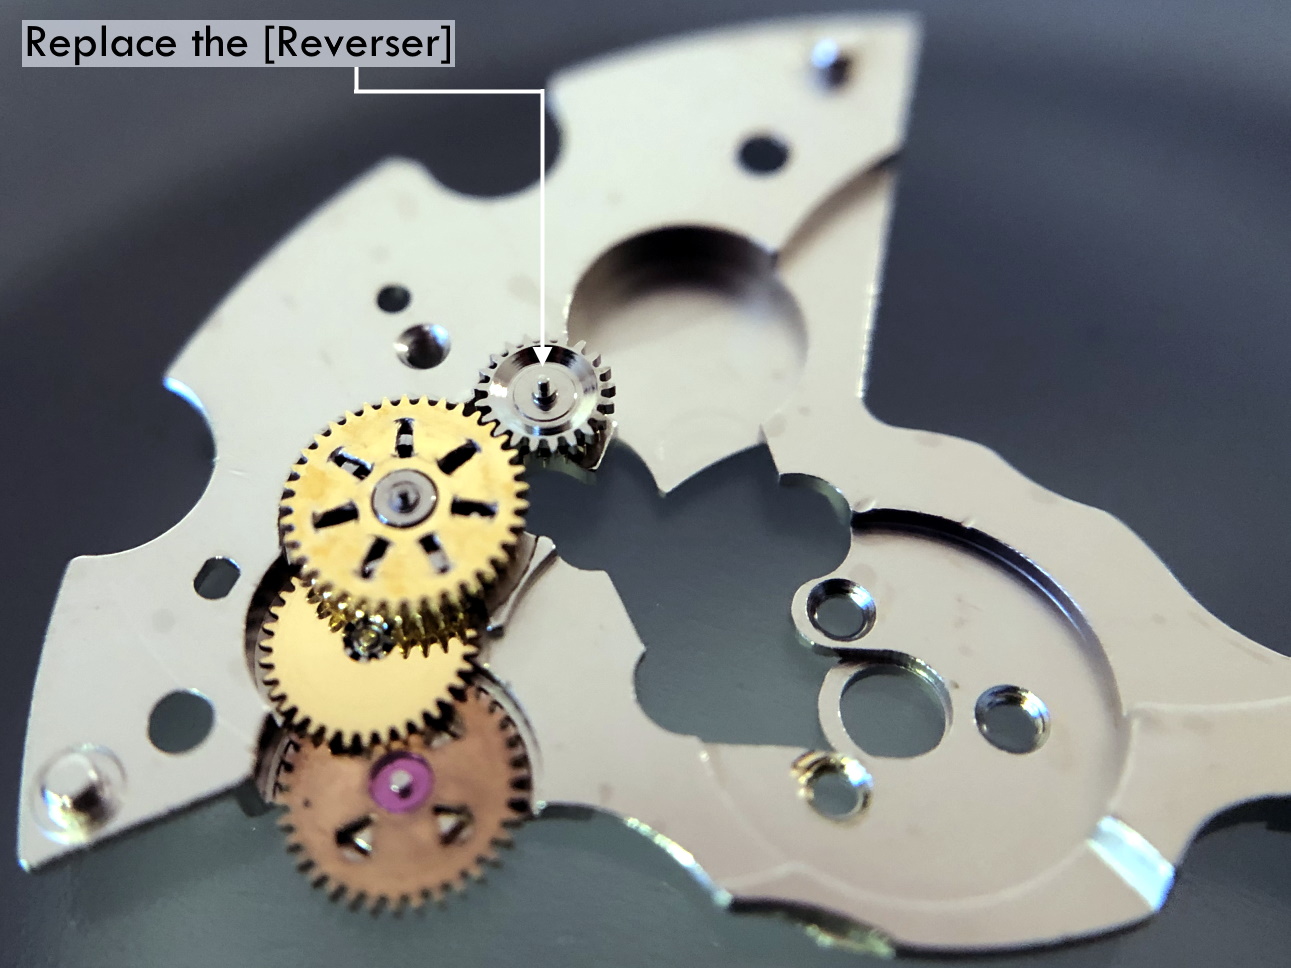
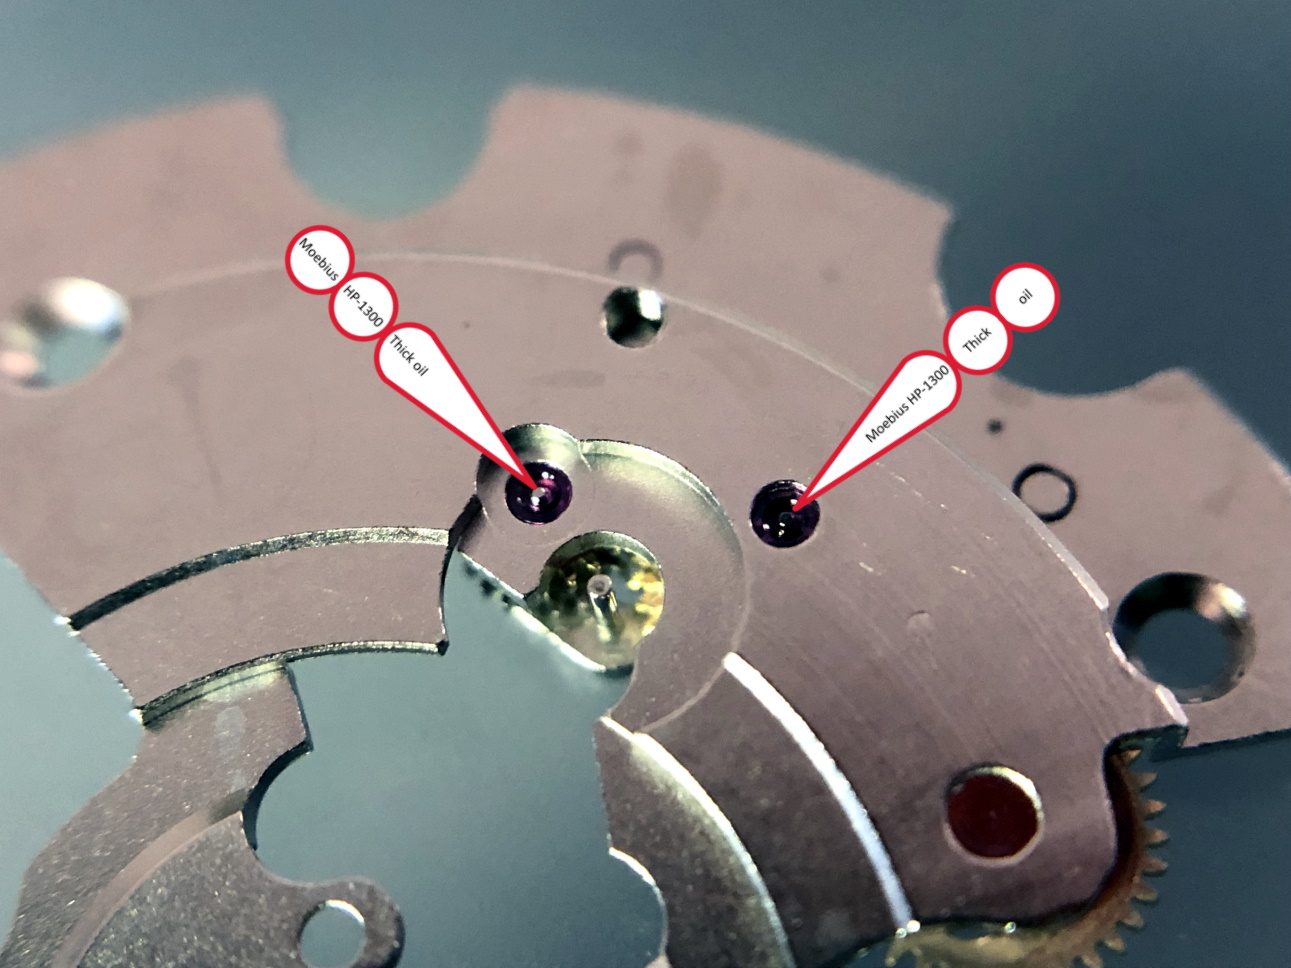
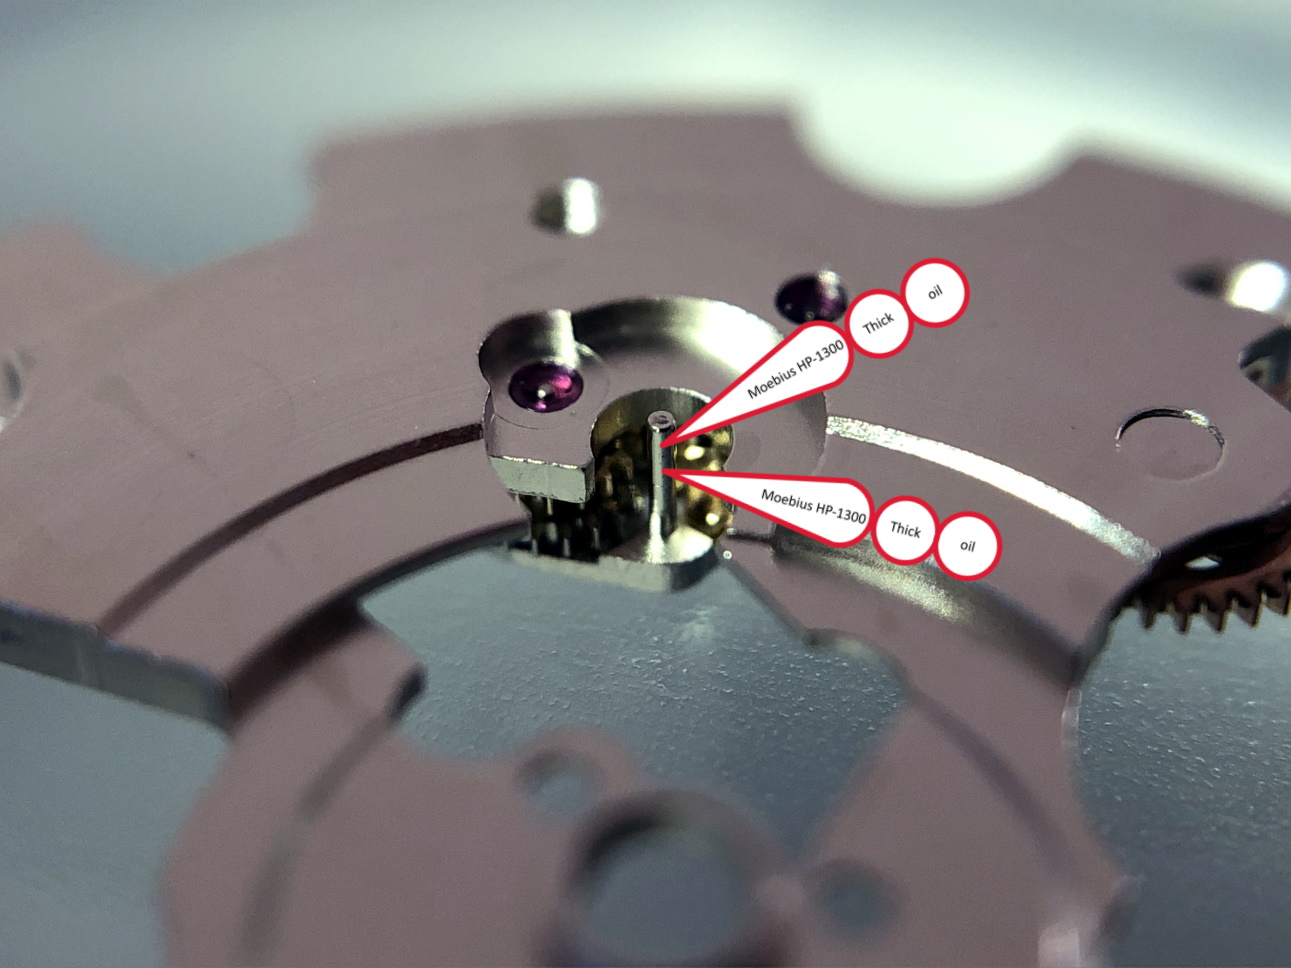
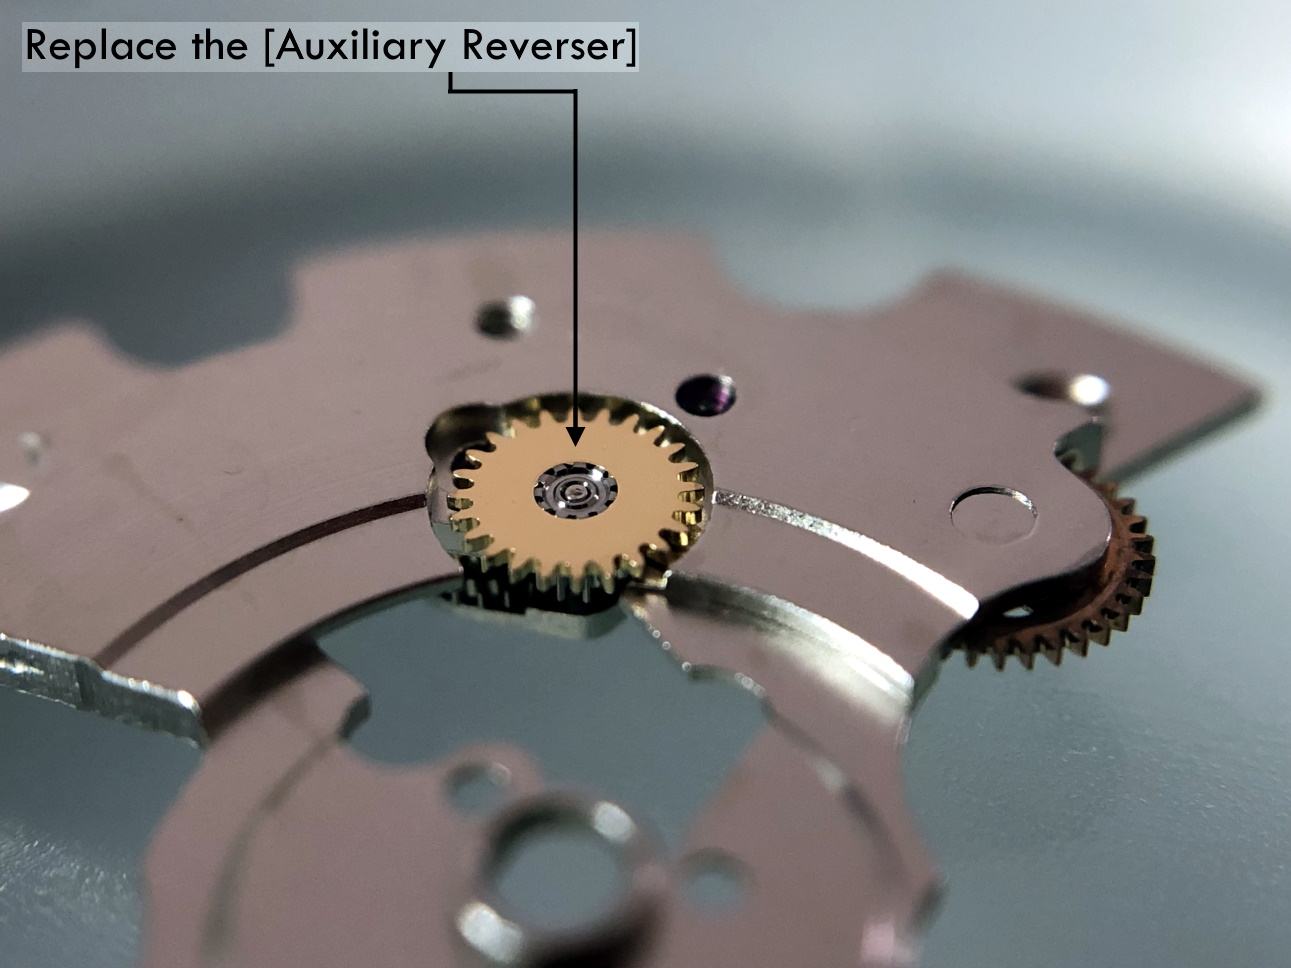
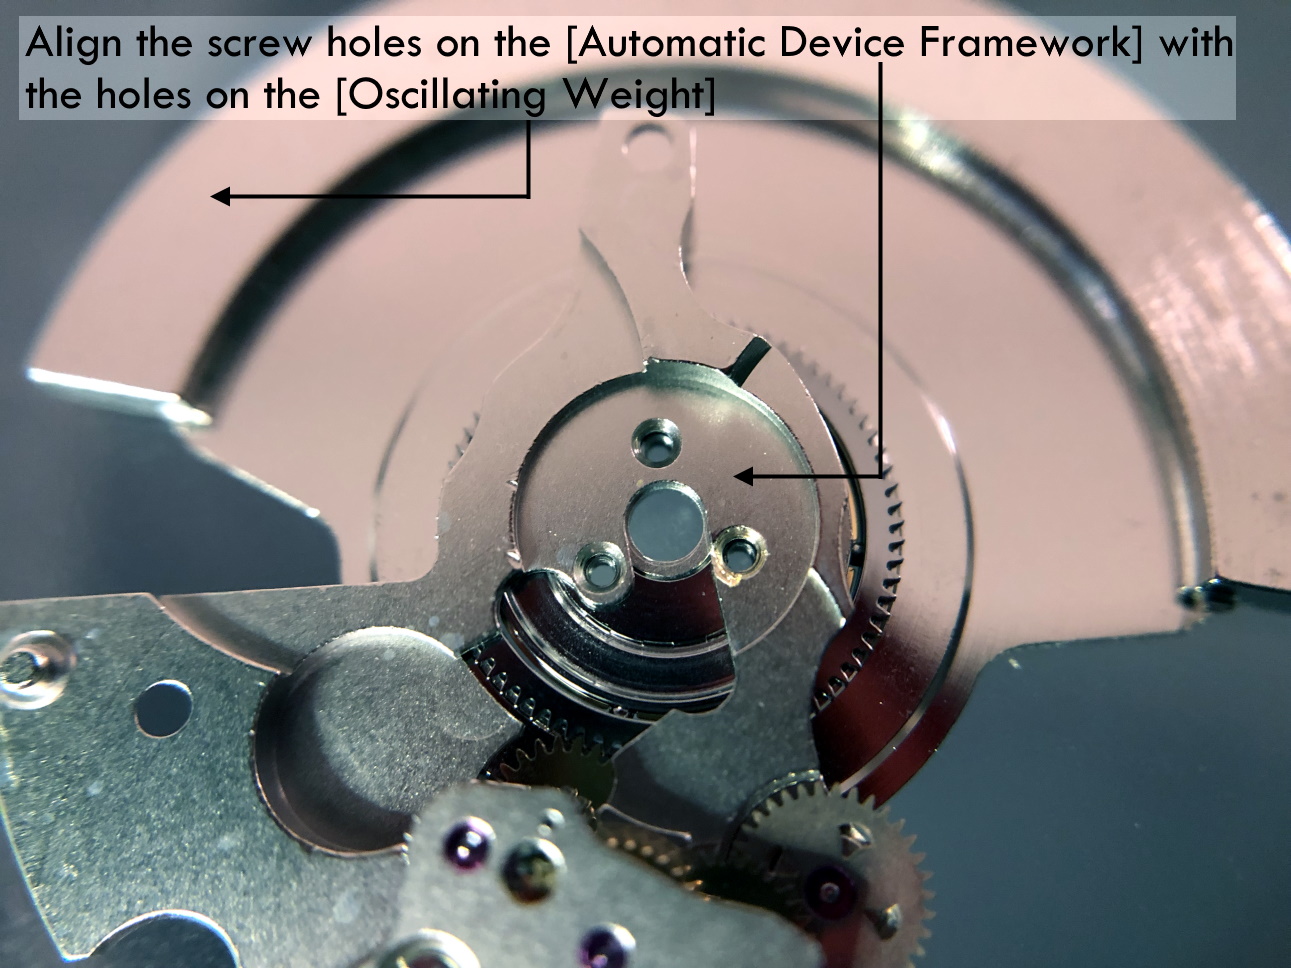
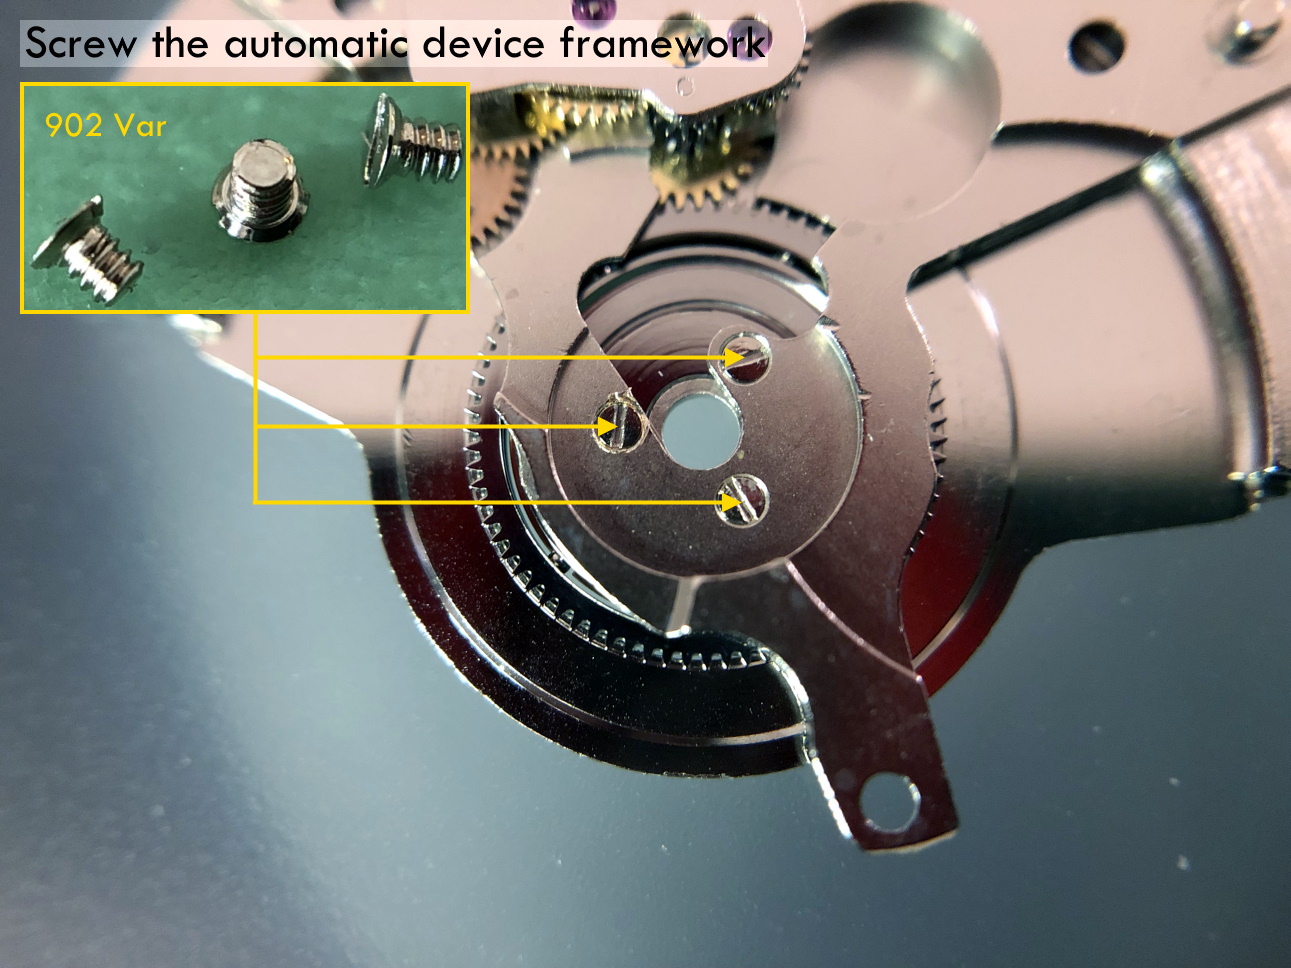
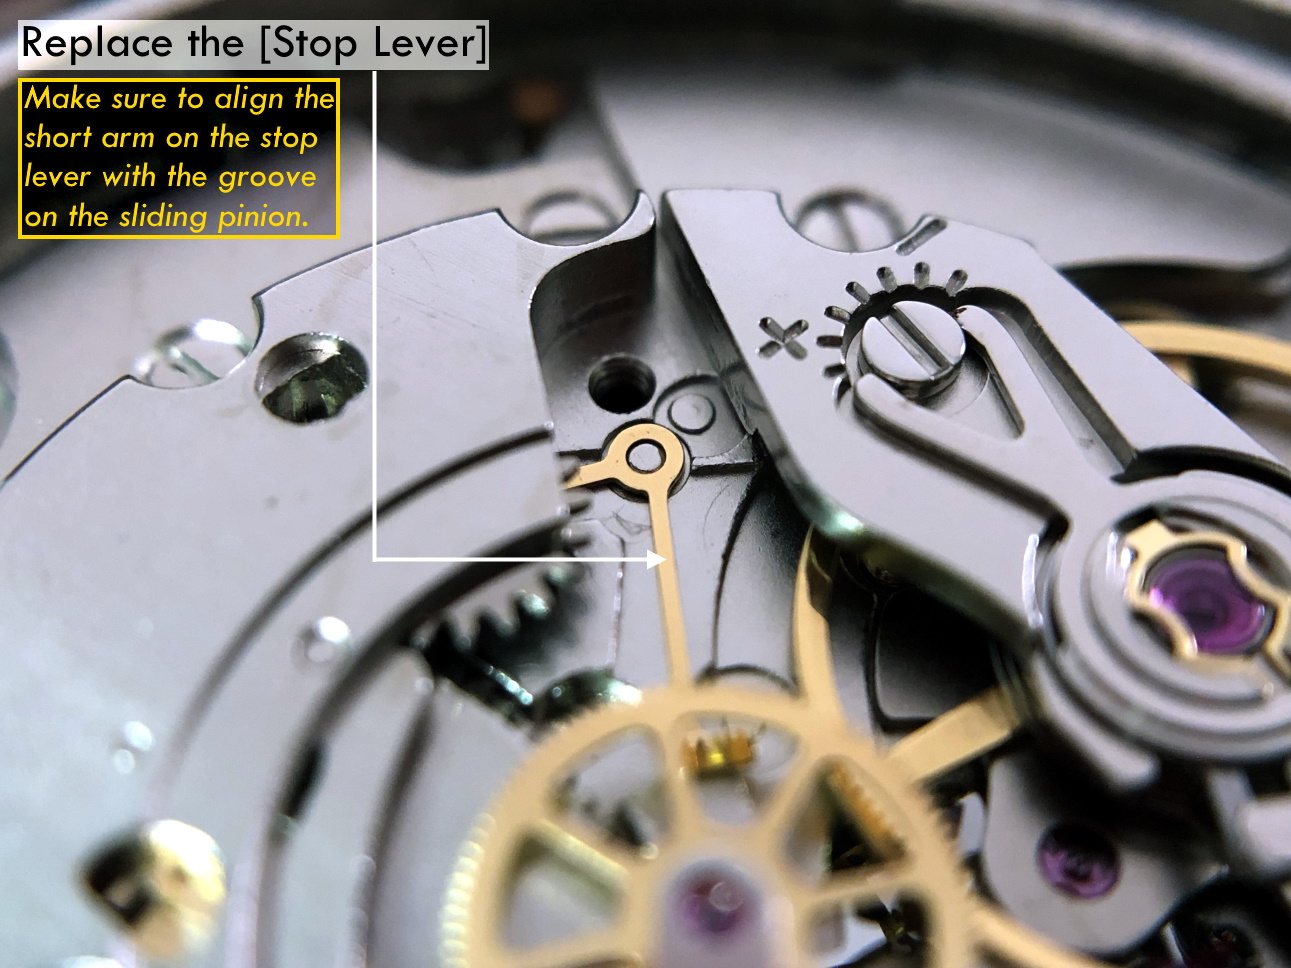
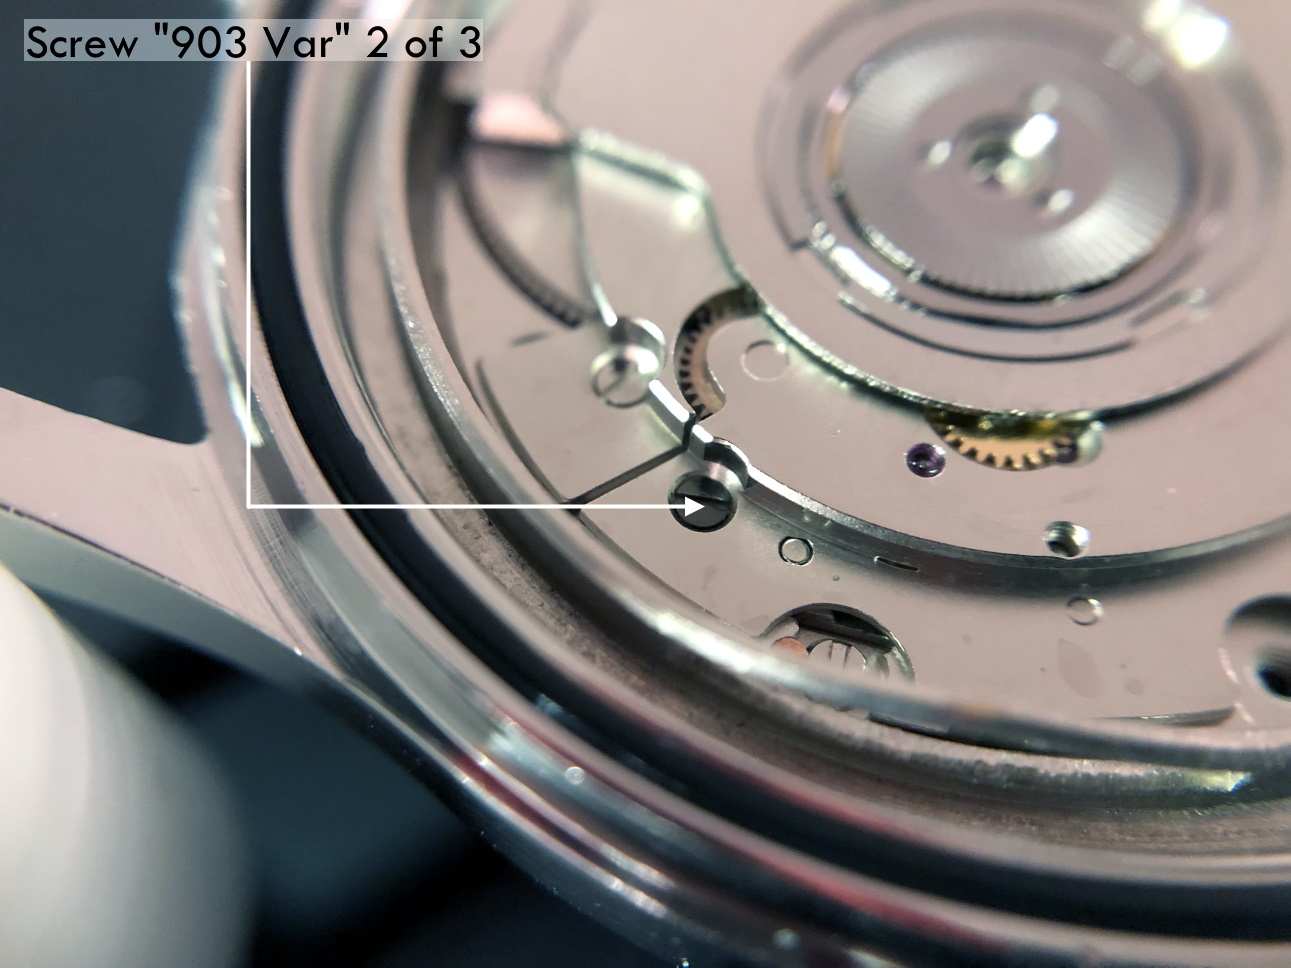
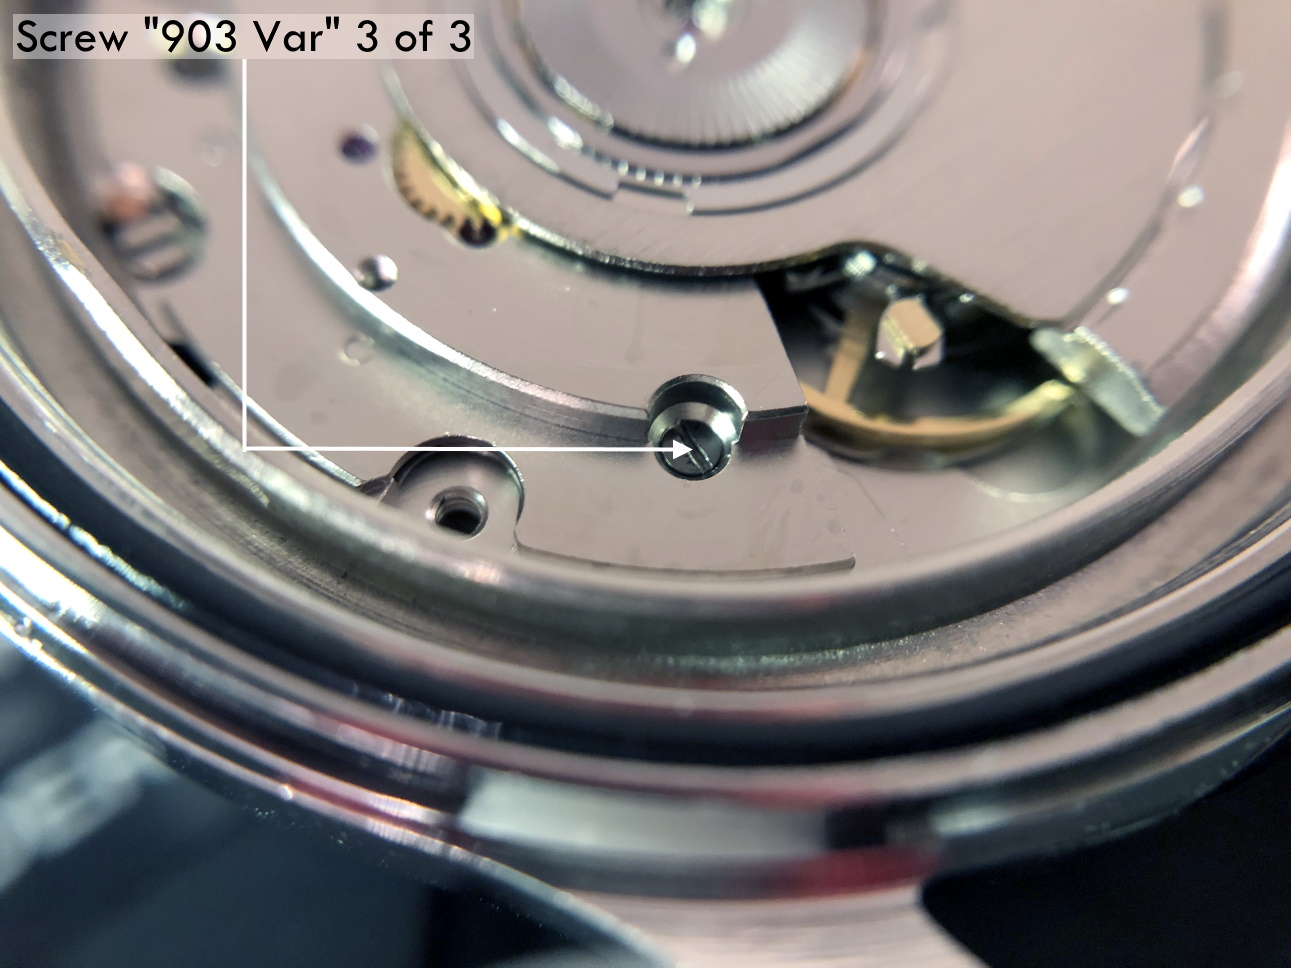
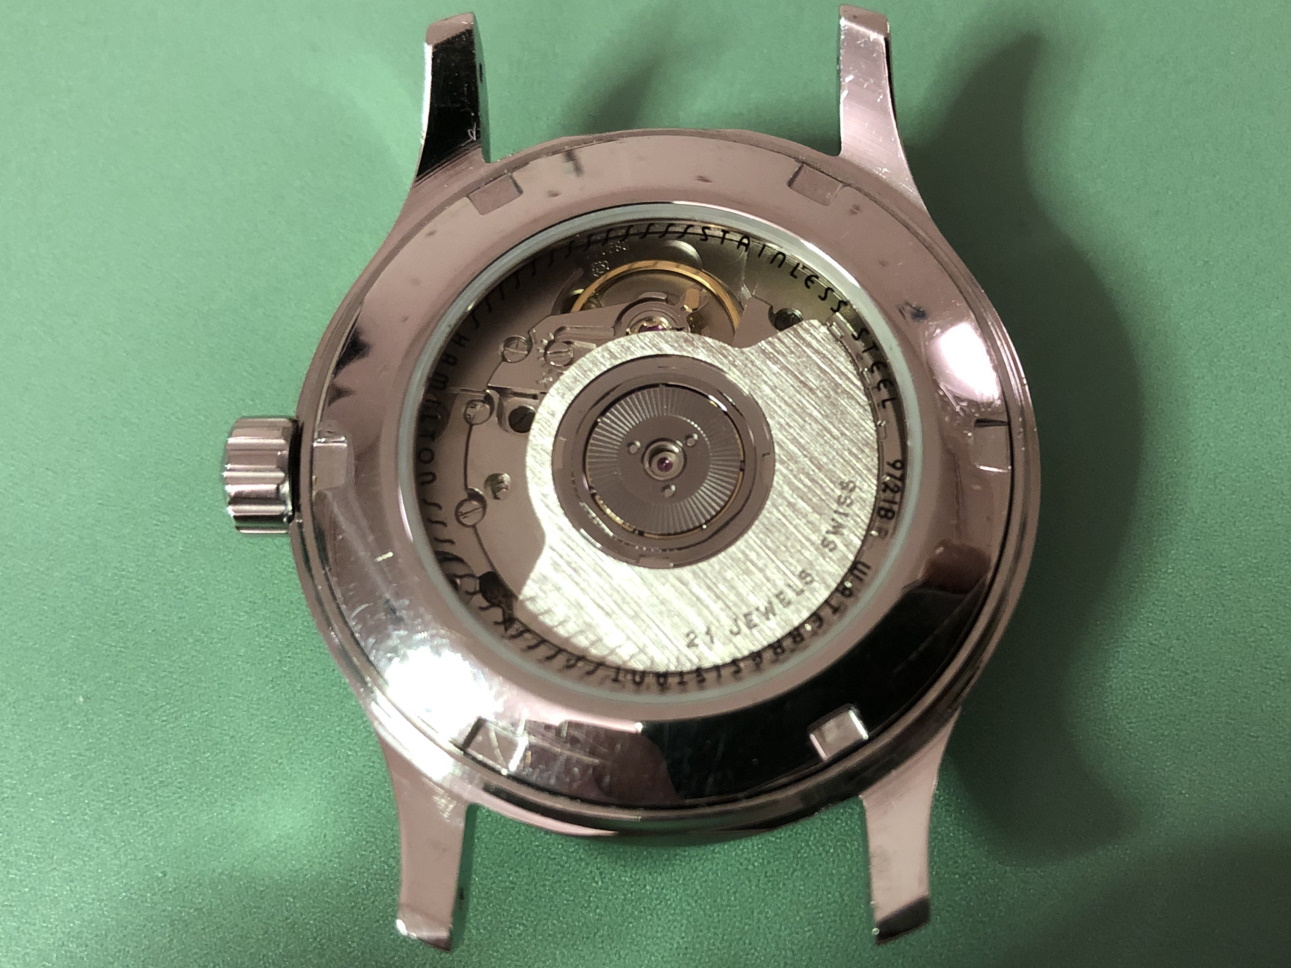
It is my impression that ETA's calibre 2892-A2 is usually found in more expensive watches and in luxury watches where oftentimes the movement has been modified. Mechanically, I don't think the 2892-A2 is superior to ETA’s classic 2824-2. Both movements have the same diameter (11 ½´´´ Ø 25.60 mm), the same frequency (28’800 A/h), and the same date complication. The decisive difference is the thickness where the 2892-A2 is one-millimetre thinner (3.6mm). That, combined with being a reliable and well-functioning movement, has made it popular for additional complications and alterations such as moon phase, power reserve display, co-axial escapement, chronograph modules from Dubois Depraz, and so on. The Swiss Sellita Calibre SW300-1 is, as far as I understand, an excellent clone of the 2892-A2. There is also a Chinese clone, the Seagull Calibre ST1812 (reviewed by @Markin the video “Chinese eta 2892-A2 Clone - Service and Review - Seagull ST1812”), and possibly others. Mark has made a playlist of videos that excellently demonstrate how to service the ETA 2892-A2 movement. The playlist is named: "Omega 2500 Co-Axial Stripdown and Service (ETA 2892-A2)" I recommend Mark’s playlist for several reasons. Among other things, he shows how to mount the barrel bridge safely and how to hold the minute train bridge with your tweezers to easily get it into place on the main plate (which I found a bit fiddly). In addition, he shows and compares the parts that are all too easy to mix up. One thing that is not shown in Mark's service video is that the Incabloc setting (chaton and cap jewel) for the balance and the main plate have different diameters. The main plate Incabloc setting diameter is smaller than that of the balance. The reason this is not shown in the video is probably that Mark removes, cleans, and lubricates the Incabloc settings one at a time after he reassembles the balance, so he wouldn’t notice. Anyway, don't mix up the two sets! Something that I appreciate about Mark's videos in general and that sets him apart from basically all other watch repairers on YouTube is that he doesn't continuously babble in his videos but mainly talks to make clarifications. I enjoy those segments of silence where I can just focus on the work being done. When I started my service, I decided to follow Mark's disassembly which worked perfectly. But for the assembly, I made up my mind to follow ETA's technical documentation to the letter. It turned out to be a mistake. In ETA's documentation, the assembly of the movement begins with the keyless works, then the train of wheels and then the barrel bridge. The crucial problem with this arrangement is that it is physically impossible to mount the barrel bridge if the train of wheels is already mounted. It is also very fiddly and difficult to baste the end of the winding stem into the winding pinion hole because the hole for the winding stem in the main plate is both open and tapered and therefore does not hold the winding stem. Mark takes a considerably more hands-on approach. He begins the assembly with the barrel bridge. He then mounts the keyless works whose constituent parts (the winding stem, the winding pinion, and the sliding pinion) are supported by the underside of the barrel bridge, making it considerably easier to get the keyless works in place. After I revised my strategy, this service walkthrough now follows Mark’s approach. It surprises me, but it seems like no watchmaker has proofread ETA's technical documentation. Alternatively, ETA follows an established practice and expects those using the documentation to understand that the assembly order in the document is not significant. I am also somewhat sceptical of ETA's recommendations regarding lubrication. Where we traditionally use grease, for example in the keyless works, ETA chooses mainly oil (HP-1300). I guess that ETA treats all parts of the movement with epilame (Fixodrop) and that oil may then be a better alternative. For better or for worse, my service walkthrough follows ETA's lubrication recommendations. As usual, I would like to remind those of you with no previous experience in watch servicing that this service walkthrough should not be seen as a tutorial on how to service a watch movement. A lot of tools, consumables, training and know-how are required to succeed. Fortunately, there are several excellent resources and watchmaking schools online. When looking through the pictures you’ll see that a few screws and plates are either marred or have pits and grooves in them. None of this is my doing but is either the result of rust (that I removed) or the doings of a less scrupulous repairer than myself. Finally, someone may ask, “Why to bother to do a service walkthrough with pictures when there is such an excellent video?" The main answer to the question is that I find it interesting and fun, and I see it as a complement to Mark's service video. Using this walkthrough, you can quickly scroll through the pictures to read what the different parts are called and where and in what order they should go, what the screws to be used look like, and to read ETA's lubrication recommendations. So, I hope you’ll find this ETA 2892-A2 service walkthrough useful, now or in the future. *** ETA Calibre 2892-A2 Disassembly *** ' *** ETA Calibre 2892-A2 Assembly ***


 1 point
 -
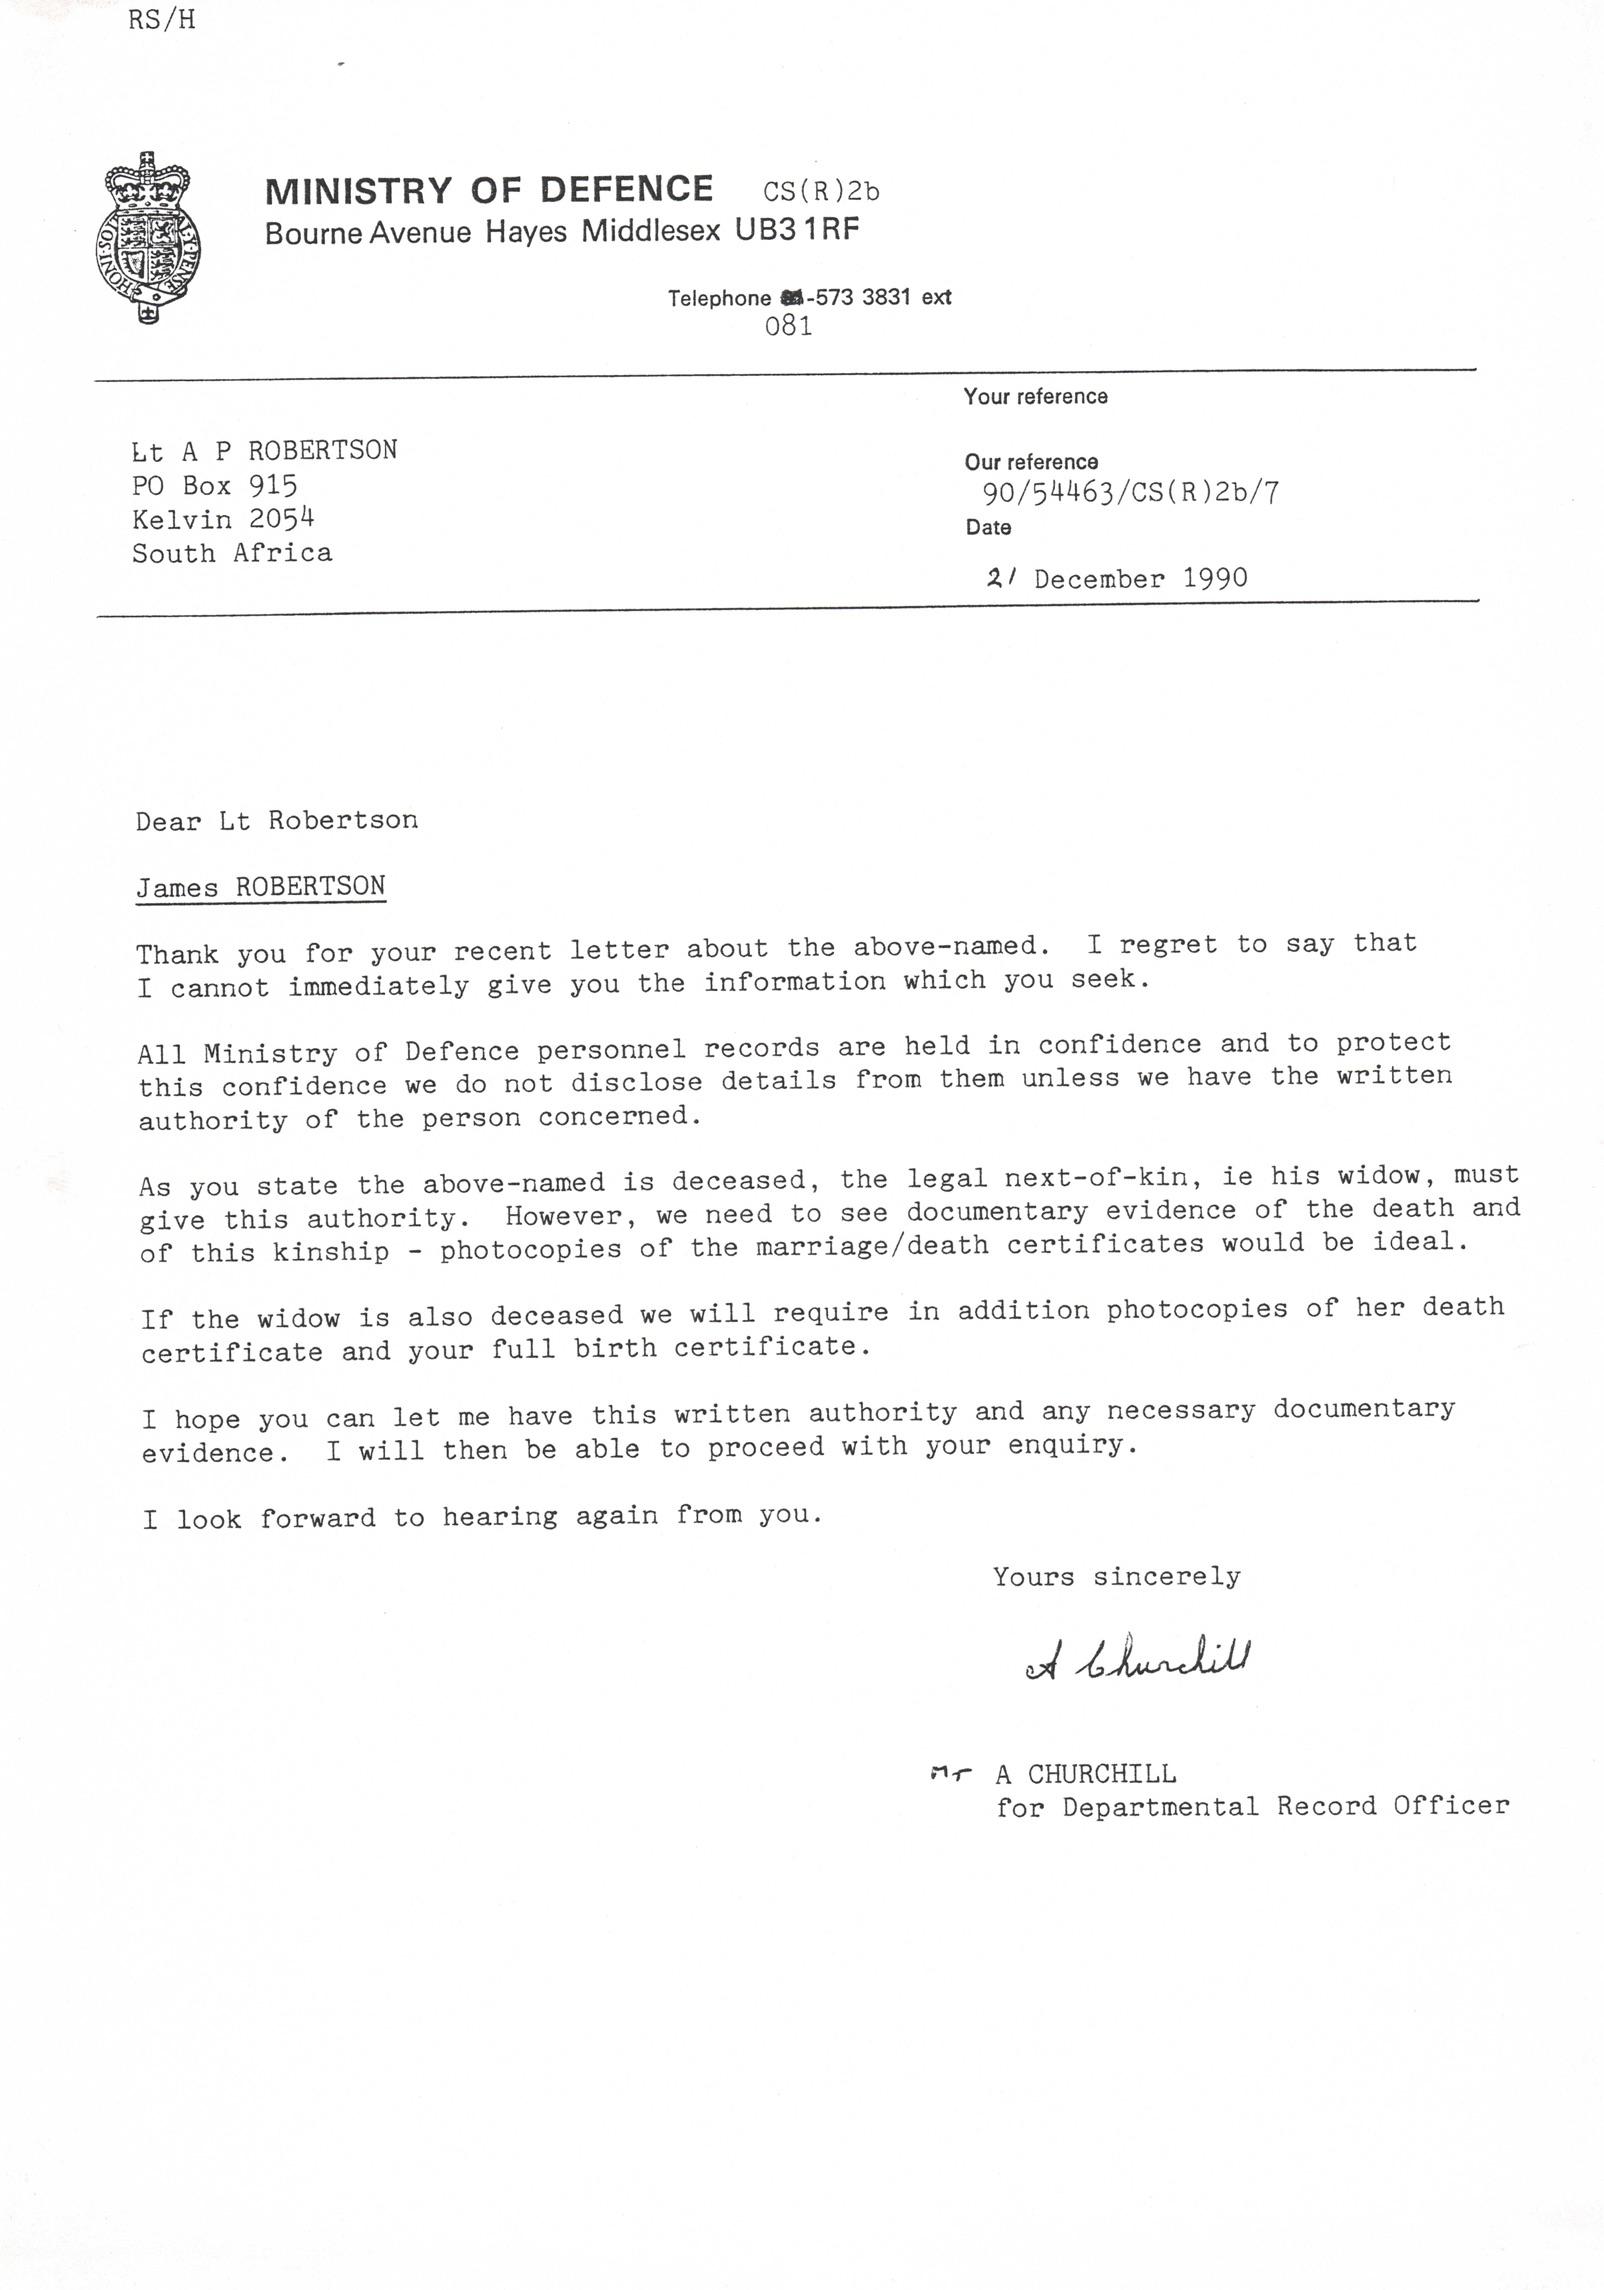
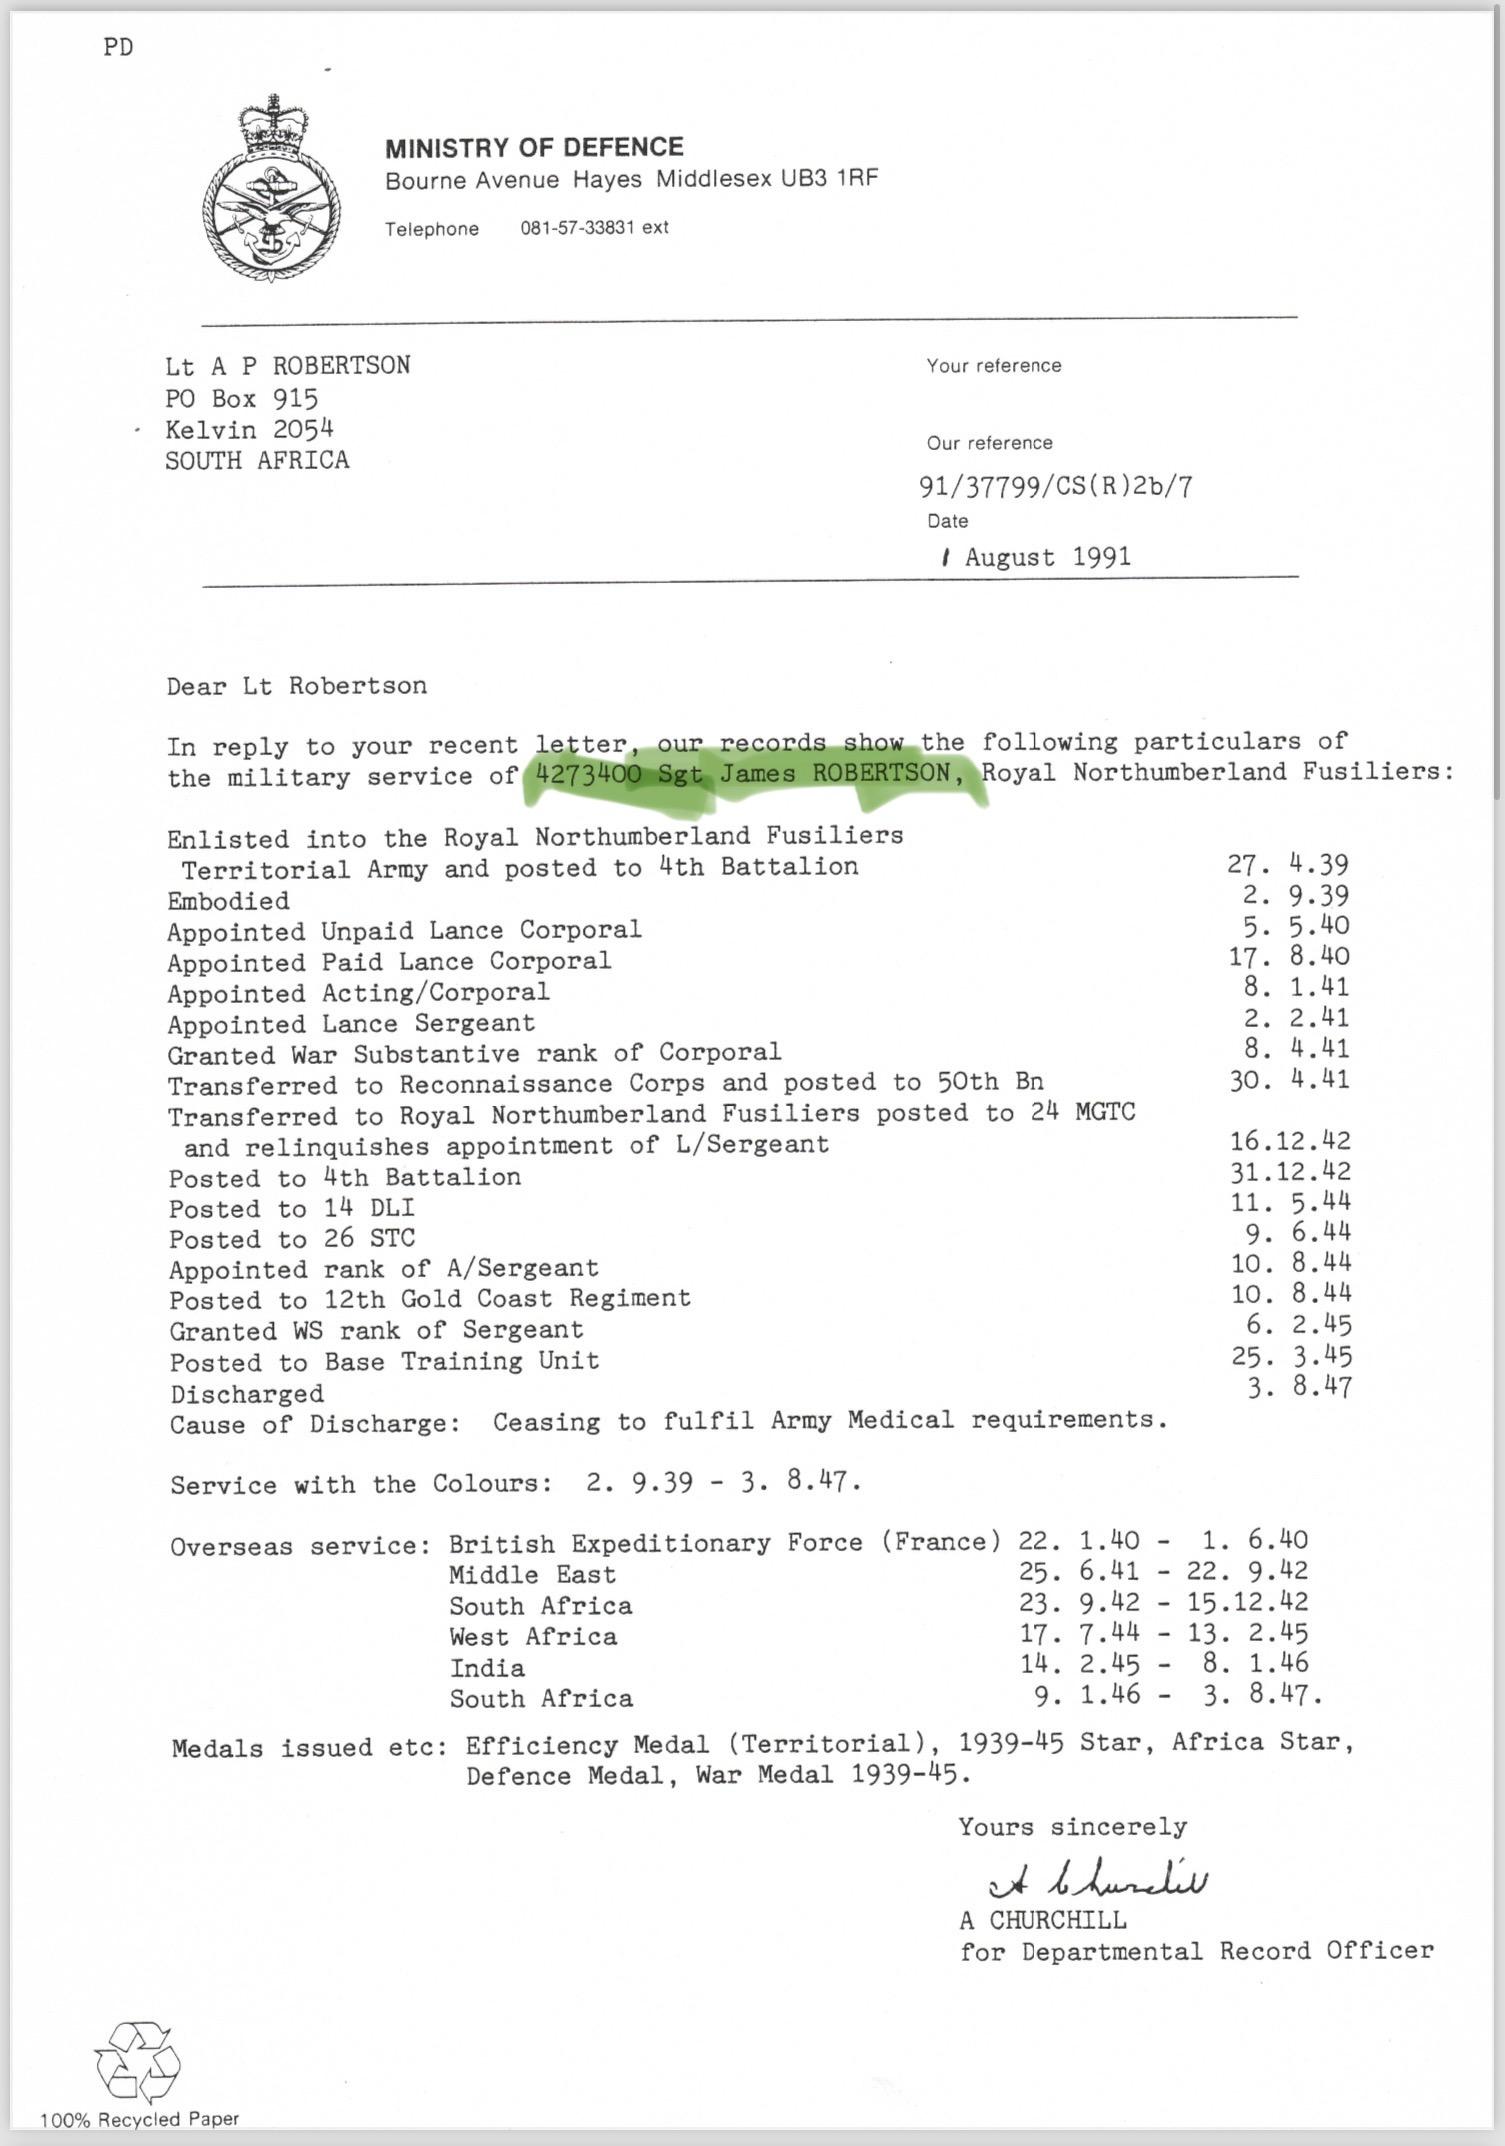
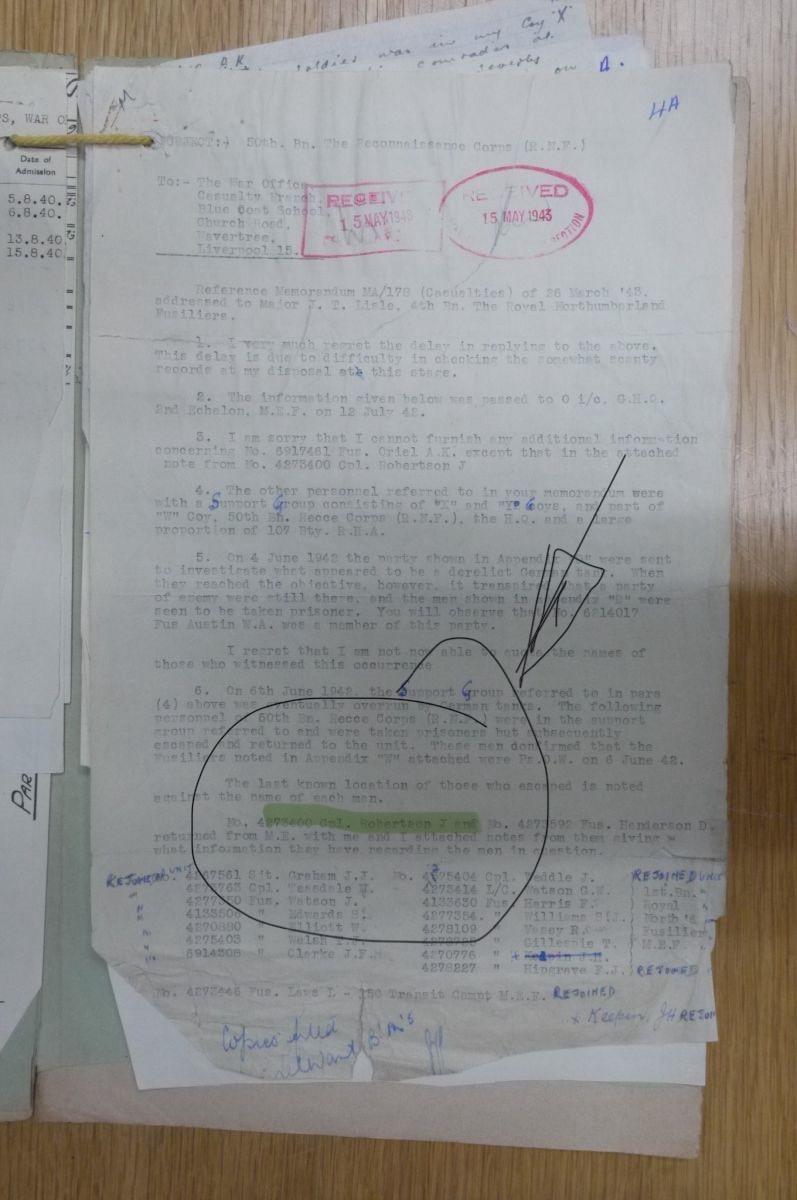
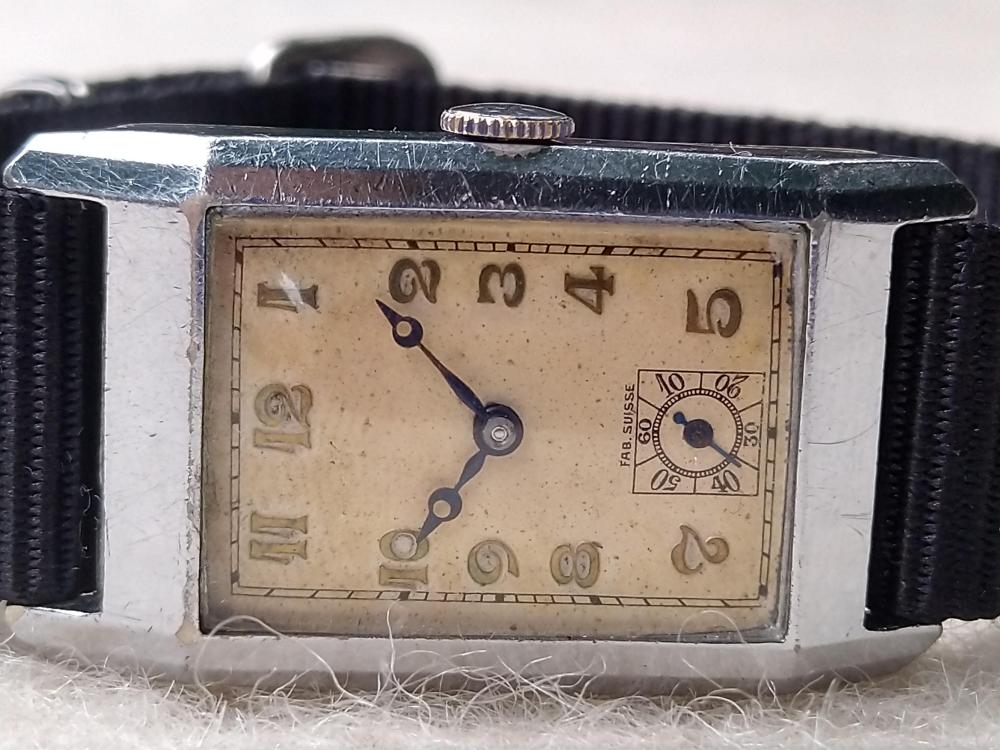
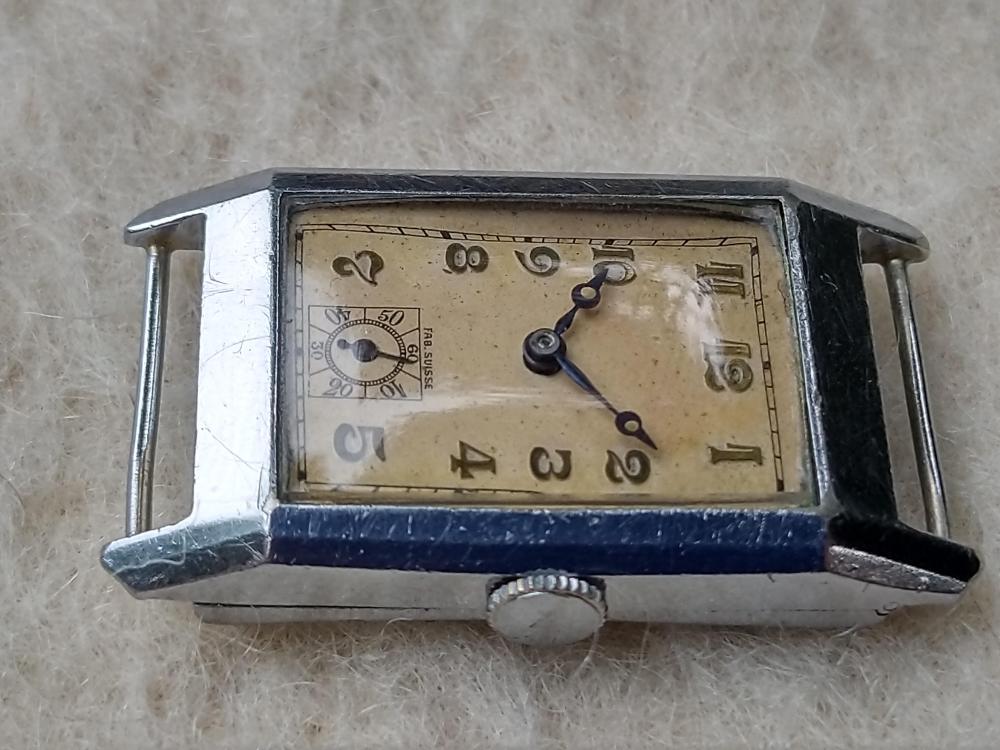
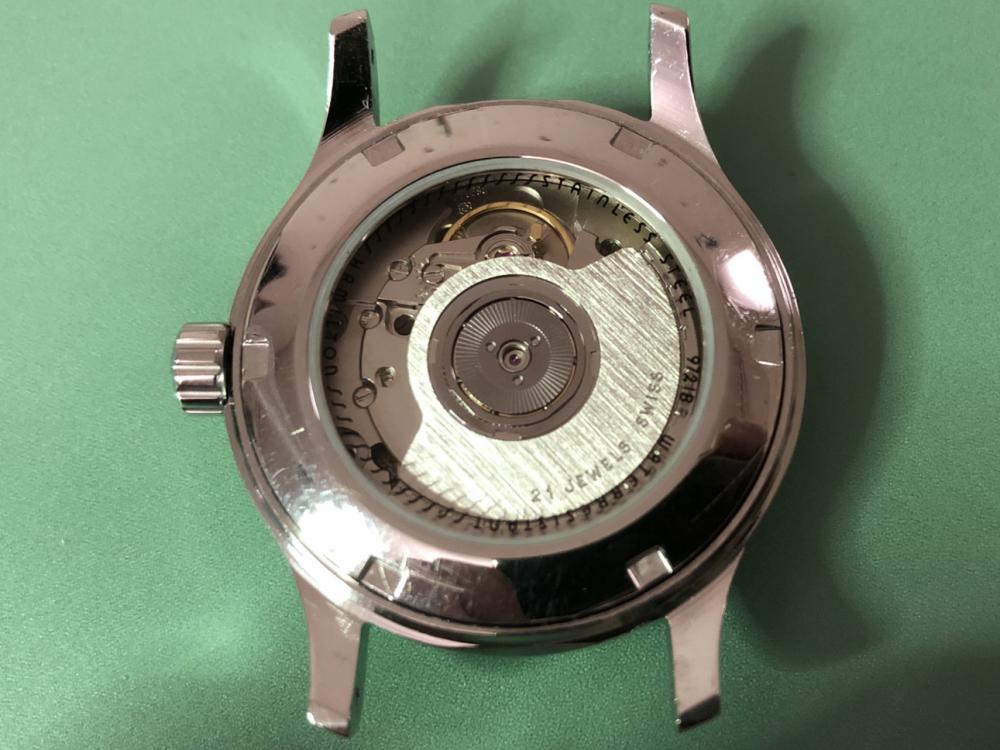
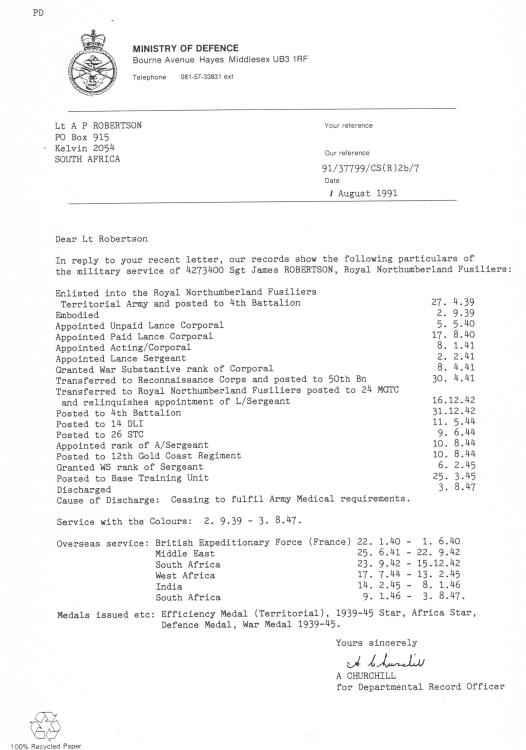
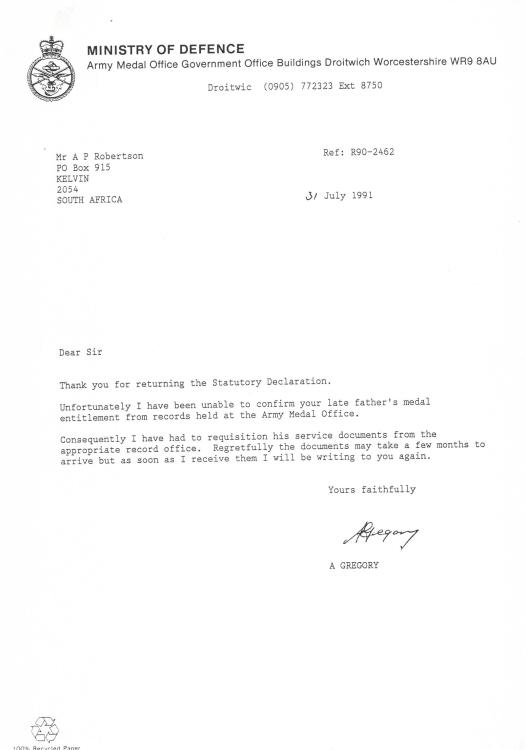
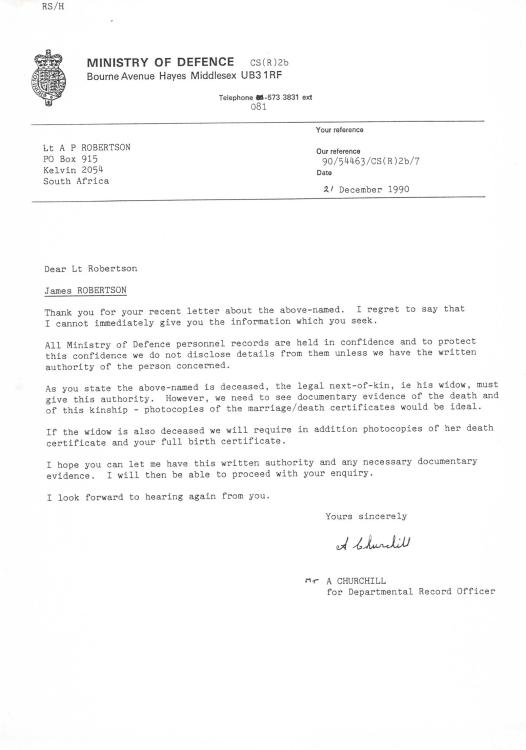
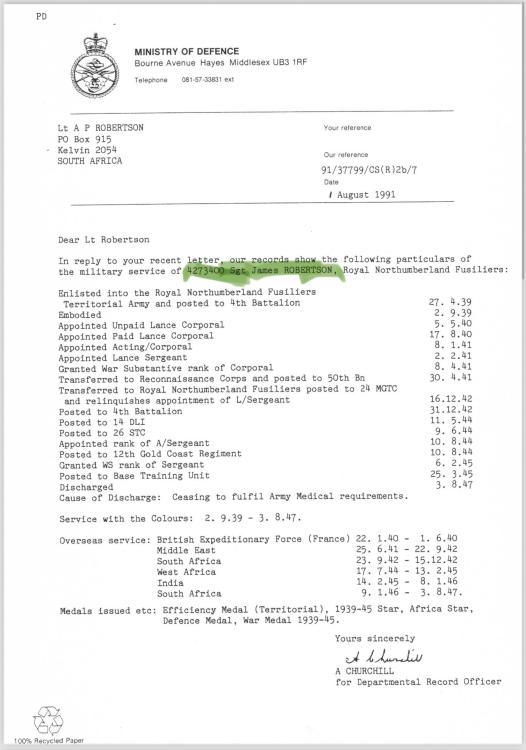
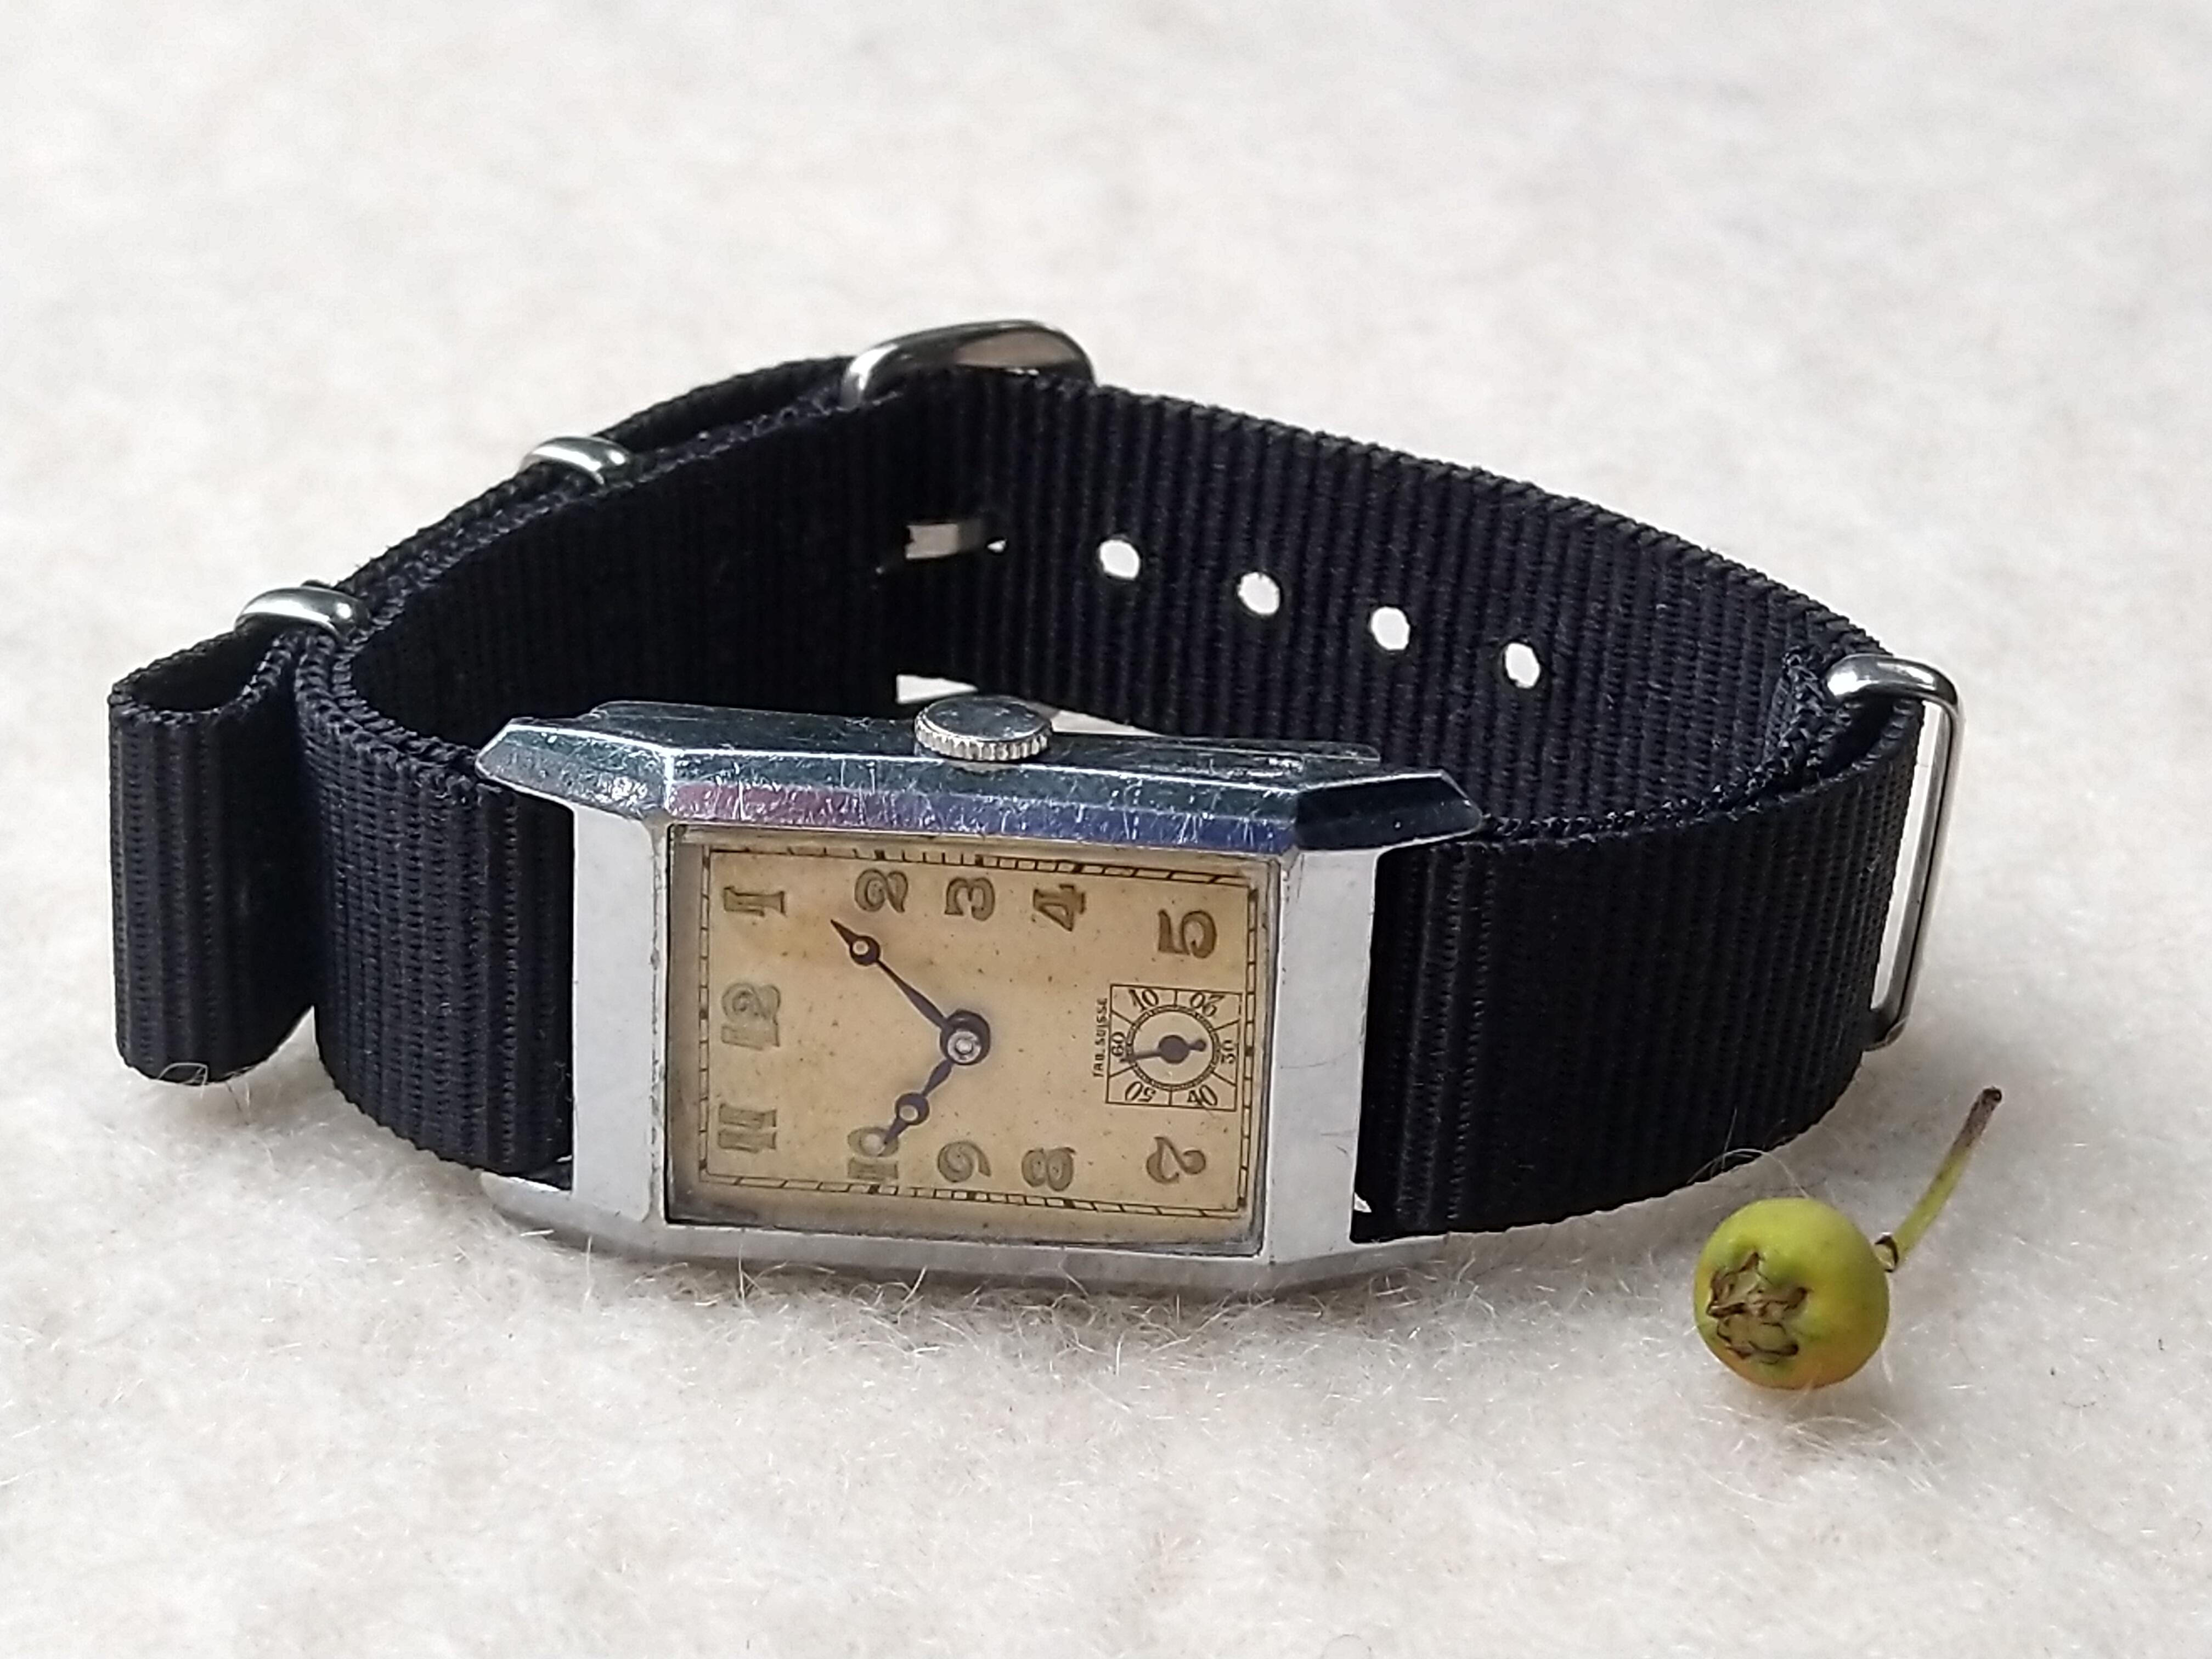
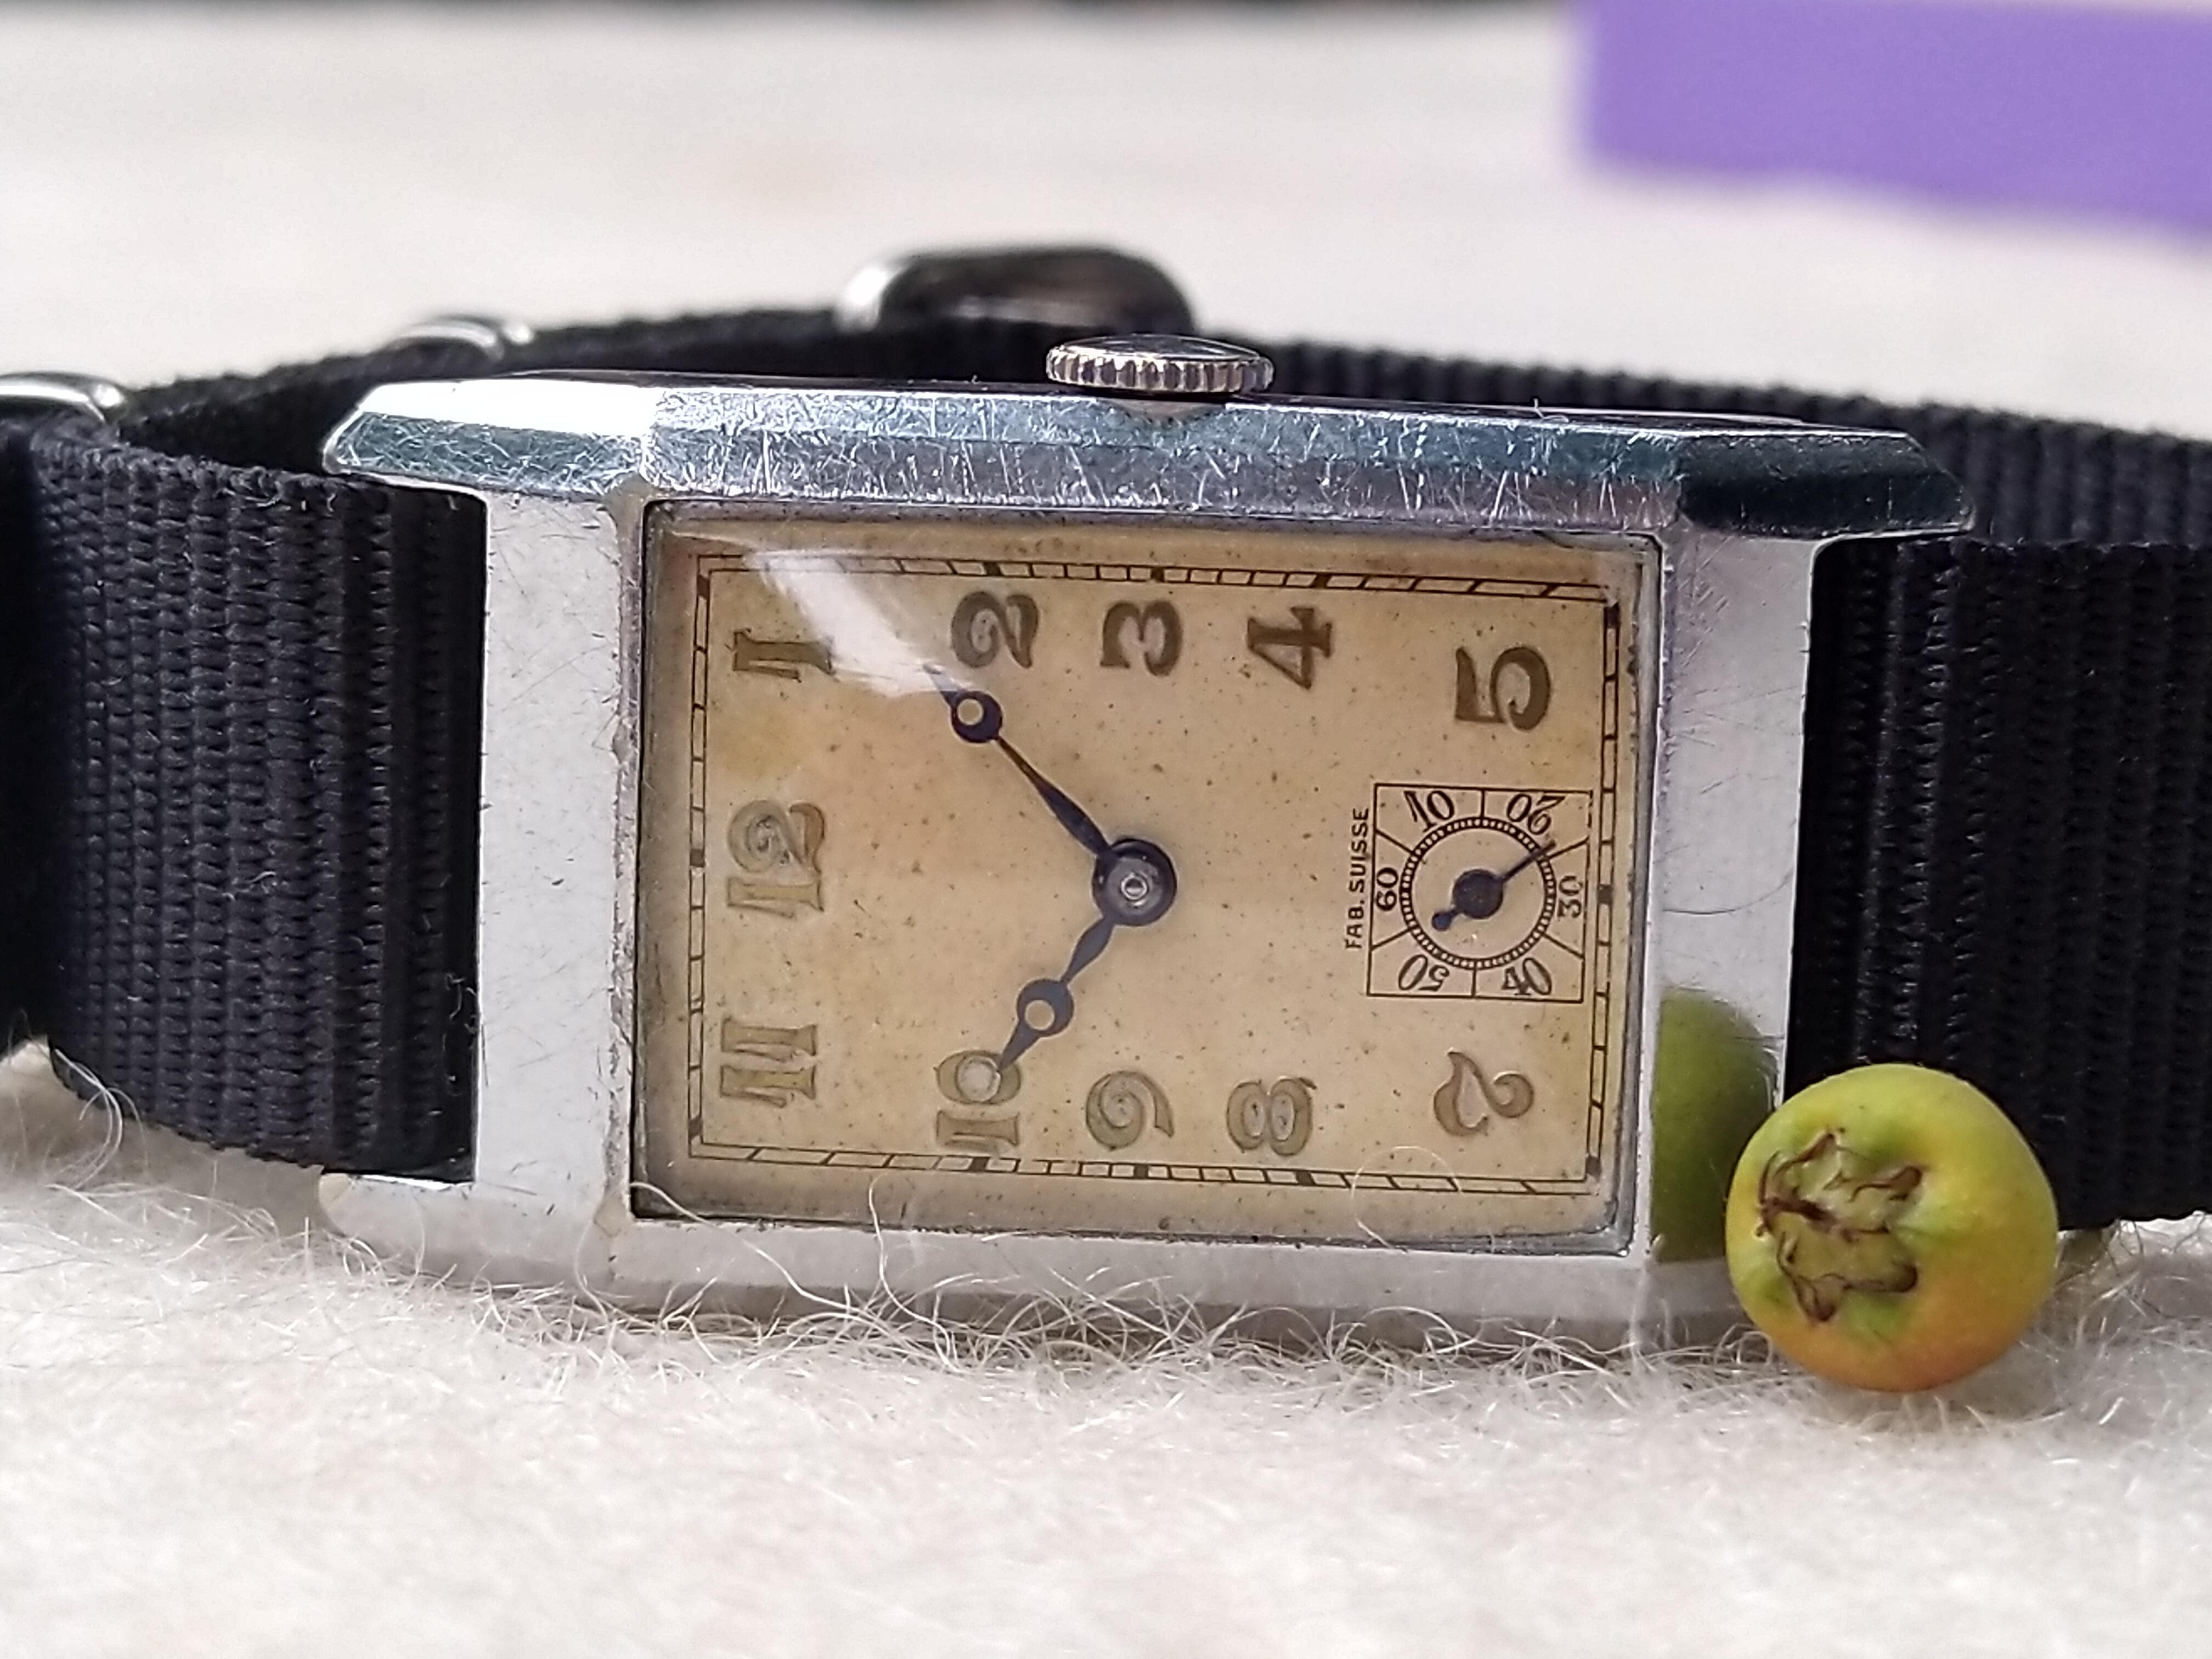
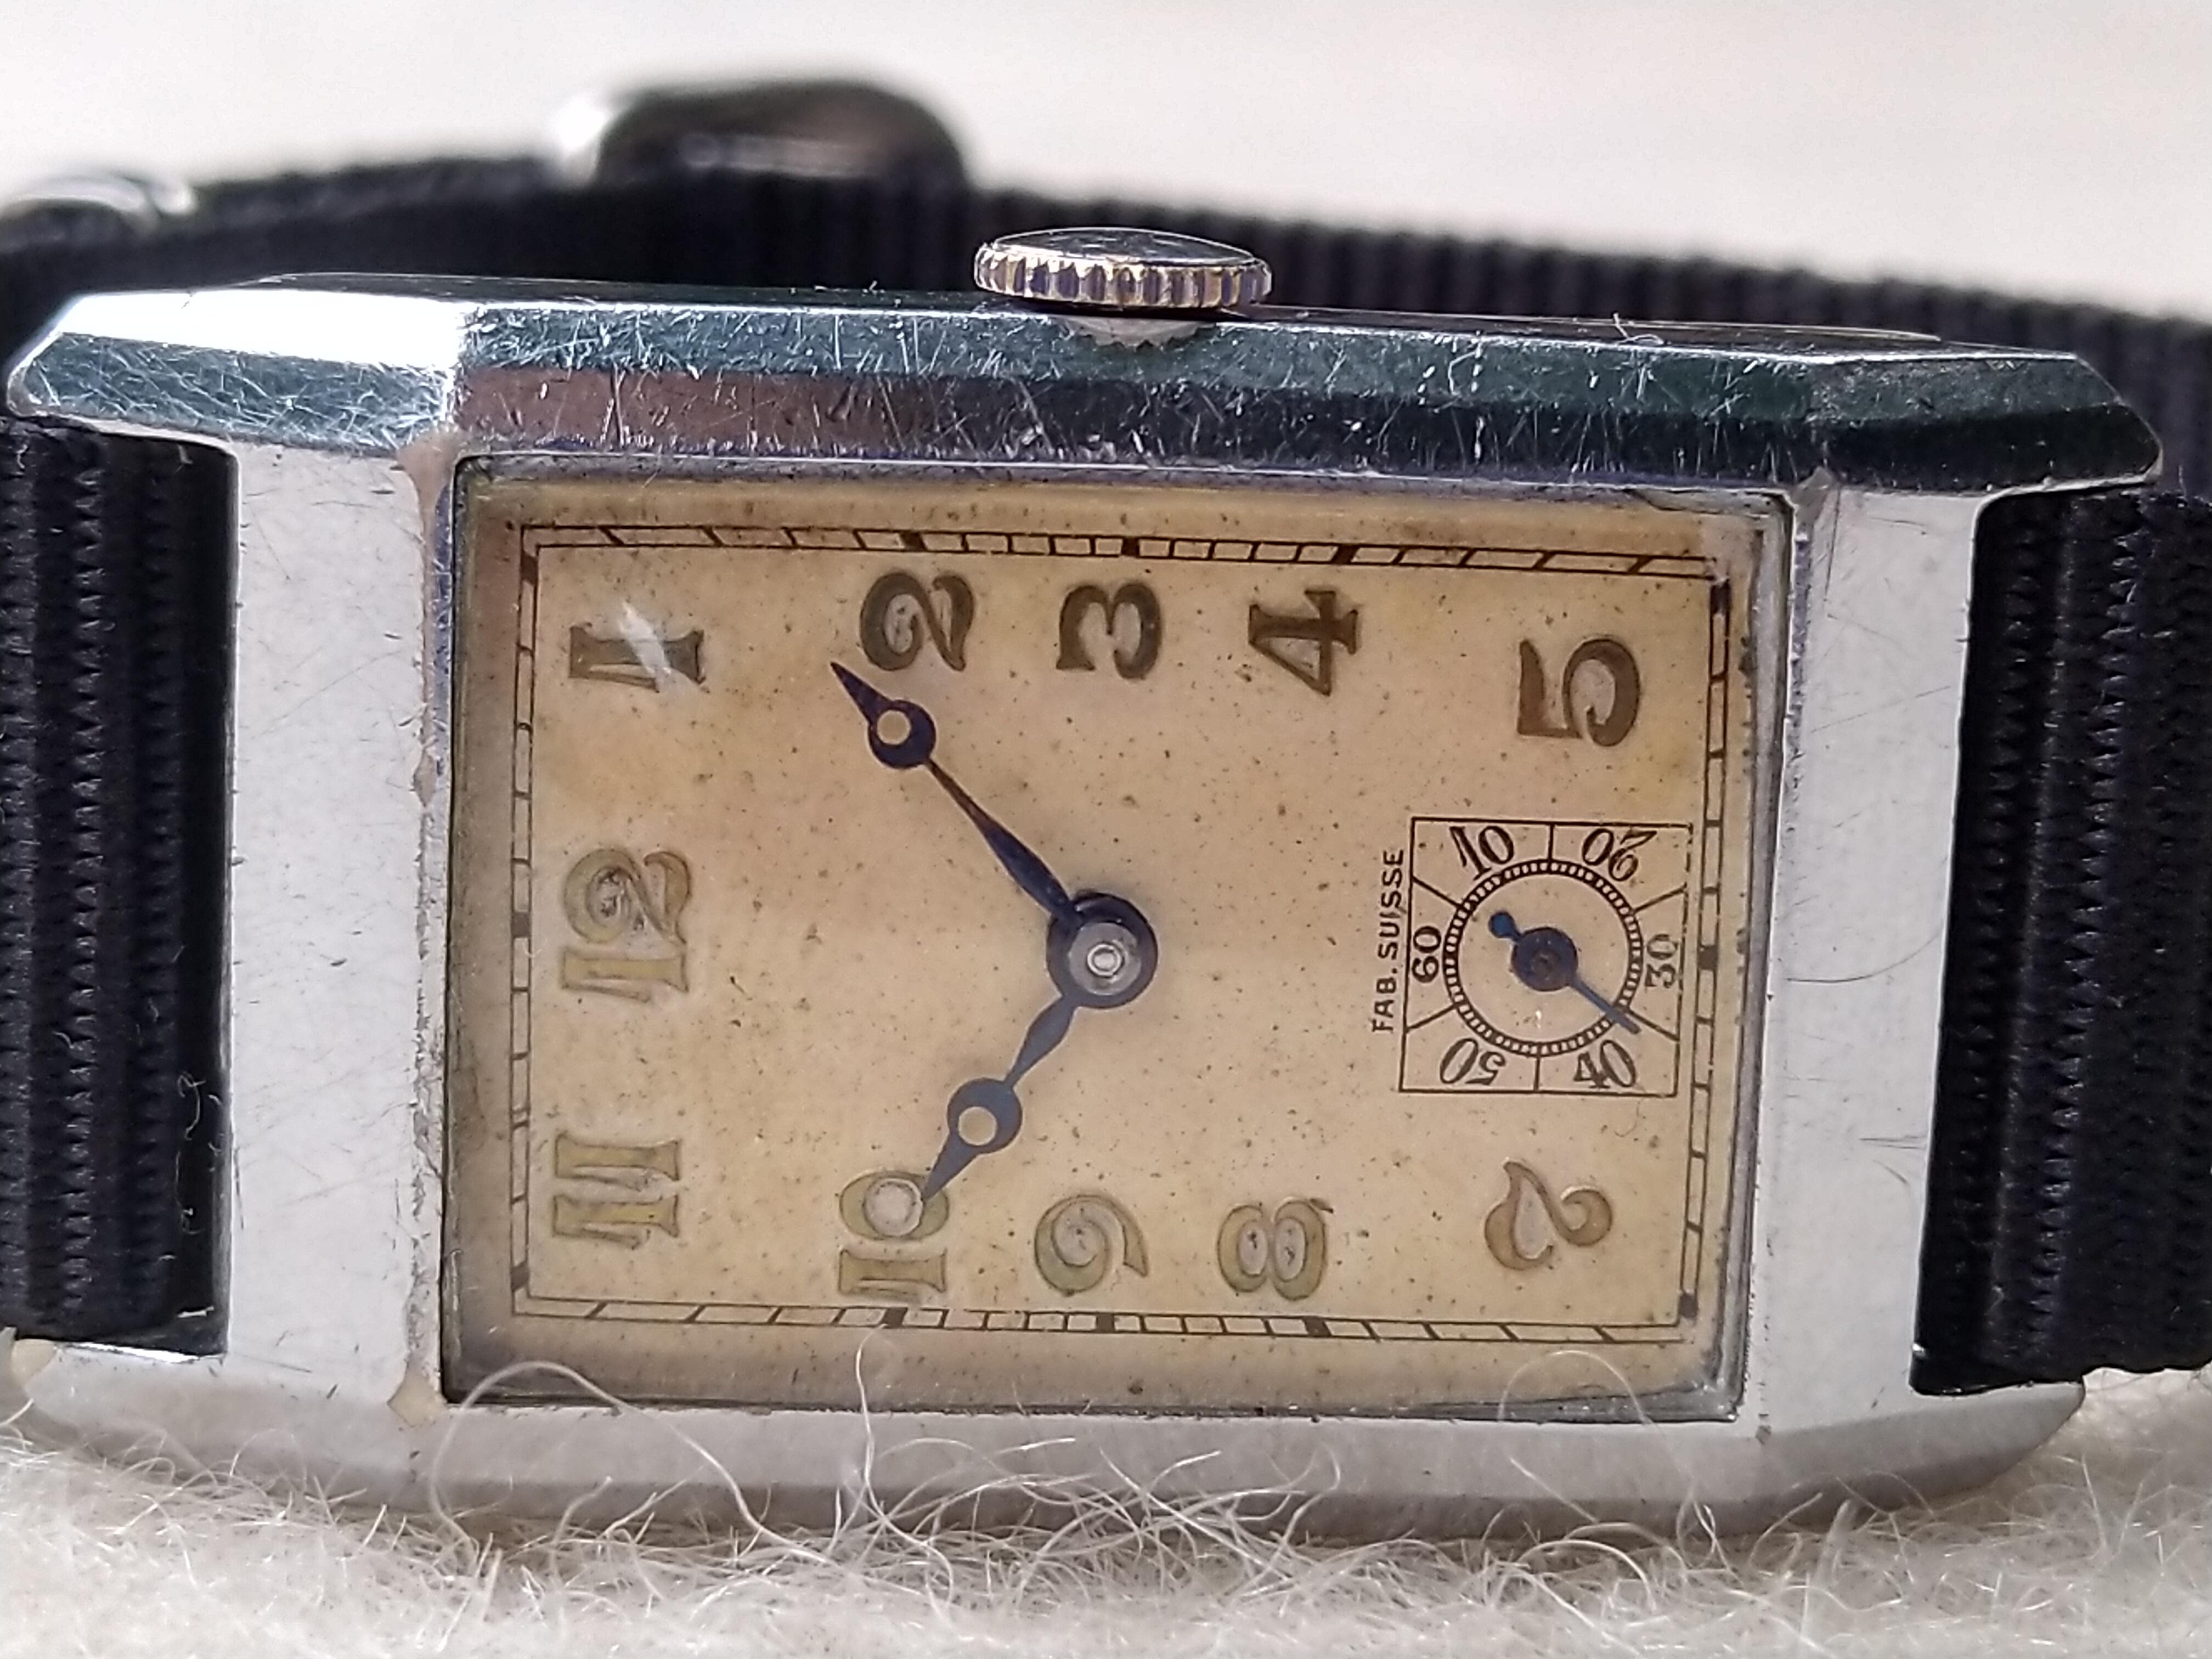
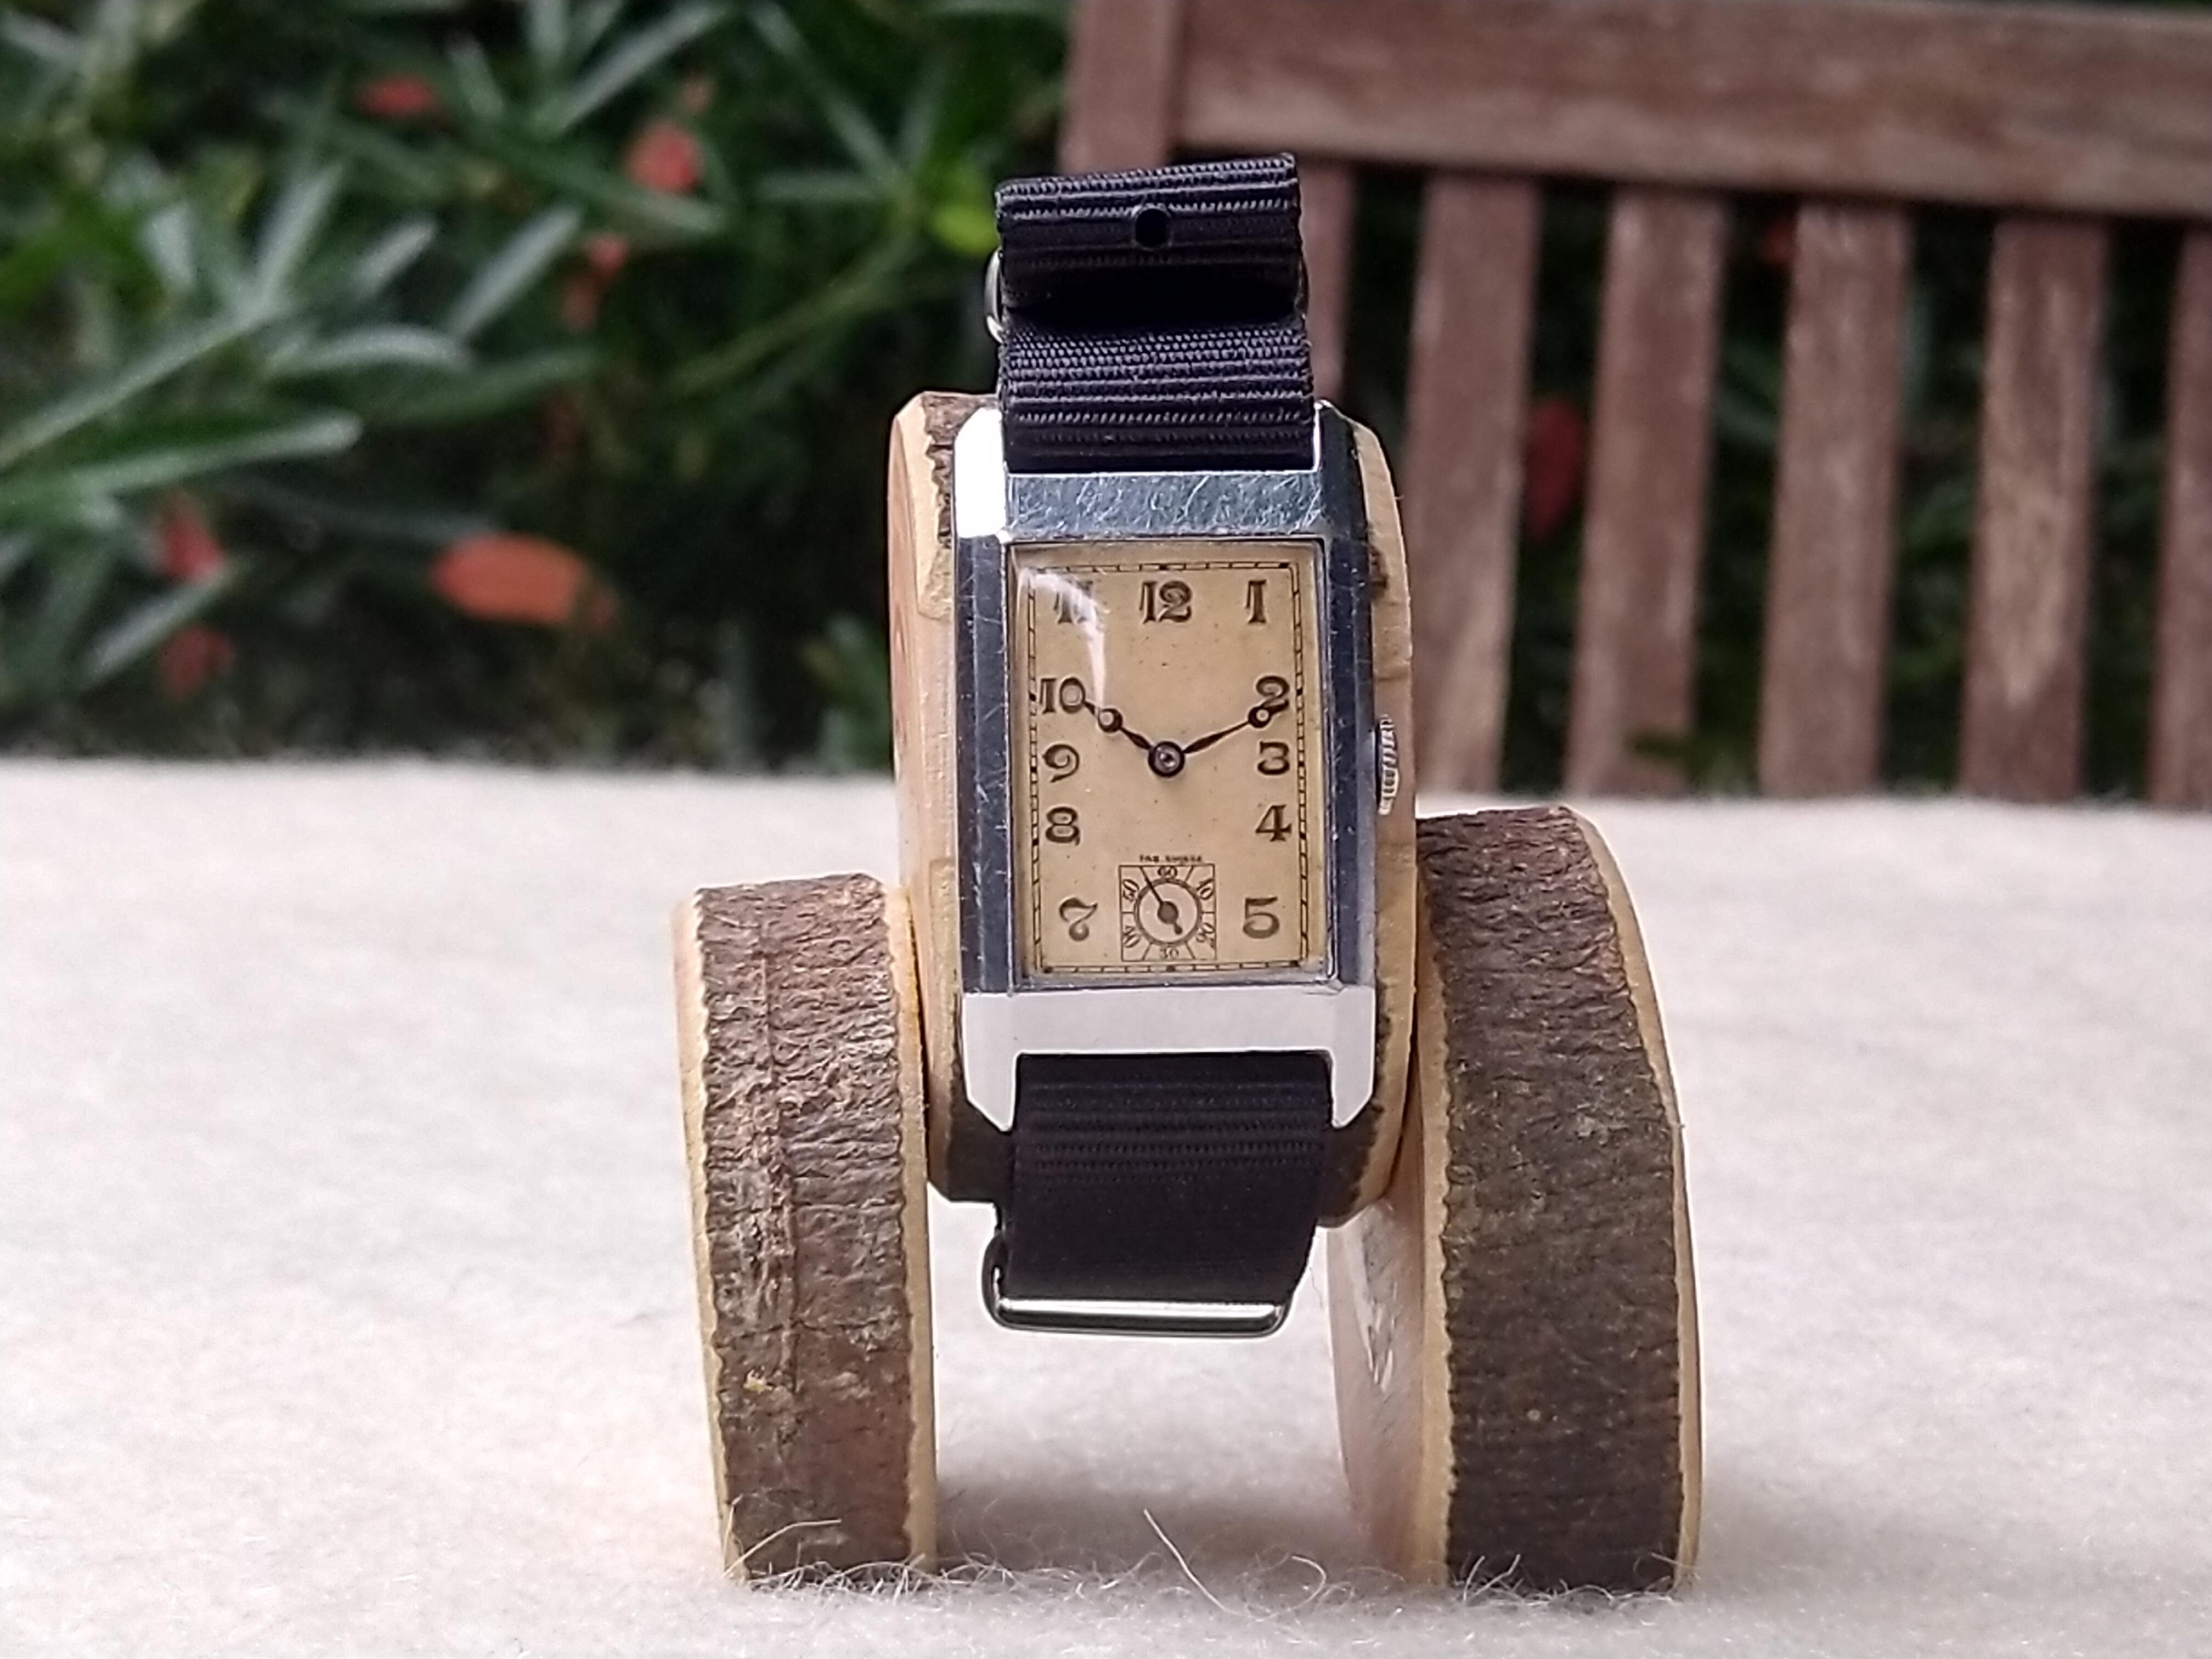
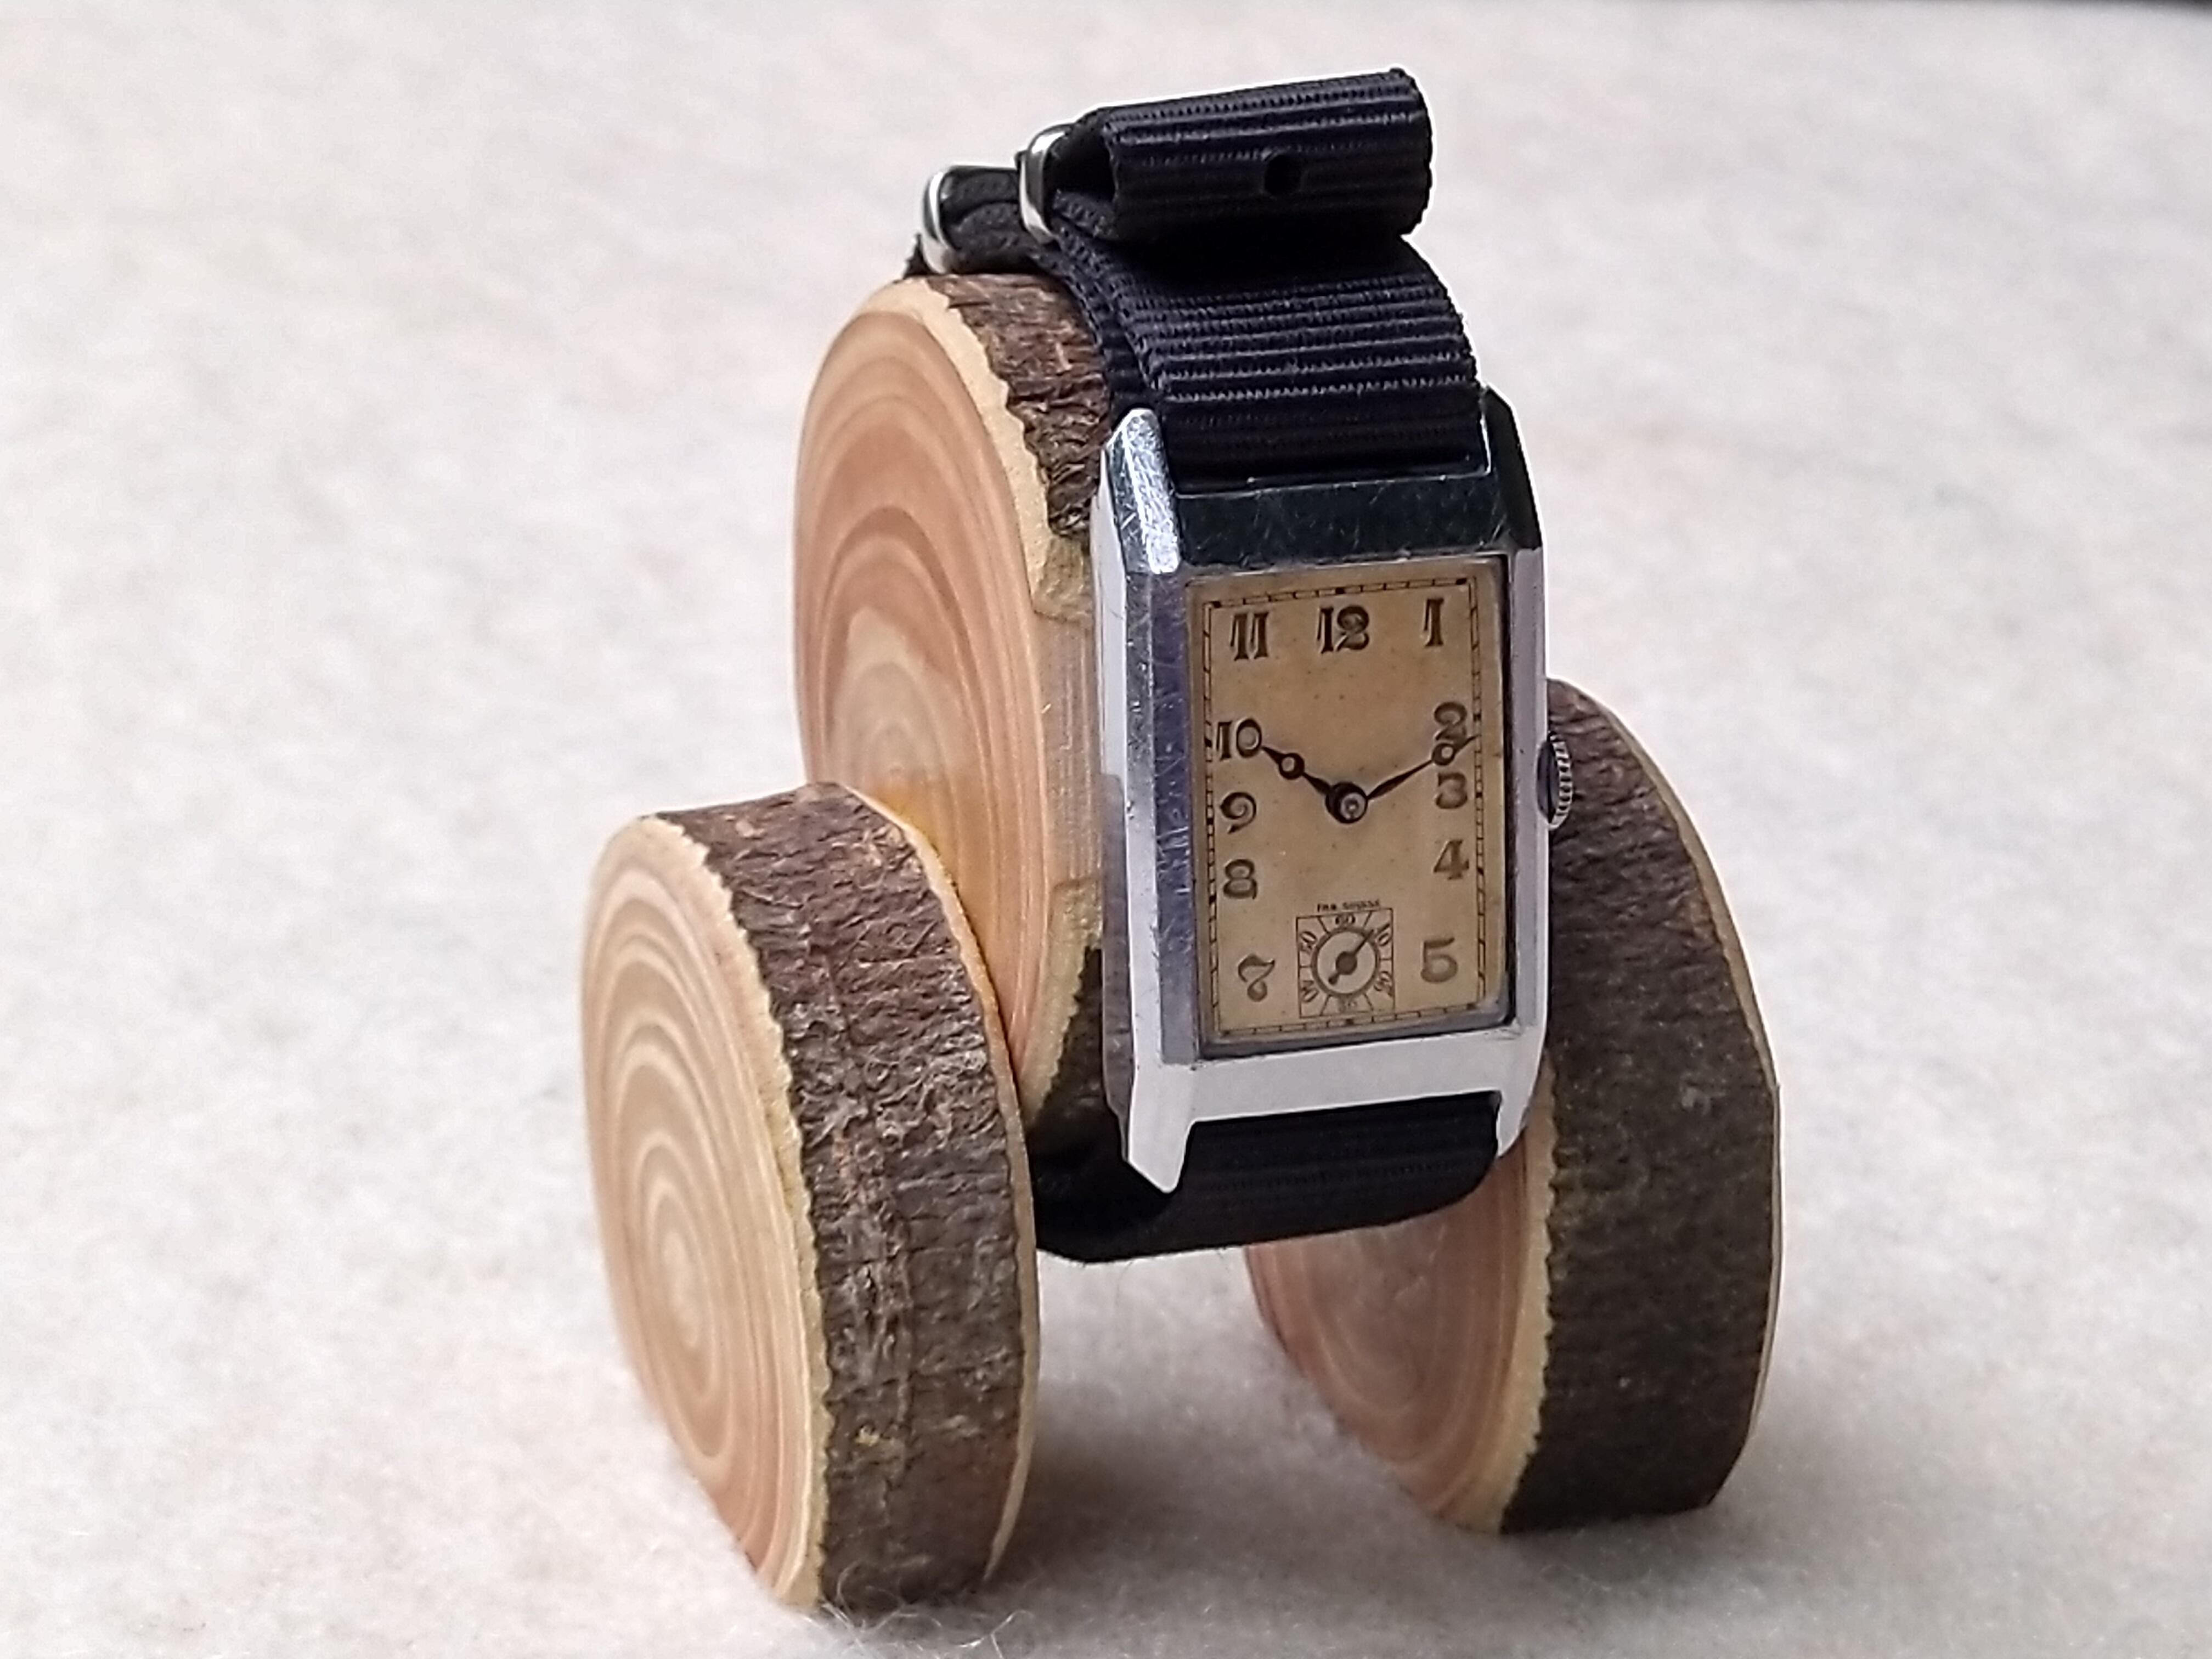
The Silvana was a purchase lol but had to get it to fill in from my obsession with WW2 that start from my grandfather. Sgt J Robertson (mother’s side). Interesting gent. Attached his records, a photo scan of him, his brother and father (father was in WW1 & WW2) there are records that I’ve attached relating to his pow escape.
JamesSnr(ourGrandadwasinWWIaswell)a..._page_1.thumb.jpeg.dcc17e48ca88bfe7d24fb161e7e43dd9.jpeg)
 1 point
 -
Hi Nick and welcome to the WRT forum. Lucky your surrounded by so many family heirloom, mostly good grade watches too. Rgds1 point
-
That's a great collection Nick. We have similar tastes. You are the first I've encountered to inherit an ATP from a relative. Brilliant! ...did gramps nick the Silvana off a dead German?1 point
-
Very nice detailed strap . Appreciate the information Angry bear, this gives something to work with.1 point
-
Extraordinary work!1 point
-
Great job pal. Gather you are a perfectionist. Hard to keep multiple complications in sync. Possibly long time since its been put together so neatly . Rare piece, a keeper? Rgds1 point
-
Hello and welcome from Leeds, England.1 point
-
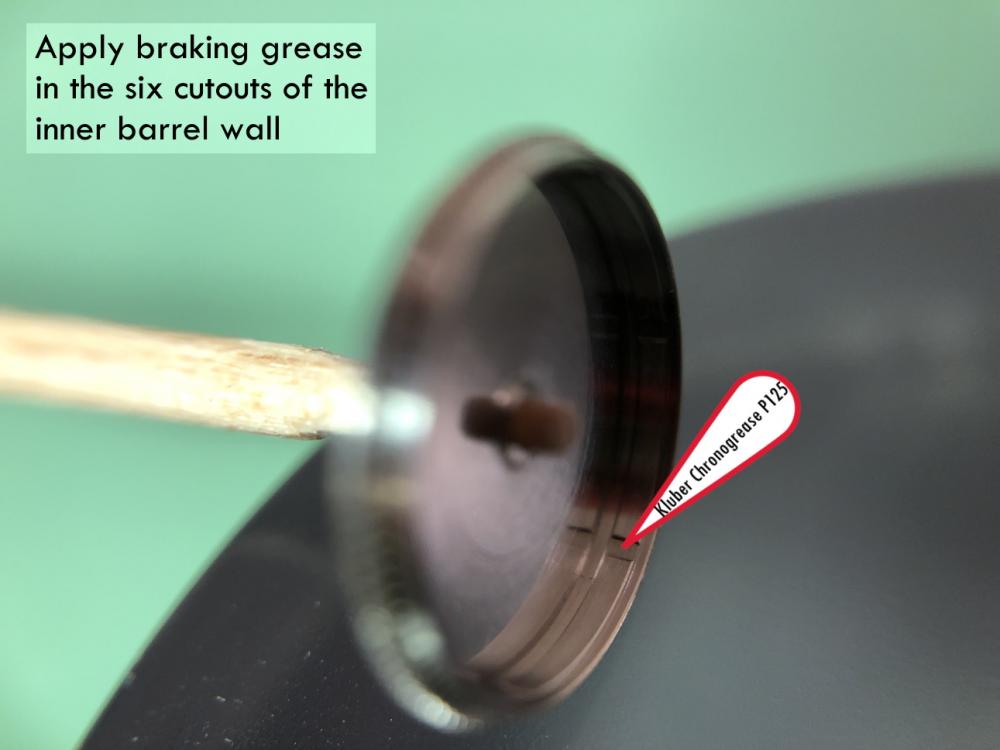
I remember watching that, he looked like he was squeezing a thin line of toothpaste along the barrel wall. I thought at the time it was a bit excessive, but as you said, some grease will stop the spring slipping if applied too thick like that black gunk and some will slip too early if too much is used. I can't see how a plain breaking grease will reduce slipping unless it is cut with graphite, which adds something different to the mix. If you look at the specs of Moebius breaking greases, they all have a different composition depending partially on the material of the barrel and different 'slips'. some slip earlier and some slip later. I don't think the grease inhibits the slip, rather it facilitates it.1 point
-
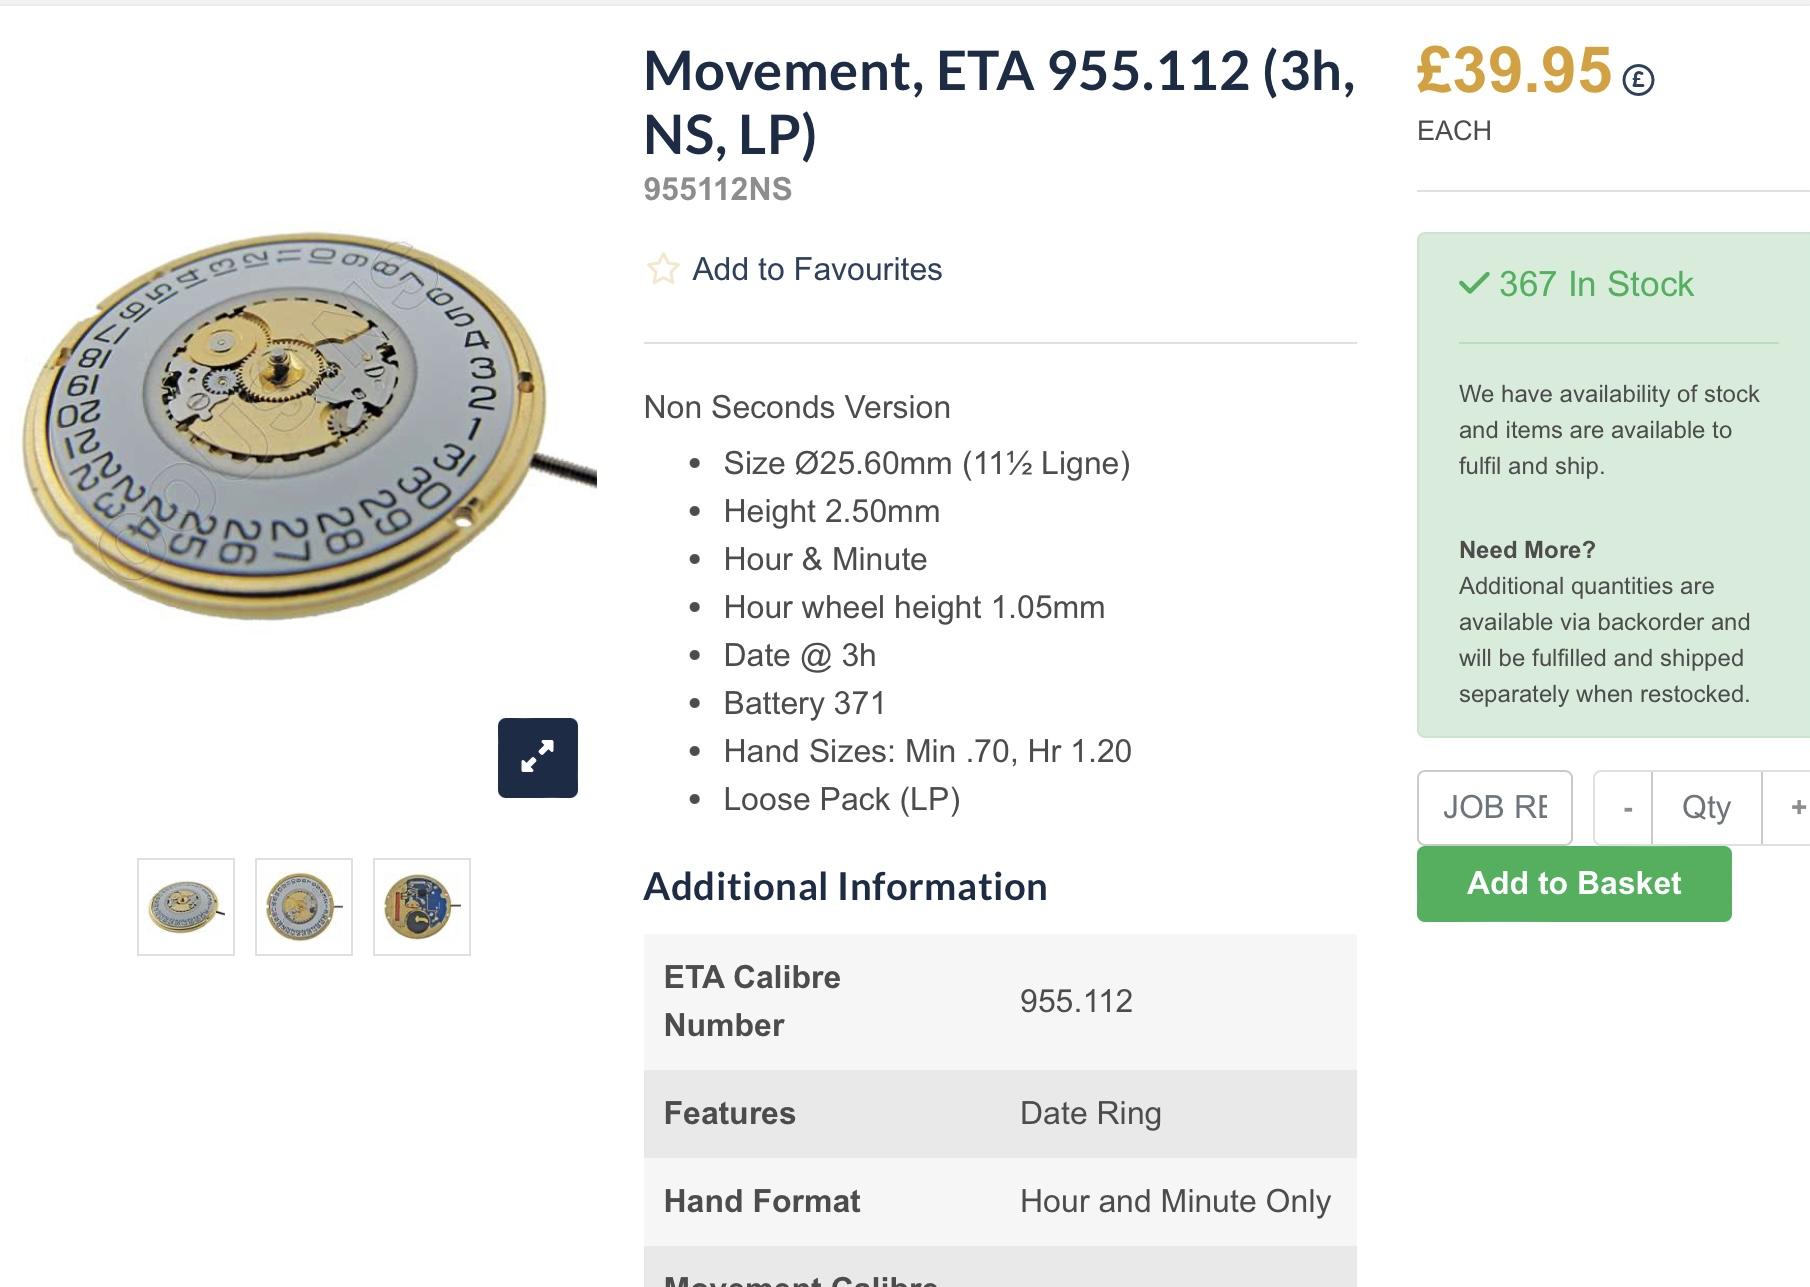
It could be a 955.121 or 955.122 with Day & Date1 point
-
Cousins UK. £39.95
 1 point
 -
It’s an ETA 955/121 point
-
I think we all can agree you did a great job on this. I think your skill level probably doesn't need validation from us, you seem extremely capable! A very complicated movement for 98% of watchmakers, and you knocked it out of the park! I like that you included a bunch of photos. It will definitely help others who service this movement. I haven't had this one come across my bench yet.1 point
-
Thanks, all. The confirmation that this is normal was what I needed to go ahead and use the press. It popped right out. The crystal's thicker than I thought. I measure it as 2.4mm thick in the centre. Makes sense for a diver's watch. 6217-8001.1 point
-
Hi. When removing cracked crystals it is wise to tape them up (sellotape) before pushing out . 1 to avoid ant accidents 2 if you can remove it whole you have a reference to measure.1 point
-
When I had a stubborn one I would use a screwdriver blade between the inside case and the tension ring.1 point
-
Looks like a diver's bezel has already been removed and the crystal just needs pressing out or fit a die inside from the back and tap it out with a hammer . Nothing to lose as the crystal looks shot.1 point
-
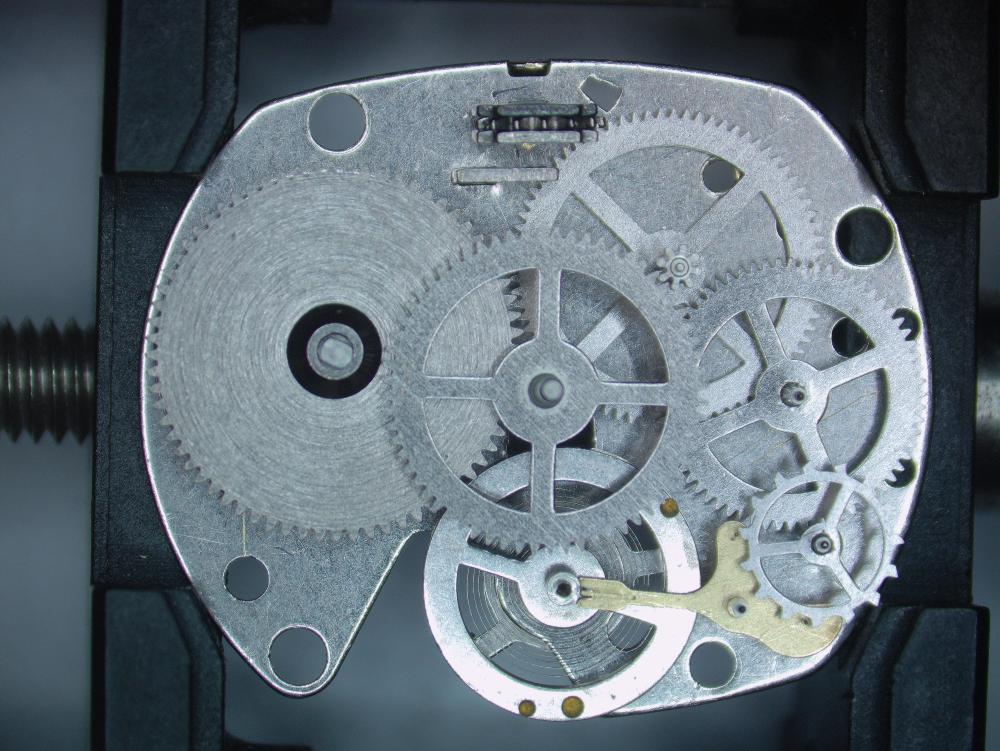
The answer to You question is that in assembled state, there should not be significant resistance due friction of the wheel table on the fusee cone and no significant free play should be too.1 point
-
Polishing this crystal won't do any good. It looks like there's a bezel around the crystal. Use a razor to open up a gap between the bezel and watch case until a case knife can be inserted to pry off the bezel. The crystal should then be able to push out easily. Unless it has been glued in.1 point
-
Sorry, didn't have a chance to work on it until today. The pliers and pin vise method worked! Thank you.1 point
-
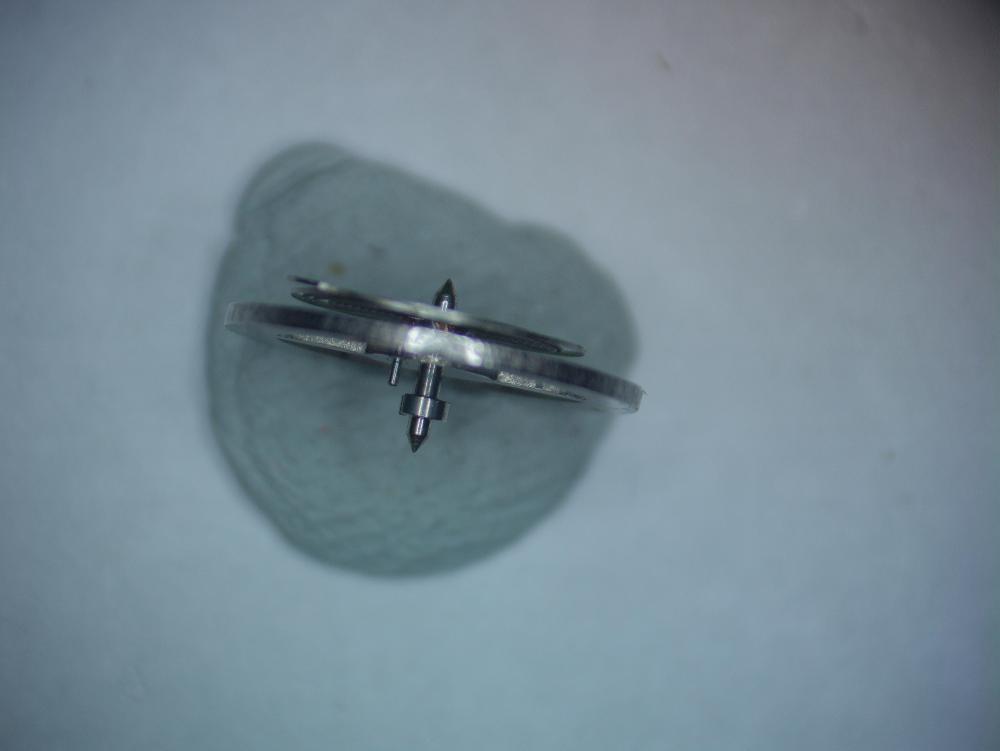
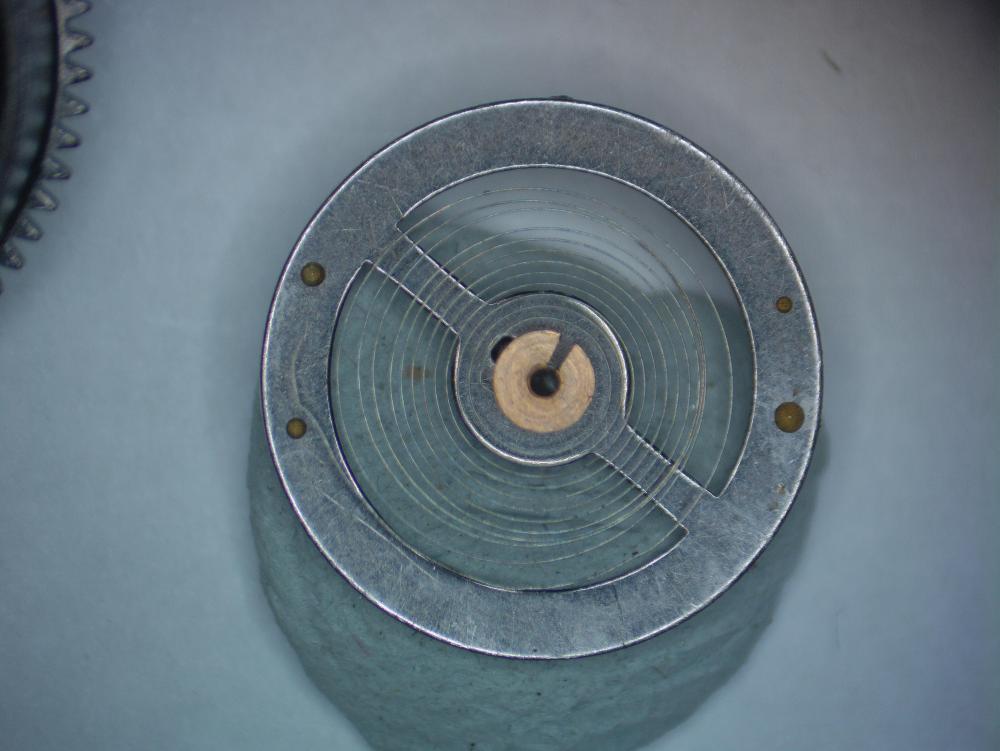
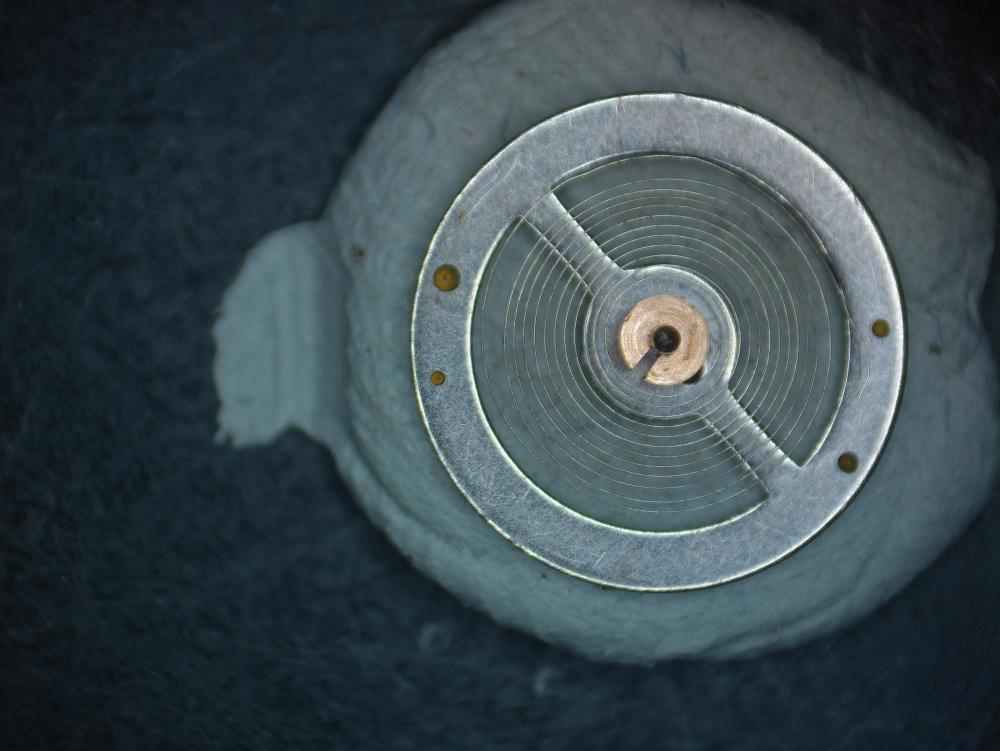
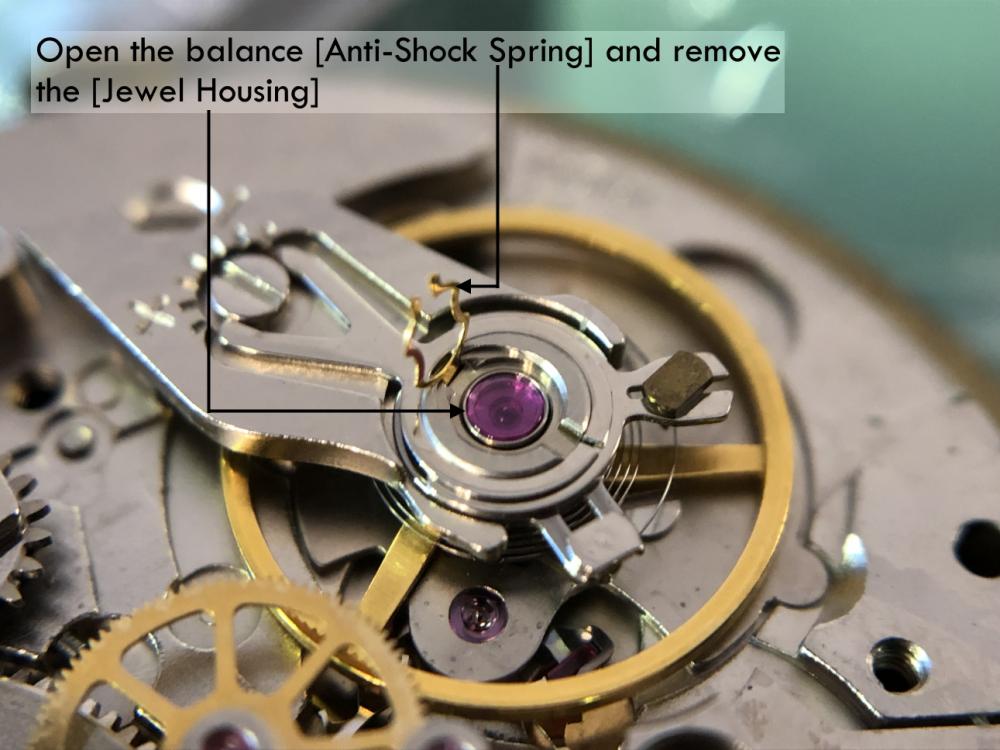
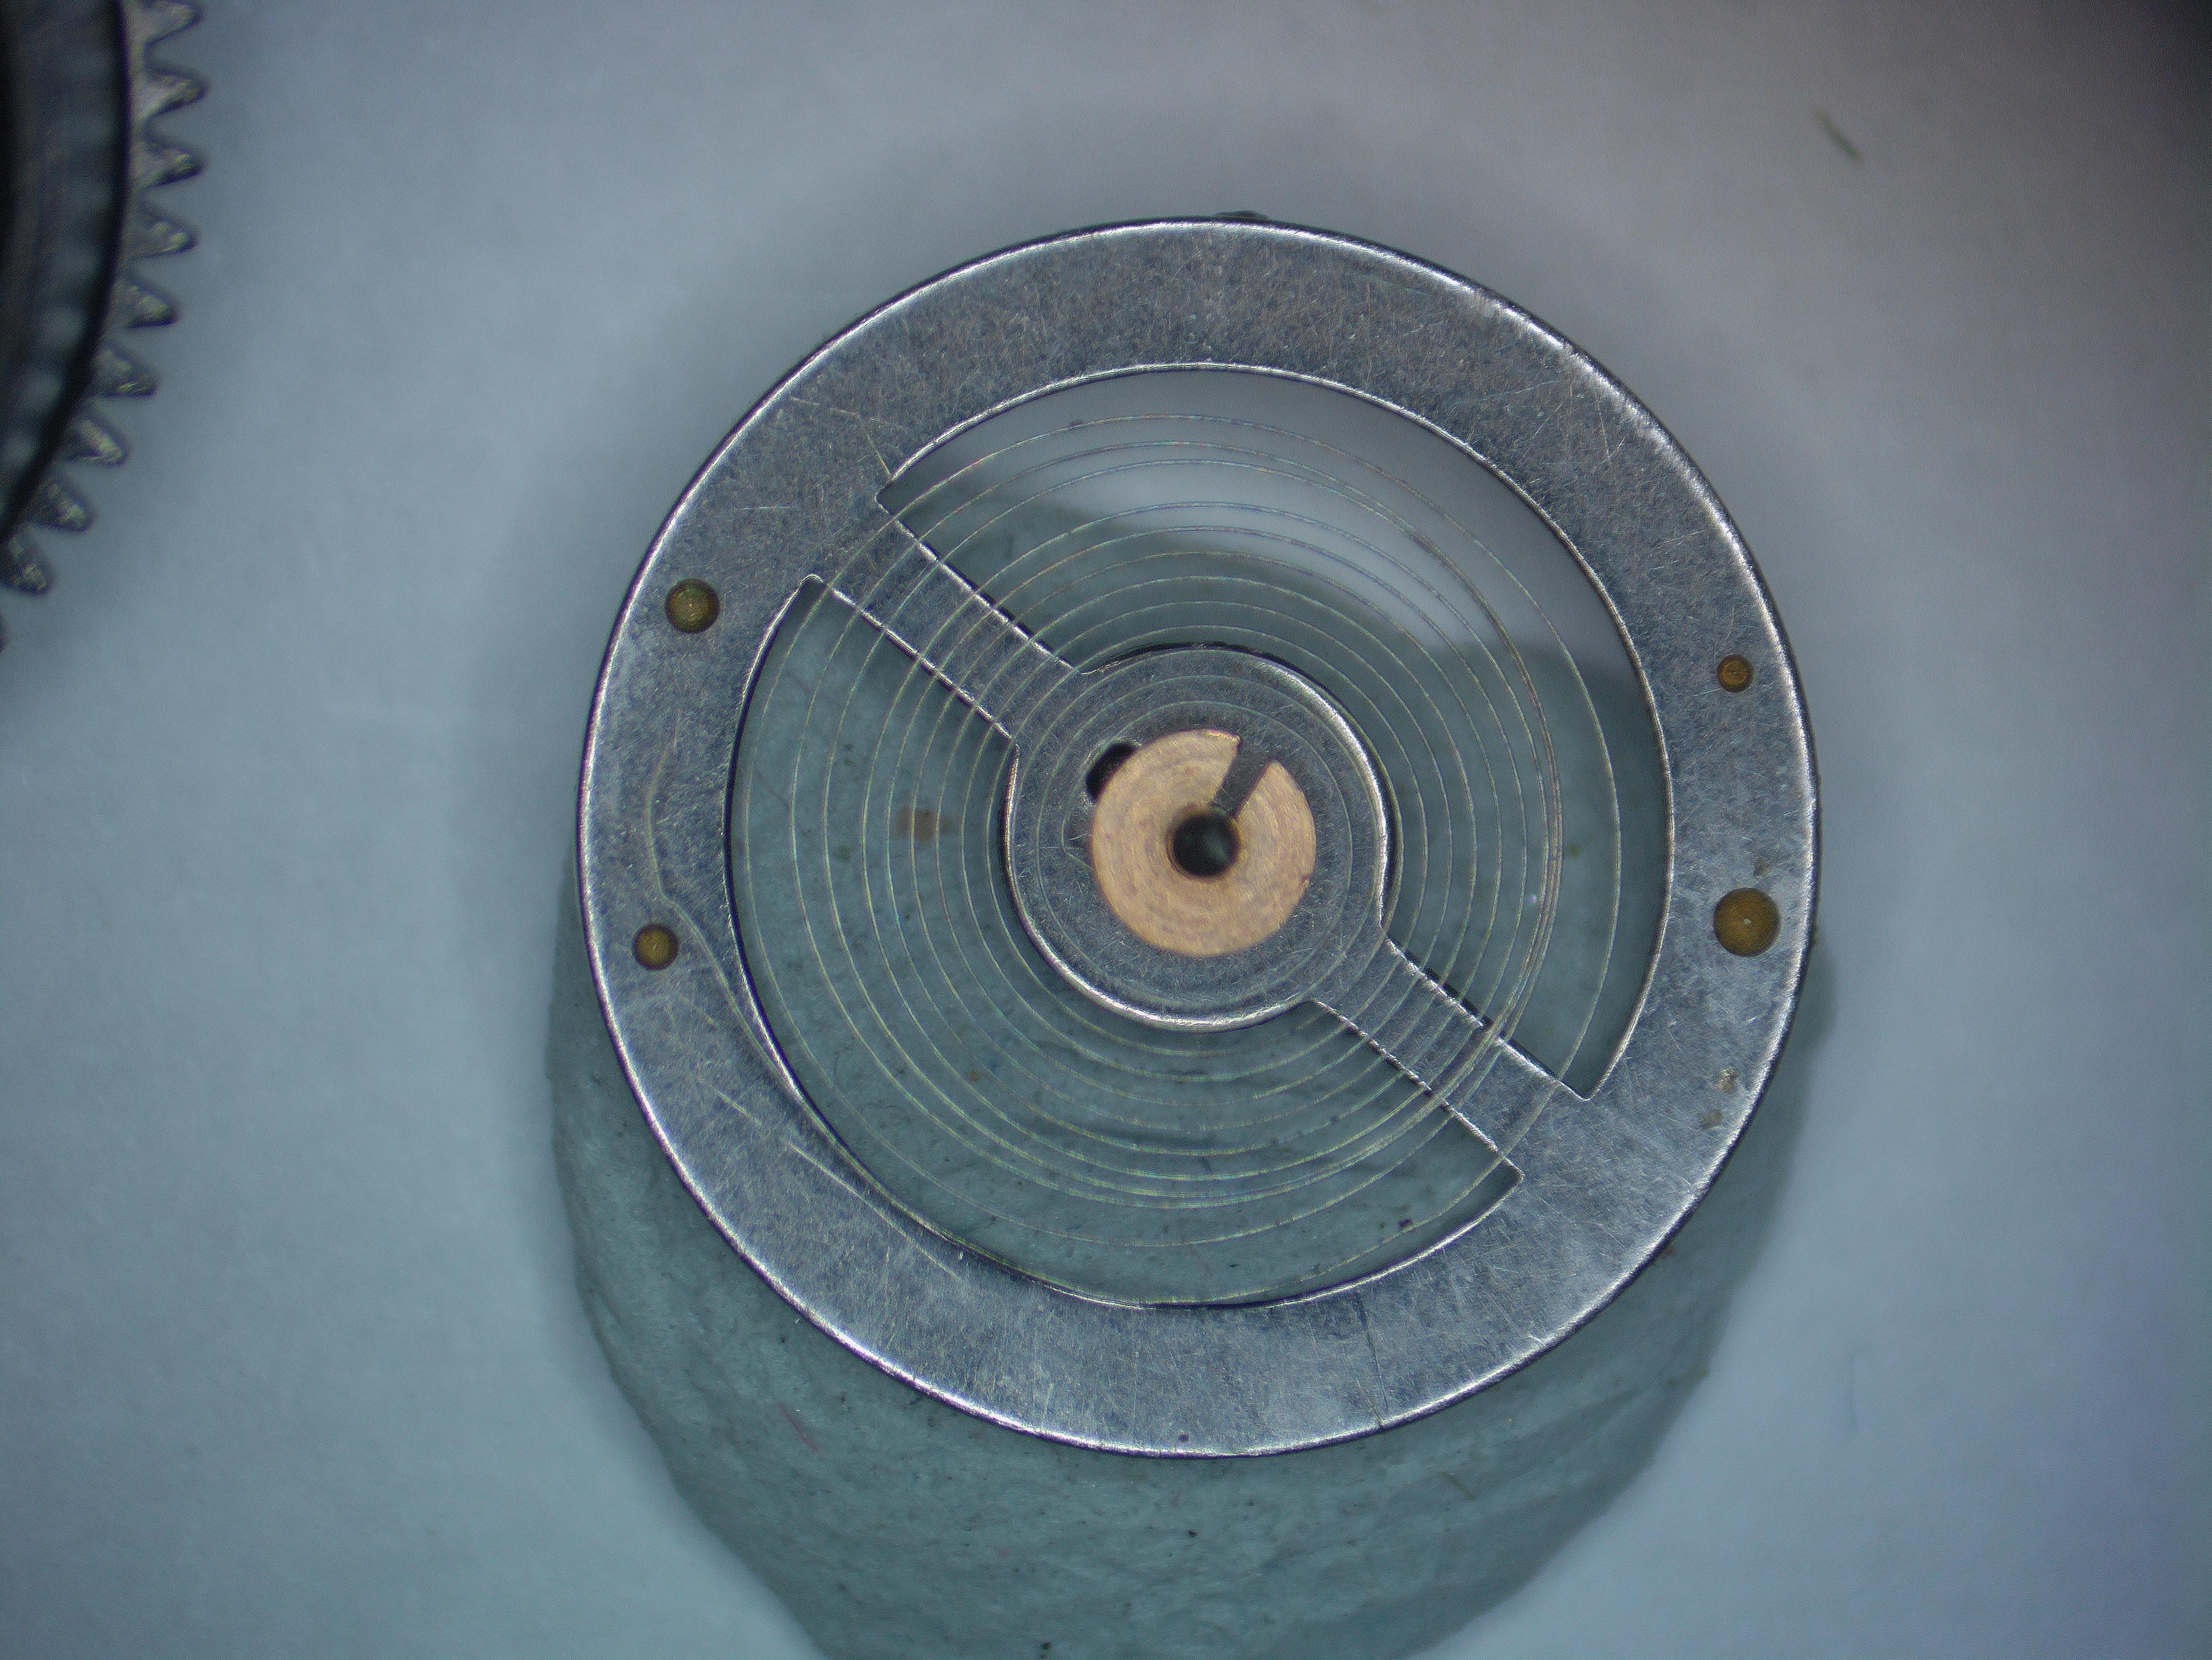
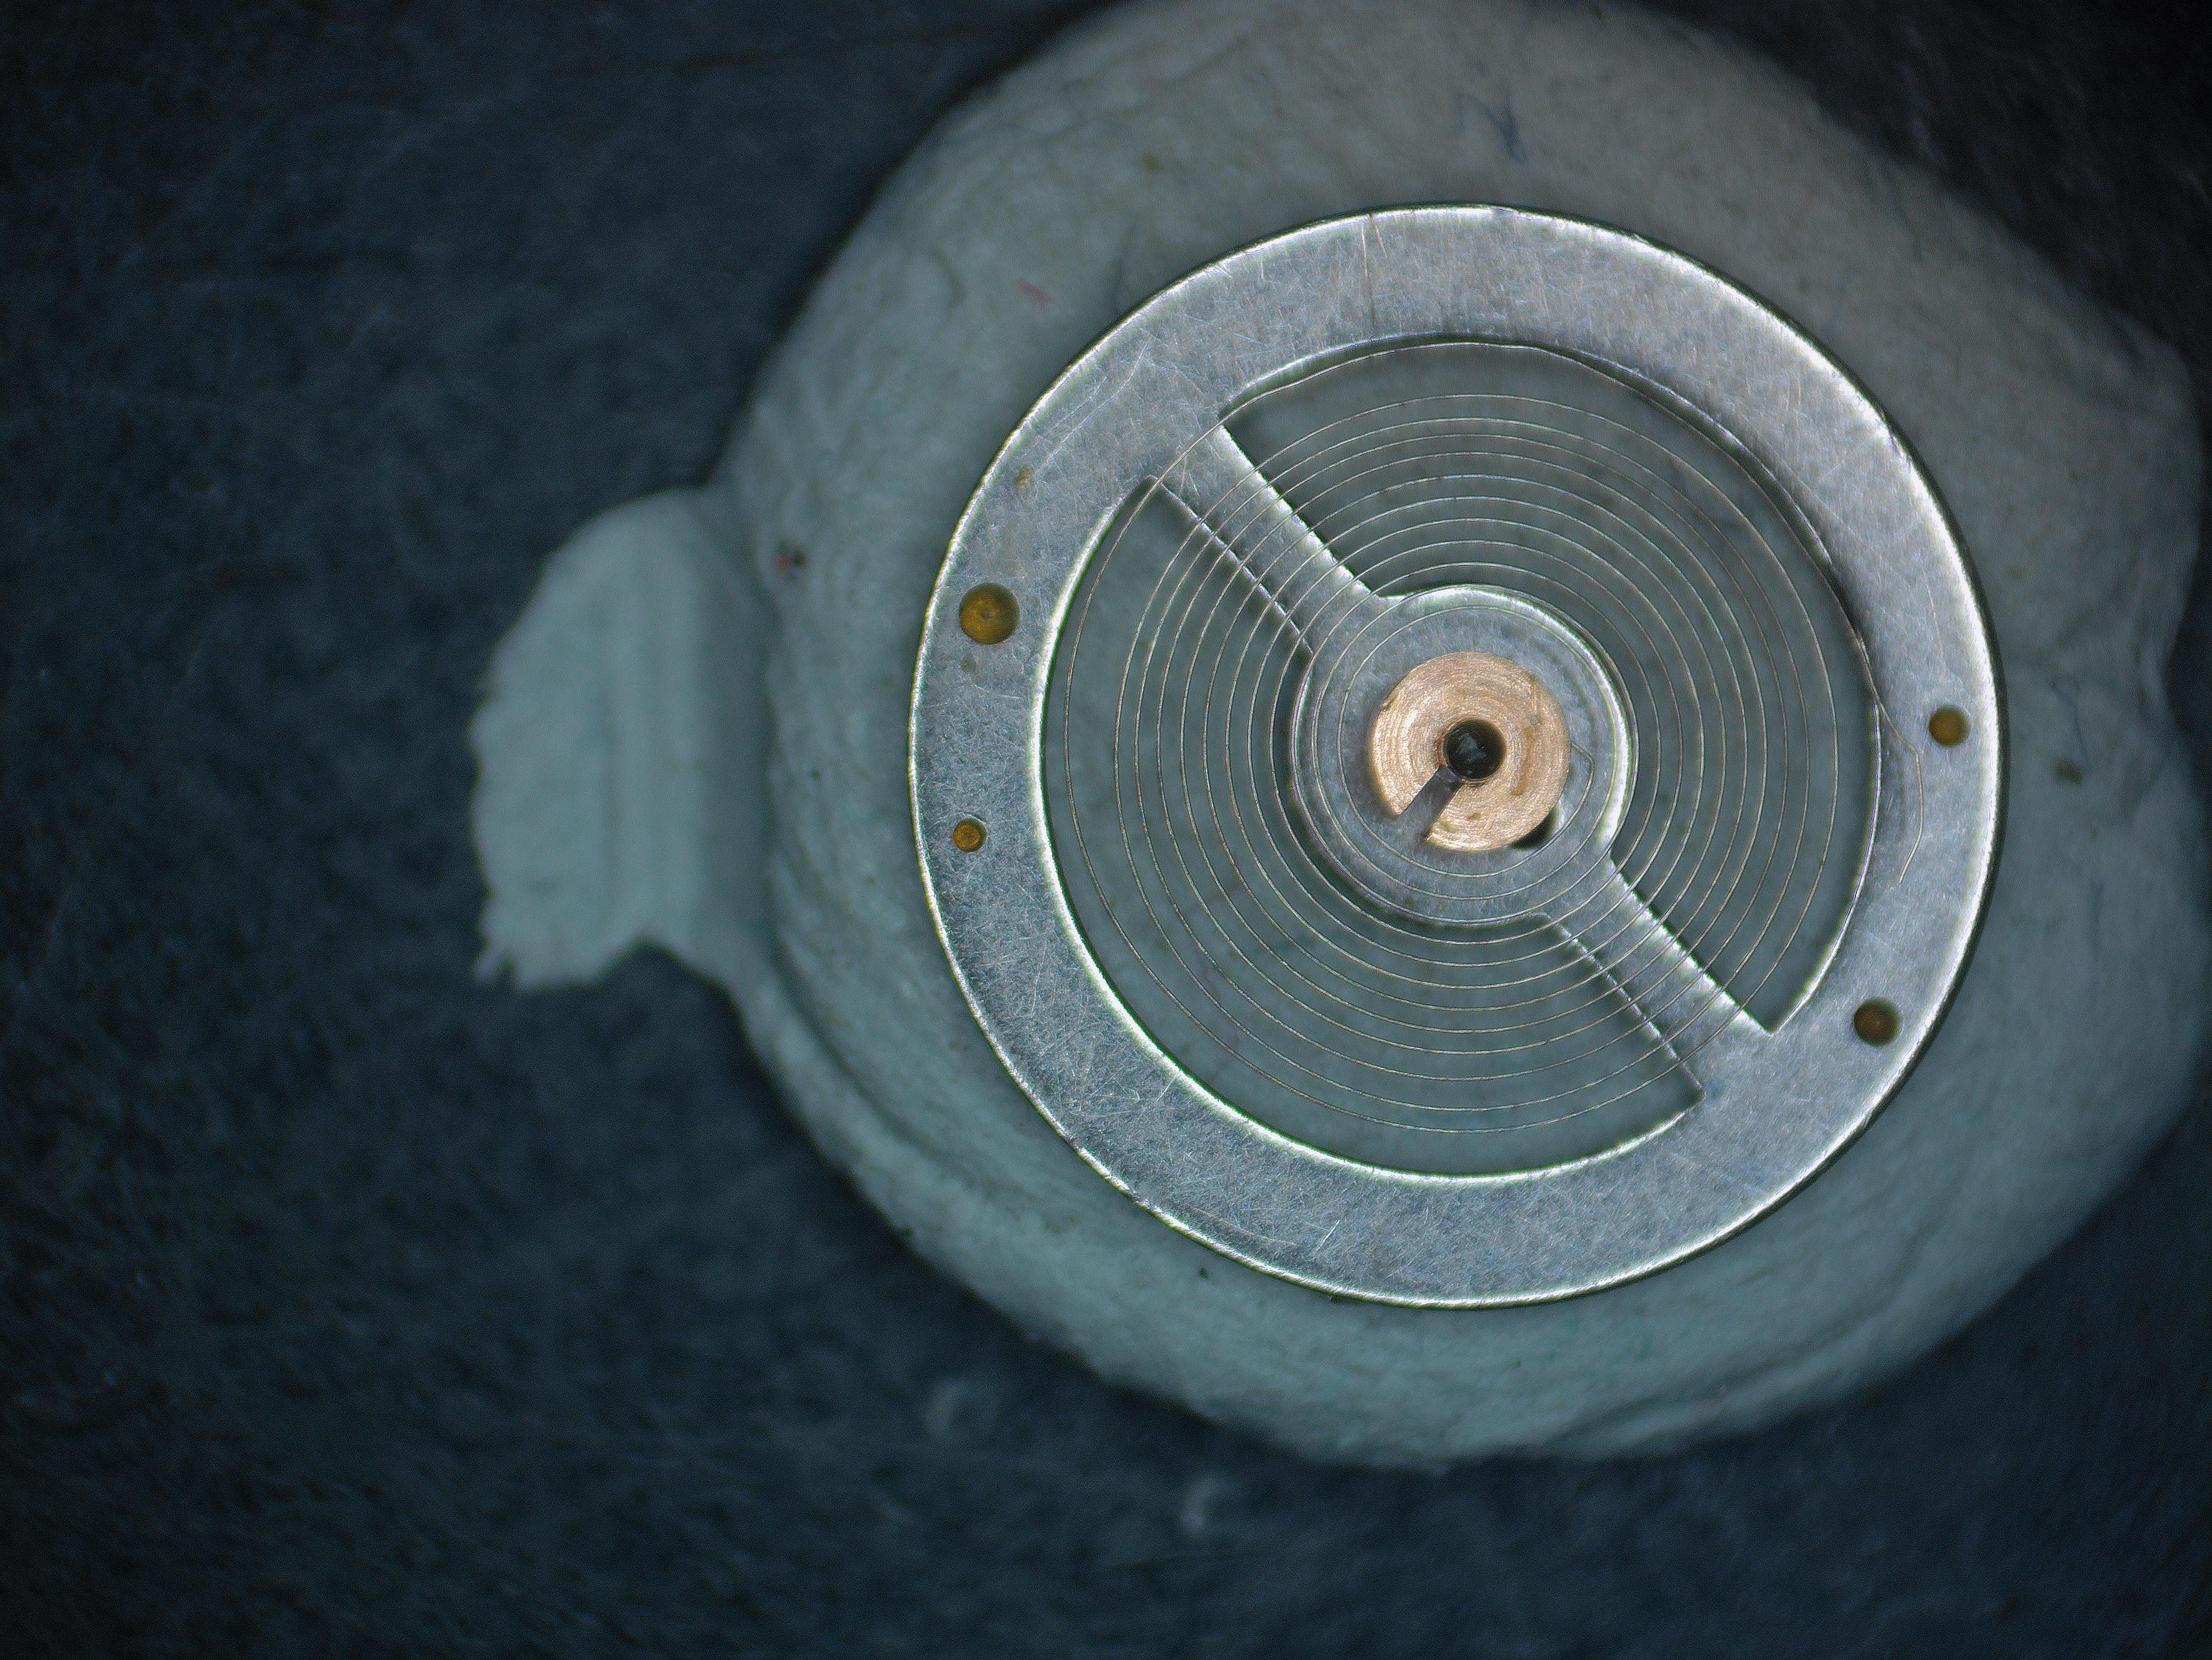
Since the impulse pin is way off it may be easier to remove the balance spring, then replace it approximately in the correct position and fine-adjust using the stud arm. Use hand levers under the collet to remove the balance spring. Use a rocking motion. I'm sure there is a video showing how it's done. Use a staking set to reinstall the collet. Do not use a hammer on the punch. Just gently press the collet down on the balance staff. After removing the balance spring, replace the balance wheel on the movement with the impulse pin centre between the banking pins. Now mark the balance wheel's rim right under the stud holder. Then replace the balance spring and fine-adjust using the stud holder arm. BTW, I don't think you can replace just the balance spring. It has something to do with the spring having to be vibrated with the balance wheel. Anyway, I know way too little about it to go into any details.1 point
-
Yey John to the rescue, my pocketwatch knowledge is about as good as my mystery tool pallet fork/balance gripper knowledge1 point
-
What You describe - that the second hand jumps when setting hands backwards is normal for this layout of train with double third wheel. Happens when the real cannon pinion(which is on the offcenter 2nd wheel) is tight. Pay attention exactly on this cannon pinion - probably somehow it has moved up on the wheel pivot and thus killing the axial free play of the wheel and rubbing on the bearing in the main plate1 point
-
Thank you both for your replies. After some adjustment I finally have managed to get it running. Every problem is a learning opportunity. Cheers!1 point
-
Movement details are here but needs cleaning up.
 1 point
 -
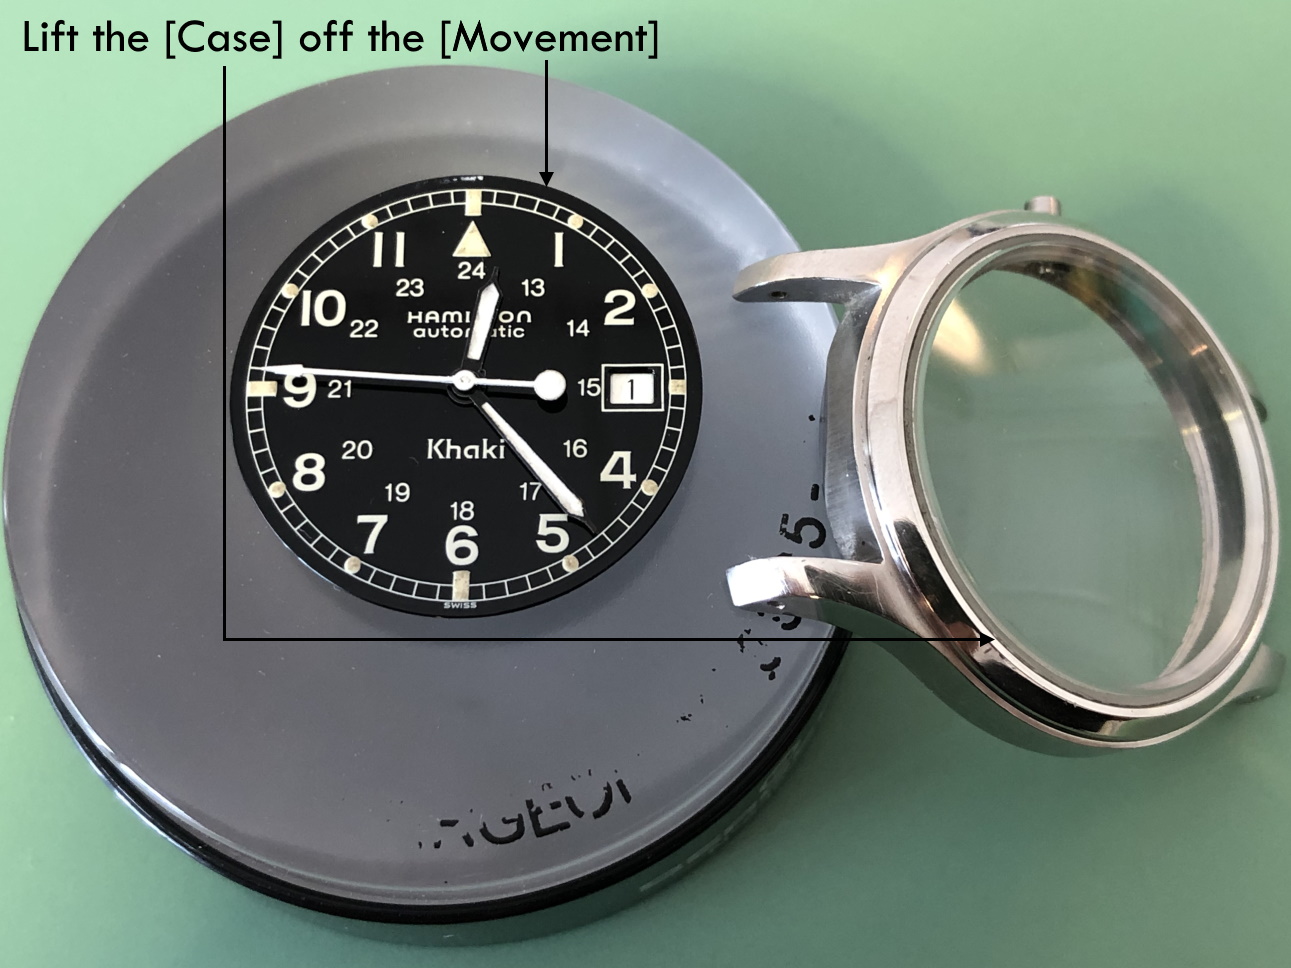
This is an American watch, so the "normal" position of the stem in the keyless is the "out" position where the spring is pushing it outward. The case must hold the stem inward to keep it in winding mode when it would otherwise want to pop out to setting mode. The stem is not split. It will be held in probably by a threaded case sleeve, and the case sleeve is responsible for adjusting the depth of the stem into the movement. If it is adjusted out too far, the stem will never engage deep enough to put the watch in winding mode. If it is in too far, it will never leave winding mode. Don't try to pull the stem out as it is, you will probably break the sleeve. A sleeve looks like this, though with variations in the number of slots in the big end. It holds the stem, allowing it to slide over its detent. With the crown unscrewed and removed, look into the top of the pendant tube. You should see threads and also 4 or perhaps 2 slots or divots. Those are meant to engage with a "sleeve wrench" which is used to turn the case sleeve in and out. It's a tool that looks like this, with many different sized and styles of tips: Probably you just need to turn in the case sleeve 1 or 1.5 turns and it will engage the movement's winding correctly. Here's a video of JD Richard adjusting one.https://www.youtube.com/watch?v=ugiH0FvERqc
 1 point
 -
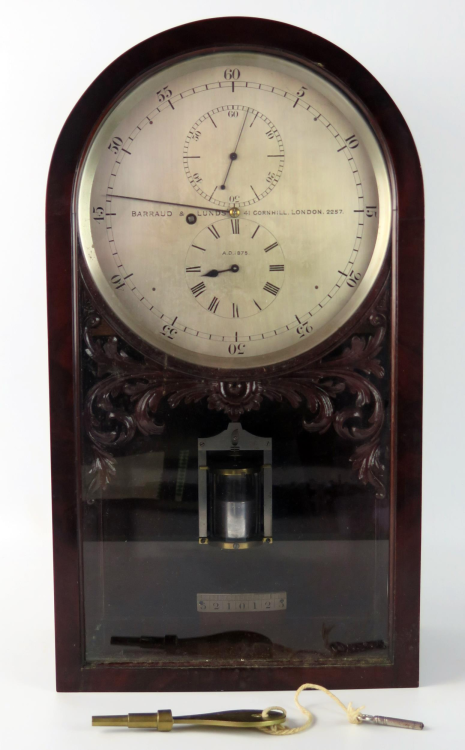
It seems Barraud and Lunds made some very fine clocks too. Example above.
 1 point
 -
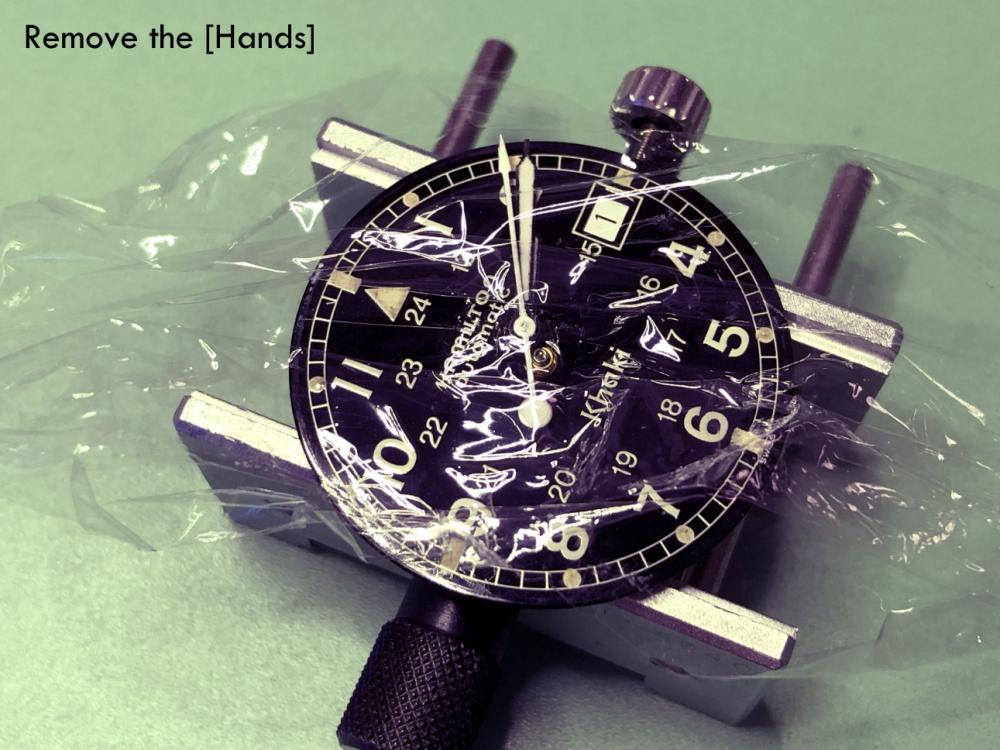
Perhaps it's wise to check the condition of the movement first before further investing in parts. It looks like the dial has been damaged by the hour hand as well.1 point
-
Welcome to the forum. Was it a screw down crown and can you post some dimensions based on this photo.
 1 point
 -
I will have to disagree this time.1 point
-
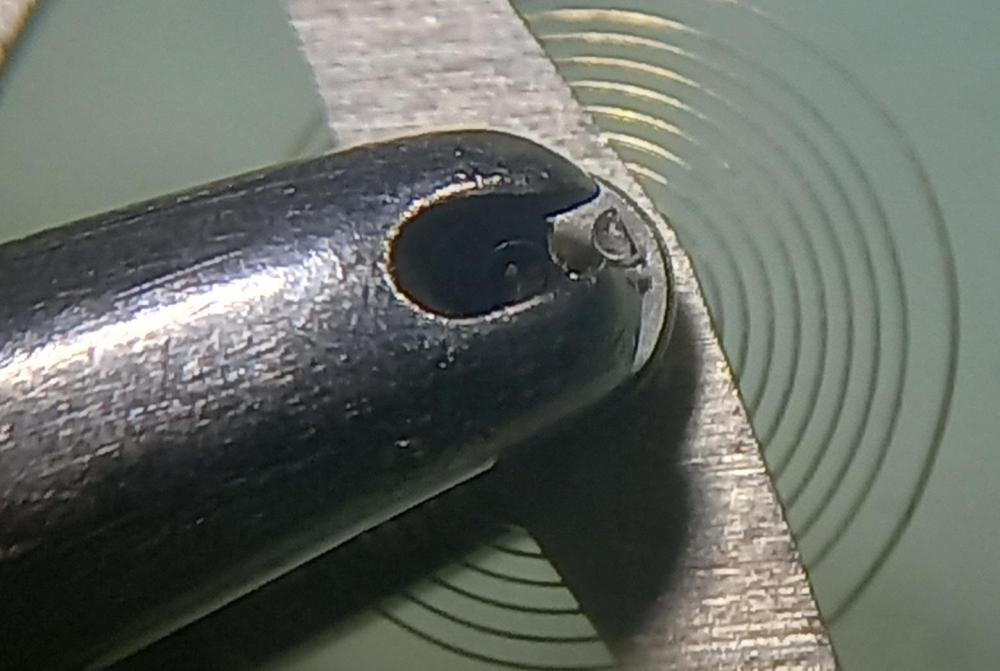
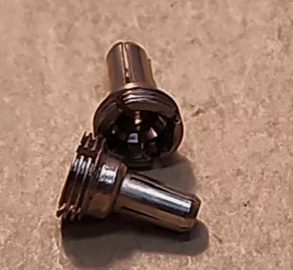
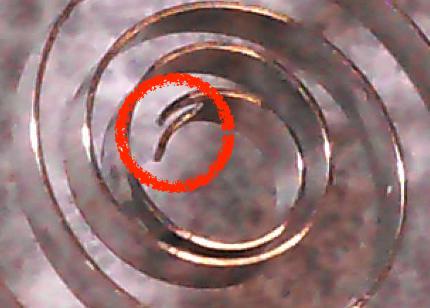
Here you go. 6.0: https://www.dropbox.com/scl/fo/gmw2oajp90cqg6rjgpqvf/ABjP2kUyq3uoIRF_bhv67XA?rlkey=hje4j5h4l9ygmq9bg5mzt25wb&st=uyqortxw&dl=0 6.5: https://www.dropbox.com/scl/fo/n2wcxy4iz1zholmpfwfx9/AG4BdCZIVCluwEpOySHLoRY?rlkey=md621fslbute05og5aykqwwo9&st=pl36794o&dl=0 and for good measure, here's one I made earlier, 5.5: https://www.dropbox.com/scl/fo/pjd7frxzcbe99ga96t4k0/ABgpEeXL3yF4nokmIqB4yk8?rlkey=jvdp4rhmi0hap8gxtdbj7x1zu&st=4voiirfc&dl=0 (I have used the 5.5 so I know it's ok.) I've done a couple of manual wind springs and feel I have a pretty good handle on winding them now, but I'm not having much success with automatic springs. In my first attempt, I had started to feed the bridle into the winder then when I was trying to wind it in, the arbor end broke (first pic below). Today trying another spring, when trying to 'encourage' the bridle into the winder I realised it was coming out one of the pusher holes ... the whole tail and bridle had snapped (second pic). Just now on a third practice spring I thought I had wound it successfully. I started the bridle in the winder then wound it in before gently releasing the tension. It looked good in the winder so I did the transfer to the barrel. I'd checked that the barrel was flush with the winder housing, then pushed the spring home, checking again that the plunger had come all the way down to the barrel, but as soon as I took the winder away the spring jumped out ... in two pieces, with the tail again broken off at the beginning of the bridle. I'm rapidly running out of automatic springs I can practice on. These springs were probably all 20+ years old, and the first two might be closer to 40 or 50 so it's possible that it was their time to break anyway, but if it's me, I want to work out what I might be doing wrong. Once the bridle is in position, should I just let the winder pull it in, or should I give it a push as well? The first one I tried to just pull in but it broke at the arbor. The second one I tried to give the bridle a push at the same time as winding to try to ease the pressure on the arbor, but ended up shearing off the tail. I don't know what the story was with the third, whether it was already broken when I tried to transfer it to the barrel, or if it broke as it flew out. Any suggestions?
 1 point
 -
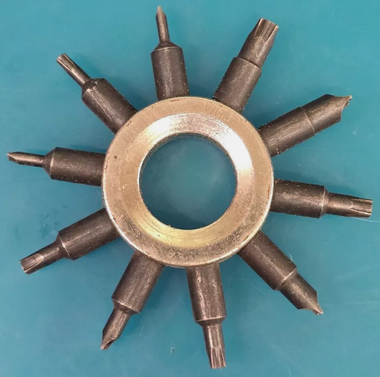
The one with the extra overlap holes is so that threads can be cut, there needs to be an edge to create the chips and somewhere for them to go. The one with single threaded holes is probably a screw guage so you can size a screw then you would use a matching threading plate to make a required screw. Tom1 point
-
Hi guys, I wrote a set of five lessons for my second year students regarding the Landeron 248 chronograph watch, which incidentally we are meeting tonight. They are going to be polishing pivots and pinion leaves of their 248s, before putting the movements through the cleaning machines. This is number one of five. I posted number two of five the other day HERE There are seven eccentric studs on this movement, so understanding what the studs do, how to set them, their actions and interactions with other parts of the chronograph mechanism is vitally important. I found there is very little out there on the internet to help understand the principles of these eccentric studs, especially video content to show various faults and alleviations, so I put together quite detailed walkthroughs of various complicated movements usually consisting of 15 to 18 hours of learning/servicing in the workshop per movement/module With any watchmaking, especially with complicated work, only make one adjustment and measure the results, if any. Be methodical in your approach. The lesson was originally in PowerPoint and I had to convert it to PDF to post here, so a lot of the video content won't play, but the PowerPoint version is in my cloud storage here. https://docs.google.com/presentation/d/10KJJ58P0v2BglKZSilIv9o69xBsbrQPI/edit?usp=sharing&ouid=107902587627140904870&rtpof=true&sd=true You'll need quite a newer version of Microsoft Office (PowerPoint) so the video content will play, otherwise it won't. I hope you find this lesson useful and begin to get a better understanding of how to set eccentric studs. Sometimes you'll come across a stud that is too loose, or even too tight. Usually if one is problematic it will be because it is loose. This can't be left, as the stud will turn whilst the chronograph is stopped, started and reset, throwing the chrono mechanism setting off which could lead to the movement grinding to a halt. Don't fool yourself in thinking it will hold. Either a replacement stud is fabricated to suit the enlarged hole, or the hole can be closed up. In turning and setting the eccentric studs prior to disassembly of the movement, we are able to set the chronograph mechanism, especially the minute register mechanism correctly and test for any faults, such as a bent wheel over fourth arbor, or incorrect depth of the dart tooth with the sliding gear, or a mis-set minute runner jumper spring, to name a few possible faults and mis-settings. Also in turning these eccentric studs we can gain a 'feel' for how tight they are in the mainplate or bridge. The more they are turned the more the chance of the stud becoming looser increases. So once set correctly prior to cleaning, the less chance they will need setting once the chrono mechanism is assembled, only if a stud isn't tight enough in its setting in the first place. This is for setting Landeron 248 eccentric studs, but once an understanding of their uses and actions is gained through theoretical aspects together with practical application, then this skill and knowledge can be used in most vintage chronographs to set their eccentric studs and even in modern timepieces where you'll find very few eccentric studs, such as an Omega Speedmaster or Tag Heuer Calibre 01 chronographs Enjoy! Lesson 22. Landeron 248 Chronograph.pdf1 point
-
There are many things I've learned in the year or so I've been tinkering with clocks & watches, most of them courtesy of the helpful WRT community. By way of an attempt at giving something back - in the sense of 'paying it forward' for the possible benefit of others at an early stage in the hobby - I thought I'd mention one or two of the things I've assimilated & find generally useful. The first is Patience: not letting oneself get annoyed when parts won't sit the right way up for the tweezers to grab and/or won't slot easily into place. To help, I remind myself that with each attempt I'm improving my manual dexterity ("practice makes perfect") so the time spent should be looked on as an investment. This approach was reinforced by reading, in George Daniels 'Watchmaking', his advice to simply practice turning tweezers through 360 deg. while holding small objects to improve one's dexterity. The other aspects of Patience I've learned are knowing when to walk away; and not trying anything tricky if one isn't in the right frame of mind. In terms of techniques, I've learned to start small screws once seated by gently giving them - with a 'stroking' motion - a few turns with the tweezers so that, being then somewhat secured, I don't 'go down a snake' when applying the much heavier screwdriver. I find my oilers are also useful for starting screws more gently than I can with the screwdriver. Of course I've lost my share of springs & screws as I've been learning just how much/little pressure to apply to them and have spent much time on my hands & knees. Yes it's frustrating but when I do locate one of the little b----rs I find I'm feeling as I imagined the father of the prodigal Son felt rather than cursing it! Another aspect of Patience, I suppose!1 point
-
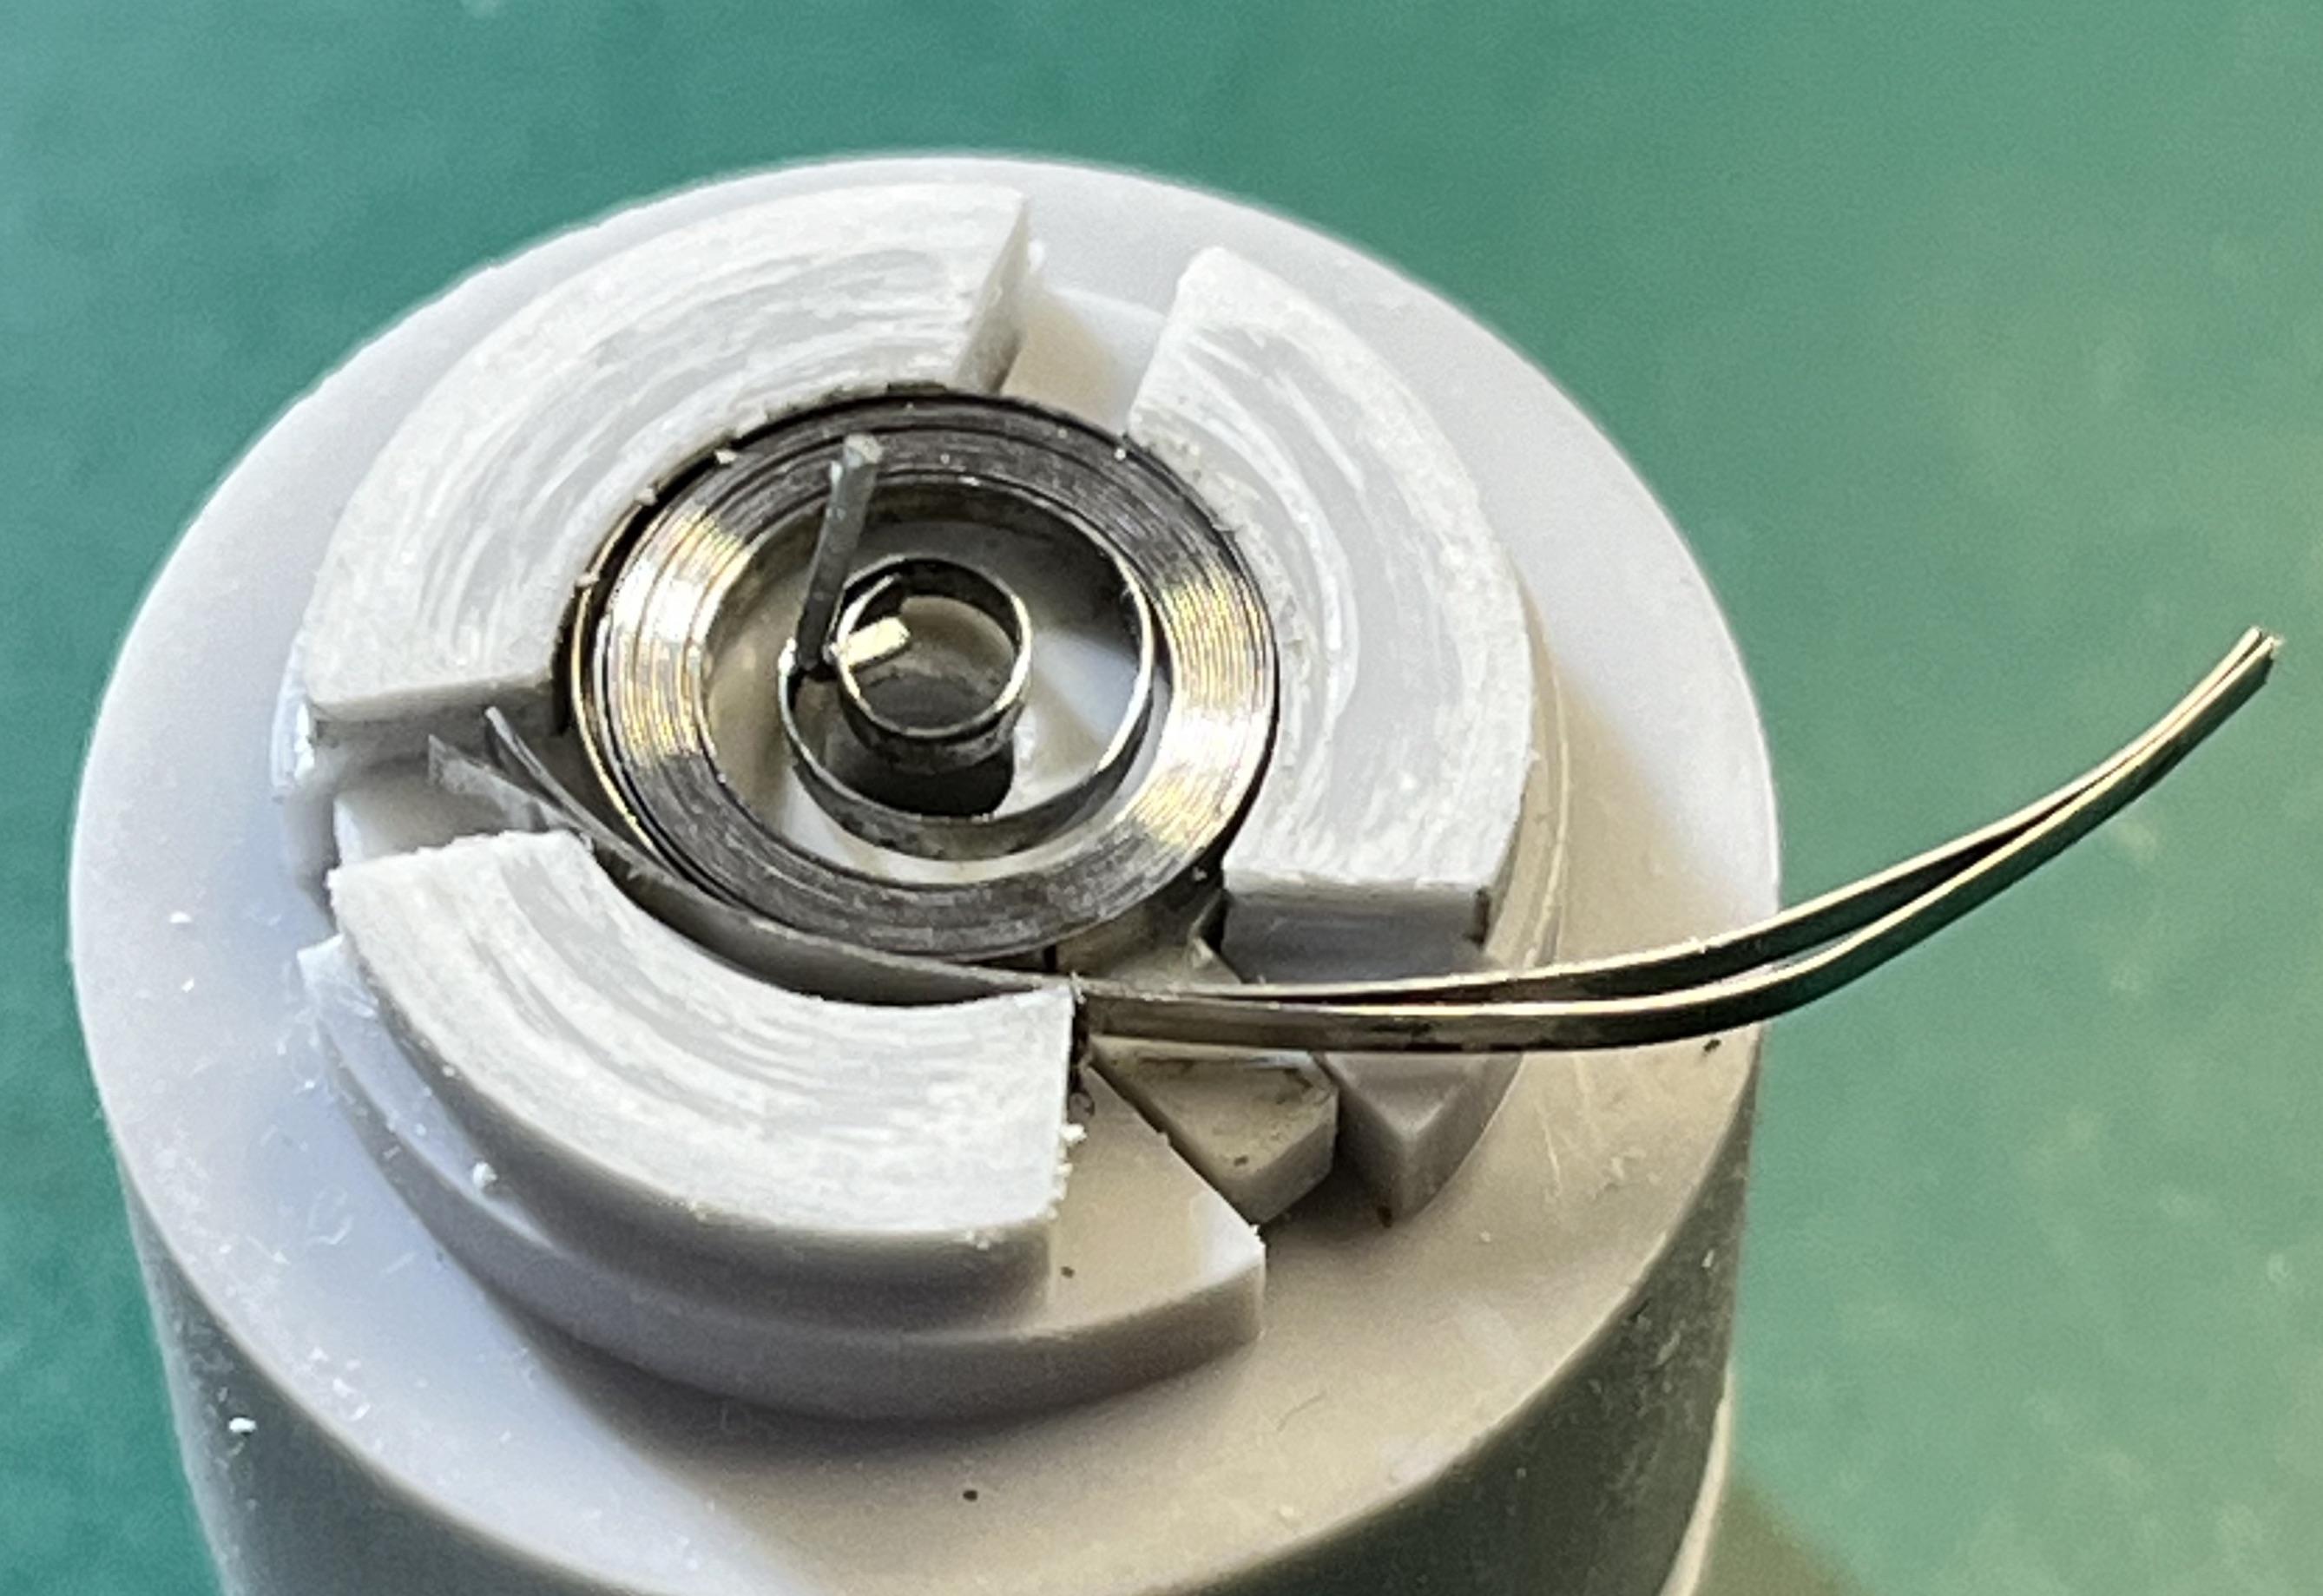
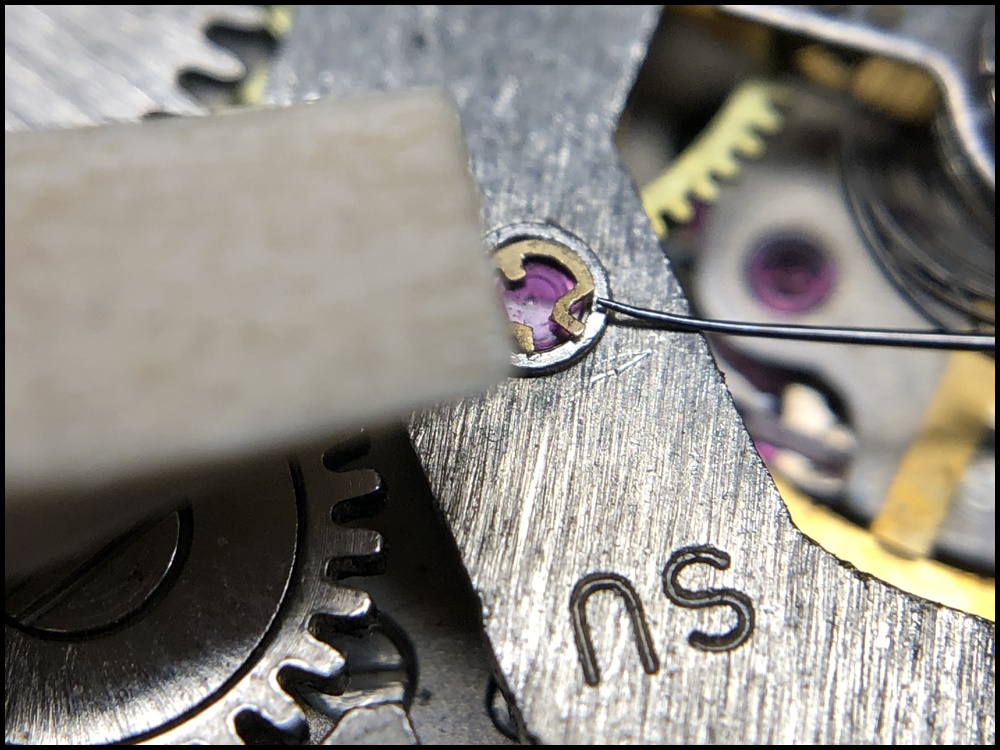
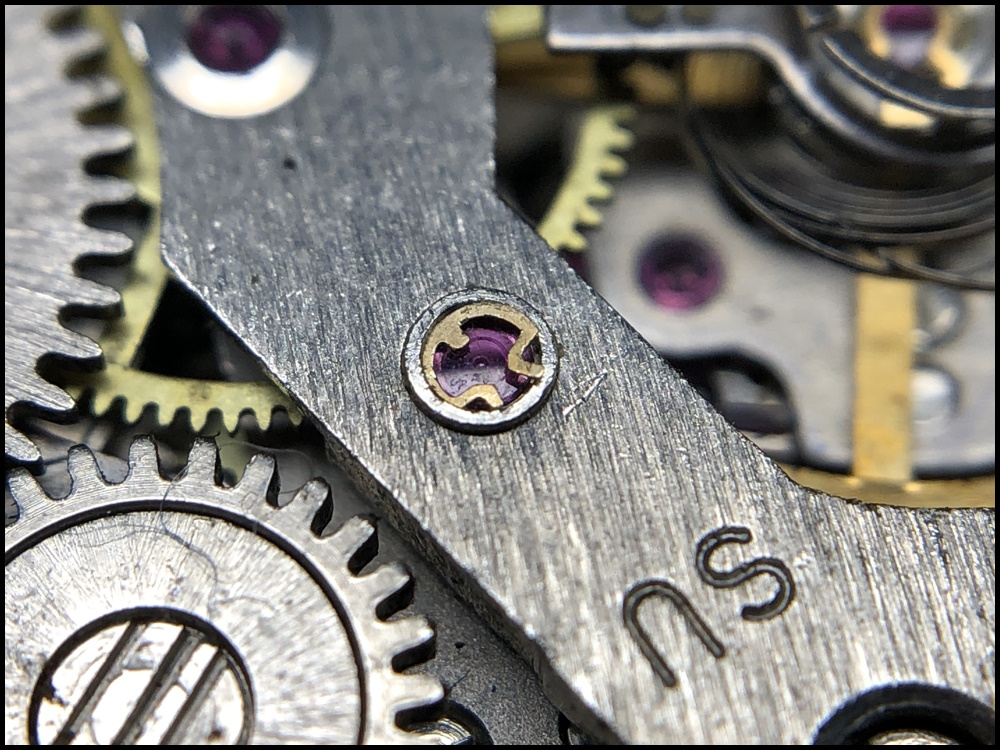
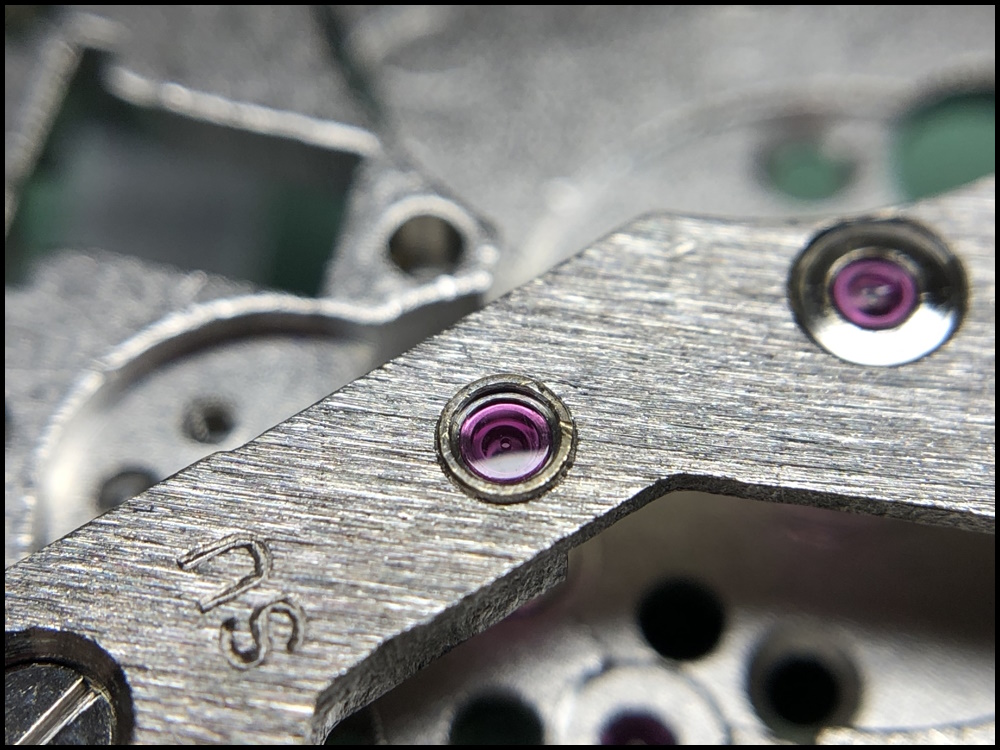
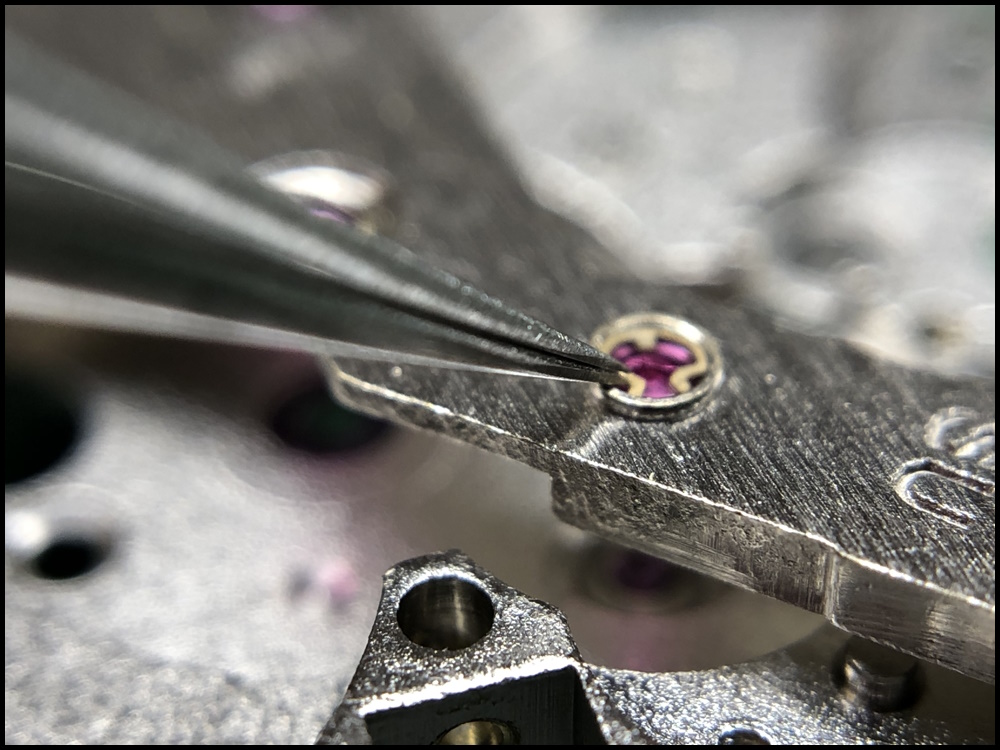
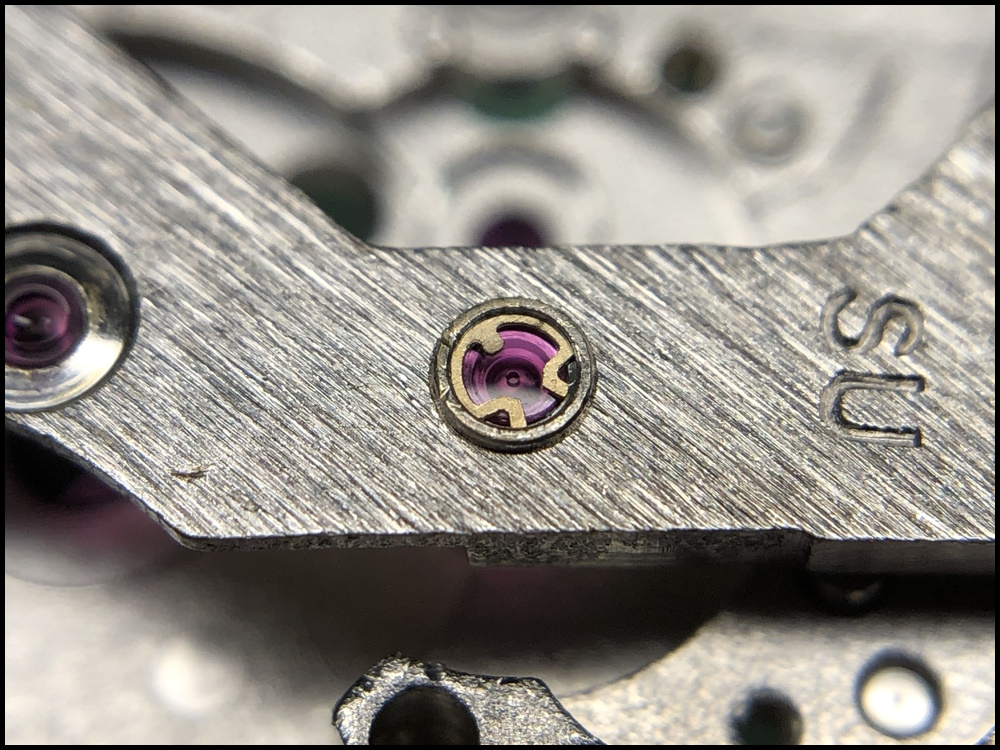
I thought some future repairer might find this thread so I will now try to describe how I dealt with the spring that covers the cap jewels for the escape wheel pivots. Thanks for all input which proved very helpful. The diameter of the spring is approximately 1.2 millimetres (the cap jewel diameter is 1.1 mm ) and the spring sits submerged in a hole and the edge of the spring is inserted into a groove that runs around a bit below the hole. It proved difficult to find a tool that was small and flexible enough to hold the spring in the hole while prying it out, so I found an alternative strategy that worked well both for removing the spring and for refitting it. See the below description. To get the spring out I used a sharpened oiler while covering as much of the jewel hole as possible with a piece of peg wood carved like a screwdriver. I jabbed the oiler under the spring and then bent the spring inwards and upwards which caused it to come loose from the groove/lip without putting undue stress on the spring. When the long leg of the spring (the other leg is, yes, shorter) has been freed from the slot in the hole, it is basically just a matter of carefully lifting the spring out of the hole. The cleaned cap jewel was refitted in the hole. To get the spring back in place, I pushed one edge of the spring into the groove of the hole. After that, I again covered as much of the hole as possible with my pegwood screwdriver blade (not visible in the picture). Finally, I gently pushed the other leg of the spring in and down with my tweezers to get it into place in the hole. Hopefully, it is clear from the picture that I pressed onto the edge of the spring between the two closed tweezer blades. Spring is fully seated.
 1 point
 -
Nice, I've 3d printed (PLA) movement adaptors and dials for a custom watch I made but FDM requires lots of post processing to clean up. I've not got into resin printers yet but I'd love to give it a go to create dials with. I'm thinking of a Panerai type sandwich dial with one layer being a glow in the dark resin.1 point


JamesSnr(ourGrandadwasinWWIaswell)a..._page_1.jpeg.94ce22cf70da8c5a323f9f0a04fc2330.jpeg)