Leaderboard


Popular Content
Showing content with the highest reputation on 10/27/24 in all areas
-
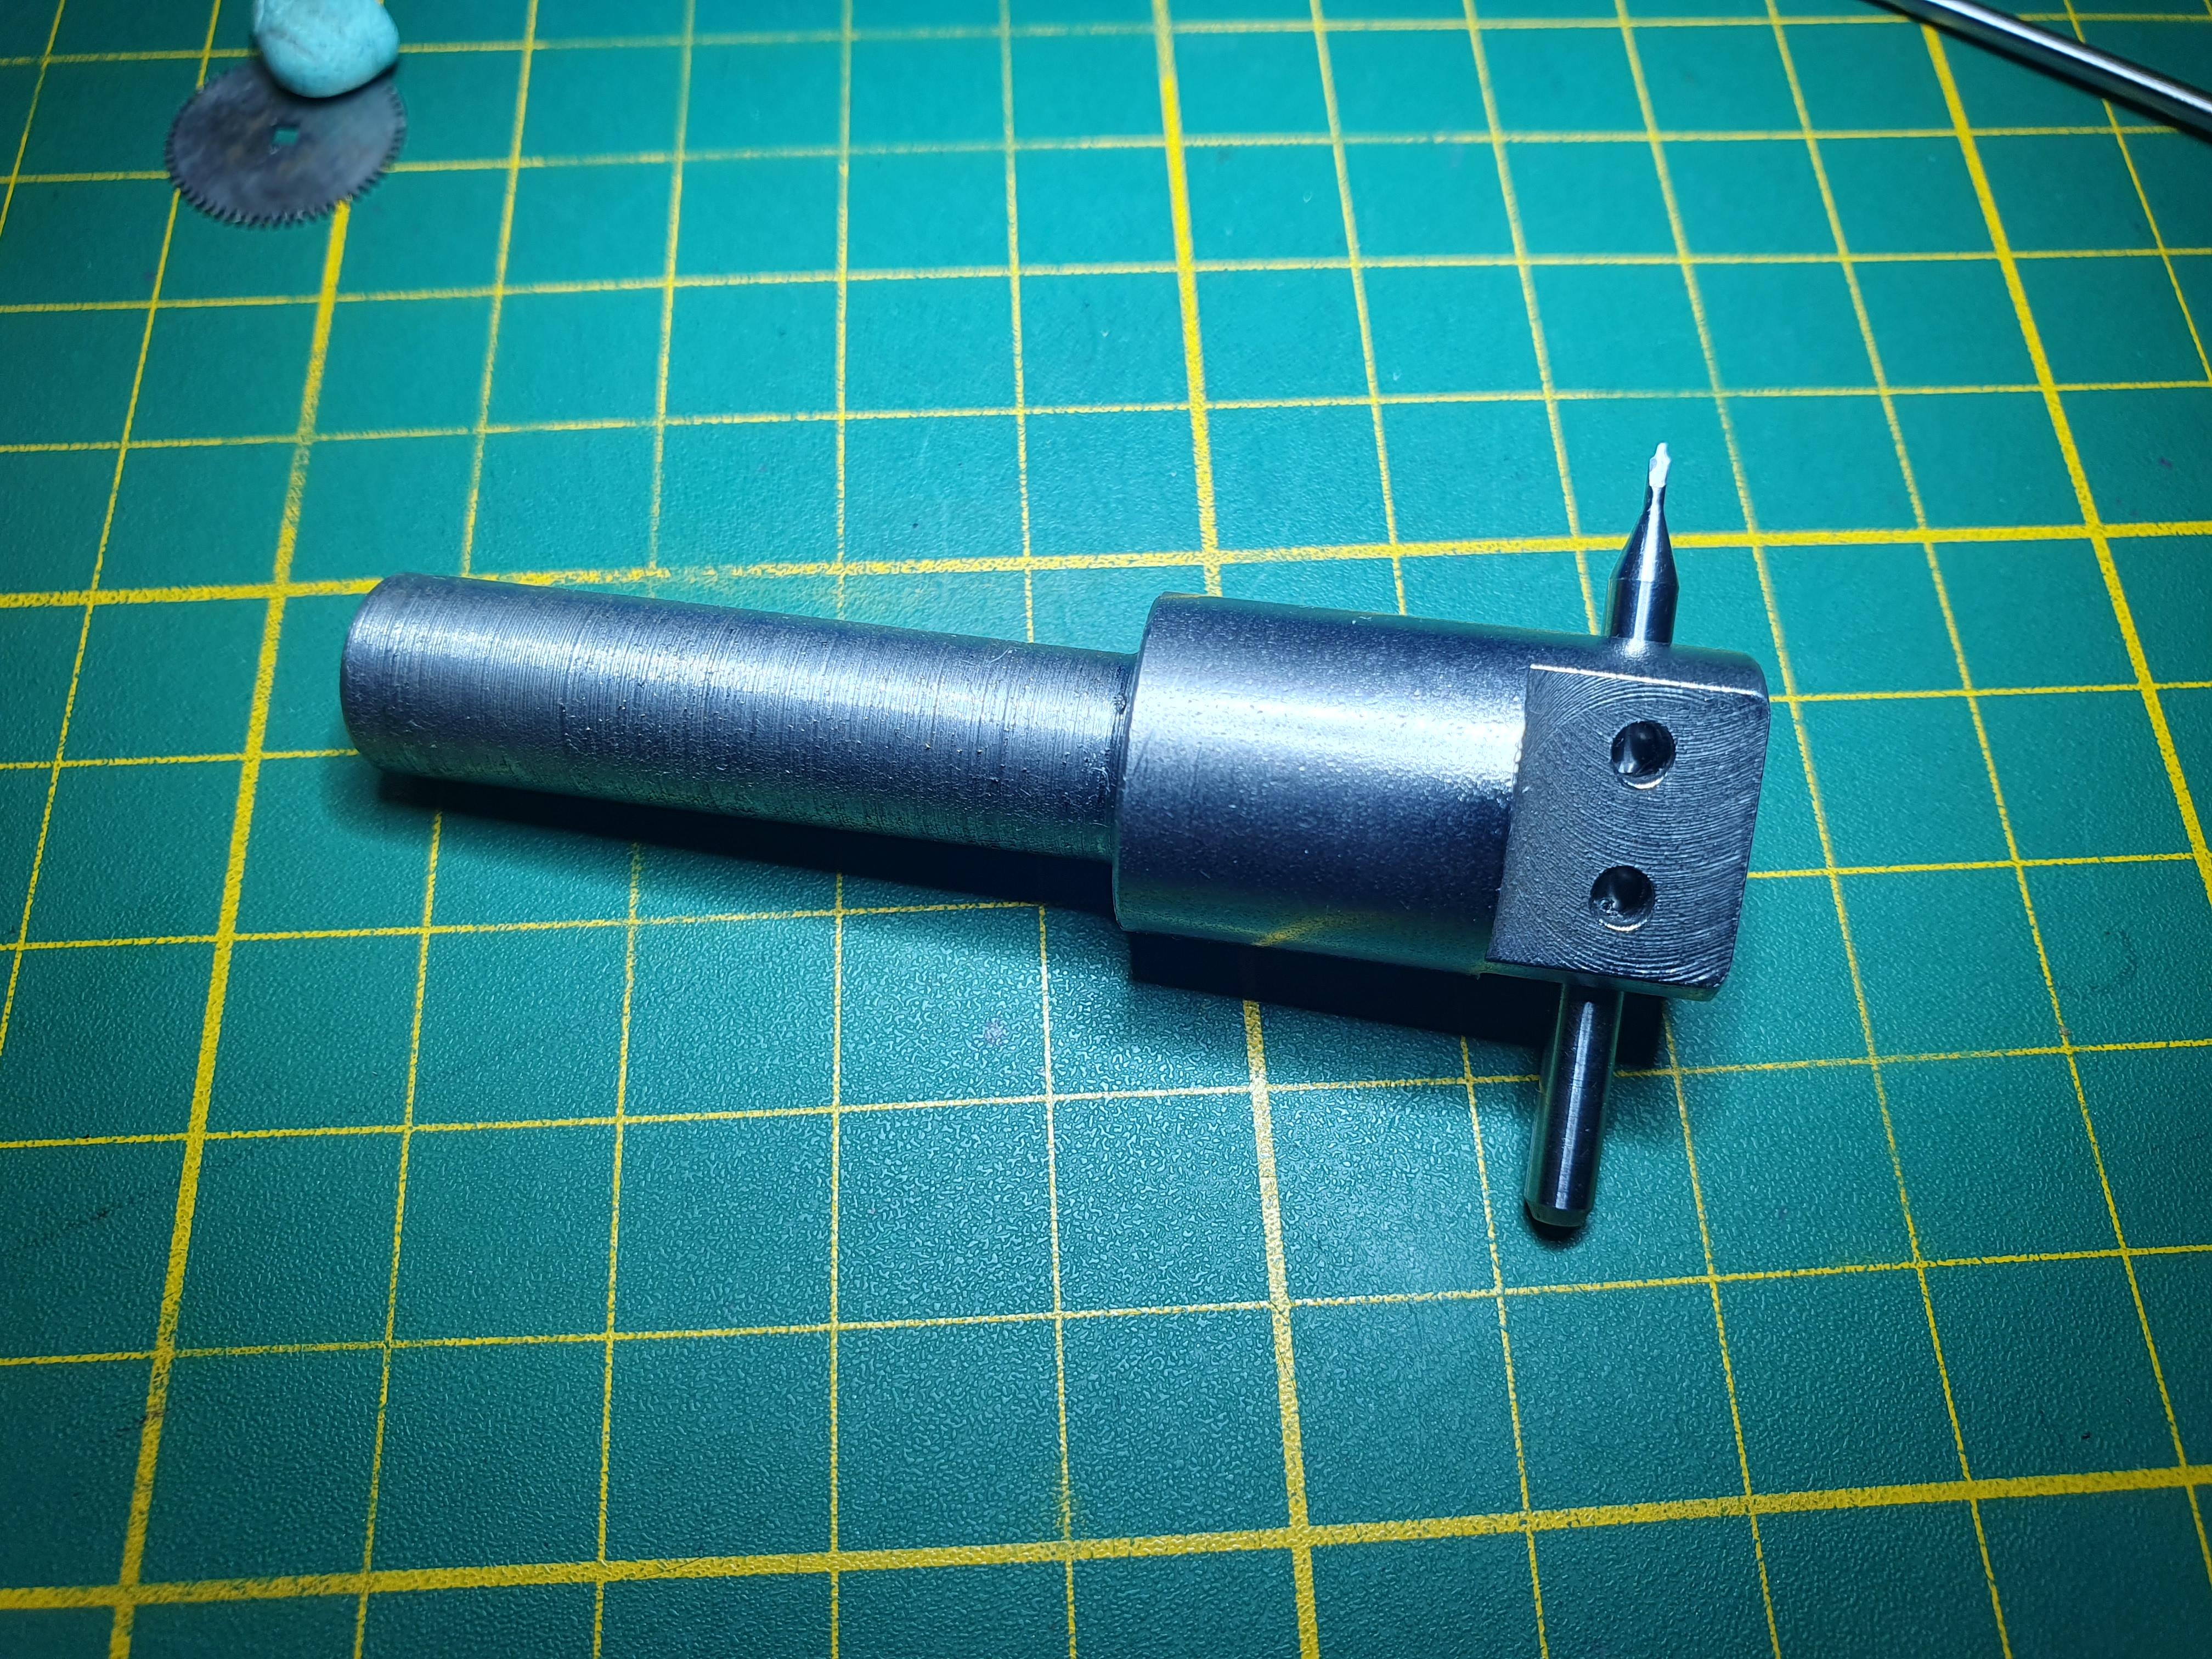
Following your suggestions, I've made something vaguely resembling a cutter. I'll set this up on my milling machine and will try using it on brass first to see what it does..
 5 points
 -
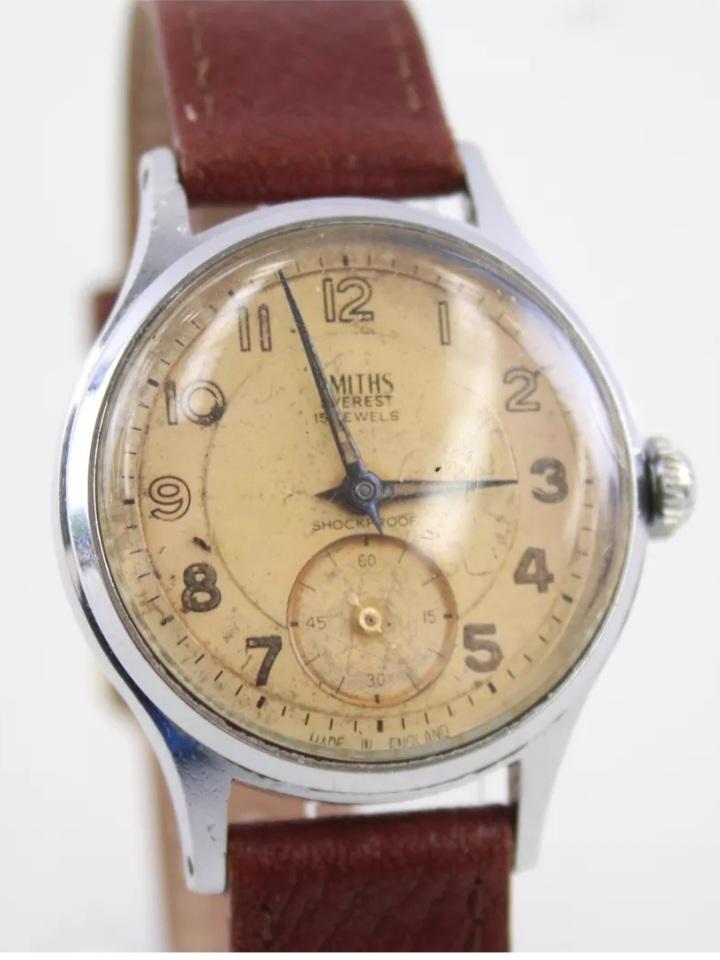
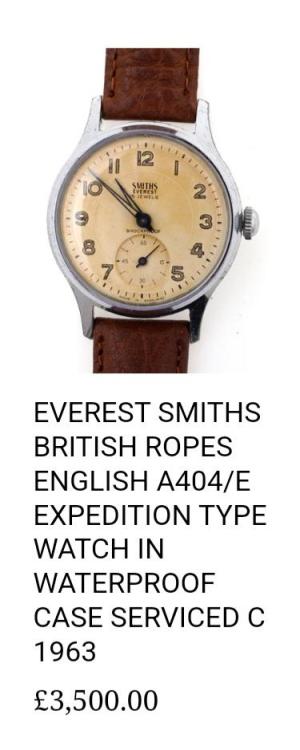
Been after this model since i started collecting Smith watches ❤ So i found this for sale at Smiths watches.com ....same model........wow...hope no-one here was upset with me last night when i won it
 3 points
 -
I've almost finished making a crude flycutter. It needs 2 grub screws and tapping the threads for those.
 3 points
 -
Be sure to cut the excess off the back end of the cutter lol2 points
-
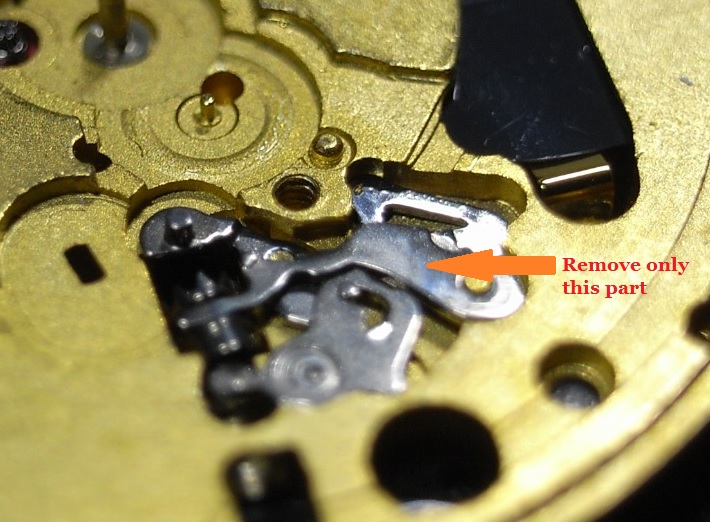
No, you don't need to do any of that. It's much simpler on your watch because it has a moveable stud carrier. The way Mark is demonstrating in the video is how to adjust it if the stud is fixed directly to the balance cock. You might have to do that if the jewel position was WAY out, but I don't think that's the case here. The whole point of a moveable stud carrier is to make it possible to make this adjustment without removing the balance and fiddling with the collet. All you need to do is move the stud carrier, as I indicated in the marked-up still I took from your video.2 points
-
A Look Inside The Geochron Clock. https://hackaday.com/2024/05/31/a-look-inside-the-geochron-clock/ A wide screen wonder from an era before "everything is an app"
 2 points
 -
Although most homes and businesses in the US have 220V/60Hz power available for large, fixed appliances and tools you will find that portable tools such as watch cleaning machines sold here will almost all be wired for 120V/60Hz, including the vintage L&R machines. They can be used on a higher mains power by using a step-down voltage transformer and the 50 to 60Hz mismatch isn't a major issue for components such as the universal motor and power resistor (heater).2 points
-
It's that time of year again, changing the bloody clocks, drives me mad. Let's just decide which is the best time and call it quits.1 point
-
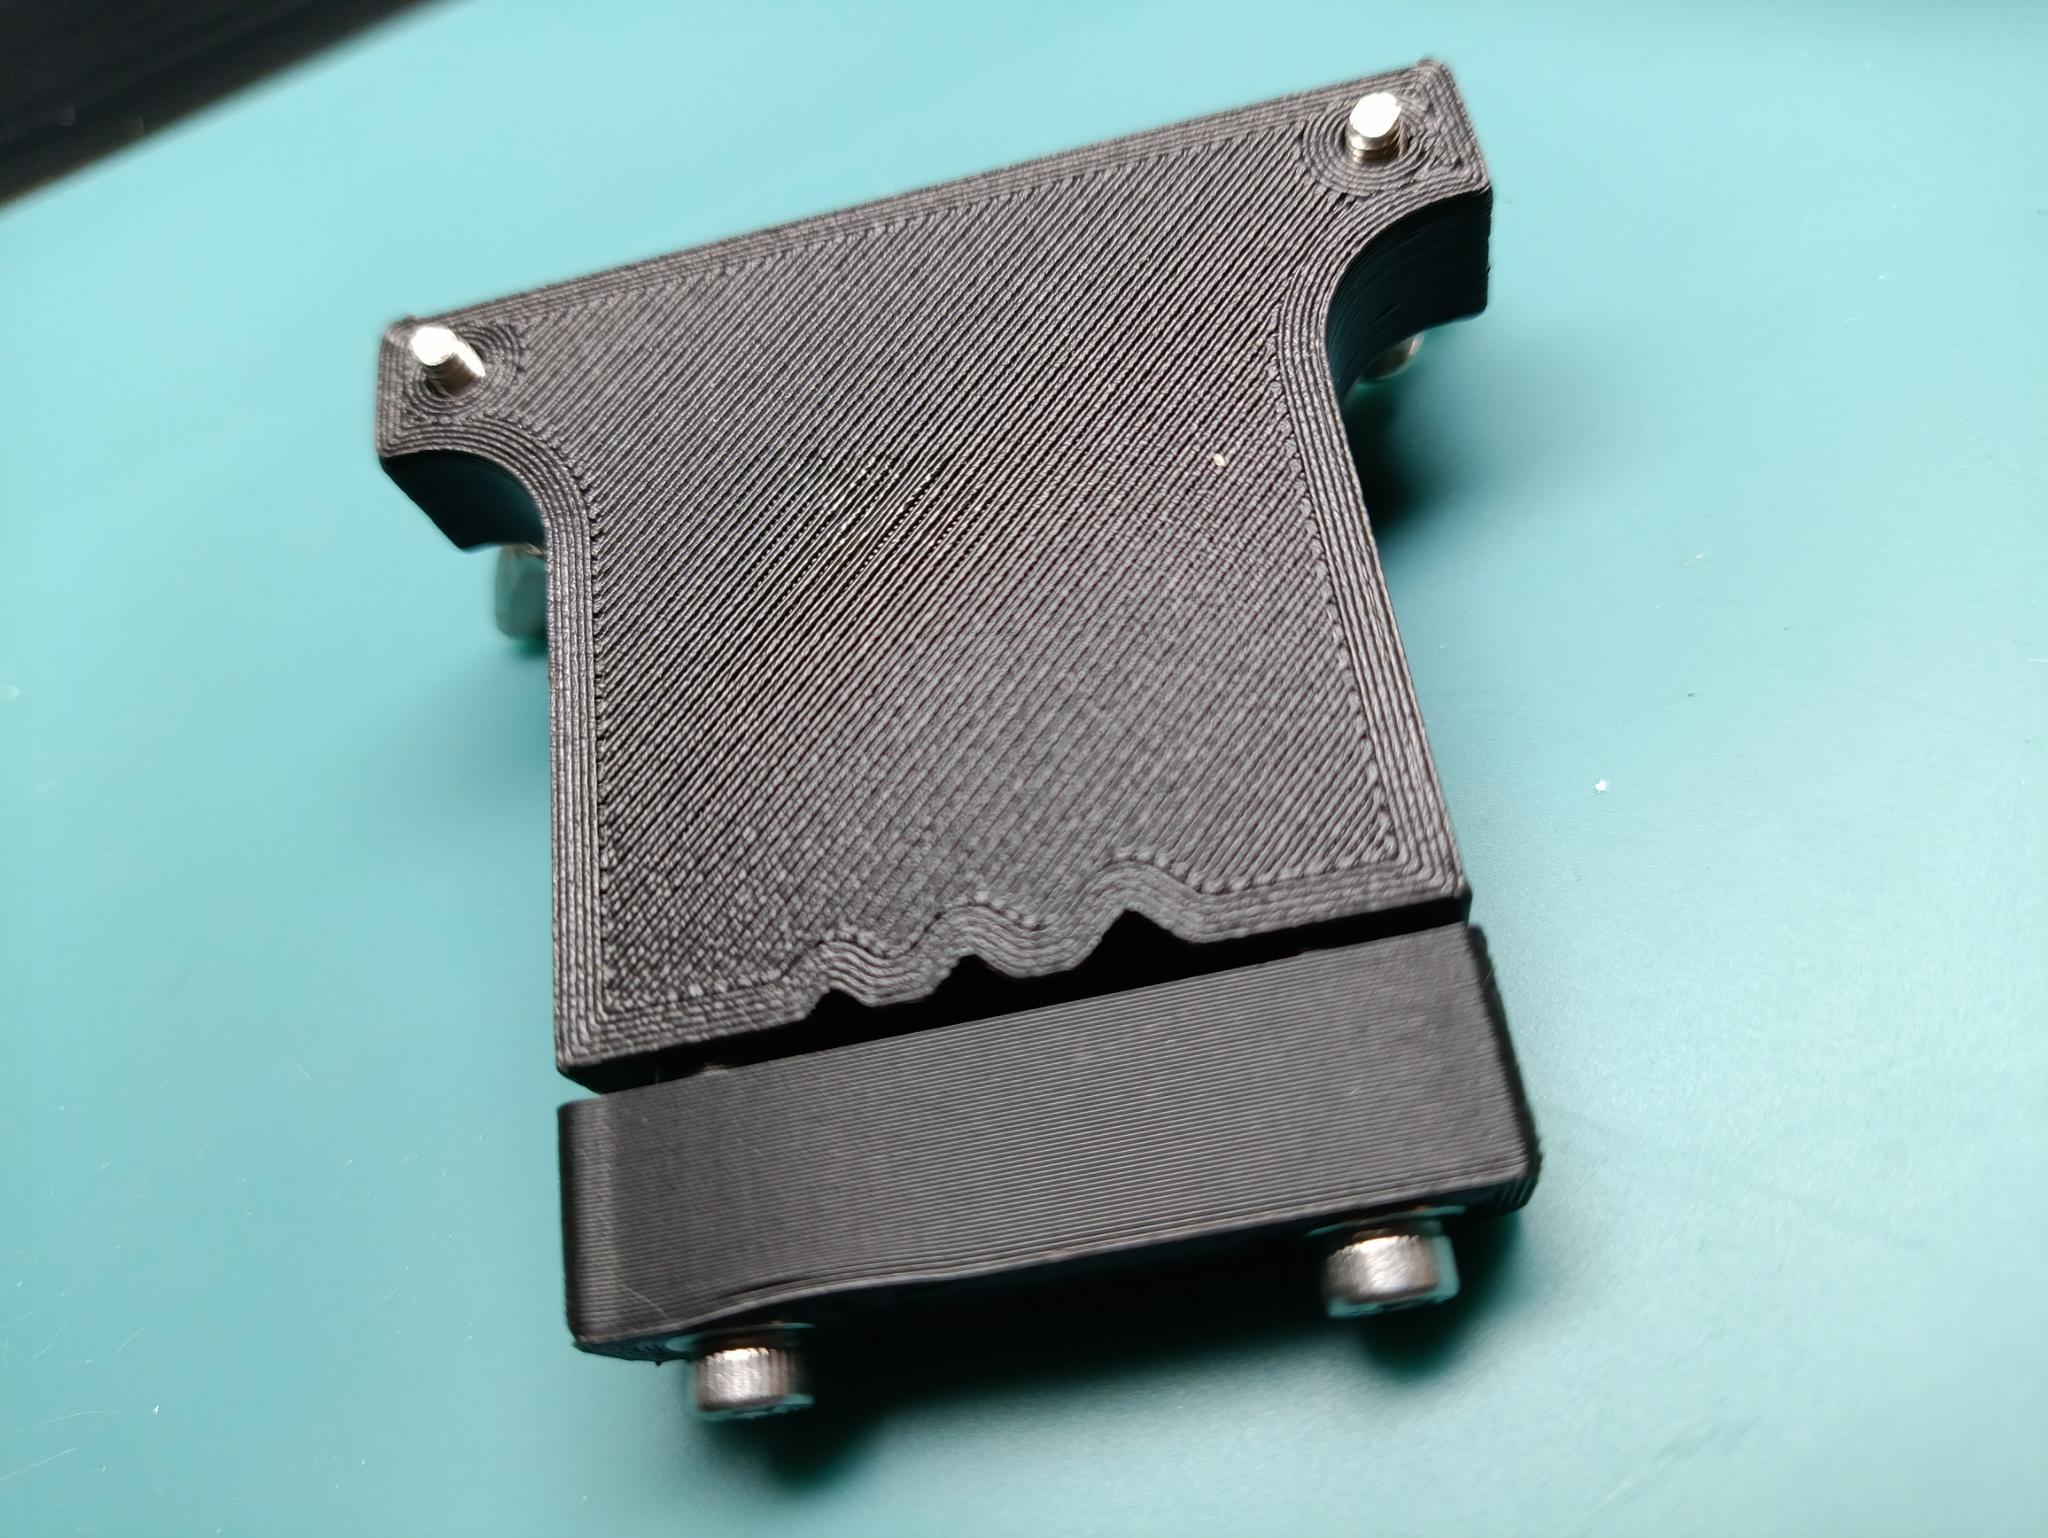
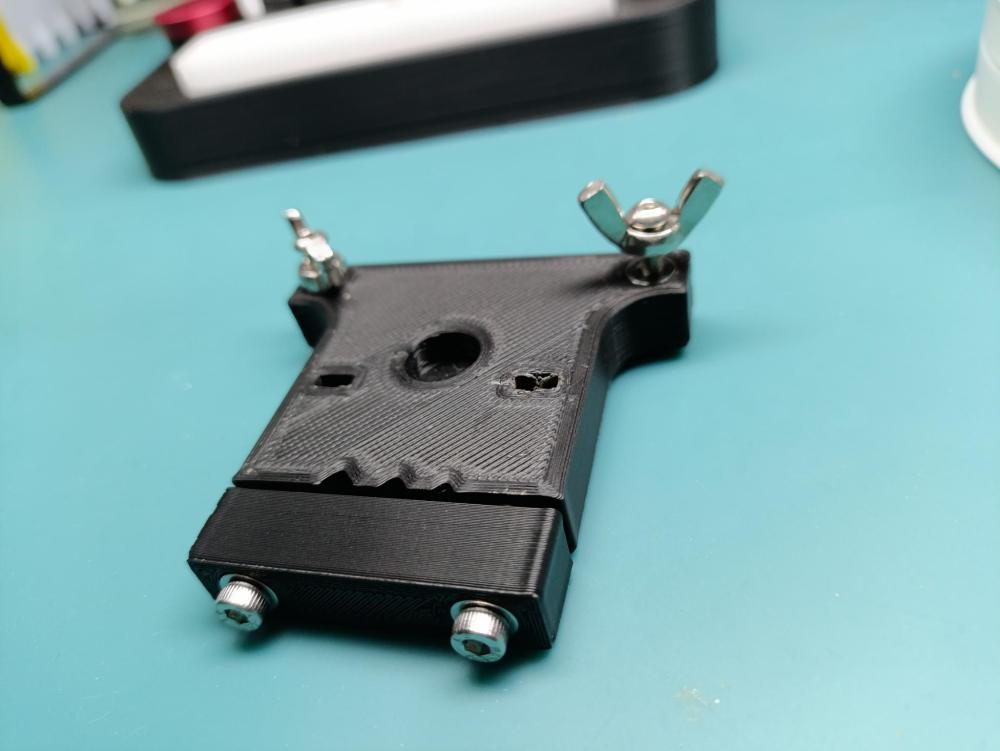
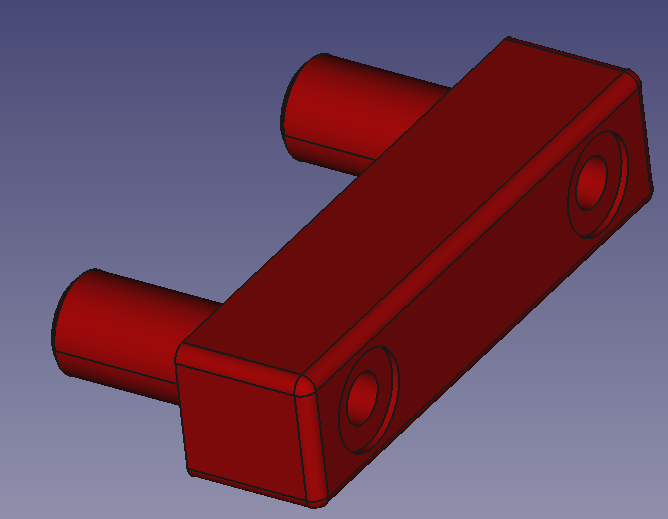
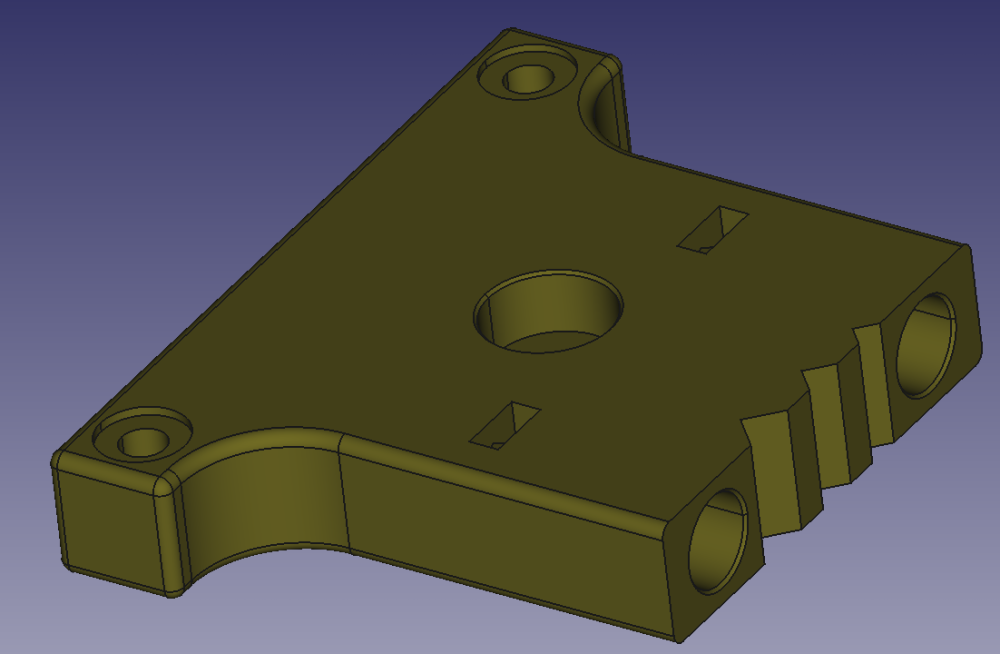
I recently watched a YouTube video (see below) on screw polishing and in the more information section there were instructions on how to build a screw polisher, I decided to make a 3D printed version of this tool based upon these instructions (pdf instructions of brass tool attached - credit or original author): Here is the version I created based upon the brass tool instructions and instruction from the video - I had to change some of the design aspects based upon the different requirements needed for 3D printing, but the essence of the design and key features are kept: Here is the top of the tool (prototype): Here is the underside: I have used M3 bolts throughout (see parts list below) and reinforced the areas under the bolt heads with a standard M3 washers, here is the FreeCAD view showing the complete assembly: Here is the "Bar" section: Here is the body "Frog", the slots in the top and back are to insert the 'trapped' M3 nuts (point down) Here is an x-ray view of the complete assembly: I used M3 wing nuts as locking nuts to prevent the bolts (legs?) backing off during use, I also included a cutout in the top to insert a bullseye level (10mm x 6mm) which hasn't arrived from Amazon yet, and so is absent from my pictures. Parts list: 2 x 40mm M3 Stainless Steel 304 Hex Socket Head Cap Screws Bolts 4 x M3 Stainless Steel 304 washers 1 x Mini Spirit Level Bullseye (10mm x 6mm) 2 x Wing Nuts M3 A2 Stainless Steel Butterfly DIN 315 4 x Hexagon flat nuts A2 Stainless Steel M3 2 x 30 mm Fully Threaded Allen Key Hex Socket Cap Screws Bolts M3 High Tensile I have uploaded the design to printibles (link here), but will include the file here also, I'll attach it as FrogV2.pdf so I can upload here, please download and replace .pdf with .zip to access. 3D printing settings: Material is PLA+, just what I had on the printer at the time, could also work with PETG etc. Fill is 75% gyroid, setting is high to ensure rigidity of the tool during use 1.6mm wall thickness, setting is high to reduce wear on faces which interact with metal parts. Here is the missing bullseye: Here is the link to the youtube: Enjoy! how-to-make-a-bolt-tool.pdf FrogV2.pdf


 1 point
 -
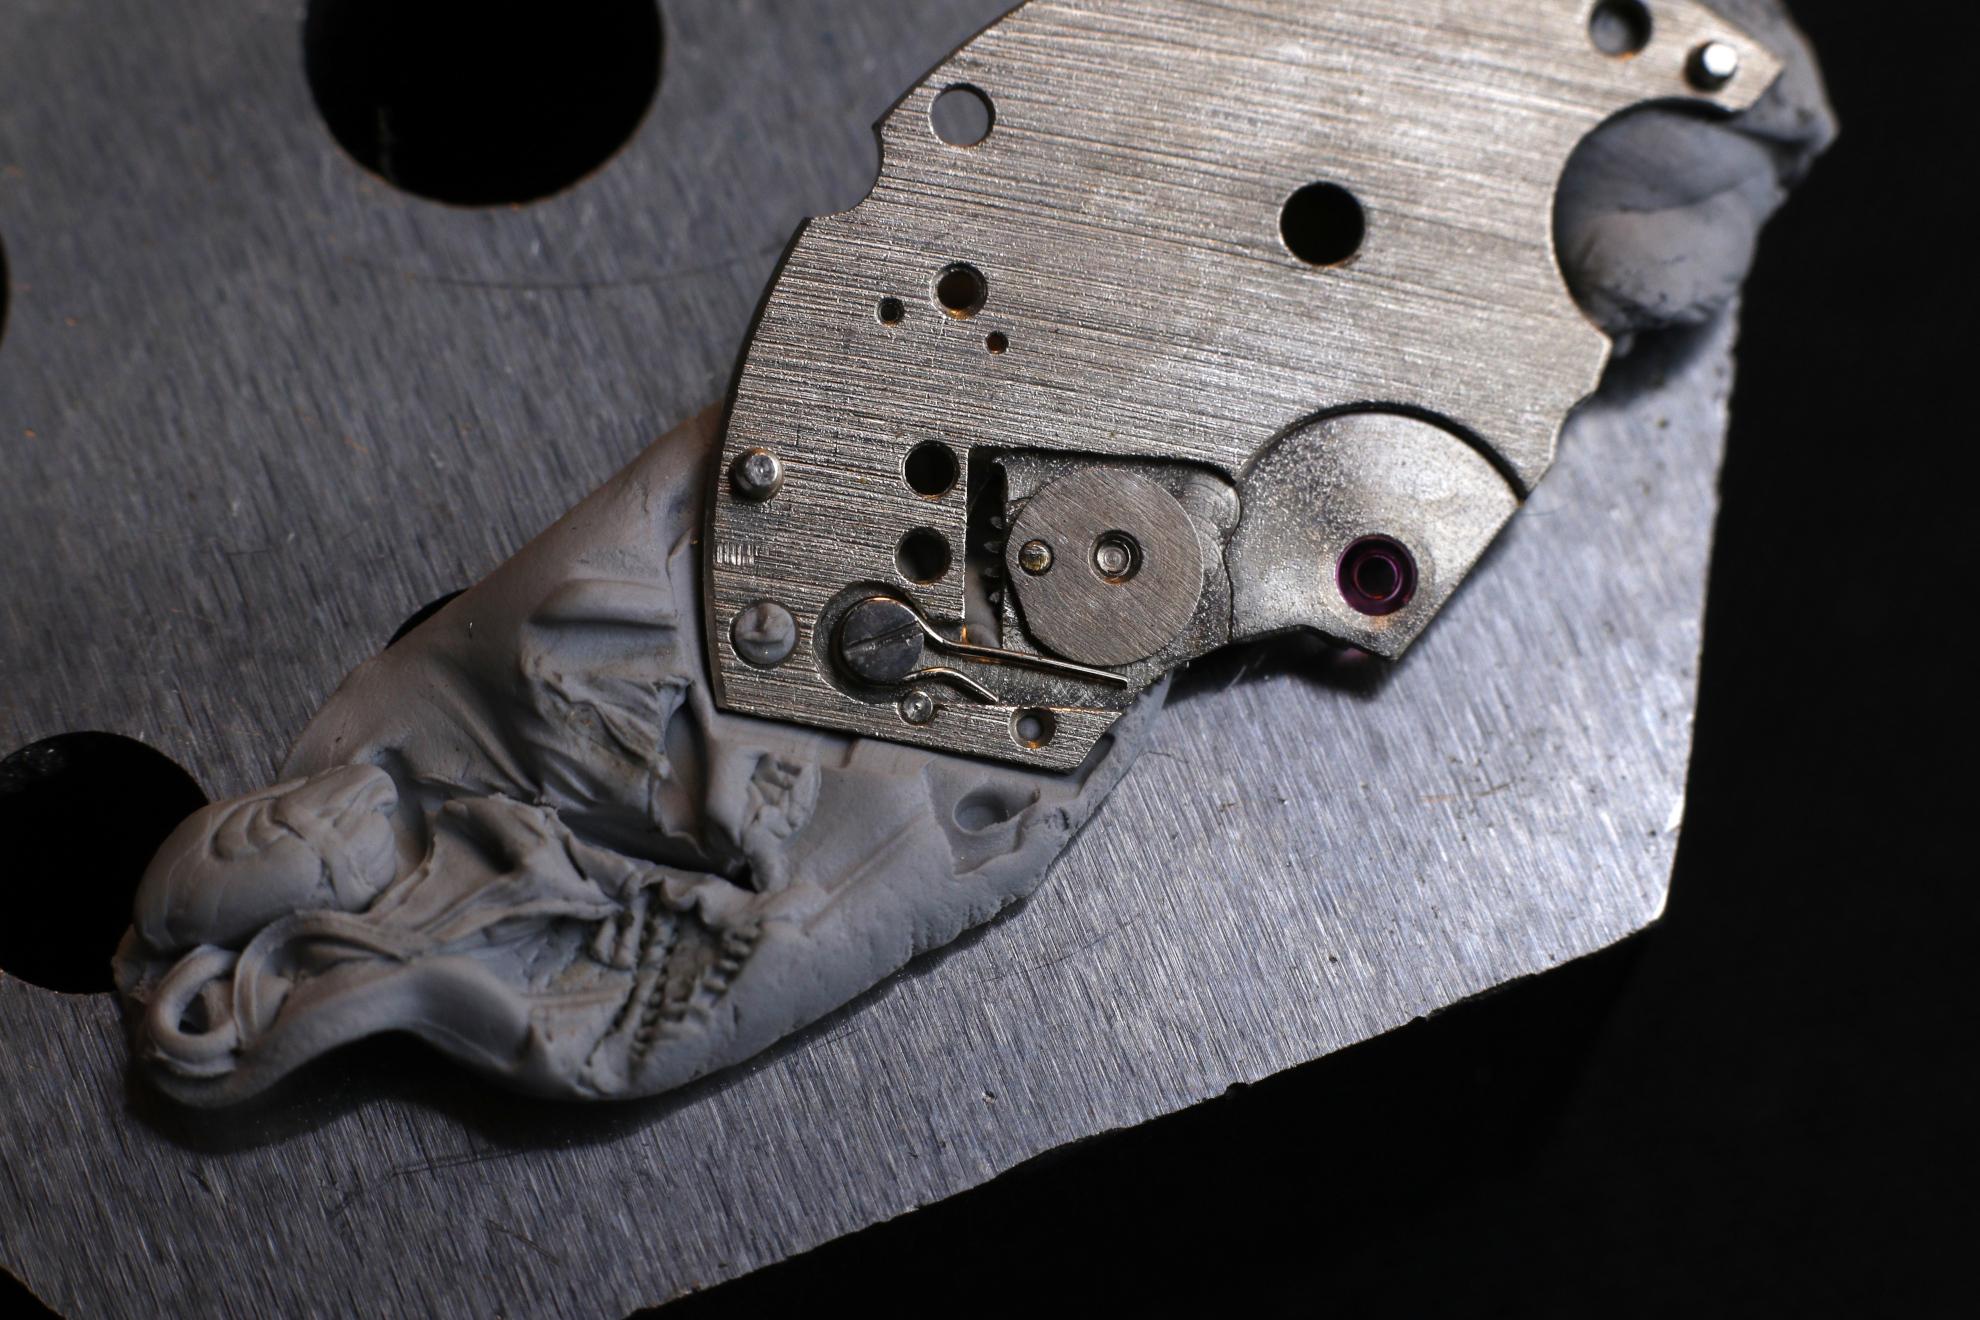
Thank you again Andy for the advice. I got a selection of springs from Cousins and shaped one using a round nose pliers, holding whatever wasn't being manipulated in a pin vise. The images below show the second one I made. The first (which was a better fit) joined the original orbiting somewhere in the lower stratosphere. In the bottom right corner of the first image is a similar spring to the one that I modified. The second image shows it after it's been trimmed a bit more, and with a screw (not touching the spring) in to hopefully slow it's progress should it decide to fly. Care should be taken when removing said screw lest it, and the spring, make a break for it. Ask me how I know. All the springs in the pack were a round profile. The original was, I believe, rectangular. The round profile leads to it springing out like Lady Macbeth going to check the guest room in the morning; particularly when a touch of grease is added.
 1 point
 -
Here is the data sheet with the Benrus part name and number for the components that are unique to the calendar works on the CE and CK movements. Benrus CE Calendar Parts.pdf1 point
-
All you need is a piece of brass wire to make the pin.1 point
-
As per my previous post, the dial is off now. The WD-40 did the trick. Just a matter of figuring out how to put it back in if the holes are pooched. Weird that the rest of the movement is just fine, and didn’t have the same corrosion issues as the dial screws.1 point
-
The straps I've used them on in the past have been solid and use knurled pins to hold them together. I don't see why they wouldn't work on this type of strap but mine are currently with a friend so can't test it for you.1 point
-
Welcome to the forum, enjoy1 point
-
If replacing the dial feet screws isn't an option, you can buy dial dots. @Neverenoughwatchesssuggestion is the best choice though.1 point
-
LOL. I thought I lost my first part today when I was cleaning the balance jewels on an Elgin pocket watch. Looked everywhere, I heard it hit something. I grabbed a jewel setting screw from another movement, and no sooner did I get it in, and I found it right underneath the holder. I then put that one back in movement I took it from. I do have to admit though I lost a couple of parts including a click and found them a week later looking for other parts. We’ll see how long my luck lasts.1 point
-
With patience and some time investment you can have an old cleaner for much less than many sell for in working condition. I have two functioning L&R "vintage" machines but I approached it the same way I do watch repair - avoiding the most trendy models and watching for bargains by piecing together various used lots that had useable parts that could be cobbled together. The really old open-frame first generation units (painted silver or gold, not black) used mixer motors that don't reverse (low resale) but I've rewired them so that they now will. For my very old "Master" I've also set it up with a wiring breakout box that includes auto-switching so it has the Forward <-> Auto Cycle switch of the black base units that get top dollar. I've probably made eight or so Ebay purchases to put together everything, but it was enjoyable. You may end up with a Frankencleaner, but it's put together with quality aged components just like the watches we like working on. However, I didn't have to buy any specialty tools, so that is one downside compared to spending that time on watch repair.1 point
-
Thank you for your introduction and welcome to this friendly forum. We all look forward to your contributions and continued involvement. If there is anything we can help you with don’t be afraid to ask. Nice clear photos can help a lot. Thanks Richard, I know my eyesight is bad I was wondering for a minute why I couldn't see the jewel.1 point
-
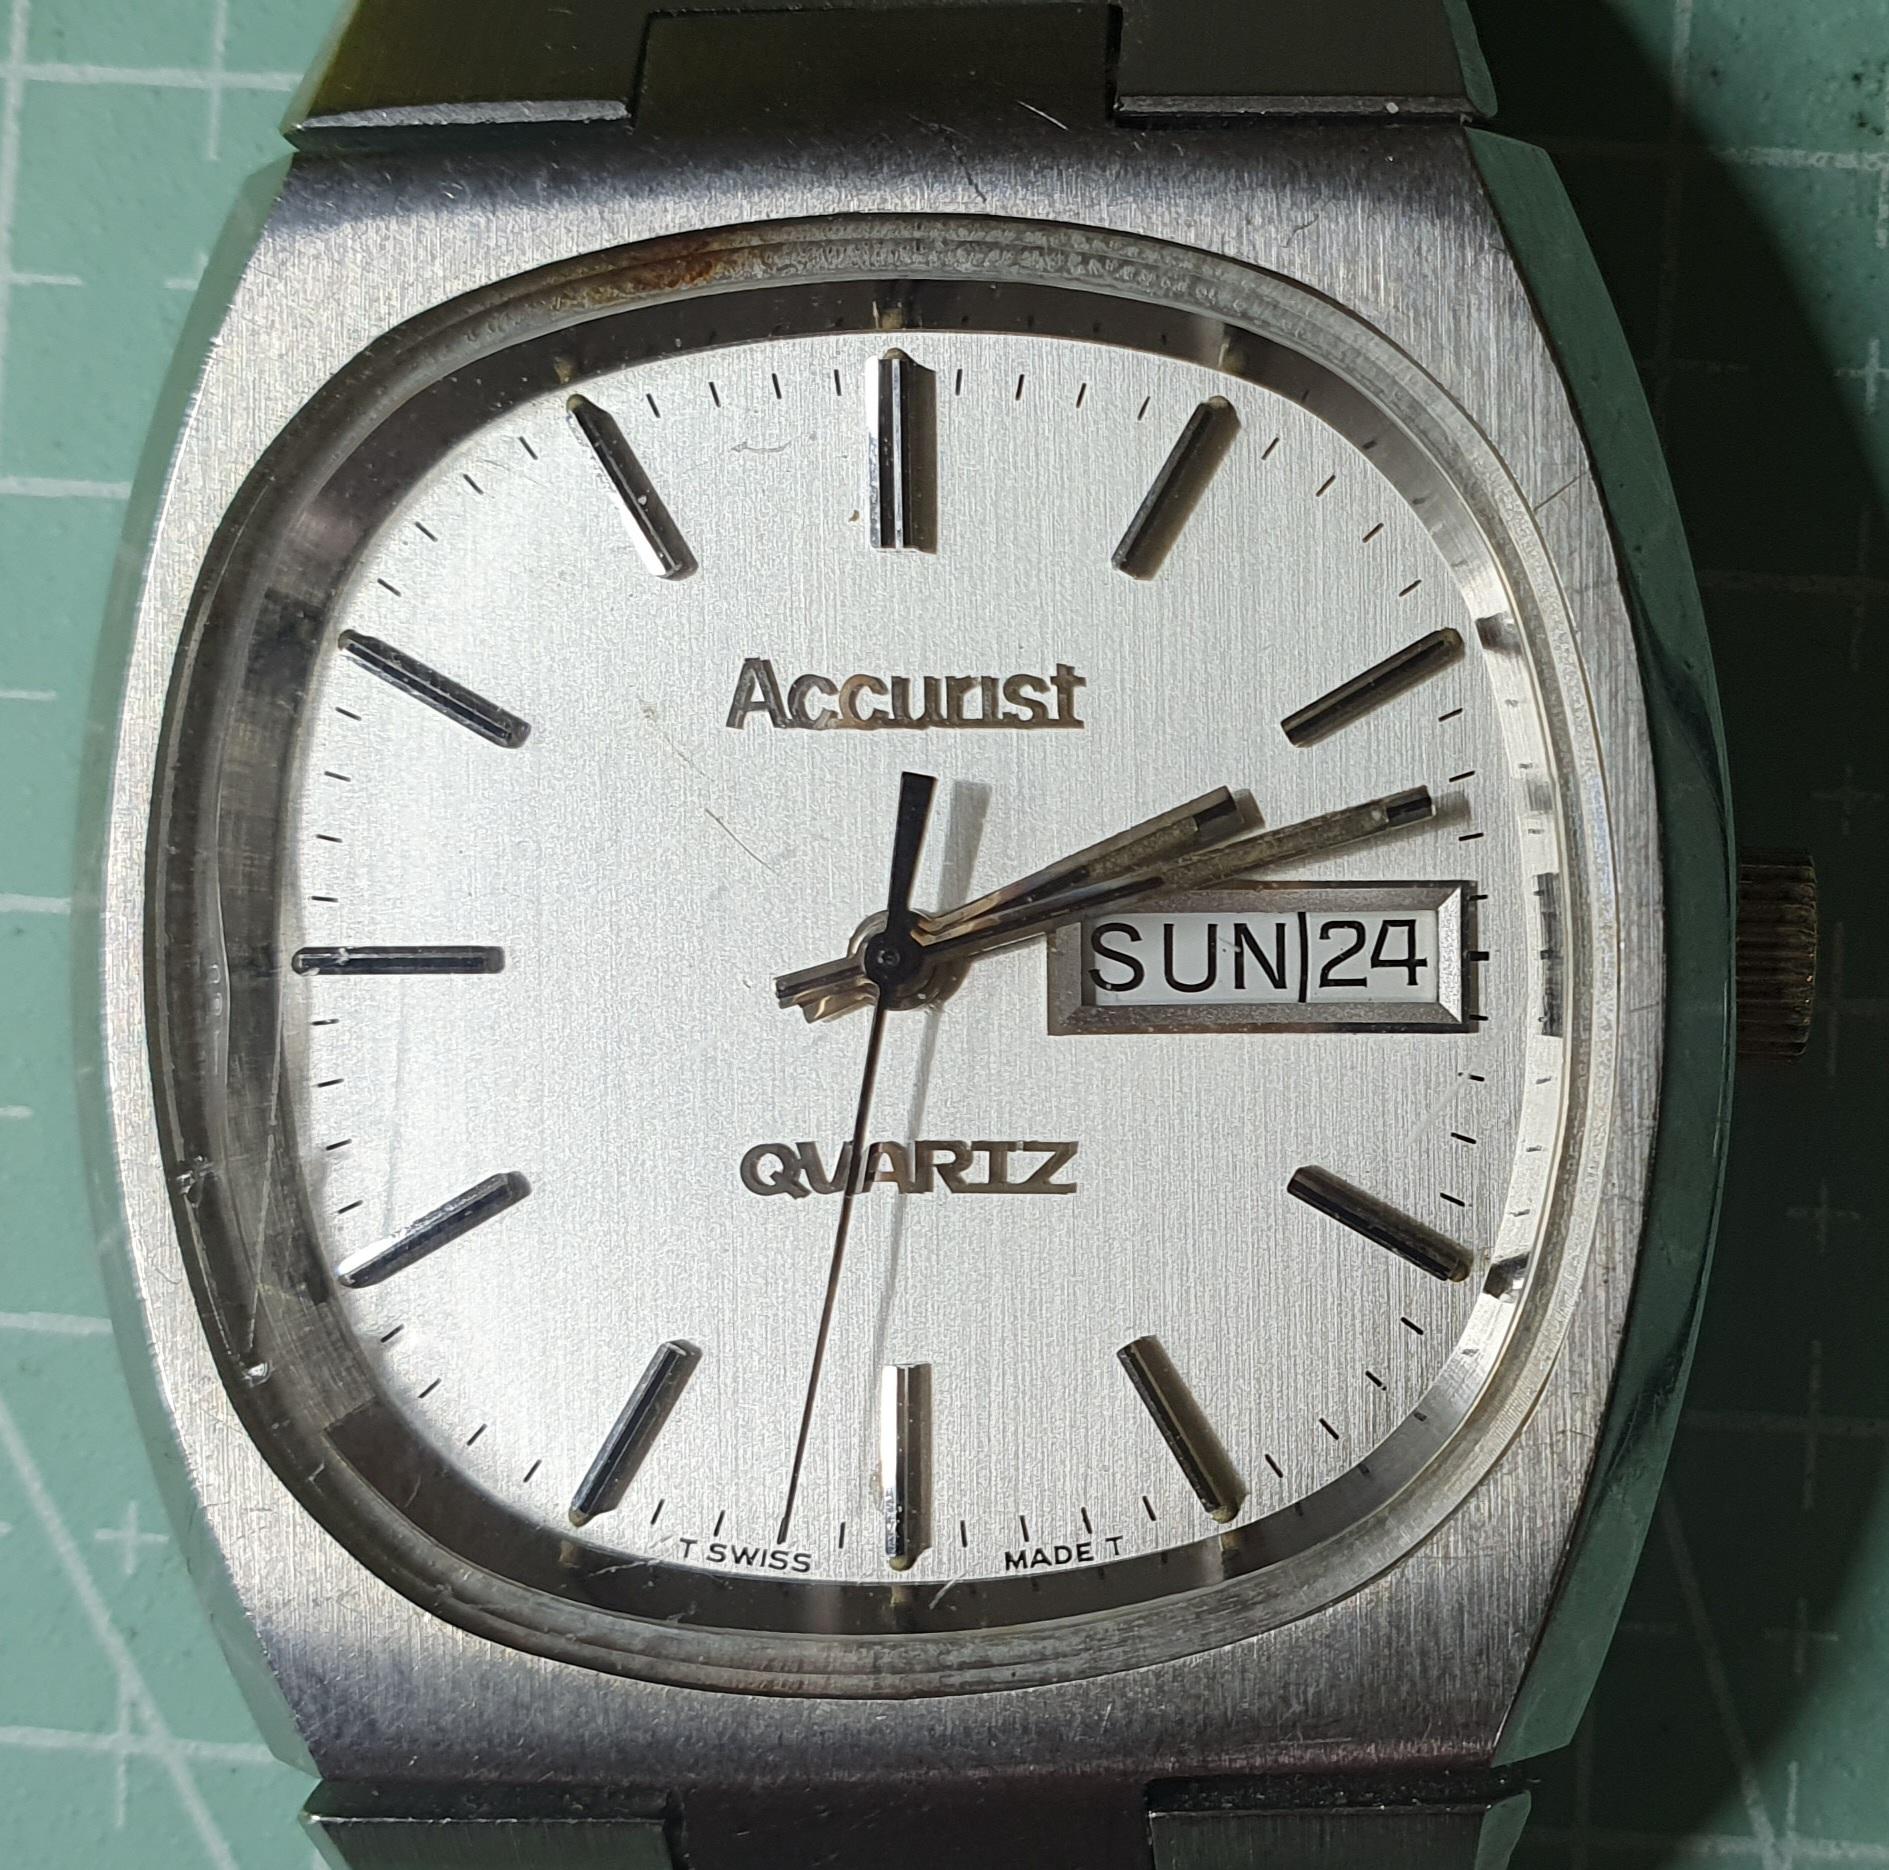
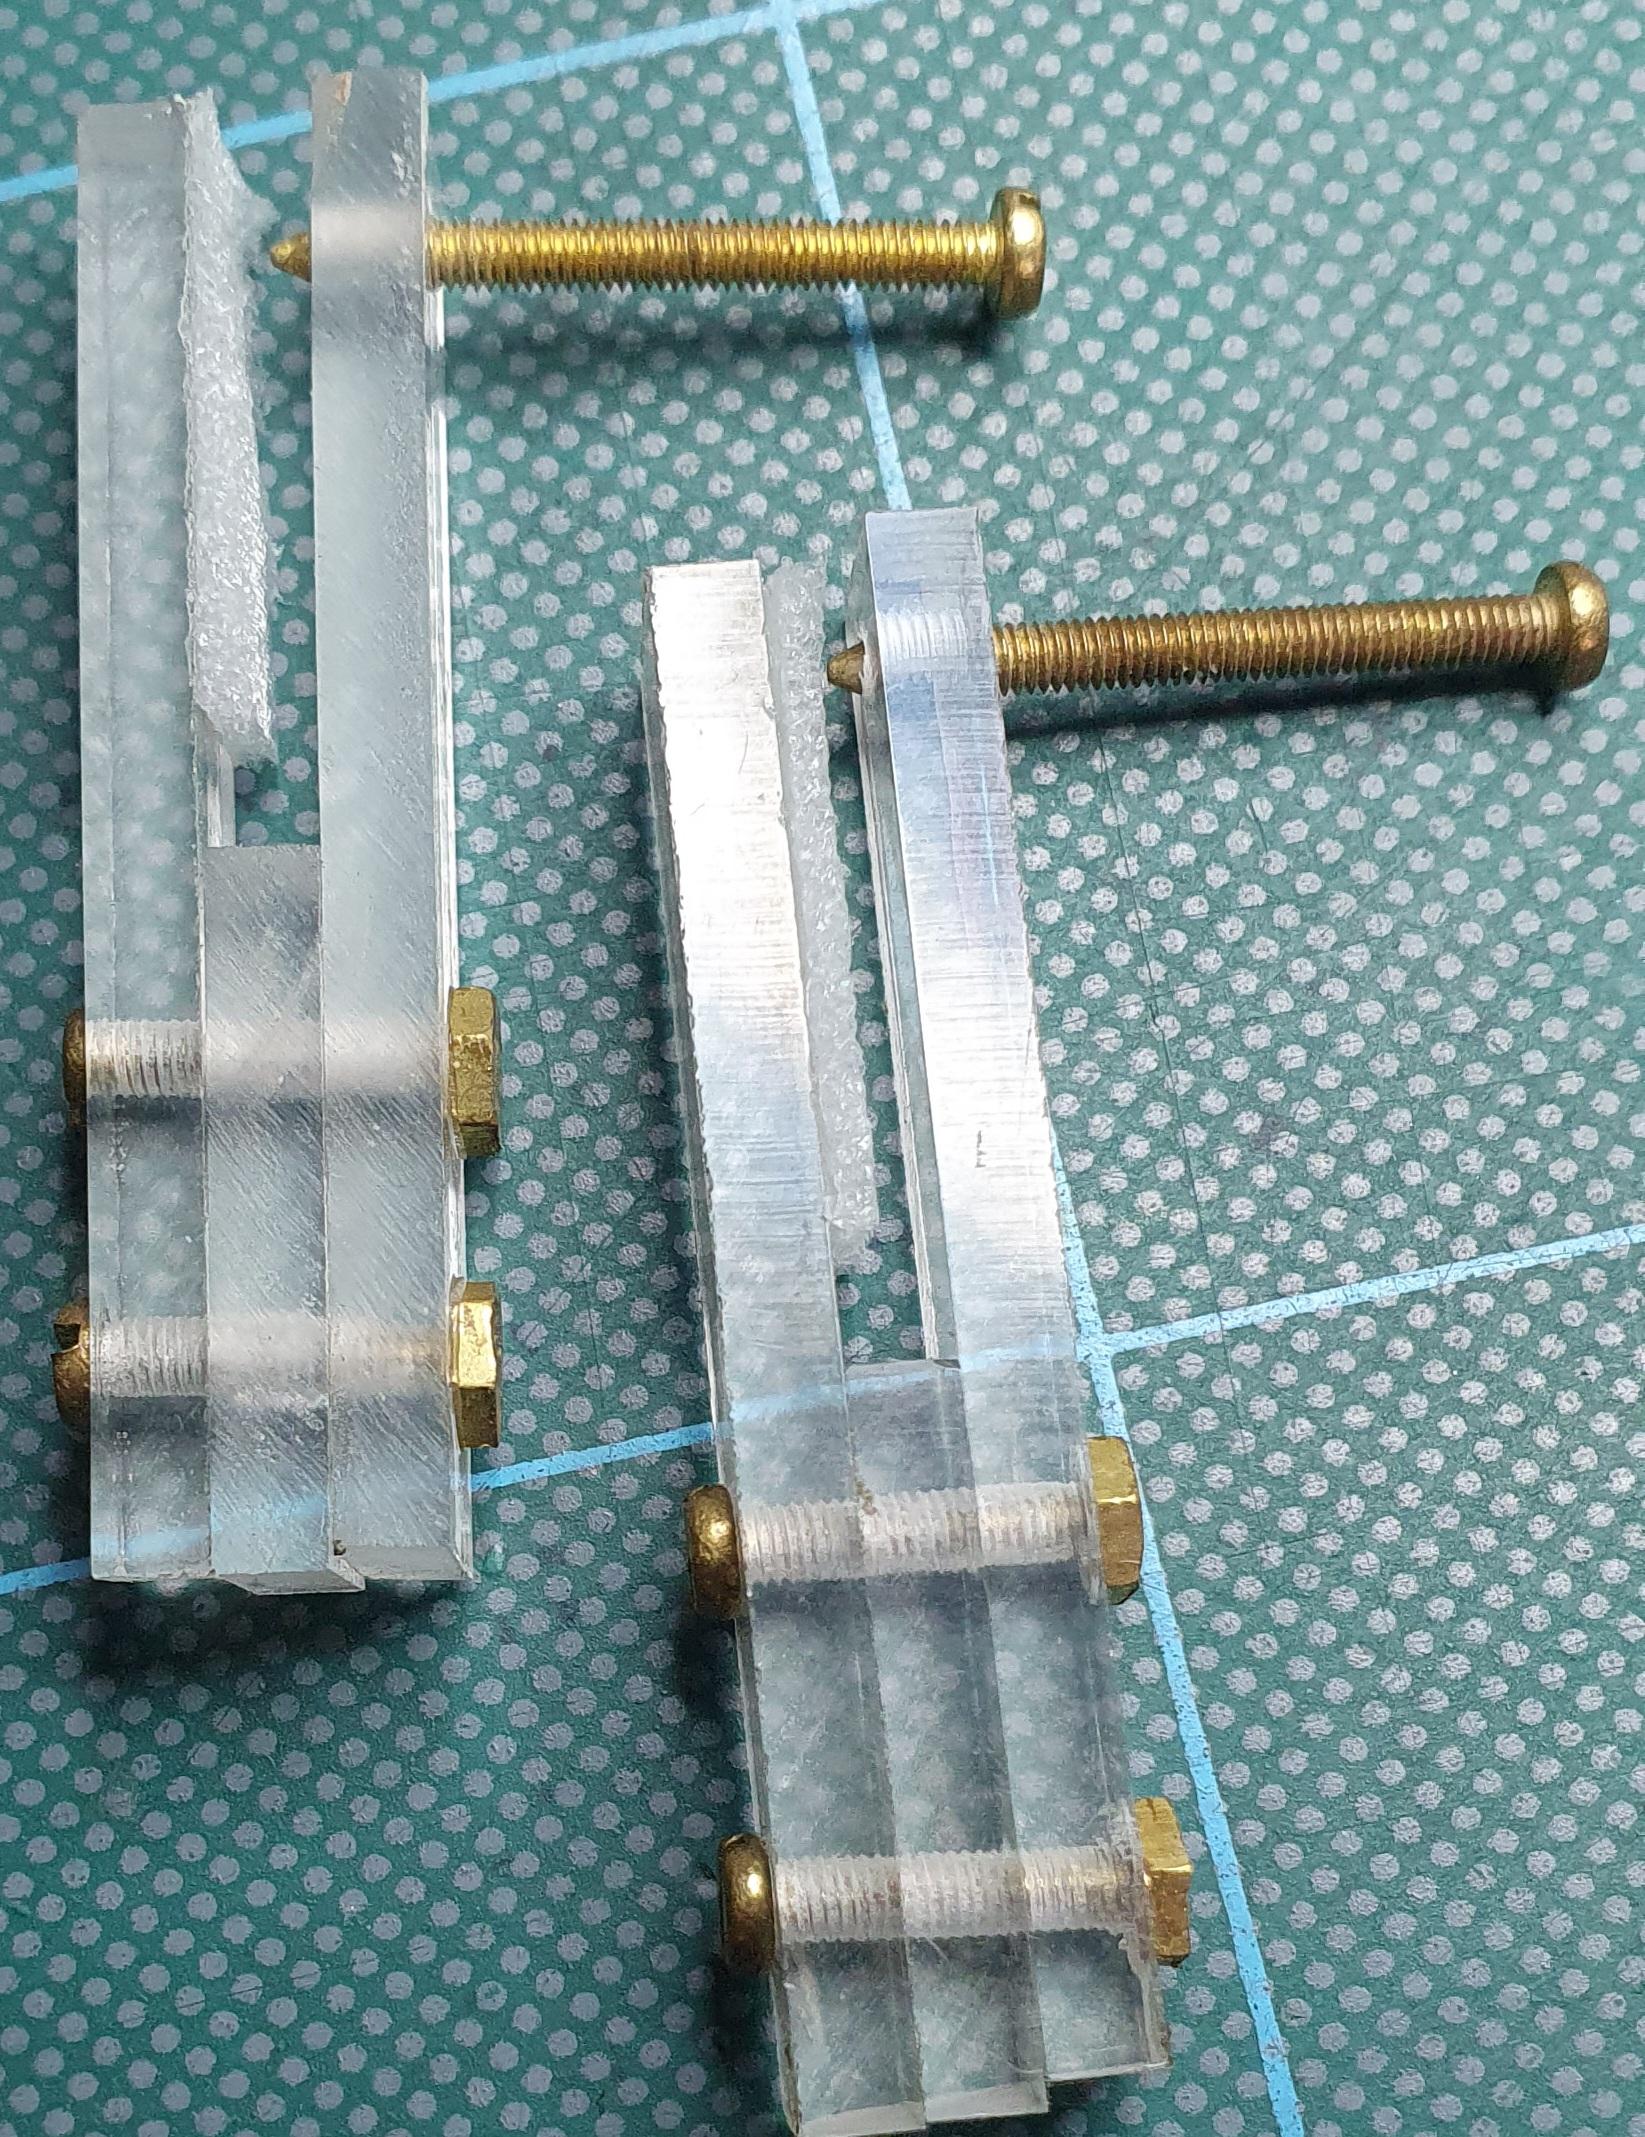
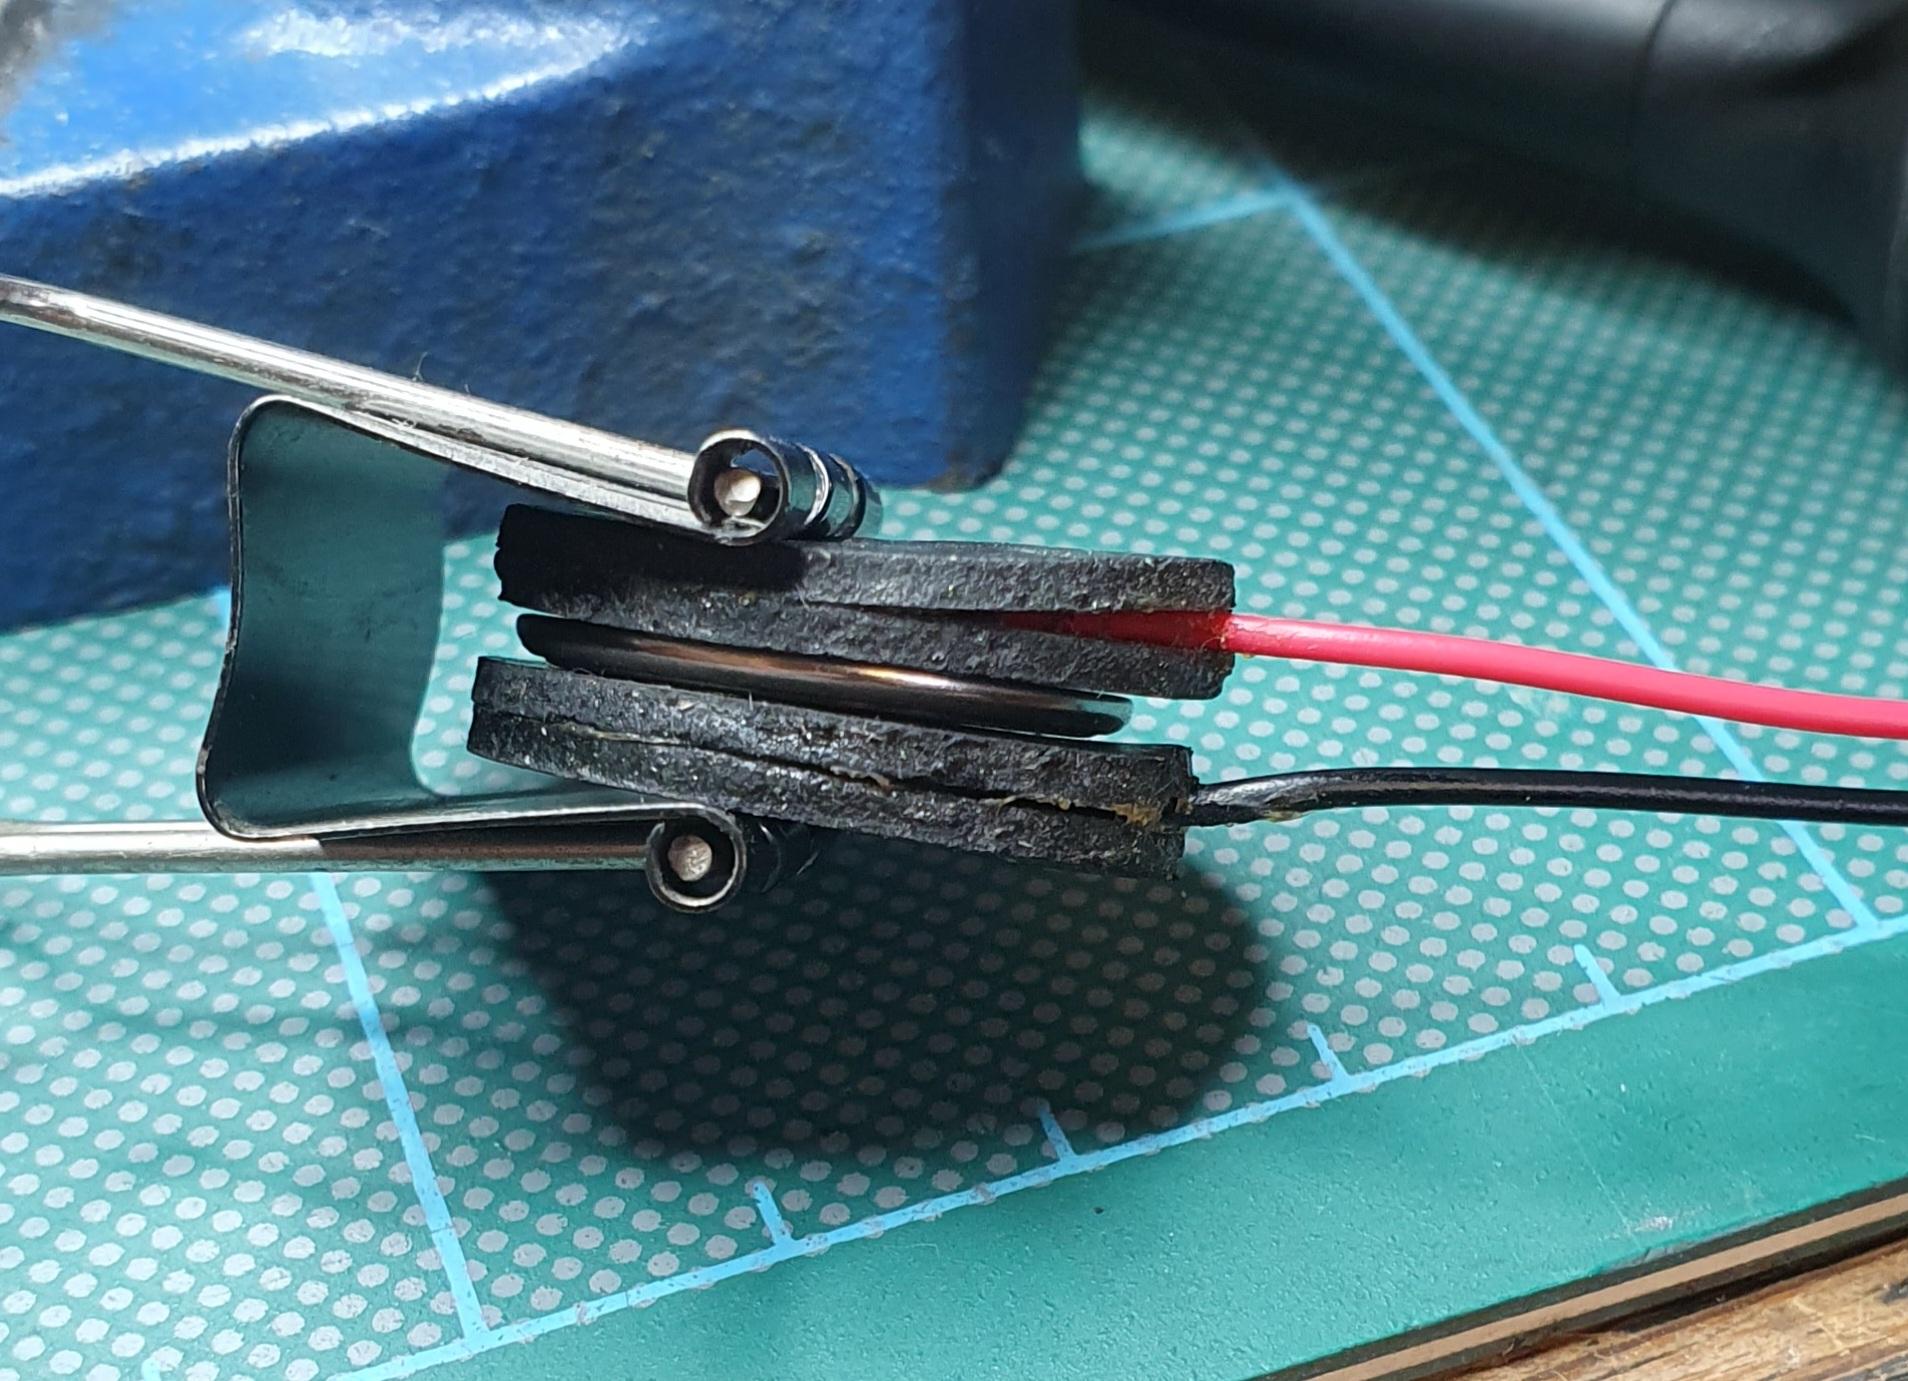
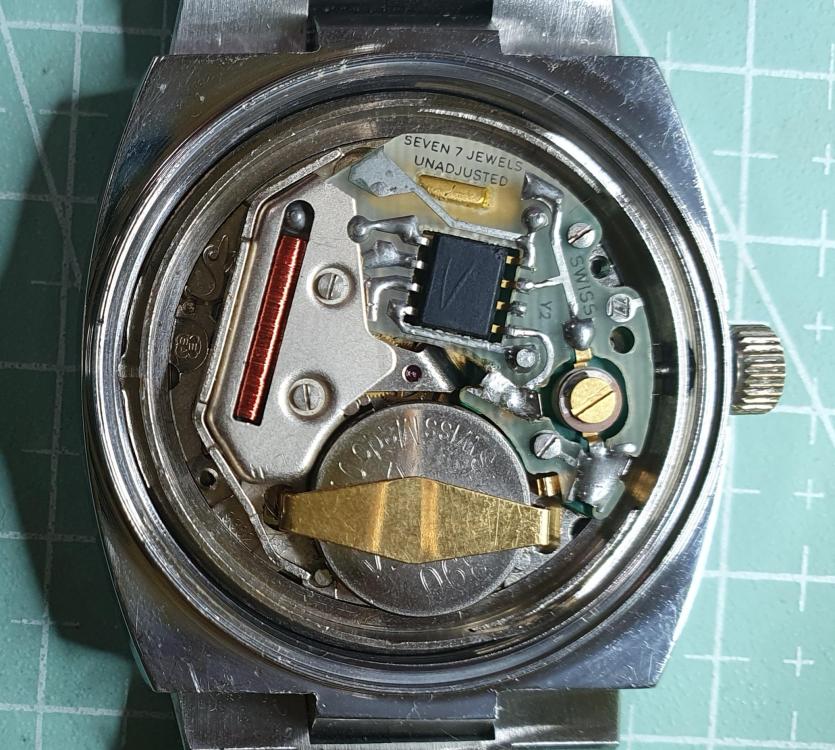
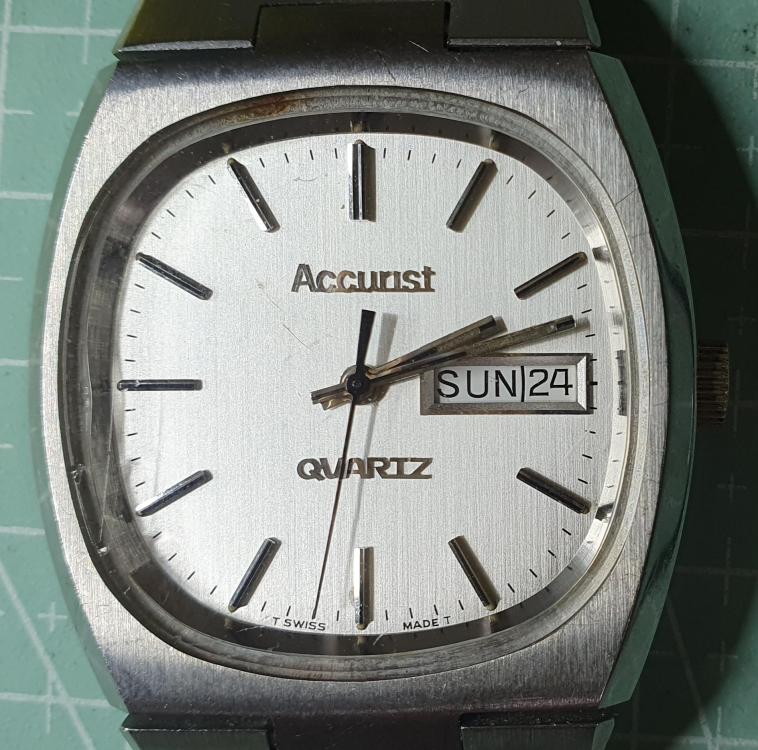
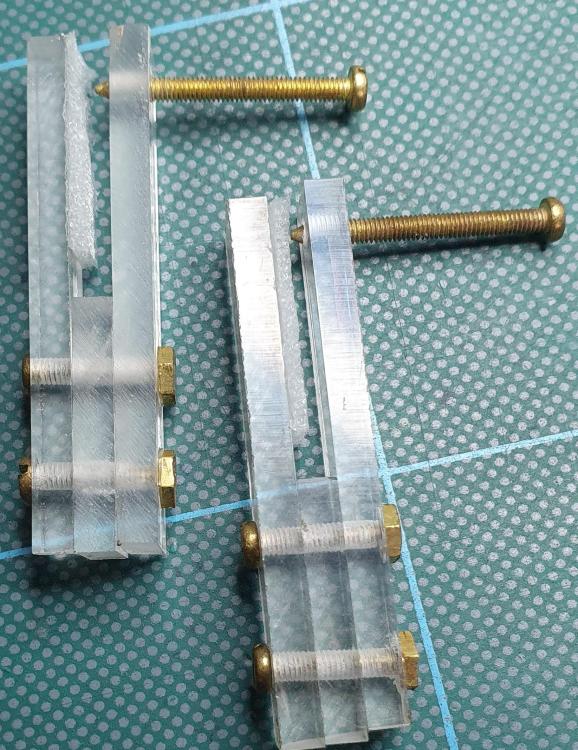
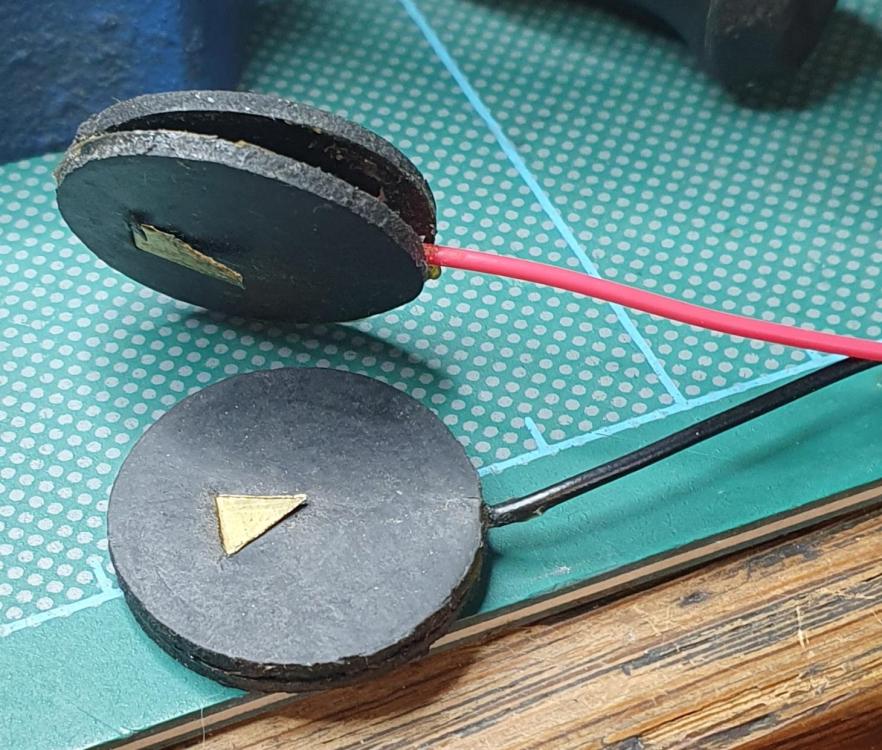
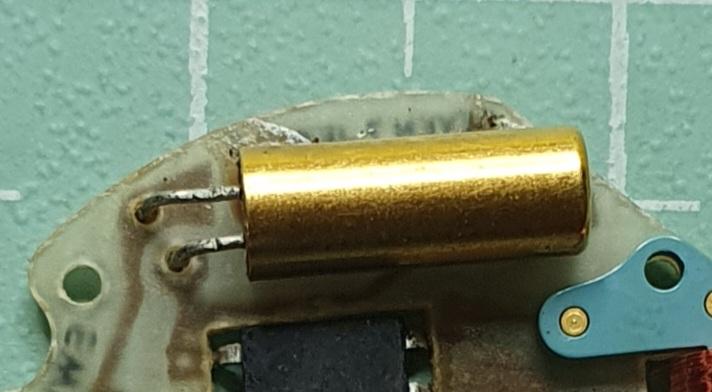
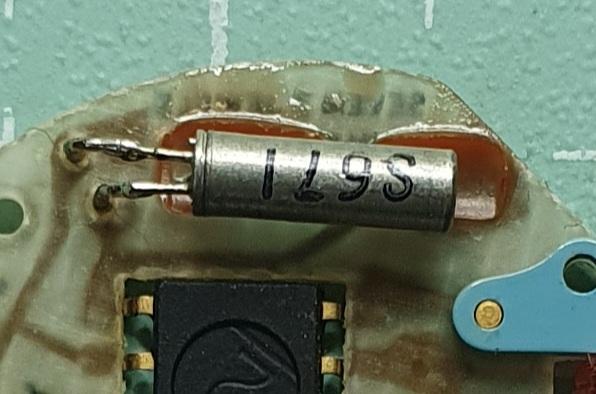
This has been a quick weekend project whilst awaiting spares to arrive. The watch is an early Accirist quartz, late 70s probably, with a Swiss ESA 9632 7 jewel movement. Inspected and could see no evidence of battery leakage, popped in a new battery and zero signs of life, so stripped down to better inspect the circuit board. Long story short, I diagnosed the quartz oscillator being at fault and the purpose of this post was to share my jury rigged method for testing the quartz. So the tricky thing about testing the quartz is that you need to power up the board whilst also getting the required access to the legs on the oscillator, so for my power source, this is my method: Then you need to be able to apply the voltage to the correct terminals on the circuit board, for this, this is my solution: Then carefully set up the board in these clamps Crocodile clips from my battery pack onto the correct polarity brass screws and that's the board now powered up, and I've got good access to the legs of the oscillator. The board I'm now testing is from a scrap job lot watch that I'm going to harvest the oscillator from, this one is working fine. For those not too familiar with the quartz oscillator, from cheap watches to expensive watches, oscillators are all the same in that they all operate at 32.768 k htz, early ones can be quite big and of different shape, but a more modern replacement will still work fine. If you have a very small quartz to replace, you will need a similar size replacement. This is the original size of the oscillator, its actually a different circuit board than the one I'm working on, this board has problems with the microprocessor chip and this oscillator may be fine, but if I'm going to change my faulty one, then I may as well use a newer replacement. This is the oscillator which I have tested from the donor now soldered into the circuit. I left the old legs in place and soldered onto these, much easier and less risk of causing heat damage and lifting tracks on the circuit board. Movement re assembled as much as needed to see if it works, all working fine. Movement now fully stripped and given the full service works. I quite enjoy these early quartz movements, all the wheels are metal, and as this one has a few jewels, they clean up and oil nicely. I am always amazed though at how dirty and full of debris most quartz watches I have worked on get, and still work. Although it all looks a bit Heath Robinson, it works for me, and many watches have been saved from the scrap box. The hand held oscilloscope you see in the picture was only £35 from amazon, works a treat. I do have an old CRT scope but have rarely been able to get a trace from an oscillator, I suspect too much internal capacitance. Watch now running fine, it will have to wait for it's turn for a bit of wrist time.


 1 point
 -
Ok thanks to all the fantastic advice here, it’s finally put back together and working. I suspect the amplitude is low, but I’ll wind and let it run for a day while I catch my breath, and then I’ll come back with more problems Thanks everyone, yet again!1 point
-
This might be instructive as well:1 point
-
They're also used for other non Rolex straps that don't have removeable links to start with which I've done many times.1 point
-
Excellent! I can't do it better.1 point
-
Because they can, watch repair addicts with plenty of cash....will want a traditional machine for just that fact alone and repair it or have it repaired. My view is to build something simple that performs as well for a very small fraction of the cost of a vintage machine that might need repair when you get it and in the future.1 point
-
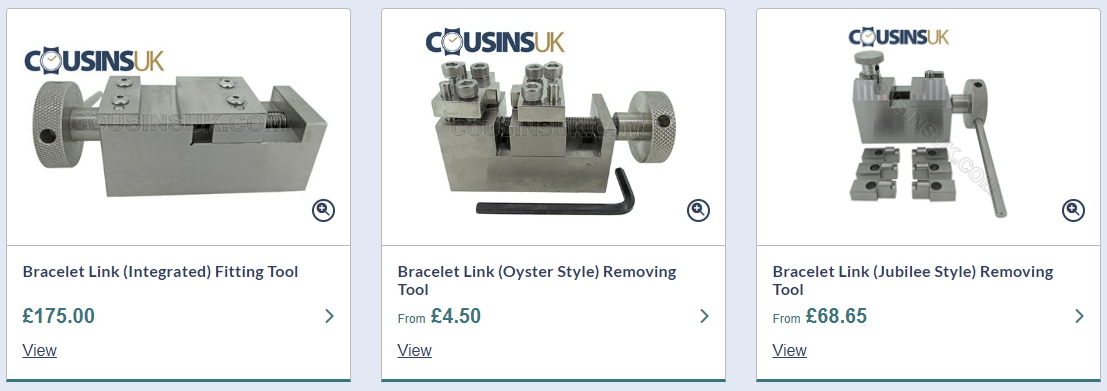
@GPrideaux & @tomh207 some straps appear not to have removable links, i.e. now holes for bars, in which case you need these type of tools.
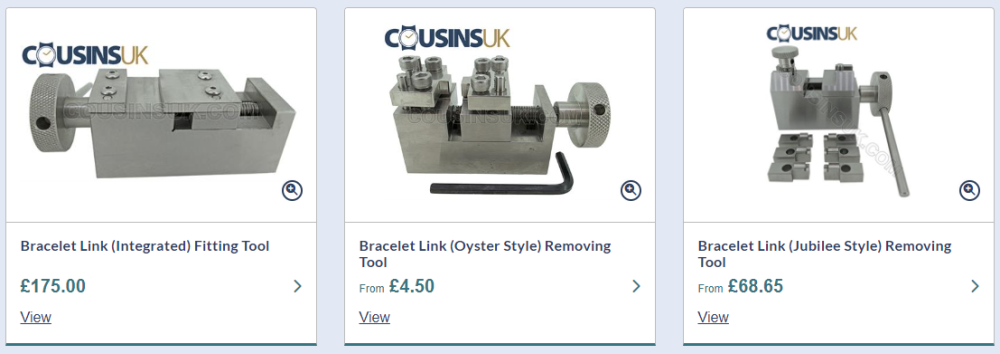 1 point
 -
I was very tired yesterday due to my diabetes so I went to bed at 9pm after I turned the bedroom clock back. I had a good night's sleep and got up 8am.1 point
-
Thank you for your introduction and welcome to this friendly forum. We all look forward to your contributions and continued involvement. If there is anything we can help you with don’t be afraid to ask. Nice clear photos can help a lot.1 point
-
Ive got both the 612 and 602 spares let me have a look and see what we have going on. Back in 10. So it seems the 602 was used either with or without the calendar works depending on the dial variation. Due either to manufacturing decisions or a watch guy choice to swap the movement for whatever was available . I'll go with with the factory as i have more than the 2 examples i show . No they aren't for sale , smiths are my main watch passion, so you better be quick with your ebay finger because I'll be right alongside side you bidding for a donor. So yes the 602 is set up for a dial date complication. The 612 i will look into for the difference. I'll pull the spring later today when i have more time, will give you a pattern to work to, i may actually have matching springs in my stock. If i have I'll send you one if not I'll make you one, close enough to work with.
 1 point
 -
I'm with you, but you can't win that fight, I fear. Here in Western Australia we've had three referendums on daylight saving (so-called) and each time the response has been "Yeah, nah." Doesn't stop people wishing we had it, though.1 point
-
I get that fella , you want make the best job of your first watch repair. What you do now will be 10 times as less effective compared to what you can do in a year if you practice regularly and develop the skill and knowledge that follows. Re the dial, you won't make much if any improvement as a beginner but surprisingly enough you could make it a whole lot worse if you try to improve it . So if you want your trophy first watch fix....then mostly leave it be . I think we need more info on the condition of those dial feet screws, as it is we can see the tops of the dial feet and you've shown us some holes where the screws go, but without using my superpowers of night or xray vision....which can only work if I'm actually with you in person looking at your watch with you, then some light in there might give us a clue as to whats going on. Maybe John will come along with his crystal ball, give it a polish and fire it up John. Maybe...just maybe...I'm in a funny old mood today. I guess I'll just apologise now in case my behaviour hits an all time low today. Seriously we need to see a screw. head...oh my Shoot me now.1 point
-
Greetings, My name is Ken and I'm a recently retired electrical engineer who has had an attraction to mechanical watches for as long as I can remember. For the past 6 months I've finally had the time to head down this watch repair rabbit hole, and so far the hole just keeps getting deeper. I'm sure I'll have plenty of questions and maybe even an answer or two. Thanks for reading this. Ken1 point
-
Hello and welcome from Leeds, England.1 point
-
sometimes with older Seiko is finding technical could be a problem but not for this watch as I've attached the PDF technical sheet and snipped out the image on how the hairspring supposed to go in. To live a nice drawing of how it's supposed to work. https://calibercorner.com/seiko-caliber-6309/ Seiko 6309A.pdf
 1 point
 -
I'm willing to take the risk on any aliexpress tool, but not if I find one that is markedly discounted from its typical alix price.1 point
-
Tempting, but based on prior experience I would avoid it. When I was starting out, I bought the red aluminum crystal screw press for $35 less than the typical price. It arrived incorrectly assembled and was generally a QA disaster. Now I assume any alix seller with a too good to be true price on a tool probably has a batch of faulty ones or factory rejects they want to unload. With some research and perseverance, and replacement hardware, I eventually got my crystal press to work correctly.1 point
-
Glad it worked out for you and judging by the pictures you published it looks exactly like mine!1 point
-
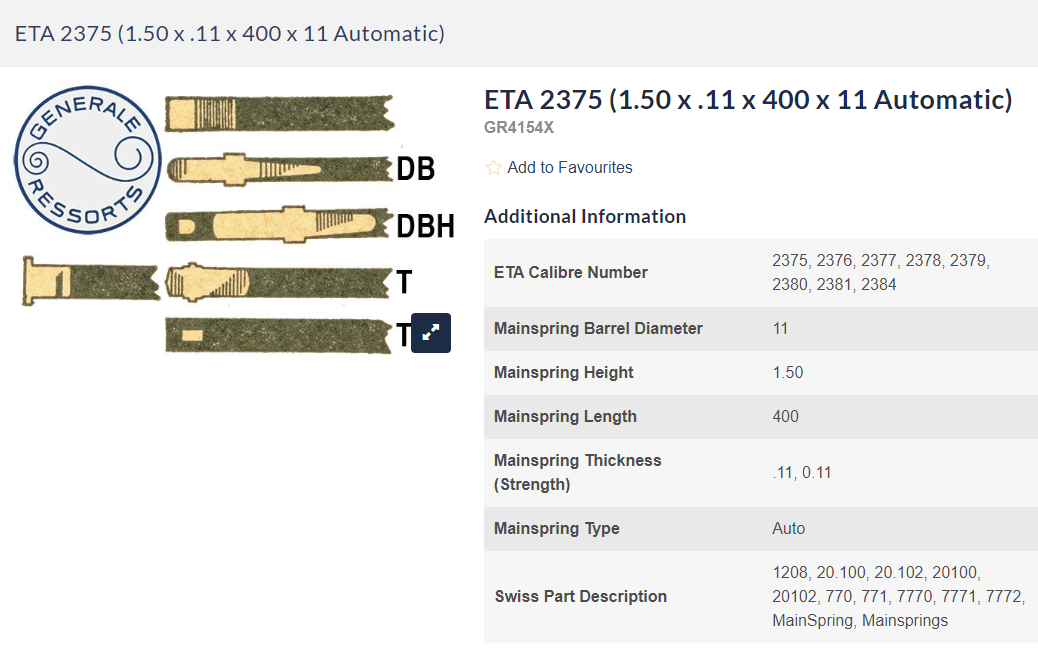
So you didn't find this on Cousins looking under parts for the ETA 2375. As @RichardHarris123 said, the amplitude may or may not be related to the mainspring. Depending where you are in the world there are numerous places for parts in general. https://www.watchmaterial.com/eta-2375-2381-2384-automatic-mainspring-self-lubricating/ Edit What bridle did the original have? Was it a separate one? What was it you actually got from timeparts?
 1 point
 -
English hallmarks are great for casemakers identities, material purity, year made and where they were assayed...pretty good for the last couple of hundred years at least but not necessarily related for the movement it carries. the movement may be identifiable, ive come across a few 5 bar cylinder movements that were traceable through the keyless part system. french hallmarks generally consisted of only two, the assay stamp.... boar,s head for Paris and the crab for other assaying locations up until the early 1960s and then a maker's stamp within a lozenge shape....No dates of manufacture.1 point
-
Success!! I do indeed now have a smile The tool is all sorted and working perfectly Many thanks again to all who helped Richard
 1 point
 -
When you succeed in reading the time, you then must subtract 1 hour again, to know what time it was when you first decided to find out.1 point
-
The spare wheel from the Favre is a perfect fit! Thanks you guys!1 point
-
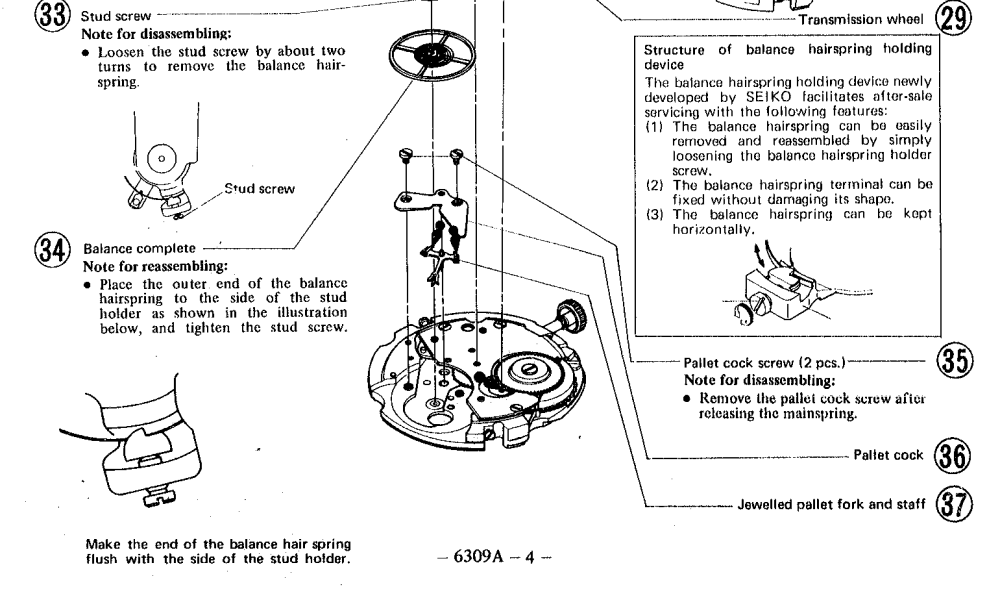
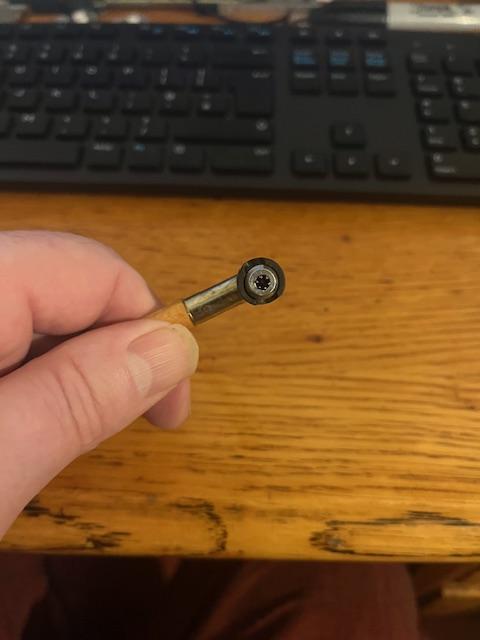
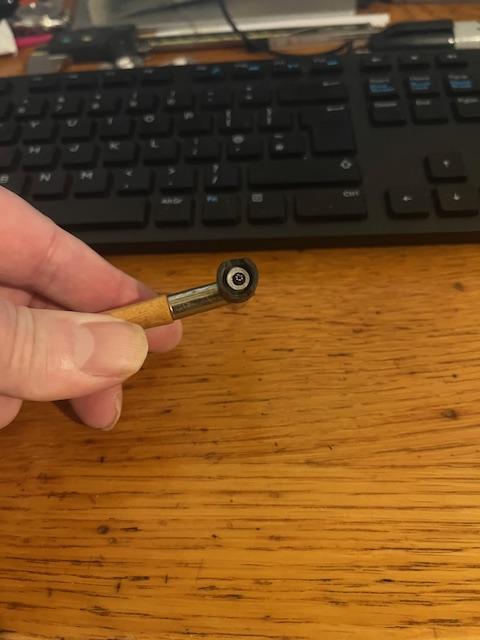
I totally missed the arrows, and I even looked for them. This is the clasp. I'm OK with it not being genuine. I want it to replace the bracelet on the Seiko 6309-5281 shown below which came with a bracelet that doesn't have any removable links as it doesn't fit me at all. The one I posted looks somewhat close, it has a brushed finish, straight endlinks, and is 3 pieces wide.
 1 point
 -
Smith parts are like rocking horse poop, which is why i buy just about every Smith watch i come across1 point
-
1 point
-
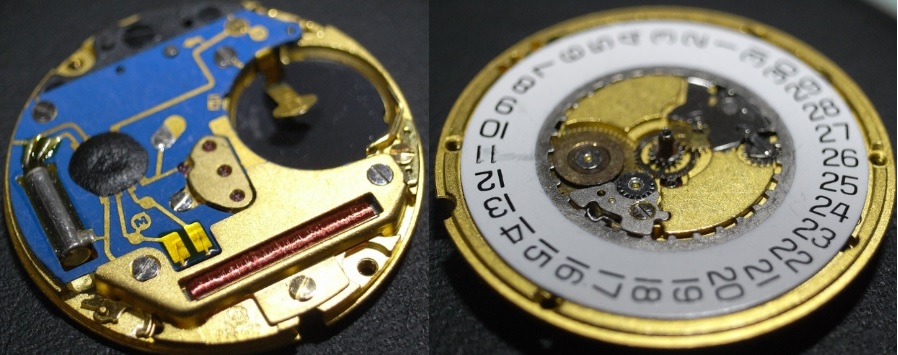
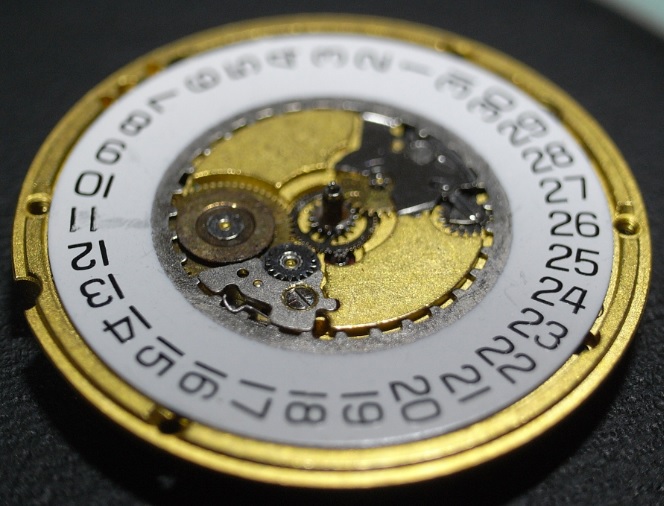
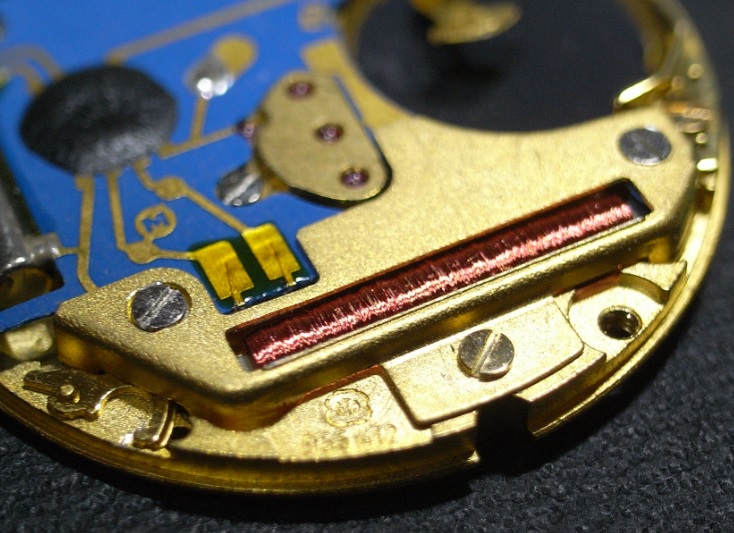
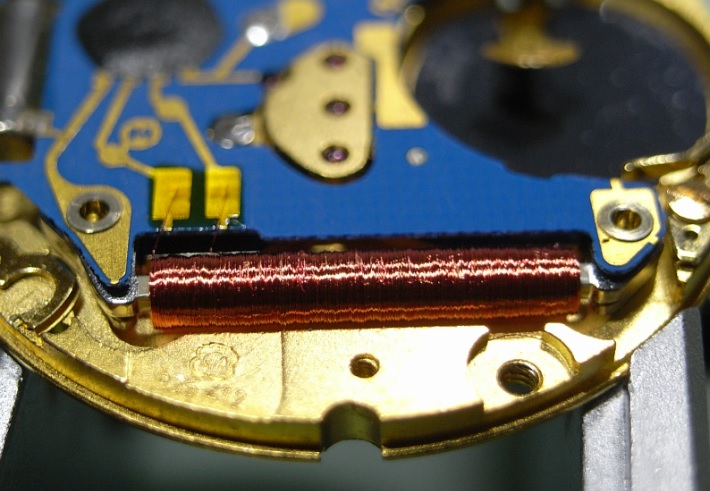
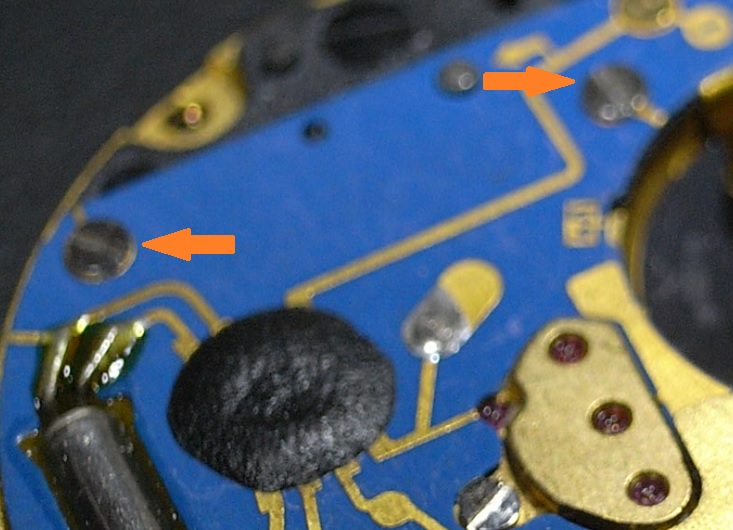
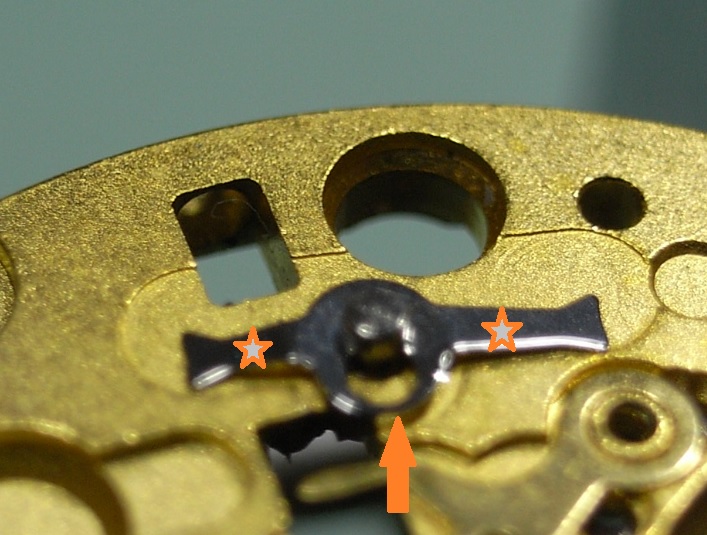
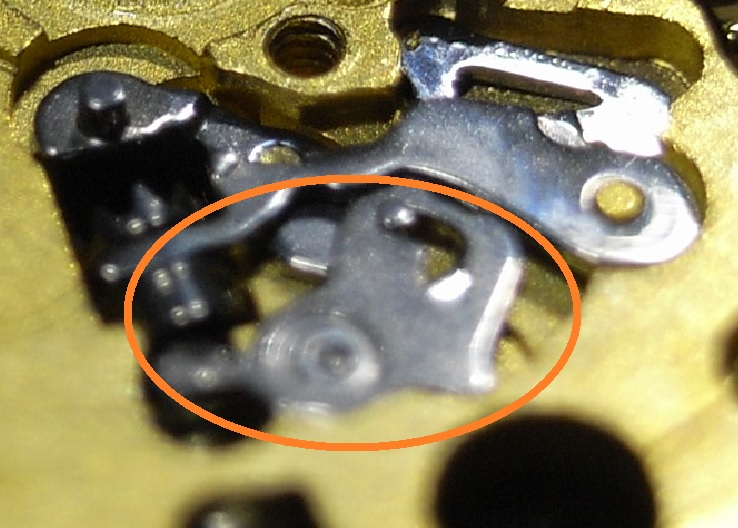
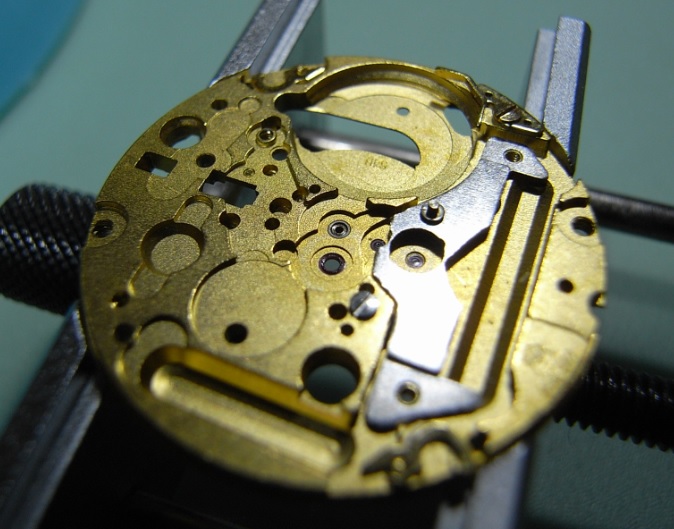
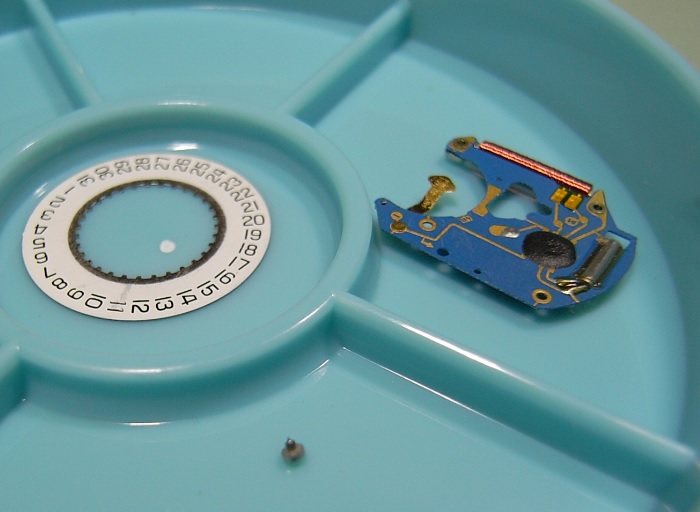
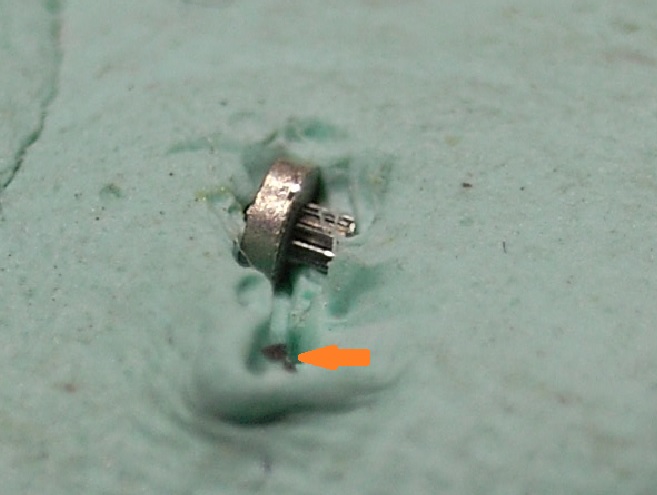
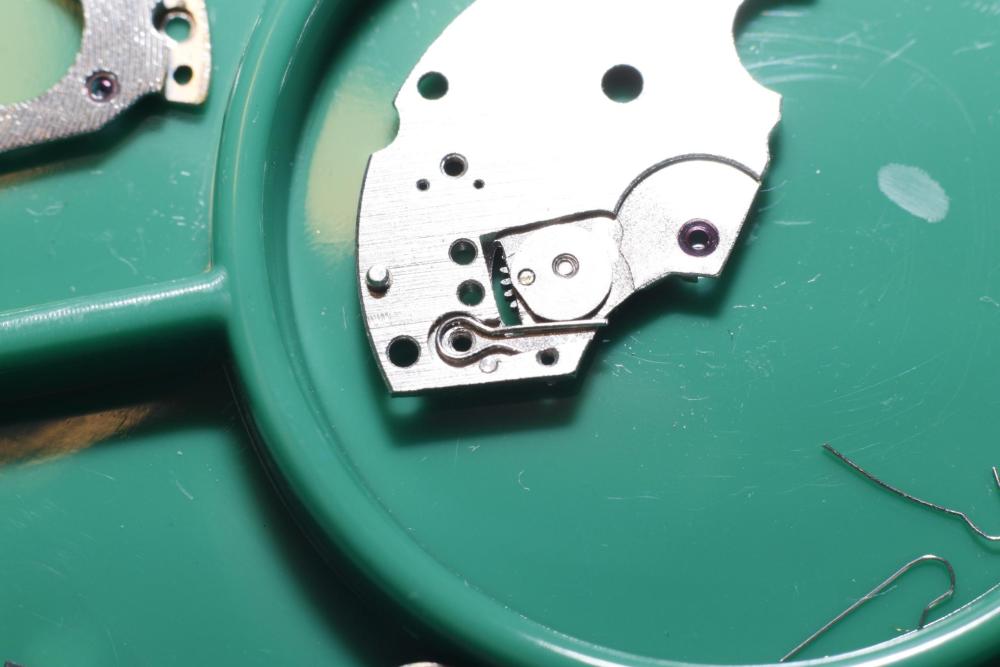
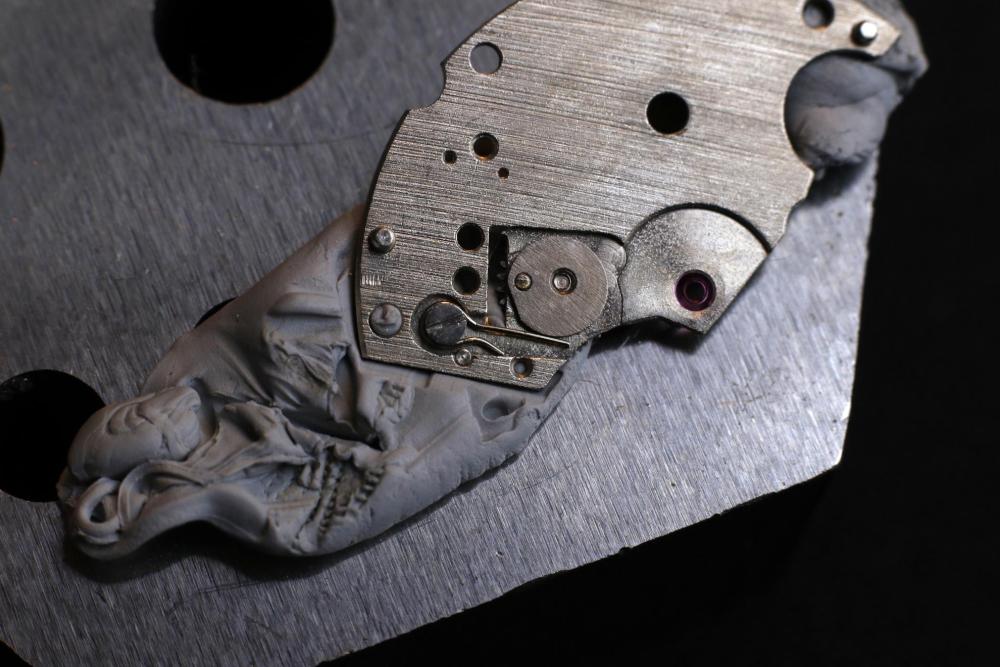
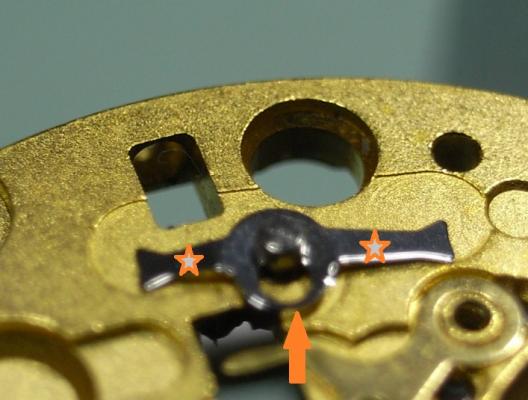
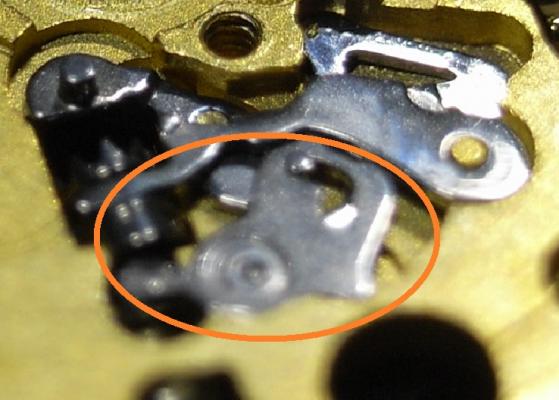
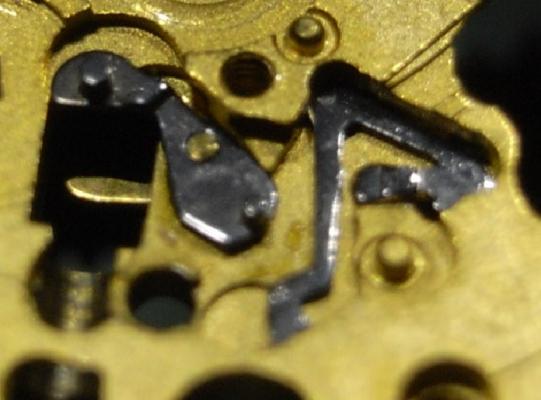
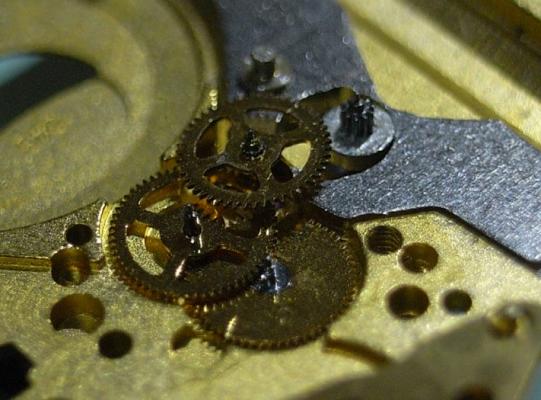
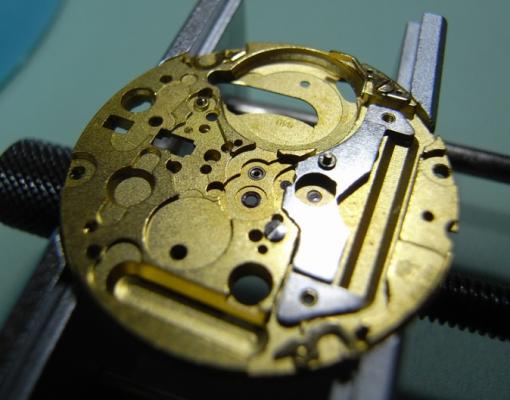
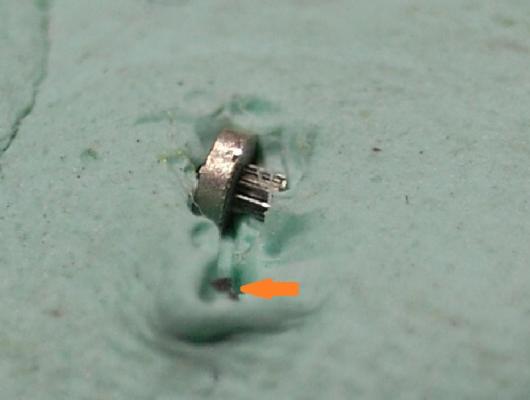
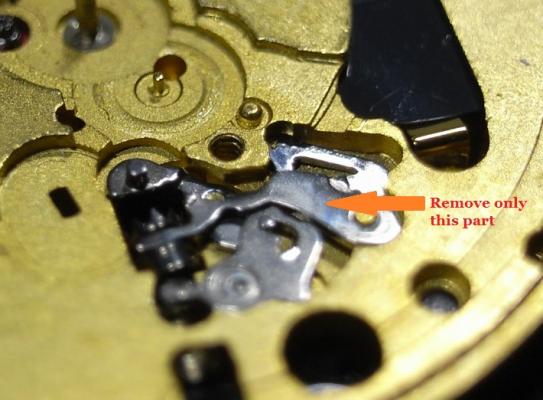
ETA 955 Service Walkthrough "The Workhorse of Highend Quartz" The ETA 955 and 956 Quartz Movements are the most commonly found movement in high-end quartz watches with three hands and a date feature. You will find them in Omega, Tag, and many other brands on the market. For this walkthrough I will be using an 955.412 Movement as my example; but the 956 is so similar to the 955, that this walkthrough will suffice for both. Please note that the numbers after the decimal place only relates to the factory in which the movement was made, so yours could read 955.112, or another factory number ... regardless, the parts are identical and interchangeable. As with all movements, quartz or mechanical, they have a service interval that should be adhered to for longevity of the movement. With quartz movements when the lubrication becomes dried out, or the movement becomes dirty, they will draw more and more current from the battery in order to maintain accurate time keeping. The ETA 955/6, when in optimum condition should draw around 800nA ~ 1.5uA, if the movement is drawing more power than this, a service is required. If a service is not performed, the battery life with decrease markedly, and can go as far as drawing more power from the battery than it was designed for, and damage the battery and cause it to leak and corrode your valuable time piece. Service Manual for the 955/6 Movement CT_956412_FDE_493024_06.pdf.PDF Disassembly Remove the two Date Wheel Keepers. I always start with the one holding the Date Jumper Spring in place. Sometimes the Date Jumper Spring can ping out of place, so be careful when removing the keeper plate above it. Here is a reference photo in case it moves before you see how it's properly seated. Next remove the Keepers and Date Wheel. Then remove the Date Jumper Spring, Motion and Calendar Work. This will leave only the Keyless Work; remove the Yoke and the Sliding Pinion only. We need to flip the movement over, and disassemble the IC Board before we can remove the rest of the Keyless Work. With the movement flipped over, remove the 3 screws holding the Coil Protector. Note for re-assembly the Gold Screw in the centre. Now that the Coil Protector is removed, GREAT care must be taken not to damage the exposed fine windings of the Coil. Then to remove the IC Board, simply remove the 2 remaining screws that hold it. Do this slowly and carefully, as you do not want to slip off the screw and damage this delicate circuit. The same level of care needs to be taken when removing the IC Board from the Main Plate. Take your time and carefully lift it off and store it immediately out of harms way. Next remove the black Insulator Block, and Battery Insulator. This will expose the Setting Lever Spring Clip, which will enable you to remove the rest of the Keyless Work. To remove the Setting Lever Spring Clip, place both points of your tweezers on the locations where I've placed the stars and gently push down on the spring. Then with a piece of Pegwood, push the spring in the direction of the arrow until it moves to the larger opening slot. This will now allow the Setting Lever to be removed, along with the rest of the Keyless Work. Next remove the Stop Lever and Switch, and remove the one screw holding the Train Bridge in place. Then carefully remove the Gear Train and the Rotor. The movement is now completely stripped and ready for inspection and cleaning. There are some parts that you do not place in the parts cleaner, they are as follows: Date Ring Rotor IC Board The rest should be demagnetized prior to cleaning to avoid any metal particles in your cleaning solution from sticking to your parts. When cleaning I also including the Insulator Block, and Battery Insulator in the basket, normal watch cleaning solutions do not harm these items and it is essential they are completely clean to provide the best insulation possible. The Rotor should be cleaned by use of Rodico. As you can see from the picture below, it's surprising the dirt and old oil this will remove ... and it is sufficient cleaning for the Rotor. I hope this has been a help to you, and I will post the assembly procedure later today, if time permits.
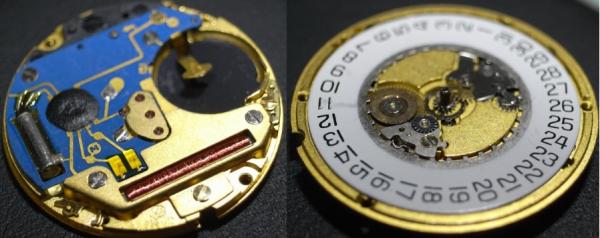

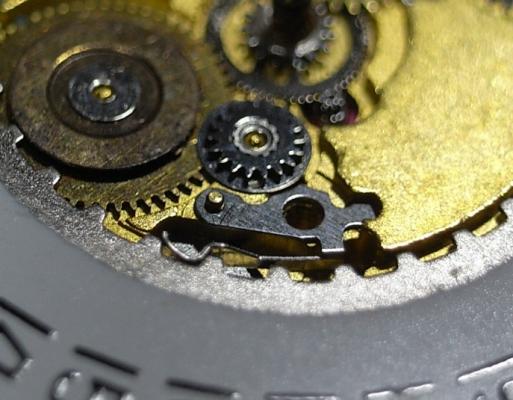


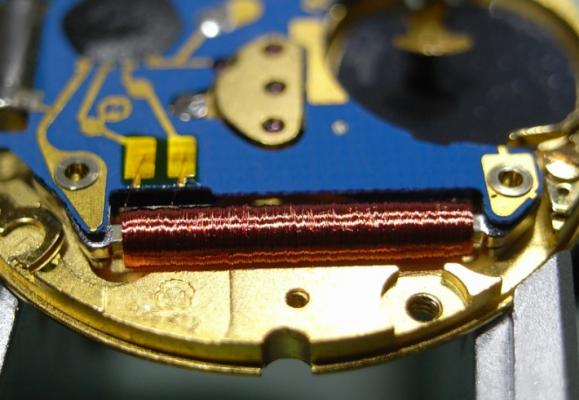

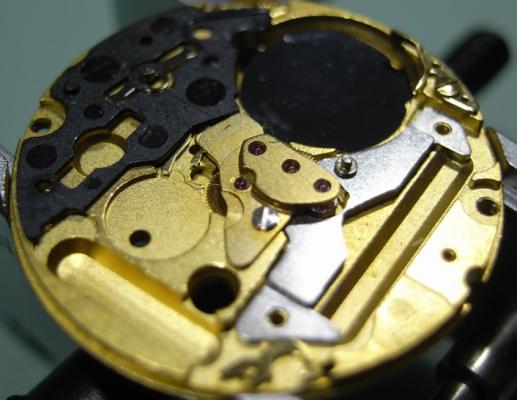


 1 point
 -
Not at all bad, considering what I started with. Most of the shine is from T-Cut automotive polish. All of the dings and scratches were removed with 80, 200, 400 and 1000 grit papers by polishing on a flat slate surface.
 1 point