Leaderboard


Popular Content
Showing content with the highest reputation on 10/28/24 in all areas
-
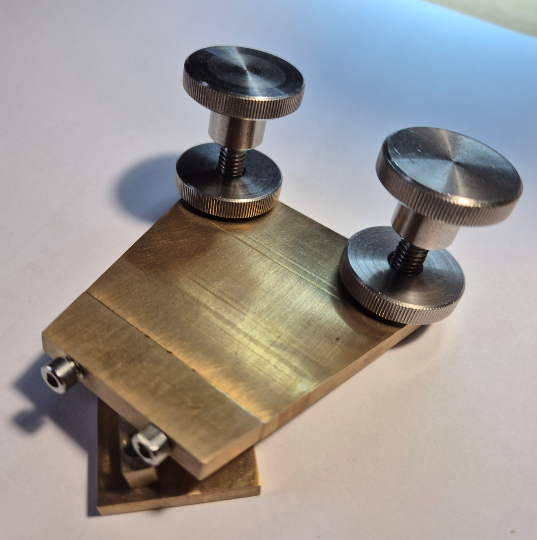
I made my own from brass, with just a saw, drill and files. It's surprisingly quick and easy to use, just a minute or two to polish a screw. (Using 9, 3 and 1 micron lapping film stuck to glass). The 'v' slots need to be very small to hold the smallest screws. I just use a fine file to score a line. I don't see the need for a spirit level (could it be accurate enough?). I just set the adjustable screws by eye, drag the frog once over the abrasive, see where it has rubbed the surface, and tweak the screws.
 4 points
 -
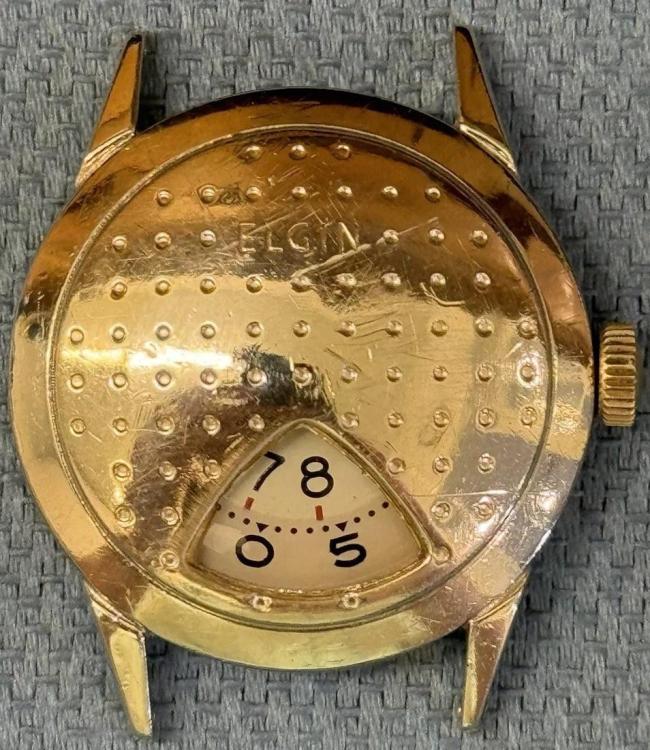
Got this one arriving today. An Elgin jump hour watch with an Elgin 717 movement. I had been itching for a jump hour watch with a nice movement in it. Most I've seen have a cheap pin pallet movement. This one is 17 jeweled. Not currently running and missing the crystal. Getting the minute wheel off may be interesting. Looks like there is a special tool to do so. https://www.crazywatches.pl/elgin-717-golfball-direct-read-jump-hour-1957
 3 points
 -
Can you get the back off to see what movement is inside and see the condition it's in?3 points
-
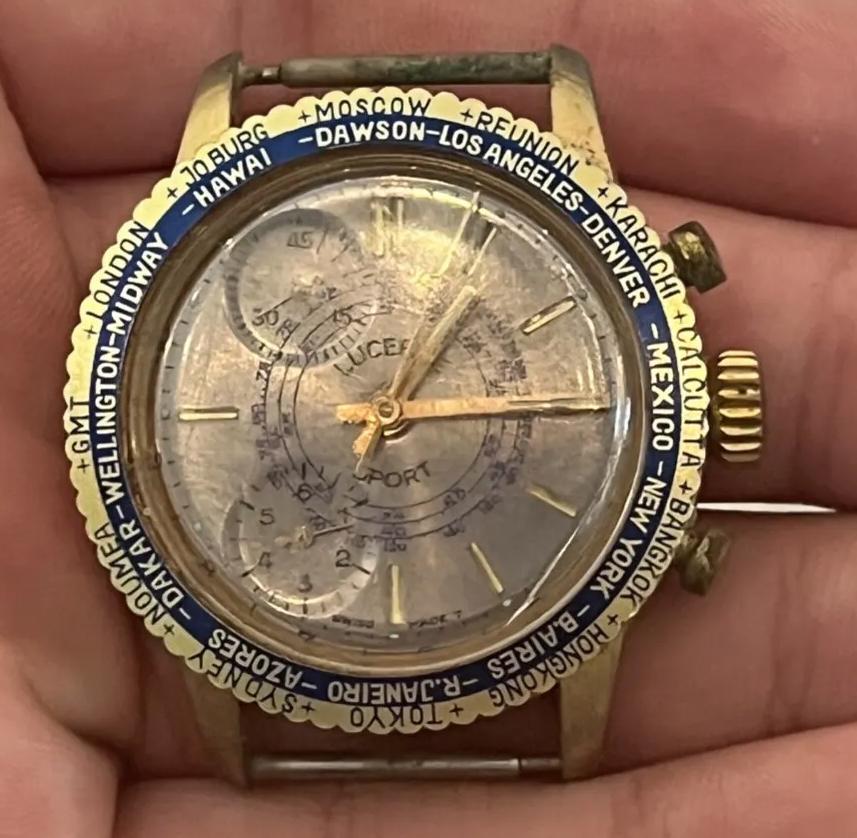
Couldn't resist this very inexpensive Lucerne Sport chronograph. It was worth the money just to satisfy my curiosity to what's inside. Seller sez:
 2 points
 -
Hi John, Actually, if the stud stays firmly in the stud carrier, there is no mater that it is not perfectly upright. The important thing here is to align the hairspring to be centered and parallel to the balance. This is done by bending and twisting the spring right where it comes out of the stud. If You expect that making the spring parallel will improve significantly any 'fluctuations', then You probably will be disappointed. If the spring now doesn't touch anything in all positions of the balance wheel when it turns, then no reason to expect improvement from the un-skewing itself. It will just make 'touching' less probable, and the spring will look more hansom.2 points
-
As already mentioned, if it's about centered it will be ok and not be the cause of the watch stopping. You mentioned that the escapewheel comes to a gentle stop. That is nice, but no guarantee. You also seem to have some doubts about the pallet fork's "snap". Sometimes an escapewheel spins great when the train is not under "load", but with some wind and the pallet fork preventing the wheels from spinning, other factors come into play. There was a post on this forum very recently where the train of a desk clock of some type spun great when free, but not under load. In the end it turned out one of the wheels had a broken pivot.. Just saying, don't assume the pallet fork or balance are now the only 2 options left.2 points
-
They wouldn't be very difficult to make if you have some dimensions. Regarding cost: the material is relatively cheap (but you'd want to use some decent quality steel) so it comes down to labour and machining mostly. If you have to take those into account, one-offs or small series will quickly be more expensive than buying them at Cousins or Ali (tools like these tend to get cheaper there after a while, like with the mainspring winders and epilame bottles for instance). If you're a hobbyist, you have tools and time is not a cost factor (but the joy of making stuff is), making them yourself is the most gratifying option imo.2 points
-
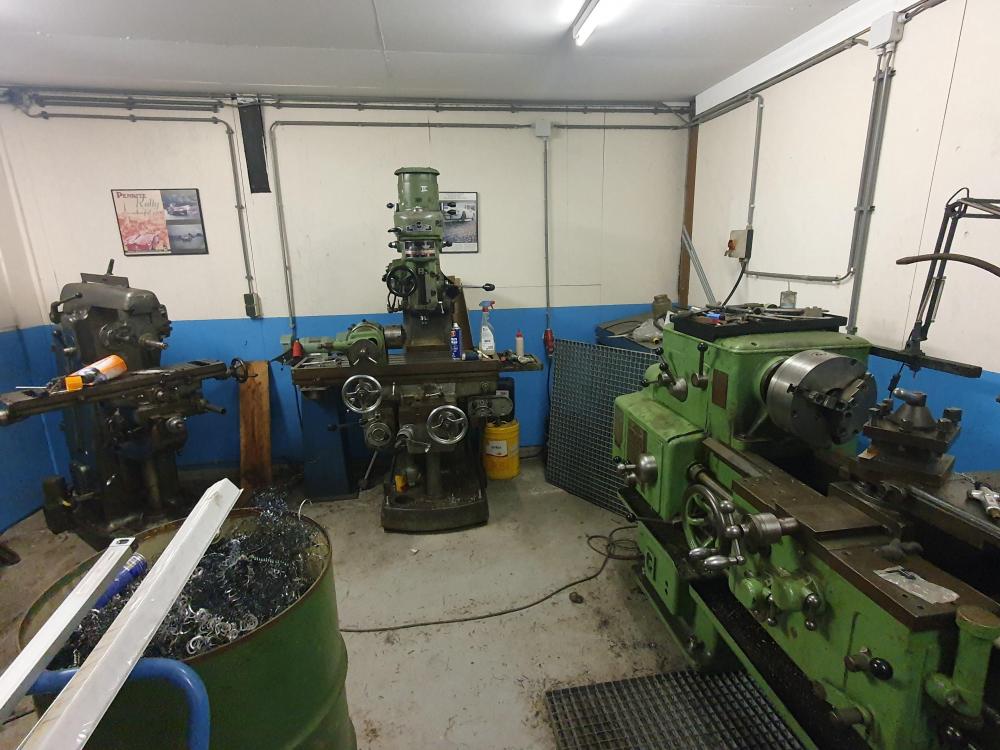
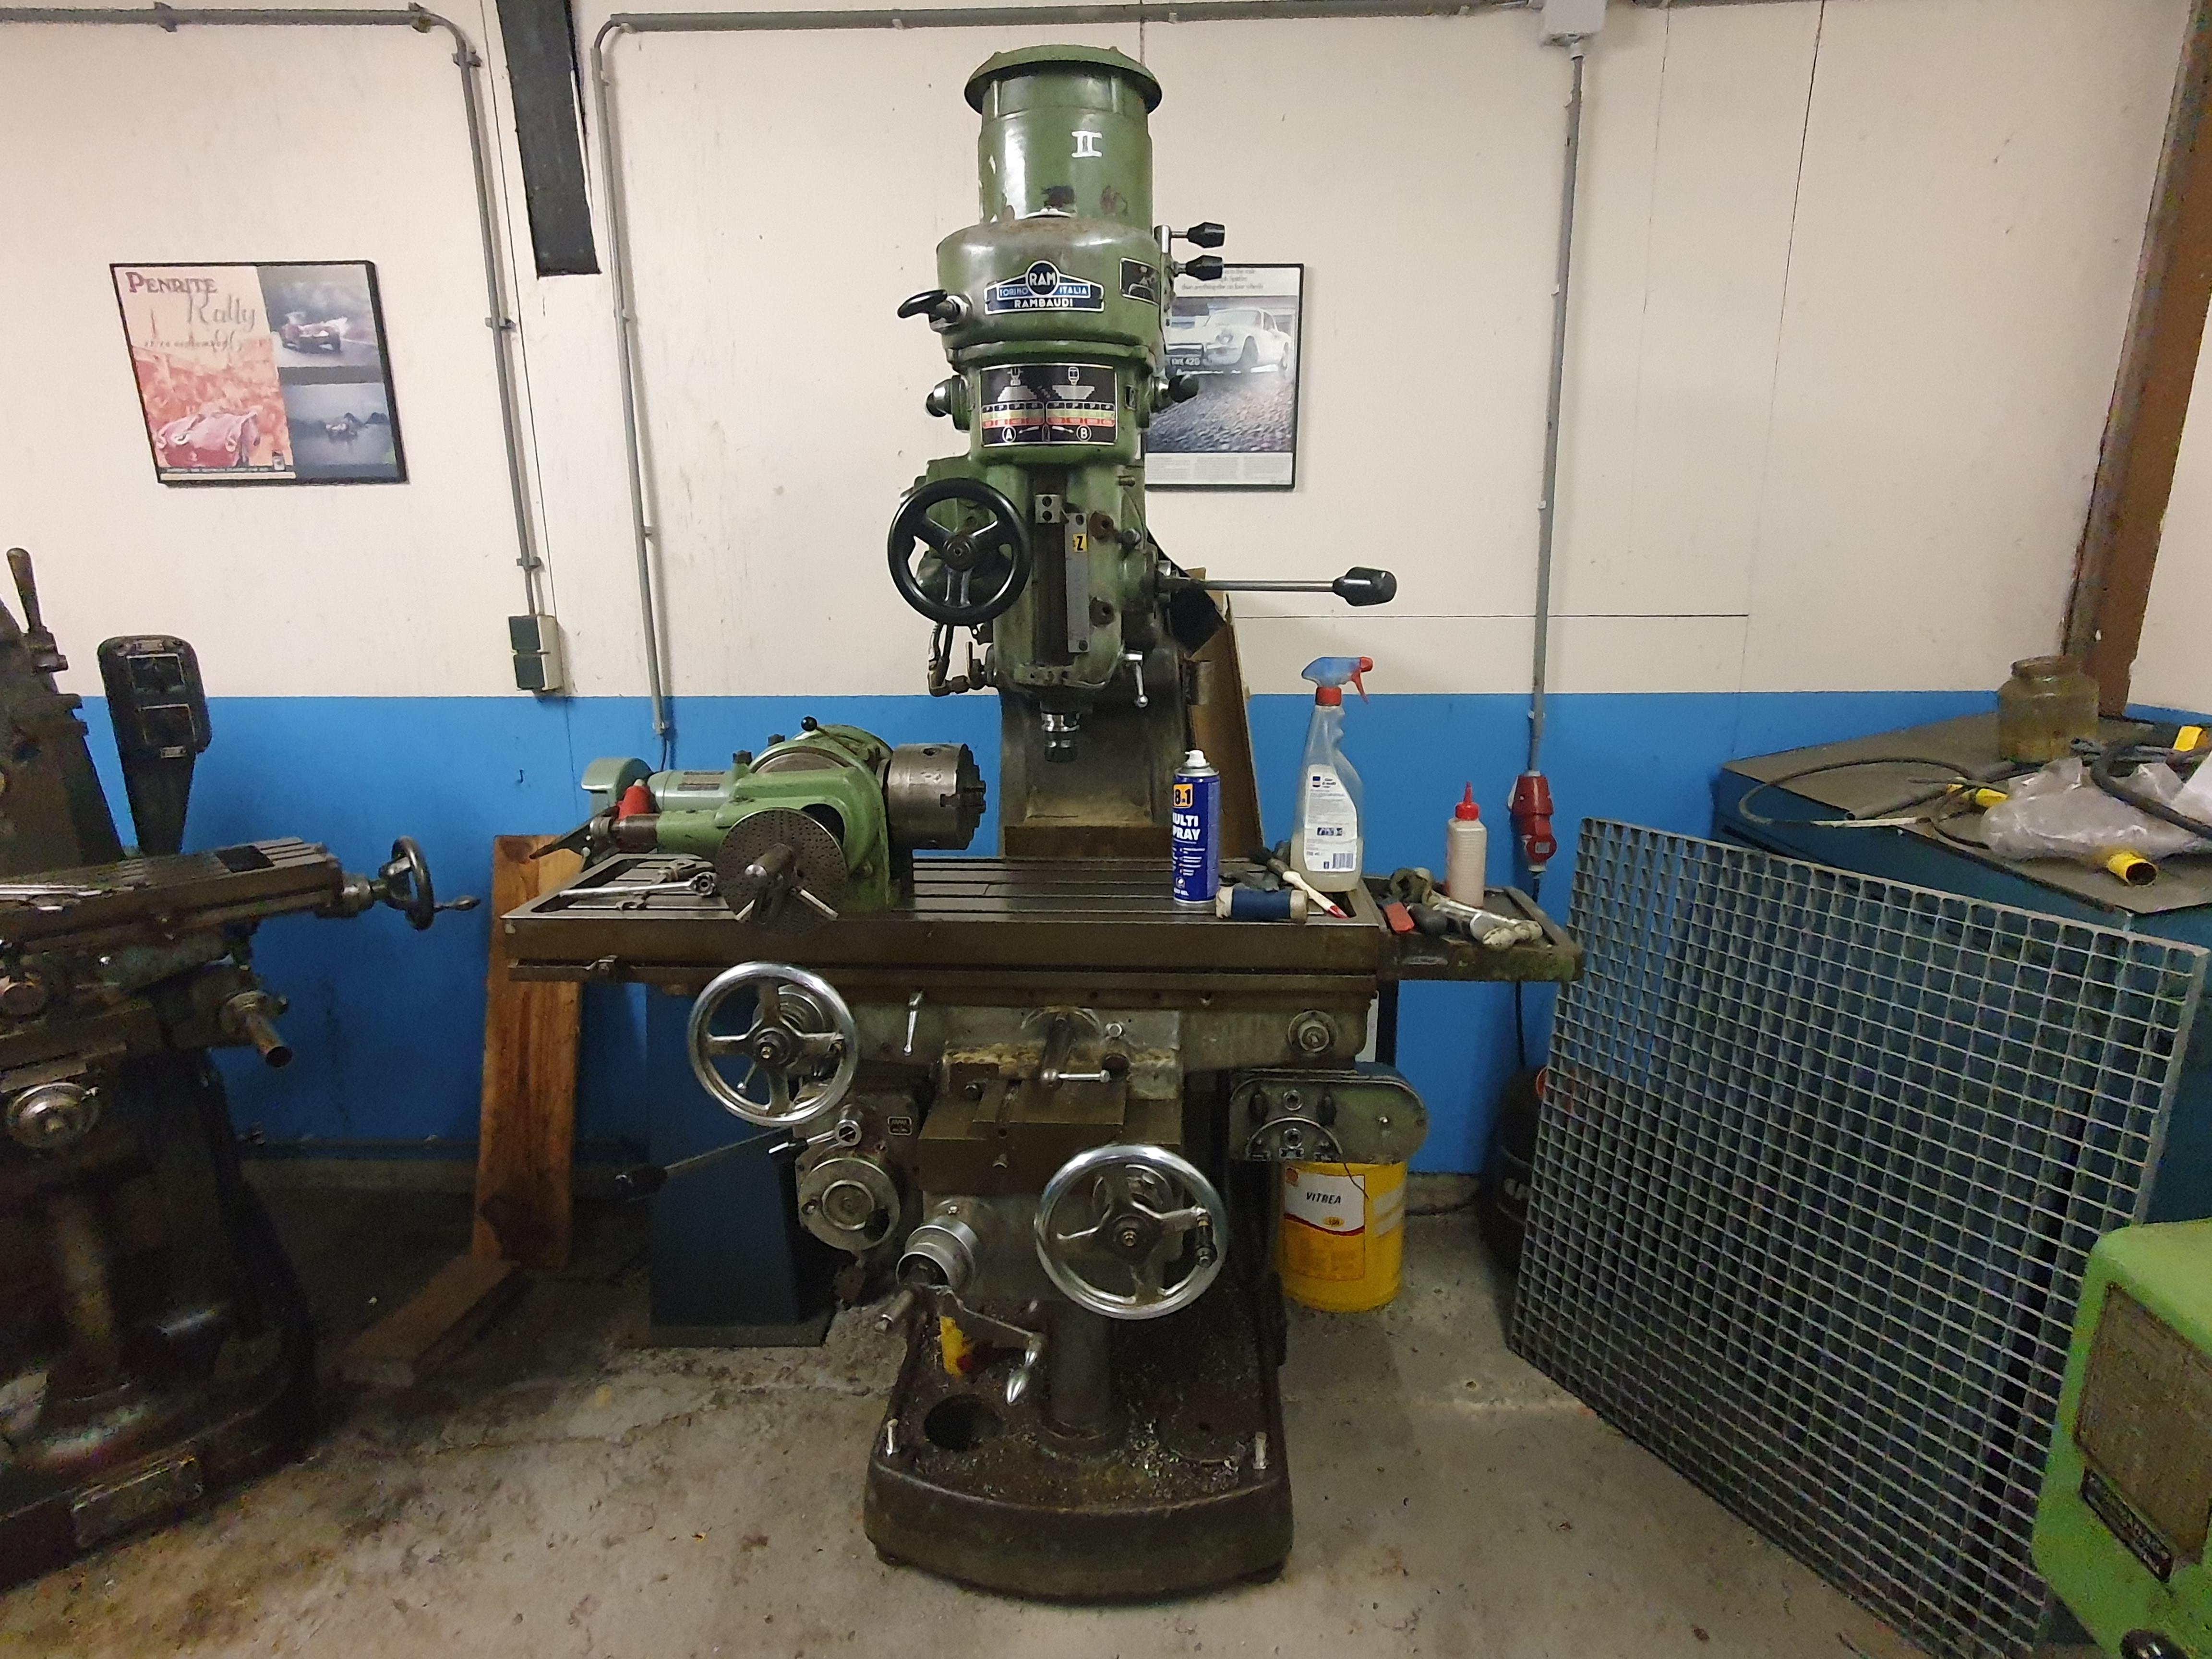
Probably too old and worn (talking about the machines...) to do any real precision work, but you never know until you try, right? The milling machine is a Rambaudi.

 2 points
 -
That makes a lot of sense and fully aligns with Russian/Soviet thinking—functionality at the lowest possible cost.2 points
-
It sounds like you have interference between the impulse jewel and either the guard pin or the fork horns (or both). By the way, the, the fork horns are what you are calling the "guard pins of the pallette fork". Remove the escape wheel, the rest of the train, and all cocks and bridges on the movement side. You want to have just the balance and the pallet fork interacting with one another, and the best view from all angles that you can get. Ideally you would remove the hairspring too, but if you feel unsure about that, leave it. Observe the interaction of the balance with the pallet fork. Take some good photos if you can, and report back.2 points
-
Yes, this is true for all USSR/Russian watches. They never did different cap stones, settings and shock springs for the main plates and balance bridges.2 points
-
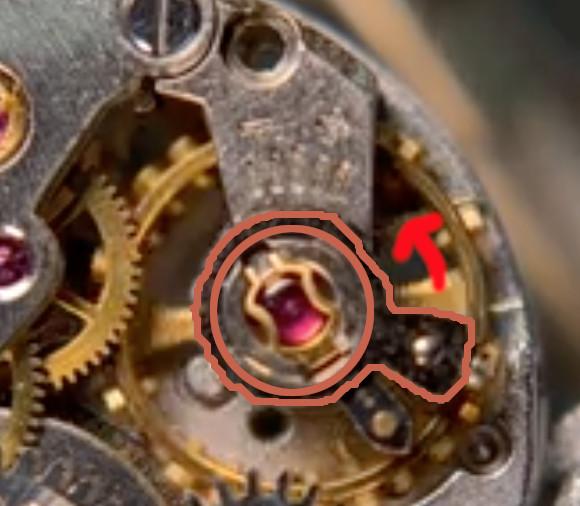
As @caseback pointed out, the stud carrier is way out. The impulse jewel should come to rest on the line that joins the pivots of the escape wheel, the pallet fork and the balance wheel, and that line should run right through the middle of the two guard pins. Something like this: From your diagram yours looks to be more like this: To fix this you should gently turn the stud carrier anticlockwise towards the balance cock with the balance installed, until the jewel comes to rest on the correct line.


 2 points
 -
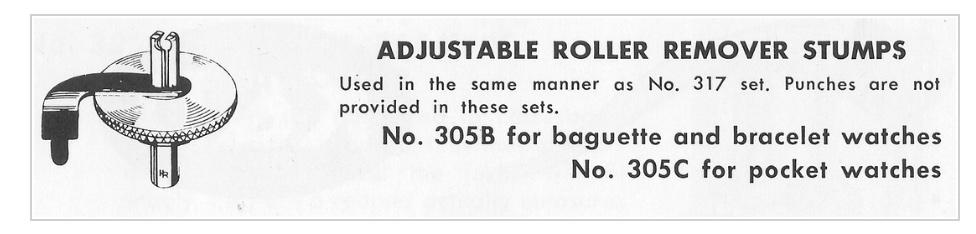
Hi Claudio, I have the first one you mentioned (K&D Inverto 18R) but a slightly older model (since the depthing gauge on this one looks newer). The piece you mentioned that is missing on the 305b and 305c roller table stumps is a black metal strap that goes around the stump and hangs over the edge and would be held in the two empty holes on in the box. When used on the tool, they would fall into the die hole on the main surface of the tool (I usually put it in the hole in the middle). It holds the stump stable, while you tighten the knurled part under it to close the jaws together. Not a showstopper, as you could easily make something to do this. The inverto models are great because you can put stakes upside down in the tool, not just coming down from the top. That gives you a crazy combination of stumps options available to you. The other one you showed (model 17) does not have the depthing guage. It is still a good staking tool, but you would need a Seitz or Horia jeweling tool to complement it, which is totally fine. Not a bad route to go. You would also possibly look for additional stakes & stumps that were not available in the 17 set, but keep in mind some stumps and stakes are really not used much anymore. If money is not an issue, I would go with your first choice, it looks like it is in good shape. I do not see any blockages, but as previously suggested definitely ask if there are any blockages and if everything is still in alignment. Are any of the stakes or stumps broken or blocked? Are there any bad rust spots? Does the knob on the back of the unit work smoothly and lock the base in place? Get the book "The Watchmakers' Staking Tool" by George G. Lucchina and Archie B. Perkins to help understand how to use all the stakes. And here are a few useful links to on Staking Tools https://kanddinverto.weebly.com https://tadelstein.com/Cross-over-punches.pdf https://tadelstein.com/Staking Tools and How to Use Them 1910 - 163p BW - S.pdf Good Luck!
 1 point
 -
Blocked punches are when a pivot has been broken off when using and now literally blocks the hole in the punch, not uncommon. This reduces the space available to get the punch over another pivot rendering the punch unusable unless you manage to unblock it. Tom1 point
-
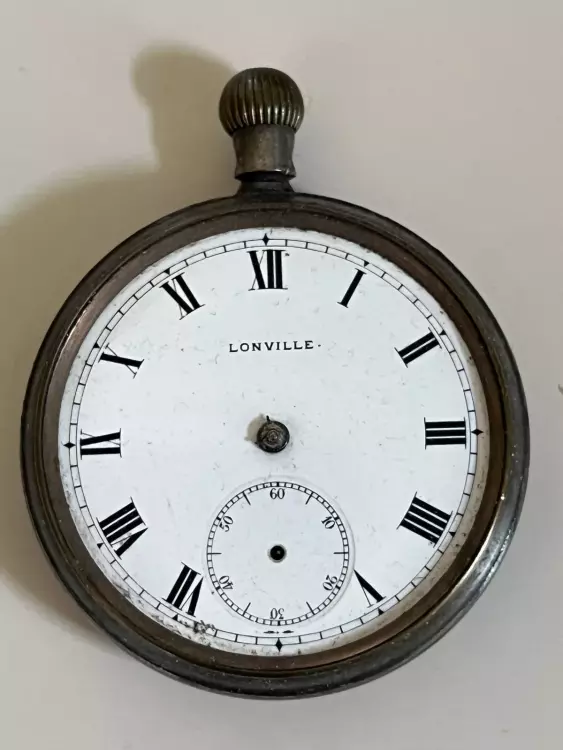
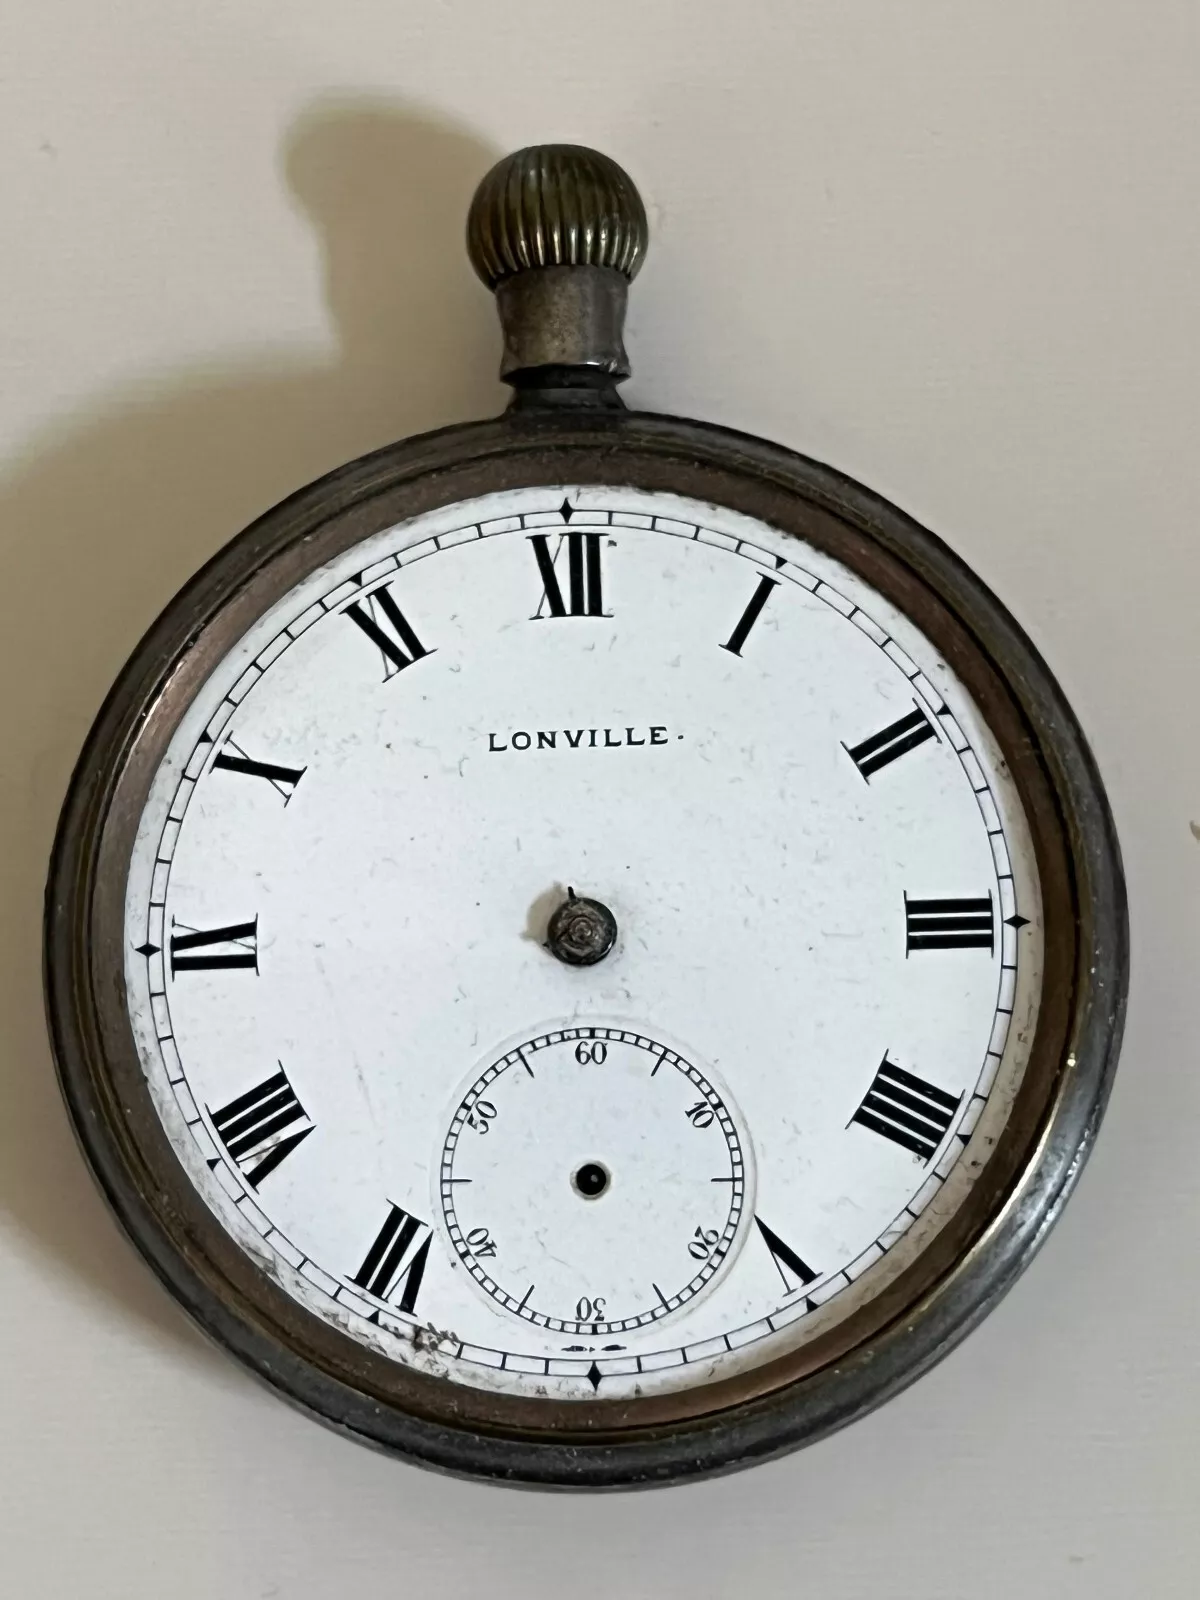
Looks worth the gamble. Looking forward to seeing what you got. Here's my latest gamble. A Lonville pocket watch in a gunmetal case. I too have absolutely no idea what lies inside. Possibly a Langendorf. Possibly a 7 jewel cylinder movement. Possibly a small lump of coal inside and a note to Santa Clause. Time will tell. Lonville watches seem to still be around (or perhaps they have been brought back to life). https://lonville.com/
 1 point
 -
If they kept GMT dark mornings wouldn't be an issue.1 point
-
I did read a review on one Ali supplier of them where someone said the oil had affected the plastic. I'm hoping (though I'm pretty sure I'm codding myself) that getting one that was a bit more expensive than the others and had more good reviews is some hope that there are differences between them. Logic says that's unlikely though.1 point
-
Harold Wilson’s Labour government tried not altering the clocks and called it British Standard Time. Went down like a divers boot, the big moan was children going to school in the dark mornings. It did not last to long before i5 was changed back.1 point
-
I have an A1 clone and it has been working out well for me. I did have an issue with the fine needle tip being bent initially. I pressed the tip gently against a case cushion to coax it back straight. No instructions, but it wasn't hard to figure out how to adjust and use it. I needed a 180 clockwise turn on the adjustment screw (not sure if clockwise or counterclockwise really matters) to get the correct size droplet. I put the tip carefully into pithwood before each application to make sure there is not any extra oil left on the tip from the last application. I have seen one YouTuber using an auto oiler with HP 1300. Not sure who nor which model auto oiler.1 point
-
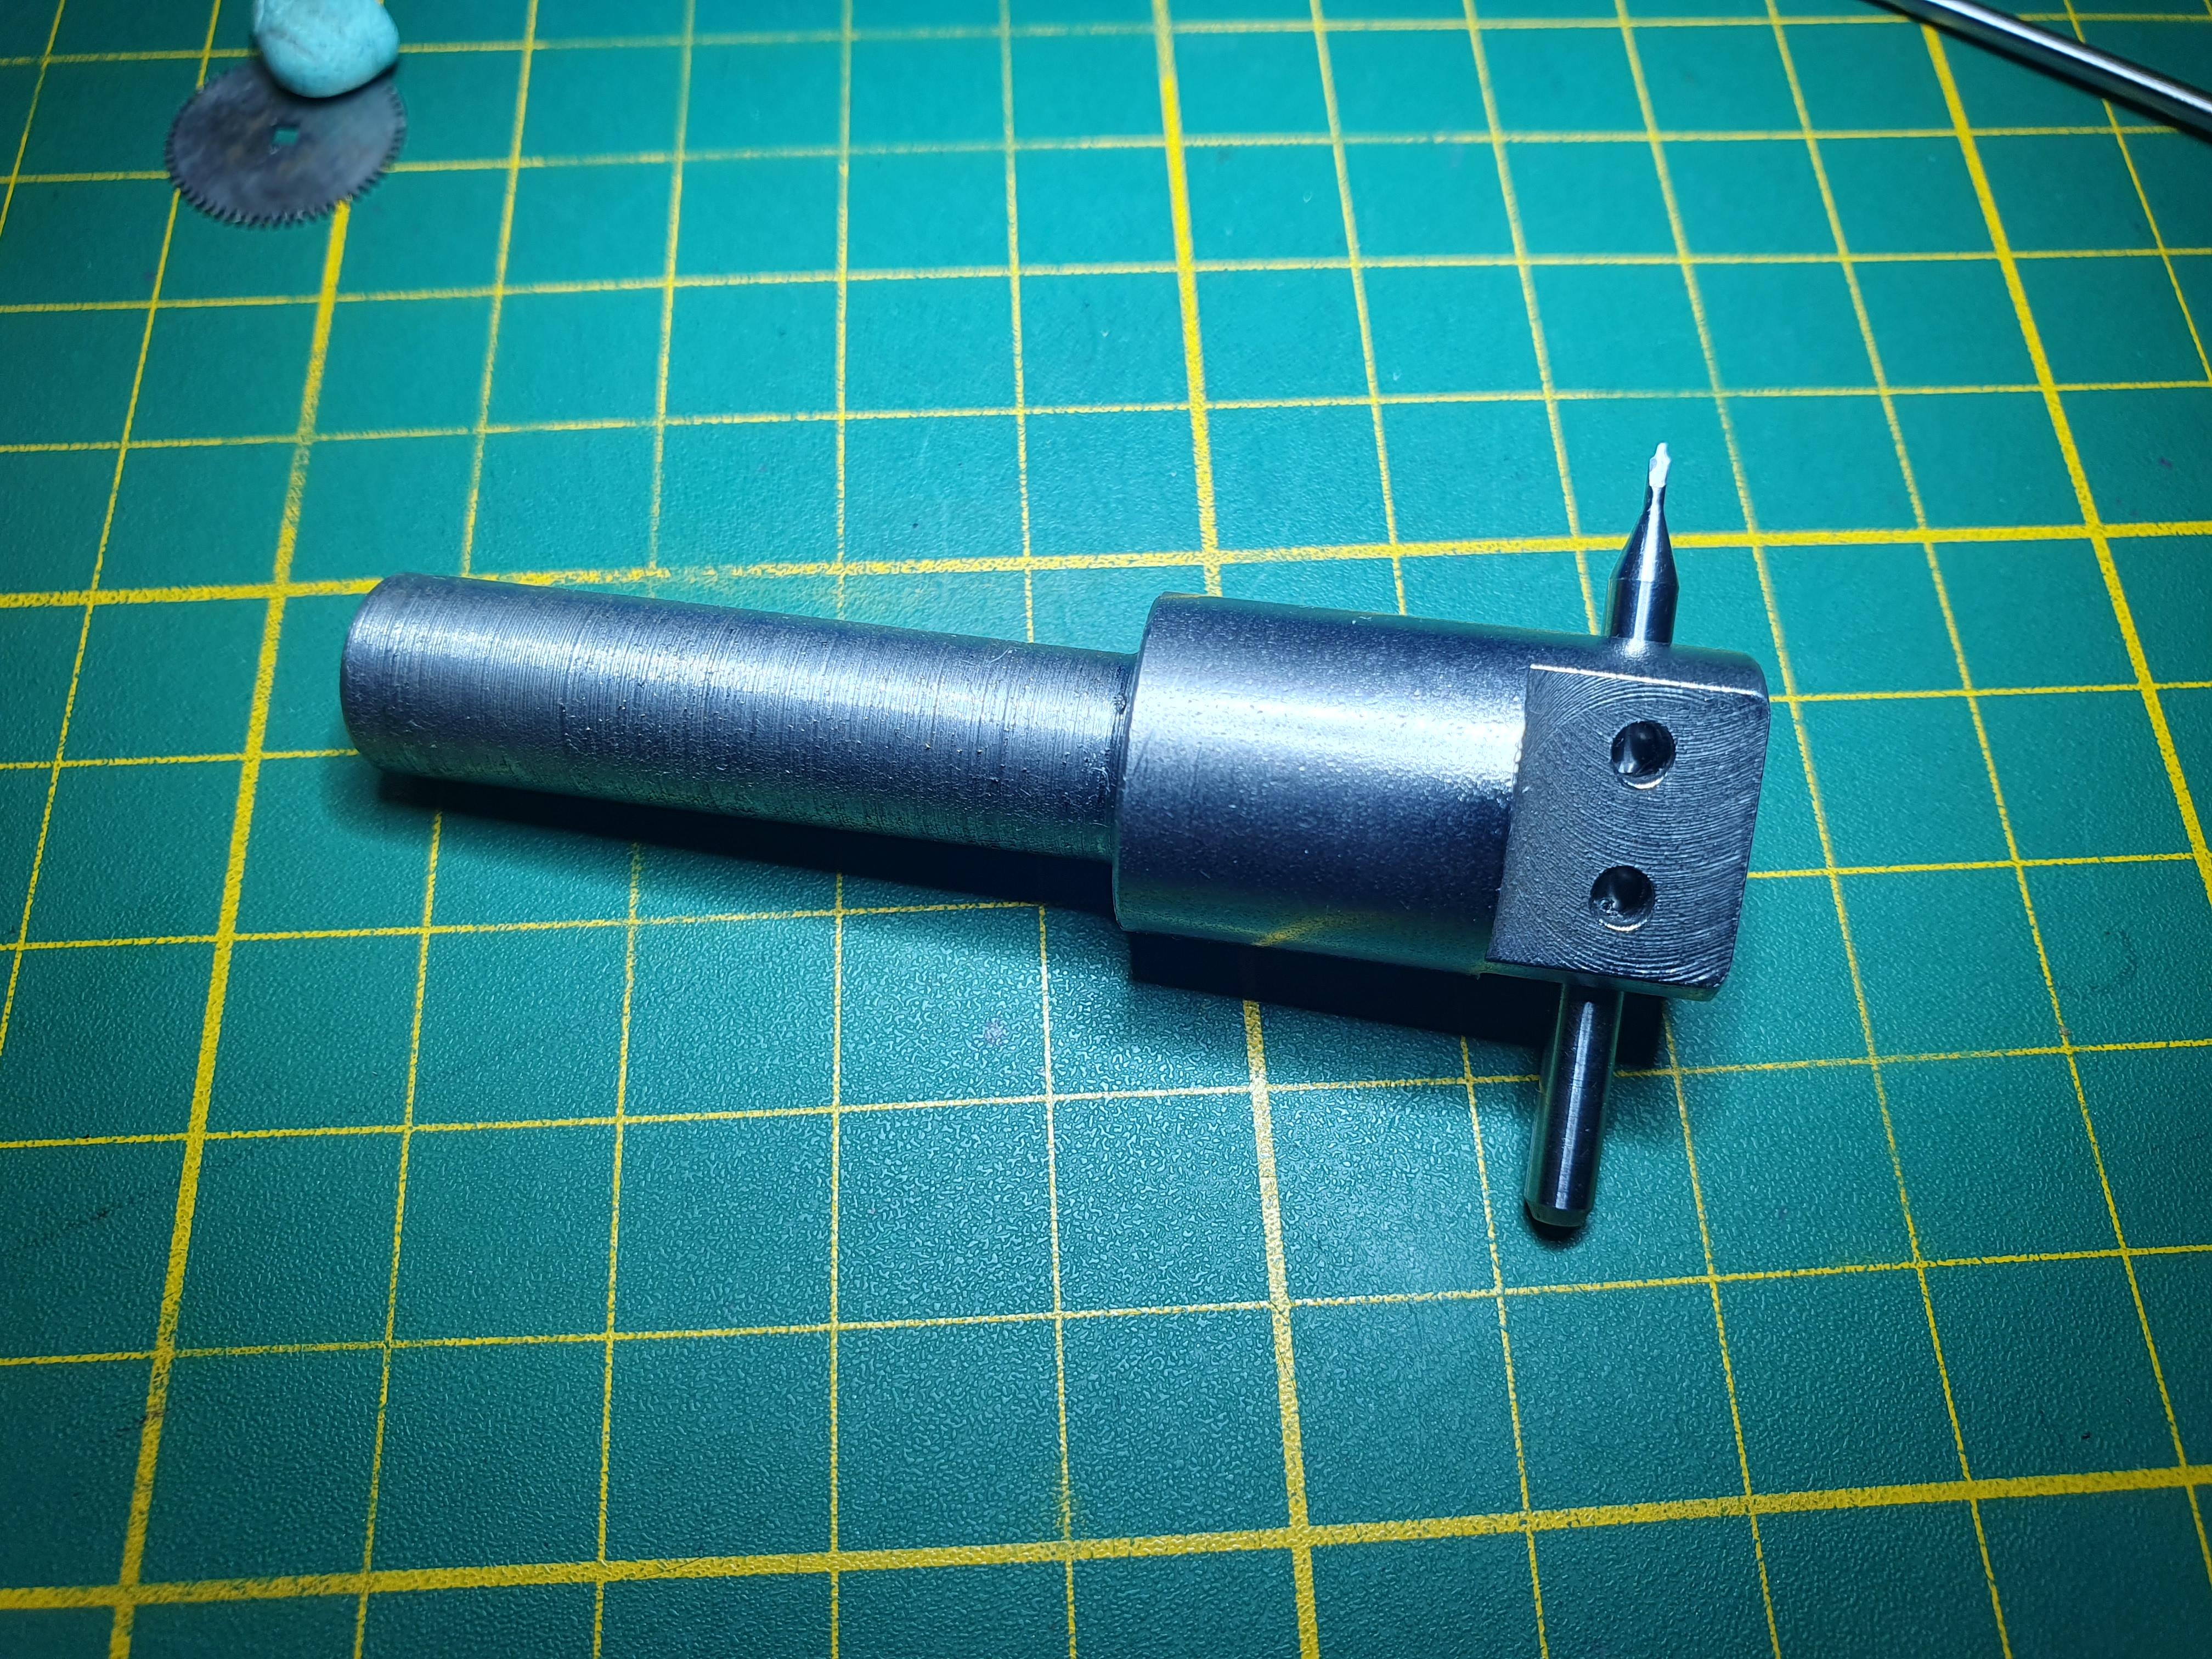
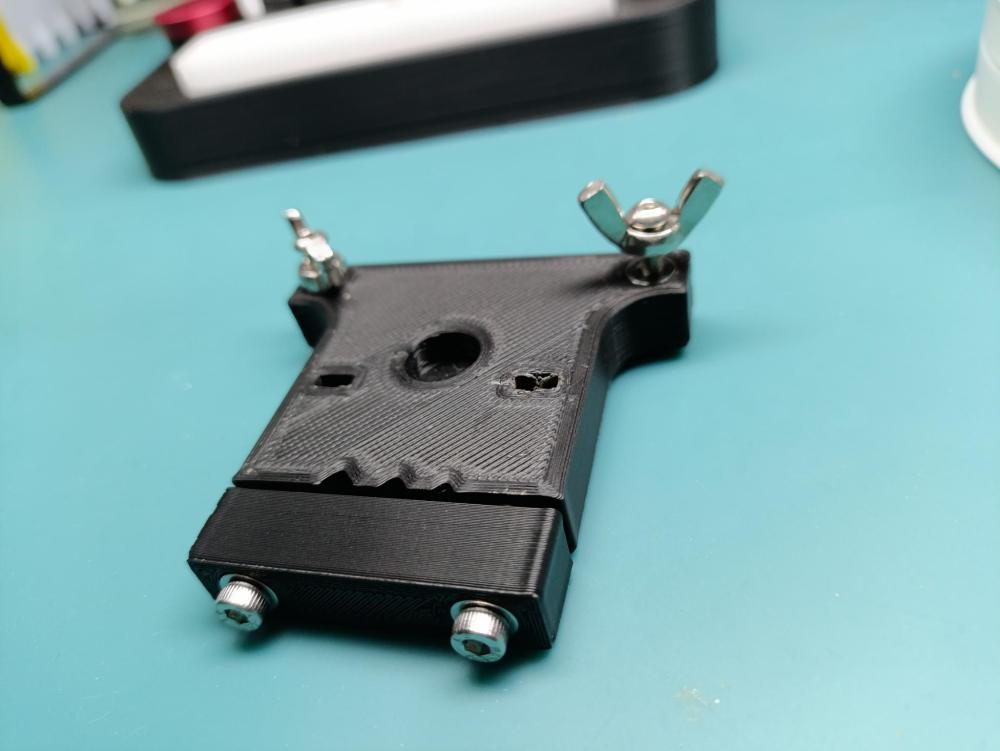
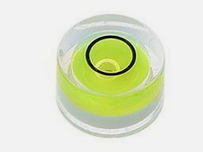
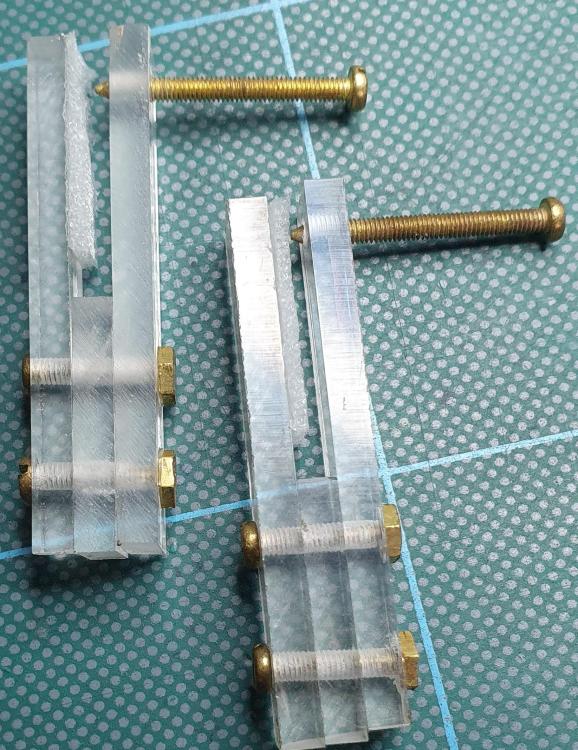
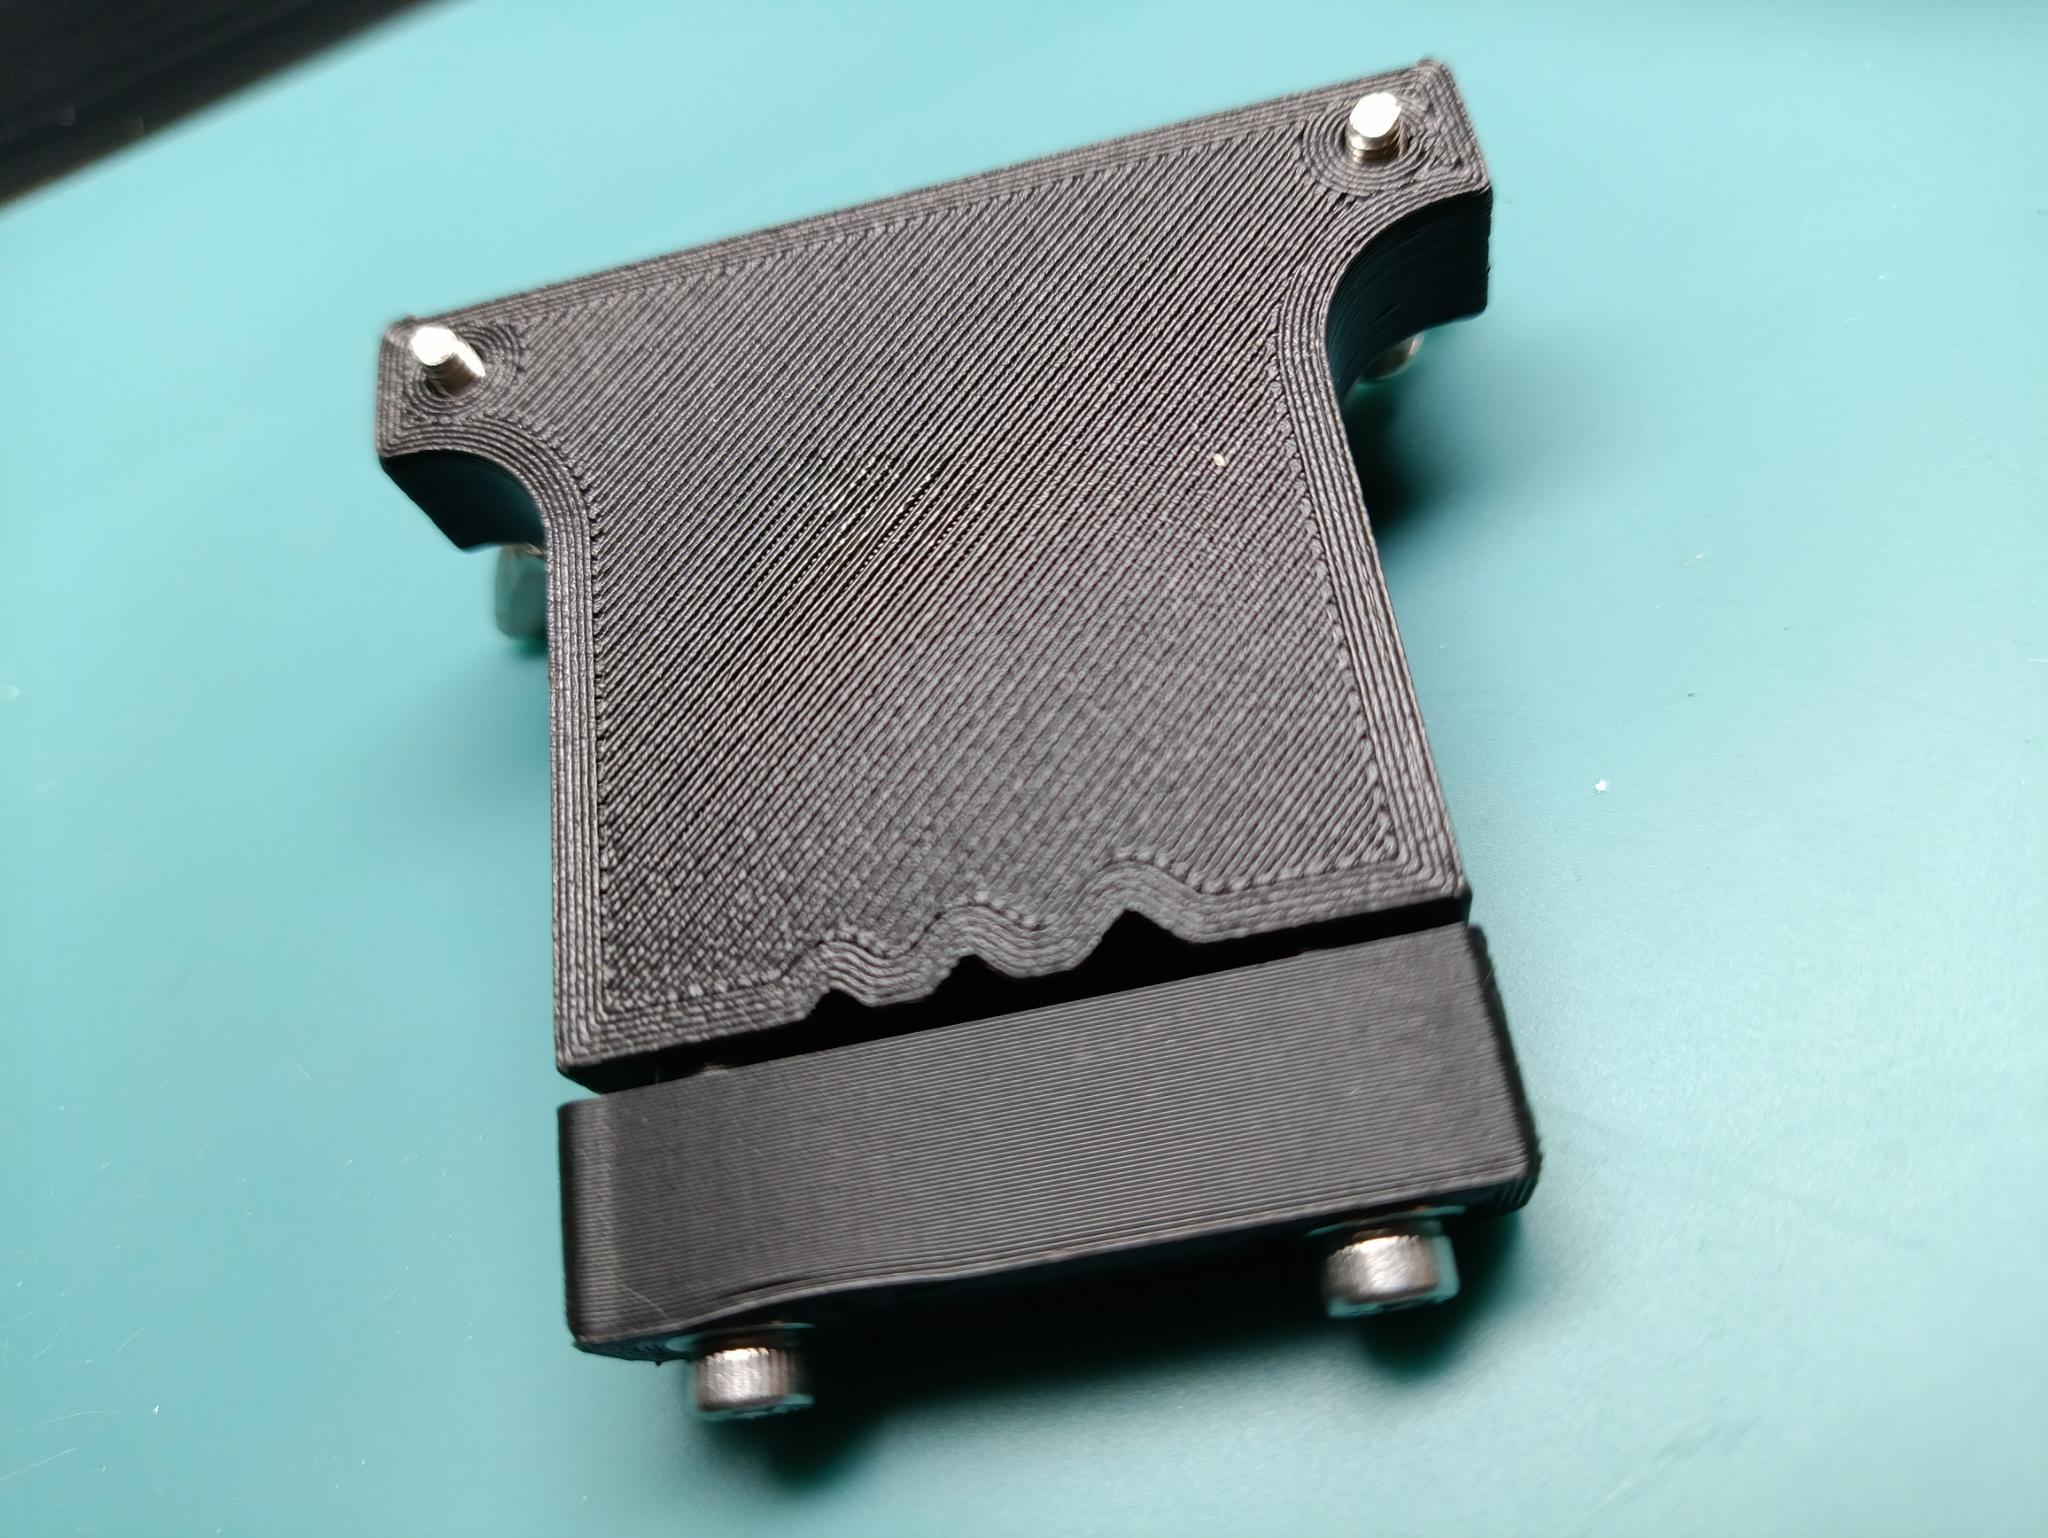
I recently watched a YouTube video (see below) on screw polishing and in the more information section there were instructions on how to build a screw polisher, I decided to make a 3D printed version of this tool based upon these instructions (pdf instructions of brass tool attached - credit or original author): Here is the version I created based upon the brass tool instructions and instruction from the video - I had to change some of the design aspects based upon the different requirements needed for 3D printing, but the essence of the design and key features are kept: Here is the top of the tool (prototype): Here is the underside: I have used M3 bolts throughout (see parts list below) and reinforced the areas under the bolt heads with a standard M3 washers, here is the FreeCAD view showing the complete assembly: Here is the "Bar" section: Here is the body "Frog", the slots in the top and back are to insert the 'trapped' M3 nuts (point down) Here is an x-ray view of the complete assembly: I used M3 wing nuts as locking nuts to prevent the bolts (legs?) backing off during use, I also included a cutout in the top to insert a bullseye level (10mm x 6mm) which hasn't arrived from Amazon yet, and so is absent from my pictures. Parts list: 2 x 40mm M3 Stainless Steel 304 Hex Socket Head Cap Screws Bolts 4 x M3 Stainless Steel 304 washers 1 x Mini Spirit Level Bullseye (10mm x 6mm) 2 x Wing Nuts M3 A2 Stainless Steel Butterfly DIN 315 4 x Hexagon flat nuts A2 Stainless Steel M3 2 x 30 mm Fully Threaded Allen Key Hex Socket Cap Screws Bolts M3 High Tensile I have uploaded the design to printibles (link here), but will include the file here also, I'll attach it as FrogV2.pdf so I can upload here, please download and replace .pdf with .zip to access. 3D printing settings: Material is PLA+, just what I had on the printer at the time, could also work with PETG etc. Fill is 75% gyroid, setting is high to ensure rigidity of the tool during use 1.6mm wall thickness, setting is high to reduce wear on faces which interact with metal parts. Here is the missing bullseye: Here is the link to the youtube: Enjoy! how-to-make-a-bolt-tool.pdf FrogV2.pdf


 1 point
 -
Yes the 8110 is also the 320W101 point
-
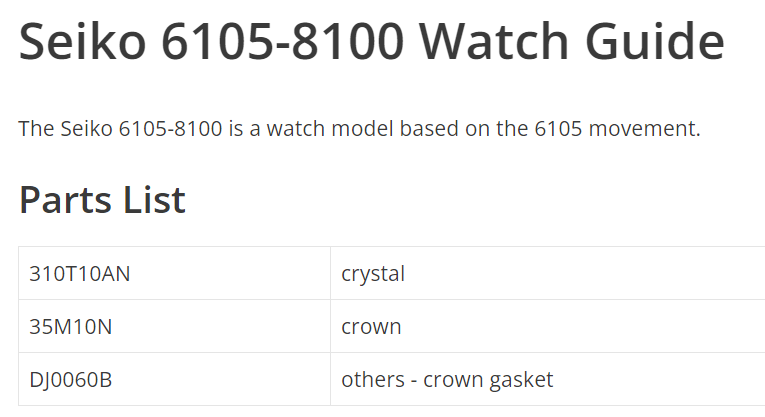
Everywhere I've looked is showing the 8100 as 310T10AN or 310T16 or 310T48
 1 point
 -
I'm there matey, i have all the machining experience that money can buy.....as long as its wood machines I suggest you stop eating all the pork pies matey1 point
-
If you just took it to somewhere that replaces batteries then they don't normally have much of a clue what they're doing.1 point
-
So the chapter ring on the 6105-8000 is a 83070954 which was also used on the 8009 Edit The 8000 (320W10GN) & 8100 (310T10AN) crystals aren't the same size.1 point
-
There is a hell of a lot of info about compound pendulums on the net and it is all free. If you are a clockmaker it is high unlikely you will get to work on such pieces.1 point
-
https://a.aliexpress.com/_mOMSdnq There are AliExpress clones too.1 point
-
Hi @ClaudioCavalli, where are you based? US, Europe...? The ones you picked are on the expensive side, but also very nice, I think. Especially if you're in Europe, also look for Boley staking sets. They're excellent. The diameter of their stakes is 4.7mm, which is still the most common diameter and you can order replacement stakes, e.g. from CousinsUK. Boley sets can go for 300-400 around here (in Europe). There are also other bands, like Favourite. The one in your first link also includes reamers. And maybe even pushers for jewelling (is there a micrometer adapter??) -- but it doesn't have pump-pushers, which makes it inferior to a dedicated jewelling set like Horia/Seitz. In terms of the actual punches/stumps, first and second link seem roughly the same. Feel free to post more links you find and we can help you choose.1 point
-
I'm starting a new thread, I need input from people with machining experience.1 point
-
Furthure to advice from OH, more details has been discussed on WRT, heres one of many.1 point
-
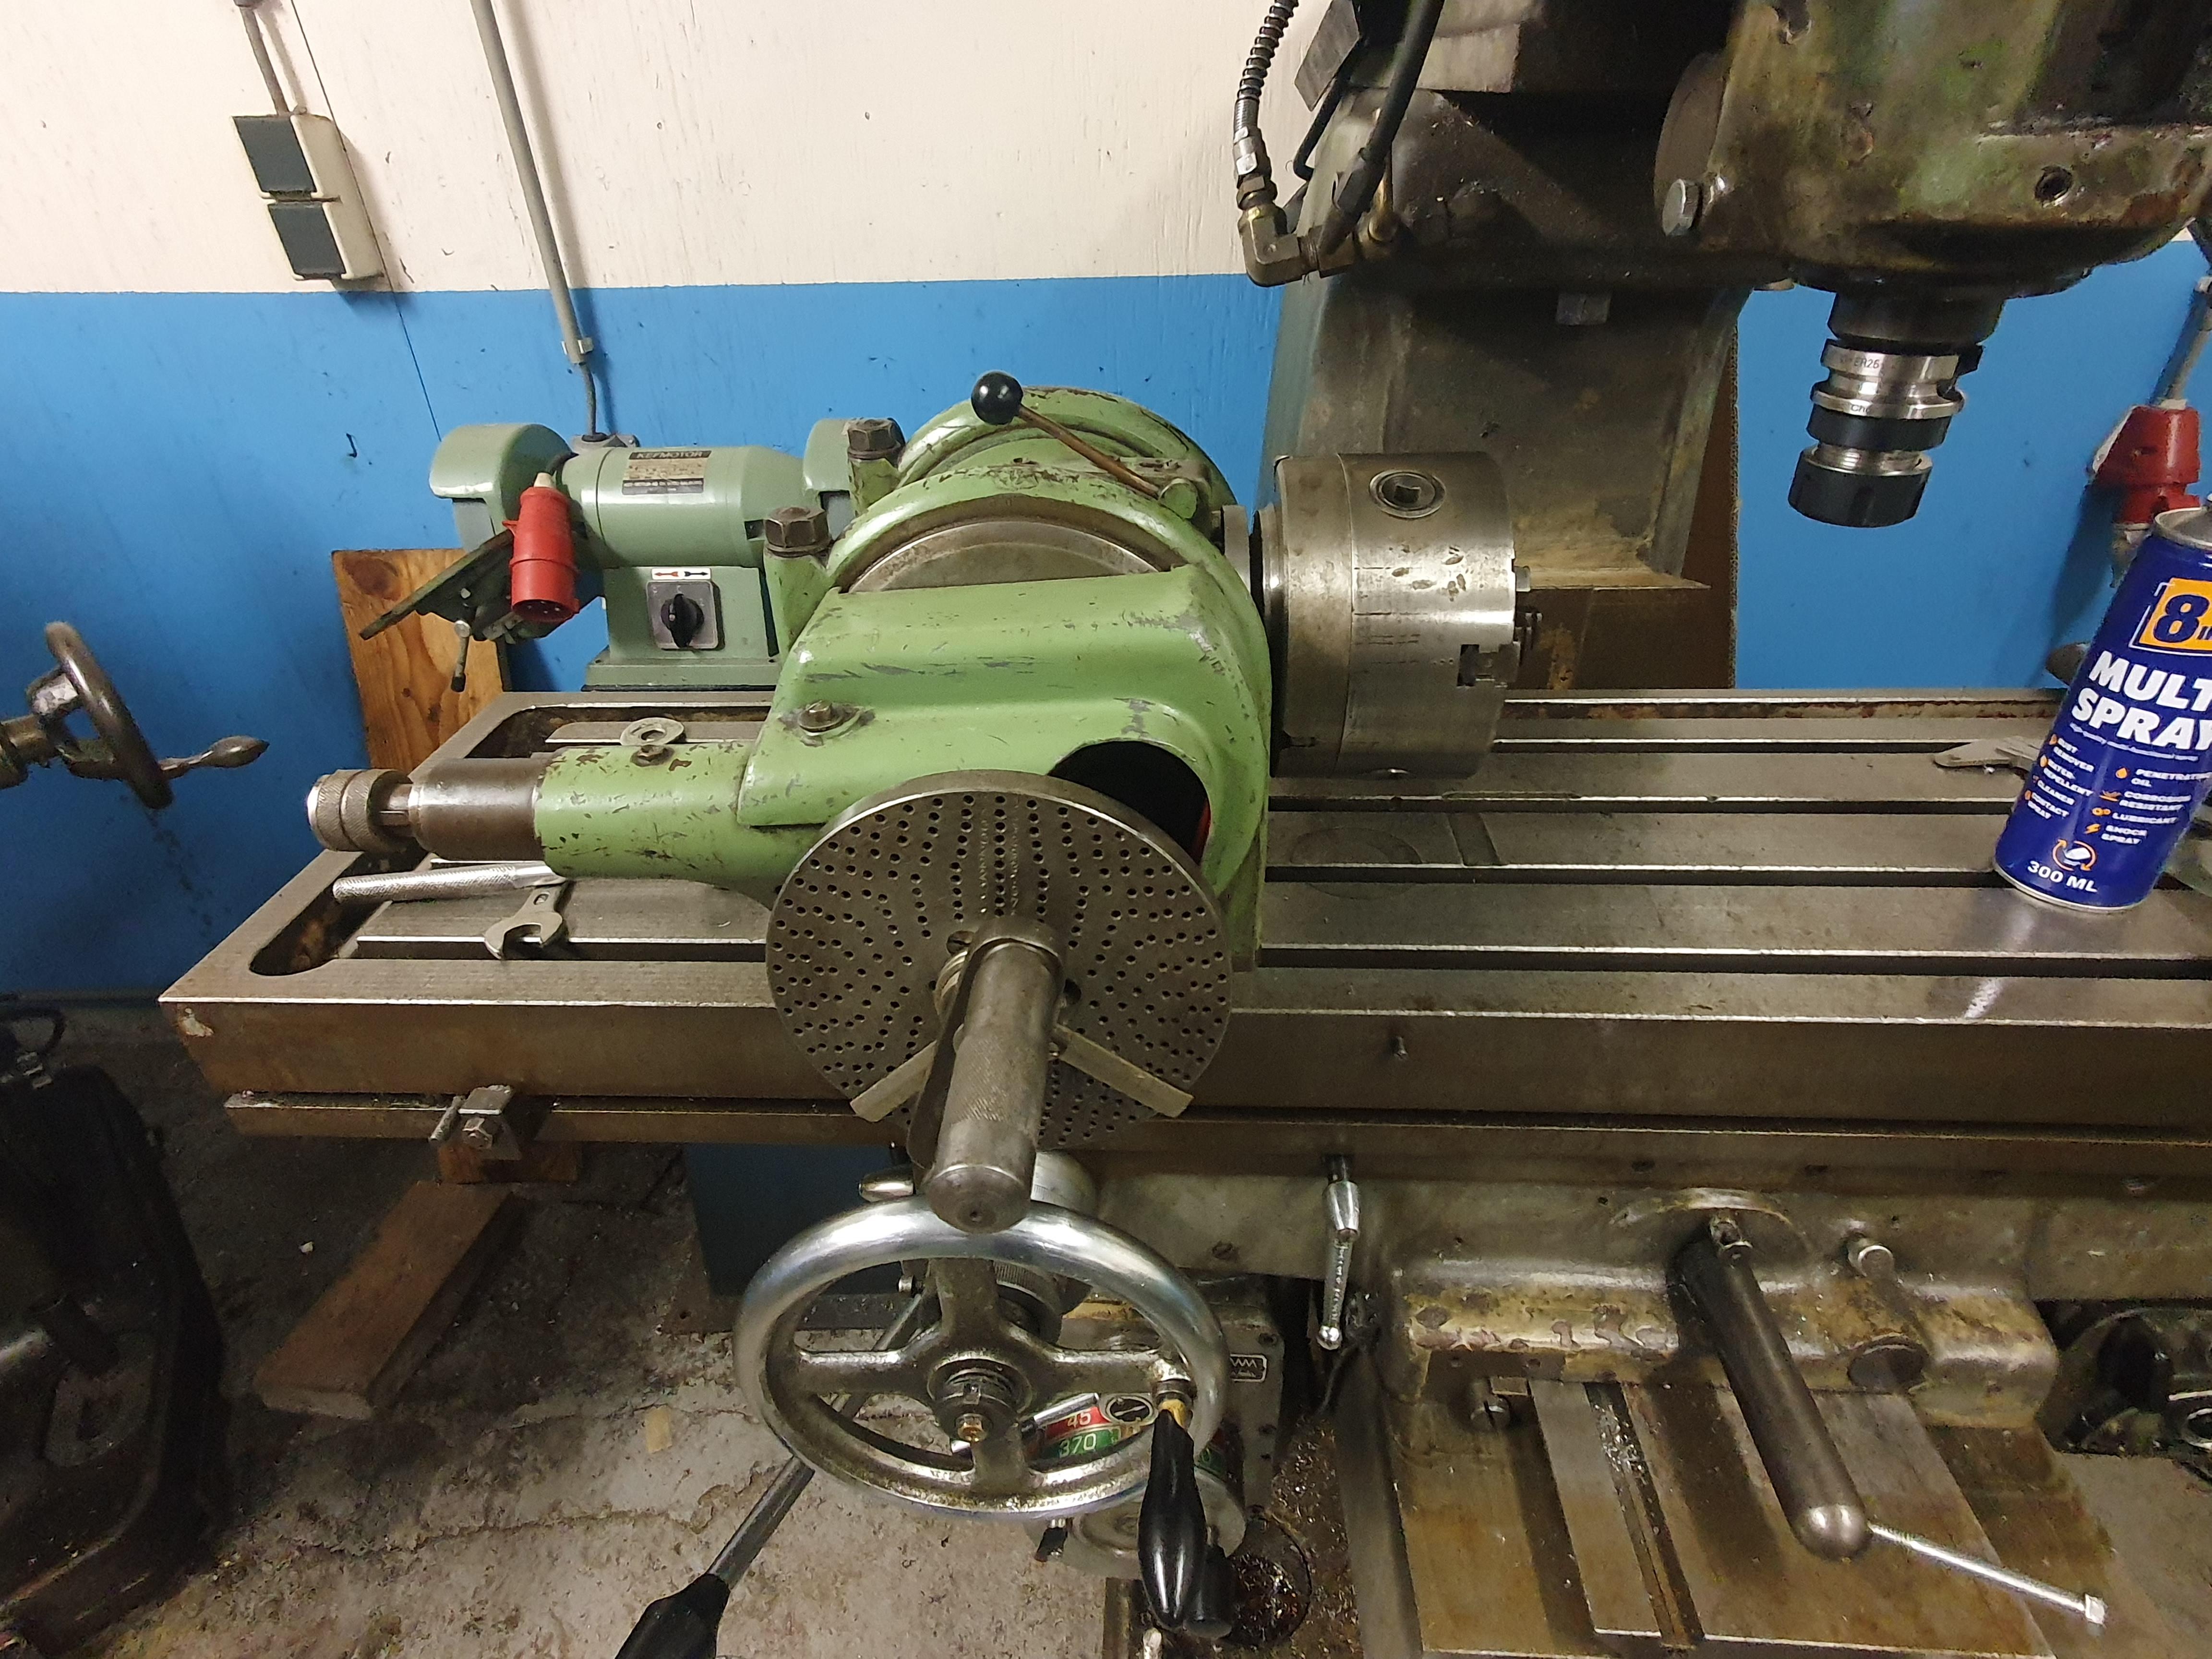
If you want to come over and make a drawbar or something, no problem. The usual place for the grate in the corner is on the floor in front of the milling machine. It avoids me standing in metal chips. There's one in front of the lathe as well.1 point
-
Aw man cool workshop, i wanna come play Is there a pot belly in the corner as well ? ....stove......1 point
-
Always when buying second hand make sure that the punches are not blocked and the same goes for the main tool. You do not want to buy one were the main tool has been dropped.1 point
-
This is a handy document when using Dennison sizes and also shows the different end terminations. https://www.jewelerssupplies.com/media/pdfs/MainspringsCatalog2018.pdf1 point
-
you better have any play on that fly cutter down to nothing and a torque wrench on those grub screws then and stand well back behind a riot shield lol, you're a better man than me Caseback can i have a look at your machine please.1 point
-
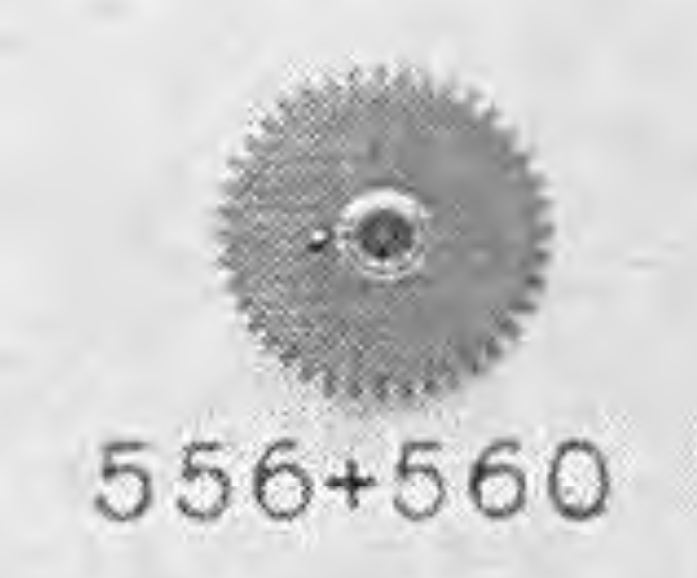
The Part #556-560 is a single part. https://www.ebay.com/itm/125640144860
 1 point
 -
@caseback I removed the pallete fork and pushed the barrel gently - the train of wheels moved along with the escape wheel which then came to a gentle stop. I am assuming we can rule out the issue being from the train? @Klassikeri will now test what you have suggested and come back with pics. Also thank you for correcting my vocabulary, and @Neverenoughwatchesfor pointing this out in the first place I do appreciate the help that this community has been offering so promptly and generously. While I have done Mark’s course part 1 and 2 multiple times (and I’m midway with 3) it is difficult to really organize concepts or learn the vocabulary unless you start applying it in the authentic context of a repair. I’ll report back soon.1 point
-
As Klassiker says, a free running test of the balance with everything else removed, in this situation you can then also position the impulse jewel correctly as line runing through the escape wheel , pallet fork pivots, banking pins and balance pivots. Hopefully there is enough adjustment on the beat regulator arm to do this.without clashing with the rate aduster1 point
-
Or maybe I could just grind a matching profile on the other end and centre the cutter in the holder...1 point
-
It seems to be a composite part that fills the role of two of the parts from the standard Swiss numbering system so they list both numbers for it. You see that sometimes. The Benrus price list showed it as a single item to purchase. I'm not sure you are going to find a source just for that part, so as mentioned above you might try to repair it by replacing the missing pin portion, or you can grab it from a parts donor movement. I pulled that wheel from a parts movement this evening to see what it looks like (see pictures) and it shows signs that someone has already done some work on this one to either secure or replace the stud, so maybe that was a common problem. Are you taking pictures and considering posting a walk-through? This is a commonly-seen complication in used watch listings but there isn't a lot of information on it. The quickset date function triggered by pushing the stem IN is unusual, and I have the Benrus CE on my list to tackle after I get a bit more experience with calendar mechanisms.
 1 point
 -
Here is the data sheet with the Benrus part name and number for the components that are unique to the calendar works on the CE and CK movements. Benrus CE Calendar Parts.pdf1 point
-
Sorry, I missed it. But, You already will know what to do in similar situations, where the screws are damaged and will not want to untighten. Now, if the threads are damaged, just use slightly bigger screw. Put some oil and screw it forward-reverse carefully until new thread is formed to the end.1 point
-
Be sure to cut the excess off the back end of the cutter lol1 point
-
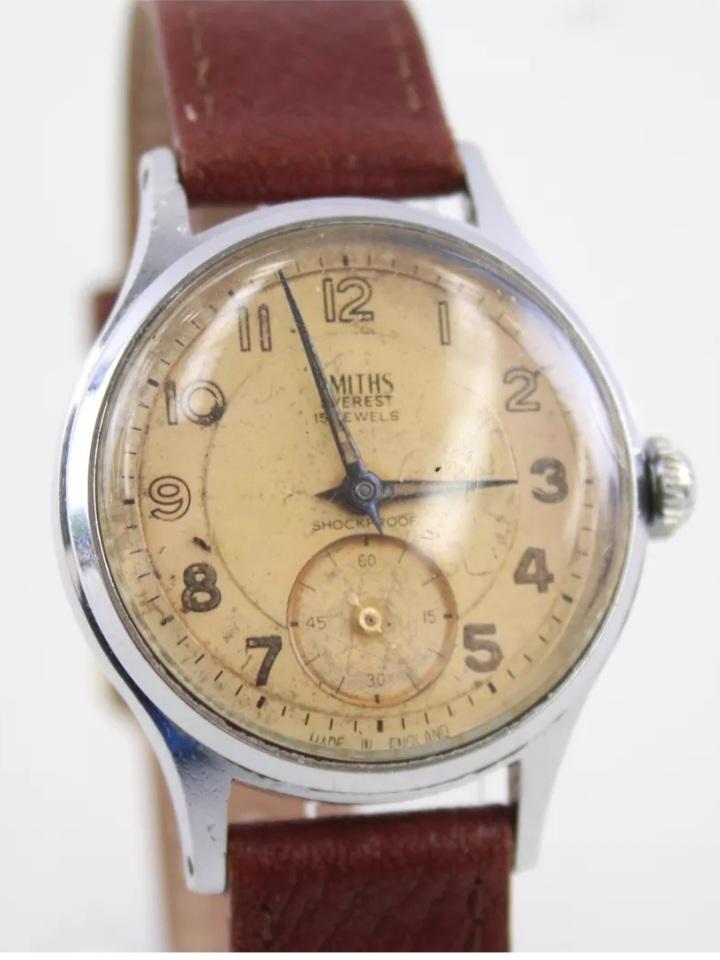
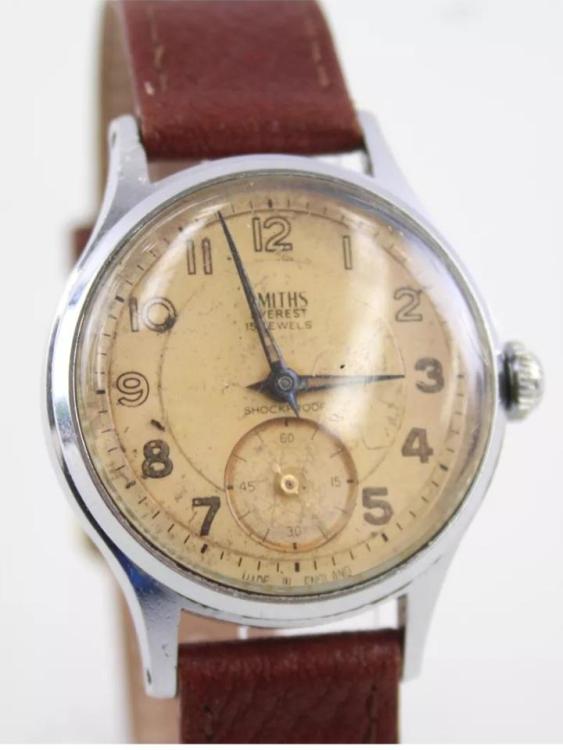
Been after this model since i started collecting Smith watches ❤ So i found this for sale at Smiths watches.com ....same model........wow...hope no-one here was upset with me last night when i won it
 1 point
 -
I've almost finished making a crude flycutter. It needs 2 grub screws and tapping the threads for those.
 1 point
 -
With patience and some time investment you can have an old cleaner for much less than many sell for in working condition. I have two functioning L&R "vintage" machines but I approached it the same way I do watch repair - avoiding the most trendy models and watching for bargains by piecing together various used lots that had useable parts that could be cobbled together. The really old open-frame first generation units (painted silver or gold, not black) used mixer motors that don't reverse (low resale) but I've rewired them so that they now will. For my very old "Master" I've also set it up with a wiring breakout box that includes auto-switching so it has the Forward <-> Auto Cycle switch of the black base units that get top dollar. I've probably made eight or so Ebay purchases to put together everything, but it was enjoyable. You may end up with a Frankencleaner, but it's put together with quality aged components just like the watches we like working on. However, I didn't have to buy any specialty tools, so that is one downside compared to spending that time on watch repair.1 point
-
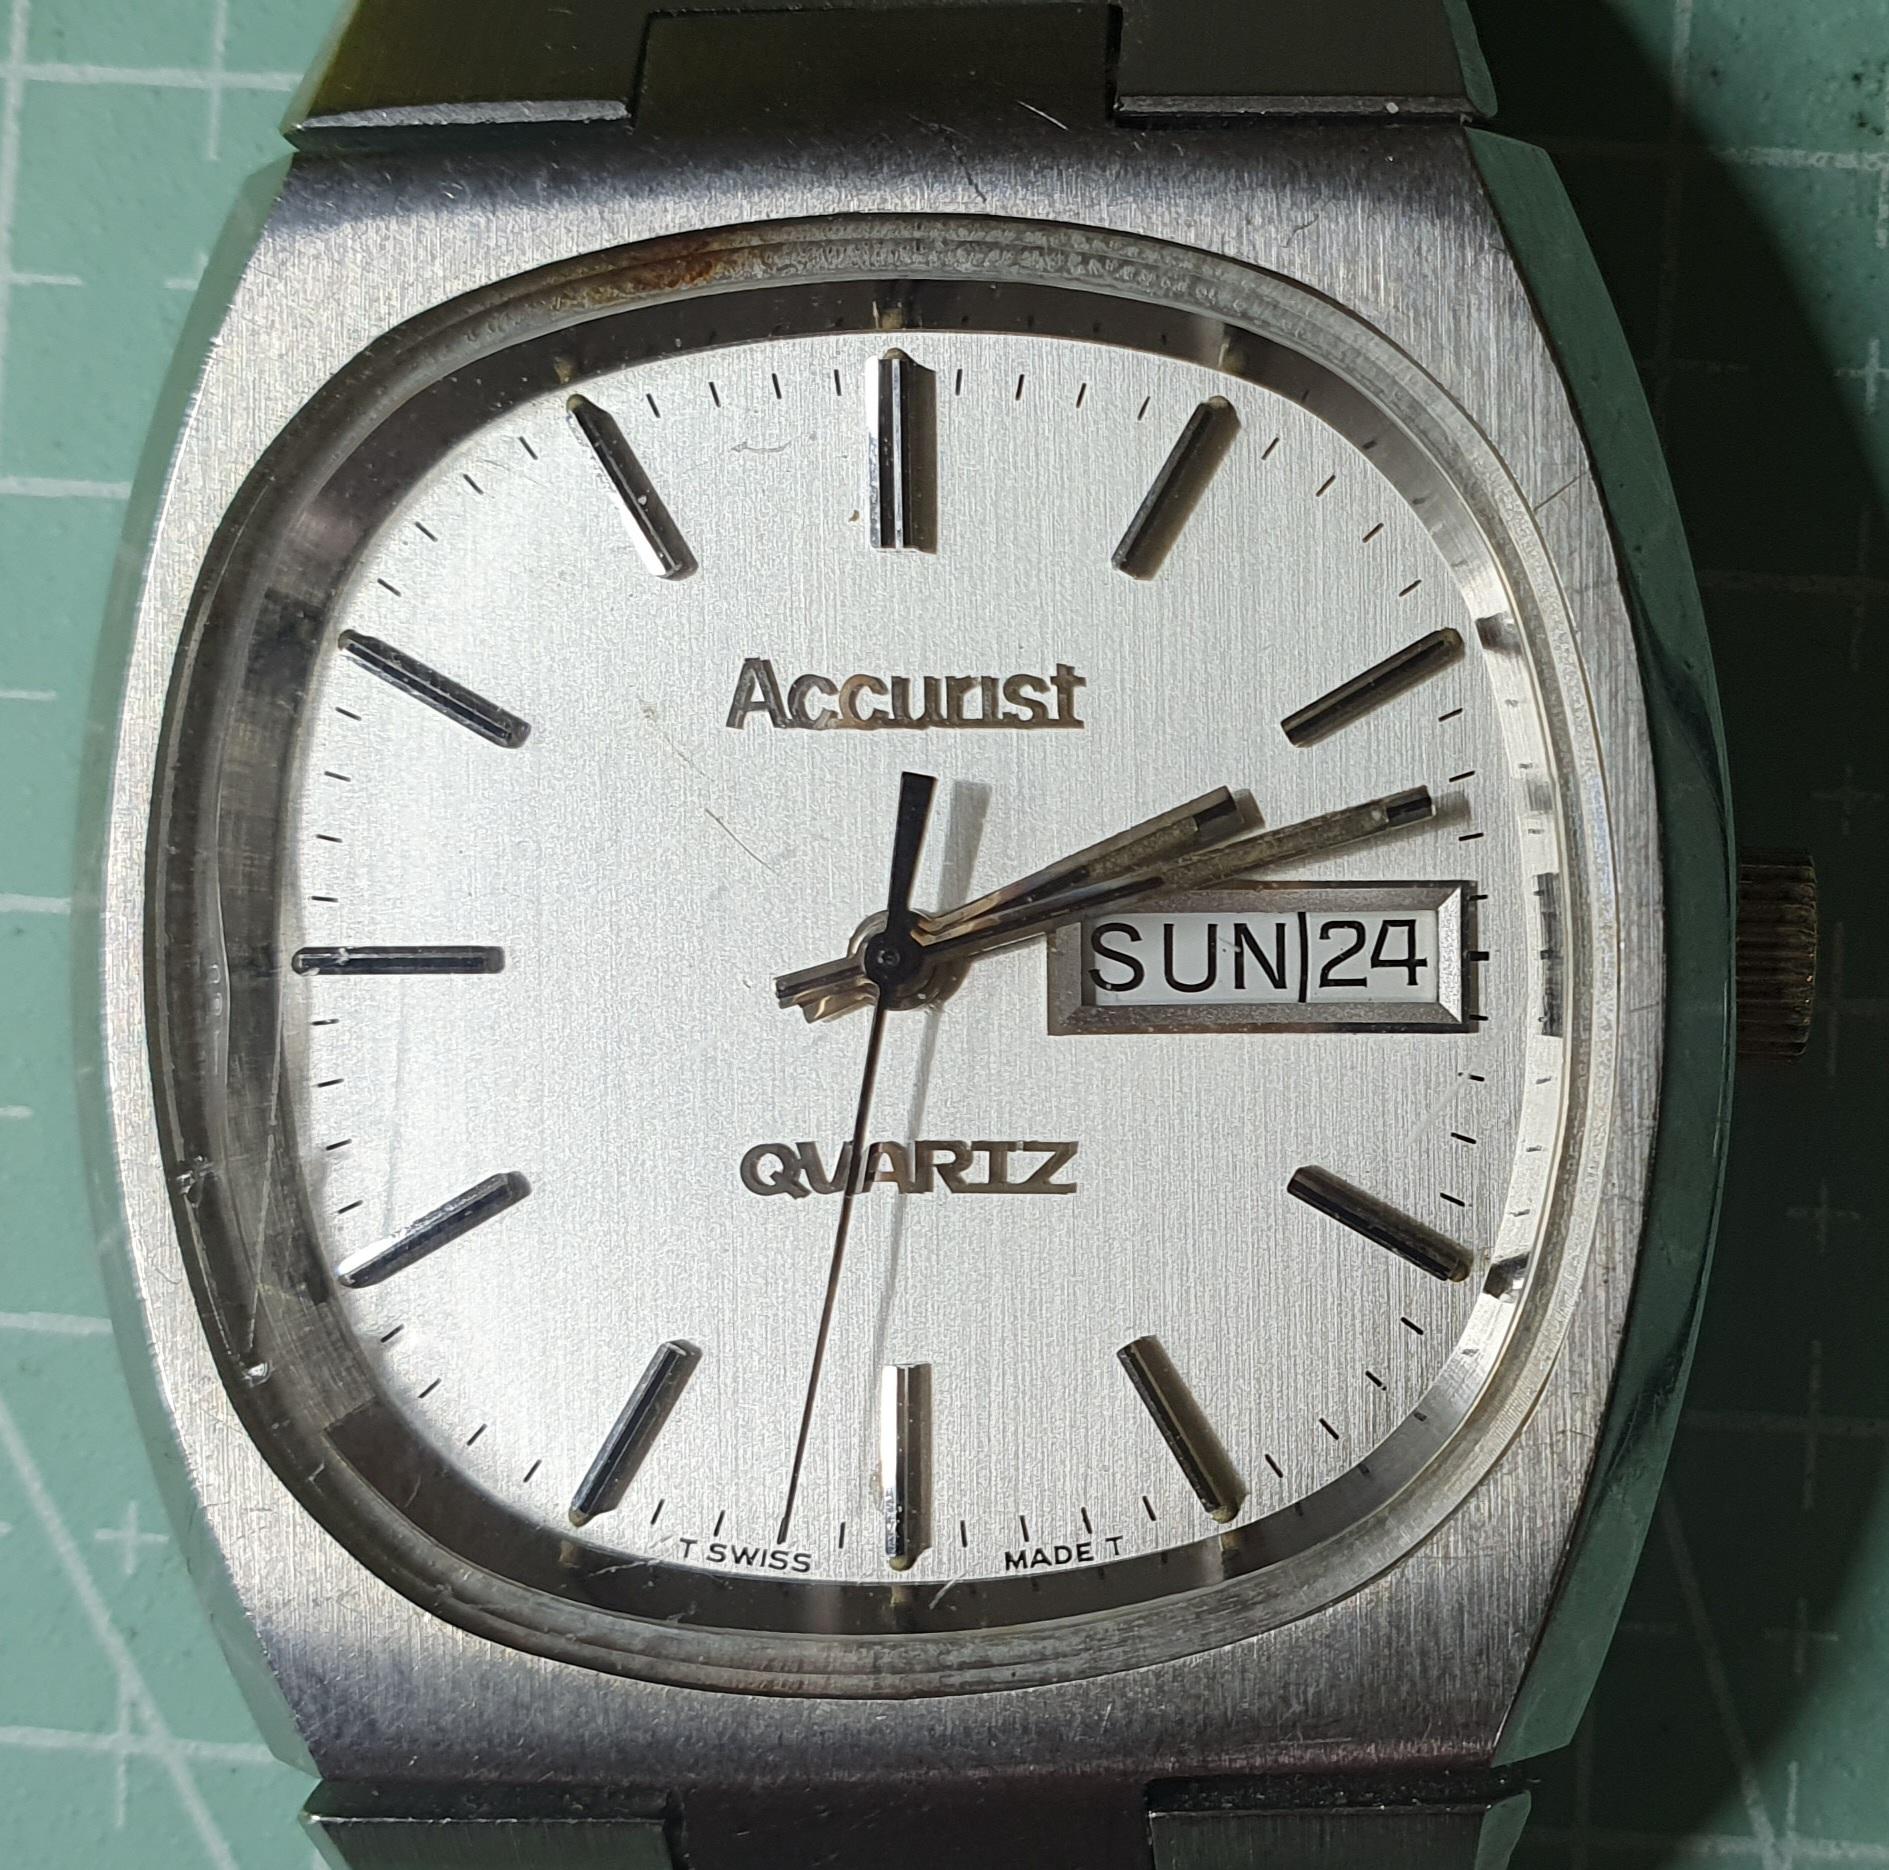
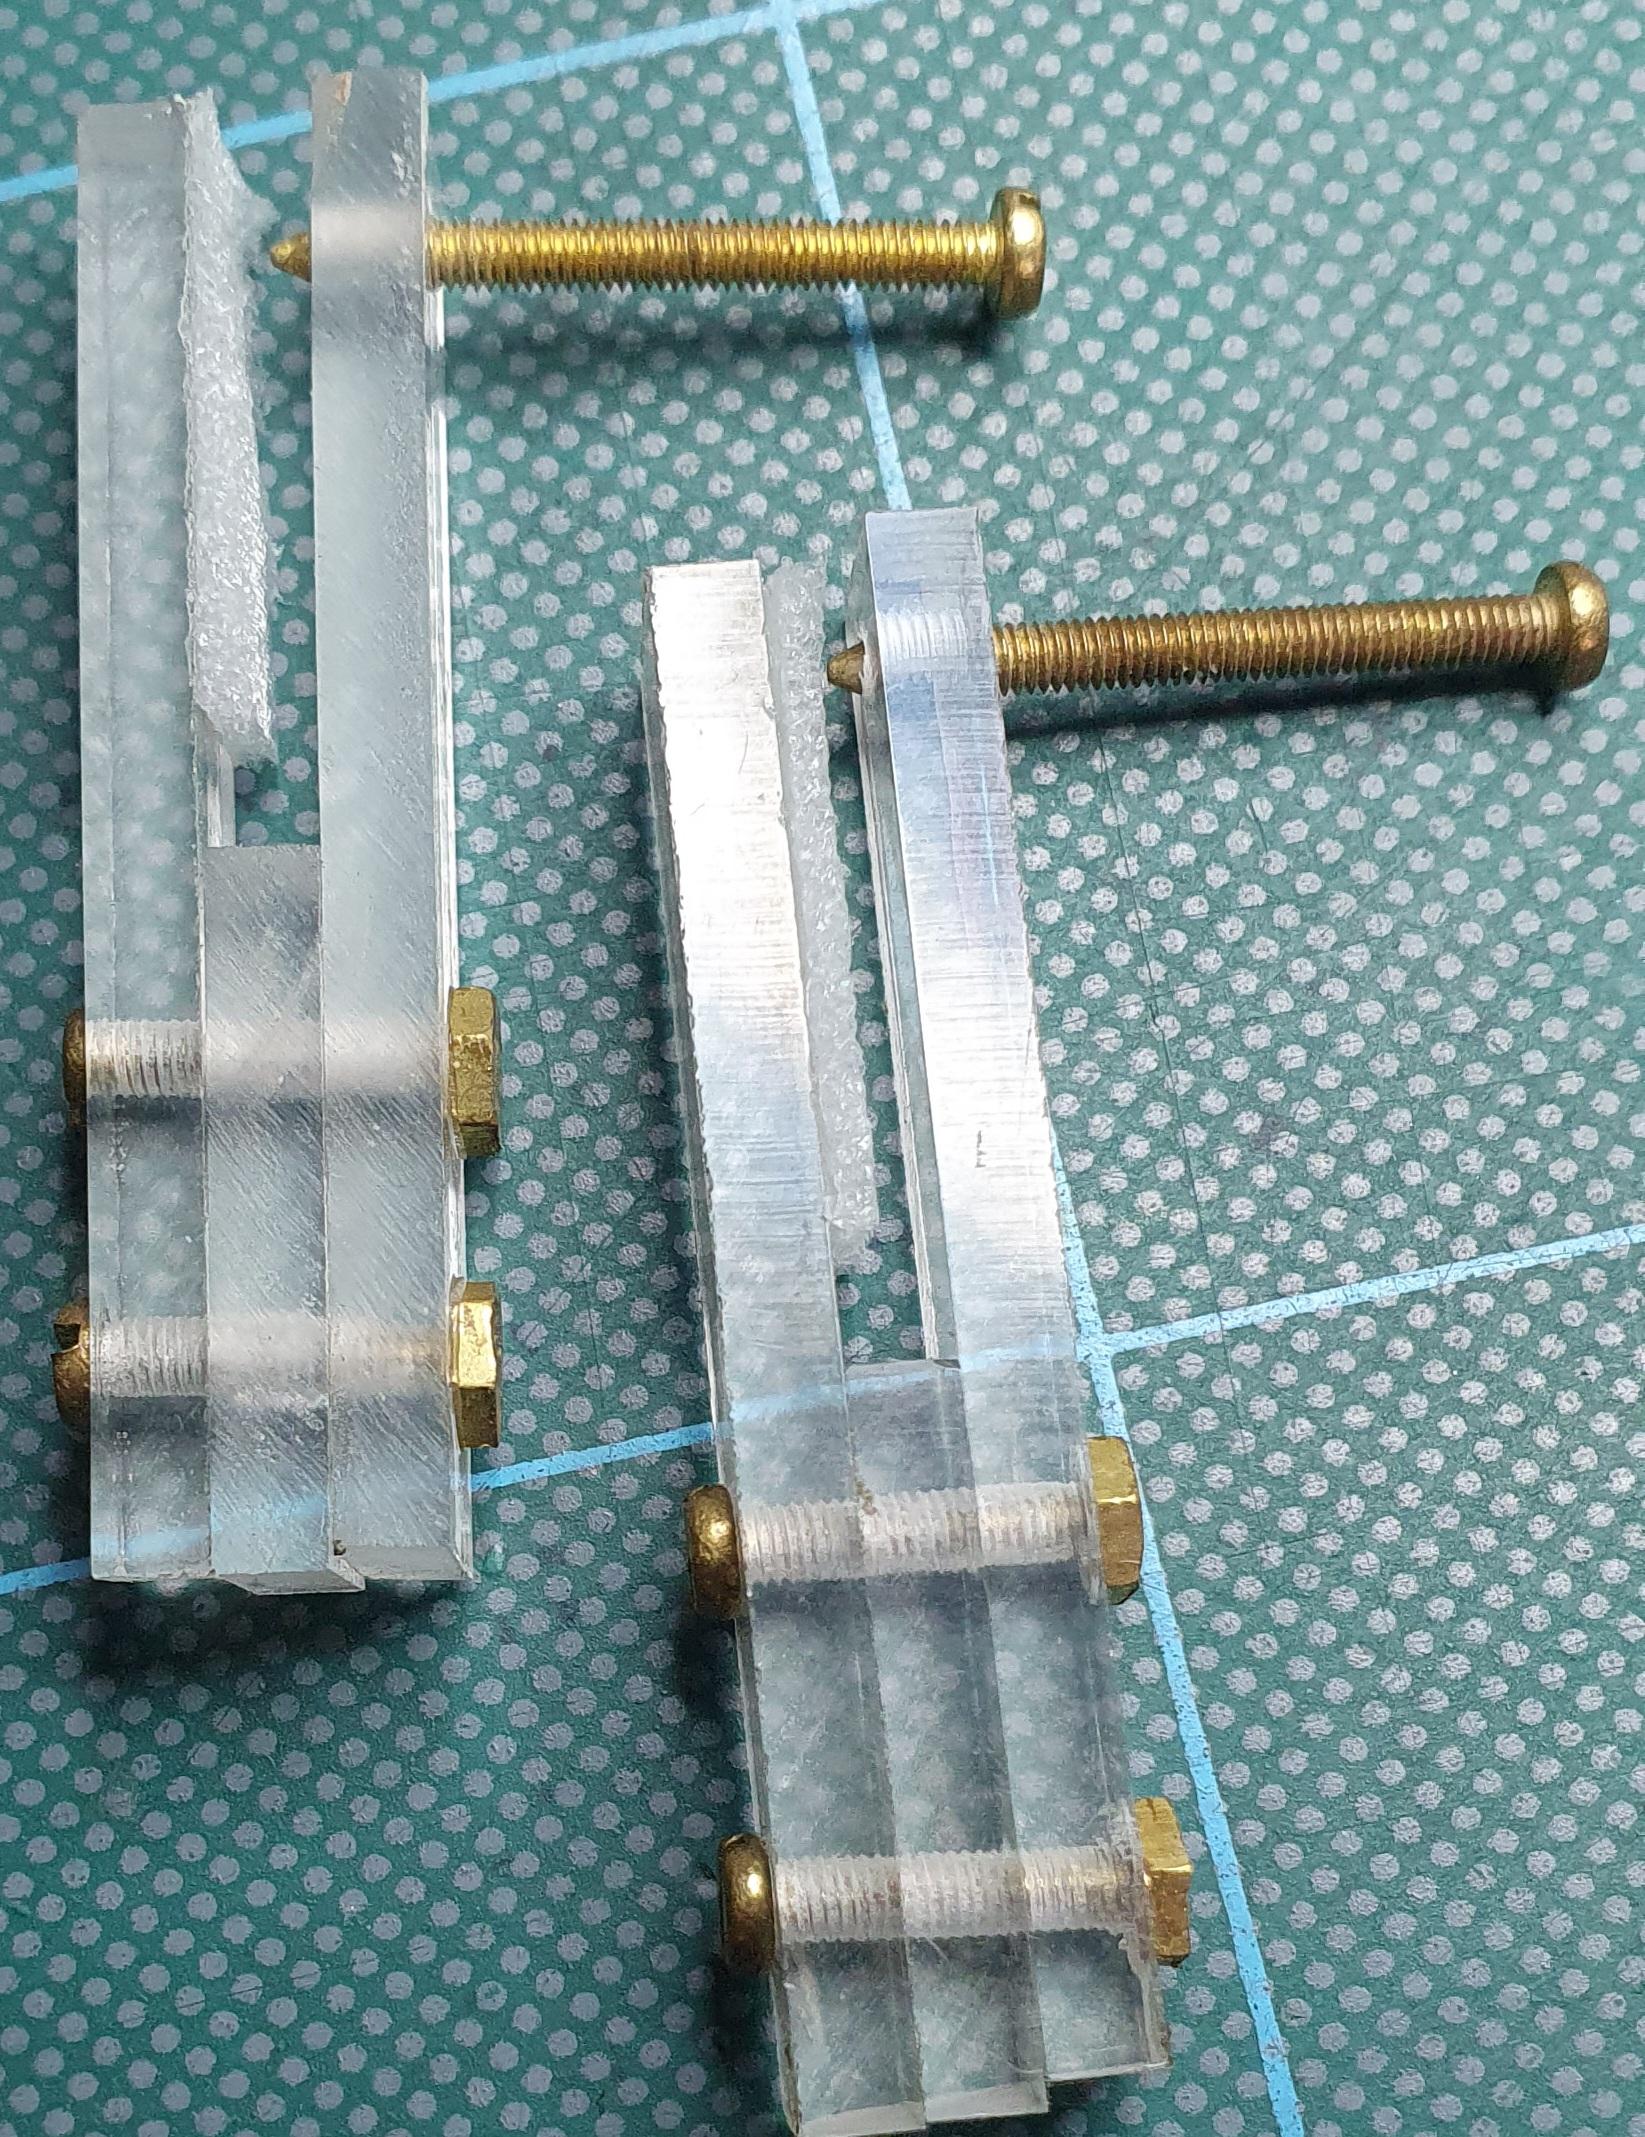
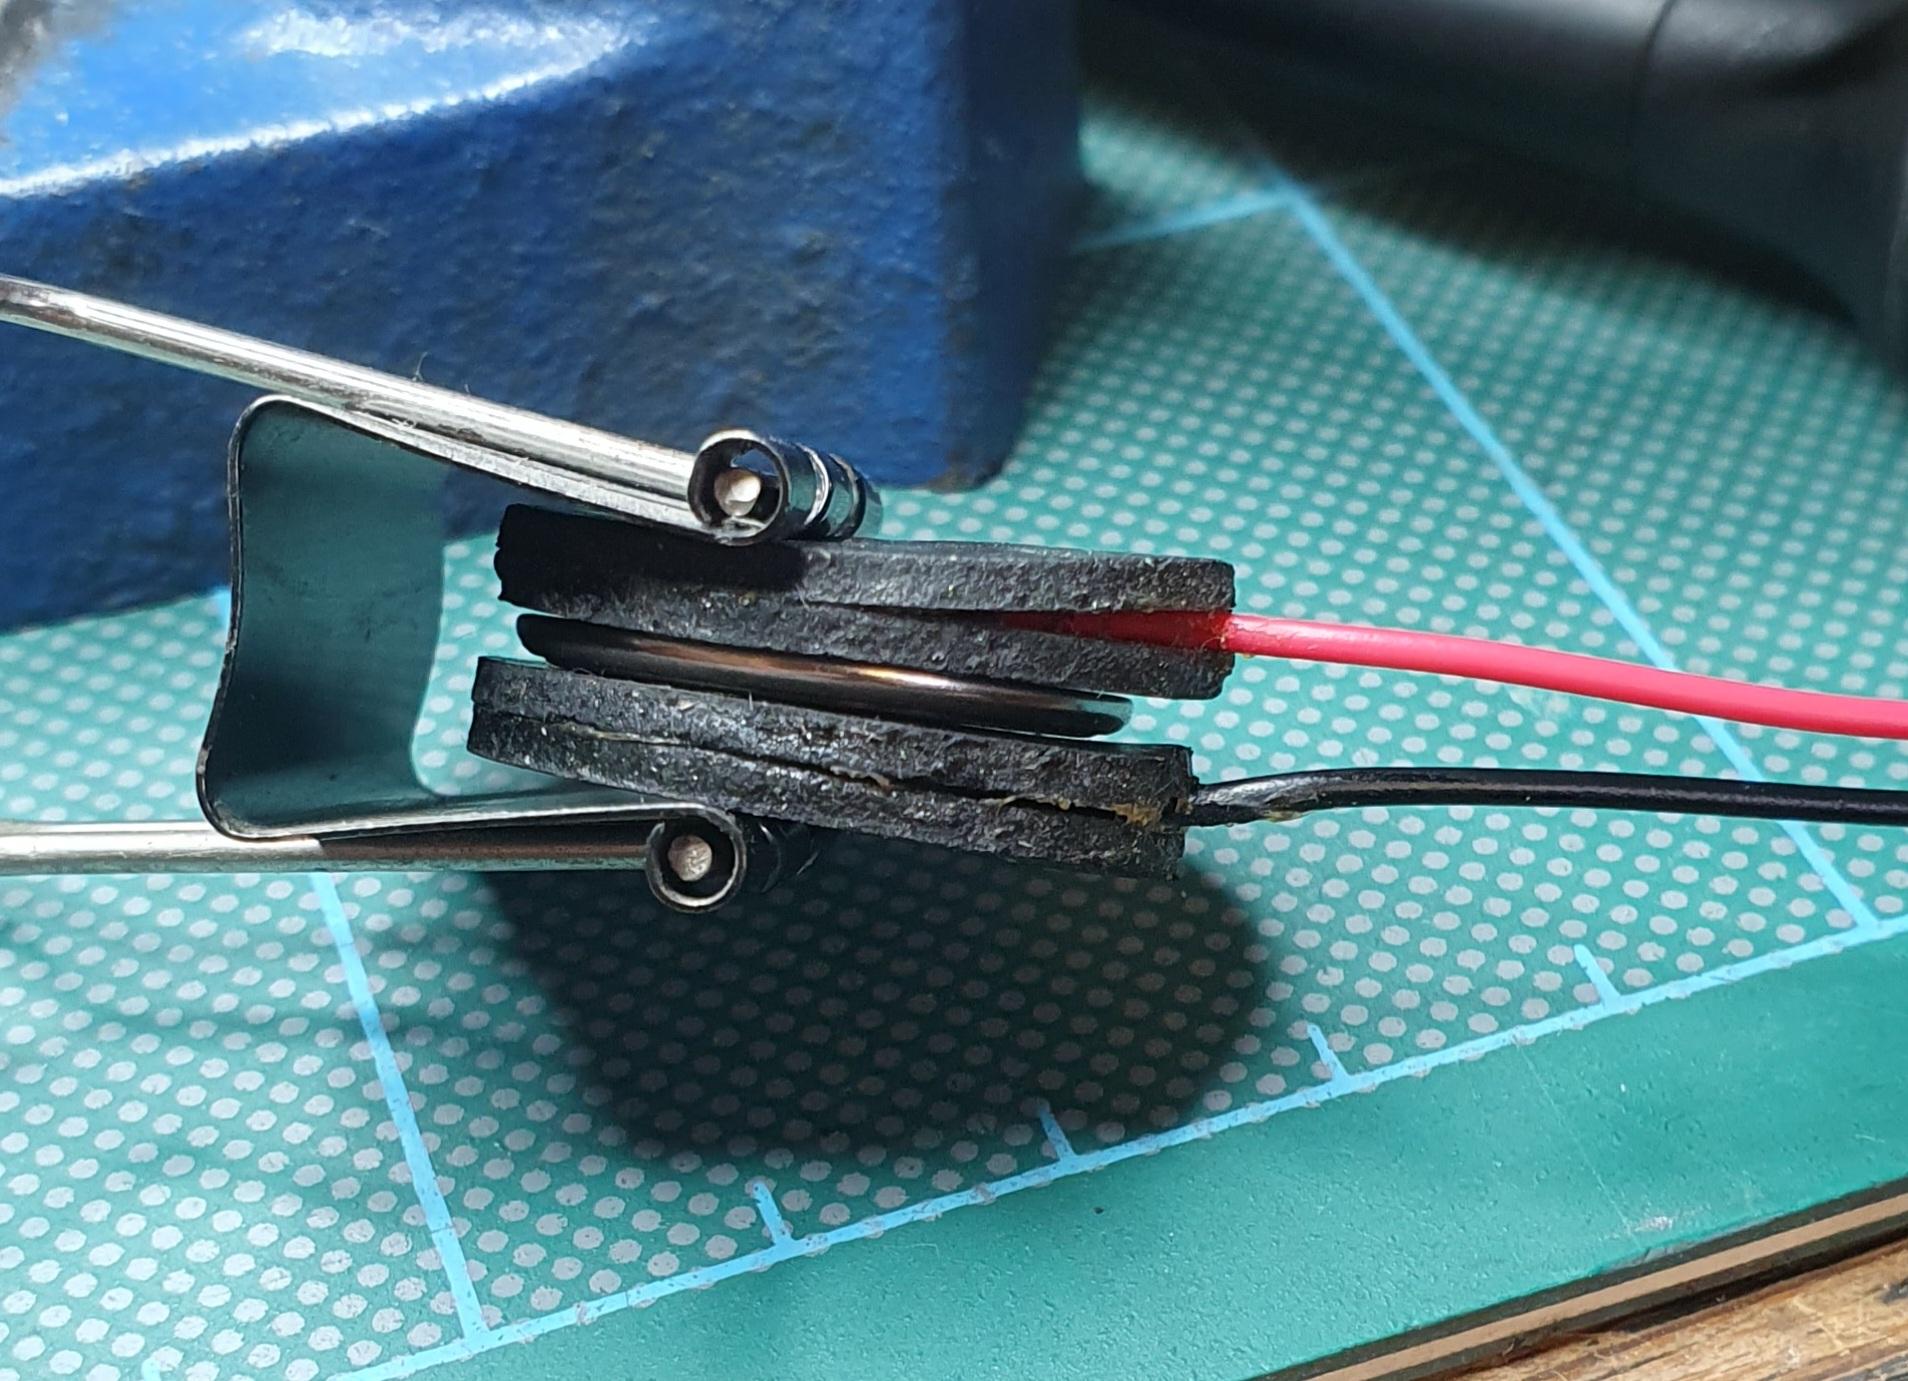
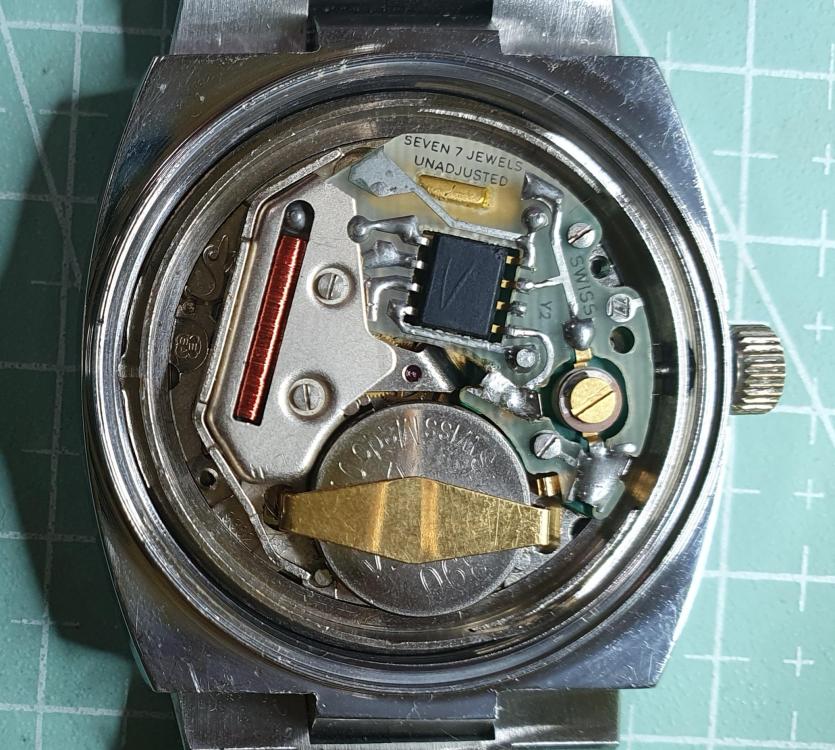
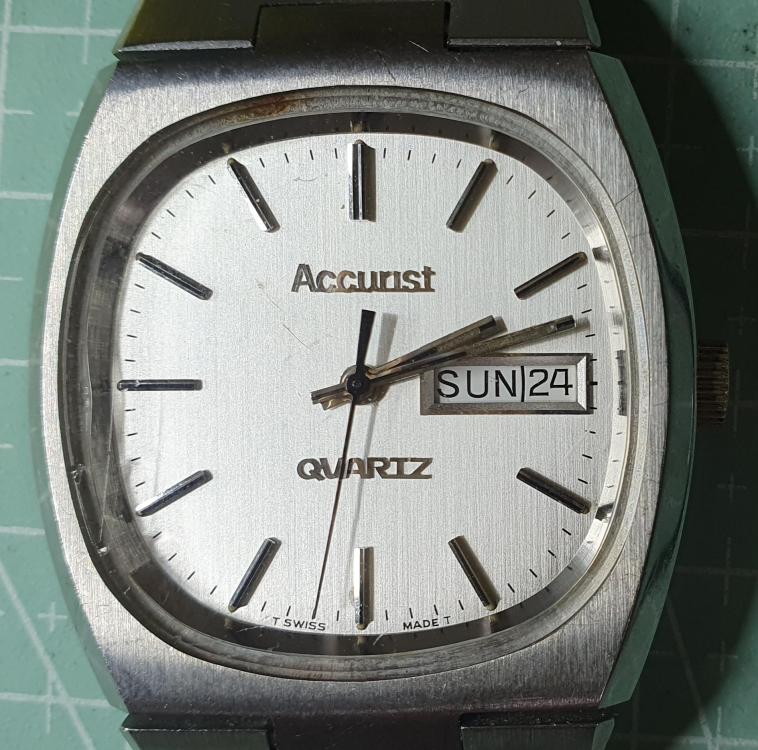
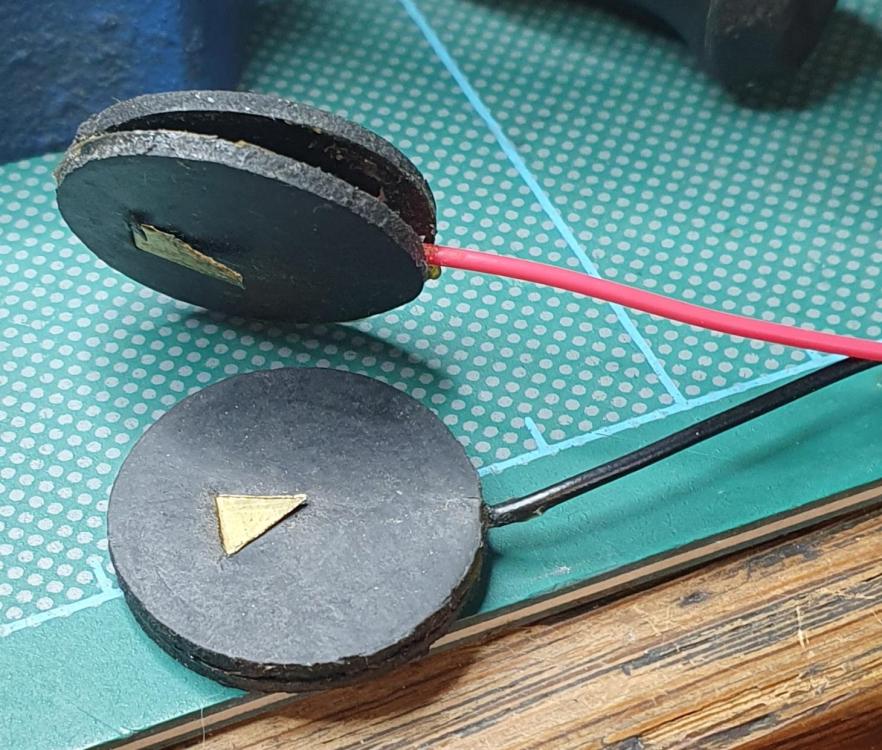
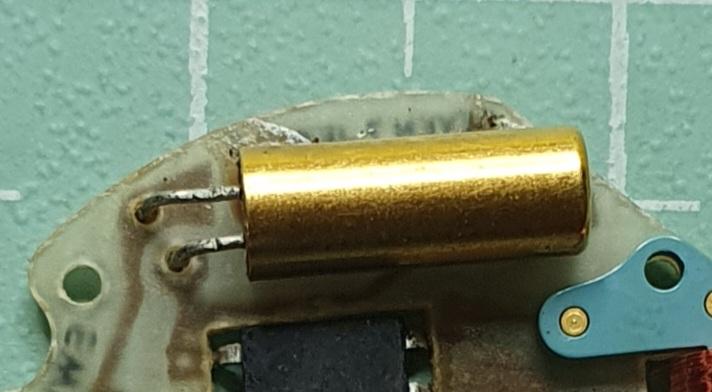
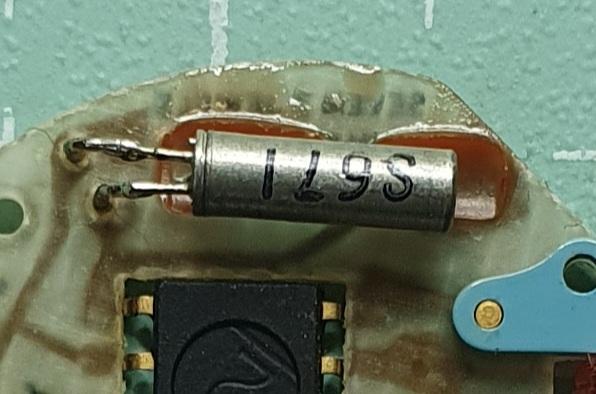
This has been a quick weekend project whilst awaiting spares to arrive. The watch is an early Accirist quartz, late 70s probably, with a Swiss ESA 9632 7 jewel movement. Inspected and could see no evidence of battery leakage, popped in a new battery and zero signs of life, so stripped down to better inspect the circuit board. Long story short, I diagnosed the quartz oscillator being at fault and the purpose of this post was to share my jury rigged method for testing the quartz. So the tricky thing about testing the quartz is that you need to power up the board whilst also getting the required access to the legs on the oscillator, so for my power source, this is my method: Then you need to be able to apply the voltage to the correct terminals on the circuit board, for this, this is my solution: Then carefully set up the board in these clamps Crocodile clips from my battery pack onto the correct polarity brass screws and that's the board now powered up, and I've got good access to the legs of the oscillator. The board I'm now testing is from a scrap job lot watch that I'm going to harvest the oscillator from, this one is working fine. For those not too familiar with the quartz oscillator, from cheap watches to expensive watches, oscillators are all the same in that they all operate at 32.768 k htz, early ones can be quite big and of different shape, but a more modern replacement will still work fine. If you have a very small quartz to replace, you will need a similar size replacement. This is the original size of the oscillator, its actually a different circuit board than the one I'm working on, this board has problems with the microprocessor chip and this oscillator may be fine, but if I'm going to change my faulty one, then I may as well use a newer replacement. This is the oscillator which I have tested from the donor now soldered into the circuit. I left the old legs in place and soldered onto these, much easier and less risk of causing heat damage and lifting tracks on the circuit board. Movement re assembled as much as needed to see if it works, all working fine. Movement now fully stripped and given the full service works. I quite enjoy these early quartz movements, all the wheels are metal, and as this one has a few jewels, they clean up and oil nicely. I am always amazed though at how dirty and full of debris most quartz watches I have worked on get, and still work. Although it all looks a bit Heath Robinson, it works for me, and many watches have been saved from the scrap box. The hand held oscilloscope you see in the picture was only £35 from amazon, works a treat. I do have an old CRT scope but have rarely been able to get a trace from an oscillator, I suspect too much internal capacitance. Watch now running fine, it will have to wait for it's turn for a bit of wrist time.


 1 point
 -
For me it would have to be a repair job. You may get away with something like a VX32 but will need different hands and possibly a crown.1 point


.thumb.jpg.cb17a66989f1e796fd4217db2e9ca9df.jpg)