Leaderboard


Popular Content
Showing content with the highest reputation on 11/21/24 in all areas
-
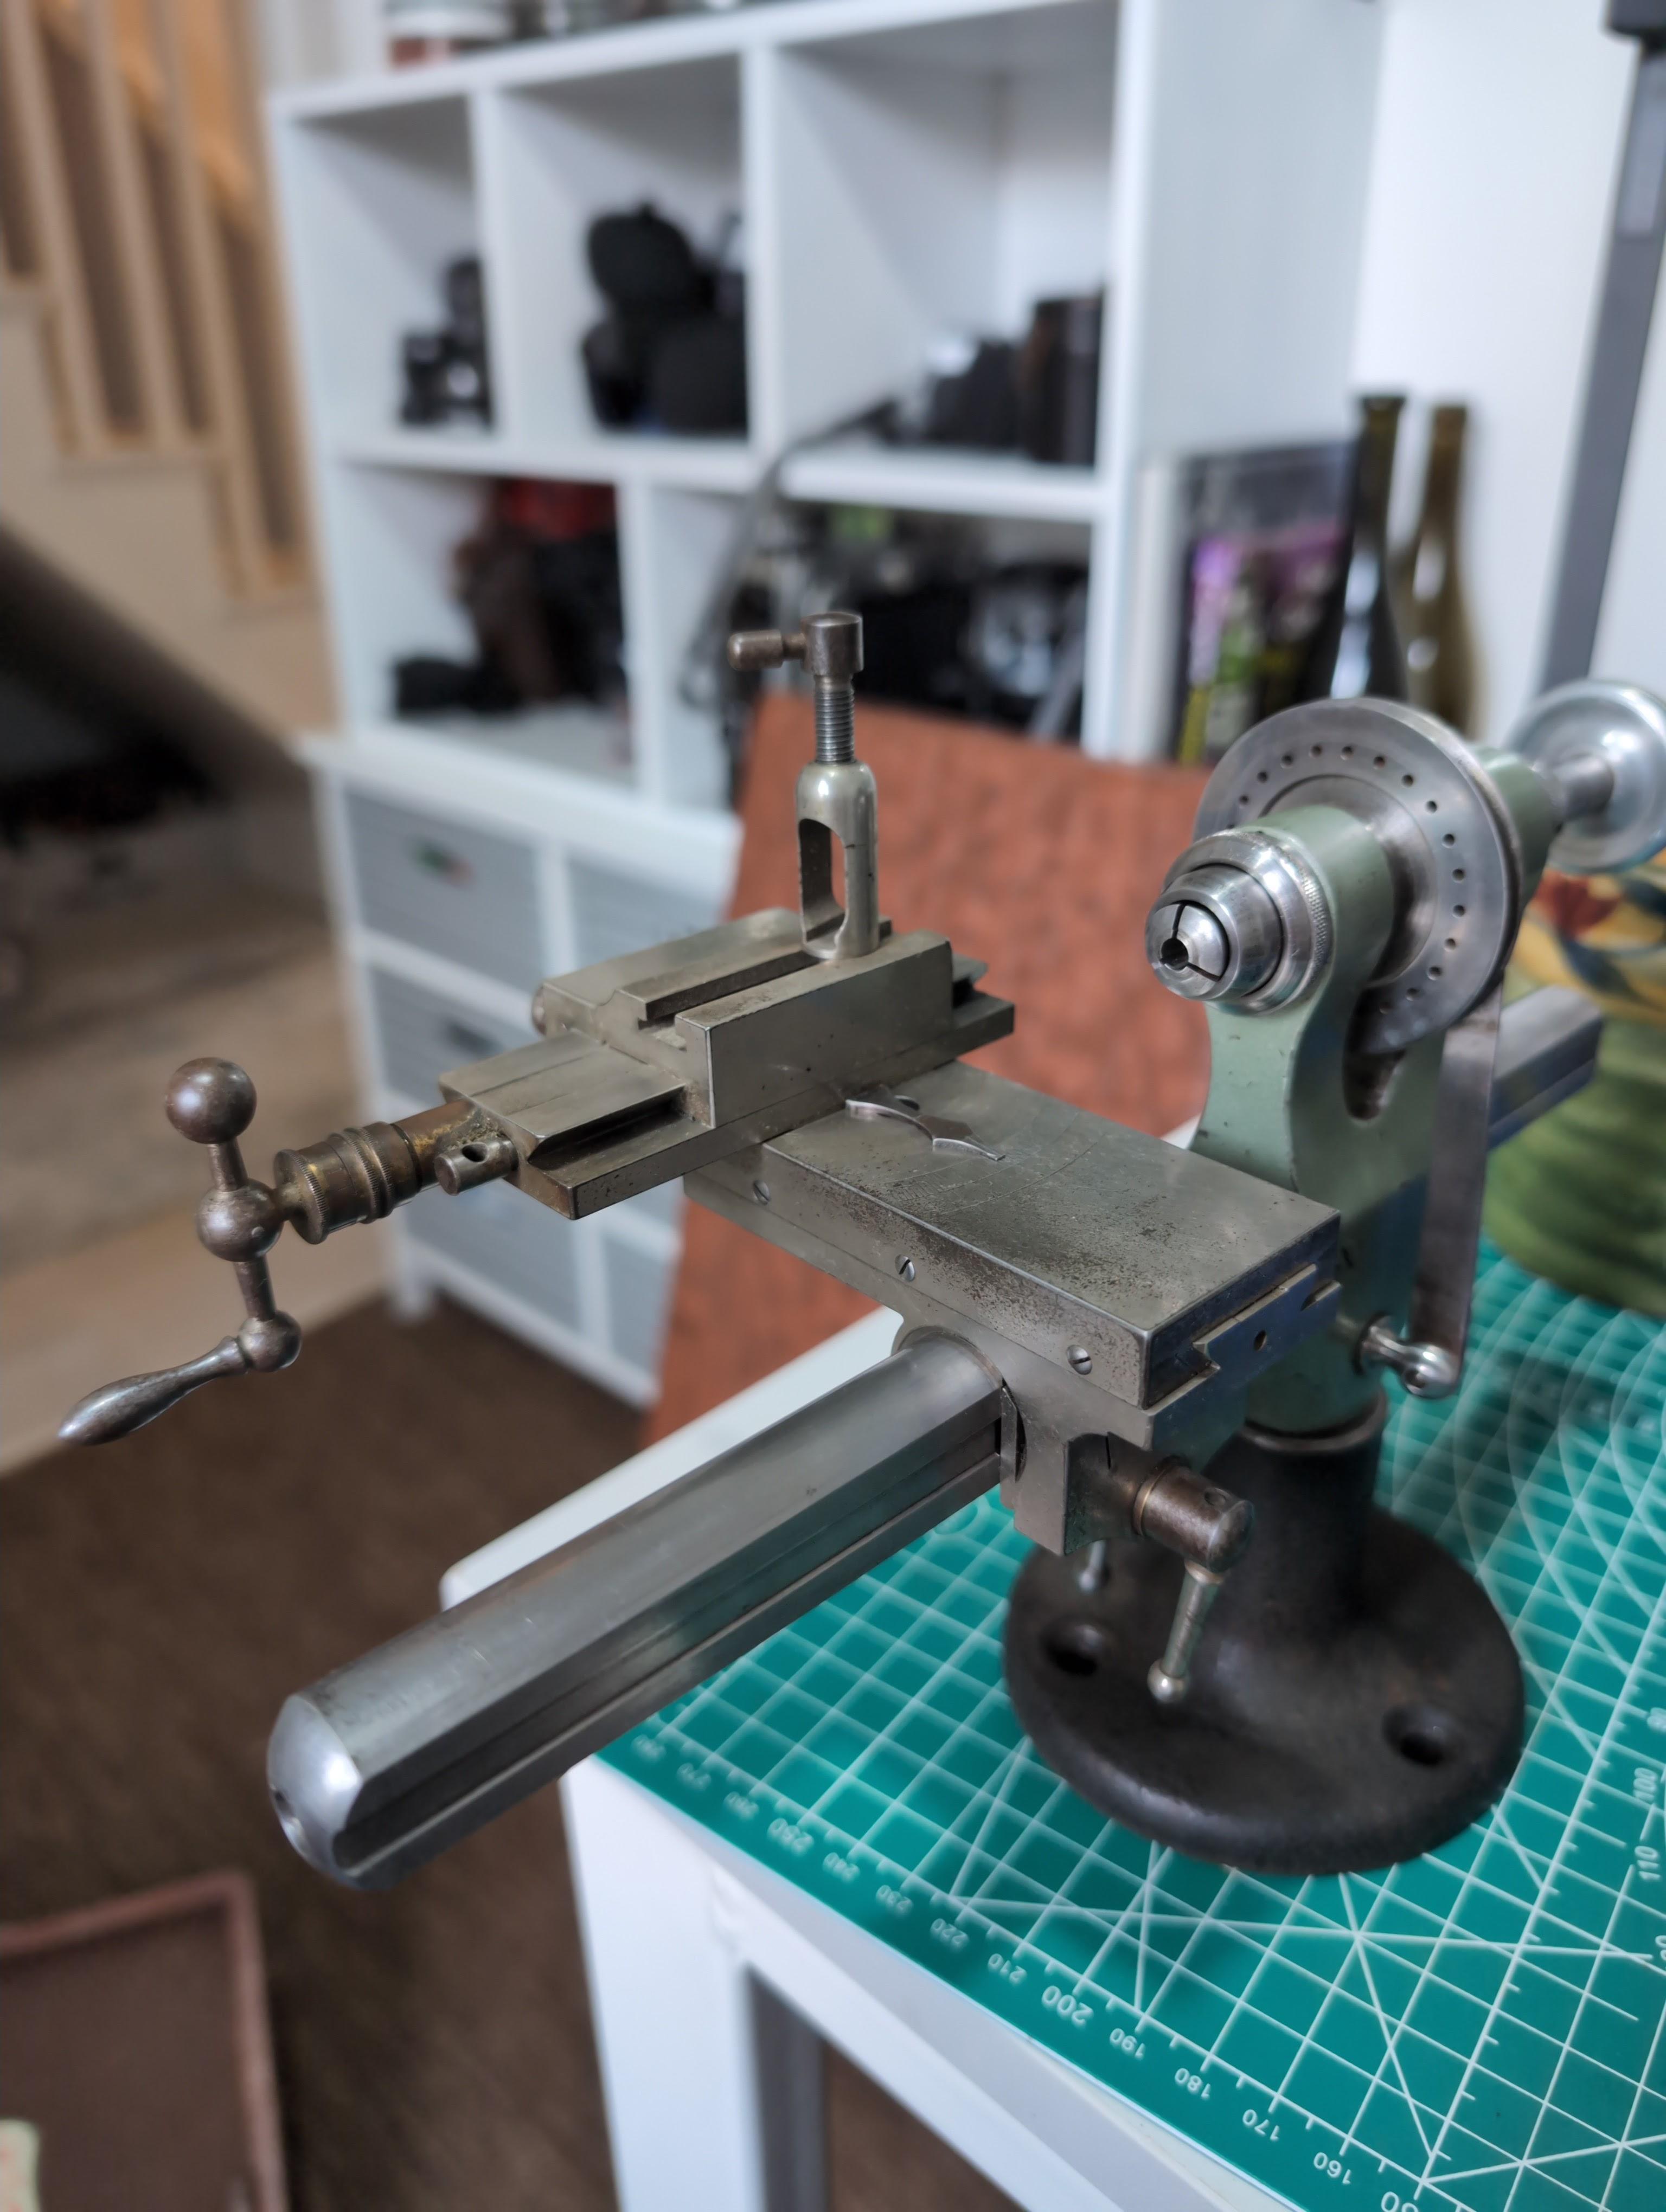
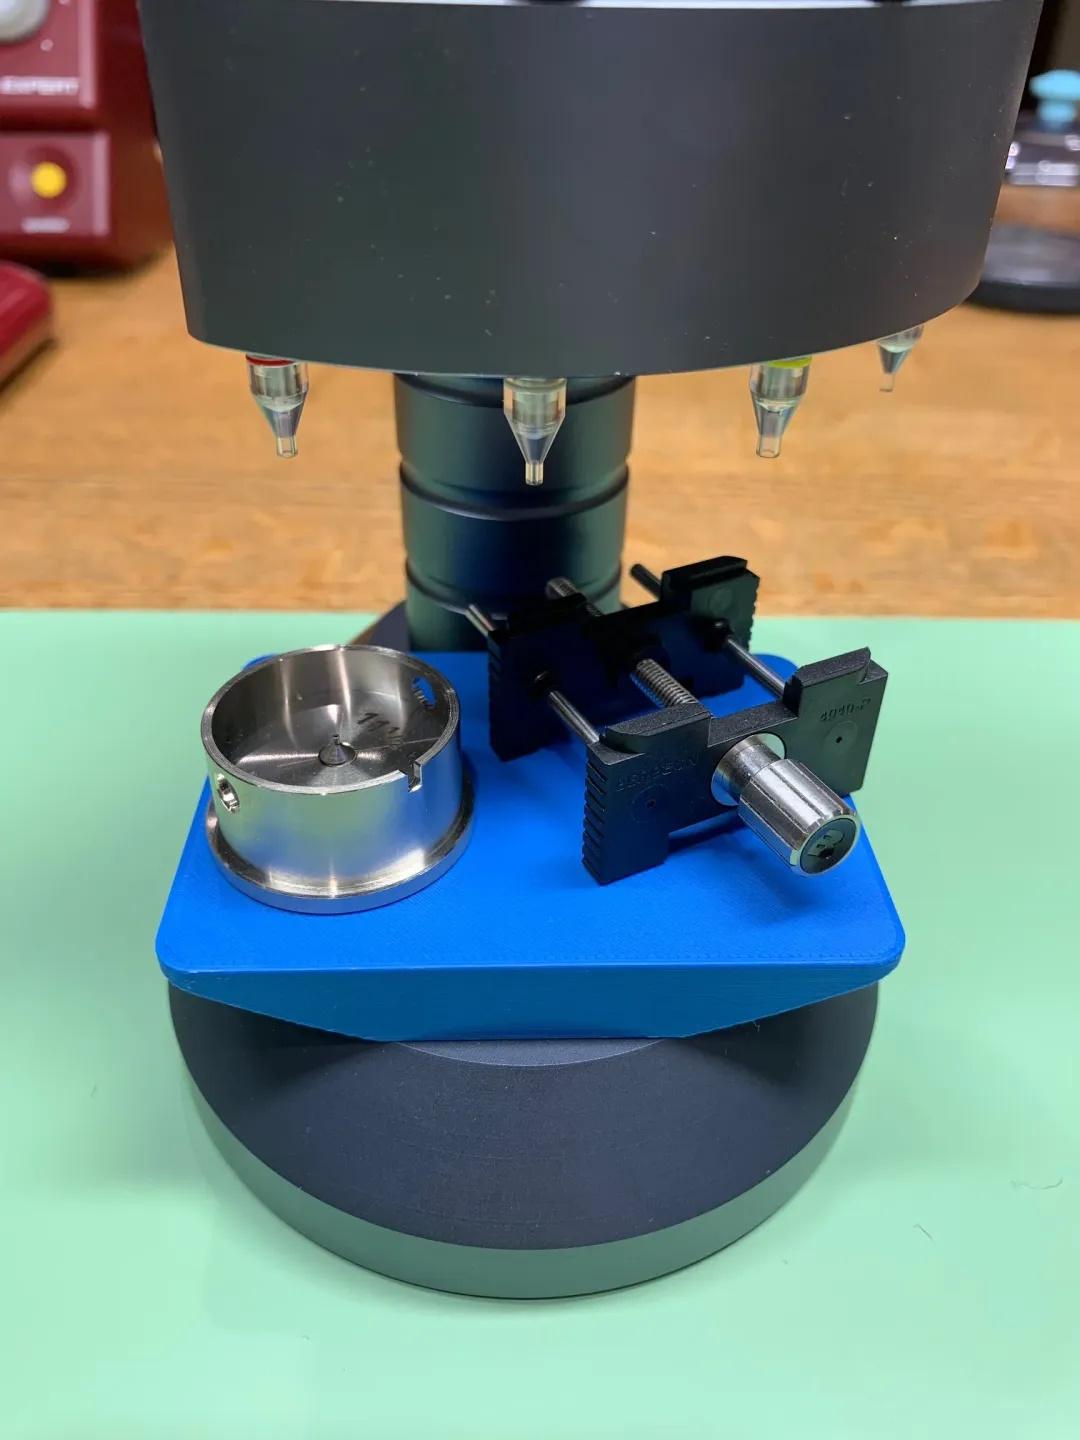
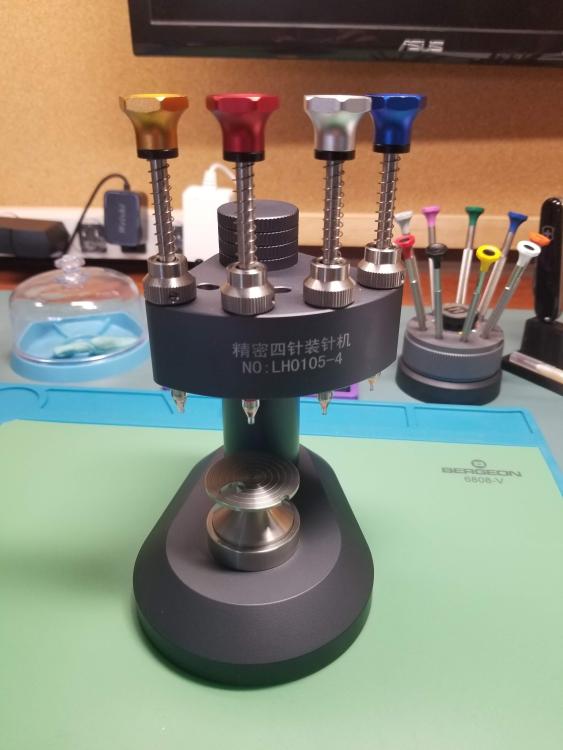
Ok so its not ideal and a its very " builder's rig " set up......milk crates..actually....newkie brown crates....solid lightweights...batterns and scaffold poles omitted for this small simple rig . And i just need to change my slippers for Rigger's boots. But its got me sat in front of a lathe so how about a round of applause for motivation and initiative fellas . Fully set up with a cuppa and a proper builder's size slice of homemade tea loaf, Archie wasn't available today so Donald has offered to chip in with his input .

 6 points
 -
Rjenkins is right on the nose- you don't want to disturb these. If there is some rust, remove it with steel wool. The lathe will still run fine, even if its lifespan has shortened. It may only do another 100K hours before needing a little touch-up.5 points
-
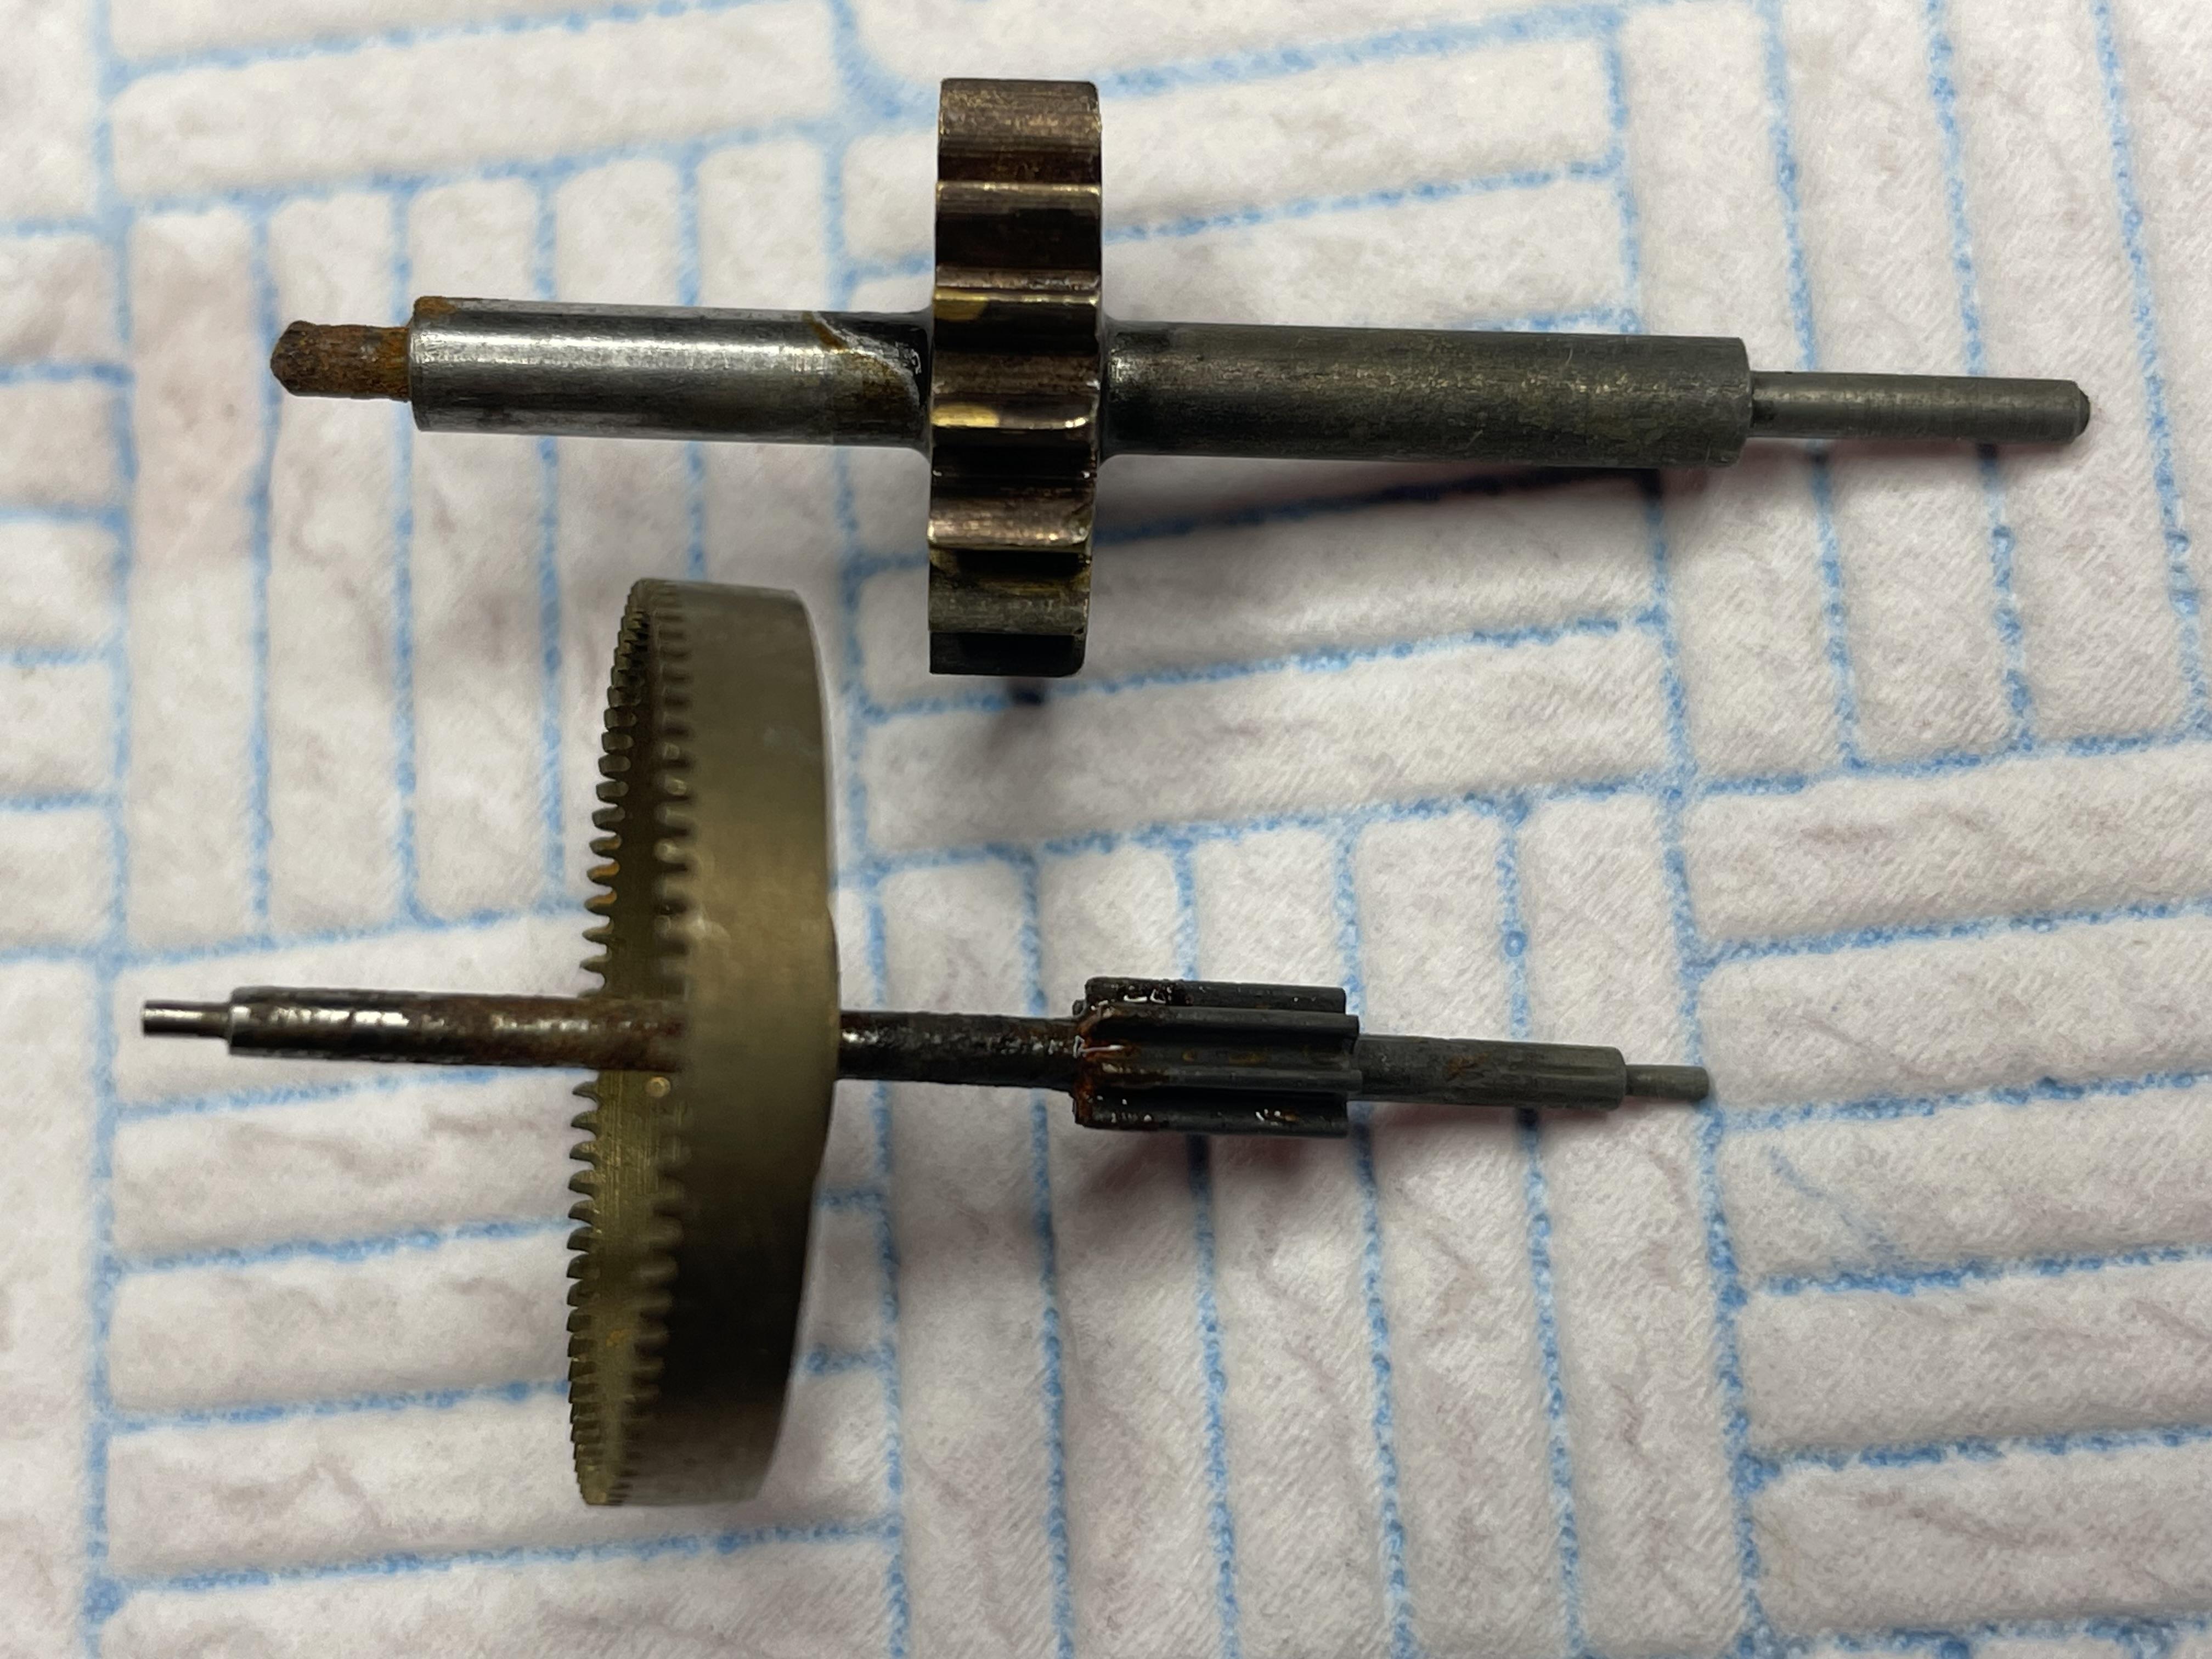
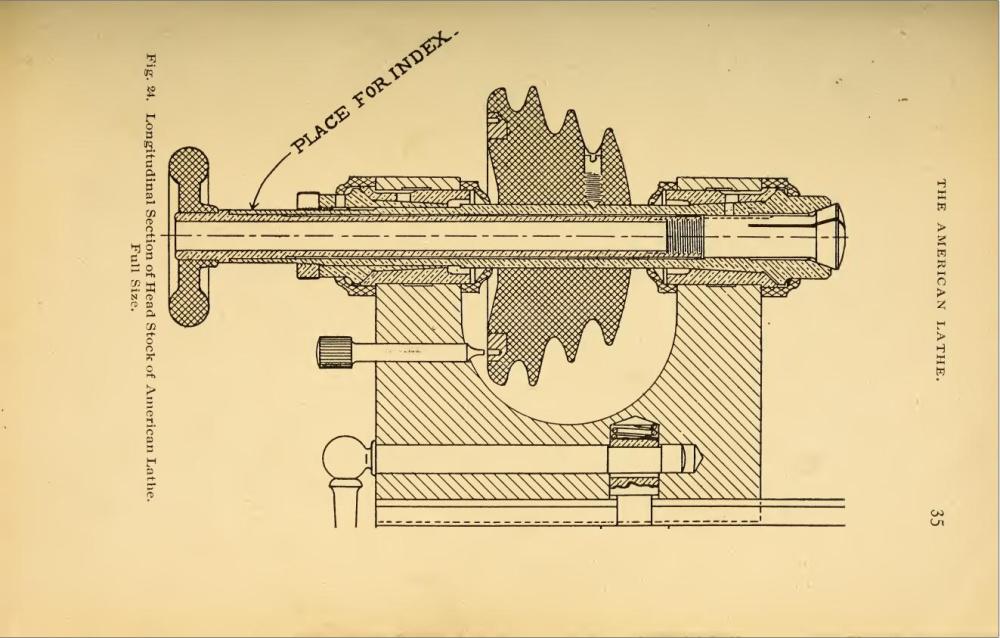
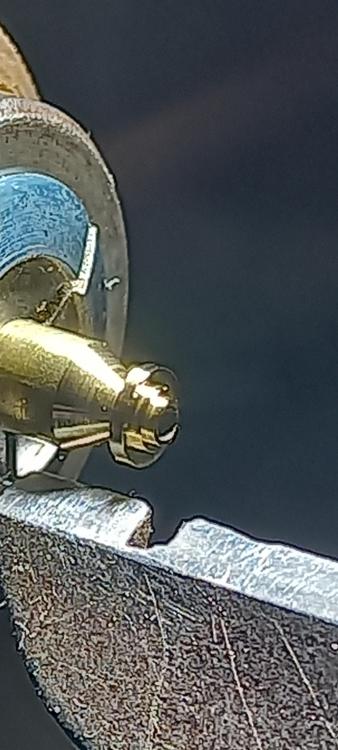
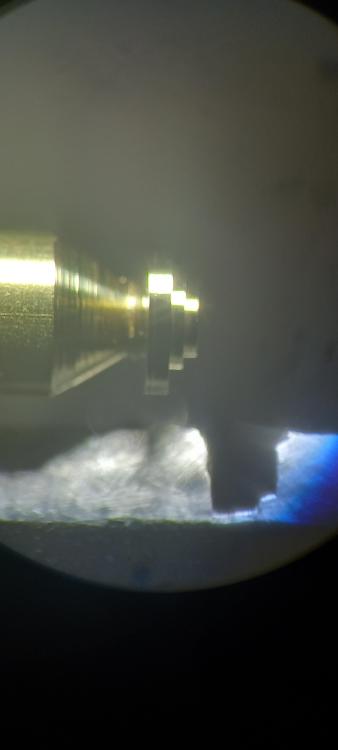
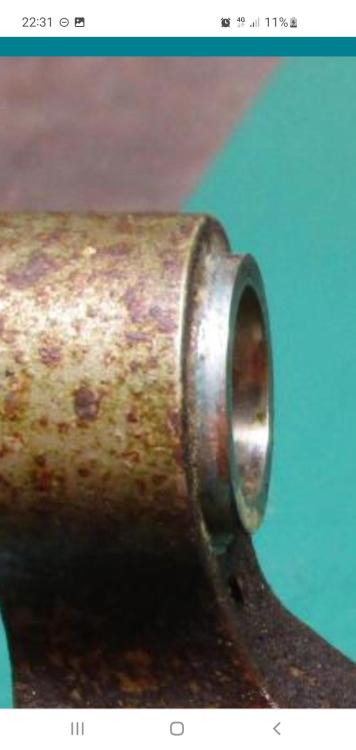
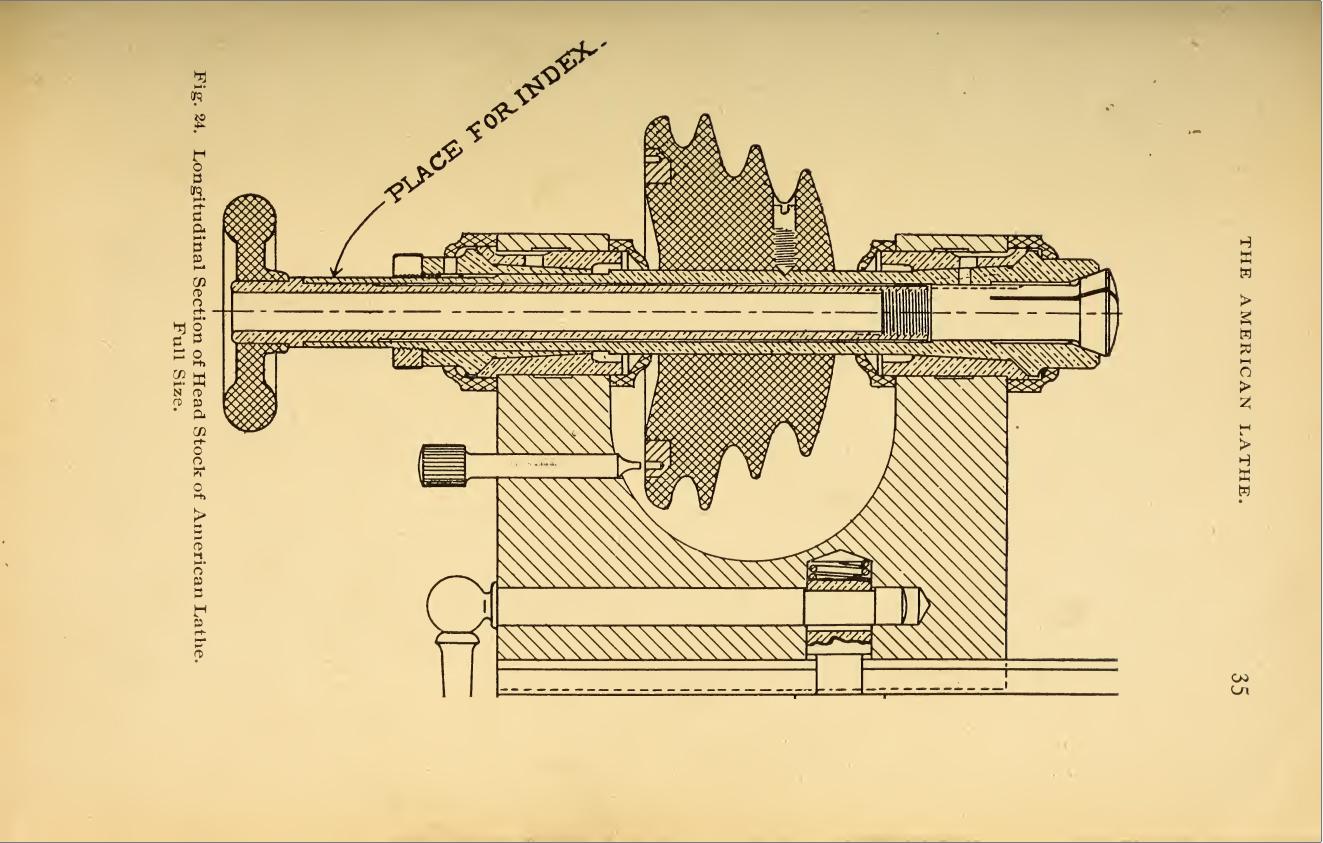
Definitely do not try to remove the bearings - they are likely pressed in, but then finish machined & ground in situ. Any disturbance could wreck the spindle. Either tape them up thoroughly or paint them with a peelable mask liquid first (or both). This is a cross section of an original WW style lathe headstock, for info: (From "The watchmakers lathe, its use and abuse" - available on archive.org).
 5 points
 -
Easiest way to do this is not to destroy your lathe by playing with them. As others have said they normally do not come out and you do not want to re-grind them. It really just looks like surface something like cleaning should solve the problem. The lathe itself doesn't exactly run on that surface anyway it basically runs on a film of oil. To just clean up whatever that is without modifying the surface if you can do it and make sure you have good oil and add oil from time to time. One of the most interesting problems I've seen of watchmaker's lathe is the failure to grasp that you need to add oil. So typically end up with people running their lathe's dry which is definitely not good at all.3 points
-
I don't see any sharp bends, so you might be lucky3 points
-
A soak in some degreaser followed by some sharpened pegwood wouldn't hurt the bearings' steel surfaces. Always difficult to judge a piece from pictures, but I wouldn't be suprised if what you see is caked on old lubricant mixed with rusted dust. Might be wishful thinking though.. But if what we see is really a heavily rusted headstock body, it will be pitted and you would need to do a lot of grinding and polishing (possibly losing the sharp edges as well) to get the surface perfect before plating. Plating doesn't fill up any surface imperfections. One could then consider to apply for instance a wrinkle finish black paint (see pic) instead of replating the part. Black wrinkle finish paint comes in spray cans. I've used it on MG-B dashboards
 3 points
 -
Yeah, but you also have to stake the new staff in right? Or am i missing something? Success!
 3 points
 -
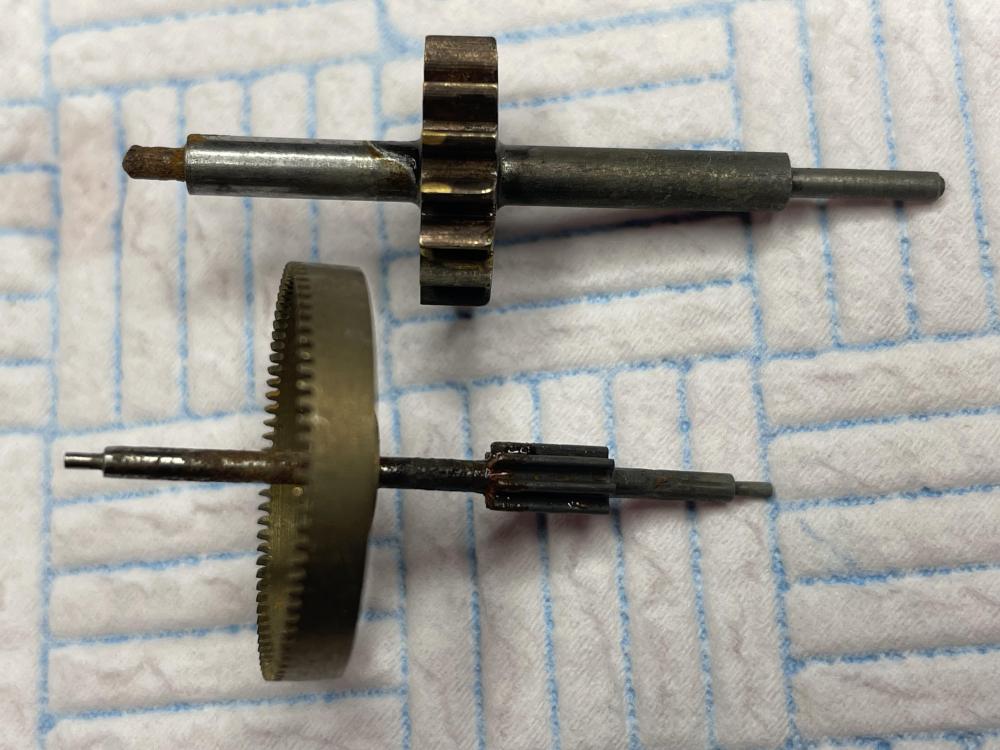
Yes, You are ready to make the bush needed. You don't need measuring tools. The hole must be 0.1 mm smaller than needed - just use the drill bit with such size. Ream and prepare the hole for the bush in the plate and use this hole for measure when turning the bush. Then, You can cut the bush longer. After soldering it in place, it will be easy to file it to acceptable height above the plate and ream the hole to fit the arbor pivot. Only the hub should be turned to right size.2 points
-
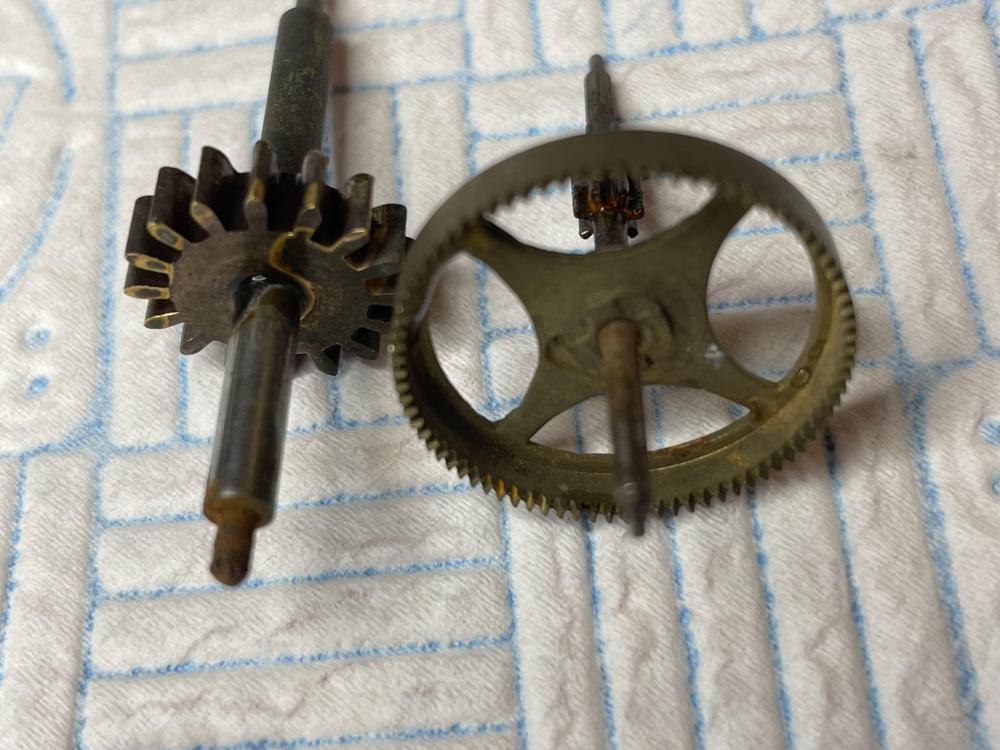
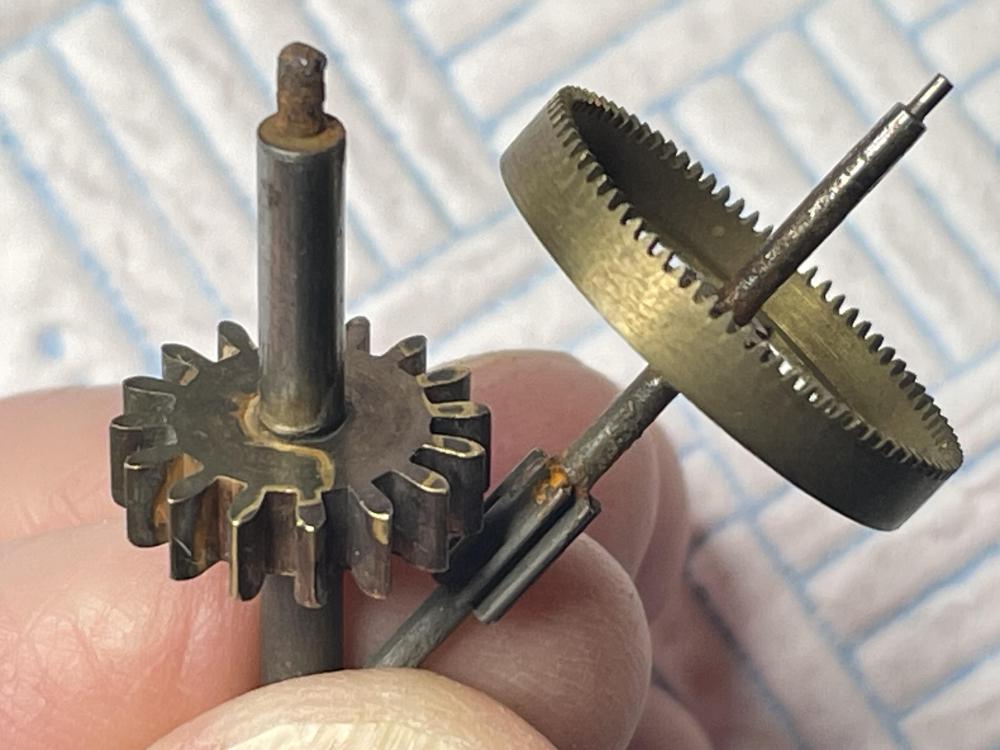
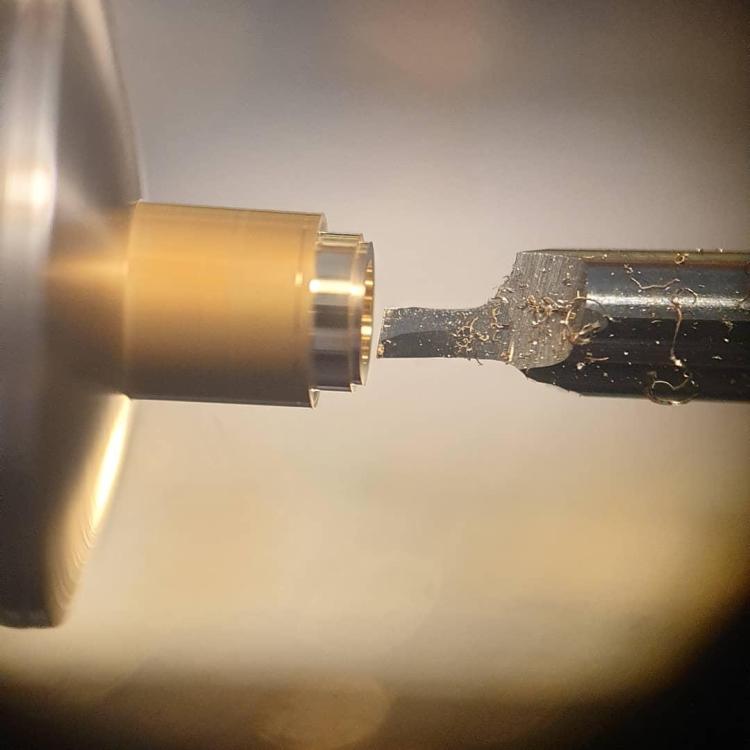
Bush made ? Yes but no. This is double the size of the drawing that Case did for me.....x2 but to fairly accurate scale. Kind of wanted to ease myself into this small stuff plus i didn't have any solid brass rod only pre drilled brass with 1mm hole...so i scaled it from that dimension. But very straight forward to make. Difficulties....sharpening the graver good enough without leaving teeth marks...at x25 and x40 just shows how rough your grinding wheel and laps are. And 2 not the right kind of measuing tools for the job....a cheap digi vernier, pin gauges and a bench micrometer did not cut it.
 2 points
 -
Ah damn, so sorry to hear that @mikepilk. That's indeed disappointing. I guess there are two aspects of the issue: 1. Not being able to focus: I really don't know why this would happen. Hopefully others can weigh in. I don't know if microscope and c-mount lens need to be specifically compatible with regard to the exact lens distance... Possibly the "original" AmScope lens will fit? Or at least the "real clone". I noticed that yours just looks a bit different in design. 2. Small field of view. Here I may be able to offer better advice. I had forgotten about this, but remembered when you shared your bad luck. Sorry that this comes too late now. So... the sensor size of your camera and the (de-)magnification of the c-mount lens need to correspond to give the desired field of view. So first, you need to find out what sensor size your camera has. Most common sensor sizes are 1/2" (then take 0.35x c-mount) and 2/3" (then take 0.5x c-mount). Here is a detailed article that explains it better: https://www.microscopeworld.com/p-3341-microscope-c-mount-field-of-view.aspx Hope you can figure it out. Cheers, C2 points
-
I gotnit a crossslide!
 2 points
 -
I've been practicing on a disposable barrel to try to get a sense of how much it takes to make a difference. (Not very much at all! Two or three taps between too loose and too tight, and even less to make a difference in end shake.) I did have a stake that worked for that barrel, but I haven't reopened the Seiko barrel yet. I won't do that until the broaches I've ordered arrive, probably in about another week or so.2 points
-
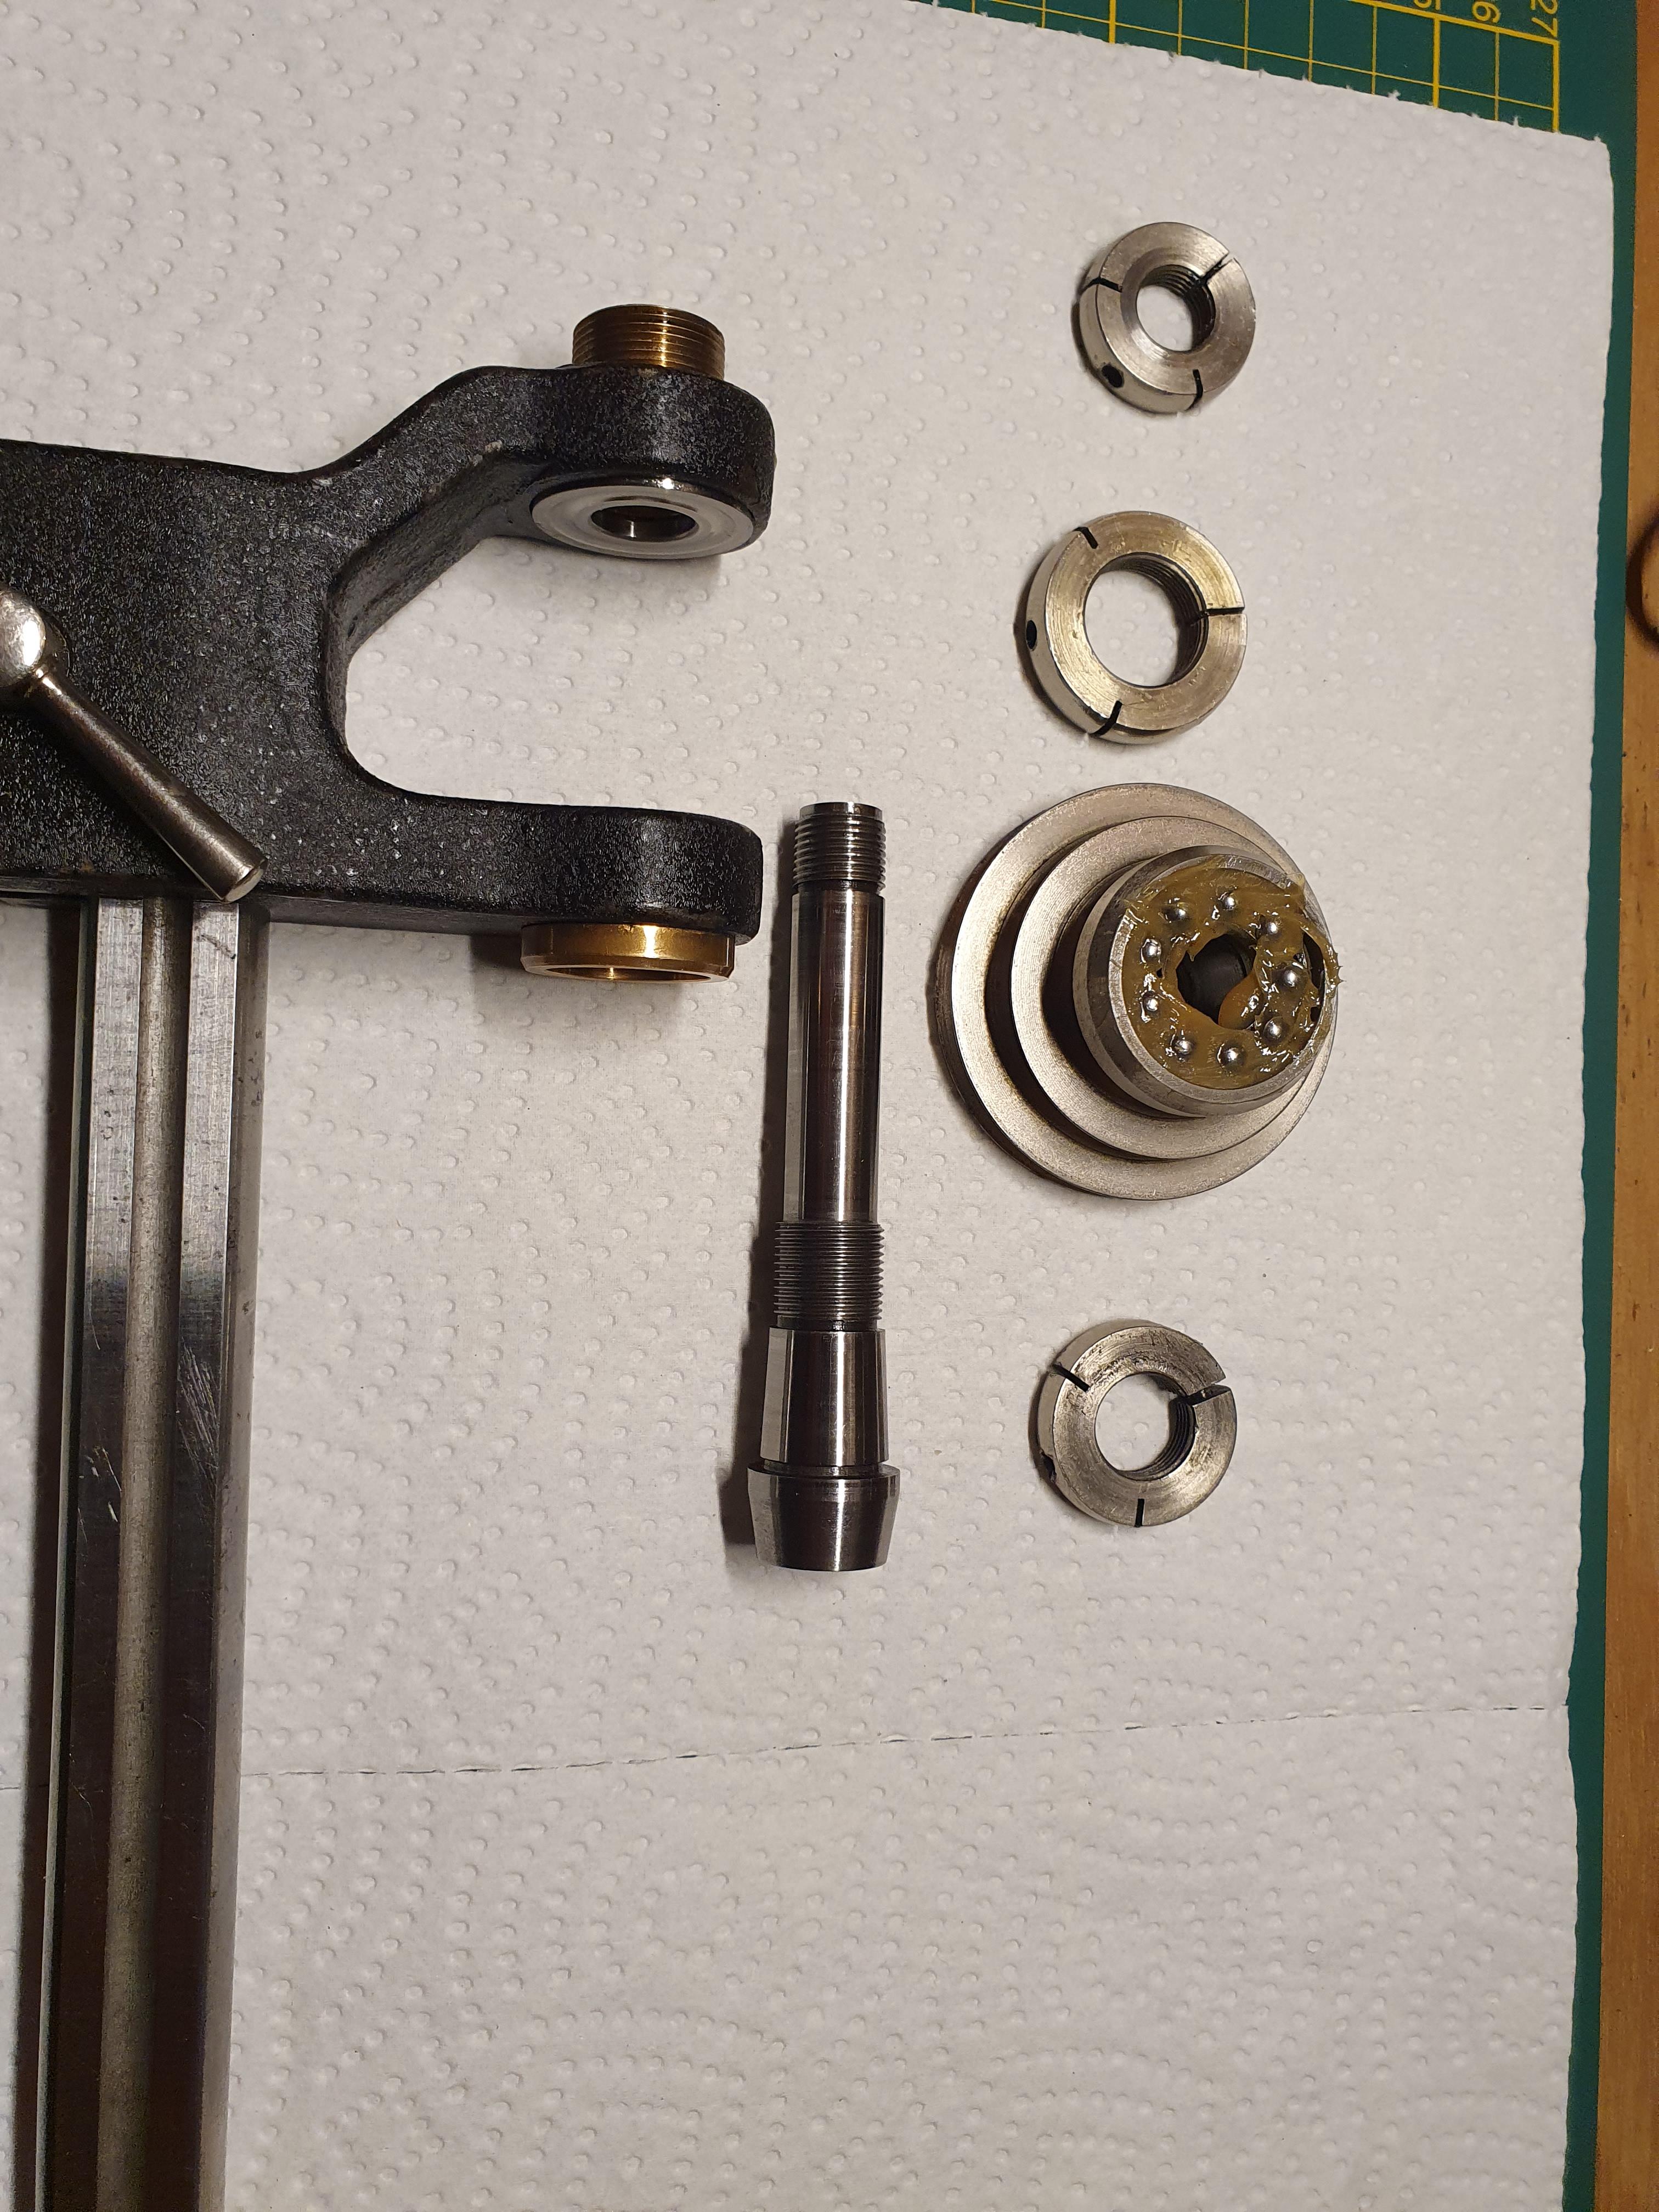
I'm not sure they can be separated. The headstock body and bearing look to be machined from one solid block, but I could be mistaken. But even if they could be pressed out, I wouldn't want to risk it. Couldn't you use a tampon galvanising process instead? On the other hand, I wouldn't be suprised if a good clean and polish would already be a big improvement. It looks to be mainly caked in old oil and dirt, or is it actually rust?
 2 points
 -
This rust remover solution was mentioned in another thread, and I thought I would do an experiment to see what effect it had if metal parts were left in it for rather longer than required. The mix is five grams of tetrasodium EDTA per 100ml of deionesed water, plus a tiny amount of citric acid to bring it to around ph 6.5 - 7 I've also used disodium EDTA, which seems to work pretty much the same; these are used in such as cosmetics, so not toxic, though I'd not inhale any dust, on principle. I normally soak parts in it for between 30 mins and a couple of hours, depending on the level of rust - and generally use it for tools and such as keyless mechanism parts, rather than movement train wheels. For this experiment, I used a couple of items from a big clock part collection I got a while ago. They were suspended part way in the solution; the one with the single thick wheel was at roughly 45' with the wheel half in the liquid, and the other was vertical with around 3/4 of the pinion submerged. This is the result after something over nine hours; the first two photos are the parts straight out of the solution, with just a rinse under the tap: And this is after drying and removing loose residue with a paint brush. They were in quite a bad way, rust scale and pitting in places, which is why I used those parts. You can still see the heavy rust on top of the small pinion, where it was not in the liquid. The pivots and steel pinion leaves do now have a matt surface; I don't know how much the size would change after re-polishing them. The brass wheel has obvious colour changes, more coppery where it was immersed, but still shiny rather than matt. This was using a fresh mix of the solution for this test & I may have added a bit too much citric acid. For comparison, this is a more normal use - a lathe bed from ebay, which had significant surface rust. Around one hour in the solution and it looks vastly better! The slight "marbling" is probably due to me initially trying to use a cloth wrapped around it & soak that; once I realised that was not working evenly I made a crude trough from cardboard lines with a bin bag, so it was fully immersed. And after; dried then oiled and thoroughly cleaned off, to avoid further rust. The stuff does definitely work very well, under appropriate circumstances.

 1 point
 -
It actually shows better on the picture, i really struggled to get the graver sharp enough, a 3000 grit diamond stone was still leaving quite visible grooves in the carbide that transferred to the workpiece. The bush measures 2mm diameter and 1.4mm for the shoulder and the back hub was around 3mm....the length doesn't look it but is 1.1mm.... the one I need is half this size. The hardest part was the messing around with inadequate measuring gear and getting the graver something like usable, the actual turning I found really easy after 20 minutes of playing, i used to wood turn years ago , the scale and material doesn't compare but the actual technique is basically the same, in fact timber is worse because of the grain variation , metal is more or less consistent throughout one piece. Small stuff was easier than I expected Case..... hell guys that turn through a loupe have some serious skill. And it was only brass....like cutting through butter but I enjoyed it....I just need to figure out why the graver isn't honing up as well as I'd like. Oh and the bloody nugget that previously owned the lathe cut 2 notches in the rest for some reason ? Thats true Nev, i dont . I only need the parts involved to make fitment checks......to the plate hole, the shoulder fitting inside the minute wheel and the arbor to check the bearing size. I measured the practice piece because i wanted to work to a scaled pattern. How you do this sort of work with a visor Nev just blows my mind1 point
-
Looks great! Working under a microscope like you do now, you'll have no trouble making the actual part after this tryout. Your lathe will be smiling as well and won't like to be put back in it's drawer..1 point
-
That's some clean turning work!1 point
-
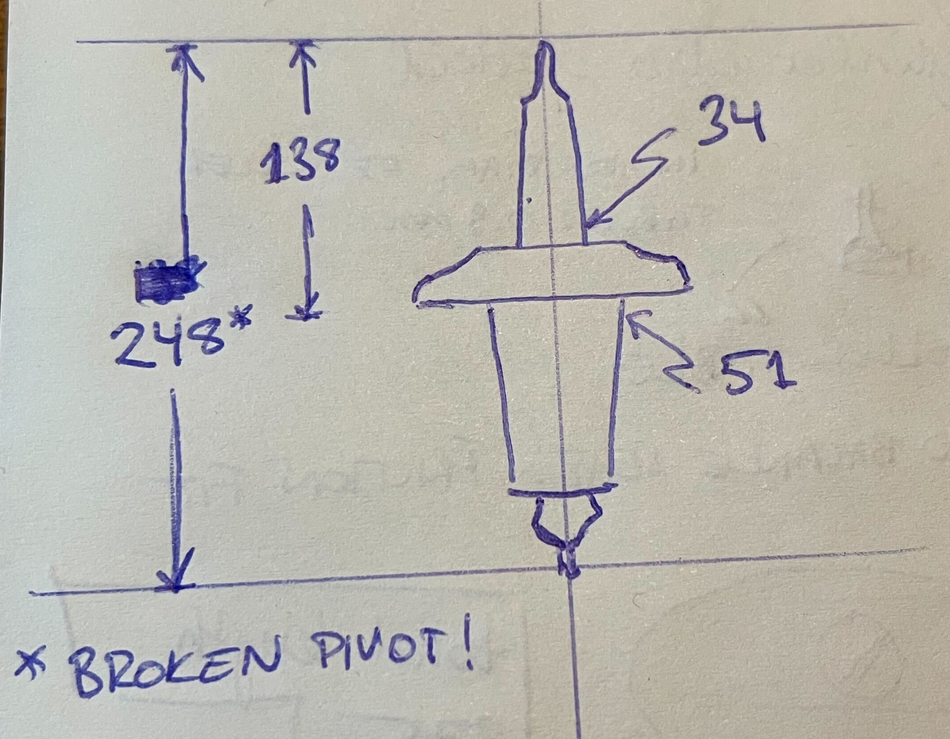
I was able to score a good deal on a vintage Feintaster on the local fleabay I've taken some measurements and produced a crude drawing (units in 1/100 mm): Now I've been through the bestfit, DCN and Ronda catalogues but I can't seem to find any non-riveted staffs, i.e. staffs where J=K in Ronda's case. Am I looking in the wrong place for the wrong thing? Don't tell my significant other -- I've started a search for vintage lathes in case I need to turn one myself...
 1 point
 -
I don't see any sharp bend in the coil. Stud restricts maneuvering hairspring free , I unpin the spring from stud, then open regulator boot, lift the balance with tangled spring. In case you have no high magnification tool such as strong loups or microscope, take pix of balance and spring on your smart phone, enlarge the pix on your screen to clearly see all details and decide how to go about untangling the spring without creating bends, take your time to find out how to go about untangling , once untangled, you can see if the spiral is a goner or not. Mild intermitant tangential to the rim of the balance air blow is risk free aproach to start oscillation, and continue to blow to increase the amplitude. Good luck.1 point
-
Always in the name of Science and becoming more educated about watch repair mb.1 point
-
Pay attention to the depth of your mainspring, you dont want it to rub the underside of the lid if you bow it inwards. Do you think the barrel hub has reduced it's height through wear ? I prefer this way, its the same as closing a tube or a ring/ split ring such as a collet. There are dedicated hour hand tube closers for the jewel press that have larger convex apertures compared to convex pushers. This method would avoid possible height reduction of the barrel hub when you use a dome punch inside it. Otherwise just peen the outside of the barrel or lid using a flat hollow stump to span over the hub. I think most folk actually do dome punch both sides of the part, i used to but have now moved away from that idea. Dome punching countersinks the hole to a greater or lesser degree depending on the size of the dome. Generally with me it did not seem to affect the arbor/bearing seating from the inside as the hub perimeter still existed enough to ride the arbor shoulder...but still i just wanted a better way to do this. Depends on the tools you have available....but I've always disliked punching the hub part of the barrel and lid, its brass and it will flatten to whatever degree you give it or the outside some. If you can just span the hub with a stump and close the outside then the squash risk is avoided...but as Mike quite rightly states besides the potential hub height reduction, punching both sides is a more solid repair compared to only doing the outer.1 point
-
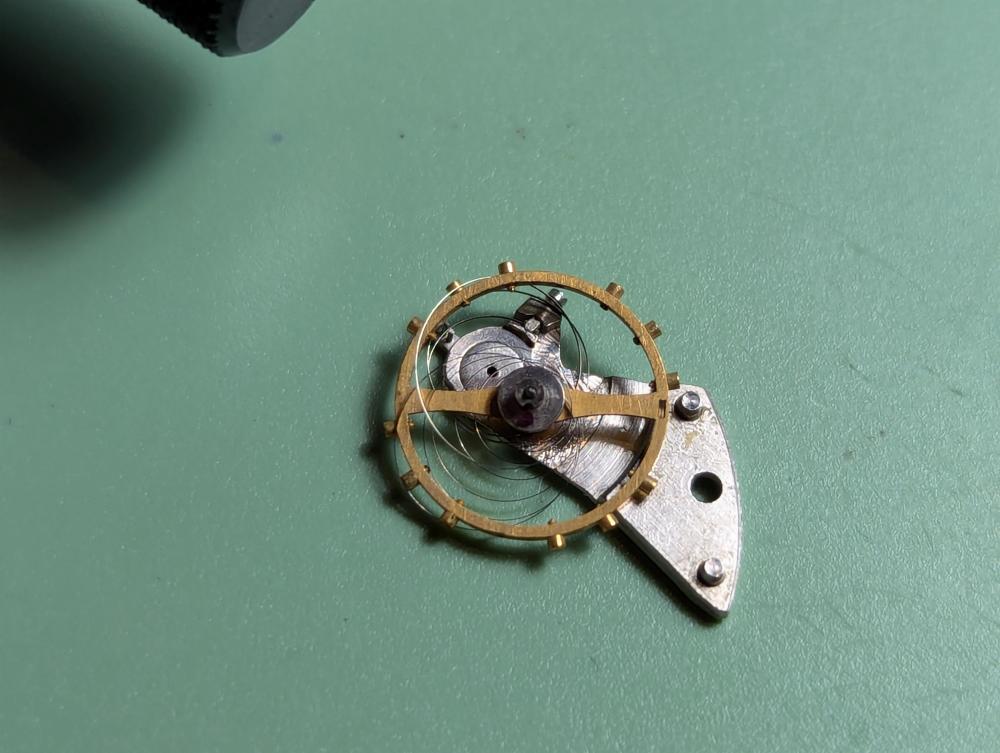
The cock was firmly screwed down, but something caused the hairspring to snag the balance screws. And the return oscillation pulled the other side of the hairspring in underneath the balance or snagged an opposite screw. Even though the hairspring looked flat, I suspect it was tilted very slightly and when it opened up on huge amplitude it just hooked itself over the balance screw. Or the spring was flat but the continued force of air from my blower pushed a coil down to hook onto the balance wheel. If there is any serious damage, it was probably done while removing the balance cock from the mainplate. I don't think I can work on it again until Saturday but I'll let you all know what becomes of it. I really enjoy learning these lessons in practice and then showing you all my mistakes. And this is why I still never open up a watch worth more than $30.1 point
-
Hello and welcome Craig to the forum, Located in the Granite City., I am at St Combs, Fraserburgh Pictures would be appreciated along with problems to help in diagnosis. I have added a couple of files for your interest. Joseph Bulova School of Watch Making.pdf TZIllustratedGlossary.pdf1 point
-
Yah- I see lots of tangles but no creases…just maybe1 point
-
Try these precision screw extractors https://www.ifixit.com/en-gb/products/precision-screw-extractor-set?gad_source=1&gbraid=0AAAAADI8WjiAtYJJp_lfPxzdESTDxAKFH&gclid=EAIaIQobChMIjtnj8oTtiQMVH4toCR3cFT3eEAQYAyABEgK98_D_BwE1 point
-
Thank you for your introduction and welcome to this friendly forum. We all look forward to your contributions and continued involvement. If there is anything we can help you with don’t be afraid to ask. Nice clear photos can help a lot.1 point
-
The important thing is that the bearings are rust free, i thought I detected some of the effect you mention at the front edges of the cone. Hopefully it is all old dried on lubricant, i had a thought about rust from swarf etc left on the headstock, its bugged me in the past about rust contamination. So not initial rust caused by oxidation but applied rust from another source, i started to think of it like a disease that can spread via contact. ????1 point
-
Hello and welcome from Leeds, England. We love photos on here.1 point
-
Welcome to the forum. Yes, alum powder does work to dissolve a stem but it's best kept warm to speed up the process. You need to remove the back from the watch and see what movement it has. There should be markings but if you can post photo along with where in the world you are to point you in the right direction. Edit A photo of the crown & broken stem would also help to see if it does need dissolving.1 point
-
How this actually happened? May be the cock was not fixed with the screw and was lifted by the air jet??? It is important to understand, that when the pallet fork is not in place, there is nothing to limit the amplitude of the balance, so it can make several full turns, even to the point where the hairspring will get deformed. In rotation direction where the spring 'unwinds', the spring may increase it's size enough to go under the balance wheel, and this is eased by the fact that it will no longer want to stay in plain. So, never blow that strong!1 point
-
Thanks. That was bothering my OCD.1 point
-
Do to it... the rust looking effect ? I'm thinking to use autosol or pollinum in like a valve griding process or could that be too much and effect the cone mating surfaces ?1 point
-
Hello Craig and welcome to the forum. Post pix of the movement to ask your questions, plenty of info and good advice to gain here. Rgds1 point
-
Many parts off 2472 variants interchange, Go on to mizeni web site or Dr ranfft's to see variants to 2472 base movement. The 17 jewels web site also might list variants to ETA 2472 family.1 point
-
What does some chisel sharpened pegwood do it Case ?1 point
-
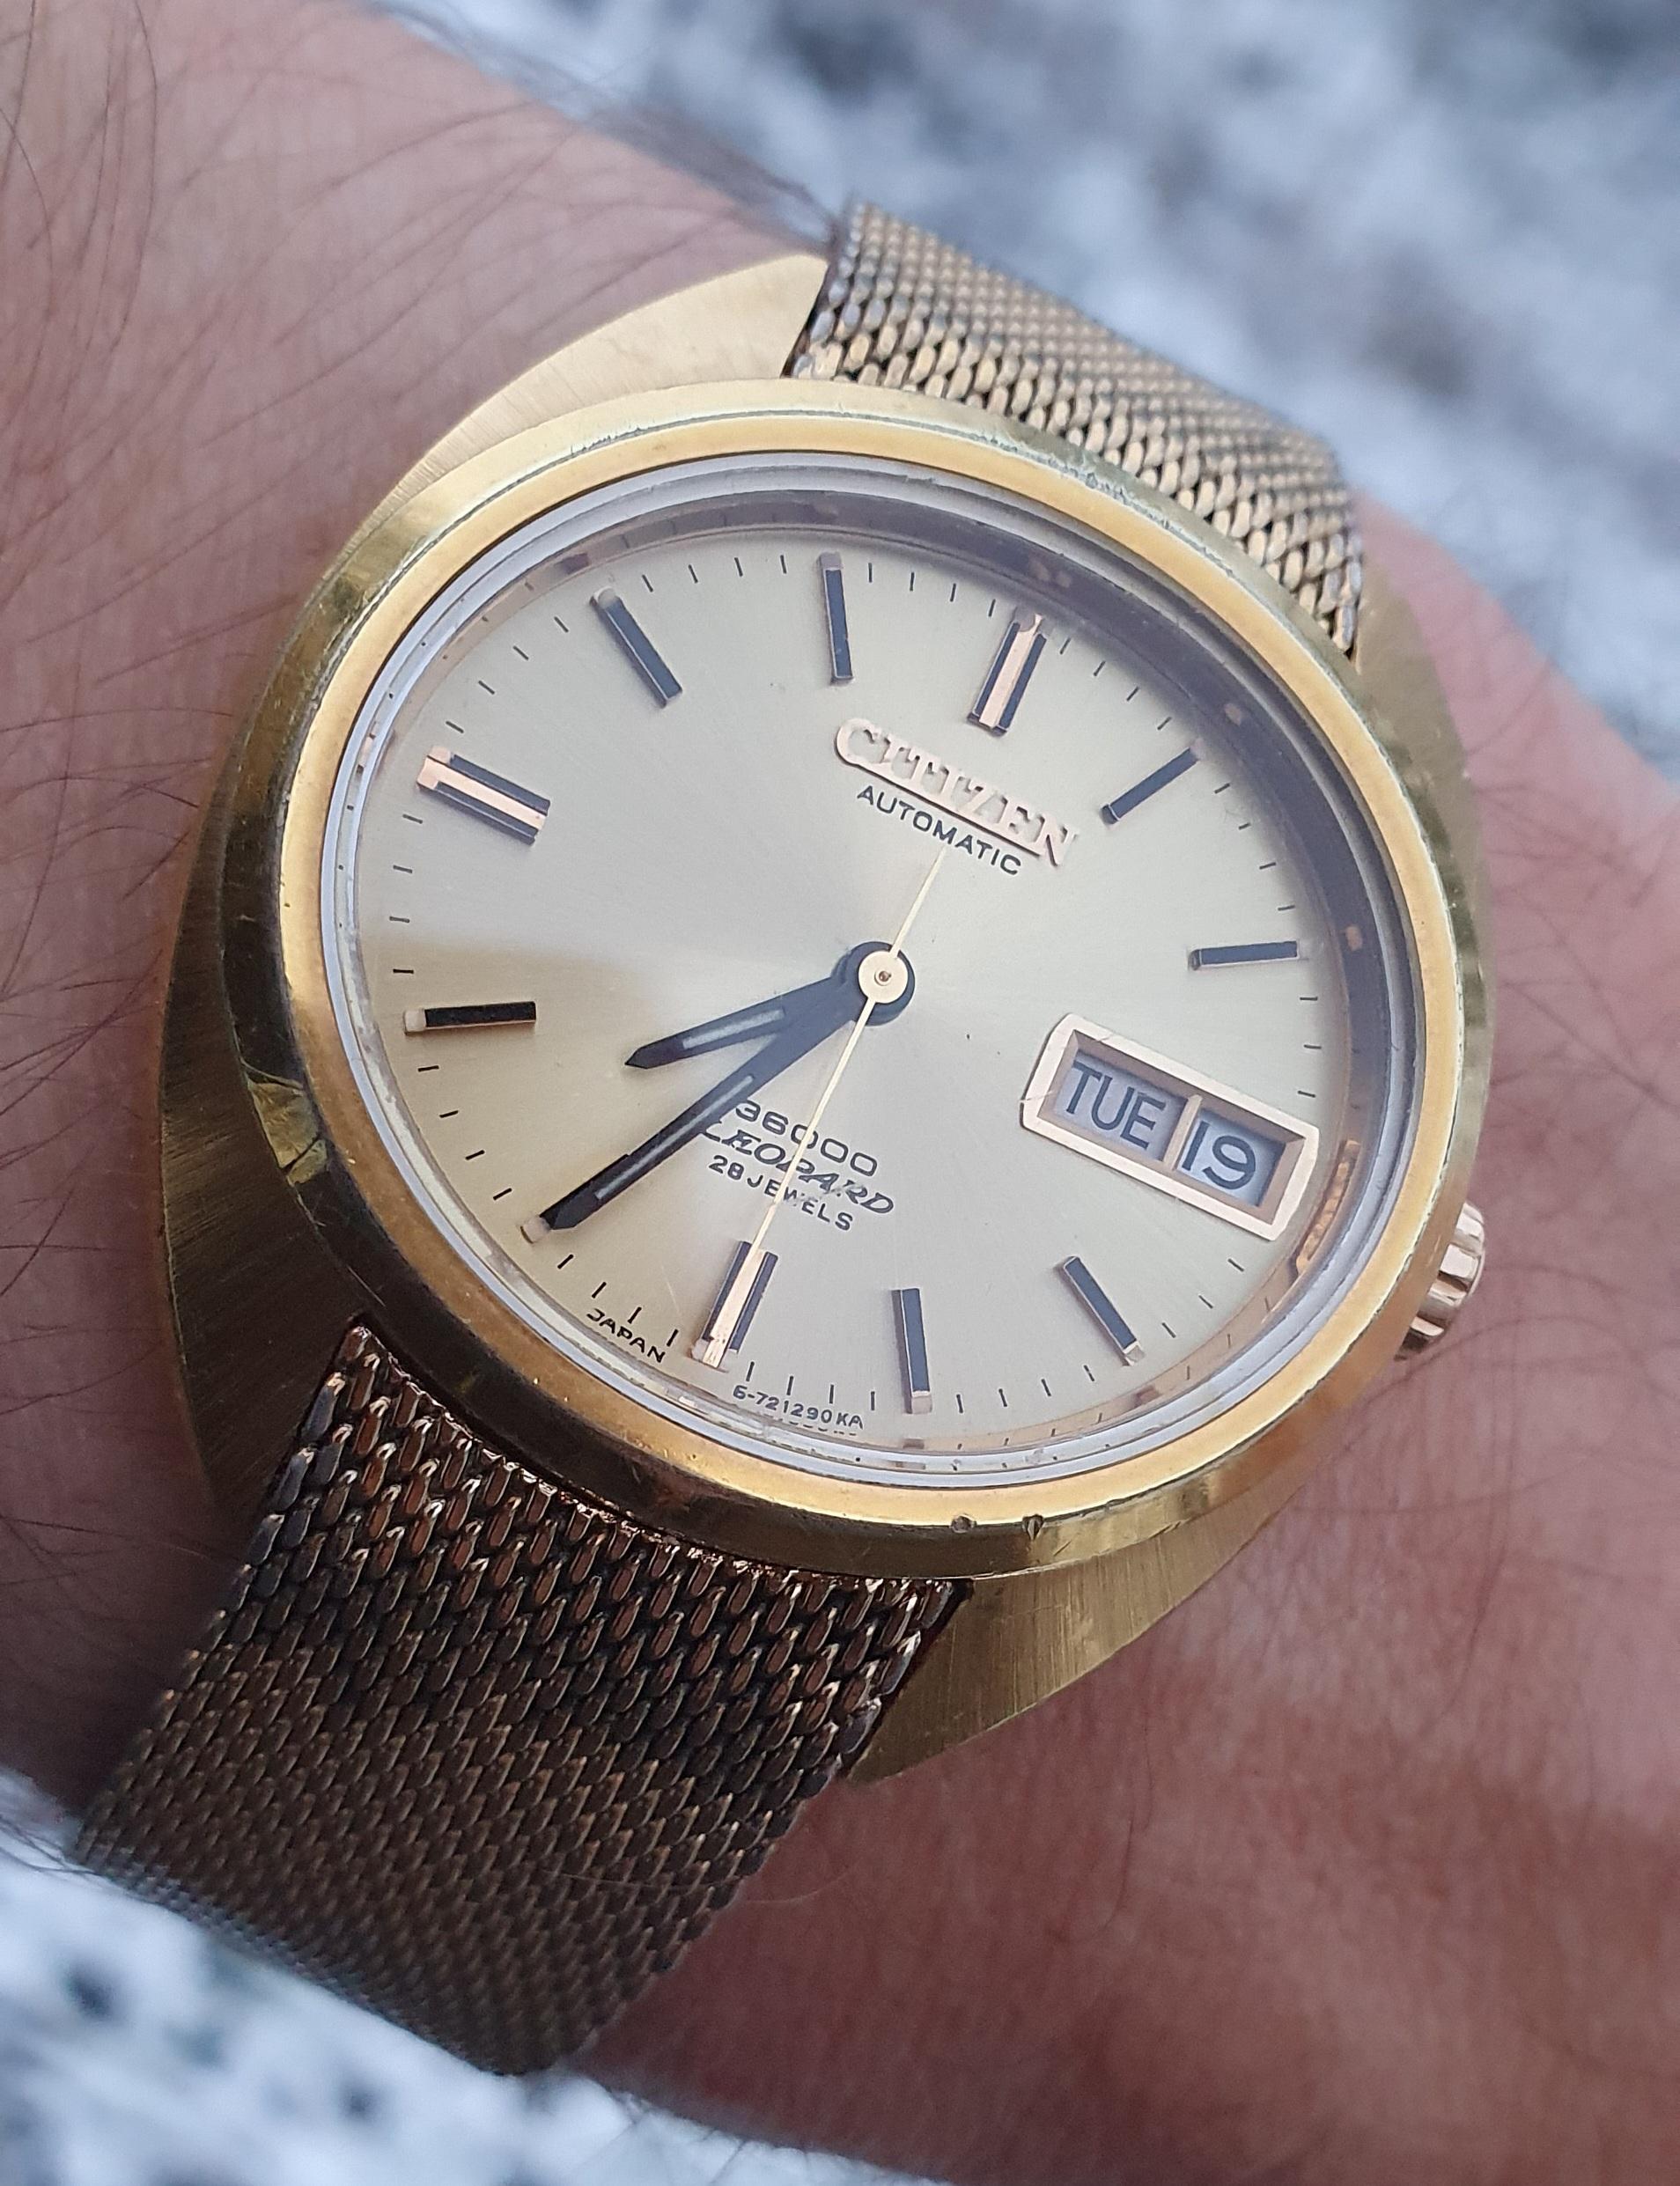
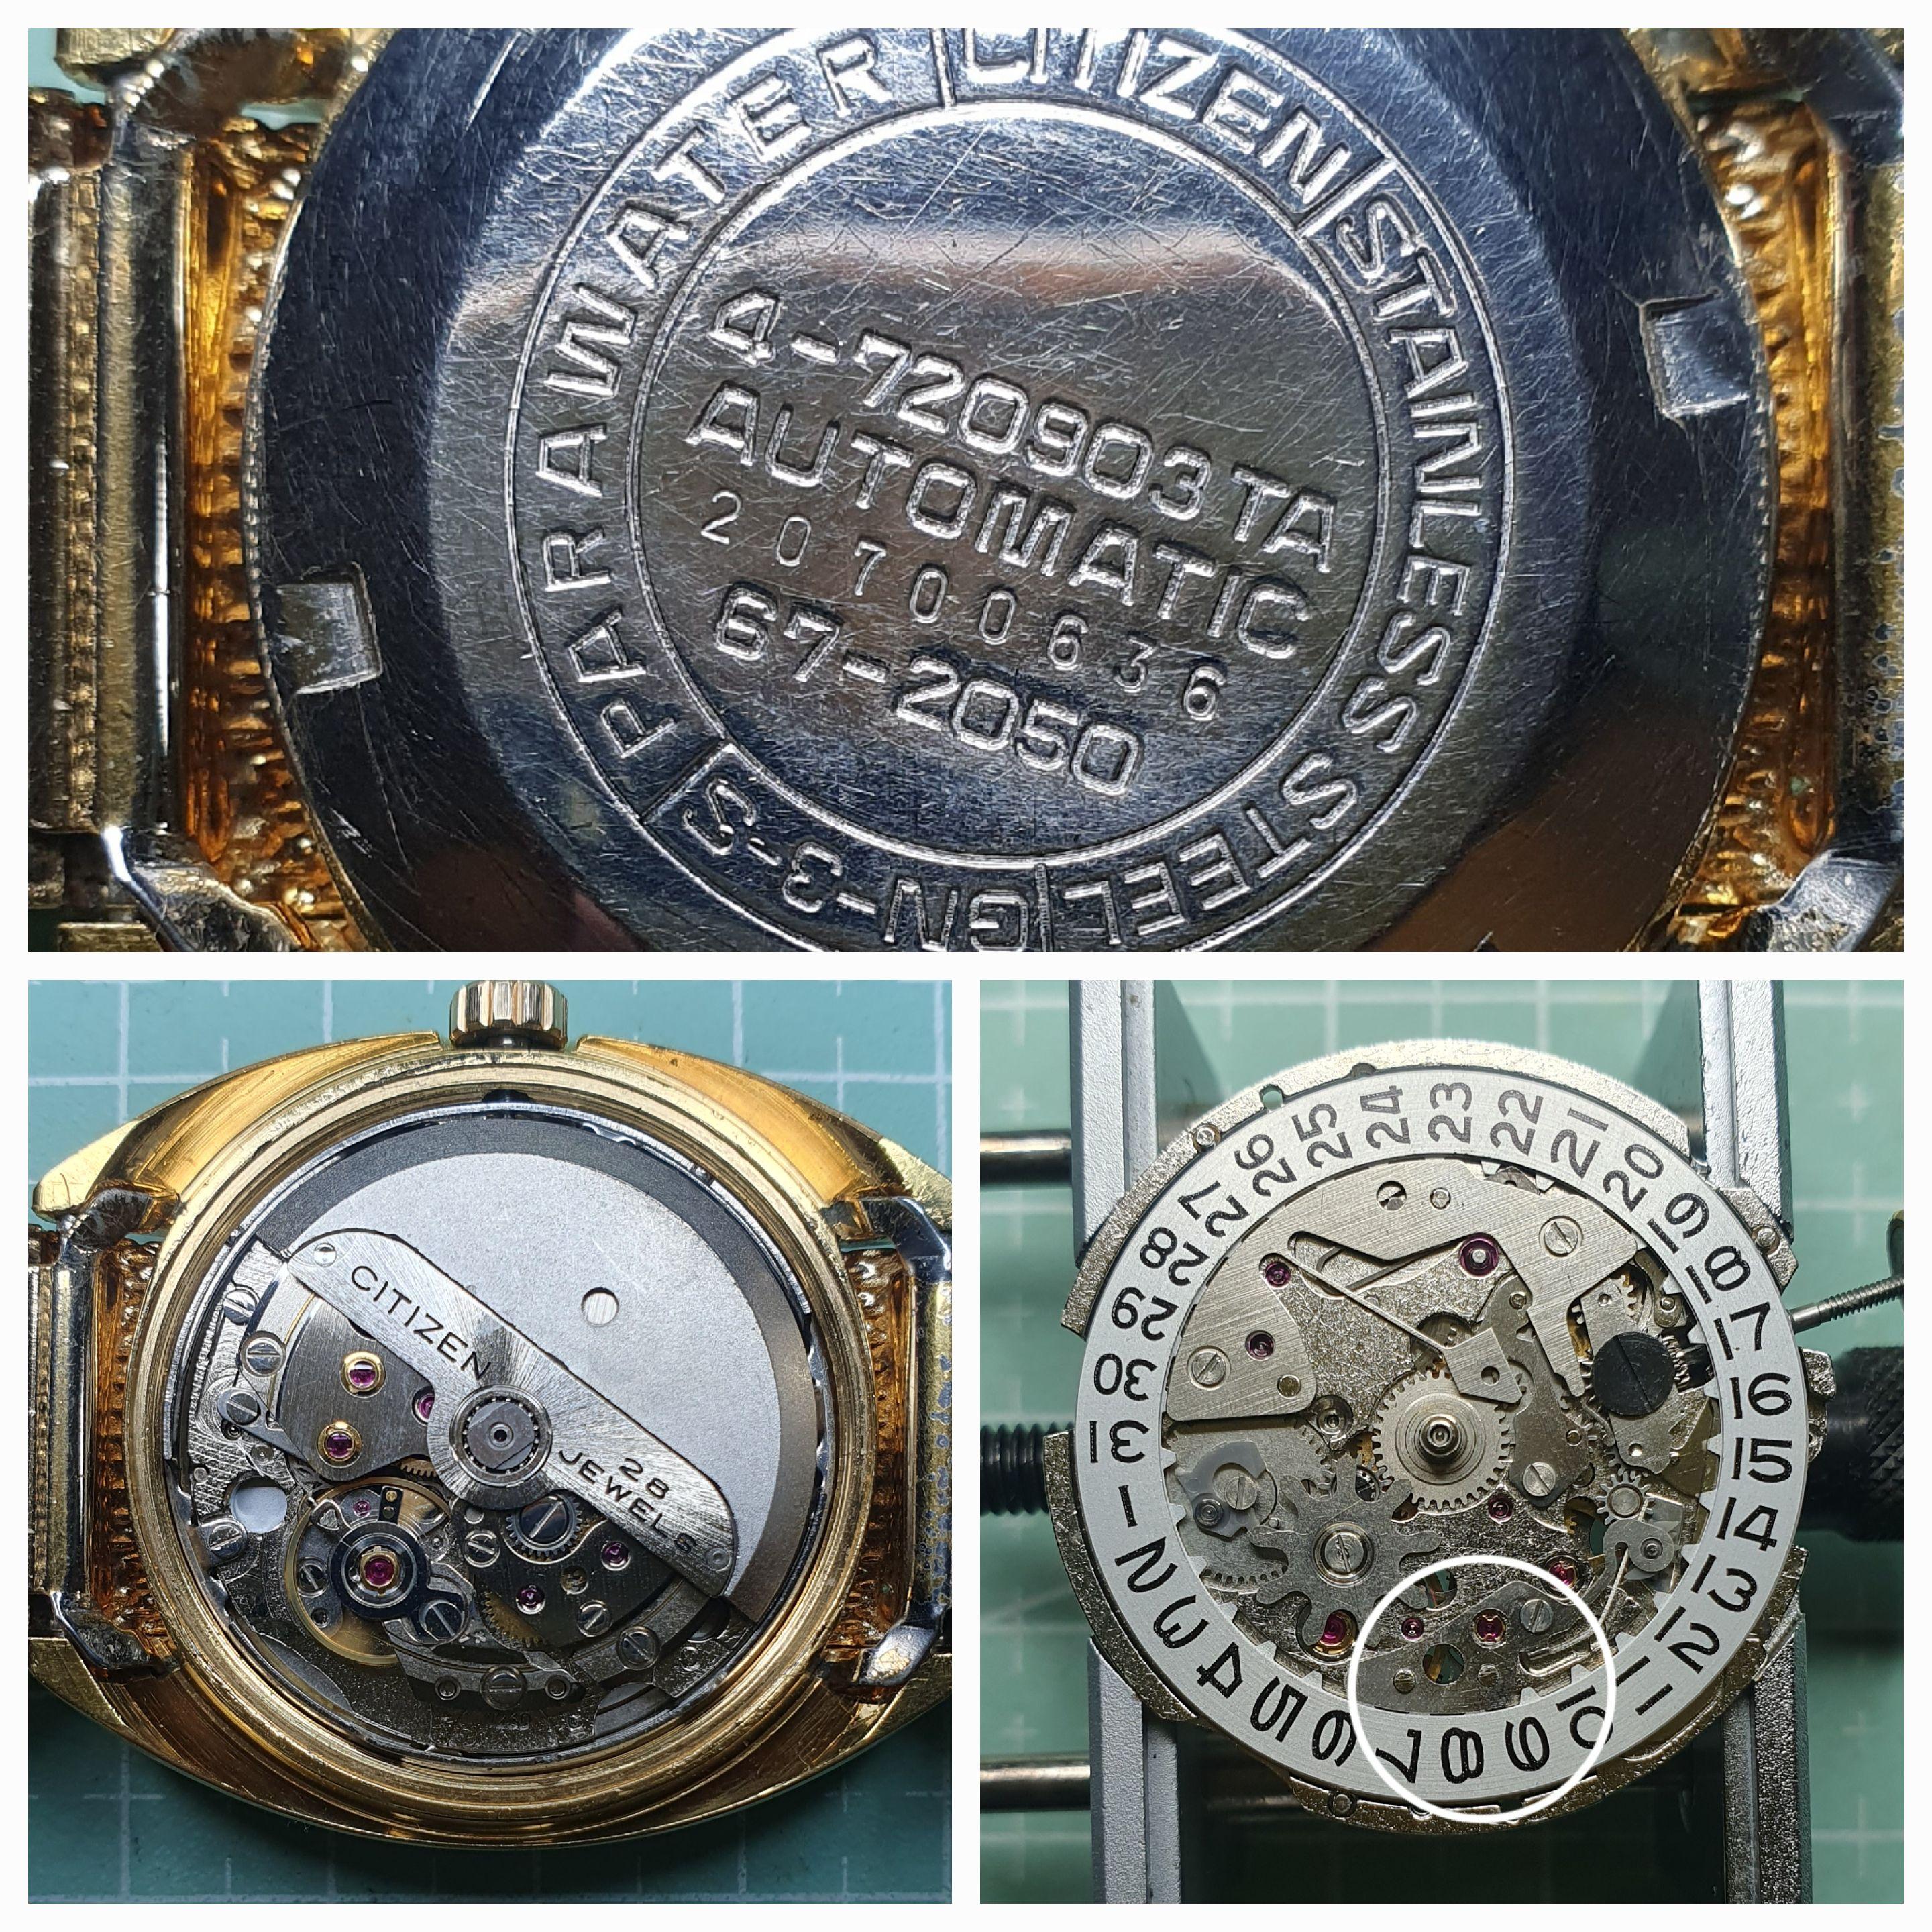
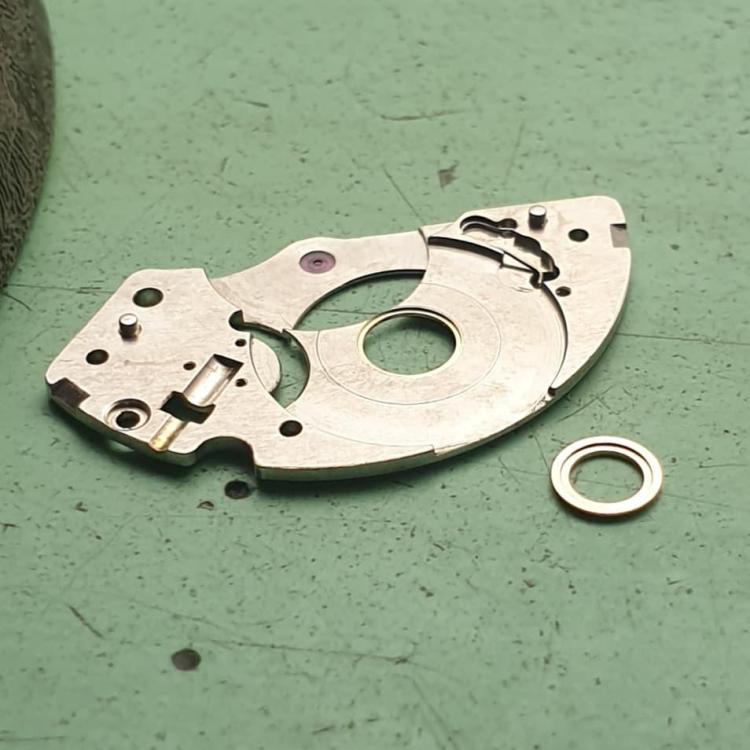
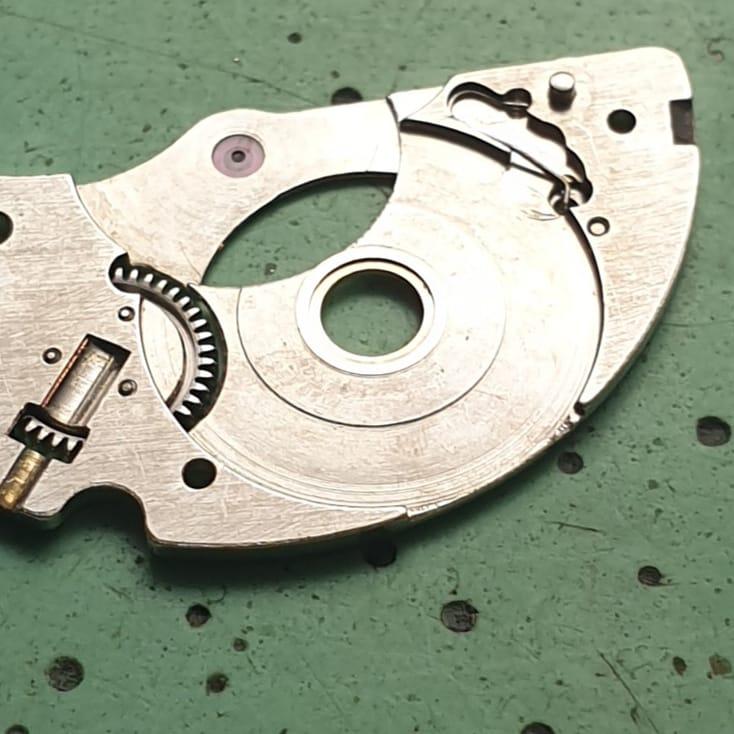
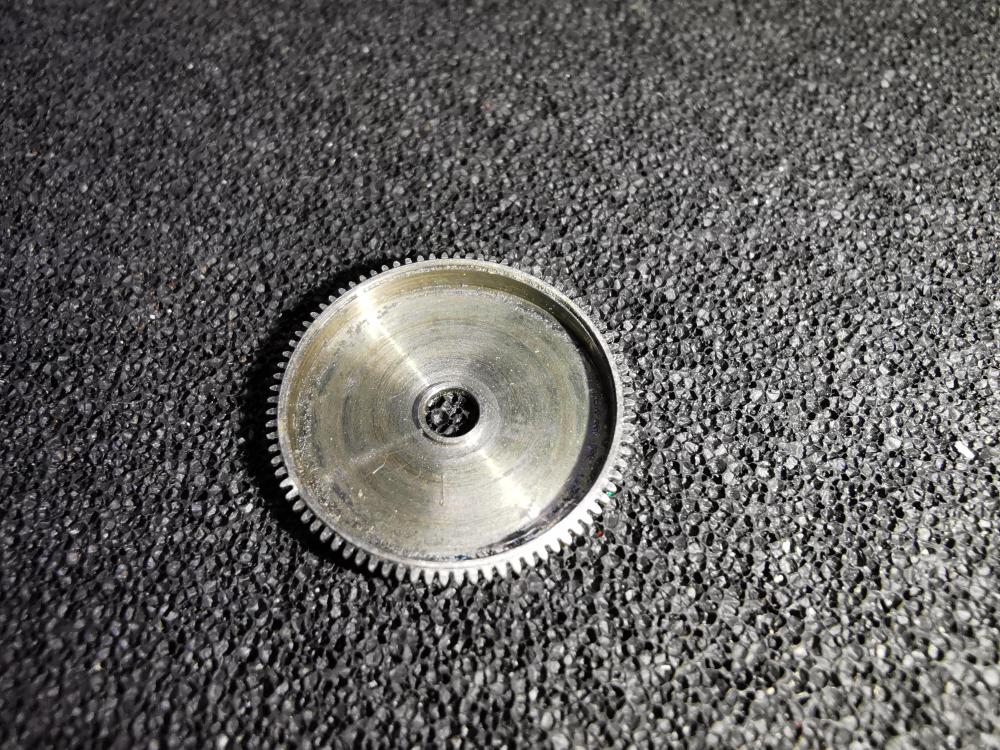
For the last couple of days, I've been giving this big cat some exercise Citizen Leopard, 1972 with the 28 jewel 7230 movement full of springs. I've had this for quite a while and must be over a year ago it was serviced and repaired. The rotor weight was adrift on one rivet and that all tightened up nicely. When I finished it, was running excellently, the cannon pinion a little on the loose side but coping well with the day date change so left it alone. I won't attempt to tighten these unless absolutely necessary, I'm still on the lookout for one for a different watch that I over tightened. A replacement for this movement I would imagine would also be hard to find, and it's coping with the day date change. Until recently, I never got to wear this after the service, when I did want to, and went to set it up, discovered it had developed an issue where the hands would lock up when passing through the midnight change over. By this time, another watch all stripped down and taking up the bench, so this got sidelined. Well I've eventually got round to it and I have eliminated the persistent niggle in the back of my mind to get this sorted. Very simple fix in the end, and a basic mistake on my behalf. Found the date ring retaining plate / quick set rocker spring (circled in picture below) was not fully home on the left hand stud causing the right hand side of the plate to dip down enough for the date ring teeth to catch on. Lucky escape for me, if I had tried to force it then the plastic day date cam would have been damaged, again, I reckon they won't be easy to find.

 1 point
 -
@cor9brg where are you stationed? Please indicate where you are in your introduction. A member close to you might have the exact part you need and be willing to help/ donate/ gift ....1 point
-
You're doing cool stuff Michael, your converted workshop is starting to reap good things....so pleased for you fella1 point
-
Too complicated ( complex : synonym ) for me ( pronoun ) to attempt (verb) ) Nicklesilver ( proper noun ) Besides ( conjunction ) I ( personal first person pronoun ) dont have ( auxiliary verb ) the ( definitive article ) tools ( collective noun ). But ( conjuction ) Wow ! ( interjection ) thats fantastic ( adjective ) work ( noun ) matey ( pronoun ).1 point
-
If you can make a stepped hole in the bridge you can avoid the need for solder. Here's a fix I did on a JLC 838, this has a suspended barrel, so 100% of wear is on the bridge and there's next to no material to work with. The worn portion protrudes down toward the barrel a bit and up toward the ratchet wheel. I did the bridge work in a faceplate, the stepped bushing was all lathe work. In the last pic the the barrel arbor looks low but it pulls up when screwed to the ratchet wheel.

 1 point
 -
This is the 3D printed platform that I use. https://www.printables.com/model/234556-platform-for-watch-hand-setting-tool?lang=en That does give the flexibility to use any type of movement holder that you wish. I usually use the holder in the 2nd photo just in case I need to support the center jewel when pressing on hands. You need an Allen wrench to adjust the center pin, though. I leave the pin flush usually, as a flat platform will provide some support to keep the main plate from flexing when pressing on the hands.

 1 point
 -
I have a Chinese copy of that hand press, and I use my Bergeon 4040 on a 3D printed platform that @gpraceman made for me. I don't know if he downloaded the model or made it himself, but it's what takes the tool from good to great. The platform fits snugly on the circular pad, and makes a nice wide base to fit your standard movement holder with lots of clearance. That little add on is what finally convinced me to get off my butt and either fix my old 3D printer or trade it in on a new one (which is what I did).1 point
-
Back in school......Just my first step in getting to Uni mate. I have no school records so I'm having to start from scratch, I'd like some qualifications under my belt besides my building apprenticeship before next years intake. Access to learning can be hit and miss for us 'old uns' and I didn't want to rely on a Uni's clearing process to scrape in. So I'm studing English , Maths and IT.....inbetween bits of work.....absolutely loving the refresher learning.1 point
-
Have you looked inside as I think you may struggle to close the barrel side with the lip.
 1 point
 -
I don't think the excessive end shake is from the barrel or lid being bowed outward; I think it's because the hub is worn. I assume that it will be ok to offset that by bowing the barrel and lid inward just a little. I'm a bit confused about instructions 3A and 3B in the Bulova instructions. Should I be doing one or the other or both? I'm guessing that I should be doing 3B if the hub is tall enough to fit a stake over it without the stake hitting the bottom of the barrel, otherwise do 3A.1 point
-
I use Liquinox in my ultrasonic cleaner. It does a good job of cleaning, but doesnt have brighteners that the ammonia based ones do. I also will sometimes have an issue with flash rusting, so I'm looking for an alternative, but it works very well so far. The issues I have dont happen every time. According to the MSDS - L&R 111 is mostly 60-65 % Mineral spirits and 15-20% naptha, with some other additives like 1-5 % ammonium hydroxide which is just ammonia and water. It has other additives like 1-5 % Oleic acid, which is an unsaturated fatty acid. Maybe could substitute Peanut Oil L&R Watch Rinse is just 70-80 % Mineral Spirits and 20-30 % naptha So in this case, I may try to concoct a solution that matches these and see if I like that solution.1 point
-
YouTube the home of tools that are interesting but not necessarily practical.1 point
-
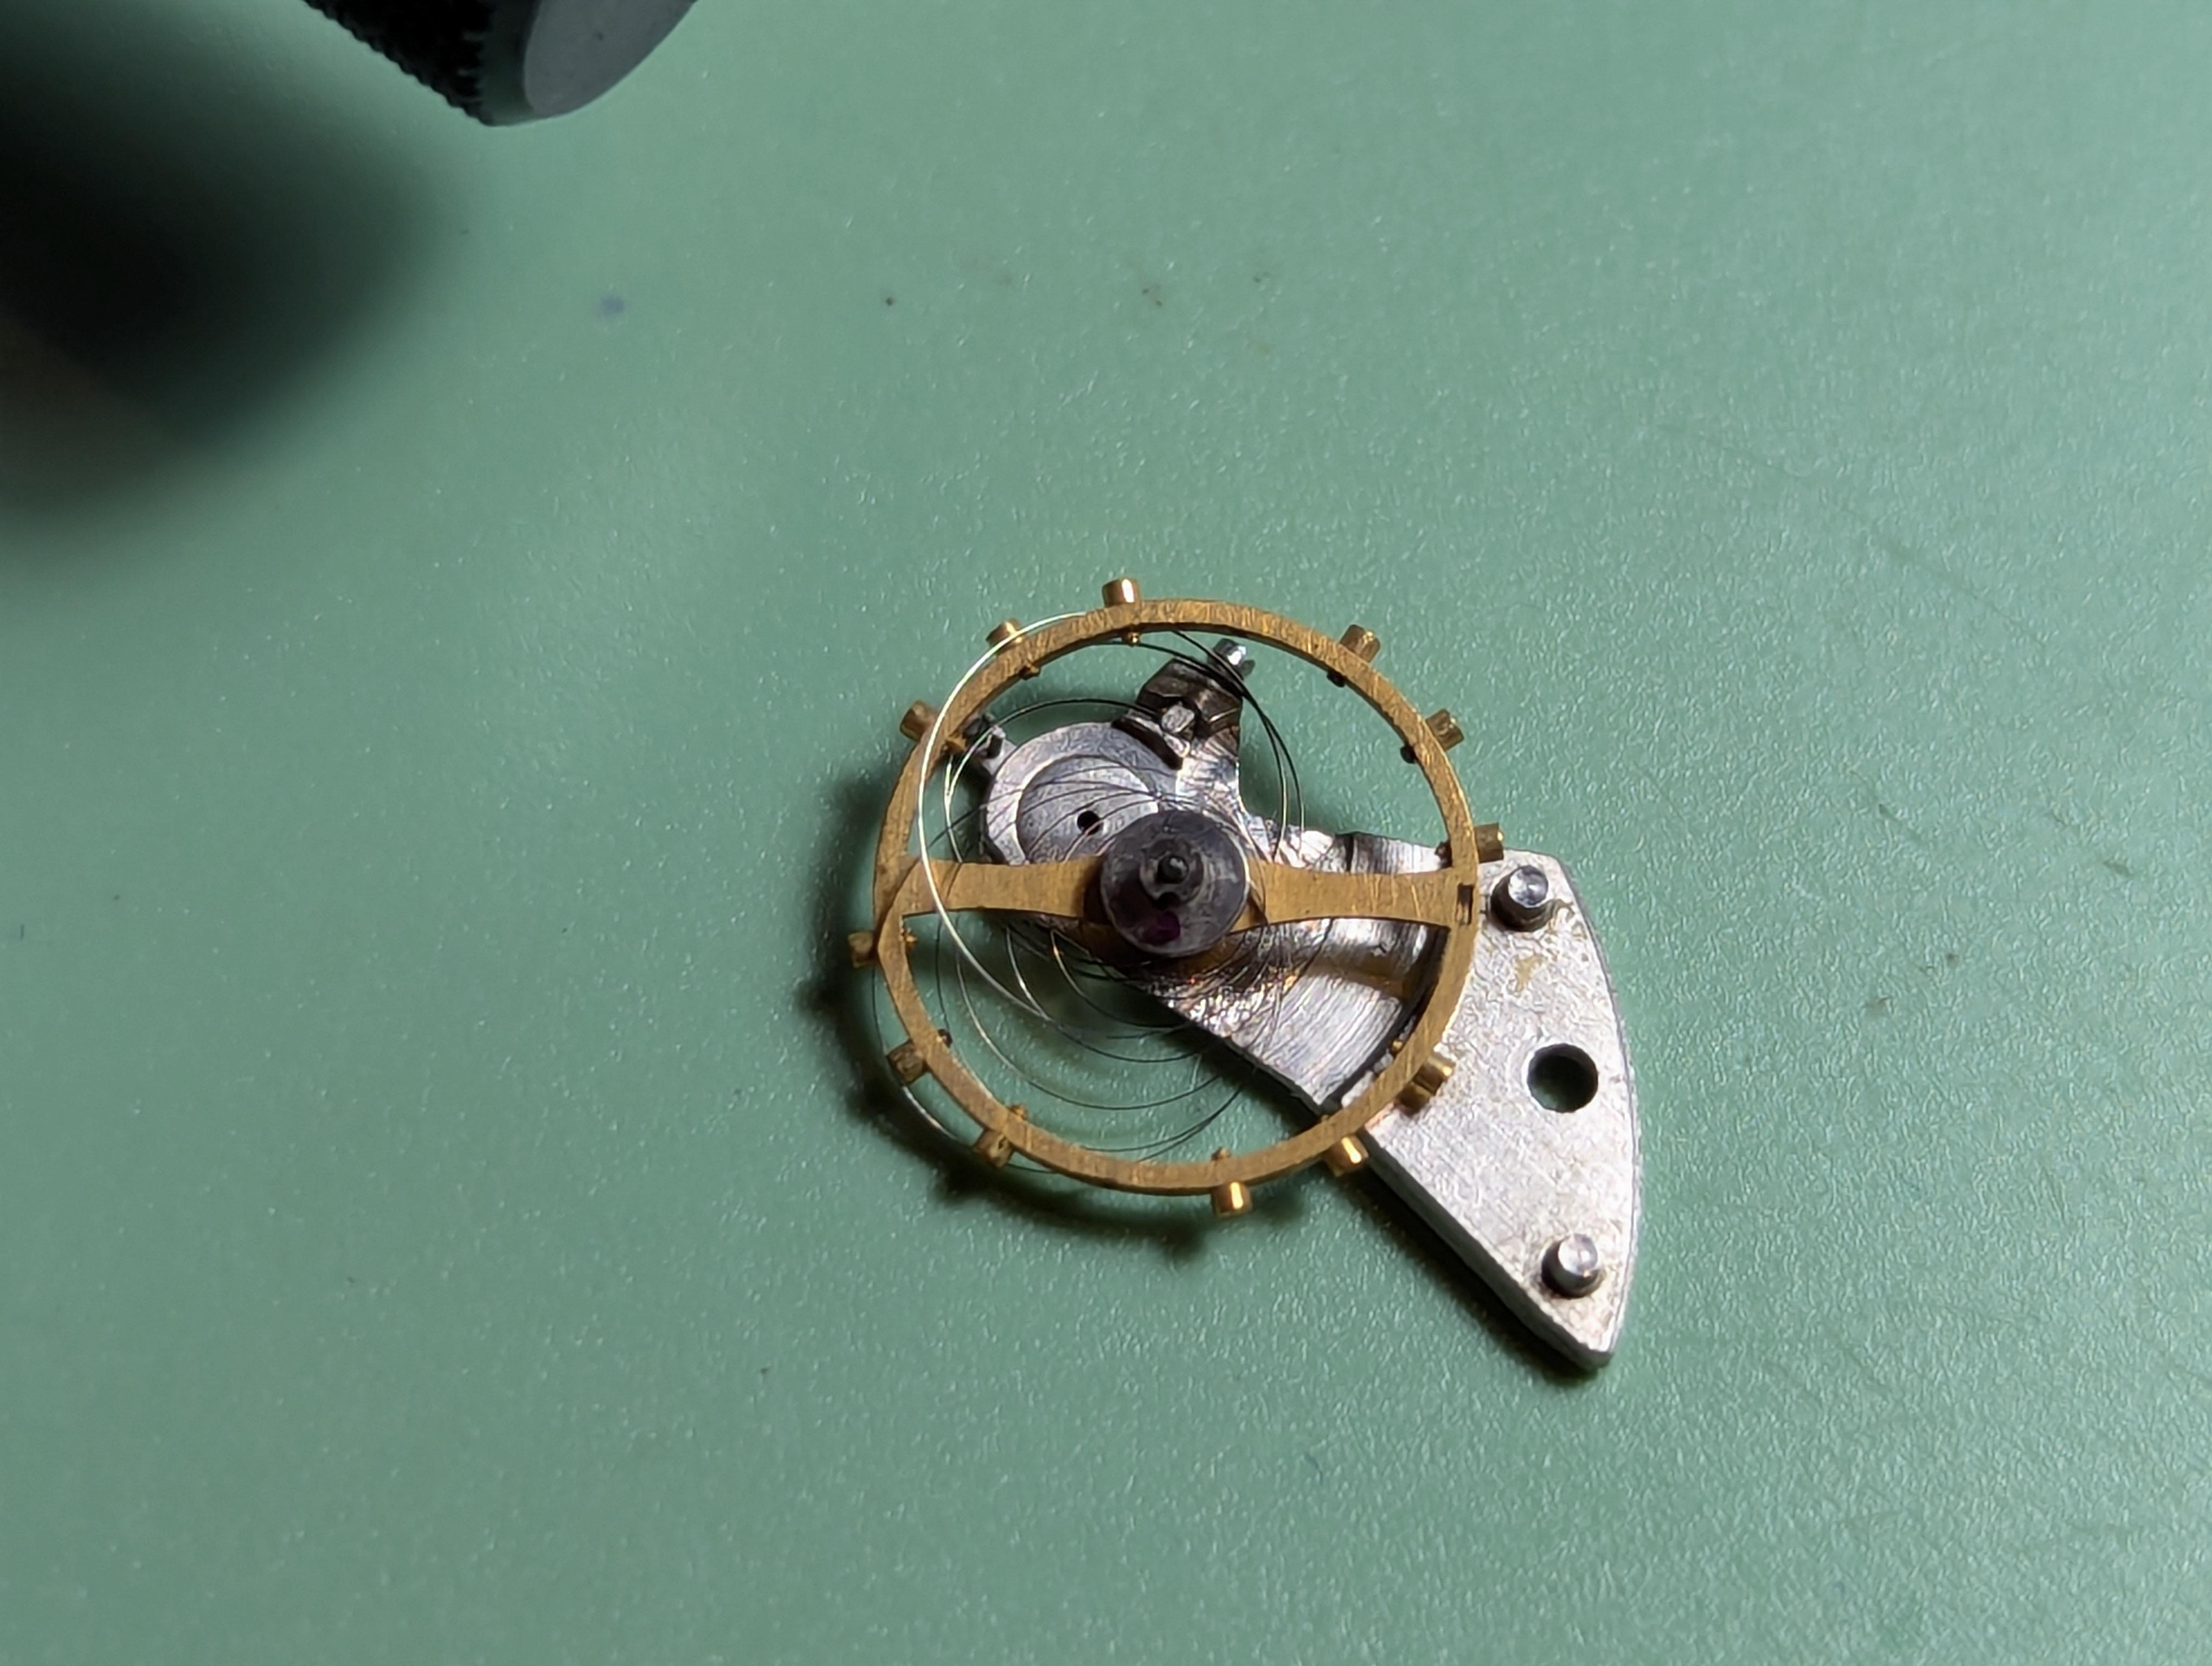
A beat up Vostok 2214 with a rusty but still nice dial didn't move as well as I wanted during an initial free oscillations test manually turning 180 and letting it spin. So I gave it a little puff of air, and learned this is not a good idea on a wristwatch with an overcoil. Time to call it a night and unless I already have another balance complete in a box somewhere, or I get lucky untangling it, this one is probably headed for the parts bin.
 0 points


.thumb.jpg.cb17a66989f1e796fd4217db2e9ca9df.jpg)