Leaderboard


Popular Content
Showing content with the highest reputation on 11/29/24 in all areas
-
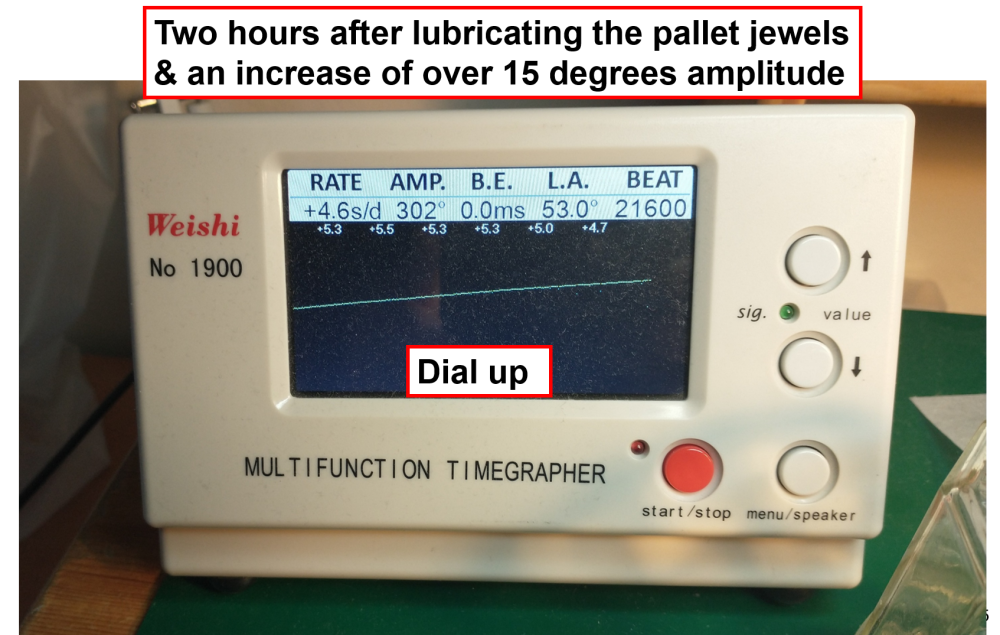
And sometimes you get too much amplitude. Years ago I started on pocket watches, and putting modern mainsprings in 100yo watches sometimes resulted in rebanking. I'm currently working on a 1957 ladies Tudor (ETA) 1137. Being a small, old movement I took time to make sure all the pivots/jewels were perfect, and fitted a new mainspring. It fired up at 320° before I'd oiled the pallets. After a day it was 340-350° and re-banking. Some HP1300 on the pallet pivots wasn't enough to stop it. Very strange. I measured the spring and it is correct size. Fortunately I hadn't thrown the old mainspring away, and refitted that. It's not run in, but just started about 280-290°. The "correct" new mainspring GR3200 1.30x0.080x200 The original measured about 1.34x0.072x210. So a lot weaker. Which is why I changed it - the shape was fine but the thickness was a lot different.4 points
-
Has anyone tried Heptane or Hexane? I've just bought 3 litres of Heptane https://www.ebay.co.uk/itm/186098040119 This is pretty much the same stuff as Essence Renatta, which is good for a 'one dip' and it's a lot cheaper. The smell is pretty much non existent and for £10 per litre, it's cheap as chips! I'll let you know how I get on with it over the next week, as I like to use Essence Renatta for any hand cleaning of parts, because it doesn't stink of ammonia as #111 does, so I'm hoping this is going to be the same, as it is chemically the same stuff. I'm also sampling a cleaner and rinse from a company called H.P Storey https://www.hpstorey.co.uk/, as they sent me some samples to try and do a write up on them. So far, they are better than L and R cleaner and rinse in their cleaning power, but it's early days and want to see if the same amount of movements can be cleaned as L and R products, but so far the results look really good and it is cheaper, although it smells pungent, even without ammonia in it.2 points
-
Check out this video around 2:30 and you can just make out the end in this clip.
 2 points
 -
GOT IT! Thanks again everyone...2 points
-
https://www.aliexpress.com/item/1005007130769712.html?spm=a2g0o.home.pcJustForYou.26.650c76dbsQ3KF2&gps-id=pcJustForYou&scm=1007.13562.416251.0&scm_id=1007.13562.416251.0&scm-url=1007.13562.416251.0&pvid=7d3d8ae1-630c-4aa4-b3ab-660351cbc021&_t=gps-id:pcJustForYou,scm-url:1007.13562.416251.0,pvid:7d3d8ae1-630c-4aa4-b3ab-660351cbc021,tpp_buckets:668%232846%238115%232000&pdp_npi=4%40dis!GBP!7.91!2.69!!!70.56!23.99!%40211b804117328967840712061e47a9!12000039506409461!rec!UK!2690227082!XZ&utparam-url=scene%3ApcJustForYou|query_from%3A The algorithm knows too much. This is AliExpress's latest suggestion for me. I have no affiliation whatsoever with this seller, but I thought these T shirts might amuse one or two of you.
 2 points
 -
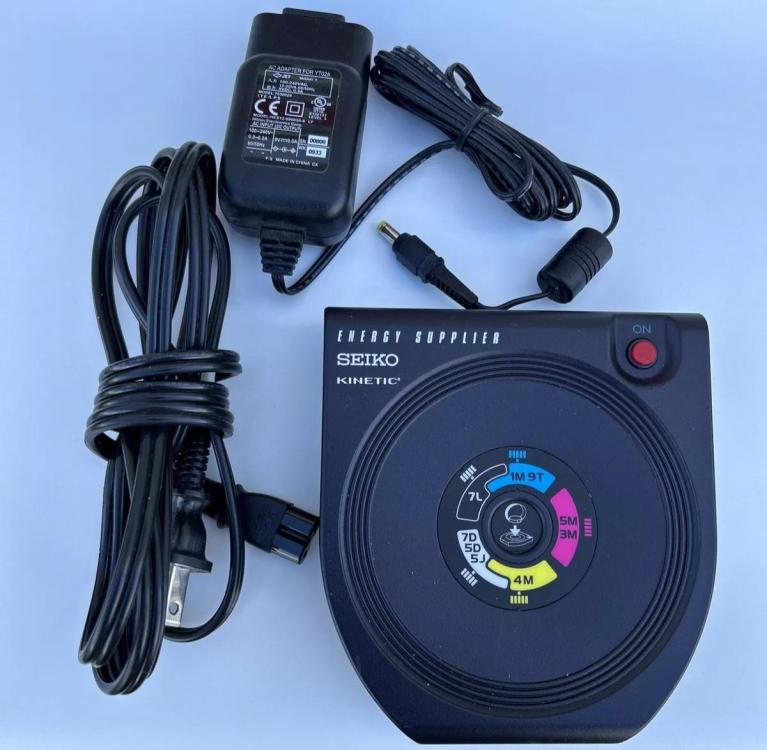
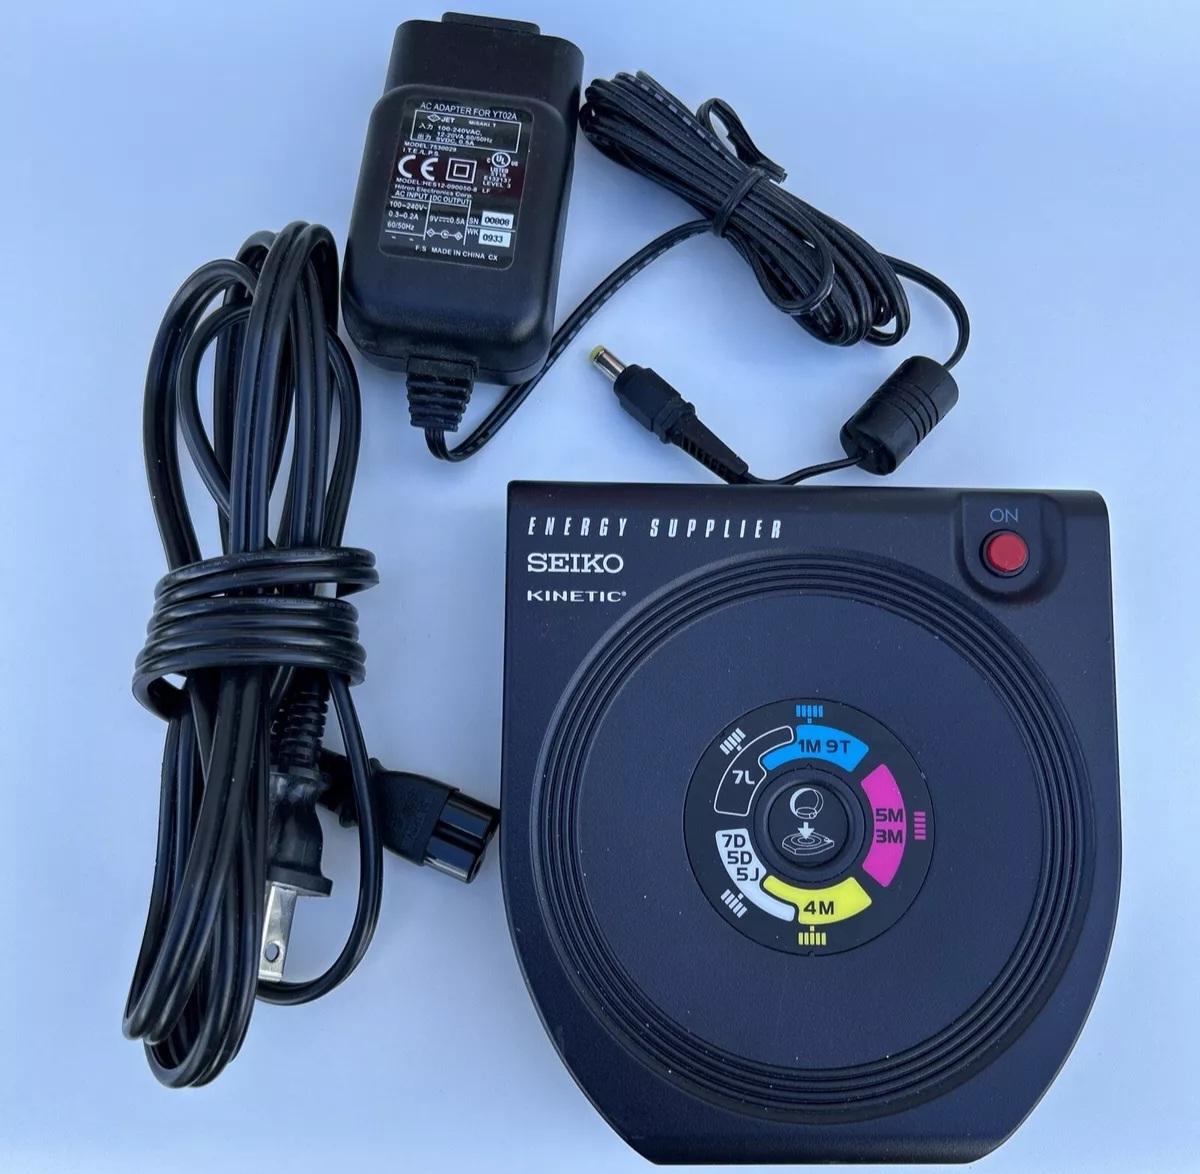
I have an old Seiko AGS watch, which I inherited from my father. This was the precursor to Kinetic watches. It uses a gold capacitor to store electrical energy, unlike modern kinetic watches that use a rechargeable lithium battery. The downside is that a gold capacitor only stores enough energy for about 48 hours. I'm not sure if the generator of my watch is wirking properly but the movement from normal everyday activities is not enough to keep the capacitor charged up. Regular automatic watch winders just don't have enough speed to wind a Seiko Kinetic watch. A special charger for the Seiko Kinetic on eBay costs around $350. I wasn't going to spend that kind of money just for charging Kinetic watches. I managed to use a wireless charger from an old electric toothbrush for charging my Kinetic but it was rather fiddly. The coil of the generator had to be placed in a sweet spot over the coil of the toothbrush charger for it to work properly. If it wasn't placed properly, the watch just wouldn't charge. Then recently, I discovered that a cheap charger from AliExpress had enough kinetic energy to charge a Kinetic. The plate swings 'violently' enough to charge up the capacitor. An hour of violent swinging is enough to give the watch a full charge. So far I'm happy with this winder. It lets me enjoy my Kinetic again. A short gif to show how violent the swinging gets.

 1 point
 -
I put quite a bit of 8217 around the barrel wall of a 7S26C, but not paint it on and use a 0.95 x 0.115 x 380 x 10 mainspring and get this. The thing with Seiko's is there so many variables that have nothing to do with the mainspring, just because of the movement and the amount of wear in these movements. One of the biggest wear being the barrel arbor hole in the bridge or mainplate. I would look at braking grease lubrication technique, rather than looking to change your grease, but that's just me, as I've found what works for me. As they say, 'the proof is in the pudding'
 1 point
 -
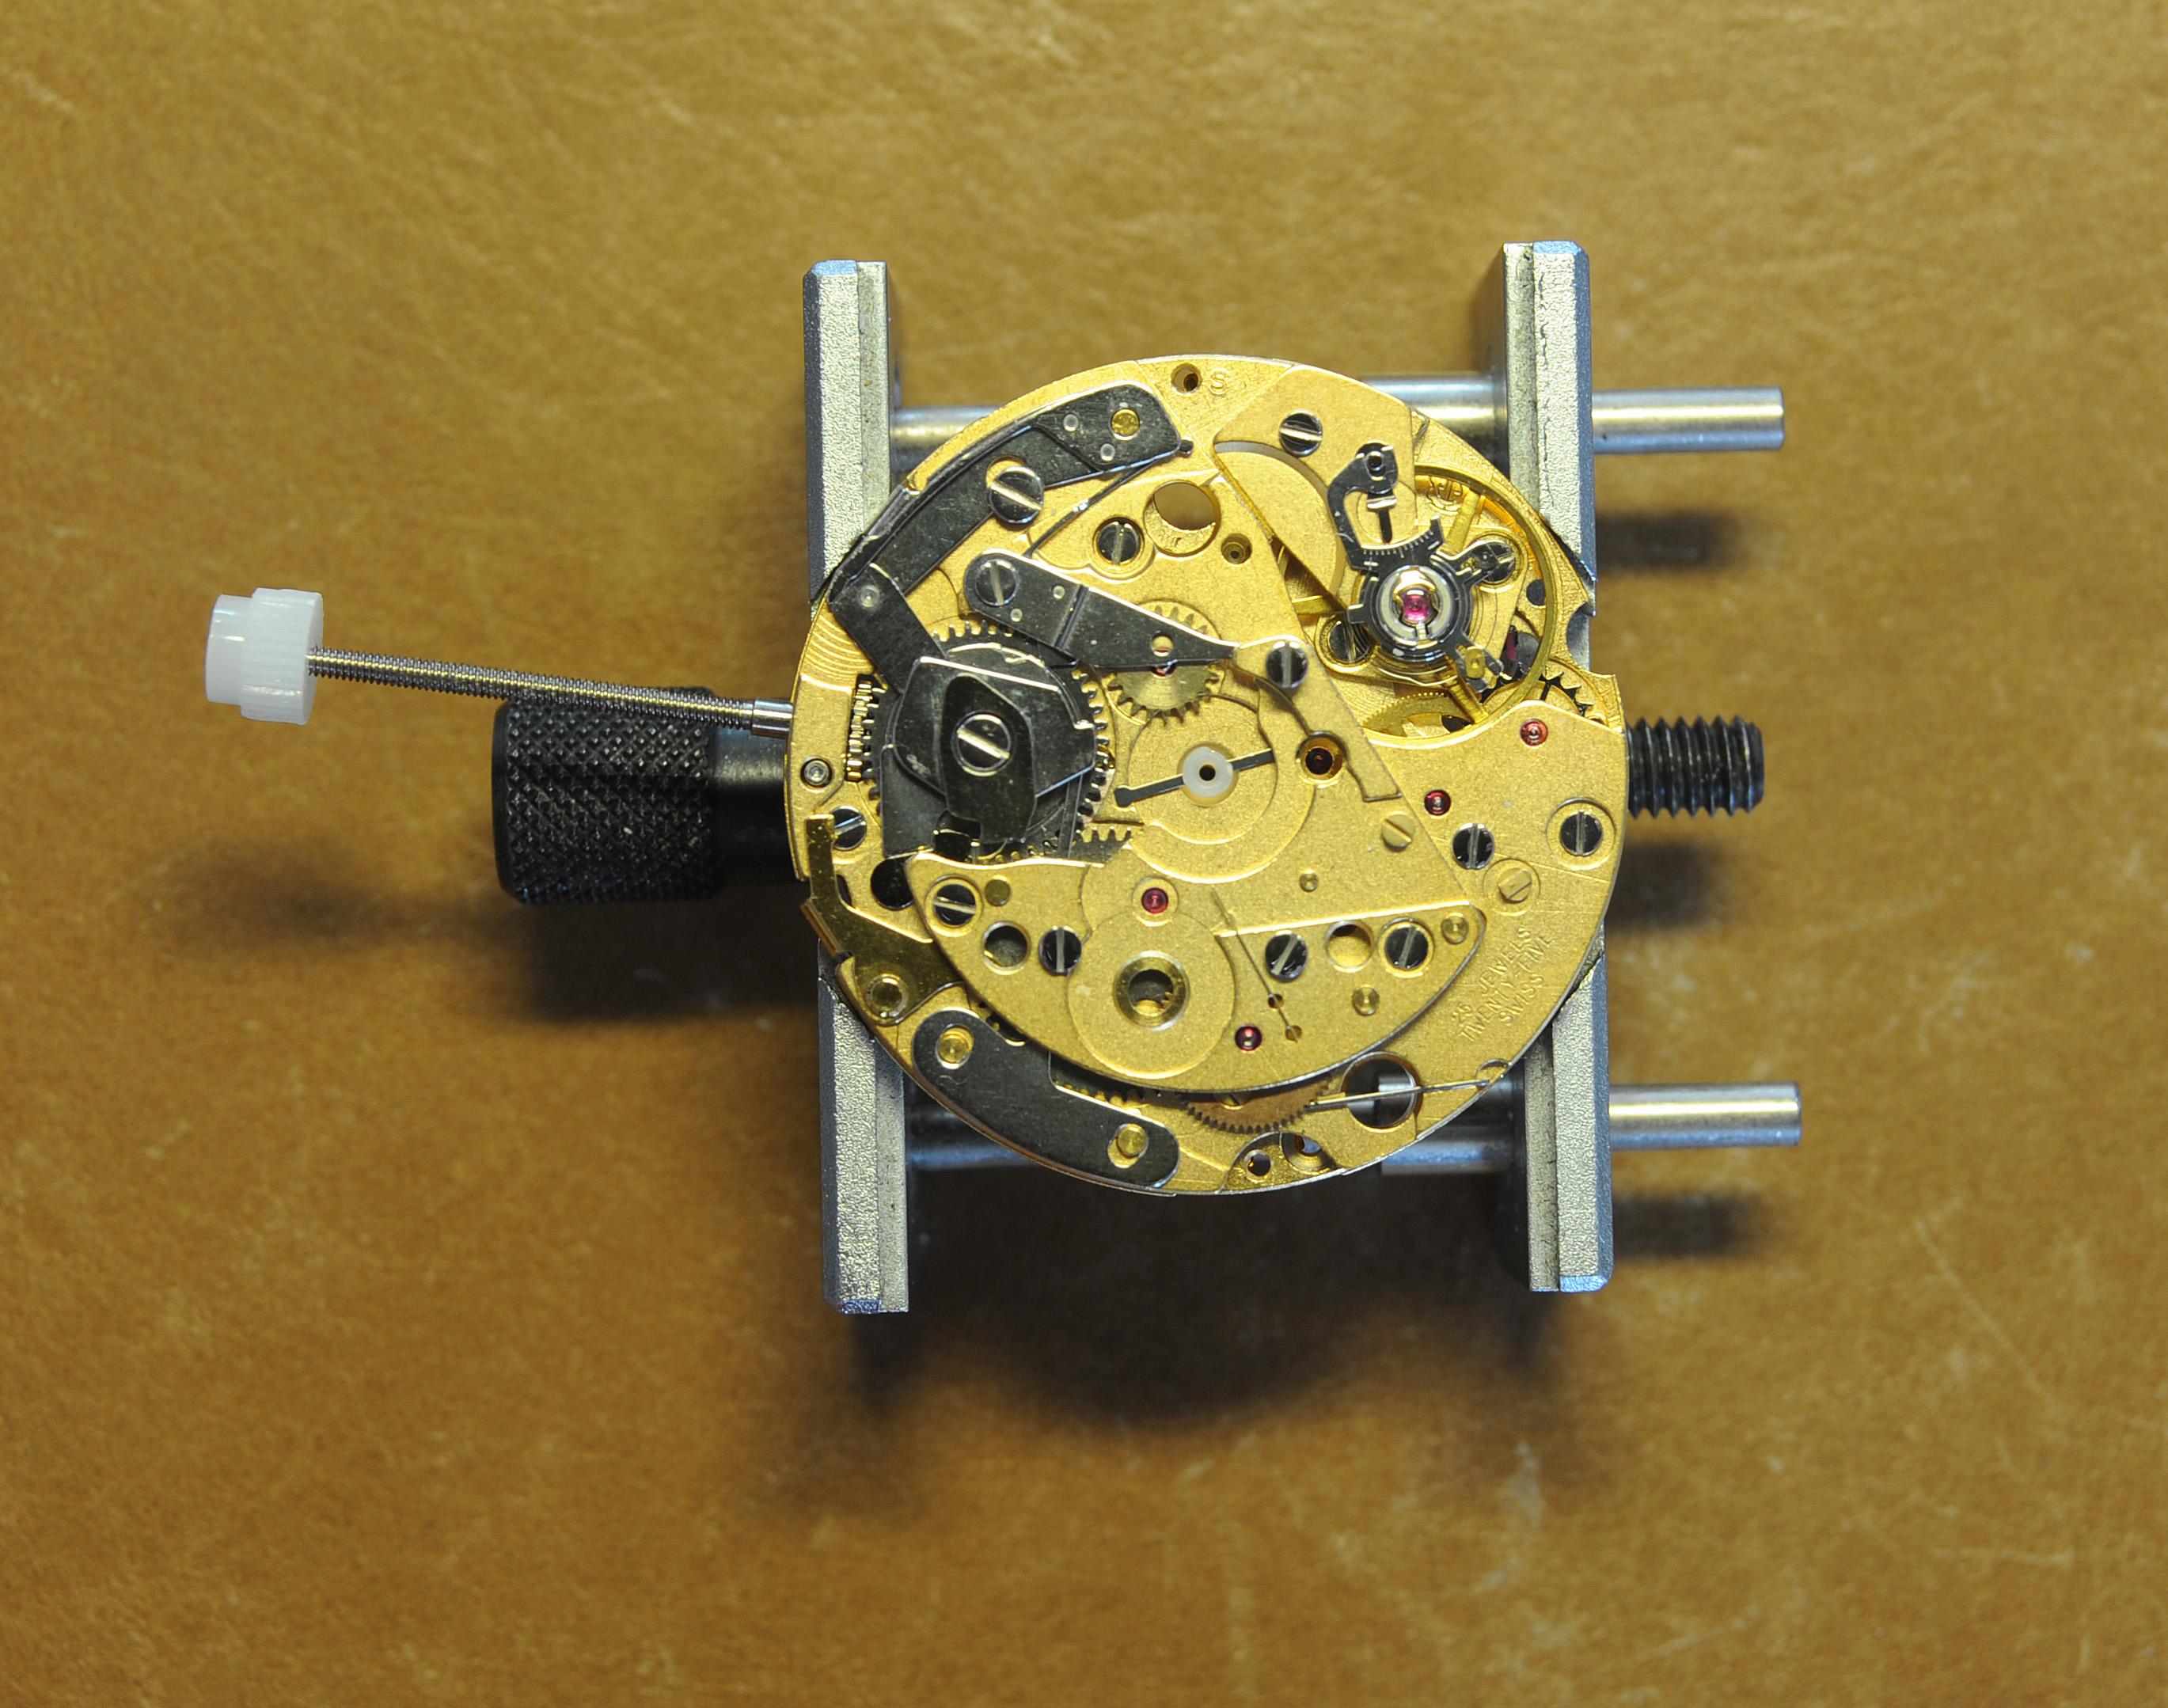
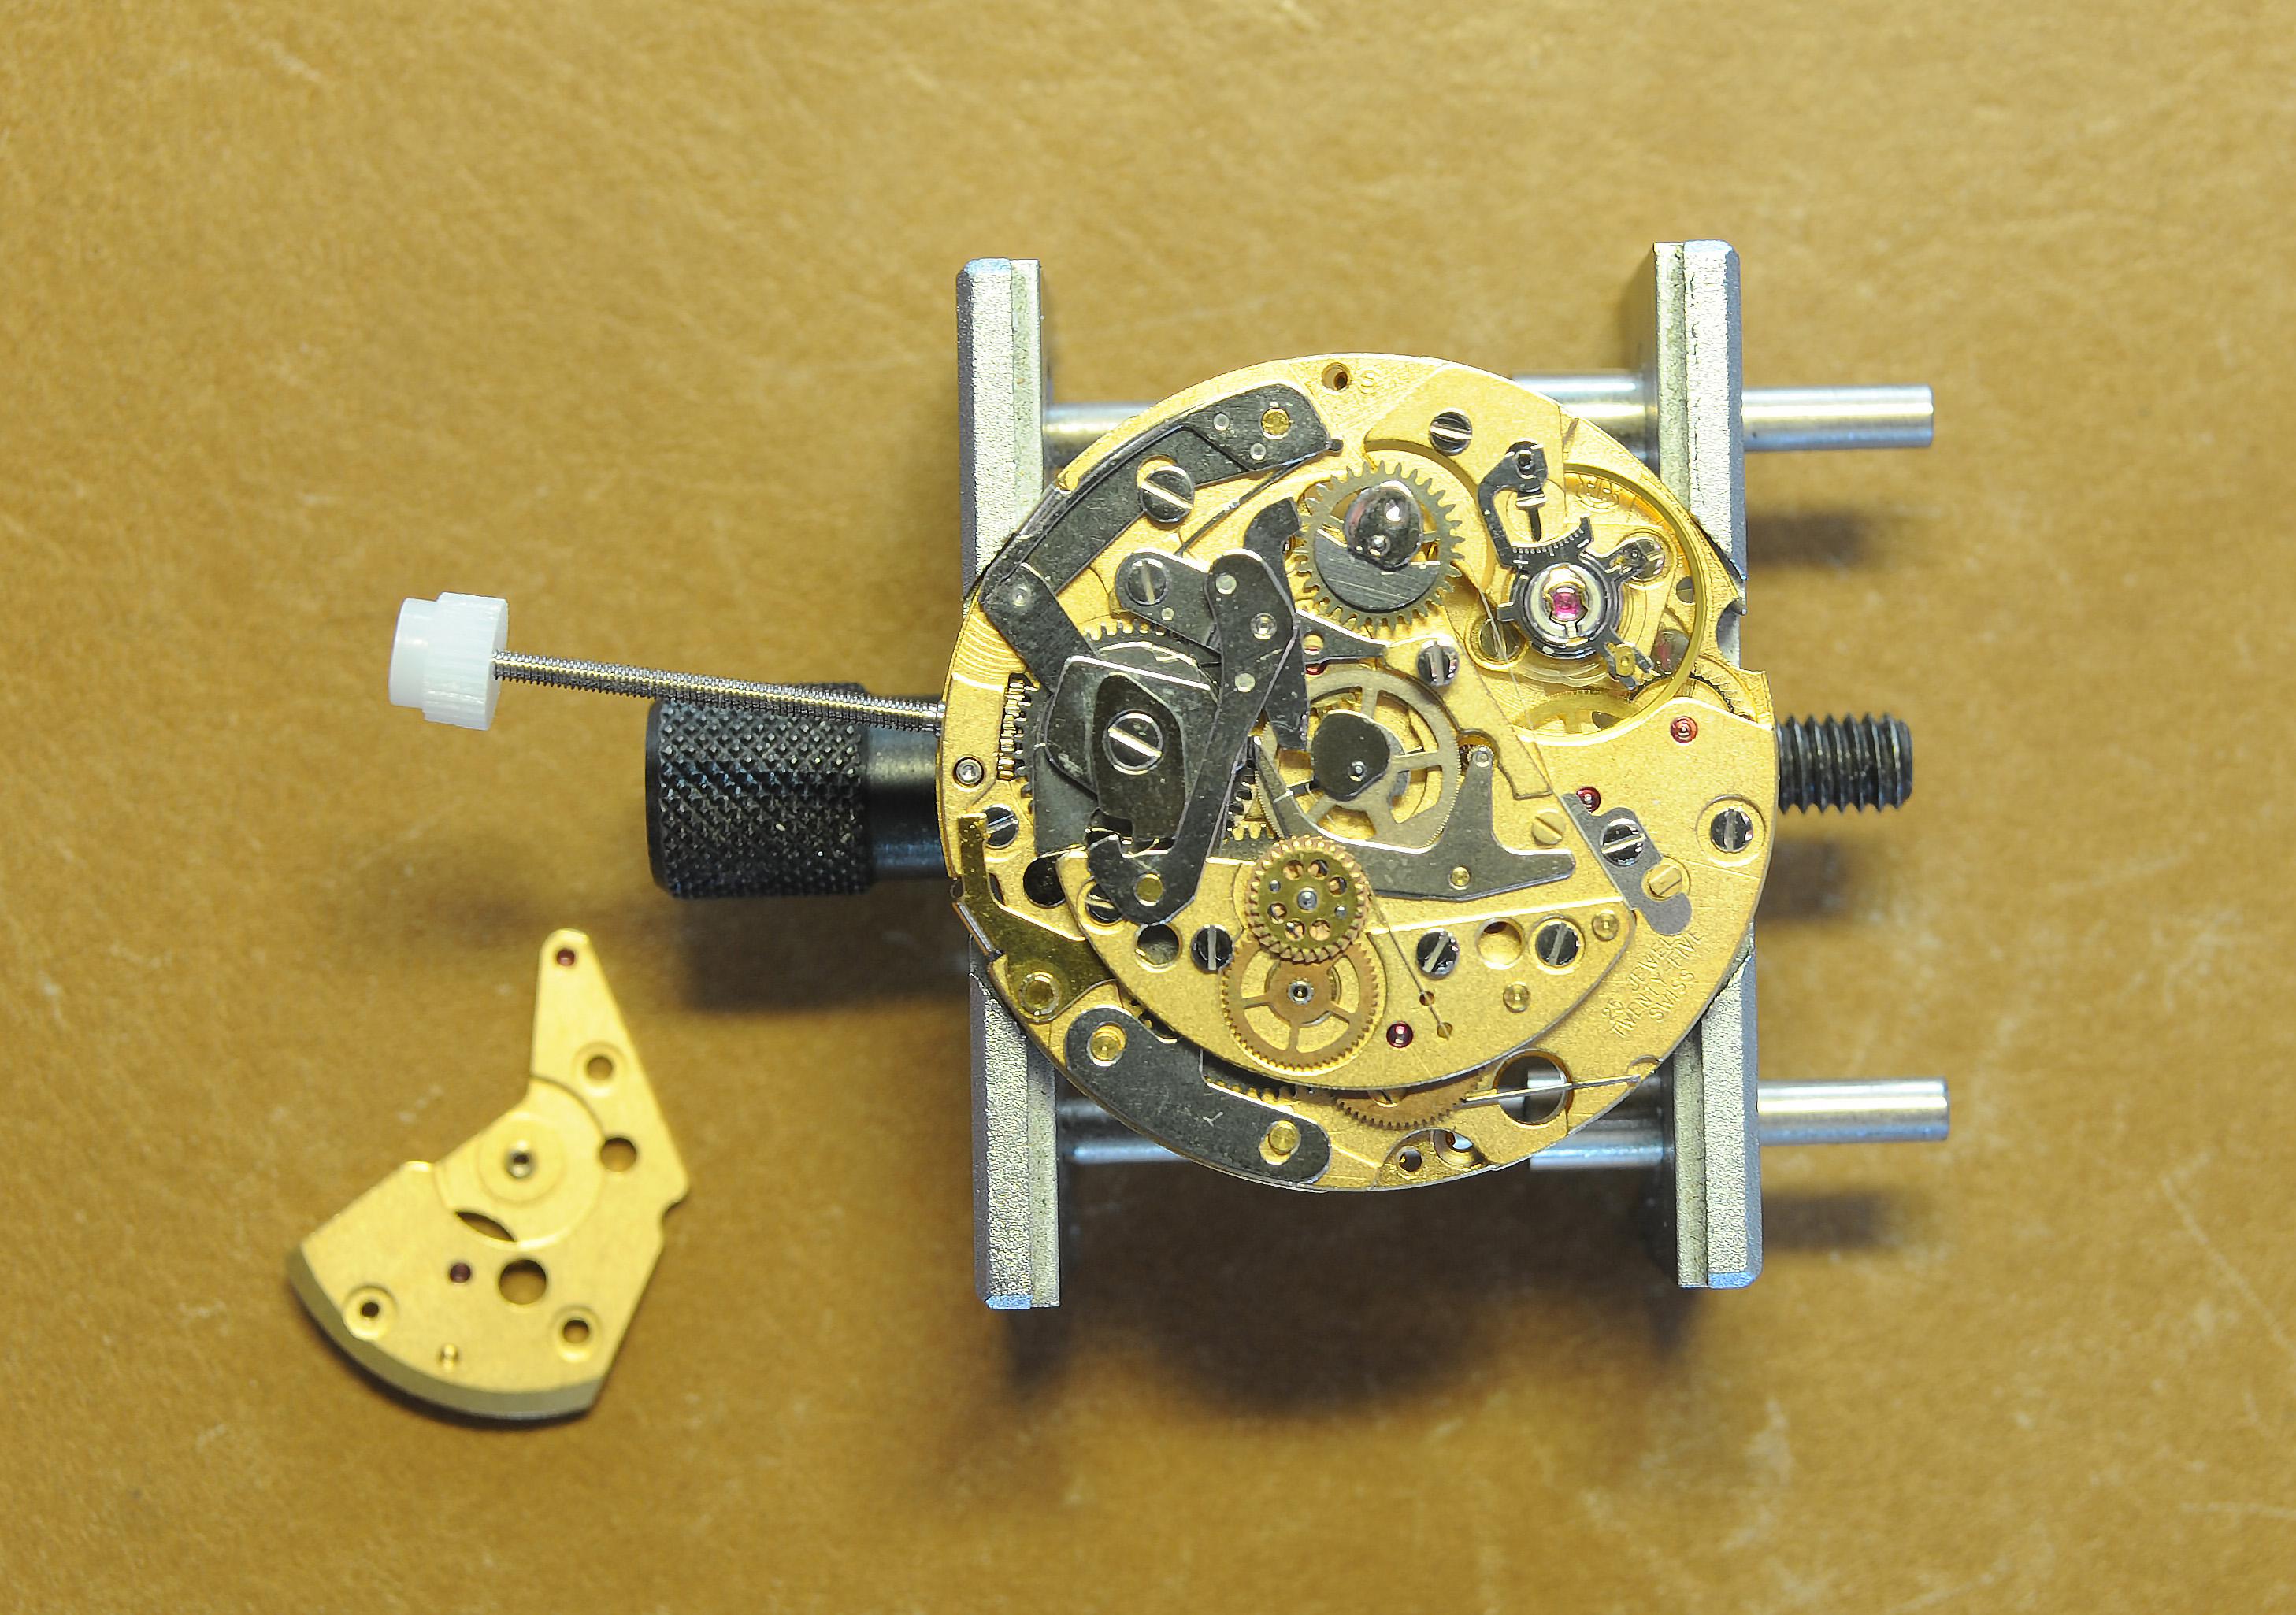
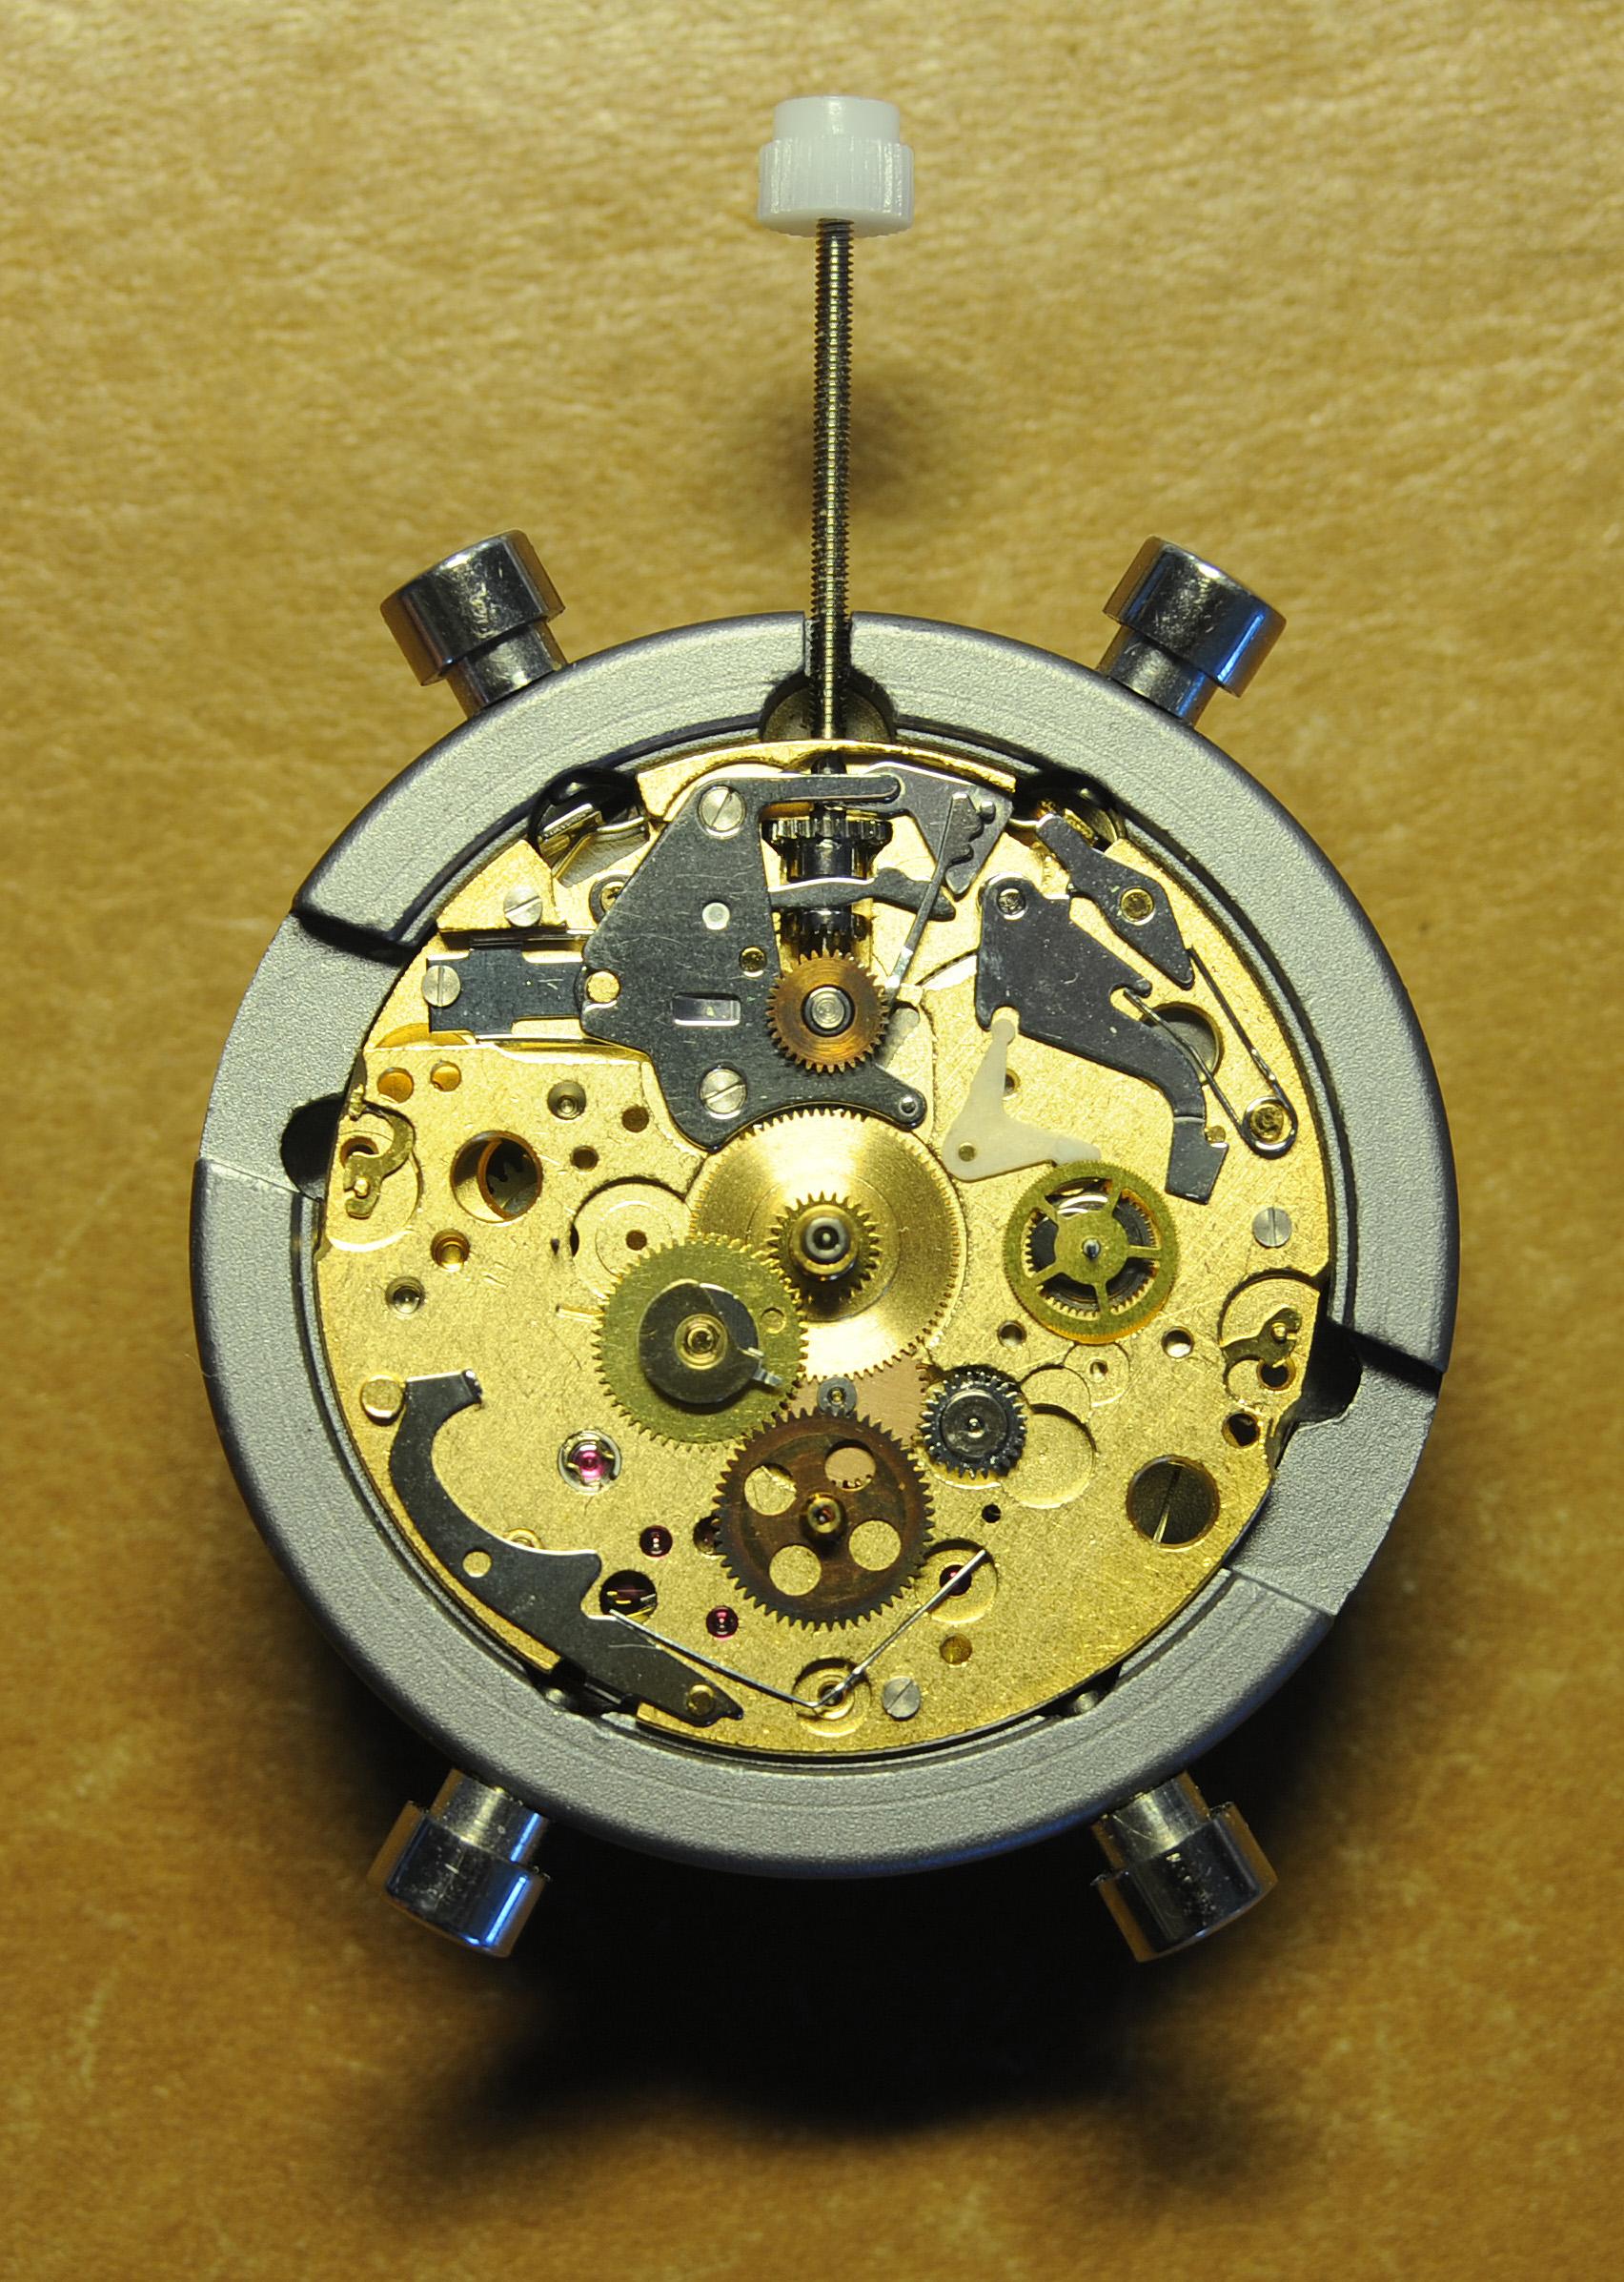
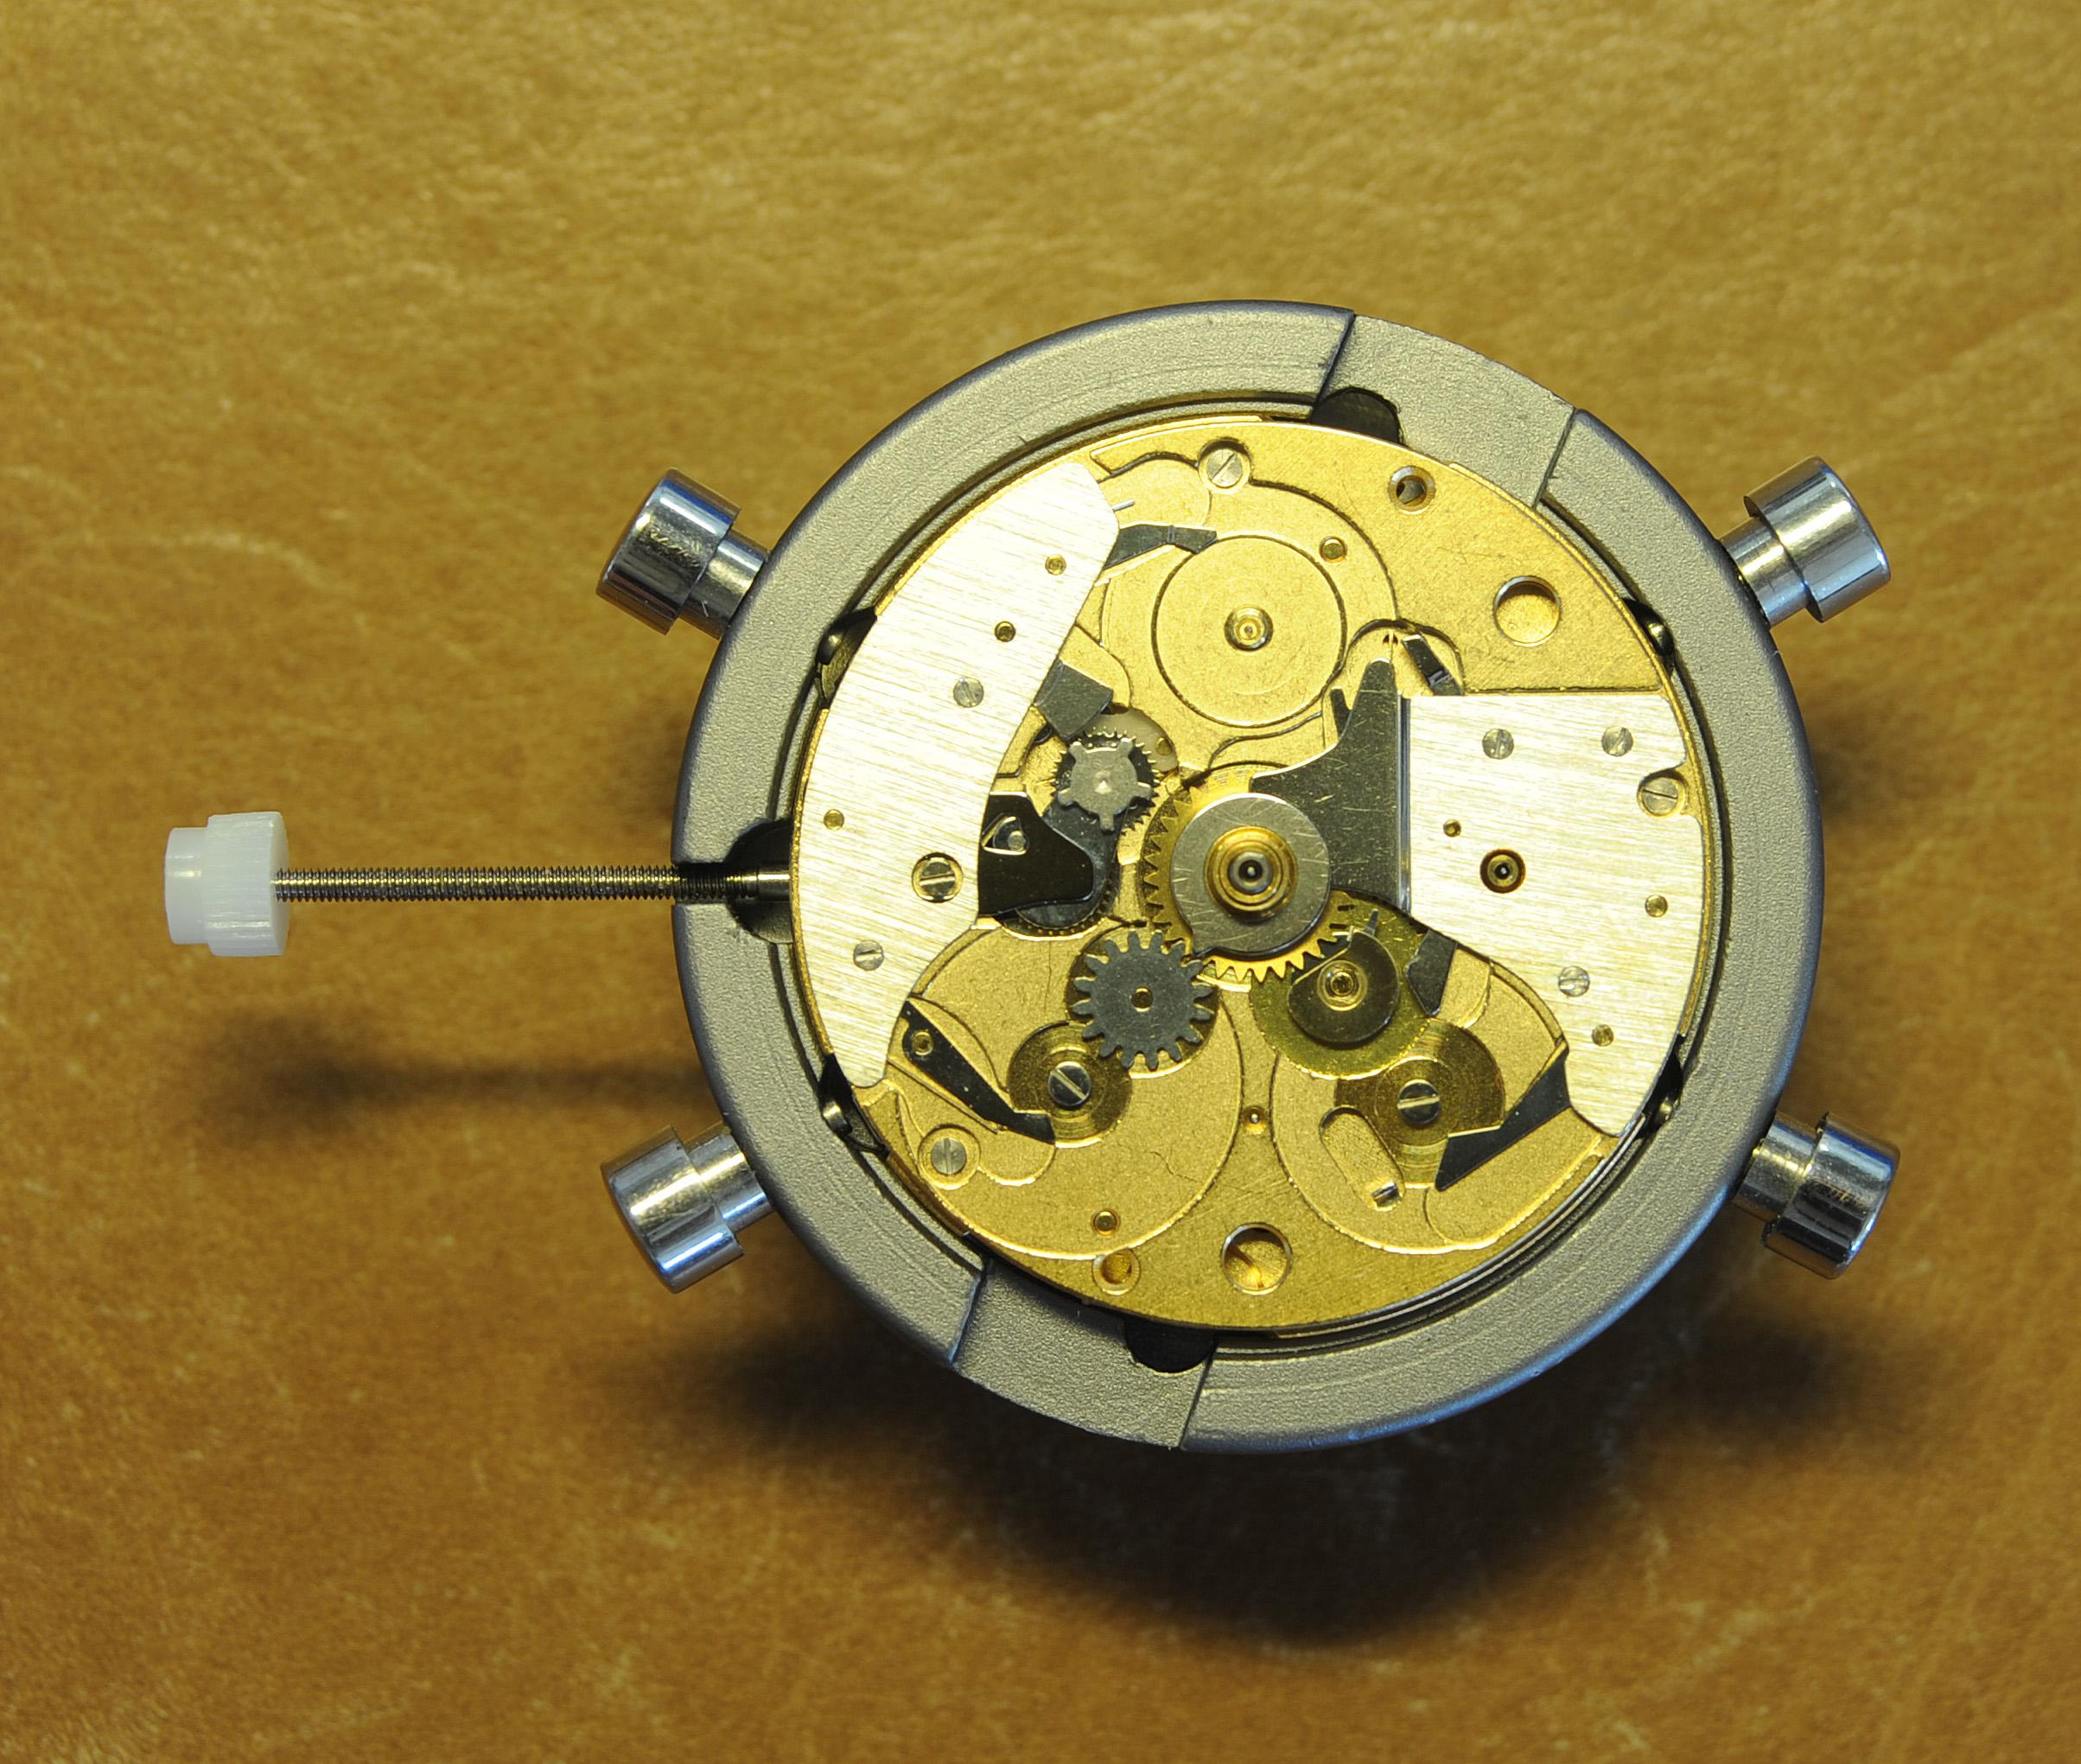
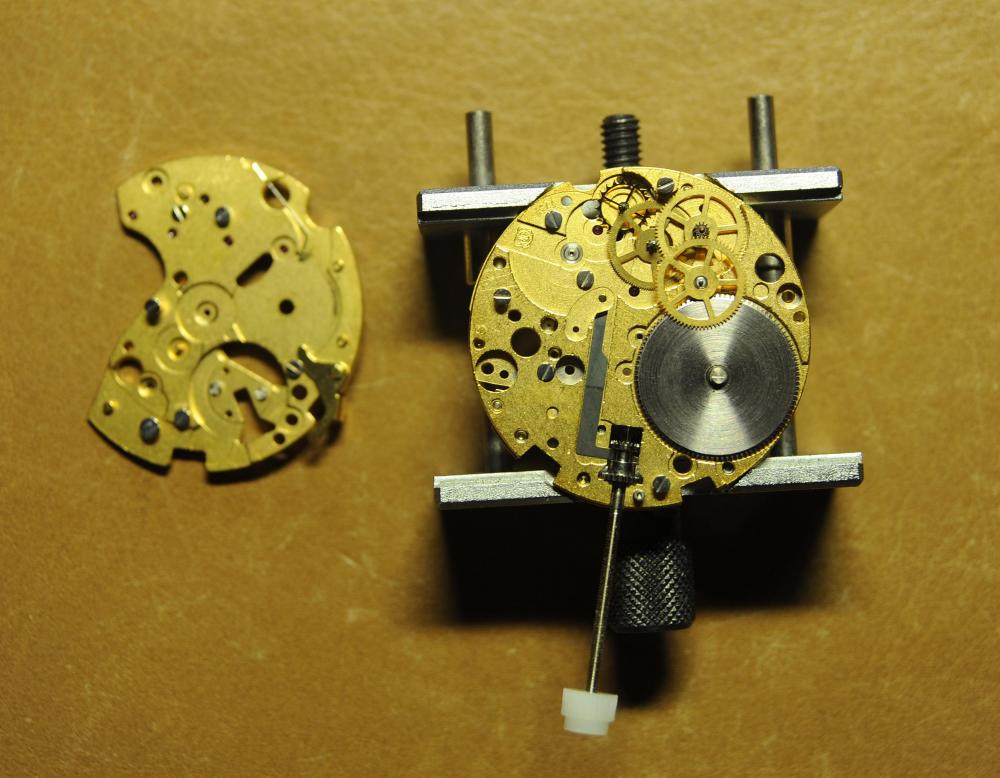
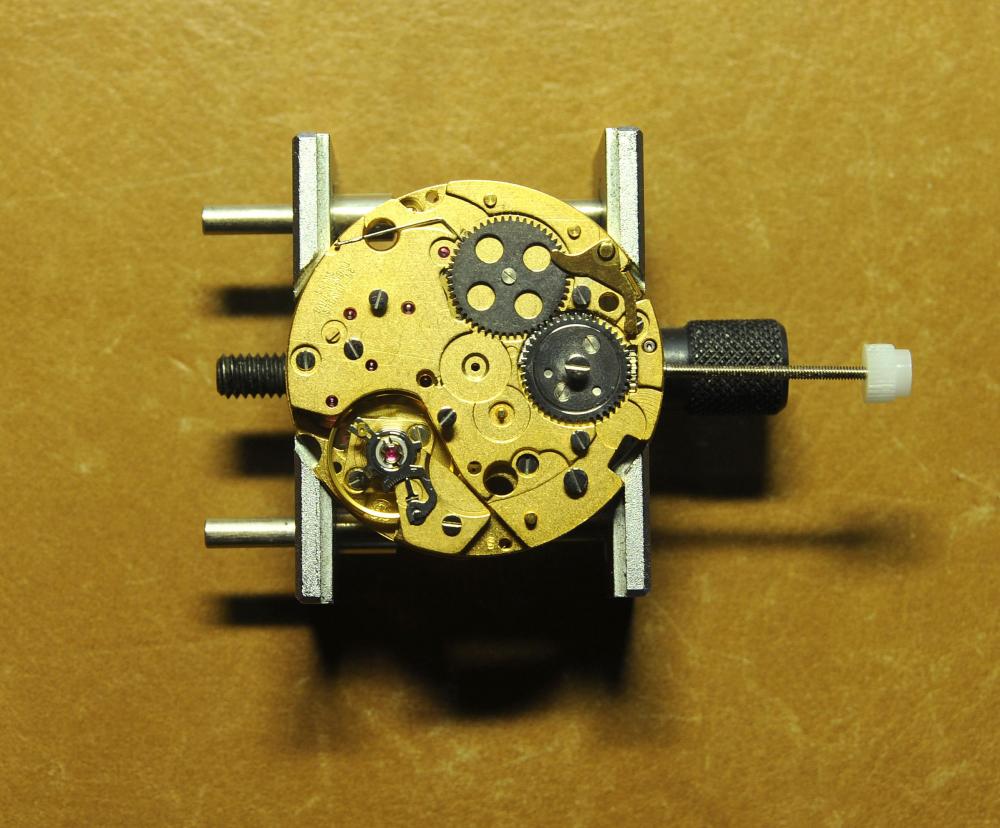
There's no quickset on this movement so you just have to take it backwards and forwards between about 8 & 12.1 point
-
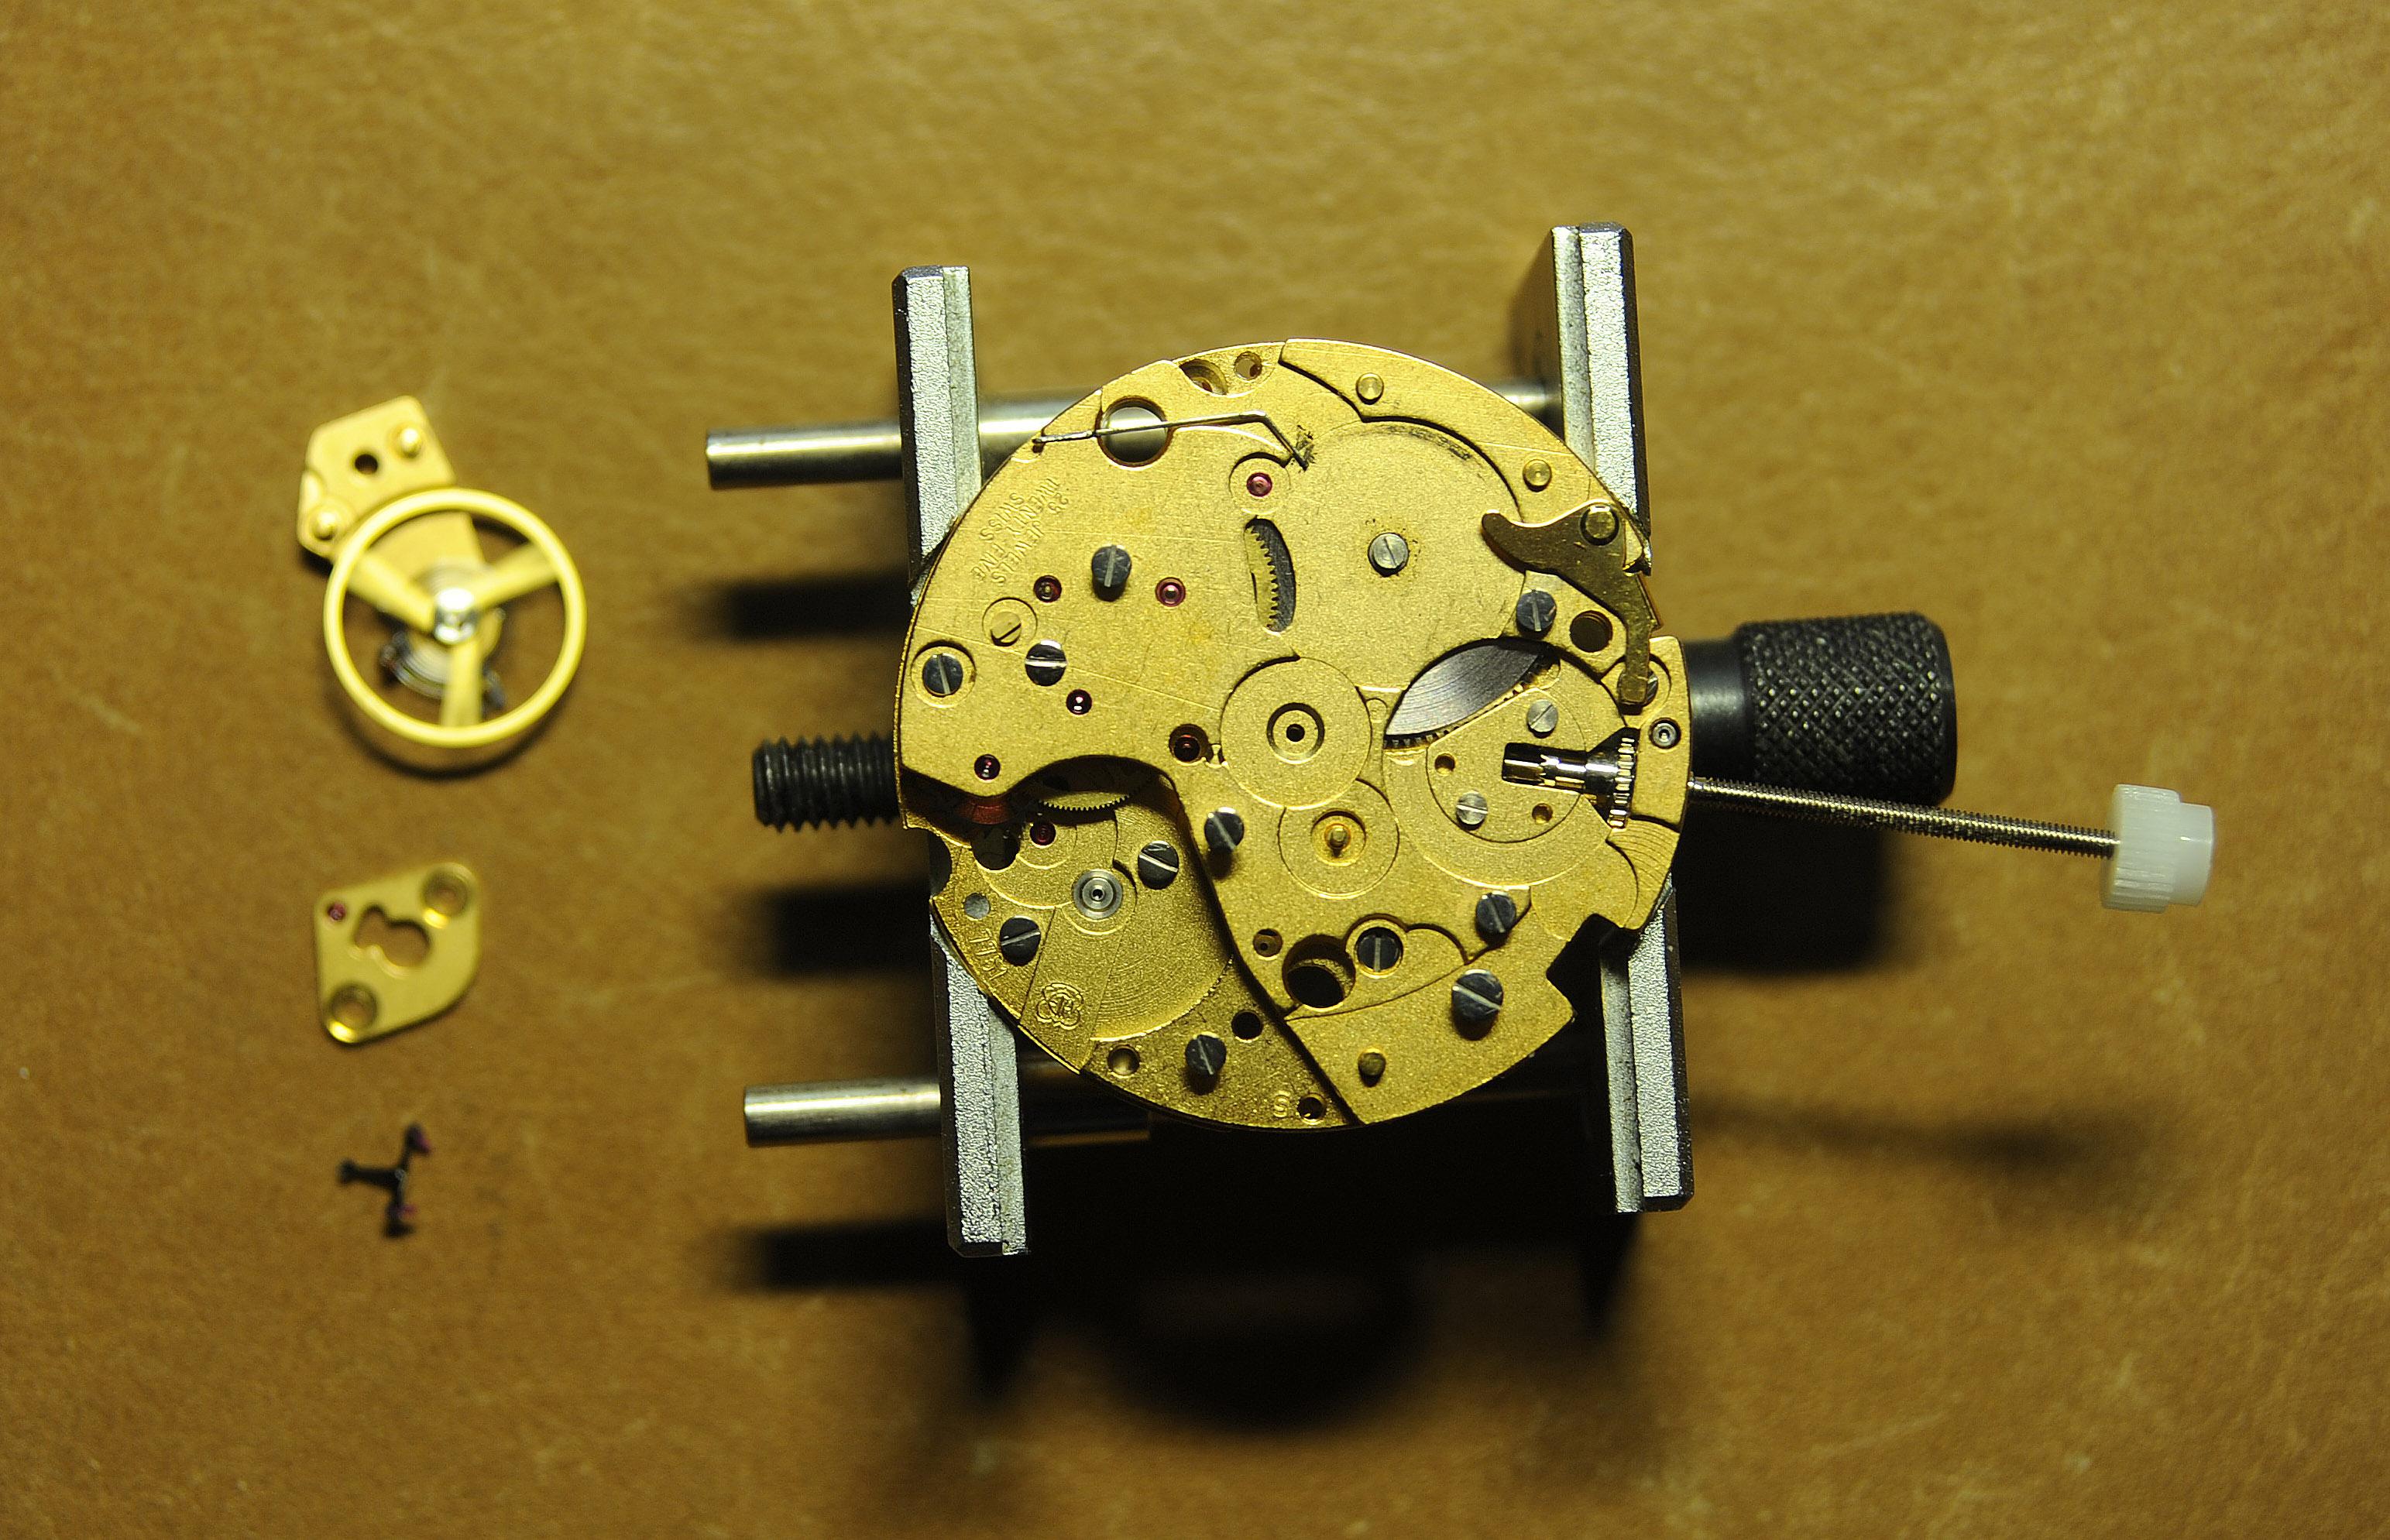
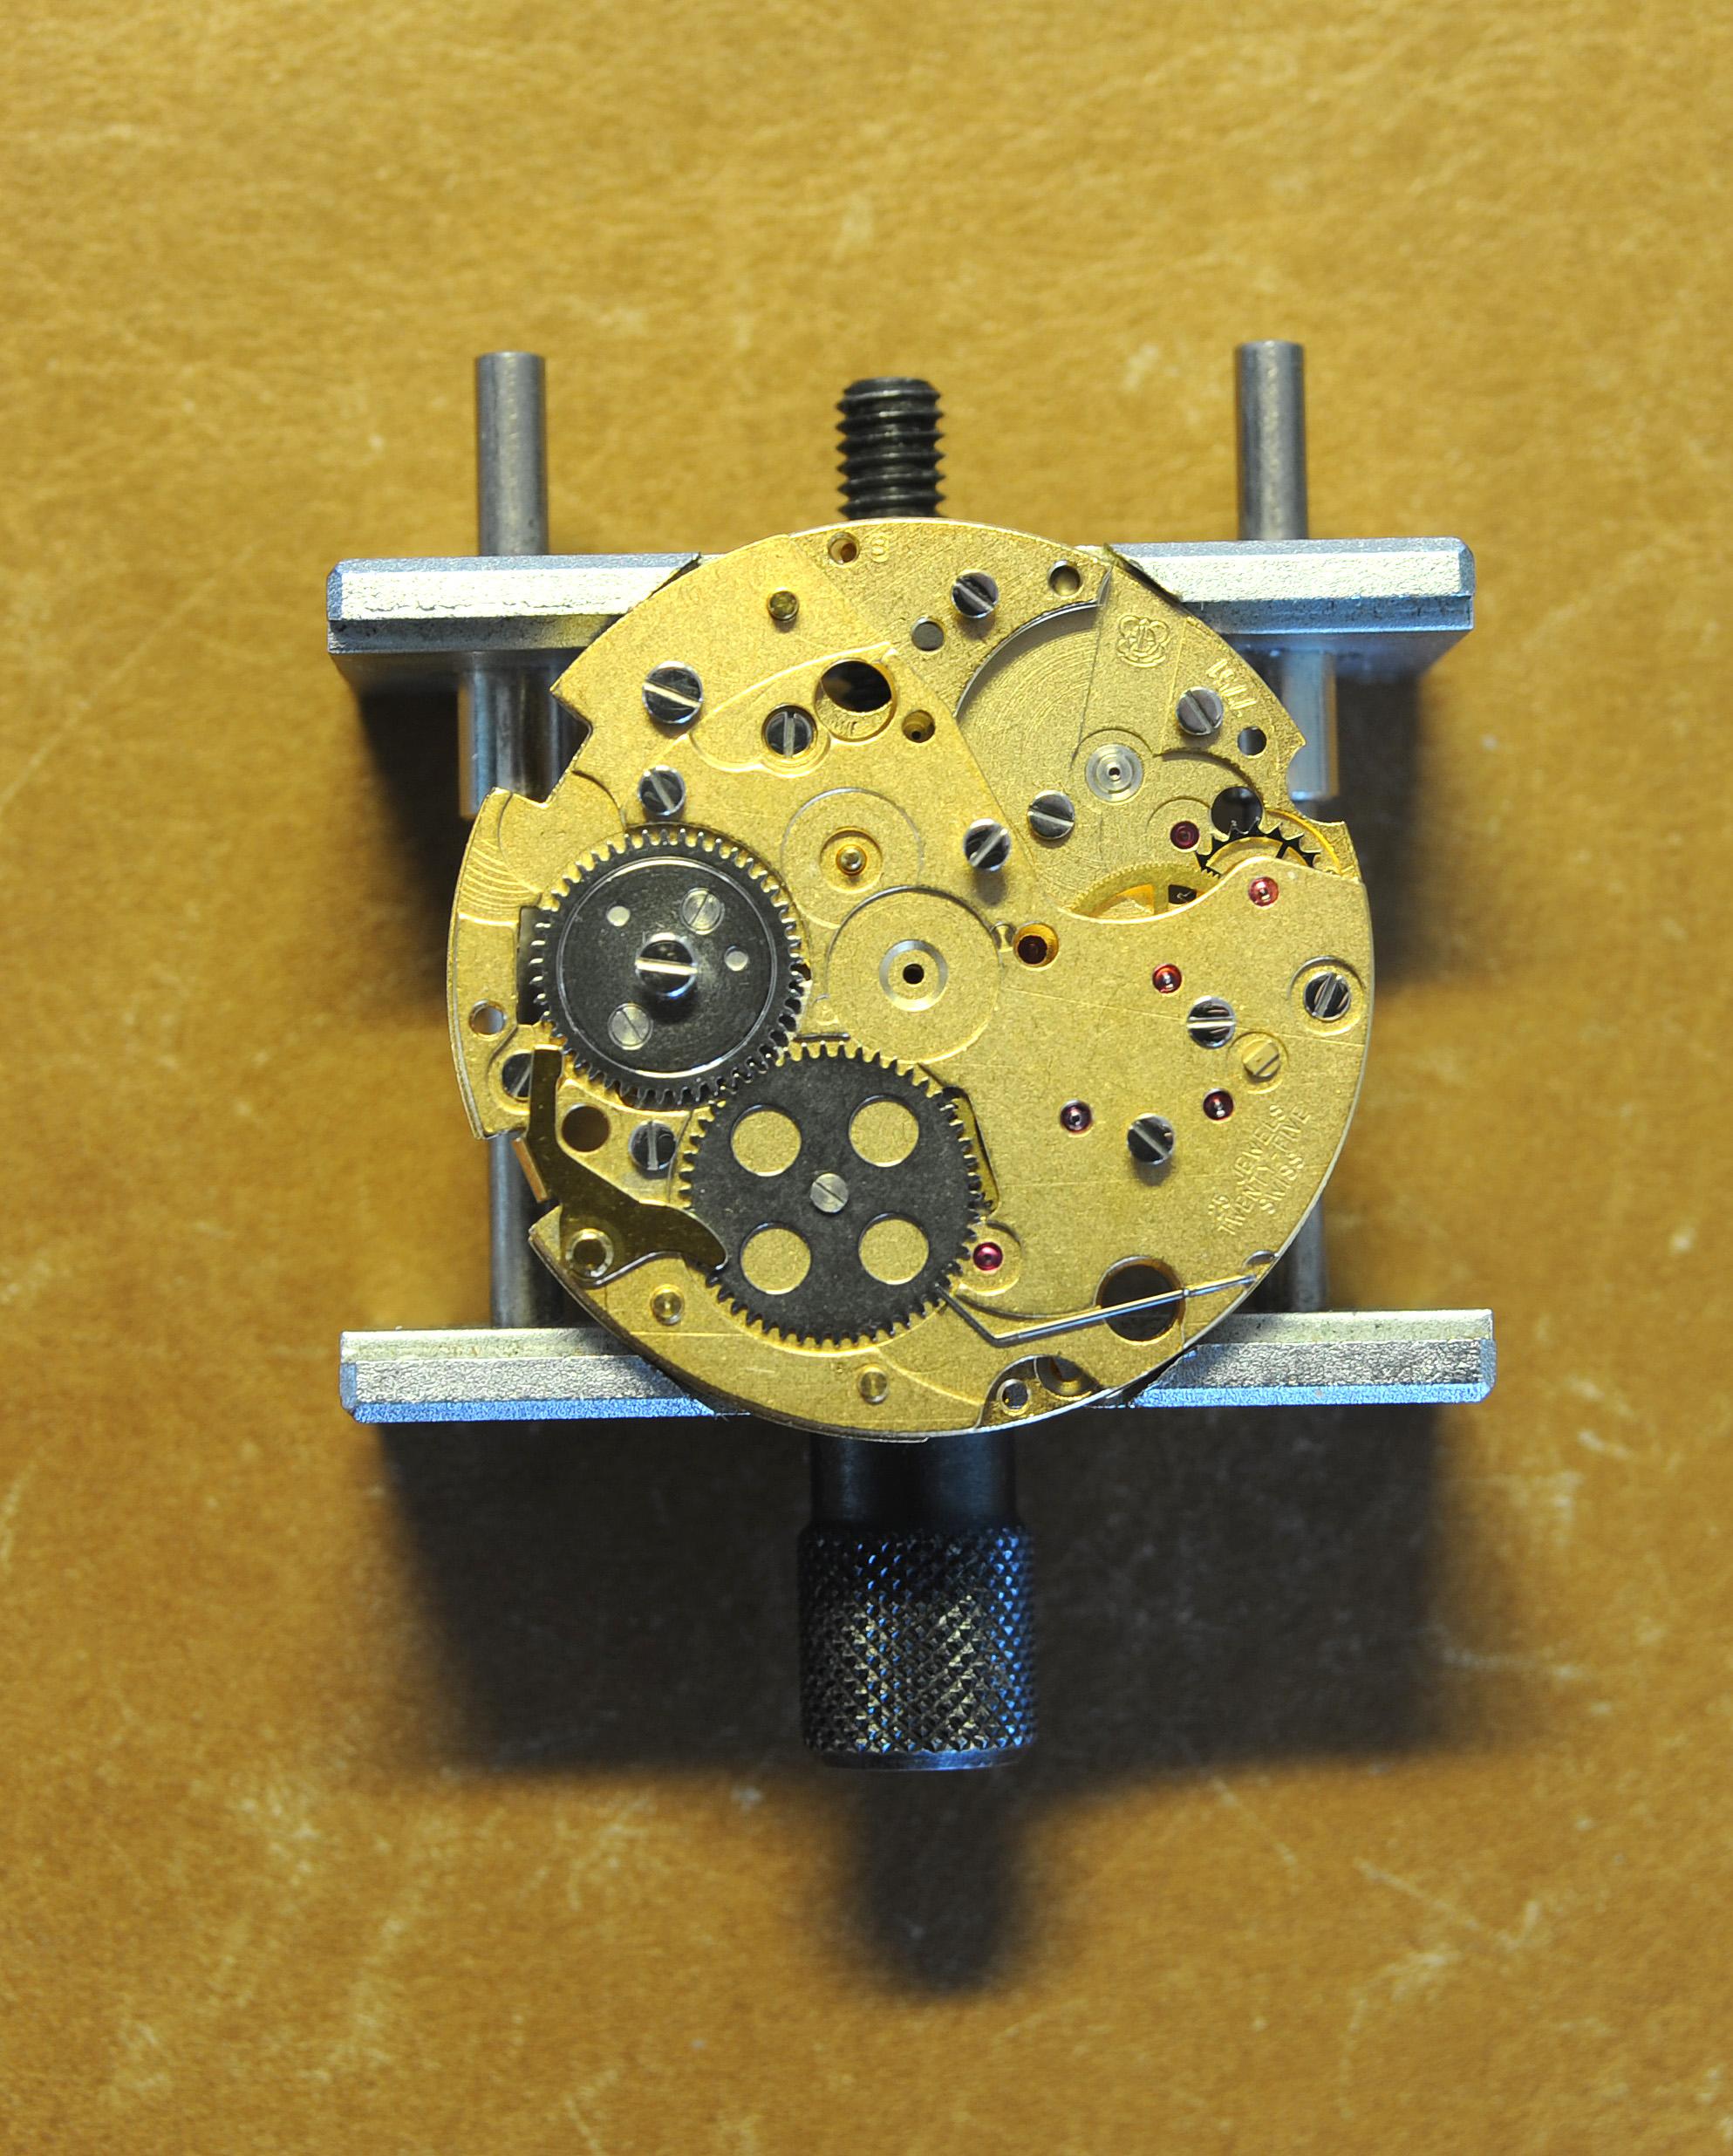
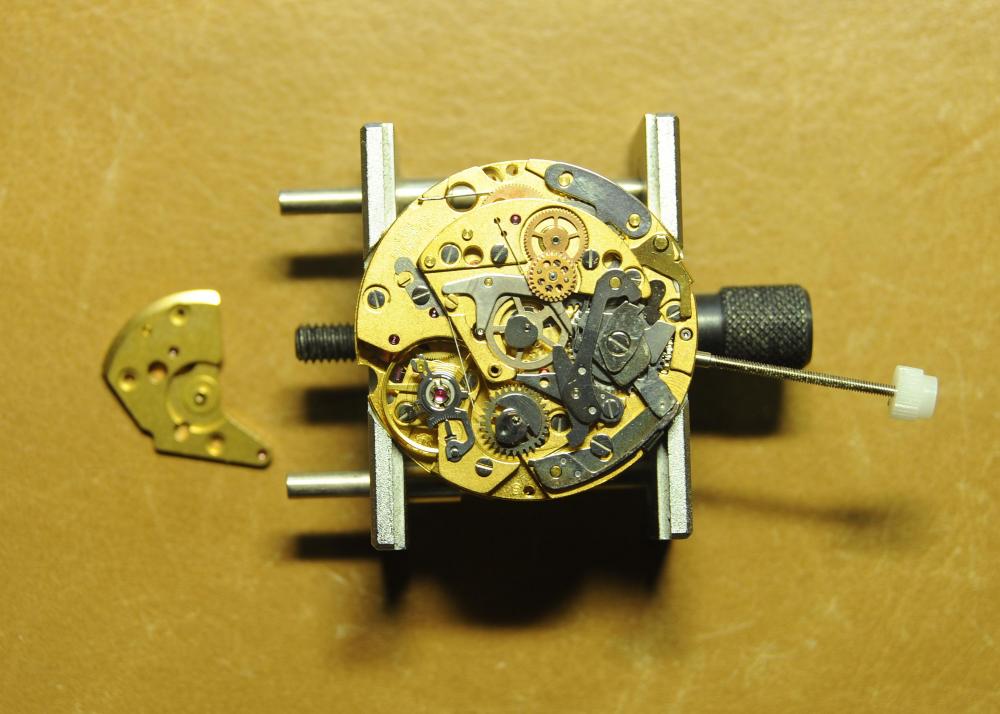
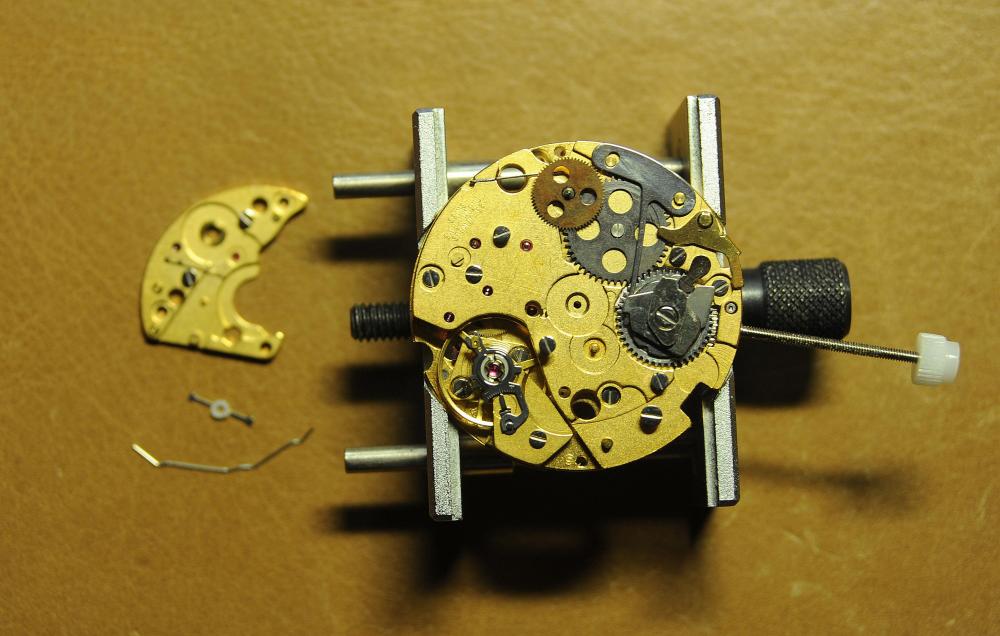
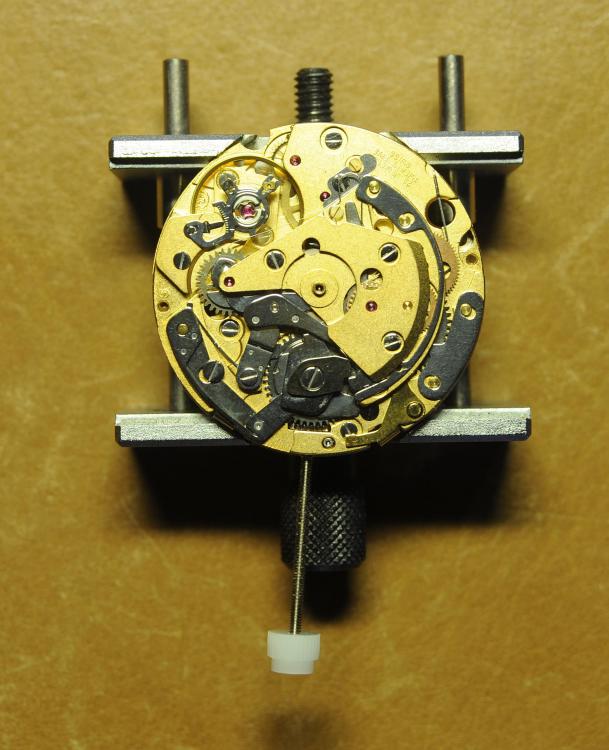
Spring is correct and think it's the correct way up now to sit under the click.
 1 point
 -
sometimes a review of the entire cleaning procedure is in order. As a proper cleaning with IPA should be fine. If you didn't have the IPA then things get interesting because the rinse doesn't always like to evaporate which is why you using the IPA or some other substance.1 point
-
I can't be bothered today, I'm just going through the motion-s.
 1 point
 -
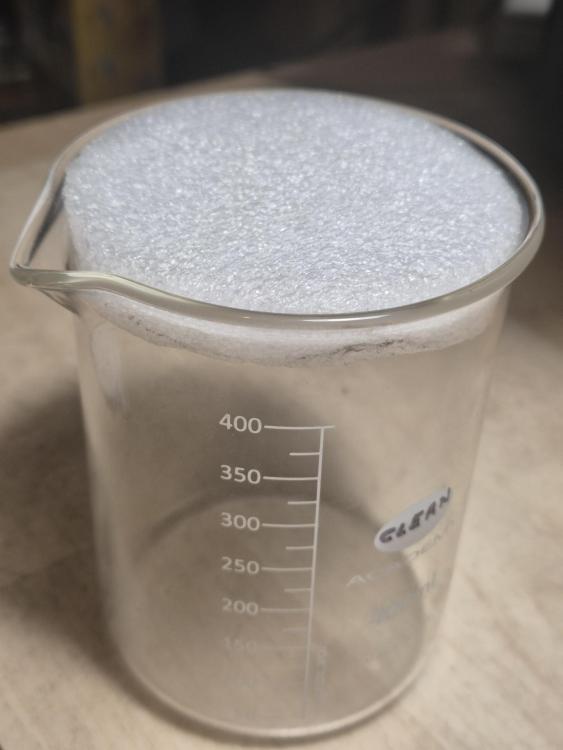
I cut some foam to use as a bung on the beaker to cut down on the smell. I use Elma solutions. I guess the formulas are similar to L&R? The WF Pro cleaner doesn't smell much, but the rinse Suprol Pro absolutely stinks.
 1 point
 -
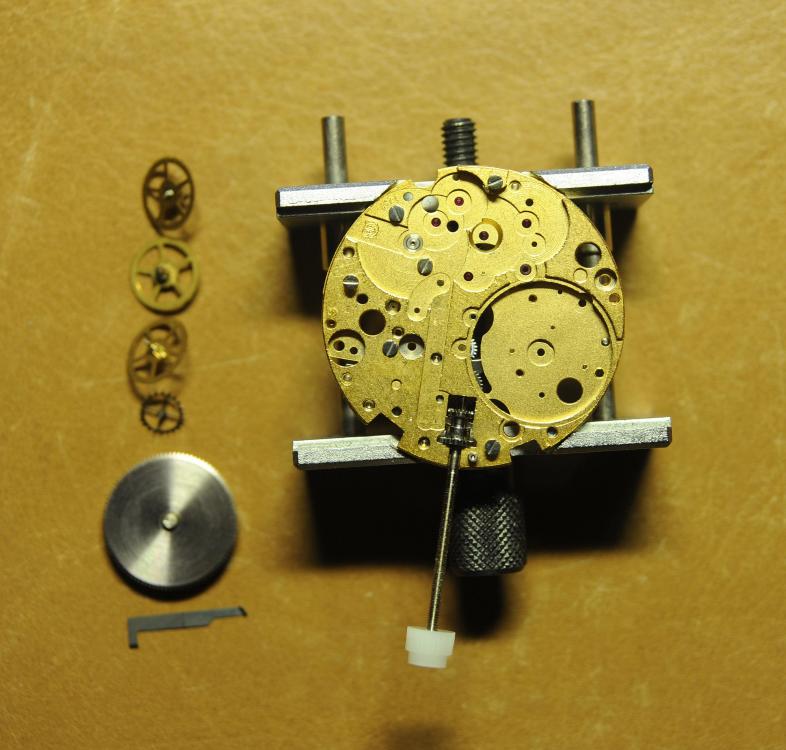
Is that not a screw in the side for the dial feet? Back to your original question it looks like an AS 612 so would be a good place to start once you've measured the existing spring.
 1 point
 -
The circuit will give an impulse to the rotor if the battery and circuit are good, and this is audible and gets picked up by machines. But- if there is a blockage in the train, the hands don't move. A typical blockage is a sliver of metal from a screw (from wrong size screwdriver for example) that will almost inevitably make its way to the highly magnetic rotor.1 point
-
Me too. I suspect the residue in and around my jewel holes might have been L&R rinse #3 which is mainly mineral spirit. Maybe my final rinse cycle with IPA wasn't efficient enough or it was contaminated.1 point
-
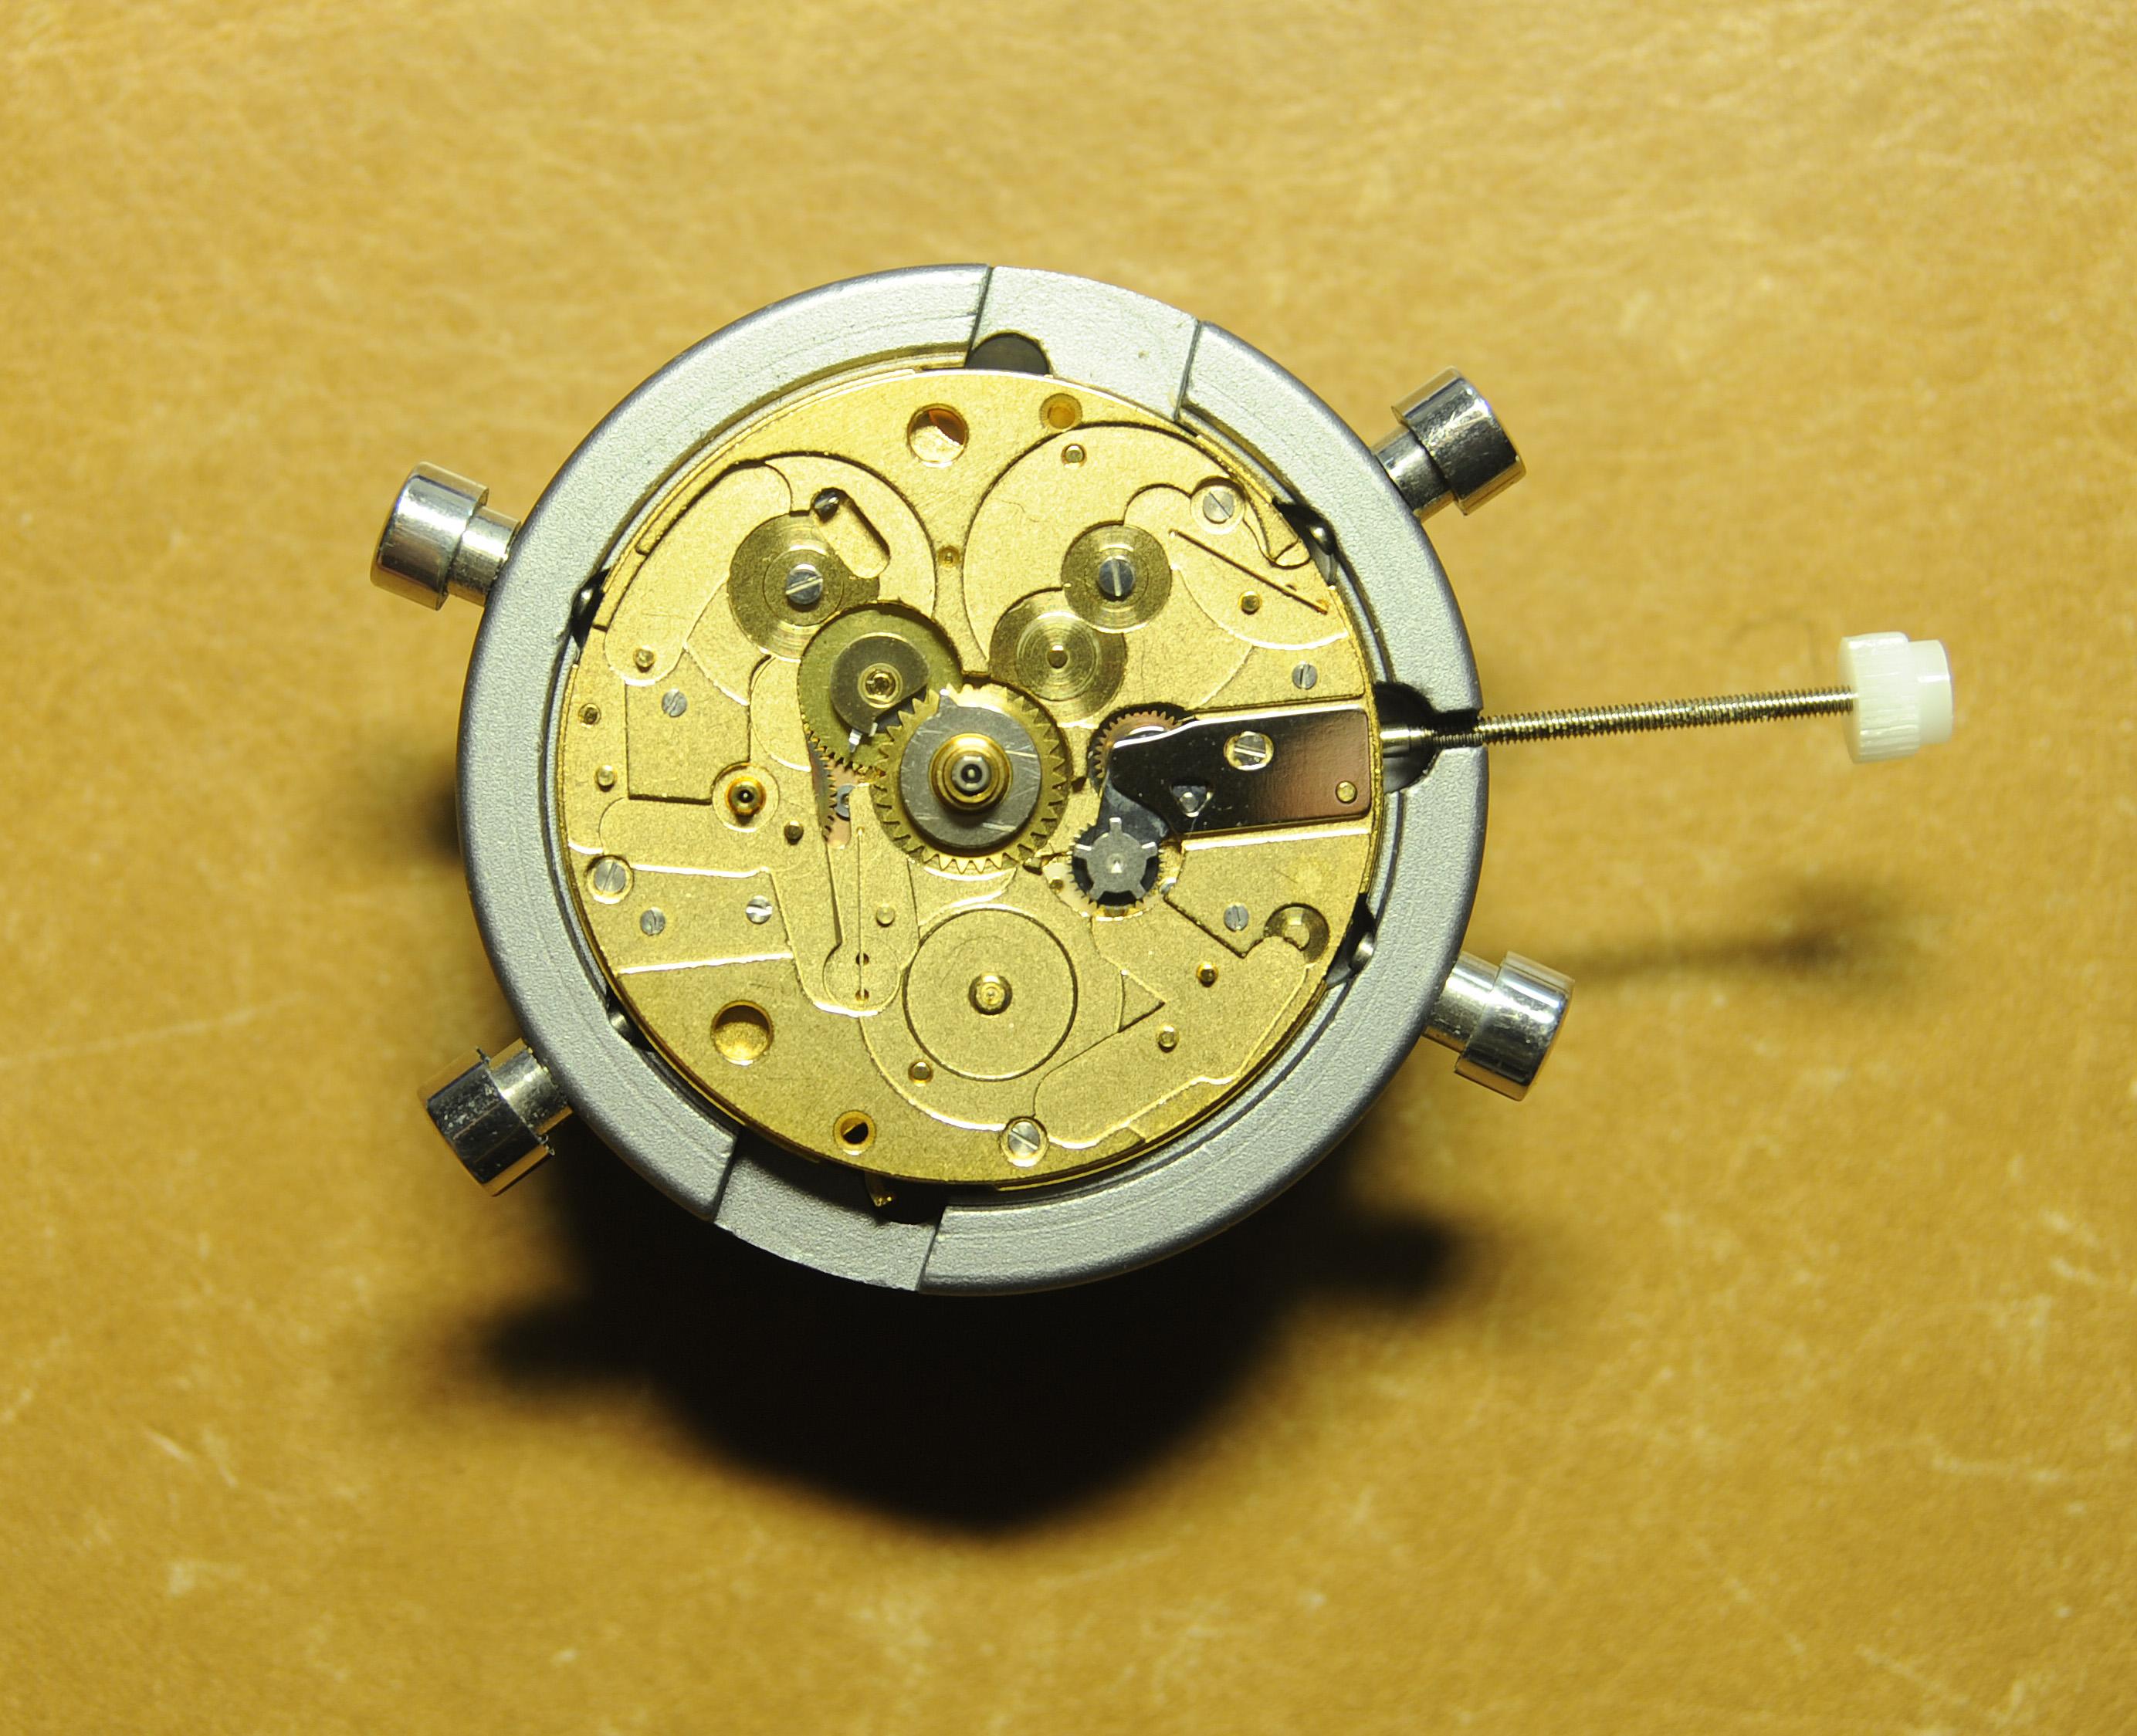
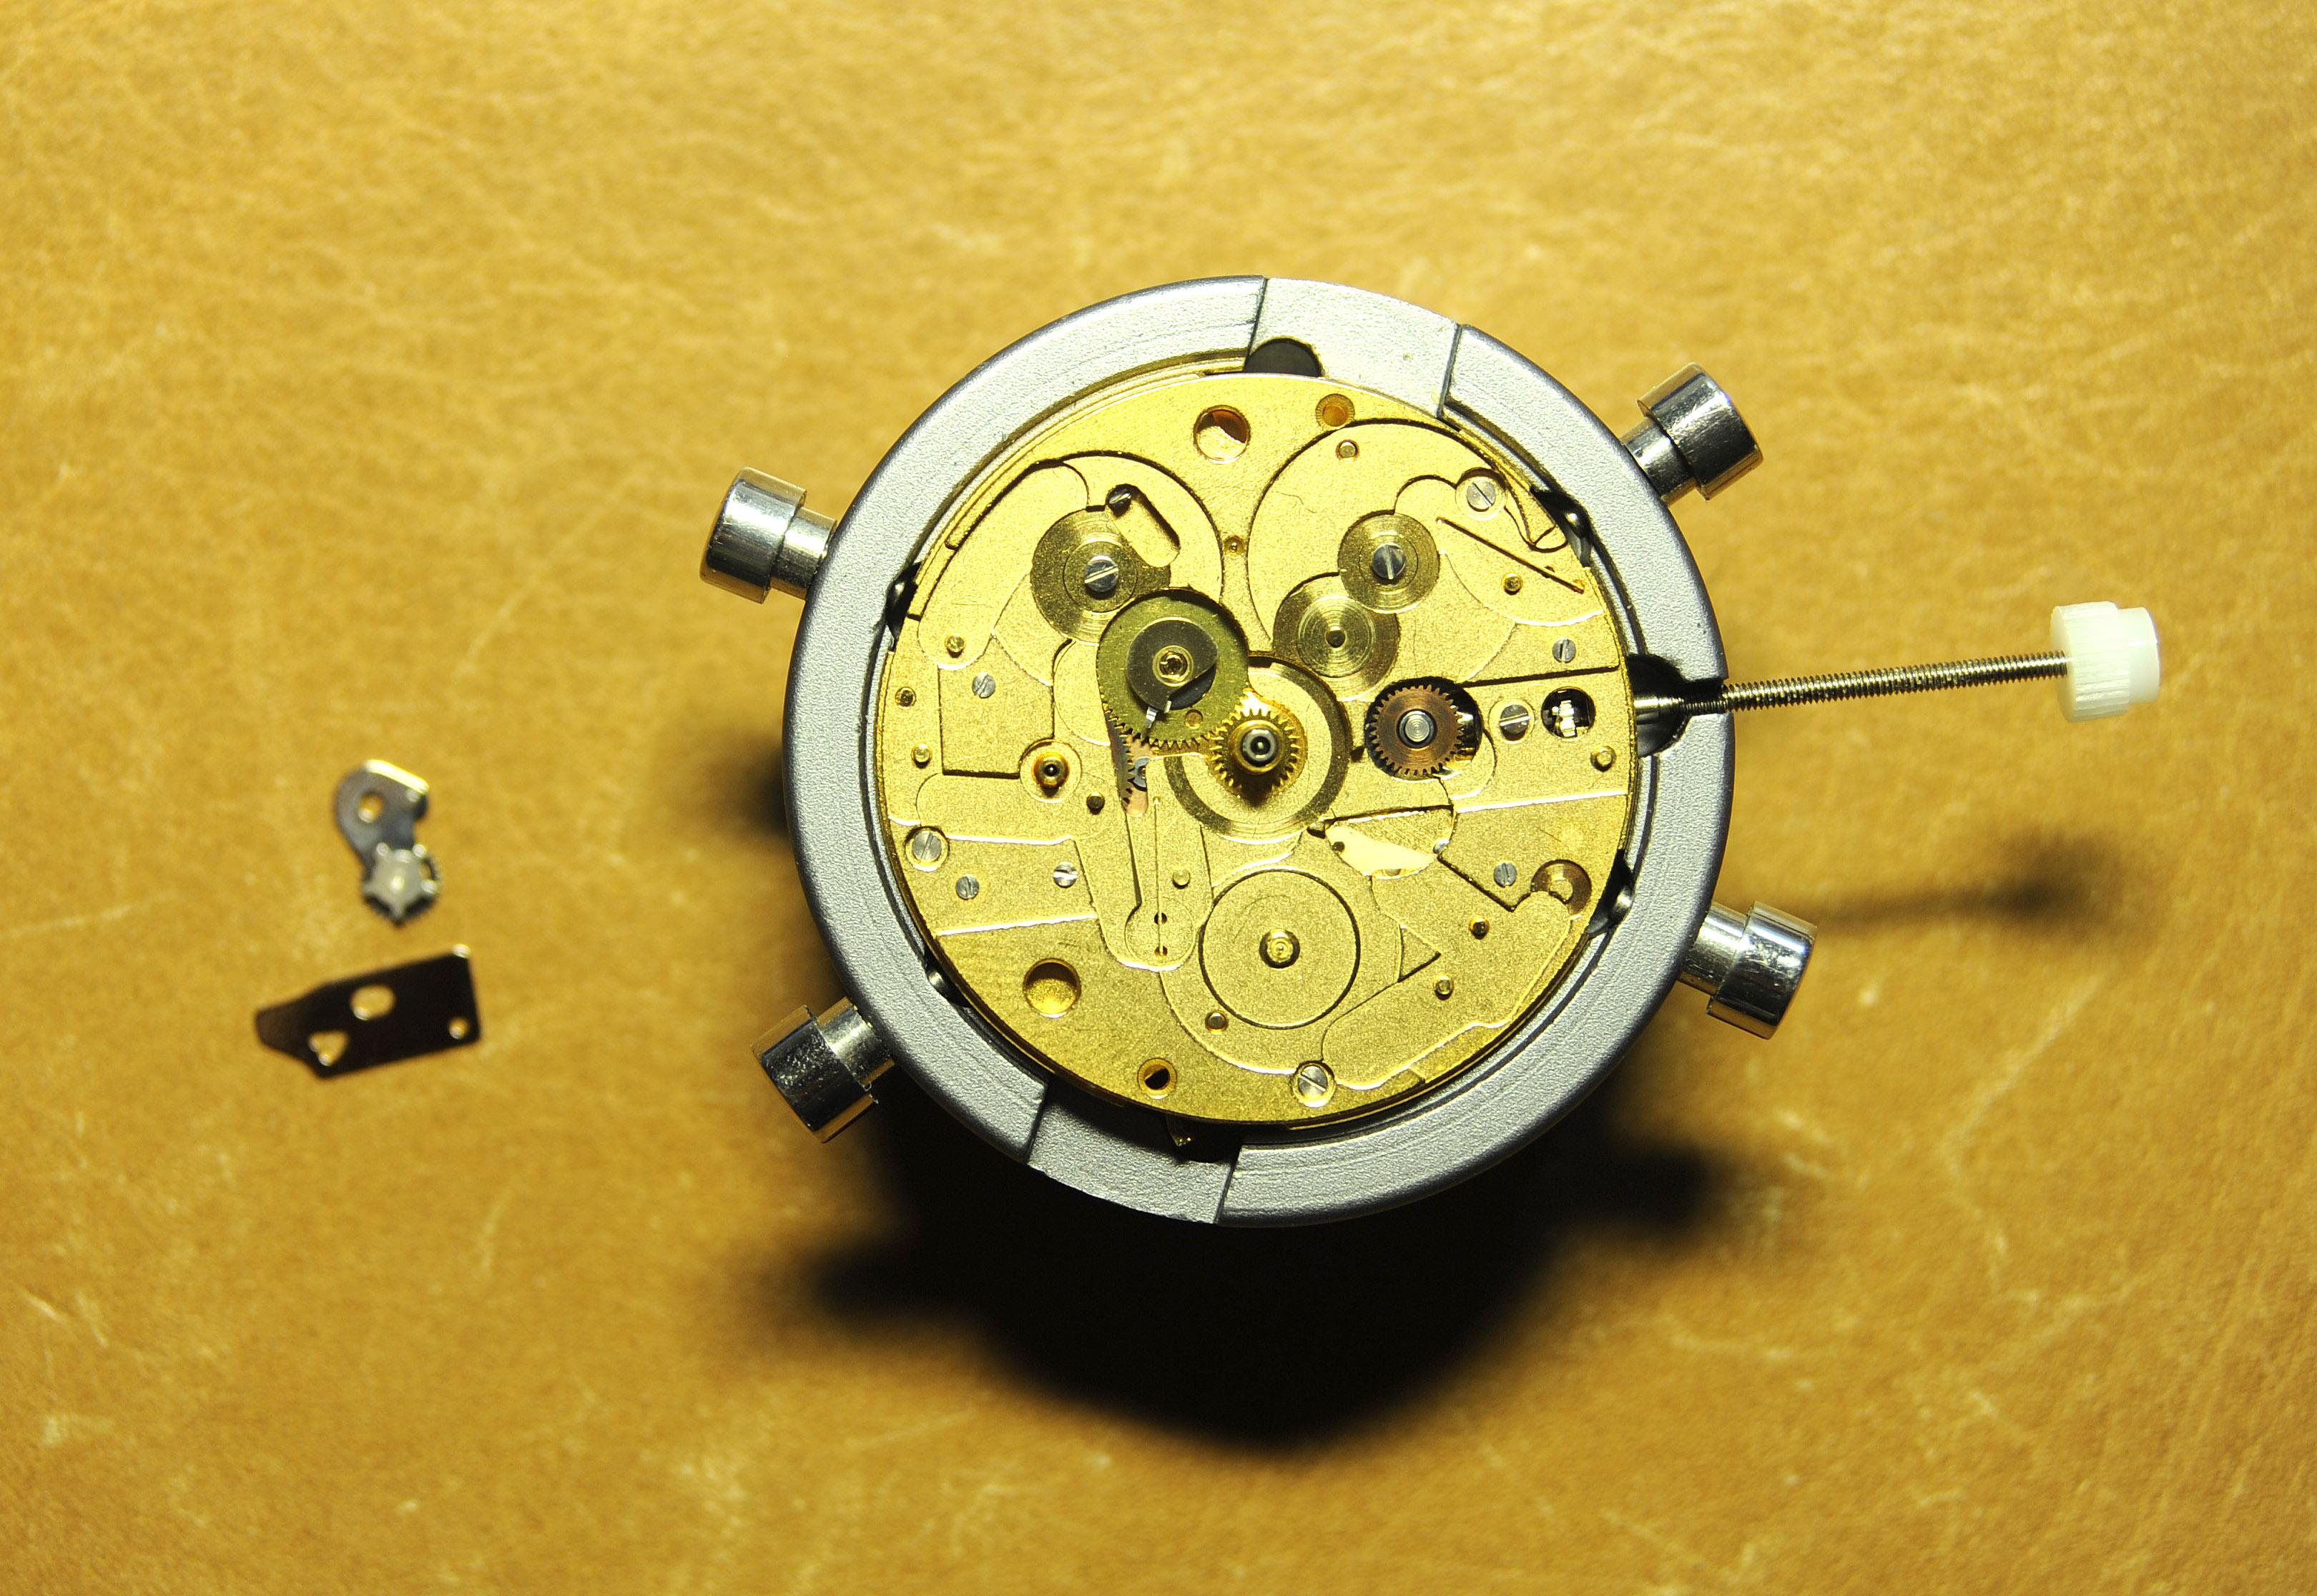
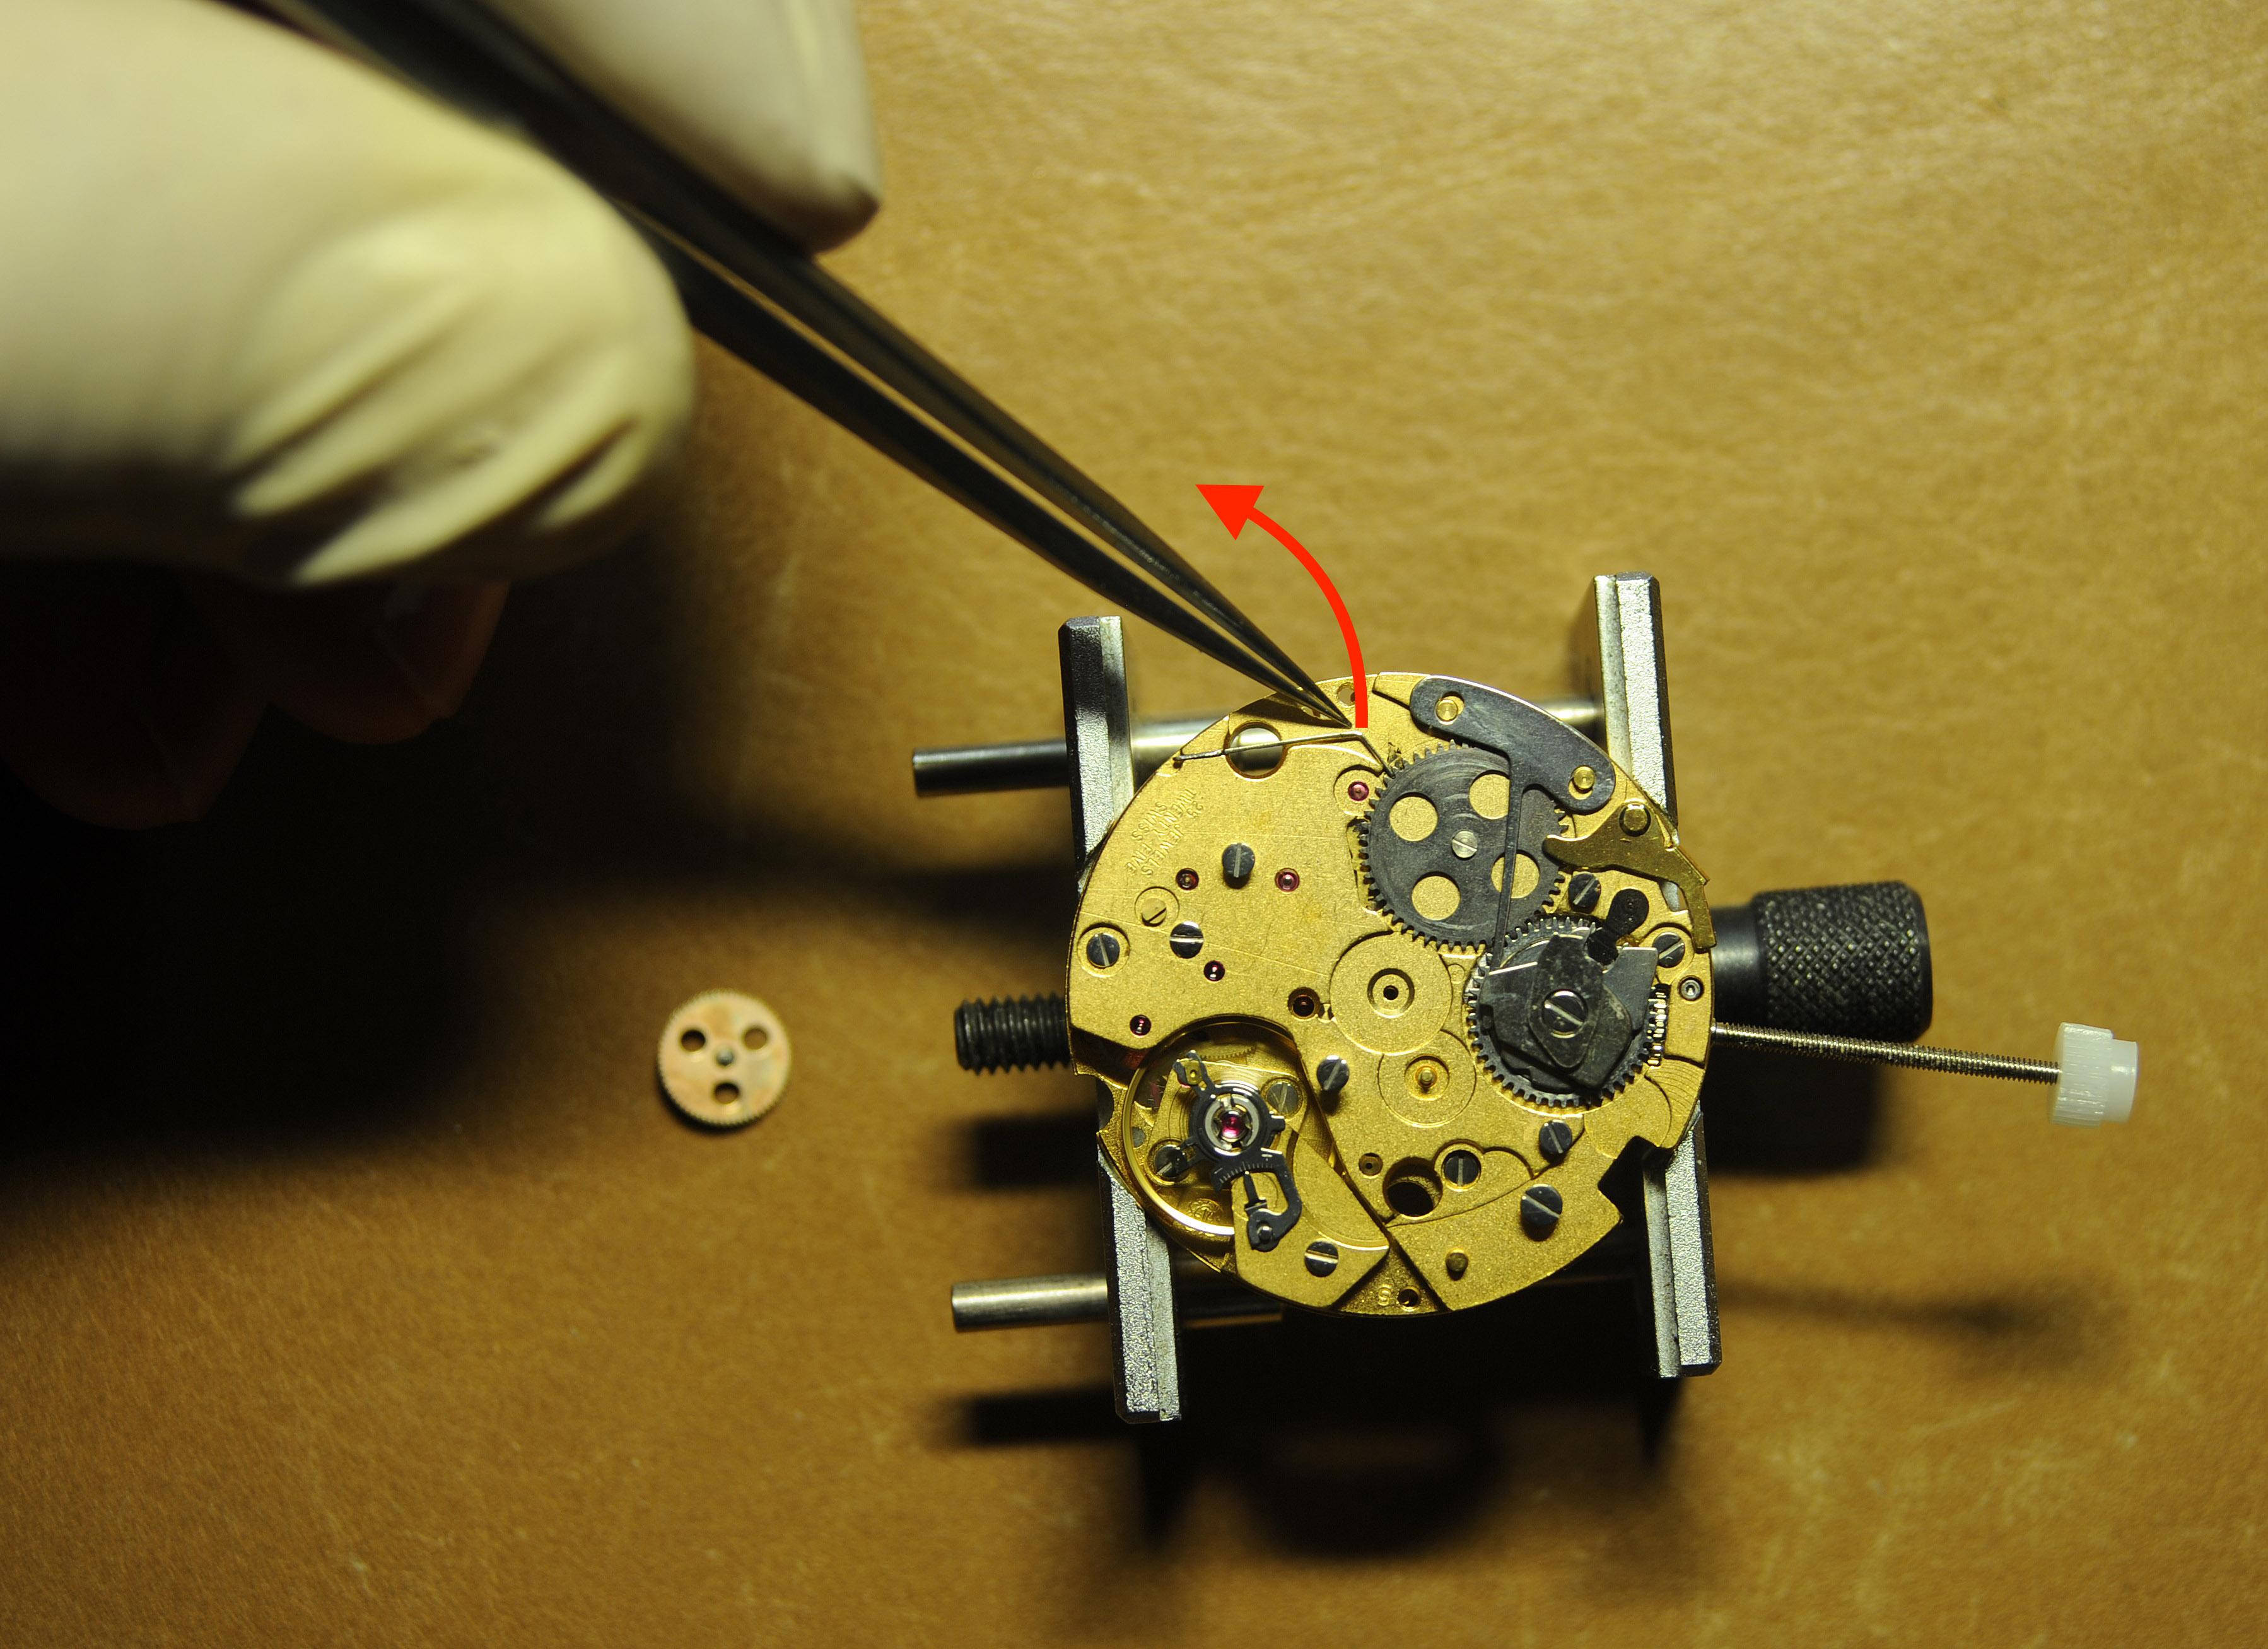
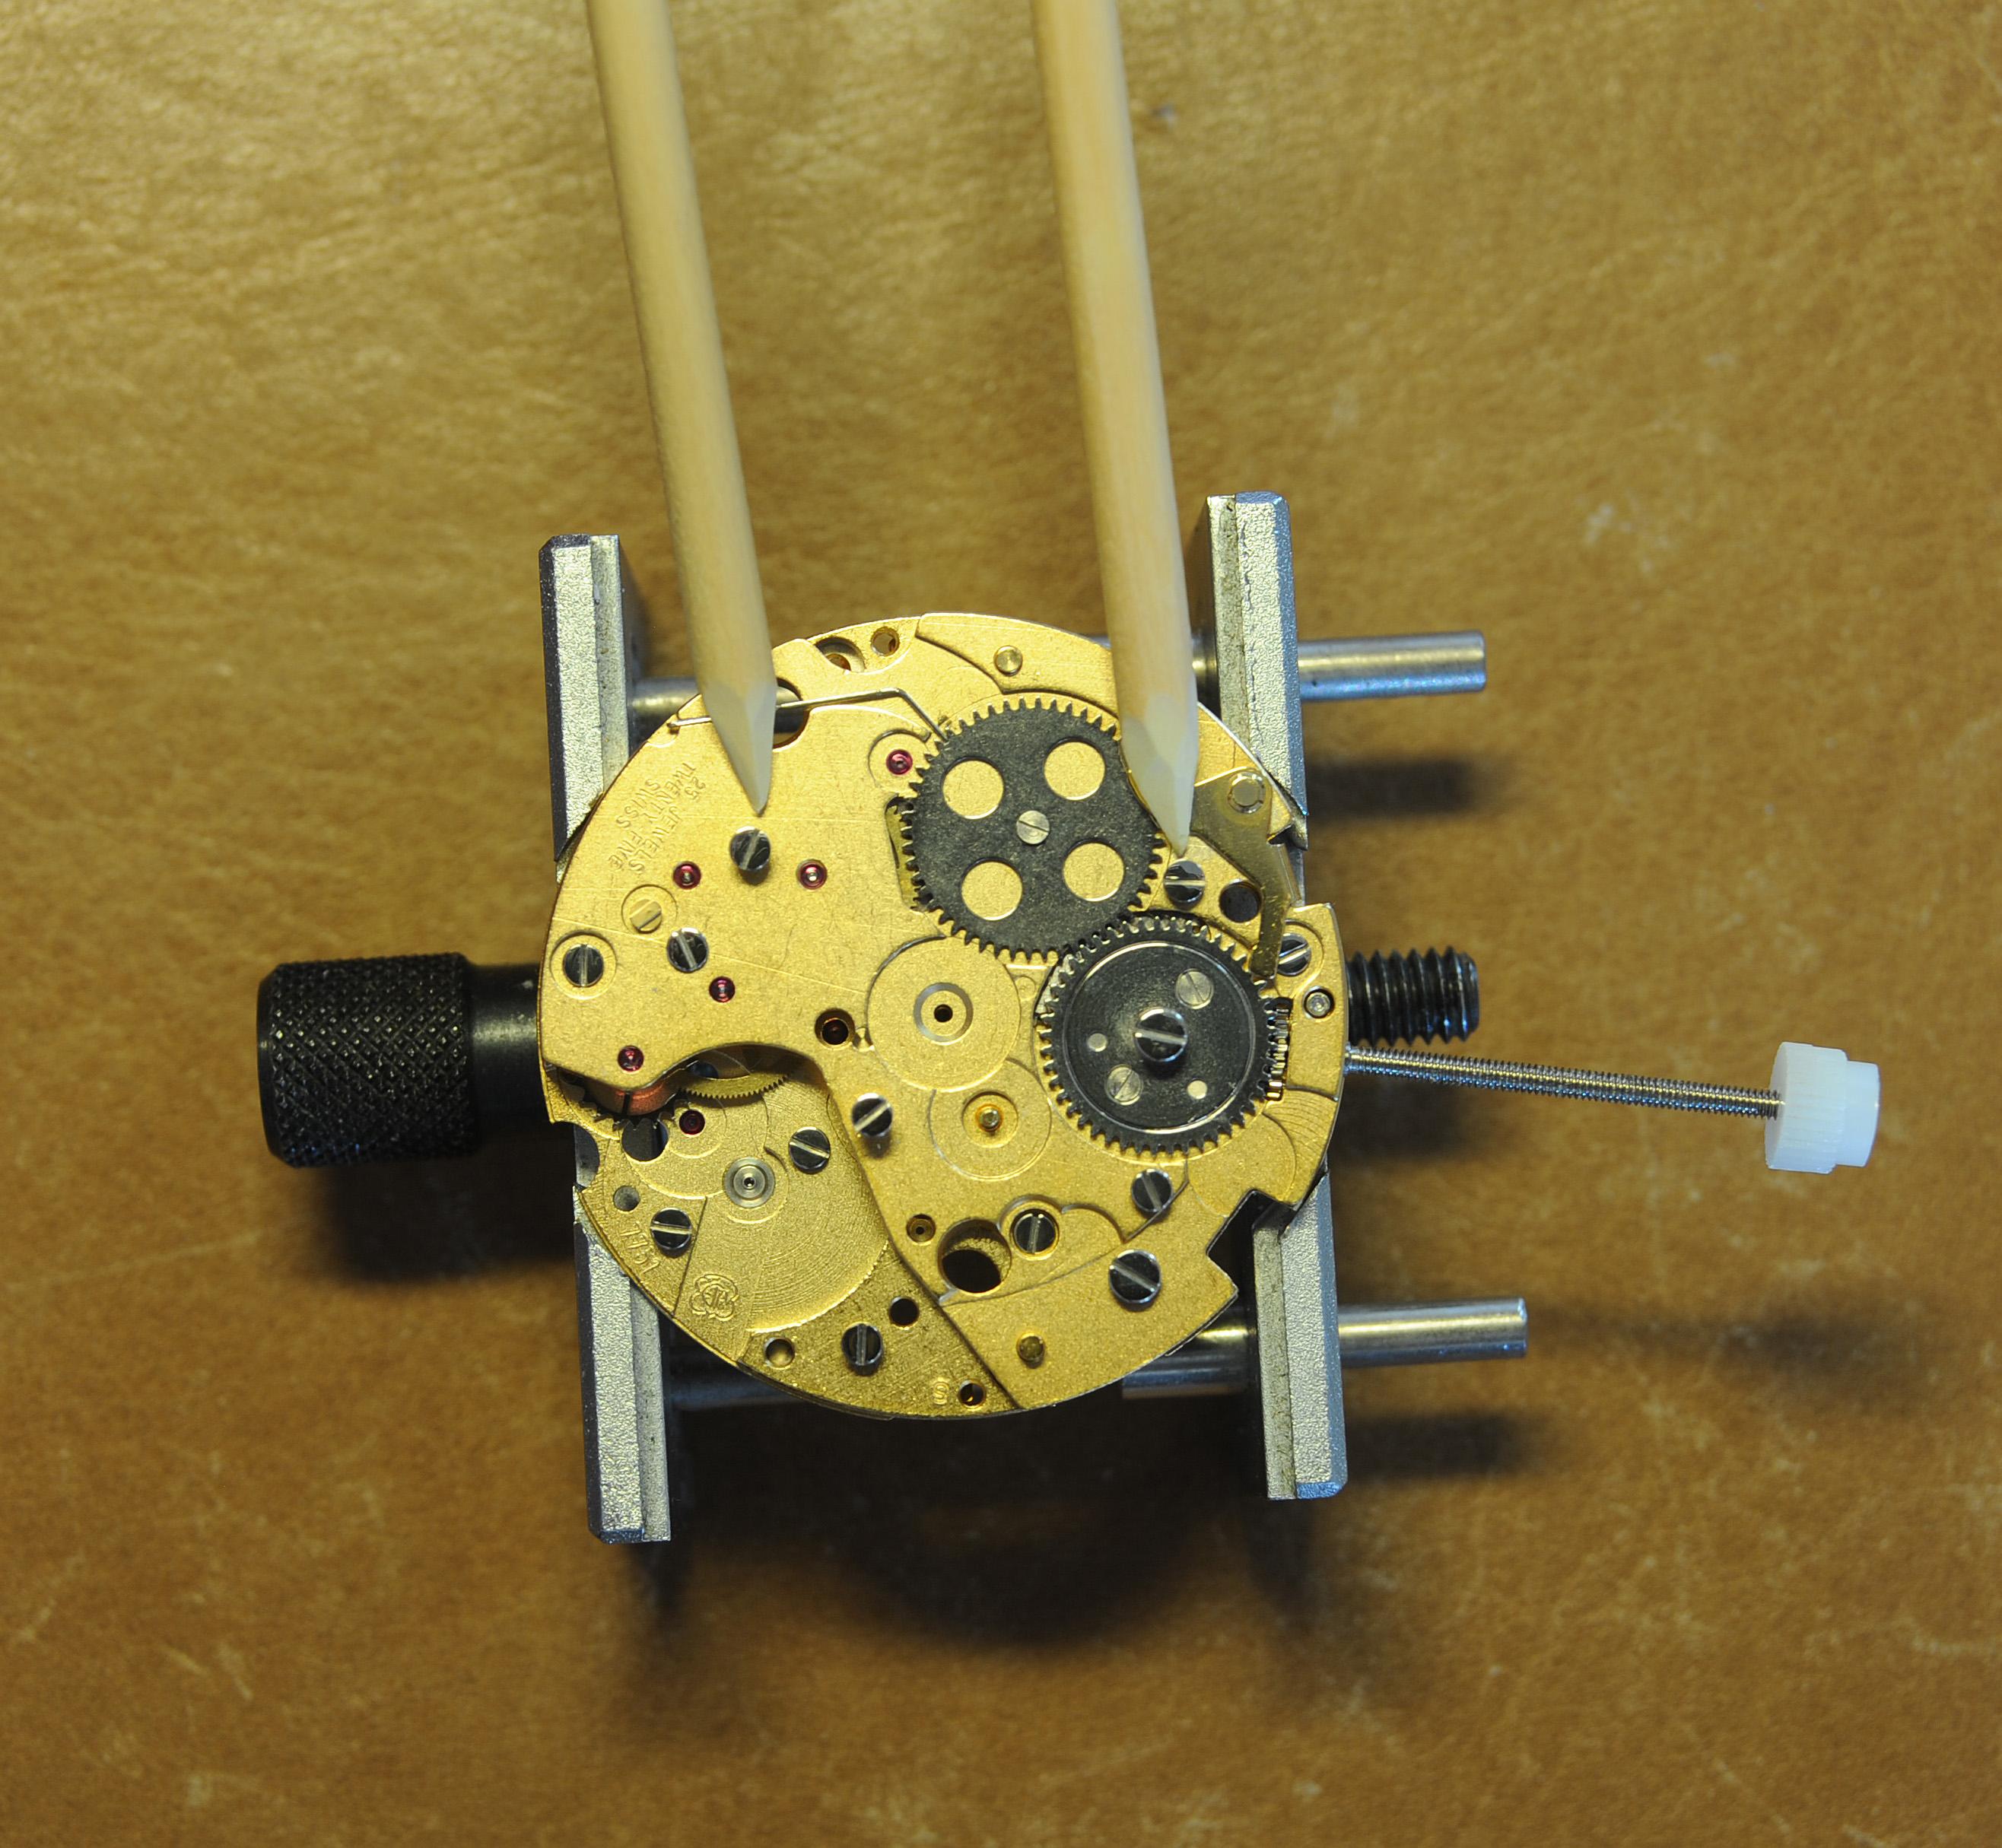
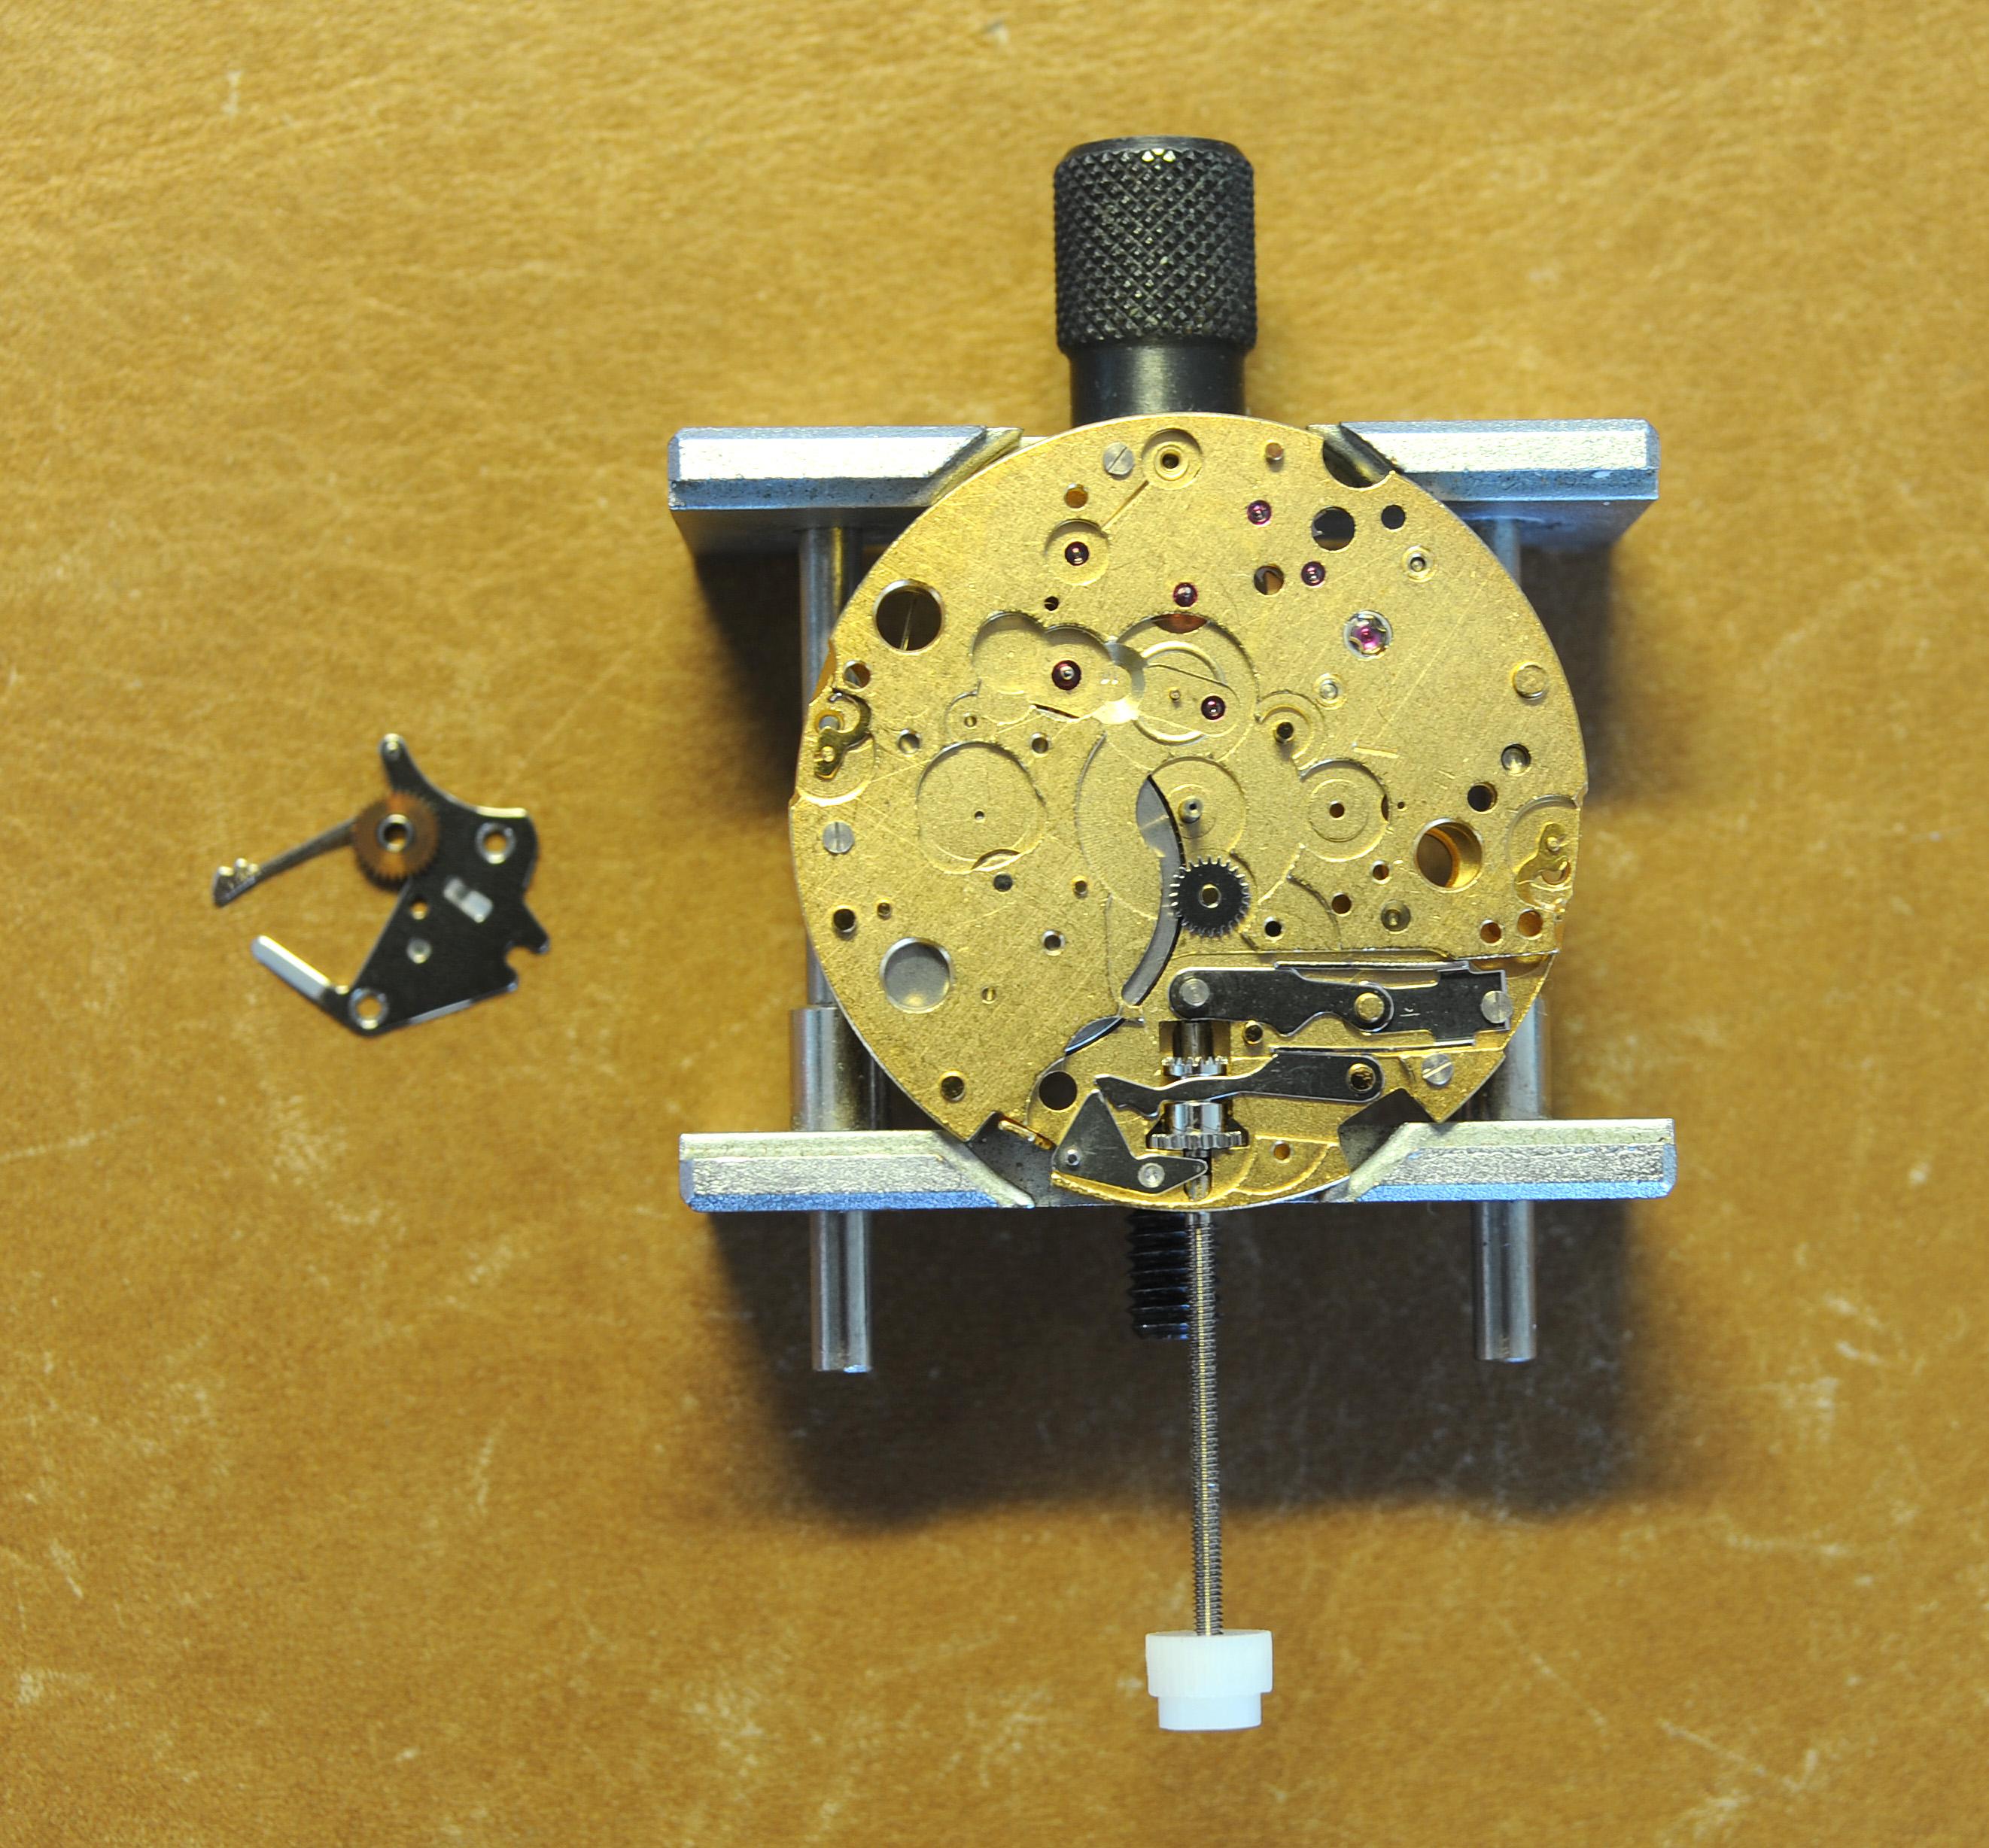
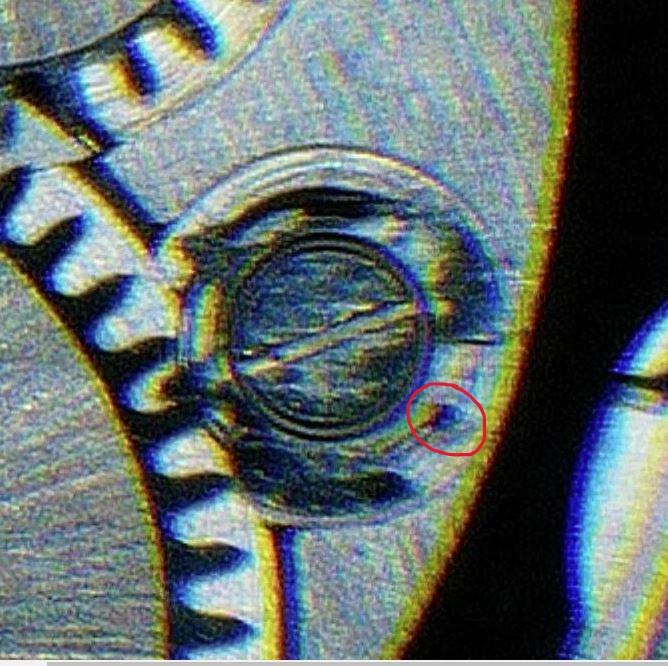
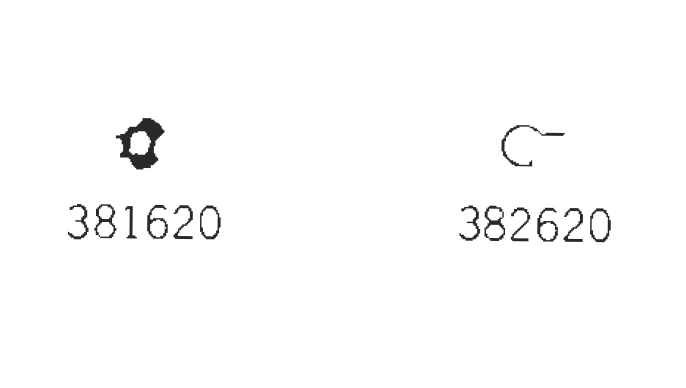
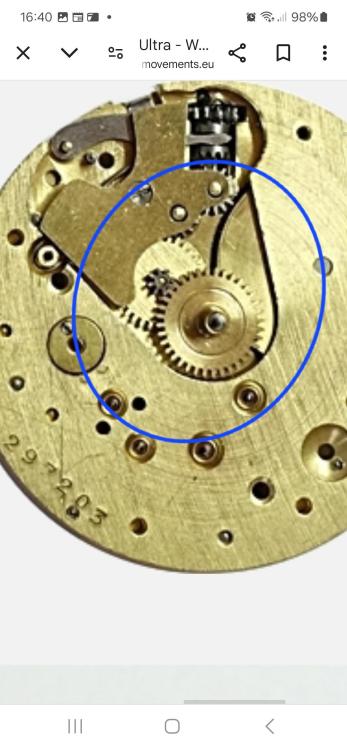
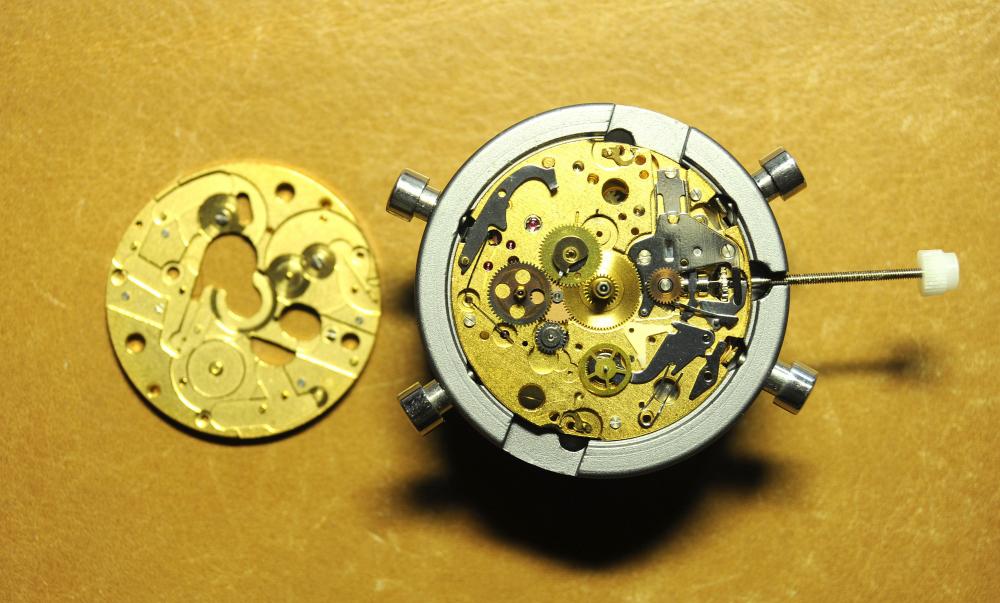
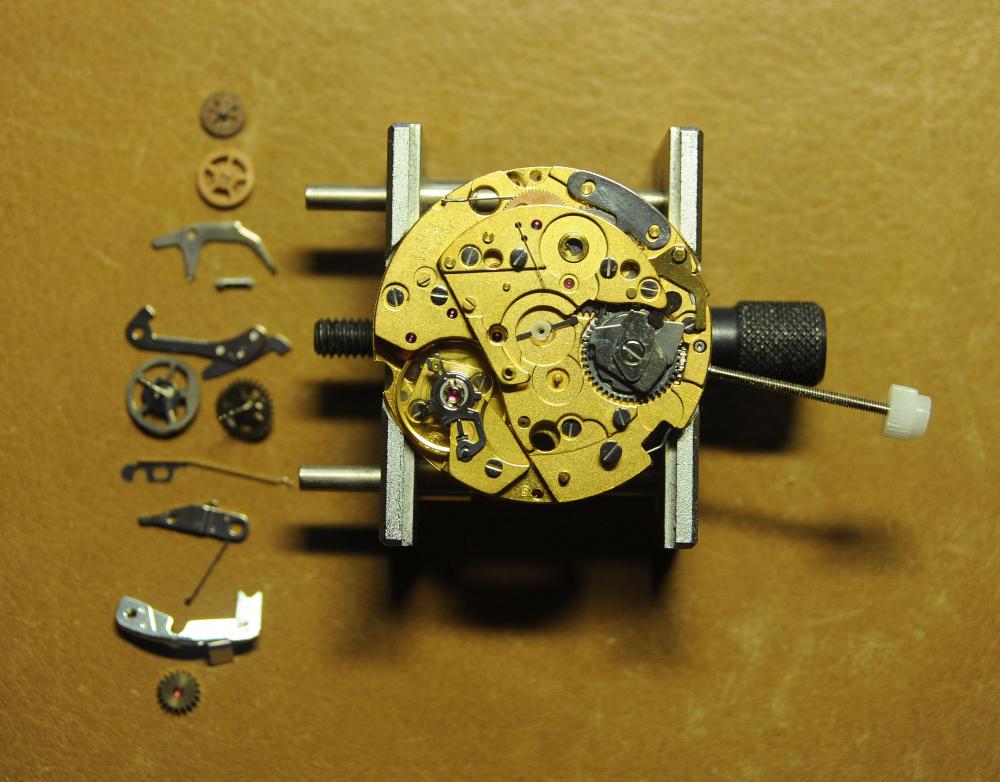
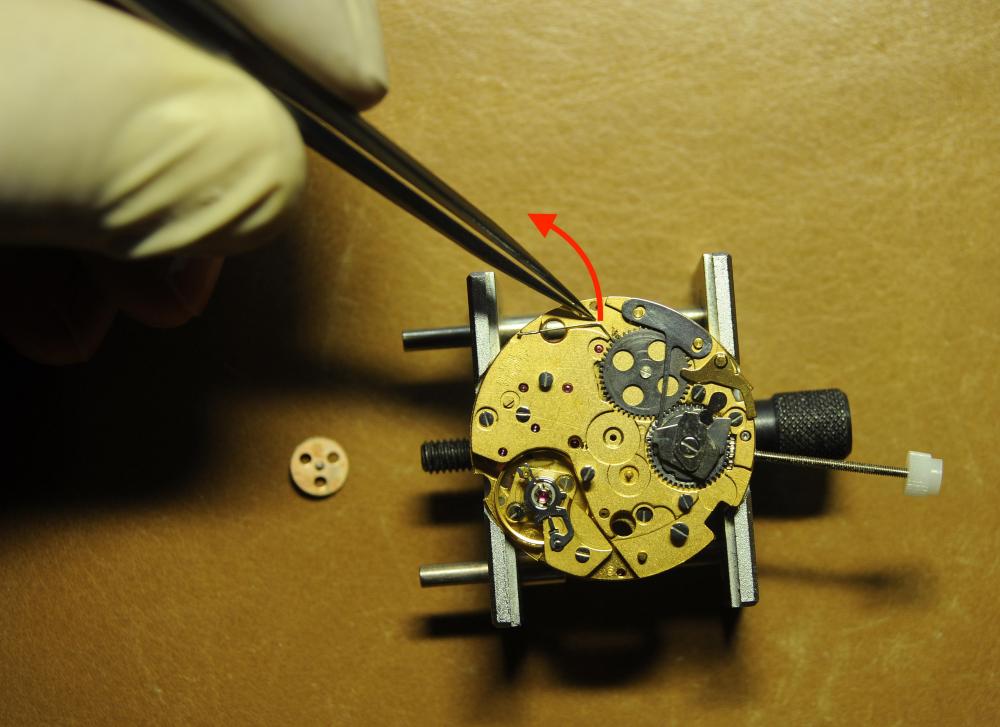
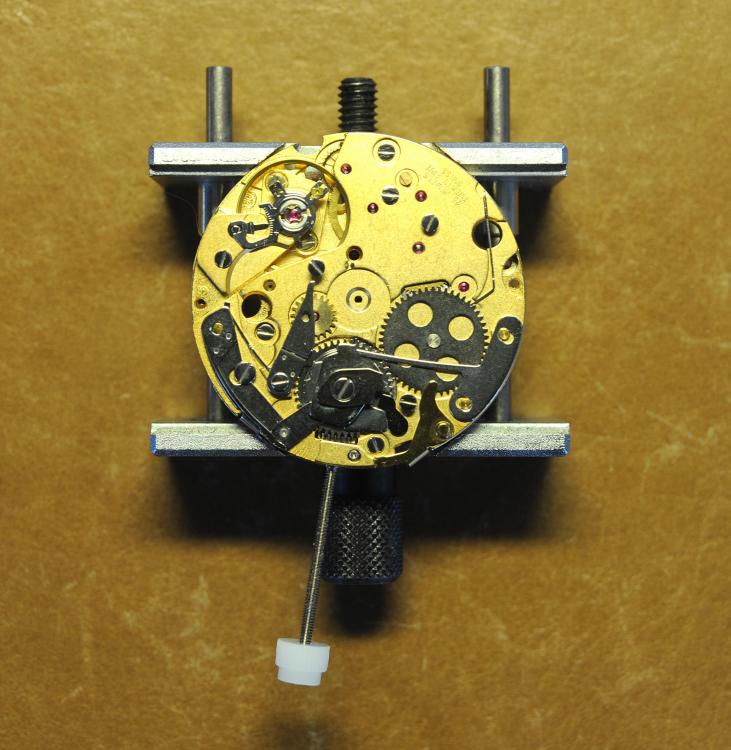
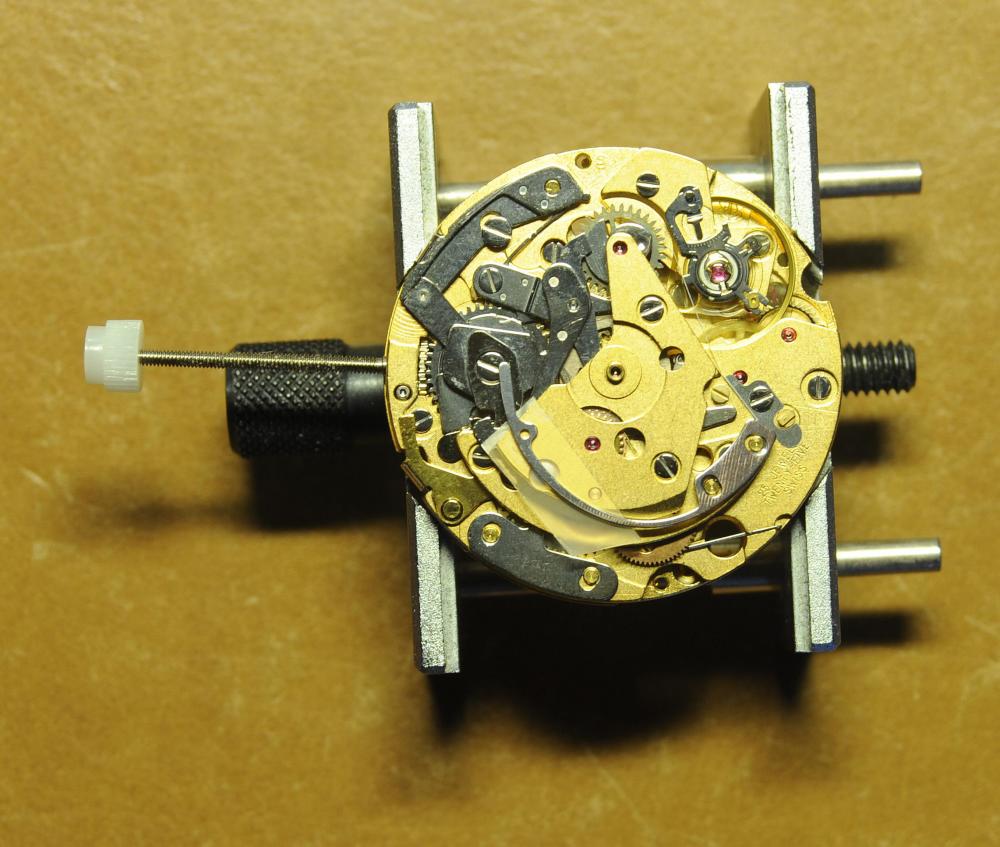
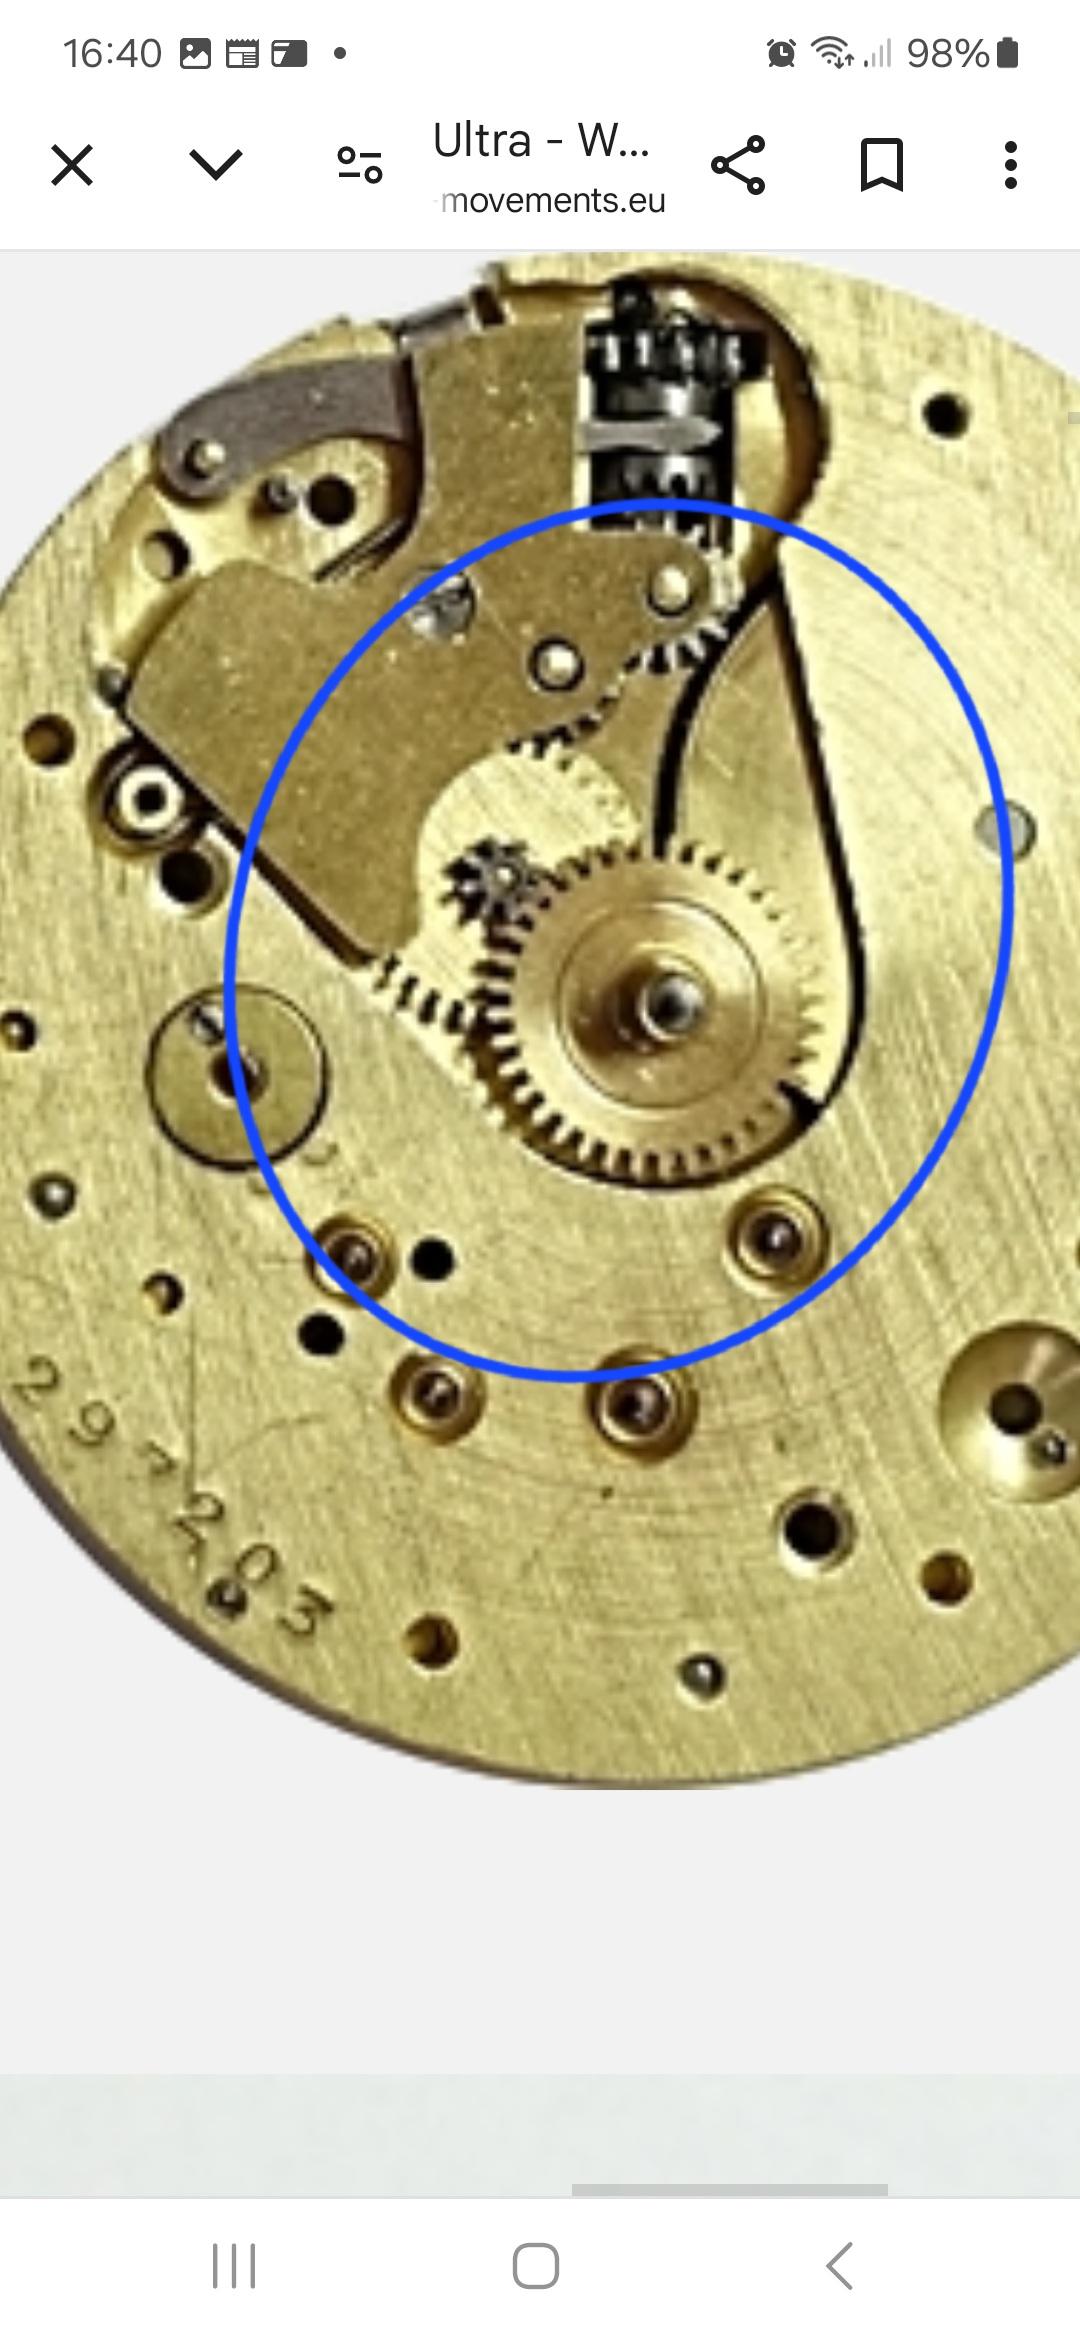
The part you have circled in red is the click which locks into the teeth of the ratchet wheel...which you don't have in place...to stop it from unwinding the power that you provide to the mainspring inside of the barrel at this end of the train ( you wind power in ...it instantly releases that power back to the crown winder if the click is non functional ) The ratchet wheel sits on top of the square profile of the barrel arbor to make connection with the mainspring....from this power is provided to the mainspring via the crown/windingworks/crown wheel/ratchet wheel connection when you wind up the watch. If the click spring....shepherd's crook....is not in place correctly...the click will not return to lock back into the rathet wheel teeth to stop it all from unwinding. The click spring fits under the click in a way that makes the click return back to lock its single tooth into the ratchet wheel teeth to prevent it from unwinding. The click acts as a one way power storage lever...it helps to keep the power going forward. Correct English sentence wording " moving forward "1 point
-
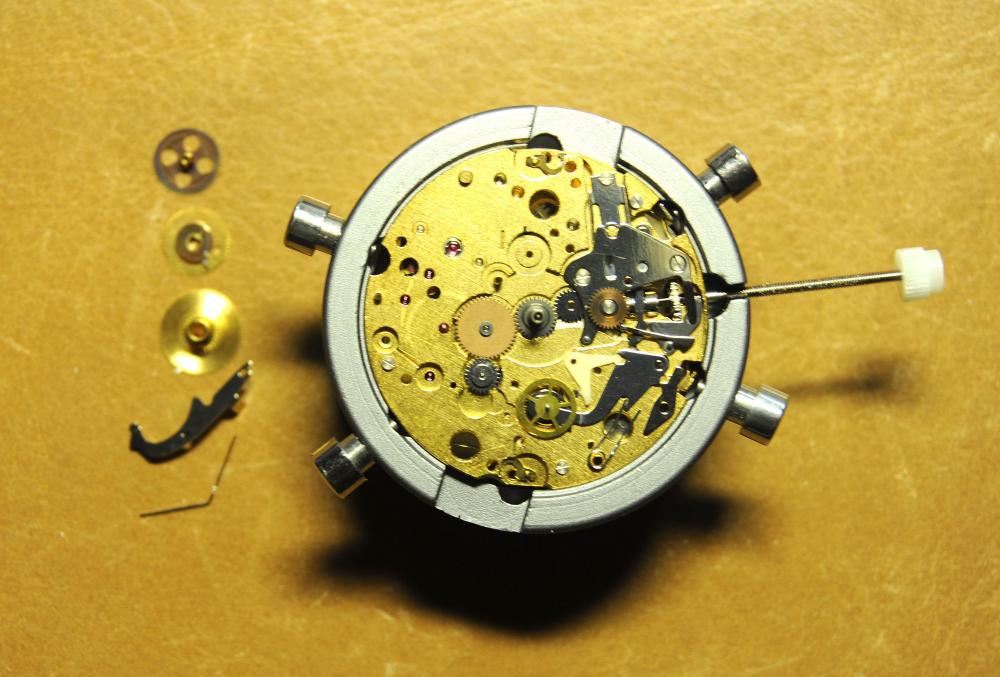
The click spring Richard mentioned is mounted below that ratchet.1 point
-
The 859+PTFE is white. It works as good as any other braking grease. Use the 8217 you have! Most hobbyists don‘t care about +/- 1 or 2 hours of power reserve. For the manufacturer it makes a notable differenz in advertised data and warranty costs. Braking grease is not meant to brake. It is meant to protect a highly loaded braking mechanism from long term wear. What I forgot to mention: The tar-like consistency of P125 seems to be unique.1 point
-
I haven't worked on a Seiko but I'm guessing it's a click spring.1 point
-
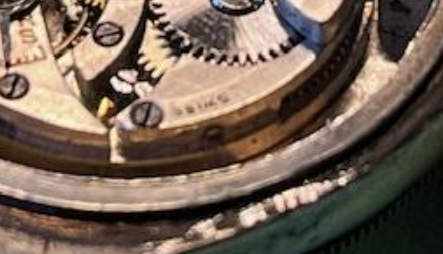
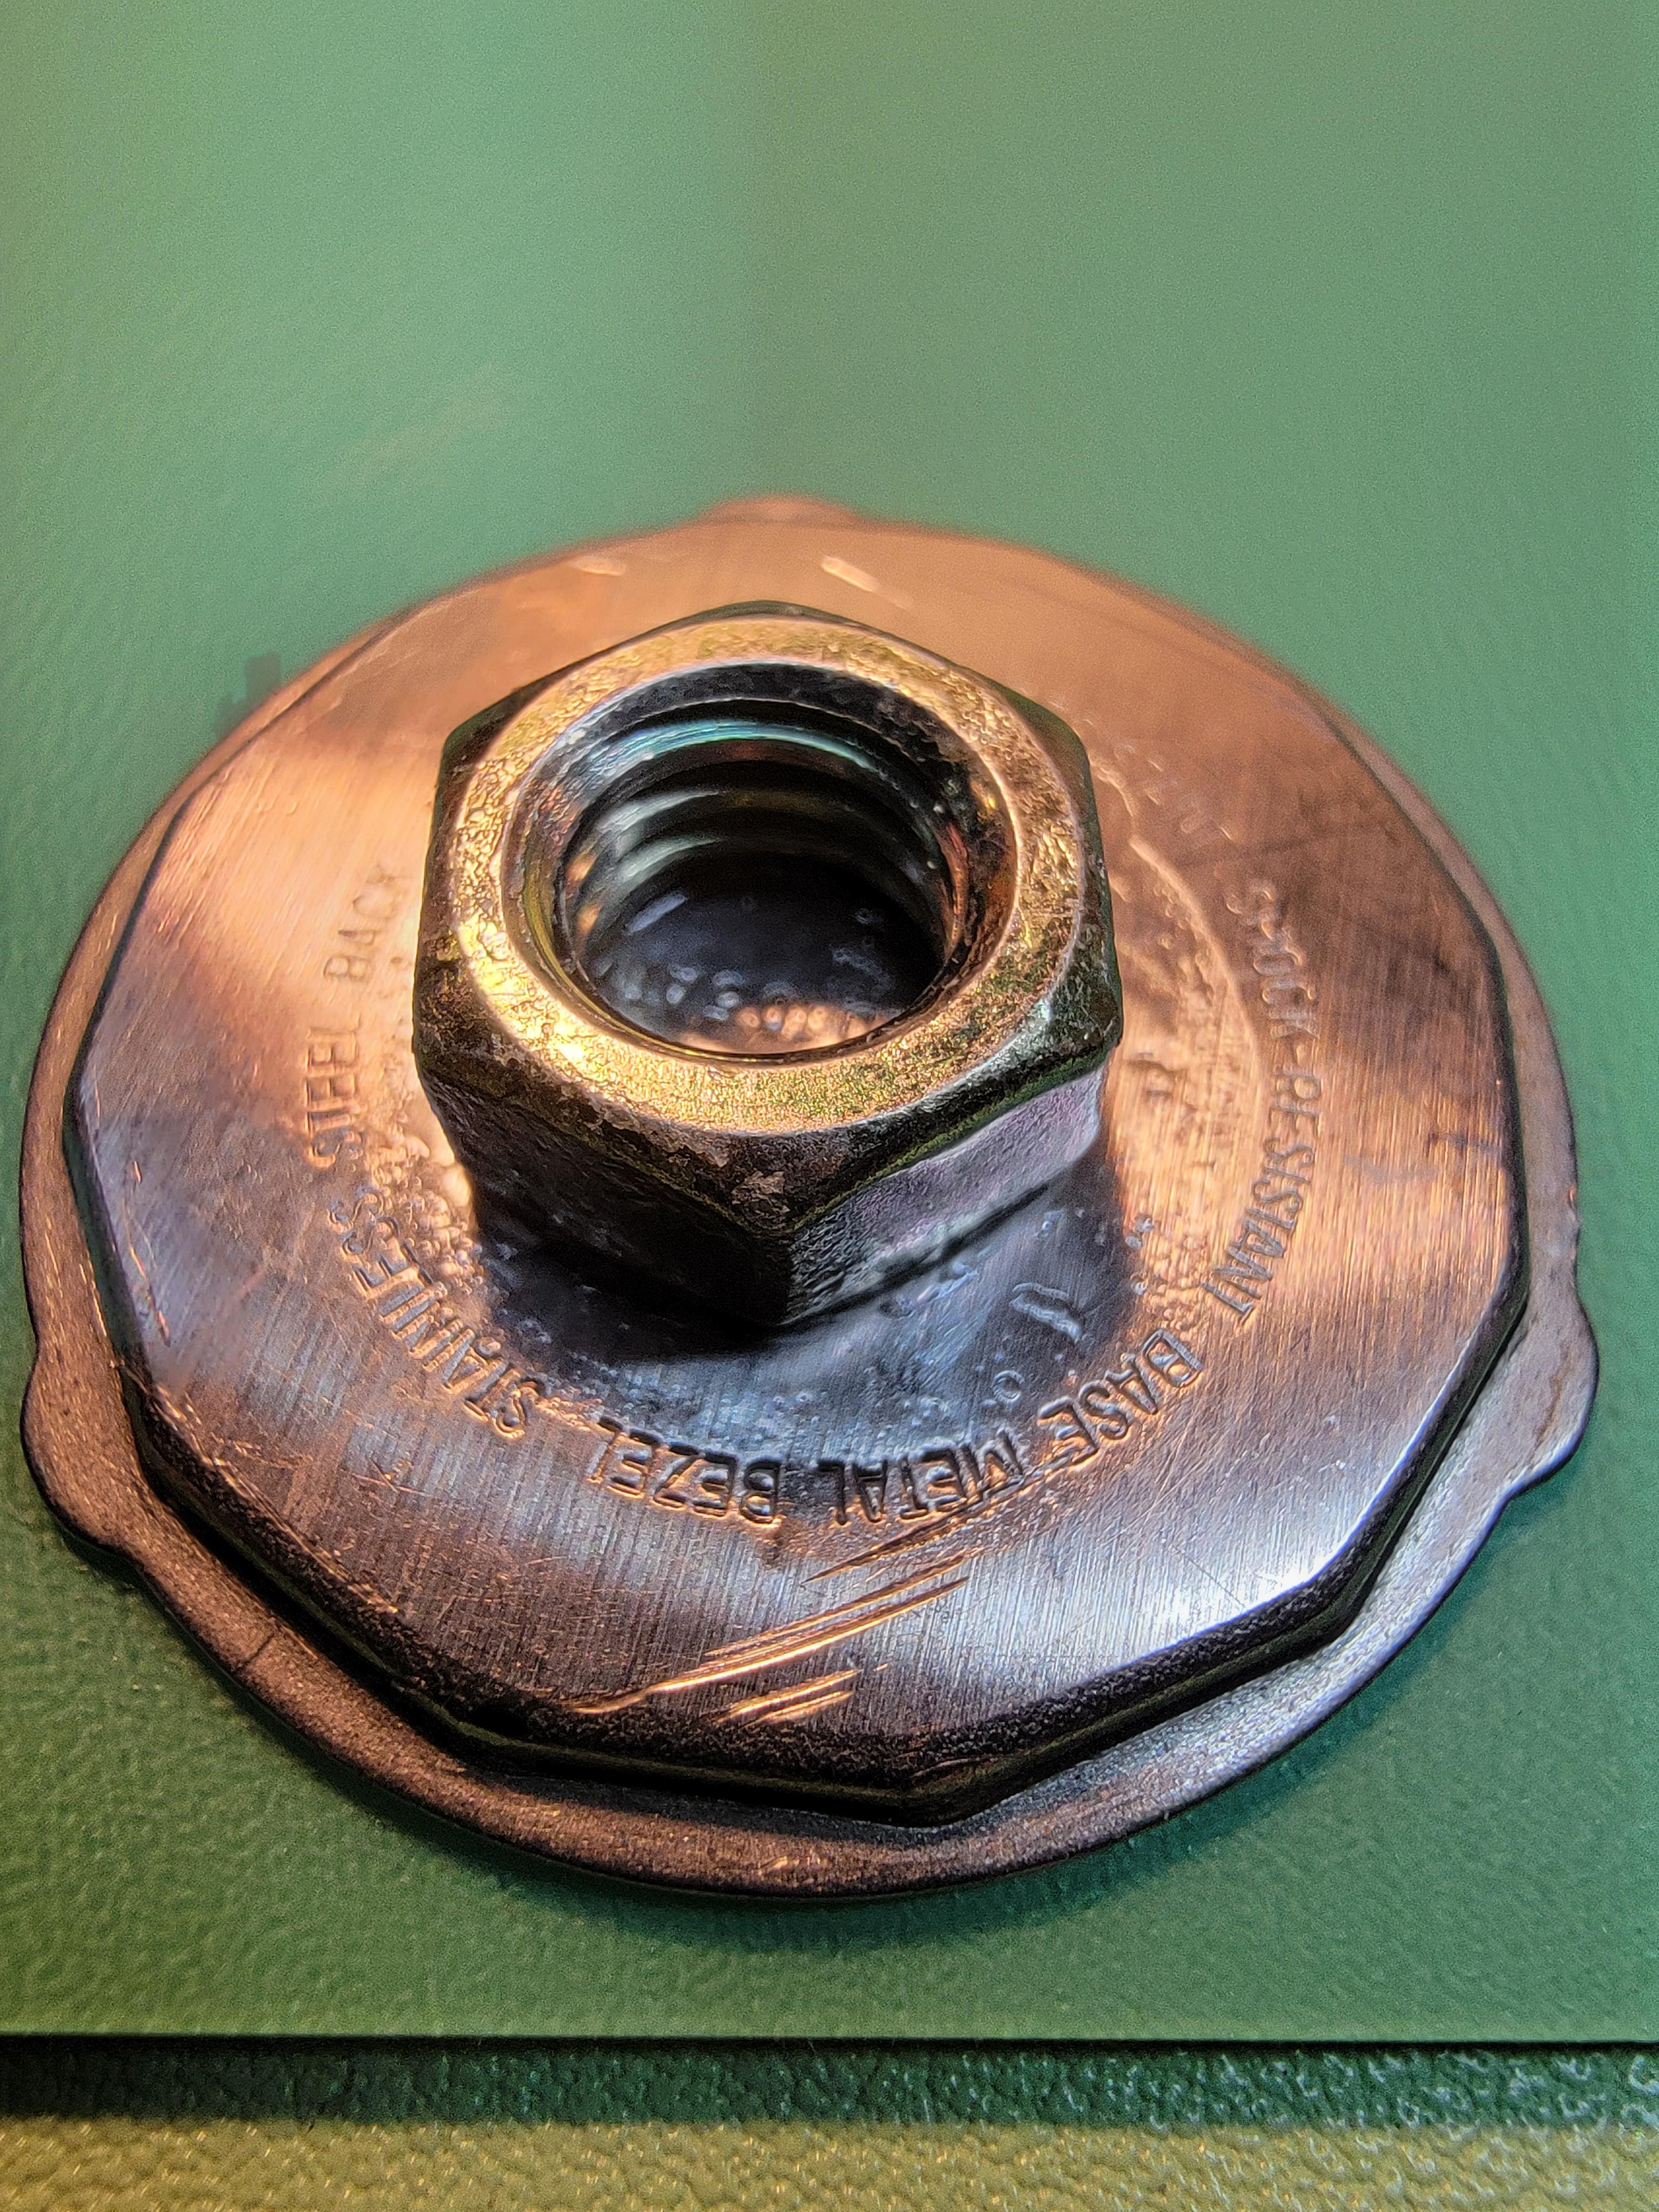
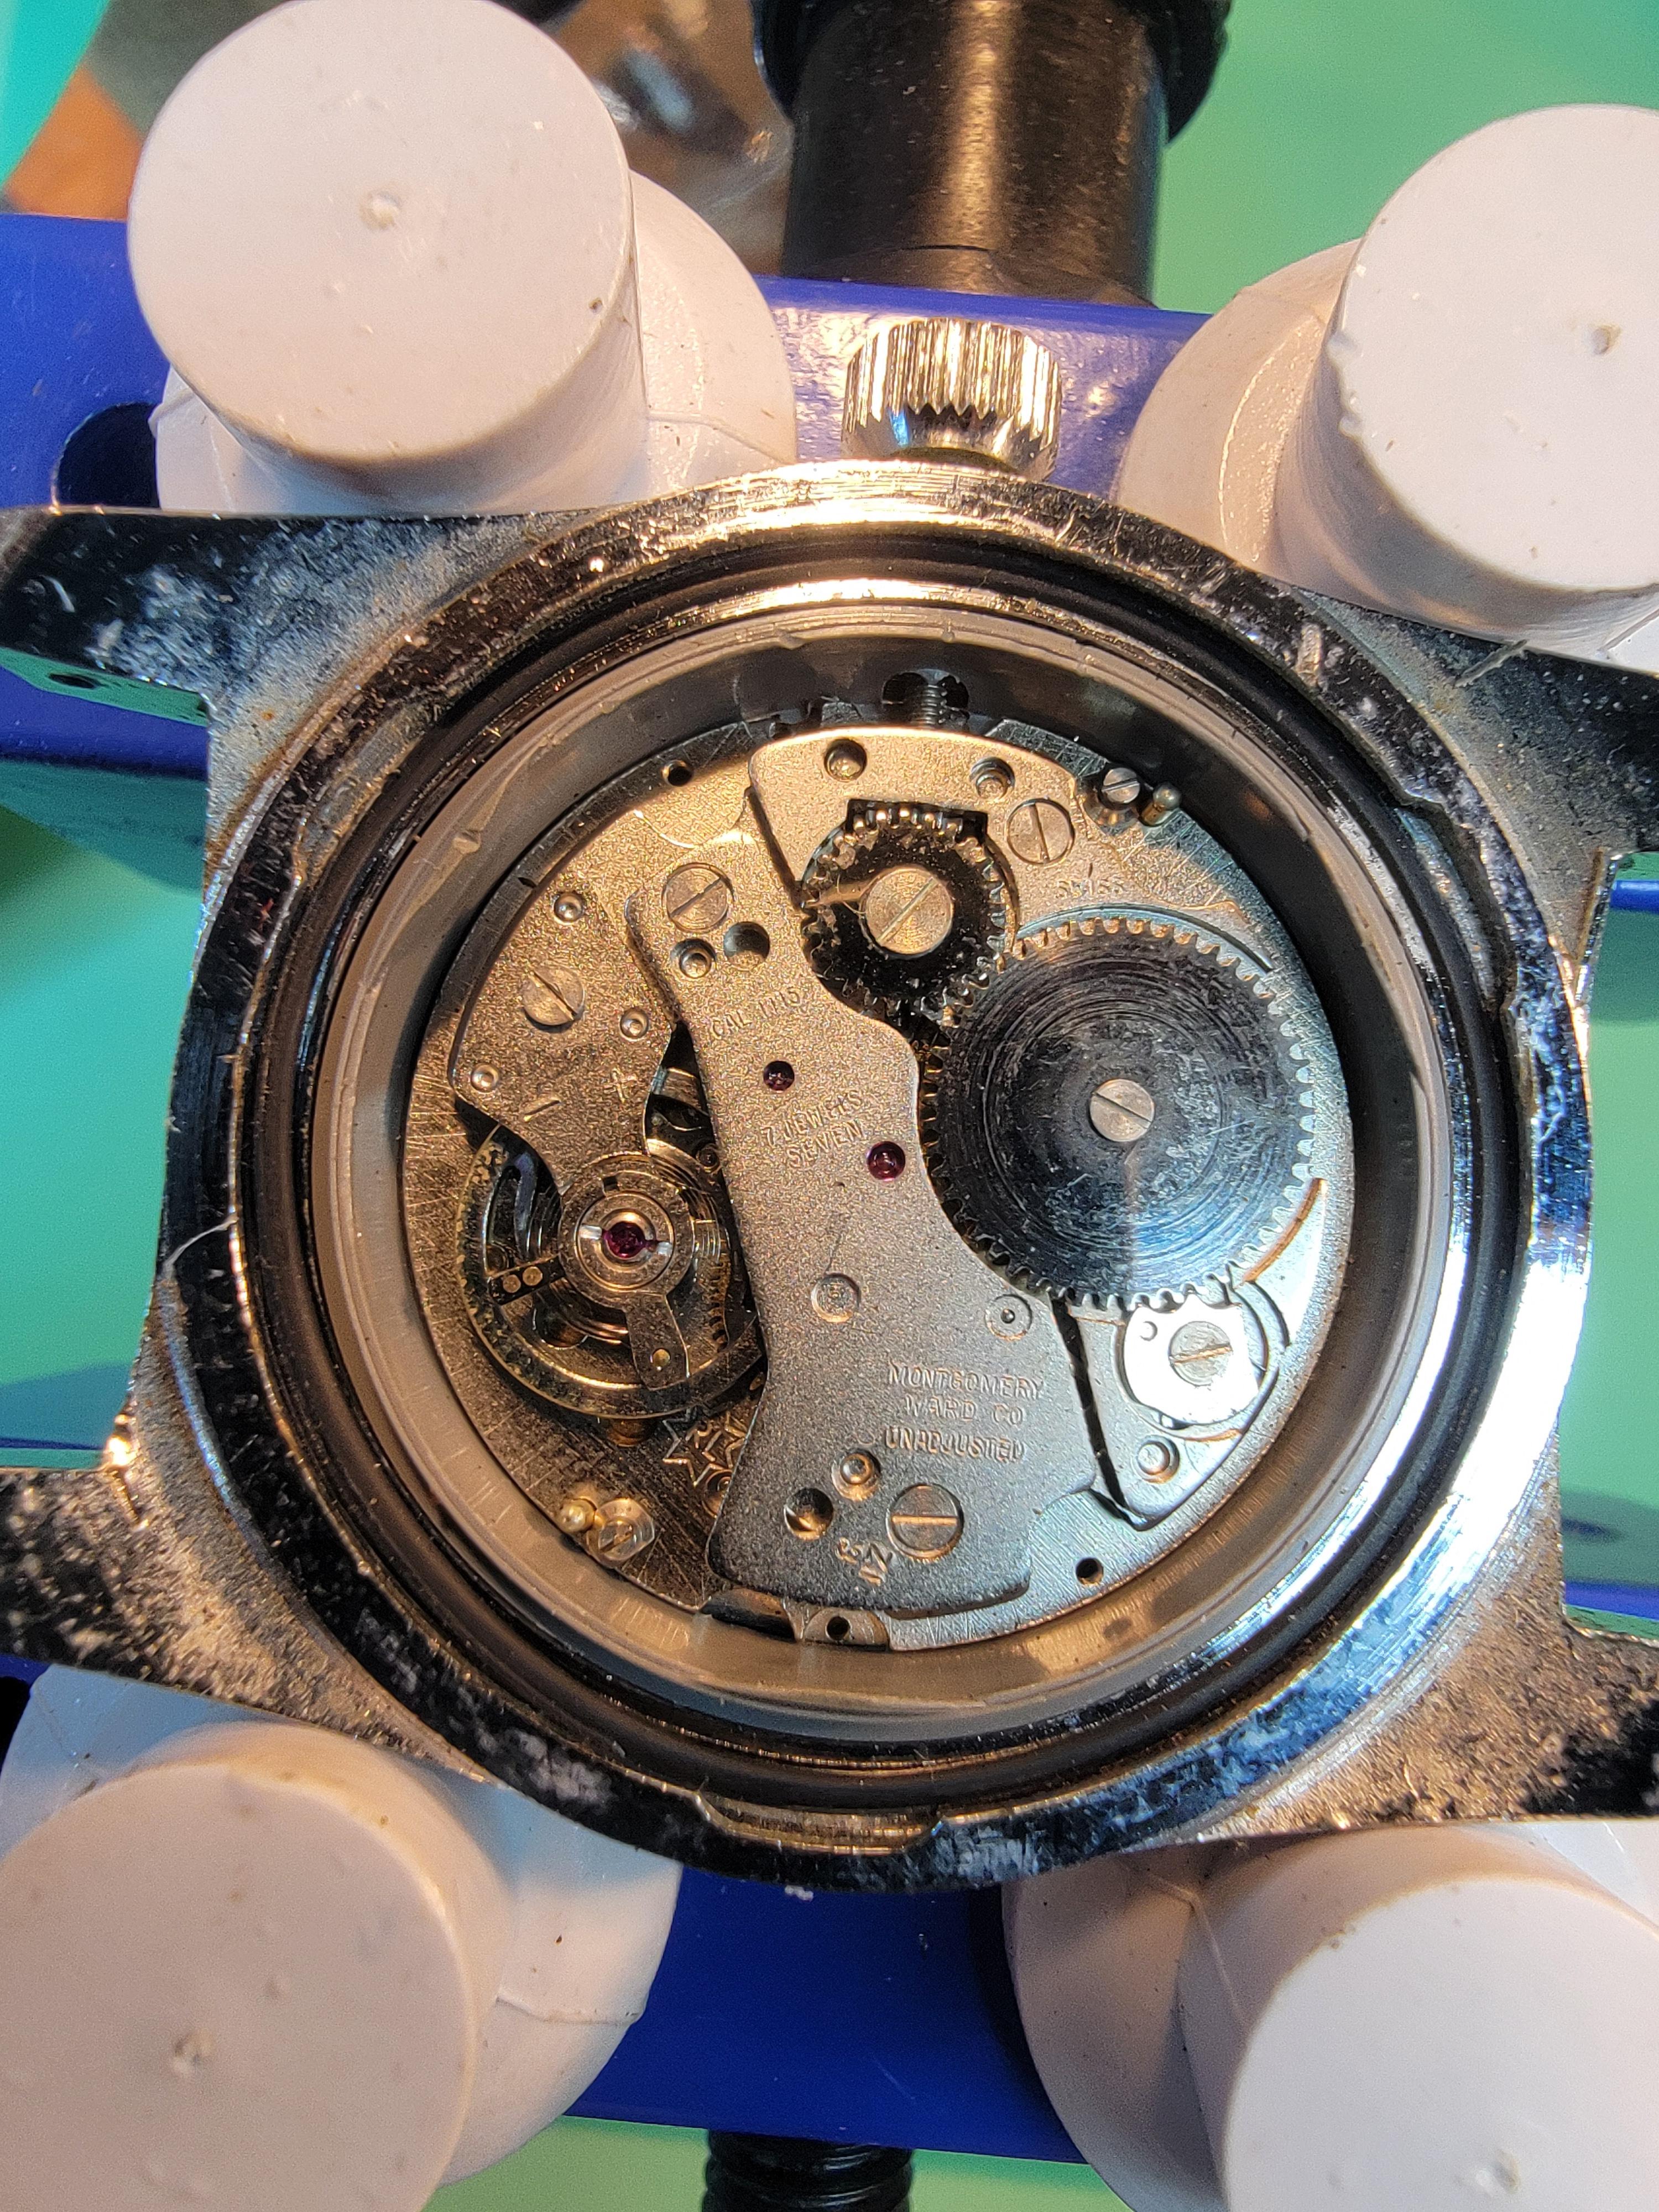
So I only had a small nut, about half the diameter of what I thought would provide enough torque to break it loose. I slathered it with superglue, set it off center unfortunately and let it sit for 30 minutes. Then I nudged a big adjustable wrench on it and voila, it worked and I didn't have to apply much pressure at all. I fully expected the nut to come off. It only had to turn a small amount and it popped out of the 3 equidistant notches. So now I'm a believer in the superglue nut technique. Here are some pic's: What a strange design. And under magnification it says cal 1115, which I take to be the movement, Swiss and Montgomery Ward.
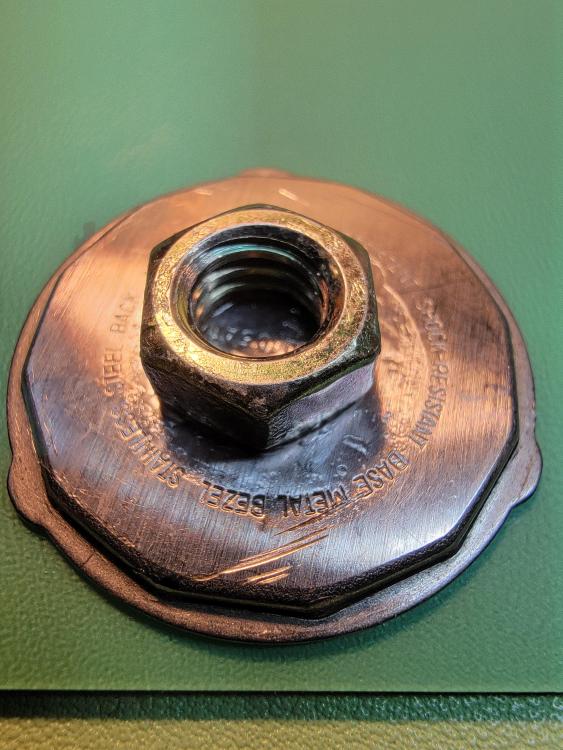
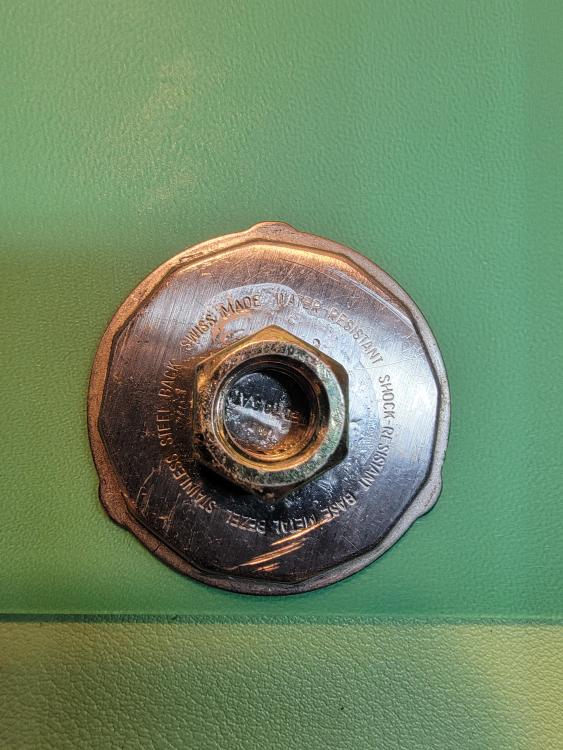
 1 point
 -
Hi. The Le Arsi is a diagnostic tool. For timing etc I use a Horotec which does quartz, mechanical watches and clocks. It’s a brilliant tool quite compact but it’s not made anlylonger.1 point
-
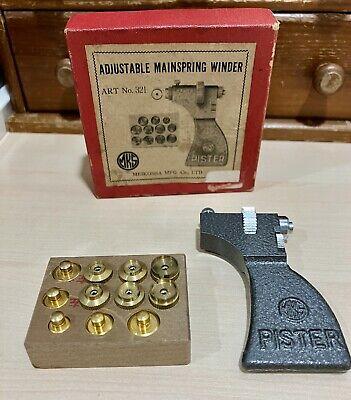
You might consider an adjustable K&D winder if you find one in good condition. Has anyone of you ever used this kind of Japanese winder? I once almost bought one but the winder diameters were all rather small (and the bids got too high) so I passed it.
 1 point
 -
f basically the same name as you would call a device for timing mechanical which would be a timing machine. Witschi makes them not cheap. Often times was some of the machines is an add-on accessory. Can find vintage ones on eBay at a variety of prices although I'm rather curious as to why you would like to adjust your watch? then the link below as a quartz testing machine which will do accuracy. You can download the users guide when you're there. https://www.esslinger.com/horotec-flash-tester-quartz-watch-tester/1 point
-
I'm not sure where he said it, but @Jon always uses 8217 and without any issues. (please correct me if wrong). And same for me. Always used 8217. So far no problems. But I've always wondered if Kluber P125 was better... but it's so expensive. Now this 859+PTFE popped up and I'm wondering if it's like P125 at lower price. PS: when saying "better", I guess there are two factors: 1. Later slipping (i.e. higher amplitude) 2. Protecting barrel walls from wear. For me, I don't care about losing 10 degrees of amplitude (@JohnR725 would be proud of me) if the barrel wall is protected better.1 point
-
I'm afraid I have no experience with the "859 + PTFE" grease, but if JLC recommends it, I'd be inclined to get it just to make sure. If, on the other hand, we could tell for sure that 8217 would do the job just as well, then why not save the money? Here's a quote from @nickelsilver that I've saved: "Moebius 8217 is the standard grease Kluber P125 is also a standard if a bit more high tech grease. Then there is 8212, also known as Glissalube B, for aluminum barrels, and 8213, Glissalube A, for brass barrels. Easy to remember as the letter code matches the opposite metal."1 point
-
I thought that 111 was the version with ammonia and we were discussing non ammoniated? Then I assume you mean the number 566? Then in case somebody's looking for safety sheets of the chemicals I have a link below. Then the second link is for the product itself with suggestions for use. I don't know if for the non-ammonia aided as it has the chemical in there to brighten the weather would have the same effect as ammonia? Specifically want to be careful with watch cleaning products unless they actually recommend elevating the temperature typically they do not or unfortunately is the second link below does not specify. In a case elevating the temperature typically speeds up the process and typically will have recommended times based on room temperature not at elevated temperatures. Then even though they only show one rinse typically two or three would be preferred. https://www.lrultrasonics.com/resources/sds-sheets-resources https://www.lrultrasonics.com/solutions/566-non-ammoniated-waterless-watch-cleaning-solution-1151 point
-
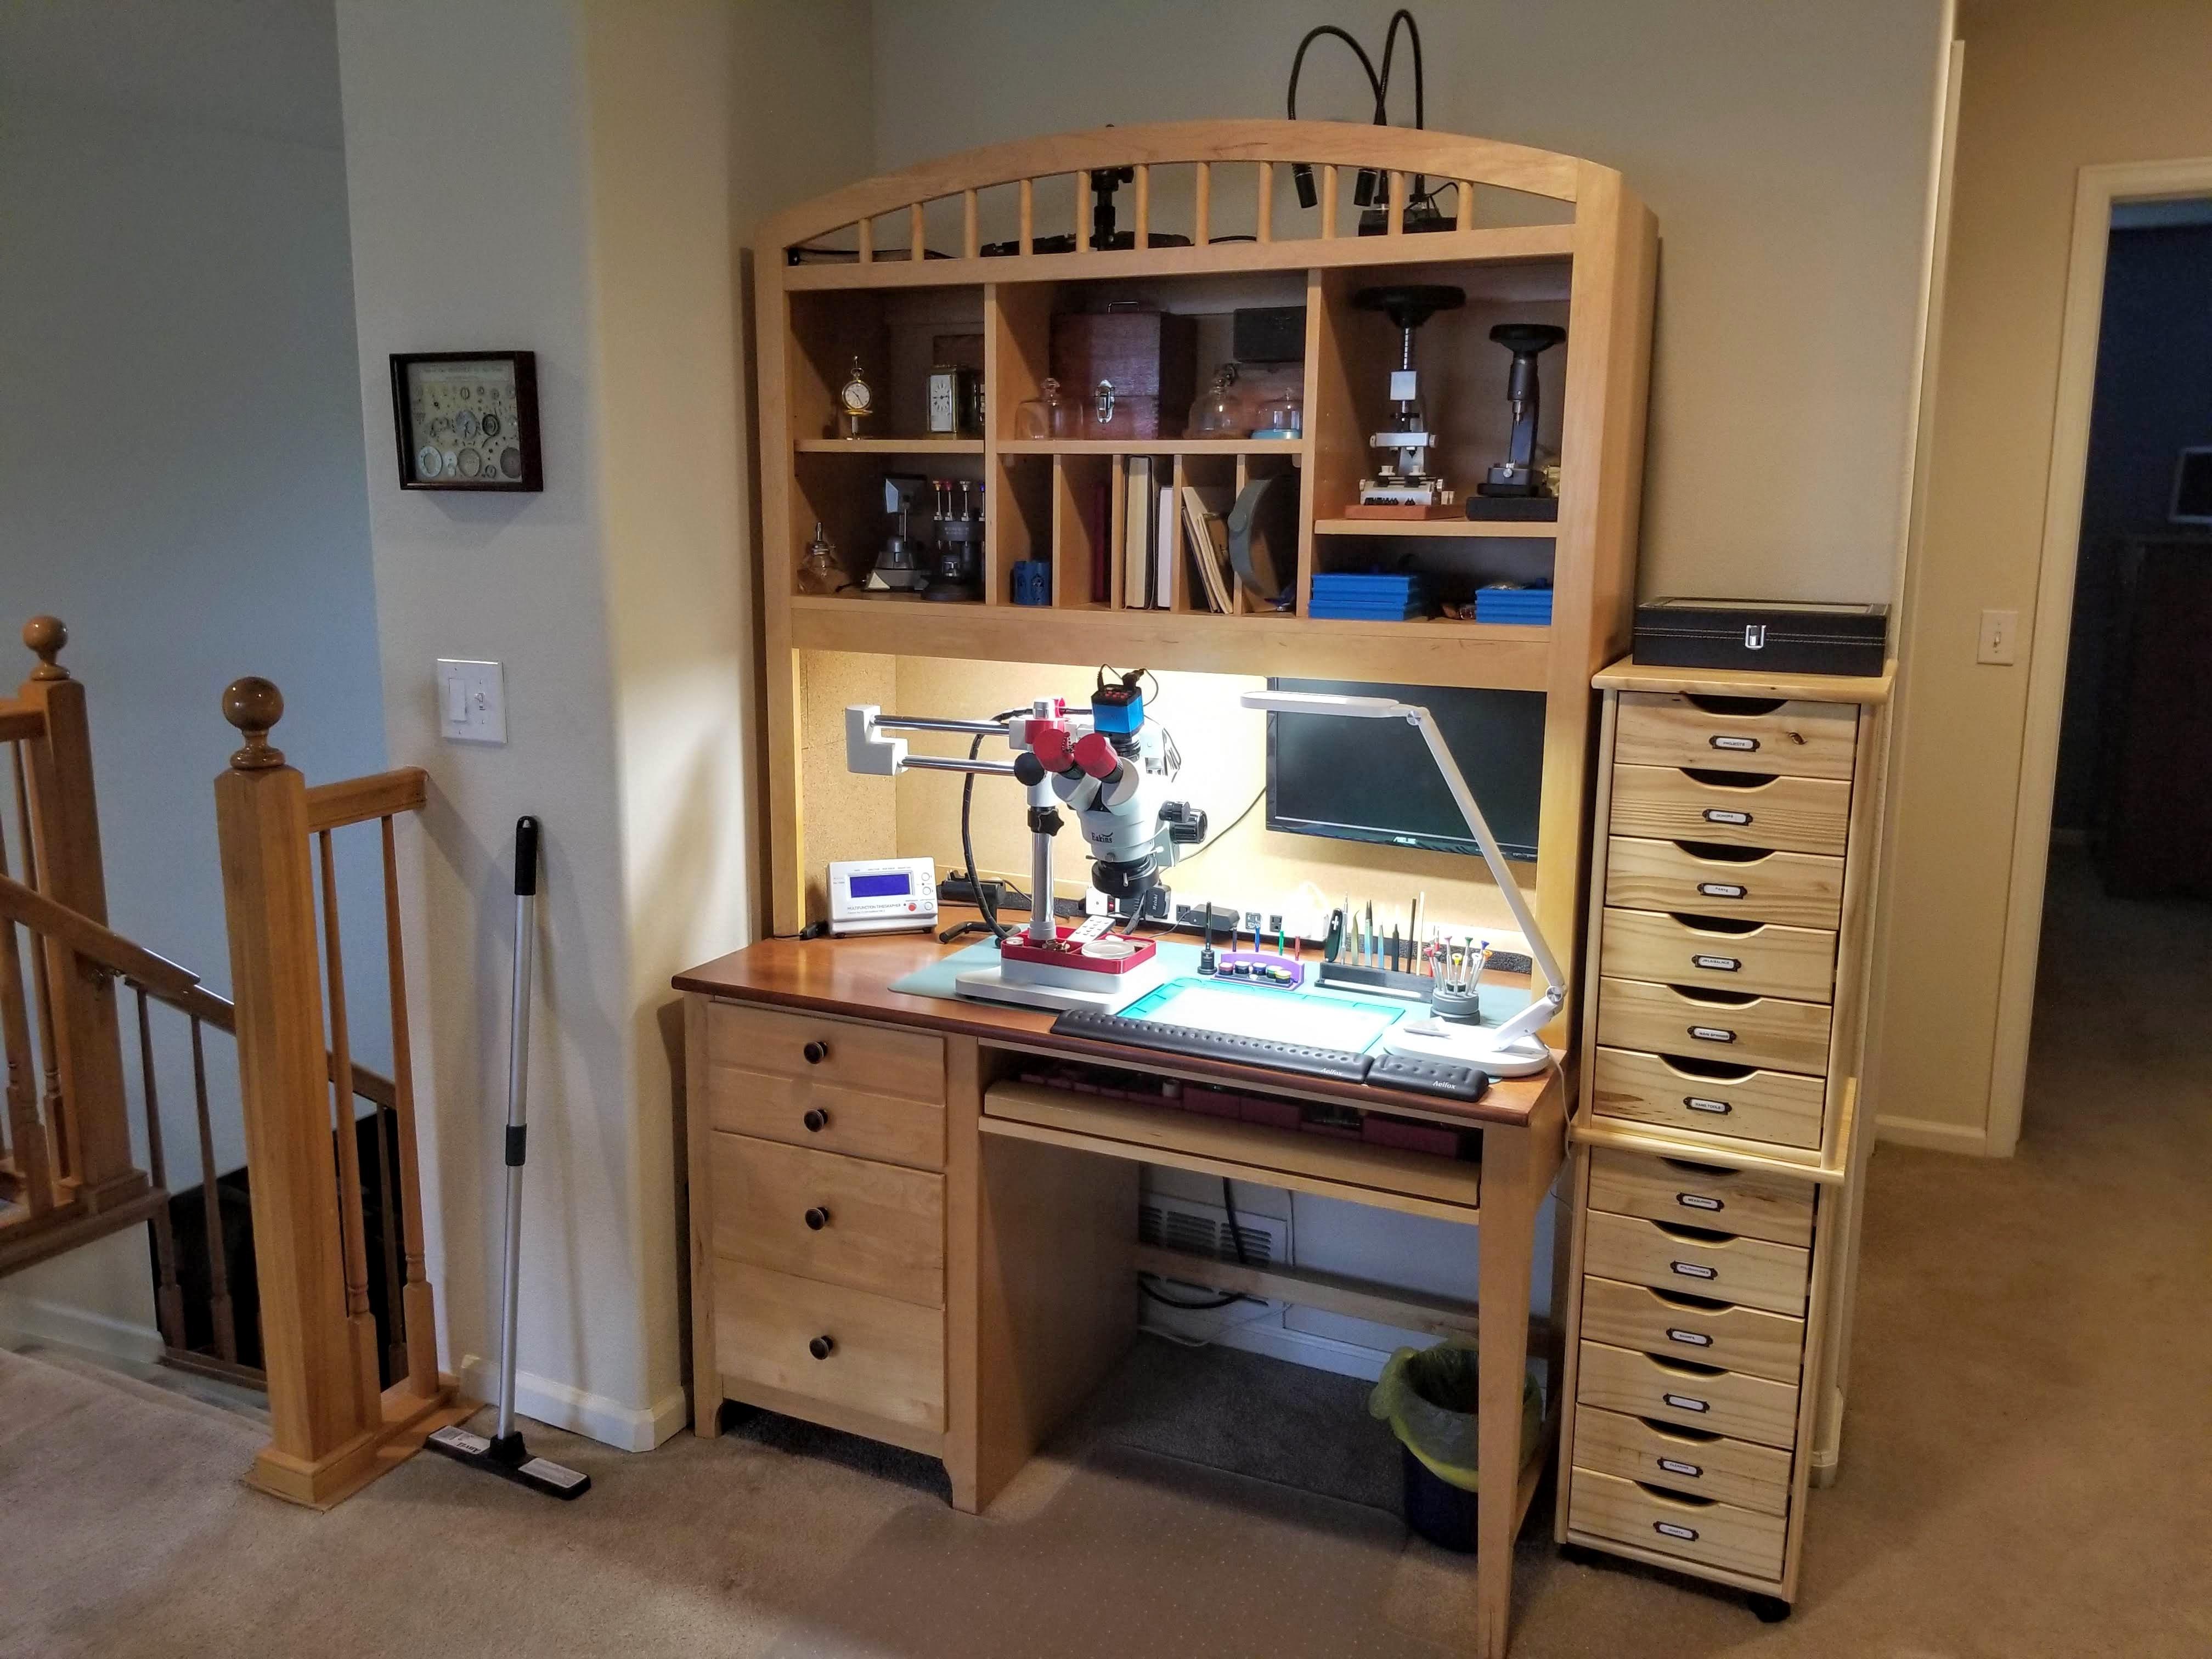
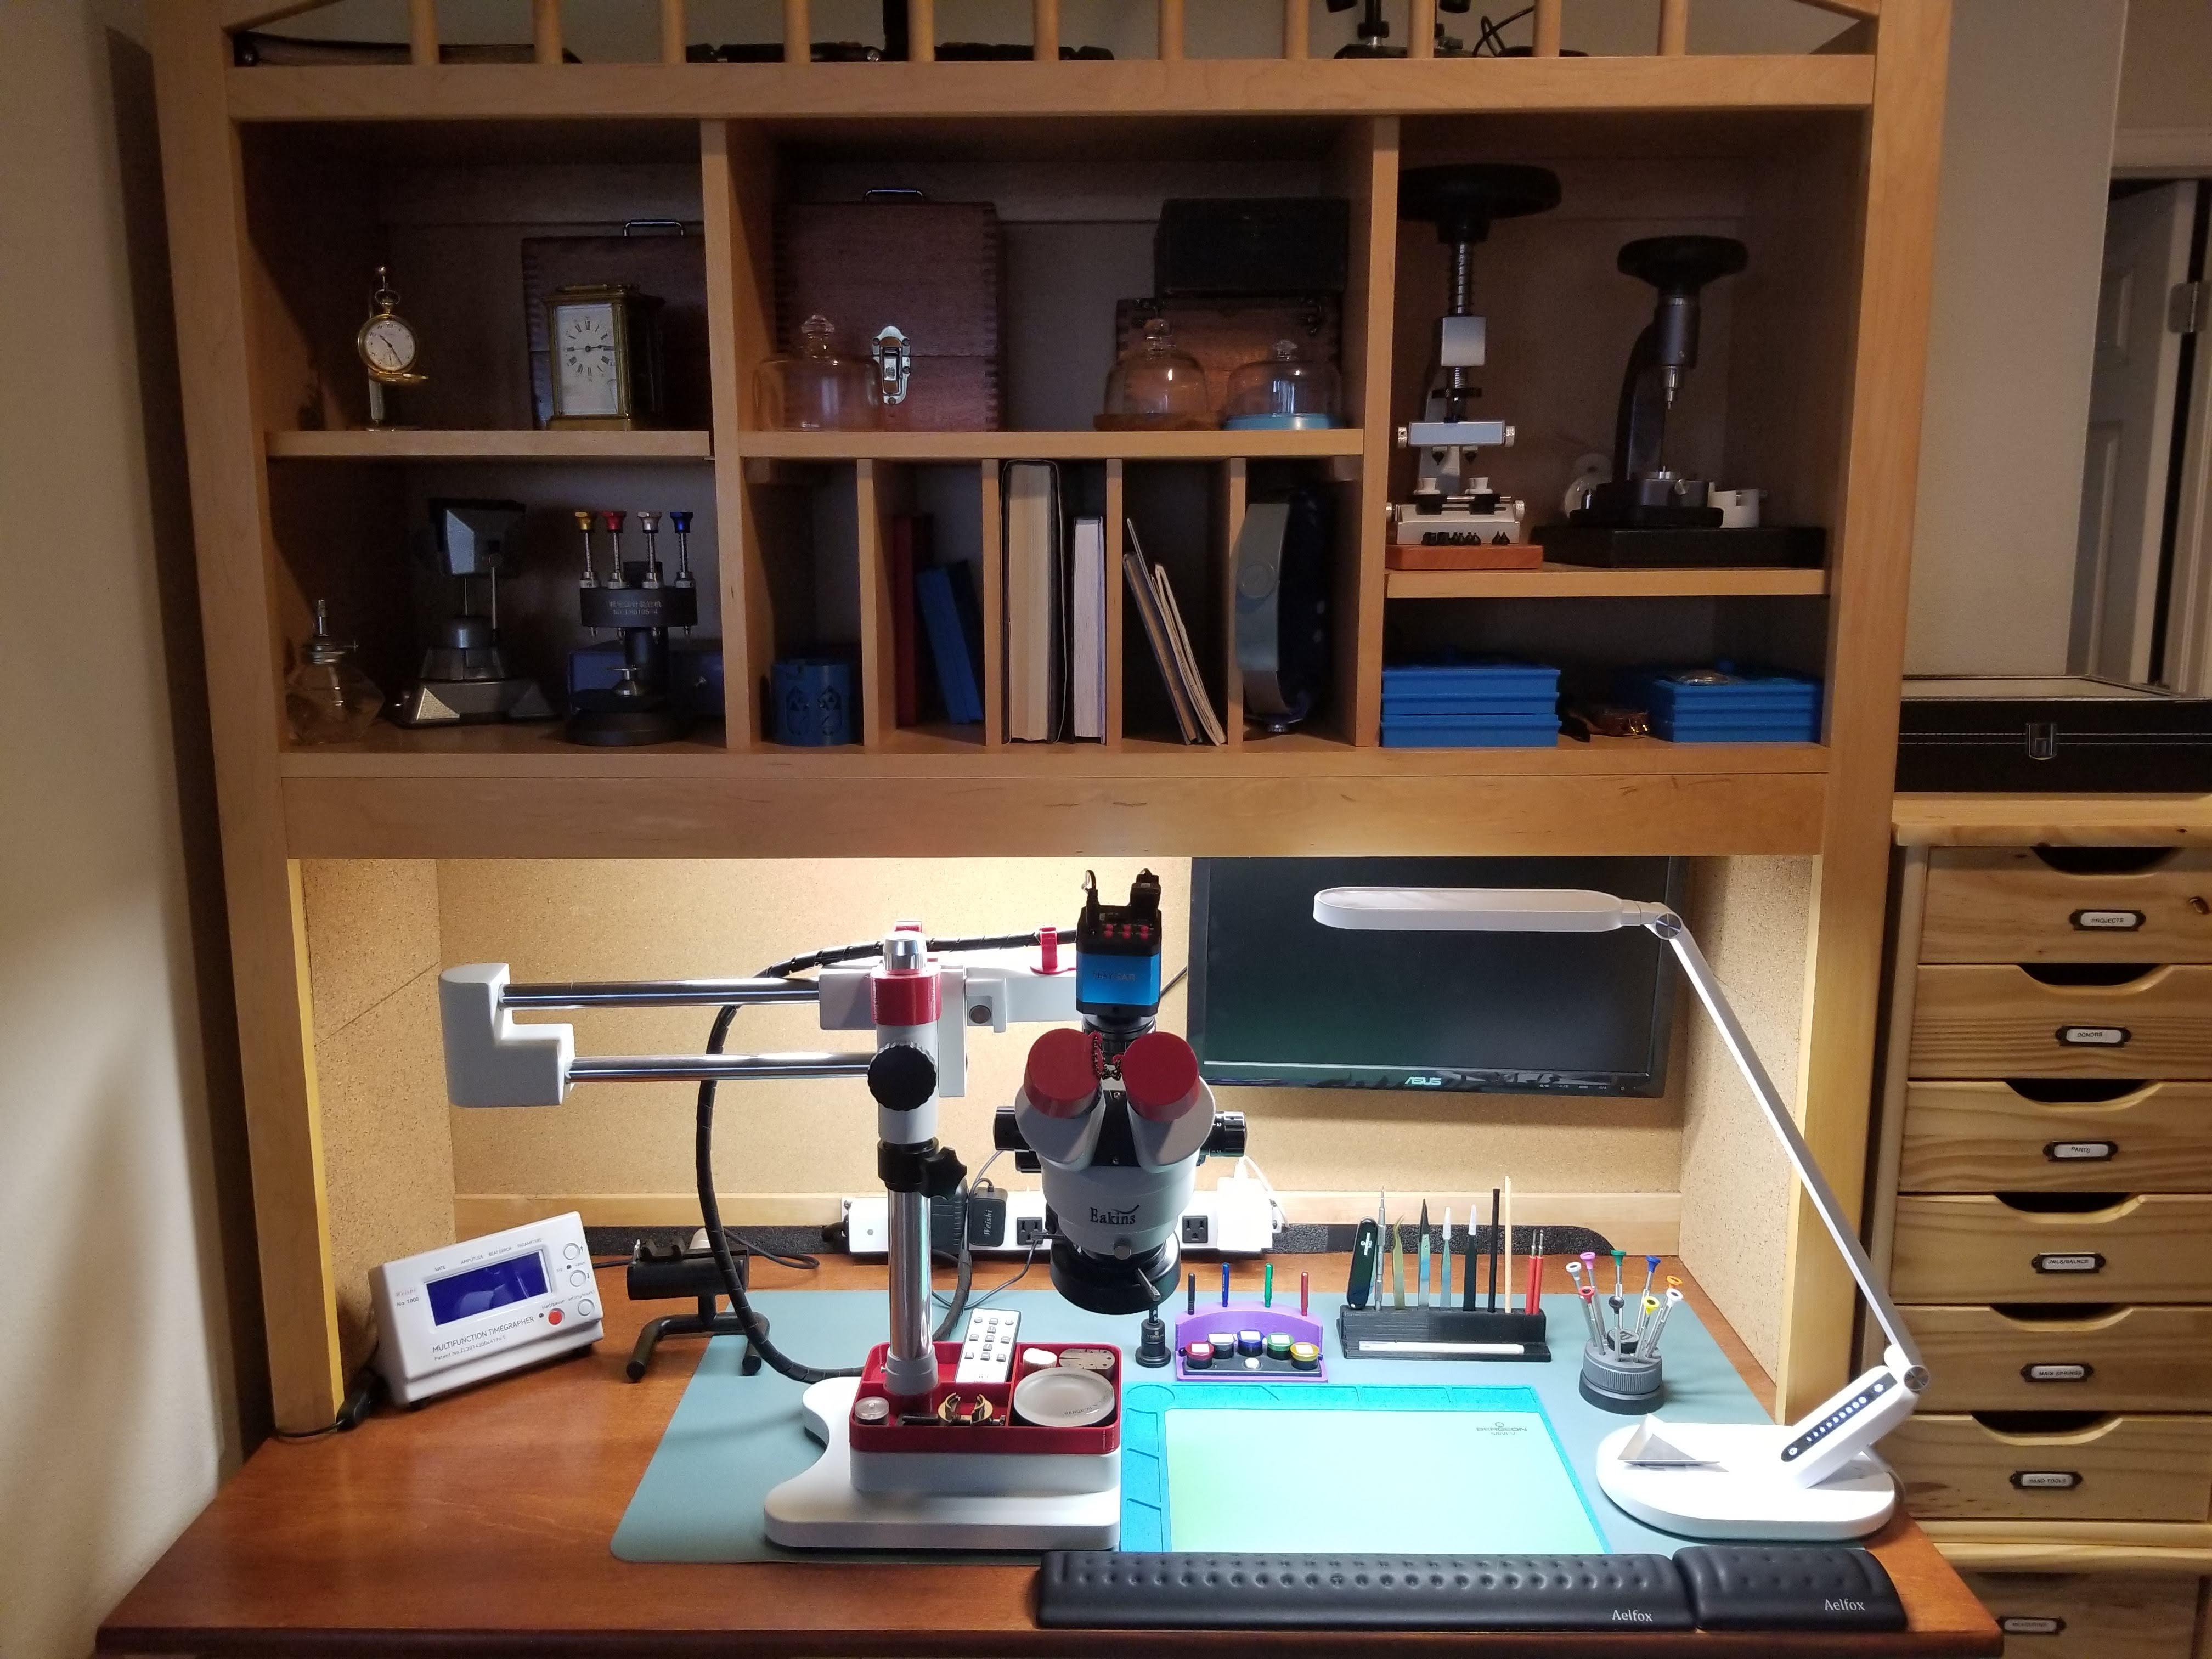
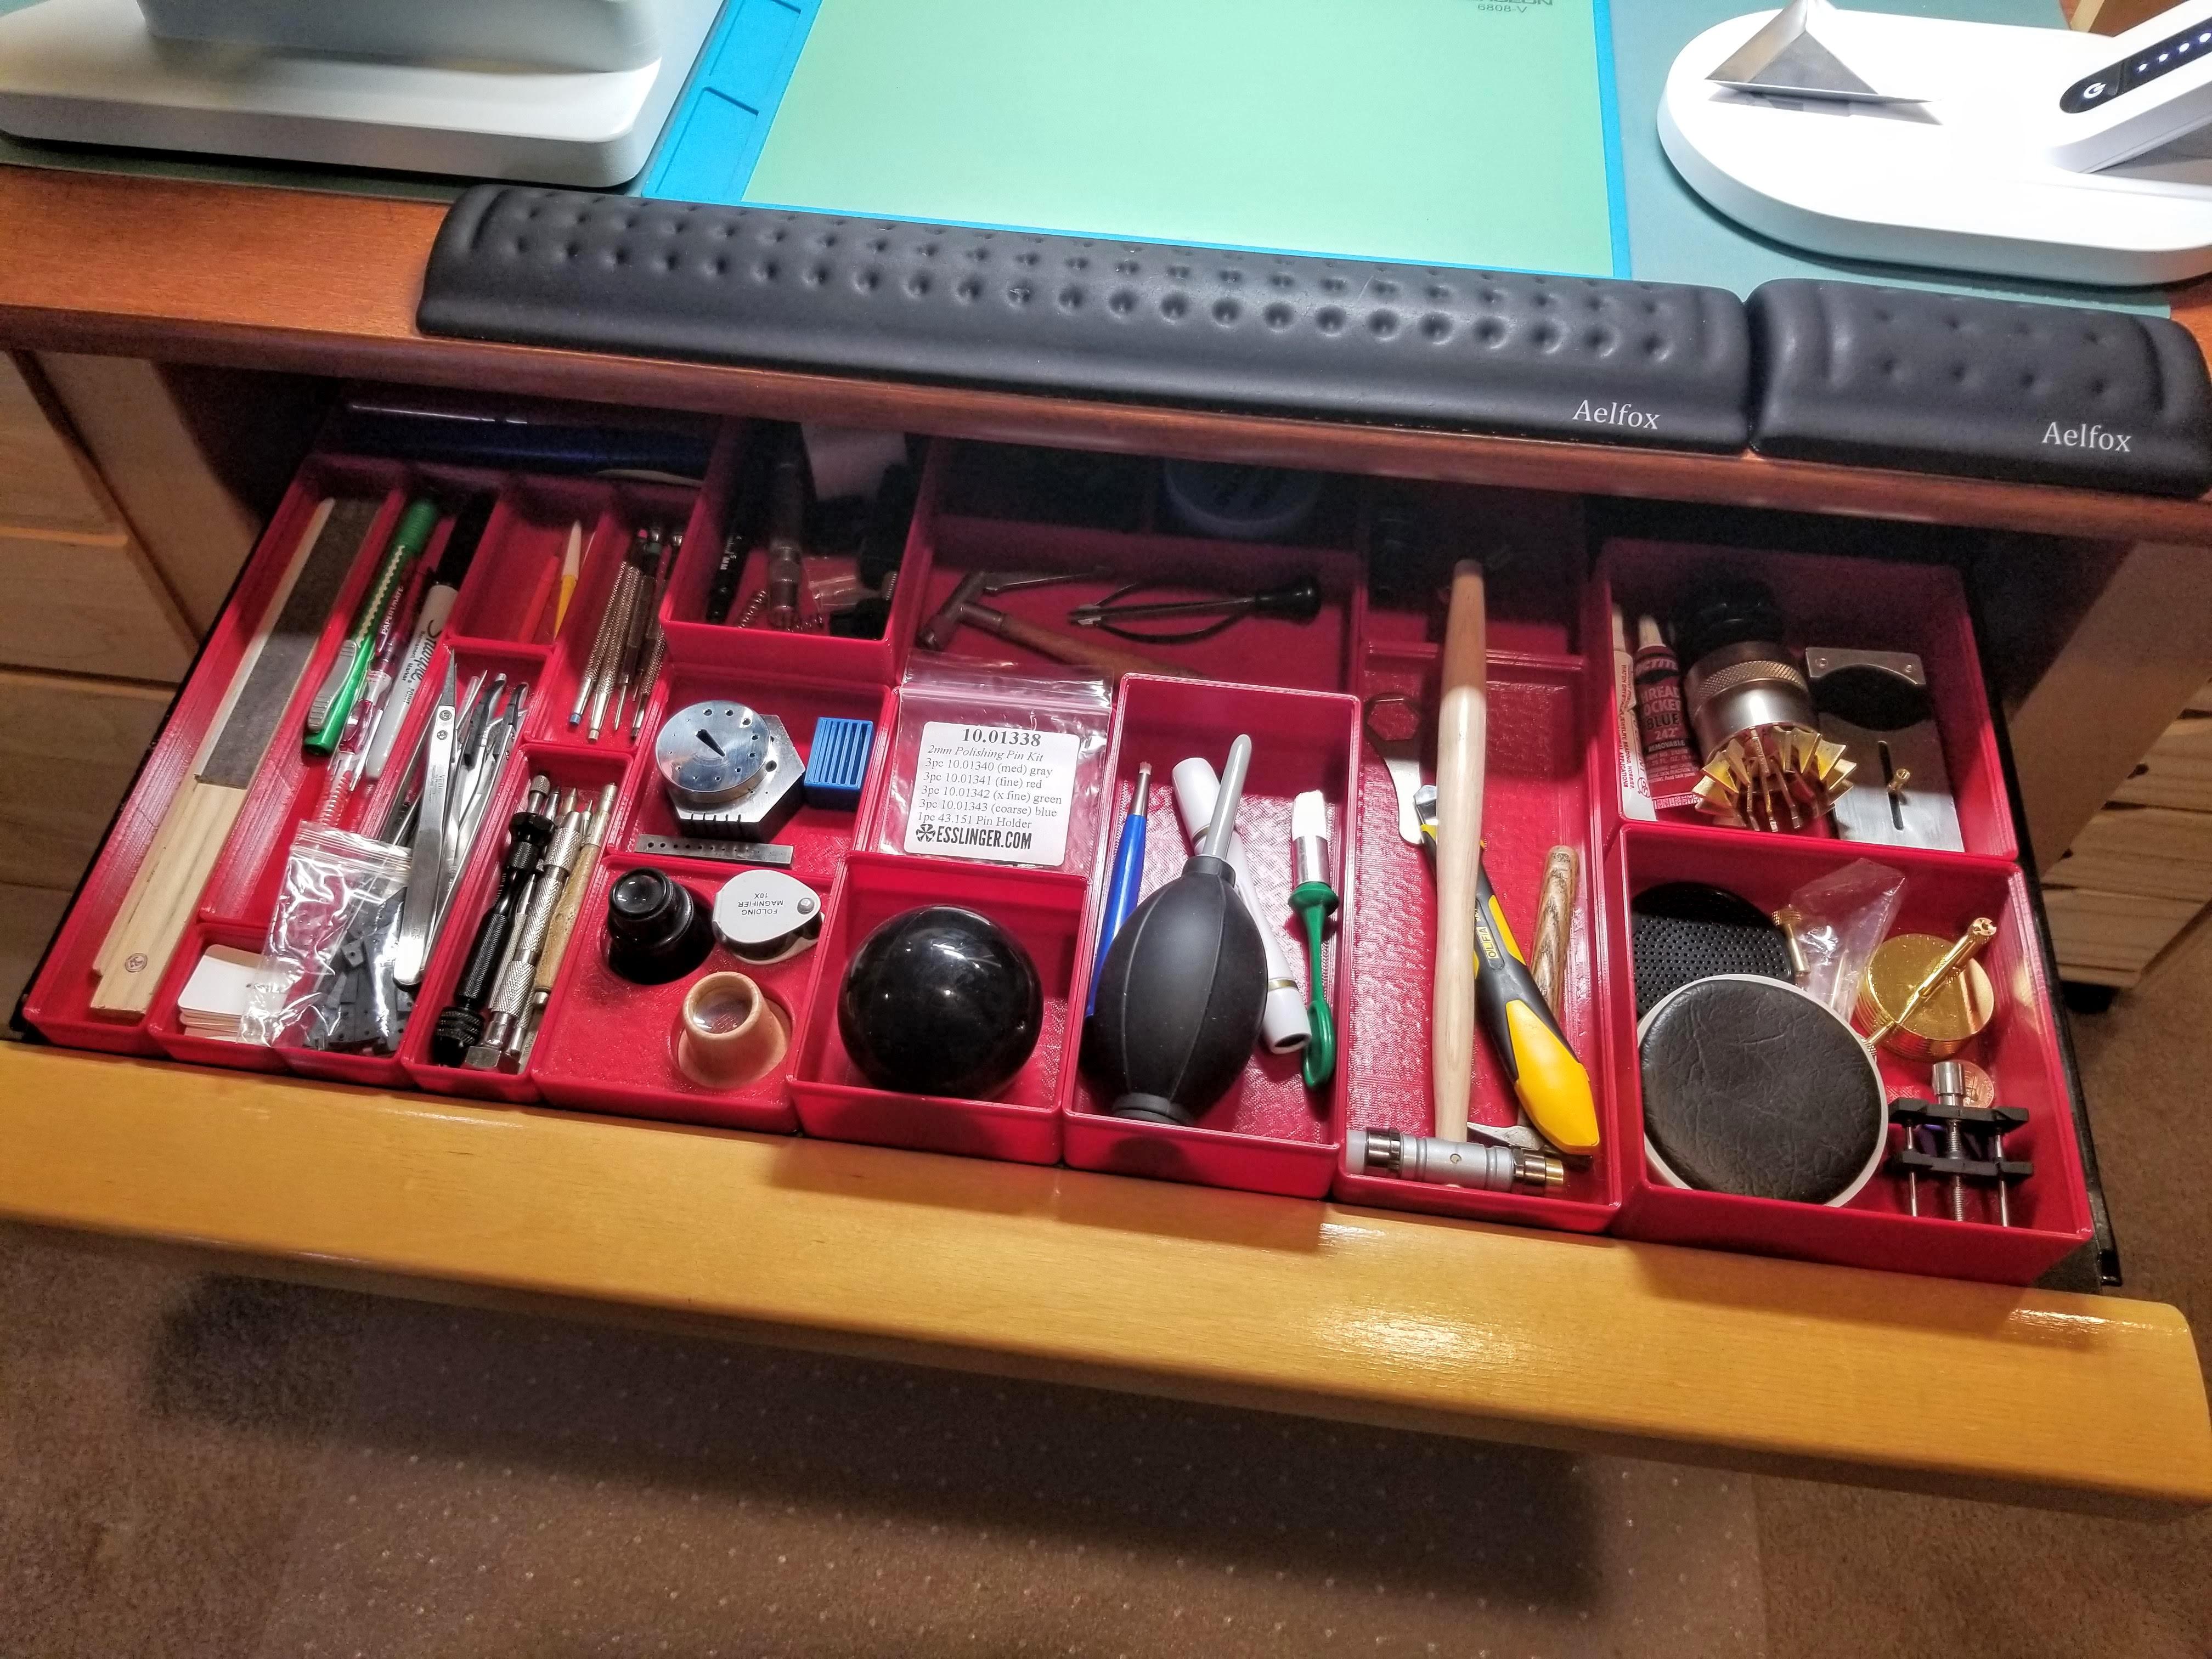
My setup has continued to evolve. Not ideal, I know, but it works well for the tight real estate that I have. Added an optical microscope. Takes up a lot of space, but so much nicer than using a loupe or magnifying visor. Better on my back, for sure. Added two sets of drawers for projects, parts and tools. Keeps me better organized. I now use the desk drawers for tools and supplies that I more commonly need. The hutch and drawer units are handy to store all of the tools that I have been acquiring. The computer wrist rests help corral parts. I plugged up the gap between the hutch and desk with some foam, where some parts liked flying to. I also added some cork board to the sides of the hutch for a bit of parts ping abatement. There's only one part (a screw) that pinged away that I haven't been able to find, even with the big magnet wand that I keep off to the left of the desk. Lighting is still something that I want a better solution for. The microscope gets in the way of a portable desk light. I did buy a unit with two adjustable lights for the times that the microscope ring light provides too much glare for photography, but it's awkward to use and isn't as bright as I'd like. I keep my ultrasonic cleaner and watch cleaning machine down in my basement.


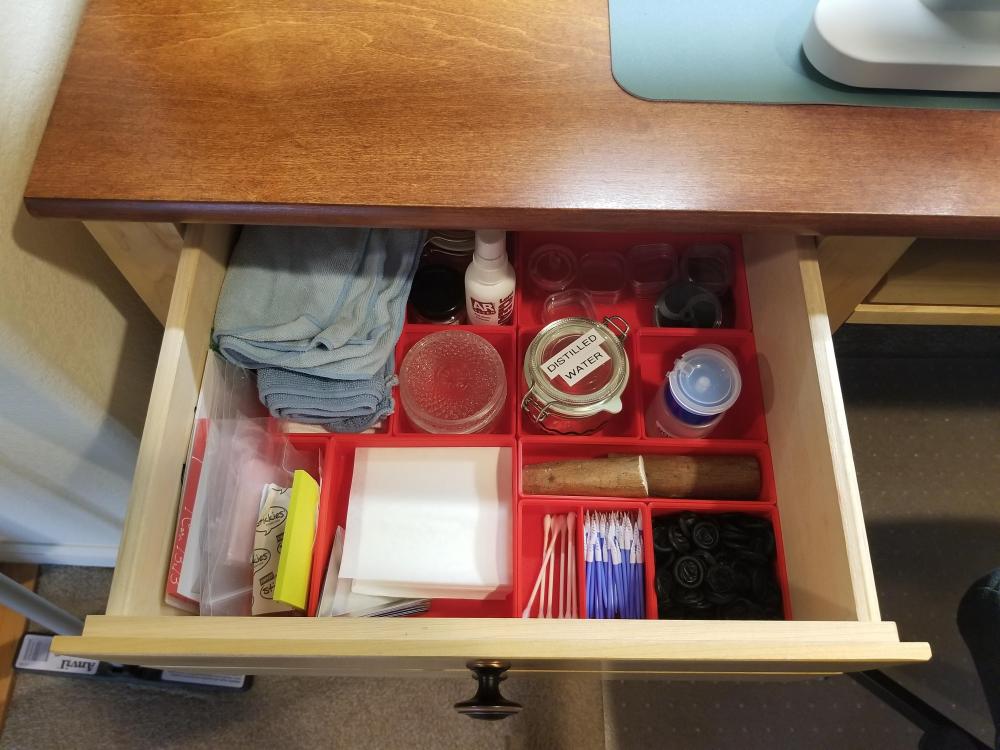
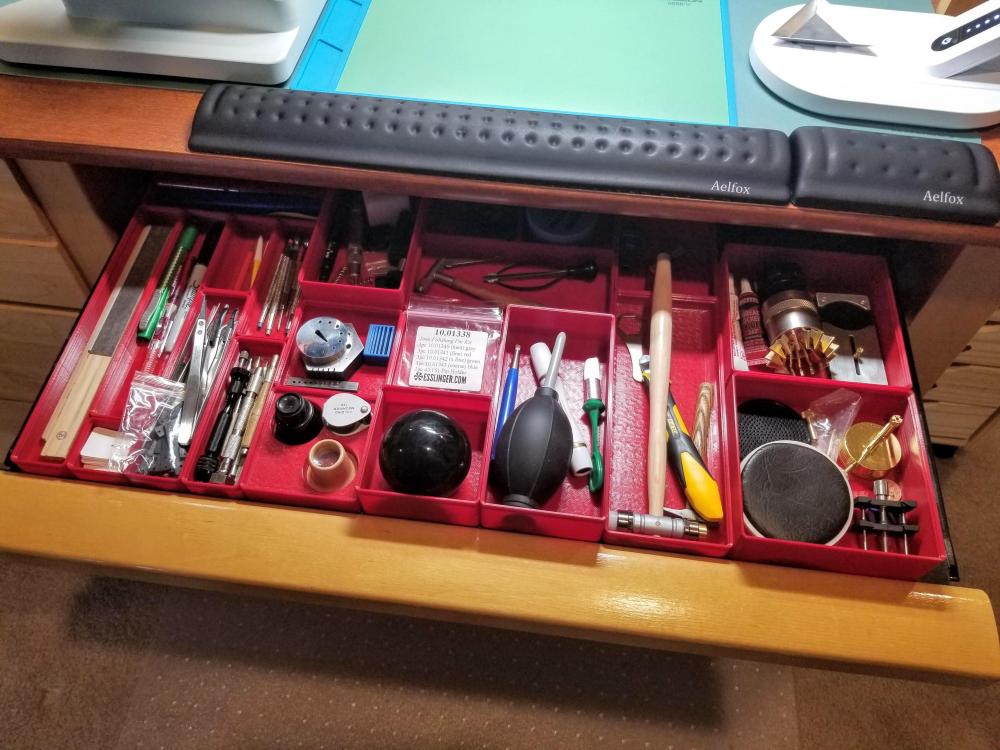 1 point
 -
@JohnL I feel your pain on cleaning fluids, I make my own (I reverse engineered the 'real' cleaning solutions) as I cannot buy locally or get them shipped, maybe you can get IPA on Amazon, which is where I get mine, but make sure it's +99%. Here is my cleaning process for ultrasonic: 10 mins @ 60 deg C in fairy liquid/water Place baskets and large parts on paper towel for 5 mins to soak up the bulk of the water/detergent Very quick dip in used/old IPA to remove water (+/-10 seconds) 10 mins @ 60 deg C in naphtha (see below) Remove small basket containing pallet fork (and anything else with shellac) and dry separately - I use a different basket for these so I can spot them easily Remove balance from main plate and soak in small jar of Hexane (substitute for one-dip) Everything else 10 mins @ 60 deg C in IPA Leave out to dry (takes << 5 mins) The Naphtha I get from Amazon also, its sold as paint thinner but on checking the MSDS sheets it is very pure naphtha (if there is such a thing as naphtha is a soup of compounds) The Naphtha I get from Amazon Just a quick note that the 'real' watch cleaning fluids are 60-80% naphtha (see MSDS sheets) and is simply lighter fluid which you will hear some people talking about so you can be confident that it is as watch safe as the commercial specialist watch cleaning fluids.
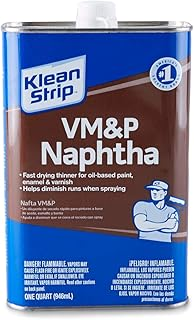 1 point
 -
Interesting post. Delightful machine.1 point
-
I took Kalanag's idea and ran with it. This works. One of the issues with the project is that the wound spring and housing does not sit inside the mainspring barrel before you press the plunger. This means the chances of the spring not seating well are high (as mentioned a few times in the thread). Kalanag's idea was to slightly eject the mainspring a tiny bit before trying to seat it in the barrel, now the spring can "set" in the bowl before you press the plunger. The chances of ejecting the spring too far and unleashing it are too great. I designed a "WinderSetBowl" to make this job foolproof. It is essentially one of Zero's barrel bowls, but set to be just 0.3mm deep. It should be sized to accommodate any winder in Zero's complete set. Instructions: After you remove the Winder Base from the Main Housing, place the housing in the "WinderSetBowl" and press the plunger. When you remove the housing, you'll notice the wound mainspring is now perfectly ejected exactly 0.3 mm. Now you can easily place it in the Barrel Bowl and eject the spring into the barrel. I am happy to place this in Thingiverse, but if Zero likes the idea, he is welcome to include it in his GitHub repository as part of his set. For now, if you would like, contact me and I'll email you the STL. I've already printed and tested this and it works great!
 1 point
 -
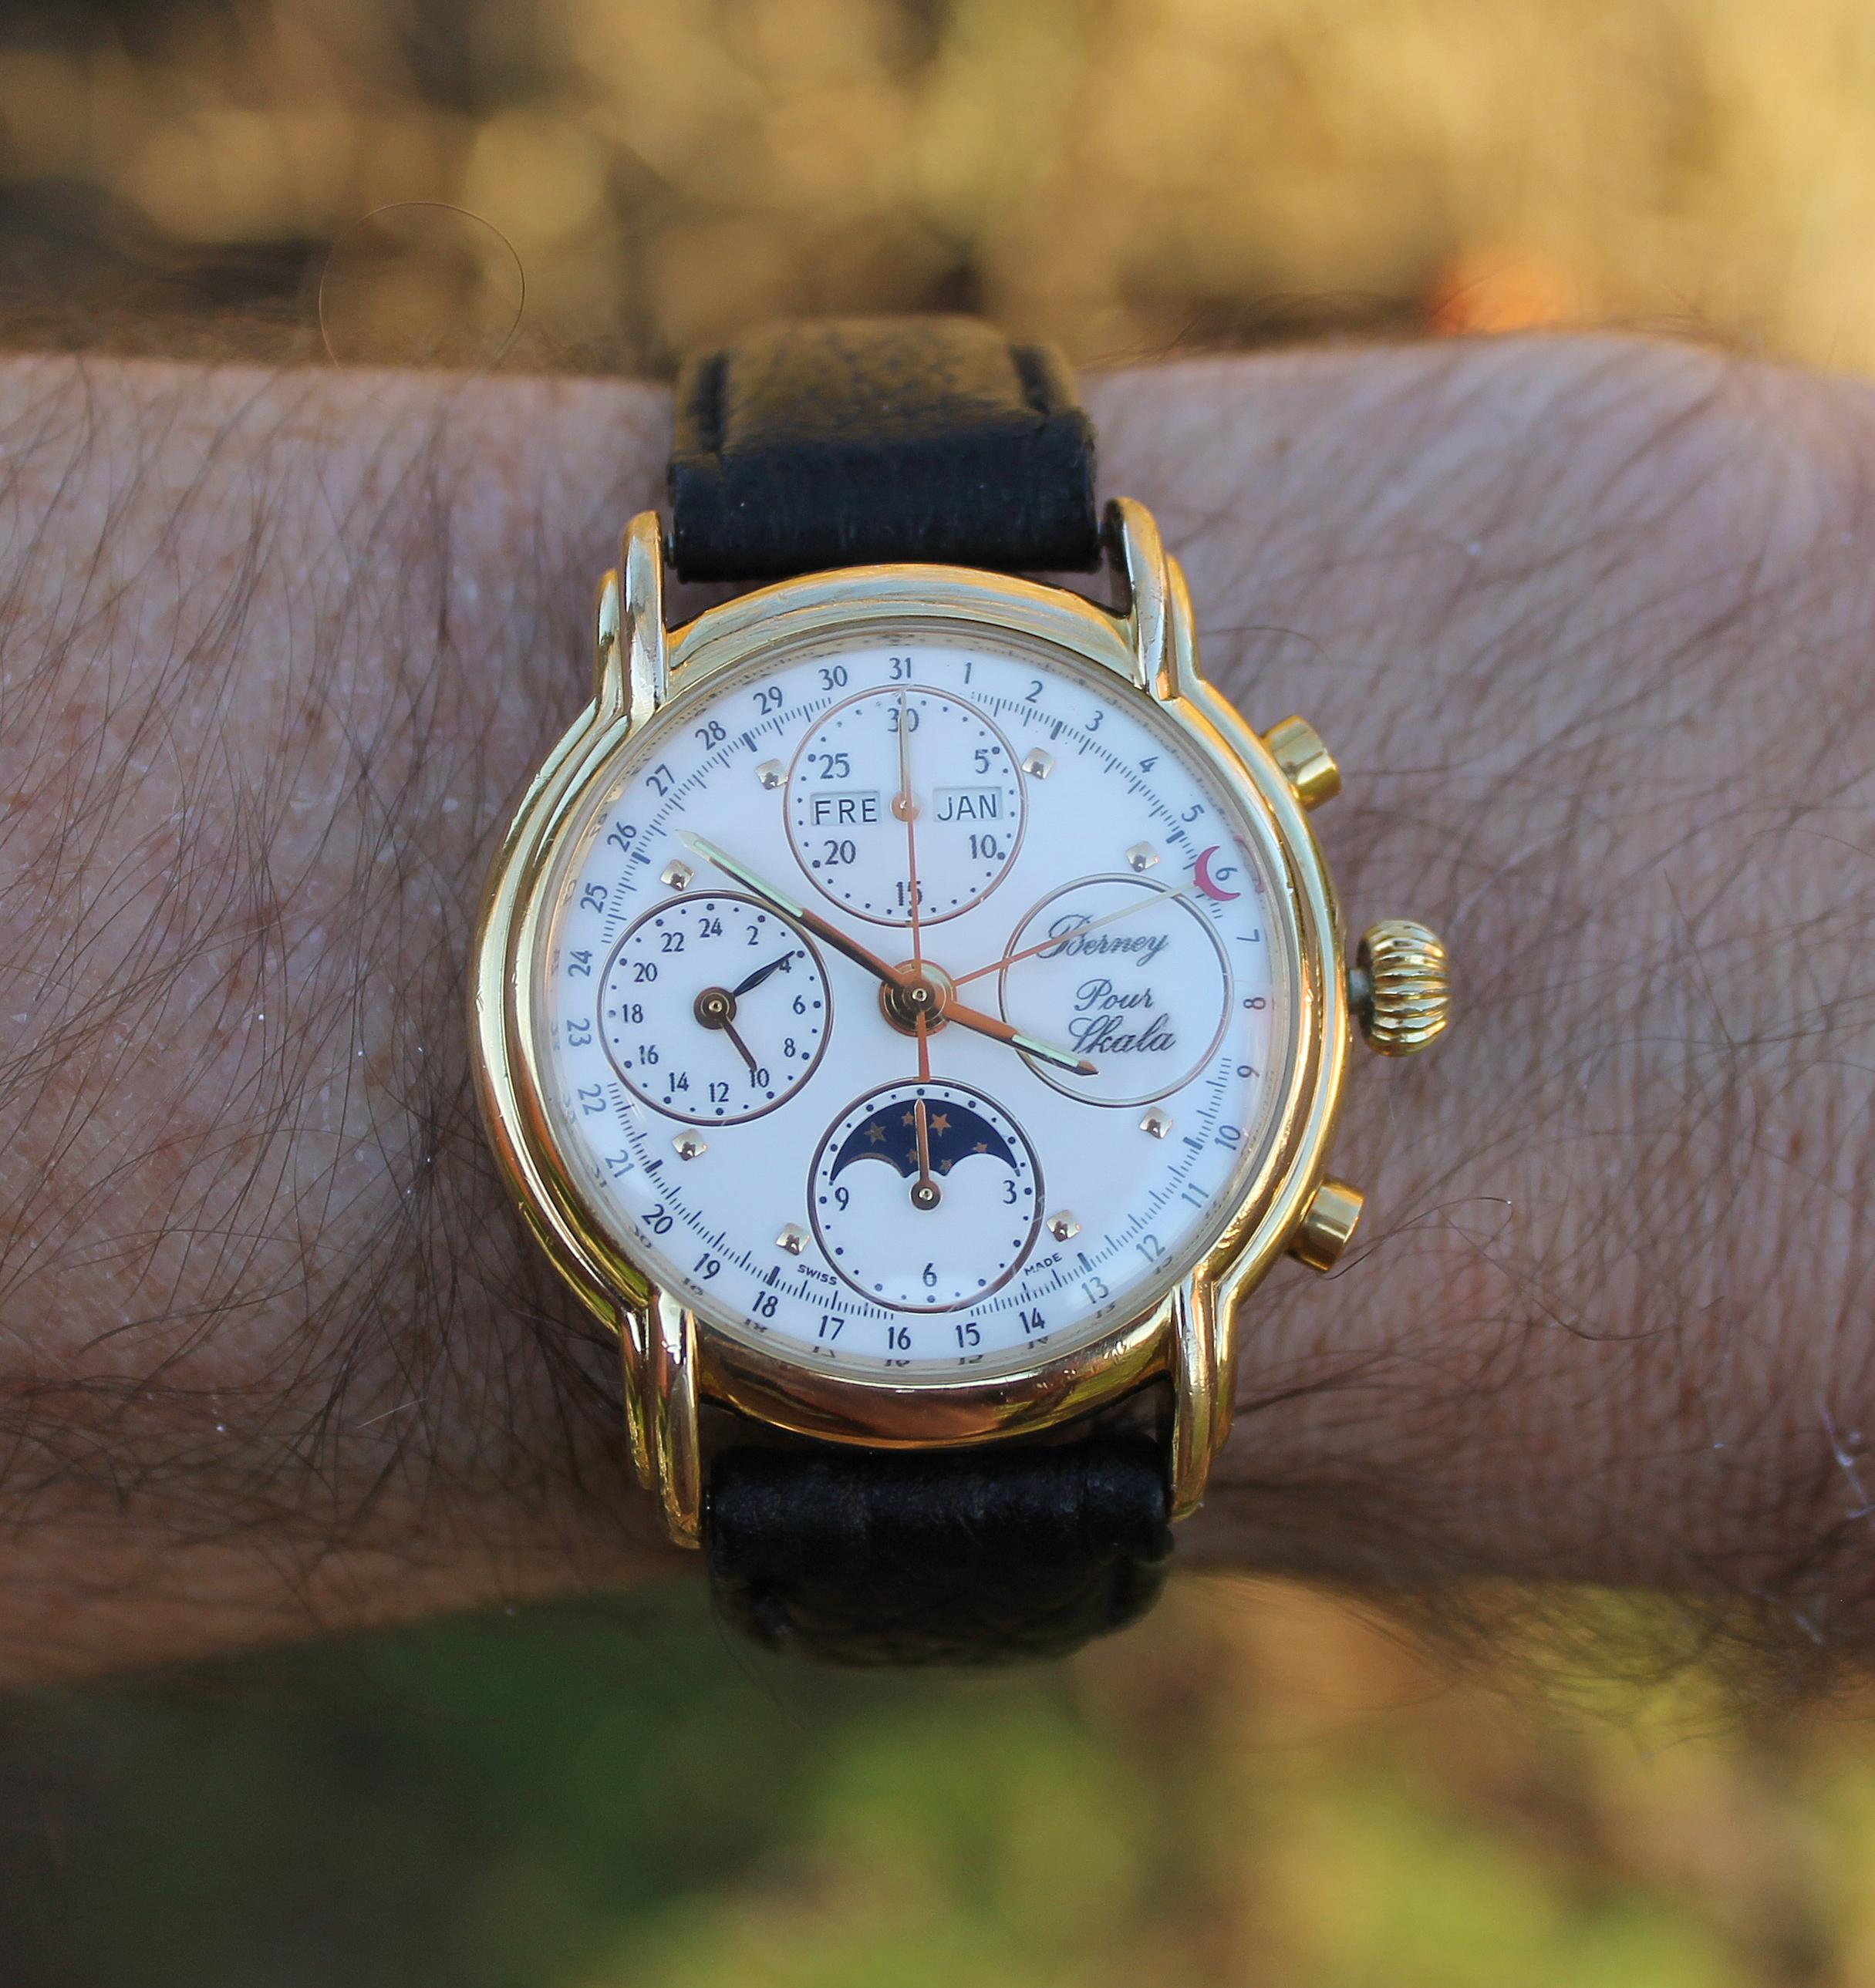
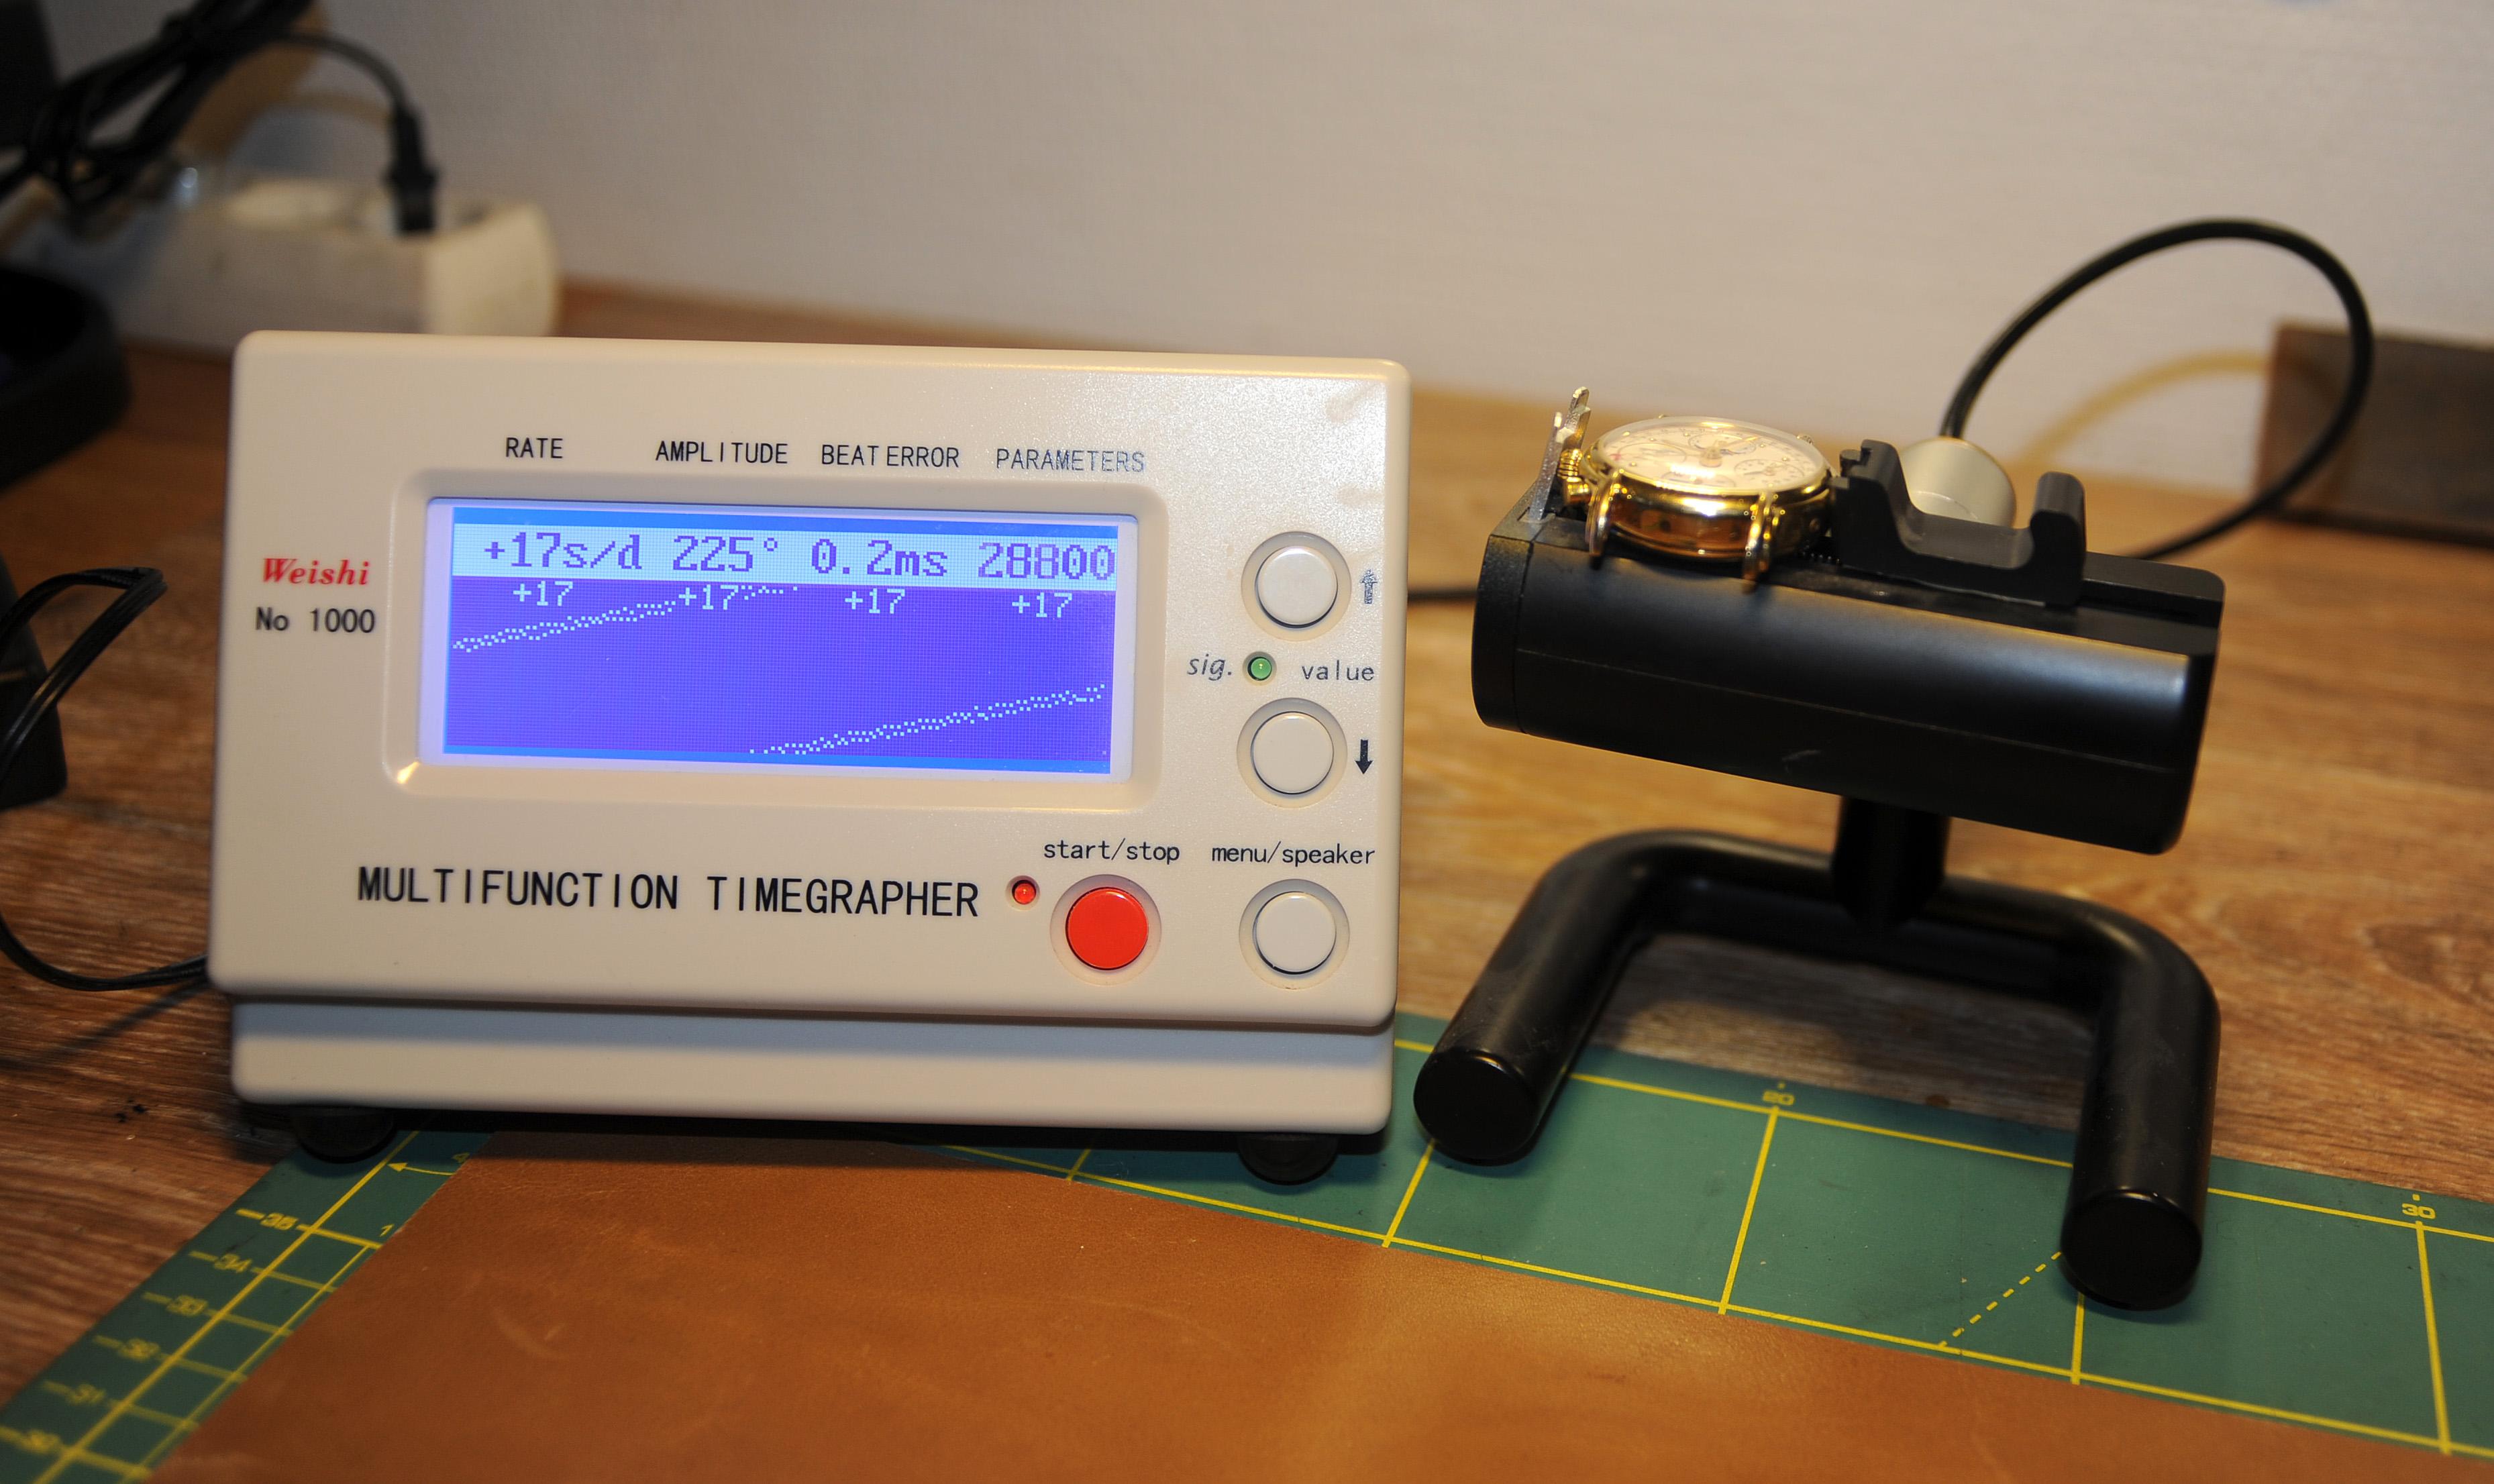
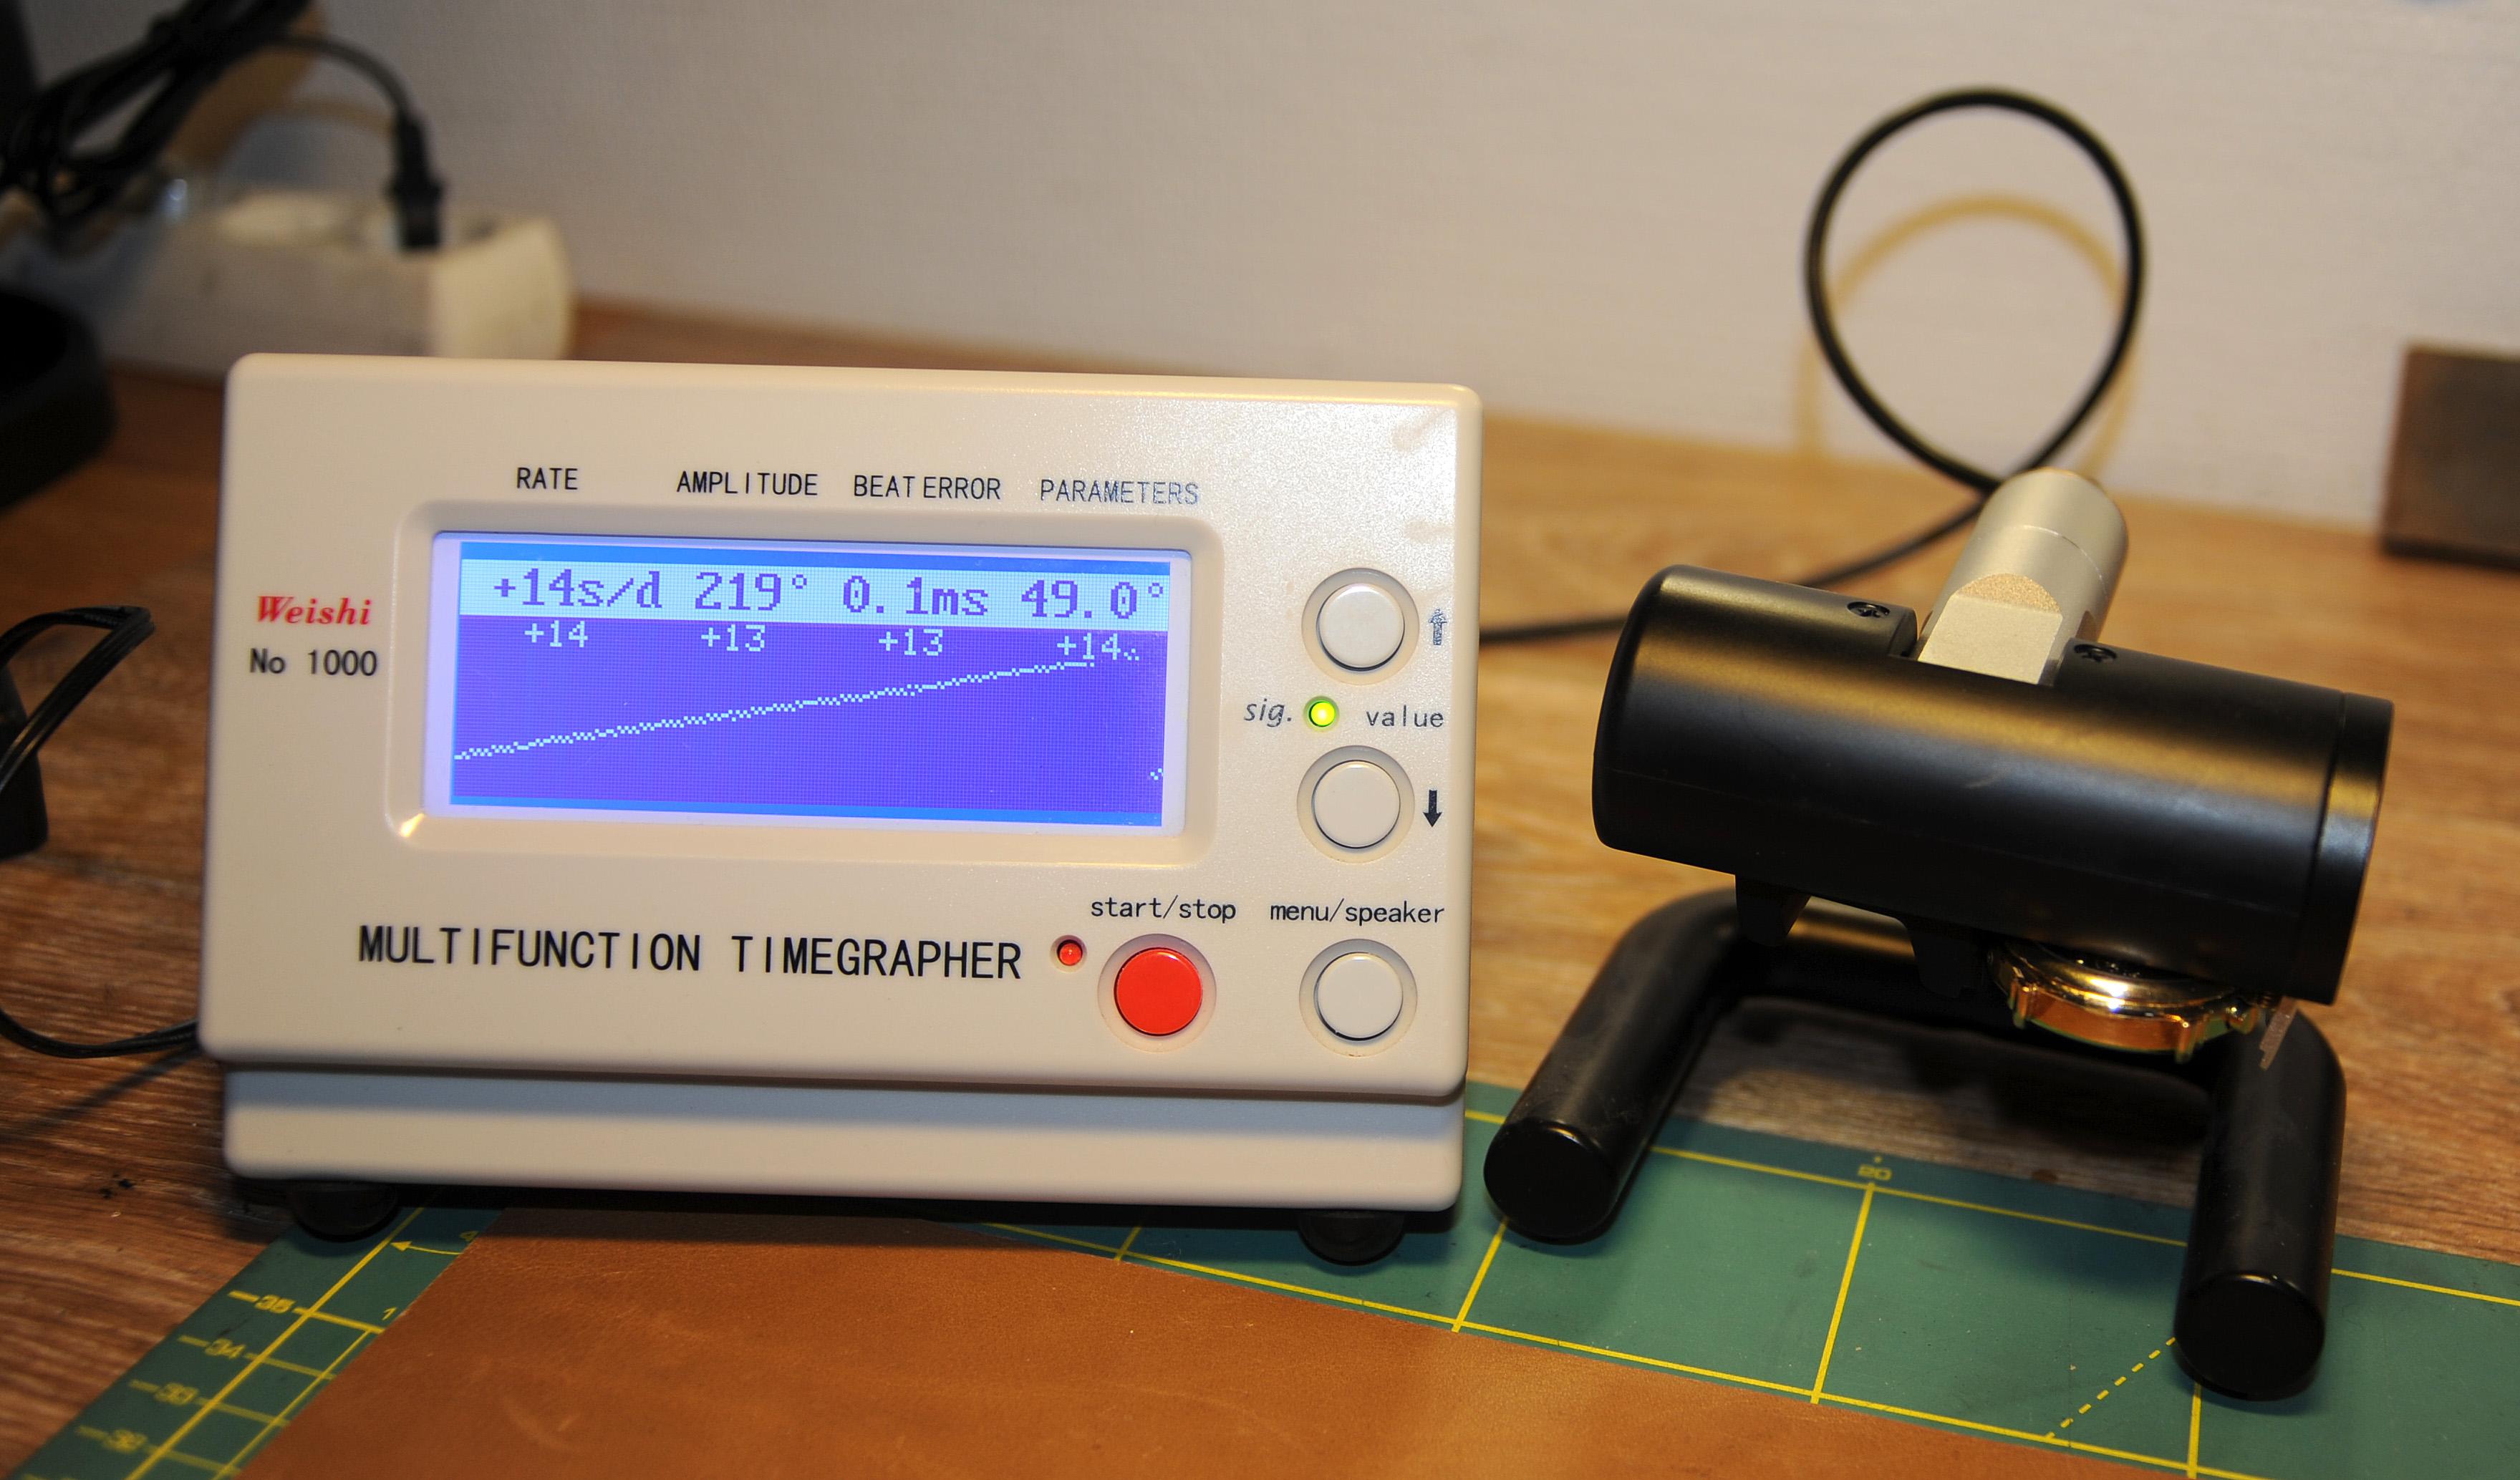
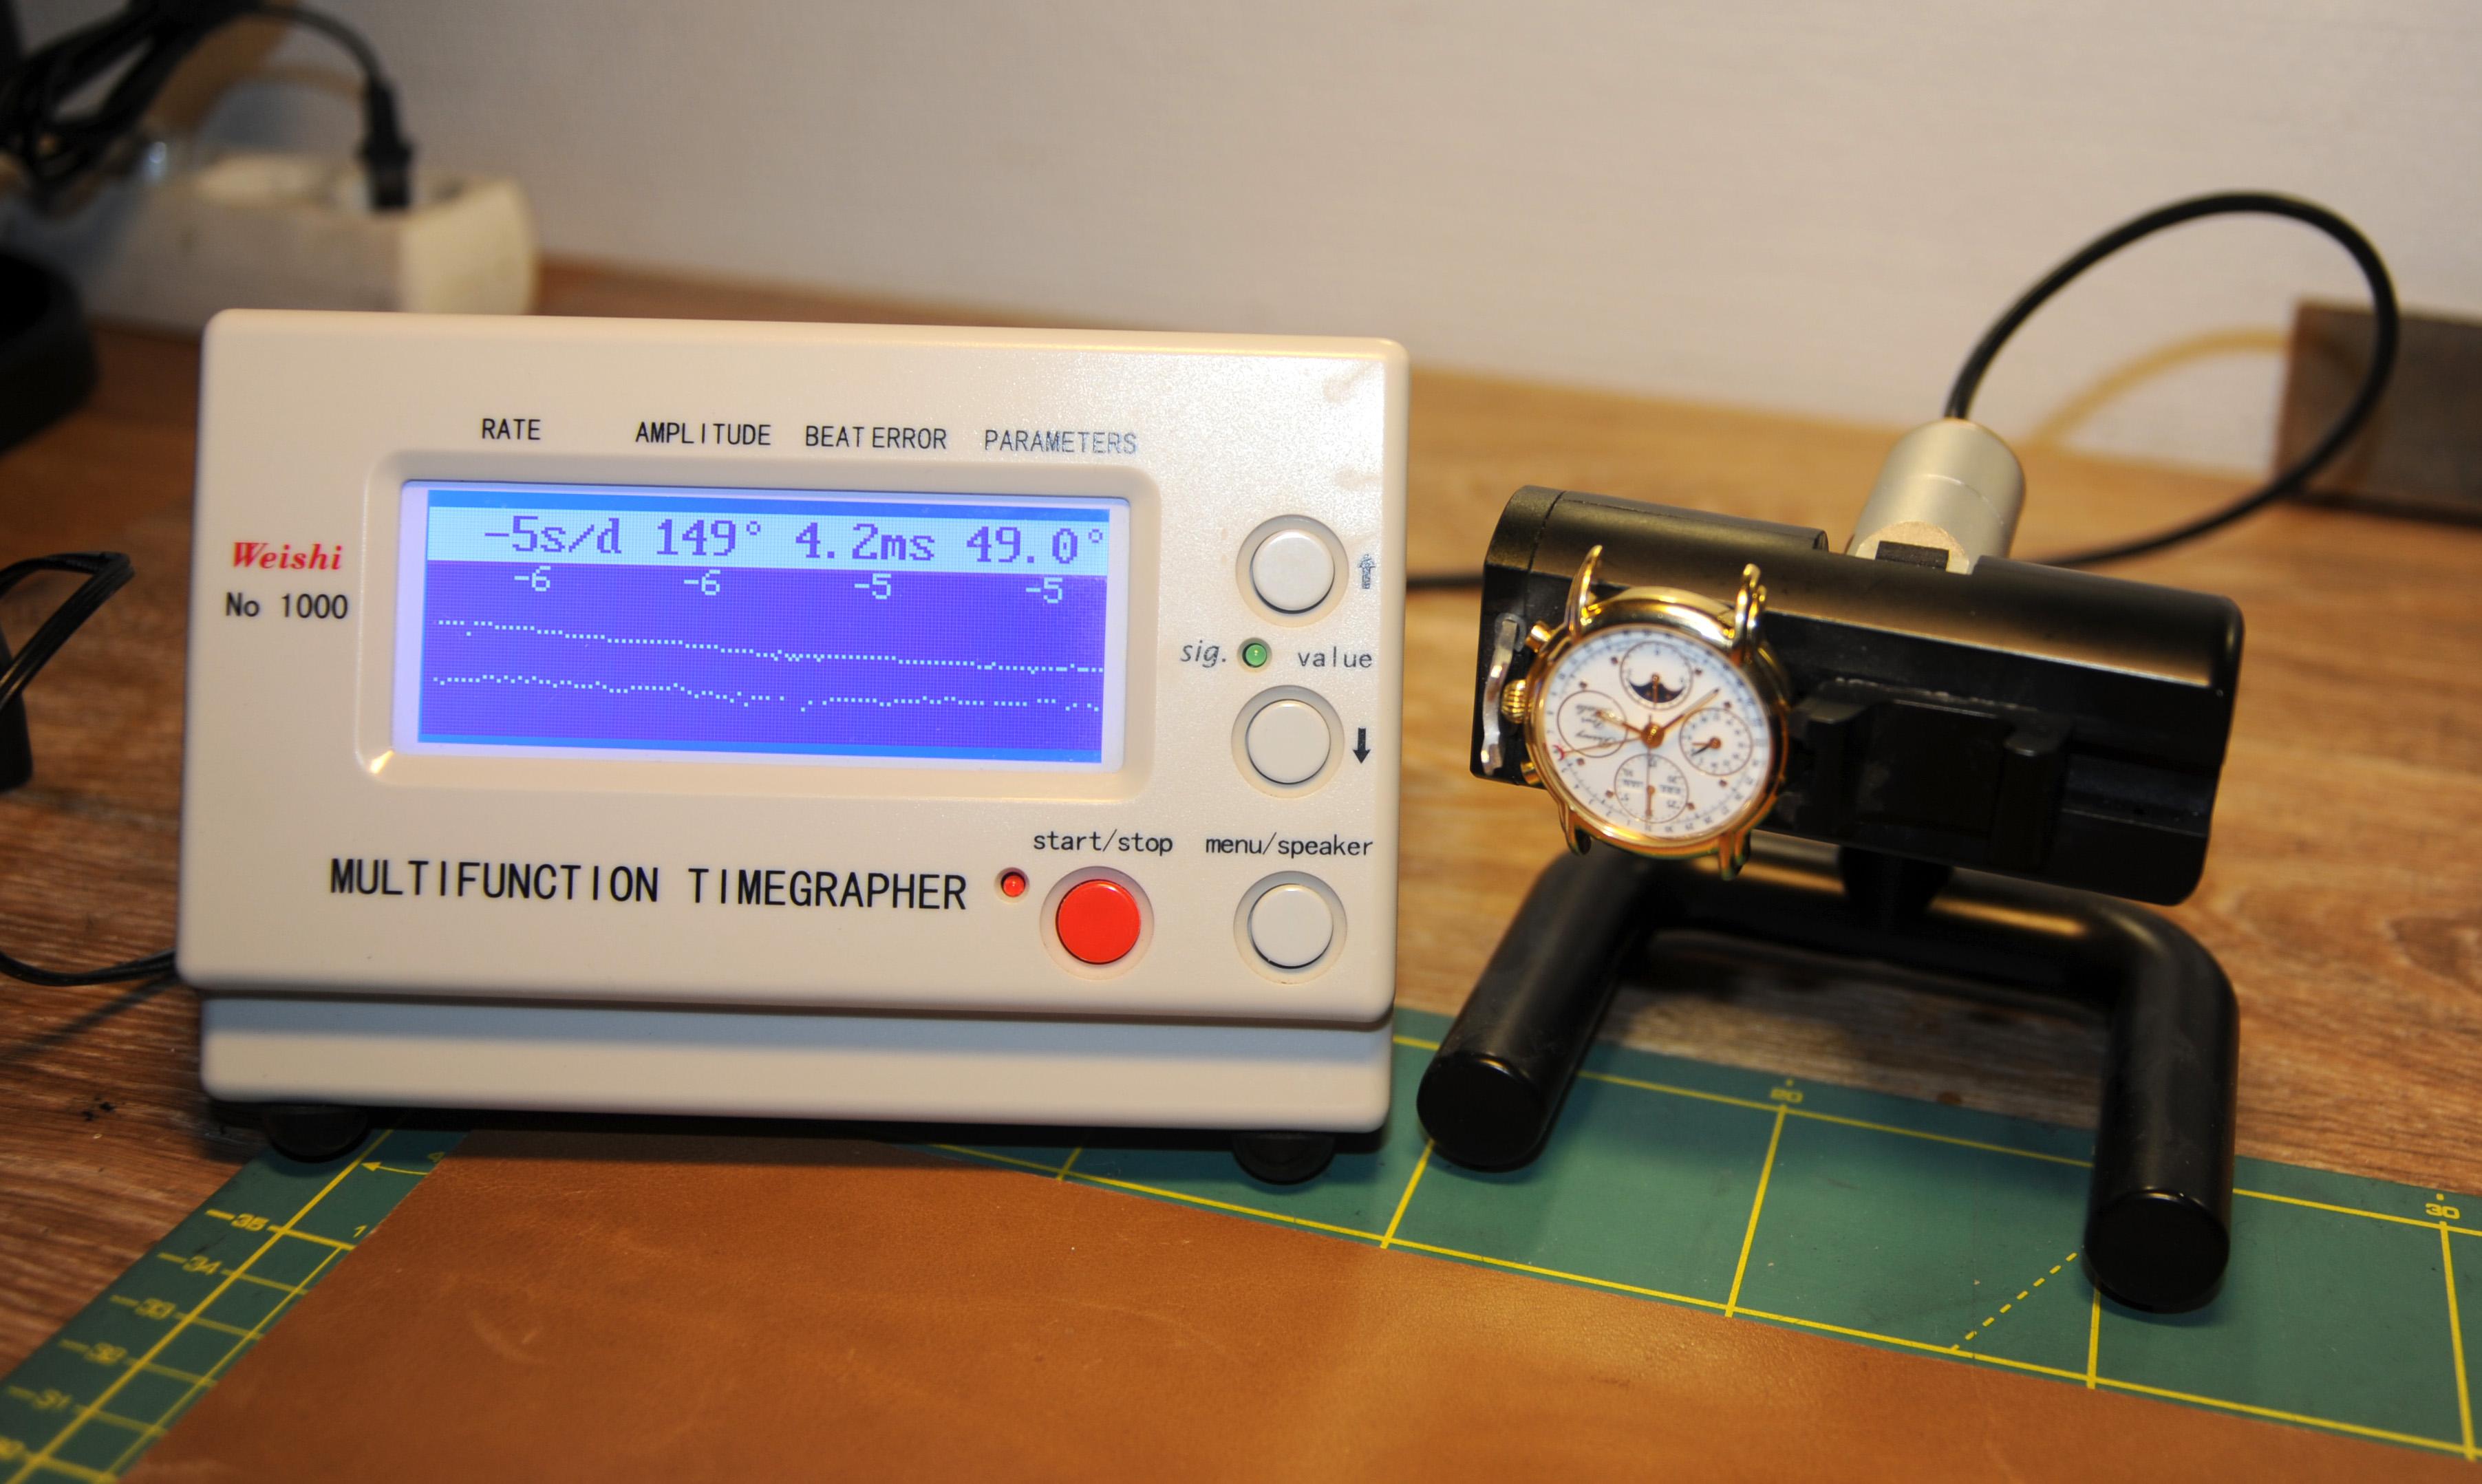
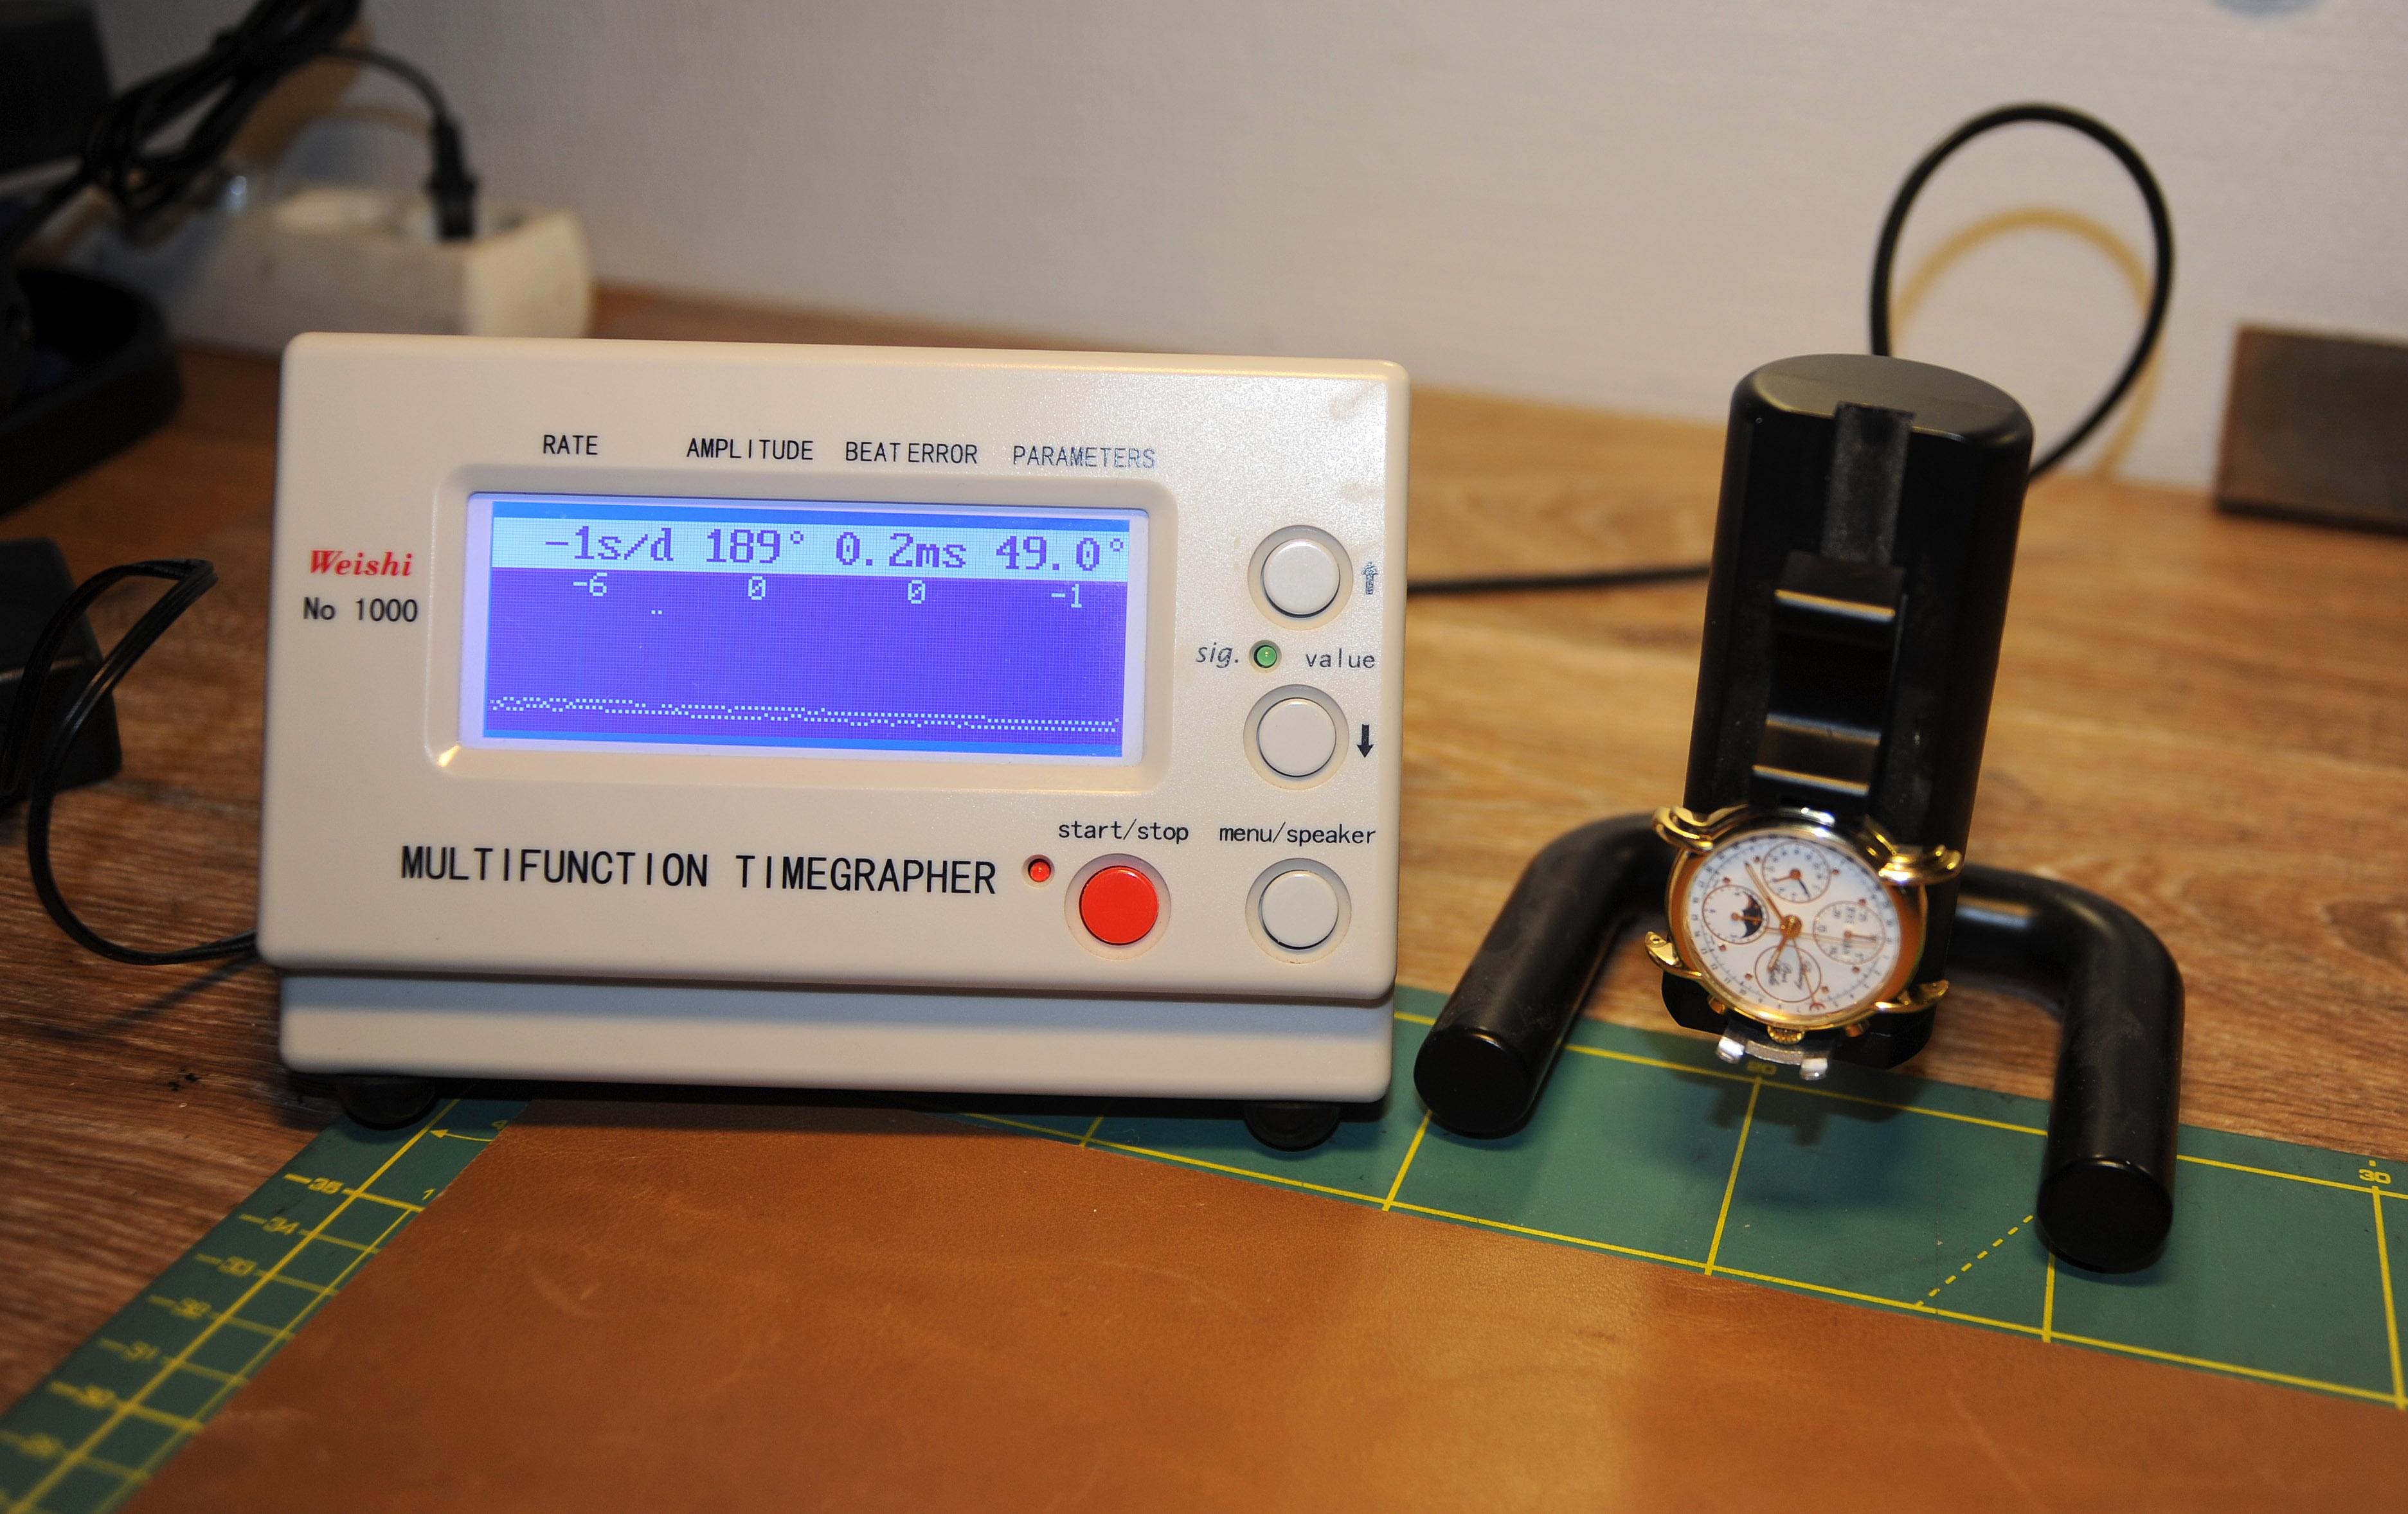
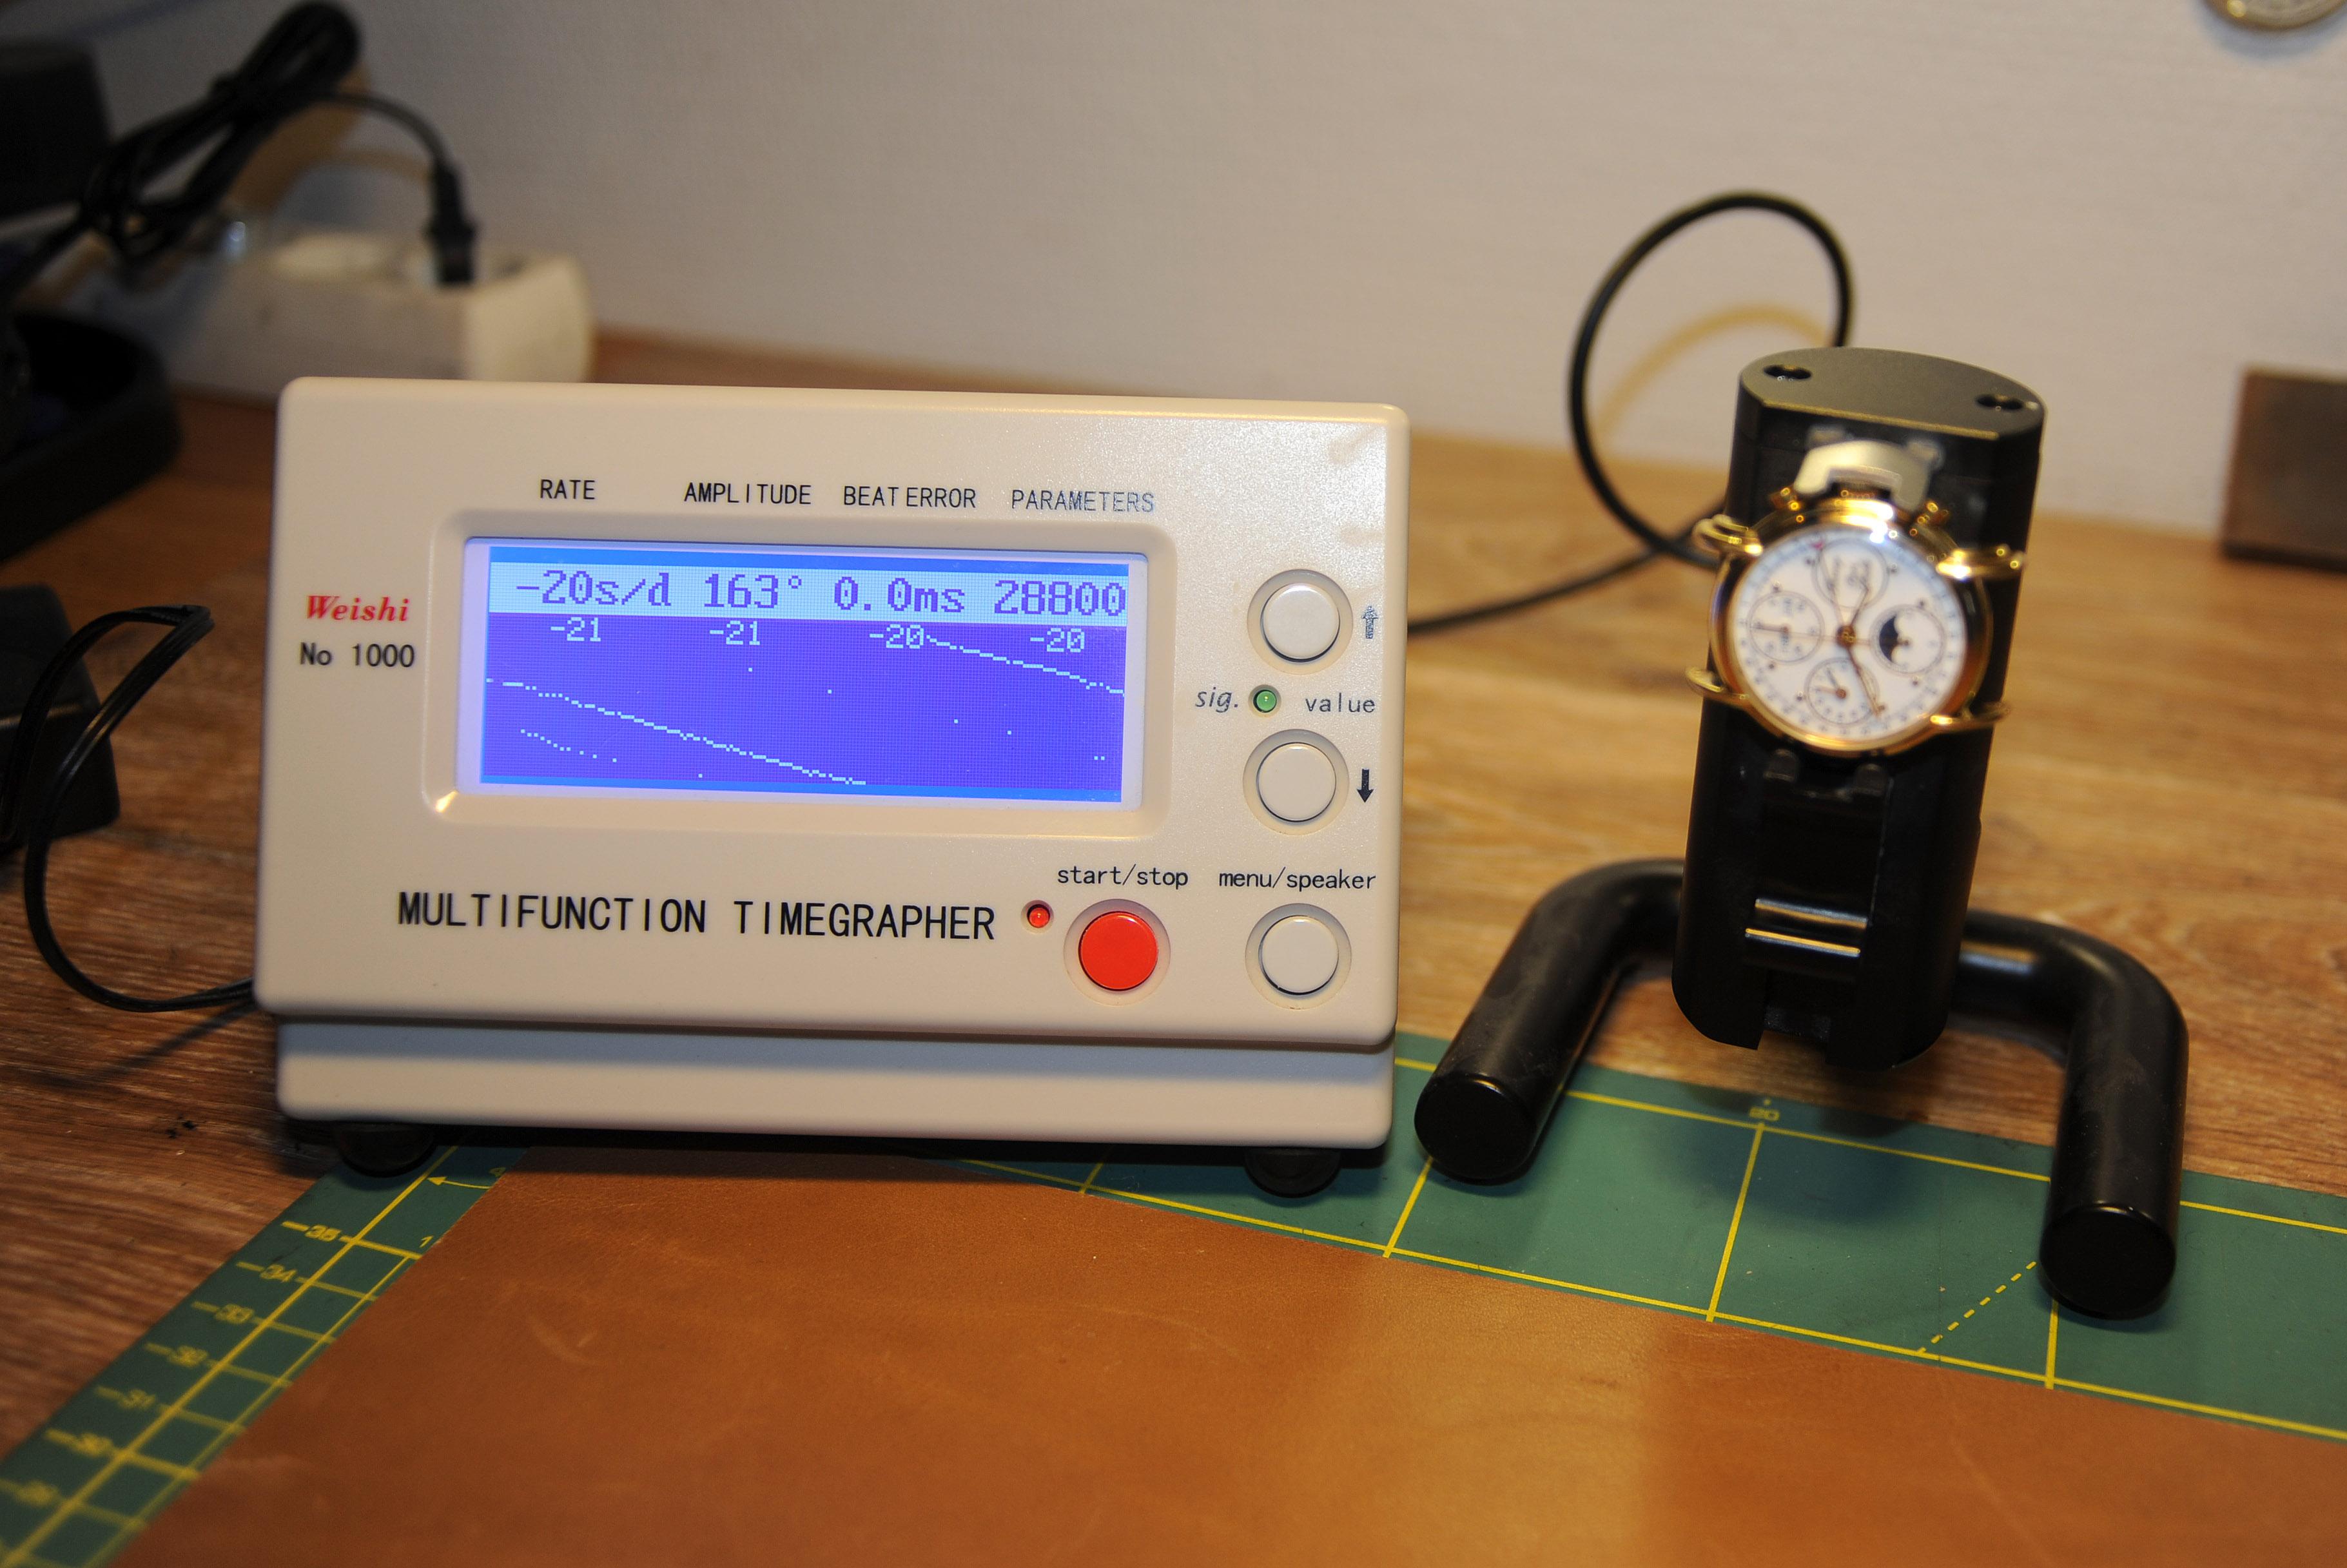
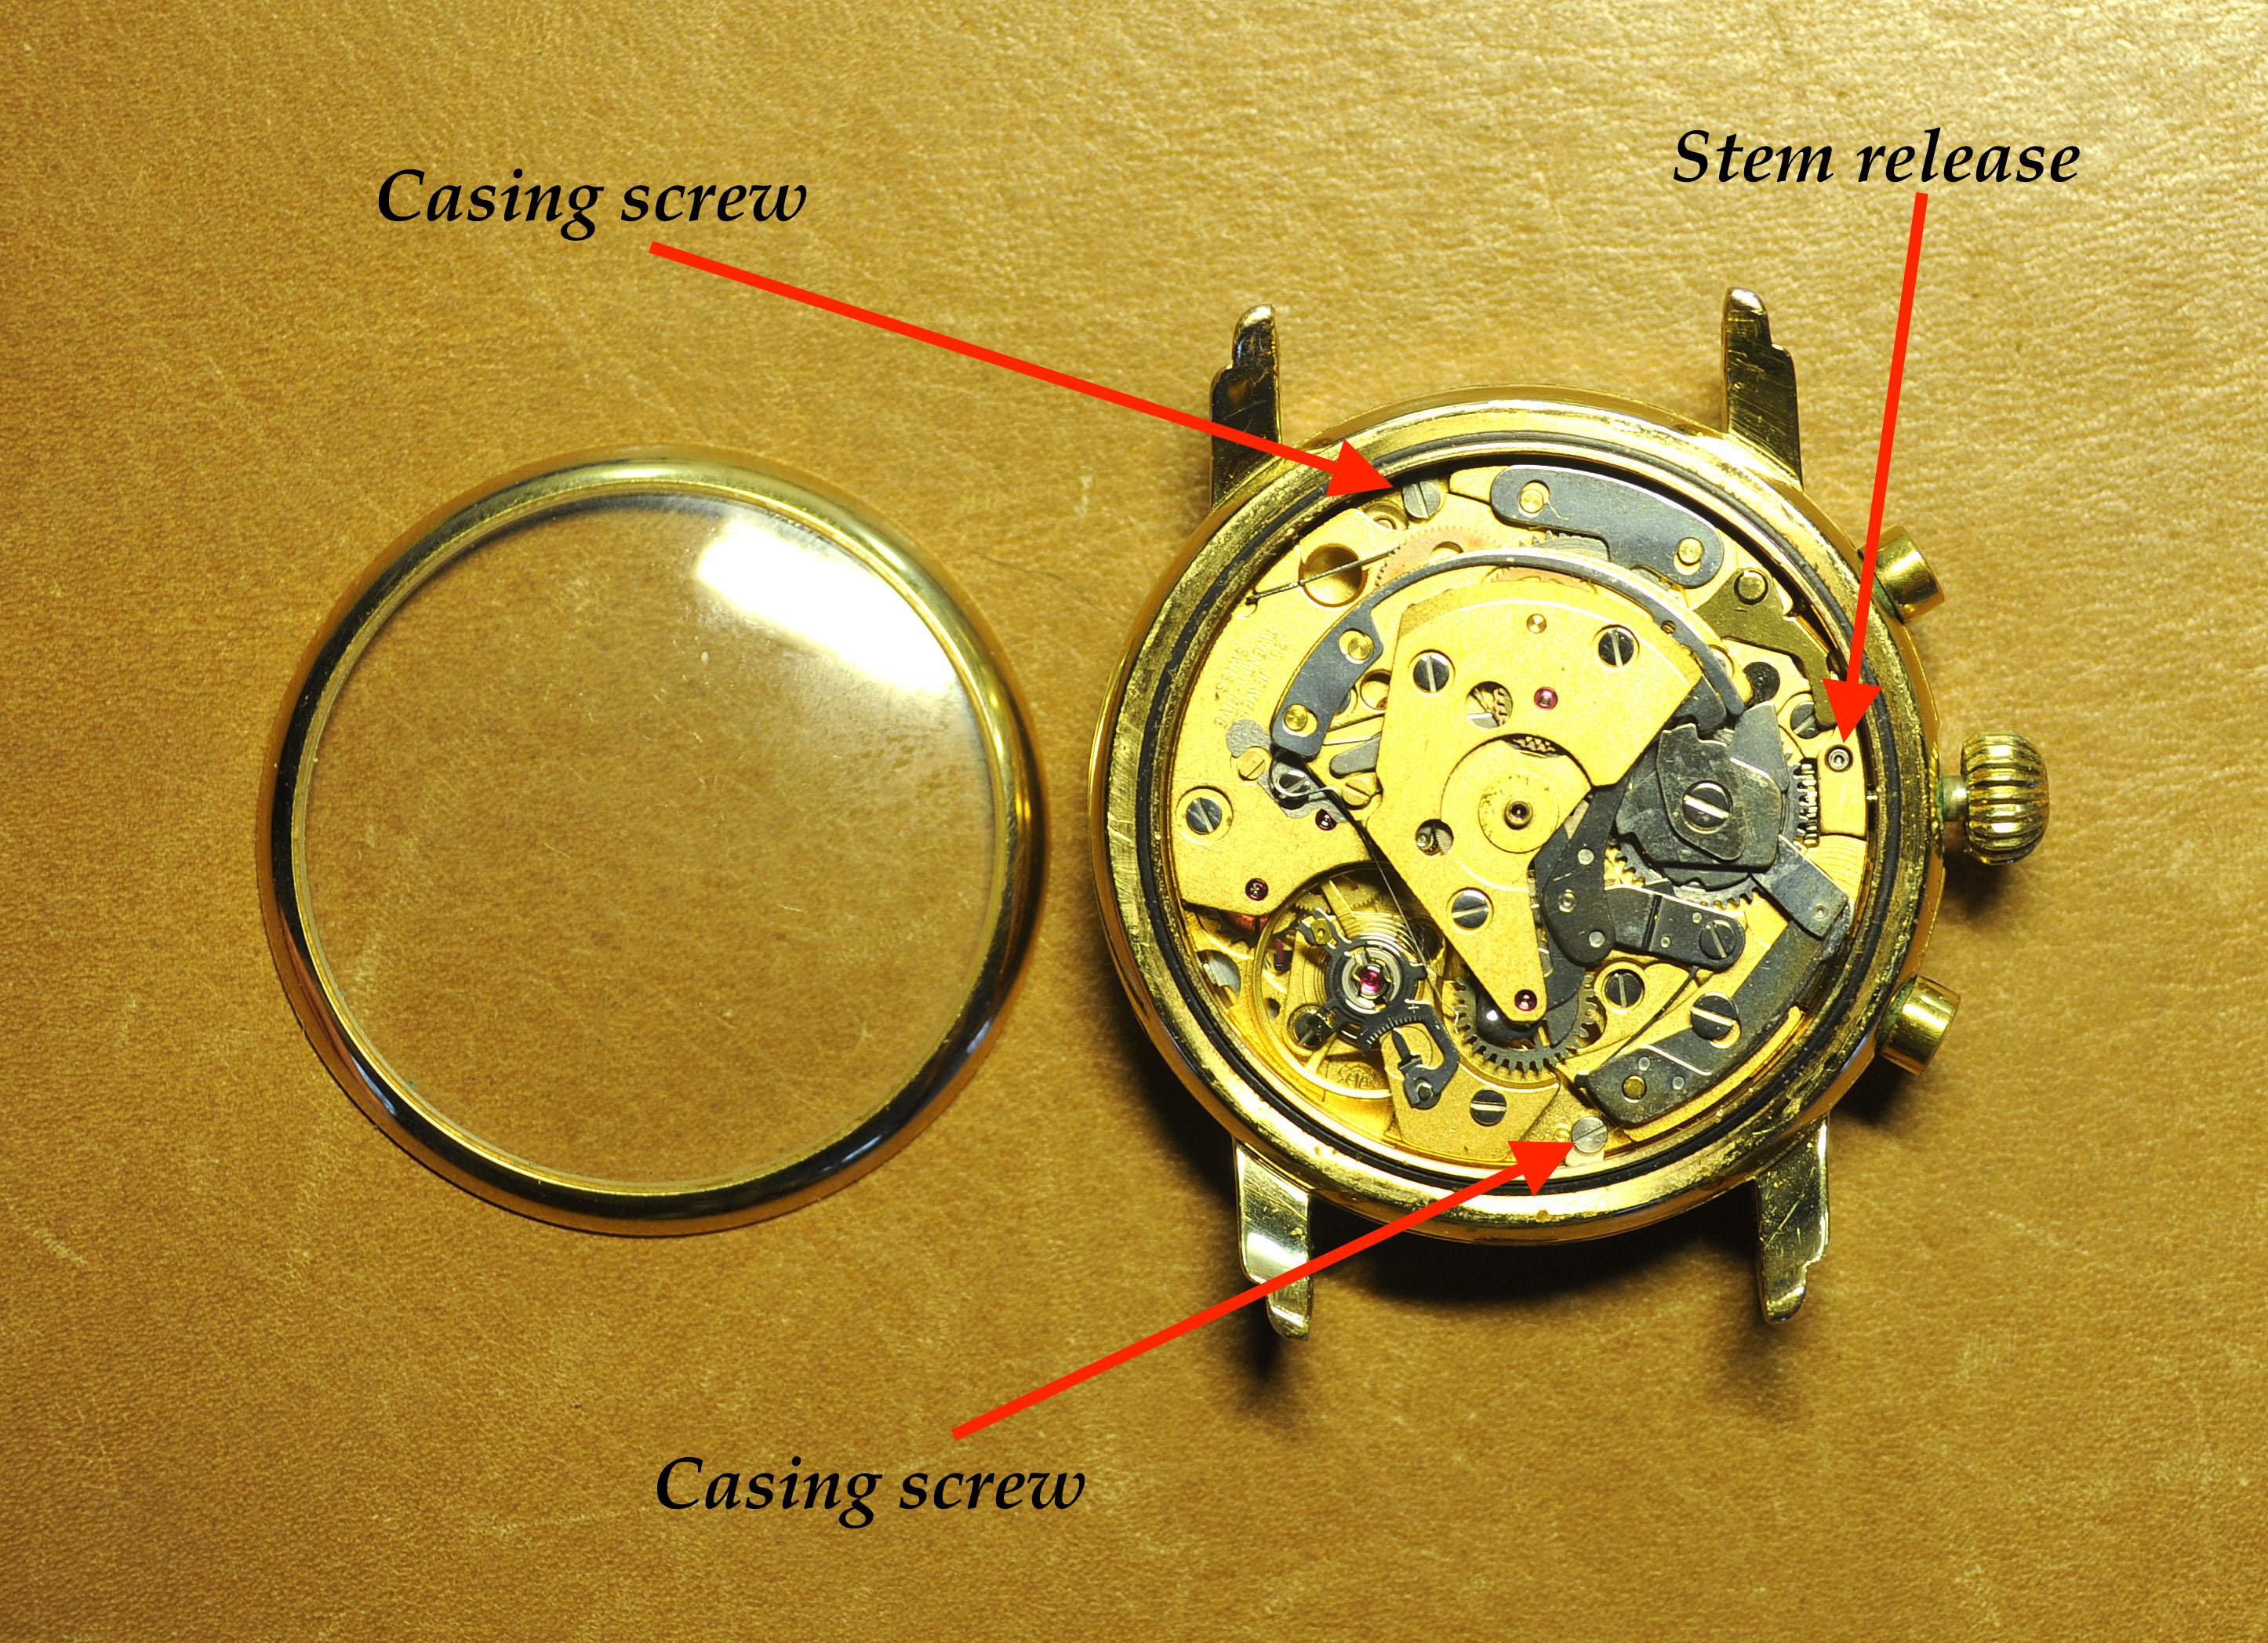
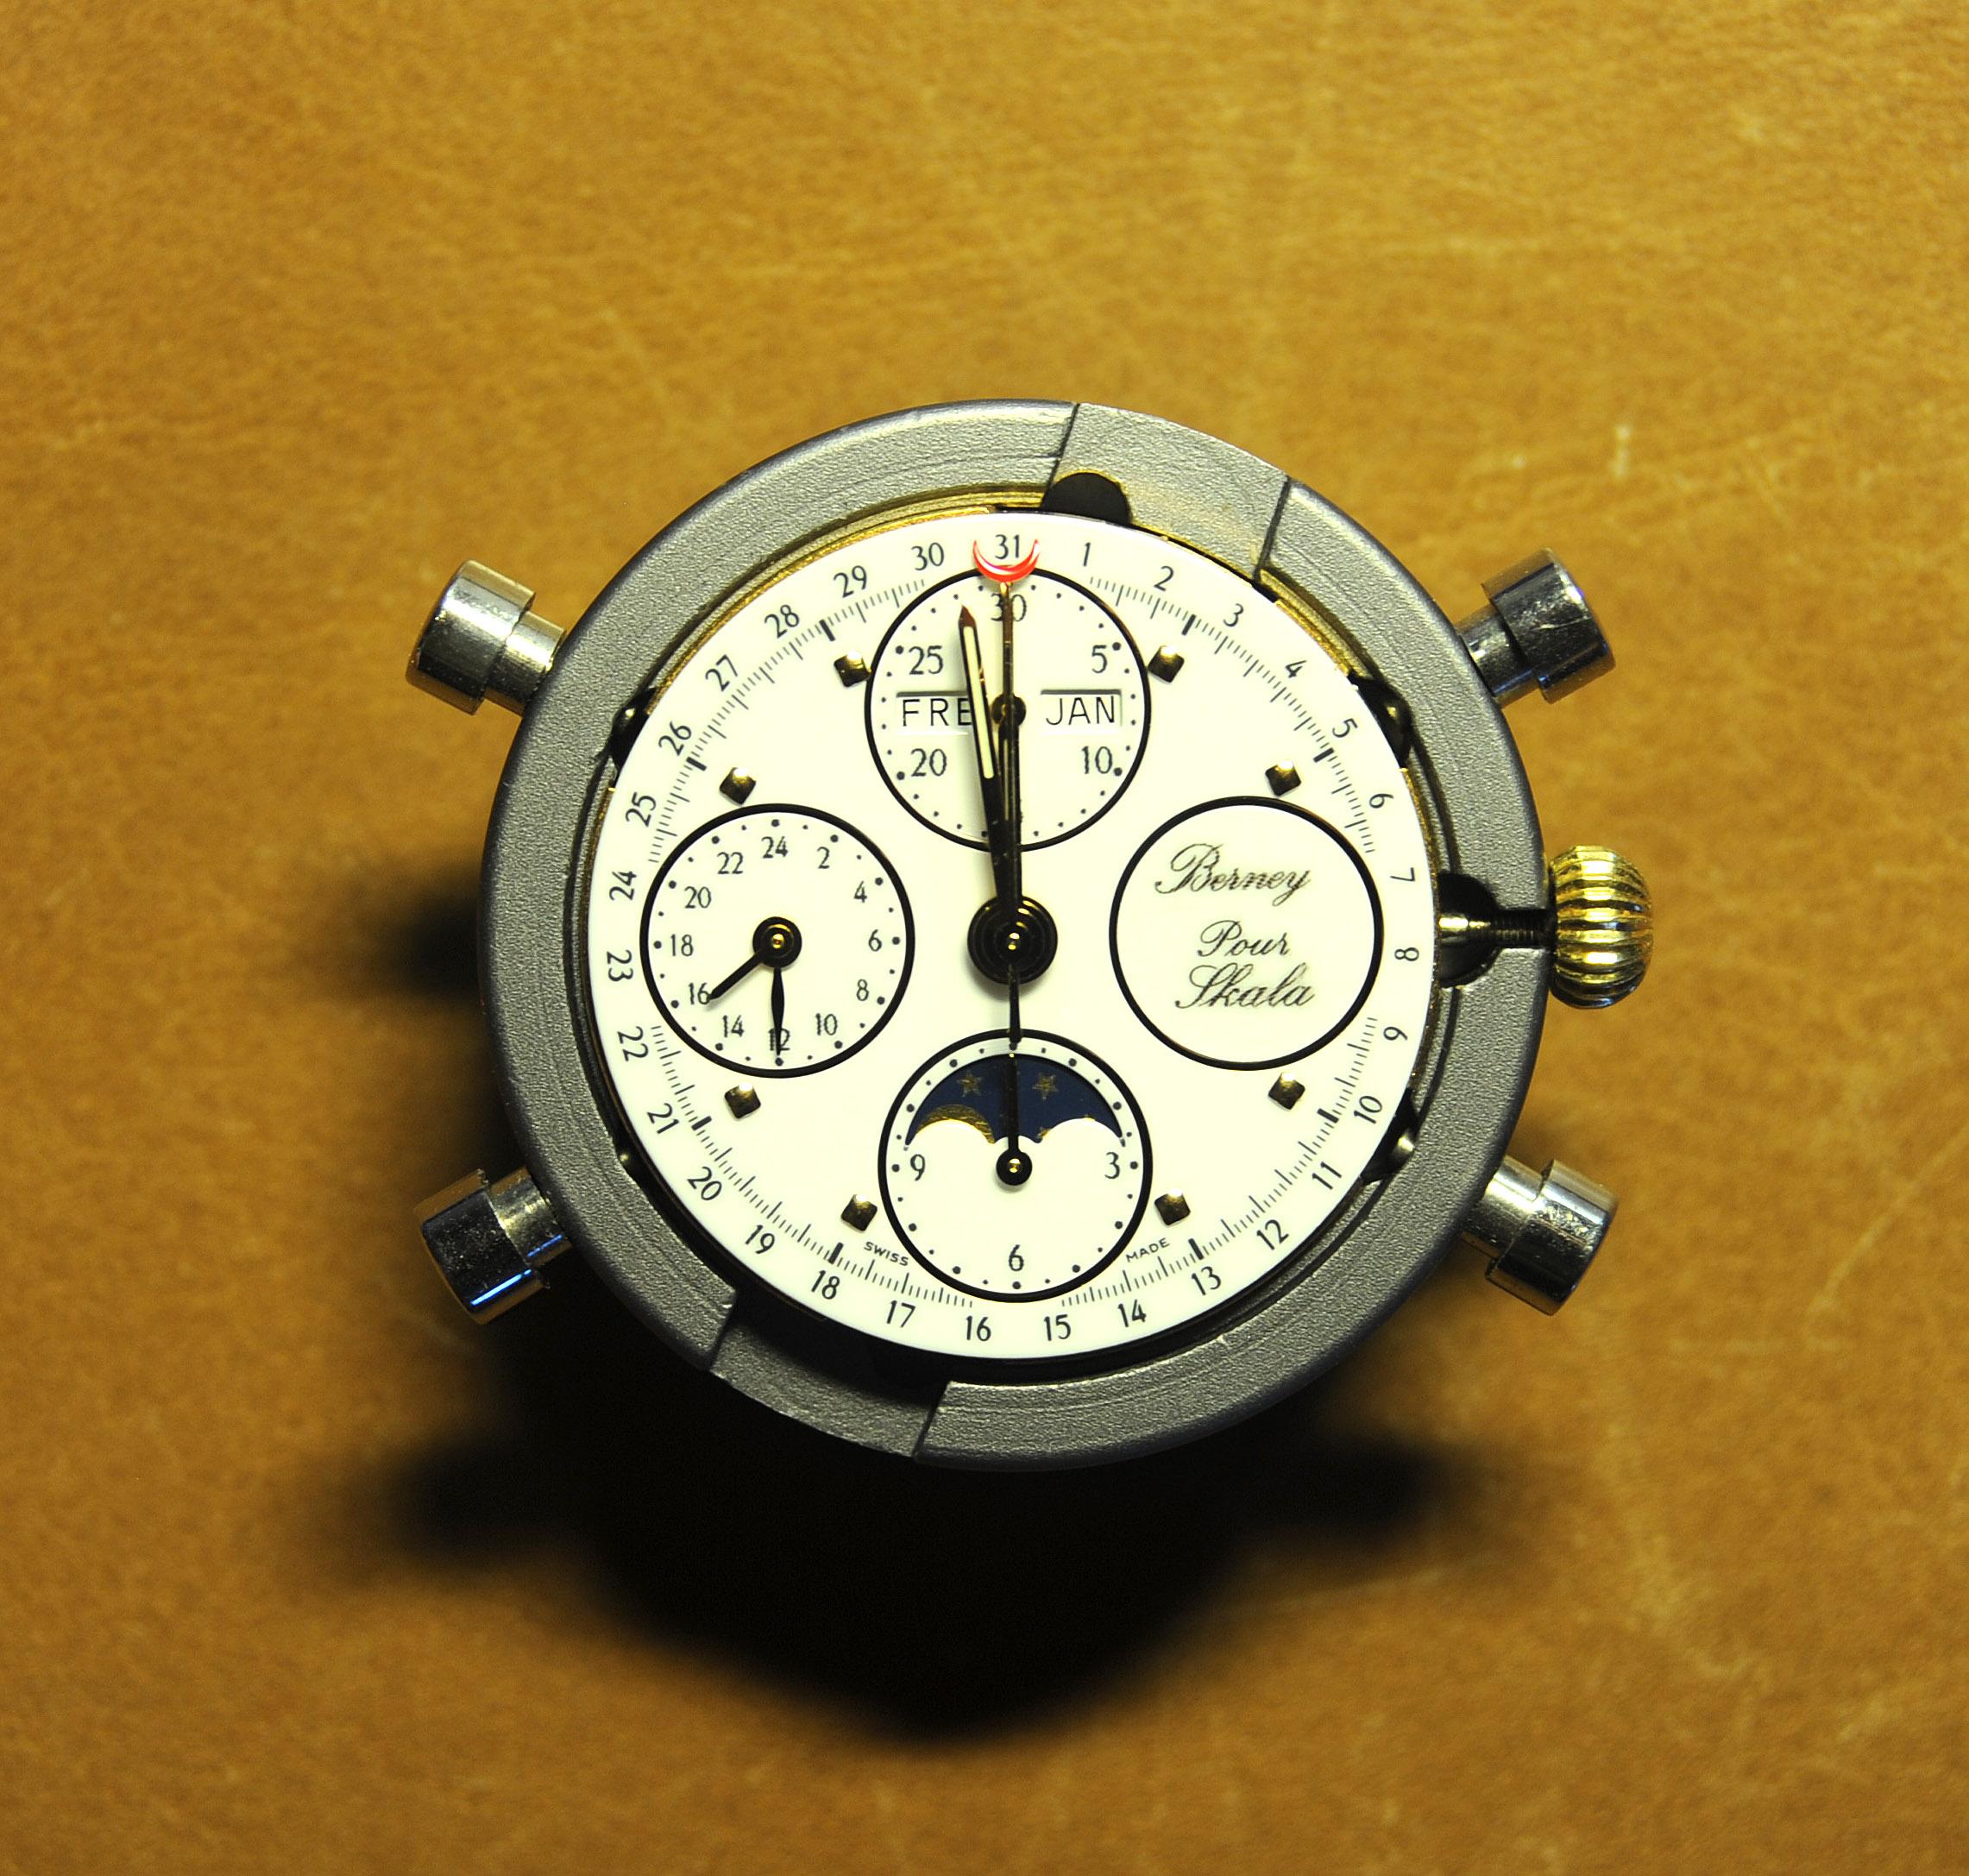
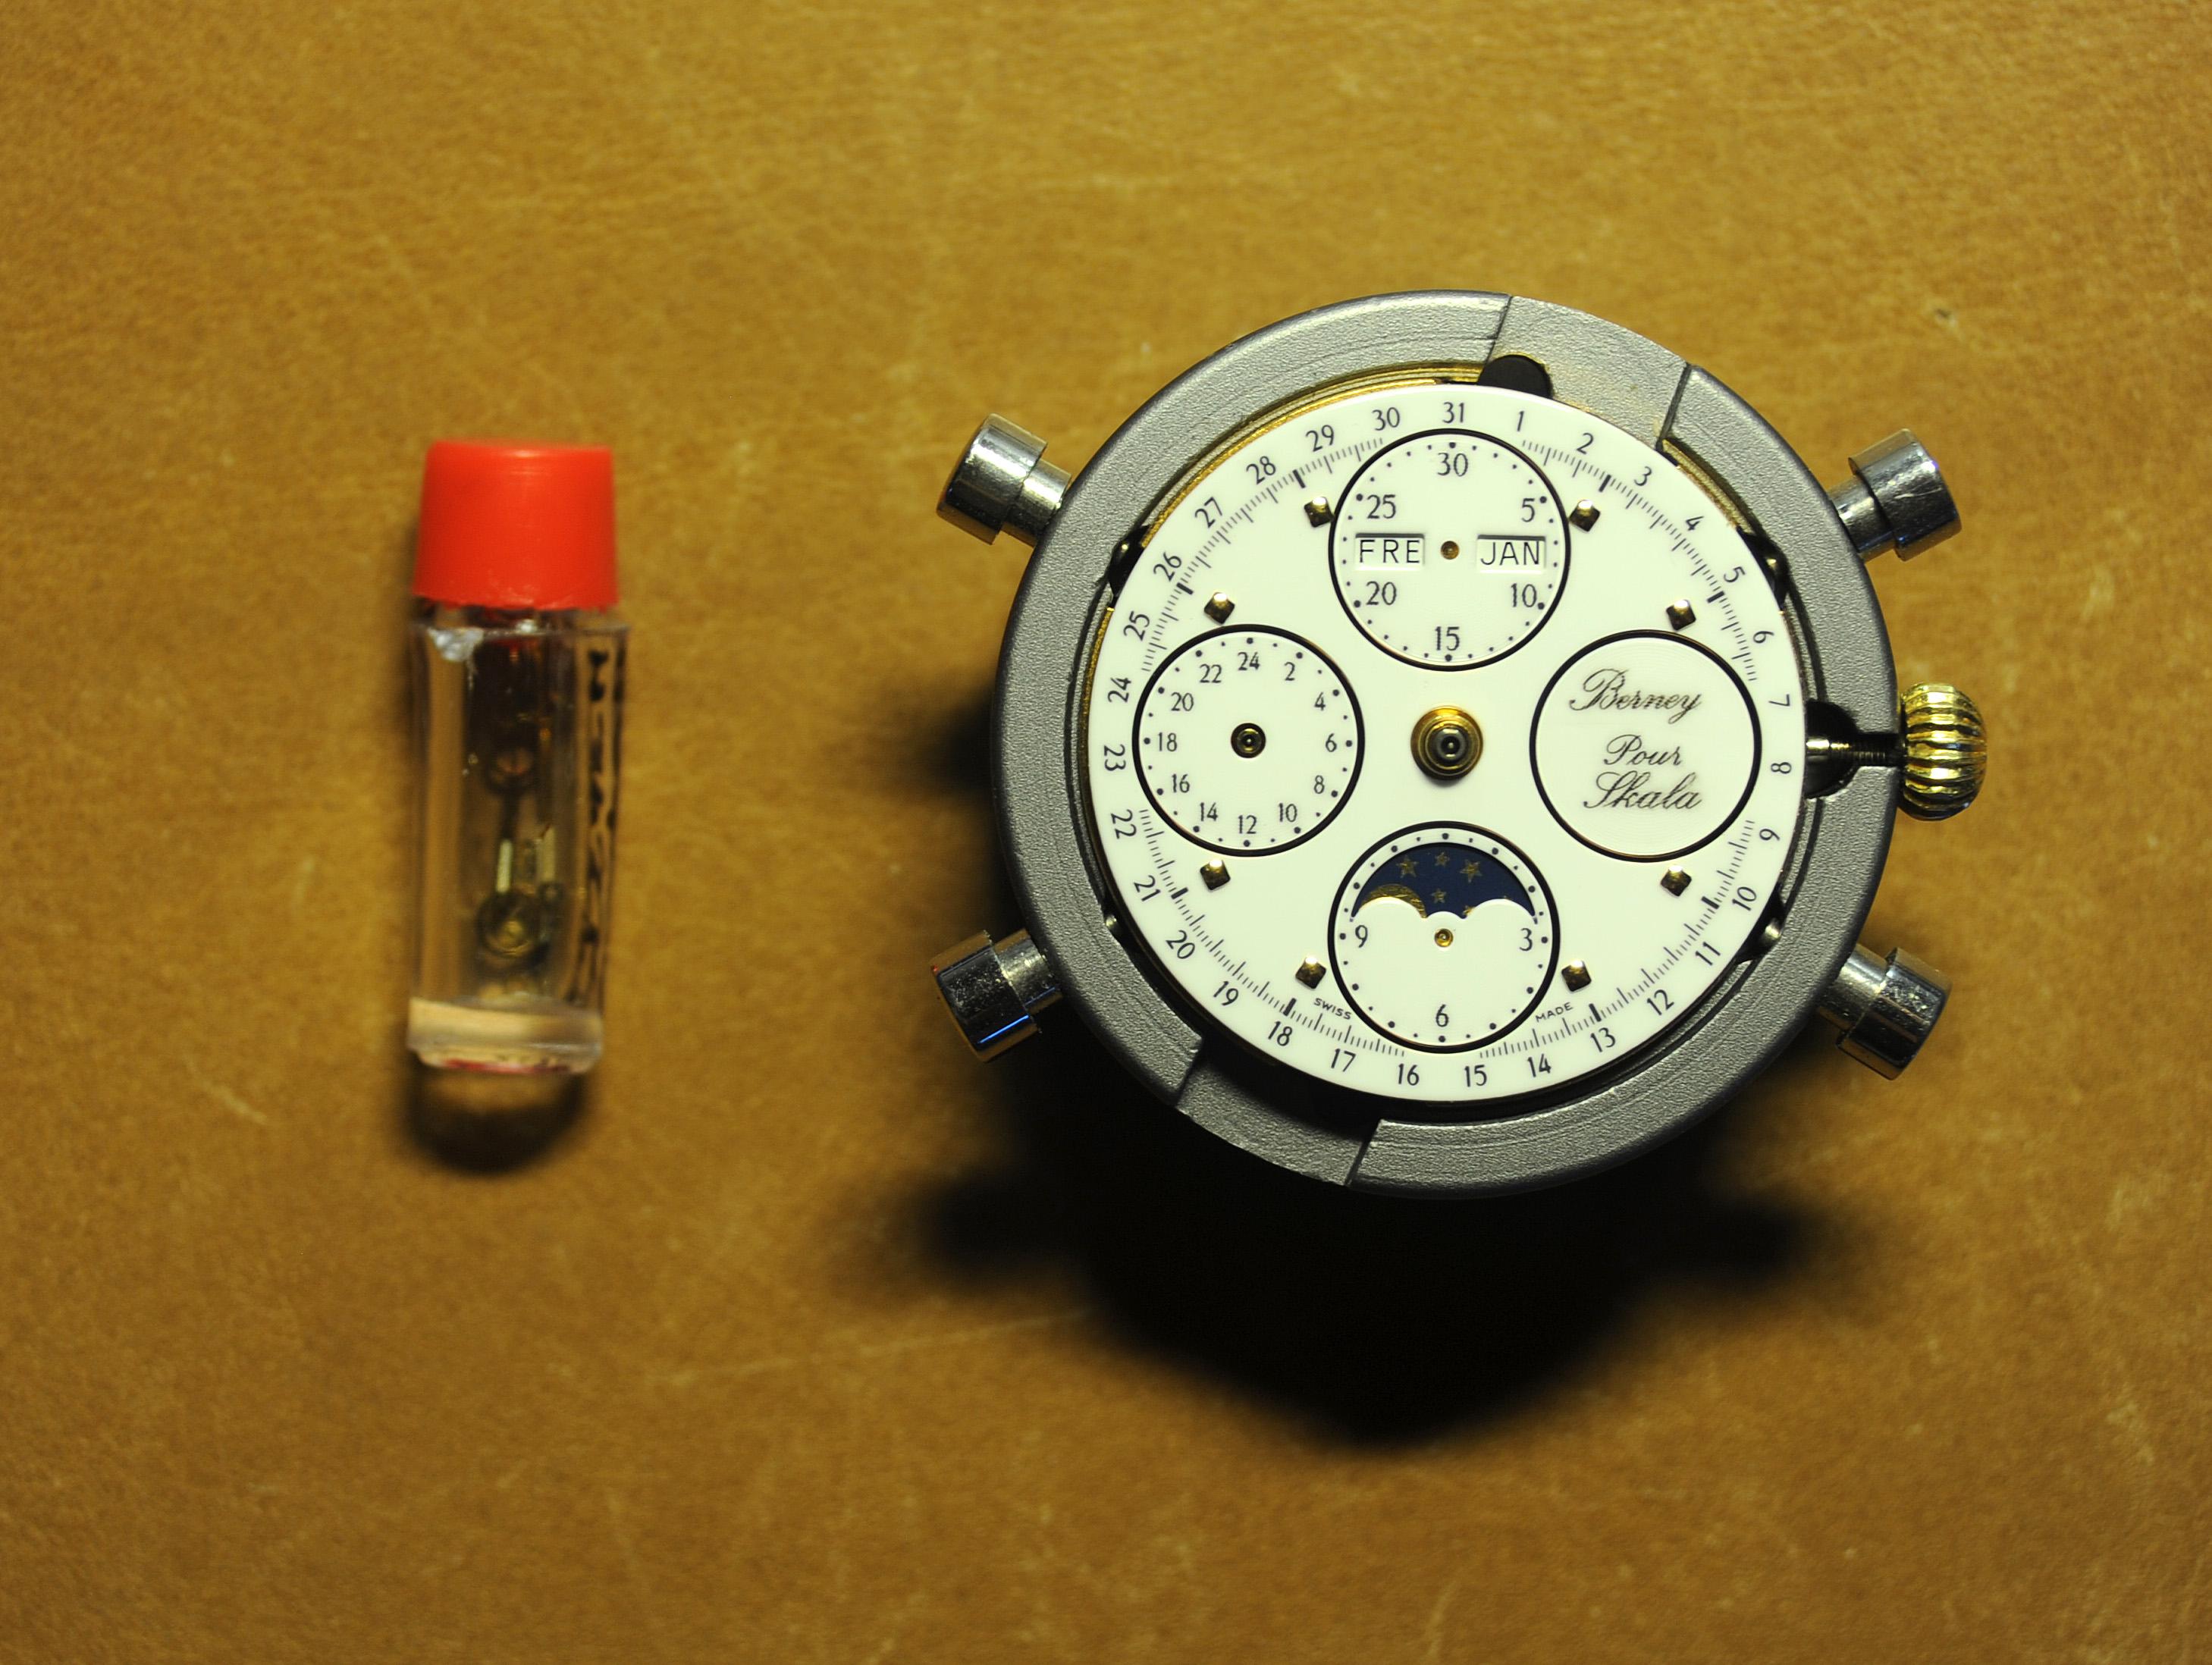
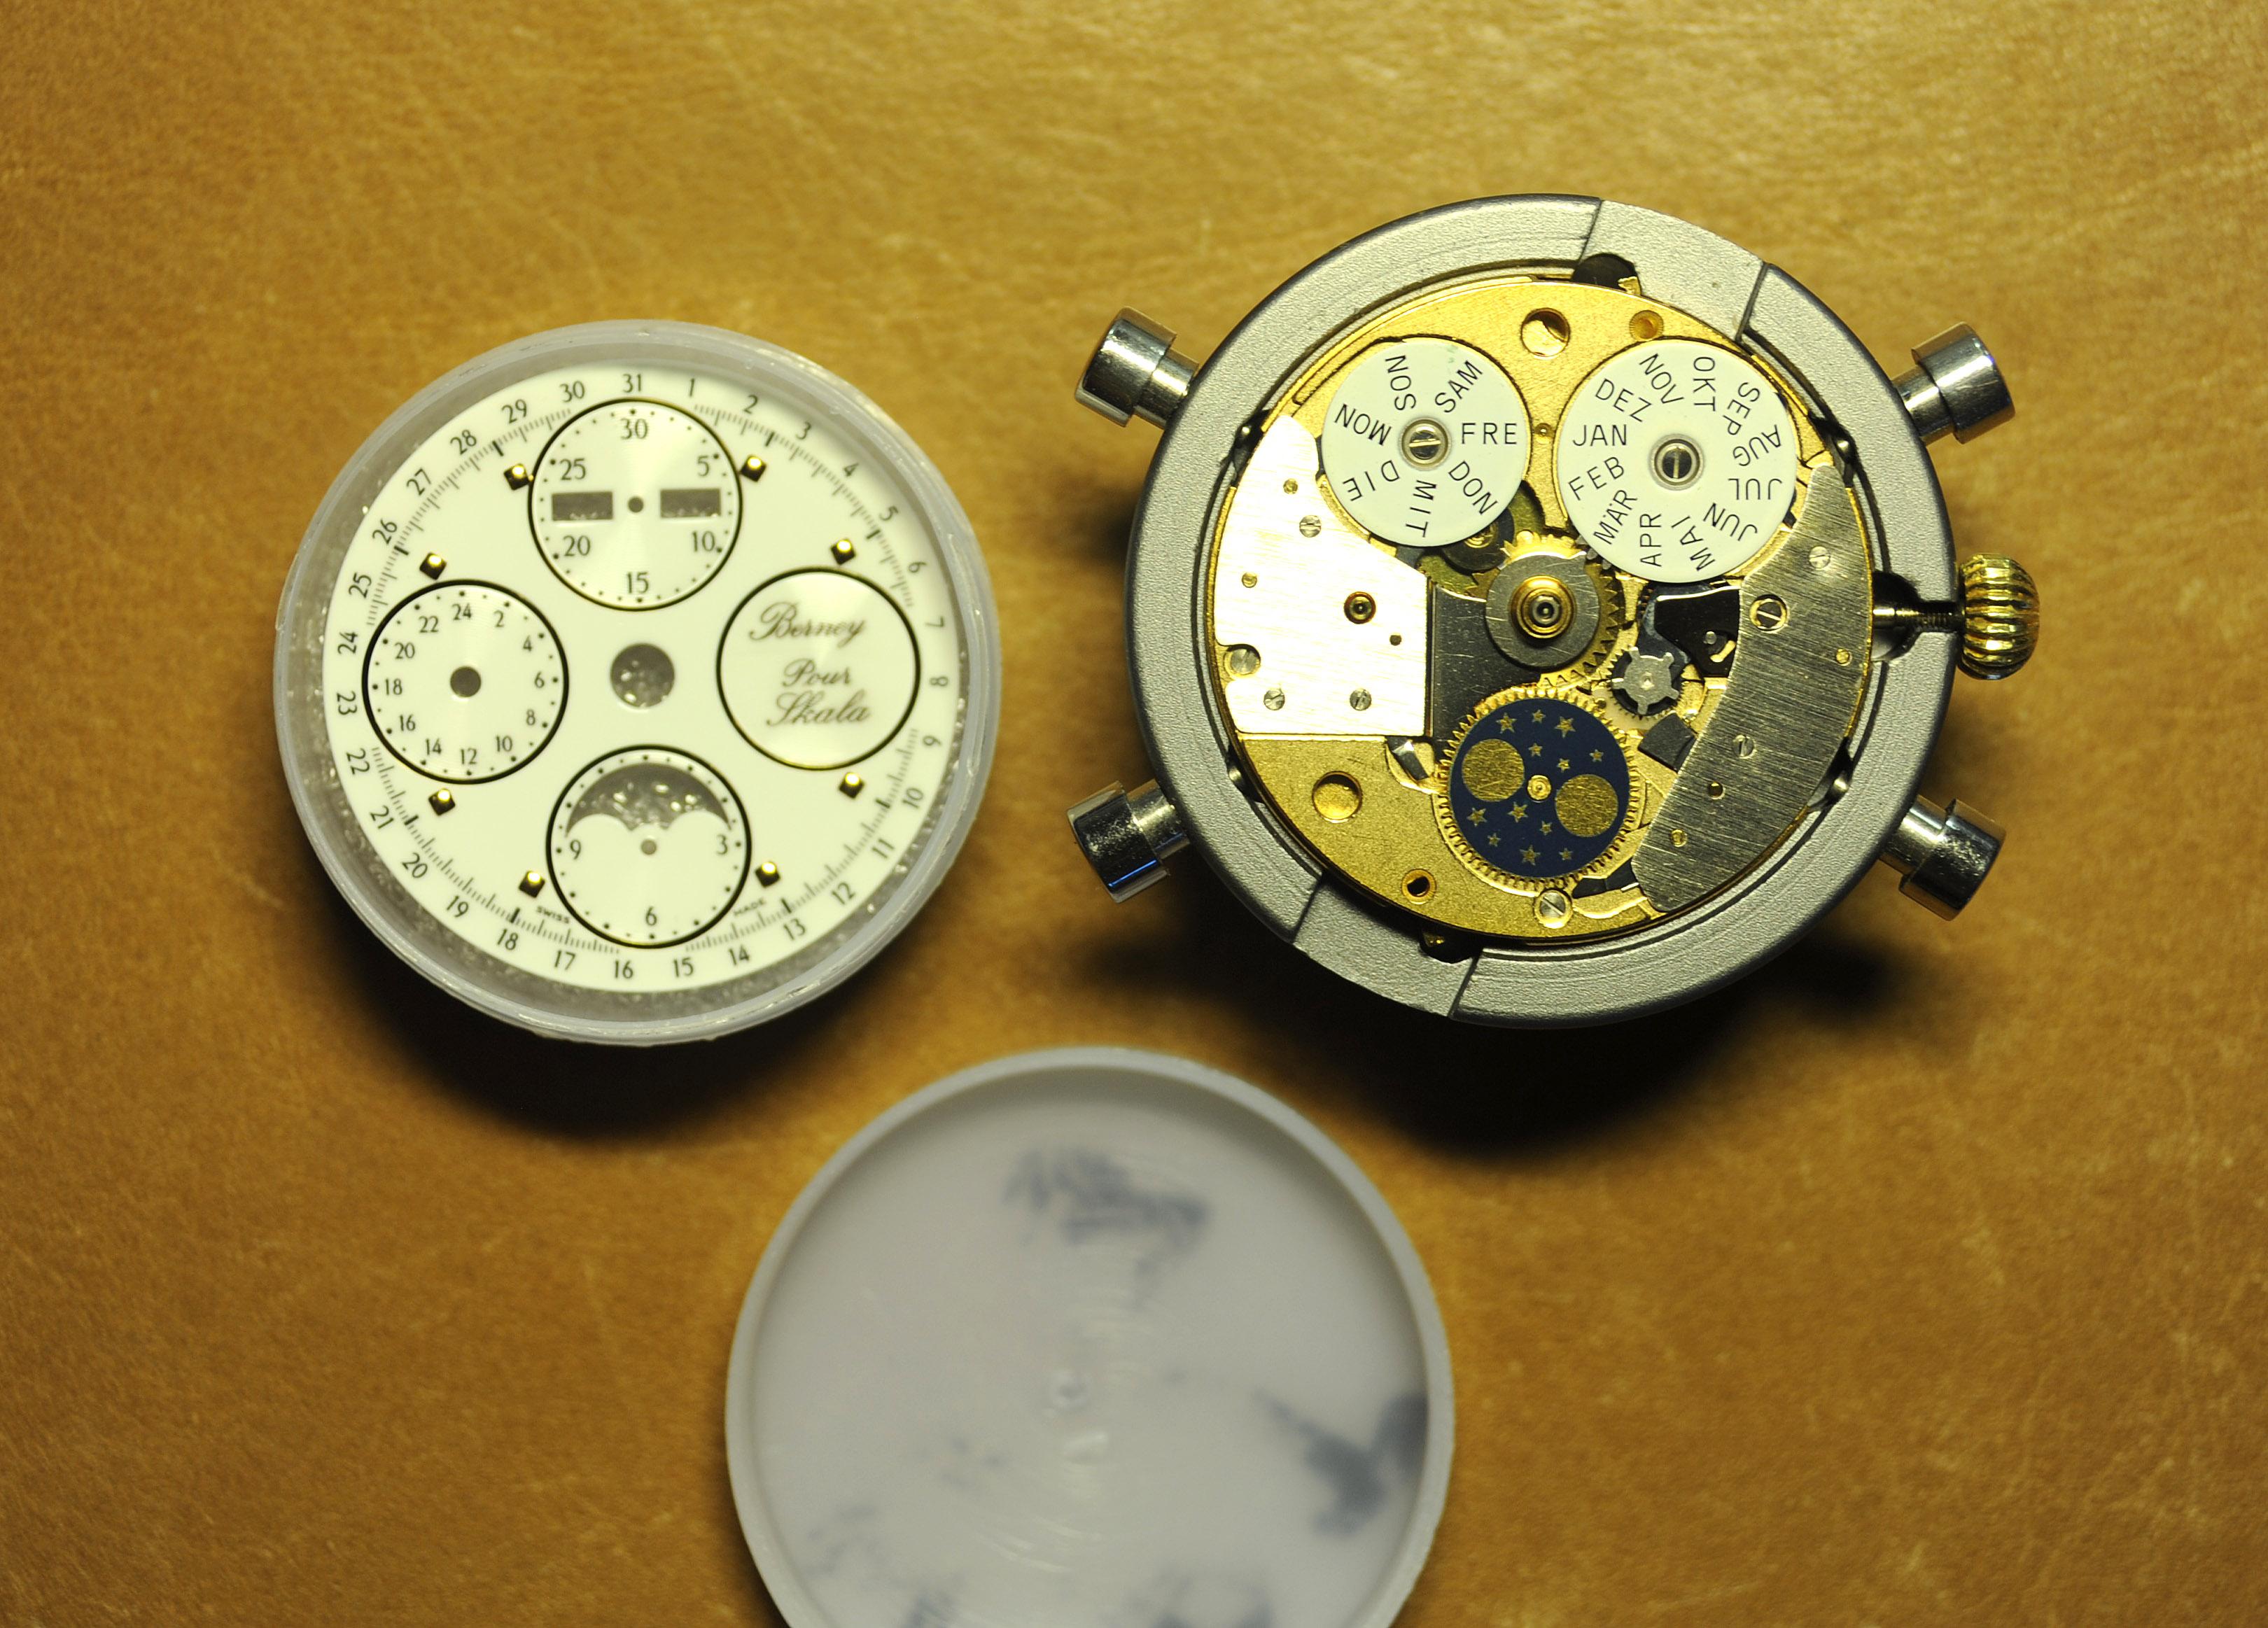
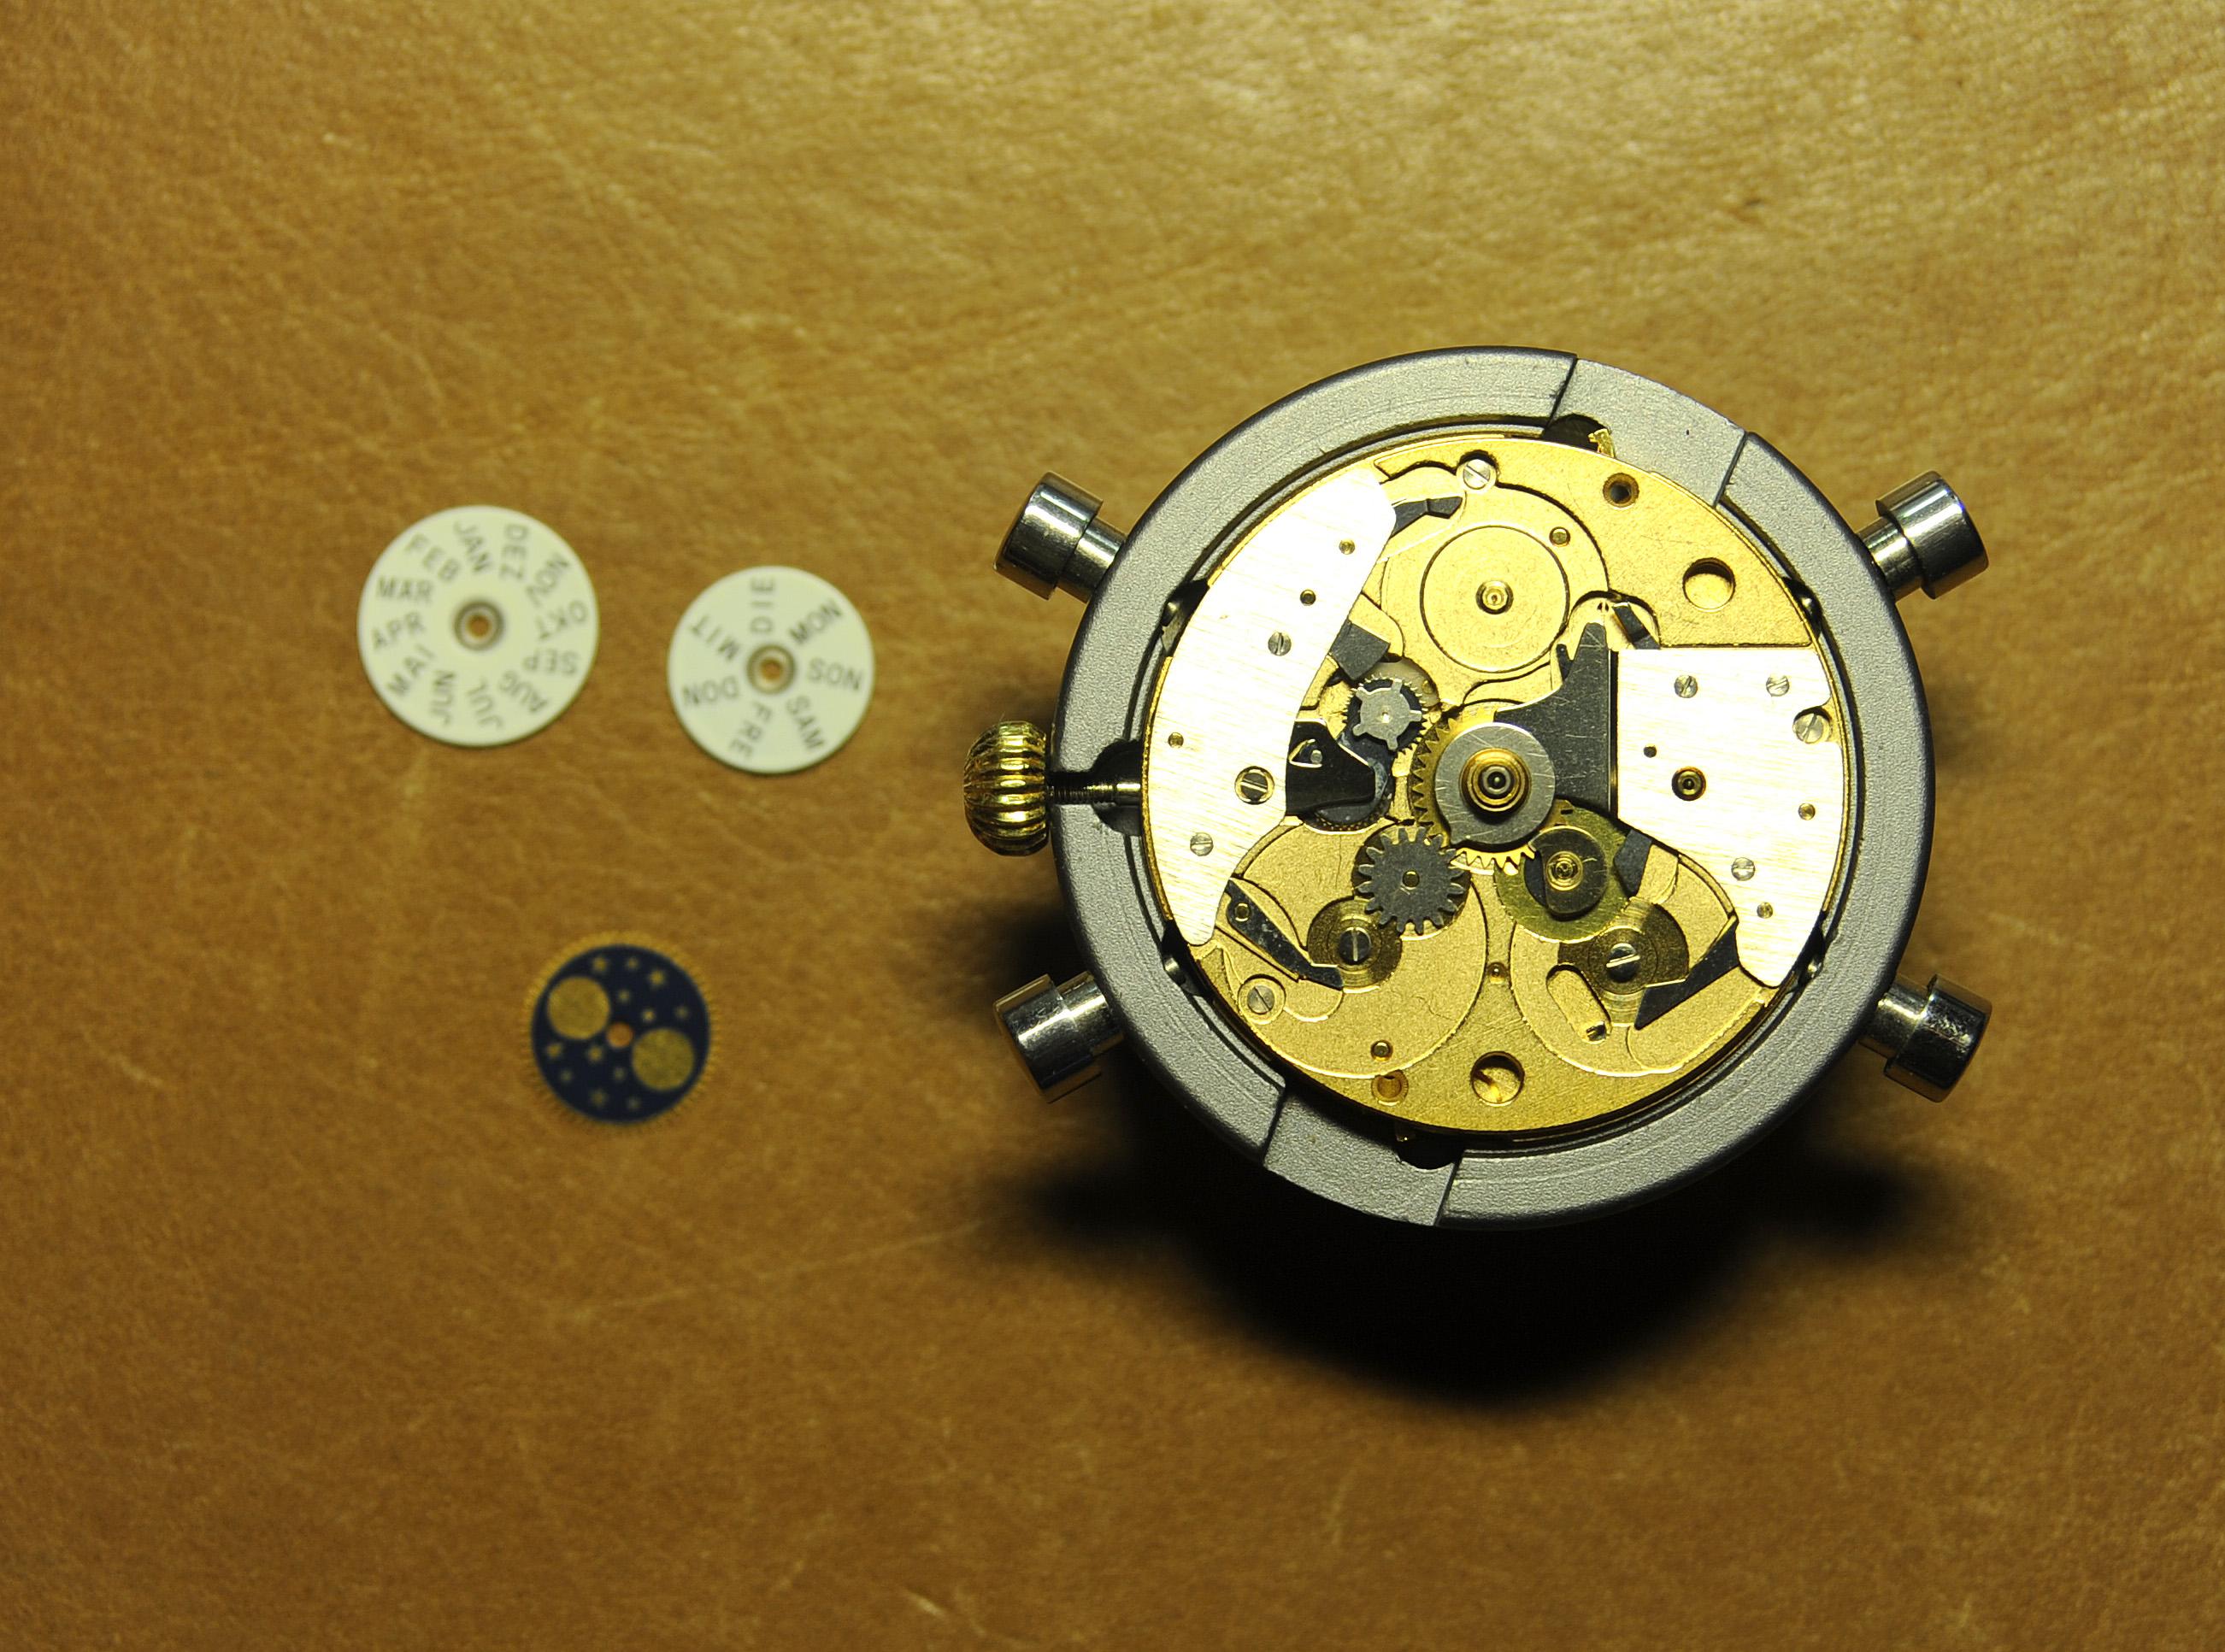
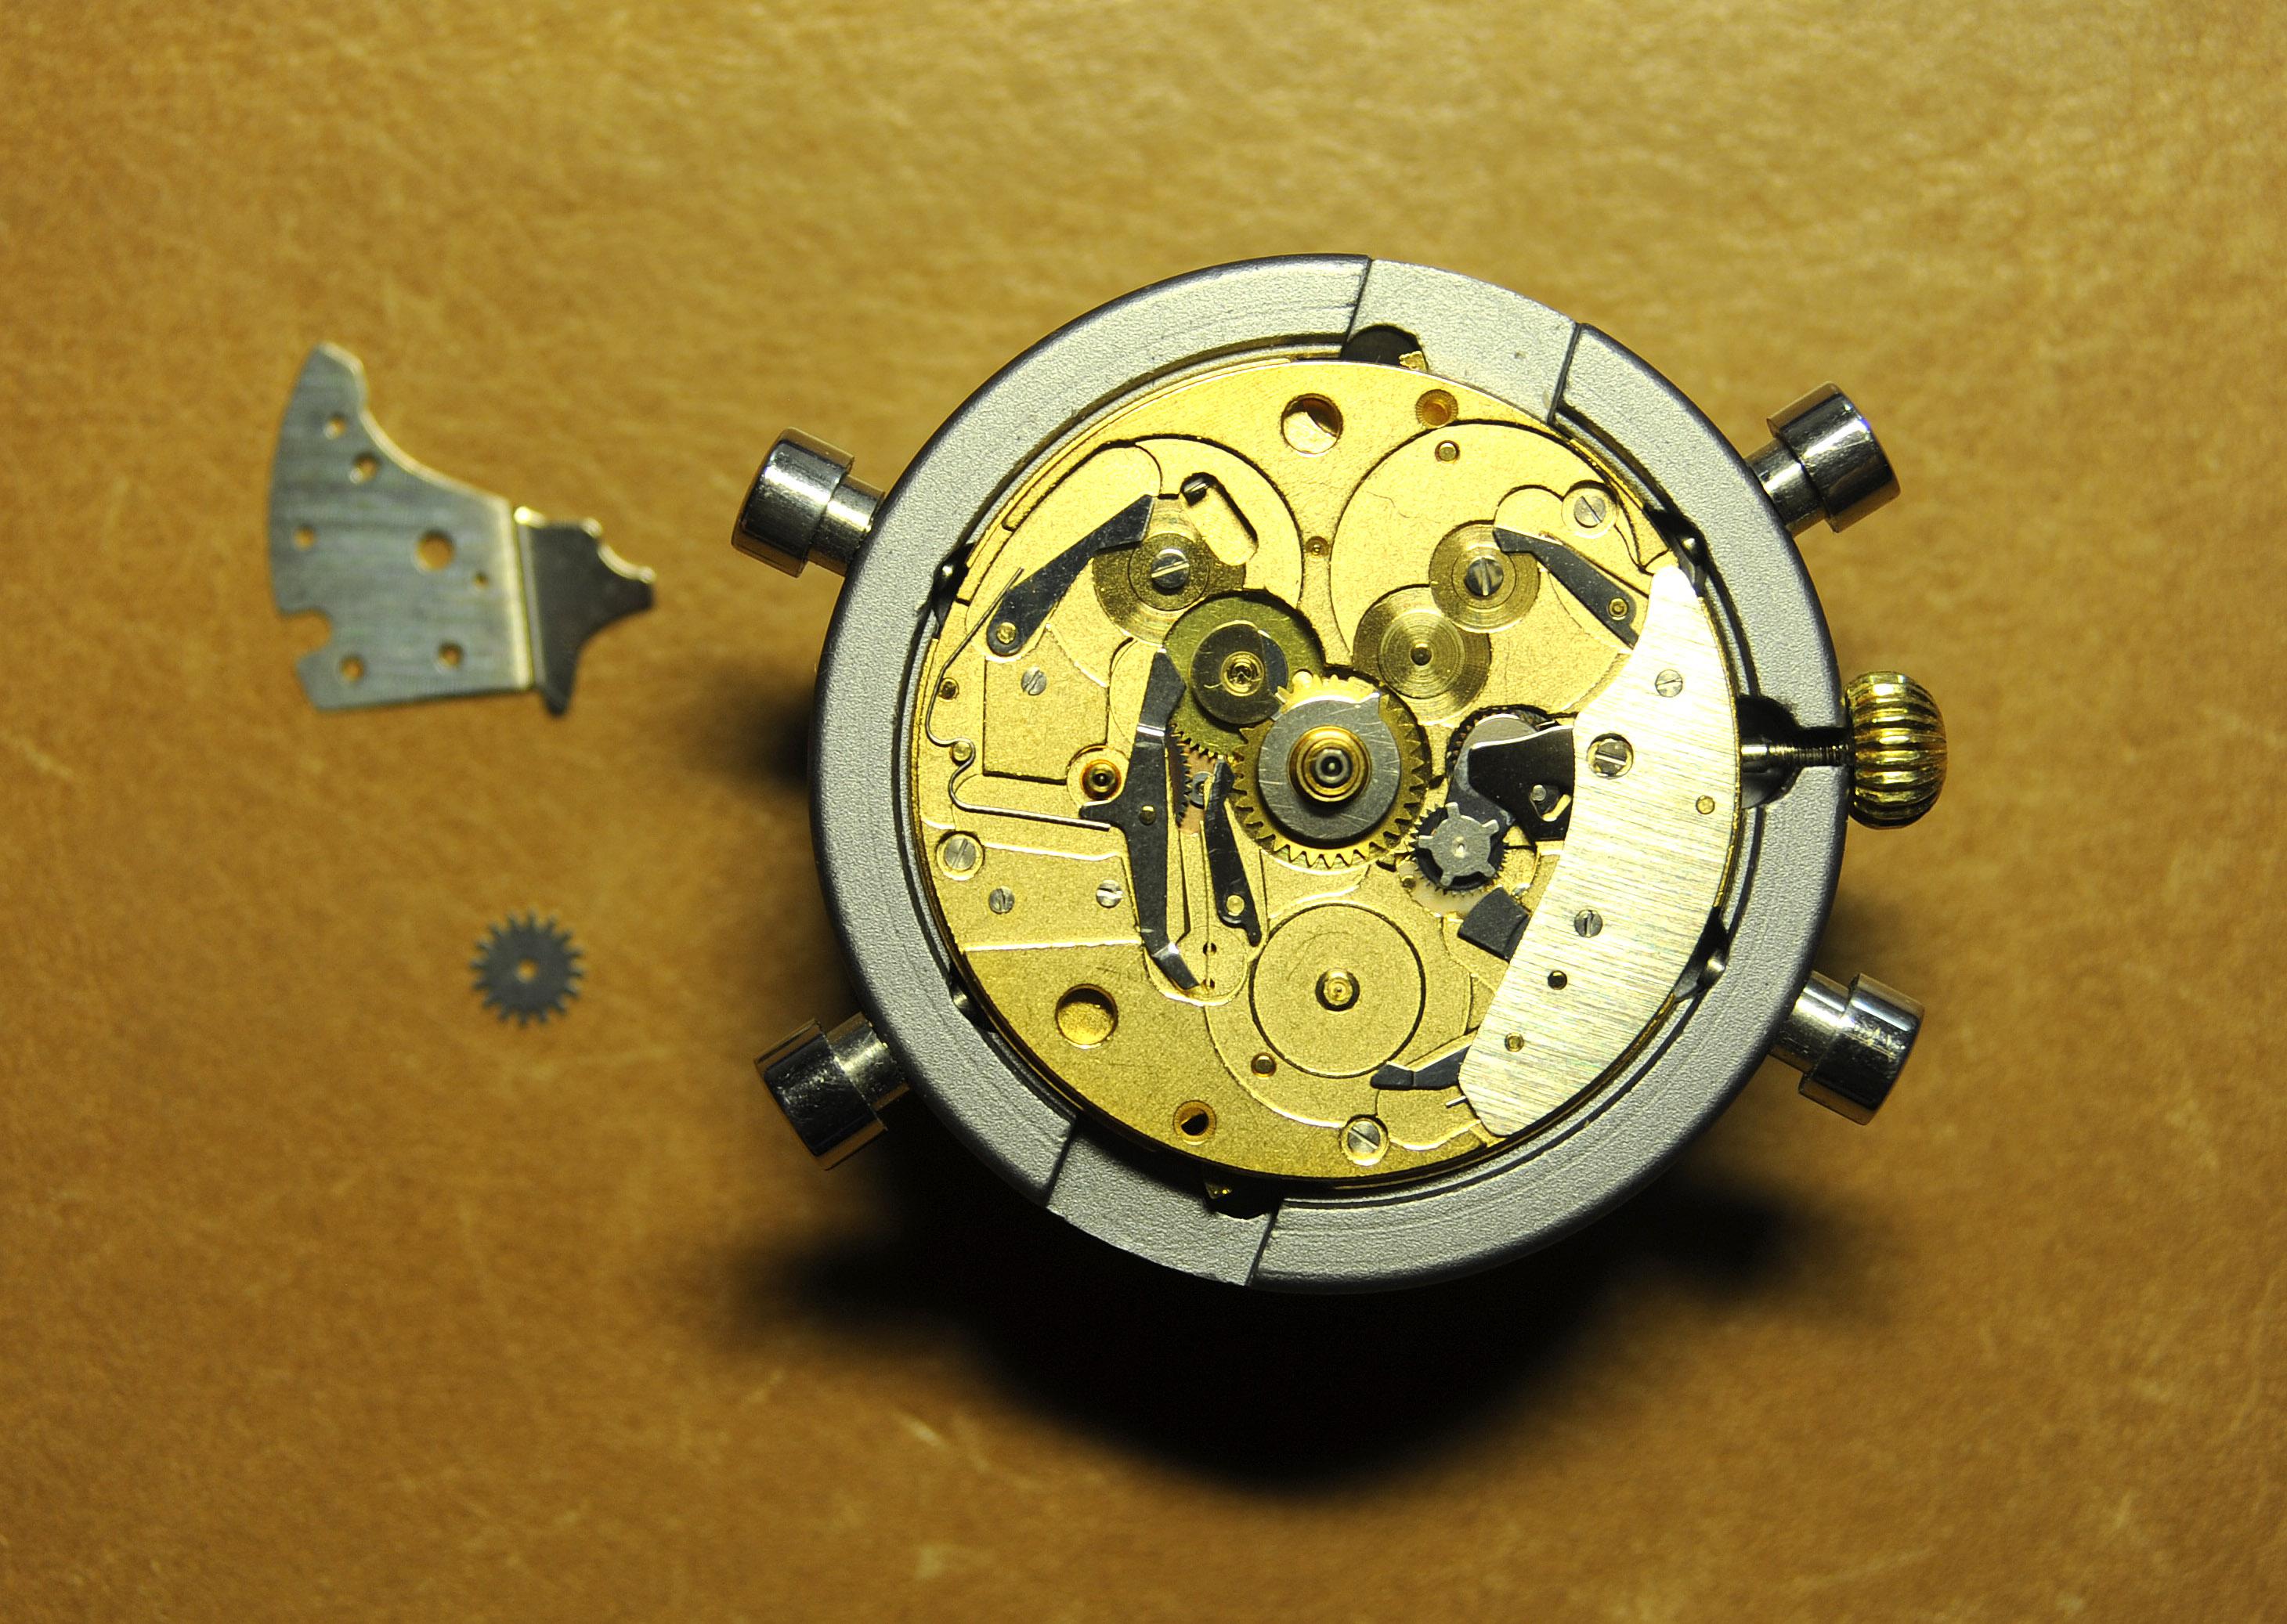
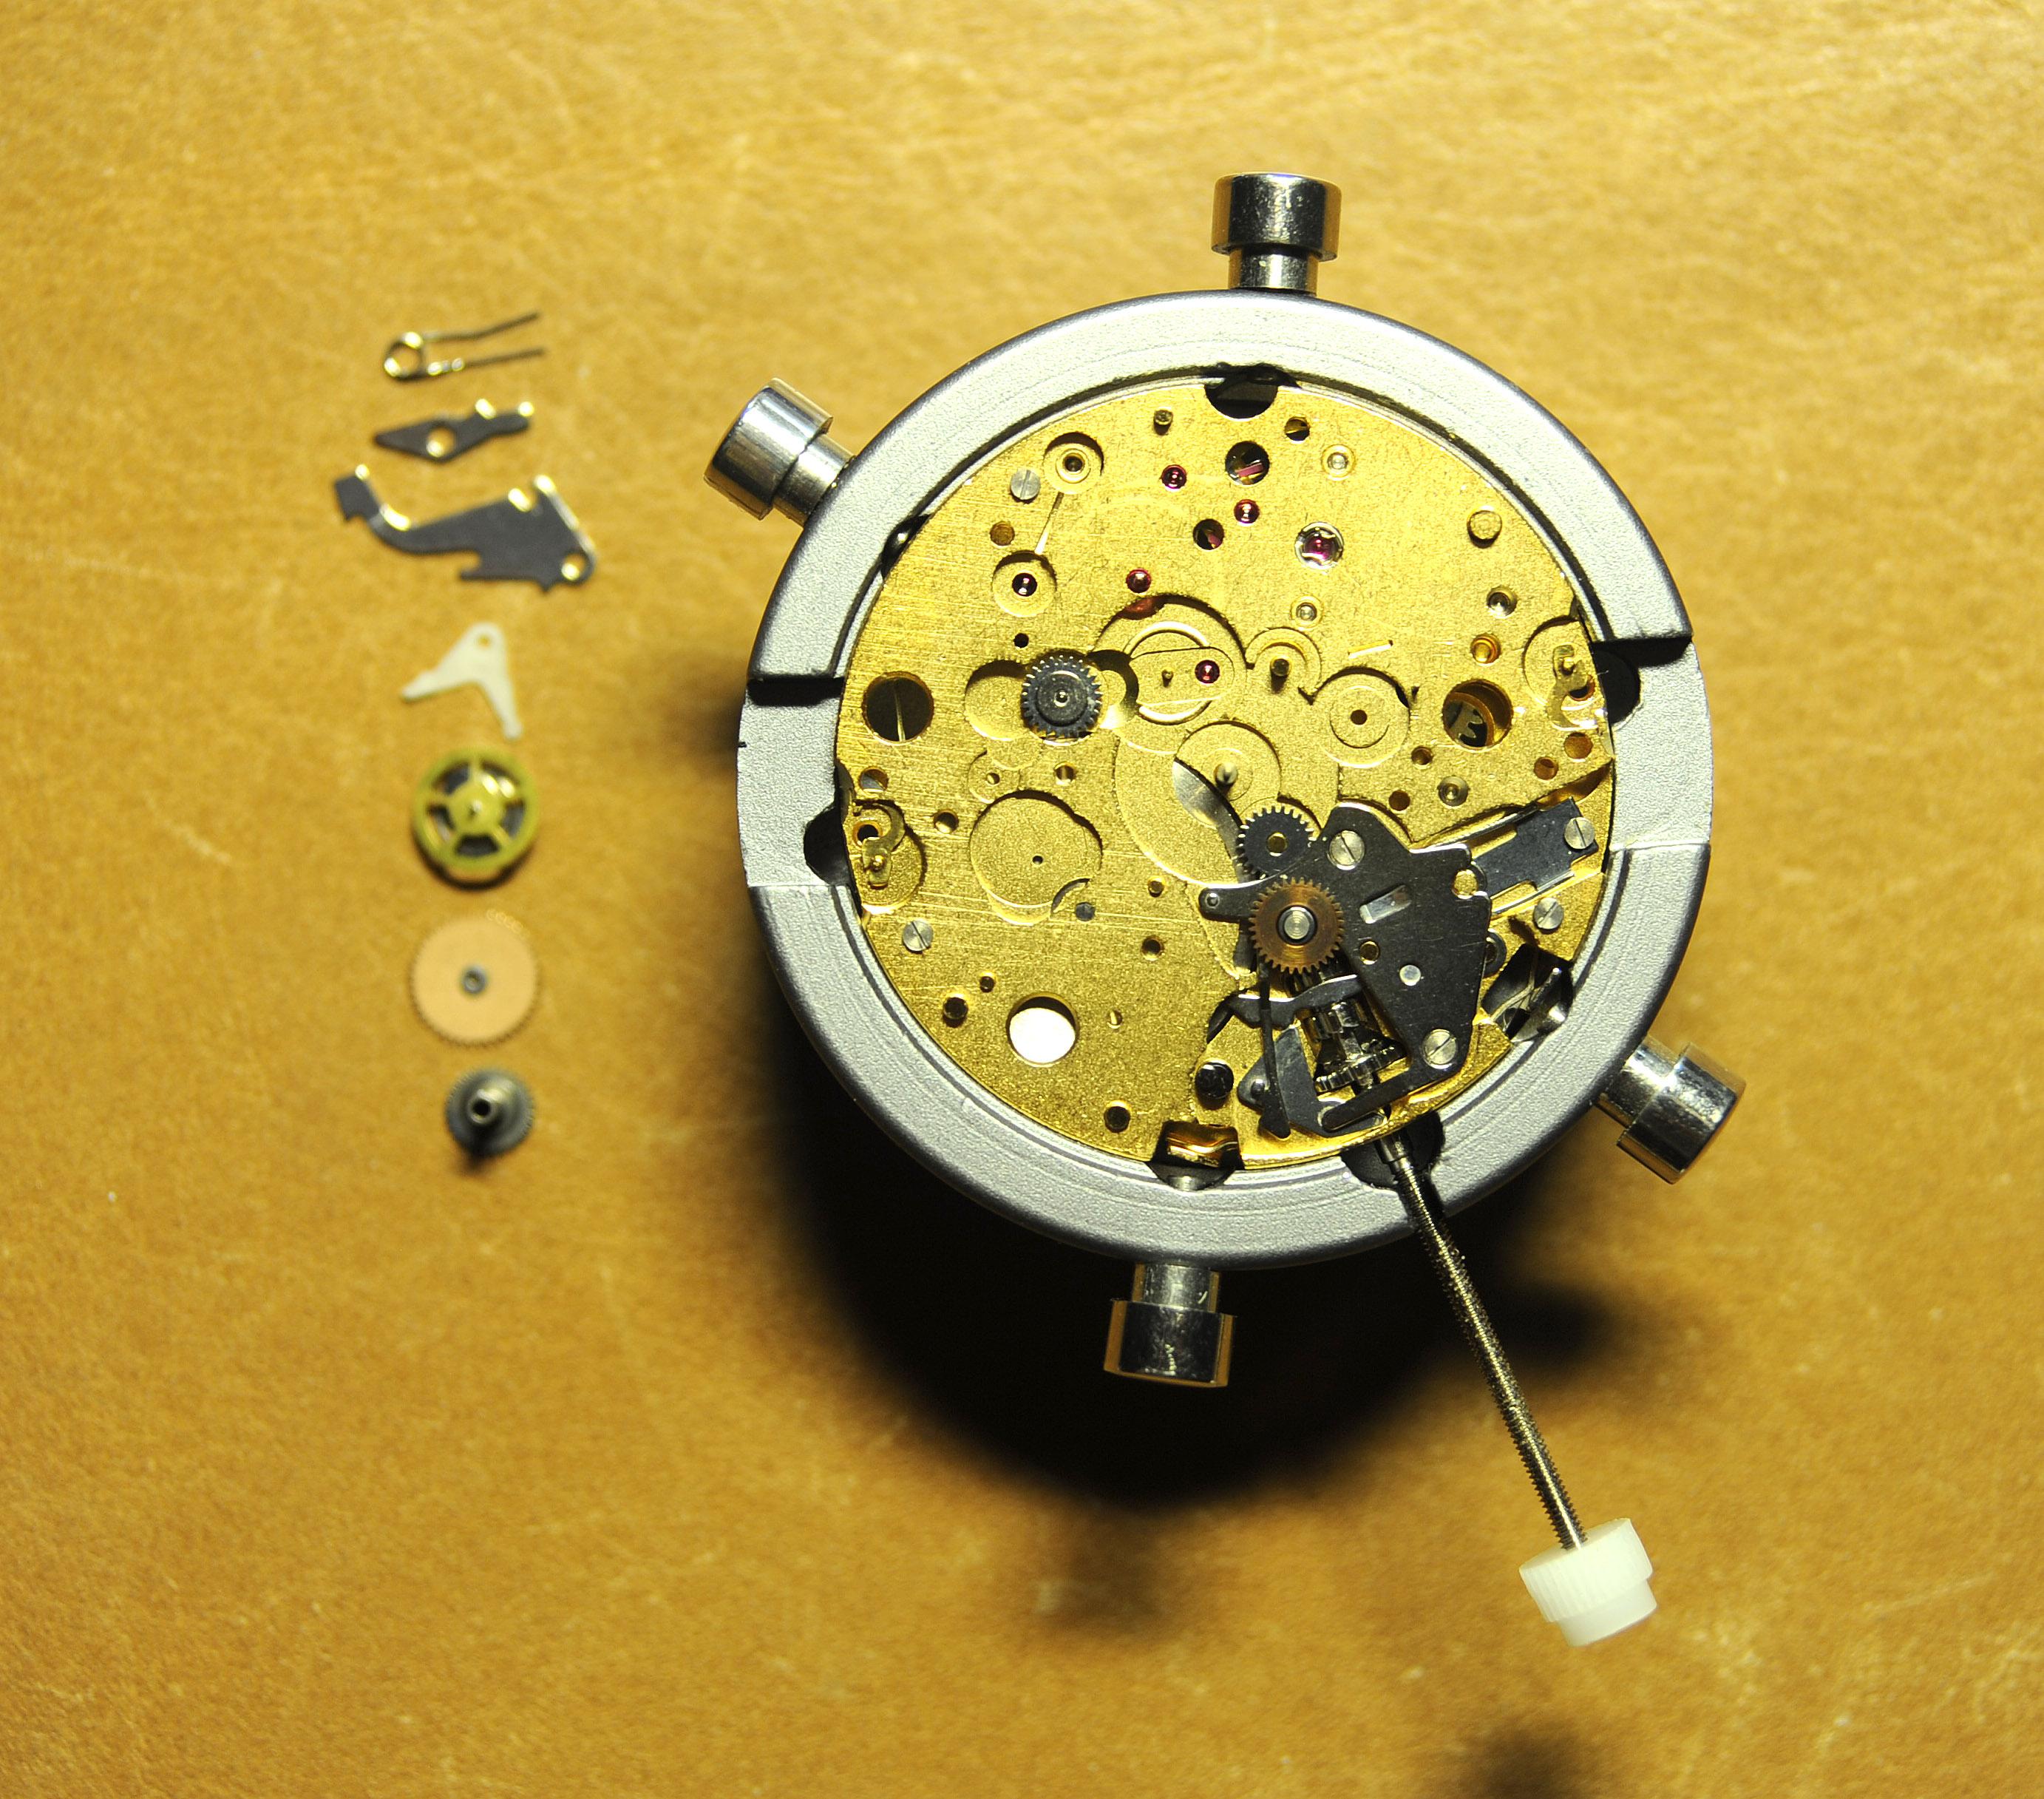
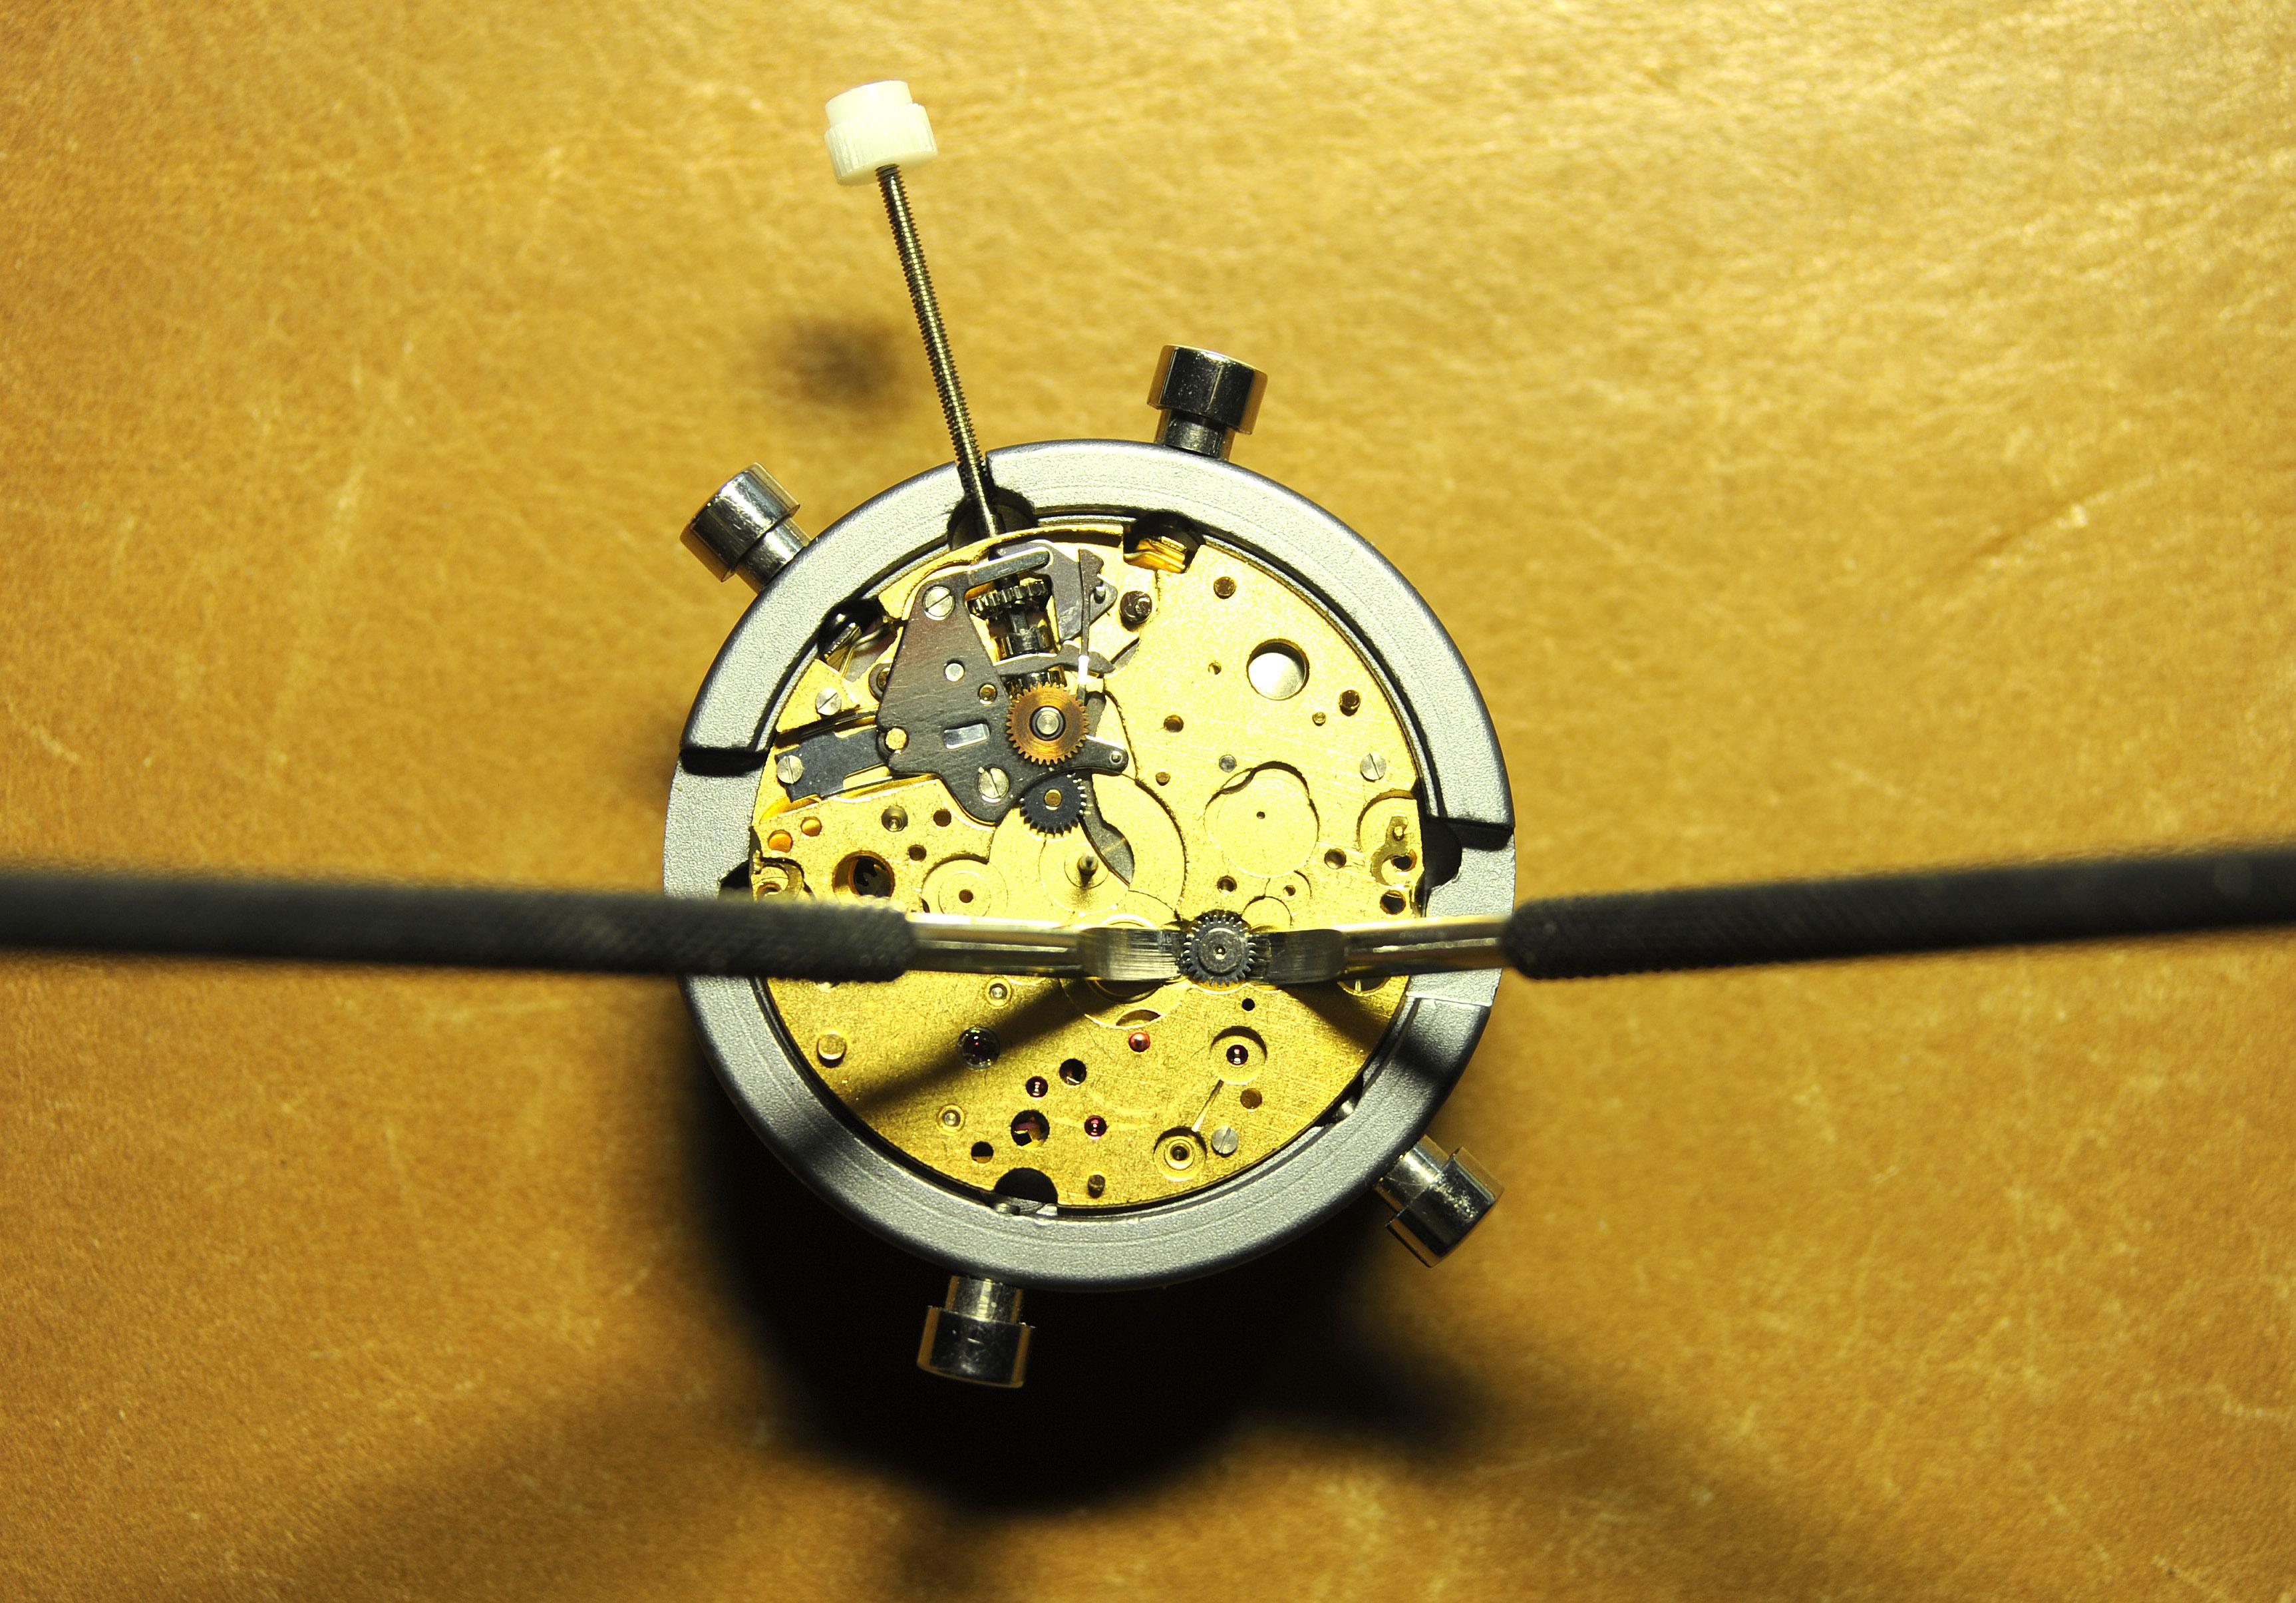
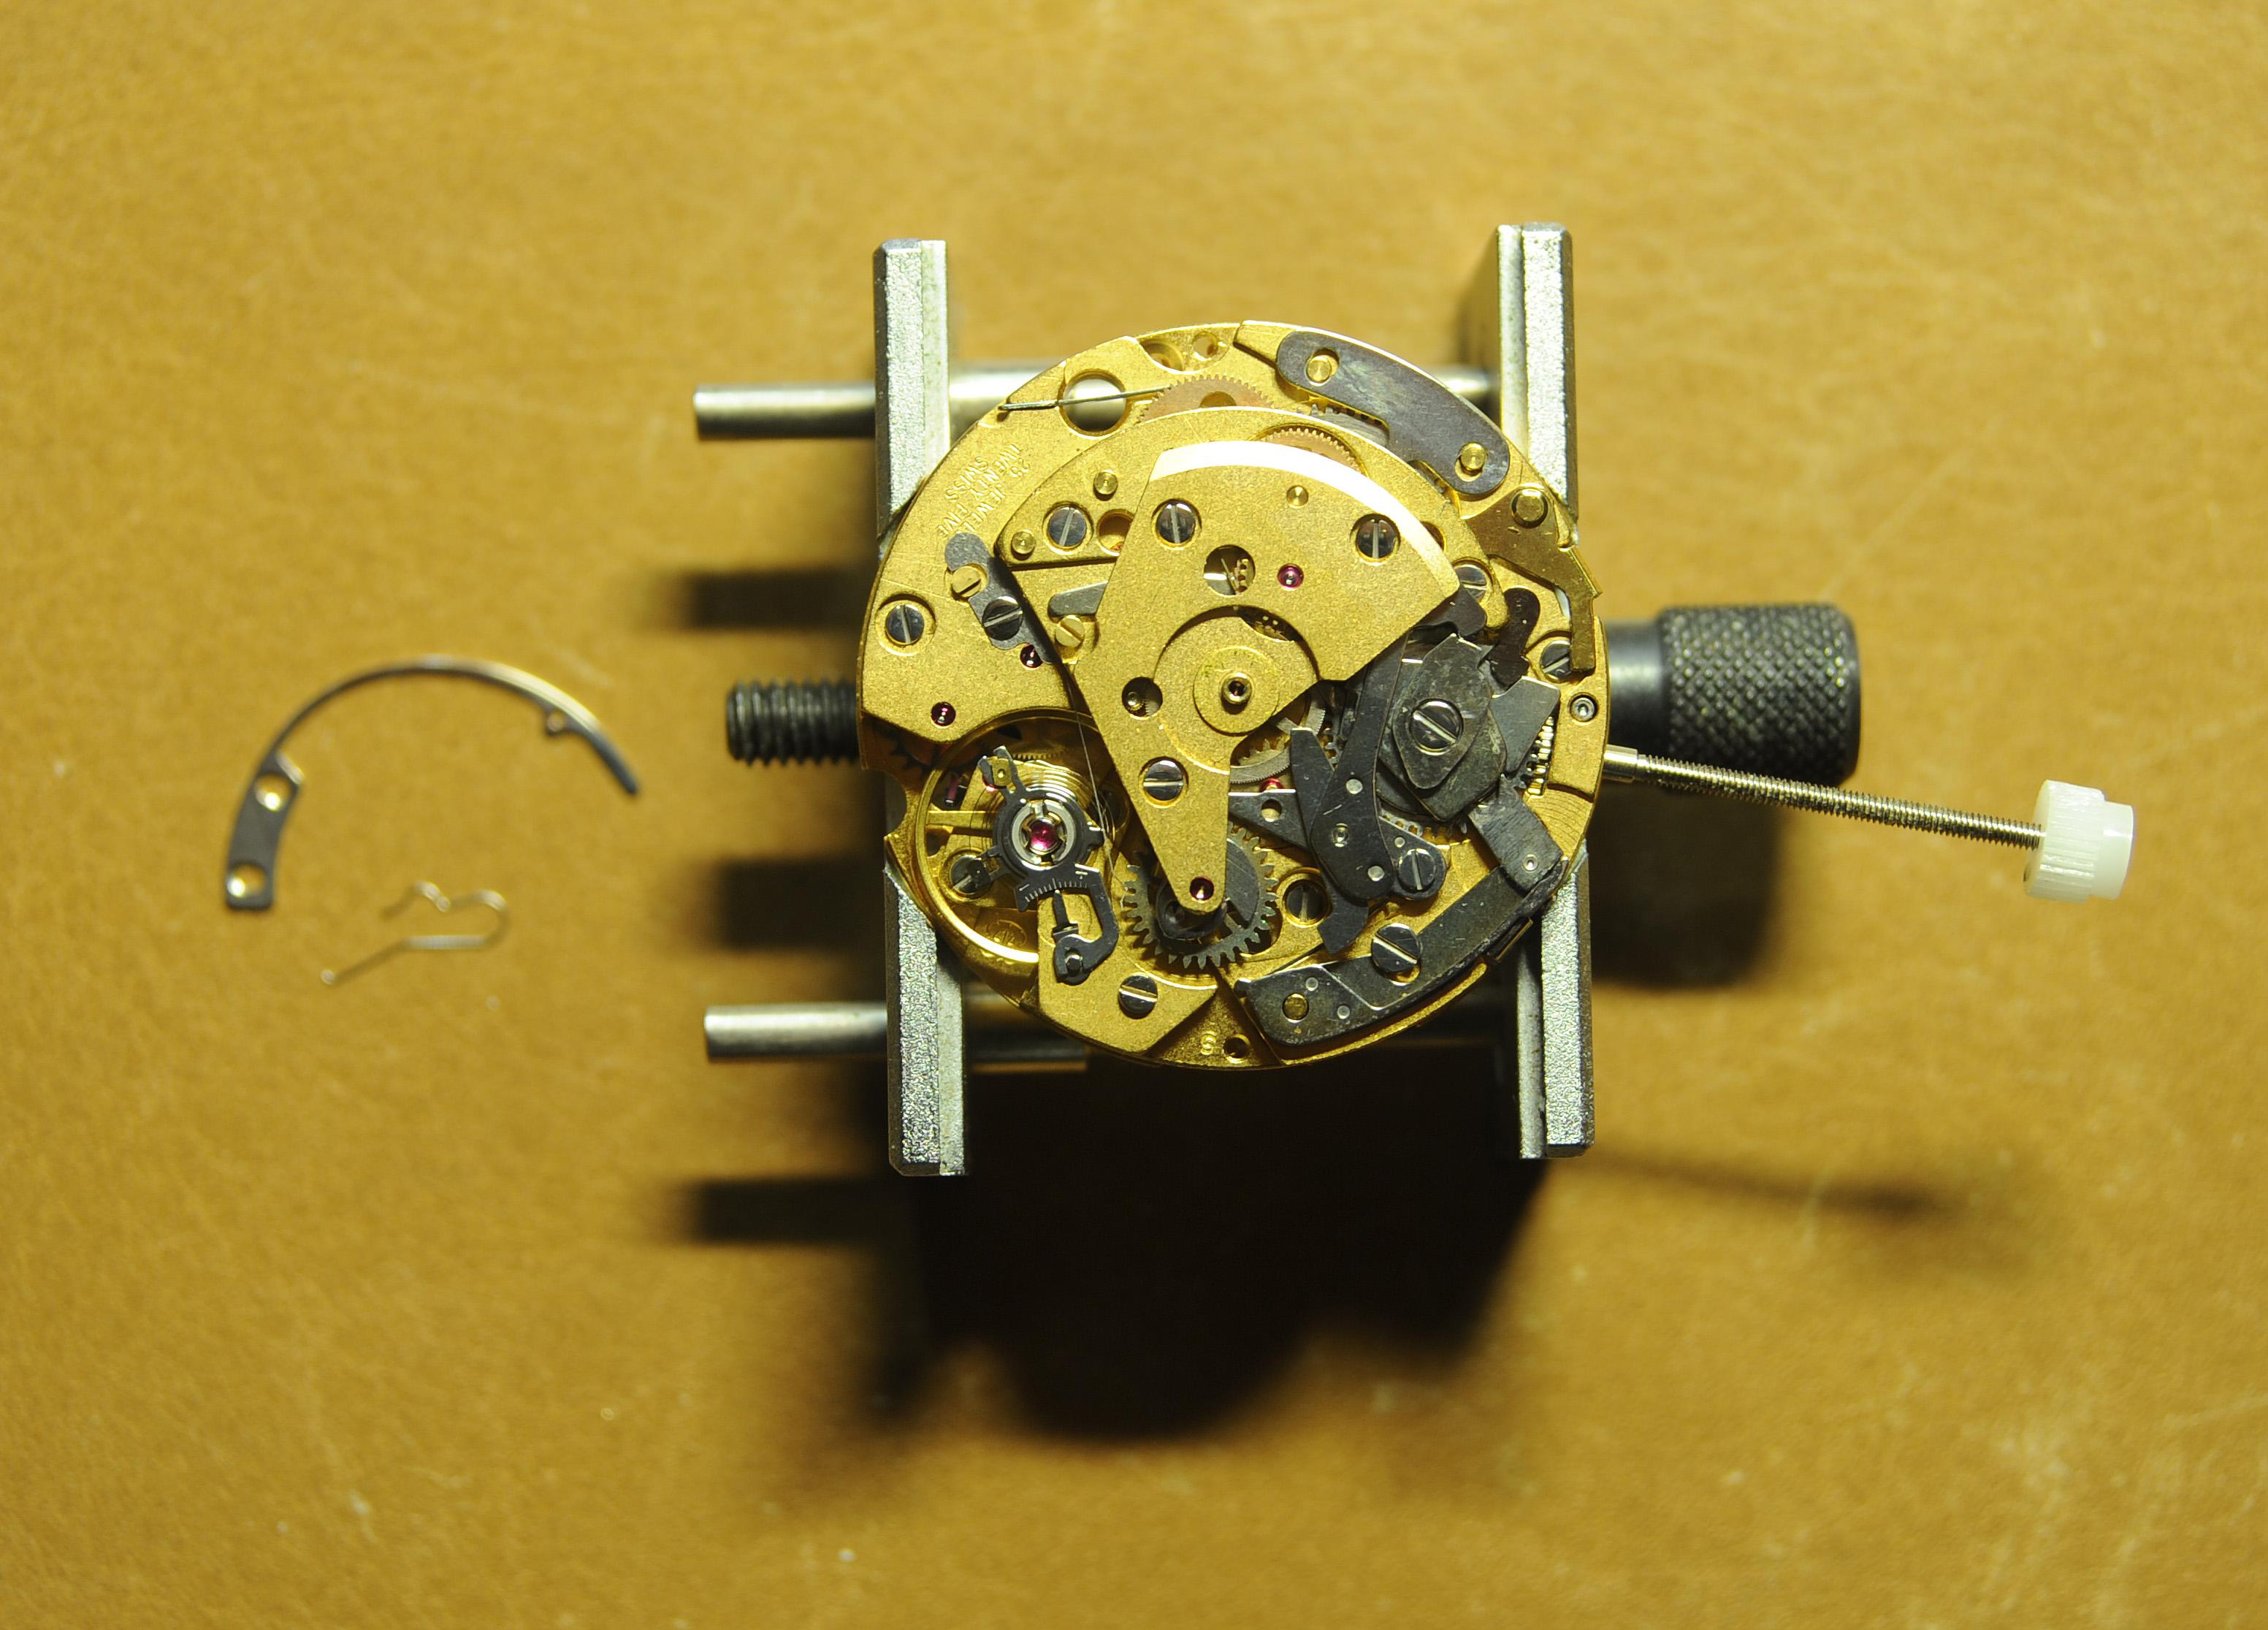
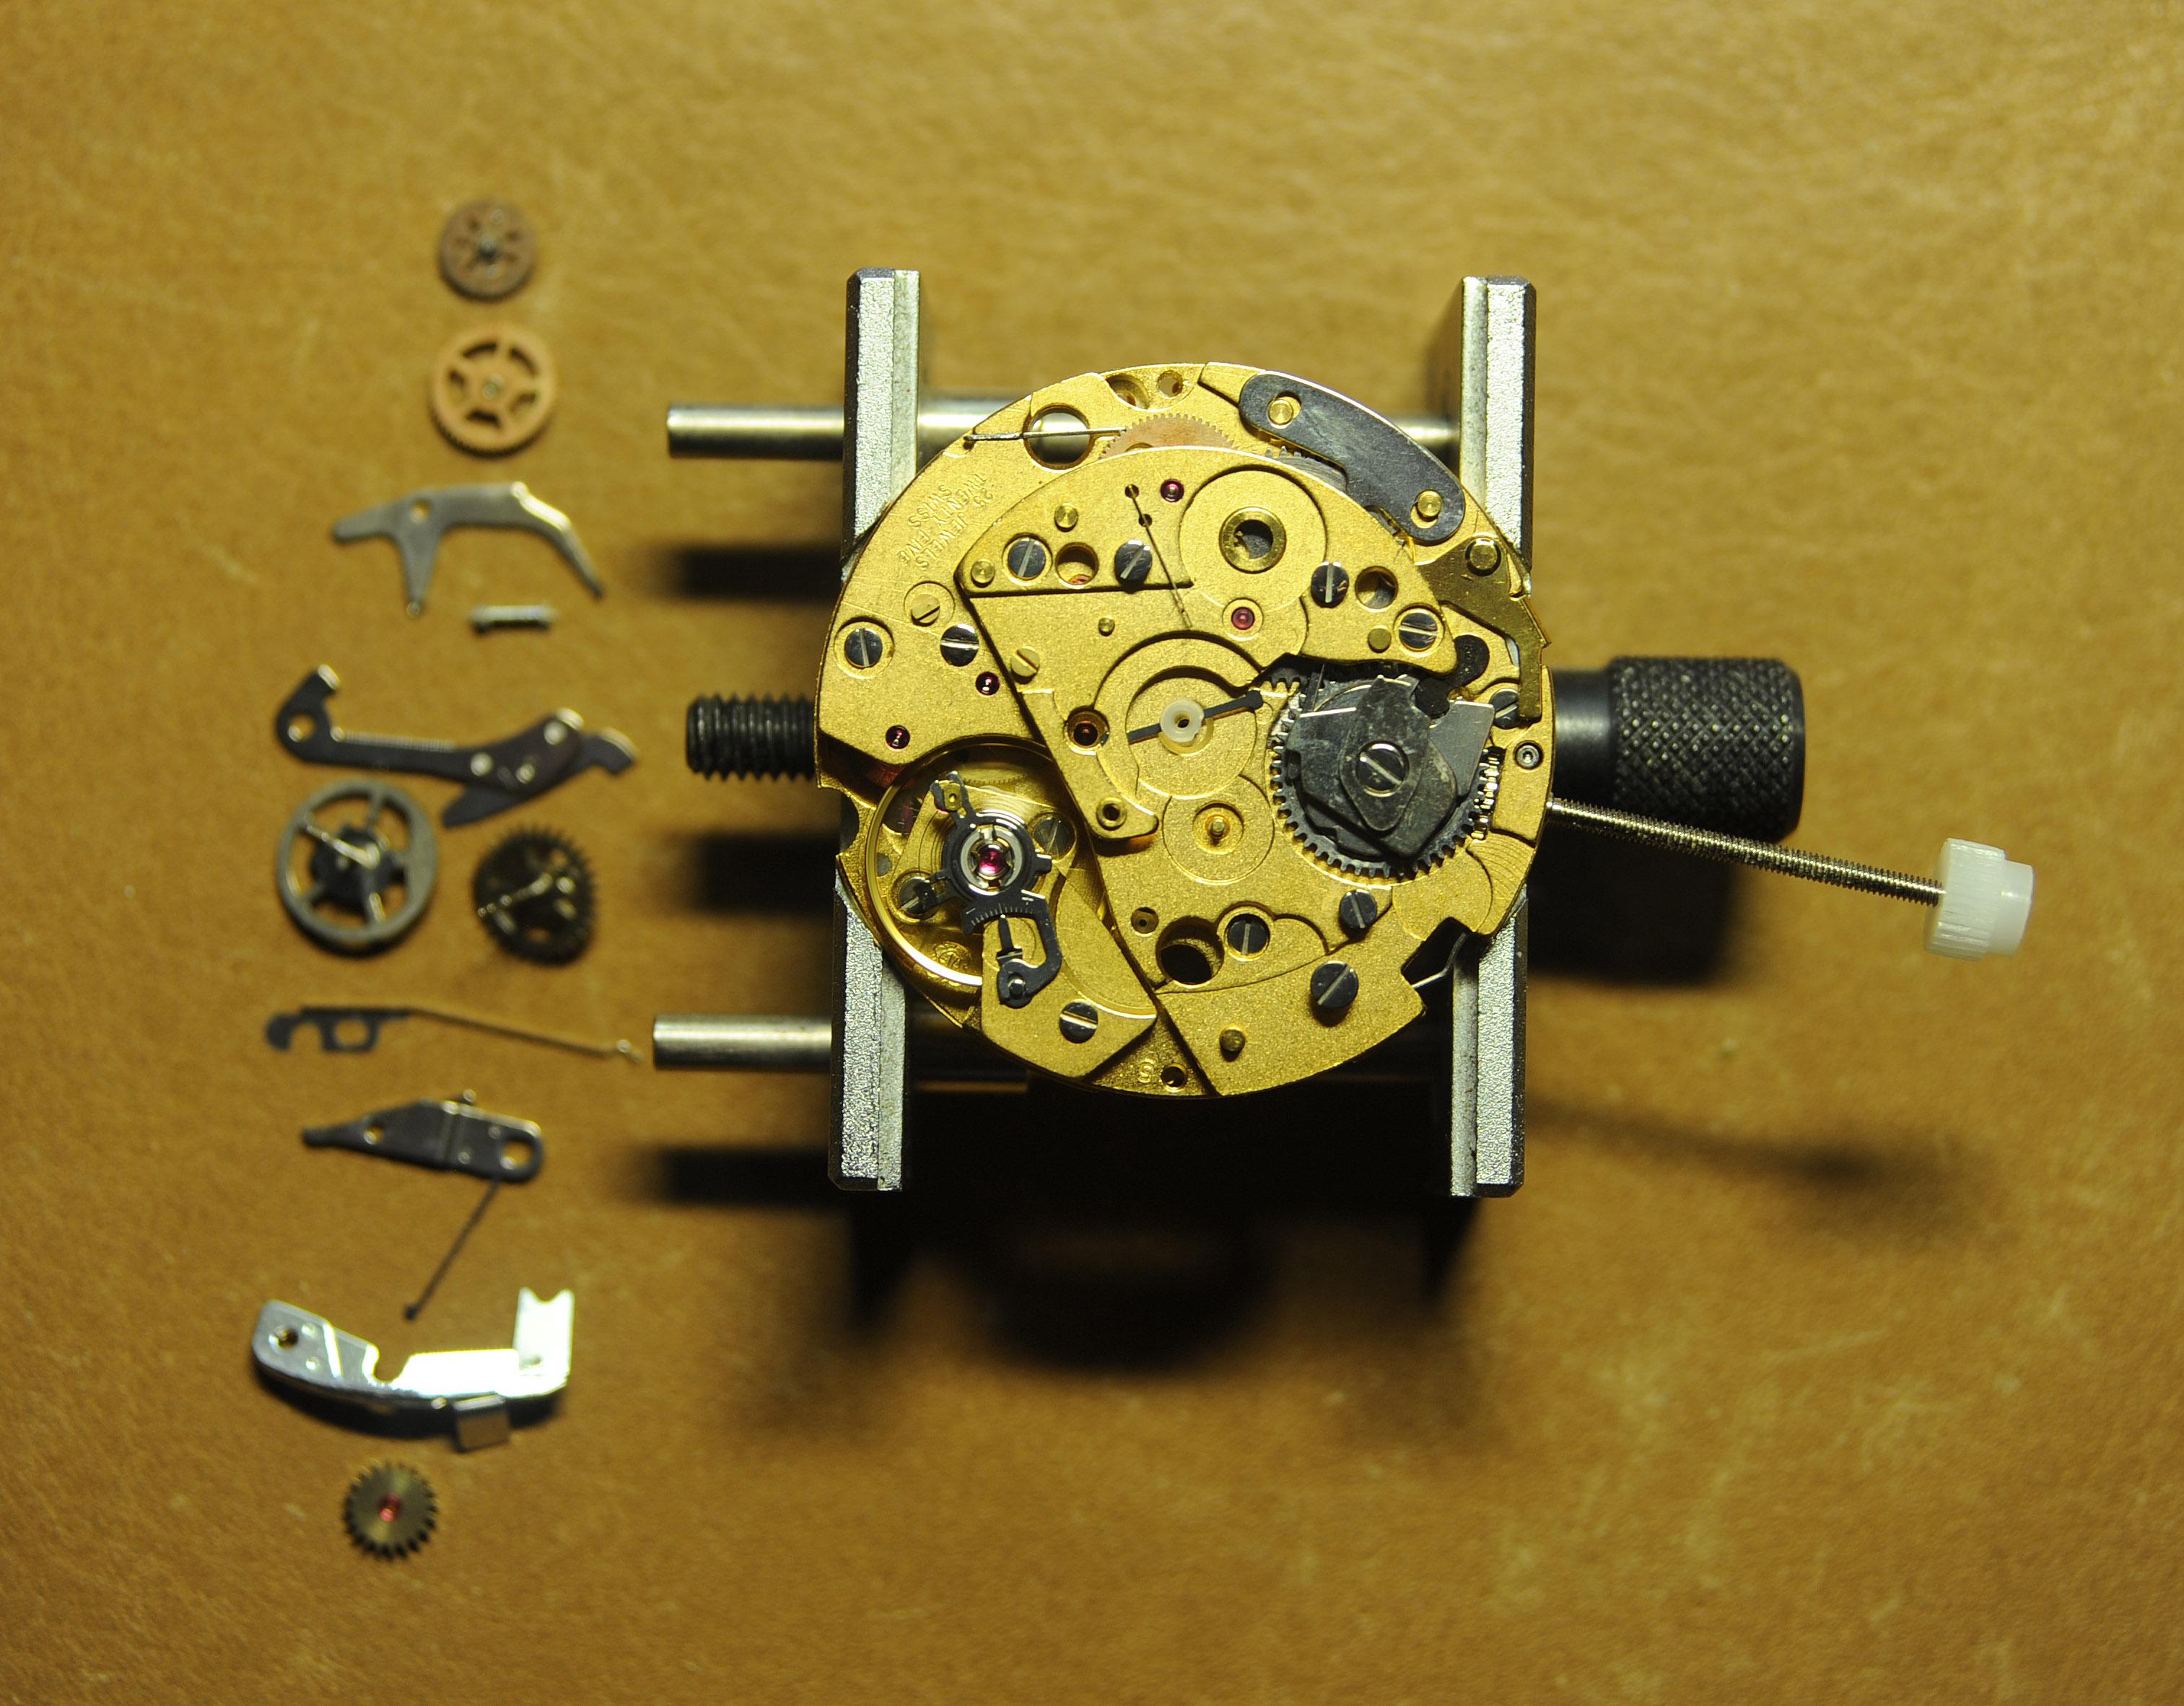
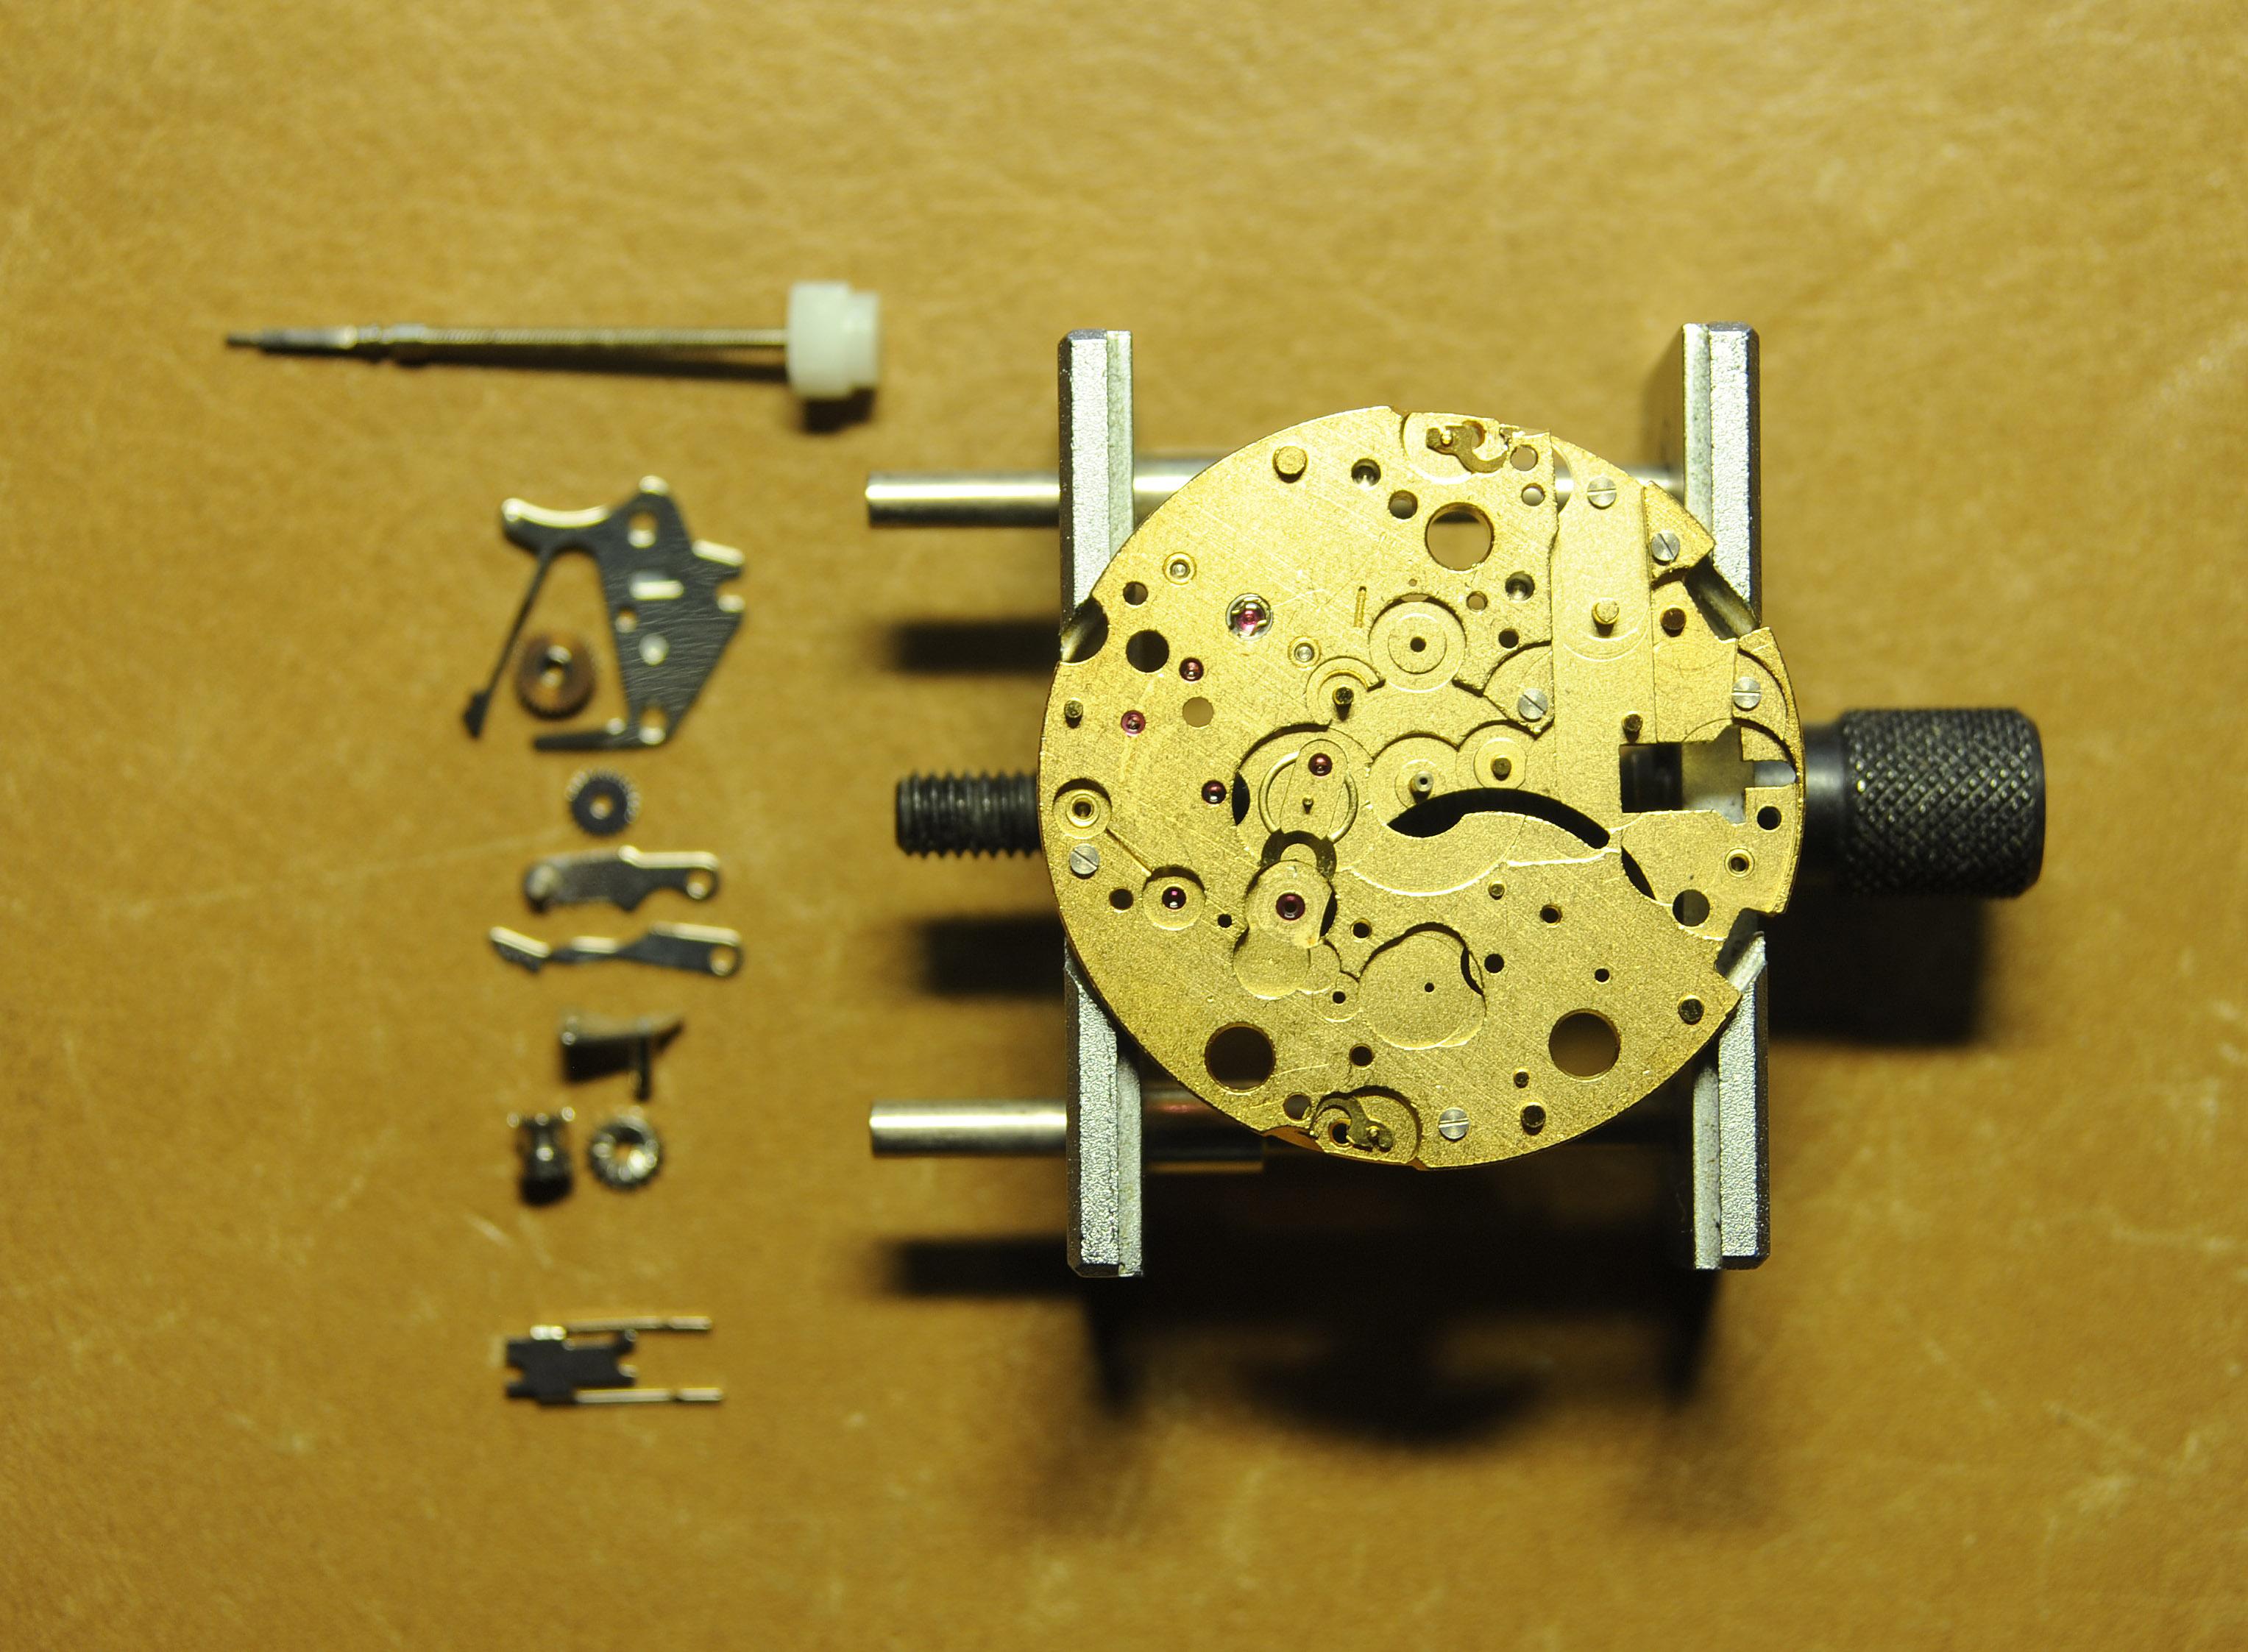
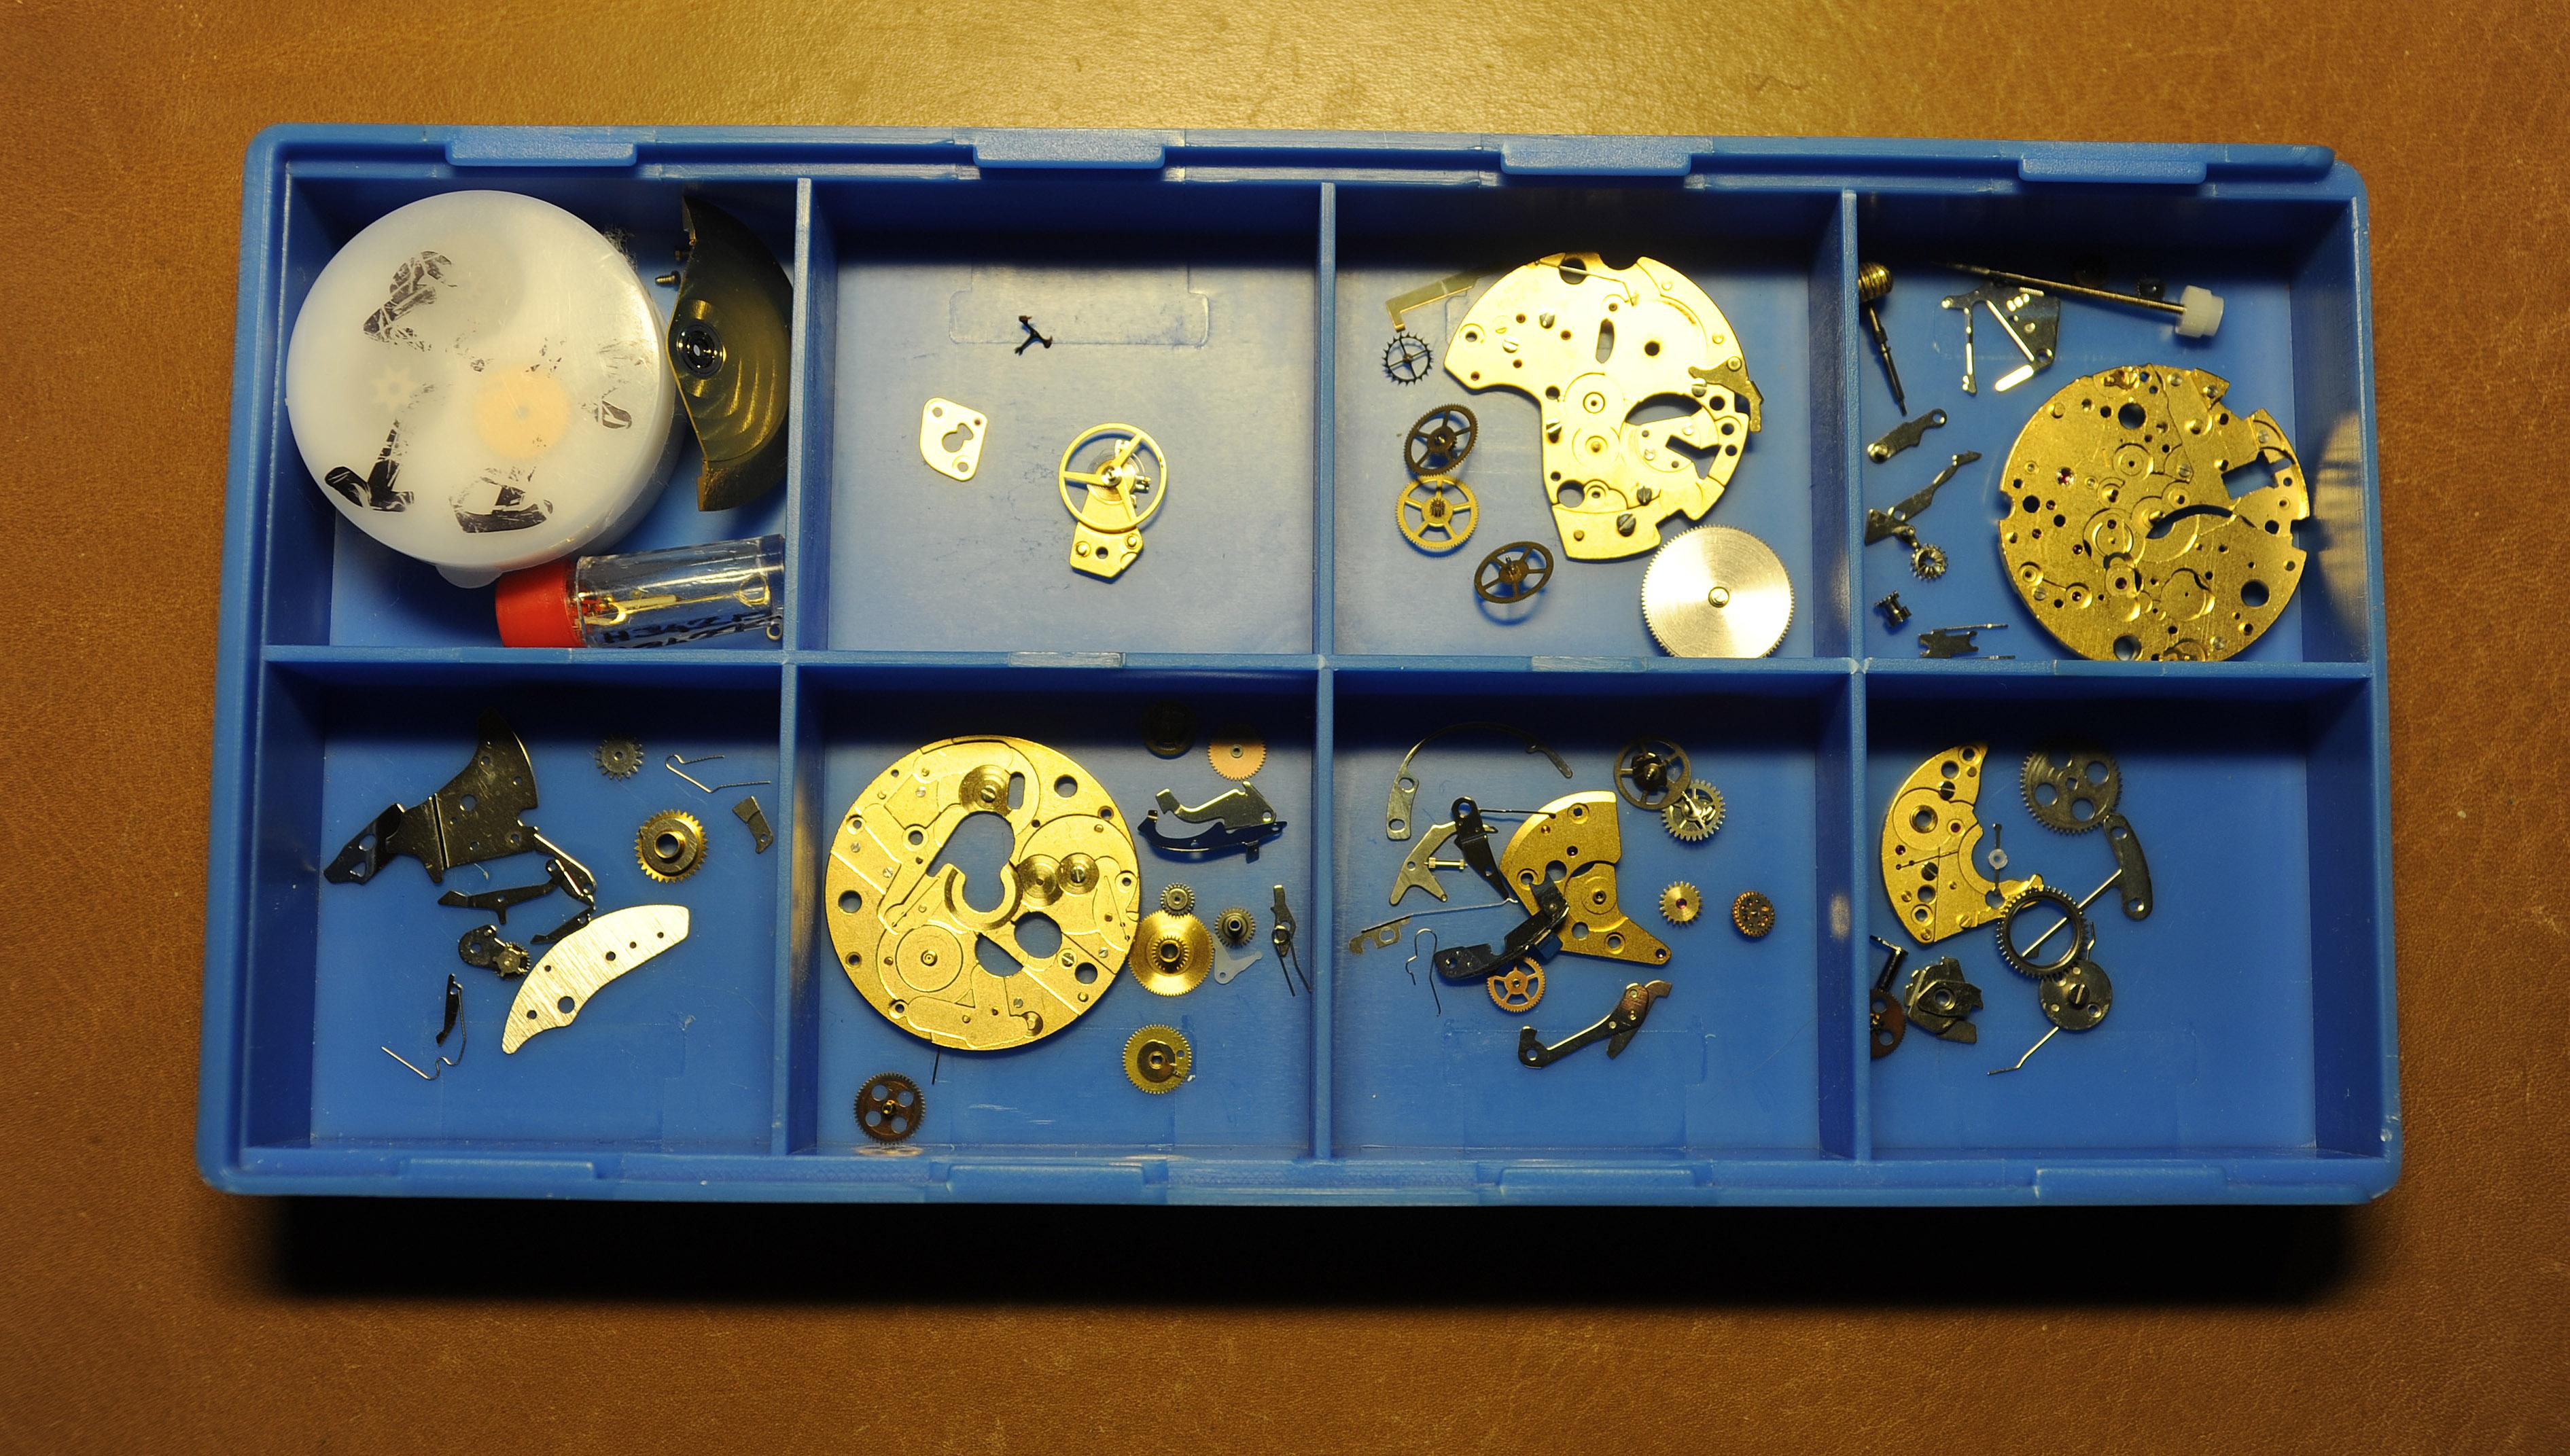
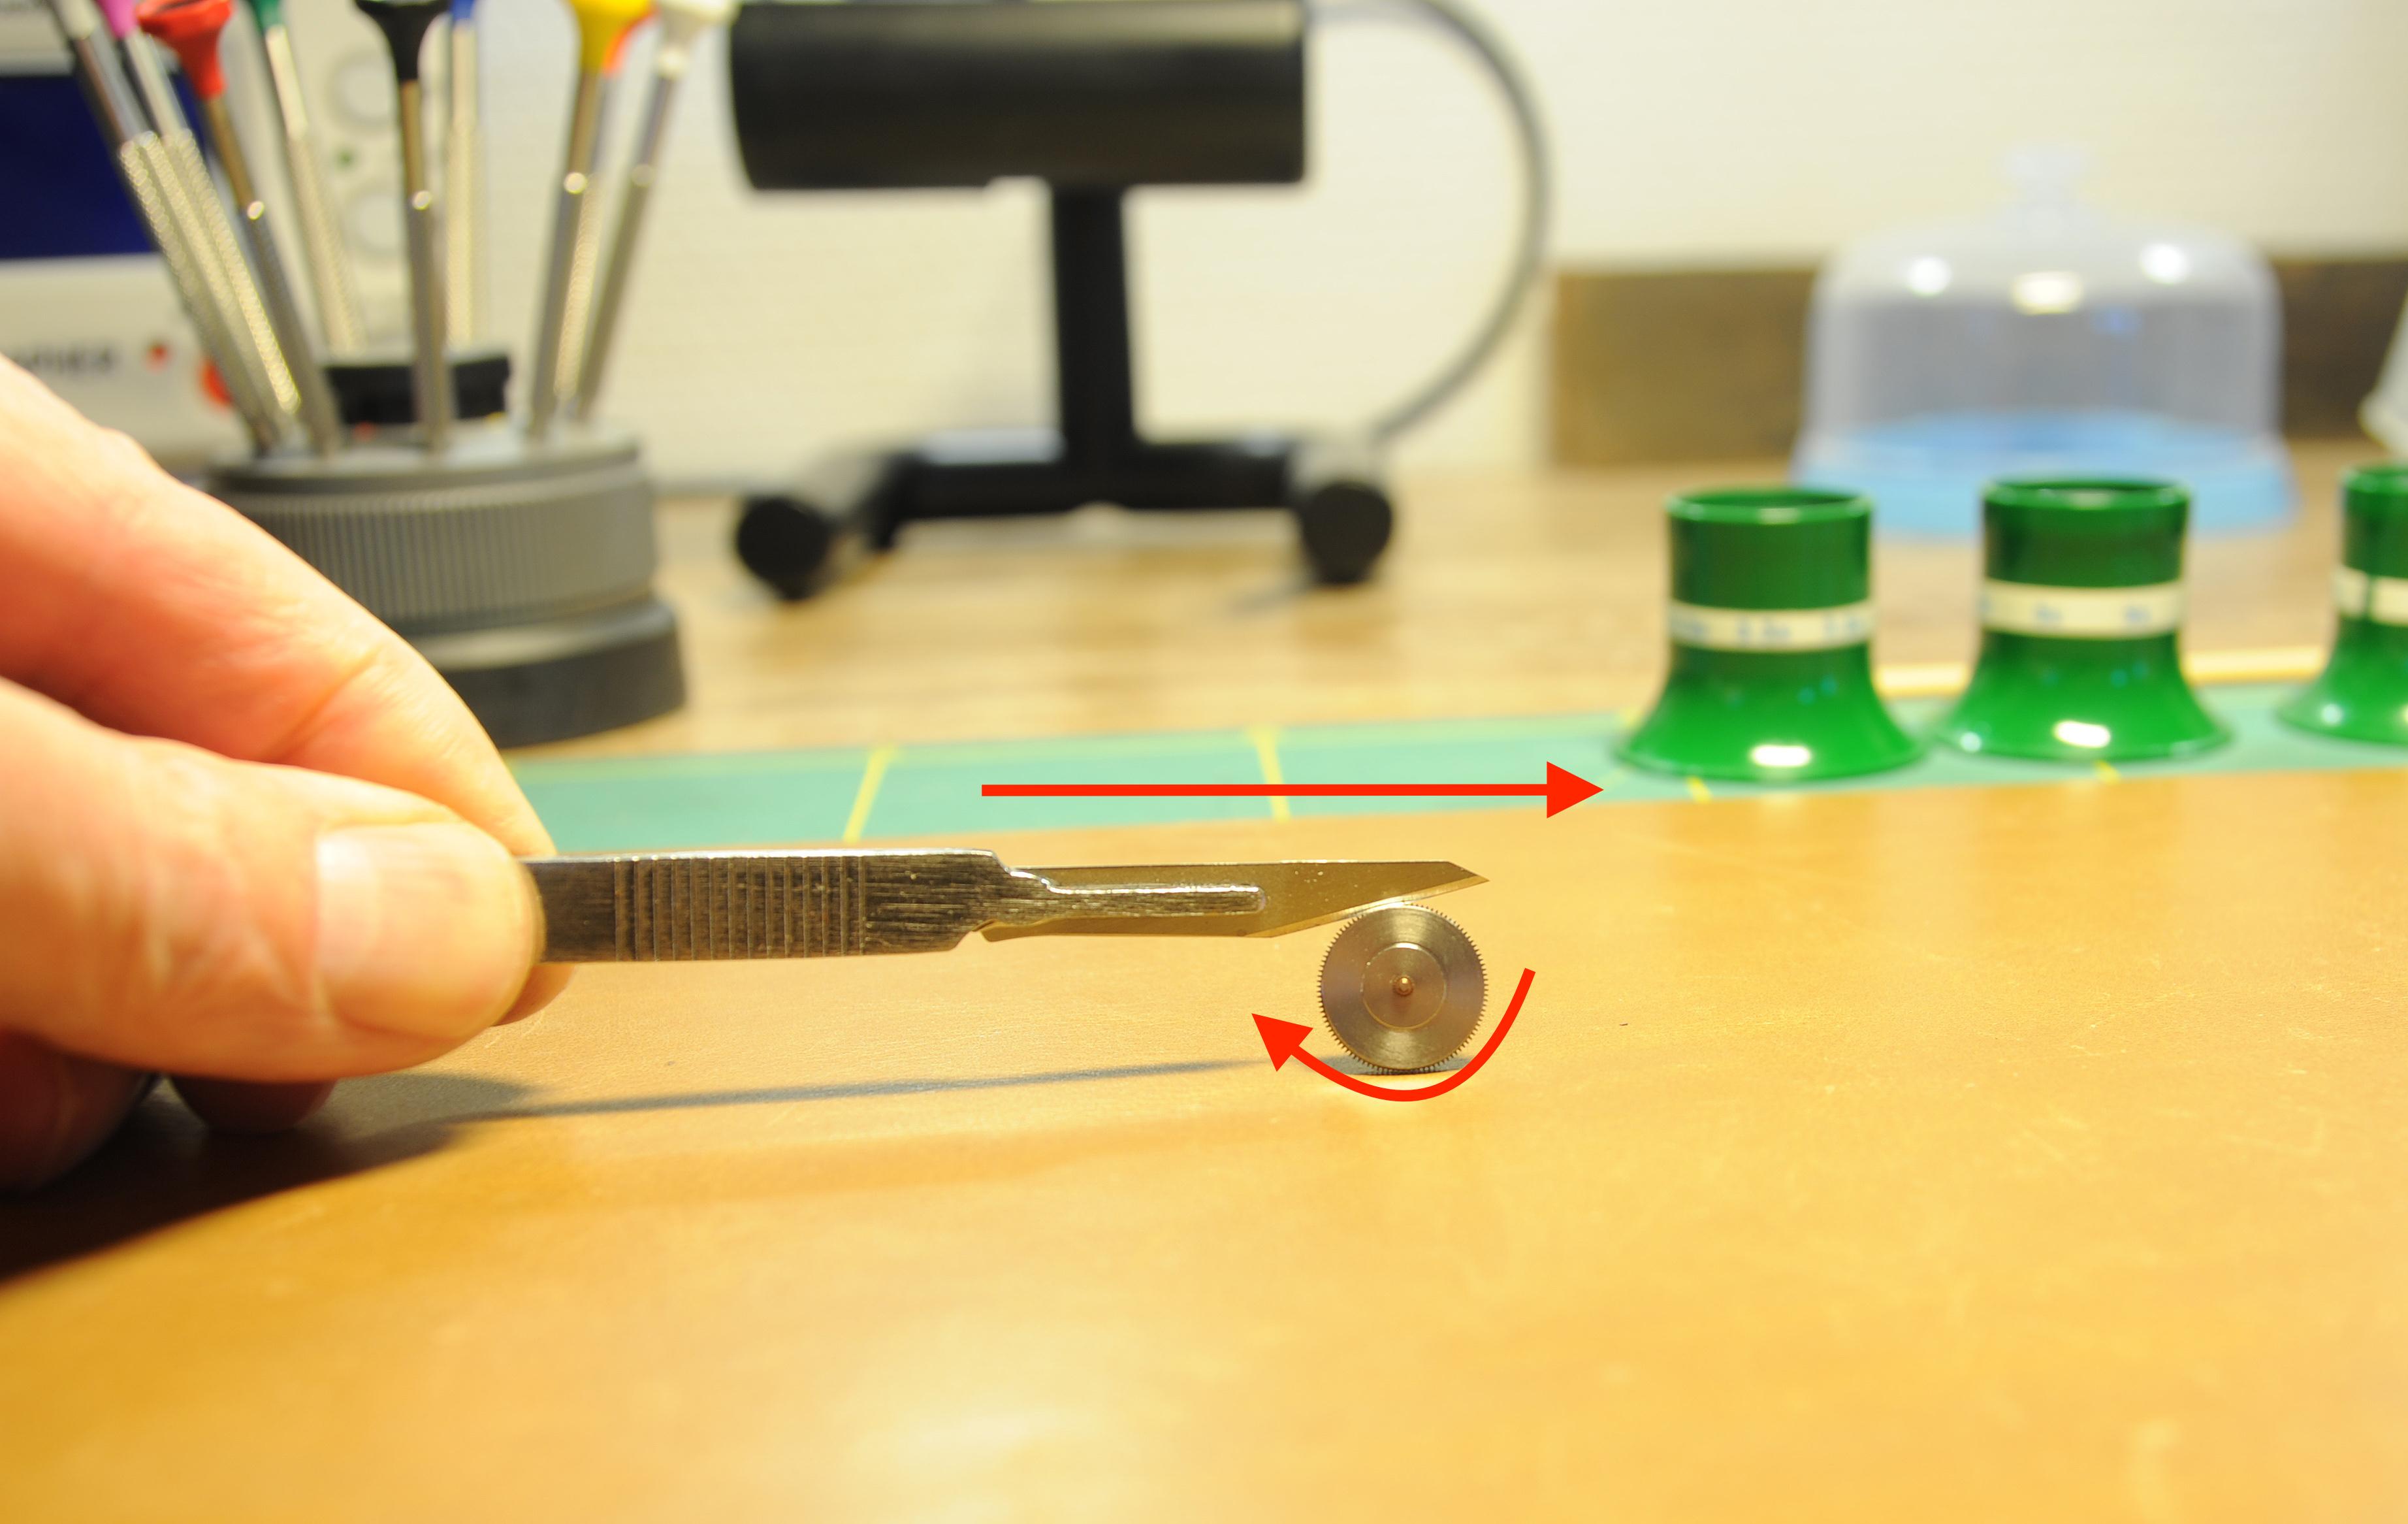
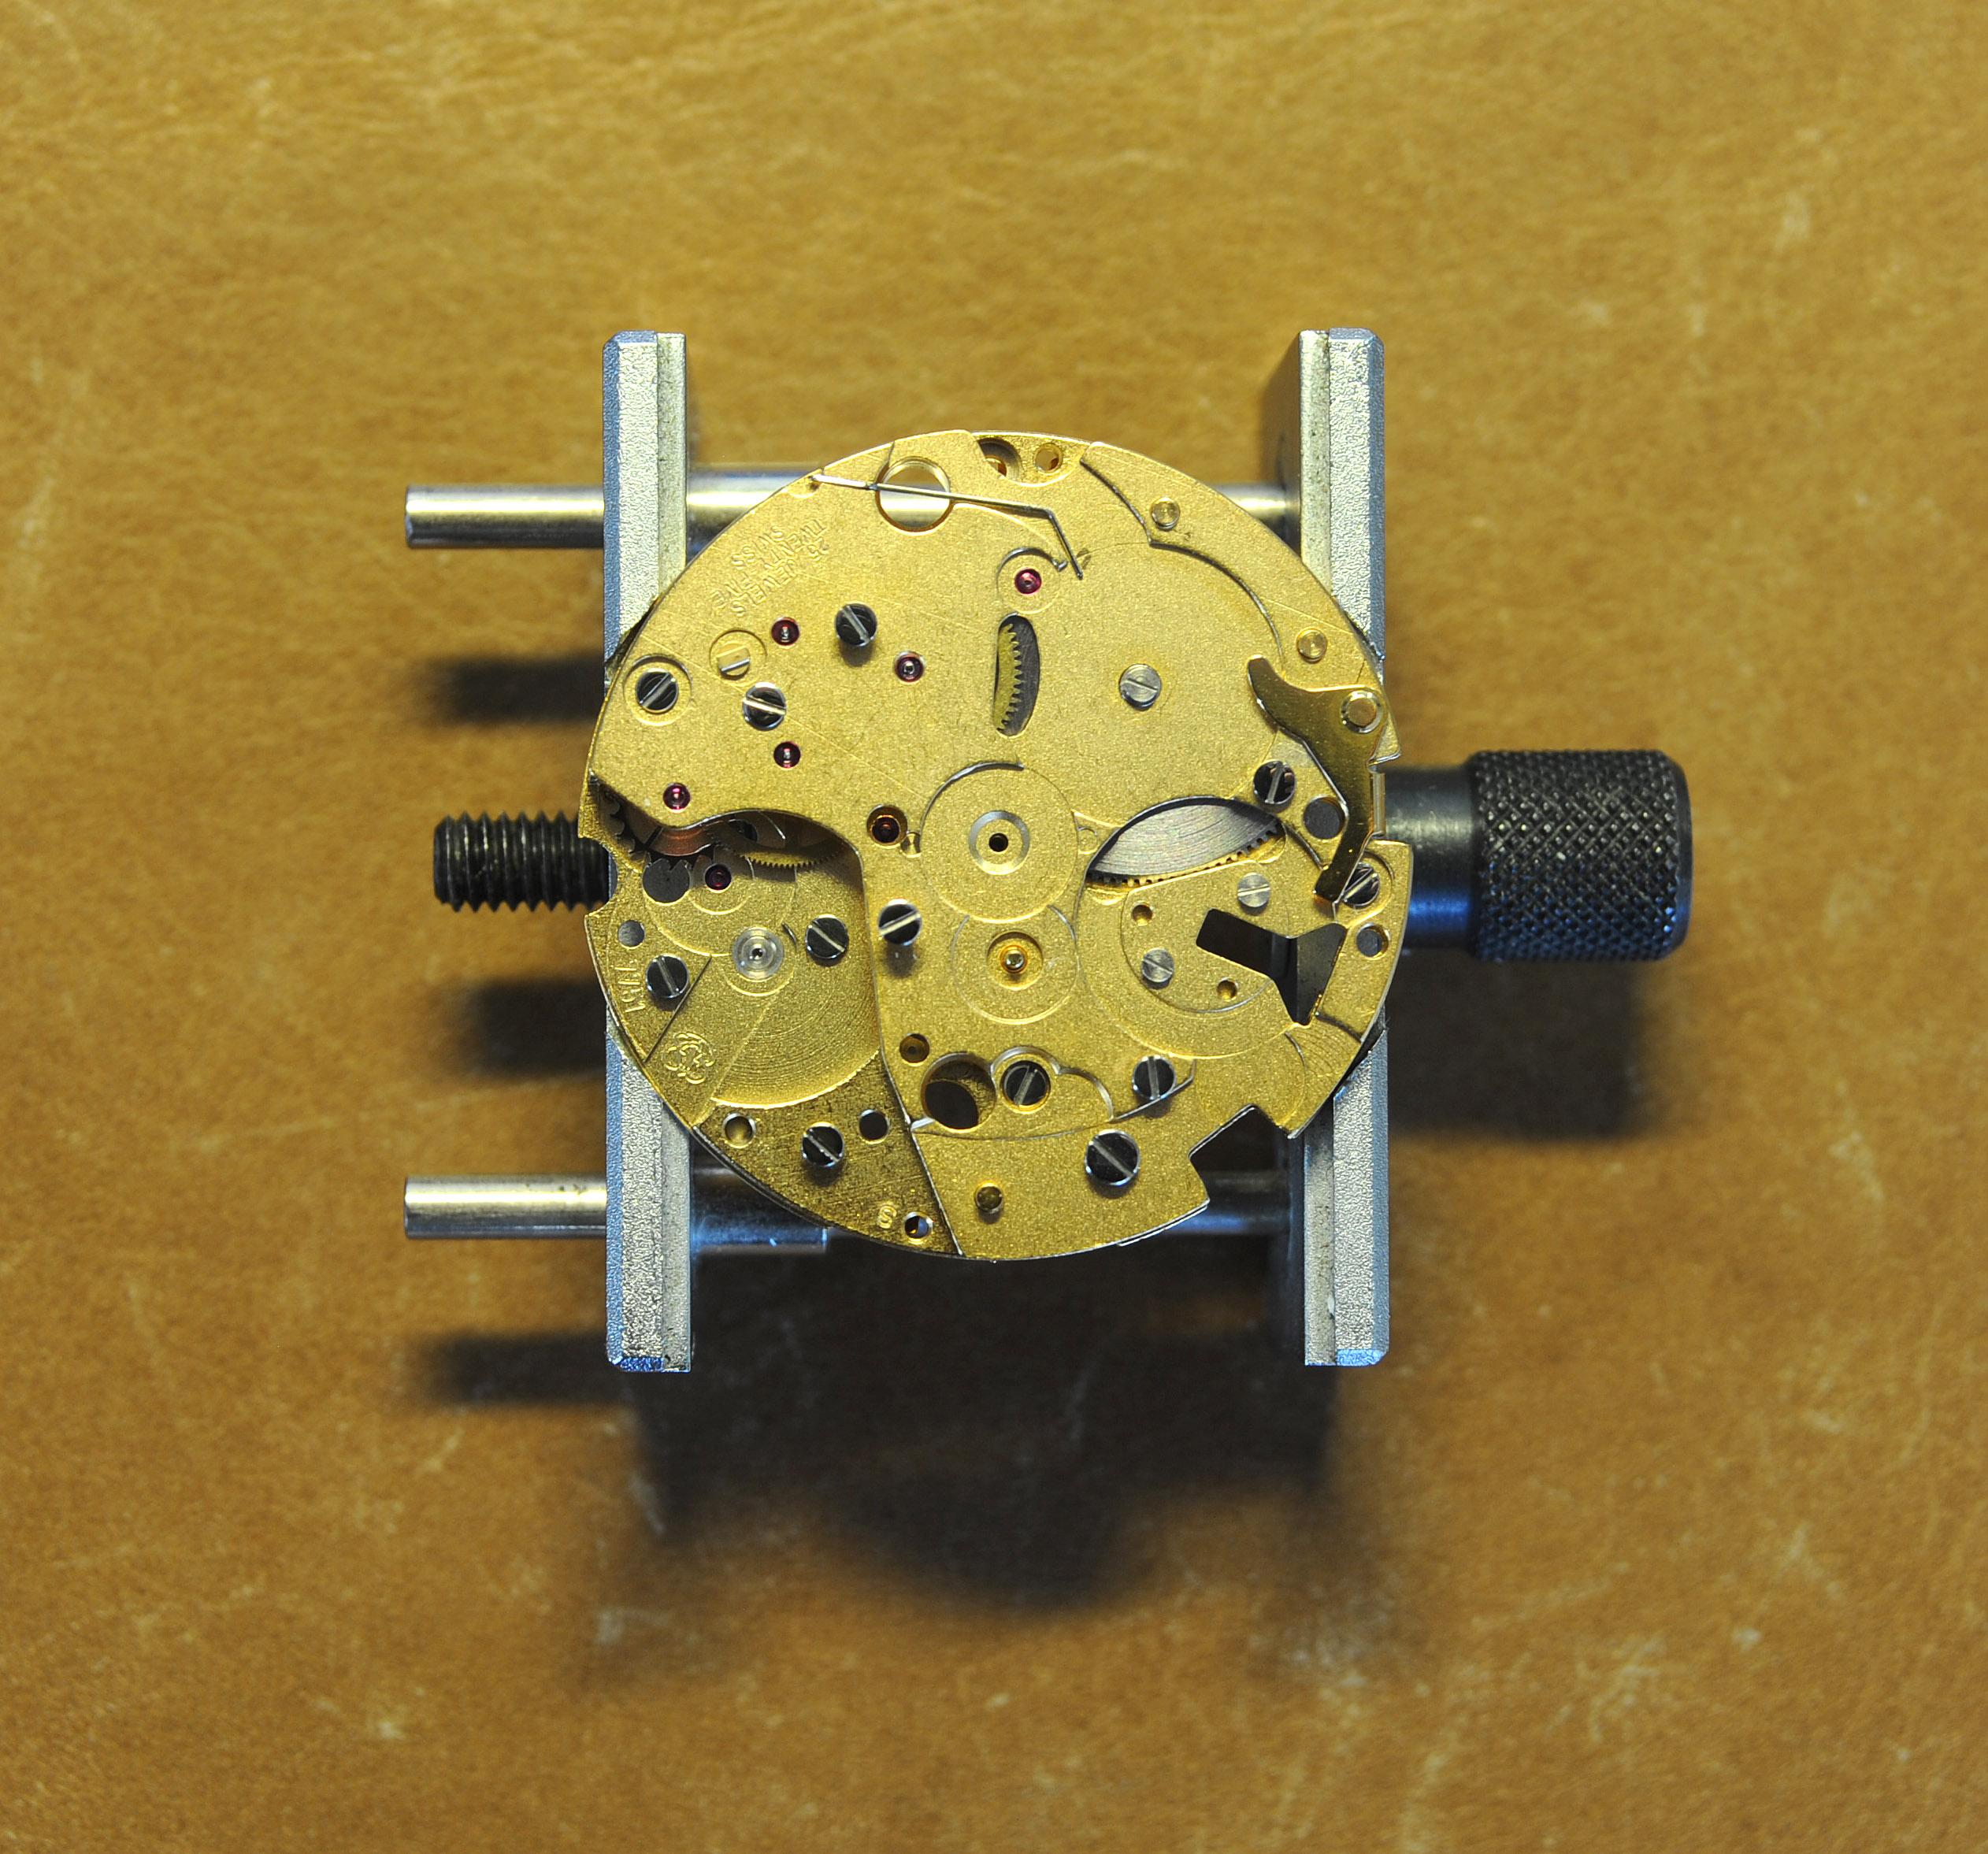
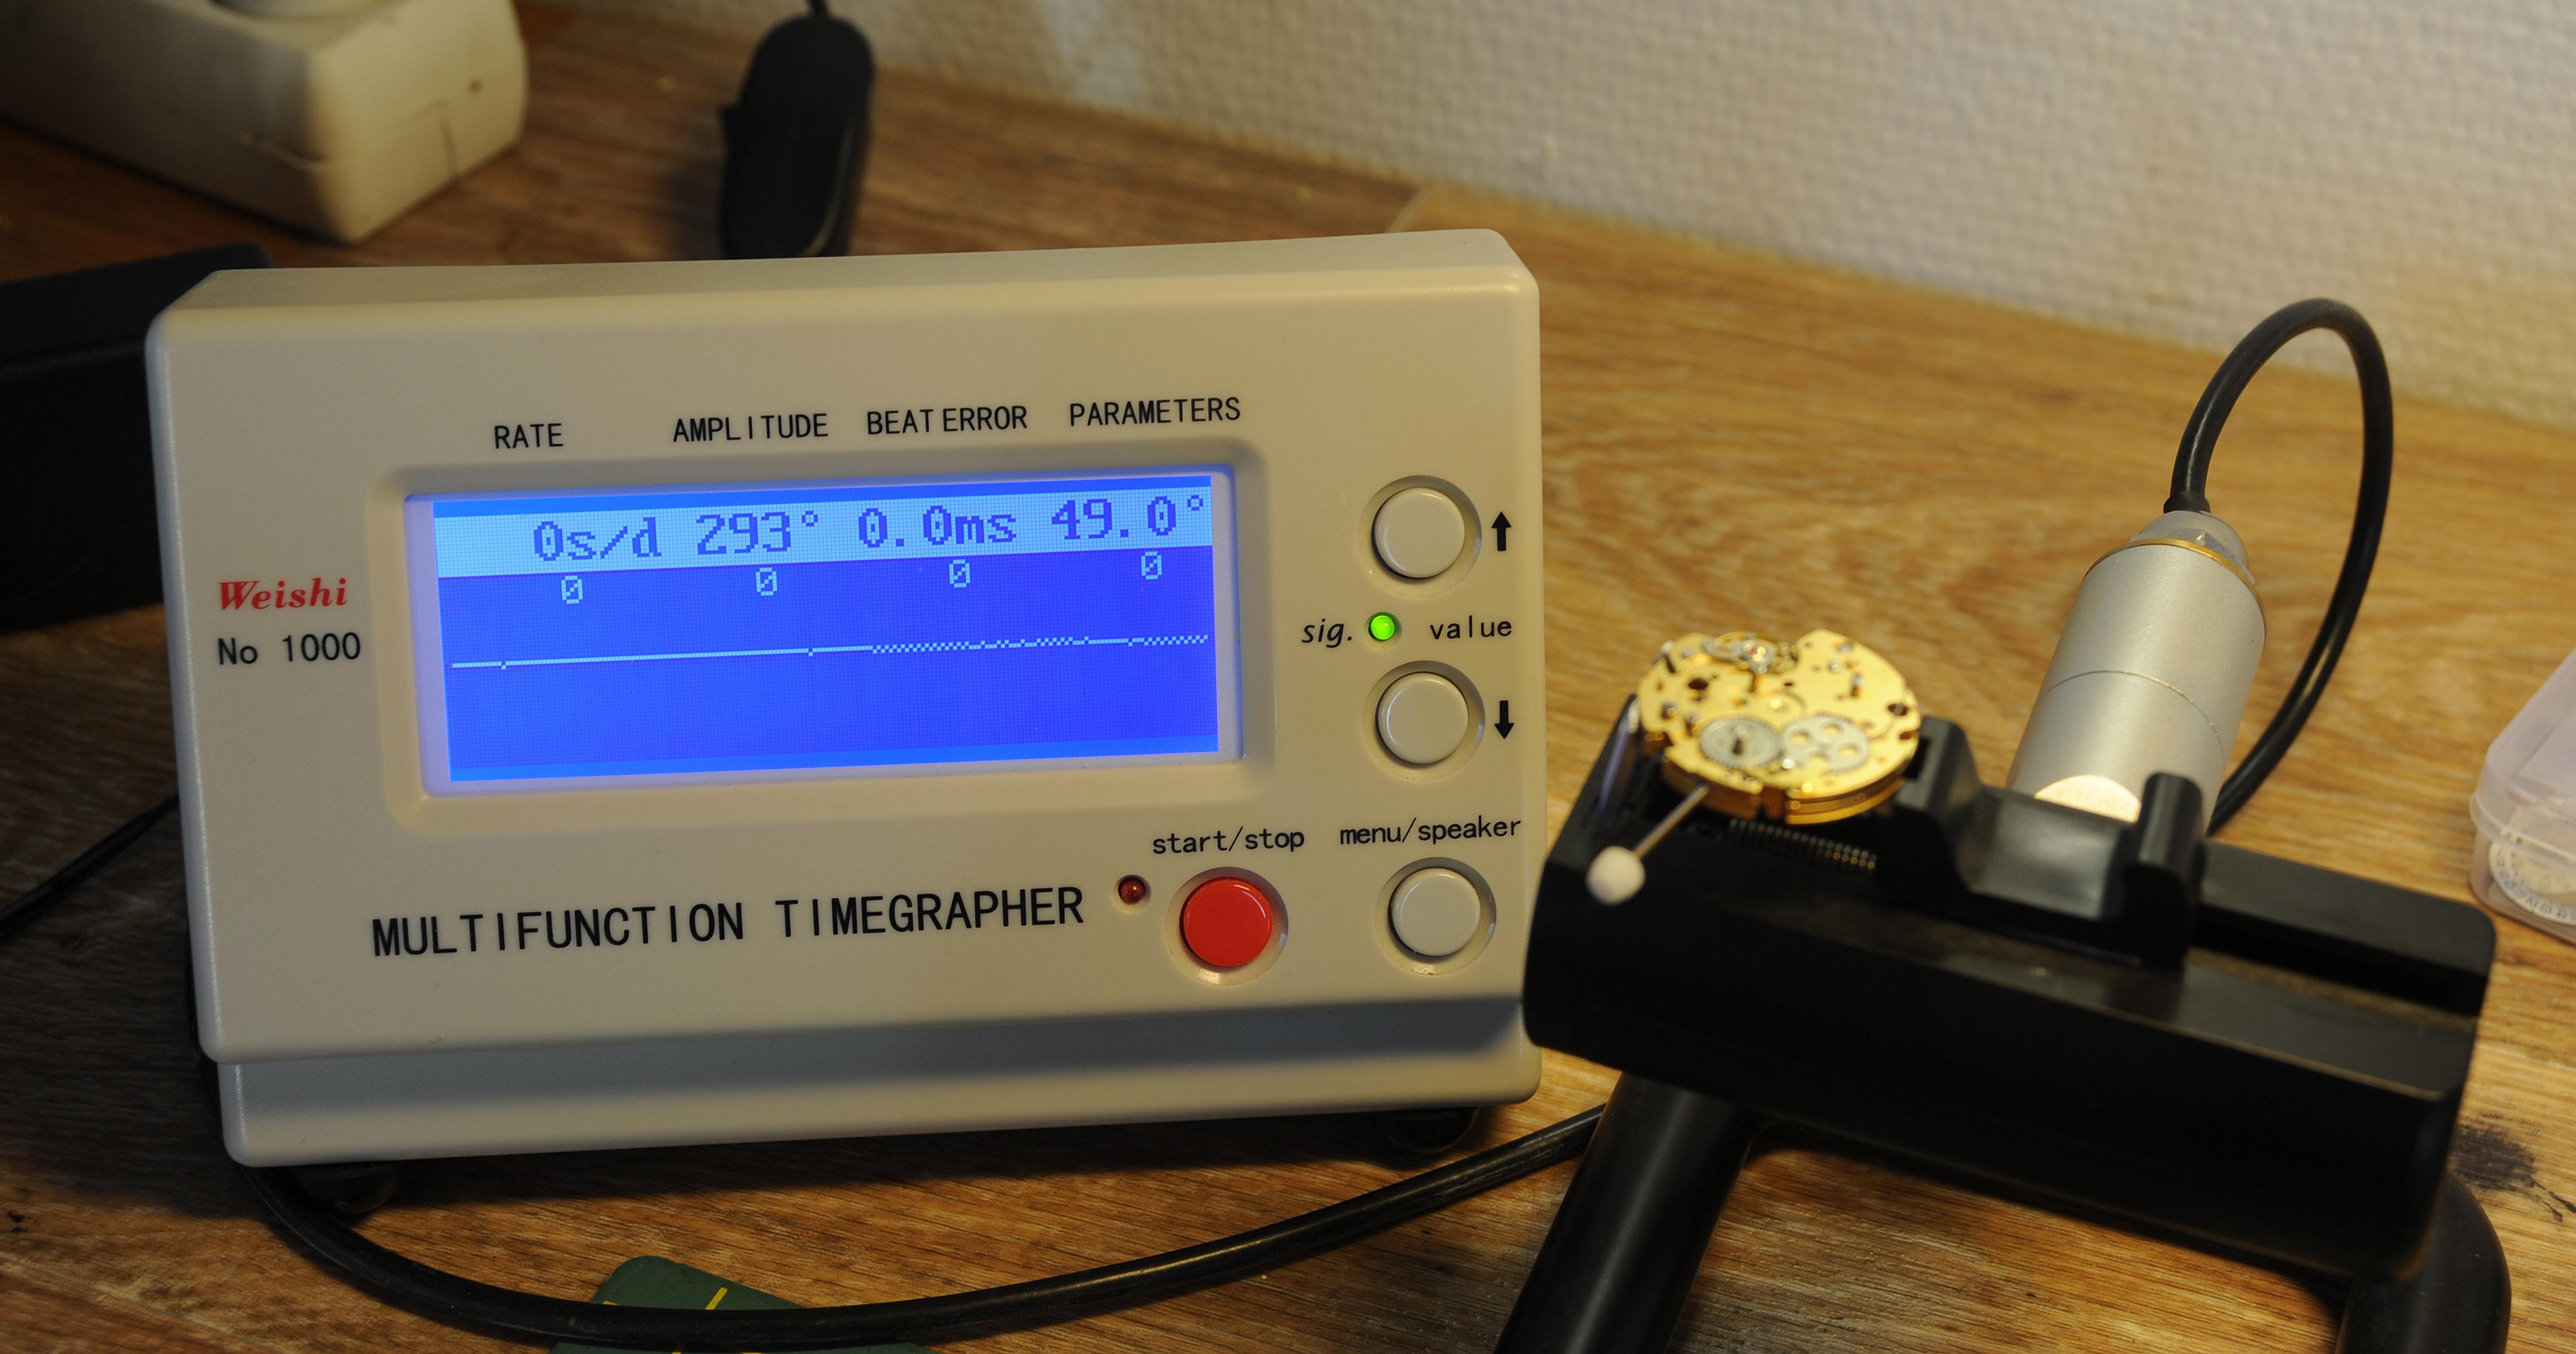
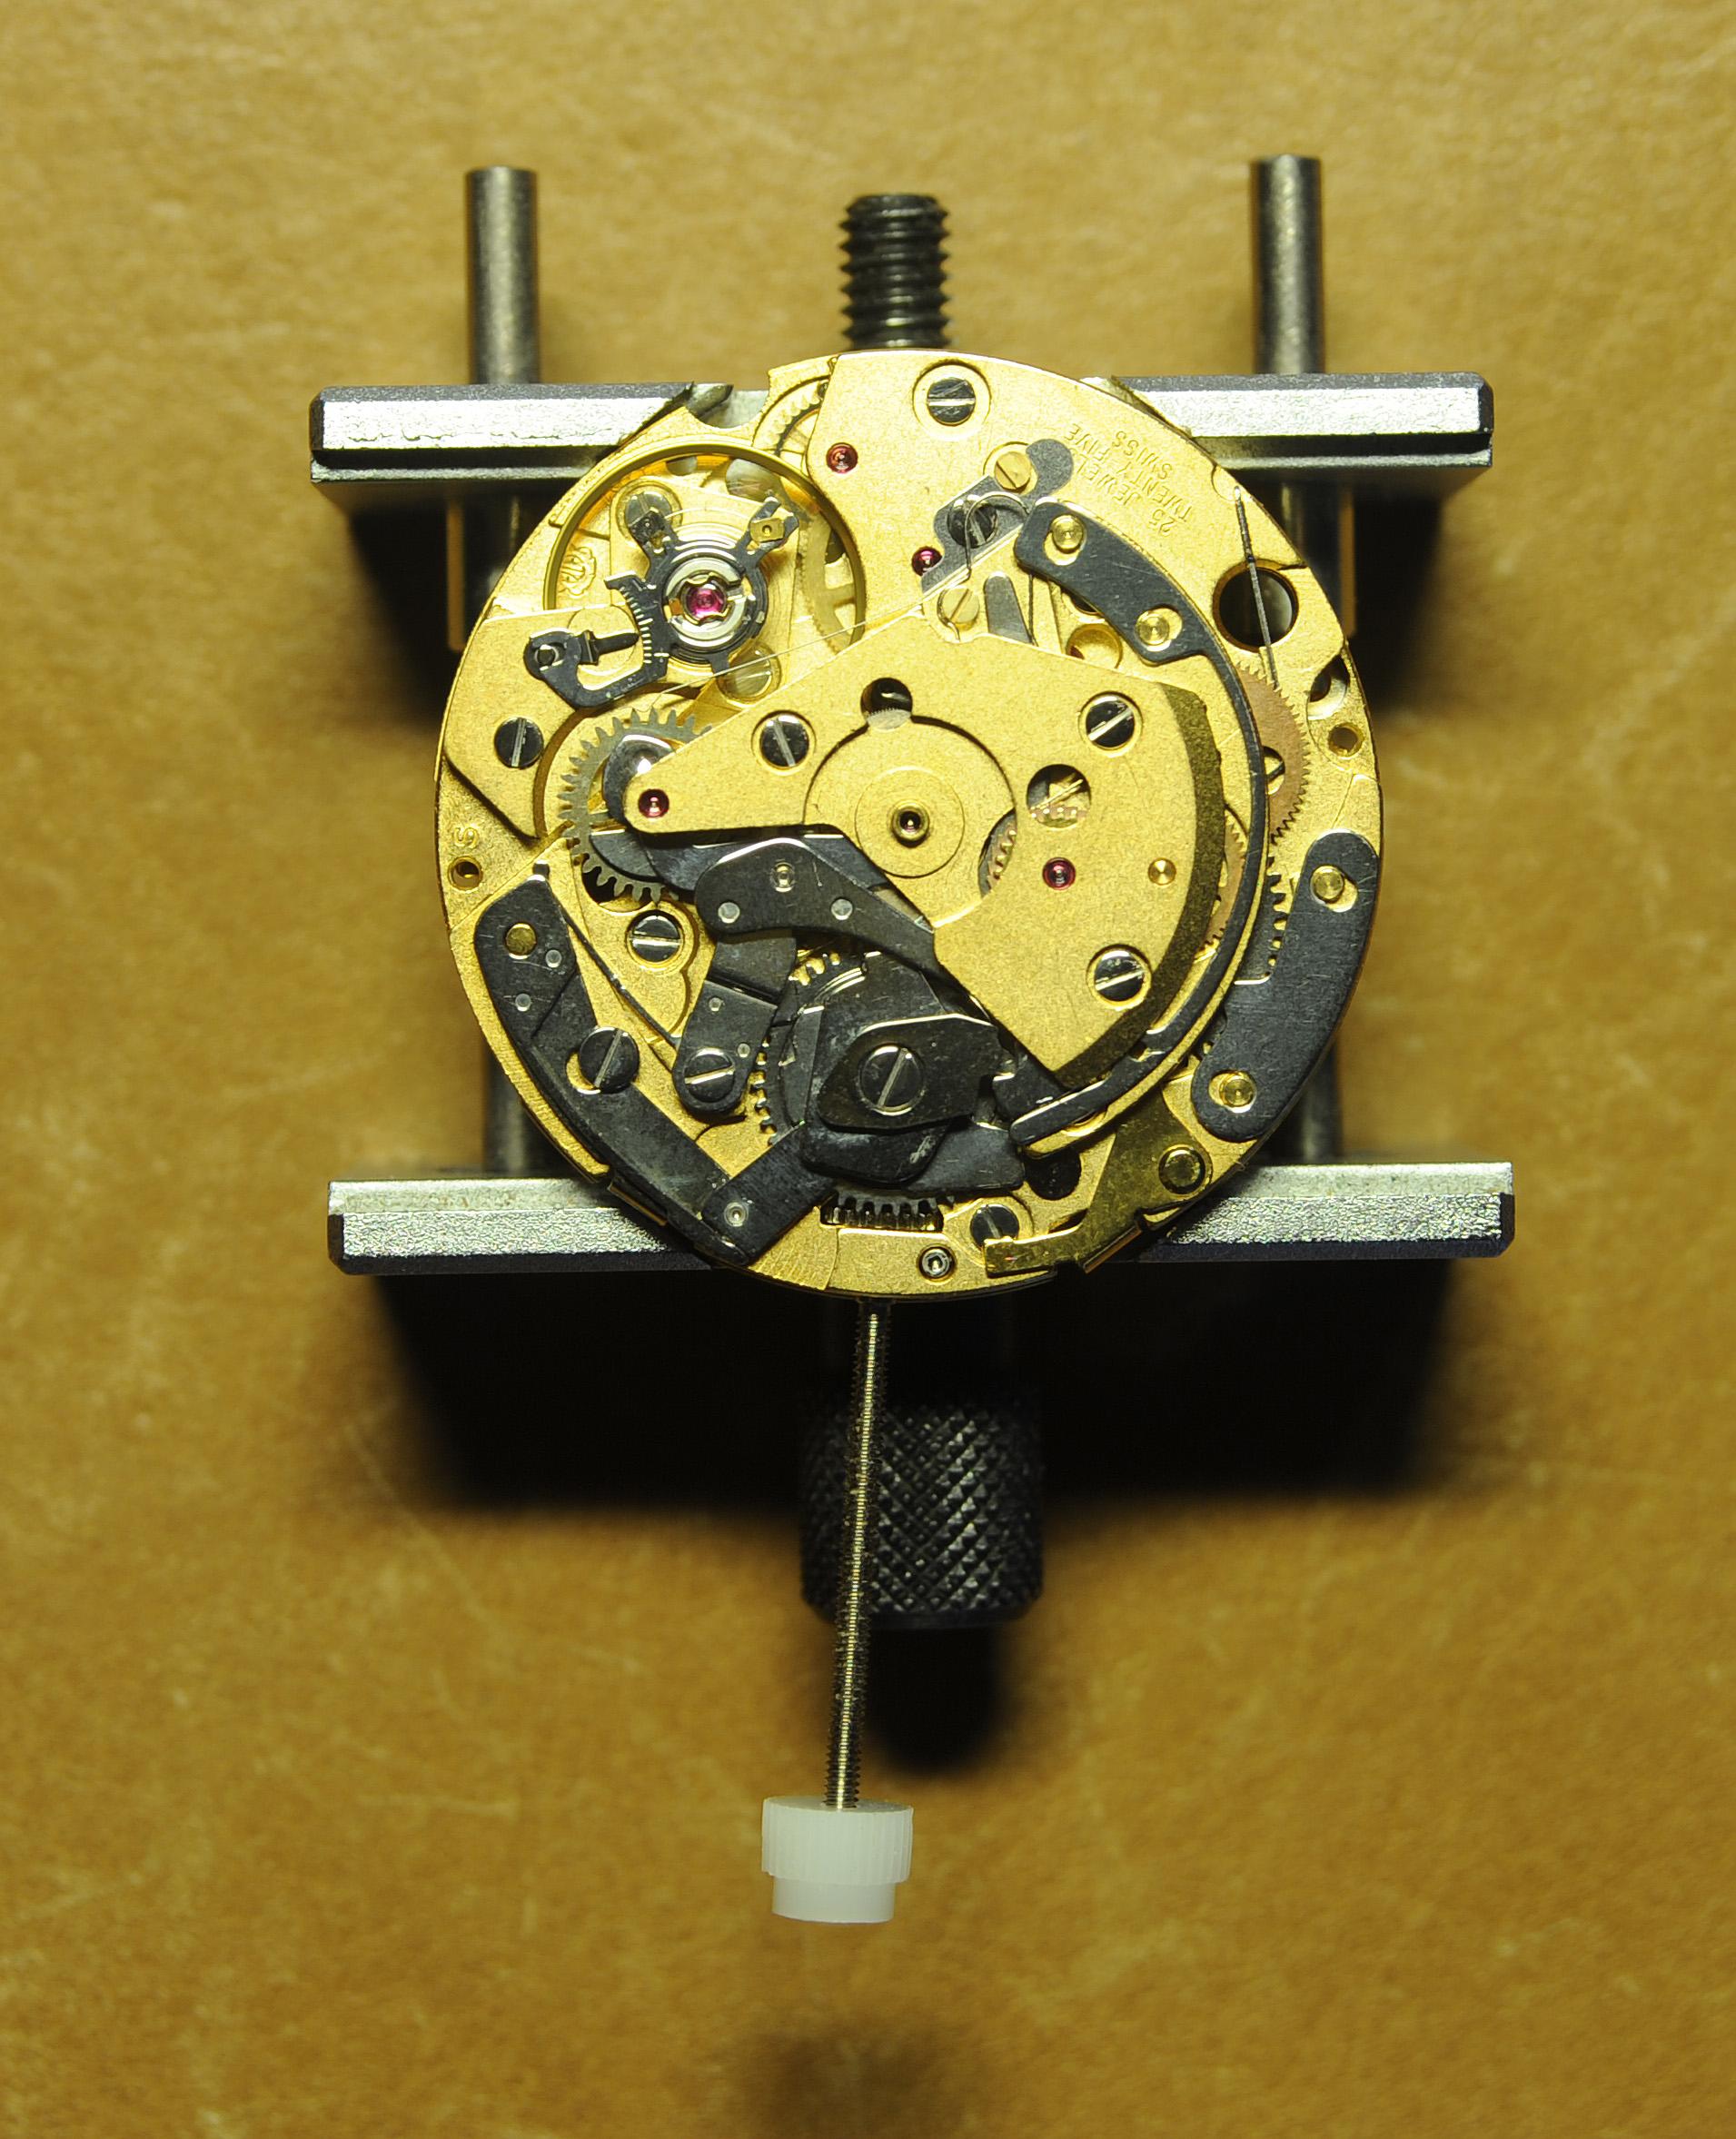
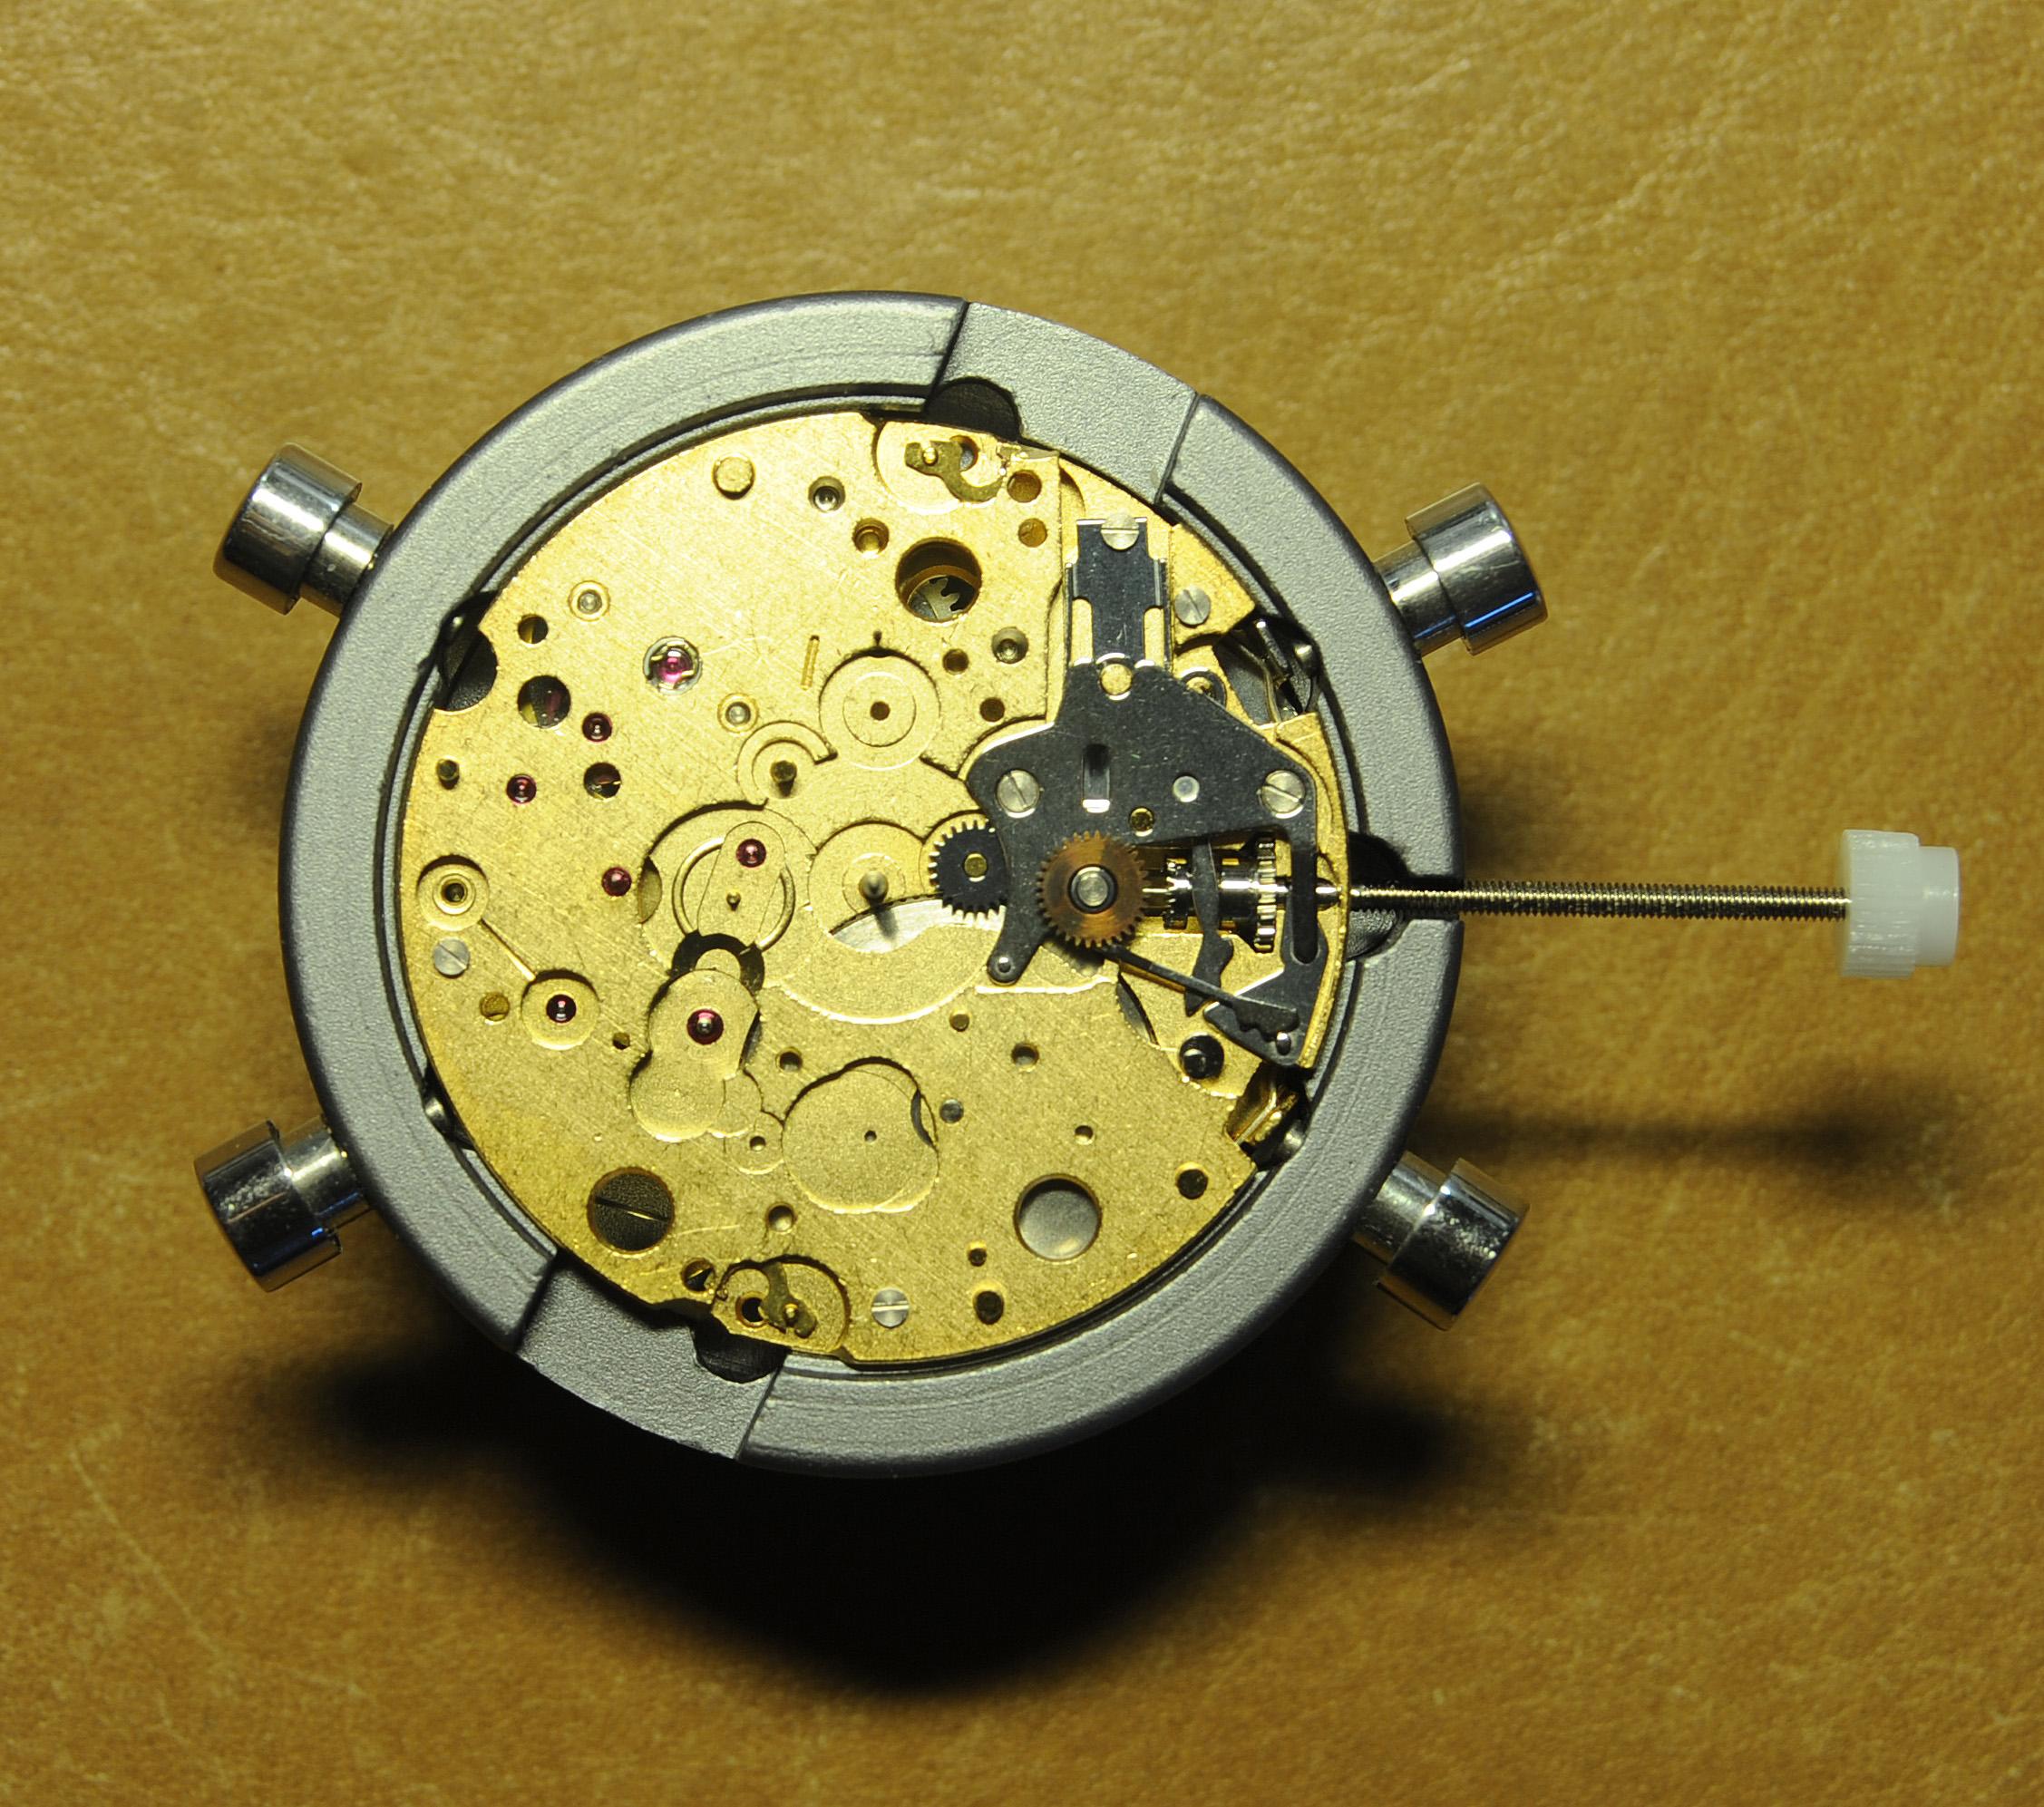
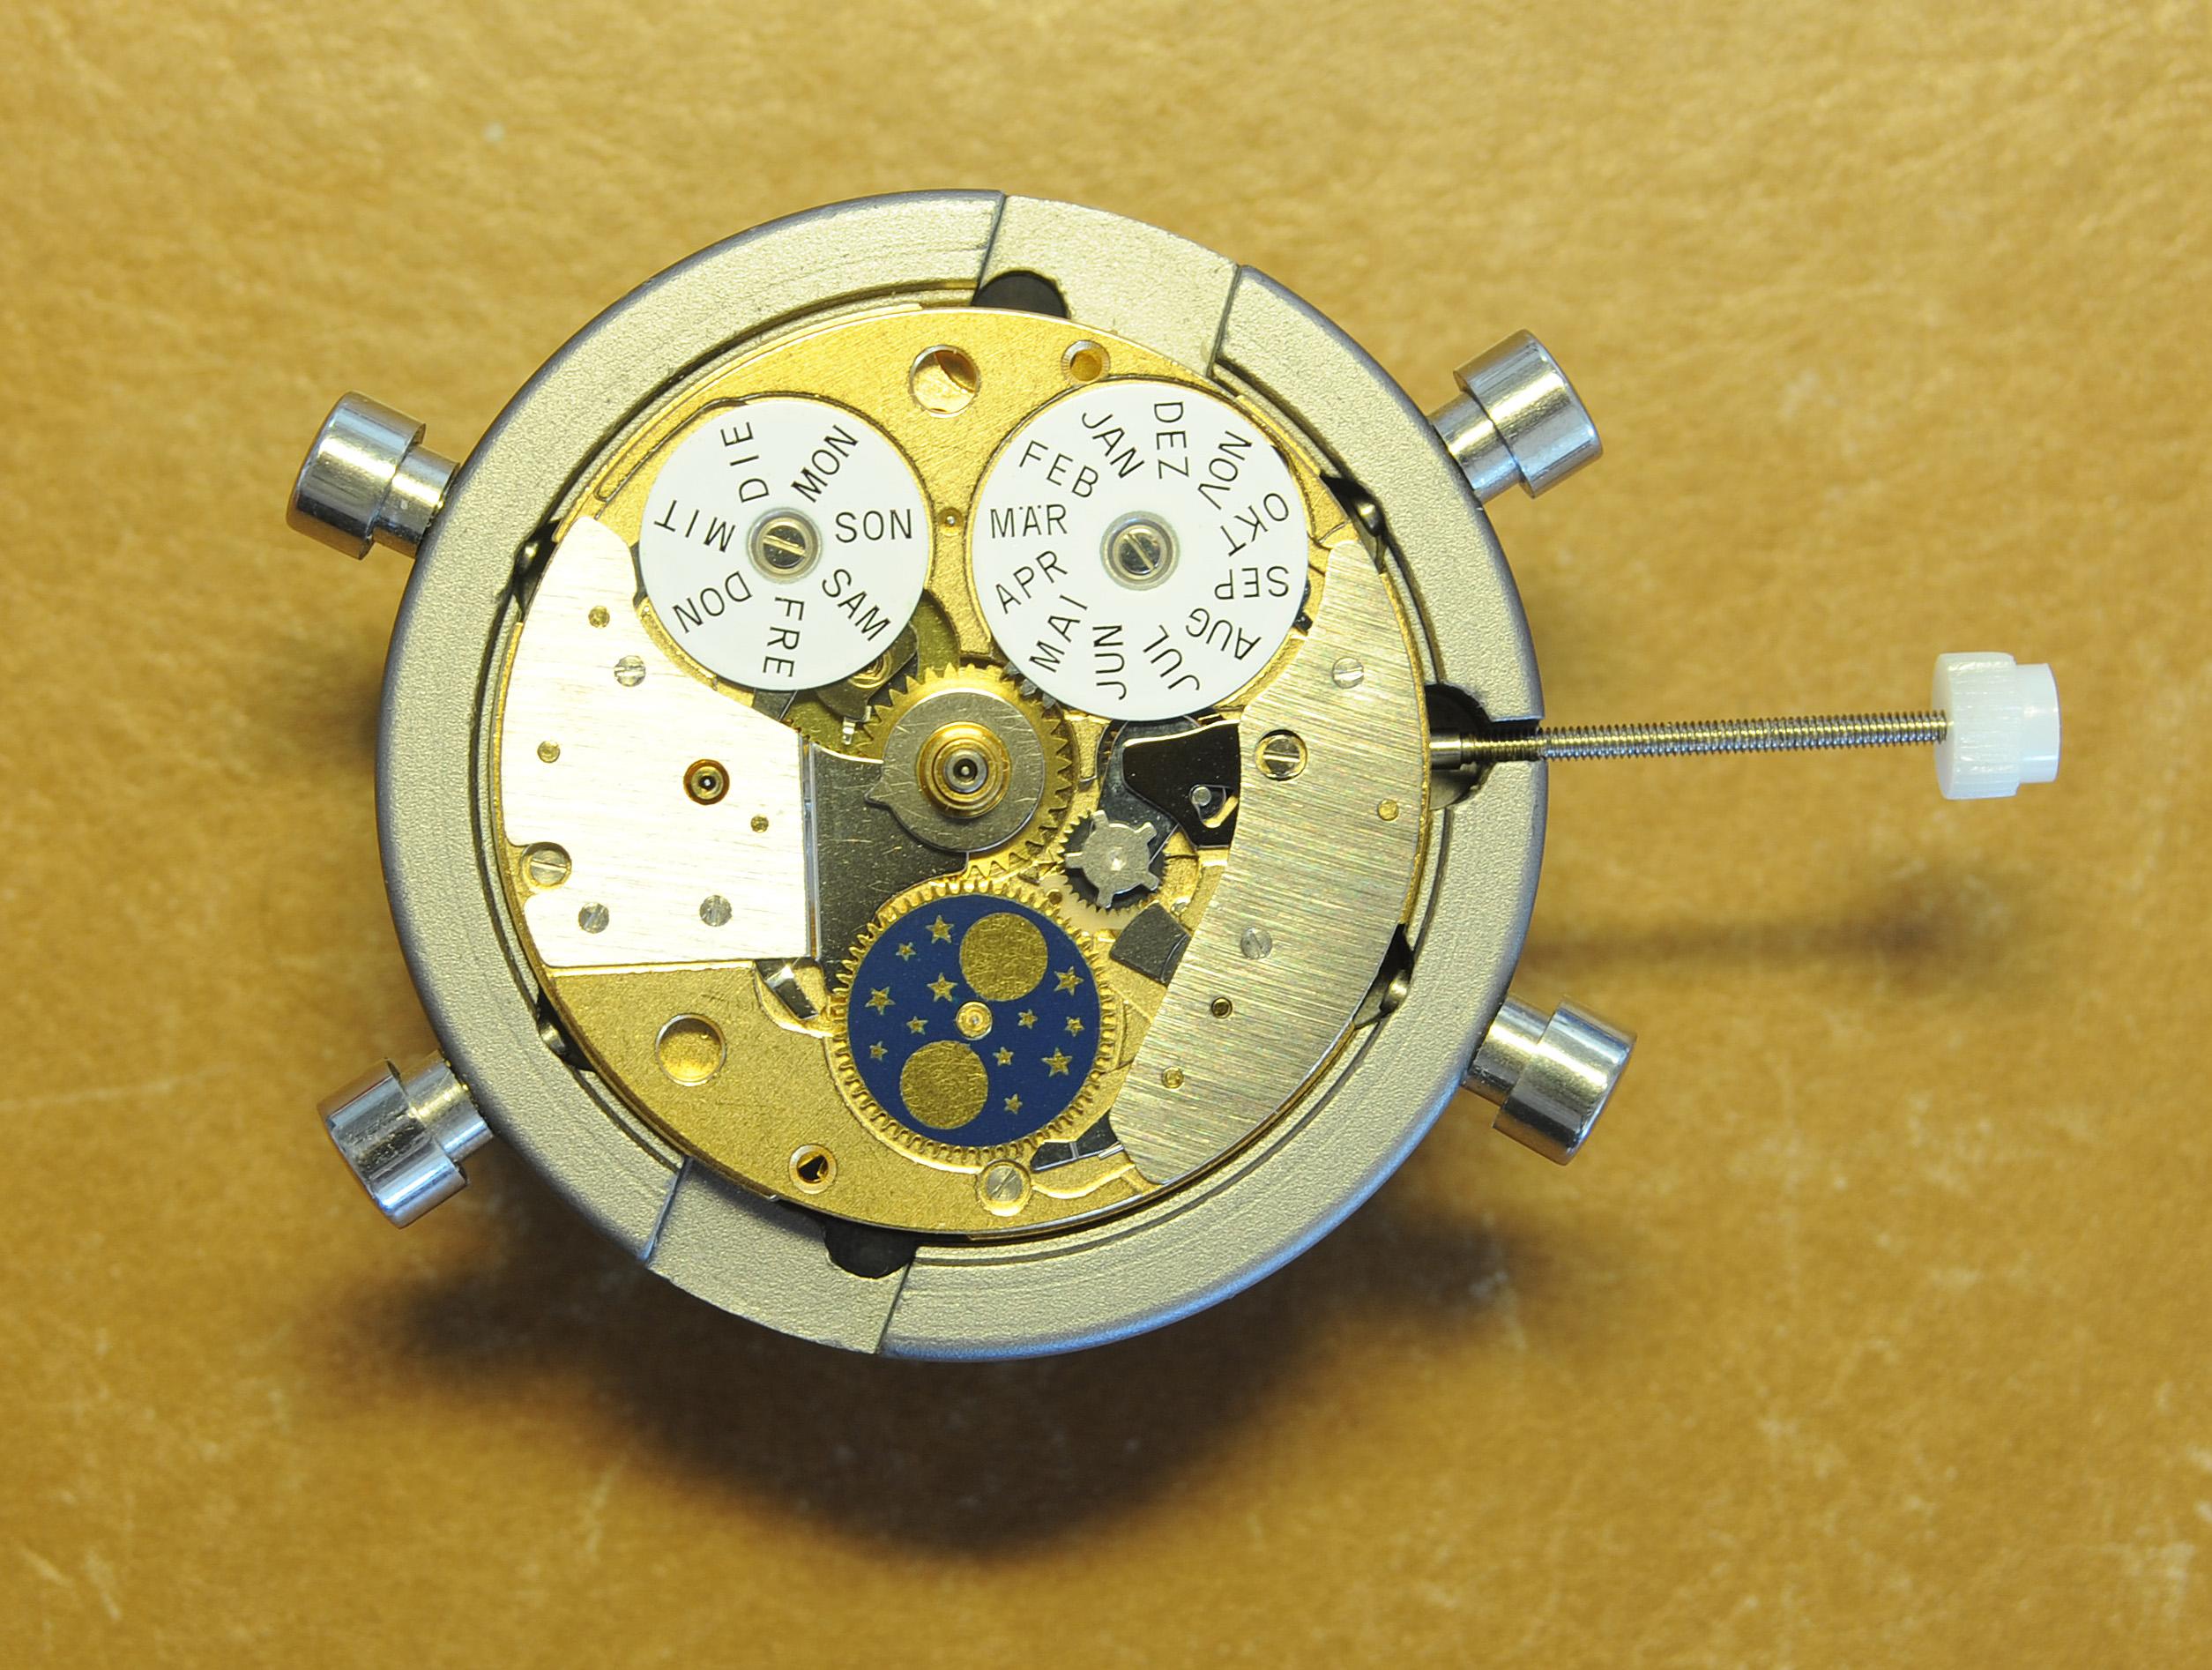
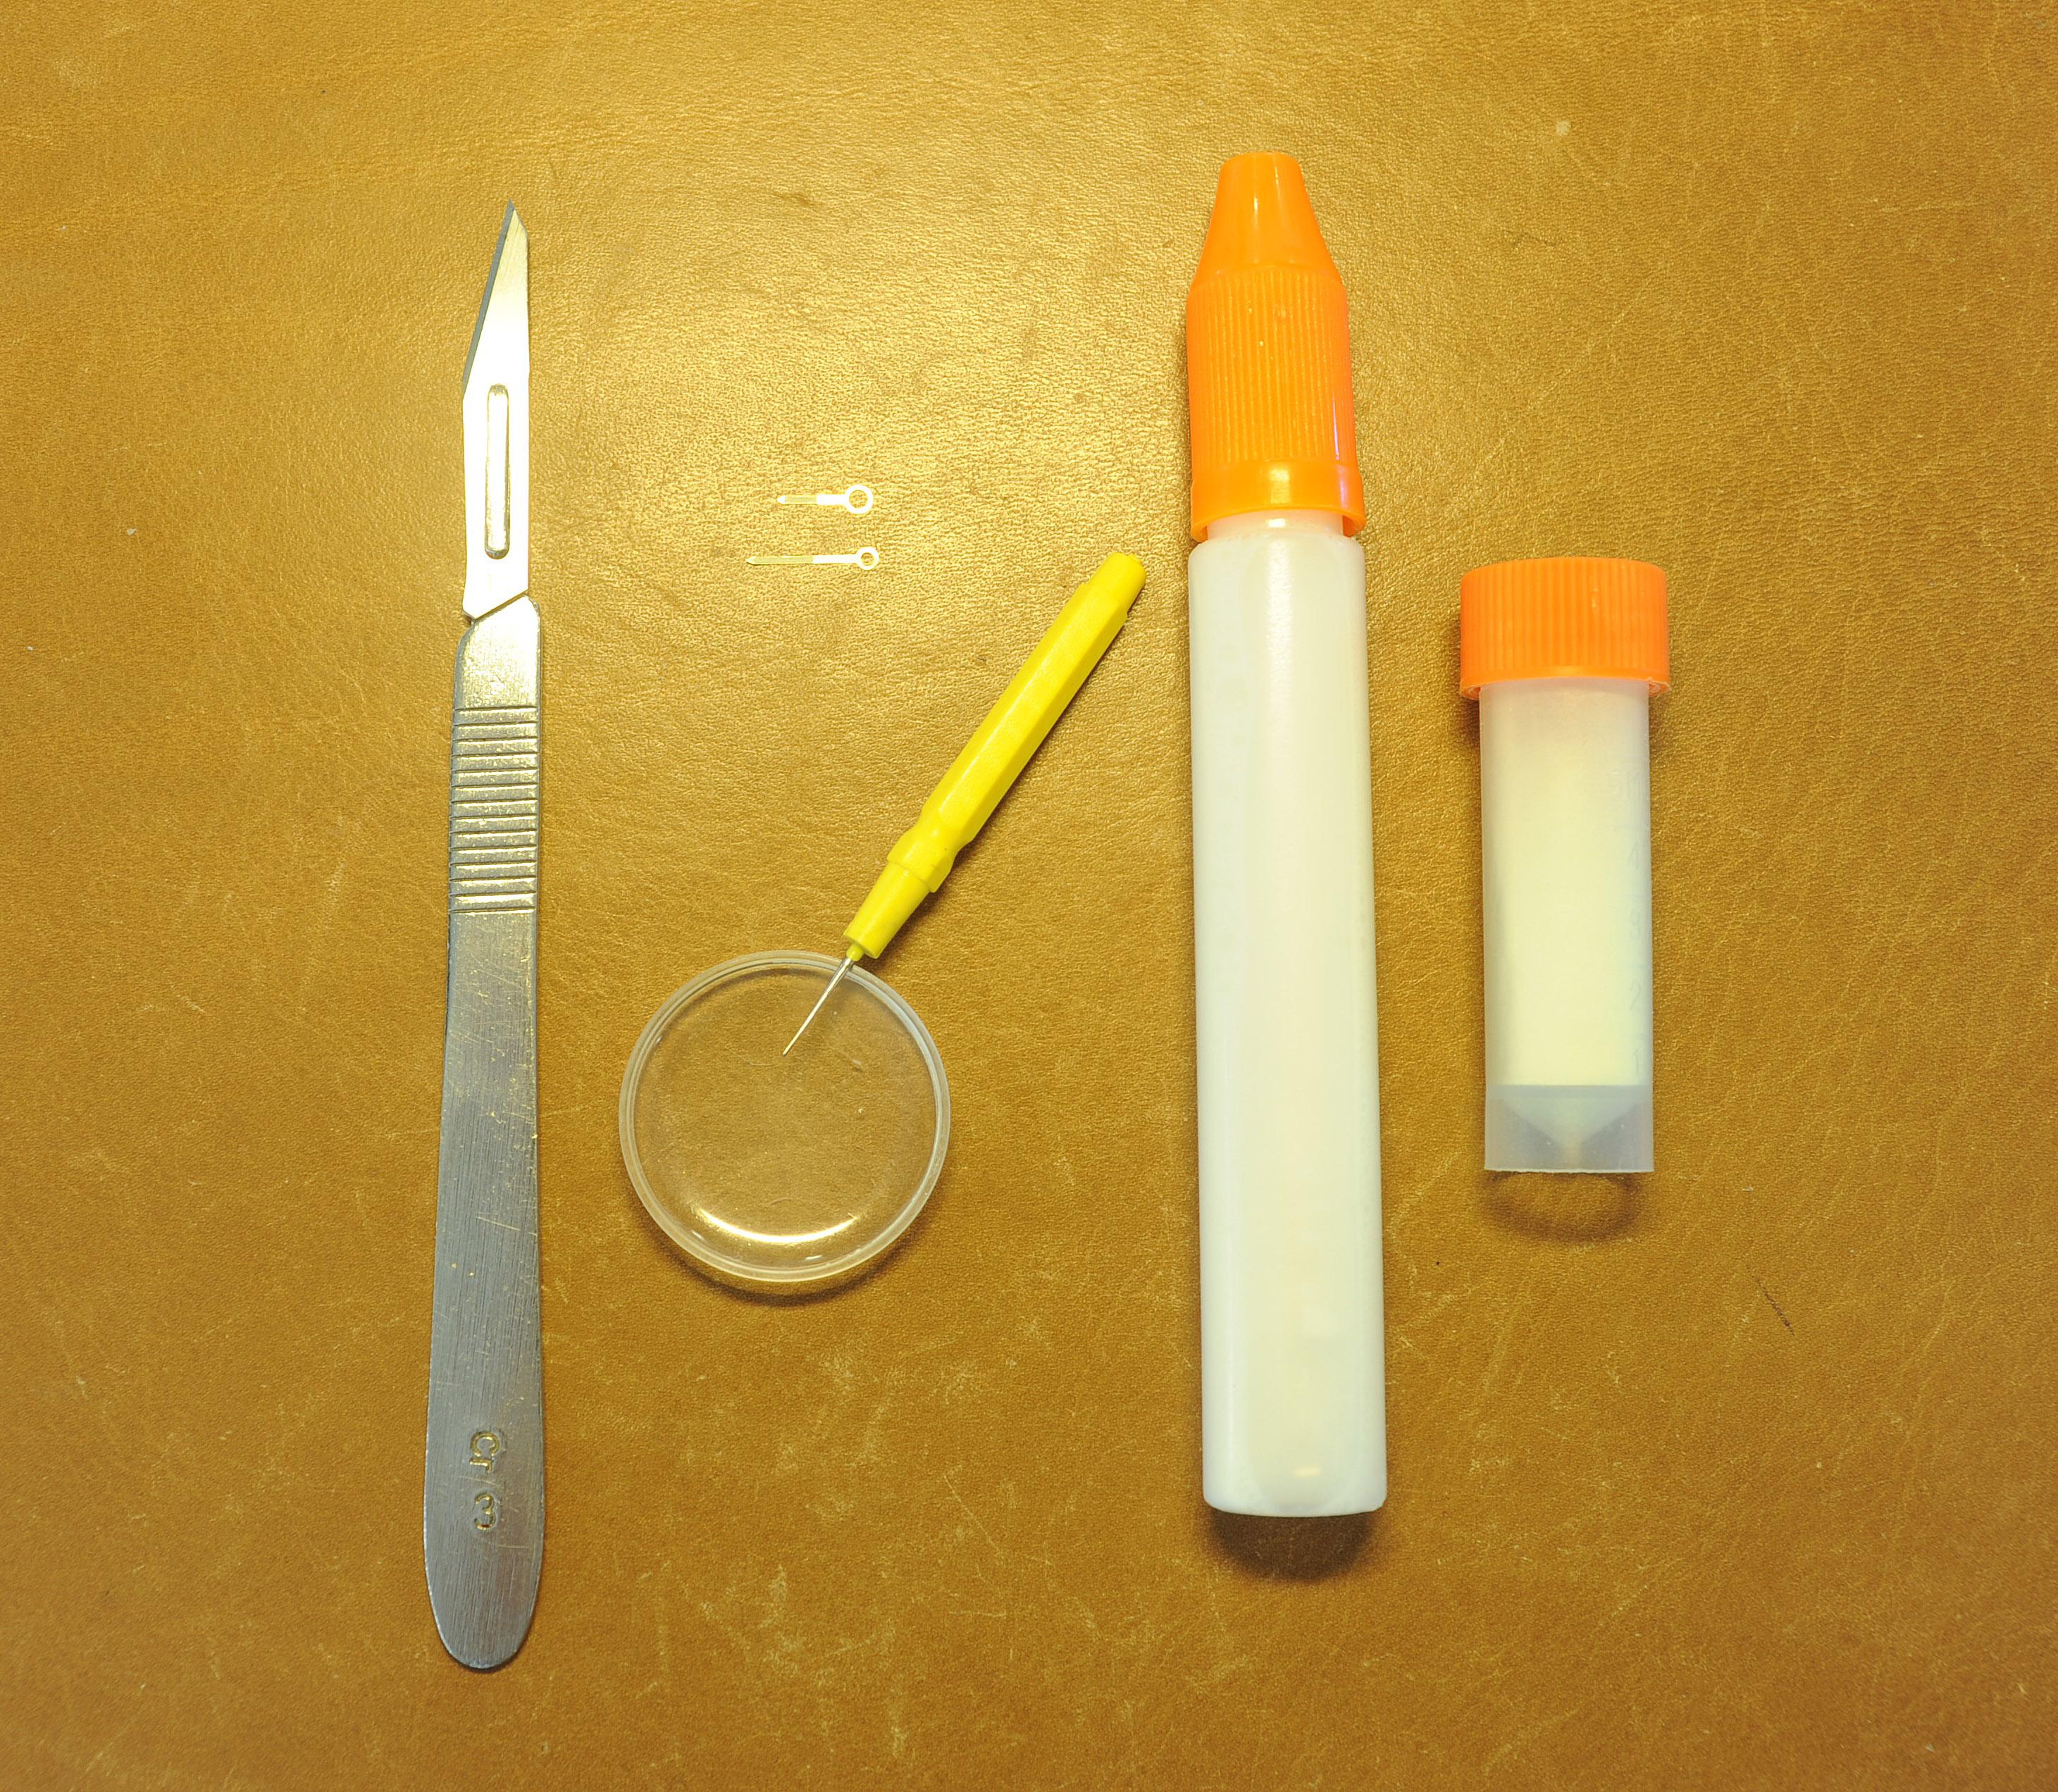
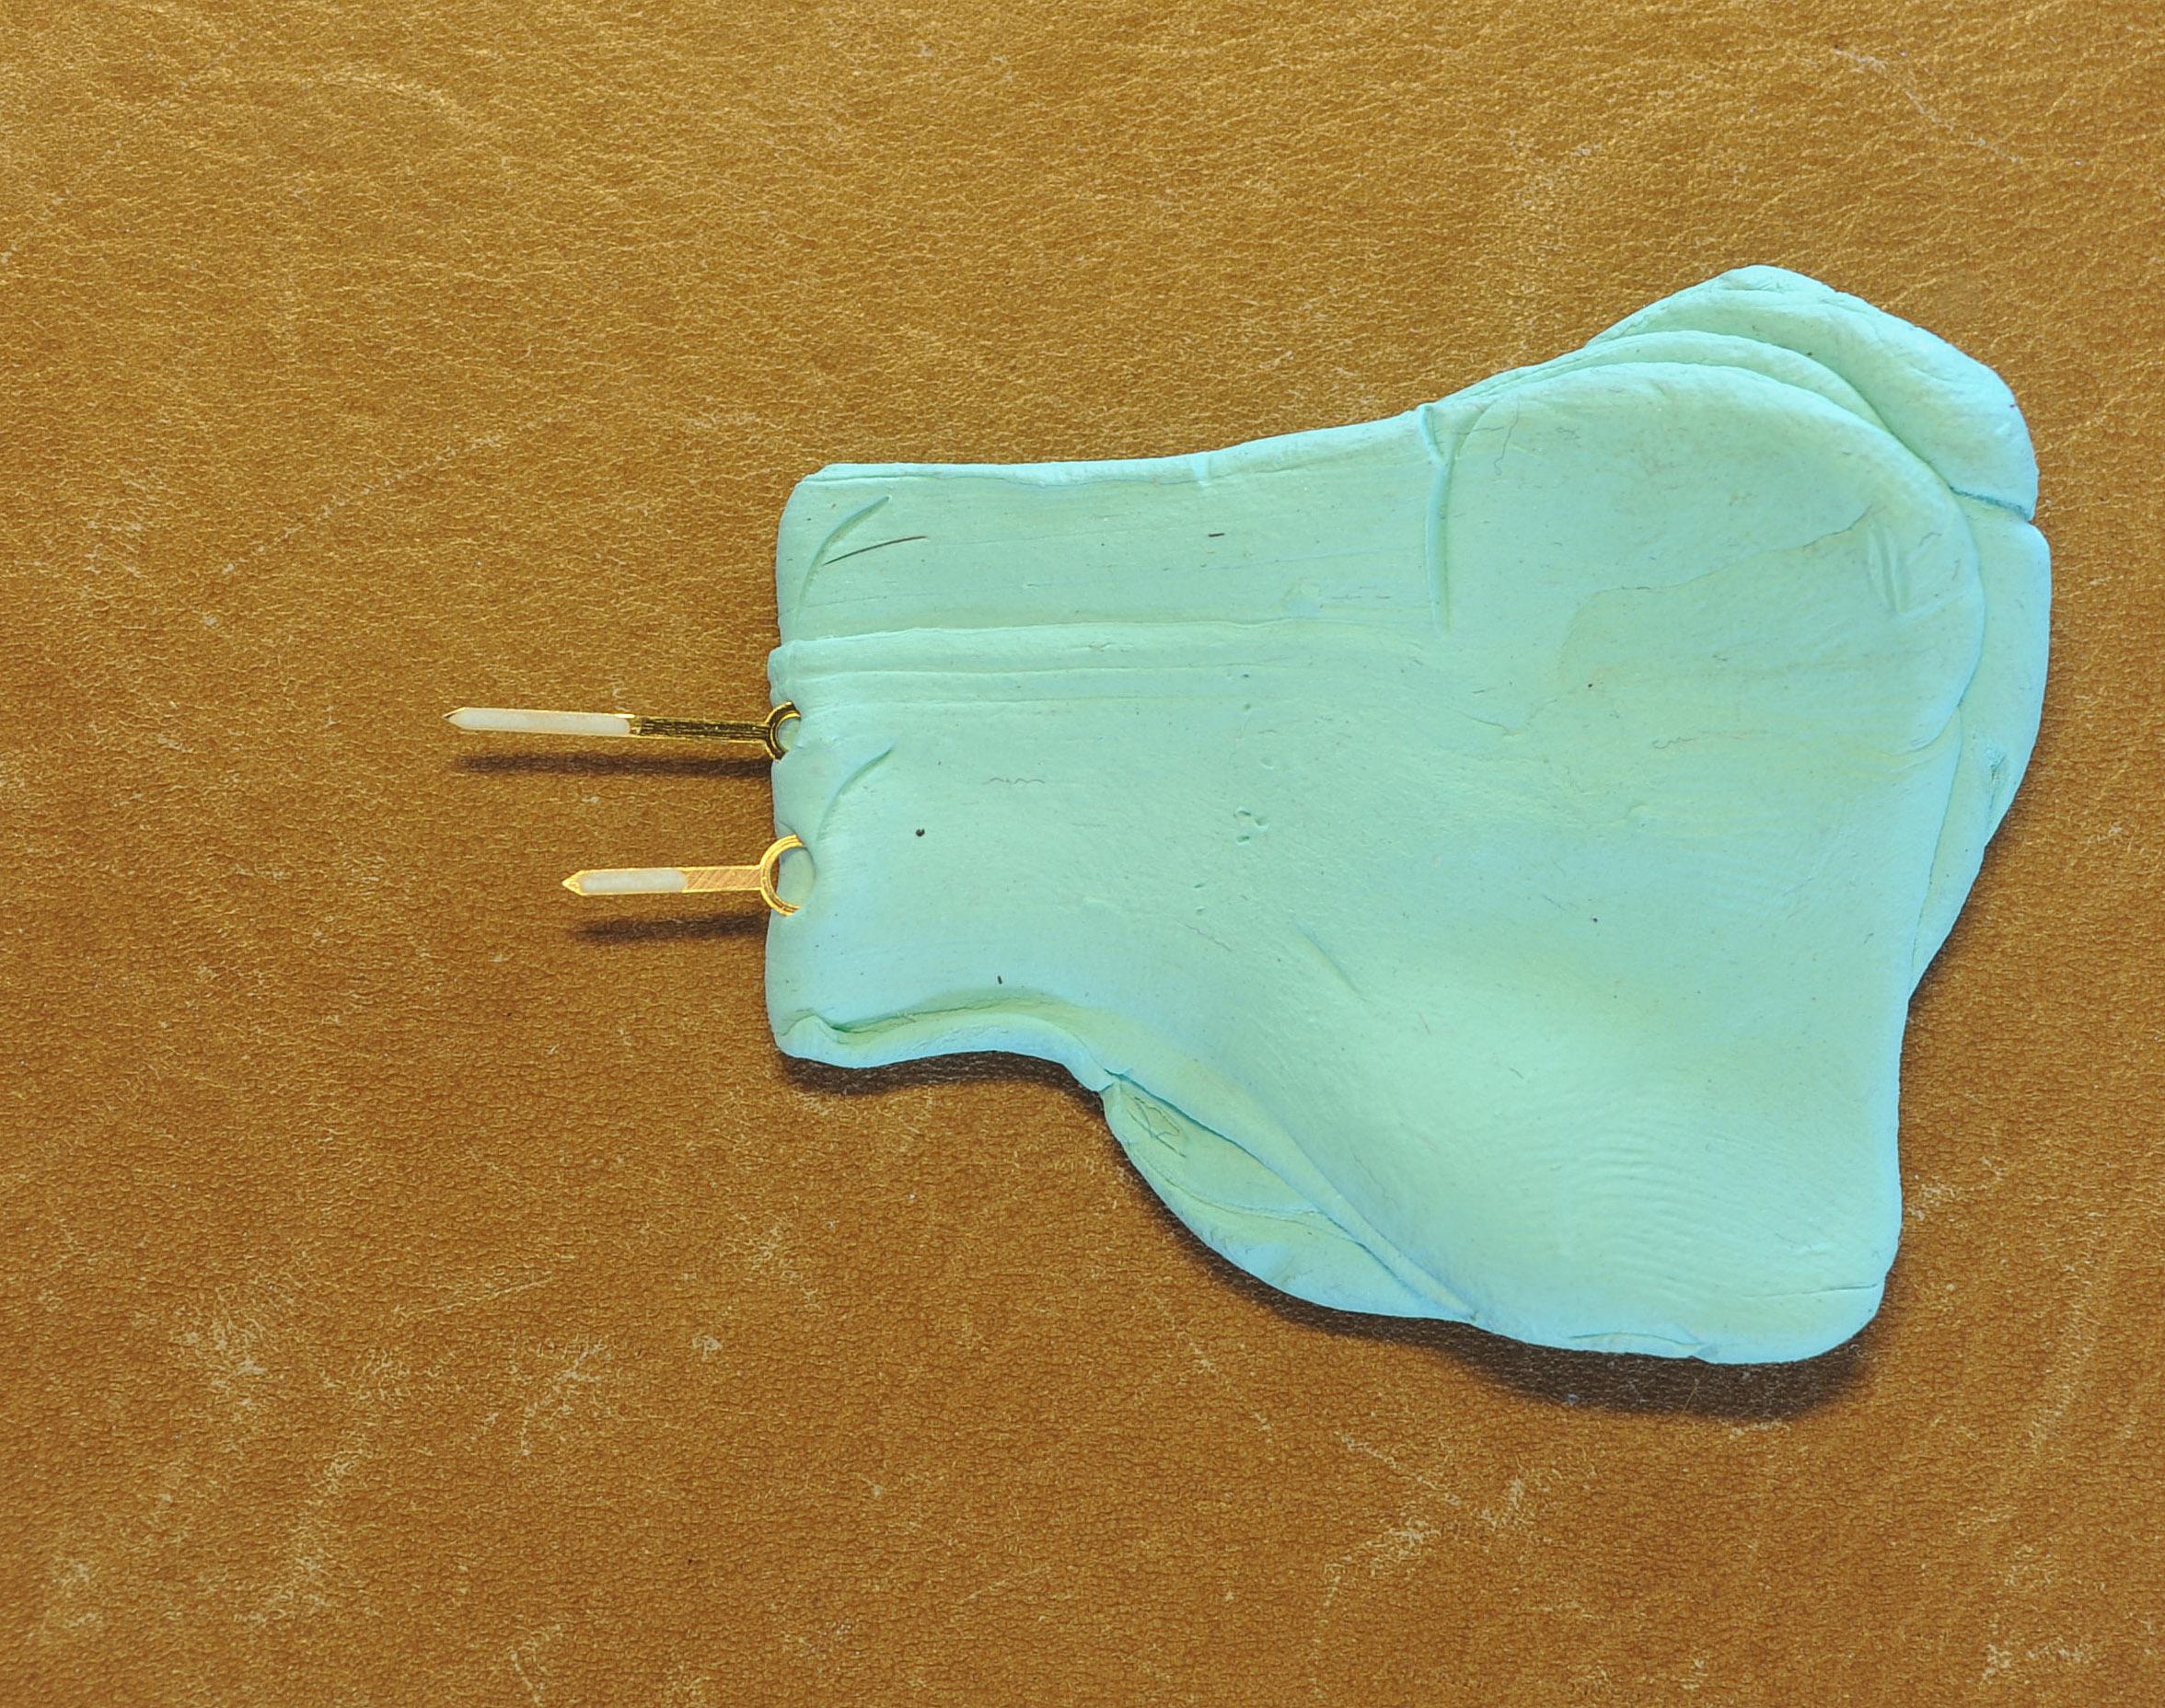
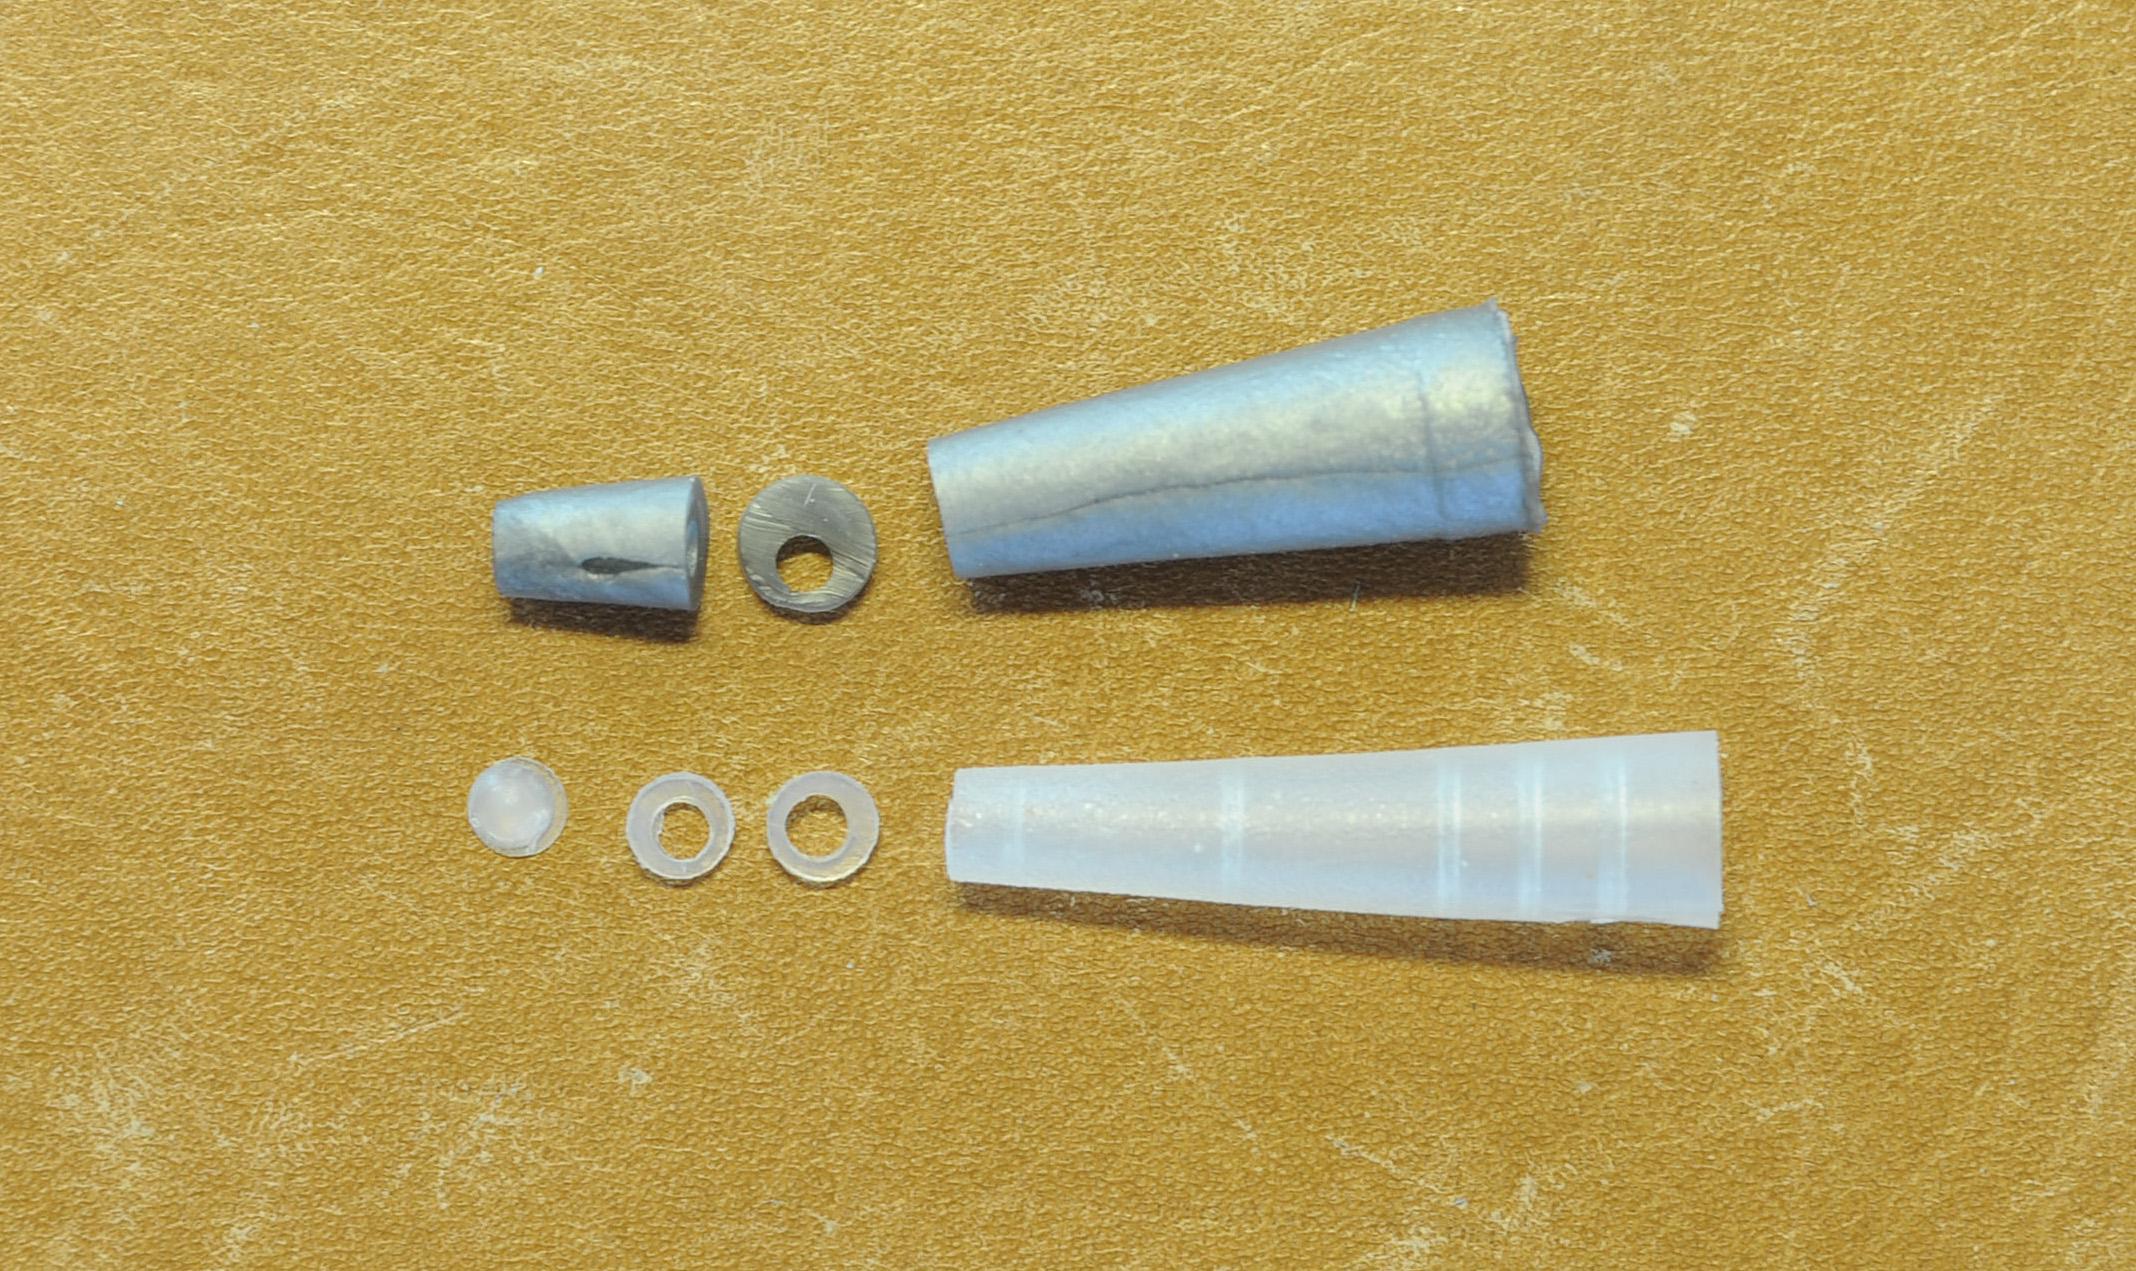
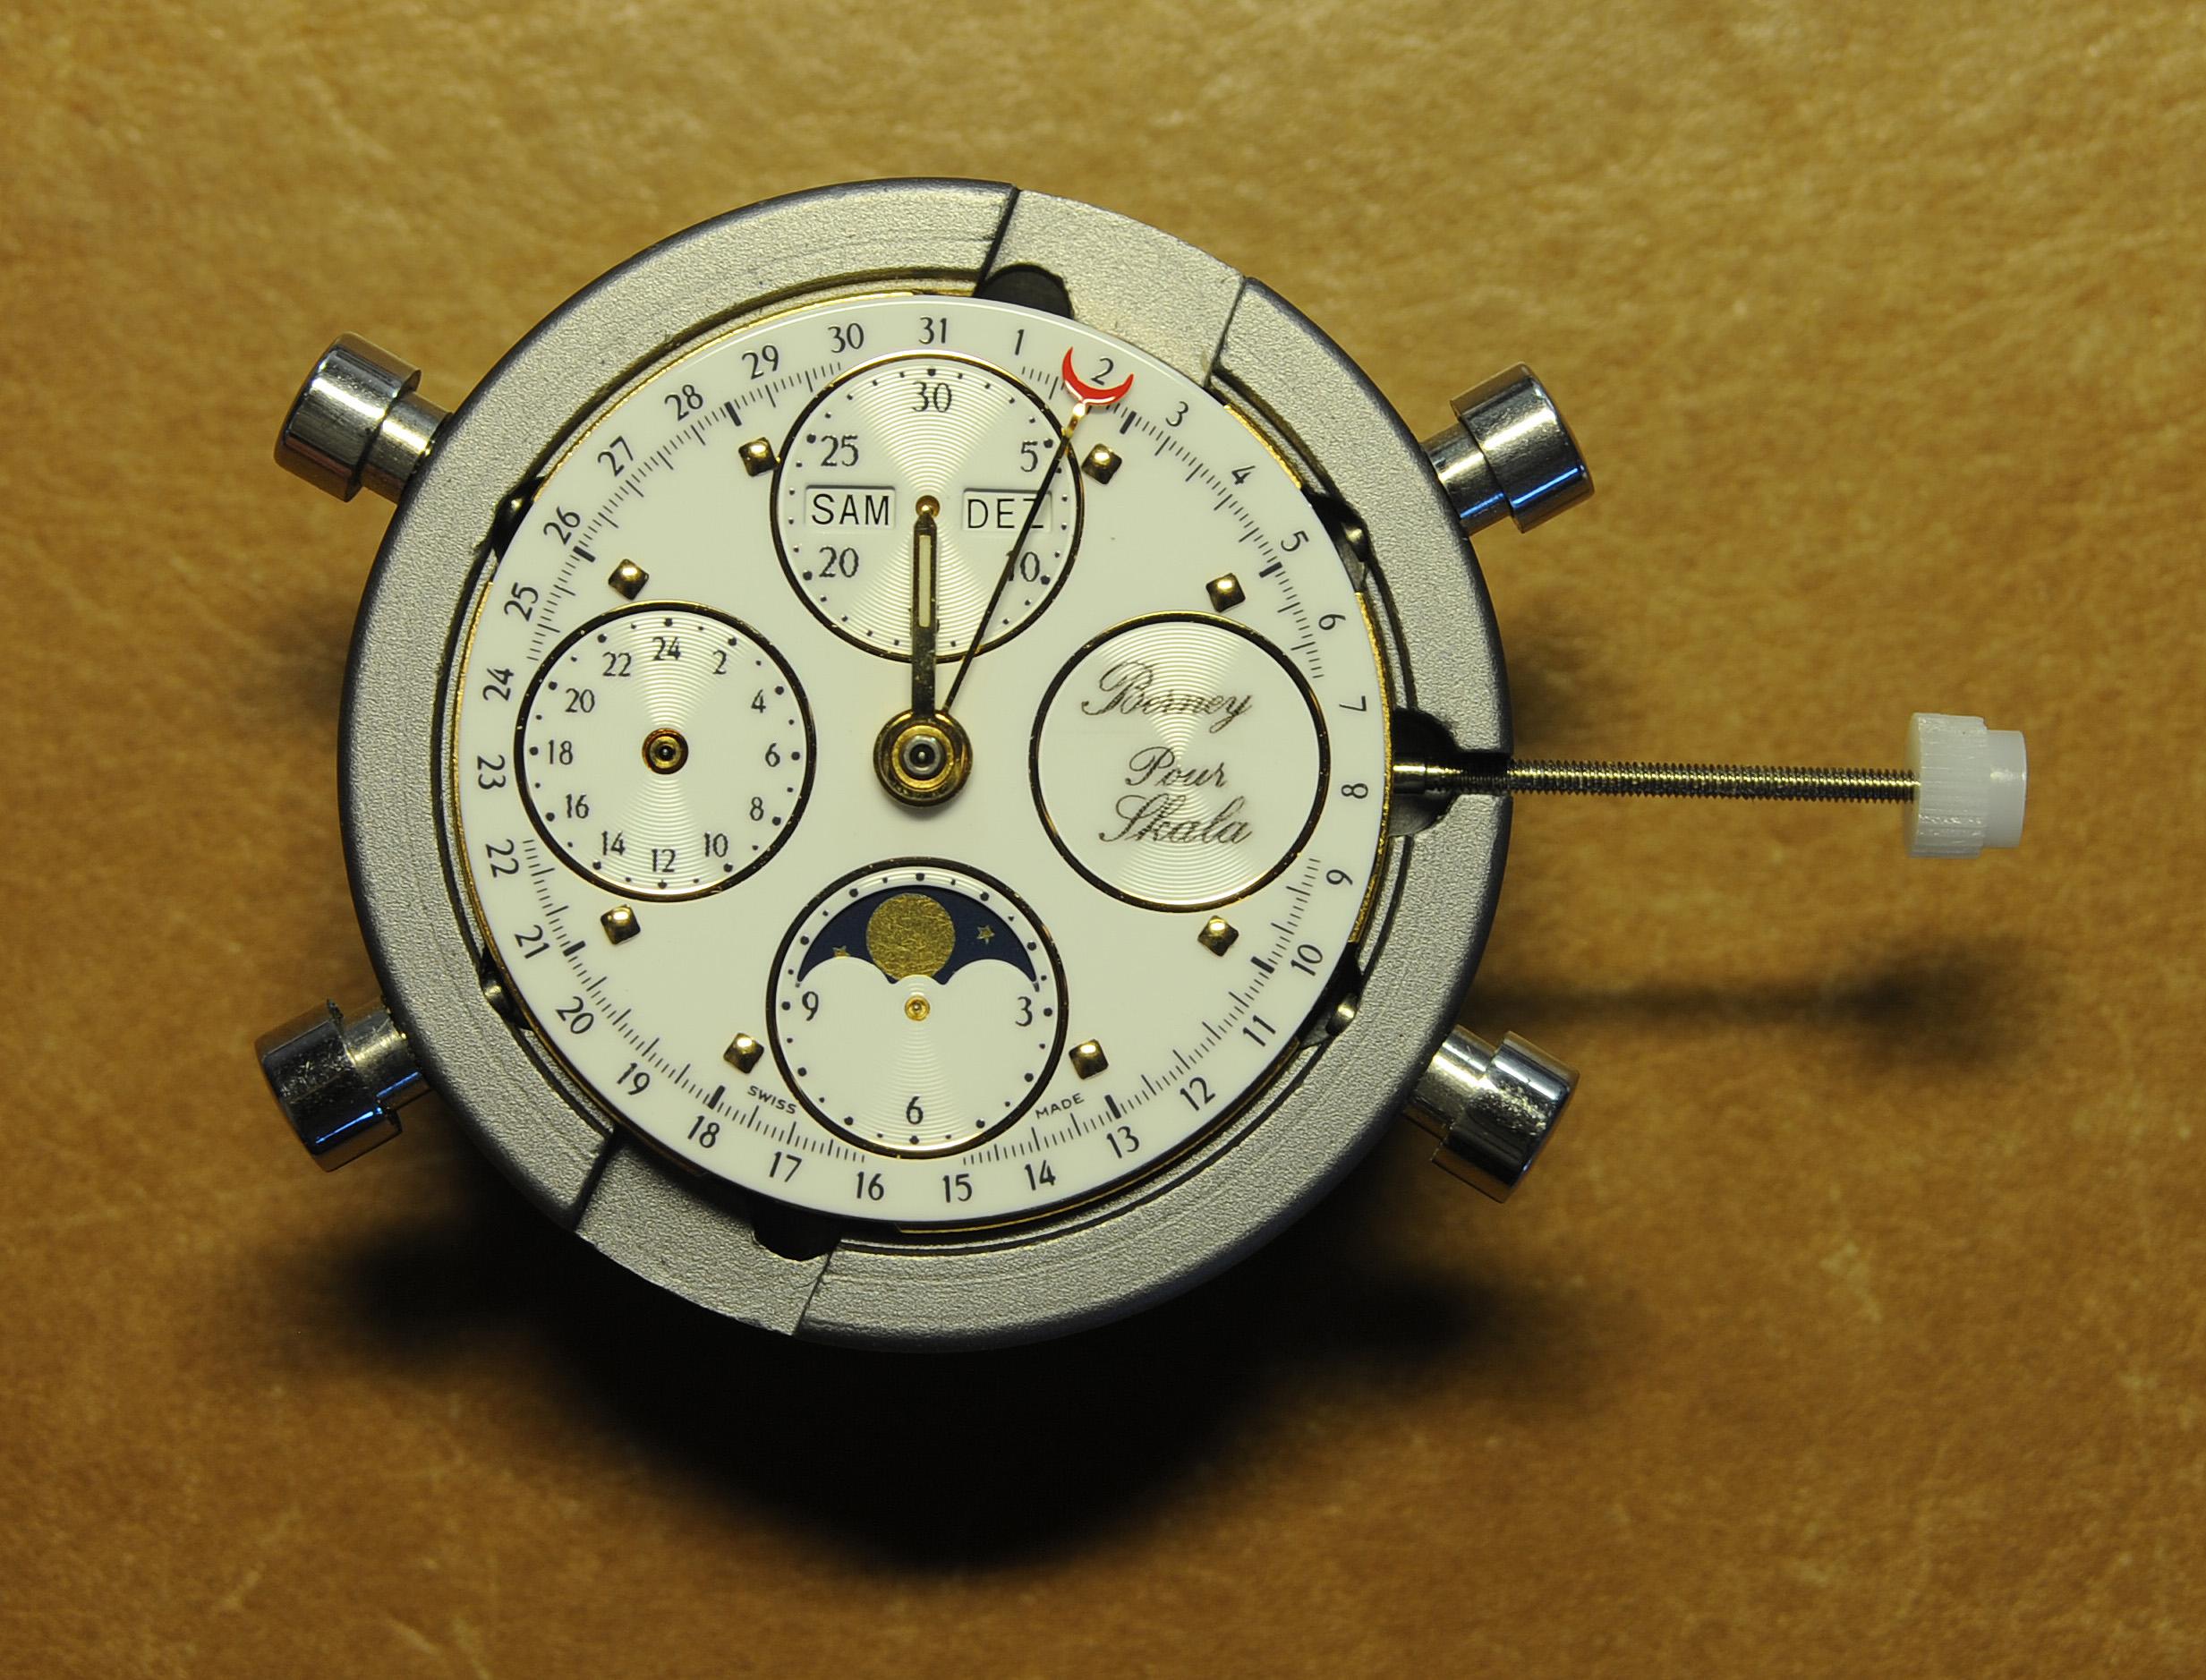
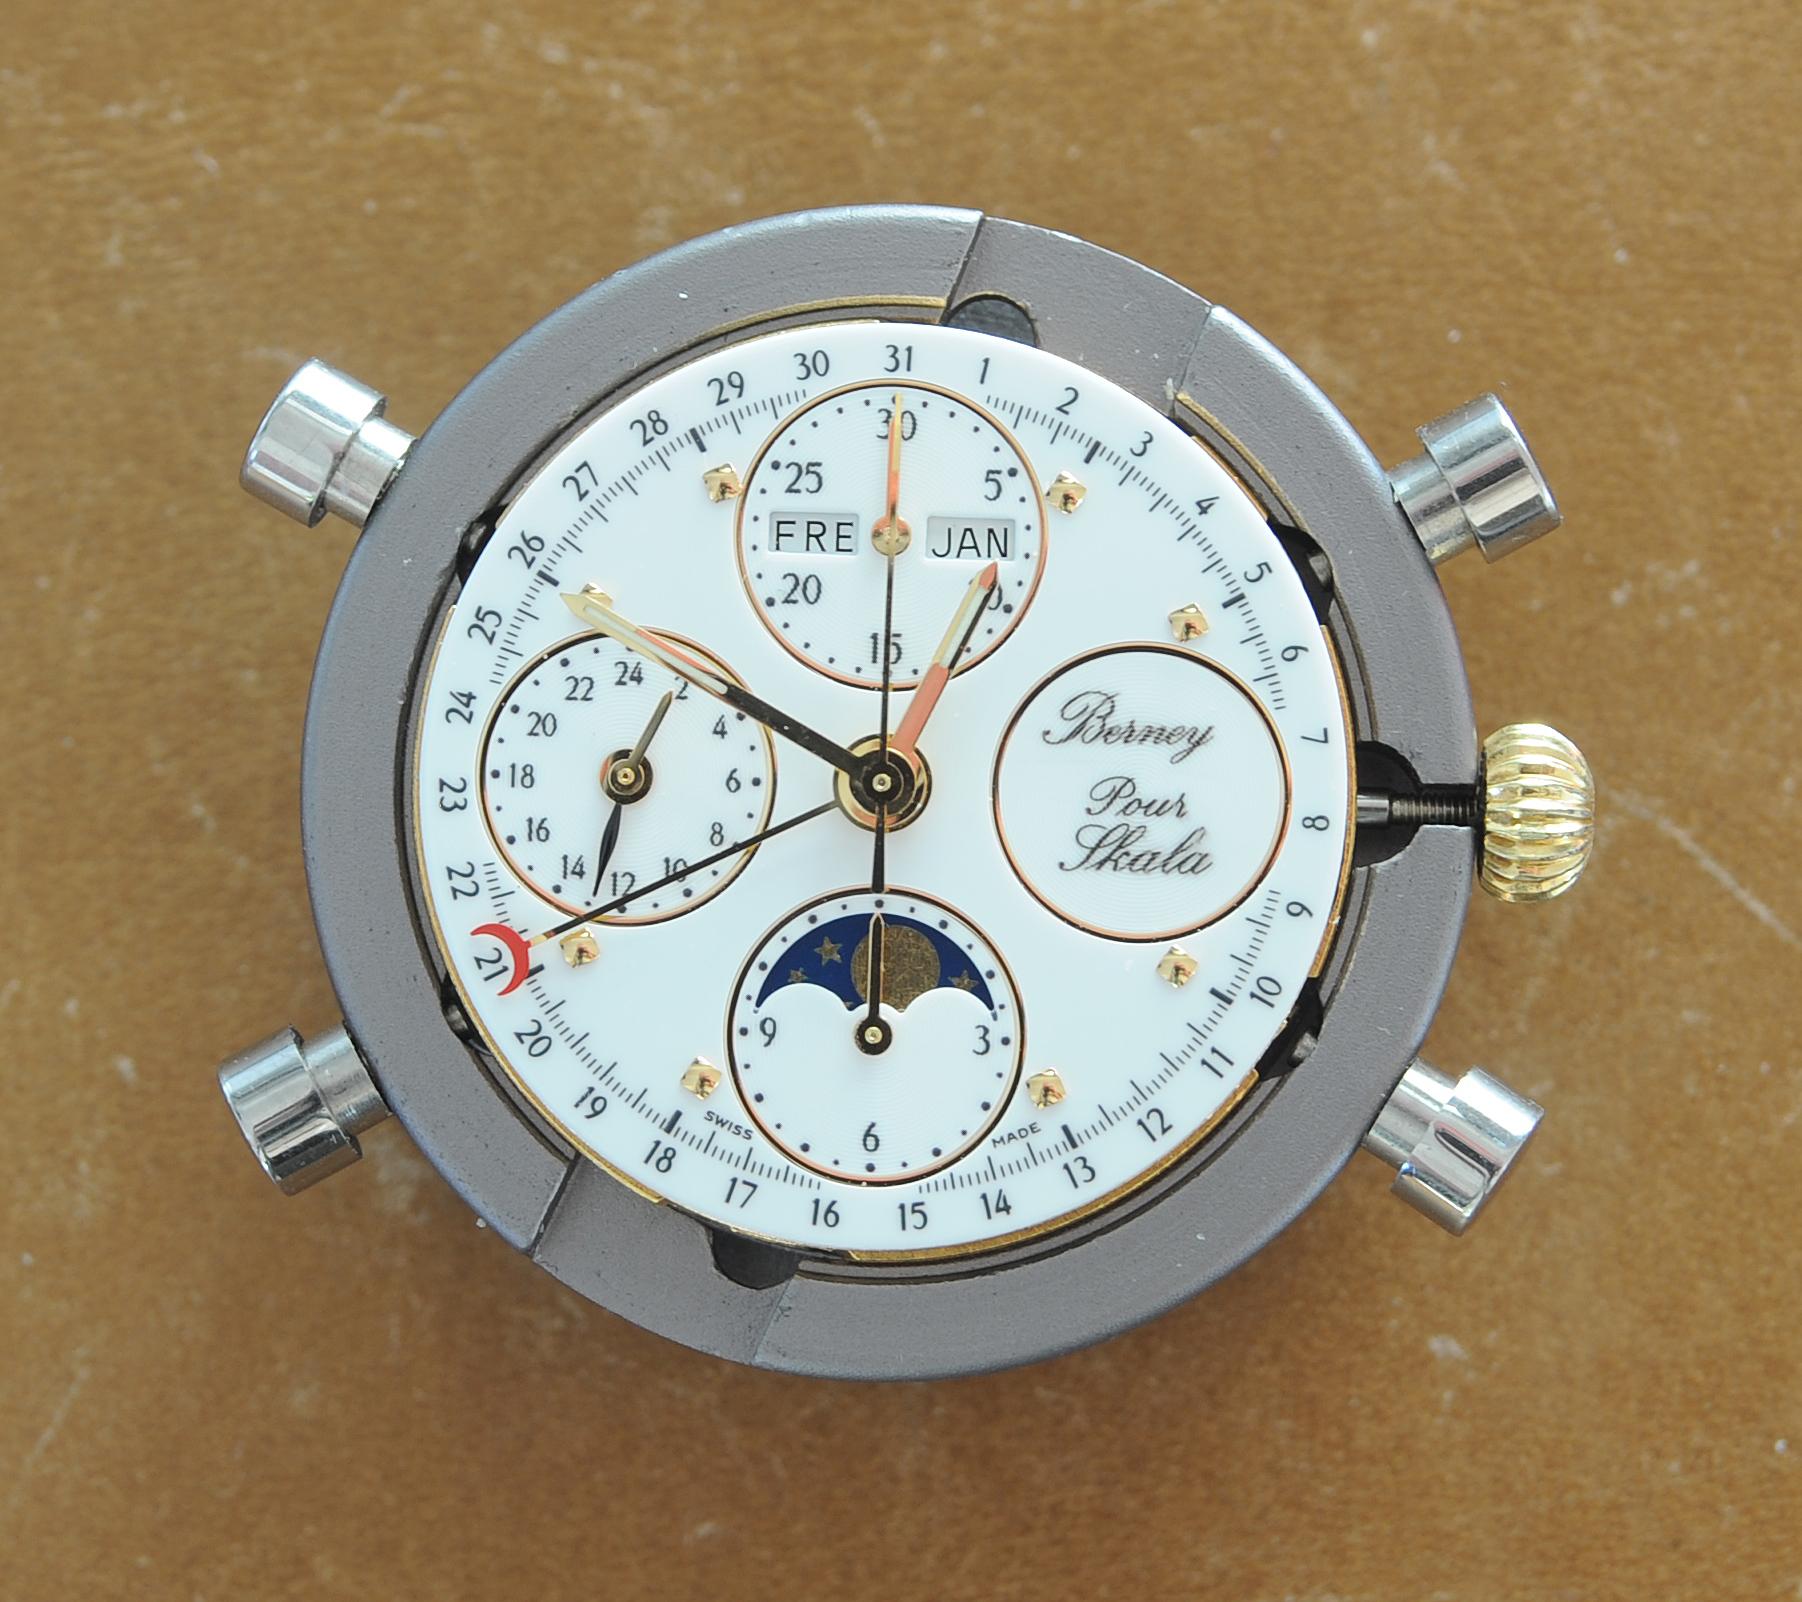
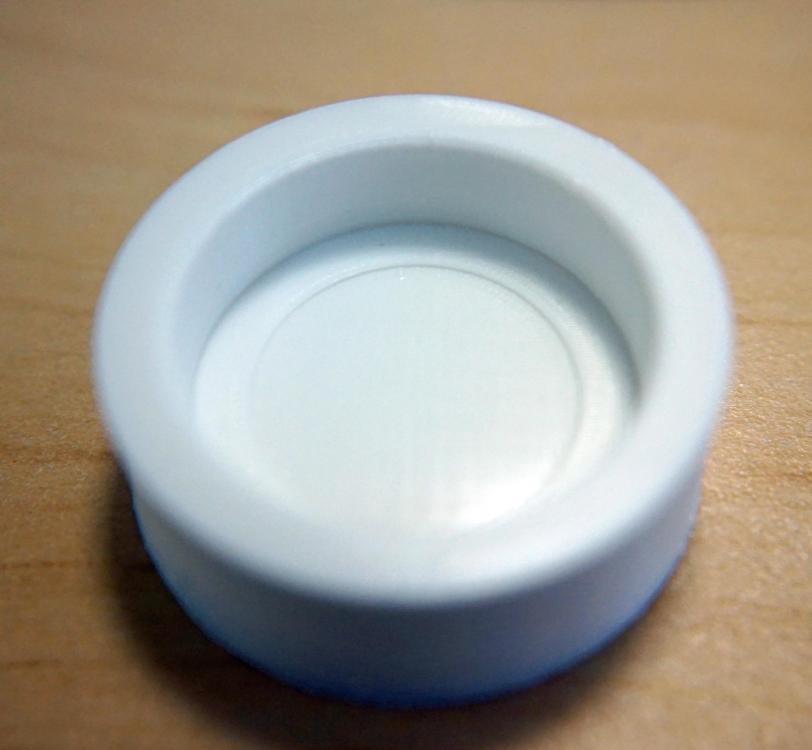
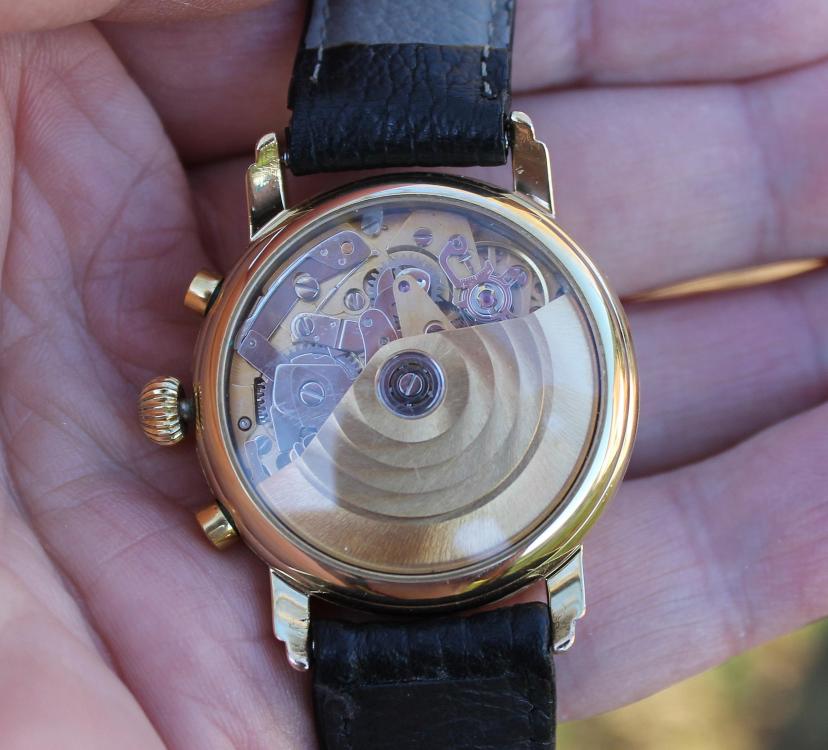
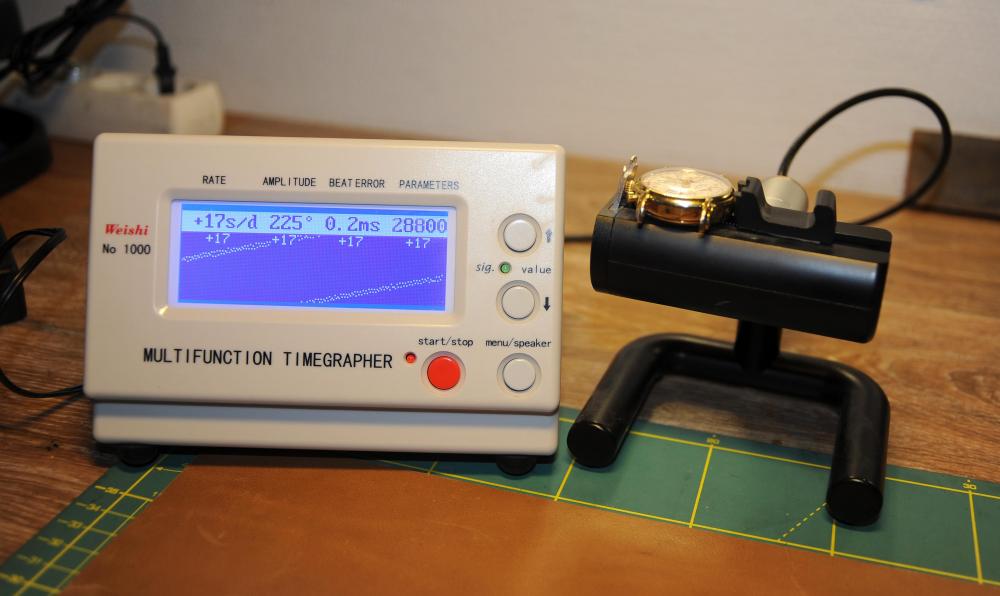
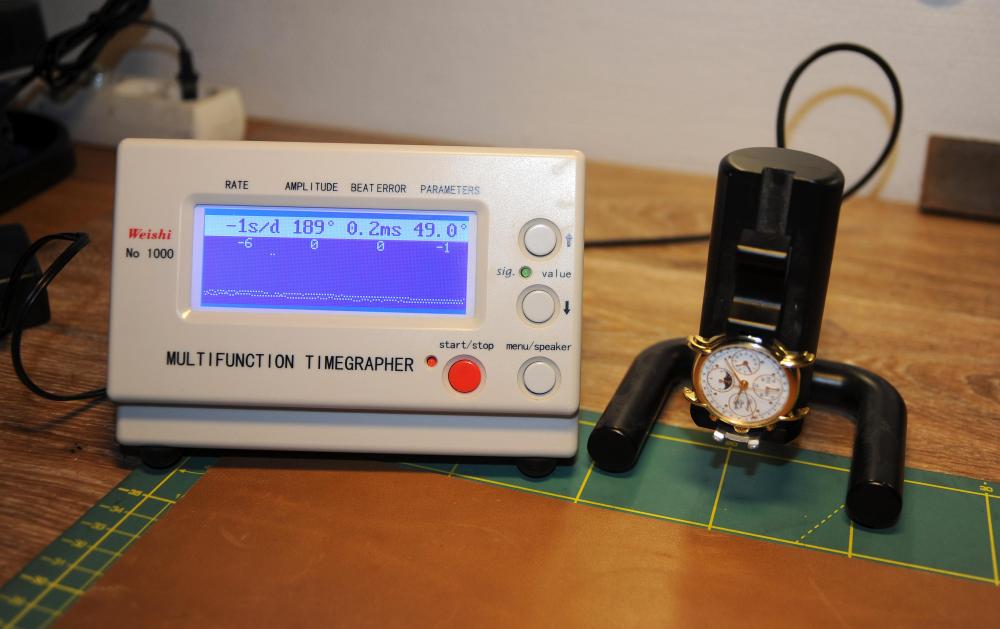
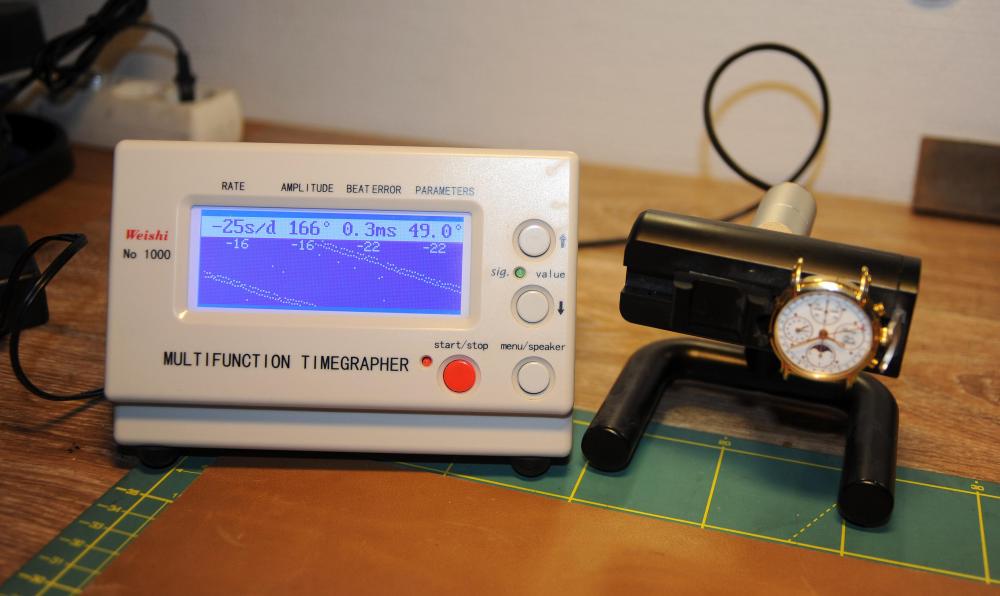
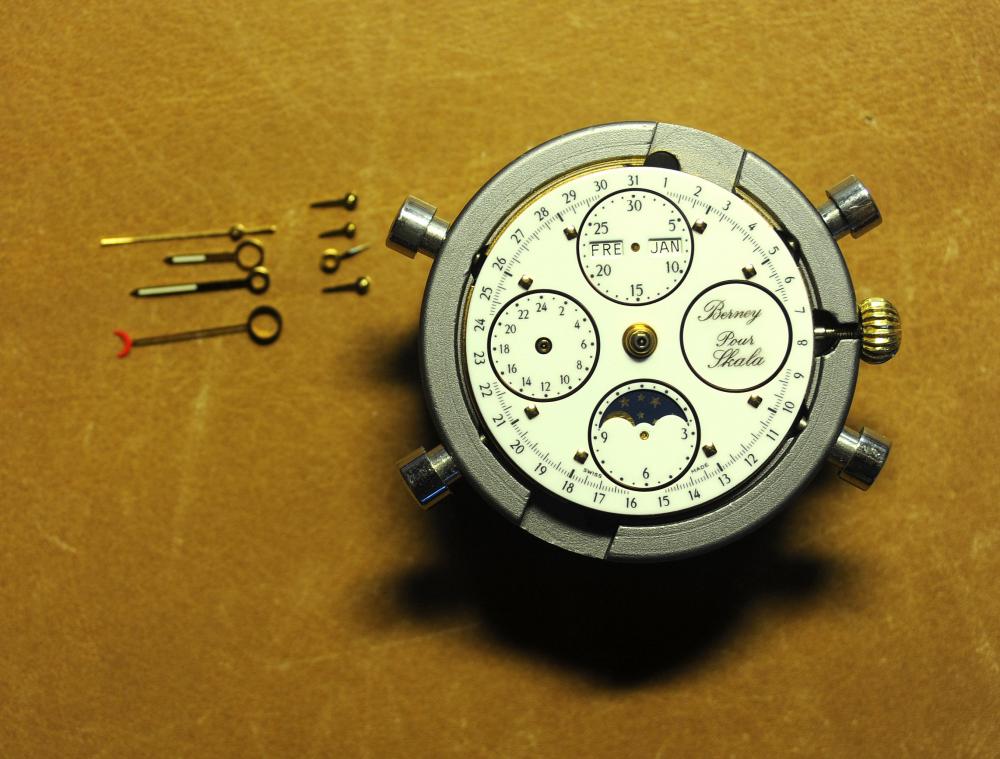
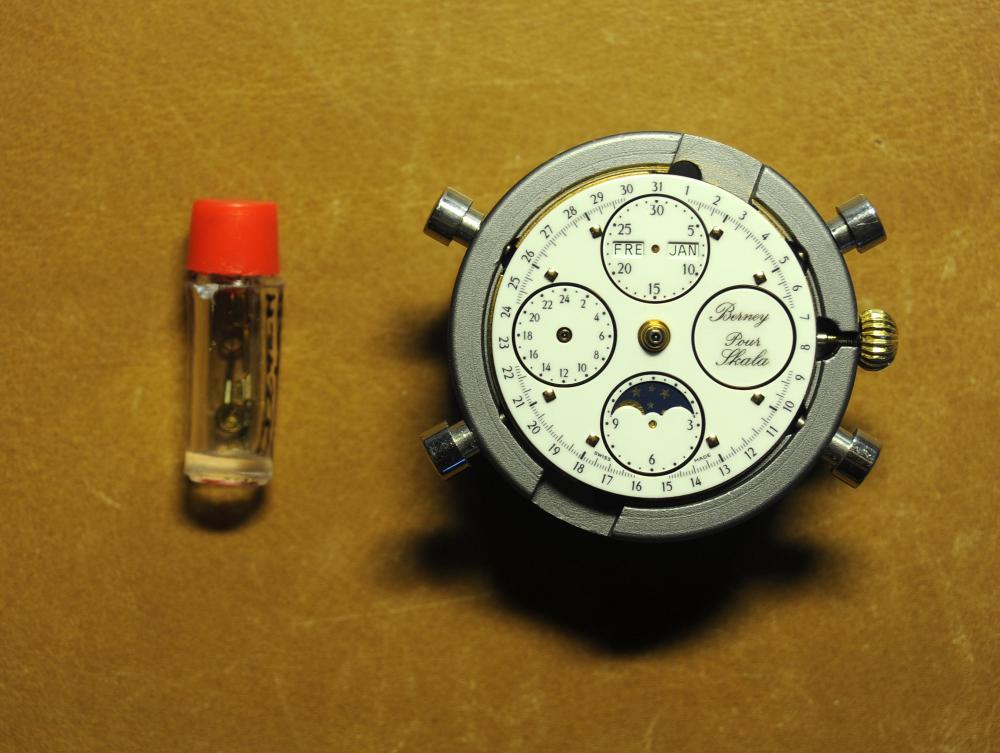
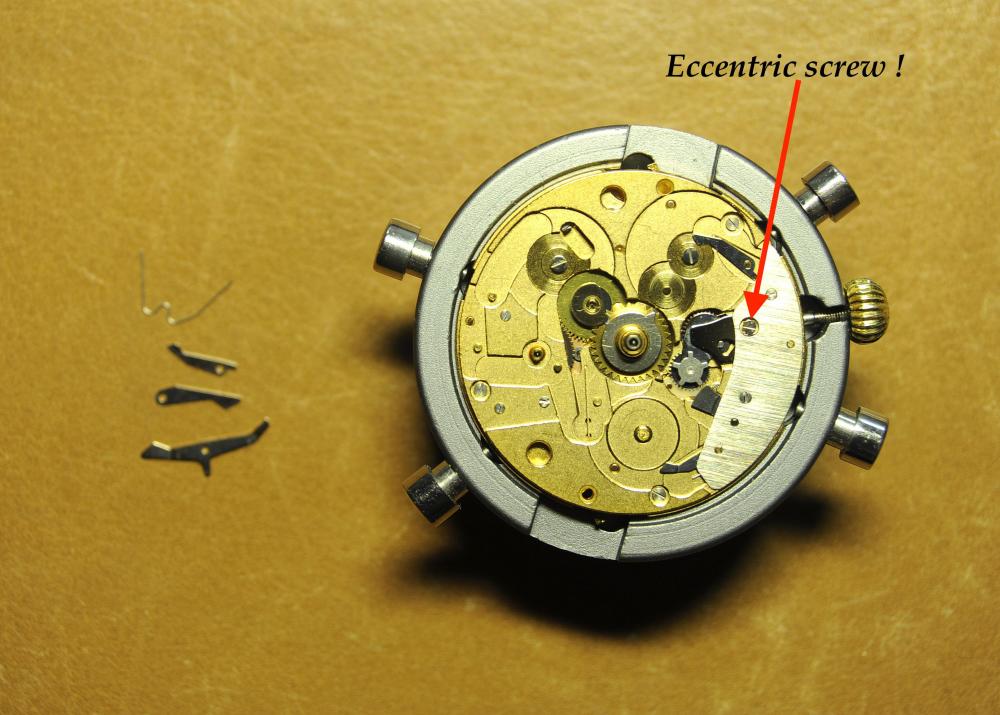
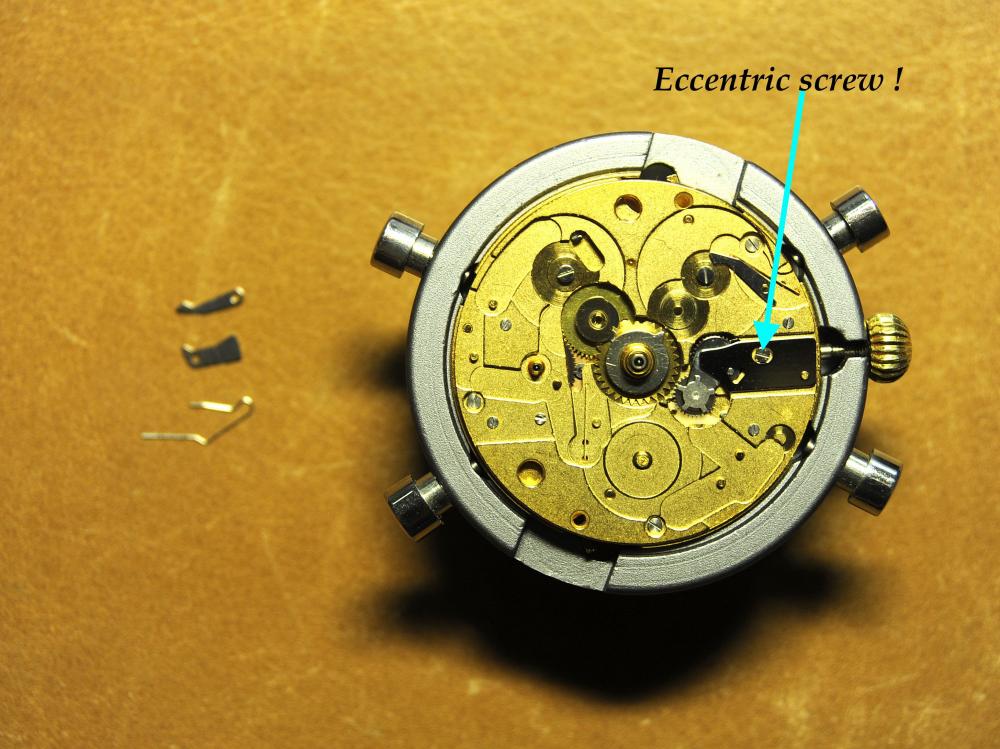
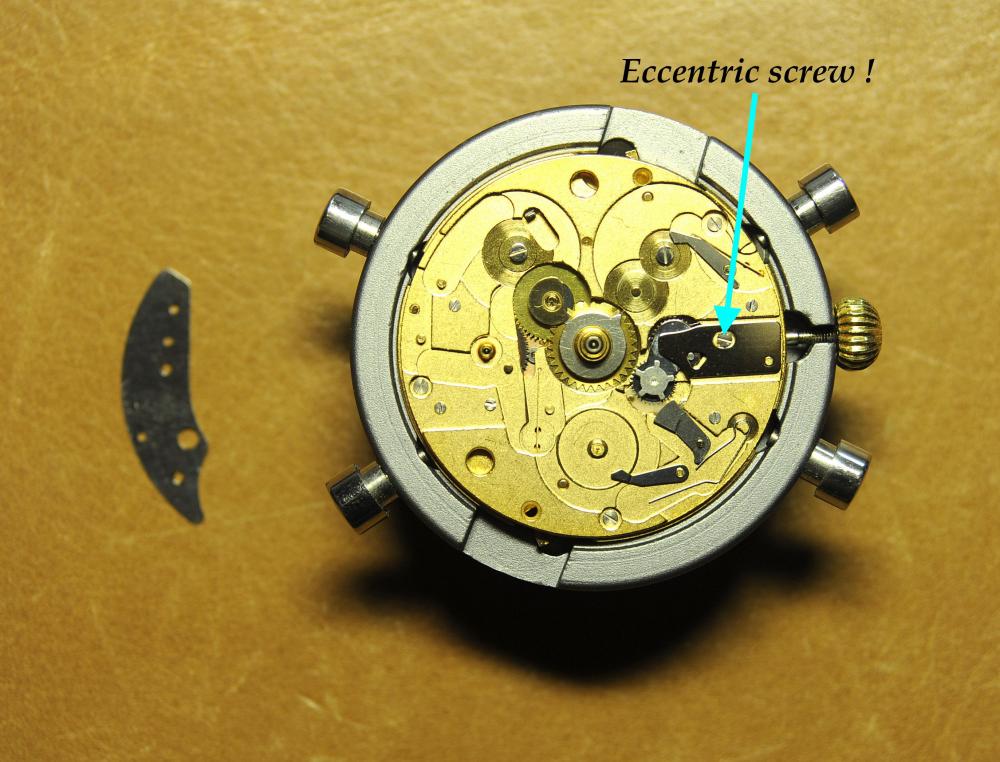
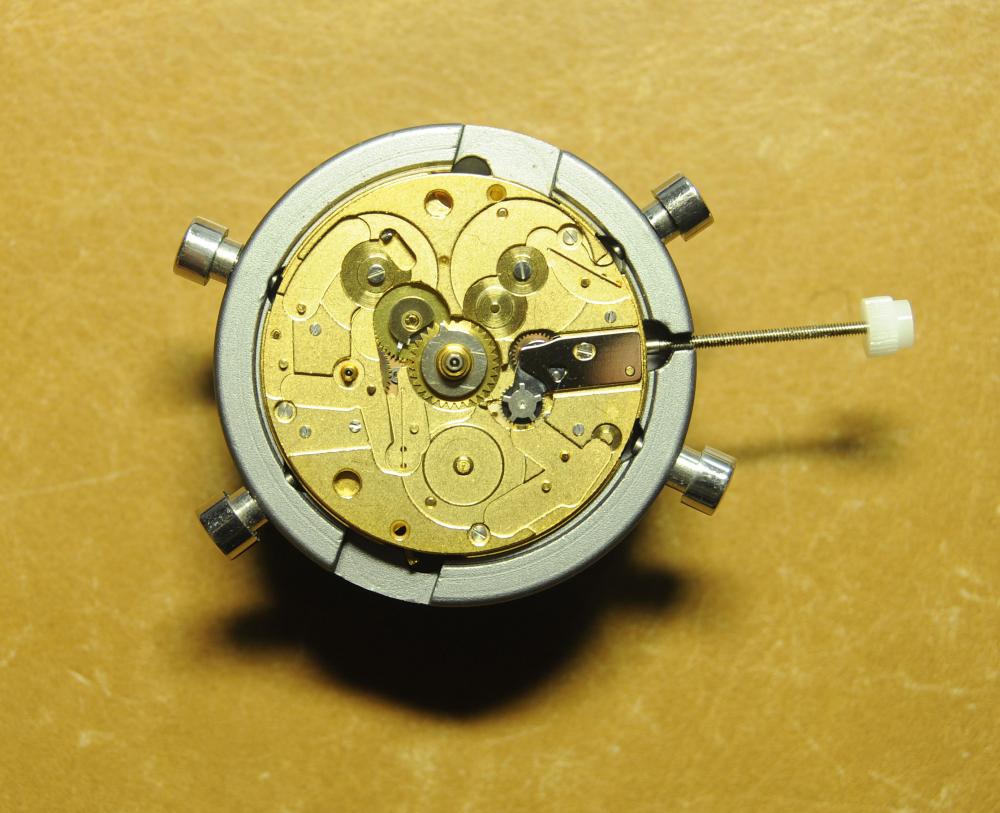
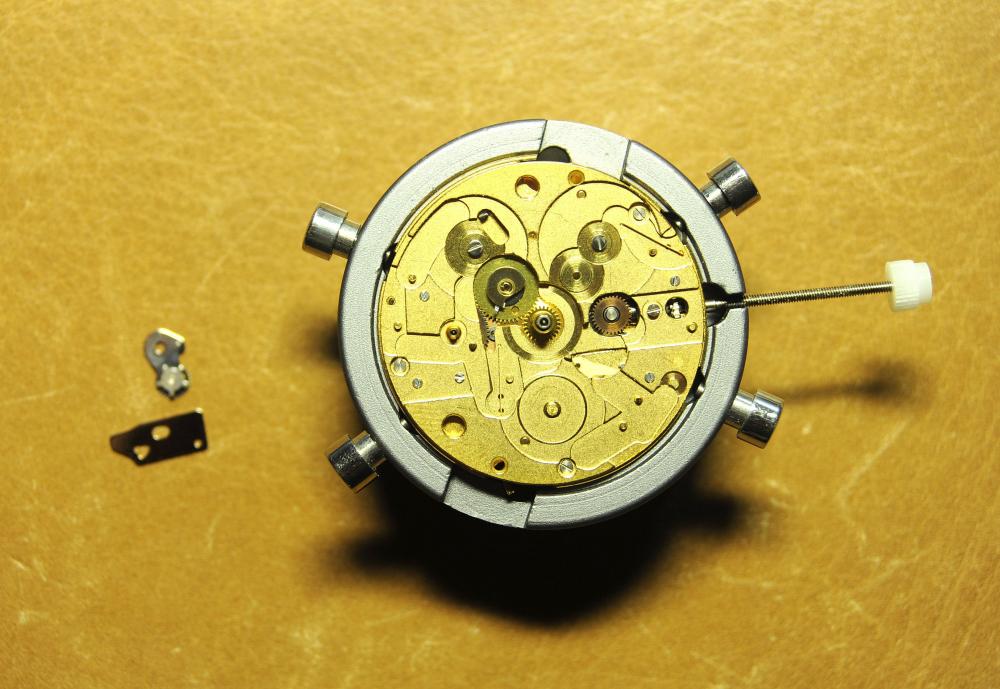
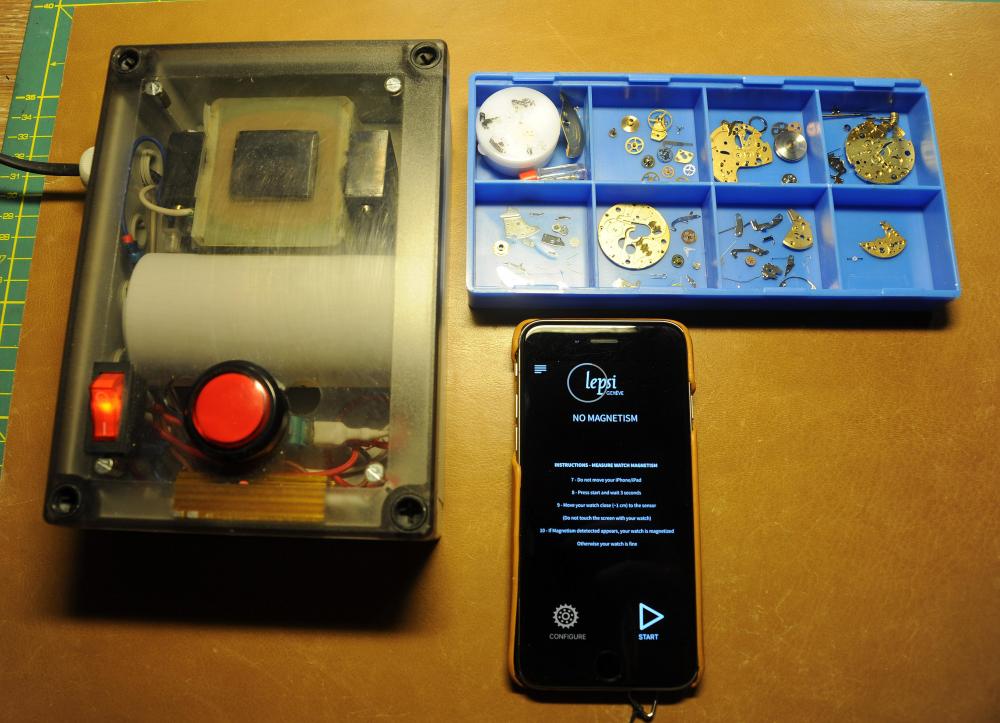
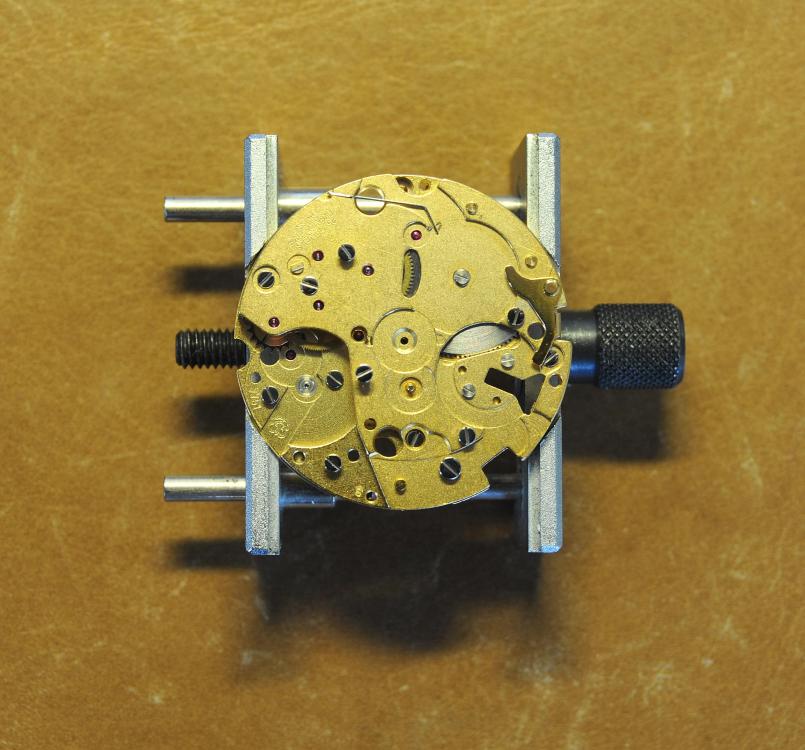
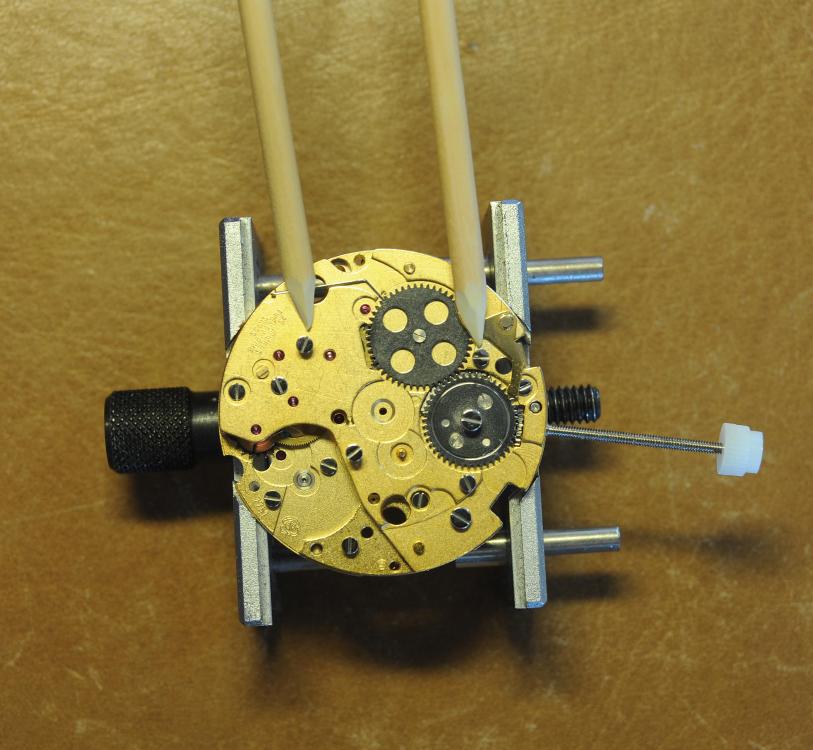
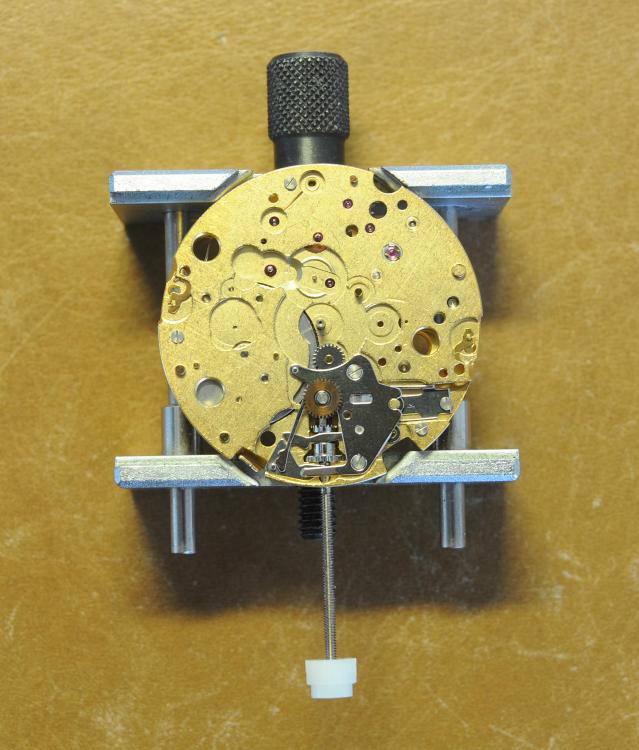
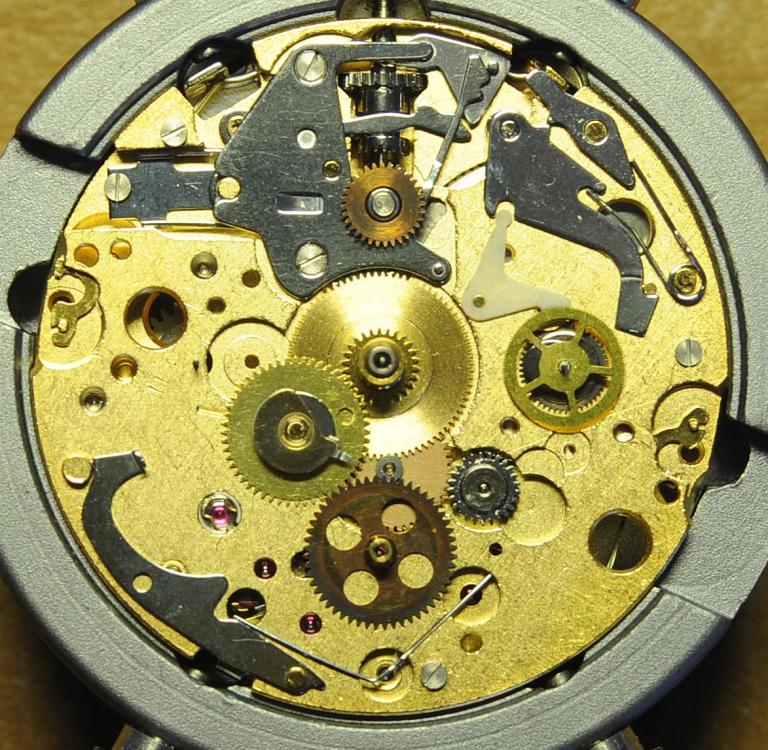
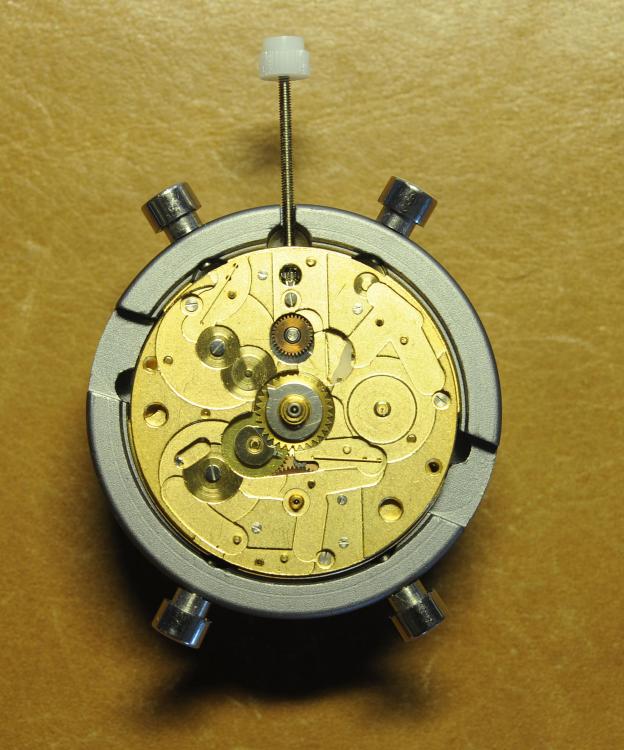
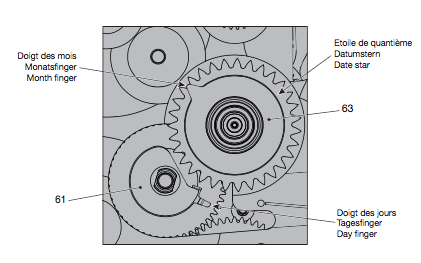
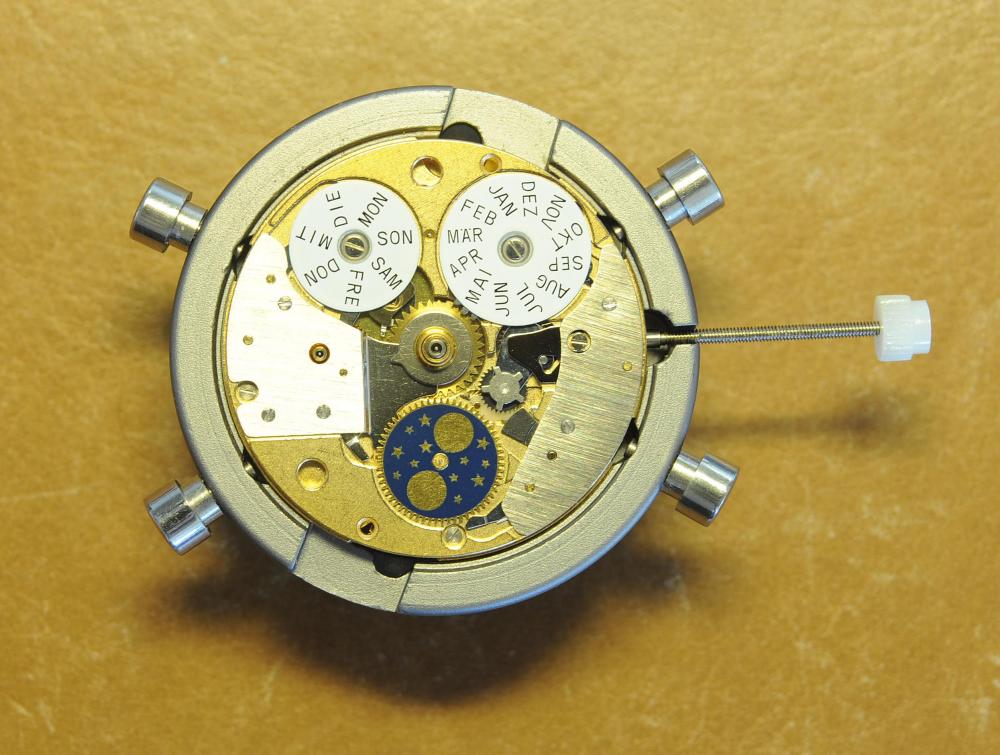
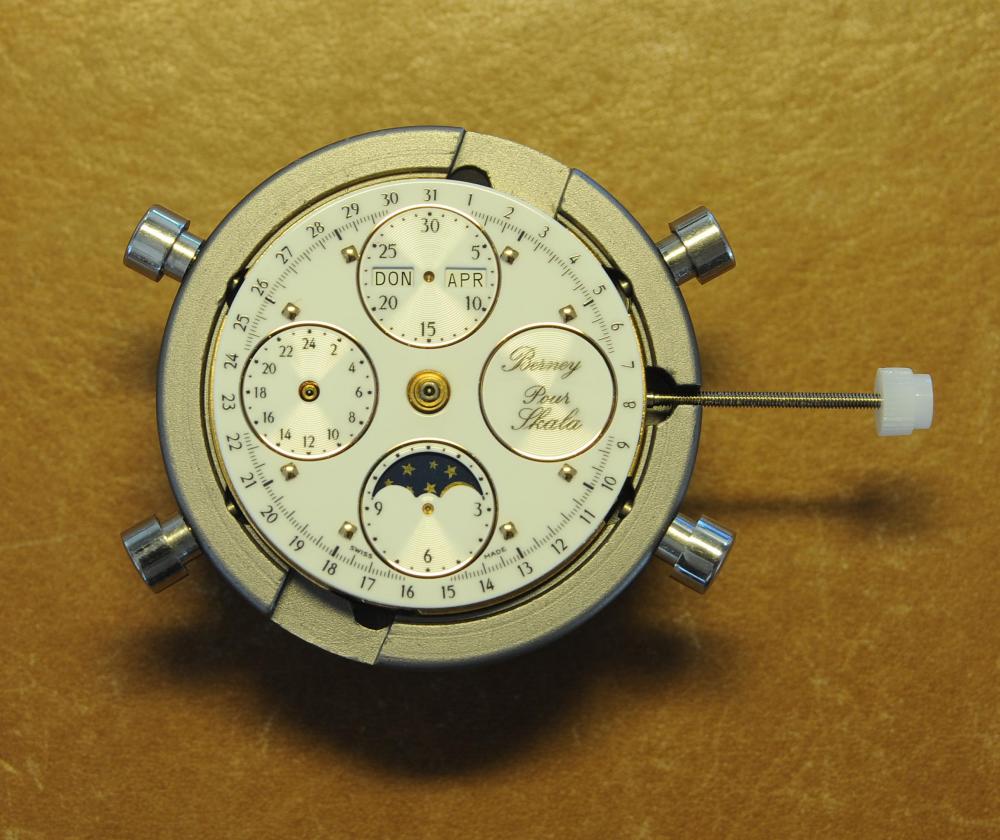
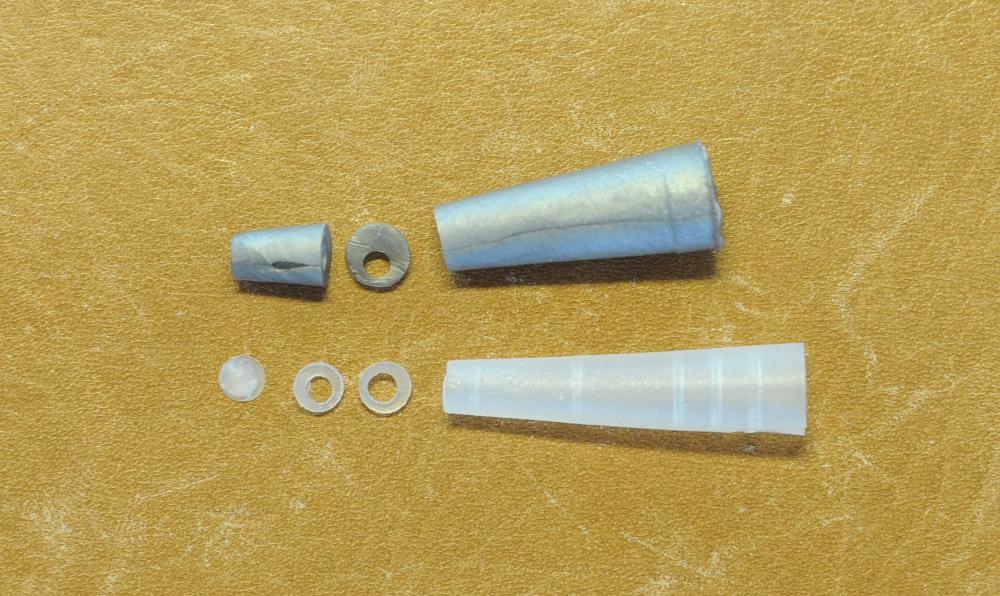
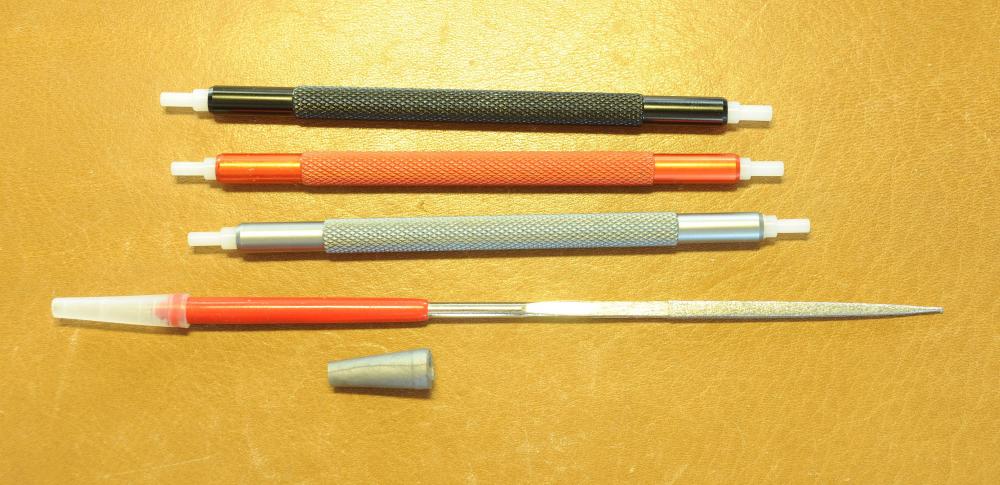
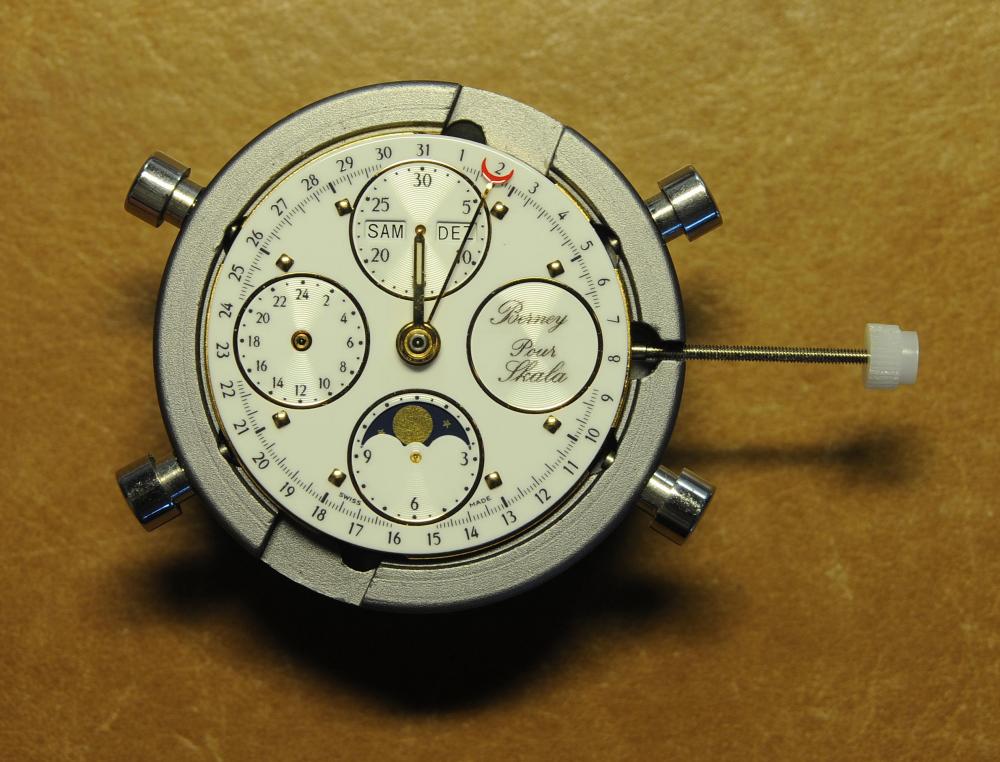
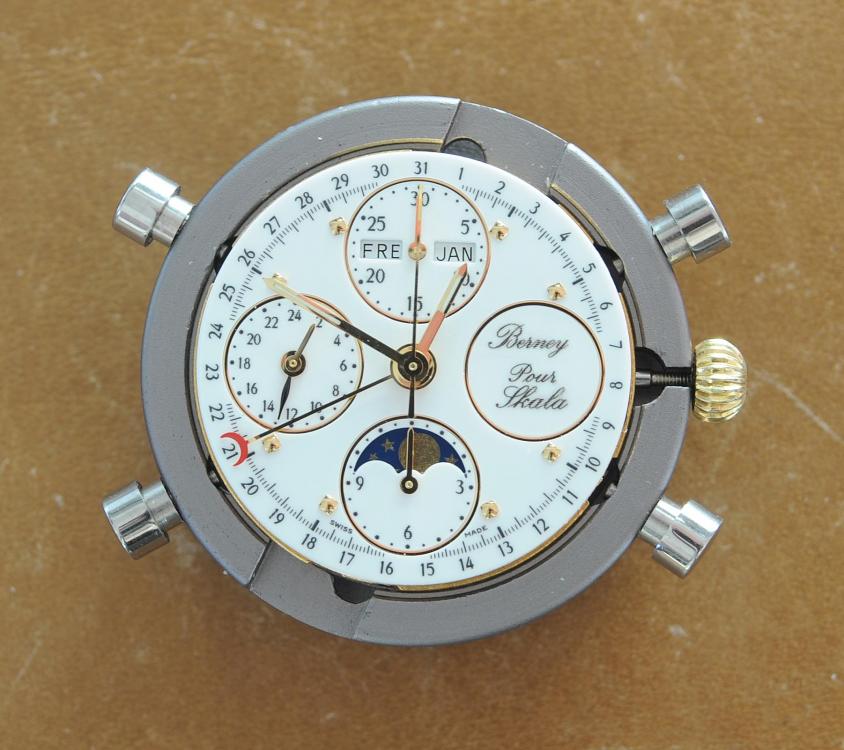
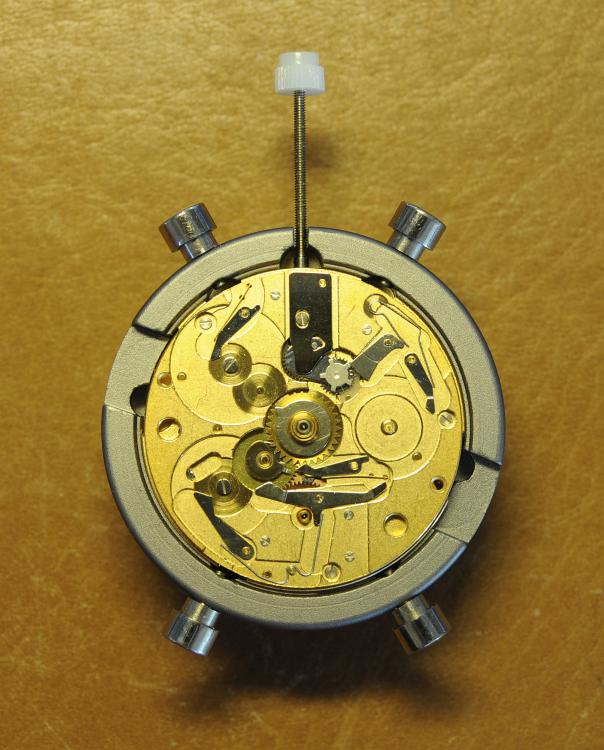
Valjoux / ETA 7751 Triple calendar moon-phase; This gold-plated Berney-Blondeau S.A. with an ETA 7751 belonged to a German gentleman who received it new on his 60th birthday in 1995. Through the years he kept the original box, the warranty card as well as the 1995 price-list and the dealer’s business card. He has worn the watch only on social accessions and the watch spent most of its time stored in a "Panzerschrank". According to the original price-list, the 1995 purchase price was 1450 CHF. As you can see, the watch held up pretty well, only a few small scratches in the front- and rear mineral-glass crystal and on the top of the lugs some of the gold-plating has worn through. The watch ran, all function did work. It had never been serviced nor opened Disclaimer; This walk-through is written in the way I do it. That's not to say it's the most correct way of doing things but as they say: there are many ways to Rome, all leading to the same result. Neither do I, as a hobbyist, have fancy horological equipment such as a cleaning machine or a "sterile" & "dust-free" room and therefor the end result will not be "Rolex"-standards. All I can say is that I'm always give it my best shot and I will mention problems encountered or were I went wrong, so you don't have to Without any further ado, let's dig into this beautiful & complicated watch ...... First make sure that you downloaded the latest ETA 7751 "Technical Communication". Throughout this walk-through I'll use the same parts reference numbers as used in the "Technical Communication". Below the currently latest September 2021 version; 7751 manual.pdf Before having done anything to the watch, I tested all the functions for proper working and took the timegrapher readings to see if there was anything which needed special attention. These readings can later be compared with the readings after the service. Dial-Up; Dial-Down; Crown-Right; Crown-Down; Crown-Left; Crown-Up; From the readings, it's clear to see that the watch needed a proper service. The back-lid, just like the front-crystals found on pocket-watches, required a knife-type case-opener. Checked out the oscillating weight ball-bearing, it had next to no play and therefor good for another round. Removed the oscillating weight (48). Removed the two casing-screws and clamps, pulled the stem and flipped the case over onto a soft pillow. With the watch-case removed, the winding stem re-inserted and the movement was placed in a proper 7750 (or family) movement-holder. To me, working on these movements a proper movement-holder is paramount. During the disassembly of the movement I encountered some problems and without this holder I most likely would have made scratches or worse..... Pulling the 8x hands; they all came off without any problems. All the hands safely nicely stored in a small plastic container. The same counts for the dial, after the removal directly stored in a plastic container with on both sides of the dial a soft lining. Removal of the Day & Month indicator disk (78) and the Moon phase indicator (79) The keen observer may have noticed that there are no screws next to the movement holder, for example the two screws holding the Day & Month indicator respectively. When working on complicated movements or movements which I'm not familiar with, I took on the habit, when possible, to replace the screws in the same hole as they came from. For sure, it's more work, but some movements do have multiple types/sizes screws and it will become a big puzzle if you store them in the same container / basket. Replacing the screws works (most of the time) very well for me, but in some cases the replaced screws shoulder-out deeper than as they would have done when holding the part above. The protruding screw may touch parts below or when replacing bridges, prevent the bridge from not seating fully "level". To me, replacing the screws thoughtfully is far simpler than facing a huge sorting puzzle later. Removal of the combined maintaining plate (76) and the Month star driving wheel (77). The three tiny screws holding the maintaining plate (76) were extremely tight. I couldn't loosen them with my standard (new) screwdriver bits so I had to grind the screwdriver bit to match the exact the same shape as the screw-grooves. Only then, with "force", they came loose and I was glad for having a proper movement-support! One slip of the screwdriver, with the force that was required, could / would have easily made a deep score in the plate or worse ........ Removal of the Day jumper spring (71), Day & Month jumper (70), Day jumper (72) and the Moon phase yoke (73) plus an early warning ! With those parts out of the way, the Moon phase platform (75) had to come off. Assuming that the with the arrow highlighted screw was one of the screws holding the platform down, I turned the screw only to discover that it was the moon-phase corrector eccentric ....... Oops !! The setting of the eccentric has to be checked at the end anyway, but now I know for sure that it's set wrongly. Removal of the Moon phase jumper (69), Corrector maintaining small plate (66) and the Moon phase jumper spring (67). Still in the picture the Date & Month jumper (74) which should have been removed before this picture was taken. The original stem was replaced by a longer stem to adjust the Calendar driving wheel (61) which was holding the Date-star (63) down. Removal of the Date-star (63, shown in the previous picture) together with the Date-corrector (65) and the corrector maintaining small plate (66). Removal of the calendar platform (62). Slowly back to familiar ground; a standard ETA 7750 starts to appear ... Removal of the Hour wheel 24hrs H1 (59), the Calendar driving wheel (61), the Hour-wheel (60), the Day corrector (58) and the Day corrector spring (57). The removal of the Hammer-spring (56), Set hour-hammer operating lever (53 & 54), Hour counter lock (55), Hour counting wheel (52), Minute-wheel (51) and the free Cannon pinion (50). Pulling of the Driving pinion (49) has to be done carefully; either with a pair of hand-levers or two small screw-drivers. The upwards force on either side of the pinion has to the equal or you may break the pinion of the great wheel (16) (a previous experience has taught me so !! ) Flip the movement over and from here on I'm using a Bergeon 4040 movement holder. First the removal of the Hammer-spring (45). When removing this spring I had up till now difficulties avoiding making a small mark in the Automatic device bridge (44). It was our WRT-member "Nickelsilver" who tipped me off using a piece of Scott tape over the edge of the bridge. This worked very well and for the first time I was able to remove the hammer without leaving a mark! Thanks Nickelsilver! The hammer-spring (45) and the Clutch-spring (47) removed. Remove the Auto device bridge (44). Removal of the Reversing wheel; (43), Reduction wheel (41), the Clutch (40), Oscillating pinion (39), the Hammer (42), Chronograph wheel (37), Minute-counting wheel (38), Minute-counting jumper (46), the Lock (33), the Operating-lever (36) and the Minute counting driving wheel (19). Removal of the Chronograph bridge (34), the Friction spring (32) and the Operating lever spring (35). After the removal of the Ratchet wheel driving wheel (33) it's time to release any residual power in the main-spring. This can be done by holding the crown, lift the Click-spring (20) and slowly release the tension by letting the crown slip through your fingers. Removal of the Chronograph cam (29), Cam jumper (28), Detent (30), Ratchet wheel (23), Crown wheel core (22) and Crown wheel (21). Removal of the Balance Assembly (26+27), Pallet bridge (25) and Pallet fork (24). Removal of the Barrel bridge (18). Removal of the power-train; the Great wheel (16), Third wheel (15), Second wheel (14), Escape wheel (13), the Movement barrel (12) and the Stop lever (17). Flip the movement over for disassembling the keyless works. Removal of the Setting lever jumper (11) together with the Intermediate setting wheel (10), the Time setting gear (9), Rocking bar (8), Yoke (6), Setting lever (5), Winding stem (4), Winding pinion (2), Sliding pinion (3) and the Yoke spring (7). All the parts safely stored in a compartmentalized box with lid, ready for cleaning & demagnetizing. Regarding the "wear & tear" of all the watch-parts; it was clear to see that the watch hadn't seen a lot of use. The Oscillating weight ball-bearing (48) was good, reversing wheel (43) looked good etc. However, I decided to change out the main-spring. This type of barrel has a lid which cannot be "pushed" open. To open the lid, I place a sharp knife in the groove between the barrel and the lid and while pressing down on the knife roll the barrel, in my case on a "soft" leather underground to avoid doing any damage. This widens the groove into a small gap and with the smallest screwdriver one can pry, going around the barrel, the lid off. When done carefully you won't leave any marks. Barrel & Arbor cleaned, braking-grease applied ready for the new spring. Apart from a few (see "technical communication" !) the parts were soaked for 24hrs in Zippo lighter fluid and pegged; all the sprockets, pivots and jewels. Thereafter all the parts were checked for magnetism. Instead of using the unreliable compass method, I'm using an App called "Lepsi" on my iPhone. This App doesn't tell you how much magnetism there is, it only indicates whether there is any. The distance of the object above the screen, by which magnetism is detected, gives you some indication of the strength of the magnetic field, but nothing more. For me, when magnetism is detected, that's enough reason to "Zap" that part on my no-nonsense self-build demagnetizer. Of course, in reality the demagnetizer is not placed anywhere near my iPhone or the other watch-parts / metal-objects like here on the photo. Also, it may be a good idea to take your watch off during the "zapping” operations! Quite a few parts, particularly in the calendar works, were magnetized. With the main-plate anti-shock Chaton cleaned, pegged, cap-stone oiled and re-installed in the main-plate (1), the assembly of the 7751 can begin. Escape wheel (13), Second-wheel (14), Third-wheel (15), Main-spring barrel (12), Great-wheel (16) and Stop-lever (17). Installation of the barrel-bridge (18) (by a 7750 the wheel-train the and barrel-bridge are combined in one bridge). Make sure that all the wheels turn fine before tightening the screws; check, check and double check. Again, if you using the re-installed screws method, some screws may protrude the bridge. (I took the "warning picture" below a little later, so don't look at any additional installed parts) All the Lubrications as per the ETA 7751 "Technical Communication". These two re-installed screws do protrude the Barrel bridge (18). The one on the left will touch the Great-wheel (16) and the one to the right may just touch the main-spring barrel (12). Back them out far enough so they don't cause any trouble. The installation of the Crown-wheel (21), Crown-wheel core (22) and the Ratchet-wheel (23). With the movement turned over, installation of the keyless works; Sliding-pinion (3), Winding pinion (2), Winding-stem (4), Setting-lever (5), Yoke-spring (7), Rocking-bar (8), Yoke (6) and placing of the Time setting gear (9) before placing the Intermediate setting wheel (10) and Setting lever jumper (11) as a "combination". Keyless work completed. Check for proper working! Installed the pallet-fork (24) and the complete balance assembly (26 & 27). Cleaned, pegged the balance Chaton and oiled the cap-stone. Before going any further with the assembling, I tested the power-train and escapement for any irregularities. On the timegrapher the readings were looking a whole lot better than initially. Instead of picturing each position, here are the readings; DU & DD both 292-294 degrees, 0 ms and 0 s/d. CU: 244, 0.1, -14 s/d CR: 249, 0.2, -16 s/d CD: 252, 0.1, -6s/d CL: 262, 0.0, -5 s/d Even though I adjusted the Etachron as good as I could, that's to say centring the hairspring between the two regulator pins and thereafter reducing the regulator pins gap to the point that the hairspring could still, but just "breath", the positional deviation with max. 16 seconds is slightly higher than I was hoping for. Then again, it's not a chronometer grade and each position produced straight lines, so I think that with some daily-rate adjustments the watch will run just fine. Once satisfied with the running of the power-train and the escapement, the assembly of the chronograph can start. Cam jumper (28), Chronograph cam (29), Detent (30), Minute counter driving wheel 30 minutes (19), Lock (33), Operating lever spring (35) and the Operating lever (36). As said; lubrication as per "Technical Communication" and test the proper function of the start/stop and reset levers. Placement of the Ratchet wheel driving wheel (31) and the Friction spring chronograph wheel (32). Install the chronograph bridge (34); don't forget the lubricate the Reversing wheel jewel on the bottom of the chronograph bridge before placement. Also pay attention to the reset-lever, it has to be pushed in so the bridge can sit level & flush. Check the working of the Ratchet driving wheel (31) and the reset lever before tightening the bridge screws. The placement of a well lubricated Reduction wheel (41), Minute counter jumper (46), Oscillation pinion (39, biggest sprocket down), seconds recording Chronograph wheel (37), Minute counting wheel (38), the Clutch (40), make sure that the oscillation pinion pivot is engaged), Reversing wheel (43) and finally the Hammer (42) before the Automatic device bridge (44). Before installing the Automatic device bridge (44), lubricate the jewel for the seconds recording Chronograph wheel underneath the bridge. The installation of the Automatic device bridge can be very tricky. It's very easy to touch the Clutch (40) and the pivot of the Oscillation pinion comes out. Before inserting or tightening the bridge screws, double-check the placing and working of every component!! Once the bridge is installed and with the relevant lubrication done, before mounting the hammer-spring (45) and the Clutch-spring (47), all the functions of the chronograph can be checked & tested; the engagement of the oscillation pinion, the smooth running of the seconds recording chronograph wheel, the advancing of the minute counting wheel, the start/stop- and reset-levers etc. Next is the installment of the Hammer-spring (45) and Clutch-spring (47). To prevent scratches on the Automatic device bridge (44), as per brilliant idea of WRT member "Nickelsilver", a piece of Scotts tape was taped over the edge of the bridge. With the installment of those two springs, the assembly of the chronograph is completed Movement flipped over and placed in the 775x movement holder. Installment of a well lubricated Driving pinion (49), The Cannon-pinion (50), the Minute wheel (51), Hour counting wheel (52), Set hour operating lever (53+54), Hour counter lock (55) the Hammer spring (56), the Day corrector spring (57) and the Day corrector (58). The build-up, up till the Day corrector spring (57) and the Day corrector (58), was identical as to a standard 7750. The Hour wheel 24hrs (59) drops over the Second wheel (14) pivot. Attention: Sadly, no picture but when installing the Hour wheel (60) over the Cannon pinion, one has to lift the Minute wheel (51) slightly and to make sure that the hour wheel teeth do engage in the small minute wheel sprocket. Once they engage, both wheels can be lowered in place. Finally, before installing the Calendar platform (62) the Calendar driving wheel (61) with the "day finger" pointing as shown. From here on I pulled the winding stem to stop the running of the movement and thereby avoiding the advancement / altering of the positions of the wheels. The installation of the Calendar platform (62) can be a bit tricky. It's all too easy to dislodge the hour lever (53) and the Hammer spring (56). Make sure that the platform sits flush with the Main plate (1) before tightening the 3x screws. Place the Day star (63) as shown in both above pictures. Placing of Date + Month jumper (70), the Day + Month jumper (74) (Both jumpers are identical), Day jumper (72), Moon phase yoke (73), Day jumper spring (71), Date corrector (65), Corrector maintaining small plate (66), Moon phase corrector (68), Moon phase jumper (69) and Moon phase jumper spring (67). Installation of the Moon phase platform (75), the Combined maintaining plate (76) (Be aware that the top of the Combined maintaining plate slides in the gap of the Day Star) and the placing of the Month star driving wheel (77). Placing the Month & Day indicator disk (78) and the Moon phase indicator (79). Adjusting the Phase corrector eccentric (64) wasn't that hard as I feared. By adjusting the eccentric one determines the "depth" of the Date corrector (65), shown by the blue arrows. Set too high and the top-sprocket of the Date corrector (65) won't even touch the Moon phase corrector (68). Set too deep the top-sprocket of the Date corrector will jam the Moon phase corrector (68) into the Moon phase indicator. The "depth" has to set such that the sprocket of the Date corrector (65) pushes the Moon phase corrector (68) just far enough so that it will just advance the Moon phase indicator by one click before the top Date corrector (65) sprocket releases the Moon phase corrector (68). There is clear information about the Moon phase corrector "depth" setting in the ETA 7751 "Technical Communication". With all parts installed and tested as far as possible, the dial goes back on. Before re-installing the hands, I re-lumed the minute & hour hand with new high-class LumiNova. Both hands now re-lumed and drying before the installation. Placing the long Date indicator hand required a bigger size hand-pusher which I didn't have. The idea was born to cut a tweezer protector-cap from the top until the required size was obtained. Stuck to protector cap onto the handle of a diamond file for more stability / pushing-power. It worked like a treat Turn the date quick-set until the month indicator disk changes month, that will be the first (1) day of the new month. The rest of the hands (8! in total) to be set at 24:00 midnight when the day indicator disk changes. Detailed instructions about the "shift tolerances" are described in the ETA 7751 "Technical Communication". All the hands installed and correctly set on the month / day / date and moon phase. The 18th of January 2022 had a full moon. The German gentleman received the watch when he turned 60 in 1995, now I'll continue with his watch as from my (65th ) birthday in January 2022 I'm still awaiting new crystals and once the case has been restored, I'll add the final picture of the fully restored/serviced watch. I really enjoyed working on this watch and even though I sometimes feel that contributing to this current WRT-forum has sadly become a bit of wasted time, I do hope that my write-up, perhaps found via Google or some other search machine, will be of some use to somebody, at some point in time Endeavor, Denmark


 1 point


.thumb.jpg.cb17a66989f1e796fd4217db2e9ca9df.jpg)