Leaderboard

.thumb.jpg.cb17a66989f1e796fd4217db2e9ca9df.jpg)


Popular Content
Showing content with the highest reputation on 12/12/24 in all areas
-
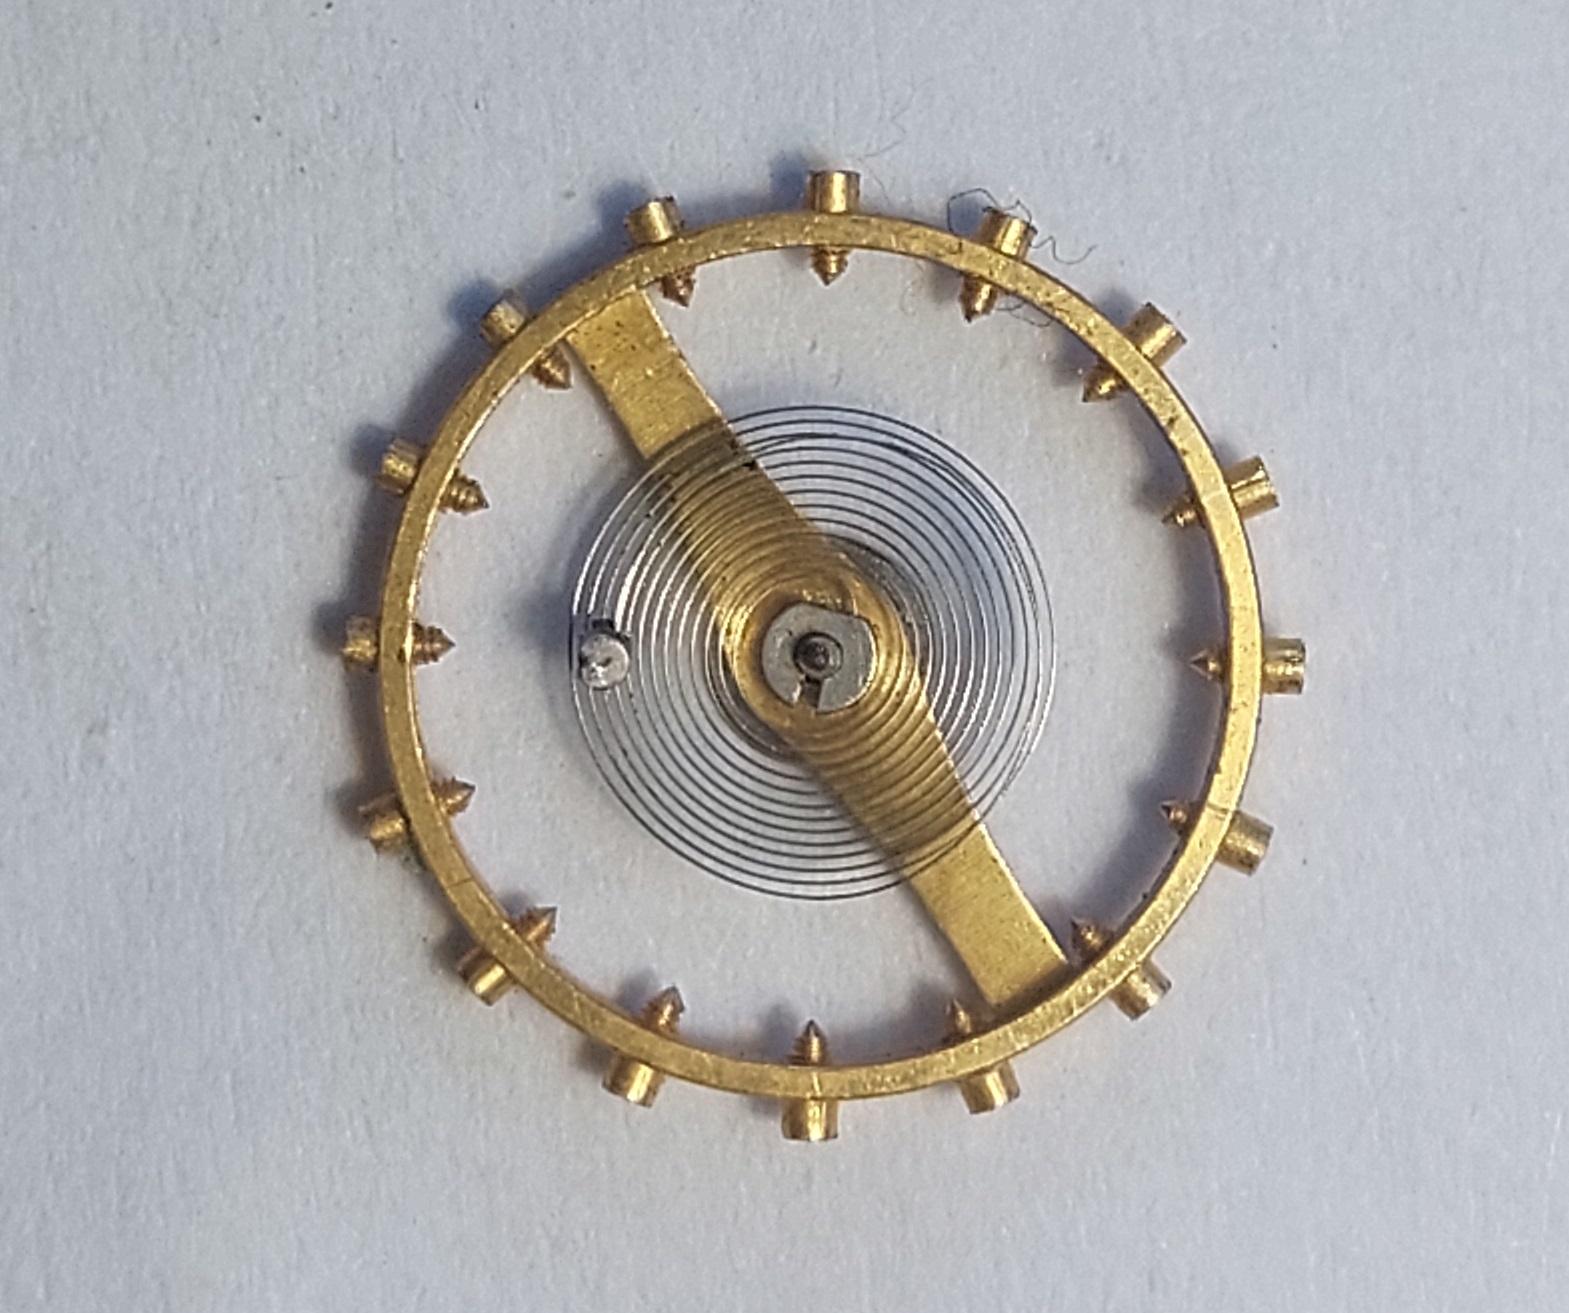
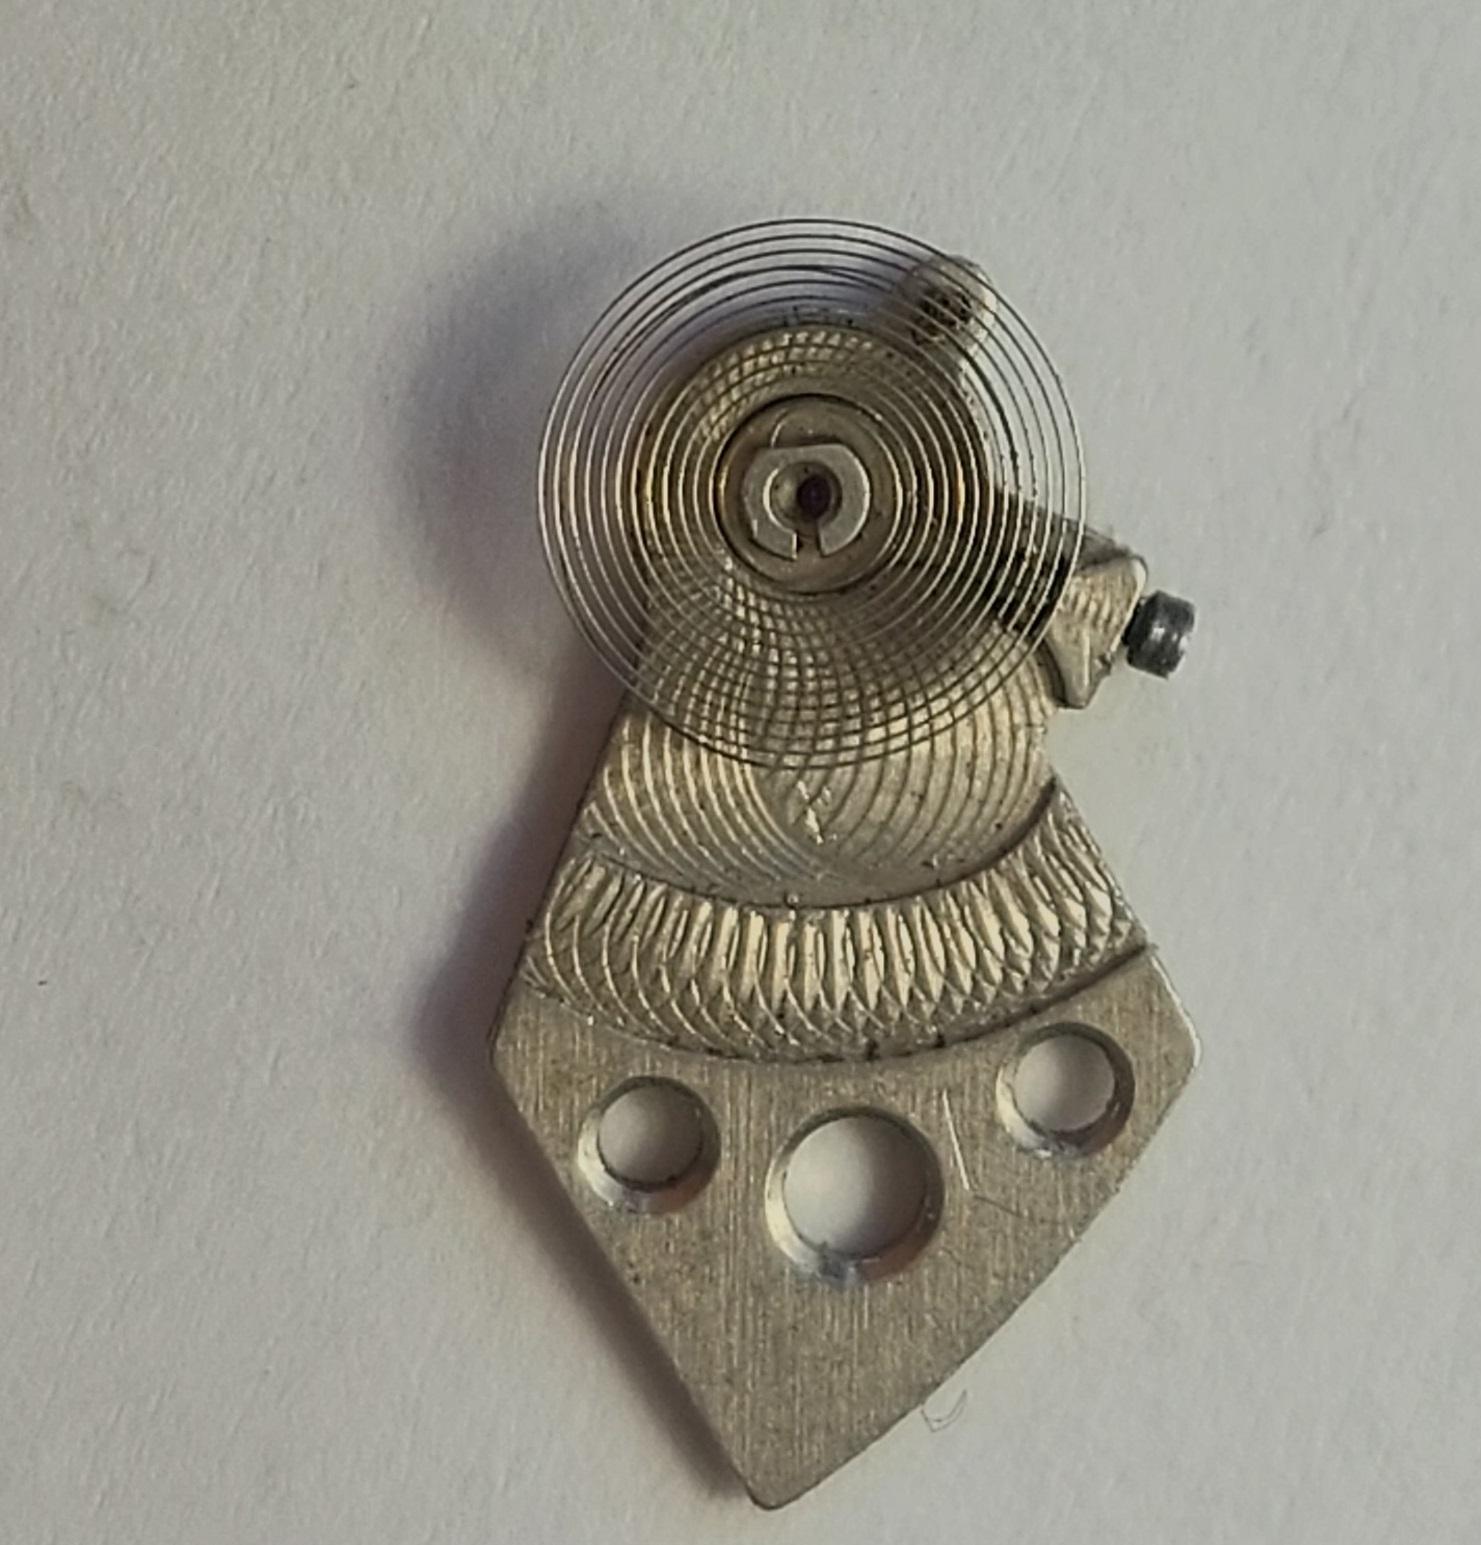
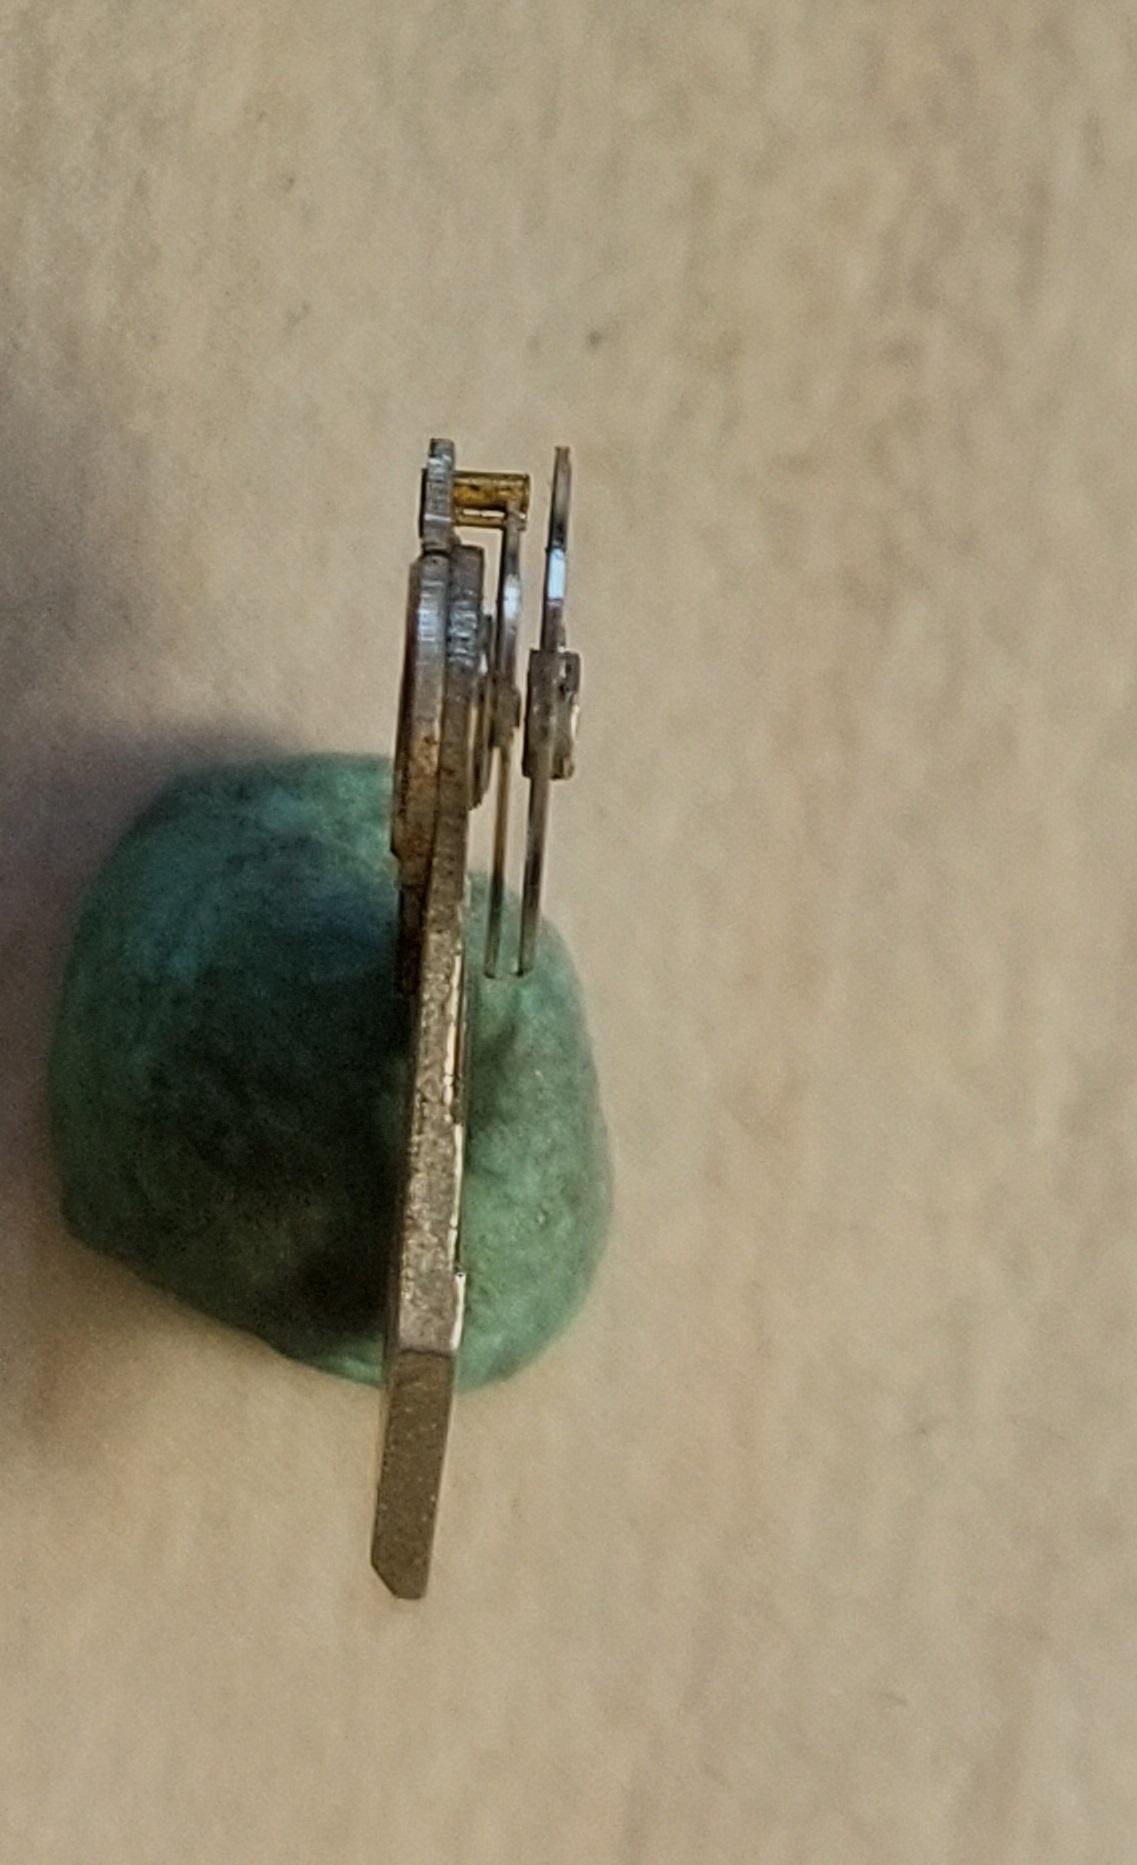
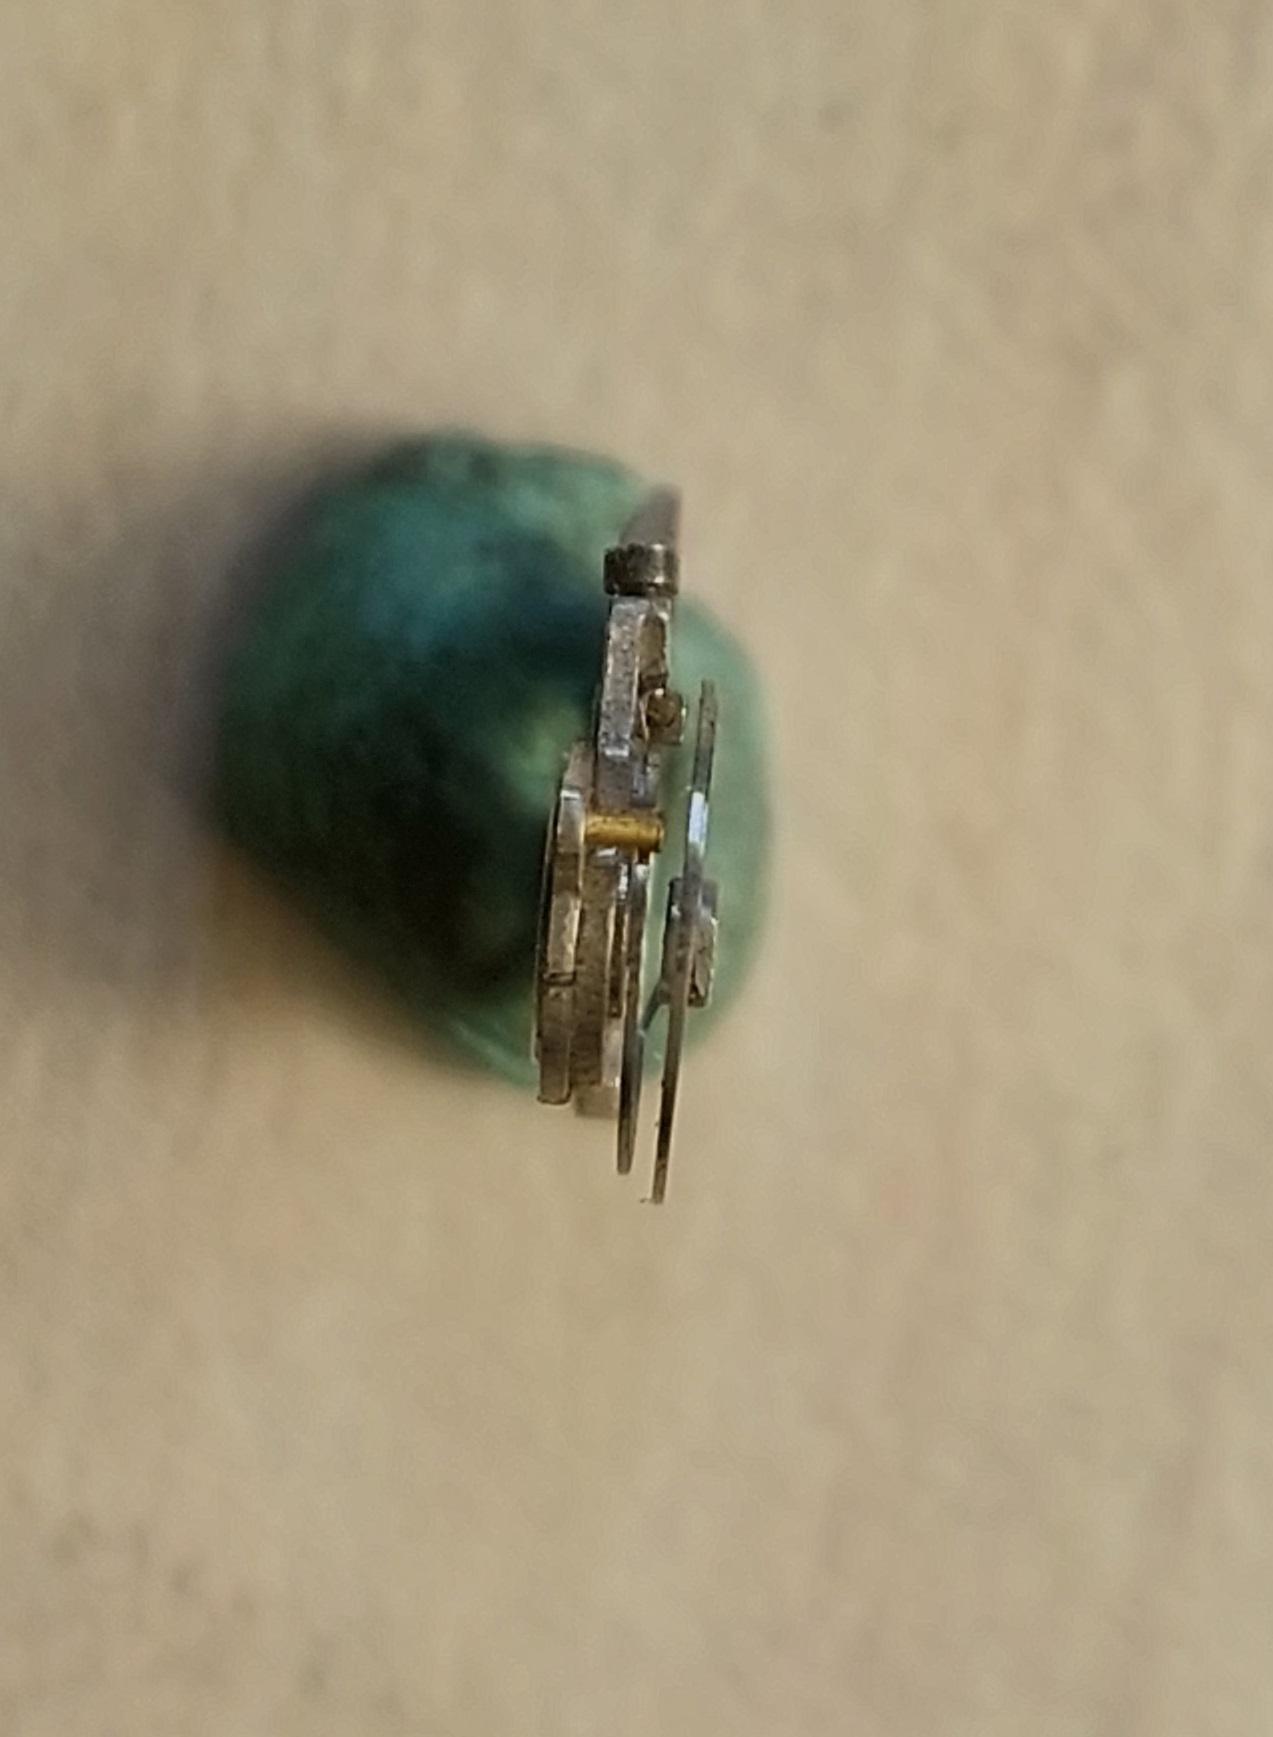
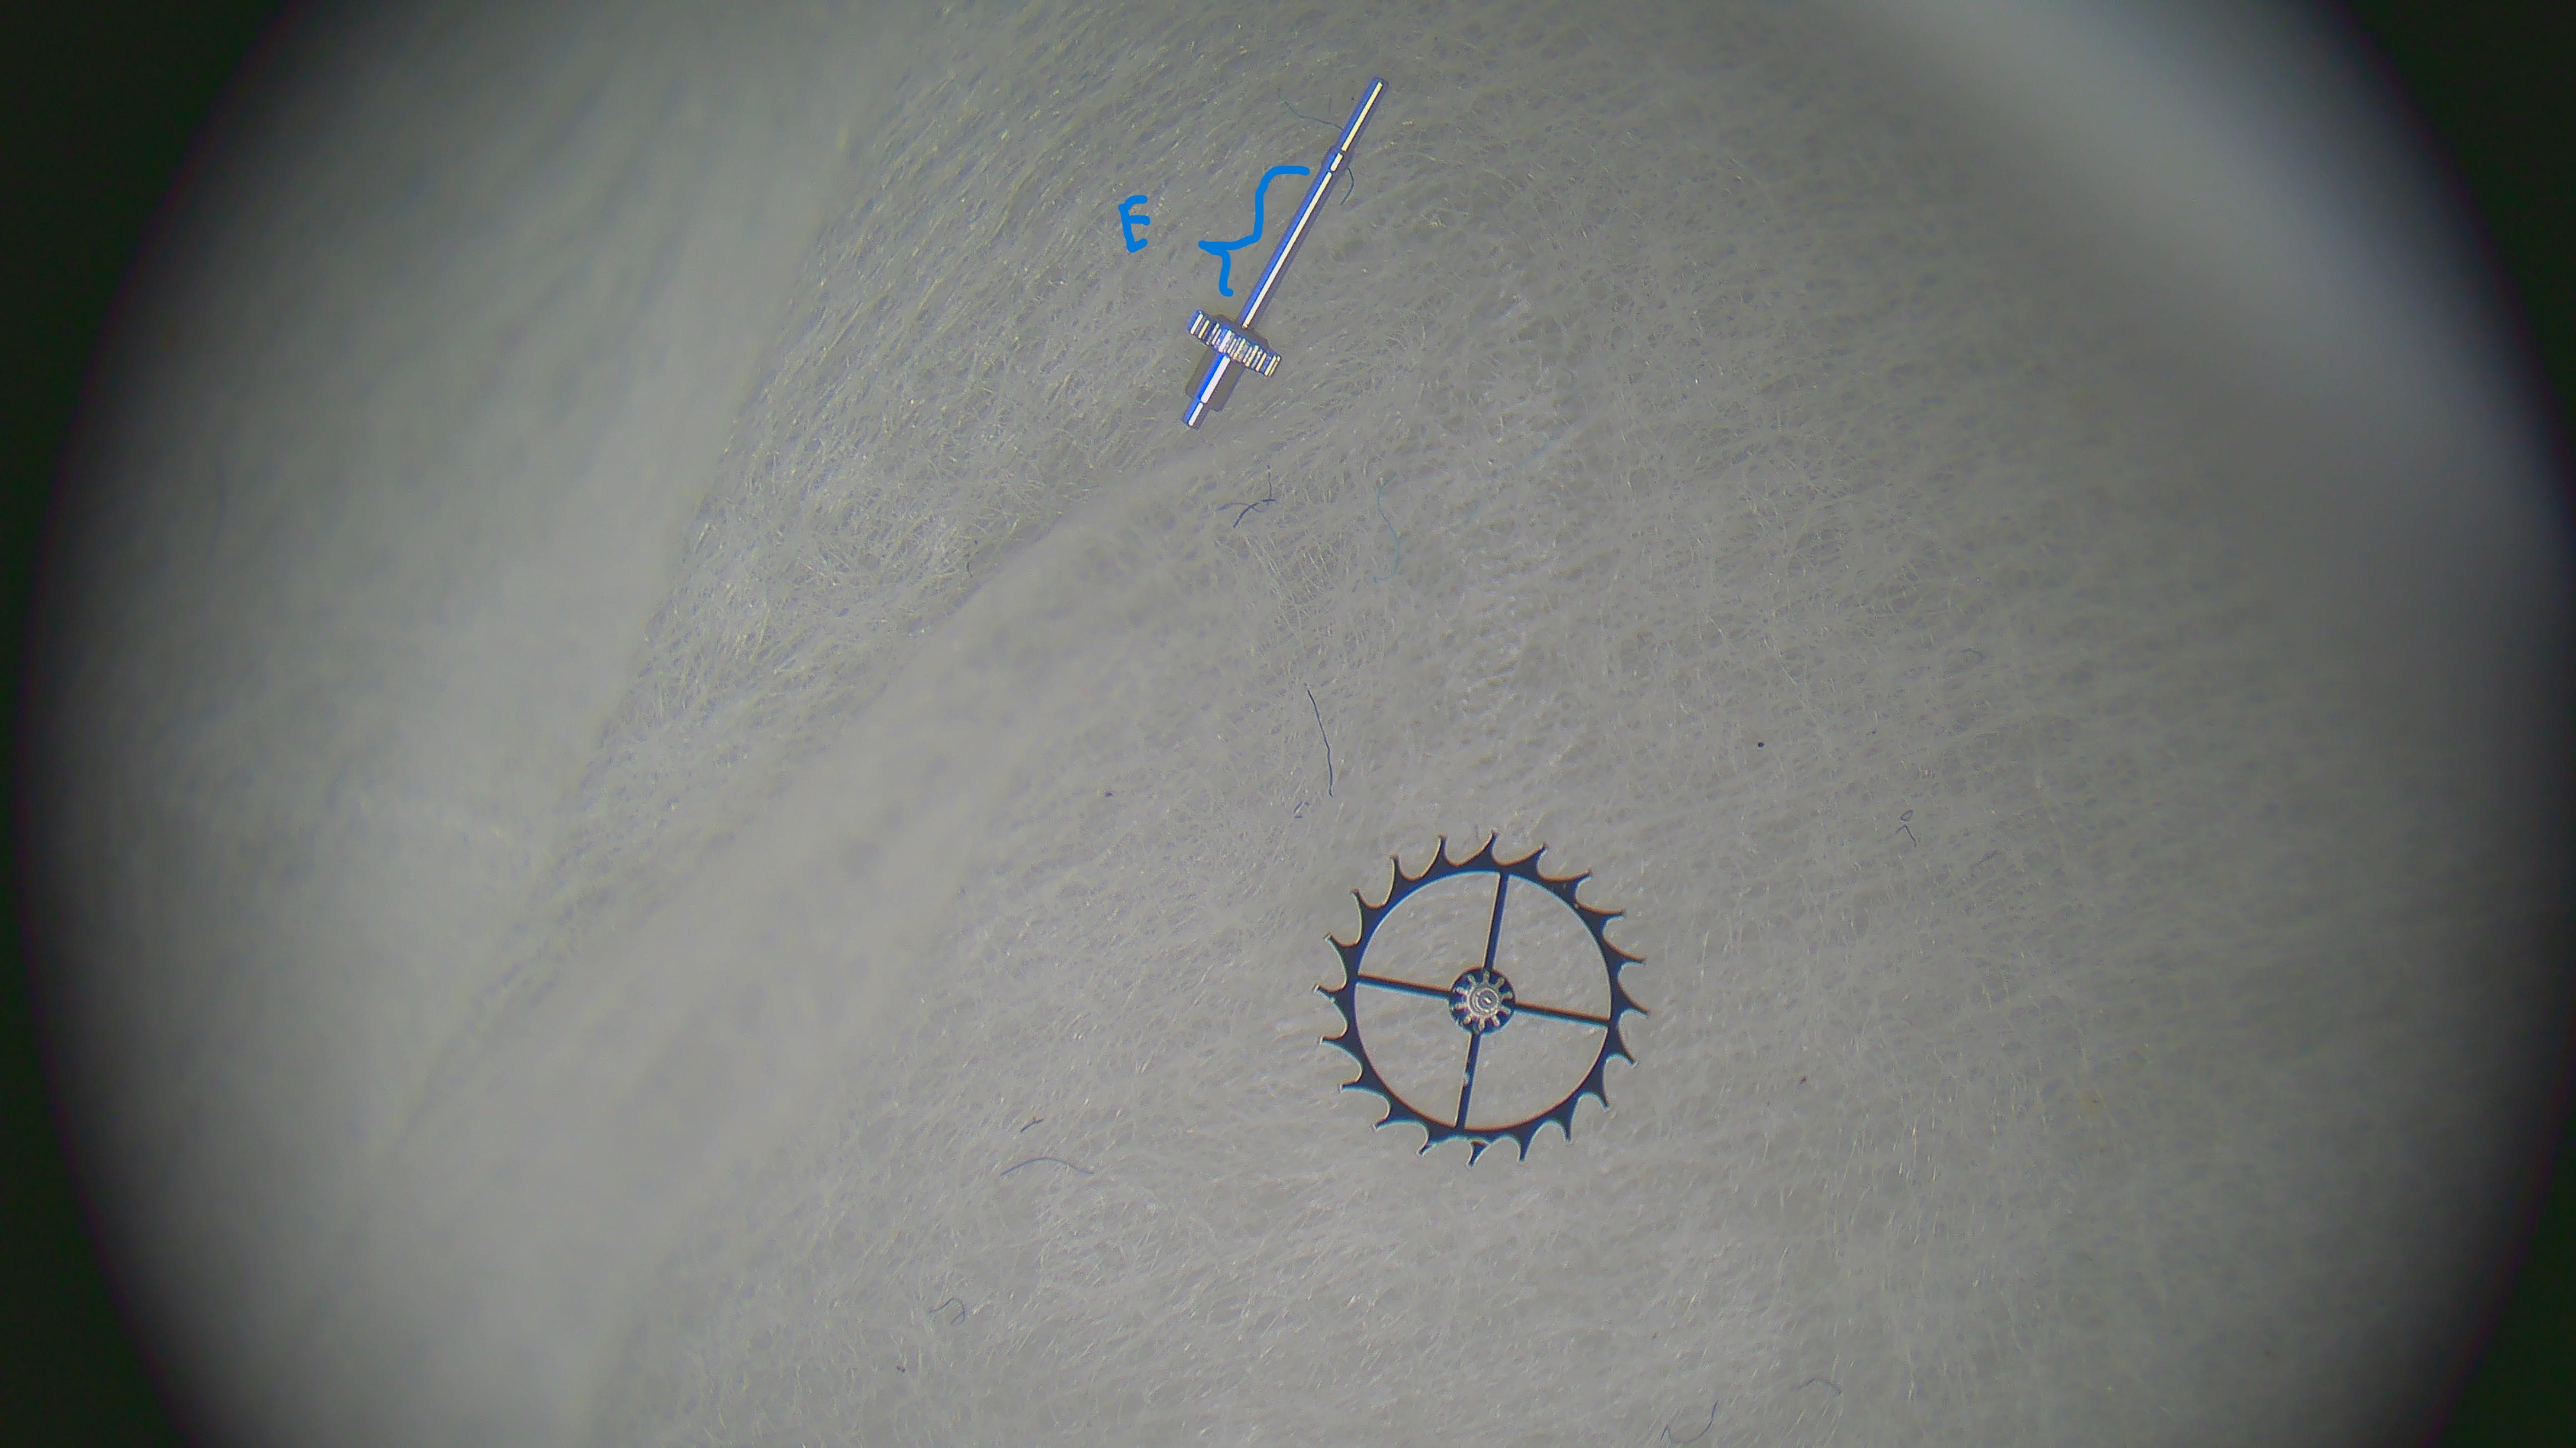
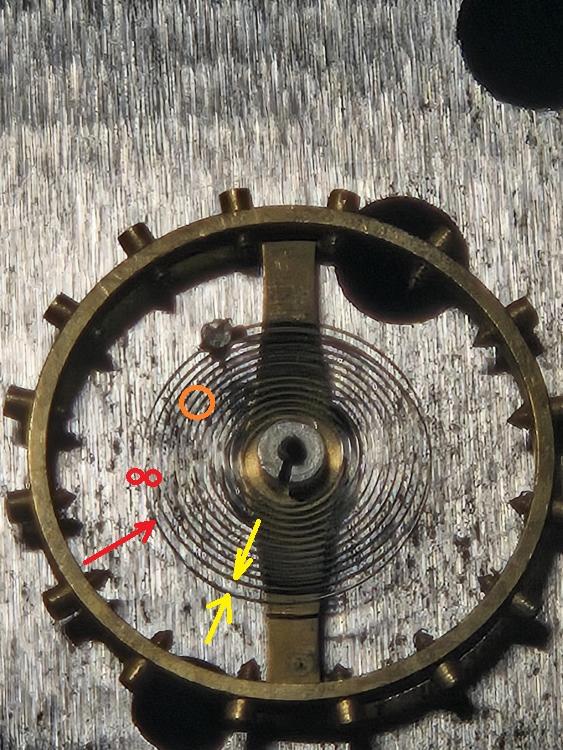
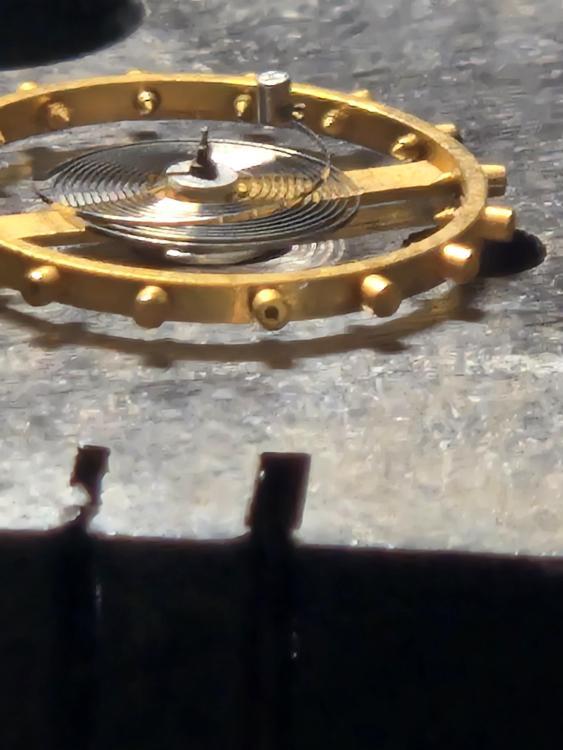
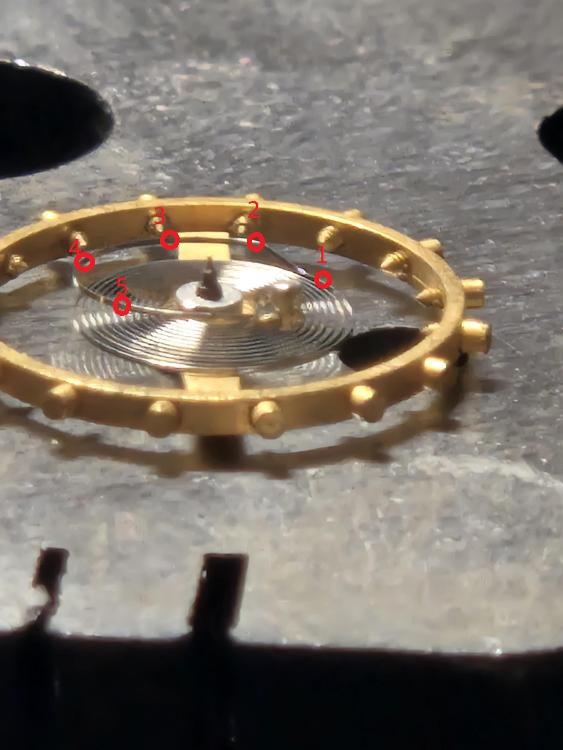
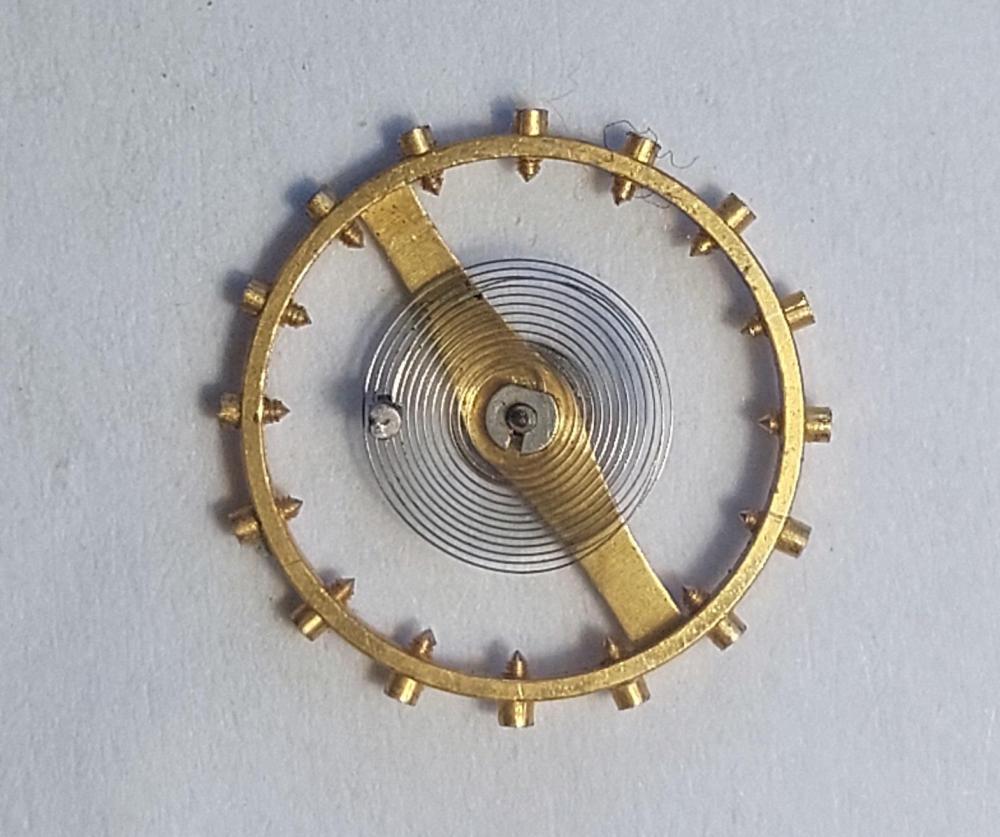
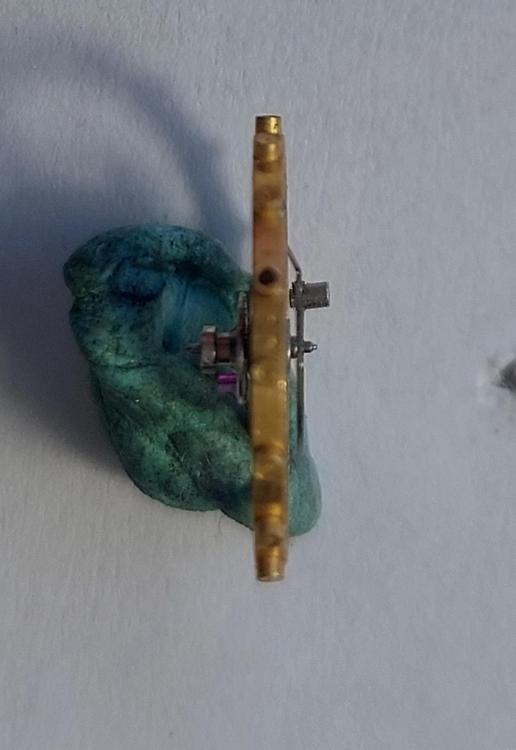
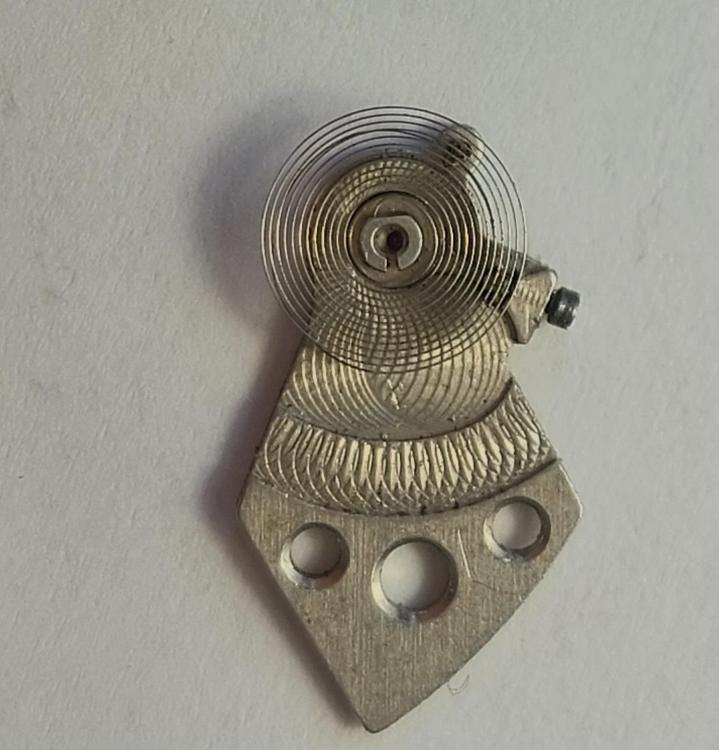
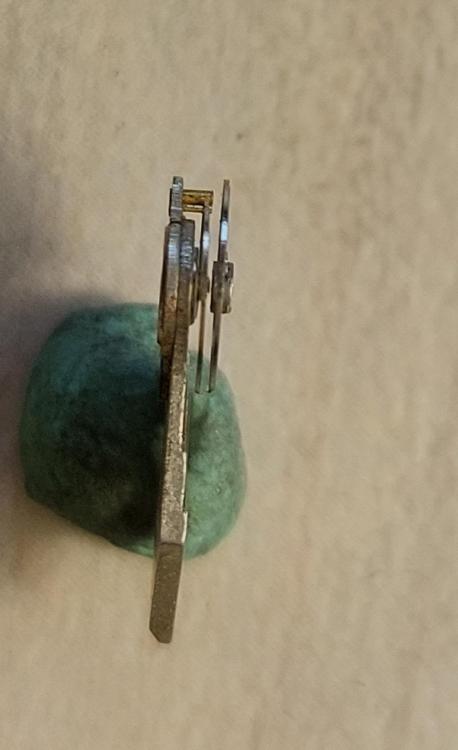
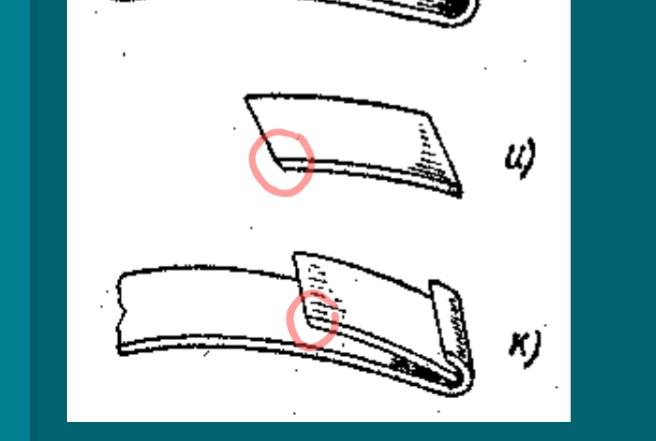
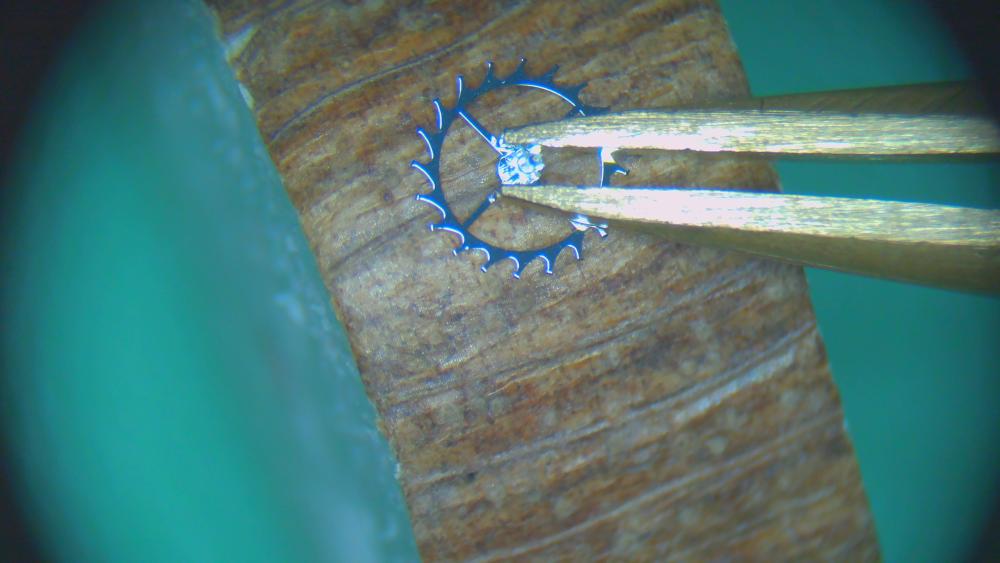
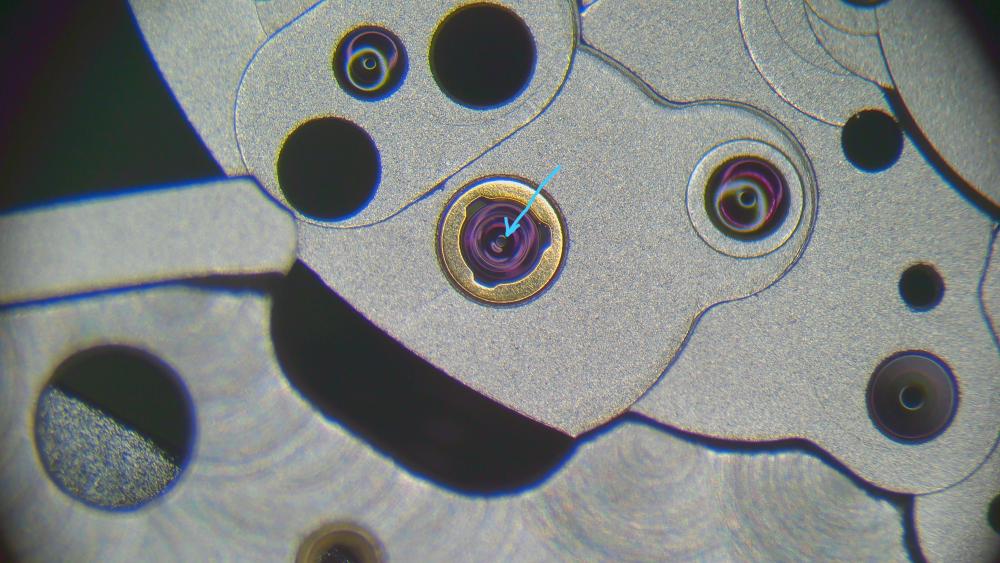
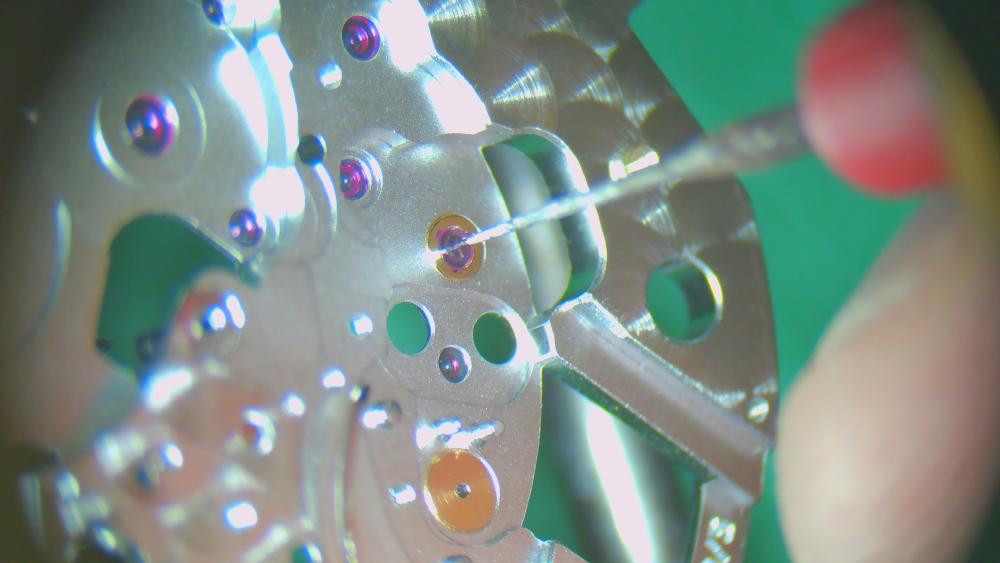
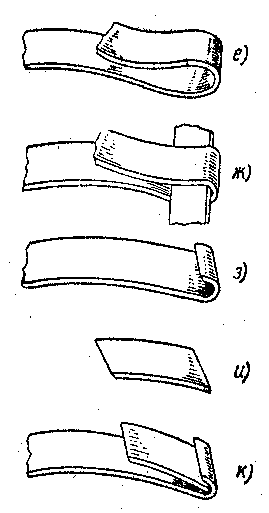
OK, I will start with some pictures of the spring as it should be. As You see, most of the picture are from aside and the aim is to show that the overcoil must be in a plain that is parallel to the spring body. The distance from every point of the overcoil to the spring body is equal. This distance is determined by the 'Z'-curve, which is actually the place where the overcoil lifts above the spring body. Then I have shown a picture from above - this is to show how the overcoil must look and where is the place of the stud relative to spring body - this is above the 4th coil from the periphery to center. Now here is You spring: It is obvious that the overcoil is twisted up. This is the main problem, as the spring with such overcoil will be pressed towards the balance arm. What to do? You need to untwist it. You see points from 1 to 5. The idea is to untwist portion by portion. You must use 2 tweezers. One will grasp the spring in point 1, the other in point 2 and You will twist by rotating tweezers 2 relatively to 1 in untwisting direction. Actually, tweezers at 1 will stay still, the tips of tweezers 2 will be guided in place and the tweezers tilted a little in a manner that grasping the spring will cause twisting. You look at the height of point 3 and when it gets equal to the height of point 2 (looking from aside), then this is done and You move one point ahead - grasp in points 2 and 3 and observe at 4, and so on to the end. This will need some practice, but what is needed is patience and good sharp tweezers. The good thing is that the overcoil is above the spring body and grasping with tweezers is easy. In the end, the overcoil must be in plain and parallel to the spring body. The distance between the stud bottom and the spring should be about the 1.5 height of the spring (width of the band of which the spring is made). Next is the overcoil shape. You must bend the overcoil inwards in several places, beginning where I have shown. Use one tweezers and needle (or the other tweezers, but hold them closed and use as a needle). The tweezers must grasp where shown with two small red circles, the needle will press in place and with direction shown with red arrow, the aim is to bring the distance which is shown with yellow arrows the same as the spacing of the coils in the untouched places. Then continue shaping the overcoil moving ahead and to the end, when the stud will come where shown with orange circle. and the overcoil will start looking as needed. Then, check again the height of the overcoil and if needed, make small corrections. The lat thing is the portion where the spring is fixed to the stud. The interest thing is that the hole in the cock not always holds the stud upright and fixing the stud when replacing the balance assembly is always connected with spring adjustment near the stud. If the spring is OK, then it can be done without removing the spring from the balance, but for a newbie it will be easier to see what He does if the spring is removed. The last pictures show how the spring must look when fixed on the cock. To achieve this, the spring can be twisted and bent up/down near the stud in order to bring it parallel and bent left/right in order to make it stay without pressure between regulator pins. The collet should stay right above the stones, thus guarantee the spring is centered. I realize that it all sounds simple, but it is not so easy to do if one has not practice. And it is easier to start with alarm clocks first, then big pocket watches and then wrist ones. The idea is to understand what needs the result to be in the end and what is the way to do it step by step. In the end the spring should not touch anything, which means there should be safe distance between it and all the other things, no matter what the position of the movement and the position of the balance in the movement is.


 9 points
 -
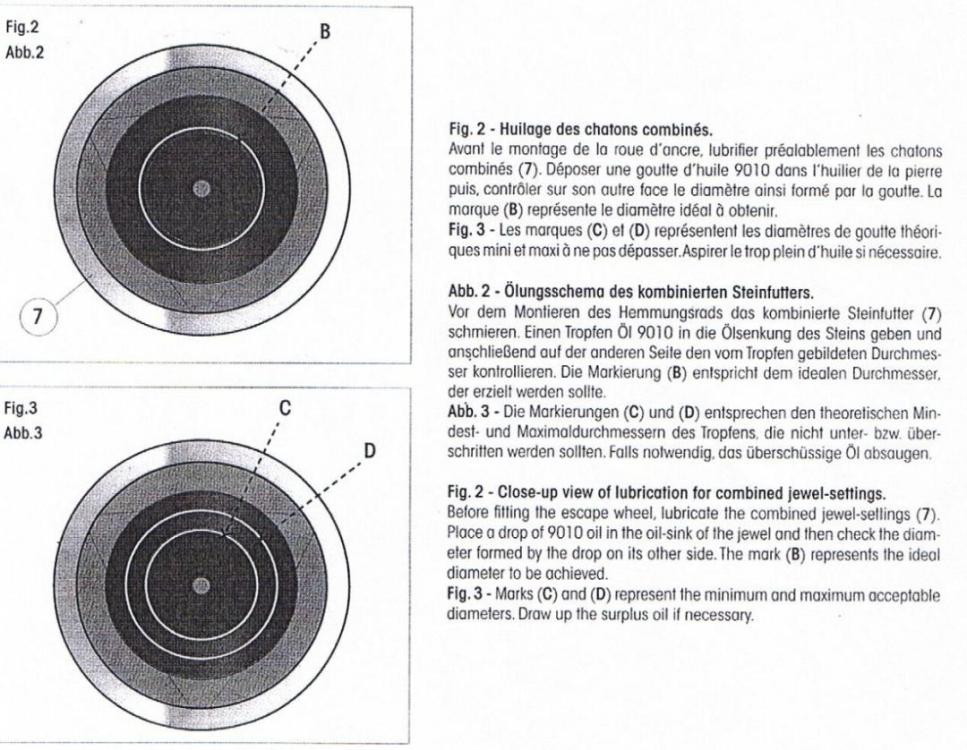
The easier way is to measure the pivot diameter. The other ways need specialized tools. There are gages for holes measuring - this may be set of pins with different known diameters , or tapered things like broaches that have marks for the diameter. Old stones are brittle, so one has to be careful when measures.4 points
-
I use these clock springs, as @nevenbekrievsuggested with my students before letting them loose on watch hairsprings, which get progressively smaller https://www.cousinsuk.com/product/hairsprings-clock4 points
-
Hello Nev, you have my highest respect that you took your time to explain and make photos! A few remarks: if bent by accident, that may be cured in just one location. Here this location seems to be between 1 and 3: directly opposite the highest part of the overcoil. Repair: twisting as explained. I was a bit astonished about your sample hairspring (top view). That is rather a sample how it should not look like . The last >90 deg to the stud are anything but concentric (what you correctly always use to emphasize). The overcoil is a #85 according given sizes. But I never saw such shape, it surely doesn‘t agree with the rules. Or was that the soviet type that had to differ from all the capitalism coil shapes? One set of sample coils that agree with theory (Helwig, Glashutte) Personally I avoid to give practical advice in cases like this unless I am sure the worker had learned everything about hairsprings and Breguet coils in advance (from textbooks, not from watching videos). Else I would regard it support for destroying hairsprings. Frank
 4 points
 -
OP, just to add that jewels in jewel settings also have different hole diameters. That is important to know when You search for jewel setting. There are lot of variations of one movement made in the years of production and often parts from a donor movement will not fit because pivot can't get in the jewel hole or enters but with wobble. This is true for the balances and balance staffs too.2 points
-
I’ll have a guess at paraffin/kerosene then Tom2 points
-
wnlewis here. I've long had a fascination with clocks, watches, and anything that takes small precise parts. Primarily I am interested in railroad pocket watches and wrist watches. I have a stainless steel Hamilton 992-B that I need to get back into running condition. I also have my father's Bulova Accutron. It needs a good cleaning, and the special battery adjuster that adapts a modern battery to the old watch. I have a Branson ultrasonic cleaner that can help with the cleaning. Now to be very careful and patient. Slow and one step at a time. My other great desire is to build a grandfather clock, including the mechanism. I have a Unimat SL lathe and intend to get the watch maker's spindle and other accessories for it to help with that project. I cut down a large black walnut tree several years ago and had the trunk slabbed. It is ready now to be cut down into good furniture and instrument grade lumber fit to make such a clock. Right now, I'm trying to ferret out a small screw from the back of a Garmin Forerunner 25 that I lost, and need to replace. So the challenge is to find a thread checker, measure an existing screw, find a suitable replacement, and turn it down to the proper length - if needed. Not exactly a mechanical watch, but a good start on getting into hobby; learn the basics, things like screws, etc. Hope to hear about other people's projects. Thanks and best wishes.1 point
-
Here's some details showing Waltham Jewels & Parts. https://watchguy.co.uk/tmp/Marshall 5.pdf1 point
-
Hello and welcome to the forum. Enjoy1 point
-
This actually can be replaced without any complicated jeweling tools. Waltham and Elgin and other American companies made these watches to be very quickly and frequently repaired, so the jewels are housed in brass settings which are then screwed down. All you need to do is find a donor, or a replacement for those jewels on ebay. A "parts or repair" 1894 movement will have the jewel you need, and it is also possible to search for new old stock or jewel lots for Waltham 16 size (or whatever size this happens to be). It is MUCH easier than replacing jewels on an old Swiss watch. The same goes for the balance complete - find a donor on ebay that is advertised as having a good balance and you may get a lot of the way there. Now, note that there is likely a serial number scratched onto the balance wheel that matches the serial of the movement plates. It is nice to keep these together and matched so keep your broken balance around until you are ready to invest in a staking set and learn to replace the staff. Then reunite your serial stamped parts. I find working on American pocket watches extremely rewarding, and if you like it, you'l end up collecting a lot of interesting purpose-made tools. Also, familiarize yourself with daveswatchparts.com - He stocks a lot of parts for American movements, and even if something is not listed on his website there is a good chance he has it and can get you exactly what you need. Oh one other thing about the jewels - after removing the screws, you can just gently push them out with pegwood. The whole brass setting will slide out. While it is firmly fit, it won't be "friction" fit such that it takes force and a special tool to remove. Pegwood will do, and there are also vintage brass "jewel pusher" tools which are sort of a star shaped thing with multiple sizes of brass nubs designed to push on the settings without cracking the jewels.1 point
-
1 point
-
Hello and welcome from Leeds, England.1 point
-
Welcome, and a tip from an amateur to an amateur: Buy yourself a pack of strong magnets from amazon or ebay, glue them to a ruler or similar, and you will have your most valuable tool as you gain control of your tweezers. Use your magnetic wand with the same motion as an airport security agent sweeping and you will usually find your lost ferrous parts in secods. (Demagnetize them after, and store it away from your work area)1 point
-
Hi Frank, I agree that the overcoil shape is a little bit odd, but I just toke it out of a movement and it was looking correct in place. The picture from above now I see is not very clear, in a manner that the overcoil is not easy to see and outline against the body of the spring, but in practice may be not 90 but the last 85 degr. are concentric. It is enough for the max regulator movement to '+'. Actually, the coil should be like 70 or 75. The radius gradually must decrease and then last 90 degr to be concentric. The usual way of bending the spring to this state is when the balance it taken out, then the body of the spring is caught by the center seconds wheel and all the overcoil gets twisted and stretched - this are my observations on this calibre. By the way, all balances from Raketa 2603, Wostok 2605 and all Pobeda-type 26 calibres with antishock will fit here. Sometimes even 2602 movements without antishock are fitted with antishock type balances and such balance will fit. Only 2609HA is totally different.1 point
-
Hi and welcome to the forum. Enjouy1 point
-
That didn't click in my head, the legs are on backwards . "The 3 legs of Mann" sounds more like a porn movie1 point
-
Hi Corey from South Carolina. It’s so nice your cat lets you try watchmaking. From the photo it’s clear who runs things … …that Elgin is valuable! Hands in good condition are difficult to locate- have fun…1 point
-
I think the Isle of Man is ahead of you on that Yes, it's an interesting wheel. It allows manual winding without driving the wheels of the automatic winding works. It slips on one direction. It's discussed a bit above. I will post details when I get to further assembly.1 point
-
Thank you for your introduction and welcome to this friendly forum. We all look forward to your contributions and continued involvement. If there is anything we can help you with don’t be afraid to ask. Nice clear photos can help a lot.1 point
-
You're welcome to join @Neverenoughwatches. Could you just drive past Cousins and pick up that mainspring that I just ordered a second time (because the first one seems to be lost in the French postal service)? Then we can get going with the rest of the watch. Here's the picture from disassembly of what you find under the barrel bridge (what I'm holding with the tweezers is the 3rd wheel which belongs under the train bridge):
 1 point
 -
Welcome Corey, it sounds like you've already made a good start. Congratulations for having the nerve for tackling a hairspring at this early stage . Your next stop is tools, tools and then some more tools, and then after that...yet more tools. Enjoy.1 point
-
There's no centre (or "central") wheel. There's a "free canon pinion on the dial side that is driven directly by the barrel; and a central seconds pinion (not wheel) on the train side.1 point
-
Yes. I see that the edge has a bevel to ensure it will work its way into the underside of the ledge.1 point
-
Welcome to the forum Corey, enjoy1 point
-
You could probably measure up the barrel and order a new mainspring by size. There’s a few formulas for calculating mainspring dimensions. Not at all, there's nothing to apologise for.1 point
-
As it is now, it's absolutely no problem to put the barrel1 point
-
Hello and welcome from Leeds, England.1 point
-
I've found this seperate loose hook a couplevof times in old movements Notice this edge to make on the loose hook to catch the barrel wall ledge.
 1 point
 -
Bingo. I was surprised at how effective it was. I just poured a bit into a disposable aluminum baking tray and used a paintbrush to scrub the surfaces clean. Now if we can figure out what brass brightening agent can be used in an oil-based cleaner, we'll have an alternative to L&R #111 cleaner.1 point
-
Hint - This solvent is dirt cheap and is @Neverenoughwatches favorite cleaning agent.1 point
-
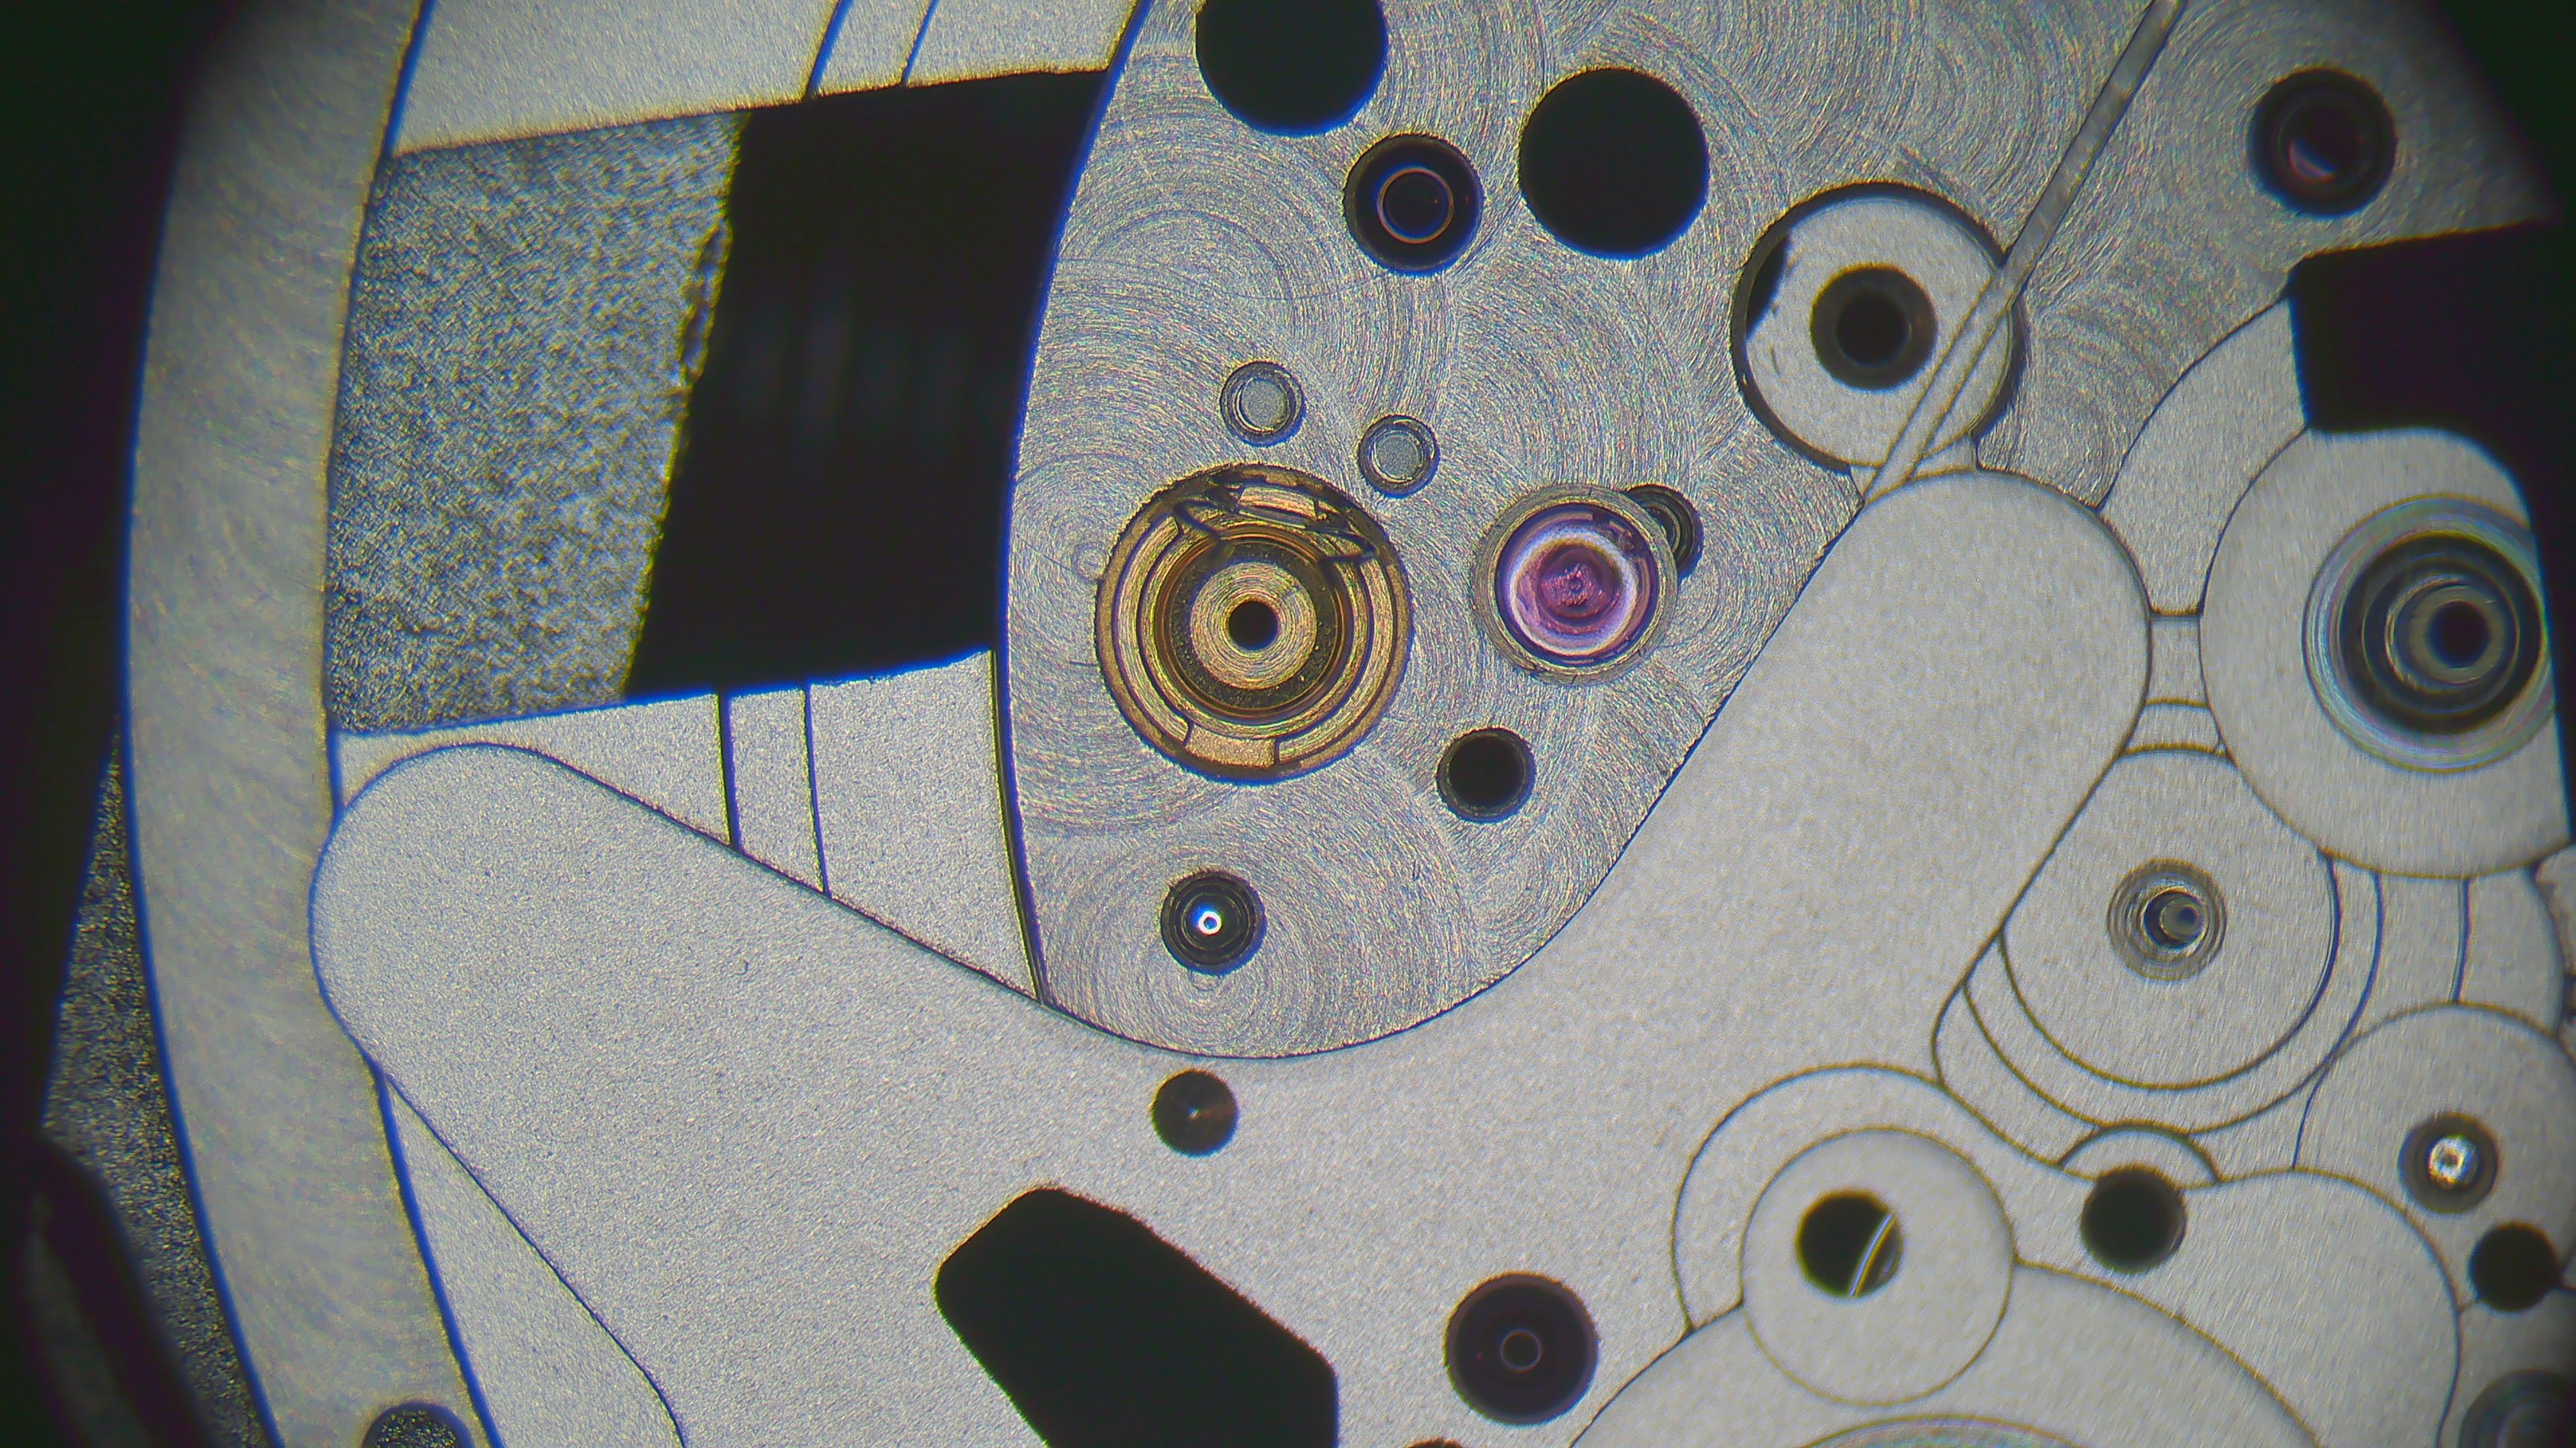
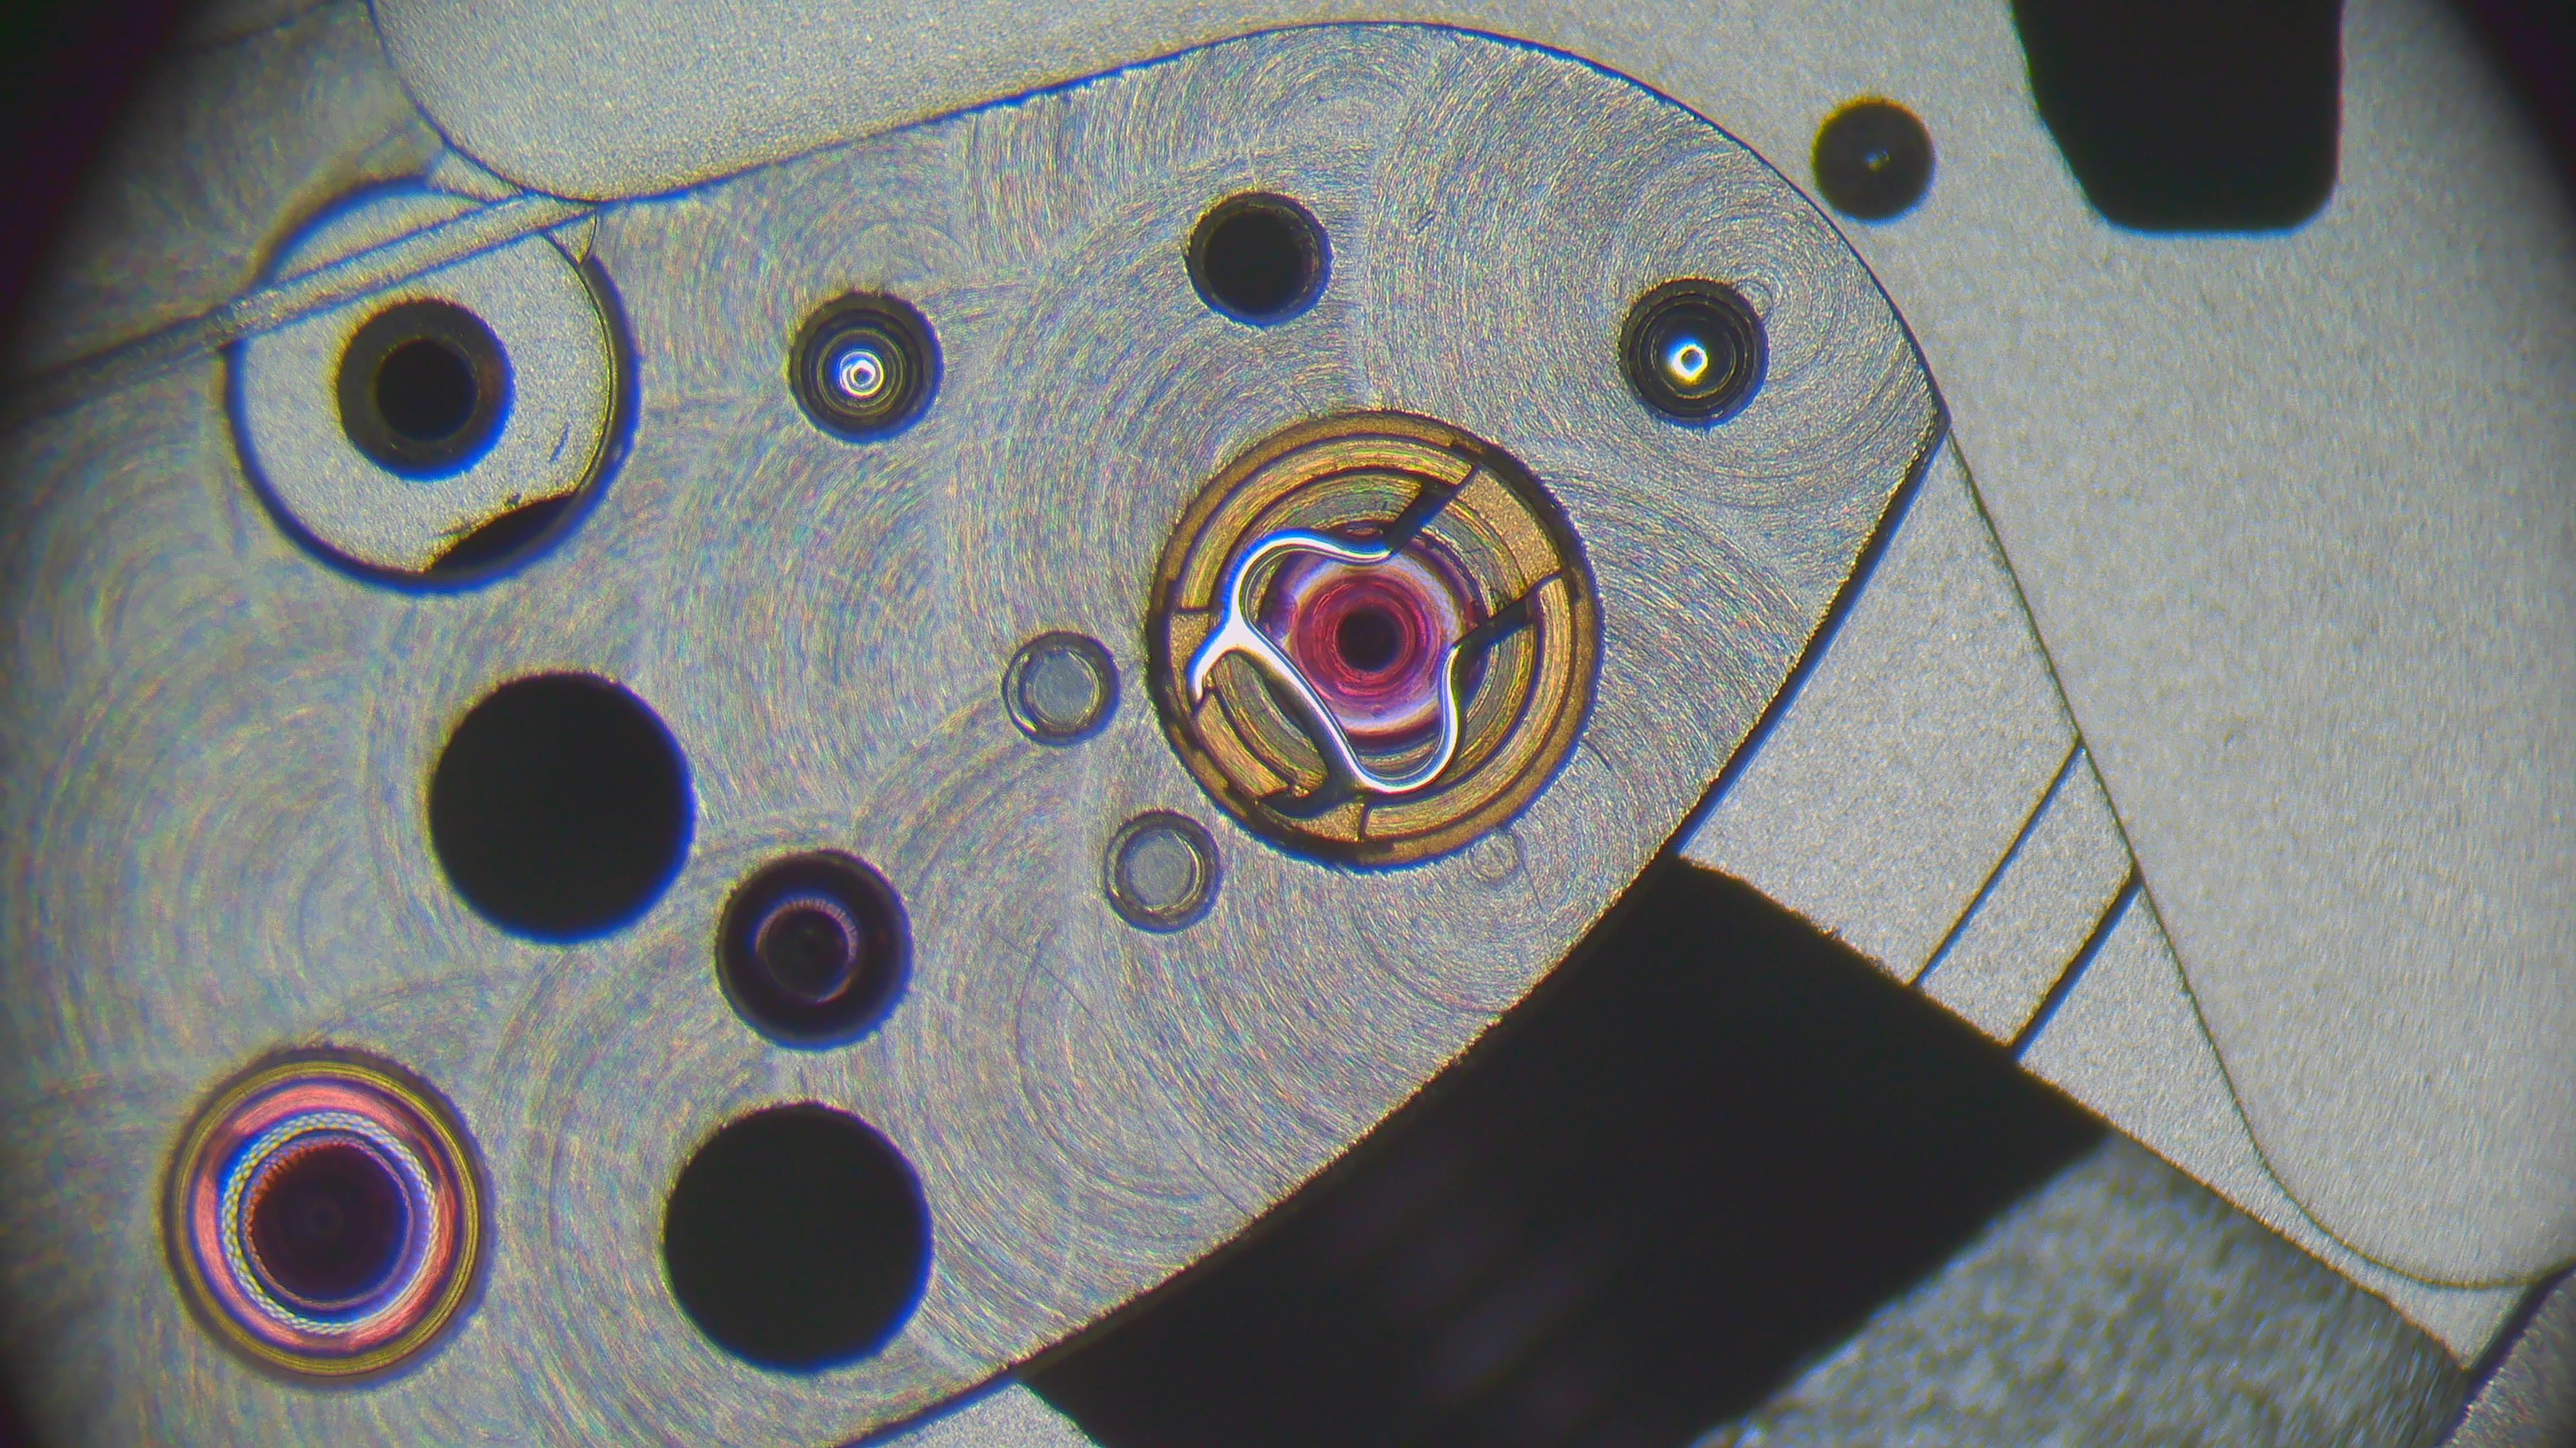
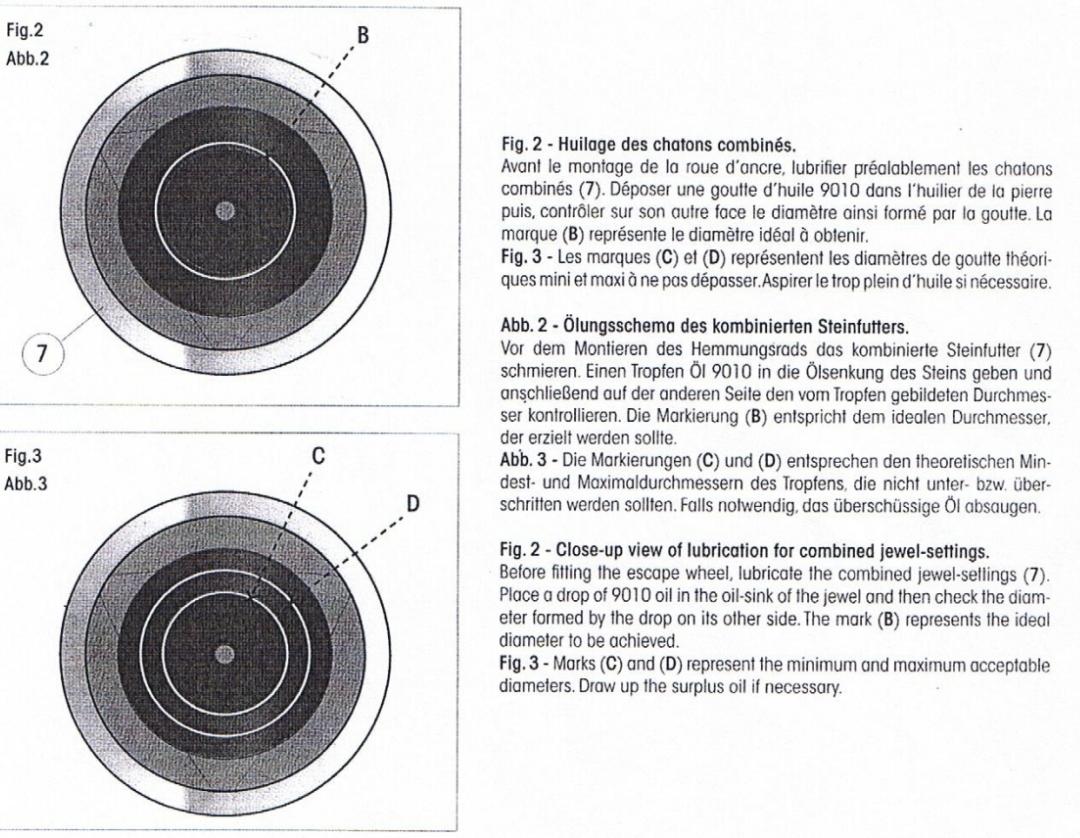
Sorry, very slow and piecemeal progress. I'm stuck because the new mainspring from Cousins is super delayed or maybe even lost by the French postal service. But well, here are the next steps that I was already able to do before the barrel and barrel bridge. Epilame treatment of pallets (syringe technique), escape wheel (removing epilame on pivots again with pithwood) and parts of the centre seconds wheel (I was probably over thinking to only apply to the centre part...). Oiling the fixed jewel settings of the escape wheel is indeed quite fiddly (like @Kalanag noted). Put a drop of oil and then push it through with a sharpend and polished oiler. I was surprised how much oil this setting swallowed until I reached the desired amount shown in the service manual Positioning the train wheels and fitted the bridge Turning the movement around to replace the oiled (not shown) balance jewels.


 1 point
 -
Cartier used some pretty hum-drum movements in the 70s (80s?), A. Schield, ETA. 30s, they were using LeCoultre stuff. Everything else about it looks cheap, not Cartier. On Edit- for a number of years I did "overboard/load" vintage work for Cartier as an external. I developed a real respect for the brand in that time- no holds barred approach to vintage SAV, and I know they ate much of the cost to provide a good service.1 point
-
I was about the play the 'age card'. I can't blame the wine, as I'm only just about to open the bottle To keep the gap constant, both jewels need moving.1 point
-
Friction only depends on surface area (for a given roughness of surfaces), so you might be nuts, but not in this case.1 point
-
Hi Mike, does the spring end now looks like on this picture? I mean the piece may have broke and now the end is without it, but may just be this kind of spring repair:
 1 point
 -
sure. Thickness of stainless steel (304 type or V2A, apparently): 0.35mm Width of all the three strips: 12mm Length of all three strips: 107mm The upright strips are bent 90° for 12mm at the bottom to attach to the base strip, in other words, those ones are 95mm upright + 12mm horizontal = 107mm total.1 point
-
It is faceted, which is on the inside, but subtle. Needs just the right light and angle to capture all of the facets, which are made up of appropriately 1cm each starting with one in the center. Then the dial has two finishes, the center square is brushed/lacquered violet sunburst, and the outer indices are sat on what looks like an overlaid matt deep sky blue. So with the facets its a nice effect in all. Crystal measures 30mm. Everything functions ok, a new crystal and a sweep second should see it complete.
 1 point
 -
Ive seen that before to make it as a hanging watch ( in a car ) Bottom lug was maybe damaged and easier to remove than to replace or even on purpose .1 point
-
Buggered Your English is coming along just great Nev.1 point
-
well those are all nice suggestion but, there is no plastic movement holder for this model. Rather it is a front loader and has a dial ring the fits between the dial and crystal. This hold the assembly in place.1 point
-
Hi all, I have uploaded a pdf copy of the Generale Ressorts catalogue. So that you can make yourself a hard copy. Handy to have in the drawer. (sometimes!). Even the pdf seems to be hard to find. Cheers Graziano. GeneraleRessorts.pdf1 point