Leaderboard


Popular Content
Showing content with the highest reputation on 01/12/25 in Posts
-
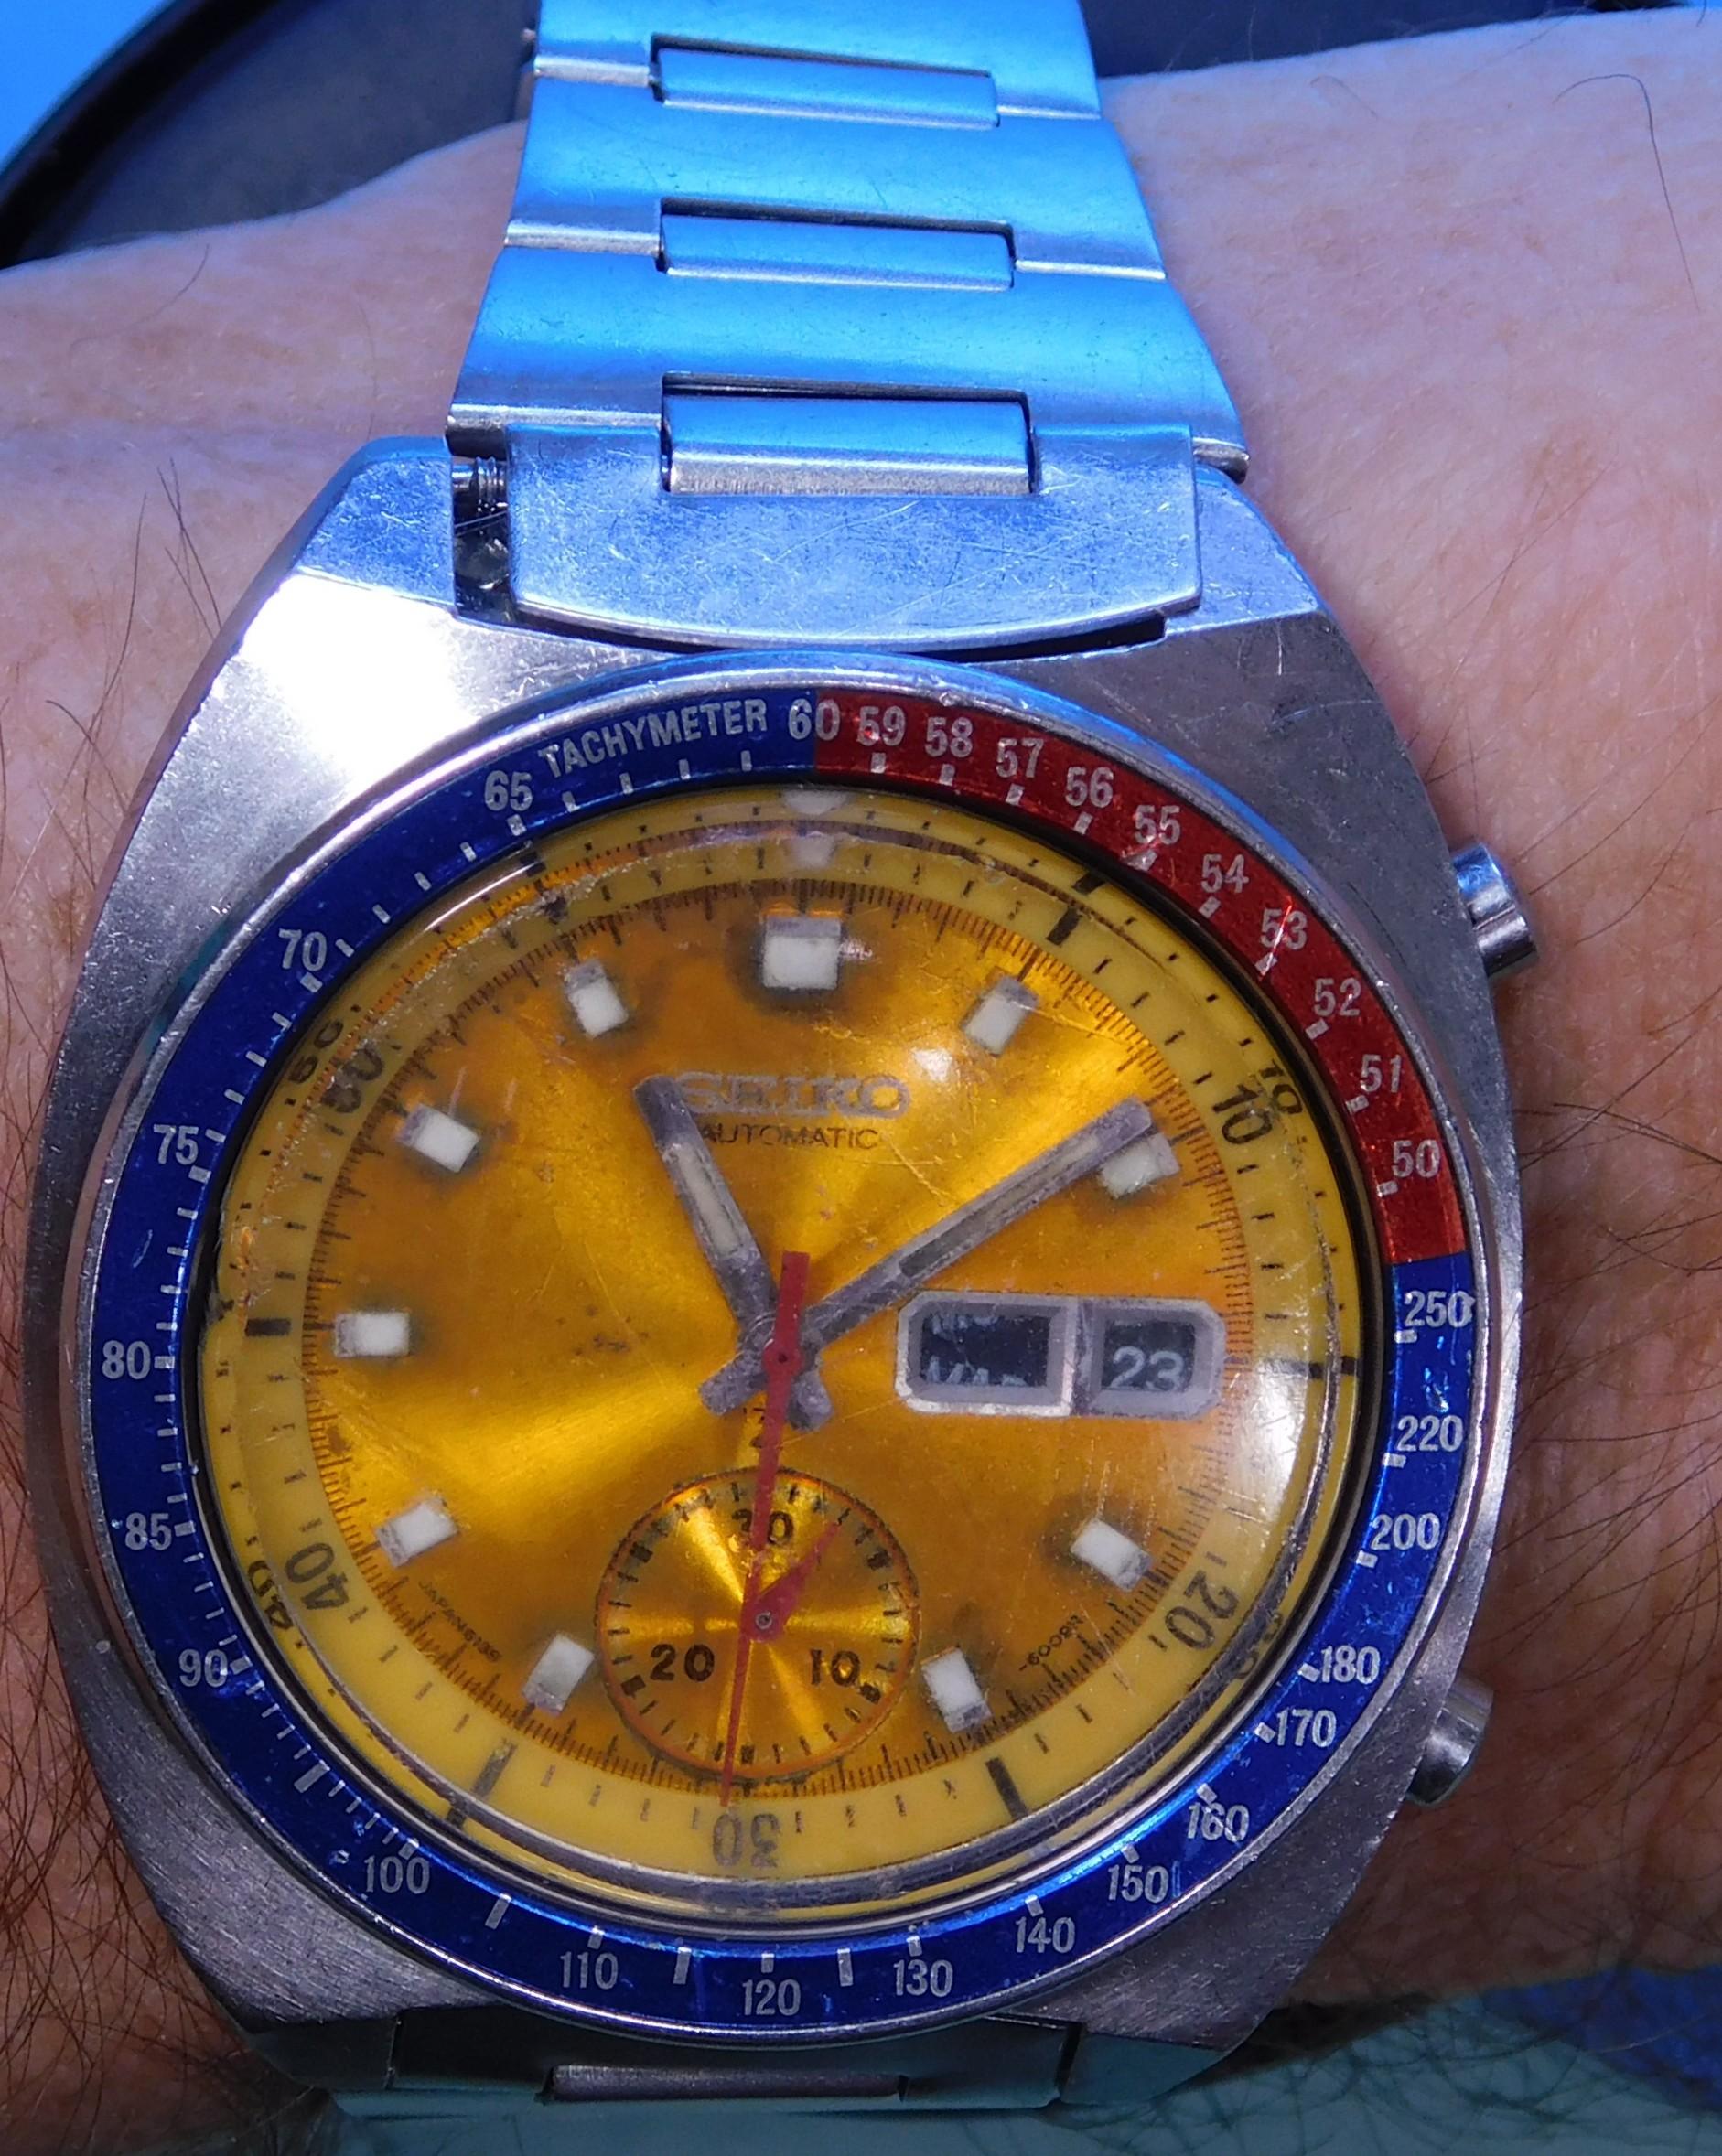
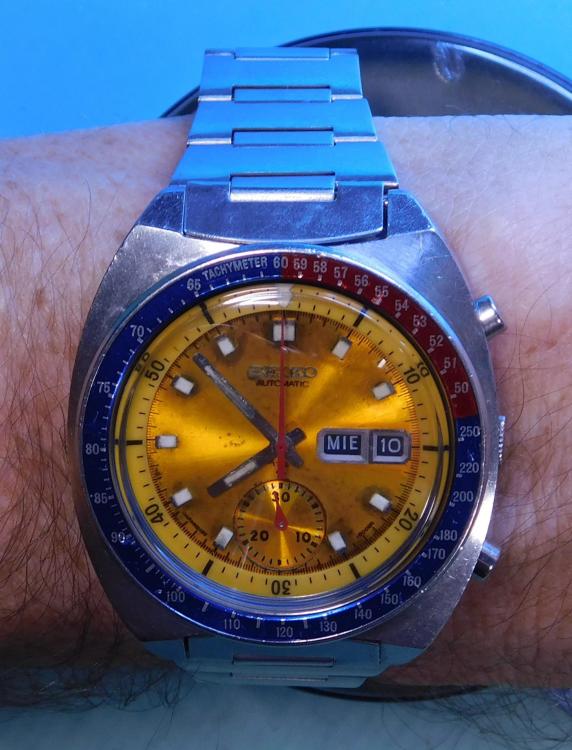
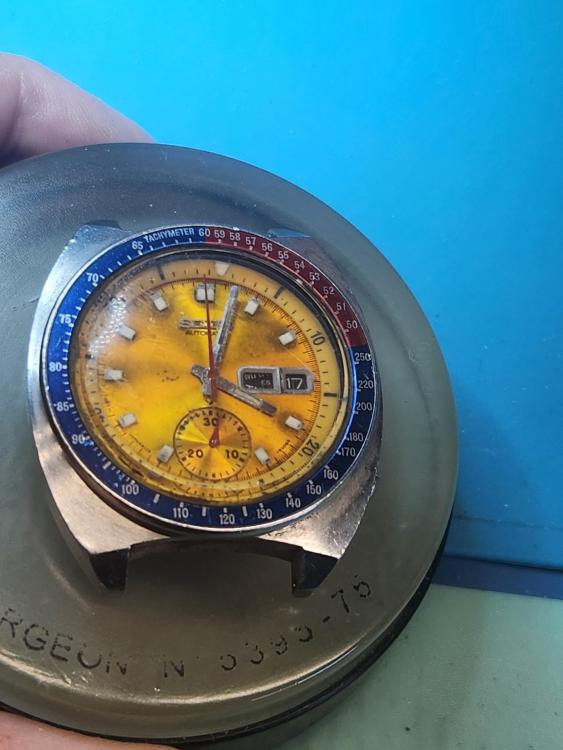
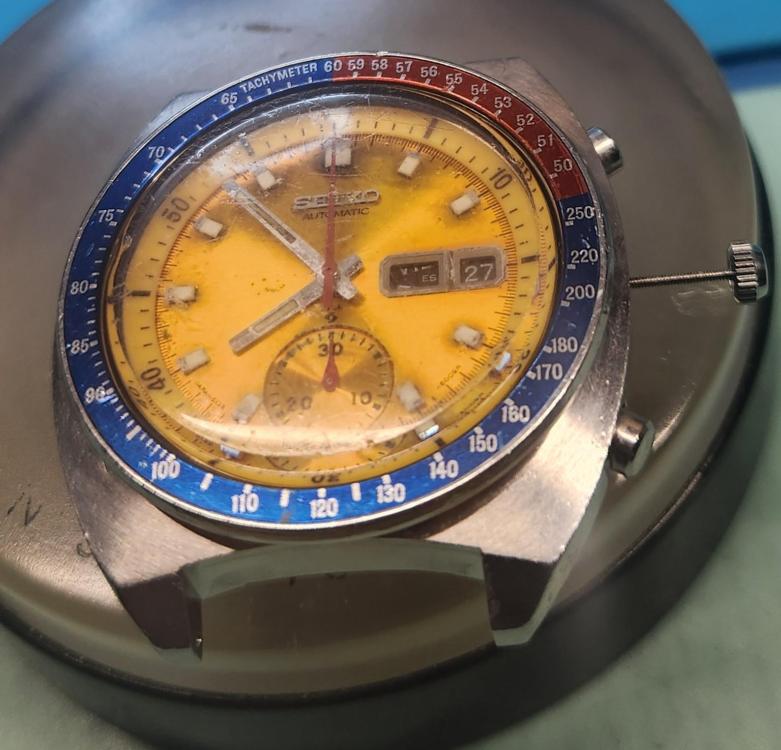
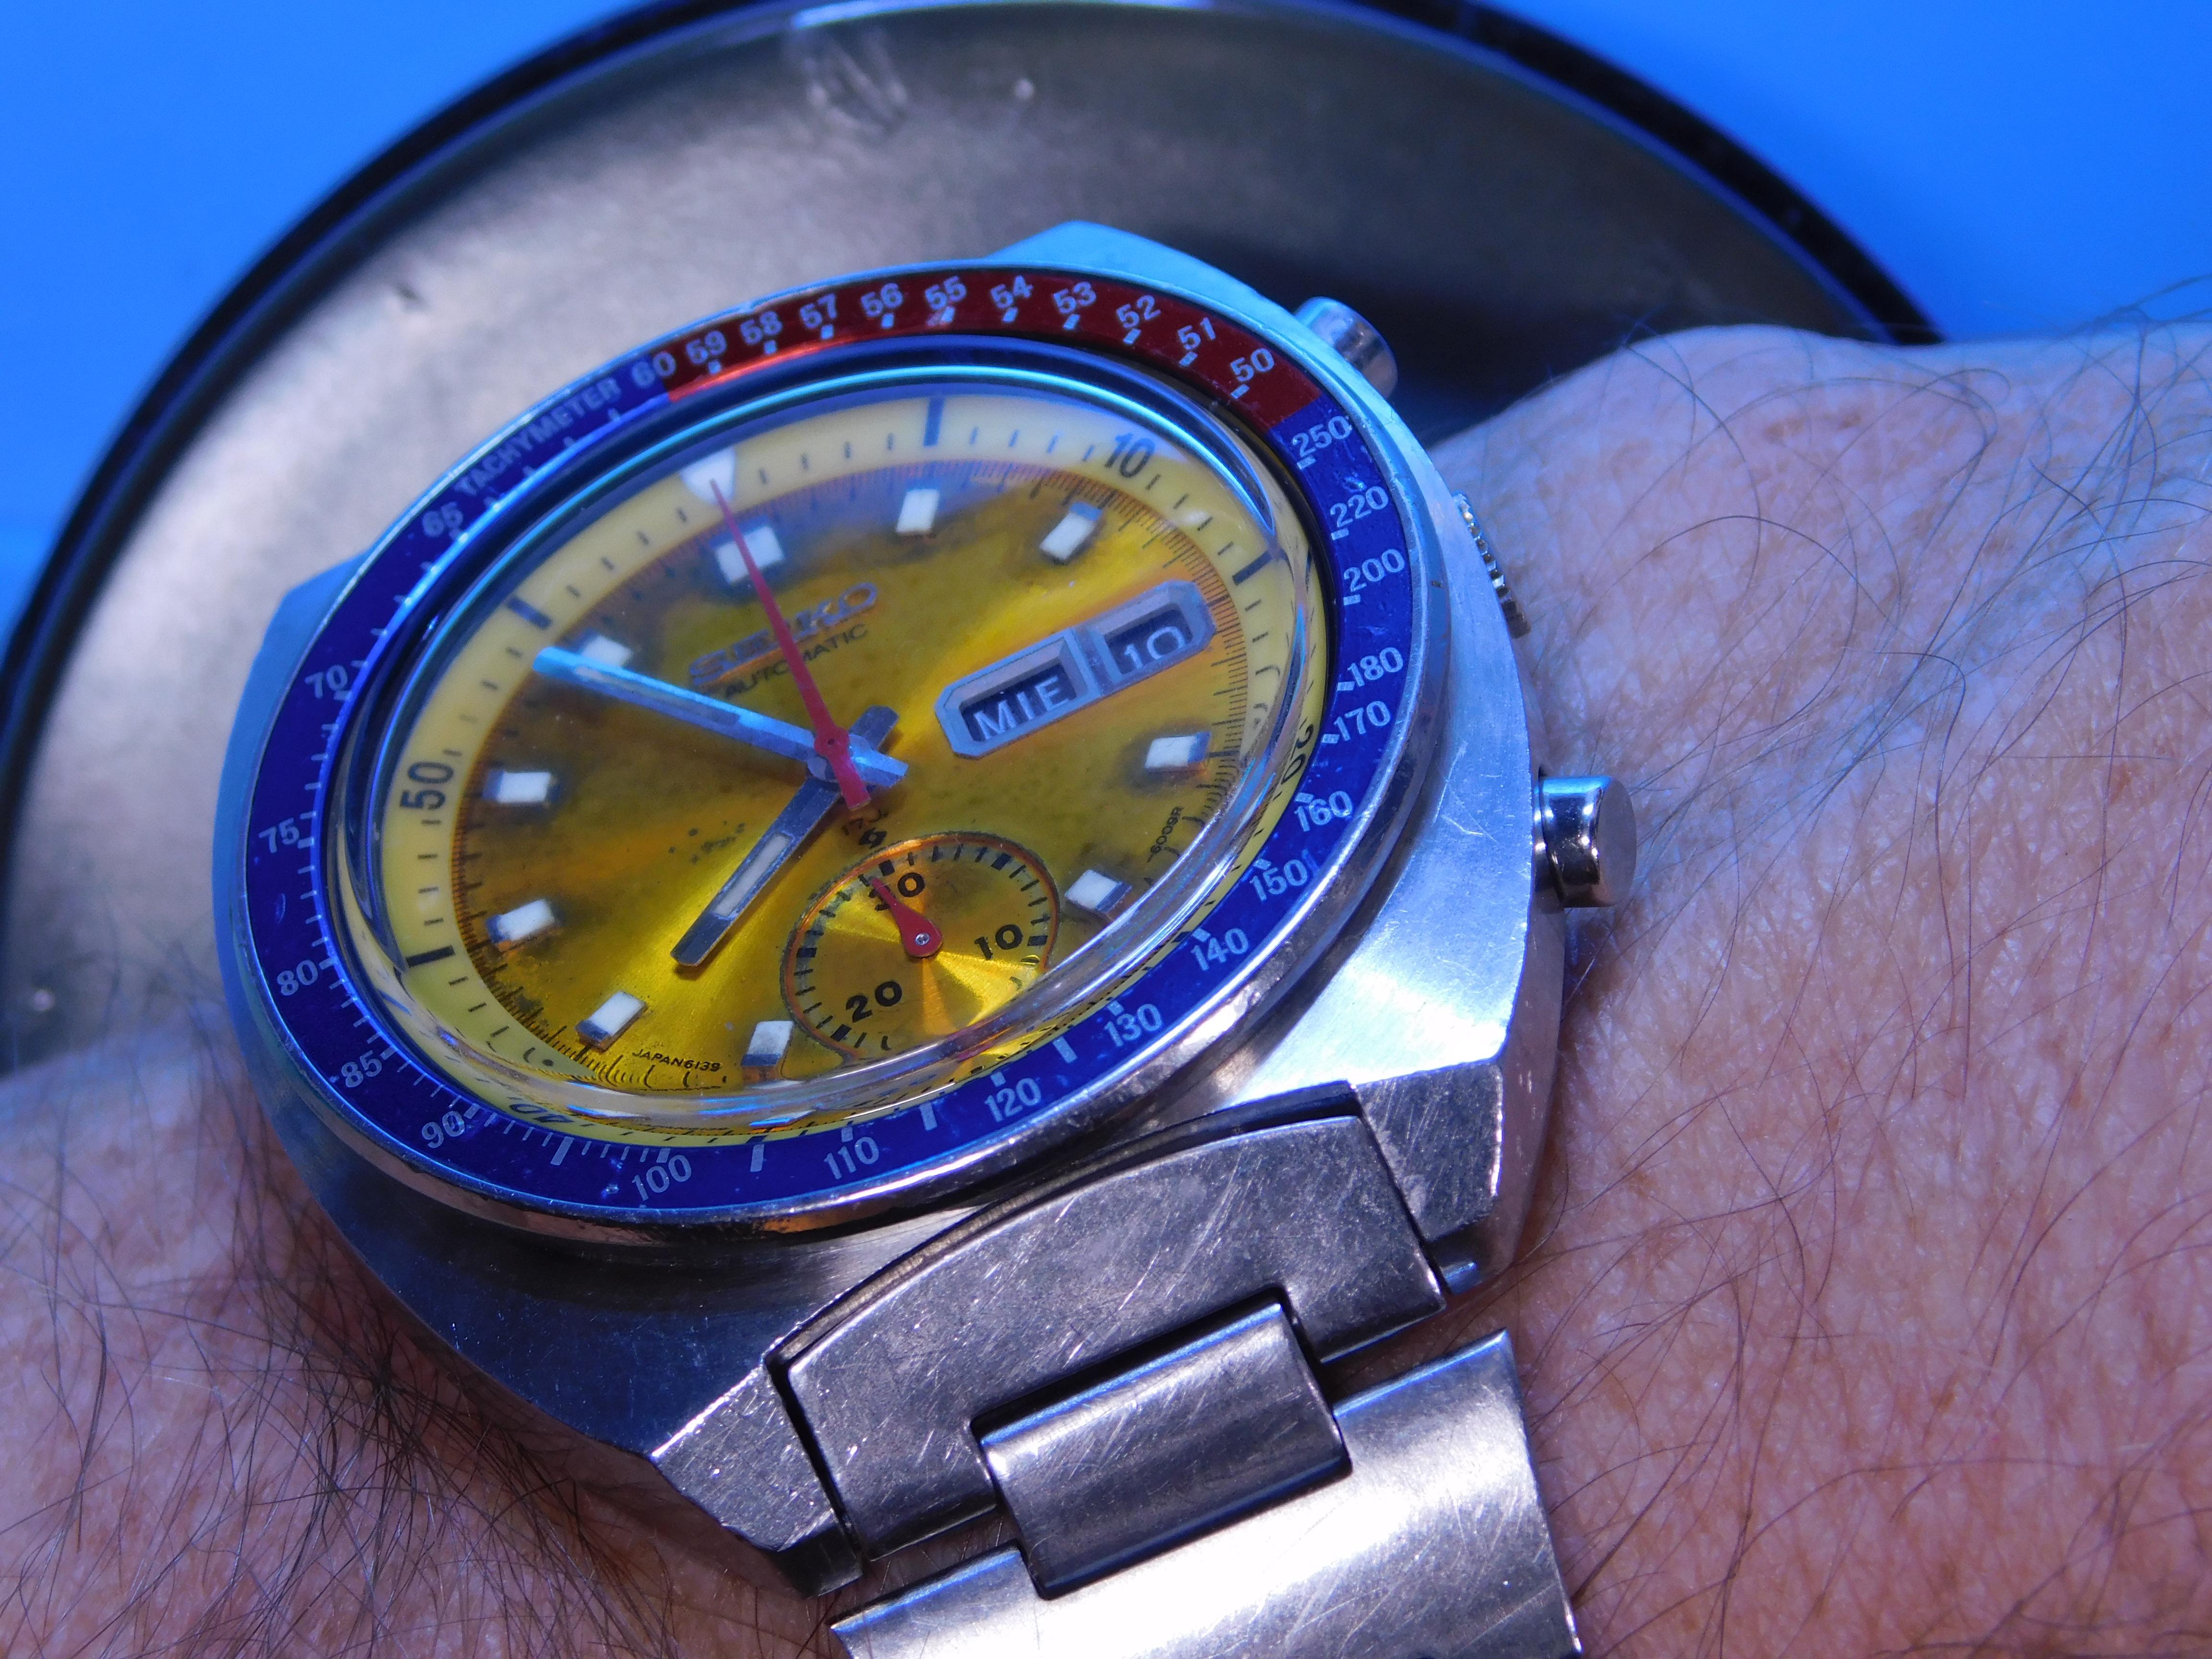
An update got a new crown and indicator wheel spring which I promptly sent into space when trying to install. Still looking for it and ordered another and got that one in. So looks like maybe some stem broke in the lost crown (was not one when purchased) and so the jump day date quickset doesn't work when cased up as just a little too short So new stem on the way. But the crystal arrived as have the aftermarket pushers as placeholders until I can fix the old bent ones or aquire originals.
 5 points
 -
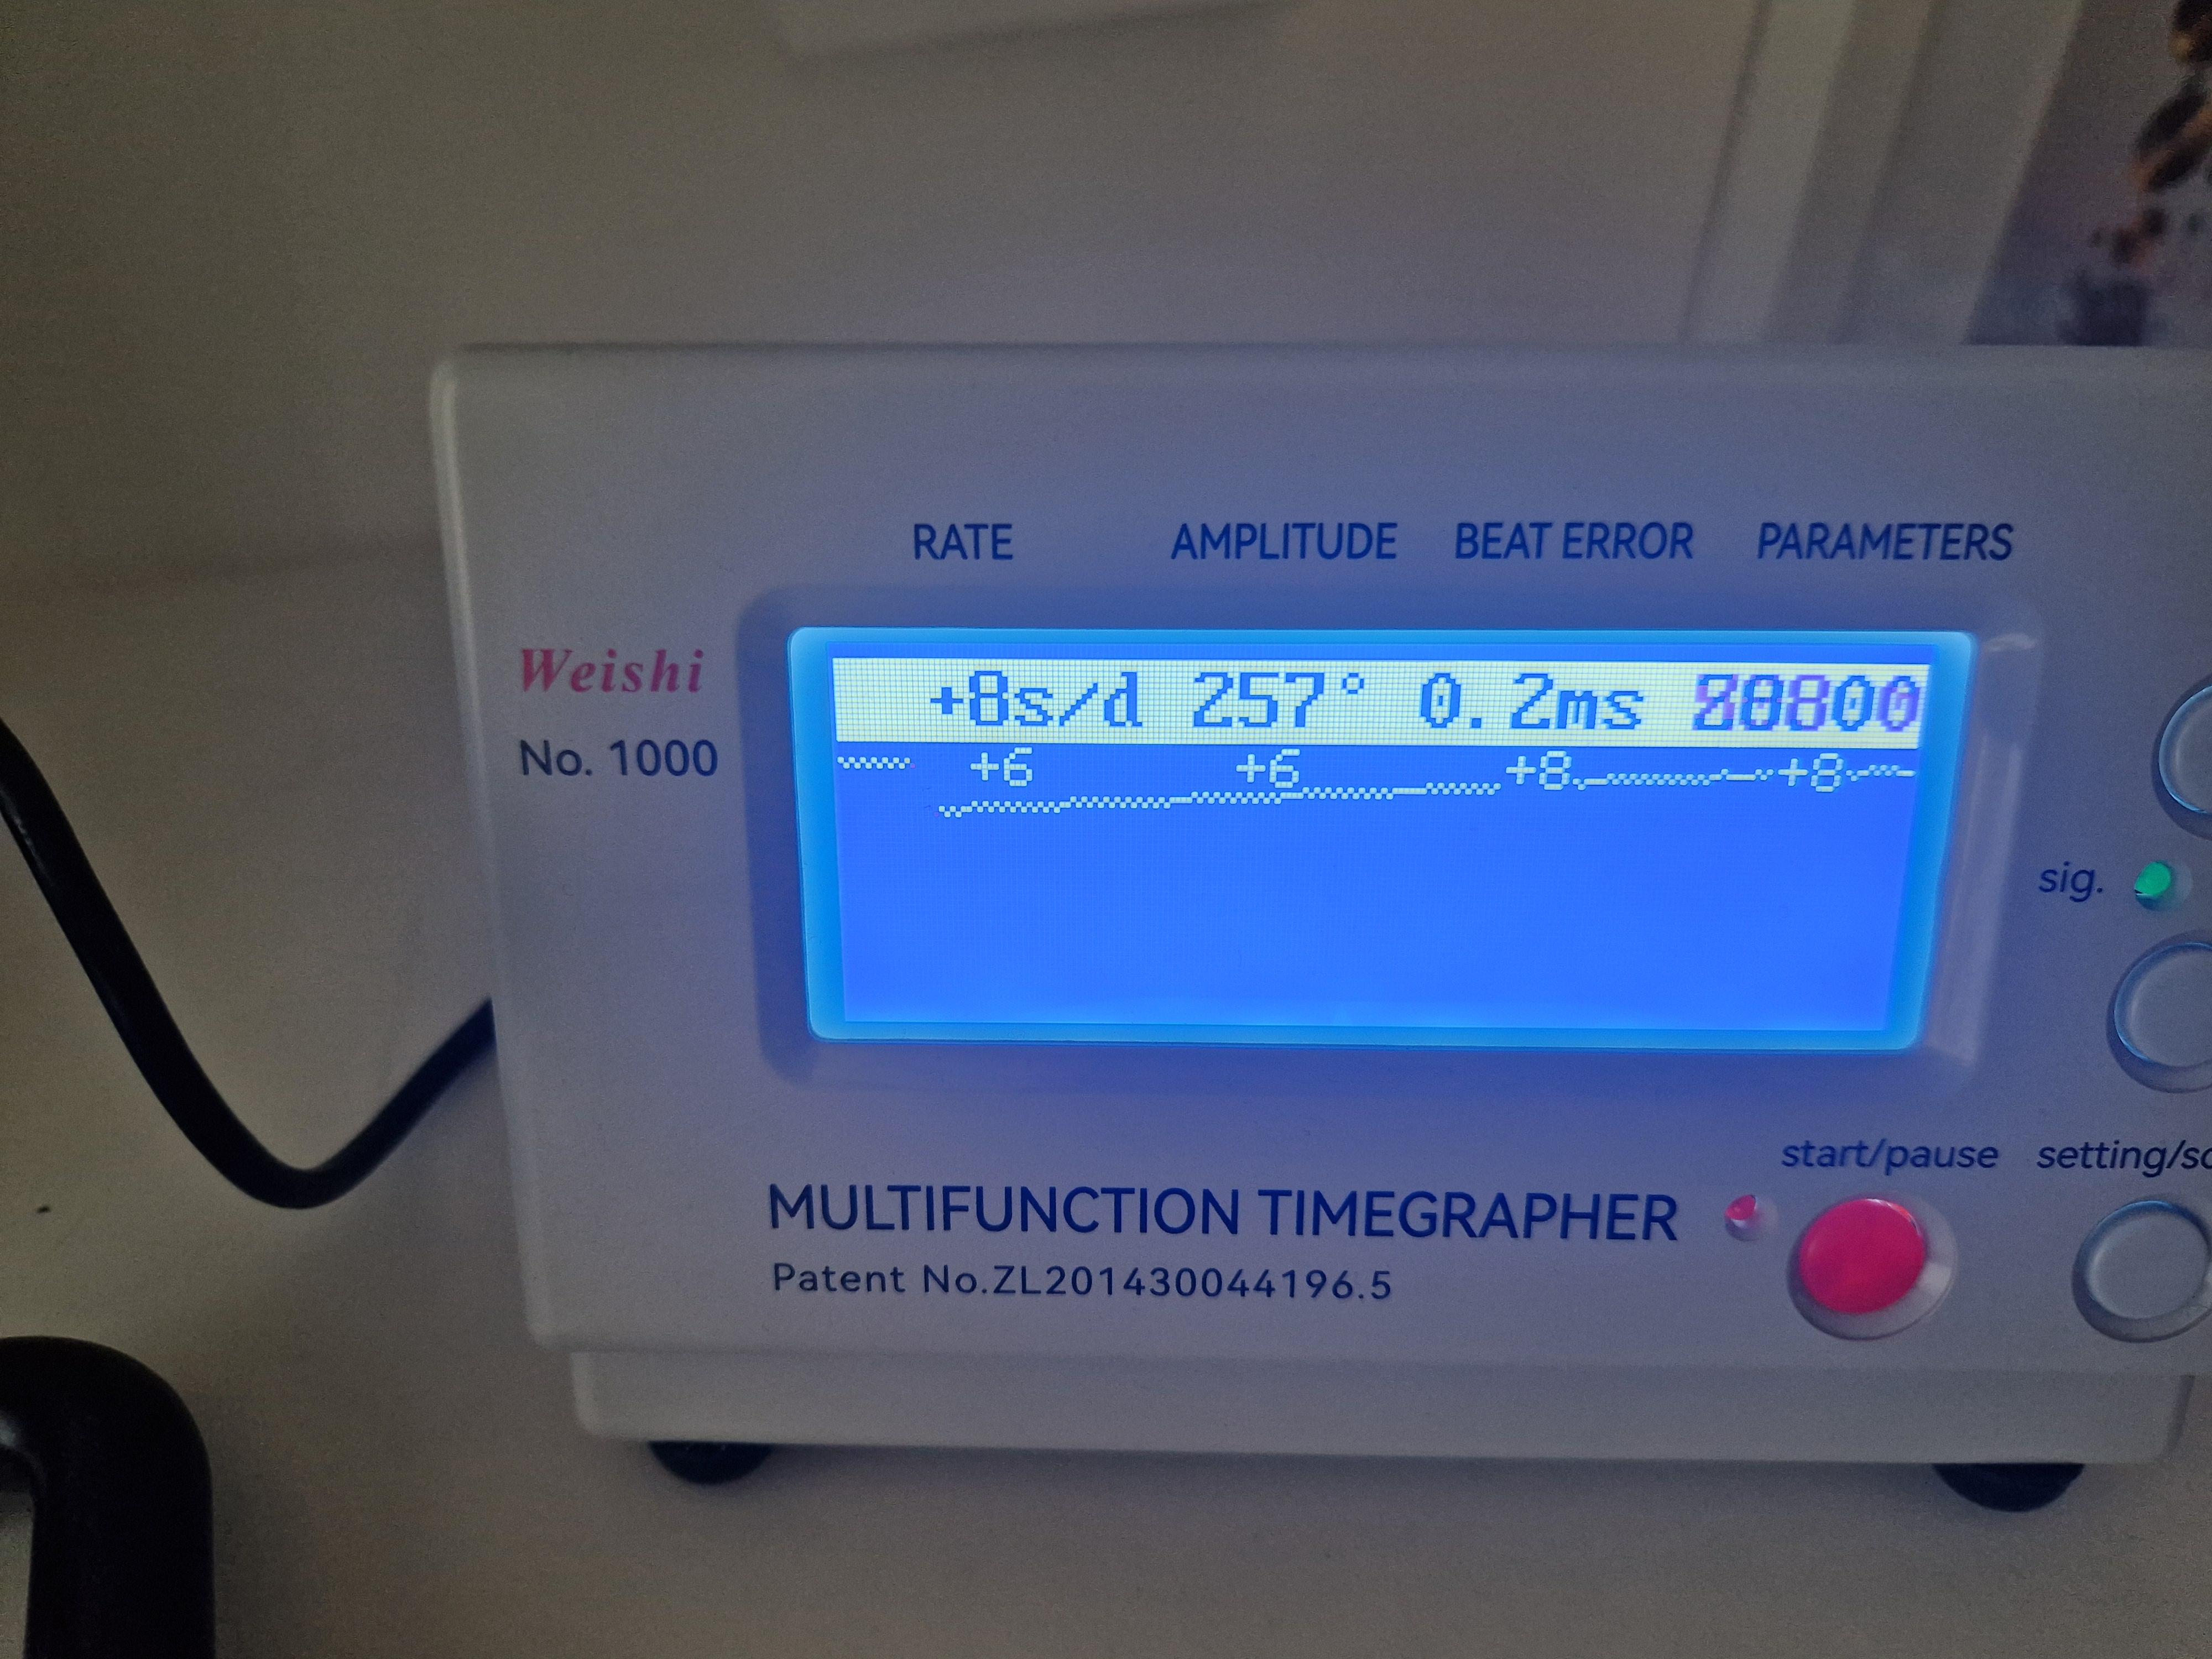
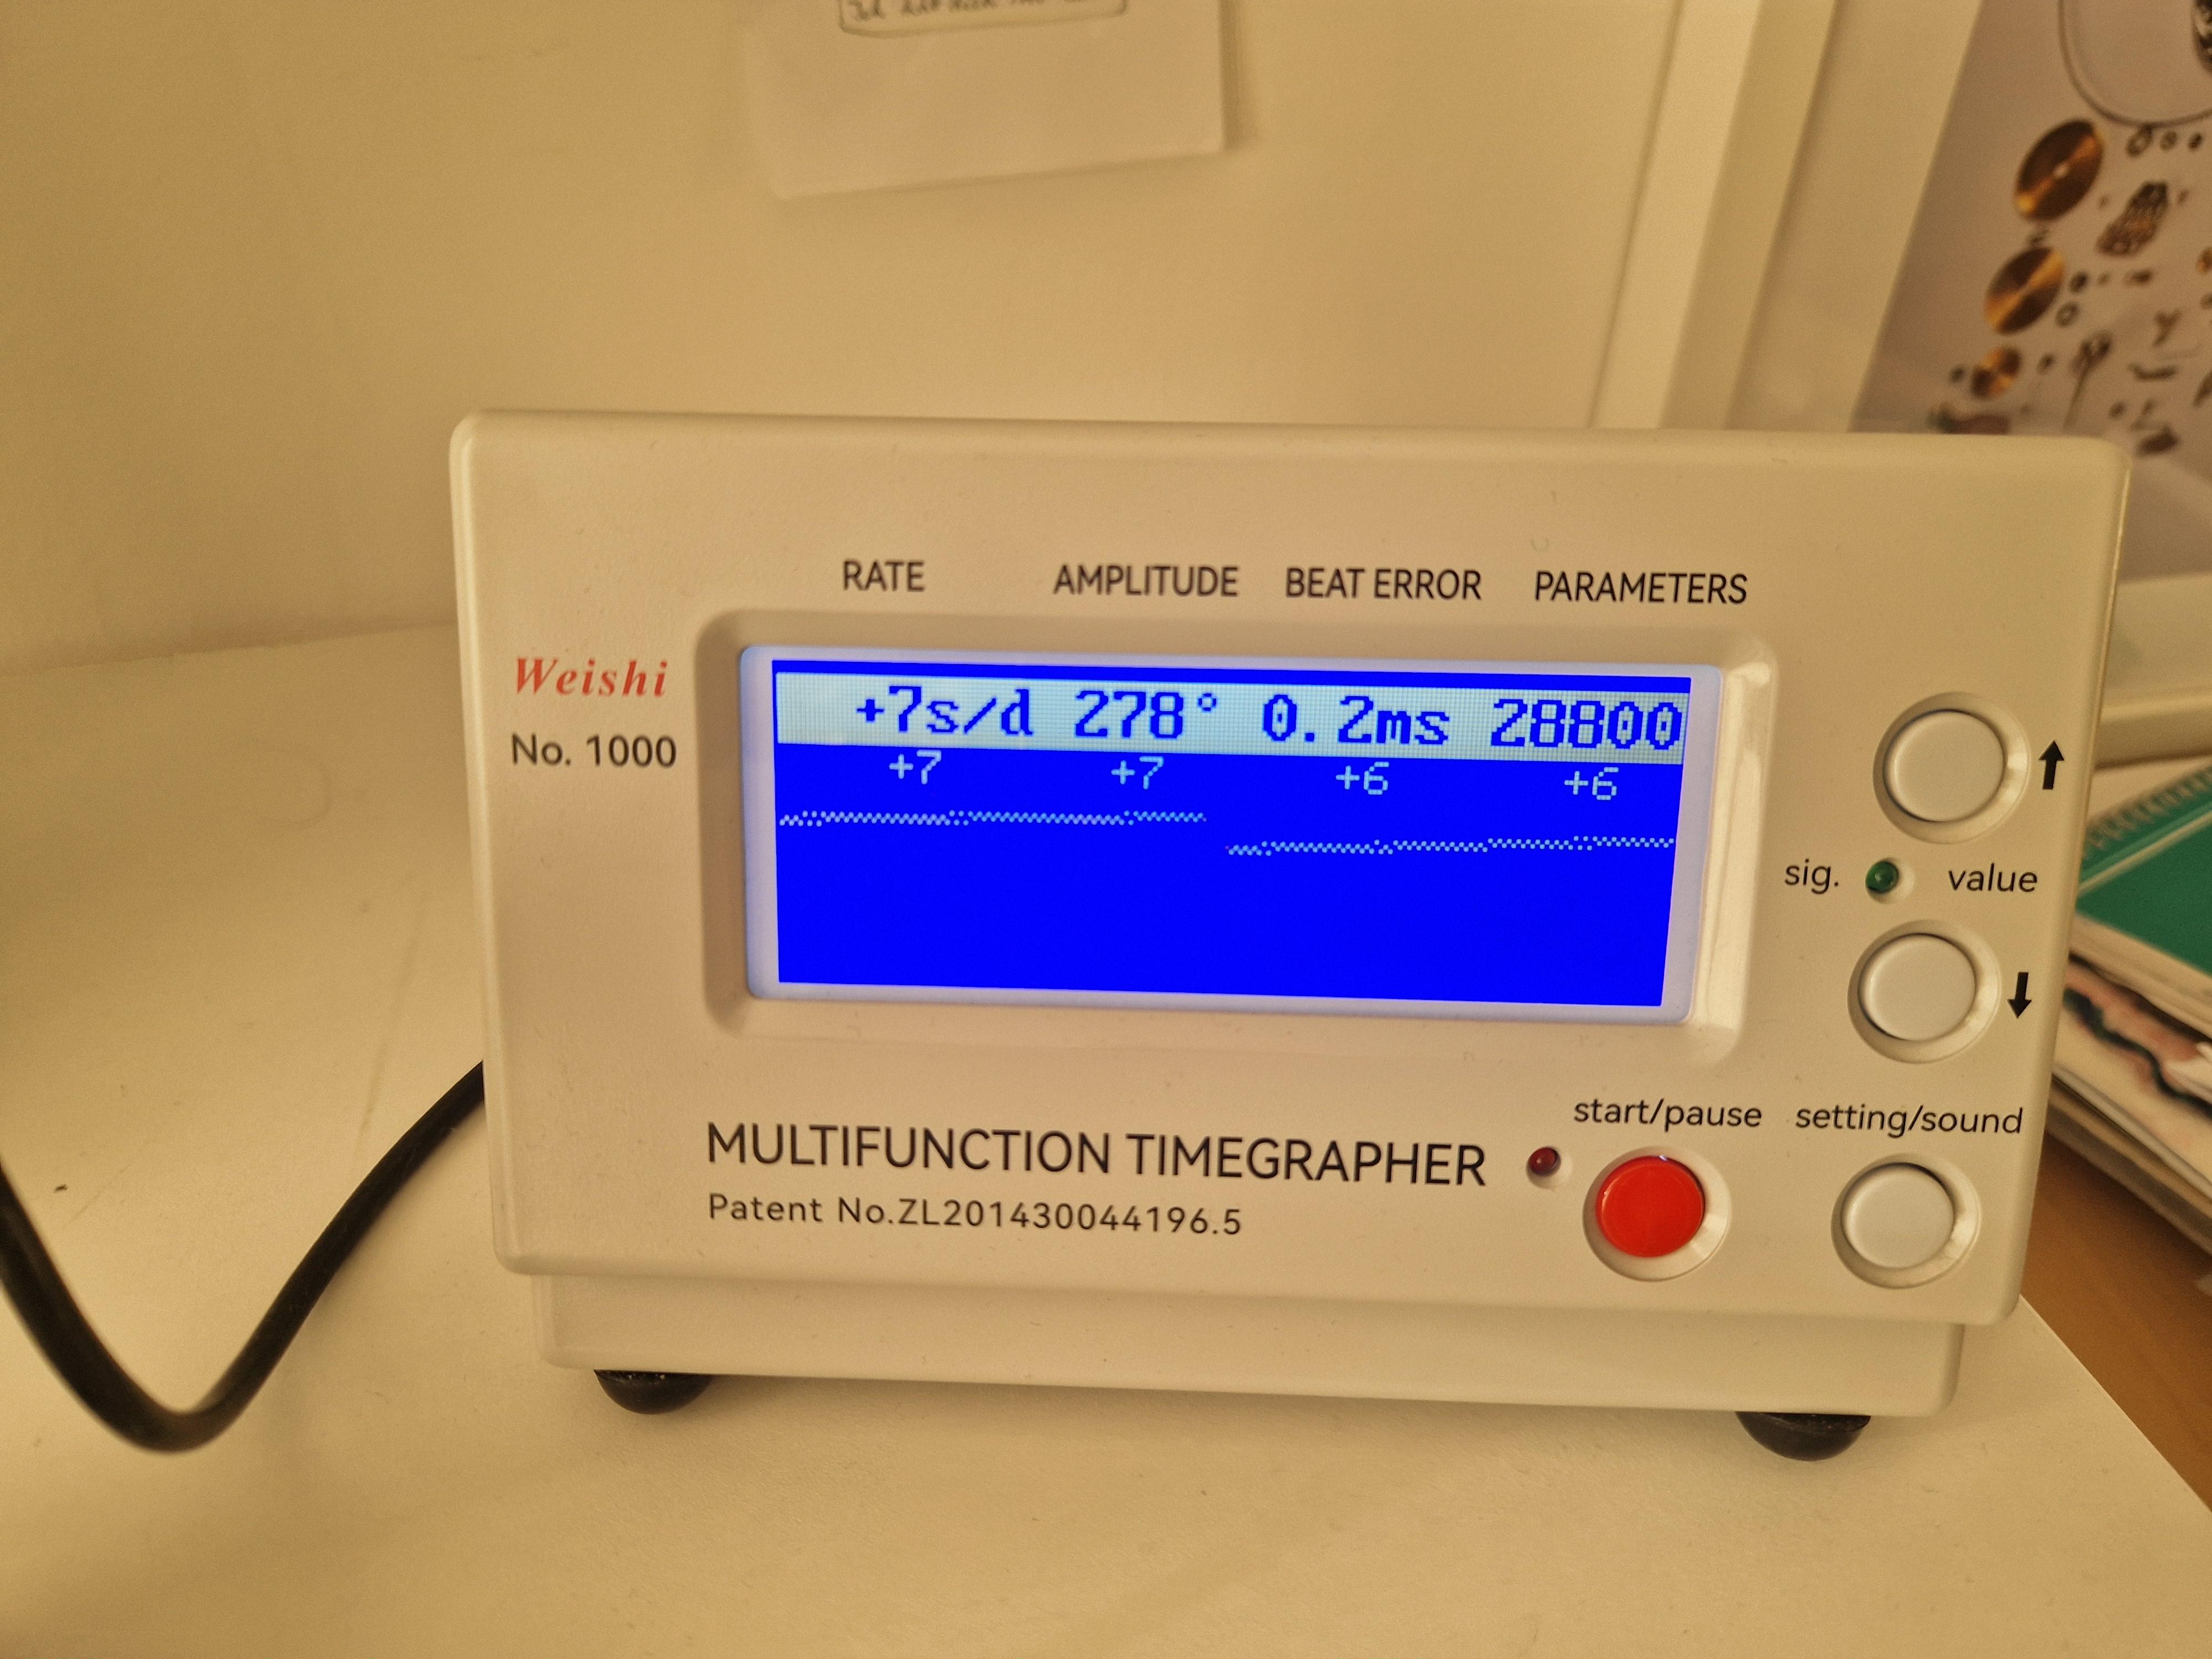
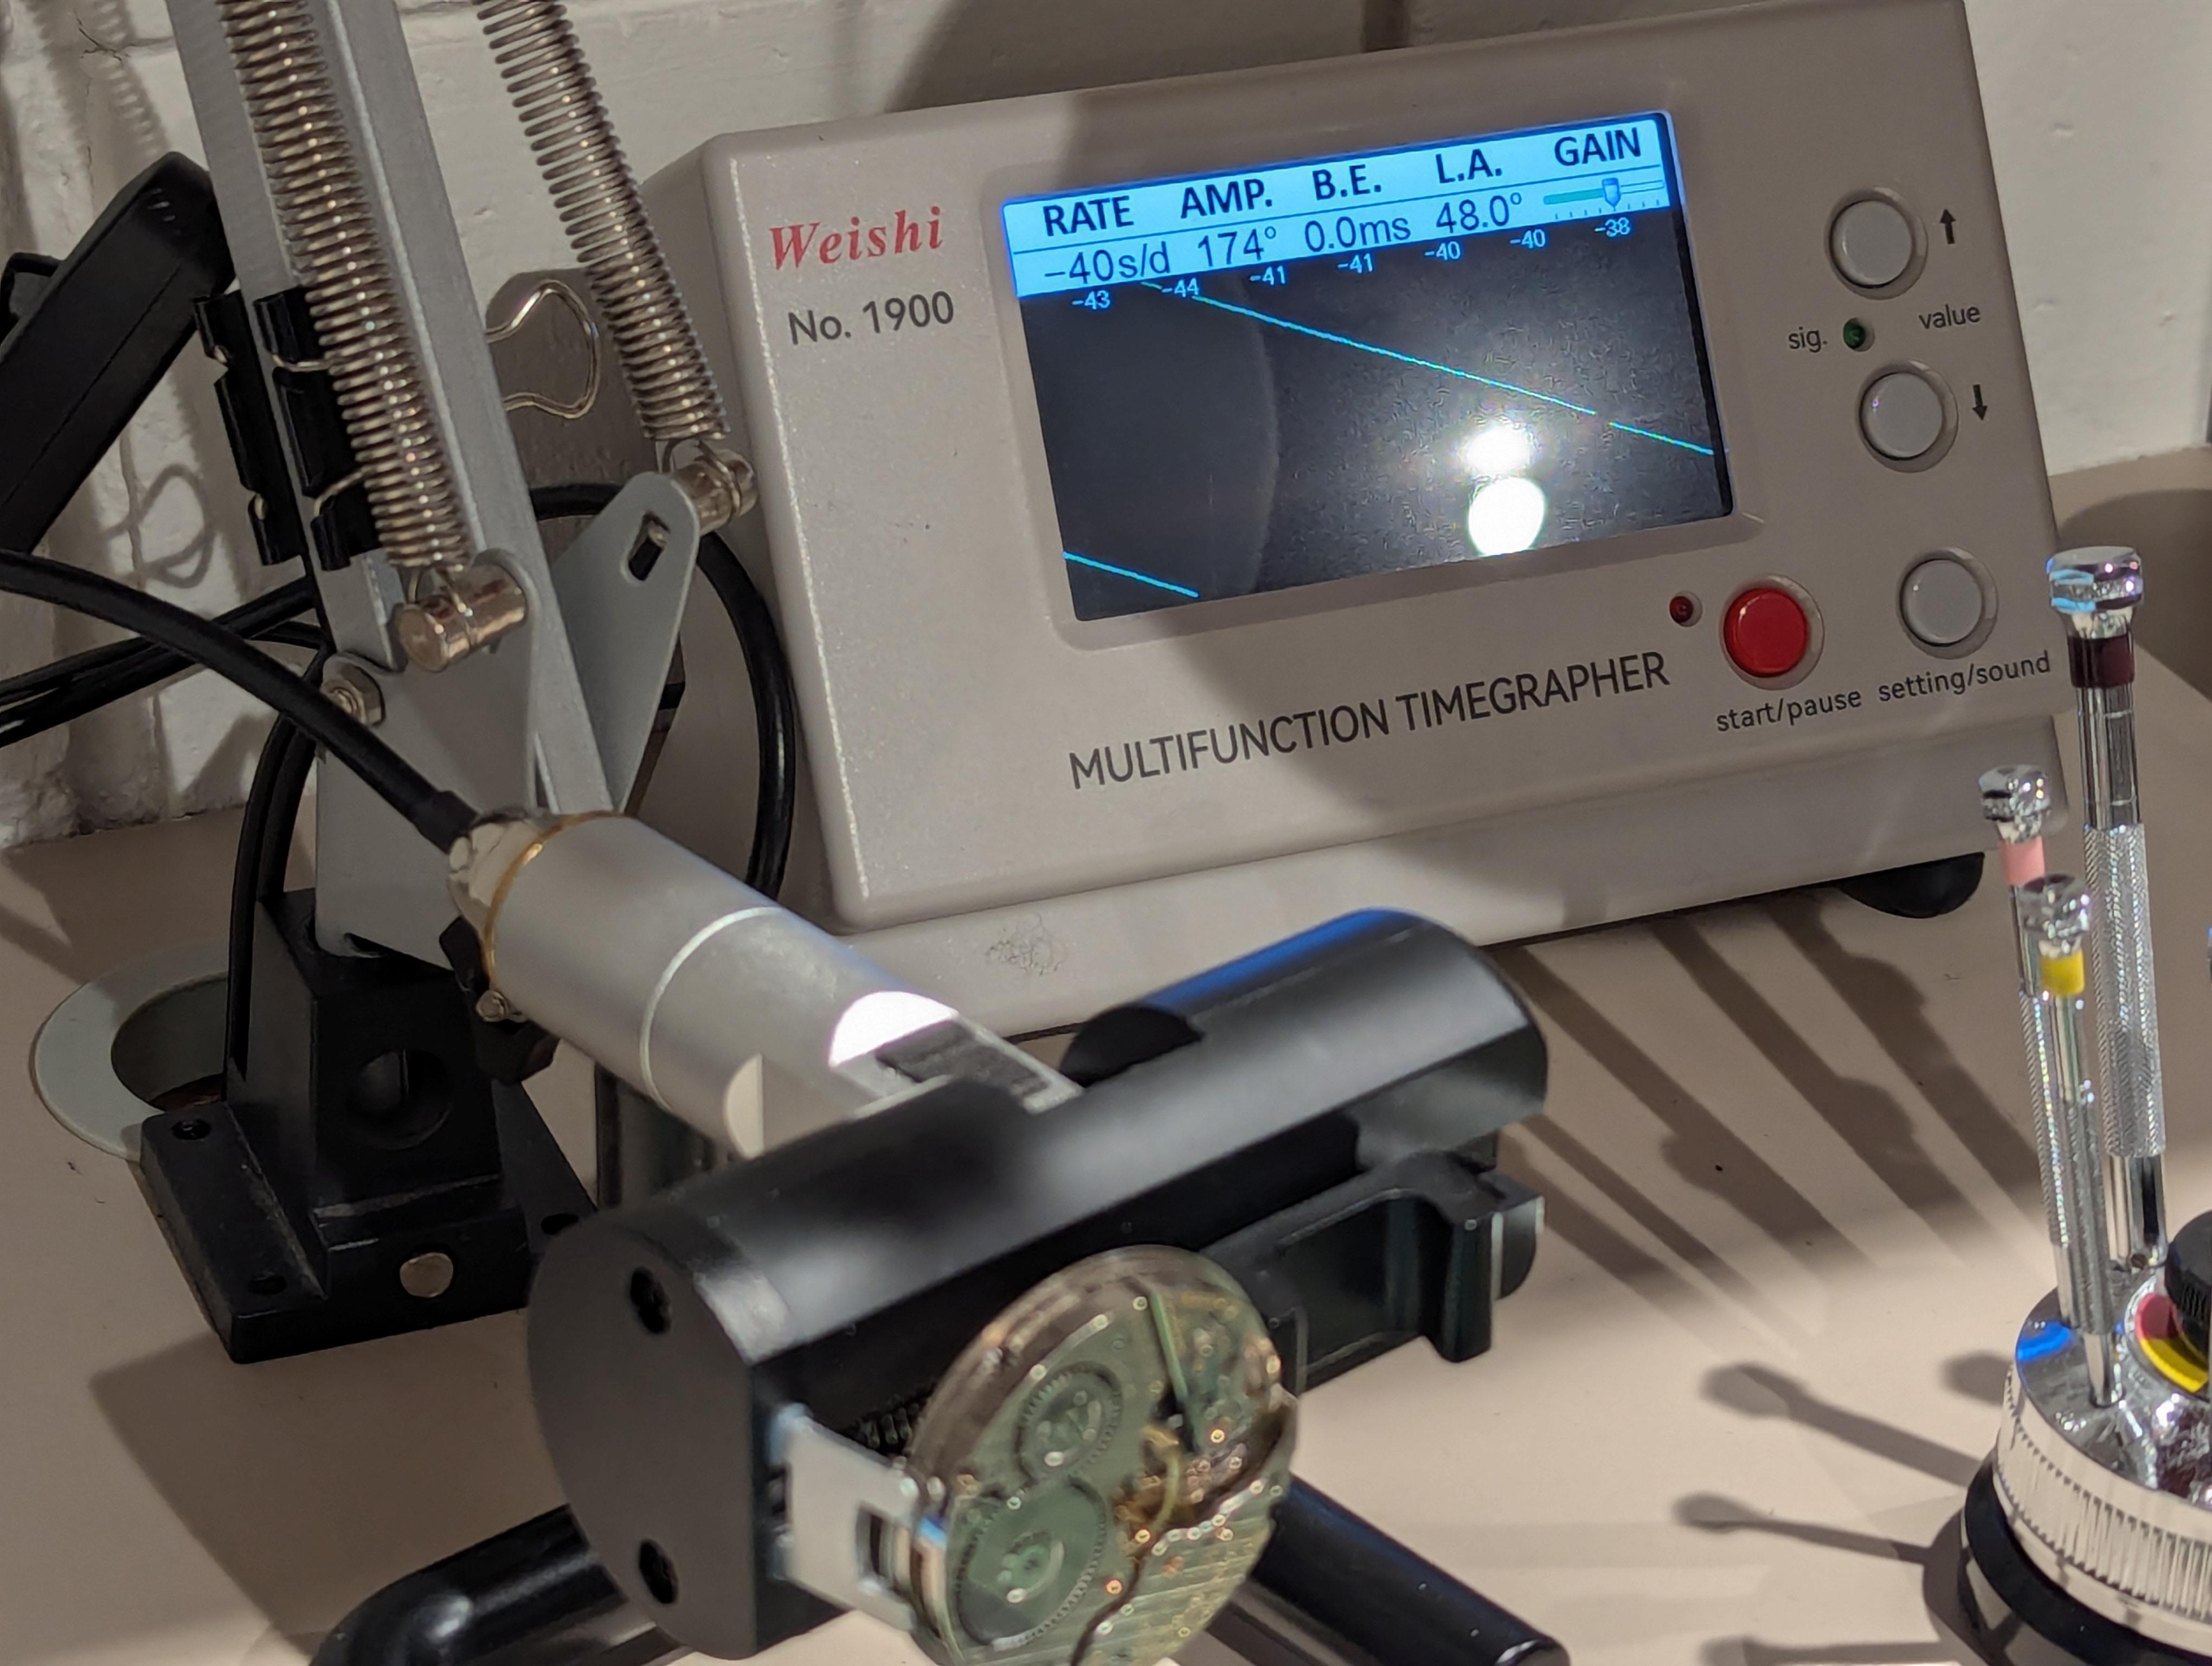
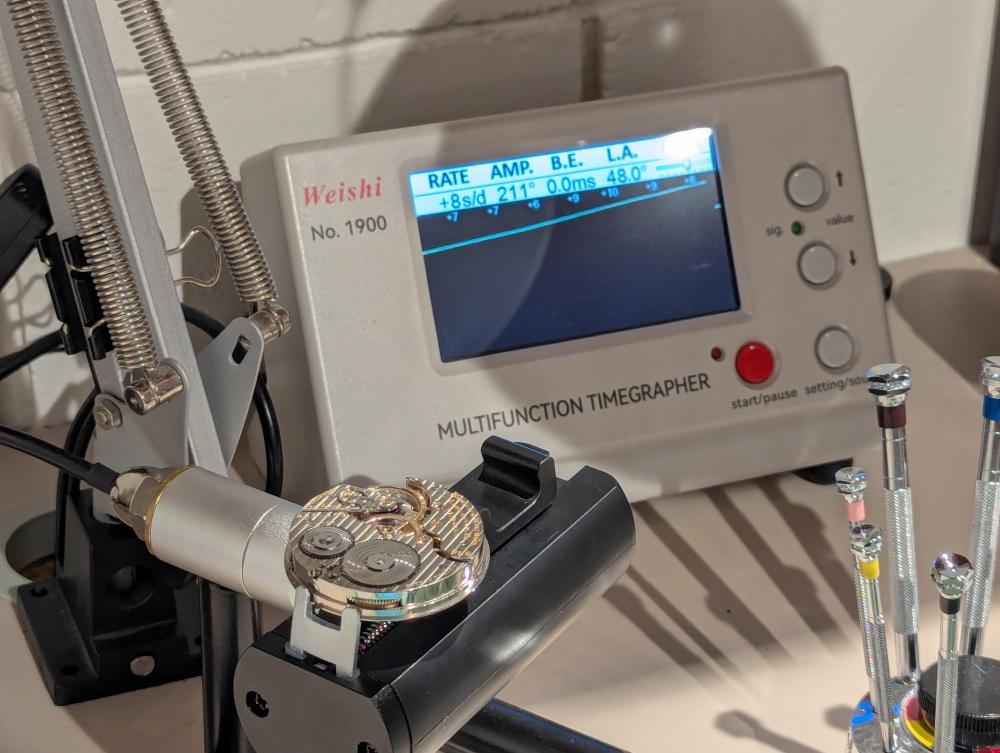
Ok, results are in @nevenbekriev, @mikepilk, @Neverenoughwatches et al. 1. The watch didn't lose/gain more time in the garage than in my watch drawer. 2. Amplitude loss when at 5°C (garage) vs 22°C (after warming it up) is 20°. Straight from the garage: After warming up: (note: background lightning difference is due to curtains being closed/open)

 4 points
 -
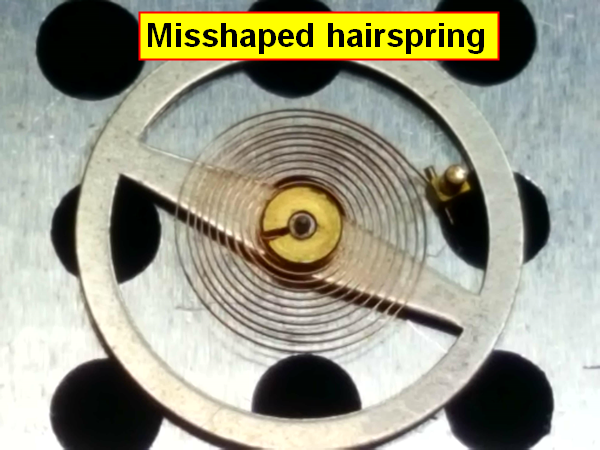
To the point: We first need to be sure the touching coils are not just stuck. If they are, then if separated, they will stay separated until something forces them to touch. If not, the spring is bent and then will show how and where to manipulate it.
 3 points
 -
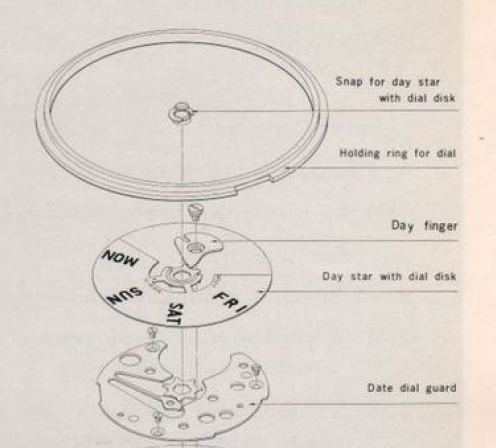
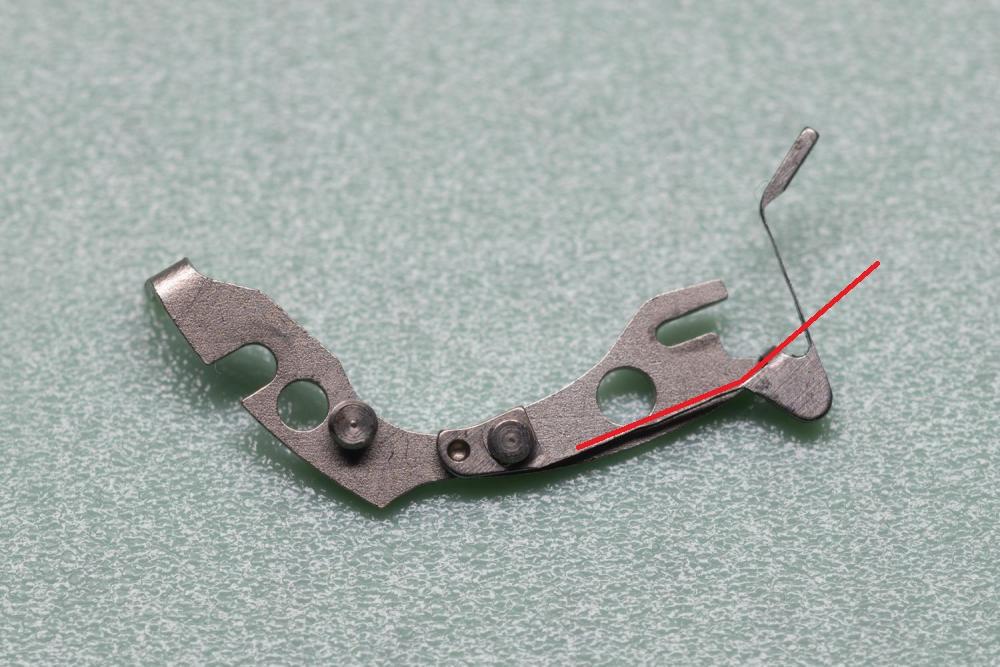
The parts marked 5 & 6 are the Date Driving Wheel.
 2 points
 -
Sorry to all of you for not responding sooner. My life got very hectic all of a sudden. Thank you for the suggesting to loosening the one screw, that did the trick! It got even more bizarre after that as the whole movement came out of the case and I had to reorient it back the way it was. It was nerve wracking but I managed it. Thank you all for responding!2 points
-
Hi. Send it back , Bergeron prices demand better quality than that wrinkly thing for sure.2 points
-
https://speedtimerkollektion.com/ have five train wheel bridges for Seiko 4006A - good price too. I would be tempted to try to fit jewels. I've rarely changed metal bushes, as It's hard to find any of the correct size. Easier to fit jewels if you can.2 points
-
On some random old Raketa, no. But on a railroad watch like mine, yes.2 points
-
A quick followup: A 30.0x29.3 i gasket 0.8mm high (Sternkreuz) and a 1.3mm 29.3 mineral glass (Cousins) Worked a treat.2 points
-
What is the set? Photos would help.2 points
-
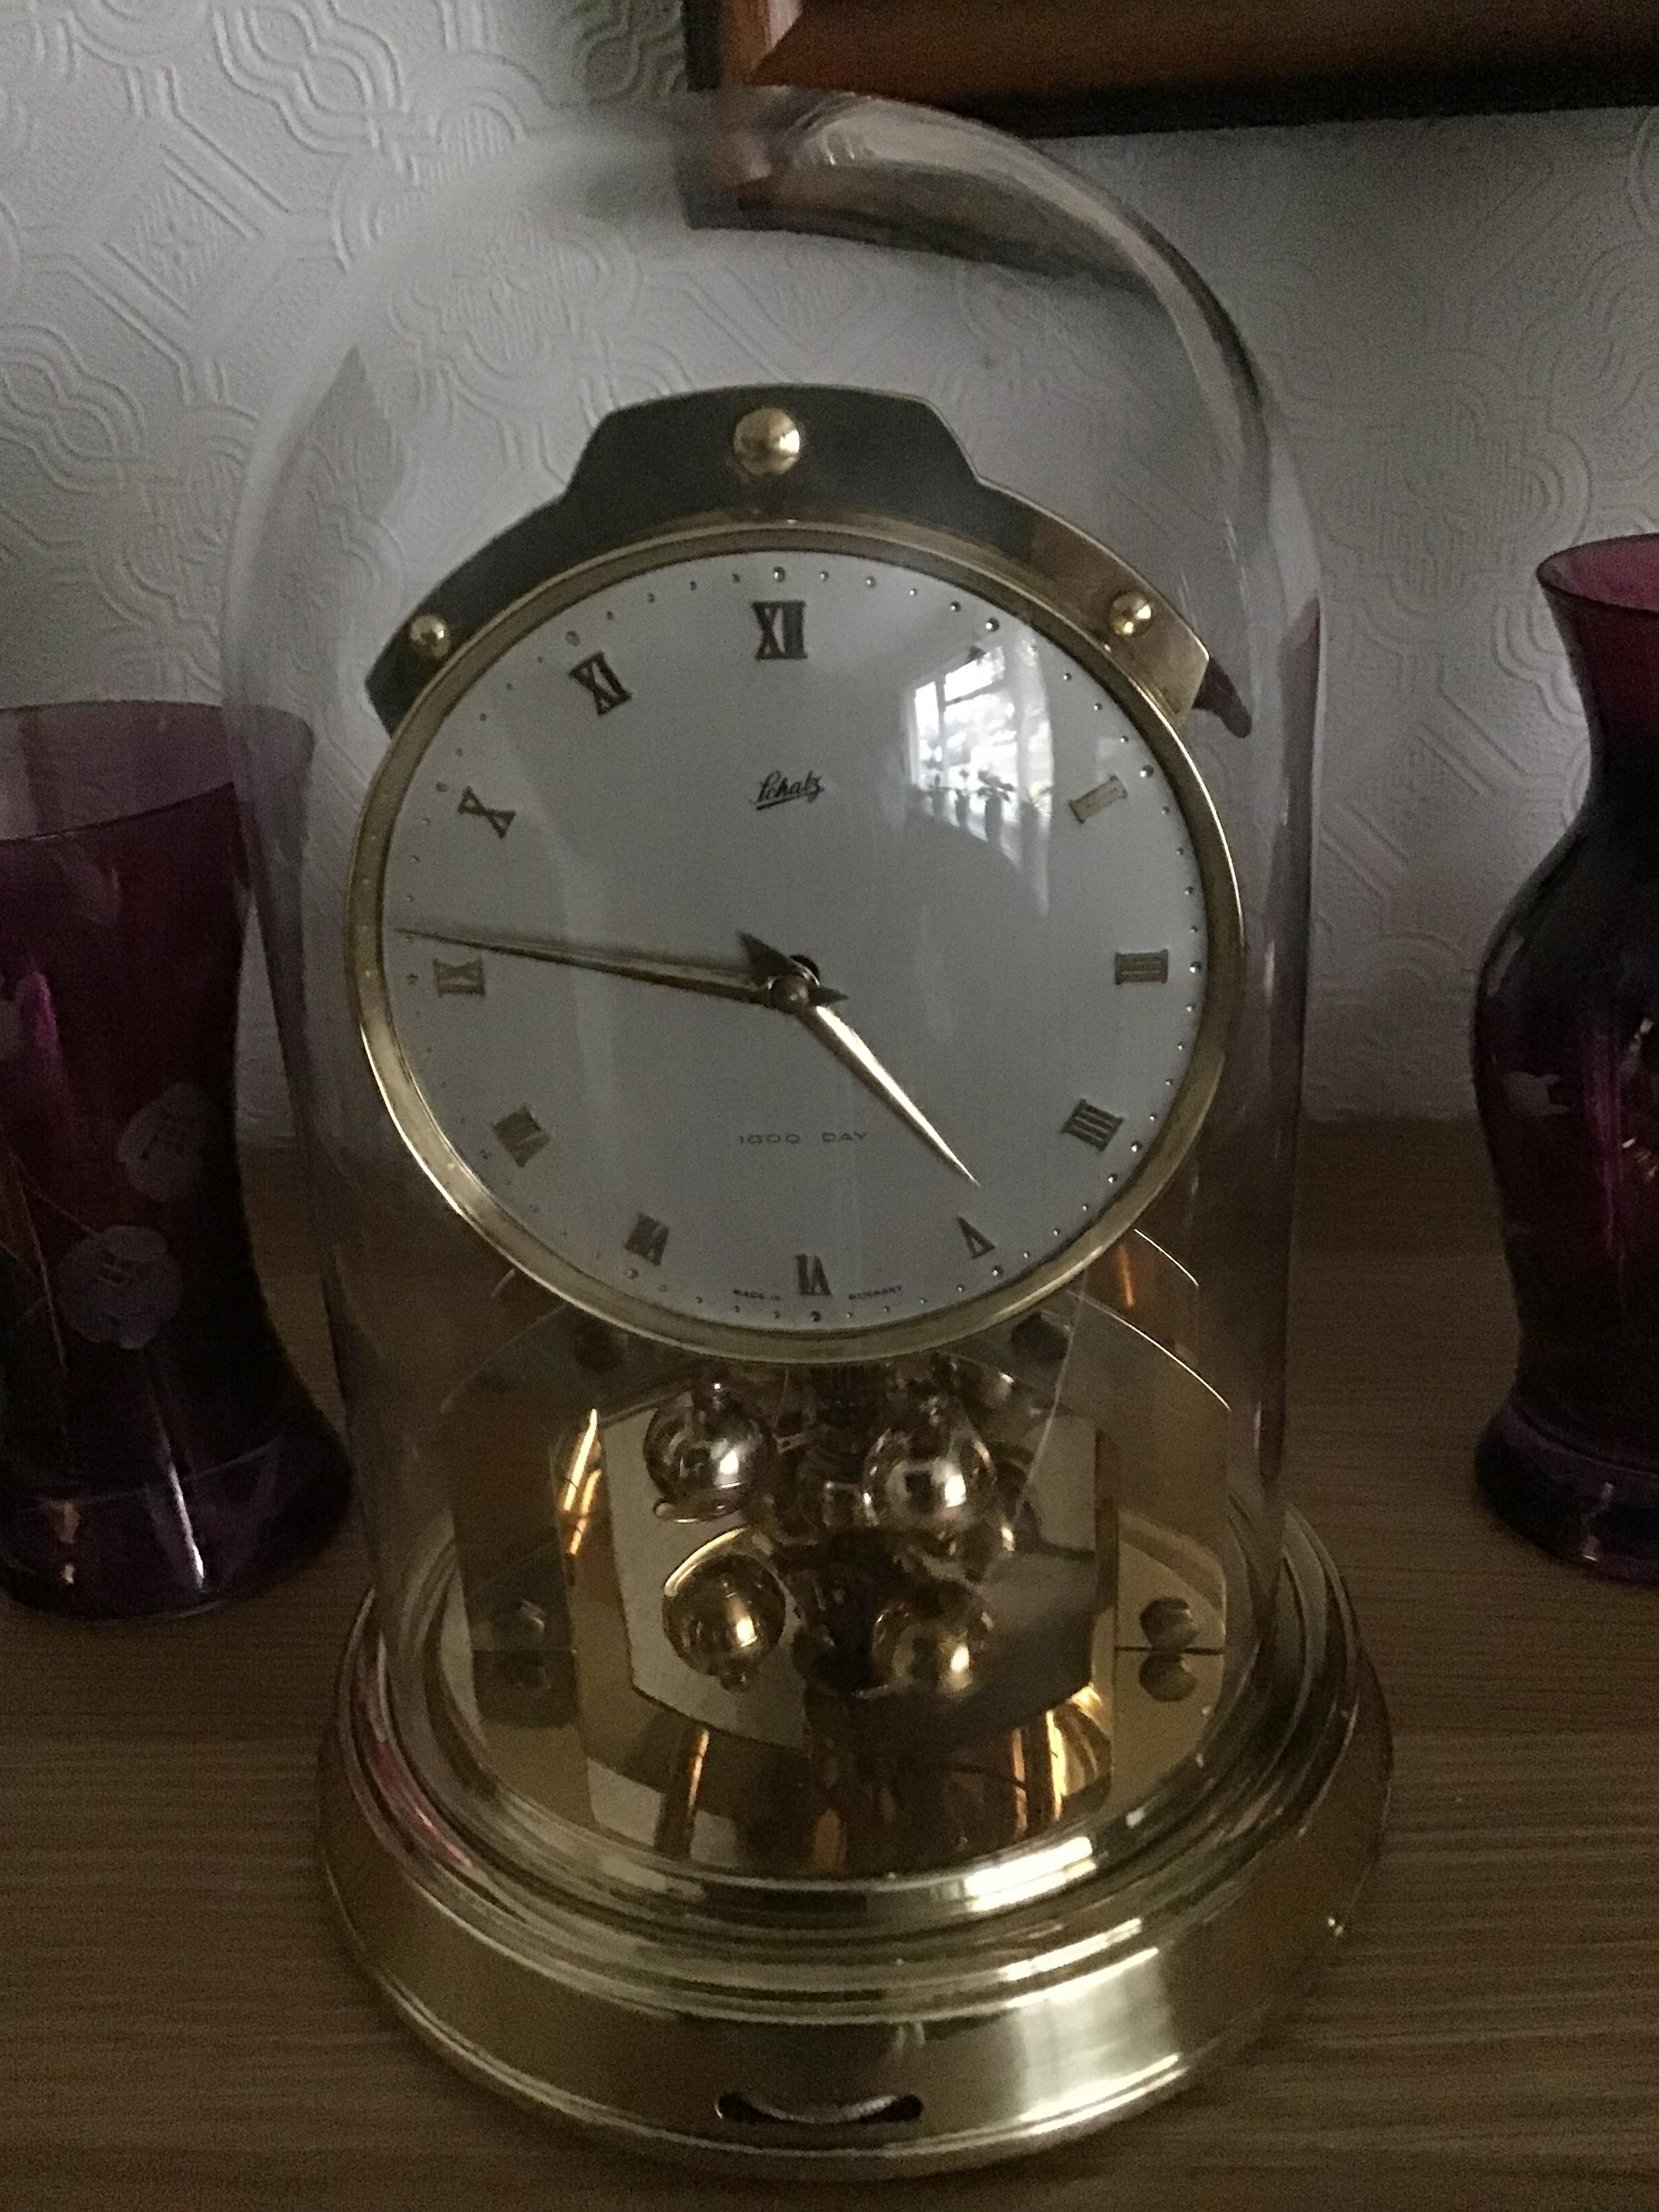
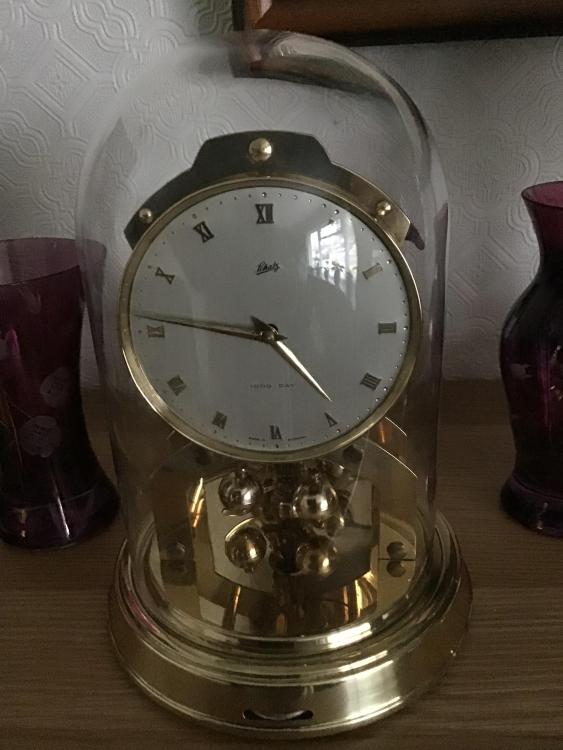
Hi Chris both parts of the block are a tight fit on the pin on some blocks I use a blade to get it apart then broach one side slightly to make life easier in future, I have done a video of Schatz 1000 day restoration if it’s any help. Did you remove the saddle? If you did then that takes a bit of setting up because it is also the eccentric bush . Dell Forgot add the picture of my 1000 day from video.
 2 points
 -
I wouldn't be satisfied, whether or not it effects function. At the price I would expect better tolerances.2 points
-
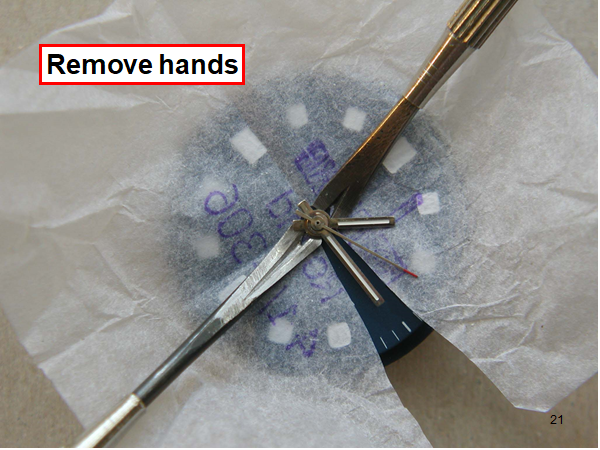
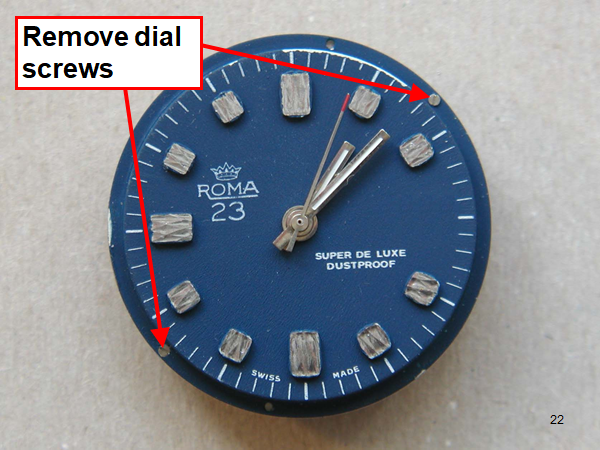
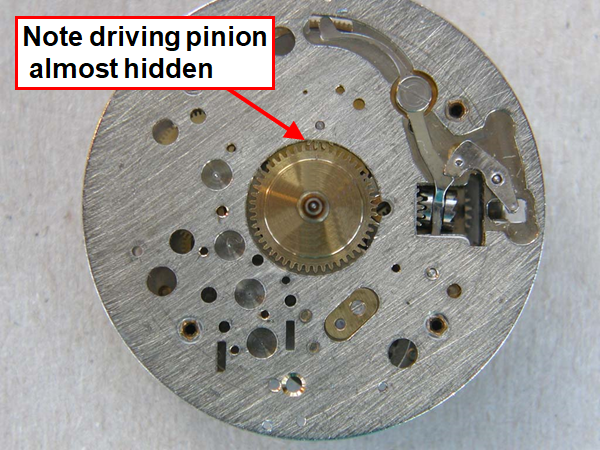
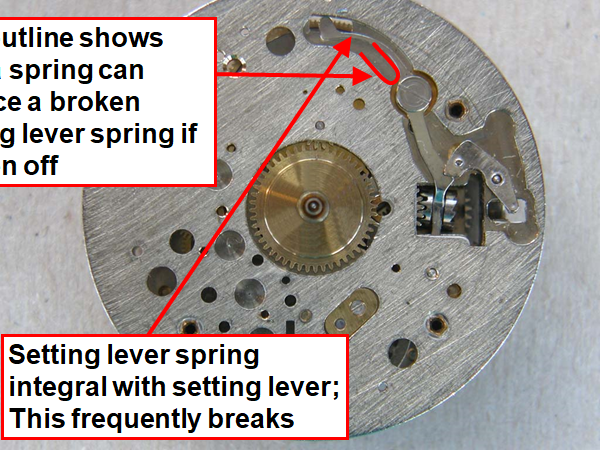
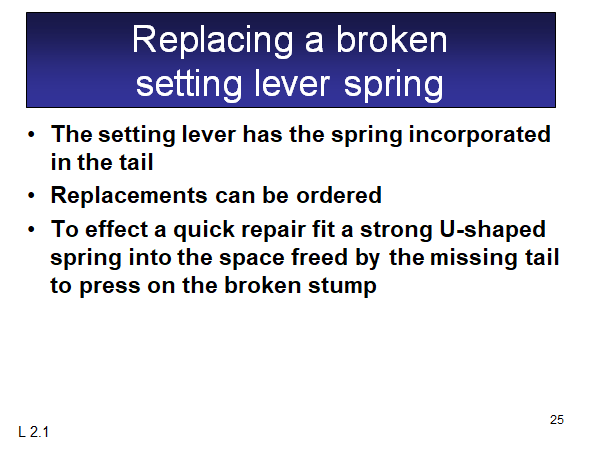
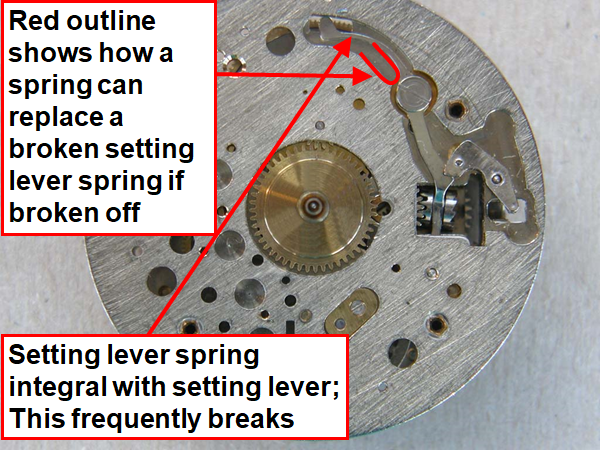
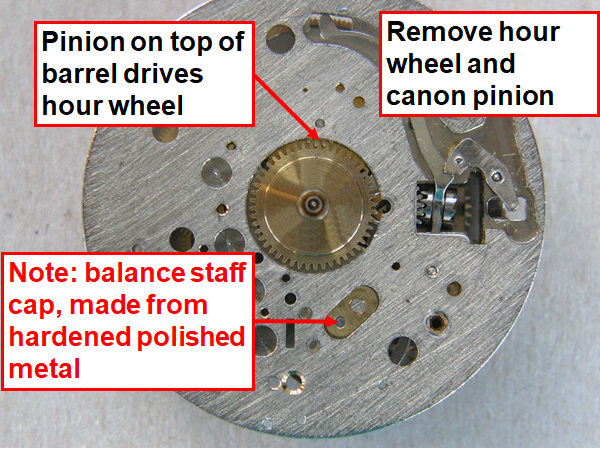
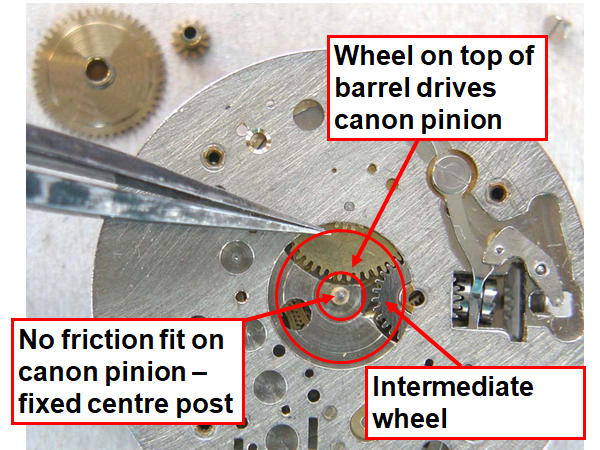
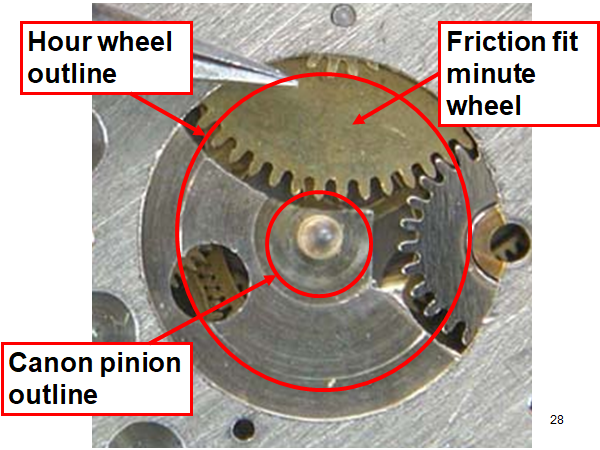
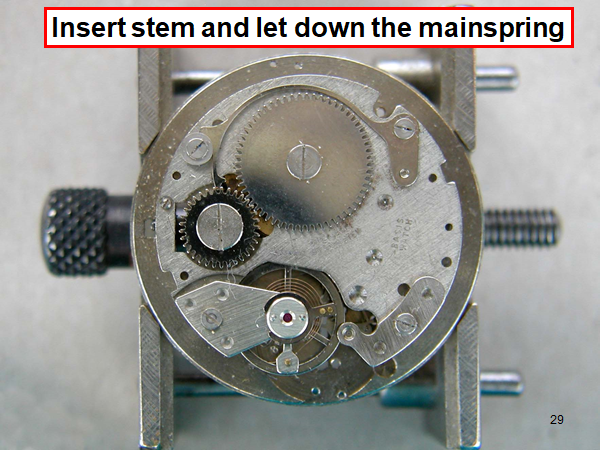
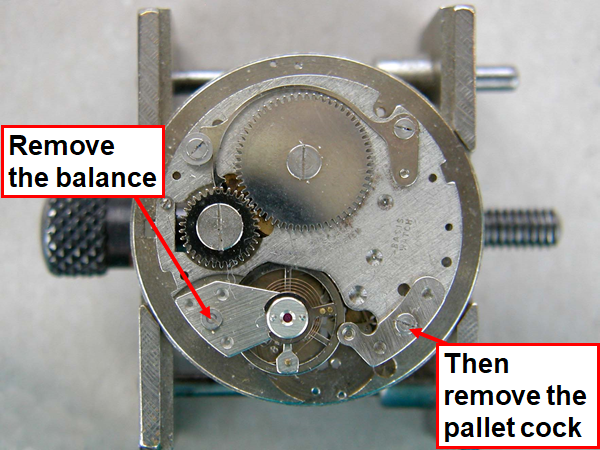
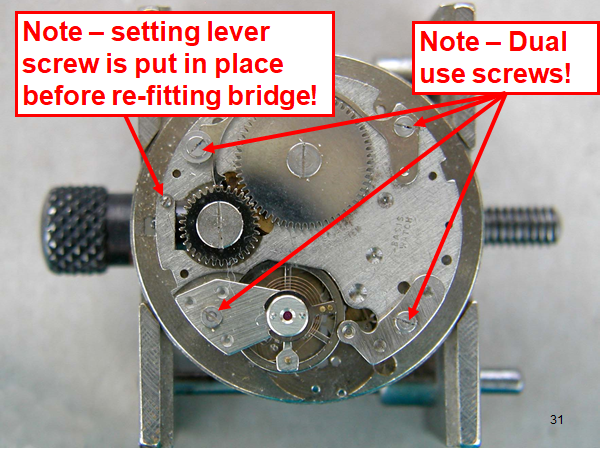
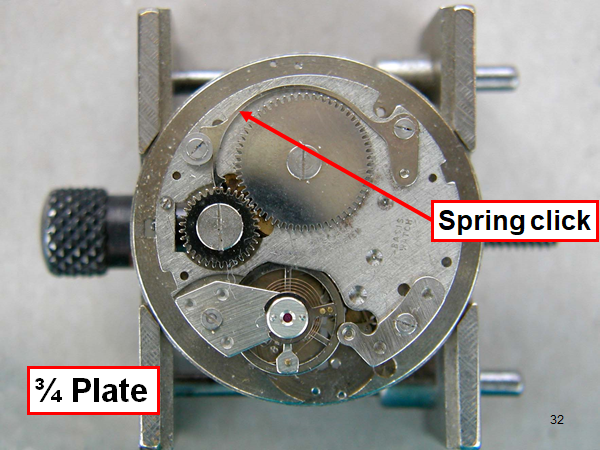
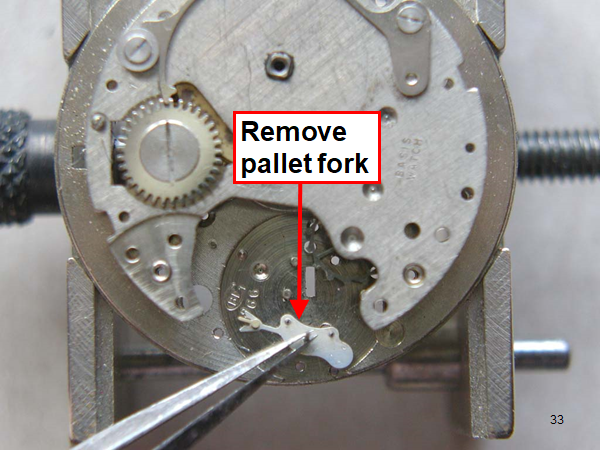
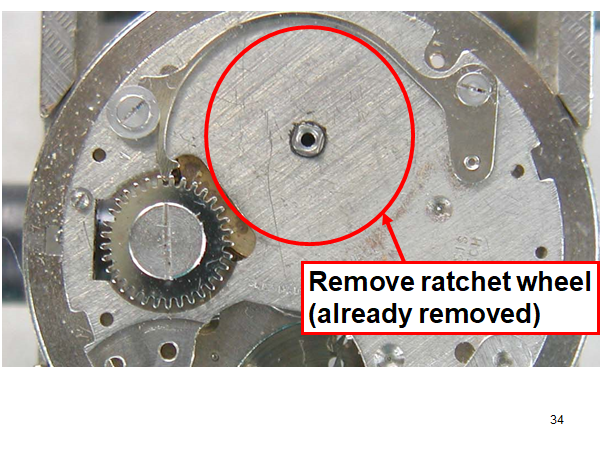
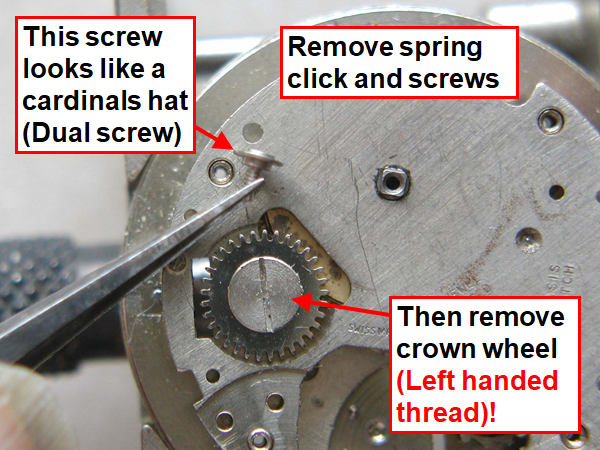
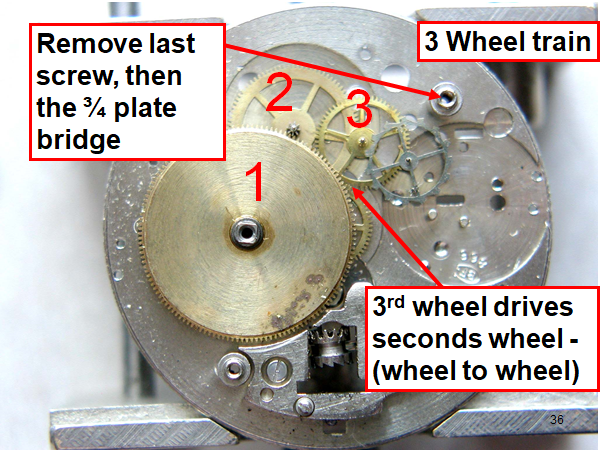
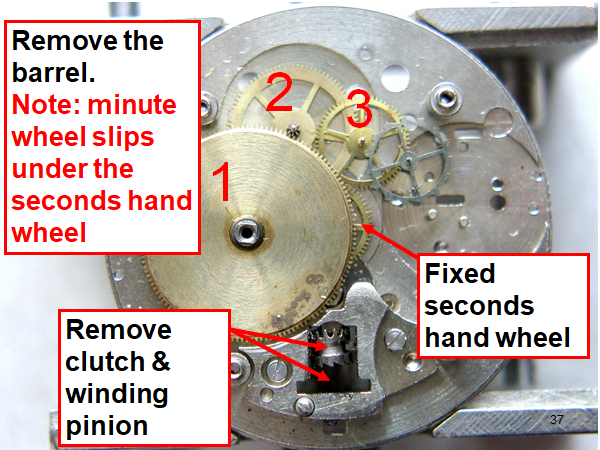
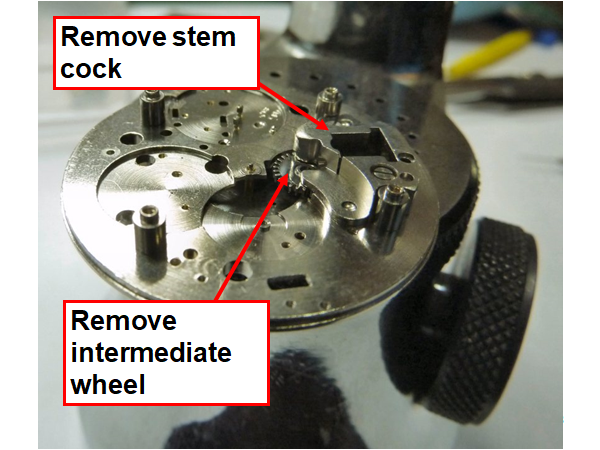
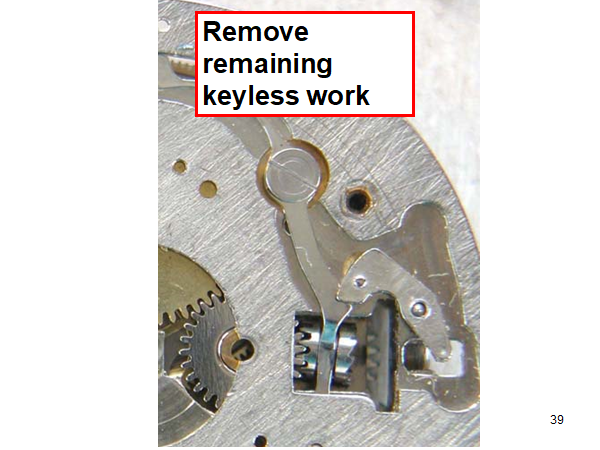
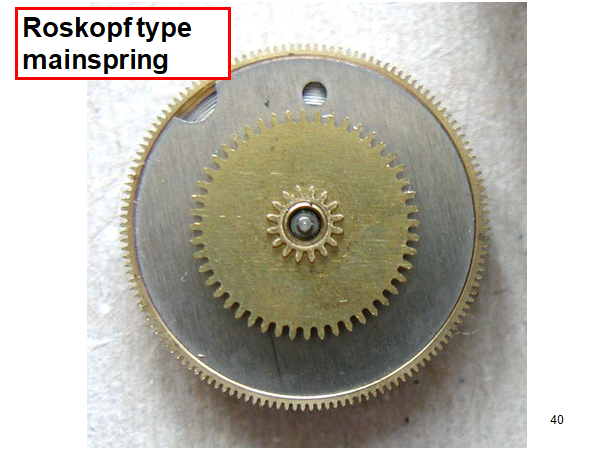
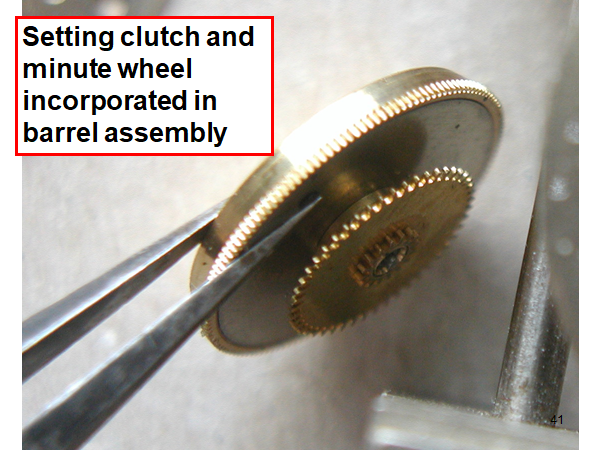
Hi, I teach watchmaking to complete beginners at Epping Forest Horology Centre, close to Epping and this is one of the lessons on the BFG 866. I wanted to show my class a classic pin pallet (Roskopf) movement and how to service it, as many watchmakers won't touch these watches as they hold no monetary value. Turn the setting lever screw 1 to 1 and a half turns to release the winding stem A piece of watch paper or small plastic jiffy bag to protect the dial, whilst removing the hands The driving pinion is part of the friction fitted minute wheel on top of the barrel. This work in a similar way to a friction fitted canon pinion to set the watch hands Remove the keyless work: setting lever, held in place by the setting lever screw, screwed from the other side of the mainplate, then the yoke, which sits on top of the clutch (castle) and also the winding pinion. I have three other lessons on this movement that cover bringing the watch 'into beat' as well as taking apart the friction fitted minute wheel from the barrel, lubricating and staking back on to achieve the correct friction setting and finally how to remove the centre seconds wheel safely and refit using a staking set. Many people leave the friction fitted minute wheel on top of the barrel, not realising the amount of old grease that can't be cleaned out from it, as well as not removing the wheel of the centre seconds arbor and again not cleaning out the pipe which has old grease inside. Hope you enjoyed the tutorial? More to come....
 1 point
 -
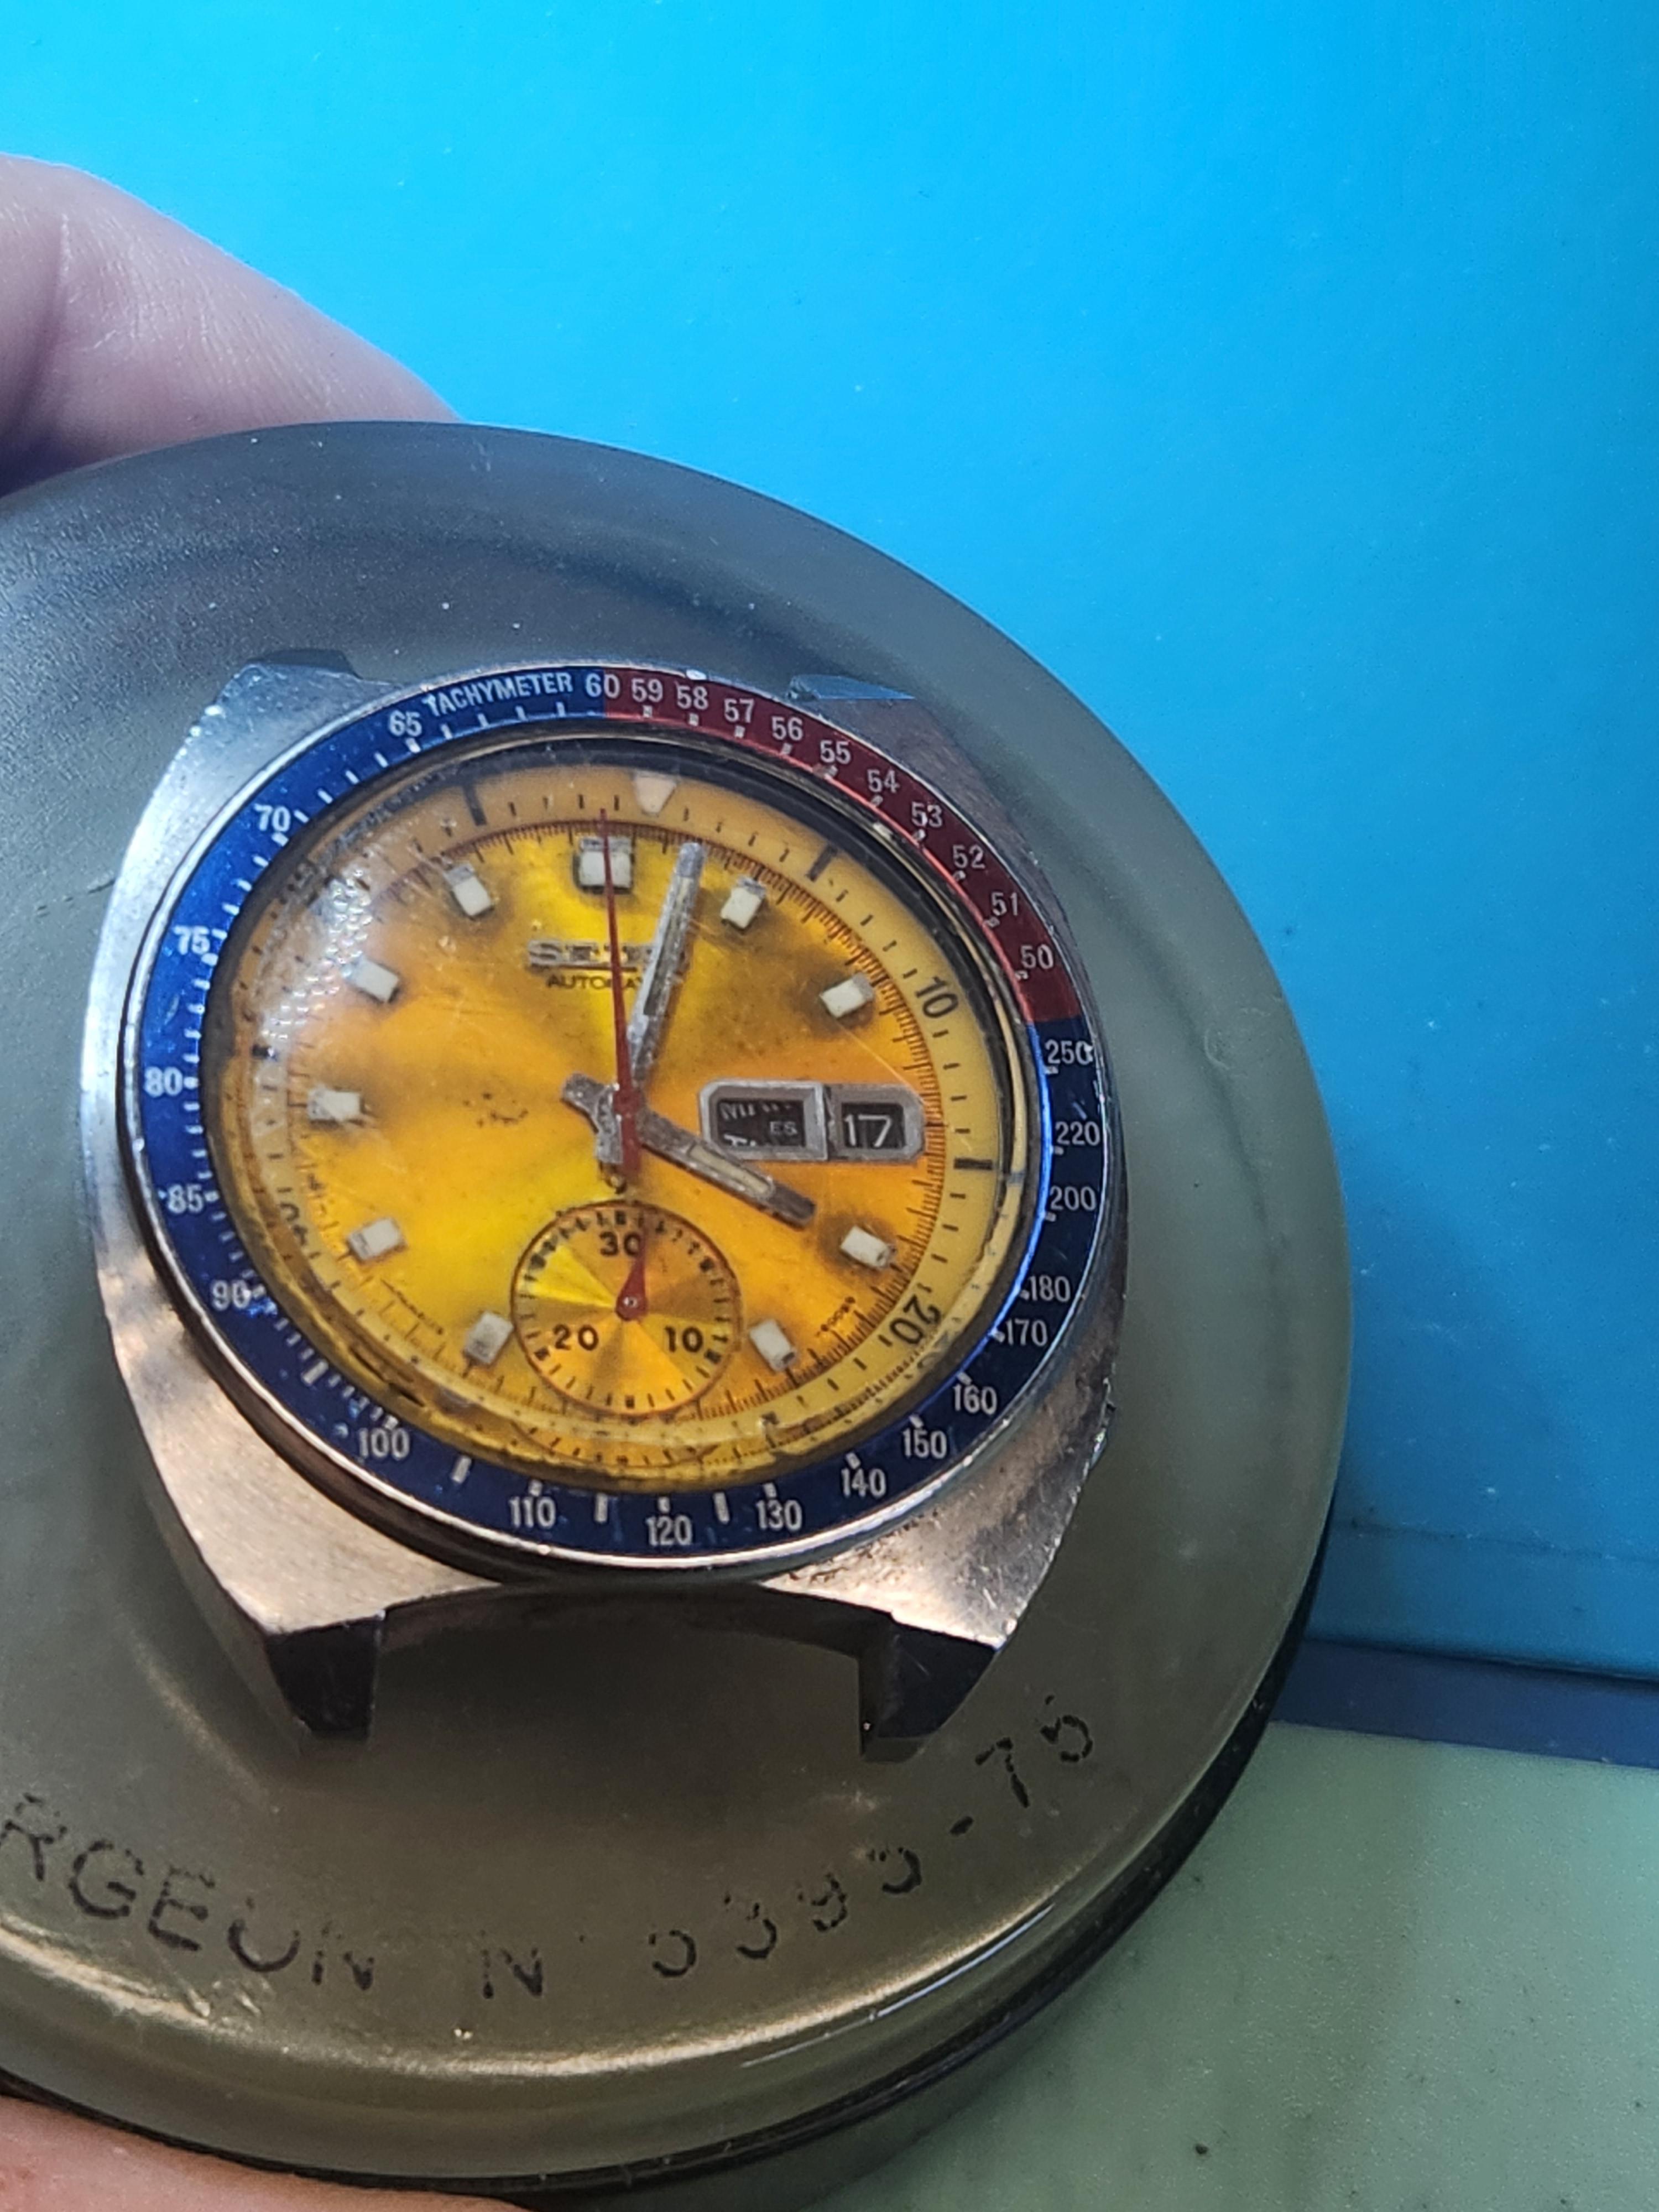
Falling down the chronograph rabbit hole. My fixer upper April 1976 arrived yesterday. Needs a crown, wheel indicator spring, crystal, new pushers, and a minute recorder wheel. Got it working and everything seems original. But waiting on the parts. The second hand constantly runs so not sure the issues. Will wait until most of the parts come in before going farther, but pretty happy all things considered. The dial has seen better days but the case, bezel and bracelet are pretty untouched by time, for the most part.
 1 point
 -
I agree and Cousins has been favorable to me in the past. If you treat them with respect, they will return the respect and help you. I must say I'm very surprised by the excessive shake. Even the shake in my $70 "budget Robur press" is considerably smaller.1 point
-
Any lawyers on here? My understanding is, even if you sign a document, if the small print breaks the law, then it's invalid. I'm not a lawyer, so I could be completely wrong.1 point
-
Figures are OK for DU & DD if you've got the correct lift angle and depending what you've done with the spring I would have expected better in the other positions though.1 point
-
Is this a fault with the movement or due to the case. If you want to get it operational as you've built it now then removing the disc and finger should work but make sure you keep them for the future.1 point
-
Taking in large collections creates big mini-projects when you need to do things like that. I also hand clean, repair as necessary, catalog, and resleeve everything that comes in. I've been gifted a few collections that people have dumped over the years, and they can really back up when time is tight. I'm currently down to 300-something after a major cull a few months back. Never broke the 1k mark though. One of my pandemic projects was a phono preamp build. All tube and passives including the power supply. I still need to make the accompanying line level amplifier, but haven't had time to even get started yet...1 point
-
When putting force on the crown, You overcome some kind of resistance and it is due some kind of unwanted friction. A lot of badly working movements will work better when additional torque applied. But this will not help understand where the problem is, just shows something is not in order. Yes, by lever I mean the 'pin pallet'. But when word 'pallet' is used, I refer it to the pallet stone, which is not present in this specific part. Of course, my understanding of english names of the parts may not be fully correct. What I would use is 'pin lever'. Now, Do I understand right that the lever doesn't snap well if no additional torque applied? If so, then investigate the train and barrel. Yes, You should release the spring and when the lever is out, wind again to see what happens. Well, make marker dot on the barrel and see if when movement seized, the barrel is always in the same position. Look around if some screw is longer than needed and touching the barrel. There is always some free play in the mesh of wheels/pinions. When the movement is seized with wound spring, try checking wheels for free play of the mesh. Thus You will come to a wheel(s) that won't have such free play as there is torque applied and to such that have free play of the mesh and no torque is applied to them. The reason of seizing then must be where the first wheel with no free play is.1 point
-
Remember that fork position in book is just a starting position, maybe correct but may have to alter very slightly. Good luck Dell1 point
-
Sounds like a classic example of a fault with the day change which I'd expect to complete around 3am. Depending what dial you've fitted it could even be dragging on it.1 point
-
The Raketas are the same so it should just push out and back in again as any crystal would do that is fitted directly to the case. I use my fingers to do both operations being careful not to distort the bezel...though they are usually quite tough. If it's glued then that's a previous repairer's idea. Acetone should work assuming the glue is superglue which is the usually home bodger's method.1 point
-
On my Seiko 7S26B the day change happens around 2am, but that's a more modern watch than your 6106. I'm curious: why leave the day works on the movement if the dial doesn't have a day window? Perhaps you could simply remove the day finger and day star with dial disk. That would remove it as a possible source for binding.1 point
-
The barrel could be converted to a hook but is that sacrilege?1 point
-
I'm not saying it was a good idea, only that I did it successfully. Maybe it's easier on a strong pocket watch spring than on a finer alloy wristwatch spring. The lubrication seemed totally dry, I could not detect any really but I expect there was some kind of coating during manufacture. I scrubbed it with naphtha and ran a film of 8200 on it.1 point
-
I had this same problem with Soviet movements , Raketa in particular are all T- end springs. Once uncoiled in the barrel they are too tight to shift along into the hole. I ended up putting the springwinder into the inner coil and winding it up a little to release some of the tension the carefully tease the T around to where it's supposed to go. Then John posted his little trick which I now follow but still use a spring winder if I happen to miss the hole.1 point
-
I don't detect any binding. The balance is so free in fact that it will oscillate a solid 2 minutes with a strong puff of air. The replacement hole jewels I bought from a guy who makes them to spec, and if I recall I actually ordered the wrong ones the first time too small, so maybe the staff is a replacement with larger pivots than the 21j original. In any case, the balance has excellent motion and freedom now. Happy to show it off. It took me half a day to get it there but it is dead in beat. Pictured DD and PU at about 2/3 wind (its worst position right now)
 1 point
 -
Hi Rich - Removed the spring from its washer? Same as I would from a mainspring barrel - lifted the inner coil free with tweezers while pinching the rest between thumb & finger, and gradually walked the spring out without drama. This is what I ended up doing on a few of my install attempts. I think only once did I get it in the hole directly from the winder, but had to remove it again to reshape the inner coil. Except I used the butt of my brass tweezers.1 point
-
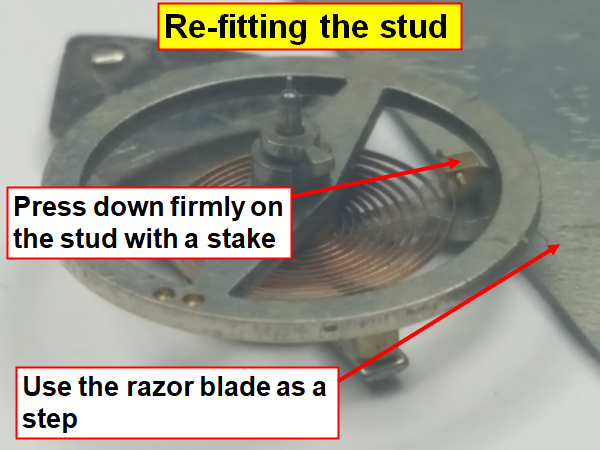
As dell has said. I would use razor blade.1 point
-
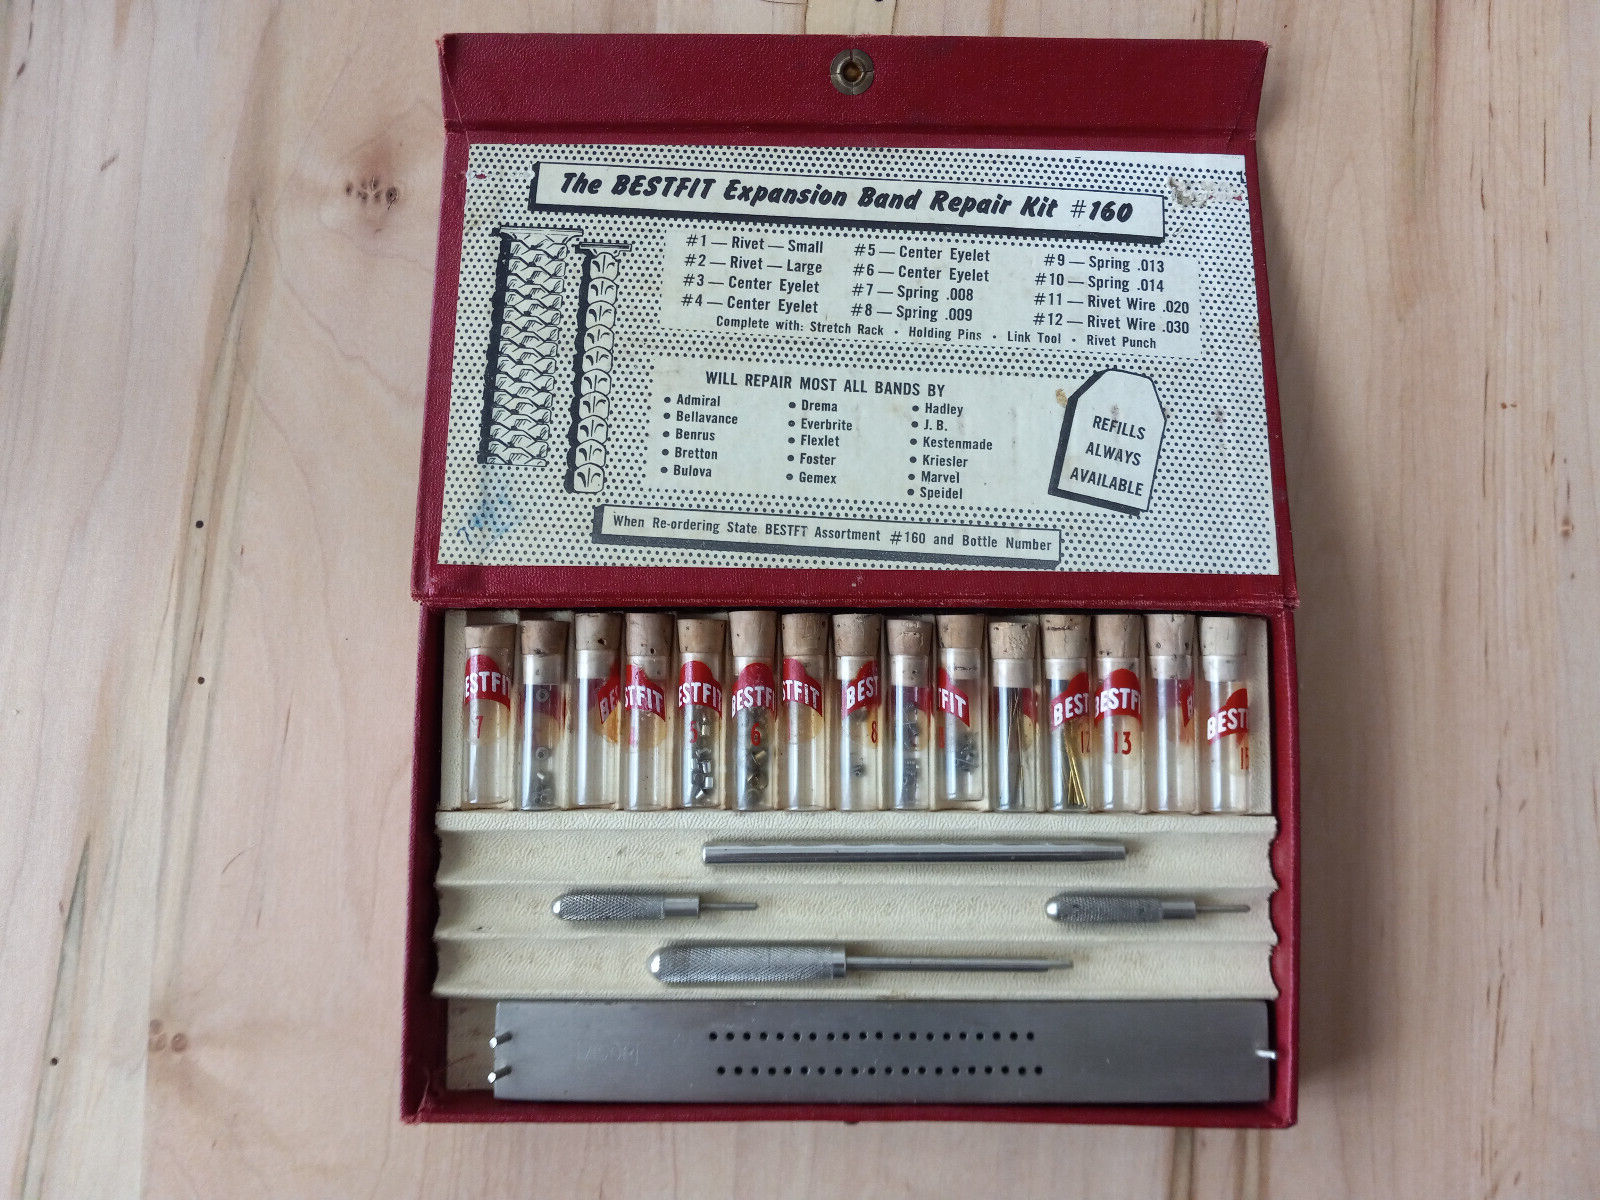
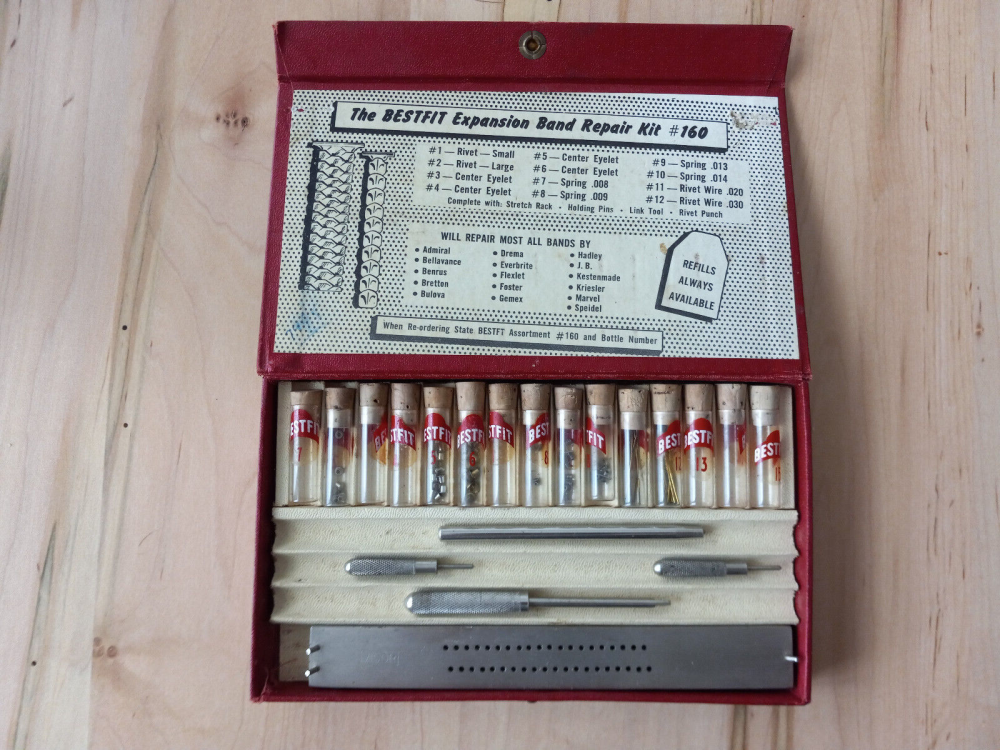
there are some makes of this type of scissor band that are adjustable but I don't think this one is, the ones that are adjustable have a "keyhole" shape where the rivet is, you would expand it to where the rivet comes out to the large part of the 'keyhole' and lift out......there is also an older kit that was sold for this type of band, it came with a staking plate, punch and rivets, they pop up on eBay from time to time
 1 point
 -
This is a great description, thank you! I have a big collection of classical music LPs >1000, and about 80% of them were rescued from public or university libraries who were throwing them out. So a lot of them are in terrible condition. I'll have to start setting aside the ones that skip when I encounter them. At one point I had a project going to hand clean every single one, but I gave up somewhere around Debussy or Delibes.1 point
-
Why don't You try to rectify the spring? What You need to do is to straighten the angle I have shown to a straight line. Don't look at the drawings of the springs, the real ones are just like yours but without that bent. I see the spring is bent a little up, but at first try without rectifying this. If really needed, the rivet may be removed and the spring then can be bent down and then new rivet placed.
 1 point
 -
This is a completely off topic aside, but a great example of extracurricular microscope activities that might affect one's choice of scope: You need greater than watchmaking levels of magnification to do this, and still quite a bit of working distance. but I forget what lens combo I ended up with off the top of my head. I used the largest oiler in a set that never seemed to get used for anything else to make a tool for the task. I sorta ground it flat on a diamond plate into something like a pointed spade (you know what the tip of an oiler looks like), then cut a hook into one side. I finished by polishing it as best I could. Skips come from when the grooves get folded over on one another, and push the needle across/between grooves. Put the LP under the scope, find the scratch (possibly the hardest part), then either push (rounded side) or pull (hook side) the vinyl out of the groove so the needle can get through while doing as little damage aside as possible. You won't be able to eliminate the damage entirely (you'll hear noise, a scratchy sound like it's dirty), but it'll play. Sometimes, it's not a scratch though. I once had a stone-like bit of ash embedded in a groove. That one was more difficult, because it was really embedded in there, and did a bit of damage getting it out. I think I had to cheat a bit and sort of reform the vinyl into minimally viable groove walls to keep the needle going so it would play afterward. Obviously not ideal, and had more noise than usual, but it played. That was a really common Billy Joel album that I must have ended up with duplicates of over time, and ended up being sold/traded. Never really thought about it again until just now, and never heard anything negative from whomever bought it, so the repair must have been acceptable. I have 300-some odd albums that we often just rotate through. I haven't had anything requiring repair in a while... Well, that's a lie, I have a small stack awaiting just that, but I guess nothing I'm super eager to listen to... anyway, there are a number of repaired albums in the lineup, and the post repair noise isn't enough for me to remember what albums have been repaired or even notice while listening.1 point
-
Without being able to put your legs under the bench, you are going to have back and neck problems in the future.1 point
-
The movement looks like an ISA 257, but the battery cover plate is different to the examples of this movement that I have seen. I think AndyGSi’s suggestion of removing just the top right screw should work.1 point
-
I'd look at just removing the top right screw first on the battery cap and see if it will slide out. Have you removed the stem and will the movement come out of the case? Edit What is the actual number of the movement?1 point
-
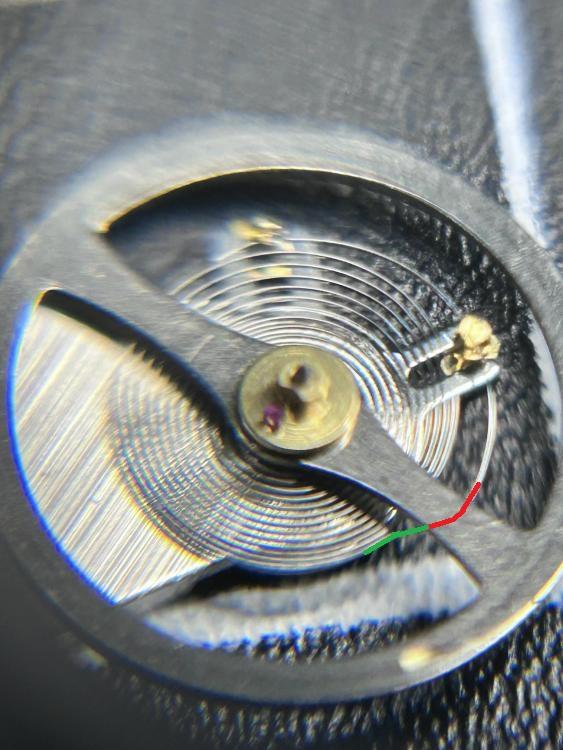
Yes, but leave this for later. Now You need to bring the spring centered and not touching the stud. Well, see how many posts and 4 pages, when it was clear from the beginning that the problem has nothing to do with magnetization1 point
-
I nearly gave you a laughing face instead of a thumbs up Nev....for just the Alleluia ! alone1 point
-
That bend on the green section should definitely be there, it's by no accident. Those two offset bends are the start of the terminal curve finishing at the stud, the space on hairspring where the regulation of the rate takes place. But as Nev says they do need tweeking a little to center the coils, just dont remove them.1 point
-
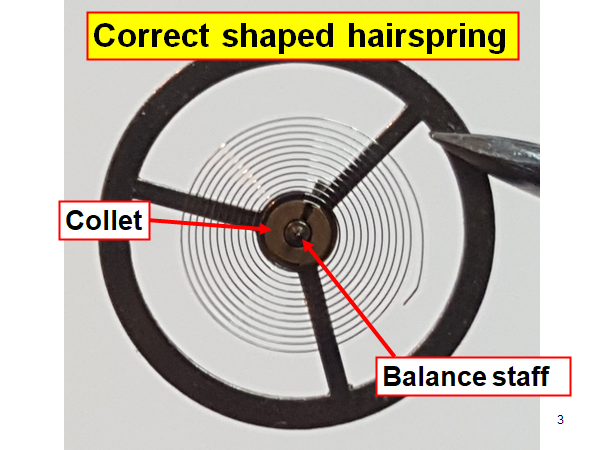
Do not remove the balance from the cock. When it is on the cock You will be able to see the result of what You are doing. Both the red and the green sections must be there1 point
-
Alleluia! We have a picture... You need to open the angle marked with red and may be a little the green one too in order to bring the spring centered. Now it touches the stud or touches it when oscillating.
 1 point
 -
Worth having a look here too https://www.ebay.com/str/vintagetimeau?_trksid=p4429486.m3561.l161211 no affiliation but they are a very well known Seiko specialist based in Adelaide south Australia. They have seiko parts and gasket sets made for their own use and sell the surplus. Tom1 point
-
The crown and indicator wheel spring are purportedly original. The pushers are certain to be aftermarket. I see original pushers online and I might be able to fix one of mine, but wanted to get it fully operational and see what i can do. I got the stem out by threading an extender on and looks to be in good shape. Put the indicator pinion on the stem and put back in and everything works smoothly, including the day and date jumping by pushing the stem. Just seems to have the day ring off by a half step, but that entails taking the hands and dial off to fix. So that day is coming but not tonight!
 1 point
 -
Thank you for your introduction and welcome to this friendly forum. We all look forward to your contributions and continued involvement. If there is anything we can help you with don’t be afraid to ask. Nice clear photos can help a lot.1 point
-
Hello and welcome to the forum. Enjoy1 point
-
Hello and welcome from Leeds, England.1 point
-
Thank you so much!! I love this forum!1 point
-
One trick that I've seen, was to put the train bridge on and align the screw holes. Then screw the screws in halfway and drop the bridge on top of the wheels. Now gently tap laterally the movement holder a couple of times and usually the small pivots will find their way into the proper holes. I've seen it, and I've tried it once and surprisingly it did work. Good luck.1 point
-
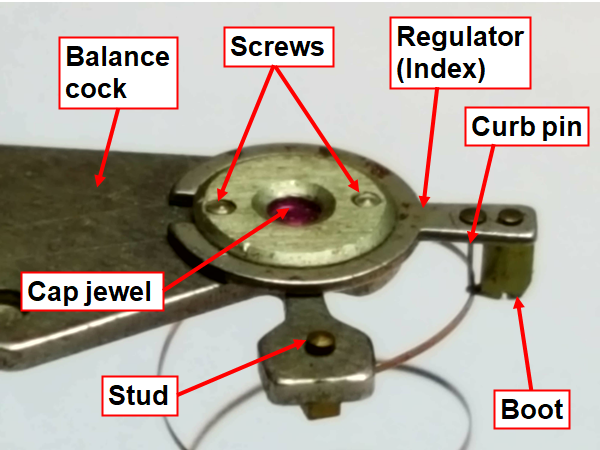
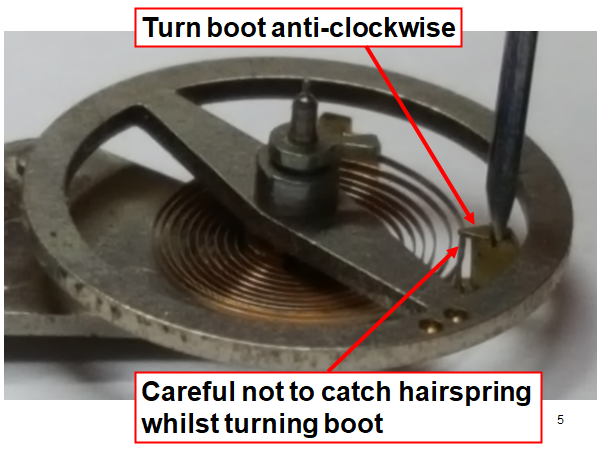
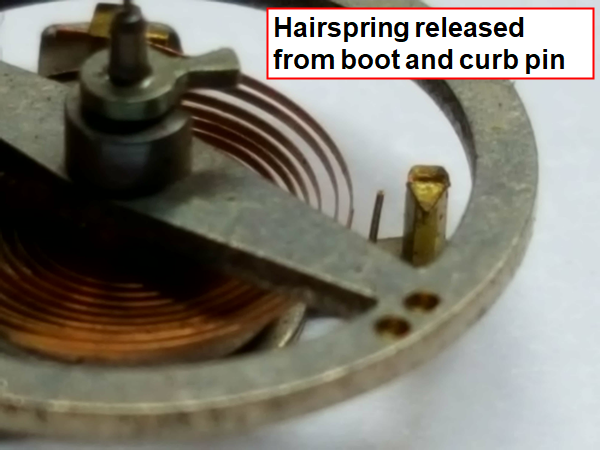
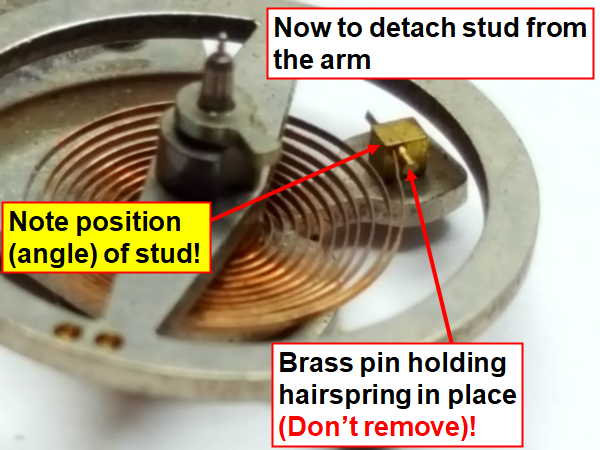
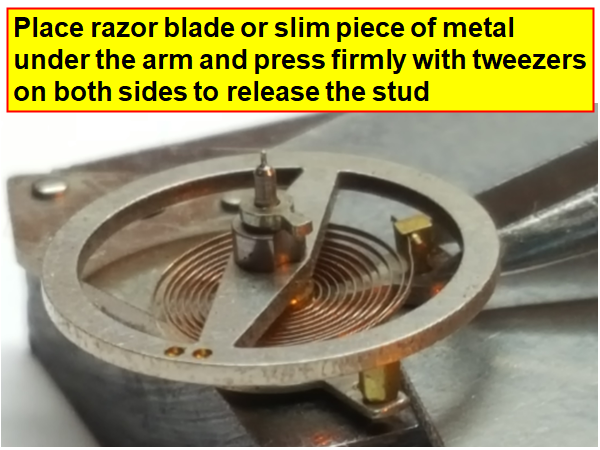
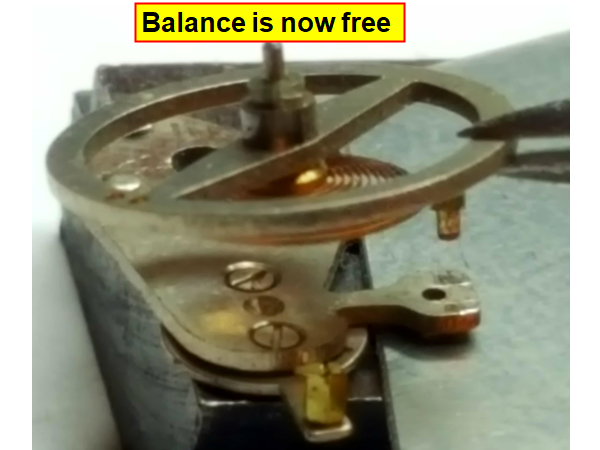
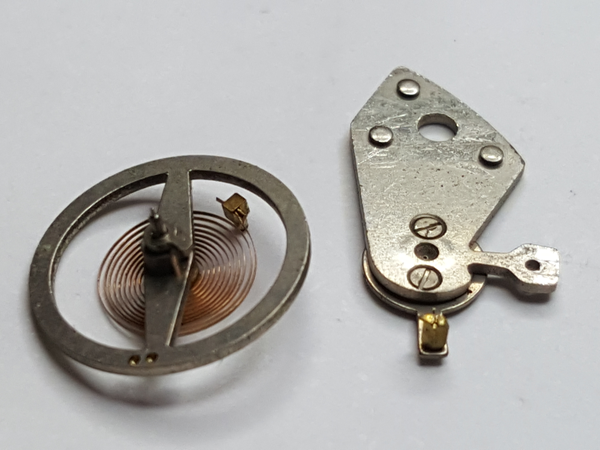
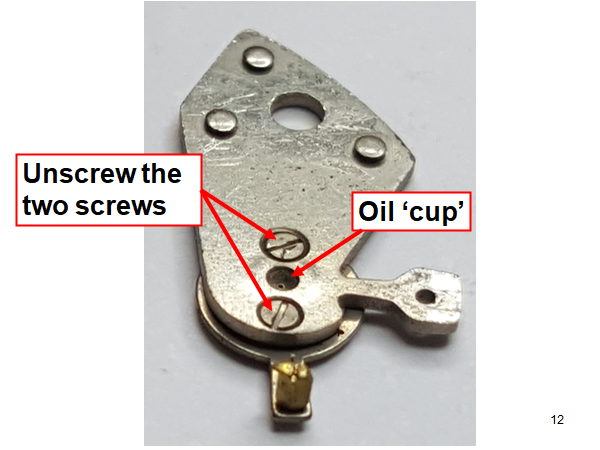
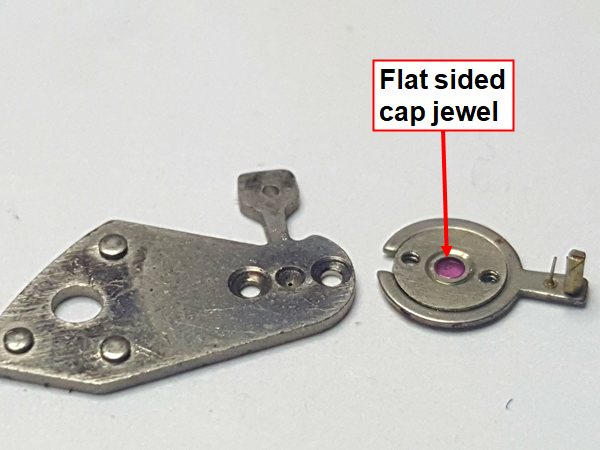
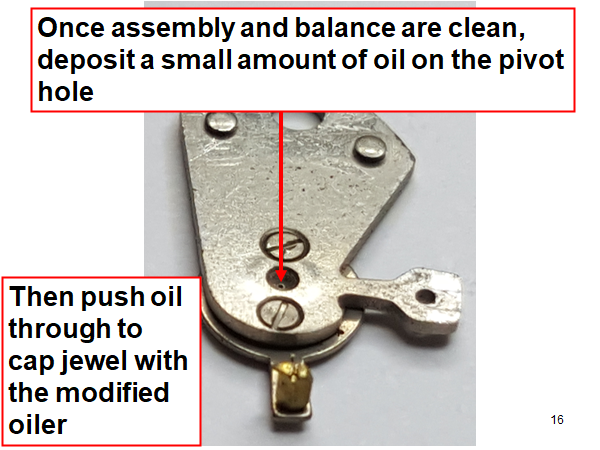
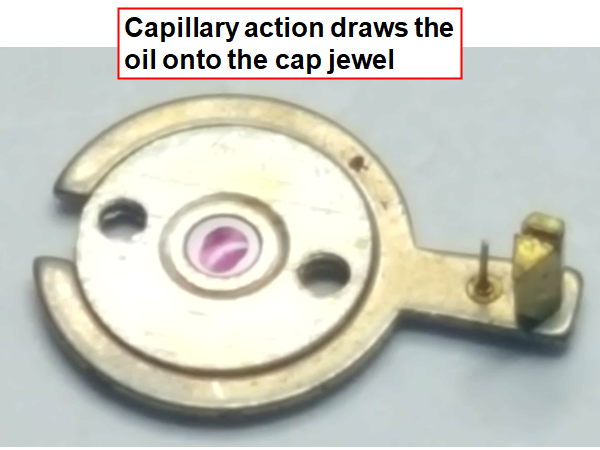
Hi All, I posted a while ago a walk through of the Baumgartner BFG 866 and wanted to add to it, especially as there is little out there to explain how to oil the cap jewels of a non shock proof watch. This is the balance cock of the BFG 866 and as you can see it has a cap jewel held in place with two screws, screwed from underneath. Some pull the hairspring out of the way to oil through the oil sink, but I find it safer to remove the hairspring, but also it is good practice to do so. If the balance and hairspring is removed the shape of the hairspring is seen a lot easier and any manipulation can be done. The hairspring may have to be taken off the balance if it isn't a simple tweak. Removing the balance from the cock is quite simple Measure the balance staff to find out how big it is, so when we make a tool to push the oil through to the cap jewel, we will know the correct size to make We need to unscrew the cap jewel to clean it Now we are going to hone an old oiler to fit through the hole in the oil sink that the balance staff pivot passes through Be careful not to damage the pivot hole Once the balance cock and setting has been cleaned thoroughly, we can then oil the cap jewel through the oil sink with Moebius 9010 If you are not sure you have oiled it enough, or your technique is correct, remove the cap jewel and have a look. Obviously before screwing back the cap jewel it will have to be cleaned properly again This is a safer way than oiling whilst the hairspring is attached to the balance cock. It may take a while longer, but it is a lot safer! It is also good practice in removing the balance and hairspring from the cock, but also checks the state of the hairspring, especially the uniformity of all the coils and how the hairspring is studded onto the collet The other cap jewel in the mainplate would be oiled in exactly the same fashion. Trying to oil the cap jewels and then fixing them onto the setting isn't a good way to oil them, as the oil will probably be smeared when re-fitting them. This is the way I teach my students to oil their non shockproof cap jewels I Hope this helps someone else in the future. More BFG 866 practicals to follow....


 1 point

.thumb.jpg.cb17a66989f1e796fd4217db2e9ca9df.jpg)