Leaderboard

.thumb.jpg.cb17a66989f1e796fd4217db2e9ca9df.jpg)


Popular Content
Showing content with the highest reputation on 01/13/25 in all areas
-
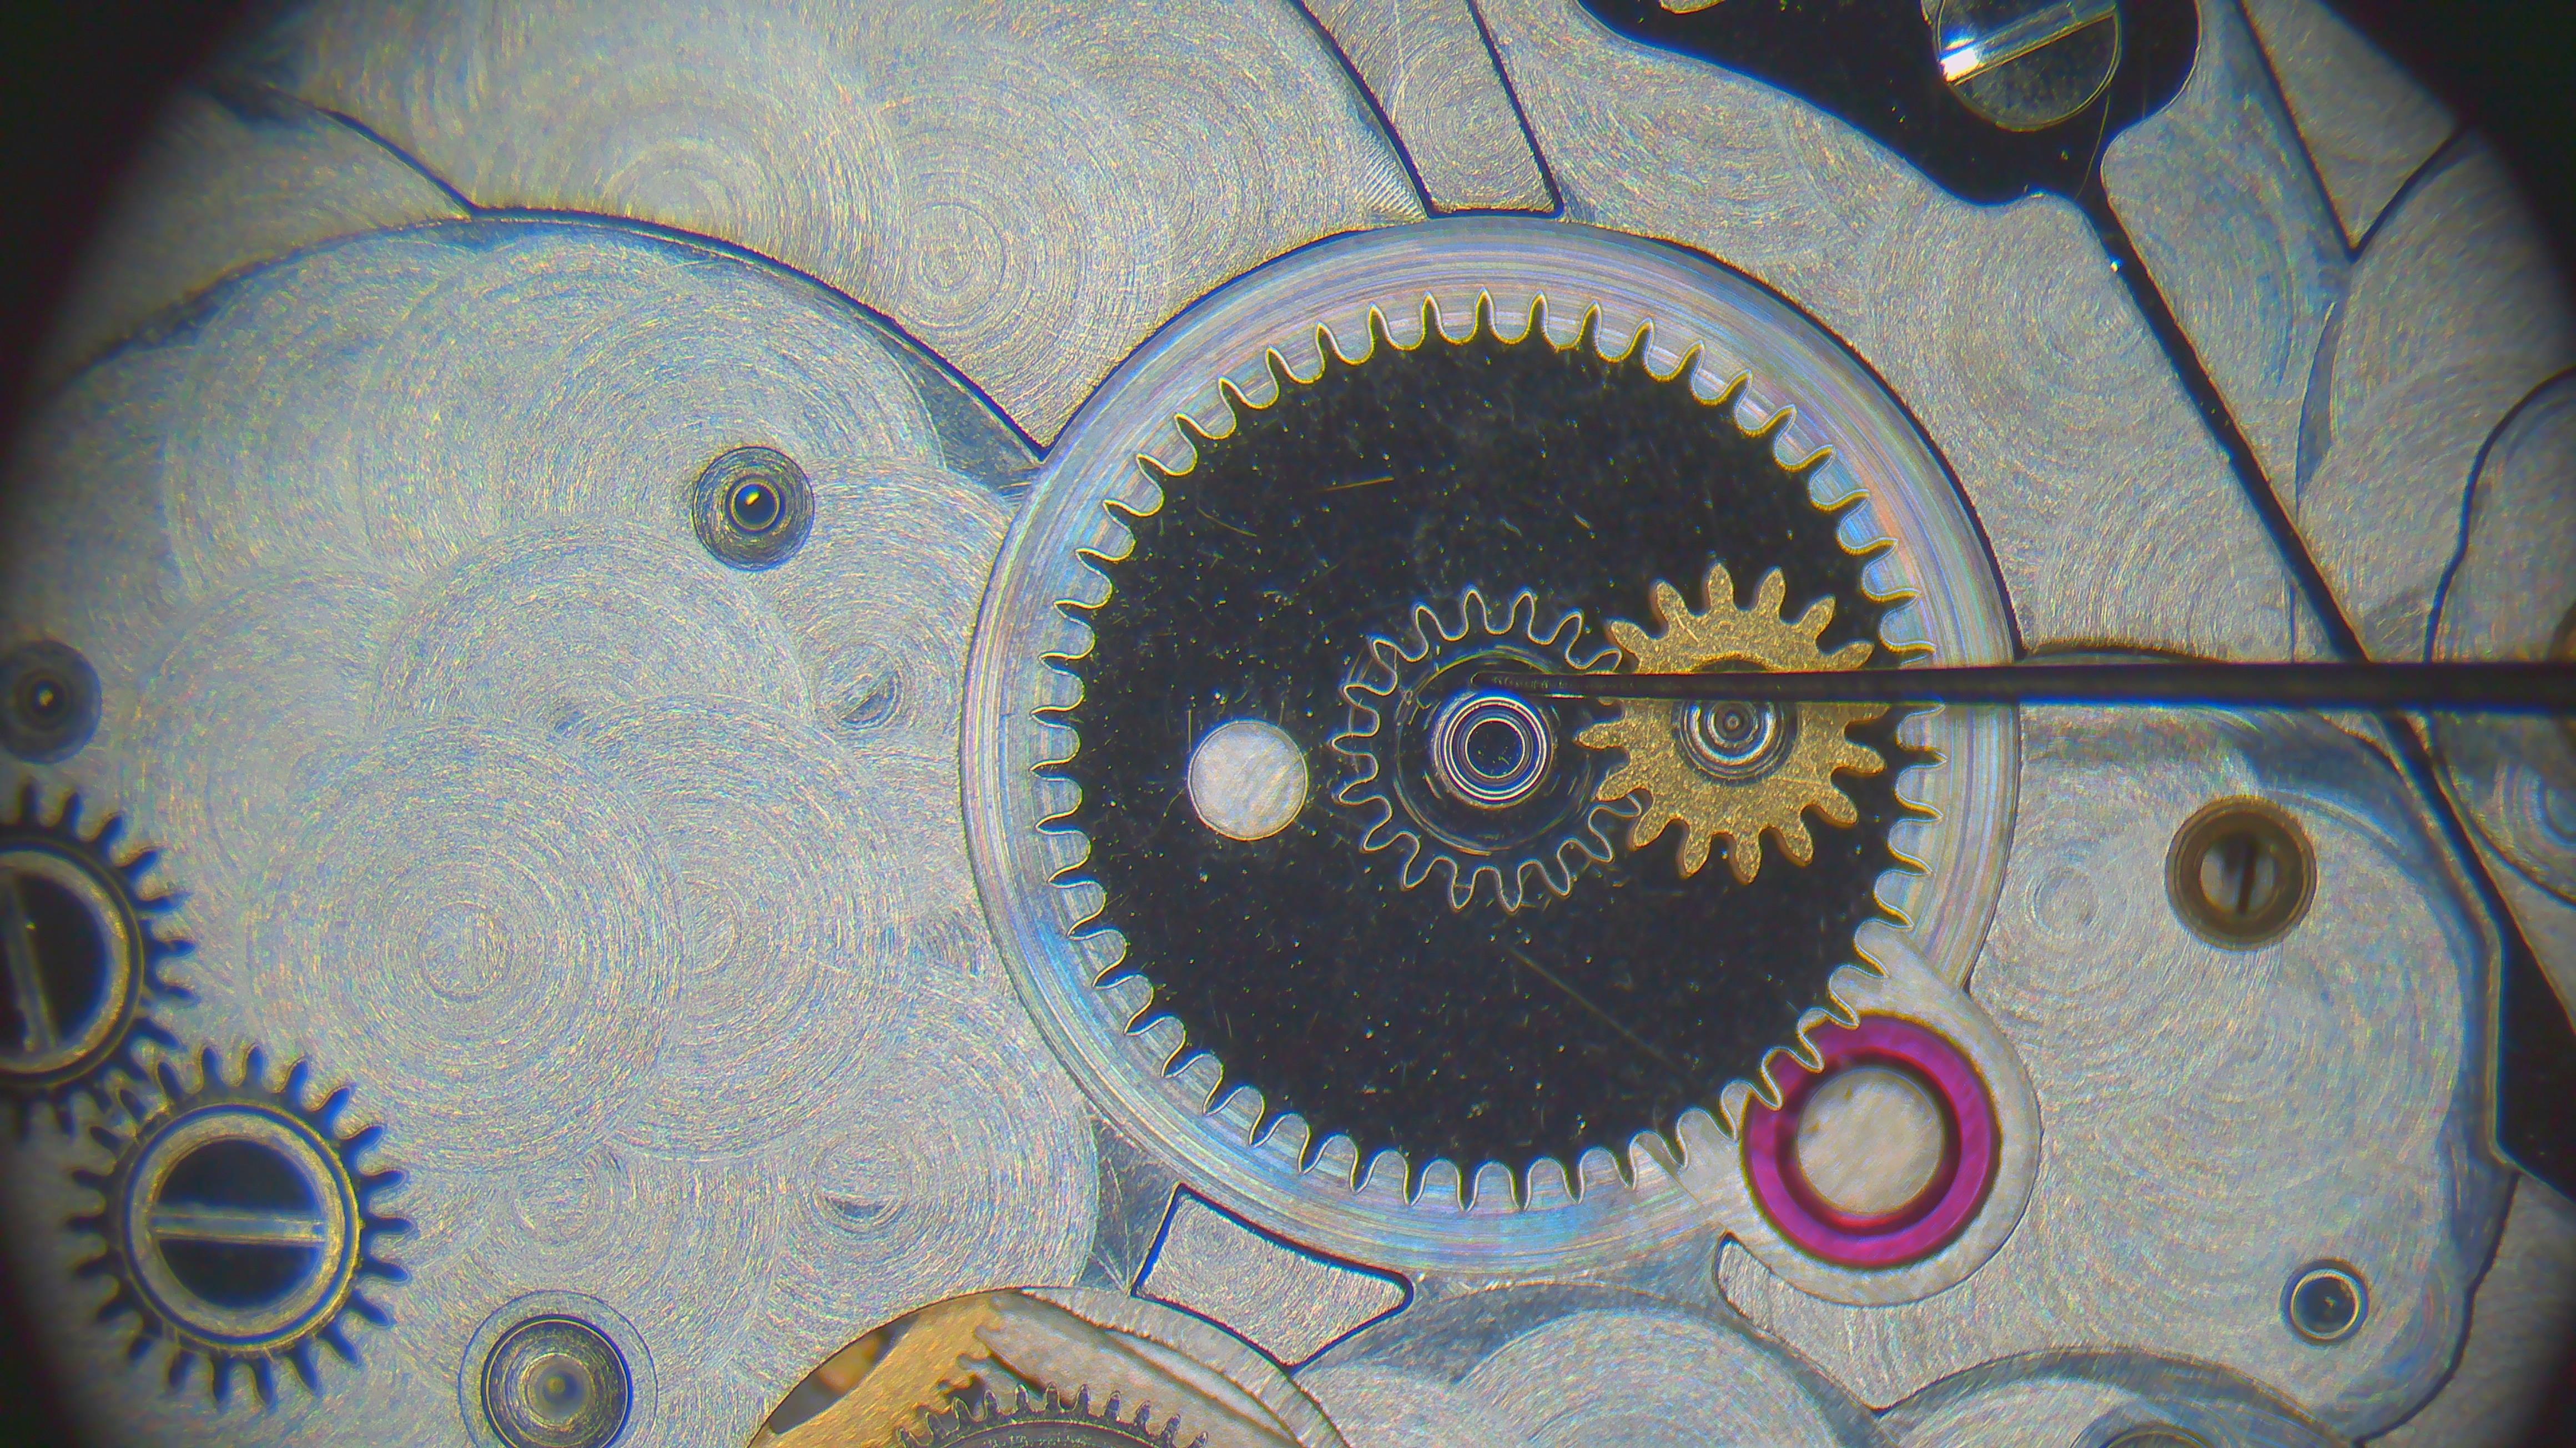
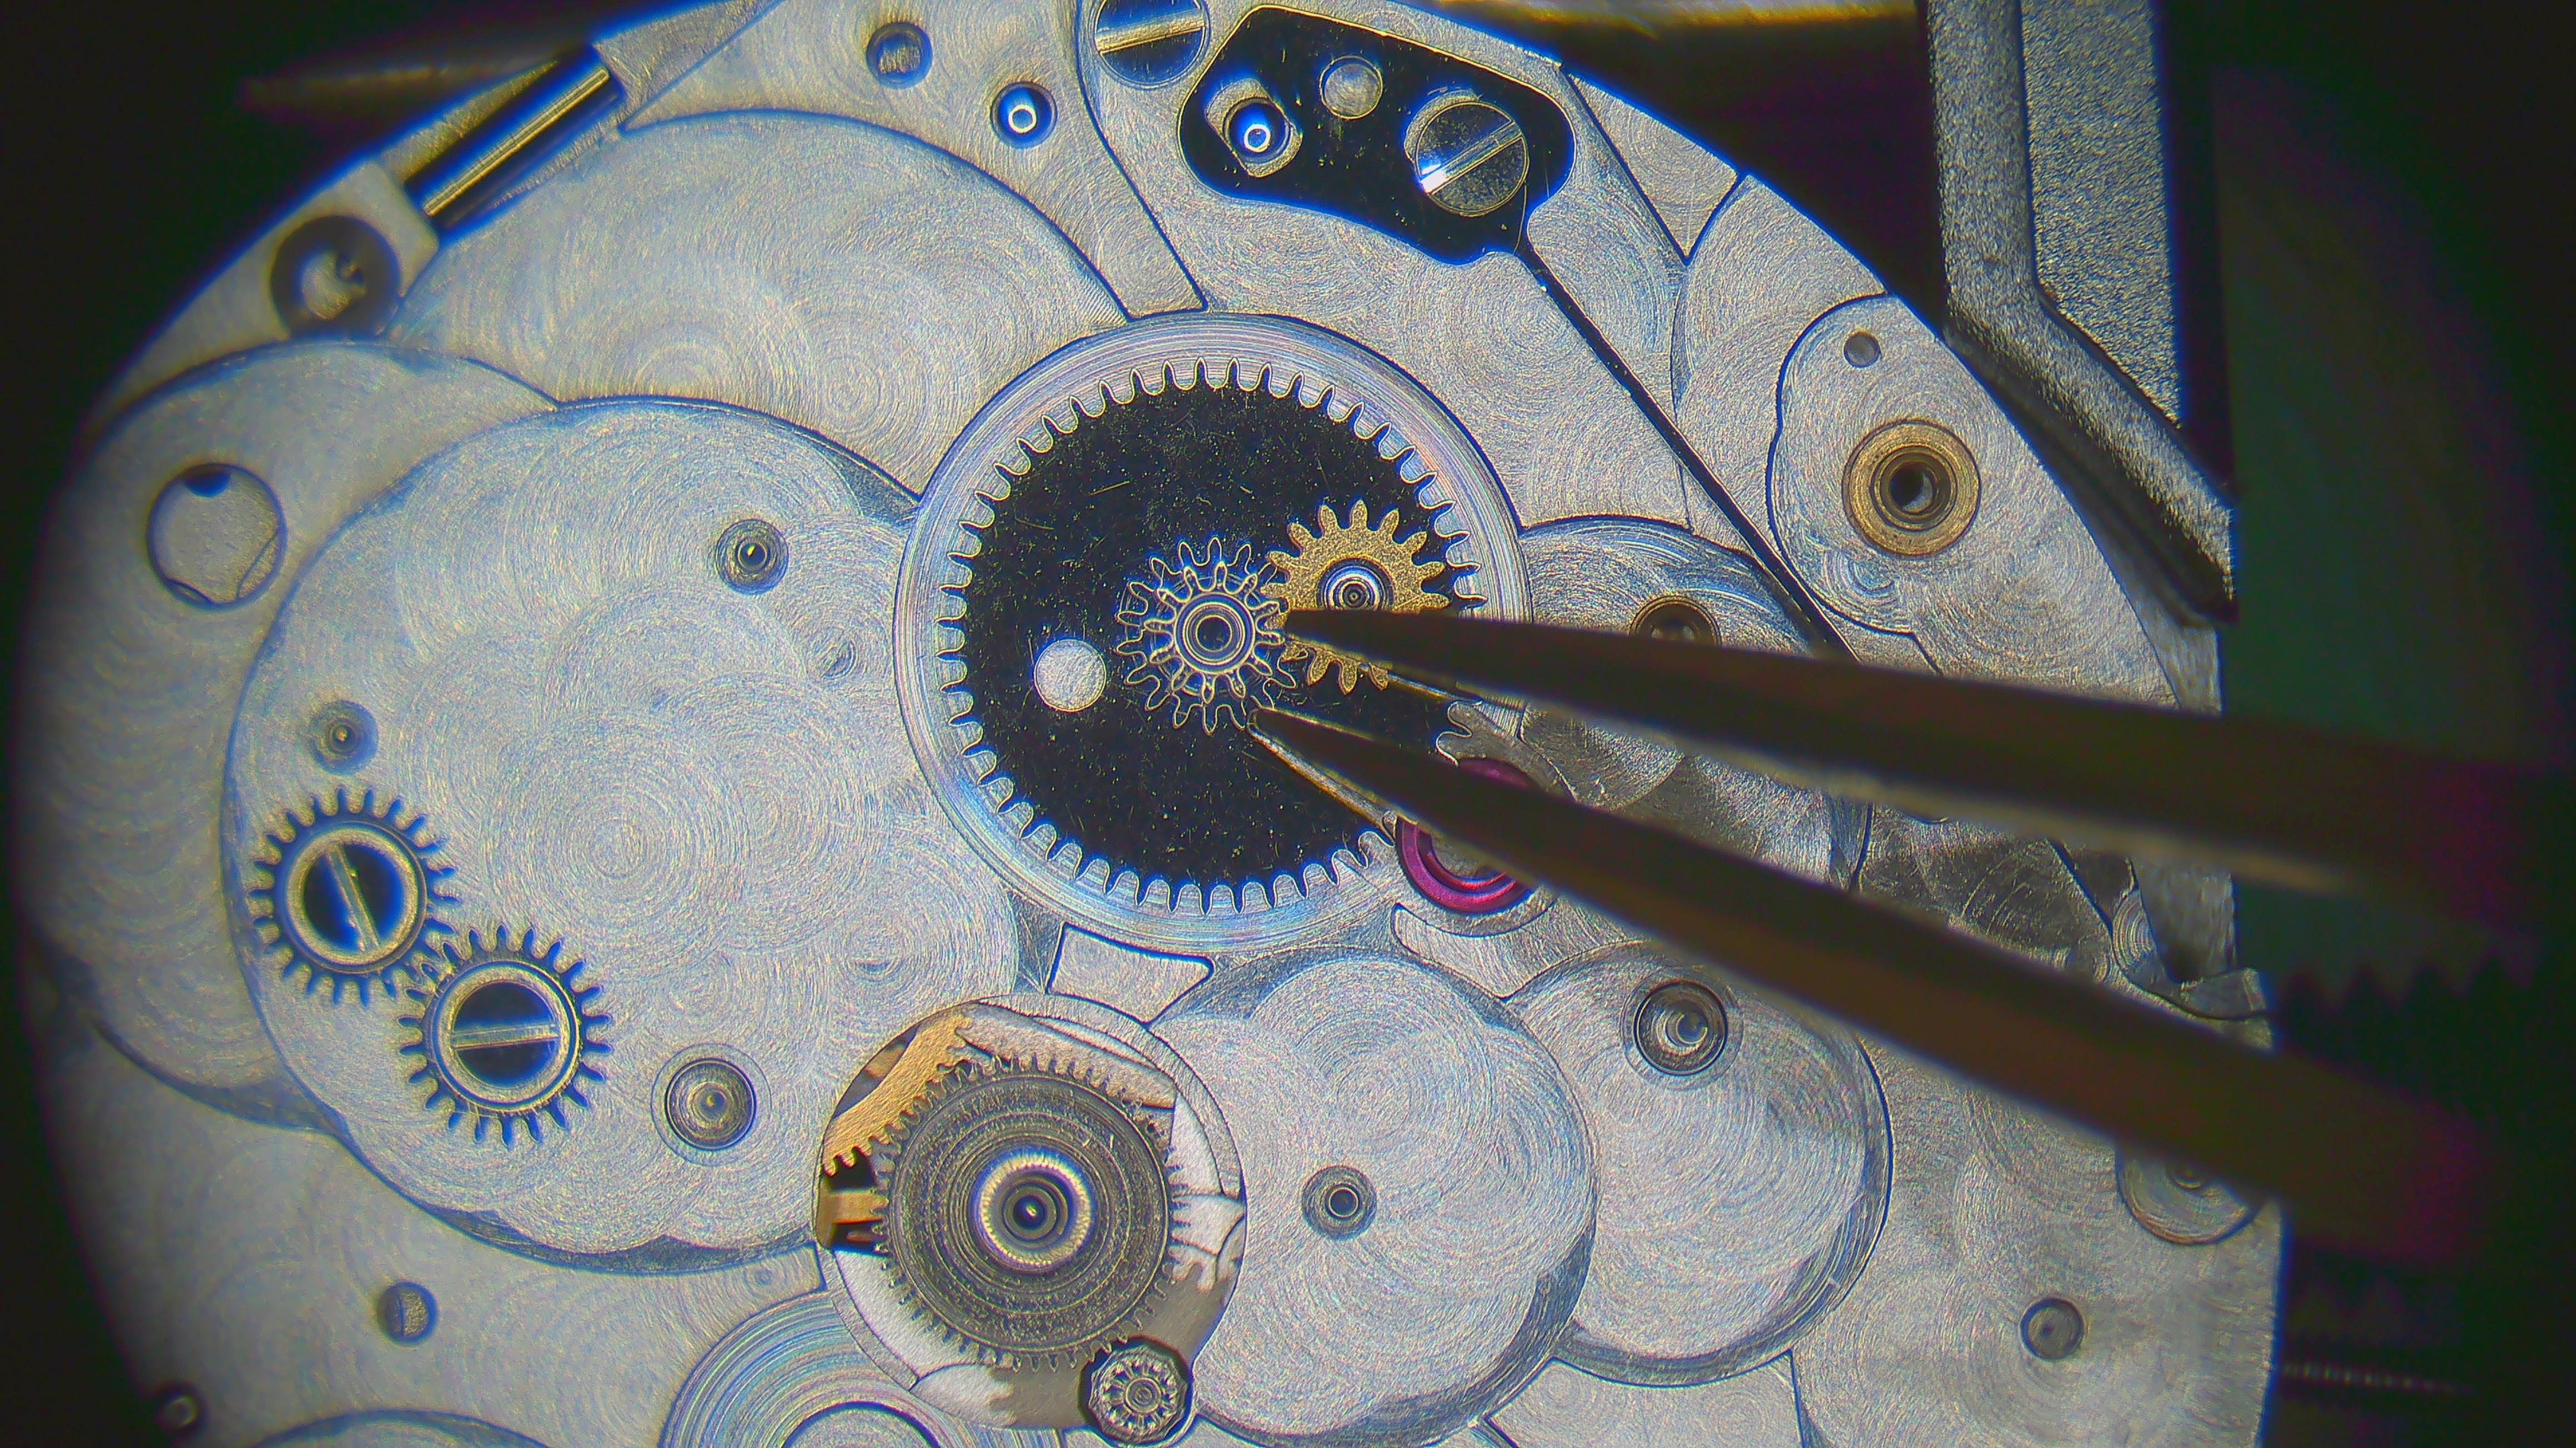
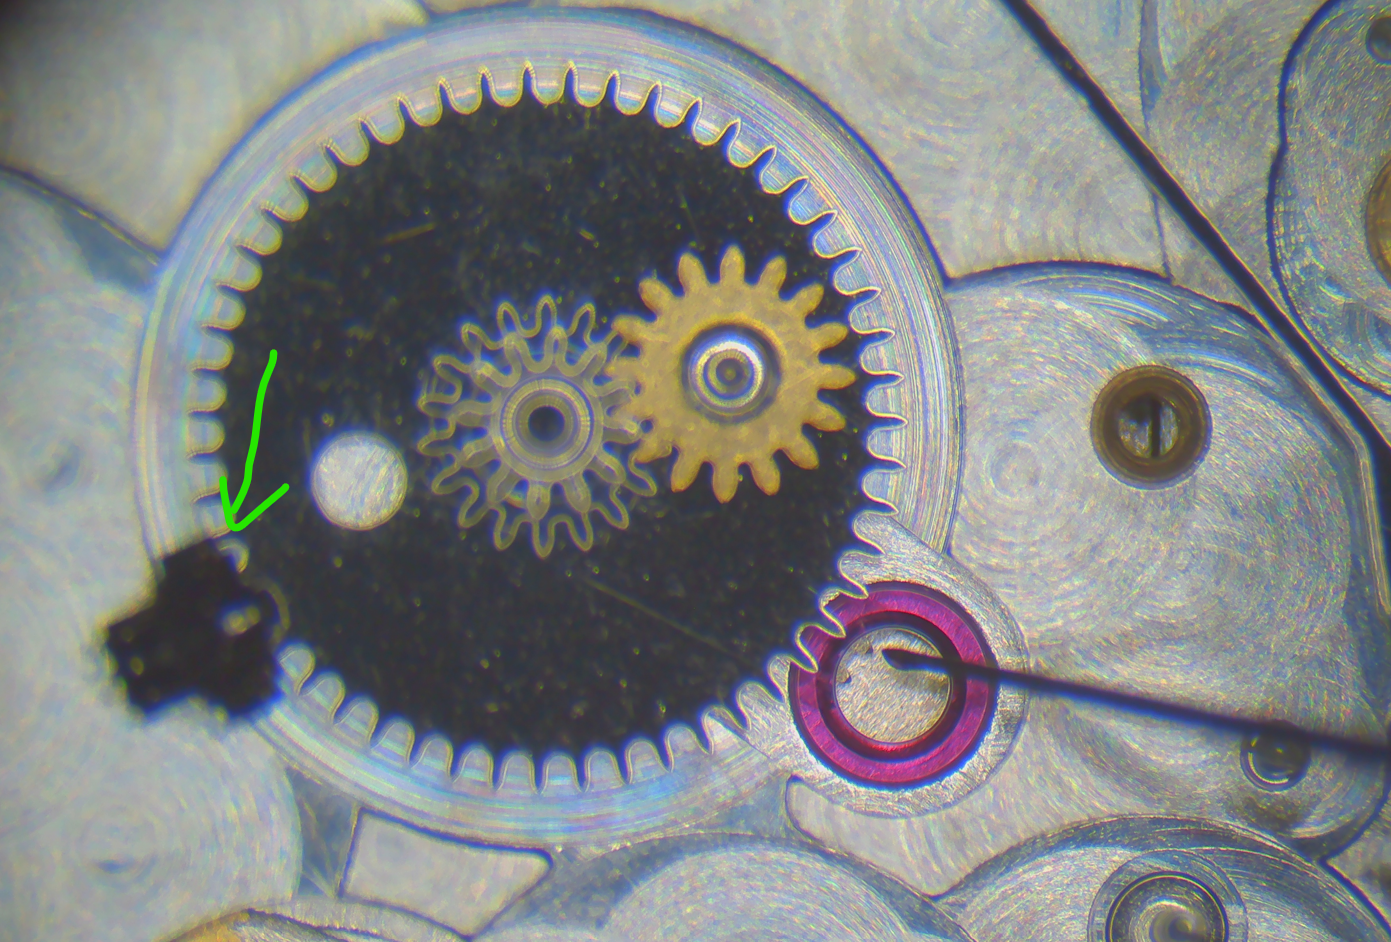
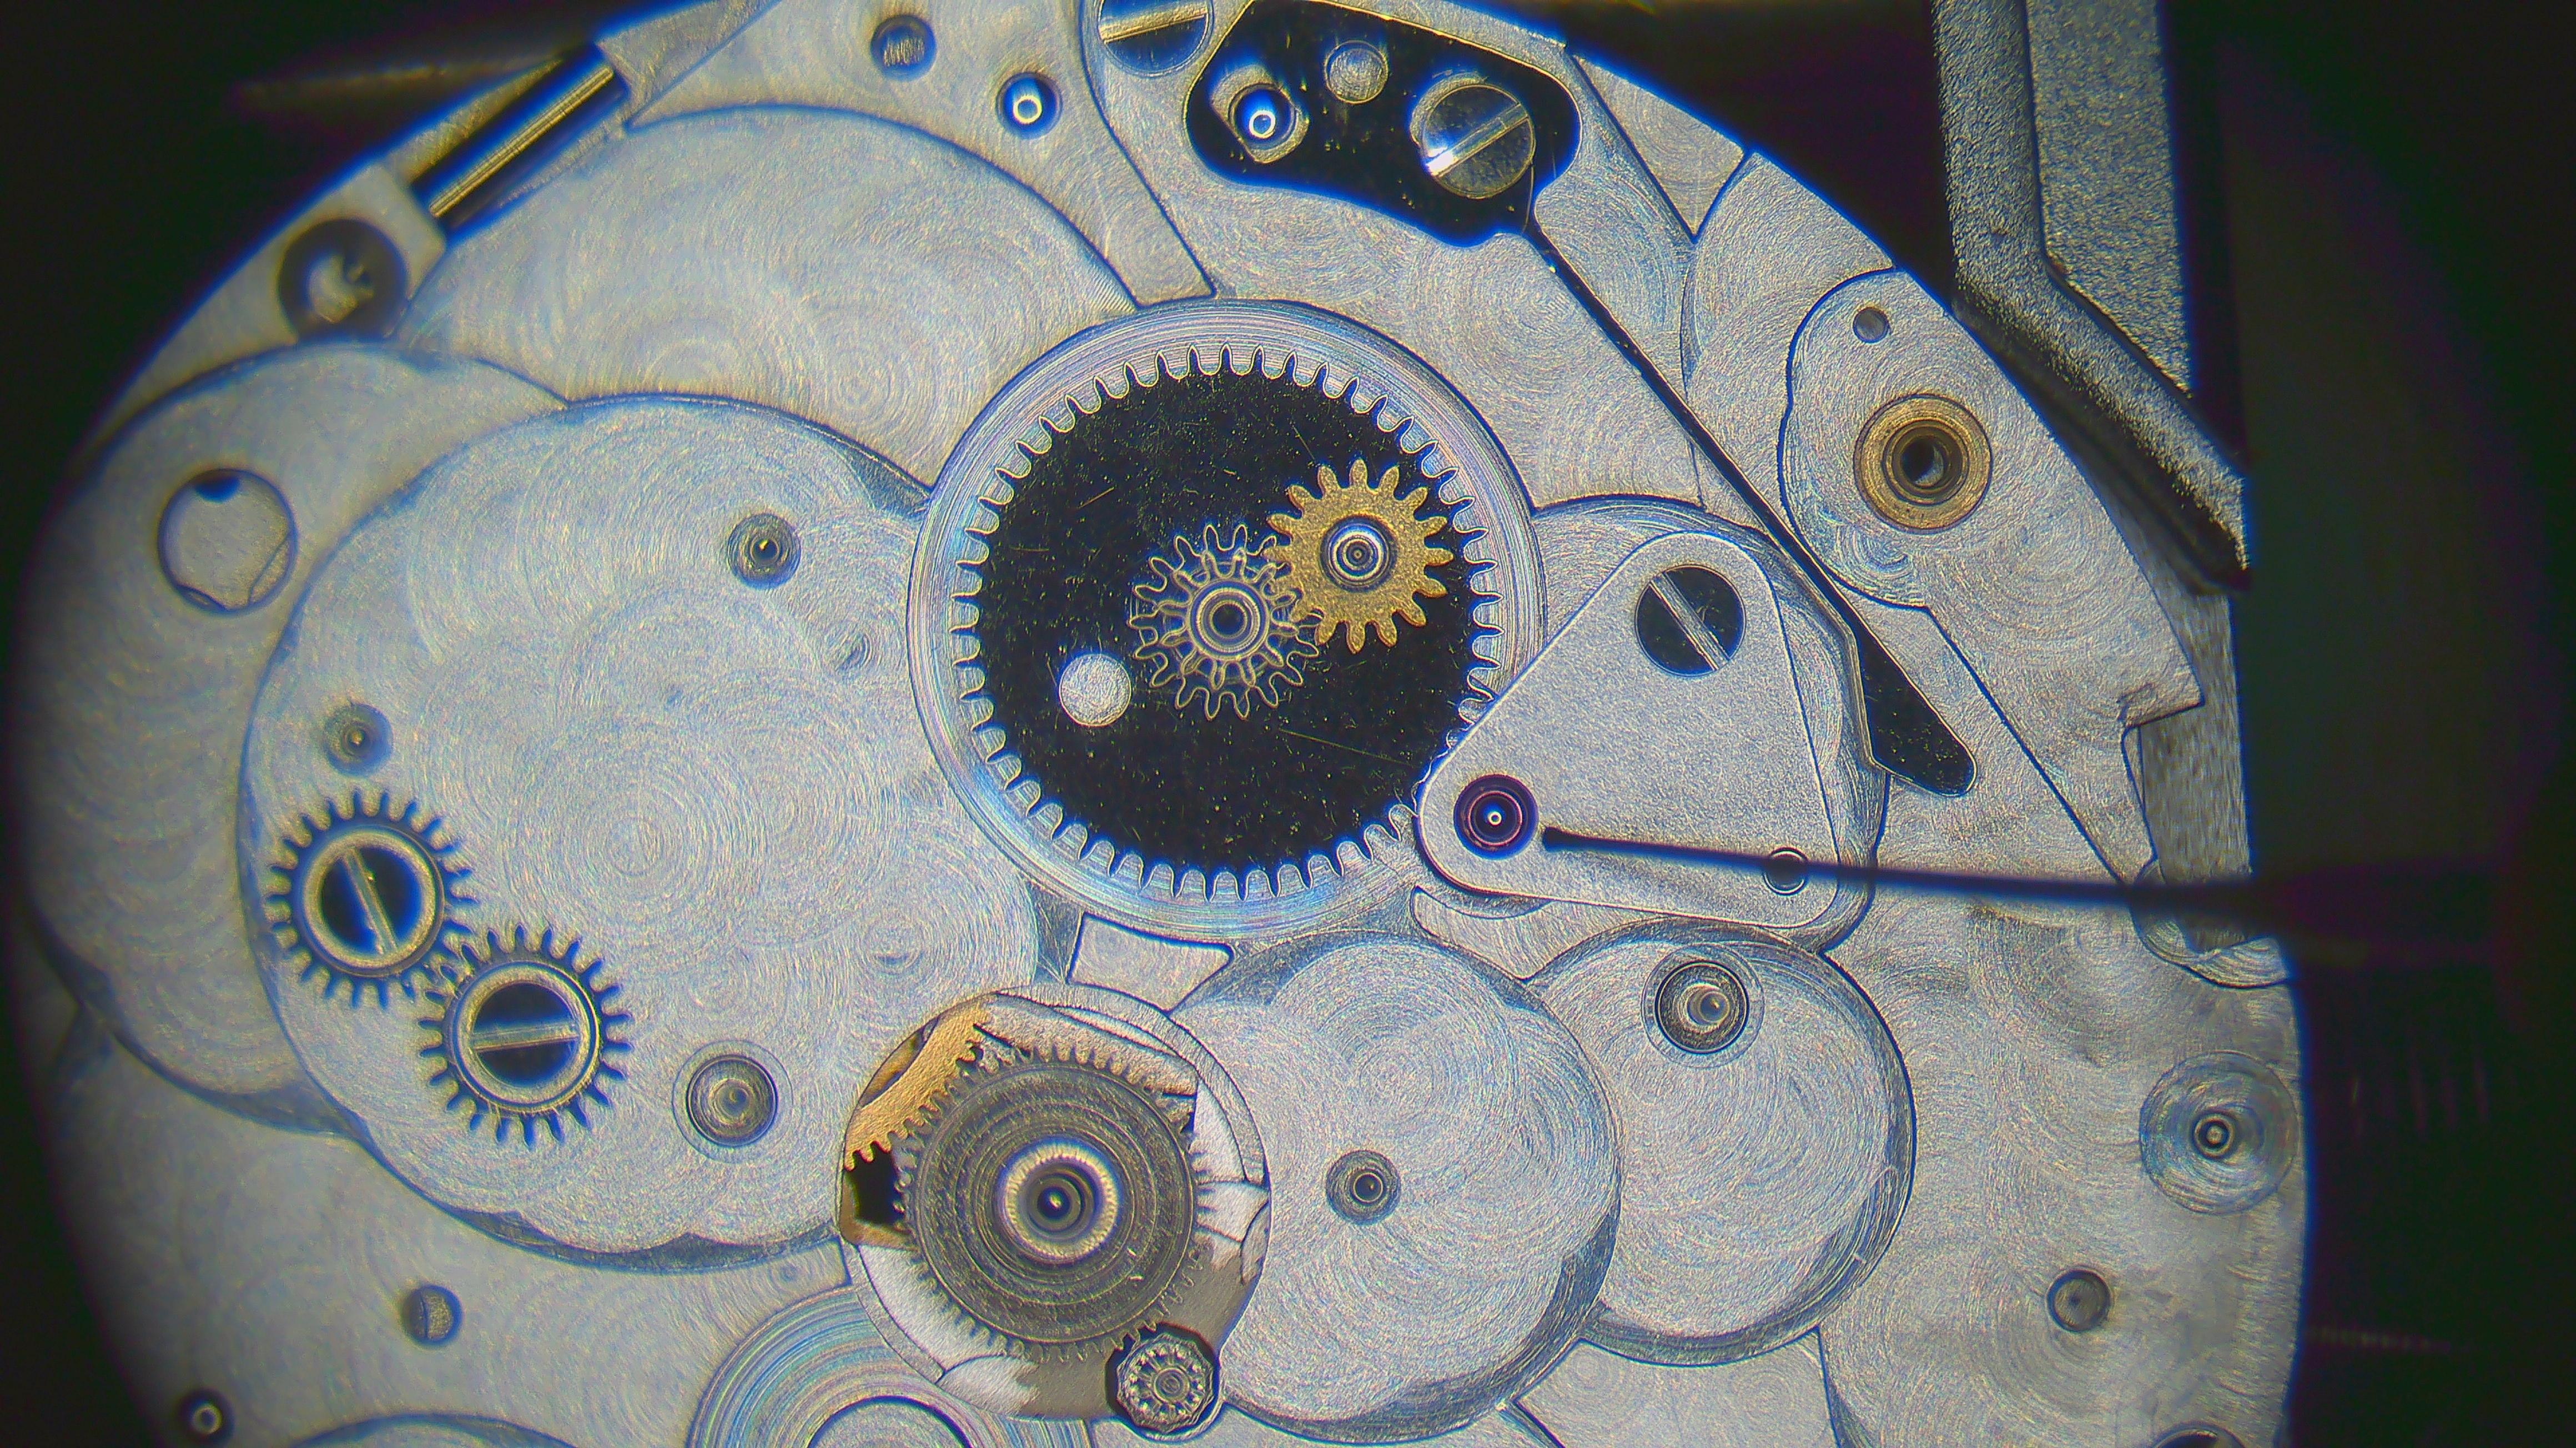
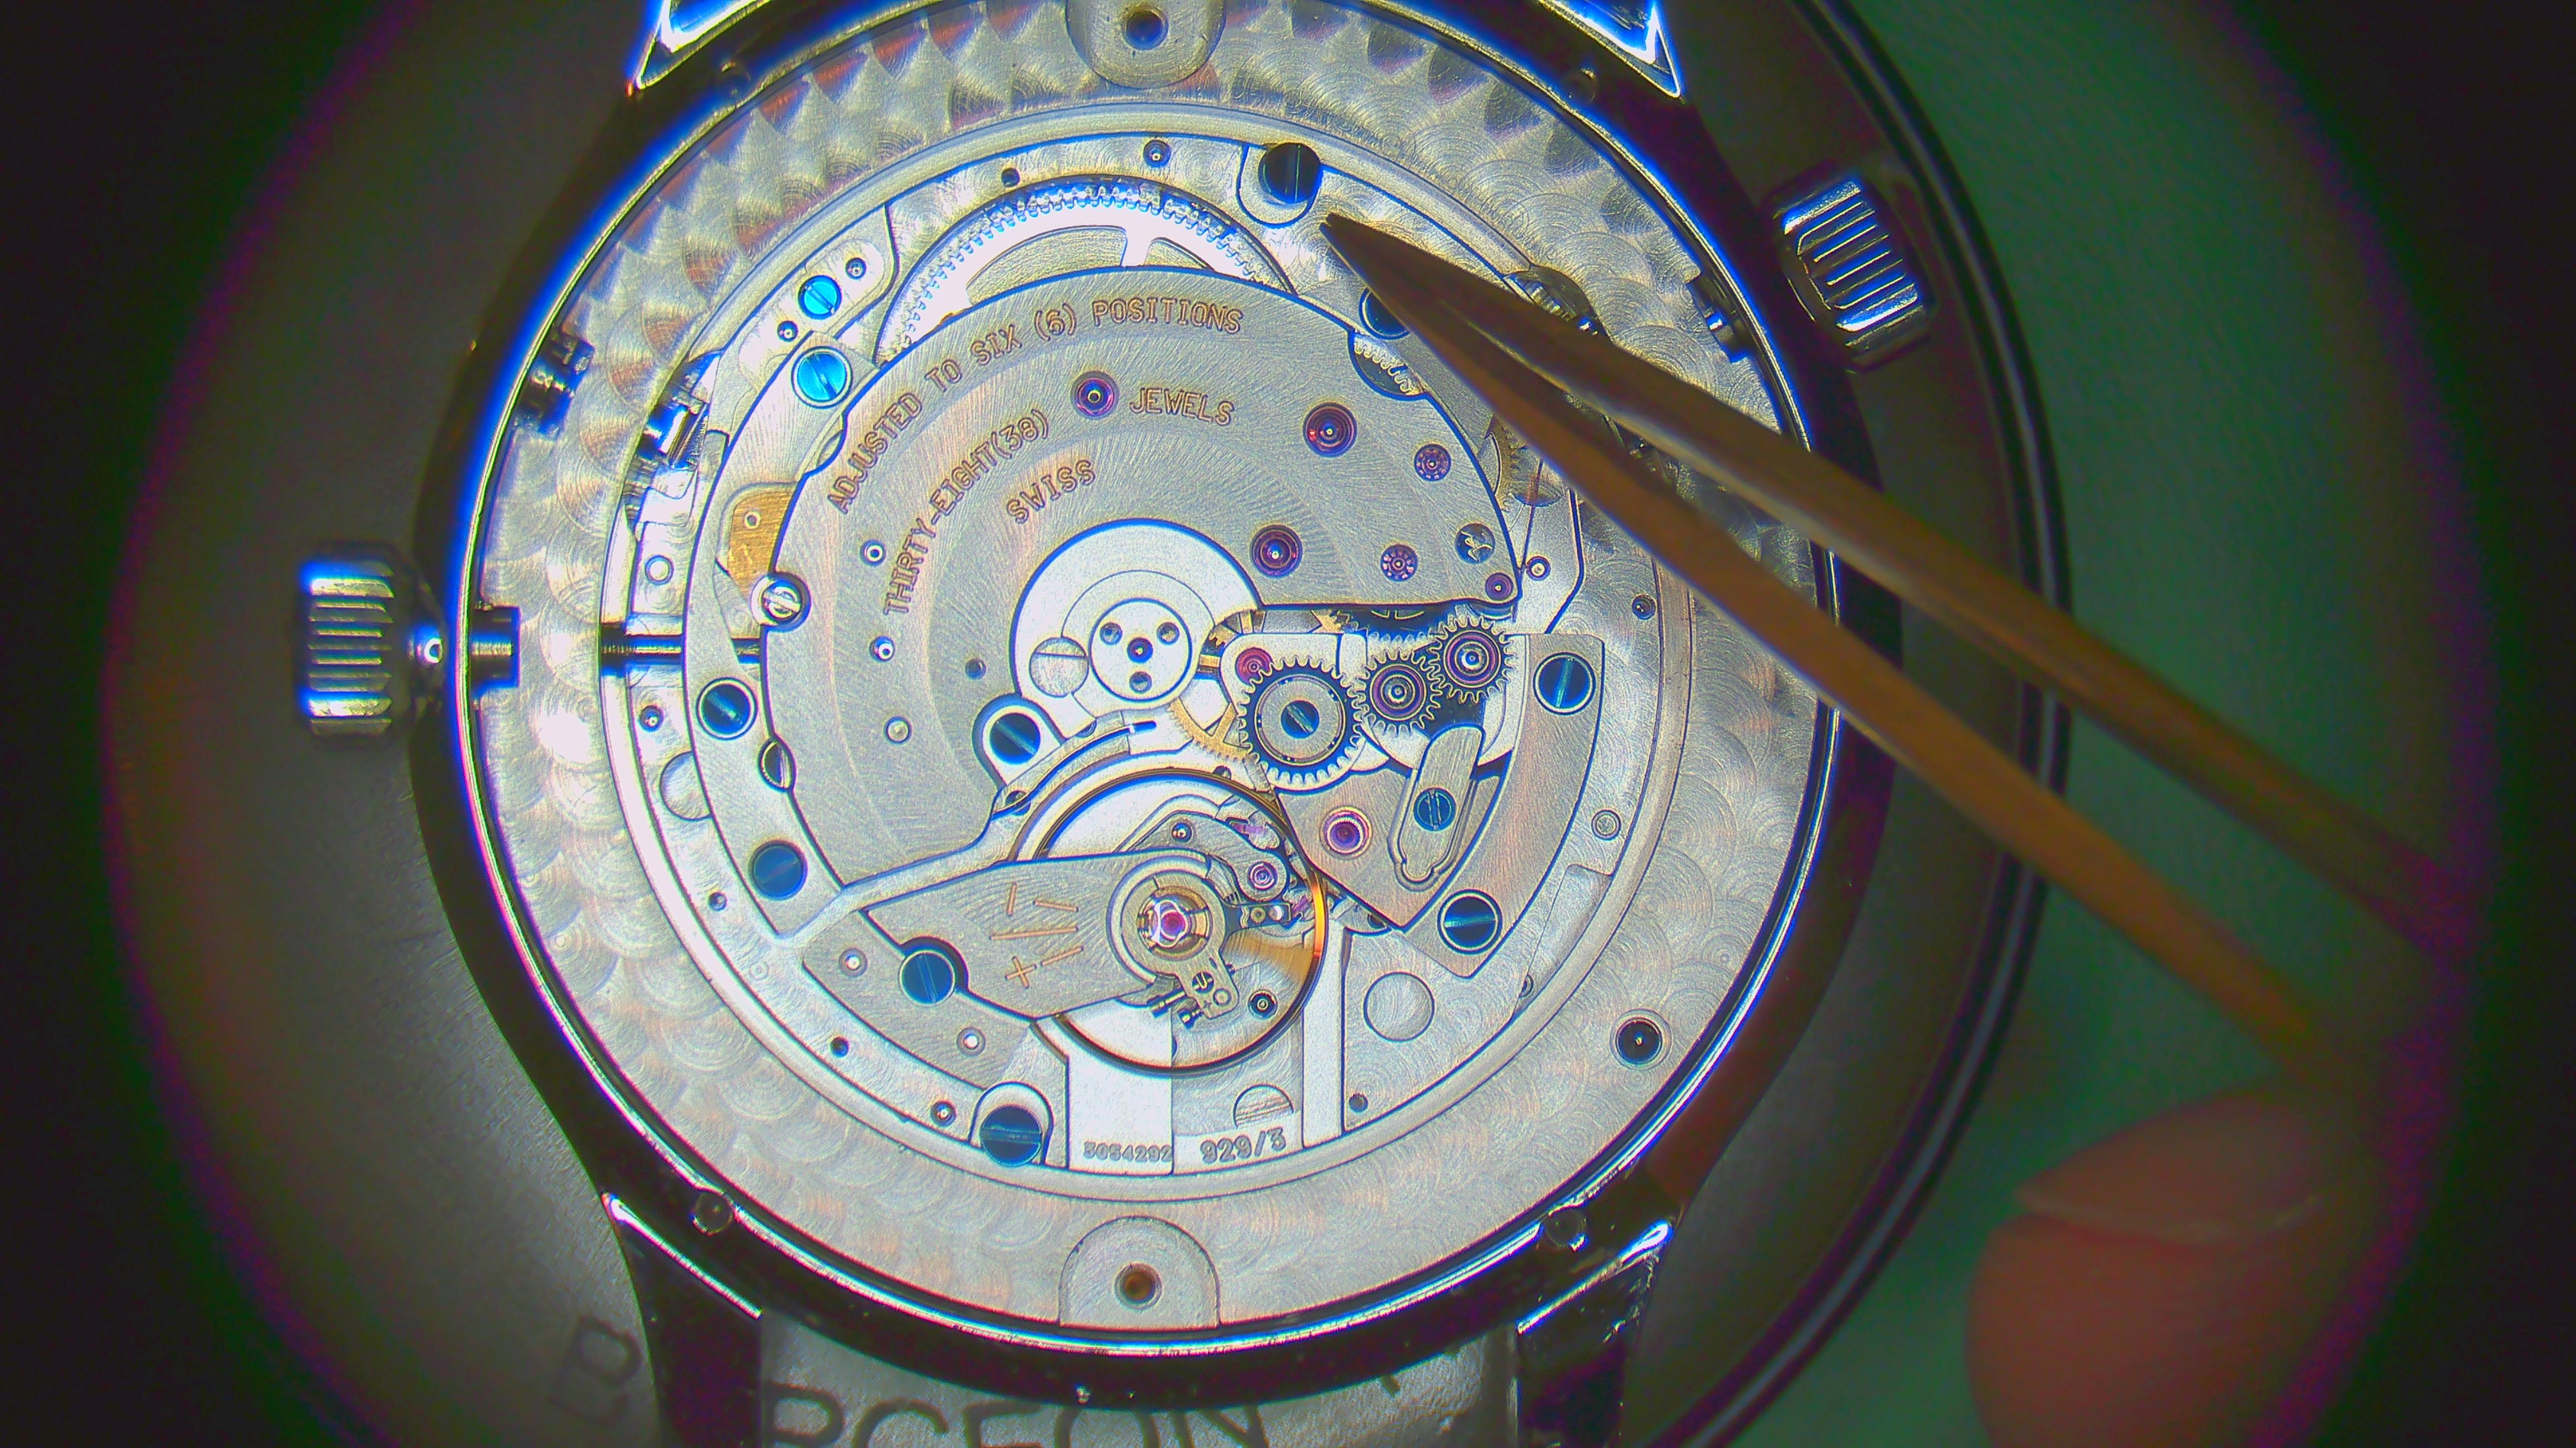
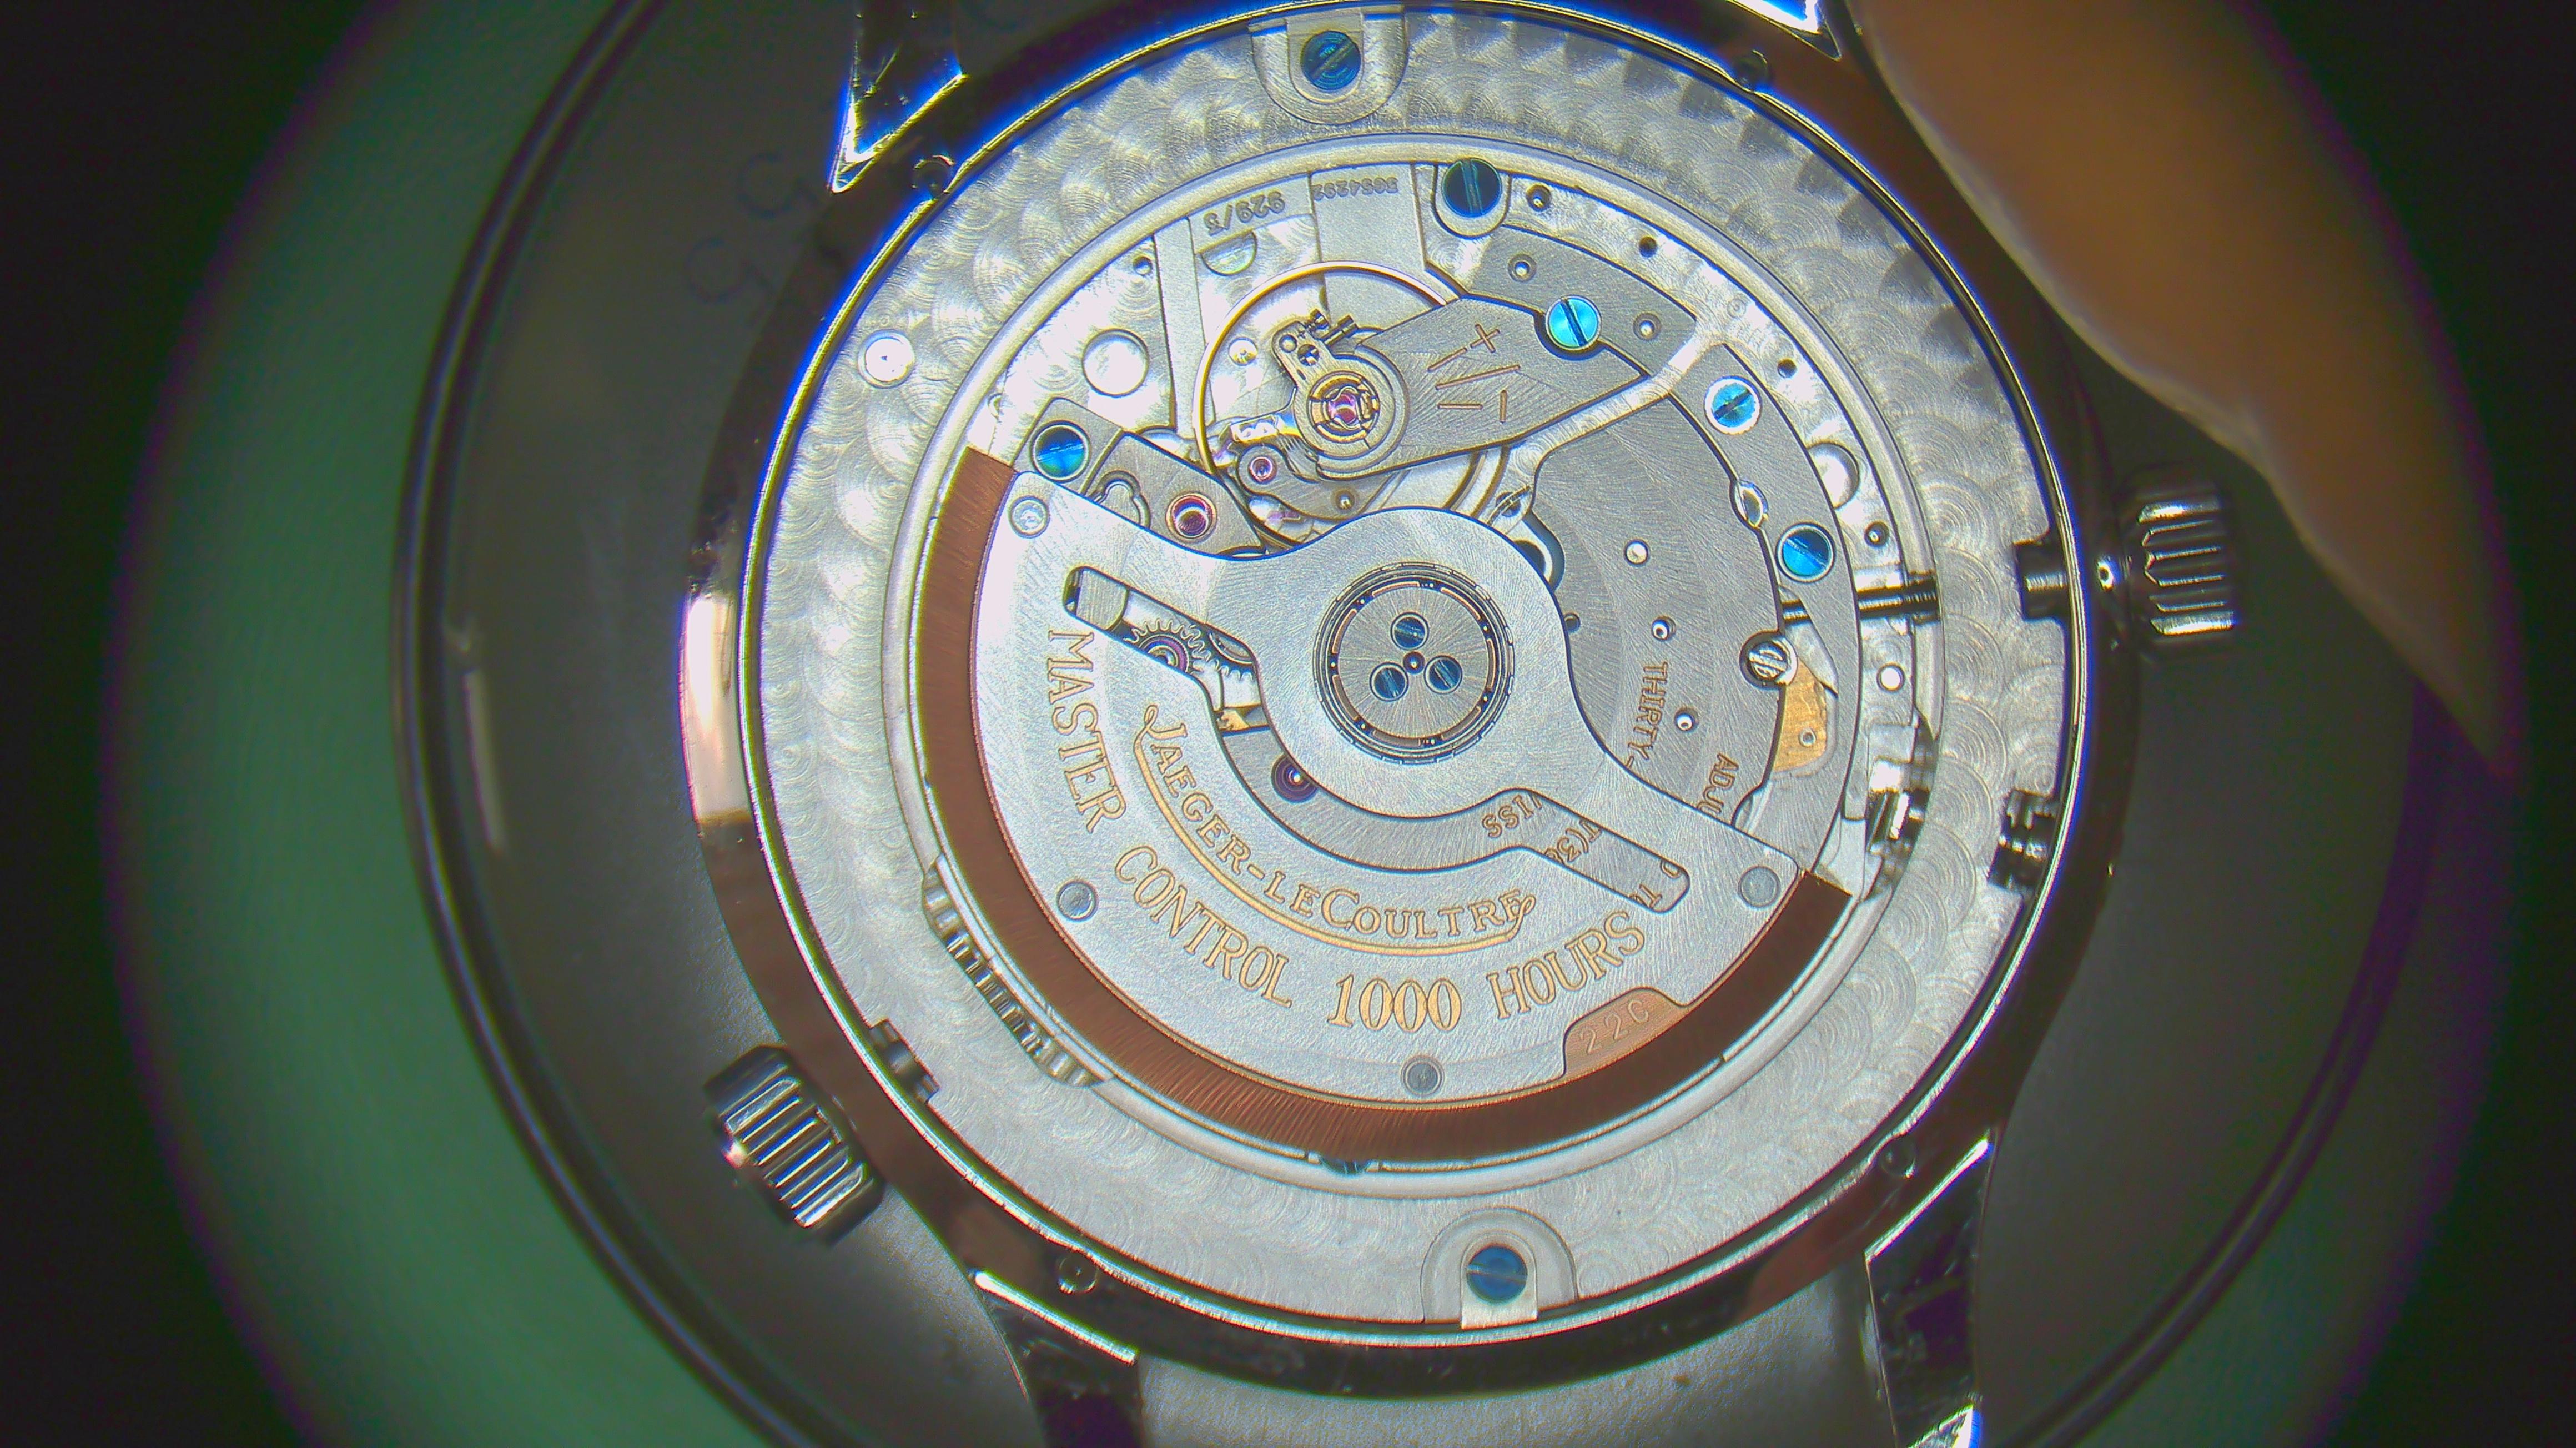
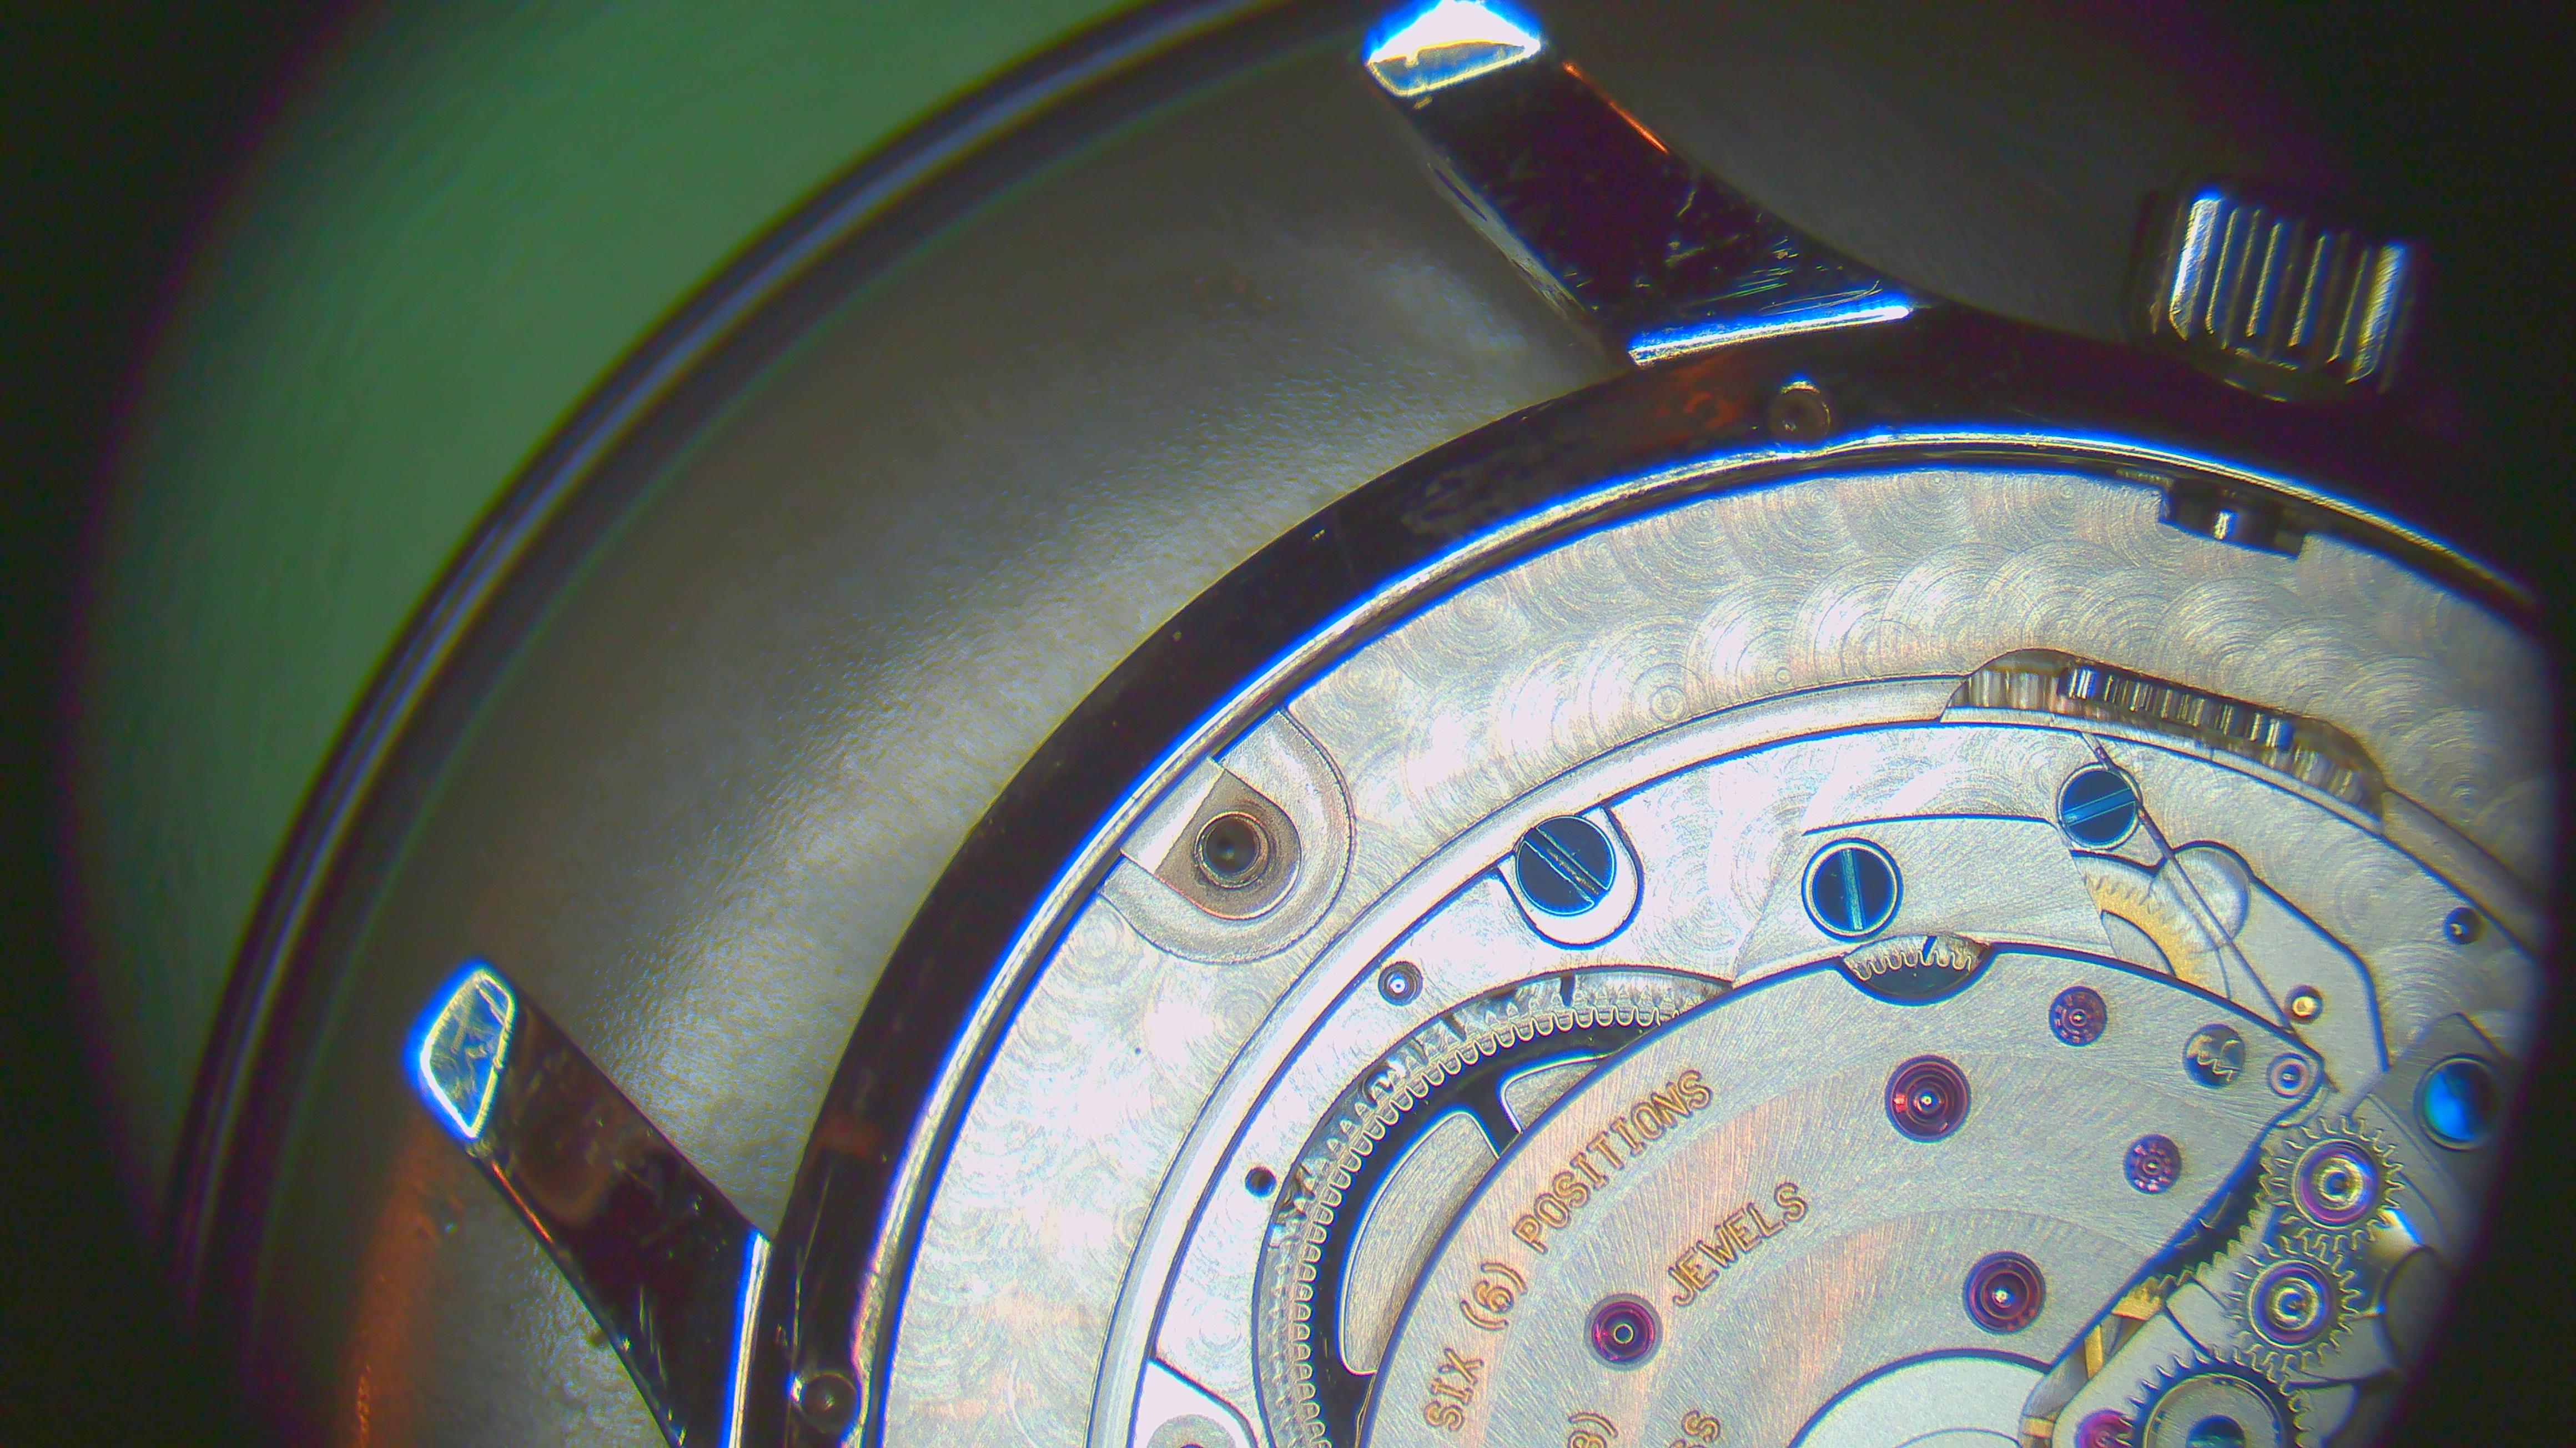
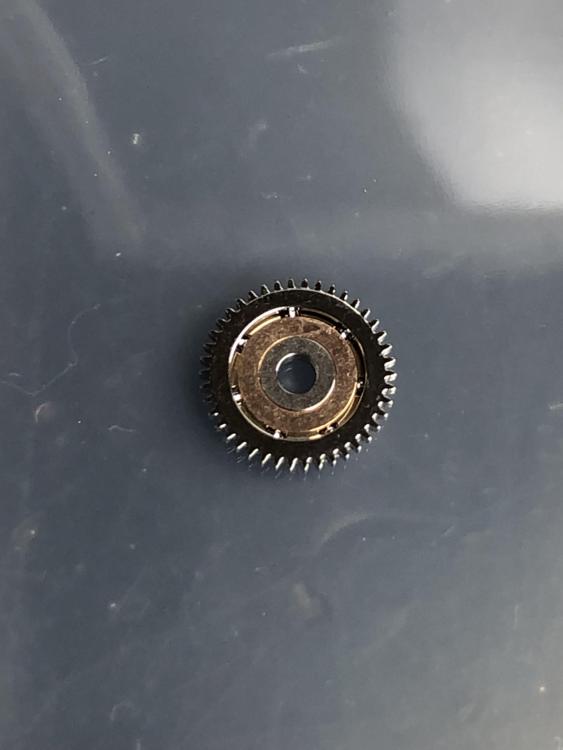
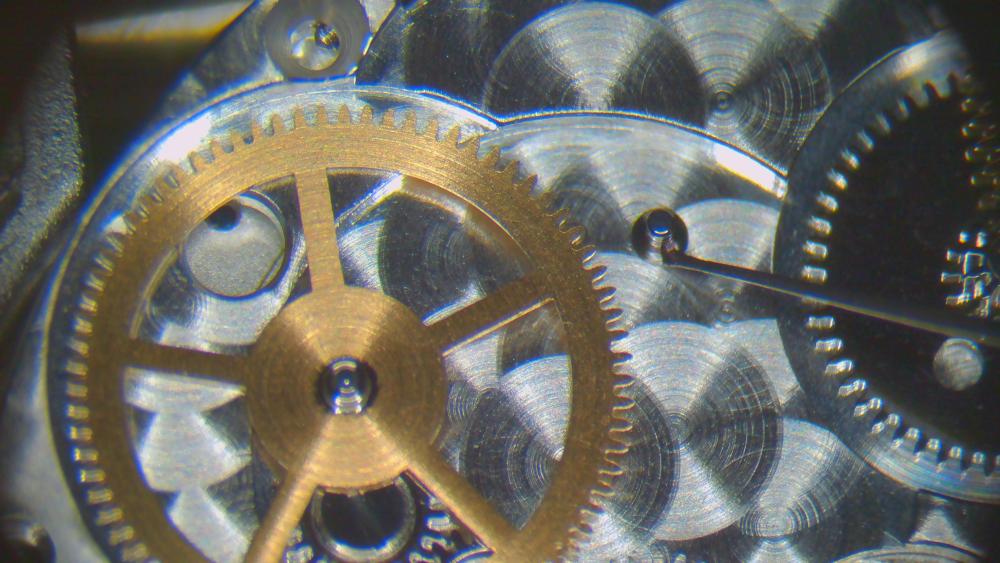
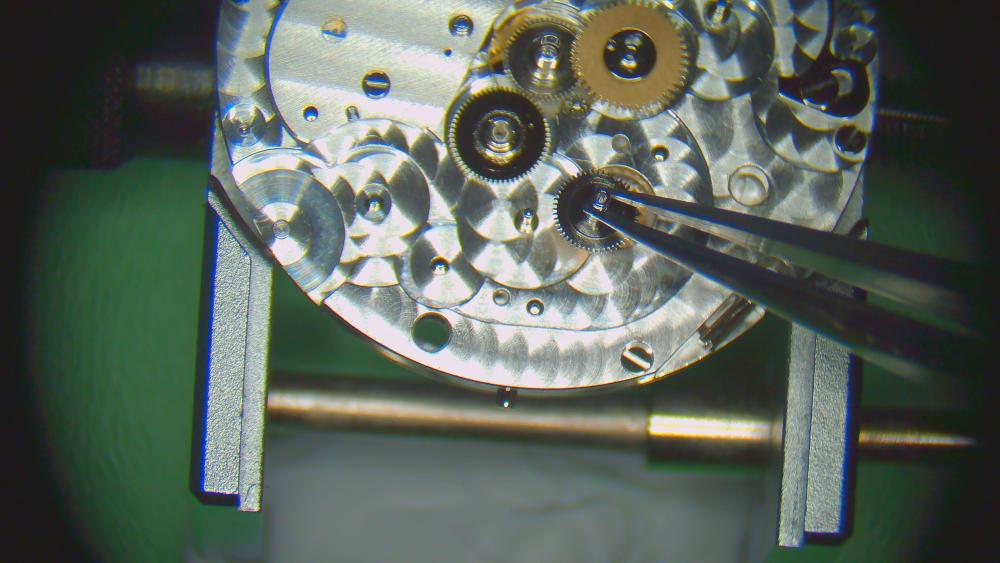
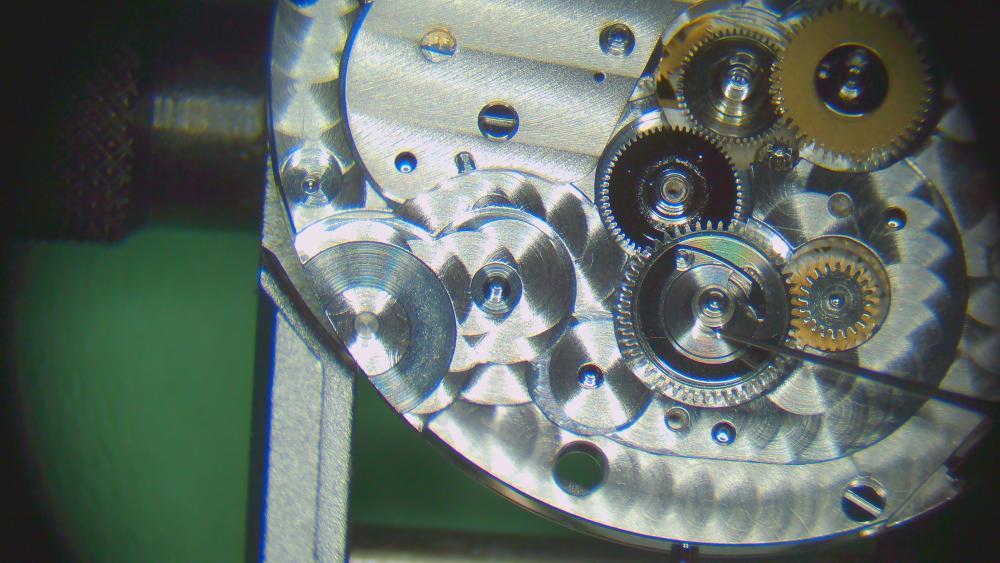
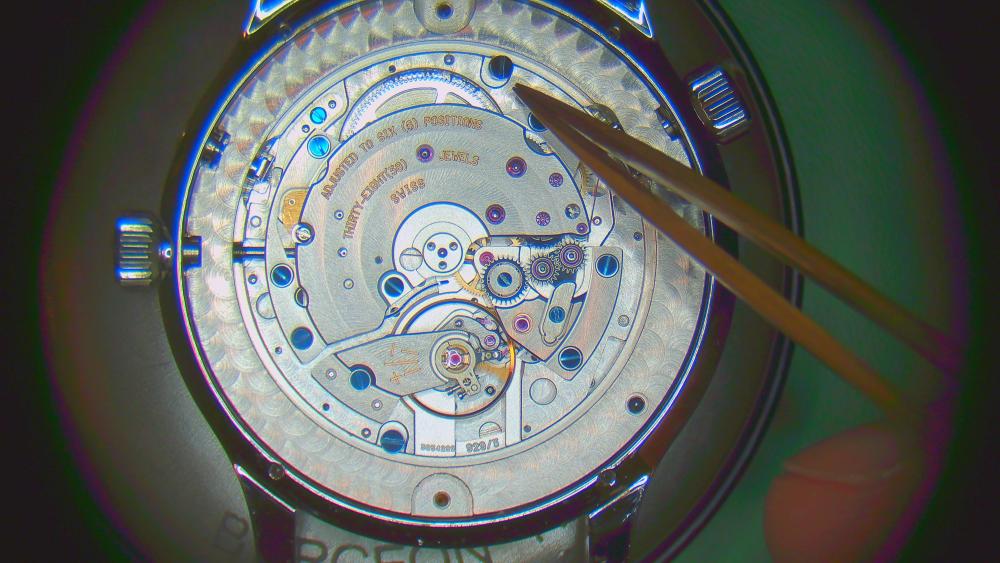
Update. Success. SW500 bearing fitted to original CW C60 SH21 Automatic rotor. Using original bearing retaining/lock shim. (Using bearing shim lock tool (From Cousins UK / Modified (Filed down) to suit this bearing + Shim). All went well. Small spacer/washer mentioned in earlier photo goes on after the rotor, under the rotor retaining screw. It is recessed for screw head on one side only. Rotor spins perfectly, without vertical deflection in any position. And the 42 tooth gear which is the underside of the bearing meshes perfectly with the winding gear of the movement. I think I just fixed my own watch myself for the first time. Dont know why i didnt think of it earlier. Can´t do everything right... But better that a 10-12 Wk wait, each service return. Twice in one year (2023), all under warranty, but still vexing. Now as far a rotor bearings go, i am self sufficient. And we now all know that a Sellita SW500 Rotor bearing (7-Ball) is a valid fitment, and as far as i am concerned, a valid upgrade, to the original (possibly older, and now no longer fitted by CW), 5-Ball item. Cool.
 5 points
 -
Yea, with that level/lack of quality, you're better off buying the Chinese tool that @VWatchie recommends in the other thread about the other dodgy Robur.3 points
-
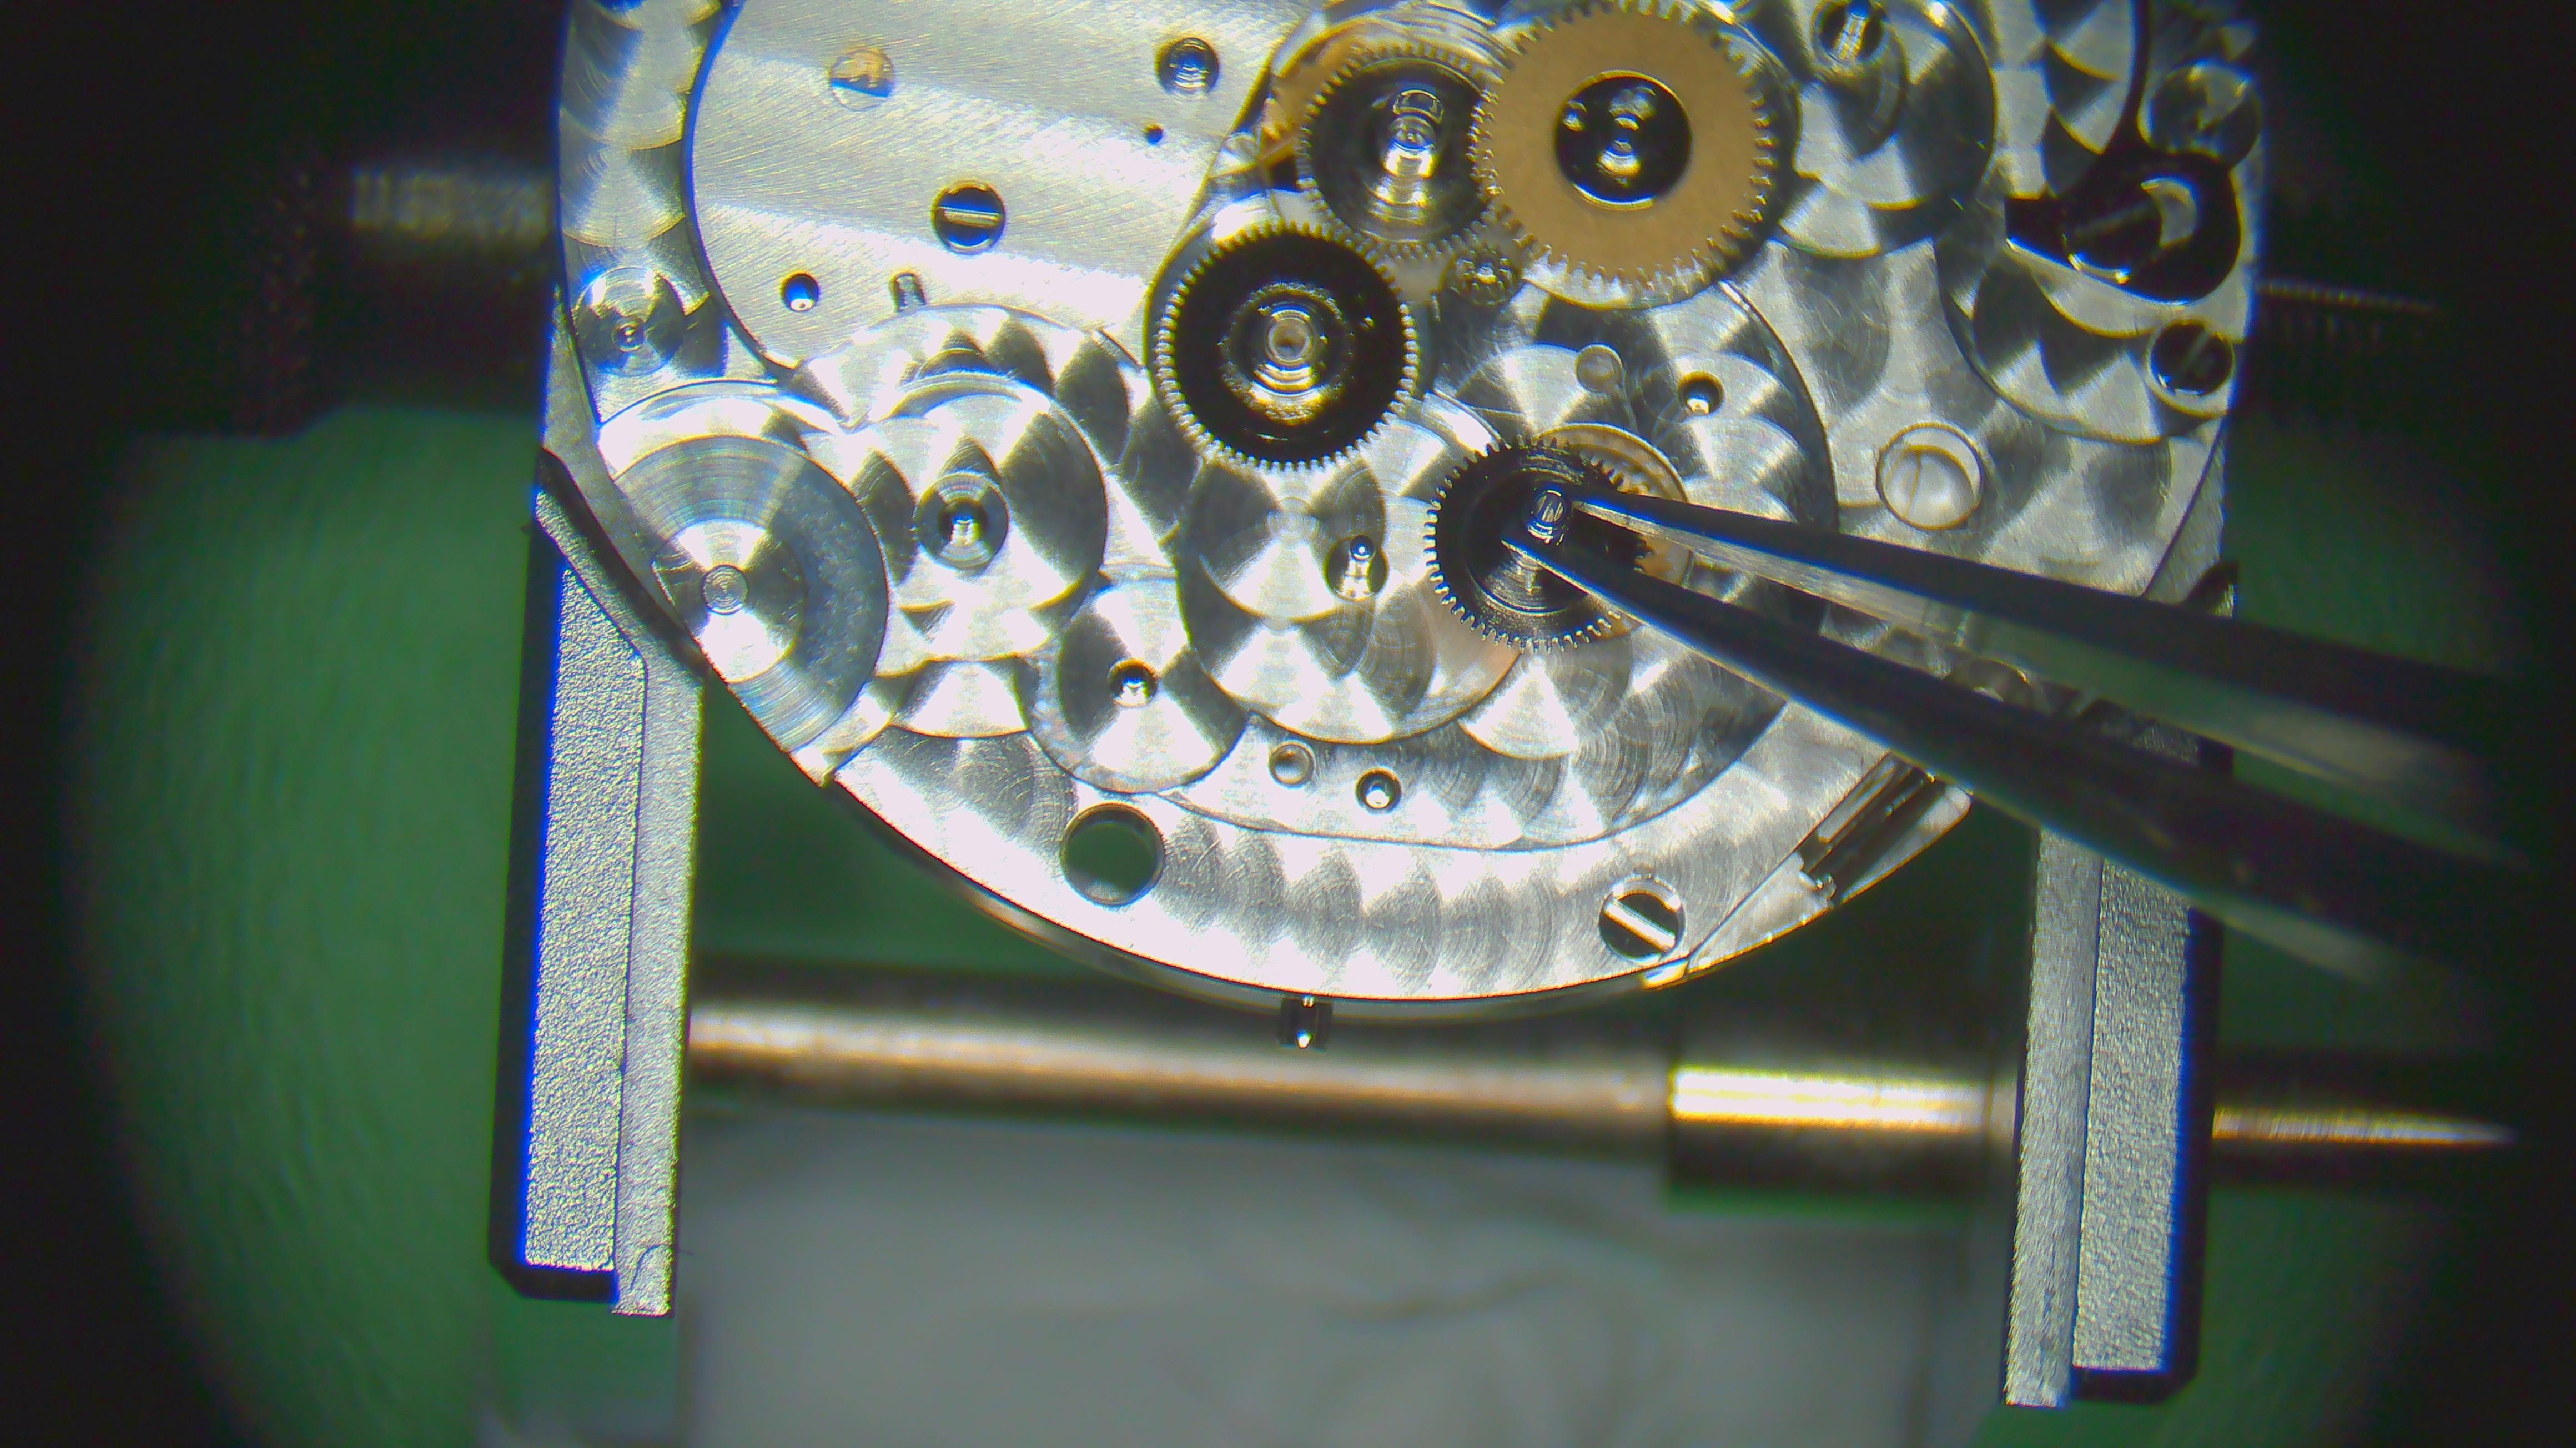
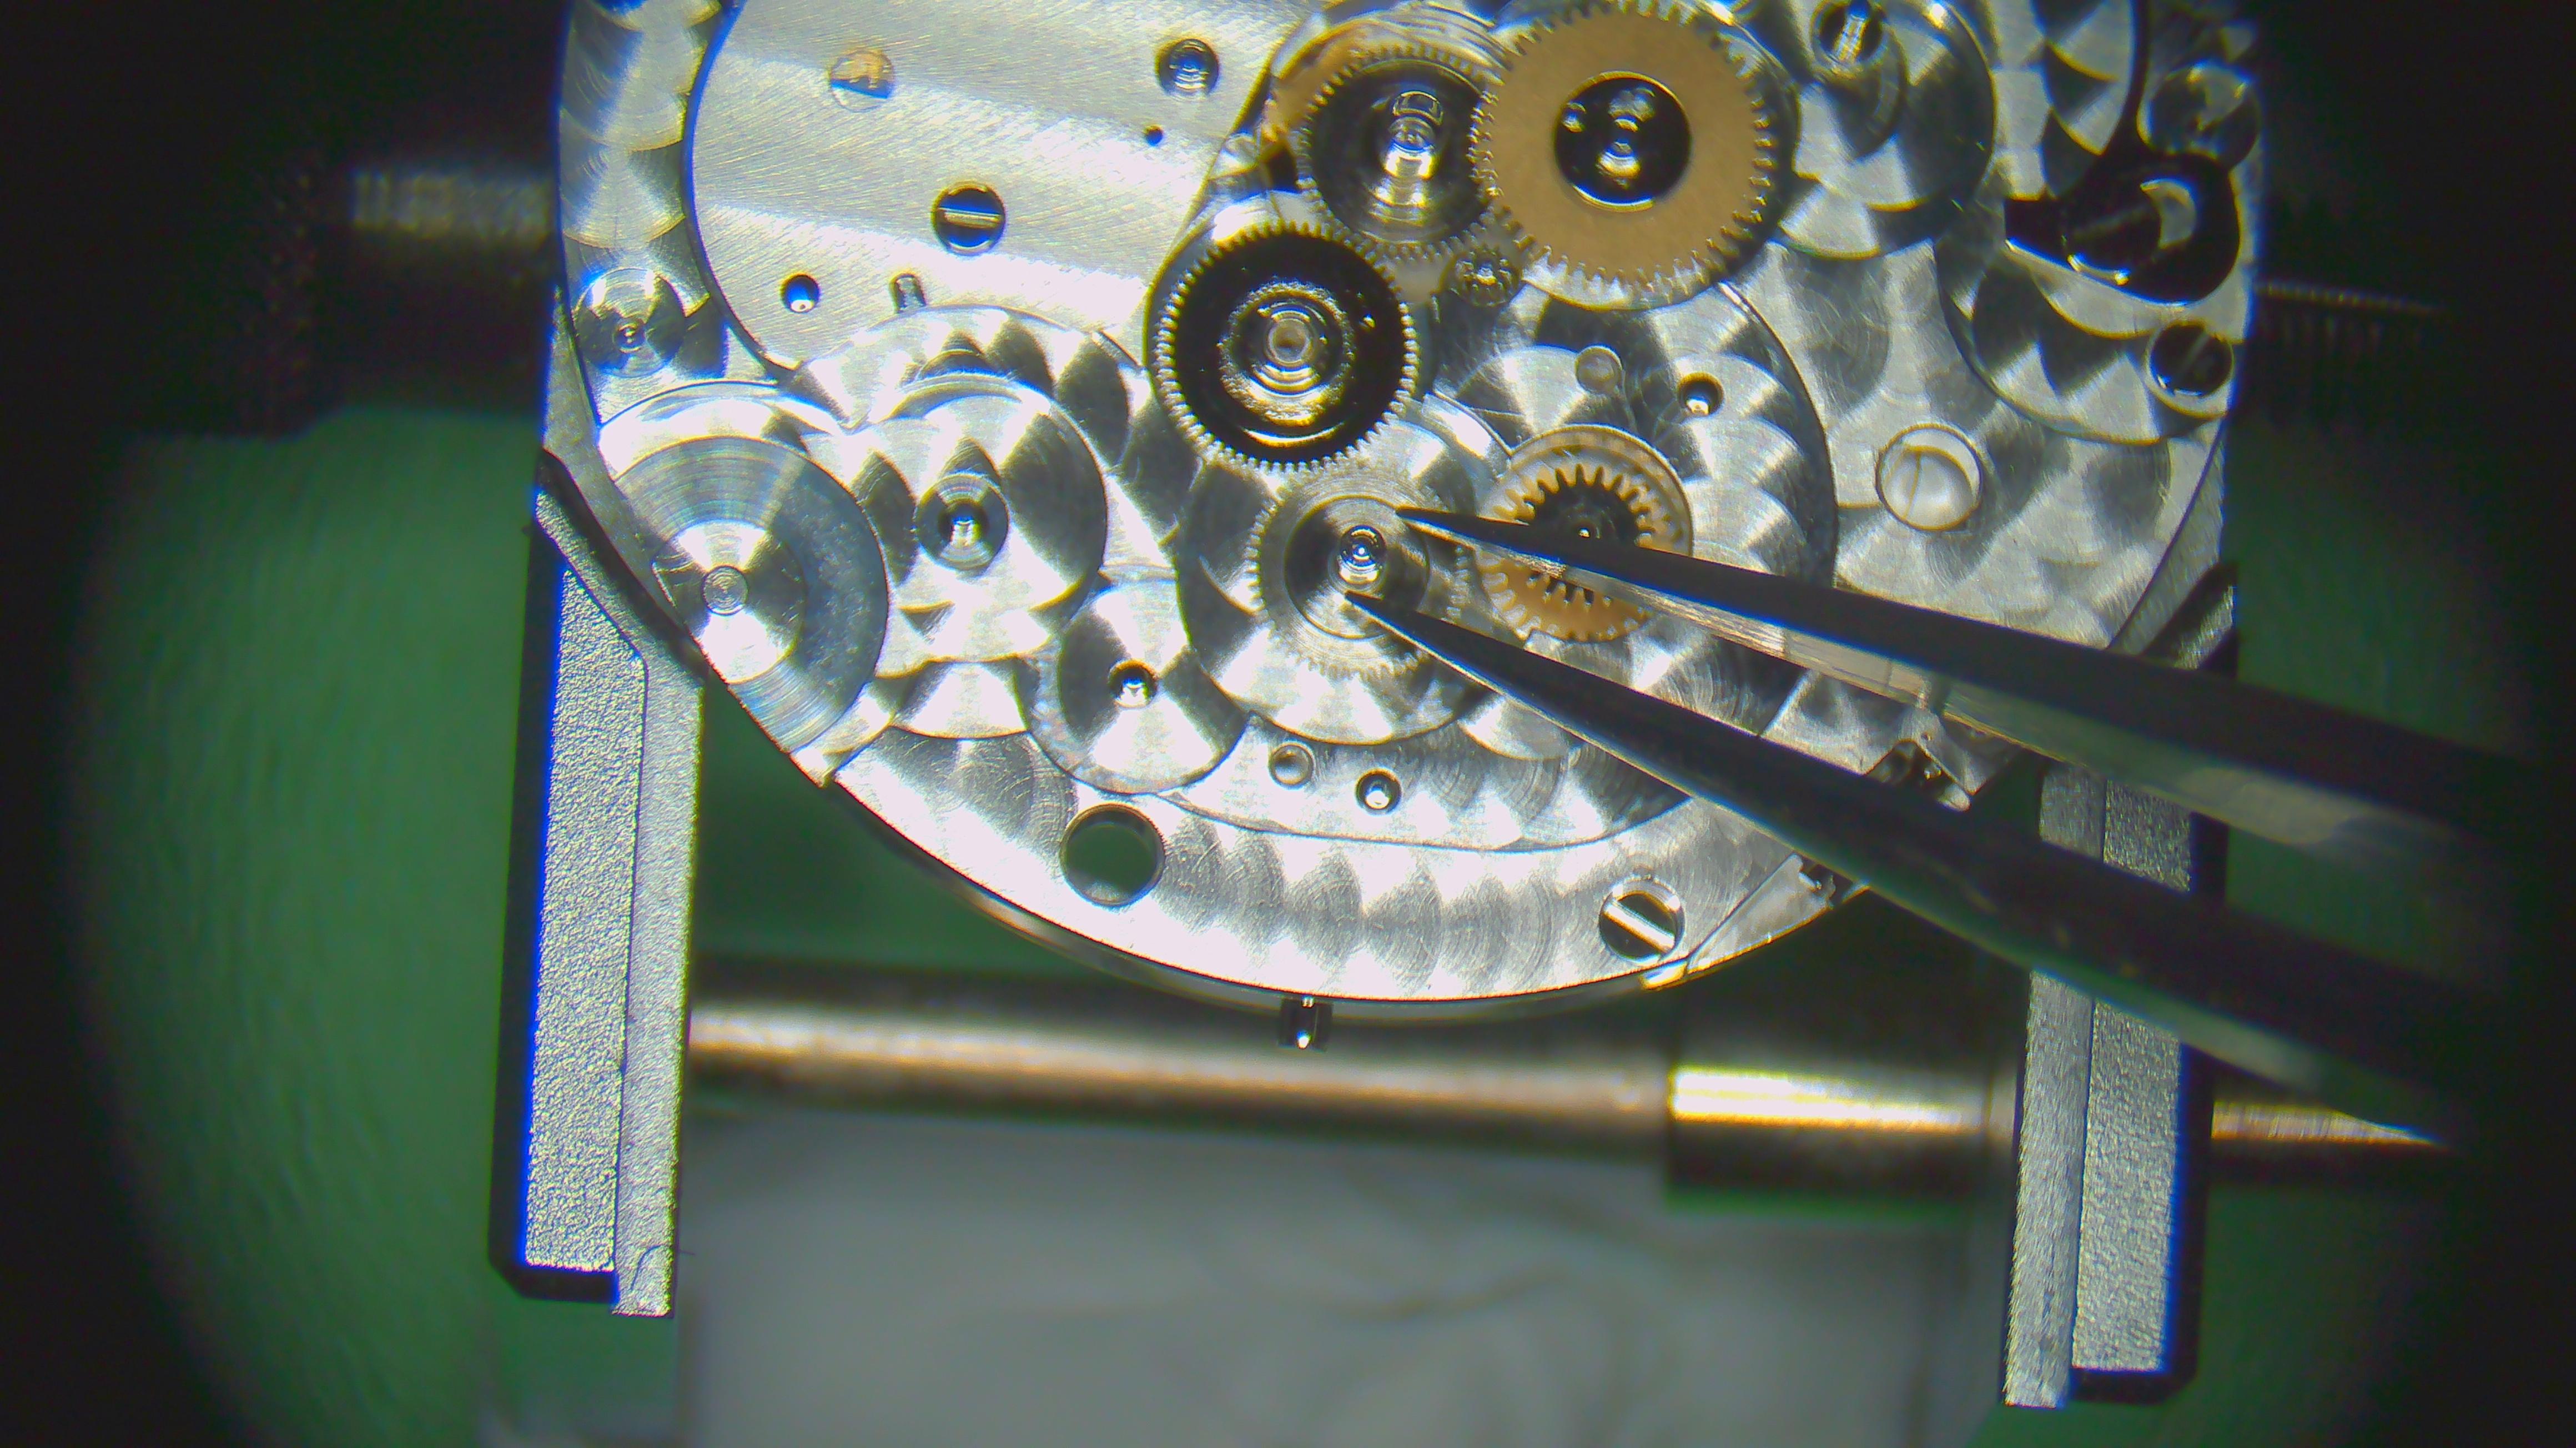
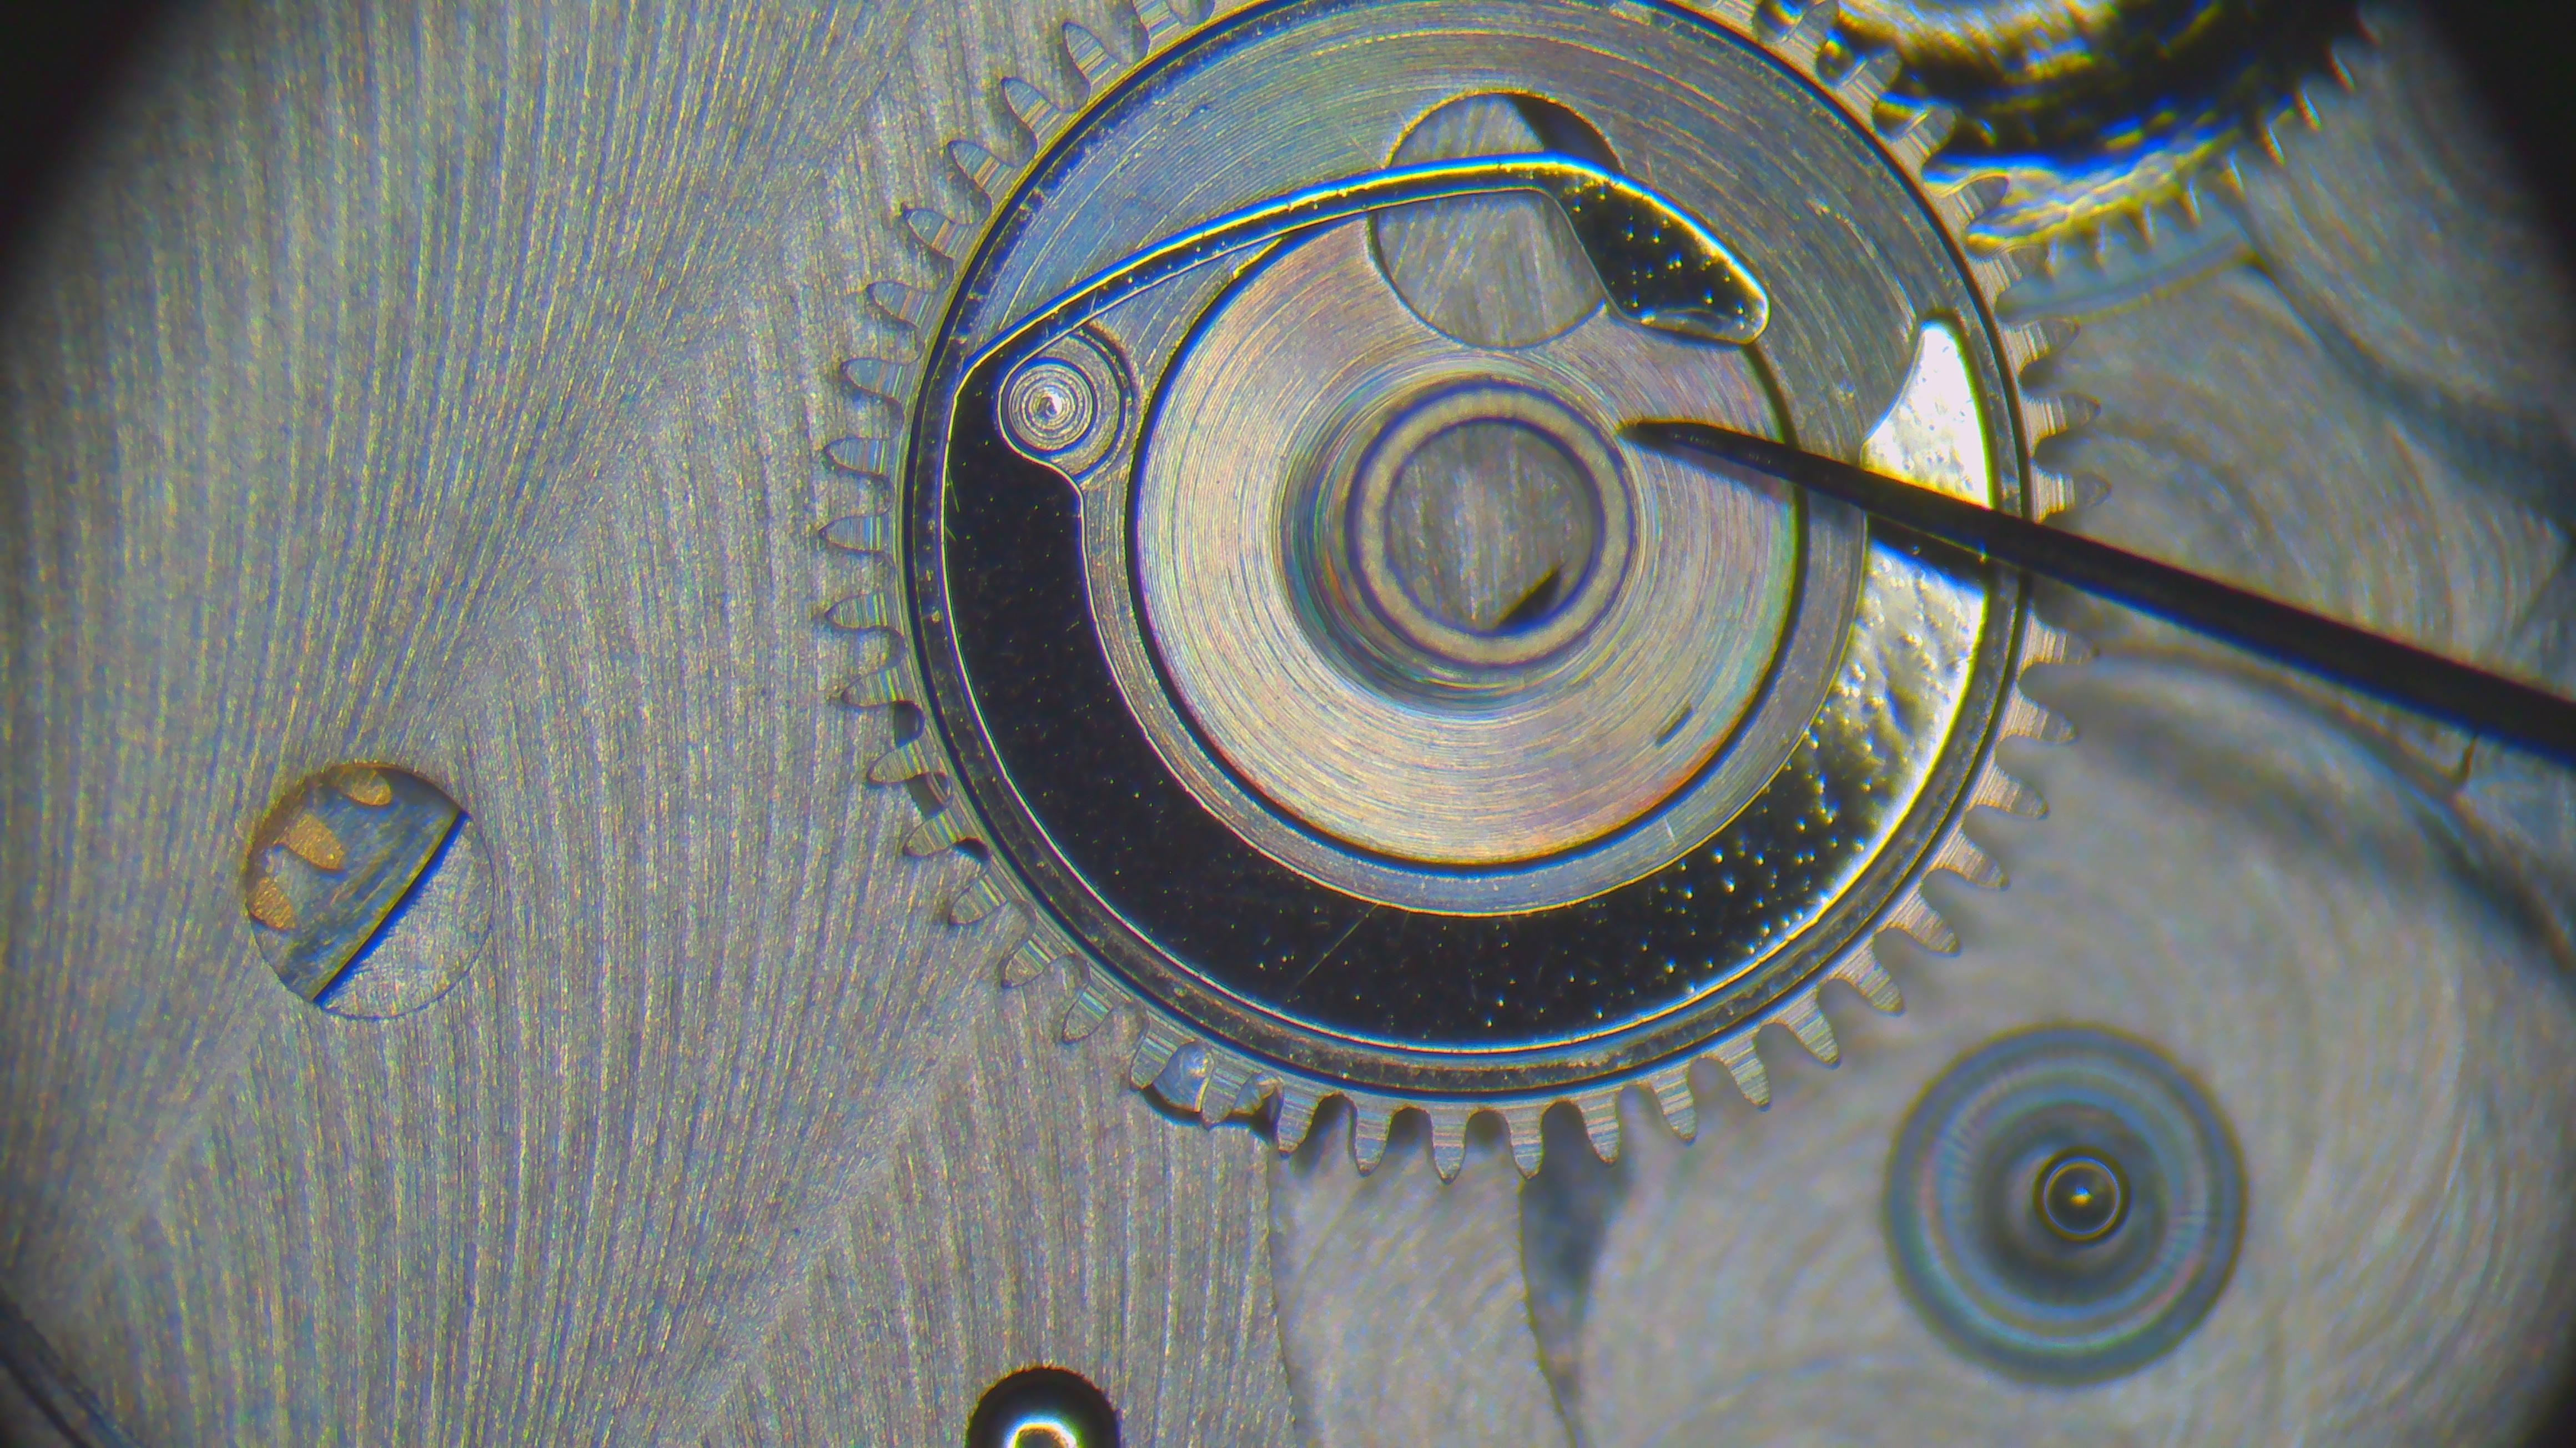
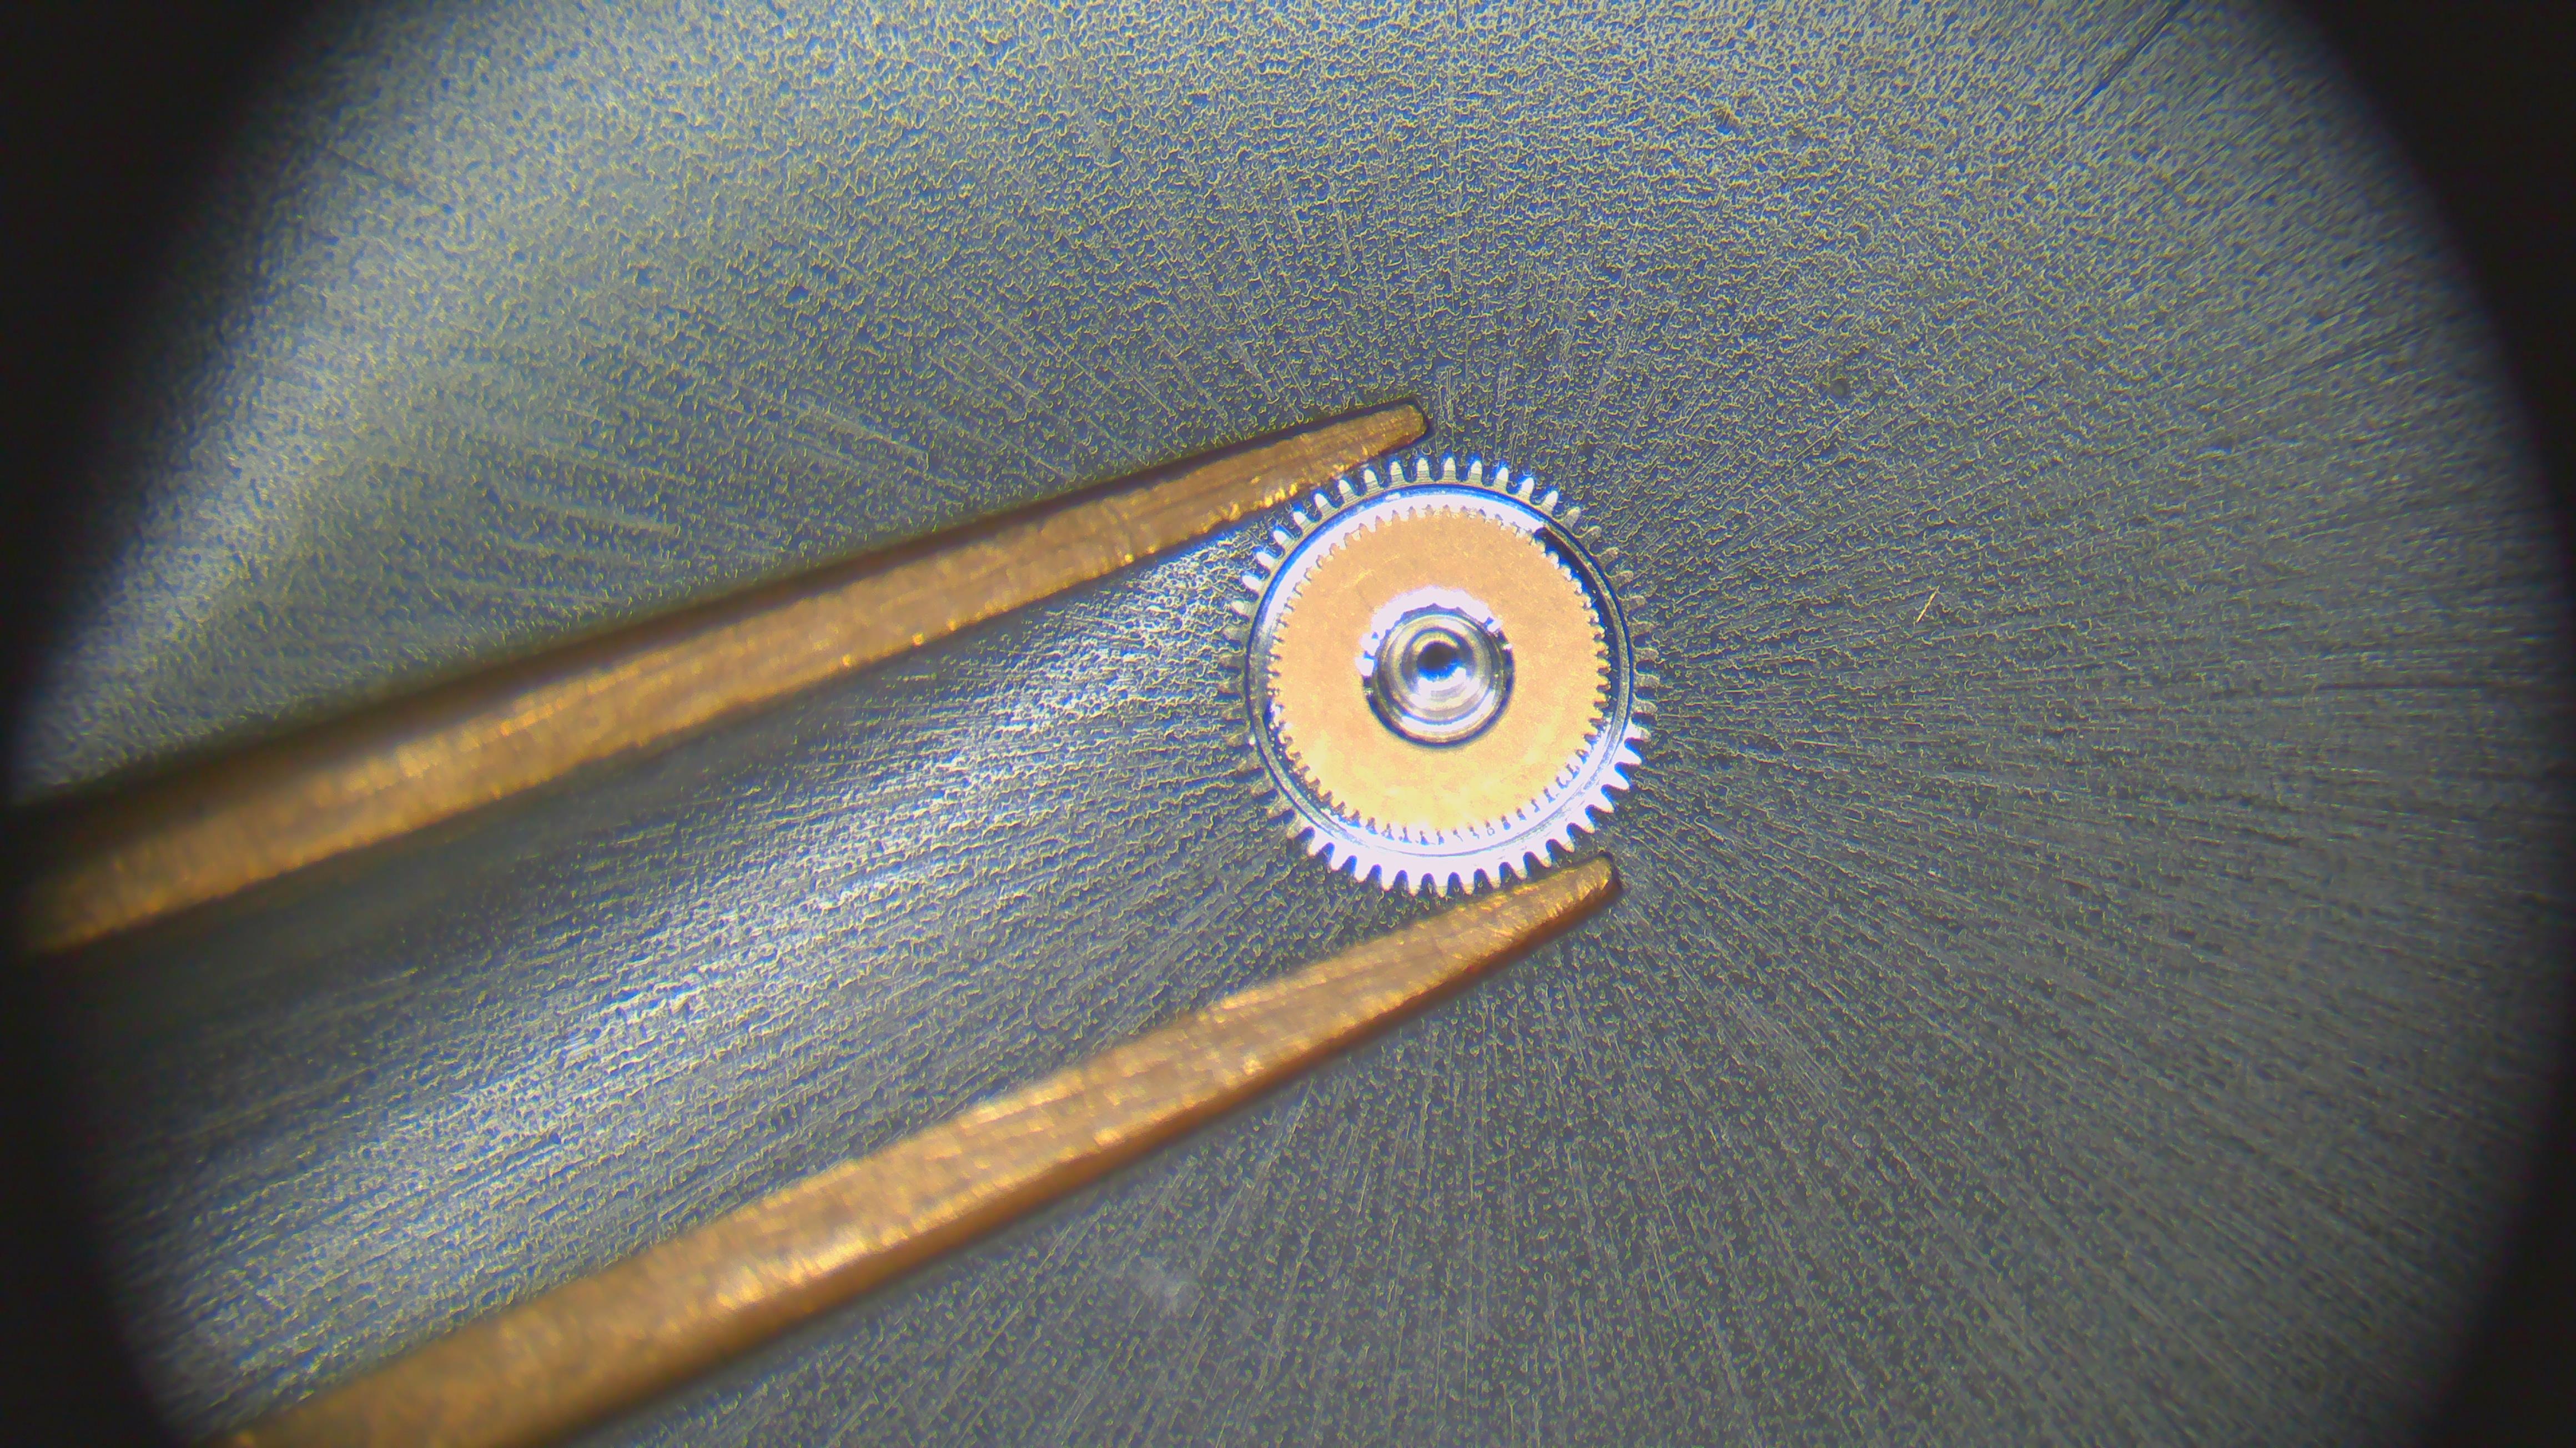
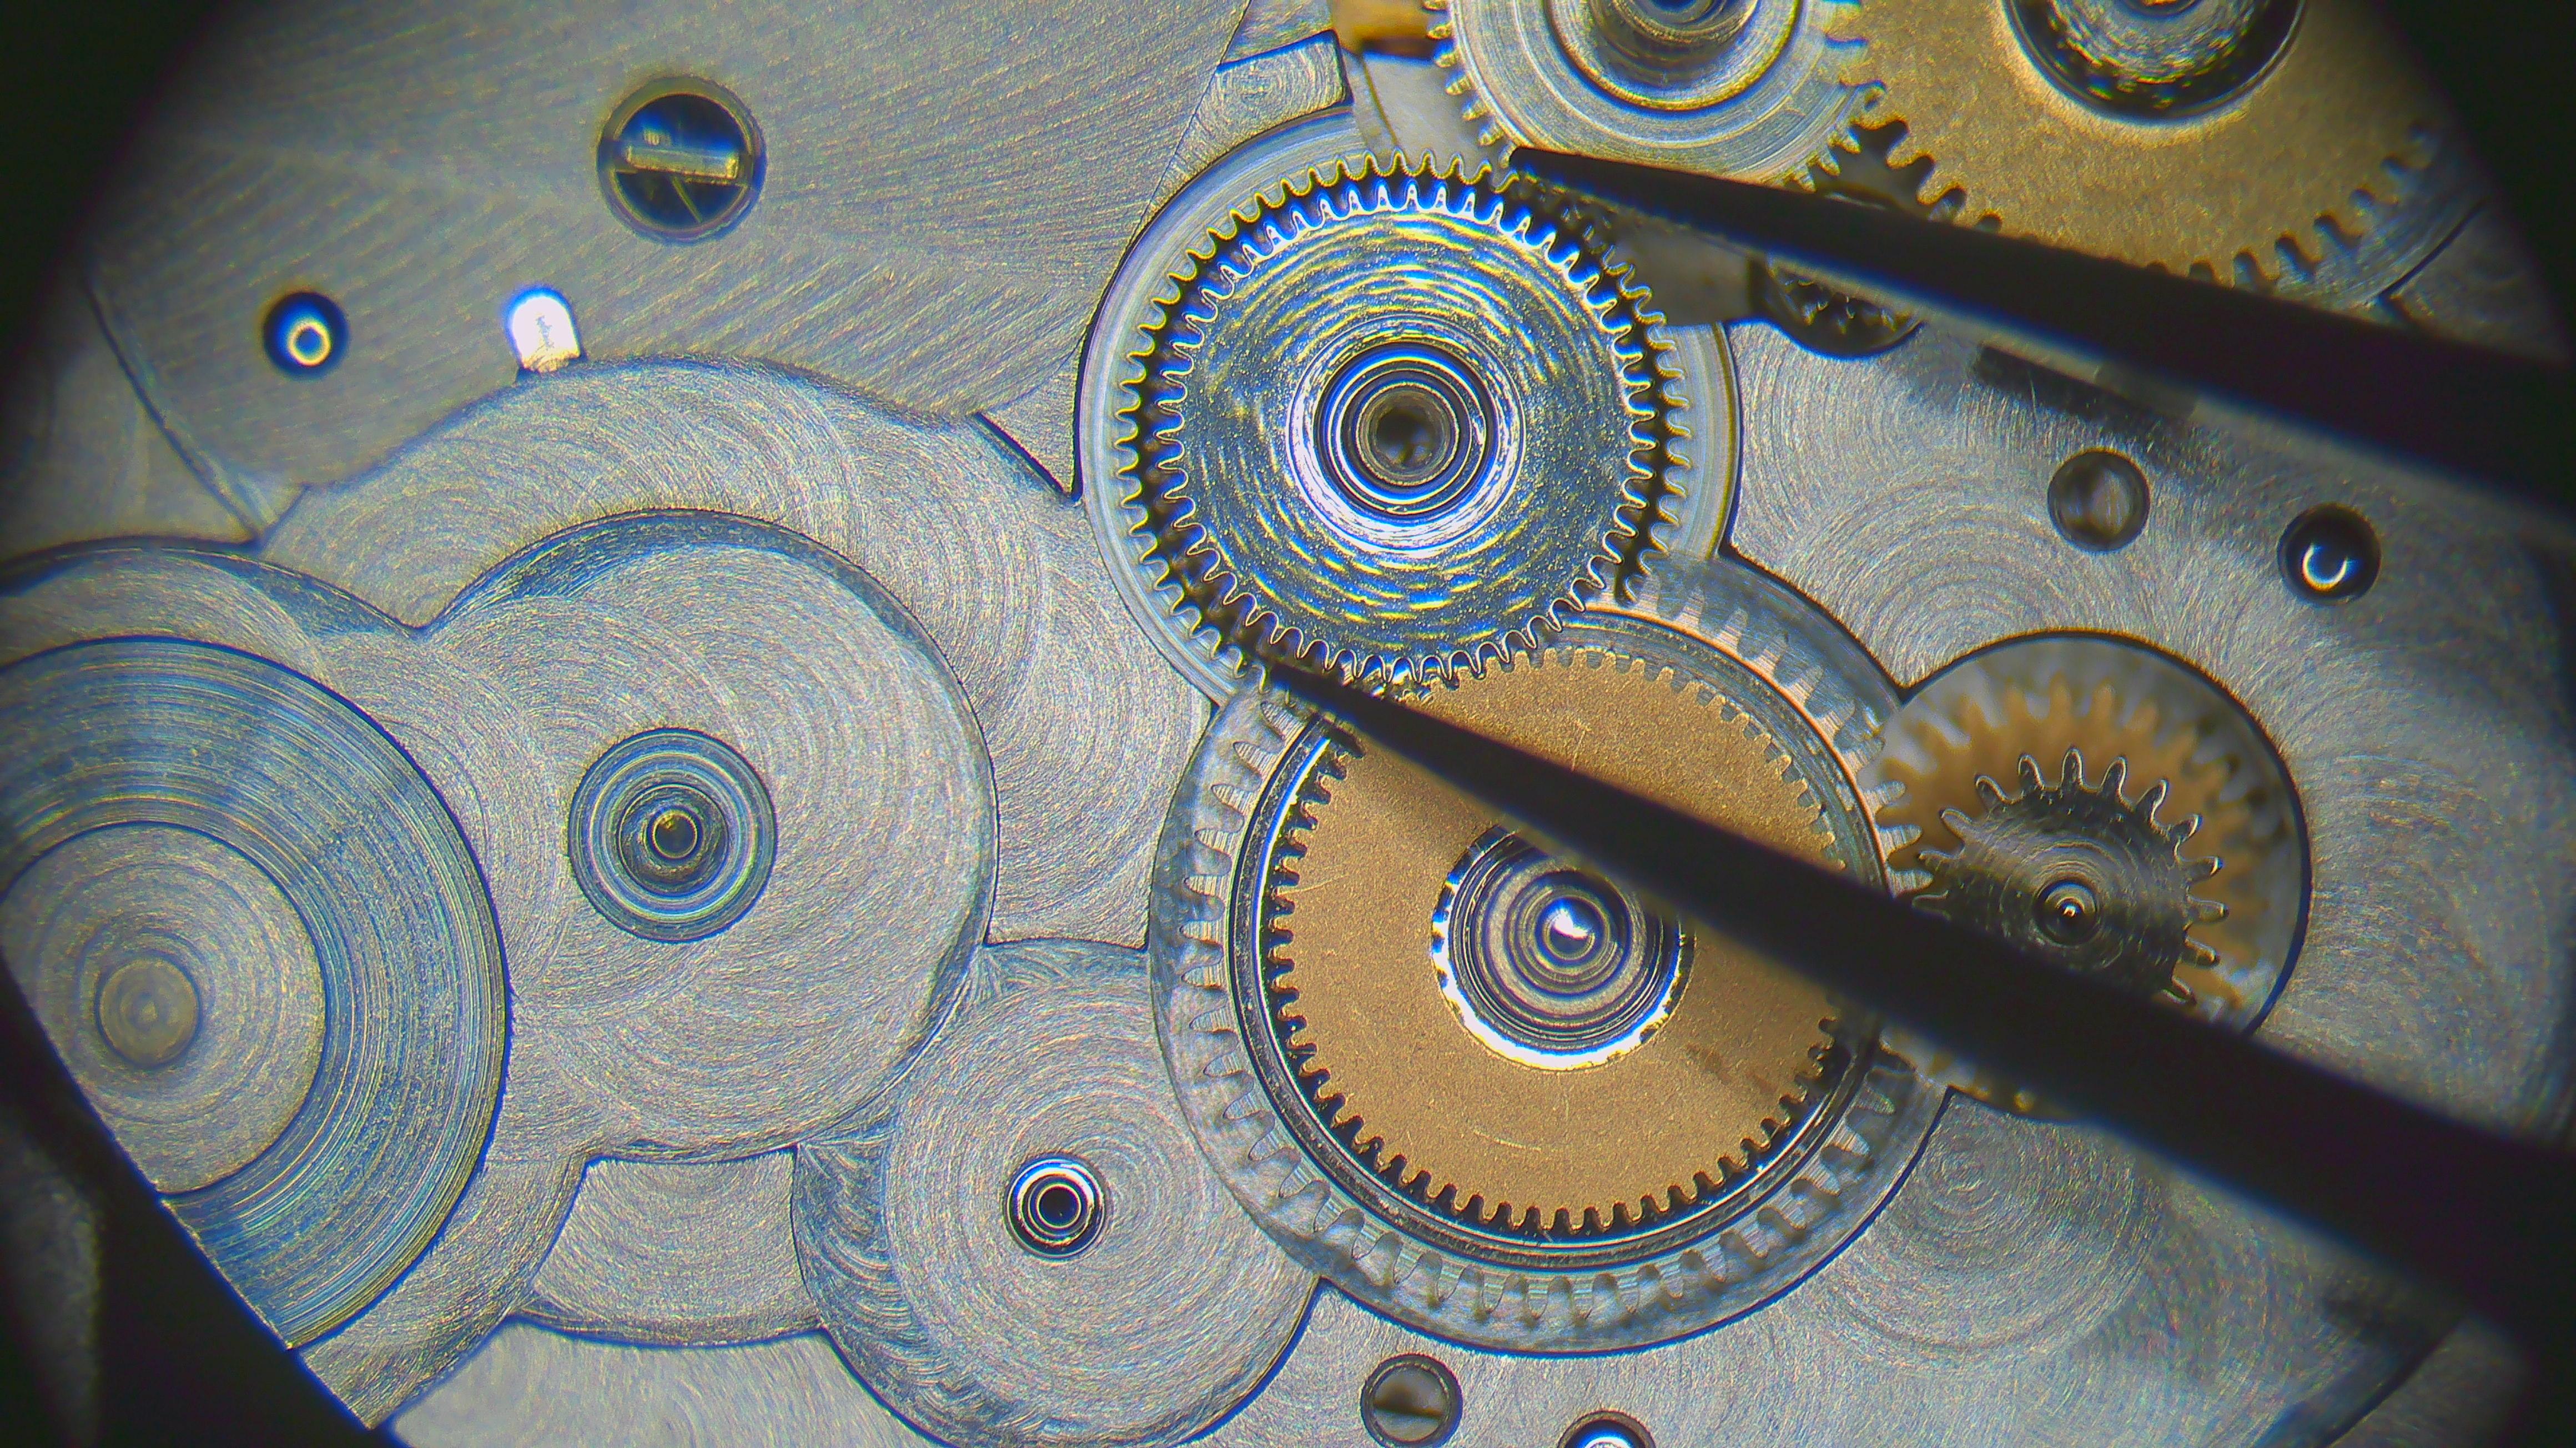
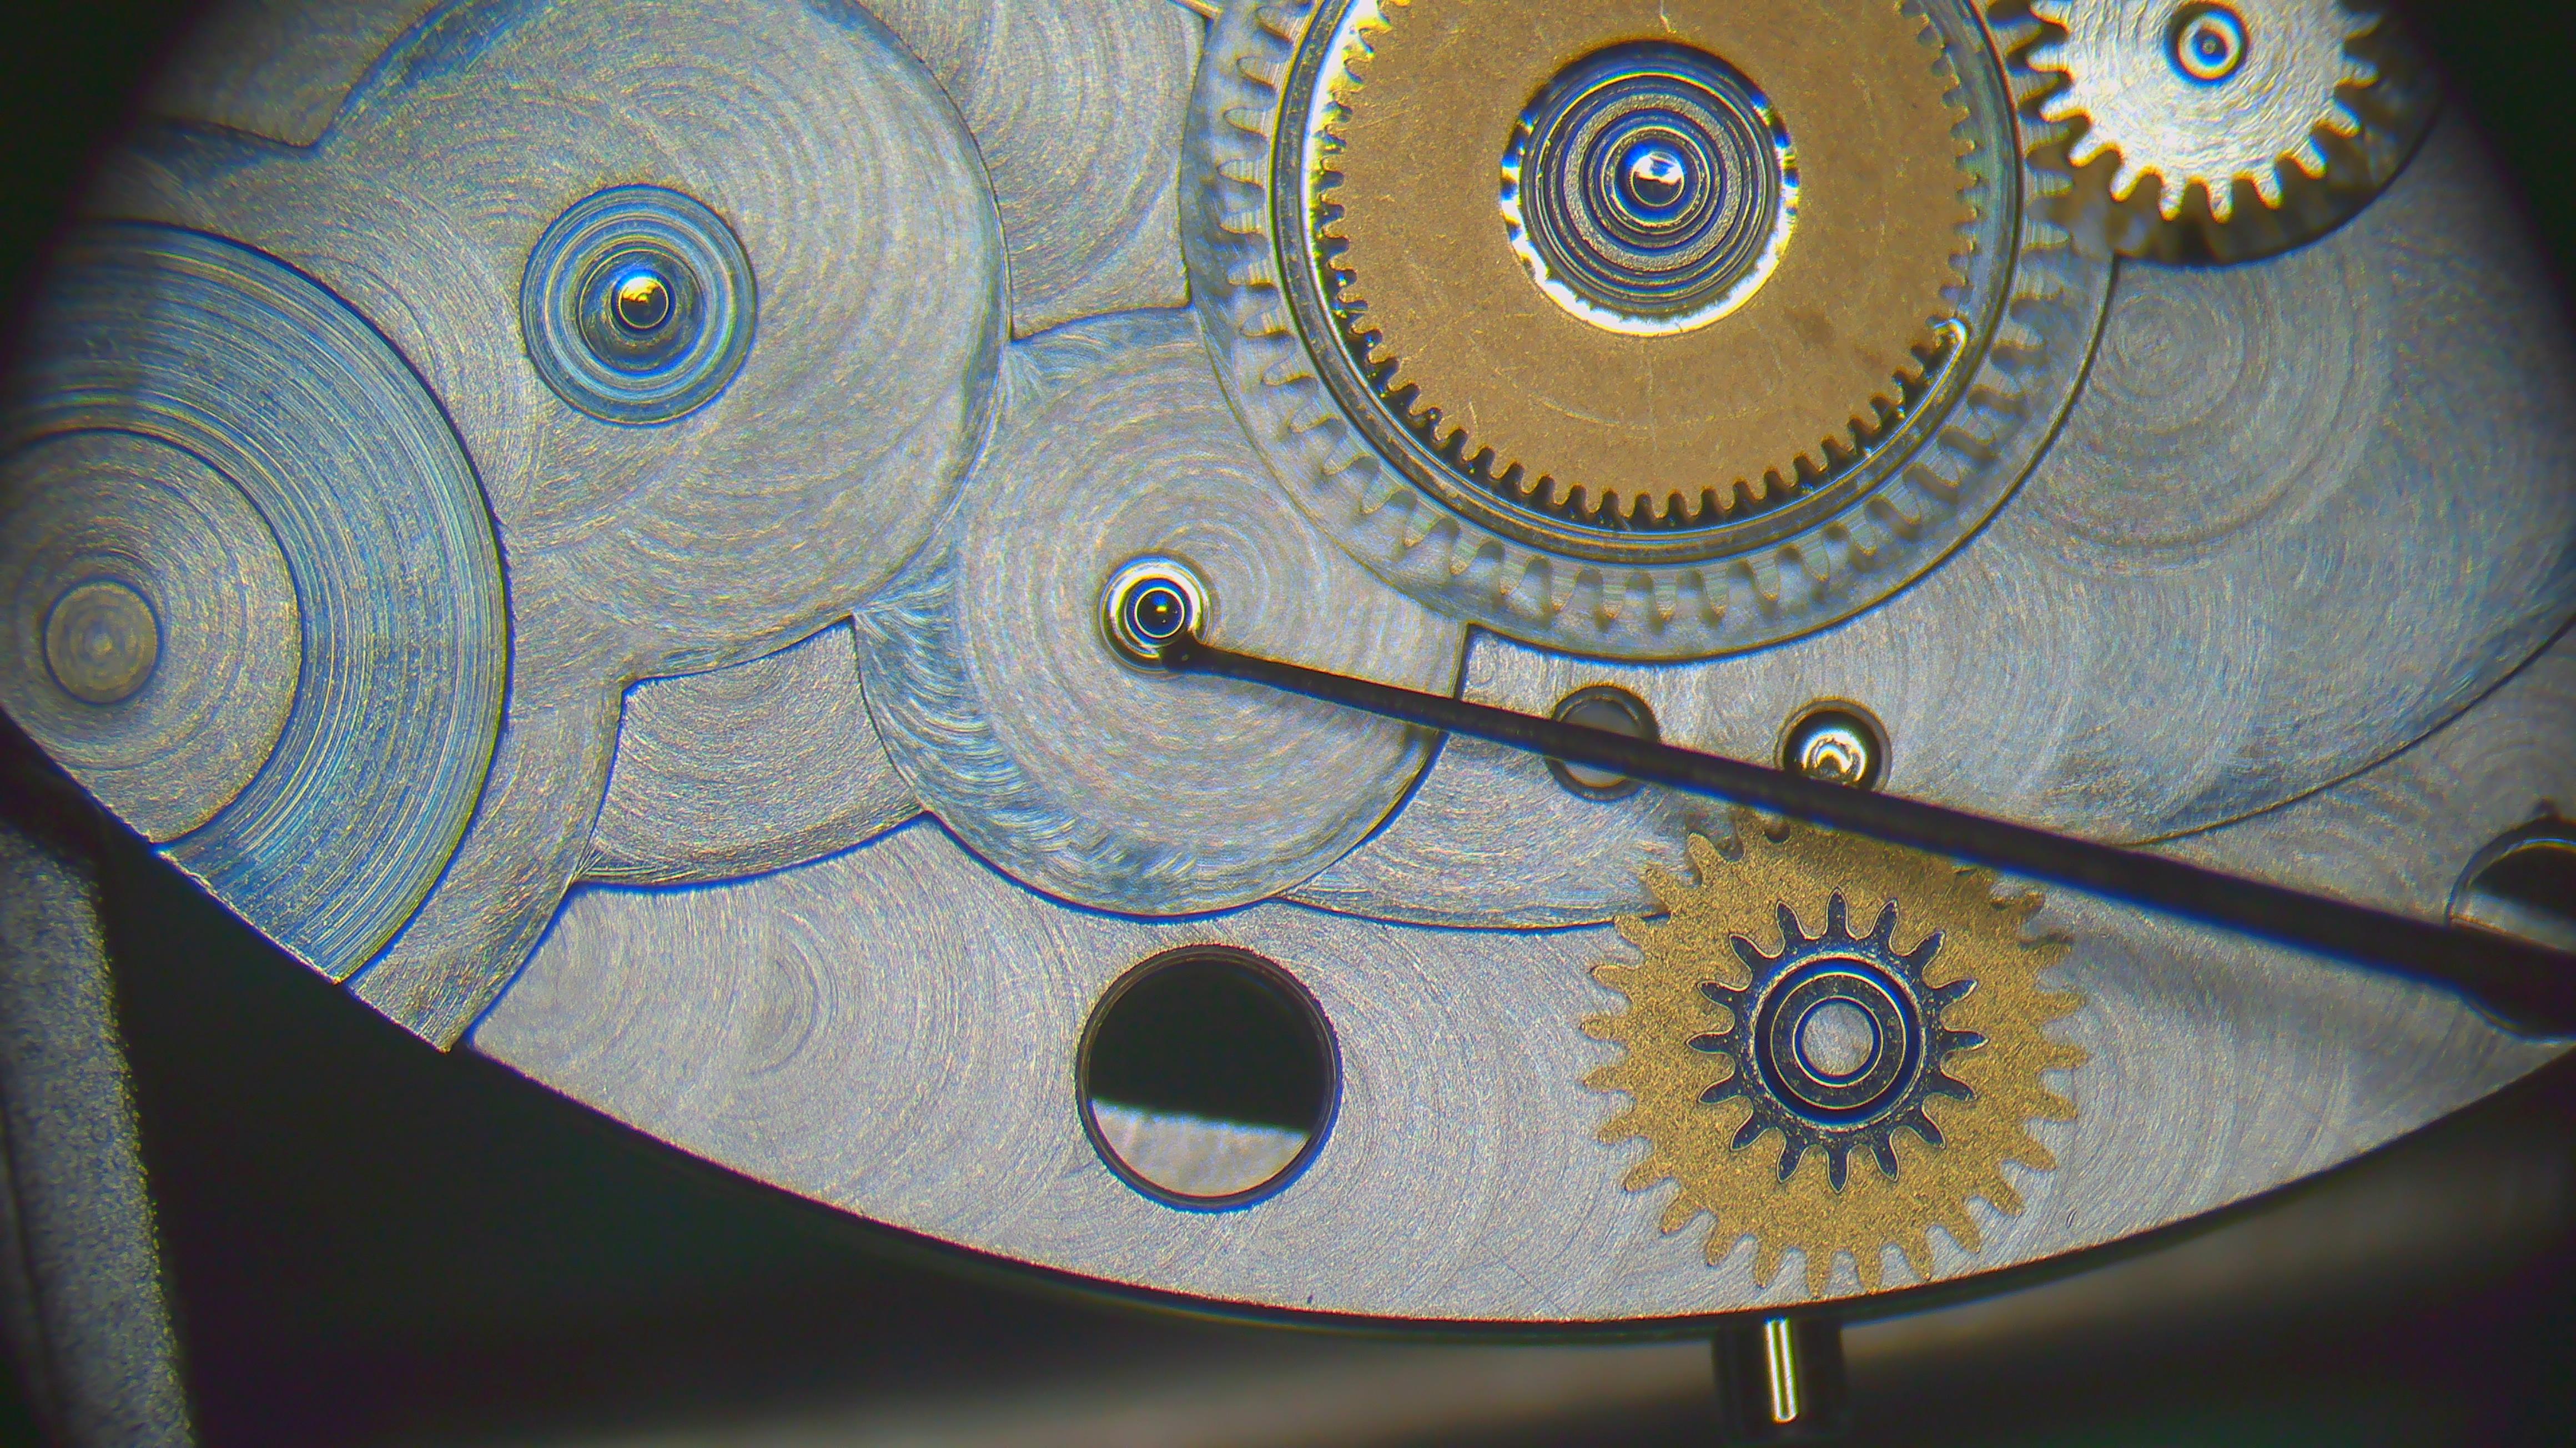
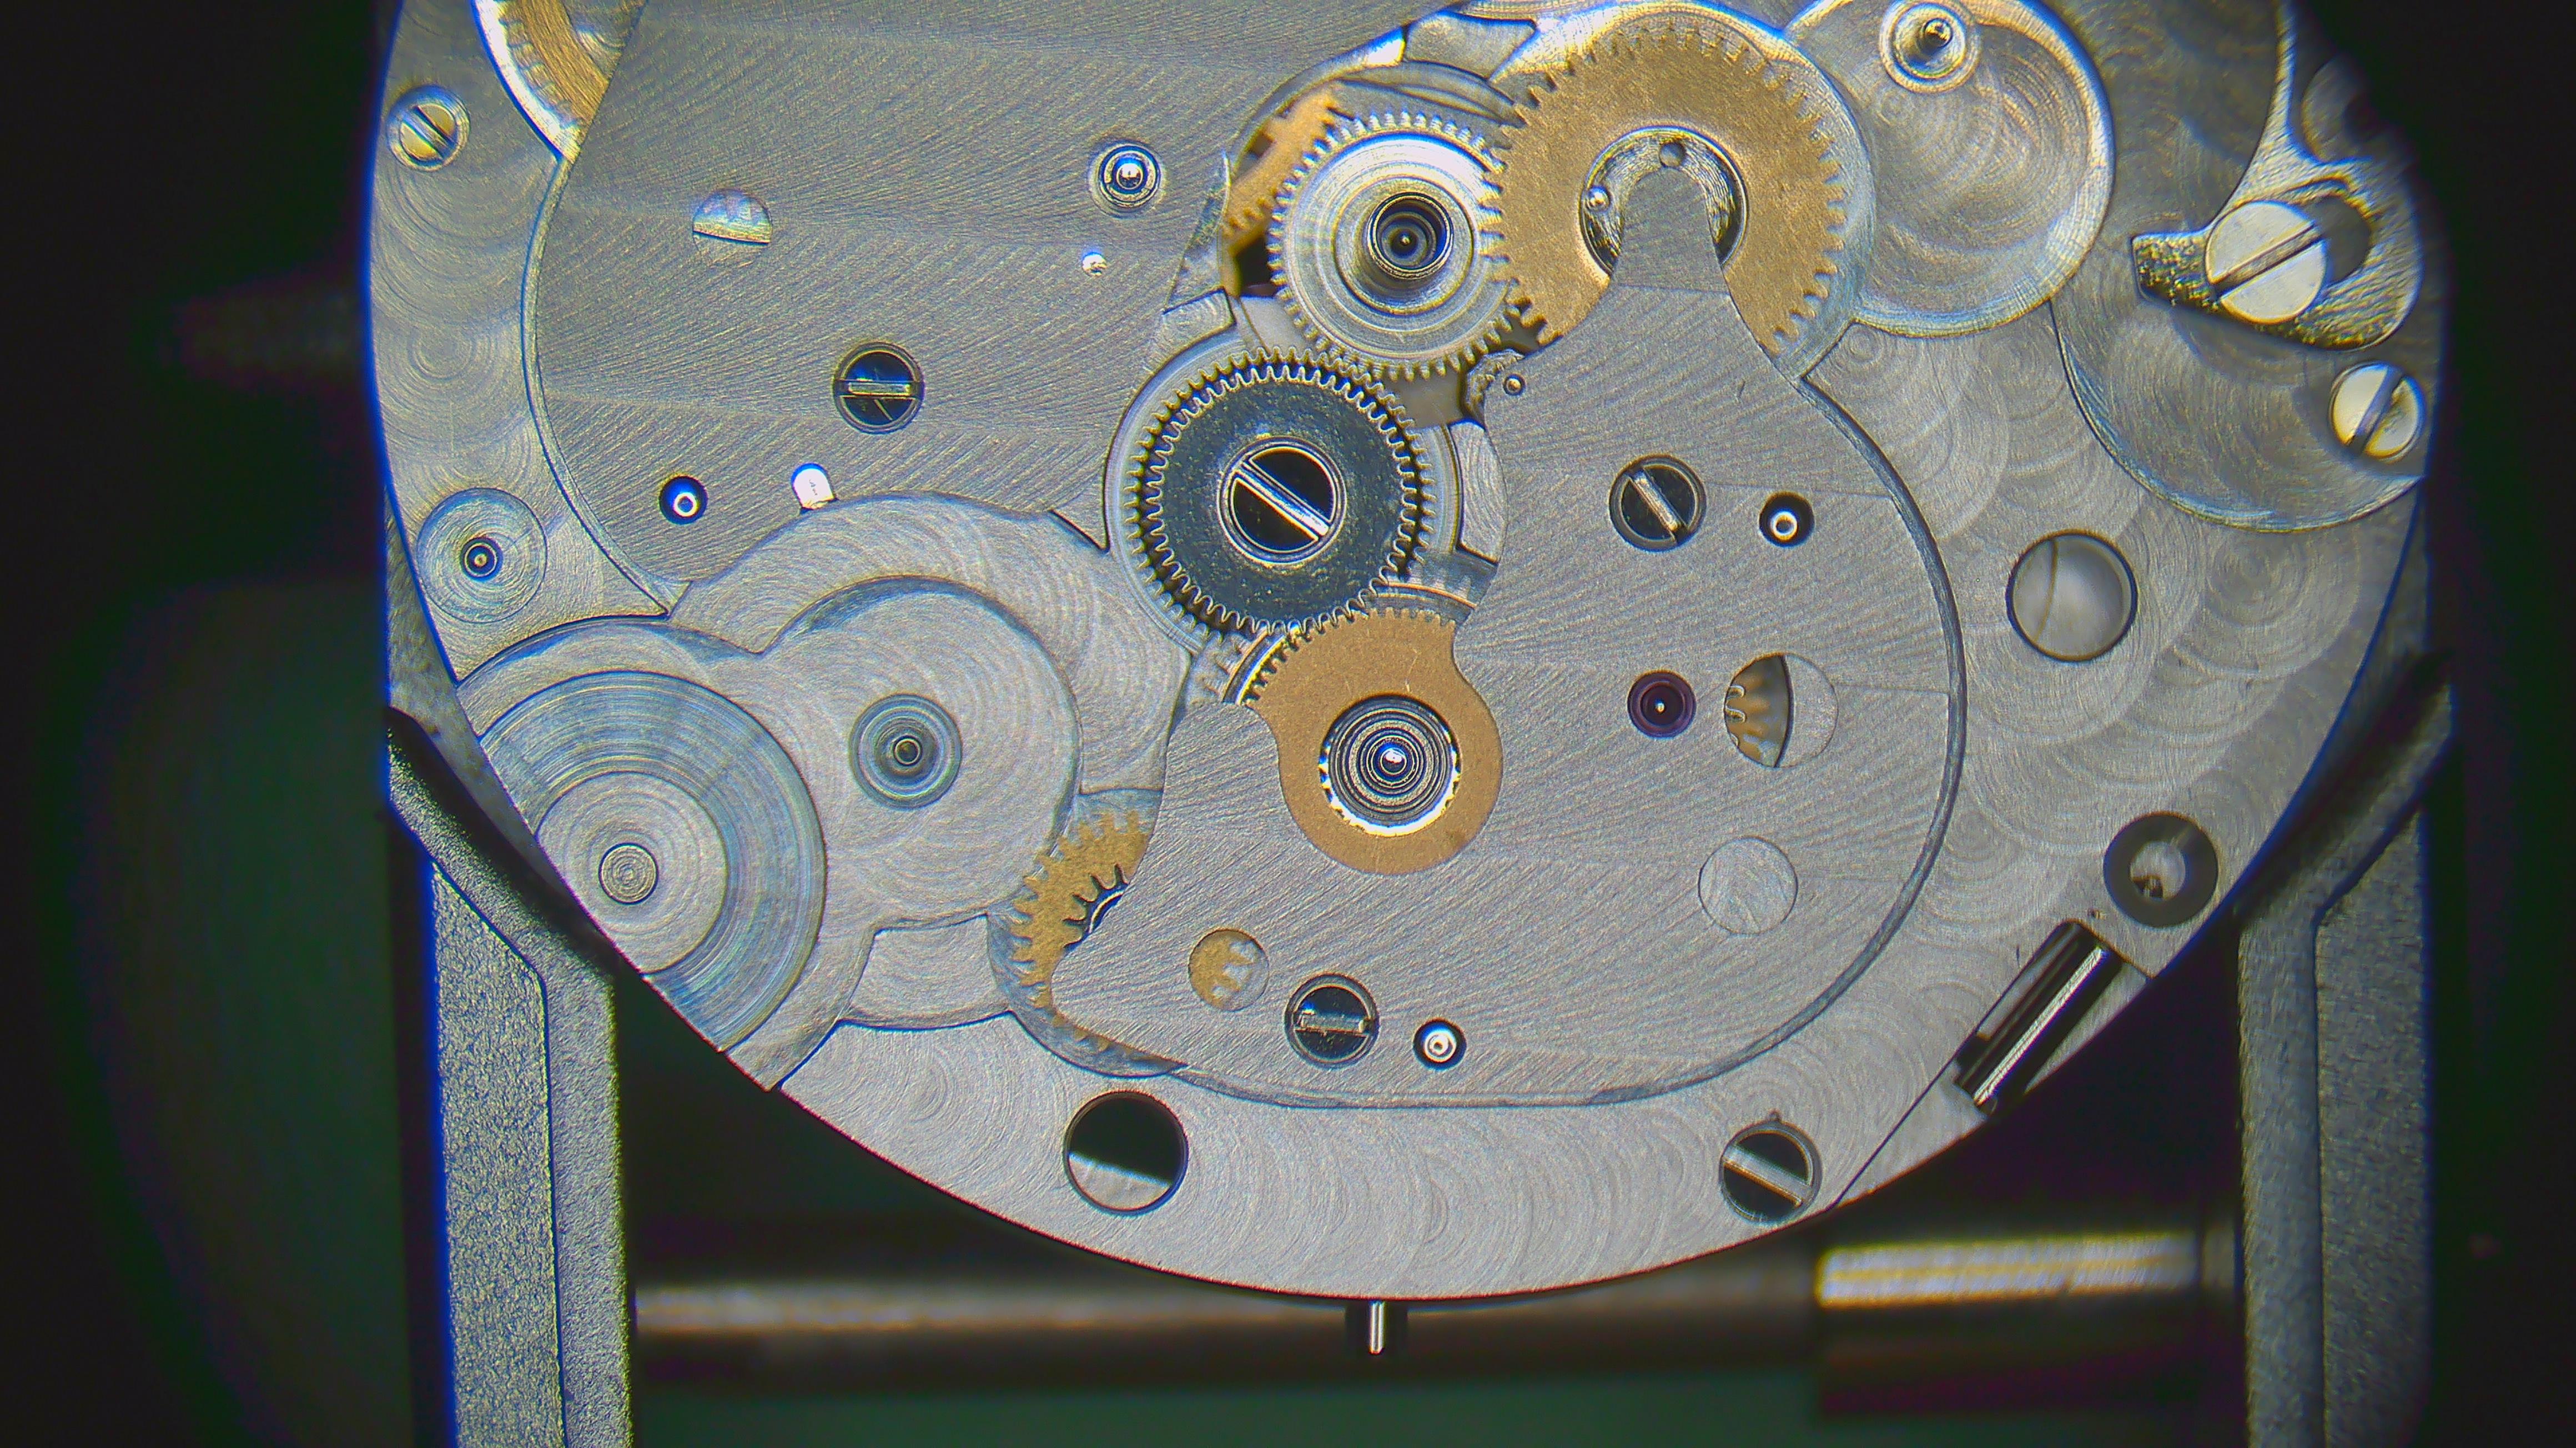
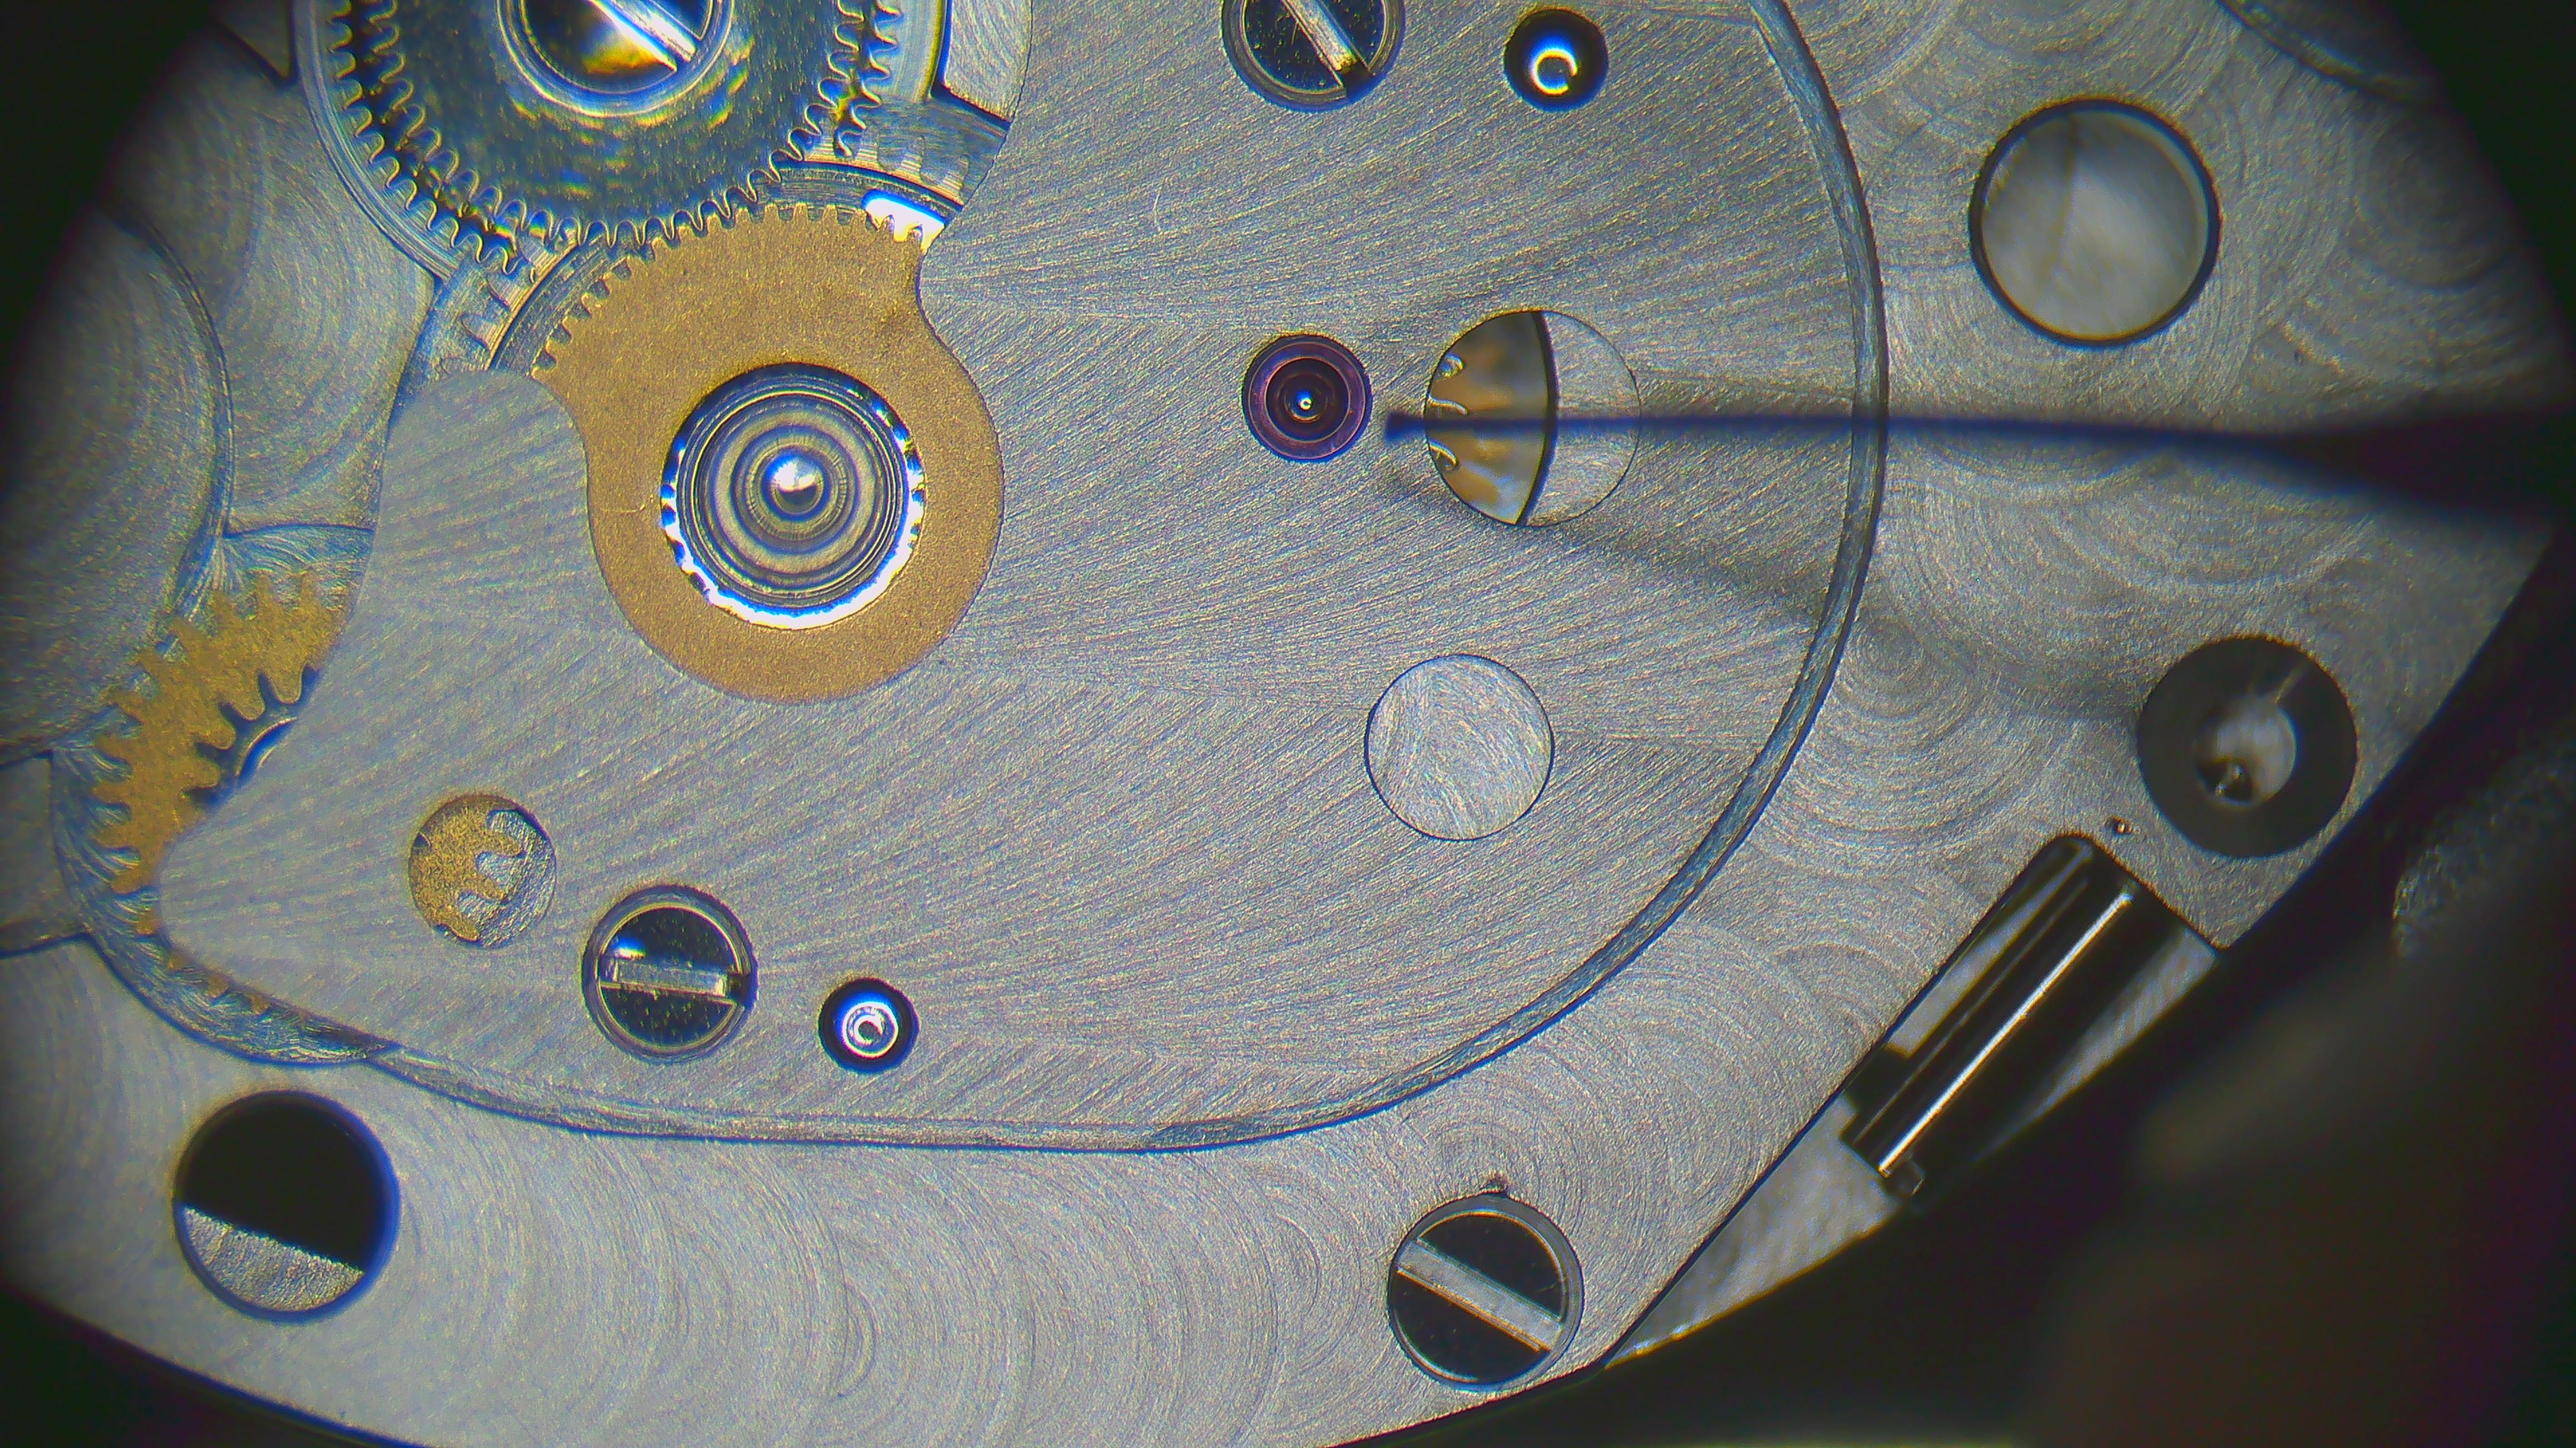
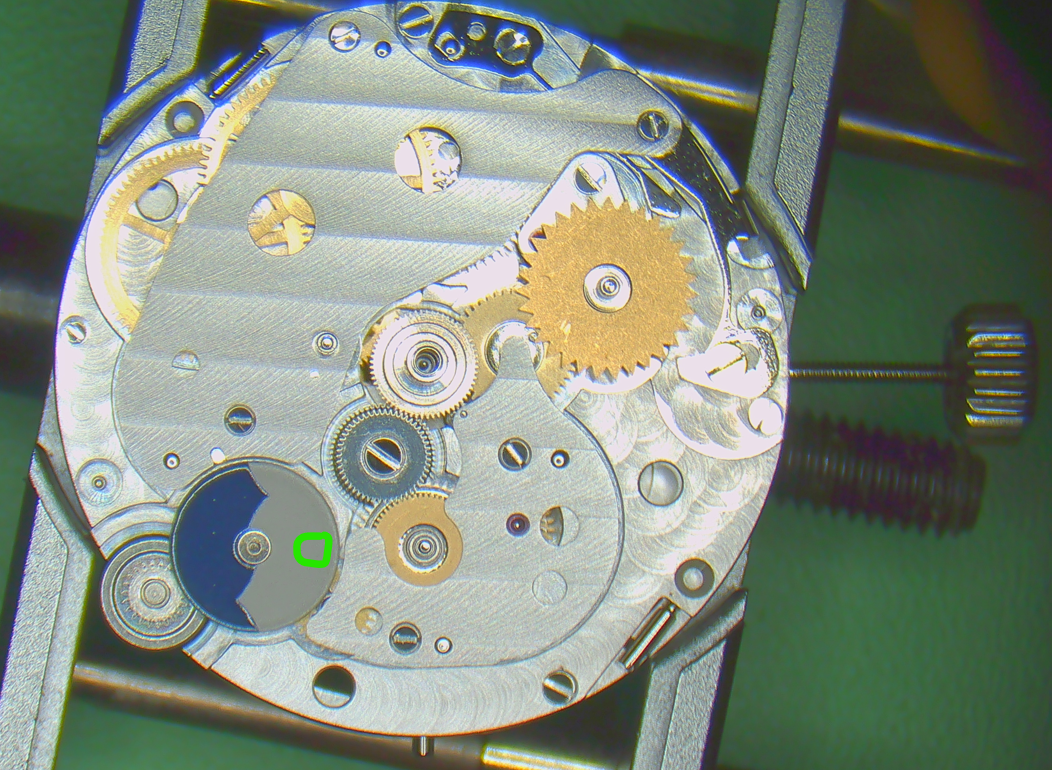
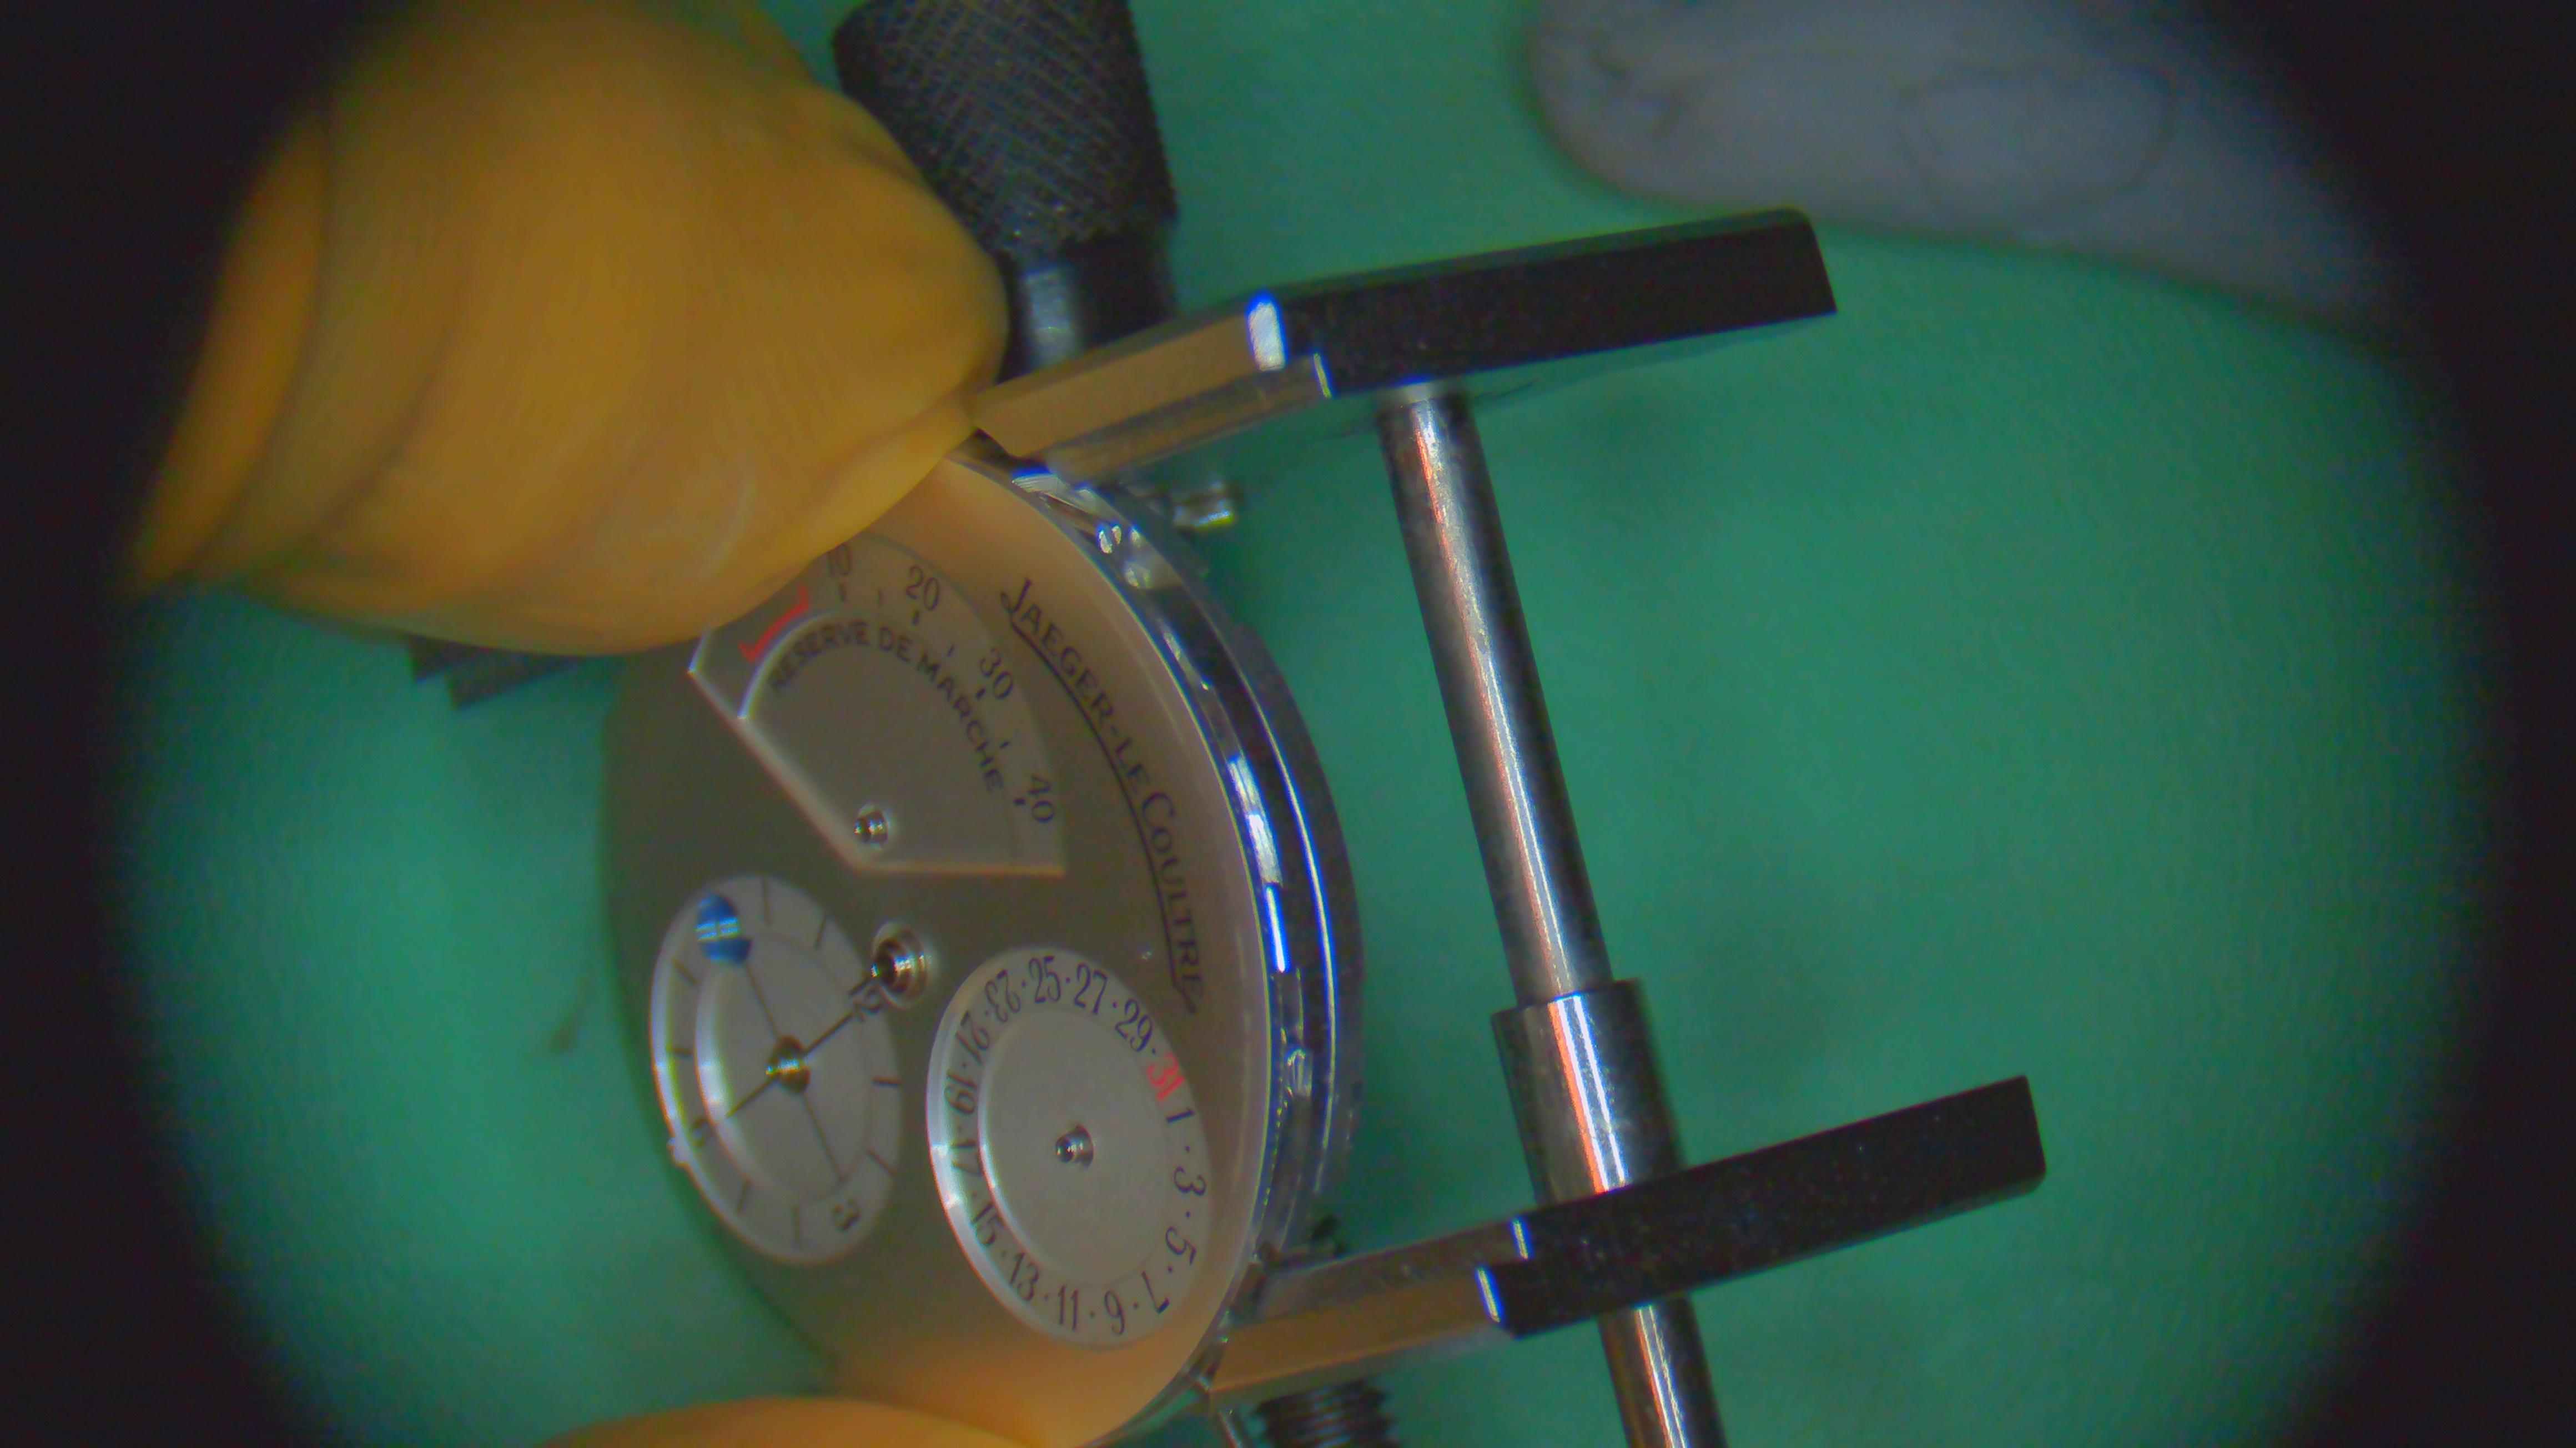
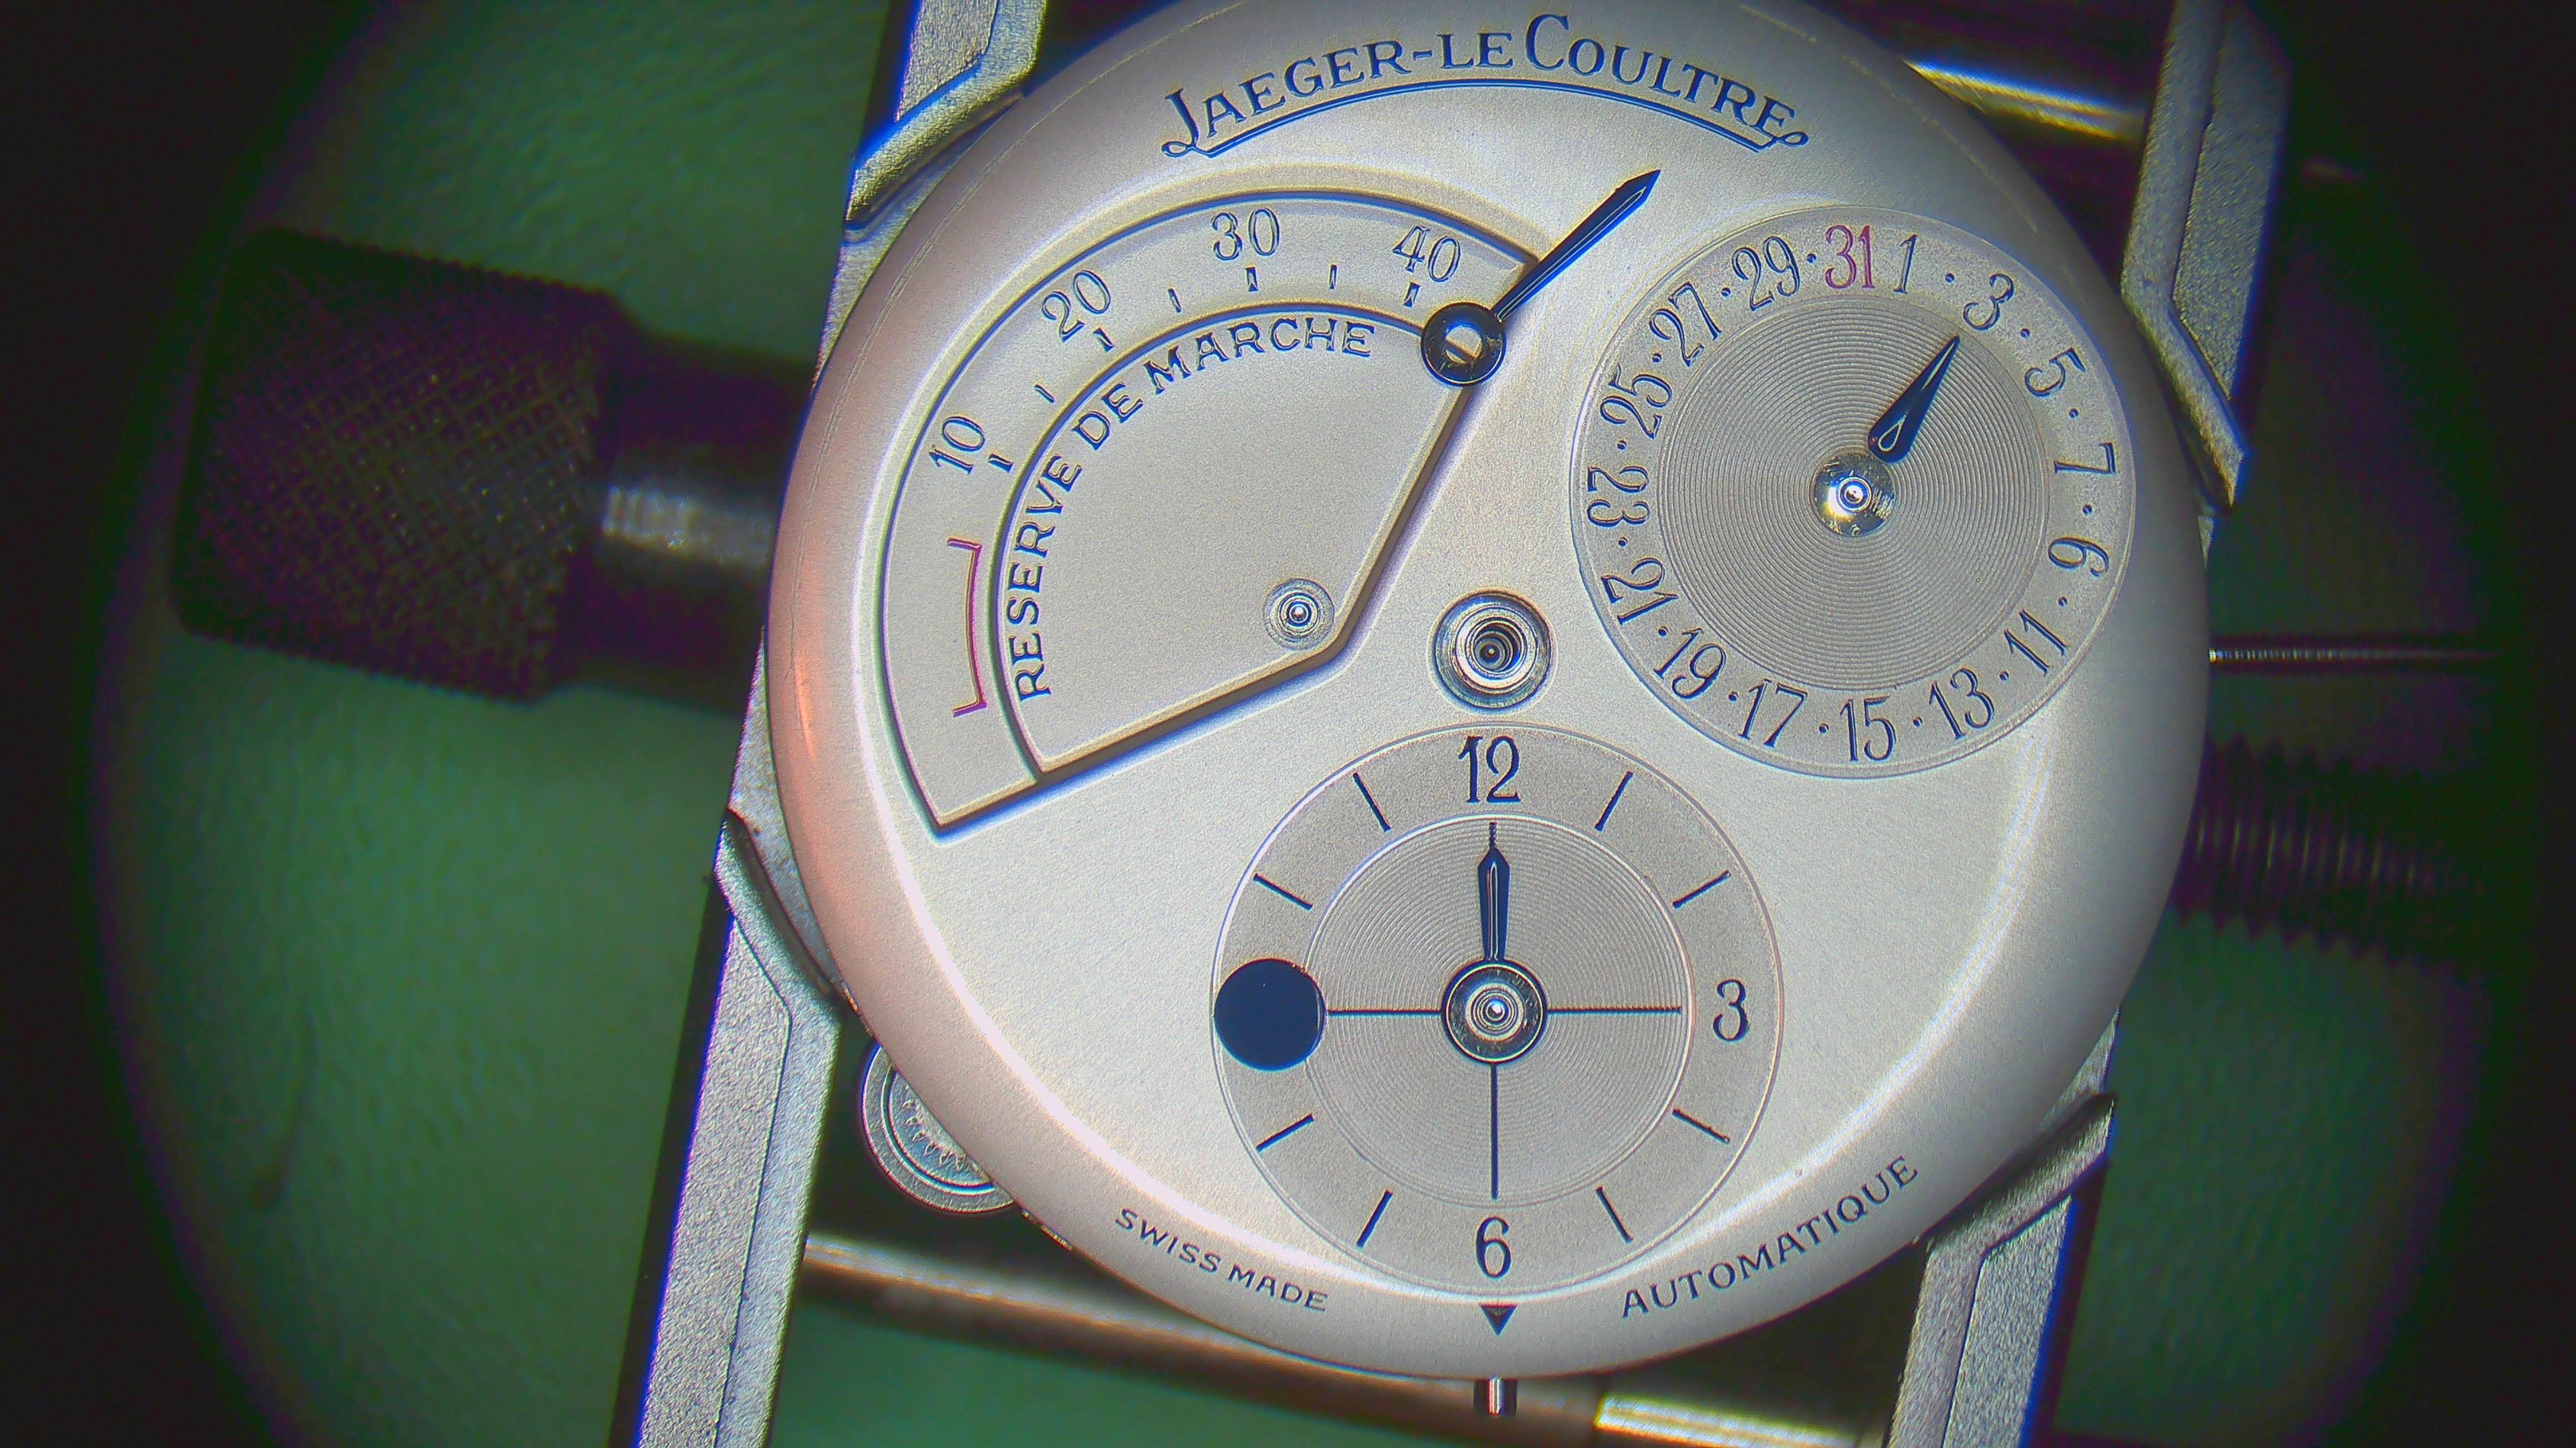
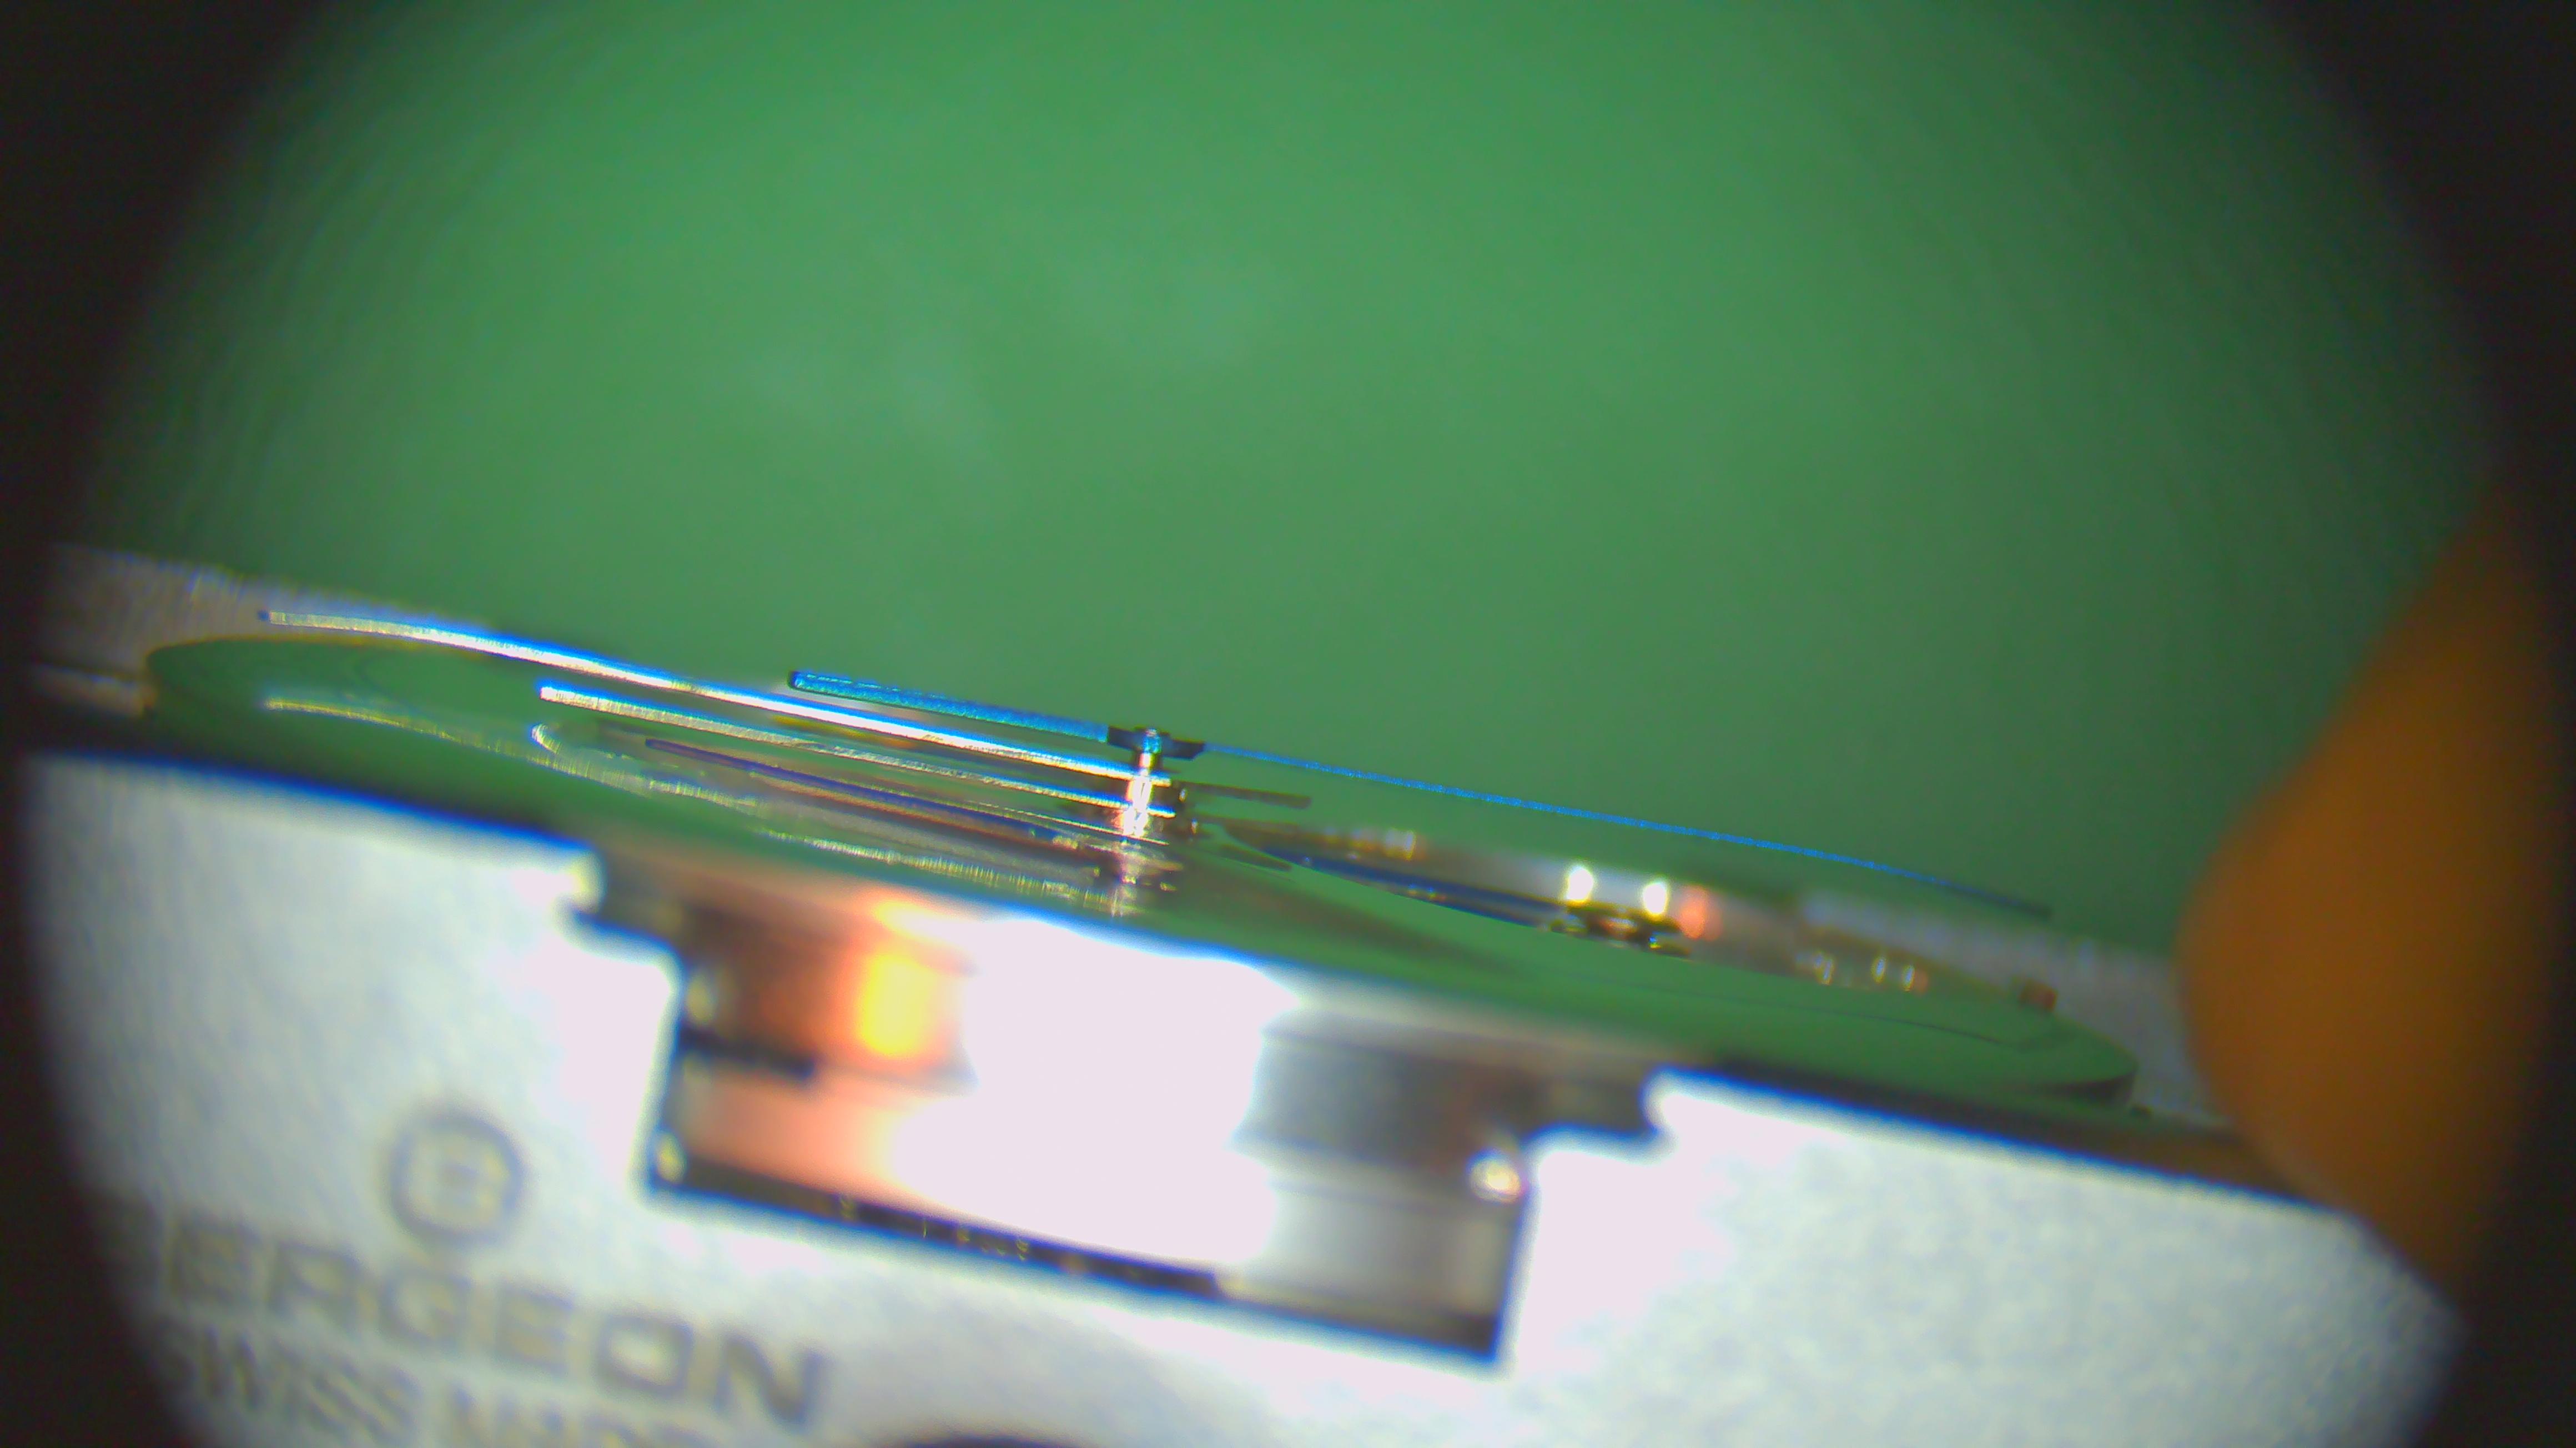
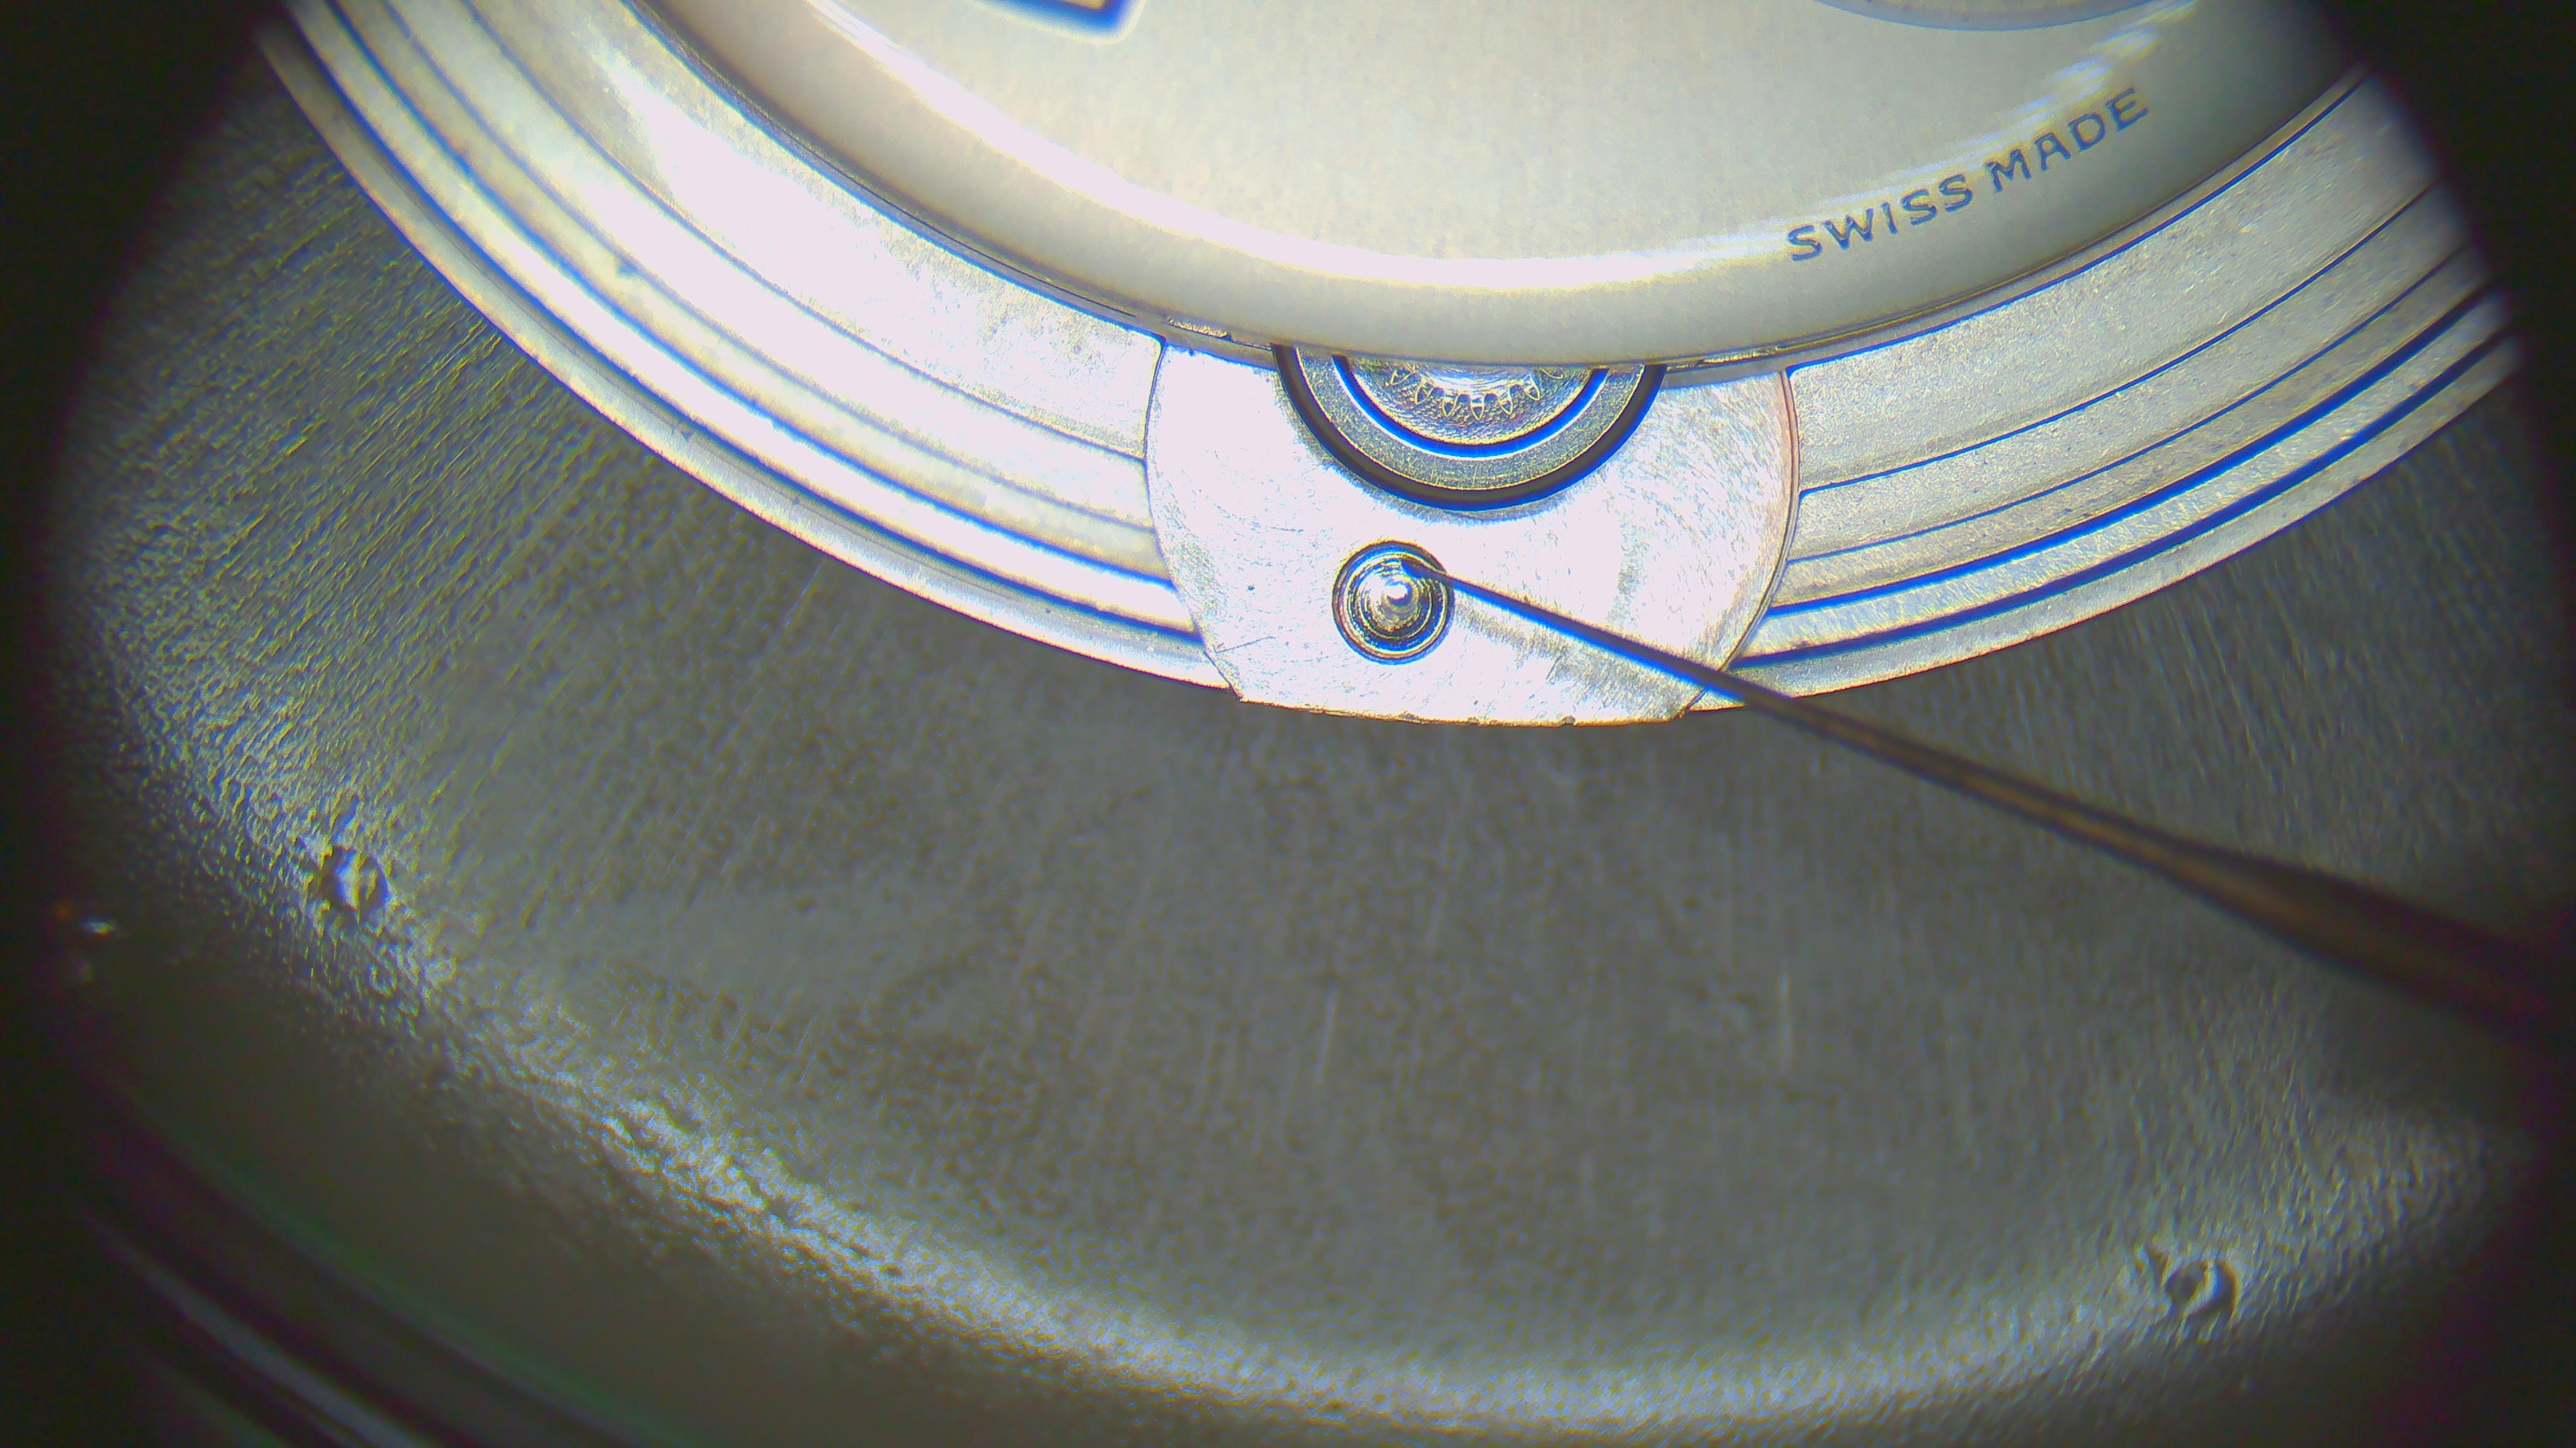
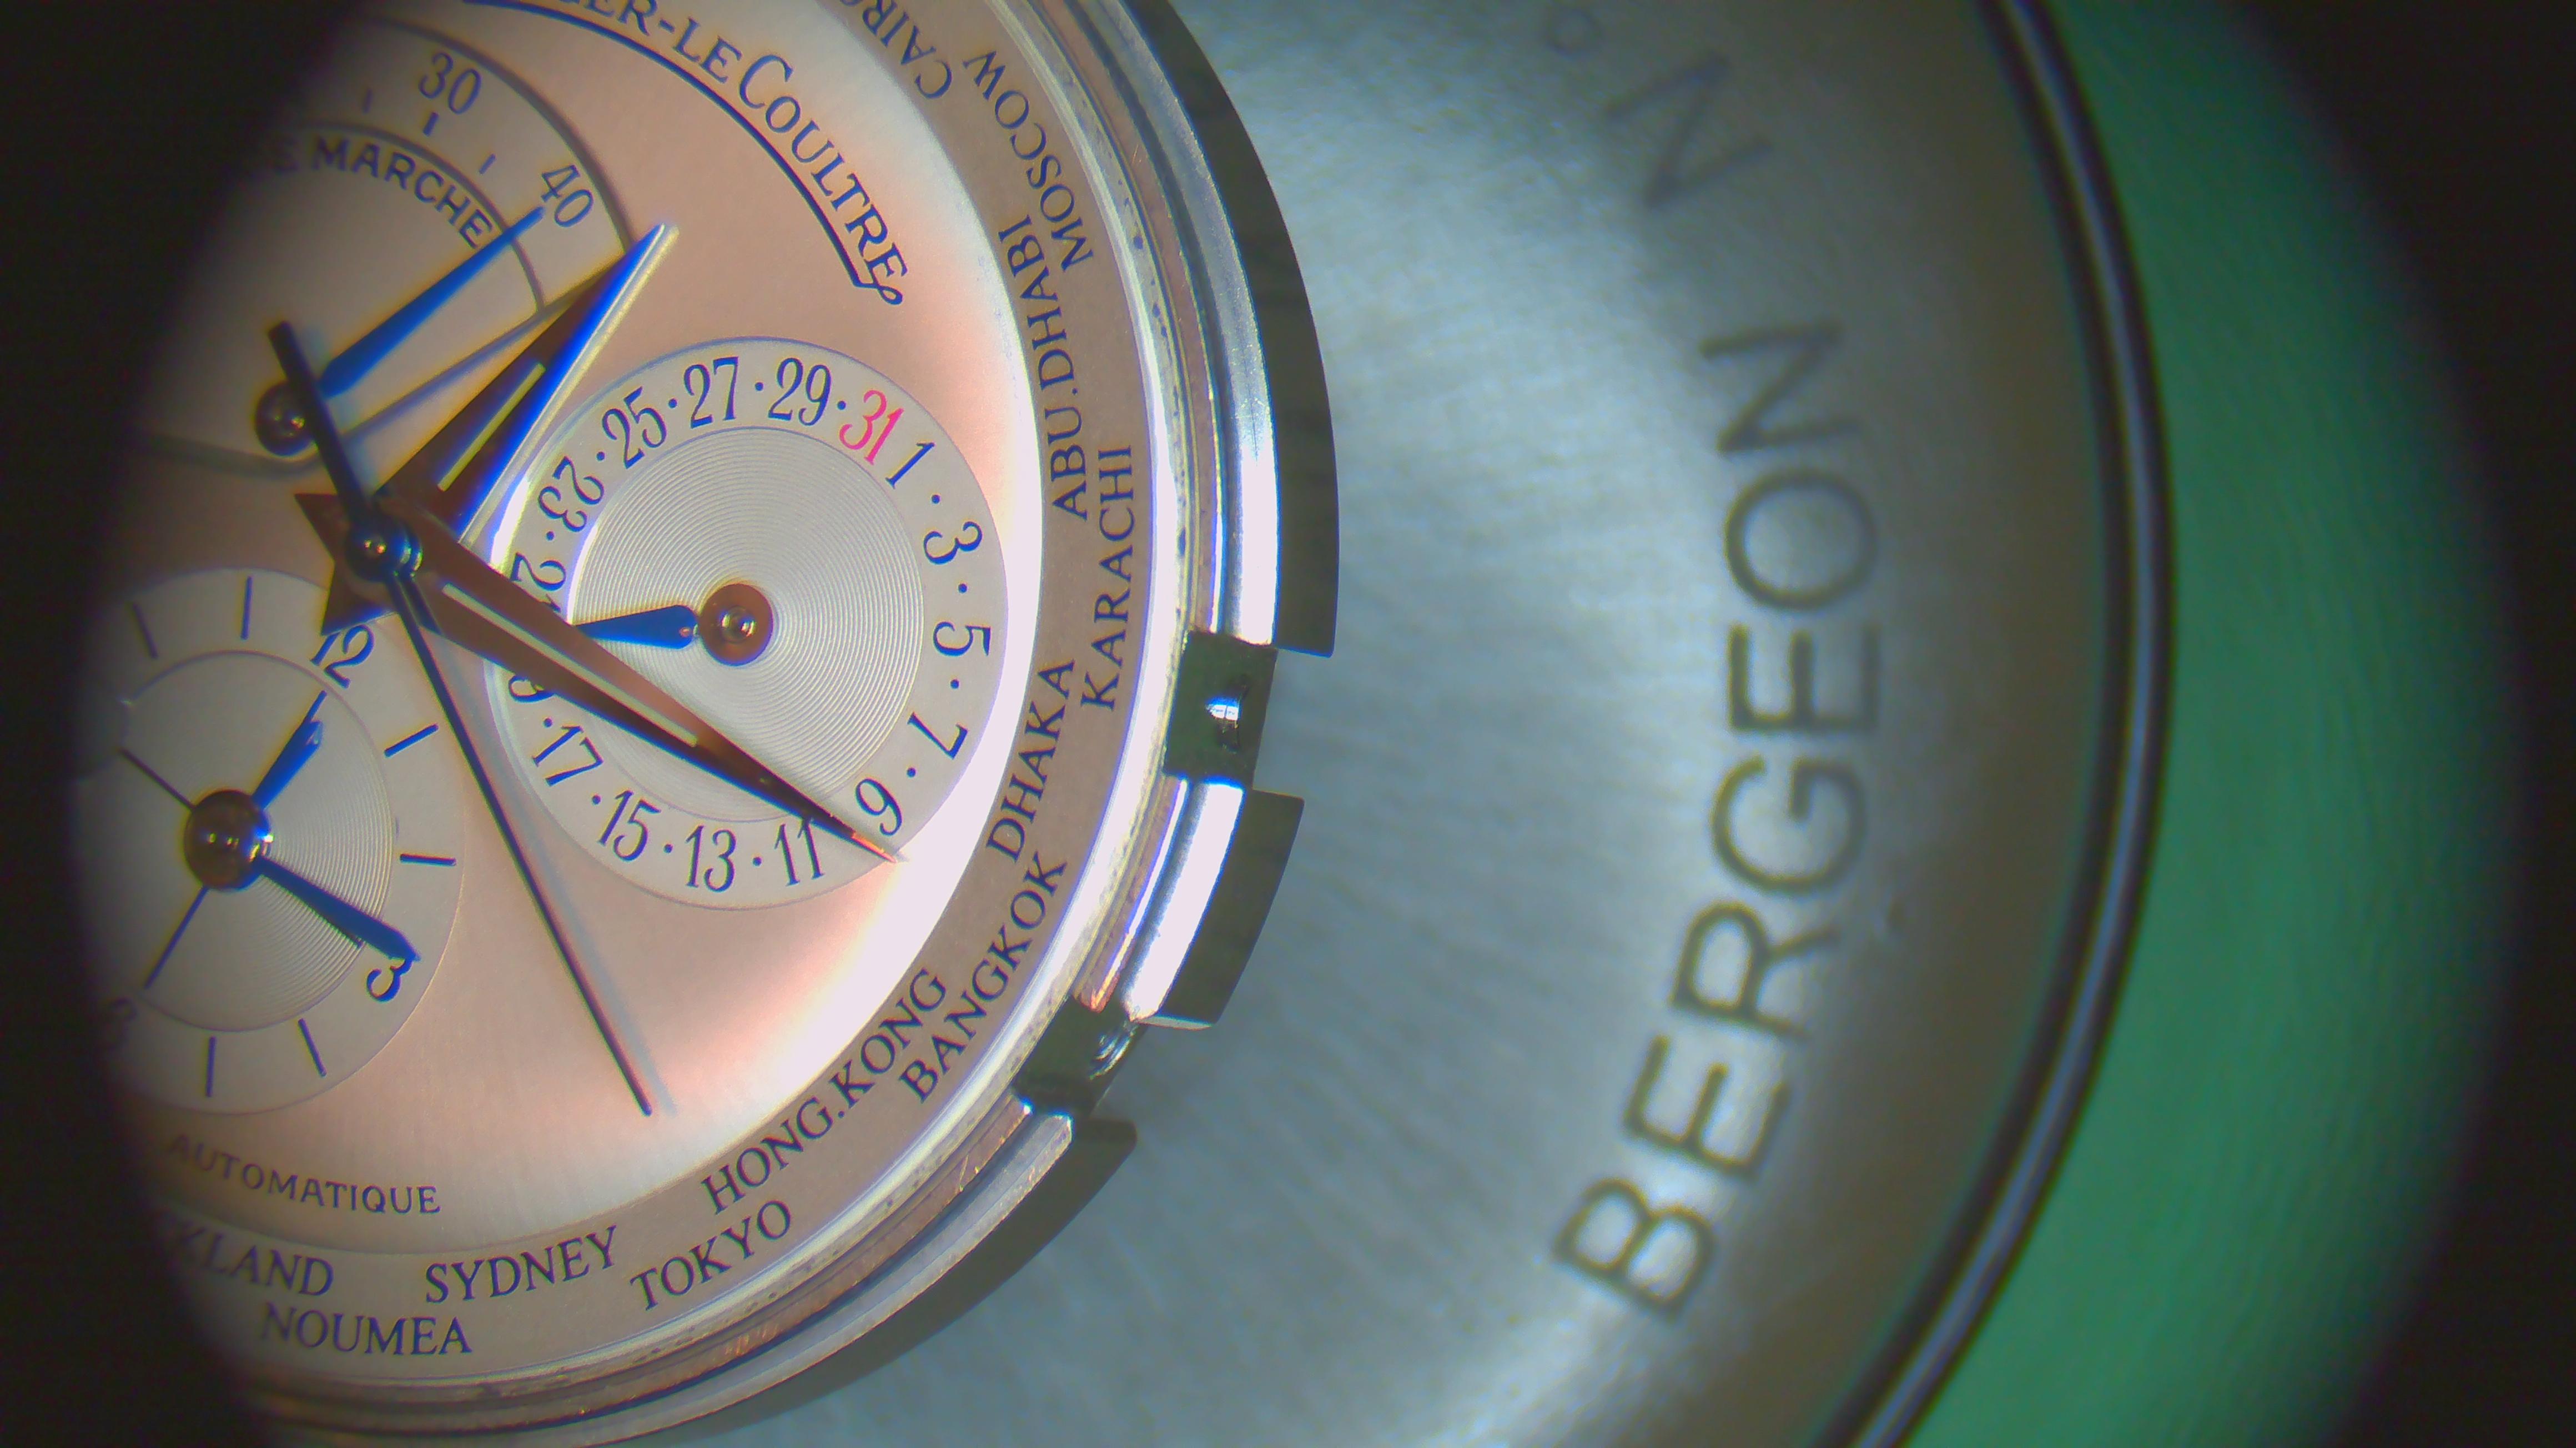
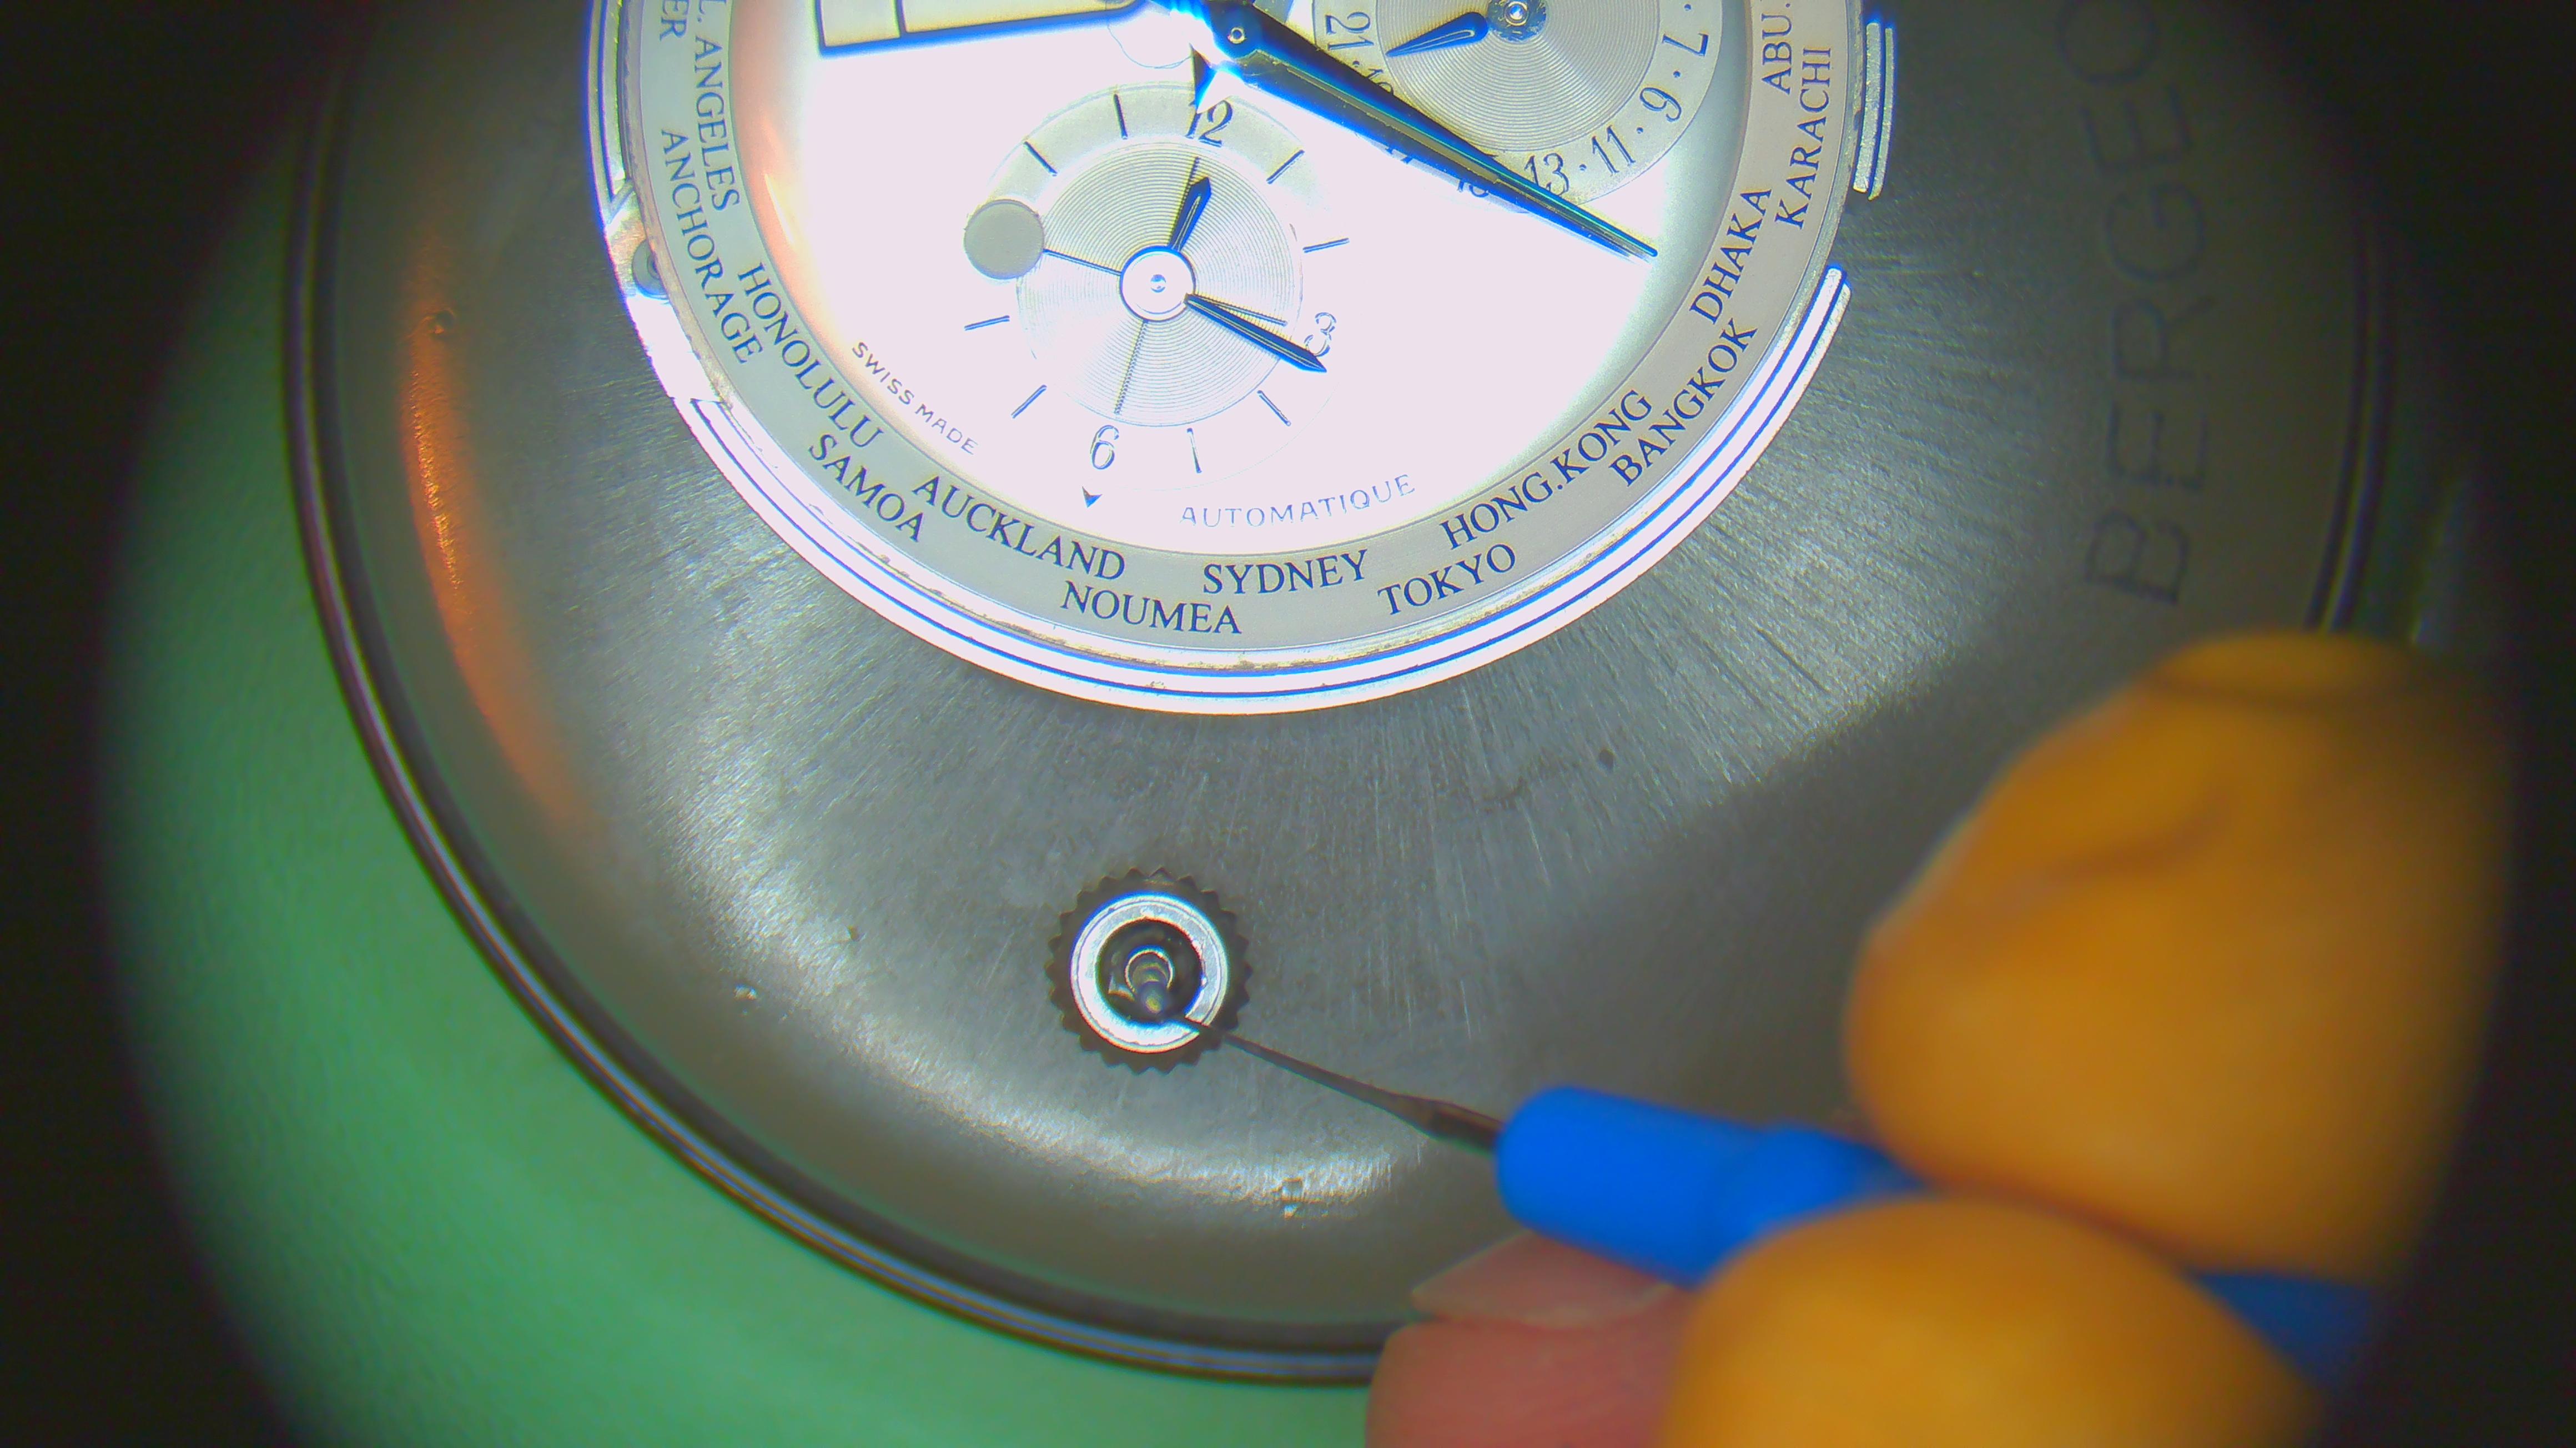
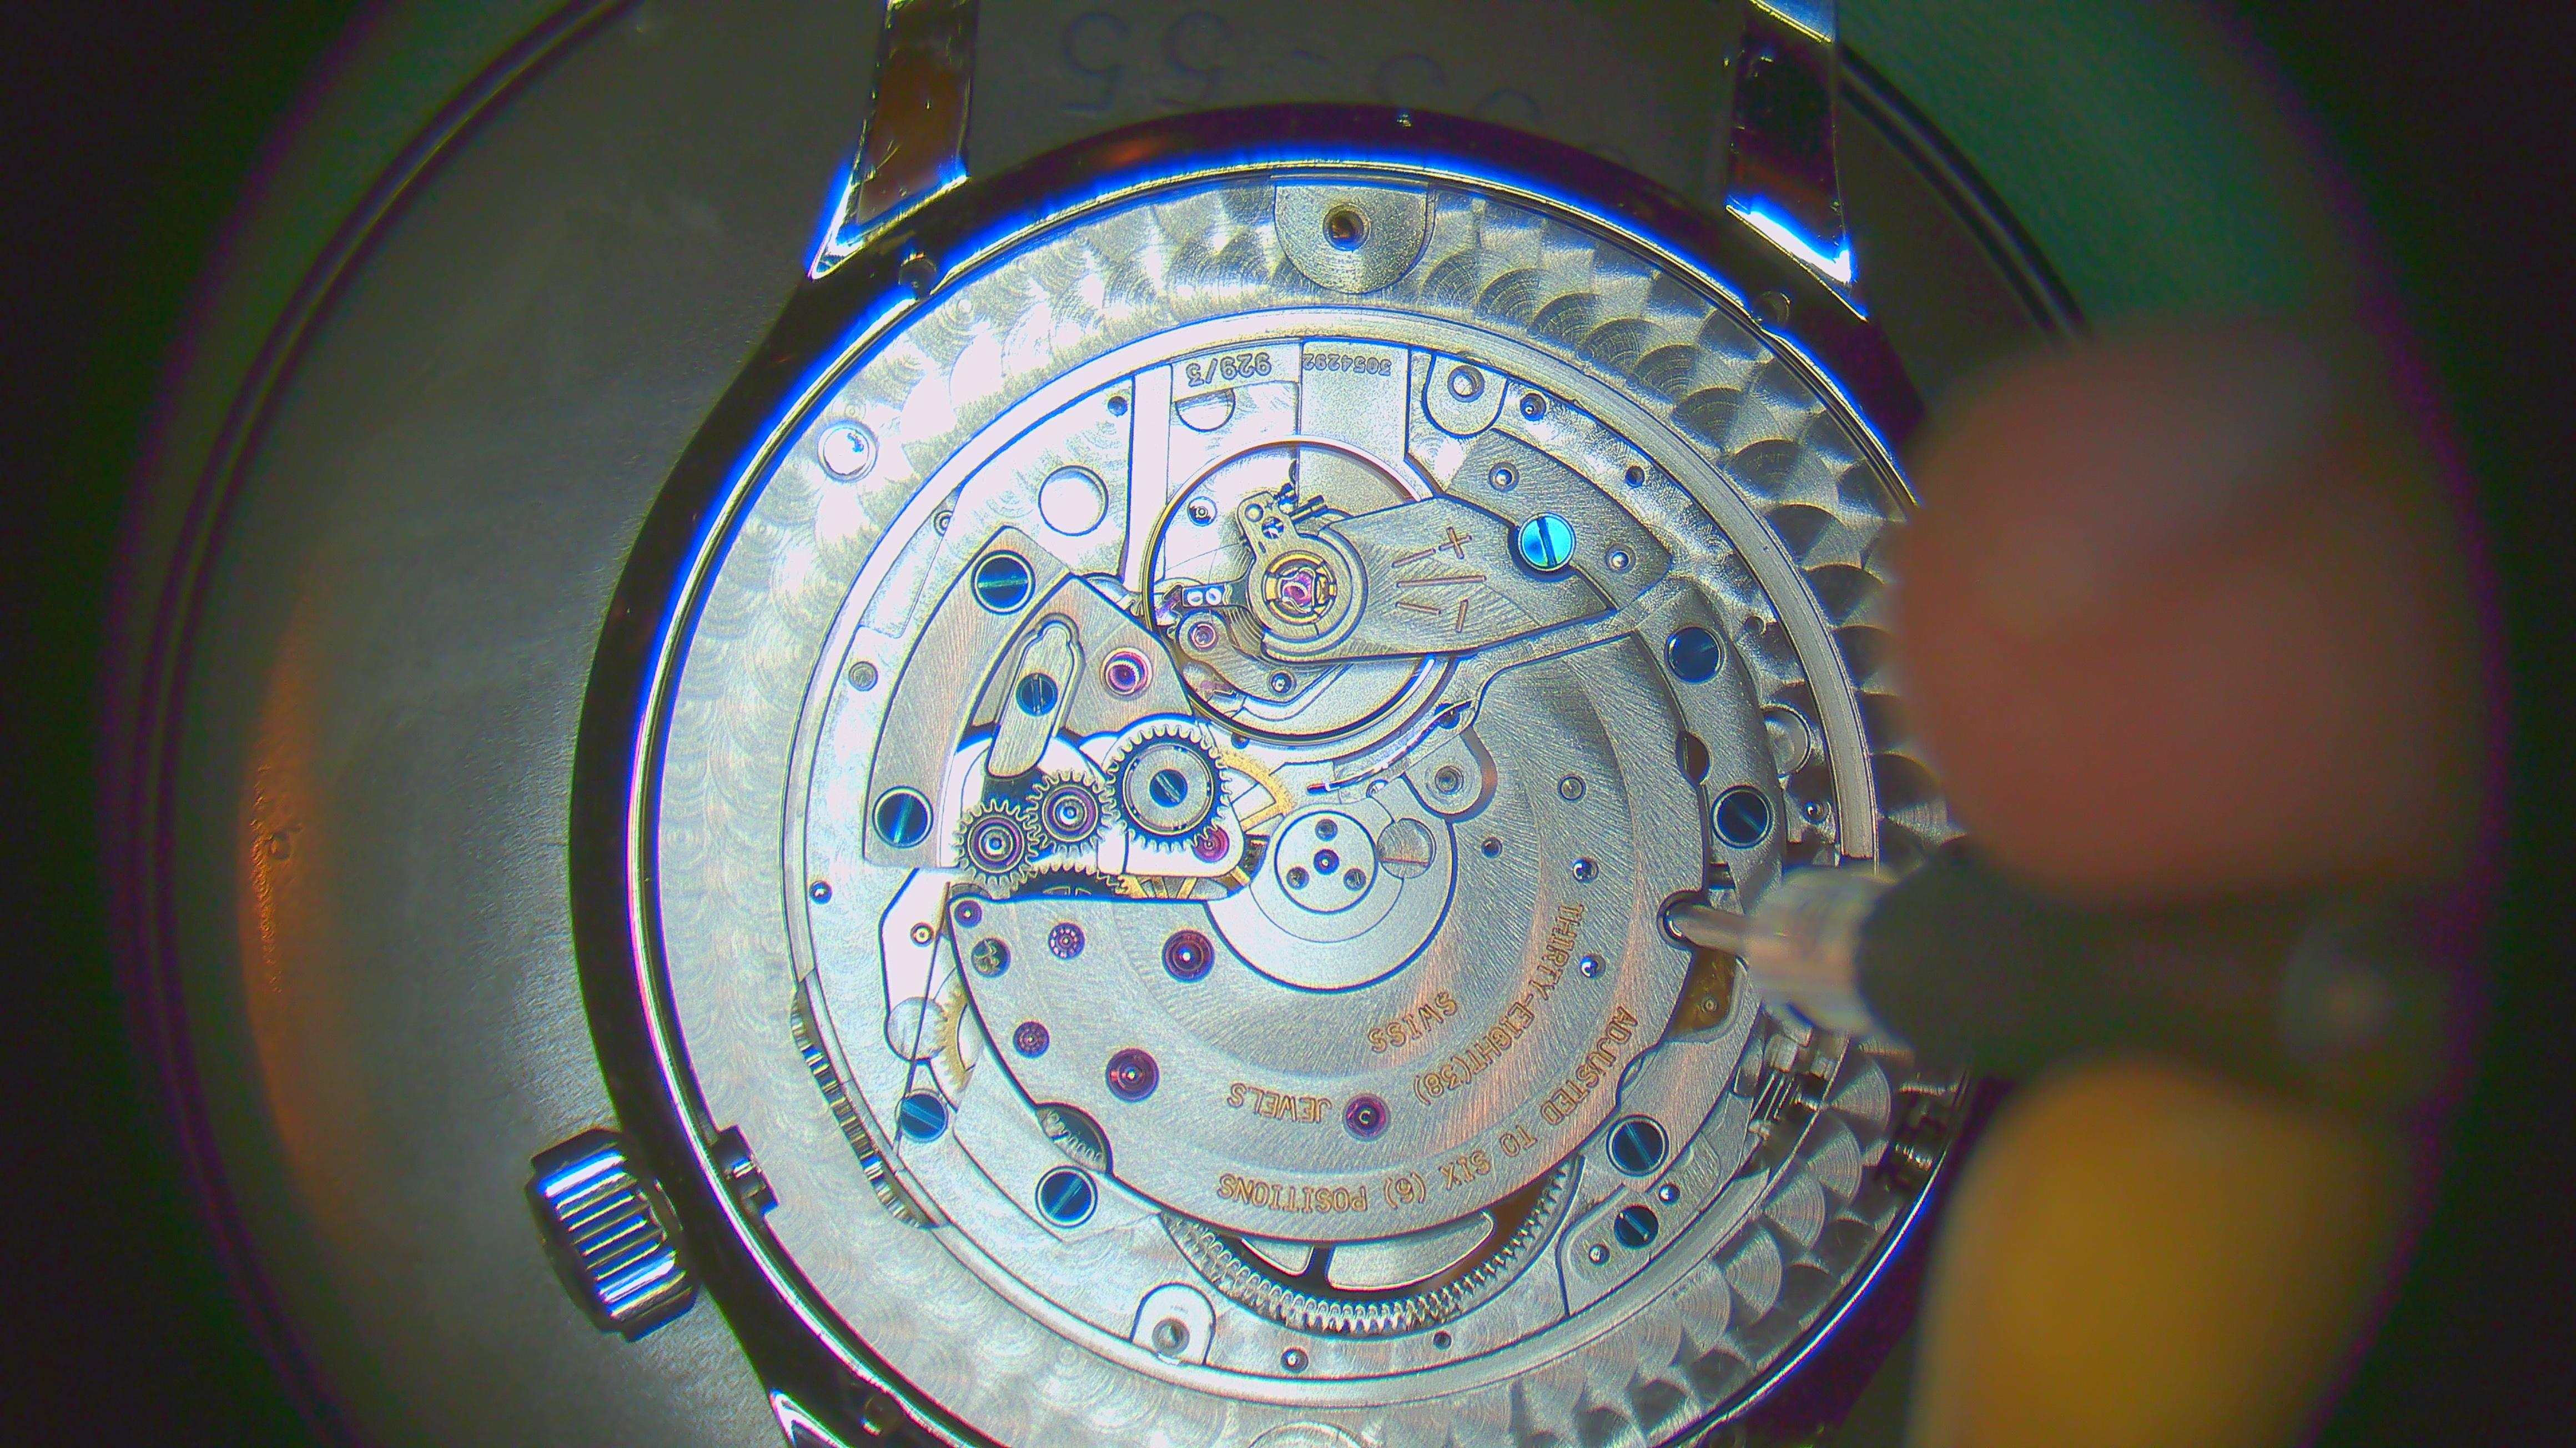
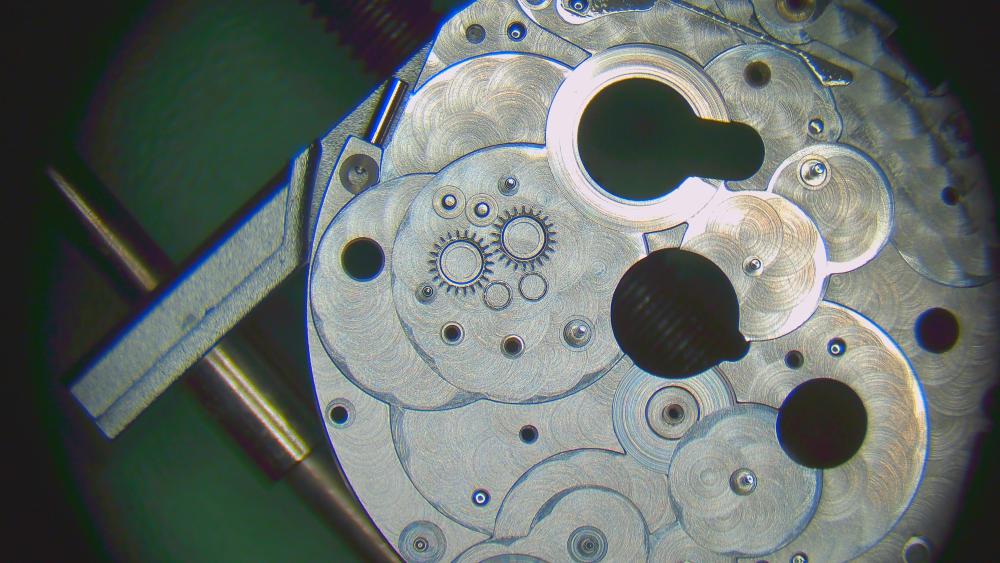
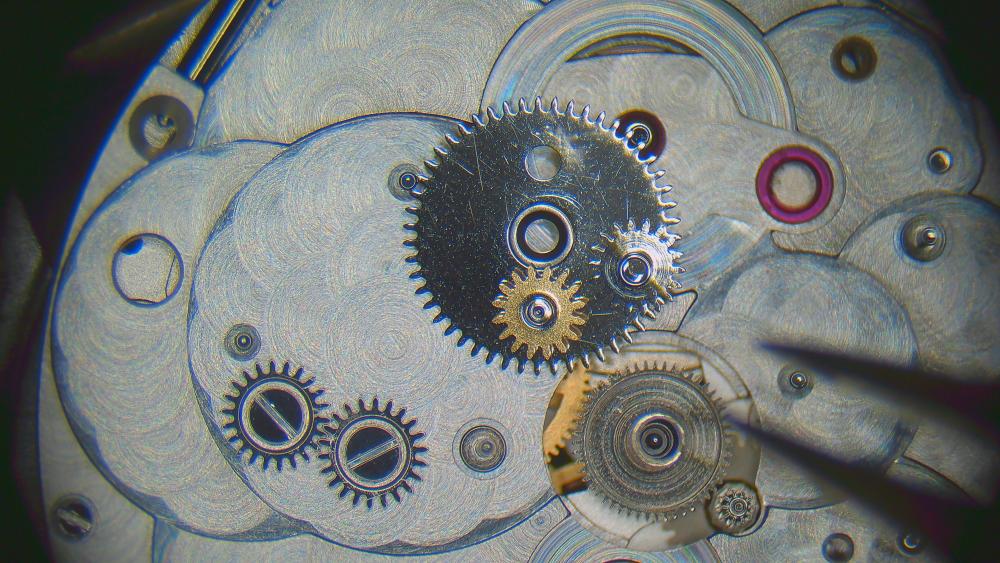
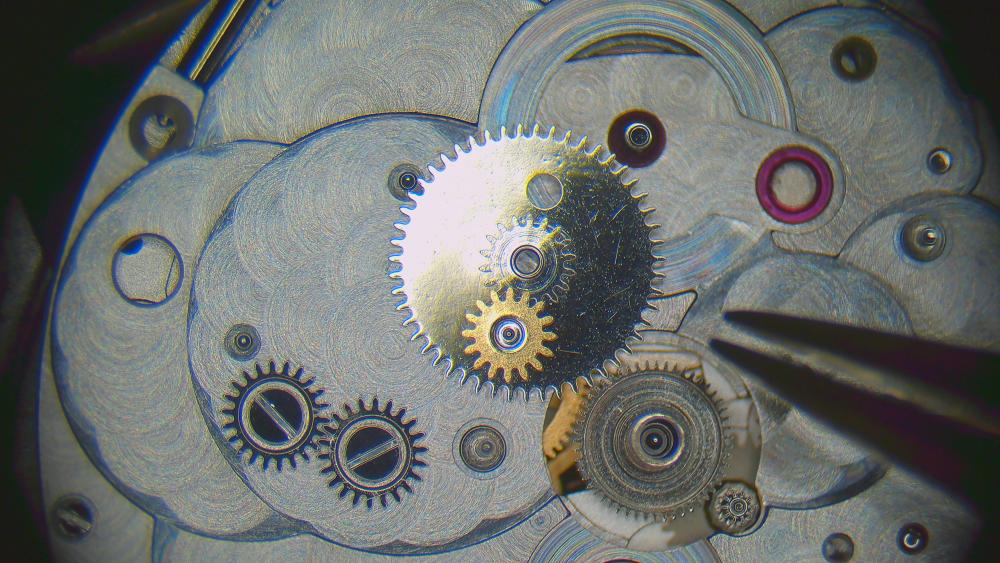
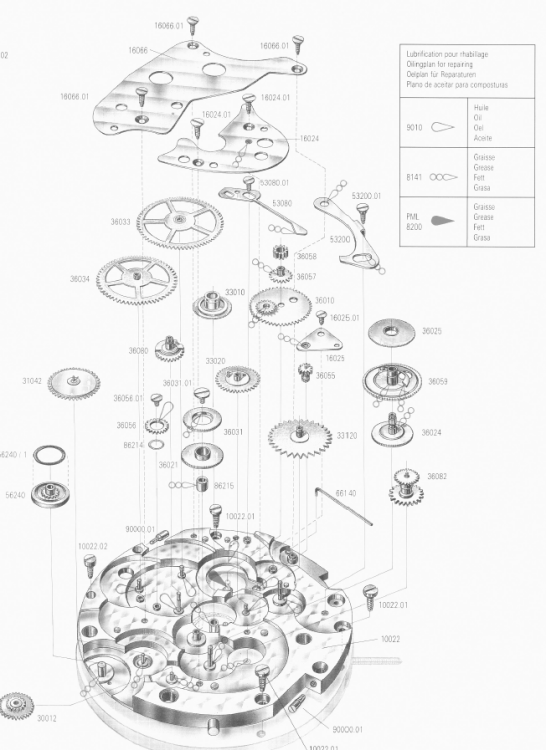
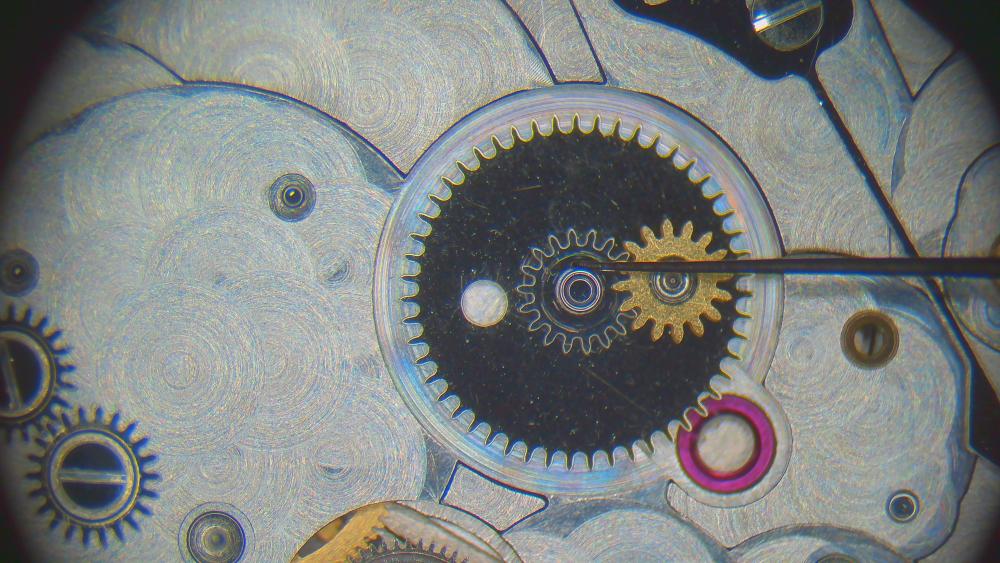
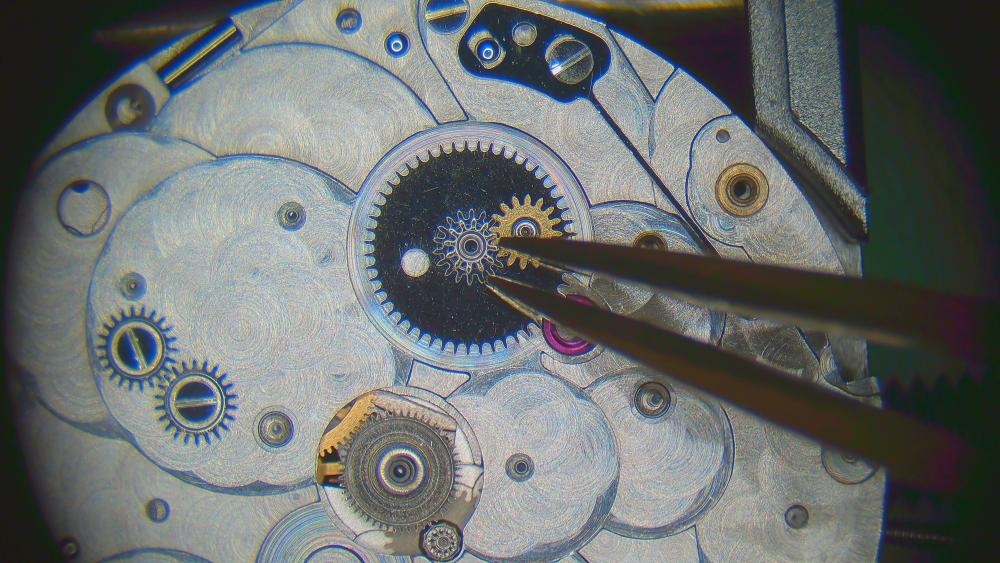
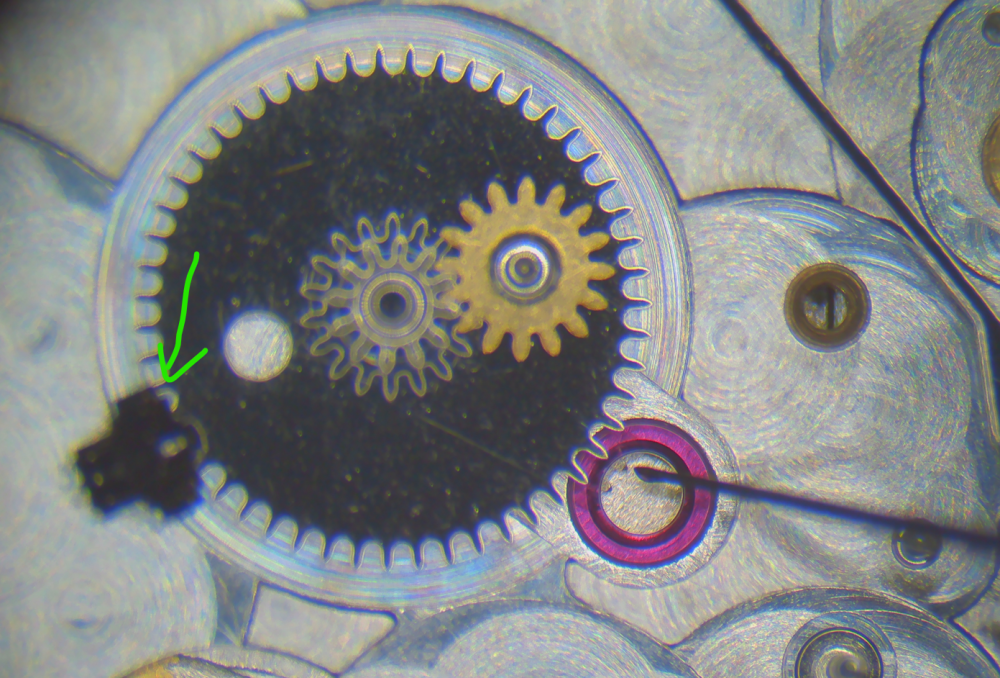
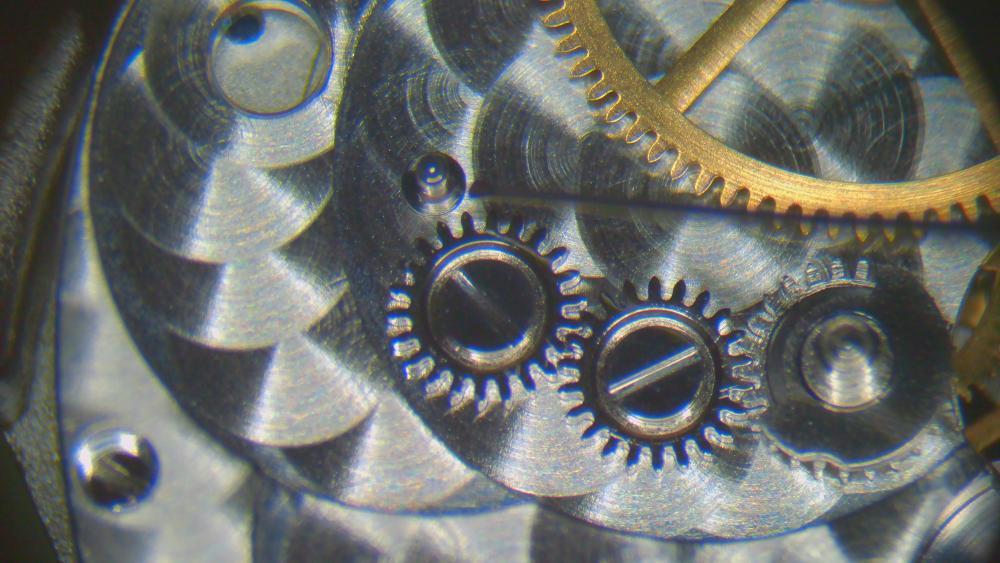
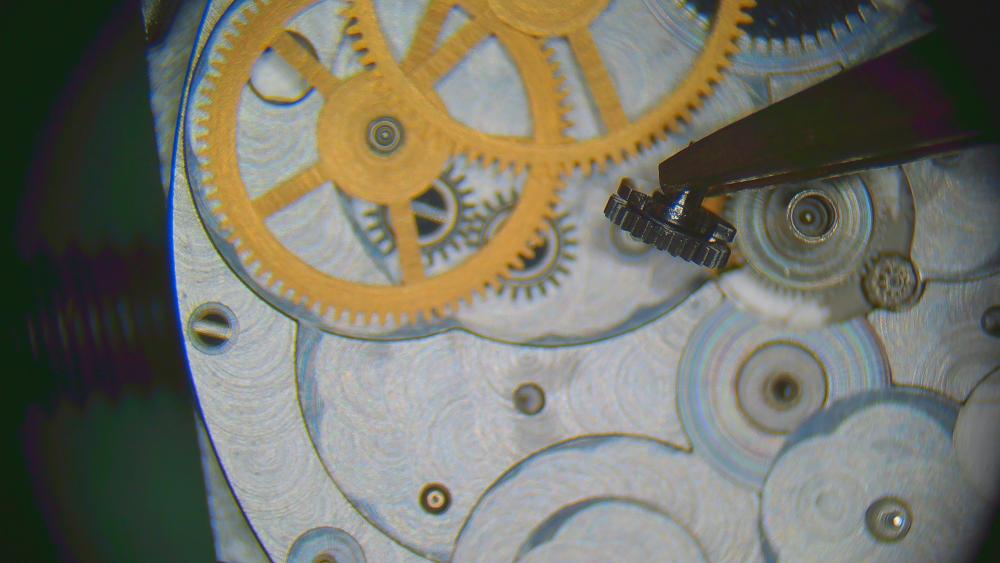
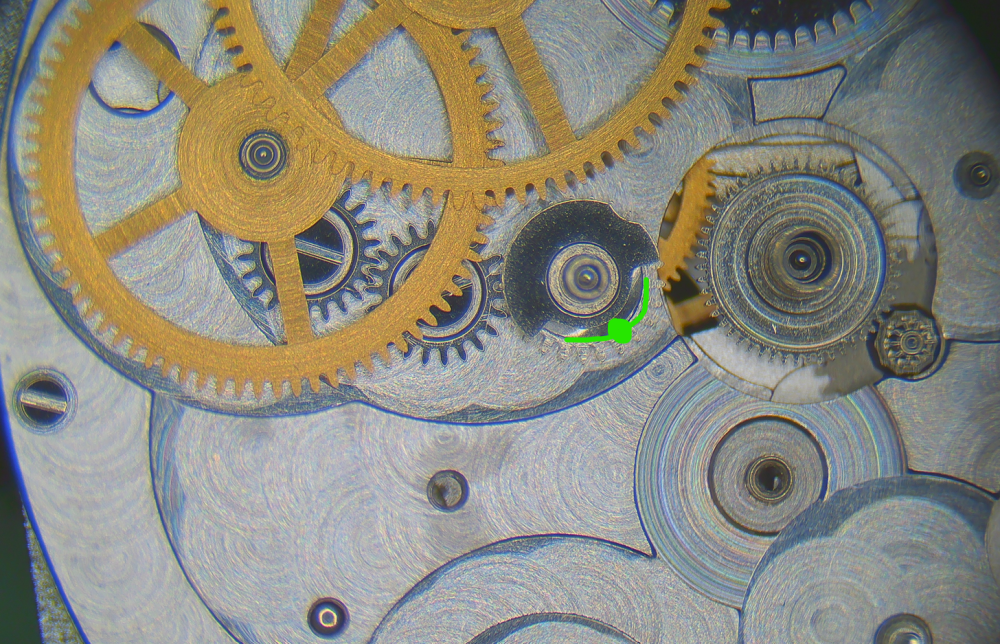
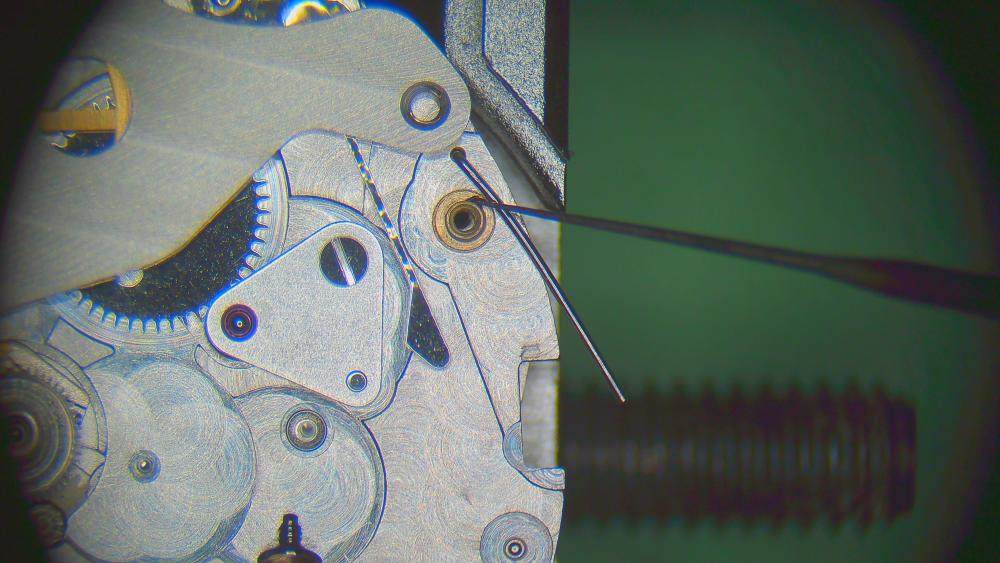
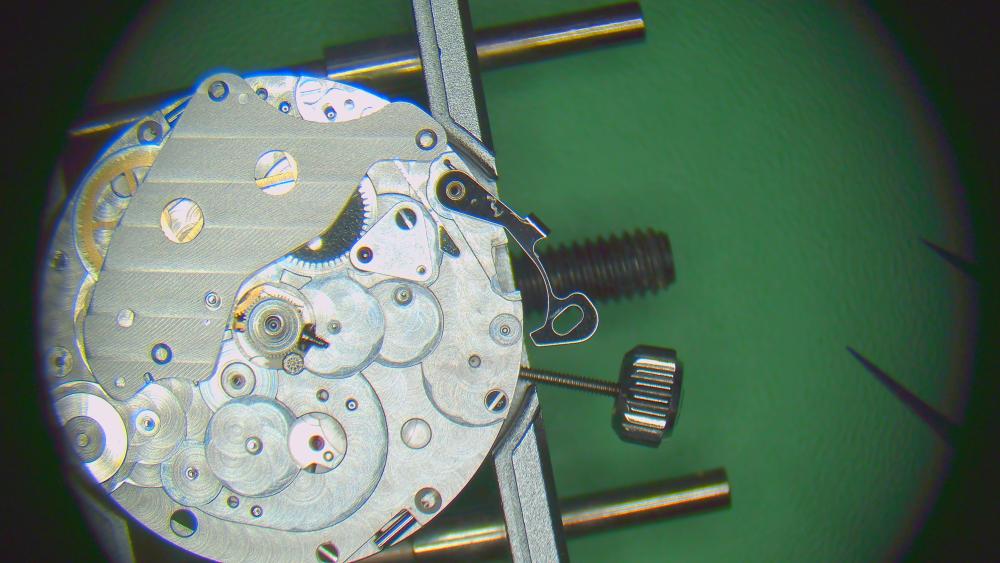
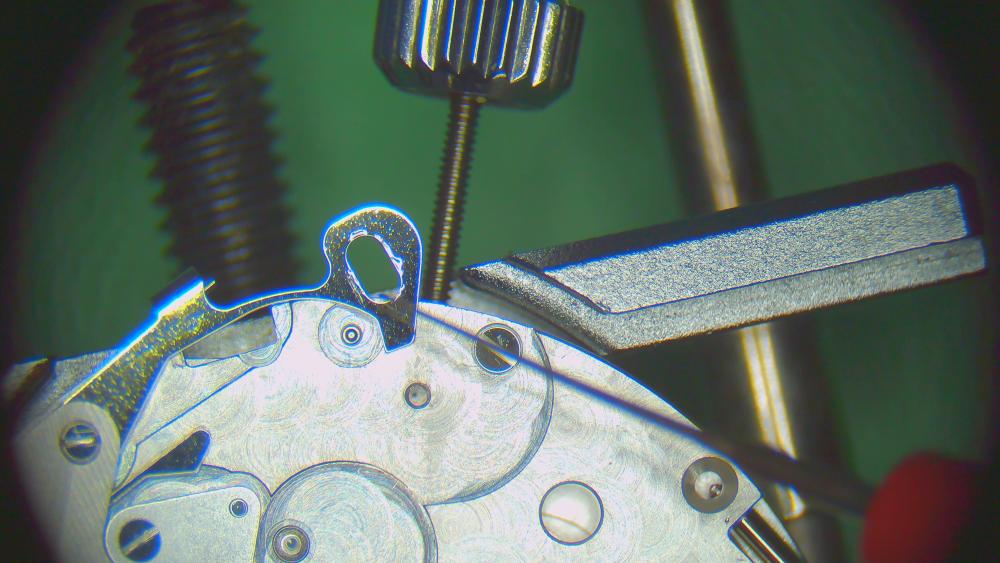
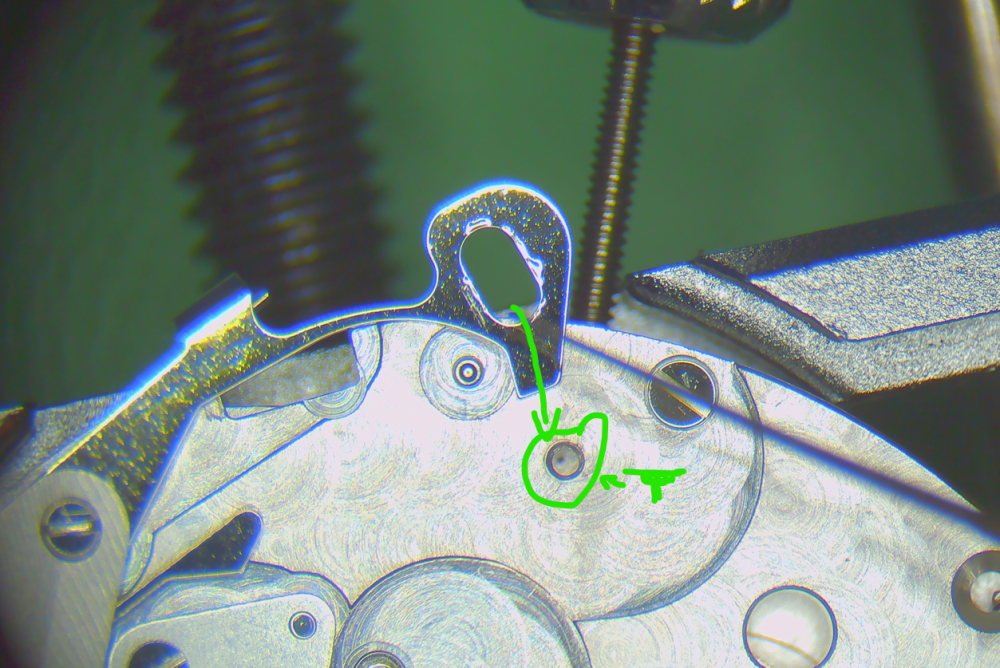
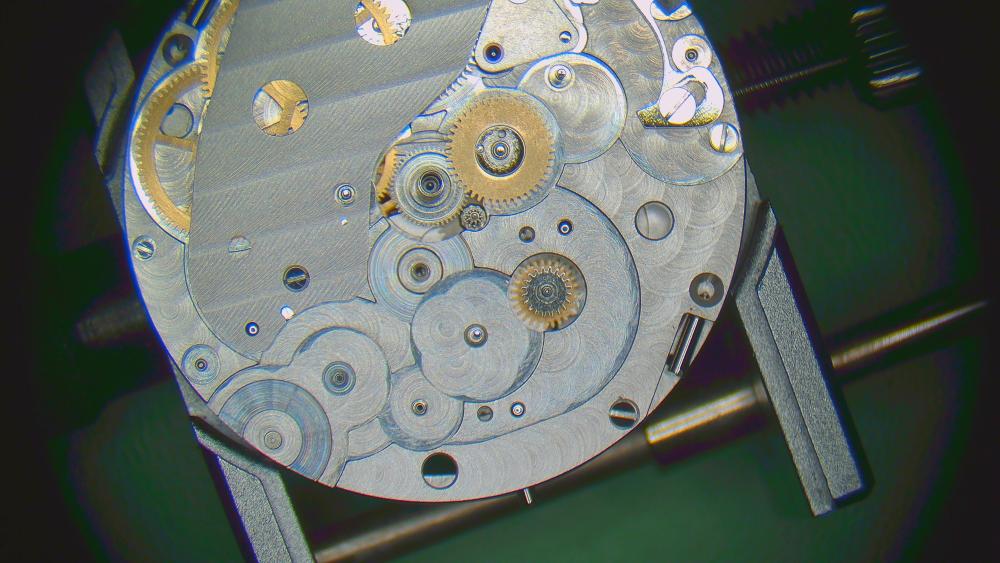
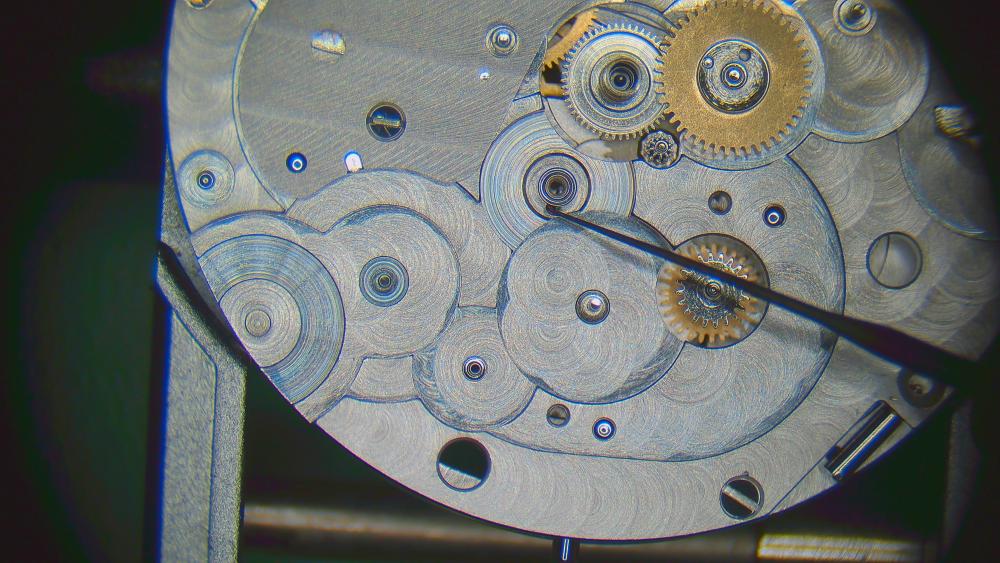
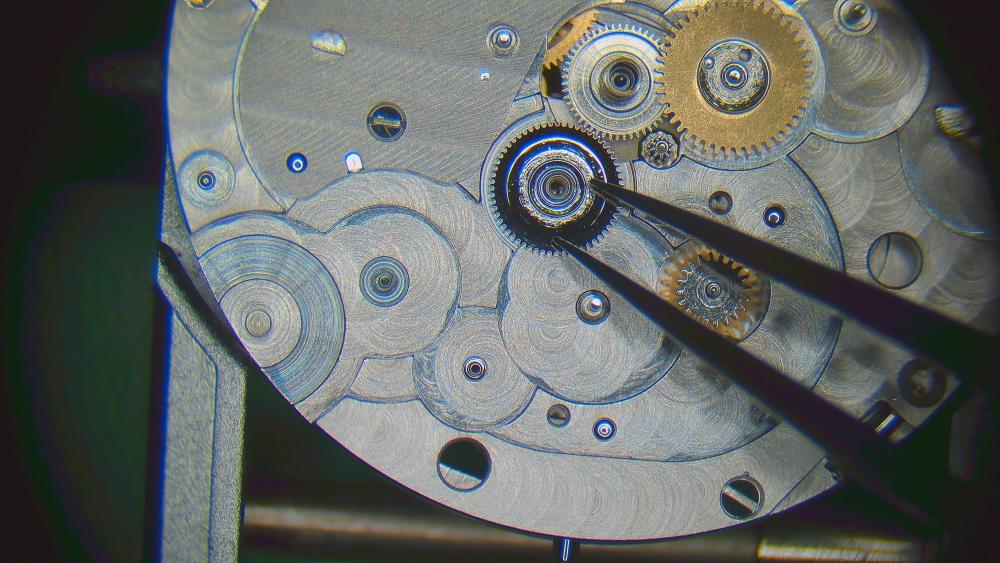
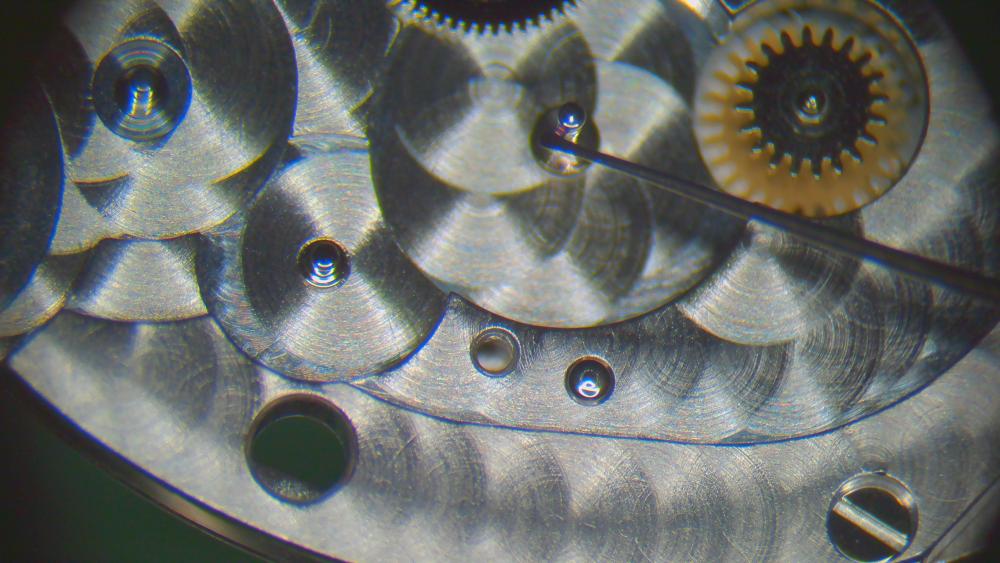
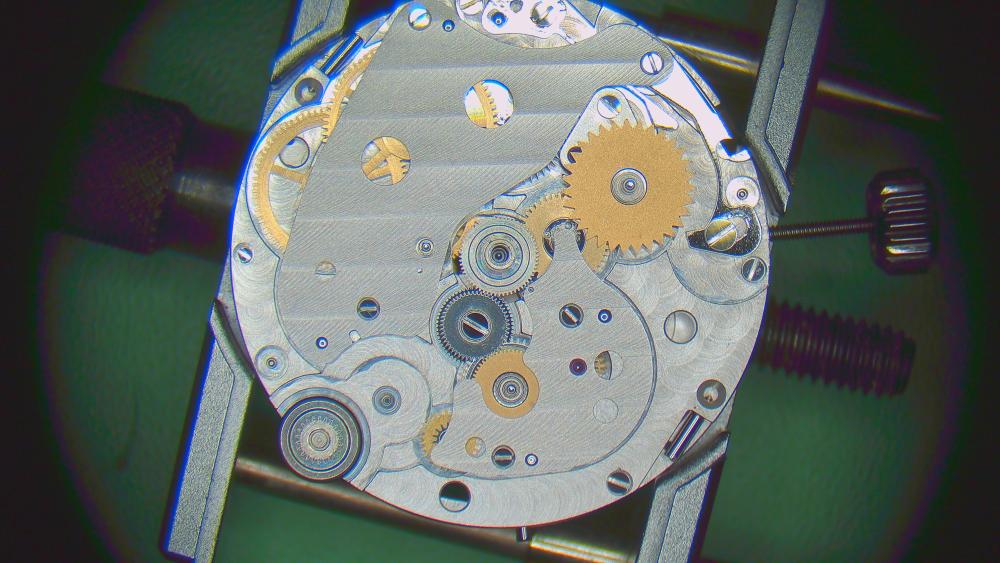
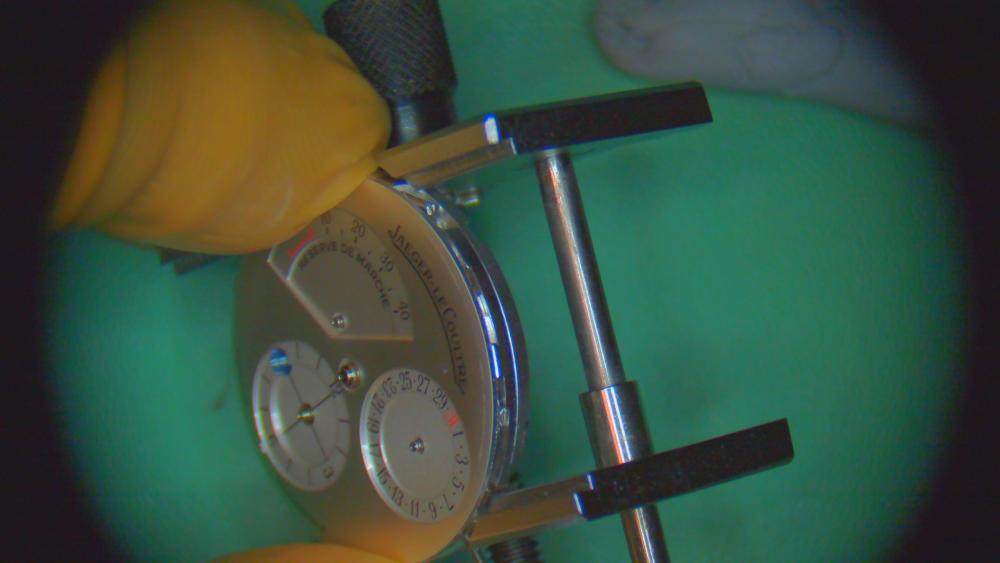
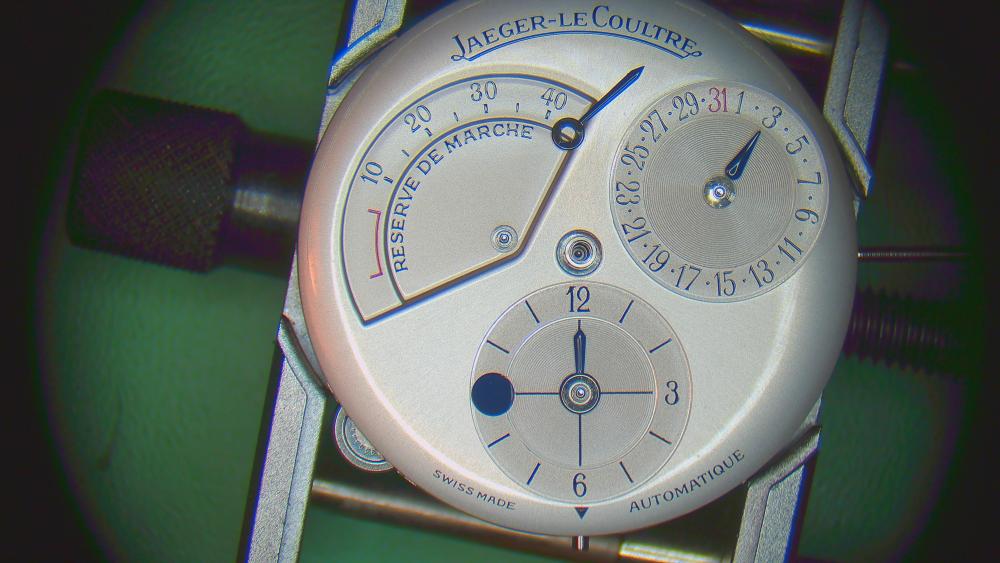
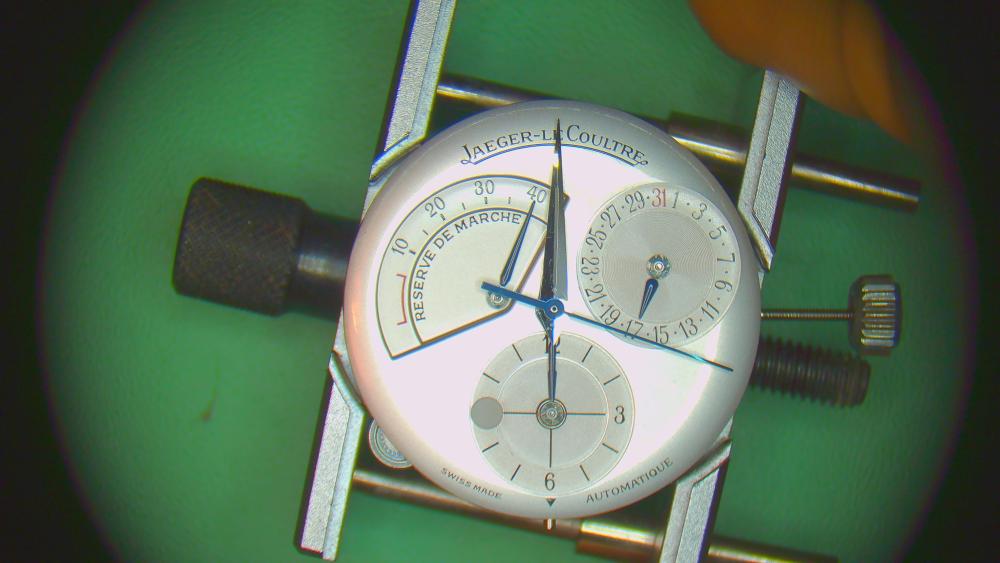
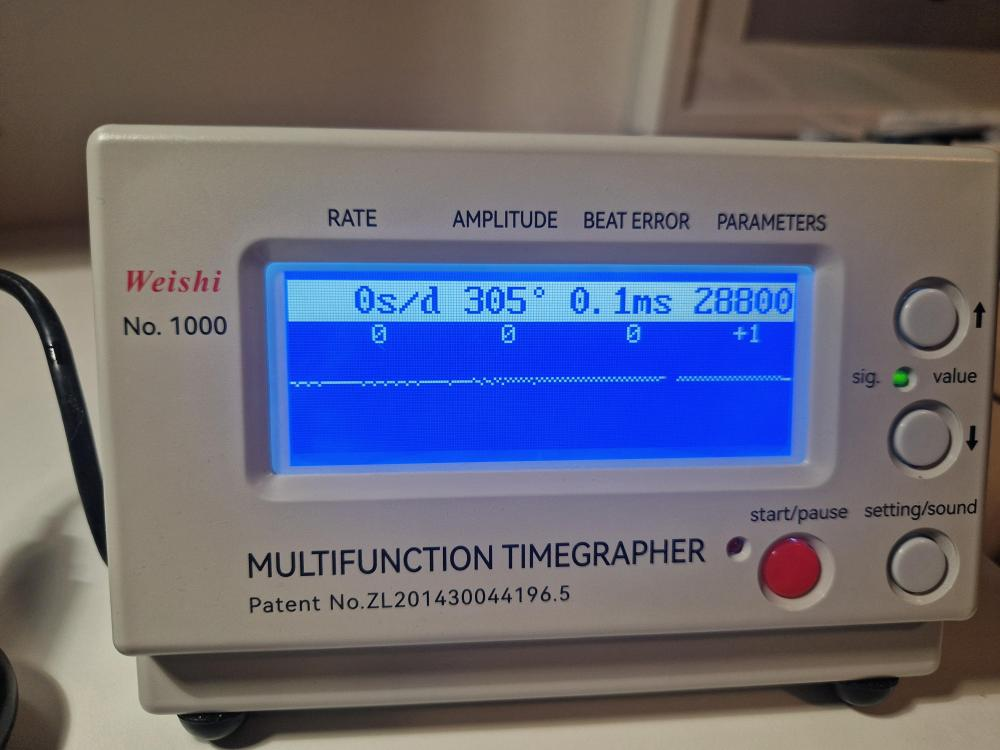
FINALLY, the complication module: - power reserve - date - second time zone with day/night indicator and city ring Here is the oiling chart and overview: NOTE: I decided to use HP1300 wherever 8141 and 9010 were recommended. Also used 9504 instead of HP1300/8141 in some places (see below). 9504 instead of 8200. I randomly start with these two wheels that are identical. But watch out, the seats are tapered, so they have a top and a bottom side. Don't force down if it doesn't fit easily. [Note: I installed these wheels before installing the complication plate on the movement, but of course, they can/should be installed when the module is on the base movement] seats installed wheels and oiling with HP1300 Complication plate installed on base movement. Three mid-sized screws on bottom, right and top. One smaller screw on the left. Next, for the power reserve is this set of wheels. They are installed on the extended barrel arbor to trace the level of winding. They are friction fit (with 9504) and the fit is quite "soft" in order to slip easily when the barrel is fully wound (the power reserve indicator can't/shouldn't move beyond 40h, but the barrel arbor will keep turning when wound further by the automatic mechanism or manual winding) Grease the bottom half (!) of the arbor position the small wheel over the hole of the large wheel. push onto the arbor, e.g. with hand fitting pusher oil the satellite wheel with HP1300 upper half of the arbor gets HP1300 another wheel on top carefully oiling the jewel for this pinion (green arrow). This pinion connects to the barrel itself and lets down the power reserve indicator. A bridge just for the pinion. Oiling with HP1300. HP1300 for the posts of the two large reduction wheels Then this special wheel (post oiled with HP1300) position the wheel more or less like this. The cover palate for these wheels has a little pin which will go into the open area of that snail-like top-part of the wheel (indicated in green). The hand for the power reserve indicator will go onto this wheel. Then the watch is fully wound, the pin on the cover plate will stop the wheel from moving further (the wheel on the barrel arbor will start to slip). Again, careful when placing the cover plate for these wheels. If the pin doesn't go into the cut-out of the wheel (green marking), you may bend the cover plate. Before placing the cover, plate, I also have to position the spring and lever for the date corrector pusher. It's a bit fiddly and falls off easily. first the spring HP1300 on the post the lever. Just balance the spring and lever in this position and install the cover plate. AFTER the cover plate is installed, oil or grease here (I use HP1300) Tension the spring/lever and install the screw (sorry, not pictured). Now, I'm testing the power reserve by fully winding until the special wheel is stopped by the pin under the cover plate. This is the position of it when it stops (small indent just a bit visible): Now to the second time zone: Oiling the bottom pivot of this wheel with HP1300. This wheel connects to the keyless works (when the stem is pulled out the the middle position, see earlier post on keyless works) and allow the setting of the second time zone (meaning: change the hour in the second time zone for a given city/time zone) A seat here HP1300 on the outside of the seat/post This wheel now (which basically copies the time from the home time to the second time zone) oiling post with HP1300 placing the wheel greasing the click within this wheel. This click ensures that the second time zone hour hand can only be set in full-hour increments. oil the seat/post inside the wheel with HP1300 I ended up removing the wheel again to place the inside wheel and ensure that the click engages properly (and that the combined wheels are "flat") then I replace it again as a unit, followed by the next wheel (held by the tweezers in this picture) And oil the post again with HP1300. the wheels are then secured with a screw (not pictured). Another post with HP1300 and the wheel in the picture (this will, via another wheel, connect to the second crown to allow changing the time zone) the cover plate for the second time zone mechanism HP1300 for this pivot now the DATE (easy peasy). Post with HP1300. date wheel. position the spring. A bit of grease on some of the teeth. testing the corrector and spreading the grease. clean off excess grease after a round. oiling with HP1300 and placing the hour wheel HP1300 for this last wheel that engages with the second crown for the time zone wheel placed (bottom left of picture) oil the post of the day/night disc with HP1300 ATTENTION: the placing of the day/night disc needs to correspond with the placing of the hour hand of the second time zone (i.e. if you place the hands at 12 noon/midnight, the disc needs to show the middle of day or night). This was a bit of trial and error.... unfortunately, I didn't take a picture of the final/good positioning of the disc, but here's my suggestion: 1. take 6am/6pm as the basis (remember to place the second time zone hour hand accordingly) 2. try to position the day/night disc in such a way that you see both blue and white approximately equally (i.e. day is coming or night is coming). The window on the dial is approximately where I drew the green circle in the picture (so the positioning on my picture is now for noon). 3. put the dial on an check. Correct disc, if necessary. [note that the below picture doesn't match the disc position on the previous picture] secure dial screws (2x) Hand setting: 1. set the second time zone hand according to the day/night disc position (e.g. as described above, if white and blue show to equal amounts, set to 6 o'clock). 2. set date hand to any date (make sure you are NOT within 10pm-2am because the hand will still be moving and you'll end up with a date hand that is off-target) 3. wind the watch fully and place the power reserve hand to 40 4. set time until the date pointed clicks over. Now place the remaining hands (including minute hand of second time zone. check hands carefully from the side, particularly to make sure that none of the hands in the recessed sub-dials are deep enough not to touch the main hour hand place the movement in the holding ring (quite easy because there's a positioning pin) and oil this post on the ring place this pinion (full leaves on top, 4-leaf to the bottom) place the city ring, but NOT like this! Ensure that a city is centrally aligned with the little arrow below the second time zone sub-dial. Using the M in GMT may be the easiest. But any city will do, just the middle of the word needs to align. Don't forget to re-insert the pin into the tube for the date corrector (above the crown) plenty of silicone grease into the crown place case on top, turn around, insert crown. Remember to loosen this screw before inserting the crown; and to tighten it again afterwards. secure the movement ring with two blued screws and two casing clamps+screws. Plus installing the rotor with 3 tiny screws. (note, these are 0.8mm screws with a relatively wide slot -- so dress the screwdriver accordingly) DONE!!! Tempted to scratch my name into the caseback, but didn't... Please refer to this thread for an extensive discussion on dealing with rebanking/"knocking" in this watch (with a happy ending!): After solving the re-banking, this is the sort of timegrapher reading I get. An impressive calibre, I must say. Dial up, fulll wind, after an hour of settling down the delta across positions all horizontal and vertical positions is approximately 10s/d (dial down is +4 and crown down is -6). Everything is 2-3 s/d faster when the wind reduces by several hours. On the wrist during the day and dial up during the night, it's running at an average of +3.


 3 points
 -
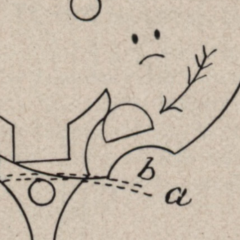
This paragraph set me thinking as to where the name pallet fork comes from. I like Nev prefer the old traditional name " lever". Pallet fork is a relatively new term, 100 years ?...a fork at one end and a pallet at the other, Wikipedia even got that wrong. " Fork" is easily explained visually , but what about " pallet "...an early English explanation of " pallet " is a straw bed...which is likely where another explanation of a platform also comes from. A wooden pallet for carrying goods is also a platform. So a "pallet" ....a bed or platform that carries the ruby stones of the "lever" I'm with Nev on this, Cheap movements such as this only have holes in the plates for wheel pivot bearings. Wear can be heavy in these holes right from the barrel up to the escapewheel, turning round holes into oval holes. Excess sideshakes in the train would cause poor meshing and binding of wheel teeth and pinions.3 points
-
I like your shop. Im trying to decide what im going to do in the future, if im going to rent commercial space, build at shed like this in town, or buy an acreage with a shop already built. Im out of room at my home. If i do build at my current place, I plan on walling off a room for polishing and grinding. Currently I have to go in the garage to use the polisher and the larger lathe and bench grinder, and its cold here and my garage isnt heated. Makes it a pain!2 points
-
I like to keep a stock of cap jewels, as they are prone to disappearing. The most common (have a look in your list) are 121.11 and 122.11 (as used in your movement).
 2 points
 -
The price was right for the watch with no bracelet. I am excited to service the movement and source the bracelet.2 points
-
Yesterday I checked over the whole train and cleaned all jewels (except not balance yet). I found an issue with the interaction between 3rd & 4th wheels where I could hear a ragged, scratchy sound when they were at high spin. I polished the 4th wheel pinion leaves with rouge & pegwood and that eliminated the scratchy sound. Before that, the train had just a little bit of backspin and afterward it has tremendous backspin. But absolutely no change in the performance. Exactly the same DU/DD amplitudes as before so something is off with the escapement. Tonight I'll clean the balance jewels again but one thing I noticed about the pallet fork is it is very hard to seat. While I had the jewels out for cleaning, I found I could not easily place the loose lower pallet hole jewel over its pivot and it is hard to seat it in the pivot hole. It makes me wonder if it is the wrong size jewel which would be binding on the pallet arbor. I do have a spare 992 mainplate with that jewel intact so I will try that one out. Of course if it was a replacement arbor with the wrong pivot sizes that isn't gong to solve it either. But lastly, documentation I could find described the original Hamilton 317 having Dennison strength 3.75, which is around 0.195mm metric (also what ofrei lists for 718040). The 718040 spring I have is marked on the envelope and measures 0.17mm. So I went ahead and ordered a stronger one at 0.19m and we'll see what difference that makes. I would be happy to gain just 20° so the verticals could stay above 190 for 24 hours.2 points
-
There's a gift right there.... Always check your work before proceeding. Failure is my best teacher. You won't make the mistake of not checking the barrel cover now, so it was an invaluable lesson. Another great lesson is removing the train bridge without letting the power down. You only do that once! I'm glad you found the walkthroughs helpful. I used to teach the set of lessons to my first year cohort, but this year I've decide to drop the BFG 866 from the curriculum because most end up hating the watch that they are working on usually due to wear. There's some great lessons to be learned from them, like the wheel train layout, bringing it into beat by spinning the collet, friction fit with staking tool the minute wheel and ultimately understanding why Roskopf watches aren't made today and seeing the differences between pin-pallet and Swiss lever escapements. I've decide to replace the BFG lessons with using a watchmaker's lathe to hand-turn Delrin hand pushers (just as good as Horotec 50 quid set!) and probe sticks, as well as making an EtaChron stud removal tool when we start to make hand levers and a spring-bar removal tool, so it will be four to five weeks of tool-making instead, which the class are very happy about. I'm a bit sad to let go of the BFG, but even I started to dread every year the parts tray coming out ready for the onslaught of pin pallet madness. I take my hat off to you for bringing this one back from the brink Well done!2 points
-
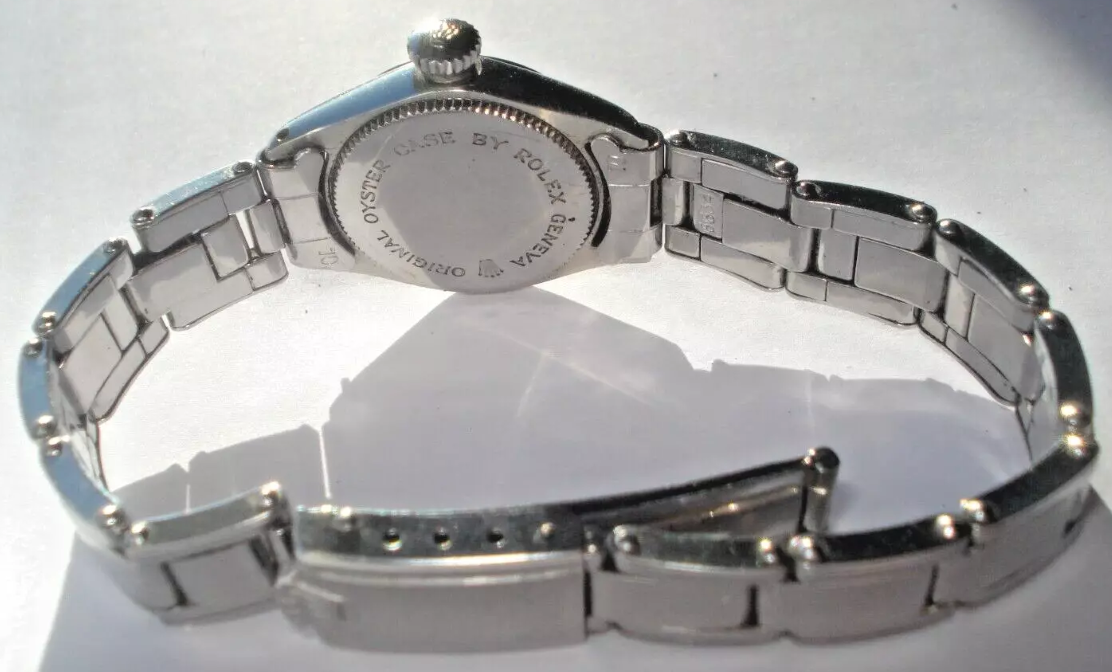
Early Tudor's (up until mid 1960s?) the cases, straps, crowns are made by Rolex and stamped with the Rolex crown. Here is a ladies 1963 Tudor Oyster I recently serviced with Rolex marks on case back, crown and bracelet.
 2 points
 -
‘Cos much cheapness at the time, Tudor was the Rolex “value” brand at the time. If you are making cases, bracelets, the crown being part of the case just chuck a standard ETA movement in and call it a day. Tom2 points
-
I bought it. Wish me luck.2 points
-
I was able to manually drill out the hole with a 0.36mm drill bit (thanks @nickelsilver). It fits again! I also had a go at tightening the REAL cannon pinion on the decentralised centre wheel. See description in an earlier post. I might have over-done it a bit, but not sure if it necessarily requires correcting/re-loosening. When setting the time counter-clockwise the balance will almost stop. There's certainly more resistance in the crown than on my other watches, but it doesn't feel excessive or like breaking teeth. I'm trying to describe the resistance. On a scale from 1 (completely loose) to 10 (breaking teeth) an 4 to 6 being the ideal/normal range, I'd say it at 7 or 7.5. What do you think?2 points
-
Is that an EU reg. This might be were tnings get a bit grey, most of Cousins customers are not registered businesses but from the account form I completed it appeared they should be to trade with them.. There are alternatives H, that work in the same way. Like another thread that was active a couple of weeks ago. A press is a press is apress. I have three such presses and they all work very well, it's the dies that do the actual good work. I wanted a Robur to begin with , I made a point of making my wife detour with me past the watch repair shop when we walked around our local town. She often left me while I drooled through the shop window at it " I'll see you later shall I dear husband ? After you've finished making out with your metallic girlfriend "2 points
-
Good morning everyone, I'm Davide from Italy and, as stated in the title, I'm a complete noob! Been passionate on watches since ever, just recently I caught the bug for repairing and generally have a better understanding of what happens under the the hood of our beloved watches. Saw millions of videos on YouTube on the matter and I'm actually doing a basic online course organized by a well established watchmaker. I'm doing all that just for passion. And, off course, already spent too much money on tools Hope to learn a lot and be able to give something back when I'll have enough knowledge and experience!1 point
-
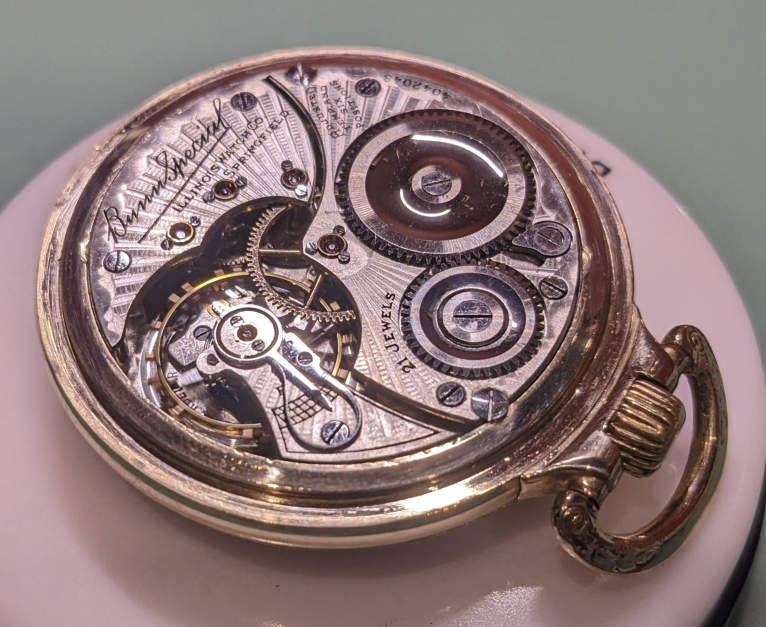
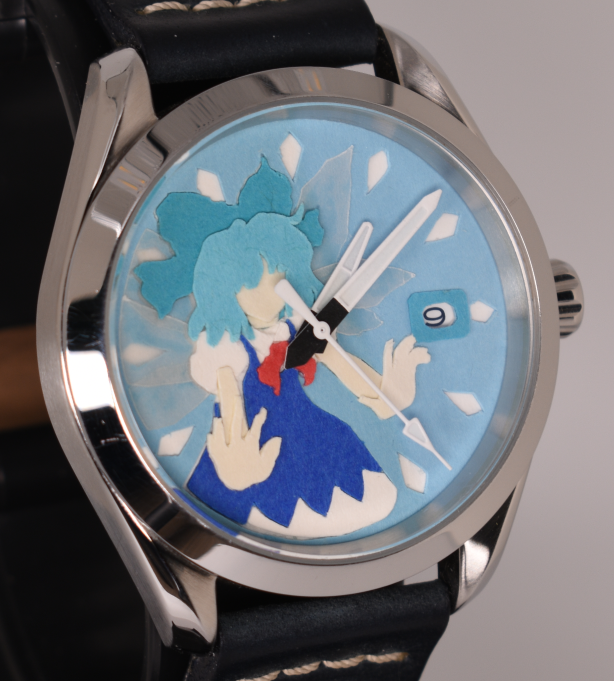
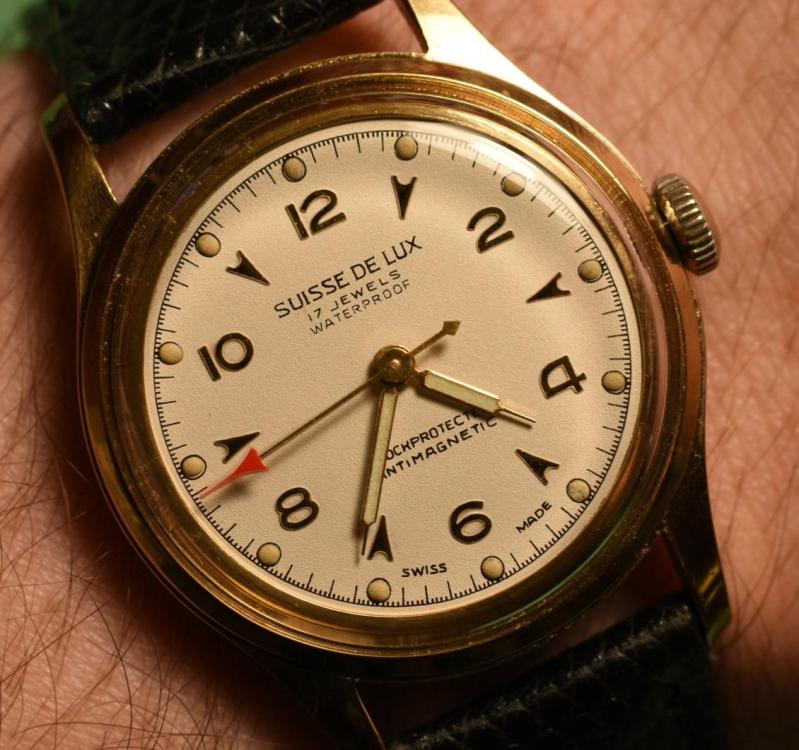
Hello, I am a hobbyist watchmaker that started in December of 2022, and have been steadily improving my knowledge and skills over the past couple years. I've mainly been learning through what I can find online, servicing lesser-known swiss movements that I could get for cheap on eBay. One of the first watches I serviced is the attached Sindaco Suisse De Lux, which I absolutely love both due to how it looks as well as the sense of accomplishment from getting my first 'good' result after a service. My tool selection has been steadily growing, and the recent addition of a stereo microscope was one of the best decisions I've made since entering the hobby. I'm now at the point where I'm confident enough to start working on higher-value movements; my current two projects are a Hamilton 662 automatic and an Illinois Bunn Special pocket watch, and next in queue is an Omega 570. In addition to vintage watch repair and servicing, I enjoy making character-themed papercraft watch dials from layered cardstock. Construction of these isn't anything noteworthy, just cases, hands, and NH35A movements from China, but they're unique and fun. I look forward to discussing watch repair with you!

 1 point
 -
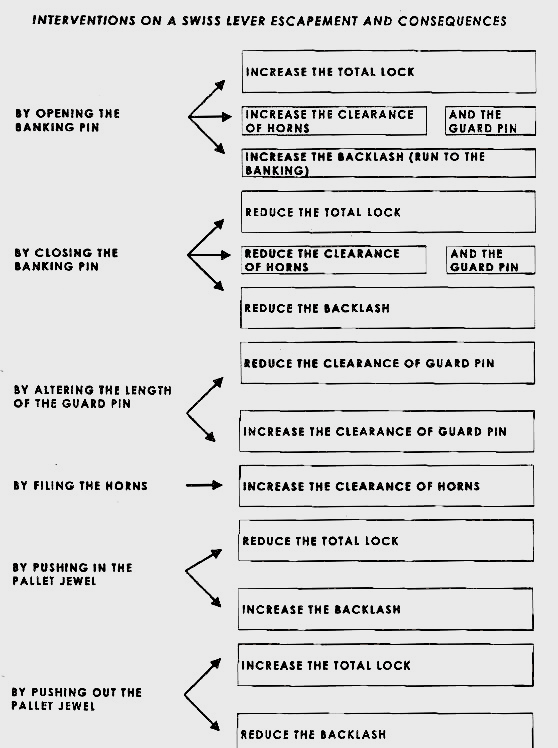
I'm attaching a amusement hand out on the escapement. The amusing aspect is it's actually a hole punch of handouts all assembled into one big handout. Including one of the handouts were notes for a lecture which strangely enough is on YouTube if you would like to watch it. Banking pins magical devices that control amplitude or? Now what makes this handout interesting is it shows the consequences of doing things but it doesn't actually say what you should or should not be doing? So the banking pins only really serve one purpose there for controlling the horn clearance it's a safety feature. But it also has consequences of affecting amplitude if they're in the wrong place. So often times people move the banking pins to do things that they're not supposed to be used for. Escapement handout wostep nscc.pdf
 1 point
 -
TBD. I'm hoping I can just pop it back on. The cracked balance jewel, on the other hand...1 point
-
If you bought the alarm stem shown in the link, it's Tap 9 (0.9mm), as I just changed one on an AS 1931 which uses the same part. I imagine the case will have crown tubes which you will have to measure. On my watch, a Memostar, the tubes measure 2.5mm (external diameter). So, for example, I needed a crown : Tap 9, waterproof, with 2.5mm stem tube. Then select the desired crown diameter. I wanted 5.50mm so chose - Do you have a pic of the case?
 1 point
 -
Yes the Bergeon are Stainless Steel which is Non Magnetic (Generally) compared with Normal Steel which is Magnetic. The last thing you want with a watch is to have it near anything that's magnetic.1 point
-
It's a pocket watch movement recently serviced and cased. I know that many would crucify me for this, but in certain cases like the watch has no historical meaning, sentimental value, or the case itself is just not too nice/precious/ uniq then the watch just might receive a second chance to live. ( I also understand that the movement was designed for the pocket.)1 point
-
Why not steel? This Bergeon 30081 set says the blades are "tempered stainless steel". These Bergeon replacement blades are listed as stainless steel. I've got no actual experience using these tools, but in my research I've never seen anyone suggest using softer materials for screwdrivers. They certainly aren't easy to find, and the prices are strange, but I found a set of standard replacement blades and a set of hollow ground replacement blades. I love the idea of making my own tool bits to use with these handles. The handles themselves seem very high quality, maybe I'll get more experience and find that the blades are quality too and stick with them. At the very least I'll have a use for the handles though.1 point
-
Threaded part only Tom1 point
-
Definitely an interesting topic and even more interesting where it might lead. Are we maybe getting to the point that the MBA program has taken us to the scenario that QC and tight tolerance in traditional high end manufacturers has been watered down? Possibly to the point that the quality of Aliexpress kit is rising to the level that the traditional manufacturers are coming down to? I expect a certain amount of fettling with any tool and have taken the view if I buy a high end item that it would need little or none, with the obverse being that if I buy cheap then I’ve got a few expected hours of work ahead. worried that this rule no longer holds and you end up with the same no matter how much or little you spend. Tom1 point
-
That manufacturer seems to have a good reputation generally and especially for screwdrivers. I would use and dress them appropriately and when you think they are getting too long in the tooth get some better ones that follow the accepted way that you can use good quality blades in. I would then get some 2mm brass rod and make bits for these for etachron adjustment, KIF spring tools and anything else you can think off. This way they will eventually become an asset rather than a pain in the backside and a waste of your precious resources. Tom p.s. I have looked and they don’t seem to sell replacement blades for these even though they make them1 point
-
I'm back again with another small update. The machine is working well, and I finally printed a panel for the buttons to attach to. One thing I was struggling with, was inserting and removing the baskets. You kind of have to just drop them in and sometimes they land crooked. So to fix that, I designed and printed this little helper.1 point
-
Thank you for your introduction and welcome to this friendly forum. We all look forward to your contributions and continued involvement. If there is anything we can help you with don’t be afraid to ask. Nice clear photos can help a lot.1 point
-
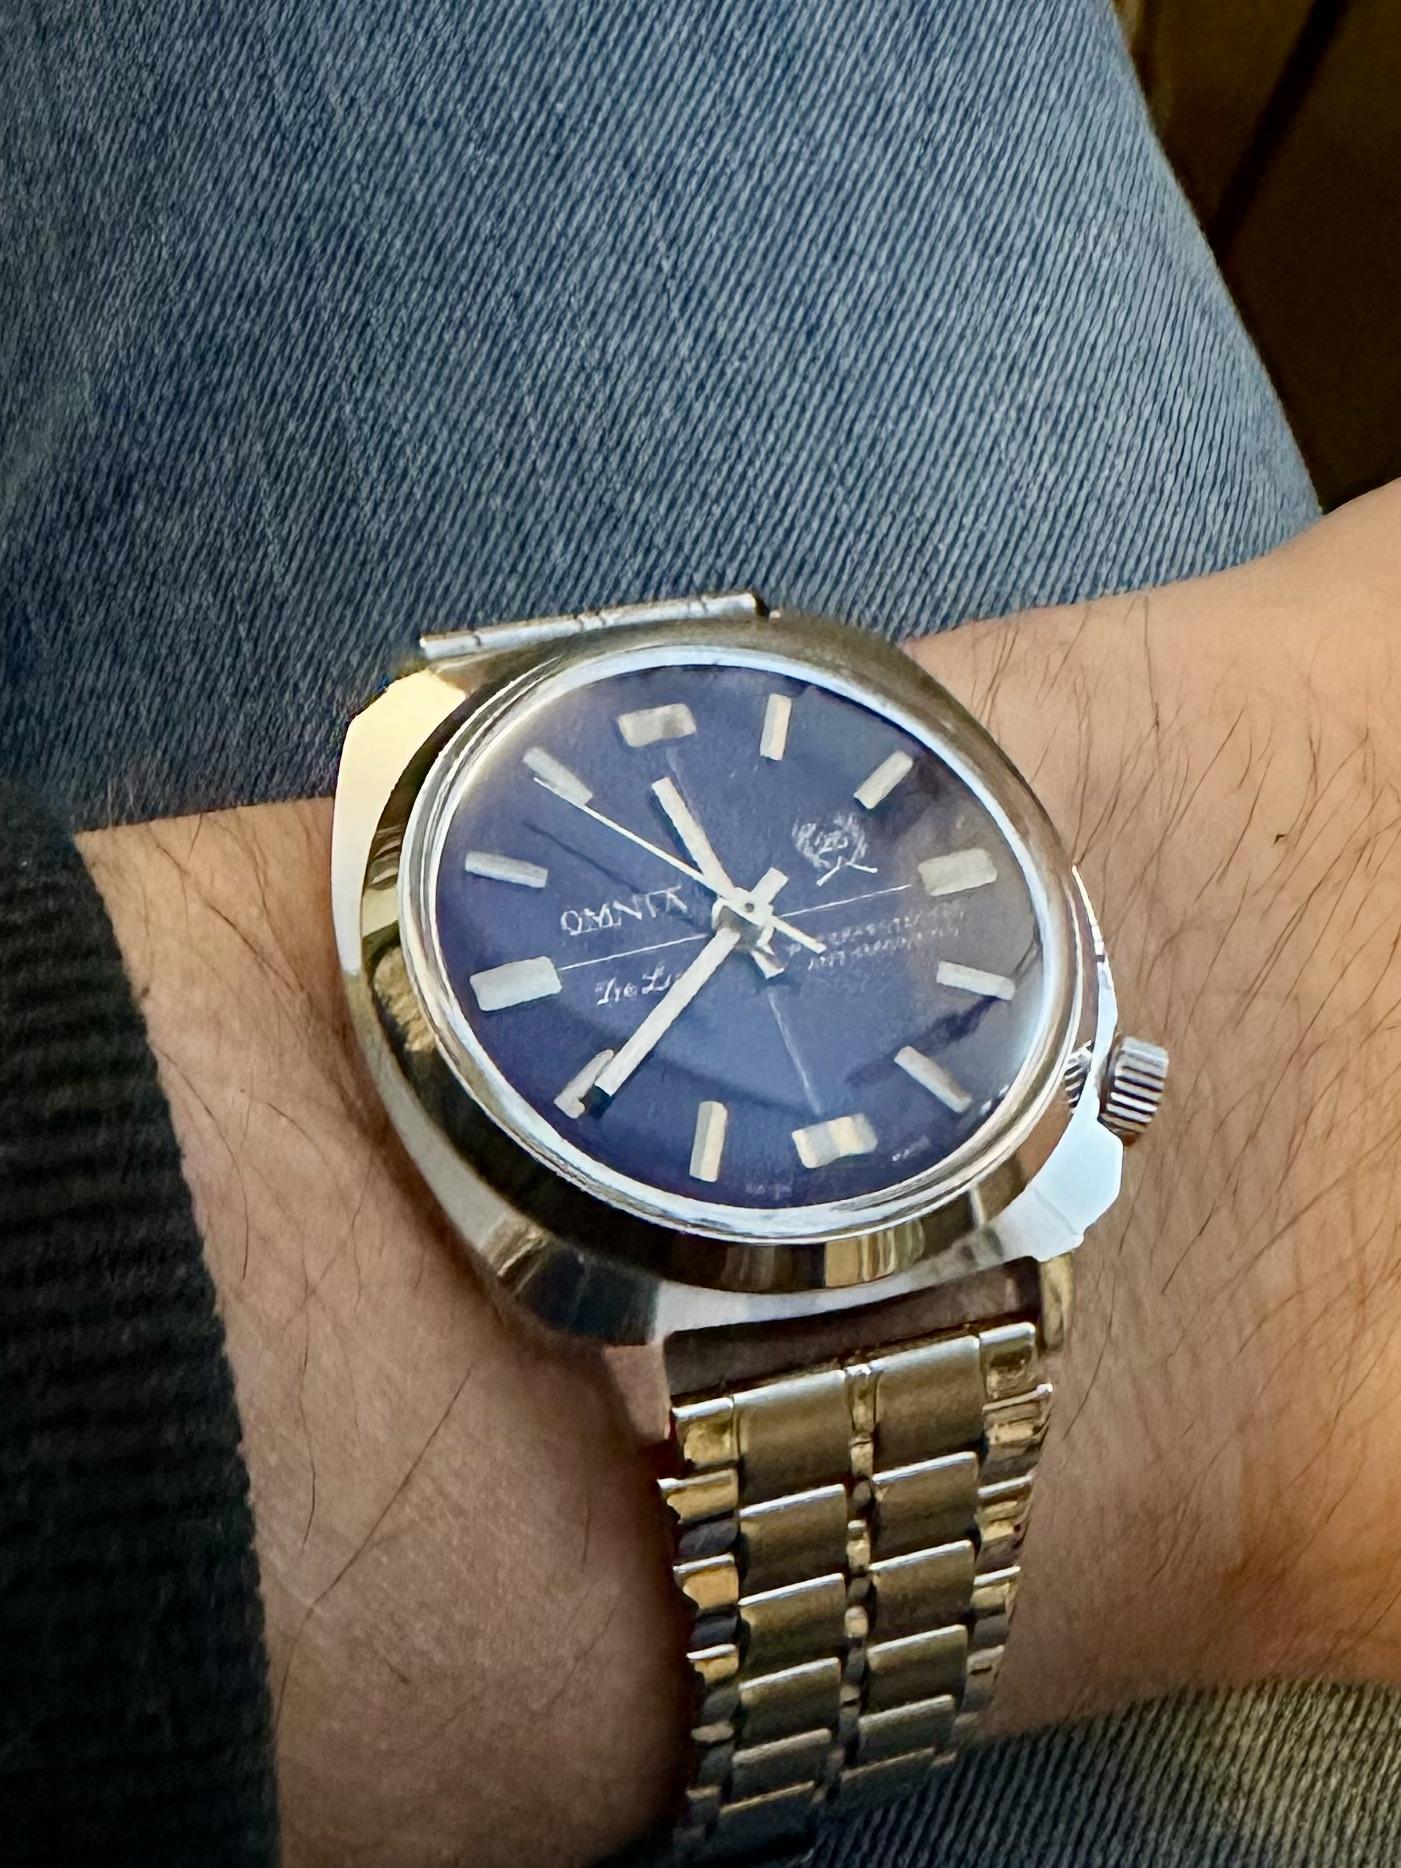
Cheers Jon, There was a lot of swearing on the initial reassembly video - lol. But from 2 hours to 30mins to 15 mins, I'm hoping it's learning and not luck I haven't regulated it. It's a bit off on the timegrapher. I might need to strip, wash, reassemble and lube again. Then I'll look to collet work. although the eyeball view looks like it's positioned between the pins, just a case of how deviant. I've got a few of them so I need the practise... Such an interesting movement as you say, and most of these are powering on, albeit a little roughly. This was actually the second as I replaced the balance from a partial movement into the blue Omnta and that's working well. It will need servicing though. Thanks for your support - before and after!

 1 point
 -
Hi there and welcome1 point
-
Hello and welcome from Leeds, England.1 point
-
It was normal at one time to have the Rolex crown on both the bracelet and the watch crown on Tudor watches. Also Tudor used the Rolex oyster case for many of their watches. Tom1 point
-
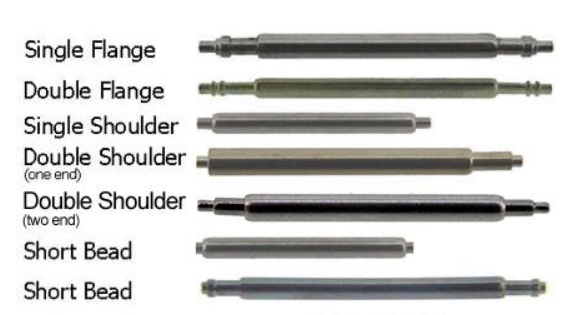
You need to make sure you get what's called the Short Bead type and also the correct diameter (1.3mm / 1.5mm / 1.8mm) to suit the strap.1 point
-
Welcome to the forum. Have you still got the spring bar that came out when you removed it? It should look like the bottom one of these.
 1 point
 -
That's the annoying part as I got pulled nearly 2 years ago and had to start operating as a business.1 point
-
There are limits now on the UK eBay that can trigger a report to HRMC to catch these folks. There will likely be some missed as well as collateral damage as all these systems are imperfect. Tom1 point
-
It sounds perfect to me.1 point
-
So I ended up stripping the movement down again and having a look at the barrel. I measured this one and hte one I'd removed and they were the same dimensions. I took the lid off to check everythign was OK inside. I checked the rotation of the attached wheel as per Jon's walkthrough and it seemed OK, not to tight, not to slack. What I think might have been the issue was the barrel lid. I suspect that it wasn't fully engaged because this time I had to use more force than I recall last time. That would explain the "friction" if it were pushing outwards into the plates. Anyway, a couple of firm clicks later and we have a running watch ladies and gentlemen. Hooray. Now all that's left is the regulation. At first the amplitude was poor, but I managed to get the rate vaguely on line. BE was poor I gave it a little puff with the blower and it really picked up. The amplitude and the BE were looking great. But now the rate is <-999 and I'm running out of room on the regulator. I suspect I need to let it run for 24 hours and let the oils bed in.1 point
-
If you're still using the old spring then 230+ are good readings for DU & DD. I'd have expected 240 to 250 if you were using a new one. Not sure what you mean by this as it should be a grease in the barrel like Moebius 82171 point
-
This may make things clearer. https://www.gov.uk/accepting-returns-and-giving-refunds Edit So DSR doesn't apply for B2B but goods must be fit for purpose.1 point
-
Any lawyers on here? My understanding is, even if you sign a document, if the small print breaks the law, then it's invalid. I'm not a lawyer, so I could be completely wrong.1 point
-
I think it comes under b2b regulations rather than consumer, at least that seems to be Cousinsuk stance. Companies have very different rights than consumers under law. Tom1 point
-
Hi. Send it back , Bergeron prices demand better quality than that wrinkly thing for sure.1 point
-
When putting force on the crown, You overcome some kind of resistance and it is due some kind of unwanted friction. A lot of badly working movements will work better when additional torque applied. But this will not help understand where the problem is, just shows something is not in order. Yes, by lever I mean the 'pin pallet'. But when word 'pallet' is used, I refer it to the pallet stone, which is not present in this specific part. Of course, my understanding of english names of the parts may not be fully correct. What I would use is 'pin lever'. Now, Do I understand right that the lever doesn't snap well if no additional torque applied? If so, then investigate the train and barrel. Yes, You should release the spring and when the lever is out, wind again to see what happens. Well, make marker dot on the barrel and see if when movement seized, the barrel is always in the same position. Look around if some screw is longer than needed and touching the barrel. There is always some free play in the mesh of wheels/pinions. When the movement is seized with wound spring, try checking wheels for free play of the mesh. Thus You will come to a wheel(s) that won't have such free play as there is torque applied and to such that have free play of the mesh and no torque is applied to them. The reason of seizing then must be where the first wheel with no free play is.1 point
-
I would run a drill in it (if you don't have a lathe then fine by hand, holding drill in a pinvice) to open it back up. It won't necessarily be a perfect hole, but there is no force here, it will work fine. Measure the post and I'll see if I have something the right size and stick it in the Post. Edit- just remembered I have a 2-66 here that's been disassembled for years. Post measures 0.35, hole gauges at 0.36.1 point
-
I am learning here. Little by little...1 point
-
I turned away a job last week for a ETA 2892-A2 chronograph because it has a bolt on chrono module. As others have already said, parts aren't available for the module, so if it is disassembled and a part is needed, a lot of time has gone into something that is now unserviceable and then you have to then explain to the customer why you can't do the work and why you have wasted their time. If the module needs no parts, that's great, but it isn't worth taking the risk in my experience1 point
-
I have a different view to the DD module world. I began watchmaking for one main reason: To understand and enjoy complicated mechanisms. So when I already had some years of experience with several ETAs, PUWs, Rolex I entered the chronograph business step by step. Landeron 248, Valjoux 7734, Valjoux 72, Buren 12. And while working on the last one I came across a picture of the DD2020 without cover plate and had only one thought: Wow! Freaky! How the hell does this thing work? So I bought a Omega Speedmaster Reduced just for the sake of disassembling, reassembling and understand that thing. I wrote a little article on the r-l-x-forum about this (not a service-walkthrough as this is not a watchmaker-forum, but just a description how it works): https://www.r-l-x.de/forum/showthread.php/197912-Konstrukteure-auf-Speed-–-das-Omega-1140-mit-Dubois-Depraz-Chrono-Modul There is a lot of information on the internet which guided me, especially Marks videos about his Breitling for Bentley service and the Omega 1140 tech sheet availiable on watchguy UK: https://watchguy.co.uk/cgi-bin/files?showfile=Omega/Omega 1140.pdf&filename=Omega 1140.pdf&dir=Technical Manuals&action=documents I am not familiar with the DD4500 but after a look at this article https://www.thenakedwatchmaker.com/decon-dubois-depraz-chrono-big-date I am quite sure that in the area of the chronograph there are a lot of levers and wheels which are identical to the DD2020. Of course this doesn't change anything on the situation that parts are not availiable (when I worked on the DD2020 I was lucky that no module parts where worn). I like the DDs as they are freaky mechanical stuff, interesting challenge for advanced amateurs with lots of time. If I was a pro and had to do a service in a short time at reasonable costs maybe I would get to a less positive judgement.1 point
-
Unlike Swatch, who will sell you something if you pass their requirements, or Rolex (who used to be the same, but-) if a pro there's always a friend or friend of a friend who can get it, or at least Ebay, DD has simply never sold parts. If you have the right security clearance with the brand using their module, you might get the entire module, but that's that. I've never had to resort to it so no idea even what the whole module costs, but c'mon, they really are the worst of the whole bunch. A. Lange & Sohne, 50K watch, yeah I get they don't want to sell a winding stem to Joe Schmo. But DD is commodity level mass produced stuff. Which I think is actually the issue- they would have to employ probably several people full time to deal with the logistics of taking orders and filling them for parts. Hmm. Imagine if someone at DD realized they could charge 15 bucks for a spring that they cost out at 0.30CHF in a module... Nah, while the Swiss do like money, they like being stubborn more. They are difficult to work on because of how they are constructed. Which is to the lowest possible price point. Lots of spindly long springs that have to be situated just so, no real logic to it if unfamiliar, and of course the stress of knowing if you can't get it back together you're hosed. I have worked on lots and lots of chronographs, and still see stuff that is new to me, and I would bet that even if presented with a complete unknown chrono completely disassembled, I would get it together in a reasonable amount of time. All bets are off with DD. I know some folks are actually familiar with them so probably not a big deal, but DD makes Seiko and Citizen chronos look like world class Swiss stuff from 1940 in comparison. (And I don't really like those either, haha.)1 point
-
I avoid these at all cost! They really aren't pleasant to work on, and the absolute unavailability of parts or tech info just makes it a gut wrenching nightmare. You can have friends in the biz with parts accounts all over the map, there are no parts available from DD. A friend of mine even lives about a block from their main building, and is their local fireman, and a trained watchmaker, and I'm 1000% sure he could show up with brownies and croissants for the whole workshop and no parts.1 point
-
I think you have a few routes if you want the press and die set. It looks like you can purchase it via aliexpress https://www.aliexpress.us/item/3256805193943005.html?spm=a2g0o.productlist.main.17.7172vBFIvBFIE2&algo_pvid=36d147b7-c85a-4e96-98c3-91f5811bfcf3&algo_exp_id=36d147b7-c85a-4e96-98c3-91f5811bfcf3-8&pdp_npi=4%40dis!USD!137.00!137.00!!!137.00!137.00!%402101d69a17073978872681499e2fa2!12000032818712504!sea!US!4296785206!&curPageLogUid=ltM7m3b9GVRw&utparam-url=scene%3Asearch|query_from%3A I wanted two tools and wasn't happy with the shipping cost, so I ended up going a more convoluted route. 1688.com is the internal chinese version of alibaba. (It's owned by alibaba just like aliexpress is). Unless you're in China you can't order from them, you have to go some other route. Sugargoo is a 'forwarder', you put in the purchase order and they buy it from the Kwong Yuen factory via 1688, it gets shipped to them (for free) as their warehouse is in Shenzen, CN. They inspect, and then repackage together all items, and reship it using UPS or whatever from China to you. I had a good experience, but I'd hardly stake my reputation on anyone else going through this process. It takes a bit of a leap of faith. Here is a link to the factory store direct on 1688.com, sometimes theres more pictures and better descriptions here (I use google translate on chrome to understand the page): https://shop9984n72151764.1688.com/page/index.html?spm=0.0.wp_pc_common_header_companyName_undefined.0 Here is a link to the factory store (routed through Sugargoo), they will translate it for you. https://www.sugargoo.com/#/home/shopProducts?source=1688&shopId=2200742215132&sellerId=b2b-220074221513217c67 Here is a direct link (via Sugargoo) to the press, I added "6175A capping machine (green machine)" and "Additional 31-piece die set", https://www.sugargoo.com/#/home/productDetail?productLink=https://detail.1688.com/offer/701338329712.html And here is a direct link (via Sugargoo) to the staking set, I added "130 punch set GY0295 (green)" : https://www.sugargoo.com/#/home/productDetail?productLink=https://detail.1688.com/offer/732431432684.html As for what that tool is, I believe its used to punch out pins to remove links in a steel bracelet. Hope that helps.1 point