Leaderboard


Popular Content
Showing content with the highest reputation on 02/13/25 in all areas
-
I see a tremendous amount of skill in a very awful environment. The camera does cut briefly just before the "final countdown'. But otherwise it's a straight cut. It looks like he's even truing the hairspring outside of the watch I think he's worked on hundreds of these calibers, if not more. Probably why the random staff he grabs fits(?) the balance, and a few tweezer taps gets the roller table fitting. Very skilled, uneducated. I've met many watchmakers with 4 years of education under their belt less skilled than this fellow.6 points
-
Just like skinning a cat, there are multiple ways to achieve the same goal. For the record, I have never skinned a cat, nor have I ever seen it done, though I'm not entirely opposed to the idea. But I digress ... Let's talk more theory than process for the moment. The purpose of cleaning watch parts is to remove anything that is not metal, mineral (jewels) or plastic and return them to a state of the least possible friction when reassembled. What's most likely to be found on said parts is lubricants that have been saturated with dirt, oxides like rust, organic material like exfoliated skin cells, lipid remnants and minerals found in sweat (and other byproducts of life that are equally disgusting), and microscopic metal shards from the effects of friction. The question is how to do this thoroughly, quickly and cheaply. The answer is ... pick any two. The concept of a cleaning machine is not necessarily to clean parts better, but to free up the watchmaker's valuable time, which to a professional, is money. To a hobbyist such as ourselves the process is the enjoyment so if it takes a little longer, that's all the better. There are other things in life that are more enjoyable the longer it takes according to my wife, but we won't go there. So, you have to ask yourself, what's the goal? To get the parts as clean as possible so the result is a tiny mechanical device that runs like a ... um ... what's another analogy for the proverbial "Swiss watch"? ;). Or perhaps it's to get the watch looking its best so that it sparkles and shines when you wave it under disinterested noses. Or maybe it's just a cosplay of Heinrich the master watchmaker in a lab coat, wearing a loupe and surrounded by weird looking tools that only the initiated will recognize. You can get good results with a little naptha, alcohol, pegwood and a brush. It requires each part to be handled individually and inspected carefully, but for just a few drachmas, or whatever is your currency of choice, you only have to spend a few hours squinting into a jar of volatile organic compounds. Or you can sell a kidney and a lung on the black market and buy all sorts of computerized machines and single-purpose chemicals for a result that may only be marginally better just to restore a watch that originally sold for $39.95 at Woolworths. The dirtier the parts are, the more pre-cleaning is essential. If you just drop them into your machine (whether hand-cranked or powered by a turboencabulator) the cleaning chemicals will become contaminated quickly and leave a residue of schmutz all over the parts, requiring a second (or third) cleaning, or if you go to the rinse jar, your rinse solution will get dirty, too. This just blows through a lot of expensive chemicals, although Elma and L&R think that's a good idea, most environmentalists and those with a disposable income that appears to already have been disposed of do not. I don't think I'd pre-clean and peg in the L&R solution. You need a solvent to get off the initial gunk and naptha and a brush will do that just fine. Pegging can be done dry. L&R is an ammoniated cleaner so it will brighten the parts as well as clean them, and yes you can use it in either a spinning basket or ultrasonic. Your best bet is to PWRRD (Prec-clean, wash, rinse, rinse, dry). For that second rinse I use IPA because it will take away any residual water and it dries faster (technically it evaporates, but in either case it's gone.) As for drying, the only thing that is necessary is moving air at a temperature greater than ambient. I use a cheap nail dryer (finger nail, not the kind you hammer ... although i have been known to hammer my fingernail, followed by a torrent of expletives).5 points
-
Excellent advice. Us amateurs are far too hard on ourselves . Enjoy the hobby. Professionals of course don't have that luxury. I used to fish, I could of been a Professional but that would of spolt the enjoyment.3 points
-
It never hurts to hone your skill! I agree with you both, that if something is to be made for myself, then in my head, aesthetics don't matter. But continuing to improve on your abilities with your own projects, translates to skills that can be applied to projects for others. I like to test out new techniques and finishes on my own builds, particularly tools. I have a brass blueing tray that I added perlage to. I test electroplating finishes on my tools as well. Im working on adding anglage to a pair of tweezers im making.3 points
-
@Bill2024 don’t get too caught up in it, you are doing this for fun and enjoyment, don’t stress. As @eccentric59 said there are many way to skin the proverbial cat. Reading some of the well respected books, I am not going to be arseing around with hydrocloric acid or potassium cyanide to fix watches. At the end of the day if you’re not doing this for a profession/to live it matters much less how you achieve your desired result. As a hobbyist you are not on the clock, take that and enjoy it, you will find ways that suit you and your circumstances and take it from there. Tom3 points
-
A bit clinical with an air of " fill up station " about it I made loads of basket carriers from various plastic items a few years ago. I couldn't think of any everyday item made from steel that would work. Then one morning while making a good brew....... If it's for someone else then it has to work and look - the dog's bits - but if it's for me then practical comes before aesthetics and often the aesthetics don't come at all, not like they used to.3 points
-
Ok but how does the coffee taste?3 points
-
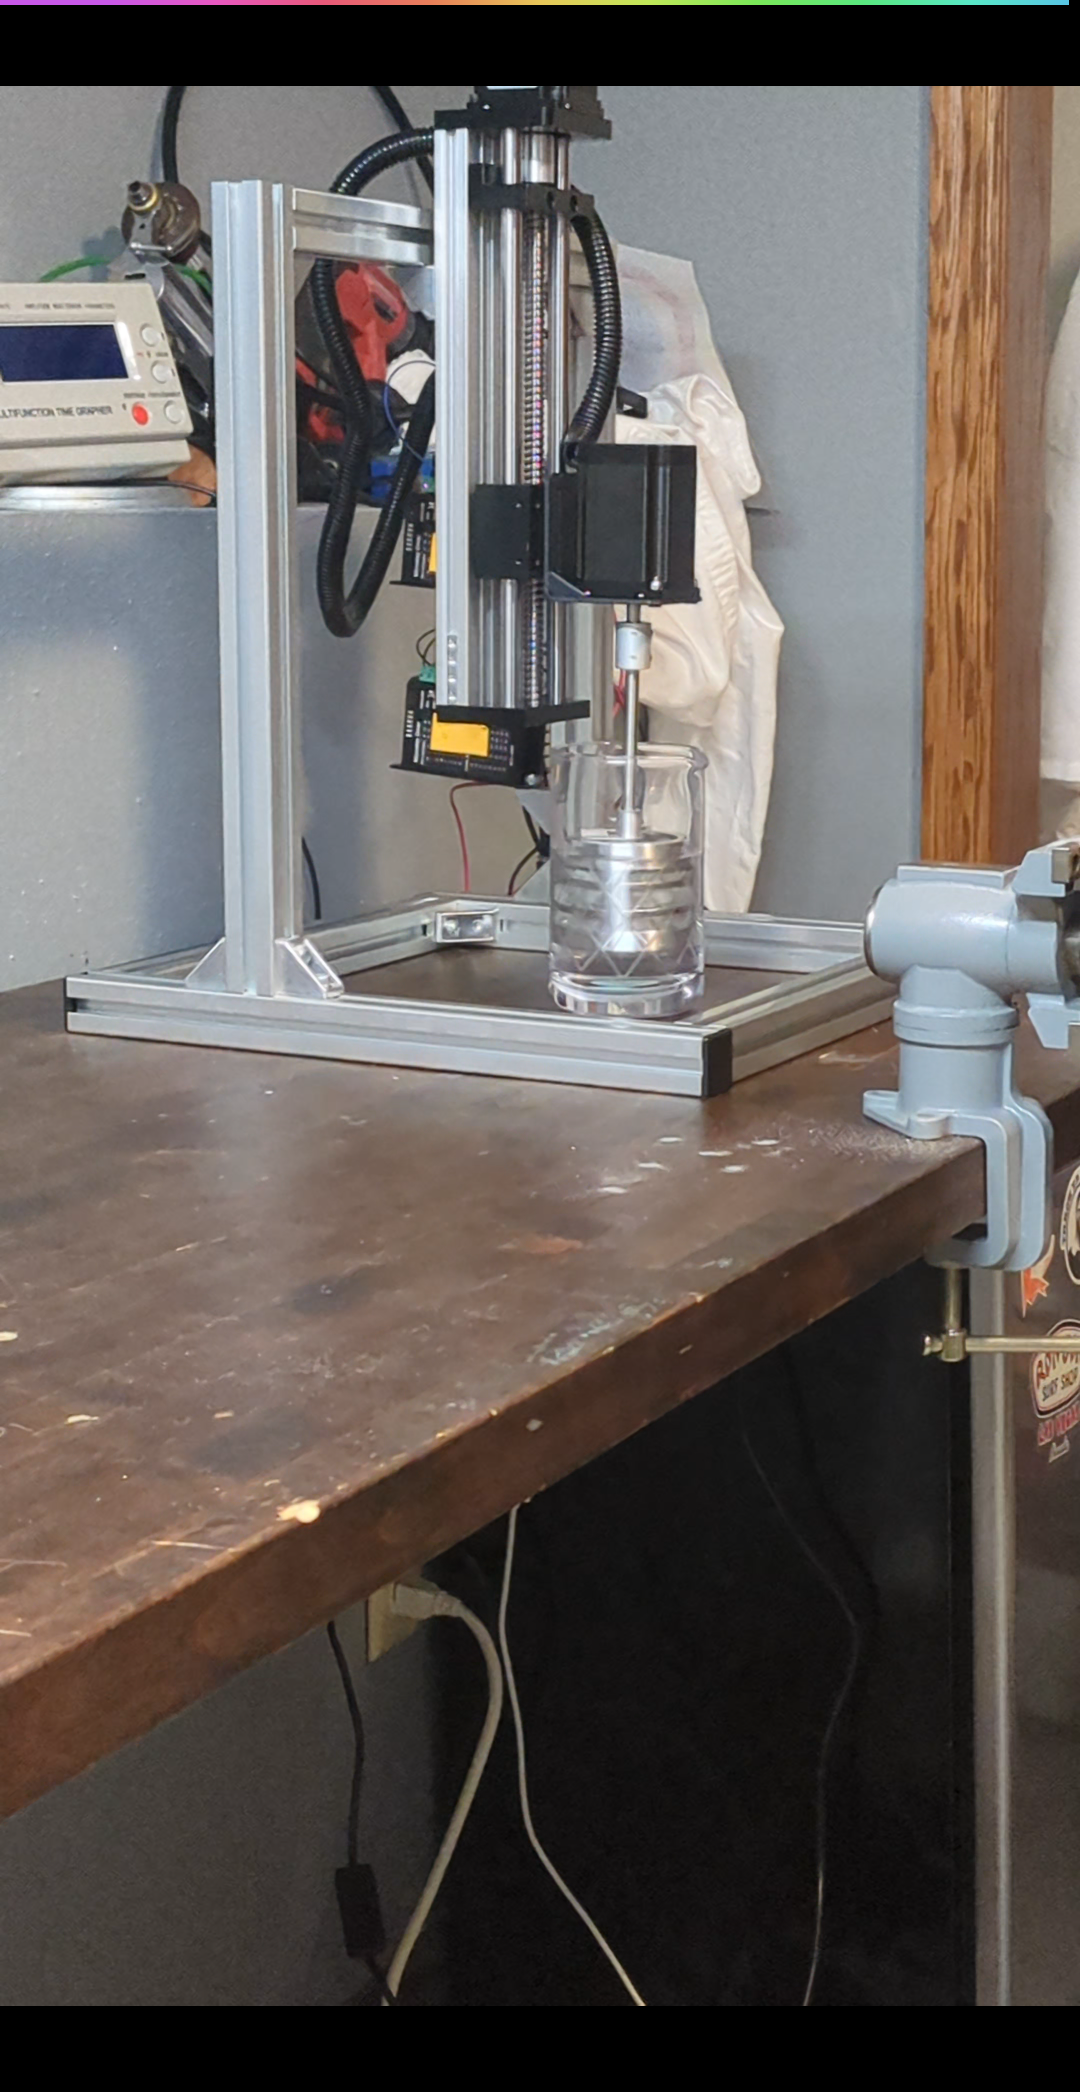
Here's my DIY cleaner. Automated cleaning time, and spinoff. I will be adding a 3 axis to mount all the jars and dryer to, so it's 100% automatic. I run 1 wash, 3 rinses, and a drying cycle with a fan
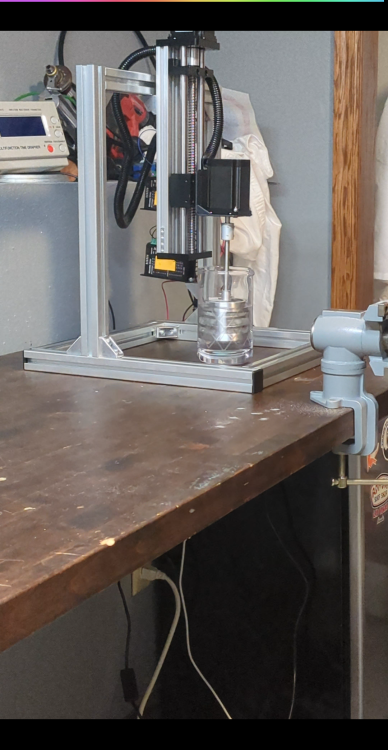 3 points
 -
I'm sure some of you guys have seen this on Alex's channel. It's available on eBay in case anyone is interested. But if you want to build it yourself, it's a modified butter churn, available from AliExpress. Hand Crank Butter Churner Manual Butter Maker Cream Mixer Silicone Food Stirring Tool Mason Jar Kitchen Accessories 1L/1.5L https://a.aliexpress.com/_mrFTHaT The cleaning basket is also available from AliExpress.
.thumb.jpg.5a2f6f87d928bc489f6b6fe71b8ce282.jpg) 3 points
3 points -
The truth is yes, I can see myself in the way He does the things and tools He uses. 10 years ago I didn't have staking set. Now I have one, but most people here will laugh at it if they can see it. The difference is I actually can be described rather as wealthy person in the place I live and I don't need to repair watches and even work at all for living. I can now afford all the fancy tools and gadgets without thinking if my budget will allow this. And I don't as am a kind of purist that stays on his previous understandings of the matter from the times when it was not possible here to get this tools and gadgets. Aside from the hygiene and the fact that He punched out the old staff, everything He did is brilliant. The hygiene is typical for the environment there, and the only way I imagine He could use to remove the broken staff in better way is using bow driven turns. I would present one to Him with big pleasure, bit I am sure He can make one if He wants.3 points
-
We all need to see video of the barrel moving with the ratchet whhel in order to believe.2 points
-
Concurring with Mike, barrel lid ought be fitted in the barrel & sit flush level with the barrel wall, check if its level ( first ) as you lift the barrel bridge when disassembling. Barrel lid must fit tight in the barrel. Check if mainspring is coned, which can happen when previous watch destroyer has pulled the spring out of the barrel. Coned mainspring can push out a loosely fitted barrel lid. The click also can diminish spring's torque. Good luck2 points
-
Haha. Sometimes I go to extremes to make something look good, when it's not necessary. Other times, f#£k it, it works.2 points
-
The one 9 posts back can be Michael, it's rough but it works. My ability to tidy it up by making it look less like, a stick stuck in a square stick with a motor fastened to a stick, far outweighs my enthusiasm to do that2 points
-
Next time I get a 2824 in, I'll mic the height of the pin. The SW200 I have in for service currently has this issue. I will either add a bit of height with my PUC welder, or drill out the pin and make a new one that is longer. It doesn't help to buy a replacement, as it will have the same problem.2 points
-
Yey Ross you're back, where the hell have you been my man ? I've missed you and was concerned and so were others. How are you matey ? Absolutely brilliant explanation H, the photo describes it perfectly.2 points
-
If you are sure that the balance is spinning freely? - a blast from a puffer and it should still be moving well after 30s. Is the gear train running freely - without the pallet or barrel, blow with a puffer and check it all spins freely. Check endshake of all wheels. A common problem is wear on the barrel bridge arbor hole. Remove the ratchet wheel from the barrel, stick some pegwood in the barrel arbor thread and check for side shake, and up and down for end shake. Too much and the barrel can touch the brige, mainplate or a wheel. You can see how to check in this video2 points
-
Yep. You can easily machine lots of materials dry if you stay within certain parameters, but machining the same material using the same tools in a high speed production environment (think cnc) you will definately want to use coolant (it's not called lubrication in machine shops).2 points
-
Very impressive skill! And I imagine him cranking out balance staffs for these movements out of needle bearing parts on an improvised lathe at a terrific pace as well (sounds familiar? ).2 points
-
I've been thinking about this since it was posted. Brilliant or a butcher? Decided, he is brilliant, definitely can't afford all the fancy tools but he breathes new life into a watch. He can't help his circumstances.2 points
-
The best and most concise description ever written of how it should be done! This is what it should look like.
 2 points
 -
Yeah you might be right. At the moment it sounds like it’s worth a try. As @Neverenoughwatches talks about inventing your own ways of doing things; I’m already thinking about ways to try and motorise the hand powered machine! That's really interesting, thanks. I did look at the ultrasonic route and will defo be giving it a try in due course. I've not seen anyone using steel cups in their ultrasonic tanks during my journey down this rabbit-hole; it sounds like a great idea though. Can I ask what cleaning solutions/rinses you use in the ultrasonic?1 point
-
There are so many threads here regarding cleaning machines, modern , traditional and homemade. They all basically do the same thing, some a little better than others, some in a much more convenient labour saving way. Personally I like the homemade route, up to something like 6 off to date. Designs can be as simple or as complicated as you like, what they all have in common is...having your wallet's best interests in mind. Surprisingly enough starting at around 20 quid, rarely reaching to a 100 for a simple device. Breaking down the actual process of how to clean effectively will help with the design ideas ( rotary ) not just for the driver but also for the baskets used and the containers specifics. Agitation is a big consideration - clothes in a washing machine don't just go around and around - the brain soon starts to throw out ideas of how to create fluid turbulence, such as the jar and basket shapes, wave breakers, basket impellers, basket speeds, alternating directions. Use one or two at least or all of them as needed. Using an ultrasonic machine requires less thought as to how you are going to get the most from it. My plan was to reduce the barriers between the cleaning cavitations and the parts to be cleaned, to an almost direct action. I managed to get that down to just one barrier. Making a lid to hold the cleaning containers keeps them off the bottom of the tank, this mean the tank holds the water and nothing else, thats one barrier removed , the tank's basket. The cavitations can then act directly on the containers. The next barriers that are normally present in most folks cleaning operation would be the parts baskets and the holder for them. I removed both of those, this is made possible by hanging parts from a small wire made part tree, that is then dangled into the cleaning fluid and slowly rotated to ensure the parts pick up small zones of cavitations. Its not quite as convenient as popping the parts into baskets but it is something I've got used to doing. I will say with only the one barrier present ( I use thin walled stainless steel cups that transmit the cavitations amazing well ) the cleaning action is insane and you do need to be a bit careful with what parts you clean this way and keep the operation short, 2 mins max, because the parts are getting practically the full force of the cavitations produced. If your machine is already powerful then you might want to add more barriers or use thick wall jars instead of steel cups. An alternative I might use is to float a small steel cup in the container and put the parts and cleaner in that second cup or rotate a small open basket in the cleaning cups. There are so many options to choose and try out, but definitely make a lid to hold your containers over the water tank. We all have ideas and we're all willing to help explain and show how we do things, your budget can be absolutely anything you like. Yeah you do that , it might jog my memory, better still have her ring my missus. Is he asking for money or else he'll plaster them all over Facebook, cis thats gonna be kind of embarrassing for you isn't it, especially if your mother in-law sees them.1 point
-
I'll have my wife explain it to you. As a matter of fact there's some guy on the internet who keeps emailing me that he has pictures.1 point
-
Submerging the entire case in IPA seems to have done it. Whereas before, I can’t even make a mark on the gasket, after IPA, it seems to have made it brittle and I was able to crack it and eventually I was able to crush it. Thanks a lot!1 point
-
Really ! nothing springs to mind at the moment , perhaps my memory is starting to fail, must have been something that happened long long ago1 point
-
Me neither, unless next door's continues to take a dump in my back garden1 point
-
I use IPA for precleaning. Not a powerful solvent but does the trick with brush. Evaporates fast and doesn't stink.1 point
-
I'm not disparaging L&R. I use it myself. It's makes the parts nice and shiny with the proper prep. I just think the cranking part would get old very quickly. I envision something between a butter churn and an ice cream freezer. The irony is that "better" watches can be much easier to work on. Sharper corners, precision fit components and just overall better materials go back together without the fuss of their lesser counterparts. You'd be surprised what a little Brasso® and a rag will do for an old case.1 point
-
So I think for the pre-cleaning I will use Naptha - in the UK it seems like lighter fluid is the equivalent or, it seems, possible to get a purer version from chemical suppliers for not a bad price. I'm still tempted to try the L&R route for main cleaning just to see what its like in the hand cranked "machine"; but to be honest everything is new to me at this stage so I just have to start somewhere. I have to admit that I have set bar pretty low at the moment in terms of restoring anything - I'm currently trying my hand at something that cost me £20 including postage and, like you say, was probably bought for not very much back in the day (or the 1970's in this case); hopefully I will be able to progress to "better" watches in time though. I do want to prove the point to myself, that I can get the movement bright and sparkly and running like a dream The case is another matter however, and rather than an ultrasonic cleaner and polishing setup, I think I'm really going to need a magic wand.1 point
-
For one person it's a Halloween costume. Two people, it's a consultation. A room full and it becomes a forum.1 point
-
This is my choice. Maybe for Halloween1 point
-
One of my favorite videos. Brings me back to my college days.1 point
-
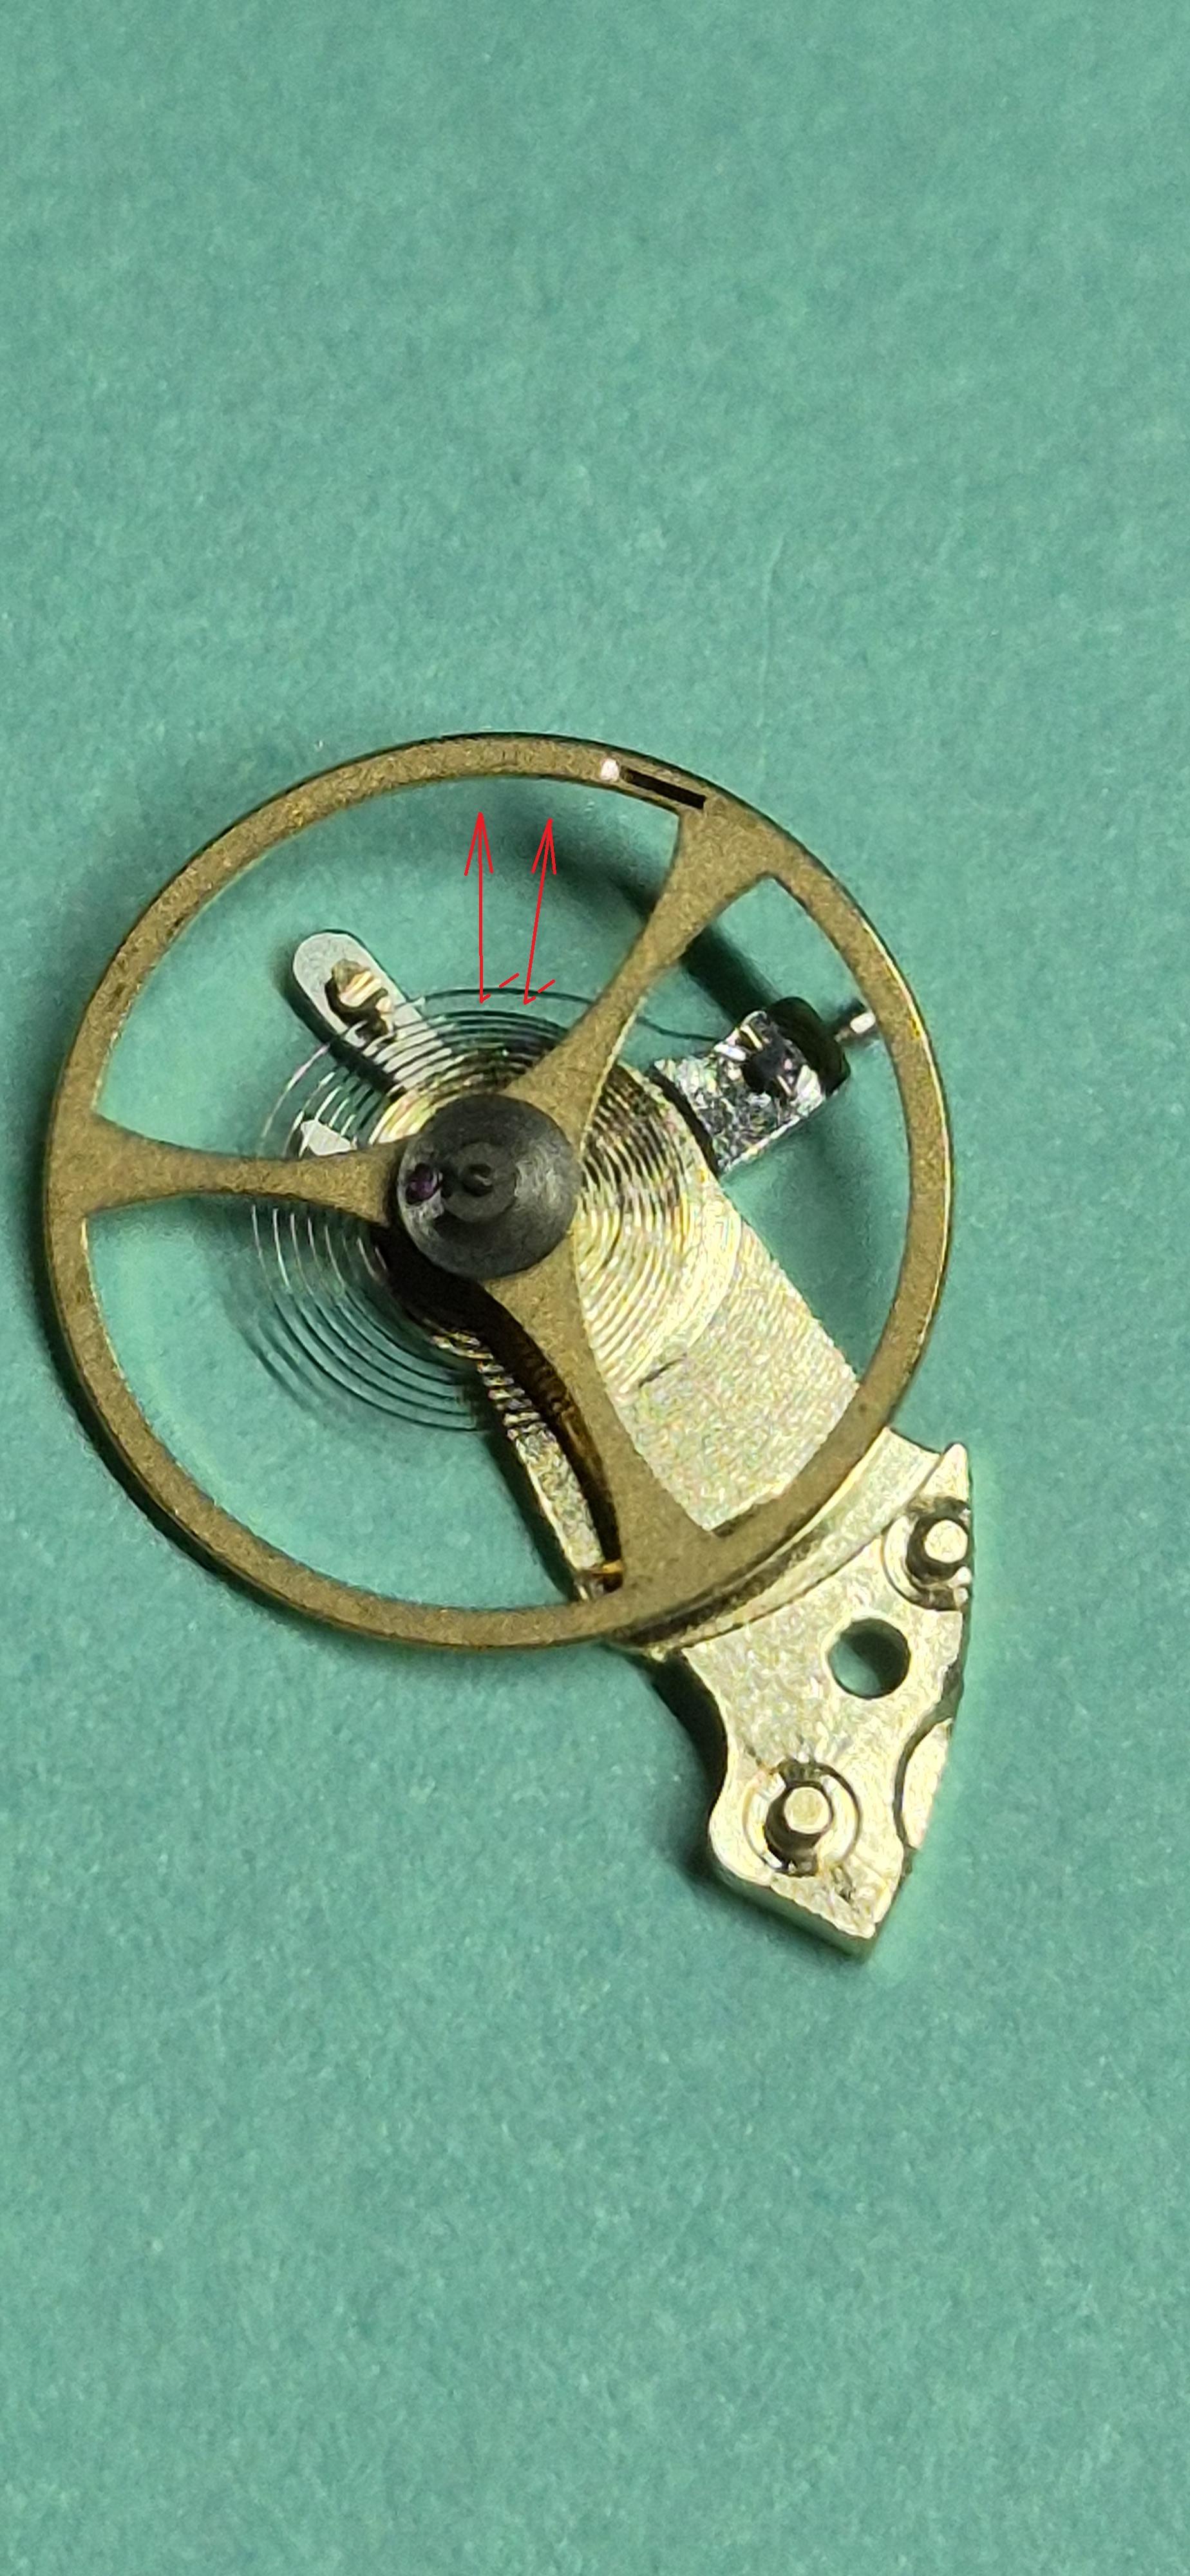
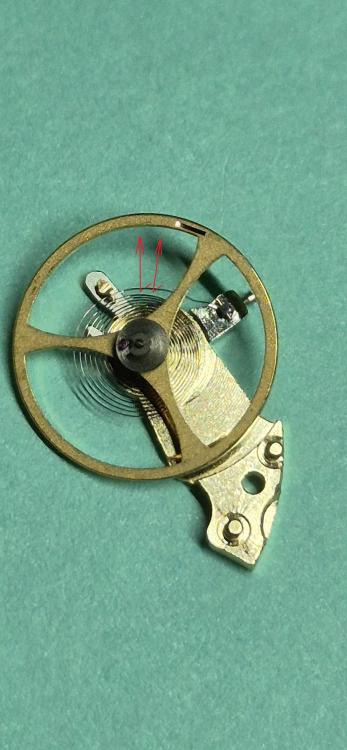
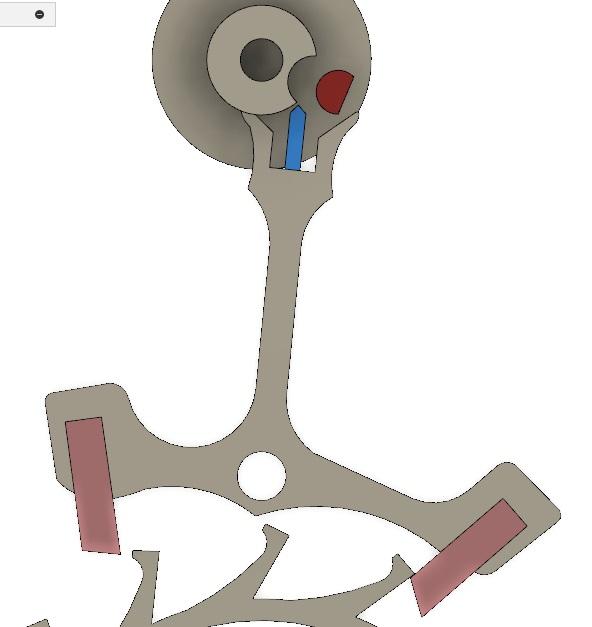
Guys, OP actually says there is little end shake. Further more, the watch has been running somehow. I would point attention to the hairspring. May be it is pressed to the balance spokes and lifting the cock (together with the spring) releases the balance. Enzo, we need photos of the hairspring - from aside and from above, may be with balance over the cock1 point
-
Bend in places and direction shown with arrows until the spring gets centered
 1 point
 -
For 5 I don’t do an extra rinse just make sure I brush the parts thoroughly whilst still in the fluid, if especially dirty I change out the fluid and give it another clean though that is not usual. I usually do keyless works last as that is where you get the sticky stuff like moly one dx. I just let the parts dry on watchmaker paper and into the cleaning jar. Tom1 point
-
Of course, how and how fast he solves the problem is great and terrible at the same time . I saw many of those watchrepairer shops in India on the streets - smaller than a phone booth (a few of us older ones will remember what that is). Frank1 point
-
I agree! I'm full of admiration for the guy.1 point
-
You really need to look at this first and foremost IF the barrel is indeed moving with the ratchet wheel.1 point
-
The braking grease will not solve your problem. The braking grease does not brake. It is specially formulated for wear prevention of the heavily loaded contact area between barrel wall and bridle. The spring should slip just a tiny amount as soon as it is fully wound. If you feel it jumping there is a problem with the spring and its bridle, or there is way too much grease. Most likely the bridle is deformed.1 point
-
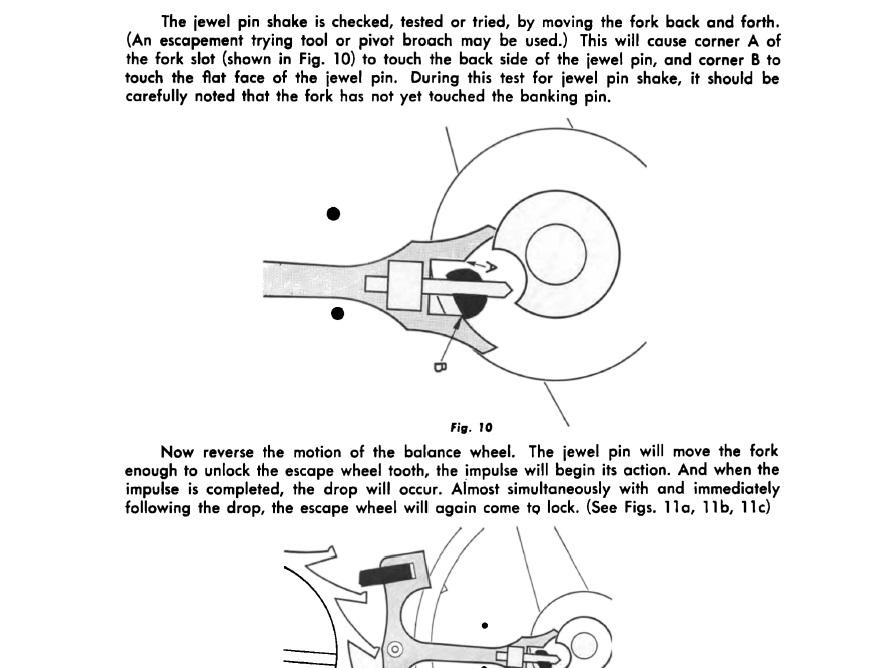
That's right. You might see in old texts mention of "corner test"; this is checking safe lock at the moment of drop lock (and that the roller is free to continue its course), but the roller jewel is still pretty much "in" the fork slot. It's also something to check, but doing the fork horn test covers it in 99.999% of cases. The fork horn clearance should be slightly larger than the guard pin clearance, so if it's good the other is too (but you still have to check to be sure guard pin clearance is smaller). I think the most comprehensive escapement set-up description I've done is here: This is a nice description of the "corner test" from the Joseph Bulova School of Watchmaking course, page 250 Here's an image showing the guard pin taking over the safety action. It's a smaller clearance for two reasons: the guard pin has less contact (friction) than the fork horns, and, depending on the horn shape, if the guard pin clearance is larger than the horn clearance, the roller jewel can hit the outside of the horn, possibly stopping the watch.
 1 point
 -
I received a full refund today1 point
-
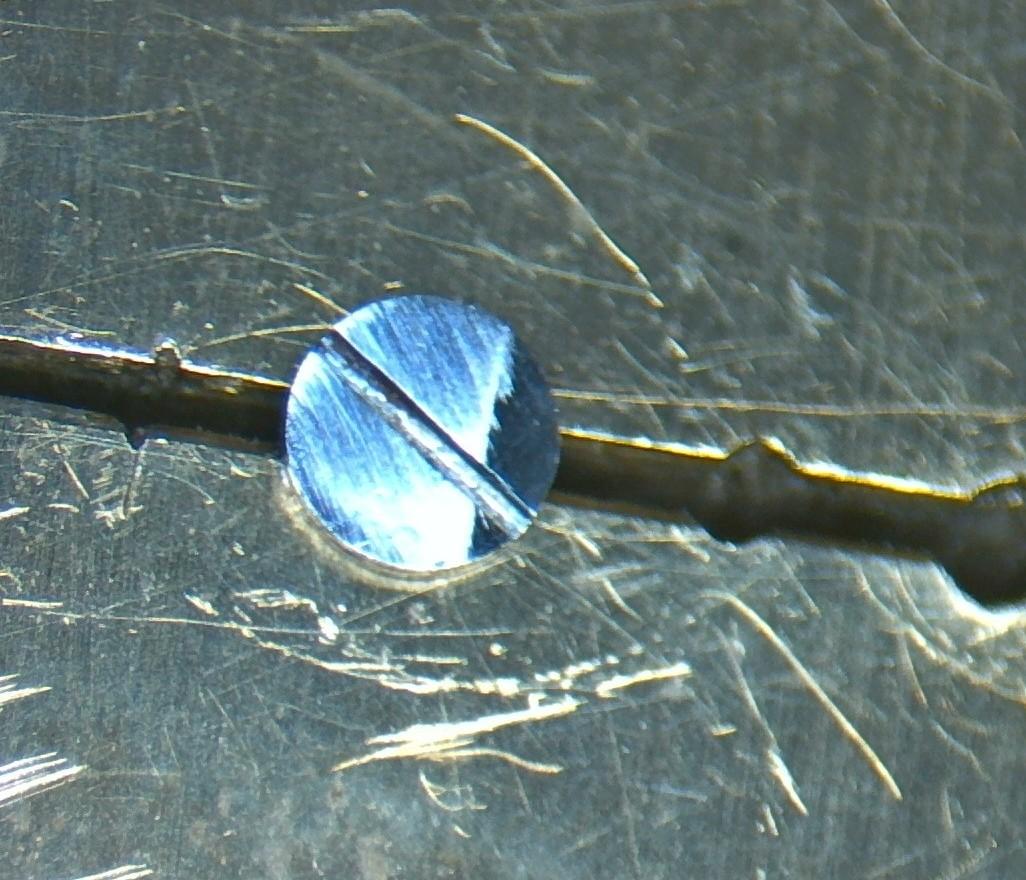
There's no need for blue - it would just make your lapping film dirty Here's a screw head I've just run up and down some 9 micron film a couple of times. It's quite clear where it's cutting
 1 point
 -
I wouldn't bother with the spirit level. Assuming you can get the screw perfectly vertically mounted in the tool, I doubt the level would be accurate enough. With my homemade tool, I find hard to get small screws mounted perfectly vertical, so I adjust the feet by eye, then I run it lightly over the lapping film and look where the screw head is marked. Then I just tweak the screws to level it up and repeat. Once you've done it a couple of times, it's quick and easy. I reckon I can polish a screw head in 2-3mins.1 point
-
Partly as an experiment to find out whether we can still get these deliveries in the USA, I ordered a screw polishing frog. I'd been meaning to try to build one myself but am missing half the tools I'd need so I'll give this a gamble at a little over $100. Look for a review if they succeed in sending it to me.
 1 point
 -
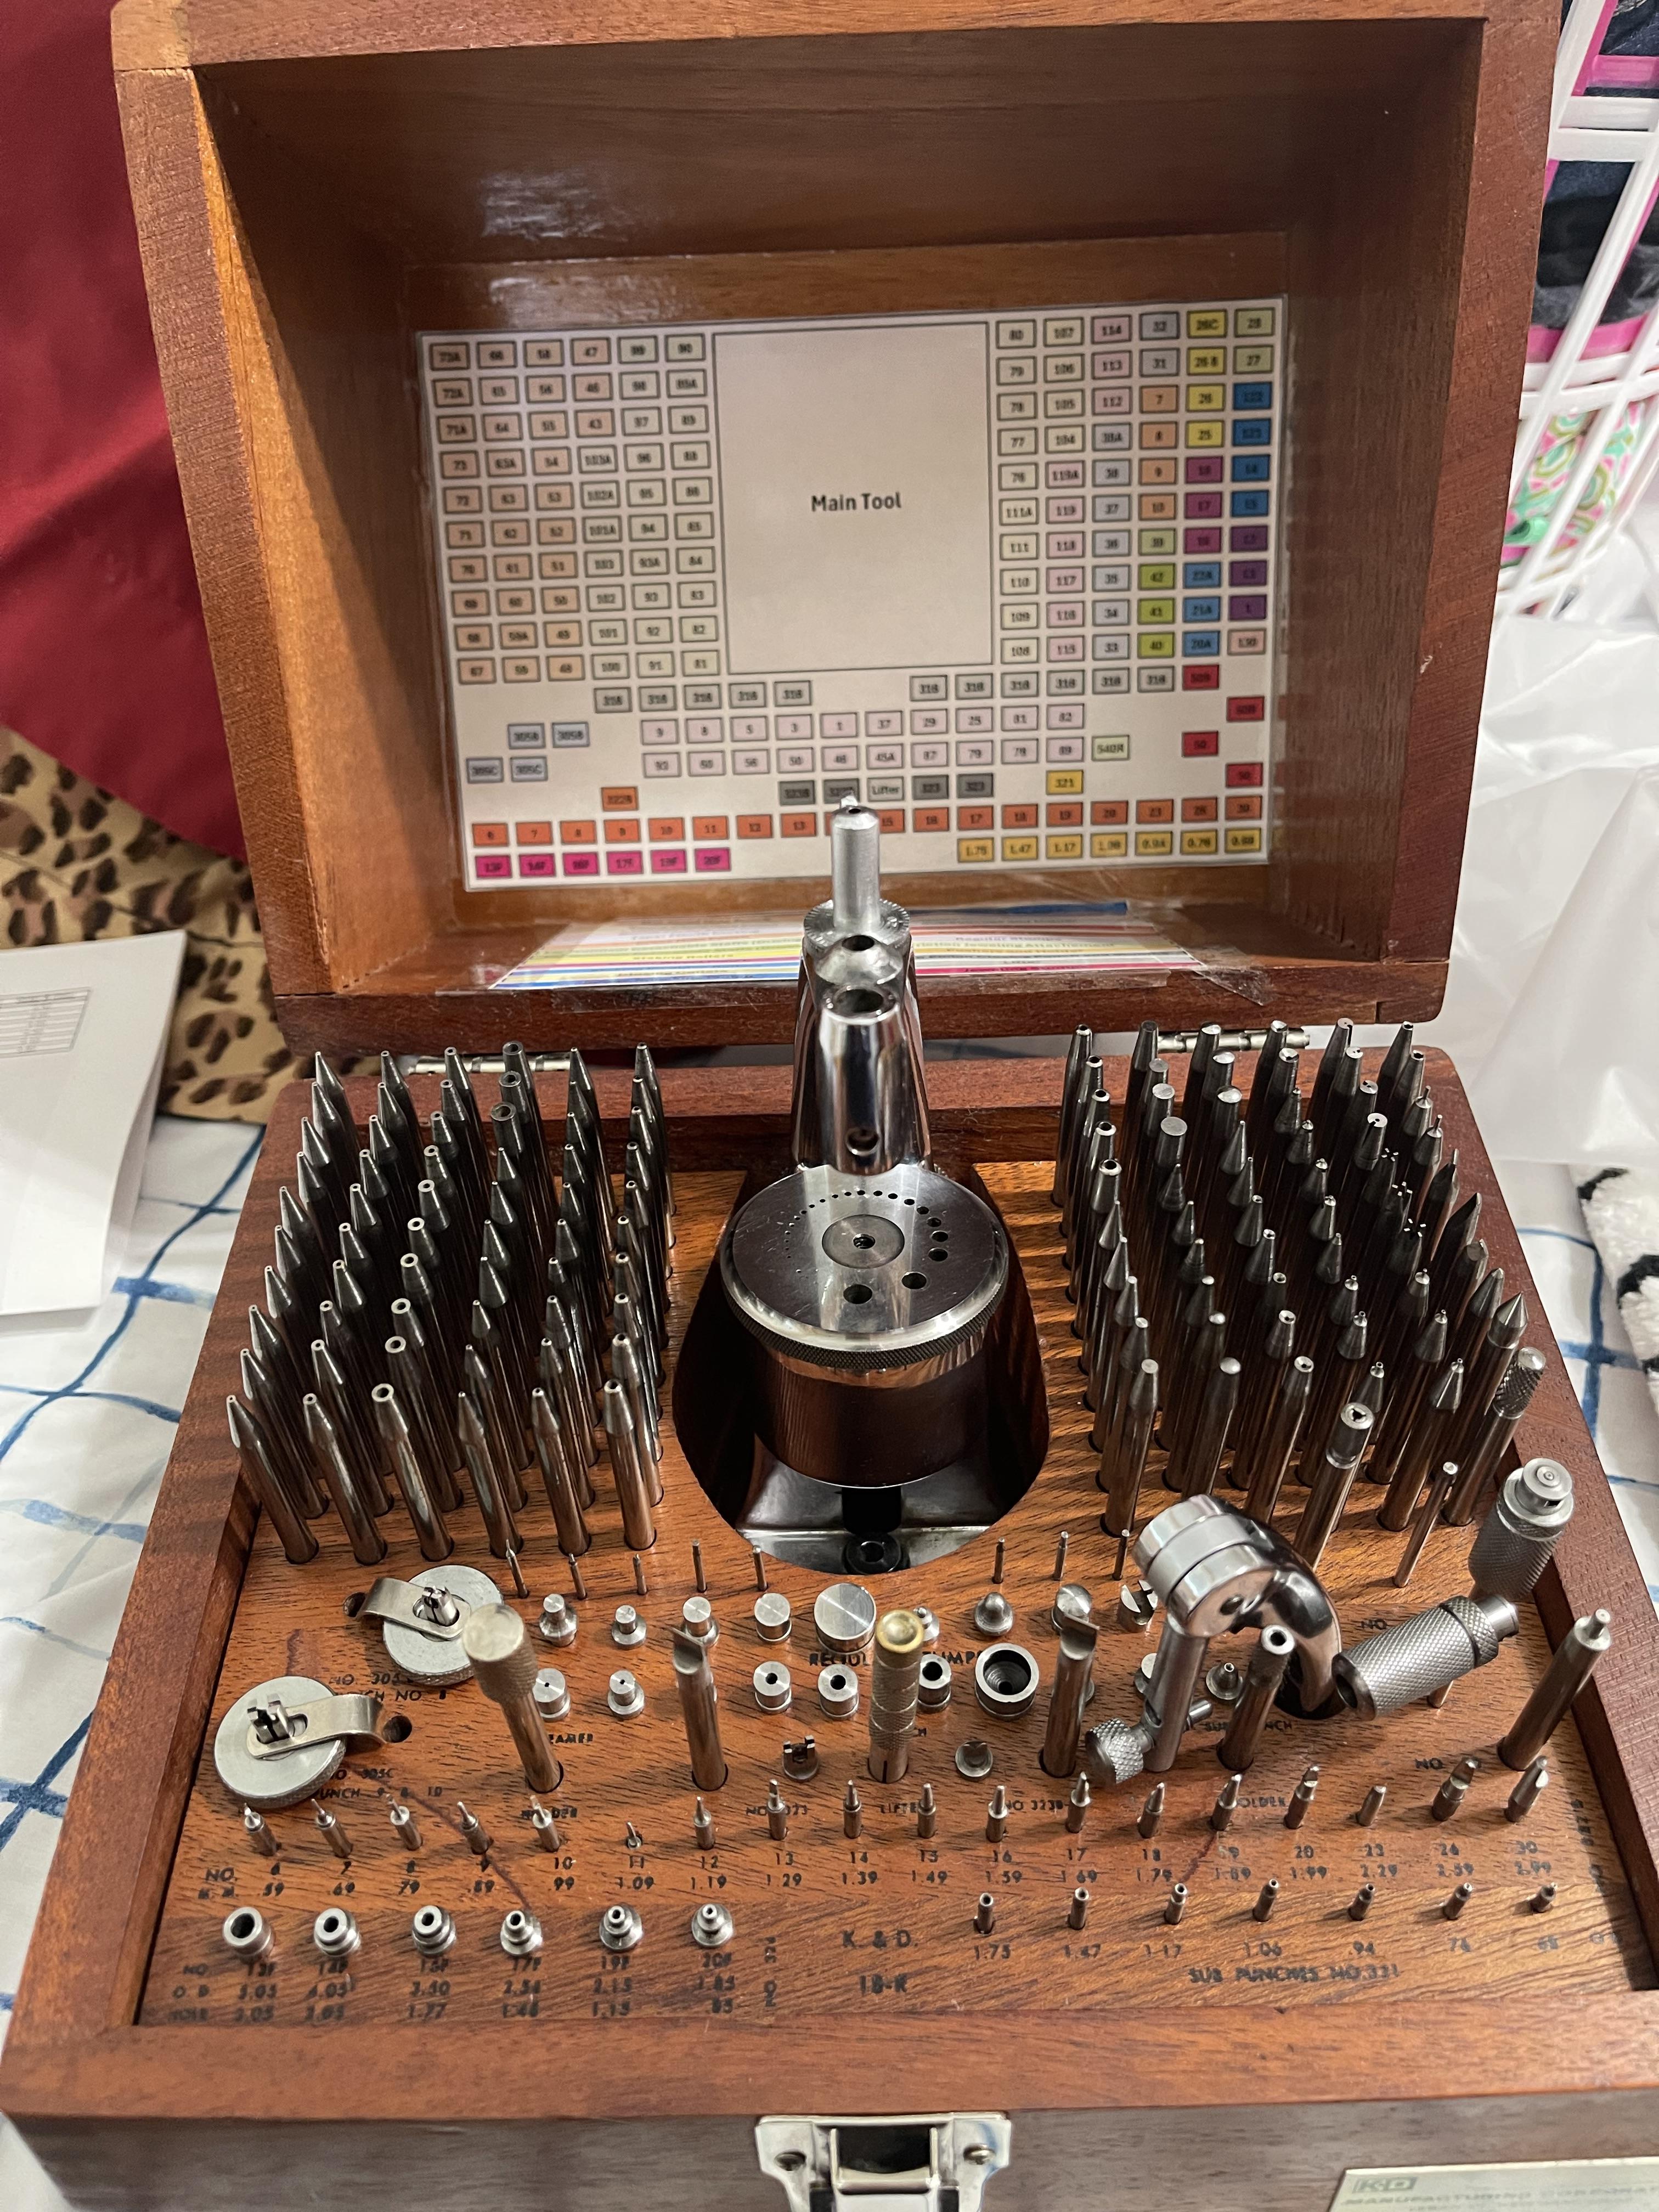
Not sure if this has been discussed before. I recently came in possession of a staking set, and I am vey satisfied with it. I noticed a couple of punches that had problems (one was not true and another has chips of the face and the seller immediately sent me replacements). Anyhow, I did an initial cleaning but later on I found out a few of the punches with holes had their holes plugged. To me it is really hard to determine if a hole is present or is plugged even under a microscope. Anyhow, after careful examination I determined that four punches were plugged (stakes 73A, 72A, 103A, 38A in the K&D catalog). They were otherwise pristine and I thought that asking for replacements would run the risk of getting punches with the same problem. It looked like there was dirt and perhaps rust inside the holes and I started to think on how to get it out. My smallest drill bit was humongous when compared to the holes and besides, I really did not want to use something that could cut in the walls of the hole. After a bit of thinking, I remembered that a while back I had bought a few pin gages to make sure my caliper and my micrometer were accurate. I took a look and unfortunately the smallest one was too big for the smallest hole (0.13mm). So I went ahead and ordered a 0.12mm pin gauge and last night I went to work under the microscope. After testing a few methods (like spinning the gauge in my fingers and keeping the punch stationary) I came up with the following solution: I placed the gauge in a set of tweezers and spun the punch in my other hand. It is a tedious job, but it works surprisingly well, not only to "drill" the hole, but to actually see if there is a hole at all. I actually tested all the punches with holes, and although all of them other than the four above had holes, a lot of them had crud inside that got dislodged by the gauge spinning inside the hole. After using the gauge in all of the punches holes, I place them in an ultrasonic cleaner for 40 minutes (20 with the holes facing up, and 20 with the holes facing down) in 99% isopropyl. I was surprised by the amount of crud that came out of those tiny holes!! Now the set is absolutely beautiful and lighly oiled to keep it from rusting. I attach an image of the completely restored set and of the video of the hole cleaning process. BTW Make sure that the punch does not go all the way to the tweezer. The gauge will break at some point. I was lucky that the first time it broke there was some space between the tweezer and the stake. There was enough gauge sticking out of the hole so that I could grab it and pull it out. If the gauge broke when there was no clearance, I do not think I would have been able to pull it out. claudio P.S. Let me know if video shows. Video
 1 point
 -
Hi all Time for the next update in this series. This time we have Hand Press tool but not the cheap red ones often found comming out of china, this one is a serious bit of kit and at £102 it sould be https://fr.aliexpress.com/item/4000316385317.html?gatewayAdapt=glo2fra&spm=a2g0o.order_list.0.0.21ef5e5btCjVvv This tool is night and day better than the cheap red ones and makes hand fitting a real brease. Its similarity to the almost a grand Bergeon tool is starting to make me think Bergeon are pulling a fast one and also having their tools made in China and just packing them in their own boxes and hiking the prices. OK I have my tin hat on after that comment but I would not be surprised if it were true A few pics of the actual tool

 1 point
 -
I suppose if it had been the near identical Bergeon set that costs nearly £600 there would be no complaints. Don't forget the idea behind these posts is to highlight quality tools for those of us less fortunate in our financial situation. Just because some of us are poor does not me we have to use rubbish tools. Am I wrong for doing this, if yes then could a mod lock the thread and I will not say any more on the subject.1 point
-
Check the anvils on these sets. The oldest have 3mm anvils and 4mm pushers, and the newest 4mm anvils and 4mm pushers. Cousins have only 4mm anvils(and pushers.1 point


.jpg.97076950e2541557d6befc9f4c31ecd1.jpg)


.thumb.jpg.cb17a66989f1e796fd4217db2e9ca9df.jpg)