Leaderboard


Popular Content
Showing content with the highest reputation on 02/16/25 in all areas
-
My lathe is almost up and running, just need to lap a bearing. I have watched t&t&t and others and am going to attempt to make a stem as my first project. I will report on how easy or not it turns out.5 points
-
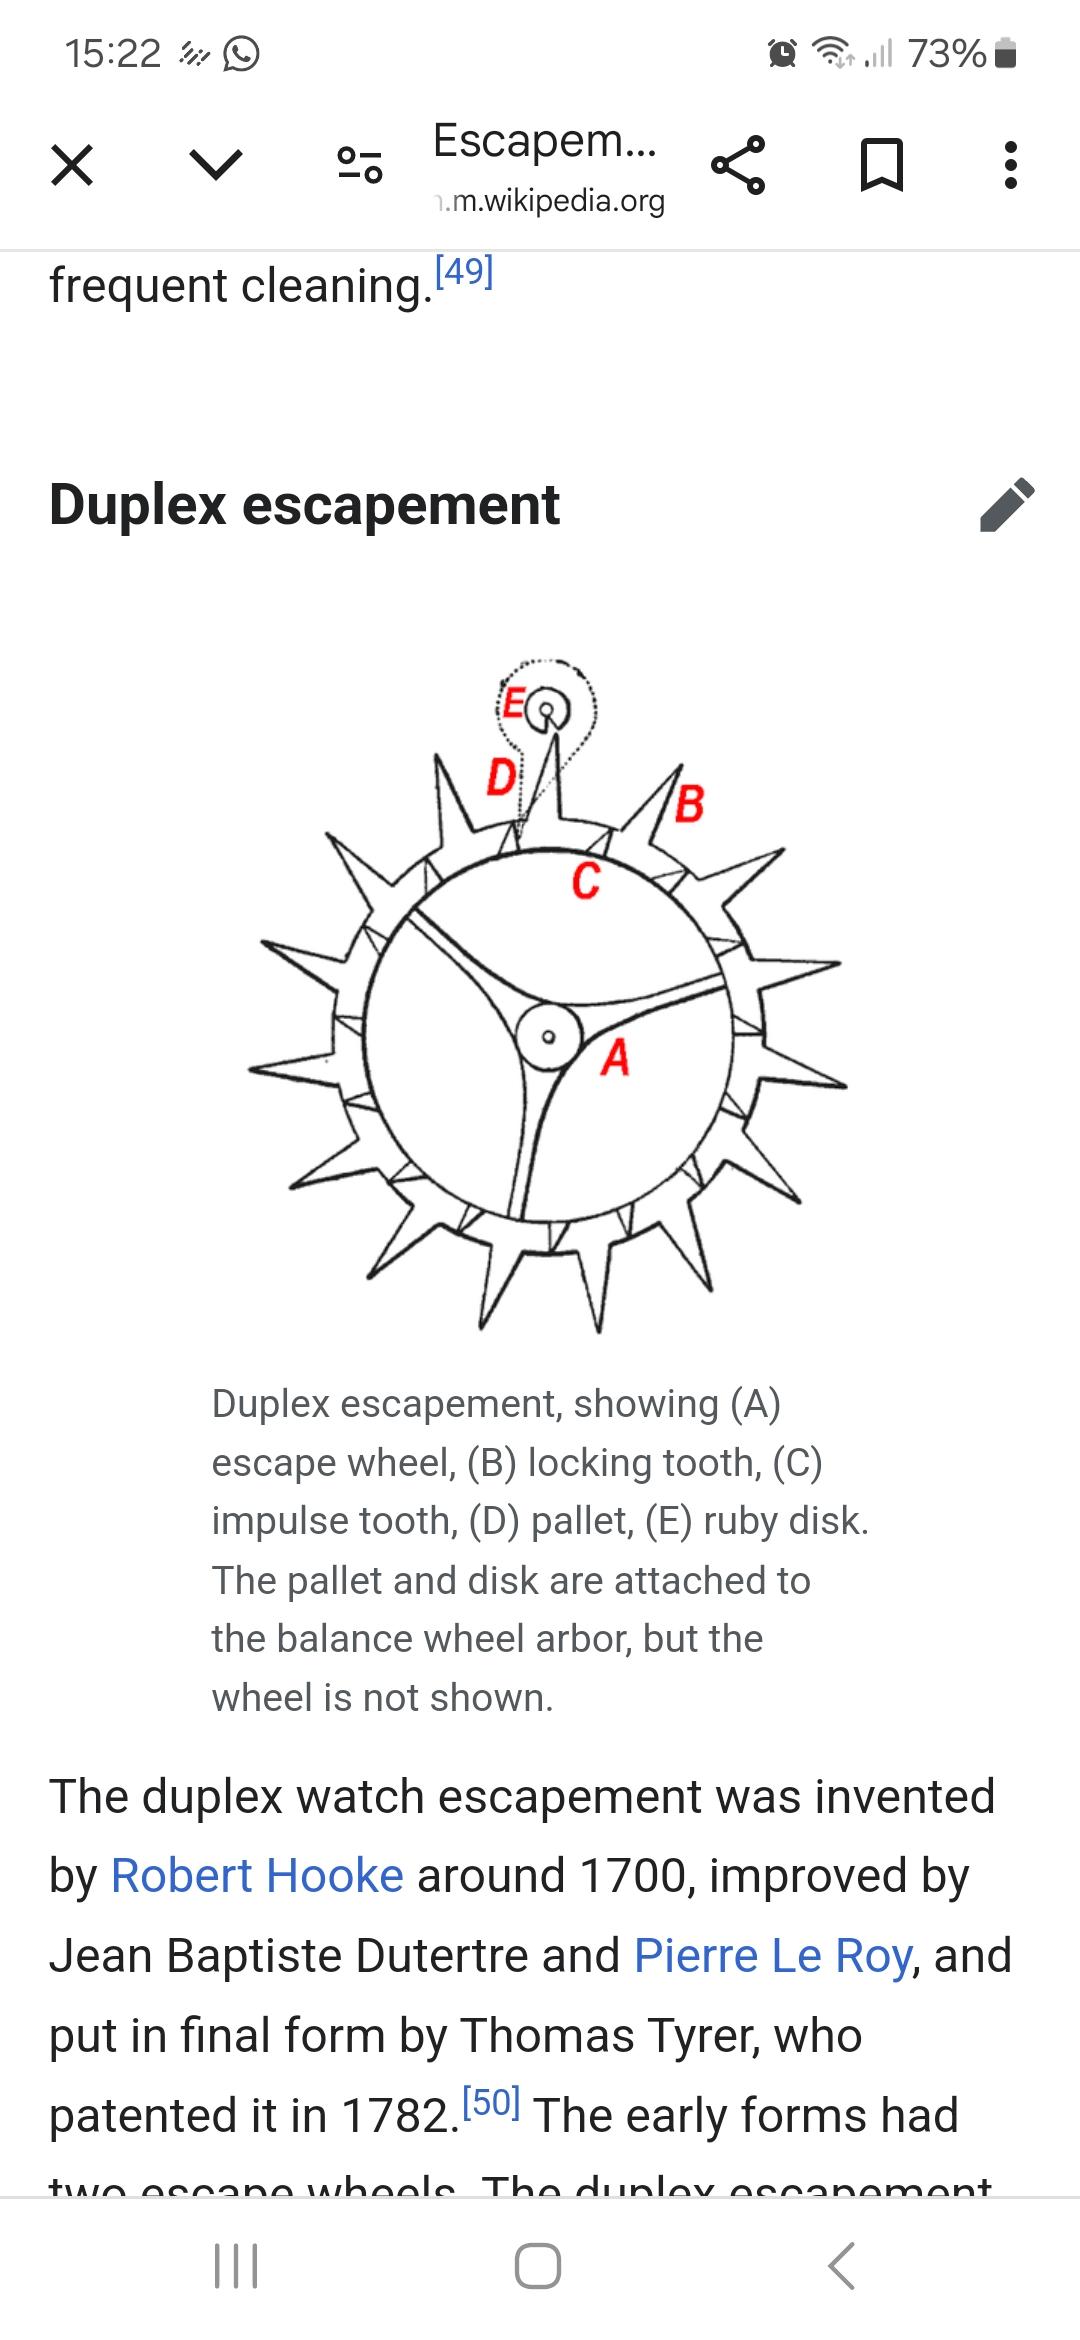
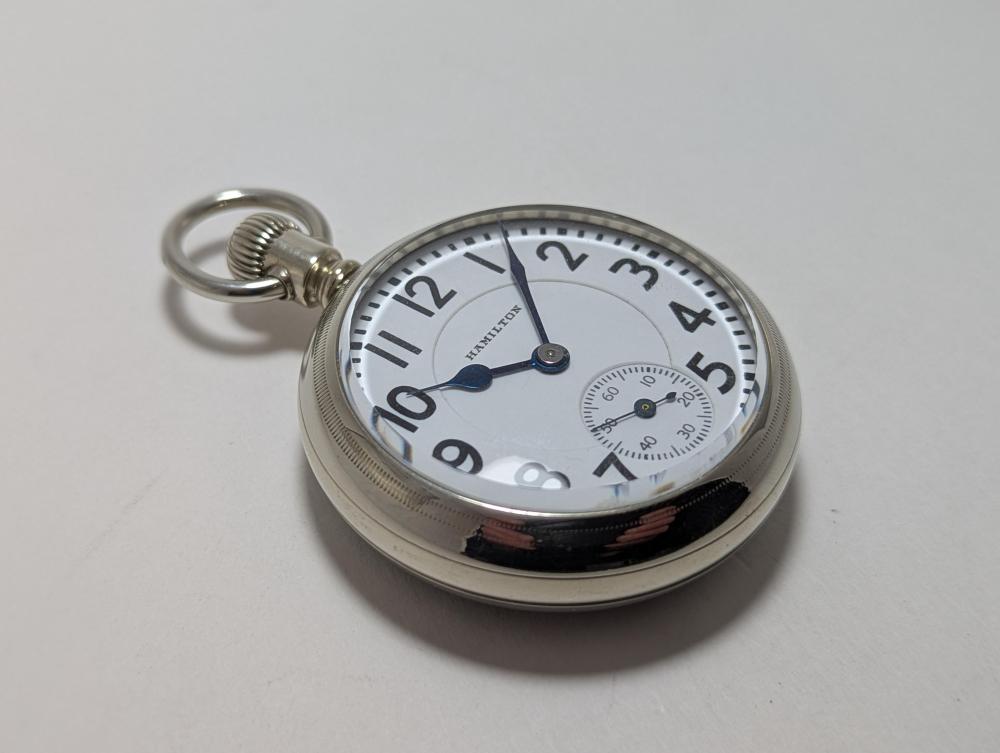
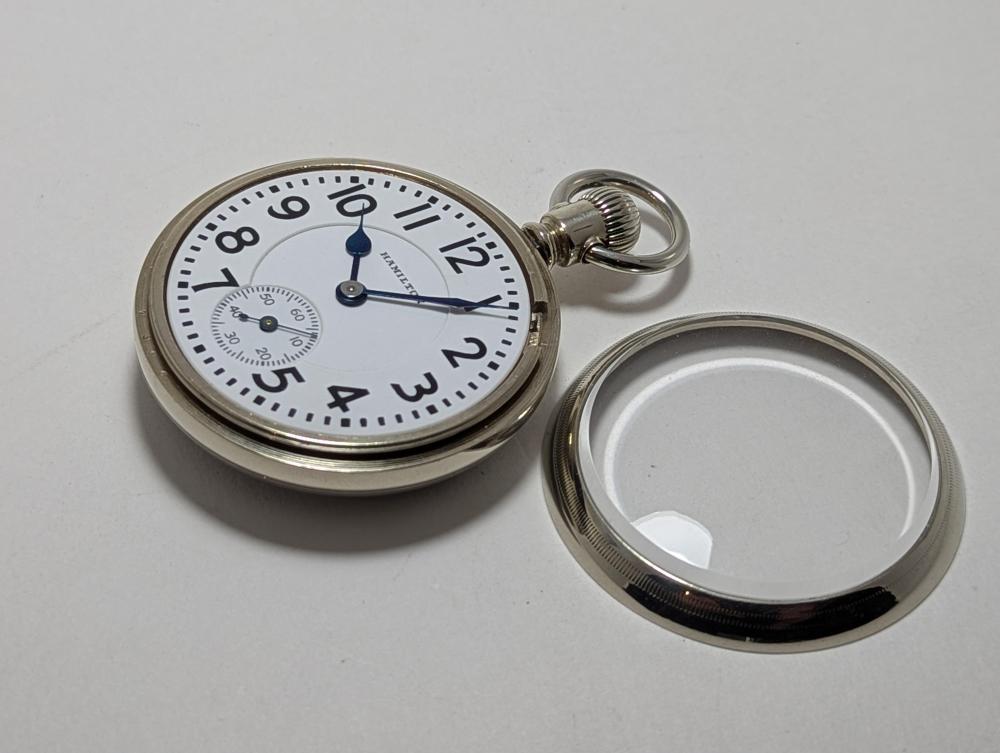
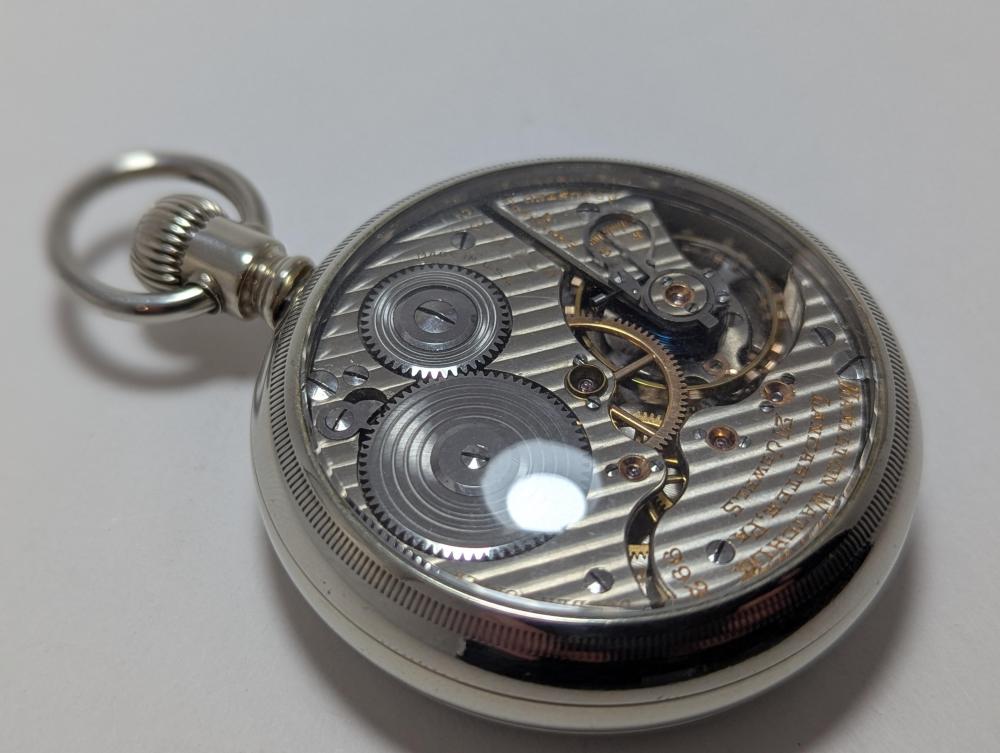
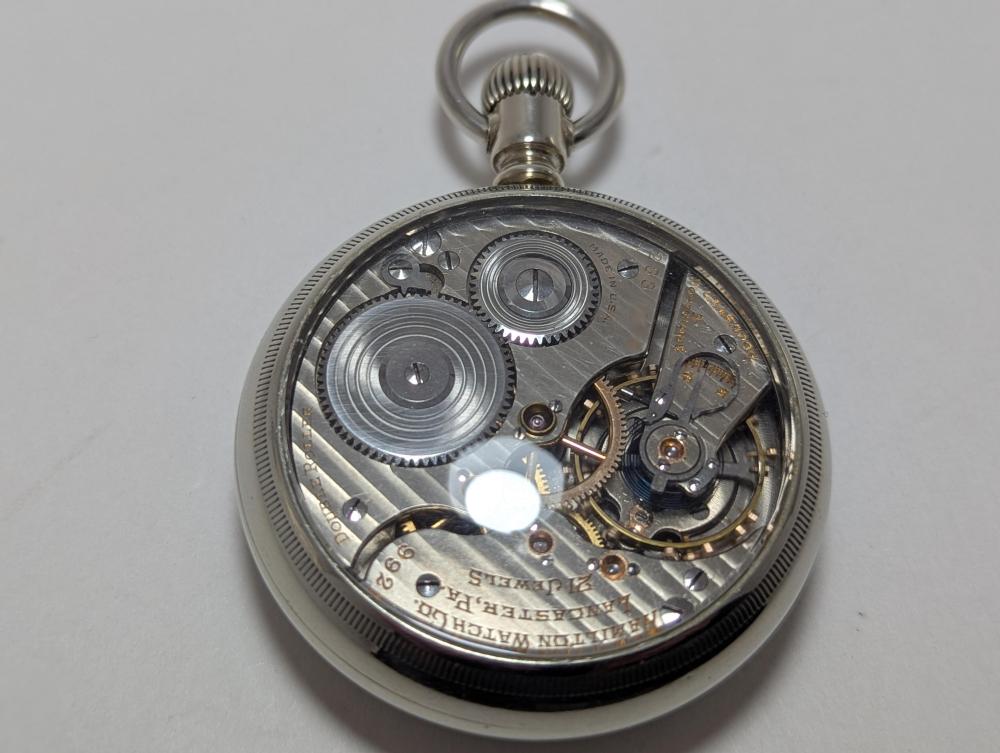
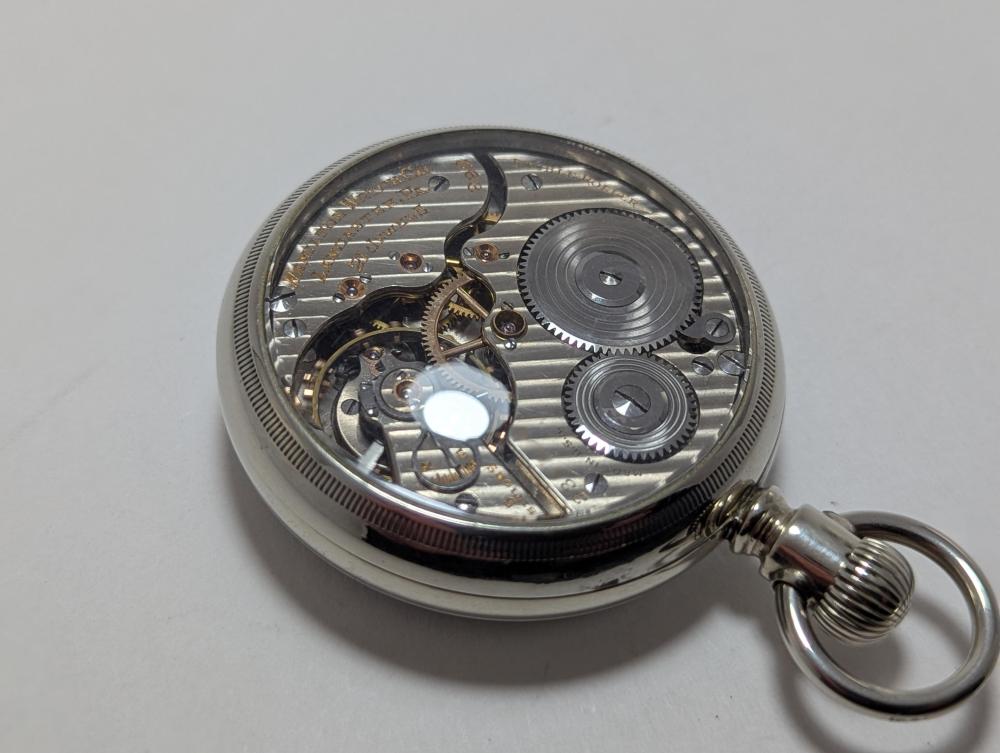
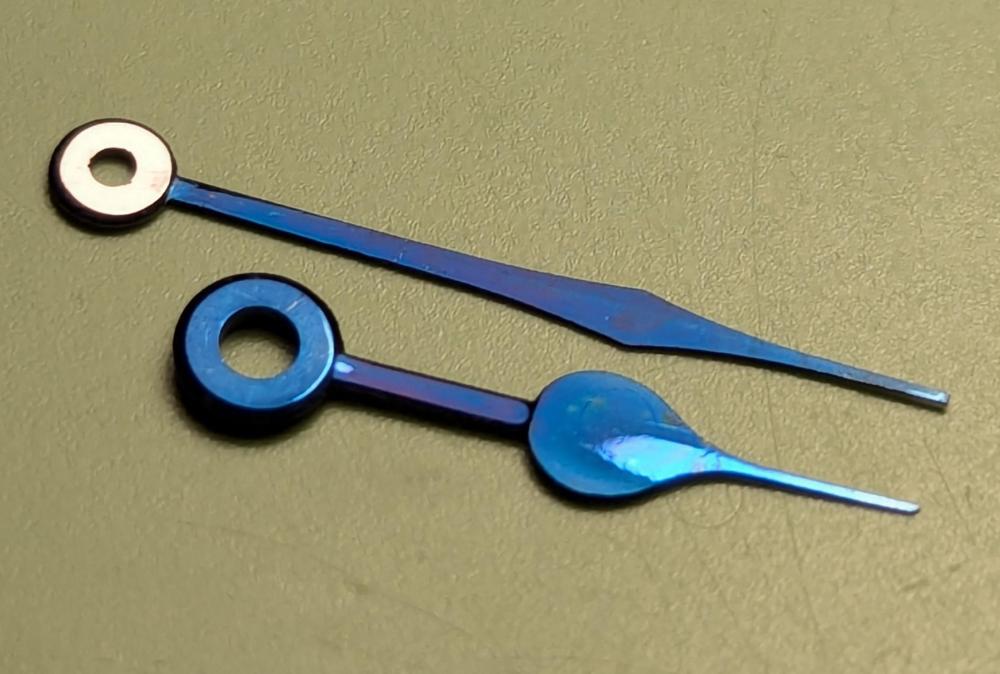
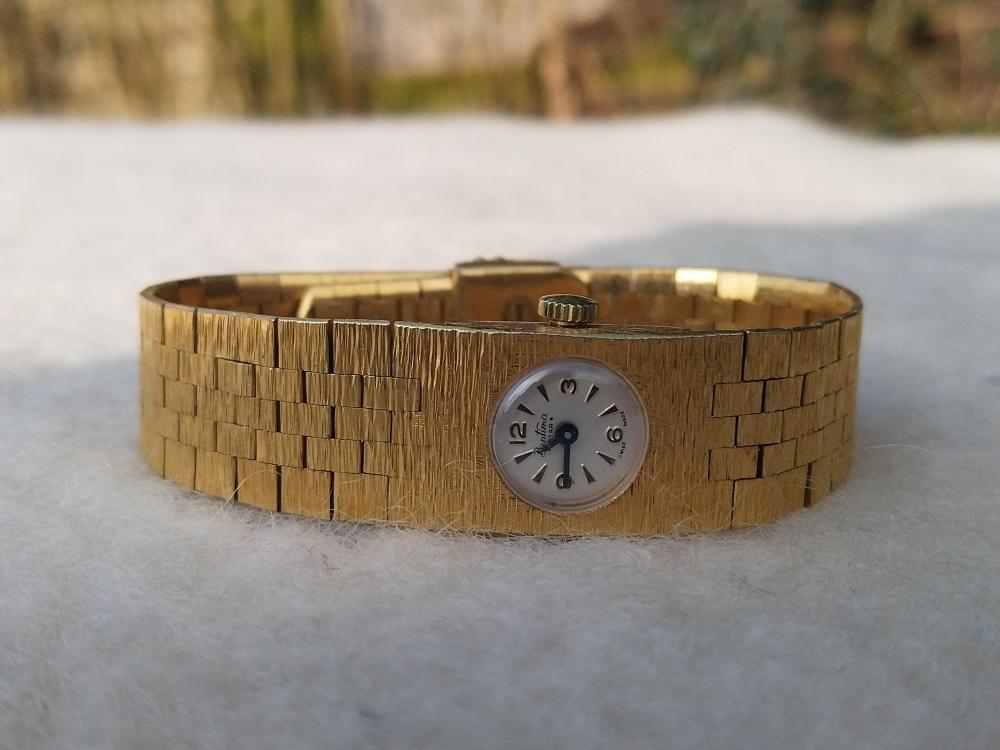
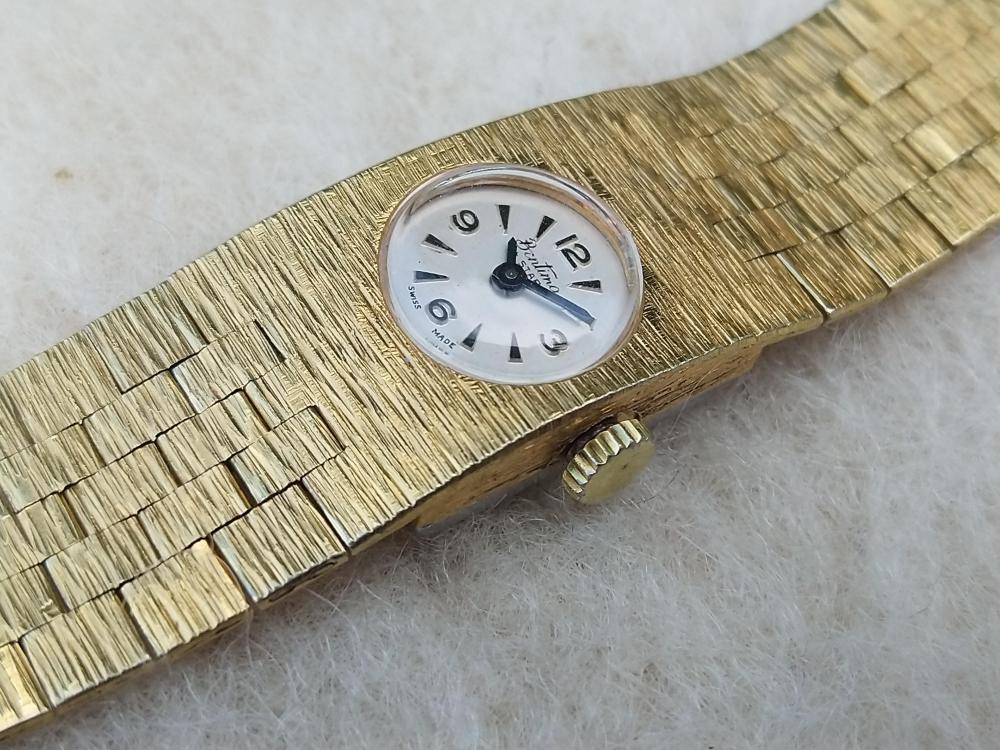
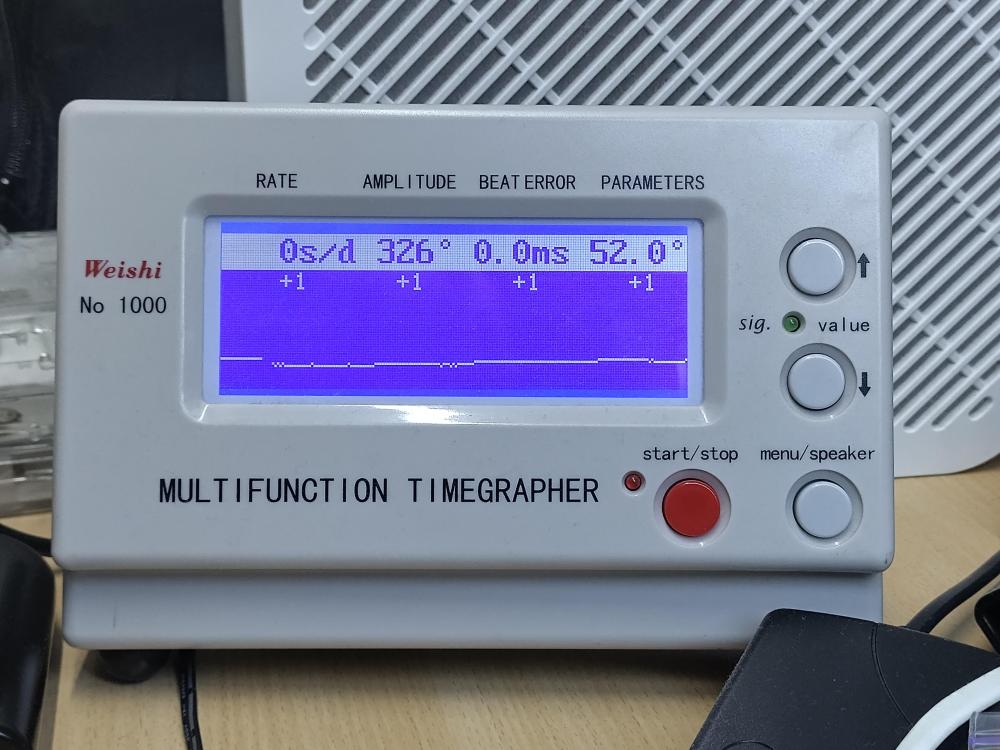
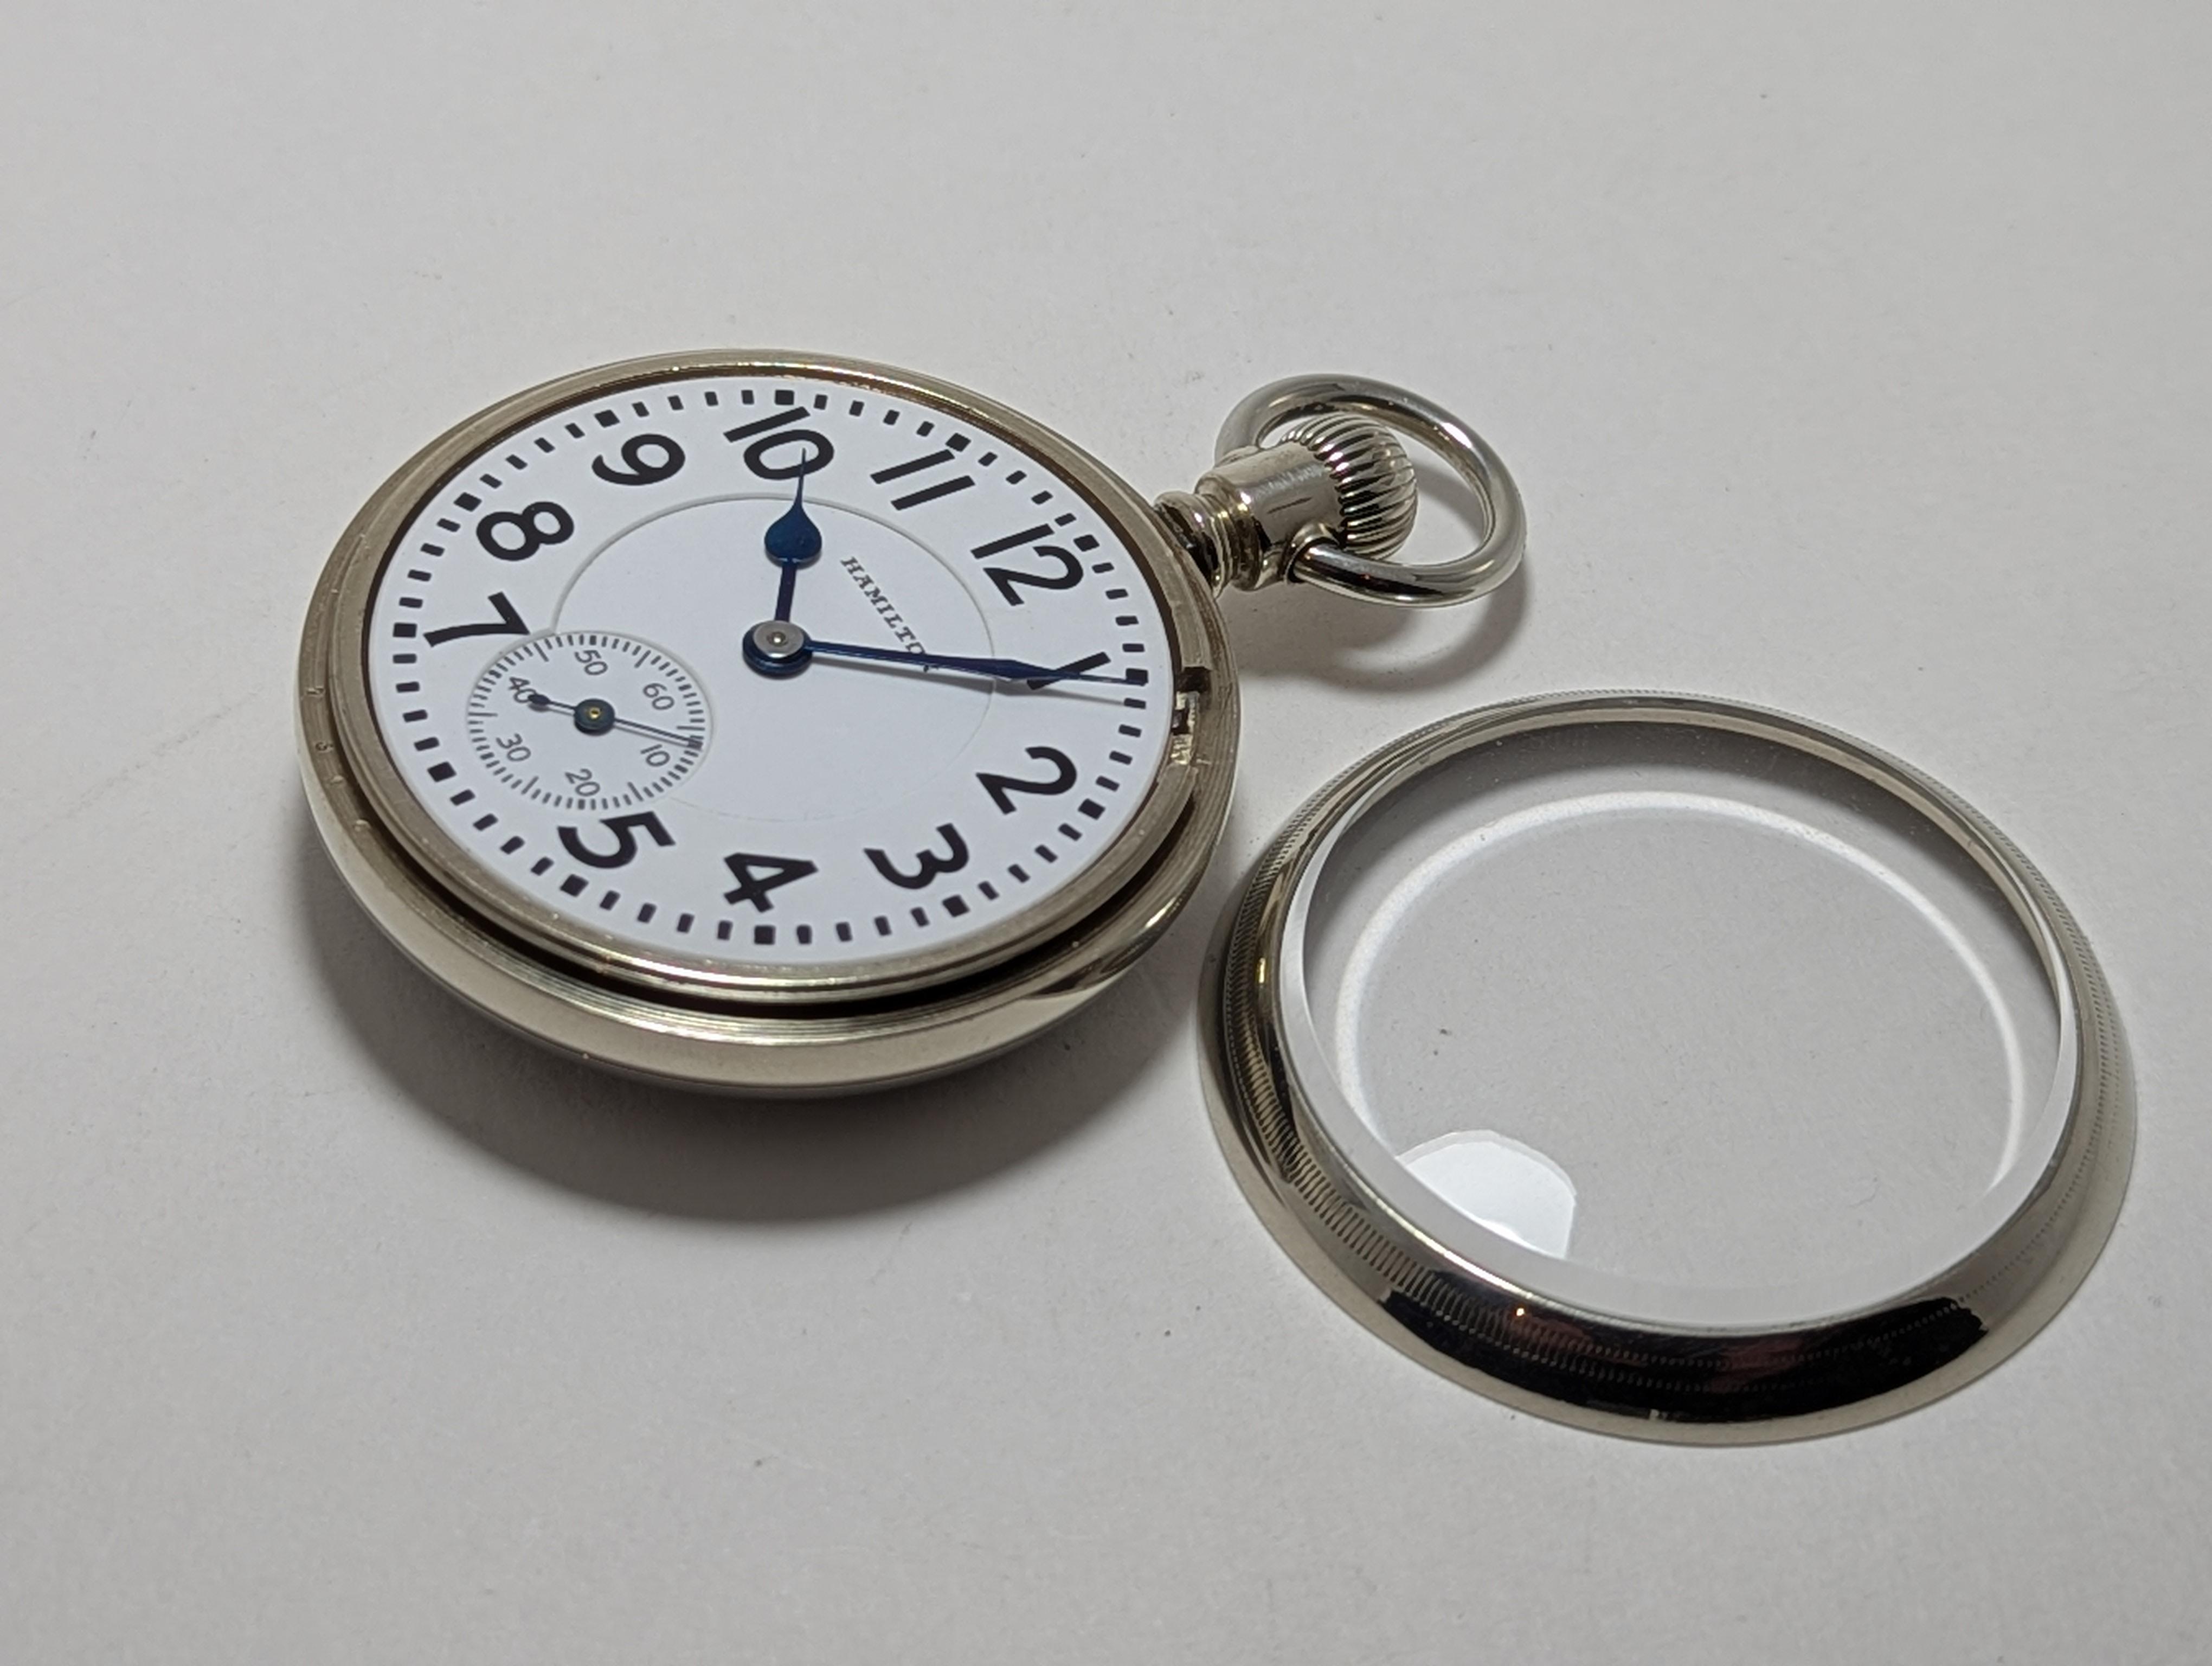
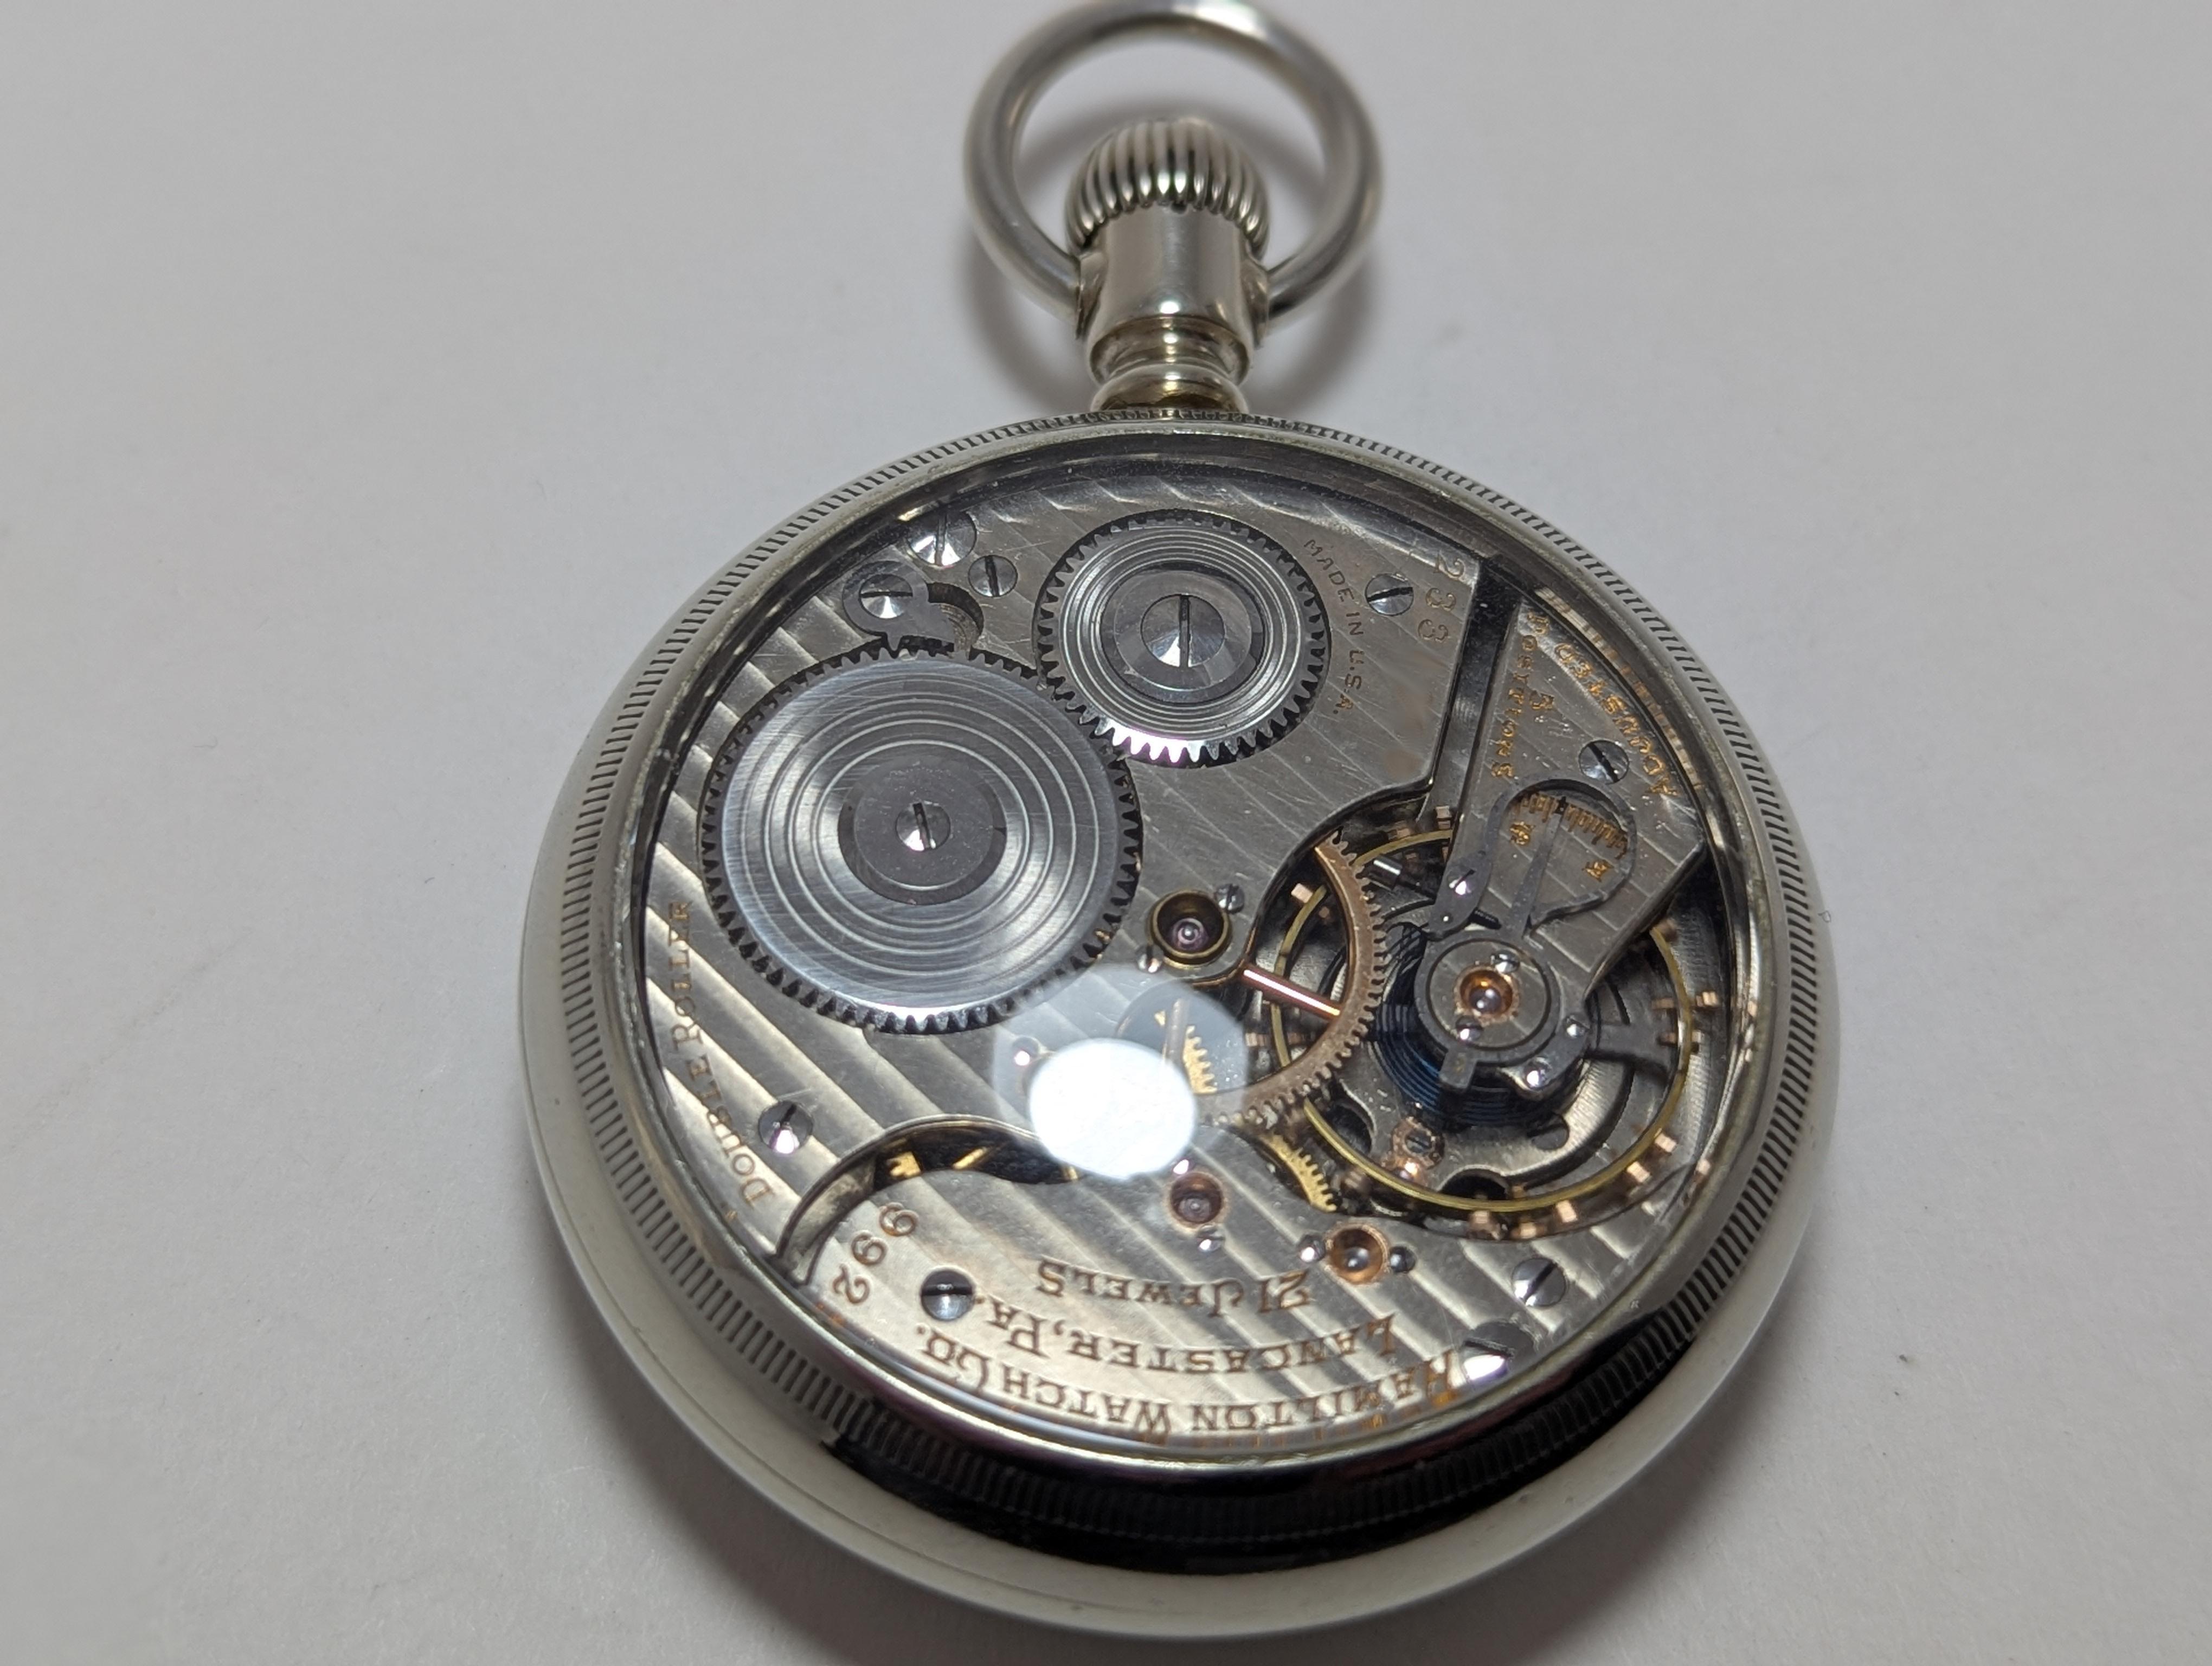
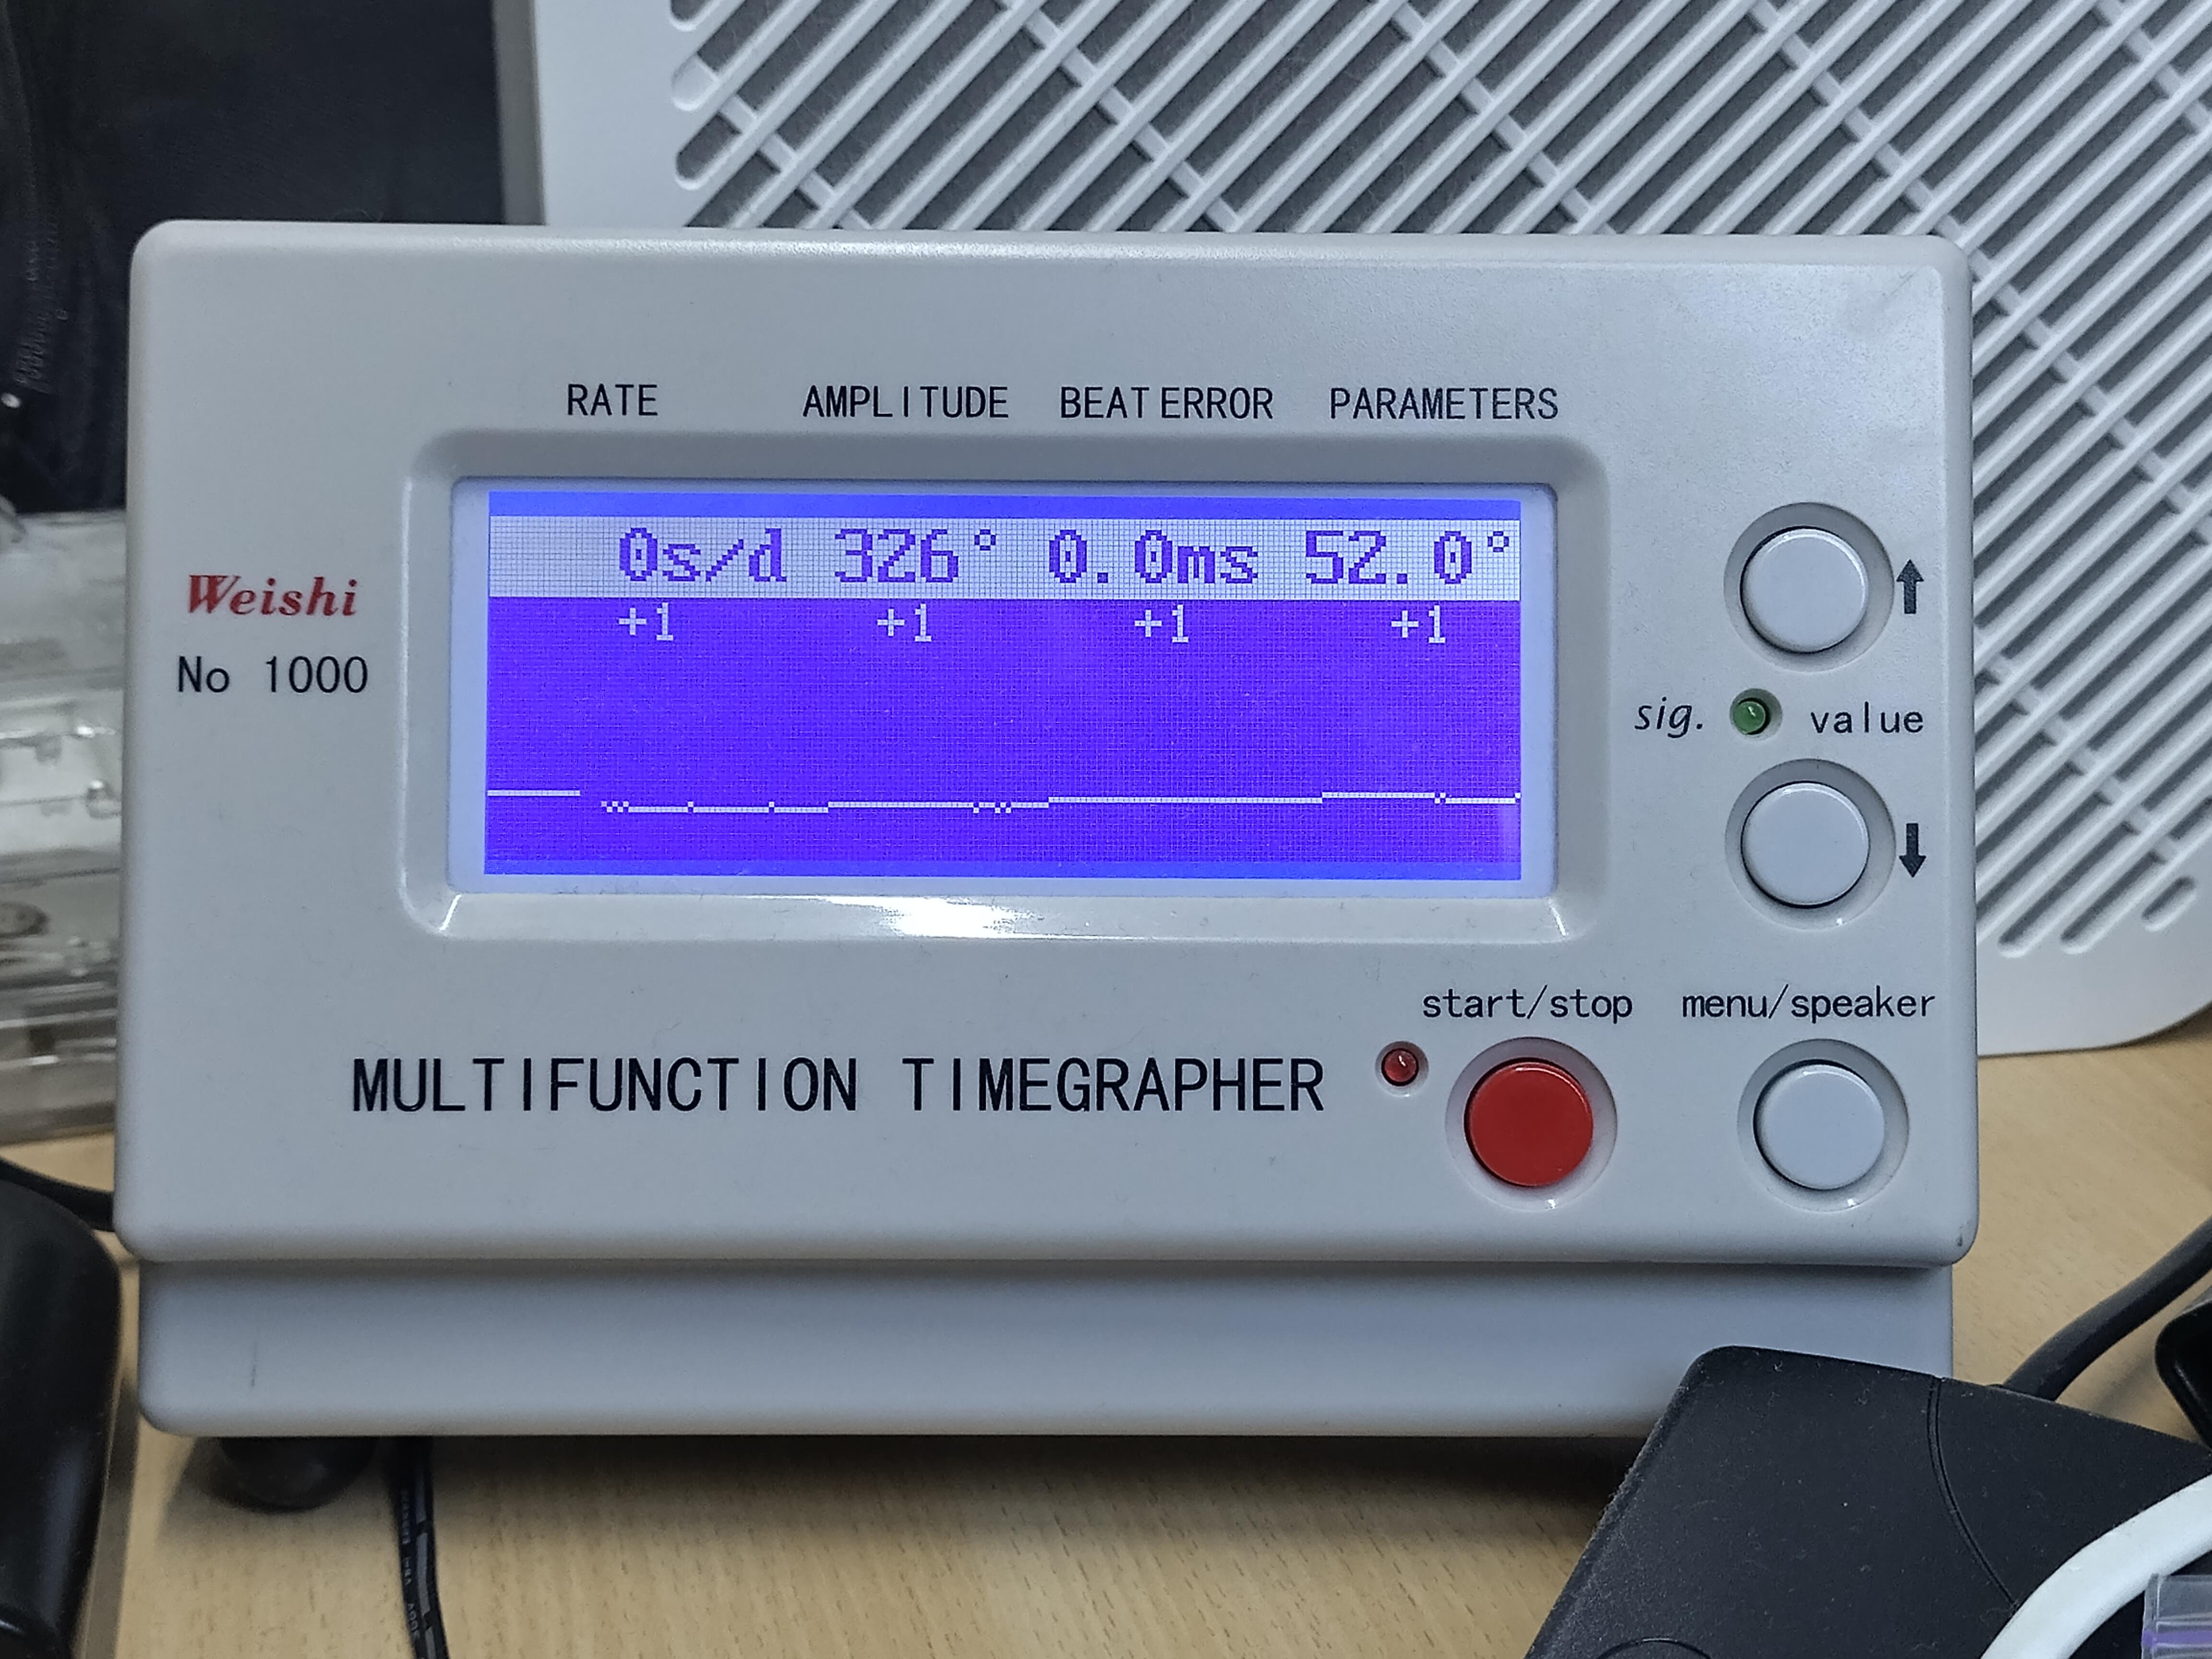
After a little over a year of restoration work, I am finally finished with my Hamilton 992 16 size railroad watch project. I'm really proud of this project because it was my first end to end restoration, with multiple repairs, banking pin adjustments, extensive poising & regulation, custom case work, hands restoration & bluing. This movement came into my possession sort of by accident when I was just starting out and recognizing it was nicer than most I had worked on I set it aside until I had a couple years experience. The movement was made in 1925, and the case I ultimately put it in is probably 20 years older than that. I started with a movement and dial - the dial was in perfect condition and the movement could tick weakly but had broken lower balance jewels. Sourcing correct replacements took a few tries. I also attempted a few replacement mainsprings, ultimately unable to form a workable inner coil on a contemporary white alloy spring and going with a genuine NOS Hamilton steel spring that in the end is performing great. I acquired loads of vintage tools for this project to do measurement, static poising, timing washers, screw undercutters, and while I was doing what I thought would be the final dynamic poising, I .... broke the balance staff. Replacing the balance staff, as stressful as that was for this project, had the positive effect of a major amplitude gain after leaving behind the worn old pivots. Before I broke the staff, I did have it running at 0.0ms beat error. After replacing the staff I really couldn't get it under 1.0ms but I decided I had to leave it there rather than risk hairspring damage. (the difficulty was probably due to nonparallel regulator pins which were fixed later) The case I chose is a Fahy's Oresilver with screw-on bezel and caseback. Since I wanted to install a glass caseback, I had to find two identical cases with good front bezels. That was one of the more difficult parts of this project - 16 size cases are far more scarce than 18 size. And though this railroad movement would most likely have been in a gold case, I will settle for an alloy that takes a good polish. I had to cut a slot for the setting lever under the bezel, and fit new glass to both sides. Plus it still has a solid metal caseback as an alternate option. Special thanks on this project to @JohnR725 who helped me with a lot of minute details in the escapement and mainspring and parts sourcing, @Neverenoughwatches and @mikepilk helped when I was learning heat bluing, and many others who probably contributed. Okay photos! The hands are Hamilton 16s railroad spade originals, polished with 10 phases of diamond paste and blued. And the minute hand hub mirror polished. Thanks to several of you who helped me build a workable bluing pan for this and develop my technique several months ago. I am happy enough with the rates, though I think the horizontal/vertical delta lands outside of railroad specs. I suspect this is due to pivot wear in the train that I could not address without a jacot lathe. But the vertical rates are all very close after dynamic poising. And since this watch is most likely destined to live as a desk clock, it has been regulated to run near 0s in the pendant up, slightly angled backward position where it stays steady for 36 hours. I'm not sure if dialing the beat error back to 0.0 would make any difference, but I doubt it and I ran into a deadline where I couldn't risk more mishaps. As it stands, if it gets wound up daily it will keep great time, hopefully another hundred years.

 4 points
 -
Can't stress this enough! That is an exquisite watch, and best set aside for a year while you gather some experience on movements you can afford to damage. Welcome - this is a very helpful forum.4 points
-
Bigger part to work and with not quite the same accuracy required for turning out a staff. A good place to start learning lathework after churing out a bucket full of mixed shavings from random bits of metal. Rolling dies...yes expensive Cees More than competent in my estimations Michael.4 points
-
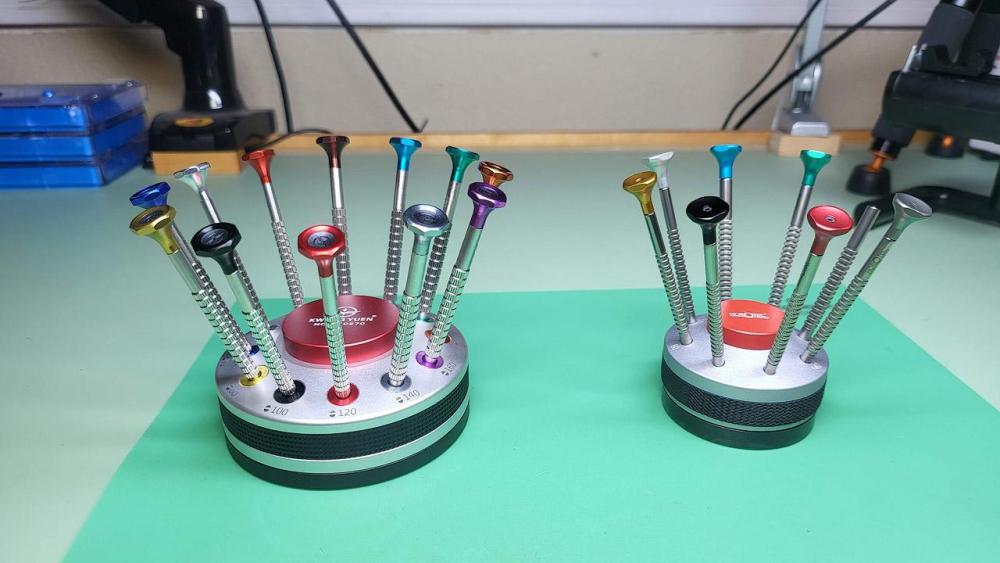
I am from India and have seen both of these in person. The Indian version looks like a miniature in front of the Chinese and you would be better off betting on the Chinese for this one. Also, the Indian set costs around USD 130 here and has and odd diameter for the punches. The tolerances and quality of the Kwong yuen set seem top notch, will post an update once my watchmaker uses that for a while.4 points
-
Worth the £20 . Can also be used to clean a watch, so double bubble.3 points
-
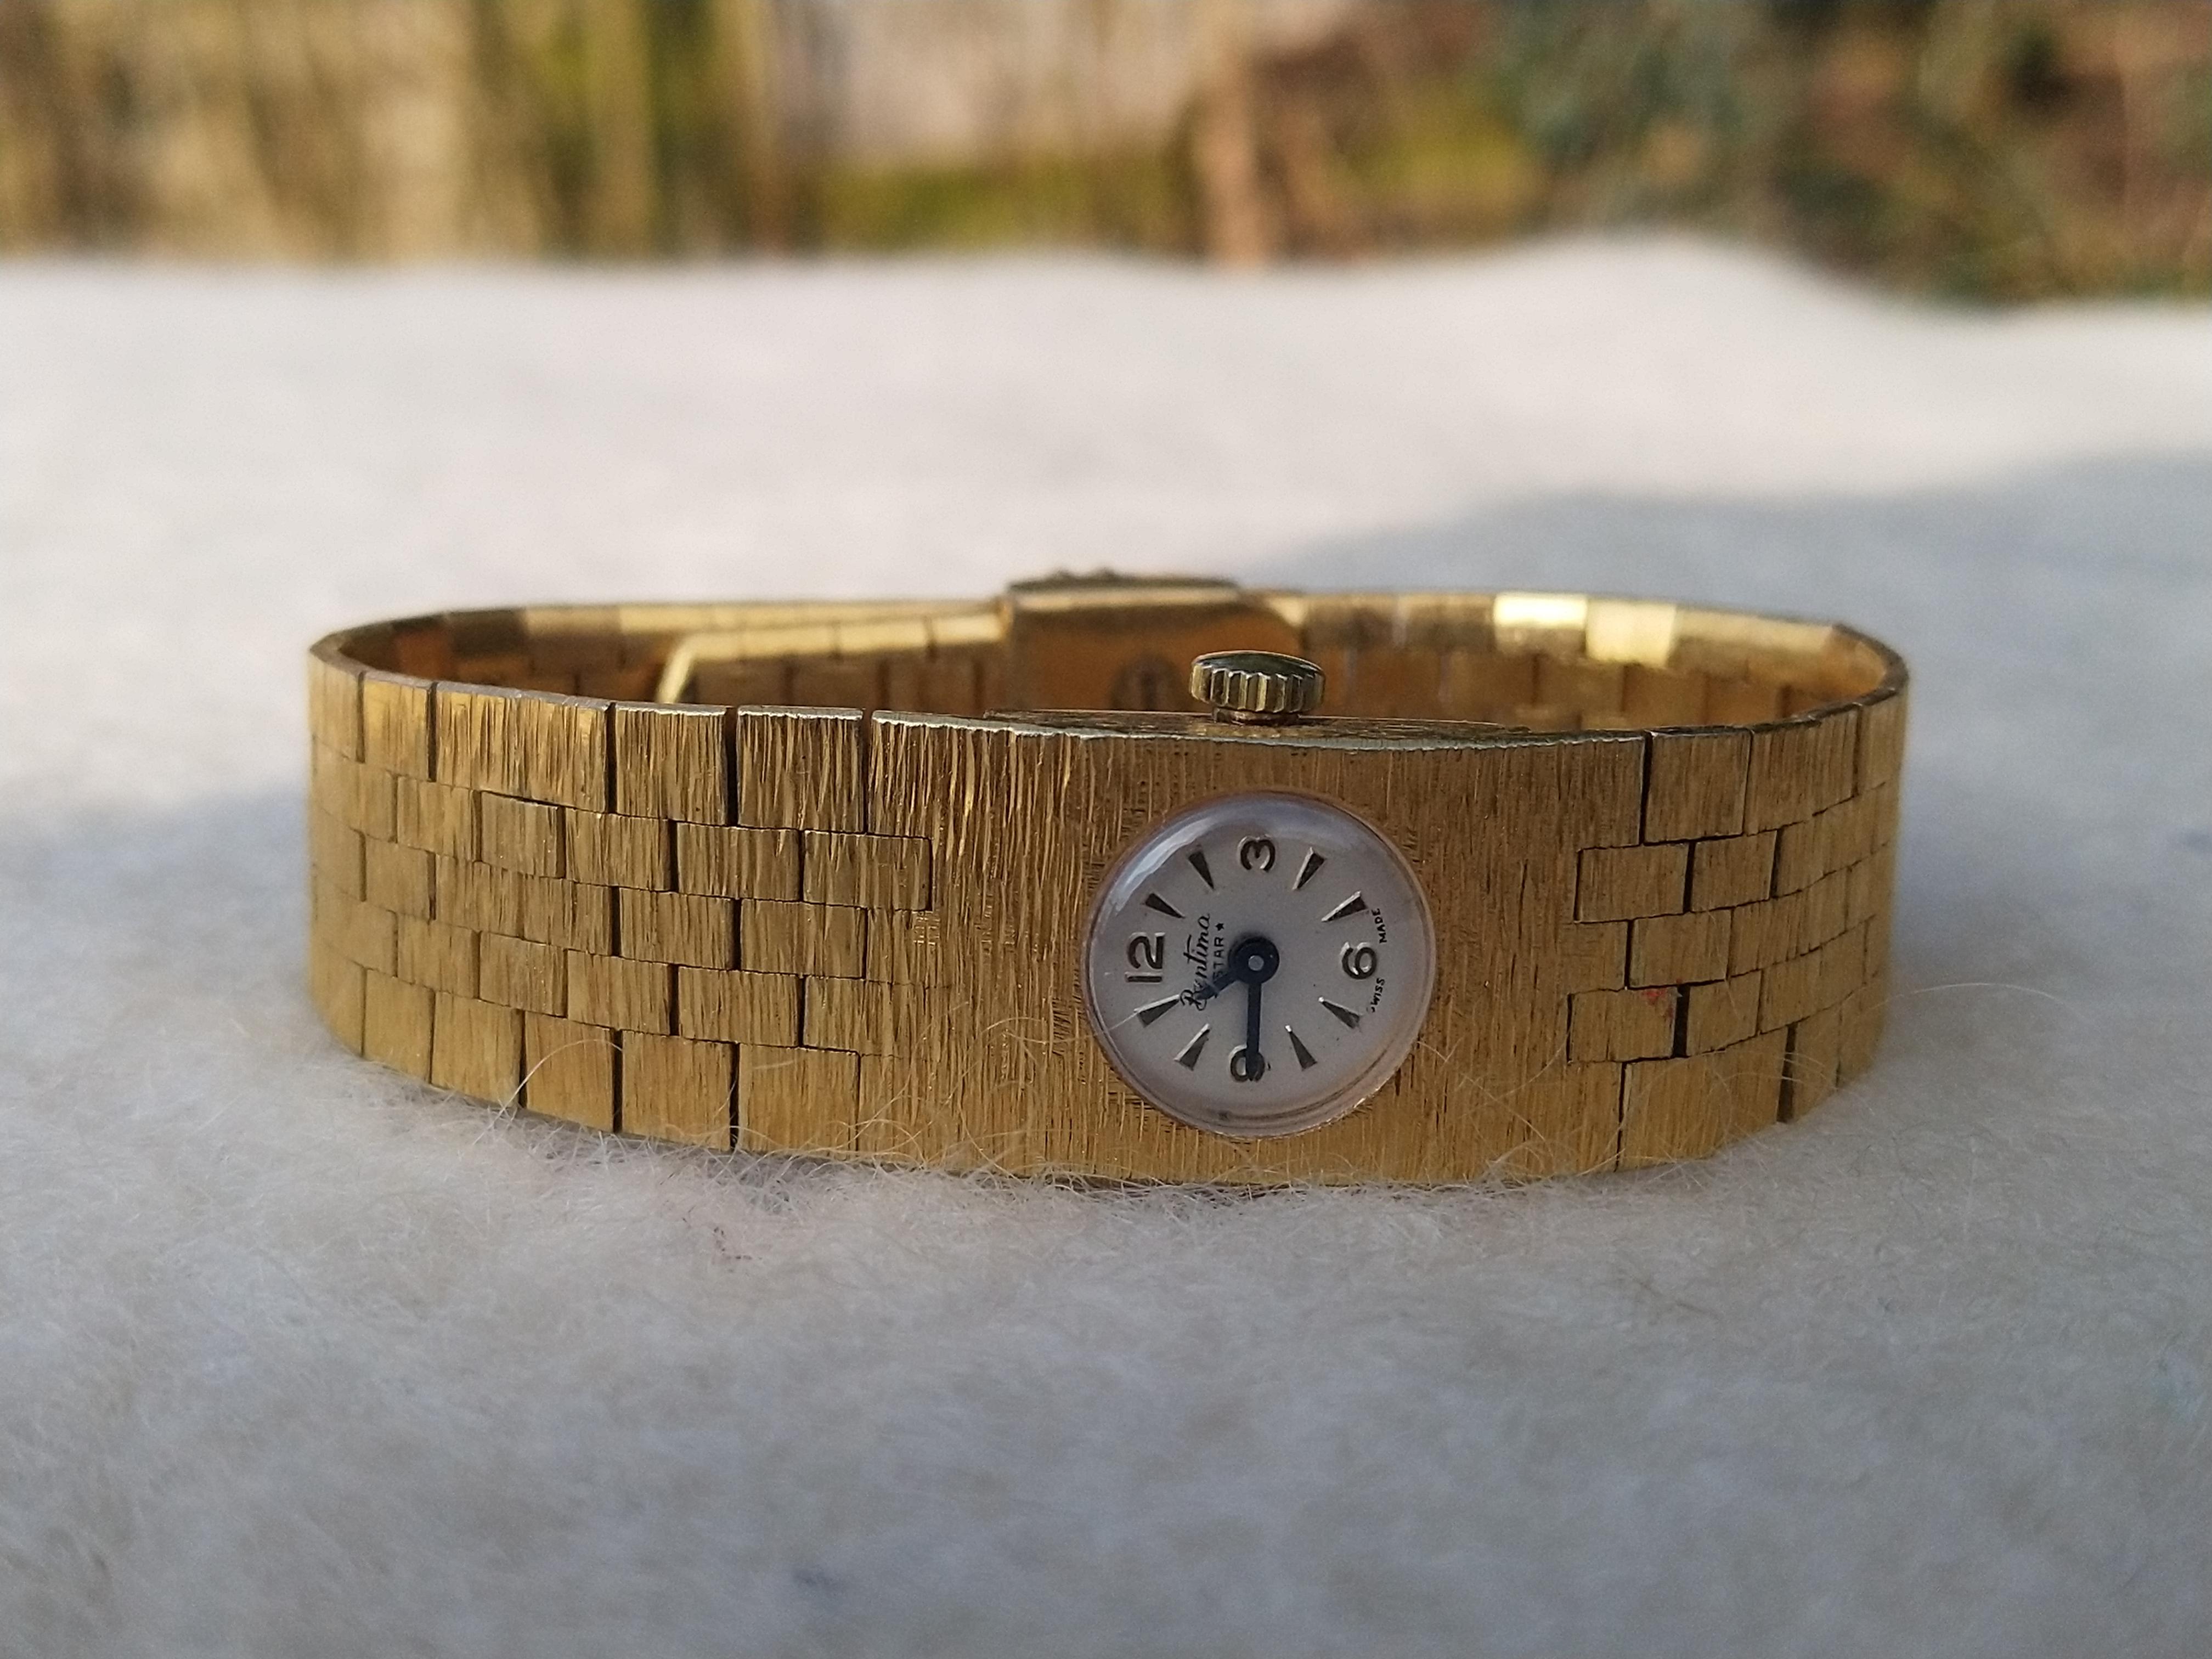
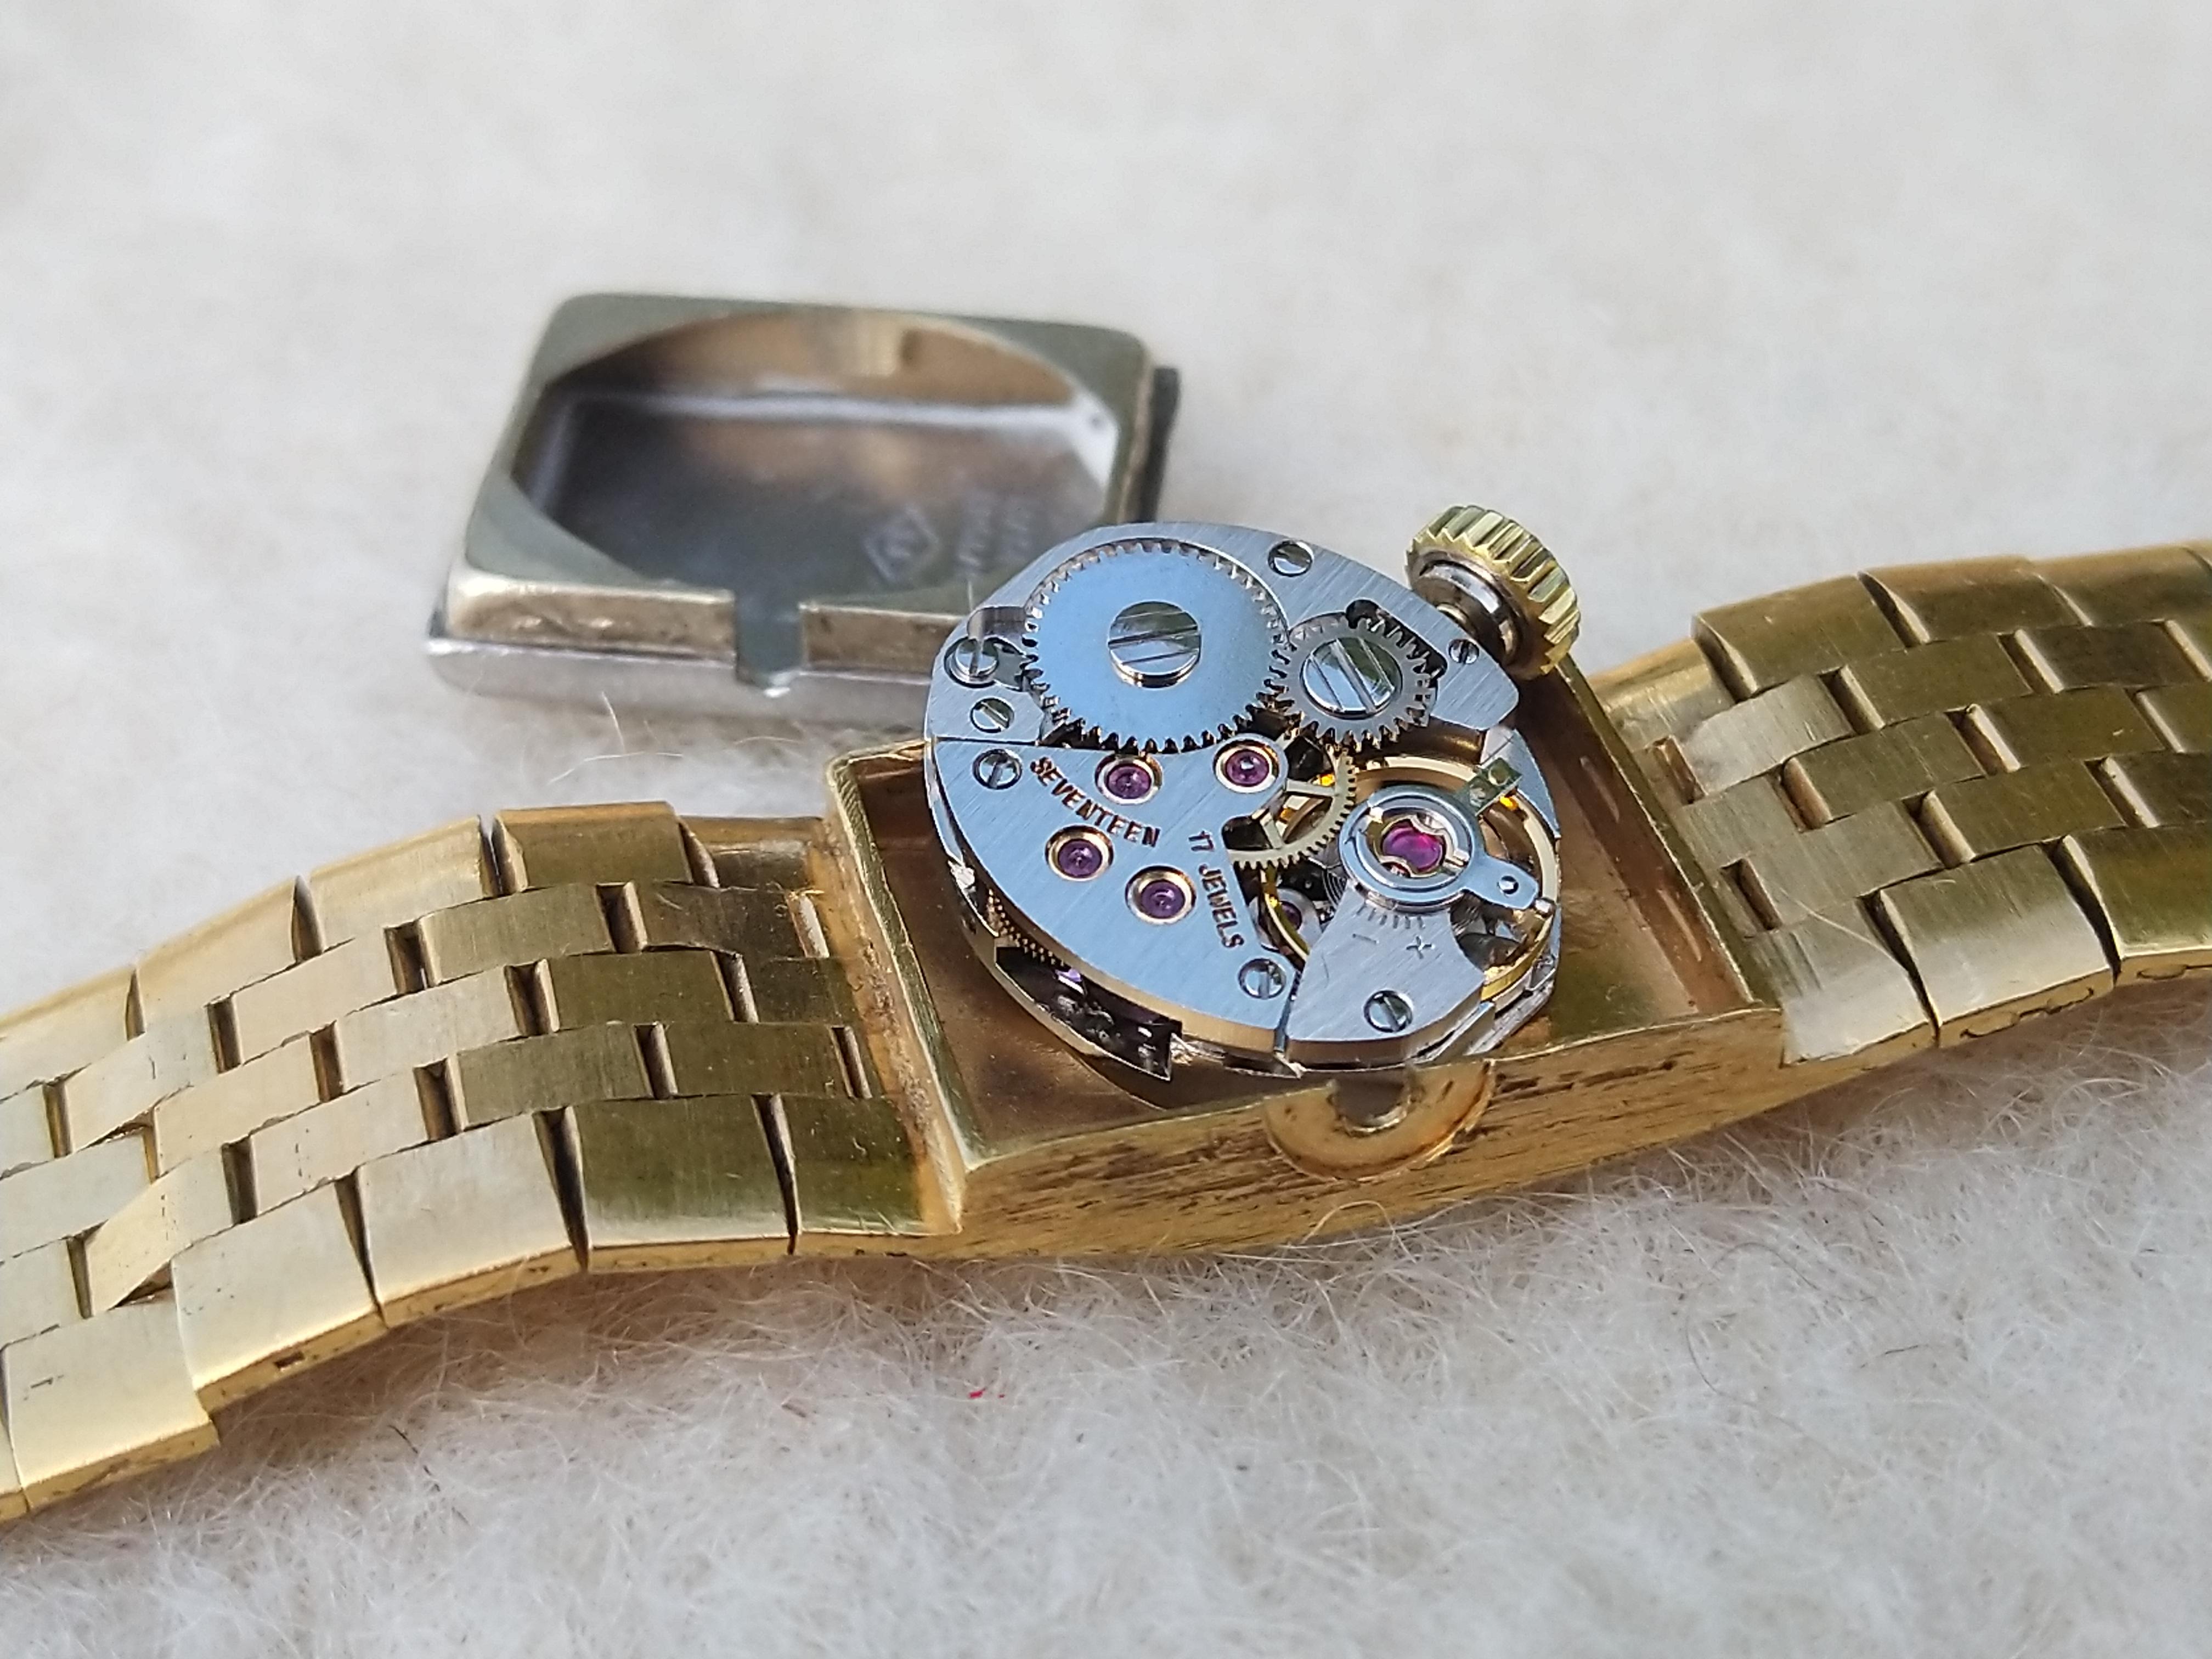
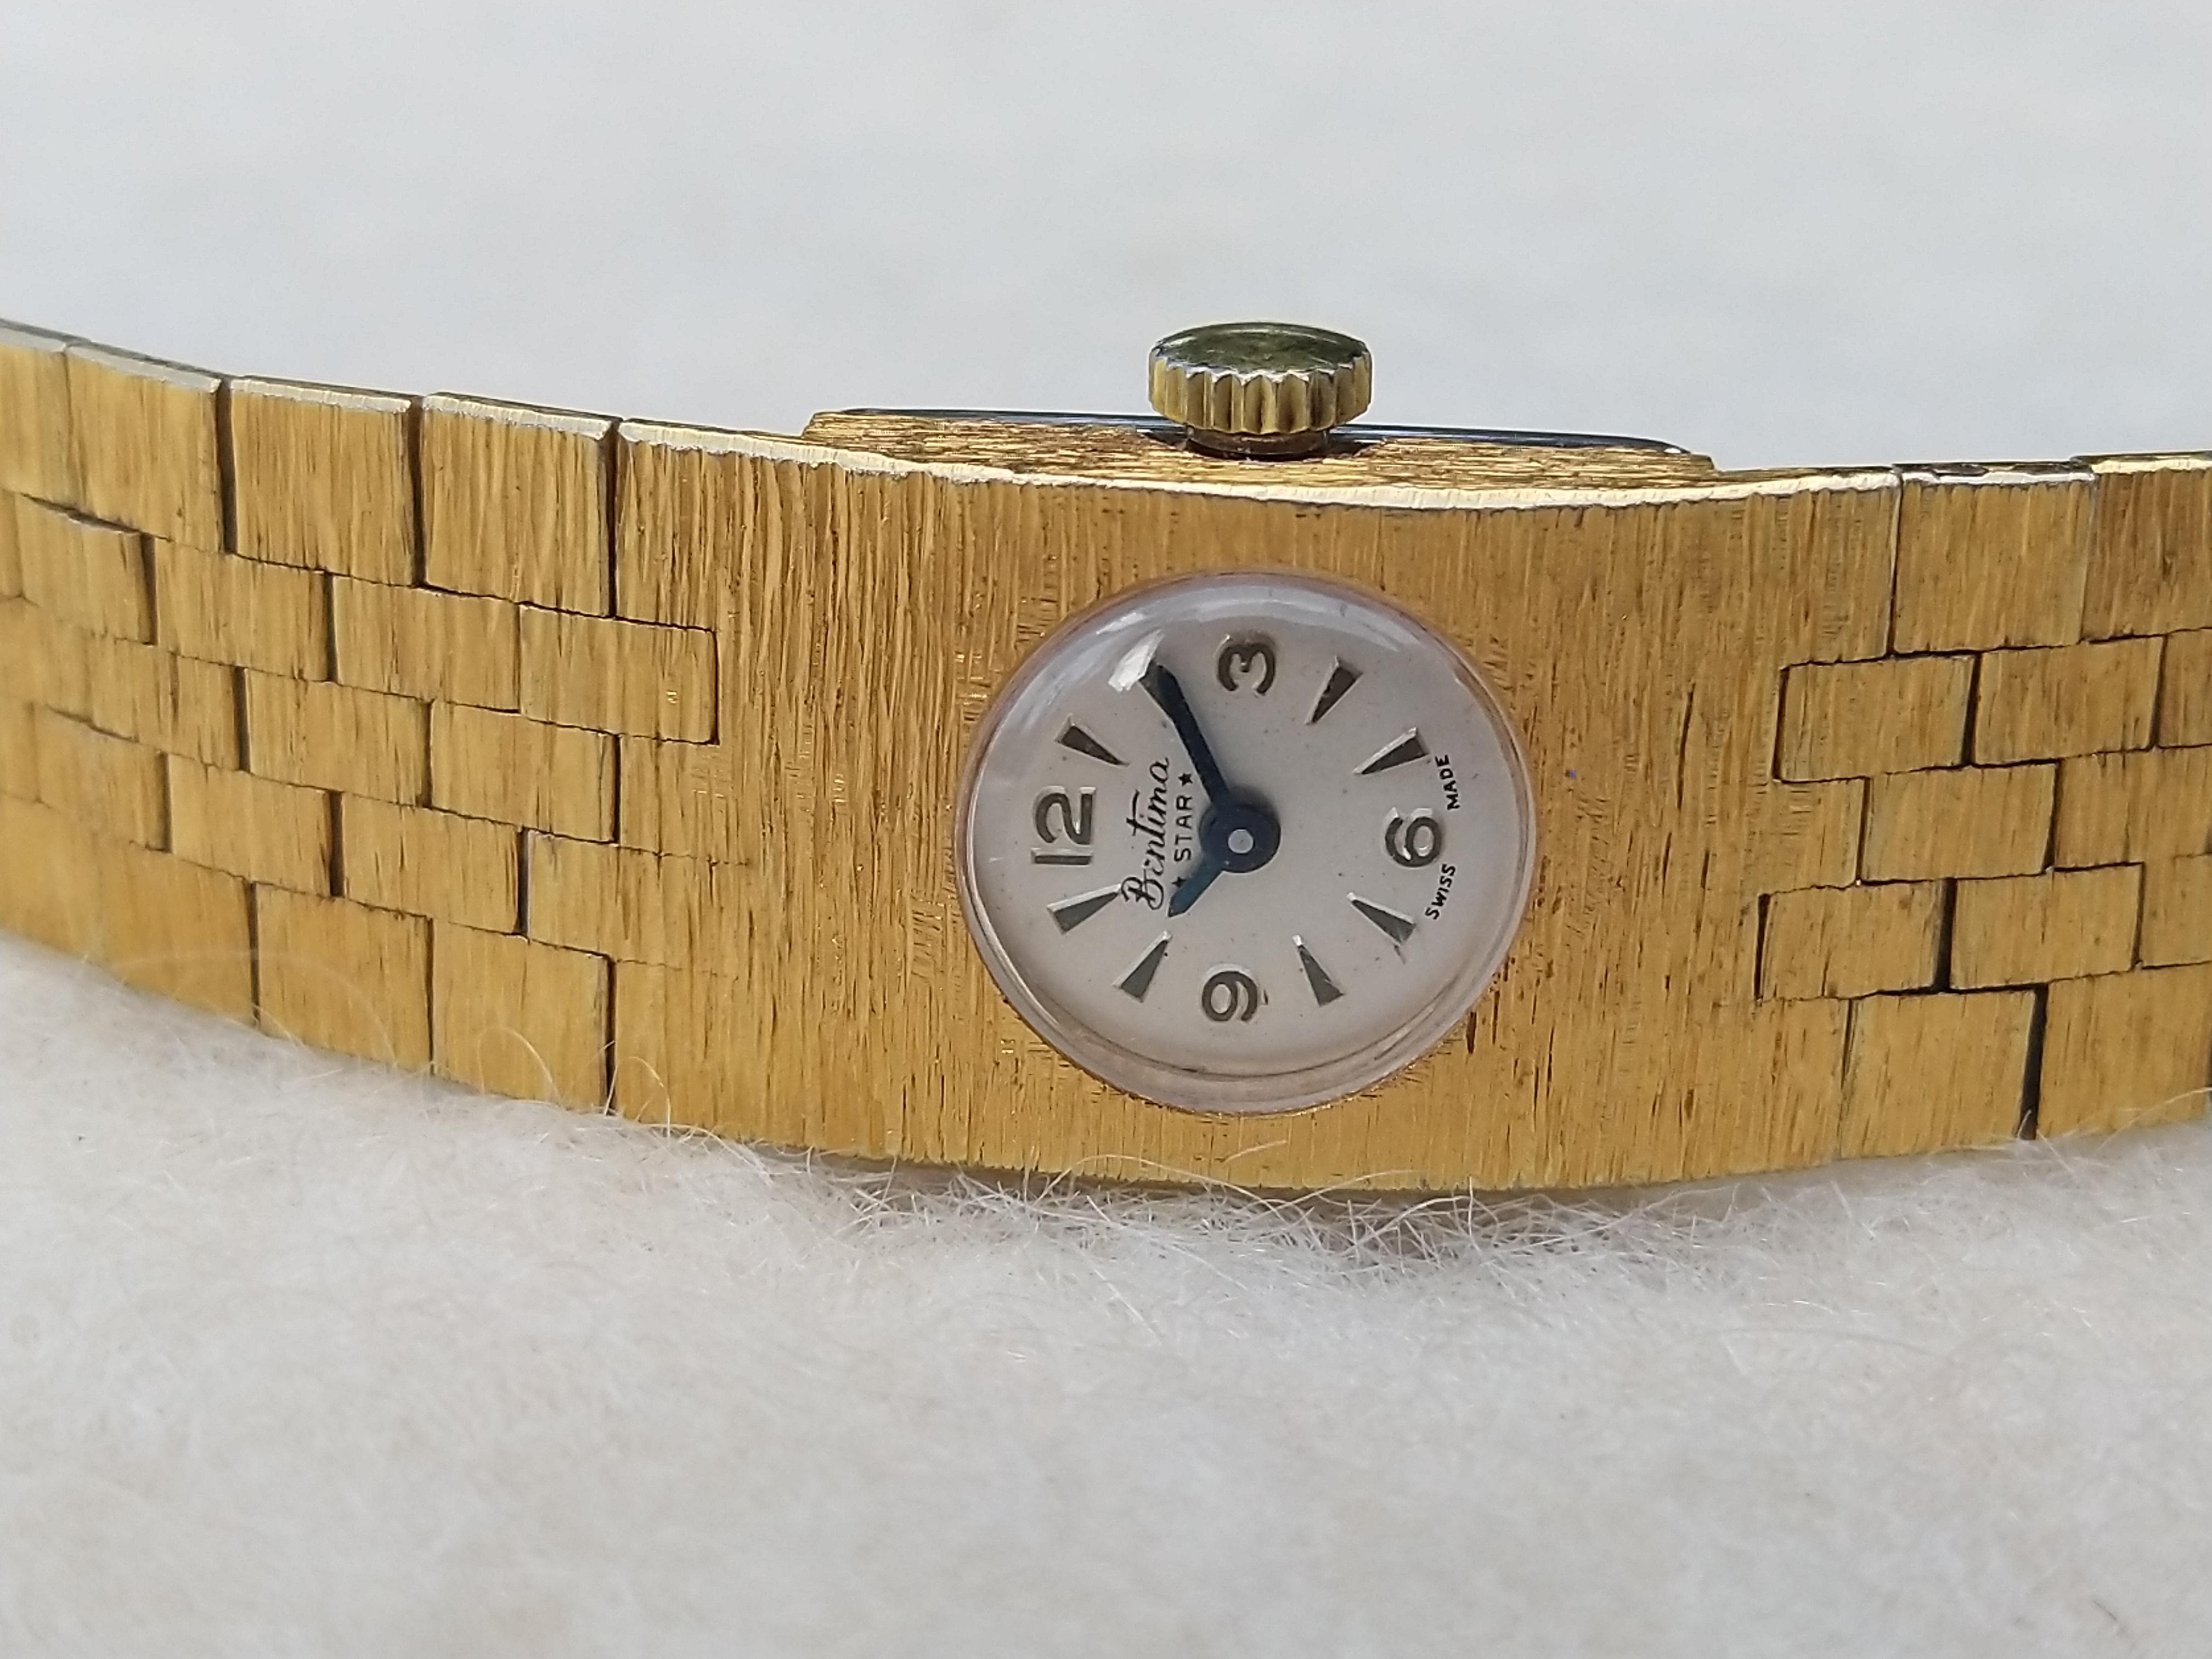
Thank you for your help, Folks. I managed to solve the problem by attaching the caseback at successive positions 'around the clock' until, thankfully, finding an orientation which allowed the watch to run ok.3 points
-
I got onto that about a year ago WW . 5 litre tins for 20 quid from motor servicing suppliers. I had a really sticky hairspring a few weeks ago, lighter fluid wouldn't touch it, it even got a short spell is an ultrasonic with elma ammoniated, still wouldn't unstick the coils. A 30 second swirl around in the lid off a tin of spray of the stuff made the coils free again. High evaporation rate similar to lighter fluid but without the addatives.3 points
-
Hello and welcome. That's a nice watch, with a fine regulation mechanism I've not seen before. You might want to practise on something less important to you. Most of us caused some level of irreversible damage to the first watches we worked on.3 points
-
Making a set of pin gauges would also be a nice easy project to practice turning down to small (and cylindrical) diameters. The diameters are relatively big, so it's not that difficult. I do like the thread cutting dies he uses, but I believe they are a bit expensive..3 points
-
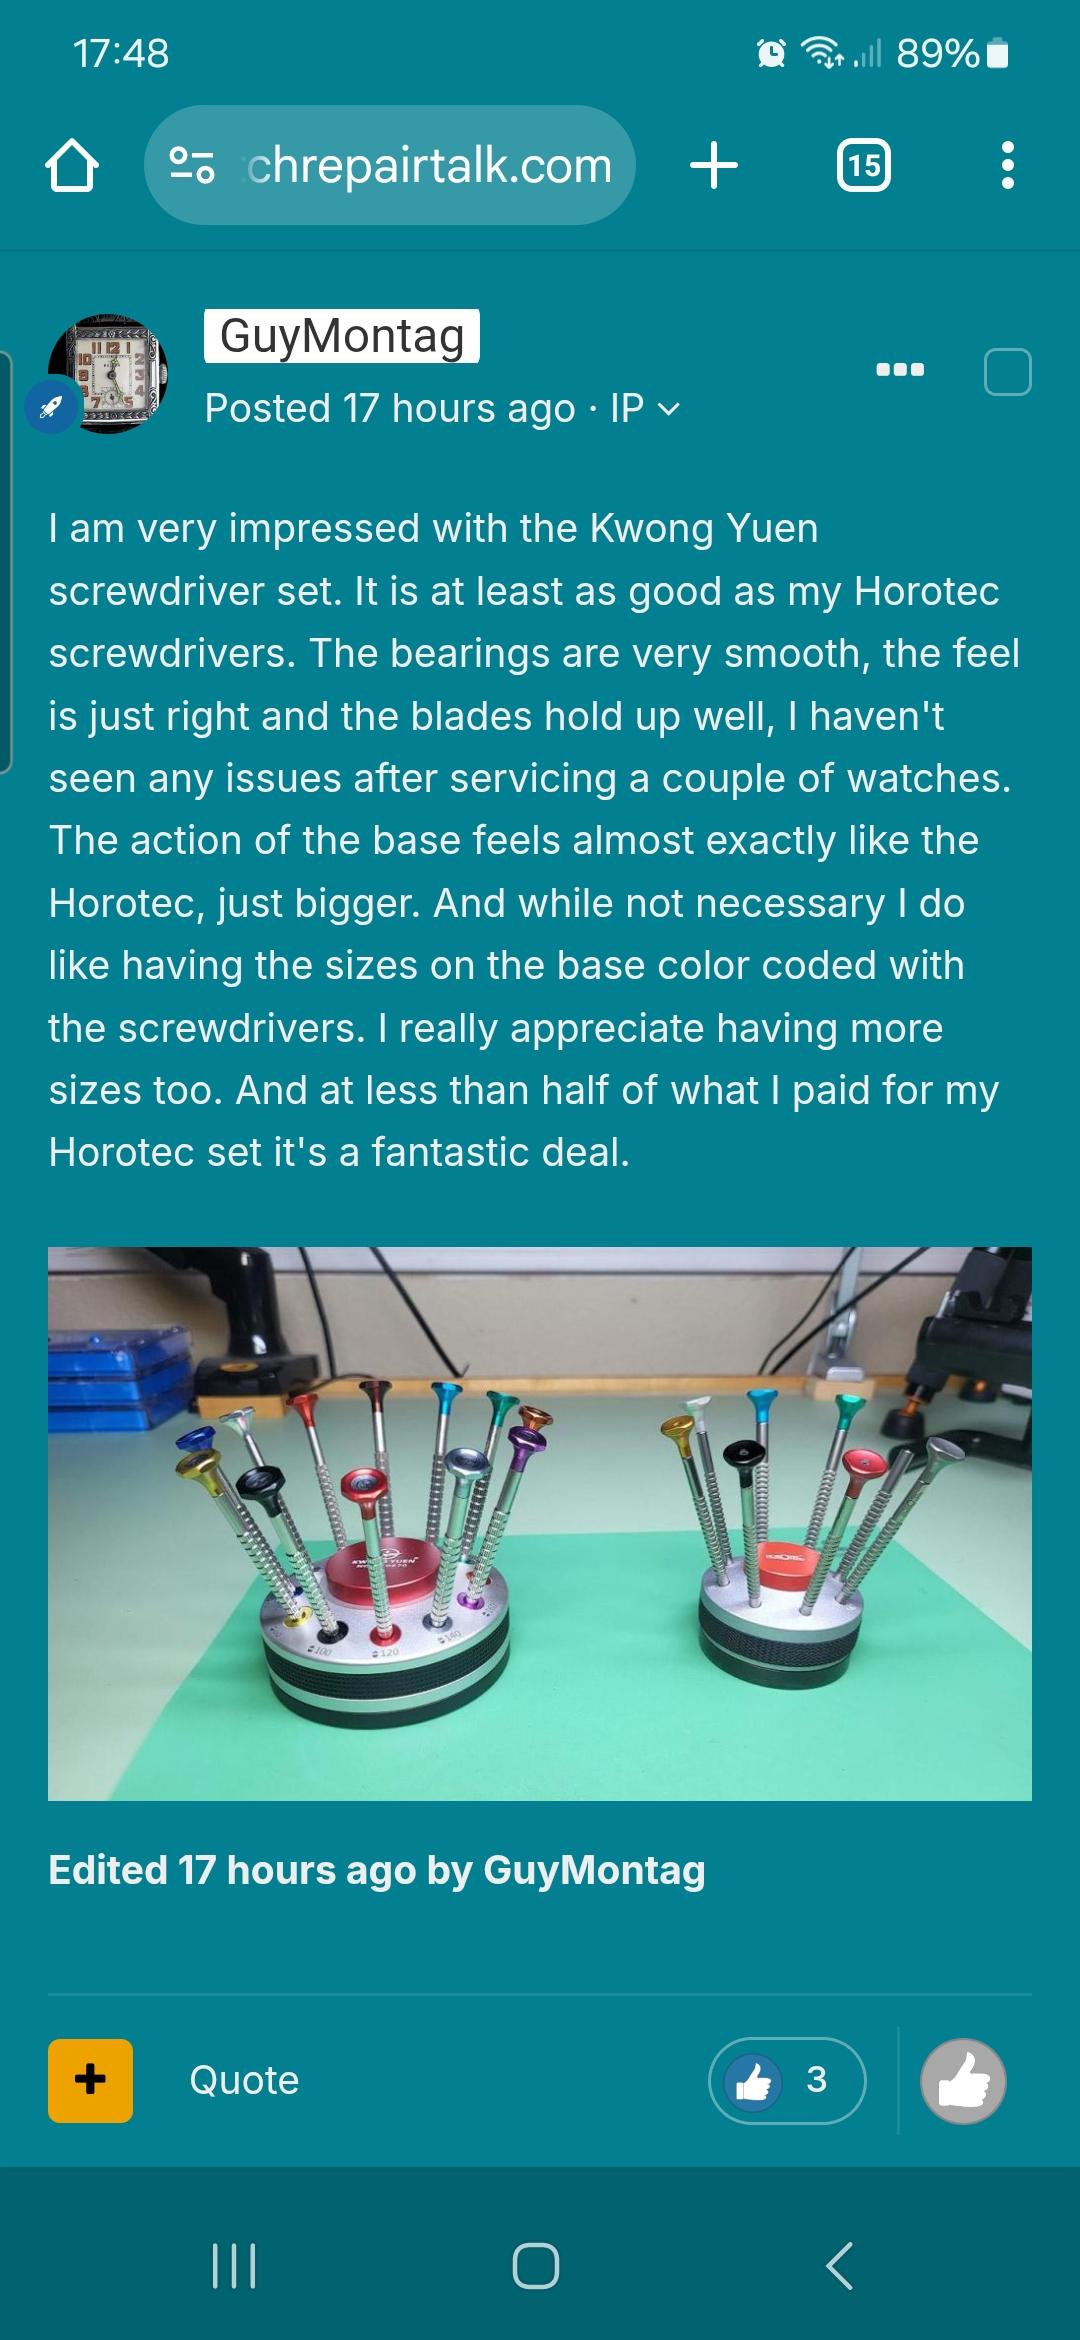
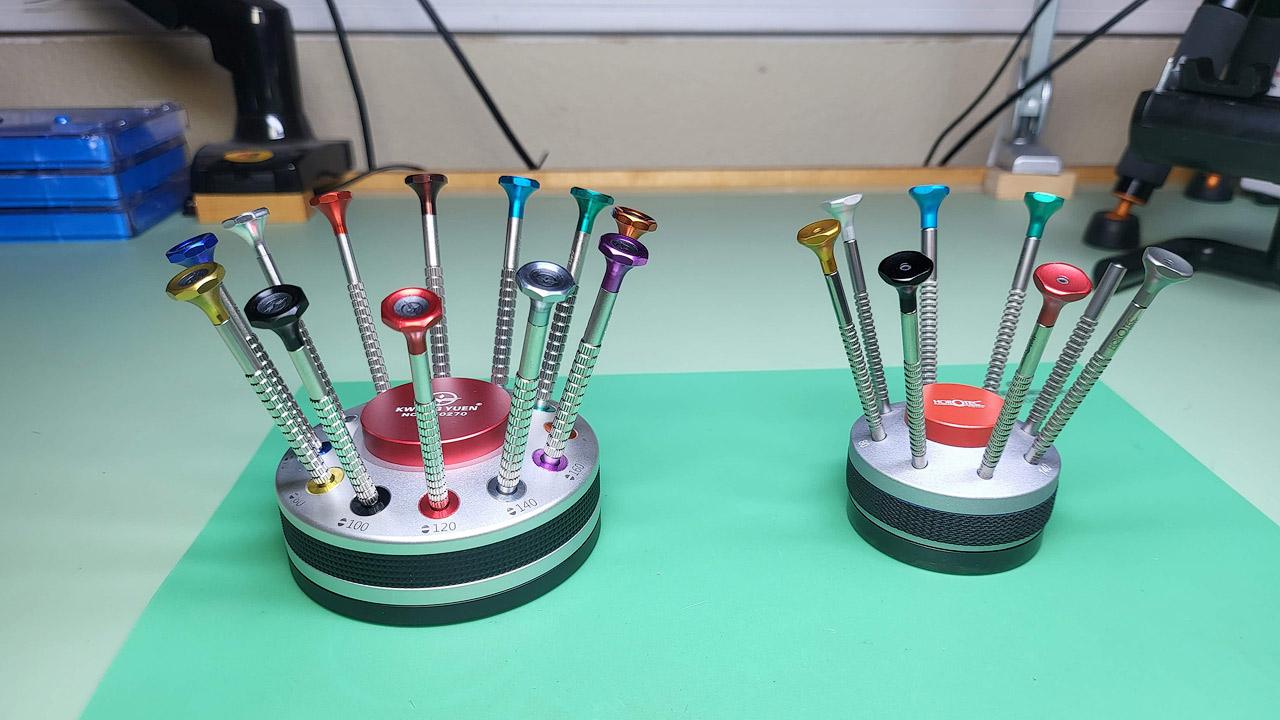
I am very impressed with the Kwong Yuen screwdriver set. It is at least as good as my Horotec screwdrivers. The bearings are very smooth, the feel is just right and the blades hold up well, I haven't seen any issues after servicing a couple of watches. The action of the base feels almost exactly like the Horotec, just bigger. And while not necessary I do like having the sizes on the base color coded with the screwdrivers. I really appreciate having more sizes too. And at less than half of what I paid for my Horotec set it's a fantastic deal.
 3 points
 -
Threadlockers belong to a class of adhesives called anaerobic adhesives. They are resins that polymerize and harden in the absence of oxygen. That's why the stuff remains liquid in the bottle but can sometimes set in the narrow tip of the applicator where the surface exposed to air is minimal. You can test to see if your bottle is ok by applying some to the threads of a clean bolt and screwing on the nut. It should start to harden in about an hour or less. But only the stuff deep in the threads will set, the excess that is squeezed out to the surface will remain wet and tacky. Heat also speeds up the set of anaerobic glues. If you are using it in arctic conditions, an accelerator is required.2 points
-
you've done an excellent job watch looks extremely beautiful. as you're happy with the rates and the watch is really beautiful I assume you do not want me to be nitpicky on timekeeping?2 points
-
Buy the Bergeon then.2 points
-
As said, start with inexpensive watches say seiko 5's for parts /in need of repair perhaps even some scraps. Stay with one calib Seiko 7009 for instance, you would then have your own inventory of spare parts and save $ £ €. Select pieces so you can eventually makes at least one good running watches out of them all. Welcome to the forum Pal.2 points
-
I use brake and clutch cleaner. I think that contains a lot hexane. £20 5 las. Leaves no residue.2 points
-
HWGIKE#43 AS 1977-2 Swiss lever, full event less service. Nice performance.


 2 points
 -
After 4 years of punching out staffs , I decided to cut hubs off, it's not difficult after a little practice . Cutting the hairspring side means trying to dig out the rivet...the hub is easier and safer to cut, then the wheel just pulls away from rivet.2 points
-
That was extremely helpful, thanks. I think I'll grind the hub off, seems like the easiest and safest option.2 points
-
When mixing and matching staking sets, watch out for GK tools. Nice vintage staking sets, but at 4.75mm they are the odd man out when it comes to compatibility.1 point
-
Hi @Bill2024, Everyone has a different approach to learning, some read, some take courses or watch videos, some just try it out. Personally, I'd just take one of your less expensive projects - maybe with just one of the two complications. And give it a go. That is if you feel comfortable with the basic manual wind movements. Especially date complications are often not so difficult (especially when they're without a quick-set). Post your project/calibre and ask your questions in a new thread. I'm sure you'll get all the info you need. PS: there was some uproar recently in another thread about Mark's absence and not reacting to messages. Probably don't expect that course to come out anytime soon.1 point
-
Michael...you must be super proud of what you've achieved here .....honestly mate it looks amazing...someone is very lucky and will be thrilled with it1 point
-
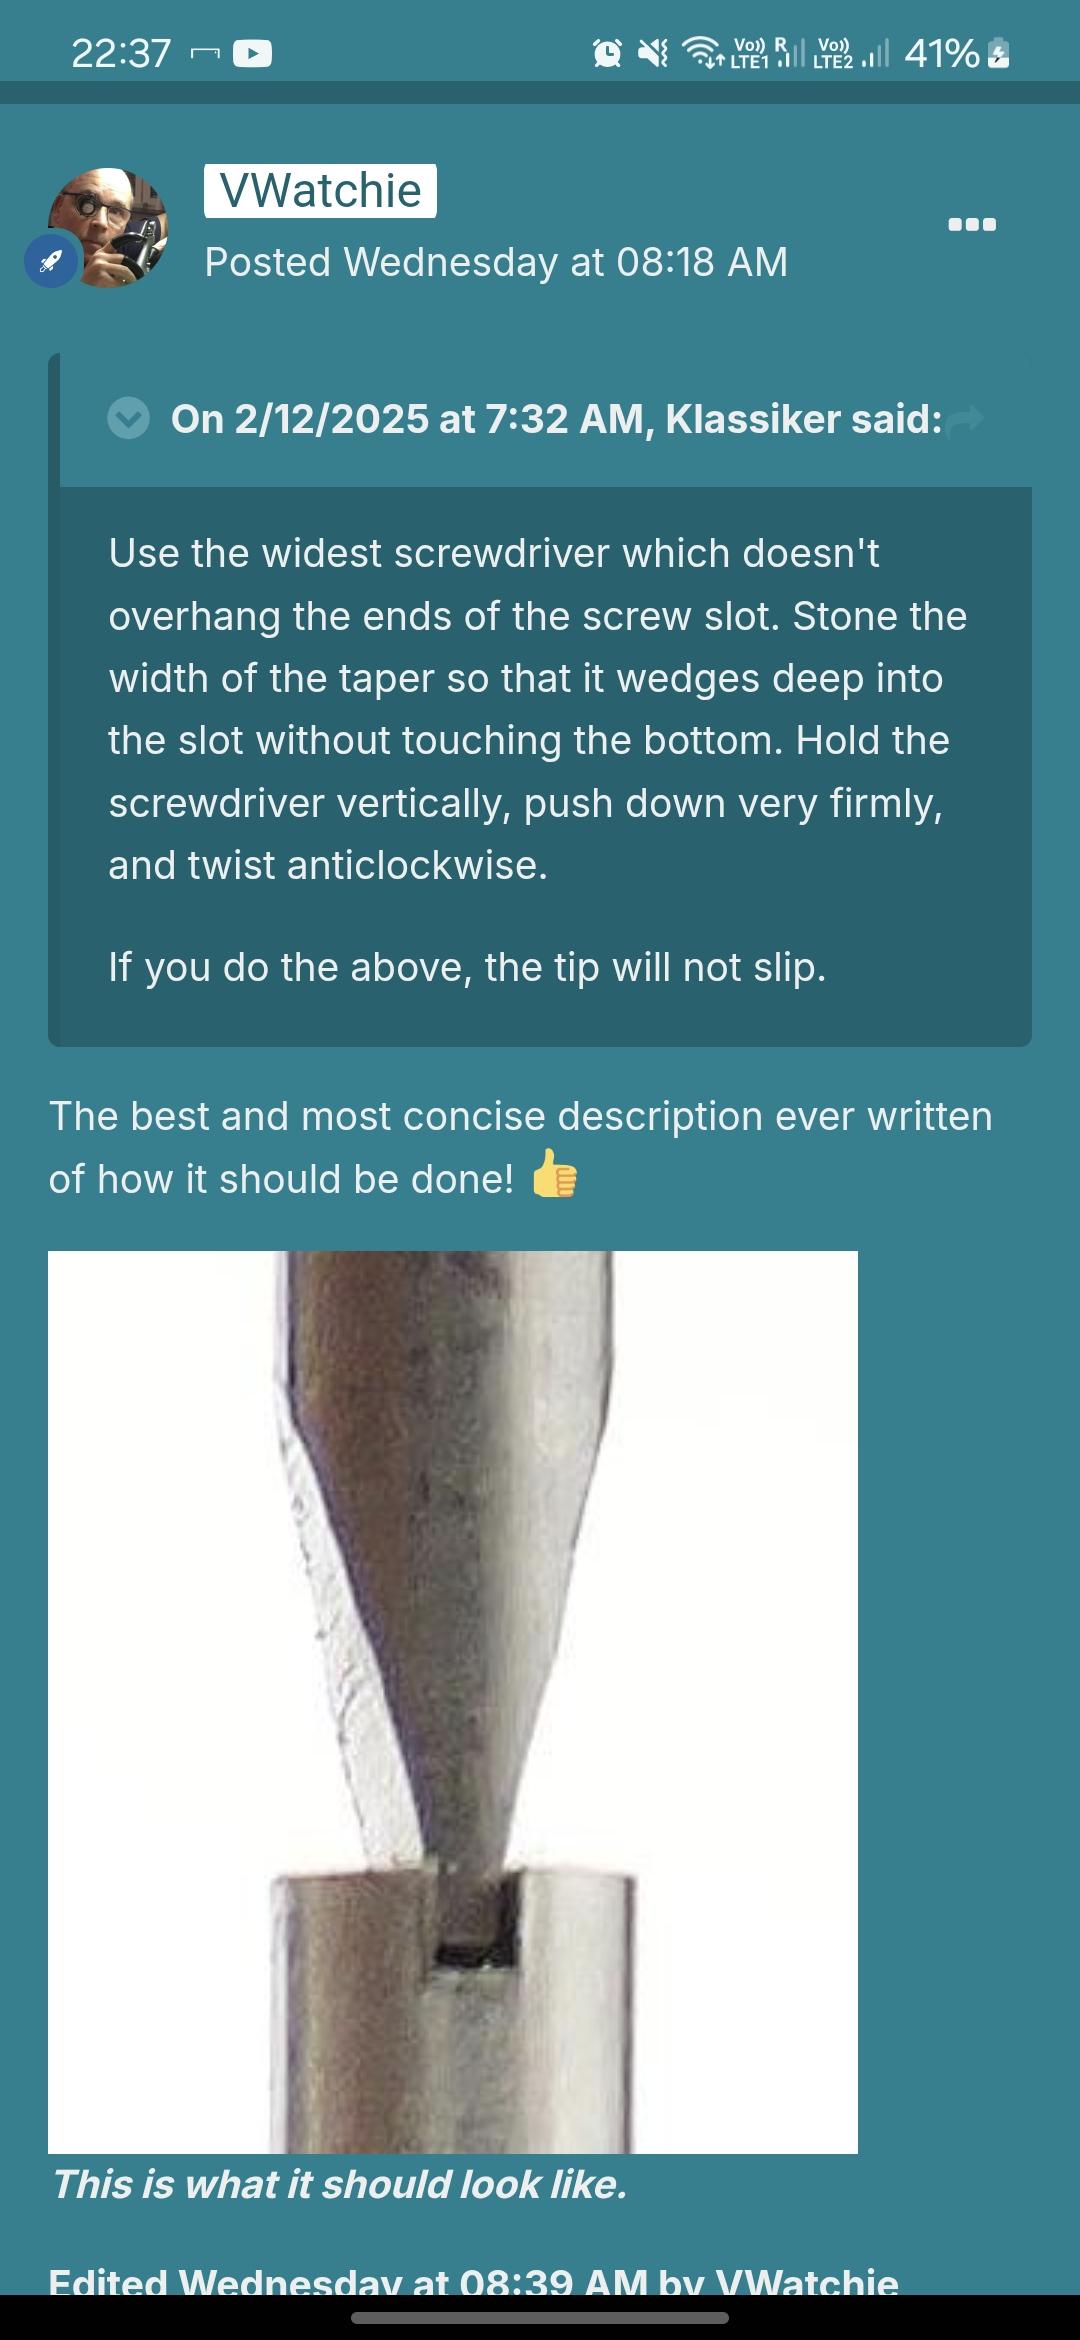
Yes indeed. I was also once fooled by this "Bullongè" brand. Sounds nice and Swiss/French, but is a cheap Indian or Chinese make. Now... screwdrivers are one of the two most used tools (next to tweezers). It's worth investing a bit in them. BUT... even the best screwdrivers don't do the job automatically. You need some practice in applying the right pressure and holding them steady. Absolutely essential is to dress the screwdrivers to the right size for the screw slots - this applies to the cheap and the most expensive screwdrivers! It is NOT enough to match the screwdriver to the length of the slot (the obvious one). You also have to adjust the thickness! This video is helpful: @VWatchie and @Klassiker also posted this in another thread to illustrate the point I am trying to make:
 1 point
 -
Welcome @jspa! Thanks for the introduction. Where are you located? It is helpful to share that so that we can give better advice on sourcing materials.1 point
-
Hampden Watch Company - Hampden was one of the big American watch companies (but still a tiny maker when compared against the giants Waltham, Elgin)1 point
-
Hello and welcome to the forum. You have had some very good advice regarding putting this one aside and honing your skills on cheap jobs that will stand a bit of messing about with. Best to destroy a $10 watch than a family piece.1 point
-
How about these?
 1 point
 -
Hi regarding screwdrivers the usual maxim is get the best you can afford. You can purchase single Bergeron ones of sets. Other sets like A*F are good . If you are taking this hobby up long term then Bergeron. Many years ago when I started you bought them single, I still have them and use them today along with others for example a French set which are good but avoid cheap ones as they are just that. Ali express , Chinese Amazon might be worth al look at . There are many on this site using Chinese tools quite satisfactory. The choice is yours in how much you are willing to pay for the.1 point
-
Yes. One bearing if pressed tight will grab and hold firmly until tapped with a brass hammer, regardless of lubrication. I expect lapping it will help.1 point
-
I had seen about cutting the rivet side in a lathe, and to be honest, I thought that seemed like a terrible idea. I then sort of dismissed the whole cutting it out situation. As soon as I saw someone say cut the hub side, i thought that seemed like the way to go. Can't believe it didn't occur to me earlier.1 point
-
..more assumptions...this is where a movement should be placed for best results. Preferably with the crown or balance nearest the mic if its safe to do that and doesn't press on any important bits.
 1 point
 -
Thank you for this valuable first hand information!1 point
-
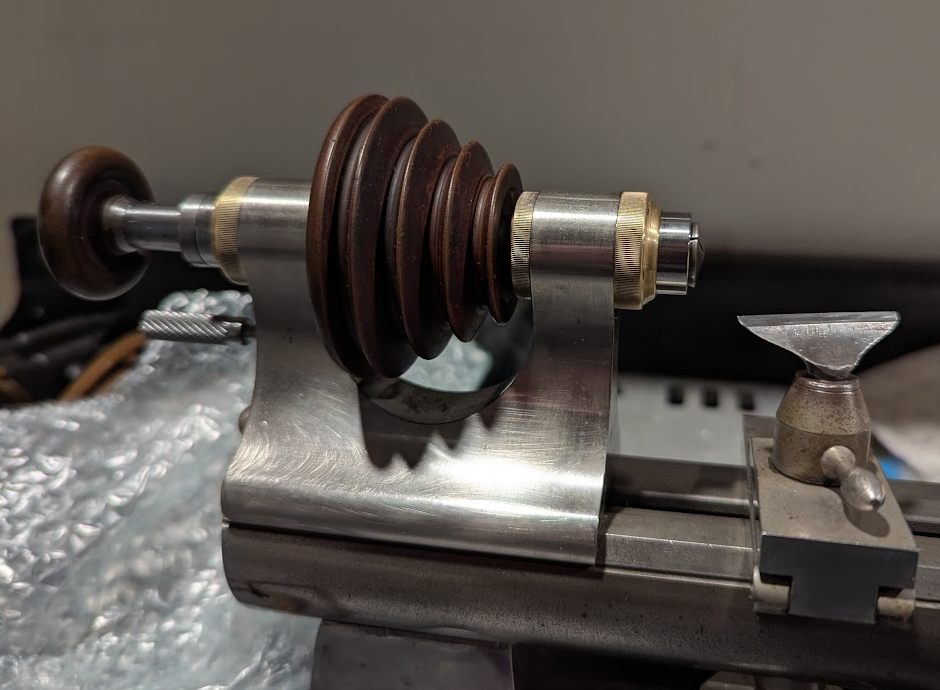
Other projects and visiting family meant putting the lathe build aside for a couple weeks, but now I have more parts and progress. I couldn't find a dog point set screw with a slotted head rather than hex, and I didn't want to mess with easy to strip hex screws anymore. So I spun a 12mm long M4 slotted set screw in a drill (since I don't have a lathe yet) and ground it with a stone drum in a Dremel into approximately a dog point to fit the spindle hole. I redrilled and tapped the pulley for the M4 screw. Aligning the spindle to the hole in the pulley was harder than I planned on since they are very tightly fit and unable to rotate or slide once in place. Took me 5 or 6 tries tapping the pulley on and off again until I nailed the screw hole placement and could get my screw all the way in. I assembled the rest of it, but I am still finding that the rear bearing binds up at a high spot, unless I press the bearing on not quite all the way, with maybe 0.05mm of play. I have ordered some Timesavers Lapping Compound as suggested by nickelsilver and will hopefully smooth that out to stop it binding. Once it grabs hold, it locks up completely. Should there be any play end to end on the spindle in the bearings? I assume not, and that the oil lubrication should form a barrier only a couple microns thick when the bearing is pressed on as far as it can go. I watched Jon's video assembling a Wolf Jahn headstock and he closed in the bearing's locknut then backed it off a tiny bit, but with no axial play. Right now I just can't assemble it without a tiny bit of axial play, but hopefully lapping the rear bearing will correct that issue. Lastly, I might file a little cutout into my brass end cap dust covers as most other lathes seem to have. It is inconvenient to have to slide them back in order to access the oil holes because they're a really tight fit. And since I don't have a big vintage motor (just a little modern sewing machine motor), mounting at the back of the Borel base was a hassle and frankly ugly. I found in a random clockmaker tools lot on ebay a lathe foot/pedestal that looks to be the right type for my bed. If it arrives next week and does fit, I will sell off the Borel base and instead mount everything on a heavy wood board as everybody except JD Richard seems to prefer. Even if I never get around to turning any stock on this thing, it has been a lot of fun learning how it works. And like everything else in watchmaking, very impressive that it could be manufactured to such precision 70 or 80 years ago.
 1 point
 -
depending upon where the bend actually is there is an easy way to try to fix this. you hold the balance wheel in one hand than with your other hand you just gently bend the arm either up or down until its alignment with the rest of the balance wheel. It's probably ask easier to do than it is trying to read my description.. Most of the time that will straighten balance wheels are out of flat sometimes it people get creative it's no longer flat in reference to the balance staff and then that becomes more complicated then you'll need a truing caliper. Or sometimes people bend the arms in and out depending upon where the end is that can become challenging to get it all back round again. But the easy thing to do is just bend it with your fingers carefully and see if you get it back flat again if you're lucky that will solve the problem I think you're going to find the transferring part is going to be quite challenging or basically impossible. With the exception of friction fit balance staffs everything else is riveted in place and getting riveted staff apart and keeping the rivets or can be used again is basically impossible. then your upper pivot does not look right at all it's a little on the short side it's not quite shaped right and it looks like it's slightly scored which would indicate a bad jewel.1 point
-
That depends, doesn't it? If you are a highly skilled watchmaker with years of experience, then it's as easy as he makes it look. Like Fried manipulating a hairspring. If you are a rank amateur like most of us here, then your results may vary. To make a functioning winding stem though, given the right tools and enough patience, should be possible for even the most ungifted amongst us.1 point
-
Never seen this. Anybody know anything about this. Brand is Addison which could me meaningless.
 1 point
 -
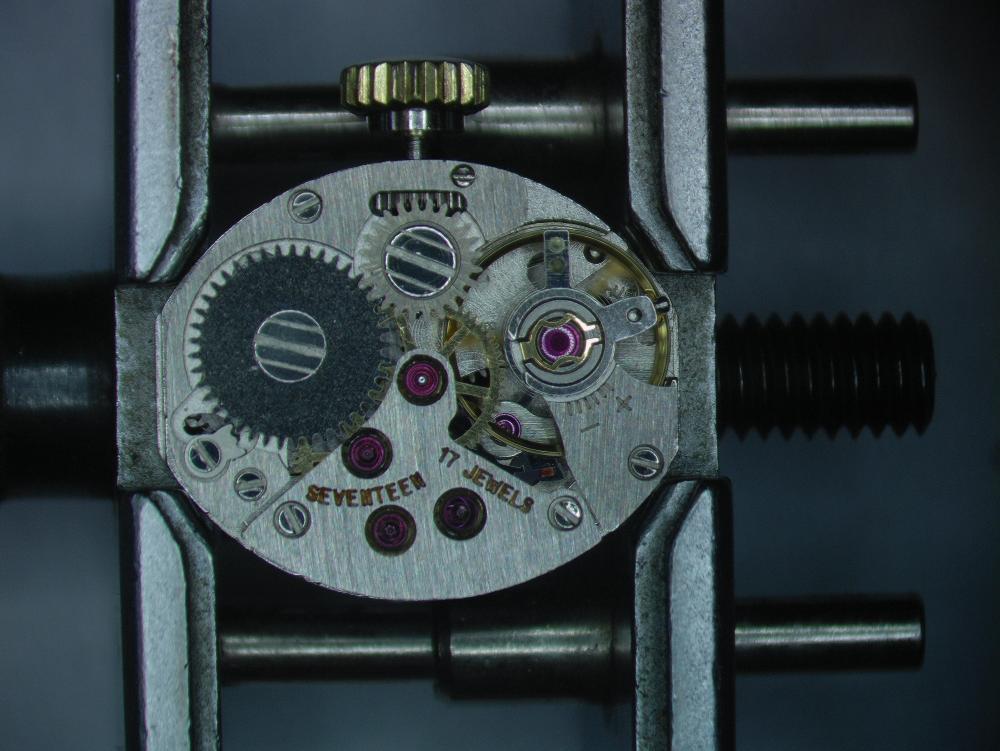
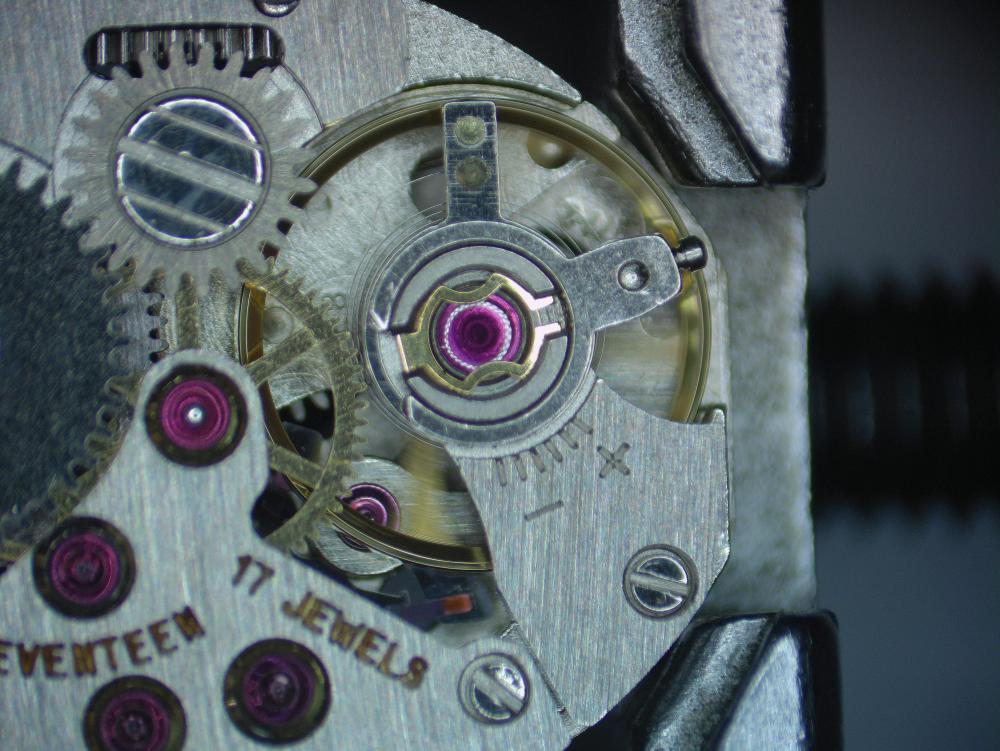
The other bit here is don’t jump to the conclusion that you are using a movement holder. You are not, you have shown here a movement held with a case vice. Tom1 point
-
1 point
-
wonderful explanation sir , thank you for sharing this in images form to make us understand very well in more understandable way to be cleared how thats work on movement's, great work sir1 point


.thumb.jpg.cb17a66989f1e796fd4217db2e9ca9df.jpg)