Leaderboard


.thumb.jpg.cb17a66989f1e796fd4217db2e9ca9df.jpg)
Popular Content
Showing content with the highest reputation on 02/17/25 in all areas
-
The wire wool won't remove any metal, just the rust. Abrasive paper will remove metal, and best to keep abrasives away from measuring tools- certainly far away from the measuring faces.5 points
-
Richard, probably the best would be to strip them down, do the gentle rust remover then remove any discolouration gently with 0000 steel wool. After that I would warm them on a radiator and very lightly give them a once over with 3-in-1, back on the radiator for a bit then wipe them off with a clean rag. Tom4 points
-
With my joinery gear stored in the garage or any rusty carboot tools I bought that needed a clean up, all I ever used was triple 0 or 0000 wire wool with a little 3 in 1 oil and then wipe back with the same oiled rag I must have used for 20 years or more.3 points
-
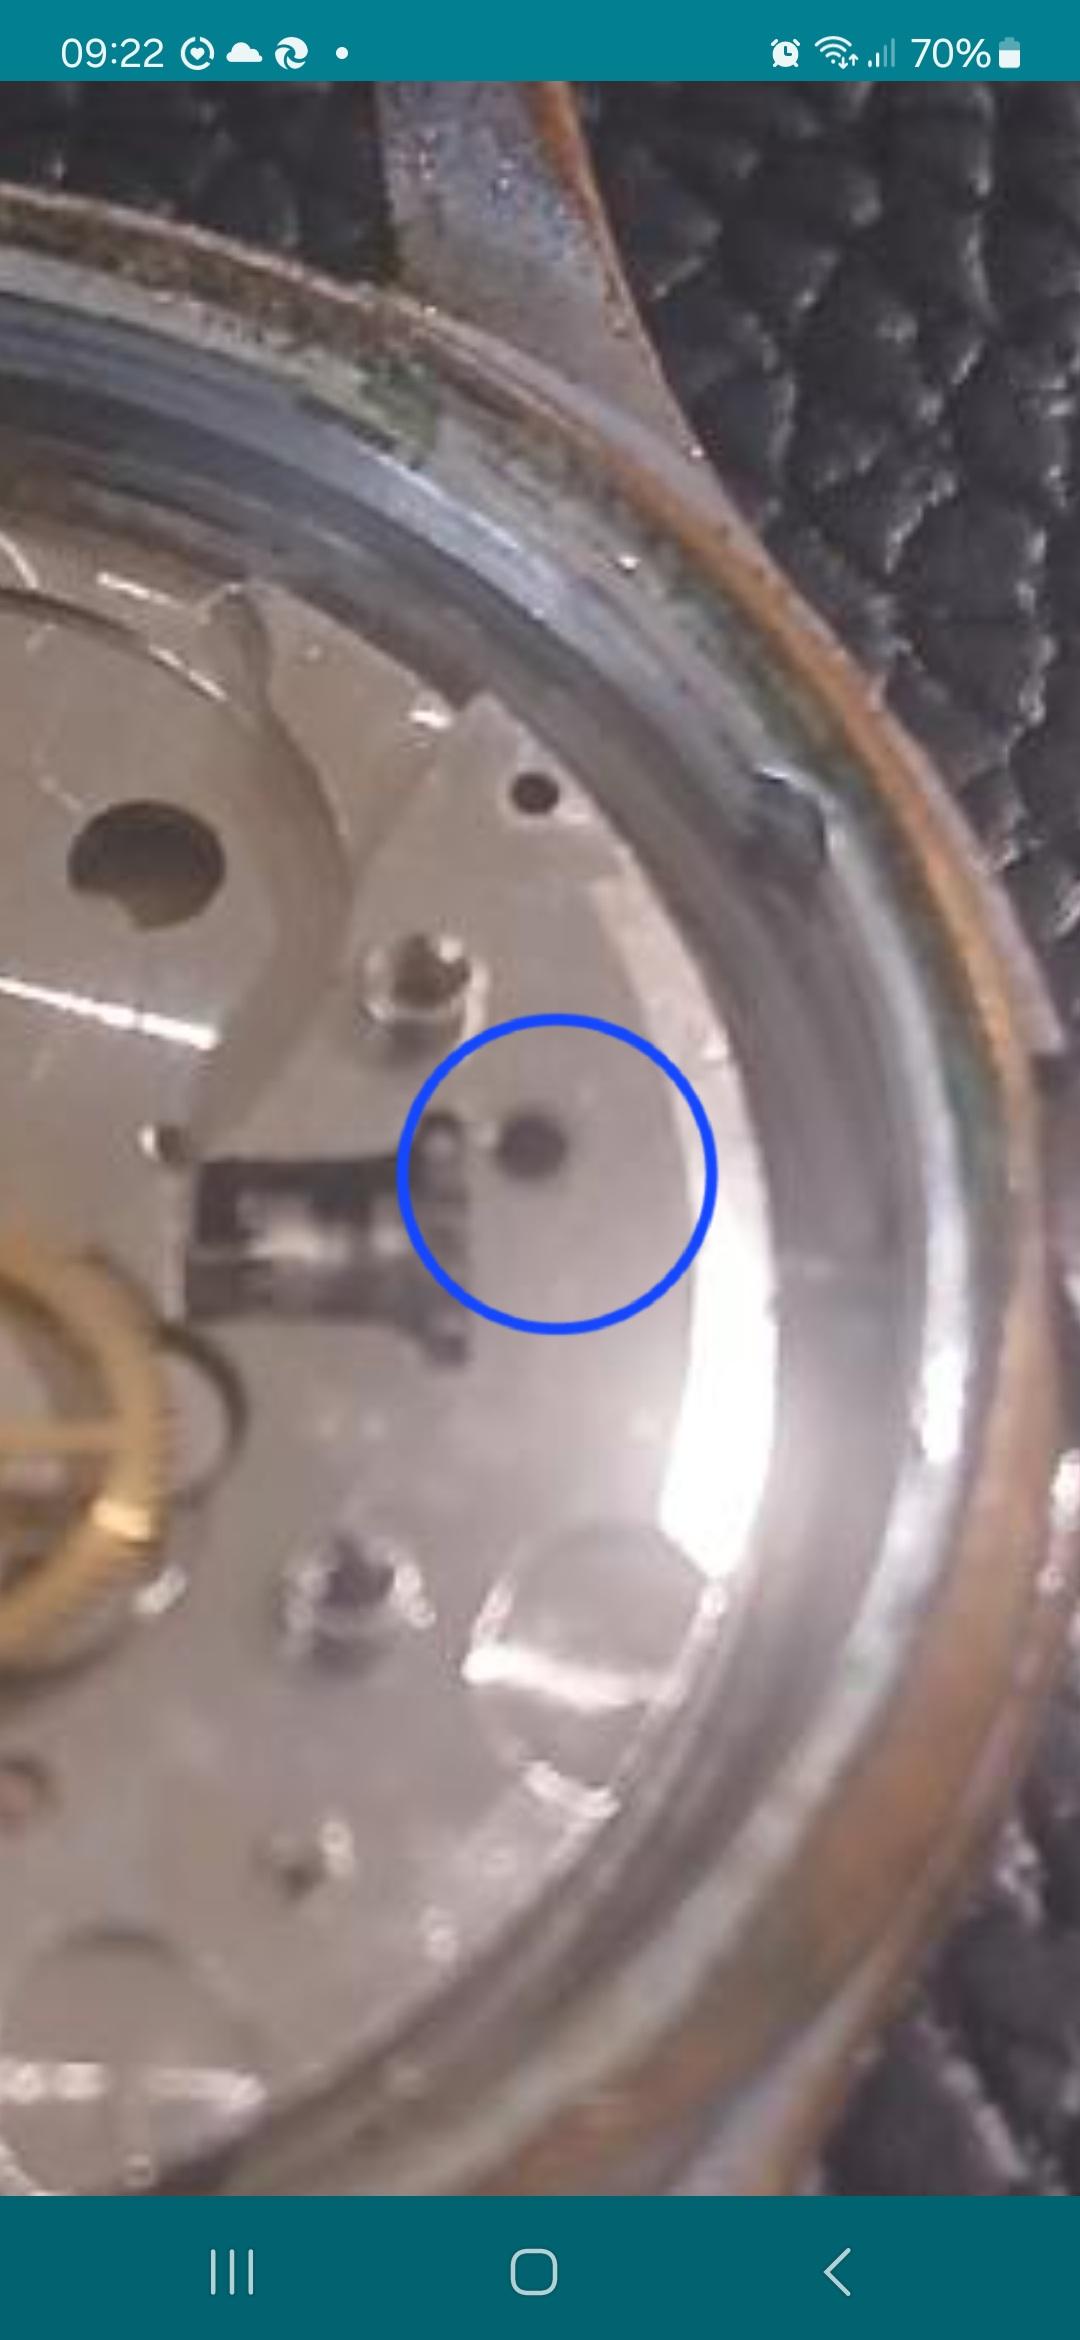
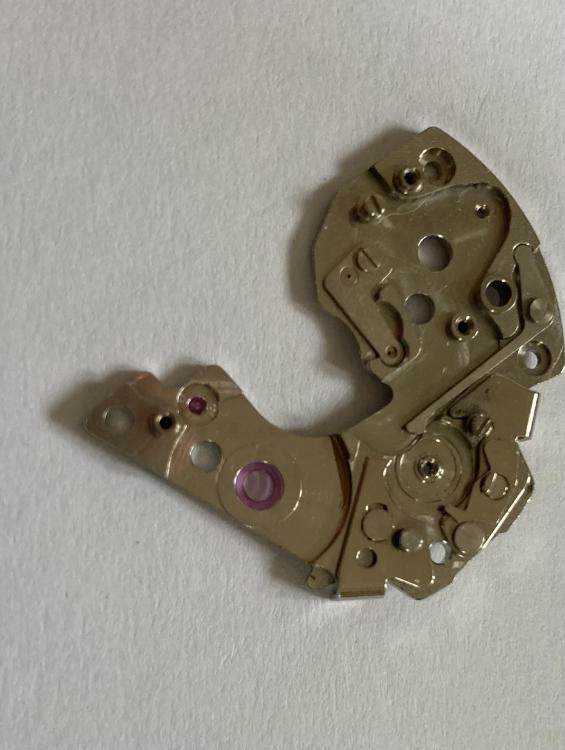
There is a crack where the arrow points OP, the internal clutch of the center wheel probably is loose too
 3 points
 -
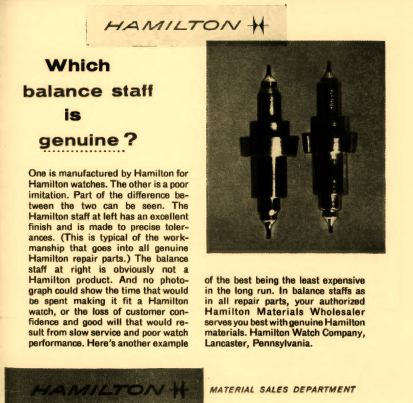
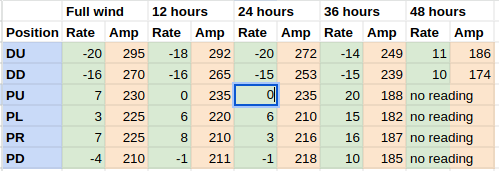
one of the things you want to pay attention to is the balance bridge and the plate as to whether anyone has modified this. Often times they will raise the metal up by shoving a graver in producing a raised surface to tip the bridge either way. something always to check for when you're having end shake issues may be a dealing with someone else's problem then thinking about Hamilton and balance staffs I was looking for something the other day and was reading the advertisement on the cover of a magazine I was looking at. July 1958 a reference to Hamilton balance staffs. unfortunately I know the feeling. Projects start off with so much promise everything seems perfect and then it spirals into a nightmare. then yes sometimes it is best to walk away even if it doesn't seem perfect. Trying to chase that last little better perfection usually leads to a nightmare. Then actual railroad timekeeping specifications are interesting in that they're not based on the timing machine. There based on allowing the watch to run for 24 hours in a variety of positions. But if I assume your 24 hour numbers were the actual running time errors you are so incredibly close to railroad timekeeping to be honest I just wouldn't worry about it. Then we get so excited of dial up having to be regulated to zero but a pocket watch they typically regulate pendant up from 0 to +5. this is a weird amusement I have a work. The store manager has a project management degree and I think she would like to have a schedule perhaps of when things will get done. But when it comes the vintage basically it's done when it leaves the store whenever that may be. Because you never know when a problem is going to pop up and often times the problems pop up as your finishing the watch and things are running. So basically scheduling the length of the vintage watch repair is something that basically cannot be scheduled.
 3 points
 -
I have four sets of the Cheap supermarket calipers, 3 from Aldi and one from Lidl. Of the four only one eats batteries, with the display blinking after a couple months, although they still read fine for months with the display blinking, which it's battery needs replacing warning. The other three have never had their batteries changed and they are well over a year old now, and the Lidl one mentions on the box that it had battery saving built in. So they are not all battery eaters, in my case it's only the oldest set.2 points
-
Hi Richard that’s a fine set beautiful satin finish , probably expensive when bought . I would agree with @Neverenoughwatches and @nickelsilver just wire wool (0000) with oil , work with the grain to avoid. damaging the finish then clean with an oily lint free cloth.2 points
-
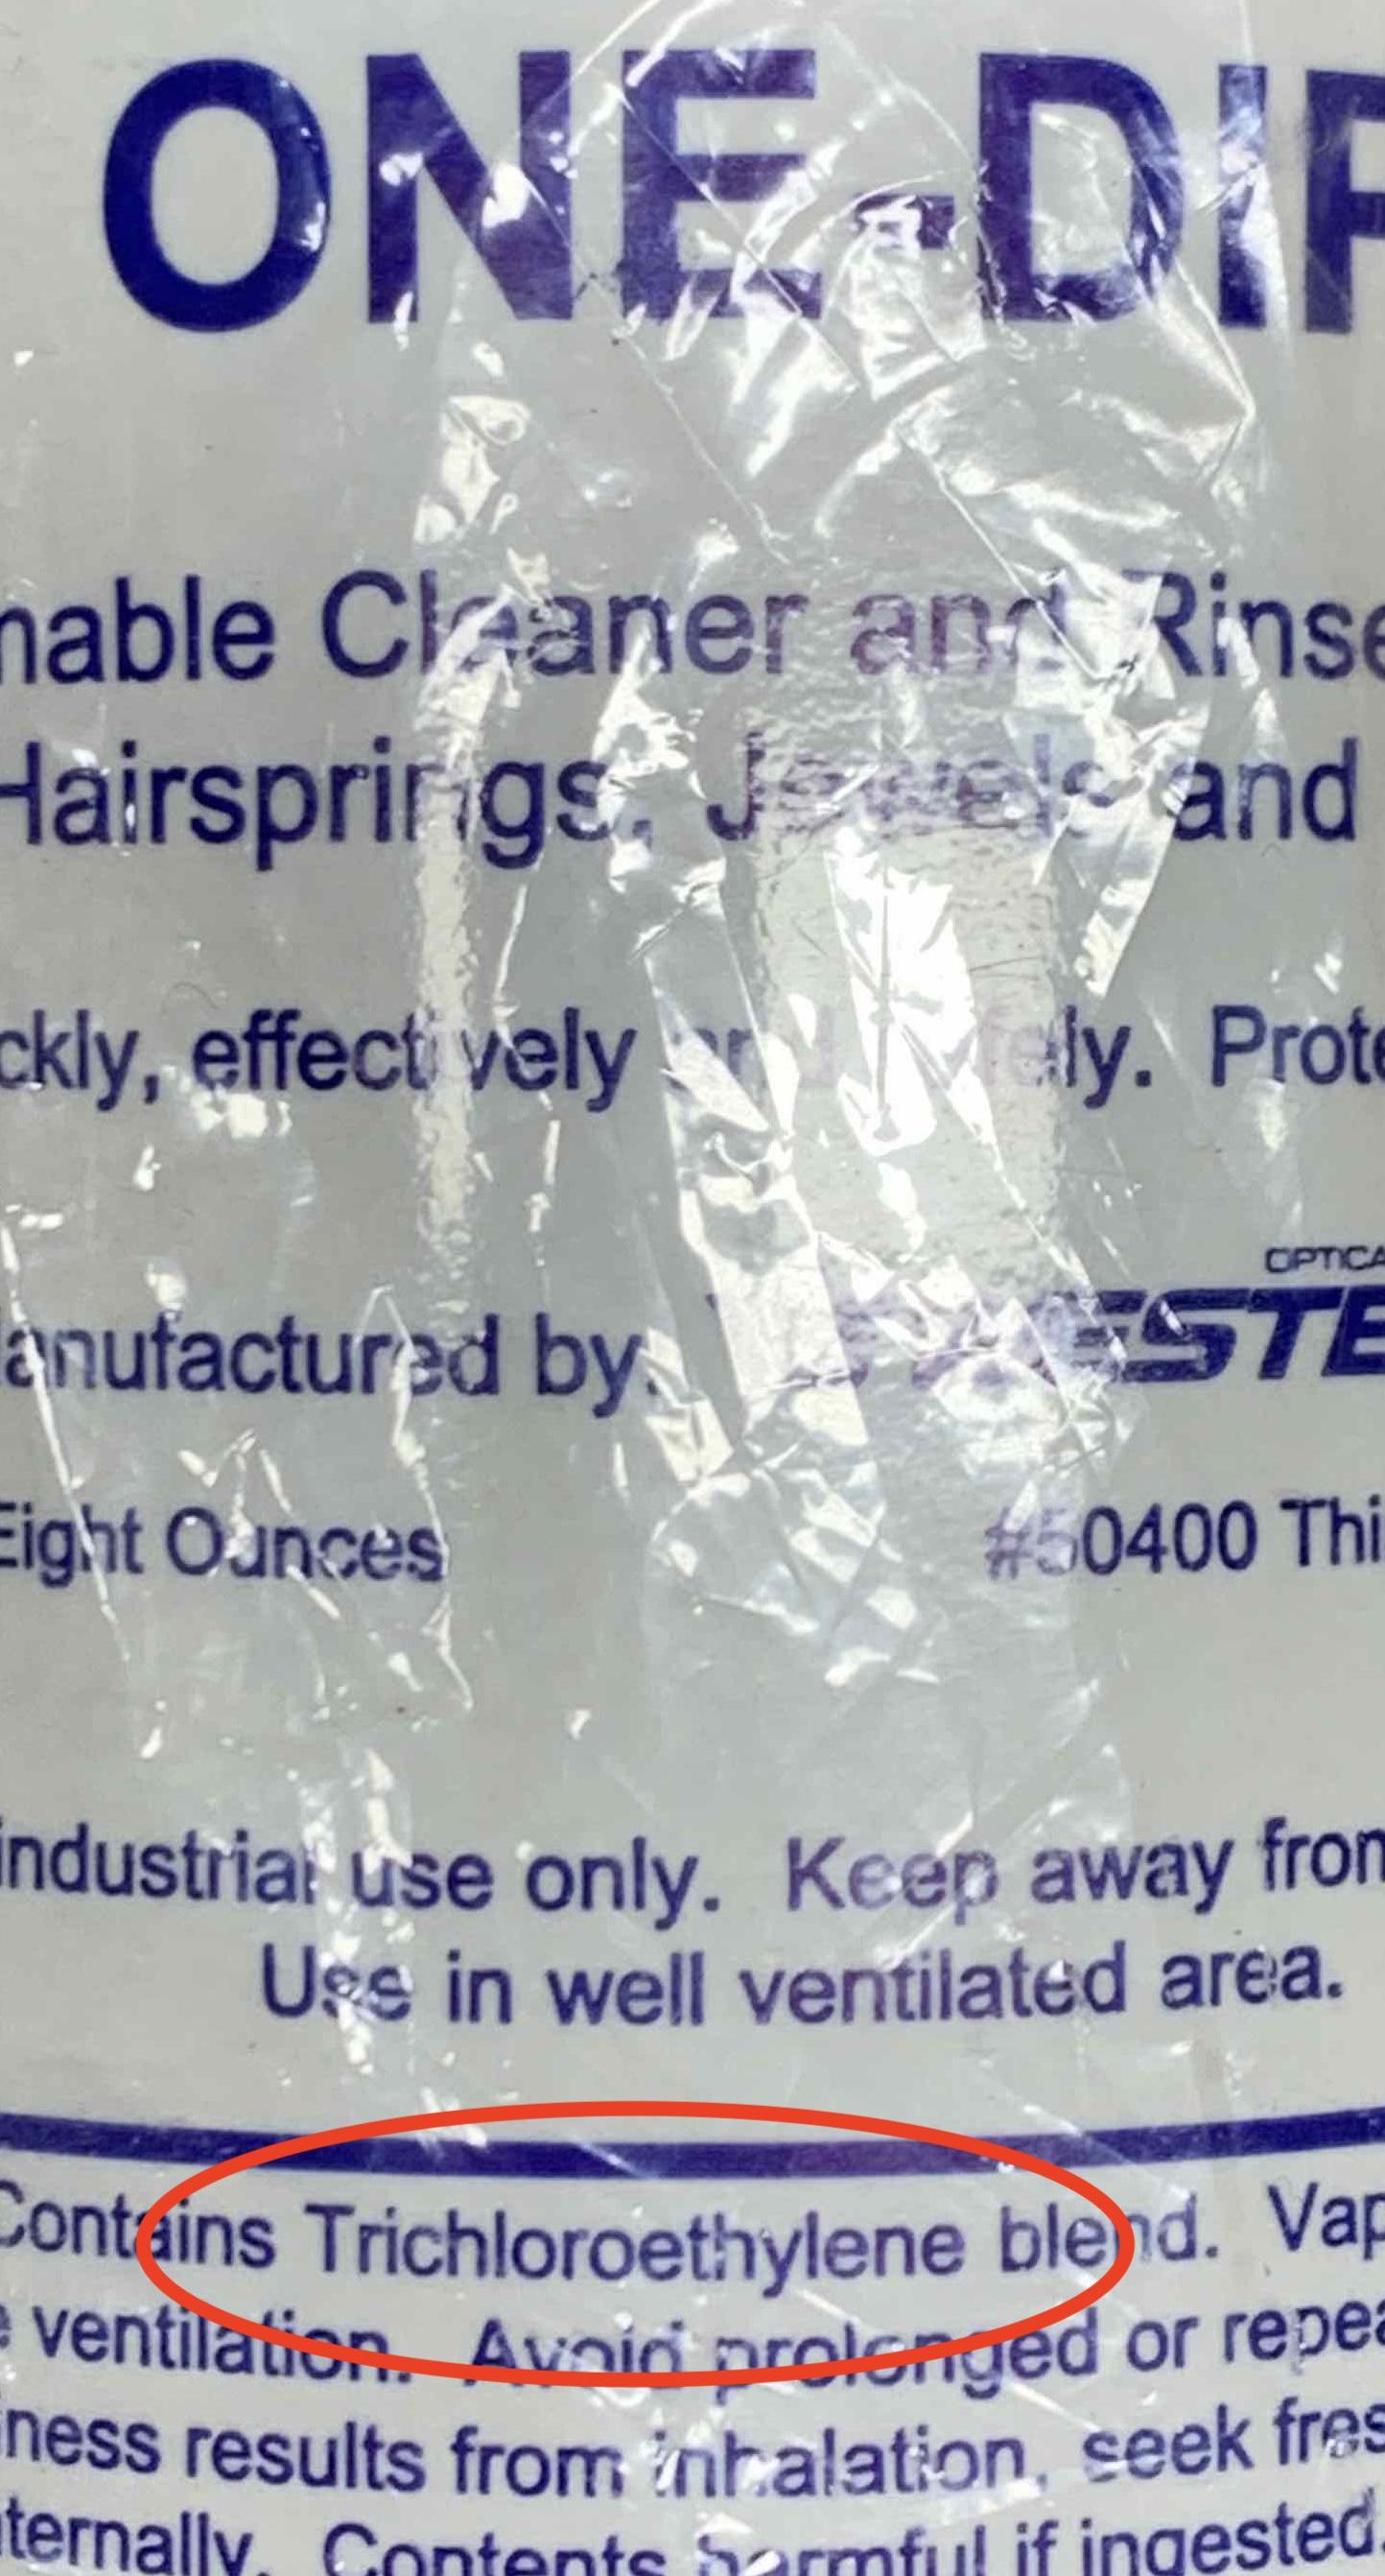
I've found CRC Brakleen® Brake Parts Cleaner to behave much like One Dip when cleaning hairsprings. It seems to have no effect on shellac which is also good. Only downside is I can spot tiny little contaminants in the CRC Brakleen® under a microscope that I don't see in One Dip. They filter out going through a coffee filter though. So I need to experiment a little more to optimize my use of CRC Brakleen®. The primary ingredient in CRC Brakleen® is tetrachloroethylene. One Dip is trichloroethylene. I'll leave it to the chemists to describe the relative cleaning merits of each. That said, limiting exposure to both seems prudent given their hazardous qualities.

 2 points
 -
It would lol, but the old time joiners that brought me up always referred to fine steel wool as triple 0. Maybe there wasn't a 0000 wire wool back then in the early 80s ? " oy lad, get some oil and triple 0 on that chisel you left out in the rain, the boss will have your **BLEEP** on a skewer if he sees it " good times2 points
-
No, I dont recall Clipper. Anything like Visicalc? He he. My first program was in Fortran on an IBM360. Input was punch cards and the output was a line printer. When running an application (like the Berkely SPICE simulator, you had to request someone at the compute center to load the tape). Things are different now. No necessarily better.2 points
-
Did a mint condition 6139 this week. It had the usual problem of a wobbly mainspring barrel due to wear of the arbor holes. Just started to rub the bridge. It gave me a chance to convert these to jewels using the Vintage Time Australia kit - at less than £30 including postage from upside land it's a bargain. The only machining required is the opening up of the lower base plate hole using a good quality 1.59 mm reamer. Seitz- Bergeon part 30522A - 159 which is around £15 UK. I opened it out first with a 1.55 mm cutting broach then used the reamer in a hand held pin vice being very careful to keep it vertical. Clamp the movement in your holder to keep things steady. The jewelling tool will keep things square as you press it home against a flat stump. Beware the reaming can leave a slight raised lip so clean up with a countersink cutter until all is flat and very clean. Sit the jewel square before you get forceful. Check it's flush. The only mistake I did make was to quote the customer over the phone whilst distracted. Needless to say he's getting a bargain job

 2 points
 -
I would just use the steel wool (I use it with a thin oil), I haven't used many rust removers aside from Naval Jelly, but I think they tend to discolor the remaining steel? These are marked " Stainless/ Hardened" , but obviously even stainless steel can rust too- no idea how it would react to the rust remover. It would be a shame to damage the nice satin finish and fine engraving. Side note- I have a fancy set of digital MItutoyo calipers I got about 25 years ago, with carbide faces and all that. Still crazy accurate (and never turn them off and batteries last like 4 years; the "B" meaning change battery has been on for at least 6 months and still going strong). I also have an old set of Swiss made Etalon vernier calipers, which, like yours, resolve to 0.02mm. I do use them, and find that I can read between the vernier marks and see 0.01mm, and have checked against a good micrometer and those dang things are always spot on! The younger folks don't really know what to do with them, so when my Mits get pinched around the shop I know the Etalons are always free.2 points
-
There is precious little technical information on fossil or diesel watches, I have tried to find it before and failed.2 points
-
Hi Alun, You have replaced the entire balance? If so, then the fact that it rotates free in the bearings means nothing. There are certain rules that will ensure a cylinder to fit in a movement. 1. The diameter of the cylinder must be the same as the original. If You replace the cylinder, but the balance wheel is original, then it is enough that cylinder fits tight in the hole of the balance wheel. If original parts are missing, then the cylinder must get free between EW teeth AND the teeth must enter free inside the cylinder 2. The position of the mouth of the cylinder in height must comply with EW teeth position in height. The cylinder mouth has 'two floors' and again, the EW teeth have 'two floors' -the teeth themselves and the base of the wheel The teeth must be corresponding to the 'second floor of the mouth (which is cut 180 degr) and the base - to first floor (which is cut 270 degr) The cylinder is correctly oriented and 'in beat' when the hairspring positions it as the mouth 2nd floor is pointed directly to the EW bearing. In the same time, the limiting pin on the balance rim must be 180 degr. from the limiting pin on the balance cock. The escapement depthing must be checked when cylinder is replaced and corrected if needed - the depth must be as small as possible when reliable drop lock still exists. Depthing is changed by moving the entire balance cocks couple.2 points
-
Yes, sounds very much like a loose cannon pinion! Relatively easy to fix (or to replace). You may not have seen it, but he base calibre (without date) has a full service video in several parts by Mark: After that, it's useful to look at Ranfft's page. You'll find out that there are many related calibres that share the same movement architecture (just with different beat rates and complications -- i.e. with our without automatic, with day, day-date etc): https://ranfft.org/caliber/877-AS-1901 When you start looking for these other calibres on YT, you find quite a few! here are a few examples I found for you. The date complication should be the same as yours -- even if they also add a day and/or automatic module.
 2 points
 -
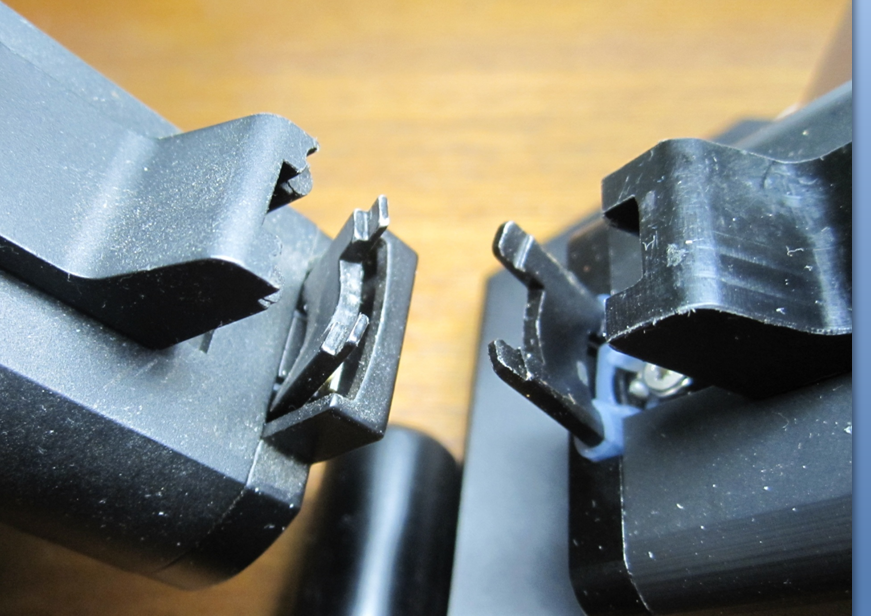
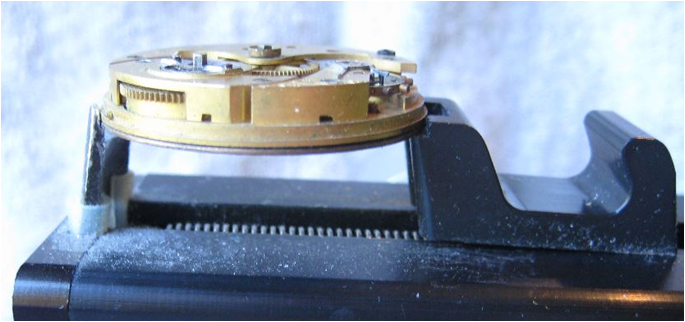
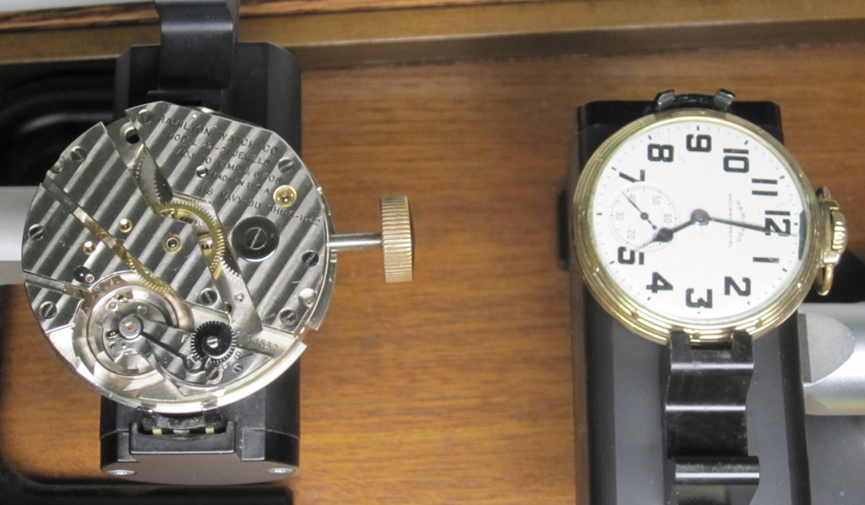
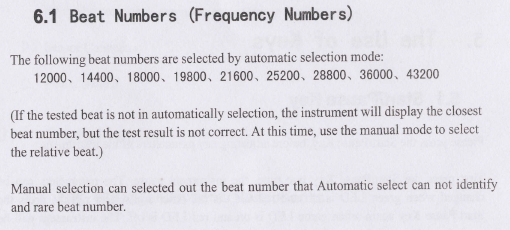
that is because it's doing exactly what it's designed to do. If you read the user guide of a timing machine and that would include a witschi they typically default for automatic mode to a limited quantity of ranges. For instance this comes from the Chinese 1000 manual. You will note it does bring up a minor problem with the Chinese machines of typically the machine will try really hard and it might make a guess which of course will be wrong. Witschi typically will not time it will give you an error and then you could switch to frequency mode word actually tell you the beats per hour. Then once you grasp that you have a non-standard watch you go in and manually set it the same as you can with the Chinese machine. the timing machine sensor needs to pick up the vibration of the watch. Anything that interferes with that will give you possibly confusing results. This also includes some watch cases do not properly transmit the signal through. So in general it is best if you can hold the watch in the holder as that's what it was designed for. one of the problems the Chinese have when cloning items is failure to grasp exactly what they're trying to achieve. So for instance on the left-hand side is a witschi microphone and on the right-hand side is the Chinese. They look very similar but the witschi has a much more defined edge for holding the watch movement. then there is some other interesting problems like what's the largest size watch you can hold. The witschi microphone in the example below is holding a 36 size Hamilton deck watch just fine. Then on the right-hand side Chinese microphone holding a 16 size pocket watch in its case. Other minor little issues like the witschi has a constant force holding so whether you barely open under all the way to end the amount of force is not the same as the Chinese which is just a simple spring. On the other hand the witschi microphone is to be purchased separately like the last time I looked the microphone alone is about $1000. Oh and because I was curious I grabbed in 18 size plate and yes the Chinese microphone will hold it. Although I was very cautious because yes the spring is practically at the end of its stretching but still I was able to put it in and it was holding. then here's an example of what the watch should look like in the holder. True that's not an 18 size pocket watch that's a 10 size Elgin watch but still the concept that is the way it should look. Is the way the microphone was designed for best pickup results.
 2 points
 -
which calibre? have you lloked for any YT videos or walk-throughs on WRT for that calibre? While there are always similarities between date complications, they can also be quite different.2 points
-
Hi @Teeroy, haha, yes, I think there's a "trick" that you're missing. I think you're trying to install the screw too early.. Finish the keyless works from the dial side first. Including the setting lever spring. The latter will hold down the setting lever sufficiently to then turn around the movement and put that screw in with no problems. But be very gentle with the first turns of the screw (almost no downward pressure) -- otherwise you may damage the setting lever spring.2 points
-
They are counterbores, for creating a sink for cheese head screws to sit down flush with a plate or bridge when the screw is tightened down. Would get more use if you were making custom/replacement bridges rather than repair unless maybe if you needed to replace a screw with a bigger one because the plate threads were stripped. Probably not the only use in repair but I’ll leave comments to folk that know a lot more than me (not hard for sure) as to any other uses. Tom2 points
-
This bent balance wheel is something normal which often happens when replacing balance staff, especially when punching out the old staff like You have done. Truing the balance wheel is routine operation which follows the staff riveting. You may find now the other wheel is bent too, but this is minor problem to solve. Now, the upper pivot of the original staff is useless. I will not say if it is due wear, working in broken hole jewel or due 'special repair', but yes, replacing the staff is what one should do in such case. Now You have two balance wheels - use the one which have better hairspring. And use the jewel settings that are normal.2 points
-
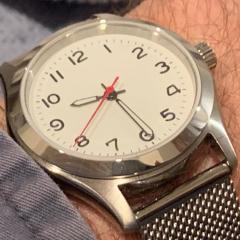
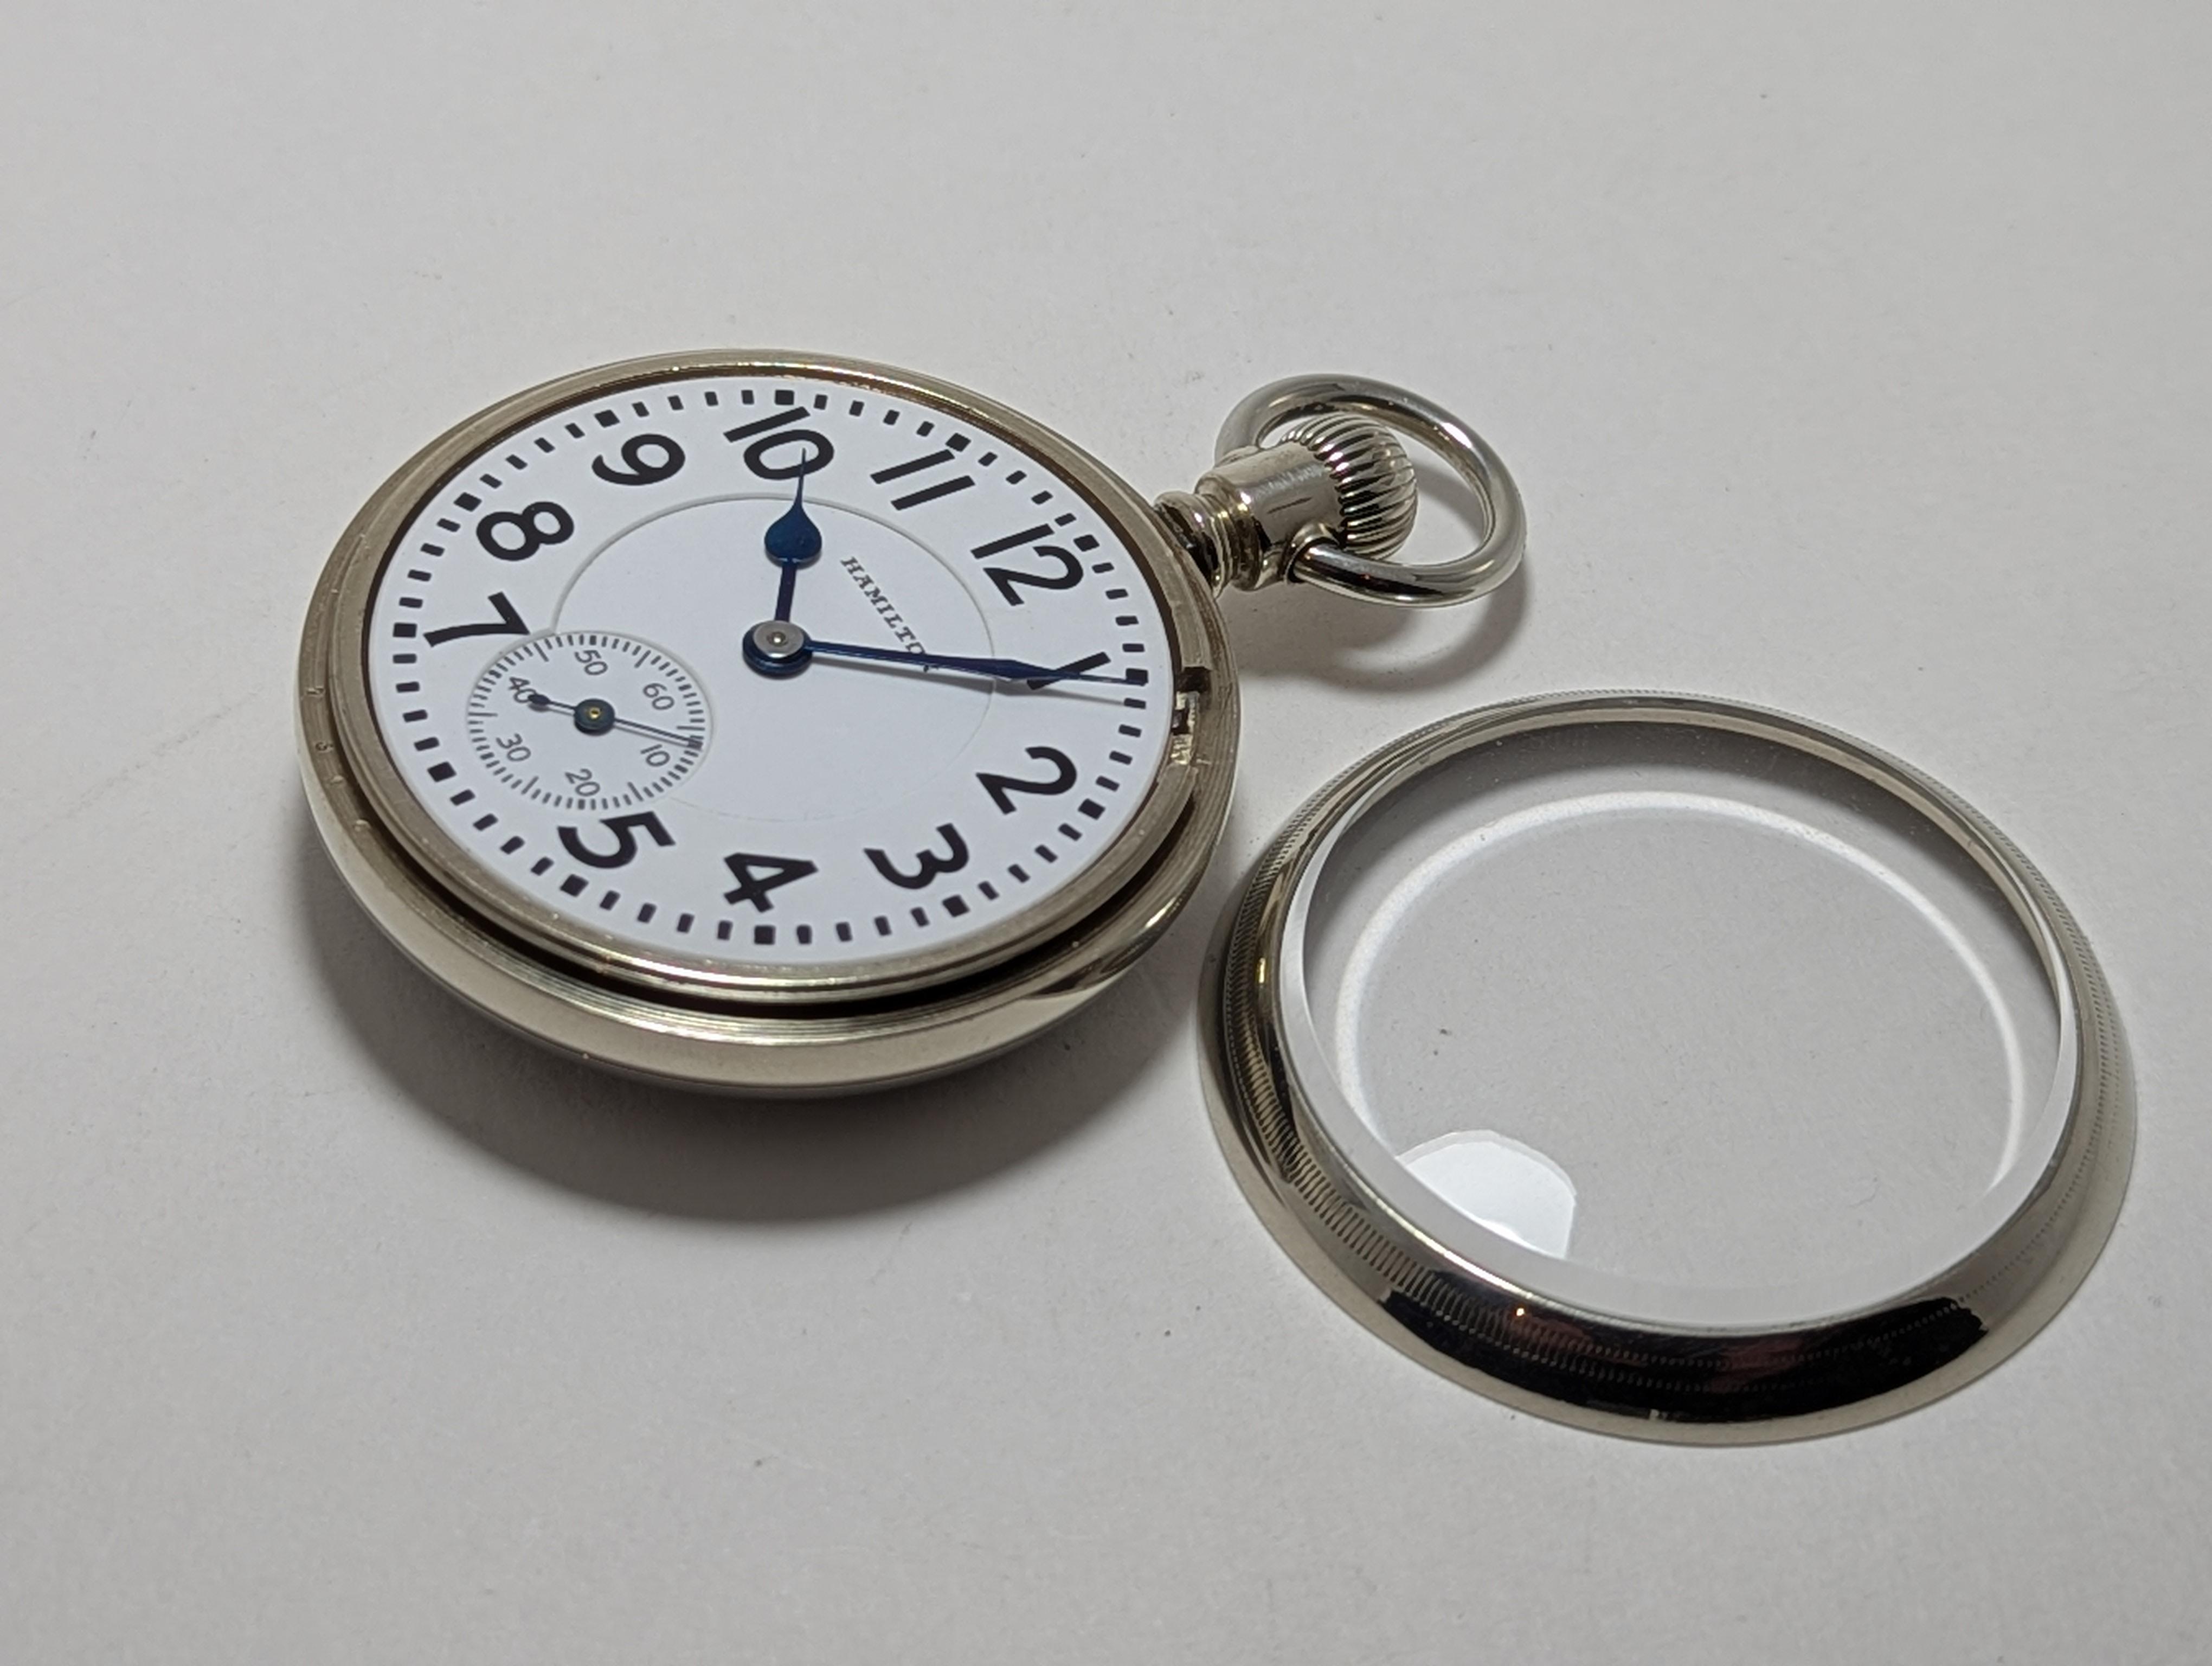
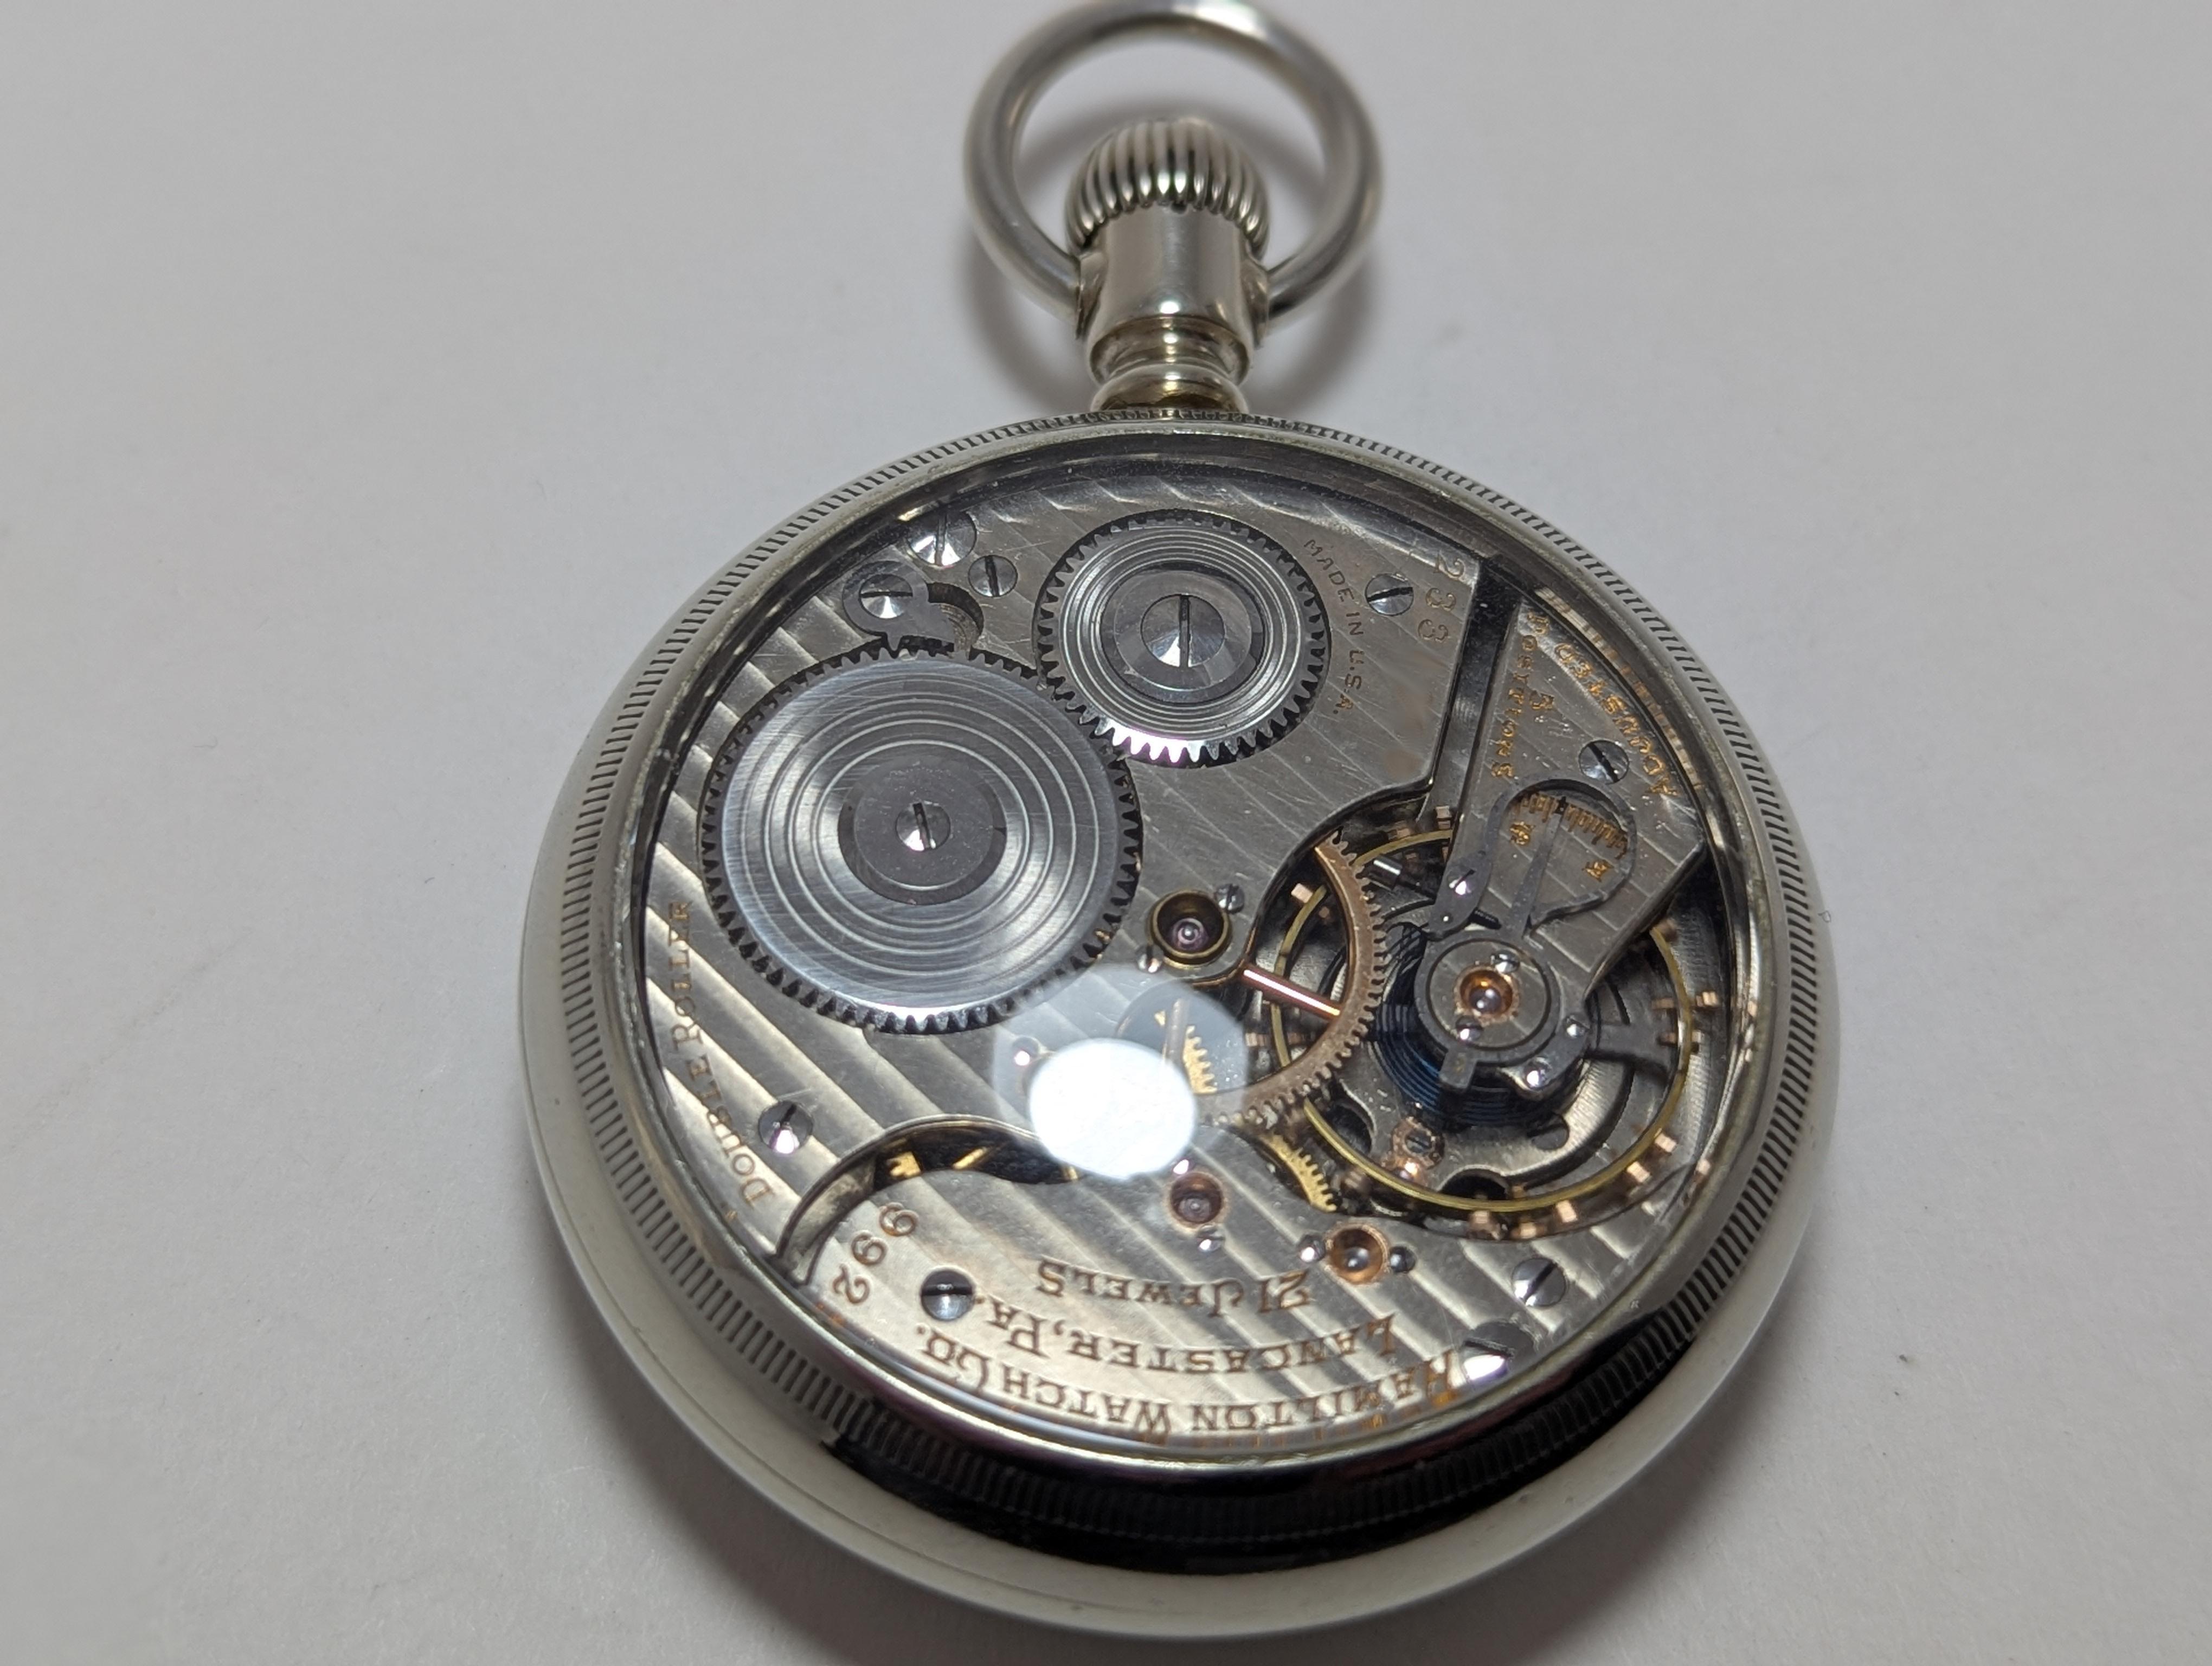
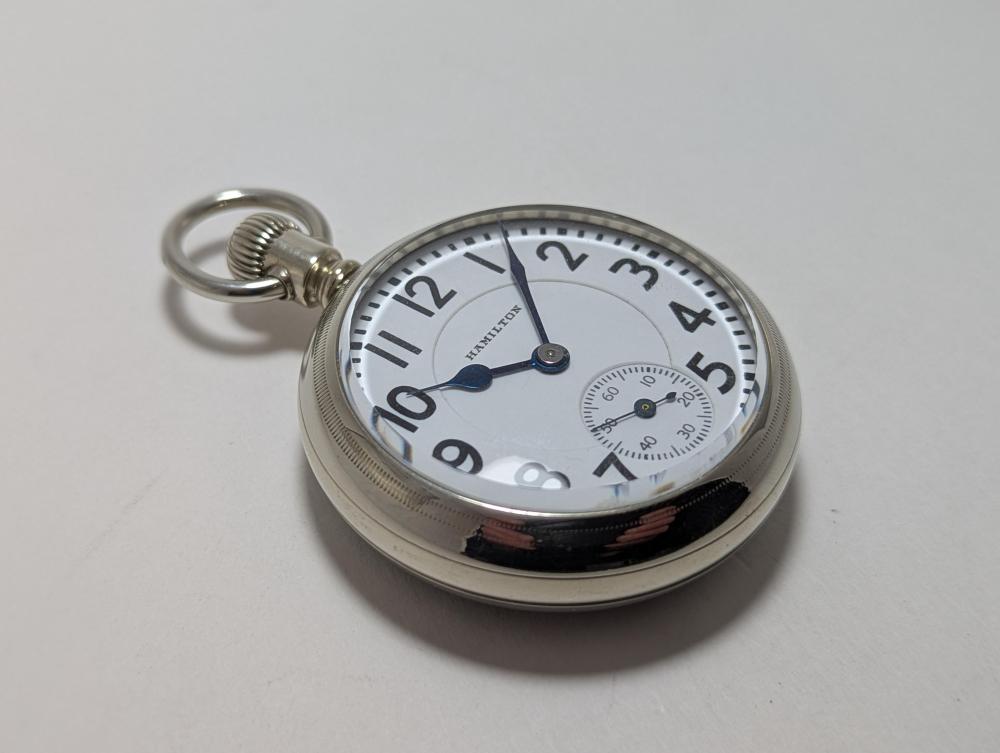
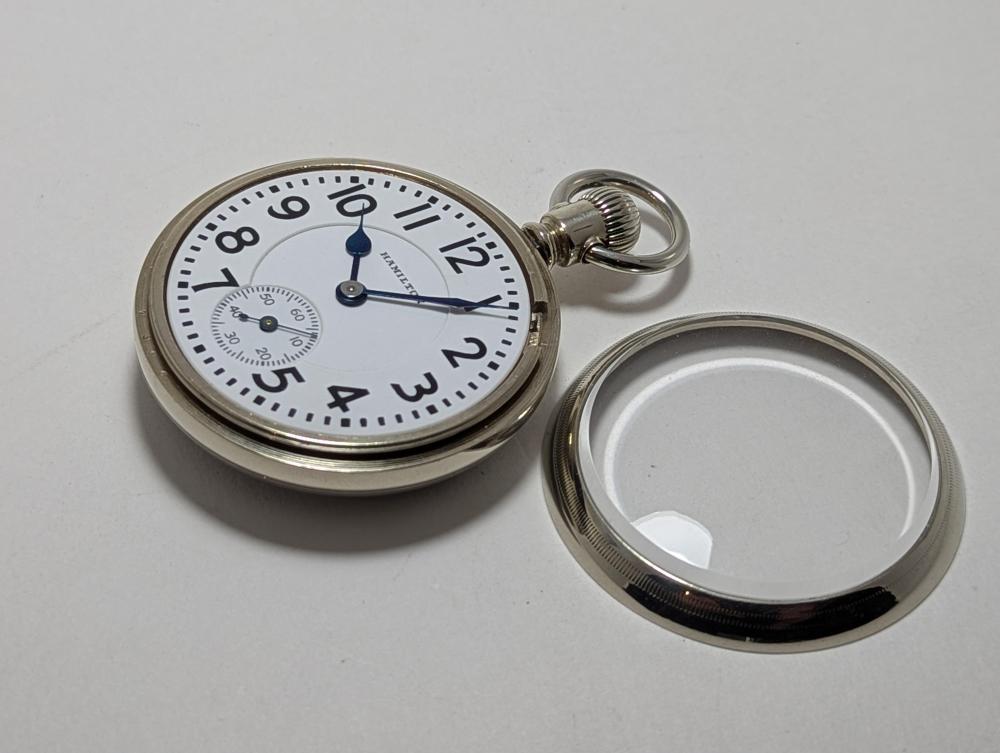
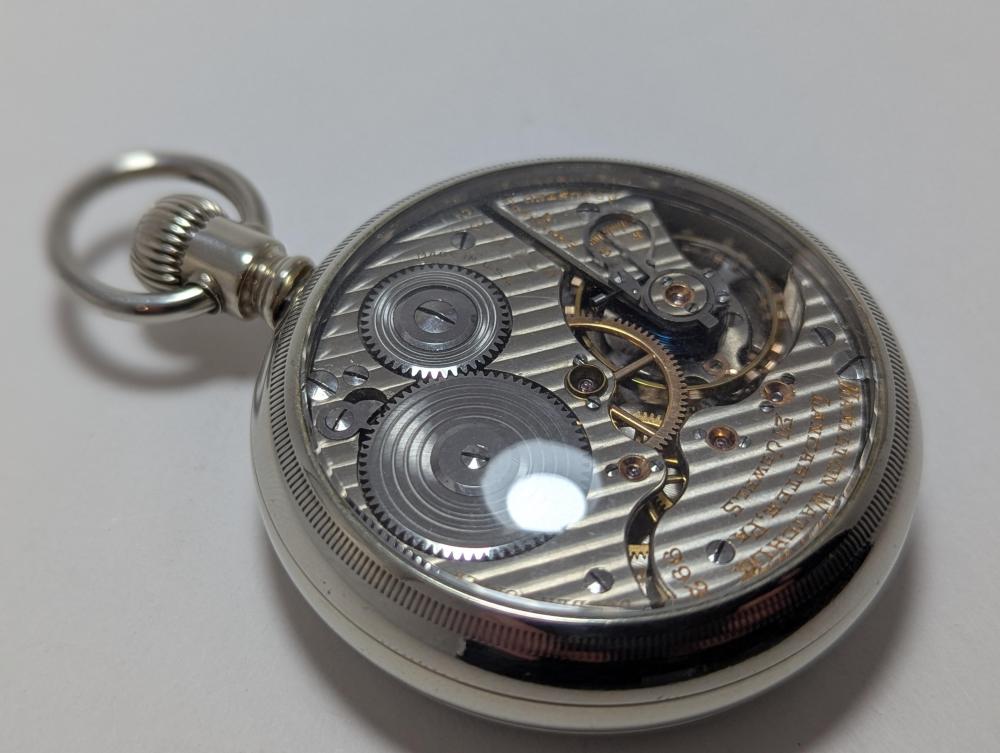
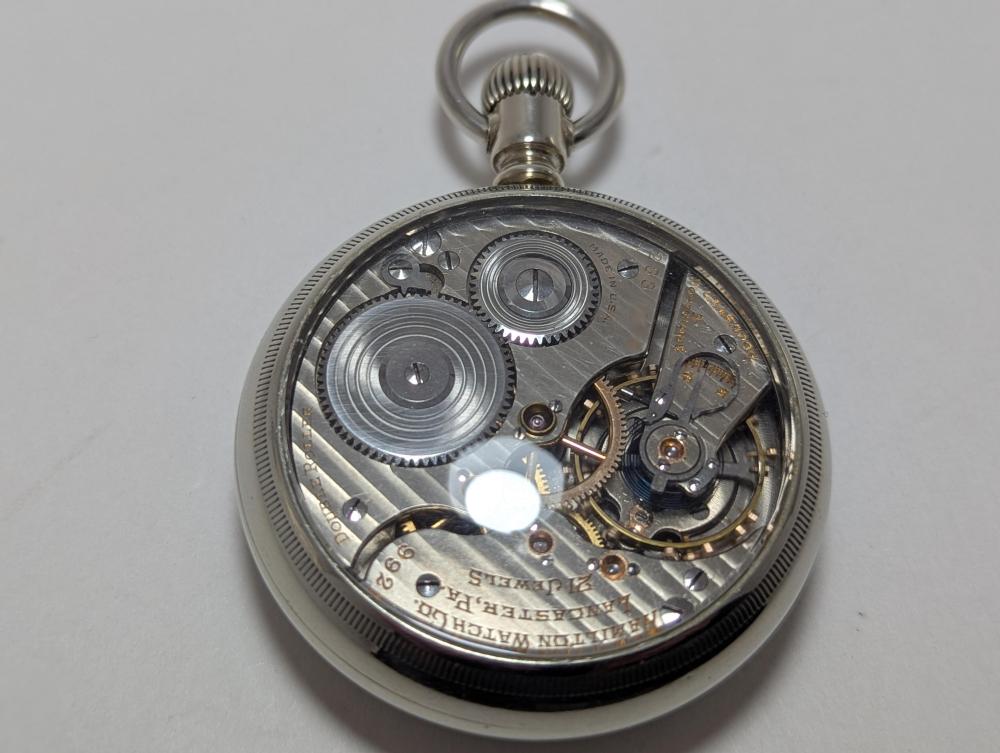
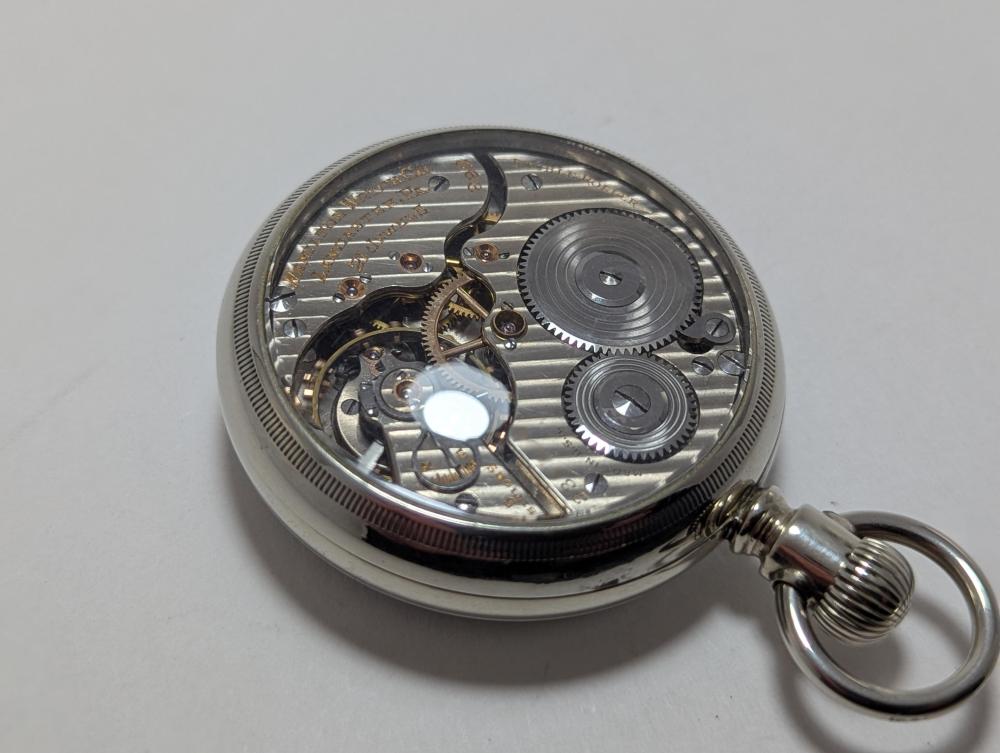
After a little over a year of restoration work, I am finally finished with my Hamilton 992 16 size railroad watch project. I'm really proud of this project because it was my first end to end restoration, with multiple repairs, banking pin adjustments, extensive poising & regulation, custom case work, hands restoration & bluing. This movement came into my possession sort of by accident when I was just starting out and recognizing it was nicer than most I had worked on I set it aside until I had a couple years experience. The movement was made in 1925, and the case I ultimately put it in is probably 20 years older than that. I started with a movement and dial - the dial was in perfect condition and the movement could tick weakly but had broken lower balance jewels. Sourcing correct replacements took a few tries. I also attempted a few replacement mainsprings, ultimately unable to form a workable inner coil on a contemporary white alloy spring and going with a genuine NOS Hamilton steel spring that in the end is performing great. I acquired loads of vintage tools for this project to do measurement, static poising, timing washers, screw undercutters, and while I was doing what I thought would be the final dynamic poising, I .... broke the balance staff. Replacing the balance staff, as stressful as that was for this project, had the positive effect of a major amplitude gain after leaving behind the worn old pivots. Before I broke the staff, I did have it running at 0.0ms beat error. After replacing the staff I really couldn't get it under 1.0ms but I decided I had to leave it there rather than risk hairspring damage. (the difficulty was probably due to nonparallel regulator pins which were fixed later) The case I chose is a Fahy's Oresilver with screw-on bezel and caseback. Since I wanted to install a glass caseback, I had to find two identical cases with good front bezels. That was one of the more difficult parts of this project - 16 size cases are far more scarce than 18 size. And though this railroad movement would most likely have been in a gold case, I will settle for an alloy that takes a good polish. I had to cut a slot for the setting lever under the bezel, and fit new glass to both sides. Plus it still has a solid metal caseback as an alternate option. Special thanks on this project to @JohnR725 who helped me with a lot of minute details in the escapement and mainspring and parts sourcing, @Neverenoughwatches and @mikepilk helped when I was learning heat bluing, and many others who probably contributed. Okay photos! The hands are Hamilton 16s railroad spade originals, polished with 10 phases of diamond paste and blued. And the minute hand hub mirror polished. Thanks to several of you who helped me build a workable bluing pan for this and develop my technique several months ago. I am happy enough with the rates, though I think the horizontal/vertical delta lands outside of railroad specs. I suspect this is due to pivot wear in the train that I could not address without a jacot lathe. But the vertical rates are all very close after dynamic poising. And since this watch is most likely destined to live as a desk clock, it has been regulated to run near 0s in the pendant up, slightly angled backward position where it stays steady for 36 hours. I'm not sure if dialing the beat error back to 0.0 would make any difference, but I doubt it and I ran into a deadline where I couldn't risk more mishaps. As it stands, if it gets wound up daily it will keep great time, hopefully another hundred years.

 1 point
 -
Hi. Glueing it is not practical and wouldn’t last five minutes,, if you can find a pinion the right size may be and only maybe it might work but the real answer it has to be dis assembles . There may be other things worn you can only find by taking it apart and inspecting it carefully. The job is not insurmountable if you take pictures and notes as you dis assembles it. It will take a bit of patience though And time. As the movement is time only it’s reasonably simple to do. If you decide to have a go there is plenty of help from the site members to get you through.1 point
-
Ouch. Mine at least last about 2 months.1 point
-
This is interesting to learn. Because all the generic cheap digital calipers eat batteries very rapidly. It is my understanding that as long as a battery is installed, they never actually stop their measurement polling loop; the "on/off" button just turns the LCD screen on or off while the electronics continue measuring endlessly for nobody. Almost every time I pull one out and turn it "on" the battery is dead or nearly dead.1 point
-
Wouldn't that be quadruple 0? Hehe.1 point
-
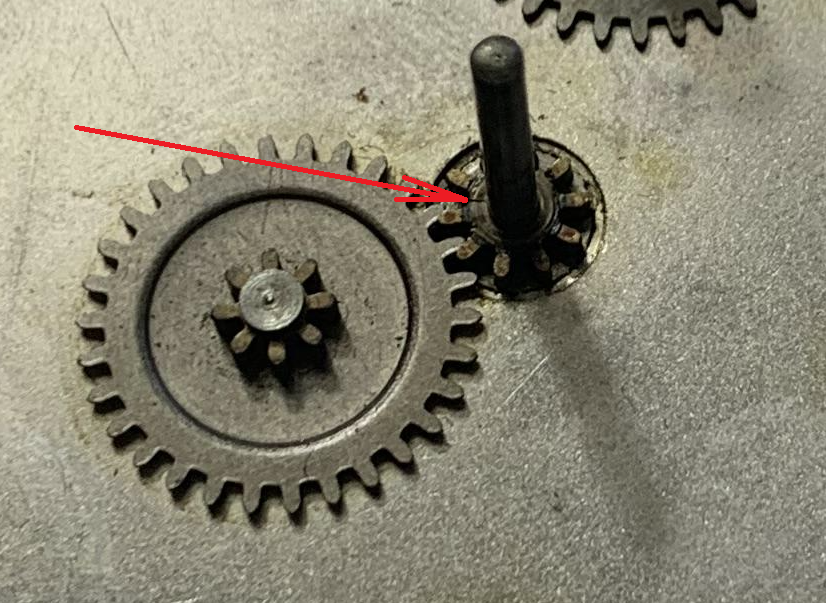
I hope You understand that the small broken pinion is responsible for not moving the hour hand, but not regular moving the minute hand is completely different problem that really needs disassembling of the movement to be solved.1 point
-
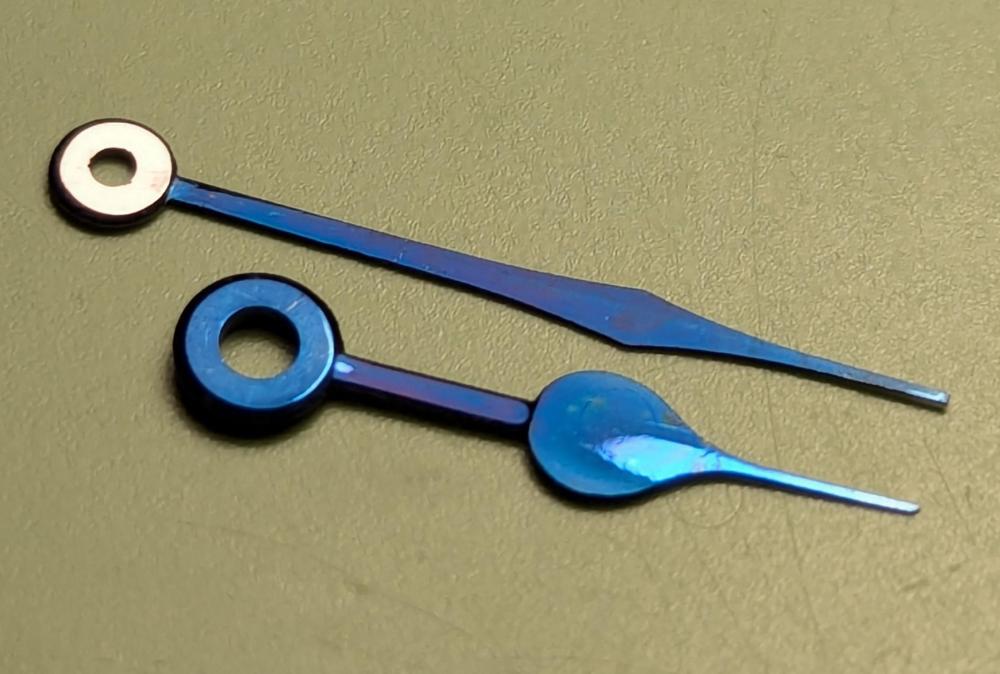
Here's a close-up of the new balance...From this angle, I can see that it's riveted.
 1 point
 -
Looks like the rivet has been broken off here.
 1 point
 -
If I am using wax for tools, I.e. staking frame I use renaissance wax Richard. Tom1 point
-
I'd just stick with the wire wool and then wax as opposed to oil.1 point
-
It is possible to pry it up, but there's a risk of damaging it further. The normal method would be to disassemble the clock and then drive the center-wheel arbour through while supporting the plate properly.1 point
-
It would likely work, I haven’t tried but I do use the wire wool a fair bit for this sort of stuff. Tom1 point
-
A new 3D picture for me from an auction.
 1 point
 -
Jean you need to post in English not French.1 point
-
OK, You don't have to worry that the rivet is slightly proud. You can grasp the hairspring seat in pin vise and try to turn the balance arm against the staff - it should not happen. Truing the balance wheel is next operation after staff riveting. Yes, You must tweak the balance to get the halves in one plain. But, the wheel must rotate true, so tweaking is to be done as to achieve so. In compensating (cut) balances, truing is separately for one half and the other. And, the best practice is not to force the place of riveting the staff, but grasp the arm near the staff rivet wit specially designed pliers that will allow bending of the arm, or use the staking set with big hole punch and anvil to fix the balance around the staff by pressing the punch from above ad thus to bend the wheel in order to make it rotate true.Yes, You can put the balance in it's place to check how it turns, but it will be much harder to take it out and put it back a lot of times than using truing calipers.1 point
-
I had thought that but looks too close to the stem.1 point
-
Here?
 1 point
 -
You can use them for milling down a replaced, too thick brass bushing. Did you see the Bergeon price for a set? But if I think about it, and to be really honest: they are of no use at all. Dispose them, you know my adress Frank1 point
-
Threadlockers belong to a class of adhesives called anaerobic adhesives. They are resins that polymerize and harden in the absence of oxygen. That's why the stuff remains liquid in the bottle but can sometimes set in the narrow tip of the applicator where the surface exposed to air is minimal. You can test to see if your bottle is ok by applying some to the threads of a clean bolt and screwing on the nut. It should start to harden in about an hour or less. But only the stuff deep in the threads will set, the excess that is squeezed out to the surface will remain wet and tacky. Heat also speeds up the set of anaerobic glues. If you are using it in arctic conditions, an accelerator is required.1 point
-
I use brake and clutch cleaner. I think that contains a lot hexane. £20 5 las. Leaves no residue.1 point
-
..more assumptions...this is where a movement should be placed for best results. Preferably with the crown or balance nearest the mic if its safe to do that and doesn't press on any important bits.
 1 point
 -
Hi. Just knocking the staff out can distort the balance wheel, professionals either use a plattax tool designed for the job or use a lathe to cut away the rivit from the staff or cu away the hub whatever your preference there are K & D tools to fit reg staking tools that do the job of the platax tool but picking up the correct size can be a lottery, I must confess I have removed the odd staff by knocking it out carefully without damaging the balance sheet. I always note the position of the inplulse pi and roller position normally at right angles to the arms and also thr stud position on the balance wheel rim for re assembly of the balance, best to tale a picture of it as is before dismantling.1 point
-
Hello and welcome from Leeds, England. I'm not the right person to advise about clocks but someone will help you soon.1 point
-
That's because it's plastic. Have you tried putting a plastic bag over your head and see how much it reduces your hearing.1 point
-
You do understand that a timegrapher works by picking up the sound with a microphone in the holder so what you're doing reduces it's ability to work correctly.1 point
-
You're supposed to put the movement directly onto the timegrapher.1 point
-
Why are you putting the watch in a holder on the timegrapher?1 point
-
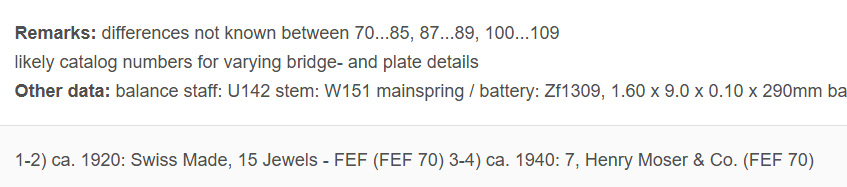
Photos on Ranfft are an FEF 70 but could be any number of FEFs from 70 to 109 as detailed.
 1 point
 -
I'm curious. Is the ammonia solution miscible with the mineral spirits and naptha? Do you end up with a milky emulsion or a clear liquid like #111? Or worse, a two phase mixture?1 point
-
Hello Everyone What exactly is the difference between a friction fit and a riveted type balance staff? What are replacing steps in each one? Is there something you shouldn't/should do with either of them? Thank you very much.1 point