Leaderboard


Popular Content
Showing content with the highest reputation on 03/09/25 in all areas
-
I asked OpenAI's Sora to generate a video of a running watch movement. It's funny how realistic it looks while also being complete nonesense. These AI models don't understand mechanics very well, but they are darn good at people. Here's what Sora generated from "Close-up shot of a watchmaker wearing a loupe inspecting a watch movement. He is using his tweezers to regulate the balance." I wish I could use tweezers with only my thumb4 points
-
Hi, here is a list of NAWCC chapters in CA., I think you can pull this up on your computer, if one is to your liking I can get the email for you if you can not open them.....these are good honest folks CALIFORNIA Chapter 5 - SAN FRANCISCO President: John Koepke [Email] Secretary: Michael Dobry [Email] VISIT CHAPTER WEBSITE Chapter 52 - LOS PADRES President: Phillip M. Keys [Email] Secretary: Phillip M. Keys VISIT CHAPTER WEBSITE Chapter 59 - SAN DIEGO COUNTY President: Larry Octan [Email] Secretary: P. Mike Dayton [Email] VISIT CHAPTER WEBSITE Chapter 71 - SACRAMENTO VALLEY President: Vince Angell Secretary: Chris Johnson [Email] VISIT CHAPTER WEBSITE Chapter 75 - SAN FERNANDO VALLEY President: James Gilmore, FNAWCC* [Email] Secretary: Chris St. Dennis [Email] Chapter 107 - DIABLO VALLEY President: Craig Chivatero [Email] Secretary: Ross W. Smith [Email] VISIT CHAPTER WEBSITE Chapter 190 - VENTURA COUNTY President: Ron Maricich [Email] Secretary: Mostyn Gale [Email] VISIT CHAPTER WEBSITE2 points
-
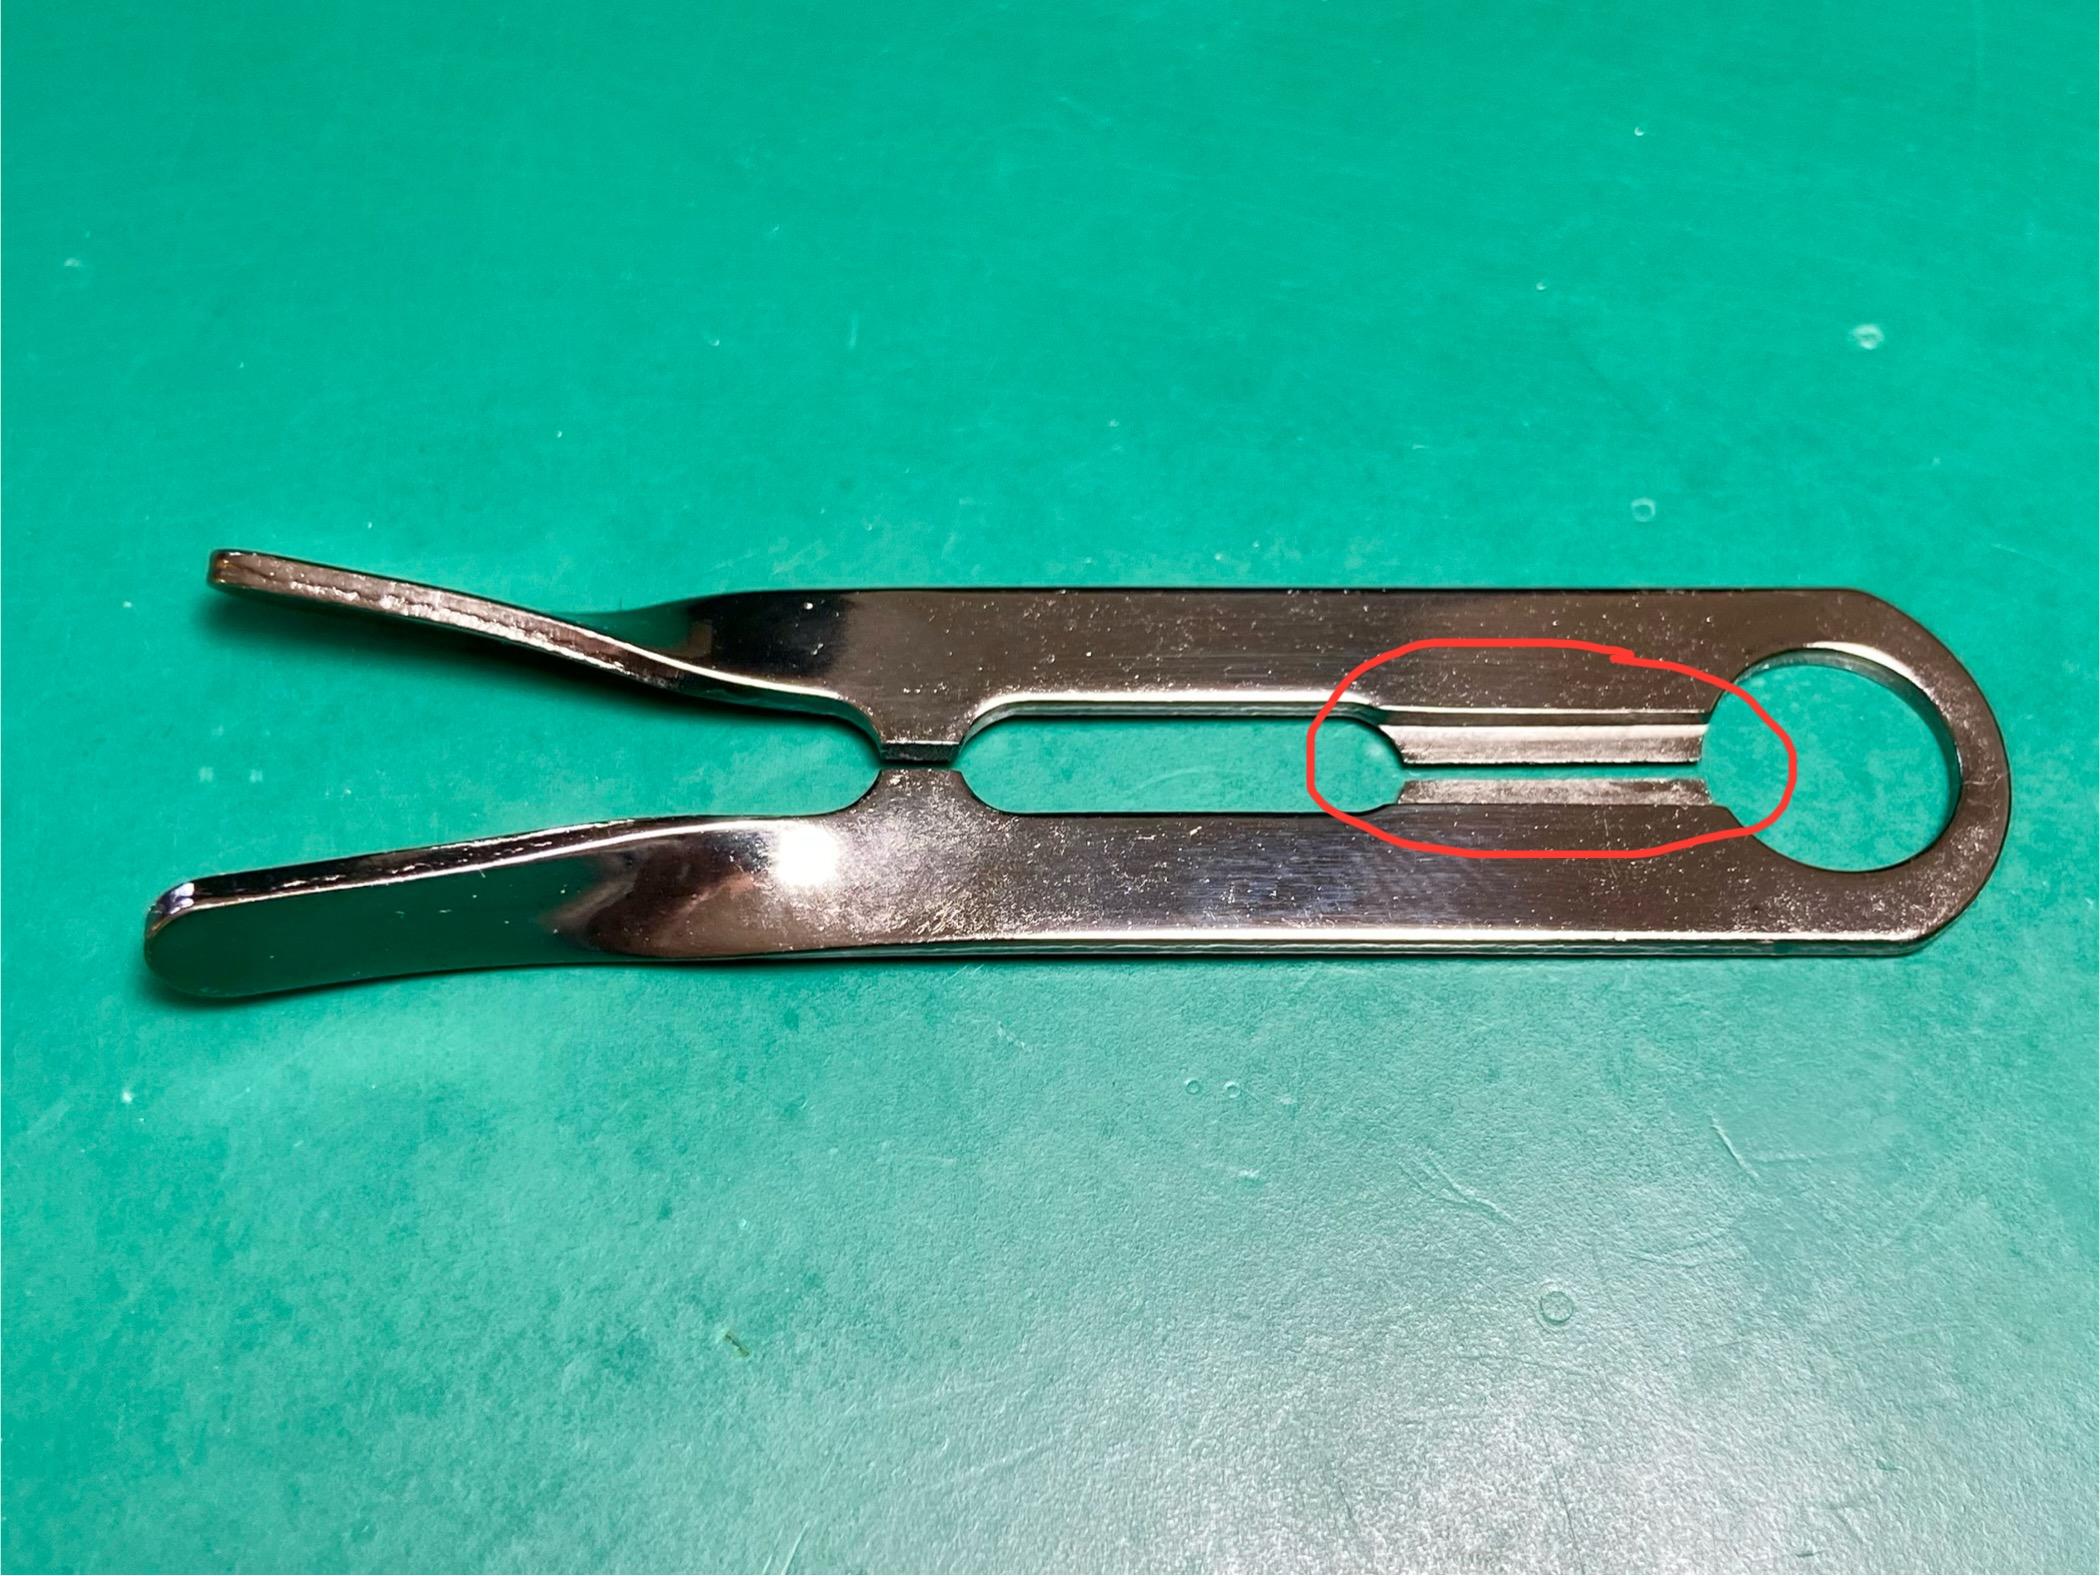
I'm pretty sure mine is a genuine and yes I did that once which is why resist using it ever again. Fortunately it's easy enough to get the broken staff out of the roller. Interesting we both have concerns I'm wondering if it work for pocket watches And your concerns whether would work for the smaller ones? Then I really should read answers from the bottom up as I thought this was a new discussion? Then the picture looks wrong if it's a double roller that is one solid piece you should be under the biggest piece because that picture doesn't look quite right at all even things like American pocket watches were double rollers can be two separate rollers I usually start at the bottom of the biggest one and then when it comes up I can get that to catch the smaller one. Then the problem with removing rollers depending upon what you work on you can't have enough tools because you never know which one is going to work the best.2 points
-
I haven't seen that diagram before but personally I would say that is not how I would want to hold a double roller. I appears to put the impulse pin at risk. The tool that I use most, and I think I have four different tools that employ the same method but in different ways, is the Bradux you have pictured at the bottom. They all hook under the roller table not the safety roller, so between the hub and the roller table. So the Bradux tool, the sides of the V slot are tapered. Often is the case, as the balance is slid up the V, the roller will part from the hub, and there is no need to squeeze the ends of the tool together. Keep focused if you do as there is a real chance of chopping the staff in half,I keep a finger between the two ends when squeezing.2 points
-
You're OK doing it naked as long as the spring doesn't come loose.2 points
-
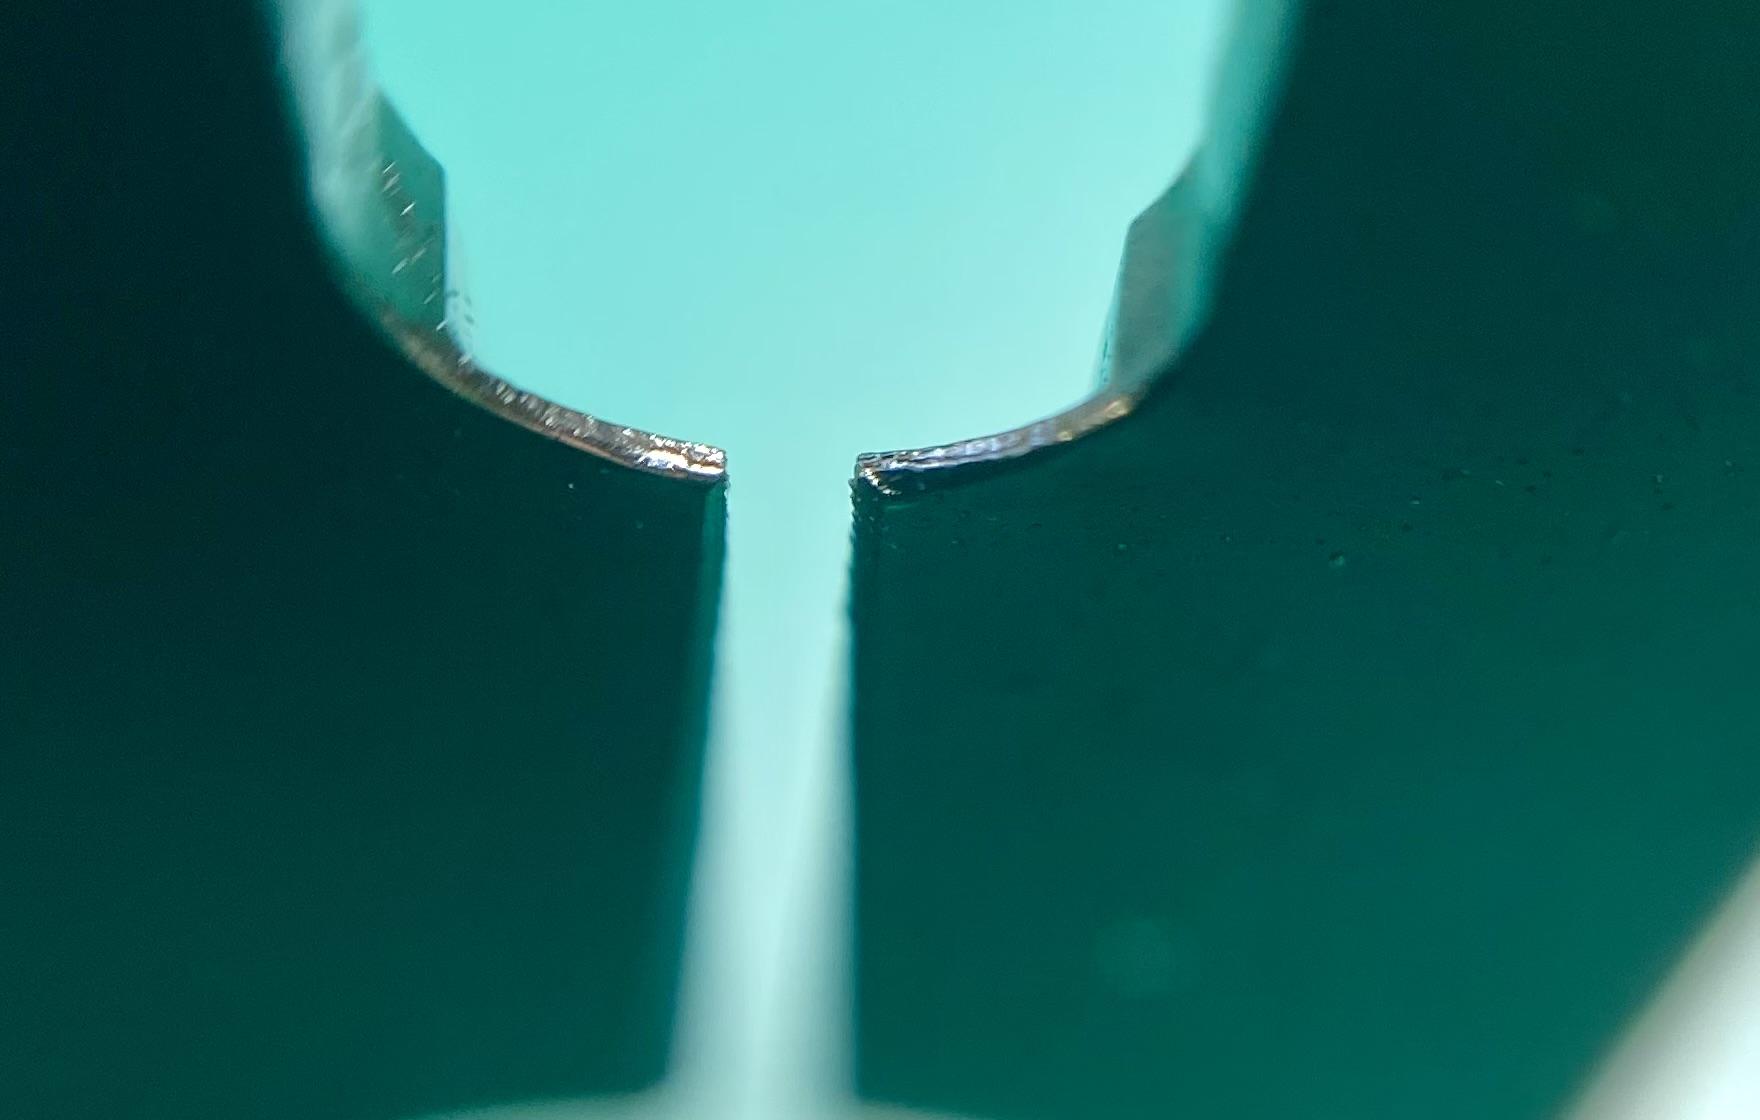
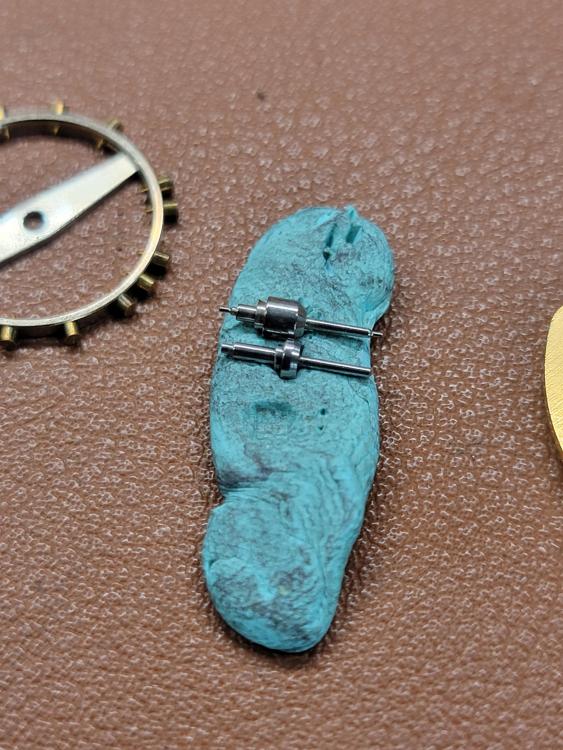
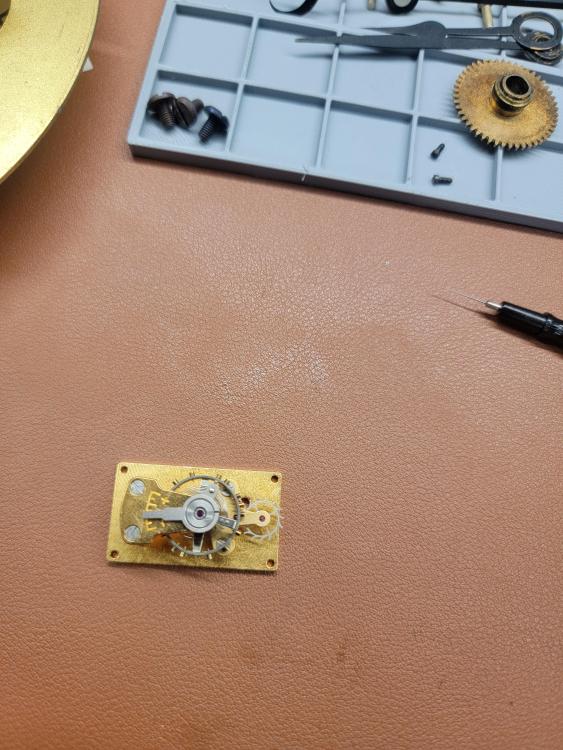
Picked this up for $80 at a little antique shop. Said it was running--not! Broken balance staff and bodged mainspring. I looked around for a staff and could only find staffs that were about 6mm long. This one is about 8mm. Both pivots were broken yet there is no indication the clock was dropped. We'll, I could see deep pot marks around the edge of the balance jewels on the plate. Some numb nutz was just forcing the balance until it broke. With little hope of finding a staff, I made one. I started with a larger PW staff. The escapement platform is assembled and my free spin test was excellent. I am repairing the MS arbor, so until that is done, I cannot test operation.


 2 points
 -
The coil with battery tab can be replaced if that's the only fault but they aren't cheap.1 point
-
The balance staff here is actually a cylinder. You don't search cylinder for specific Langendorf caliber, but for cylinder with needed diameter, height and height of the cylinder mouth from down side pivot tip. As I see, the cylinder is not broken and only the tampon of it with the broken pivot can be replaced.1 point
-
But to prove it you'd either have to clean the spring on its own, leaving everything else as is, or clean everything but the spring, test, then clean the spring and test again.1 point
-
I'd expected cleaning and lubricating to give an improvement and the best way to quantify is before and after results on the timegrapher.1 point
-
If servicing a watch professionally then a new mainspring is a minor cost compared to the service, so will probably be fitted. I used to nearly always fit new mainsprings to my own watches. But after reading advice, and years of experience, I found it rarely necessary to fit new springs. Unless they are completely set or distorted, I nearly always use the old spring. I'd guess on about 80% of the watches I service, I don't fit a new spring.1 point
-
The control coil supplies the feedback signal to the transistor circuit. Open coil = no feedback = fork cannot vibrate.1 point
-
Are you aware of this document? Edit Is that the 320 Stop Spring? https://www.spareparts-watches.com/product/12524790/pierce-134-pierce-130-pierce-134d Esemble-O-Graf Volume 15 Pierce 134.pdf1 point
-
Hello and welcome lisa77 to the forum enjoy ex tyke living in Scotland. Attached a little reading to get you underway. Cheers dictionary_ebauches_sa.pdf TZIllustratedGlossary.pdf1 point
-
Yes, what's your question relating too?1 point
-
Hello and welcome from Leeds, England. I don't understand your question.1 point
-
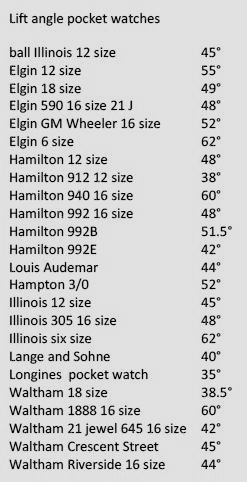
The reason I wanted it clarify is there is a software-based timing program labeled TG for which I'm not overly impressed with and occasionally people using on the discussion group. Which is why just wanted to make sure I was understanding. Then other places to find lift angles but not entirely helpful are PDFs. So basically companies that produce timing machines early on that could measure amplitude would have a lift angle listing so people would know how to use their newfangled timing machines. One of the listings that are not sure where it actually even came from my butt on a spreadsheet that somebody made. Then there is the one that came from witschi with bonus where the sounds come from and our oscilloscope diagrams which unfortunately did not seem that entirely resemble the real world. I think they're more of an exaggeration of what things may or may not look like then the oscilloscope brings up the problem of it would be really nice if all the timing machines could actually do a oscilloscope. Then not just the oscilloscope it be really nice if they did what Sort of what witschi does an added show what they're triggering off of. I use the wording is sort of in that I wish that they would shift the display a little bit so you can see the beginning were clearly. But they will usually show you what they're triggering off of for locking and this is where you typically will see variations of basically the timing machine is not triggering exactly where it's supposed to be. This is where sometimes it's amusing to look at the witschi our oscilloscope at work and noticed that it gets confused a lot of times especially when I'm working on pocket watches and I don't really think they had pocket watches in mind when they made their timing machine. Then I just now doing a search for lift angle in the computer I see another listing that I hadn't already attached. Amusingly I find another one in the computer not attaching it because it only has one Bulova watch how strange? Then the amusing pocket watch listing? Why is it amusing because I've actually seen it quoted on the Internet wherever I last placed at somebody found it quoted it someplace else.. Then the other day at work they were apparently looking for lift angles for pocket watches and found the list and noticed it came from me my list.. But I find quite interesting that no one else is bothered to make a listing of their pocket watches.. So the early days where I worked my boss was much more obsessed with amplitude now I typically just don't worry about it if the numbers are the way to hire way too low I might just adjust the lift angles the numbers look more realistic but I don't worry about it typically unless they're extremely low then I may be more concerned than actually bothered to set the lift angle otherwise I typically just don't worry about it.. Lift Angle big list .pdf Lift Angles Watch gamma lift angle.pdf Lift Angles Watch Witschi Electronic AG.pdf Lift-Angles Wostep.pdf
 1 point
 -
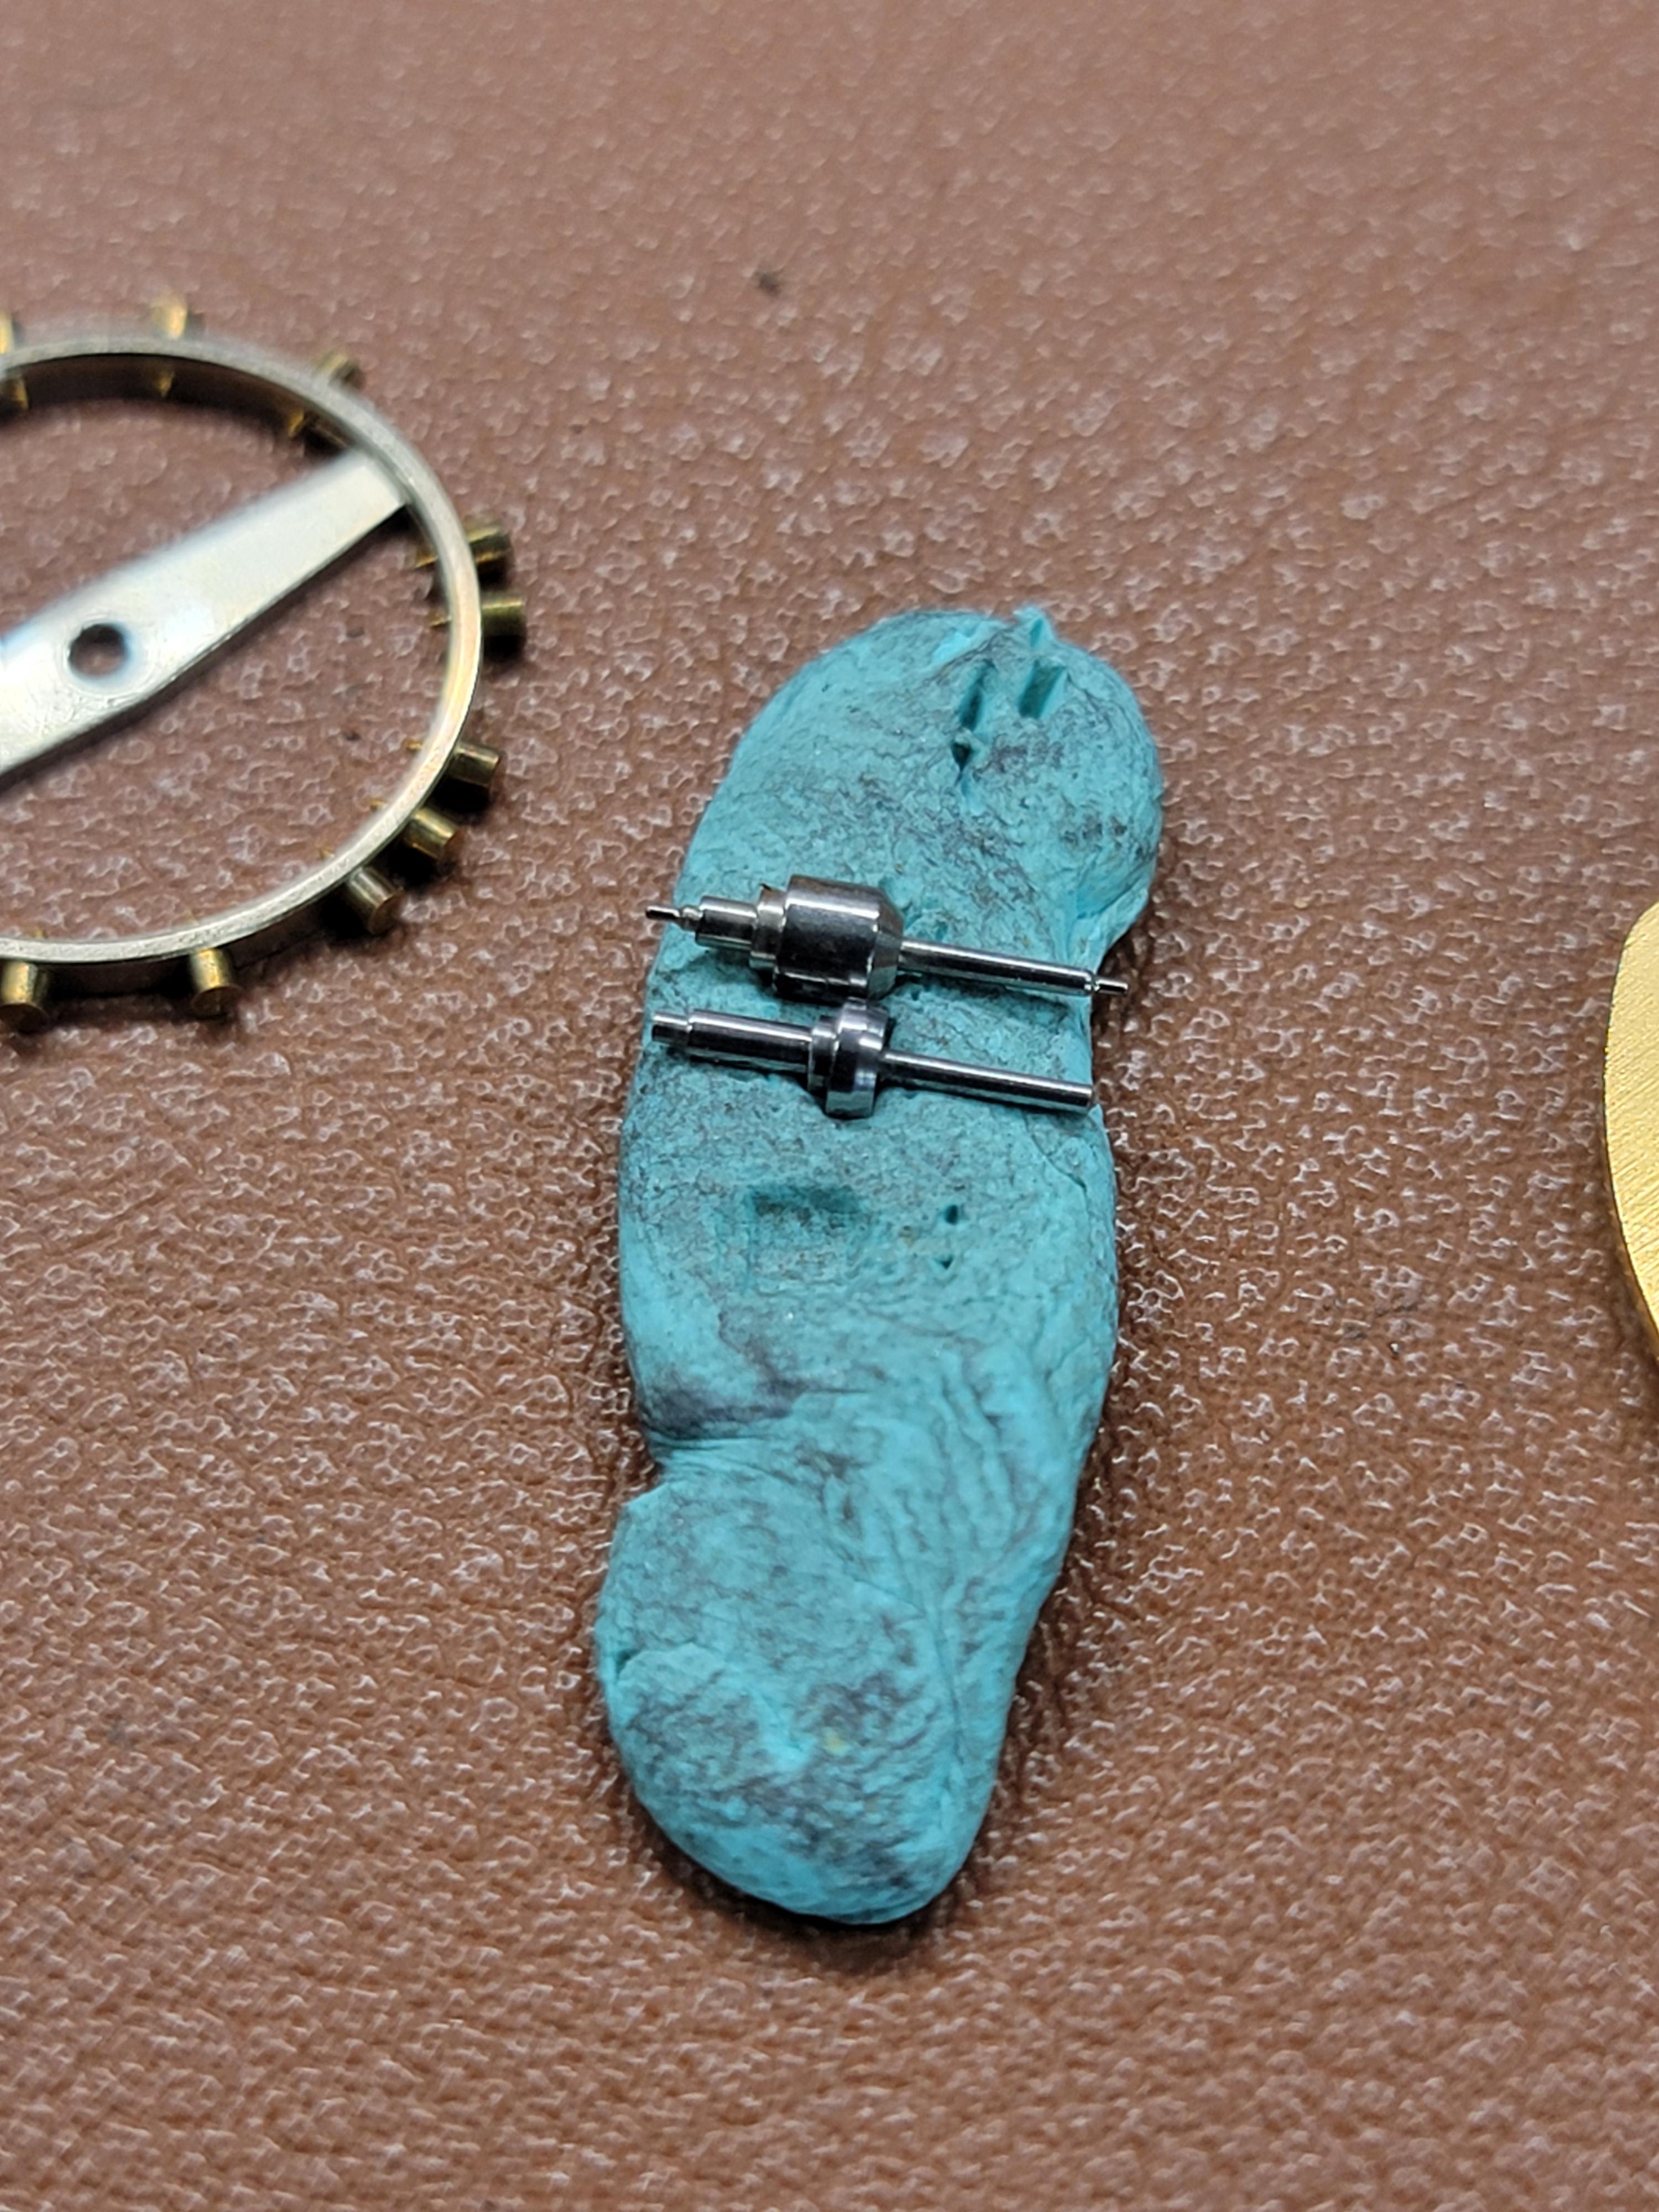
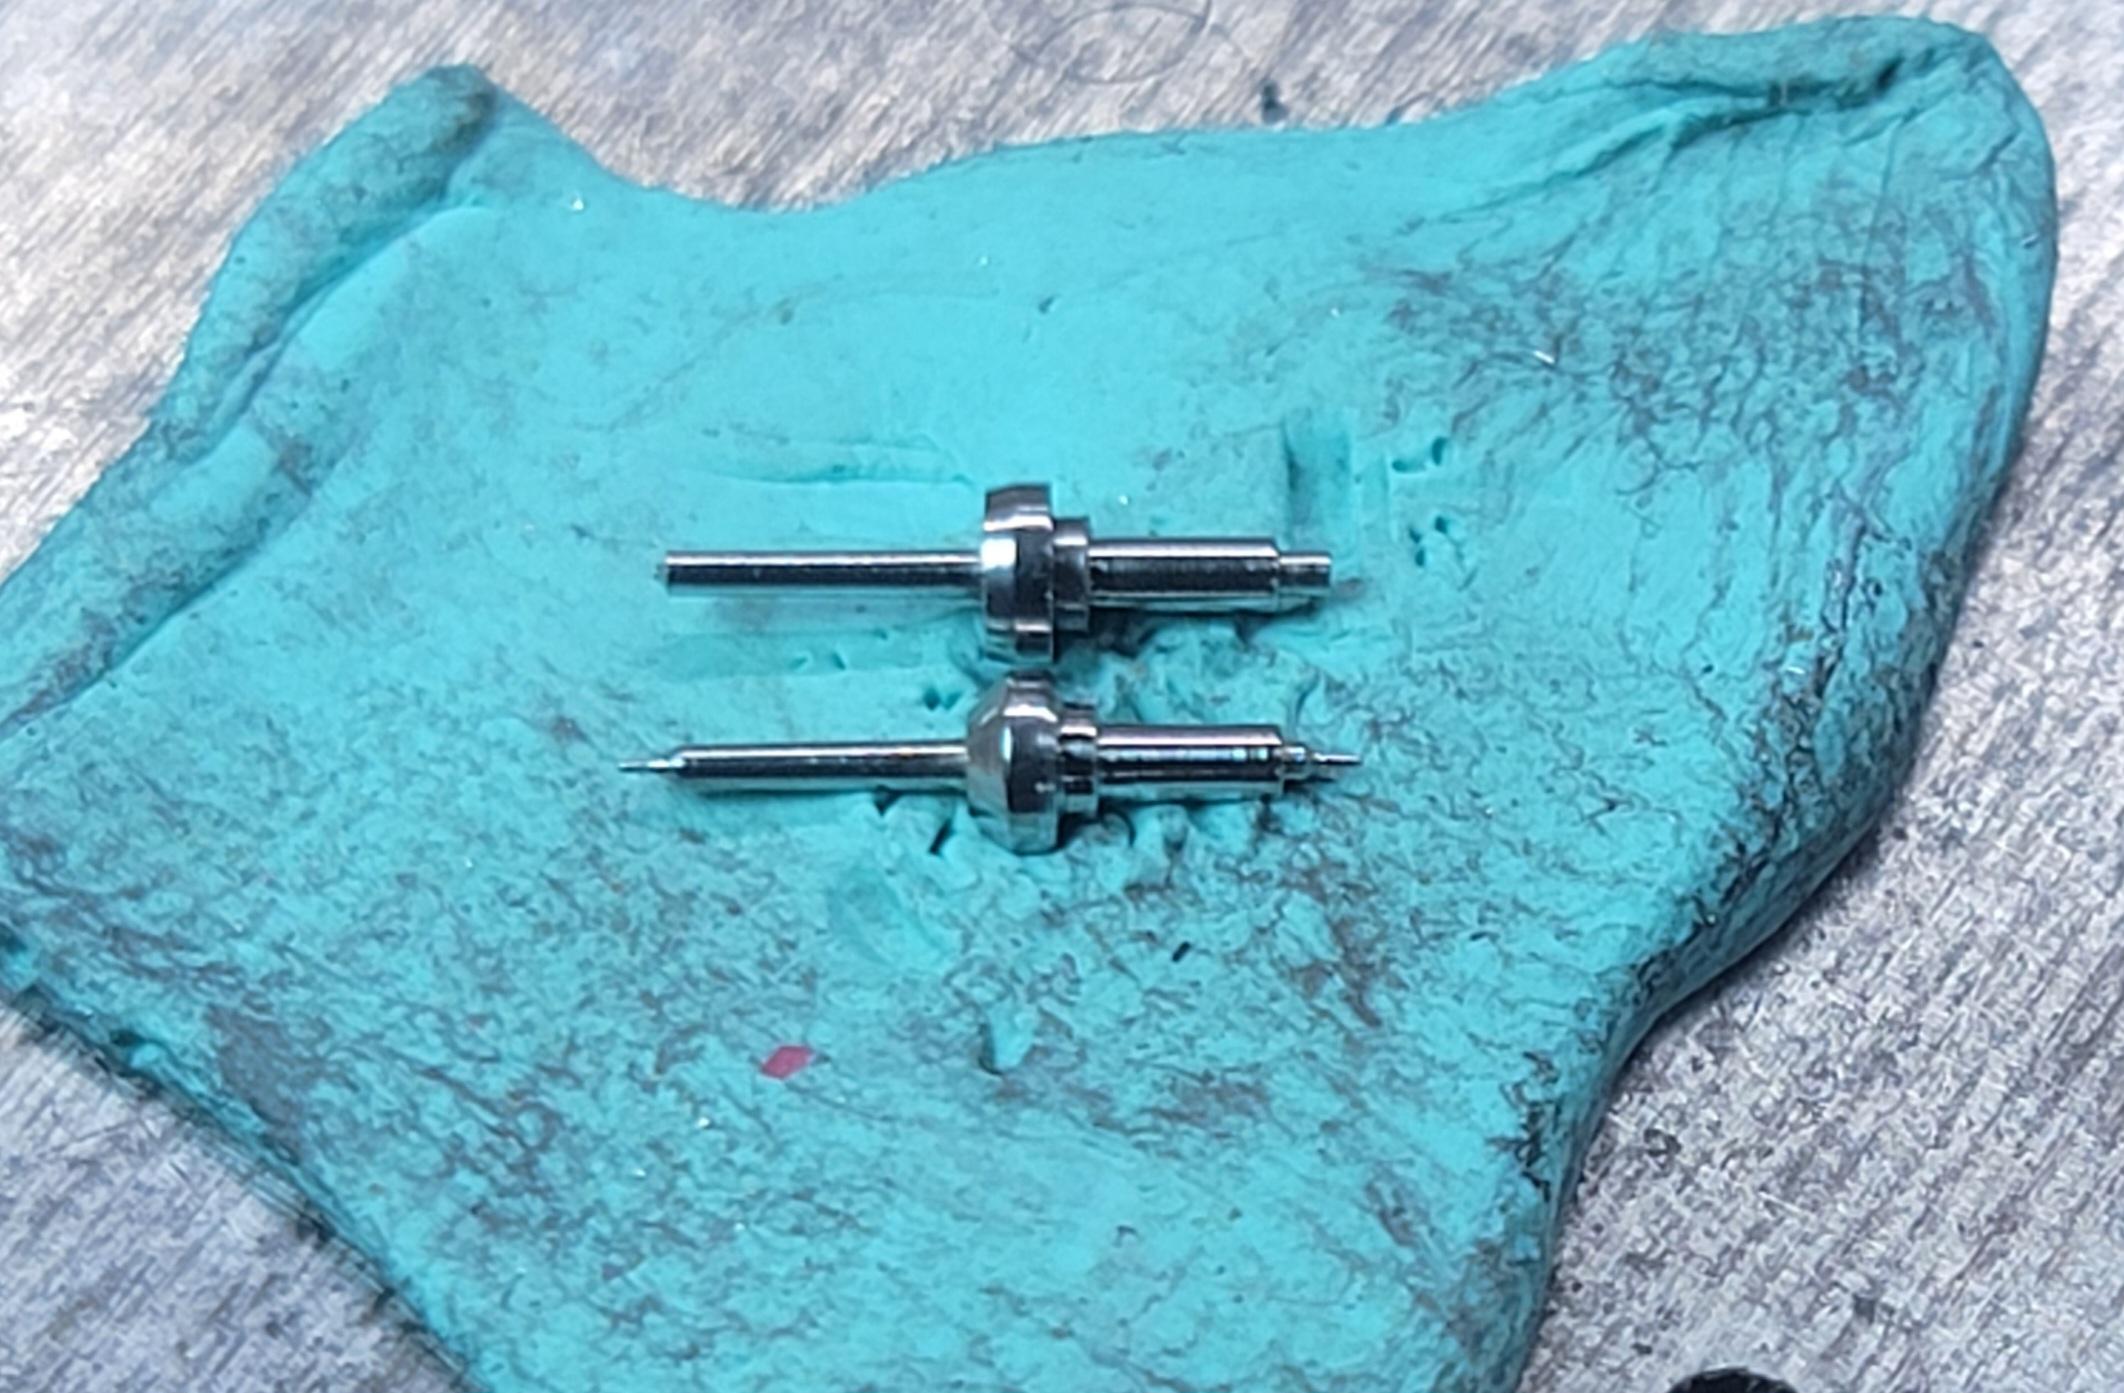
I did end up buying the Bergeon 2810 and have had no problems with it. You do have to be careful though. You need to make sure it's seated between the roller and staff shoulder and not pushing on the balance arms. Rollers can be very soft, and too much pressure on the tool can easily bend them.1 point
-
Yes, Kalle With just a little bit of bad luck you will turn/remove the staff, not the roller … Frank1 point
-
I‘ve seen Kalle (Youtube) using this kind of tool for roller removal. It makes sense to me.1 point
-
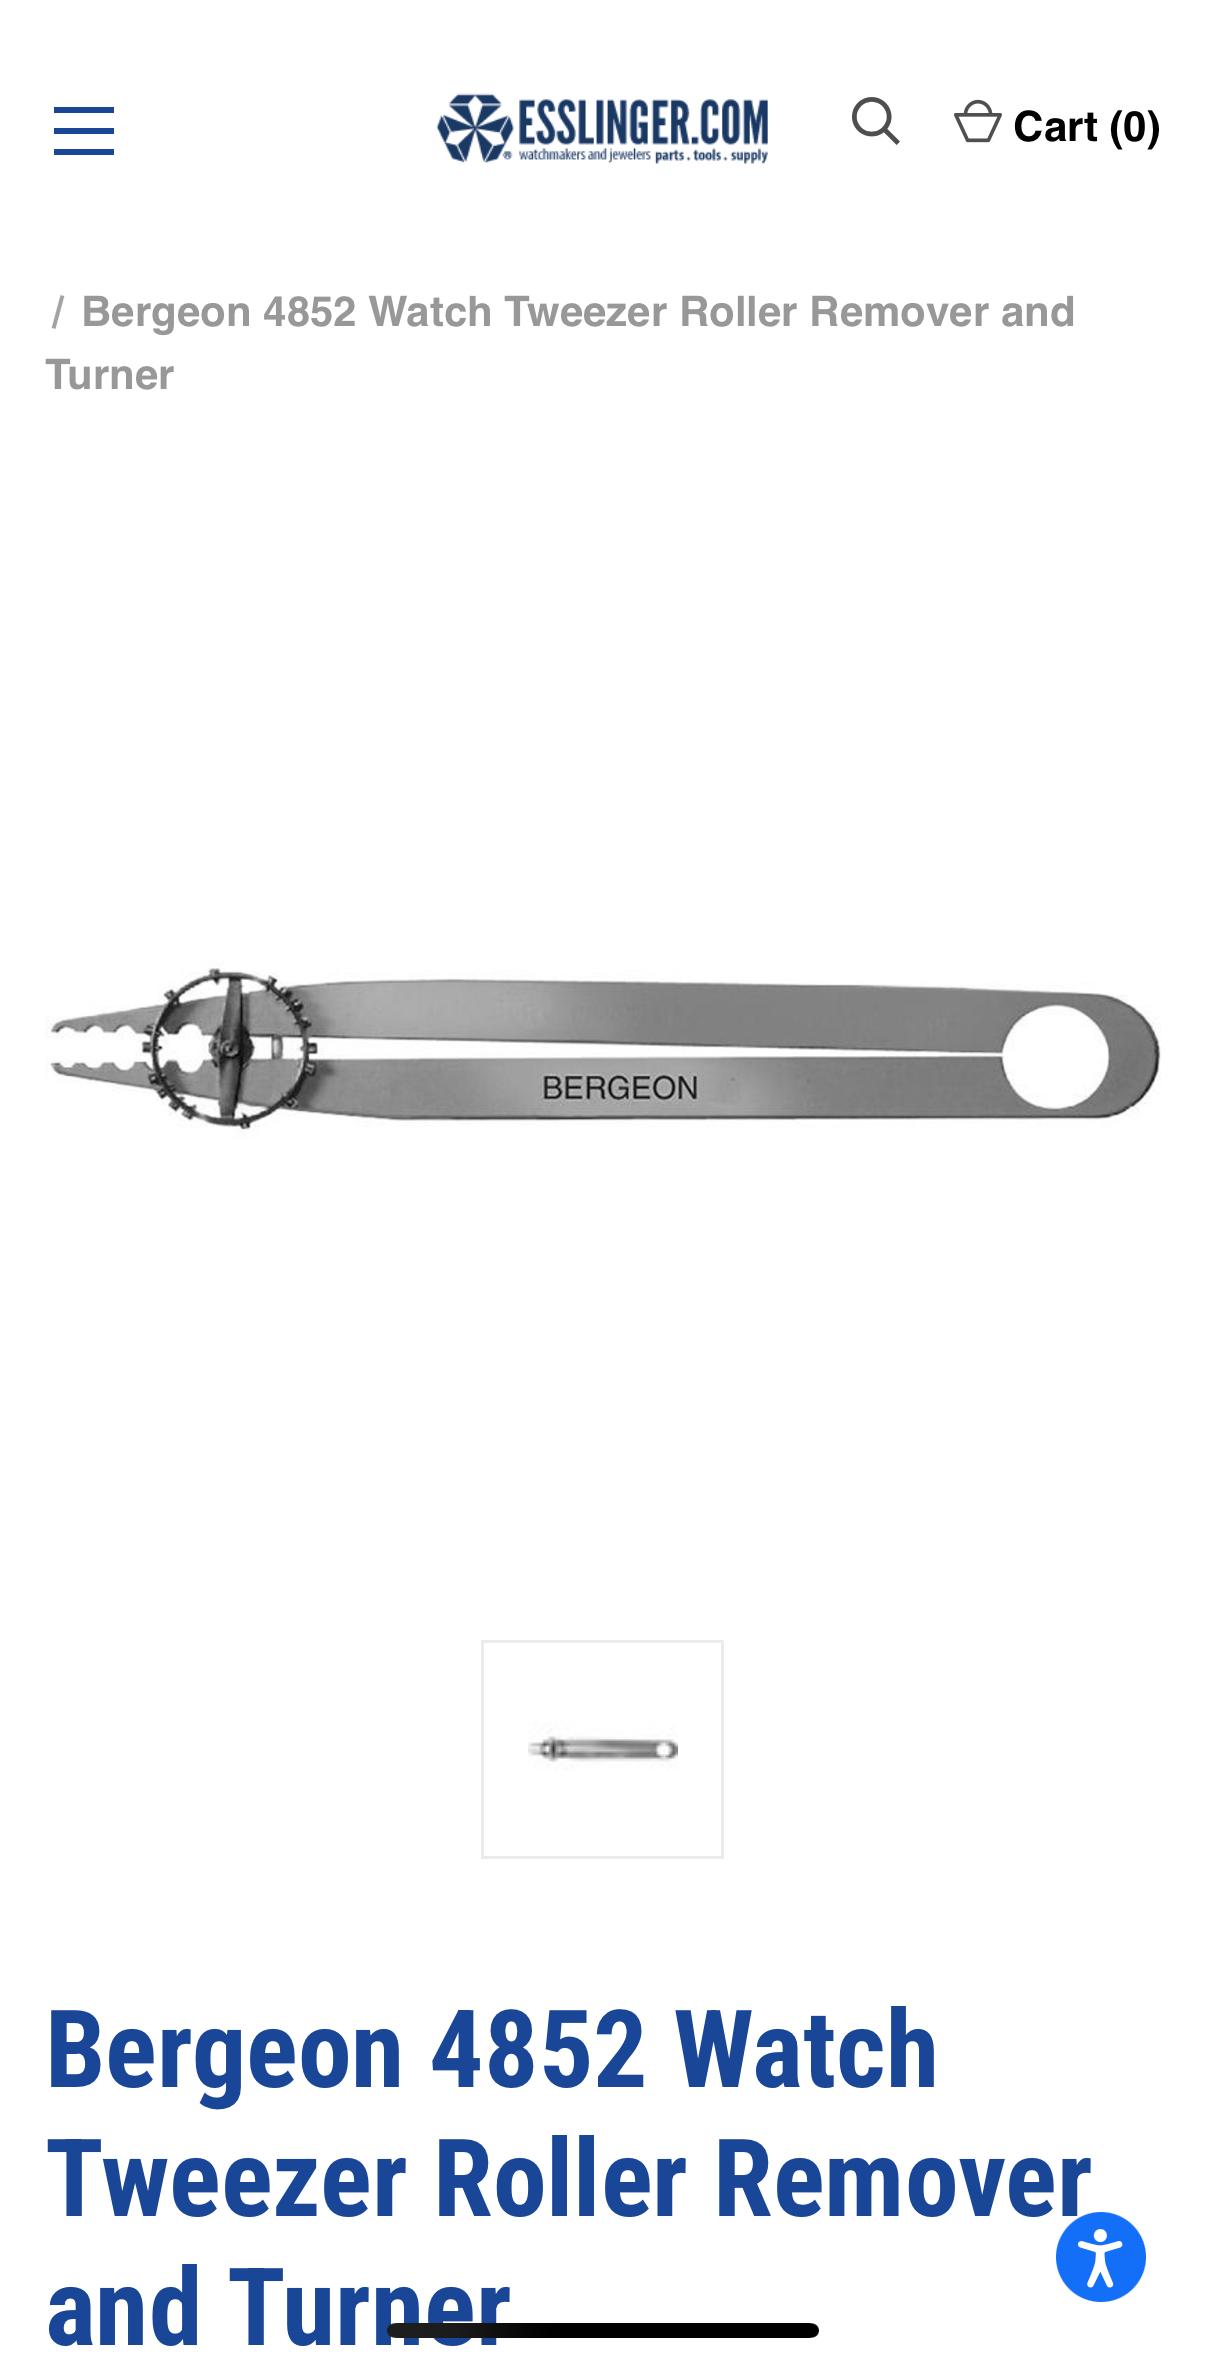
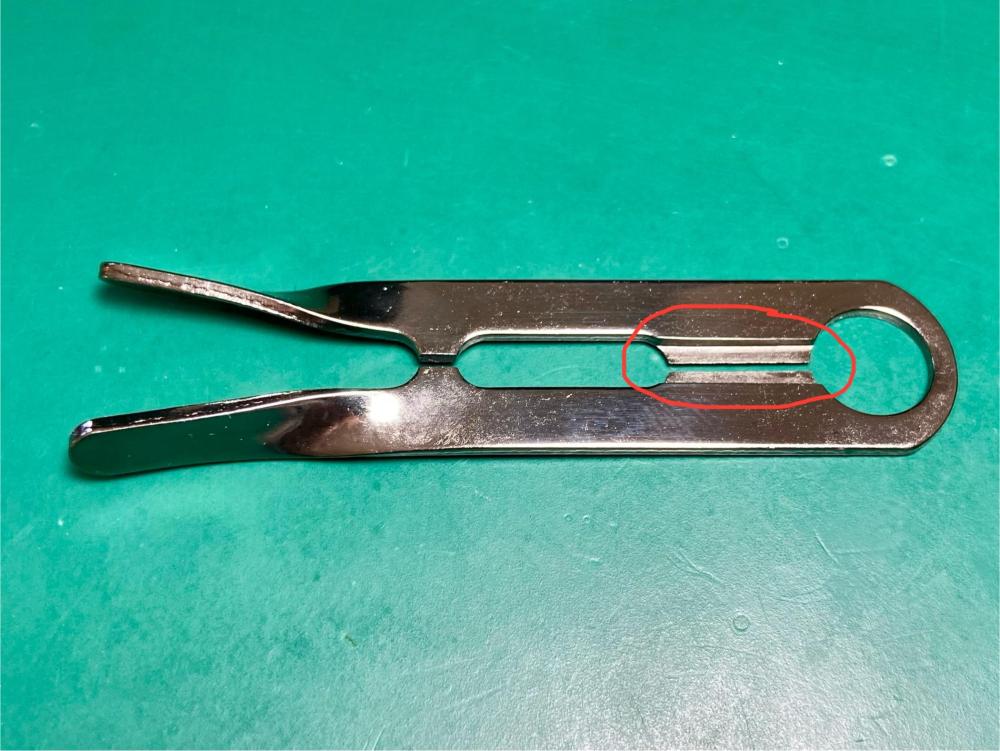
I’ve had watch parts arrive with the cheap version of the 2810 thrown in. Indeed it is of the quality as described. Fortunately the bloke who retired his K&D staking set also bequeathed a lovely Bergeon version of the tool to me in the bottom of the case.. I’m curious if anyone uses the Bergeon 4852 for removal? Esslinger describes as a remover?
 1 point
 -
Greetings! I've been interested in mechanical watches since 2000. I live in Seattle and I'm switching careers to become a watchmaker. I'm currently enrolled in the Norwest School of Horology. I don't know how active I'll be on this site, but y'all want an introduction so Hi There!1 point
-
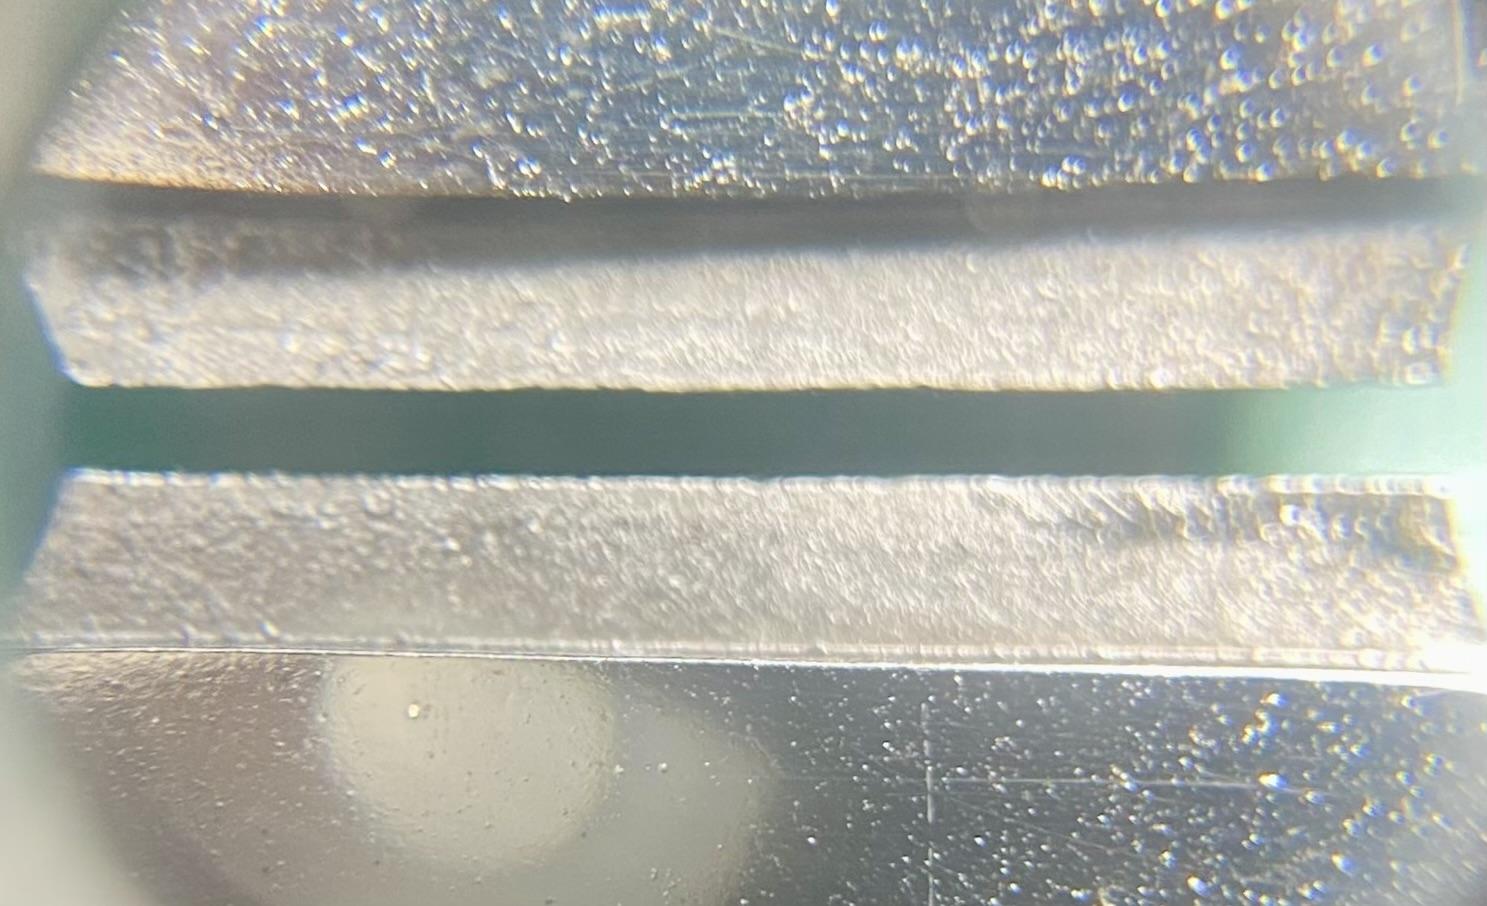
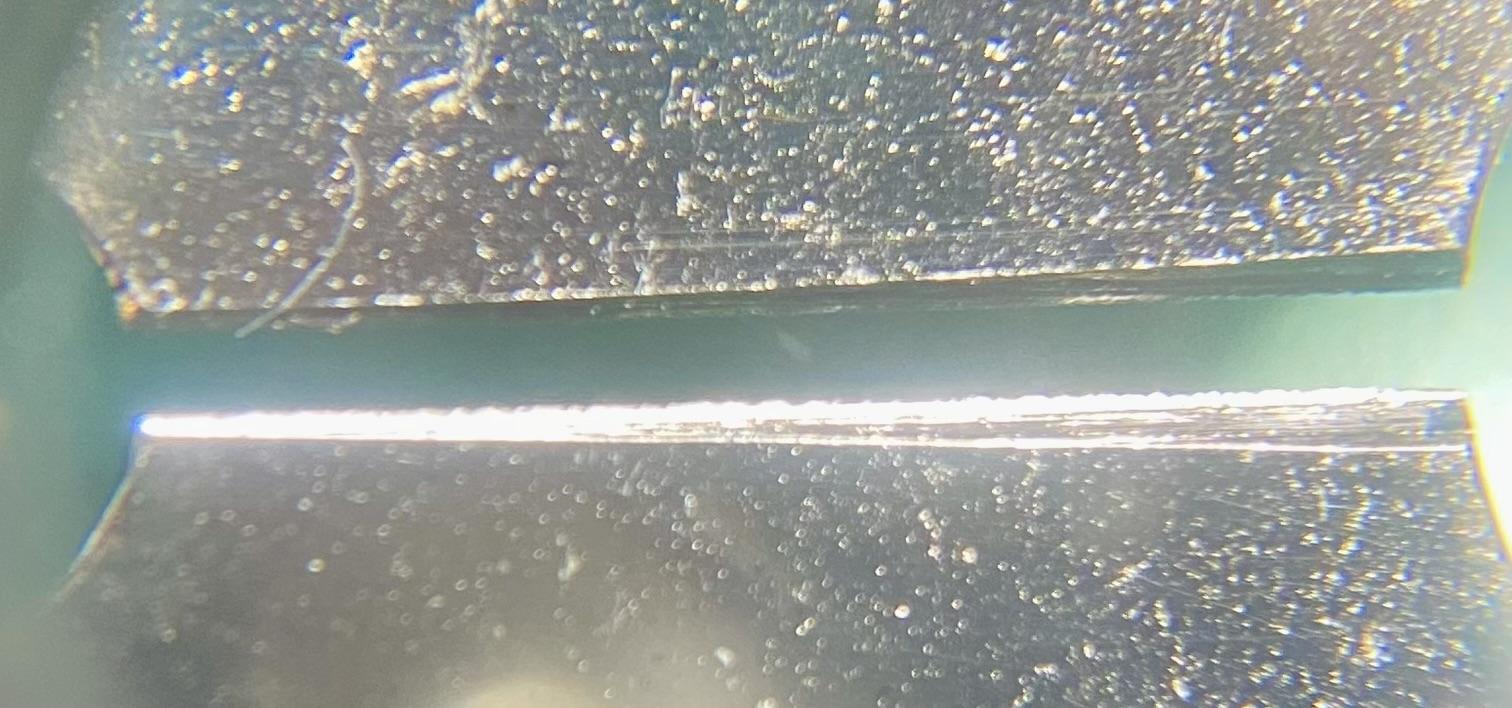
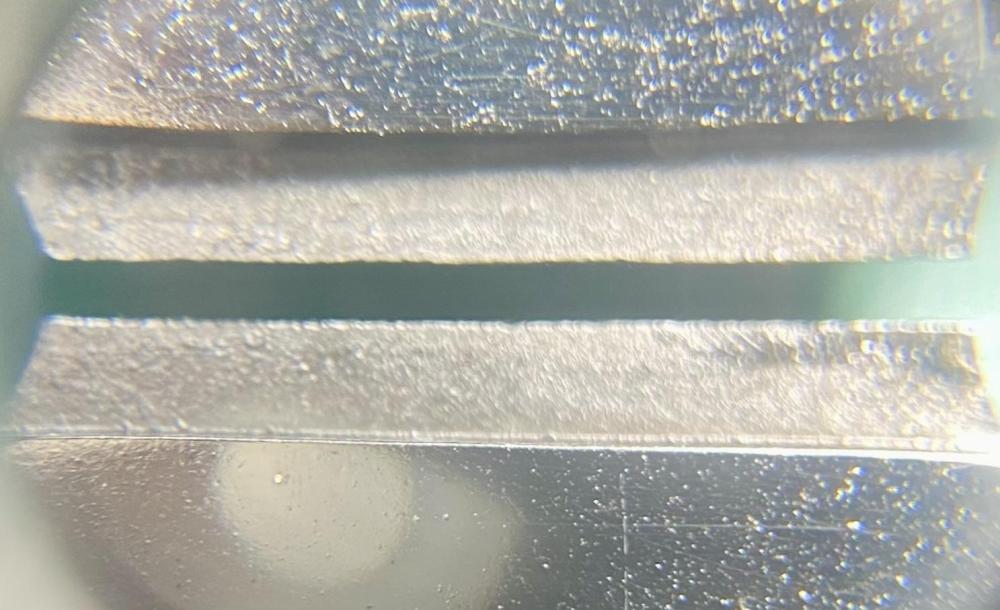
I have this cheap Chinese version of the Bergeon 2810. It is scrap, as the pictures show!

 1 point
 -
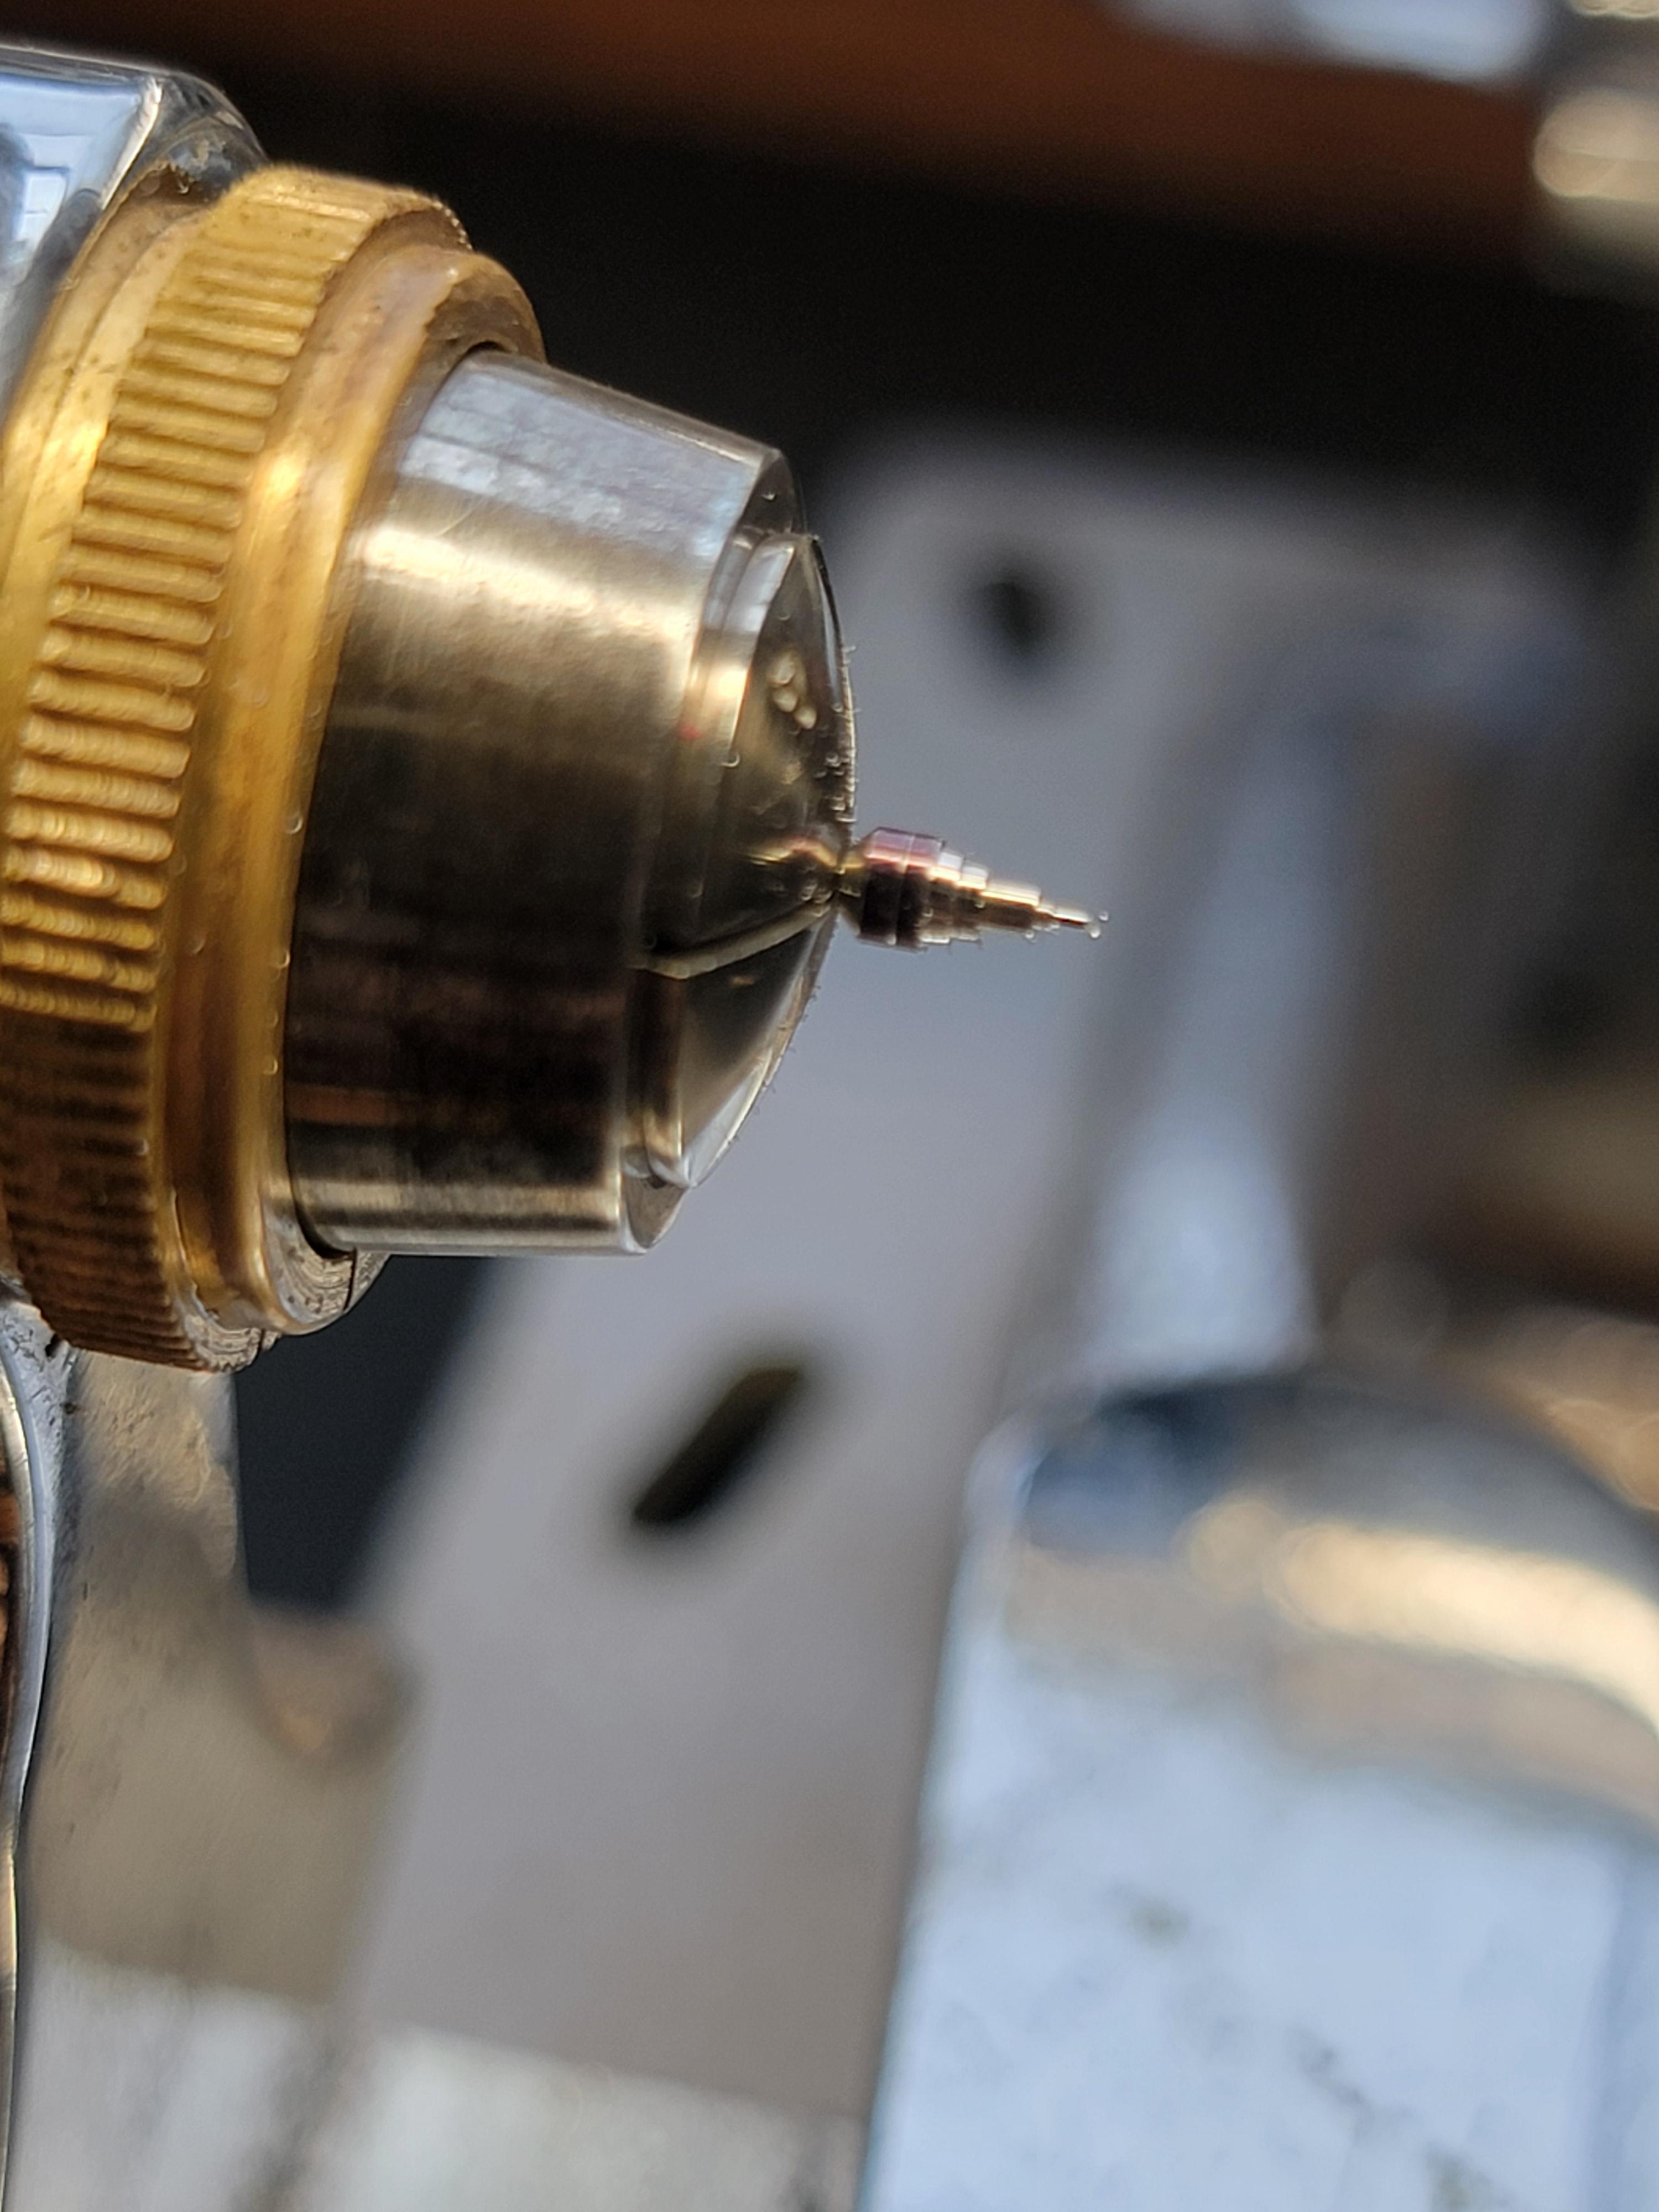
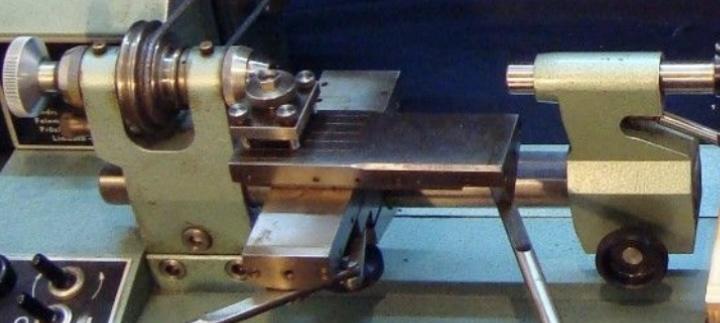
I liked and used the Bradux (beware of the cheap Indian copy!!), but now most often I use a tool like this: Collet shoulder in headstock, roller in tailstock collet. Slightly spin and pull. Frank
 1 point
 -
I recently purchased some surprisingly high quality screwdrivers from AliExpress that have the exact same design as the Bergeon 30081 series, but at a quarter of the price. Unfortunately, the blades tips were flattened too much during manufacture, which meant that I could barely use anything other than the 0.6 mm to 1 mm screwdrivers, because the blades wouldn't fit into any screw slots. I've sharpened screwdrivers in the past, but I've never done it very well. The angle of the wedge was never quite the same, and I couldn't never quite get the orientation correct, meaning that I was cutting a new blade face rotated by a few degrees rather than sharpening the existing one. I have the Bergeon screwdriver sharpening tool holder (https://www.cousinsuk.com/sku/details/screwdriver-sharpeners/s1521?skuId=26987). The problem is, when sharpening, your screwdriver blade angle will change depending on how far into the holder you place your screwdriver. If you put the screwdriver in too far, your blade angle will be very narrow, travel further down the shaft, and the blade will be very thin at the tip, possibly risking breaking. Not far enough, and your blade will be fat and you won't be able to fit the tip into any screw slots. So, I endeavored to create a solution... Judging by the picture of the replacement blades, the tip angle looks to be 26 degrees total included. The goal here is to then create something which limits the length of screwdriver that you can insert into the sharpener, and which results in the screwdriver sitting at 13 degrees to the horizontal. Without getting into the trigonometry, you need to extend the screwdriver about 30 mm from the sharpeners pivot point in order to reach 13 degrees. I sketched it up in Tinkercad (attached picture). The curvature of the sharpener fits onto the top, and the screwdriver points down. There is a V-notch at the bottom that orients the blade so that you're always resharpening the existing faces of the blade, rather than having the blade rotated slightly, which would cause you to cut a new face. And I'm happy to report that it worked extremely well, probably within 1 to 2 degrees of what I calculated. The blades were sharpened precisely over the old face, and the end was perfectly perpendicular. And that 1-2 degree error is not down to a lack of theory, but rather the realities of 3D printing; that you'll always get layer lines, and that corners can never be truly sharp. I think what was happening is that in the initial version, the blade-orienting slot was designed as a sharp V-notch. But since 3D printers can't print infinitely sharp slots, the screwdriver didn't fit into it exactly as intended. So I made a follow up version (haven't tested it yet) that includes a small recess at the bottom of the V to allow the very end of the blade to fit in. If you would like to try it, the file is available at https://drive.google.com/file/d/1mWjxi0HUs9jL55ysQaSV2xnyMiAOS29Y/view?usp=drive_link. Just note that this was built to fit the Bergeon screwdriver sharpener. Other brands might have different geometries which might result in different blade angles, though I don't think this will be so drastically different.
 1 point
 -
Thank you. For the longest time I was using a set of cheapo Indian screwdrivers, which I had eventually swapped Bergeon blades into. They never gave me a day of trouble with slotting into screws so I figured I'd just emulate what I already knew worked.1 point
-
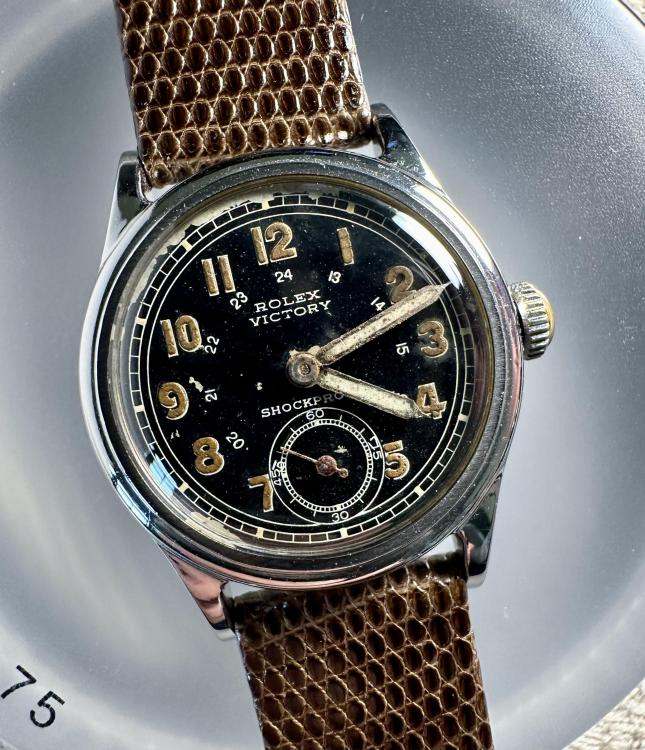
I may be mistaken, but I don't see any lume on the dial or hands. Just for peace of mind keep your fingers away from your face, wash your hands afterwards and wipe down your work area. You'll be fine.1 point
-
…it may difficult for some to appreciate but a dial that has aged as gracefully as this is very desirable by many collectors (as is the ‘suiza’ designation)…and as recommended above the movement, case and a light polish of the hands will freshen everything while still maintaining coherence…this heavy patina Rolex I have is a very modest watch but receives outsized attention at places where expensive watches prevail… …this is a thread where dial restoration was discussed in detail. Hope it is constructive for your Longines…
 1 point
 -
It's important to understand that most of that discolouration isn't dirt, it is irreversible staining caused by chemical processes in the paint and lacquer. No substance in the world can remove it, and an incautious attempt will ruin it. I think it has aged in a dignified manner and would polish the hands and crystal but leave the dial alone. If your brother is not happy with it, then the only real alternatives are replacement or refurbishment. A lot more can and should in my opinion be done with the case and movement.1 point
-
My advice would be to either leave as is or take to a professional as any attempt to clean the dial is likely to make it worse.1 point
-
Looks like the balance wheel is bent and needs truing. May be rotating out of true is what You call 'dancing'? A video of balance rotating will help...1 point
-
Oh come on Richard chip in after all I tried to teach you have you forgotten all ready.1 point
-
Hi there are organisations in America such as the AWCI and the NAWCC who like the British BHI will be able to point you in the right direction as regards finding the right people in your area who can restore your clock which will look superb once restored. If you contact either or both of these organisations I'm am sure they would be able to help.. Good luck in your endeavors and keep us posted on any progress as to how you get on. We remain interested. Cheers1 point
-
Doober on the side says she's in SoCal. Can't tell much about the movement from the photos, but the walnut case is going to need some top tier talent to get back to good condition. That appears to be a genuinely nice clock. Don't cheap out and take it to some hack, or it'll just be destroyed further. Advice about taking the case and movement to separate people is correct. Very different sets; skill, tool, TV, etc. You'll want to take it to a good clockmaker, who will remove and repair the movement. Then you'll take the case to a VERY good furniture restorer. Case will probably take more and longer than the movement. I have both of those skillsets (more on the woodworking side than clockmaking, to be fair), and with the figured walnut there, and I'm guessing a French polish finish (seems to have been fairly shiny, and would have been appropriate to the time and place), you don't want some hack just sanding it down and slapping on some Home Depot canned crap and gooping in wood filler. If the restorer doesn't have a glue pot (a little slow cooker looking device for keeping hide glue at the right temperature), and a huge stack of walnut lying around, it's probably the wrong restorer. Save every splinter; carefully fitting a shard is WAY easier and better looking than trying to grain match.1 point
-
I have been replying to this for LadyLost by message. It certainly is a Tavern clock early 1800's that you can be sure of by the size of the dial. The clock tax ended in 1798, but the design carried on but the size became smaller. The very early ones had very large dials. The name on the dial is the maker.1 point
-
It's a press, for fitting crystals, bezels and casebacks.1 point
-
Hello and welcome to the forum.1 point
-
Hello and welcome from Leeds, England.1 point
-
They are counterbores, for creating a sink for cheese head screws to sit down flush with a plate or bridge when the screw is tightened down. Would get more use if you were making custom/replacement bridges rather than repair unless maybe if you needed to replace a screw with a bigger one because the plate threads were stripped. Probably not the only use in repair but I’ll leave comments to folk that know a lot more than me (not hard for sure) as to any other uses. Tom1 point
-
You could do that. Most would use a slide rest for this work; quite often it would be used to put a step on a setting, modify the diameter/s seat height etc. Also useful when making new settings. All depends of course on how true it runs (the ones I've encountered haven't been great).1 point
-
The things in the bag are countersinks, for cutting radiused sinks in holes. Looks like you have a couple of 8mm collets there next to it too. The table with clamps is a little faceplate, you would center a part in it with a point in the spindle, then clamp it in place to work on it. The collet that's in the spindle should be a 2.2mm; they used this odd diameter for the reamers for some reason. These are great tools, nicer than Seitz, and only equalled by Chatons SA (their later sets were amazing).1 point