Leaderboard


Popular Content
Showing content with the highest reputation on 03/24/25 in Posts
-
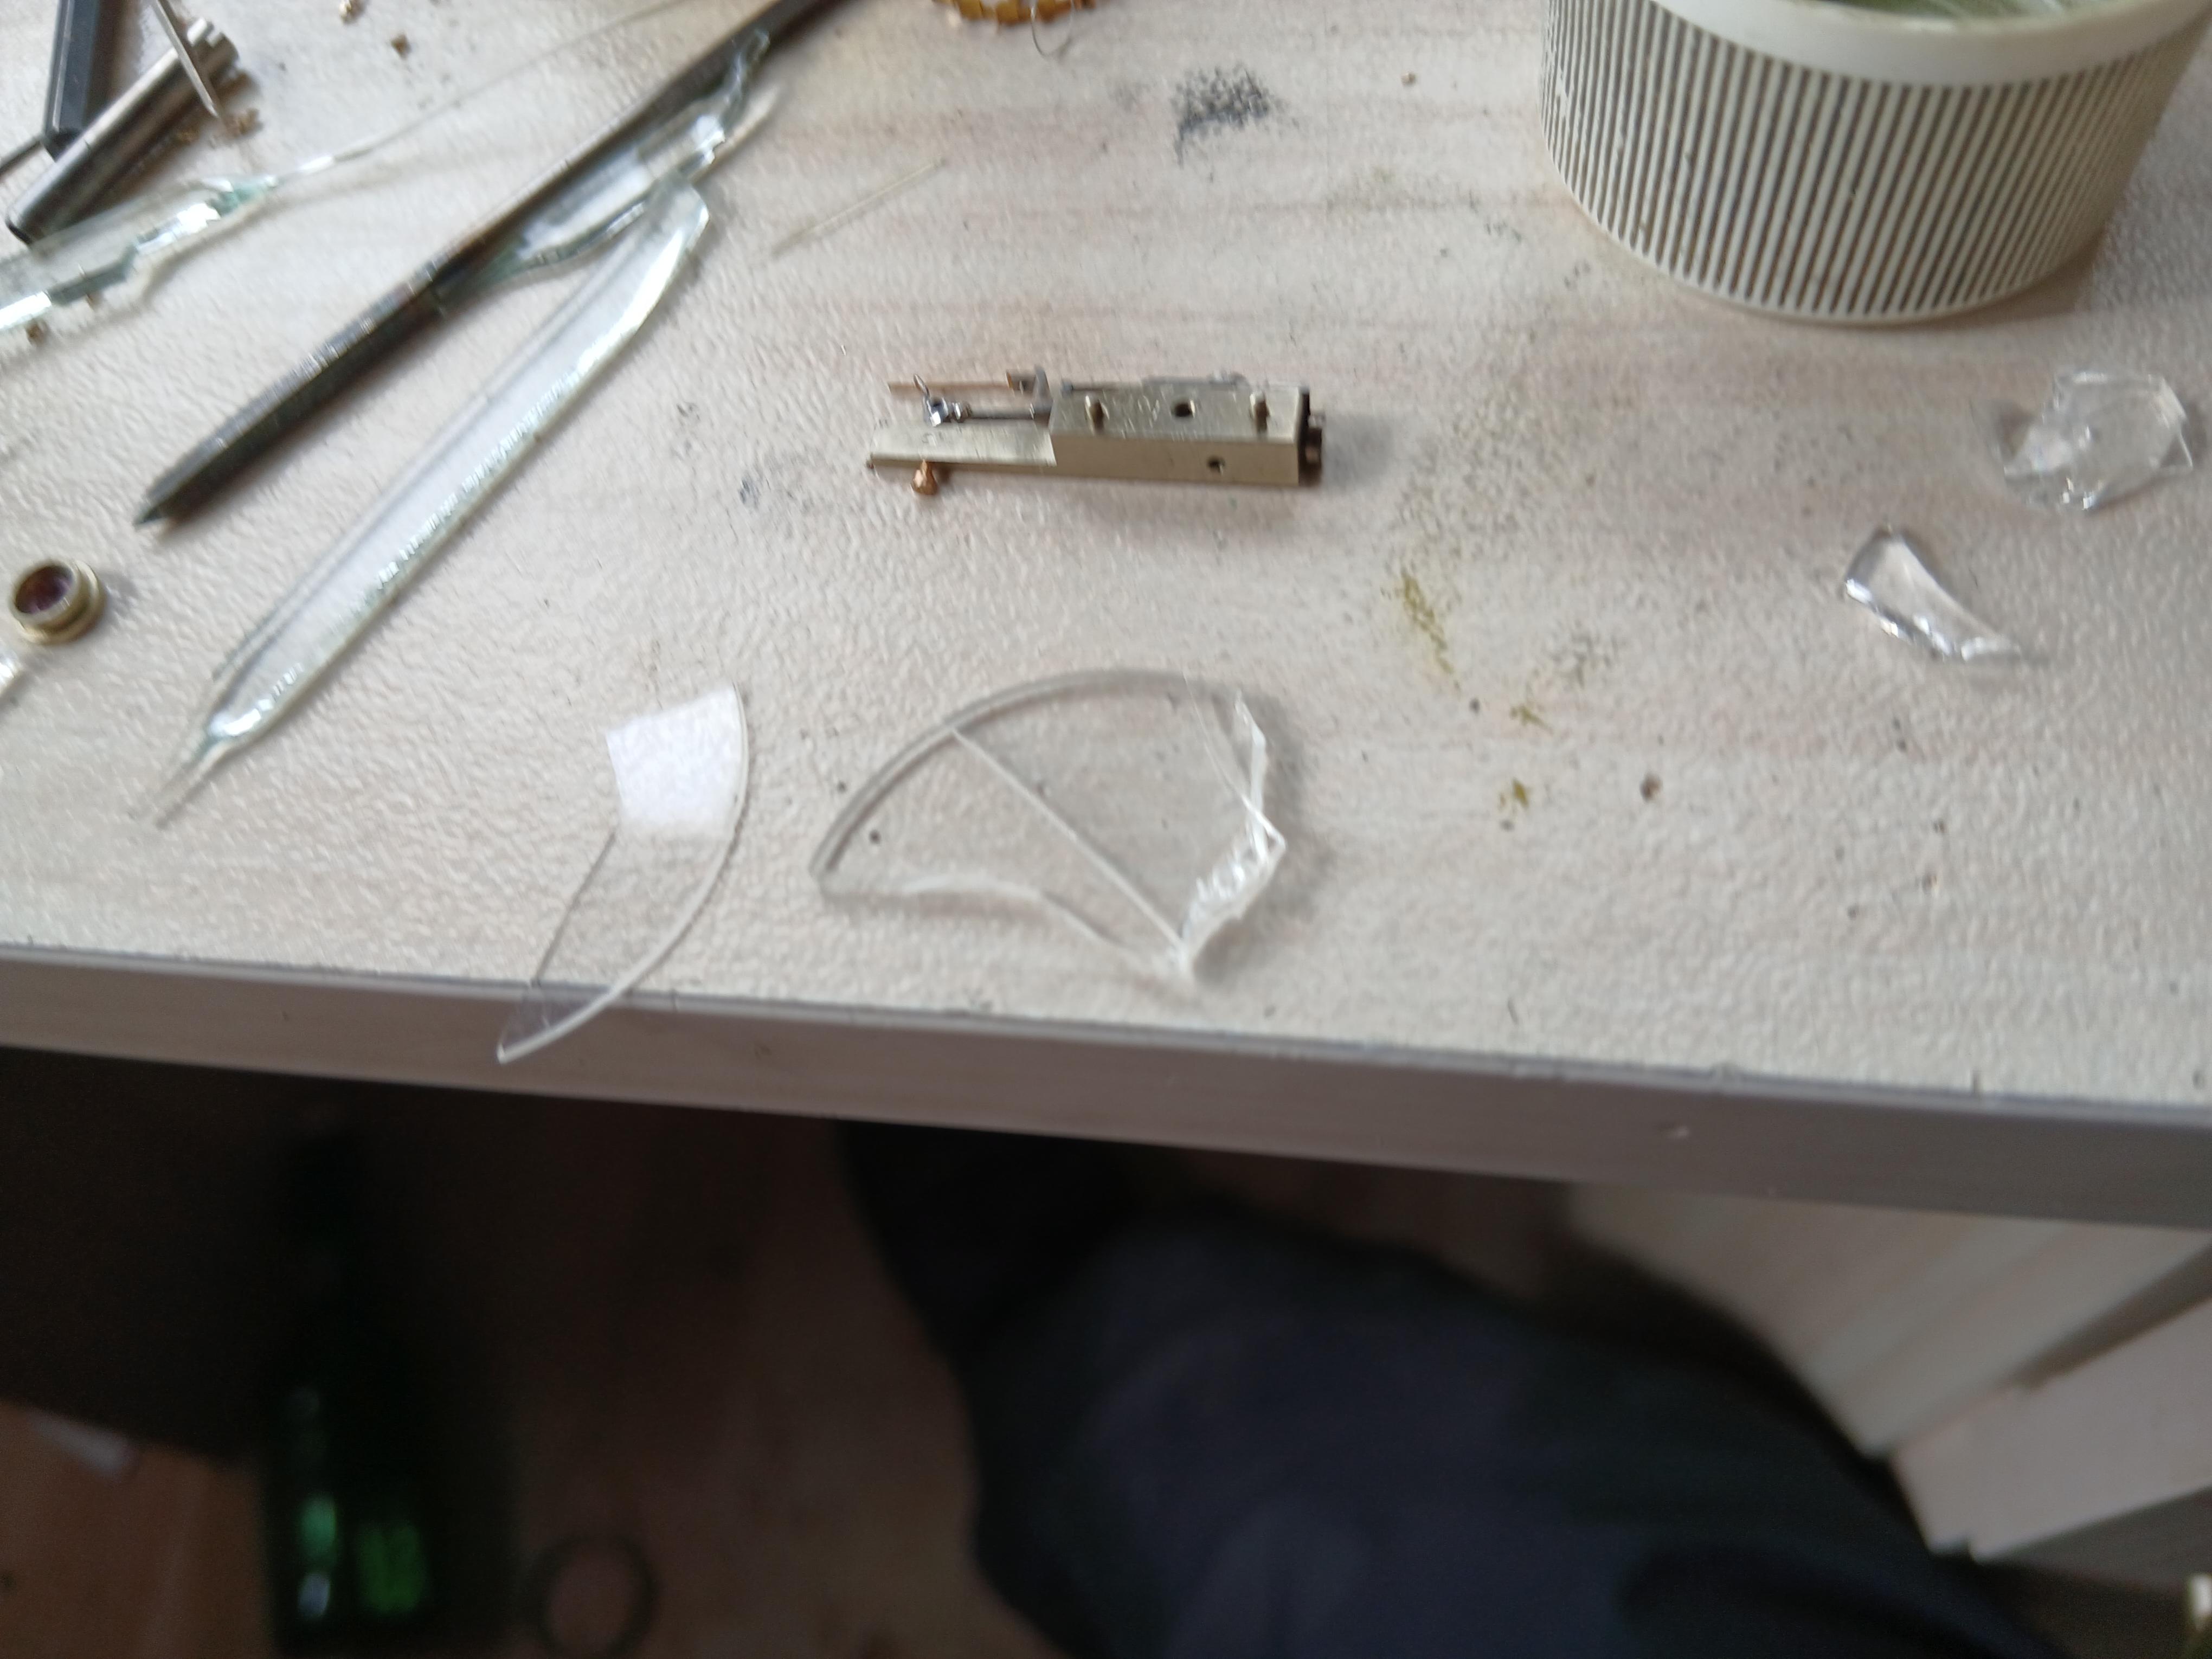
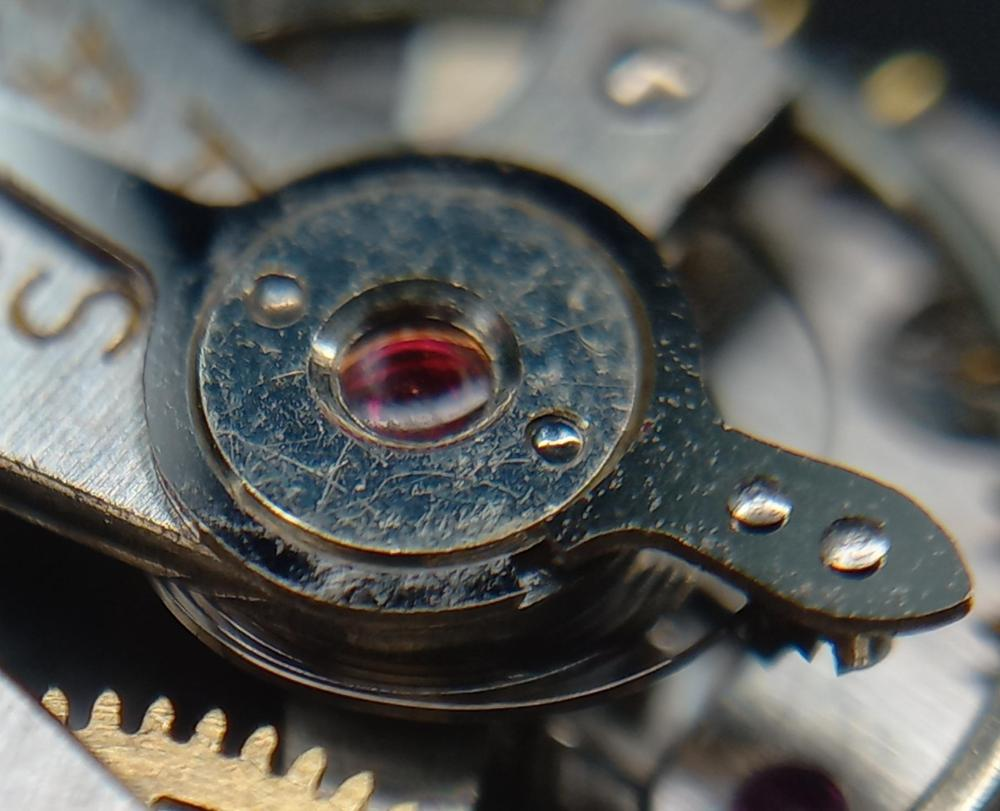
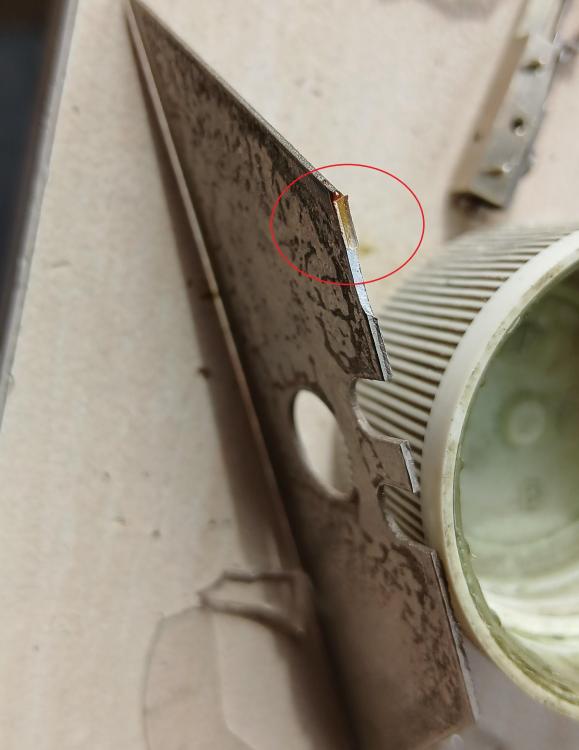
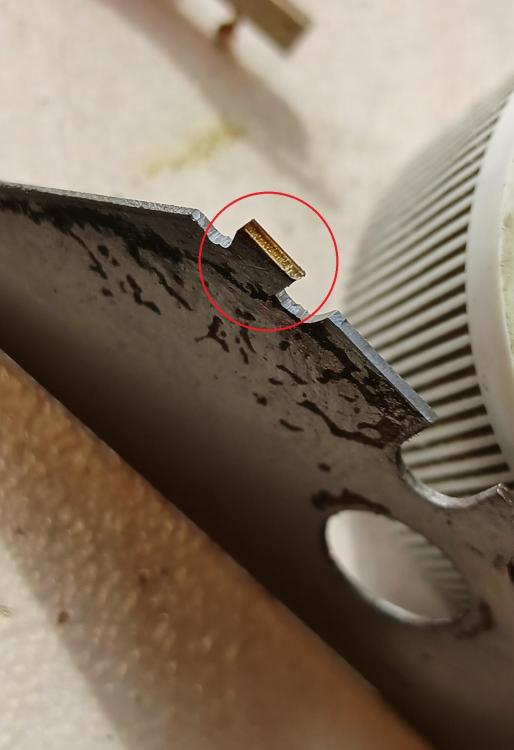
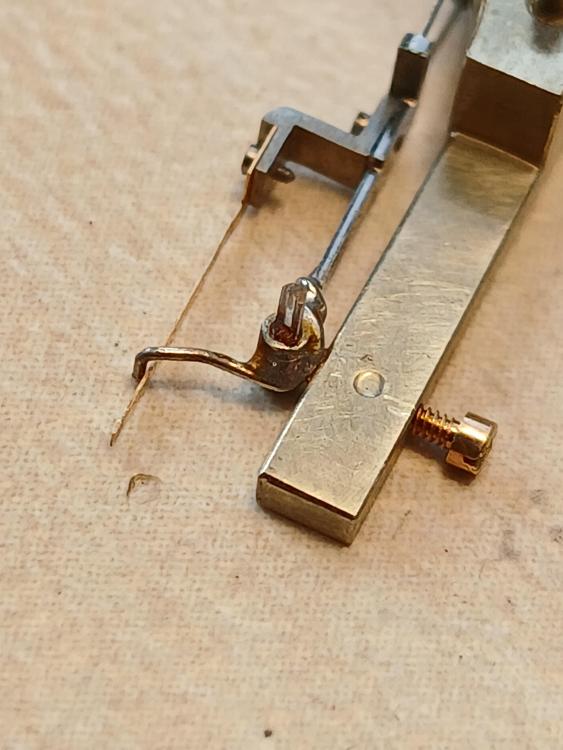
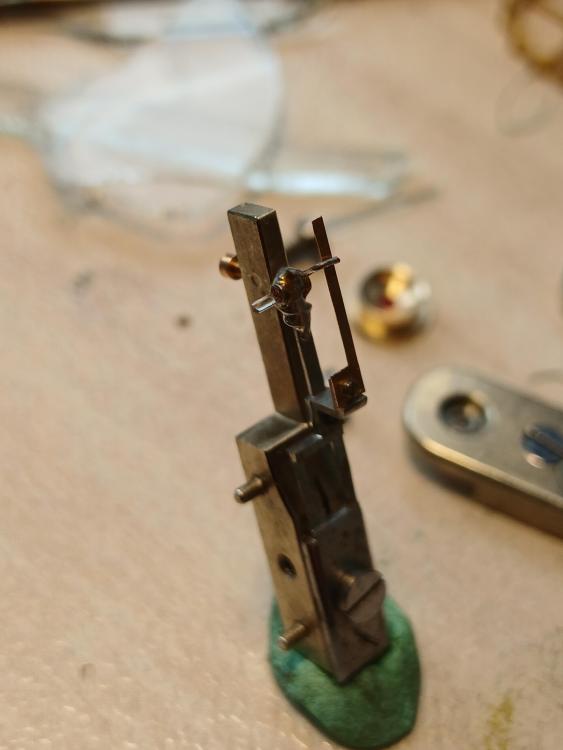
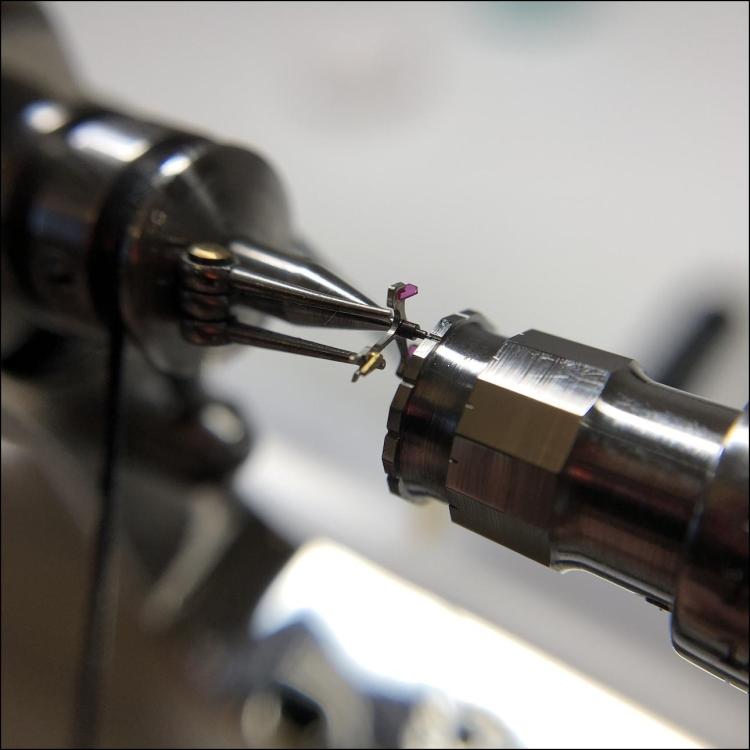
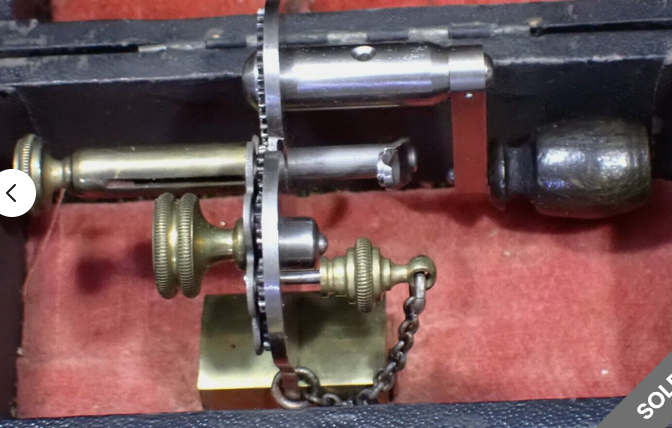
OK, today I visited a friend who is watchmaker and asked him if he has useless old sapphire crystal. He took out one from an old Seiko Kinetic for parts and gave it to me. I came home and started work. The first I did was to break the crystal with the hope some small piece will have suitable shape to work on. For my surprise, appears there is thin (0.35mm) sapphire layer on top of a thick glass piece. I first was disappointed, as the stone I need is with diam 0.65mm (and then ground to half to obtain D cross-section) but then figured that it may be actually better for me. Realized that I can use one of the flat and polished faces as locking face of the jewel and thus there is still enough meat in thickness of the sapphire. So, I ground small rectangle piece and glued it with shellac on the side of a 0.6mm steel plate, then filed it round and lapped it to form the 'back' of the stone. I think the stone is good enough and will do the job it is meant for. I cleaned all the parts of the movement as there was gummed oil everywhere. The spring is very strong and it was challenge to get it wound while holding the barrel and collect it in the winder barrel to extract it. It left for tomorrow to test everything
 5 points
 -
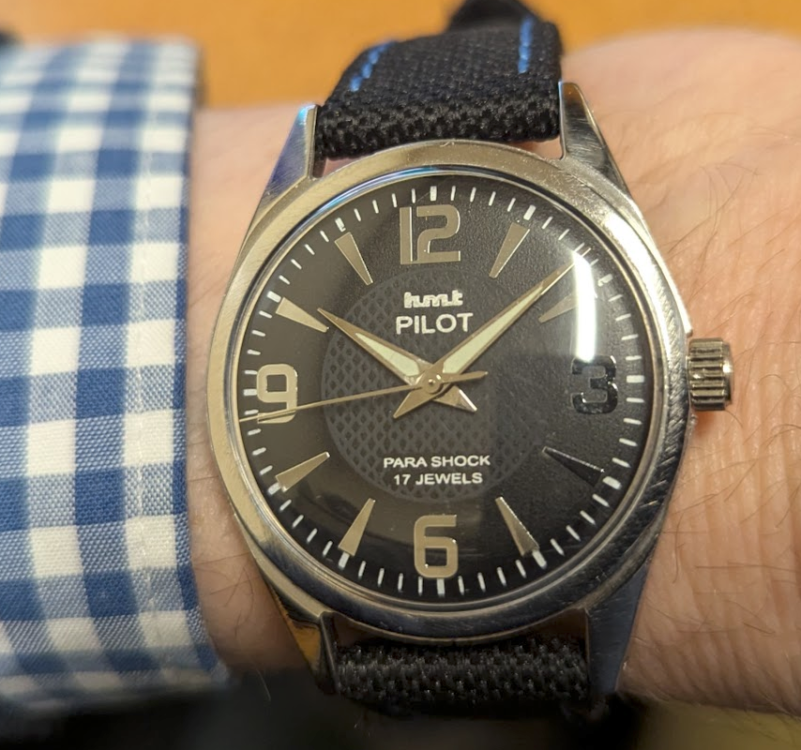
Another HMT, posting mainly to contrast with the one I posted last week. I paid about $14 for this watch and it is the nicest Pilot dial I've had (lots of them can be really, really terrible). HMT 0231 manual wind same as last week's Kohinoor. But where that one was great out of the box, this one was all problems inside. It was clean for a start, as many times you'll find soil inside. But it ran like a roller coaster on the timegrapher. 120° of amplitude horizontal and rate fluctuations between +200 and -300. In the movement, the hairspring stud was shellacked into the balance cock, the hairspring was out of flat, cannon pinion had no friction, the center wheel pinion was badly rusted, every wheel in the train had zero end shake - none. And the barrel arbor was a tight fit into the lid without free movement. The mainspring was fine. One by one I went though all of these, dissolved the shellac and put in a hairspring stud screw and center wheel from a spare movement, improved all the end shakes, broached open the barrel lid arbor hole, got it to about 1.0ms beat error. Now it runs about 220° which is as good as I ever get on this caliber. The dial does look better than I could capture with a camera, a rich textured black. Also this was $14.
 4 points
 -
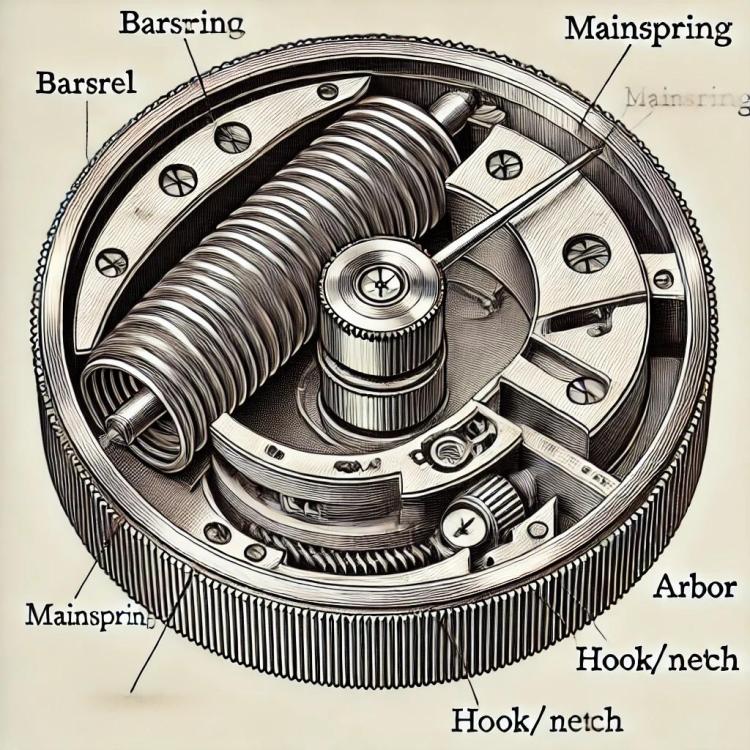
Here is an illustration of what the inside of a mainspring barrel looks like in case you've never seen one. Yes, watch movements are complex machines! "Here's the detailed cross-sectional illustration of the watch mainspring barrel, showing how the mainspring is anchored to the barrel wall." It came as part of an answer to the question: "Please explain and, if possible, illustrate how one end of the mainspring for a manually wound watch is anchored to the barrel wall." The verbal explanation was totally OK though.
 4 points
 -
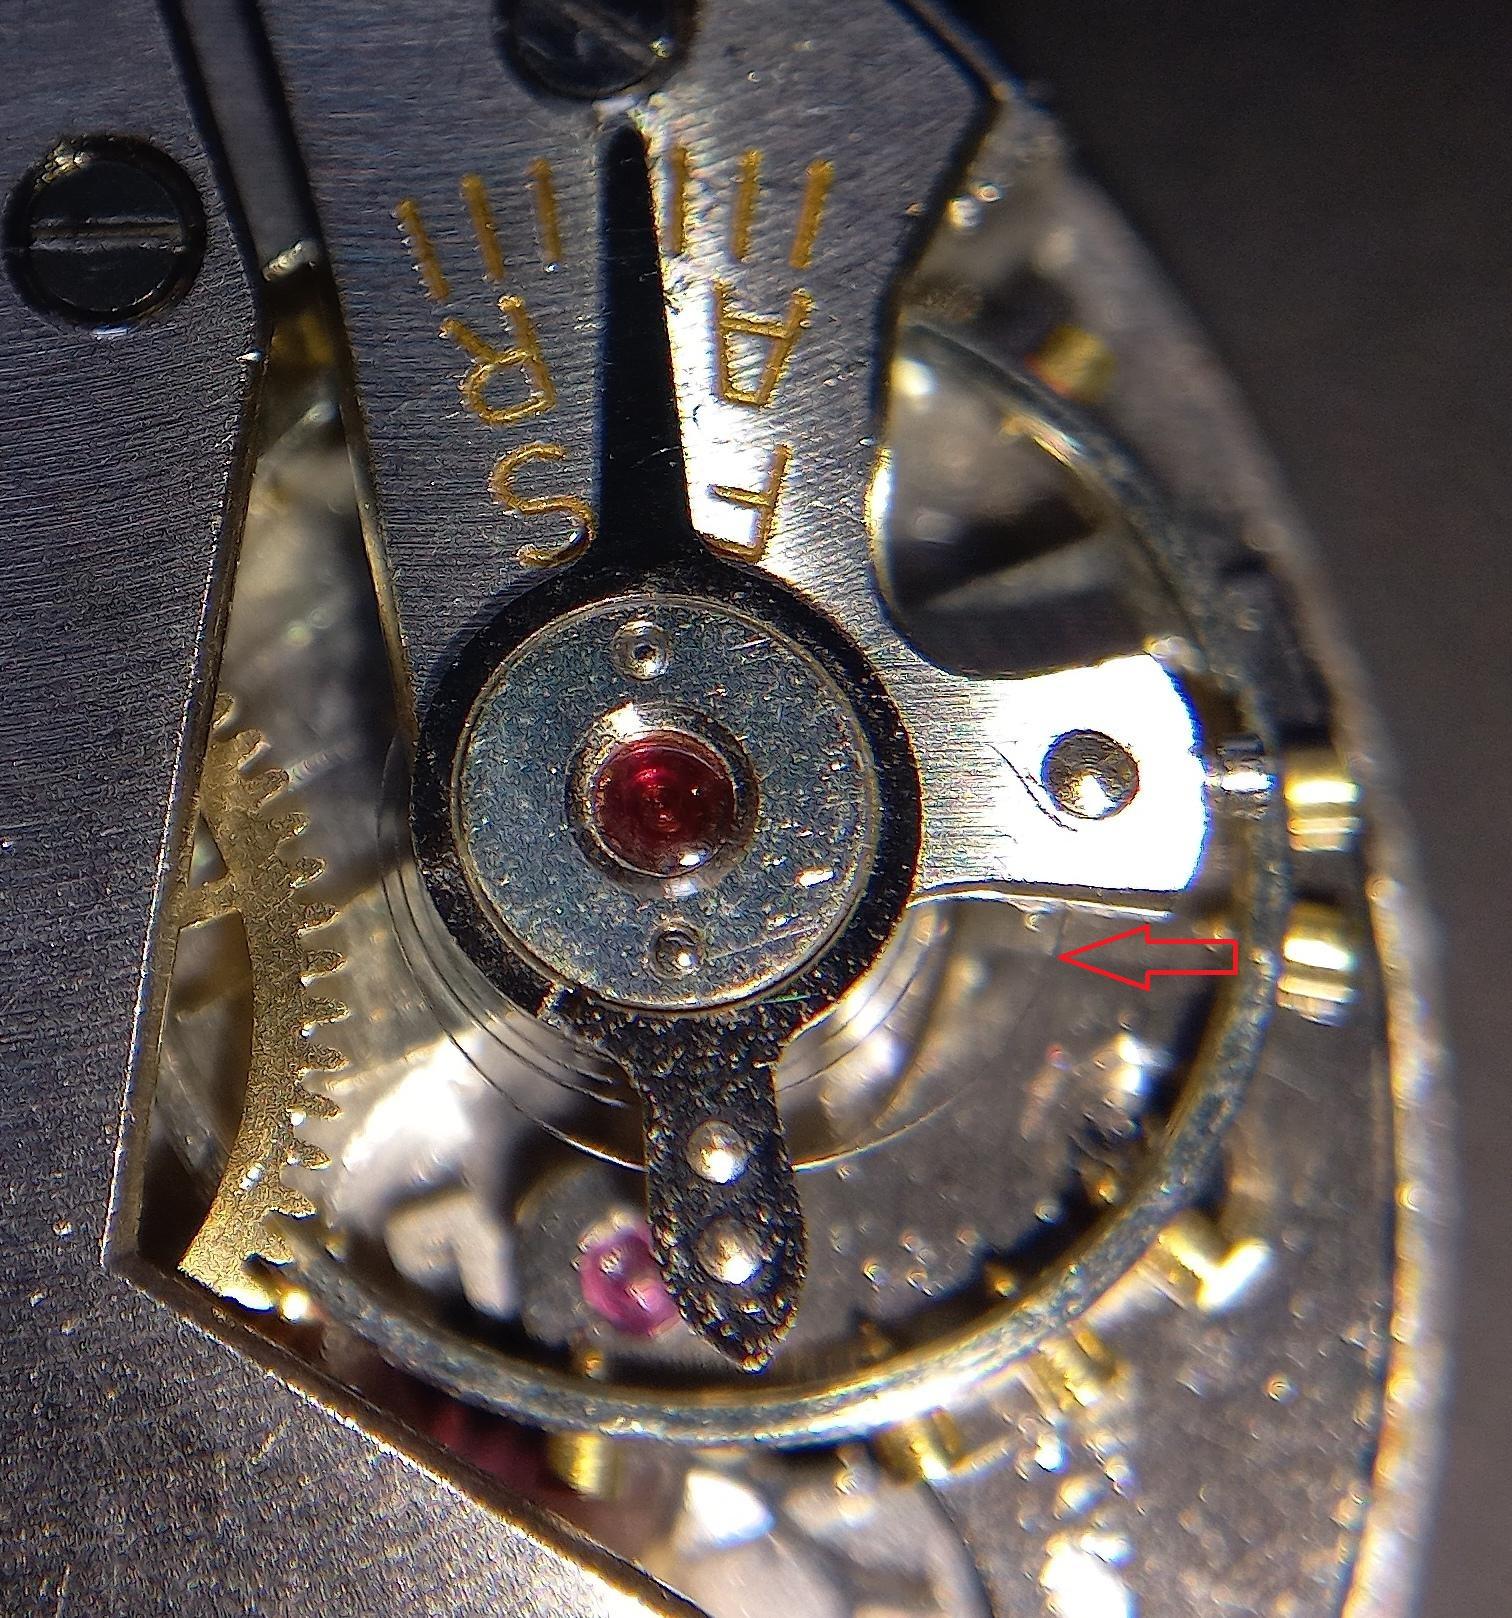
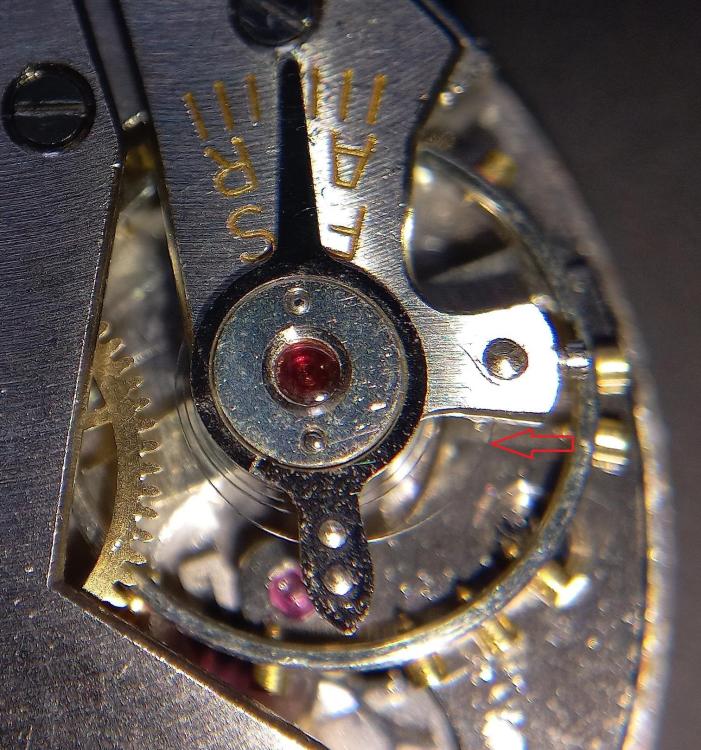
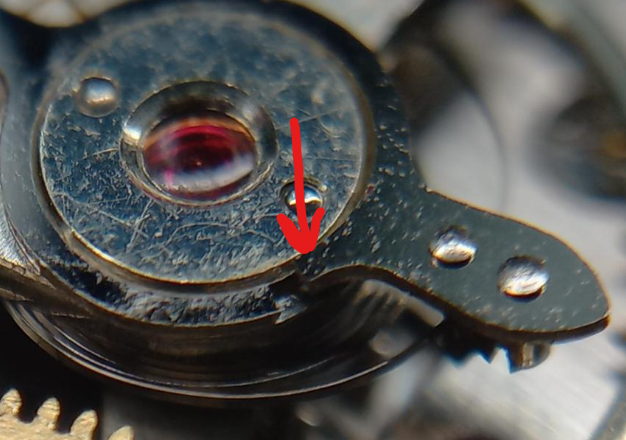
The hairspring isn't centered as it was originally. Press at the arrow to get the coil spacing even. The regulator pin gap should be 1.5-2x the hairspring thickness, and the spring should be centered in the gap when at rest. You will have to make gentle nudges at the stud to center it once you've centered the body (coils) by pressing at the arrow. The regulator curve should follow an arc centered on the balance center. It's also out of flat; manipulate it at the stud to bring the opposite side down, and you may still need to lower the stud. The current condition could have the hairspring touching the stud and/or the underside of the balance cock.
 4 points
 -
It's not bent, it just hasn't been pushed down in to place correctly. Gently pushing out and down at the arrow should allow it to clip back in to place. Then the hairspring adjustment
 4 points
 -
Is it just the angle of the photo or is it bent up / not pressed down?
 4 points
 -
I think the best thing going is @praezis (Frank's) software. He offers a simple pickup, or you can use one from old machines (which are handy and can be had cheap on ebay). I think he has a free version and a paid one, I have the latter and it really rocks. Will show you your heavy spot for dynamic poise too! Just PM him. I do like the old paper tape machines too, as they will pick up anything... if they are functional. So far I haven't been able to stump Frank's software, including cylinder and detent escapements.3 points
-
Thanks all for the great advice and the pictures! I did the job yesterday and it worked out great. There was already a small indent on the cannon pinion, which made it easier to position the nail clipper. For now inserted a screw driver of the correct diameter to make sure I couldn't tighten it too much. The hands are no longer slipping and the watch is running perfectly! Another new job learned in the watchmaking journey Thanks again everyone!
 3 points
 -
One of my teachers worked in a Seiko service center and the factory instruction was to have the hairspring remain in contact with the pin at all amplitudes. JLC went further on some calibers having only only one "pin", with the spring always in contact. But in most cases with a flat hairspring you want the gap about 1.5-2x the spring thickness, with the spring well centered for best results.
 3 points
 -
Faster rate and lower amplitude, points to a hairspring issue, perhaps spring is rubbing on underside of the cock, and spring bulging in terminal curve section, moves impulse pin thus increased BE. Side view of hairspring coil, would show if its rubbing, which might happen ONLY when oscilator is swinging. Good luck3 points
-
While taking my daily walk yesterday, I was thinking about a pallet fork pivot that didn’t seem in great condition and what I could do about it. My next thought—incorrect, as it would turn out—was how unfortunate it was that you couldn't burnish pallet pivots using a Jacot tool. But then I took the thought one step further and realized that a pallet fork is just as symmetrical as a wheel and that it might be possible to use the pallet fork's arm as if it were a wheel spoke. It felt a bit of a long shot, especially since I had never seen anyone do it or talk about it. But when I got home, I figured it was worth a try—and to my astonishment, it worked perfectly! I was so thrilled that I felt I had to share this, what was for me, a groundbreaking discovery. It’s probably nothing new to many of you, especially not to the professionals, but I hope those of you who, like me, thought it couldn’t be done, now know that it absolutely can
 2 points
 -
Fantastic work Neven!2 points
-
Basically yes. Center it as best as you can, bore out the hole until its concentric, then plug with brass. Then, you should mount the bridge on to the mainplate, and mount the whole mainplate with the bridge facing the headstock. Then center the arbor hole on the mainplate in the headstock, and drill a small hole through the mainplate and into the new bushing. Then reverse the mainplate in the headstock again, and bore the hole to size. Then its in perfect alignment.2 points
-
Rich, John said it very nicely - with a tiny bit of irony. Pro: you have a print out (if that paper is still available) and always paper for small notes. You might get a microphone with stand (if its crystal is not yet deaf). And all advantages that John mentioned. Contra: It is a rather huge device, afaik has tubes, so you have to wait after switch-on. Often their time base is out of order. It will give much less info than your Weishi. It even provides less info than PCTM free version. Frank Btw: few months ago I put an Elma TM on Ebay. Though it was fully functional (tested, warranted), had much accessory, had transistorized electronics, I had to be happy to find someone to pay EUR 70.2 points
-
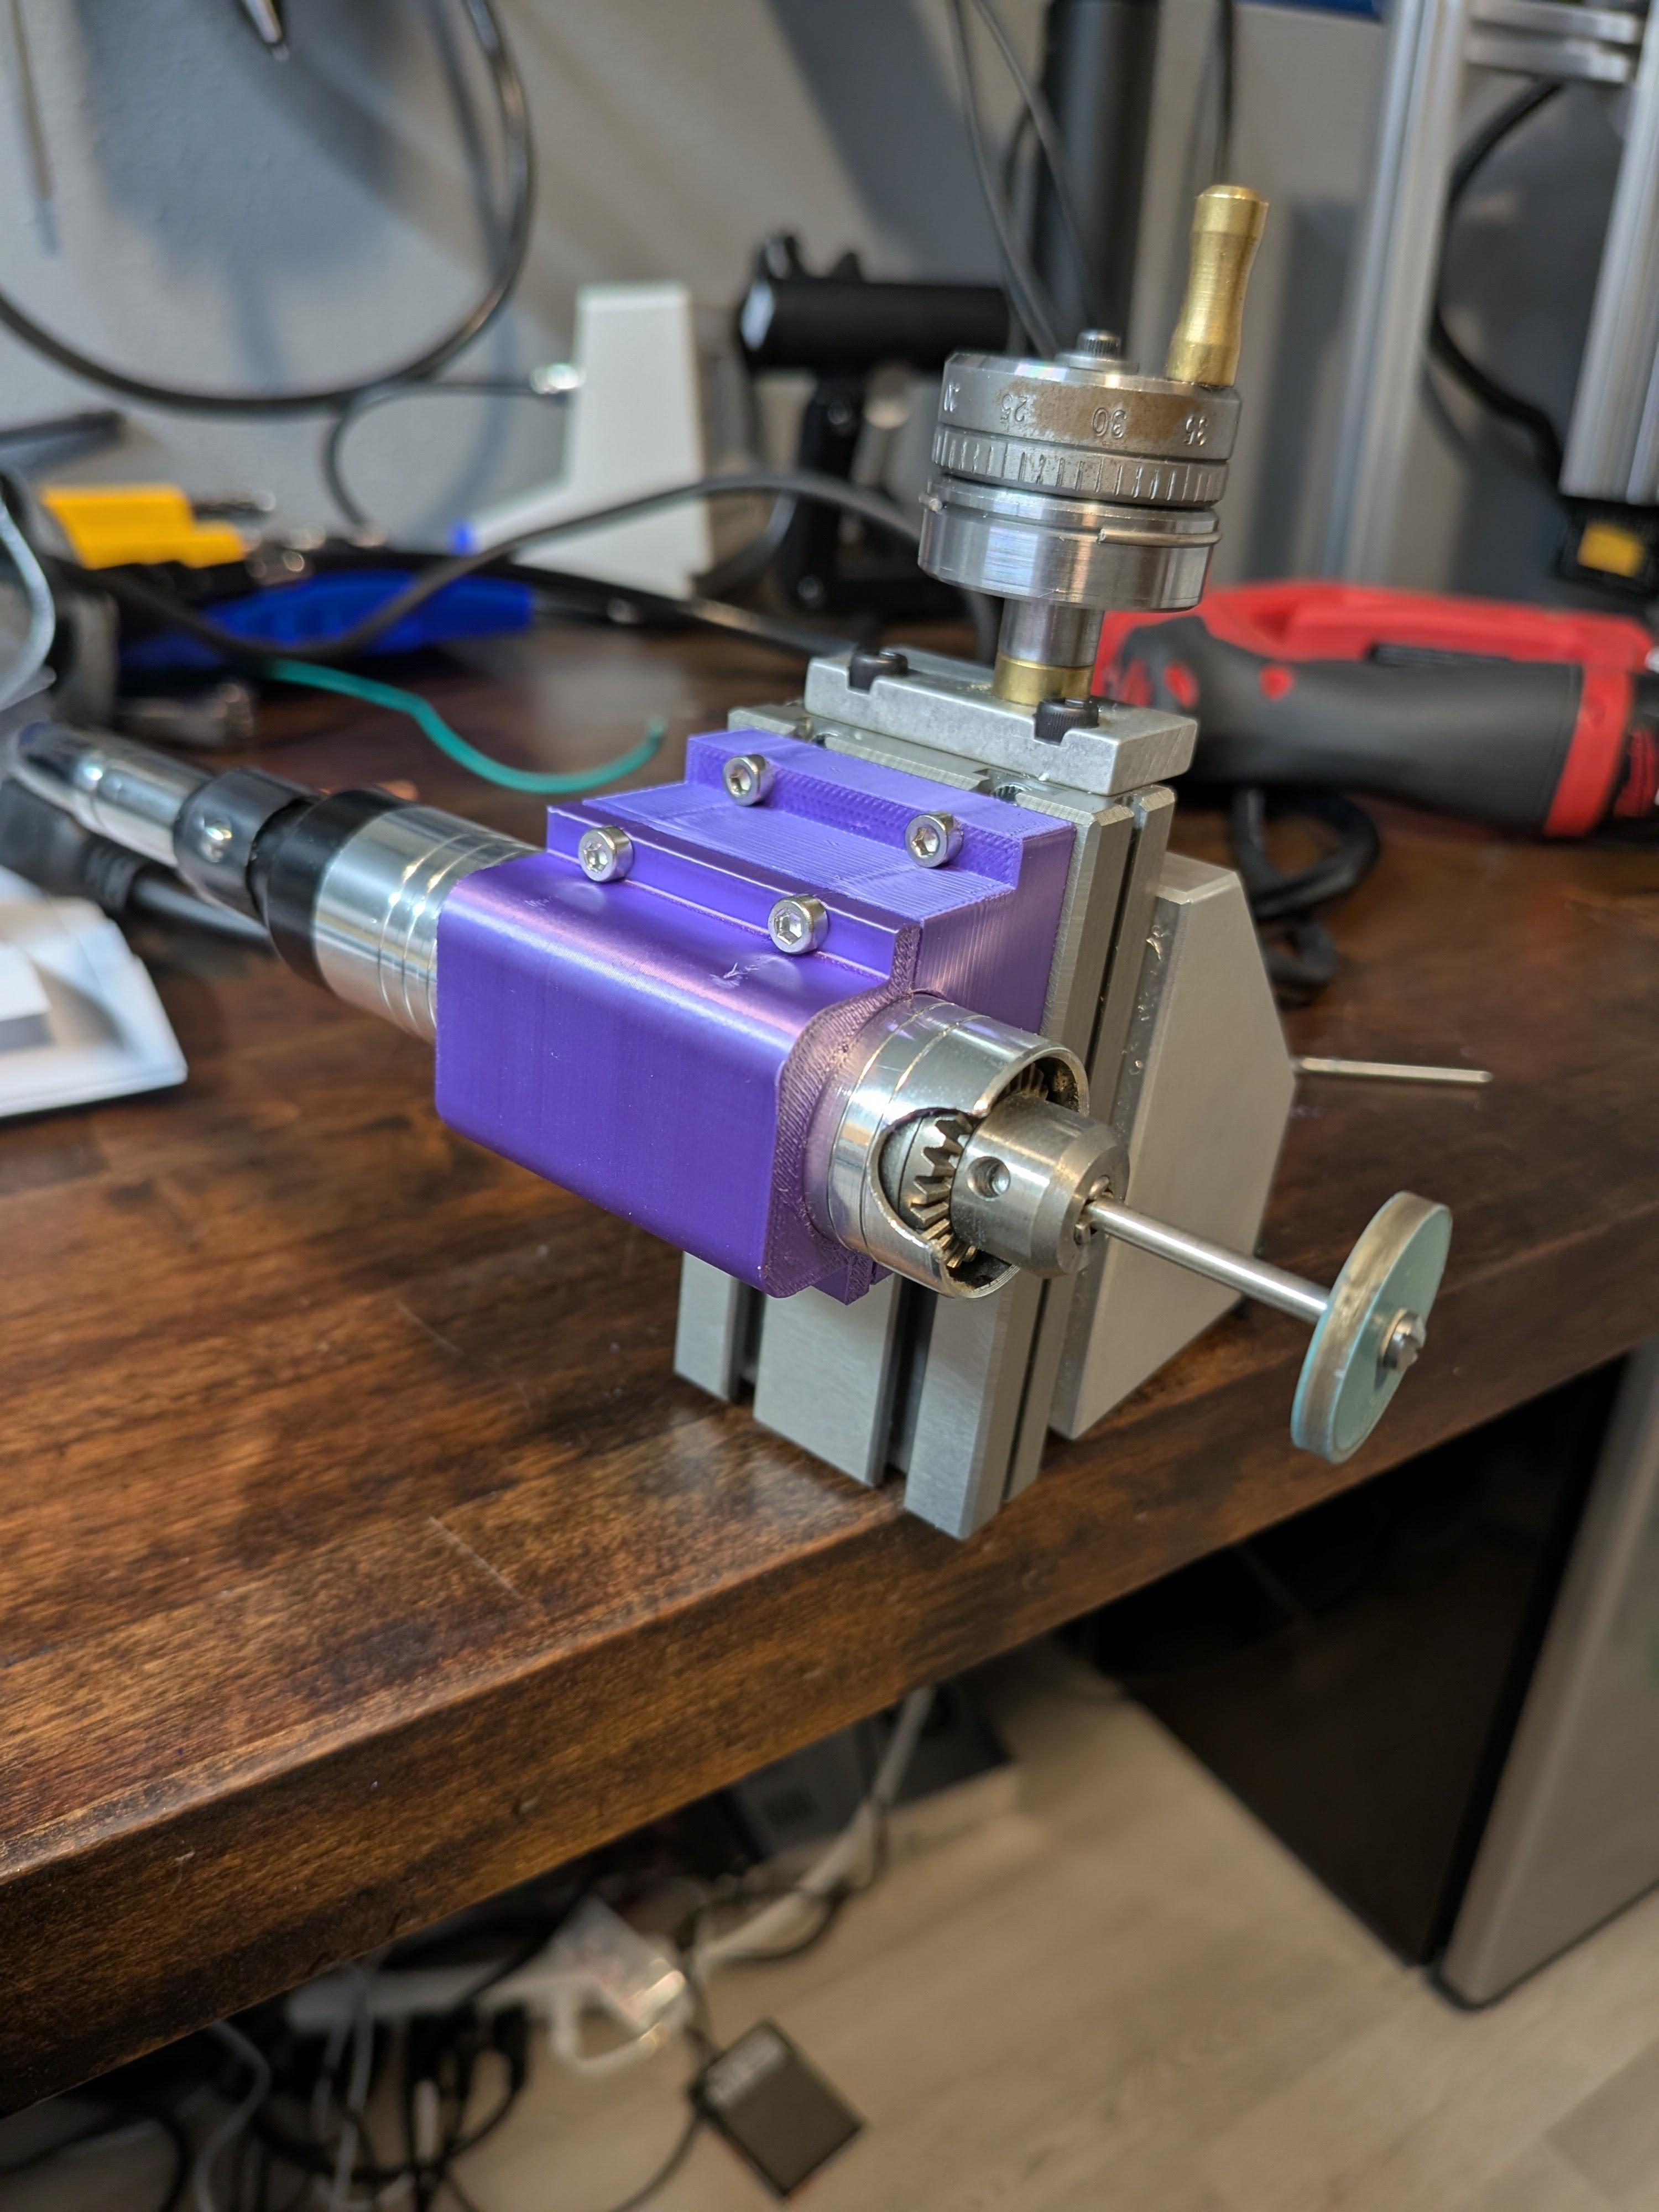
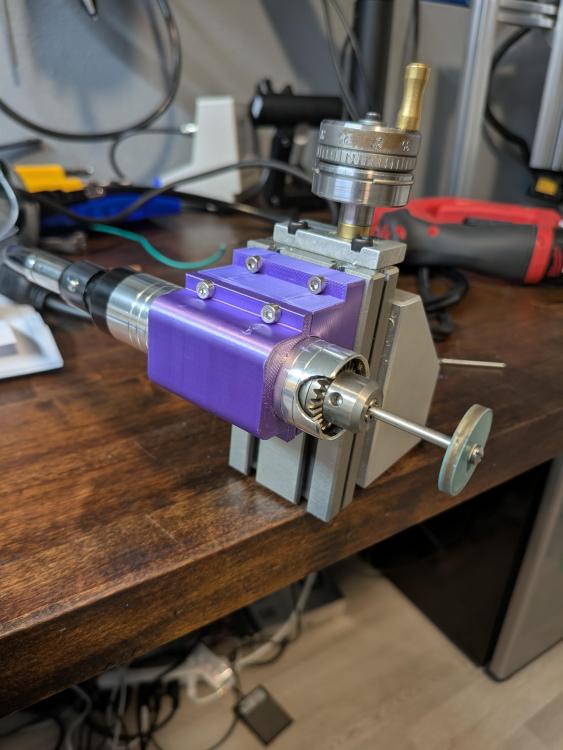
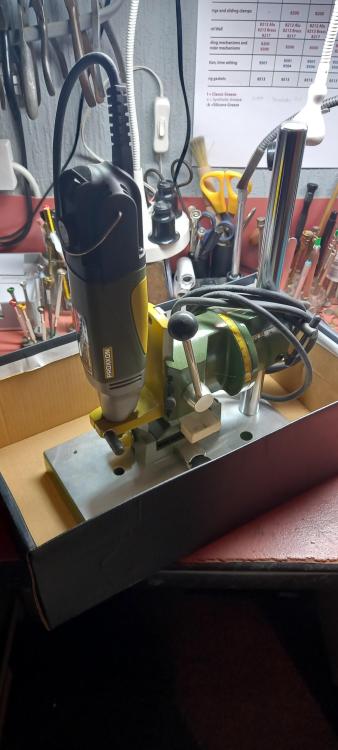
I made a mount for my rotary tool so it can be used in my lathe
 2 points
 -
I've used one of these. They really are more for lapping a surface by hand, more than polishing. We use them in the jewelry industry for faceting metal. They sure are cool for what they do, but I don't have one for watchmaking or restoration. Our surfaces are just a bit too large I think to try to free hand a bevel, and these take lapping paper that can remove material in a hurry if you aren't careful. A standard buffing machine is better I think for a final finish, and a lapping wheel is a more accurate approach.2 points
-
It's maybe not something that anyone else does, but I had a really stiff reg arm a while back, so i greased the ring very lightly where it fits the jewel plate to ease it up a bit. The candle grease was more of an idea for experimentation, i know someone that uses candle grease on a mainspring ! Wierd.... right ?2 points
-
Yes, on a flat hairspring, which you have, you want the gap about that size. On a Breguet (overcoil) you want it as small as possible without binding.2 points
-
Who knows . If it were me though, I'd be looking to straighten things out and shorten the pin to fit neatly under the boot in your picture .Providing the rest of the balance accomodated it....you could correct it and make it look all pretty..to have it then run like " a bag of shite " . Something I'd want to weigh up first before doing its makeover.2 points
-
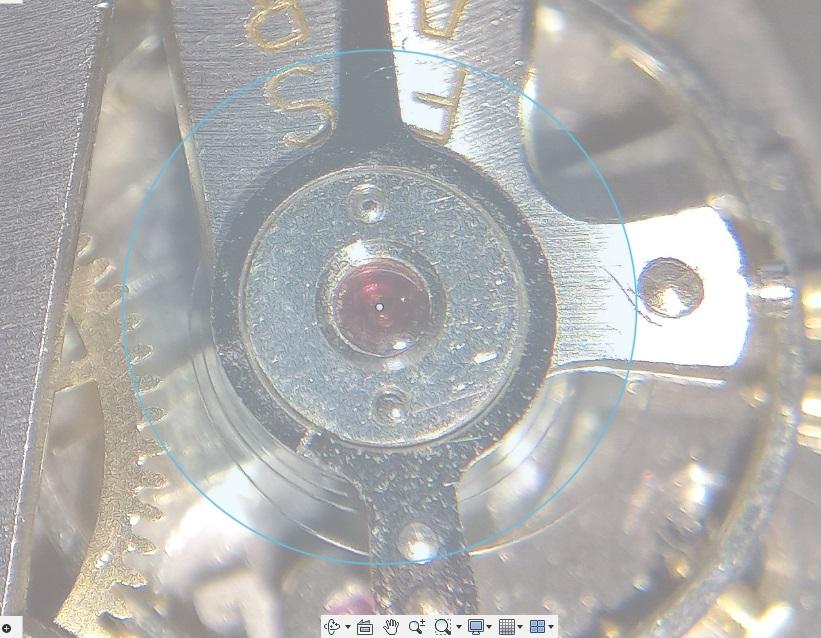
Notice the width of slot is about 2 to 3 times the thickness of hairspring.2 points
-
When refitting the balance and spring it’s not done on a flat surface there is always the chance of displacing the regulator arm. Done that my self as the regulator arm is split and works on a undercut and friction.2 points
-
Might be the screw above ...overtightened it and that side of the arm has popped out. The arm doesn't click in like a shock setting, its assembled under the fixed jewel plate and held by the two screws ( heads underneath ) I do think the op needs to take apart ( as much as it's a pain ) and close up the split in the arm. Maybe there is a bit of a leading edge on the arm or the plate ? that's forcing the arm out when the screw is tightened .2 points
-
I agree with the observation made by @mikepilk and @AndyGSi. The regulator arm hasn't pressed down all the way. Also, I noticed that the regulator arm isn't in its "before" position. It has been moved to speed up the rate towards F(ast) A(vance). Ensure the balance spring isn't pinched between the boot and the index pin before you move it back towards S(low)/R(etard).2 points
-
Good spot mike It might click into place , unlike a shock setting though with beat adjustment. The jewel plate holds the rate arm under it , the op might need to dissemble again. Close up the gap on the arm and reassemble it.2 points
-
Just realised you can see it here too. Edit Could it be the way they've inserted the jewel into the fork when fitting?
 2 points
 -
If you look the pin wheel & fly pinion are different from chime side to strike side have you got them mixed up ? Dell
 2 points
 -
Introducing myself to you all... I am a healthcare professional by trade, watch enthusiast and recently obsessed with watch repairs... Looking forward to learning from you all and sharing with everyone... Keep on searching these floors for the spring that flew into orbit my friends lol Peter.1 point
-
So I've just bought a bow mill for $150us with all the cutters in relatively good condition, (Although I want to try making new ones at some point). Just wondering if anyone had a recommended tool for bending the bows into shape? I already have a self-made pair of bow-opening pliers, and I will get a pair of bow-closing pliers and some 2.6mm nickel silver wire when I do my next Cousins order.
 1 point
 -
Bought the mother-in-law a newish sewing machine, just finished servicing her old one. Going to offer it for free to anyone who wants it. A couple of left hand threads, not indicated, only experience told me to try the opposite way.1 point
-
Some of the (older?) HMTs also have the left hand thread indicated, but quite a few (most?) do not. I'm a bit if an HMT fan, so more HMTs please!1 point
-
You can use the original stud carrier but will more than likely need to rotate the collet to align the jewel and set the beat error.1 point
-
paper tapes aren't necessarily that loud in fact the ticking of the timing machine is much nicer than the synthetic ticking of the Chinese timing machines. Although it is rather embarrassing if you're in a classroom and your watches too much amplitude of the timing machine sounds like a horse galloping then maybe it is to win the entire world knows that you have a problem. I'll skip over how I know that I had thought at one time although obtaining this now would be a bit hard perhaps there are some typewriter ribbons that you can trim the size. Things like Selectric's used a plastic film at one time I was thinking about how to make something that I can run the typewriter ribbon through and it would trim off the excess and give me a piece the right size but I never got that far as the regional school I had was fine plus some more I think I have a bonus new spool then you really don't need a ribbon anyway. The problem with some of the timing machines in the past were things like this. You notice how the paper feeds from the bottom and your printing on the opposite side of the machine in your picture. This means you can use the B200 paper and toss the ribbon away. the price on eBay of use timing machines with paper tape can be quite amusing. I keep it active eBay search for timing machines just because I like to see what turns up. Right now I was checking the completed or sold items and all the wishful thinkers of getting several hundred dollars for their vintage timing machine they basically aren't selling. or basically there is an amusing discrepancy between what people were hoping for and what people will take to get rid of their timing machine. Not to say that the vintage machines don't sell I recently purchased one for $65 with free shipping included. As advertised as not working minus the power supply which was also quite amusing as the definition of power supply is power cord. then the description was accurate that machine would not turn on and definitely was not running due to the fact that the belt had disintegrated. On the other hand I didn't actually buy it for the timing machine which was a Vibrograf MR600. I purchased it because it included a microphone a rather interesting microphone. Okay technically it had one of the half microphones it did have the base of the microphone that was supposed to come with the machine minus the top part? The second microphone was a really interesting red color and does seem to resemble a witschi watch expert number one microphone. Although I do feel sad for anyone that has one of these? In the picture I couldn't quite tell about the cord it almost looked like someone had modified the cord but I was wrong the shiny copper that I can see is the shielding the black insulation has entirely disintegrate. Hopefully that's not the future of all witschi microphone cords? So basically I purchased it for witschi microphone with a bonus paperweight type machine that wasn't really that expensive. what would be a really interesting new toy to get is to find one of the before paper machines. Some of those were quite fascinating as they did have a spinning disk a flashing strobe light and they were probably quite interesting although I don't think I've ever seen one come up for sale on eBay. But maybe you need a little more convincing as it would be a new toy to play with and we did discuss it relatively recently.
 1 point
 -
Did You correct this? Not needed to remove the enstone plate, just pressing down the regulator exactly where the arrow is enough, but first remove the balance and press while the cock is supported on something. The hairspring is not centered and what @nickelsilver said is the way to correct it, but the reason possibly is that the stud is placed turned in the hole and the screw tightened while the stud is not in correct orientation. Turning the stud clockwise if seen from above will help to center the spring It will be good if we can see a picture of the hairspring while balance over the cock1 point
-
yeah, that's a Hermle 340-020 movement (https://www.cousinsuk.com/product/hermle-340020-a). I have one here on my bench.1 point
-
Welcome to the WRT forum.1 point
-
Tights or pantyhose over the vacuum nozzle is better than a clean bag.1 point
-
The entire lathe is very precise. Adjustable gibs to take up slack. There is a bit of backlash in the slide, but since im not using a DRO, its easy to get used to.1 point
-
one of the things you can do is to not tear off the ribbon and basically wind it back in and you can use it a couple of times. At least that's what I remember from vague memory from the one I was once using. then we really need a picture of the machine as there is another possibility of using paper designed for the B200 machine. It depends upon how the paper roll feeds out. for those not familiar with the B200 paper when it's impacted on one side or even robbed it will produce a visible marking so you don't actually need a ribbon but the machine does have to feed it in the right direction. Because oftentimes the earlier Greiner machines the paper would feed opposite of the B200 machine and it didn't work. Plus there was also a size issue of the earlier machines used a paper that's not as wide. Although at one time for those somebody did make B200 type paper specifically designed for those early Greiner machines which I doubt is no longer available. oh almost forgot it does do something that the newfangled electronic does not it consumes energy and the vacuum tubes will get toasty warm ill keep you warm on a cold night. it's not as big as some of the machines in the past. then the time base probably hasn't been calibrated in the last 75 years like probably most other paper tape machines basically never calibrated or even checked after the left the factory1 point
-
I would be really curious as to how it interprets the spring on a balance wheel locks? Then yes it looks like the future watchmaking is safe from artificial intelligence until it works out the problem of simplifying the mainspring barrel.1 point
-
no pictures so I have to use my imagination? it gives you a nice paper tape print out nice and permanent. It also reduces stress of working on watches as you no longer looking at numeric numbers that are going to upset you. With the added bonus of you no longer have to worry about amplitude1 point
-
Tool making ....sweet H i have a Proxon rotary also, but went for the domestic UK voltage . The drill press is also great, not sure if it fits the 12 volt drill...it should do. Been watching Leo for a year or more now...I like him..good humor as well. Thats one of my next lathe purchases, a vertical slide, not easy choosing something off the bay though.
 1 point
 -
…very Jules Verne steampunk…1 point
-
Wow ! that looks sooo cool, it's about time I started servicing mainsprings, I always wondered what was under the barrel lid....I can't wait .1 point
-
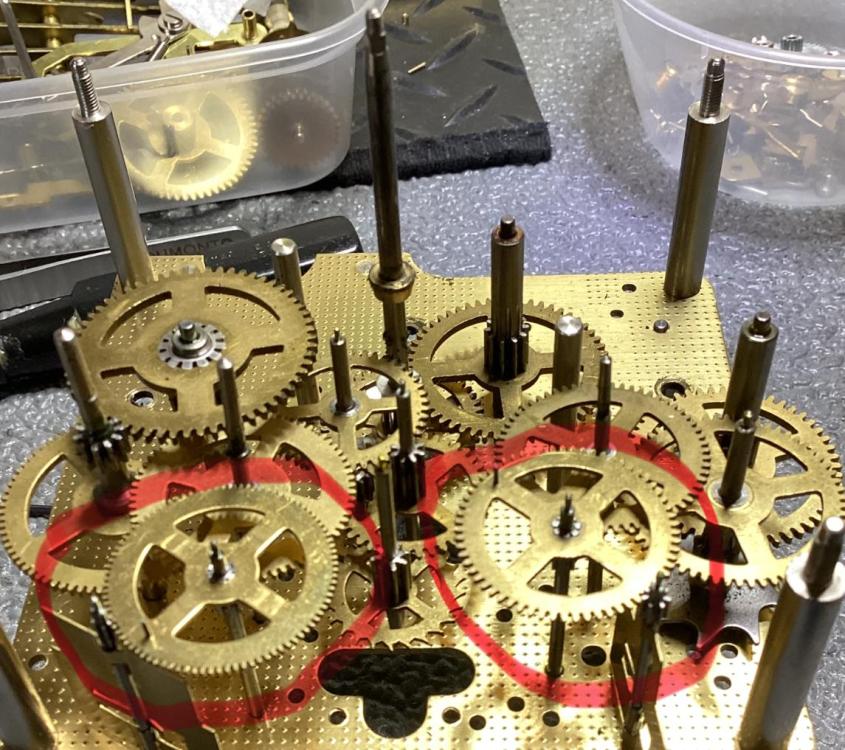
Good point Dell that is why always use tubs to keep the parts separate.1 point
-
Starting with wire that has enough excess length, wrap a tight spiral around a slightly undersize round bar or rod. Or just one and a bit turns for a single piece You can then slit the spiral along the length of the rod and get as many near perfect circular pieces as you need of that size. They would just need a slight twist to bring the ends back in to alignment. (I've never made bows but have made coils and springs etc. using that type of technique).1 point
-
The free oscillations test is to be performed without pallet fork. We do not speak about power in the mainspring, as there is no matter if the mainspring is mounted in the movement or not. Balance swings on it's own. I guess that what You cal 'balance wobble' is happening when it rotates. If so, this is simlpy balance out of true and it has nothing to do with the axial free play. To check the axial free play, move the balance up/down, but observe the balance staff (or the roller), not the balance rim1 point
-
Hi. The modern day clocks are built from different levels of brass and steel in order to cut costs and increase the profit margin , I have said before the buying public are wowed by the look of it aka fashion watches selling at 100 s of pounds all swish and nice powered by a Hattori plastic movement costing a few quid at most. Modern clocks are no better. You could put the best movement possible in a crappy case and it wouldn’t sell well. Unfortunately it is the modern way, don’t like it but we have to accept it .1 point
-
This 1970 Sea King 'FD' has a stunning blue sunburst dial that changes through different shades of blue as the light hits it. It's on its original stainless steel expansion bracelet with dark blue corfam inserts.

 1 point
 -
Thanks for your reply. Unfortunately I don’t think Seiko were on Ronda’s radar at the time. Bestfit, Ronda and DCN do not appear to have manufactured a staff for this calibre. I would suspect I’m looking for a Seikosha manufactured part. Balancestaffs.com is a great site and a lot more user friendly than the Mid 60s manuals. Although in favour of the manuals, when comparing prints of 50s to 60s manuals you get to see how Ronda re-used their codes as staffs went obsolete. And of course you can’t beat the smell of vintage paper!1 point
-
After circling around and around it, I finally adjusted the pallet-jewels of my 1975 Omega Speedmaster Mark II. Inspired & guided by this article, and after having had a huge learning curve replacing "Garnet"-jewels for modern (too small, too low) jewels in a 120 years old pocket watch, I decided it was time to tackle the job. There are many valuable tips in this article and all I like to do is to share a few of my experiences. Like VWatchie, I also found that Acetone is a very effective way to remove the old shellac, more effective than industrial isopropanol. Acetone is widely available, no need to look further than your wife's nail-polish remover. In my case the Acetone turned to old shellac in a white transparent substance, which later, while cleaning the fork-slot, caught me out. I simply didn't see it and hence the fork-slot wasn't cleaned properly. As for applying the shellac; I tried the "pulling strands on peg-wood"-method and the "creating small balls"-method. To me, the "small balls"-method worked the best. If the size of the ball is too big, one can "nibble" it down with some fine tweezers. As for the ease of adjusting the depth of the jewels, again I came to the same conclusion as VWatchie. For me it worked far better, and far more relaxed to adjust the jewels without the Shellac applied. As VWatchie said, hopefully there is enough friction between the jewel and the fork-slot to keep the jewel in place for testing. When Shellac is applied, one has to melt it, do the adjustment above a hot plate and there is time-pressure. Plus, without the Shellac, it became for me far more easy to see if the jewel had moved or not. Adjusting the jewels became for me far less cumbersome when done without Shellac. As for melting the Shellac; initially I used a timer, to get an idea of how long it took for my alcohol burner / pallet-fork heater to get to the Shellac melting-temperature. That worked fine one day, not the other. The alcohol-burner I'm using is not producing a consistent heat and when heating 1 minute was fine on the day, it totally melted the Shellac to "water" on the next. The method I'm using now is to place the Shellac ball on the end of the fork-slot and heat the pallet heater above the flame, performing checks on very regular intervals. One sees the Shellac-balls slowly melting and continues until your are happy with the distribution. If the size of the Shellac ball is slightly too big, you stop before it flows out too far. If the ball is slightly too small, you just heat somewhat longer until it flows out far enough. As for adjusting the jewels; one can use brass tweezers to push the jewels, from the rear, further out of the fork-slot, but I used peg-wood to push the jewels back in. I did some adjustment testing on junk pallet-forks and when using steel tweezers, the chances that you chip the impulse-plane or the back of the jewel, are very high. With steel-tweezers I had a 100% chip-score with the jewels of both test forks. One very important "adjustment"-lesson I've learned from @nickelsilver; if you move one jewel, it affects the other: https://www.watchrepairtalk.com/topic/23176-1975-omega-861-amplitude-after-24hrs/#comment-196690 . It surely does !! Many thanks to VWatchie for penning this thread and thanks to @nickelsilver and @JohnR7251 point