Leaderboard


Popular Content
Showing content with the highest reputation on 04/02/25 in all areas
-
This is how the hairspring looks now after I manipulated it according to @nickelsilver's instructions. It once again looks just like it did before the accident. A huge thank you to all of you, but a special and heartfelt thanks to nickelsilver for the illustration and the accompanying pedagogical explanation, which—just like always—is world-class! The first thing I attempted was to adjust the slight indentation in the terminal curve just below the curb pins. I probably didn’t succeed completely, but I also didn’t want to tamper with it unnecessarily, as every adjustment carries a certain risk. Here are the tools I used. I held the spring in place with the tweezers right at the bend (at the blue arrow in nickelsilver's illustration) and then gently stroked the part of the spring that lies between the terminal curve and the main body of the hairspring, using the oiler, repeatedly in the direction of the arrow. I did this in stages, checking the shape of the spring after each step. I took my time and continuously monitored my breathing, and kept my shoulders relaxed. After eight years of working on watches, I know that when things go wrong, it’s usually because you feel stressed and tense. I also had to manipulate the hairspring slightly at the stud in the direction of the green arrow (in nickelsilver's illustration), as the spring was making slight contact with the curb pin. However, I made this adjustment as close to the stud as possible. Fortunately, things were not as bad as I initially feared. In my first post, I mentioned that the balance cock jumped at least ten centimeters into the air. In reality, it was probably no more than two or three centimeters—but it felt like a meter. And like my heart stopped. What likely saved the situation was that the only part mounted on the main plate at the time was the balance cock—no other components. In other words, there were no other parts for the balance wheel to get caught on. Before I begin assembling a movement, I always install the balance assembly, chatons, and cap jewels first to check the free movement of the balance wheel. It was right after doing this, when I was about to remove the balance cock, that the accident happened. I must say, I feel very encouraged and inspired after this “little” operation, so once again, a huge thank you!
.thumb.jpg.9385550d228113fa7b67d93c68b52d12.jpg)
.thumb.jpg.a6131757362d38af302ef12fe9e0e3f2.jpg) 5 points
5 points -
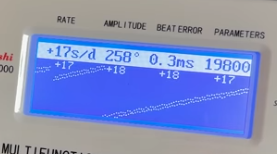
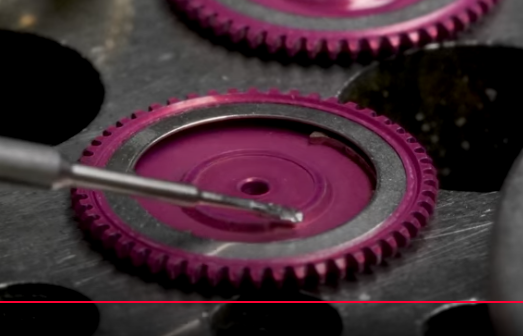
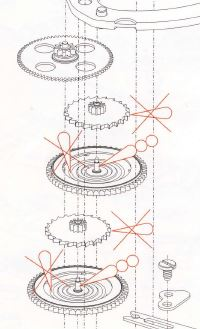
Yes this particular video of his is rather peculiar as well he's definitely not at his best today. Peculiar aspects is he talks about removing the roller and then does not which I think is part of his problem. If the roller is removed the hole for driving the staff out in the staking would be much smaller. Then yes the much bigger hole and not holding the arms down nice and tight definitely leads to bad very bad distortion of the balance wheel as this is a bimetallic balance wheel.. Right after he does it you can see that the arms are no longer in alignment as he's warped the balance wheel. It's always bad if you can notice it before it's on the truing caliper. Are you suggesting that someone that has over 900,000 subscribers, a video that's only been out 20 hours as over 100,000 views that is not lubricating as Rolex correctly? Plus it is a heck of a lot a credit to Mark who is responsible for starting this message board and claimed he watched every single one of his videos. So basically it's how he learned watch repair except did he learn watch repair? He doesn't believe in reading the service manual if he even had one. Then lubrication questions I wonder how we lubricated the escapement? But the instant the watch ran it's on the timing machine and those lines do not look impressive at all which would indicate a lubrication or some other escapement issue? Although he just started the watch running and it's only run for a few seconds? Okay I guess I got the answer to my question he must've actually lubricated in the lubrication has now migrated around as the lines are looking better not outstanding. Then yes eventually puts it in beat but he never does put it in any other position at least initially on the timing machine. I was thinking I can see skipping steps because it be hard to show every single step every single lubrication point these are really not meant to be step-by-step how to do a Rolex they're meant to be more entertaining. So it looks like in the image the Oilers just about the touch and it's going to leave a big puddle of oil right there which is a really interesting place Would have to study the Rolex manual in more detail for every single lubrication point but the basics would be epilam is applied because as you can see in the image the only thing that gets oiled is the center wheel post. With very clearly my interpretation of the drawing versus the video up above we have a conflict of that is definitely not where you're supposed to place the oil. But for entertaining video do we really care?

 4 points
 -
@Leonid, the only way forward is to service and repair your watch. Either take it to someone you trust or do it yourself. However, you should not try to do it yourself until you have successfully serviced and repaired, let's say, 20 or so less expensive watches (Vostok 24xx movements are amazing for practice). Rolex spare parts can be very expensive and difficult to get by should you lose or accidentally damage or destroy a part. There is, unfortunately, no quick fix!4 points
-
In my day we had charts to go by, just as well as I was crap at maths.3 points
-
Ha ha, me too. Literally, every week. It can be done with the wheels still in the plates, but is a little slower. With the mainspring unwound, I remove the click, then add a pencil or fine Sharpie mark to one of the teeth on each wheel, then gently rotate the wheels, count the teeth and hope no one interrupts you. It can sometimes help to mark every 10th tooth in case you lose count. It's a very effective way to regulate the finished clock though, I use it all the time. Much faster than tweaking the regulation once a day. Interestingly, I had a Smiths clock in the other week that was racing after a service. I used the formula to calculate the correct bph, tested it, and eventually figured out it had come in with the wrong pendulum or some other issue. With the pendulum adjusted to its lowest position, it still couldn't achieve the correct rate. The problem in the end was that the clock had an incorrect suspension spring that was too stiff.3 points
-
Speedtona? Daytomaster? Tom3 points
-
Hey everyone, I started learning watchmaking and repair in early 2024. At the time, I made two beginner mistakes: I didn’t have a proper workspace, and I chose 1980s Russian movements to start with (which, as I’ve learned, aren’t exactly beginner-friendly). That combination, along with the back pain from constantly hunching over a loupe, led me to pause things until I had better tools and a proper setup. Recently I got a stereo microscope, and it’s been a total game changer. Now I can spend hours at the "bench" without wrecking my posture, and I’m enjoying the process so much more. I’m still early in the journey — I haven’t yet gotten a movement running better than before I took it apart — but I’ve been focused on getting comfortable with the tools, practicing disassembly and reassembly, and not breaking anything along the way. Looking forward to learning from everyone!2 points
-
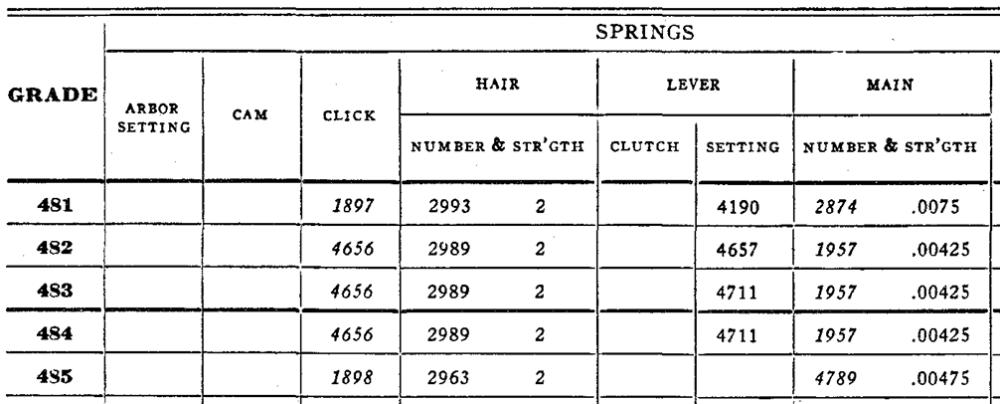
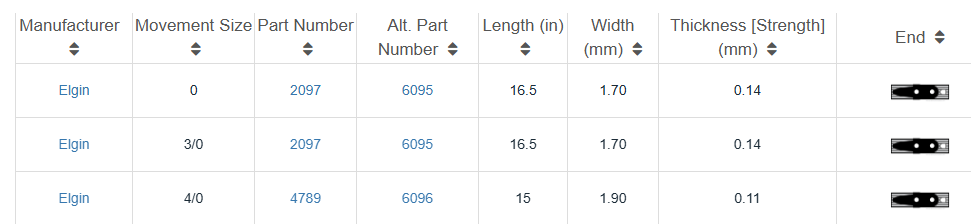
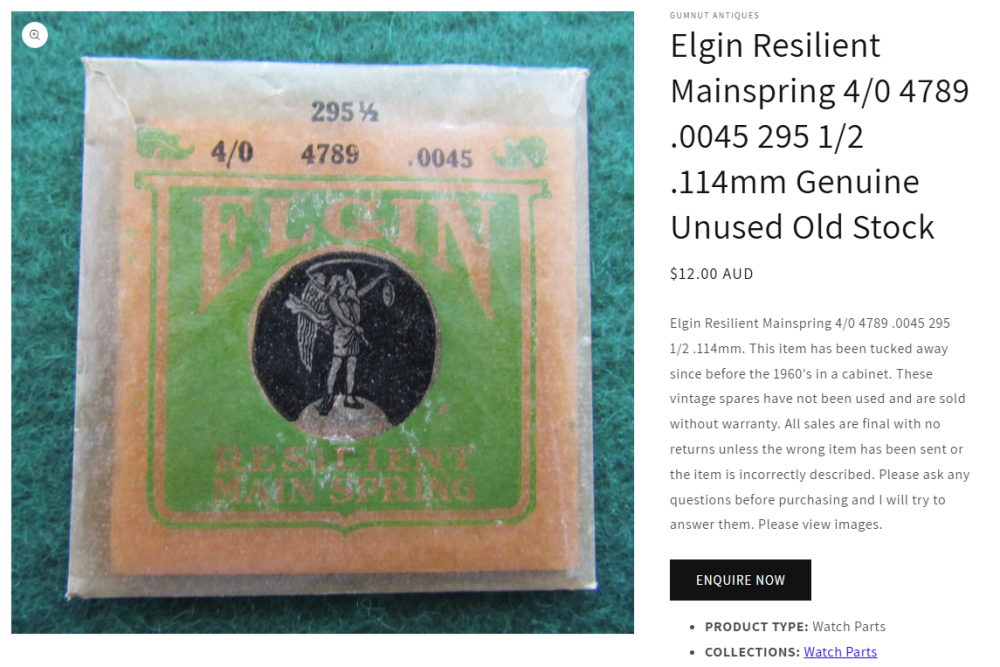
Welcome to the forum. So from the Serial No you can find from the following sites that it's a Grade 485 Movement. https://www.elginnumbers.com/index.php https://pocketwatchdatabase.com/search/result/elgin/33154921 If you then look at the attached PDF you'll see it's a 4789 Mainspring. An eBay search comes up with these as an example but there is a slight conflict on the strength. https://www.ebay.com/itm/115496722196?norover=1&siteid=1&mkevt=1&mkcid=16&chn=psoc https://www.ebay.co.uk/itm/374299307774 The Pocket Watch Database site above also confirms this. Edit And again a slight difference on the strength. Final Edit If you wanted a GR Mainspring then you could check this site which doesn't appear to be working correctly at the moment. Grade 481 to 520.pdf
 2 points
 -
Bingo on the tapers meeting to make an olive jewel. I harden it so it doesnt deform as easily. The issue I have with the wire method is work holding. I dont like having the wire run through the headstock, as you have to be very careful not to let it rub on the drawbar, or it will break. It's a much more delicate operation and takes longer, so the steel rod is my preferred way. If you cant drill the brass with the tailstock, you could cut the center with a graver first, then use the drill press. Or you can drill it freehand with a pin vise. Now I'm seeing you want to grind it with a drill press. I'm not sure on the runout on you drill press, but they seem to average about 0.16mm, where as my Moseley is 0.001mm2 points
-
Exactly, I often compare it with the washing of clothes in a washing machine/ dryer. You add chemicals to a container of fluid - the tub - , it has a basket - the drum - which you put clothes into to be washed. The drum is rotated forwards and backwards to agitate the fluid and the clothes. The machine goes through rinse cycles to clean off the chemicals, it then spins to get rid of the excess rinse so that a heating element can dry the clothes while they tumble around through blown warm air. Tom has pointed you in the right direction, there is a YouTube vid by Alex Hamilton doing just that. I bought one but never used it, I made up my own various spinney baskets from bits and pieces until I was happy with the design. You should look at our threads on diy rotary machines, there is loads of info on them. From homemade nice and shiny automated machines, to my claptrap 20 quid efforts, my last recall I think I was at around MK Vll.2 points
-
If you have access to the going train wheels, you can count the teeth and calculate exactly what the correct beat rate should be. If you had, say, a center wheel (CW), a 4th wheel (4W), and an escape wheel (EW), you could use the following formula: (CW teeth x 4W teeth x EW teeth x 2) / (4W pinion teeth x EW pinion teeth) = bph2 points
-
I think we should really cut Marshall some slack here. Mark’s videos and courses are not Rolex specific. He also says every video that he is a hobbyist, same as most of us here. Going by several comments from newcomers here he has done a lot more than most to promote watch repair as a hobby. He does have a bit of an advantage in that he comes from an entertainment background I believe and has a huge following from “magic the gathering “ commentary and YouTube videos which from what I have seen is most of his followers on the watch channel is from that. Just my opinion for what it’s worth. He is a member here, doesn’t participate anymore for whatever reason but does visit. Tom2 points
-
Cousins have baskets in the ultrasonic basket section that folks have used and adapted to be spun Tom2 points
-
Watch accessories original suitable for Seiko 7009 7S26 NH35 movement shock absorber spring shock drag bowl shock stone https://a.aliexpress.com/_m08nrxd Have you tried Aliexpress?2 points
-
Have you seen this with the Part No's NH3x Detailed Parts List.pdf2 points
-
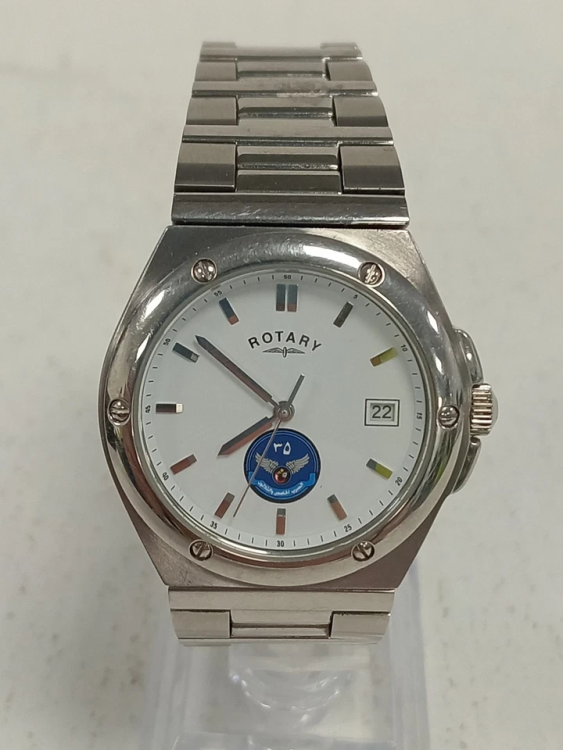
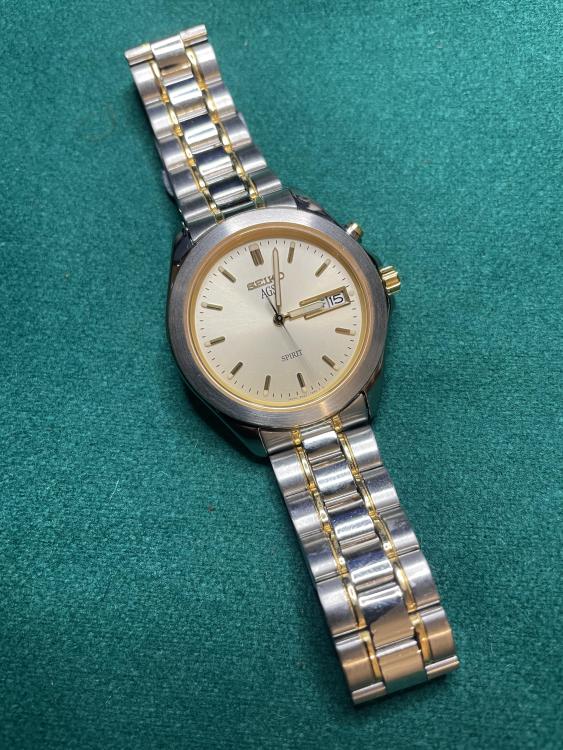
Another one on its way as the emblem on the dial intrigued me.
 2 points
 -
A great example of how NOT to lubricate Rolex reversing wheels.2 points
-
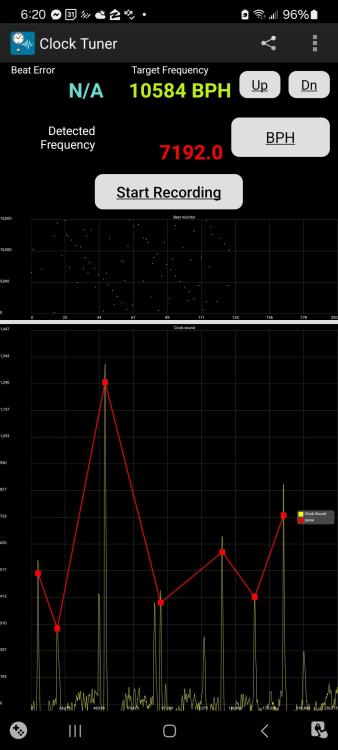
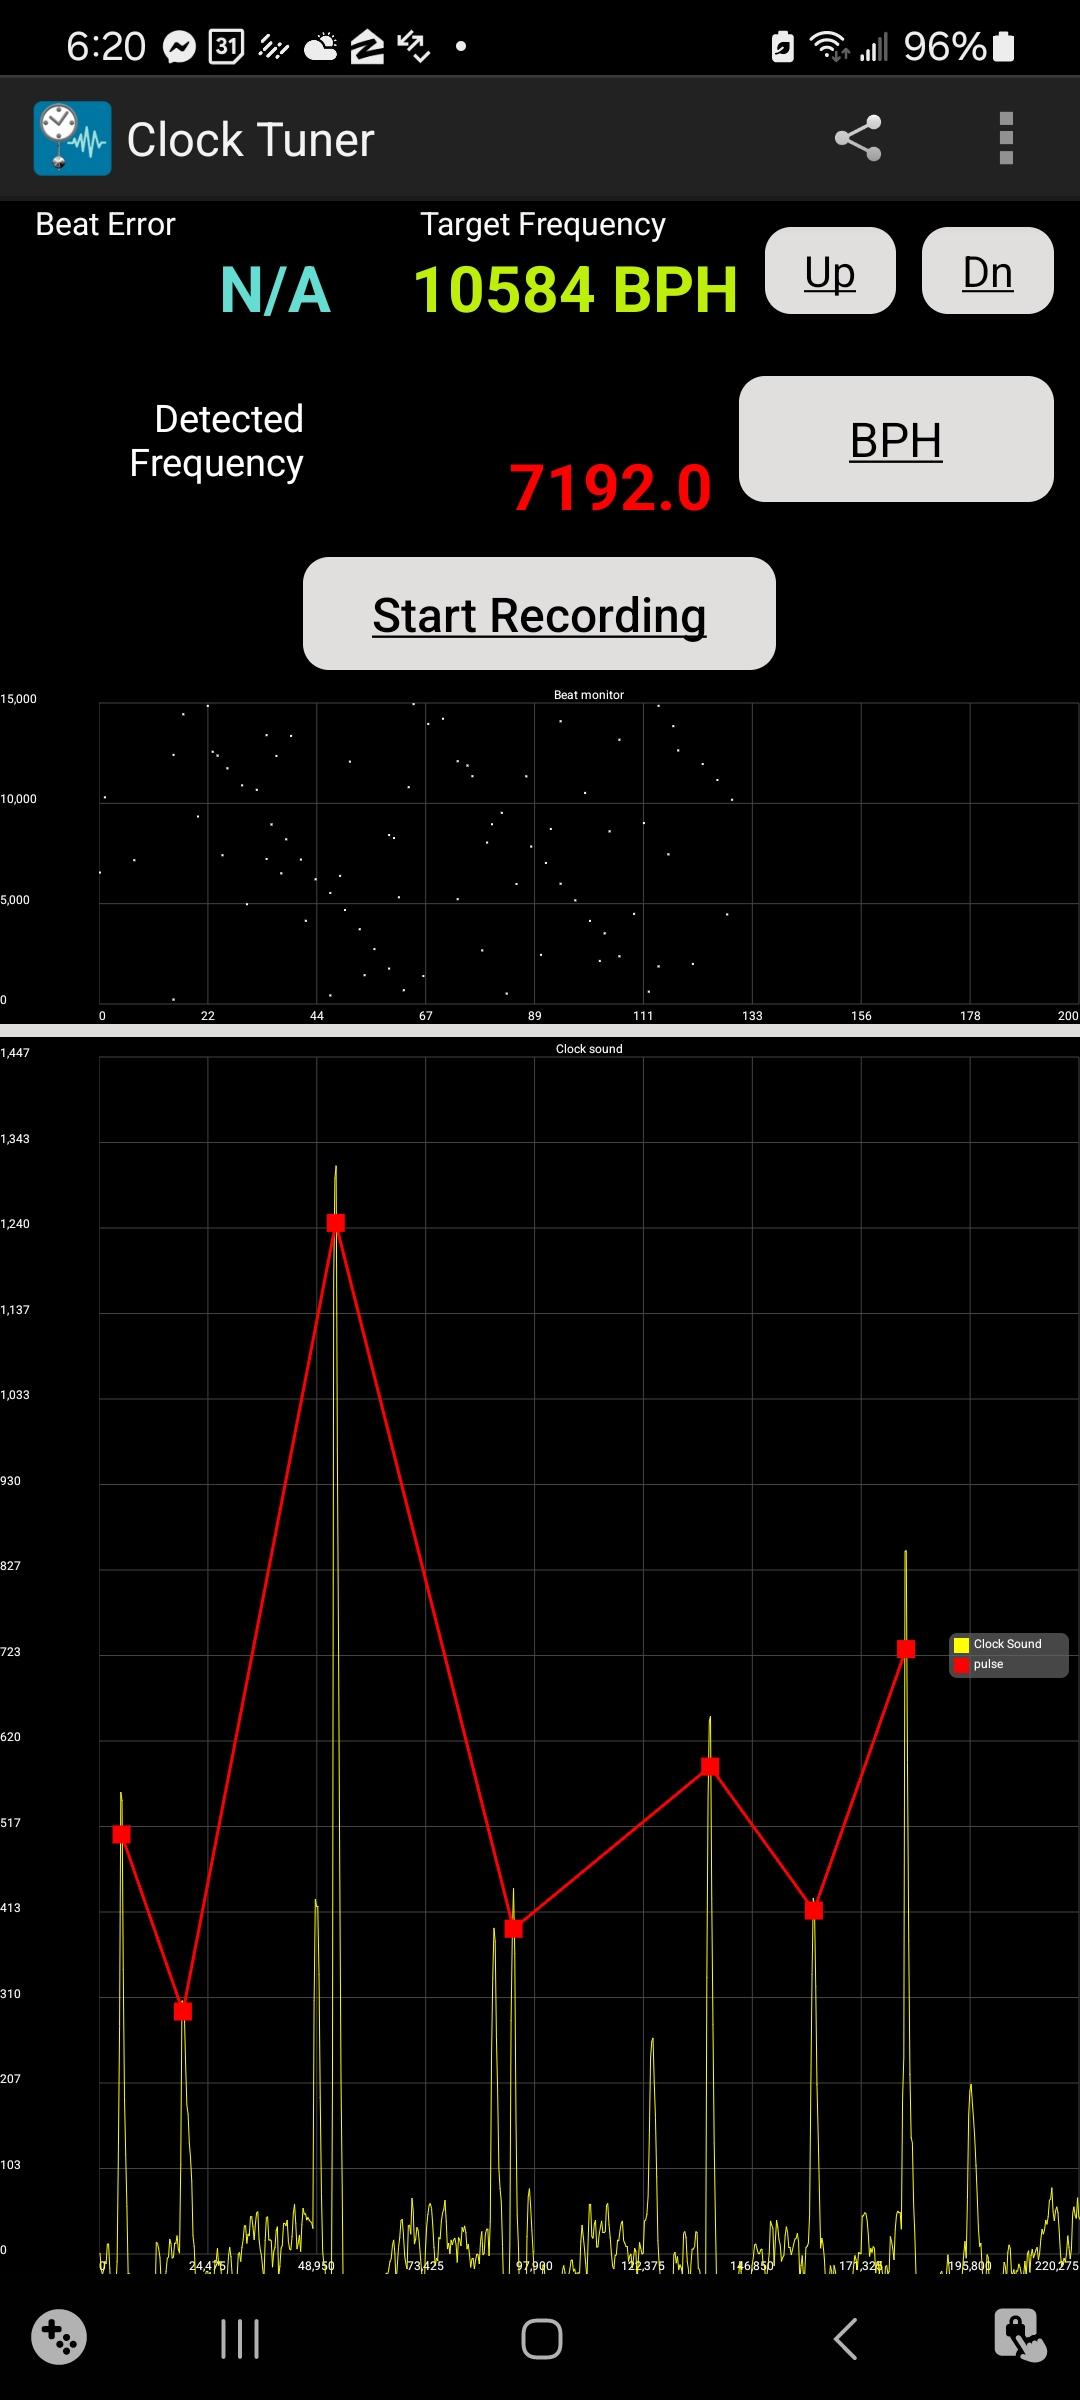
This is a pretty cool app for regulating clocks.
 1 point
 -
I wonder if somebody copied the number wrong? Because that would definitely be stronger than anything else we have listed that would be more like a mainspring for something much much bigger. Then often times at least in this country the mainsprings you get are Sometimes repackaged GR mainsprings and that would give you a clue if there is a problem but here they have the right thickness so I'm assuming somebody just made a clerical mistake? Oh and if this was a standard Swiss spring and you wanted to shove it in from the ring that it comes in having the barrel ID is nice. With a spring like this with the protruding parts that have to go into a slot in the barrel it's extremely unlikely you can just shove it in from the ring. This means you either will have to hand wind the spring in or if you in a mainspring winder which is what I would preferred there is a procedure. But I'm assuming that you probably don't have a mainspring winder so you'll probably put it in by hand but the case are long I will show you the procedure that I like. Then having the arbor dimension would be really nice if that was a specification but it's not. With the aftermarket not following the original of the American pocket watch. Personally I find it's a much bigger issue with the smaller size watches like this which is why if you get an original spring it would be preferred.
 1 point
 -
Welcome to the WRT forum and good luck with your forey into horology.1 point
-
Newbie from PA. in the US, started out just watching Marshall on Wristwatch Revival. added watching WatchRepair with Mark. Moved on to chewing through Marks course videos and starting to accumulate my own tools (expensive hobby to find interest in...lol)1 point
-
Hello and welcome from Leeds, England.1 point
-
Thank you for your introduction and welcome to this friendly forum. We all look forward to your contributions and continued involvement. If there is anything we can help you with don’t be afraid to ask. Nice clear photos can help a lot.1 point
-
His videos should be looked at as entertainment not as an instructional video. So as long as you look at it as entertainment and not as an instructional video you'll be fine.1 point
-
I‘d want to mention that even Mark does not oil the Rolex reversers correctly…1 point
-
I’ve seen for sale jewel collets that are brass and rather than using a draw bar you insert it into a normal collet. Collet in collet if you know what I mean. You should be able to knock those up on your lathe but would need a fine slitting saw and interesting work holding. Tom1 point
-
I have a document from Timetrax with lists of beat rates1 point
-
An 1890 Joyce Tower clock driving two faces on St Mary's Church in Sandbach.
.thumb.jpg.b1adf596e17bef8dea2c29462d93f077.jpg)
 1 point
 -
I watched this last night and thought the same thing. There were big quantities of oil and grease going everywhere. Off his game a bit…1 point
-
Thanks for describing your method in such detail. I can imagine needing to do something similar in the future, and you will have saved me a lot of trouble. Why does the steel need to be hardened? Also, what were the difficulties you had with the wire method? Could it work better for olive jewels?1 point
-
Welcome to the forum, enjoy1 point
-
Its not bad, you will know how good it is by the results. The only step that ,I feel, is missing is a spin off inbetween fluid changes. How about making a rotary machine, lots of folk here have made them, it doesn't not have to be complicated.1 point
-
I find that the most airtight bottles for volatile solvents those with ground glass stoppers. I got some for my clinic over 30 yrs ago. Somehow over the years, I am left with only two. But it keeps acetone and xylene very well. Maybe I should go down to that quaint little dental supply shop and see if they have any hiding in some forgotten corner.1 point
-
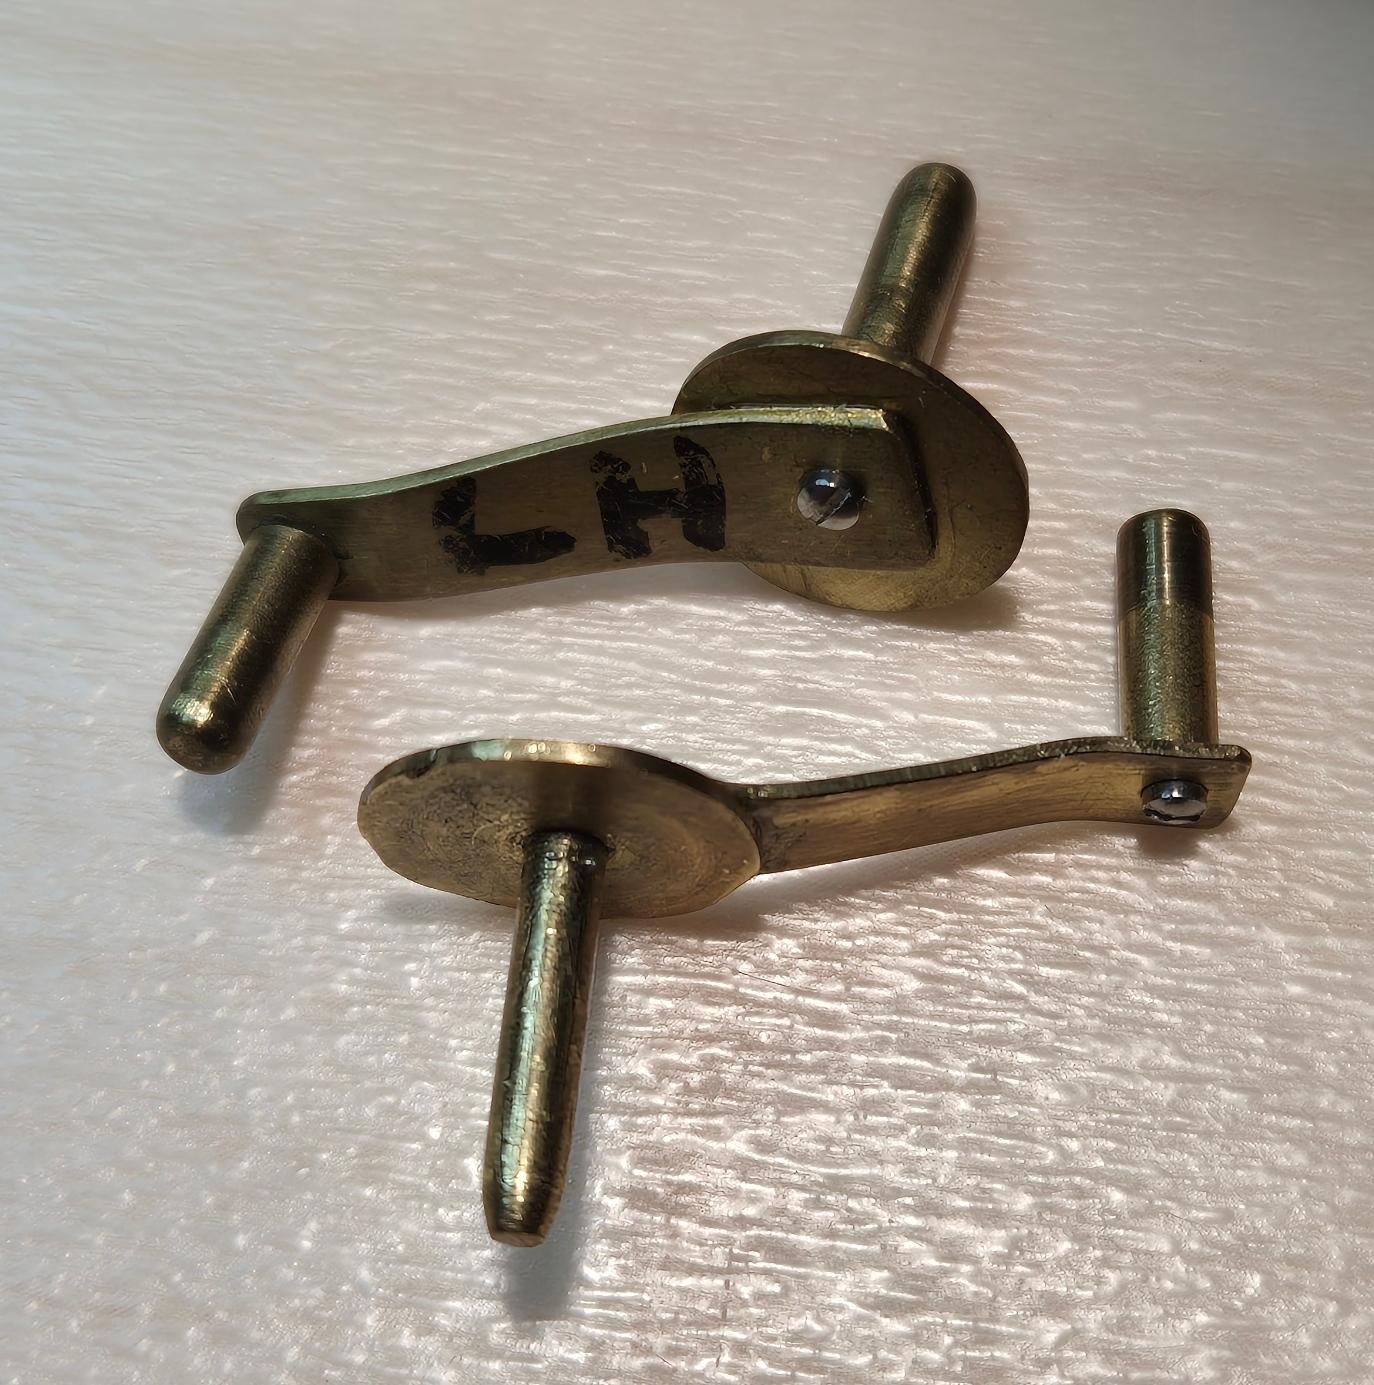
Lathe? I wish . I made these with just a saw, files, drill and a tap. I needed some left handed, so I made some. I got the centre spindles down to size by putting in an electric drill and using a file, then wet and dry. For the hooks, I drilled a hole, hammered in a bit of steel ( I think I used a needle) then filed to shape.
 1 point
 -
I would watch these!1 point
-
Yes it's a 100 (26.5 T3) and I think your only option is to try and repair the spring as prices are stupid. Try soaking it in acetone to dissolve / soften the glue.1 point
-
Mostly, and to maintain a constant pressure on the hole, and to keep the rod aligned Yes I use the same technique on balance pivot holes as well. This is just what is currently on the bench for this type of repair. The smallest I've done is 0.09, but It should scale down, although I haven't done a 0.07 hole yet. I have some sapphire rod, maybe ill cut a slice off and see how small of a hole I can make someday. I would someday like to start a YouTube series on lathe work, from basic gravers, to making your own jewels and threading attachments. But I'm swamped, have roughly 35 watches in the backlog.1 point
-
That might be possible, but with the cone of a balance staff, it would eventually start to touch the jewel, possibly before you have reached your desired ID. Plus, I don't have balance staffs on hand, I generally make them. Its much faster for me to just turn a piece of steel the correct size. And the very slight taper is important, similar to a reamer. Absolutely. I don't think many people are aware you can do this, which is why I wanted to share. You arent going to be able to make huge changes in the size, but if you have a jewel that's very close, this is an excellent way to make it fit. You may also wonder why I dont just turn down the pivot of the part im making the jewel for, and thats because I dont want to alter the strength of the pivot.1 point
-
You want to make sure it doesn't show. Have you tried all the glass panels when the case is all together because you don't want to break any.1 point
-
And the good news is the going train runs on it's own!! Going is alive !!!?!
 1 point
 -
Might find this helpful in your quest dictionary_ebauches_sa.pdf TZIllustratedGlossary.pdf 3395_ETA 1260.pdf1 point
-
Mb, folks like me and John will always get the info out there. For those that don't know I'm "Nickelsilver" here, and on Instagram. On a few other websites I'm Maillchort (a misspelling of German Silver in french). They all mean the same thing, and I do too, haha.1 point
-
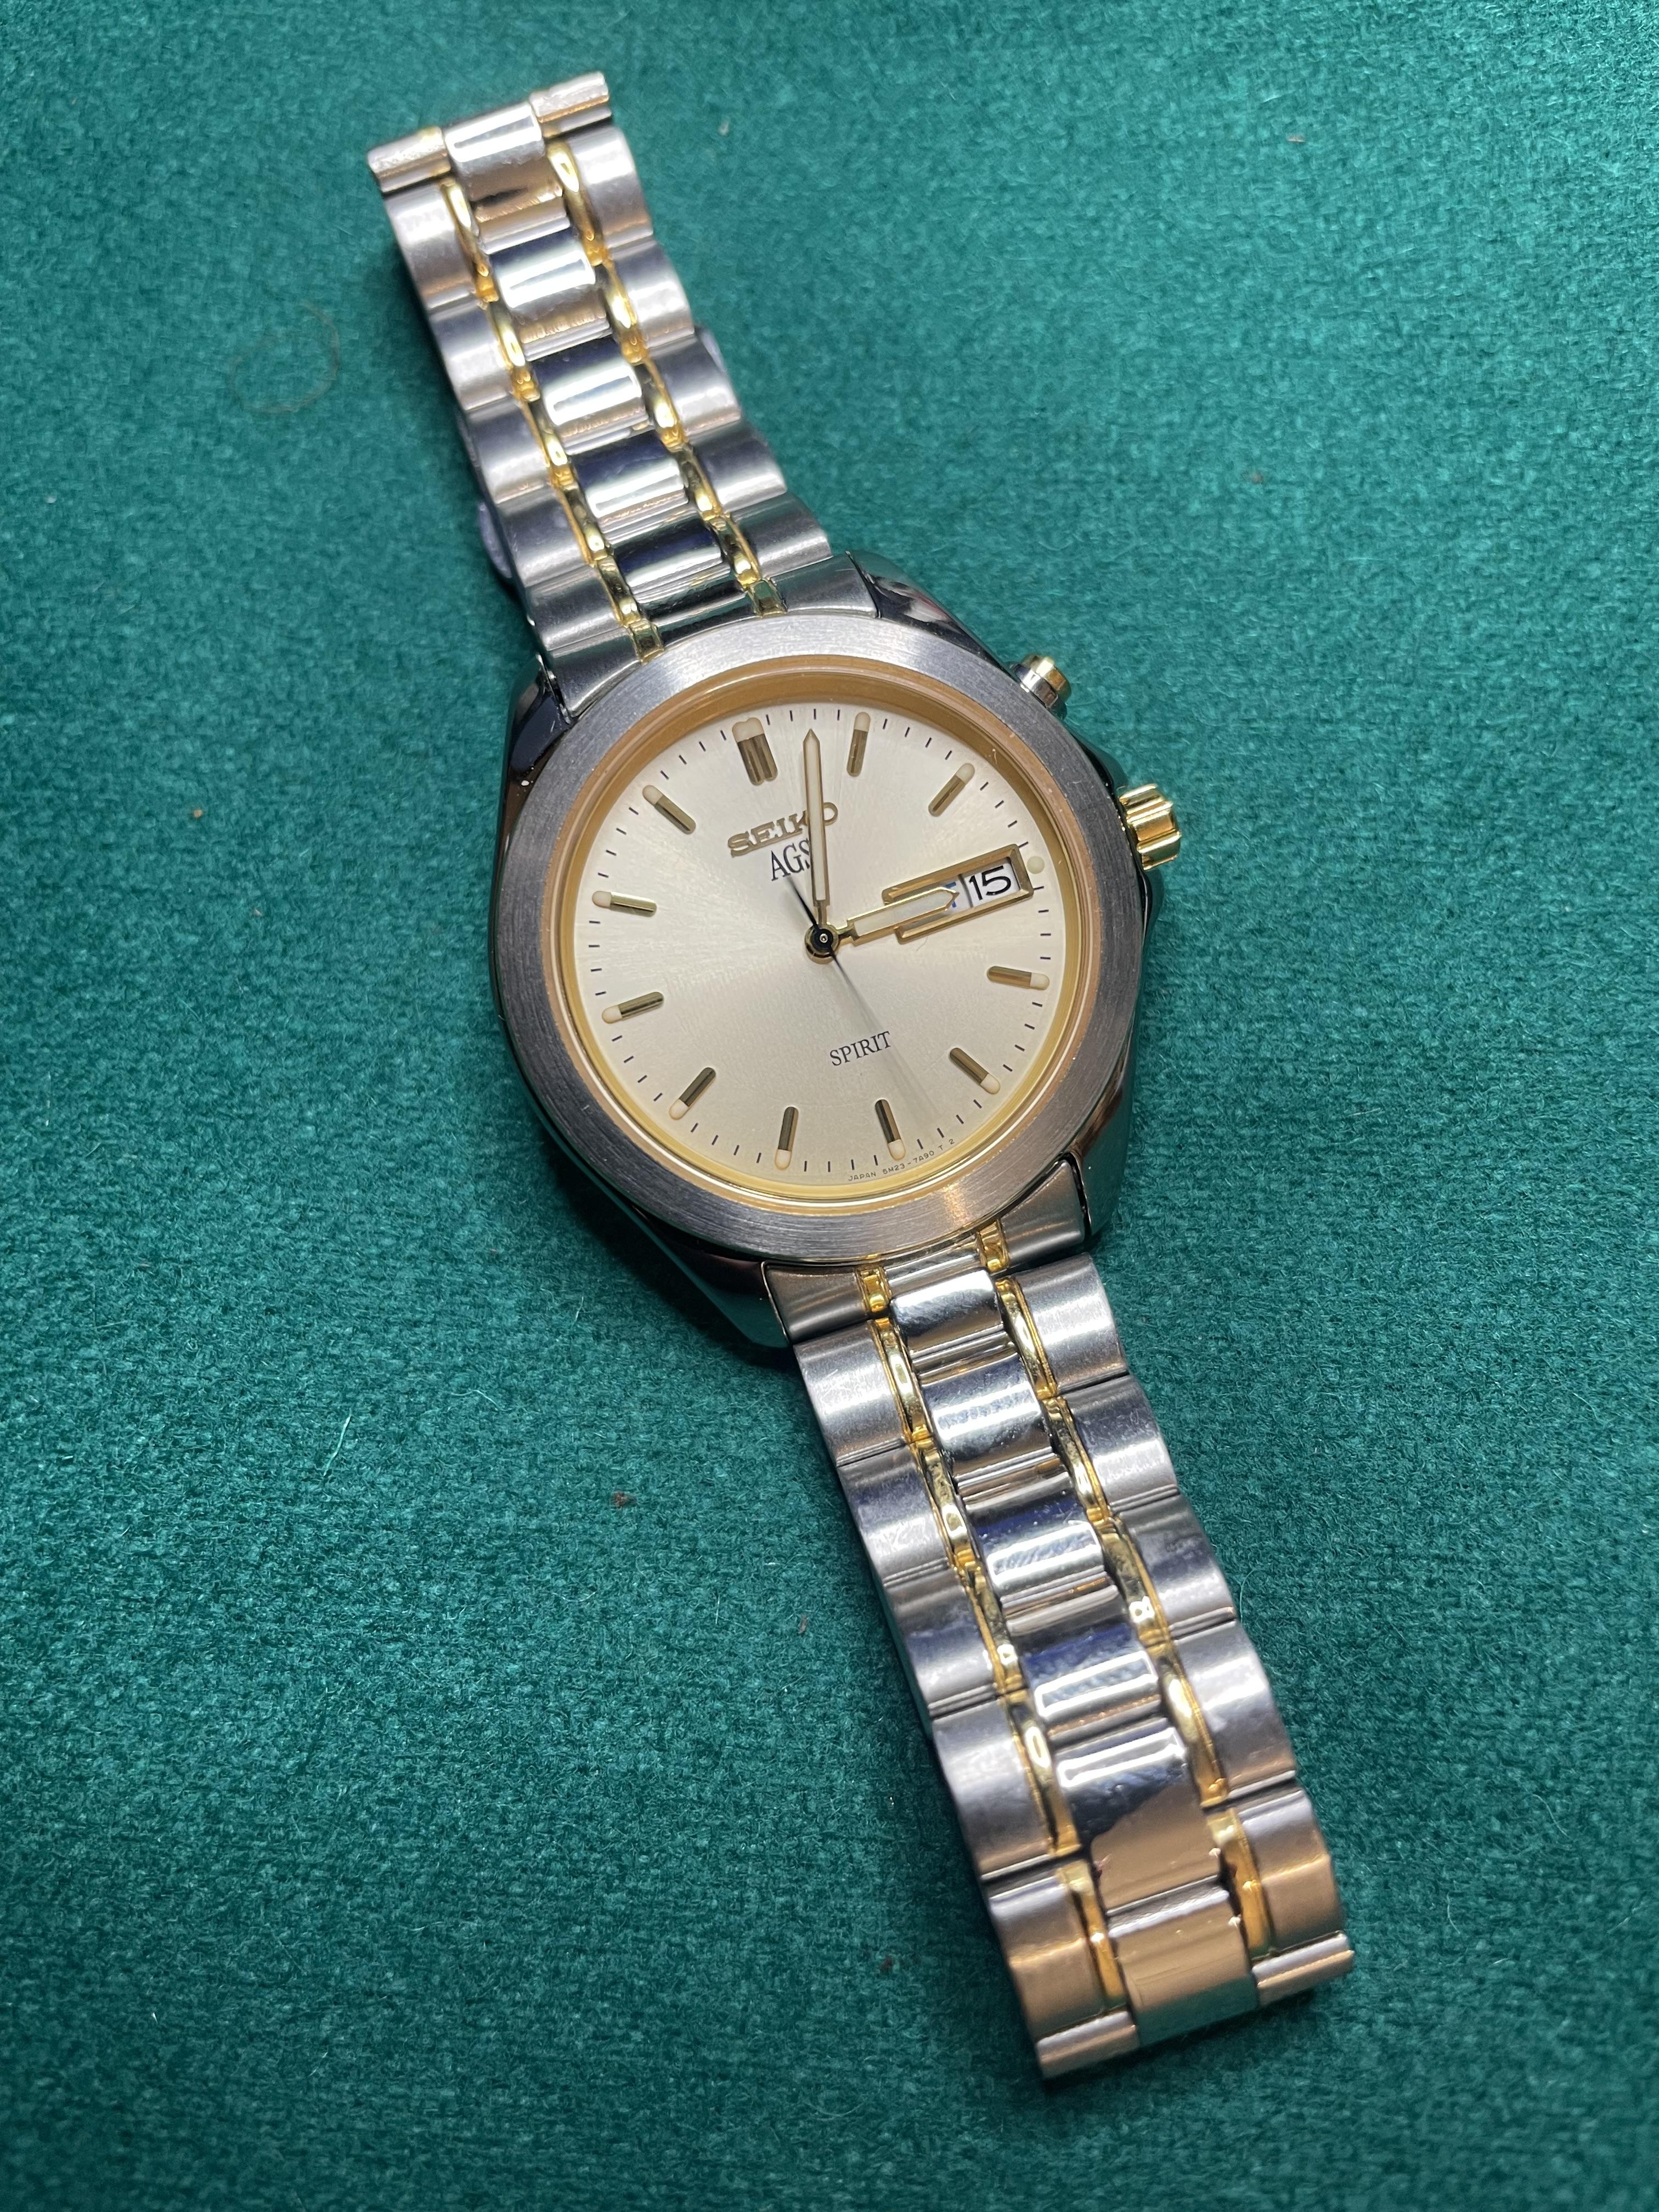
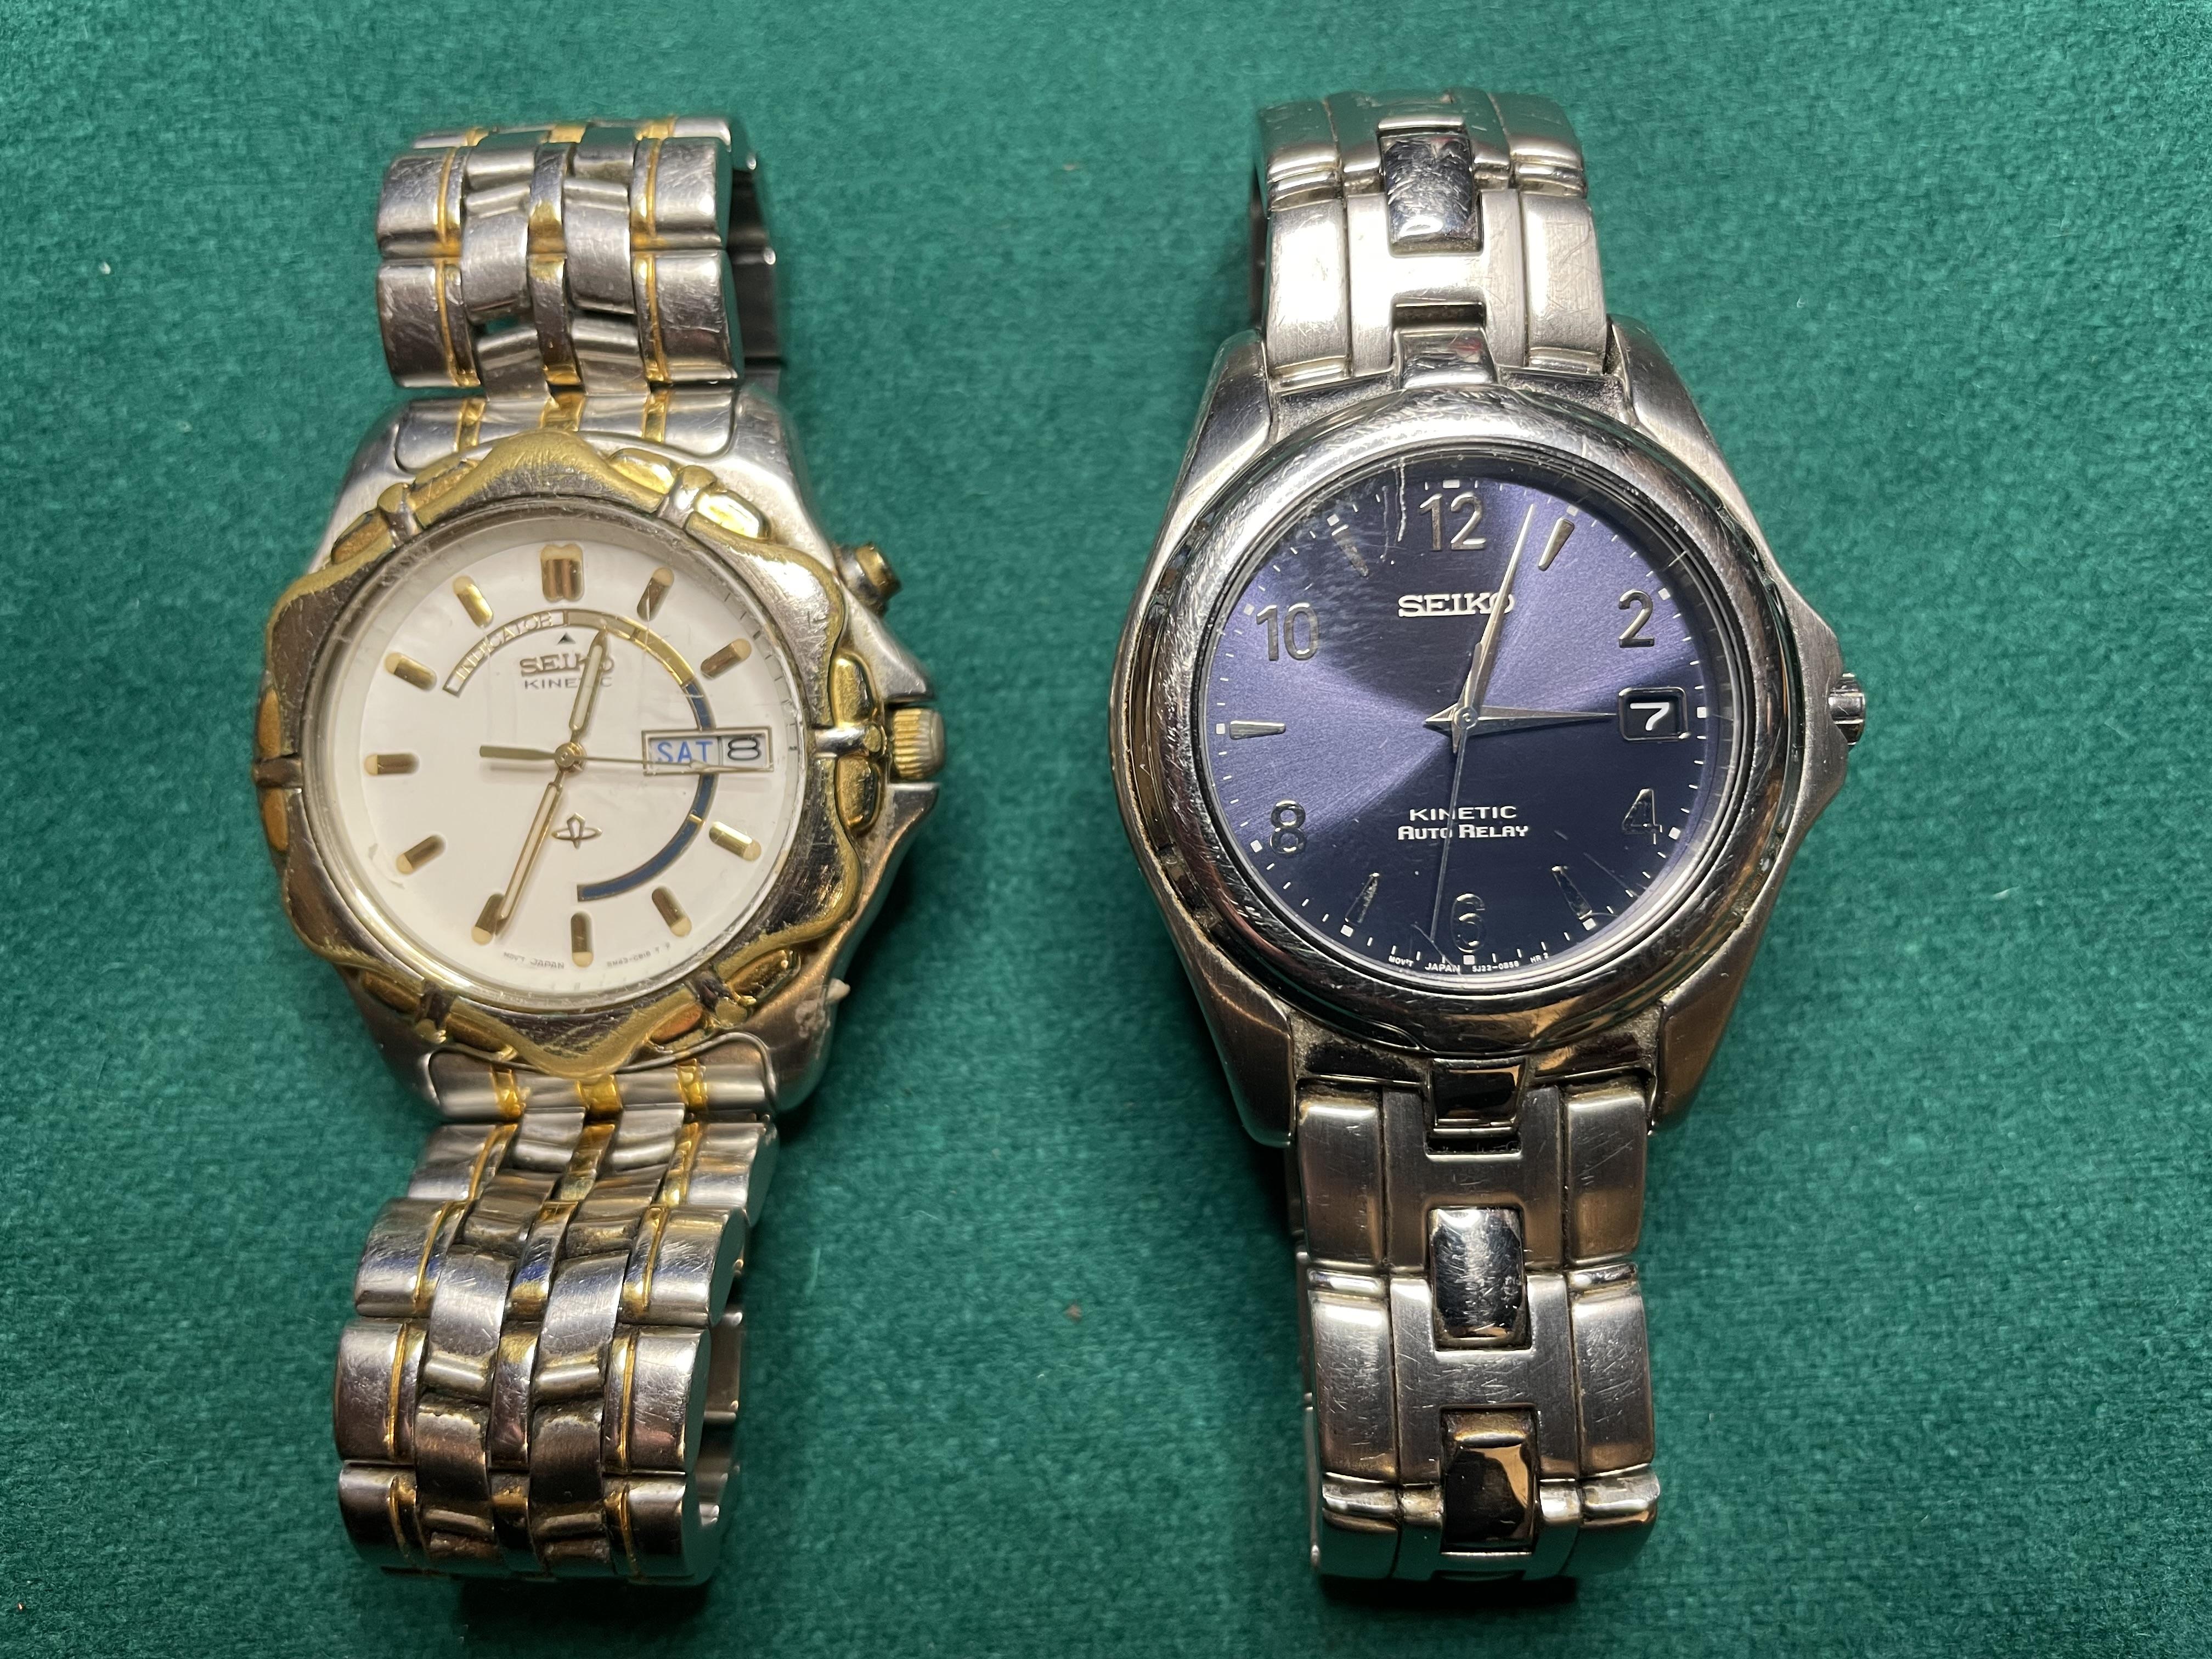
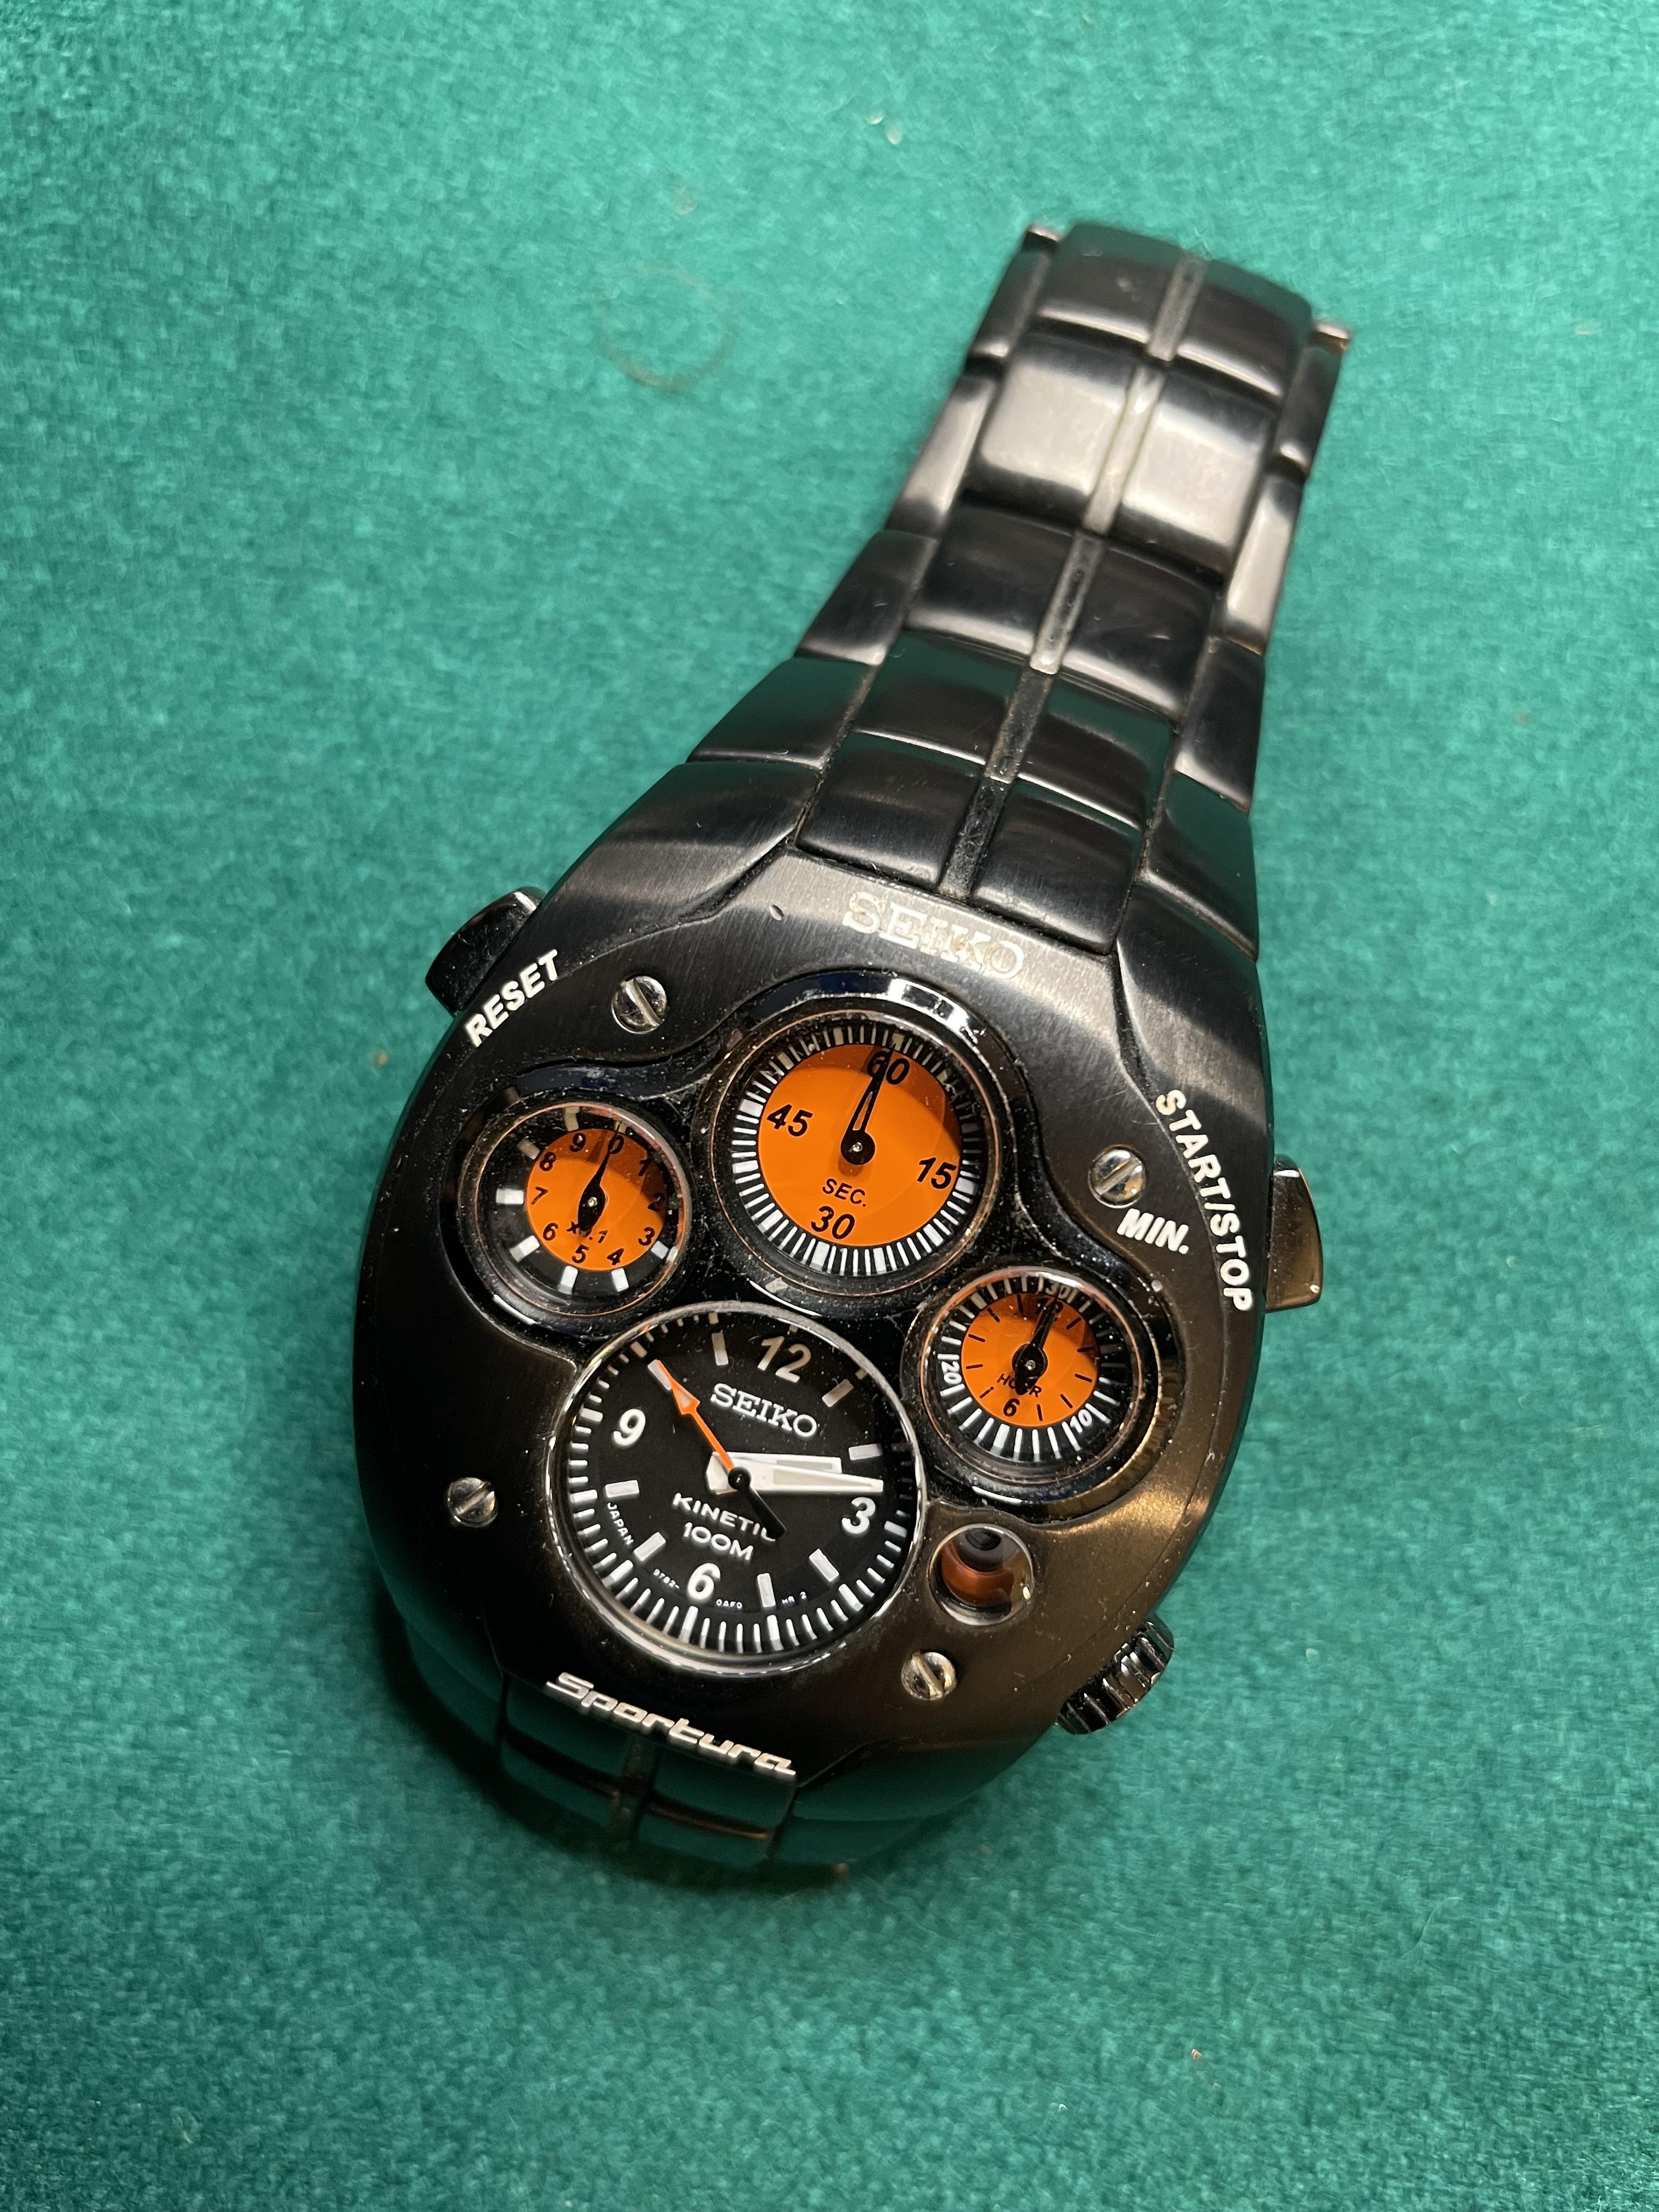
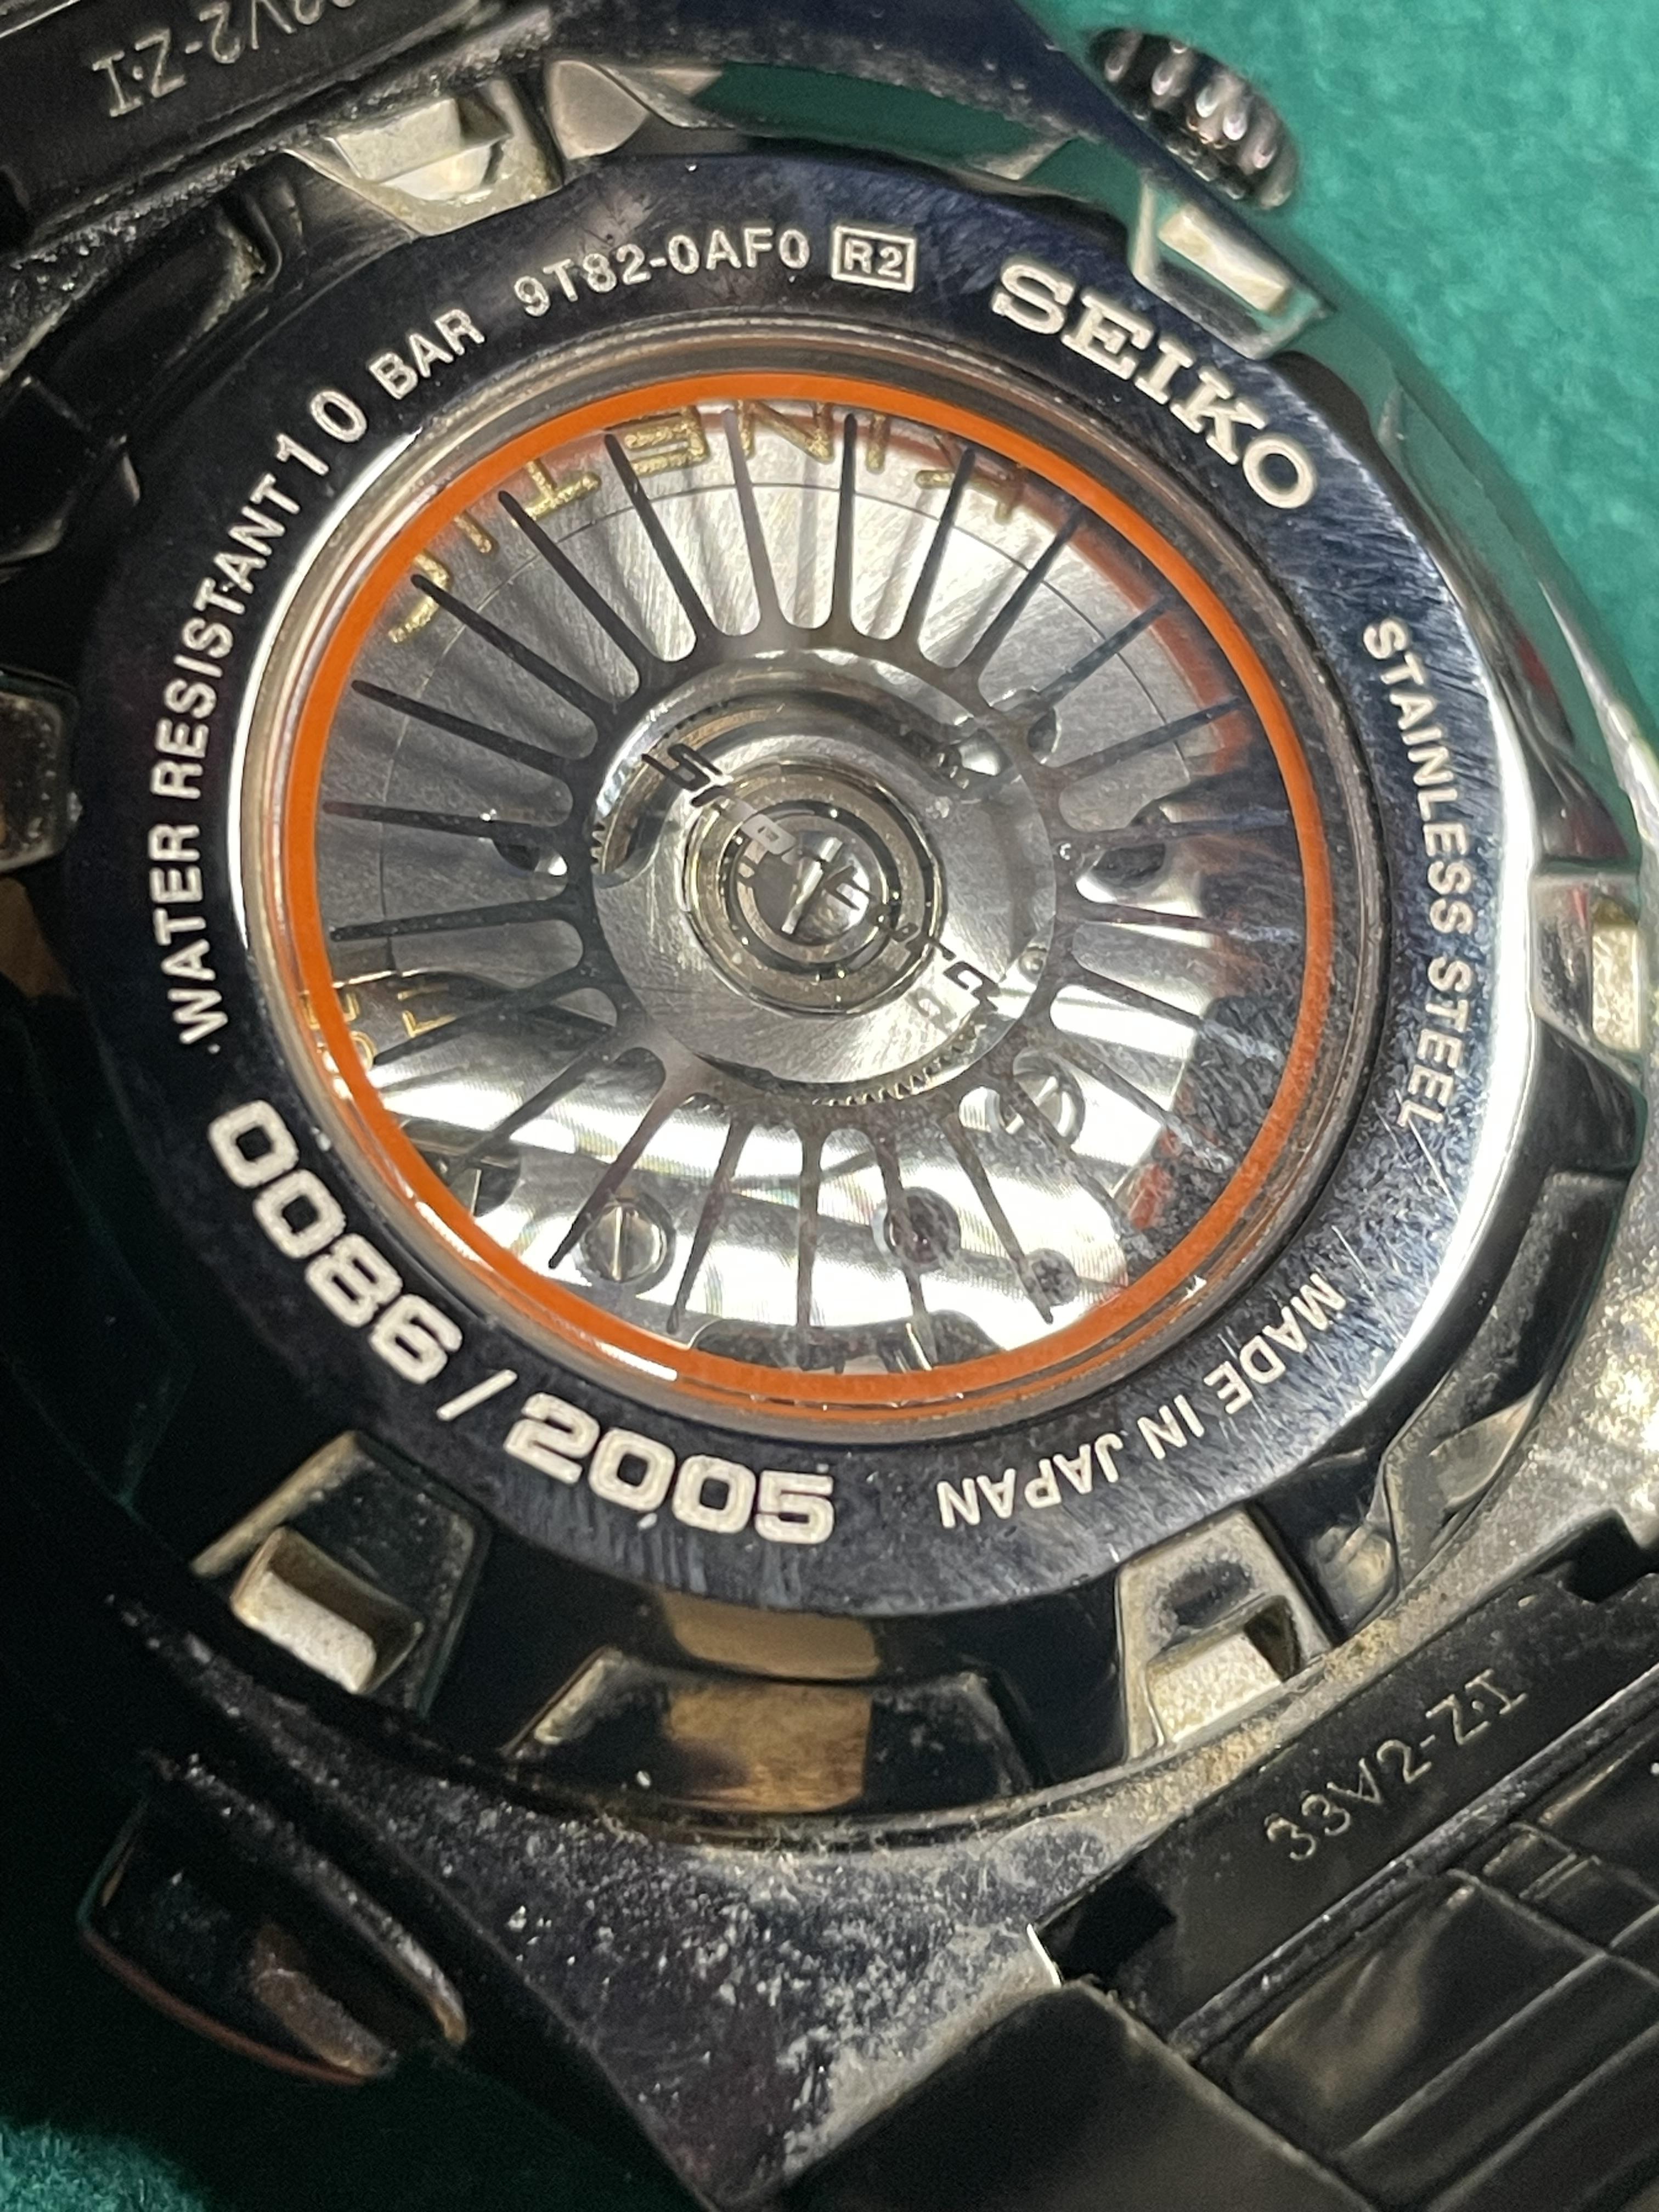
A bit late as I already have these, but anyway: I got interested in the Seiko Kinetic watches (see the end for the reason), and wanted a smart wearable one, so found this; titanium cased, 5M23 movement and in really nice and fully working condition. It came from Japan & has a Chinese inscription on the back which when translated reveals it was someone's retirement gift after 30 years service! Also wanting something to mess with, I found a pair of non-workers from a charity shop on ebay: The one on the left (5M43 movement) has a really bad, worn away case so I'm saving that until needed. The one on the right (5J22 movement) started up after an hour on a pendulum charger and has run perfectly ever since! It easily lasts a week at a time. It's a "relay" version so the hands stop moving to save the battery/capacitor if not worn for a day or two, then it sets the hands once it's being worn or moved again. It needs a bit of cleaning and polishing, but it's pretty good for one supposedly dead. And this - given to me by an old friend, who I'd happened to show one of the old watches I'd restored. He is an Apple fan and told me he's never going to wear it again, so he wanted someone interested in watches to have it! It's complete with everything - box, paperwork, case, guarantee and receipt! It needs a bit of a cosmetic clean but is otherwise near mint, just slight wear on the raised bezel around the small dials. It has a 9T82 movement which is apparently "Grand Seiko" grade - and (officially) unserviceable except by Seiko Japan. The capacitor battery is a bit tired and it only lasts about a week rather than a month, but not too bad. The chronometer is purely mechanical and has a tenth second dial, with the hand rotating once per second; the minutes dial has two hand for hours and minutes. There a photos of one being fully rebuilt in a thread here; the capacitor change requires dis-assembly of the chronograph! Servicing this is beyond my present skill level, as a single damaged part means it's wrecked. It will have to go to Seiko once that's unavoidable. https://forumamontres.forumactif.com/t263764-remplacement-batterie-sur-une-seiko-9t82 ps. The dirt on the back was not obvious in normal room lighting...


 1 point
 -
Just looked at their vid "Balance staff repair- the easy way". Yikes. The balance arms are visibly more true before he removes the staff than after (punched out without any special tool like the K&D/Platax) , and he says it looks pretty good on the truing caliper, when it's off a mile. Yuk.1 point
-
I thought the same after reading what appears to be contradictory information. But the OP does say when the watch is on his winder ' it gains so much time so quickly ' .1 point
-
If it's ETA 980, Cousins have the setting lever springs US Suppliers probably have them too.
 1 point
 -
Hearsay and misinformation is why I replied to that video. If you are going to present yourself as someone with knowledge or a level of expertise you better have your facts straight. Well that is unless you are running for political office. Peace and happiness!1 point
.jpg.2545a6b013f1962fe4114b2f62b7397e.jpg)
.jpg.d9b39a50742de9e83904eb0bdab01fec.jpg)


.thumb.jpg.cb17a66989f1e796fd4217db2e9ca9df.jpg)


.jpg.b4866d35ec225dffd1352dbbd3abdc41.jpg)