
I Hope This Is Not Too Obvious A Question

-
Recently Browsing
- No registered users viewing this page.
-
Topics
-
-
Posts
-

By HectorLooi · Posted
If the watch is new, just return it to the seller for a refund or replacement. -
 Keevo, Welcome to the group ! I'm thinking that you have some damage to the hour, and/ or minute wheel. Possibly just a bent, otherwise damaged, or missing tooth. Your photo didn't post that I can see. I think you'll have to open it to start really finding the issue. Best, Randy
 -

By Neverenoughwatches · Posted
An industrial break cleaner , like Holts does a good job of rinsing off paraffin -
 In cap jewels on several watches I have serviced over the years. I've recently serviced a couple of Longines movements where the cap jewels were colourless. They are a real pain. Without colour they disappear when immersed in any liquid for cleaning 😲 Not necessarily. Cousins do a 10ml bottle for £26 which will last me for years. That's just half the price of a simple Bergeon silicone cushion, so not too expensive 🤣
 -
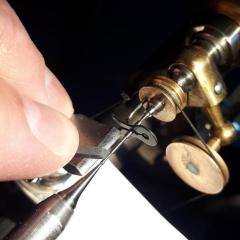
 I wanted to post an update as I have two movements running really well now, 230-250 amplitude , 0.5 and under beat error, and +/-8 seconds or so. I removed the hairspring assembly in order to start over and noticed that the terminal curve between the stud and regulator arm was distorted. The stud was lower than it should be. I massaged the curve to look pretty good and reinstalled it. I followed Alex's video advice, best I could with 10x magnification, and with the regulator arm set in the middle of the curve I adjusted the stud so the spring was centered. I then made sure I could move the regulator arm the entire terminal curve without upsetting the coils. I then put it back on the Timegrapher and began closing down the regulator pins until I saw a change in amplitude which means to me that the pins were now pinching the spring. I opened them slightly and it looks good except I have a 0 on dial down, +3 on dial up but -16 on crown down. I'm a bit stuck on how to adjust out the positional error. I also noticed a drop in amplitude, 180-200 on crown down. In the other video link I posted at about minute 26 if I remember he adjusts out positional error by manipulating the regulator pin gap. With crown down the hairspring falls away from the pin and the rate slows so he closes the pins a bit to keep them tighter in crown down position. That means the spring is tighter on dial up as well but then he moved the regulator arm to slow the movement. There must be some Seiko experts here that have some methods for dialing out positional errors.
-


Recommended Posts