

-
Recently Browsing
- No registered users viewing this page.
-
Topics
-
-
Posts
-
 Hey everyone! I sure this topic has probably been discussed before, but I want some good recommendations based on experience or knowledge about a good affordable high torque DC motor that I can use for my lathe. I have a little lathe but it has the regular old style motor that was used in the past with a foot controller. However, I would like to improve it by buy a nice motor with a speed controller so I don’t have to use my foot. I would like the motor to have really good torque so that even if I run it at a very low speed, it still can cut material easily. I saw online this brand called Servo sewing machine motor with a speed controller, but I don’t know how good they are and if they would work like I would like to for my lathe. Thank you for all the help!
 -
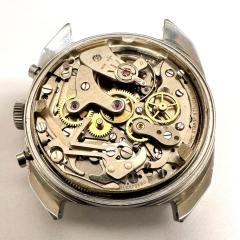
 Your only partially correct here. Let's look at a magnified view of the image up above. Then for a flat hairspring to function correctly there has to be a little bit of breathing room unfortunately. If you would like Better timekeeping if you get a watch with the over coil hairspring then those regulator pins are supposed to be as tight as possible but still allow the hairspring the slide. With if the pins are opened up at all you'll see a dramatic timing change based on amplitude. So in our example down below initially hairspring is basically free-floating not touching anything the effective length of the hairspring is at the stud. As the amplitude picks up at some point in time they hairspring will just tide should one pin on one swing and the other pin on the other swing. As soon as it does that it changes the effective length to being closer to the regulator pins. As the amplitude picks up more and more it's obviously touching the regulator pins more and more and the length of the hairspring shortens the watch speeds up. This is where in your video at around 16 minutes he opens up the regulator pins and the watch slows down. This is because they hairspring is no longer bouncing off either pin as much. Then because the watches running slow he speeds it up just to show that yes you could regulate the watch but now you have a problem. Because the regulator pins are much farther apart amplitude is going to have a much greater effect. Like in the image down below they hairspring is properly spaced between the pins. But if those pins are farther apart the effect of amplitude will be much greater. So he speeds up the watch to cancel out the effect of the regulator pins at the particular amplitude which was dial down then when he moves the watch to a crown position which will always have an amplitude decrease because the amount of friction on the sides of the pins now the hairspring is not touching the regulator pins as much and the watch dramatically slows down. Let's look at the other example image. In this particular example they hairspring is actually touching the regulator pin at restWhich means the effective length of the hairspring is at the regulator pin the watch runs fast. As the amplitude picks up hairspring will lift off the PN moving the effective length towards the stud which is why the watches slowing down. As you can see is the amplitude picks up They hairspring is not centered C not getting even timekeeping and the watch is slowing even more down. But at some point in time when the amplitude gets high enough this will depend upon the watch the spacing Excedrin whatever the amplitude is will be balancing actually between the pins in the watch will of course speed up and then at some point time you reach that sweet spot where it's bouncing between the two pins but as you can see it's at a much higher amplitude. So this is why hairspring has to be properly centered between the pins and the pins have to be at the right spacing otherwise you going to get strange timekeeping based on amplitude which no matter what you're going to get a little bit of that as you do have to have a little bit a spacing. At least on a flat hairspring.
 -
 My understanding is that In the Etachron system the spring is only centered n order to set the stud angle when the the pins are wide open and the regulator block in at the midway point. After that the pins are rotated in one direction only so that the width between the spring and one of the studs is 1/2 width of the spring. This results in the spring always being closer to one stud than other one.
 -
 The idea is that the spring is centred between the pins when at rest. Then when the watch is running it will oscillate equally between the pins i.e. bounce off one pin then the other, as the hairspring breathes. If the spring is only hitting one pin, then it isn't centred, and most likely the pins are too far apart. Yes, the regulator pins are there to adjust the effective length of the hairspring. The spacing of the regulator pins should not affect the amplitude. The vertical positions typically have lower amplitude than the horizontal ones. This has nothing to with the regulator - hairspring interaction. Increased friction in the verticals sucks energy from the system and reduces the amplitude. If the amplitude is less, the breathing is less. More tim between the pins = more effective length. Depending on how well the hairspring is centred, and which direction it sags, some vertical positions might run faster than the horizontal ones, and others slower. For example, if the spring is off centre towards on pin, and pressed against it by gravity, it might never bounce off that pin => faster. At the position 180 deg. away, the spring will spend more time in between the pins => slower.
 -

By coreymsnow · Posted
Thank you all for the tips and insights. I'm looking carefully at the Sherline lathes with a milling attachment. I need to figure out exactly what I'd need to get in terms of the base lathe and attachments to be able to fabricate basic parts and learn how to fabricate some of the less basic ones- like a cannon pinion. Thank you again.
-

Recommended Posts