Jump to content

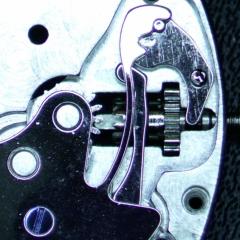
Hardening/tempering watch fusee ratchet pawls


Recommended Posts

I find these very fiddly to make to replace fusee pawls which have worn out - they are not too bad to make from a turned blank with a spigot to go in the hole in the fusee plus some filing (usually aided by supergluing the part to a convenient steel handle), but then the question arises of hardening and tempering. I normally do this as per screws, heat to red heat in a little container tipping into water, polish and then blue in a pan over the spirit lamp, but then they need to be riveted in and at this point I find they break very easily, presumably because too hard around the rivet.

If they were bigger I'd just harden the ratchet tip (and use a shoulder screw rather than a rivet)

Does anyone have tips to make this easier?

Edited by AlanB
rivet not ratchet
Link to comment
Share on other sites

Depends a lot on the steel you're using. In the States O1 is a standard steel used for parts like this. It's an oil hardening steel (the O). There's also W1, and O2 (haven't been able to discern an actual difference between O1 and O2).


If you harden an oil hardening steel in water it gets even harder- to the point it may crack at stress points before you get to tempering. In the same vein, if you need extreme hardness you might harden an oil hardening steel in water for something like a cutting tool. In very extreme cases you may quench in salt water brine or even mercury.


For most watch parts it's good to harden, then temper to a dark blue. But depending on the steel a light blue may be more appropriate. Also, if not using an oven for the hardening stage, you can be off in temperature enough that you change the metal to a degree that even tempering past light blue results in brittle parts.


I also use a little container (ex- CO2 or NO2 cartridge, top cut off, welded to a steel rod), filled with finely ground wood charcoal. Parts at the bottom of that. The charcoal alights, burns out, looks like lava moving around for a while, then calms down. That's when I quench. The charcoal doesn't add any carbon, but it excludes oxygen enough that the parts come out grey. Tempering to color is easy then. The charcoal is ground in an espresso grinder at its finest setting- if you don't want to spring for a commercial level espresso grinder, you can buy it at health food shops and it's even more finely ground.


Steels I use are O1, Sandvik 20AP, and Klein Law 100x (same as 20AP minus the tiny bit of lead Sandvik used). O1 is clearly the best for cutting tools, the other two great for parts. Just made some 4th wheel pinions with extra long pivot in 20AP/Law 100x and no deformation in hardening.

Edited by nickelsilver
  • Like 2
Link to comment
Share on other sites

In the last 15 years I have worked mostly on fusee movements. Mostly verge, but english lever too. I have found that problems in the ratchet works in the fusee is common for such movements, so I have done many of them. I can not refer to something written in a book, but what I have found is that the ratchet pawls are not hardened. This is may be because the riveting in place, if they were hardened, then the degree of riveting needed would be not possible without breaking. I make this only parts in the watch movements from ordinary nails as material. The nail is harder than soft steel because of the plastic deformation in time of it's ptroduction and is just what is needed for the purpose.

Edited by nevenbekriev
  • Like 1
Link to comment
Share on other sites

Actually thinking about it - the pawl to be replaced was clearly not hardenend, that's probably why it wore in the way it did, maybe the idea is for the pawl to wear rather than the ratchet wheel. 

As people like photos here is a (soft) one that I have made up

But I like the charcoal idea for hardening other parts without scale built up, will have to try that.  The surplus place often has old coffee grinders.

For steel we have the UK/US terminology differences, I've been using gauge plate and silver steel (maybe drill rod in us terms).  But I'll see if I can get some O1 round.  

Ratchet_pawl.JPG

  • Like 1
Link to comment
Share on other sites

Join the conversation

You can post now and register later. If you have an account, sign in now to post with your account.
Note: Your post will require moderator approval before it will be visible.

Guest
Reply to this topic...

×   Pasted as rich text.   Restore formatting

  Only 75 emoji are allowed.

×   Your link has been automatically embedded.   Display as a link instead

×   Your previous content has been restored.   Clear editor

×   You cannot paste images directly. Upload or insert images from URL.


  • Recently Browsing

    • No registered users viewing this page.
  • Topics

  • Posts

    • So no problem as long as you understand what needs to be done. Very good! 👍 I started the disassembly yesterday. With a few exceptions the screws looked untouched so maybe the watch has never been serviced. I have the principle of treating all watches regardless of value and brand in the same way but hand on heart, I took extra time and was extra careful to dress my screwdrivers and tweezers. This level of quality is beyond anything I have experienced except possibly a couple of Omega movements. In general, it is easier to handle high-quality movements because all the parts fit together so perfectly, especially during assembly. Just screwing the case back on and off feels almost a little sensual. It almost makes you blush and look over your shoulder 😆 The fit is exceptionally precise! In the long run, maybe sometime in the fall, I plan to create a service walkthrough. Therefore, I take lots of pictures of which I may then use a third. If there is interest in taking a look at the status of the movement, you can click on the link below where I will gradually post the raw material. On Thursday, the family goes on vacation so the continuation first in the second half of August if all goes as planned. https://1drv.ms/f/s!AnVrKJ9agkNWkoFMtyD2O4kPIs66Jg?e=oMRKbn  
    • AndyGSI,  Thx sir for "reeling me in"!  I actually found the correct stem in a box of spares that I had..  Just enough length to set it up.  I was unable to verify the PN prior to purchase, but it seems to fit fine!!!  Thx for the assist sir!!! John
    • if you like playing with chemicals I'm pretty sure that the clock repair books have formulas for how to do the silvering powder. it's amazing what happens if you Google clock silvering there is lots and lots of links out there is rather surprised the video below shows a different product at about two minutes. Slightly closer than ordering from the UK. although it's a bit of a sticker shock it and realize the stuff was that expensive here's a link https://timesavers.com/i-8944166-dial-silvering-powder.html this one probably isn't helpful to the UK again https://priorypolishes.co.uk/product/clock-dial-silvering-restoration-kit/ searching for stuff online is quite interesting as the phrase I'm using is dial silvering powder Australia although conveniently that last word of Australia seems be missing from all the searches where finding all kinds of sites with silvering powder. So yes there is more than one company out there possibly a less somebody's making it the selling and everybody else. Or as I said you do DIY I can't remember what would be the bad if you did a wrong? Plus he still needs some silver compounds are going to be pricey   then I found the DIY formula thanks to @nickelsilver found at the link below.    
    • I have quite a few of these little compartment boxes, that Chinese electronic component kits, screw kits etc. are supplied in. They mostly have some or all dividers movable, so the compartment sizes can be adjusted to suit the items you are storing: (The original components are only ever used for prototypes & test rigs, as the quality is often dubious - but good value for that purpose, and often cheaper than the boxes alone, if you try to buy those!)   OK! Not bad, the currency prefix was too small to read...
    • I usually store the dial, date and day rings and any hands to keep the set together, I think they are too thin for much else. Some dial feet are too long for the holders I have so you can't close the lid, but I would say that about 80-90% fit just fine. There are larger ones and I am thinking about getting a set of those for those dials that do not fit in the ones I have, it's on my list of things to do. Not £8.90, 8.90 AED - that's UAE Dihrums so about £1.92 for 10
×
×
  • Create New...