Jump to content

Chinese Timegraphers


Recommended Posts

33 minutes ago, mikepilk said:

I guessed that's what the pot does.

Problem is, it's dead, bereft of life, it's kicked the bucket. 

When I plug the USB in, the computer doesn't see it, and the LED doesn't light. 

All that way from China, and it worked (?) for about an hour.

I guess it must be the main chip that's failed - so there's nothing I can do ?

image.thumb.png.3289d939aec0f5993ba62f9580aa1683.png

Did you check with another computer or device? 
Windows USB issues may not indicate actual hardware failure. Deleting the device info from registry/device manager may be necessary for redetection. 

Link to comment
Share on other sites

40 minutes ago, JohnFrum said:

Did you check with another computer or device? 
Windows USB issues may not indicate actual hardware failure. Deleting the device info from registry/device manager may be necessary for redetection. 

Just tried deleting it from the device manager - unfortunately it didn't work.

Link to comment
Share on other sites

It looks like a USB-C connector, due to the number of leads I see on the connector to to the PCB.  I don't see the Rd resistors that a USB-C UFP must have to signal to the DFP to supply power.  For some reason the cheap boards don't have these?  Even though it's just two chip resistors that are just a fraction of a value of the components already on the board.  Here's an explanation of USB-C termination resistors.

Try a USB-C to USB-A cable.  The USB-A port doesn't use sense resistors and will always supply power.

That would be step one here, power.  Check the Vbus - GND pins on the USB-C connector for power.  There are breakout boards you can insert between the recepticle socket and the cable plug, but for someone used to working with watch parts, it should be possible to probe the connector leads.  No power and that explains everything and tells you it's probably something related to the USB-C power protocol, the aforementioned Rd resistors, or a broken socket.  Could be over-current from a short, when then causes the USB hub to shut off power, but at least on Linux you'll get a message about this on the computer, so I'd think that's unlikely.

Link to comment
Share on other sites

I see you checked power at C11/C12.  Are those VBus and GND?  They look to me like they'd be the USB data lines, DP and DM.  I'd guess the pair of outermost large pads are shield GND, as well as the pair of medium sized pads inboard of them as signal GND.  Then the next pair of medium pads are VBus.  Followed by the smaller pads for the signal lines.  So maybe you aren't really getting USB power?

If I'm following the traces correctly, the LED is connected to R5 and thence to the upper right pin (12) on the CM108, which is LED0.  The datasheet only says, "Output H for Power On; Toggling for Data Transmit".   So if you have power, it should be on I think.  Check the power pins on the CM108, pins DVDD, AVDD1, AVDD2 should all be 5V.  Pin REGV should be 3.3V, but this is from the CM108's regulator supplying power.

Link to comment
Share on other sites

3 hours ago, xyzzy said:

Try a USB-C to USB-A cable.  The USB-A port doesn't use sense resistors and will always supply power.

I'm using a USB-A (at the computer) to USB-C (at the microphone) cable.

37 minutes ago, xyzzy said:

I see you checked power at C11/C12.  Are those VBus and GND?  

Thanks for being so helpful, but I'm an aero engineer, these terms mean nothing to me 🥴

I just put the meter probes somewhere on C11 and C12 to check that the USB socket was OK,  and saw volts !

38 minutes ago, xyzzy said:

 Check the power pins on the CM108, pins DVDD, AVDD1, AVDD2 should all be 5V.  Pin REGV should be 3.3V, but this is from the CM108's regulator supplying power.

How do I find out which these pins are? I only have a digital multimeter, I'll have to use a needle or something as the pins are very small. I guess the GND I connect the other end to is anywhere on the same side of the circuit board? 


Link to comment
Share on other sites

LittleWatchShop has shown exactly what I meant.

To get a small probe, you can use an oiler and then touch the probe to the oiler.  The ground probe clipped to something, e.g. the metal shell of the USB connector, or the black wire to the piezo, can act as a hands free ground so you can use both hands for the other probe.

I've also used small gauge wire.  Extract a single strand from some random bit stranded wire.  Twist it around the probe tip and leave a tail sticking out.  Needs to be somewhat short since the wire is not stiff.  Then use that.

And as shown in LittleWatchShop's picture, the pins on the chip connect to the components, which are somewhat larger with more space around them.

Anyway....

I think you are measuring the data lines on the USB connector instead of the power lines.  There are four pins of note on the connector.  5 volts (called Vbus), ground, and two data lines called DP and DM.  The LED should light up if you have 5V and ground.  So measure that.  Here's where I think they are:

usb-c-cm108.jpg.9598d31921305664b4bb55554817759d.jpg

The light green color is copper trace, the dark green are gaps.  So the lines of light green are the "wires" on the PCB.  You can visually follow them.  It looks like the pads labeled GND above touch the big light green area that covers most of the PCB, so this area is all electrically connected to ground.  This is a pretty typical design.  You can see all the yellow arrows in the LWS's picture appear to touch this area too.

If the VBus pads are too small to probe, try to follow the traces.  You can see each has a short stub going to the right that ends in a tiny hole called a via.  This is a connection to the other side of the PCB.  Flip it over and you'll find the via on the other side and the trace it's connected to and can continue to follow the circuit.  Eventually it might connect to something larger.  I think it connects to the left side of R3 (you can see the via it come back to the front side to the left of R3), which should be an easier spot to probe.

You might notice there are two pads connected to DM and two pads connected to DP?  This is why you can flip the connector over and have it still work.  Only one set is connected at a time and changes when the cable is flipped.

Edited by xyzzy
  • Like 1
Link to comment
Share on other sites

18 hours ago, JohnR725 said:

One of things I find interesting is the disk wires look to be relatively stiff? Whereas ideally they should be very fine wire with perhaps a little coil in them so that their free to move around. At least all the ones I've ever seen in a timing machine there are always very tiny wires. Oh and then your volume adjustment is in a different position then the previous one we have a picture of.


My board is exactly the same, so are the wires:

mikepilk2B64A428-68AA-4A70-99C7-E886989F40E8.thumb.jpeg.9f2d507206d6e94fbcc0b7407fbef541.jpeg

Kalanag8CAF5634-35D6-4C3B-B5DF-5D5AA631DAB2.thumb.jpeg.e96fa190c76805d9ab1fe898af781983.jpeg


Edited by Kalanag
Link to comment
Share on other sites

9 hours ago, xyzzy said:

I think you are measuring the data lines on the USB connector instead of the power lines.  There are four pins of note on the connector.  5 volts (called Vbus), ground, and two data lines called DP and DM.  The LED should light up if you have 5V and ground.  So measure that.  Here's where I think they are:

I made a probe from a bit of (top E) guitar string - it's thin and rigid, works a treat. I'm working under a microscope, which makes it easier.

With the other probe clipped to the black GND at the piezo - I'm getting 5.1V on the two pins you labelled VBUS, and with the meter set to continuity testing (beep), the GNDs are OK

11 hours ago, xyzzy said:

If I'm following the traces correctly, the LED is connected to R5 and thence to the upper right pin (12) on the CM108, which is LED0.  The datasheet only says, "Output H for Power On; Toggling for Data Transmit".   So if you have power, it should be on I think.  Check the power pins on the CM108, pins DVDD, AVDD1, AVDD2 should all be 5V.  Pin REGV should be 3.3V, but this is from the CM108's regulator supplying power.


10 hours ago, LittleWatchShop said:


2023-01-25 18_01_51-Window.png


The red arrows on the CM108- all read about 5.1V  the  yellow arrows 0V.

Pin REGV (if it's the lower left on the pic), left side of R2,  is 0.66V  (my meter is old, I need a new one, so the values fluctuate a bit)

Left side of

R3  5.2V

R5 0.75V

R6, R7 2.1V

C4,C5,C6 5.2V

C1 0V

Note the 0V values fluctuate from 0 to -0.15V, might be my meter.

This is fun !!


Edited by mikepilk
Link to comment
Share on other sites

15 hours ago, mikepilk said:

Pin REGV (if it's the lower left on the pic), left side of R2,  is 0.66V  (my meter is old, I need a new one, so the values fluctuate a bit)

Left side of

R3  5.2V

R5 0.75V

R6, R7 2.1V

C4,C5,C6 5.2V

C1 0V

R3 looks good.

R5 is consistent with the LED being off.  I think 0.75 V, as opposed to 0 V, is caused by the forward voltage of the diode.

R6, R7 aren't right.  Should be 4.5V microphone bias voltage.  What does the right side of R6 measure?  This should be the nearly the same as the left, unless there is current on the bias line, which I don't think there should be.

C4,5,6 are getting power as they should.  These decouple the power supply, to keep the voltage from fluctuating as the power drawn by the chip changes.

C1 left side ok, ground.  But the right side of C1 should be the same as the left side of R2, which should be 3.3V.  0.66 V is not right.  Something is up there.

The resistance, with the board off, measured between the right side of R2 and the top of C12 (which is the USB data line DP) should be about 0 Ω.  The 3.3 volts going through R2 is supposed to signal that this a full-speed USB device as opposed to low-speed USB.  Lack of this voltage would explain the host computer not reacting to the plugging the board in.

Looking at the picture closely, C13 isn't centered on the pads very well and doesn't look like a good solder job.  Also C3's right side looks like the solder didn't wet out the pad well.

I'd inspect the pads, looking for a bad joint.  The solder should spread out, like a drop of oil on a dirty cap jewel, as opposed to ball up, like on a epilamed jewel.  The USB IC just up and dying without some kind of electrical abuse is highly unlikely.  But these cheap boards have a very poor solder job with no QC, so a bad joint that worked for a bit before board flex caused it to pop free is certainly possible.

Another thing to check is the frequency from the crystal module, which is Y1.  It should have 5V on it's bottom left pad, which is the same as the C13 left pad.  The top right should be 0V.  And between the top left and top right should be a 12 MHz signal.  You probably need a scope to measure 12 MHz.

Link to comment
Share on other sites

12 hours ago, xyzzy said:

The resistance, with the board off, measured between the right side of R2 and the top of C12 (which is the USB data line DP) should be about 0 Ω.  

That does seem to be about 0 Ω.

12 hours ago, xyzzy said:

Looking at the picture closely, C13 isn't centered on the pads very well and doesn't look like a good solder job.  Also C3's right side looks like the solder didn't wet out the pad well.

Another thing to check is the frequency from the crystal module, which is Y1.  It should have 5V on it's bottom left pad, which is the same as the C13 left pad.  The top right should be 0V.  And between the top left and top right should be a 12 MHz signal.  You probably need a scope to measure 12 MHz.

 C13 is wonky but the solder looks OK, I'll go over the whole board under the microscope.

I can't measure frequency, but I'm thinking of buying a new meter, this one can measure frequency, what do you think? https://www.amazon.co.uk/AstroAI-Multimeters-Capacitance-Transistors-Temperature

If you open this pic, you can see the voltages 

2.thumb.jpg.b84b011a655fa52435404bb40933b22e.jpg

Edited by mikepilk
Link to comment
Share on other sites

On 1/25/2023 at 3:22 PM, mikepilk said:

I guess it must be the main chip that's failed - so there's nothing I can do ?

The soldering on the USB socket looks dodgy. Maybe, if you have some flux, and a soldering iron, or better still a hot air station you could try re-flowing that.

On 1/27/2023 at 3:52 PM, mikepilk said:

I'm thinking of buying a new meter, this one can measure frequency, what do you think? https://www.amazon.co.uk/AstroAI-Multimeters-Capacitance-Transistors-Temperature

There are loads of similar meters. They are generally OK, so long as you don't believe that CAT rating. I wouldn't connect most of them to the mains, far less the 800 Volts it claims.

Edited by AndyHull
Link to comment
Share on other sites

15 minutes ago, AndyHull said:

The soldering on the USB socket looks dodgy. Maybe, if you have some flux, and a soldering iron, or better still a hot air station you could try re-flowing that.

My first thought was something on the socket breaking when I plugged it in. 

But it seems to be supplying the 5V power, and the other connections are giving 0.65V. I don't know if this is OK for the data connections? 

Unfortunately the finest tip on my soldering iron is much too big. I could file it to a point and work under the microscope. Then just work my way round all the solder connections on the board (excluding the main chip).

WIN_20230128_18_13_00_Pro.thumb.jpg.4515a4415b5ef80dcccb83170b0f8958.jpg

WIN_20230128_18_11_36_Pro.thumb.jpg.9bf49d5127128787d30082e685b0cc66.jpg

Link to comment
Share on other sites

25 minutes ago, AndyHull said:

better still a hot air station

When I was looking at this discussion I was thinking if you had the hot air station you just go through an re-melt everything Probably would fix the problem because it's probably just a bad solder connection. But how many of us have a hot air station?

Link to comment
Share on other sites

1 minute ago, JohnR725 said:

When I was looking at this discussion I was thinking if you had the hot air station you just go through an re-melt everything Probably would fix the problem because it's probably just a bad solder connection. But how many of us have a hot air station?

Not me, I've never even heard of one 🥴

Is my idea of sharpening the tip and trying to resolder all the joints utter madness, or has it a chance of success ?

Edited by mikepilk
Link to comment
Share on other sites

12 minutes ago, mikepilk said:

Is my idea of sharpening the tip and trying to resolder all the joints utter madness, or has it a chance of success ?

You do not need a sharper tip. The professional repairers apply flux before soldering. This makes sure that the solder remains exactly at the soldered leg of the device without building bridges between the legs even if the tip of the soldering iron is relatively large and touches several legs at once. Here I learned alot: NorthridgeFix. His effective method of fault finding with just a multimeter is also impressiv.

Edited by Kalanag
Link to comment
Share on other sites

15 minutes ago, mikepilk said:

Not me, I've never even heard of one 🥴

Is my idea of sharpening the tip and trying to resolder all the joints utter madness, or has it a chance of success ?

I was looking into surfacemount components and trying to figure out how to solder them. You can do it I have a really tiny soldering iron but there's better way. Like if you have an entire circuit board you put it on a hot plate and the whole thing melts at the same time. But the hot air station is like a soldering gun without a tip it just has a blast of really hot air and it works from what I've seen really nicely with surfacemount.

Oh and then there is the other problem? I had a circuit board that I needed to put a connector on no problem normally heated up with soldering iron suck away the solder with the solder sucker and the problem just as a reminder the modern leadfree solder's melt at a much higher temperature than the old days of.


Edited by JohnR725
Link to comment
Share on other sites

33 minutes ago, Kalanag said:

You do not need a sharper tip. The professional repairers apply flux before soldering. This makes sure that the solder remains exactly at the soldered leg of the device without building bridges between the legs even if the tip of the soldering iron is relatively large and touches several legs at once. Here I learned alot: NorthridgeFix. His effective method of fault finding with just a multimeter is also impressiv.

Thanks I'll watch the video. What sort of flux do I need ?

Link to comment
Share on other sites

For flux you could use the one NorthridgeFix recommends (Amtech) IIRC, but don't get it from eBay or Amazon almost if not all the Amtech on those platforms is counterfeit.

Have a look on YouTube there are quite a few reviews on the different types of smd fluxes.

  • Like 1
Link to comment
Share on other sites

Flux is key to surface mount soldering. You don't need the very expensive stuff, and in fact I have experimented with violin resin dissolved in ispropanol. It does work, but its a bit of a faff when you can buy the stuff for pennies anyway.

As to "who has a hot air station?" I do, but then again I've been working with electronics for many years.
Hot air stations are not that expensive, if you are willing to put up with "cheap from China".
A high quality one will set you back a bit more though.

Link to comment
Share on other sites

58 minutes ago, AndyHull said:

Flux is key to surface mount soldering. You don't need the very expensive stuff, and in fact I have experimented with violin resin dissolved in ispropanol. It does work, but its a bit of a faff when you can buy the stuff for pennies anyway.

As to "who has a hot air station?" I do, but then again I've been working with electronics for many years.
Hot air stations are not that expensive, if you are willing to put up with "cheap from China".
A high quality one will set you back a bit more though.

If you turn on the heater of your Pearl watch cleaner while you're in the cleaning stage it will evenly distribute solder to every part in your cleaning basket by the end of stage four...

Link to comment
Share on other sites

On 1/27/2023 at 7:52 AM, mikepilk said:

I can't measure frequency, but I'm thinking of buying a new meter, this one can measure frequency, what do you think? https://www.amazon.co.uk/AstroAI-Multimeters-Capacitance-Transistors-Temperature

If you open this pic, you can see the voltages 

Most multi-meters I've seen can only do frequency up to around 1 MHz.  That one says it can go to 60 MHz?  I don't know if I believe that.  It is very cheap and will be low quality.  But probably perfectly functional.

The voltage you see on the clock of 2.1 V is probably the result of averaging the clock's output that is cycling between 0V and 5.1V.  A scope would tell you.  But I'm guessing it's ok.

The voltages that are fluctuating may not be your meter but voltages that are in fact changing.  And the LED anode, R5, will slowly drop to the forward voltage of the diode if it is powered on briefly.  So a higher voltage that is dropping down to 0.3 V also makes sense, and likely means the LED got some voltage for a brief time.  You wouldn't necessarily be able to see it.

The 3.3V regulator output used as the DP pull-up, between C1 and R2, is not right.  It's not clear to me if the 0.65 V is coming from the CM108 or from the USB host.

Do you have a USB charger you could plug it into?  It must be a charger with a USB-A socket and then use the USB-C to USB-A cable.  This device will NOT work with a USB-C charger or a laptop USB-C port.

The fact that you see some voltage on R5 makes me think the chip might be briefly supply power to it, and then perhaps the USB host will shut it down from over current, which is limited to 100 mA until the USB device requests more.  Perhaps the big electrolytic on the left is an issue.  Simple USB chargers don't bother with power requests and should be able to supply more current from the start.   Charger should have a spec on it, which is almost certainly at least 500 mA, but I think I do have really old and cheap ones that are less.

I'm going on the assumption on that LED should light if the chip gets power. The datasheet was vague.  Maybe @Kalanagcan confirm, since his works, if a just a charger will cause the LED to light.  Maybe it needs to identify a USB host before it lights up?

Another possibility is to inject 5V without using the socket.  A wire soldered to the left-most pad where the speaker connector would have been could be a ground.  And maybe either side of R3 is easiest access to Vbus.  5V there with no USB cable should power it up.  You can run the power through your meter in current mode (remember to change plugs) and see what it is drawing.  It'll let you know if there is a short.  If it draws nothing that tells you something too.

I wouldn't resolder everything.  The pins LWS identified on the CM108, besides the clock chip, are the only ones I'd be concerned about not having good joints.  You should be able to tell in a microscope if it's good or not.

Link to comment
Share on other sites

4 hours ago, xyzzy said:

Do you have a USB charger you could plug it into?  It must be a charger with a USB-A socket and then use the USB-C to USB-A cable.  This device will NOT work with a USB-C charger or a laptop USB-C port.

Just tried a Samsung charger plug (rated 1.55A) with USB A socket, and USB A - C cable.

Reading 0.3V at C1, R2

4 hours ago, xyzzy said:

Another possibility is to inject 5V without using the socket.  A wire soldered to the left-most pad where the speaker connector would have been could be a ground.  And maybe either side of R3 is easiest access to Vbus.  5V there with no USB cable should power it up.  You can run the power through your meter in current mode (remember to change plugs) and see what it is drawing.  It'll let you know if there is a short.  If it draws nothing that tells you something too.

I do have a DC power supply I bought for plating. I need to read the instructions (so I don't blow it up) but I think I can set it to 5V in "voltage mode", then see what current it draws. Or do I need to put the meter in-line?

1.thumb.jpg.a1f56845747b078309b6cf4bf3a967b3.jpg

Link to comment
Share on other sites

5 hours ago, xyzzy said:

Do you have a USB charger you could plug it into?  It must be a charger with a USB-A socket and then use the USB-C to USB-A cable.  This device will NOT work with a USB-C charger or a laptop USB-C port.

The fact that you see some voltage on R5 makes me think the chip might be briefly supply power to it, and then perhaps the USB host will shut it down from over current, which is limited to 100 mA until the USB device requests more.  Perhaps the big electrolytic on the left is an issue.  Simple USB chargers don't bother with power requests and should be able to supply more current from the start.   Charger should have a spec on it, which is almost certainly at least 500 mA, but I think I do have really old and cheap ones that are less.

I'm going on the assumption on that LED should light if the chip gets power. The datasheet was vague.  Maybe @Kalanagcan confirm, since his works, if a just a charger will cause the LED to light.  Maybe it needs to identify a USB host before it lights up?…

My test result: The LED doesn‘t light up if the device is just connected to an USB charger. Connected to my PC the LED lights up.

I measured the voltages according to @mikepilk

The results (just) on the USB side of the board are very different! The REGV output of the CM108 has the correct voltage of 3,3V where the faulty board just has 0,64V.

2DAA9C1B-8F7F-4898-8DC4-6570076E5070.thumb.jpeg.52f8d7fedf7eb1417bebf726e722da73.jpeg

Edited by Kalanag
Link to comment
Share on other sites

Join the conversation

You can post now and register later. If you have an account, sign in now to post with your account.
Note: Your post will require moderator approval before it will be visible.

Guest
Reply to this topic...

×   Pasted as rich text.   Restore formatting

  Only 75 emoji are allowed.

×   Your link has been automatically embedded.   Display as a link instead

×   Your previous content has been restored.   Clear editor

×   You cannot paste images directly. Upload or insert images from URL.


  • Similar Content

  • Recently Browsing

    • No registered users viewing this page.
  • Topics

  • Posts

    • The post below contains the link. If you don't already have a discord account it will take you to the registration screen.  Registration is free.   https://www.watchrepairtalk.com/topic/31653-mark/?do=findComment&comment=279066
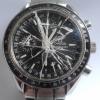
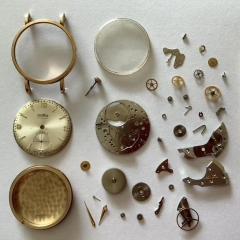
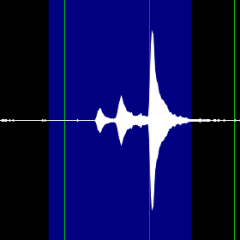
    • HWGIKE#57 Valex FEF 190 15 jewels Swiss lever full service and repair This one was waiting for a balance staff replacement in my cabinet parts and case cleaned up with a new balance staff and a 4th wheel as the original 4th wheel had a broken pivot for the off center second hand. I never attempted a balance staff replacement before however I received a Bergeon Molfres (i was hunting it for about 2 years) and with the help of it I managed to remove the old staff and riveted the new one in. It also received a new MS, crystal and the hole for the MS arbor was also tightened. With the new MS now it has an acceptable performance meaning that the amplitude goes up to 280 fully wound, has an acceptable beat error and I have the two nice lines but only dial up, dial down is not as nice and I could not figure out as why. I have the two lines but the amplitude is dropping to around 230 and the lines are a bit hairy. Both dial up and dial down the lines just go up and down without seemingly any pattern. I cleaned the movement two times, and then a 3rd time pegged out the main plate and train bridge holes but made no change. Both the HS collet and the roller table was too lose on the new staff... I did not count how many times I took the balance cock off to sort out the HS collet, the roller table and the beat error, somebody before me also shortened the HS by pushing it out a bit and it seems every time somebody is messing with the end of the HS the protruding bit is most of the time twisted bent etc. This one was probably one of the most challenging repair and service. I might take the new MS out and clean it lubricate it as I just pushed the new one in to the barrel from the retaining ring. Plus started to re-read the theory of the escapement and how to analyse the graph on the timing machine: Greiner Chronografic Record manual. I am also thinking to put the watch on a 24 hour long run with the eTimer SW it once helped me to figure out what was wrong with a watch. There is an interesting part of the Greiner record manual talking about the pallets and the end shake of the balance and pallet staff. Maybe this is my issue? Who could that possibly identify? After a few years now I am still without a clue how could watchmakers make parts I can only see with my microscope or how could/can they carry out complicated services impossible to do.. real magic..... .... ..... before I sent this post while the pics were uploading I had an idea, i was browsing the possible outcomes on the timing machine I had one for magnetism..... so I demagnetized the movement and it is not hairy now.... two really nice lines 0.2 ms beat error still a bit wavy, but a lot lot better..... argh....  
    • Hi there, welcome here.  
    • yes the advertising revenue should generate money. The question is how much money? Then as far as the cost of the website goes that's relatively easy to determine? all you would have to do to grasp costs and profitability would be to go to the link below and you can actually get a website for free try it out for free I believe you get no advertising initially. They also talk about that they'll help you out they have marketing tools and some sort of paid subscription or something. So I guess were shopping for a whatever just ask them what would a maybe could use this one as an example in other words it's going to look basically identical to this is going to have advertising a paid subscriptions what's it going to cost? After all they want to sell or give us a message board like this they should bill answer the questions as they're the people who did the software for this. Yes they really said you can have a free discussion group at least to start. https://invisioncommunity.com/ I was curious about the monthly supporter thing where exactly do we find that on this message board? A quick search I'm not finding it so obviously I'm not looking in the right place?
    • Help me out here, but with all the advertising on this site (which I don't mind) wouldn't it pay for itself or even make money for the owner ???
×
×
  • Create New...